
Release 6.6.0 NUBOMEDIA
67
nubomedia-vca Documentation Release 6.6.0 NUBOMEDIA November 08, 2016
Transcript of Release 6.6.0 NUBOMEDIA

nubomedia-vca DocumentationRelease 6.6.0
NUBOMEDIA
November 08, 2016


Contents
1 Contents 31.1 Introduction . . . . . . . . . . . . . . . . . . . . . . . . . . . . . . . . . . . . . . . . . . . . . . . 31.2 Installation guide . . . . . . . . . . . . . . . . . . . . . . . . . . . . . . . . . . . . . . . . . . . . . 41.3 Developer guide . . . . . . . . . . . . . . . . . . . . . . . . . . . . . . . . . . . . . . . . . . . . . 61.4 Tutorials . . . . . . . . . . . . . . . . . . . . . . . . . . . . . . . . . . . . . . . . . . . . . . . . . 101.5 Advanced guide . . . . . . . . . . . . . . . . . . . . . . . . . . . . . . . . . . . . . . . . . . . . . 62
i

ii

nubomedia-vca Documentation, Release 6.6.0
Contents 1

nubomedia-vca Documentation, Release 6.6.0
2 Contents

CHAPTER 1
Contents
1.1 Introduction
NUBOMEDIA-VCA is a part of the NUBOMEDIA , which is the first cloud platform specifically designed for hostinginteractive multimedia services. NUBOMEDIA exposes to developers PaaS APIs for creating media pipelines. Amedia pipeline is a chain of elements providing media capabilities such as encryption, transcoding, augmented realityor video content analysis. These chains allow building arbitrarily complex media processing for applications. As aunique feature, from the point of view of the pipelines, the NUBOMEDIA cloud infrastructure behaves as a singlevirtual super-computer encompassing all the available resources of the physical network. This part of the project isin charge of the Video Content Analysis (VCA), through which the developers can apply different computer visionfilters to their media pipelines.
Through this documentation you can learn how to install and develop using the API of the following filters: facedetector, mouth detector, nose detector, eye detector, ear detector, and tracker filter. Futhermore, you can findinformation about tutorials in order to test the different filters, and also you can read more about the architecture ofVCA filter within NUBOMEDIA in the advanced guide.
3

nubomedia-vca Documentation, Release 6.6.0
1.2 Installation guide
This section is divided in two parts. On the one hand, we see how to install the NUBOMEDIA-VCA filters using therepositories of the project. On the other hand, we see how to install these filters from the source code.
1.2.1 From repositories
In order to install the latest stable version of the NUBOMEDIA-VCA filters in your local environment, first of all youneed an instance of Kurento Media Server installed in your machine. To do that, use the following commands:
echo "deb http://ubuntu.kurento.org trusty kms6" | sudo tee /etc/apt/sources.list.d/kurento.listwget -O - http://ubuntu.kurento.org/kurento.gpg.key | sudo apt-key add -sudo apt-get updatesudo apt-get install kurento-media-server-6.0
Then you are able to install the NUBOMEDIA-VCA filters. To do that, you have type the following commands:
sudo apt-get install software-properties-commonsudo apt-key adv --keyserver keyserver.ubuntu.com --recv-keys F04B5A6Fsudo add-apt-repository "deb http://repository.nubomedia.eu/ trusty main"sudo apt-get update
# To install ear detector filtersudo apt-get install nubo-ear-detector nubo-ear-detector-dev
# To install eye detector filter
4 Chapter 1. Contents

nubomedia-vca Documentation, Release 6.6.0
sudo apt-get install nubo-eye-detector nubo-eye-detector-dev
# To install face detector filtersudo apt-get install nubo-face-detector nubo-face-detector-dev
# To install mouth detector filtersudo apt-get install nubo-mouth-detector nubo-mouth-detector-dev
# To install nose detector filtersudo apt-get install nubo-nose-detector nubo-nose-detector-dev
# To install tracker filtersudo apt-get install nubo-tracker nubo-tracker-dev
1.2.2 From source code
In order to install the NUBOMEDIA-VCA from the source code you need the development packages for Kurento. Toinstall these components use the following commands:
echo "deb http://ubuntu.kurento.org trusty kms6" | sudo tee /etc/apt/sources.list.d/kurento.listwget -O - http://ubuntu.kurento.org/kurento.gpg.key | sudo apt-key add -sudo apt-get updatesudo apt-get install kurento-media-server-6.0 kurento-media-server-6.0-devsudo apt-get install kms-core-6.0 kms-core-6.0-devsudo apt-get install cimg-devsudo apt-get install devscripts
After that, you are able to generate the Debian packages of the NUBOMEDIA-VCA filters from the source code. Todo that, you need to clone the official repository on GitHub and the execute the build script.
git clone https://github.com/nubomedia/NUBOMEDIA-VCA.gitcd NUBOMEDIA-VCA./build.sh
If everything goes well, a new folder called output will be created. Inside this folder you can find the Debian packagesfor the different filters. To install these filters, you need to run the following commands:
cd output
# To install ear detector filtersudo dpkg -i nubo-ear-detector_6.6.0~rc1_amd64.deb nubo-ear-detector-dev_6.6.0~rc1_amd64.deb
# To install eye detector filtersudo dpkg -i nubo-eye-detector_6.6.0~rc1_amd64.deb nubo-eye-detector-dev_6.6.0~rc1_amd64.deb
# To install face detector filtersudo dpkg -i nubo-face-detector_6.6.0~rc1_amd64.deb nubo-face-detector-dev_6.6.0~rc1_amd64.deb
# To install mouth detector filtersudo dpkg -i nubo-mouth-detector_6.6.0~rc1_amd64.deb nubo-mouth-detector-dev_6.6.0~rc1_amd64.deb
# To install nose detector filtersudo dpkg -i nubo-nose-detector_6.6.0~rc1_amd64.deb nubo-nose-detector-dev_6.6.0~rc1_amd64.deb
# To install tracker filtersudo dpkg -i nubo-tracker_6.6.0~rc1_amd64.deb nubo-tracker-dev_6.6.0~rc1_amd64.deb
1.2. Installation guide 5

nubomedia-vca Documentation, Release 6.6.0
1.3 Developer guide
On this section, we will see the different APIs to use every single filter. As it was explained on introduction, thefollowing filters are available to use in the NUBOMEDIA platform: face detector, mouth detector, nose detector,eye detector, ear detector and tracker filter. From a developer point of view, these filters can be used in twoscenarios:
1. Using your own instance of Kurento Media Server with the proper filter installed. If this is your case, please take alook to the installation guide for further information about filter installation.
2. Using the NUBOMEDIA PaaS to host your application. If this is your case, you don’t need to worry about the filterinstallation since the platform has these filters installed out of the box.
In any case, you need to use the proper Java dependency in your application. To add this dependency, first you need toinclude the following directive in your pom.xml (this part is a must to locate the NUBOMEDIA-VCA Maven artifacts):
<repositories><repository>
<id>kurento-releases</id><name>Kurento Repository</name><url>http://maven.kurento.org/releases</url><releases>
<enabled>true</enabled></releases><snapshots>
<enabled>false</enabled></snapshots>
</repository></repositories>
Then, you will be able to add the proper NUBOMEDIA-VCA Maven artifact, namely:
• Face detector:
<dependency><groupId>org.kurento.module</groupId><artifactId>nubofacedetector</artifactId><version>6.6.0</version>
</dependency>
• Mouth detector:
<dependency><groupId>org.kurento.module</groupId><artifactId>nubomouthdetector</artifactId><version>6.6.0</version>
</dependency>
• Nose detector:
<dependency><groupId>org.kurento.module</groupId><artifactId>nubonosedetector</artifactId><version>6.6.0</version>
</dependency>
• Eye detector:
<dependency><groupId>org.kurento.module</groupId>
6 Chapter 1. Contents

nubomedia-vca Documentation, Release 6.6.0
<artifactId>nuboeyedetector</artifactId><version>6.6.0</version>
</dependency>
• Ear detector:
<dependency><groupId>org.kurento.module</groupId><artifactId>nuboeardetector</artifactId><version>6.6.0</version>
</dependency>
• Tracker filter:
<dependency><groupId>org.kurento.module</groupId><artifactId>nubotracker</artifactId><version>6.6.0</version>
</dependency>
The following sections provides information of the Java API provided by each NUBOMEDIA-VCA component.
1.3.1 Face, mouth, nose, eye and ear
All this filters have a similar API, for this reason, we are going to see all of them together.
NuboFaceDetector
This filter receives a stream of images as input. The output of the filter will be a collection of bounding boxes. Eachbounding box represents the position of each face in the image. A bounding box is an area defined by two points.It is very important to highlight that this algorithm only detects front faces. Therefore, all the faces that are laterallyfocused will not be detected.
NuboMouthDetector , NuboNoseDetector, NuboEarDetector, NuboEyeDetector
As for mouth, nose, eye and ear detector, these filters receive a stream of images as input. The output of each filter willbe a collection of bounding boxes. Each bounding box represents the position of each mouth,nose, eye and found inthe image. These algorithms needs to detect previously the different faces included on the image, with the exceptionof the ear detector which have to detect the side of the face. The faces can be detected by its own, or can be receivedas an input.
The developers can use the following API for this filter:
1.3. Developer guide 7

nubomedia-vca Documentation, Release 6.6.0
Function
Description
void showX(int)
To show or hide the bounding boxes of the detectedfaces, mouths, ears, noses,and eyes within the image.
Parameter’s value:- 0 (default), the bounding boxes will not beshown.- 1, the bounding boxes will be drawn in theframe
void detectByEvent(int)
To indicate to the algorithm if it must process all theimages or only whenit receives a specific event such as motion detection.
Parameter’s value:- 0 (default) , process all the frames;- 1 , process a frame when it receives a specificevent
void sendMetaData(int)
To send the bounding boxes of the faces, mouths, eyesnoses and ears detected toanother ME as a metadata.
Parameter’s value:- 0 (default) , metadata are not sent- 1 , metadata are sent
void widthToProcess(int)
To indicate the width of the image that the algorithm isgoing to process toanother ME as a metadata.
Parameter’s value:- 160 (default), 240, 320, 640
void processXevery4Frames(int)
To indicate the number of frames that the algorithmprocess every 4 frames.
Parameter’s value:- 1, processes one image and discard 3 (8 fps)- 2, processes two images and discard 2 (12 fps)- 3, processes three images and discard 1 (18 fps)- 4, processes four images (24 fps)
void setOverlayedImage(uri, float, float, float, float)
Sets the image to use as overlay on the detectedelement.
Parameter’s value:- 1, URI where the image is located- 2, the offset applied to the image, from the Xcoordinate of the detected element upper rightcorner- 3, the offset applied to the image, from the Ycoordinate of the detected element upper rightcorner- 4, proportional width of the overlaid image,relative to the width of the detected element.- 5, proportional height of the overlaid image,relative to the height of the detected element
void unsetOverlayedImage()
Clear the image to be shown over each detected face.
8 Chapter 1. Contents

nubomedia-vca Documentation, Release 6.6.0
* showX can be depending on the algorithm: showFaces(int), showNoses(int), showMouths(int), showEyes(int),showEars(int).
1.3.2 Tracker
The developers can use the following API for this filter:
Function
Description
void setVisualMode(int)
To show or hide the objects detected.
Parameter’s value:- 0 (default), the bounding boxes will not beshown.- 1, the bounding boxes will be drawn in theframe
void setThreshold(int)
To set up the minumum difference among pixels toconsider motion
Parameter’s value:- 0-255 (20 default)
void setMinArea(int)
To set up the minumum area to consider objects
Parameter’s value:- 0 - 10000 (50 default)
void setMaxArea(int)
To set up the maximum area to consider objects
Parameter’s value:- 0 - 300000 (30000 default)
void setDistance(int)
To set up the distance among object to merge them
Parameter’s value:- 0 - 2000 (35 Default)
1.3. Developer guide 9

nubomedia-vca Documentation, Release 6.6.0
1.4 Tutorials
This section contains tutorials showing how to use the different VCA filters. These tutorials can be found within theGitHub NUBOMEDIA organization. By default, this demos use a local Kurento Media Server with the proper filterinstalled. The available tutorials are the following:
• Ear detector. This web application consists on a WebRTC video communication with a ear detector filter.
• Eye detector. This web application consists on a WebRTC video communication with a eye detector filter.
• Face detector. This web application consists on a WebRTC video communication with a face detector filter.
• Face profile. This web application consists on a pipeline composed by a WebRTC video communication withface, mouth, nose and eye detector filter.
• Mouth detector. This web application consists on a WebRTC video communication with a mouth detectorfilter.
• Nose detector. This web application consists on a WebRTC video communication with a nose detector filter.
1.4.1 Ear Detector
This web application consists on a WebRTC video communication with a ear detector filter (loopback, the mediastream going from client to the media server and back to client).
Compiling & Running
This section explain how to compile and run this tutorial in a local environment. To install the necessary softwareplease see the installation guide. To compile and run this tutorial from the source code you can use the followingcommands:
git clone https://github.com/nubomedia/nubomedia-vca-ear-tutorialcd nubomedia-vca-ear-tutorialmvn spring-boot:run
At this point we can test the application accessing the following URL: https://localhost:8443/.
Understanding this example
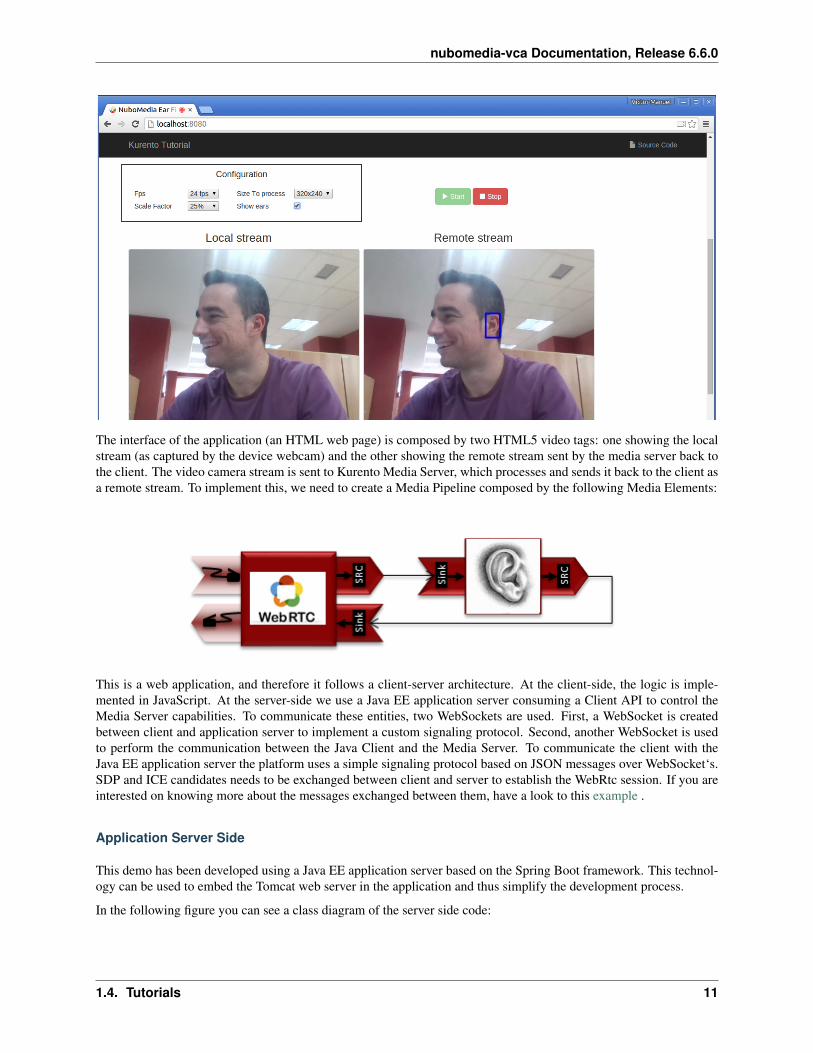
The following figure shows a screenshoot of this demo running.
10 Chapter 1. Contents
nubomedia-vca Documentation, Release 6.6.0
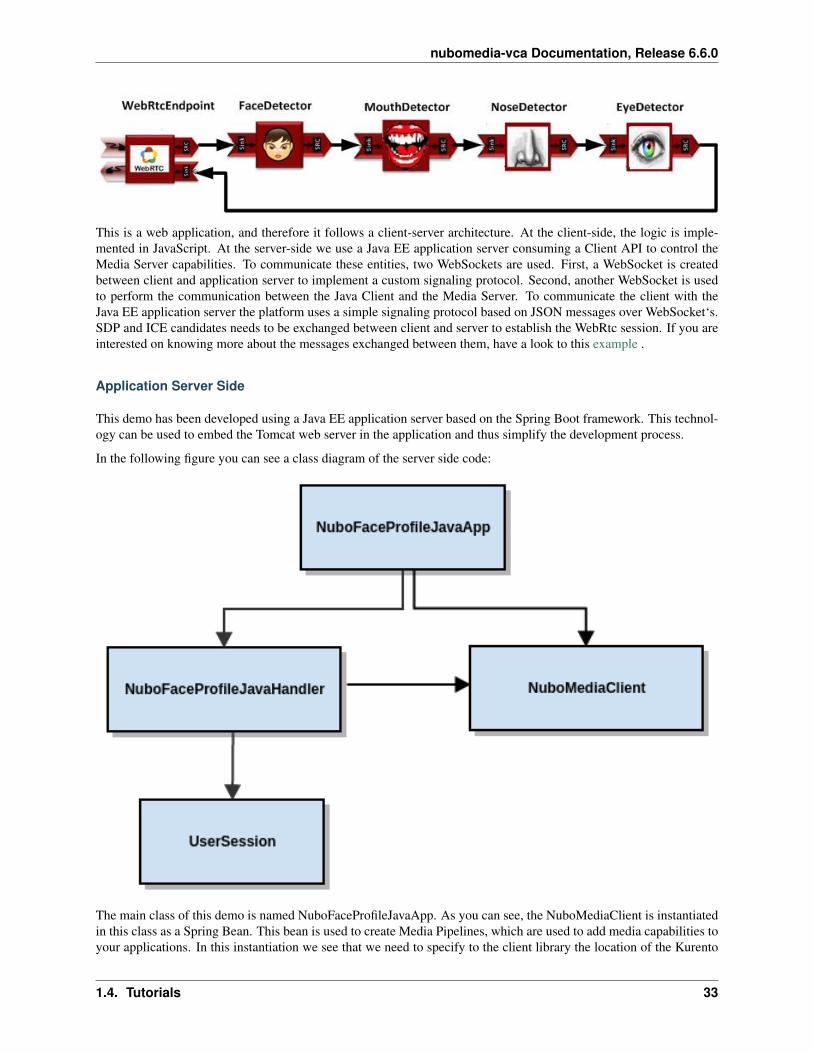
The interface of the application (an HTML web page) is composed by two HTML5 video tags: one showing the localstream (as captured by the device webcam) and the other showing the remote stream sent by the media server back tothe client. The video camera stream is sent to Kurento Media Server, which processes and sends it back to the client asa remote stream. To implement this, we need to create a Media Pipeline composed by the following Media Elements:
This is a web application, and therefore it follows a client-server architecture. At the client-side, the logic is imple-mented in JavaScript. At the server-side we use a Java EE application server consuming a Client API to control theMedia Server capabilities. To communicate these entities, two WebSockets are used. First, a WebSocket is createdbetween client and application server to implement a custom signaling protocol. Second, another WebSocket is usedto perform the communication between the Java Client and the Media Server. To communicate the client with theJava EE application server the platform uses a simple signaling protocol based on JSON messages over WebSocket‘s.SDP and ICE candidates needs to be exchanged between client and server to establish the WebRtc session. If you areinterested on knowing more about the messages exchanged between them, have a look to this example .
Application Server Side
This demo has been developed using a Java EE application server based on the Spring Boot framework. This technol-ogy can be used to embed the Tomcat web server in the application and thus simplify the development process.
In the following figure you can see a class diagram of the server side code:
1.4. Tutorials 11

nubomedia-vca Documentation, Release 6.6.0
The main class of this demo is named NuboEarJavaApp. As you can see, the NuboMediaClient is instantiated in thisclass as a Spring Bean. This bean is used to create Media Pipelines, which are used to add media capabilities to yourapplications. In this instantiation we see that we need to specify to the client library the location of the Kurento MediaServer. In this example, we assume it’s located at localhost listening in port 8888. If you reproduce this tutorial you’llneed to insert the specific location of your Kurento Media Server instance there.
@Configuration@EnableWebSocket@EnableAutoConfigurationpublic class NuboEarJavaApp implements WebSocketConfigurer {
final static String DEFAULT_KMS_WS_URI = "ws://localhost:8888/kurento";
@Beanpublic NuboEarJavaHandler handler() {return new NuboEarJavaHandler();
}
@Beanpublic KurentoClient kurentoClient() {return KurentoClient.create(System.getProperty("kms.ws.uri",DEFAULT_KMS_WS_URI));
}
@Overridepublic void registerWebSocketHandlers(WebSocketHandlerRegistry registry) {
12 Chapter 1. Contents

nubomedia-vca Documentation, Release 6.6.0
registry.addHandler(handler(), "/nuboeardetector");}
public static void main(String[] args) throws Exception {new SpringApplication(NuboEarJavaApp.class).run(args);
}}
This web application follows Single Page Application architecture and uses a WebSocket to communicate client withapplication server by means of requests and responses. Specifically, the main app class implements the interfaceWebSocketConfigurer to register a WebSocketHanlder to process WebSocket requests in the path /nuboeardetector.
NuboEarJavaHandler class implements TextWebSocketHandler to handle text WebSocket requests. The central pieceof this class is the method handleTextMessage. This method implements the actions for requests, returning responsesthrough the WebSocket. In other words, it implements the server part of the signaling protocol depicted.
In the designed protocol there are three different kinds of incoming messages to the Server: start, show_ears,scale_factor, process_num_frames, width_to_process, stop and onIceCandidates. These messages are treated in theswitch clause, taking the proper steps in each case.
public class NuboEarJavaHandler extends TextWebSocketHandler {
@Overridepublic void handleTextMessage(WebSocketSession session, TextMessage message)throws Exception {JsonObject jsonMessage = gson.fromJson(message.getPayload(),JsonObject.class);
log.debug("Incoming message: {}", jsonMessage);
switch (jsonMessage.get("id").getAsString()) {case "start":start(session, jsonMessage);break;case "show_ears":setVisualization(session, jsonMessage);break;case "scale_factor":log.debug("Case scale factor");setScaleFactor(session, jsonMessage);break;case "process_num_frames":log.debug("Case process num frames");setProcessNumberFrames(session, jsonMessage);break;case "width_to_process":log.debug("Case width to process");setWidthToProcess(session, jsonMessage);break;
case "stop":{UserSession user = users.remove(session.getId());if (user != null) {user.release();
}break;
}case "onIceCandidate":
1.4. Tutorials 13

nubomedia-vca Documentation, Release 6.6.0
{JsonObject candidate = jsonMessage.get("candidate").getAsJsonObject();
UserSession user = users.get(session.getId());if (user != null) {IceCandidate cand = new IceCandidate(candidate.get("candidate").getAsString(), candidate.get("sdpMid").getAsString(),candidate.get("sdpMLineIndex").getAsInt());
user.addCandidate(cand);}break;
}
default:sendError(session,"Invalid message with id " + jsonMessage.get("id").getAsString());
break;}
}
private void start(WebSocketSession session, JsonObject jsonMessage) {...
}
private void sendError(WebSocketSession session, String message) {...}...
}
In the following snippet, we can see the start method. It handles the ICE candidates gathering, creates a Media Pipeline,creates the Media Elements (WebRtcEndpoint and NuboEarDetectorFilter) and make the connections among them. AstartResponse message is sent back to the client with the SDP answer.
private void start(final WebSocketSession session, JsonObject jsonMessage) {try {// Media Logic (Media Pipeline and Elements)UserSession user = new UserSession();MediaPipeline pipeline = kurento.createMediaPipeline();user.setMediaPipeline(pipeline);webRtcEndpoint = new WebRtcEndpoint.Builder(pipeline).build();user.setWebRtcEndpoint(webRtcEndpoint);users.put(session.getId(), user);
webRtcEndpoint.addOnIceCandidateListener(new EventListener < OnIceCandidateEvent > () {@Overridepublic void onEvent(OnIceCandidateEvent event) {JsonObject response = new JsonObject();response.addProperty("id", "iceCandidate");response.add("candidate", JsonUtils.toJsonObject(event.getCandidate()));
try {synchronized(session) {session.sendMessage(new TextMessage(response.toString()));
}
14 Chapter 1. Contents
nubomedia-vca Documentation, Release 6.6.0
} catch (IOException e) {log.debug(e.getMessage());
}}
});
ear = new NuboEarDetector.Builder(pipeline).build();webRtcEndpoint.connect(ear);ear.connect(webRtcEndpoint);
// SDP negotiation (offer and answer)String sdpOffer = jsonMessage.get("sdpOffer").getAsString();String sdpAnswer = webRtcEndpoint.processOffer(sdpOffer);
// Sending response back to clientJsonObject response = new JsonObject();response.addProperty("id", "startResponse");response.addProperty("sdpAnswer", sdpAnswer);
synchronized(session) {session.sendMessage(new TextMessage(response.toString()));
}webRtcEndpoint.gatherCandidates();
} catch (Throwable t) {sendError(session, t.getMessage());
}}
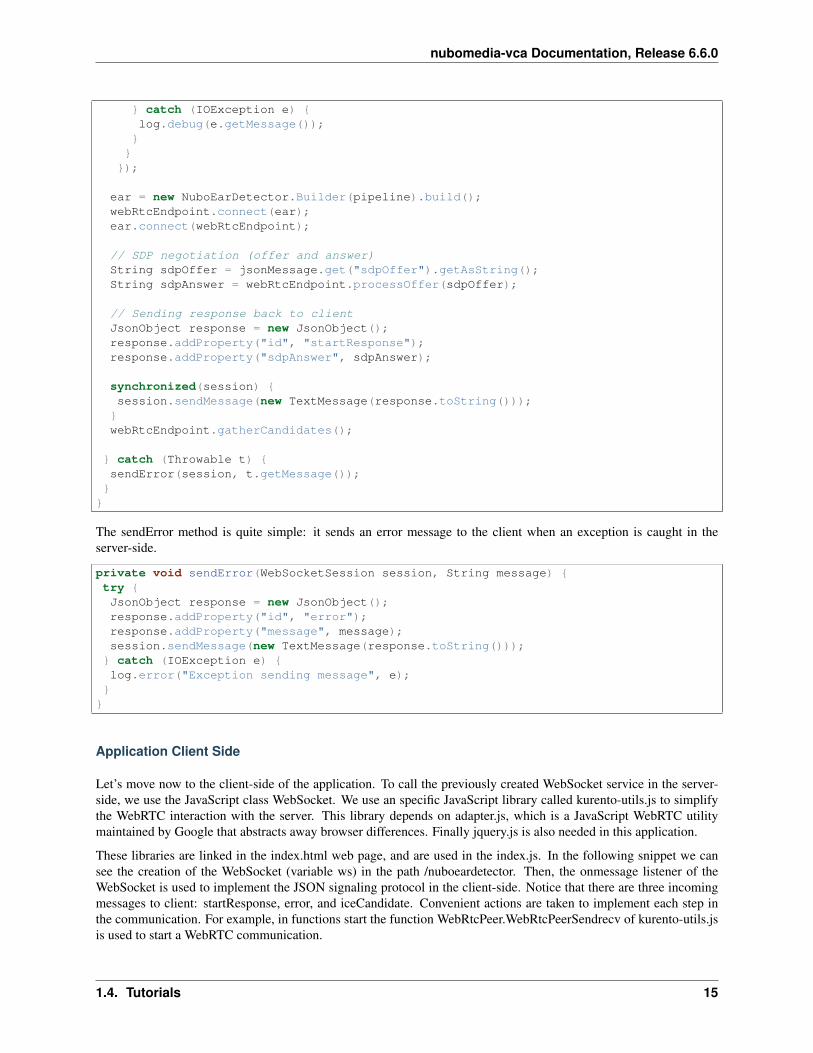
The sendError method is quite simple: it sends an error message to the client when an exception is caught in theserver-side.
private void sendError(WebSocketSession session, String message) {try {JsonObject response = new JsonObject();response.addProperty("id", "error");response.addProperty("message", message);session.sendMessage(new TextMessage(response.toString()));
} catch (IOException e) {log.error("Exception sending message", e);
}}
Application Client Side
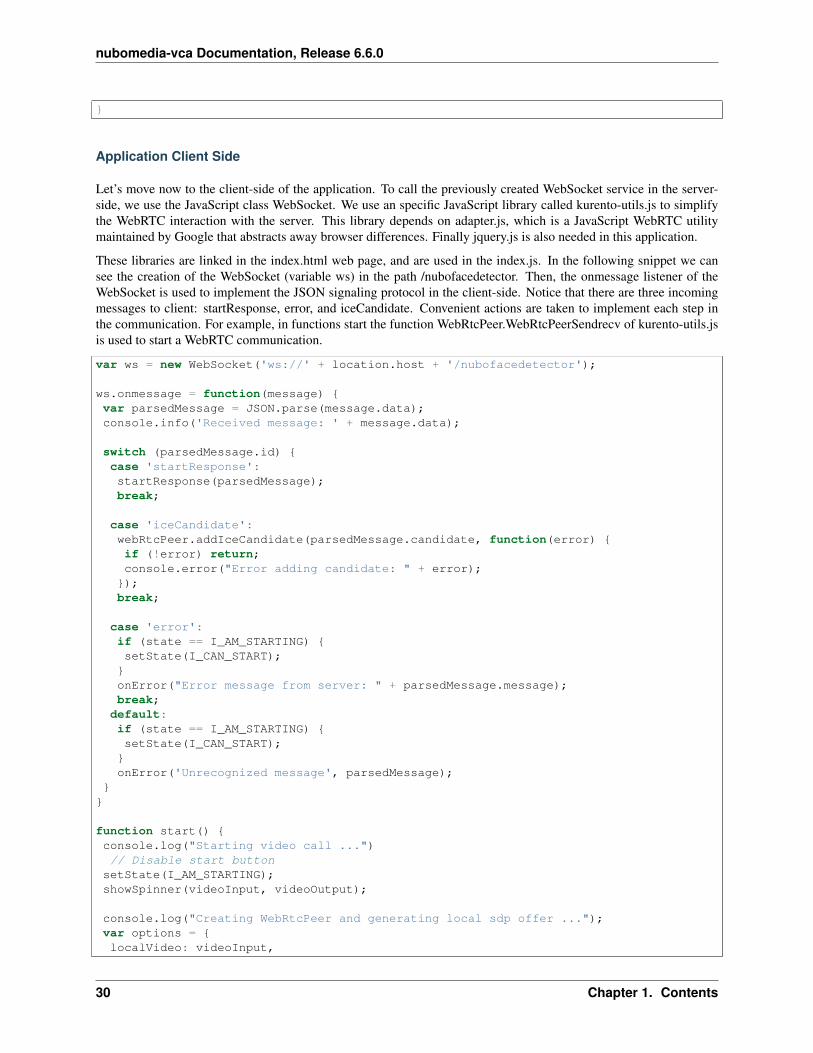
Let’s move now to the client-side of the application. To call the previously created WebSocket service in the server-side, we use the JavaScript class WebSocket. We use an specific JavaScript library called kurento-utils.js to simplifythe WebRTC interaction with the server. This library depends on adapter.js, which is a JavaScript WebRTC utilitymaintained by Google that abstracts away browser differences. Finally jquery.js is also needed in this application.
These libraries are linked in the index.html web page, and are used in the index.js. In the following snippet we cansee the creation of the WebSocket (variable ws) in the path /nuboeardetector. Then, the onmessage listener of theWebSocket is used to implement the JSON signaling protocol in the client-side. Notice that there are three incomingmessages to client: startResponse, error, and iceCandidate. Convenient actions are taken to implement each step inthe communication. For example, in functions start the function WebRtcPeer.WebRtcPeerSendrecv of kurento-utils.jsis used to start a WebRTC communication.
1.4. Tutorials 15

nubomedia-vca Documentation, Release 6.6.0
var ws = new WebSocket('ws://' + location.host + '/nuboeardetector');
ws.onmessage = function(message) {var parsedMessage = JSON.parse(message.data);console.info('Received message: ' + message.data);
switch (parsedMessage.id) {case 'startResponse':startResponse(parsedMessage);break;
case 'iceCandidate':webRtcPeer.addIceCandidate(parsedMessage.candidate, function(error) {if (!error) return;console.error("Error adding candidate: " + error);
});break;
case 'error':if (state == I_AM_STARTING) {setState(I_CAN_START);
}onError("Error message from server: " + parsedMessage.message);break;default:if (state == I_AM_STARTING) {setState(I_CAN_START);
}onError('Unrecognized message', parsedMessage);
}}
function start() {console.log("Starting video call ...")// Disable start button
setState(I_AM_STARTING);showSpinner(videoInput, videoOutput);
console.log("Creating WebRtcPeer and generating local sdp offer ...");var options = {localVideo: videoInput,remoteVideo: videoOutput,onicecandidate: onIceCandidate
}
webRtcPeer = new kurentoUtils.WebRtcPeer.WebRtcPeerSendrecv(options,function(error) {if (error) {return console.error(error);
}webRtcPeer.generateOffer(onOffer);});
}
function onOffer(error, offerSdp) {if (error) return console.error("Error generating the offer");console.info('Invoking SDP offer callback function ' + location.host);var message = {
16 Chapter 1. Contents

nubomedia-vca Documentation, Release 6.6.0
id: 'start',sdpOffer: offerSdp
}sendMessage(message);
}
function onIceCandidate(candidate) {console.log("Local candidate" + JSON.stringify(candidate));
var message = {id: 'onIceCandidate',candidate: candidate
};sendMessage(message);
}
Dependencies
This Java Spring application is implemented using Maven. The relevant part of the pom.xml is where NUBOMEDIAdependencies are declared. we need two dependencies: the Client Java dependency (kurento-client) and the JavaScriptKurento utility library (kurento-utils) for the client-side. Browser dependencies (i.e. bootstrap, ekko-lightbox, andadapter.js) are handled with Webjars.
<dependencies><dependency>
<groupId>org.kurento</groupId><artifactId>kurento-client</artifactId>
</dependency><dependency>
<groupId>org.kurento</groupId><artifactId>kurento-utils-js</artifactId>
</dependency></dependencies>
Note: We are in active development. You can find the latest version of Kurento Java Client at Maven Central.
1.4.2 Eye Detector
This web application consists on a WebRTC video communication with a eye detector filter (loopback, the mediastream going from client to the media server and back to client).
Compiling & Running
This section explain how to compile and run this tutorial in a local environment. To install the necessary softwareplease see the installation guide. To compile and run this tutorial from the source code you can use the followingcommands:
git clone https://github.com/nubomedia/nubomedia-vca-eye-tutorialcd nubomedia-vca-eye-tutorialmvn spring-boot:run
At this point we can test the application accessing the following URL: https://localhost:8443/.
1.4. Tutorials 17

nubomedia-vca Documentation, Release 6.6.0
Understanding this example
The following figure shows a screenshoot of this demo running.
The interface of the application (an HTML web page) is composed by two HTML5 video tags: one showing the localstream (as captured by the device webcam) and the other showing the remote stream sent by the media server back tothe client. The video camera stream is sent to Kurento Media Server, which processes and sends it back to the client asa remote stream. To implement this, we need to create a Media Pipeline composed by the following Media Elements:
This is a web application, and therefore it follows a client-server architecture. At the client-side, the logic is imple-mented in JavaScript. At the server-side we use a Java EE application server consuming a Client API to control theMedia Server capabilities. To communicate these entities, two WebSockets are used. First, a WebSocket is createdbetween client and application server to implement a custom signaling protocol. Second, another WebSocket is usedto perform the communication between the Java Client and the Media Server. To communicate the client with theJava EE application server the platform uses a simple signaling protocol based on JSON messages over WebSocket‘s.SDP and ICE candidates needs to be exchanged between client and server to establish the WebRtc session. If you areinterested on knowing more about the messages exchanged between them, have a look to this example .
Application Server Side
This demo has been developed using a Java EE application server based on the Spring Boot framework. This technol-ogy can be used to embed the Tomcat web server in the application and thus simplify the development process.
18 Chapter 1. Contents

nubomedia-vca Documentation, Release 6.6.0
In the following figure you can see a class diagram of the server side code:
The main class of this demo is named NuboEyeJavaApp. As you can see, the NuboMediaClient is instantiated in thisclass as a Spring Bean. This bean is used to create Media Pipelines, which are used to add media capabilities to yourapplications. In this instantiation we see that we need to specify to the client library the location of the Kurento MediaServer. In this example, we assume it’s located at localhost listening in port 8888. If you reproduce this tutorial you’llneed to insert the specific location of your Kurento Media Server instance there.
@Configuration@EnableWebSocket@EnableAutoConfigurationpublic class NuboEyeJavaApp implements WebSocketConfigurer {
final static String DEFAULT_KMS_WS_URI = "ws://localhost:8888/kurento";
@Beanpublic NuboEyeJavaHandler handler() {return new NuboEyeJavaHandler();
}
@Beanpublic KurentoClient kurentoClient() {return KurentoClient.create(System.getProperty("kms.ws.uri",DEFAULT_KMS_WS_URI));
}
1.4. Tutorials 19

nubomedia-vca Documentation, Release 6.6.0
@Overridepublic void registerWebSocketHandlers(WebSocketHandlerRegistry registry) {registry.addHandler(handler(), "/nuboeyedetector");
}
public static void main(String[] args) throws Exception {new SpringApplication(NuboEyeJavaApp.class).run(args);
}}
This web application follows Single Page Application architecture and uses a WebSocket to communicate client withapplication server by means of requests and responses. Specifically, the main app class implements the interfaceWebSocketConfigurer to register a WebSocketHanlder to process WebSocket requests in the path /nuboeyedetector.
NuboEyeJavaHandler class implements TextWebSocketHandler to handle text WebSocket requests. The central pieceof this class is the method handleTextMessage. This method implements the actions for requests, returning responsesthrough the WebSocket. In other words, it implements the server part of the signaling protocol depicted.
In the designed protocol there are three different kinds of incoming messages to the Server: start, show_eyes,scale_factor, process_num_frames, width_to_process, stop and onIceCandidates. These messages are treated in theswitch clause, taking the proper steps in each case.
public class NuboEyeJavaHandler extends TextWebSocketHandler {
@Overridepublic void handleTextMessage(WebSocketSession session, TextMessage message)throws Exception {JsonObject jsonMessage = gson.fromJson(message.getPayload(),JsonObject.class);
log.debug("Incoming message: {}", jsonMessage);
switch (jsonMessage.get("id").getAsString()) {case "start":start(session, jsonMessage);break;case "show_eyes":setVisualization(session, jsonMessage);break;case "scale_factor":log.debug("Case scale factor");setScaleFactor(session, jsonMessage);break;case "process_num_frames":log.debug("Case process num frames");setProcessNumberFrames(session, jsonMessage);break;case "width_to_process":log.debug("Case width to process");setWidthToProcess(session, jsonMessage);break;
case "stop":{UserSession user = users.remove(session.getId());if (user != null) {user.release();
20 Chapter 1. Contents

nubomedia-vca Documentation, Release 6.6.0
}break;
}case "onIceCandidate":{JsonObject candidate = jsonMessage.get("candidate").getAsJsonObject();
UserSession user = users.get(session.getId());if (user != null) {IceCandidate cand = new IceCandidate(candidate.get("candidate").getAsString(), candidate.get("sdpMid").getAsString(),candidate.get("sdpMLineIndex").getAsInt());
user.addCandidate(cand);}break;
}
default:sendError(session,"Invalid message with id " + jsonMessage.get("id").getAsString());
break;}
}
private void start(WebSocketSession session, JsonObject jsonMessage) {...
}
private void sendError(WebSocketSession session, String message) {...}...
}
In the following snippet, we can see the start method. It handles the ICE candidates gathering, creates a Media Pipeline,creates the Media Elements (WebRtcEndpoint and NuboEyeDetectorFilter) and make the connections among them. AstartResponse message is sent back to the client with the SDP answer.
private void start(final WebSocketSession session, JsonObject jsonMessage) {try {// Media Logic (Media Pipeline and Elements)UserSession user = new UserSession();MediaPipeline pipeline = kurento.createMediaPipeline();user.setMediaPipeline(pipeline);webRtcEndpoint = new WebRtcEndpoint.Builder(pipeline).build();user.setWebRtcEndpoint(webRtcEndpoint);users.put(session.getId(), user);
webRtcEndpoint.addOnIceCandidateListener(new EventListener < OnIceCandidateEvent > () {
@Overridepublic void onEvent(OnIceCandidateEvent event) {JsonObject response = new JsonObject();response.addProperty("id", "iceCandidate");response.add("candidate", JsonUtils.toJsonObject(event.getCandidate()));
1.4. Tutorials 21
nubomedia-vca Documentation, Release 6.6.0
try {synchronized(session) {session.sendMessage(new TextMessage(response.toString()));
}} catch (IOException e) {log.debug(e.getMessage());
}}
});
eye = new NuboEyeDetector.Builder(pipeline).build();webRtcEndpoint.connect(eye);eye.connect(webRtcEndpoint);
// SDP negotiation (offer and answer)String sdpOffer = jsonMessage.get("sdpOffer").getAsString();String sdpAnswer = webRtcEndpoint.processOffer(sdpOffer);
// Sending response back to clientJsonObject response = new JsonObject();response.addProperty("id", "startResponse");response.addProperty("sdpAnswer", sdpAnswer);
synchronized(session) {session.sendMessage(new TextMessage(response.toString()));
}webRtcEndpoint.gatherCandidates();
} catch (Throwable t) {sendError(session, t.getMessage());
}}
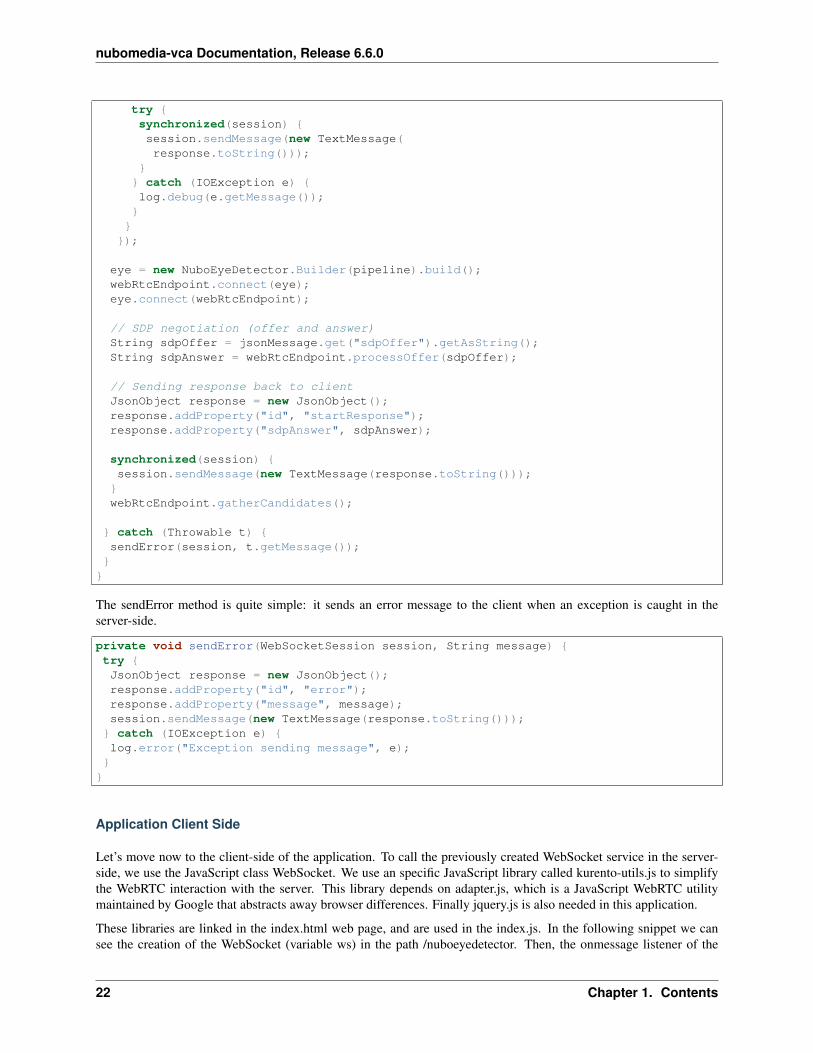
The sendError method is quite simple: it sends an error message to the client when an exception is caught in theserver-side.
private void sendError(WebSocketSession session, String message) {try {JsonObject response = new JsonObject();response.addProperty("id", "error");response.addProperty("message", message);session.sendMessage(new TextMessage(response.toString()));
} catch (IOException e) {log.error("Exception sending message", e);
}}
Application Client Side
Let’s move now to the client-side of the application. To call the previously created WebSocket service in the server-side, we use the JavaScript class WebSocket. We use an specific JavaScript library called kurento-utils.js to simplifythe WebRTC interaction with the server. This library depends on adapter.js, which is a JavaScript WebRTC utilitymaintained by Google that abstracts away browser differences. Finally jquery.js is also needed in this application.
These libraries are linked in the index.html web page, and are used in the index.js. In the following snippet we cansee the creation of the WebSocket (variable ws) in the path /nuboeyedetector. Then, the onmessage listener of the
22 Chapter 1. Contents

nubomedia-vca Documentation, Release 6.6.0
WebSocket is used to implement the JSON signaling protocol in the client-side. Notice that there are three incomingmessages to client: startResponse, error, and iceCandidate. Convenient actions are taken to implement each step inthe communication. For example, in functions start the function WebRtcPeer.WebRtcPeerSendrecv of kurento-utils.jsis used to start a WebRTC communication.
var ws = new WebSocket('ws://' + location.host + '/nuboeyedetector');
ws.onmessage = function(message) {var parsedMessage = JSON.parse(message.data);console.info('Received message: ' + message.data);
switch (parsedMessage.id) {case 'startResponse':startResponse(parsedMessage);break;
case 'iceCandidate':webRtcPeer.addIceCandidate(parsedMessage.candidate, function(error) {if (!error) return;console.error("Error adding candidate: " + error);
});break;
case 'error':if (state == I_AM_STARTING) {setState(I_CAN_START);
}onError("Error message from server: " + parsedMessage.message);break;default:if (state == I_AM_STARTING) {setState(I_CAN_START);
}onError('Unrecognized message', parsedMessage);
}}
function start() {console.log("Starting video call ...")// Disable start button
setState(I_AM_STARTING);showSpinner(videoInput, videoOutput);
console.log("Creating WebRtcPeer and generating local sdp offer ...");var options = {localVideo: videoInput,remoteVideo: videoOutput,onicecandidate: onIceCandidate
}
webRtcPeer = new kurentoUtils.WebRtcPeer.WebRtcPeerSendrecv(options,function(error) {if (error) {return console.error(error);
}webRtcPeer.generateOffer(onOffer);});
}
1.4. Tutorials 23

nubomedia-vca Documentation, Release 6.6.0
function onOffer(error, offerSdp) {if (error) return console.error("Error generating the offer");console.info('Invoking SDP offer callback function ' + location.host);var message = {id: 'start',sdpOffer: offerSdp
}sendMessage(message);
}
function onIceCandidate(candidate) {console.log("Local candidate" + JSON.stringify(candidate));
var message = {id: 'onIceCandidate',candidate: candidate
};sendMessage(message);
}
Dependencies
This Java Spring application is implemented using Maven. The relevant part of the pom.xml is where NUBOMEDIAdependencies are declared. we need two dependencies: the Client Java dependency (kurento-client) and the JavaScriptKurento utility library (kurento-utils) for the client-side. Browser dependencies (i.e. bootstrap, ekko-lightbox, andadapter.js) are handled with Webjars.
<dependencies><dependency>
<groupId>org.kurento</groupId><artifactId>kurento-client</artifactId>
</dependency><dependency>
<groupId>org.kurento</groupId><artifactId>kurento-utils-js</artifactId>
</dependency></dependencies>
Note: We are in active development. You can find the latest version of Kurento Java Client at Maven Central.
1.4.3 Face Detector
This web application consists on a WebRTC video communication with a face detector filter (loopback, the mediastream going from client to the media server and back to client).
Compiling & Running
This section explain how to compile and run this tutorial in a local environment. To install the necessary softwareplease see the installation guide. To compile and run this tutorial from the source code you can use the followingcommands:
24 Chapter 1. Contents

nubomedia-vca Documentation, Release 6.6.0
git clone https://github.com/nubomedia/nubomedia-vca-face-tutorialcd nubomedia-vca-face-tutorialmvn spring-boot:run
At this point we can test the application accessing the following URL: https://localhost:8443/.
Understanding this example
The following figure shows a screenshoot of this demo running.
The interface of the application (an HTML web page) is composed by two HTML5 video tags: one showing the localstream (as captured by the device webcam) and the other showing the remote stream sent by the media server back tothe client. The video camera stream is sent to Kurento Media Server, which processes and sends it back to the client asa remote stream. To implement this, we need to create a Media Pipeline composed by the following Media Elements:
This is a web application, and therefore it follows a client-server architecture. At the client-side, the logic is imple-mented in JavaScript. At the server-side we use a Java EE application server consuming a Client API to control theMedia Server capabilities. To communicate these entities, two WebSockets are used. First, a WebSocket is created
1.4. Tutorials 25

nubomedia-vca Documentation, Release 6.6.0
between client and application server to implement a custom signaling protocol. Second, another WebSocket is usedto perform the communication between the Java Client and the Media Server. To communicate the client with theJava EE application server the platform uses a simple signaling protocol based on JSON messages over WebSocket‘s.SDP and ICE candidates needs to be exchanged between client and server to establish the WebRtc session. If you areinterested on knowing more about the messages exchanged between them, have a look to this example .
Application Server Side
This demo has been developed using a Java EE application server based on the Spring Boot framework. This technol-ogy can be used to embed the Tomcat web server in the application and thus simplify the development process.
In the following figure you can see a class diagram of the server side code:
The main class of this demo is named NuboFaceJavaApp. As you can see, the NuboMediaClient is instantiated in thisclass as a Spring Bean. This bean is used to create Media Pipelines, which are used to add media capabilities to yourapplications. In this instantiation we see that we need to specify to the client library the location of the Kurento MediaServer. In this example, we assume it’s located at localhost listening in port 8888. If you reproduce this tutorial you’llneed to insert the specific location of your Kurento Media Server instance there.
@Configuration@EnableWebSocket@EnableAutoConfigurationpublic class NuboFaceJavaApp implements WebSocketConfigurer {
26 Chapter 1. Contents
nubomedia-vca Documentation, Release 6.6.0
final static String DEFAULT_KMS_WS_URI = "ws://localhost:8888/kurento";
@Beanpublic NuboFaceJavaHandler handler() {return new NuboFaceJavaHandler();
}
@Beanpublic KurentoClient kurentoClient() {return KurentoClient.create(System.getProperty("kms.ws.uri",DEFAULT_KMS_WS_URI));
}
@Overridepublic void registerWebSocketHandlers(WebSocketHandlerRegistry registry) {registry.addHandler(handler(), "/nubofacedetector");
}
public static void main(String[] args) throws Exception {new SpringApplication(NuboFaceJavaApp.class).run(args);
}}
This web application follows Single Page Application architecture and uses a WebSocket to communicate client withapplication server by means of requests and responses. Specifically, the main app class implements the interfaceWebSocketConfigurer to register a WebSocketHanlder to process WebSocket requests in the path /nubofacedetector.
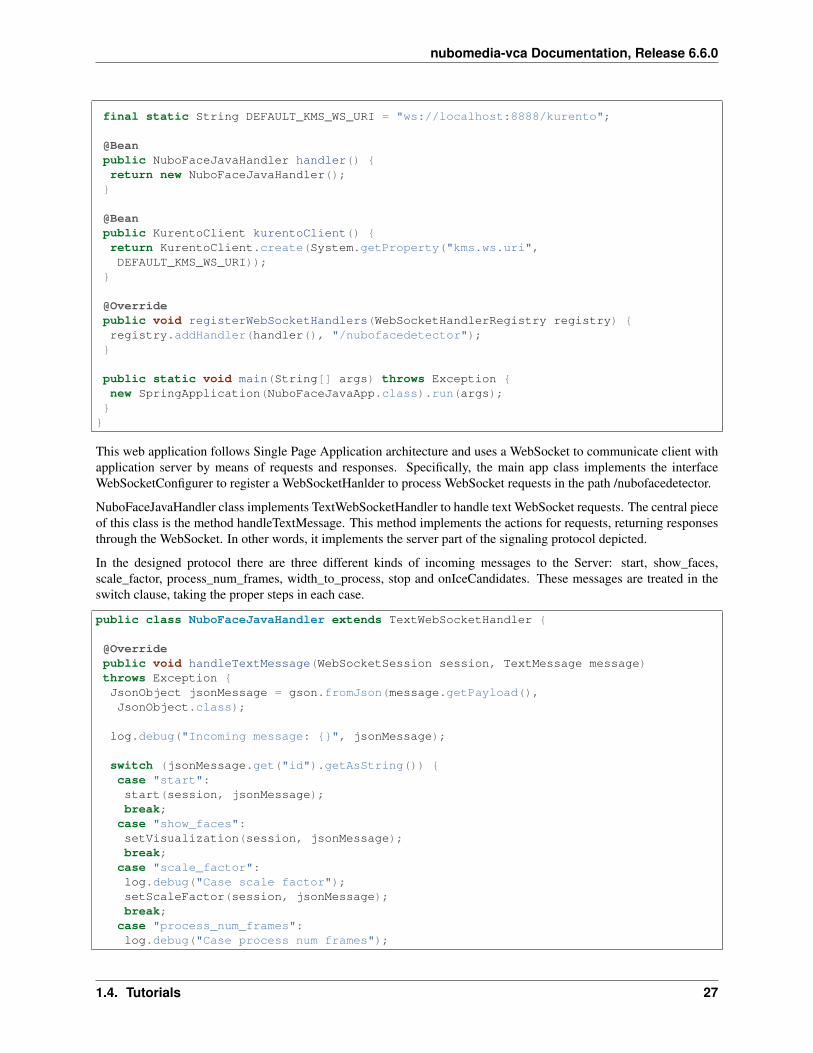
NuboFaceJavaHandler class implements TextWebSocketHandler to handle text WebSocket requests. The central pieceof this class is the method handleTextMessage. This method implements the actions for requests, returning responsesthrough the WebSocket. In other words, it implements the server part of the signaling protocol depicted.
In the designed protocol there are three different kinds of incoming messages to the Server: start, show_faces,scale_factor, process_num_frames, width_to_process, stop and onIceCandidates. These messages are treated in theswitch clause, taking the proper steps in each case.
public class NuboFaceJavaHandler extends TextWebSocketHandler {
@Overridepublic void handleTextMessage(WebSocketSession session, TextMessage message)throws Exception {JsonObject jsonMessage = gson.fromJson(message.getPayload(),JsonObject.class);
log.debug("Incoming message: {}", jsonMessage);
switch (jsonMessage.get("id").getAsString()) {case "start":start(session, jsonMessage);break;case "show_faces":setVisualization(session, jsonMessage);break;case "scale_factor":log.debug("Case scale factor");setScaleFactor(session, jsonMessage);break;case "process_num_frames":log.debug("Case process num frames");
1.4. Tutorials 27

nubomedia-vca Documentation, Release 6.6.0
setProcessNumberFrames(session, jsonMessage);break;
case "width_to_process":log.debug("Case width to process");setWidthToProcess(session, jsonMessage);break;
case "stop":{UserSession user = users.remove(session.getId());if (user != null) {user.release();
}break;
}case "onIceCandidate":{JsonObject candidate = jsonMessage.get("candidate").getAsJsonObject();
UserSession user = users.get(session.getId());if (user != null) {IceCandidate cand = new IceCandidate(candidate.get("candidate").getAsString(), candidate.get("sdpMid").getAsString(),candidate.get("sdpMLineIndex").getAsInt());
user.addCandidate(cand);}break;
}
default:sendError(session,"Invalid message with id " + jsonMessage.get("id").getAsString());
break;}
}
private void start(WebSocketSession session, JsonObject jsonMessage) {...
}
private void sendError(WebSocketSession session, String message) {...}...
}
In the following snippet, we can see the start method. It handles the ICE candidates gathering, creates a Media Pipeline,creates the Media Elements (WebRtcEndpoint and NuboFaceDetectorFilter) and make the connections among them.A startResponse message is sent back to the client with the SDP answer.
private void start(final WebSocketSession session, JsonObject jsonMessage) {try {// Media Logic (Media Pipeline and Elements)UserSession user = new UserSession();MediaPipeline pipeline = kurento.createMediaPipeline();user.setMediaPipeline(pipeline);webRtcEndpoint = new WebRtcEndpoint.Builder(pipeline).build();
28 Chapter 1. Contents

nubomedia-vca Documentation, Release 6.6.0
user.setWebRtcEndpoint(webRtcEndpoint);users.put(session.getId(), user);
webRtcEndpoint.addOnIceCandidateListener(new EventListener < OnIceCandidateEvent > () {
@Overridepublic void onEvent(OnIceCandidateEvent event) {JsonObject response = new JsonObject();response.addProperty("id", "iceCandidate");response.add("candidate", JsonUtils.toJsonObject(event.getCandidate()));
try {synchronized(session) {session.sendMessage(new TextMessage(response.toString()));
}} catch (IOException e) {log.debug(e.getMessage());
}}
});
face = new NuboFaceDetector.Builder(pipeline).build();webRtcEndpoint.connect(face);face.connect(webRtcEndpoint);
// SDP negotiation (offer and answer)String sdpOffer = jsonMessage.get("sdpOffer").getAsString();String sdpAnswer = webRtcEndpoint.processOffer(sdpOffer);
// Sending response back to clientJsonObject response = new JsonObject();response.addProperty("id", "startResponse");response.addProperty("sdpAnswer", sdpAnswer);
synchronized(session) {session.sendMessage(new TextMessage(response.toString()));}webRtcEndpoint.gatherCandidates();
} catch (Throwable t) {sendError(session, t.getMessage());
}}
The sendError method is quite simple: it sends an error message to the client when an exception is caught in theserver-side.
private void sendError(WebSocketSession session, String message) {try {JsonObject response = new JsonObject();response.addProperty("id", "error");response.addProperty("message", message);session.sendMessage(new TextMessage(response.toString()));
} catch (IOException e) {log.error("Exception sending message", e);
}
1.4. Tutorials 29
nubomedia-vca Documentation, Release 6.6.0
}
Application Client Side
Let’s move now to the client-side of the application. To call the previously created WebSocket service in the server-side, we use the JavaScript class WebSocket. We use an specific JavaScript library called kurento-utils.js to simplifythe WebRTC interaction with the server. This library depends on adapter.js, which is a JavaScript WebRTC utilitymaintained by Google that abstracts away browser differences. Finally jquery.js is also needed in this application.
These libraries are linked in the index.html web page, and are used in the index.js. In the following snippet we cansee the creation of the WebSocket (variable ws) in the path /nubofacedetector. Then, the onmessage listener of theWebSocket is used to implement the JSON signaling protocol in the client-side. Notice that there are three incomingmessages to client: startResponse, error, and iceCandidate. Convenient actions are taken to implement each step inthe communication. For example, in functions start the function WebRtcPeer.WebRtcPeerSendrecv of kurento-utils.jsis used to start a WebRTC communication.
var ws = new WebSocket('ws://' + location.host + '/nubofacedetector');
ws.onmessage = function(message) {var parsedMessage = JSON.parse(message.data);console.info('Received message: ' + message.data);
switch (parsedMessage.id) {case 'startResponse':startResponse(parsedMessage);break;
case 'iceCandidate':webRtcPeer.addIceCandidate(parsedMessage.candidate, function(error) {if (!error) return;console.error("Error adding candidate: " + error);
});break;
case 'error':if (state == I_AM_STARTING) {setState(I_CAN_START);
}onError("Error message from server: " + parsedMessage.message);break;default:if (state == I_AM_STARTING) {setState(I_CAN_START);
}onError('Unrecognized message', parsedMessage);
}}
function start() {console.log("Starting video call ...")// Disable start button
setState(I_AM_STARTING);showSpinner(videoInput, videoOutput);
console.log("Creating WebRtcPeer and generating local sdp offer ...");var options = {localVideo: videoInput,
30 Chapter 1. Contents

nubomedia-vca Documentation, Release 6.6.0
remoteVideo: videoOutput,onicecandidate: onIceCandidate
}
webRtcPeer = new kurentoUtils.WebRtcPeer.WebRtcPeerSendrecv(options,function(error) {if (error) {return console.error(error);
}webRtcPeer.generateOffer(onOffer);});
}
function onOffer(error, offerSdp) {if (error) return console.error("Error generating the offer");console.info('Invoking SDP offer callback function ' + location.host);var message = {id: 'start',sdpOffer: offerSdp
}sendMessage(message);
}
function onIceCandidate(candidate) {console.log("Local candidate" + JSON.stringify(candidate));
var message = {id: 'onIceCandidate',candidate: candidate
};sendMessage(message);
}
Dependencies
This Java Spring application is implemented using Maven. The relevant part of the pom.xml is where NUBOMEDIAdependencies are declared. we need two dependencies: the Client Java dependency (kurento-client) and the JavaScriptKurento utility library (kurento-utils) for the client-side. Browser dependencies (i.e. bootstrap, ekko-lightbox, andadapter.js) are handled with Webjars.
<dependencies><dependency>
<groupId>org.kurento</groupId><artifactId>kurento-client</artifactId>
</dependency><dependency>
<groupId>org.kurento</groupId><artifactId>kurento-utils-js</artifactId>
</dependency></dependencies>
Note: We are in active development. You can find the latest version of Kurento Java Client at Maven Central.
1.4. Tutorials 31

nubomedia-vca Documentation, Release 6.6.0
1.4.4 Face Profile
This web application consists on a pipeline composed by a WebRTC video communication with an face, mouth, noseand eye detector filter (loopback, the media stream going from client to the media server and back to client).
Compiling & Running
This section explain how to compile and run this tutorial in a local environment. To install the necessary softwareplease see the installation guide. To compile and run this tutorial from the source code you can use the followingcommands:
git clone https://github.com/nubomedia/nubomedia-vca-face-profile-tutorialcd nubomedia-vca-face-profile-tutorialmvn spring-boot:run
At this point we can test the application accessing the following URL: https://localhost:8443/.
Understanding this example
The following figure shows a screenshoot of this demo running.
The interface of the application (an HTML web page) is composed by two HTML5 video tags: one showing the localstream (as captured by the device webcam) and the other showing the remote stream sent by the media server back tothe client. The video camera stream is sent to Kurento Media Server, which processes and sends it back to the client asa remote stream. To implement this, we need to create a Media Pipeline composed by the following Media Elements:
32 Chapter 1. Contents
nubomedia-vca Documentation, Release 6.6.0
This is a web application, and therefore it follows a client-server architecture. At the client-side, the logic is imple-mented in JavaScript. At the server-side we use a Java EE application server consuming a Client API to control theMedia Server capabilities. To communicate these entities, two WebSockets are used. First, a WebSocket is createdbetween client and application server to implement a custom signaling protocol. Second, another WebSocket is usedto perform the communication between the Java Client and the Media Server. To communicate the client with theJava EE application server the platform uses a simple signaling protocol based on JSON messages over WebSocket‘s.SDP and ICE candidates needs to be exchanged between client and server to establish the WebRtc session. If you areinterested on knowing more about the messages exchanged between them, have a look to this example .
Application Server Side
This demo has been developed using a Java EE application server based on the Spring Boot framework. This technol-ogy can be used to embed the Tomcat web server in the application and thus simplify the development process.
In the following figure you can see a class diagram of the server side code:
The main class of this demo is named NuboFaceProfileJavaApp. As you can see, the NuboMediaClient is instantiatedin this class as a Spring Bean. This bean is used to create Media Pipelines, which are used to add media capabilities toyour applications. In this instantiation we see that we need to specify to the client library the location of the Kurento
1.4. Tutorials 33

nubomedia-vca Documentation, Release 6.6.0
Media Server. In this example, we assume it’s located at localhost listening in port 8888. If you reproduce this tutorialyou’ll need to insert the specific location of your Kurento Media Server instance there.
@Configuration@EnableWebSocket@EnableAutoConfigurationpublic class NuboFaceProfileJavaApp implements WebSocketConfigurer {
final static String DEFAULT_KMS_WS_URI = "ws://localhost:8888/kurento";
@Beanpublic NuboFaceProfileJavaHandler handler() {return new NuboFaceProfileJavaHandler();
}
@Beanpublic KurentoClient kurentoClient() {return KurentoClient.create(System.getProperty("kms.ws.uri",DEFAULT_KMS_WS_URI));
}
@Overridepublic void registerWebSocketHandlers(WebSocketHandlerRegistry registry) {registry.addHandler(handler(), "/nubofaceprofiledetector");
}
public static void main(String[] args) throws Exception {new SpringApplication(NuboFaceProfileJavaApp.class).run(args);
}}
This web application follows Single Page Application architecture and uses a WebSocket to communicate client withapplication server by means of requests and responses. Specifically, the main app class implements the interface Web-SocketConfigurer to register a WebSocketHanlder to process WebSocket requests in the path /nubofaceprofiledetector.
NuboFaceProfileJavaHandler class implements TextWebSocketHandler to handle text WebSocket requests. The cen-tral piece of this class is the method handleTextMessage. This method implements the actions for requests, returningresponses through the WebSocket. In other words, it implements the server part of the signaling protocol depicted.
In the designed protocol there are three different kinds of incoming messages to the Server: start, show_faces,show_mouths, show_noses, show_eyes, scale_factor, process_num_frames, face_resolution, mouth_resolution,nose_resolution, eye_resolution, width_to_process, stop and onIceCandidates. These messages are treated in theswitch clause, taking the proper steps in each case.
public class NuboFaceProfileJavaHandler extends TextWebSocketHandler {
@Overridepublic void handleTextMessage(WebSocketSession session, TextMessage message)throws Exception {JsonObject jsonMessage = gson.fromJson(message.getPayload(),JsonObject.class);
log.debug("Incoming message: {}", jsonMessage);switch (jsonMessage.get("id").getAsString()) {case "start":start(session, jsonMessage);break;
case "show_faces":setViewFaces(session, jsonMessage);
34 Chapter 1. Contents

nubomedia-vca Documentation, Release 6.6.0
break;
case "show_mouths":setViewMouths(session, jsonMessage);break;
case "show_noses":setViewNoses(session, jsonMessage);break;
case "show_eyes":setViewEyes(session, jsonMessage);break;
case "face_res":changeResolution(FACE_FILTER, session, jsonMessage);break;
case "mouth_res":changeResolution(this.MOUTH_FILTER, session, jsonMessage);break;
case "nose_res":changeResolution(this.NOSE_FILTER, session, jsonMessage);break;
case "eye_res":changeResolution(this.EYE_FILTER, session, jsonMessage);break;
case "fps":setFps(session, jsonMessage);break;
case "scale_factor":setScaleFactor(session, jsonMessage);break;
case "stop":{UserSession user = users.remove(session.getId());if (user != null) {user.release();
}break;
}case "onIceCandidate":{JsonObject candidate = jsonMessage.get("candidate").getAsJsonObject();UserSession user = users.get(session.getId());if (user != null) {IceCandidate cand = new IceCandidate(candidate.get("candidate").getAsString(), candidate.get("sdpMid").getAsString(),candidate.get("sdpMLineIndex").getAsInt());user.addCandidate(cand);
}break;
1.4. Tutorials 35

nubomedia-vca Documentation, Release 6.6.0
}
default:System.out.println("Invalid message with id " + jsonMessage.get("id").getAsString());sendError(session,"Invalid message with id " + jsonMessage.get("id").getAsString());
break;}
}private void start(WebSocketSession session, JsonObject jsonMessage) {...
}
private void sendError(WebSocketSession session, String message) {...}...
}
In the following snippet, we can see the start method. It handles the ICE candidates gathering, creates a Media Pipeline,creates the Media Elements and make the connections among them. A startResponse message is sent back to the clientwith the SDP answer.
private void start(final WebSocketSession session, JsonObject jsonMessage) {try {// Media Logic (Media Pipeline and Elements)UserSession user = new UserSession();pipeline = kurento.createMediaPipeline();user.setMediaPipeline(pipeline);webRtcEndpoint = new WebRtcEndpoint.Builder(pipeline).build();user.setWebRtcEndpoint(webRtcEndpoint);users.put(session.getId(), user);
webRtcEndpoint.addOnIceCandidateListener(new EventListener < OnIceCandidateEvent > () {
@Overridepublic void onEvent(OnIceCandidateEvent event) {JsonObject response = new JsonObject();response.addProperty("id", "iceCandidate");response.add("candidate", JsonUtils.toJsonObject(event.getCandidate()));try {synchronized(session) {session.sendMessage(new TextMessage(response.toString()));
}} catch (IOException e) {log.debug(e.getMessage());
}
});
pipeline.setLatencyStats(true); face = new NuboFaceDetector.Builder(pipeline).build(); face.sendMetaData(1); face.detectByEvent(0); face.showFaces(0);
mouth = new NuboMouthDetector.Builder(pipeline).build(); mouth.sendMetaData(0); mouth.detectByEvent(1); mouth.showMouths(0);
nose = new NuboNoseDetector.Builder(pipeline).build(); nose.sendMetaData(0); nose.detectByEvent(1); nose.showNoses(0);
eye = new NuboEyeDetector.Builder(pipeline).build(); eye.sendMetaData(0); eye.detectByEvent(1); eye.showEyes(0);
36 Chapter 1. Contents

nubomedia-vca Documentation, Release 6.6.0
webRtcEndpoint.connect(face); face.connect(mouth); mouth.connect(nose); nose.connect(eye); eye.connect(webRtcEndpoint);
// SDP negotiation (offer and answer)String sdpOffer = jsonMessage.get("sdpOffer").getAsString(); String sdpAnswer = webRtcEndpoint.processOffer(sdpOffer);
// Sending response back to clientJsonObject response = new JsonObject(); response.addProperty("id", "startResponse"); response.addProperty("sdpAnswer", sdpAnswer);
synchronized(session) {session.sendMessage(new TextMessage(response.toString()));
}webRtcEndpoint.gatherCandidates();
} catch (Throwable t) {sendError(session, t.getMessage());
}}
}
The sendError method is quite simple: it sends an error message to the client when an exception is caught in theserver-side.
private void sendError(WebSocketSession session, String message) {try {JsonObject response = new JsonObject();response.addProperty("id", "error");response.addProperty("message", message);session.sendMessage(new TextMessage(response.toString()));
} catch (IOException e) {log.error("Exception sending message", e);
}}
Application Client Side
Let’s move now to the client-side of the application. To call the previously created WebSocket service in the server-side, we use the JavaScript class WebSocket. We use an specific JavaScript library called kurento-utils.js to simplifythe WebRTC interaction with the server. This library depends on adapter.js, which is a JavaScript WebRTC utilitymaintained by Google that abstracts away browser differences. Finally jquery.js is also needed in this application.
These libraries are linked in the index.html web page, and are used in the index.js. In the following snippet we can seethe creation of the WebSocket (variable ws) in the path /nubofaceprofiledetector. Then, the onmessage listener of theWebSocket is used to implement the JSON signaling protocol in the client-side. Notice that there are three incomingmessages to client: startResponse, error, and iceCandidate. Convenient actions are taken to implement each step inthe communication. For example, in functions start the function WebRtcPeer.WebRtcPeerSendrecv of kurento-utils.jsis used to start a WebRTC communication.
var ws = new WebSocket('ws://' + location.host + '/nubofaceprofiledetector');
ws.onmessage = function(message) {var parsedMessage = JSON.parse(message.data);console.info('Received message: ' + message.data);
switch (parsedMessage.id) {case 'startResponse':startResponse(parsedMessage);
1.4. Tutorials 37

nubomedia-vca Documentation, Release 6.6.0
break;
case 'iceCandidate':webRtcPeer.addIceCandidate(parsedMessage.candidate, function(error) {if (!error) return;console.error("Error adding candidate: " + error);
});break;
case 'error':if (state == I_AM_STARTING) {setState(I_CAN_START);
}onError("Error message from server: " + parsedMessage.message);break;default:if (state == I_AM_STARTING) {setState(I_CAN_START);
}onError('Unrecognized message', parsedMessage);
}}
function start() {console.log("Starting video call ...")// Disable start button
setState(I_AM_STARTING);showSpinner(videoInput, videoOutput);
console.log("Creating WebRtcPeer and generating local sdp offer ...");var options = {localVideo: videoInput,remoteVideo: videoOutput,onicecandidate: onIceCandidate
}
webRtcPeer = new kurentoUtils.WebRtcPeer.WebRtcPeerSendrecv(options,function(error) {if (error) {return console.error(error);
}webRtcPeer.generateOffer(onOffer);});
}
function onOffer(error, offerSdp) {if (error) return console.error("Error generating the offer");console.info('Invoking SDP offer callback function ' + location.host);var message = {id: 'start',sdpOffer: offerSdp
}sendMessage(message);
}
function onIceCandidate(candidate) {console.log("Local candidate" + JSON.stringify(candidate));
38 Chapter 1. Contents

nubomedia-vca Documentation, Release 6.6.0
var message = {id: 'onIceCandidate',candidate: candidate
};sendMessage(message);
}
Dependencies
This Java Spring application is implemented using Maven. The relevant part of the pom.xml is where NUBOMEDIAdependencies are declared. we need two dependencies: the Client Java dependency (kurento-client) and the JavaScriptKurento utility library (kurento-utils) for the client-side. Browser dependencies (i.e. bootstrap, ekko-lightbox, andadapter.js) are handled with Webjars.
<dependencies><dependency>
<groupId>org.kurento</groupId><artifactId>kurento-client</artifactId>
</dependency><dependency>
<groupId>org.kurento</groupId><artifactId>kurento-utils-js</artifactId>
</dependency></dependencies>
Note: We are in active development. You can find the latest version of Kurento Java Client at Maven Central.
1.4.5 Mouth Detector
This web application consists on a WebRTC video communication with a mouth detector filter (loopback, the mediastream going from client to the media server and back to client).
Compiling & Running
This section explain how to compile and run this tutorial in a local environment. To install the necessary softwareplease see the installation guide. To compile and run this tutorial from the source code you can use the followingcommands:
git clone https://github.com/nubomedia/nubomedia-vca-mouth-tutorialcd nubomedia-vca-mouth-tutorialmvn spring-boot:run
At this point we can test the application accessing the following URL: https://localhost:8443/.
Understanding this example
The following figure shows a screenshoot of this demo running.
1.4. Tutorials 39

nubomedia-vca Documentation, Release 6.6.0
The interface of the application (an HTML web page) is composed by two HTML5 video tags: one showing the localstream (as captured by the device webcam) and the other showing the remote stream sent by the media server back tothe client. The video camera stream is sent to Kurento Media Server, which processes and sends it back to the client asa remote stream. To implement this, we need to create a Media Pipeline composed by the following Media Elements:
This is a web application, and therefore it follows a client-server architecture. At the client-side, the logic is imple-mented in JavaScript. At the server-side we use a Java EE application server consuming a Client API to control theMedia Server capabilities. To communicate these entities, two WebSockets are used. First, a WebSocket is createdbetween client and application server to implement a custom signaling protocol. Second, another WebSocket is usedto perform the communication between the Java Client and the Media Server. To communicate the client with theJava EE application server the platform uses a simple signaling protocol based on JSON messages over WebSocket‘s.SDP and ICE candidates needs to be exchanged between client and server to establish the WebRtc session. If you areinterested on knowing more about the messages exchanged between them, have a look to this example .
Application Server Side
This demo has been developed using a Java EE application server based on the Spring Boot framework. This technol-ogy can be used to embed the Tomcat web server in the application and thus simplify the development process.
In the following figure you can see a class diagram of the server side code:
40 Chapter 1. Contents

nubomedia-vca Documentation, Release 6.6.0
The main class of this demo is named NuboMouthJavaApp. As you can see, the NuboMediaClient is instantiated inthis class as a Spring Bean. This bean is used to create Media Pipelines, which are used to add media capabilities toyour applications. In this instantiation we see that we need to specify to the client library the location of the KurentoMedia Server. In this example, we assume it’s located at localhost listening in port 8888. If you reproduce this tutorialyou’ll need to insert the specific location of your Kurento Media Server instance there.
@Configuration@EnableWebSocket@EnableAutoConfigurationpublic class NuboMouthJavaApp implements WebSocketConfigurer {
final static String DEFAULT_KMS_WS_URI = "ws://localhost:8888/kurento";
@Beanpublic NuboMouthJavaHandler handler() {return new NuboMouthJavaHandler();
}
@Beanpublic KurentoClient kurentoClient() {return KurentoClient.create(System.getProperty("kms.ws.uri",DEFAULT_KMS_WS_URI));
}
@Overridepublic void registerWebSocketHandlers(WebSocketHandlerRegistry registry) {
1.4. Tutorials 41

nubomedia-vca Documentation, Release 6.6.0
registry.addHandler(handler(), "/nubomouthdetector");}
public static void main(String[] args) throws Exception {new SpringApplication(NuboMouthJavaApp.class).run(args);
}}
This web application follows Single Page Application architecture and uses a WebSocket to communicate client withapplication server by means of requests and responses. Specifically, the main app class implements the interfaceWebSocketConfigurer to register a WebSocketHanlder to process WebSocket requests in the path /nubomouthdetector.
NuboMouthJavaHandler class implements TextWebSocketHandler to handle text WebSocket requests. The centralpiece of this class is the method handleTextMessage. This method implements the actions for requests, returningresponses through the WebSocket. In other words, it implements the server part of the signaling protocol depicted.
In the designed protocol there are three different kinds of incoming messages to the Server: start, show_mouths,scale_factor, process_num_frames, width_to_process, stop and onIceCandidates. These messages are treated in theswitch clause, taking the proper steps in each case.
public class NuboMouthJavaHandler extends TextWebSocketHandler {
@Overridepublic void handleTextMessage(WebSocketSession session, TextMessage message)throws Exception {JsonObject jsonMessage = gson.fromJson(message.getPayload(),JsonObject.class);
log.debug("Incoming message: {}", jsonMessage);
switch (jsonMessage.get("id").getAsString()) {case "start":start(session, jsonMessage);break;
case "show_mouths":setVisualization(session, jsonMessage);break;
case "scale_factor":log.debug("Case scale factor");setScaleFactor(session, jsonMessage);break;
case "process_num_frames":log.debug("Case process num frames");setProcessNumberFrames(session, jsonMessage);break;
case "width_to_process":log.debug("Case width to process");setWidthToProcess(session, jsonMessage);break;
case "stop":{UserSession user = users.remove(session.getId());if (user != null) {user.release();
}break;
}
42 Chapter 1. Contents

nubomedia-vca Documentation, Release 6.6.0
case "onIceCandidate":{JsonObject candidate = jsonMessage.get("candidate").getAsJsonObject();
UserSession user = users.get(session.getId());if (user != null) {IceCandidate cand = new IceCandidate(candidate.get("candidate").getAsString(), candidate.get("sdpMid").getAsString(),candidate.get("sdpMLineIndex").getAsInt());
user.addCandidate(cand);}break;
}
default:sendError(session,"Invalid message with id " + jsonMessage.get("id").getAsString());
break;}
}
private void start(WebSocketSession session, JsonObject jsonMessage) {...
}
private void sendError(WebSocketSession session, String message) {...}...
}
In the following snippet, we can see the start method. It handles the ICE candidates gathering, creates a Media Pipeline,creates the Media Elements (WebRtcEndpoint and NuboMouthDetectorFilter) and make the connections among them.A startResponse message is sent back to the client with the SDP answer.
private void start(final WebSocketSession session, JsonObject jsonMessage) {try {// Media Logic (Media Pipeline and Elements)UserSession user = new UserSession();MediaPipeline pipeline = kurento.createMediaPipeline();user.setMediaPipeline(pipeline);webRtcEndpoint = new WebRtcEndpoint.Builder(pipeline).build();user.setWebRtcEndpoint(webRtcEndpoint);users.put(session.getId(), user);
webRtcEndpoint.addOnIceCandidateListener(new EventListener < OnIceCandidateEvent > () {
@Overridepublic void onEvent(OnIceCandidateEvent event) {JsonObject response = new JsonObject();response.addProperty("id", "iceCandidate");response.add("candidate", JsonUtils.toJsonObject(event.getCandidate()));
try {synchronized(session) {session.sendMessage(new TextMessage(
1.4. Tutorials 43

nubomedia-vca Documentation, Release 6.6.0
response.toString()));}
} catch (IOException e) {log.debug(e.getMessage());
}}
});
mouth = new NuboMouthDetector.Builder(pipeline).build();webRtcEndpoint.connect(mouth);mouth.connect(webRtcEndpoint);
// SDP negotiation (offer and answer)String sdpOffer = jsonMessage.get("sdpOffer").getAsString();String sdpAnswer = webRtcEndpoint.processOffer(sdpOffer);
// Sending response back to clientJsonObject response = new JsonObject();response.addProperty("id", "startResponse");response.addProperty("sdpAnswer", sdpAnswer);
synchronized(session) {session.sendMessage(new TextMessage(response.toString()));}webRtcEndpoint.gatherCandidates();
} catch (Throwable t) {sendError(session, t.getMessage());
}}
The sendError method is quite simple: it sends an error message to the client when an exception is caught in theserver-side.
private void sendError(WebSocketSession session, String message) {try {JsonObject response = new JsonObject();response.addProperty("id", "error");response.addProperty("message", message);session.sendMessage(new TextMessage(response.toString()));
} catch (IOException e) {log.error("Exception sending message", e);
}}
Application Client Side
Let’s move now to the client-side of the application. To call the previously created WebSocket service in the server-side, we use the JavaScript class WebSocket. We use an specific JavaScript library called kurento-utils.js to simplifythe WebRTC interaction with the server. This library depends on adapter.js, which is a JavaScript WebRTC utilitymaintained by Google that abstracts away browser differences. Finally jquery.js is also needed in this application.
These libraries are linked in the index.html web page, and are used in the index.js. In the following snippet we cansee the creation of the WebSocket (variable ws) in the path /nubomouthdetector. Then, the onmessage listener of theWebSocket is used to implement the JSON signaling protocol in the client-side. Notice that there are three incomingmessages to client: startResponse, error, and iceCandidate. Convenient actions are taken to implement each step in
44 Chapter 1. Contents

nubomedia-vca Documentation, Release 6.6.0
the communication. For example, in functions start the function WebRtcPeer.WebRtcPeerSendrecv of kurento-utils.jsis used to start a WebRTC communication.
var ws = new WebSocket('ws://' + location.host + '/nubomouthdetector');
ws.onmessage = function(message) {var parsedMessage = JSON.parse(message.data);console.info('Received message: ' + message.data);
switch (parsedMessage.id) {case 'startResponse':startResponse(parsedMessage);break;
case 'iceCandidate':webRtcPeer.addIceCandidate(parsedMessage.candidate, function(error) {if (!error) return;console.error("Error adding candidate: " + error);
});break;
case 'error':if (state == I_AM_STARTING) {setState(I_CAN_START);
}onError("Error message from server: " + parsedMessage.message);break;default:if (state == I_AM_STARTING) {setState(I_CAN_START);
}onError('Unrecognized message', parsedMessage);
}}
function start() {console.log("Starting video call ...")// Disable start button
setState(I_AM_STARTING);showSpinner(videoInput, videoOutput);
console.log("Creating WebRtcPeer and generating local sdp offer ...");var options = {localVideo: videoInput,remoteVideo: videoOutput,onicecandidate: onIceCandidate
}
webRtcPeer = new kurentoUtils.WebRtcPeer.WebRtcPeerSendrecv(options,function(error) {if (error) {return console.error(error);
}webRtcPeer.generateOffer(onOffer);});
}
function onOffer(error, offerSdp) {if (error) return console.error("Error generating the offer");
1.4. Tutorials 45

nubomedia-vca Documentation, Release 6.6.0
console.info('Invoking SDP offer callback function ' + location.host);var message = {id: 'start',sdpOffer: offerSdp
}sendMessage(message);
}
function onIceCandidate(candidate) {console.log("Local candidate" + JSON.stringify(candidate));
var message = {id: 'onIceCandidate',candidate: candidate
};sendMessage(message);
}
Dependencies
This Java Spring application is implemented using Maven. The relevant part of the pom.xml is where NUBOMEDIAdependencies are declared. we need two dependencies: the Client Java dependency (kurento-client) and the JavaScriptKurento utility library (kurento-utils) for the client-side. Browser dependencies (i.e. bootstrap, ekko-lightbox, andadapter.js) are handled with Webjars.
<dependencies><dependency>
<groupId>org.kurento</groupId><artifactId>kurento-client</artifactId>
</dependency><dependency>
<groupId>org.kurento</groupId><artifactId>kurento-utils-js</artifactId>
</dependency></dependencies>
Note: We are in active development. You can find the latest version of Kurento Java Client at Maven Central.
1.4.6 Nose Detector
This web application consists on a WebRTC video communication with a nose detector filter (loopback, the mediastream going from client to the media server and back to client).
Compiling & Running
This section explain how to compile and run this tutorial in a local environment. To install the necessary softwareplease see the installation guide. To compile and run this tutorial from the source code you can use the followingcommands:
46 Chapter 1. Contents

nubomedia-vca Documentation, Release 6.6.0
git clone https://github.com/nubomedia/nubomedia-vca-nose-tutorialcd nubomedia-vca-nose-tutorialmvn spring-boot:run
At this point we can test the application accessing the following URL: https://localhost:8443/.
Understanding this example
The following figure shows a screenshoot of this demo running.
The interface of the application (an HTML web page) is composed by two HTML5 video tags: one showing the localstream (as captured by the device webcam) and the other showing the remote stream sent by the media server back tothe client. The video camera stream is sent to Kurento Media Server, which processes and sends it back to the client asa remote stream. To implement this, we need to create a Media Pipeline composed by the following Media Elements:
This is a web application, and therefore it follows a client-server architecture. At the client-side, the logic is imple-mented in JavaScript. At the server-side we use a Java EE application server consuming a Client API to control theMedia Server capabilities. To communicate these entities, two WebSockets are used. First, a WebSocket is createdbetween client and application server to implement a custom signaling protocol. Second, another WebSocket is usedto perform the communication between the Java Client and the Media Server. To communicate the client with theJava EE application server the platform uses a simple signaling protocol based on JSON messages over WebSocket‘s.
1.4. Tutorials 47

nubomedia-vca Documentation, Release 6.6.0
SDP and ICE candidates needs to be exchanged between client and server to establish the WebRtc session. If you areinterested on knowing more about the messages exchanged between them, have a look to this example .
Application Server Side
This demo has been developed using a Java EE application server based on the Spring Boot framework. This technol-ogy can be used to embed the Tomcat web server in the application and thus simplify the development process.
In the following figure you can see a class diagram of the server side code:
The main class of this demo is named NuboNoseJavaApp. As you can see, the NuboMediaClient is instantiated in thisclass as a Spring Bean. This bean is used to create Media Pipelines, which are used to add media capabilities to yourapplications. In this instantiation we see that we need to specify to the client library the location of the Kurento MediaServer. In this example, we assume it’s located at localhost listening in port 8888. If you reproduce this tutorial you’llneed to insert the specific location of your Kurento Media Server instance there.
@Configuration@EnableWebSocket@EnableAutoConfigurationpublic class NuboNoseJavaApp implements WebSocketConfigurer {
final static String DEFAULT_KMS_WS_URI = "ws://localhost:8888/kurento";
@Beanpublic NuboNoseJavaHandler handler() {
48 Chapter 1. Contents

nubomedia-vca Documentation, Release 6.6.0
return new NuboNoseJavaHandler();}
@Beanpublic KurentoClient kurentoClient() {return KurentoClient.create(System.getProperty("kms.ws.uri",DEFAULT_KMS_WS_URI));
}
@Overridepublic void registerWebSocketHandlers(WebSocketHandlerRegistry registry) {registry.addHandler(handler(), "/nubonosedetector");
}
public static void main(String[] args) throws Exception {new SpringApplication(NuboNoseJavaApp.class).run(args);
}}
This web application follows Single Page Application architecture and uses a WebSocket to communicate client withapplication server by means of requests and responses. Specifically, the main app class implements the interfaceWebSocketConfigurer to register a WebSocketHanlder to process WebSocket requests in the path /nubonosedetector.
NuboNoseJavaHandler class implements TextWebSocketHandler to handle text WebSocket requests. The central pieceof this class is the method handleTextMessage. This method implements the actions for requests, returning responsesthrough the WebSocket. In other words, it implements the server part of the signaling protocol depicted.
In the designed protocol there are three different kinds of incoming messages to the Server: start, show_noses,scale_factor, process_num_frames, width_to_process, stop and onIceCandidates. These messages are treated in theswitch clause, taking the proper steps in each case.
public class NuboNoseJavaHandler extends TextWebSocketHandler {
@Overridepublic void handleTextMessage(WebSocketSession session, TextMessage message)throws Exception {JsonObject jsonMessage = gson.fromJson(message.getPayload(),JsonObject.class);
log.debug("Incoming message: {}", jsonMessage);
switch (jsonMessage.get("id").getAsString()) {case "start":start(session, jsonMessage);break;case "show_noses":setVisualization(session, jsonMessage);break;case "scale_factor":log.debug("Case scale factor");setScaleFactor(session, jsonMessage);break;case "process_num_frames":log.debug("Case process num frames");setProcessNumberFrames(session, jsonMessage);break;case "width_to_process":log.debug("Case width to process");setWidthToProcess(session, jsonMessage);
1.4. Tutorials 49

nubomedia-vca Documentation, Release 6.6.0
break;
case "stop":{UserSession user = users.remove(session.getId());if (user != null) {user.release();
}break;
}case "onIceCandidate":{JsonObject candidate = jsonMessage.get("candidate").getAsJsonObject();
UserSession user = users.get(session.getId());if (user != null) {IceCandidate cand = new IceCandidate(candidate.get("candidate").getAsString(), candidate.get("sdpMid").getAsString(),candidate.get("sdpMLineIndex").getAsInt());
user.addCandidate(cand);}break;
}
default:sendError(session,"Invalid message with id " + jsonMessage.get("id").getAsString());
break;}
}
private void start(WebSocketSession session, JsonObject jsonMessage) {...
}
private void sendError(WebSocketSession session, String message) {...}...
}
In the following snippet, we can see the start method. It handles the ICE candidates gathering, creates a Media Pipeline,creates the Media Elements (WebRtcEndpoint and NuboNoseDetectorFilter) and make the connections among them.A startResponse message is sent back to the client with the SDP answer.
private void start(final WebSocketSession session, JsonObject jsonMessage) {try {// Media Logic (Media Pipeline and Elements)UserSession user = new UserSession();MediaPipeline pipeline = kurento.createMediaPipeline();user.setMediaPipeline(pipeline);webRtcEndpoint = new WebRtcEndpoint.Builder(pipeline).build();user.setWebRtcEndpoint(webRtcEndpoint);users.put(session.getId(), user);
webRtcEndpoint.addOnIceCandidateListener(new EventListener < OnIceCandidateEvent > () {
50 Chapter 1. Contents
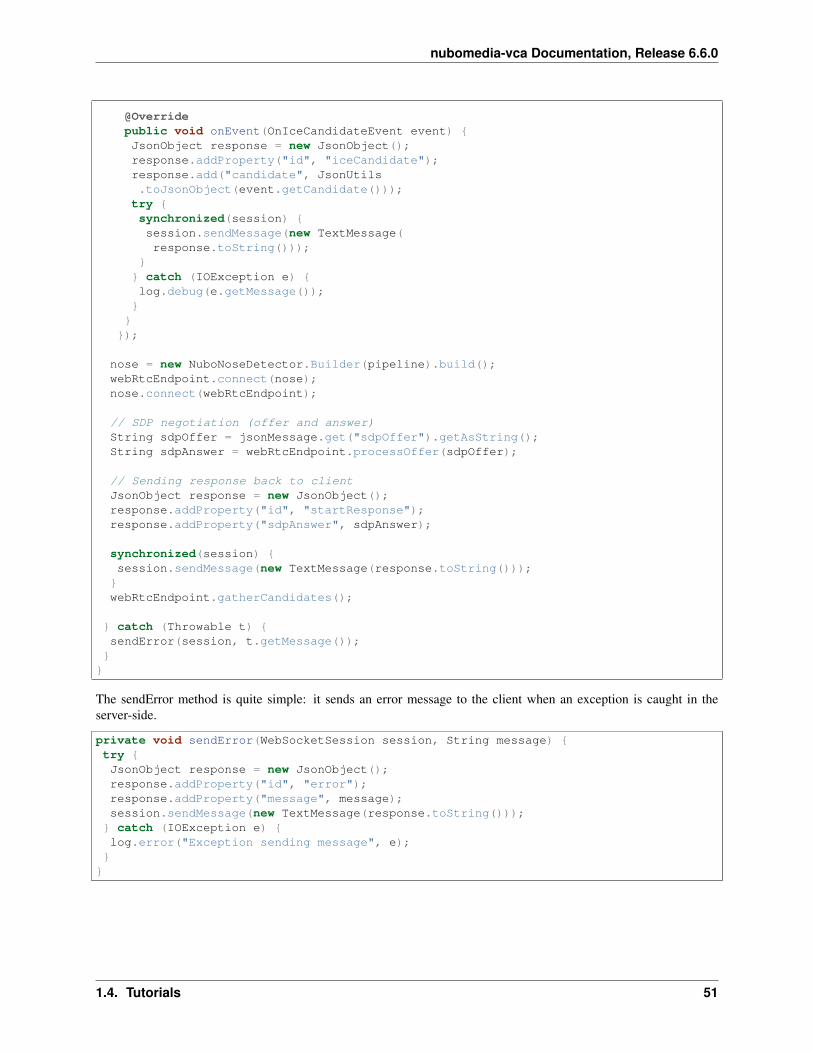
nubomedia-vca Documentation, Release 6.6.0
@Overridepublic void onEvent(OnIceCandidateEvent event) {JsonObject response = new JsonObject();response.addProperty("id", "iceCandidate");response.add("candidate", JsonUtils.toJsonObject(event.getCandidate()));
try {synchronized(session) {session.sendMessage(new TextMessage(response.toString()));
}} catch (IOException e) {log.debug(e.getMessage());
}}
});
nose = new NuboNoseDetector.Builder(pipeline).build();webRtcEndpoint.connect(nose);nose.connect(webRtcEndpoint);
// SDP negotiation (offer and answer)String sdpOffer = jsonMessage.get("sdpOffer").getAsString();String sdpAnswer = webRtcEndpoint.processOffer(sdpOffer);
// Sending response back to clientJsonObject response = new JsonObject();response.addProperty("id", "startResponse");response.addProperty("sdpAnswer", sdpAnswer);
synchronized(session) {session.sendMessage(new TextMessage(response.toString()));}webRtcEndpoint.gatherCandidates();
} catch (Throwable t) {sendError(session, t.getMessage());
}}
The sendError method is quite simple: it sends an error message to the client when an exception is caught in theserver-side.
private void sendError(WebSocketSession session, String message) {try {JsonObject response = new JsonObject();response.addProperty("id", "error");response.addProperty("message", message);session.sendMessage(new TextMessage(response.toString()));
} catch (IOException e) {log.error("Exception sending message", e);
}}
1.4. Tutorials 51

nubomedia-vca Documentation, Release 6.6.0
Application Client Side
Let’s move now to the client-side of the application. To call the previously created WebSocket service in the server-side, we use the JavaScript class WebSocket. We use an specific JavaScript library called kurento-utils.js to simplifythe WebRTC interaction with the server. This library depends on adapter.js, which is a JavaScript WebRTC utilitymaintained by Google that abstracts away browser differences. Finally jquery.js is also needed in this application.
These libraries are linked in the index.html web page, and are used in the index.js. In the following snippet we cansee the creation of the WebSocket (variable ws) in the path /nubonosedetector. Then, the onmessage listener of theWebSocket is used to implement the JSON signaling protocol in the client-side. Notice that there are three incomingmessages to client: startResponse, error, and iceCandidate. Convenient actions are taken to implement each step inthe communication. For example, in functions start the function WebRtcPeer.WebRtcPeerSendrecv of kurento-utils.jsis used to start a WebRTC communication.
var ws = new WebSocket('ws://' + location.host + '/nubonosedetector');
ws.onmessage = function(message) {var parsedMessage = JSON.parse(message.data);console.info('Received message: ' + message.data);
switch (parsedMessage.id) {case 'startResponse':startResponse(parsedMessage);break;
case 'iceCandidate':webRtcPeer.addIceCandidate(parsedMessage.candidate, function(error) {if (!error) return;console.error("Error adding candidate: " + error);
});break;
case 'error':if (state == I_AM_STARTING) {setState(I_CAN_START);
}onError("Error message from server: " + parsedMessage.message);break;default:if (state == I_AM_STARTING) {setState(I_CAN_START);
}onError('Unrecognized message', parsedMessage);
}}
function start() {console.log("Starting video call ...")// Disable start button
setState(I_AM_STARTING);showSpinner(videoInput, videoOutput);
console.log("Creating WebRtcPeer and generating local sdp offer ...");var options = {localVideo: videoInput,remoteVideo: videoOutput,onicecandidate: onIceCandidate
}
52 Chapter 1. Contents

nubomedia-vca Documentation, Release 6.6.0
webRtcPeer = new kurentoUtils.WebRtcPeer.WebRtcPeerSendrecv(options,function(error) {if (error) {return console.error(error);
}webRtcPeer.generateOffer(onOffer);});
}
function onOffer(error, offerSdp) {if (error) return console.error("Error generating the offer");console.info('Invoking SDP offer callback function ' + location.host);var message = {id: 'start',sdpOffer: offerSdp
}sendMessage(message);
}
function onIceCandidate(candidate) {console.log("Local candidate" + JSON.stringify(candidate));
var message = {id: 'onIceCandidate',candidate: candidate
};sendMessage(message);
}
Dependencies
This Java Spring application is implemented using Maven. The relevant part of the pom.xml is where NUBOMEDIAdependencies are declared. we need two dependencies: the Client Java dependency (kurento-client) and the JavaScriptKurento utility library (kurento-utils) for the client-side. Browser dependencies (i.e. bootstrap, ekko-lightbox, andadapter.js) are handled with Webjars.
<dependencies><dependency>
<groupId>org.kurento</groupId><artifactId>kurento-client</artifactId>
</dependency><dependency>
<groupId>org.kurento</groupId><artifactId>kurento-utils-js</artifactId>
</dependency></dependencies>
Note: We are in active development. You can find the latest version of Kurento Java Client at Maven Central.
1.4. Tutorials 53

nubomedia-vca Documentation, Release 6.6.0
1.4.7 Tracker
This web application consists on a WebRTC video communication with a tracker detector filter (loopback, the mediastream going from client to the media server and back to client).
Compiling & Running
This section explain how to compile and run this tutorial in a local environment. To install the necessary softwareplease see the installation guide. To compile and run this tutorial from the source code you can use the followingcommands:
git clone https://github.com/nubomedia/nubomedia-vca-tracker-tutorialcd nubomedia-vca-tracker-tutorialmvn spring-boot:run
At this point we can test the application accessing the following URL: https://localhost:8443/.
Understanding this example
The following figure shows a screenshoot of this demo running.
The interface of the application (an HTML web page) is composed by two HTML5 video tags: one showing the localstream (as captured by the device webcam) and the other showing the remote stream sent by the media server back tothe client. The video camera stream is sent to Kurento Media Server, which processes and sends it back to the client asa remote stream. To implement this, we need to create a Media Pipeline composed by the following Media Elements:
54 Chapter 1. Contents

nubomedia-vca Documentation, Release 6.6.0
This is a web application, and therefore it follows a client-server architecture. At the client-side, the logic is imple-mented in JavaScript. At the server-side we use a Java EE application server consuming a Client API to control theMedia Server capabilities. To communicate these entities, two WebSockets are used. First, a WebSocket is createdbetween client and application server to implement a custom signaling protocol. Second, another WebSocket is usedto perform the communication between the Java Client and the Media Server. To communicate the client with theJava EE application server the platform uses a simple signaling protocol based on JSON messages over WebSocket‘s.SDP and ICE candidates needs to be exchanged between client and server to establish the WebRtc session. If you areinterested on knowing more about the messages exchanged between them, have a look to this example .
Application Server Side
This demo has been developed using a Java EE application server based on the Spring Boot framework. This technol-ogy can be used to embed the Tomcat web server in the application and thus simplify the development process.
In the following figure you can see a class diagram of the server side code:
1.4. Tutorials 55

nubomedia-vca Documentation, Release 6.6.0
The main class of this demo is named NuboTrackerJavaApp. As you can see, the NuboMediaClient is instantiated inthis class as a Spring Bean. This bean is used to create Media Pipelines, which are used to add media capabilities toyour applications. In this instantiation we see that we need to specify to the client library the location of the KurentoMedia Server. In this example, we assume it’s located at localhost listening in port 8888. If you reproduce this tutorialyou’ll need to insert the specific location of your Kurento Media Server instance there.
@Configuration@EnableWebSocket@EnableAutoConfigurationpublic class NuboTrackerJavaApp implements WebSocketConfigurer {
final static String DEFAULT_KMS_WS_URI = "ws://localhost:8888/kurento";
@Beanpublic NuboTrackerJavaHandler handler() {return new NuboTrackerJavaHandler();
}
@Beanpublic KurentoClient kurentoClient() {return KurentoClient.create(System.getProperty("kms.ws.uri",DEFAULT_KMS_WS_URI));
}
@Overridepublic void registerWebSocketHandlers(WebSocketHandlerRegistry registry) {
56 Chapter 1. Contents
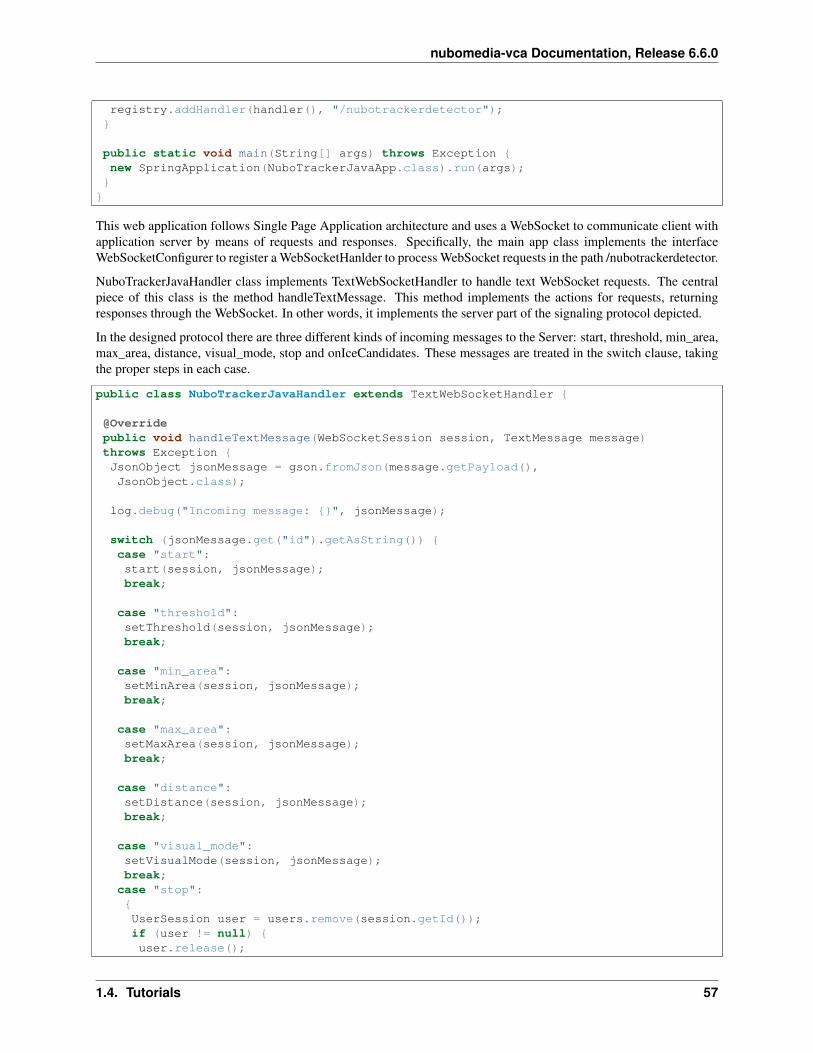
nubomedia-vca Documentation, Release 6.6.0
registry.addHandler(handler(), "/nubotrackerdetector");}
public static void main(String[] args) throws Exception {new SpringApplication(NuboTrackerJavaApp.class).run(args);
}}
This web application follows Single Page Application architecture and uses a WebSocket to communicate client withapplication server by means of requests and responses. Specifically, the main app class implements the interfaceWebSocketConfigurer to register a WebSocketHanlder to process WebSocket requests in the path /nubotrackerdetector.
NuboTrackerJavaHandler class implements TextWebSocketHandler to handle text WebSocket requests. The centralpiece of this class is the method handleTextMessage. This method implements the actions for requests, returningresponses through the WebSocket. In other words, it implements the server part of the signaling protocol depicted.
In the designed protocol there are three different kinds of incoming messages to the Server: start, threshold, min_area,max_area, distance, visual_mode, stop and onIceCandidates. These messages are treated in the switch clause, takingthe proper steps in each case.
public class NuboTrackerJavaHandler extends TextWebSocketHandler {
@Overridepublic void handleTextMessage(WebSocketSession session, TextMessage message)throws Exception {JsonObject jsonMessage = gson.fromJson(message.getPayload(),JsonObject.class);
log.debug("Incoming message: {}", jsonMessage);
switch (jsonMessage.get("id").getAsString()) {case "start":start(session, jsonMessage);break;
case "threshold":setThreshold(session, jsonMessage);break;
case "min_area":setMinArea(session, jsonMessage);break;
case "max_area":setMaxArea(session, jsonMessage);break;
case "distance":setDistance(session, jsonMessage);break;
case "visual_mode":setVisualMode(session, jsonMessage);break;case "stop":{UserSession user = users.remove(session.getId());if (user != null) {user.release();
1.4. Tutorials 57
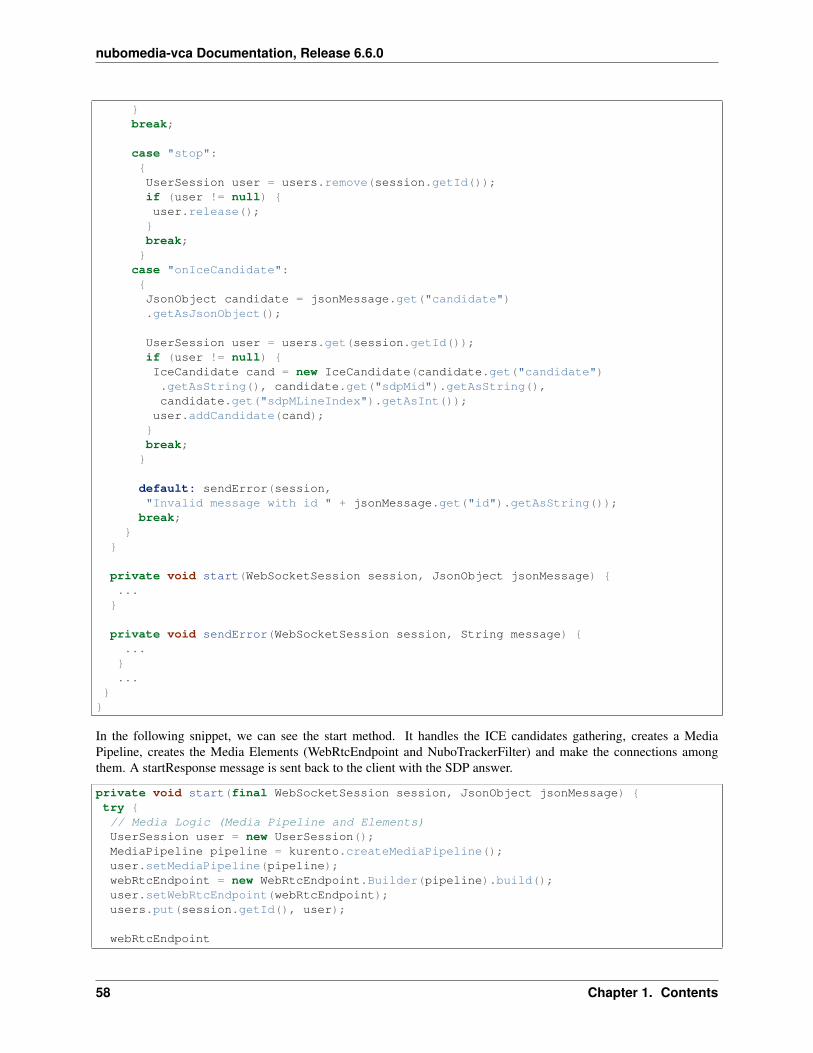
nubomedia-vca Documentation, Release 6.6.0
}break;
case "stop":{UserSession user = users.remove(session.getId());if (user != null) {user.release();
}break;
}case "onIceCandidate":{JsonObject candidate = jsonMessage.get("candidate").getAsJsonObject();
UserSession user = users.get(session.getId());if (user != null) {IceCandidate cand = new IceCandidate(candidate.get("candidate").getAsString(), candidate.get("sdpMid").getAsString(),candidate.get("sdpMLineIndex").getAsInt());user.addCandidate(cand);
}break;
}
default: sendError(session,"Invalid message with id " + jsonMessage.get("id").getAsString());
break;}
}
private void start(WebSocketSession session, JsonObject jsonMessage) {...}
private void sendError(WebSocketSession session, String message) {...
}...
}}
In the following snippet, we can see the start method. It handles the ICE candidates gathering, creates a MediaPipeline, creates the Media Elements (WebRtcEndpoint and NuboTrackerFilter) and make the connections amongthem. A startResponse message is sent back to the client with the SDP answer.
private void start(final WebSocketSession session, JsonObject jsonMessage) {try {// Media Logic (Media Pipeline and Elements)UserSession user = new UserSession();MediaPipeline pipeline = kurento.createMediaPipeline();user.setMediaPipeline(pipeline);webRtcEndpoint = new WebRtcEndpoint.Builder(pipeline).build();user.setWebRtcEndpoint(webRtcEndpoint);users.put(session.getId(), user);
webRtcEndpoint
58 Chapter 1. Contents

nubomedia-vca Documentation, Release 6.6.0
.addOnIceCandidateListener(new EventListener < OnIceCandidateEvent > () {
@Overridepublic void onEvent(OnIceCandidateEvent event) {JsonObject response = new JsonObject();response.addProperty("id", "iceCandidate");response.add("candidate", JsonUtils.toJsonObject(event.getCandidate()));
try {synchronized(session) {session.sendMessage(new TextMessage(response.toString()));
}} catch (IOException e) {log.debug(e.getMessage());
}}
});
tracker = new NuboTracker.Builder(pipeline).build();webRtcEndpoint.connect(tracker);tracker.connect(webRtcEndpoint);
// SDP negotiation (offer and answer)String sdpOffer = jsonMessage.get("sdpOffer").getAsString();String sdpAnswer = webRtcEndpoint.processOffer(sdpOffer);
// Sending response back to clientJsonObject response = new JsonObject();response.addProperty("id", "startResponse");response.addProperty("sdpAnswer", sdpAnswer);
synchronized(session) {session.sendMessage(new TextMessage(response.toString()));}webRtcEndpoint.gatherCandidates();
} catch (Throwable t) {sendError(session, t.getMessage());
}}
The sendError method is quite simple: it sends an error message to the client when an exception is caught in theserver-side.
private void sendError(WebSocketSession session, String message) {try {JsonObject response = new JsonObject();response.addProperty("id", "error");response.addProperty("message", message);session.sendMessage(new TextMessage(response.toString()));
} catch (IOException e) {log.error("Exception sending message", e);
}}
1.4. Tutorials 59

nubomedia-vca Documentation, Release 6.6.0
Application Client Side
Let’s move now to the client-side of the application. To call the previously created WebSocket service in the server-side, we use the JavaScript class WebSocket. We use an specific JavaScript library called kurento-utils.js to simplifythe WebRTC interaction with the server. This library depends on adapter.js, which is a JavaScript WebRTC utilitymaintained by Google that abstracts away browser differences. Finally jquery.js is also needed in this application.
These libraries are linked in the index.html web page, and are used in the index.js. In the following snippet we cansee the creation of the WebSocket (variable ws) in the path /nubotrackerdetector. Then, the onmessage listener of theWebSocket is used to implement the JSON signaling protocol in the client-side. Notice that there are three incomingmessages to client: startResponse, error, and iceCandidate. Convenient actions are taken to implement each step inthe communication. For example, in functions start the function WebRtcPeer.WebRtcPeerSendrecv of kurento-utils.jsis used to start a WebRTC communication.
var ws = new WebSocket('ws://' + location.host + '/nubotrackerdetector');
ws.onmessage = function(message) {var parsedMessage = JSON.parse(message.data);console.info('Received message: ' + message.data);
switch (parsedMessage.id) {case 'startResponse':startResponse(parsedMessage);break;
case 'iceCandidate':webRtcPeer.addIceCandidate(parsedMessage.candidate, function(error) {if (!error) return;console.error("Error adding candidate: " + error);
});break;
case 'error':if (state == I_AM_STARTING) {setState(I_CAN_START);
}onError("Error message from server: " + parsedMessage.message);break;default:if (state == I_AM_STARTING) {setState(I_CAN_START);
}onError('Unrecognized message', parsedMessage);
}}
function start() {console.log("Starting video call ...")// Disable start button
setState(I_AM_STARTING);showSpinner(videoInput, videoOutput);
console.log("Creating WebRtcPeer and generating local sdp offer ...");var options = {localVideo: videoInput,remoteVideo: videoOutput,onicecandidate: onIceCandidate
}
60 Chapter 1. Contents
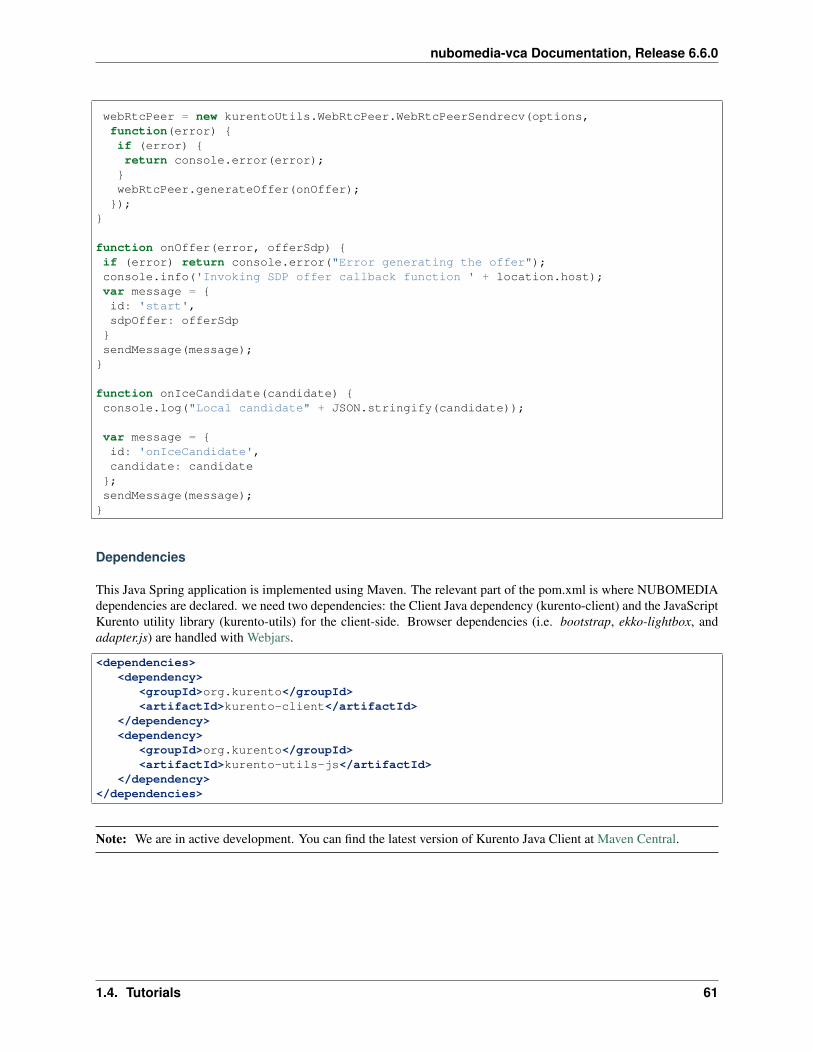
nubomedia-vca Documentation, Release 6.6.0
webRtcPeer = new kurentoUtils.WebRtcPeer.WebRtcPeerSendrecv(options,function(error) {if (error) {return console.error(error);
}webRtcPeer.generateOffer(onOffer);});
}
function onOffer(error, offerSdp) {if (error) return console.error("Error generating the offer");console.info('Invoking SDP offer callback function ' + location.host);var message = {id: 'start',sdpOffer: offerSdp
}sendMessage(message);
}
function onIceCandidate(candidate) {console.log("Local candidate" + JSON.stringify(candidate));
var message = {id: 'onIceCandidate',candidate: candidate
};sendMessage(message);
}
Dependencies
This Java Spring application is implemented using Maven. The relevant part of the pom.xml is where NUBOMEDIAdependencies are declared. we need two dependencies: the Client Java dependency (kurento-client) and the JavaScriptKurento utility library (kurento-utils) for the client-side. Browser dependencies (i.e. bootstrap, ekko-lightbox, andadapter.js) are handled with Webjars.
<dependencies><dependency>
<groupId>org.kurento</groupId><artifactId>kurento-client</artifactId>
</dependency><dependency>
<groupId>org.kurento</groupId><artifactId>kurento-utils-js</artifactId>
</dependency></dependencies>
Note: We are in active development. You can find the latest version of Kurento Java Client at Maven Central.
1.4. Tutorials 61
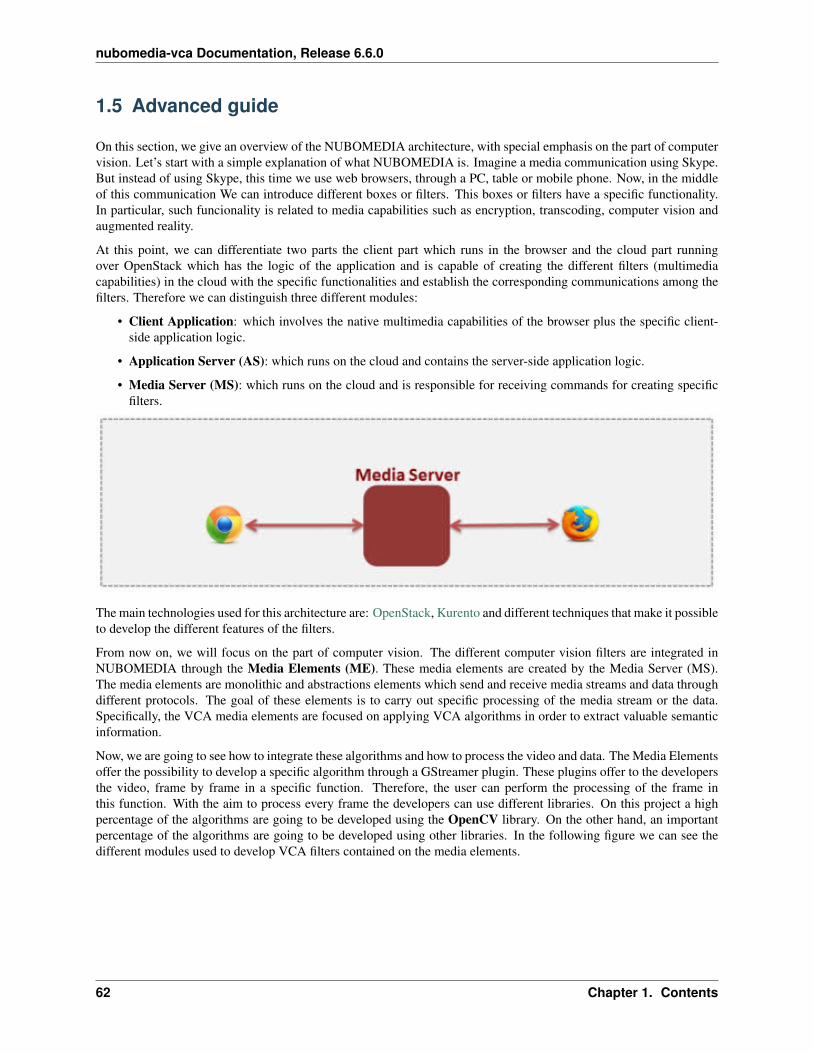
nubomedia-vca Documentation, Release 6.6.0
1.5 Advanced guide
On this section, we give an overview of the NUBOMEDIA architecture, with special emphasis on the part of computervision. Let’s start with a simple explanation of what NUBOMEDIA is. Imagine a media communication using Skype.But instead of using Skype, this time we use web browsers, through a PC, table or mobile phone. Now, in the middleof this communication We can introduce different boxes or filters. This boxes or filters have a specific functionality.In particular, such funcionality is related to media capabilities such as encryption, transcoding, computer vision andaugmented reality.
At this point, we can differentiate two parts the client part which runs in the browser and the cloud part runningover OpenStack which has the logic of the application and is capable of creating the different filters (multimediacapabilities) in the cloud with the specific functionalities and establish the corresponding communications among thefilters. Therefore we can distinguish three different modules:
• Client Application: which involves the native multimedia capabilities of the browser plus the specific client-side application logic.
• Application Server (AS): which runs on the cloud and contains the server-side application logic.
• Media Server (MS): which runs on the cloud and is responsible for receiving commands for creating specificfilters.
The main technologies used for this architecture are: OpenStack, Kurento and different techniques that make it possibleto develop the different features of the filters.
From now on, we will focus on the part of computer vision. The different computer vision filters are integrated inNUBOMEDIA through the Media Elements (ME). These media elements are created by the Media Server (MS).The media elements are monolithic and abstractions elements which send and receive media streams and data throughdifferent protocols. The goal of these elements is to carry out specific processing of the media stream or the data.Specifically, the VCA media elements are focused on applying VCA algorithms in order to extract valuable semanticinformation.
Now, we are going to see how to integrate these algorithms and how to process the video and data. The Media Elementsoffer the possibility to develop a specific algorithm through a GStreamer plugin. These plugins offer to the developersthe video, frame by frame in a specific function. Therefore, the user can perform the processing of the frame inthis function. With the aim to process every frame the developers can use different libraries. On this project a highpercentage of the algorithms are going to be developed using the OpenCV library. On the other hand, an importantpercentage of the algorithms are going to be developed using other libraries. In the following figure we can see thedifferent modules used to develop VCA filters contained on the media elements.
62 Chapter 1. Contents

nubomedia-vca Documentation, Release 6.6.0
Finally, once the algorithm has been developed and installed, the developers can use the filter using the Java orJavaScript API.
1.5. Advanced guide 63