Release 2.2 Hardware User’s Guide - TouchWindo · i Preface Audience This book is written for...
174
NCR 7454 Retail Terminal Release 2.2 Hardware User’s Guide 18004 NC R B005-0000-1256 Issue H
Transcript of Release 2.2 Hardware User’s Guide - TouchWindo · i Preface Audience This book is written for...

NCR 7454 Retail TerminalRelease 2.2
Hardware User’s Guide
18004
NCR
B005-0000-1256Issue H

The products described in this book are licensed products of NCR Corporation.
NCR is a registered trademark of NCR Corporation.NCR RealPOS, NCR RealScan, and NCR EasyPoint are either registered trademarks or trademarks of NCRCorporation in the United States and/or other countries.MicroTouch is a registered trademark of 3M.Sound Blaster is a registered trademark of Creative Technology Ltd. in the United States and/or othercountries.Intel, Pentium, and Celeron are registered trademarks of Intel Corporation.Microsoft, Windows, Windows NT, and MS-DOS are either trademarks or registered trademarks ofMicrosoft Corporation in the United States and/or other countries.DiskOnChip is a trademark or registered trademark of M-Systems in the United States.Novell and Netware are either registered trademarks or trademarks of Novell, Inc. in the United States andother countries.UNIX is a registered trademark of The Open Group in the United States and other countries.Symantic and Ghost are registered trademarks of Symantec Corporation in the United States and othercountries.backpack is a registered trademark of MicroSolutions, Inc.
It is the policy of NCR Corporation (NCR) to improve products as new technology, components, software,and firmware become available. NCR, therefore, reserves the right to change specifications without priornotice.
All features, functions, and operations described herein may not be marketed by NCR in all parts of theworld. In some instances, photographs are of equipment prototypes. Therefore, before using this document,consult with your NCR representative or NCR office for information that is applicable and current.
To maintain the quality of our publications, we need your comments on the accuracy, clarity, organization,and value of this book.
Address correspondence to:
Manager, Information ProductsNCR Corporation2651 Satellite Blvd.Duluth, GA 30096
Copyright © 2002By NCR CorporationDayton, Ohio U.S.A.All Rights Reserved

i
PrefaceAudience
This book is written for hardware installer/service personnel, systemintegrators, and field engineers.
Notice: This document is NCR proprietary information and is not tobe disclosed or reproduced without consent.
Safety Warnings
Fuse ReplacementCaution: For continued protection against risk of fire, replace onlywith the same type and ratings of fuse.
Attention: Pour prévenir et vous protéger contre un risque de feu,remplacer la fusible avec une autre fusible de même type, seulement.
Power Supply Cord Used as Disconnect MeansCaution: The power supply cord is used as the main disconnectdevice. Ensure that the socket outlet is located/installed near theequipment and is easily accessible.
Attention: Le cordon d'alimentation est utilisé comme interrupteurgénéral. La prise de courant doit être située ou installée å proximité dumatériel et être facile d'accés.
Warning: DO NOT connect or disconnect a printer, keyboard, orany other terminal-powered peripheral while the terminal ispowered on. Doing so may result in peripheral or system damage.
Warning: The NCR 7454 must be mounted securely to prevent ahazard. It must be installed in accordance with local building codes.The post or wall on which the unit is mounted should be able towithstand four times the weight of the unit, which is approximately20 lbs. (9 kg).

ii
Lithium Battery WarningCaution: Danger of explosion if battery is incorrectly replaced.Replace only with the same or equivalent type as recommended by themanufacturer. Discard used batteries according to the manufacturer’sinstructions.
Attention: Il y a danger d'explosion s'il y a remplacement incorrect dela batterie. Remplacer uniquement avec une batterie du même type oud'un type recommandé par le constructeur. Mettre au rébut lesbatteries usagées conformément aux instructions du fabricant.
Peripheral Usage
This terminal should only be used with peripheral devices that arecertified by the appropriate safety agency for the country of installation(UL, CSA, TUV, VDE) or those which are recommended by NCRCorporation.
Environmental Consciousness
NCR is demonstrating its concern for the environment by designing anintelligent power management system into this terminal that operatesefficiently whether the system is in a stand-alone or networkenvironment.

iii
References• NCR 7454 Retail Terminal Hardware Service Guide
(B005-0000-1342)
• NCR 7454 Retail Terminal Site Preparation Guide(B005-0000-1257)
• NCR 7454 Retail Terminal Software User’s Guide(B005-0000-1259)
• NCR 7401/7454 Retail Terminal Parts Identification Manual(B005-0000-1072)
• NCR Retail Platform Software Terminal Utilities Guide(B005-0000-1503)
• NCR FitClient Software User’s Guide(B005-0000-1235)

iv

v
Table of Contents
Chapter 1: Product Overview
Introduction .................................................................. 1-1Serial Number/Model Number Label ........................ 1-2Hardware Modules ...................................................... 1-3
Base Unit ................................................................. 1-3Hardware Options ................................................. 1-4
Terminal Components not Supported.............. 1-6System Configuration Diagram................................... 1-7Hardware Module Descriptions.................................. 1-8
Processor Board...................................................... 1-8Processor/Chip Set ............................................ 1-8Video Subsystem................................................ 1-9
Ethernet 10/100Base-T LANCommunications .............................................. 1-10Wireless LAN Communications ..................... 1-11Universal Serial Bus ......................................... 1-12Serial Ports........................................................ 1-13Hardware Monitor........................................... 1-13PCI Expansion Header .................................... 1-14IDE Header....................................................... 1-14Audio ................................................................ 1-14Magnetic Stripe Reader ................................... 1-14Touch Screen Controller .................................. 1-15Processor Board Connectors ........................... 1-15Compact Flash.................................................. 1-16NCR Retail Specific Hardware........................ 1-16Board BIOS ....................................................... 1-18

vi
BIOS Upgrades................................................. 1-19Operator Display.................................................. 1-20
LCD Adapter Board......................................... 1-21LCD Backlight Inverter Module ..................... 1-21Touch Screen .................................................... 1-22
NCR 7454 Integrated Customer Display ............ 1NCR 5973 International VFD Customer Display1-23
-22
Table Top Mount.............................................. 1-2316" High Post Mount........................................ 1-23
Features ....................................................................... 1-24Magnetic Stripe Reader........................................ 1-24Printer Options ..................................................... 1-25
2214 Printer....................................................... 1-257158 Printer....................................................... 1-267166 Printer....................................................... 1-267167 Printer....................................................... 1-277194 Printer....................................................... 1-277196 Printer....................................................... 1-287197 Printer....................................................... 1-28
Other Integrated Devices and Indicators ........... 1-29Hard Disk Drive............................................... 1-29Reset Switch...................................................... 1-29Internal Speaker ............................................... 1-29POS Connector Board ...................................... 1-30Motion Sensor .................................................. 1-30Power/Status LED........................................... 1-31Power OK LED................................................. 1-31LAN Status LEDs ............................................. 1-31Power Supply ................................................... 1-32Integrated Speaker Module (Optional) .......... 1-32USB RS-232 Port Server ................................... 1-33

vii
Additional Pentium III and CeleronConnectors........................................................ 1-34
Chapter 2: Hardware Installation
Introduction .................................................................. 2-1Installation Summary............................................. 2-1
Installation Restrictions................................................ 2-2Connecting the Cables.................................................. 2-3
Accessing the Cable Connectors ........................... 2-3Routing the Cables ................................................. 2-4Identifying the Cable Connectors ......................... 2-5
Installing Peripherals ................................................... 2-6Installing a Transaction Printer............................. 2-6
RS-232 Installation ............................................. 2-7USB Installation.................................................. 2-82214 Printer......................................................... 2-9
Installing a Remote Customer Display............... 2-105974 Remote Customer Display...................... 2-105972-1100 Remote Customer Display ............. 2-125973 International VFD Customer Display .... 2-14
Installing a High-Post Integrated CustomerDisplay .................................................................. 2-16
Installing an Integrated Customer Display(5972-F039)........................................................ 2-17
Installing a Cash Drawer ..................................... 2-22Installing a Second Cash Drawer.................... 2-23
Mounting the 7454...................................................... 2-24Wall Mounting a Tilt Mount ............................... 2-25
Finalizing the Installation .......................................... 2-26Completing the OS Installation (Win2000) .... 2-26Completing the OS Installation (WinXPe) ..... 2-26Completing the OS Installation (WinNT)....... 2-27

viii
Completing the OS Installation (Win98) ........ 2-27Completing the OS Installation (Win95) ........ 2-28Completing the OS Installation (DOS) ........... 2-28
Setting Auto-Logon (WinNT Terminal).................... 2-29Installing a Serial Mouse............................................ 2-34Guidelines for Calibrating the Touch Screen ........... 2-35
Calibration Procedure.......................................... 2-35Summary............................................................... 2-37
Out-of-Box Failures .................................................... 2-37
Chapter 3: Setup
Introduction .................................................................. 3-1BIOS Versions......................................................... 3-1Entering Setup Without a Keyboard..................... 3-1Entering Setup Using a Keyboard......................... 3-2How to Select Menu Options ................................ 3-2Restoring Factory Settings..................................... 3-3BIOS Default CMOS Values (Pentium) ................ 3-4
Main Values........................................................ 3-4Advanced Values ............................................... 3-6I/O Device Configuration ................................. 3-6PCI Configuration.............................................. 3-7
Interrupts (Pentium) .............................................. 3-8Memory Map (Pentium) ........................................ 3-9
BIOS Default CMOS Values (PentiumIII/Celeron) .......................................................... 3-10
Main Values...................................................... 3-10Advanced Values ............................................. 3-11Security Values................................................. 3-15Power Values.................................................... 3-16Boot Values....................................................... 3-16Exit Values........................................................ 3-16

ix
Interrupts (Pentium III/Celeron)........................ 3-17Memory Map (Pentium III/Celeron).................. 3-19
Chapter 4: Operating System Recovery
Introduction .................................................................. 4-1Prerequisites ........................................................... 4-1Updating Procedures ............................................. 4-2
Completing the OS Installation (Win2000) ...... 4-5Completing the OS Installation (WinXPe) ....... 4-5Completing the OS Installation (WinNT)......... 4-6Completing the OS Installation (Win98) .......... 4-6Completing the OS Installation (Win95) .......... 4-7Completing the OS Installation (DOS) ............. 4-7
Gold Disk Contents ...................................................... 4-8Microsoft Operating System LicenseAgreements............................................................. 4-8Operating System Restrictions .............................. 4-9
Standby and Hibernate Mode Restriction........ 4-9NCR 7454-32xx Win2000 Operating SystemRecovery Software (Version 02.02.00.02)............. 4-10
NCR 7454-3xxx WinXPe Operating SystemRecovery Software (Version 02.02.00.01)............ 4-12NCR 7454-22xx Win2000 Operating SystemRecovery Software (Version 01.01.00.00 .............. 4-13
NCR 7454-32xx NT Operating System RecoverySoftware (Version 02.02.00.01............................... 4-15NCR 7454-22xx NT Operating System RecoverySoftware (Version 01.04.01.00............................... 4-17NCR 7454-32xx Win98 Operating SystemRecovery Software (Version 02.02.00.01)............. 4-19
NCR 7454-22xx Win98 Operating SystemRecovery Software (Version 01.01.00.00)............. 4-21

x
NCR 7454-32xx Win95 Operating SystemRecovery Software (Version 02.01.00.01)............. 4-22
NCR 7454-22xx Win95 Operating SystemRecovery Software (Version 01.02.00.00)............. 4-24
OS Recovery from a Larger Disk Image ................... 4-25
Chapter 5: BIOS Updating Procedures
Introduction .................................................................. 5-1Prerequisites ........................................................... 5-1Updating Procedures ............................................. 5-2
BIOS Crisis Recovery ................................................... 5-4Recovery Procedures ............................................. 5-5
Cable/Connector Pin-Out Information ...................... 5-8
Chapter 6: NCR 7454 4x20 Customer Display
Introduction .................................................................. 6-1Viewing Area.......................................................... 6-1Diagnostics.............................................................. 6-2
Character Set................................................................. 6-3Page 1 – International ........................................ 6-3Page 2 – Japanese ............................................... 6-4Page 3 – Code Page 850 ..................................... 6-5
Command Descriptions ............................................... 6-6Structure/Logic Description ................................. 6-6Host/Retail VFD Command Interface.................. 6-6
Reset Display...................................................... 6-8Erase Display...................................................... 6-8Invalid Command.............................................. 6-8Set Diagnostic State............................................ 6-9Set Display State On........................................... 6-9Set Low Power State On .................................. 6-10Enable Cursor................................................... 6-10

xi
Disable Cursor.................................................. 6-10Set Screen Save Blank ...................................... 6-11Set Screen Save Walk ....................................... 6-11Turn On Screen Save........................................ 6-11Disable Screen Save Option............................. 6-12Enable Character Blink .................................... 6-12Disable Character Blink ................................... 6-12Move Cursor Left ............................................. 6-13Move Cursor Right .......................................... 6-13Move Cursor Up .............................................. 6-13Move Cursor Down ......................................... 6-14Move Cursor To Specified Position ................ 6-14Brightness Adjustment .................................... 6-15Read Display ID Byte....................................... 6-15Read Display ID String .................................... 6-15Display ESC Character .................................... 6-16Select Character Set n....................................... 6-16Read Display Data String ................................ 6-16
Appendix A: Cables
Appendix B: Feature Kits
7454 Kits ..................................................................B-1Kit Index........................................................................B-2
xii
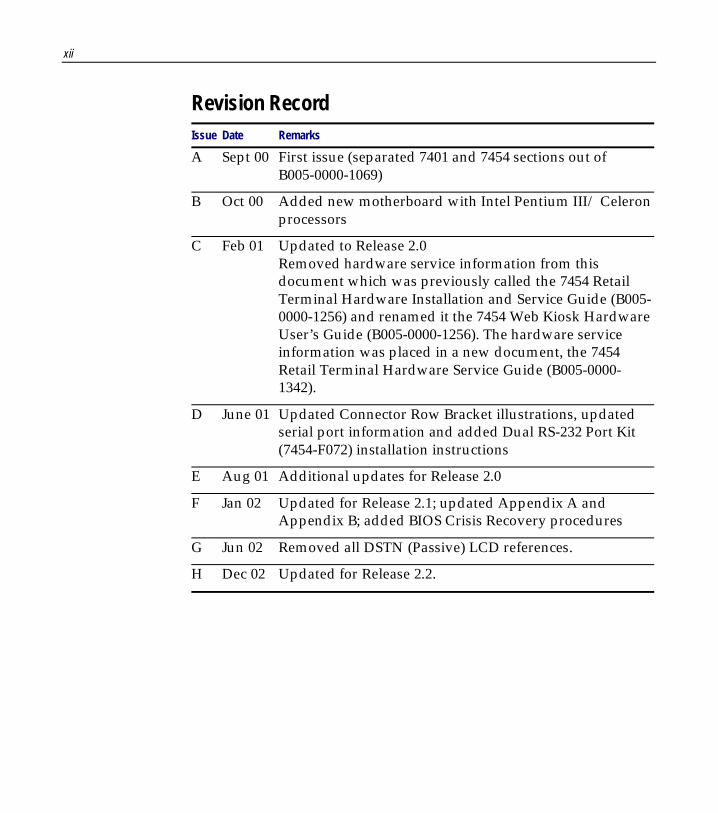
Revision RecordIssue Date Remarks
A Sept 00 First issue (separated 7401 and 7454 sections out ofB005-0000-1069)
B Oct 00 Added new motherboard with Intel Pentium III/ Celeronprocessors
C Feb 01 Updated to Release 2.0Removed hardware service information from thisdocument which was previously called the 7454 RetailTerminal Hardware Installation and Service Guide (B005-0000-1256) and renamed it the 7454 Web Kiosk HardwareUser’s Guide (B005-0000-1256). The hardware serviceinformation was placed in a new document, the 7454Retail Terminal Hardware Service Guide (B005-0000-1342).
D June 01 Updated Connector Row Bracket illustrations, updatedserial port information and added Dual RS-232 Port Kit(7454-F072) installation instructions
E Aug 01 Additional updates for Release 2.0
F Jan 02 Updated for Release 2.1; updated Appendix A andAppendix B; added BIOS Crisis Recovery procedures
G Jun 02 Removed all DSTN (Passive) LCD references.
H Dec 02 Updated for Release 2.2.

xiii
Radio Frequency Interference Statements
Federal Communications Commission (FCC)Information to UserThis equipment has been tested and found to comply with the limits for a Class Adigital device, pursuant to Part 15 of FCC Rules. These limits are designed to providereasonable protection against harmful interference when the equipment is operated ina commercial environment. This equipment generates, uses, and can radiate radiofrequency energy and, if not installed and used in accordance with the instructionmanual, may cause harmful interference to radio communications. Operation of thisequipment in a residential area is likely to cause interference in which case the userwill be required to correct the interference at his own expense.
NCR is not responsible for any radio or television interference caused by unauthorizedmodification of this equipment or the substitution or attachment of connecting cablesand equipment other than those specified by NCR. The correction of interferencecaused by such unauthorized modification, substitution or attachment will be theresponsibility of the user. The user is cautioned that changes or modifications notexpressly approved by NCR may void the user’s authority to operate the equipment.
Canadian Department of CommunicationsThis digital apparatus does not exceed the Class A limits for radio noise emissionsfrom digital apparatus set out in the Radio Interference Regulations of the CanadianDepartment of Communications.
Le présent appareil numérique n'émet pas de bruits radioélectriques dépassant leslimites applicables aux appareils numériques de la classe A prescrites dans lerèglement sur le brouillage radioélectriques édicté par le ministrère desCommunications du Canada.
Voluntary Control Council for Interference (VCCI)

xiv
Declaration of ConformityManufacturer’s Name NCR Corporation
Manufacturer’s Address NCR CorporationRetail Solutions Division – Atlanta2651 Satellite BoulevardDuluth, GA 30096-5810
Type of Equipment Information Technology Equipment
Model Number Class 7454
Electrical Ratings (Input) 100-120 V/200-240 V, 2.0 A/1.0 A, 50-60 Hz
NCR Corporation, 1700 South Patterson Boulevard, Dayton, OH 45479,USA, declares that the equipment specified above conforms to thereferenced EU Directives and Harmonized Standards.
EU Directive Harmonized Standard(s)
89/336/EEC (EMC) EN 55022: 1987 (CISPR 22)EN 50082-1, Part 1: 1992IEC 801-2: 1984IEC 801-3: 1984IEC 801-4: 1988
73/23/EEC (Low Voltage) EN 60 950: 1992 +A1+A2:1993 +A3:1995
Director of Quality AssuranceNCR CorporationRetail Solutions Division — Atlanta2651 Satellite BoulevardDuluth, GA 30096-5810
European Contact:International IP Counsel206 Marylebone RoadLondon, NW1 6LY, England

Chapter 1: Product Overview
18004
NCR
Introduction
The NCR 7454 Retail Terminal is an interactive touch screen terminaldesigned specifically for the hospitality marketplace. Housed in anintegrated, compact cabinet, the 7454 supports a complete set ofperipherals.
The major hardware features of the 7454 are a flat panel display withtouch screen input and LAN connectivity, plus optional magneticstripe reader, scanner, stereo audio, and wireless LAN.
The 7454 is Internet/Intranet ready. System loading can occur from anetwork server, and software and data content are delivered from aserver through standard internet protocols.
1-2 Chapter 1: Product Overview
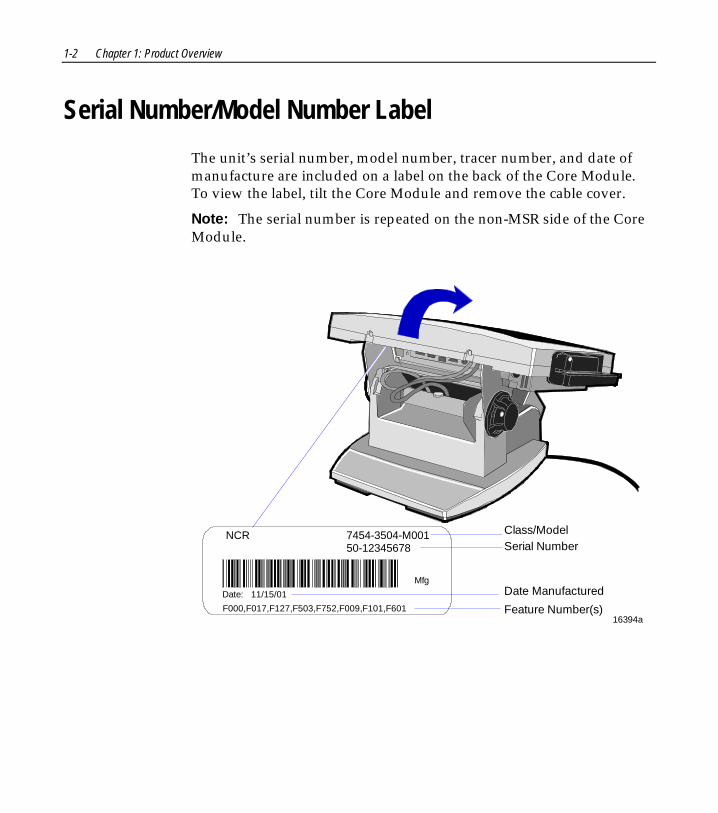
Serial Number/Model Number Label
The unit’s serial number, model number, tracer number, and date ofmanufacture are included on a label on the back of the Core Module.To view the label, tilt the Core Module and remove the cable cover.
Note: The serial number is repeated on the non-MSR side of the CoreModule.
NCR 7454-3504-M00150-12345678
Mfg
Date: 11/15/01
F000,F017,F127,F503,F752,F009,F101,F601
Class/ModelSerial Number
Feature Number(s)
Date Manufactured
16394a

Chapter 1: Product Overview 1-3
Hardware Modules
Base Unit• Processor Board
− Intel® Pentium® III or Celeron-class processor
− SVGA chipset
− MPEGII chipset
− 32 MB RAM on board (Celeron 600 MHz processor)
− 64 MB RAM on board (Celeron 700 MHz processor)
− 4 MB Video Memory
− 1 MB Flash BIOS (not CMOS)
− Four RS-232 ports (two optionally powered)
− 10/100BaseT Ethernet LAN chipset, Wake-on-LAN support,and RJ-45 port
− PC Audio with an internal mono speaker
− Sound Blaster® 16-compatible audio chipset
− Two USB type A ports
− PS/2 keyboard port
− External VGA display port.
− External stereo speaker port
− Internal PS/2 mouse (dedicated to the touch screen)
− One SODIMM (Small Outline DIMM) RAM socket (32 MB)
− IDE support for a hard disk and an optional compact flash

1-4 Chapter 1: Product Overview
• POS Connector Board
− Cash drawer port (supports two drawers via a Y-cable)
− Internal parallel port (dedicated to the optional customerdisplay)
• 12.1-Inch Operator Display - capacitive or resistive touch LCD,available in active matrix models
• 15-Inch Color TFT LCD Operator Display panel with capacitivetouch screen
• 2.5" hard disk
• Integrated Motion Sensor, capable of waking up the terminal froma low power state
• Integrated Power Supply
• Reset switch which can be used to recover from a lock-up condition
• 3-meter Ethernet cable
• 85W Power Supply
• U.S. power cord
Hardware Options• Intel Pentium III processor
• Intel Celeron (700 MHz) processor
• Integrated MSR (3-track ISO or JIS)
• Integrated Stereo Module
• Integrated Infrared Sensor
• Dual PCMCIA (for wireless LAN)
• Gray (G105) or Charcoal Gray (CG01) cabinet colors
• Mounting options: Table-top, Wall
• 7837 Hand-held Scanner
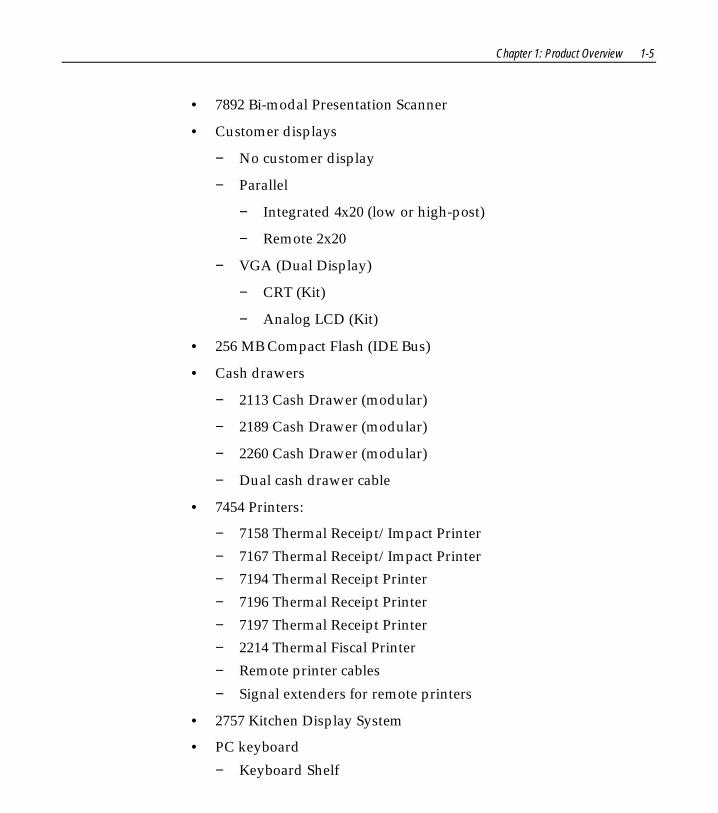
Chapter 1: Product Overview 1-5
• 7892 Bi-modal Presentation Scanner
• Customer displays
− No customer display
− Parallel
− Integrated 4x20 (low or high-post)
− Remote 2x20
− VGA (Dual Display)
− CRT (Kit)
− Analog LCD (Kit)
• 256 MB Compact Flash (IDE Bus)
• Cash drawers
− 2113 Cash Drawer (modular)
− 2189 Cash Drawer (modular)
− 2260 Cash Drawer (modular)
− Dual cash drawer cable
• 7454 Printers:
− 7158 Thermal Receipt/Impact Printer
− 7167 Thermal Receipt/Impact Printer
− 7194 Thermal Receipt Printer
− 7196 Thermal Receipt Printer
− 7197 Thermal Receipt Printer
− 2214 Thermal Fiscal Printer
− Remote printer cables
− Signal extenders for remote printers
• 2757 Kitchen Display System
• PC keyboard
− Keyboard Shelf

1-6 Chapter 1: Product Overview
• USB RS-232 Port Server
− USB Serial Converter• CD-ROM Drive
Terminal Components not Supported
It is important to note that the terminal does not support the followingcomponents.
Not supported Alternative implementation
CMOS for hard totals, logs, andtallies
Hard disk, compact flash, or serverstorage
Removable media, e.g., a flexdisk
LAN communication to an NT servervia standard protocols
SLP terminal loading Local storage, TCP/IP networkingand PXE loading
Keylock for security (X, L, R, S) Reset switch based securityISA and PCI Expansion slots USB and LAN based devices (future)DVD ROMInternal UPS External UPSManual Video and audiocontrols
Software controlled
Windows® 3.1,Windows NT® 3.51, OS/2
Windows NT 4.0, MS-DOS®,Windows® CE, Windows® 95,Windows® 98, Windows® 2000,Windows® XPe
Intel 133 MHz, 166 MHz, and266 MHz Pentium ProcessorsAMD 366 MHz and 400 MHzProcessors
Intel Pentium III 550 MHzIntel Celeron® 600 MHz and 700 MHzprocessors

Chapter 1: Product Overview 1-7
System Configuration Diagram
18470b
2260/2183/21892nd Cash Drawer
(Y-Cable)
5972/5973
PS/2 KBD VGA
POS Connector Bd.
USB
Audio
RS232 (4)2 OptionallyPowered
Customer Display(Parallel)
Cash Dwr
2336-K007
Ethernet
2336-K008
2113
7196 7166 2010 CoinDispenser
78922214
Processor Board
7837
5974
7194 7158
Note: 7158, 7167, 7194,and 7197 are available in both RS-232 and USB.
71677197

1-8 Chapter 1: Product Overview
Hardware Module Descriptions
Processor Board
Processor/Chip Set
The terminal uses an Intel architecture processor, which permits it toleverage existing software drivers and applications, as well as providethe greatest flexibility in choosing an operating system. This providesseveral other advantages:
• Capable of SW MPEG-1 playback at 30 frames per second with 22KHz stereo audio (may be limited by OS constraints)
• Sound Blaster-compatible audio capability
• Java Benchmark performance > 1000 Caffeinemarks, JIT compiled
• OS support to run Java
• Expansion capabilities for optional features and futurerequirements (ISA/PCI bus and USB)
The following sections identify processors, system bus speed, and on-board memory available on 7454 Release 2.x processor boards:
Release 2.0/2.1• Intel 600 MHz µPGA2 Celeron Processor and 440BX chipset
consisting of the 82443BX (North Bridge) System Controller, alsocalled the MTXC, and the 82371EB (South Bridge) PCI ISAaccelerator, also called the PIIX4E.
• 100MHz system bus
• 32 MB memory with ability to add SODIMMS to increase thememory capacity of the terminal
Release 2.2• Intel 700 MHz Celeron Processor (BGA) on board, removing the
µPGA2 processor socket. Intel 440BX PC chipset same as in Release2.0/2.1

Chapter 1: Product Overview 1-9
• 100MHz system bus
• 64 MB memory with ability to add SODIMMS to increase thememory capacity of the terminal
Video Subsystem
The Release 2.x Motherboard uses the Silicon Motion (SMI) (LynxEM4or LynxEM4+), with 4MB internal memory, 64 Bit memory bus, AGP1x Support, 66MHz bus interface through AGP port, TFT panel supportup to 1280x1024.
The video subsystem supports the following LCD types:
• 12.1-Inch active matrix (TFT) 800x600 with 64 k colors
• 15-inch active matrix (TFT) 1024x768 with 262 k+ colors
Support for the LCD integrated display is provided internally. Externalsupport for SVGA monitors (800x600) [or better] resolution and 64 K[or better] colors) is provided by a CRT 15-pin D-shell connector.
The LCD brightness is software controlled. The terminal does not havehardware controls for brightness or contrast.
The LCD back lighting is also software controlled. In addition to OFFand ON modes, a dimmed mode is supported in the hardware to permitincreased tube life. If appropriate software drivers are loaded, fullbrightness is restored when touched, motion detection (Motion Sensorsection), or an application request (i.e., to play promotional material ona preset schedule).
Dual DisplaysThe Summa POS Motherboard is dual display (LCD and CRT) capable.In a dual display environment the 7454 terminal supports 16-bit colorwhen both displays are connected to the motherboard. Both displaysmust have the same maximum resolution capability. Refer to thefollowing information for details about the implementation of a dualdisplay configuration.

1-10 Chapter 1: Product Overview
• Lynx Family Control Panel Specification 1.2 on the NCR 74xx BaseSystem and Client Third party Drivers CD-ROM (Product ID:D370-0111-0100) or in the video.exe self-extracting Video Driversfile on the Retail Solutions Specific Third Party Products Drivers andPatches web site at:http://www.ncr..com/support/support_drivers_patches.asp?Class=retail_TPP.
• Retail Customer Information Display User’s Guide (BD20-1431-B) onthe NCR Information Products web site at:http://www.info.ncr.com/eHome.cfm
Ethernet 10/100Base-T LAN Communications
The terminal contains a 10/100Base-T Ethernet PCI connection.Ethernet 100Base-T is also known as Fast Ethernet. The Boot ROM fordiskless boot functionality is included in the 1 MB system ROM. Thehardware is compatible with the TCP/IP, DHCP, and TFTP protocolsrequired for remote boot of the platform. Appropriate software mustbe used to enable each protocol used over the Ethernet link.
The terminal may be connected to either a 10 Mbps or 100 MbpsEthernet connection. The hardware automatically selects the correctspeed (if enabled by software to do so).
The LAN hardware supports wakeup packet capability as defined inthe Device Class Power Management Specification, Network DeviceClass (available from the Microsoft® Web site).
When the platform is in the Soft OFF state (refer to Advanced PowerManagement section that follows), receipt of a Wakeup Packet on theLAN can return the system to the ON state, if this feature is enabled bysoftware.
Note: Due to limitations of the LAN controller and the OS, all featuresdescribed in the Network Device Class specification may not beavailable.

Chapter 1: Product Overview 1-11
100Base-T is wired identically to 10Base-T, except that the twisted paircable must be Category 5 and the hubs must permit 100 or 10/100Mbps operation. Although 10Base-T will operate on Category 3 twistedpair, or NCR “747” cable, an upgrade to Category 5 is required for100Base-T.
A customer desiring to use the terminal in an existing 10Base-Tenvironment can do so and simply run at 10 MB. In order to upgrade to100Mbps, Category 5 cable and 100 or 10/100 hubs must be installed.NCR strongly recommends the use of Category 5 for all new cabling,even if the customer initially intends to run only 10Base-T.
LED Indicators for Link Integrity (verifies cable and hub connection aregood) and LAN speed is provided on the Processor Board near the rowof connectors at the bottom of the e-box. The LED is ON (yellow) whenthe speed is running at 100 Mbps.
Link Integrity is provided to the PC chipset to permit boot-up softwareto verify the presence of the LAN connection. Software must provide 2seconds after power-up in order for the Link Integrity signal to becomevalid.
Wireless LAN Communications
Where a wired Ethernet connection is not desired a wireless LANadapter may be installed in the PCMCIA socket. This requires that thePCMCIA daughter-card feature be installed. A wireless LAN used inthe terminal must meet the following requirements:
• Integrated antenna that meets the requirements of PCMCIA (PCCard) Extended Type 2 card definition (a maximum of 5-cmadditional length).
• Power consumption within the capabilities of the PCMCIAdaughter-card.
• Signaling requirements within the capabilities of the terminalPCMCIA interface. The main restriction is that DMA transactionsare not supported over the PCMCIA interface.
• Device drivers for the targeted operating system must exist.

1-12 Chapter 1: Product Overview
• Appropriate infrastructure (server support, Base Stations, CeilingAntennas, etc) must be present in the installation site, and themaximum RF range of the wireless system must not be exceeded.
Interoperability - While the 802.11 standard provides an interoperableprotocol definition, there are vendor-specific extensions to the protocolthat encourage users to stay with one supplier’s equipment. This alsoapplies to wireless infrastructure and access points, 802.11 does notgovern this operation. Mixing of RF suppliers on a site is notrecommended until the RF suppliers have demonstratedinteroperability.
The wireless networks operate at speeds of 1-11 Mbps with 2 percentpacket loss typical. The application developer must be aware of theperformance limitations and design applications that are acceptable tothe customer when run over the slower network.
Remote Wakeup over the wireless network is not possible because thecards do not support it. An alternative is to use the system real-timeclock wake up at a scheduled time.
Depending on the OS environment, Remote Boot may be supported,but due to the slow network speed a large boot image may take anunacceptably long time to load. The application developer needs toensure that the load is of reasonable size.
The wired Ethernet connection is not certified for use in configurationswhere a wireless adapter is installed.
Universal Serial Bus
The Summa POS Motherboard provides three ports, one of which isreserved for integrated devices (not externally accessible). Only two ofthe three USB ports on the Summa POS Motherboard can be active atthe same time. If the internal auxiliary USB port is enabled, one of thetwo ports on the main connector row becomes disabled. Thisfunctionality is controlled through the BIOS setup menu.
Note: USB peripherals require support from the operating system,which is currently limited to Windows 98.

Chapter 1: Product Overview 1-13
Serial Ports
The Summa POS Motherboard provides two RS-232 ports (9-pin D-shell connectors, Ports 1 and 2) directly on the Motherboard andsupports two additional RS-232 ports. Ports 3 and 4 require an optionalharness connection to the Motherboard. Ports 1 and 3 can be suppliedwith +12 V DC on Pin 9 when properly set up in the BIOS. The totalpower drawn by Ports 1 and/or 3 must be no greater than 1 amp at +12V DC. Refer to the following table for RS-232 pinout information.
The BIOS provides flexibility in mapping resources. However, a fully-loaded system (2 PCMCIA cards that require IRQs, four serial ports inuse, USB in use, parallel port in use, and MSR) may not have enoughavailable IRQs to support all serial ports. Use a USB serial portexpander to overcome this PC architecture limitation.
RS-232 DB-9 Male Connector Pinout
Pin Port A Port B
1 DCD DCD2 RXD RXD3 TXD TXD4 DTR DTR5 GND GND6 DSR DSR7 RTS RTS8 CTS CTS9 RI or +12*
VDCRI
* If Port 1 or 3 is powered, pin 9 will be +12 V.
Hardware Monitor
The hardware monitor generates an interrupt to the system wheneverany of the internal voltages used by the system processor goes above orbelow the acceptable operating range. An interrupt is also generatedwhen the temperature of the Processor exceeds safe levels. Softwarecan use this indication to slow or stop the system and/or force a reset.

1-14 Chapter 1: Product Overview
PCI Expansion Header
A single expansion header is provided to support optional features, such as the PCMCIA for Wireless LAN Board. This board supports two Type 2 or one Type 3 PCMCIA type cards.
IDE Header
A standard IDE header is provided to support the 2.5" hard disk drive or the 64 MB and 256 MB compact flash.
Audio
The base unit has Sound Blaster-compatible audio. Wave table synthesis is not supported. FM synthesis and MIDI are supported in the hardware, but requires software driver support to function.
Higher quality integrated stereo speakers may be added as an option to the terminal. The amplifier is located on the Processor Board; the speaker output is provided on a header that receives the harness from the speaker module. In addition, a Line Out is provided on a 3.5mm stereo jack that permits connection of external amplified speakers.
The integrated stereo speakers, or an amplifier connected to Line Out, must be used in order to play Sound Blaster (audio subsystem) audio. However, an internal EUI speaker provides PC speaker functionality (beeps and tones) for all configurations.
The volume control can be set using the Windows OS Control Panel. There is no volume control under DOS.
The PC speaker sounds (such as beeps and touch clicks) are directed into the audio subsystem and are audible if speakers are connected.
Magnetic Stripe Reader
A 3-track MSR head is available as an option. The ISO and JIS card format is supported.
When card data is read, an interrupt is generated. A software device driver for the MSR must be loaded to enable the application to process the data.

Chapter 1: Product Overview 1-15
Touch Screen ControllerThe MicroTouch® “Excalibur” chip is used to interface the touch panel.This controller supports MicroTouch capacitive panels.
In order to save an RS-232 port, the touch data is delivered to thesystem through the mouse interface. This requires a mouse-awaretouch device driver for the appropriate OS.
When the system is operating in the dimmed display mode, touchactivity can restore full brightness if instructed by software to do so.When system is in low power mode, touch activity can generate themouse port interrupt (IRQ12).
The Summa POS Motherboard supports the following touch screenLCDs;
• Sharp TFT LCD/capacitive touch screen (F002)
• Sharp TFT LCD/resistive touch screen (F004)\
• 15-inch LG TFT LCD/capacitive touch screen (F008)
Processor Board ConnectorsAll connectors are either keyed or impossible to plug incorrectly due tomechanical design of the product.
External Connectors Internal Connectors
VGA CRT RGB 15-pin D Shell LCD
Ethernet RJ45 Back light Inverter
Dual USB Type A Integrated Speaker Module
External Stereo speaker(3.5mm jack)
MSR
Power supply Touch screen (PS/2)
RS-232 9-pin D shell (two, onewith +12 V power option)
PS/2 Keyboard Motion Sensor / Power Indicator
Customer Display PCI Expansion header

1-16 Chapter 1: Product Overview
External Connectors Internal Connectors
Cash Drawer IDE
20-pin high density RS-232Conversion connector
Parallel port (POS Board header)
Microphone Cash Drawer port (POS Board header)
S-Video
Compact Flash
The optional compact flash replaces the hard drive in the unit. The64MB compact flash is large enough to support a Windows CE load.The 256MB compact flash can be used in a Windows XP embeddedenvironment. When using the Windows XP embedded OS, anadditional 128MB SDRAM SODIMM is required to support thenecessary virtual memory requirements.
NCR Retail Specific Hardware
The Processor Board contains logic that provides support for thecustom retail interface. The logic controls the following features:
• Dual Cash Drawer Support
• Cash Drawer Diagnostic Support
• Magnetic Stripe Reader Interface
• Motion Detector
• Touch Screen Interface
An integrated retail specific feature of the processor is the cash drawercircuitry. The onboard circuitry internal to the board provides thecontrol for two external cash drawers. A portion of the POS Boardheader (J6) is provided on the board to interface to the dual cashdrawer connector. Header J6 only contains the control signals; it doesnot provide power. Software controls the cash drawer(s) through I/Oport 00Exh. This means it can be I/O ports E0/E1h, E2/E3h, E4/E5h,or EA/EBh depending on the configuration of the SMC I/Ocontroller’s GPIO port(s). Default setting is E0/E1h.

Chapter 1: Product Overview 1-17
Cash Drawer I/O Port Bit Definition:
Bit # Description Bit = 1 Bit = 0
7 Solenoid B Control Turns off solenoidoutput
Activates solenoidoutput
6 Solenoid A Control Turns off solenoidoutput
Activates solenoidoutput
5 Reserved Reserved Reserved
4 Reserved Reserved Reserved
3 Solenoid B Status Solenoid B outputactive
Solenoid B outputinactive
2 Solenoid A Status Solenoid A outputactive
Solenoid A outputinactive
1 Reserved Reserved Reserved
0 Cash Drawer(s) Status Drawer(s) open Drawer(s) closed
Note: Bits 2 and 3 are set to ‘1’ by each device reset.
The cash drawer interface can be diagnosed remotely. For securityreasons, the cash drawer diagnostics mode must first be activated bypressing an external momentary switch (SW2). The intention is forauthorized personnel to be present when the cash drawer diagnostictests take place.
There is only one cash drawer status signal; therefore, bit 0 is the statusof either cash drawer or both cash drawers.
Power LEDThe Processor Board provides support for an external power LEDthrough the onboard Motion/Power LED connector. This LED iscontrolled through the SMC 37C935 GPIO pins. Once the SMC chip isprogrammed to support the Power LED function on GPIO pin 13, theLED is turned “on” anytime all power to the Processor Board is good.The system’s power management software has the option to turn theLED off indicating the system is in a power-managed mode.
1-18 Chapter 1: Product Overview
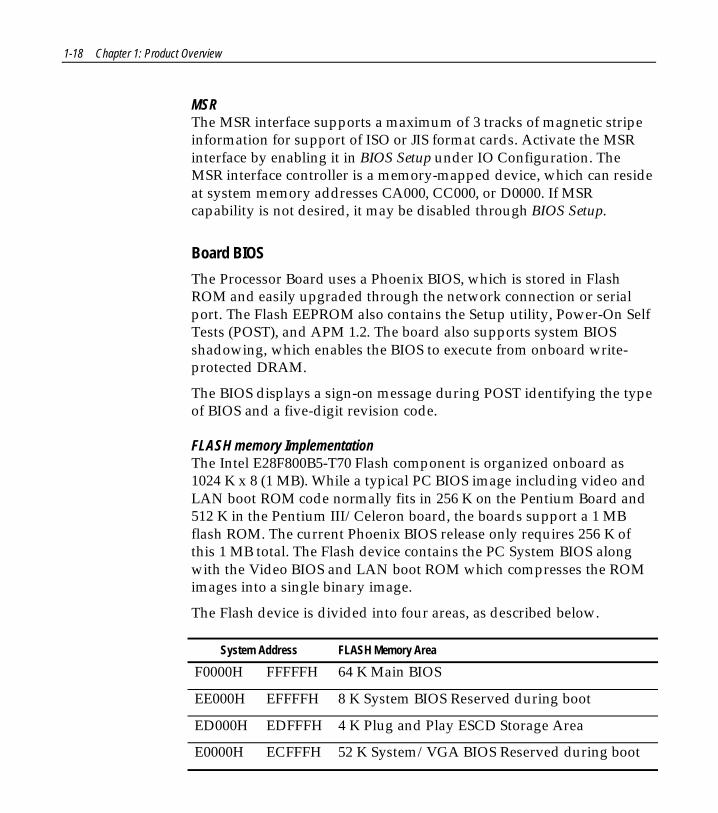
MSRThe MSR interface supports a maximum of 3 tracks of magnetic stripeinformation for support of ISO or JIS format cards. Activate the MSRinterface by enabling it in BIOS Setup under IO Configuration. TheMSR interface controller is a memory-mapped device, which can resideat system memory addresses CA000, CC000, or D0000. If MSRcapability is not desired, it may be disabled through BIOS Setup.
Board BIOS
The Processor Board uses a Phoenix BIOS, which is stored in FlashROM and easily upgraded through the network connection or serialport. The Flash EEPROM also contains the Setup utility, Power-On SelfTests (POST), and APM 1.2. The board also supports system BIOSshadowing, which enables the BIOS to execute from onboard write-protected DRAM.
The BIOS displays a sign-on message during POST identifying the typeof BIOS and a five-digit revision code.
FLASH memory ImplementationThe Intel E28F800B5-T70 Flash component is organized onboard as1024 K x 8 (1 MB). While a typical PC BIOS image including video andLAN boot ROM code normally fits in 256 K on the Pentium Board and512 K in the Pentium III/Celeron board, the boards support a 1 MBflash ROM. The current Phoenix BIOS release only requires 256 K ofthis 1 MB total. The Flash device contains the PC System BIOS alongwith the Video BIOS and LAN boot ROM which compresses the ROMimages into a single binary image.
The Flash device is divided into four areas, as described below.
System Address FLASH Memory Area
F0000H FFFFFH 64 K Main BIOS
EE000H EFFFFH 8 K System BIOS Reserved during boot
ED000H EDFFFH 4 K Plug and Play ESCD Storage Area
E0000H ECFFFH 52 K System/VGA BIOS Reserved during boot

Chapter 1: Product Overview 1-19
BIOS Upgrades
Flash memory makes distributing BIOS upgrades easy. A new versionof the BIOS can be installed from the hard disk, network or through aserial port.
The disk-based Flash upgrade utility, PHLASH.EXE, ensures theupgrade BIOS extension matches the target system to preventaccidentally installing a BIOS for a different type of system.
Setup UtilityThe ROM-based Setup utility permits the system configuration to bemodified without opening the system for most basic changes. TheSetup utility is accessible only during the Power-On Self Test (POST)by pressing the <F2> key after the POST memory test has begun andbefore boot begins. A prompt may be enabled that informs users topress the <F2> key to access Setup.
Note: An external alphanumeric keyboard is recommended forrunning the BIOS CMOS Setup Utility. Otherwise, a Touch Screen canbe used.
Plug and PlayThe Processor BIOS also has a setup option to support the Windowsruntime plug and play utilities. When this option is selected, onlydevices critical to boot are assigned resources by the BIOS. DeviceNode information is available for all devices to ensure compatibilitywith Windows 95. System configuration information is stored in ESCDformat. The ESCD data is cleared upon loss of the CMOS voltage.
Advanced Power ManagementThe Processor BIOS has support for both 1.1 and 1.2 Advanced PowerManagement (APM). The version of APM drivers loaded in theoperating system by the user determines what specification the BIOSadheres too. In either case the energy saving Standby mode can beinitiated by a keyboard hot key sequence or a time-out period set bythe user.

1-20 Chapter 1: Product Overview
When in Stand-by mode, the Processor Board reduces powerconsumption by utilizing the processor System Management Mode(SMM) capabilities and also spinning down hard drives and turning offVESA DPMS compliant monitors. During setup, the user may selectwhich DPMS mode (Stand By, Suspend, or Off) is sent to the monitor.The ability to respond to external interrupts is fully maintained whilein Stand-by mode enabling the system to service requests such as in-coming data or network messages while unattended. The user mayalso select any keyboard or mouse activity to take the system out of theenergy saving Standby mode. When this occurs, the monitor and IDEdrives are turned back on immediately.
APM is disabled in BIOS by default; therefore, the user must enablethis feature. The system must be configured with an APM driver inorder for the system power saving features to take effect.
Operator Display
18004
NCR
The 7454 is available with two LCD types
• 12.1-Inch TFT (active matrix) 800x600 with 64K colors
• 15-inch TFT (active matrix) 1024 x 768 with 262K+ colors

Chapter 1: Product Overview 1-21
Contrast control is set by software, using a digital potentiometer on theProcessor Board. The terminal does not have a user-accessible contrastadjustment. Software can set a default value after reading the Panel ID.
Display contrast changes with temperature.
LCD Adapter Board
The signals from the LCD header on the Processor Board are broughtto the LCD on a harness. Since there are multiple pin configurationsand connector types being used on the LCD, a small adapter board isused to receive the LCD harness and map the signals into the correctpinout for the LCD panel. This board has a connector that plugsdirectly into the LCD panel.
LCD Backlight Inverter Module
An Inverter Board supplies power for the LCD Backlight, which is aseparate module in the terminal. The inverter has a connector thatreceives power, ground, and a Backlight dimming signal from theProcessor Board. The inverter generates the high voltage necessary tostart and run dual CCFL Backlights.
A fuse located on the Inverter Board protects power to the inverter.This fuse protects the system from damage in the event of a Backlightor Inverter Board fault. The fuse is not field replaceable; if it blows, thesafety characteristics of one or more components on the Inverter Boardmay have been compromised and the Inverter Board should bereplaced.
If one or both Backlight tubes become disconnected or otherwise open-circuited, protection circuitry shuts down the inverter. This avoidsover-powering a single tube and also protects against high voltageshorting.
1-22 Chapter 1: Product Overview
Touch Screen
The Touch Screen completely covers the LCD and is mounted directlyin front of the LCD, behind the front plastic bezel of the terminal. Thetouch controller on the Processor Board supports capacitive andresistive touch glass.
The touch glass has an integrated harness that is routed into theProcessor Board enclosure and is connected to a header on theProcessor Board. The touch glass has a glare-reducing texture that alsohelps hide fingerprints.
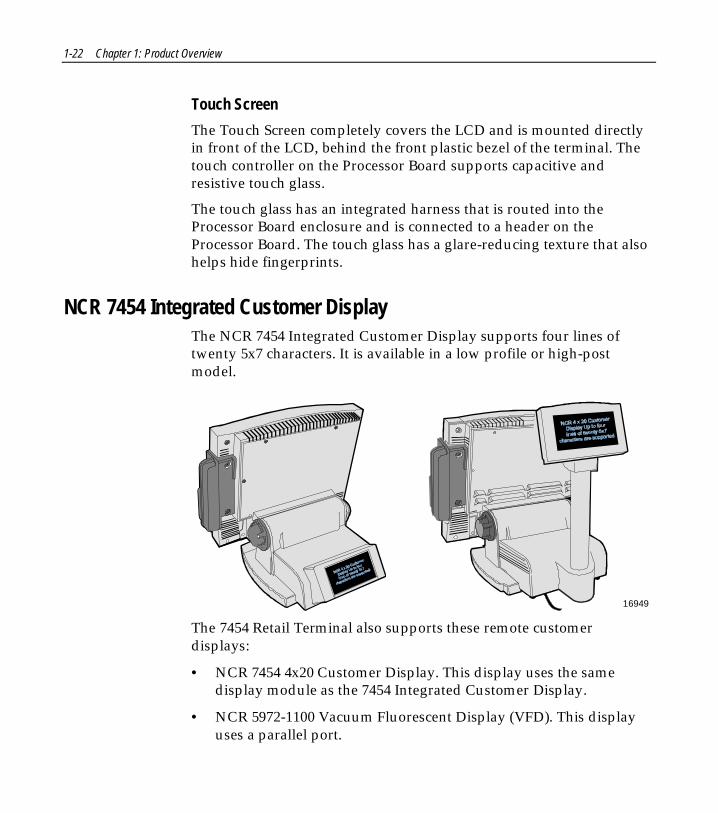
NCR 7454 Integrated Customer DisplayThe NCR 7454 Integrated Customer Display supports four lines oftwenty 5x7 characters. It is available in a low profile or high-postmodel.
16949
The 7454 Retail Terminal also supports these remote customerdisplays:
• NCR 7454 4x20 Customer Display. This display uses the samedisplay module as the 7454 Integrated Customer Display.
• NCR 5972-1100 Vacuum Fluorescent Display (VFD). This displayuses a parallel port.

Chapter 1: Product Overview 1-23
NCR 5973 International VFD Customer DisplayThe NCR 5973 VFD (Vacuum Fluorescent Display) is an optionaldisplay device for the 7454 Retail Terminal. The VFD is available inmodels that have a combination of:
• Dark gray cabinetry
• Mounting configurations
• System specific cables
Table Top Mount
12271
16" High Post Mount
17198

1-24 Chapter 1: Product Overview
Features
Magnetic Stripe ReaderA single 3-track analog Magnetic Stripe Reader (MSR) is available as afeature, supporting ISO and JIS format cards. When the MSR is notdesired, a filler piece for the MSR section is included to make the unitappear uniform.
18286
NCR
MSR

Chapter 1: Product Overview 1-25
Printer OptionsThe sections that follow provide an illustration and brief description ofthe available printer options.
2214 Printer
The 2214 Printer is a thermal fiscal printer that can issue tickets andproduce a journal. Its power cord plugs into a 120 VAC power sourceand the included RS-232 cable connects the printer’s serial connector tothe workstation.
18541
1-26 Chapter 1: Product Overview
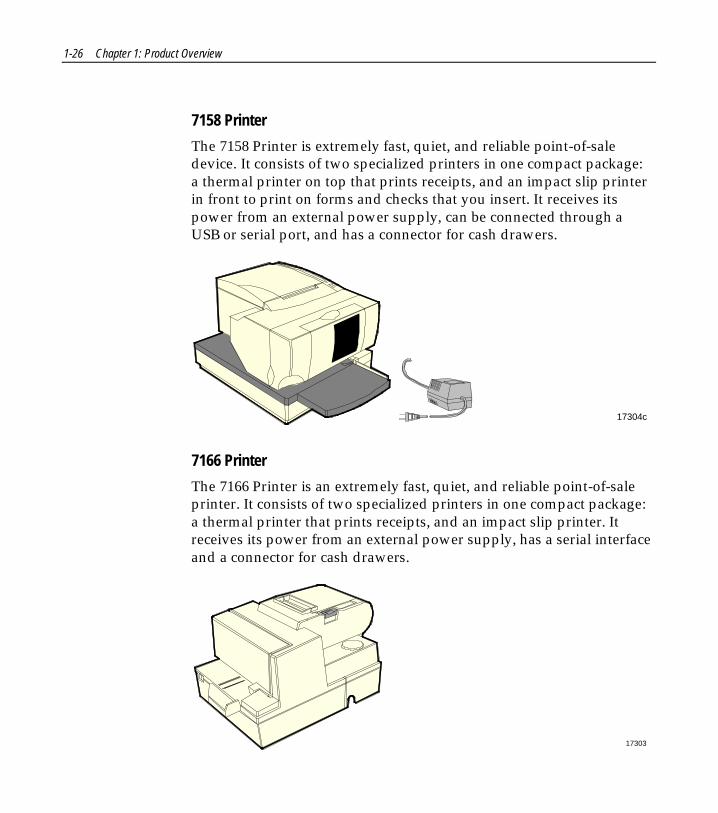
7158 Printer
The 7158 Printer is extremely fast, quiet, and reliable point-of-saledevice. It consists of two specialized printers in one compact package:a thermal printer on top that prints receipts, and an impact slip printerin front to print on forms and checks that you insert. It receives itspower from an external power supply, can be connected through aUSB or serial port, and has a connector for cash drawers.
17304c
7166 Printer
The 7166 Printer is an extremely fast, quiet, and reliable point-of-saleprinter. It consists of two specialized printers in one compact package:a thermal printer that prints receipts, and an impact slip printer. Itreceives its power from an external power supply, has a serial interfaceand a connector for cash drawers.
17303

Chapter 1: Product Overview 1-27
7167 Printer
The NCR 7167 Printer is a fast, quiet, relatively small and very reliablemulti-function printer. It prints receipts, validates and prints checks,and prints on a variety of single or multiple part forms. There is nojournal as it is kept electronically by the host terminal. The printerfeatures a dual interface, so it can connect to the host terminal eitherthrough a USB or RS-232 connector. It receives its power from anexternal power supply, and has a connector for cash drawers.
19711e
7194 PrinterThe 7194 Printer is a high speed, high-resolution printer, capable ofboth text and graphics printing. It offers direct thermal printing in areceipt station. It receives its power from an external power supply,can be connected through a USB or serial connector, and has aconnector for cash drawers.
16437
1-28 Chapter 1: Product Overview
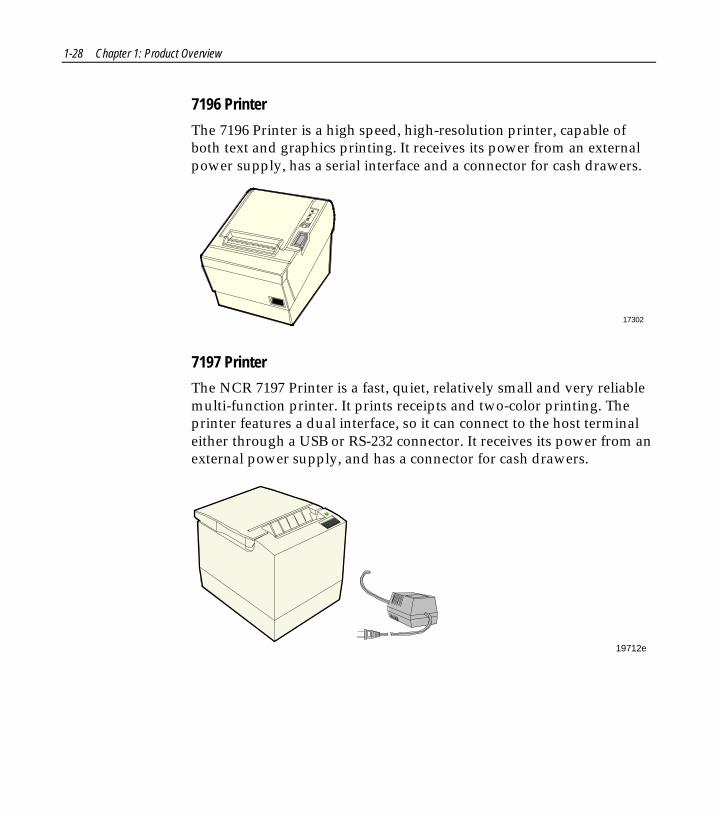
7196 Printer
The 7196 Printer is a high speed, high-resolution printer, capable ofboth text and graphics printing. It receives its power from an externalpower supply, has a serial interface and a connector for cash drawers.
17302
7197 Printer
The NCR 7197 Printer is a fast, quiet, relatively small and very reliablemulti-function printer. It prints receipts and two-color printing. Theprinter features a dual interface, so it can connect to the host terminaleither through a USB or RS-232 connector. It receives its power from anexternal power supply, and has a connector for cash drawers.
19712e
Chapter 1: Product Overview 1-29
Other Integrated Devices and Indicators
Hard Disk Drive
A 2.5" IDE hard disk is available. The drive is the standard type that isused by notebook PCs.
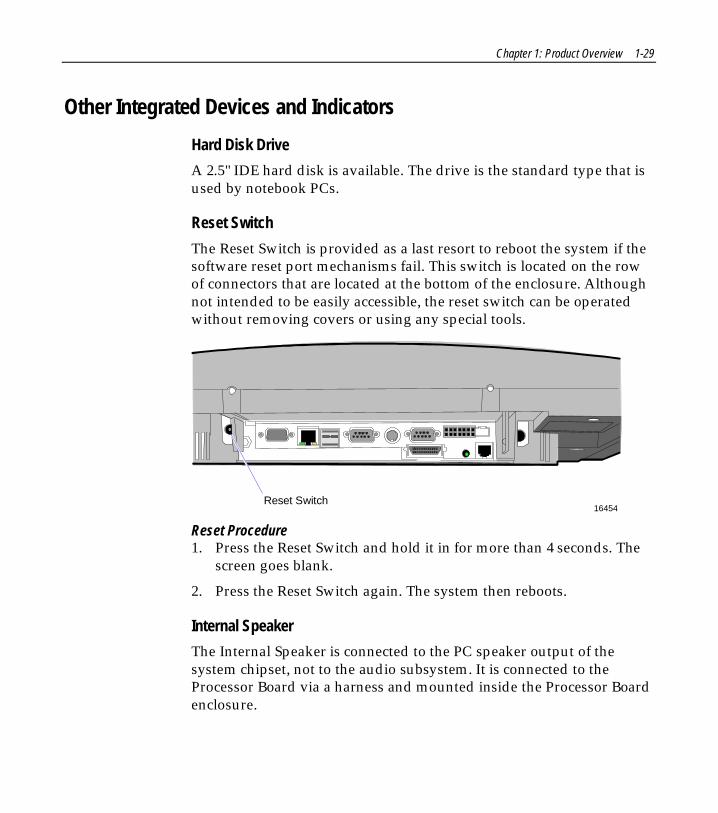
Reset Switch
The Reset Switch is provided as a last resort to reboot the system if thesoftware reset port mechanisms fail. This switch is located on the rowof connectors that are located at the bottom of the enclosure. Althoughnot intended to be easily accessible, the reset switch can be operatedwithout removing covers or using any special tools.
16454Reset Switch
Reset Procedure1. Press the Reset Switch and hold it in for more than 4 seconds. The
screen goes blank.
2. Press the Reset Switch again. The system then reboots.
Internal Speaker
The Internal Speaker is connected to the PC speaker output of thesystem chipset, not to the audio subsystem. It is connected to theProcessor Board via a harness and mounted inside the Processor Boardenclosure.

1-30 Chapter 1: Product Overview
POS Connector Board
The POS Connector Board is a small daughter board that mountsdirectly on the Cash Drawer and Parallel Port header. Connectors onthe edge of this board form a second connector row above theProcessor Board connectors. Connectors are available for two cashdrawers, a customer display and a microphone.
Power for the cash drawers (24 V) and VFD customer display (5 V and12 V) is supplied by the Enhanced Power Supply through the parallelconnector.
Motion Sensor
The terminal hardware can detect movement near the terminal andenables software to prompt system operation from a low-power state.Application software may also be able to make use of motion detectionwhen in the ON state if it is enabled by lower-level software.
18287
NCR
Motion Sensor
Power/Status LED
Motion is detected as a change in ambient light level that is greaterthan a software-controlled threshold.
A photodiode mounted behind the front bezel of the unit sensesambient light levels. The photodiode resides on a small circuit board(the Motion Sensor Board). A harness connects the Motion SensorBoard to the amplifier and motion sensing logic on the ProcessorBoard. The user Power/Status LED indicator shares this board.
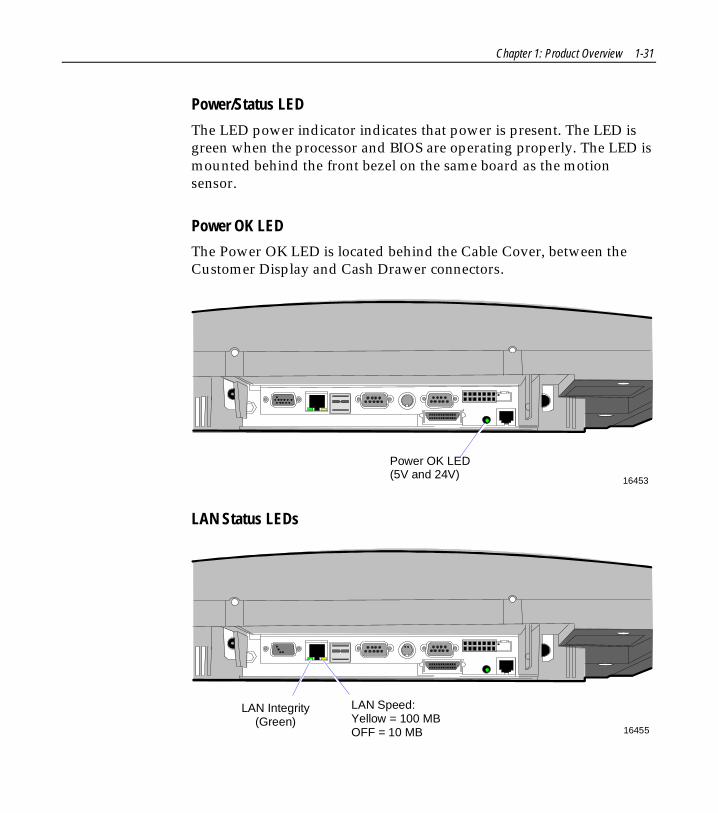
Chapter 1: Product Overview 1-31
Power/Status LED
The LED power indicator indicates that power is present. The LED isgreen when the processor and BIOS are operating properly. The LED ismounted behind the front bezel on the same board as the motionsensor.
Power OK LED
The Power OK LED is located behind the Cable Cover, between theCustomer Display and Cash Drawer connectors.
16453
Power OK LED(5V and 24V)
LAN Status LEDs
16455
LAN Integrity(Green)
LAN Speed:Yellow = 100 MBOFF = 10 MB

1-32 Chapter 1: Product Overview
Power Supply
The terminal uses an AC adapter for its power supply, concealed in theterminal mounting. The supply is inaccessible when the terminal is inthe normal operation and mounting position to prevent tampering, andsealed to help protect against spills or other environmental hazards.
Note: The power supply automatically senses the proper AC voltage;therefore only normal servicing access is required.
All power required to operate the base unit, PCMCIA option andPCMCIA cards, speaker option, scanner option, and bus-powered USBperipherals is provided by the power supply.
The Processor Board serves as the hub to distribute power to allterminal functions. Cash drawers, VFD customer display, PS/2keyboard, PCMCIA daughter board and slots, scanner (through RS-232port), USB, hard disk, and the LCD all receive power through theirrespective Processor Board connectors.
Integrated Speaker Module (Optional)
The Integrated Speaker feature provides two stereo speakers thatattach to the bottom of the Core Module. The maximum output of thespeakers is approximately 6 watts per channel.

Chapter 1: Product Overview 1-33
USB RS-232 Port Server
The USB RS-232 Port Server is an intelligent, stackable expansionmodule that connects to the terminal Universal Serial Bus (USB) port,providing high-speed RS-232 serial ports.
7454/7401 USB Port
RS-232 Ports
16944
1-34 Chapter 1: Product Overview
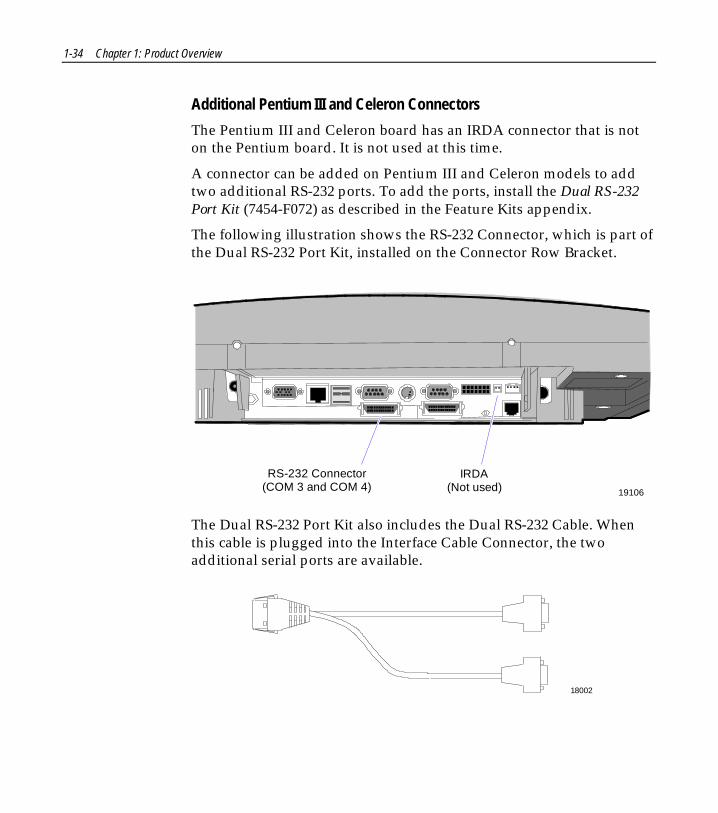
Additional Pentium III and Celeron Connectors
The Pentium III and Celeron board has an IRDA connector that is noton the Pentium board. It is not used at this time.
A connector can be added on Pentium III and Celeron models to addtwo additional RS-232 ports. To add the ports, install the Dual RS-232Port Kit (7454-F072) as described in the Feature Kits appendix.
The following illustration shows the RS-232 Connector, which is part ofthe Dual RS-232 Port Kit, installed on the Connector Row Bracket.
19106
IRDA(Not used)
RS-232 Connector(COM 3 and COM 4)
The Dual RS-232 Port Kit also includes the Dual RS-232 Cable. Whenthis cable is plugged into the Interface Cable Connector, the twoadditional serial ports are available.
18002

Chapter 2: Hardware Installation
IntroductionThe terminal is fully assembled at the factory. This chapter explains themounting options and how to connect optional hardware componentsto the terminal.
Installation SummaryThe terminal should be removed from the shipping packaging andvisual checks made to verify the correct hardware configuration. Thesystem is then configured and any communication cables areconnected.
Only after inspection should the power cord be attached to the systemand then connected to the AC power source. Power-up self-tests willrun to verify basic functionality.
ROM-based setup should be used to configure network options. Fullconfiguration depends upon the system server and the managementWeb site.

2-2 Chapter 2: Hardware Installation
Installation Restrictions• Before installing the terminal, read and follow the guidelines in the
NCR 7454 Retail Terminal Site Preparation Guide and the NCRWorkstation and Peripheral AC Wiring Guide.
• Install the terminal near an electrical outlet that is easily accessible.Use the power cord as a power-disconnect device.
• Do not permit any object to rest on the power cord. Do not locatethe terminal where the power cord can be walked on.
• Use a grounding strap or touch a grounded metal object todischarge any static electricity from your body before servicing theterminal.
• If the power cord is replaced, it must be replaced with the sametype of cord with the protective shroud.
• Do not route the power cord through openings with sharp edges.
Caution: This unit contains hazardous voltages and should only beserviced by qualified service personnel.
Caution: DO NOT connect or disconnect the transaction printer whilethe terminal is connected to AC power. This can result in system orprinter damage.
Warning: The 7454 must be mounted securely to prevent a hazard. Itmust be installed in accordance with local building codes. The post orwall on which the unit is mounted should be able to withstand fourtimes the weight of the unit, which is approximately 20 lbs. (9 kg).

Chapter 2: Hardware Installation 2-3
Connecting the CablesTilt Mount cable connectors are located on the underside of the CoreModule, under a cable cover.
Accessing the Cable Connectors1. Tilt the display to access the cable connectors.
Cable Cover
Thumb Screw
15968
2. Loosen the thumbscrew that secures the Cable Cover and removethe cover.

2-4 Chapter 2: Hardware Installation
Routing the CablesThe 7454 has three places to secure cables to the base of the unit byusing a cable tie wrap. Remove the power supply cover or customerdisplay from the base of the unit, two thumb screws on bottom rear,and use a tie wrap to secure the Ethernet cable to one of the providedmolded cable tie holders on the base. This should provide sufficientstrain relief to prevent the cable from becoming tight and damaging theconnector on the Processor Board.
The peripheral cables are routed down through the Mount Assemblyand out the rear of the unit.
16413a
Bottom View

Chapter 2: Hardware Installation 2-5
Identifying the Cable ConnectorsThe following illustration identifies each of the cable connectors. Referto the sections following the illustration for specific instructions oninstalling each peripheral. After installing the peripheral and LANcables, replace the cable cover and tighten the thumbscrew.
19107
CRT
LAN
USB 1
COM 1
COM 2
KeyboardPS/2
Parallel
Power
Audio Out
Cash Drawer
Speaker
RS-232(COM 3 & 4)
IRDA (not used)
Microphone(optional)
USB 2
Note: COM1 and COM3 are powered ports.
Note: The COM3 & COM4 RS-232 ports require the Dual RS-232 PortKit (7454-F072) feature
2-6 Chapter 2: Hardware Installation
Installing PeripheralsThis section describes how to install transaction printers and otherperipherals on the 7454 terminal.
Installing a Transaction PrinterTransaction printers can connect through a non-powered RS-232 orUSB connector as defined in the table below. Each printer except the2214 requires an external power supply. The illustrations show how toconnect to the 7194 printer. Connecting to the other printers is done inthe same manner. Refer to the corresponding printer owner’s manualfor illustrations of the connector locations.
Printer Type RS-232 USB
2214 Thermal Fiscal √7158 Thermal Receipt/Impact Slip √ √7166 Thermal Receipt/Impact Slip √7167 Thermal Receipt/Impact Slip √ √7194 Thermal Receipt √ √7196 Thermal Receipt √7197 Thermal Receipt √ √
Owner’s Manuals/Guides• NCR 7158 Thermal Receipt/Impact Printer Owner’s Guide
(B005-0000-1112)
• NCR 7166 Multifunction Printer Setup & User’s Guide(B005-0000-1002)
• NCR RealPOS 7167 Two-Station POS Printer Owner’s Manual (B005-0000-1406)
• NCR 7194 Thermal Receipt Printer Owner’s Guide (B005-0000-1097)
• NCR 7196 Thermal Receipt Printer Operator Manual (B005-0000-1171)
• NCR RealPOS 7197 Receipt Printer Owner’s Manual (B005-0000-1409)

Chapter 2: Hardware Installation 2-7
RS-232 Installation
1. Connect the Printer Interface Cable to the RS-232 Connector on theback or on the bottom of the printer.
16632aRS-232 Connector
Power Connector
Cash Drawer Connector
2. Connect the other end of the printer cable to one of the RS-232(non-powered) ports on the terminal.
3. Connect the external power supply cable to the Power Connector onthe printer.
4. Plug the external power supply AC cable into an AC outlet.
2-8 Chapter 2: Hardware Installation
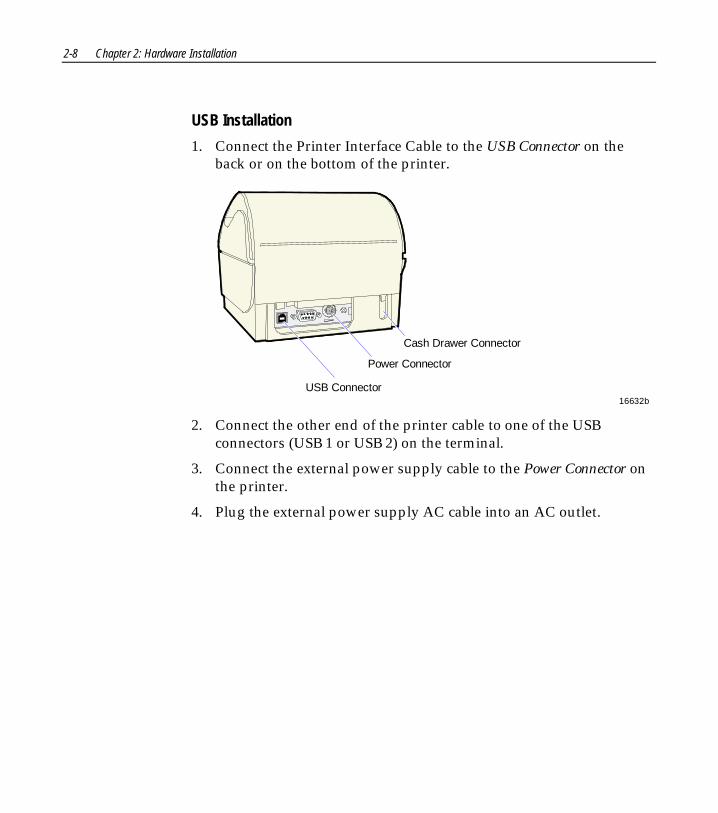
USB Installation
1. Connect the Printer Interface Cable to the USB Connector on theback or on the bottom of the printer.
16632b
USB Connector
Power Connector
Cash Drawer Connector
2. Connect the other end of the printer cable to one of the USBconnectors (USB 1 or USB 2) on the terminal.
3. Connect the external power supply cable to the Power Connector onthe printer.
4. Plug the external power supply AC cable into an AC outlet.
Chapter 2: Hardware Installation 2-9
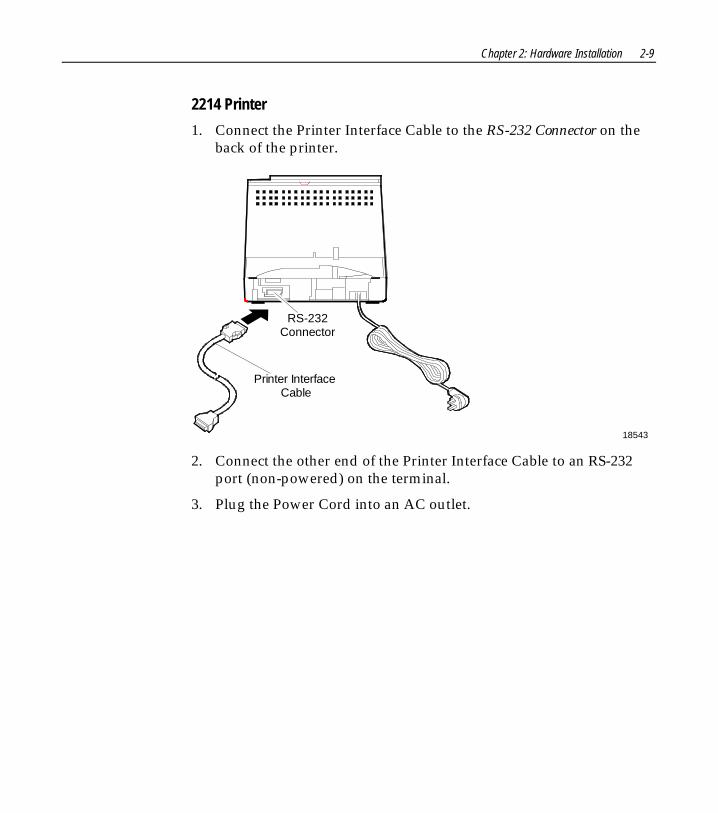
2214 Printer
1. Connect the Printer Interface Cable to the RS-232 Connector on theback of the printer.
18543
RS-232Connector
Printer InterfaceCable
2. Connect the other end of the Printer Interface Cable to an RS-232port (non-powered) on the terminal.
3. Plug the Power Cord into an AC outlet.
2-10 Chapter 2: Hardware Installation
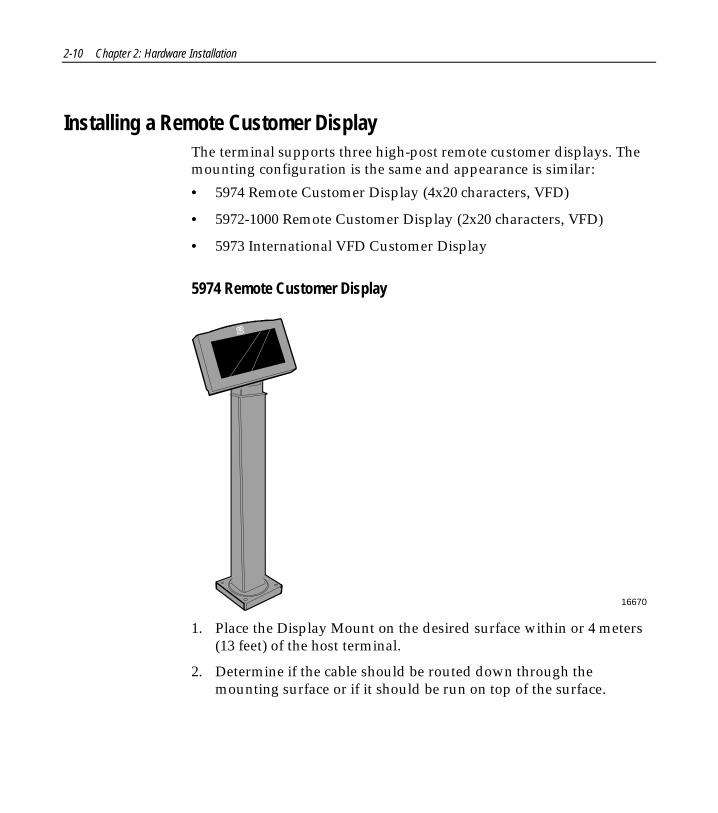
Installing a Remote Customer DisplayThe terminal supports three high-post remote customer displays. Themounting configuration is the same and appearance is similar:
• 5974 Remote Customer Display (4x20 characters, VFD)
• 5972-1000 Remote Customer Display (2x20 characters, VFD)
• 5973 International VFD Customer Display
5974 Remote Customer Display
16670
1. Place the Display Mount on the desired surface within or 4 meters(13 feet) of the host terminal.
2. Determine if the cable should be routed down through themounting surface or if it should be run on top of the surface.

Chapter 2: Hardware Installation 2-11
3. Secure the Mounting Plate with 4 screws provided.
16671
Mounting Plate4 Holes0.40 mm(0.16 in.)Diameter
76 mm(3 in.)
4. Connect the Display Cable to the Customer Display port on theterminal.
15969b
CustomerDisplay
2-12 Chapter 2: Hardware Installation
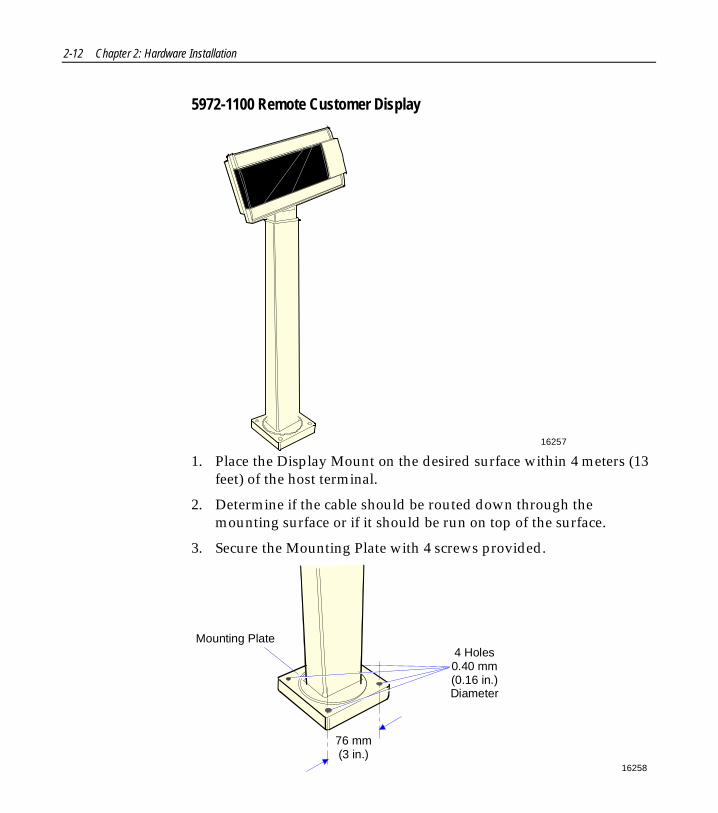
5972-1100 Remote Customer Display
16257
1. Place the Display Mount on the desired surface within 4 meters (13feet) of the host terminal.
2. Determine if the cable should be routed down through themounting surface or if it should be run on top of the surface.
3. Secure the Mounting Plate with 4 screws provided.
16258
Mounting Plate4 Holes0.40 mm(0.16 in.)Diameter
76 mm(3 in.)

Chapter 2: Hardware Installation 2-13
4. Connect the 5972 Display Cable to the Parallel I/F Adapter Cable.
16291a
CustomerDisplay
5972 Display Cable497-0405676 - 4 M1416-C278-0040
Parallel I/F Adapter Cable497-0411000 - 0.6 M1416-C472-0006
7454 Cust.Display Port
PowerBrick
5. Connect the Parallel I/F Adapter Cable to the Customer Displayport on the terminal.
15969b
CustomerDisplay
6. Connect the 5972 Display Cable Power Brick connector to thePower Brick cable.
7. Plug the Power Brick into an AC outlet.
2-14 Chapter 2: Hardware Installation
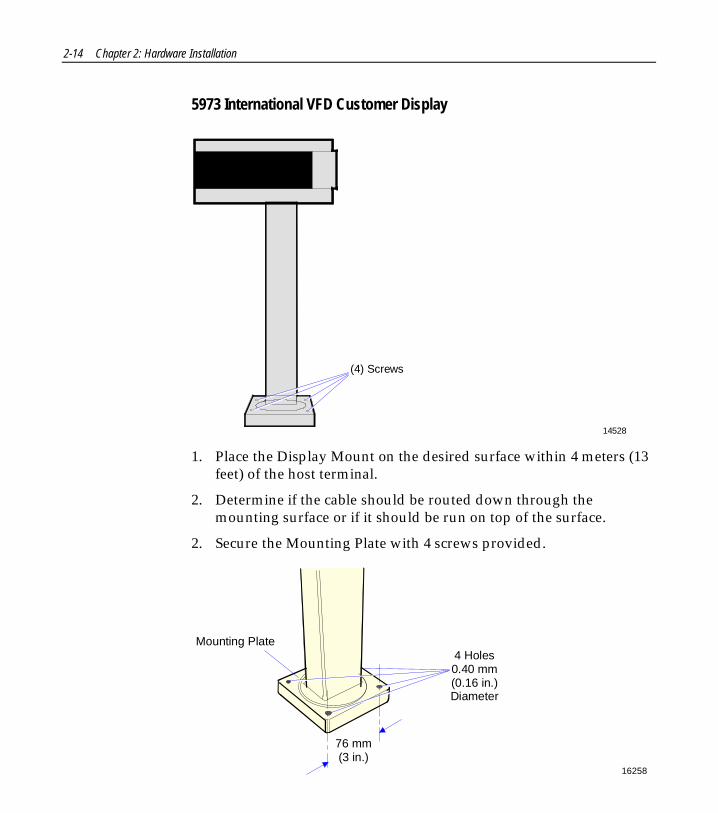
5973 International VFD Customer Display
14528
(4) Screws
1. Place the Display Mount on the desired surface within 4 meters (13feet) of the host terminal.
2. Determine if the cable should be routed down through themounting surface or if it should be run on top of the surface.
2. Secure the Mounting Plate with 4 screws provided.
16258
Mounting Plate4 Holes0.40 mm(0.16 in.)Diameter
76 mm(3 in.)

Chapter 2: Hardware Installation 2-15
3. Connect the 5973 Parallel Cable to the Customer Display port onthe terminal.
15969b
CustomerDisplay

2-16 Chapter 2: Hardware Installation
Installing a High-Post Integrated Customer DisplayThe 7454 Integrated Customer Display supports four lines of twenty5x7 characters. This is the same display module that is used with thelow-profile integrated display.
16713

Chapter 2: Hardware Installation 2-17
Installing an Integrated Customer Display(5972-F039)
The standard Power Supply Cover on the 5953-F022 Remote Table TopMount does not support attachment of an integrated NCR 7454 4 x 20Customer Display. In order to mount an integrated display you need toinstall 5972-F039, which includes:
1. Power Supply Cover
2. 12-inch Integrated Display Post
3. Top Bracket.
4. Nylon Hole Plug
19726b
3
2
1
4
2-18 Chapter 2: Hardware Installation
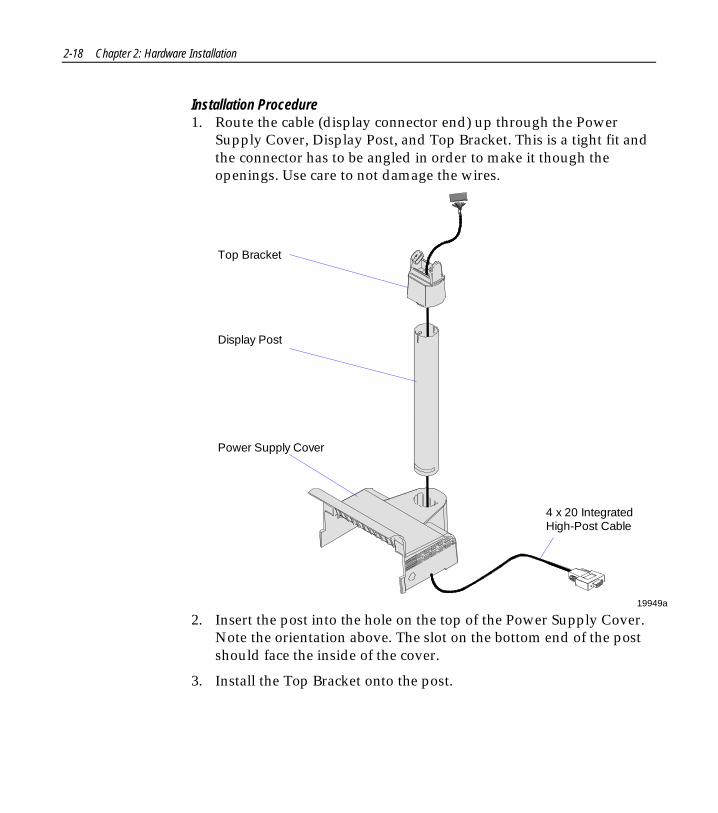
Installation Procedure1. Route the cable (display connector end) up through the Power
Supply Cover, Display Post, and Top Bracket. This is a tight fit andthe connector has to be angled in order to make it though theopenings. Use care to not damage the wires.
19949a
Top Bracket
Display Post
Power Supply Cover
4 x 20 IntegratedHigh-Post Cable
2. Insert the post into the hole on the top of the Power Supply Cover.Note the orientation above. The slot on the bottom end of the postshould face the inside of the cover.
3. Install the Top Bracket onto the post.

Chapter 2: Hardware Installation 2-19
4. Connect the cable to the
a) Remove the Integrated Display Bracket (2 screws).
b) Connect the cable to the 2 x 20 VFD Assembly.
c) Replace the Integrated Display Bracket.
19948a
4 x 20 VFD Assembly Integrated Display Bracket Phillips PH Screw(4-24 x 0.625)
5. Install the Display Assembly onto the Top Bracket.

2-20 Chapter 2: Hardware Installation
6. Install the Nylon Hole Plug in the Power Supply Cover, locking thepost in place. The slot permits the display to be rotated to personalpreference.
16948
7454 CustomerDisplay Connector
Nylon Hole Plug

Chapter 2: Hardware Installation 2-21
7. Remove the Power Supply Cover from the 7454 unit.
a) Remove the screws (2) that secure the cover.
b) Press in on both sides of the cover and lift it up in the back toremove it.
20049
Screws (2)Press in on Both Sides
8. Install the Customer Display and Cover assembly onto the 7454(2 screws).
16713
9. Connect the Display Cable to the Customer Display connector onthe terminal.

2-22 Chapter 2: Hardware Installation
Installing a Cash Drawer1. Place the cash drawer in the desired location, within cable length of
the terminal.
16269
2. Connect the cash drawer cable to the terminal cash drawerconnector.
15969cCash Drawer
Note: The Cash Drawer can optionally be connected to the printer.

Chapter 2: Hardware Installation 2-23
Installing a Second Cash Drawer
The terminal supports a 2-drawer configuration with a Y-cable(1416-C372-0006).
1. Place the cash drawer in the desired location, within cable length ofthe terminal.
2. Connect the Y-cable to the terminal cash drawer connector.
16270
Dual Cash Drawer Y-Cable1416-C372-0006
Note: The Y-cable can optionally be connected to the printer.

2-24 Chapter 2: Hardware Installation
Mounting the 7454A Tilt Mount terminal can be installed on a flat horizontal surface or aflat vertical surface.
16429
NCR
Wall MountTable-Top Mount

Chapter 2: Hardware Installation 2-25
Wall Mounting a Tilt MountTo install the Tilt Mount on a flat vertical surface, use the K533 WallMount Bracket Kit.
1. Secure the Wall Plate to the wall with lag screws (4) into the studsor with hardware of similar strength. The recommended viewingheight for the terminal is 1.2 m (48") from the floor.
16400
Wall Plate
Wall Mount Adapter Plate
Release Lever
2. Install the Wall Mount Adapter Plate to the bottom of the terminalwith screws (4).
3. Install the terminal to the Wall Plate. The bottom of the Wall MountAdapter Plate has slots that mate to locking tabs on the Wall Plate.
4. Latch the Release Lever.

2-26 Chapter 2: Hardware Installation
Finalizing the InstallationAfter the hardware installation has been completed, the terminal canbe powered up to finalize the installation. The operating system, alongwith platform modifications, is pre-installed. The following sections listthe steps involved to complete the system installation for each of theGold Disk operating systems.
Completing the OS Installation (Win2000)
The system automatically reboots when the image recovery is completeand starts the software installation. This installation also installs mostof the additional software and drivers that are included in the diskimage. Complete the installation as follows.
1. After the terminal reboots, it will perform a disk check and thencontinue with the Windows 2000 installation.
2. Enter the User Name and Organization.
3. Enter the Computer Name for the client.
4. Enter the Administrator’s Account Password (optional)
5. When prompted, press Finish to reboot the client.
6. Login when prompted.
7. Run the MicroTouch screen calibration from the Desktop icon.
Completing the OS Installation (WinXPe)
The system automatically reboots when the image recovery is completeand starts the software installation. This installation also installs mostof the additional software and drivers that are included in the diskimage. Complete the installation as follows.
1. Click the Admin button to login as Administrator.
2. Read the EULA (End-User License Agreement) information in theDOS window, then type EXIT and press Enter to close the DOSwindow.

Chapter 2: Hardware Installation 2-27
3. Start the Network Setup Wizard.
4. Select options to identify the network information for the terminalenvironment.
5. Enter the Computer Description.
6. Enter the Computer Name.
7. Enter the Workgroup Name.
8. When prompted, press Finish to reboot the terminal.
9. Log in when prompted.
1. Open the Control Panel or use the TouchWare Icon on the desktopand run the MicroTouch screen calibration.
Completing the OS Installation (WinNT)
The system automatically reboots when the image recovery is completeand starts the software installation. This installation also installs mostof the additional software and drivers that are included in the diskimage. Complete the installation as follows.
1. After the terminal reboots, press Next at the Windows Setup screen.
2. Accept the Microsoft license agreement.
3. Enter the User Name and Organization.
4. Enter the Computer Name for the client.
5. Enter the Administrator’s Account Password (optional).
6. When prompted, press Finish to reboot the client.
7. Log in when prompted.
8. Open the Control Panel and run the MicroTouch screen calibration.
Completing the OS Installation (Win98)
The system automatically reboots when the image recovery is completeand starts the software installation. This installation also installs mostof the additional software and drivers that are included in the diskimage. Complete the installation as follows.

2-28 Chapter 2: Hardware Installation
1. When the terminal boots it enters the Windows setup routine.
Note: When installing Win98 on terminals with early ProcessorBoards (7454-22xx) there are few differences in the procedure asfollows:
a) The terminal starts the Add New Hardware Wizard.
b) For each device found, permit Windows to search for newdrivers (take defaults).
c) After each driver is installed you are asked to reboot. AnswerNo.
2. At the User Information screen, enter the User information. This canbe done using a keyboard or you can use the touch screenkeyboard. After entering the information, press Enter or touch OK.
3. Go into the Control Panel and set the terminal Date and Time.
4. In the Control Panel, run the MicroTouch screen calibration.
Completing the OS Installation (Win95)
The system automatically reboots when the image recovery is completeand starts the software installation. This installation also installs mostof the additional software and drivers that are included in the diskimage. Complete the installation as follows.
1. After the terminal reboots, press Next at the Windows Setup screen.
2. At the User Information screen, enter the User information. This canbe done using a keyboard or you can use the touch screenkeyboard. After entering the information, press Enter or touch OK.
3. Run the MicroTouch screen calibration as described later in thischapter.
Completing the OS Installation (DOS)
The system automatically reboots when the image recovery is completeand opens at the DOS C: prompt.
Chapter 2: Hardware Installation 2-29
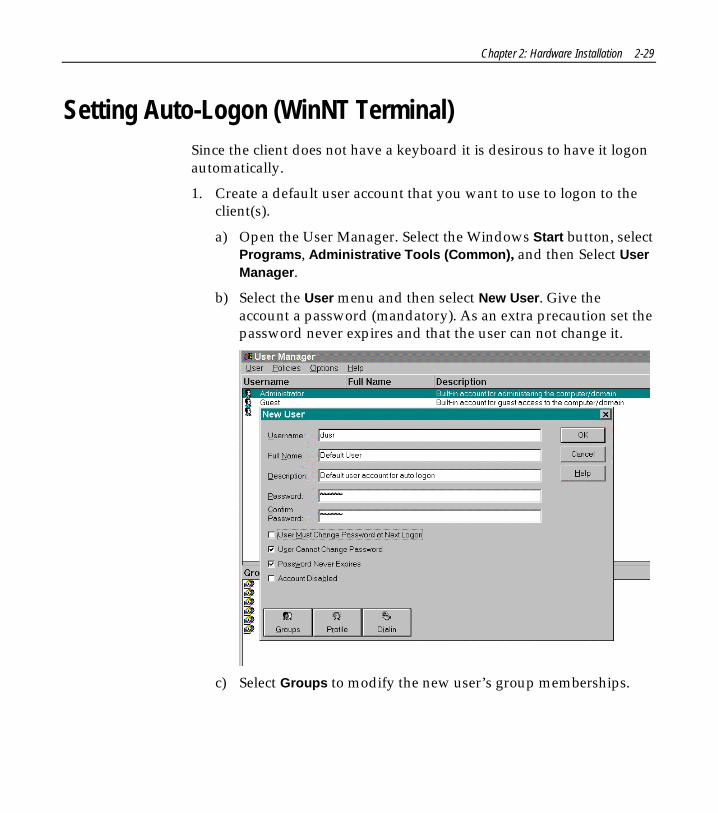
Setting Auto-Logon (WinNT Terminal)Since the client does not have a keyboard it is desirous to have it logonautomatically.
1. Create a default user account that you want to use to logon to theclient(s).
a) Open the User Manager. Select the Windows Start button, selectPrograms, Administrative Tools (Common), and then Select UserManager.
b) Select the User menu and then select New User. Give theaccount a password (mandatory). As an extra precaution set thepassword never expires and that the user can not change it.
c) Select Groups to modify the new user’s group memberships.

2-30 Chapter 2: Hardware Installation
d) Add the new user to the Administrators group. You need to dothis in order to be able to later turn off the auto-logonfunction.
e) Select OK to close the Group Membership box.
f) Select OK to create the account.
2. Modify the Registry. Select the Windows Start button and selectRun.
3. Enter regedit and then select OK.
4. Open the following registry subkey:
HKEY_LOCAL_MACHINE\Software\Microsoft\WindowsNT\CurrentVersion\Winlogon

Chapter 2: Hardware Installation 2-31
5. Create a new string value to permit auto logon for the default user.Select the Edit menu, select New and then select String Value.
6. Name the new entry AutoAdminLogon.
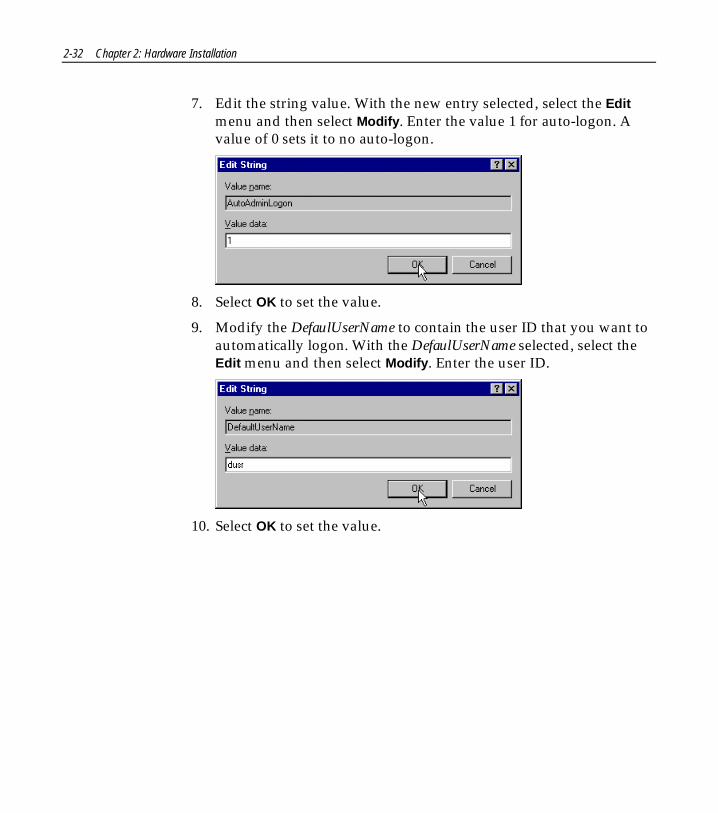
2-32 Chapter 2: Hardware Installation
7. Edit the string value. With the new entry selected, select the Editmenu and then select Modify. Enter the value 1 for auto-logon. Avalue of 0 sets it to no auto-logon.
8. Select OK to set the value.
9. Modify the DefaulUserName to contain the user ID that you want toautomatically logon. With the DefaulUserName selected, select theEdit menu and then select Modify. Enter the user ID.
10. Select OK to set the value.

Chapter 2: Hardware Installation 2-33
11. Create a new string value to contain the password for the defaultuser. Select the Edit menu, select New and then select String Value.
12. Name the new entry DefaultPassword.
13. Edit the string value. With DefaultPassword selected, select the Editmenu and then select Modify. Enter the value of the password of thedefault user (from Step 1). The example below uses password.
14. Select OK to set the value.
This completes the client installation.
To bypass auto logon, and to log on as a different user, hold down theSHIFT key after a logoff or after a Windows NT restart.

2-34 Chapter 2: Hardware Installation
Installing a Serial MouseFollow these steps to install a Serial Mouse on the terminal.
1. Edit the boot.ini file, which is located in the root of the C drive.
a. Open Windows NT Explorer
b. Go to the View menu and select Folder Options.
c. Select the View tab.
d. Scroll down until you see a folder that is labeled Hidden Files.Make sure the button labeled Show All Files is selected and thenselect OK.
e. Select the C drive root directory. Scroll down until you find thefile named boot.ini and select it.
f. Open the File menu and then select Properties.
g. Uncheck the box labeled Read Only and then select OK.
h. Open the boot.ini file with Notepad. It should have thefollowing entries:
[operating systems]multi(0)disk(0)rdisk(0)partition(1)\WINNT="WindowsNT Workstation Version 4.00" /NoSerialMice
multi(0)disk(0)rdisk(0)partition(1)\WINNT="WindowsNT Workstation Version 4.00 [VGA mode]" /basevideo/sos
2. Delete the text /NoSerialMice. The file should now look like:
3. Save the file and then restart the terminal with the serial mouseconnected.
After the terminal restarts it recognizes the mouse and installs thesupporting drivers. The drivers are located on the hard drive atC:\install\i386. If for some reason they are not on the hard drive,connect the terminal to a network and share a CD-ROM drive with theNT Operating System disk installed, or copy the files needed to thenetwork.
Chapter 2: Hardware Installation 2-35
Guidelines for Calibrating the Touch ScreenThe following guidelines should be observed for calibrating the touchscreen.
• Calibration should be done at time of installation
• Recalibrate the touch screen when the system is installed at its finallocation.
• Recalibrate whenever the terminal is moved to a new location.
• Recalibrate the touch screen anytime the system has beendisassembled for servicing.
• Only use the Microcal (DOS) program, the Touchware ControlPanel (Windows), or Touchware icon on the Desktop (XPe) tocalibrate the touch screen.
Microcal:a. Set the video resolution. Go to the Tools menu, Video. Select 800
x 600 256 colors.
b. Go to the Tools menu, select Calibrate.
Touchware Control Panel:
a. Go to the Calibrate tab and press Calibrate.
Calibration ProcedureThe calibration program looks at where your finger is when you lift itoff the screen, not where you touch it. Therefore, calibrate the screen asfollows:
1. Touch the screen near the calibration target.
2. Keep your finger on the screen and slide it to the center of thetarget.
3. Hold your finger firmly on the target for two seconds, then lift it offquickly.

2-36 Chapter 2: Hardware Installation
4. Verify that the calibration was set accurately before making aservice call. Perform the calibration again if necessary.
• If cursor is not stable, or false touches are suspected, run the NoiseCheck Utility from the Touchware Control Panel (Windows) orfrom the Microcal (DOS) program. Choose the recommendedfrequency (the one with the lowest noise level). This should also bedone if the touch screen is still not calibrated after one attempt torecalibrate it.
Microcal:
a. Set the video resolution. Go to the Tools menu, Video. Select800 x 600 256 colors.
b. Go to the Tools menu, select Noise Check.
c. Follow the instruction prompts. Choose the frequency with thelowest noise level.
Touchware Control Panel:a. Go to the Cursor tab and press Stabilize Cursor.
b. Choose the recommended frequency.
• The Edge Adjust should be turned off if using Windows.
Touchware Control Panel:
a. Go to the Cursor tab. Edge Adjustment should be turned off.
Application software can possibly generate a dialog box from theTouch Driver, with the message that the touch screen needs to be re-calibrated. If the screen appears to be working normally, then thismessage can be ignored. There is a check box labeled, Do not showthis message again. Make sure this box is checked.

Chapter 2: Hardware Installation 2-37
SummaryIf there is a touch screen calibration issue during or after installation,take the following actions in the order listed:1. Recalibrate.2. If re-calibration is unsuccessful after two attempts, then run the
Noise check to change the frequency.3. If you are still not able to calibrate, change the touch screen glass.
4. The final step is to replace the Processor Board. If this corrects theproblem, then the old glass is probably OK to reuse.
Out-of-Box FailuresThe RSG-Atlanta Customer Satisfaction Hotline will replace out-of-boxfailed hard disks with identical, preloaded drives. Once a system issuccessfully installed, all disk contents are the responsibility of thecustomer. The customer is responsible for restoring operating systemsoftware and/or customer-specific data onto replacement disks sent torepair a failed or damaged disk in the field. NCR provides recoverytools for the operating system and platform software.

Chapter 3: Setup
IntroductionThis chapter describes how to configure the BIOS CMOS options.Following this Introduction, there are sections specific to Pentiumterminals and sections specific to Pentium III/Celeron terminals.
Note: An external alphanumeric keyboard is not required to run theBIOS CMOS Setup Utility, but a keyboard makes the setup easier.
BIOS VersionsThe Setup Menus in this chapter reference NCR 7401/7454 BIOSVersion 1.5.0.4 (Pentium) and NCR 7401/7452/7453/7454/7455 BIOSVersion 2.1.2.x (Pentium III).
Entering Setup Without a Keyboard1. Apply power to the terminal.
2. Calibrate the touch screen.
a) When the screen prompt that says Touch the screen two times toenter Setup appears, touch the screen three times. This causesthe system to bypass the BIOS Setup and go directly to theTouch Screen Calibration Setup.
Note: Setup can also be entered from the Boot Menu that isdisplayed when you press ESC during POST.
b) As instructed on the screen, touch the circle near the lower-leftcorner of the screen. For best results, press the screen near thecircle and then slide your finger onto the circle without raisingyour finger from the screen.
3-2 Chapter 3: Setup
c) Using the same method as above, touch the circle near theupper-right corner of the screen.
You should receive a Successful Calibration message and then thePhoenixBIOS Setup Utility should come up.
d) Select the setup parameters by touching the controls at thebottom of the screen.
Entering Setup Using a Keyboard1. Apply power to the terminal.
2. Press the F2 key when the message at the bottom of the screenprompts you to do so.
Note: Setup can also be entered from the Boot Menu that isdisplayed when you press ESC during POST.
How to Select Menu OptionsThe following keyboard controls are used to select the various menuoptions and to make changes to their values.
• Use the arrow keys to select (highlight) options and menu screens.
• Use the + and - (or F5 and F6) keys to change field values.
• To view help information on the possible selections for thehighlighted item, press F1.
• To save the changes, move the cursor to the Exit Menu, select eitherSave Changes & Exit or Save Changes, and press Enter.
Note: If you are not using an external keyboard, you can touch themenu controls at the bottom of the screen. If you encounter difficultydoing this, recalibrate the screen.
Chapter 3: Setup 3-3
Restoring Factory SettingsTo automatically reset all values to their default settings for the currentscreen, press F9. The terminal will automatically load BIOS defaultCMOS values for boot up.
To reset all BIOS settings to their default settings go to the Exit menu,press F9, select either Save Changes & Exit or Save Changes, and pressEnter.
Refer to the BIOS Default CMOS Values section later in this chapter forthe pre-installed Setup defaults.

3-4 Chapter 3: Setup
BIOS Default CMOS Values (Pentium)The following are the BIOS default CMOS values for the terminal.
Note: When installing a new BIOS from the CD, the Processor Boardtype is automatically detected and the correct BIOS is automaticallyinstalled.
Main Values
System Time (variable)
System Date (variable)
Legacy Diskette A: 144 MV/1.25 MV, 3 ½"
Legacy Diskette B: Disabled
IDE Primary Master
Type [Auto]
Cylinders 4191
Heads 16
Sectors/Track 63
Maximum Capacity 2163 MB
Multi-Sector Transfers 16 Sectors
LBA Mode Control Enabled
32 Bit I/O Disabled
Transfer Mode Fast PIO 4
Ultra DMA Mode Disabled
IDE Primary Slave
Type None

Chapter 3: Setup 3-5
IDE Secondary Master
Type None
IDE Secondary Slave
Type None
Memory Cache Enabled
Cache System BIOS area Enabled
Cache Video BIOS area Disabled
System Memory 640 K
Extended Memory 31744 K
Power Savings Disabled
Standby Timeout Off
Auto Suspend Timeout Off
Fixed Disk Disabled
Video Disabled
IDE Drive 0 Monitoring Disabled
IDE Drive 1 Monitoring Disabled
IDE Drive 2 Monitoring Disabled
IDE Drive 3 Monitoring Disabled
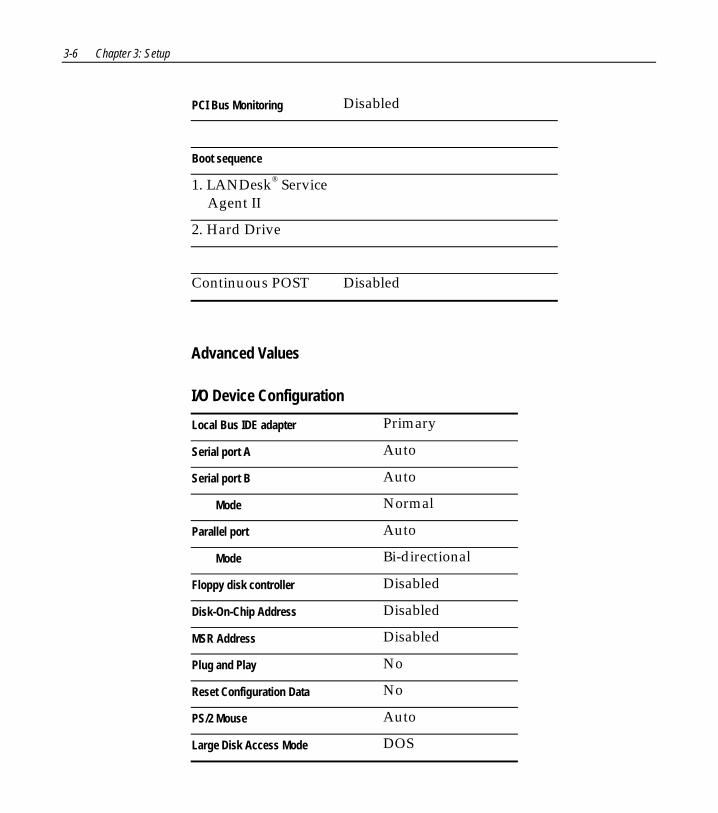
3-6 Chapter 3: Setup
PCI Bus Monitoring Disabled
Boot sequence
1. LANDesk® ServiceAgent II
2. Hard Drive
Continuous POST Disabled
Advanced Values
I/O Device Configuration
Local Bus IDE adapter Primary
Serial port A Auto
Serial port B Auto
Mode Normal
Parallel port Auto
Mode Bi-directional
Floppy disk controller Disabled
Disk-On-Chip Address Disabled
MSR Address Disabled
Plug and Play No
Reset Configuration Data No
PS/2 Mouse Auto
Large Disk Access Mode DOS
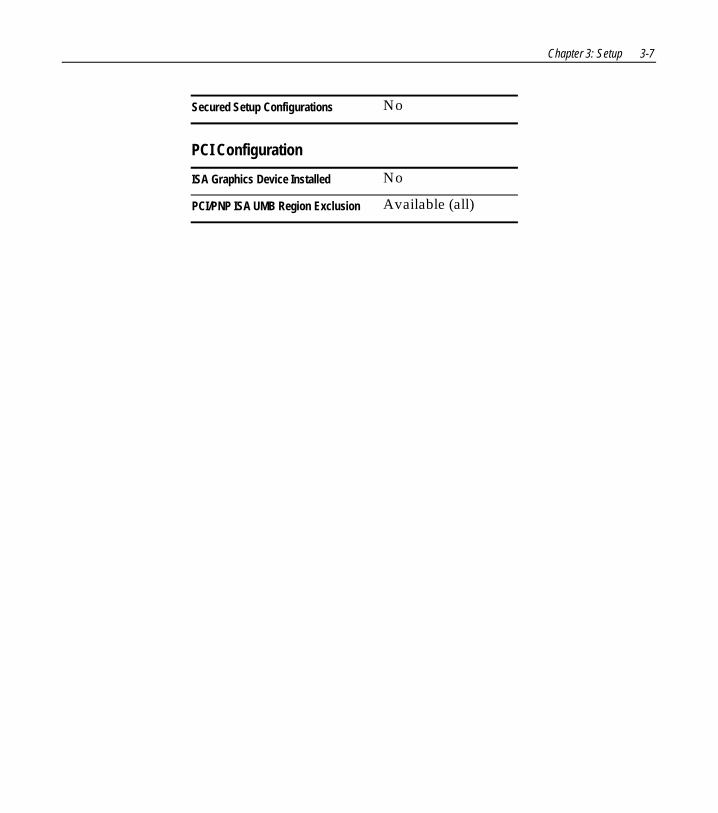
Chapter 3: Setup 3-7
Secured Setup Configurations No
PCI Configuration
ISA Graphics Device Installed No
PCI/PNP ISA UMB Region Exclusion Available (all)

3-8 Chapter 3: Setup
Interrupts (Pentium)The following table lists the default settings.
IRQ System Resource
NMI I/O Channel Check
0 Reserved, Interval Timer
1 Reserved, Keyboard buffer full
2 Reserved, Cascade interrupt
3 Serial Port 2
4 Serial Port 1
5 User available
6 Reserved, Floppy
7 Parallel Port 1
8 Real Time Clock
9 NCR Motion, Thermal interrupt
10 LAN
11 Windows Sound System/USB
12 Touch Screen
13 Reserved, Math coprocessor
14 On-board IDE (available if IDE is disabled)
15 MSR
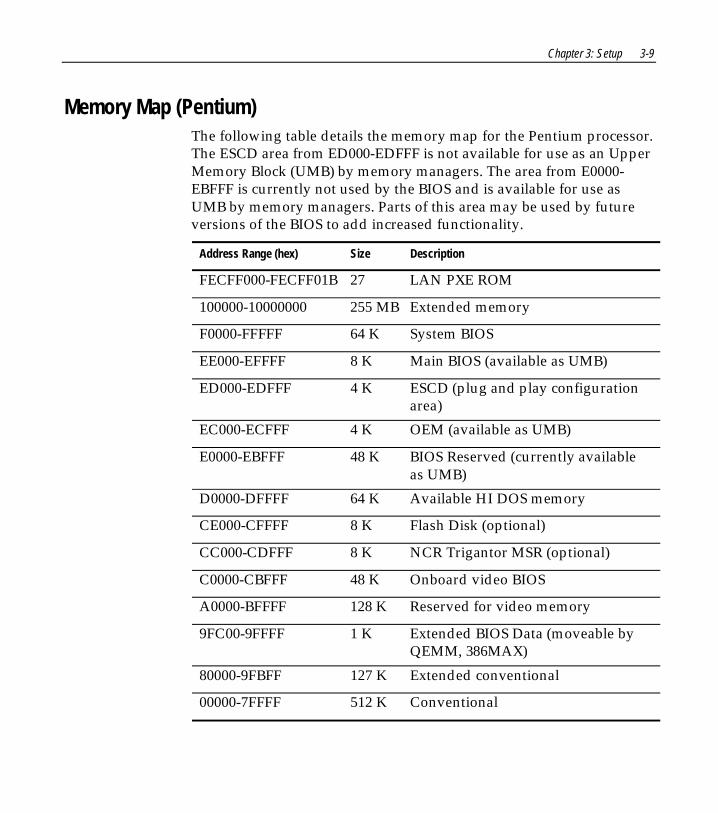
Chapter 3: Setup 3-9
Memory Map (Pentium)The following table details the memory map for the Pentium processor.The ESCD area from ED000-EDFFF is not available for use as an UpperMemory Block (UMB) by memory managers. The area from E0000-EBFFF is currently not used by the BIOS and is available for use asUMB by memory managers. Parts of this area may be used by futureversions of the BIOS to add increased functionality.
Address Range (hex) Size Description
FECFF000-FECFF01B 27 LAN PXE ROM
100000-10000000 255 MB Extended memory
F0000-FFFFF 64 K System BIOS
EE000-EFFFF 8 K Main BIOS (available as UMB)
ED000-EDFFF 4 K ESCD (plug and play configurationarea)
EC000-ECFFF 4 K OEM (available as UMB)
E0000-EBFFF 48 K BIOS Reserved (currently availableas UMB)
D0000-DFFFF 64 K Available HI DOS memory
CE000-CFFFF 8 K Flash Disk (optional)
CC000-CDFFF 8 K NCR Trigantor MSR (optional)
C0000-CBFFF 48 K Onboard video BIOS
A0000-BFFFF 128 K Reserved for video memory
9FC00-9FFFF 1 K Extended BIOS Data (moveable byQEMM, 386MAX)
80000-9FBFF 127 K Extended conventional
00000-7FFFF 512 K Conventional

3-10 Chapter 3: Setup
BIOS Default CMOS Values (Pentium III/Celeron)The following are the BIOS default CMOS values for the workstation.
Note: When installing a new BIOS from the CD, the Processor Boardtype is automatically detected and the correct BIOS is automaticallyinstalled.
Main Values
Note: An asterisk (*) indicates a variable value based on systemspecification, etc. .
System Time *
System Date *
Legacy Diskette A: Disabled
Legacy Diskette B: Disabled
Primary Master 2168 MB
Type Auto
Cylinders 4200
Heads 16
Sectors 63
Maximum Capacity 2168 MB
Total Sectors 4233600
Maximum Capacity 2168MB
Multi-Sector Transfers 16 Sectors
LBA Mode Control Enabled
32 Bit I/O Disabled
Transfer Mode FPI0 4/DMA 2
Ultra DMA Mode Mode 2
Primary Slave None
Type Auto

Chapter 3: Setup 3-11
Multi-Sector Transfers Disabled
LBA Mode Control Disabled
32 Bit I/O Disabled
Transfer Mode Standard
Ultra DMA Mode Disabled
Secondary Master None
Type Auto
Multi-Sector Transfers Disabled
LBA Mode Control Disabled
32 Bit I/O Disabled
Transfer Mode Standard
Ultra DMA Mode Disabled
Secondary Slave None
Type Auto
Multi-Sector Transfers Disabled
LBA Mode Control Disabled
32 Bit I/O Disabled
Transfer Mode Standard
Ultra DMA Mode Disabled
System Memory 640 K
Extended Memory 64512 K
Advanced Values
Installed O/S Other
Secured Setup Configuration No
Reset Confirmation Data No
Cache Memory

3-12 Chapter 3: Setup
Memory Cache Enabled
Cache System BIOS Write Protect
Cache Video BIOS Write Protect
Cache Base 0-512 K Write Back
Cache Base 512K-640 K Write Back
Cache Extended Memory Write Back
Cache A000-AFFF Disabled
Cache B000-BFFF Disabled
Cache C800-CBFF Disabled
Cache CC00-CFFF Disabled
Cache D000-D3FF Disabled
Cache D400-D7FF Disabled
Cache D800-DBFF Disabled
Cache DC00-DFFF Disabled
Cache E000-E3FF Write Protect
Cache E400-E7FF Write Protect
Cache E400-E7FF Write Protect
Cache EC00-EFFF Write Protect
PS/2 Port Touchscreen
USB Port 2 Primary
I/O Device Configuration
Serial Port A Auto
Powered Port Auto
Serial Port B Auto
Parallel Port Auto
Mode ECP
Fdc on Lpt Disabled

Chapter 3: Setup 3-13
Floppy Diskette Controller Enabled
Serial Port C Enabled
Mode Normal
Base I/O Address 3E8
Interrupt IRQ 5
Powered Auto
Serial Port D Enabled
Base I/O Address 2E8
Interrupt IRQ 11
Mode RS-232
Disk-On-Chip Address CE00 - CFFF
MSR Address CC00 - CDFF
MSR Interrupt 6
System Monitors
+12 V Status *
+ 2.5 V Status *
+ 5 V Status *
CPU Temperature *
System Temperature *
Vcc Status *
Vcore Status *
Vio Status *
Vlcd Status *
Vtt Status *
Multiple ROM Menu

3-14 Chapter 3: Setup
On-board Intel LAN Enabled
Parallel CD-ROM Boot Disabled
On-board Intel PXE Enabled
Lucent WaveLAN ROM Disabled
WaveLAN PXE ROM Disabled
Selectable ROM 7 Disabled
Selectable ROM 8 Disabled
Selectable ROM 9 Disabled
Selectable ROM 10 Disabled
Selectable ROM 11 Disabled
Selectable ROM 12 Disabled
Selectable ROM 13 Disabled
Selectable ROM 14 Disabled
Selectable ROM 15 Disabled
Selectable ROM 16 Disabled
Beep Error Codes Off
Large Disk Access Mode DOS
Local Bus IDE Adapter Both
Advanced Chipset Control
Graphics Aperture 64 MB
Enable memory gap Disabled
ECC Config Disabled
SERR Signal condition Multiple bit
Default Primary Video Adapter AGP
PCI/PNP UMB Resource Exclusion
C800 - CBFF Available

Chapter 3: Setup 3-15
CC00 – CFFF Available
D000 – D3FF Available
D400 – D7FF Available
D800 – DBFF Available
DC00 - DFFF Available
PCI/PNP IRQ Resource Exclusion
IRQ 3 Available
IRQ 4 Available
IRQ 5 Available
IRQ 7 Available
IRQ 9 Reserved
IRQ 10 Available
IRQ 11 Available
PCI IRQ line 1: Auto Select
PCI IRQ line 2: Auto Select
PCI IRQ line 3: Auto Select
PCI IRQ line 4: Auto Select
Boot-Time Diagnostic Screen Disabled
QuickBoot Mode Enabled
Continuous POST Disabled
Boot menu retry Keyboard
Allow warm boot Disabled
Security Values
Supervisor Password Is Clear

3-16 Chapter 3: Setup
User Password Is Clear
Set Supervisor Password Press ENTER
Set User Password Press ENTER
Diskette Access Supervisor
Fixed Disk Boot Sector Normal
Password on Boot Disabled
Power Values
Power Savings Disabled
Standby Timeout Off
Auto Suspend Timeout Off
IDE Drive 0 Monitoring Disabled
IDE Drive 1 Monitoring Disabled
IDE Drive 2 Monitoring Disabled
IDE Drive 3 Monitoring Disabled
PCI Bus Monitoring Disabled
Video Power State Control Auto
Boot Values
Intel ( R ) Boot Agent Version 4.0.17
Hard Drive
ATAPI CD-ROM Drive
Removable Devices
Exit Values
Exit Saving Changes Press ENTER

Chapter 3: Setup 3-17
Exit Discarding Changes Press ENTER
Load Setup Defaults Press ENTER
Discard Changes Press ENTER
Save Changes Press ENTER
Interrupts (Pentium III/Celeron)The following table lists the default settings.
IRQ System Resource
NMI I/O Channel Check
0 Reserved, Interval Timer
1 Reserved, Keyboard buffer full
2 Reserved, Cascade interrupt
3 Serial Port 2
4 Serial Port 1
5 Serial Ports 3 and 4
6 Reserved, Floppy
7 Parallel Port 1
8 Real Time Clock
9 NCR Thermal interrupt/PII4 SMBus
10 Audio
11 LAN
12 Mouse (available if disabled)
13 Reserved, Math coprocessor
14 On-board IDE (available if IDE is disabled)
15 On-board IDE (available for MSR if IDE is disabled)

3-18 Chapter 3: Setup

Chapter 3: Setup 3-19
Memory Map (Pentium III/Celeron)The following table details the memory map for the Pentium III/Celeronprocessors. The ESCD area from ED000-EDFFF is not available for use asan Upper Memory Block (UMB) by memory managers. The area fromE0000-EBFFF is currently not used by the BIOS and is available for use asUMB by memory managers. Parts of this area may be used by futureversions of the BIOS to add increased functionality.
Address Range (hex) Size Description
FECFF000-FECFF01B 27 LAN PXE ROM
100000-10000000 255 MB Extended memory
F0000-FFFFF 64 K System BIOS
EE000-EFFFF 8 K Main BIOS (available as UMB)
ED000-EDFFF 4 K ESCD (plug and play configurationarea)
EC000-ECFFF 4 K OEM (available as UMB)
E0000-EBFFF 48 K BIOS Reserved (currently availableas UMB)
D0000-DFFFF 64 K Available HI DOS memory
CE000-CFFFF 8 K Flash Disk (optional)
CC000-CDFFF 8 K NCR Trigantor MSR (optional)
C0000-CAFFF 42 K Onboard video BIOS
A0000-BFFFF 128 K Reserved for video memory
9FC00-9FFFF 1 K Extended BIOS Data (moveable byQEMM, 386MAX)
80000-9FBFF 127 K Extended conventional
00000-7FFFF 512 K Conventional


Chapter 4: Operating System Recovery
IntroductionThis chapter discusses procedures how to recover the OperatingSystem by using the parallel CD-ROM drive. The software isdistributed on bootable CD-ROM media. The drivers that are necessaryto run the CD-ROM are temporarily installed during boot.
It is also possible to perform a BIOS update using a networkconnection. Refer to the NCR FitClient Software User's Guide forinformation about that procedure.
Prerequisites
The following are required on the 7454 in order to perform an OSrecovery using a CD.
• Bootable CD-ROM drive
• External 2336-K007 (Parallel CD-ROM – Series 5 or Series 6)
• The terminal BIOS must be 1.02.00.00 or greater.
• MicroSolutions BackPack CD-ROM Series 6 requires BIOS2.1.1.1 or greater
• Keyboard
Caution: When performing an OS recovery from a larger sourceimage (larger disk) to a smaller destination disk you must use thespecial procedure described in the OS Recovery from a Larger Disk Imagesection that follows.

4-2 Chapter 4: Operating System Recovery
Updating Procedures1. Connect the external CD-ROM (2336-K007) drive to the parallel
port on the terminal.
2. Connect the power connector to the CD-ROM drive.
18250
Parallel Connector
Parallel Connector
Power Connector
Note: The parallel port on the 7454 is the Customer Display port.Therefore, if your terminal is configured with a Customer Display,you must temporarily disconnect it in order to use the CD-ROMdrive.

Chapter 4: Operating System Recovery 4-3
3. Apply power to the terminal so the CD-ROM drive can be opened.
4. Insert the CD that contains the operating system image.
7454Model Software CD LPINs
Win2000 WinXPe WinNT Win98 Win95 DOS
*22xx D370-0489-0100 Not Supported D370-0433-0100 D370-0444-0100 D370-0442-0100 D370-0445-0100
32xx D370-0516-0100 D370-0565-0100 D370-0501-0100 D370-0500-0100 D370-0503-0100**Controlled
D370-0445-0100
34xx,35xx,36xx,37xx
D370-0516-0100 D370-0565-0100 D370-0501-0100 D370-0500-0100 **Discontinued D370-0445-0100
Note: * The 22xx models have been discontinued. Contact NCRProduct Manager for LPIN availability.** Contact Product Manager for Controlled Delivery support ofWindows 95 LPIN for 32xx model.
5. Boot the terminal.
6. Press F2 at the screen prompt to enter Setup.
7. Press F9 to set BIOS System defaults.
8. In the Advanced menu, select I/O Device Configuration.
9. Verify that the LPT 1 Mode is set to ECP.
10. Go back to the Advanced menu, select Multiple ROM Menu.
11. Set the Parallel CD-ROM Boot to Enabled.
12. Set all other Boot options to Disabled.
13. Exit Setup and Save Changes.
As the terminal reboots, you should see a message during bootindicating that the CD-ROM has been recognized:
Micro Solutions BACKPACK CD-ROM v0.3. . .Booting from BACKPACK CDStarting MS-DOS

4-4 Chapter 4: Operating System Recovery
14. Follow the DOS screen prompts. After each entry you are asked toconfirm your input. You can use 1 or y for Yes, 2 or n for No.
15. Enter whether or not you want to perform Disk verification.(Answering Yes takes twice as long, but is recommended.)
If Yes is selected:
• The Ghost® software verifies write operations and handles badFAT clusters.
• The Ghost error file (GHOST.ERR) is displayed beforerebooting
If No is selected:
• The Ghost error file is displayed before rebooting only if Ghostaborts.
Caution: If the error file is displayed, the batch file pauses foruser input before rebooting. You may use Ctrl-C to cancel out ofthe batch file if you want to see the error file again, but nothingshould be done that writes to the hard disk before rebooting.GHOST.ERR is on the RAM disk and is lost on reboot.
16. Select which type of recovery you want to perform from the nextmenu (normally option #1).
1) Redo entire disk with the first partition the same size.
2) Redo the first OS partition.
3) Redo the second OS partition.
The Ghost software then begins the disk recovery from the CD. Itdisplays a progress bar and gives you an estimate how long theprocess should take.
When the recovery process is completed, the client hard disk isrestored to its preinstalled condition, as originally received fromthe factory.
17. At the completion of the recovery process remove the CD and pressENTER to reboot the terminal.

Chapter 4: Operating System Recovery 4-5
18. Remove the CD during reboot for the OS to begin. When system isrestored, reset the BIOS to normal defaults.
Completing the OS Installation (Win2000)
The system automatically reboots when the image recovery is completeand starts the software installation. This installation also installs mostof the additional software and drivers that are included in the diskimage. Complete the installation as follows.
1. After the terminal reboots, it will perform a disk check and thencontinue with the Windows 2000 installation.
2. Enter the User Name and Organization.
3. Enter the Computer Name for the client.
4. Enter the Administrator’s Account Password (optional)
5. When prompted, press Finish to reboot the client.
6. Login when prompted.
7. Run the MicroTouch screen calibration from the Desktop icon.
Completing the OS Installation (WinXPe)
The system automatically reboots when the image recovery is completeand starts the software installation. This installation also installs mostof the additional software and drivers that are included in the diskimage. Complete the installation as follows.
1. Click the Admin button to login as Administrator.
2. Read the EULA (End-User License Agreement) information in theDOS window, then type EXIT and press Enter to close the DOSwindow.
3. Start the Network Setup Wizard.
4. Select options to identify the network information for the terminalenvironment.
5. Enter the Computer Description.
6. Enter the Computer Name.

4-6 Chapter 4: Operating System Recovery
7. Enter the Workgroup Name.
8. When prompted, press Finish to reboot the terminal.
9. Log in when prompted.
10. Open the Control Panel or use the TouchWare Icon on the desktopand run the MicroTouch screen calibration.
Completing the OS Installation (WinNT)
The system automatically reboots when the image recovery is completeand starts the software installation. This installation also installs mostof the additional software and drivers that are included in the diskimage. Complete the installation as follows.
1. After the terminal reboots, press Next at the Windows Setup screen.
2. Accept the Microsoft license agreement.
3. Enter the User Name and Organization.
4. Enter the Computer Name for the client.
5. Enter the Administrator’s Account Password (optional).
6. When prompted, press Finish to reboot the client.
7. Log in when prompted.
8. Open the Control Panel and run the MicroTouch screen calibration.
Completing the OS Installation (Win98)
The system automatically reboots when the image recovery is completeand starts the software installation. This installation also installs mostof the additional software and drivers that are included in the diskimage. Complete the installation as follows.
1. When the terminal boots it enters the Windows setup routine.
Note: When installing Win98 on terminals with early ProcessorBoards (7454-22xx) there are few differences in the procedure asfollows:
a) The terminal starts the Add New Hardware Wizard.

Chapter 4: Operating System Recovery 4-7
b) For each device found, permit Windows to search for newdrivers (take defaults).
c) After each driver is installed you are asked to reboot. AnswerNo.
2. At the User Information screen, enter the User information. Thiscan be done using a keyboard or you can use the touch screenkeyboard. After entering the information, press Enter or touch OK.
3. Go into the Control Panel and set the terminal Date and Time.
4. In the Control Panel, run the MicroTouch screen calibration.
Completing the OS Installation (Win95)
The system automatically reboots when the image recovery is completeand starts the software installation. This installation also installs mostof the additional software and drivers that are included in the diskimage. Complete the installation as follows.
1. After the terminal reboots, press Next at the Windows Setup screen.
2. At the User Information screen, enter the User information. Thiscan be done using a keyboard or you can use the touch screenkeyboard. After entering the information, press Enter or touch OK.
3. Open the Control Panel and run the MicroTouch screen calibration.
Completing the OS Installation (DOS)
The system automatically reboots when the image recovery is completeand opens at the DOS C: prompt.
4-8 Chapter 4: Operating System Recovery
Gold Disk ContentsThis section describes the contents of each of the Gold Disk Images,including all the additions and changes that were made on top of thegeneric operating system.
Important: For each operating system, NCR strongly recommendsthat the drivers placed in the c:\install directory be left there forthe purposes of servicing and maintaining the system. If you are usingthe information in this section to build your own operating systemimage and not using NCR’s provided OS Recovery image as a baseimage, then we recommend that all installed drivers be placed in asimilar c:\install directory for support.
Microsoft Operating System License AgreementsWhen purchasing a workstation or kiosk preloaded with a Microsoftoperating system, the application provider must follow certain licenseagreement guidelines. Listed below are some of the major points ofMicrosoft’s “Embedded Software” agreement, which currently coversDOS, Win 3.11, Windows 95, Windows 98, Windows NT, Windows2000, and Windows XPe.
• The end user application should not permit the user (typically acashier) to exit the application so that they may be able to browsethe operating system desktop, explorer, or other Microsoftoperating system user interface elements. This does not apply toservicing, upgrading, or diagnosing problems for the workstationby services or field engineers. This restriction is meant to ensurethat the end user is only permitted to navigate within the confinesof the end user’s application under normal operating conditions.
• The NCR OS Recovery image can only be used to recover or updatesystems with licenses procured from NCR.
Chapter 4: Operating System Recovery 4-9
Operating System RestrictionsThe following section describes restrictions for operating systems usedwith the 7454 terminal.
Standby and Hibernate Mode Restriction
When using a 7454 terminal without a keyboard or mouse, theWindows 2000, Windows XP PRO, and Windows XP Embedded OSStandby Mode and Hibernate Mode should be avoided. These two modesplace the hardware in a low power state which requires an interrupt torestart the processor.
The Windows 2000 and Windows XP Embedded Gold Disk Imagesdisable Hibernate Mode and Standby Mode on the 7454 terminal. Thesetwo modes should not be used without a keyboard or mouse.
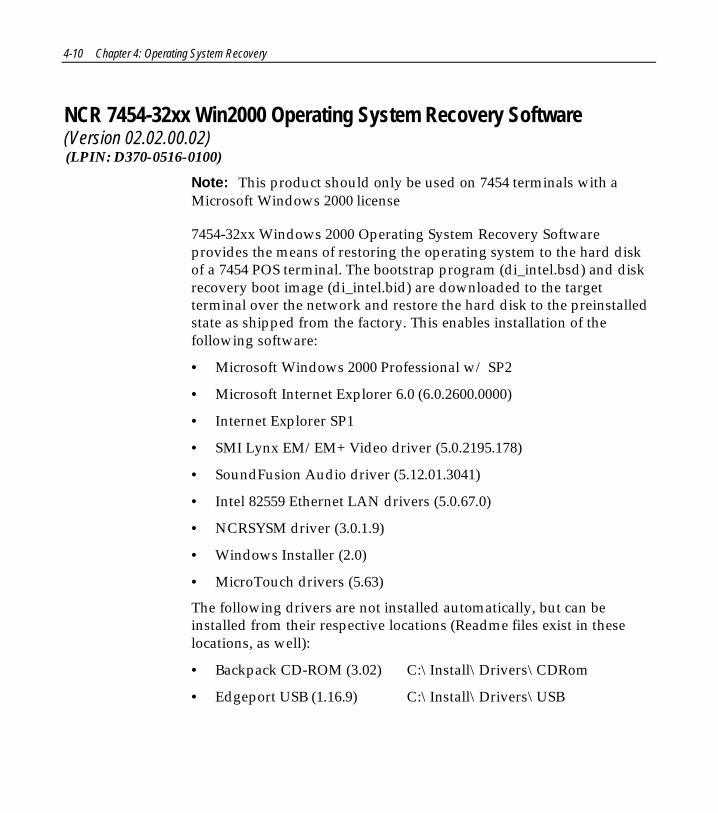
4-10 Chapter 4: Operating System Recovery
NCR 7454-32xx Win2000 Operating System Recovery Software(Version 02.02.00.02)(LPIN: D370-0516-0100)
Note: This product should only be used on 7454 terminals with aMicrosoft Windows 2000 license
7454-32xx Windows 2000 Operating System Recovery Softwareprovides the means of restoring the operating system to the hard diskof a 7454 POS terminal. The bootstrap program (di_intel.bsd) and diskrecovery boot image (di_intel.bid) are downloaded to the targetterminal over the network and restore the hard disk to the preinstalledstate as shipped from the factory. This enables installation of thefollowing software:
• Microsoft Windows 2000 Professional w/ SP2
• Microsoft Internet Explorer 6.0 (6.0.2600.0000)
• Internet Explorer SP1
• SMI Lynx EM/EM+ Video driver (5.0.2195.178)
• SoundFusion Audio driver (5.12.01.3041)
• Intel 82559 Ethernet LAN drivers (5.0.67.0)
• NCRSYSM driver (3.0.1.9)
• Windows Installer (2.0)
• MicroTouch drivers (5.63)
The following drivers are not installed automatically, but can beinstalled from their respective locations (Readme files exist in theselocations, as well):
• Backpack CD-ROM (3.02) C:\Install\Drivers\CDRom
• Edgeport USB (1.16.9) C:\Install\Drivers\USB

Chapter 4: Operating System Recovery 4-11
Furthermore, the following settings/revisions have been configured:
• Preinstalled W2K to include the Product ID Number (PID)
• Placed the Gold Drive Part Number, Date Created, LPIN, andRelease in Registry under:
HKey-Local_Machine\Software\NCR\Gold Drive
• Ran Sysprep, using sysprep.inf and sysprep.bat, so that the miniinstallation will run on initial boot with the following parameters:
- Automatically include PID
• Established a FAT32 primary system partition that fills the entiredrive
• Included necessary OS cab files in C:\Install
• Installed SP2
• Exposed to both EM and EM+ video chipsets
• Exposed to a mouse so MicroTouch will install properly
• Installed SMI Control Panel (4.3.5)
• Installed Intel Proset utility
• Set virtual memory to 192-394
• Enabled APM
• Set ‘APM monitor shutoff’ to ‘Never’
• ‘Enable PME’ (in Intel Proset utility) set to ‘Hardware Default’
• Disabled game port
• Enabled DMA
• Set color to 16 bit
• Added SetResolution.exe to RunOnce registry.
• Added TerminalCheck.exe to Run registry.
• Added NCR-specific EULA.
• Added '/noguiboot' parameter to boot.ini to hide splash at startup.

4-12 Chapter 4: Operating System Recovery
NCR 7454-3xxx WinXPe Operating System Recovery Software(Version 02.02.00.01)(LPIN: D370-0565-0100)
Note: This product should only be used on 7454 terminals with aMicrosoft Windows XPe license.
7454-3xxx Windows XPe Operating System Recovery Softwareprovides the means of restoring the operating system to the hard diskof a 7454 POS terminal. The bootstrap program (di_intel.bsd) and diskrecovery boot image (di_intel.bid) are downloaded to the targetterminal over the network and restore the hard disk to the preinstalledstate as shipped from the factory. This enables installation of thefollowing software:
• Microsoft Windows XPe w/ SP1
• SMI Lynx EM/EM+ Video driver (6.13.10.228)
• Intel 82559 Ethernet LAN drivers (6.01.03.0000)
• NCRSYSM driver (3.0.4.12)
• MicroTouch drivers (5.64)
The following drivers are not installed automatically, but can beinstalled from their respective locations (Readme files exist in theselocations, as well):
• Backpack CD-ROM (4.0.100.1190) C:\Install\Drivers\CDRom
• Edgeport USB (2.20) C:\Install\Drivers\USB
• Inside Out NetworksWatchport/V Camera (2.20) C:\Install\Drivers\Camera
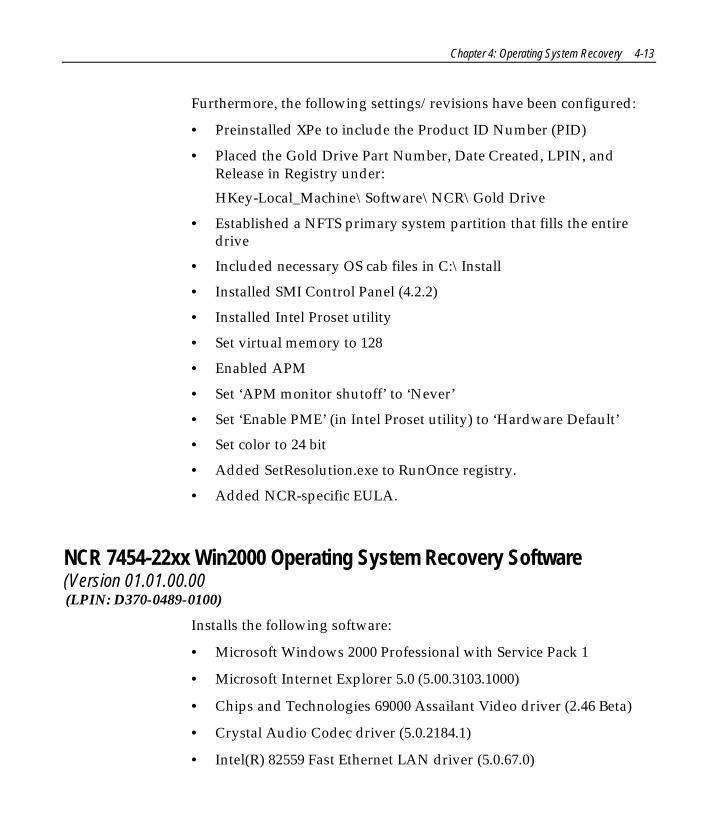
Chapter 4: Operating System Recovery 4-13
Furthermore, the following settings/revisions have been configured:
• Preinstalled XPe to include the Product ID Number (PID)
• Placed the Gold Drive Part Number, Date Created, LPIN, andRelease in Registry under:
HKey-Local_Machine\Software\NCR\Gold Drive
• Established a NFTS primary system partition that fills the entiredrive
• Included necessary OS cab files in C:\Install
• Installed SMI Control Panel (4.2.2)
• Installed Intel Proset utility
• Set virtual memory to 128
• Enabled APM
• Set ‘APM monitor shutoff’ to ‘Never’
• Set ‘Enable PME’ (in Intel Proset utility) to ‘Hardware Default’
• Set color to 24 bit
• Added SetResolution.exe to RunOnce registry.
• Added NCR-specific EULA.
NCR 7454-22xx Win2000 Operating System Recovery Software(Version 01.01.00.00(LPIN: D370-0489-0100)
Installs the following software:
• Microsoft Windows 2000 Professional with Service Pack 1
• Microsoft Internet Explorer 5.0 (5.00.3103.1000)
• Chips and Technologies 69000 Assailant Video driver (2.46 Beta)
• Crystal Audio Codec driver (5.0.2184.1)
• Intel(R) 82559 Fast Ethernet LAN driver (5.0.67.0)
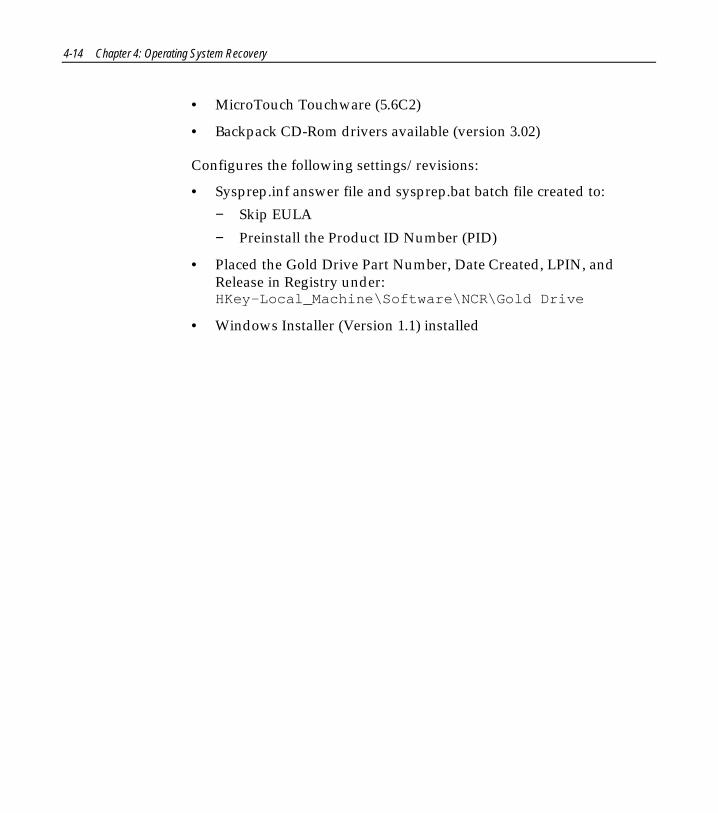
4-14 Chapter 4: Operating System Recovery
• MicroTouch Touchware (5.6C2)
• Backpack CD-Rom drivers available (version 3.02)
Configures the following settings/revisions:
• Sysprep.inf answer file and sysprep.bat batch file created to:
− Skip EULA
− Preinstall the Product ID Number (PID)
• Placed the Gold Drive Part Number, Date Created, LPIN, andRelease in Registry under:HKey-Local_Machine\Software\NCR\Gold Drive
• Windows Installer (Version 1.1) installed

Chapter 4: Operating System Recovery 4-15
NCR 7454-32xx NT Operating System Recovery Software(Version 02.02.00.01(LPIN: D370-0501-0100)
Note: This product should only be used on 7454 terminals with aMicrosoft Windows NT license.
7454-32xx NT Operating System Recovery Software provides themeans of restoring the operating system to the hard disk of a 7454 POSterminal. The bootstrap program (di_intel.bsd) and disk recovery bootimage (di_intel.bid) are downloaded to the target terminal over thenetwork and restore the hard disk to the preinstalled state as shippedfrom the factory. This permits installation of the following software:
• Microsoft Windows NT with SP6a
• Microsoft Internet Explorer 6.0 (6.0.2600.0000)
• Internet Security Update (Q323759.exe)
• SMI Lynx 3DM Video driver (4.00.1381.0178)
• SoundFusion Audio driver (4.01.2086)
• Intel 82559 Ethernet LAN drivers (5.00.66.0000)
• NCRSYSM driver (3.0.1.9)
• Windows Installer (2.0)
• MicroTouch drivers (5.63 SR3)
The following drivers are not installed automatically, but can beinstalled from their respective locations (Readme files exist in theselocations, as well):
• Backpack CD-ROM (2.04) C:\Install\Drivers\CDRom
• Edgeport USB (2.13) C:\Install\Drivers\USB

4-16 Chapter 4: Operating System Recovery
Furthermore, the following settings/revisions have been configured:
• Preinstalled NT to include the Product ID Number (PID)
• Placed the Gold Drive Part Number, Date Created, LPIN, andRelease in Registry under:
HKey-Local_Machine\Software\NCR\Gold Drive
• Ran Sysprep (so that the mini installation will run on initial boot)with the following parameters:
- Automatically include PID
• Host.cmd set in RunOnce to update the registry
• Established a 2gb FAT16 primary system partition
• Established a secondary NTFS partition that fills the remainder ofthe drive
• Included necessary OS cab files in C:\Install
• Made SP6a folder available in C:\Install (installed)
• Exposed to both EM and EM+ video chipsets
• Installed SMI Control Panel (4.3.5)
• Installed Intel Proset utility
• 'Enable PME' (in Intel Proset utility) set to 'Hardware Default'
• Enabled DMA
• Muted Volume Line-In
• Added SetResolution.exe to RunOnce registry.
• Added TerminalCheck.exe to Run registry.
• Added NCR-specific EULA.
• Added '/noguiboot' parameter to boot.ini to hide splash at startup.

Chapter 4: Operating System Recovery 4-17
NCR 7454-22xx NT Operating System Recovery Software(Version 01.04.01.00(LPIN: D370-0433-0100)
Installs the following software:
• Microsoft Windows NT Workstation 4.0 with Service Pack 4a.Service Pack 6 included (but not installed) on the disk
• Microsoft Internet Explorer 5.0
• MicroTouch TouchWare Version 5.4 for Mouse Port software
• Chips & Technologies 69000 Video driver
• CrystalWare Audio driver
• Intel EtherExpress software
• Intel PIIX Bus Master IDE drivers
• M-Systems DiskOnChip 2000 driver (not installed) available
• Backpack CD-ROM drivers (not installed) available
Configures the following settings/revisions:
• Enables the NT Dump settings to:
− send an administrative alert
− write dump to file
− overwrite existing file
− auto reboot after dump
• Mutes the Volume Line-In
• Changes event log to overwrite events as needed for theApplication Type event logs
• Changes the Windows Scroll Bar Size from 16 to 18 pixels for easierTouch response

4-18 Chapter 4: Operating System Recovery
• Sysprep.inf answer file created to:
− Skip EULA
− Preinstall the Product ID Number (PID)
• Places the Gold Drive Part Number, Date Created, LPIN, andVersion in Registry under:HKey-Local_Machine\Software\NCR\Gold Drive
• Windows Installer (Version 1.1) installed
• Removes the following key from the registry (as a current COM9issue workaround):Hkey_Local_Machine\System\CurrentControlSet\Services\Serial\Parameters\ Serial 10999
• Changes page file size to 139-256

Chapter 4: Operating System Recovery 4-19
NCR 7454-32xx Win98 Operating System Recovery Software(Version 02.02.00.01)(LPIN: D370-0500-0100)
Note: This product should only be used on 7454 terminals with aMicrosoft Windows 98 license.
7454-32xx Win98 Operating System Recovery Software provides themeans of restoring the operating system to the hard disk of a 7454 POSterminal. The bootstrap program (di_intel.bsd) and disk recovery bootimage (di_intel.bid) are downloaded to the target terminal over thenetwork and restore the hard disk to the preinstalled state as shippedfrom the factory. This permits installation of the following software:
• Microsoft Windows 98SE
• Microsoft Internet Explorer 6.0 (6.0.2600.0000)
• Internet Explorer Security Update (Q323759.exe)
• SMI Lynx 3DM Video driver(4.12.01.0034)
• SoundFusion Audio driver (4.12.2885)
• Intel 82559 Ethernet LAN drivers (5.00.67.0000)
• NCRSYSM driver (3.0.1.8)
• Windows Installer (2.0)
• MicroTouch drivers (5.63 SR3)
The following drivers are not installed automatically, but can beinstalled from their respective locations (Readme files exist in theselocations, as well):
• Backpack CD-ROM (2.04) C:\Install\Drivers\CDRom
• Edgeport USB (1.16.9) C:\Install\Drivers\USB

4-20 Chapter 4: Operating System Recovery
Furthermore, the following settings/revisions have been configured:
• Preinstalled Win98 to include the Product ID Number (PID)
• Placed the Gold Drive Part Number, Date Created, LPIN, andRelease in Registry under:
HKey-Local_Machine\Software\NCR\Gold Drive
• Added Userinfo.exe to Start Menu to capture User Name, UserOrganization, Computer Name, and Workgroup (once the user hasentered this information, userinfo will remove itself from the StartMenu)
• Established a FAT32 primary system partition that fills the entiredrive
• Included necessary OS cab files in C:\Install
• Exposed to both EM and EM+ video chipsets
• Installed Intel Proset Utility
• Applied a Microsoft hotfix to replace usbhub.sys version 4.10.2222with 4.10.2223; this executable has been placed inC:\Install\Drivers\USB\Hotfix
• Enabled DMA
• Disabled DSound Acceleration and Sensaura/EAX in theSoundFusion control panel
• Disabled game device and joystick
• Set to High Color
• ‘Enable PME’ (in Intel Proset utility) set to ‘Hardware Default’
• Muted the Volume Line-In
• Added SetResolution.exe to RunOnce registry.
• Added TerminalCheck.exe to Run registry.
• Added NCR-specific EULA.
• Added '/noguiboot' parameter to boot.ini to hide splash at startup.

Chapter 4: Operating System Recovery 4-21
NCR 7454-22xx Win98 Operating System Recovery Software(Version 01.01.00.00)(LPIN: D370-0444-0100)
Installs the following software:
• Microsoft Windows 98 Second Edition
• Microsoft Internet Explorer 5.0
• MicroTouch TouchWare Version 5.4 for Mouse Port software
• Chips & Technologies 69000 Video driver
• Crystal Audio driver
• Intel 8255x-based PCI Ethernet Adapter
• Intel PIIX Bus Master IDE drivers
• Backpack CD-ROM drivers (not installed) available
Configures the following settings/revisions:
• Mutes the Volume Line-In
• Places the Gold Drive Part Number, Date Created, LPIN, andVersion in Registry under:HKey-Local_Machine\Software\NCR\Gold Drive
• Windows Installer (Version 1.1) installed

4-22 Chapter 4: Operating System Recovery
NCR 7454-32xx Win95 Operating System Recovery Software(Version 02.01.00.01)(LPIN: D370-0503-0000)
Note: This product should only be used on 7454 terminals with aMicrosoft Windows 95 license.
7454-32xx Windows 95 Operating System Recovery Software providesthe means of restoring the operating system to the hard disk of a 7454POS terminal. The bootstrap program (di_intel.bsd) and disk recoveryboot image (di_intel.bid) are downloaded to the target terminal overthe network and restore the hard disk to the preinstalled state asshipped from the factory. This permits installation of the followingsoftware:
• Microsoft Windows 95 OSR2
• Microsoft Internet Explorer 5.5 (5.50.4134.0600)
• SMI Lynx 3DM Video driver (4.12.01.0034)
• SoundFusion Audio driver (4.12.2885)
• Intel 82559 Ethernet LAN drivers (5.00.66.0000)
• PIIX IDE BusMaster drivers (3.3.0.2)
• NCRSYSM driver (2.01.01.004)
• Windows Installer (1.1)
• MicroTouch drivers (5.62)
The following drivers are not installed automatically, but can beinstalled from their respective locations (Readme files exist in theselocations, as well):
• Backpack CD-ROM (2.04) C:\Install\Drivers\CDRom
• M-Systems DiskOnChip (4.2) C:\Install\Drivers\DskonChp
• Edgeport USB (1.15.2) C:\Install\Drivers\USB

Chapter 4: Operating System Recovery 4-23
Furthermore, the following settings/revisions have been configured:
• Preinstalled Win95 to include the Product ID Number (PID)
• Placed the Gold Drive Part Number, Date Created, LPIN, andRelease in Registry under:
HKey-Local_Machine\Software\NCR\Gold Drive
• Added Userinfo.exe to Start Menu to capture User Name, UserOrganization, Computer Name, and Workgroup (once the user hasentered this information, userinfo will remove itself from the StartMenu)
• Established a 2gb FAT16 primary system partition
• Established a secondary FAT32 partition that fills the remainder ofthe drive
• Included necessary OS cab files in C:\Install
• Exposed to both EM and EM+ video chipsets
• Installed Intel Proset Utility
• Disabled game device and joystick
• Set color to 256

4-24 Chapter 4: Operating System Recovery
NCR 7454-22xx Win95 Operating System Recovery Software(Version 01.02.00.00)(LPIN: D370-0442-0000)
Installs the following software:
• Win95 w/PID
• Msdos.sys file edited to include the following parameter:Autoscan = 2
• IE5
• MicroTouch version 5.4
• Volume Line-in set to 0
• Scroll Bar Size set to 18
• PCMCIA files updated:
− Cbss.vxd
− Pci.vxd
− Pccard.vxd
− Pcmcia.inf
• Userinfo.exe added (User info input)
• Windows Installer
• Amdk6upd.exe
• Version control added to Registry to track Gold Disk version info:Hkey_Local_Machine\Software\NCR\FitSock\Gold Drive
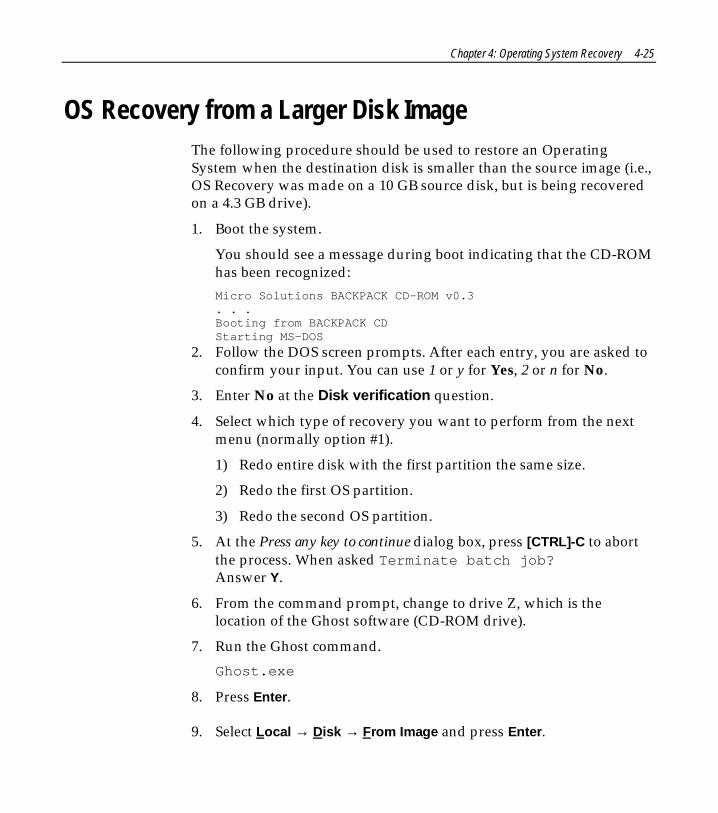
Chapter 4: Operating System Recovery 4-25
OS Recovery from a Larger Disk ImageThe following procedure should be used to restore an OperatingSystem when the destination disk is smaller than the source image (i.e.,OS Recovery was made on a 10 GB source disk, but is being recoveredon a 4.3 GB drive).
1. Boot the system.
You should see a message during boot indicating that the CD-ROMhas been recognized:
Micro Solutions BACKPACK CD-ROM v0.3. . .Booting from BACKPACK CDStarting MS-DOS
2. Follow the DOS screen prompts. After each entry, you are asked toconfirm your input. You can use 1 or y for Yes, 2 or n for No.
3. Enter No at the Disk verification question.
4. Select which type of recovery you want to perform from the nextmenu (normally option #1).
1) Redo entire disk with the first partition the same size.
2) Redo the first OS partition.
3) Redo the second OS partition.
5. At the Press any key to continue dialog box, press [CTRL]-C to abortthe process. When asked Terminate batch job?Answer Y.
6. From the command prompt, change to drive Z, which is thelocation of the Ghost software (CD-ROM drive).
7. Run the Ghost command.
Ghost.exe
8. Press Enter.
9. Select Local → Disk → From Image and press Enter.

4-26 Chapter 4: Operating System Recovery
10. The directory that Ghost is now looking in should be Z: (if not,switch to Z). Select the File name to load image from file(nnnnnnn.gho) and press Enter.
11. Select the Local destination drive and press Enter.
12. Set the sizes of the primary and secondary partitions as follows.
O/S Primary Partition/ Format Secondary Partition Size
DOS 2 GB/FAT16 2 GB/FAT16
Win95 2 GB/FAT16 Fill remainder as FAT 32
WinNT 2 GB/FAT16 Fill remainder as NTFS
Win98 Single FAT 32 partition N/A
Win2000 Single FAT 32 partition N/A
WinXPe Single NTFS partition N/A
Note: In order to do this you may need to clear the amount fromthe second partition.
13. Press Enter.
14. If you are recovering from Win9x, it is likely that the secondpartition will be too small for FAT32. If so, a dialog is displayedConverting partition from FAT32 to FAT, proceed?Choose Yes.
15. At the next dialog box,Proceed with disk load? Destination drive will bepermanently overwritten,Choose Yes to start the recovery process.

Chapter 5: BIOS Updating Procedures
IntroductionThe terminal’s BIOS can be updated using a parallel CD-ROM driveand software available on bootable CD-ROM media. The driversnecessary to run the CD-ROM are temporarily installed during boot.This chapter describes this procedure.
It is also possible to perform a BIOS update using a networkconnection. Refer to the NCR FitClient Software User's Guide forinformation about that procedure.
Crisis Recovery
In the event the BIOS becomes corrupt, such as the result of a powerfailure during the BIOS Update procedure, you can use the methoddiscussed later in this chapter in the BIOS Crisis Recovery section torecover the BIOS.
PrerequisitesThe following are required on the 7454 in order to perform a BIOSupdate using a CD.
• Bootable CD-ROM drive
• External 2336-K007 (Parallel CD-ROM – Series 5 or Series 6)
• The terminal BIOS must be 1.02.00.00 or greater.
• MicroSolutions backpack CD-ROM Series 6 requires BIOS2.1.1.1 or greater
• Keyboard
• NCR BIOS and BIOS Update Software(LPIN: A370-0022-0100)

5-2 Chapter 5: BIOS Updating Procedures
Updating Procedures1. Connect the external CD-ROM (2336-K007) drive to the parallel
port on the terminal.
2. Connect the power connector to the CD-ROM drive.
18250
Parallel Connector
Parallel Connector
Power Connector
Note: The parallel port on the 7454 is the Customer Display port.Therefore, if your terminal is configured with a Customer Display, youmust temporarily disconnect it in order to use the CD-ROM drive.
3. Apply power to the terminal so the CD-ROM drive can be opened.
4. Insert the BIOS update CD.
NCR BIOS and BIOS Update SoftwareLPIN: A370-0022-0100
5. Boot the terminal.

Chapter 5: BIOS Updating Procedures 5-3
6. Press F2 at the screen prompt to enter the Setup Utility.
7. In the Advanced menu, select I/O Device Configuration.
8. Verify that the LPT 1 Mode is set to ECP.
9. Go back to the Advanced menu, select Multiple ROM Menu.
10. Set the Parallel CD-ROM Boot to Enabled.
11. Exit Setup and Save Changes.
As the terminal reboots, you should see a message during bootindicating that the CD-ROM has been recognized:
Micro Solutions BACKPACK CD-ROM v0.3. . .Booting from BACKPACK CDStarting MS-DOS
12. Follow the screen prompts on the client to update the BIOS. Youcan select two methods to run the update program.
• Automatic BIOS Update – update process runs unattended
Note: You see a prompt for terminal model and serial numberinformation. If the program detects invalid information in thecurrent BIOS, or if you are replacing the Processor Board, thereis not model/serial number information in the BIOS.
Important: Model/Serial Number is mandatory for FitClientoperation.
• Interactive BIOS Update – permits you to input/replace themodel/serial number information that is stored in the BIOS.
Note: Model/Serial number data that is currently stored in theBIOS is displayed during power up.
13. When you get the green window, this indicates a successful update.14. Remove the CD and then press any key to reboot.
13. When the system reboots, press F2 at the screen prompt to enterSetup.
14. In the Exit menu, select Load Setup Defaults.15. Exit Setup and Save Changes.
5-4 Chapter 5: BIOS Updating Procedures
BIOS Crisis RecoveryThe procedures below provide a way to restore the BIOS resultingfrom a non-recoverable condition.
Note: Use this BIOS crisis recovery procedure only for aNON-RECOVERABLE BIOS failure. A non-recoverable BIOS statetypically results from power loss during a flash BIOS update process.This is a rare occurrence and should not be confused with otherhardware errors that cause a no video state. This procedure is notintended to be used for changing or upgrading an operational BIOS.
Required Hardware
Part Number Part Name Use
PC with at serial port Download BIOS
497-0408349 Cable, 9-Pin Female to 9-PinFemale RS232
PC to terminalconnection
497-0411000 Cable, Parallel Interface 7454 parallel port toDongle connection
497-0413418 Parallel Dongle Forces BIOS recovery
497-0414184 POS Connector Board 7454 parallel port(not required ifalready present)
Required Software
Acquire the following software from NCR.
NCR 74xx BIOS and BIOS Update SoftwareLPIN: A370-0022-0100, Release 3.0 or laterP/N: 497-0424310
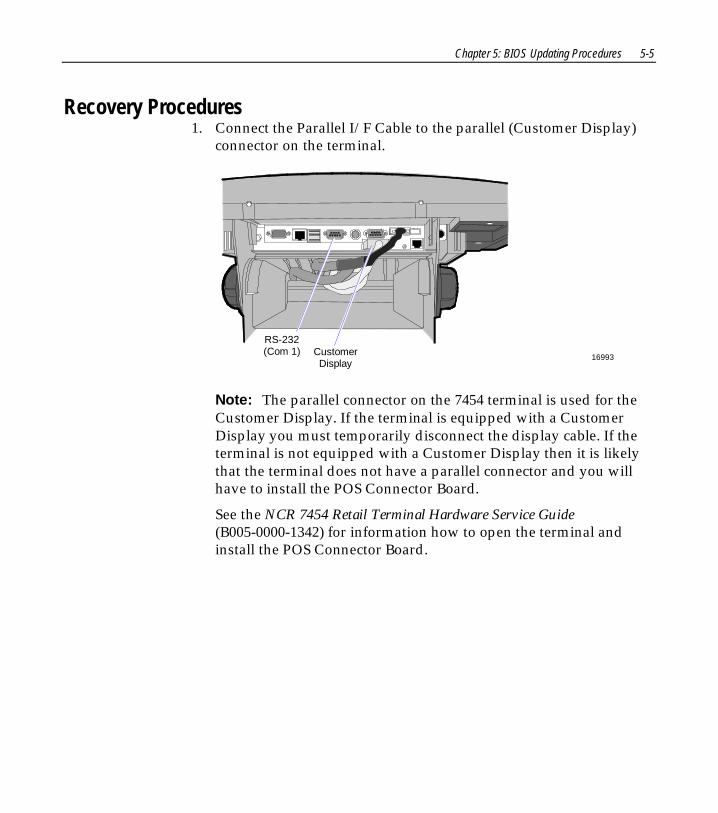
Chapter 5: BIOS Updating Procedures 5-5
Recovery Procedures1. Connect the Parallel I/F Cable to the parallel (Customer Display)
connector on the terminal.
16993CustomerDisplay
RS-232(Com 1)
Note: The parallel connector on the 7454 terminal is used for theCustomer Display. If the terminal is equipped with a CustomerDisplay you must temporarily disconnect the display cable. If theterminal is not equipped with a Customer Display then it is likelythat the terminal does not have a parallel connector and you willhave to install the POS Connector Board.
See the NCR 7454 Retail Terminal Hardware Service Guide(B005-0000-1342) for information how to open the terminal andinstall the POS Connector Board.
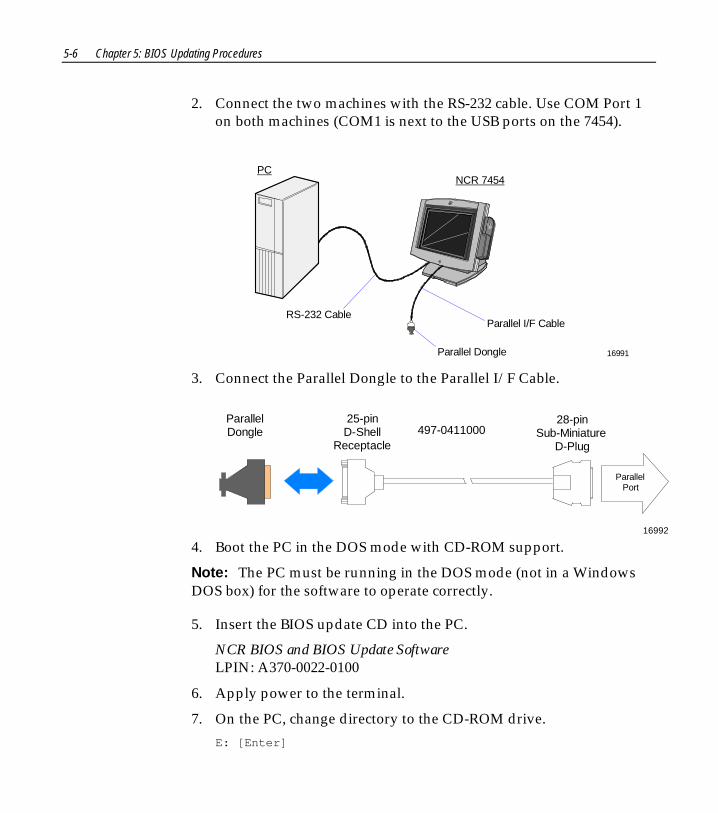
5-6 Chapter 5: BIOS Updating Procedures
2. Connect the two machines with the RS-232 cable. Use COM Port 1on both machines (COM1 is next to the USB ports on the 7454).
16991
NCR 7454PC
Parallel Dongle
Parallel I/F CableRS-232 Cable
3. Connect the Parallel Dongle to the Parallel I/F Cable.
16992
497-041100025-pinD-Shell
Receptacle
28-pinSub-Miniature
D-Plug
ParallelPort
ParallelDongle
4. Boot the PC in the DOS mode with CD-ROM support.
Note: The PC must be running in the DOS mode (not in a WindowsDOS box) for the software to operate correctly.
5. Insert the BIOS update CD into the PC.
NCR BIOS and BIOS Update SoftwareLPIN: A370-0022-0100
6. Apply power to the terminal.
7. On the PC, change directory to the CD-ROM drive.
E: [Enter]

Chapter 5: BIOS Updating Procedures 5-7
8. Enter the update command:
EMBflash [Enter]
9. Select the number for the 7454 terminal from the menu list:
1) 74542) 74013) 74524) 74535) 74556) 74607) 74518) 7456
1 [Enter]
A blue screen displays as the program runs, showing the programprogress, followed by a green screen, indicating a successful load.
PhoenixPhlash Status
PRESS ANY KEY TO EXIT
Flash memory has been successfully programmed
19502
The Class/Model/Serial # information is deleted using the CrisisRecovery procedure. Use the normal BIOS update procedures, asdiscussed earlier in this chapter, to restore the information.

5-8 Chapter 5: BIOS Updating Procedures
Cable/Connector Pin-Out Information
Parallel Dongle
19513
25-Pin D-shell Receptacle(Viewed from wiring side)
25 24 23 22 21 20 19 18 17 16 15 14
13 12 11 10 9 8 7 5 4 3 2 16
RS-232 Cable
19512
1
2
3
4
5
6
7
8
1
2
3
4
5
6
7
8
P1 P2
9-PinD-shell
Receptacle
16
59
P1 P2
165
9
9-PinD-shell
Receptacle

Chapter 5: BIOS Updating Procedures 5-9


Chapter 6: NCR 7454 4x20 Customer Display
IntroductionThis chapter defines the character sets and supported commands. TheNCR 7454 4x20 Customer Display is IEEE 1284 Compatible andsupports Extended Capability Parallel (ECP).
Viewing AreaThe characters are arranged in 4 rows of 20 characters. Each characteris a 5x7 dot matrix.
16674
1 2 3 20

6-2 Chapter 6: NCR 7454 4x20 Customer Display
DiagnosticsPower-Up Diagnostics occur soon after the hardware reset circuitry isreleased, or when a Reset Display command is received from the hostsoftware. When the hardware is powered down, all registers andmemory are lost. The display is not capable of any kind of powerrecovery back to a previous state. As a part of the Power-UpDiagnostics, the working registers and variables are initialized (set tozero).
The self-diagnostics include:
1. Micro-controller Test
The Busy line is set active at the beginning of the test. The first testis Exclusive-ORing all internal program memory locations and theresult of the test is zero. Any unused bytes in the summed page arealways programmed with null values so that they do not have animpact on the execution of the test. An internal RAM test writes avarying numerical value to each RAM location. The pattern mustshow that all RAM locations can be uniquely addressed. All RAMwill be written. After the write phase is complete, a read phasebegins to ensure the writes held. If an error is discovered, testinghalts and the firmware begins executing a forever do nothing loop.
2. Display Test
The display will run an extra test that turns on all pixels on thedisplay (character cells) for about two seconds and then displaysthe part number and the firmware version “008-0221552, V1.00.01”for another two seconds. This permits a user to examine the displayfor any pixel failure. The unit does not have the capability todetermine if the Display Test passed. Once diagnostic testing iscompleted, the line states will be returned to normal and thefirmware branches to its idle routine.
Note: When the I/F receives a Reset command, only Step 1 isexecuted. The Display Test is not executed.

Chapter 6: NCR 7454 4x20 Customer Display 6-3
Character Set
Page 1 – International

6-4 Chapter 6: NCR 7454 4x20 Customer Display
Page 2 – Japanese

Chapter 6: NCR 7454 4x20 Customer Display 6-5
Page 3 – Code Page 850

6-6 Chapter 6: NCR 7454 4x20 Customer Display
Command Descriptions
Structure/Logic DescriptionThe Retail VFD firmware is comprised of operating system typeservices such as common subroutines, interrupt service routines, anddata processing routines. Normally, the firmware is always activerefreshing the Retail VFD to keep display data visible. The firmwarewill also act on interrupts due to host parallel communication. Thiscommunication is in the form of commands from the host to the RetailVFD that require the Retail VFD to modify the display appearance.
The Retail VFD firmware uses a micro-controller and interfaces toparallel links.
Host/Retail VFD Command InterfaceThe Retail VFD accepts two types of data; display data and commanddata. If a byte received from the host is any character except ESC (0x1B)character, it is processed as a character and displayed on the RetailVFD. If an ESC character (0x1B) is received, the subsequent byte(s) isprocessed as a command. If the subsequent byte is an invalidcommand it will be ignored. If an ESC is received, but no subsequentbyte is received within ten seconds, the firmware will ignore it.
Note that each command consists of at least two bytes. The first byte(0x1B) is a command identifier indicating the next byte(s) is acommand byte. The command byte may be followed by parameter ordata bytes depending on the command. It is only valid to receive anESC (0x1B) as a command identifier.
The following table describes the supported Retail VFD commands.
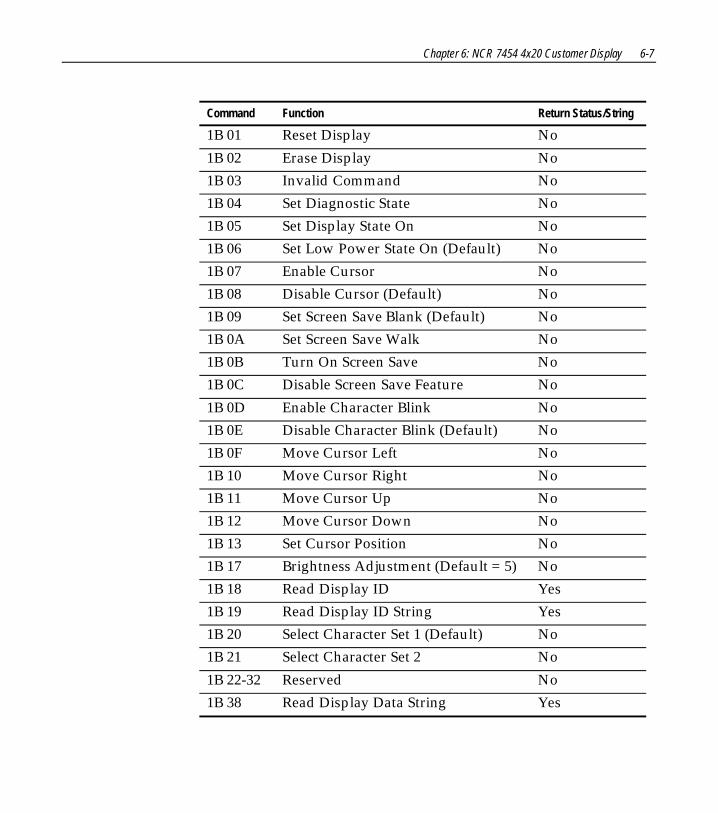
Chapter 6: NCR 7454 4x20 Customer Display 6-7
Command Function Return Status/String
1B 01 Reset Display No
1B 02 Erase Display No
1B 03 Invalid Command No
1B 04 Set Diagnostic State No
1B 05 Set Display State On No
1B 06 Set Low Power State On (Default) No
1B 07 Enable Cursor No
1B 08 Disable Cursor (Default) No
1B 09 Set Screen Save Blank (Default) No
1B 0A Set Screen Save Walk No
1B 0B Turn On Screen Save No
1B 0C Disable Screen Save Feature No
1B 0D Enable Character Blink No
1B 0E Disable Character Blink (Default) No
1B 0F Move Cursor Left No
1B 10 Move Cursor Right No
1B 11 Move Cursor Up No
1B 12 Move Cursor Down No
1B 13 Set Cursor Position No
1B 17 Brightness Adjustment (Default = 5) No
1B 18 Read Display ID Yes
1B 19 Read Display ID String Yes
1B 20 Select Character Set 1 (Default) No
1B 21 Select Character Set 2 No
1B 22-32 Reserved No
1B 38 Read Display Data String Yes

6-8 Chapter 6: NCR 7454 4x20 Customer Display
Reset Display
Format: 1B 01
Description: This command executes the power-down power-up diagnosticsequence. The BUSY line is set to active condition. The micro-controllertest consists of a sum-check test on the ROM and a write/read test onthe RAM. After executing the command, the display screen is cleared,the cursor moves to the 0 position, the BUSY line is set to inactiveconditions, and all registers and variables are initialized. Note that thescreen is cleared during this command. If a host needs previous dataredisplayed, the host must resend the previous data after thiscommand has completed.
Erase Display
Format: 1B 02
Description: This command clears all of the displayed characters by writing a spaceto each display position. A space is defined as character 0x20 of thecurrent character set. The cursor moves to the 0 position.
Invalid Command
Format: 1B 03
Description: This in now an invalid command.

Chapter 6: NCR 7454 4x20 Customer Display 6-9
Set Diagnostic State
Format: 1B 04
Description: This state is exclusive from the On and Low Power states. Thiscommand causes the firmware to display the current NCR part numberand firmware version of the device. For example, the current partnumber and firmware version of the device are 008-0221537 andV1.00.01) for two seconds and then step through each installed 256-character set (default and user defined) displaying one character at atime on all 40 display positions at a rate of about one character persecond. Start with the currently selected character set and then displayall of the characters from the other sets the same way. This continuesuntil one of the other state commands is performed. Prior display datais saved and can be restored be sending the Turn On (state 3) com-mand.
Set Display State On
Format: 1B 05
Description: This state is used for normal run-time conditions. This operationinstructs the firmware to leave one of the other states and beginperforming normal refresh operations. There may be a slight delaybefore the VFD reaches the specified brightness setting when exitingthe Low Power State. This delay should not exceed 1 second from thetime the command is received until the time the VFD reaches thespecified brightness.
Highest priority is given to refresh operations and a lower priority isgiven to host communications. Host communications still work, but if alarge amount of data is to be programmed in a very short time frame, itwould work faster if the Blank State was programmed prior to theinformation transfer.
The Screen Save feature may be in force during the Display On state.This means that after about five minutes of no new display activity, theScreen Save feature could take over and cause the display to go blankor begin walking from right to left.

6-10 Chapter 6: NCR 7454 4x20 Customer Display
Set Low Power State On
Format: 1B 06
Description: This state is used to reduce Retail VFD power consumption and extendthe life of the Retail VFD. Power is only removed from the VFD and thedisplay will not be refreshed. The Retail VFD controller is still fullyoperational and will continue to accept commands. This commandcauses the firmware to blank or turn off the Retail VFD. Display datacan be processed while the display is in the Low Power state, but it willnot appear until the Low Power state is changed. The displayedcharacter(s) states is preserved so that upon leaving the Low PowerState the display is restored. To leave the Low Power State, one of theother state commands must be received. This is the default state for theRetail VFD after power-up.
Enable Cursor
Format: 1B 07
Description: This command causes a flashing cursor to be used whenever theDisplay On state is in force. When the cursor is enabled, the firmwarewill show a visible flashing cursor at the current cursor position. Theflashing cursor should be visible for one second and then the characterat the cursor position should be visible for one second. The effect is toalternate between the character and the cursor. The cursor is defined ascharacter 5FH of whatever character set is currently chosen. For thetwo supported character sets, the cursor is the bottom row of pixelsturned on. For a user defined character set, the cursor will be whateveris defined as character 5FH of the character set. When the cursor isenabled, it overwrites the character at the cursor position. If the cursoris disabled, the character at the cursor position is left visible.
Disable Cursor
Format: 1B 08
Description: This command causes the cursor to be turned off. This is the defaultstate for the cursor after power-up. A disabled cursor does notoverwrite a displayed character.

Chapter 6: NCR 7454 4x20 Customer Display 6-11
Set Screen Save Blank
Format: 1B 09
Description: This command is intended to preserve the life of the display hardwareunit. The firmware maintains a five-minute timer that triggers thisfeature. The Screen Save feature can be disabled through a commandfrom the host software. When the feature is not disabled, two specificoptions exist. The Set Screen Save Blank operation causes the display togo blank when the timer expires. When the firmware receives thecommand code, the Screen Save mode is canceled and the five-minutetimer is established. Screen Save Blank removes power from the RetailVFD and does not refresh the display in the same manner as the SetLow Power On command. At power up, the timer is established at fiveminutes and Screen Save Blank is established as a default. The fiveminute timer is not reset by any invalid or incorrect command.
Set Screen Save Walk
Format: 1B 0A
Description: This command causes the visible display to walk right to left when theScreen Save timer expires (five minutes). The characters on the displaywill appear to walk across the corresponding display row from right toleft. The four lines in the 4x20 Display will walk in parallel completelyoff the left side of the display and then the four lines will appear tocome back from the right. If the display is space filled, then no effect isperceived even though the walking is taking place. The Screen SaveBlank mode is the default mode after power up.
Turn On Screen Save
Format: 1B 0B
Description: This command causes the one of the screen save functions (Set ScreenSave Blank or Set Screen Save Walk) to activate immediately ratherthan waiting for the screen save timer to expire. If the Disable ScreenSave Option command is in effect when this command is issued, it iscanceled and the screen saver is enabled and activated immediately.

6-12 Chapter 6: NCR 7454 4x20 Customer Display
Disable Screen Save Option
Format: 1B 0C
Description: The firmware will cease to keep time for the screen save activity fromthe host software and the display will neither go blank nor begin towalk due to inactivity from the host. This command can be canceled bythe Turn On Screen Save, Set Screen Save Blank, and Set Screen SaveWalk commands.
Enable Character Blink
Format: 1B 0D
Description: The blink attribute is the only modifier that is supported for the displaycharacter positions. The attribute itself is not necessarily programmedwith each new character code. Rather, each time a new character isreceived, the current setting of the character blink operator is adoptedas the working attribute for the new character. If a new character isreceived while character blink is enabled, the new character will blink.This makes it possible to have a display with both blinking and non-blinking characters. The blink period is one second on and one secondoff. All characters that are blink enabled, blink at the same time. Theonly way to cause an existing character to start or stop blinking is to setup the character blink operator, locate the cursor to the correctcharacter, and resend the individual character code.
Disable Character Blink
Format: 1B 0E
Description: This command counteracts the Enable Character Blink. The firmwarewill implement all new character codes with an on and holdingcharacter presentation. On power up, the character blink modifier isdefaulted to disabled.
Chapter 6: NCR 7454 4x20 Customer Display 6-13
Move Cursor Left
Format: 1B 0F
Description: Moves the cursor one position to the left. When the cursor is at the leftend of the rows 2-4, it moves to the right end of the row above it. Whenthe cursor is at the left end of the row 1, it moves to the right end of therow 4. The cursor location always indicates the position of the nextcharacter to be displayed, whether the cursor is enabled and blinkingor not. After each character is displayed, the firmware performs alogical Move Cursor Right command.
Move Cursor Right
Format: 1B 10
Description: Moves the cursor one position to the right. When the cursor is at theright end of the row 1-3, it moves to the left end of the next row. Whenthe cursor is at the right end of the row 4, it moves to the left end of therow 1. The cursor location always indicates the position of the nextcharacter to be displayed, whether the cursor is enabled and blinkingor not. After each character is displayed, the firmware performs alogical Move Cursor Right command. When the cursor is at the rightend of the row 4, it moves to the left end of the row 1 and operates inan Overwrite Mode. (i.e., The next character sent to the display willoverwrite the character in the left end of the row 1.)
Move Cursor Up
Format: 1B 11
Description: Moves the cursor up one line. When the cursor is on the row 2-4, thecursor is moved to the same column on the row above it. When thecursor is on the row 1, the cursor is moved to the same column on therow 4. The cursor location always indicates the position of the nextcharacter to be displayed, whether the cursor is enabled and blinkingor not. After each character is displayed, the firmware performs alogical Move Cursor Right command.
6-14 Chapter 6: NCR 7454 4x20 Customer Display
Move Cursor Down
Format: 1B 12
Description: Moves the cursor down one line. When the cursor is on the 1-3, thecursor is moved to the same column on the next row. When the cursoris on the row 4, the cursor is moved to the same column on the row 1.The cursor location always indicates the position of the next characterto be displayed, whether the cursor is enabled and blinking or not.After each character is displayed, the firmware performs a logicalMove Cursor Right command.
Move Cursor To Specified Position
Format: 1B 13 nn
Range: 00 ≤ nn ≤ 4F (hex)
Description: Moves the cursor to the specified position. Position 0 is the upperleftmost position and position 4F is the lower rightmost position. Anyvalue outside this range will be discarded, the command will beignored, and the cursor will not be moved. The cursor location alwaysindicates the position of the next character to be displayed, whether thecursor is enabled and blinking or not. After each character is displayed,the firmware performs a logical Move Cursor Right command. Thecharacter positions are shown below.
16675
1 2 3 4 5 6 7 8 9 0A 0B 0C 0D 0E 0F 10 11 12 13
15 16 17 18 1914
0
1A 1B 1C 1D 1E 1F 20 21 22 23 24 25 26 27
28 29 2A 2B 2C 2D 2E 2F 30 31 32 33 34 35 36 37 38 39 3A 3B
3C 3D 3E 3F 40 41 42 43 44 45 46 47 48 49 4A 4B 4C 4D 4E 4F

Chapter 6: NCR 7454 4x20 Customer Display 6-15
Brightness Adjustment
Format: 1B 17 nn
Range: 01 ≤ nn ≤ 05
Description: Adjusts the brightness of the entire display. Individual characters or displaypositions will not be adjusted. On power up, the default brightness setting is 5(100%).
Nn Brightness
01 0%
02 25%
03 50%
04 75%
05 100%
Read Display ID Byte
Format: 1B 18
Returns: 0x8E
Description: This command is a request for the Retail VFD to return a identifier. TheRetail VFD returns one byte (0x8E) that identifies the Retail VFD as a4x20 with 5x7 dot matrix.
Read Display ID String
Format: 1B 19
Returns: 0x1D, "NCR_008-0221552,_F/W_V1.00.01"
Where 0x1D is a 1 byte string length indicator which indicates thelength of the string that follows the string length indicator. Forexample, 1DH characters are sent after the string length indicator.Note: “_”indicates a space character (20H). The quotation marks “” arenot part of the string and are not returned.
Description: This command is a request for the Retail VFD to return an ASCII stringwith detailed product information.

6-16 Chapter 6: NCR 7454 4x20 Customer Display
Display ESC Character(Not a supported command)
Format: 1B 1B
Description: This command is a request for the ESC character to be displayed to thecurrent cursor position.
Select Character Set n
Format: 1B 20 - 1B 21
Description: This set of command chooses one of the two supported internalcharacter sets. Character set 1 is defined as Page 1(International),character set 2 is defined as Page 2(Japanese). Character set selection isdynamic. Host software can switch between character sets at any time.Switching between sets does not erase or change the display. Thismeans characters from multiple character sets may be on a display. Thedefault character set is Page 1(International).
Read Display Data String
Format: 1B 38
Returns: 0x50, "xxx---------xxxxx"
Where 0x50 is a 1 byte string length indicator which indicates the lengthof the string that follows the string length indicator. For example, 50Hcharacters are sent after the string length indicator. Note: The quotationmarks “” are not part of the string and are not returned.
Description: This command is a request for the Retail VFD to return an ASCII stringwhich are being displayed on the Retail VFD.

Appendix A: Cables
Cable Index
Corporate ID Part Number Description
1416-C041-0030 497-0008623 Ethernet 10/100BaseT
1416-C262-0040 497-0404832 2010 coin dispenser
1416-C266-0040 497-0407943 9-pin female to 9-pin femaleRS-232
1416-C266-0152 497-0409379 7193 RS-232 50' 9-pin female to 9-pin female
1416-C320-0030 006-8601011 Cord set – SEV plug with straight“BM” power
1416-C321-0030 006-8601012 Cord set – United Kingdom plugwith straight “BM” power
1416-C322-0030 006-8601019 Cord set – Australian cable withstraight “BM” power
1416-C323-0030 006-8601010 Cord set – International plugwith straight “BM” power
1416-C325-0030 006-1009037 Cord set – Power, US
1416-C337-0010 497-0407427 RS-232 interface, integrated
1416-C337-0040 497-0407429 RS-232 interface, remote
1416-C337-0152 497-0407430 RS-232 interface 50'
1416-C359-0007 497-0408349 RS-232 (27") 9-pin female to 9-pinfemale
1416-C372-0006 497-0409394 Dual cash drawer (Y-cable)
1416-C373-0080 497-0409432 25' cable

A-2 Appendix A: Cables
Corporate ID Part Number Description
1416-C374-0040 497-0409433 14' cable
1416-C408-0030 230-0113955 Power, SEV
1416-C409-0030 230-0113956 Power, UK rectangular
1416-C411-0030 006-1012224 Power, international
1416-C417-0040 497-0411815 Printer extender, 9-pin female to25-pin female
1416-C418-0040 497-0411816 Printer extender, 25-pin male to25-pin female
1416-C419-0030 250-0023191 Power, 120V twist lock
1416-C420-0030 008-0218043 Power – Japan w/ lock plug
1416-C422-0030 006-1002021 Power – US
1416-C464-0006 497-0413011 Backpack CD-ROM, Parallel
1416-C472-0006 497-0411000 Parallel interface
1416-C528-0010 497-0415949 USB, 1 meter
1416-C528-0040 497-0415950 USB, 4 meter
Appendix B: Feature Kits
7454 KitsBelow is a comprehensive list of the optional hardware Feature Kitsthat can be installed in the customer environment. Kit installationinstructions (for those requiring instruction) are available on theInformation Products web sites.
• NCR Intranet: http://inforetail.atlantaga.ncr.com
• Internet: http://www.info.ncr.com
To locate the installation guides on these sites:
1. Select General Search.
2. Select the Kit Instructions icon.
3. In the Kit Title field, enter the Kit Title.
Example: Flash
or
In the Kit Number field, enter the Kit Number.
Example: 7454-K040
4. Select Search
The file can be viewed online by left-mouse clicking on the pubtitle, or if you prefer to download the entire file you can right-mouse click on the title then select the Save Target as... option.
If you aren’t sure of the title of number you can display all kitsassociated with a terminal product class by:
1. In the Class drop-down list, select the Class of the terminal.
Example: 7454
2. Select Search.

B-2 Appendix B: Feature Kits
Kit IndexKit Number Part Number Description
2010-K020-V001 497-0414206 Coin tray
2126-K161-V001 603-6211364 C-3 till
2126-K302-V001 603-6211312 C-3 till, lid with lock(2188-K202-V001)
2189-K052-V002 497-0009697 Slip tray (7450 G13)
2189-K053-V002 497-0009695 Coin tray (7450 G13)
2189-K060-V001 497-0009209 Till 2 ½
2189-K061-V001 497-0009210 Lid 2 ½
2330-K340-V001 497-0416464 WaveLAN II Turbo 11 Mbs PCMCIAcard for USA & Canada
2330-K341-V001 497-0416466 WaveLAN II Turbo 11 Mbs PCMCIAcard for Japan
2330-K350-V001 497-0412349 Range extender antenna
2336-K001-V001 497-0411988 Ethernet to RS-232 port server
2336-K007-V002 497-0421213 Informa CD-ROM
2336-K008-V001 497-0413014 USB to RS-232 port server
2336-K012-V001 497-0413710 USB to RS-232 2 port server
2336-K016-V001 230-0145388 Hand-held scanner (12 V power)
2336-K019-V001 497-0417069 Mouse, RS-232
2336-K022-V001 497-0417043 Teleqip coin dispenser base unit &RS-232 cable (100V)
2336-K030-V001 497-0417048 Coin cartridge – US 340403
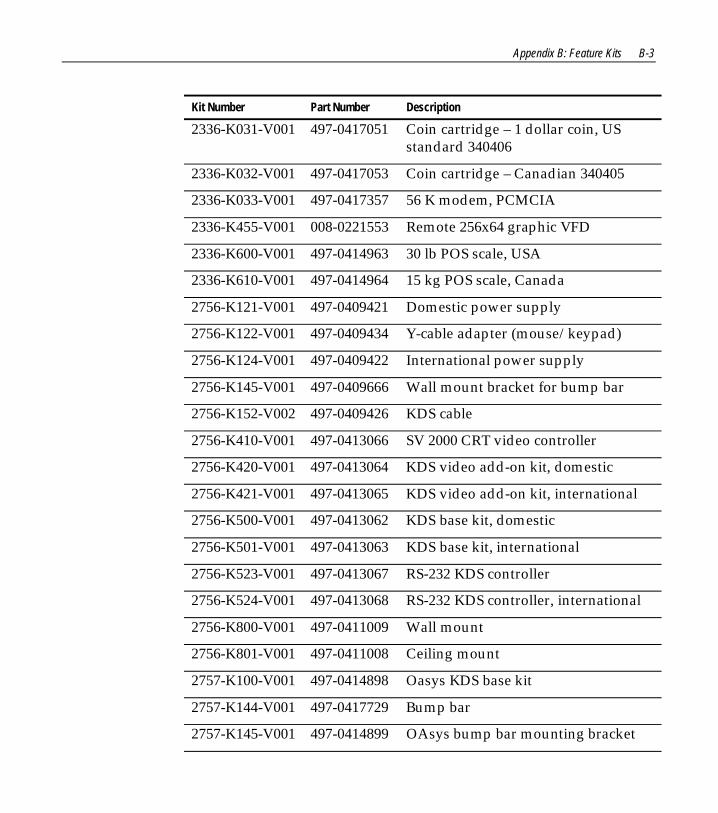
Appendix B: Feature Kits B-3
Kit Number Part Number Description
2336-K031-V001 497-0417051 Coin cartridge – 1 dollar coin, USstandard 340406
2336-K032-V001 497-0417053 Coin cartridge – Canadian 340405
2336-K033-V001 497-0417357 56 K modem, PCMCIA
2336-K455-V001 008-0221553 Remote 256x64 graphic VFD
2336-K600-V001 497-0414963 30 lb POS scale, USA
2336-K610-V001 497-0414964 15 kg POS scale, Canada
2756-K121-V001 497-0409421 Domestic power supply
2756-K122-V001 497-0409434 Y-cable adapter (mouse/keypad)
2756-K124-V001 497-0409422 International power supply
2756-K145-V001 497-0409666 Wall mount bracket for bump bar
2756-K152-V002 497-0409426 KDS cable
2756-K410-V001 497-0413066 SV 2000 CRT video controller
2756-K420-V001 497-0413064 KDS video add-on kit, domestic
2756-K421-V001 497-0413065 KDS video add-on kit, international
2756-K500-V001 497-0413062 KDS base kit, domestic
2756-K501-V001 497-0413063 KDS base kit, international
2756-K523-V001 497-0413067 RS-232 KDS controller
2756-K524-V001 497-0413068 RS-232 KDS controller, international
2756-K800-V001 497-0411009 Wall mount
2756-K801-V001 497-0411008 Ceiling mount
2757-K100-V001 497-0414898 Oasys KDS base kit
2757-K144-V001 497-0417729 Bump bar
2757-K145-V001 497-0414899 OAsys bump bar mounting bracket

B-4 Appendix B: Feature Kits
Kit Number Part Number Description
2757-K150-V001 497-0423521 OAsys KDS base kit with AV1000card
2757-K200-V001 497-0414900 OAsys video add-on kit
2757-K250-V001 497-0423522 OAsys KDS add-on kit with AV1000card
2757-K300-V001 497-0414901 10 MB Ethernet card with softwarelicense
5945-K010-V002 497-0414162 Cable – 4 M RS-232 (9-pin D shell)
5945-K012-V001 497-0414163 Cable – 8 M RS-232 (9-pin D shell)
5945-K020-V001 497-0412046 Power supply (120 V, 60 Hz, US/Can)
5945-K025-V001 497-0412800 Power supply (220-240 V, 50 Hz)
5945-K030-V001 497-0412047 Generic keyboard overlay
5945-K150-V001 497-0416018 Electronic payment terminal with2-track MSR
5945-K350-V002 497-0419112 Electronic payment terminal with3-track MSR
5992-K095-V002 497-0421692 Stylus
5992-K150-V005 497-0423889 Signature capture plus with 2-trackMSR
7156-K270-V001 497-0408657 Switch button (20 pieces)
7156-K280-V001 497-0408653 Slip table
7158-K301-V001 497-0411975 Power supply (55 W)
7401-K021-V001 497-0422274 32 MB SDRAM service kit
7401-K024-V001 497-0414201 64 MB SDRAM service kit
7401-K025-V001 497-0414202 128 MB SDRAM service kit
7401-K051-V001 497-0413160 Large capacity hard drive
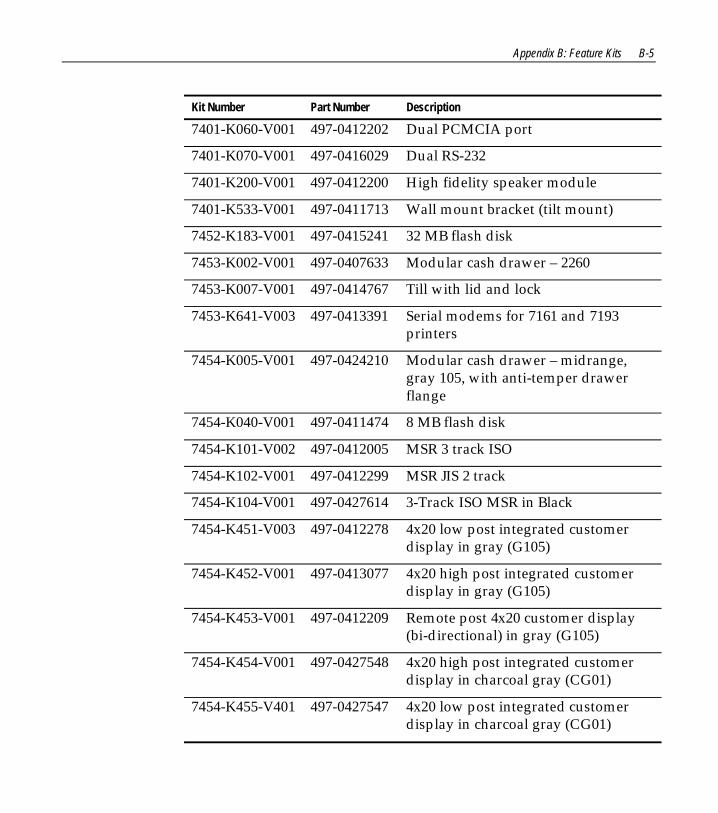
Appendix B: Feature Kits B-5
Kit Number Part Number Description
7401-K060-V001 497-0412202 Dual PCMCIA port
7401-K070-V001 497-0416029 Dual RS-232
7401-K200-V001 497-0412200 High fidelity speaker module
7401-K533-V001 497-0411713 Wall mount bracket (tilt mount)
7452-K183-V001 497-0415241 32 MB flash disk
7453-K002-V001 497-0407633 Modular cash drawer – 2260
7453-K007-V001 497-0414767 Till with lid and lock
7453-K641-V003 497-0413391 Serial modems for 7161 and 7193printers
7454-K005-V001 497-0424210 Modular cash drawer – midrange,gray 105, with anti-temper drawerflange
7454-K040-V001 497-0411474 8 MB flash disk
7454-K101-V002 497-0412005 MSR 3 track ISO
7454-K102-V001 497-0412299 MSR JIS 2 track
7454-K104-V001 497-0427614 3-Track ISO MSR in Black
7454-K451-V003 497-0412278 4x20 low post integrated customerdisplay in gray (G105)
7454-K452-V001 497-0413077 4x20 high post integrated customerdisplay in gray (G105)
7454-K453-V001 497-0412209 Remote post 4x20 customer display(bi-directional) in gray (G105)
7454-K454-V001 497-0427548 4x20 high post integrated customerdisplay in charcoal gray (CG01)
7454-K455-V401 497-0427547 4x20 low post integrated customerdisplay in charcoal gray (CG01)

B-6 Appendix B: Feature Kits
Kit Number Part Number Description
7454-K456-V001 497-0414192 4x20 low post remote customerdisplay in gray (G105)
7454-K457-V001 497-0427615 4x20 high post external customerdisplay in charcoal gray (CGT01)
Index
—7—7454 Kits, B-1
—A—Advanced power management, 1-19Audio, 1-14Auto-Logon
Setting, 2-29
—B—BIOS crisis recovery, 5-4BIOS default CMOS values, 3-4BIOS Recovery
crisis recovery procedures, 5-4using CD-ROM, 5-1
BIOS valuesCeleron processor, 3-4, 3-10Pentium III processor, 3-10
BIOS Versions, 3-1
—C—Cash drawer
Installation, 2-22, 2-23CMOS values
Celeron processor, 3-4, 3-10
Pentium III processor, 3-10Compact Flash, 1-16Completing the OS Installation (DOS),
2-28, 4-7Completing the OS Installation
(Win2000), 2-26, 4-5Completing the OS Installation (Win95),
2-28, 4-7Completing the OS Installation (Win98),
2-27, 4-6Completing the OS Installation (WinNT),
2-27, 4-6Completing the OS Installation (WinXPe),
2-26, 4-5Configuration diagram, 1-7Customer Display (4x20), 6-1
Character sets, 6-3Command descriptions, 6-6Diagnostics, 6-2
Customer Display CommandDescriptionsBrightness Adjustment, 6-15Disable Character Blink, 6-12Disable Cursor, 6-10Disable Screen Save Option, 6-12Display ESC Character, 6-16Enable Character Blink, 6-12Enable Cursor, 6-10Erase Display, 6-8Invalid Command, 6-8Move Cursor Down, 6-14

Index-2
Move Cursor Left, 6-13Move Cursor Right, 6-13Move Cursor to Specified Position, 6-14Move Cursor Up, 6-13Read Display Data String, 6-16Read Display ID Byte, 6-15Read Display ID String, 6-16Reset Display, 6-8Select Character Set n, 6-16Set Diagnostic State, 6-9Set Display State On, 6-9Set Low Power State On, 6-10Set Screen Save Blank, 6-11Set Screen Save Walk, 6-11Turn On Screen Save, 6-11
—D—dual display implementation, 1-9
—E—Ethernet 10/100Base-T, 1-10
—F—Finalizing the Installation after hardware
installation, 2-26FLASH memory implementation, 1-18
—G—Gold disk contents, 4-8
—H—Hard disk drive, 1-29
Hardware monitor, 1-13Hardware options, 1-4
Features not supported, 1-6
—I—Installing the Integrated Customer
Display, 2-17Integrated customer display
Description, 1-22Internal speaker, 1-29Interrupts, 3-8, 3-9, 3-17, 3-19
—L—LAN status LEDs, 1-31LCD adapter board, 1-21LCD backlight inverter module, 1-21
—M—Magnetic stripe reader, 1-14, 1-18Model number, 1-2Motion sensor, 1-30Mounting the terminal
Pedestal-mount, 2-24MSR, 1-14, 1-18
—O—Operating System Recovery
Using CD-ROM, 4-1Operating System Restrictions, 4-9Operator display
Description, 1-20

Index-3
—P—PCI expansion header, 1-14Pentium III connectors, 1-34Plug and Play, 1-19POS connector board, 1-30
Features, 1-4Power LED, 1-17Power OK LED, 1-31Power supply
Description, 1-32Power/status LED, 1-31Printer Installation, 2-6Printers, 1-25Processor board
Connector descriptions, 1-15Description, 1-8Features, 1-3
Processor/chip set, 1-8
—R—Remote customer display
Installation, 2-10, 2-16Reset switch, 1-29
—S—Serial mouse
Installation, 2-34
Serial number, 1-2Serial ports, 1-13Setup
Default factory settings, 3-3Eentering with a keyboard, 3-2Entering without a keyboard, 3-1
Setup utility, 1-19Speaker module, 1-32Standby and Hibernate Mode Restriction,
4-9
—T—Touch screen controller, 1-15
—U—Universal serial bus, 1-12USB RS-232 port server, 1-33
—V—Video subsystem, 1-9
—W—Wireless LAN communications, 1-11


B005-0000-1256 Dec 2002 Printed on recycled paper