relayfax - Network Fax Manager V7.1 - User Manual -...
216
User Manual v7.1
-
Upload
phungthuan -
Category
Documents
-
view
214 -
download
0
Transcript of relayfax - Network Fax Manager V7.1 - User Manual -...
User Manualv7.1

Products that are referred to in this document may be trademarks and/or registeredtrademarks of the respective owners.
Copyright © 1996-2014. All rights reserved. Alt-N Technologies, Ltd.
RelayFax - Network Fax Manager
User Manual
v7.1.0 - April 2014

Copyright © 1996-2014. All rights reserved. Alt-N Technologies, Ltd.
3Contents
Table of Contents
Section I Introduction 8
......................................................................................................................................81 Introduction
......................................................................................................................................122 Installation
Section II RelayFax's Main Display 16
......................................................................................................................................161 RelayFax's Main Display
......................................................................................................................................172 Menu Bar
......................................................................................................................................183 Toolbar
......................................................................................................................................194 Tool Window
......................................................................................................................................205 Log Window
..................................................................................................................................................................21Shortcut Menu
......................................................................................................................................236 Rescan Ports
......................................................................................................................................247 Add Modem
......................................................................................................................................278 Modem Properties
..................................................................................................................................................................27Fax Device
..................................................................................................................................................................30Modem Profile
..................................................................................................................................................................32SIP Account
..................................................................................................................................................................34Options
..................................................................................................................................................................36Dialing
..................................................................................................................................................................37Log
Section III RelayFax Properties 40
......................................................................................................................................401 RelayFax Properties
......................................................................................................................................412 Fax Server
..................................................................................................................................................................42Banner Text & Formatting Characters
......................................................................................................................................443 Mail Server
......................................................................................................................................464 Client Updates
......................................................................................................................................485 Options
......................................................................................................................................516 Service
......................................................................................................................................537 Logs and Contacts
......................................................................................................................................558 Select Printer
..................................................................................................................................................................55Select Printer
..................................................................................................................................................................56Options
..................................................................................................................................................................57Network Resource Access
Section IV MDaemon SMTP/POP3 Server 60
......................................................................................................................................601 MDaemon Server Settings
Section V Faxing Options & Exporting 62
......................................................................................................................................621 Attachment Faxing

Copyright © 1996-2014. All rights reserved. Alt-N Technologies, Ltd.
RelayFax Network Fax Manager v7.14
......................................................................................................................................652 Exporting
..................................................................................................................................................................67Export File Format
......................................................................................................................................713 Imaging Options
......................................................................................................................................734 OCR Options
......................................................................................................................................765 Text Options
......................................................................................................................................776 TWAIN Device Support
Section VI Mail Sources and Rules 80
......................................................................................................................................801 Mail Sources & Rules dialog
......................................................................................................................................802 Calling Number Display (CND) Fax Routing
......................................................................................................................................823 Mail Sources
......................................................................................................................................844 Default Rules
......................................................................................................................................865 Outbound Fax Rules
......................................................................................................................................926 Inbound Fax Rules
......................................................................................................................................967 Junk Faxes
Section VII Event Scheduler 98
......................................................................................................................................981 Event Scheduler
Section VIII Dialup Settings 102
......................................................................................................................................1021 Dialup Settings
Section IX Cover Pages 106
......................................................................................................................................1061 Cover Pages
Section X Contact Manager 110
......................................................................................................................................1101 Contact Manager
Section XI Account Settings 112
......................................................................................................................................1121 Accounts
......................................................................................................................................1142 Options/Password
Section XII Templates and Billing Codes 118
......................................................................................................................................1181 Fax Templates
..................................................................................................................................................................118Fax Templates
..................................................................................................................................................................120Template Properties
............................................................................................................................................................120Description
............................................................................................................................................................121Defaults
............................................................................................................................................................123Options
......................................................................................................................................1252 Billing Codes
Section XIII RelayFax SMTP Client 128
......................................................................................................................................1281 Introduction

Copyright © 1996-2014. All rights reserved. Alt-N Technologies, Ltd.
5Contents
......................................................................................................................................1292 Using the RelayFax SMTP Client
......................................................................................................................................1323 Properties Dialog
..................................................................................................................................................................132Personal Settings
..................................................................................................................................................................134Server Settings
..................................................................................................................................................................135Dialup Settings
..................................................................................................................................................................137Client Settings
..................................................................................................................................................................139Scanner Settings
..................................................................................................................................................................140Contact List
......................................................................................................................................1414 Compose Fax Dialog
..................................................................................................................................................................141Compose Fax Dialog
..................................................................................................................................................................142Properties
..................................................................................................................................................................145Cover Pages
..................................................................................................................................................................149Send Schedule
..................................................................................................................................................................150Scan Image
............................................................................................................................................................151Scanning Options
..................................................................................................................................................................153Attached Documents
..................................................................................................................................................................154Advanced Options
..................................................................................................................................................................155Error Message
......................................................................................................................................1565 Working with Faxes
..................................................................................................................................................................156RelayFax Printer Driver
..................................................................................................................................................................157Viewing, Printing, and Editing Faxes
..................................................................................................................................................................158Sending a Fax via an Email Client
............................................................................................................................................................158Sending a Fax via an Email Client
............................................................................................................................................................159Attaching Documents to Fax Messages
............................................................................................................................................................159Email Macros
............................................................................................................................................................164Banner Text & Formatting Characters
..................................................................................................................................................................166Advanced Features
............................................................................................................................................................166Sending Faxes Programmatically
............................................................................................................................................................167Using the Broadcast Fax Wizard
............................................................................................................................................................172ODBC Selector Wizard
Section XIV Fax Broadcasting 178
......................................................................................................................................1781 Using the Broadcast Fax Wizard
......................................................................................................................................1852 ODBC Selector Wizard
......................................................................................................................................1893 Canceling a Broadcast Fax
......................................................................................................................................1904 Pausing a Broadcast Fax
Section XV RelayFax Macros 192
......................................................................................................................................1921 Email Macros
......................................................................................................................................1972 Outbound Fax Rule Macros
......................................................................................................................................1983 DAT File Processing Macros
......................................................................................................................................2044 RelayFax Data Files
Index 209

Copyright © 1996-2014. All rights reserved. Alt-N Technologies, Ltd.
Section
I

Copyright © 1996-2014. All rights reserved. Alt-N Technologies, Ltd.
RelayFax Network Fax Manager v7.18
1 Introduction
1.1 Introduction
RelayFax is a powerful network fax manager that automates sending, receiving andmanaging faxes for your users, and that integrates full faxing capabilities directly intoyour existing email system. RelayFax will monitor any number of POP accessiblemailboxes on one or more mail servers, connect to those servers at scheduled intervals,collect all waiting email messages it finds, and then fax, email, or print them basedupon a user defined set of fax rules. RelayFax can also dial your Internet ServiceProvider (ISP) to collect mail periodically instead of being forced to remain onlinecontinuously.
Printer drivers for Windows enable you to print directly from any Windows applicationand have the resulting document faxed to anyone anywhere. The RelayFax SMTP Clientcomponent enables you to print from a Windows application at home or on the road andhave the resulting document faxed from your RelayFax server at the office. Full dragand drop support also makes it possible for you to fax a document by simply dragging itonto the tray icon or open client dialog.
RelayFax also contains support for TWAIN devices such as digital cameras andscanners. With RelayFax's one-touch scanning features, documents can be scannedand faxed as easily as from a typical fax machine. In addition, scanner support in theclient provides this same functionality to both local and remote users.
Faxing from remote and local locations is not limited to just users of the RelayFax SMTPClient — users can also use their favorite email client to send faxes. By includingspecial macros in their messages and then sending them to RelayFax's email address,they can emulate the client's functionality. Documents and other files attached toemail messages can also be extracted automatically by RelayFax, converted to afaxable image format, and faxed immediately.
RelayFax is also equipped with the latest Optical Character Recognition (OCR)technology. OCR makes it possible for RelayFax to "read" incoming faxes and route them

Copyright © 1996-2014. All rights reserved. Alt-N Technologies, Ltd.
Introduction 9
based upon their contents. Faxes can be searched for specific names and phrases andthen compared to special Fax Rules that determine what action should be taken when arule is matched. Further, OCR files can be saved in a large number of the most commondocument formats. This makes it possible for you to instantly convert a fax to aneditable and usable format instead of it simply remaining a static document.
Through the application of administrator-defined Inbound and Outbound Fax Rules,delivering fax and email messages to their proper recipients has never been easier.Users need not even know the fax number of the recipient—outbound messages can bedelivered to their correct destination by several alternative routing methods defined inthe Outbound Fax Rules. Inbound Fax Rules can also be created that will causeincoming faxes to be delivered to specific locations and users. OCR routing and thesending fax device's Fax ID can be compared to the rules to determine the fax'sdestination. Finally, there are several other actions made possible by the Fax Rulessuch as: automatic printing to specific printers, assigning alternate cover pages,attaching Fax Templates which provide various functions, and others. Even faxbroadcasting, which sends the same fax to multiple different numbers, is supported bythe RelayFax rules system.
RelayFax Feature Summary
Automatic extraction and faxing of documents attached to email messages sentto the server.
Check any number of POP mailboxes on any number of mail servers for new mailto be faxed.
Complete RAS/DUN dial-up support for collecting mail from servers on theInternet.
Fully schedulable mail collection capabilities.
Easy integration with MDaemon Email Server and WorldClient .
Automatic detection and use of all fax modems available to the server.
Support for individually configuring each available modem for sending andreceiving faxes.
Runs as a Windows service.
Elaborate rules based outbound faxing, which provides the ability to fax or emaila message to one or more recipients, fax a message without knowing the faxnumber, attach an alternate cover page, and much more.
Fax Broadcasting capability.
Integrated support for the Microsoft™ Cover Page Editor.
Least-cost routing support using SMTP sends some mail to other servers overthe Internet for faxing.
Rules based inbound fax routing using the ID of the sending fax device. Thismakes it possible to route faxes to specific users or printers.
Automatic printing of inbound and outbound faxes.
Printer drivers for Windows supports printing to RelayFax from any application.
60
Copyright © 1996-2014. All rights reserved. Alt-N Technologies, Ltd.
RelayFax Network Fax Manager v7.110
Fax client software sends output from printer driver to RelayFax's mail serveraccount for pickup.
Shared network-wide fax contacts and address book capability.
Sending Faxes
You can send a fax by using any of the following methods:
Drag a document onto the RelayFax SMTP Client's tray icon, or onto an openClient dialog.
Send an email message to RelayFax's designated email address and place therecipient's fax number anywhere in the message's TO: line.
Send an email message to RelayFax's designated email address and let the FaxRules system determine where to fax it.
Print to the RelayFax Printer Driver from any Windows application.
Send only a cover page with a brief message on it through a single click of theRelayFax SMTP Client.
Receiving Faxes
RelayFax detects and enable all of your fax modems when it is started. In addition, youcan selectively configure modems that you may wish to use only for inbound oroutbound faxing.
When a fax is received the transmitting fax device's Caller Sender Identification (CSID)is compared to your Inbound Fax Rules. Then, the fax is folded into an email messageusing MIME techniques and is sent to any number of recipients determined by the FaxRules, or to a default address if no rules are applied. Incoming faxes can also be routedbased upon the COM port of the receiving modem, and upon the results of opticalcharacter recognition (OCR). Rules can be set up to search for specific words orphrases in the faxed document and then routed based on the results of the search.
New in RelayFax 7.1
Special Considerations
The product registration system has been updated to utilize a digitally signedXML based license file. This approach allows for greater flexibility, and it willenable Alt-N Technologies to offer new innovative purchasing and renewaloptions. The installation process will automatically download the license file.Product activation has been replaced by a scheduled mechanism that will updatethe license file on a periodic basis. The system is able to accommodatetemporary connectivity outages, however communication with the licensingservice is required for continued use of the product.
Changes and Additional Features
Updated Black Ice printer drivers to 13.77.
The printer driver version in now shown in Help|About.
Updated data collection in installer.
128
86
156

Copyright © 1996-2014. All rights reserved. Alt-N Technologies, Ltd.
Introduction 11
Updated Brooktrout SDK to 6.6
Export csv file now contains column names
All fields in export csv file are now quoted
For a complete list of all changes and fixes included in RelayFax 7.1, see RelNotes.html located in the \RelayFax\Docs\ subfolder.
New in RelayFax 7.0
Redesigned Interface - The entire graphical user interface (GUI) has beencompletely redesigned and modernized in both RelayFax and the RelayFax SMTPClient.
T.38 Over IP - RelayFax now supports up to 30 virtual fax devices that canlogin to a Session Initiation Protocol (SIP) based software PBX (private branchexchange). For more information, see the Add Modem dialog and the new SIPAccount pane.
Activation - RelayFax now requires registration key activation. The goal of theactivation system is to combat piracy and protect the interests of legitimatecustomers. Activation verifies that the key you are using is legitimate, and it tiesyour registration information to the computer on which RelayFax is installed,making it difficult for others to illegally use your registration key.
An activation wizard is available which will walk you through the simple processof activating your registration key. You can activate automatically or manually,and the process takes only a few seconds. No personal information about you isrequired or transmitted, and no reactivation is required unless you replace yourcomputer's network card. If you should need to reactivate RelayFax in the
future, the activation wizard is located under the "Help » Activate your Alt-N
software" menu selection. Registered users have 30 days in which to activate
before RelayFax will stop functioning.
For more on activation, visit: http://www.altn.com/Activation/faq.asp
Improved Context-sensitive Help - The user help has been redesigned andexpanded in both RelayFax and the RelayFax SMTP Client. Additionally, virtuallyall dialogs and panes have a Help button that is context sensitive. Click Helpanywhere in RelayFax or in the RelayFax SMTP Client to open the user help tothe related section.
See also:
Installation
RelayFax's Main Display
RelayFax SMTP Client
24
32
12
16
128

Copyright © 1996-2014. All rights reserved. Alt-N Technologies, Ltd.
RelayFax Network Fax Manager v7.112
1.2 Installation
System Requirements
These are the minimum recommended system requirements for RelayFax to run. Thisdoes not take into account running multiple applications simultaneously. To run severalapplications at the same time, your computer should exceed these recommendations.
Microsoft Windows OS
Windows XP (32-bit and 64-bit)
Windows Server 2003 (32-bit and 64-bit)
Vista (32-bit and 64-bit) (excluding Vista Home Edition)
Windows Server 2008, Windows 2008 R2 (32-bit and 64-bit)
Windows 7 (32-bit and 64-bit)
Windows Server 2012 (32-bit and 64-bit)
Windows 8 (32-bit and 64-bit)
CPU 1GHz (or higher) processor.
512 MB of memory (1GB recommended).
Minimum hard disk space required: 100 MB of free space, plus space for logs andsaved faxes (30 MB for RelayFax SMTP Client).
TCP/IP network protocol installed.
Internet or Intranet communication capabilities.
Access to a standard SMTP/POP3 Email server. This server does not need to beinstalled on your LAN. RelayFax's Internet and dialup features make it possible touse your ISP's mail server, or any other server that you are allowed to use forcollecting and sending email.
Although not required, RelayFax can be run concurrently withyour mail server on the same computer. In fact, if you areusing MDaemon Email Server then this is recommended inorder to utilize its built-in integration features more effectively.
One or more fax boards or class 1, 1.0, 2, 2.0, or 2.1 fax modems, or a T.38compatible VOIP gateway (when using Fax-over-IP) to convert T.38 packets toaudio for transmission to a conventional fax machine. Not required for theRelayFax SMTP Client.
Before You Begin
RelayFax's installation program will ask you a number of questions during the installationprocess that are required to properly configure your server. While it is possible to entersome of this information after installation, you can save time and end your installationwith a fully configured server by knowing the answers to these questions before youbegin.
60
Copyright © 1996-2014. All rights reserved. Alt-N Technologies, Ltd.
Introduction 13
You will need to know:The drive and directory in which you wish to install RelayFax (the default is C:\Program Files\RelayFax).
The registered user's name and company.
Which components you wish to install at this time. You can choose to install:the RelayFax server application and support files, the RelayFax SMTP Fax Client,the printer drivers, and the OCR Printer Driver.
Server
You will need to know:Your Company name.
The Call Subscriber Identification (CSID) that you wish to assign to your faxdevice (this is usually the same as your company name). In some areas of theworld this information is required.
Your fax and voice numbers.
The domain name or IP address of your mail server.
The logon and password for the RelayFax account on your mail server.
Client
You will need to know:The domain name or IP address of your mail server
Your email address
The email address of the RelayFax mail account.
Optical Character Recognition (OCR)
RelayFax is equipped with Optical Character Recognition (OCR) technology, but to makethese features available you must install a separate plug-in module(rfocr700_xx.exe). If you have not yet installed it, the options on the OCR Options
pane will be unavailable and it will contain a message informing you that it needs to beinstalled. A link is also provided to the RelayFax web site from which the module can bedownloaded.
Brooktrout Boards
If you wish to use a board based on Brooktrout's open BOSTON architecture, RelayFaxsupports this via Cantata Technology's Brooktrout System Software. To add thisfunctionality to RelayFax v7, install RelayFax and then install rfbt700_xx.exe and
follow the instructions provided during installation and in the installed readme.txt file.
73

Copyright © 1996-2014. All rights reserved. Alt-N Technologies, Ltd.
RelayFax Network Fax Manager v7.114
See Also:
Introduction
RelayFax's Main Display
RelayFax SMTP Client
8
16
128

Section
II
Copyright © 1996-2014. All rights reserved. Alt-N Technologies, Ltd.
RelayFax Network Fax Manager v7.116
2 RelayFax's Main Display
2.1 RelayFax's Main Display
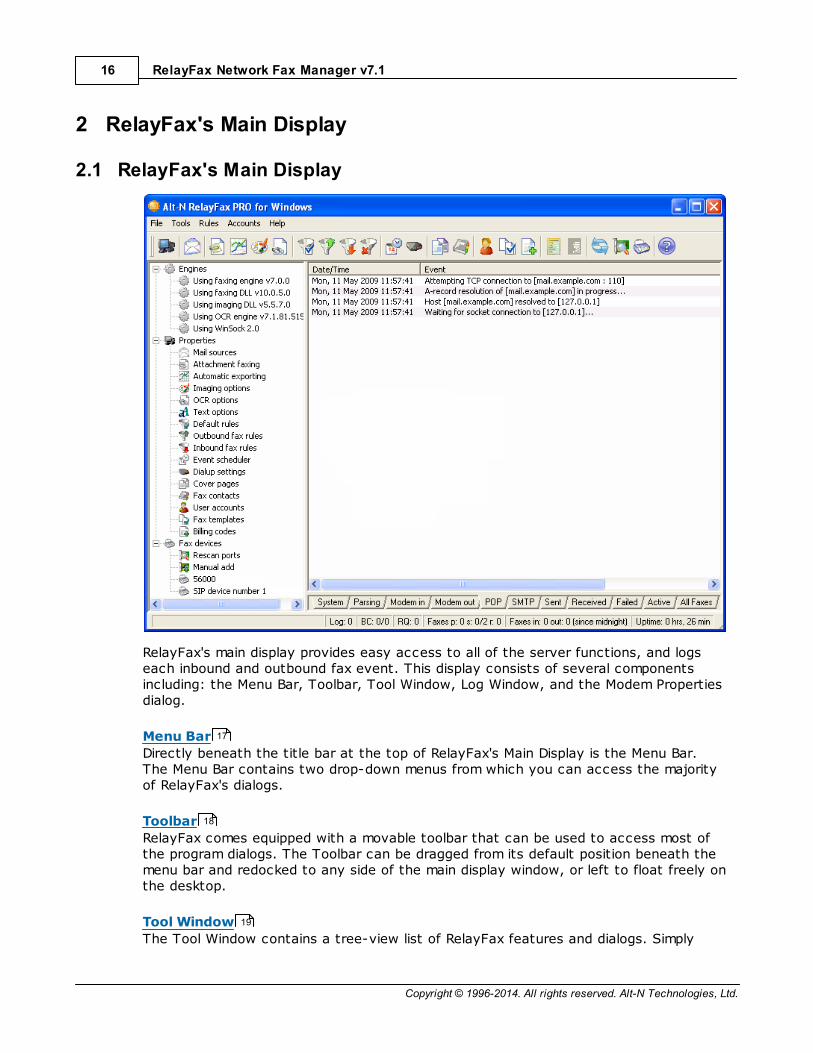
RelayFax's main display provides easy access to all of the server functions, and logseach inbound and outbound fax event. This display consists of several componentsincluding: the Menu Bar, Toolbar, Tool Window, Log Window, and the Modem Propertiesdialog.
Menu Bar
Directly beneath the title bar at the top of RelayFax's Main Display is the Menu Bar.The Menu Bar contains two drop-down menus from which you can access the majorityof RelayFax's dialogs.
Toolbar
RelayFax comes equipped with a movable toolbar that can be used to access most ofthe program dialogs. The Toolbar can be dragged from its default position beneath themenu bar and redocked to any side of the main display window, or left to float freely onthe desktop.
Tool Window
The Tool Window contains a tree-view list of RelayFax features and dialogs. Simply
17
18
19

Copyright © 1996-2014. All rights reserved. Alt-N Technologies, Ltd.
RelayFax's Main Display 17
double-click any listed item to open its corresponding dialog or feature.
Log Window
The Log Window displays a continually updated and highly detailed log of all faxingevents and POP and SMTP sessions occurring within RelayFax. Several tabs in the LogWindow also contain an entry for each inbound and outbound fax that has been sent,received, or is pending. You can right-click any entry to display a Shortcut Menu ,which is used to perform various actions.
Rescan Ports
When this control is clicked RelayFax will attempt to automatically detect all faxdevices accessible to the RelayFax Server.
Add Modem
Use the Add Modem dialog to manually configuration modems that RelayFax is unable todetect by the Rescan Ports control.
Modem Properties
Use the Modem Properties dialog to control several setup and configuration factors ofeach fax device installed on your system.
See Also:
Introduction
RelayFax Properties Dialog
Mail Sources & Rules
Event Scheduler
Dialup Settings
RelayFax SMTP Client
RelayFax Driver
2.2 Menu Bar
Directly beneath the title bar at the top of RelayFax's Main Display is the Menu Bar.The Menu Bar contains several drop-down menus from which you can access themajority of RelayFax's dialogs. Simply click on a menu item to make a desired selection.
Alternatively, you can access most of RelayFax's features and quickly accomplish tasksyou perform frequently by using shortcut keys. Shortcut keys are signified by theunderlined letter in a menu title, corresponding drop-down list item, or controldescription in an individual dialog box. To use a keyboard shortcut simply press the ALTkey followed by the underlined letter of the desired command. In the case of items onthe drop-down list, there is no need to press the ALT key first.
20
21
23
24
27
8
41
82
98
102
128
156

Copyright © 1996-2014. All rights reserved. Alt-N Technologies, Ltd.
RelayFax Network Fax Manager v7.118
2.3 Toolbar
RelayFax comes equipped with a movable toolbar that can be used to access most ofthe program dialogs. The Toolbar can be dragged from its default position beneath themenu bar and docked to any side of the main display window. Alternatively, it can beleft in a detached state and it will float freely wherever it is placed on the displaywindow or it can be dragged completely off the display and placed upon the WindowsDesktop. To move the Toolbar simply click on it anywhere above or below its buttonsand drag it to the desired position. In its free-floating state the RelayFax Toolbar canalso be resized by moving the pointer over its edge and then dragging to the desiredsize.
Position the pointer over any of the Toolbar's buttons and atool tip will appear telling you its use.

Copyright © 1996-2014. All rights reserved. Alt-N Technologies, Ltd.
RelayFax's Main Display 19
2.4 Tool Window
The Tool Window contains a tree-view list ofRelayFax features and dialogs. Double-click anylisted item to open its corresponding dialog, orright-click an item and then choose Propertiesfrom the shortcut menu. You can collapse orexpand each section of the list by clicking on itsrespective plus or minus sign located to the leftof the section's top item.
The Modem Properties dialogand the Add Modem dialog canonly be reached through the ToolWindow. Double-click on a listedmodem to open its ModemProperties dialog. You can alsoright-click the listed modem toaccess its properties, reinitialize it,delete it from the list, or reorder itsposition in the list (pending faxesare assigned to available faxdevices in the order in which theyappear in the list). If no modemsare listed you may need to clickthe Rescan Ports button first todetect and list your installedmodems. You can manually addmodems that may not be listed bydouble-clicking the Manual Addicon and using the Add Modemdialog that will be opened.
27
24

Copyright © 1996-2014. All rights reserved. Alt-N Technologies, Ltd.
RelayFax Network Fax Manager v7.120
2.5 Log Window
The largest pane in RelayFax's main display is the Log Window, which displays acontinually updated and highly detailed log of all faxing events and POP and SMTPsessions occurring within RelayFax. This feature makes it possible to quickly referenceany information regarding RelayFax's recent activities about which you may havequestions. It will also alert you to errors and problems that may occur duringprocessing, thus aiding in diagnosing possible problems. The Log Window containsmultiple tabs — use the tabs at the bottom to select which specific category of detailsyou would like to view.
Entries for each inbound and outbound fax processed is included on several tabs: Sent,Received, Failed, Active, and All Faxes. The sender and recipient of the fax is listed aswell as the time and date of the fax, the fax device's ID, the status of each fax (e.g.Pending, Sending, Received, or Sent), and a number of other facts.
The status bar directly below the Log Window shows what the server is currentlydoing. It lists the number of entries present in the fax log, and the number of messagesin the remote queue waiting to be uploaded to the mail server. It also displays thenumber of faxes currently pending (p:), being sent (s:), and being received (r:). Thetwo elements of the "s:" counter reflect the number of faxes in progress (the numberto the left of the slash) and the total number of modems available to send faxes (thenumber to the right of the slash). The rest of the status bar shows the number offaxes that have been received and transmitted since midnight and the total amount oftime the server has been running since it was last started.
For each fax entry there is also a Shortcut Menu that can be used to performvarious actions. The Shortcut Menu can be reached by right clicking any entry. Themenu's controls will apply to any faxes selected in the window.
21
Copyright © 1996-2014. All rights reserved. Alt-N Technologies, Ltd.
RelayFax's Main Display 21
The number of pending faxes that will be displayed in thiswindow is determined by the "MaxPendingFaxCount=" switch inthe "[FaxServer]" section of the RelayFax.ini file. The defaultsetting for this switch is "10". If you have configured RelayFaxto use multiple modems then you may wish to increase thisvalue by 5-10 for each modem being used. In other words: 10for one modem, 15-20 for two, and so on.
See:
Shortcut Menu
2.5.1 Shortcut Menu
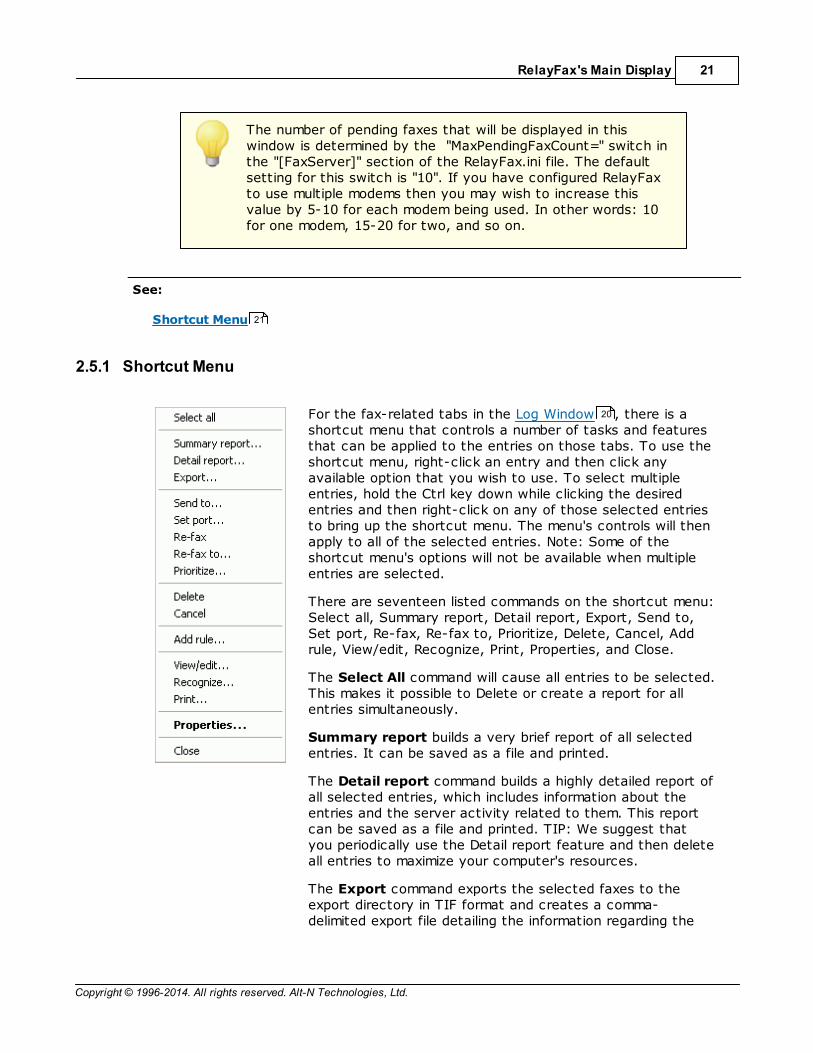
For the fax-related tabs in the Log Window , there is ashortcut menu that controls a number of tasks and featuresthat can be applied to the entries on those tabs. To use theshortcut menu, right-click an entry and then click anyavailable option that you wish to use. To select multipleentries, hold the Ctrl key down while clicking the desiredentries and then right-click on any of those selected entriesto bring up the shortcut menu. The menu's controls will thenapply to all of the selected entries. Note: Some of theshortcut menu's options will not be available when multipleentries are selected.
There are seventeen listed commands on the shortcut menu:Select all, Summary report, Detail report, Export, Send to,Set port, Re-fax, Re-fax to, Prioritize, Delete, Cancel, Addrule, View/edit, Recognize, Print, Properties, and Close.
The Select All command will cause all entries to be selected.This makes it possible to Delete or create a report for allentries simultaneously.
Summary report builds a very brief report of all selectedentries. It can be saved as a file and printed.
The Detail report command builds a highly detailed report ofall selected entries, which includes information about theentries and the server activity related to them. This reportcan be saved as a file and printed. TIP: We suggest thatyou periodically use the Detail report feature and then deleteall entries to maximize your computer's resources.
The Export command exports the selected faxes to theexport directory in TIF format and creates a comma-delimited export file detailing the information regarding the
21
20
Copyright © 1996-2014. All rights reserved. Alt-N Technologies, Ltd.
RelayFax Network Fax Manager v7.122
selected faxes. This export file can then be used with anydatabase, spreadsheet, or other product which can importcomma-delimited files.
For more information on exporting files and their format,see: Exporting and Export File Format .
Send To will email the fax image to the address you specify.You will be prompted for the email address.
Use the Set port command to assign a specific port onwhich to send a pending fax.
The Re-fax command will resend a failed or previously sentfax.
The Re-fax to command is the same as Re-fax above exceptthat you will be asked which number that you wish to sendthe fax to, plus you can optionally include different Companyand Attention information than that which was in the originalfax.
Prioritize opens a dialog from which you can change apending message's priority setting. Note: you can onlymodify the Priority setting of faxes with a status of"Pending".
Click Delete to cause the selected entry or entries to beremoved from the window and from the directory where thefax file is stored. Any fax image or work files that may betaking up disk space will also be deleted. You can also deleteentries by selecting them and pressing the DELETE key.
The Cancel command is used to cancel faxes that are inprogress. Click this option to cancel a fax in progress beforedeleting it.
The Add rule command, when selected on a received fax,will start the rule editor with the remote fax ID as the"match text". This will save time when setting up rules forinbound fax routing.
The View/edit command will open the selected fax file forviewing in your default editor.
Click Recognize to OCR recognize the selected fax. A dialogwill appear on which you can assign a filename and choosethe format in which the OCR file will be saved.
Print will print the selected entries. The Select Printer dialogwill open first so that you can choose which printer to use.
Click the Properties command to open the Fax Statusproperty sheet for the selected fax entry. This sheet listsseveral facts and statistics about the fax in question. It also
65 67
Copyright © 1996-2014. All rights reserved. Alt-N Technologies, Ltd.
RelayFax's Main Display 23
has a "View" button that can be used to view the fax towhich it corresponds. Note: Fax Status property sheets ofinbound faxes will be limited in their scope. There is muchmore information available to RelayFax on outgoing faxes.
Click the Close command to close the shortcut menuwithout executing any other shortcut commands.
If you have configured the ImagingOptions dialog to Remove fax imagesfrom disk after they are sent then youwill not be able to use some of theseoptions.
2.6 Rescan Ports
Click either the button on the Toolbar or the icon listed under the Fax Devicessection of the Tool Window to scan the local COM ports to detect installed modems.RelayFax will attempt to detect automatically all fax devices accessible to the RelayFaxServer. Occasionally you may need to rescan your ports after starting RelayFax or inthe event of some error. If the server is unable to detect your modem you can use the Add Modem feature to enter your device's information manually.
71
24
Copyright © 1996-2014. All rights reserved. Alt-N Technologies, Ltd.
RelayFax Network Fax Manager v7.124
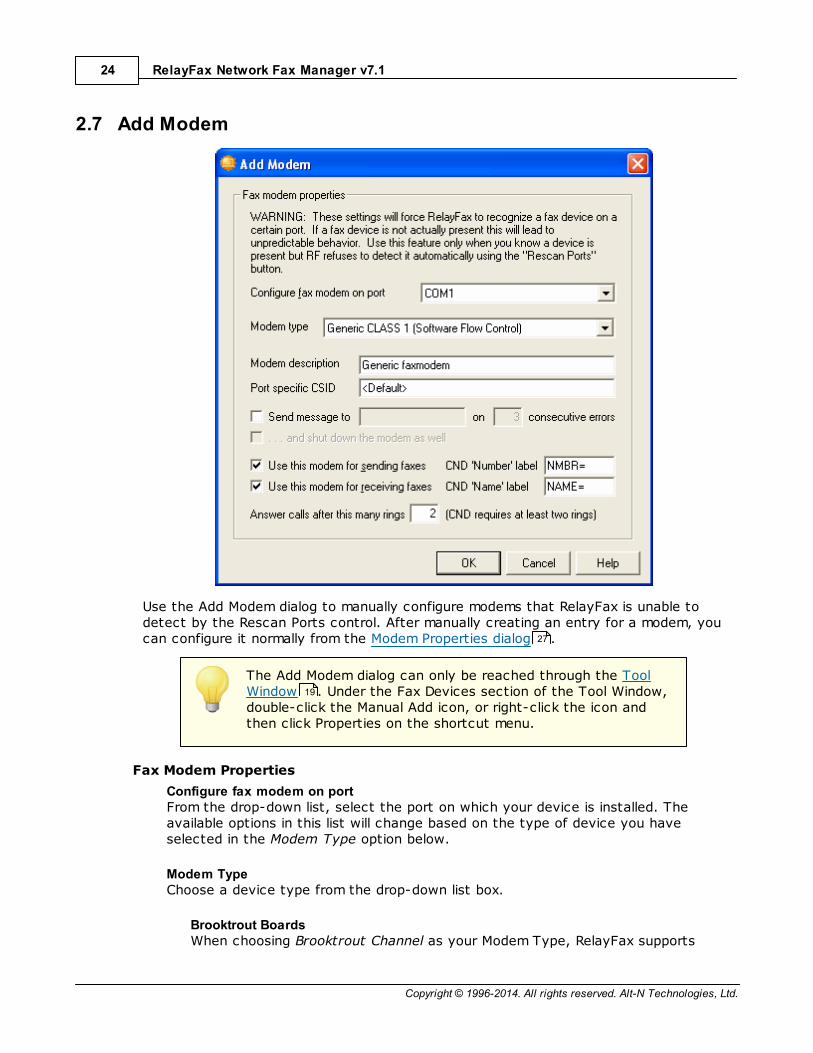
2.7 Add Modem
Use the Add Modem dialog to manually configure modems that RelayFax is unable todetect by the Rescan Ports control. After manually creating an entry for a modem, youcan configure it normally from the Modem Properties dialog .
The Add Modem dialog can only be reached through the ToolWindow . Under the Fax Devices section of the Tool Window,double-click the Manual Add icon, or right-click the icon andthen click Properties on the shortcut menu.
Fax Modem Properties
Configure fax modem on portFrom the drop-down list, select the port on which your device is installed. Theavailable options in this list will change based on the type of device you haveselected in the Modem Type option below.
Modem TypeChoose a device type from the drop-down list box.
Brooktrout BoardsWhen choosing Brooktrout Channel as your Modem Type, RelayFax supports
27
19
Copyright © 1996-2014. All rights reserved. Alt-N Technologies, Ltd.
RelayFax's Main Display 25
boards based on Brooktrout's open BOSTON architecture via CantataTechnology's Brooktrout System Software. To add this functionality to RelayFaxv7, install rfbt700_xx.exe and follow the instructions provided during
installation and in the installed readme.txt file.
T.38 DevicesRelayFax supports up to 30 virtual fax devices that can logon to a SIP-basedsoftware PBX. To add a T.38 device, first choose SIP (T.38) Channel as yourModem Type. Then configure the other settings on this dialog and click OK. Next,double-click the new device's entry in the Tool Window. This will open theModem Properties dialog, which contains the SIP Account pane necessary forconfiguring the device.
Modem DescriptionUse this text box for listing a small description of the fax modem (e.g. "XYZ modem","Modem for receiving faxes", and so on). This description will be displayed under the"Fax devices" heading in the Tool Window of the RelayFax interface.
Port specific CSIDEach fax device must have a unique Call Subscriber Identification by which itidentifies itself when connecting to other fax devices. It is common practice to useeither your company name or fax number as your CSID. Use this option to enter aspecific CSID for this modem, or leave it set to <Default> to use the CSID specifiedelsewhere in RelayFax's settings.
If you enter a specific CSID in this control then it will be usedfor all incoming and outgoing faxes on this device and overrideany other CSIDs that you have specified elsewhere (forexample, on the Fax Server pane of RelayFax Properties, oron a Fax Template ). Thus, if you want to assign dynamicCSIDs based on templates and rules then you must leave thisoption set to <Default>.
Send message to [email address] on XX consecutive errorsClick this option and specify an email address and numerical value if you wish tosend a warning message to someone whenever the specified number of connectionerrors occurs. This can be used for example to notify the administrator that theserver is having a problem connecting to other devices and thus alert him that therecould be a problem with your modem or phone line.
...and shut down the modem as wellClick this option if you want the modem to be taken offline if the number ofconnection errors specified in the above control occurs. If you are dividing yourfax load across multiple modems then this could be a good way to cause a faultymodem to be shut down automatically and thus transfer the workload to yourother modems until you can identify the problem.
Use this modem for sending faxesSelect this option if you wish to use this device to send faxes.
32
19
41
118
Copyright © 1996-2014. All rights reserved. Alt-N Technologies, Ltd.
RelayFax Network Fax Manager v7.126
Use this modem for receiving faxesSelect this option if you wish to use this device to receive faxes.
CND 'Number' labelEnter the label that your modem adds to the Calling Number Display (CND) datacorresponding to the caller's fax number (e.g. "NUMB=", "CALLER NUMBER:", and soon). You can identify the label by watching for it in the main display during anincoming call being processed by RelayFax.
CND 'Name' labelEnter the label that your modem adds to the Calling Number Display (CND) datacorresponding to the caller's name (e.g. "NAME=", "CALLER NAME:", and so on). Youcan identify the label by watching for it in the main display during an incoming callbeing processed by RelayFax.
Answer calls after this many rings [xx] (CND requires at least two rings)Specify how many times the line must ring before RelayFax will answer it.
When utilizing RelayFax's CND features (i.e. Caller ID), youmust specify at least two rings in this control because CNDdata is transmitted between the first and second ring.
See also
Calling Number Display (Caller ID) Fax Routing
80
80
80
Copyright © 1996-2014. All rights reserved. Alt-N Technologies, Ltd.
RelayFax's Main Display 27
2.8 Modem Properties
2.8.1 Fax Device
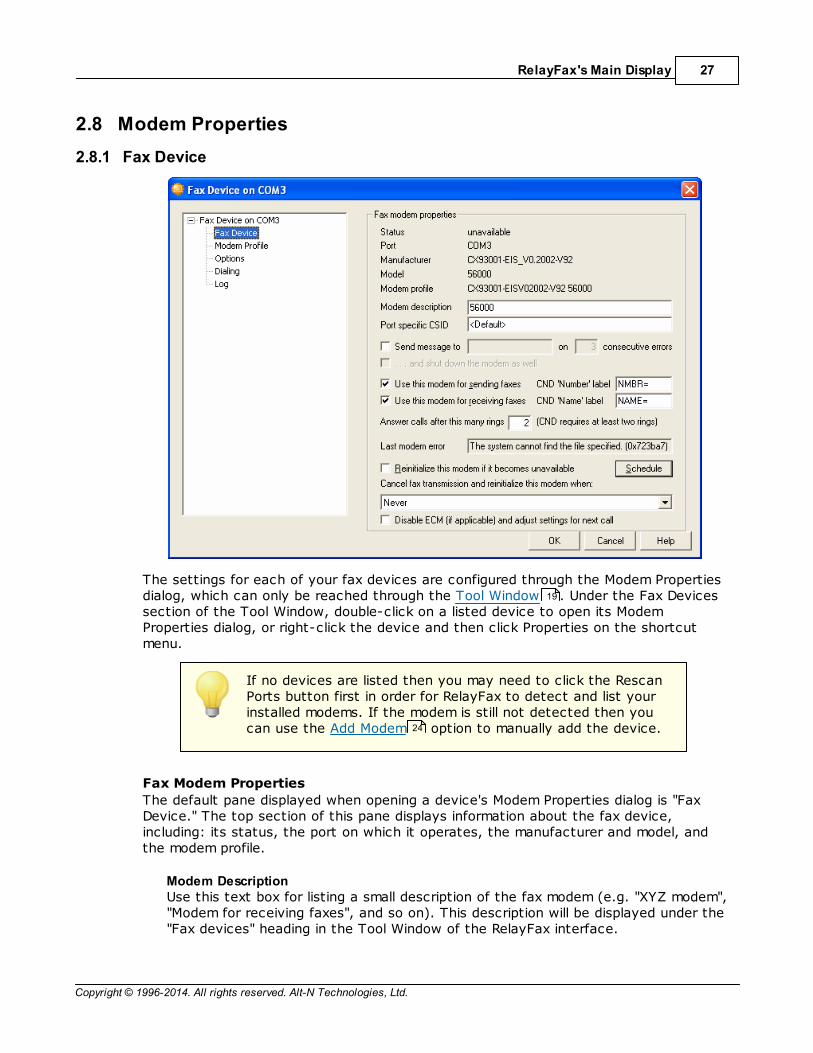
The settings for each of your fax devices are configured through the Modem Propertiesdialog, which can only be reached through the Tool Window . Under the Fax Devicessection of the Tool Window, double-click on a listed device to open its ModemProperties dialog, or right-click the device and then click Properties on the shortcutmenu.
If no devices are listed then you may need to click the RescanPorts button first in order for RelayFax to detect and list yourinstalled modems. If the modem is still not detected then youcan use the Add Modem option to manually add the device.
Fax Modem Properties
The default pane displayed when opening a device's Modem Properties dialog is "FaxDevice." The top section of this pane displays information about the fax device,including: its status, the port on which it operates, the manufacturer and model, andthe modem profile.
Modem DescriptionUse this text box for listing a small description of the fax modem (e.g. "XYZ modem","Modem for receiving faxes", and so on). This description will be displayed under the"Fax devices" heading in the Tool Window of the RelayFax interface.
19
24

Copyright © 1996-2014. All rights reserved. Alt-N Technologies, Ltd.
RelayFax Network Fax Manager v7.128
Port specific CSIDEach fax device must have a unique Call Subscriber Identification by which itidentifies itself when connecting to other fax devices. It is common practice to useeither your company name or fax number as your CSID. Use this option to enter aspecific CSID for this modem, or leave it set to <Default> to use the CSID specifiedelsewhere in RelayFax's settings.
If you enter a specific CSID in this control then it will be usedfor all incoming and outgoing faxes on this device and overrideany other CSIDs that you have specified elsewhere (forexample, on the Fax Server pane of RelayFax Properties, oron a Fax Template ). Thus, if you want to assign dynamicCSIDs based on templates and rules then you must leave thisoption set to <Default>.
Send message to [email address] on XX consecutive errorsClick this option and specify an email address and numerical value if you wish tosend a warning message to someone whenever the specified number of connectionerrors occurs. This can be used for example to notify the administrator that theserver is having a problem connecting to other devices and thus alert him that therecould be a problem with your modem or phone line.
...and shut down the modem as wellClick this option if you want the modem to be taken offline if the number ofconnection errors specified in the above control occurs. If you are dividing yourfax load across multiple modems then this could be a good way to cause a faultymodem to be shut down automatically and thus transfer the workload to yourother modems until you can identify the problem.
Use this modem for sending faxesSelect this option if you wish to use this device to send faxes.
Use this modem for receiving faxesSelect this option if you wish to use this device to receive faxes.
CND 'Number' labelEnter the label that your modem adds to the Calling Number Display (CND) datacorresponding to the caller's fax number (e.g. "NUMB=", "CALLER NUMBER:", and soon). You can identify the label by watching for it in the main display during anincoming call being processed by RelayFax.
CND 'Name' labelEnter the label that your modem adds to the Calling Number Display (CND) datacorresponding to the caller's name (e.g. "NAME=", "CALLER NAME:", and so on). Youcan identify the label by watching for it in the main display during an incoming callbeing processed by RelayFax.
Answer calls after this many rings [xx] (CND requires at least two rings)Specify how many times the line must ring before RelayFax will answer it.
41
118
80
80
Copyright © 1996-2014. All rights reserved. Alt-N Technologies, Ltd.
RelayFax's Main Display 29
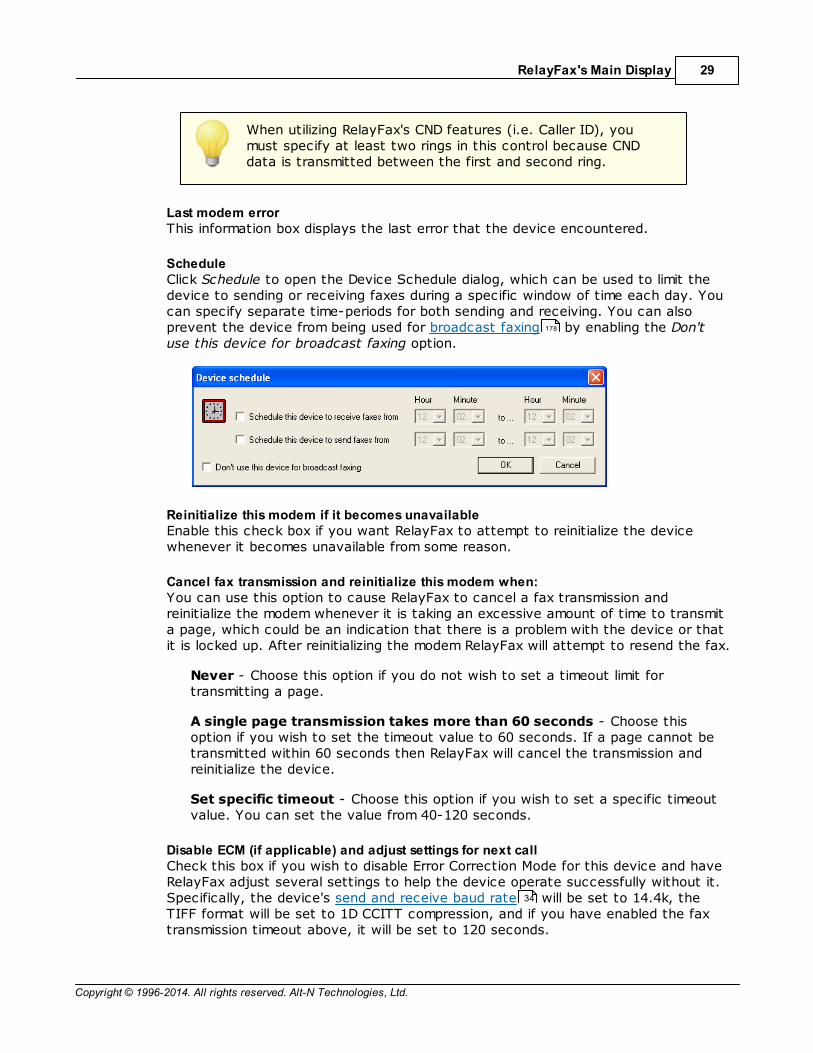
When utilizing RelayFax's CND features (i.e. Caller ID), youmust specify at least two rings in this control because CNDdata is transmitted between the first and second ring.
Last modem errorThis information box displays the last error that the device encountered.
ScheduleClick Schedule to open the Device Schedule dialog, which can be used to limit thedevice to sending or receiving faxes during a specific window of time each day. Youcan specify separate time-periods for both sending and receiving. You can alsoprevent the device from being used for broadcast faxing by enabling the Don'tuse this device for broadcast faxing option.
Reinitialize this modem if it becomes unavailableEnable this check box if you want RelayFax to attempt to reinitialize the devicewhenever it becomes unavailable from some reason.
Cancel fax transmission and reinitialize this modem when:You can use this option to cause RelayFax to cancel a fax transmission andreinitialize the modem whenever it is taking an excessive amount of time to transmita page, which could be an indication that there is a problem with the device or thatit is locked up. After reinitializing the modem RelayFax will attempt to resend the fax.
Never - Choose this option if you do not wish to set a timeout limit fortransmitting a page.
A single page transmission takes more than 60 seconds - Choose thisoption if you wish to set the timeout value to 60 seconds. If a page cannot betransmitted within 60 seconds then RelayFax will cancel the transmission andreinitialize the device.
Set specific timeout - Choose this option if you wish to set a specific timeoutvalue. You can set the value from 40-120 seconds.
Disable ECM (if applicable) and adjust settings for next callCheck this box if you wish to disable Error Correction Mode for this device and haveRelayFax adjust several settings to help the device operate successfully without it.Specifically, the device's send and receive baud rate will be set to 14.4k, theTIFF format will be set to 1D CCITT compression, and if you have enabled the faxtransmission timeout above, it will be set to 120 seconds.
178
34
Copyright © 1996-2014. All rights reserved. Alt-N Technologies, Ltd.
RelayFax Network Fax Manager v7.130
See also
Calling Number Display (Caller ID) Fax Routing
RelayFax Properties » Options
2.8.2 Modem Profile
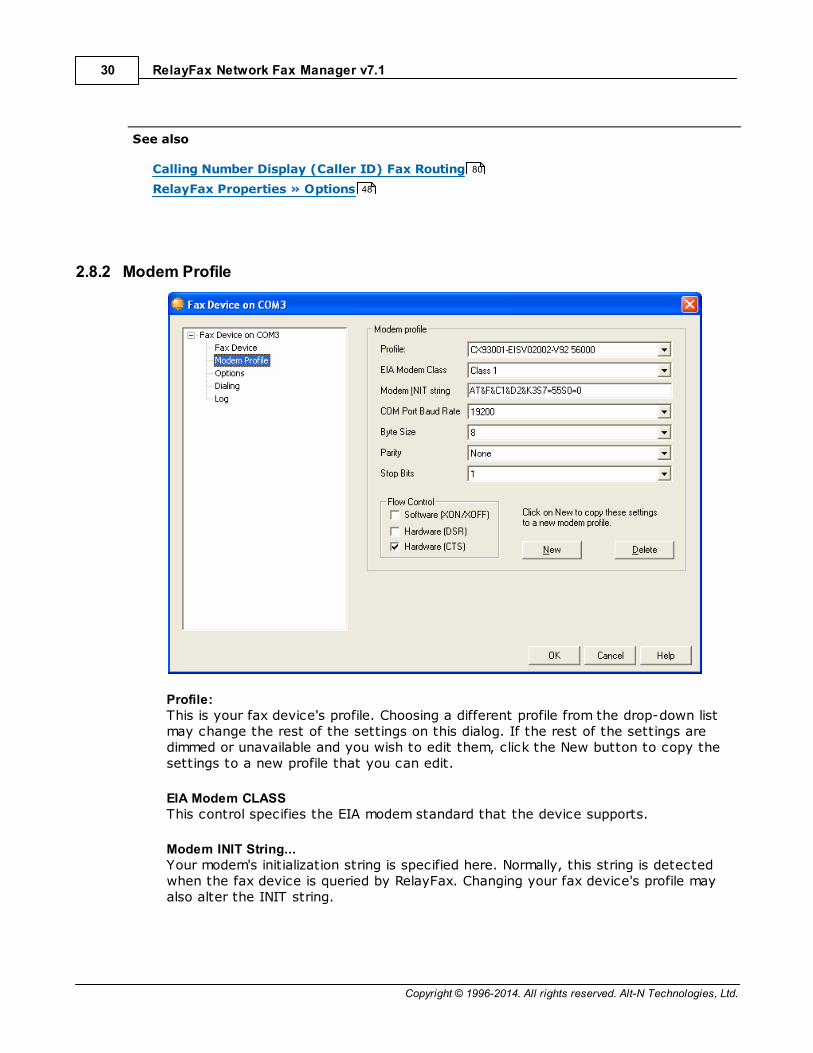
Profile:This is your fax device's profile. Choosing a different profile from the drop-down listmay change the rest of the settings on this dialog. If the rest of the settings aredimmed or unavailable and you wish to edit them, click the New button to copy thesettings to a new profile that you can edit.
EIA Modem CLASSThis control specifies the EIA modem standard that the device supports.
Modem INIT String...Your modem's initialization string is specified here. Normally, this string is detectedwhen the fax device is queried by RelayFax. Changing your fax device's profile mayalso alter the INIT string.
80
48
Copyright © 1996-2014. All rights reserved. Alt-N Technologies, Ltd.
RelayFax's Main Display 31
Although RelayFax will allow you to edit the INIT value, do sowith caution. Improper changes to modem INIT strings cancause your modem to stop working properly. See your modemdocumentation for more information on initialization strings.
COM Port Baud RateThis is the maximum rate in bits per second (bps) that RelayFax may communicatewith the fax device. This is not the rate at which the fax device communicates withother fax devices. That rate is specified on the Options pane.
Byte SizeThis is the number of data bits used for each character that is transmitted andreceived by the modem. This setting must match the same setting in the modemwith which you are communicating. Most fax devices use a value of 8, so you shouldnot change it to another value unless you are certain it's necessary.
ParityParity is a method of error correction. With parity correction enabled, an extra bit istransmitted with each character in order to make the number of bits sent either Oddor Even. There are also Mark and Space settings, which cause the parity bit to beeither always set or always cleared, respectively. Both modems, whether sending orreceiving, must have the same parity setting—it should typically be set to Nonebecause most connections use more sophisticated methods of error correction.
Stop BitsThis is the number of stop bits sent to indicate the end of each transmittedcharacter. This is typically set to "1."
Flow Control
Flow Control is a method for compensating for the difference between the speed atwhich data reaches a device and the speed at which that device can process andtransmit it. Because data might be sent faster than it can be processed, flow controlcan help prevent data from being lost by telling the sending device to pause while itcatches up.
Software (XON/XOFF)Click to enable this software-based method of flow control. This method transmitsstandard ASCII characters to pause and resume the flow of data. This software-based method is typically inferior to hardware flow control, but not all fax devicesare equipped with a hardware-based method.
Hardware (DSR)Click to enable DSR (Data Set Ready), a hardware-based method of flow control.
Hardware (CTS)Click to enable CTS (Clear to Send), a hardware-based method of flow control.
34

Copyright © 1996-2014. All rights reserved. Alt-N Technologies, Ltd.
RelayFax Network Fax Manager v7.132
Creating/Deleting Profiles
NewIf the settings on this pane are dimmed or unavailable and you wish to edit them,click New to copy the settings to a new profile that you can edit. After clicking New, designate a name for the new profile and click OK.
DeleteIf the displayed profile is one that you have created, clicking this button will deleteit and return this pane to its default settings.
2.8.3 SIP Account
Use the options on this pane to configure your virtual T.38 device, after creating thedevice using the Add Modem dialog. This pane will only be available for T.38 devices.
SIP Account
ServerEnter the host name or IP address of the SIP-based software PBX here. If the serverport is not 5060, then a colon and the port number can be appended. For example:"pbx.example.com" or "192.168.1.2:5063".
24
Copyright © 1996-2014. All rights reserved. Alt-N Technologies, Ltd.
RelayFax's Main Display 33
AccountIn this field, enter the SIP account name or extension. The SIP account name istypically a phone extension.
Authentication
UsernameThis field is for your login or authentication credential. This is usually the same asthe Account, but not always.
PasswordEnter your username's corresponding password.
Network
IP AddressThis is RelayFax's IP address as seen by the SIP Server. If RelayFax is behind a NATfirewall and the SIP Server is outside that firewall, then this will be the externaladdress of the NAT firewall. Consequently, your firewall must be configured toforward the SIP and RTP ports designated below to RelayFax's internal or network IPaddress. If the SIP Server has direct access to RelayFax, such as if they are bothon the same network without a firewall between them, then you can use RelayFax'slocal IP address here and the ports will not need to be forwarded.
SIP PortEnter your SIP port setting here. The default is 5060.
RTP PortThis is the port used for the Real-time Transport Protocol (RTP) and T.38 protocol.The default setting is 8000.

Copyright © 1996-2014. All rights reserved. Alt-N Technologies, Ltd.
RelayFax Network Fax Manager v7.134
2.8.4 Options
Device Options
ChannelsThe first few items displayed on this pane have to do with the channels used by thedevice. The number of available channels, usable channels, and the maximumchannels to use for sending and receiving are all listed.
CCITT Compression:This option designates the highest supported compression that this device can usewhen sending and receiving faxes.
Receive baud rateThis is the maximum rate in bits per second (bps) at which faxes can be received bythe fax device.
Send baud rateThis is the maximum rate in bits per second (bps) at which faxes can be sent by thefax device.
Enable Error Correcting Mode (ECM)Click this check box to enable Error Correcting Mode (ECM). Receiving devices thatsupport ECM can request that portions of an image be resent if they are receivedwith errors. This is enabled by default for most fax devices.
Copyright © 1996-2014. All rights reserved. Alt-N Technologies, Ltd.
RelayFax's Main Display 35
Use Black Ice engineCheck this box if you wish to use the Black Ice fax engine with this device instead ofRelayFax's native engine. Depending on the device you are using, this option may ormay not be available. Some older device architectures may require you to use theBlack Ice engine.
Distinctive Ring
If you are using a distinctive ring system, you can use these options to designate theRING patterns to which the fax device will respond. If in incoming call returns a ringcode that is disabled here, RelayFax will ignore that call (i.e. the fax device will notanswer it).
Speaker Mode
Use this option to designate whether or not the modem's speaker will be activatedwhen the modem is in use. You can choose to leave the speaker Off or On, or you canset it to be activated only Until Connected. The latter option will cause the speaker tobe activated only until the modem successfully establishes a connection (for example,while dialing and attempting to connect to a fax number).
Speaker Volume
Use this option to designate the desired volume of your modem's speaker.
Enable DTMF detection
If your device supports voice features, click this option to configure it to listen forDTMF (Duel Tone Multi-frequency, also known as "Touch Tone") signals whenanswering calls. Any DTMF digits received will be treated as Direct Inward Dialing (DID)by RelayFax for the purpose of routing incoming faxes. RelayFax also is equipped withDTMF support for CAPI devices. As with DTMF support for voice modems, the DTMFdigits will be used as DID, but only if no called party number is received. Otherwise, theDTMF digits will be added to the fax number, separated by "x", and that combinationwill be treated as DID. In that case an account's DID setting would have to looksomething like, "1234567x1234" in order for the fax to be routed properly.
# digitsWhen using the Black Ice engine, you must specify the number of DTMF digits tolisten for on the Modem Properties dialog. When using the Alt-N fax engine or CAPIdevices, instead of specifying the number of digits, the line will be monitored for tenseconds or until a fax tone is received. You can adjust the timeout value by editingthe VoiceAnswerTimeout parameter located under the [FaxServer] section of the
RelayFax.ini file.
To send DTMF digits with voice modems or CAPI devices, usethe "x" or "@" character to separate the fax number from theDTMF digits. For example, "FAXNUMBER:1234567@1234" willdial "1234567" and wait for silence (lack of ringback), transmitthe DTMF digits "1234", and then start the fax transmission.Using "x" instead of "@" allows for the format:"[email protected]". Note, however, that althoughRelayFax displays DTMF digits after "x", it actually sends "@" to

Copyright © 1996-2014. All rights reserved. Alt-N Technologies, Ltd.
RelayFax Network Fax Manager v7.136
the modem. The modem-specific parameters of the "@"character should be documented in your modem's manual underthe "D" command. For CAPI devices, there are several DTMFoptions in the [CAPI] section of RelayFax.ini to control thedelay before and after sending DTMF digits, the length of eachdigit, and the gap between digits in milliseconds.
2.8.5 Dialing
Dialing Rules
RelayFax supports Windows Dialing Rules. Windows Dialing Rules provide options forhandling area and country codes that cannot be implemented using the OutboundRules. Activating the Use Windows Dialing Rules option enables automatic processing of"canonical" numbers in the form "+<country code> (area code) <number>" (e.g. +1(616) 555 1212). The "+" is automatically converted into "011" if the call isinternational, and it prefixes a "1" if the call is domestic long distance. The "+<countrycode>" is optional but the parentheses are required, and the default country code isautomatically prepended if the number does not start with a "+". The windows dialingrules will convert "canonical" numbers to a dialable string according to the optionsconfigured in the selected location. Note that the outbound and prefix rules are applied

Copyright © 1996-2014. All rights reserved. Alt-N Technologies, Ltd.
RelayFax's Main Display 37
before the Windows Location rules are processed. Fax numbers that are not in thecorrect format will be dialed unmodified.
2.8.6 Log
This pane displays the most recently logged activities of the fax device. A detailed logof incoming faxes, outgoing faxes, and any errors encountered are all temporarilydisplayed here before they are combined with other logged events into the primary logfiles.

Copyright © 1996-2014. All rights reserved. Alt-N Technologies, Ltd.

Section
III

Copyright © 1996-2014. All rights reserved. Alt-N Technologies, Ltd.
RelayFax Network Fax Manager v7.140
3 RelayFax Properties
3.1 RelayFax Properties
The RelayFax Properties dialog, located under the File»RelayFax properties ... menu,
contains six panes that are used for configuring various settings and features of yourRelayFax Server. These six panes are:
Fax Server
The Fax Server pane is used to set up several default settings for you RelayFax Server.Here you will designate the default cover page, banner text , company name andaddress, fax device ID, and fax and voice numbers.
Mail Server
Use the Mail Server pane to specify the mail server that the RelayFax Server willconnect to for delivering incoming faxes. In addition, this mail server will be used byRelayFax for delivering fax confirmation and failure status messages. You will alsospecify a default email address and a few other parameters on this pane.
Client Updates
On the Shortcut menu of the RelayFax SMTP Client there is an option to "UpdateRelayFax Client". When a user clicks that option, an update request message is sent tothe RelayFax server. The Client Updates pane controls how RelayFax will respond tothese update requests.
Options
The Options pane of the RelayFax Properties dialog is used to specify several optionalsettings. These include the number of retry attempts for failed faxes, specifyingwhether all faxes should be printed or not, whether delivery confirmation requestsshould be honored, and several others.
Service
The Service pane of the RelayFax Properties dialog is used to control whether or notyou wish to run RelayFax as a Windows system service. RelayFax can be configured torun as a system service under Windows NT/2000 and under Windows 95/98.
Logs
The RelayFax Server maintains a continually updated and highly detailed log of allFaxing Events and POP Sessions. Here you will assign a name and maximum size to thatfile.
41
42
44
46
48
51
53
Copyright © 1996-2014. All rights reserved. Alt-N Technologies, Ltd.
RelayFax Properties 41
3.2 Fax Server
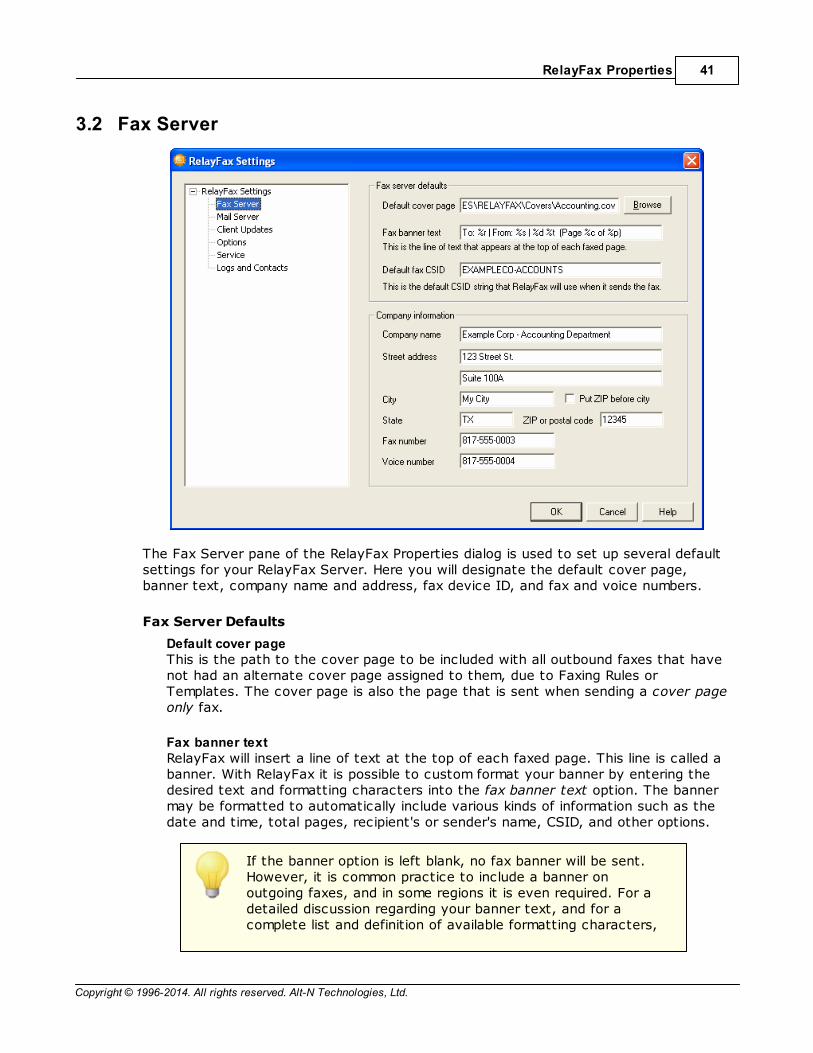
The Fax Server pane of the RelayFax Properties dialog is used to set up several defaultsettings for your RelayFax Server. Here you will designate the default cover page,banner text, company name and address, fax device ID, and fax and voice numbers.
Fax Server Defaults
Default cover pageThis is the path to the cover page to be included with all outbound faxes that havenot had an alternate cover page assigned to them, due to Faxing Rules orTemplates. The cover page is also the page that is sent when sending a cover pageonly fax.
Fax banner textRelayFax will insert a line of text at the top of each faxed page. This line is called abanner. With RelayFax it is possible to custom format your banner by entering thedesired text and formatting characters into the fax banner text option. The bannermay be formatted to automatically include various kinds of information such as thedate and time, total pages, recipient's or sender's name, CSID, and other options.
If the banner option is left blank, no fax banner will be sent.However, it is common practice to include a banner onoutgoing faxes, and in some regions it is even required. For adetailed discussion regarding your banner text, and for acomplete list and definition of available formatting characters,
Copyright © 1996-2014. All rights reserved. Alt-N Technologies, Ltd.
RelayFax Network Fax Manager v7.142
see:
Banner Text & Formatting Characters
Default fax CSIDEach fax device must have a unique Caller Sender Identification (CSID). It iscommon practice to use either your company name or fax number as your fax ID.When two fax devices are negotiating a connection they make this informationavailable to one another.
In some regions, providing a CSID is required.
Company Information
Company name and addressEnter your company's name and address in this section. It is common practice toprovide the company name when sending and receiving faxes. By default thisinformation will appear on outbound cover pages.
Fax numberThis is your fax number. By default it will appear on your cover page.
Voice numberThis is your voice telephone number. By default it will appear on your cover page.
3.2.1 Banner Text & Formatting Characters
RelayFax will insert a line of text at the top of each faxed page. This line is called abanner. With RelayFax it is possible to custom format your banner to automaticallyinclude various kinds of information such as the date and time, total pages, recipient'sor sender's name, your fax device's identifier (CSID), and various other options.
By inserting special formatting characters into the banner, you may automaticallyinclude some information concerning the fax. See the list below for descriptions ofthese characters.
Although the banner may be any length, only one line will appear at the top of a fax.This line may consist of up to three parts. These parts are a left-justified portion, acenter-justified portion, and a right-justified portion. Each part is separated by thevertical bar character ("|"). Since none of these areas are limited in size, there is thepotential that they may at times overwrite one another.
If the banner option is left blank no fax banner will be sent.However, it is common practice to include a banner onoutgoing faxes, and in some regions it is even required.
42

Copyright © 1996-2014. All rights reserved. Alt-N Technologies, Ltd.
RelayFax Properties 43
RelayFax Banner Formatting Characters
The following is a glossary of all valid formatting characters that may be used in theRelayFax Banner:
%d = date in short format
%D = date in long format
%t = send time (24 hour format, e.g. 1:00pm = 13:00:00)
%p = total number of pages in the fax
%c = current page
%r = Recipient's Name
%y = Recipient's Company
%s = Sender's Name
%m = Sender's Company
%i = Sender's Fax ID
%u = Subject of Fax
%f = Recipient's Fax Number
%o = Comments
%x = Sender's Fax Number
%h = Sender's Voice Number
%T = Tracking Number
Inbound Banner Formatting Characters
On the Default Rules pane of the Mail Sources and Rules dialog, you can configureRelayFax to add a banner to inbound faxes. The following formatting characters can beused in that feature:
%d = date in short format
%D = date in long format
%t = send time (24 hour format, e.g. 1:00pm = 13:00:00)
%p = total number of pages in the fax
%c = current page
%r,%f = DID number if available, otherwise received port
%s = Caller ID information if available, otherwise Sender's Fax ID
%i = Sender's Fax ID
%T = Tracking Number
84
Copyright © 1996-2014. All rights reserved. Alt-N Technologies, Ltd.
RelayFax Network Fax Manager v7.144
3.3 Mail Server
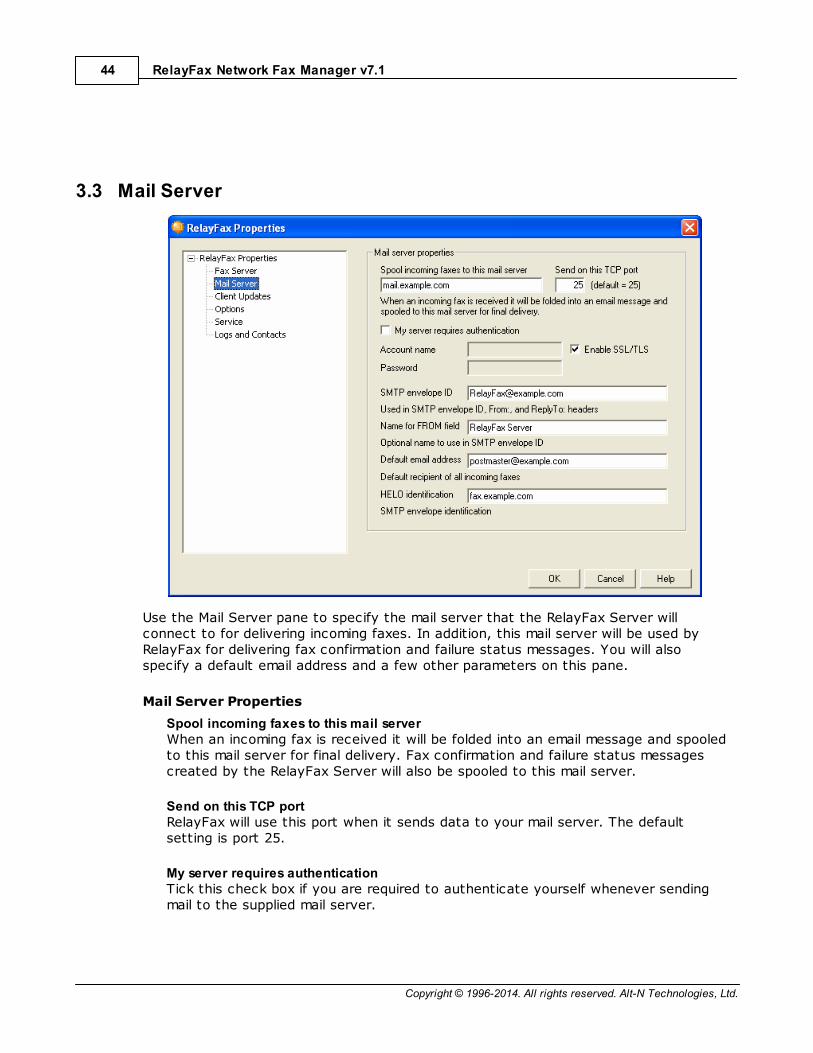
Use the Mail Server pane to specify the mail server that the RelayFax Server willconnect to for delivering incoming faxes. In addition, this mail server will be used byRelayFax for delivering fax confirmation and failure status messages. You will alsospecify a default email address and a few other parameters on this pane.
Mail Server Properties
Spool incoming faxes to this mail serverWhen an incoming fax is received it will be folded into an email message and spooledto this mail server for final delivery. Fax confirmation and failure status messagescreated by the RelayFax Server will also be spooled to this mail server.
Send on this TCP portRelayFax will use this port when it sends data to your mail server. The defaultsetting is port 25.
My server requires authenticationTick this check box if you are required to authenticate yourself whenever sendingmail to the supplied mail server.

Copyright © 1996-2014. All rights reserved. Alt-N Technologies, Ltd.
RelayFax Properties 45
Account nameEnter the account name or login here that is required by your mail server.
PasswordEnter the password required by your mail server.
Enable SSL/TLSCheck this box if you wish to use SSL/TLS when sending messages to the mailserver.
SMTP envelope IDThis is the address used in the SMTP "MAIL FROM" command when RelayFax spoolsan inbound fax or other message to your mail server. It is also used as the FROMand ReplyTo within RelayFax generated messages. Make sure that you specify anaddress in this field that RelayFax checks for email messages. If you do not specifya valid email address in this control then RelayFax will not receive messages fromusers when they are attempting to reply to a message that RelayFax sent to them(for example, to have RelayFax resend a failed fax). Thus, RelayFax will not be ableto fulfill the commands contained in those messages.
Name for FROM fieldUse this control if you want to an optional name to be entered into the name portionof the FROM field of RelayFax generated messages. The default value for this controlis "RelayFax Server".
Default email addressIf RelayFax cannot determine to whom an incoming fax should be addressed, thisdefault address will be used.
This address must be different than that of your RelayFaxemail account (specified on the Mail Sources dialog) in orderto prevent mail loops.
HELO identificationWhen spooling an inbound fax to your mail server, RelayFax will identify itself asbeing a member of this domain.
Example:
HELO example.com
82

Copyright © 1996-2014. All rights reserved. Alt-N Technologies, Ltd.
RelayFax Network Fax Manager v7.146
3.4 Client Updates
On the Shortcut menu of the RelayFax SMTP Client there is an option to "UpdateRelayFax Client". When a user clicks that option, an update request message is sent tothe RelayFax server. The Client Updates pane controls how RelayFax will respond to theupdate requests. If you have configured RelayFax to honor update requests it will emailthe contents of the UPDATE.DAT file to the user making the request. This file is located
in the \RelayFax\app\ subfolder and can be edited with any plain text editor such as
Notepad. To simplify the editing process you can click Edit UPDATE.DAT file on thispane to open it in your default text editor.
This pane also provides the option to automatically send the update message to anyusers who send a message to RelayFax from an older version of the client. This is amore "user friendly" method since they will not need to remember to check for updates;they will be informed automatically whenever the version they are using is out of date.
Client Updating
Allow clients to request update instructions from the serverClick this checkbox if you want RelayFax to email the contents of UPDATE.DAT to
users who click Update RelayFax Client on their client's shortcut menu.
If this option is not checked then RelayFax will simply deleteupdate requests without responding to them.
129
Copyright © 1996-2014. All rights reserved. Alt-N Technologies, Ltd.
RelayFax Properties 47
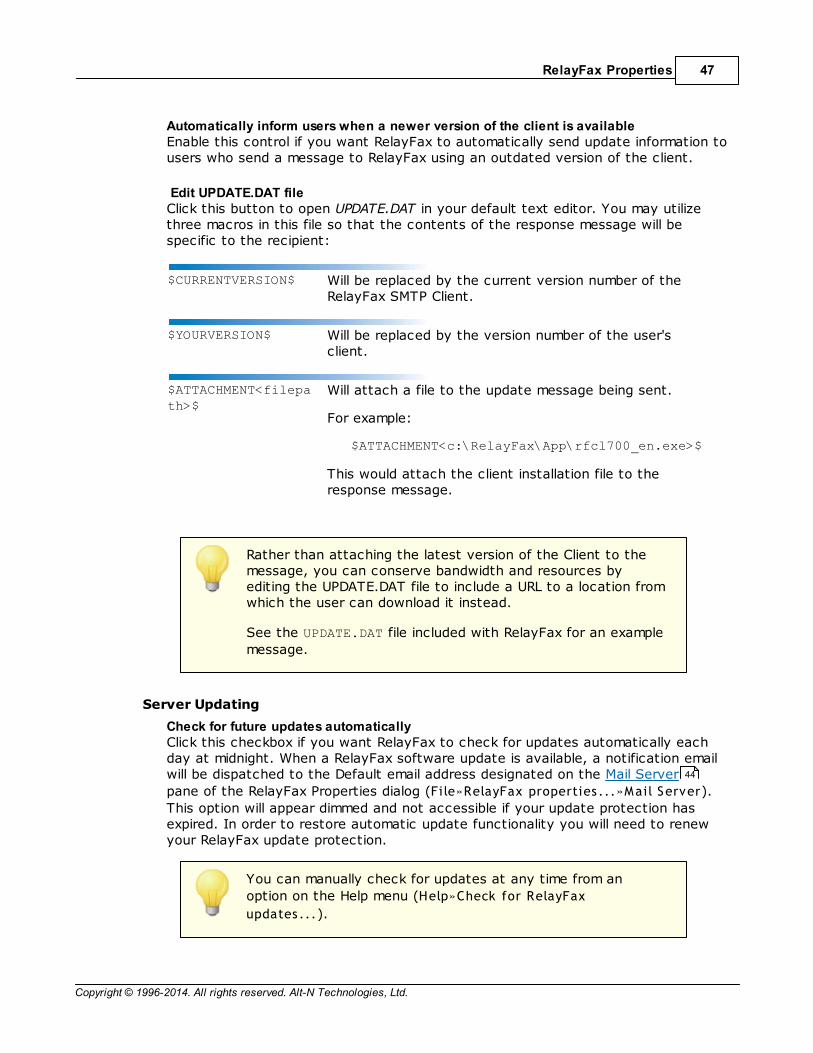
Automatically inform users when a newer version of the client is availableEnable this control if you want RelayFax to automatically send update information tousers who send a message to RelayFax using an outdated version of the client.
Edit UPDATE.DAT fileClick this button to open UPDATE.DAT in your default text editor. You may utilizethree macros in this file so that the contents of the response message will bespecific to the recipient:
$CURRENTVERSION$ Will be replaced by the current version number of theRelayFax SMTP Client.
$YOURVERSION$ Will be replaced by the version number of the user'sclient.
$ATTACHMENT<filepath>$
Will attach a file to the update message being sent.
For example:
$ATTACHMENT<c:\RelayFax\App\rfcl700_en.exe>$
This would attach the client installation file to theresponse message.
Rather than attaching the latest version of the Client to themessage, you can conserve bandwidth and resources byediting the UPDATE.DAT file to include a URL to a location fromwhich the user can download it instead.
See the UPDATE.DAT file included with RelayFax for an example
message.
Server Updating
Check for future updates automaticallyClick this checkbox if you want RelayFax to check for updates automatically eachday at midnight. When a RelayFax software update is available, a notification emailwill be dispatched to the Default email address designated on the Mail Server
pane of the RelayFax Properties dialog (File»RelayFax properties ...»Mail Server).
This option will appear dimmed and not accessible if your update protection hasexpired. In order to restore automatic update functionality you will need to renewyour RelayFax update protection.
You can manually check for updates at any time from an
option on the Help menu (Help»Check for RelayFax
updates ...).
44

Copyright © 1996-2014. All rights reserved. Alt-N Technologies, Ltd.
RelayFax Network Fax Manager v7.148
3.5 Options
The Options pane of the RelayFax Properties dialog is used to specify several optionalsettings. These include the number of retry attempts for failed faxes, specifyingwhether all faxes should be printed or not, whether delivery confirmation requestsshould be honored, and several others.
Faxing Options
Wait this many seconds for fax machines to answerIf the Fax number to which RelayFax is trying to connect doesn't answer within thismany seconds, RelayFax will abort the attempt and try again later based upon theparameters outlined below.
Stop trying if fax attempt fails this many timesWhen a fax attempt fails, RelayFax will continue trying to send the fax until it hasfailed this many times. After this number of unsuccessful attempts RelayFax will giveup permanently and inform the sender that the fax could not be sent. The defaultsetting is "3". If you enter "0" or "1" in this option then RelayFax will not try to sendthe fax again if the initial attempt fails.
During retries of partially completed faxes, by default RelayFaxwill only attempt to resend unsent pages. If you wish to
Copyright © 1996-2014. All rights reserved. Alt-N Technologies, Ltd.
RelayFax Properties 49
configure RelayFax to attempt to resend the entire fax instead,open RelayFax.ini in Notepad and change
ResendPartialFaxes=Yes to ResendPartialFaxes=No under
[FaxServer].
Wait this many seconds before subsequent retriesThis is the amount of time between subsequent delivery attempts.
Auto format all cover page text to lines of this lengthPlacing a value in this control will cause text placed in the cover page's commentssection to have line breaks inserted at the specified length. Setting this control to"0" will cause the text to appear exactly as it was typed by the user. If the textwas composed without any line breaks, and it extended beyond the edge of thedesignated comments area, then it would be truncated.
Wait this many seconds before sending next faxThis is the number of seconds that RelayFax should wait between sending faxes.
When retrying a fax document...Choose the option from the drop-down list that you wish to use when RelayFaxretries sending a fax.
Use first available deviceWhen this option is selected, RelayFax will use the first available fax device whenretrying to send a fax, with priority give to the order in which the devices appearin the list. Click Reorder... to change the order of the devices.
Use next available deviceChoose this option if you want RelayFax to retry sending a fax on a differentdevice than the one used on the previous attempt. If you have only one devicethen this option has no effect.
Reorder...Click this button to open the list of your fax devices. You can select a deviceand then use the up/down arrows on the dialog to reorder the list. When retryingfaxes, priority is given to the devices in the order they are listed.
Honor fax delivery confirmation requestsRelayFax is equipped with the ability to inform users of the status of their outgoingfaxes. When this option is enabled and RelayFax receives a message for faxing fromthe RelayFax SMTP Client or an regular email client requesting a Return Receipt, ashort message will be emailed back to the sender when the fax has beensuccessfully delivered. The confirmation message will only be sent when the sender'sRelayFax SMTP Client is set to use the I want confirmation that this fax was sentproperly option, or when the Return-Receipt-To header is present in an emailmessage. This option only affects whether or not delivery confirmation messagesare sent. The sender will always be informed when a fax cannot be delivered,regardless of this setting.
154

Copyright © 1996-2014. All rights reserved. Alt-N Technologies, Ltd.
RelayFax Network Fax Manager v7.150
Always send fax delivery confirmation reportsEnable this check box if you wish to send a message to the sender of an outgoingfax message when the fax is successfully delivered, regardless of whether or not thesender requested delivery confirmation. This option only affects delivery confirmationmessages. When a fax cannot be delivered RelayFax will inform the sender regardlessof this setting.
Immediately fail outbound faxes on 'NO CONNECT' messageCheck this box if you do not wish to send a fax signal when RelayFax detects that aperson rather than a fax device answered the dialed number. RelayFax will treat theoutbound fax as failed and proceed accordingly.
Print all outbound faxes to a specific printerEnable this control if you want RelayFax to automatically print a copy of alldocuments that it receives for outbound faxing. These documents will be printed towhichever printer you have designated in the Select Printer dialog.
Print all inbound faxes to a specific printerClick this option if you want a copy of all faxes that RelayFax receives to be printedto a specific printer. Click the Select printer button beside this control to choose theprinter.
Select PrinterClick this button to open the Select Printer dialog.
For a complete discussion on the Select Printer dialog and printing in general, see: Select Printer .
Dialing Options
Prefix outbound phone numbers longer than [xx] digits with [xx]For outgoing faxes, you can have RelayFax automatically add a prefix to the calledparty's number. Prefixes may, for instance, be necessary to access a central officeline, or to restrict the transmission of your Caller ID to the called party. RelayFaxwill, however, add the prefix to the number only if the number contains more digitsthan the amount specified here. If your fax device is connected to a PBX, the digitthreshold can prevent the prefix from being dialed if the called number is anextension on the same PBX. Enter both the digit threshold and the prefix to be dialedinto this option. Use "0" in the first box if you wish to add the prefix to all numbersdialed.
When specifying numbers for RelayFax to dial, you can use "w"or "W" to instruct RelayFax to wait for a subsequent dial tone.For example, "8w5551212" will dial 8, wait for the next dialtone, and then dial the remainder of the number. Similarly, the"%" character will insert a pause within the dialing process. Forexample, "8%5551212" will dial 8, pause, and then dial the restof the number. The length of time during a pause is determinedby modem S register settings.
55

Copyright © 1996-2014. All rights reserved. Alt-N Technologies, Ltd.
RelayFax Properties 51
3.6 Service
The Service pane of the RelayFax Properties dialog is used to designate whether or notyou will run RelayFax as a Windows system service. Running RelayFax as a serviceallows it to start when Windows starts, allows it to operate when no users are loggedin to Windows, and provides greater security.
Service Options
Run RelayFax as a Windows system serviceEnable this check box if you wish to run RelayFax as a service. Windows serviceshave a number of configurable options such as Dependencies and Start-up choices.
Service Name (do not use / or \ characters)This is the designated name of the service.
DependenciesThis list box displays the names of any services that must start before RelayFaxdoes.
RemoveClick this button to remove a selected Dependency from the Dependencies listbox.

Copyright © 1996-2014. All rights reserved. Alt-N Technologies, Ltd.
RelayFax Network Fax Manager v7.152
New DependencyEnter the name of a service upon which you wish the RelayFax service to bedependent and click the Add button to add it to the list of Dependencies.
AddClick this button to add a service, which you have entered into the NewDependency text box, to the Dependencies list.
Start ServiceThis is the initial state of the service.
Automatically - starts the service when Windows starts.
Manually - starts the service only via user intervention.
Disabled - does not start the service at all.
Install ServiceClick this button to install or remove the RelayFax service.
For more information on Windows Services and Dependencies,consult your Windows help files and documentation.

Copyright © 1996-2014. All rights reserved. Alt-N Technologies, Ltd.
RelayFax Properties 53
3.7 Logs and Contacts
The RelayFax Server maintains a continually updated and highly detailed log of allFaxing Events and POP and SMTP Sessions. In the top section you can assign a namefor your server log file. In the next section you can specify the maximum permitted logfile size and configure several other logging-related options. At the bottom of this paneyou can choose which contact manager to use by default. You can choose either theWindows Address Book or Address Express.
Server Log
File NameDesignate a name for your server log file here. It is called RelayFax.Log by default.
Do not include the path to the file; only enter the filename.
Logging Options
Create a standard set of log filesClick this option to maintain a standard single set of log files.
Create a new set of log files each dayIf this option is selected then separate log files will be generated each day. Thenames of the files will correspond to the date they were created.
Create log files based on the day of the weekIf this option is selected, separate log files will be generated for each day of theweek. The names of the log files will correspond to the day of the week on which

Copyright © 1996-2014. All rights reserved. Alt-N Technologies, Ltd.
RelayFax Network Fax Manager v7.154
they were created.
Log SMTP Session ActivityClick here if you want the log to contain transcripts of SMTP session activity withyour mail servers.
Log POP Session ActivityClick here if you want the log to contain transcripts of POP session activity withyour mail servers.
Log each service into a separate log fileClick this checkbox if you want RelayFax to maintain separate logs by service ratherthan in a single file. For example, RelayFax will log SMTP activity in a separate logfile than other activity.
Enable debug loggingClick this check box to enable debug logging, which is more verbose and resourceintensive. This is only recommended when you are attempting to diagnose a problemwith RelayFax.
Maximize log file size [XX] bytesUse this control to designate a maximum size (if any) for RelayFax's log file. Whenthe file reaches this size it will be saved with the file extension *.OLD. Then, a newRelayFax *.Log file will be created and maintained until it also reaches the maximumsize. At that time the *.OLD log file will be overwritten by the new *.OLD file, and soon. If you do not wish to lose previously saved *.OLD files then you must savethose files under a different name or extension before the RELAYFAX.LOG filereaches the maximum allowed size.
If you designate Max Size [xx] Bytes as 0 the *.Log file willnever be saved as *.OLD and then reset. However, dependingupon the volume of server use, this could result in a very largelog file.
Contacts Manager
Use Windows Address Book (WAB) as a default contact manager.Choose this option if you wish to use the Windows Address Book as your defaultcontacts manager in RelayFax.
Use Address Express as a default contact manager.Choose this option if you wish to use the Address Express contact manager that isincluded with RelayFax.
ContactsClick this button to open your default contact manager .110
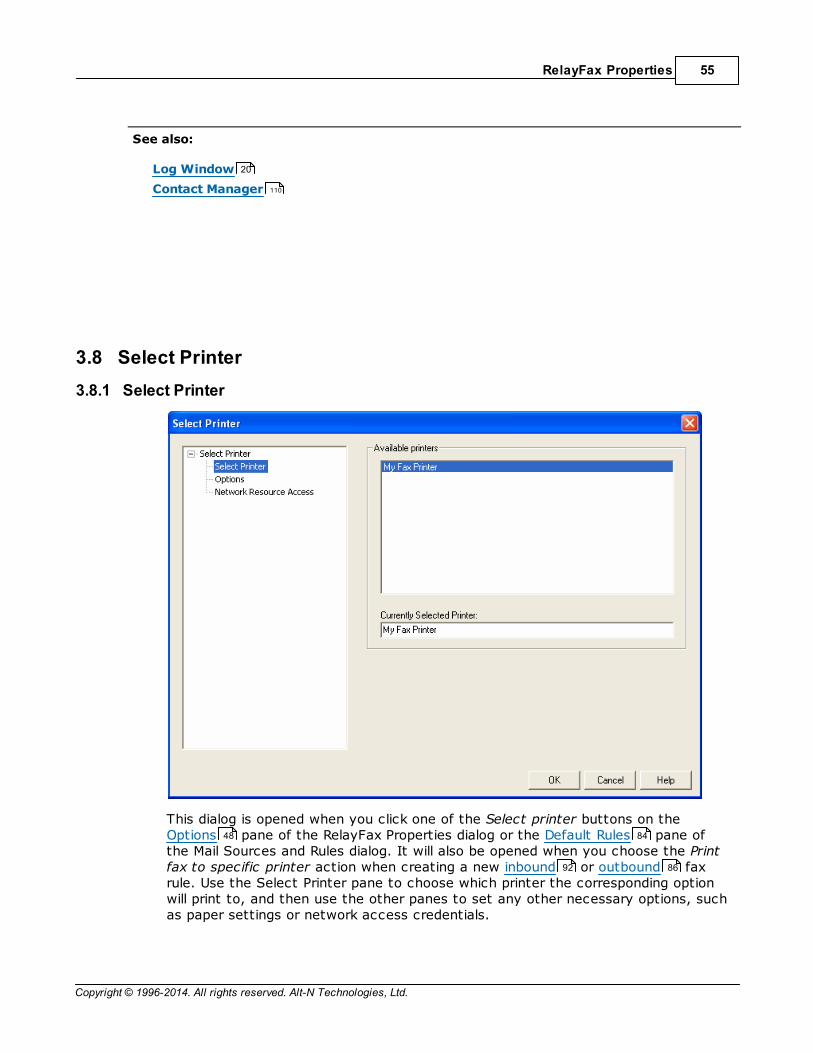
Copyright © 1996-2014. All rights reserved. Alt-N Technologies, Ltd.
RelayFax Properties 55
See also:
Log Window
Contact Manager
3.8 Select Printer
3.8.1 Select Printer
This dialog is opened when you click one of the Select printer buttons on theOptions pane of the RelayFax Properties dialog or the Default Rules pane ofthe Mail Sources and Rules dialog. It will also be opened when you choose the Printfax to specific printer action when creating a new inbound or outbound faxrule. Use the Select Printer pane to choose which printer the corresponding optionwill print to, and then use the other panes to set any other necessary options, suchas paper settings or network access credentials.
20
110
48 84
92 86

Copyright © 1996-2014. All rights reserved. Alt-N Technologies, Ltd.
RelayFax Network Fax Manager v7.156
Available PrintersThis area will display all printers that are available for RelayFax to use whenconfigured to print inbound or outbound faxes. To select a printer simply click on thedesired entry in this list and then click OK.
Currently Selected PrintersThis text box displays the name of the printer that you have selected to be used bythe corresponding option that opened the Select Printer dialog.
See also:
Select Printer Options
Network Resource Access
3.8.2 Options
Use the options on this pane to specify your desired settings for the selected printer.You can select the paper size and source, the number of fax images that you wish toprint per page, the maximum number of pages to print per fax, and other settings. Withthe Transmission Report drop-down list you can designate whether or not to print atransmission report along with each printed fax. Alternatively, you can choose to printa transmission report only, instead of the fax.
56
57
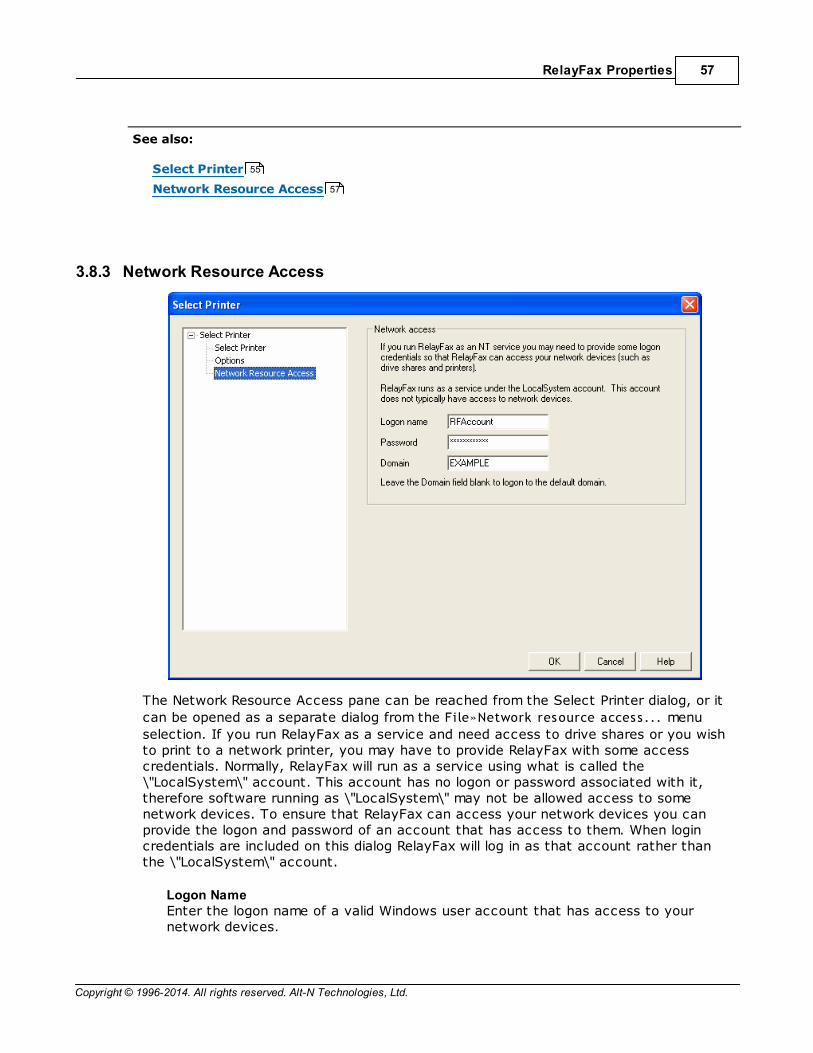
Copyright © 1996-2014. All rights reserved. Alt-N Technologies, Ltd.
RelayFax Properties 57
See also:
Select Printer
Network Resource Access
3.8.3 Network Resource Access
The Network Resource Access pane can be reached from the Select Printer dialog, or it
can be opened as a separate dialog from the File»Network resource acces s ... menu
selection. If you run RelayFax as a service and need access to drive shares or you wishto print to a network printer, you may have to provide RelayFax with some accesscredentials. Normally, RelayFax will run as a service using what is called the\"LocalSystem\" account. This account has no logon or password associated with it,therefore software running as \"LocalSystem\" may not be allowed access to somenetwork devices. To ensure that RelayFax can access your network devices you canprovide the logon and password of an account that has access to them. When logincredentials are included on this dialog RelayFax will log in as that account rather thanthe \"LocalSystem\" account.
Logon NameEnter the logon name of a valid Windows user account that has access to yournetwork devices.
55
57

Copyright © 1996-2014. All rights reserved. Alt-N Technologies, Ltd.
RelayFax Network Fax Manager v7.158
PasswordEnter the password to the above account.
DomainOptionally, enter the domain with which the user account is associated. If you leavethis field blank RelayFax will try to log in to the default domain.
Printing under a windows network can be difficult to set up.You must take steps to make sure that the printer you aretrying to access across your network has the correctpermissions configured to allow RelayFax to access it.Sometimes printer access problems can be resolved by settingup the network printer to allow print access from any memberof the "EVERYONE" group. This includes the \"LocalSystem\"account and therefore works when RelayFax is setup to run asa system service.
See also:
Select Printer
Select Printer Options
55
56

Section
IV

Copyright © 1996-2014. All rights reserved. Alt-N Technologies, Ltd.
RelayFax Network Fax Manager v7.160
4 MDaemon SMTP/POP3 Server
4.1 MDaemon Server Settings
Although RelayFax can be used with any email server, it has been designed to workexceptionally well with Alt-N Technologies' MDaemon Server for Windows. It can sharea modem with MDaemon and integrates well with your MDaemon user list andMDaemon's WorldClient webmail component.
The options on the MDaemon Properties dialog (File»MDaemon properties ...) make it
possible for RelayFax to be installed on the same machine as your MDaemon Server andshare a single modem with MDaemon without causing any conflicts. Immediately beforeMDaemon attempts a dialup connection it will create a file called PREDIAL.SEM. At theclose of the connection, POSTDIAL.SEM will be created. RelayFax can look for thesefiles before dialing and thus avoid attempting to use the modem when it is already inuse by MDaemon.
Within MDaemon, you must specify at least 2 redial attempts inthe RAS configuration pane in order for this feature to beutilized.
MDaemon Settings
Monitor for COM port sharing signals from MDaemonEnable this switch if you want RelayFax to share a COM port with MDaemon.
When MDaemon needs to dial make sure COM port [xx] is freeWhen RelayFax detects that MDaemon needs to dial, it will free this port forMDaemon's use. If necessary, RelayFax will suspend listening for faxes while the portis in use by MDaemon.

Section
V
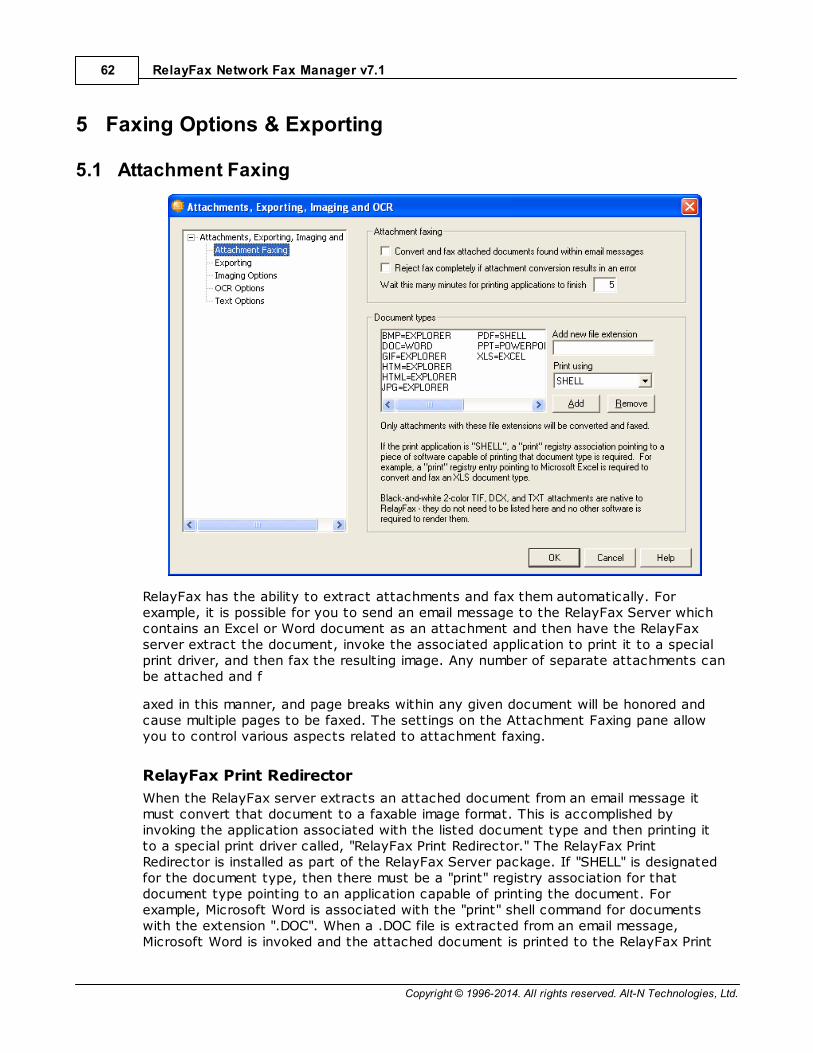
Copyright © 1996-2014. All rights reserved. Alt-N Technologies, Ltd.
RelayFax Network Fax Manager v7.162
5 Faxing Options & Exporting
5.1 Attachment Faxing
RelayFax has the ability to extract attachments and fax them automatically. Forexample, it is possible for you to send an email message to the RelayFax Server whichcontains an Excel or Word document as an attachment and then have the RelayFaxserver extract the document, invoke the associated application to print it to a specialprint driver, and then fax the resulting image. Any number of separate attachments canbe attached and f
axed in this manner, and page breaks within any given document will be honored andcause multiple pages to be faxed. The settings on the Attachment Faxing pane allowyou to control various aspects related to attachment faxing.
RelayFax Print Redirector
When the RelayFax server extracts an attached document from an email message itmust convert that document to a faxable image format. This is accomplished byinvoking the application associated with the listed document type and then printing itto a special print driver called, "RelayFax Print Redirector." The RelayFax PrintRedirector is installed as part of the RelayFax Server package. If "SHELL" is designatedfor the document type, then there must be a "print" registry association for thatdocument type pointing to an application capable of printing the document. Forexample, Microsoft Word is associated with the "print" shell command for documentswith the extension ".DOC". When a .DOC file is extracted from an email message,Microsoft Word is invoked and the attached document is printed to the RelayFax Print

Copyright © 1996-2014. All rights reserved. Alt-N Technologies, Ltd.
Faxing Options & Exporting 63
Redirector.
All documents printed to the RelayFax Print Redirector must be printed in "Fine FAXResolution 204 x 196 DPI." This value is set automatically during installation and islocated within the RelayFax Print Redirector's printing preferences, under Printers andFaxes on the Windows Start menu or Control Panel. Exercise caution in changing thisvalue, since failure to set the correct resolution could result in improperly formatted faximages that appear out of scale or otherwise deformed.
The RelayFax Print Redirector logs its activities into a file called REDIRECT.LOG, located
in the RelayFax\app\ directory.
The RelayFax Print Redirector must be set as the Default Printerbecause RelayFax invokes applications that will print to theDefault Printer only.
Since it is possible for some applications to run macros whenopening and printing certain types of documents, be aware ofpossible security concerns that you may have when choosingwhich application to associate with a given document type.
Further, it is possible to attach URL and HTML files to amessage and have RelayFax invoke your browser to render theURL or HTML file to fax a completed document. However, whenprocessing URL or HTML attachments, care must be takensince HTML documents can contain Java applets, JavaScript,and the like, which will be executed when the URL or HTML isrendered by the web browser. It is up to the administrator todetermine if URL or HTML attachments should be processedthrough RelayFax.
Attachment Faxing
Convert and fax attached documents found within email messagesClick this switch to turn on the attachment faxing feature. Without this switch setRelayFax will not fax documents attached to email messages.
Reject fax completely if attachment conversion results in an errorEnable this option if you wish to reject a fax when an error occurs during anattachment's conversion. RelayFax will send a message to the sender to let him orher know that the fax couldn't be sent. Uncheck this box if you want RelayFax tosend the fax anyway, even if an error occurs, as long as there are some other pagesto be sent.
Wait this many minutes for printing applications to finishFor each attachment, this is the number of minutes that RelayFax will wait fornotification that the RelayFax Print Redirector has finished converting the document.If no notification is received in this amount of time then the conversion fails andRelayFax will proceed accordingly based on your other settings. This setting isnecessary because occasionally some applications require user input and would
Copyright © 1996-2014. All rights reserved. Alt-N Technologies, Ltd.
RelayFax Network Fax Manager v7.164
effectively wait forever for that input without printing or exiting. Also somedocuments can take a very long time to print, depending on the size of thedocument and the associated application.
Document typesWhen the Convert and fax attached documents... option above is enabled, thedocument types listed here will be extracted, converted, and faxed. Since black andwhite 2-color TIF, DCX, and TXT file attachments are native to RelayFax, thosedocument types do not need to be listed, nor is any other software required forRelayFax to render them. They will be converted and faxed regardless of theAttachment Faxing dialog's settings.
Add new file extension / addTo add a new document type to the list, enter a new file extension, use the Printusing drop-down list to choose the application that you wish to associate with it,and click Add.
Print usingWhen adding a new document type, use this drop-down list to choose theapplication that will be used to print documents of that type. If you choose SHELLthen a "print" registry association must exist for that document type.
RemoveIf you wish to delete a document type, select it from the list and then click Removeto delete it.
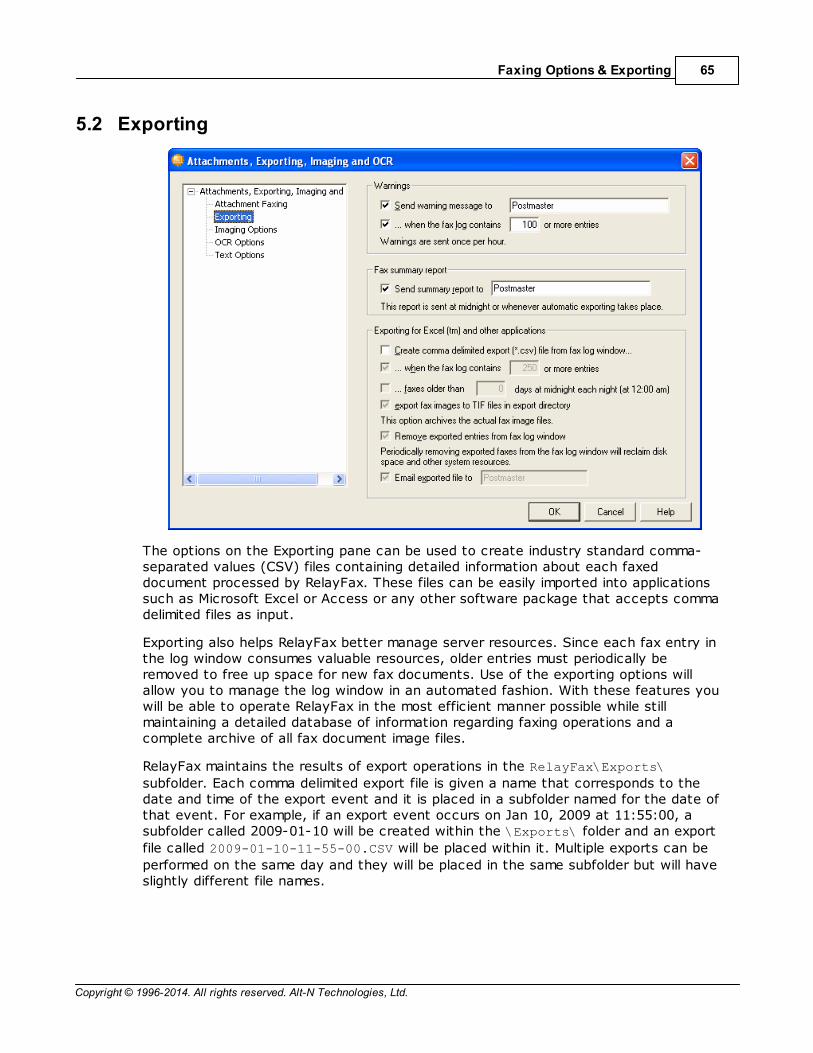
Copyright © 1996-2014. All rights reserved. Alt-N Technologies, Ltd.
Faxing Options & Exporting 65
5.2 Exporting
The options on the Exporting pane can be used to create industry standard comma-separated values (CSV) files containing detailed information about each faxeddocument processed by RelayFax. These files can be easily imported into applicationssuch as Microsoft Excel or Access or any other software package that accepts commadelimited files as input.
Exporting also helps RelayFax better manage server resources. Since each fax entry inthe log window consumes valuable resources, older entries must periodically beremoved to free up space for new fax documents. Use of the exporting options willallow you to manage the log window in an automated fashion. With these features youwill be able to operate RelayFax in the most efficient manner possible while stillmaintaining a detailed database of information regarding faxing operations and acomplete archive of all fax document image files.
RelayFax maintains the results of export operations in the RelayFax\Exports\
subfolder. Each comma delimited export file is given a name that corresponds to thedate and time of the export event and it is placed in a subfolder named for the date ofthat event. For example, if an export event occurs on Jan 10, 2009 at 11:55:00, asubfolder called 2009-01-10 will be created within the \Exports\ folder and an export
file called 2009-01-10-11-55-00.CSV will be placed within it. Multiple exports can be
performed on the same day and they will be placed in the same subfolder but will haveslightly different file names.

Copyright © 1996-2014. All rights reserved. Alt-N Technologies, Ltd.
RelayFax Network Fax Manager v7.166
Warnings
Send warning message to [XX]Click here and specify an email address where RelayFax should direct its warningmessages. You can have multiple addresses specified here if you separate each witha comma.
...when the fax log contains [XX] or more entriesClick here and specify a threshold value if you want RelayFax to send a warningmessage to the address designated above when the number of fax entriespresent in the log window meets or exceeds the specified value.
Fax Summary Report
Send summary report to...Click this checkbox and fill in one or more email addresses (separated by commas)and RelayFax will send them a summary of all fax activity currently listed in the logwindow. This report is not as detailed as the file generated by the export processand is in a format typical of standard fax devices. It will be emailed to the addressesjust before midnight each night or whenever automatic exporting occurs.
Exporting for Excel™ and other applications
Create comma delimited export (*.csv) file from fax log window...Click here if you want RelayFax to create export files automatically. For moreinformation on the format of RelayFax's CSV files, see: Export File Format .
...when the fax log contains XX or more entriesClick here and specify a threshold value if you want RelayFax to perform anexport operation whenever the number of fax entries present in the log windowmeets or exceeds this value.
...faxes older than XX days at midnight each night (at 12:00 am)Click this option to enable daily exporting. At midnight each night, all faxes olderthan the specified number of days will be exported. For example, a value of "2"would mean that faxes would remain in the fax log for two full days before beingexported at midnight.
Export fax images to TIF files in export directoryWhen this option is enabled, TIF images of each faxed document will be createdand placed in the export directory along with the comma-delimited export file.This will allow you to keep archives of all fax images. When a fax image is placedin the export directory, its name will be the fax's unique tracking number, with .TIF as its file extension. For example, "5254.TIF" or "6523.TIF." You can
match an image to a record in the comma-delimited file by using this trackingnumber.
Remove exported entries from fax log windowClick this option and RelayFax will automatically remove exported faxes from thefax log window. In this way the log window can be automatically pruned of oldfaxes and server resources can be conserved. Periodic removal of old faxes fromthe log window is required to reclaim disk space and other resources devoted to
67

Copyright © 1996-2014. All rights reserved. Alt-N Technologies, Ltd.
Faxing Options & Exporting 67
an entry when it is present there.
If this option is disabled then the entries in the Fax LogWindow will not be removed after an export file is created.Thus, when later export files are created these files will beexported again. If you do not want an entry to be included infuture export files then it must be deleted from the fax logwindow, either manually or by enabling this option.
Email exported file to XXEnable this option and specify an email address and the comma-delimited filecreated during an export event will be folded into an email message and sent tothe specified address. You can specify more than one address by separatingeach with a comma.
See Also:
Export File Format
5.2.1 Export File Format
The format of the comma-delimited export file is as follows:
TNUMBER This field contains the unique identifier assigned tothis fax. If image files were also exported then thisvalue is used as the filename of the exported imagefile.
FSTATUS 4 = SENT, 8 = FAILED, 16 = RECEIVED
PRIORITY Indicates the priority value assigned to this fax. The default of 50 will be automatically assigned toincoming faxes. Outgoing faxes can be assignedany value between 0 and 100
RNAME This is the name of the recipient of the fax - ifknown.
FAXNUMBER If this is a SENT fax, this is the number to which itwas sent.
SUBJECT This is the subject of the fax - if known.
FROMLINE This is the name or email of the sender of the fax.
BANNER This is the banner string that was used whensending the fax.
67
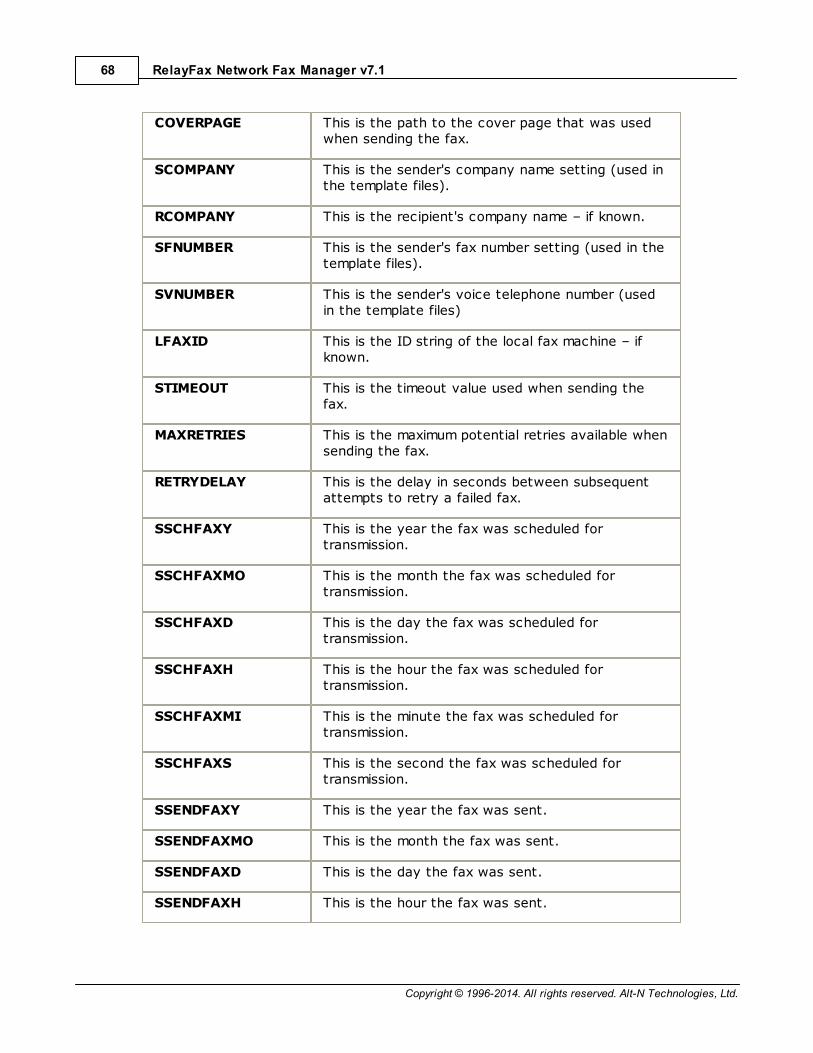
Copyright © 1996-2014. All rights reserved. Alt-N Technologies, Ltd.
RelayFax Network Fax Manager v7.168
COVERPAGE This is the path to the cover page that was usedwhen sending the fax.
SCOMPANY This is the sender's company name setting (used inthe template files).
RCOMPANY This is the recipient's company name – if known.
SFNUMBER This is the sender's fax number setting (used in thetemplate files).
SVNUMBER This is the sender's voice telephone number (usedin the template files)
LFAXID This is the ID string of the local fax machine – ifknown.
STIMEOUT This is the timeout value used when sending thefax.
MAXRETRIES This is the maximum potential retries available whensending the fax.
RETRYDELAY This is the delay in seconds between subsequentattempts to retry a failed fax.
SSCHFAXY This is the year the fax was scheduled fortransmission.
SSCHFAXMO This is the month the fax was scheduled fortransmission.
SSCHFAXD This is the day the fax was scheduled fortransmission.
SSCHFAXH This is the hour the fax was scheduled fortransmission.
SSCHFAXMI This is the minute the fax was scheduled fortransmission.
SSCHFAXS This is the second the fax was scheduled fortransmission.
SSENDFAXY This is the year the fax was sent.
SSENDFAXMO This is the month the fax was sent.
SSENDFAXD This is the day the fax was sent.
SSENDFAXH This is the hour the fax was sent.
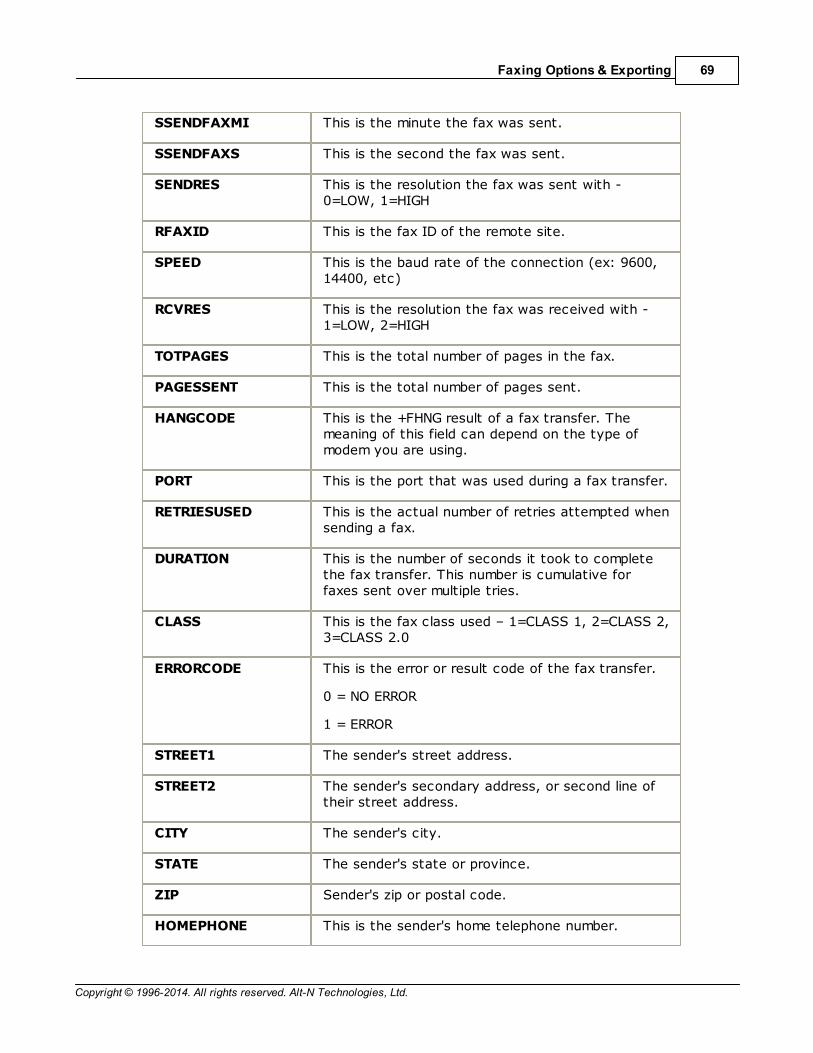
Copyright © 1996-2014. All rights reserved. Alt-N Technologies, Ltd.
Faxing Options & Exporting 69
SSENDFAXMI This is the minute the fax was sent.
SSENDFAXS This is the second the fax was sent.
SENDRES This is the resolution the fax was sent with -0=LOW, 1=HIGH
RFAXID This is the fax ID of the remote site.
SPEED This is the baud rate of the connection (ex: 9600,14400, etc)
RCVRES This is the resolution the fax was received with -1=LOW, 2=HIGH
TOTPAGES This is the total number of pages in the fax.
PAGESSENT This is the total number of pages sent.
HANGCODE This is the +FHNG result of a fax transfer. Themeaning of this field can depend on the type ofmodem you are using.
PORT This is the port that was used during a fax transfer.
RETRIESUSED This is the actual number of retries attempted whensending a fax.
DURATION This is the number of seconds it took to completethe fax transfer. This number is cumulative forfaxes sent over multiple tries.
CLASS This is the fax class used – 1=CLASS 1, 2=CLASS 2,3=CLASS 2.0
ERRORCODE This is the error or result code of the fax transfer.
0 = NO ERROR
1 = ERROR
STREET1 The sender's street address.
STREET2 The sender's secondary address, or second line oftheir street address.
CITY The sender's city.
STATE The sender's state or province.
ZIP Sender's zip or postal code.
HOMEPHONE This is the sender's home telephone number.

Copyright © 1996-2014. All rights reserved. Alt-N Technologies, Ltd.
RelayFax Network Fax Manager v7.170
HOMEFAX This is the sender's home fax number.
BUSPHONE The sender's business phone number.
BUSFAX Sender's business fax number.
BILLINGCODE The billing code of the sender.
IMAGESIZE This field contains the size (in bytes) of the faximage disk file.
COUNTER Always contains a value of "1".
EXPORTIMAGE Was fax image exported?
0 = FAX IMAGE NOT EXPORTED
1 = FAX IMAGE EXPORTED
DID This is the Direct Inward Dial number.
ERRORSTRING If ERRORCODE=0, this column is empty, otherwise itcontains a description of the error.
RETRYDURATIONS Contains the duration, in seconds, of each fax retryattempt. For example, if there were three attemptsto deliver a particular fax, then the entry might looklike this: "30,20,40." This would indicate three retryattempts with durations of 30, 20, and 40 secondsrespectively. The export file's DURATION columndefined above is the sum of all attempts, or thetotal time to transfer the fax.
See Also:
Exporting 65

Copyright © 1996-2014. All rights reserved. Alt-N Technologies, Ltd.
Faxing Options & Exporting 71
5.3 Imaging Options
The Imaging Options pane is used for configuring RelayFax's handling of fax images. Youcan designate whether or not images will be stored after they have been sent, whetherto use enhanced resolution when creating them, the image format that will be usedwhen emailing faxes to your users, and several other options.
Fax Image Options
Remove fax images from disk after they are sentEnable this control if you want RelayFax to delete fax image files from disk after theyhave been delivered to their final destination. Since fax image files can be somewhatlarge, this feature can be used to conserve storage space if that is of concern toyou.
Several features require the fax image to be present ondisk (for example: viewing the image from the FaxWindow on the main interface). Consequently, if you areremoving images from the disk not all features will beavailable.
Create fax images in enhanced resolutionUse this switch if you wish to send high-resolution images when a document isfaxed. Selecting this switch provides superior fax image quality but consumes a bitmore disk space and transmission time.

Copyright © 1996-2014. All rights reserved. Alt-N Technologies, Ltd.
RelayFax Network Fax Manager v7.172
Fax Image Manipulation
Incoming faxes should be sent to users as...This is the image format that will be used when sending incoming faxes to your usersin the form of email attachments.
a single multi-page TIF image (image/tif, default)This is the default setting. When selected it will cause a single multi-page TagImage File Format (TIFF) image of the incoming fax to be attached to themessage. This file will have the TIF extension.
multiple TIF images (image/tif, 1 image per faxed page)This option will cause a separate TIFF image to be attached for every page thatthe fax contained. This can be useful since some TIFF viewers do not supportmultiple pages.
multiple JPG images (image/jpg, 1 image per faxed page)Causes one JPEG image to be attached per faxed page.
multiple GIF images (image/gif, 1 image per faxed page)When this option is selected, RelayFax will attach a single Graphic InterchangeFormat (GIF) image for each page that the fax contained.
multiple BMP images (image/bmp, 1 image per faxed page)Multiple Bitmap (BMP) images will be attached when this option is chosen.
multiple PNG images (image/png, 1 image per faxed page)Multiple Portable Network Graphic (PNG) images will be attached when this optionis chosen.
a single PDF document (image/pdf)This option sends incoming faxes to users as a single multi-page PortableDocument Format (PDF) file.
RelayFax also supports PDF encryption. To create encrypted PDF files, choosethis imaging option and add the following to your RelayFax.ini file:
[PDF]
Encrypt=Yes
OwnerPassword=
(Recommended) An owner password gives full access to thedocument. No owner password means that anyone canchange the permissions.
UserPassword= Designating a user password means that it will be required toopen the document.
Permissions=-44
"-64" disallows all...no printing, editing, copying, and so on. "-44" permits printing and copying but disallows modifying thecontents and annotations. "-4" allows all. For more onencryption and permissions, see the Adobe PDF Specification

Copyright © 1996-2014. All rights reserved. Alt-N Technologies, Ltd.
Faxing Options & Exporting 73
at adobe.com.
The following options will not be available when youchoose the single multi-page TIF image option above.
Always create fax images with this extension [xx] (blank for default)If you want the file attachments to have an extension other than the given format'sdefault setting, specify that extension here.
Scale image to [xx] percent actual size (10-200%)Specify a percentage in this option if you want the attached image file to be scaledto a different size than the original fax image. You may specify any value from 10%to 200%.
5.4 OCR Options
RelayFax is equipped with Optical Character Recognition (OCR) technology that can beused to route incoming faxes based upon their content rather than just the sender'sfax ID or the port on which faxes arrive. RelayFax's OCR engine will scan the incomingfax and recognize any typewritten text that it contains. Using the OCR options and Inbound Fax Rules , you can configure RelayFax to route faxes automatically based92
Copyright © 1996-2014. All rights reserved. Alt-N Technologies, Ltd.
RelayFax Network Fax Manager v7.174
on names and email addresses it finds, and you can search for specific text and thenroute faxes based upon the results of the search.
The OCR Options pane is used to configure the various options associated withRelayFax's OCR capabilities. You can specify the number of pages that will be read, thelanguage that you want OCR to recognize, whether or not you want the OCR files to besaved and the format in which to save them, and whether or not RelayFax shouldautomatically route the fax to your users when if finds one of their names in the fax.
Document recognition is not just limited to incoming faxes. You can also recognize a
document manually by clicking "File»Recognize..." and then specifying both the file
that you want to be recognized and the format in which you want it to be saved.
OCR is only effective for typewritten documents; it cannotrecognize handwriting.
OCR engine status
RelayFax's OCR engine is supplied as a plug-in module. If you have not yet installed itthen this section will contain a message informing you that it needs to be installed. Italso contains a hyperlink to the RelayFax web site from which the module can bedownloaded. If the OCR module is not installed then the controls below this section willbe dimmed. They will not be accessible until it is installed.
OCR options
OCR all inbound faxesClick this check box if you want to OCR scan all incoming faxes.
Include OCR text in email bodyClick this check box if you want to include the resulting text of OCR scans in thebody of email messages. This option is independent of the $ATTACHOCRFILE$ macro
— if you are using this option and that macro, the OCR files will still be attachedto the email.
Restrict OCR recognition to the first [xx] faxed pages onlyBy default, only the first page of incoming faxes will be recognized. If you wantRelayFax to recognize more than the first page then you can use this control tospecify an alternate number. If you want all pages to be recognized then enter "0".
OCR recognizes documents written in...There are several languages that the OCR engine is capable of recognizing. From thedrop-down list box choose the language that you want it to look for whenrecognizing the documents.
Save OCR work files in this format...By default, the results of the OCR process will be used for routing purposes and thendeleted. However, RelayFax provides the option to save these files for your use.This is a highly useful feature because the files can be saved in the most commonlyused document formats, including: Microsoft Word, Microsoft Excel, WordPerfect,Adobe Acrobat, HTML, Lotus, plain text, text with line breaks, and others. If you
198
Copyright © 1996-2014. All rights reserved. Alt-N Technologies, Ltd.
Faxing Options & Exporting 75
want to save these files then click this checkbox and choose the desired formatfrom the drop-down list box. Each file will be saved in RelayFax's \Faxfile\ subfolderalong with the TIFF file with which it is associated. OCR files will be saved with theextension ".ocr" regardless of the format in which they were saved. Some softwareproducts may not support files without certain file extensions, so in some cases itmay be necessary to rename the *.ocr file before it can be viewed by your product.When you have configured a rule to email an OCR document to someone, the fileextension will be renamed to match the appropriate document format. Manually
recognizing a document (File»Recognize...) will cause it to be saved with the
chosen format's file extension as well.
OCR technology isn't perfect. Characters with similar shapes,unusual fonts, or fuzzy or unclear text may cause somemistakes in the documents resulting from the OCR process.However, in most cases only a moderate amount of editing willbe required to correct these mistakes.
Automatically route faxes to known email addresses (known accounts)Click this option if you want RelayFax to automatically route incoming faxes to yourusers when the OCR engine finds an account holder's real name in a document. Forexample, if Frank Thomas had a fax account on your RelayFax server, enabling thisoption would cause any fax containing "Frank Thomas" to be routed to himautomatically without the need to create a specific fax rule to do so.
Automatically route faxes to unknown email addressesWhen this switch is enabled, the OCR engine will scan the fax for the first emailaddress that it contains and then automatically route the fax to that address, evenif it is otherwise unknown to RelayFax (not a known account). RelayFax will useRegular Expression Matching to determine what portion of the recognized textconstitutes an email address. The Regular Expression syntax that RelayFax uses toextract addresses is located in the RelayFax.ini file and appears as follows:
[OCR]LinePattern=[Tt][Oo]?:[a-zA-Z0-9\.]+@[a-zA-Z0-9\.]+EmailPattern=[a-zA-Z0-9\.]+@[a-zA-Z0-9\.]+
RelayFax first uses LinePattern= to extract the line that contains an email address. Then the address is extracted from that line by using EmailPattern=, which almostassures a reliable result. If you need to adjust either of these values due to yourparticular situation, you can easily do so by editing their corresponding INI entries.
Enabling this feature will in effect cause RelayFax to becomean open fax gateway for any user. That is, of course, the goalof this feature, but it may violate your local network policy.
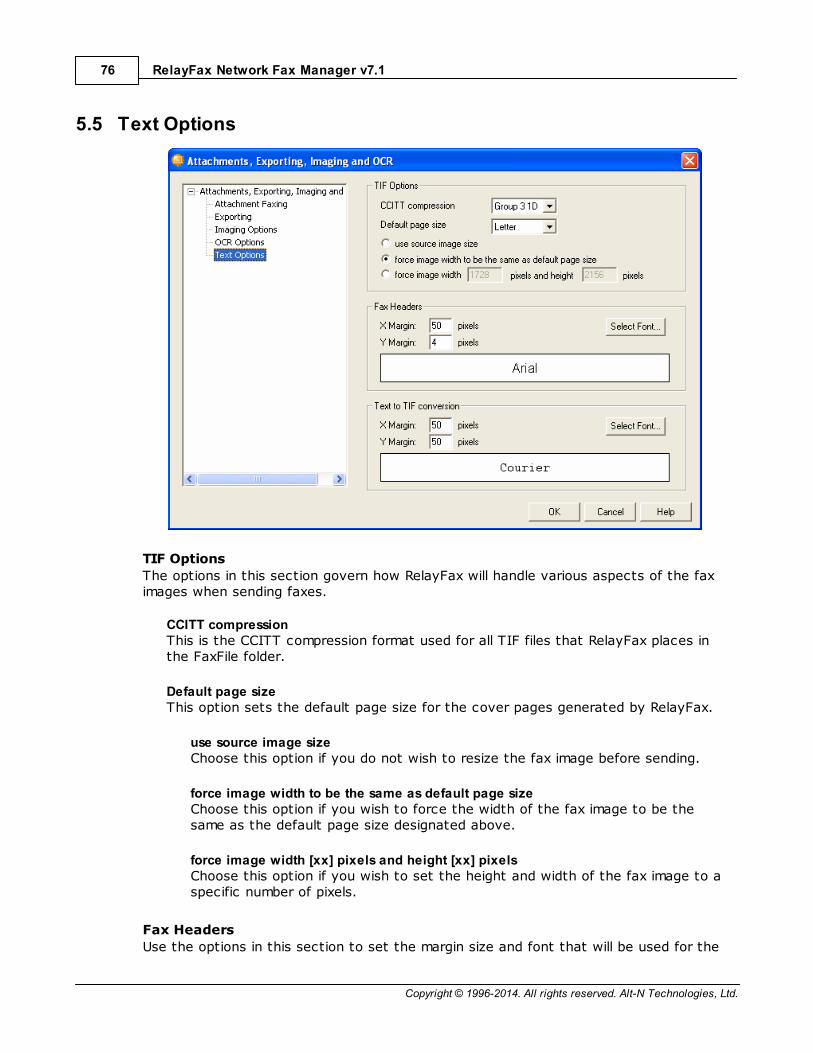
Copyright © 1996-2014. All rights reserved. Alt-N Technologies, Ltd.
RelayFax Network Fax Manager v7.176
5.5 Text Options
TIF Options
The options in this section govern how RelayFax will handle various aspects of the faximages when sending faxes.
CCITT compressionThis is the CCITT compression format used for all TIF files that RelayFax places inthe FaxFile folder.
Default page sizeThis option sets the default page size for the cover pages generated by RelayFax.
use source image sizeChoose this option if you do not wish to resize the fax image before sending.
force image width to be the same as default page sizeChoose this option if you wish to force the width of the fax image to be thesame as the default page size designated above.
force image width [xx] pixels and height [xx] pixelsChoose this option if you wish to set the height and width of the fax image to aspecific number of pixels.
Fax Headers
Use the options in this section to set the margin size and font that will be used for the
Copyright © 1996-2014. All rights reserved. Alt-N Technologies, Ltd.
Faxing Options & Exporting 77
inbound and outbound fax banners.
Text to TIF Conversion
When there is a plain text attachment or the text for the cover page comments is toolarge to fit in the space provided, RelayFax will create an additional TIF image/page forthe text, using the margin and font settings defined in this section.
The size limit for text on the cover page is governed by the following key in the RelayFax.ini file:
[Special]CommentCutoff=3000
If the amount of text exceeds this value then the text is moved to its own pageinstead of appearing on the cover page. In any case, the client's "Comments for coverpage " option is still limited to 3000 characters, regardless of this setting.
5.6 TWAIN Device Support
RelayFax supports TWAIN compatible devices such as digital cameras and scanners.Documents can be scanned directly into RelayFax and then faxed to their properdestinations at the touch of a button. From the RelayFax server's interface, you can
acquire a document from a scanner by clicking "File»Select source...", choosing the
device that you wish to use, and then clicking "File»Acquire...".
Because the scanner features are primarily accessed from within the RelayFax SMTPClient, you will find a more thorough discussion of them in the client section.
See:
Scan Image
Scanning Options
142
150
150
151

Copyright © 1996-2014. All rights reserved. Alt-N Technologies, Ltd.

Section
VI

Copyright © 1996-2014. All rights reserved. Alt-N Technologies, Ltd.
RelayFax Network Fax Manager v7.180
6 Mail Sources and Rules
6.1 Mail Sources & Rules dialog
The Mail Sources and Rules dialog consists of five panes: Mail Sources, Default Rules,Outbound Fax Rules, Inbound Fax Rules, and Junk Faxes. The dialog is used todesignate the location of POP3 mail hosts from which the RelayFax Server is to collectmail for faxing, and to specify what actions should be taken by the server when thecollected mail meets certain administrator defined criteria. In addition, it is used toroute incoming faxes to specific destinations, also based upon administrator definedcriteria.
Mail Sources
On the Mail Sources pane, you will specify the POP3 mail hosts from which the RelayFaxServer is to collect mail to be processed and faxed. RelayFax will connect to each oneof these hosts, collect any waiting messages, and then process these messages basedupon the criteria designated on the Rules panes of this same dialog.
Default Rules
When RelayFax receives a document for faxing, or if it receives an incoming fax, it willfirst attempt to apply the Outbound or Inbound Fax Rules specified on their respectivepanes. If no rule can be applied to the document or fax then RelayFax will actaccording to the default rules specified here.
Outbound Fax Rules
With the Outbound Fax Rules feature, you can setup rules that RelayFax will use todetermine what to do with each email message that it receives. Careful utilization ofthe rules system will allow you to setup a very flexible and robust fax server system.
Inbound Fax Rules
Inbound Fax Rules are used to tell RelayFax where to post incoming faxes. When a faxis received, the transmitting fax device's ID is compared to the current list of InboundFax Rules. Then, the fax is processed and routed according to these rules.
Junk Faxes
One of the available actions that can be specified in the Inbound Fax Rules is the "Markas SPAM (junk)" action. The options on the Junk Faxes pane are used to designatewhat will happen to messages that have been marked as SPAM.
6.2 Calling Number Display (CND) Fax Routing
RelayFax is equipped with support for routing incoming faxes based upon Calling NumberDisplay (commonly called Caller ID) data. As with other methods of routing inboundfaxes, this is accomplished by using the Inbound Fax Rule editor. You will createrules specifying the text for which RelayFax will search and then the actions that willbe taken when that text is or isn't found.
There are a few requirements that must be met before you will be able to route faxesbased upon Calling Number Display (CND) information. First, the CND service must be
82
84
86
92
96
92
Copyright © 1996-2014. All rights reserved. Alt-N Technologies, Ltd.
Mail Sources and Rules 81
active on the telephone line on which you receive faxes. This service is provided byyour telephone company, usually for a small extra monthly charge. Also, your receivingfax modem must have support for detecting and preserving CND data so that RelayFaxcan acquire it, and that support must be enabled. Since CND support is not normallyenabled by default for most modems, it is likely that you will need to add theappropriate command to your modem's INIT string within RelayFax. Consult yourmodem's user manual for the proper INIT string command that enables CND support.See Modem Properties for information about editing your INIT string.
Many inexpensive modems do not have CND capability.
CND data is transmitted from the telephone company to your fax modem in a packet ofinformation between the first and second ring. Therefore, you must configure yourmodem to allow at least two rings before answering the call if you want to be able toroute messages based on CND data. You can configure this setting on the ModemProperties dialog.
CND data can be provided to RelayFax in a variety of formats. It can be sent as a rawbyte stream, in single-message format, or multi-message format. To make full use ofRelayFax's CND routing capabilities you must configure your modem to provide CND datain multi-message format. Consult your modem manual for the proper INIT string settingsrequired to achieve this (for example +VCID=1). In multi-message format most modemsappend "labels" to the raw CND data elements in order to make it easier to read, butthere are no uniform standards governing what these labels should be. Thereforedifferent modems use different labels for each piece of CND information. One modem,for example, might label the CND number as "NUMB=" while another would use "CALLERNUMBER:". Because RelayFax needs to know which labels your modem uses so that itcan parse the number and name elements from the CND data, you will need todetermine them and then enter them into the controls found on the Modem Propertiesdialog. You can determine them by watching for the labels in the main display during anincoming call being processed by RelayFax. Technically, RelayFax should be able toacquire the CND data in raw format (which doesn't require any labels), butexperimentation has discovered that some modems modify even the raw data beforepassing it to RelayFax. This makes parsing at the application level inevitable.
In addition to the normal actions that can be assigned to Inbound Rules, there is onespecial action available for use exclusively with CND routing. Since CND detection takesplace prior to answering the call, you can use the "Do no answer incoming call" action.When an incoming call is ignored as a result of such a rule the call is not answered andwill ring until the remote side gives up. While the phone is ringing you may see one ormore error messages such as "unspecified modem error" or "timeout during fax send/recv". These error messages are of no real concern. The presence of these errormessages does not effect the performance of the software in any way.
See the "DAT File Processing Macros " section for information regarding CND relatedmacros available for use within DAT files.
30
27
198

Copyright © 1996-2014. All rights reserved. Alt-N Technologies, Ltd.
RelayFax Network Fax Manager v7.182
6.3 Mail Sources
Use the Mail Sources pane to specify the mail hosts from which the RelayFax Servershould collect mail to be processed and faxed.
Mail Sources
Here you can specify as many mail server accounts as you wish. RelayFax will collectemail from each of them, convert the emails to faxes, and then send them.
ServerEnter the server from which you wish to be collect RelayFax's messages.
LogonEnter the username or login credential of the mail account on the specified server.
PasswordEnter the password needed to access the account.
RemoveIf you wish to delete a mail source, select it from the list and then click this buttonto remove it.
Enable/DisableClicking this button toggles the state of the selected mail source entries. Thisswitch gives you control over whether RelayFax will collect mail for this entry or skipover it when it performs the mail collection process.

Copyright © 1996-2014. All rights reserved. Alt-N Technologies, Ltd.
Mail Sources and Rules 83
AddAfter entering the server and login credentials in the spaces provided, click thisbutton to add the mail source to the list.
ReplaceWhen an entry is selected from the list, it will be presented for editing. After anydesired changes are made click this button to apply those changes.
Remove downloaded mail from this serverEnable this check box if you wish to remove the mail from the server after it iscollected. Otherwise it will be left on the server.
Use SSL/TLSCheck this box if you wish to use SSL/TLS when collecting messages from the mailsource.
Adding a New Mail SourceTo add a new mail source to the list, enter the server and login credentials, choosewhether or not to Remove downloaded mail..., and then click Add. At each designatedprocessing interval RelayFax will check all enabled entries for new mail messages.
Editing an Existing Mail SourceTo edit an existing mail source, first click the desired entry. This will display its currentsettings in the various controls on this dialog. Make any desired changes to thesesettings and then click the Replace button. The old settings for this entry will then bereplaced by the new.
Do not click the Add button when editing an existing entry.Click the Replace button to save any changes to the entry.
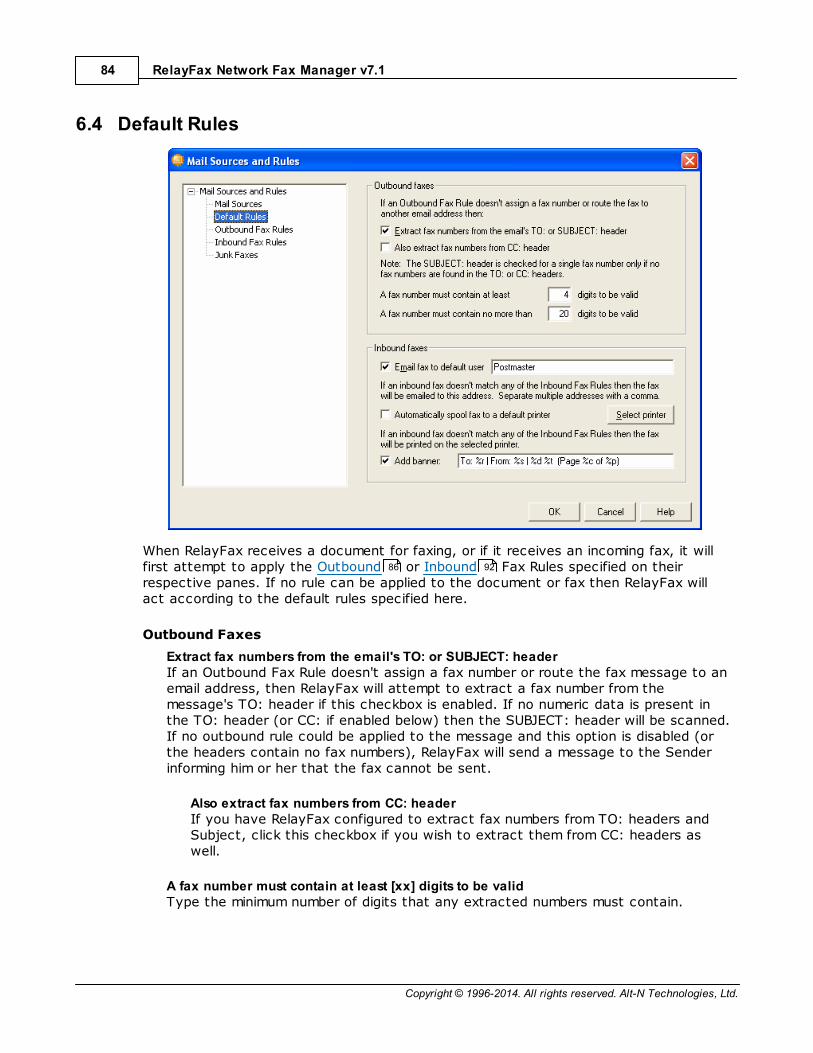
Copyright © 1996-2014. All rights reserved. Alt-N Technologies, Ltd.
RelayFax Network Fax Manager v7.184
6.4 Default Rules
When RelayFax receives a document for faxing, or if it receives an incoming fax, it willfirst attempt to apply the Outbound or Inbound Fax Rules specified on theirrespective panes. If no rule can be applied to the document or fax then RelayFax willact according to the default rules specified here.
Outbound Faxes
Extract fax numbers from the email's TO: or SUBJECT: headerIf an Outbound Fax Rule doesn't assign a fax number or route the fax message to anemail address, then RelayFax will attempt to extract a fax number from themessage's TO: header if this checkbox is enabled. If no numeric data is present inthe TO: header (or CC: if enabled below) then the SUBJECT: header will be scanned.If no outbound rule could be applied to the message and this option is disabled (orthe headers contain no fax numbers), RelayFax will send a message to the Senderinforming him or her that the fax cannot be sent.
Also extract fax numbers from CC: headerIf you have RelayFax configured to extract fax numbers from TO: headers andSubject, click this checkbox if you wish to extract them from CC: headers aswell.
A fax number must contain at least [xx] digits to be validType the minimum number of digits that any extracted numbers must contain.
86 92

Copyright © 1996-2014. All rights reserved. Alt-N Technologies, Ltd.
Mail Sources and Rules 85
A fax number must contain no more than [xx] digits to be validType the maximum number of digits that you wish to allow extracted numbers tocontain. This is useful if you wish to prohibit your users from sending faxes to longdistance numbers.
Inbound Faxes
Email fax to default user [address]When RelayFax receives an inbound fax that does not match any of the Inbound FaxRules, it will be emailed to this address. If entering multiple addresses they must beseparated by commas.
Automatically spool fax to a default printerCheck this box if you wish to print all inbound faxes that do not match any InboundFax Rules. Click the Select Printer button to choose the printer that you wish touse.
Select PrinterClick this button to open the Select Printer dialog from which you can choose aprinter and set several options.
Add BannerClick this option if you wish to add a custom banner to inbound faxes that do notmatch one of the Inbound Fax Rules. For more on banners, see: Banner Text &Formatting Characters .
55
42
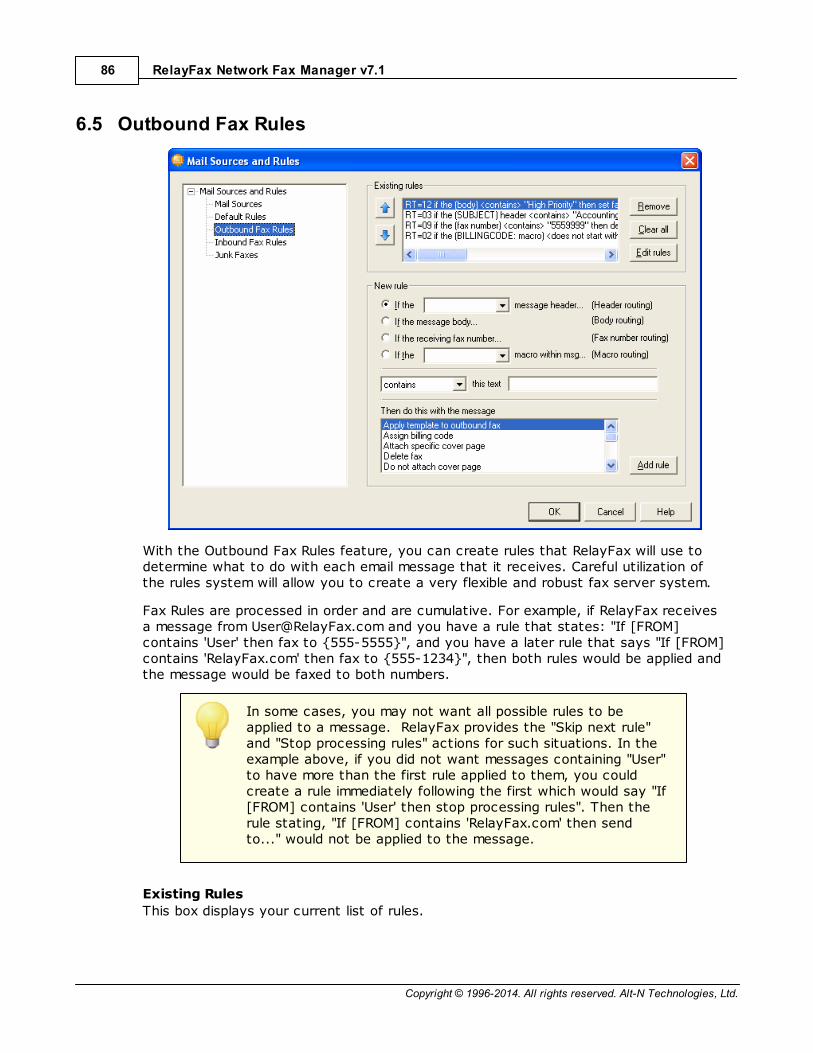
Copyright © 1996-2014. All rights reserved. Alt-N Technologies, Ltd.
RelayFax Network Fax Manager v7.186
6.5 Outbound Fax Rules
With the Outbound Fax Rules feature, you can create rules that RelayFax will use todetermine what to do with each email message that it receives. Careful utilization ofthe rules system will allow you to create a very flexible and robust fax server system.
Fax Rules are processed in order and are cumulative. For example, if RelayFax receivesa message from [email protected] and you have a rule that states: "If [FROM]contains 'User' then fax to {555-5555}", and you have a later rule that says "If [FROM]contains 'RelayFax.com' then fax to {555-1234}", then both rules would be applied andthe message would be faxed to both numbers.
In some cases, you may not want all possible rules to beapplied to a message. RelayFax provides the "Skip next rule"and "Stop processing rules" actions for such situations. In theexample above, if you did not want messages containing "User"to have more than the first rule applied to them, you couldcreate a rule immediately following the first which would say "If[FROM] contains 'User' then stop processing rules". Then therule stating, "If [FROM] contains 'RelayFax.com' then sendto..." would not be applied to the message.
Existing Rules
This box displays your current list of rules.
Copyright © 1996-2014. All rights reserved. Alt-N Technologies, Ltd.
Mail Sources and Rules 87
UP/DOWN ArrowsBecause rules are processed in order, changing a rule's position in the list can alterwhen or if it is applied to a given message. To change a rule's position, select itsentry and this click the up or down arrow to move it.
RemoveIf you wish to delete an outbound rule, select it and then click Remove to delete itfrom the list.
Clear allThis button removes all existing rules.
Edit rulesIf this button is clicked, the OUTRULES.DAT file will be opened in Notepad for manual
editing of Outbound Fax Rules.
Take care not to violate the syntax of the OUTRULES.DAT file.
New Rule
Header routing
If the [HEADER] message header...Click this option if you want the fax rule to route messages based on the text ina specific message header.
Body routing
If the message body...Click this option if you want the fax rule to route messages based on the text inthe message body.
Fax number routing
If the receiving fax numberClick this option if you want the rule to be based on the fax number to which thefax is being sent.
Macro routing
If the [xx] macro within msg...When this option is chosen, the fax rule's routing will be based on the presenceof certain email macros found within the message body.
For more information regarding email macros, see:
Sending a Fax via an Email Client
Email Macros
158
192

Copyright © 1996-2014. All rights reserved. Alt-N Technologies, Ltd.
RelayFax Network Fax Manager v7.188
Comparison type
contains, does not contain, does not start with, is equal to, is not equal to, starts withThis option is for designating what relationship should exist between the part ofthe message being searched and the "this text" value designated for the rule.
this textUse this field to specify the text that RelayFax should look for, which will triggerthe rule when a match is found or not found, depending on the rule.
Action
Then do this with the messageThis box lists the available actions that can be performed if a received messagemeets an Outbound Fax Rule's criteria. When creating a rule, the types ofactions that will be available depends upon which routing method you selectabove. Not all actions are available for all routing types. The following is a list ofthe actions and their functions:
Add text to end of fax number - This option allows you to add text to theend of a fax number if it meats the rules criteria. This action is only availablewhen you choose the Fax number routing method.
Add text to start of fax number - This option allows you to add text to thebeginning of a fax number if it meats the rules criteria. This action is onlyavailable when you choose the Fax number routing method.
Apply template to outbound fax - Use this option if you want a specificTemplate to be applied to messages meeting an Outbound Fax Rule'scriteria. With Templates you can designate alternate banners, cover pages,and other fax parameters. To create a rule that will take this action specifythe routing type, comparison type, and text to be tested. Then, click the Apply template to outbound fax action, click the Add rule button, choose thetemplate file (*.TP) that you want to assign to the rule, and then click OPEN.
Before you can create a rule that will take this action youmust first create the Template that you wish to assign tothe rule.
For more information on Templates, see:
Templates
Assign Billing Code - Use this action to assign a specific Billing Code to anoutbound fax meeting the rule's criteria. When you click the Add rule button,a dialog will open from which you can choose the desired Billing Code orcreate a new one.
Attach specific cover page - Use this feature if you want an alternateCover Page to be attached to messages that match a rule's criteria. Tocreate a rule that will take this action specify the routing type, comparisontype, and text to be tested. Then click the Attach specific cover page
118
118
106
Copyright © 1996-2014. All rights reserved. Alt-N Technologies, Ltd.
Mail Sources and Rules 89
action, click the Add rule button, choose the cover page file that you wantto assign to the rule, and then click OPEN.
Before you can create a rule that will take this action youmust first create the alternate Cover Page that you wishto assign to the rule.
For more information on cover pages, see:
Cover Pages
Do not attach cover page – Select this action if you wish to prevent acover page from being attached to the outbound fax when the fax messagematches the rule's criteria.
Delete fax – Select this action if you want the message to be deleted if itmatches the rule.
Email fax to sender – Using this rule will cause any outbound fax matchingthe rule's criteria to be emailed to the sender of the fax message.
Email fax to specific user(s) - Select this action, click the Add rule button,enter one or more Email addresses into the dialog that will open (clicking Addafter each address entered), and then click OK. This will cause RelayFax toforward any message that meets the specified Rule's requirements to theaddresses indicated in the Rule.
Several special formatting macros are available for use inspecifying these email addresses. See the Outbound FaxRule Macros for a complete listing.
Print fax to specific printer – Select this action, click the Add rule button,and then the Select Printer dialog will be opened. Choose a printer fromthe Available Printers list and then click OK. This will cause all outboundfaxes that meet the rule's criteria to be sent to the selected printer.
Run a program - This action can be used to run a particular program whenan outbound fax message meets the rule's conditions. You must specify thepath to the program that you wish to run, and you can specify whether ornot RelayFax should suspend its operations temporarily or indefinitely while itwaits for the program to terminate. Further, you can force the program toterminate and/or run it in a hidden window.
Replace text within fax number - Use this action if you want to replacethe specified text in a fax number with some other text when it meets therule's criteria. When you choose this option and click Add rule, a box will openin which you will specify the new text. This action is only available when youchoose the Fax number routing method.
Send fax at specific day and time – Select this action, click the Add rule
106
197
55

Copyright © 1996-2014. All rights reserved. Alt-N Technologies, Ltd.
RelayFax Network Fax Manager v7.190
button, and then choose the date and time that you want a fax matchingthe rule to be sent.
Click to open the graphical calendar from which you can choose the dateto send the fax.
Send fax to numbers found in text file - Select this action, click the Addrule button, and then pick the text file that contains your list of fax numbers.When this rule is triggered RelayFax will fax the message to each numberspecified in the file. The file must contain no more than one fax number perline, but each line can also contain the recipient's name and companyinformation. Lines beginning with "#" or ";" are ignored to allow you to putcomments throughout the file as necessary.
Examples:
555-1212 -only the fax number is specified
555-1212, Arvel Hathcock -fax number and recipient namespecified
555-1212, Arvel Hathcock, Alt-NTechnologies
-fax number, name, and companyspecified
555-1212, Arvel Hathcock, "Alt-NTech, LTD."
-fax params may contain commas ifquoted
555-1212, , Alt-N Technologies -only fax number and companyspecified
There is no theoretical limit to the quantity of faxnumbers that such a file can contain. However, RelayFax
Copyright © 1996-2014. All rights reserved. Alt-N Technologies, Ltd.
Mail Sources and Rules 91
sets an arbitrary limit of 100 numbers to keep fromdraining the computer of too many resources. If this limitis too low, it can be adjusted by manually editing theRelayFax.ini file under the following key:
[Special]MaxNumbersFromFile=100.
Send fax to specific number - Select this action, click the Add rule button,and then enter one or more fax numbers into the dialog that will open(clicking Add after each fax number entered), and then click OK. This willcause RelayFax to fax any message that meets the specified rule'srequirements to the fax numbers indicated in the Rule. The dialog that opensin response to this command will also allow you to specify the recipient'sname and company information.
Set the priority level for this fax – Select this action, click the Add rulebutton, and then specify the priority value (0-100) that you want to beassigned to faxes matching this rule. "0" is the highest priority and "100" isthe lowest. Faxes are always sent in the order of their priority setting
Send fax using a specific fax port – Select this action, click the Add rulebutton, and select a port value from the dialog that will open. This will causeRelayFax to send any fax that meets the specified Rule's criteria through acertain com port.
Strip text from fax number(s) – This action is only available in rules usingFax Number Routing. It will cause the specified text to be stripped from therecipient fax number before RelayFax attempts to send the fax. Choosing the"contains" qualifier will cause the text to be stripped from the numberanywhere that it occurs. Use the "starts with" qualifier if you want to stripthis text from only the beginning of fax numbers. For example, you could usethis action combined with the "starts with" qualifier to cause a certainunnecessary area code to be removed from the beginning of any fax numberin which it appears.
Skip next rule – Use this rule to skip over the next rule.
For example,
You could have two rules which read:
"If From contains 'RelayFax.com' then send to [email protected]""If Subject contains 'Private' then send to [email protected]"
If a message arrives from "[email protected]" it will match to the firstrule. If it has the word "Private" in the subject it will also match the secondrule. This will result in the fax being emailed to both addresses (both UserAand UserB).
But, if you wish to send messages matching the first rule to only the firstaddress, you could insert a new rule between the first two like this:

Copyright © 1996-2014. All rights reserved. Alt-N Technologies, Ltd.
RelayFax Network Fax Manager v7.192
"If From contains 'RelayFax.com' then send to [email protected]""If From contains 'RelayFax.com' then skip next rule""If Subject contains 'Private' then send to [email protected]"
This would prevent the message from being sent to UserB if it was fromsomeone at RelayFax.com.
Stop processing rules - Use this rule to cause further rule processing tostop for this message.
Add RuleAfter choosing an action from the list under Then do this with the message, clickthe Add rule button to proceed with the rule creation process.
6.6 Inbound Fax Rules
Inbound Fax Rules are used to tell RelayFax how to handle incoming faxes. When a faxis received, the transmitting fax device's ID, the port on which the fax arrived, and theOCR results of its contents are compared to the current list of Inbound Fax Rules. If amatch to one or more rules is made then the fax will be routed accordingly. Otherwise,the fax will be handled according to the settings on the Default Rules pane.
Existing Rules
The Existing Rules list box shows you a list of all rules that are currently in use.
84

Copyright © 1996-2014. All rights reserved. Alt-N Technologies, Ltd.
Mail Sources and Rules 93
UP/DOWN ArrowsBecause rules are processed in order, changing a rule's position in the list can alterwhen or if it is applied to a given message. To change a rule's position, select itsentry and this click the up or down arrow to move it.
RemoveIf you wish to delete an inbound rule, select it and then click Remove to delete itfrom the list.
Clear allThis button removes all existing rules.
Edit rulesIf this button is clicked the INRULES.DAT file will be opened in Notepad for manual
editing of Inbound Fax Rules.
Take care not to violate the syntax of the INRULES.DAT file.
New Rule
Port routing
If the fax arrives via port xxClick here and specify a port if you wish to base your rule on the COM port onwhich the fax arrives. Use the "*" wildcard in this space if you wish the rule toapply to all ports rather then a specific one.
CSID routing
If the sending device's FAX MACHINE ID string...Click here to base your rule on the Call Subscriber Identification of the fax devicethat is sending the incoming fax.
OCR routing
If the fax text...Click this option if you wish to base the rule on the results of the OCR process.RelayFax will recognize the document and then compare its contents to theinbound rules that you have created. For example: if you created a rule that said"...if OCR contains 'Make money today!' then delete fax", then all incoming faxesin which RelayFax found the typewritten phrase 'Make money today!' would bedeleted. See OCR Options for more information on routing faxes automaticallyby using RelayFax's OCR features.
CND routing
If the CND (Caller ID) information...Click this option if you wish to base the rule on the incoming CND information.See Calling Number Display (Caller ID) Fax Routing for more information onusing CND routing.
73
80
Copyright © 1996-2014. All rights reserved. Alt-N Technologies, Ltd.
RelayFax Network Fax Manager v7.194
DID routing
If the DID (Direct Inward Dialing) information...Click this option if your system supports Direct Inward Dialing (DID) and you wishto base the rule on the number that the sending fax device dialed.
Comparison type
contains, does not contain, does not start with, is equal to, is not equal to, starts withThis option is for designating what relationship should exist between the elementof the fax being examined and the "this text" value designated for the rule.
this textUse this field to specify the text that RelayFax should look for, which will triggerthe rule when a match is found or not found, depending on the rule.
Action
Then do this with the incoming faxThis box lists the available actions that can be performed if an inbound fax meetsan Inbound Fax Rule's criteria. When creating a rule, the types of actions thatwill be available depends upon which routing method you select above. Not allactions are available for all routing types. The following is a list of the actionsand their functions:
Assign billing code - This action will assign a specific billing code to InboundFaxes matching the rule's criteria.
Copy fax to folder - This action will cause the fax to be copied to a specificfolder.
Delete Fax - This action will simply delete the incoming fax.
Email fax to specific user(s) - Select this action, click the Add rule button,enter one or more Email addresses into the dialog that will open (clicking Addafter each address entered), and then click OK. This will cause RelayFax toemail any fax that meets the specified Rule's requirements to the addressesindicated in the Rule. A rule of this type will be created automatically whenan incoming fax is routed to someone via email and he or she clicks the "Toroute future faxes from [sender] to someone else..." link included by defaultin the message. See the $INCLUDEURL$ Macro description in DAT FileProcessing Macros for more information.
Hide fax from specific user(s) - This action will prevent a fax that matchesthe rule from being delivered to the specified user. A rule of this type will becreated automatically when an incoming fax is routed to someone via emailand he or she clicks the "To ignore future faxes from [sender]..." linkincluded by default in the message. See the $INCLUDEURL$ Macro descriptionin DAT File Processing Macros for more information.
Mark fax as SPAM (junk) - This action marks the inbound fax as SPAM (ajunk fax). Use the options on the Junk Faxes pane to specify what shouldbe done with messages that are marked as SPAM. A rule of this type will be
198
198
96
Copyright © 1996-2014. All rights reserved. Alt-N Technologies, Ltd.
Mail Sources and Rules 95
created automatically when an incoming fax is routed to someone via emailand he or she clicks the "To mark future faxes from [sender] as unwantedspam..." link included by default in the message. See the $INCLUDEURL$Macro description in DAT File Processing Macros for more information.
Print message to specific printer - Select this action, click the Add rulebutton, and then the Select Printer dialog will be opened. Choose a printerfrom the Available Printers list and then click OK. This will cause all inboundfaxes that meet the rule's criteria to be sent to the selected printer.
Run a program - This action can be used to run a particular program whenan incoming fax meets the rule's conditions. You must specify the path to theprogram that you wish to run, and you can specify whether or not RelayFaxshould suspend its operations temporarily or indefinitely while it waits for theprogram to terminate. Further, you can force the program to terminate and/or run it in a hidden window.
Skip next rule - Use this option to skip over the next rule.
For example,
Suppose you have two rules which read:
"If ID contains '123' then send to [email protected]""If ID contains '456' then send to [email protected]"
If an inbound fax arrives from a device with the ID '123456' then it will berouted to two different users (UserA and UserB).
But suppose you inserted a new rule between the first two like this:
"If ID contains '123' then send to [email protected]""If ID contains '123' then skip next rule""If ID contains '456' then send to [email protected]"
This would prevent the fax from being sent to UserB if it was from '123456'.
Stop processing rules - Use this rule to stop further rules processing forthe message.
Use specific OCR language - Tells RelayFax to use the language youspecify to recognize the characters in the OCR engine.
Add ruleAfter making a selection from the Then do this with the incoming fax list, clickthe Add rule button to proceed with the rule creation process.
198

Copyright © 1996-2014. All rights reserved. Alt-N Technologies, Ltd.
RelayFax Network Fax Manager v7.196
6.7 Junk Faxes
One of the available actions that can be specified in the Inbound Fax Rules is the"Mark as SPAM (junk)" action. The options on the Junk Faxes pane are used todesignate what will happen to messages that have been marked as SPAM. You canchoose to delete them or move them to a specific folder.
92

Section
VII
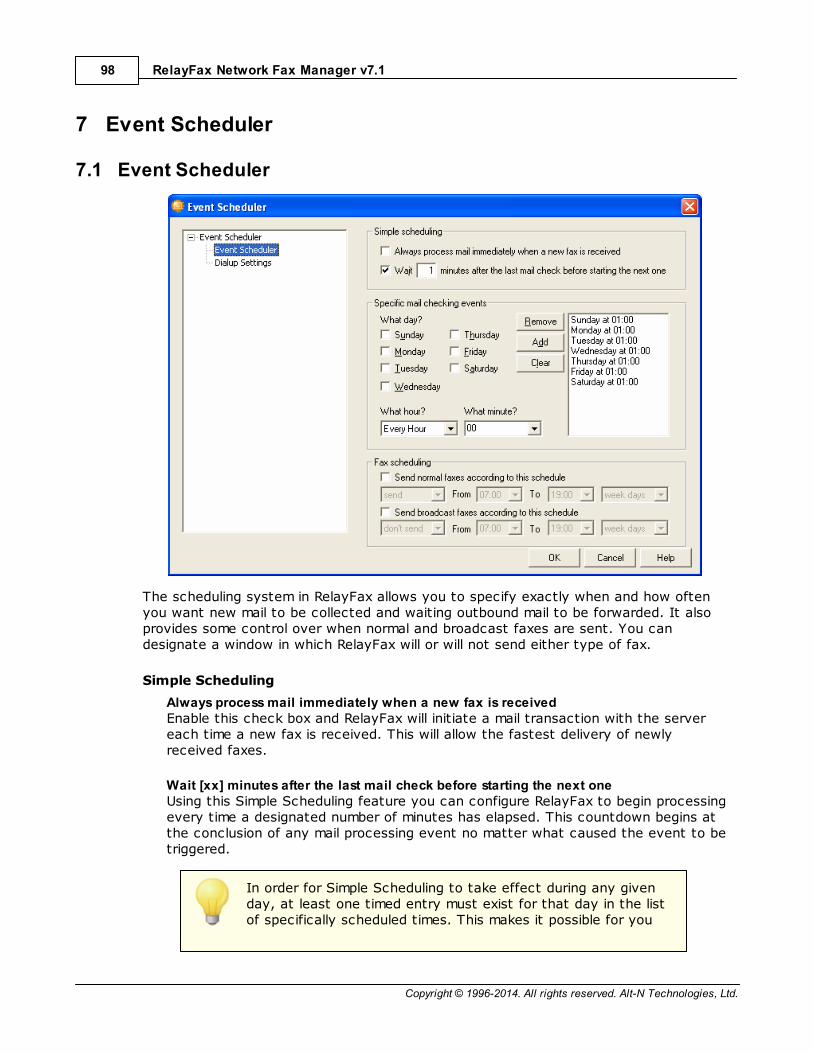
Copyright © 1996-2014. All rights reserved. Alt-N Technologies, Ltd.
RelayFax Network Fax Manager v7.198
7 Event Scheduler
7.1 Event Scheduler
The scheduling system in RelayFax allows you to specify exactly when and how oftenyou want new mail to be collected and waiting outbound mail to be forwarded. It alsoprovides some control over when normal and broadcast faxes are sent. You candesignate a window in which RelayFax will or will not send either type of fax.
Simple Scheduling
Always process mail immediately when a new fax is receivedEnable this check box and RelayFax will initiate a mail transaction with the servereach time a new fax is received. This will allow the fastest delivery of newlyreceived faxes.
Wait [xx] minutes after the last mail check before starting the next oneUsing this Simple Scheduling feature you can configure RelayFax to begin processingevery time a designated number of minutes has elapsed. This countdown begins atthe conclusion of any mail processing event no matter what caused the event to betriggered.
In order for Simple Scheduling to take effect during any givenday, at least one timed entry must exist for that day in the listof specifically scheduled times. This makes it possible for you

Copyright © 1996-2014. All rights reserved. Alt-N Technologies, Ltd.
Event Scheduler 99
to use simple scheduling but still limit faxing to specific days.
For example,
If you want to schedule 45 minutes between dialup sessionsbut only on Monday through Friday. You will need to enablethe Simple Scheduling option and enter 45 minutes into thecontrol. Then you must enter at least one scheduled time foreach day (Monday, Tuesday, Wednesday, Thursday, andFriday). Since there wouldn't be a scheduled time for Saturdayor Sunday, those days would be exempt and no mail processingevent would be triggered by Simple Scheduling. The time youselect when you setup your trigger days doesn't matter.Simple Scheduling only checks whether or not an entry for anyparticular day exists.
Specific Mail Checking Events
Using this method, you can designate exact times that you wish RelayFax to begin MailChecking Events.
What day?Select the days that you wish to schedule.
What hour?Select the hour that you wish to schedule.
What minute?Select the minute that you wish to schedule.
RemoveIf you wish to delete an entry from the list, select it and then click this button.
AddOnce you've selected the day, hour, and minute, click this button to add the time tothe list of scheduled events.
ClearThis button removes all entries from the schedule listing.
Fax Scheduling
Use the options in this section to schedule a daily window of time in which faxes mayor may not be sent by RelayFax. You can specify a separate time-period for bothnormal and broadcast faxes , whether the period is to allow or disallow sending faxes,and whether or not it will be applied every day or just weekdays (Monday thru Friday).
Send normal faxes according to this scheduleClick this option to set a time window for all normal (i.e. non-broadcast) faxes.Choose "send" in the first drop-down box if you wish to allow RelayFax to send faxesduring the scheduled time. Choose "don't send" if you wish to disallow the sending of
178
Copyright © 1996-2014. All rights reserved. Alt-N Technologies, Ltd.
RelayFax Network Fax Manager v7.1100
faxes during that period. Designate the starting and ending hour, and then choose"every day" if you wish the period to be enforced every day or "weekdays" if youwish the scheduled period to be enforced only Monday thru Friday.
Send broadcast faxes according to this scheduleClick this option to set a time window for all broadcast faxes. Choose "send" in thefirst drop-down box if you wish to allow RelayFax to send broadcast faxes during thescheduled time. Choose "don't send" if you wish to disallow the sending of broadcastfaxes during that period. Designate the starting and ending hour, and then choose"every day" if you wish the period to be enforced every day or "weekdays" if youwish the scheduled period to be enforced only Monday thru Friday.

Section
VIII
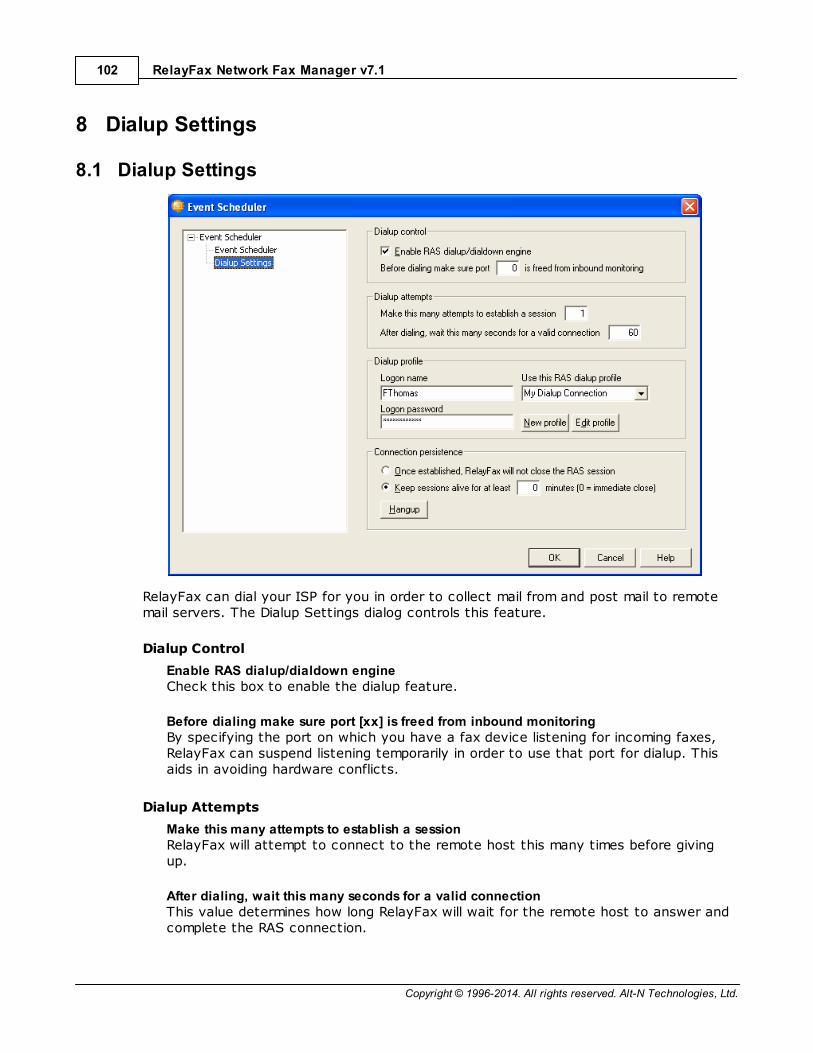
Copyright © 1996-2014. All rights reserved. Alt-N Technologies, Ltd.
RelayFax Network Fax Manager v7.1102
8 Dialup Settings
8.1 Dialup Settings
RelayFax can dial your ISP for you in order to collect mail from and post mail to remotemail servers. The Dialup Settings dialog controls this feature.
Dialup Control
Enable RAS dialup/dialdown engineCheck this box to enable the dialup feature.
Before dialing make sure port [xx] is freed from inbound monitoringBy specifying the port on which you have a fax device listening for incoming faxes,RelayFax can suspend listening temporarily in order to use that port for dialup. Thisaids in avoiding hardware conflicts.
Dialup Attempts
Make this many attempts to establish a sessionRelayFax will attempt to connect to the remote host this many times before givingup.
After dialing, wait this many seconds for a valid connectionThis value determines how long RelayFax will wait for the remote host to answer andcomplete the RAS connection.
Copyright © 1996-2014. All rights reserved. Alt-N Technologies, Ltd.
Dialup Settings 103
Dialup Profile
Logon nameThe value specified here will be passed to the remote host during the authenticationprocess.
Logon passwordThe value specified here will be passed to the remote host during the authenticationprocess.
Use this RAS dialup profileThis drop-down list box allows you to select a session profile that has beenpreviously defined through Windows Dialup Networking or Remote Access Servicessetup.
New profileClick this button to create a new Dialup Networking or Remote Access Servicesprofile.
Edit profileClick this button to edit the currently selected Dialup Networking or Remote AccessServices profile.
Connection Persistence
Once established, RelayFax will not close the RAS sessionBy default, RelayFax will shut down a created connection immediately after all mailtransactions have been completed, and the session is no longer needed. Selectingthis option will allow the session to remain active even after all mail has beentransacted.
Keep sessions alive for at least XX minutes (0=immediate close)If enabled, this option will allow a RelayFax created RAS session to survive for thenumber of minutes specified. Placing a zero in this entry will cause the connection tobe immediately closed after the transactions are completed.
Hang-upThis button will break the connection to the ISP. This button is active only ifRelayFax has initiated the RAS session.

Copyright © 1996-2014. All rights reserved. Alt-N Technologies, Ltd.

Section
IX
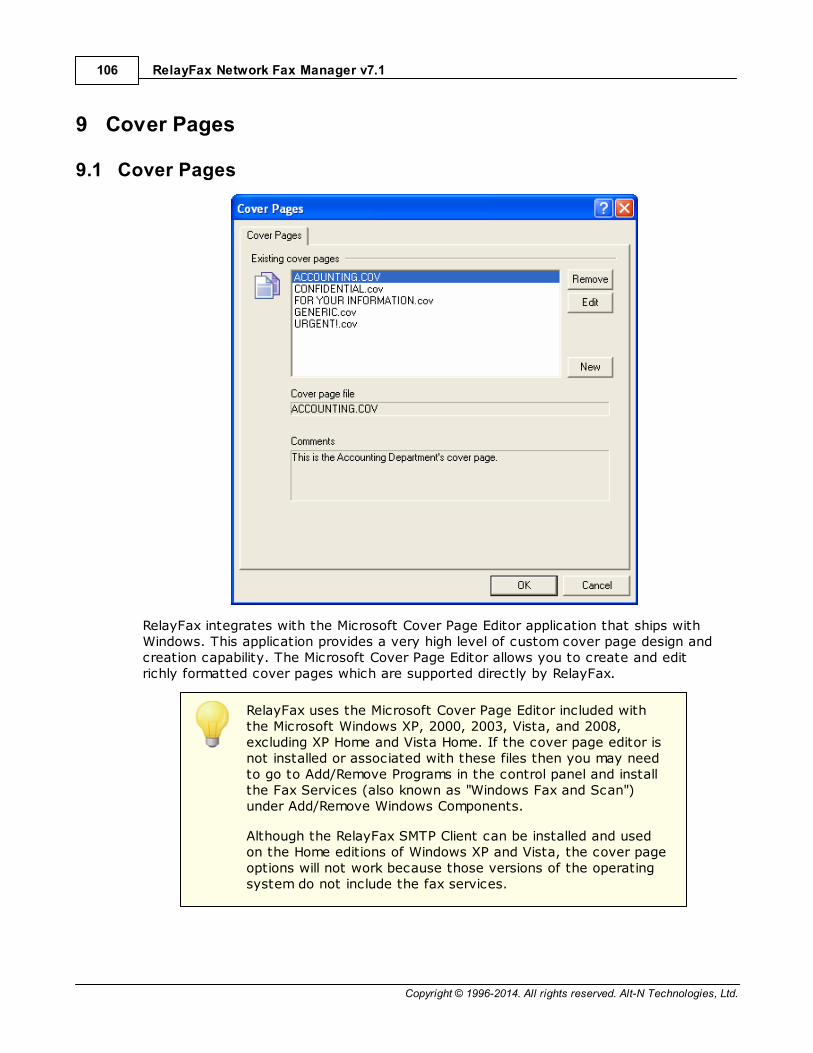
Copyright © 1996-2014. All rights reserved. Alt-N Technologies, Ltd.
RelayFax Network Fax Manager v7.1106
9 Cover Pages
9.1 Cover Pages
RelayFax integrates with the Microsoft Cover Page Editor application that ships withWindows. This application provides a very high level of custom cover page design andcreation capability. The Microsoft Cover Page Editor allows you to create and editrichly formatted cover pages which are supported directly by RelayFax.
RelayFax uses the Microsoft Cover Page Editor included withthe Microsoft Windows XP, 2000, 2003, Vista, and 2008,excluding XP Home and Vista Home. If the cover page editor isnot installed or associated with these files then you may needto go to Add/Remove Programs in the control panel and installthe Fax Services (also known as "Windows Fax and Scan")under Add/Remove Windows Components.
Although the RelayFax SMTP Client can be installed and usedon the Home editions of Windows XP and Vista, the cover pageoptions will not work because those versions of the operatingsystem do not include the fax services.
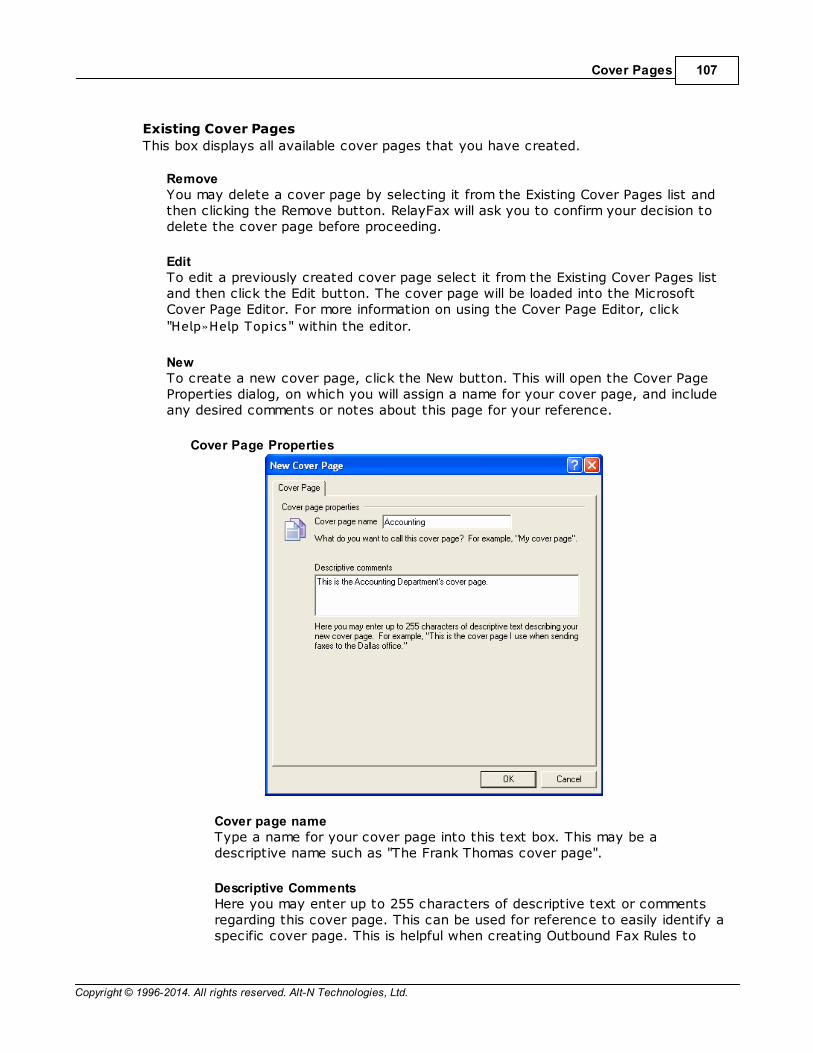
Copyright © 1996-2014. All rights reserved. Alt-N Technologies, Ltd.
Cover Pages 107
Existing Cover Pages
This box displays all available cover pages that you have created.
RemoveYou may delete a cover page by selecting it from the Existing Cover Pages list andthen clicking the Remove button. RelayFax will ask you to confirm your decision todelete the cover page before proceeding.
EditTo edit a previously created cover page select it from the Existing Cover Pages listand then click the Edit button. The cover page will be loaded into the MicrosoftCover Page Editor. For more information on using the Cover Page Editor, click
"Help»Help Topics" within the editor.
NewTo create a new cover page, click the New button. This will open the Cover PageProperties dialog, on which you will assign a name for your cover page, and includeany desired comments or notes about this page for your reference.
Cover Page Properties
Cover page nameType a name for your cover page into this text box. This may be adescriptive name such as "The Frank Thomas cover page".
Descriptive CommentsHere you may enter up to 255 characters of descriptive text or commentsregarding this cover page. This can be used for reference to easily identify aspecific cover page. This is helpful when creating Outbound Fax Rules to

Copyright © 1996-2014. All rights reserved. Alt-N Technologies, Ltd.
RelayFax Network Fax Manager v7.1108
assign alternate cover pages. For example, "This is the cover page that FrankThomas uses when sending faxes about his many heroic exploits." When thisparticular cover page is selected from the Existing Cover Pages list this textwill appear in the Comments section of the Cover Pages dialog.
These comments are saved in your cover page folder asthe file "<Cover Page Name>.cmt".
Cover page file:This is the filename of the cover page. Cover pages are stored in the ...\RelayFax
\Covers subfolder.
Comments:When you create a cover page you will have the opportunity to include somecomments or a description of the page for your personal reference. These commentswill appear in this area when a cover page is selected from the Existing Cover Pageslist. This text will not appear on the cover page itself.
Section
X

Copyright © 1996-2014. All rights reserved. Alt-N Technologies, Ltd.
RelayFax Network Fax Manager v7.1110
10 Contact Manager
10.1 Contact Manager
RelayFax and the RelayFax SMTP Client are each equipped with integrated support fortwo contact management systems. You can choose to use either Windows AddressBook (WAB) or the included Address Express (Address Ex) as your default contactmanager. WAB is enabled by default, but if you wish to use Address Ex then you canchange this setting on the Logs and Contacts pane of the RelayFax Properties
dialog. To open the default contact manager, click "Tools » Fax contacts ..." or click
the Fax contacts icon on the toolbar.
Address Express can be used to manage all of your contacts, and supports storing alarge amount of information for each one. You can add up to 50 fields for eachcontact, assign contacts to groups, add notes for them, sort by any field, launch yourweb browser, phone dialer, or email program, and a host of other features.
For more information regarding the various features and options available within eitherWAB or Address Ex, see their respective online Help systems.
See also:
Logs and Contacts
53
53

Section
XI
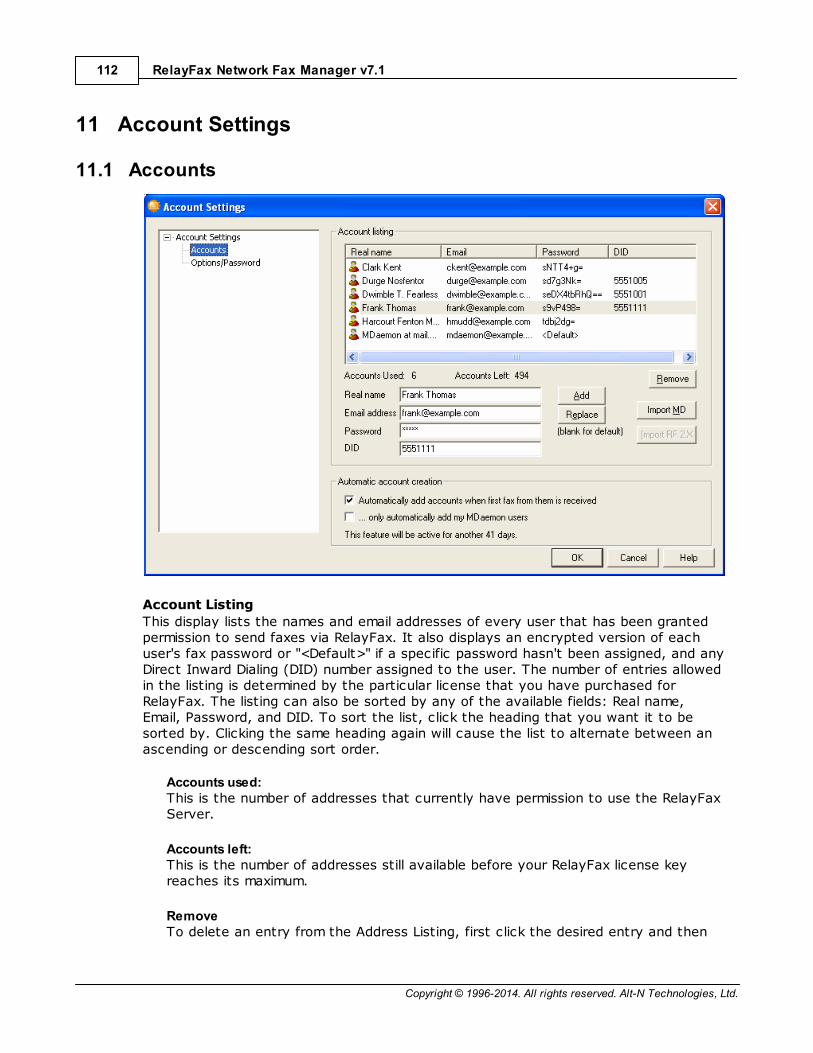
Copyright © 1996-2014. All rights reserved. Alt-N Technologies, Ltd.
RelayFax Network Fax Manager v7.1112
11 Account Settings
11.1 Accounts
Account Listing
This display lists the names and email addresses of every user that has been grantedpermission to send faxes via RelayFax. It also displays an encrypted version of eachuser's fax password or "<Default>" if a specific password hasn't been assigned, and anyDirect Inward Dialing (DID) number assigned to the user. The number of entries allowedin the listing is determined by the particular license that you have purchased forRelayFax. The listing can also be sorted by any of the available fields: Real name,Email, Password, and DID. To sort the list, click the heading that you want it to besorted by. Clicking the same heading again will cause the list to alternate between anascending or descending sort order.
Accounts used:This is the number of addresses that currently have permission to use the RelayFaxServer.
Accounts left:This is the number of addresses still available before your RelayFax license keyreaches its maximum.
RemoveTo delete an entry from the Address Listing, first click the desired entry and then
Copyright © 1996-2014. All rights reserved. Alt-N Technologies, Ltd.
Account Settings 113
this button.
Real nameType the user's real name into this field.
Email addressType the user's email address. The user's message must be sent from this address orRelayFax will not fax it.
PasswordIf you specify a password in this field then the user must include it in his messagefor RelayFax to fax the message. In the RelayFax SMTP Client there is a specificcontrol used for including the user's password, but if they send their message via aregular email client then they must include the "FAXPASSWORD:pass" macro in thebody of their message. Leaving the Password field blank will set the user's passwordto "<default>". If no default password has been designated on the Options/Password
pane then no password will be required in their messages. If there has been apassword designated then they must include it in their message in the same waythat a user-specific password would be included.
DIDIf you are using a Direct Inward Dialing (DID) system, and the user has a DID faxnumber assigned to him or her, enter that number here.
AddClick this button to add the user to the list after entering their information.
ReplaceWhen you click an entry in the list of accounts its information will be displayed in thefields below the listing. If you edit that information then click this button to updatethe entry in the listing.
Import MDIf your local mail server is an MDaemon Email Server then you may click this buttonto automatically import your MDaemon users into RelayFax.
Import RF 2.XBefore version 3, RelayFax used a different format for its user listing. Click thisbutton if you used one of these very early versions of RelayFax and wish to importits user listing.
Options
Automatically add accounts when first fax from them is receivedWhen this switch is enabled, RelayFax will automatically add a new address to thelist of accounts in the Address Listing whenever the first fax from it is received. Thismakes it possible to dynamically build your list of users.
114

Copyright © 1996-2014. All rights reserved. Alt-N Technologies, Ltd.
RelayFax Network Fax Manager v7.1114
When using this feature, RelayFax will accept messages fromanyone until the maximum number of accounts has beenreached. If you wish to limit or control permissions to yourRelayFax Server, do not use this feature; disable this checkboxand then manually enter those addresses that you wish togrant permission to use your RelayFax Server.
This feature can be enabled/disabled in only the first 60 days ofa RelayFax Server's lifespan; after that time this feature ispermanently disabled. Below this control is a counter letting youknow how many days you have left. Only in unlimited user licenseversions of RelayFax will this feature be permanently usable.
...only automatically add my MDaemon usersIf you are using MDaemon as your local email server then click this checkbox if youwant the Automatically add accounts... feature to apply only to your MDaemonusers. Non-MDaemon users will not be added. New installations will not have toduplicate your MDaemon users. RelayFax will use MDaemon's account database up tothe maximum number of users allowed by your RelayFax license.
11.2 Options/Password

Copyright © 1996-2014. All rights reserved. Alt-N Technologies, Ltd.
Account Settings 115
On the Options/Password pane of the Account Settings dialog, you can designate whatRelayFax will do when it encounters a message that originates from an address otherthan those listed on the Accounts pane. These actions will also be taken when you arerequiring your users to provide a password in their messages and an invalid one isgiven, or a password is omitted altogether.
These options are not applied unless the Automatically addaccounts when first fax from them is received option (locatedon the Accounts pane) has been turned off or the maximumnumber of Accounts has already been reached.
Non-Licensed Users
When a message is processed that does not originate from one of the addresses listedon the Accounts pane or does not contain a valid password, RelayFax will delete theincoming message and then take two possible actions listed below. You may configureRelayFax to do one, both, or neither of these tasks.
...send note telling him/her they are not authorizedWhen this checkbox is enabled, RelayFax will convert the contents of theNOACCESS.DAT file (located in the ...\RelayFax\app folder) into an email messageand send it to the non-licensed user.
...inform [address] about incidentWhen this checkbox is enabled, RelayFax will send a message to the addressspecified, informing it that an unauthorized user has attempted to use the RelayFaxsystem. Additionally, the complete message of the unauthorized user will be includedwith this email notification as a file attachment.
When neither of these options is enabled, RelayFax will simplydelete unauthorized user messages and take no furtheractions.
<Default> password
When a password is required, messages that do not give the password to RelayFax willnot be processed. This security measure is at your disposal if you are worried aboutnon-authorized personnel sending faxes through your server. If such is the case, it isrecommended that you specify a password and force users of your fax system to use itwhen they send a fax.
Accounts without their own password must use the system defaultEnable this checkbox if you want all users to be required to include a password withtheir messages even when one hasn't been specifically assigned to their accounts.Accounts without their own unique password must use the password defined in the<Default> password control.
<Default> passwordSpecify the password that you wish to require of all users that haven't been givenone specific to their account.
112

Copyright © 1996-2014. All rights reserved. Alt-N Technologies, Ltd.
RelayFax Network Fax Manager v7.1116
DID Routing (requires DID-capable hardware)
Route inbound faxes to users based on DIDIf you are using a Direct Inward Dialing (DID) system, then click this check box ifyou want RelayFax to automatically route incoming faxes to users based on the DIDnumbers assigned under their account settings.
Only answer calls to user DID numbersClick this check box if you want RelayFax to respond only to incoming calls destinedfor DID numbers that have been specified under the individual user Accounts.Inbound calls to unknown DID numbers will not be answered by RelayFax.
Section
XII

Copyright © 1996-2014. All rights reserved. Alt-N Technologies, Ltd.
RelayFax Network Fax Manager v7.1118
12 Templates and Billing Codes
12.1 Fax Templates
12.1.1 Fax Templates
Fax Templates can be used to assign a large number of alternate variables to outboundfaxes. Applied through the Outbound Fax Rules, templates make it possible to: usealternate cover pages and banner text, change the sender's name, company, Fax ID,fax and voice numbers, and assign alternate dialing and retry settings. With Templatesyou can cause RelayFax to simultaneously support and appear as any number ofdifferent fax devices at different companies or departments.
For more information on applying Templates through Outbound Fax Rules, see:
Outbound Fax Rules
Existing Templates
All available Templates are displayed in this area.
RemoveTo remove a Template from the Existing Templates list, click the desired templateand then the Remove button.
EditTo edit a previously created Template, double-click the desired template in the
86

Copyright © 1996-2014. All rights reserved. Alt-N Technologies, Ltd.
Templates and Billing Codes 119
Existing Templates list or click the template and then the Edit button. This will openthe template's Template Properties dialog.
NewClick the New button to open the New Template Properties dialog used forcreating new Templates.
Template File:Here you will find the file path to the currently selected Template.
Description:When you create a Template you will have the opportunity to include somecomments or a description of the template for your personal reference. Thosecomments or descriptions will appear in this area when a template is selected fromthe Existing Templates list. This text will not appear on any faxed or printed pages.
See Also:
Template Description
Template Defaults
Template Options
Outbound Fax Rules
120
120
120
121
123
86
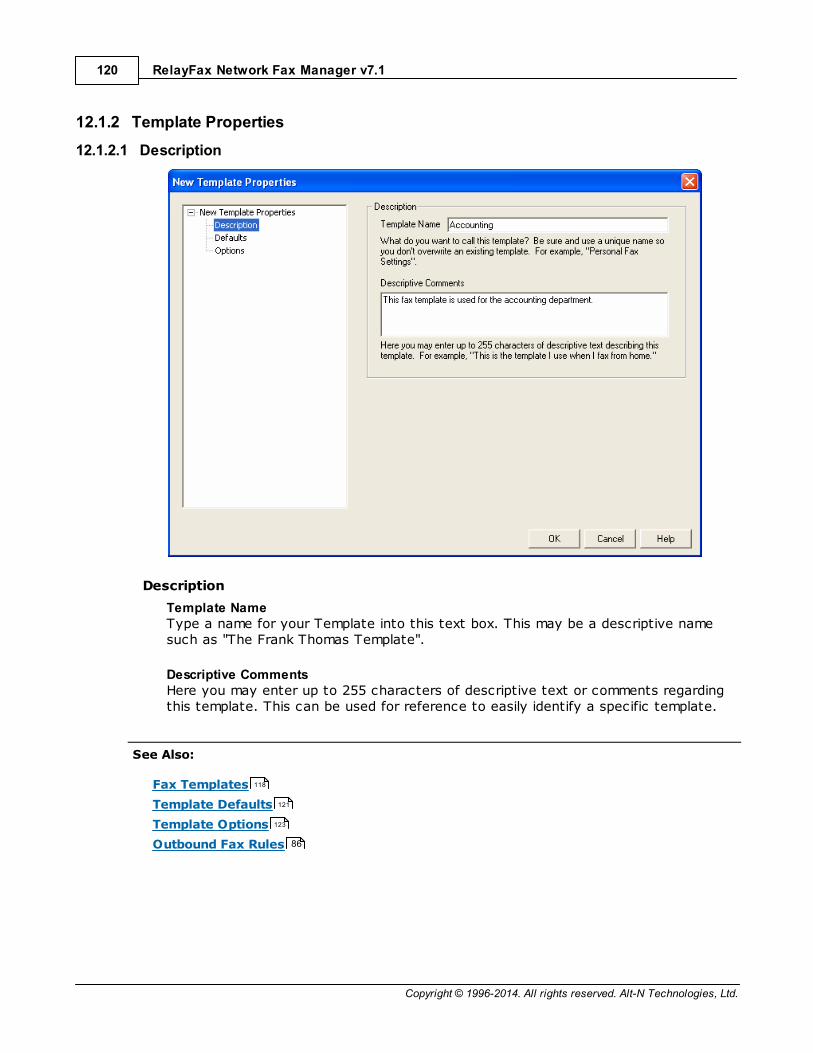
Copyright © 1996-2014. All rights reserved. Alt-N Technologies, Ltd.
RelayFax Network Fax Manager v7.1120
12.1.2 Template Properties
12.1.2.1 Description
Description
Template NameType a name for your Template into this text box. This may be a descriptive namesuch as "The Frank Thomas Template".
Descriptive CommentsHere you may enter up to 255 characters of descriptive text or comments regardingthis template. This can be used for reference to easily identify a specific template.
See Also:
Fax Templates
Template Defaults
Template Options
Outbound Fax Rules
118
121
123
86
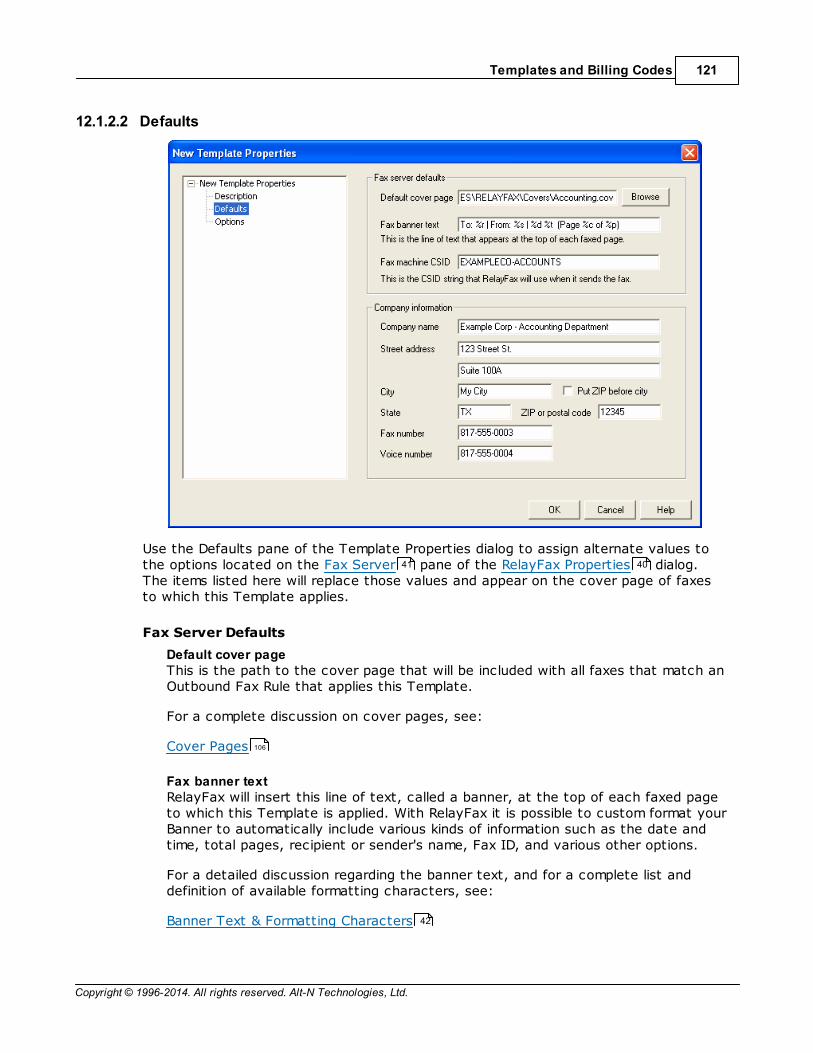
Copyright © 1996-2014. All rights reserved. Alt-N Technologies, Ltd.
Templates and Billing Codes 121
12.1.2.2 Defaults
Use the Defaults pane of the Template Properties dialog to assign alternate values tothe options located on the Fax Server pane of the RelayFax Properties dialog.The items listed here will replace those values and appear on the cover page of faxesto which this Template applies.
Fax Server Defaults
Default cover pageThis is the path to the cover page that will be included with all faxes that match anOutbound Fax Rule that applies this Template.
For a complete discussion on cover pages, see:
Cover Pages
Fax banner textRelayFax will insert this line of text, called a banner, at the top of each faxed pageto which this Template is applied. With RelayFax it is possible to custom format yourBanner to automatically include various kinds of information such as the date andtime, total pages, recipient or sender's name, Fax ID, and various other options.
For a detailed discussion regarding the banner text, and for a complete list anddefinition of available formatting characters, see:
Banner Text & Formatting Characters
41 40
106
42

Copyright © 1996-2014. All rights reserved. Alt-N Technologies, Ltd.
RelayFax Network Fax Manager v7.1122
Fax machine CSIDEach fax device must have a unique fax ID. It is common practice to use either yourcompany name or fax number as your fax ID. When two fax devices are negotiatinga connection they make this information available to one another.
In some regions, providing a fax ID is required.
Company Information
In this section enter the name, address, fax number, and other informationcorresponding to the company from which you wish the fax to appear to originate. It iscommon practice to make much of this information available when sending andreceiving faxes.
See Also:
Fax Templates
Template Description
Template Options
Outbound Fax Rules
118
120
123
86

Copyright © 1996-2014. All rights reserved. Alt-N Technologies, Ltd.
Templates and Billing Codes 123
12.1.2.3 Options
With the Options pane of the Template Properties dialog, you can assign alternatevalues to the controls located in the Faxing and Dialing options sections of RelayFaxProperties » Options . These alternate values will be applied to messages that matchan Outbound Fax Rule assigning this Template.
Faxing Options
Wait this many seconds for fax machines to answerIf the Fax number to which RelayFax is trying to connect doesn't answer within thismany seconds, RelayFax will abort the attempt and try again later based upon theparameters outlined below.
Stop trying if fax attempt fails this many timesWhen a fax attempt fails, RelayFax will continue trying to send the fax until it hasfailed this many times. After this number of unsuccessful attempts RelayFax will giveup permanently and inform the sender that the fax could not be sent. The defaultsetting is "3". If you enter "0" or "1" in this option then RelayFax will not try to sendthe fax again if the initial attempt fails.
During retries of partially completed faxes, by default RelayFaxwill only attempt to resend unsent pages. If you wish toconfigure RelayFax to attempt to resend the entire fax instead,open RelayFax.ini in Notepad and change
ResendPartialFaxes=Yes to ResendPartialFaxes=No under
48
86
Copyright © 1996-2014. All rights reserved. Alt-N Technologies, Ltd.
RelayFax Network Fax Manager v7.1124
[FaxServer].
Wait this many seconds before subsequent retriesThis is the amount of time that RelayFax will wait between subsequent deliveryattempts.
Auto format all cover page text to lines of this lengthPlacing a value in this control will cause text placed in the cover page's commentssection to have line breaks inserted at the specified length. Setting this control to"0" will cause the text to appear exactly as it was typed by the user. If the textwas composed without any line breaks, and it extended beyond the edge of thedesignated comments area, then it would be truncated.
Send PriorityUse this option to designate a send priority for all faxes to which this template isapplied. You can set the value from 0-100. "0" is the highest priority, "50" is thenormal, default value, and "100" is the lowest. Faxes are always sent in the order oftheir priority setting.
Port
Send fax using modem on this specific portHere you can restrict faxes to which this template is applied, to using the modemlocated on a specific port.
Dialing Options
Prefix outbound phone numbers longer than [xx] digits with [xx]For outgoing faxes, you can have RelayFax automatically add a prefix to the calledparty's number. Prefixes may, for instance, be necessary to access a central officeline, or to restrict the transmission of your Caller ID to the called party. RelayFaxwill, however, add the prefix to the number only if the number contains more digitsthan the amount specified here. If your fax device is connected to a PBX, the digitthreshold can prevent the prefix from being dialed if the called number is anextension on the same PBX. Enter both the digit threshold and the prefix to be dialedinto this option. Use "0" in the first box if you wish to add the prefix to all numbersdialed.
When specifying fax numbers for RelayFax to dial you can use"w" or "W" to cause RelayFax to wait for a subsequent dialtone. For example, "8w5551212" will dial 8, wait for the nextdial tone, and then dial the remainder of the number. Similarly,the "%" character will insert a pause within the dialing process.For example, "8%5551212" will dial 8, pause, and then dial therest of the number. The length of time during a pause isdetermined by modem S register settings.

Copyright © 1996-2014. All rights reserved. Alt-N Technologies, Ltd.
Templates and Billing Codes 125
See Also:
Fax Templates
Template Description
Template Defaults
RelayFax Properties » Options
Outbound Fax Rules
12.2 Billing Codes
Combined with the Outbound Fax Rules and Exporting features, billing codes canbe used to track the fax expenses and RelayFax time usage of specific groups of users.Users can be forced to include a billing code before their fax will be accepted, and rulescan be configured that will cause specific actions to be taken when certain billingcodes are encountered. The export file includes a field for each fax's billing code andcan therefore be used as a field in a spreadsheet, which you might wish to create inorder to track this usage.
Billing Codes
Outbound faxes must supply a valid billing codeClick this option if you want to require all users to supply a billing code in their faxmessages before they will be accepted. Billing codes can be inserted via the theoutbound fax rules, the RelayFax SMTP Client, or by using the Billing Code email
118
120
121
48
86
86 65
Copyright © 1996-2014. All rights reserved. Alt-N Technologies, Ltd.
RelayFax Network Fax Manager v7.1126
macro when sending a fax via an email client.
Valid Billing Codes
This box displays all valid billing codes that you have created.
RemoveTo remove a code from the list, click the code and then click this button.
Add new billing codeTo add a billing code to list, enter it here and then click the Add button.
See also:
Outbound Fax Rules
Exporting
Email Macros
86
65
192

Section
XIII

Copyright © 1996-2014. All rights reserved. Alt-N Technologies, Ltd.
RelayFax Network Fax Manager v7.1128
13 RelayFax SMTP Client
13.1 Introduction
RelayFax includes a special application called the RelayFax SMTP Client, which can beinstalled on your network workstation, at home, or at any other remote location. TheRelayFax SMTP Client, and the accompanying RelayFax Printer Driver and RelayFaxOCR (Optical Character Recognition) Printer Driver, make it possible to fax anythingthat you can scan or print. The client will attach the relevant document to an emailmessage and then send it to the RelayFax server. Then, based upon the contents ofthe message or the fax rules configured on the server, RelayFax will route the fax to itsappropriate destination. The client also contains a "Cover page only" feature forsending short messages requiring only a cover page. Documents can be faxed byprinting to the RelayFax Printer Driver instead of to your normal printer, scanning themusing the client's scanner and twain support, or by attaching files using the client'sAttached Documents pane.
Whenever you scan a document or print one to the RelayFax Printer Driver, theRelayFax SMTP Client will be opened automatically for completing your fax. You willenter the fax recipient information manually or with the Contact Manager, choose fromseveral other options such as alternate cover pages and scheduling, and then click theSend Fax button. The client will then email the document to your RelayFax server'smailbox (dialing into the Internet if necessary) where it will be collected and faxed toits final destination.
When faxing documents via the RelayFax OCR Printer Driver, the documents will bescanned for specific identifiers to determine the recipient's fax number and name, thesubject of the fax, and so on. It will then be sent to your RelayFax server normally,just like when sending manually or printing to the RelayFax Printer Driver. The FaxClient, however, will not be opened because the recipient and other information will betaken from the document itself.
The RelayFax SMTP Client and RelayFax Printer Driver can also be accessed by customapplications in order to automatically fax documents. For more information on using thisfunctionality, see: Sending Faxes Programmatically
RelayFax SMTP Client Features
Immediate faxing from within any application by printing a document to the RelayFax Printer Driver .
A cover page comment feature allows quick and easy faxing of a brief "coverpage only" message.
Full twain device support for faxing from scanners and digital cameras.
Quick-Scan features make it possible to scan and fax documents by simplyclicking a shortcut menu option or pressing the button on your scanner.
Contact Manager that can be used to share contacts over a network.
Confirmation Request feature that will cause RelayFax to inform the senderwhen their fax has been successfully transmitted.
RAS Dialup controls make it possible for the Client to automatically dial into
156
166
156
142
150
139
140
154
135
Copyright © 1996-2014. All rights reserved. Alt-N Technologies, Ltd.
RelayFax SMTP Client 129
the Internet when being used remotely.
Support for including extra information on the cover page such as: recipient'sname and company, sender's name and contact information, billing codes, andmore.
Client may be used to email messages directly to users instead of to RelayFaxfor faxing.
Scheduling feature so that you can designate a specific date and time tosend the fax.
By setting the parameters in the FAXCLNT.INI file, the RelayFax SMTP Client andRelayFax Printer Driver can be accessed programmatically by otherapplications, which enables them to send faxes automatically.
Client contains a personal cover page manager and can utilize custom coverpages.
Client allows attachment of documents to outgoing faxes.
See also:
Using the RelayFax SMTP Client
13.2 Using the RelayFax SMTP Client
Starting the ClientTo start the RelayFax SMTP Client click the icon on the desktop, or click the WindowsSTART button and navigate to the client's icon in the RelayFax program group. Theclient starts automatically when you print to the RelayFax Printer Driver from within aWindows application, or when you click the scan button on your scanner.
Using the ClientWhen the client is running, an icon will be displayed in the system tray. Right-click thisicon to display a shortcut menu from which you can access various client features.
142
142
149
166
145
153
129
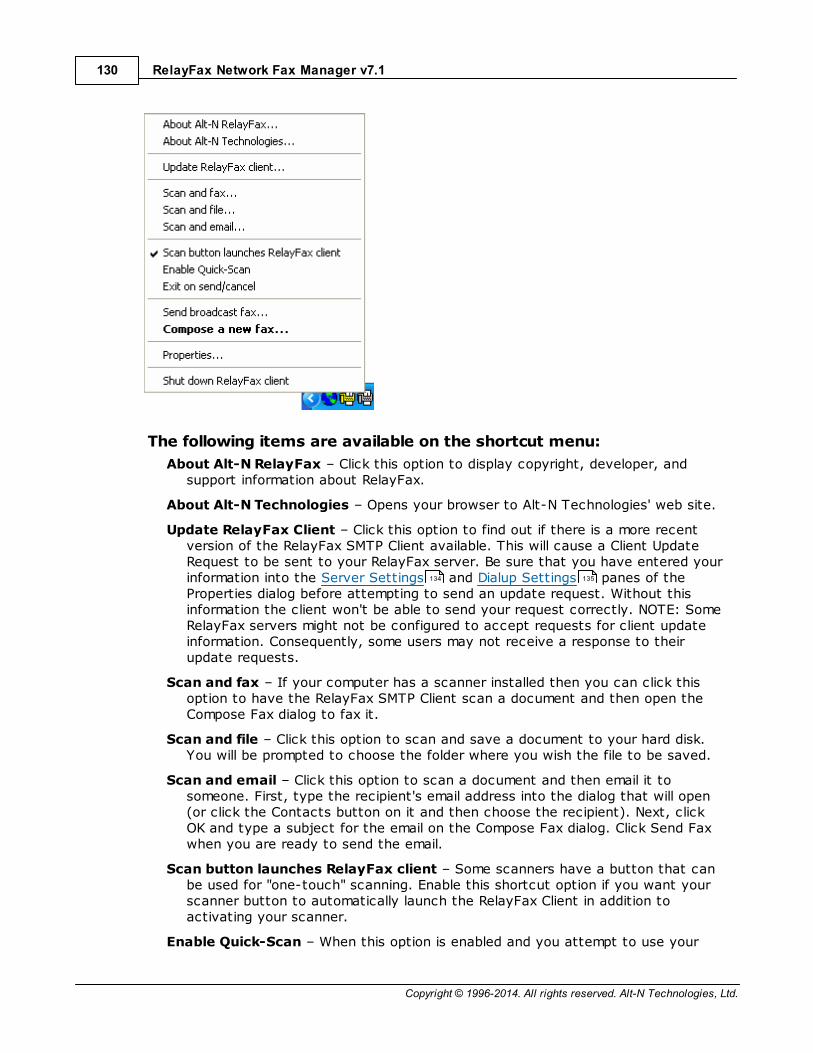
Copyright © 1996-2014. All rights reserved. Alt-N Technologies, Ltd.
RelayFax Network Fax Manager v7.1130
The following items are available on the shortcut menu:
About Alt-N RelayFax – Click this option to display copyright, developer, andsupport information about RelayFax.
About Alt-N Technologies – Opens your browser to Alt-N Technologies' web site.
Update RelayFax Client – Click this option to find out if there is a more recentversion of the RelayFax SMTP Client available. This will cause a Client UpdateRequest to be sent to your RelayFax server. Be sure that you have entered yourinformation into the Server Settings and Dialup Settings panes of theProperties dialog before attempting to send an update request. Without thisinformation the client won't be able to send your request correctly. NOTE: SomeRelayFax servers might not be configured to accept requests for client updateinformation. Consequently, some users may not receive a response to theirupdate requests.
Scan and fax – If your computer has a scanner installed then you can click thisoption to have the RelayFax SMTP Client scan a document and then open theCompose Fax dialog to fax it.
Scan and file – Click this option to scan and save a document to your hard disk.You will be prompted to choose the folder where you wish the file to be saved.
Scan and email – Click this option to scan a document and then email it tosomeone. First, type the recipient's email address into the dialog that will open(or click the Contacts button on it and then choose the recipient). Next, clickOK and type a subject for the email on the Compose Fax dialog. Click Send Faxwhen you are ready to send the email.
Scan button launches RelayFax client – Some scanners have a button that canbe used for "one-touch" scanning. Enable this shortcut option if you want yourscanner button to automatically launch the RelayFax Client in addition toactivating your scanner.
Enable Quick-Scan – When this option is enabled and you attempt to use your
134 135

Copyright © 1996-2014. All rights reserved. Alt-N Technologies, Ltd.
RelayFax SMTP Client 131
scanner to acquire a document, the RelayFax Client will immediately scan thedocument using the scanner's current default settings rather than present youwith a Scanner Options dialog first. A check mark will appear beside this optionwhen it is enabled.
Exit on send/cancel – Activate this option if you want the RelayFax SMTP Clientto shut down after a fax is sent or the Cancel button inside the client is clicked– the client will close and the tray icon will disappear. When this control is notenabled, the Compose Fax dialog will close but the tray icon will still beaccessible.
Send broadcast fax - Opens the broadcast fax wizard that will walk youthrough the steps of sending a broadcast fax.
Compose a new fax – Click this option to open the client's Compose Fax dialog.
Shut down RelayFax client – Click this option to shut down the RelayFax SMTPClient. The tray icon will disappear and all client dialogs will close.
Properties – Click this option to open the client's Properties dialog, which isused to configure your personal settings, server settings, dialup options, andmore.
167
141
132

Copyright © 1996-2014. All rights reserved. Alt-N Technologies, Ltd.
RelayFax Network Fax Manager v7.1132
13.3 Properties Dialog
13.3.1 Personal Settings
The Personal Settings pane is used to include various bits of personal information onyour fax's cover page. This information may also be compared by the RelayFax serverto its Outbound Fax Rules. When a message matches one of the rules, the server willperform whatever action the rule was designed to cause. It could, for example, fax themessage to a specific destination, print it, email it to someone, and so on.
Filling in the fields on this dialog doesn't necessarily mean theywill all appear on the cover page. Cover pages will only displaythe information that they have been designed to display.
My Personal Information
My real name isEnter your name here. This information may appear on the cover page of faxes thatyou send.
My email address isPlace your email address in this text box. RelayFax will send delivery confirmationnotices and notifications of problems with your fax to this address.

Copyright © 1996-2014. All rights reserved. Alt-N Technologies, Ltd.
RelayFax SMTP Client 133
This address must match a licensed user of the RelayFaxsystem. For information on RelayFax User Accounts, see: Accounts .
My street address isEnter your street address here. Two fields are provided but you can leave thesecond one blank if it isn't needed.
My cityThis field is for you city.
My state or provinceEnter your state or province here.
My ZIP or postal codeThis field is for your ZIP or postal code.
Put ZIP before CityWhen formatting an address in some regions, the zip or postal code is placed beforethe city. Click this check box if you want your address to be formatted that way.
My company nameType the name of your company here.
Home phoneYour home telephone number.
Home faxYour home fax number.
Business phoneEnter the voice telephone number of your business.
Business faxThis is your business fax number.
Billing codeIf you are required to provide a billing code or special identifier with your faxes,enter it into this field.
Fax passwordIf you are required to include a password with your faxes then enter it here.
112

Copyright © 1996-2014. All rights reserved. Alt-N Technologies, Ltd.
RelayFax Network Fax Manager v7.1134
13.3.2 Server Settings
This dialog is used to configure various settings that the RelayFax SMTP Client needs inorder to process your faxes.
Mail Server Properties
My mail server's domain name or IP addressEnter the domain name or IP address of your mail server, where your email accountis located. This could be a mail host provided by your Internet service provider, amail service provider, or a server located at your company. When sending a fax theRelayFax SMTP Client will fold it into an email message and then send that messageto this mail server for delivery to the RelayFax Server mailbox.
Send on this TCP portThe client will send your messages on this port.
Visually verify transfer of fax data to serverNormally the client transfers fax data in the background. Click this switch tointeractively monitor transactions as they occur.
My server requires authenticationClick this check box and enter your login credentials below if you are required to login to your mail server when sending email.
Account nameEnter the account name or login used for logging into your mail server.

Copyright © 1996-2014. All rights reserved. Alt-N Technologies, Ltd.
RelayFax SMTP Client 135
PasswordEnter the password corresponding to the Account name specified above.
Enable SSL/TLSCheck this box if you wish to use SSL/TLS when sending faxes to the mail server.
Optional path to RelayFax server's RFC822 directoryIf your RelayFax SMTP Client is installed on the same machine as your RelayFaxserver, or one that is accessible via your local area network, then you can specifythe path to its RFC822 directory here (e.g. "C:\Program Files\RelayFax\Rfc822").This will deliver your outbound faxes directly to RelayFax instead of having to gothrough your mail server.
RelayFax Account Email Address
RelayFax account email addressThis is the email address that the RelayFax server will check for messages waiting tobe faxed. All of your outbound fax messages should be sent here so that they canbe processed by RelayFax.
13.3.3 Dialup Settings
Use the options on this pane if you need to configure your client to dial in to theInternet in order to pass a fax to the RelayFax server for faxing. If your computerresides on a network or you have some other direct connection to the Internet such as
Copyright © 1996-2014. All rights reserved. Alt-N Technologies, Ltd.
RelayFax Network Fax Manager v7.1136
DSL, then this feature will not be necessary.
Dialup Control
Enable RAS dialup/dialdown engineClick this checkbox to enable/disable the dialup feature.
Make this many attempts to establish a sessionRelayFax will attempt to connect to the remote host this many times before givingup.
After dialing, wait this many seconds for a valid connectionThis value determines how long the client will wait for the remote computer toanswer and complete the dialup connection.
Dialup Profile
Logon nameThe value specified here will be passed to the remote host during the authenticationprocess.
Logon passwordThe value specified here will be passed to the remote host during the authenticationprocess.
Use this RAS dialup profileThis drop-down list allows you to select the session profile that has been previouslydefined through windows Dialup Networking or Remote Access Services Setup.
New profileClick this button to create a new Dialup Networking or Remote Access Servicesprofile.
Edit profileClick this button to edit the currently selected Dialup Networking or Remote AccessServices profile.
Connection Persistence
Once established, RelayFax will not close the RAS sessionBy default, RelayFax will shut down a created connection immediately after all mailtransactions have been completed and the session is no longer in use. Selecting thisoption will allow the session to remain active even after all mail has been sent.
Keep sessions alive for at least XX minutesIf enabled, this option will allow a RelayFax created RAS session to survive for atleast the number of minutes specified. Placing a zero in this entry will cause theconnection to be immediately closed after all transactions have been completed.
HangupThis button will break the connection to the ISP. This button is active only ifRelayFax has initiated the dialup session.
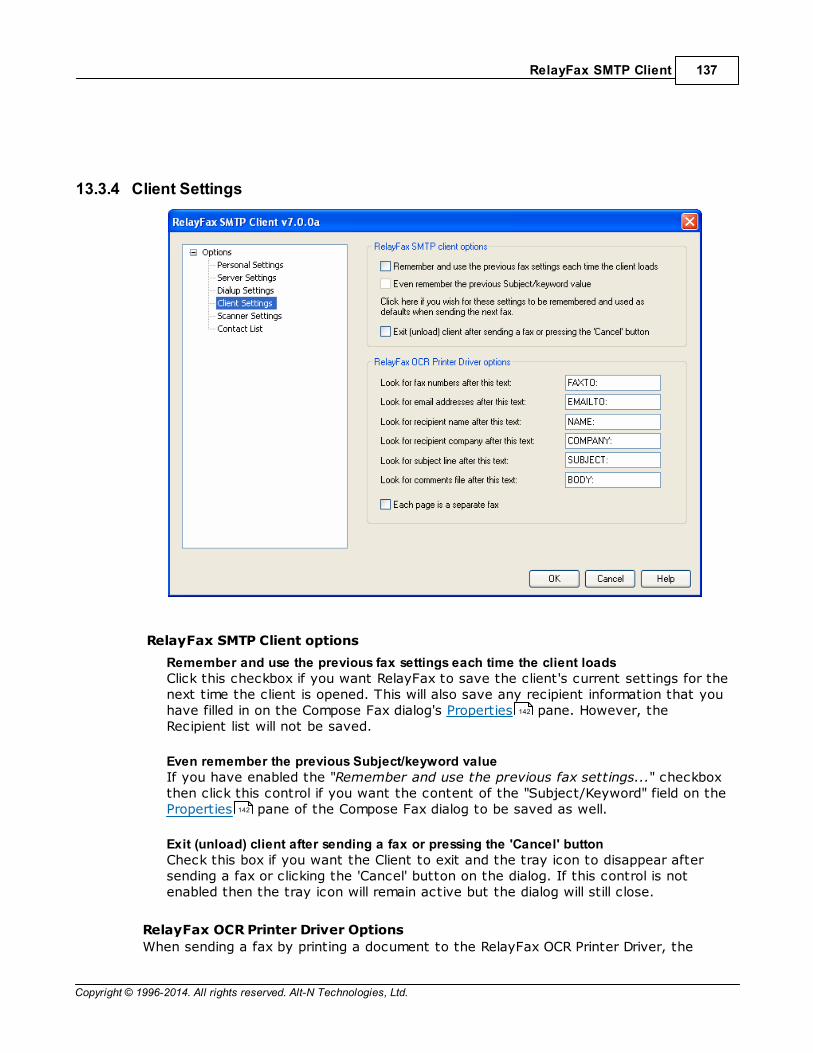
Copyright © 1996-2014. All rights reserved. Alt-N Technologies, Ltd.
RelayFax SMTP Client 137
13.3.4 Client Settings
RelayFax SMTP Client options
Remember and use the previous fax settings each time the client loadsClick this checkbox if you want RelayFax to save the client's current settings for thenext time the client is opened. This will also save any recipient information that youhave filled in on the Compose Fax dialog's Properties pane. However, theRecipient list will not be saved.
Even remember the previous Subject/keyword valueIf you have enabled the "Remember and use the previous fax settings..." checkboxthen click this control if you want the content of the "Subject/Keyword" field on the Properties pane of the Compose Fax dialog to be saved as well.
Exit (unload) client after sending a fax or pressing the 'Cancel' buttonCheck this box if you want the Client to exit and the tray icon to disappear aftersending a fax or clicking the 'Cancel' button on the dialog. If this control is notenabled then the tray icon will remain active but the dialog will still close.
RelayFax OCR Printer Driver Options
When sending a fax by printing a document to the RelayFax OCR Printer Driver, the
142
142
Copyright © 1996-2014. All rights reserved. Alt-N Technologies, Ltd.
RelayFax Network Fax Manager v7.1138
settings in this section will be used during the Optical Character Recognition scan todetermine the various parameters associated with the fax. Place these identifiers inyour documents in order to designate the fax number, the recipient's name, the subjectof the fax, and so on.
Look for fax numbers after this textWhen the RelayFax OCR Printer Driver encounters this text while scanning adocument, the set of numbers immediately following this identifier will be treated asa fax number.
Look for email addresses after this textWhen the RelayFax OCR Printer Driver scans a document, it will look for an emailaddress immediately following this designated text. RelayFax will then email a copyof the fax to the address.
Look for recipient name after this textThis text denotes that there is a recipient name following.
Look for recipient company after this textThe fax client will treat text following this identifier as the recipient's companyname.
Look for subject line after this textThis text identifies the subject line of the fax.
Look for comments file after this textAfter this text, the fax client will look for a reference to a text file; the contents ofthe file will be included in the comment section of the cover page. The text file mustbe contained in the \RelayFax\App\ subfolder.
Each page is a separate faxClick this check box if you wish to treat each page of a document printed to theOCR Printer Driver as a separate fax. If using this option, be sure to include anidentifier listed above such as FAXTO: or EMAILTO: on each page of the document.
You can also use this feature to include multiple, consecutivepages of a document in a single fax. Any pages that do notinclude either a FAXTO: or EMAILTO: identifier will beappended to the fax delimited by the last page that did includeone of those identifiers. For example, if page one and page sixof a document included a FAXTO: identifier, then pages onethrough five would be included with the first fax, and pages sixand subsequent pages would be included with the second fax.
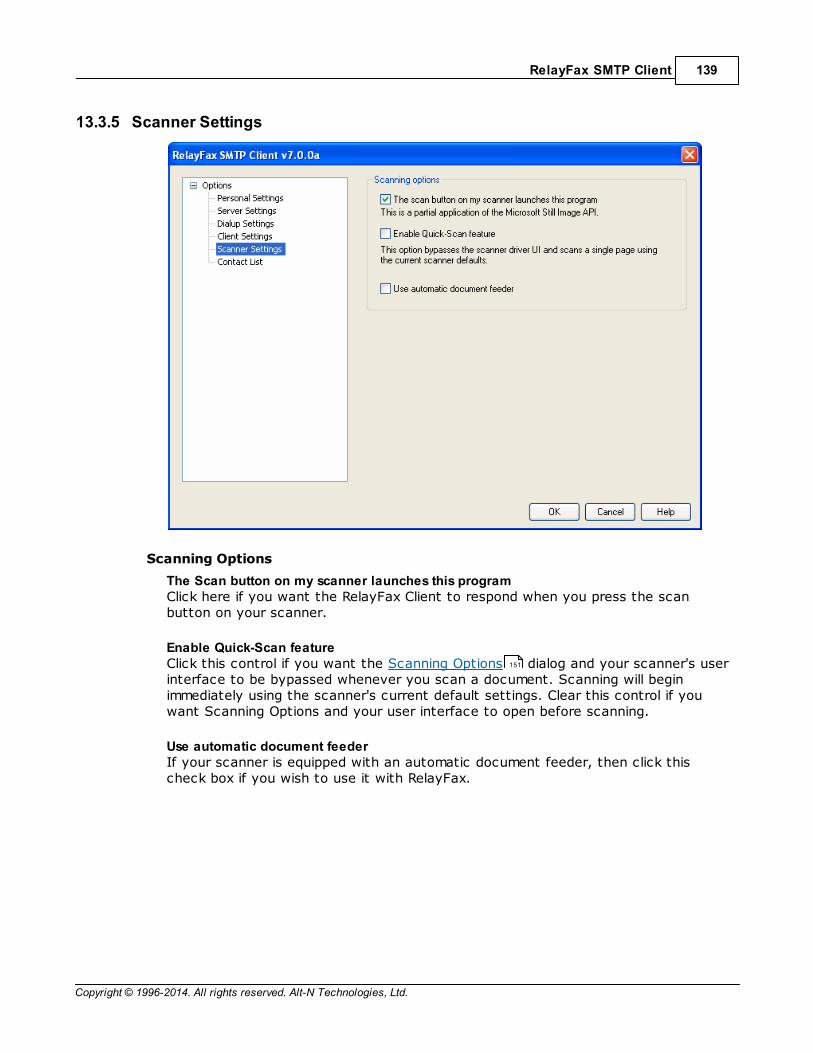
Copyright © 1996-2014. All rights reserved. Alt-N Technologies, Ltd.
RelayFax SMTP Client 139
13.3.5 Scanner Settings
Scanning Options
The Scan button on my scanner launches this programClick here if you want the RelayFax Client to respond when you press the scanbutton on your scanner.
Enable Quick-Scan featureClick this control if you want the Scanning Options dialog and your scanner's userinterface to be bypassed whenever you scan a document. Scanning will beginimmediately using the scanner's current default settings. Clear this control if youwant Scanning Options and your user interface to open before scanning.
Use automatic document feederIf your scanner is equipped with an automatic document feeder, then click thischeck box if you wish to use it with RelayFax.
151
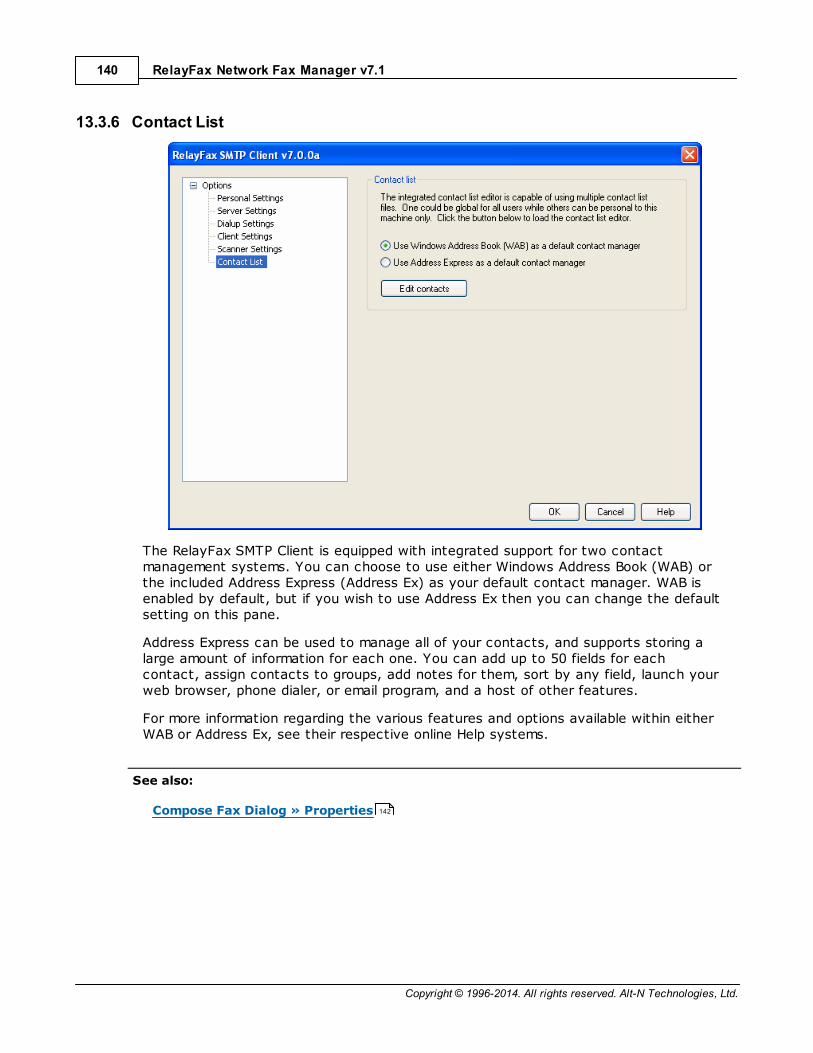
Copyright © 1996-2014. All rights reserved. Alt-N Technologies, Ltd.
RelayFax Network Fax Manager v7.1140
13.3.6 Contact List
The RelayFax SMTP Client is equipped with integrated support for two contactmanagement systems. You can choose to use either Windows Address Book (WAB) orthe included Address Express (Address Ex) as your default contact manager. WAB isenabled by default, but if you wish to use Address Ex then you can change the defaultsetting on this pane.
Address Express can be used to manage all of your contacts, and supports storing alarge amount of information for each one. You can add up to 50 fields for eachcontact, assign contacts to groups, add notes for them, sort by any field, launch yourweb browser, phone dialer, or email program, and a host of other features.
For more information regarding the various features and options available within eitherWAB or Address Ex, see their respective online Help systems.
See also:
Compose Fax Dialog » Properties 142
Copyright © 1996-2014. All rights reserved. Alt-N Technologies, Ltd.
RelayFax SMTP Client 141
13.4 Compose Fax Dialog
13.4.1 Compose Fax Dialog
The Compose Fax dialog is used to enter information relevant to individual faxes. Thisdialog appears when you click "Compose a new fax..." or one of the scanning optionson the RelayFax Client's shortcut menu . It will appear automatically each time thatyou print to the RelayFax Printer Driver.
This dialog contains six panes:
PropertiesOn this pane you will specify the fax number, the subject of the fax, the recipient'sname and company, and any comments that you want to appear on the cover page.
Cover PagesThis pane allows you to specify what cover page (if any) will be included with anoutbound fax.
Send ScheduleUsed for scheduling a specific date and time that the fax should be sent.
Scan ImageUsed to acquire a document from a scanner or twain device for faxing. For otheroptions see the Scanner Settings pane on the client's Properties dialog.
Attached DocumentsUse the settings on this pane to attach documents to your fax. If the RelayFaxServer has Attachment Faxing support enabled, each attached document will beconverted to a faxable image format and sent as additional pages. Attachments willalso be listed here when you use the RelayFax Printer Driver.
Advanced OptionsUsed for designating a priority setting for your fax. This pane also contains a controlthat governs whether or not a confirmation will be returned to you when your fax isdelivered.
129
142
145
149
150
139
153
154

Copyright © 1996-2014. All rights reserved. Alt-N Technologies, Ltd.
RelayFax Network Fax Manager v7.1142
13.4.2 Properties
On this pane you will specify the number to which you want the fax to be sent, thesubject of the fax, the recipient's name and company, and any comments that youwant to appear on the fax's cover page.
Fax Specifics
Fax numberEnter the fax number to which you want your fax to be sent and then click the Addbutton to add it to the recipient list. This will also add the contents of the otherrecipient information fields.
Recipient's NamePlace the name of the fax recipient here.
Recipient's CompanyPlace the name of the fax recipient's company here.
Fax subject/keywordEnter the subject of the fax into this field. This field can also be used for enteringkeywords that the RelayFax server's fax rules system may be configured to searchfor.
Billing codeThis control will display the default billing code value that you have designated onthe Personal Settings pane of the Client Properties dialog. You may enter an

Copyright © 1996-2014. All rights reserved. Alt-N Technologies, Ltd.
RelayFax SMTP Client 143
alternate value into this text field if you wish to override it for the current fax.
AddClick this button to add the contents of Fax number, Recipient name,and Recipientcompany to the recipient list.
ContactsEntries can also be added to the Recipient list by using the Contact Manager orthe MDaemon/Outlook Contacts dialog. Click Contacts and then choose either theRelayFax Contacts or MDaemon/Outlook Contacts option to open the desired dialog.If using the Contact Manager, click any entry that you wish to add to the list, andthen click OK. If using the MDaemon/Outlook Contacts dialog, click the desired entryand then click either the Send Email or Send Fax icon. In both dialogs you can selectmultiple entries by holding down the CTRL key as you click them.
When using the MDaemon/Outlook option you can access either your WorldClientcontacts stored online in your MDaemon/WorldClient email account (requiresMDaemon 9.0 or later), or you can access your Outlook contacts stored locallyunder an Outlook profile, when Outlook is your default email client.
Email RecipientsIf you wish to email a copy of the fax to someone, click this button to specify theaddress.
Recipient ListThis is the list of all the recipients that will receive a copy of this fax. This list mustcontain at least one recipient.
RemoveClick this button to remove selected entries from the Recipient List.
Comments for cover pageUse this box to enter any text that you wish to appear in the comments section ofthe cover page. If there is more text than will fit in the space provided, a separatepage will be created for the comments. Comments are limited to 3000 characters.Any text beyond 3000 characters is ignored.
Send FaxAfter you have filled in all areas relevant to your fax, click this button to send it.The RelayFax SMTP Client will fold the fax into an email message and dispatch it tothe RelayFax Server. The Recipient List must contain at least one entry for thisbutton to be enabled.
To send a "cover page only" fax, simply use this pane to enterthe recipients and your comments and then click Send Fax. Aslong as you have not included any Attached Documents ,the cover page with your included comments is all that will besent.
140
153

Copyright © 1996-2014. All rights reserved. Alt-N Technologies, Ltd.
RelayFax Network Fax Manager v7.1144
Error Message
After clicking Send Fax on the Compose Fax dialog, a warning message may appearinforming you that the client encountered an error while attempting to deliver the fax.This is usually due to an error in your Client Properties configuration — a partialtranscript of the delivery attempt will be displayed to help you diagnose the problem.Click Open Properties to open the Client Properties dialog so that you can check yoursettings. The mail server and dialup settings information on this dialog must be enteredproperly in order for the client to be able to deliver messages. Make sure that thecorrect IP address or domain name of your mail server has been entered on the ServerSettings pane and that correct ISP account information has been entered on theDialup Settings pane (if using the dialup features). You can also click Send again ifyou wish to try to send the fax again or Cancel fax to cancel it.
134
135
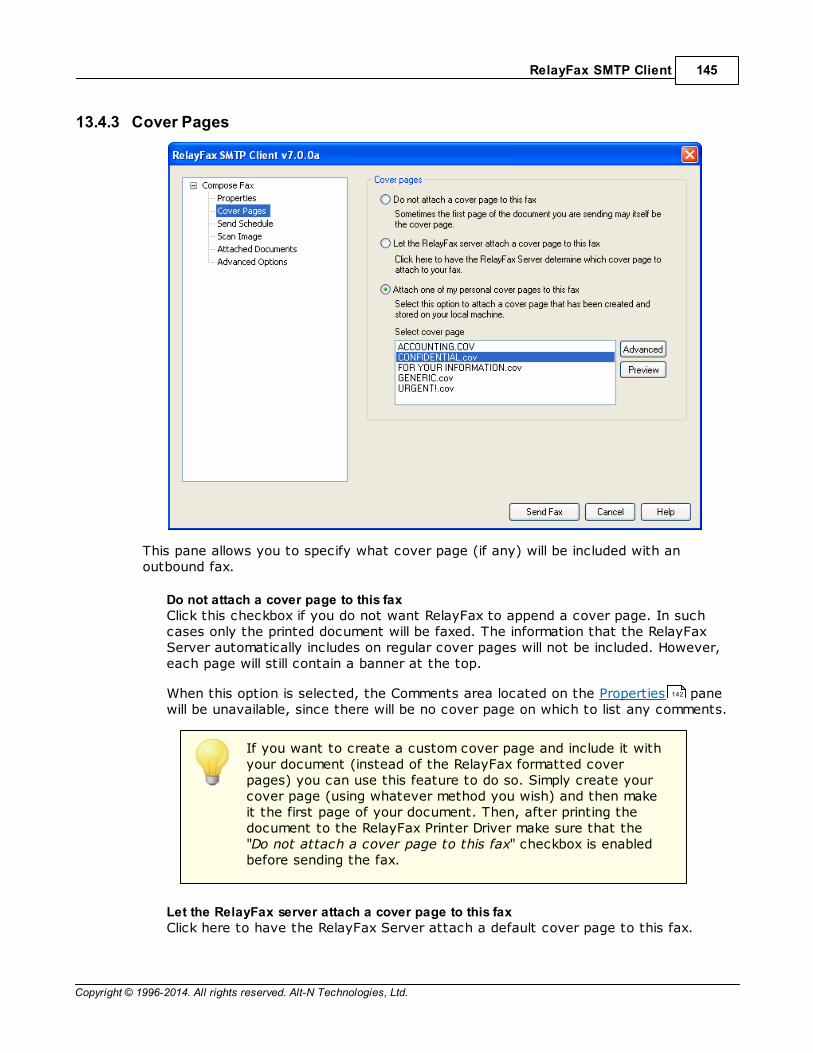
Copyright © 1996-2014. All rights reserved. Alt-N Technologies, Ltd.
RelayFax SMTP Client 145
13.4.3 Cover Pages
This pane allows you to specify what cover page (if any) will be included with anoutbound fax.
Do not attach a cover page to this faxClick this checkbox if you do not want RelayFax to append a cover page. In suchcases only the printed document will be faxed. The information that the RelayFaxServer automatically includes on regular cover pages will not be included. However,each page will still contain a banner at the top.
When this option is selected, the Comments area located on the Properties panewill be unavailable, since there will be no cover page on which to list any comments.
If you want to create a custom cover page and include it withyour document (instead of the RelayFax formatted coverpages) you can use this feature to do so. Simply create yourcover page (using whatever method you wish) and then makeit the first page of your document. Then, after printing thedocument to the RelayFax Printer Driver make sure that the"Do not attach a cover page to this fax" checkbox is enabledbefore sending the fax.
Let the RelayFax server attach a cover page to this faxClick here to have the RelayFax Server attach a default cover page to this fax.
142

Copyright © 1996-2014. All rights reserved. Alt-N Technologies, Ltd.
RelayFax Network Fax Manager v7.1146
Attach one of my personal cover pages to this faxClick here and select a cover page from the list and it will be used when the fax issent.
PreviewClick this button to preview the cover page, as it will appear in the fax.
AdvancedClick this button to open the Cover Pages dialog. This can be used to manageyour custom cover pages.
The RelayFax SMTP Client integrates with the Microsoft Cover Page Editor includedwith Windows. This application provides a very high level of custom cover pagedesign and creation capability. The Microsoft Cover Page Editor allows you tocreate and edit richly formatted cover pages which are supported directly byRelayFax.
The RelayFax SMTP Client uses the Microsoft Cover PageEditor included with Microsoft Windows XP, 2000, 2003,Vista, and 2008, excluding XP Home and Vista Home. If thecover page editor is not installed or associated with thesefiles then you may need to go to Add/Remove Programs inthe control panel and install the Fax Services (also known as"Windows Fax and Scan") under Add/Remove Windows

Copyright © 1996-2014. All rights reserved. Alt-N Technologies, Ltd.
RelayFax SMTP Client 147
Components.
Although the RelayFax SMTP Client can be installed and usedon the Home editions of Windows XP and Vista, the coverpage editor options will not work because those versions ofthe operating system do not include the fax services.
Existing Cover Pages
This box displays all available cover pages that you have created.
RemoveYou may delete a cover page by selecting it from the Existing Cover Pages listand then clicking the Remove button. You will be asked to confirm your decisionto delete the cover page before proceeding.
EditTo edit a previously created cover page select it from the Existing Cover Pageslist and then click the Edit button. The cover page will be loaded into theMicrosoft Cover Page Editor (not available in XP Home or Vista Home editions).
For more information on using the Cover Page Editor, click "Help»Help Topics"
within the editor.
NewTo create a new cover page, click the New. This will open the Cover PageProperties dialog, on which you will assign a name for your cover page, andinclude any desired comments or notes about this page for your reference.
Cover Page Properties
Copyright © 1996-2014. All rights reserved. Alt-N Technologies, Ltd.
RelayFax Network Fax Manager v7.1148
Cover page nameType a name for your cover page into this text box. This may be adescriptive name such as "The Frank Thomas cover page".
Descriptive CommentsHere you may enter up to 255 characters of descriptive text or commentsregarding this cover page. This can be used for reference to easily identify aspecific cover page. This is helpful when creating Outbound Fax Rules toassign alternate cover pages. For example, "This is the cover page that FrankThomas uses when sending faxes about his many heroic exploits." When thisparticular cover page is selected from the Existing Cover Pages list this textwill appear in the Comments section of the Cover Pages dialog.
These comments are saved in your cover page folder asthe file "<Cover Page Name>.cmt".
Cover page file:This is the filename of the cover page. Cover pages are stored in the ...
\RelayFax\Covers subfolder.
Comments:When you create a cover page you will have the opportunity to include somecomments or a description of the page for your personal reference. Thesecomments will appear in this area when a cover page is selected from theExisting Cover Pages list. This text will not appear on the cover page itself.

Copyright © 1996-2014. All rights reserved. Alt-N Technologies, Ltd.
RelayFax SMTP Client 149
13.4.4 Send Schedule
This pane makes it possible for you to designate a specific date and time for RelayFaxto send your fax.
Schedule fax for specific time
I want my fax to be sent immediatelyClick this option if you want the RelayFax server to send your fax at the earliestopportunity and on the first available fax modem.
I want to schedule my fax for sending at a particular date and timeChoose this option to cause the RelayFax server to send your fax at a specific dateand time.
Select the date to send your faxType the date that you want your fax to be sent. The date must be in the format:
mm/dd/yyyy. You can also click to open a calendar from which you can choosethe date instead.
Select the time to send your faxUse the drop-down list boxes to choose the hour, AM or PM, and minute to send thefax.
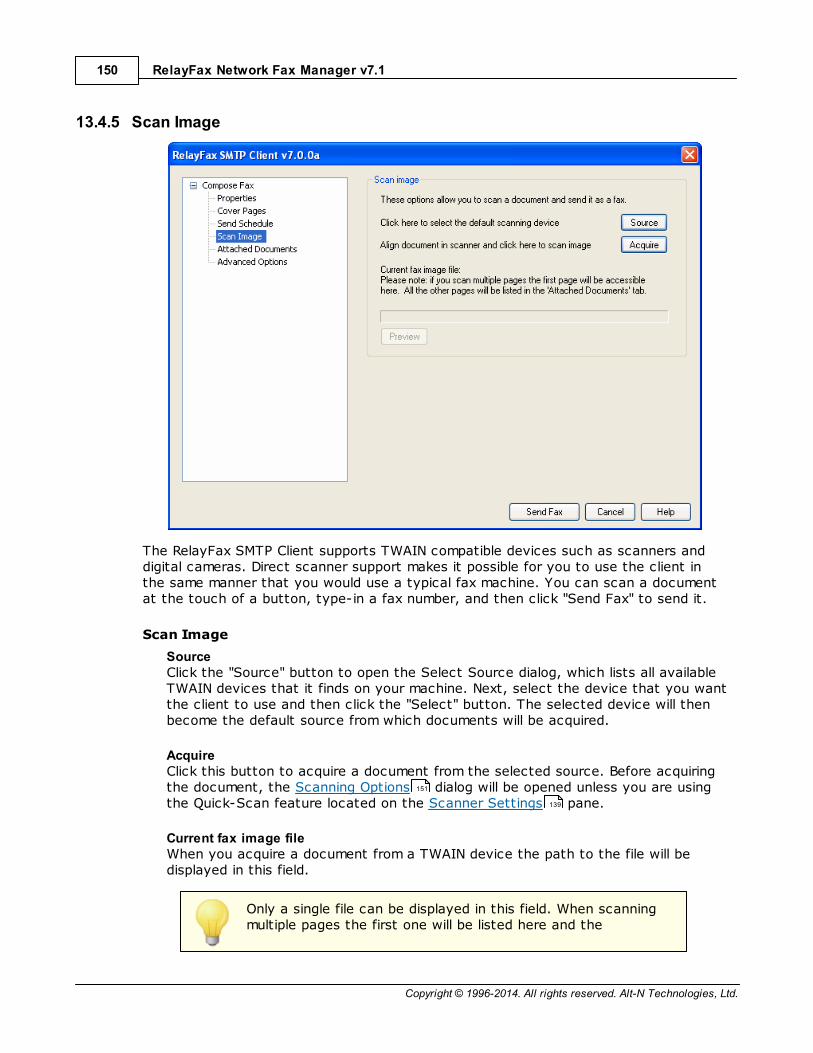
Copyright © 1996-2014. All rights reserved. Alt-N Technologies, Ltd.
RelayFax Network Fax Manager v7.1150
13.4.5 Scan Image
The RelayFax SMTP Client supports TWAIN compatible devices such as scanners anddigital cameras. Direct scanner support makes it possible for you to use the client inthe same manner that you would use a typical fax machine. You can scan a documentat the touch of a button, type-in a fax number, and then click "Send Fax" to send it.
Scan Image
SourceClick the "Source" button to open the Select Source dialog, which lists all availableTWAIN devices that it finds on your machine. Next, select the device that you wantthe client to use and then click the "Select" button. The selected device will thenbecome the default source from which documents will be acquired.
AcquireClick this button to acquire a document from the selected source. Before acquiringthe document, the Scanning Options dialog will be opened unless you are usingthe Quick-Scan feature located on the Scanner Settings pane.
Current fax image fileWhen you acquire a document from a TWAIN device the path to the file will bedisplayed in this field.
Only a single file can be displayed in this field. When scanningmultiple pages the first one will be listed here and the
151
139

Copyright © 1996-2014. All rights reserved. Alt-N Technologies, Ltd.
RelayFax SMTP Client 151
remainder will be listed on the Attached Documents pane.
ViewClick View to open the file listed in the Current fax image file control.
See also:
Scanning Options
Scanner Settings
Attached Documents
13.4.5.1 Scanning Options
Scanning Options
Number of pages to scan [xx]If you are sending a multi-page fax, use this control to enter the number of pagesthat it contains (including cover page). You will be prompted to ready each pagebefore it is scanned. Depending upon your scanner, a product-specific user interfacemay or may not appear. If you are using an automatic document feeder (ADF) withyour scanner then you may enter "0" to cause it to scan all loaded pages. Be sure toenable the Use automatic document feeder control if you are using one.
Use automatic document feederClick this check box if your scanner is equipped with an ADF unit.
153
151
139
153
Copyright © 1996-2014. All rights reserved. Alt-N Technologies, Ltd.
RelayFax Network Fax Manager v7.1152
Do not enable this control if your scanner isn't equipped withan automatic document feeder. Configuring the client to usean ADF unit when there isn't one could lead to errors or systeminstability.
Scan resolutionClick the drop-down list box and choose the resolution setting that you want to beused when scanning the documents.
Brightness adjustmentUse This slider to adjust the brightness setting that will be used when scanning.
Contrast adjustmentUse this slider to adjust the contrast setting that will be used when scanning.
Not all scanner device drivers will accept the Resolution,Brightness, and Contrast settings from RelayFax. You mayhave to replicate these settings once the scanner driver userinterface has loaded.

Copyright © 1996-2014. All rights reserved. Alt-N Technologies, Ltd.
RelayFax SMTP Client 153
13.4.6 Attached Documents
Use the settings on this pane to attach documents to your fax. If the RelayFax Serverhas Attachment Faxing support enabled, each attached document will be converted toa faxable image format and sent as additional pages.
Attach These Documents To This Fax
This list shows the currently attached documents.
RemoveClick this button to remove the selected documents from the list.
OpenSelect a file from the list and then click this button to open it.
Add This DocumentType in the path to the document you wish to include with this fax.
AddClick here to add the specified document to the list.
AcquireClick this button to acquire a document from your default TWAIN device.
BrowseClick here to select a document to include with this fax.
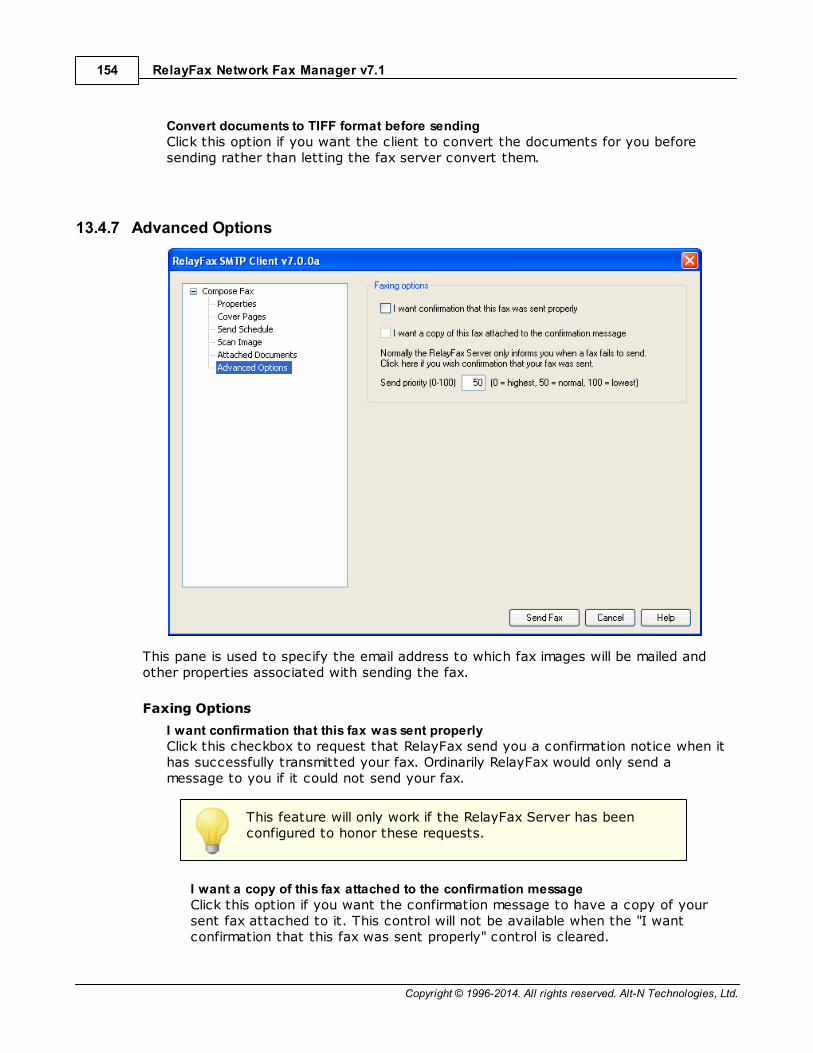
Copyright © 1996-2014. All rights reserved. Alt-N Technologies, Ltd.
RelayFax Network Fax Manager v7.1154
Convert documents to TIFF format before sendingClick this option if you want the client to convert the documents for you beforesending rather than letting the fax server convert them.
13.4.7 Advanced Options
This pane is used to specify the email address to which fax images will be mailed andother properties associated with sending the fax.
Faxing Options
I want confirmation that this fax was sent properlyClick this checkbox to request that RelayFax send you a confirmation notice when ithas successfully transmitted your fax. Ordinarily RelayFax would only send amessage to you if it could not send your fax.
This feature will only work if the RelayFax Server has beenconfigured to honor these requests.
I want a copy of this fax attached to the confirmation messageClick this option if you want the confirmation message to have a copy of yoursent fax attached to it. This control will not be available when the "I wantconfirmation that this fax was sent properly" control is cleared.
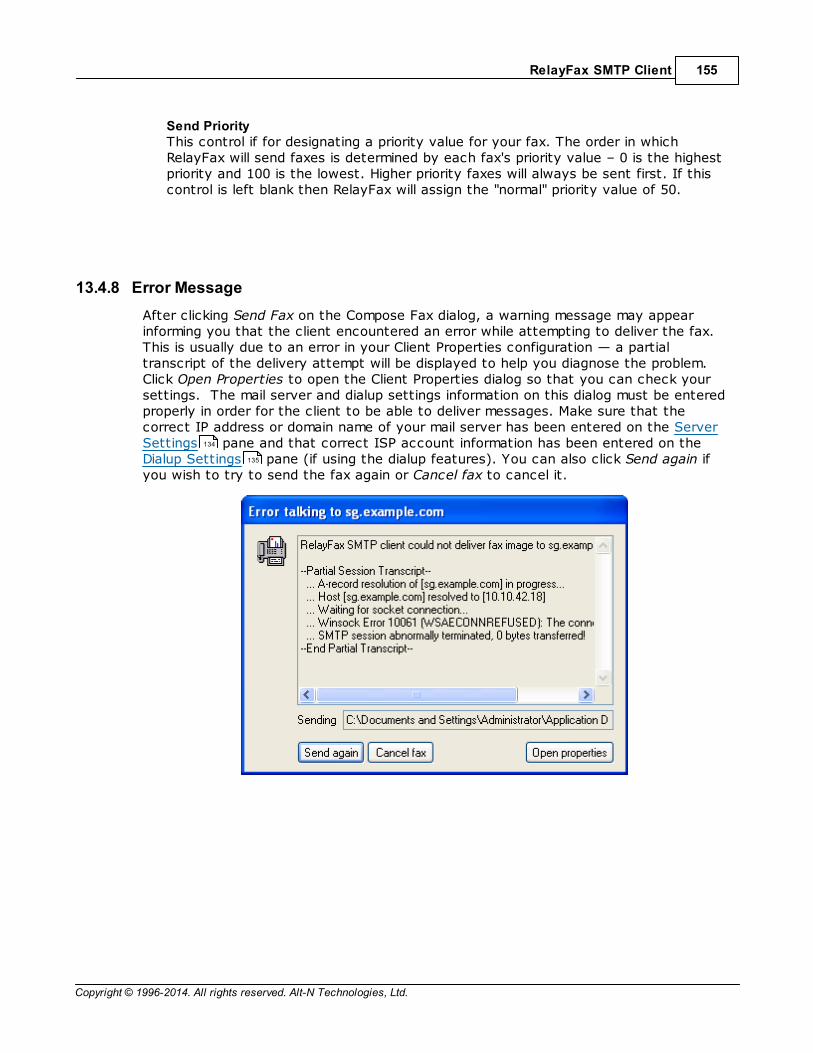
Copyright © 1996-2014. All rights reserved. Alt-N Technologies, Ltd.
RelayFax SMTP Client 155
Send PriorityThis control if for designating a priority value for your fax. The order in whichRelayFax will send faxes is determined by each fax's priority value – 0 is the highestpriority and 100 is the lowest. Higher priority faxes will always be sent first. If thiscontrol is left blank then RelayFax will assign the "normal" priority value of 50.
13.4.8 Error Message
After clicking Send Fax on the Compose Fax dialog, a warning message may appearinforming you that the client encountered an error while attempting to deliver the fax.This is usually due to an error in your Client Properties configuration — a partialtranscript of the delivery attempt will be displayed to help you diagnose the problem.Click Open Properties to open the Client Properties dialog so that you can check yoursettings. The mail server and dialup settings information on this dialog must be enteredproperly in order for the client to be able to deliver messages. Make sure that thecorrect IP address or domain name of your mail server has been entered on the ServerSettings pane and that correct ISP account information has been entered on theDialup Settings pane (if using the dialup features). You can also click Send again ifyou wish to try to send the fax again or Cancel fax to cancel it.
134
135

Copyright © 1996-2014. All rights reserved. Alt-N Technologies, Ltd.
RelayFax Network Fax Manager v7.1156
13.5 Working with Faxes
13.5.1 RelayFax Printer Driver
With the RelayFax Printer Driver you can fax documents directly from within theapplications that you use to create them. You can do this by printing the document tothe RelayFax Printer Driver instead of to your usual printer. After setting the desiredparameters, click OK and then the client's Compose Fax dialog will be openedautomatically for completing the fax.
During installation, the RelayFax Printer Driver's default settingswill be set to the proper resolution. Exercise caution inchanging these settings. Failure to properly configure theprinter driver will result in improperly formatted fax images thatappear out of scale or otherwise deformed.
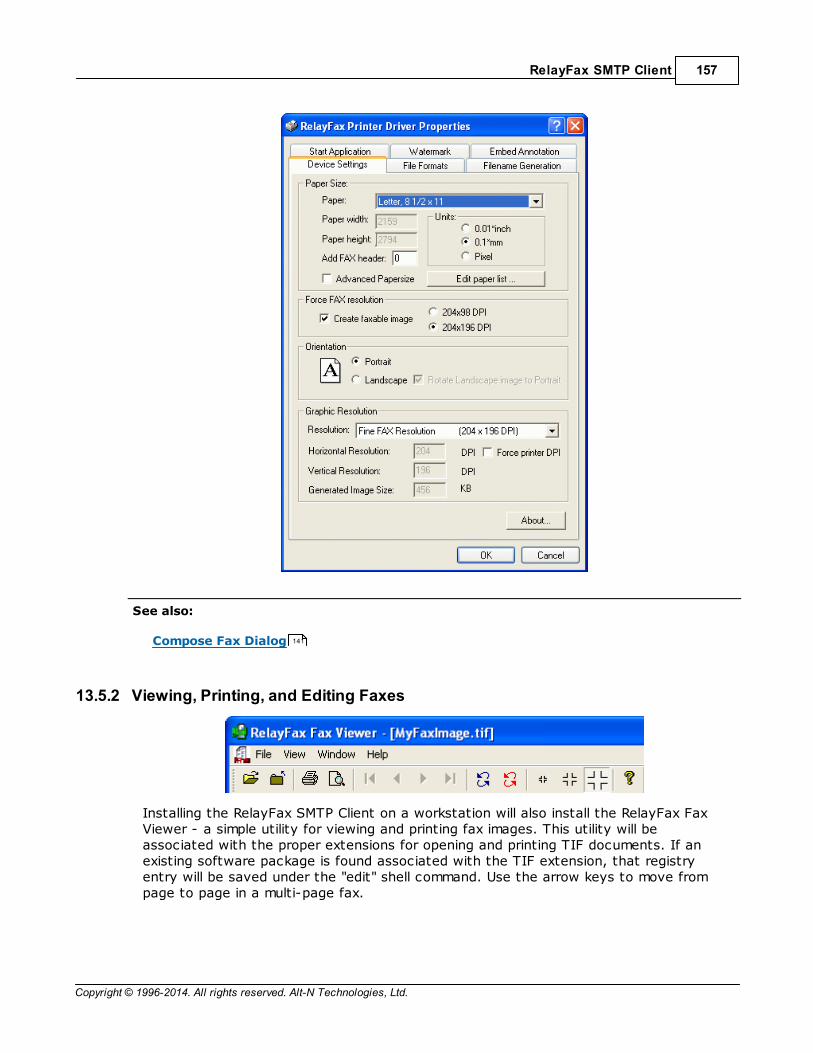
Copyright © 1996-2014. All rights reserved. Alt-N Technologies, Ltd.
RelayFax SMTP Client 157
See also:
Compose Fax Dialog
13.5.2 Viewing, Printing, and Editing Faxes
Installing the RelayFax SMTP Client on a workstation will also install the RelayFax FaxViewer - a simple utility for viewing and printing fax images. This utility will beassociated with the proper extensions for opening and printing TIF documents. If anexisting software package is found associated with the TIF extension, that registryentry will be saved under the "edit" shell command. Use the arrow keys to move frompage to page in a multi-page fax.
141

Copyright © 1996-2014. All rights reserved. Alt-N Technologies, Ltd.
RelayFax Network Fax Manager v7.1158
13.5.3 Sending a Fax via an Email Client
13.5.3.1 Sending a Fax via an Email Client
Most of the time a fax will be created by printing to the RelayFax Printer Driver fromwithin a Windows application. However, it is possible and sometimes most effective tosimply load up your email client and directly generate a message to be faxed. This isdone by composing your email message and addressing it to one of the email accountsthat you know RelayFax is monitoring. For example, if RelayFax is collecting all the emailmessages sent to [email protected] then sending your message to that addresswill get it faxed. Several special considerations must be observed in order to use thismethod of faxing.
Including a Fax Number in the TO: Header
When you address your email message you can specify just a fax number on the TO:line like this:
"555-1212" <[email protected]>
You can also specify the recipient's name, company information, and fax number likethis:
"555-1212, Jeff Boyd, Forest Park Lanes" <[email protected]>
Note how each part within the quotations is separated by a comma. The format is likethis:
[Open Quote]FAX NUMBER[Comma]PERSONAL NAME[Comma]COMPANY NAME[CloseQuote]
Because the various sections are separated by a comma, you will need to enclose inquotation marks any field value that contains a comma. For example:
"555-1212, "Boyd, Jeff", "Alt-N Technologies, Ltd.""<[email protected]>
Finally, you can specify just the recipient's fax number and company name like this:
"555-1212, , "Alt-N Technologies, Ltd."" <[email protected]>
Using a Fax Number in the Email Address
Your fax server/mail server configuration may have an entire domain (e.g."fax.example.com") dedicated to fax messages, allowing a fax number to be used as themailbox portion of the email address itself. If that is the case then you would formatthe email address like this:
"Frank Thomas, Example Co." <[email protected]>
See:
Email Macros
Attaching Documents to Fax Messages
159
159

Copyright © 1996-2014. All rights reserved. Alt-N Technologies, Ltd.
RelayFax SMTP Client 159
13.5.3.2 Attaching Documents to Fax Messages
The RelayFax Server has the ability to extract attachments and fax themautomatically. For example, it is possible for you to send an email message to theRelayFax Server which contains an Excel or Word document as an attachment. TheRelayFax Server will extract the document, invoke the associated application to print itand then fax the resulting image. Any number of separate attachments can beattached and faxed in this manner. Page breaks within any given document will behonored and cause multiple pages to be faxed.
When you send a fax through an email message and notthrough the printer driver, the text of your mail will be placedin the comments section of the cover page if the cover pageexists and the length of the text of your message is less than1000 characters. However, page breaks within the body ofthe email message will be honored and cause RelayFax togenerate multiple faxed pages rather than just a cover page.
See Also:
Attached Documents
Attachment Faxing
13.5.3.3 Email Macros
When RelayFax processes an email message in preparation for faxing, it examines themessage to determine where and to whom the fax should be sent. Most of the time thisinformation will be specified on the TO: line, however it is possible to specify severalkey items within the email message itself. The following special macros can be placedwithin the body of an email message to achieve specific results. Each macro mustappear on its own line and at the top of the message body:
AUTOEXTRACT: true This macro tells the RelayFax Server to performOCR on the attached TIF file and search forfaxnumbers.
AUTOEXTRACTKEY: true If AUTOEXTRACT is true, then this macrocontains the string to search for when lookingfor recipient fax numbers.
AUTOEXTRACTNAME: true If AUTOEXTRACT is true, then this macrocontains the string to search for when lookingfor the recipient name.
153
62
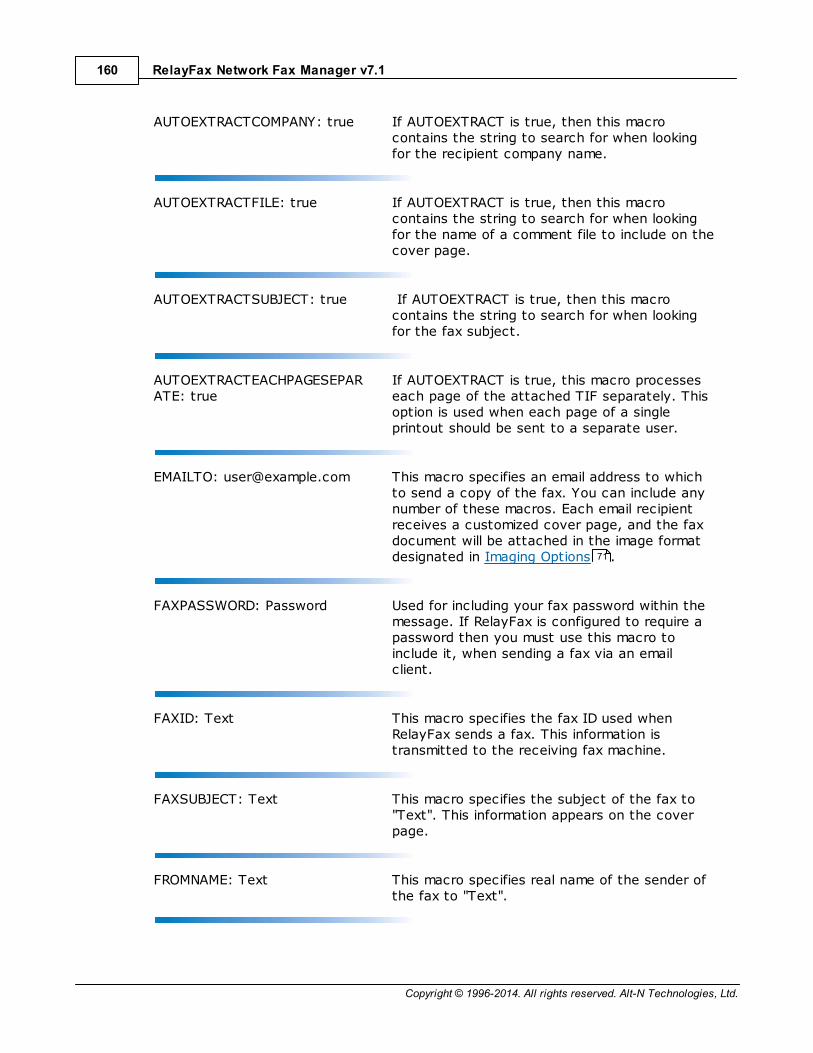
Copyright © 1996-2014. All rights reserved. Alt-N Technologies, Ltd.
RelayFax Network Fax Manager v7.1160
AUTOEXTRACTCOMPANY: true If AUTOEXTRACT is true, then this macrocontains the string to search for when lookingfor the recipient company name.
AUTOEXTRACTFILE: true If AUTOEXTRACT is true, then this macrocontains the string to search for when lookingfor the name of a comment file to include on thecover page.
AUTOEXTRACTSUBJECT: true If AUTOEXTRACT is true, then this macrocontains the string to search for when lookingfor the fax subject.
AUTOEXTRACTEACHPAGESEPARATE: true
If AUTOEXTRACT is true, this macro processeseach page of the attached TIF separately. Thisoption is used when each page of a singleprintout should be sent to a separate user.
EMAILTO: [email protected] This macro specifies an email address to whichto send a copy of the fax. You can include anynumber of these macros. Each email recipientreceives a customized cover page, and the faxdocument will be attached in the image format designated in Imaging Options .
FAXPASSWORD: Password Used for including your fax password within themessage. If RelayFax is configured to require apassword then you must use this macro toinclude it, when sending a fax via an emailclient.
FAXID: Text This macro specifies the fax ID used whenRelayFax sends a fax. This information istransmitted to the receiving fax machine.
FAXSUBJECT: Text This macro specifies the subject of the fax to"Text". This information appears on the coverpage.
FROMNAME: Text This macro specifies real name of the sender ofthe fax to "Text".
71
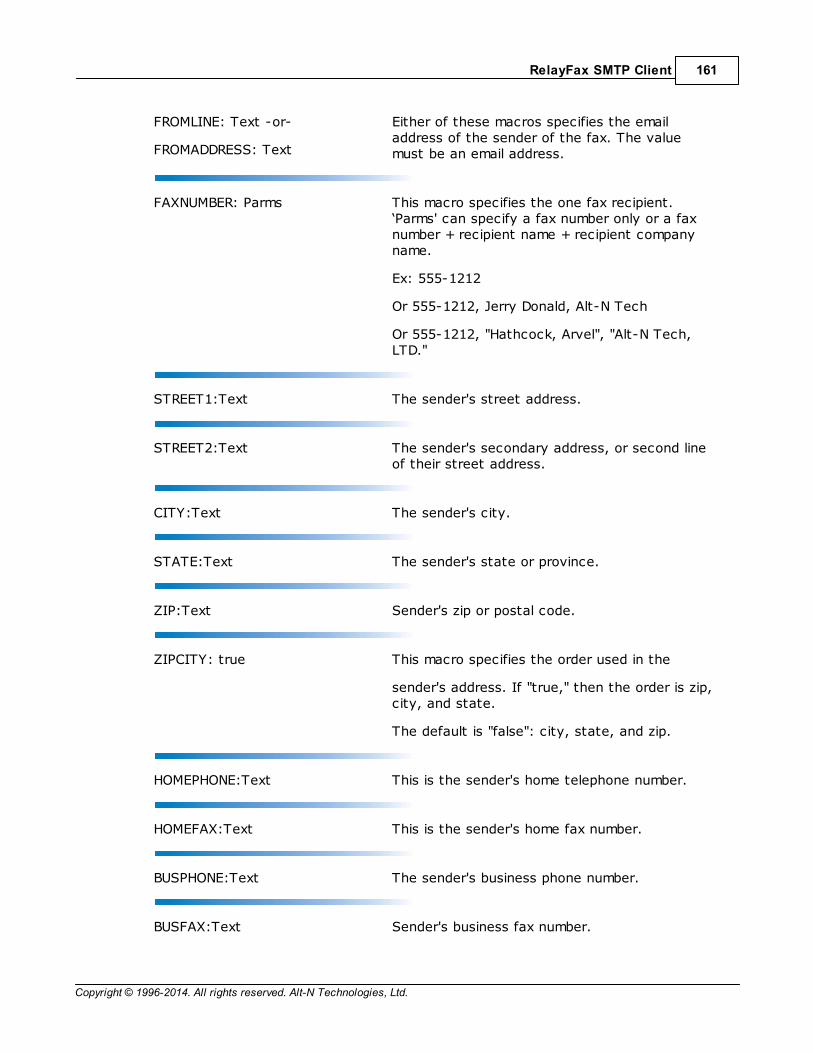
Copyright © 1996-2014. All rights reserved. Alt-N Technologies, Ltd.
RelayFax SMTP Client 161
FROMLINE: Text -or-
FROMADDRESS: Text
Either of these macros specifies the emailaddress of the sender of the fax. The valuemust be an email address.
FAXNUMBER: Parms This macro specifies the one fax recipient.‘Parms' can specify a fax number only or a faxnumber + recipient name + recipient companyname.
Ex: 555-1212
Or 555-1212, Jerry Donald, Alt-N Tech
Or 555-1212, "Hathcock, Arvel", "Alt-N Tech,LTD."
STREET1:Text The sender's street address.
STREET2:Text The sender's secondary address, or second lineof their street address.
CITY:Text The sender's city.
STATE:Text The sender's state or province.
ZIP:Text Sender's zip or postal code.
ZIPCITY: true This macro specifies the order used in the
sender's address. If "true," then the order is zip,city, and state.
The default is "false": city, state, and zip.
HOMEPHONE:Text This is the sender's home telephone number.
HOMEFAX:Text This is the sender's home fax number.
BUSPHONE:Text The sender's business phone number.
BUSFAX:Text Sender's business fax number.
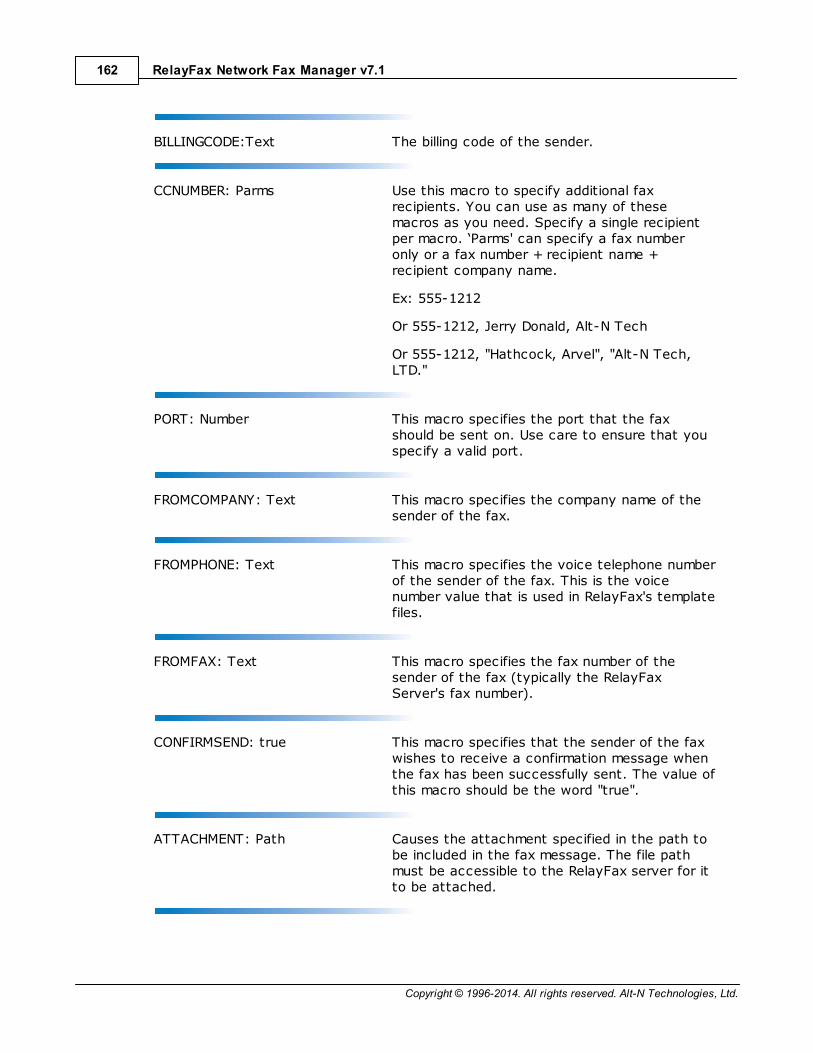
Copyright © 1996-2014. All rights reserved. Alt-N Technologies, Ltd.
RelayFax Network Fax Manager v7.1162
BILLINGCODE:Text The billing code of the sender.
CCNUMBER: Parms Use this macro to specify additional faxrecipients. You can use as many of thesemacros as you need. Specify a single recipientper macro. ‘Parms' can specify a fax numberonly or a fax number + recipient name +recipient company name.
Ex: 555-1212
Or 555-1212, Jerry Donald, Alt-N Tech
Or 555-1212, "Hathcock, Arvel", "Alt-N Tech,LTD."
PORT: Number This macro specifies the port that the faxshould be sent on. Use care to ensure that youspecify a valid port.
FROMCOMPANY: Text This macro specifies the company name of thesender of the fax.
FROMPHONE: Text This macro specifies the voice telephone numberof the sender of the fax. This is the voicenumber value that is used in RelayFax's templatefiles.
FROMFAX: Text This macro specifies the fax number of thesender of the fax (typically the RelayFaxServer's fax number).
CONFIRMSEND: true This macro specifies that the sender of the faxwishes to receive a confirmation message whenthe fax has been successfully sent. The value ofthis macro should be the word "true".
ATTACHMENT: Path Causes the attachment specified in the path tobe included in the fax message. The file pathmust be accessible to the RelayFax server for itto be attached.
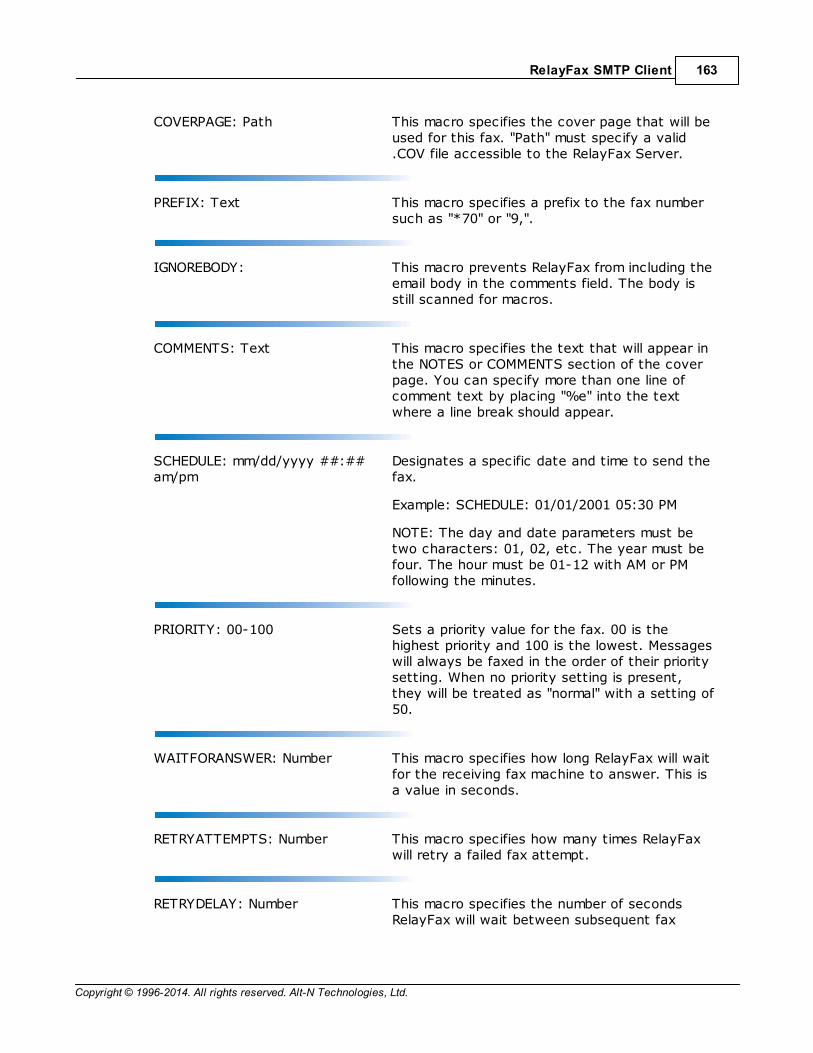
Copyright © 1996-2014. All rights reserved. Alt-N Technologies, Ltd.
RelayFax SMTP Client 163
COVERPAGE: Path This macro specifies the cover page that will beused for this fax. "Path" must specify a valid.COV file accessible to the RelayFax Server.
PREFIX: Text This macro specifies a prefix to the fax numbersuch as "*70" or "9,".
IGNOREBODY: This macro prevents RelayFax from including theemail body in the comments field. The body isstill scanned for macros.
COMMENTS: Text This macro specifies the text that will appear inthe NOTES or COMMENTS section of the coverpage. You can specify more than one line ofcomment text by placing "%e" into the textwhere a line break should appear.
SCHEDULE: mm/dd/yyyy ##:##am/pm
Designates a specific date and time to send thefax.
Example: SCHEDULE: 01/01/2001 05:30 PM
NOTE: The day and date parameters must betwo characters: 01, 02, etc. The year must befour. The hour must be 01-12 with AM or PMfollowing the minutes.
PRIORITY: 00-100 Sets a priority value for the fax. 00 is thehighest priority and 100 is the lowest. Messageswill always be faxed in the order of their prioritysetting. When no priority setting is present,they will be treated as "normal" with a setting of50.
WAITFORANSWER: Number This macro specifies how long RelayFax will waitfor the receiving fax machine to answer. This isa value in seconds.
RETRYATTEMPTS: Number This macro specifies how many times RelayFaxwill retry a failed fax attempt.
RETRYDELAY: Number This macro specifies the number of secondsRelayFax will wait between subsequent fax
Copyright © 1996-2014. All rights reserved. Alt-N Technologies, Ltd.
RelayFax Network Fax Manager v7.1164
attempts.
NOCOVERPAGE: true This macro will prevent RelayFax fromgenerating a dynamic cover page and sending italong with your fax. This is useful for situationsin which you either do not want a cover page orthe first printed page of your document is thecover page for the fax.
BANNERTEXT: Text This macro specifies the text that appears atthe top of each faxed page. You can use thespecial banner characters here. See the BannerText & Formatting Characters for moreinformation.
---Example Start---
From: [email protected]: "555-1212, Eddie Filewood, "Forest Park Lanes, Front Desk""<[email protected]>Subject: My time.
FROMNAME: Frank ThomasFROMCOMPANY: Forest Park Lanes, Inc.PRIORITY: 00COMMENTS: Say, hit me in! I be in ina minute. %e Tell me I'm a lyin'. %e Frank
---Example End---
13.5.3.4 Banner Text & Formatting Characters
RelayFax will insert a line of text at the top of each faxed page. This line is called abanner. With RelayFax it is possible to custom format your banner to automaticallyinclude various kinds of information such as the date and time, total pages, recipient'sor sender's name, your fax device's identifier (CSID), and various other options.
By inserting special formatting characters into the banner, you may automaticallyinclude some information concerning the fax. See the list below for descriptions ofthese characters.
Although the banner may be any length, only one line will appear at the top of a fax.This line may consist of up to three parts. These parts are a left-justified portion, acenter-justified portion, and a right-justified portion. Each part is separated by thevertical bar character ("|"). Since none of these areas are limited in size, there is thepotential that they may at times overwrite one another.
42

Copyright © 1996-2014. All rights reserved. Alt-N Technologies, Ltd.
RelayFax SMTP Client 165
If the banner option is left blank no fax banner will be sent.However, it is common practice to include a banner onoutgoing faxes, and in some regions it is even required.
RelayFax Banner Formatting Characters
The following is a glossary of all valid formatting characters that may be used in theRelayFax Banner:
%d = date in short format
%D = date in long format
%t = send time (24 hour format, e.g. 1:00pm = 13:00:00)
%p = total number of pages in the fax
%c = current page
%r = Recipient's Name
%y = Recipient's Company
%s = Sender's Name
%m = Sender's Company
%i = Sender's Fax ID
%u = Subject of Fax
%f = Recipient's Fax Number
%o = Comments
%x = Sender's Fax Number
%h = Sender's Voice Number
%T = Tracking Number
Inbound Banner Formatting Characters
On the Default Rules pane of the Mail Sources and Rules dialog, you can configureRelayFax to add a banner to inbound faxes. The following formatting characters can beused in that feature:
%d = date in short format
%D = date in long format
%t = send time (24 hour format, e.g. 1:00pm = 13:00:00)
%p = total number of pages in the fax
%c = current page
%r,%f = DID number if available, otherwise received port
84

Copyright © 1996-2014. All rights reserved. Alt-N Technologies, Ltd.
RelayFax Network Fax Manager v7.1166
%s = Caller ID information if available, otherwise Sender's Fax ID
%i = Sender's Fax ID
%T = Tracking Number
13.5.4 Advanced Features
13.5.4.1 Sending Faxes Programmatically
Your custom application can use the RelayFax system to send a fax by observing thefollowing steps:
Set the following parameters in the FAXCLNT.INI file under the [FAXPARMS] section.This file can be found in the \Application Data\RelayFax\ subdirectory of the user'sprofile (e.g. Documents and Settings in Windows 2000/XP).
LastFaxNumber=555-1212 ; set the fax number here
LastRecipientName=Arvel Hathcock ; set the recipient's name here
LastRecipientCompany=Alt-N Tech ; set the recipient's company here
LastFaxSubject=Sample Subject ; set the subject of the fax message here
LastComments=This is%ea comment ; comments for cover page (%e = linebreak)
[email protected] ; address of RelayFax Server'semail account.
ConfirmSend=Yes (or No) ; request a send confirmation
NoCoverPage=Yes (or No) ; use a cover page?
DefaultCoverPage=Yes (or No) ; user server assigned cover page
SpecificCoverPage=Yes (or No) ; use a specific cover page
LastCoverPage=FILENAME ; filename of specific cover page to use
VerifyTransfer=Yes (or No) ; view mail sessions in progress
Once the above parameters are set to your liking, set the following key to activateautomatic faxing: AutoFax=Yes (or No)
If the AutoFax key is set to Yes the RelayFax SMTP Client will create and spool thenext printed document sent to the RelayFax Printer Driver automatically withoutprompting the user for any information. After doing so the RelayFax SMTP Client willreset the AutoFax key to No.
When specifying the LastCoverPage key use only the name of the cover page file – notthe complete path to the file itself. The Client will assume the file is located in theCover Page Directory.
Also, the NoCoverPage, DefaultCoverPage, and SpecificCoverPage keys work together.Only one can be set to Yes. The others must be set to No. An error will result if morethan one of these keys are set to Yes at the same time.
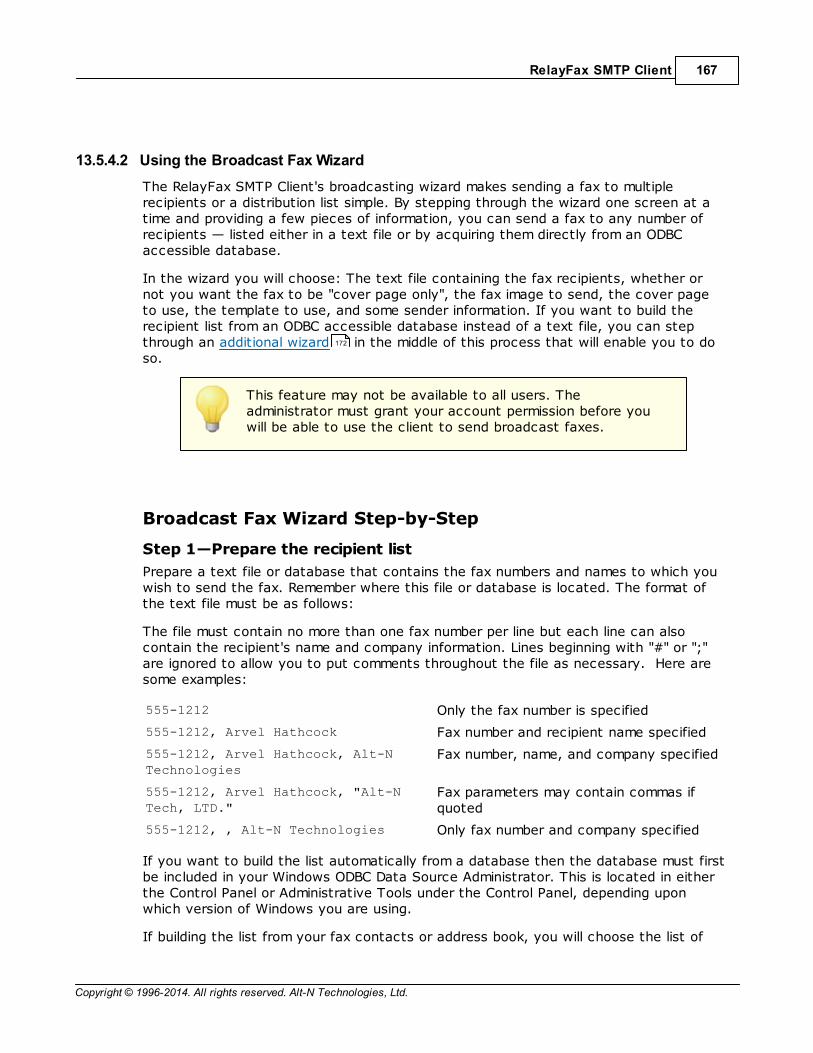
Copyright © 1996-2014. All rights reserved. Alt-N Technologies, Ltd.
RelayFax SMTP Client 167
13.5.4.2 Using the Broadcast Fax Wizard
The RelayFax SMTP Client's broadcasting wizard makes sending a fax to multiplerecipients or a distribution list simple. By stepping through the wizard one screen at atime and providing a few pieces of information, you can send a fax to any number ofrecipients — listed either in a text file or by acquiring them directly from an ODBCaccessible database.
In the wizard you will choose: The text file containing the fax recipients, whether ornot you want the fax to be "cover page only", the fax image to send, the cover pageto use, the template to use, and some sender information. If you want to build therecipient list from an ODBC accessible database instead of a text file, you can stepthrough an additional wizard in the middle of this process that will enable you to doso.
This feature may not be available to all users. Theadministrator must grant your account permission before youwill be able to use the client to send broadcast faxes.
Broadcast Fax Wizard Step-by-Step
Step 1—Prepare the recipient list
Prepare a text file or database that contains the fax numbers and names to which youwish to send the fax. Remember where this file or database is located. The format ofthe text file must be as follows:
The file must contain no more than one fax number per line but each line can alsocontain the recipient's name and company information. Lines beginning with "#" or ";"are ignored to allow you to put comments throughout the file as necessary. Here aresome examples:
555-1212 Only the fax number is specified
555-1212, Arvel Hathcock Fax number and recipient name specified
555-1212, Arvel Hathcock, Alt-NTechnologies
Fax number, name, and company specified
555-1212, Arvel Hathcock, "Alt-NTech, LTD."
Fax parameters may contain commas ifquoted
555-1212, , Alt-N Technologies Only fax number and company specified
If you want to build the list automatically from a database then the database must firstbe included in your Windows ODBC Data Source Administrator. This is located in eitherthe Control Panel or Administrative Tools under the Control Panel, depending uponwhich version of Windows you are using.
If building the list from your fax contacts or address book, you will choose the list of
172
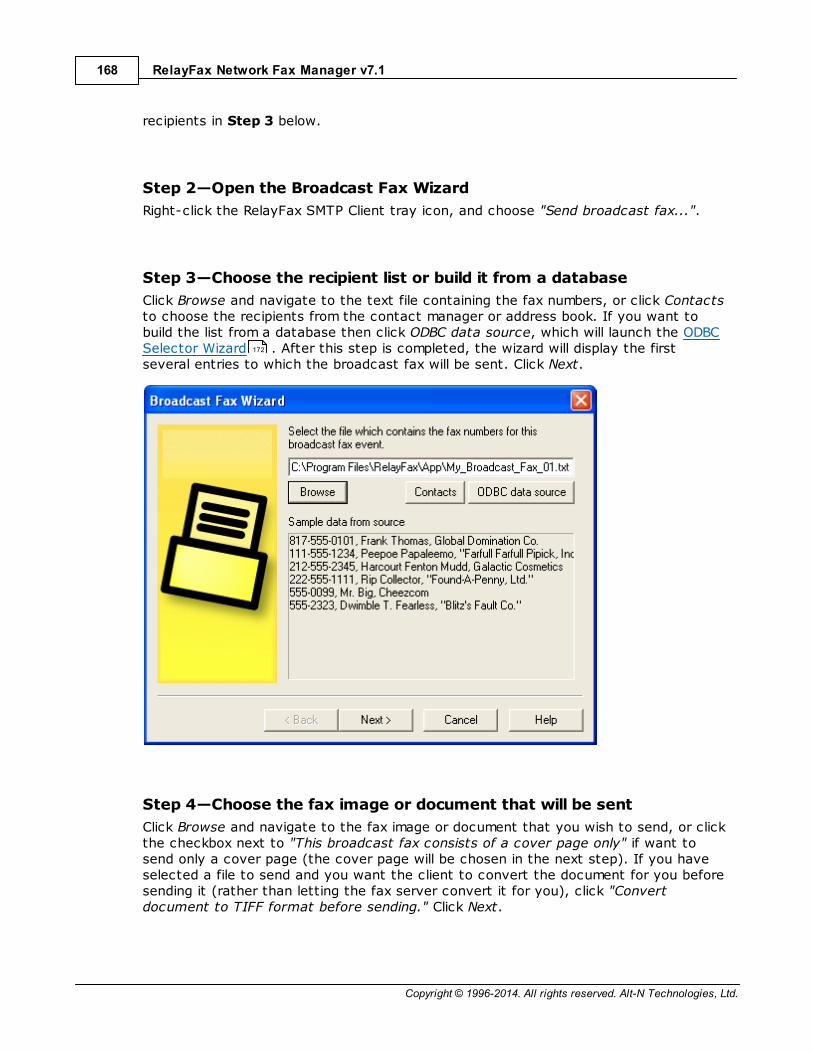
Copyright © 1996-2014. All rights reserved. Alt-N Technologies, Ltd.
RelayFax Network Fax Manager v7.1168
recipients in Step 3 below.
Step 2—Open the Broadcast Fax Wizard
Right-click the RelayFax SMTP Client tray icon, and choose "Send broadcast fax...".
Step 3—Choose the recipient list or build it from a database
Click Browse and navigate to the text file containing the fax numbers, or click Contactsto choose the recipients from the contact manager or address book. If you want tobuild the list from a database then click ODBC data source, which will launch the ODBCSelector Wizard . After this step is completed, the wizard will display the firstseveral entries to which the broadcast fax will be sent. Click Next.
Step 4—Choose the fax image or document that will be sent
Click Browse and navigate to the fax image or document that you wish to send, or clickthe checkbox next to "This broadcast fax consists of a cover page only" if want tosend only a cover page (the cover page will be chosen in the next step). If you haveselected a file to send and you want the client to convert the document for you beforesending it (rather than letting the fax server convert it for you), click "Convertdocument to TIFF format before sending." Click Next.
172

Copyright © 1996-2014. All rights reserved. Alt-N Technologies, Ltd.
RelayFax SMTP Client 169
Step 5—Choose the cover page
Choose the cover page for the fax. If you need to create a new cover page or edit anexisting one, click Advanced to open the Cover Page dialog. If you don't want toinclude a cover page with the broadcast fax then click the checkbox next to "I do notwish to use a cover page". Click Next.
145
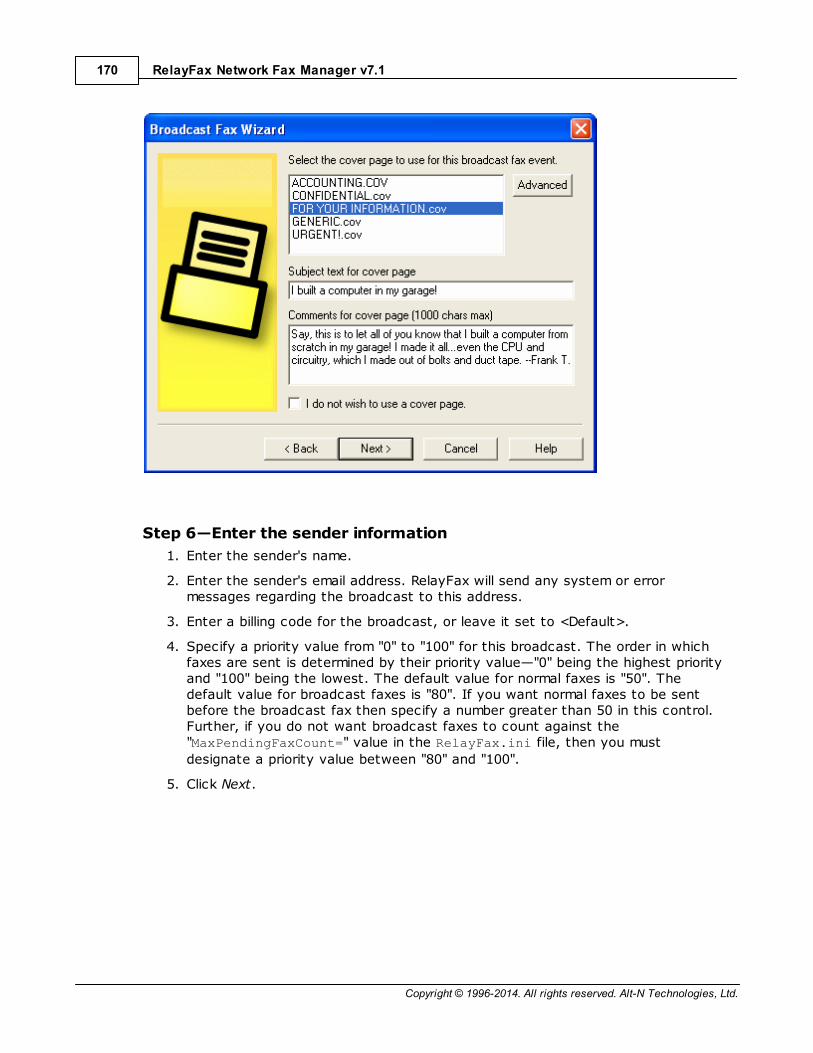
Copyright © 1996-2014. All rights reserved. Alt-N Technologies, Ltd.
RelayFax Network Fax Manager v7.1170
Step 6—Enter the sender information
1. Enter the sender's name.
2. Enter the sender's email address. RelayFax will send any system or errormessages regarding the broadcast to this address.
3. Enter a billing code for the broadcast, or leave it set to <Default>.
4. Specify a priority value from "0" to "100" for this broadcast. The order in whichfaxes are sent is determined by their priority value—"0" being the highest priorityand "100" being the lowest. The default value for normal faxes is "50". Thedefault value for broadcast faxes is "80". If you want normal faxes to be sentbefore the broadcast fax then specify a number greater than 50 in this control.Further, if you do not want broadcast faxes to count against the"MaxPendingFaxCount=" value in the RelayFax.ini file, then you must
designate a priority value between "80" and "100".
5. Click Next.

Copyright © 1996-2014. All rights reserved. Alt-N Technologies, Ltd.
RelayFax SMTP Client 171
Step 7—Begin the broadcast
Click Finish to start broadcasting your fax.

Copyright © 1996-2014. All rights reserved. Alt-N Technologies, Ltd.
RelayFax Network Fax Manager v7.1172
See also:
ODBC Selector Wizard
13.5.4.3 ODBC Selector Wizard
If you choose to build the Broadcast Fax recipient list from a database instead of apreviously prepared text file, use the following steps to do so:
Step 1—Prepare your database
Prepare your database making sure that the table from which you wish to build the listcontains fields for each recipient's fax number, name, and company. Add the databaseto your Windows ODBC Data Source Administrator. ODBC Data Source is located ineither the Control Panel or Administrative Tools under the Control Panel, dependingupon which version of Windows you are using.
Step 2—Open the Broadcast Fax Wizard
Right-click the RelayFax SMTP Client tray icon and click "Send broadcast fax...". Thiswill open the Broadcast Fax Wizard.
Step 3-Open the ODBC Selector Wizard
In the Broadcast Fax Wizard, click "ODBC data source" to open the ODBC SelectorWizard.
172

Copyright © 1996-2014. All rights reserved. Alt-N Technologies, Ltd.
RelayFax SMTP Client 173
Step 4—Choose the data source
This dialog lists all data sources currently included in the ODBC Data SourceAdministrator. Click the data source that contains the table that will be used to buildyour list. If a logon and password is required to gain access to the data source theninclude that information on this dialog as well. Click "Next".
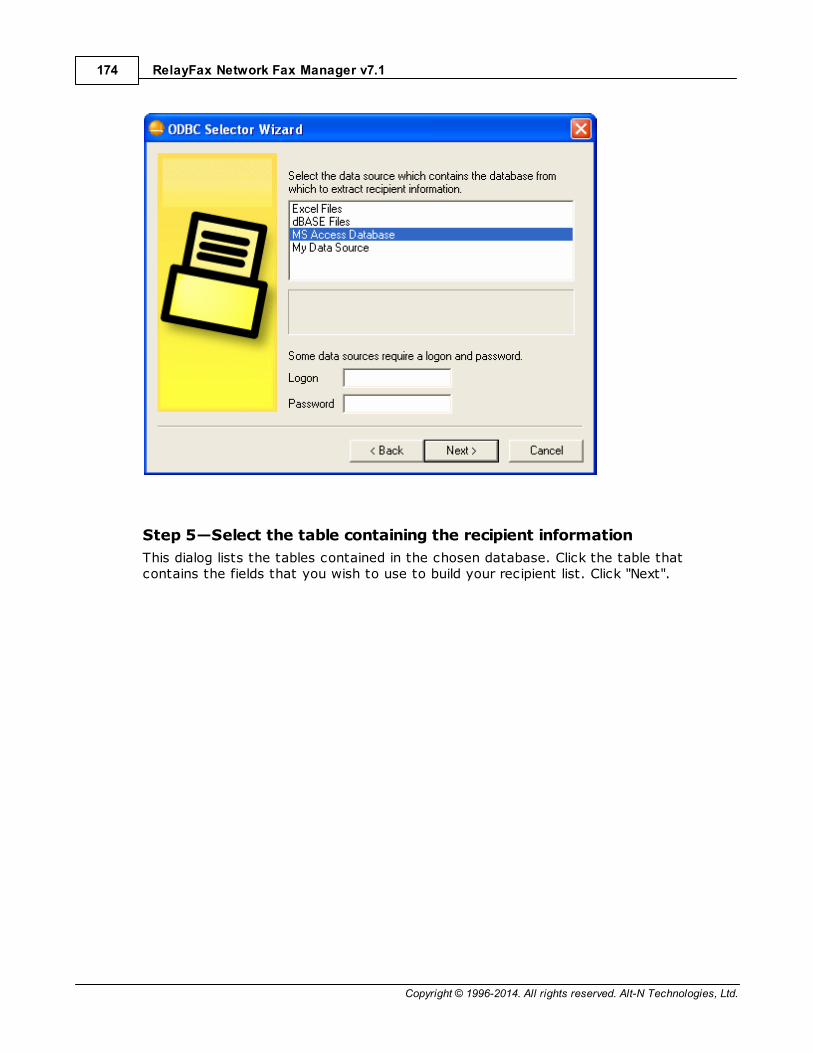
Copyright © 1996-2014. All rights reserved. Alt-N Technologies, Ltd.
RelayFax Network Fax Manager v7.1174
Step 5—Select the table containing the recipient information
This dialog lists the tables contained in the chosen database. Click the table thatcontains the fields that you wish to use to build your recipient list. Click "Next".

Copyright © 1996-2014. All rights reserved. Alt-N Technologies, Ltd.
RelayFax SMTP Client 175
Step 6—Select the columns to use
Use the drop-down list boxes to select the database columns that you wish to use tobuild your list of recipients. Select columns that correspond to the recipient faxnumber, name, and company. Name fields 2 and 3 are optional. If your databasecontains a single column for Name, then you can assign it to Name field 1 and leave theothers blank. This dialog also contains an optional control that can be used to enter anSQL SELECT statement "WHERE" clause if necessary. Click "Next". The recipient list willbe built and you will be returned to the Broadcast Fax Wizard.

Copyright © 1996-2014. All rights reserved. Alt-N Technologies, Ltd.
RelayFax Network Fax Manager v7.1176
Step 7—Continue in the Broadcast Fax Wizard
Go to step 3 in the Broadcast Fax Wizard and continue normally from that pointforward.
See also:
Using the Broadcast Fax Wizard
167
167

Section
XIV
Copyright © 1996-2014. All rights reserved. Alt-N Technologies, Ltd.
RelayFax Network Fax Manager v7.1178
14 Fax Broadcasting
14.1 Using the Broadcast Fax Wizard
RelayFax's broadcasting wizard makes sending a fax to multiple recipients or adistribution list simple. By stepping through the wizard one screen at a time andproviding a few pieces of information, you can send a fax to any number of recipients— listed either in a text file or by acquiring them directly from an ODBC accessibledatabase.
In the wizard you will choose: The text file containing the fax recipients, whether ornot you want the fax to be "cover page only", the fax image to send, the cover pageto use, the template to use, and some sender information. If you want to build therecipient list from an ODBC accessible database instead of a text file, you can stepthrough an additional wizard in the middle of this process that will enable you to doso.
Once the broadcast fax begins, RelayFax will queue some of the faxes into the Fax LogWindow so that you can see its status at any time. As the broadcast continues,RelayFax will constantly monitor the progress — remembering where it is in the list andwhich faxes have been completed. If the broadcast is interrupted due to a powerfailure or shutting down the server, the broadcast fax will be continued from the pointat which it was left off as soon as RelayFax is launched.
One additional note: When the broadcast is finished, you can utilize RelayFax'sexporting features coupled with your database or spreadsheet application to create alist of the numbers that failed to receive the fax. You can then use that information toupdate your database or resend the fax to only those numbers.
Broadcast Fax Wizard Step-by-Step
Step 1—Prepare the recipient list
Step 2—Open the Broadcast Fax Wizard
Step 3—Choose the recipient list or build it from a database
Step 4—Choose the fax image or document that will be sent
Step 5—Choose the cover page
Step 6—Choose the Fax Template
Step 7—Enter the sender information
Step 8—Begin the broadcast
Step 1—Prepare the recipient list
Prepare a text file or database that contains the fax numbers and names to which youwish to send the fax. Remember where this file or database is located. The format ofthe text file must be as follows:
The file must contain no more than one fax number per line but each line can alsocontain the recipient's name and company information. Lines beginning with "#" or ";"are ignored to allow you to put comments throughout the file as necessary. Here are
185
178
179
179
180
181
182
183
184
Copyright © 1996-2014. All rights reserved. Alt-N Technologies, Ltd.
Fax Broadcasting 179
some examples:
555-1212 Only the fax number is specified
555-1212, Arvel Hathcock Fax number and recipient name specified
555-1212, Arvel Hathcock, Alt-NTechnologies
Fax number, name, and company specified
555-1212, Arvel Hathcock, "Alt-NTech, LTD."
Fax parameters may contain commas ifquoted
555-1212, , Alt-N Technologies Only fax number and company specified
If you want to build the list automatically from a database then the database must firstbe included in your Windows ODBC Data Source Administrator. This is located in eitherthe Control Panel or Administrative Tools under the Control Panel, depending uponwhich version of Windows you are using.
If building the list from your fax contacts or address book, you will choose the list ofrecipients in Step 3 below.
Step 2—Open the Broadcast Fax Wizard
In RelayFax, click "Create broadcast fax..." on the Tools menu, or click the BroadcastFax icon on the toolbar. This will open the Broadcast Fax Wizard.
Step 3—Choose the recipient list or build it from a database
Click Browse and navigate to the text file containing the fax numbers, or click Contactsto choose the recipients from the contact manager or address book. If you want tobuild the list from a database then click ODBC data source, which will launch the ODBCSelector Wizard . After this step is completed, the wizard will display the firstseveral entries to which the broadcast fax will be sent. Click Next.
179
185
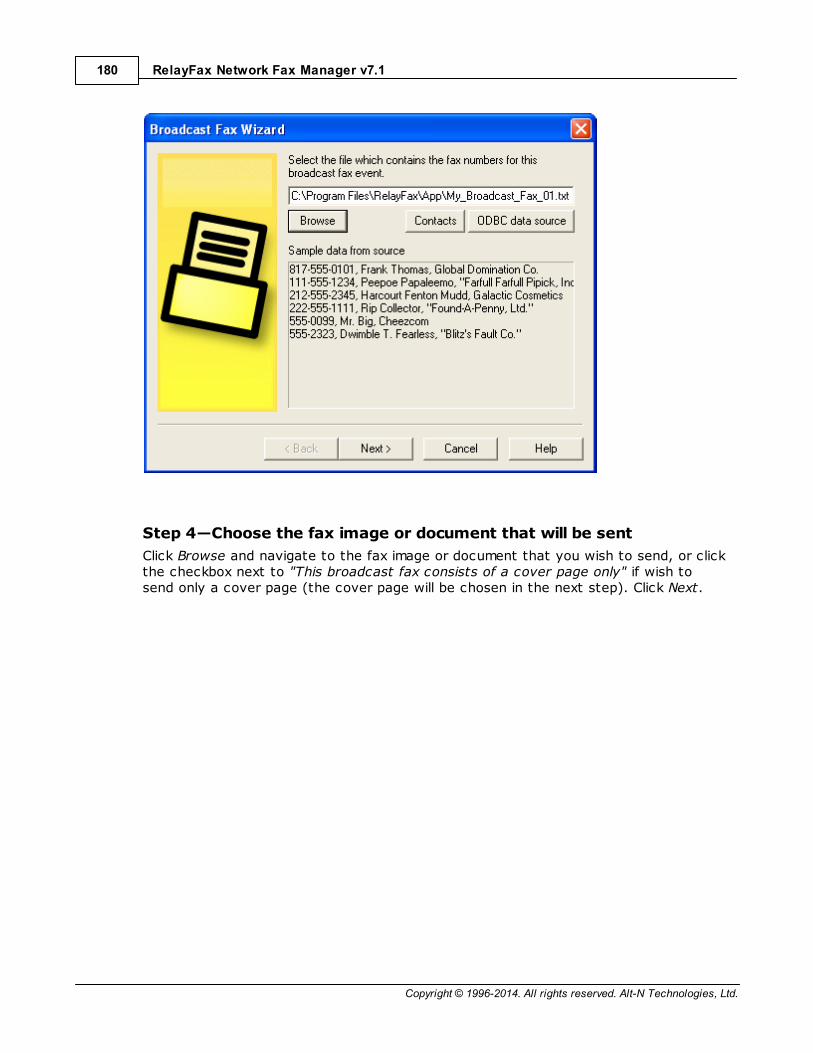
Copyright © 1996-2014. All rights reserved. Alt-N Technologies, Ltd.
RelayFax Network Fax Manager v7.1180
Step 4—Choose the fax image or document that will be sent
Click Browse and navigate to the fax image or document that you wish to send, or clickthe checkbox next to "This broadcast fax consists of a cover page only" if wish tosend only a cover page (the cover page will be chosen in the next step). Click Next.

Copyright © 1996-2014. All rights reserved. Alt-N Technologies, Ltd.
Fax Broadcasting 181
Step 5—Choose the cover page
Choose the cover page for the fax. If you need to create a new cover page or edit anexisting one, click Advanced to open the Cover Page dialog. If you don't want toinclude a cover page with the broadcast fax then click the checkbox next to "I do notwish to use a cover page". Click Next.
106

Copyright © 1996-2014. All rights reserved. Alt-N Technologies, Ltd.
RelayFax Network Fax Manager v7.1182
Step 6—Choose the fax template
Choose the fax template to use. If you need to create a new template or edit anexisting one, click Advanced to open the Templates dialog . If you don't want to usea template with the broadcast fax then click the checkbox next to "I do not wish touse a fax template." When you choose not to use a template RelayFax's defaultsettings will be used instead. Click Next.
120
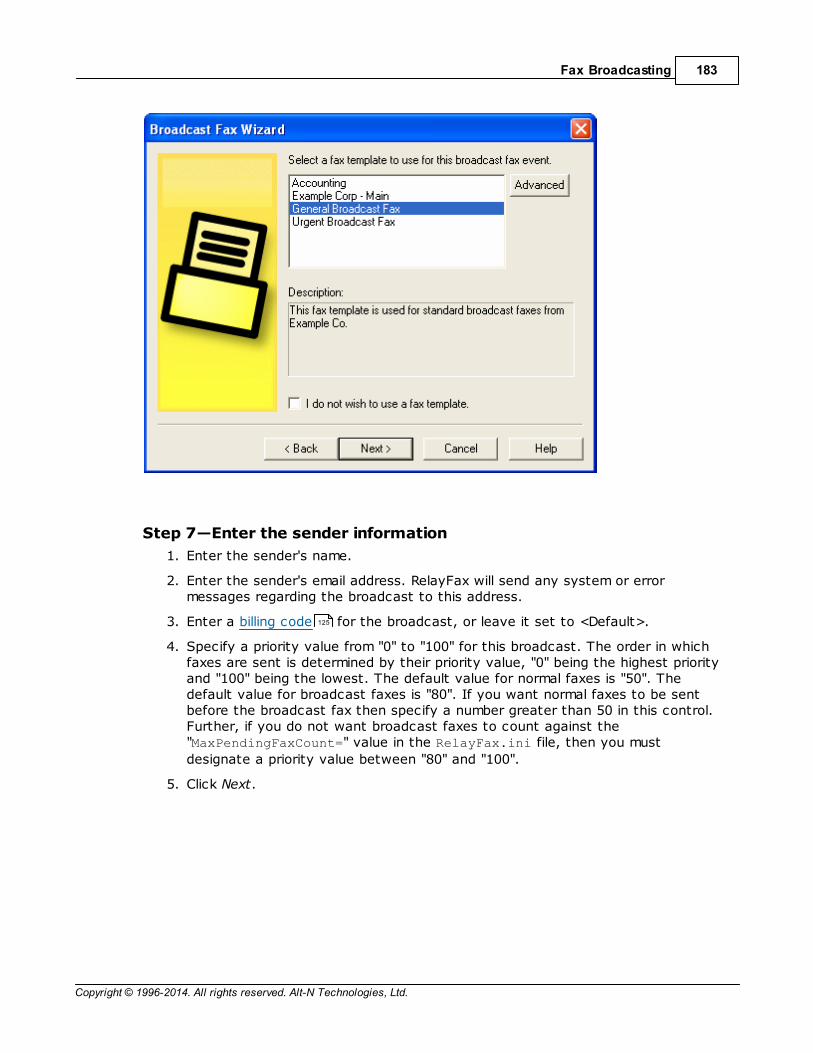
Copyright © 1996-2014. All rights reserved. Alt-N Technologies, Ltd.
Fax Broadcasting 183
Step 7—Enter the sender information
1. Enter the sender's name.
2. Enter the sender's email address. RelayFax will send any system or errormessages regarding the broadcast to this address.
3. Enter a billing code for the broadcast, or leave it set to <Default>.
4. Specify a priority value from "0" to "100" for this broadcast. The order in whichfaxes are sent is determined by their priority value, "0" being the highest priorityand "100" being the lowest. The default value for normal faxes is "50". Thedefault value for broadcast faxes is "80". If you want normal faxes to be sentbefore the broadcast fax then specify a number greater than 50 in this control.Further, if you do not want broadcast faxes to count against the"MaxPendingFaxCount=" value in the RelayFax.ini file, then you must
designate a priority value between "80" and "100".
5. Click Next.
125

Copyright © 1996-2014. All rights reserved. Alt-N Technologies, Ltd.
RelayFax Network Fax Manager v7.1184
Step 8—Begin the broadcast
Click Finish to start broadcasting your fax.

Copyright © 1996-2014. All rights reserved. Alt-N Technologies, Ltd.
Fax Broadcasting 185
See also:
ODBC Selector Wizard
14.2 ODBC Selector Wizard
If you choose to build the Broadcast Fax recipient list from a database instead of apreviously prepared text file, use the following steps to do so:
Step 1—Prepare your database
Prepare your database making sure that the table from which you wish to build the listcontains fields for each recipient's fax number, name, and company. Add the databaseto your Windows ODBC Data Source Administrator. ODBC Data Source is located ineither the Control Panel or Administrative Tools under the Control Panel, dependingupon which version of Windows you are using.
Step 2—Open the Broadcast Fax Wizard
In RelayFax, click "Create broadcast fax..." on the "Tools" menu, or click the BroadcastFax icon on the toolbar.
Step 3-Open the ODBC Selector Wizard
In the Broadcast Fax Wizard, click "ODBC data source" to open the ODBC SelectorWizard.
185
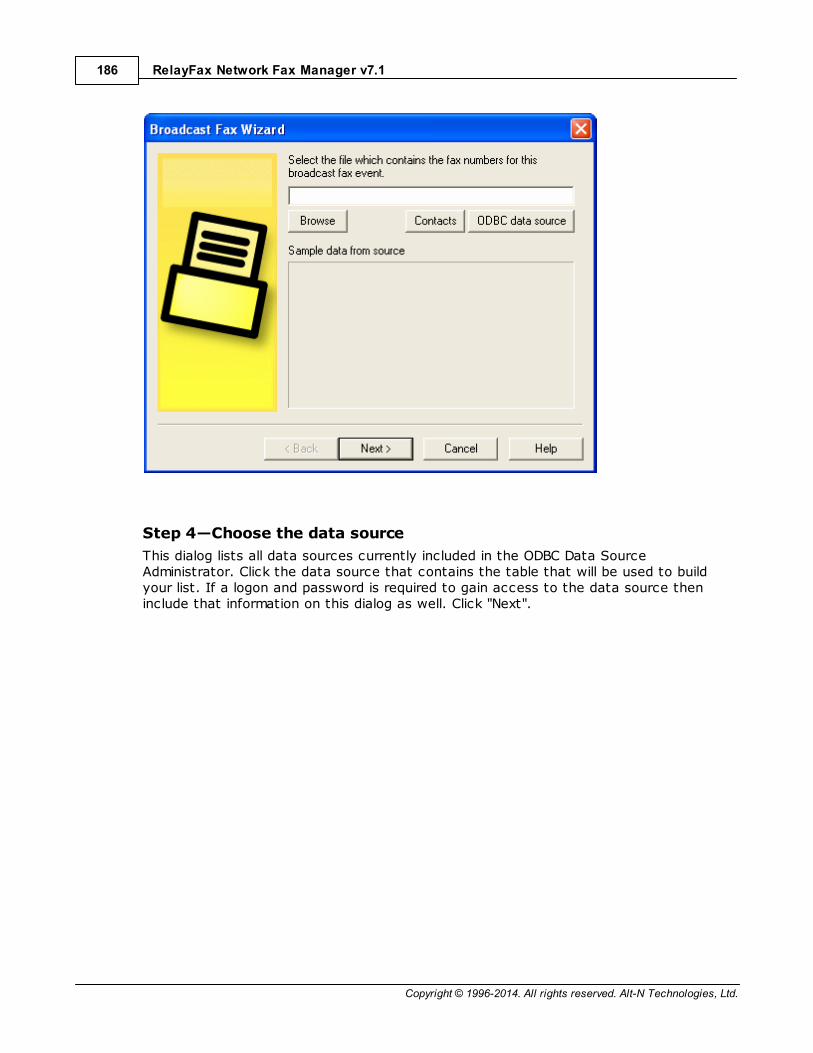
Copyright © 1996-2014. All rights reserved. Alt-N Technologies, Ltd.
RelayFax Network Fax Manager v7.1186
Step 4—Choose the data source
This dialog lists all data sources currently included in the ODBC Data SourceAdministrator. Click the data source that contains the table that will be used to buildyour list. If a logon and password is required to gain access to the data source theninclude that information on this dialog as well. Click "Next".

Copyright © 1996-2014. All rights reserved. Alt-N Technologies, Ltd.
Fax Broadcasting 187
Step 5—Select the table containing the recipient information
This dialog lists the tables contained in the chosen database. Click the table thatcontains the fields that you wish to use to build your recipient list. Click "Next".
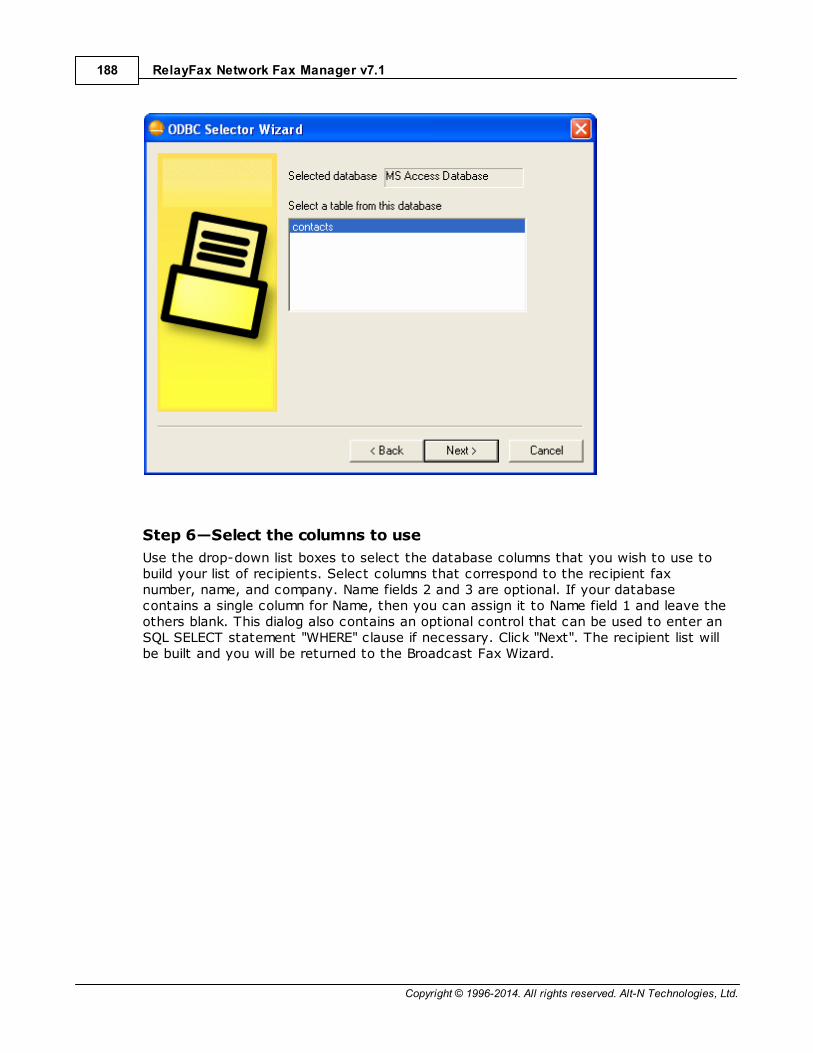
Copyright © 1996-2014. All rights reserved. Alt-N Technologies, Ltd.
RelayFax Network Fax Manager v7.1188
Step 6—Select the columns to use
Use the drop-down list boxes to select the database columns that you wish to use tobuild your list of recipients. Select columns that correspond to the recipient faxnumber, name, and company. Name fields 2 and 3 are optional. If your databasecontains a single column for Name, then you can assign it to Name field 1 and leave theothers blank. This dialog also contains an optional control that can be used to enter anSQL SELECT statement "WHERE" clause if necessary. Click "Next". The recipient list willbe built and you will be returned to the Broadcast Fax Wizard.

Copyright © 1996-2014. All rights reserved. Alt-N Technologies, Ltd.
Fax Broadcasting 189
Step 7—Continue in the Broadcast Fax Wizard
Go to step 3 in the Broadcast Fax Wizard and continue normally from that pointforward.
See also:
Using the Broadcast Fax Wizard
14.3 Canceling a Broadcast Fax
You can cancel a broadcast fax at any time from the Tools » Cancel broadcas t fax...
menu selection, or by clicking the "Cancel broadcast fax" button on the toolbar. Thiswill prevent RelayFax from queuing any more faxes for the broadcast. However, anyfaxes that are pending in the Log Window before the button is pressed will still be sentnormally. This option will not be available when there is no broadcast in progress.
Canceling a broadcast is a final decision. The broadcast cannotbe resumed once it has been canceled.
179
178
Copyright © 1996-2014. All rights reserved. Alt-N Technologies, Ltd.
RelayFax Network Fax Manager v7.1190
14.4 Pausing a Broadcast Fax
You can pause the broadcast fax at any time by clicking the Disable Modems button
on the toolbar. If RelayFax is currently sending a fax when the button is pressed, itwill complete the fax before pausing. As long as the button remains depressed RelayFaxwill not send any more faxes on any modems. Click the button again to resume faxing.
Section
XV

Copyright © 1996-2014. All rights reserved. Alt-N Technologies, Ltd.
RelayFax Network Fax Manager v7.1192
15 RelayFax Macros
15.1 Email Macros
When RelayFax processes an email message in preparation for faxing, it examines themessage to determine where and to whom the fax should be sent. Most of the time thisinformation will be specified on the TO: line, however it is possible to specify severalkey items within the email message itself. The following special macros can be placedwithin the body of an email message to achieve specific results. Each macro mustappear on its own line and at the top of the message body:
AUTOEXTRACT: true This macro tells the RelayFax Server to performOCR on the attached TIF file and search forfaxnumbers.
AUTOEXTRACTKEY: true If AUTOEXTRACT is true, then this macrocontains the string to search for when lookingfor recipient fax numbers.
AUTOEXTRACTNAME: true If AUTOEXTRACT is true, then this macrocontains the string to search for when lookingfor the recipient name.
AUTOEXTRACTCOMPANY: true If AUTOEXTRACT is true, then this macrocontains the string to search for when lookingfor the recipient company name.
AUTOEXTRACTFILE: true If AUTOEXTRACT is true, then this macrocontains the string to search for when lookingfor the name of a comment file to include on thecover page.
AUTOEXTRACTSUBJECT: true If AUTOEXTRACT is true, then this macrocontains the string to search for when lookingfor the fax subject.
AUTOEXTRACTEACHPAGESEPARATE: true
If AUTOEXTRACT is true, this macro processeseach page of the attached TIF separately. Thisoption is used when each page of a singleprintout should be sent to a separate user.
EMAILTO: [email protected] This macro specifies an email address to whichto send a copy of the fax. You can include any
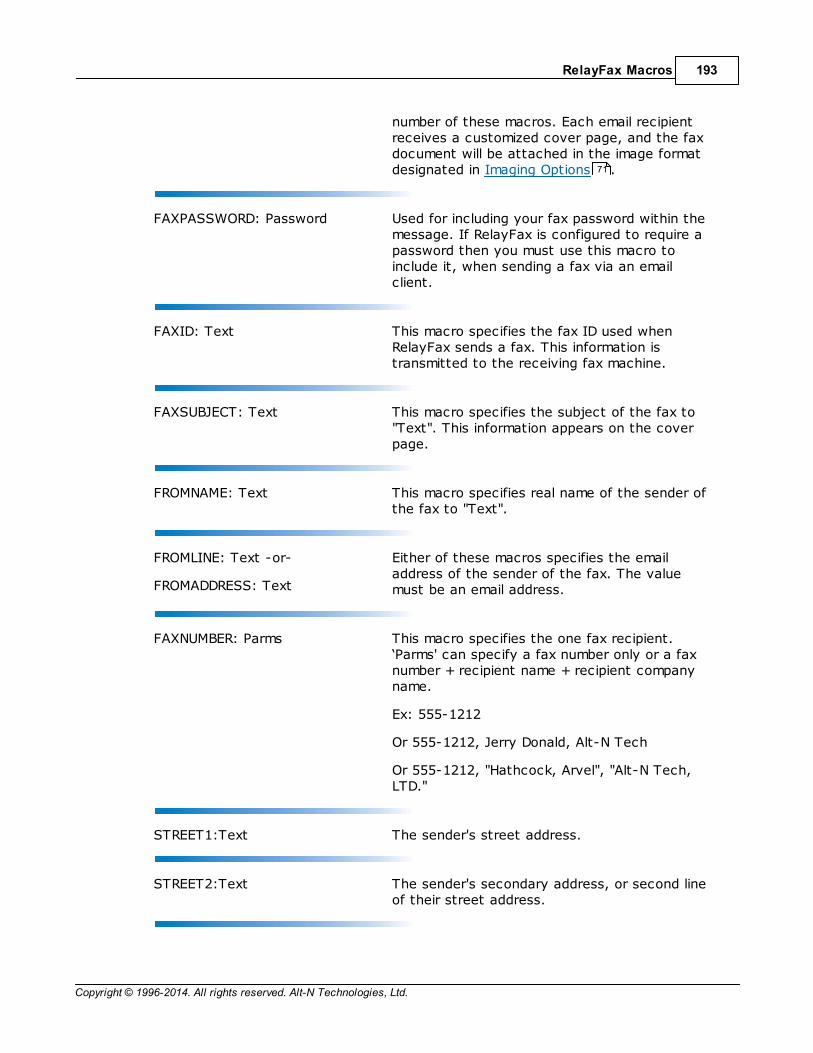
Copyright © 1996-2014. All rights reserved. Alt-N Technologies, Ltd.
RelayFax Macros 193
number of these macros. Each email recipientreceives a customized cover page, and the faxdocument will be attached in the image format designated in Imaging Options .
FAXPASSWORD: Password Used for including your fax password within themessage. If RelayFax is configured to require apassword then you must use this macro toinclude it, when sending a fax via an emailclient.
FAXID: Text This macro specifies the fax ID used whenRelayFax sends a fax. This information istransmitted to the receiving fax machine.
FAXSUBJECT: Text This macro specifies the subject of the fax to"Text". This information appears on the coverpage.
FROMNAME: Text This macro specifies real name of the sender ofthe fax to "Text".
FROMLINE: Text -or-
FROMADDRESS: Text
Either of these macros specifies the emailaddress of the sender of the fax. The valuemust be an email address.
FAXNUMBER: Parms This macro specifies the one fax recipient.‘Parms' can specify a fax number only or a faxnumber + recipient name + recipient companyname.
Ex: 555-1212
Or 555-1212, Jerry Donald, Alt-N Tech
Or 555-1212, "Hathcock, Arvel", "Alt-N Tech,LTD."
STREET1:Text The sender's street address.
STREET2:Text The sender's secondary address, or second lineof their street address.
71

Copyright © 1996-2014. All rights reserved. Alt-N Technologies, Ltd.
RelayFax Network Fax Manager v7.1194
CITY:Text The sender's city.
STATE:Text The sender's state or province.
ZIP:Text Sender's zip or postal code.
ZIPCITY: true This macro specifies the order used in the
sender's address. If "true," then the order is zip,city, and state.
The default is "false": city, state, and zip.
HOMEPHONE:Text This is the sender's home telephone number.
HOMEFAX:Text This is the sender's home fax number.
BUSPHONE:Text The sender's business phone number.
BUSFAX:Text Sender's business fax number.
BILLINGCODE:Text The billing code of the sender.
CCNUMBER: Parms Use this macro to specify additional faxrecipients. You can use as many of thesemacros as you need. Specify a single recipientper macro. ‘Parms' can specify a fax numberonly or a fax number + recipient name +recipient company name.
Ex: 555-1212
Or 555-1212, Jerry Donald, Alt-N Tech
Or 555-1212, "Hathcock, Arvel", "Alt-N Tech,LTD."
PORT: Number This macro specifies the port that the faxshould be sent on. Use care to ensure that youspecify a valid port.

Copyright © 1996-2014. All rights reserved. Alt-N Technologies, Ltd.
RelayFax Macros 195
FROMCOMPANY: Text This macro specifies the company name of thesender of the fax.
FROMPHONE: Text This macro specifies the voice telephone numberof the sender of the fax. This is the voicenumber value that is used in RelayFax's templatefiles.
FROMFAX: Text This macro specifies the fax number of thesender of the fax (typically the RelayFaxServer's fax number).
CONFIRMSEND: true This macro specifies that the sender of the faxwishes to receive a confirmation message whenthe fax has been successfully sent. The value ofthis macro should be the word "true".
ATTACHMENT: Path Causes the attachment specified in the path tobe included in the fax message. The file pathmust be accessible to the RelayFax server for itto be attached.
COVERPAGE: Path This macro specifies the cover page that will beused for this fax. "Path" must specify a valid.COV file accessible to the RelayFax Server.
PREFIX: Text This macro specifies a prefix to the fax numbersuch as "*70" or "9,".
IGNOREBODY: This macro prevents RelayFax from including theemail body in the comments field. The body isstill scanned for macros.
COMMENTS: Text This macro specifies the text that will appear inthe NOTES or COMMENTS section of the coverpage. You can specify more than one line ofcomment text by placing "%e" into the textwhere a line break should appear.
SCHEDULE: mm/dd/yyyy ##:##am/pm
Designates a specific date and time to send thefax.

Copyright © 1996-2014. All rights reserved. Alt-N Technologies, Ltd.
RelayFax Network Fax Manager v7.1196
Example: SCHEDULE: 01/01/2001 05:30 PM
NOTE: The day and date parameters must betwo characters: 01, 02, etc. The year must befour. The hour must be 01-12 with AM or PMfollowing the minutes.
PRIORITY: 00-100 Sets a priority value for the fax. 00 is thehighest priority and 100 is the lowest. Messageswill always be faxed in the order of their prioritysetting. When no priority setting is present,they will be treated as "normal" with a setting of50.
WAITFORANSWER: Number This macro specifies how long RelayFax will waitfor the receiving fax machine to answer. This isa value in seconds.
RETRYATTEMPTS: Number This macro specifies how many times RelayFaxwill retry a failed fax attempt.
RETRYDELAY: Number This macro specifies the number of secondsRelayFax will wait between subsequent faxattempts.
NOCOVERPAGE: true This macro will prevent RelayFax fromgenerating a dynamic cover page and sending italong with your fax. This is useful for situationsin which you either do not want a cover page orthe first printed page of your document is thecover page for the fax.
BANNERTEXT: Text This macro specifies the text that appears atthe top of each faxed page. You can use thespecial banner characters here. See the BannerText & Formatting Characters for moreinformation.
---Example Start---
From: [email protected]: "555-1212, Eddie Filewood, "Forest Park Lanes, Front Desk""<[email protected]>Subject: My time.
FROMNAME: Frank ThomasFROMCOMPANY: Forest Park Lanes, Inc.
42
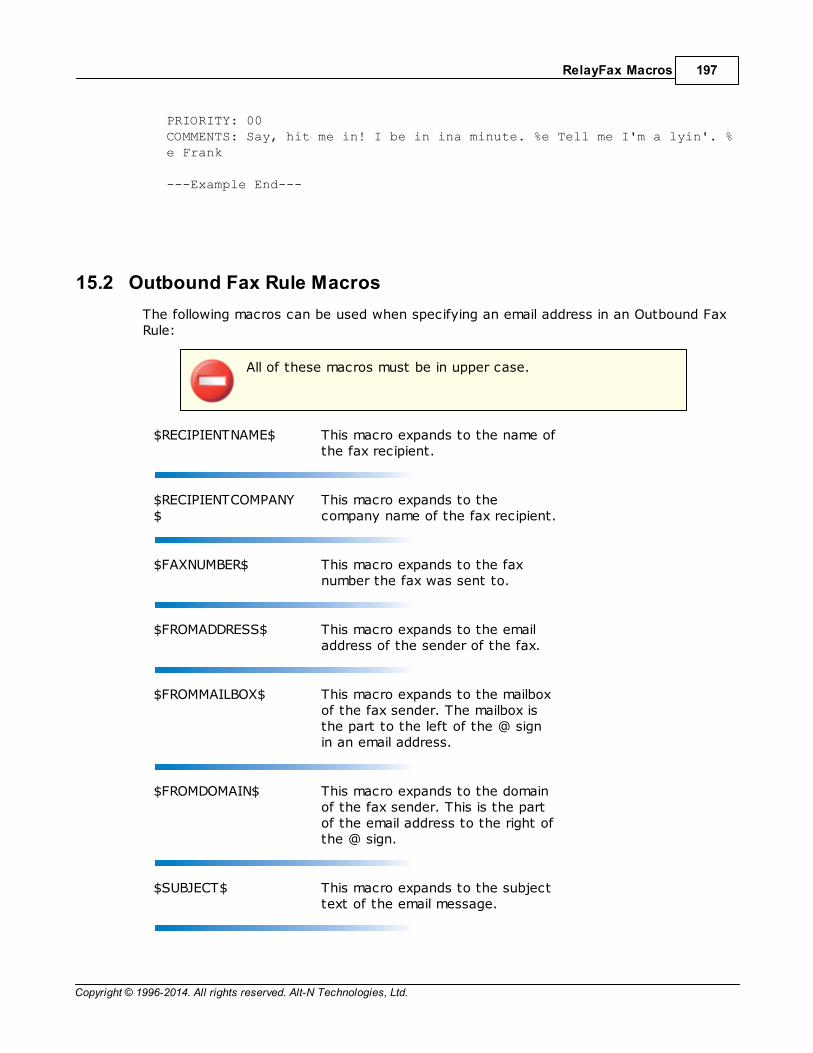
Copyright © 1996-2014. All rights reserved. Alt-N Technologies, Ltd.
RelayFax Macros 197
PRIORITY: 00COMMENTS: Say, hit me in! I be in ina minute. %e Tell me I'm a lyin'. %e Frank
---Example End---
15.2 Outbound Fax Rule Macros
The following macros can be used when specifying an email address in an Outbound FaxRule:
All of these macros must be in upper case.
$RECIPIENTNAME$ This macro expands to the name ofthe fax recipient.
$RECIPIENTCOMPANY$
This macro expands to thecompany name of the fax recipient.
$FAXNUMBER$ This macro expands to the faxnumber the fax was sent to.
$FROMADDRESS$ This macro expands to the emailaddress of the sender of the fax.
$FROMMAILBOX$ This macro expands to the mailboxof the fax sender. The mailbox isthe part to the left of the @ signin an email address.
$FROMDOMAIN$ This macro expands to the domainof the fax sender. This is the partof the email address to the right ofthe @ sign.
$SUBJECT$ This macro expands to the subjecttext of the email message.
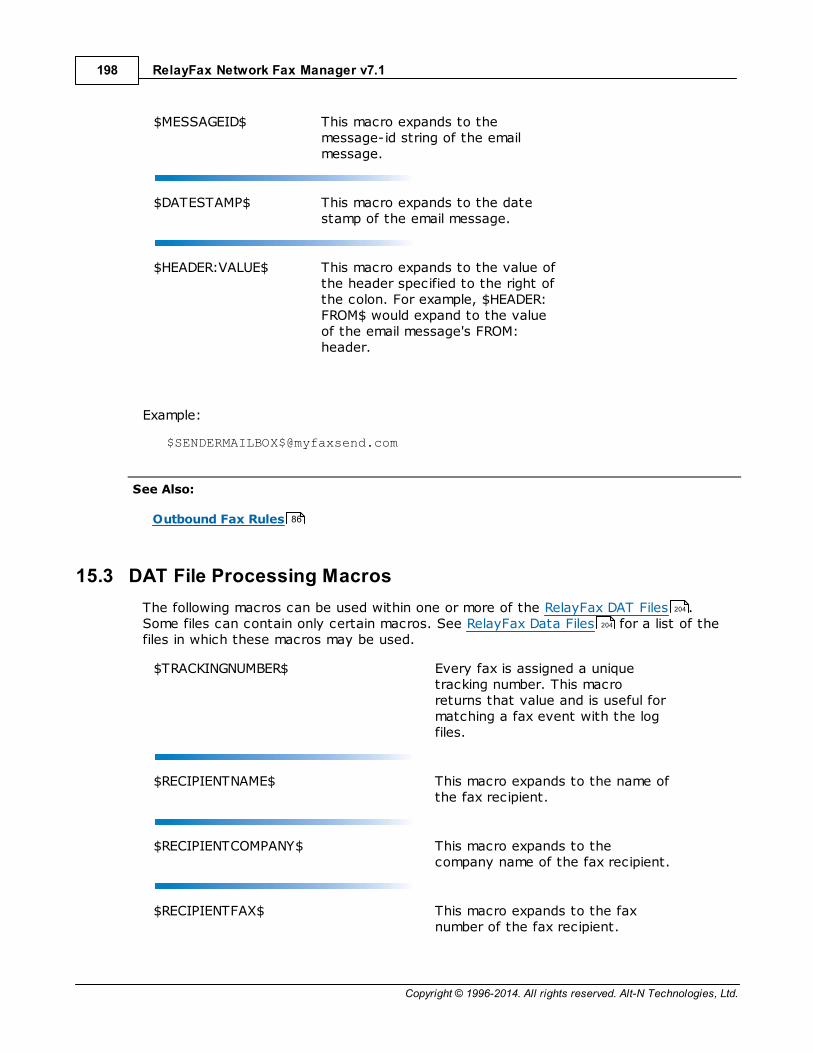
Copyright © 1996-2014. All rights reserved. Alt-N Technologies, Ltd.
RelayFax Network Fax Manager v7.1198
$MESSAGEID$ This macro expands to themessage-id string of the emailmessage.
$DATESTAMP$ This macro expands to the datestamp of the email message.
$HEADER:VALUE$ This macro expands to the value ofthe header specified to the right ofthe colon. For example, $HEADER:FROM$ would expand to the valueof the email message's FROM:header.
Example:
See Also:
Outbound Fax Rules
15.3 DAT File Processing Macros
The following macros can be used within one or more of the RelayFax DAT Files .Some files can contain only certain macros. See RelayFax Data Files for a list of thefiles in which these macros may be used.
$TRACKINGNUMBER$ Every fax is assigned a uniquetracking number. This macroreturns that value and is useful formatching a fax event with the logfiles.
$RECIPIENTNAME$ This macro expands to the name ofthe fax recipient.
$RECIPIENTCOMPANY$ This macro expands to thecompany name of the fax recipient.
$RECIPIENTFAX$ This macro expands to the faxnumber of the fax recipient.
86
204
204

Copyright © 1996-2014. All rights reserved. Alt-N Technologies, Ltd.
RelayFax Macros 199
$FAXNUMBER$ This macro expands to the faxnumber to which the fax was sent.
$DID$ This macro expands to the DIDnumber.
$FAXSUBJECT$ This macro expands to the subjectof the fax.
$FROMLINE$ -or-
$FROMADDRESS$
This macro expands to the emailaddress of the sender of the fax.
$FROMNAME$ This macro expands to the name ofthe sender of the fax.
$FROMCOMPANY$ This macro expands to the name ofthe company that sent the fax.
$FROMFAX$ This macro expands to the faxnumber of the sender of the fax.(typically the RelayFax Server's faxnumber).
$FROMPHONE$ This macro expands to thetelephone number of the sender ofthe fax. This macro corresponds tothe voice number setting inRelayFax's template files.
$STREET1$ Expands to the sender's streetaddress.
$STREET2$ Expands to the sender's secondaryaddress, or second line of theirstreet address.
$CITY$ Expands to the sender's city.
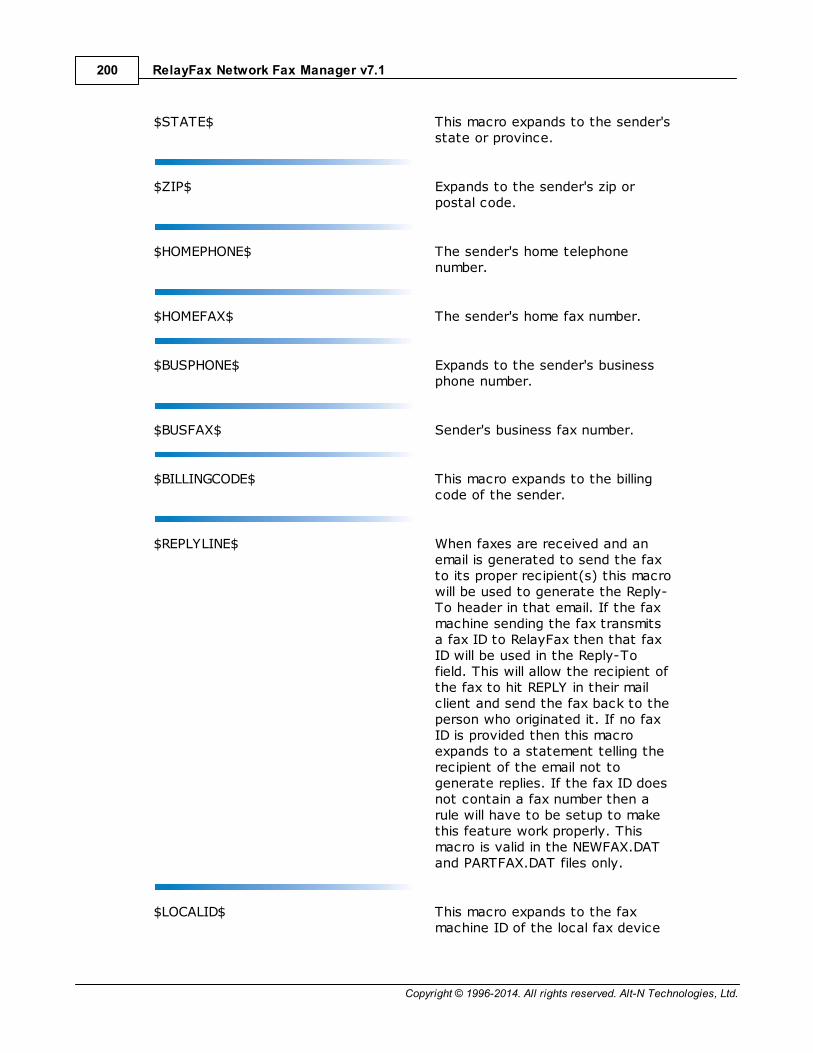
Copyright © 1996-2014. All rights reserved. Alt-N Technologies, Ltd.
RelayFax Network Fax Manager v7.1200
$STATE$ This macro expands to the sender'sstate or province.
$ZIP$ Expands to the sender's zip orpostal code.
$HOMEPHONE$ The sender's home telephonenumber.
$HOMEFAX$ The sender's home fax number.
$BUSPHONE$ Expands to the sender's businessphone number.
$BUSFAX$ Sender's business fax number.
$BILLINGCODE$ This macro expands to the billingcode of the sender.
$REPLYLINE$ When faxes are received and anemail is generated to send the faxto its proper recipient(s) this macrowill be used to generate the Reply-To header in that email. If the faxmachine sending the fax transmitsa fax ID to RelayFax then that faxID will be used in the Reply-Tofield. This will allow the recipient ofthe fax to hit REPLY in their mailclient and send the fax back to theperson who originated it. If no faxID is provided then this macroexpands to a statement telling therecipient of the email not togenerate replies. If the fax ID doesnot contain a fax number then arule will have to be setup to makethis feature work properly. Thismacro is valid in the NEWFAX.DATand PARTFAX.DAT files only.
$LOCALID$ This macro expands to the faxmachine ID of the local fax device
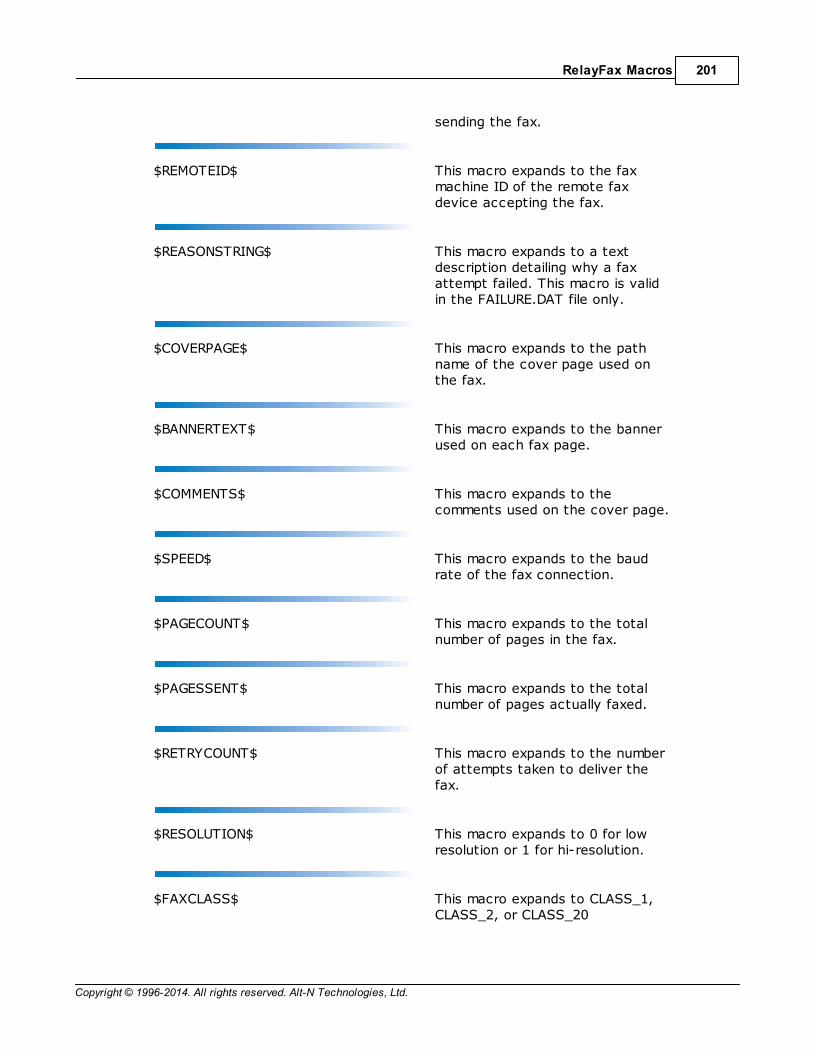
Copyright © 1996-2014. All rights reserved. Alt-N Technologies, Ltd.
RelayFax Macros 201
sending the fax.
$REMOTEID$ This macro expands to the faxmachine ID of the remote faxdevice accepting the fax.
$REASONSTRING$ This macro expands to a textdescription detailing why a faxattempt failed. This macro is validin the FAILURE.DAT file only.
$COVERPAGE$ This macro expands to the pathname of the cover page used onthe fax.
$BANNERTEXT$ This macro expands to the bannerused on each fax page.
$COMMENTS$ This macro expands to thecomments used on the cover page.
$SPEED$ This macro expands to the baudrate of the fax connection.
$PAGECOUNT$ This macro expands to the totalnumber of pages in the fax.
$PAGESSENT$ This macro expands to the totalnumber of pages actually faxed.
$RETRYCOUNT$ This macro expands to the numberof attempts taken to deliver thefax.
$RESOLUTION$ This macro expands to 0 for lowresolution or 1 for hi-resolution.
$FAXCLASS$ This macro expands to CLASS_1,CLASS_2, or CLASS_20
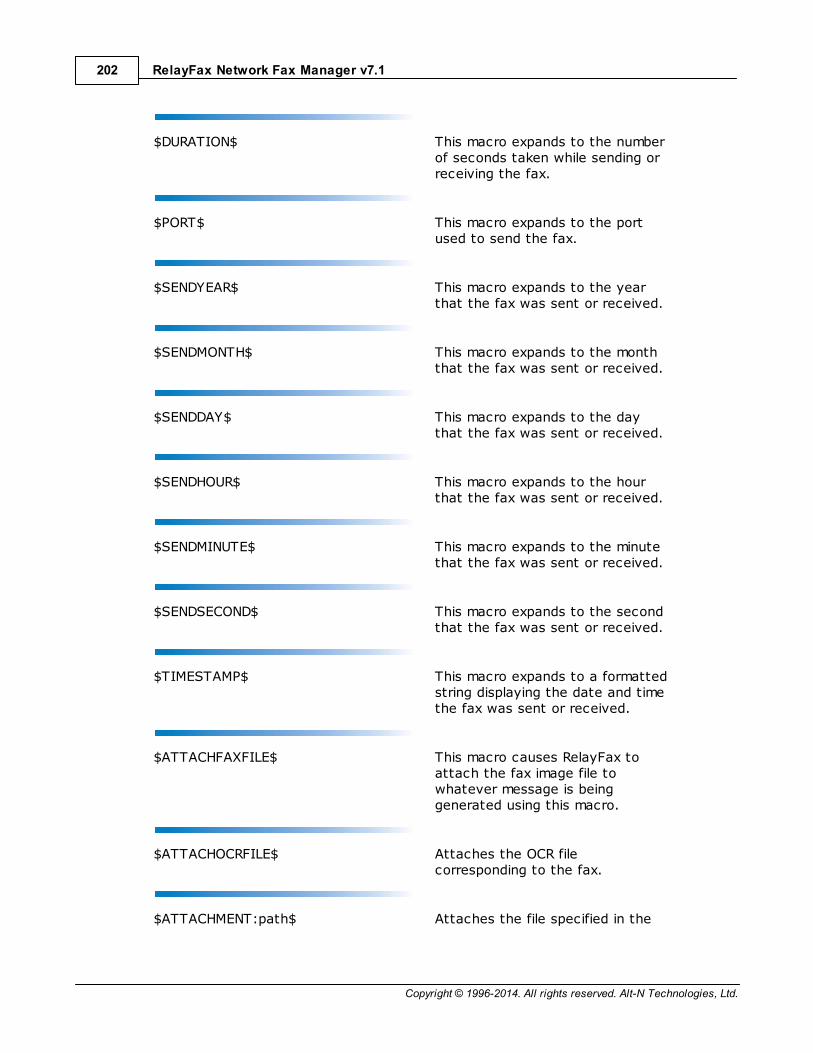
Copyright © 1996-2014. All rights reserved. Alt-N Technologies, Ltd.
RelayFax Network Fax Manager v7.1202
$DURATION$ This macro expands to the numberof seconds taken while sending orreceiving the fax.
$PORT$ This macro expands to the portused to send the fax.
$SENDYEAR$ This macro expands to the yearthat the fax was sent or received.
$SENDMONTH$ This macro expands to the monththat the fax was sent or received.
$SENDDAY$ This macro expands to the daythat the fax was sent or received.
$SENDHOUR$ This macro expands to the hourthat the fax was sent or received.
$SENDMINUTE$ This macro expands to the minutethat the fax was sent or received.
$SENDSECOND$ This macro expands to the secondthat the fax was sent or received.
$TIMESTAMP$ This macro expands to a formattedstring displaying the date and timethe fax was sent or received.
$ATTACHFAXFILE$ This macro causes RelayFax toattach the fax image file towhatever message is beinggenerated using this macro.
$ATTACHOCRFILE$ Attaches the OCR filecorresponding to the fax.
$ATTACHMENT:path$ Attaches the file specified in the
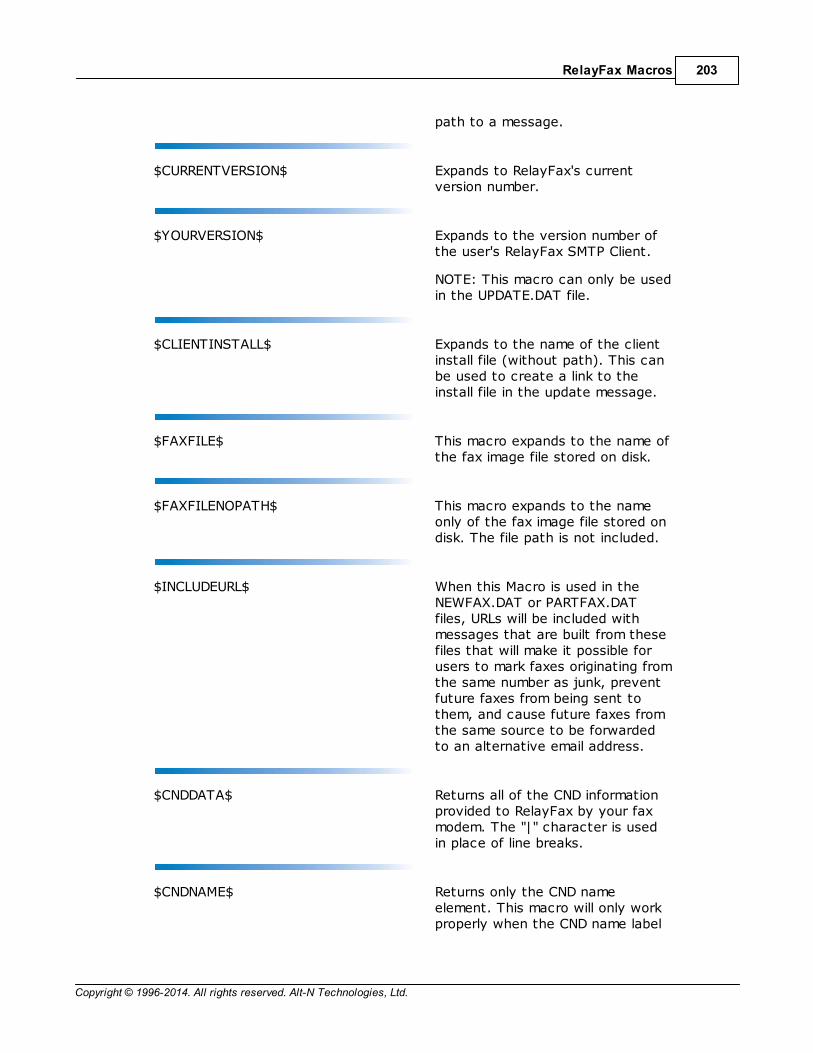
Copyright © 1996-2014. All rights reserved. Alt-N Technologies, Ltd.
RelayFax Macros 203
path to a message.
$CURRENTVERSION$ Expands to RelayFax's currentversion number.
$YOURVERSION$ Expands to the version number ofthe user's RelayFax SMTP Client.
NOTE: This macro can only be usedin the UPDATE.DAT file.
$CLIENTINSTALL$ Expands to the name of the clientinstall file (without path). This canbe used to create a link to theinstall file in the update message.
$FAXFILE$ This macro expands to the name ofthe fax image file stored on disk.
$FAXFILENOPATH$ This macro expands to the nameonly of the fax image file stored ondisk. The file path is not included.
$INCLUDEURL$ When this Macro is used in theNEWFAX.DAT or PARTFAX.DATfiles, URLs will be included withmessages that are built from thesefiles that will make it possible forusers to mark faxes originating fromthe same number as junk, preventfuture faxes from being sent tothem, and cause future faxes fromthe same source to be forwardedto an alternative email address.
$CNDDATA$ Returns all of the CND informationprovided to RelayFax by your faxmodem. The "|" character is usedin place of line breaks.
$CNDNAME$ Returns only the CND nameelement. This macro will only workproperly when the CND name label

Copyright © 1996-2014. All rights reserved. Alt-N Technologies, Ltd.
RelayFax Network Fax Manager v7.1204
is properly configured within theModem Properties dialog.
$CNDNUMBER$ Returns only the CND numberelement. This macro will only workproperly when the CND numberlabel is properly configured withinthe Modem Properties dialog.
See also:
RelayFax Data Files
15.4 RelayFax Data Files
The following files are used by the RelayFax Server to perform various functions thatare described below. Other than ACCTINFO.DAT these files can be edited freely using atext editor and can be customized as required.
EmailSubject: You can customize the email subject forthe first four data files listed below:Failure.dat, Confirm.dat, NewFax.dat,and PartFax.dat. To use this featureadd a line beginning with "EmailSubject:"to the top of the desired file.
In addition to normal text, you can usethe following DAT file processing macrosin the EmailSubject line: $REMOTEID$,$CNDNUMBER$, $CNDNAME$,$PAGECOUNT$, $TRACKINGNUMBER$,$PORT$, $REASONSTRING$,$RECIPIENTNAME$,$RECIPIENTCOMPANY$, $FAXNUMBER$,$FROMNAME$, and $FROMCOMPANY$.
FAILURE.DAT This file is returned to the sender of afax whenever RelayFax has an errorsending it.
The "EmailSubject:" command may beused in this file.
ANY DAT FILE PROCESSING MACRO.
204

Copyright © 1996-2014. All rights reserved. Alt-N Technologies, Ltd.
RelayFax Macros 205
CONFIRM.DAT This file is sent back to people whorequest a confirmation of their fax beingsent.
The "EmailSubject:" command may beused in this file.
ANY DAT FILE PROCESSING MACRO.
NEWFAX.DAT When an incoming fax is completelyreceived it is sometimes folded into anemail message and sent to one or morerecipients. This file will be the body ofthat email message.
The "EmailSubject:" command may beused in this file.
The following macros are valid for thisfile:
$TRACKINGNUMBER$, $REMOTEID$,$SPEED$, $REPLYLINE$, $PAGECOUNT$,$RESOLUTION$, $PORT$, $SENDYEAR$,$SENDMONTH$, $SENDDAY$,$SENDHOUR$, $SENDMINUTE$,$SENDSECOND$, $TIMESTAMP$,$DURATION$, $FAXCLASS$,$ATTACHFAXFILE$, and $INCLUDEURL$.
PARTFAX.DAT When an incoming fax is only partiallyreceived it is sometimes folded into anemail message and sent to one or morerecipients. This file will be the body ofthat email message.
The "EmailSubject:" command may beused in this file.
The following macros are valid for thisfile:
$TRACKINGNUMBER$, $REMOTEID$,$SPEED$, $REPLYLINE$, $PAGECOUNT$,$RESOLUTION$, $PORT$, $SENDYEAR$,$SENDMONTH$, $SENDDAY$,$SENDHOUR$, $SENDMINUTE$,$SENDSECOND$, $TIMESTAMP$,$DURATION$, $FAXCLASS$,$ATTACHFAXFILE$, and $INCLUDEURL$.

Copyright © 1996-2014. All rights reserved. Alt-N Technologies, Ltd.
RelayFax Network Fax Manager v7.1206
UPDATE.DAT This contents of this file will be emailedto users making client update requests,and to users sending messages from anoutdated client, when RelayFax hasbeen configured to send it.
The following macros are valid for thisfile:
$CURRENTVERSION$, $YOURVERSION$,$ATTACHMENT:path$, $CLIENTINSTALL$
POPHOSTS.DAT This file lists the pop servers and logincredentials of all the mail hosts RelayFaxis configured to connect to and checkfor new mail to be faxed.
NO MACROS ARE USED IN THIS FILE.
NOTO.DAT If RelayFax is asked to fax a messagebut no fax number can be determinedthen this message will be emailed backto the person trying to send the fax.
NO MACROS ARE USED IN THIS FILE.
NOCOVER.DAT Returned when the prescribed coverpage cannot be attached to the fax.
NO MACROS ARE USED IN THIS FILE.
EXT.DAT Lists the file extensions that RelayFaxwill attempt to convert and fax whenthey are attached to a message.
NO MACROS ARE USED IN THIS FILE.
SMTPFAIL.DAT This file will be sent when an emailmessage cannot be delivered due to anSMTP failure.
NO MACROS ARE USED IN THIS FILE.
NOACCESS.DAT If RelayFax determines that the senderof a fax is not a licensed user then thismessage will be returned to them and

Copyright © 1996-2014. All rights reserved. Alt-N Technologies, Ltd.
RelayFax Macros 207
their fax will not be sent.
NO MACROS ARE USED IN THIS FILE.
OUTRULES.DAT This file lists the rules for processingoutgoing faxes.
NO MACROS ARE USED IN THIS FILE.
INRULES.DAT This file lists the rules for processingincoming faxes.
NO MACROS ARE USED IN THIS FILE.
FAXBOOK.DAT This file lists fax contacts. This file canbe shared amongst all network users.
NO MACROS ARE USED IN THIS FILE.
ACCT3X.DAT This file lists the email address, realname, and fax password, of eachRelayFax user account The entrieswithin this file are stored in anencrypted format for security.
NO MACROS ARE USED IN THIS FILE.
UIDL.DAT This file lists the UIDL values ofmessages stored on mail servers. Thisfile is used to make sure RelayFax doesnot duplicate faxes.
NO MACROS ARE USED IN THIS FILE.
MSGID.DAT This file lists the Message-ID values ofmessages stored on mail servers. Thisfile is used to make sure RelayFax doesnot duplicate faxes.
NO MACROS ARE USED IN THIS FILE.
SCHEDULE.DAT This file lists the times and schedulingsettings RelayFax uses to determinewhen it should connect and collect mailto fax out.
Copyright © 1996-2014. All rights reserved. Alt-N Technologies, Ltd.
RelayFax Network Fax Manager v7.1208
NO MACROS ARE USED IN THIS FILE.
See also:
DAT File Processing Macros 198
Copyright © 1996-2014. All rights reserved. Alt-N Technologies, Ltd.
Index 209
Index- A -Access
Network Printer 57
Account Address 134
Account Settings
Accounts 112
Options 114
Accounts
Adding 112
Address Listing 112
Automatically creating 112
Creating 112
Importing from RelayFax 1.0 112
Number Left 112
Number Used 112
Removing 112
Settings 112
User 112
ACCTINFO.DAT 204
Acquiring documents 150
Add Rule 21
Adding
Accounts 112
Document Types 62
Mail Hosts 82
Outbound Fax Rules 86
Templates 118
Adding Modems Manually 24
Address 132
Address Book 110, 140
Address Express 110, 140
Address Listing 112
ADF 139
Advanced Options 154
Alt-N RelayFax Driver 156
Apply template to outbound fax 86
Archiving fax image files 65
Attach specific cover page 86
Attached Documents 153
Attaching Documents to Fax Messages 159
Attaching files to faxes 153
Attaching personal cover pages to faxes 145
Attachment
Converting for faxing 62
Email 62
Faxing 62
File Extensions 62
Attachment Files 71
Authorization Password 114
Automatic document feeder 139
Automatic Fax Exporting 65
Automatically Printing Faxes 84
- B -Banner
Characters 42
Formatting Characters 42
Special Characters 42
String 41
String Formatting Characters 41
Text 41
Text Characters 42
Text Formatting Characters 41
Text Special Characters 41
Banner Text 42, 76, 121, 164
billing 125
billing codes 125
BMP 71
Broadcast Fax 129
Canceling 189
Pausing 190
Sending 167, 178
Wizard 167, 178
Broadcast Faxes 172, 185
Brooktrout
Installation 12, 24
- C -Caller ID 80, 92
Calling Number Display 80, 92
Cantata
Installation 12, 24
characters 41, 42, 164
Class 24
Client 132
Address Book 140
Attached Documents 153
Attaching files to faxes 153
Copyright © 1996-2014. All rights reserved. Alt-N Technologies, Ltd.
RelayFax Network Fax Manager v7.1210
Client 132
Attaching personal cover pages to faxes 145
Comments for cover page 142
Contact Manager 140
Cover Pages 145
Dialup Settings 135
Email 158
Fax Properties 142
Fax Specifics 142
Mail Server 134
Printer Driver 156
Properties 134, 142
Sending Faxes Programmatically 166
Server's domain name 134
Server's IP Address 134
Windows Address Book 140
Client Properties
Client Settings 137
Contact List 140
Dialup Settings 135
Personal Settings 132
Scanner Settings 139
Server Settings 134
Client Settings 137
Client Updates 46
CND 80
Labels 24
CND routing 92
Collecting mail for faxing 82
Comma Delimited Export Files 65
Comments 76
Comments for cover page 142
Company 121
Company Name 41
Compose Fax Dialog
Advanced Options 154
Attached Documents 153
Cover Pages 145
Error Message 142, 155
Properties 142
Scan Image 150
Scanning Options 151
Send Schedule 149
Summary 141
Composing a fax 129
Configuring Modems 24
Confirmation messages 154
Confirmation Requests 48
Connection Persistance 102, 135
Contact Manager 53, 110, 140
Contacts
Address Express 53
Default contact manager 53
WAB 53
Window Address Book 53
Converting email attachments for faxing 62
cost per fax 125
COV file 106
Cover Page 41, 121
Attaching Specific 86
Cover page comments 76
Cover Pages 145
Comments 106
COV file 106
Creating 106
Description 106
Editing 106
Editor 106
Existing Pages 106
Properties 106
Removing 106
Cover Pages tab (Client) 145
CPE file 106
Create Report 21
Creating
Accounts 112
Comma Delimited Export Files 65
Cover Pages 106
Templates 118
Creating and Editing Templates 118
Creating your Banner 42
CSID 24
CSID routing 92
- D -DAT file processing macros 198
DAT Files 204
Data Files 204
Database Wizard 172, 185
Default
Fax Rules 84
Inbound Rules 84
Outbound Rules 84
Default Email Address 44
Definition of Formatting Characters 42
Copyright © 1996-2014. All rights reserved. Alt-N Technologies, Ltd.
Index 211
Delete Fax 92
Delivery confirmation 154
Delivery Confirmation Requests 48
Dependencies 51
Detecting Modems 23
Device
Dialing properties 36
Device Log 37
Dialing
Prefix 36
Pulse 36
Rules 36
Tone 36
Dialing properties 36
Dialup
Attempts 102
Closing sessions 102, 135
Connection Persistance 102, 135
Freeing ports for 102
Hangup 102, 135
Keeping sessions alive 102, 135
Logon Name 102, 135
Logon Password 102, 135
Number of attempts 102, 135
Profiles 102, 135
RAS 102, 135
Settings 102, 135
Time to wait for a connection 102, 135
Dialup Settings 135
document feeder 139
Document Types 62
Driver 156
- E -Editing
Cover Pages 106
Templates 118
Editing Faxes 157
Email Address 44
Email Client
Sending faxes via 158
Email exported files to 65
Email Macros 159, 192
Email message to specific user(s) 86, 92
Enabling a modem to receive faxes 27
Enabling a modem to send faxes 27
Enabling RAS dialup/dialdown engine 102, 135
Enhanced Resolution 48
Error Message 142, 155
Error sending fax 142, 155
Event Log Window 20
Event Scheduler 98
Existing Cover Pages 106
Export 21
Export File Format 67
Exporting
fax images to TIF files 65
Faxes Automatically 65
Extracting Numbers from TO or SUBJECT 84
- F -Fax
Exporting 65
Machine ID 41
Number 41
Server 41
Server Properties 41
Fax Attachments 71
Fax Broadcast 129
Canceling 189
Pausing 190
Fax Broadcasting
Sending 167, 178
Wizard 167, 178
Fax Devices 23
fax device's ID string 92
Fax Exporting 65
Fax Images
Removing from Disk 48
Fax Log Window 20
Fax Machine ID 121
Fax Messages
Attaching Documents to 159
Fax Modem Settings 27
Fax number 132
Fax Properties 142
Fax Routing 80
Fax Rule Macros 197
Fax Template Properties 120, 123
Fax Templates 118, 123
Banner Text 121
Company 121
Cover Page used in 121
Description 120

Copyright © 1996-2014. All rights reserved. Alt-N Technologies, Ltd.
RelayFax Network Fax Manager v7.1212
Fax Templates 118, 123
Dialing Options 123
Fax Machine ID 121
Fax Number 121
Name 120
Options 123
Port 123
Properties 120, 121, 123
Voice Number 121
Fax Viewer 157
Fax Window 20
FAXCLNT.EXE file 166
FAXCLNT.INI file 166
Faxes
Automatically Printing 84
Confirming delivery 154
Default Rules 84
Emailing to default user 84
Inbound Rules 92
Outbound Rules 86
Sending Programmatically 166
Faxing
Using a scanner 150
Faxing Attachments 62
Faxing Email Attachments 62
Faxing Rules 86
Faxing to a list 167, 178
FAXPARMS 166
Features 8
feeder 139
Files 204
Filtering 96
Format 71
Format for the export files 67
Formatting Characters 41, 42, 164
- G -GIF 71
Group Templates 118
Groups 118
- H -Hangup 102, 135
headers 76
HELO identification 44
Hiding SMTP Sessions 48
High Resolution 71
Honor Confirmation Requests 48
- I -ID 41
Image Format 71
Imaging 71
Importing Accounts from RelayFax 1.0 112
Inbound Default Rules 84
Inbound Fax Rules 92
INIT 27
Installation 12
Introduction 8, 16, 128
ISP Account Information 102, 135
- J -JPEG 71
JPG 71
Junk Faxes 96
- K -Keywords 142
- L -List of Formatting Characters 42
Log
Device 37
Modem 37
Log Window 20
Logging
Max Log Size 53
Options 53
POP Session Activity 53
Server 53
Settings 53
SMTP Session Activity 53
- M -Machine ID 41
Macros

Copyright © 1996-2014. All rights reserved. Alt-N Technologies, Ltd.
Index 213
Macros
DAT file processing 198
Email 159, 192
Outbound Fax Rule 197
Mail Hosts
Adding 82
Collecting from 82
Editing 82
enabling/disabling 82
Removing 82
Mail Server 44, 134
Mail Server Properties 44
Mail Sources
Adding 82
Collecting from 82
Editing 82
enabling/disabling 82
Removing 82
Mail Sources & Rules 80
Mail Sources and Rules 82
Managing contacts 53
Manual Add 24
MDaemon
Freeing port for 60
ini file 60
Server 60
Settings 60
Sharing ports with 60
Using RelayFax with 60
Menu 21
Menu Bar 17
Message
Error sending fax 142, 155
Modem 27
Dialing properties 36
Modem Class 24
Modem INIT String 27
Modem Initialization String 27
Modem Log 37
Modem Manual Add 19, 24
Modem Properties 19, 27
Modem RESET String 27
Modem Settings 27
Modems 23
- N -Network Printer Access 57
New in RelayFax 8
Non-licensed users 114
Number Prefixes 48
- O -OCR
Installation 12
OCR Options 73
OCR Printer Driver Options 137
OCR routing 92
ODBC Selector Wizard 172, 185
Options 114, 123
Dialing 48
Faxing 48
Miscellaneous 48
System Service 51
Outbound Default Rules 84
Outbound Fax 86
Apply template to 86
Rules 86
Outbound Fax Rule Macros 197
Overview 8, 16
- P -Paper size 56
Paper source 56
Password
Authorization 114
PBX 32
Personal settings 132
Phone Numbers 41
POP3 Mail Hosts
Adding 82
Collecting from 82
Editing 82
Enabling/disabling 82
Removing 82
POP3 servers 82
Port 27
freeing for MDaemon 60
Sharing with MDaemon 60
TCP 44
Port Routing 92
Port Status
Current 27
Copyright © 1996-2014. All rights reserved. Alt-N Technologies, Ltd.
RelayFax Network Fax Manager v7.1214
POSTDIAL.SEM file 60
Postmaster 114
PREDIAL.SEM file 60
Prefix 48
Print message to specific printer 92
Printer
Access 57
Domain 57
Network Access 57
Printer Access 57
Printer Driver 156
Printer options 56
Printing
Faxes Automatically 84
Printing Faxes 157
Printing Outbound Faxes 48
Processing mail immediately 98
Profiles
Dialup 102, 135
Properties 21, 27
Client 142
Cover Page 106
Fax Server 41
Fax Templates 120, 121
Logs 53
Mail Server 44
Options 48
RelayFax 40
Service 51
Template 121
Templates 120
Properties Dialog
Client Settings 137
Contact List 140
Dialup Settings 135
Personal Settings 132
Scanner Settings 139
Server Settings 134
- Q -Quick-scan 139
- R -RAS/DUN Dialup 102
Receiving Faxes 27
Recipient's Company 142
Recipient's Name 142
Re-Fax 21
Regular Expression Matching 73
RelayFax 8
RelayFax - Fax Server For Windows 16
RelayFax Data Files 204
RelayFax Driver 156
RelayFax Fax Viewer
Editing faxes 157
Printing faxes 157
Viewing faxes 157
RelayFax Printer Driver 156
RelayFax Properties 40
RelayFax Settings 40
RelayFax SMTP Client 129
Attached Documents 153
Attaching files to faxes 153
Attaching personal cover pages to faxes 145
Comments for cover page 142
Cover Pages 145
Dialup Settings 135
Fax Properties 142
Fax Specifics 142
Introduction 128
Mail Server 134
Overview 128
Printer Driver 156
Properties 134, 142
Sending Faxes Programmatically 166
Server's domain name 134
Server's IP Address 134
Removing
Accounts 112
Cover Pages 106
Document Types 62
exported fax log entries 65
Fax Images from Disk 48
Mail Hosts 82
Templates 118
Reports 56
Requirements 12
Rescan Ports 23
RESET 27
Retry Attempts 48
Return receipt 154
Routing 80
RTP 32

Copyright © 1996-2014. All rights reserved. Alt-N Technologies, Ltd.
Index 215
Rules 96
Default 84
Inbound Default 84
Inbound Fax 92
Outbound Default 84
Outbound Fax 86
Running RelayFax as a Service 51
- S -Saving settings 137
Scaling Images 71
Scan Image 150
Scanner Settings 139
Scanner support 77
Scanning 129
Scanning options
ADF 151
Document feeder 151
Resolution 151
Scanning Ports 23
Schedule 149
Scheduling 98
Security 114
Select All 21
Select Printer 48
Send fax
to numbers found in text file 86
to specific number 86
using a specific fax port 86
Send fax error message 142, 155
Send Schedule 149
Send To 21
Sending Faxes 27, 142
Sending Faxes Programmatically 166
Sending faxes via an email client 158
Sending to multiple users 167, 178
Sending Warning Messages 65
Server 134
MDaemon 60
Server Log 53
Service
Options 51
Settings 40
Logs 53
Mail Server 44
MDaemon 60
Options 48
Setup Menu 17
Sharing ports with MDaemon 60
Shortcut 21
Shortcut Menu
Add Rule 21
Client 129
Create Report 21
Delete 21
Export 21
Print 21
Properties 21
Re-Fax 21
Select All 21
Send To 21
View/Edit 21
Simple Scheduling 98
SIP Account 32
Skip next rule 86, 92
SMTP Client
Attached Documents 153
Attaching files to faxes 153
Attaching personal cover pages to faxes 145
Comments for cover page 142
Cover Pages 145
Dialup Settings 135
Fax Properties 142
Fax Specifics 142
Mail Server 134
Printer Driver 156
Properties 134, 142
Sending Faxes Programmatically 166
Server's domain name 134
Server's IP Address 134
SMTP Envelope ID 44
Source 150
SPAM 96
Special characters 41, 42, 164
Spooling Faxes to Printer 84
Spooling Incoming Faxes 44
Stop processing rules 86
Storing on disk 71
String 41
Modem INIT 27
Modem RESET 27
Summary 8, 16
System Requirements 12
System Service 51

Copyright © 1996-2014. All rights reserved. Alt-N Technologies, Ltd.
RelayFax Network Fax Manager v7.1216
- T -T.38 32
Template Description 120
Template Options 123
Template Properties 121, 123
Templates
Banner Text 121
Company 121
Cover Page used in 121
Creating 118
Description 118, 120
Dialing Options 123
Editing 118
Existing 118
Fax 118
Fax Machine ID 121
Fax Number 121
File 118
Name 120
Options 123
Port 123
Properties 120, 121, 123
Removing 118
Voice Number 121
Text options 76
Text to TIF conversion 76
TIF compression 76
TIFF 71
Timers 48
Tool Window 19
Toolbar 18
Tracking Number 20
Transmission reports 56
Tree 19
Twain 150
Twain support 77
Types 62
- U -Unable to detect a modem 24
Updating the client 46, 129
User Accounts 112
User Address Listing 112
Using the RelayFax SMTP Client 129
- V -View/Edit 21
Viewer
Editing faxes 157
Printing faxes 157
Viewing faxes 157
Voice Number 41
- W -Warning 142, 155
Warning Messages 65
Windows Address Book 110, 140


![Blackmagic Fusion Keyboard Shortcuts · Viewer Spline Editor Blackmagic Fusion Keyboard Shortcuts alt [+ alt ← + Last Keyframe alt ] + alt → + Next Keyframe ctrl + drag: to selection:](https://static.fdocuments.in/doc/165x107/5e9af199383e7e73741f2919/blackmagic-fusion-keyboard-shortcuts-viewer-spline-editor-blackmagic-fusion-keyboard.jpg)