Relativity Data Grid Data Grid.pdf · RelativityDataGridGuide 8 2Elasticsearchsystemrequirements...
97
Relativity Data Grid Guide 1 Relativity Data Grid Guide December 20, 2019 | Version 9.7.229.5 For the most recent version of this document, visit our documentation website .
Transcript of Relativity Data Grid Data Grid.pdf · RelativityDataGridGuide 8 2Elasticsearchsystemrequirements...

Relativity Data Grid Guide 1
Relativity Data Grid GuideDecember 20, 2019 | Version 9.7.229.5
For the most recent version of this document, visit our documentation website.

Relativity Data Grid Guide 2
Table of Contents1 Relativity Data Grid 5
1.1 Getting started 5
1.2 Hardware and system requirements 7
1.3 Supported and unsupported functionality 7
1.3.1 Storage (as compared to SQL storage) 7
2 Elasticsearch system requirements 8
2.1 Infrastructure considerations 8
2.2 Other considerations 8
2.3 Elasticsearch cluster system requirements 9
2.3.1 Tier 2 (1.5-3TB) 9
2.3.2 Tier 3 (3-15 TB) 10
2.4 Java version compatibility 10
3 Installing Data Grid 11
3.1 Enabling your workspace and extracted text field for Data Grid 11
3.2 Data Grid agents 12
4 Installing Elasticsearch 14
4.1 Creating master, client, and data nodes 14
4.1.1 Adding additional masters 20
4.1.2 Java Virtual Machine (JVM) settings 21
4.2 Creating a cluster 21
4.3 Installing a monitoring cluster 22
4.4 Installing the license 24
4.4.1 Setting up the Kibana server 25
4.4.2 Installing Kibana 26
4.4.3 Installing Marvel and Sense 27
4.4.4 Configuring Shield 27
4.4.5 Updating your Elasticsearch cluster 27
4.5 Linking Relativity to the Elasticsearch cluster 28
4.6 Configuring Shield authentication 32

Relativity Data Grid Guide 3
4.6.1 Installing the Shield plugins 33
4.6.2 Configuring custom authentication 33
4.6.3 Installing an X.509 certificate 36
4.6.4 Create a keystore and generate a keypair 36
4.6.5 Create a certificate signing request (CSR) 37
4.6.6 Send the certificate to your certificate authority (CA) for signing 37
4.6.7 Install the signed certificate 38
4.7 Enabling SSL in the node configuration 38
4.8 Configuring Kibana to work with Shield 38
5 Monitoring Elasticsearch 40
5.1 Head 40
5.2 Marvel 40
5.3 Curator 42
5.3.1 Cluster metrics to monitor 42
5.3.2 Monitoring bulk rejections 43
5.3.3 Monitoring backup and recover times 43
5.3.4 Additional cluster monitoring information 43
5.4 Querying with Sense 44
5.4.1 Creating and deleting indexes 44
5.4.2 Retrieving documents and cluster settings 44
5.4.3 Shutting down a cluster 46
5.4.4 Backing up clusters 47
6 Backing up Relativity Data Grid 49
6.1 Backing up Elasticsearch 49
6.2 Creating a repository 49
6.3 Creating snapshots 51
6.3.1 Creating snapshots manually from within Sense 51
6.3.2 Scheduling a Windows task using Curator 52
6.4 Restoring a snapshot 68
6.4.1 Restoring snapshots from the Elasticsearch head console 68
6.4.2 Restoring snapshots with cURL 68

Relativity Data Grid Guide 4
7 Upgrading Data Grid 70
7.1 Finding the Elasticsearch version 70
7.2 Upgrading from Elasticsearch 2.1.2 to 2.3.3.x 71
7.3 Preparing the environment for upgrade 71
7.4 Running the upgrade script 72
7.5 Verifying the upgrade 72
7.6 Running a manual upgrade 73
7.6.1 Upgrading a node 73
7.6.2 Verifying the upgrade 76
7.7 Resetting the Shield or Head password 77
8 Audit 79
8.1 Supported functionality 79
8.2 Installing and configuring Audit 79
8.2.1 Audit agents 80
8.3 Audit tab 80
8.3.1 Searching on the Details column 81
8.3.2 Exporting workspace audits 83
8.4 Instance audits 84
8.4.1 Filtering on multi-workspace audits 85
8.5 Reverting audited actions 86
8.5.1 Mass reverting 87
8.6 Audit Migration Reports tab 88
8.6.1 Migration Error Report 88
8.6.2 Migration Error Retry Script 90
8.6.3 Migration Status Report 91
8.7 Audit Workspace Settings tab 92
8.7.1 DisplayAuditDataSource 92
8.7.2 HistoryTabVisibleOnUpgrade 93
8.8 Audited actions 94

Relativity Data Grid Guide 5
1 Relativity Data GridRelativity Data Grid allows you to store, search, and analyze extracted text and audit data at massivescale. Data Grid enables faster workflows through continuous indexing and distributed search to gaindeeper insight to your extracted text and audit data. The benefits of using the Data Grid data store include:
n Scalability and more efficient review workflows on case sizes with 10 million or more documents andbillions of audits.
n More performant database maintenance, backup, and upgrades.
n A reduction in SQL server database sizes, leading to better performing SQL databases.
n Increased visibility into reviewer productivity and system performance.
Note: Text or audit information stored in Relativity Data Grid is inaccessible for some third-partyapplications. It's recommended that you contact any vendors of third-party applications to confirm theircompatibility with Relativity Data Grid.
Data Grid uses Elasticsearch to store and search audits.
This page provides a brief description of Data Grid terminology, functionality, and importantconsiderations to take into account before implementing Data Grid for new workspaces.
Note: Data Grid supports Windows servers only.
This page contains the following sections:
1.1 Getting startedUse the following workflow to get started with Data Grid.

Relativity Data Grid Guide 6

Relativity Data Grid Guide 7
1.2 Hardware and system requirementsThe following table describes the hardware and system requirements per Data Grid feature.
Storage Audit
Hardwarerequirements
Fileshare Elasticsearch
Systemrequirements
Per Relativityspecification
For more information about system requirements and infrastructurerecommendations, see Elasticsearch system requirements.
1.3 Supported and unsupported functionalityThe following sections describe supported and unsupported functionality for Data Grid.
1.3.1 Storage (as compared to SQL storage)To store text in Data Grid, you can use the same default file share as your natives and images, or you candesignate a file share specifically Data Grid text. Once you enable an extracted text field's access to DataGrid, you can't disable it, so it's important to understand the benefits and limitations of storing text in DataGrid.
Supported extracted text functionality Currently unsupported functionality
n Import/export through the RelativityDesktop Client
n Viewer
n Preview
n OCR
n dtSearch indexing and searching
n Persistent highlight sets
n Processing
n Relativity Integration Points
n Analytics
n ARM
n Keyword search
n SQL queries to long text fields stored in DataGrid
n Adding extracted long fields stored in DataGrid to layouts (including the Documentpanel)
n RSAPI query
n Pivot and Sort in the UI
n Filtering in the Document list on extracted text
n Mass operations:o Edit
o Replace
o Tally/Sum/Average
o Export to File

Relativity Data Grid Guide 8
2 Elasticsearch system requirementsDepending on your infrastructure tier, you have different server specifications and recommendations forthe Elasticsearch cluster available to you. Elasticsearch is built on a distributed architecture made up ofmany servers or nodes. A node is a running instance of Elasticsearch (a single instance of Elasticsearchrunning in the JVM). Every node in an Elasticsearch cluster can serve one of three roles.
n Master nodes are responsible for managing the cluster.
n Data nodes are responsible for indexing and searching of the stored data.
n Client nodes are load balancers that redirect operations to the node that holds the relevant data,while offloading other tasks.
Set up an entirely separate cluster to monitor Elasticsearch with one node that serves all three roles:master, data, and client. While this setup doesn’t take advantage of the distributed architecture, it acts asan isolated logging system that won’t affect the main cluster.
2.1 Infrastructure considerationsConsider the following factors when determining the infrastructure requirements for creating anElasticsearch environment:
n Infrastructure tier – When you build out your initial Relativity environment, we use these meas-ures to determine a tier level of 1, 2, or 3. This tier level takes into consideration the number ofusers, SQL sizes, and the amount of data and activity in your system.
n Virtual versus physical servers – Although Elastic recommends physical servers, our imple-mentation doesn't require physical servers. Virtual servers can be implemented for all nodes.
n Storage type – Elasticsearch is a distributed system and you should run it on storage local to eachserver. SSDs are not required.
n Network connectivity – Because of the distributed architecture, network connectivity can impactperformance, especially during peak activity. Consider 10 GBit as you move up to the higher tiers.
n Client nodes – Larger clusters that do not perform heavy aggregations (search against your data),may perform better without client nodes. Simply usie a master and data node configuration with aload balancer to handle data in your cluster.
Note: Elasticsearch won't t allocate new shards to nodes once they have more than 85%disk used.
2.2 Other considerationsn Shield is one of the many plugins that comes with Elasticsearch. Shield provides a user name and
password for REST interaction and JWKS authentication to Relativity. JWKS is already running onyour Relativity web server.
n The Elasticsearch cluster uses the certificate from a Relativity web server or a load balanced site forauthentication to Relativity.

Relativity Data Grid Guide 9
n You can set up the nodes for TLS communication node to node. TLS communication requires a wildcard for the nodes that contains a valid chain and SAN names. This is highly recommended forclusters that are in anyway exposed to the internet. You can request a script which can be usedagainst an installation of OpenSSL to create the full chain that is not readily available. All of the cer-tificates are contained within a Java keystore which is setup during installation by the script. Torequest this script, contact [email protected] you have a chain of certificates with a wild card certificate and private key that contains SANnames of the servers, you can use those certificates to build the Java keystore for TLS.
2.3 Elasticsearch cluster system requirementsThe number of nodes required and the specifications for the nodes change depending on both yourinfrastructure tier and the amount of data that you plan to store in Elasticsearch.
Note: These recommendations are for audit only.
2.3.0.1 Test (425 GB)
Node type # of nodes needed CPU RAM DISK (GB)
Master/Client/Data 1 8 32 500
Monitoring cluster 0-1 4 8 200
2.3.0.2 Tier 1 (850 GB)
Node type # of nodes needed CPU RAM DISK (GB)
Master/Data 1 8 32 1000
Client/Data 1 8 32 1000
Monitoring cluster 0-1 4 8 200
2.3.1 Tier 2 (1.5-3TB)
Node type # of nodes needed CPU RAM DISK (GB)
Data 2-4 8 32 1800
Master* 3 4 8 200
Monitoring cluster 0-1 4 8 200
*Inactive master nodes are used as clients.

Relativity Data Grid Guide 10
2.3.2 Tier 3 (3-15 TB)
Node type # of nodes needed CPU RAM DISK (GB)
Data 4-20 8 64 1800
Master* 3 4 8 200
Monitoring cluster 1 4 8 200
*Inactive master nodes are used as clients.
To assess the sizes of a workspace’s activity data and extracted text, contact [email protected] andrequest the AuditRecord and ExtractedText Size Gatherer script.If you have further questions after running the script, our team can review the amount of activity andmonitoring data you want to store in Elasticsearch and provide a personalized recommendation ofmonitoring nodes required.
2.4 Java version compatibilitySee theElastic website for compatible Java versions.

Relativity Data Grid Guide 11
3 Installing Data GridThis page includes steps for configuring Data Grid Text (Core) in your environment. Before configuringData Grid, ensure you've completed the pre-installation steps. For more information, see .
3.1 Enabling your workspace and extracted text field forData GridTo enable your workspace for Data Grid, perform the following steps:
Note: We recommend you only enable Data Grid for fields storing extracted text, OCR text, ortranslated text.
1. Navigate to theWorkspace Details tab, and then click Edit.
2. Set the Enable Data Grid field to Yes.
3. (Optional) Next to Data Grid File Repository, select the path for the physical location of the textfiles used by Data Grid. If no file repository is specified for this field, and Data Grid is enabled, DataGrid stores text in the default file repository.
Note: If you run out of space in this repository, you can specify a new repository. Data Grid willcontinue to read from the old repository as well as the new repository.
4. Click Save.

Relativity Data Grid Guide 12
To enable the extracted text field for Data Grid, perform the following steps:
1. Navigate to the Fields tab.
2. Locate the extracted text field and click the Edit link next to it.
3. Set the Enable Data Grid field to Yes.
Note: If you are storing extracted text in Data Grid, the Include in Text Index field is set to Nobecause there is no SQL text index. If you want to search using dtSearch, you must follow bestpractice of creating a saved search of fields you want to index.
4. Click Save.
Note: Enabling extracted text fields for Data Grid works for new workspaces only. You can't enableData Grid for fields that already have text in SQL. If you want to migrate fields from SQL to Data Grid,you must use the Data Grid Text Migration application.
3.2 Data Grid agentsA number of agents are available to facilitate Data Grid operations in your environment. Ensure that thefollowing agents are installed in your environment. For more information on installing agents, see theAgents Guide.

Relativity Data Grid Guide 13
Agent name Requirementinformation
Function Agenttype
Data Grid Man-ager
Only 1 per envir-onment
A Data Grid Manager agent is an off-hours agentresponsible for Data Grid enabled workspace man-agement, including deleting outdated search resultscache tables and monitoring Data Grid index con-ditions.
Single-installation
Data Grid Worker At least 1 per envir-onment.
A Data Grid worker agent is part of building the DataGrid File Repository.
Multiple-installation

Relativity Data Grid Guide 14
4 Installing ElasticsearchIf you want to use Audit in your environment, you must install Elasticsearch.
The procedure for installing Elasticsearch to your Relativity environment is the following:
1. Complete the pre-installation steps. See the Pre-Installation Guide.
2. Install the software on which Elasticsearch runs. This includes:a. Master, client and data nodes. See Creating master, client, and data nodes below
b. A cluster. See Creating a cluster on page 21.
c. Amonitoring cluster. See Installing a monitoring cluster on page 22
3. Install and configure the Relativity components. These include the following:a. The license and plugins. See Installing the license on page 24
b. The Instance Settings that accompany the Data Grid Core application. See Linking Relativityto the Elasticsearch cluster on page 28.
c. Elasticsearch plugins. See Setting up the Kibana server on page 25.
d. Shield authentication. See Configuring Shield authentication on page 32
Once all installation steps are completed, you must configure the Relativity core application. See InstallingData Grid on page 11.
Note: Ensure that your antivirus software excludes the Data Grid data location (data node) fromscanning. See the Environment Optimization Guide.
4.1 Creating master, client, and data nodesThree different types of nodes are required to run Elasticsearch in your environment:
n Master - the node within a cluster that manages changes across an entire cluster.
n Client - the node within a cluster that either serves as the gateways through which data enters acluster.
n Data - the node that stores data within a cluster.
The Tier 1 installation of Elasticsearch involves configuring one or more dedicated master nodes, onededicated client node, one monitoring node, and two data nodes. The master node(s) manage the overallstate of the cluster, delegates the structure by which data is stored and replicated across a cluster, andfacilitates resources returned during searches. The client node serves as the endpoint through which youimport data into the Elasticsearch cluster. The data nodes store primary shards and replica shards.
Note: Elasticsearch won't t allocate new shards to nodes once they have more than 85%disk used.
The account running the Elasticsearch service requires access to SQL Server, and specifically needs tohave read, write, and bulk permissions for all workspace databases.

Relativity Data Grid Guide 15
For more information on cluster specifications for each tier, see Elasticsearch system requirements onpage 8.
To install a master, client, or data node, perform the following steps. Note that the settings within theElasticsearch.yml determine which type of node you're installing, but the remaining steps apply to all nodetypes.
1. Install the Java Development Kit. See the Elastic website for compatible Java versions. For ques-tions, email [email protected].
2. Use the following steps to insert an environment variable (KCURA_JAVA_HOME).a. Click Start.
b. Right-click on Computer and select Properties.
c. ClickAdvanced system settings.
d. Select the Advanced tab.
e. Click Environment Variables…
f. ClickNew under System Variables.
g. Name the variable KCURA_JAVA_HOME.
h. Copy the file path to C:\Program Files\Java\jdk(version_number)
3. Contact your Relativity Account Manager to download the Elasticsearch installer package.

Relativity Data Grid Guide 16
4. Extract the Elasticsearch zip folder to a root directory (Example: C:\RelativityDataGrid).
5. Rename the default directory (\RelativityDataGrid\elasticsearch-2.x.x) to \Relativ-ityDataGrid\elasticsearch-main. This allows you to make upgrades to Elasticsearch without hav-ing to modify the folder to accommodate future version numbers.
6. Navigate to \RelativityDataGrid\elasticsearch-main\config\elasticsearch.yml and update thesettings in the following Elasticsearch.yml file in a text editor. This is where you'll specify what type ofnode you're creating:
Note: When entering these values, you must enter a single space between the field name andthe field value.
n cluster.name - enter the name of the cluster. All nodes on the cluster must share a commonname in order to communicate with one another.
Note: You can't use hyphens to name a cluster. Use underscores if necessary.
n node.name - enter the fully qualified domain name.
n node.master - enter true because this is a master node. Enter false for client and datanodes.
n node.data - enter false for a master and client node. Enter true for a data node.
n discovery.zen.minimum_master_nodes - enter 1
n discovery.zen.ping.multicast.enabled - enter false
n discovery.zen.ping.unicast.hosts - enter the full computer name of all nodes on thecluster using the following format: ["DN_FULL_COMPNAME_1","DN_FULL_COMPNAME_2","DN_FULL_COMPNAME_3"]. Always include the master node in the list of hosts.
Note: Don't put spaces between the commas when specifying multiple nodes. The defaultport number is 9300, but you can specify a port number after the computer name with thefollowing format: "DN_FULL_COMPNAME_1:9500". The specified port must be free.
n marvel.agent.enabled - enter false
n marvel.agent.exporter.es.hosts - enter the computer name (and optionally port number)that each node should send stats to. ["host1","host2:port"]
n action.destructive_requires_name - enter true. This prevents destructive actions w/ wild-cards. For example, DELETE /*.
n action.auto_create_index - enter false. This disables automatic index creation.
n format - enter json. This is for global cluster state file to be readable.
n transport.tcp.compress - enter true
n http.max_content_length - enter 201mb
n http.cors.enabled - enter false

Relativity Data Grid Guide 17
n gateway.expected_master_nodes - enter 0. This delays cluster recovery, providing addi-tional time for all nodes to first come online.
n gateway.expected_data_nodes - enter 0
n gateway.recover_after_time - enter 5m
n script.disable_dynamic - enter true. This puts all scripting functionality in a sandbox.
n script.default_lang - enter groovy
n script.groovy.sandbox.enabled - enter true
n path.data - enter the path of the location in which you want to store the allotted index data forthis node. For example,C:\RelativityDataGrid\data.
n path.repo - enter the path of the location in which you want to store backups. For example,\\networklocation\backups.
Note: You can specify multiple backup locations with the following format:["/mount/backups", "/mount/longterm_backups"]. You can also specify a network sharewith the following format: ["\\\\my_server\\snapshots"].
n Configure the Shield settings as follows:
Note: To disable Shield, remove the number sign (#) in front of shield.enabled:false.
#shield.enabled: falseshield.authc.realms:custom:type: kCuraBearerRealmorder: 0publicJWKsUrl: https://<server>/Relativity/Identity/.well-known/jwks
esusers1:type: esusersorder: 1
Note: The URL must point to the Relativity installation where Identity Server can be found.This should be the same URL used to log in to Relativity.
7. If using Shield, see Configuring Shield authentication on page 32 for steps on configuring users androles.
8. Use the following steps to launch the command prompt:a. Click Start.
b. Search for "cmd".
c. Right-click on cmd.exe and select Run as Administrator.
9. Navigate to the bin directory in the RelativityDataGrid folder (\RelativityDataGrid\elasticsearch-main\bin) by running cd \RelativityDataGrid\elasticsearch-main\bin and enter the following com-mands:

Relativity Data Grid Guide 18
a. Install the Windows service: .\kservice.bat install
b. Run the GUI manager: .\kservice.bat manager
c. Use the drop down menu for Startup Type to select Automatic.
d. Click the Java tab and configure theMaximum memory pool to be 30 GB or half of the totalRAM available (whichever is less). You can enter identical values for the Initial memorypool andMaximum memory pool settings. It's recommended that you keep the Threadstacks size value at its default of 256.

Relativity Data Grid Guide 19

Relativity Data Grid Guide 20
e. Select the Log On tab. In the Log on as setting, select This account. Enter a valid Relativ-ity service account domain name and password and confirm the password.
f. ClickOK.
g. Return to the command prompt.
h. Start the Windows service: .\kservice.bat start
Note: Don't start the Windows service on a node until you complete step 5 above toconfigure the elasticsearch.yml file on the node.
10. Verify the installation is complete by navigating to the following address in a Chrome browser:http://computername:9200/_plugin/head or http://localhost:9200/_plugin/head
Note: This page might not properly display in Internet Explorer. Use Chrome for verification.
4.1.1 Adding additional mastersElasticsearch 2.x allows for multiple masters with a minimum of 3 masters. With multiple masters, yourcluster is highly available. If a master node goes down, one of your additional master nodes can be electedand your cluster will continue in an active green state.
Set up your additional two master nodes per the instruction for installing Elasticsearch nodes.
The following needs to be updated in the elasticsearch.yml file for all master nodes:discovery.zen.minimum_master_nodes: 2

Relativity Data Grid Guide 21
This will ensure that if any master goes offline, the third one joins the cluster forming a quorum.
For more information please see Elastic documentation here.
Note: Enabling multiple masters is optional. If you would like to stay at 1 master, move on to the nextstep to install plugins.
4.1.2 Java Virtual Machine (JVM) settingsYou must also configure the following settings on each JVM for JVM logging:
1. Run the Elasticsearch GUI manager: .\kservice.bat manager
2. Select default logging to "Error" instead of "Info".
3. Update JVM memory to half of total RAM of the machine or 30GB (whichever is less).
4. Start each of the nodes services: .\kservice.bat start
Note: Never restart a node if data already exists on the cluster. If there is no data in the cluster,you can restart the service if it's already started and configuration settings change. SeeRestarting nodes and clusters for more information.
Clusters automatically form between nodes on a network if the cluster names are the same across nodes.
4.2 Creating a clusterClusters automatically form between multiple nodes when the same cluster name is specified acrossmultiple nodes in the elasticsearch.yml file. You can check to see if your various nodes have joined thecluster by checking Head. Navigate to http://computername:9200/_plugin/head orhttp://localhost:9200/_plugin/head and see if all of your nodes are present.

Relativity Data Grid Guide 22
4.3 Installing a monitoring clusterAmonitoring cluster allows you to store Marvel data from the production cluster for analysis. Amonitoringcluster for Data Grid only needs one node, but you can set up a multi-node monitoring cluster if you prefer.We recommend using no more than three monitoring cluster nodes.
Use the following steps to install Elasticsearch 2.x on a machine that you want to use as a single nodemonitoring cluster:
1. Install the Java Development Kit. You can acquire the correct version by emailing [email protected].
2. Use the following steps to insert an environment variable (KCURA_JAVA_HOME):1. Click Start.
2. Right-click on Computer and select Properties.
3. ClickAdvanced system settings.
4. Select the Advanced tab.
5. Click Environment Variables…

Relativity Data Grid Guide 23
6. ClickNew under System Variables.
7. Name the variable KCURA_JAVA_HOME.
8. Copy the file path to C:\Program Files\Java\jdk(version_number)
3. Contact your Relativity Account Manager to download and unzip the Elasticsearch installer pack-age.
4. Extract the Elasticsearch zip folder to a root directory (Example: C:\RelativityDataGrid).
5. Rename the default directory (C:\RelativityDataGrid\elasticsearch-2.1.x) to \Relativ-ityDataGrid\elasticsearch-main. This allows you to make upgrades to Elasticsearch without hav-ing to modify the folder to accommodate future version numbers.
6. Extract and copy the Relativity Data Grid package to each node on your monitoring cluster.
7. Navigate to \RelativityDataGrid\elasticsearch-main\config\elasticsearch.yml and update onlythe following settings in the elasticsearch.yml file in a text editor.
Note: When entering these values, you must enter a single space between the field name andthe field value.
n cluster.name - enter the name of the monitoring cluster. All nodes on the cluster must sharea common name in order to communicate with one another. Do not confuse this cluster name

Relativity Data Grid Guide 24
with the name of the production cluster. This cluster name should be the name of the mon-itoring cluster.
n node.name - enter the name of the monitoring node.
n node.master - enter true because this node performs the same tasks as a master node.
n node.data - enter true. You can use the master node to store data for a single node mon-itoring cluster, but don't store data on the master node for Tier 2 or Tier 3 setups on a pro-duction cluster.
n action.auto_create_index - enter true.
8. If you have Shield enabled on your cluster, create a user with a kibana4_server role and marvel_remote_agent role, both of which are defined in roles.yml. For more information on defining roles,see Configuring Shield authentication on page 32.
4.4 Installing the licenseInstall the Elasticsearch license from the search/bin folder. If you haven’t already, submit a support ticketto Relativity Client Services for a production grade license for Elasticsearch plugins. While you wait for alicense, you can continue using the plugins on a trial period.
To install the license, complete the following in Sense or Head:

Relativity Data Grid Guide 25
1. Copy the contents of the license and run PUT/_license<<contents_of_license_file.json>>
2. Verify that the expiration date is set to a year from now by running the commandGET/_license.
4.4.1 Setting up the Kibana serverExtract the Kibana 4.5.3 package on your monitoring cluster, and then use the following steps to set up theKibana server on your monitoring cluster.
The following table breaks down the compatibility of different versions of Data Grid, Marvel, and Kibana.
Data Grid version Marvel version Kibana version
2.3.3 2.3.3 4.5.3+

Relativity Data Grid Guide 26
4.4.2 Installing KibanaKibana is a requirement for Marvel which allows you to manage your Elasticsearch indexes.
To use Kibana with Elasticsearch, you need the following:
n Elasticsearch 2.1 or later.
n One of the following supported browsers: IE9, IE10+, Firefox, Chrome, Safari (Mac).
n The endpoint of the master node of the Data Grid instance you're connecting to.
n Which Data Grid indexes you want to search.
To install and start Kibana:
1. Download the Kibana 4.5.x binary package for your platform.
2. Extract the .zip or tar.gz archive file.
3. After installing, run Kibana from the install directory: bin/kibana (Linux/MacOSX) or bin\kibana.bat(Windows).
4. Navigate to the kibana.yml file, and update the following in a text editor:n elasticsearch.url - enter the name of your monitoring cluster.
5. If you have Shield enabled on your cluster, also update the following kibana.yml settings in a texteditor:
n kibana_elasticsearch_username - enter the name of the user with a kibana4_server roledefined in roles.yml.
n kibana_elasticsearch_password - enter the password for the user who has the kibana4_server role defined in roles.yml.
n elasticsearch.ssl.ca - enter PEM file path.
n elasticsearch.ssl.verify - enter false.
n path.data - enter the path of the location in which you want to store the allotted data for thisnode. For example,C:\RelativityDataGrid\data.
n path.repo - enter the path of the location in which you want to store backups. For example,\\networklocation\backups. You can specify multiple backup locations with the followingformat: ["/mount/backups", "/mount/longterm_backups"]. You can also specify a networkshare with the following format: ["\\\\my_server\\snapshots"].
n server.port - enter the port where the Kibana server runs. Defaults to 5601.
n server.host - enter the IP address where the Kibana server runs. Defaults to 0.0.0.0 (loc-alhost).
6. Browse to the kibana/bin folder and enter the following: n kibana plugin -i elasticsearch/marvel/2.3.3
n kibana plugin -i elastic/sense

Relativity Data Grid Guide 27
7. Start the Kibana server by running the following:n bin/kibana.bat
8. Open http://localhost:5601 or http://<<machine-name>>:5601/ to view Kibana.
4.4.3 Installing Marvel and SenseMarvel is a management and monitoring tool for Elasticsearch. Marvel aggregates cluster wide statisticsand events and offers a single interface to view and analyze them.
Sense is a Kibana plugin and visual console that provides auto-complete, auto-indentation, and syntaxchecking.
To install Marvel and Sense:
1. Refer to the Marvel requirements and Sense requirements.
2. Open the command prompt and go to the elasticsearch/bin directory. Enter the following com-mand: plugin install marvel-agent
3. Browse to the Kibana/bin folder and enter the following:n kibana plugin --install elasticsearch/marvel/2.3.3
n kibana plugin --install elastic/sense
4. Open http://<<machine-name>>:5601/ to view Kibana.
4.4.4 Configuring ShieldWhen you install Elasticsearch 2.3.3, Shield is enabled by default; however, you still need to configureShield's authentication on every node. For more information, see Configuring Shield authentication.
Note: With Shield on by default, other plugins like Marvel or Head are not supported. In order to useyour other plugins, you need to provide the Kibana server with credentials so it can access the .kibanaindex and monitor the cluster. See Configuring Shield authentication for more information.
4.4.5 Updating your Elasticsearch clusterTo finish setting up your monitoring cluster, the following changes need to be made on all nodes in theElasticsearch cluster.
Complete the following on all nodes in the Elasticsearch cluster:
1. Install the marvel-agent plugin by running the command below.n bin\plugin install marvel-agent
2. If your monitoring cluster has Shield enabled, navigate to C:\RelativityDataGrid\elasticsearch-main\config\elasticsearch.yml and update the elasticsearch.yml file in a text editor with the fol-lowing. Set the auth.username and auth.password to the user who has the remote_marvel_agent role defined in roles.yml
marvel.agent.exporters:id1:
type: http

Relativity Data Grid Guide 28
host: ["http://es-mon-1:9200", "http://es-mon2:9200"]auth:
username:password:
3. Restart the Elasticsearch service for the changes to take effect.
4. Monitor your Elasticsearch cluster by going to http://<<machine-name>>:5601/app/marvel.
4.5 Linking Relativity to the Elasticsearch clusterAfter you've installed the Data Grid Core application and added the accompanying agents in the Agentstab, you'll need to configure all the entries in the Instance Settings tab that allow Relativity to communicatewith the Elasticsearch service.
This will enable Relativity to save data into the cluster you created as part of the Elasticsearch componentinstallation.
Use the following steps to link Relativity to your Elasticsearch service:
1. Specify the URL and port of the client node in the DataGridEndPoint instance setting value (i.e.,http://CLIENT_NODE_COMPNAME:9200). This is the endpoint that Relativity uses to ingest datainto the cluster. If you have multiple client nodes, you can specify all of them as end points. Separateyour endpoints by commas.
2. Enter a unique prefix for this instance of Relativity in the DataGridIndexPrefix instance settingvalue.The prefix allows you to differentiate data from instance to instance within the cluster.
3. Set the number_of_shards and number_of_replicas fields in the DataGridIndexCreationSettingsand DataGridIndexCreationSettings instance setting value to match your cluster setup. The num-ber_of_shards field should be one shard per data note, and the number_of_replicas field shouldbe two. The default instance setting value for number_of_shards is set to four, which assumes fourdata nodes. The default instance setting value for number_of_replicas value is two.Use the following steps to edit the DataGridIndexCreationSettings instance setting value to matchyour particular cluster setup. The instance setting value holds the template for creating a text index(DataGridIndexCreationSettings) in Elasticsearch.
a. Enter the following for the DataGridIndexCreationSettings entry in Instance Settings, edit thenumber_of_shards and number_of_replicas fields to match your preferred settings, andpaste the updated text into the text box.
{"template": "relativity_*","aliases": {
"{index}_read": {},"{index}_write": {},"{index}_verify": {}
},"settings": {
"index": {"number_of_shards": 12,"number_of_replicas": 2
},"analysis": {

Relativity Data Grid Guide 29
"analyzer": {"lwhitespace": {
"tokenizer": "whitespace","filter": [
"lowercase"]
}}
}},"mappings": {
"document": {"_timestamp": {
"enabled": true},"_size": {
"enabled": true},"dynamic_templates": [
{"raw": {
"match_mapping_type": "string","path_match": "*.*.Value","mapping": {
"type": "string","fields": {
"raw": {"type": "string","analyzer": "lwhitespace"
}}
}}
}]
}}
}
b. You must install the Data Grid for Audit application from the library in at least one workspacein order to use Data Grid for Audit and to create audit indexes. This installation creates yournecessary Data Grid for Audit entries in the Instance Settings tab.
c. Enter a unique prefix for this instance of Relativity in the ESIndexPrefix instance setting value.The prefix allows you to differentiate data from instance to instance within the cluster.
d. Set the number of shards and number of replicas fields in the ESIndexCreationSettingsinstance setting value to match your cluster setup. The number of shards field should betwice the number of nodes on the cluster, and the number of replicas field should be two. Usethe following steps to edit the ESIndexCreationSettings and instance setting value to matchyour particular cluster setup. The instance setting value holds the template for creating anaudit index (ESIndexCreationSettings) in Elasticsearch.
e. The ESIndexCreationSettings value populates with the default template that includes settingsfor four shards and two replicas. Edit the ESIndexCreationSettings entry in Instance Settingsto update the template if your setup requires shard or replication modifications. Alwaysupdate the template through these instance settings to keep templates consistent across

Relativity Data Grid Guide 30
Relativity and Elasticsearch.
Note: If you already migrated audit data into Elasticsearch through the Data Grid for Auditapplication, you must manually delete the template in Elasticsearch (DELETE /_template/audit and DELETE /_template/document) before updating the template with anynew changes. Contact [email protected] if you require assistance.
f. Use the following command to edit the ESIndexCreationSettings instance setting value tomatch your particular cluster setup:
{"template": "audit_*",
"aliases": {"{index}_read": {
},"{index}_write": {
},"{index}_verify": {
}},"settings": {
"index": {"number_of_shards": 4,"number_of_replicas": 2
},"analysis": {
"analyzer": {"str_search_analyzer": {
"tokenizer": "keyword","filter": ["lowercase","substring"]
},"str_index_analyzer": {
"tokenizer": "keyword","filter": ["lowercase","substring"]
},"lwhitespace": {
"tokenizer": "whitespace","filter": ["lowercase"]
}},"filter": {
"substring": {"type": "nGram","min_gram": 1,"max_gram": 20
}}
}},"mappings": {
"audit": {"dynamic_templates": [{
"raw": {"match_pattern": "regex",

Relativity Data Grid Guide 31
"path_match": "Details\\.auditElement\\..*","mapping": {
"type": "string","fields": {
"Raw": {"analyzer": "lwhitespace","type": "string"
}}
},"match_mapping_type": "string"
}},{
"newvalue": {"match_pattern": "regex","path_match": ".*\\.newValue$","mapping": {
"type": "string","fields": {
"Raw": {"analyzer": "lwhitespace","type": "string"
}}
}}
},{
"oldvalue": {"match_pattern": "regex","path_match": ".*\\.oldValue$","mapping": {
"type": "string","fields": {
"Raw": {"analyzer": "lwhitespace","type": "string"
}}
}}
},{
"analytics_text": {"match_pattern": "regex","path_match": ".*\\.#text$","mapping": {
"type": "string","fields": {
"Raw": {"analyzer": "lwhitespace","type": "string"
}}
}}
}],"_timestamp": {

Relativity Data Grid Guide 32
"enabled": true},"_size": {
"enabled": true},"properties": {
"ActionName": {"type": "string","index": "not_analyzed"
},"UserName": {
"type": "string","index": "not_analyzed"
}}
}}
}
4. Change the Enable Data Grid setting on the workspace details tab from No to Yes.
5. Change the Enable Data Grid setting for extracted text from No to Yes. On import, all data mappedto this field saves to Data Grid.
6. For information on setting up Data Grid for Audit, see Installing Data Grid on page 11.
Note: You can't migrate extracted text fields that already contain data from the SQL Server to DataGrid.
4.6 Configuring Shield authenticationShield allows you to easily protect your data from unintentional modification or unauthorized access whilesimplifying your architecture. Without Shield, anyone who knows the correct endpoint or URL can query,update, or delete all data in Data Grid. With default Shield installation, only Relativity can access Data Griddata, and all traffic between servers is encrypted. In addition, system admins can specify customauthentication realms so that targeted users can interact with Data Grid data outside of Relativity (viaplugins and endpoints).
When you install Elasticsearch 2.3.3, Shield is enabled by default; however, you still need to configureShield's authentication on every node.
The basic procedure for configuring Shield authentication is the following:
1. Install the authenticate Shield plugin on every node. Installing the Shield plugins on the next page.
2. Configure custom authentication. See Configuring custom authentication on the next page.
3. Install an X.509 certificate. See Installing an X.509 certificate on page 36.
4. Enable SSL in the node configuration. See Enabling SSL in the node configuration on page 38.
5. Restart Elasticsearch.

Relativity Data Grid Guide 33
Note: With Shield on by default, other plugins like Marvel or Head aren't operational until you configureKibana to use your other plugins. For information on configuring Kibana, see Configuring Kibana to workwith Shield.
4.6.1 Installing the Shield pluginsTo install the authenticate and Shield plugins, perform the following steps on every node:
1. Copy the authenticate and Shield plugins from the elasticsearch-main\plugins folder in the zip file tothe plugins folder.
2. Restart Elasticsearch.
Note: Relativity 9.3.389.9 includes a change to the Shield plugin. Data Grid no longer needs to sendcredentials back to Relativity for verification, which enhances security between Data Grid and Relativity.If you adopted Shield before Relativity 9.3.389.9, we recommend you update your elasticsearch.yml filewith the new Shield configuration on every node to get the benefits of this change to Data Gridauthentication.
4.6.2 Configuring custom authenticationWith Shield authentication, you can also specify custom authentication that allows targeted users tointeract with Data Grid data outside of Relativity. To specify custom authentication, you must first defineroles in the roles.yml file, located in <installDirectory>\plugins\shield\config\roles.yml, and assignusers to roles using your preferred authentication realm.
4.6.2.1 Defining rolesThe roles.yml file contains a default role called admin, which Relativity uses to access the data stored inRelativity. The admin role has complete system admin rights to all data stored in Data Grid.
Note: The node manages the roles.yml file locally; the cluster doesn't manage the yml file globally. Thismeans that with a typical multi-node cluster, you need to apply the exact same changes on each andevery node in the cluster. A safer approach would be to apply the change on one of the nodes and havethe roles.yml distributed/copied to all other nodes in the cluster (either manually or using a configurationmanagement system such as Puppet or Chef).
If you want to create a new role with a different permission set, you must configure the roles.yml file tospecify the unique role name(s) and the cluster and indices permissions associated with it. For example:
# All cluster rights# All operations on all indicesadmin:
cluster: allindices:
'*':privileges: all
# Monitoring cluster privileges# All operations on all indicespower_user:
cluster: monitorindices:

Relativity Data Grid Guide 34
'*':privileges: all
# Only read operations on indicesuser:
indices:'*':
privileges: read
# Only read operations on indices named events_*events_user:
indices:'events_*':
privileges: read
See the complete list of cluster and indices privileges here.
Once you create your roles, you can create users using any of the following authentication realms andassociate them to a role to determine the level of permissions they have to access data stored in DataGrid.
4.6.2.2 Native realmThe default Shield realm is the native realm. In the native realm, all user operations occur within theElasticsearch cluster. The native realm stores and distributes users with the Elasticsearch cluster. Usersauthenticate with a username and password.
To add or update a user to the native realm, submit a PUT or POST request to the /_shield/user/<username> endpoint. The username must be at least 1 character and no longer than 30characters. The first character must be a letter (a-z or A-Z) or an underscore (_). Subsequent characterscan be letters, underscores (_), digits (0-9), or any of the following symbols: @, -, . or $
POST /_shield/user/username{
"password" : "P@ssword1","roles" : [ "admin", "other_role1" ],"full_name" : "Jane Smith","email" : "[email protected]","metadata" : {
"intelligence" : 7}
}
Note the following considerations:
n password - the password for the user. Passwords must be at least 6 characters long.
n roles - determines the user's access privileges. You must assign at least one role to the user.
n full_name - (Optional) the user's full name.
n email - (Optional) - the user's email address.
n metadata - (Optional) arbitrary metadata you want to associate with the user.
4.6.2.3 Elastic Shield realmUsing the Elastic Shield realm allows you to add a user to your cluster and specify a password. This realmis not recommended because it potentially undermines Shield authentication.

Relativity Data Grid Guide 35
To configure the Elastic Shield realm:
1. Open the command prompt and navigate to elasticsearch/bin/shield.
2. Enter the following command to add a new user to your cluster and specify a password for that user:n esusers useradd <username> -p <secret>
3. Too add users to roles, enter the following command.n esusers roles <username> -a <comma-separated list of roles> -r <comma-separated list of
roles>
The -a option adds a comma-separated list of roles to a user. The -r option removes a comma-separated list of rules from a user.
4.6.2.4 LDAP realmTo integrate with LDAP you must configure an LDAP realm and assign LDAP groups to Shield roles in therole mapping file.
To configure the LDAP realm with User search, add the following settings to the elasticsearch.yml file in atext editor:
shield.authc.realms:ldap1:
type: ldaporder: 1url: "LDAP://Test-DC01.testing.corp:389"bind_dn: "CN=Administrator,CN=Users,DC=testing,DC=corp"bind_password: P@ssw0rd@1user_search:
base_dn: "DC=testing,DC=corp"attribute: sAMAccountName
group_search:base_dn: "DC=testing,DC=corp"Settings with User template
To configure the LDAP realm with User templates, add the following settings to the elasticsearch.yml file ina text editor:
ldap2:type: ldaporder: 2url: "LDAP://Test-DC01.testing.corp:389"user_dn_templates:- "cn={0},OU=Testing - Users,DC=testing,DC=corp"group_search:
base_dn: "DC=testing,DC=corp"
To assign LDAP groups to Shield roles, add the following settings for your user to the role_mapping.ymlfile in a text editor:
admin:- "OU=Testing - Admins,DC=testing,DC=corp"- "OU=Testing - Users,DC=testing,DC=corp"- "CN=Jane Smith,OU=Testing - Users,DC=testing,DC=corp"

Relativity Data Grid Guide 36
4.6.2.5 Active Directory (AD) realmTo configure the Active Directory realm, add the following settings to the elasticsearch.yml file in a texteditor:
active_directory:type: active_directoryorder: 2domain_name: testing.corpurl: ldap://testing.corp:636user_dn_templates:
- "CN=Administrator,OU=Testing - Users,DC=testing,DC=corp"group_search:
base_dn: "DC=testing,DC=corp"
4.6.3 Installing an X.509 certificateInstalling an X.509 certificate consists of the following tasks:
1. Create a keystore and generate a node certificate.
2. Create a certificate signing request (CSR).
3. Send the certificate to your certificate authority (CA) for signing OR set up your certificate authorityto sign the certificate.
4. Add the signed certificate to the node's keystore.
4.6.4 Create a keystore and generate a keypair1. Create a keystore and import your certificate authority's (CA) certificate or a trusted certificate using
Java Keytool. This process configures the node to trust certificates signed by the CA. For example,the following command creates a keystore for node01 and imports the CA certificate cacert.pem.Local self-signed certificates are not recommended. The keytool can be found in the following:
cd \Program Files\Java\jdk1.8.*\bin keytool -importcert -keystore node01.jks -file cacert.pem -alias my_ca
The Java keystore file (.jks) securely stores certificates for the node. The CA cert must be a PEMencoded certificate. If you need to convert your certificate to PEM file, you can use a tool such asOpenSSL to convert a certificate.
When you create a keystore, you are prompted to set a password. This password protects theintegrity of the keystore. You need to provide it whenever you interact with the keystore.
Note: When the CA certificate expires, you must update the node’s keystore with the new CAcertificate.
You can also store the CA certificate in a separate truststore. For more information, see Configuringa truststore.
2. Generate a private key and certificate for the node with Java Keytool. For example, the followingcommand creates a key and certificate for node01:

Relativity Data Grid Guide 37
keytool -genkey -alias node01 -keystore node01.jks -keyalg RSA -keysize 2048 -validity 712 -extsan=dns:node01.example.com,ip:192.168.1.1
This command creates an RSA private key with a key size of 2048 bits and a public certificate that isvalid for 712 days. The key and certificate are stored in the node01.jks keystore.
The san value specifies all alternative names for the node. The generated certificate is valid for theDNS names and IP addresses specified as alternative names. You can specify multiple DNS or IPaddress entries as a comma-separated list.
When you run keytool -genkey, Keytool prompts you for the information needed to populate thenode’s distinguished name that’s stored the certificate. Use a trusted domain wildcard certificatethat can be trusted among many nodes. For example:
What is your first and last name?[Unknown]: *.domain.corp
What is the name of your organizational unit?[Unknown]: test
What is the name of your organization?[Unknown]: RelativityWhat is the name of your City or Locality?[Unknown]: Chicago
What is the name of your State or Province?[Unknown]: Illinois
What is the two-letter country code for this unit?[Unknown]: US
Is CN=*.domani.corp, OU=test, O=Relativity, L=Chicago, ST=Illinois, C=US correct?[no]: yes
Enter key password for <node01>(RETURN if same as keystore password):
4.6.5 Create a certificate signing request (CSR)A node’s certificate needs to be signed by a trusted CA for the certificate to be trusted. To get a certificatesigned, you need to create a certificate signing request (CSR) and send it to your CA.
To create a CSRwith Java Keytool, use the keytool t-certreq command. You specify the same alias,keystore, key algorithm, and DNS names and IP addresses that you used when you created the nodecertificate. Specify where you want to store the CSRwith the -file option.
keytool -certreq -alias node01 -keystore node01.jks -file node01.csr -keyalg rsa -extsan=dns:*domain.corp,ip:192.168.1.1
4.6.6 Send the certificate to your certificate authority (CA) for signingTo get a signed certificate, send the generated CSR file to your CA. The CAwill sign it and send you thesigned version of the certificate.

Relativity Data Grid Guide 38
4.6.7 Install the signed certificateTo install the signed certificate, use keytool -importcert to add it to the node’s keystore. You specify thesame alias and keystore that you used when you created the node certificate.
cd CONFIG_DIR/shield keytool -importcert -keystore node01.jks -file node01-signed.crt -alias node01
4.7 Enabling SSL in the node configurationOnce you've added the signed certificate to the node’s keystore, you need to modify the nodeconfiguration to enable SSL then restart Elasticsearch.
To enable SSL, make the following changes in elasticsearch.yml:
1. Specify the location of the node’s keystore and the password(s) needed to access the node’s cer-tificate. For example:
shield.ssl.keystore.path: /home/es/config/shield/node01.jksshield.ssl.keystore.password: myPassshield.ssl.hostname_verification: false
The first line indicates the full path to the node keystore file. This must be a location within theElasticsearch configuration directory.
2. Enable SSL on the transport networking layer to ensure that communication between nodes isencrypted:
shield.transport.ssl: true
3. Enable SSL on the HTTP layer to ensure that communication between HTTP clients and the clusteris encrypted:
shield.http.ssl: true
4. Restart Elasticsearch so these configuration changes take effect.
5. Copy and install the SSL certificate to all agent and web servers.
4.8 Configuring Kibana to work with ShieldWhen you install or update to Relativity 9.7, Shield is enabled by default. With Shield on by default, otherplugins like Marvel or Head are not supported. In order to use your other plugins, you need to provide theKibana server with credentials so it can access the .kibana index and monitor the cluster.
To configure credentials for the Kibana server:
1. Assign the kibana4_server role to a user in Shield. For more information, see Configuring a Rolefor the Kibana 4 Server in the Shield documentation.
2. Set the kibana_elasticsearch_username and kibana_elasticsearch_password properties inkibana.yml to specify the credentials of the user you assigned to the kibana4_server role:

Relativity Data Grid Guide 39
kibana_elasticsearch_username: kibana4-userkibana_elasticsearch_password: kibana4-password
3. Update the following setting in kibana.yml to false:
elasticsearch.ssl.verify: false
Kibana 4 users also need access to the .kibana index so they can save and load searches, visualizations,and dashboards. For more information, see Configuring Roles for Kibana 4 Users in the Shielddocumentation.

Relativity Data Grid Guide 40
5 Monitoring ElasticsearchThere are several tools external to Relativity that you can use to monitor and manage a Data Grid cluster.This page lists several of the most useful tools available with brief overviews of their functionality,installation instructions, and links to further documentation.
5.1 HeadHead shows the overall health of the cluster, which nodes are connected, and the health of the indices.Using head, perform queries from the head console that retrieve JSON results. The head plugin is easilyaccessible and doesn't require extensive set up.
Head uses three color-coded statuses to report on shard allocation:
n green - all shards are allocated.
n yellow - the primary shards are allocated, but replicas are not.
n red - the primary shard isn't allocated in the cluster.
A red status indicates that the specific primary shard is not allocated in the cluster, yellow means that theprimary shard is allocated but replicas are not, and green means that all shards are allocated. The indexlevel status is controlled by the worst shard status. The cluster status is controlled by the worst indexstatus, so what this means is that if a shard or index is red, the cluster will be red and so on. Grey meansthat the cluster is not connected.
5.2 MarvelAll customers of Relativity that implement Data Grid may receive Marvel licenses. Marvel allows you toview your cluster status in a simple, single pane overview; investigate highly detailed system metricsincluding Apache Lucene; visualize cluster events and metrics together to analyze how changes affectperformance; and access the REST API.

Relativity Data Grid Guide 41
Note: You must install Marvel on each node in the cluster in order for it to properly work. Marvel'sdefault settings are configured to store data in the same cluster that it monitors. If you use Marvel tomonitor a production cluster, you must send the data to a secondary monitoring cluster. See this site formore information on setting up a secondary monitoring cluster.
The Marvel plugin provides the following features:
n Clusters - The clusters page shows you the clusters you're monitoring and allows you to selectthem.
n Overview dashboard - The overview dashboard displays a quick look at your cluster performance.The four counters are an aggregate of the entire cluster. If there are any performance issues, invest-igate the individual components of the cluster.
n Nodes - The nodes section lists all of the nodes that are in the cluster that are being monitored, aswell as information on CPU usage, memory usage, disk free space, and the shard they contain.From the nodes section, you can select individual nodes for more detailed information about howthose nodes are using the compute allocated to them as well as all indices and shards on the node.
n Indices - Indices show the same counters as the overview dashboard, but allow you to get moreinformation on individual indices. Some indices on your cluster will be larger than others and requiremore monitoring. The indices page shows the size of indices from a data and document count per-spective and the index and search rate for each individual index. From here, you can select indi-vidual indices to see the state of different shards (primary, replica, relocating, initializing andunassigned) and additional information which can be used to monitor performance.
Use the following steps to install Marvel and Sense on the monitoring cluster.
1. Open the command prompt and navigate to the kibana/bin folder.
2. Enter the following command to install Marvel:
kibana plugin --install elasticsearch/marvel/2.1.2

Relativity Data Grid Guide 42
Note: Marvel versions must match the Data Grid version.
3. Enter the following command to install Sense:
kibana plugin --install elastic/sense
4. Open http://<<machine-name>>:5601/ to view Kibana.
5.2.0.1 Performing offline installations of MarvelUse the following steps to download and install Marvel on a machine that doesn't have access to theinternet.
1. Download the installer from this URL on a machine that has internet:
http://download.elasticsearch.org/elasticsearch/marvel/marvel-latest.zip
2. Save the zip file on the C: drive of your cluster node.
3. Open a command prompt and execute the following command:
C:\RelativityDataGrid\elasticsearch-main>bin\plugin -i marvel -u file:///C:/marvel-latest.zip
See this site for more information on using the Marvel plugin.
5.3 CuratorThe Curator Python API allows you to manage indexes and snapshots with the following features:
n Iterative methods - allow you to retrieve data across the cluster within specified parameters.
n Non-iterative methods - allow you to retrieve data within a single index or snapshot.
n Helper methods - allow you to retrieve values required to complete iterative and non-iterative meth-ods.
You can install Curator on any machine that has access to the cluster. Use the following steps to installPython and Curator:
1. Download and install the latest version of Python from this site.
Note: Verify that the version of Python you choose to install includes pip.
2. Enter the following command in the Python command line interface (python.exe):
pip install elasticsearch-curator
5.3.1 Cluster metrics to monitorThere are certain metrics that you should always monitor such as availability and status, indexing rate,RAM usage, etc. Review the following sites for information on metrics to monitor:

Relativity Data Grid Guide 43
n See this site for an extensive list of critical metrics.
n See this site for an Elasticsearch guide on monitoring individual nodes.
5.3.2 Monitoring bulk rejectionsIt is important that you monitor bulk rejections. You can access information on bulk rejections throughSense.
Use the following query to access information on bulk rejections for the cluster:
GET /_cat/thread_pool?v&h=id,host,bulk.active,bulk.rejected,bulk.completedv?
If you see a message that reads "BULK THREAD POOL REJECTED", or if BULK THREAD POOL QUEUESIZE rises above your specified limit, increase the default of 50 to 300 or reduce the writes to Data Grid.
5.3.3 Monitoring backup and recover timesIt's important to monitor backup and recovery times to properly set RTO and RPO expectations.
Use the following queries to access information on backup and restore operations:
GET /_cat/snapshots/{snapshotname}?v
GET _cat/recovery?v
5.3.4 Additional cluster monitoring informationUse the following queries to access additional monitoring information form the cluster that may be usefulto your team:
#Cluster information
Get _cat/health?v
#Node information
GET _cat/nodes?v
GET _cat/nodes?v&h=host,name,node.role,version,build,jdk,uptime
GET _cat/nodes?v&h=name,disk.avail,heap.percent,ram.percent,file_desc.-percent,merges.total,segments.count,segments.memory
GET _cat/allocation?v
#Index information
Get _cat/indices?v
Get _cat/indices?v&h=index,tm

Relativity Data Grid Guide 44
Get _cat/count?v/{indexname}
#Shard information
Get _cat/shards?v
5.4 Querying with SenseThis page provides a list of the most commonly used queries.
This page contains the following sections:
n Creating and deleting indexes below
n Retrieving documents and cluster settings below
n Shutting down a cluster on page 46
n Backing up clusters on page 47
5.4.1 Creating and deleting indexesUse the following query to create an index:
POST /index_name
Use the following query to delete an index:
DELETE /index_name*
5.4.2 Retrieving documents and cluster settingsUse the following query to retrieve the settings and fields for document mapping:
GET /relativity_relativity_edds1019984_10/_mapping/document
Use the following query to retrieve the settings for the specified index:
GET /relativity_relativity_edds1019984_10/_settings
Use the following query to retrieve the total count of documents in the specified index:
GET /relativity_relativity_edds1019984_10/document/_count{
"query": {"match_all": {}
}}
Use the following query to retrieve the top five documents in the specified index:

Relativity Data Grid Guide 45
GET /relativity_relativity_edds1019984_10/document/_search?size=5{
"query": {"match_all": {}
}}
Use the following query to retrieve the documents containing a specified term:
POST /relativity_relativity_edds1019984_10/document/_search{
"query": {"query_string": {
"query": "happy","fields": [
"Fields.ExtractedText.Value"]
}}
}
Use the following queries to retrieve cluster health information:
GET cat/health?v
GET _cluster/settings
Use the following query to retrieve all nodes detected by the master node:
GET _cat/nodes?v
Use the following query to retrieve information on the allocation of shards:
GET _cat/allocation?v
Use the following queries to retrieve the state of all indexes in the cluster:
GET _cat/indices
GET _cat/indices?v
GET _cat/indices/logstash*
GET _cat/indices/index_name*
Use the following queries to retrieve all aliases:
GET _cat/aliases
GET _cat/aliases/relativity_integration_edds9999*
Use the following query to update an alias:

Relativity Data Grid Guide 46
POST /_aliases{
"actions" : [{ "add" : { "index" : "relativity_integration_f176bd64-7926-4d59-9838-a88f3dfe9ab7_edds9999_10",
"alias" : "relativity_integration_edds9999_10_read" } }]
}
Use the following queries to retrieve and read templates:
GET /_template/
GET /_template/kcuratemplate
GET /_template/audit
Use the following commands to perform maintenance tasks on the cluster:
POST _flush/sync?wait_if_ongoing=true
POST _refresh
POST /relativity_integration_484a7590-3d90-4215-b5ab-e29aa91b99b8_edds9999_10/_refresh
POST _optimize
5.4.3 Shutting down a clusterTo shut down a cluster, copy and paste the following template into the Sense plugin of Kibana and followthe instructions:
##################################
# Reboot procedure for data nodes
##################################
# Step 1# Disable or delete all Audit Migration agents.
# Step 2# Check the cluster health.
GET _cluster/health
# Note the cluster health should be green for "status".# Take note of the number of Data Nodes in "number_of_data_nodes".
# Step 3# Perform a flush synced
POST _flush/synced# Ensure there are no failed shards for the sync operation

Relativity Data Grid Guide 47
# Step 4# Turn off shard allocation
PUT _cluster/settings{"persistent": {"cluster.routing.allocation.enable": "none"}}
# Step 5# Perform maintenance on the node, for example Windows updates, and restart.
# Step 6# Check the cluster health and wait for the "number_of_data_nodes" to be the same as step 2. You may needto run the command multiple times as the node comes online.
GET _cluster/health# Note: After the data node comes online, the cluster will remain in "status" yellow
# Step 7# Turn shard allocation back on.
PUT _cluster/settings{"persistent": {"cluster.routing.allocation.enable": "all"}}
# Step 8# Check the cluster health and esure it is green.
GET _cluster/health# Note you may need to run the command multiple times until the "active_shards_percent_as_number" is 100
# Step 9# Repeat these steps for the remaining nodes that need maintenance.
##################################
# Additional notes
# Single node clusters do not need to go through these steps. They can be rebooted once the migrationagents are turned off.
# Clusters with single master nodes will go down completely when the master node is rebooted. When asingle master node is used, make sure migration agents are turned off and reboot the master node.
# For clusters with multiple masters: Reboot each master in turn and allow them to come back up beforerebooting the next master. This can be done with migration agents active.
# Client nodes can be rebooted without the above steps as long as migration is not active.
5.4.4 Backing up clustersUse the following commands for backup and restore operations:
Use the following command to get all backup repositories:

Relativity Data Grid Guide 48
GET /_snapshot/_all
Use the following command to create a backup repository:
PUT /_snapshot/my_backup{
"type": "fs","settings": {
"location": "/shares/backups/my_backup","compress": true
}}
Use the following command to create a backup:
PUT /_snapshot/my_backup/snapshot_1{
"indices": "relativity_test_loadfile,trial_loadfile","ignore_unavailable": "true","include_global_state": false
}
Use the following command to check running status of a snapshot:
GET /_snapshot/_status
Use the following command to check the status of a specific snapshot even if not running:
GET /_snapshot/my_backup/snapshot_1/_status
Use the following command to restore a backup:
POST /_snapshot/my_backup/snapshot_1/_restore{
"indices": "relativity_test_loadfile,trial_loadfile","ignore_unavailable": "true","include_global_state": false,"rename_pattern": "relativity_test_(.+)","rename_replacement": "restored_$1"
}

Relativity Data Grid Guide 49
6 Backing up Relativity Data GridData Grid now stores text data in your file share. There is no longer automatic redundant storage ofdocument text. Because Data Grid text data is now stored in your file share, you may need to adjust yourfile system data backup frequency to meet the requirements of your Service Level Agreements (SLAs)and disaster recovery plans.
6.1 Backing up ElasticsearchClick to expand instructions for backing up Elasticsearch.We recommend you routinely back up your data. Elasticsearch replicas provide high availability during runtime, allowing toleration of sporadic node loss without interruption of service, but replicas don't provideprotection against catastrophic failures. Create a complete backup of the entire cluster to protect yourdata if something goes wrong.
You can use the snapshot API to create a backup of the cluster. The snapshot API saves the current stateof all data in your cluster to a shared repository. The first snapshot you create is a complete copy of alldata on the cluster. Each subsequent snapshot compares the current state of the data in the cluster to thedata stored in the repository and only modifies the differences between the two. The snapshot APIincrementally edits the repository each time you create a new snapshot, so subsequent backups aresignificantly faster since they require less data transmission. This page explains all steps necessary toback up and restore Elasticsearch.
Note: Data Grid supports Windows servers only.
6.2 Creating a repositoryBefore implementing this backup method, you must create a repository that can store snapshots. You canuse any of the following four repository types:
n Shared file system, such as a NAS
n Amazon S3
n Hadoop Distributed File System (HDFS)
n Azure Cloud
Use the following steps to create and share a folder:
1. Create a folder named ElasticBackup to store snapshots. (//COMPUTER_NAME.busi-ness.corp/ElasticBackup).
2. Right-click on the folder, and then click Properties.
3. Select the Sharing tab, and then click Share.

Relativity Data Grid Guide 50
4. Enter the user that runs the Elasticsearch Windows service (domain\account), and then clickAdd.
5. Select the user on the share list and set the Permission Level to Co-owner.
6. Click Share.
7. When the share completes, clickDone.
8. On the Document Properties dialog, select the Security tab.
9. Verify that the user that runs the Elasticsearch Windows service has Full Control security per-missions to the folder.
Use the following steps to link Elasticsearch to the repository folder:
1. LaunchMarvel from within a browser to connect to one of the nodes in your cluster.
2. Launch Sense from the Dashboards drop-down near the top right.
3. Edit the location value and run the following to set up a shared file system repository:
PUT /_snapshot/my_backup{
"type": "fs",

Relativity Data Grid Guide 51
"settings": {"location": "//COMPUTER_NAME.business.corp/Shared/ElasticBackup","compress": true
}}
4. Verify your snapshot settings exist by performing the following call:
GET /_snapshot/
6.3 Creating snapshotsThere are two ways to create snapshots:
n Creating snapshots manually from within Sense below
n Scheduling a Windows task using Curator on the next page
6.3.1 Creating snapshots manually from within SenseRun the following to back up all open indexes into a snapshot named "snapshot_1".
PUT /_snapshot/ElasticBackup/snapshot_1
Note: Increment the name of the snapshot for best results (e.g., snapshot_1, snapshot_2, snapshot_3,etc.). All alphabetical characters in the snapshot name must be lowercase.
Verify that this process created a backup by navigating to the following location:
//COMPUTER_NAME.business.corp/Shared/ElasticBackup
Your backup should look similar to the following image:

Relativity Data Grid Guide 52
For more information on snapshot commands, including the ability to snapshot specific indexes, see theBacking up your cluster article on the Elasticsearch website for your version of Elasticsearch.
6.3.2 Scheduling a Windows task using CuratorThe best way to schedule automatic backups of your data is to use Curator, which you can combine withscheduled tasks to automatically invoke the desired behavior.
The Curator Python API can be used to manage indexes and snapshots with the following features:

Relativity Data Grid Guide 53
n Iterative methods - allow you to retrieve data across the cluster within specified parameters.
n Non-iterative methods - allow you to retrieve data within a single index or snapshot.
n Helper methods - allow you to retrieve values required to complete iterative and non-iterative meth-ods.
For more information on Curator and snapshot capabilities, please see the following website:
6.3.2.1 Installing Curator 4Before setting up Curator, you must complete the following:
1. Download and run the Curator installer from Elastic.
2. Download and install the Microsoft C++ redistributable.
6.3.2.2 Running CuratorOnce you install Curator, you can use it to run “actions” which are created in the action.yml file. Use thefollowing command to run an operation in the action.yml file:
Note: This command runs a dry-run where Curator simulates the action(s) in the file without makingany changes. To actually run the operation, remove the --dry-run flag.
curator [--config CONFIG.YML] [--dry-run] ACTION_FILE.YML
This command references both a configuration and action file. You can run PowerShell scripts toautomatically create the files needed to run Curator. For more information, see Running Curator fromPowerShell below. If you want to manually set up Curator, see Running Curator manually on page 63.
Running Curator from PowerShellThe following PowerShell scripts automatically create the PS1 and YML files needed to run Curator. It alsosets up three Windows tasks: backup, backup cleanup, and Marvel cleanup.
Click to expand the Curator setup without SSLRun the following in Powershell:
<##>Param($probHostName = "masternodename",$marvelHostName = "marvelnodename",$repositoryName = "datagridbackup",[string]$esUsername = "esadmin",[string]$esPassword = "esadmin",[string]$marvelUsername = "marvel",[string]$marvelPassword = "marvel",$curatorMsiPath = "C:\Curator\elasticsearch-curator-4.2.6-win32.msi",$curatorPath = "C:\Curator",$useSSL = "False")
$httpAuth = [system.Text.Encoding]::ASCII$httpAuth = "$esUsername`:$esPassword"$httpAuthMarvel = [system.Text.Encoding]::ASCII$httpAuthMarvel = "$marvelUsername`:$marvelPassword"$powerShellPath = (Resolve-Path /Windows/System32/WindowsPowerShell/v1.0/).Path

Relativity Data Grid Guide 54
function IsCuratorInstalled {$isInstalled = ((Get-ChildItem "HKLM:\Software\Microsoft\Windows\CurrentVersion\Uninstall") | Where-
Object { $_.GetValue( "DisplayName" ) -eq "elasticsearch-curator" } )
If (!$isInstalled) {Try{
Write-Host "Installing Curator 4.2.6" -ForegroundColor GreenStart-Process msiexec.exe -Wait -ArgumentList "/I $curatorMsiPath /quiet" -ErrorAction StopWrite-Host "Installation Complete."
}Catch{$ErrorMessage = $_.Exception.Message; Break
}}else{Write-Host "Curator is already installed." -ForegroundColor Green}
}IsCuratorInstalled
function MakeFiles{function MakeProdConfigYML{$prodConfigYml = @"---# Remember, leave a key empty if there is no value. None will be a string,# not a Python "NoneType"client:
hosts:- $probHostNameport: 9200url_prefix:use_ssl: $useSSLcertificate:client_cert:client_key:ssl_no_validate: Truehttp_auth: $httpAuthtimeout: 30master_only: False
logging:loglevel: INFOlogfile:logformat: defaultblacklist: ['elasticsearch', 'urllib3']
"@
$prodConfigYml | Out-File .\prodConfig.yml -Encoding ascii}MakeProdConfigYML
function MakeBackupActionYML{$prodBackupYml = @"# Remember, leave a key empty if there is no value. None will be a string,# not a Python "NoneType"## Also remember that all examples have 'disable_action' set to True. If you# want to use this action as a template, be sure to set this to False after

Relativity Data Grid Guide 55
# copying it.# Leaving name blank will result in the default 'curator-%Y%m%d%H%M%S'actions:
1:action: snapshotdescription: "Created snapshots for all indexes."options:
repository: $repositoryNamename:ignore_unavailable: Falseinclude_global_state: Truepartial: Falsewait_for_completion: Trueskip_repo_fs_check: Falsetimeout_override:continue_if_exception: Falsedisable_action: False
filters:- filtertype: none
"@
$prodBackupYml | Out-File .\prodBackup.yml -Encoding ascii}MakeBackupActionYML
function MakeCleanUpActionYML{$prodCleanUpYml = @"# Remember, leave a key empty if there is no value. None will be a string,# not a Python "NoneType"## Also remember that all examples have 'disable_action' set to True. If you# want to use this action as a template, be sure to set this to False after# copying it.# Leaving name blank will result in the default 'curator-%Y%m%d%H%M%S'actions:
1:action: delete_snapshotsdescription: "Deletes snapshots older than 14 days."options:
repository: $repositoryNameretry_interval:retry_count:timeout_override:continue_if_exception: Falsedisable_action: False
filters:- filtertype: pattern
kind: prefixvalue: curator-exclude:
- filtertype: agesource: creation_datedirection: olderunit: daysunit_count: 14exclude:
"@
$prodCleanUpYml | Out-File .\prodCleanUp.yml -Encoding ascii

Relativity Data Grid Guide 56
}MakeCleanUpActionYML
function MakeMarvelConfigYML{$marvelConfigYml = @"---# Remember, leave a key empty if there is no value. None will be a string,# not a Python "NoneType"client:
hosts:- $marvelHostNameport: 9200url_prefix:use_ssl: Falsecertificate:client_cert:client_key:ssl_no_validate: Falsehttp_auth: $httpAuthMarveltimeout: 30master_only: False
logging:loglevel: INFOlogfile:logformat: defaultblacklist: ['elasticsearch', 'urllib3']
"@
$marvelConfigYml | Out-File .\marvelConfig.yml -Encoding ascii}MakeMarvelConfigYML
function MakeMarvelCleanUpYML{$marvelCleanUpYml = @"# Remember, leave a key empty if there is no value. None will be a string,# not a Python "NoneType"## Also remember that all examples have 'disable_action' set to True. If you# want to use this action as a template, be sure to set this to False after# copying it.# Leaving name blank will result in the default 'curator-%Y%m%d%H%M%S'actions:
1:action: delete_indicesdescription: "Deletes old marvel indexes"options:
timeout_override:continue_if_exception: Falsedisable_action: False
filters:- filtertype: pattern
kind: regexvalue: .marvel-es-exclude:
- filtertype: agesource: creation_datedirection: older

Relativity Data Grid Guide 57
unit: daysunit_count: 30exclude:
"@
$marvelCleanUpYml | Out-File .\marvelCleanUp.yml -Encoding ascii}MakeMarvelCleanUpYML
function MakeBackupActions{$prodBackUp = @"cd\cd ".\Program Files\elasticsearch-curator".\curator --config $curatorPath\prodConfig.yml $curatorPath\prodBackUp.yml"@
$prodBackUp | Out-File .\prodBackup.ps1}MakeBackupActions
function MakeCleanUpActionProd{$prodCleanUpPs = @"cd\cd ".\Program Files\elasticsearch-curator".\curator --config $curatorPath\prodConfig.yml $curatorPath\prodCleanUp.yml"@
$prodCleanUpPs | Out-File .\prodCleanup.ps1}MakeCleanUpActionProd
function MakeCleanUpActionMarvel{$marvelCleanUp = @"cd\cd ".\Program Files\elasticsearch-curator".\curator --config $curatorPath\marvelConfig.yml $curatorPath\marvelCleanUp.yml"@
$marvelCleanUp | Out-File .\marvelCleanup.ps1}MakeCleanUpActionMarvel}MakeFiles
<#Make scheduled tasks.
#>
function MakeScheduledTaskDataGridBackup{$action = New-ScheduledTaskAction -Execute ("$powerShellPath" + "powershell.exe") -WorkingDirectory $cur-atorPath -Argument ".\prodBackUp.ps1"$trigger = New-JobTrigger -Once -At (Get-Date).date -RepeatIndefinitely -RepetitionInterval (New-TimeSpan-Hours 6)$settings = New-ScheduledTaskSettingsSet -AllowStartIfOnBatteries -DontStopIfGoingOnBatteries -WakeToRunRegister-ScheduledTask -Action $action -Trigger $trigger -RunLevel Highest -TaskName "Data Grid Backup" -Description "Scheduled snapshot of the Production Data Grid cluster." -Settings $settings

Relativity Data Grid Guide 58
}
MakeScheduledTaskDataGridBackup
function MakeScheduledTaskDataGridBackupCleanup{$action = New-ScheduledTaskAction -Execute ("$powerShellPath" + "powershell.exe") -WorkingDirectory $cur-atorPath -Argument ".\prodCleanUp.ps1"$trigger = New-JobTrigger -Once -At (Get-Date).date -RepeatIndefinitely -RepetitionInterval (New-TimeSpan-Hours 24)$settings = New-ScheduledTaskSettingsSet -AllowStartIfOnBatteries -DontStopIfGoingOnBatteries -WakeToRunRegister-ScheduledTask -Action $action -Trigger $trigger -RunLevel Highest -TaskName "Data Grid BackupCleanup" -Description "Scheduled clean up job for the Production Data Grid cluster."}
MakeScheduledTaskDataGridBackupCleanup
function MakeScheduledTaskMarvelCleanup{$action = New-ScheduledTaskAction -Execute ("$powerShellPath" + "powershell.exe") -WorkingDirectory $cur-atorPath -Argument ".\marvelCleanUp.ps1"$trigger = New-JobTrigger -Once -At (Get-Date).date -RepeatIndefinitely -RepetitionInterval (New-TimeSpan-Hours 24)$settings = New-ScheduledTaskSettingsSet -AllowStartIfOnBatteries -DontStopIfGoingOnBatteries -WakeToRunRegister-ScheduledTask -Action $action -Trigger $trigger -TaskName "Marvel CleanUp" -Description "Deletesindexes on the marvel cluster older than 30 days."}
MakeScheduledTaskMarvelCleanup
Click to expand the Curator setup with SSLRun the following in Powershell:
<##>Param($probHostName = "dg-ramp-01",$marvelHostName = "dg-ramp-agt",$repositoryName = "datagridbackup",[string]$esUsername = "esadmin",[string]$esPassword = "esadmin",[string]$marvelUsername = "marvel",[string]$marvelPassword = "marvel",$curatorMsiPath = "C:\Curator\elasticsearch-curator-4.2.6-win32.msi",$curatorPath = "C:\Curator",$useSSL = "True")
$httpAuth = [system.Text.Encoding]::ASCII$httpAuth = "$esUsername`:$esPassword"$httpAuthMarvel = [system.Text.Encoding]::ASCII$httpAuthMarvel = "$marvelUsername`:$marvelPassword"$powerShellPath = (Resolve-Path /Windows/System32/WindowsPowerShell/v1.0/).Path
function IsCuratorInstalled {$isInstalled = ((Get-ChildItem "HKLM:\Software\Microsoft\Windows\CurrentVersion\Uninstall") | Where-
Object { $_.GetValue( "DisplayName" ) -eq "elasticsearch-curator" } )
If (!$isInstalled) {Try{

Relativity Data Grid Guide 59
Write-Host "Installing Curator 4.2.6" -ForegroundColor GreenStart-Process msiexec.exe -Wait -ArgumentList "/I $curatorMsiPath /quiet" -ErrorAction StopWrite_host "Installation Complete."
}Catch{$ErrorMessage = $_.Exception.Message; Break
}}else{Write-Host "Curator is already installed." -ForegroundColor Green}
}IsCuratorInstalled
function MakeFiles{function MakeProdConfigYML{$prodConfigYml = @"---# Remember, leave a key empty if there is no value. None will be a string,# not a Python "NoneType"client:
hosts:- $probHostNameport: 9200url_prefix:use_ssl: $useSSLcertificate:client_cert:client_key:ssl_no_validate: Truehttp_auth: $httpAuthtimeout: 30master_only: False
logging:loglevel: INFOlogfile:logformat: defaultblacklist: ['elasticsearch', 'urllib3']
"@
$prodConfigYml | Out-File .\prodConfig.yml -Encoding ascii}MakeProdConfigYML
function MakeBackupActionYML{$prodBackupYml = @"# Remember, leave a key empty if there is no value. None will be a string,# not a Python "NoneType"## Also remember that all examples have 'disable_action' set to True. If you# want to use this action as a template, be sure to set this to False after# copying it.# Leaving name blank will result in the default 'curator-%Y%m%d%H%M%S'actions:
1:action: snapshotdescription: "Created snapshots for all indexes."options:

Relativity Data Grid Guide 60
repository: $repositoryNamename:ignore_unavailable: Falseinclude_global_state: Truepartial: Falsewait_for_completion: Trueskip_repo_fs_check: Falsetimeout_override:continue_if_exception: Falsedisable_action: False
filters:- filtertype: none
"@
$prodBackupYml | Out-File .\prodBackup.yml -Encoding ascii}MakeBackupActionYML
function MakeCleanUpActionYML{$prodCleanUpYml = @"# Remember, leave a key empty if there is no value. None will be a string,# not a Python "NoneType"## Also remember that all examples have 'disable_action' set to True. If you# want to use this action as a template, be sure to set this to False after# copying it.# Leaving name blank will result in the default 'curator-%Y%m%d%H%M%S'actions:
1:action: delete_snapshotsdescription: "Deletes snapshots older than 14 days."options:
repository: $repositoryNameretry_interval:retry_count:timeout_override:continue_if_exception: Falsedisable_action: False
filters:- filtertype: pattern
kind: prefixvalue: curator-exclude:
- filtertype: agesource: creation_datedirection: olderunit: daysunit_count: 14exclude:
"@
$prodCleanUpYml | Out-File .\prodCleanUp.yml -Encoding ascii}MakeCleanUpActionYML
function MakeMarvelConfigYML{$marvelConfigYml = @"---

Relativity Data Grid Guide 61
# Remember, leave a key empty if there is no value. None will be a string,# not a Python "NoneType"client:
hosts:- $marvelHostNameport: 9200url_prefix:use_ssl: Falsecertificate:client_cert:client_key:ssl_no_validate: Falsehttp_auth: $httpAuthMarveltimeout: 30master_only: False
logging:loglevel: INFOlogfile:logformat: defaultblacklist: ['elasticsearch', 'urllib3']
"@
$marvelConfigYml | Out-File .\marvelConfig.yml -Encoding ascii}MakeMarvelConfigYML
function MakeMarvelCleanUpYML{$marvelCleanUpYml = @"# Remember, leave a key empty if there is no value. None will be a string,# not a Python "NoneType"## Also remember that all examples have 'disable_action' set to True. If you# want to use this action as a template, be sure to set this to False after# copying it.# Leaving name blank will result in the default 'curator-%Y%m%d%H%M%S'actions:
1:action: delete_indicesdescription: "Deletes old marvel indexes"options:
timeout_override:continue_if_exception: Falsedisable_action: False
filters:- filtertype: pattern
kind: regexvalue: .marvel-es-exclude:
- filtertype: agesource: creation_datedirection: olderunit: daysunit_count: 30exclude:
"@
$marvelCleanUpYml | Out-File .\marvelCleanUp.yml -Encoding ascii}

Relativity Data Grid Guide 62
MakeMarvelCleanUpYML
function MakeBackupActions{$prodBackUp = @"cd\cd ".\Program Files\elasticsearch-curator".\curator --config $curatorPath\prodConfig.yml $curatorPath\prodBackUp.yml"@
$prodBackUp | Out-File .\prodBackup.ps1}MakeBackupActions
function MakeCleanUpActionProd{$prodCleanUpPs = @"cd\cd ".\Program Files\elasticsearch-curator".\curator --config $curatorPath\prodConfig.yml $curatorPath\prodCleanUp.yml"@
$prodCleanUpPs | Out-File .\prodCleanup.ps1}MakeCleanUpActionProd
function MakeCleanUpActionMarvel{$marvelCleanUp = @"cd\cd ".\Program Files\elasticsearch-curator".\curator --config $curatorPath\marvelConfig.yml $curatorPath\marvelCleanUp.yml"@
$marvelCleanUp | Out-File .\marvelCleanup.ps1}MakeCleanUpActionMarvel}MakeFiles
<#Make scheduled tasks.
#>
function MakeScheduledTaskDataGridBackup{$action = New-ScheduledTaskAction -Execute ("$powerShellPath" + "powershell.exe") -WorkingDirectory $cur-atorPath -Argument ".\prodBackUp.ps1"$trigger = New-JobTrigger -Once -At (Get-Date).date -RepeatIndefinitely -RepetitionInterval (New-TimeSpan-Hours 6)$settings = New-ScheduledTaskSettingsSet -AllowStartIfOnBatteries -DontStopIfGoingOnBatteries -WakeToRunRegister-ScheduledTask -Action $action -Trigger $trigger -RunLevel Highest -TaskName "Data Grid Backup" -Description "Scheduled snapshot of the Production Data Grid cluster." -Settings $settings}
MakeScheduledTaskDataGridBackup
function MakeScheduledTaskDataGridBackupCleanup{

Relativity Data Grid Guide 63
$action = New-ScheduledTaskAction -Execute ("$powerShellPath" + "powershell.exe") -WorkingDirectory $cur-atorPath -Argument ".\prodCleanUp.ps1"$trigger = New-JobTrigger -Once -At (Get-Date).date -RepeatIndefinitely -RepetitionInterval (New-TimeSpan-Hours 24)$settings = New-ScheduledTaskSettingsSet -AllowStartIfOnBatteries -DontStopIfGoingOnBatteries -WakeToRunRegister-ScheduledTask -Action $action -Trigger $trigger -RunLevel Highest -TaskName "Data Grid BackupCleanup" -Description "Scheduled clean up job for the Production Data Grid cluster."}
MakeScheduledTaskDataGridBackupCleanup
function MakeScheduledTaskMarvelCleanup{$action = New-ScheduledTaskAction -Execute ("$powerShellPath" + "powershell.exe") -WorkingDirectory $cur-atorPath -Argument ".\marvelCleanUp.ps1"$trigger = New-JobTrigger -Once -At (Get-Date).date -RepeatIndefinitely -RepetitionInterval (New-TimeSpan-Hours 24)$settings = New-ScheduledTaskSettingsSet -AllowStartIfOnBatteries -DontStopIfGoingOnBatteries -WakeToRunRegister-ScheduledTask -Action $action -Trigger $trigger -TaskName "Marvel CleanUp" -Description "Deletesindexes on the marvel cluster older than 30 days."}
MakeScheduledTaskMarvelCleanup
Running Curator manuallyThe following sections contain examples of the different action files you can create manually to run inCurator. You can save these YML files anywhere. Ensure you use a full path to the files when executingthe command.
Sample configuration fileClick to expand a sample config.yml file containing one master node.
---# Remember, leave a key empty if there is no value. None will be a string,# not a Python "NoneType"client:
hosts:- cs-mv1-agtfsport: 9200url_prefix:use_ssl: Falsecertificate:client_cert:client_key:ssl_no_validate: Falsehttp_auth:timeout: 30master_only: False
logging:loglevel: INFOlogfile:logformat: defaultblacklist: ['elasticsearch', 'urllib3']
Sample backup action fileClick to expand a sample action_file.yml file that runs a backup action.

Relativity Data Grid Guide 64
# Remember, leave a key empty if there is no value. None will be a string,# not a Python "NoneType"## Also remember that all examples have 'disable_action' set to True. If you# want to use this action as a template, be sure to set this to False after# copying it.# Leaving name blank will result in the default 'curator-%Y%m%d%H%M%S'actions:
1:action: snapshotdescription: "description"options:
repository: datagridbackupname:ignore_unavailable: Falseinclude_global_state: Truepartial: Falsewait_for_completion: Trueskip_repo_fs_check: Falsetimeout_override:continue_if_exception: Falsedisable_action: False
filters:- filtertype: none
Sample restore action fileClick to expand a sample action_file.yml file that runs a restore action.
# Remember, leave a key empty if there is no value. None will be a string,# not a Python "NoneType"## Also remember that all examples have 'disable_action' set to True. If you# want to use this action as a template, be sure to set this to False after# copying it.actions:
1:action: closedescription: "Close selected indices"options:
delete_aliases: Falsetimeout_override:continue_if_exception: Falsedisable_action: False
filters:- filtertype: none
2:action: restoredescription: "restore"options:
repository: datagridbackup# Leaving name blank will result in restoring the most recent snapshot by agename:# Leaving indices blank will result in restoring all indices in the snapshotindices:include_aliases: Falseignore_unavailable: Falseinclude_global_state: Truepartial: Falserename_pattern:

Relativity Data Grid Guide 65
rename_replacement:extra_settings:wait_for_completion: Trueskip_repo_fs_check: Falsetimeout_override:continue_if_exception: Falsedisable_action: False
filters:- filtertype: state
state: SUCCESSexclude: False
6.3.2.3 Backup script with email serviceYou can also use Curator to send an email if an action failed or succeeded.
The script in the example uses a global variable to run and will not work if credentials are needed and it isrun outside of the ISE, which contains that global variable. To create a global variable for your ISE session,run the following:
$global:cred = get-credential (Run this to create a global variable for your ISE session)
Click to expand a sample backup script with email service
Note: Ensure you use the format [email protected] or the email server will not recognize you.
cd "C:\Program Files\elasticsearch-curator"
.\curator.exe --config "C:\Users\csadmin\Desktop\Curator\Configuration.yml" "C:\User-s\csadmin\Desktop\Curator\Backup.yml" | Out-File C:\Logs.txt
$Job = (Get-Content C:\Logs.txt | Select-String "successfully completed")$complete = $Job.Contains("Job completed.")
$Job = (Get-Content C:\Logs.txt | Select-String "Snapshot FAILED")$failed = $Job.Contains("FAILED")
if($failed) {$body = "A Data Grid Backup Job has failed check the backup job or email sup-
[email protected] to create a ticket"Send-MailMessage -From "Jane Smith <[email protected]>"`
-To "Jane Smith <[email protected]>"`-Subject "A Data Grid backup job has failed."`-Body $body -BodyAsHTML -SmtpServer smtp.office365.com -credential $cred -UseSsl
-Port 587}
else { $body = "The Data Grid backup job has completed."
Send-MailMessage -From "Jane Smith <[email protected]>"`-To "Jane Smith <[email protected]>"`-Subject "A Data Grid backup job has is successful."`-Body $body -BodyAsHTML -SmtpServer smtp.office365.com -credential $cred -UseSsl
-Port 587}
Write-Output("Done")

Relativity Data Grid Guide 66
6.3.2.4 Setting the script as a scheduled taskUse the following steps to set the script as a scheduled task:
1. Click Start >Administrative Tools >Windows Task Scheduler on the system that runs sched-uled tasks.
2. In the Task Scheduler, clickCreate Task under Actions on the right.
3. Enter a name and description for the task. (Entering a description is optional.)
4. Navigate to theGeneral tab, and then select Security Options.
5. Specify the user account that runs scheduled tasks. The account can be the same one that runs theElasticsearch Windows service.
6. Edit the settings to run tasks regardless of whether or not the user is logged in.
7. Navigate to the Triggers tab, and then clickNew to add a new trigger for the scheduled task.
8. Verify that the Begin the Task field is set toOn a schedule, and then set the start date to your pre-ferred time.
9. Set the frequency to be every one hour if you're unsure what your recovery point objective goalsare.
Note: Relativity stores the last 90 days of audits for each workspace in SQL Server. Long textfields, like extracted text, are usually never edited post import.
10. Set the duration of the task to run indefinitely.

Relativity Data Grid Guide 67
11. ClickOK.
12. The following example has the task running every hour indefinitely:
13. Navigate to the Actions tab, and then clickNew.
14. Set the Action to Start a program.
15. In the Program/script field, enter "Powershell."
16. In the Add arguments (optional) field, enter the following value:
.\[Your PowerShell Script Name]
For example, if your PowerShell script is named "Migration1.ps1" then you would enter".\Migration1.ps1" as the value.
17. In the Start in (optional) field, add the location of the folder that contains your PowerShell script. Inthis example, the script directory is C:\Script.The location entered in the Start in box also stores the scheduled task run times, the job history forthe copies, and any additional logging that may occur.

Relativity Data Grid Guide 68
18. ClickOK after configuring your preferred settings.
19. Set any other preferred settings in the Conditions and Settings tabs. You can also set up an addi-tional action to email an system admin each time the script runs.
20. ClickOK.
When you complete these steps, the task runs according to your settings.
6.4 Restoring a snapshotThere are multiple methods for restoring snapshots. Restoring snapshots from the Elasticsearch headconsole is the recommended procedure, but you can also use cURL to restore snapshots. TheElasticsearch website's documentation relies heavily on cURL commands for snapshot restoration. Briefdescriptions of both methods are provided here.
6.4.1 Restoring snapshots from the Elasticsearch head consoleYou can restore a snapshot from the Elasticsearch head console. Use the following steps to restore asnapshot with this method:
1. Navigate to the Elasticsearch head console URL (http://localhost:9200/_plugin/head).
2. Expand theQuery tab.
3. Enter the following URL in the first field: http://localhost:9200/
4. Enter _search in the second field, and use the drop-down menu to selectGET.
5. Enter the following code to retrieve your snapshot:
{"type": "fs","settings": {
"location": "/mount/backups/my_backup","compress": true
}}
Note: You can restore a snapshot on a functioning cluster, but all indexes residing on the cluster mustbe closed. The restore only updates closed indexes and creates a new index for any index that doesn'talready exist on the cluster.
6.4.2 Restoring snapshots with cURLMost of the documentation on the Elasticsearch website relies on cURL commands to restore snapshots.You must install cURL for Windows in order to have access to cURL commands in a Windowsenvironment. You can download cURL for Windows .the following site:http://www.confusedbycode.com/curl/.

Relativity Data Grid Guide 69
Note: You can paste cURL commands into Marvel Sense (excluding the $ character), and Marvelautomatically converts the cURL command into JSON. The cURL command doesn't convert if typed inmanually, you must paste it from your clipboard.
Once you install cURL for Windows, you can restore the cluster state and all indexes in a snapshot with thefollowing cURL command:
$ curl -XPOST "localhost:9200/_snapshot/my_backup/snapshot_1/_restore"
Note: You can restore a snapshot on a functioning cluster, but all indexes residing on the cluster mustbe closed. The restore only updates closed indexes and creates a new index for any index that doesn'talready exist on the cluster.
For more information on creating or restoring snapshots of Elasticsearch, the following site:
http://www.elasticsearch.org/guide/en/elasticsearch/reference/current/modules-snapshots.html

Relativity Data Grid Guide 70
7 Upgrading Data GridThe Data Grid Core and Audit applications are updated automatically with Relativity. If you are upgradingto Relativity 9.7 and your environment uses Elasticsearch 2.3.3.58 or below to store audits, you mustupgrade to Elasticsearch 2.3.3.79 or above when upgrading to Relativity 9.7. Once you upgrade toElasticsearch 2.3.3.79, you're unable to use your Elasticsearch clusters with 2.1.2 or have a partiallyupgraded cluster.
n If you are upgrading to Relativity 9.7 from a version prior to Relativity 9.5.219.30, you must moveyour long text data out of Elasticsearch and import to SQL. After upgrade, reimport the data to DataGrid. Only then will you be able to access your long text in Data Grid. For more information contactRelativity Support.
7.1 Finding the Elasticsearch versionTo find the version of Elasticsearch installed, you must connect to your client node endpoint. The clientnode is a member of a Relativity Data Grid Elastic cluster. The client nodes stores no data itself; rather, itcommunications to and from Relativity agent and web servers and the Data Grid Elastic cluster.
The client node is the value in the AuditDataGridEndPoint and/or DataGridEndPoint instance setting.To connect to the client endpoint, enter the following URL into Chrome or Firefox, substituting the name ofyour client node. Internet Explorer won't properly display the page.
Note: You may be prompted for a username and password. If you are not sure of the username andpassword, see Resetting the Shield or Head password on page 77.
http://nameofclientnode:9200/
Once you connect to the endpoint, the following page appears which displays, among other things, yourElasticsearch version number.

Relativity Data Grid Guide 71
7.2 Upgrading from Elasticsearch 2.1.2 to 2.3.3.xIn order to upgrade Elasticsearch from 2.1.2 to 2.3.3.x, complete the following workflow:
Click to expand instructions for upgrading Elasticsearch.In order to upgrade Elasticsearch from 2.1.2 to 2.3.3.x, complete the following workflow:
n Prepare the environment for upgrade. For more information, see Preparing the environment forupgrade below.
n Run the upgrade script on data, master, and client nodes in that order. For more information, seeRunning the upgrade script on the next page.
n Verify your upgrade completed successfully. For more information, see Verifying the upgrade onthe next page.
If you want to manually upgrade Elasticsearch, see Running a manual upgrade on page 73.
7.3 Preparing the environment for upgradeBefore upgrading Elasticsearch, perform the following:
n Ensure that the Elasticsearch service is running under a user account that has access to SQLServer, and specifically has read, write, and bulk permissions for all workspace databases.
n Verify that no reads or writes to Elasticsearch occur during the upgrade process.
n Disable all Audit migration and deletion agents.
n Disable all Text migration and deletion agents.
n Verify that all imports or publishing from Processing have stopped.
n Save a backup of the current lib and bin folders from any node and the data folder from the masternode to mitigate the risk in possible restoration. Don’t save the backup files to the installer folder.
n If you are also upgrading Java versions, open the command prompt and run the following com-mand. This example assumes you are upgrading to Java 8 Update 45 (64-bit). Edit the version num-ber appropriately.
SETX /M KCURA_JAVA_HOME "C:\Program Files\java\jdk1.8.0_45"
n Disable shard allocation:o Run the following command in Sense to turn off re-balancing and set the cluster to persistent.
The persistent state ensures that re-balancing stays off when the cluster restarts.
PUT _cluster/settings{"persistent":{"cluster.routing.allocation.enable": "none"}}

Relativity Data Grid Guide 72
o Run the following command to perform a synced flush:
POST /_flush/synced
7.4 Running the upgrade script
Note: If you run the script on Powershell versions earlier than 5.1, the script displays an error duringback up but will continue with the upgrade.
Extract the contents of the upgrade package, and make sure the following files are in the folder:
n datagrid-2.3.3.58-install.zip
n elasticupgrade.ps1
n upgrade.psd1
You must run the upgrade script on each node. We recommend the following order when upgrading yournodes:
1. Data nodes
2. Master nodes
3. Client nodes
To upgrade a node, complete the following:
1. Open the upgrade.psd1 file in a text editor. Update the following configurations:n UpgradeFile - enter the file path to the upgrade package.
n CurrentPath - enter the current location of the installed Elasticsearch service.
n Url - enter the URL of the local machine's Elastic endpoint.
n UserName - (optional) enter the service user name that has access to SQL.
n Password - (optional) enter the password for the server user.
2. Run elasticupgrade.ps1.
7.5 Verifying the upgradeAfter you upgrade all of the nodes on your cluster, complete the following on the cluster to complete theupgrade:
1. Run the following command in Sense:
GET /_nodes/jvm?filter_path=**.jvm.gc_collectors
Ensure the result shows "ParNew", "ConcurrentMarkSweep".

Relativity Data Grid Guide 73
2. Enable shard allocation to rebalance the cluster:
PUT _cluster/settings{"persistent":{"cluster.routing.allocation.enable": "all"}}
You can monitor the indexes by running the following in Sense:
GET _cat/recovery?&v
3. Verify the cluster status by running the following command in Sense.
GET _cat/health
Once the cluster is GREEN, your node restart is complete.
If the cluster status remains RED for an extended period, run the following in Sense to identify whichindexes are RED:
GET _cat/recovery?&v
Note: If you are using Kibana, ensure your version of Kibana is compatible with your version ofElasticsearch.
Note: With Shield on by default, other plugins like Marvel or Head are not supported. In order to useyour other plugins, you need to provide the Kibana server with credentials so it can access the .kibanaindex and monitor the cluster. See the Relativity Data Grid guide for more information.
7.6 Running a manual upgradeClick to expand instructions on how to run a manual Elasticsearch upgradeIn order to upgrade Elasticsearch from 2.1.2 to 2.3.3.x, complete the following workflow:
n Prepare the environment for upgrade. For more information, see Preparing the environment forupgrade on page 71.
n Upgrade your data, master, and client nodes in that order. For more information, see Upgrading anode below.
n Verify your upgrade completed successfully. For more information, see Verifying the upgrade onpage 76.
7.6.1 Upgrading a nodePerform the following steps on each node in the cluster. We recommend the following order whenupgrading your nodes:
1. Data nodes
2. Master nodes
3. Client nodes

Relativity Data Grid Guide 74
To upgrade a node, complete the following:
1. Shut down the node.a. Open a Windows command prompt as an administrator, and then navigate to the bin dir-
ectory in the RelativityDataGrid folder.
c:\RelativityDataGrid\elasticsearch-main\bin
b. Stop the Elasticsearch service by running the following command:
.\kservice.bat stop
Note: If the service doesn't shut down after being stopped, end the process using ProcessExplorer.
2. Save your current Java settings.a. Run the following:
.\kservice.bat manager
b. On the Java tab, take note of the values for the following settings:n Initial memory pool
n Maximum memory pool
n Thread stack size

Relativity Data Grid Guide 75
3. Remove the service:
.\kservice.bat remove
4. Delete the old lib, bin, sqlauth,modules, and plugin folders from \Relativ-ityDataGrid\elasticsearch-main.
n Copy the lib, bin, sqlauth,modules, and plugin folders from the Elastic 2.3.3.x extractedzip file to \RelativityDataGrid\elasticsearch-main.
5. Configure the elasticsearch.yml file (\RelativityDataGrid\elasticsearch-main\-config\elasticsearch.yml) with the following:
a. Add .security to the action.auto_create_index values. This is required when Shield isenabled and auto create is set to false.
# This disables automatic index creationaction.auto_create_index: false,.security
b. Configure the Shield settings as follows:
Note: To disable Shield, remove the number sign (#) in front of shield.enabled:false.
#shield.enabled: falseshield.authc.realms:custom:type: kCuraBearerRealmorder: 0publicJWKsUrl:
https://<RELATIVITY_IDENTITY_SERVER>/Relativity/Identity/.well-known/jwksesusers1:type: esusersorder: 1
Note: The URL must point to the Relativity installation where Identity Server can be found.This should be the same URL used to log in to Relativity.
6. Install the service:
.\kservice.bat install
7. Verify the Java settings:
.\kservice.bat manager
a. On the Java tab, make sure the values for the following settings for each particular nodematch the settings you took note of above:
n Initial memory pool
n Maximum memory pool
n Thread stack size
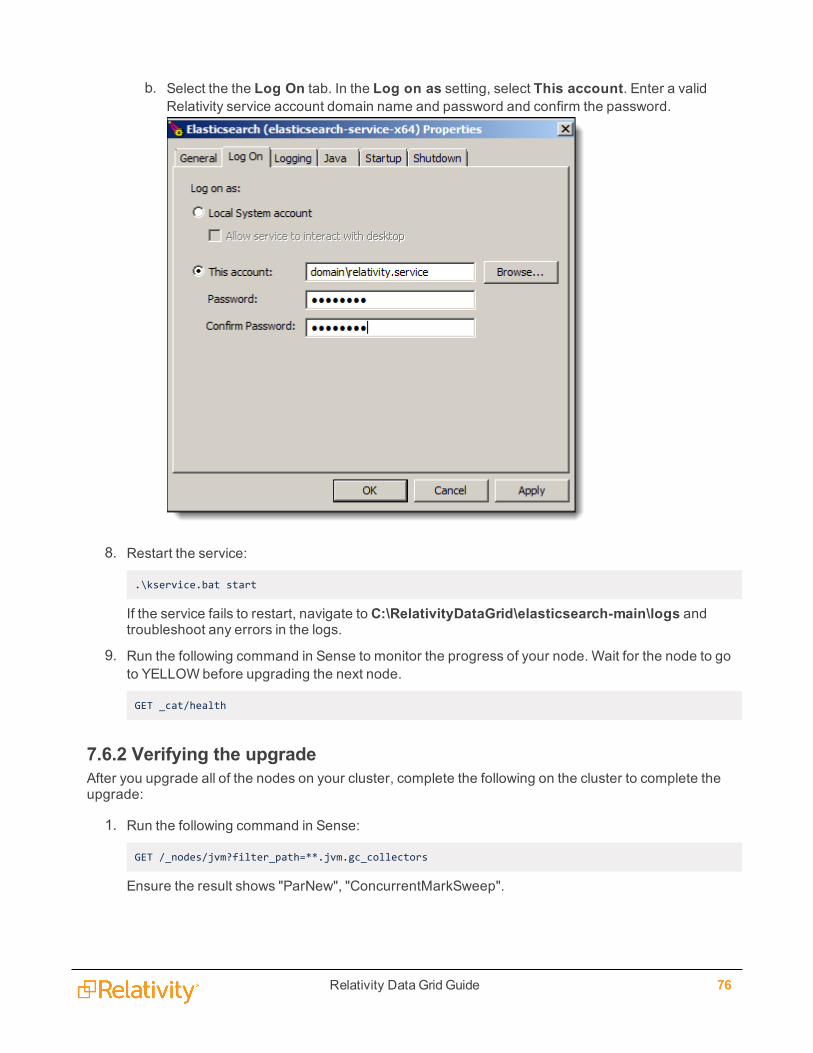
Relativity Data Grid Guide 76
b. Select the the Log On tab. In the Log on as setting, select This account. Enter a validRelativity service account domain name and password and confirm the password.
8. Restart the service:
.\kservice.bat start
If the service fails to restart, navigate to C:\RelativityDataGrid\elasticsearch-main\logs andtroubleshoot any errors in the logs.
9. Run the following command in Sense to monitor the progress of your node. Wait for the node to goto YELLOWbefore upgrading the next node.
GET _cat/health
7.6.2 Verifying the upgradeAfter you upgrade all of the nodes on your cluster, complete the following on the cluster to complete theupgrade:
1. Run the following command in Sense:
GET /_nodes/jvm?filter_path=**.jvm.gc_collectors
Ensure the result shows "ParNew", "ConcurrentMarkSweep".

Relativity Data Grid Guide 77
2. Enable shard allocation to rebalance the cluster:
PUT _cluster/settings{"persistent":{"cluster.routing.allocation.enable": "all"}}
You can monitor the indexes by running the following in Sense:
GET _cat/recovery?&v
3. Verify the cluster status by running the following command in Sense.
GET _cat/health
Once the cluster is GREEN, your node restart is complete.
If the cluster status remains RED for an extended period, run the following in Sense to identify whichindexes are RED:
GET _cat/recovery?&v
Note: If you are using Kibana, ensure your version of Kibana is compatible with your version ofElasticsearch.
Note: With Shield on by default, other plugins like Marvel or Head are not supported. In order to useyour other plugins, you need to provide the Kibana server with credentials so it can access the .kibanaindex and monitor the cluster. See the Relativity Data Grid guide for more information.
7.7 Resetting the Shield or Head passwordWhen navigating to Head or Sense on any node, you may be prompted for a username and password. Ifyou are unsure of the password, or if the password is not set, you can use the esusers tool in the shieldfolder. This tool can list users, change passwords, and create REST users on the node. The tool is node-specific, meaning you create a user and password only on that node.
1. Run PowerShell as an administrator, and then navigate to C:\RelativityDataGrid\elasticsearch-main\bin\shield.
2. Enter the following command to list the users on the node.
.\esusers list
3. If no user exists, create a user using the following command.
.\esusers passwd esadmin -p password123 -r admin
Note: This example creates a new user, esadmin, with the password password123 and the roleof admin. Substitute the user name and password for the user you want to create.

Relativity Data Grid Guide 78
4. To change the password on the node, use the following command:
.\esusers passwd esadmin -p newpasswordhere

Relativity Data Grid Guide 79
8 AuditAudit is an application that you can use to monitor and run reports on audited user activity. With Audit, youcan use pivots and visualizations to quickly identify audit activity in your Relativity instance.
Some of the benefits of using Audit include:
n Building multiple widgets and lists to create custom dashboards for reporting.
n Viewing audit records that occur at the instance level through the Relativity UI.
n Easily searching through millions of audits to identify actions ranging from reviewer codingdecisions to users logging in and out of Relativity for monitoring activity
n Quickly exporting audits to meet stakeholder requests for reporting on user activity in Relativity.
For information about common Audit workflows, see Recipes.
You must have Elasticsearch configured to use the Audit application. See Data Grid for more informationon setting up the preliminary requirements.
8.1 Supported functionalityThe following lists supported and unsupported Audit functionality as compared to the history tab.
Supported functionality Currently unsupported functionality
n Dashboards
n Group By/Pivot On functionality
n Item list
n Filtering
n Search conditions
n Views
n Widgets
n Reverting/mass revert document edits
n Error reporting
n Exporting
n Exporting data in lists
n Exporting dashboard widgets as image
n Custom scripts
8.2 Installing and configuring AuditIn order to use Audit, you must complete the following:
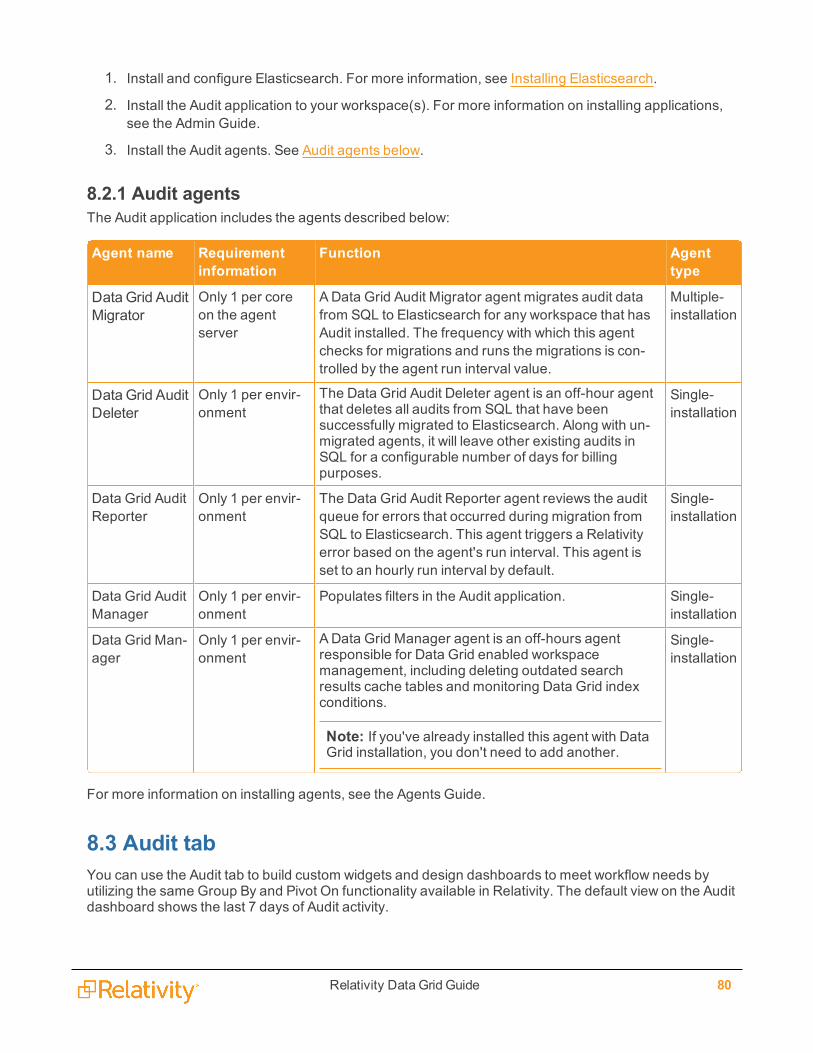
Relativity Data Grid Guide 80
1. Install and configure Elasticsearch. For more information, see Installing Elasticsearch.
2. Install the Audit application to your workspace(s). For more information on installing applications,see the Admin Guide.
3. Install the Audit agents. See Audit agents below.
8.2.1 Audit agentsThe Audit application includes the agents described below:
Agent name Requirementinformation
Function Agenttype
Data Grid AuditMigrator
Only 1 per coreon the agentserver
A Data Grid Audit Migrator agent migrates audit datafrom SQL to Elasticsearch for any workspace that hasAudit installed. The frequency with which this agentchecks for migrations and runs the migrations is con-trolled by the agent run interval value.
Multiple-installation
Data Grid AuditDeleter
Only 1 per envir-onment
The Data Grid Audit Deleter agent is an off-hour agentthat deletes all audits from SQL that have beensuccessfully migrated to Elasticsearch. Along with un-migrated agents, it will leave other existing audits inSQL for a configurable number of days for billingpurposes.
Single-installation
Data Grid AuditReporter
Only 1 per envir-onment
The Data Grid Audit Reporter agent reviews the auditqueue for errors that occurred during migration fromSQL to Elasticsearch. This agent triggers a Relativityerror based on the agent's run interval. This agent isset to an hourly run interval by default.
Single-installation
Data Grid AuditManager
Only 1 per envir-onment
Populates filters in the Audit application. Single-installation
Data Grid Man-ager
Only 1 per envir-onment
A Data Grid Manager agent is an off-hours agentresponsible for Data Grid enabled workspacemanagement, including deleting outdated searchresults cache tables and monitoring Data Grid indexconditions.
Note: If you've already installed this agent with DataGrid installation, you don't need to add another.
Single-installation
For more information on installing agents, see the Agents Guide.
8.3 Audit tabYou can use the Audit tab to build custom widgets and design dashboards to meet workflow needs byutilizing the same Group By and Pivot On functionality available in Relativity. The default view on the Auditdashboard shows the last 7 days of Audit activity.

Relativity Data Grid Guide 81
Note: You can't add the Security, Edit, Name, System Last Modified On, System Last Modified By,System Created By, or System Created On fields to an Audit list view.
The following functionality is also available:
n Searching on Field, Old Value, and New Value columns in list view.
n Creating and customizing views on the Audit tab.
n Applying filters and conditions to sort through audit records.
n Exporting audit data from list views and widgets.
8.3.1 Searching on the Details column
To display the query text of an audit record, click in the Details column for that record. You can togglebetween a table view and JSON view of audit details.

Relativity Data Grid Guide 82

Relativity Data Grid Guide 83
8.3.2 Exporting workspace auditsYou can export audit data from list views and widgets. The export respects the data made on the filters inthe list view, and the results are filterable.
Note: When you export audit data, the Field, Old Value, and New Value are not included in the output.
To export audit data, complete the following:

Relativity Data Grid Guide 84
1. From the mass operations bar, click Export.
2. Select the format you want to export your audits in (either .csv or .xlsx).
3. ClickRun.
Note: Exporting audits is not available at the instance level.
8.4 Instance auditsThe Audit tab is available at the instance level upon upgrade. You must have Elasticsearch installed andconfigured to use the Audit tab. If you don't have Elasticsearch installed, you can hide this tab.
Note: You must be a system admin to view audits at the instance level.
The Admin tab functions the same at the instance level. You can build custom widgets and designdashboards by utilizing the same Group By and Pivot On functionality available in workspace audits.However, exporting audits is not available. For a list of admin-level audited actions, see Audited actions.

Relativity Data Grid Guide 85
8.4.1 Filtering on multi-workspace auditsSystem admins can view workspace audits at the instance level.
You can filter on theWorkspace Name column to view audits for specific workspaces. By default, theAudit application displays audit information for the first 10 workspaces, sorted by Artifact ID. You canconfigure this number using the MaxAggregatedWorkspaces instance setting.

Relativity Data Grid Guide 86
8.5 Reverting audited actionsSystem admins can revert a coding decision made by a user on a document from the Audit list. Revertingthe coding decision will edit the choice back to the previous selection.
You can only mass revert the Document Update, Mass Update, or Propagate action. You can only massrevert on the following field types:
n Currency
n Date
n Decimal
n Fixed length
n Single choice
n Single object
n User
n Whole number
n Yes/No
To revert a coding decision:

Relativity Data Grid Guide 87
1. (optional) Filter on the Action column for Update.
2. Click the Revert button next to a coding decision. Amodal appears asking if you're sure you want torevert the audit.
3. ClickRevert again.
After you revert the audit, a new audit record is created for the revert you made.
8.5.1 Mass revertingSystem admins can also mass revert audits. Mass reverting is only available at the workspace level.
You can only mass revert the Document Update, Mass Update, or Propagate action, and it only applies tothe latest action on the Document object. You can only mass revert on the following field types:
n Currency
n Decimal
n Single choice
n Single object
n Whole number
To mass revert:
1. From the mass operations bar, select Revert in the drop-down menu.
Note: By default, the maximum number of audits that can be present on the item list view torunthe mas revert operation is 5000. You can configure this number using the RevertMaxAuditCountinstance setting.

Relativity Data Grid Guide 88
2. Audit scans the list of audits to determine howmany are revertible. Once it finishes, clickRun.
3. ClickClose to close the pop-up window.
As when you revert a single audit, a new audit record is created for each reverted audit.
8.6 Audit Migration Reports tabThe Audit Migration Reports tab provides you with the option of generating a migration error and migrationstatus report for you to monitor the status of audit data as you migrate it into Elasticsearch. You also havethe option of running a migration error retry script.
8.6.1 Migration Error ReportThe Migration Error Report generates a report that provides information on all errors that have occurredwhile migrating audit data into Elasticsearch, including batch and document errors.
Note: You can also run this script on all environments in your workspace from the Relativity ScriptLibrary tab. Click the user drop-down menu in the upper-right corner of Relativity, and then click Home.Navigate to the Applications & Scripts >Relativity Script Library tab, and then search for the nameof the script.
To preview the script, select the radio button for this script and click Preview. To run this report, clickRun.The following results populate the bottom of the window.
Note: Audit automatically retries certain audit migration errors, like SQL timeouts, invalid XML, andinability to connect to Elasticsearch. With this improvement, the migration error report may display atotal of 0 errors because the system automatically retried and resolved those common errors. In thissituation, there is no need to run the Migration Error Retry Script.

Relativity Data Grid Guide 89

Relativity Data Grid Guide 90
n Total Error Counts - this section provides a summary of all errors that occurred during migration.o Batch Errors - lists the total number of batch errors that occurred during migration.o Document Errors - lists the total number of document errors that occurred during migration.
n Batch Errors - this section provides a summary of all batch errors that occurred during migration.o Batch ID - lists the batch ID number of the batch that received an error.
o Audit ID Range - lists the first and last Audit ID numbers contained in the batch that receivedan error.
o Time Stamp - lists the time at which the error occurred.o Error Message - lists the text of the batch error.
n Document Errors - this section provides a summary of all document errors that occurred duringmigration.
o Audit ID - lists the audit ID number of the document that received an error.
o Batch ID - lists the batch ID number of the batch in which the document that received anerror was contained.
o Time Stamp - lists the time at which the error occurred.o Error Message - lists the text of the document error.
8.6.2 Migration Error Retry ScriptAfter identifying errors with the Migration Error Report, an admin can investigate and fix specific auditissues. Once the issues have been fixed, this script will resubmit audit records with errors to be migratedinto Elasticsearch.
Note: You can also run this script on all environments in your workspace from the Relativity ScriptLibrary tab. Click the user drop-down menu in the upper-right corner of Relativity, and then click Home.Navigate to the Applications & Scripts >Relativity Script Library tab, and then search for the nameof the script.

Relativity Data Grid Guide 91
In the Error type to retry drop-down, select from the following options:
n Batch Errors - retries all batches with errors as reported in the Migration Error Report.
n Document Errors - retries all documents with errors as reported in the Migration Error Report
n All Errors - retries all batch errors and document errors as reported in the Migration Error Report.
Click Preview to see a sample of the report, or select the appropriate option and clickRun to execute thescript.
8.6.3 Migration Status ReportThe Migration Status Report generates a report that shows the progress of the migration of audit data intoElasticsearch. This includes audits in SQL, audits pending migrations, and migration errors. To previewthe script, select the radio button for this script and click Preview.

Relativity Data Grid Guide 92
ClickRun to generate this report and display the following information:
n Audits in SQL - lists the number of audits in the SQL database.
n Audits Pending Migration - lists the number of audits in queue for migration into Data Grid.
n Migration Errors - lists the number of errors that occurred during migration.
8.7 Audit Workspace Settings tabUse the Audit Workspace Setting tab to configure settings specific to the Audit application. The AuditWorkspace Setting tab contains two settings, DisplayAuditDataSource and HistoryTabVisibleOnUpgrade.
Note: You must have permission to view this tab in order to configure the setting.
8.7.1 DisplayAuditDataSourceThe DisplayAuditDataSource setting configures whether Relativity displays audits from SQL or Data Gridon the document history pane in the viewer and the View Audit button on object layout pages.
If you set audits to display from Data Grid, there may be a slight delay in viewing the most recent audits. A"Last Updated" value next to audits indicates the last time all audits were verified as migrated for thatobject. This let's you know that several of a document's most recent audits might not be migrated yet.

Relativity Data Grid Guide 93
You can configure the DisplayAuditDataSource setting with one of three values:
n 0 - displays audits from SQL until the first point that the audit migration has no more audits tomigrate. At this point, the system automatically updates this value to "1," and audits are displayedfrom Data Grid going forward.
n 1 - displays audits from Data Grid only.
n 2 - displays audits from SQL only.
By default, DisplayAuditDataSource is set to display audits from SQL only. To configureDisplayAuditDataSource ,click the Edit link and modify the Value field in the subsequent layout.
8.7.2 HistoryTabVisibleOnUpgradeThe HistoryTabVisibleOnUpgrade tab configures whether the History tab is visible when upgrading theAudit application.
You can configure the HistoryTabVisibleOnUpgrade setting with one of two values:
n True - displays the History tab upon upgrade.
n False - hides the History tab upon upgrade.

Relativity Data Grid Guide 94
By default, the HistoryTabVisibleOnUpgrade setting is set to hide the History tab when upgrading the Auditapplication. To configure HistoryTabVisibleOnUpgrade, click the Edit link and modify the Value field in thesubsequent layout.
8.8 Audited actionsThe following table lists audited actions in Relativity:
Note: If you perform a job while previewing a user's security settings, the audit action will be credited toyour user name and not to the user whose security you were previewing when you started the job.
Action name Description of activity
CaseMap - Add Docu-ment
A document was sent to CaseMap.
CaseMap - Add Fact A selection of text from the viewer was sent to CaseMap as a fact.
Conversion Complete A file was converted by way of a user clicking on a file link in the documentlist, running an imaging set, imaging on the fly, running a mass image oper-ation, or switching to text or production mode in the viewer.
Create An item was created.
Delete An item was deleted.
Document Query A query was run on a list of documents, or a document query was canceled.(Amessage indicating that a query was canceled is displayed in the detailsand on the Query Text pop-up.)
Export The contents of a production set, saved search, folder, or subfolder wereexported.
Images - Created Images were created.
File Download A file was downloaded through the Single File Upload application. Forexample, a user clicked Download File on the Error Actions console of anindividual processing error layout.
File Upload A file was uploaded through the Single File Upload application. For example,a user clicked Upload Replacement File on the Error Actions console of anindividual processing error layout.
Images - Created for Pro-duction
Images corresponding to a production outside of Relativity were importedinto the system.
Images - Deleted Images were deleted.
Import Content associated with a load, production, or image file was imported.
Markup - Image - Created Redactions or highlights were added to an image.
Markup - Image - Deleted Redactions or highlights were removed from an image.
Markup - Image - Modified Redactions or highlights were moved, resized or edited on an image.

Relativity Data Grid Guide 95
Action name Description of activity
Markup - Native - Created Redactions or highlights were added. This audit entry applies to transcriptsonly.
Markup - Native - Deleted Redactions or highlights were removed. This audit entry applies to tran-scripts only.
Markup - Native - Updated Redactions or highlights were moved, resized or edited. This audit entryapplies to transcripts only.
Move A document was moved from one folder to another.
Native - Created A native file was loaded into Relativity.
Native - Deleted A native file was removed from Relativity.
Pivot Query A Pivot report was run, or a Pivot report was canceled. (Amessage indic-ating that a query was canceled is displayed in the details and on the QueryText pop-up.)
Print A document was printed. (ActiveX viewer only)
Production - Add Docu-ment
A document was added to a production.
Production - RemoveDocument
A document was removed from a production.
Query A process ran a query (such as categorization), or a query was canceled. (Amessage indicating that a query was canceled is displayed in the details andon the Query Text pop-up.)
RelativityScriptExecution ARelativity script was run.
ReportQuery A summary report was run.
Run A file was imaged, saved as a PDF, or otherwise converted for viewing
Search Cache TableCreation
A search cache table was created. (Search cache tables are created the firsttime you search for a term or phrase using dtSearch or Relativity Analytics.)
Security Security rights were assigned or changed
Tally/Sum/Average The mass operation Tally/Sum/Average was run in the workspace.
Update Document metadata was updated on a single-document basis. In addition, fil-ters on information related to applications installed through the workspace orby an agent.
Update - Mass Edit Document metadata was updated on a mass basis.
Update - Mass Replace Document metadata was edited using a text mass replacement.
Update - Propagation Document metadata was edited according to a propagation rule.
View A document was viewed.
Workspace Upgrade Details about scripts run on a workspace during an upgrade.

Relativity Data Grid Guide 96
The following actions are audited at the admin-level
Action name Description of activity
Create An item was created.
Update An item was updated
Delete An item was deleted.
Security An owner of a saved search was set during cre-ation or edit.
Login A user logged in to Relativity.
Logout A user logged out of Relativity.
Export Data was exported from a tab at the instance level.For example, a workspace list, list of users, list ofgroups, etc.
RelativityScriptExecution ARelativity script was executed.
Password Reset Request - Submitted A password reset request was submitted.
Password Reset Request - Opened A password reset request was opened.
Password Reset Request - Successful A password reset request was successful.
Security Preview Started A security preview started on a user or group.
Security Preview Ended A security preview ended on a user or group.
Workspace Upgrade Upgrade script run on the workspace (details canbe viewed in the JSON tab of the Details).
Login - Failed A login attempt to Relativity failed.

Relativity Data Grid Guide 97
Proprietary RightsThis documentation (“Documentation”) and the software to which it relates (“Software”) belongs toRelativity ODA LLC and/or Relativity’s third party software vendors. Relativity grants written licenseagreements which contain restrictions. All parties accessing the Documentation or Software must: respectproprietary rights of Relativity and third parties; comply with your organization’s license agreement,including but not limited to license restrictions on use, copying, modifications, reverse engineering, andderivative products; and refrain from any misuse or misappropriation of this Documentation or Software inwhole or in part. The Software and Documentation is protected by the Copyright Act of 1976, asamended, and the Software code is protected by the Illinois Trade Secrets Act. Violations can involvesubstantial civil liabilities, exemplary damages, and criminal penalties, including fines and possibleimprisonment.©2019. Relativity ODA LLC. All rights reserved. Relativity® is a registered trademark of RelativityODA LLC.