RED AMA Plug-in Guide - Avidresources.avid.com/SupportFiles/attach/RED_AMA_v5_5_v9_5.pdf · 1 RED...
34
1 RED AMA Plug-in Guide Avid announces the support of RED media through Avid’s Media Access (AMA) method from an Avid editing application. Things You Should Know About the RED AMA Plug-in • The RED plug-in is supported with Avid Media Composer v5.0, Avid Symphony v5.0 and Avid NewsCutter v9.0 and higher. • You can link to and edit RED 4K media files through the AMA RED plug-in. New options allow you to perform image processing, color correction, live preview and display in a histogram. • The Red Rocket card has been qualified for transcode only when used with a Media Composer software only system running with a 64-bit OS. The minimum drivers currently supported with Avid Media Composer v5.5, Avid Symphony v5.5 and Avid NewsCutter v9.5 is Red Rocket driver v1.3.3.0 and Red Rocket firmware v1.1.8.6. The Avid editing application Console window displays when the REDRocket card is initialized and the version of the driver and firmware. • You cannot relink or conform sequences that were edited and moved to and from REDCINE-X and Avid AMA. • (Offline to online workflow) If you move a (transcoded) sequence that includes AMA clips to another Avid editing system, be aware that custom metadata (for example, locators or new clip names) will be lost if you open the sequence first and then link the clips through AMA. If you open the bin with the AMA clips first, then link the clips through AMA and then open the sequence, custom metadata should display correctly. • Using AMA to link to R3D files in any SD project type or 720p/23.976 results in incorrect timecode tracking. • Because of differences in development in Avid editing products and native support in RED tools, images may look different. For example, the image could be less sharp or colors might look different from the original image. • Aspect ratios might be inconsistent when you work with 2:1 or 2.35 in HD then reopen the sequence in SD for universal mastering. You might need to change the sources and update the sequence. This is different than the expected default behavior. • Avid does not support MultiCamera editing with RED AMA clips. • For additional RED AMA information, see www.avid.com/ama.
Transcript of RED AMA Plug-in Guide - Avidresources.avid.com/SupportFiles/attach/RED_AMA_v5_5_v9_5.pdf · 1 RED...

1 RED AMA Plug-in Guide
Avid announces the support of RED media through Avid’s Media Access (AMA) method from an Avid editing application.
Things You Should Know About the RED AMA Plug-in• The RED plug-in is supported with Avid Media Composer v5.0, Avid Symphony v5.0
and Avid NewsCutter v9.0 and higher.
• You can link to and edit RED 4K media files through the AMA RED plug-in. New options allow you to perform image processing, color correction, live preview and display in a histogram.
• The Red Rocket card has been qualified for transcode only when used with a Media Composer software only system running with a 64-bit OS. The minimum drivers currently supported with Avid Media Composer v5.5, Avid Symphony v5.5 and Avid NewsCutter v9.5 is Red Rocket driver v1.3.3.0 and Red Rocket firmware v1.1.8.6. The Avid editing application Console window displays when the REDRocket card is initialized and the version of the driver and firmware.
• You cannot relink or conform sequences that were edited and moved to and from REDCINE-X and Avid AMA.
• (Offline to online workflow) If you move a (transcoded) sequence that includes AMA clips to another Avid editing system, be aware that custom metadata (for example, locators or new clip names) will be lost if you open the sequence first and then link the clips through AMA. If you open the bin with the AMA clips first, then link the clips through AMA and then open the sequence, custom metadata should display correctly.
• Using AMA to link to R3D files in any SD project type or 720p/23.976 results in incorrect timecode tracking.
• Because of differences in development in Avid editing products and native support in RED tools, images may look different. For example, the image could be less sharp or colors might look different from the original image.
• Aspect ratios might be inconsistent when you work with 2:1 or 2.35 in HD then reopen the sequence in SD for universal mastering. You might need to change the sources and update the sequence. This is different than the expected default behavior.
• Avid does not support MultiCamera editing with RED AMA clips.
• For additional RED AMA information, see www.avid.com/ama.
1 RED AMA Plug-in Guide
2
RED MediaThe RED Digital Cinema Company produces a high performance digital cinema camera with the quality of 35mm film and the convenience of pure digital. The RED ONE camera generates a 4K (or 2K - 4.5K) full resolution REDCODE™ RAW (.R3D) file.
Media is stored on a REDFlash card or a RED drive. You can link to a specific R3D file on the volume or link to the entire volume.
RED ONE cameras record metadata which displays in an Avid bin. The metadata includes: edge code, timecode, lens parameters, audio settings and any video image processing information.
Your Avid editing application supports RED R3D files as high quality HD media. Once you link the clips through AMA, you can change and fine-tune the clip color settings through the Source Settings dialog.
The RED AMA plug-in should be installed on your system. To link RED media through the AMA method, use Link to AMA Volumes. For more information, see “The Avid Media Access (AMA) Workflow” on page 14 and “Linking Media with AMA” on page 20.
For specific RED workflow steps, see “Workflow for Editing RED Clips with AMA” on page 32.
n Avid supports the use of the REDRocket Accelerator card for transcoding, rendering and mixdown at full debayer settings. Playback is supported, however not through the REDRocket Accelerator card. We do not use the video output connections on the card. The card is not supported on 32-bit Windows operating systems.

RED Media
3
RED Formats and Resolutions
The following table lists the formats and resolutions available when you work with RED media:
RED Files and Folders
The RED Camera records a unique clip name and additional files that include the REDCODE RAW files and an optional QuickTime reference file placed in a clip folder (.RDC).
The system names clips by Camera Letter + Reel Number + Month + Day + a two digit alphanumeric random number.
For example: A001_C002_0502A6.RDC
A = camera A, 001 = reel 001, C002 = clip 002, and 0502 = May 2, A6 = two digit random number (to help avoid duplicate files names).
Each clip folder (.RMD) is at the root directory. In each of these folders is the .RDC folder which contains the video, audio, and metadata files:
• (Windows) drive:\camera+reel_date.RMD\camera+reel_clip_date+random number.RDC
• (Macintosh) Macintosh HD/camera+reel_date.RMD/camera+reel_clip_date+random number.RDC
AMA detects folders named with RMD and RDC and files named .R3D.
Media Type ResolutionNumber of Audio Channels (maximum)
RED R3D 2K 2:12K 16:92K ANA3K 2:13K 16:93K ANA4K 2:14K 16:94K ANA4.5K
4

1 RED AMA Plug-in Guide
4
Connecting the RED ONE Drive or Card
Connect the RED Drive directly through an industry-standard USB or FireWire port on your computer, or insert the RED Card into the RED camera and connect to your computer.
The drive or card mounts as individual media drives on your desktop and then link to your Avid editing system through AMA.
n See RED documentation for specific information about the RED ONE camera, REDFlash card and RED drive.
Spanned Clips and RED
You cannot span media across multiple cards. Each clip is recorded as a separate clip, regardless of how many cards you use. There is a 2GB limit on a single master clip. As you record footage, once a 2GB file is captured, an R3D file is created (.001). The camera continues to record and the next 2GB (or less) of media creates another R3D file (.002) until you end recording. So, you can have several R3D files in one clip folder but they are all associated with one master clip. When you link these files/folders through the AMA method, one master clip appears in your bin
Copying RED Files to a FireWire or Network Drive
After you attach the RED drive or insert a REDFlash card, you can copy the RED media to a FireWire drive or a network drive and then disconnect the drive. You might find it convenient to copy several cards to other drives so you can reuse the cards quickly.
You can connect a FireWire drive, for example, and store the contents of several cards on it so you can keep using the cards in the camera.
To copy the REDFlash cards to another drive:
1. On the drive, set up a folder for each card or drive you want to copy.
Avid recommends that you do not place the media folder at the top level of the drive.
2. Give each folder a unique name that identifies the card or drive.
The name does not have to be the same as the actual drive or card name.
3. Navigate to the actual drive or card and select the contents of the folder.
You can select the top directory of several RDC folders (containing an R3D file and a color metadata file such as RSX or RMD).

RED Media
5
4. Do one of the following:
t Copy and paste the contents of the folder to the folder on the other drive.
t Click the drive or card folder and drag it to the folder on the other drive.
5. Remove the drive.
Adjusting RED Source Settings
When you link to R3D (RED) files, the Avid editing system reads each REDCODE RAW file directly. You can then change the clip’s color values: color balance, exposure, and contrast in the Source Settings window. This color value information is encoded with the R3D file through an RLX, RSX or RMD file. These files hold the camera’s original color values of your clip.
n The RLX, RSX or RMD files might be created if you set the color values outside of the Avid editing application. These files can be loaded and applied to the associated RED clip through the Source Settings window.
When a RED clip displays in the bin, the system displays the metadata columns of the clip’s color values. For example: Color Space, Gamma Space, Kelvin, Tint. You can export this information to ALE (Avid Log Exchange) and XML (through Avid FilmScribe) for downstream use in your workflow.
The Source Settings window also has three color spaces to choose from: REDSpace, Camera RGB, and REC.709. You can set up different color options (or presets) in each of these color spaces and then apply their color values to multiple clips.
To change the RED source settings:
1. Link the RED clip through the AMA Link to Volume option.
See “The Avid Media Access (AMA) Workflow” on page 14 and “Linking Media with AMA” on page 20 for information on linking.
2. Right-click the RED clip in the bin and select Set Source Settings.
The Source Settings dialog box opens. The clip displays in the video area.
You can choose from the Settings menu to select a camera metadata setting or an RSX, RLX or RMD setting (template), or adjust your own custom parameters. This procedure details the custom parameters.
For information on settings (templates) in the Settings menu and how to apply a setting, see “Using Source Settings” on page 9 and “Applying a Source Setting” on page 10.

1 RED AMA Plug-in Guide
6
3. Drag the video slider to the frame you want to view.
The new frame displays and the histogram updates.
The histogram is a tool that helps you more precisely adjust Source Settings. For more information about the histogram, see “Understanding the Source Settings Histogram” on page 11. “Understanding the Source Settings Histogram” in the Help for the Media Composer family.
4. Set the appropriate options:
Option Description
Color Space Choose from:Camera RGB: as close to RAWREC.709: SMPTE standard color space for HDREDcolor: newest, more accurate color science from REDREDSpace (default): based on the camera’s RGB but more saturated

RED Media
7
Gamma Curve Lets you override the gamma curve. Choose from:REC.709: a REC.709 gamma curve with a linear portion at black and a gamma at 2.2 curveREDLog: maps the 12-bit sensor data on to a 10-bit curve with minimal lossREDSpace: (default) based on REC.709 but with more contrastREDGamma: gamma curve from RED with a smoother highlight rolloff
Kelvin Adjusts the RGB color to compensate for red - blue tinting of the scene at different color temperatures of the ambient light while you shoot. Common values are 3200 (tungsten) and 5600 (daylight). Click and drag the slider from 1700 to 9400. Default is 5600.
Tint Adjusts the RGB color to compensate for yellow - green tinting of the scene at different color temperatures of the ambient light while you shoot. This is valuable when the ambient light source contains a significant amount of yellow or green, such as fluorescent. Click and drag the slider from -100 to 100. Default is 0.00.
ISO Allows the ISO level to change from 50 to 2000. Default is 320.
FLUT™ The latest color science developed by RED. Allows you to balance your mid-grays in the center of the histogram without pushing highlight details over the edge.
Shadow Adjusts the overall black level of the image without affecting the white level. Click and drag the slider from 0.00 to 1.00. Default is 0.00.
DRX Lets you recover potentially lost dynamic range by extending and balancing highlights, taking into account the rendering intent of the desired Klevin and Tint white balance. Click and drag the slider from 0.00 to 1.00. Default is 0.00.
Debayer Detail Choose from High (default), Medium, or Low.This setting is ignored when you use REDRocket.
Chroma Denoise Choose from Off (default), Minimum, Milder, Mild, Strong, or Maximum.
OLPF Controls the optical low-pass filter. Choose from Off (default), Low, Medium, or High.The system ignores this setting when you use REDRocket.
Exposure Allows adjustment to the clip exposure. Click and drag the slider from -7.00 to 7.00. Default is 0.00.
Option Description
1 RED AMA Plug-in Guide
8
5. Click Apply.
The changes apply to your clip. You can continue to make additional changes.
If the clip is in the Source viewer, the changes are reflected in the Source viewer and in the Client monitor (if you have one attached).
If you click Cancel after you click Apply, the Set Source Settings window closes with the changes you made.
6. Click OK to save your change and close the window.
The system updates the bin column metadata with the new parameters.
n If you make changes in the Source Settings window and then relink the clip through AMA again, you still keep all the parameters that you set.
Brightness Adjusts the overall brightness of the image. Lifts blacks without affecting the white level. Click and drag the slider from -10.00 to 10.00. Default is 0.00.
Contrast Adjusts the tonal range of the image, which usually improves sharpness and detail. When you increase the Contrast, it increases tonal separation between adjacent gray levels but decreases the total number of discreet gray levels in the image.Click and drag the slider from -1.00 to 1.00. Default is 0.00.
Saturation Affects the intensity of the red, green and blue channels. As the value increases color saturation increases. As the value decreases, so does the color decrease. If the value is set to high, colors might clip. If the level is set to 0.00, a monochromatic image with only gray tones appear. Click and drag the slider from 0.00 to 4.00. Default is 1.00
Red Increases or decreases the camera’s sensitivity to red light by amplifying the R channel digital video signal received from the sensor. A 0 (zero) no Red is visible, the image has a strong cyan cast. Click and drag the slider from 0.00 to 10.00. Default is 1.00.
Green Increases or decreases the camera’s sensitivity to green light by amplifying the G channel digital video signal received from the sensor. At 0 (zero), no green is visible, the image has a strong magenta cast. Click and drag the slider from 0.00 to 10.00. Default is 1.00.
Blue Increases or decreases the camera’s sensitivity to blue light by amplifying the B channel digital video signal received from the sensor. At 0 (zero), no blue light is visible, the image has a strong yellow cast. Click and drag the slider from 0.00 to 10.00. Default is 1.00.
Option Description
RED Media
9
Using Source Settings
Source Settings lets you choose from a selection of preset templates or you can create your own look. Each source setting has its own color values associated with it. There are a few different ways to obtain source settings:
• Camera and default source settings are included with the RED AMA plugin
• Link a RED clip from RED Alert! (imports the RSX source setting)
• Load a source setting onto your system (for example, an RLX, RSX, or RMD)
• Create a custom source setting
You cannot change the default RSX and RLX source settings, these are predefined. Once you make a change to a parameter, the setting becomes a Custom setting. At this time, you can only have one Custom setting.
You can load multiple RSX and RLX source settings. As you link a RED clip from RED Alert! (RSX) or load an RLX file, the setting appears in the Source Settings menu.
Source Settings are helpful when you want to apply one setting to multiple clips in your bin.
Different subclips from the same master clip can have different source settings.
When you edit a clip into a sequence, the material you edit in uses the clip’s current attribute values or RED source settings. If you change the RED source settings at a later point in your workflow, the sequence does not automatically adjust for the change. If you want the sequence to use the RED source settings for clips that you have changed since you edited, you must refresh the sequence. For procedures on how to refresh your sequence, see “Refreshing Sequences to Use Current Clip Attributes” in the Avid editing Help.

1 RED AMA Plug-in Guide
10
Applying a Source Setting
To apply a source setting to a RED clip:
1. Right-click a RED clip in the bin (or Shift-click multiple clips), then choose Set Source Settings.
The Set Source Settings window opens and your clip displays in the viewer.
2. Select a setting (template) from the Source Settings menu.
Source Settings vary depending on the files or templates loaded on your system.
3. Click Apply.
The settings apply to the clip and if the clip is loaded in the Timeline, the video updates and displays in a Client monitor (if one is attached) and the Source monitor.
4. Click OK to save your settings and close the window.
The system updates the bin column RED metadata with the parameters.
If you make additional changes after you select a setting, the system creates a Custom setting and Custom appears in the Settings list. You cannot make changes to a system generated setting, however you can use a system setting and make changes to create your own Custom setting.
To import additional source settings:
1. From the Source Settings window, click the Load button.
The Load External Settings window opens.
2. Browse to the Settings file.
3. Change the filter to display RSX, RLX or RMD files.
4. Select your setting and click OK.
The new source setting appears in the Source Settings menu, and is immediately applied to the clip.
Setting Origin
Camera Metadata Settings Default
Default Settings Default
Grade (RSX) Settings RED Alert!
filename RLX Setting RED Alert!
Grade (RMD) Setting REDCINE-X
Custom User created in Avid
RED Media
11
Understanding the Source Settings Histogram
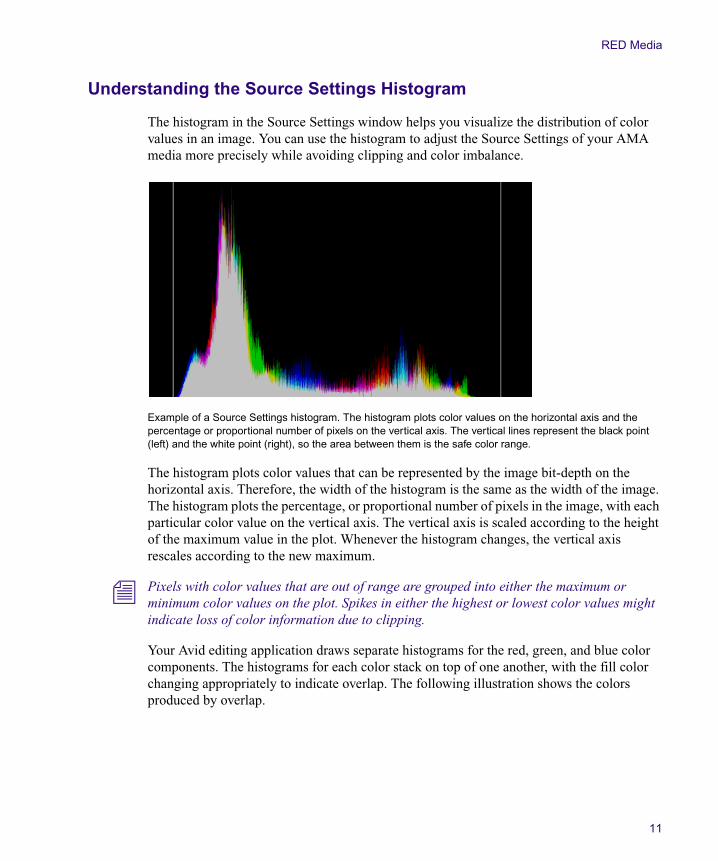
The histogram in the Source Settings window helps you visualize the distribution of color values in an image. You can use the histogram to adjust the Source Settings of your AMA media more precisely while avoiding clipping and color imbalance.
Example of a Source Settings histogram. The histogram plots color values on the horizontal axis and the percentage or proportional number of pixels on the vertical axis. The vertical lines represent the black point (left) and the white point (right), so the area between them is the safe color range.
The histogram plots color values that can be represented by the image bit-depth on the horizontal axis. Therefore, the width of the histogram is the same as the width of the image. The histogram plots the percentage, or proportional number of pixels in the image, with each particular color value on the vertical axis. The vertical axis is scaled according to the height of the maximum value in the plot. Whenever the histogram changes, the vertical axis rescales according to the new maximum.
n Pixels with color values that are out of range are grouped into either the maximum or minimum color values on the plot. Spikes in either the highest or lowest color values might indicate loss of color information due to clipping.
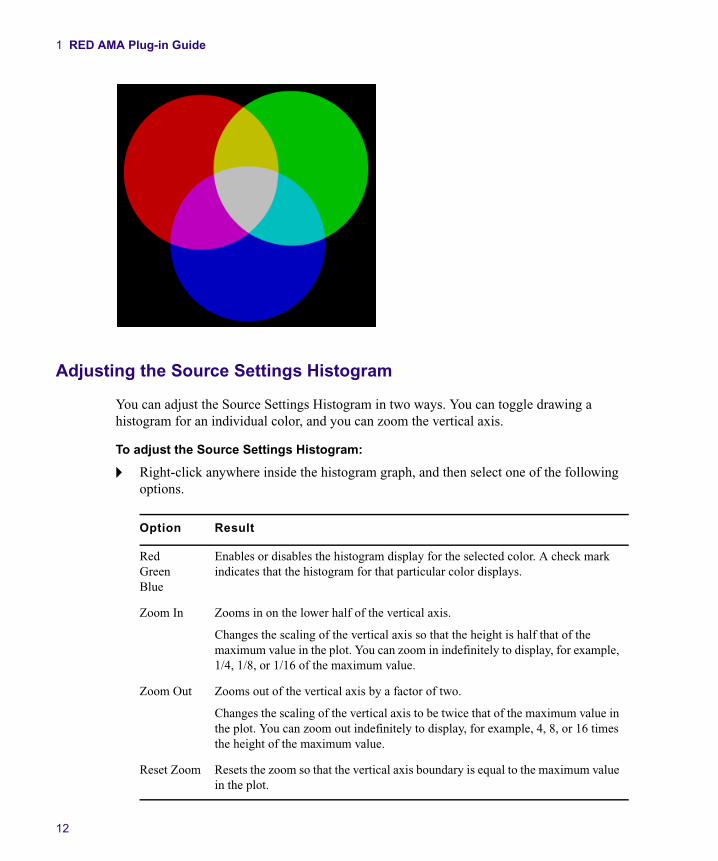
Your Avid editing application draws separate histograms for the red, green, and blue color components. The histograms for each color stack on top of one another, with the fill color changing appropriately to indicate overlap. The following illustration shows the colors produced by overlap.
1 RED AMA Plug-in Guide
12
Adjusting the Source Settings Histogram
You can adjust the Source Settings Histogram in two ways. You can toggle drawing a histogram for an individual color, and you can zoom the vertical axis.
To adjust the Source Settings Histogram:
t Right-click anywhere inside the histogram graph, and then select one of the following options.
Option Result
RedGreenBlue
Enables or disables the histogram display for the selected color. A check mark indicates that the histogram for that particular color displays.
Zoom In Zooms in on the lower half of the vertical axis.
Changes the scaling of the vertical axis so that the height is half that of the maximum value in the plot. You can zoom in indefinitely to display, for example, 1/4, 1/8, or 1/16 of the maximum value.
Zoom Out Zooms out of the vertical axis by a factor of two.
Changes the scaling of the vertical axis to be twice that of the maximum value in the plot. You can zoom out indefinitely to display, for example, 4, 8, or 16 times the height of the maximum value.
Reset Zoom Resets the zoom so that the vertical axis boundary is equal to the maximum value in the plot.

RED Media
13
Preparing your RED Clip for Transcode, Mixdown, or Render
If you want to take a RED clip and offline it to another application, you can create a different resolution RED file, depending on your requirements. This changes the speed and quality of the clip, which could affect the playback performance. The higher the video quality the slower the process (transcode, mixdown, render). The lower the video quality the faster the process. Before you transcode, mixdown or render your clip or sequence, set the appropriate quality in the Media Creation dialog box.
n If you apply any Reformat options (stretch, letterbox, etc.) to your clip, when you perform a transcode, the reformatting options will apply.
To prepare your RED clip for transcoding, mixdown or rendering:
1. Before you transcode, mixdown or render, select Tools > Media Creation.
2. Click the Mixdown & Transcode tab or click the Render tab.
3. Select the playback quality from the R3D Source Quality (Debayer) menu.
t Full
t Half (Best Quality)
t Half (Good Quality)
t Quarter
t Eighth
t Sixteenth
4. Click OK.

1 RED AMA Plug-in Guide
14
5. Transcode, mixdown or render your clip or sequence as required.
For information about transcoding, see “Using the Transcode Command” in the Avid editing Help.
For information about mixdown, see “Performing a Video Mixdown” in the Help.
For information about render, see “Basics of Effects Rendering” in the Avid editing Help.
The Avid Media Access (AMA) WorkflowAvid Media Access (AMA) is a plug-in architecture that lets you link directly to clips from a third-party volume (for example, a P2, XDCAM or GFCAM device) or to a file based media clip (for example, QuickTime or MXF) into a bin without storing the media directly on your system. AMA lets you be more productive by browsing and editing directly from the device or volume.
The bin lets you log, browse, and view these clips in the usual way. Once the third-party device is disconnected, the bin still exists with the clips, although the media displays as offline. When you reconnect the device, the media appears online. The system automatically displays the media; you do not need to mount the drives.
The AMA method also allows for more metadata to be brought into the bin which gives you more information about the media. For example, essence marks (or locators) associated with the clip are automatically brought into your bin.
To display metadata information in your bin, see “Adding a Metadata Bin Column Heading” in the Avid editing Help.
The following considerations and limitations apply:
• When the AMA setting is activated, the non-AMA method does not appear in the File menu. Deactivate the AMA setting to display the File > Import P2 (and Import XDCAM Proxy) option. The AMA setting is on by default.
• The Link to AMA File(s) menu choice is available for third-party AMA file based media plug-ins. To see the available AMA plug-ins available to download for your Avid editing application, go to www.avid.com/ama.You must have a third-party plug-in installed on your system for the option to display.
The Avid Media Access (AMA) Workflow
15
• Windows UNC (Universal Naming Convention) paths are not supported with AMA media. To link AMA media, map it to the drive.
In order to link to AMA files on a mapped network drive, enter the command “alldrives 1” in the Console window. This displays the mapped network drive. If you quit and then reopen the Avid editing application, the mapped network drives still display. To turn this function off, enter “alldrives 2.” For more information on mapping network drives, see “Using The Console Window” in the Avid editing Help.
• When you render an audio effect on an AMA media clip, all audio media files are written as PCM (MXF), regardless of what you set for the audio file format.
• The Dynamic Relink option is not supported with AMA clips.
• Avid does not support MultiCamera editing with AMA clips.
• You should not mix workflows. Either use the AMA method or use the traditional import/batch import method.
Selecting the AMA Settings
You can set options in the AMA Settings dialog box to turn AMA on or off (on by default), to automatically mount your volumes, to customize your bin, and to set audio channel linking options.
To check for and download additional or updated AMA plug-ins, click the link to www.avid.com/ama.
To set up AMA:
1. In the Project window, click the Settings tab.
2. Double-click AMA.
The AMA Settings dialog box appears.

1 RED AMA Plug-in Guide
16
3. Click the Volume Mounting tab.
4. Select “Enable AMA Volume Management.”
By default, this option is selected. If you deselect the option and then reselect it, you must quit and restart your Avid editing application. When this option is selected, the File > Import menu item is no longer available.
5. If you want the system to automatically scan drives (volumes) every time, select the option “When mounting previously mounted volumes, do not check for modifications to the volume.” This option is off by default.
6. If you remount a volume, deselect the option “When mounting previously mounted volumes, do not check for modifications to the volume,” and the system checks the modification date of the device or drive against the last time the clips were linked. If the date is the same, the clips come back online. If the date is different, the system links the clips again, and links any new clips added to the volume. This option is off by default.
n If you restart your Avid editing application, the system automatically rescans the drives regardless of the options you’ve selected.
7. To customize your bin, click the Bins tab.
By default, the system links your clips into a new bin using the same name as your project name. If you want to change the bin name or want to use an already existing bin, you can make these changes in the Bins tab.
For more information on Bins options, see “AMA Settings: Bins Tab” on page 30.
The Avid Media Access (AMA) Workflow
17
n Depending on your AMA Settings, every time you insert a card into a reader or connect a device, the system creates a new bin whether the same card or device has been previously inserted or not.
8. To map source audio channels to multichannel or mono tracks in your clips, click the Link Options tab, and then click Edit.
The Set Multichannel Audio dialog box opens. For information on setting multichannel audio options, see “Linking to AMA Multiple Resolution Media” on page 23.
9. Click OK.
Viewing Installed AMA Plug-ins
Once you download and install a third-party plug-in from www.avid.com/ama, you can enter a console command to view a list and the version number of the plug-ins installed on your system.
To display the list of installed AMA plugins:
1. Select Tools > Console.
2. In the command entry text box, type: AMA_ListPlugins
3. Press Enter (Windows) or Return (Macintosh).
AMA_ListPlugins displays a list of the plugins installed on your system.
Understanding Linking with AMA
Linking lets you point to media on a device or point to the media directly on your system. The media physically resides on your system or it can reside on an external device. The device can be a camera, a card reader, an optical disk, a virtual volume on your desktop or on a server. The media points to the most recent source. For example, if you link the clips to a virtual volume on your desktop, the drive column displays the desktop as the location where the clips are linked to. If you then insert a card into a reader with the same media, the clips point to the media on the card. If you remove the card, the clips point to the media on the card and the clips appear offline. The card being the most recent source. Once the card is reinserted, the clips in the bin appear online.
1 RED AMA Plug-in Guide
18
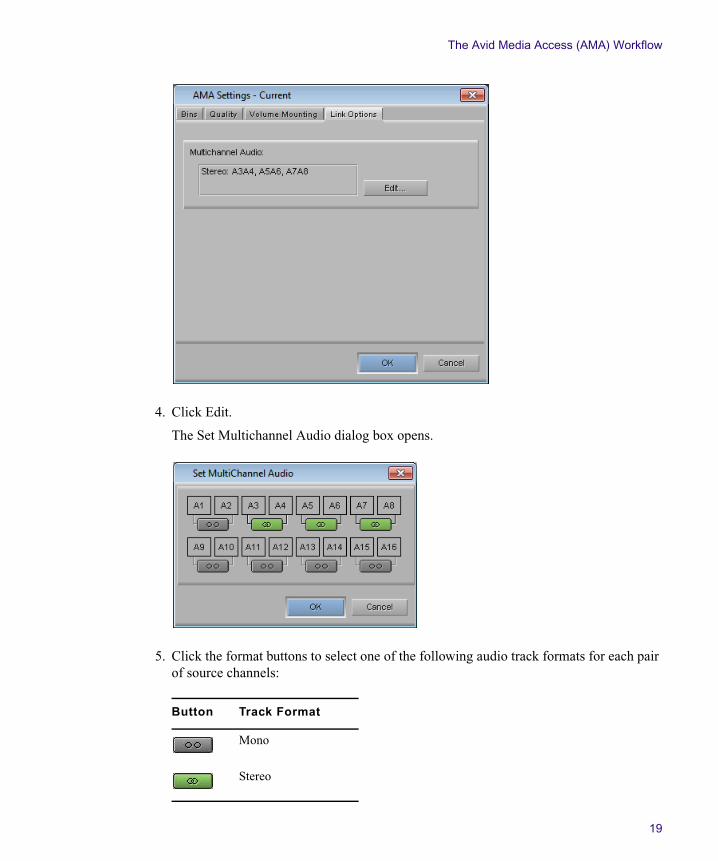
AMA Linking with Multichannel Audio
You can use the AMA Settings dialog box to define the audio track formats for the audio channels in your linked media, up to a maximum of 16 audio channels for the clips in your bins. This allows you to specify which source channels are treated as mono or multichannel audio tracks in your project, rather than having to modify the clips in your bin after you link to the AMA media.
The mappings affect all media clips created when you link to your source media. If you want to use different mixes for different master clips or different projects, create a custom AMA Settings template for each separate type of mix and then create your linked master clips.
Each stereo track requires two channels, but you can mix mono and stereo input channels for your linking operation as long as you do not exceed the maximum of 16 audio channels for each master clip.
To specify the multichannel audio mix for linked AMA clips:
1. In the Project window, click the Settings tab.
2. Double-click AMA.
The AMA Settings dialog box appears.
For information about the AMA Settings, see “AMA Settings” on page 30.
3. Click the Link Options tab.
The Link Options tab lists any multichannel audio mappings in the current AMA Settings template.
The Avid Media Access (AMA) Workflow
19
4. Click Edit.
The Set Multichannel Audio dialog box opens.
5. Click the format buttons to select one of the following audio track formats for each pair of source channels:
Button Track Format
Mono
Stereo

1 RED AMA Plug-in Guide
20
You must map source audio channels in mono or stereo pairs. For example, you cannot map A1 to a mono track and A2 and A3 to a stereo track. Instead, map A1 and A2 to mono tracks, and A3 and A4 to a stereo track. If the source media does not have an audio channel on A2, the Avid editing application ignores the channel.
6. Click OK to close the Set Multichannel Audio dialog box, and then click OK to close the AMA Settings dialog box.
The Track Formats column in the bin Text view displays the format for all multichannel audio tracks in a master clip.
To save a custom map of linked audio channels as a settings template:
1. Click the Settings tab in the Project window.
The Settings list appears.
2. Click AMA.
3. Select Edit > Duplicate.
A duplicate setting appears in the Settings list.
4. Name the setting by doing the following:
a. Click the custom name column.
b. Type a name.
c. Press Enter (Windows) or Return (Macintosh).
n The custom name column is the center column in the Project window. When you move the pointer over the custom name column, the pointer changes from a pointing finger to a text insertion bar.
You can select this new setting whenever you link clips with AMA.
Linking Media with AMA
Use the File > Link to AMA Volume(s) option if you link to media which originates on a volume (XDCAM EX, XDCAM, P2, RED or GFCAM). You can also use File > Link to AMA Volume(s) if you want to link to multiple QuickTime files located in a single folder. If you link directly to a single media file clip (MXF or QuickTime), use the File > Link to AMA File(s) option.
n For optimum viewing and playing, Avid recommends a single clip length should not exceed more than 12 hours.
n The decompose option from the Clip menu is not available with AMA. You do not need to decompose clips when you use the AMA method.

The Avid Media Access (AMA) Workflow
21
To automatically link clips on a volume with AMA:
t Connect the drive or card reader through a USB or FireWire port on your computer, insert a card or disk.
The system scans the device and links the clips into the default bin and with the default multichannel audio track formats (based on the AMA settings). The clips highlight in yellow.
To change the default bin, bin name, or audio track format, from the Project window double-click AMA Settings and select options from the Bins and Link Options tabs. For more information, see “AMA Settings” on page 30 and “Linking to AMA Multiple Resolution Media” on page 23.
To manually link clips from a virtual volume with AMA:
1. Select File > Link to AMA Volumes.
The Browse For Folder dialog box opens.
2. Navigate to the P2, XDCAM, RED, GFCAM clips or the QuickTime folder, and then click OK.
For P2, navigate one level above the Contents folder. For XDCAM disks, navigate to one level above the Clip folder. For XDCAM EX, navigate to one level above the BPAV folder. For RED, navigate to the root directory of the RED card. For GFCAM, navigate to the root directory of the GFPAK. For QuickTime, navigate to the QuickTime folder that holds the QuickTime files.
Depending if you are using an existing bin or creating a new bin, the Bin Selection dialog box opens.

1 RED AMA Plug-in Guide
22
3. Select Bin Selection options.
n If you relink a sequence and the bin that stores the AMA referenced clips is closed, the media does not relink. Before you relink, open the bin of the referenced clips.
4. Click OK.
The clips appear in the bin or bins depending on the options you selected, they highlight in yellow.
To link clips from a file with AMA:
1. Select File > Link to AMA File(s).
You can also right-click a bin and select Link to AMA File(s).
n The system ignores the settings you have selected in the AMA Volume Mounting settings.
2. If there is no active bin, a dialog box appears asking you to select a bin.
The Select file(s) for AMA linking dialog box opens.
3. From the AMA Plugin Filter menu, select the type of file.
4. Select the file(s) you want to link. Ctrl+click or Shift+click to select multiple files.
Option Description
Single Bin Based On Selected Folder Places all linked clips into one default bin.
Single Bin Named Lets you create a new bin and type in a new bin name. Places all linked clips into that bin.
Bin(s) Based on Current AMA Setting
Places the clips in the bin(s) you set up in the AMA Settings Bins tab.
Bin(s) Based on Subfolders Places the clips in bin(s) based on their subfolders.
Top Bin Window Places the clips in the active bin.
Option Description
All AMA Plugins Files Searches and displays all files.
QuickTime Searches and displays only QuickTime files.
MXF Searches and displays only MXF files.
RED R3D Searches and displays only RED files.

The Avid Media Access (AMA) Workflow
23
5. Click Open.
The clips appear in the active bin with the default multichannel audio track formats (based on the AMA settings). The clips are highlighted in yellow.
If the system cannot link a file, an error message displays informing you to open the Console window for more information about the file(s) in error.
If you move the clip from the original drive to another drive on your system, the clip displays as offline in your bin.
n If you move a source file from one location to another and then back to the original location, you might need to refresh the bin to redisplay the clip. Close and reopen the bin to refresh the bin.
Working with AMA Multiple Resolution Media
If you choose to link to low-resolution media, you can link to any combination of proxy or high-resolution audio or video media. For instance, you can link to the most compressed (proxy) video and the highest quality audio.
Disks can take some time spinning up to link the high-resolution media, so linking to the low-resolution media saves you time. You can edit with the low-resolution media and once you are finished, you can relink to the high-resolution media.
Linking to AMA Multiple Resolution Media
Before you link to low-resolution or high-resolution media, you need to select the video and audio quality in the AMA Settings Quality tab.
The steps below highlight linking to low-resolution media. You can also link to high-resolution media.
n For information about linking with AMA, see “The Avid Media Access (AMA) Workflow” on page 14.
To link to low-resolution media:
1. In the Project window, click the Settings tab.
2. Double-click AMA.
The AMA Settings dialog box appears.
For information about the AMA Settings, see “AMA Settings” on page 30.
3. Click the Quality tab.

1 RED AMA Plug-in Guide
24
4. Click the appropriate resolution for your video in the AMA Link Preference section, and click OK.
If a particular resolution is not available, it will be grayed out.
5. Insert the disk into the device.
6. Select Bin Selection options from the Bins tab.
For information on bin selection options, see “Linking Media with AMA” on page 20.
7. Select File > Link to AMA Volume.
The Browse for Folder dialog box opens.
8. Navigate to the clips, and then click OK.
The clips appear in the bin or bins depending on the bin options you select. Clips highlight in yellow.
The Video column in the bin displays the project type of the clip.

The Avid Media Access (AMA) Workflow
25
Switching Between Multiple Resolution Media
Once you link to the low-resolution or high-resolution media and complete your edits, you can easily switch from low to high and high to low-resolution media. When you switch to a different resolution, the system replaces the clip in the bin with the new clip and resolution.
The steps below highlight switching from low-resolution to high-resolution media. You can also switch from high-resolution to low-resolution.
n For XDCAM, if you use the Sony PDZ-1 software to assign a User Disc ID, the Avid editing system displays this information in a bin column and knows what disk name is associated with each clip.
To switch from low-resolution to high-resolution media:
1. Insert the disk in the device.
2. Select the low-resolution clips in the bin.
3. Right-click the bin and select Modify AMA Resolutions.
The AMA Resolutions Quality dialog box appears.
4. Click the Highest Quality for your video (audio is always set to Highest Quality) and click OK.
The highest quality clips replace the most compressed (low-resolution) clips in the bin, they highlight in yellow.
If the bin contains clips from multiple volumes, you will be prompted to insert another disk.

1 RED AMA Plug-in Guide
26
Consolidating Multiple Resolution Media
When you are ready to move your media to shared storage, you can link to your resolution and consolidate at the same time.
The steps below highlight consolidating high-resolution media. You can also consolidate low-resolution media.
For information on why you should consolidate, see “Consolidating Media” in the Avid editing Help.
To consolidate high-resolution media:
1. In the Project window, click the Settings tab.
2. Double-click AMA.
The AMA Settings dialog box appears.
For information about the AMA Settings, see “AMA Settings” on page 30.
3. Click the Quality tab.
4. Click the appropriate resolution for your video in the Consolidate Preference section, and click OK.
If a particular resolution is not available, it will be grayed out.
The Avid Media Access (AMA) Workflow
27
5. To consolidate the clip, follow the steps in “Using the Consolidate Command” in the Help.
The resolutions you select in the Consolidate Preference area of the AMA Settings Quality tab displays in the Transcode/Consolidate dialog box when you consolidate or transcode.
Relinking to AMA Files
After you link AMA QuickTime files into your sequence, you have the option to make changes (in a third party applications, such as Adobe After Effects) to that file. If you change the filename or change the location of the file, the best way to link that clip back into your sequence is through the relink option. Relinking to an AMA file allows you to link to a different file. This process only works if the targeted file is compatible with the old file, for example the file has the same duration, edit rate or number of tracks.
This feature is helpful when you have a group of linked clips that were moved to a different folder or drive. You can relink the clips to the new location. You can also use this feature to toggle between different versions of a QuickTime movie, for example a low-resolution version of the movie is myMovie_DV.mov and the high-resolution version of the movie is myMovie_1to1.mov. You can relink to both of these versions, to see which clip works better in your sequence.
At this time, Relink to AMA File(s) is only available with AMA QuickTime files.
To relink to an AMA QuickTime file:
1. Link to an AMA QuickTime file.
The clips highlight yellow in the bin.
For information on linking, see “Linking Media with AMA” on page 20.
2. If you then decide to change the original clip in the bin in your third-party application, create the new movie file.
3. In your bin, Ctrl+click (Windows) or Command+click (Macintosh) or right-click the clip or clips you want to relink.
4. Select Relink to AMA File(s).
The Select file to relink AMA clip dialog box opens asking you to locate the new file.
5. Locate the new file.
If you have multiple clips selected in the bin, the system prompts you for the location of each file, one at a time.
6. Click Open.
The new clip highlights in the bin.

1 RED AMA Plug-in Guide
28
n If the new file is not compatible with the clip in the bin (it does not have the same duration, edit rate or number of tracks), the clip in the bin retains its original link.
The AMA Plug-in Log File
The Avid system creates an AMA plug-in log file when you link clips. The log file records errors and information about the clips. If you experience any problems while you link clips or if you receive an error message, check the AMA log file to get more information about the error (for example: a corrupt file or a bad filename). You can view the log file from the following location on your system:
• (Windows) drive:\Program Files\Avid\Media Composer\Avid FatalError Reports. The name of the log file is AMALoggerMM_DD_YY.log.
• (Macintosh) Volume/Users/Shared/AvidMediaComposer/Avid FatalError Reports. The name of the log file is AMALoggerMM_DD_YY.log.
Using Virtual Volumes
You can use a virtual volume to copy media from a card or disk. This lets you use the card or disk again. A virtual volume can be a folder on your desktop or a folder located on a server. However, the virtual volume folder should reside one level down from the root level in order for the system to display it as a virtual volume. The following are examples of virtual volumes:
• C:\Desktop\BPAV
• Z:\P2\Card 1
• Z:\GFPAK\
With the AMA method, all drives and virtual volumes associated with your bin mount automatically. You cannot remove a volume while in AMA, however you can remove a virtual volume.
To unmount a virtual volume:
1. Choose File > Unmount.
The Unmount dialog box opens.
2. Select the virtual volume you want to remove.
3. Click OK.
The system removes the virtual volume from your system and clips linked to this virtual volume appear offline. When you restart your Avid editing application, the system scans the system for virtual volumes and the clips appear online.

The Avid Media Access (AMA) Workflow
29
Virtual Volumes and AMA Bins
If you select Volume Name in the AMA Bin Settings tab, the system names the bin the same name as the virtual volume drive name. If you continue to use the same virtual volume to link other media through AMA, the system continues to place the linked media in the same bin. If you want to create a new bin for different types of media you link through AMA, you can either create a new virtual volume drive for each type of media (XDCAM, XDCAM EX, P2, GFCAM, etc.) or you can create a new bin every time you link to new media on a virtual volume.
To create a new bin on the same virtual volume:
1. Before you link your media through AMA, click the Settings tab in the Project window.
2. Double-click AMA.
3. Click the Bins tab.
4. Select “Create a new bin” and specify a new bin name.
5. Click OK.
6. Select File > Link to AMA Volumes.
The media appears in the newly created bin. Repeat these steps for each type of media.
Deleting Clips
You can delete master clips, but you cannot delete media files that reside on drives. Your Avid editing application treats files as read-only devices.
You can delete master clips and media files the same way you delete other master clips and media files. However, you might not be able to delete files that you moved rather than copied. If you cannot delete master clips and media files, first unlock the clips as described in the second procedure, and then delete them.
To delete files from cards/volumes:
1. Quit your Avid editing application.
2. On the desktop, navigate to the drive.
3. Select the files you want to delete and press the Delete key.
To delete files on a local drive in your Avid editing application:
1. In a bin, select the clips you want to delete.
2. (Option) Right-click and select Unlock Bin Selection.
3. Press the Delete key.
The Delete dialog box opens.
1 RED AMA Plug-in Guide
30
4. Select Delete master clips and Delete associated media files.
5. Click OK.
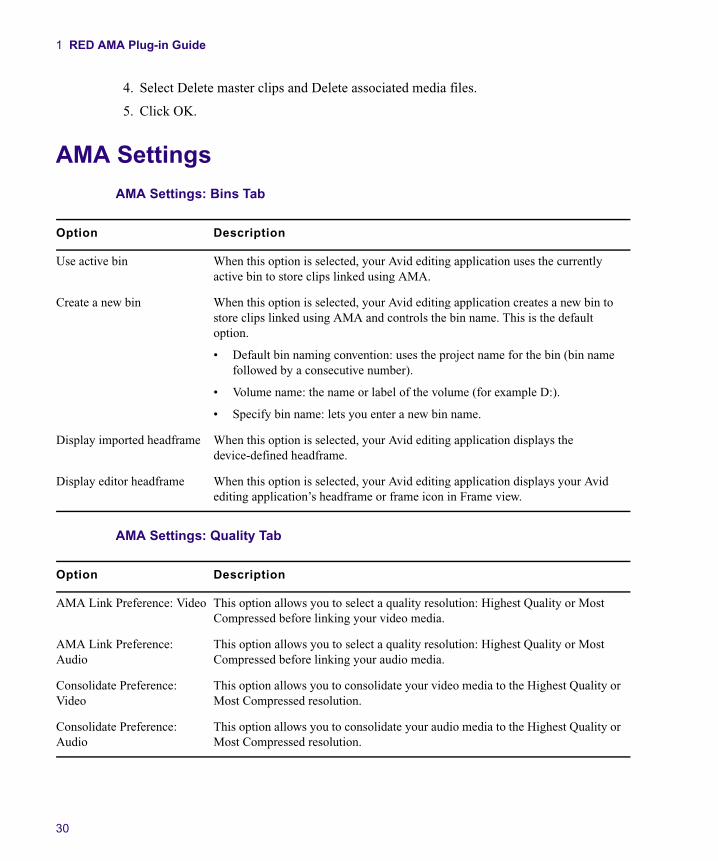
AMA SettingsAMA Settings: Bins Tab
AMA Settings: Quality Tab
Option Description
Use active bin When this option is selected, your Avid editing application uses the currently active bin to store clips linked using AMA.
Create a new bin When this option is selected, your Avid editing application creates a new bin to store clips linked using AMA and controls the bin name. This is the default option.
• Default bin naming convention: uses the project name for the bin (bin name followed by a consecutive number).
• Volume name: the name or label of the volume (for example D:).
• Specify bin name: lets you enter a new bin name.
Display imported headframe When this option is selected, your Avid editing application displays the device-defined headframe.
Display editor headframe When this option is selected, your Avid editing application displays your Avid editing application’s headframe or frame icon in Frame view.
Option Description
AMA Link Preference: Video This option allows you to select a quality resolution: Highest Quality or Most Compressed before linking your video media.
AMA Link Preference: Audio
This option allows you to select a quality resolution: Highest Quality or Most Compressed before linking your audio media.
Consolidate Preference: Video
This option allows you to consolidate your video media to the Highest Quality or Most Compressed resolution.
Consolidate Preference: Audio
This option allows you to consolidate your audio media to the Highest Quality or Most Compressed resolution.

AMA Settings
31
AMA Settings: Volume Mounting Tab
AMA Settings: Link Options Tab
Option Description
Enable AMA Volume Management
Enables AMA linking of file-based media from supported third-party devices and drives. You must quit and restart your Avid editing application for the changes to take effect.
When mounting previously mounted volumes, do not check for modifications to the volume.
If you select this option, your Avid editing application automatically scans and links all clips from the third-party device and drive every time a device or drive is attached to your system. If you do not select this option, the system checks the modification date of the device or drive against the last time the clips were linked. If the date is the same, the clips come back online. If the date is different, the system links the clips again, and links any new clips added to the volume. The option is off by default.
Option Description
Multichannel Audio Select this option if you want to assign audio tracks to specific channels in your linked media, up to a maximum of 16 audio channels for the clips in your bins. This allows you to specify which source channels are treated as mono or multichannel audio tracks in your project, rather than having to modify the clips in your bin after you link to the AMA media.
Click Edit to open the Multiple Mixes dialog box, which allows you to map audio tracks to channels. For more information, see “AMA Linking with Multichannel Audio” on page 18.

1 RED AMA Plug-in Guide
32
Workflow for Editing RED Clips with AMAOnce you have linked the RED clips from a RED drive or card, you can transcode the media from your sequence. Transcoding your media is helpful when you work with multiple resolutions.
n You cannot consolidate the RED media in your Avid editing application.
A typical workflow is as follows:
1. The RED AMA plug-in should be installed on your system.
2. Attach the RED drive or insert a REDFlash card.
Your Avid editing system links the RED clips automatically into a bin. The media itself remains on the disk. The clips point directly to the high-resolution media on the disk. All metadata information displays as columns in the bin.
n If you use multiple cards and you remove one of the cards, your media displays offline.
3. Right-clip the clip in the bin and select Set Source Settings.
For detailed information to set clip parameters, see “Adjusting RED Source Settings” on page 5.
4. Use the master clips to edit the sequence.
5. (Option) Rename the clips to help you organize your material.
6. Choose the video quality from the Transcode & Consolidate tab of the Media Creation setting.
For more information, see “Preparing your RED Clip for Transcode, Mixdown, or Render” on page 13.
7. Transcode your sequence or clips to an HD or SD resolution.
Avid supports the use of the REDRocket Accelerator card for transcoding, rendering and mixdown at full debayer settings. Playback is supported, however not through the REDRocket Accelerator card. We do not use the video output connections on the card. The card is not supported on 32-bit Windows operating systems.
If you need to output to a resolution higher than HD, then export an AFE of your sequence for the conform process on an Avid DS. If your high-resolution media is on a shared storage device and Avid DS has access to the device, Avid DS automatically relinks to the RED files.
8. Remove the RED drive or card.

Workflow for Editing RED Clips with AMA
33
Legal NoticesProduct specifications are subject to change without notice and do not represent a commitment on the part of Avid Technology, Inc.
This product is subject to the terms and conditions of a software license agreement provided with the software. The product may only be used in accordance with the license agreement.
Avid products or portions thereof are protected by one or more of the following United States Patents: 5,077,604; 5,267,351; 5,309,528; 5,355,450; 5,396,594; 5,440,348; 5,467,288; 5,513,375; 5,528,310; 5,557,423; 5,568,275; 5,577,190; 5,584,006; 5,634,020; 5,640,601; 5,644,364; 5,654,737; 5,715,018; 5,719,570; 5,724,605; 5,726,717; 5,729,673; 5,745,637; 5,752,029; 5,754,180; 5,754,851; 5,799,150; 5,812,216; 5,828,678; 5,842,014; 5,852,435; 5,905,841; 5,929,836; 5,930,445; 5,946,445; 5,986,584; 5,987,501; 6,016,152; 6,018,337; 6,023,531; 6,058,236; 6,061,758; 6,091,778; 6,105,083; 6,118,444; 6,130,676; 6,134,607; 6,141,691; 6,198,477; 6,201,531; 6,223,211; 6,249,280; 6,269,195; 6,330,369; 6,351,557; 6,353,862; 6,357,047; 6,392,710; 6,404,435; 6,407,775; 6,417,891; 6,426,778; 6,477,271; 6,489,969; 6,512,522; 6,532,043; 6,546,190; 6,552,731; 6,553,142; 6,570,624; 6,571,255; 6,583,824; 6,618,547; 6,636,869; 6,665,450; 6,678,461; 6,687,407; 6,704,445; 6,747,705; 6,763,134; 6,766,063; 6,791,556; 6,810,157; 6,813,622; 6,847,373; 6,871,003; 6,871,161; 6,901,211; 6,907,191; 6,928,187; 7,043,058; 7,081,900; 7,103,231; 7,266,241; 7,280,117; RE40,107; 7,403,561; 7,433,519; 7,512,885; 7,545,957; D352,278; D392,267; D392,268; D392,269; D395,291; D396,853; D398,912. Other patents are pending.
Avid products or portions thereof are protected by one or more of the following European Patents: 0506870; 0515031; 0635188; 0674414; 0694243; 0705517; 0752174; 0857293; 0976108; 0988756; 1068723; 1068734; 1111910; 1173850; 1629675. Other patents are pending.
Avid products or portions thereof are protected by one or more of the following United States Patents: 5,077,604; 5,267,351; 5,309,528; 5,355,450; 5,396,594; 5,440,348; 5,467,288; 5,513,375; 5,528,310; 5,557,423; 5,568,275; 5,577,190; 5,584,006; 5,634,020; 5,640,601; 5,644,364; 5,654,737; 5,715,018; 5,719,570; 5,724,605; 5,726,717; 5,729,673; 5,745,637; 5,752,029; 5,754,180; 5,754,851; 5,799,150; 5,812,216; 5,828,678; 5,842,014; 5,852,435; 5,905,841; 5,929,836; 5,930,445; 5,946,445; 5,986,584; 5,987,501; 5,999,406; 6,016,152; 6,018,337; 6,023,531; 6,038,573; 6,058,236; 6,061,758; 6,069,668; 6,091,778; 6,105,083; 6,118,444; 6,130,676; 6,134,607; 6,141,007; 6,141,691; 6,198,477; 6,201,531; 6,211,869; 6,223,211; 6,249,280; 6,269,195; 6,330,369; 6,351,557; 6,353,862; 6,357,047; 6,392,710; 6,404,435; 6,407,775; 6,417,891; 6,426,778; 6,477,271; 6,489,969; 6,512,522; 6,532,043; 6,546,190; 6,552,731; 6,553,142; 6,570,624; 6,571,255; 6,583,824; 6,596,031; 6,618,547; 6,636,869; 6,665,450; 6,678,461; 6,687,407; 6,704,445; 6,747,705; 6,763,134; 6,763,523; 6,766,063; 6,766,357; 6,791,556; 6,810,157; 6,813,622; 6,847,373; 6,871,003; 6,871,161; 6,901,211; 6,907,191; 6,928,187; 7,043,058; 7,081,900; 7,103,231; 7,266,241; 7,280,117; RE40,107; 7,403,561; 7,433,519; 7,512,885; 7,545,957; D352,278; D372,478; D373,778; D392,267; D392,268; D392,269; D395,291; D396,853; D398,912. Other patents are pending.
Avid products or portions thereof are protected by one or more of the following European Patents: 0506870; 0515031; 0635188; 0674414; 0694243; 0705517; 0752174; 0857293; 0895623; 0976108; 0988756; 1068617; 1068723; 1068734; 1111910; 1173850; 1629675. Other patents are pending.
No part of this document may be reproduced or transmitted in any form or by any means, electronic or mechanical, including photocopying and recording, for any purpose without the express written permission of Avid Technology, Inc.
Copyright © 2010 Avid Technology, Inc. and its licensors. All rights reserved. Printed in USA.
Attn. Government User(s). Restricted Rights LegendU.S. GOVERNMENT RESTRICTED RIGHTS. This Software and its documentation are “commercial computer software” or “commercial computer software documentation.” In the event that such Software or documentation is acquired by or on behalf of a unit or agency of the U.S. Government, all rights with respect to this Software and documentation are subject to the terms of the License Agreement, pursuant to FAR §12.212(a) and/or DFARS §227.7202-1(a), as applicable.
Trademarks003, 192 Digital I/O, 192XD I/O, 888 I/O, AirPlay, AirSPACE, AirSPACE HD, AirSpeed, ALEX, Alienbrain, AniMatte, AudioMarket, AudioPages, AudioSuite, AudioVision, AutoSync, Avid, Avid Advanced Response, Avid DNA, Avid DNxcel, Avid DNxHD, AVIDdrive, Avid DS Assist Station, Avid EditStar, Avid Learning Excellerator, Avid Liquid, Avid Liquid Chrome Xe, Avid MEDIArray, Avid Mojo, AvidNet, AvidNetwork, Avid NewStar, Avid Remote Response, AVIDstripe, Avid Unity, Avid Unity ISIS, Avid VideoRAID, Avid Xpress, AVoption, AVX, Beauty Without The Bandwidth, Boom, C|24, CaptureManager, ChromaCurve, ChromaWheel, Command|24, Conectiv, CountDown, DAE, Dazzle, Dazzle Digital Video Creator, Deko, DekoCast, D-Fi, D-fx, DigiDelivery, Digidesign, Digidesign Audio Engine, Digidesign Intelligent Noise Reduction, DigiDrive, DigiLink, DigiMeter, DigiSerial, DigiStudio, DigiStudio Control, Digital Nonlinear Accelerator, DigiTranslator, DINR, DNxchange, do more, DVD Complete, D-Verb, Eleven, Equinox, EveryPhase, ExpertRender, Fastbreak, Fast Track, FieldPak, Film Composer, FilmScribe, Flexevent, FluidMotion, FXDeko, G7, G-Rack, HD Core, HD Process, HDPack, HYBRID, HyperControl, HyperSPACE, HyperSPACE HDCAM, IllusionFX, Image Independence, iNEWS, iNEWS Assign, iNEWS ControlAir, Instantwrite, Instinct, Intelli-sat Broadcasting Recording Manager, Intelli-Sat, InterFX, Interplay, inTONE, Intraframe, iS9, iS18, iS23, iS36, ISIS, IsoSync, KeyRig, KeyStudio, LaunchPad, LeaderPlus, Lightning, ListSync, Lo-Fi, Magic Mask, Make Anything Hollywood, make manage move | media, Marquee, M-Audio, M-Audio Micro, Maxim, Mbox, MCXpress, Media Browse, Media Composer,

1 RED AMA Plug-in Guide
34
MediaDock, MediaDock Shuttle, Media Fusion, Media Illusion, MediaLog, Media Reader, Media Recorder, MEDIArray, MediaShare, MediaStream, Media Suite, Meridien, MetaFuze, MetaSync, MicroTrack, Midiman, MissionControl, Mix Rack, MixLab, Moviebox, Moviestar, NaturalMatch, Nearchive, NetReview, NewsCutter, Nitris, NRV-10 interFX, Octane, OMF, OMF Interchange, OMM, OnDVD, Open Media Framework, Open Media Management, Palladium, Pinnacle, Pinnacle DistanTV, Pinnacle Geniebox, Pinnacle HomeMusic, Pinnacle MediaSuite, Pinnacle Mobile Media, Pinnacle Studio, Pinnacle Studio MovieBoard, Pinnacle Systems, ProEncode, ProServices, ProSessions, Pro Tools, QuietDrive, Recti-Fi, Reel Tape Delay, Reel Tape Flanger, Reel Tape Saturation, RetroLoop, rS9, rS18, Salesview, Sci-Fi, Scorch, Scorefitter, ScriptSync, SecureProductionEnvironment, Session, Show Center, Sibelius, SIDON, Soft SampleCell, Soft-Clip Limiter, Sound Designer II, SPACE, SPACEShift, SpectraGraph, SpectraMatte, Sputnik, Starplay, SteadyGlide, Streamfactory, Streamgenie, StreamRAID, Strike, Structure, Studiophile, SubCap, Sundance Digital, Sundance, Symphony, SYNC HD, SynchroScience, SynchroScope, Syntax, TDM FlexCable, Thunder, Titan, Titansync, TL Aggro, TL AutoPan, TL Drum Rehab, TL Everyphase, TL Fauxlder, TL In Tune, TL MasterMeter, TL Metro, TL Space, TL Utilities, Torq, Torq Xponent, Transfuser, Trigger Finger, Trillium Lane Labs, TruTouch, UnityRAID, Vari-Fi, Velvet, Venom, VideoRAID, Video Slave Driver, VideoSPACE, VideoSpin, Vortx, Xdeck, X-Form, Xmon, Xponent, and X-Session are either registered trademarks or trademarks of Avid Technology, Inc. in the United States and/or other countries.
Adobe and Photoshop are either registered trademarks or trademarks of Adobe Systems Incorporated in the United States and/or other countries. Apple and Macintosh are trademarks of Apple Computer, Inc., registered in the U.S. and other countries. Windows is either a registered trademark or trademark of Microsoft Corporation in the United States and/or other countries. All other trademarks contained herein are the property of their respective owners.
RED AMA Plug-in • Part Number 0130-30336-01B • 3/8/11