Recommended GRIN-Global Procedures - Startup & … · Web viewThe Taxonomic data is the same data...
31
Recommended GRIN-Global Procedures - Startup & Ongoing Revision Date July 6, 2017 This document is currently divided into two main sections: the first section contains brief overviews to GG elements and links to other supporting documents which will be useful to any organization planning to test or implement GG; the second section focuses on the steps that each NPGS site should take prior to NPGS implementation. NPGS readers can skip directly to the second section to review the steps their site should follow for GG implementation, but consider using the first section as a reference. The webpage: https://www.grin-global.org contains links to many GRIN- Global references, including the guides mentioned in this document. Refer to the menu options “Documentation” and “Training.” Use the links to launch and review the GRIN-Global guides, videos, and other resources. NPGS Users: [2015 Pre Implementation Stage] In addition to that link, we also have a page specifically for NPGS where we have posted webinar schedules, etc. - Training Resource Page . NPGS users – skip to the NPGS section . document.docx Page | 1
Transcript of Recommended GRIN-Global Procedures - Startup & … · Web viewThe Taxonomic data is the same data...
Recommended GRIN-Global Procedures - Startup & Ongoing
Revision DateJuly 6, 2017
This document is currently divided into two main sections: the first section contains brief overviews to GG elements and links to other supporting documents which will be useful to any organization planning to test or implement GG; the second section focuses on the steps that each NPGS site should take prior to NPGS implementation. NPGS readers can skip directly to the second section to review the steps their site should follow for GG implementation, but consider using the first section as a reference.
The webpage: https://www.grin-global.org contains links to many GRIN-Global references, including the guides mentioned in this document. Refer to the menu options “Documentation” and “Training.” Use the links to launch and review the GRIN-Global guides, videos, and other resources.
NPGS Users: [2015 Pre Implementation Stage] In addition to that link, we also have a page specifically for NPGS where we have posted webinar schedules, etc. - Training Resource Page.
NPGS users – skip to the NPGS section.
document.docx P a g e | 1
Table of ContentsInstallation Options 3
Install GRIN-Global...................................................................................................................................3
Overview of the Data Required at Start Up 3Security....................................................................................................................................................4Import Wizard..........................................................................................................................................4Taxonomy................................................................................................................................................4Codes and Code Groups...........................................................................................................................5Sites and Site Codes.................................................................................................................................7Cooperators.............................................................................................................................................8Inventory Maintenance Policies...............................................................................................................9Methods..................................................................................................................................................9Inventory Viability Rules........................................................................................................................11Region and Geography...........................................................................................................................11Users......................................................................................................................................................12Connect User PCs to the Organization’s Production GRIN-Global Server..............................................12Crop Descriptors....................................................................................................................................13Source Habitat Codes.............................................................................................................................13Passport Data.........................................................................................................................................13Inventory...............................................................................................................................................13Orders....................................................................................................................................................13Miscellaneous Admin Functions............................................................................................................13
NPGS-Specific Steps to Transition to GG 15Determine What PCs Will Connect to the GRIN-Global Server with the Curator Tool...........................15Determine Who will be the Primary GRIN-Global Site Representative..................................................15Verify Site Users.....................................................................................................................................15Curator Tool User Name and Password Conventions............................................................................15Logging on to the CT..............................................................................................................................16Establish Public Website User Accounts................................................................................................17Ownership: Review................................................................................................................................18Permissions: Set.....................................................................................................................................18Codes: Verify..........................................................................................................................................19Inventory Maintenance Policies: Verify Your Site’s Policies are in GG...................................................21Methods................................................................................................................................................22Coordinate Links from Your Site’s Pages to the Public Website.............................................................24Train Your Requesters / Point to the New GRIN-Global.........................................................................24Update Your Lookup Tables on Day 1....................................................................................................24
document.docx P a g e | 2

Installation Options
Install GRIN-Global Decide if you (or your organization) will be maintaining the GRIN-Global database on a network server, or on a stand-alone PC. The choice you take will determine how you will install GG.
NPGS users will be connecting to a server in Beltsville; each user will only need to install the Curator Tool on the user’s PC.
NetworkedWhen installing to a network, the administrator complete two different installations: she first installs the complete suite of software on the server; then on each user PC the admin (or the user) installs the Curator Tool (CT). (During the installation of the CT, the GG Search Tool (ST) also installs automatically.)
Beginning with version 1.9.2, the Curator Tool is installed via the “InstallShield” installer program. The Curator Tool installation file is a self-extracting .exe file. (Self-extracting means that when you open the file (double-click on the file’s name, the InstallShield program starts working to unbundle the Curator Tool files and installs them on the PC. (Prior to 1.9.2, the CT was installed via the GRIN-Global Updater program, but that is no longer the case.)
For PCs where an older version of the CT has already been installed, the Curator Tool will first need to be uninstalled via the Updater and then installed via the new .exe file. NPGS users who already have the CT on a PC, but not version 1.9.6.41, should consult the document “CT Installation Issues.”
Stand-Alone PCIf the GG database is to be installed on just a single PC, the entire suite of the GG software must be installed on that PC: the Server software (which uses Microsoft’s IIS), the database, and the CT and ST. (This does not apply to NPGS.)
Public Website To set up GRIN-Global for the public, that is, for breeders and researchers who will be ordering germplasm, a public URL will need to be established so that people ordering germplasm can use their browser to point to the GG public website. These external germplasm consumers (external to the genebank organization) do not need any software installed on their PCs; they just need to have internet access to the organization’s GG website.
Complete directions for installing GG are detailed in the GRIN-Global Installation Guide.
document.docx P a g e | 3

Overview of the Data Required at Start UpWhen an organization is starting with a new, empty GRIN-Global database, it is necessary to populate some of the GG ancillary tables. These supporting tables do not contain the base curatorial data (accessions, inventory, orders, etc.), but rather taxonomy information, codes, and other GG system information.
In any case, either via the Admin Tool or the Curator Tool, the GG administrator will need to populate certain tables with data. What kinds of data? Taxonomy was mentioned above, but other information such as Sites, Cooperators, Region and Geography values, and Inventory Maintenance Policies, etc. must be populated.
Also, some data is automatically installed that is required by GRIN-Global; for example, there are two default users automatically installed with a new system: Administrator and Guest. A default Site Code (SYS for system) is also installed. Do not delete any of these default records.
SecurityWhen GRIN-Global is initially installed, security is enabled by default. Some organizations may desire to permanently disable the security feature, although this is not recommended. However, during the initial installation process, you may decide to temporarily disable security in order that records owned by the administrator can be edited and deleted. To disable security, in the AT, in the Web Application node, double-click on the DisableSecurity parameter and change from the default “False” to “True.”
Security (ownership and permissions) is described in detail in two documents – the Admin Guide and the Curator Tool User Guide. A GRIN-Global administrator should review both of these sections. Furthermore, users will need to be trained on the various security options available to them. Briefly, every record has one owner; the owner can specify permissions. That is, the owner of the record decides which users may read, update, and delete records that he or she owns.
Import WizardYou should be aware that there is an Import Wizard in the Admin Tool. The Admin Tool’s Import Wizard is handy for initially loading data into a new GRIN-Global system. However, to repeat what has been highlighted in the Import Wizard Guide (“the Cookbook for Data Importing”), the Wizard has not been updated for some time to keep up with the current schema. That said, it is handy for the initial loading of data. Unfortunately, it is not a perfect solution. For example, it only adds and updates records; the Import Wizard cannot be used to delete records.
document.docx P a g e | 4

In general, when using the Import Wizard, follow the order suggested by the numbered dataviews. The Import Wizard dataviews useful for initially bulk loading data:
TaxonomyBefore inputting an accession (and its passport data), taxonomy information must be in the database (the user selects the accession’s taxonomy from a list when entering an accession record). This ensures that the taxonomy is spelled consistently and correctly. Taxonomy is just one example of requisite data.
Downloading Taxonomy and Geography data is optional when installing GG. The Taxonomic data is the same data used by the U.S. National Plant Germplasm System (NPSGS) GRIN/GRIN-Global systems. (Complete directions for downloading the taxonomy and geography data are detailed in the Installation Guide.)
By installing the NPGS taxonomy tables, an organization is not restricted to using this taxonomy “as is” – an organization can remove any taxonomy data from the tables and add their own taxonomy as needed. If a genebank’s collection spans many species, we recommend that the organization initially load the default taxonomy data, and then add any additional taxonomic data required by the organization that is not already included in the GRIN data. At the same time, if the organization is confident that certain taxonomy will never be used, the organization’s GG administrator can remove those taxonomy records.
Alternatively, if an organization’s GG database will focus on just a few taxa, it may be beneficial to only include those in their GG database. However, leaving the default taxonomy in the system does not impact performance. The only negative aspect is that a user would see taxonomy displayed in dropdowns that are not pertinent to the organization and the user could mistakenly select taxonomy that wasn’t applicable.
Complete directions for downloading the Taxonomy data are in the Installation Guide, but the basic idea is for the administrator to hold the Ctrl + Shift keys before clicking the Download/Install button when using the GG Updater program to install the server components.
When inputting a new Taxonomy Species record, be sure that it has its requisite Genus and Family records. Conversely, if you are going to delete any Taxonomy Family records, you must
document.docx P a g e | 5
first delete any children Species and then Genus records that relate to that Family.
Codes and Code GroupsMany codes are used throughout the GG system; during the installation, a default set of Code Groups and their codes are installed. An organization new to GG should review the codes and edit, add, or delete them in order to match the organization’s specific needs before adding accessions, inventory, and germplasm orders.
It is simpler to delete the codes during installation rather than later. As curatorial data gets added to the database, records will be created using the codes in these fields.
In the Curator Tool, Code groups are easily recognizable – when editing a record, a dropdown displays choices (the codes – the possible values for that field) when clicked:
Also, when you position the mouse over the heading, the rollover tooltip will indicate the respective Code Group:
Code editing is generally done manually within the GG Admin Tool.
document.docx P a g e | 6

As an alternative to using the AT Code editor, when initially reviewing /editing the codes installed with GG, you can use the Curator Tool’s Get Code Value and Get Code Value Language dataviews. An advantage with using the CT is you can edit multiple records at the same time (and use “drag and drop” to move back and forth from a spreadsheet).
By design, the Get Code Value and Get Code Value Language dataviews are read-only. In order to edit the records in the CT, use the Admin Tool to change the read-only attribute. In the AT, open the dataviews, switch to the Properties tab, temporarily uncheck the Is Read Only checkbox. In the Fields tab, uncheck the fields that will be edited. For example, in the Get Code Value dataview, you will want to edit the group_name and value fields.
When deleting codes, delete the children Get Code Value Language records first, before deleting the corresponding Get Code Value records.
Remember to reset the Read Only properties when you have completed the code editing!
There are many Code Groups and codes used throughout the GRIN-Global system. An organization is not restricted to using these codes. Before any accession data is entered into the system, the GG administrator should review these codes and consider deleting codes the organization will never use and adding additional codes matching the organization’s need. However, do not remove any of the Code Groups. (There a few Code Groups that can be removed since they are specific to NPGS site inventory dataviews, but there is no compelling reason to delete them. If the NPGS specific dataviews are never used, the user will never see these groups.)
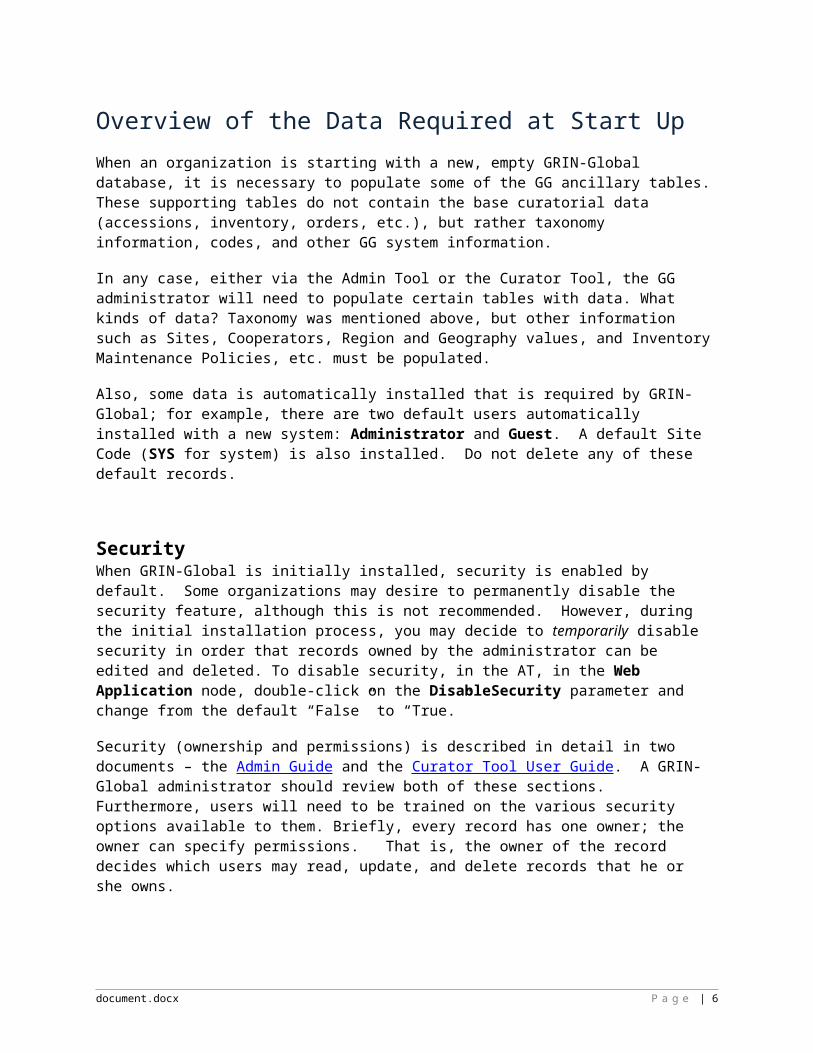
In the Recommended Order for Importing Data section in the Overview of the Import Wizard Cookbook, there is a table listing the important ancillary data that can be loaded via the Import Wizard in the Admin Tool. (This data could also be brought into GG via the Curator Tool, but this Import Wizard was designed to make an initial dump of data into an organization’s new database.) You can use the Import Wizard to export the codes into a spreadsheet where you can review them as a whole.
document.docx P a g e | 7

Codes cannot be deleted via the Import Wizard; the simplest way to delete a code is to use the Admin Tool’s Code Group editor.
The online data dictionary has a sheet where many of the NPGS codes are described: Codes. Review this to get a sense of how the codes are used. GG administrators should also read and review the detailed “Codes” section in the Admin Tool Guide.
The Geographic data uses ISO country codes and administrative type codes. These codes can be used as is, or additional codes can be added by the organization as needed.
Sites and Site Codes(Site Codes are a different kind of code as compared to the Codes described in the Codes and Code Groups section.). An organization using GRIN-Global can establish Site Codes for various reasons. The sites may be separate physical locations such as in the U.S., where “COR” is the site code for the Corvallis, Oregon genebank and “W6” is the code for the Western Regional Plant Introduction Station in Pullman, Washington.
A site code could be set up as the (virtual) site for special purposes, for example the “black box” storage of certain collections that are not routinely distributed.
A site could also be set up for a specific crop or even for specific germplasm types. For example, if your genebank has two sets of procedures that vary, depending on the germplasm type, such as In-vitro and seeds, it may be helpful to create one site for the in-vitro, and the second for seeds.
Sites Example:
CooperatorsA person or an institution can be considered a cooperator. This means that people and organizations are stored in the same table. When creating a new cooperator, either the Last Name or the Organization field must be specified. An institution cooperator record will have a null Last Name field. Each cooperator must have a unique index comprised of Last Name, First Name, Organization, Geography_ID, and Address Line 1 fields.
When an organization installs Taxonomy with GG, approximately 30 related cooperator records are also loaded – otherwise, just five essential ”SYSTEM” type cooperator records will be installed. (The system cooperator records are required by the software.)
document.docx P a g e | 8

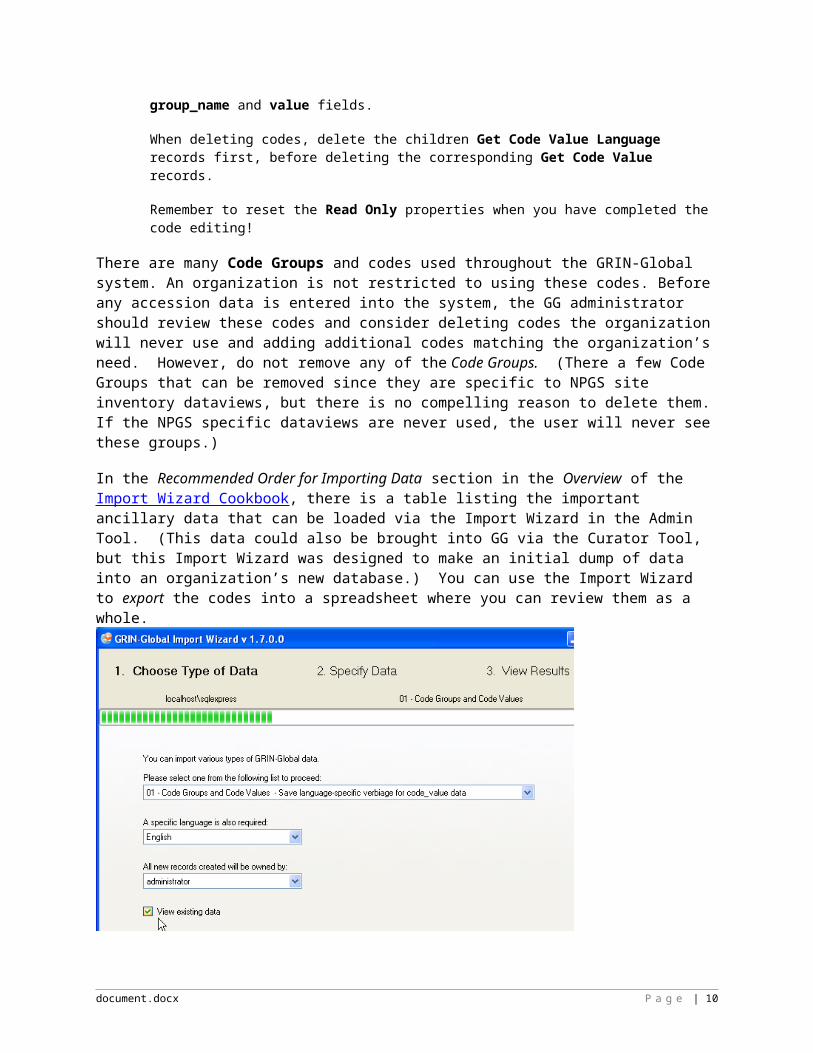
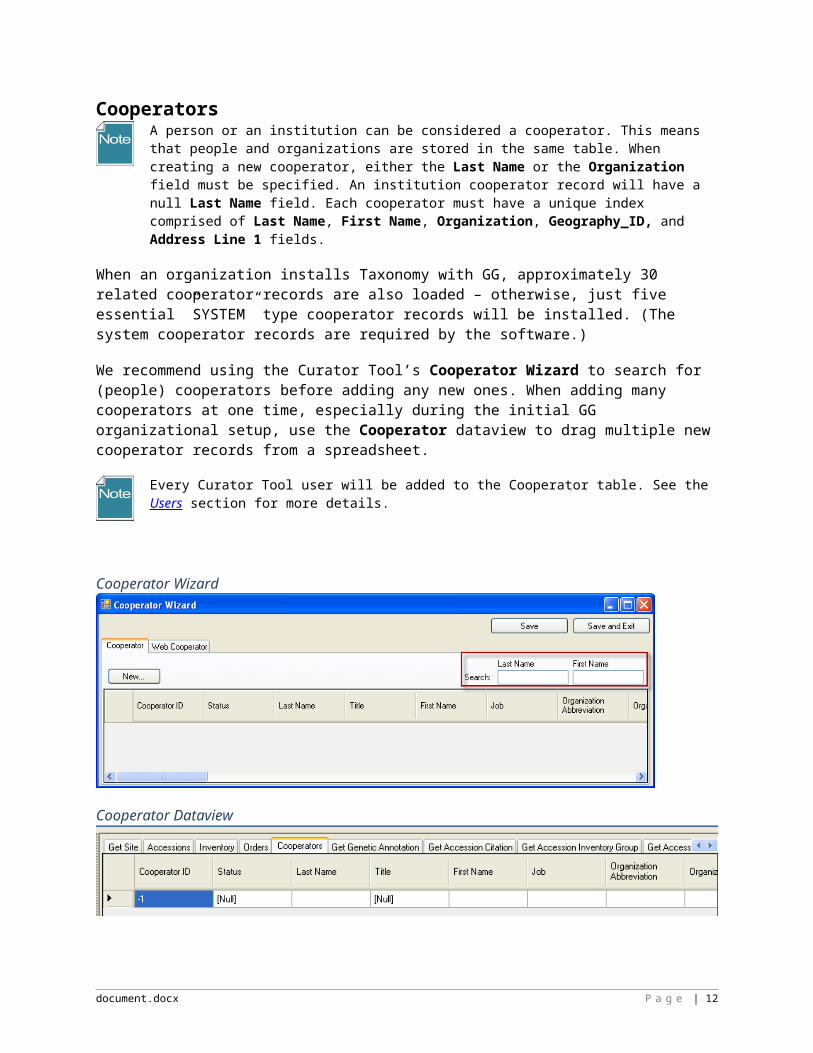
We recommend using the Curator Tool’s Cooperator Wizard to search for (people) cooperators before adding any new ones. When adding many cooperators at one time, especially during the initial GG organizational setup, use the Cooperator dataview to drag multiple new cooperator records from a spreadsheet.
Every Curator Tool user will be added to the Cooperator table. See the Users section for more details.
Cooperator Wizard
Cooperator Dataview
Inventory Maintenance PoliciesGRIN-Global is installed with one default inventory maintenance policy: “SYSTEM.”
GG users at a site (location) can create inventory maintenance policies to determine how inventory lots will be processed. These policies specify the standard germplasm form to be distributed, the standard amount to be distributed, and the setting of critical distribution and replenishment levels.
The only inventory maintenance policy installed with GG is SYSTEM. Before adding any inventory records, someone, either a Curator, a user at a site, or the GG administrator, will need to input (or copy from a spreadsheet) any desired inventory maintenance policies.
Review the Inventory Maintenance Policy section in the online GRIN-Global Inventory document that describes in detail how to create inventory polices.
document.docx P a g e | 9
Every new inventory record requires its Inventory Maintenance Policy field to be filled. This field is doubly important, because the owner of the policy record becomes the owner of the inventory record. In creating these policies, ensure that the policy record owner is the person who is intended to be the owner of the inventory records created when using that policy. For example, if “John Doe” (Juan Coneja?) will ultimately become the inventory record owner, than create an inventory maintenance policy where he is the owner of the policy. If you are signed on as administrator and have created these policies, you can transfer ownership to the respective cooperators.
The Import Wizard in the Admin Tool has a dataview for the bulk addition of Inventory Maintenance Policies into the GG database.
MethodsThe Method dataview accesses the table of methods and procedures used to determine the crop specific attributes of the germplasm. Each environment used in an evaluation should have its own record in the method table. Other procedures can also be included in this method table (e.g. germination procedures).
In many dataviews, the Method field may be optional, but it is a required field when recording Crop Trait Observation records. Therefore, before any observations can be recorded, the pertinent methods must first be defined.
When creating method records, only one field is required – the method’s Name field. Other fields are available for storing the method’s specifics and the environment where it was conducted. In the naming convention used by some NPGS sites, the Name includes the year of the trial, as shown below:
Methods are used in at least twelve dataviews such as Inventory, Inventory Action, Crop Trait Observation, etc. For example, in the Inventory dataview, two different fields are completed by selecting a method: Preservation Method and the Regeneration Method fields.
document.docx P a g e | 10

In the Admin Tool an administrator can display what dataviews use the method_lookup dataview. (Right-click and then select Show Dependencies from the menu.)
Inventory Viability RulesThe germination evaluation methods are stored in the inventory_viability_rule table. (This is a change for the NPGS – in GRIN germination evaluation methods were stored in the Method table.) Therefore, in the Curator Tool, use the inventory_viability_rule dataview to store the germination evaluation protocols.
When recording an inventory viability record, there is a field to select from the list of Inventory Viability Rules (this field is not required).
Region and GeographyThe Region and Geography tables are used by many dataviews. Default geography data can be downloaded during installation. Complete directions for downloading both the Taxonomy and Geography data are in the Installation Guide, but the basic idea is for the administrator to hold the Ctrl + Shift keys before clicking the Download/Install button when using the GG Updater program to install the server components.
RegionThe Region dataview accesses the Region table, which includes world regions and continent information. The region table is used by the geography_map table to group countries into regions. The main fields are continent and sub-continent names and abbreviations. The Import Wizard Cookbook describes a method for quickly importing region data via the Admin Tool Import Wizard, but it is also possible to simply add and edit data in the Region dataview.
document.docx P a g e | 11
GeographyThis dataview accesses the table of countries and their political subdivisions. Former names of countries are also in this table.
GG has a code group, GEOGRAPHY_COUNTRY_CODE, which contains three letter codes. The numbers are for countries that do not have an ISO code (historical areas no longer existing). The ISO codes are three-letter codes.
Users“Setting up users” here is referring to creating Curator Tool user accounts. In some organizations, an administrator may also be creating a few additional administrator accounts as well. Use the Admin Tool to create/modify Curator Tool user accounts.
At a minimum, when adding a new CT user, establish/select the following: User Name and Password Geography and Site codes Enabled (checkbox – denotes the user will be a CT user) Active (checkbox – indicates the user will be an active cooperator) Groups: CT Users
Some organizations may have multiple sites, whereas others may establish just one site – even if the personnel are physically located in remote sites. In the U.S., each genebank location has its own unique site code. (Refer to the Sites and Site Codes section for more details.)
Users accessing the Public Website (PW) do not need the GG administrator to do anything. Any user with a browser can access the organization’s GRIN-Global PW. This assumes that the URL is a publicly available URL. A user can browse the GG Public Website, self-enroll, and create a PW user account similar to the way many websites operate. However, a staff person internal to the organization can have their PW account connected to their Curator Tool (CT) account by the GG administrator (explained below). (The GG administrator manually will use the Admin Tool to manually connect the two accounts.)
document.docx P a g e | 12
Connect User PCs to the Organization’s Production GRIN-Global Server
Curator Tool The Curator Tool (CT) application must be installed on all PCs which will be used to access the GRIN-Global database. Administrators should read and follow the complete CT installation directions that are in the separate GRIN-Global Installation Guide.
Check that each user can login successfully. Ideally the administrator will test the user’s Username and Password and the GG server address on the PC being used to access GRIN-Global.
Public WebsiteUsers access the Public Website via a browser. Ensure that each genebank user knows the correct URL for the Public Website. Other than a browser, no additional software is needed to use a GG Public Website.
The user’s account for the Public Website is for the Public Website only. It is not the same account as the Curator Tool user account. In the PW, a user can self-register and create her own account, or the administrator can create the PW account for her.
Connecting the CT and PW AccountsThe GG database administrator can then connect the two accounts via the Admin Tool. All CT user accounts must be made and edited by the GG administrator. In some organizations, where the user creates her own PW account, the GG admin may wait until later to relate the PW account to the user’s CT account.
Crop DescriptorsBefore observations can be recorded in GG, the traits must be described and any associated trait codes must also be defined. Also, the Taxonomy Crop Map records must be established to relate taxonomic species records to crops. A complete document explains how to set up descriptors, codes, and observations: https://www. grin-global.org/docs/gg_observations_and_descriptors.pdf
Source Habitat CodesFive GRIN-Global tables provide an extremely flexible method for adding details about the collection site; genebank personnel can create custom descriptors and codes for an unlimited amount of detail on the collection site. Possible Source/Habitat descriptors that an organization could record with these descriptors include: Slope, Aspect, Soil pH, and Soil Texture. Details may be found at:
https://www.grin-global.org/docs/gg_source_habitat_descriptors.pdf
document.docx P a g e | 13

Passport Data The list of multi-crop passport descriptors (MCPD), is developed jointly by IPGRI and FAO to provide international standards to facilitate germplasm passport information exchange. In GRIN-Global, the multicrop passport descriptors (MCPD) data, and other data, is distributed across multiple accession tables that are linked to each other.
Complete information about passport data is in the document: https://www. grin-global.org/docs/accessions_and_passport_data.pdf
The main Accession records need to be added before any auxiliary child records are added. After the primary accession records have been added to the database, the adding of the remaining passport data can be addressed. The Curator Toll has an “Accession Wizard” which expedites the inputting of the supplementary at a for one accession at a time, or a user can bulk add data using the CT’s drag-and-drop method for adding data.
InventoryOne general guideline to remember is that inventory must be tied to an accession. Complete information about managing inventory data is in the document: https://www. grin-global.org/docs/gg_inventory.pdf
OrdersComplete information about the Order Wizard and order processing is in the document: https://www. grin-global.org/docs/gg_order_processing.docx
For most new GG installations, order records will typically be new records generated within GRIN-Global after the system is up and running. However, an organization could bulk load orders from some other system by using the Curator Tool’s drag-and-drop method.
Miscellaneous Admin FunctionsGG was designed to be easily customized; some of this configuration is done by the administrator within the Admin Tool. Refer to the Admin Tool Guide and review the main sections. For example, you should review the Web Application section.
Admin Tool Guide
document.docx P a g e | 14

USDA NPGS-Specific Steps to Transition to GGEach NPGS site needs to complete several steps in order to implement GRIN-Global. The directions below summarize these steps. For additional details, consult the available GRIN-Global documentation available online on the NPGS Training Resources Page.
Determine What PCs Will Connect to the GRIN-Global Server with the Curator Tool Since the USDA has not supported the Windows XP operating system since April, 2014, PCs running the GRIN-Global Curator Tool must use either Windows 7 or 8.1. PCs accessing the GG Public Website simply need a relatively current browser.
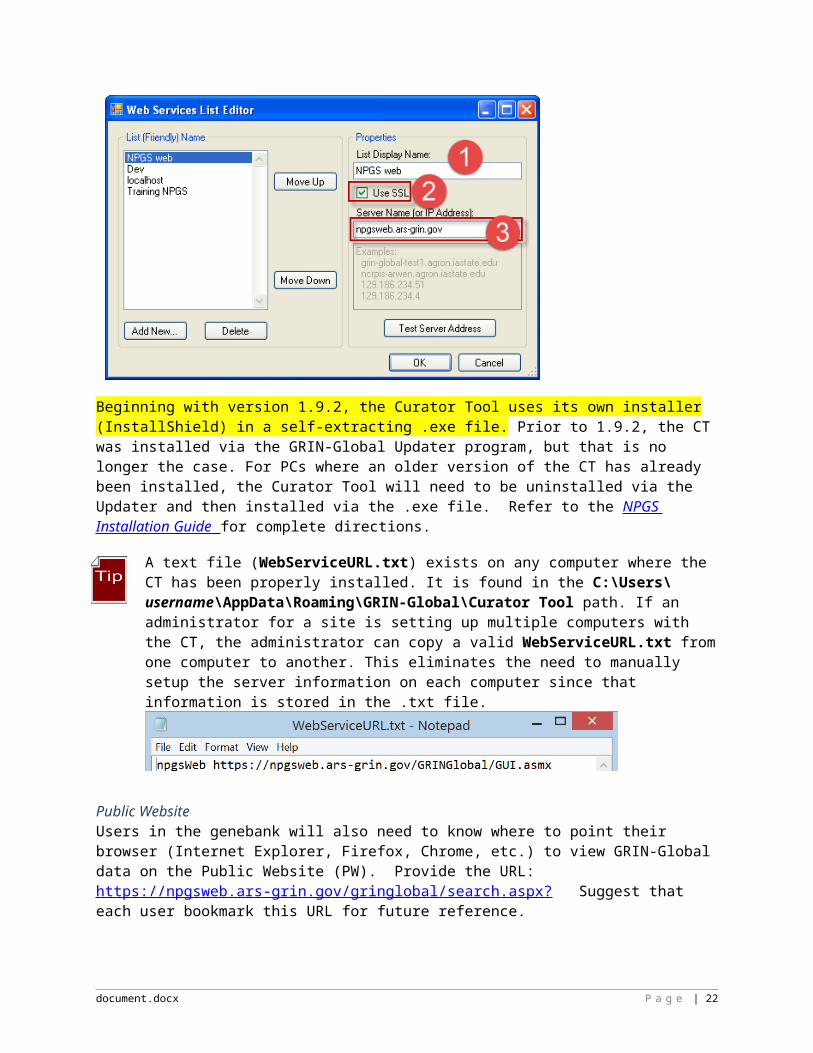
The NPGS GRIN-Global database is stored on a server in Beltsville Maryland and maintained by the Database Management Unit (DBMU). The server’s address is npgsweb.ars-grin.gov.
Determine Who will be the Primary GRIN-Global Site RepresentativeIdentify someone from each site who will be verifying that the GRIN-Global setup has been done properly.
Verify Site UsersThe site’s primary GG person should install the GRIN-Global Curator Tool on at least one PC. Refer to the NPGS Installation Guide for complete directions.
Log in to the Curator Tool and review the names listed in the “Show lists from:” drop down. This list should include all of the site personnel who will be using GRIN-Global. (The GRIN-Global database administrator (Quinn Sinnott) set up each user account and indicated the site code for each user.)
Contact DBMU’s Quinn Sinnott if any site personnel names are missing or if the list displays names that should not have been included for that site.
Curator Tool User Name and Password ConventionsUser NamesBeginning with CT version 1.9.4, the user name is the user’s email address, example: john.doe @ars.usda.gov
PasswordsPasswords must follow the current ARS guidelines:
12 characters minimum at least one of each are required: upper case, lower case, digit, and special character
(virtually any special character is valid)
document.docx P a g e | 15

passwords can change only once per day five failed logins initiates a temporary lockout for 15 minutes
If a password is forgotten or hasn’t been used for some time, the GG administrator must be contacted (to create a new one).
Logging on to the CTYou are not required to VPN or be on the ARS network.
Ensure That the Server Connections are Set Up Properly
Curator ToolThe Curator Tool is the application program that is used by genebank personnel to edit and input GRIN-Global data. Each user at a genebank site will be using the Curator Tool to access GG data. Every genebank PC that will be running the Curator Tool will need to have a copy of the CT installed on the PC.
Beginning with version 1.9.2, the Curator Tool uses its own installer (InstallShield) in a self-extracting .exe file. Prior to 1.9.2, the CT was installed via the GRIN-Global Updater program, but that is no longer the case. For PCs where an older version of the CT has already been installed, the Curator Tool will need to be uninstalled via the Updater and then installed via the .exe file. Refer to the NPGS Installation Guide for complete directions.
A text file (WebServiceURL.txt) exists on any computer where the CT has been properly installed. It is found in the C:\Users\username\AppData\Roaming\GRIN-Global\Curator Tool path. If an administrator for a site is setting up multiple computers with the CT, the administrator can copy a valid WebServiceURL.txt from one computer to another. This eliminates the need to manually setup the server information on each computer since that information is stored in the .txt file.
document.docx P a g e | 16

Public WebsiteUsers in the genebank will also need to know where to point their browser (Internet Explorer, Firefox, Chrome, etc.) to view GRIN-Global data on the Public Website (PW). Provide the URL:https://npgsweb.ars-grin.gov/gringlobal/search.aspx? Suggest that each user bookmark this URL for future reference.
Note that the PW is also the interface your germplasm requestors will be using to review and order GG germplasm data. Provide the GG URL to your user community in your communications and website.
Review Your Data During the Pre-Implementation PeriodDuring the period leading to the implementation date, we recommend that you review a sample of your accession data to confirm that the data was transferred from GRIN properly. At the implementation date, a fresh copy of the GRIN data will be installed on the server and replace the date used during testing.
Immediately After the Implementation
Refresh Lookup TablesAll CT users will need to reload all of their lookup tables. This should be a one time occurrence in production – going forward, the lookups will point to the data records as they change.
Establish Public Website User AccountsThe public will use the GRIN-Global Public Website for reviewing and ordering germplasm. However, genebank personnel will also find the Public Website useful and complementary to the Curator Tool.
There are two main features embedded in the PW that are only available to users with accounts and whose accounts have been given access to these features. The general public will not have access to the Tools option on the PW menu bar, nor will they have access to reports designed specifically for NPGS-use only. Upon request, the NPGS database administrator, Quinn Sinnott, will associate an NPGS user’s account with these features.
The two features available are:
Tools | Web Query SQL queries can be run against the GG database. (Former GRIN SQL users need to be aware that
document.docx P a g e | 17
the fieldnames in GG are different from GC, and that we now are using MS SQL Server and not Oracle, so the SQL statements have slightly different constructs.) There is a growing library of SQL examples available online on the NPGS Training Resource page.
Additional ReportsUnder the Reports menu option, a list of reports is available. This list is still developing, but in the example below, the highlighted report is currently the only list available to the general public, all of the others lists are only available too users who have signed in and whose user account has been given access to these reports.
Ownership: ReviewIn GRIN, the site owned the accession data and all site personnel had the same level of access to the site’s records; in GRIN-Global, records are no longer owned by sites, but by individual cooperators.
In the NPGS, each site needs to evaluate and determine who the record owners should be and what permissions need to be assigned to other site genebank personnel. CT users should refer to the Security section in the Curator Tool User Guide.
In GRIN-Global, an individual owns each data record and can determine what access other individuals can have. “Owner” in this context is the person in GG who can allocate permissions to other individuals. A site may consider the curator as the actual owner of certain accessions, but prefer designating some other employee (e.g. the site primary) as the “owner” within GG since that person will be using GRIN-Global on a daily basis.
There is only one owner per record.
In GRIN-Global it is relatively simple to transfer ownership so that record ownership should not be an issue. However, upon conversion, we recommend that each site review sample records to verify that the ownership rights set up during the conversion from GRIN to GG are what is expected and what the site needs in order to complete their daily procedures. If records have an incorrect owner, then change the ownership to the correct owner or desired owner. This can be done by contacting the incorrect owner
document.docx P a g e | 18
and asking them to transfer ownership to the correct person. Refer to the Security (Ownership & Permissions) section in the Curator Tool User Guide for complete directions.
Permissions: SetAlthough there can only be one owner per record, the owner of a GRIN-Global record can assign permissions to other individuals. Permissions establish who can read, update, create, or delete records. With this flexibility, there are various ways to set up permissions to meet the genebank’s needs. For example, you may have the situation where a student or technician will be uploading observation data or creating action records on an inventory, but they should not be altering the inventory data. Hence they can create new observation or action data, but not update or delete inventory records.
One note about permissions: Just because you may have created the record does not imply that you are automatically the record owner. For example, when creating an inventory record, one of the required fields is Inventory Maintenance Policy. The Inventory Maintenance Policy that is selected determines who the owner is. So in this case, the creator of the inventory record may, or may not be the owner of the inventory record, depending on the Inventory Maintenance Policy (IMP) associated with that inventory record. The owner of the IMP record owns the inventory record. Read also the Inventory Maintenance Policy section for more details.
Establishing permissions for the site’s accessions, inventory, and order records should be completed after record ownership has been verified. Refer to the Security (Ownership & Permissions) section in the Curator Tool User Guide for complete directions.
Codes: VerifyCodes are used throughout the GRIN-Global system to ensure data integrity and avoid typographical errors. The Codes are added and maintained by the GRIN-Global administrator (Quinn Sinnott). When you use the Curator Tool, contact Quinn if you need to have any codes added or edited. The Codes list in dropdowns when editing or adding records.
In Edit mode, dropdowns using the Code Groups are visibly recognized – they initially display [Null]:
Click in the cell, and then click again to display the dropdown menu:
document.docx P a g e | 19
In this example, in the Inventory dataview, the Availability Status field is using codes:
SQL Query for Listing GG Code Groups and CodesUsing the SQL Query option described earlier, it is possible to list all of the codes in the system.
USE gringlobal;SELECT cv.code_value_id as value_id, cv.group_name as group_name, cv.value as gg_value, cvl.title as cvl_titleFROM code_value cv inner join code_value_lang cvl on cv.code_value_id = cvl.code_value_id left join sys_lang sl2 on cvl.sys_lang_id = sl2.sys_lang_id WHERE sl2.sys_lang_id = 1 /* and group_name = 'inventory_action' *//* use and clause to search for a specific code */ORDER BY group_name, gg_value
Inventory Maintenance Policies: Verify Your Site’s Policies are in GGIn dataviews, when editing or adding data, some fields use a “Lookup Picker” to select data from other tables. This is different then when fields use Codes, since codes are displayed in dropdowns. Data displayed in a lookup picker window is data that has been entered into GG by users and is stored in the GG database.
document.docx P a g e | 20

The following illustrates a field using a Lookup Picker to supply its data – in this example, the Inventory Maintenance Policy is highlighted:
This is the lookup picker window that pops up and lists the available Inventory Maintenance Policies:
Since sites are responsible for creating their own Inventory Maintenance Policies, if they need to add one they must create an inventory maintenance policy record. Refer to the instructions for Managing Inventory (this document is listed on the NPGS Training Resources page.).
MethodsThe Methods dataview uses the table of methods and procedures which are used to determine the crop specific attributes of the germplasm. Each environment used in an evaluation should have its own record. The method is primarily used for crop trait evaluations. (For additional background information on methods, refer to the Create Methods section in this document.)
document.docx P a g e | 21
In GG we moved the germination evaluation methods into the inventory_viability_rule table. Instead of the method dataview, use the inventory_viability_rule table for germination evaluation protocols. Raw data can be stored in the inventory_viability_data table, but currently there are no wizards to roll up this raw data into the inventory_viability table.
You should search for your site’s methods to ensure that the methods you will be using in making future observations are in place in GRIN-Global. A simple search in the ST or Dynamic Query in the CT will produce a list of methods records – you can then display them in the CT or drag them into a spreadsheet for further review.
Example:
Sample Dynamic Folder criteria for displaying a site’s Methods:
@method.method_id > 0 AND @site.site_short_name = 'W6' AND @method.name LIKE 'ALFALFA%'
document.docx P a g e | 22
Coordinate Links from Your Site’s Pages to the Public WebsiteFortunately any URL links that worked in GRIN will continue to work in GRIN-Global. This will be accomplished by redirecting, so that you or your users will not need to edit existing links. The following two lines are pointing to the accession:
System URL format
GRIN http://www.ars-grin.gov/cgi-bin/npgs/acc/display.pl?1395885
GRIN-Global https://npgsweb.ars-grin.gov/gringlobal/accessiondetail.aspx?1395885
Future links will of course use the GRIN-Global form.
Prior to implementation, the redirect cannot be tested.
Train Your Requesters / Point to the New GRIN-Global If you use newsletters or other means to regularly communicate with your users, please include a notice about the switch to GRIN-Global. Remind them that there is a Help file (will be substantially updated in December) in the Public Website. [tbd: help videos will also be available at a later date]
Update Your Lookup Tables on Day 1Since NPGS will have been using the same server for testing and then production, when the GRIN database is brought over to the server (date to be determined), users will need to update their PC’s lookup tables. If you think about this, it is necessary because there is an entirely new database –users who have been testing have lookup tables pointing to the test database records.
This is one time when you should use the Load All button. Going forward, you should not need to update all of the lookup tables at one time.
document.docx P a g e | 23