Recipe: Cajun spiced bread rolls - illuminate.digital 4 Recipes... · See fi lm: Bread-making –...
27
© Illuminate Publishing Ltd AQA GCSE Food Preparation and Nutrition by Tull, Littlewood, Maitland, Worger Chapter 4: Functional and chemical properties of food 105–115 Ingredients: 300ml warm water 30ml vegetable oil 15ml tomato paste 500g strong plain white bread flour 1½ tsp paprika pepper 1 tsp cayenne pepper 1 tsp dried oregano ½ tsp freshly ground black pepper 2 cloves garlic, crushed ½ tsp salt ½ tsp sugar 1½ tsp fast acting dried yeast 1 egg You will need a baking tray baking parchment Storage instructions: Freezer: Allow to cool then place in a suitable container or cover carefully with suitably strong foil or plastic and freeze for up to 3 months. See film: Bread-making – bread rolls See animations: Convection and Gluten formation Method: 1. Preheat oven Gas 7/220°C (200°C if you are using a fan oven). 2. Mix the yeast in with the flour, salt, spices, oregano, crushed garlic and sugar together in a mixing bowl. 3. Add the tomato paste to the warm water, pour it into the mixing bowl and use a wooden spoon to mix the ingredients to a dough. 4. Turn the dough out onto the work surface and knead it until it is very smooth and elastic. 5. Divide the dough into 8 pieces. 6. Shape each piece of dough into a roll and place it on a greased and lined baking tray and glaze with beaten egg or oil. 7. Leave the rolls to rise in a warm place for at least 20 minutes. 8. Bake for 15–18 minutes, until well risen, crusty and sounding hollow when tapped. 2.2.1 Proteins – gluten formation Recipe: Cajun spiced bread rolls
Transcript of Recipe: Cajun spiced bread rolls - illuminate.digital 4 Recipes... · See fi lm: Bread-making –...

© Illuminate Publishing Ltd AQA GCSE Food Preparation and Nutrition by Tull, Littlewood, Maitland, Worger
Cha
pte
r 4
: Functio
na
l a
nd
che
mic
al p
rop
ert
ies o
f fo
od
10
5–11
5
Ingredients:
300ml warm water30ml vegetable oil15ml tomato paste500g strong plain white bread fl our
1½ tsp paprika pepper1 tsp cayenne pepper1 tsp dried oregano½ tsp freshly ground black pepper
2 cloves garlic, crushed½ tsp salt½ tsp sugar1½ tsp fast acting dried yeast
1 egg
You will needa baking traybaking parchment
Storage instructions:Freezer: Allow to cool then place in a suitable container or cover carefully with suitably strong foil or plastic and freeze for up to 3 months.
See fi lm: Bread-making – bread rolls
See animations: Convection and Gluten formation
Method:
1. Preheat oven Gas 7/220°C (200°C if you are using a fan oven).
2. Mix the yeast in with the fl our, salt, spices, oregano, crushed garlic and sugar together in a mixing bowl.
3. Add the tomato paste to the warm water, pour it into the mixing bowl and use a wooden spoon to mix the ingredients to a dough.
4. Turn the dough out onto the work surface and knead it until it is very smooth and elastic.
5. Divide the dough into 8 pieces.
6. Shape each piece of dough into a roll and place it on a greased and lined baking tray and glaze with beaten egg or oil.
7. Leave the rolls to rise in a warm place for at least 20 minutes.
8. Bake for 15–18 minutes, until well risen, crusty and sounding hollow when tapped.
2.2.1 Proteins – gluten formation
Recipe: Cajun spiced bread rolls

© Illuminate Publishing Ltd AQA GCSE Food Preparation and Nutrition by Tull, Littlewood, Maitland, Worger
Ingredients:
Marinade1 red pepper1 medium red onion2 skinless, boneless chicken breasts
1 small pinch of ground cumin
1 limeolive oilblack pepper, freshly ground4 small fl our tortillas150ml fat-free natural yogurt50 g Cheddar cheese
For the salsa½–1 fresh red chilli2–3 tomatoes1 small bunch fresh coriander
sea saltblack pepper, freshly ground
See fi lm: Knife skills: preparing fruit and vegetables
See animations: Conduction and Tenderising meat
Method:
1. Slice the chicken into strips. Put the chicken into a bowl with the cumin. Squeeze over the juice of half a lime, drizzle over olive oil, season with a good pinch of pepper and mix well.
2. Put to one side to marinate for about 5 minutes while you make the salsa.
3. Salsa: Finely chop the chilli. Roughly chop the tomatoes and the coriander.
4. Put the chilli and tomatoes into a second bowl, add the juice of half a lime, then stir in the chopped coriander.
5. Tortillas: Halve and de-seed the pepper and cut it into thin strips. Peel, halve, and fi nely slice the onion.
Using a wok or griddle pan, cook the pepper, onion and chicken for 6–8 minutes until the chicken is golden and cooked through.
6. Warm the tortillas in a microwave oven or a warm, dry frying pan.
7. Add the cooked meat to the tortillas, with some salsa, yogurt, and top with cheese.
2.2.1 Proteins – denaturationC
ha
pte
r 4
: Functio
na
l a
nd
che
mic
al p
rop
ert
ies o
f fo
od
10
5–11
5
Recipe: Chicken fajitas (marinade)

© Illuminate Publishing Ltd AQA GCSE Food Preparation and Nutrition by Tull, Littlewood, Maitland, Worger
See fi lm: Knife skills: preparing fruit and vegetables
See animations: Conduction and Convection and Coagulation of protein
Method:
1. Heat the oven to Gas 3/170°C (150°C if you are using a fan oven).
2. Caramel: Dissolve the sugar in the water in a thick-based saucepan and bring it to the boil. Boil gently until the sugar has caramelised. Do not stir the mixture.
3. Immediately and very carefully (caramelised sugar is extremely hot) divide the caramel between the ramekin dishes.
4. Crème: Use a stick blender to whisk or blend the eggs and sugar together, then add the milk and vanilla essence.
5. Divide the egg mixture between the ramekins. Cover them with aluminium foil and bake in the oven in a bain marie for about 30–35 minutes. The water acts as a buffer or barrier between the heat of the oven and the egg mixture, to prevent the egg protein from coagulating too quickly and squeezing out the water it contains.
6. When the crème caramels are cooked, they should be slightly wobbly when gently shaken.
7. Cool and chill the crème caramels before turning them out onto a plate – it takes a few hours for the caramel to dissolve to form a sauce.
8. For crème brulee: Do not put the caramel in the dishes – just the egg mixture. Once the egg mixture has cooked and is cold, sprinkle the tops with brown sugar and put them under a hot grill until melted and bubbling – about 2–3 minutes. Alternatively, use a cook’s blow torch to melt the sugar and caramelise it.
9. Serve with seasonal fruit salad.
Ingredients:(makes 4)
Caramel2 tbsp water80g caster sugar
Crème300ml whole milk2 large eggs25g caster sugar½ tsp vanilla essence
You will need4 ovenproof ramekin dishes that hold at least 130 ml of liquid
aluminium foilbain marie
Storage instructions:Refrigerator: Allow to cool then cover and store in the refrigerator (0°C to below 5°C) for up to 2 days.
A bain marie is a roasting tin containing some water, in which the ramekins are placed before they go into the oven – the water should come about halfway up the side of the ramekins.
Cha
pte
r 4
: Functio
na
l a
nd
che
mic
al p
rop
ert
ies o
f fo
od
10
5–11
52.2.1 Proteins – coagulation
Recipe: Crème caramel

© Illuminate Publishing Ltd AQA GCSE Food Preparation and Nutrition by Tull, Littlewood, Maitland, Worger
Ingredients:(serves 8)
Pastry200g plain fl our100g butter10 tsp cold wateror20cm baked shortcrust pastry fl an case
Filling125ml milk (any type)2 large eggs Pepper to season50g grated Cheddar cheese or similar
1 onion50g mushrooms 1 large tomato
You will need20–23cm fl an tin or dishbaking parchmentbaking beans
See fi lms: Knife skills: preparing fruit and vegetables and Making shortcrust pastry and Lining a � an tin with pastry and Cheese and tomato � an
See animation: Convection and Coagulation of protein
Method:
1. Heat the oven to Gas 6/200°C (190°C if you are using a fan oven).
2. Prepare the pastry.Either: Using your fi ngertips, rub the fat into the fl our until it looks like breadcrumbs. Add the water and mix until a dough forms.Or: Using a processor, put the fl our, butter and water into the processor and process for a few seconds until a dough forms.
3. Knead the pastry lightly until it is smooth.
4. Roll out the dough on a lightly fl oured surface.
5. Line the fl an tin or dish with the pastry – try not to stretch it.
6. Fill the pastry case with baking paper and put some baking beans on top.
7. Blind bake the pastry case for 15 minutes, then remove the baking beans and bake for a few more minutes if necessary.
8. Leave the pastry case to cool slightly.
9. Turn the oven temperature down to Gas 5/190°C (180 °C if you are using a fan oven).
10. Make the fi lling: Dice the onion, wash and slice the mushrooms thinly and grate the cheese.
11. Whisk the eggs and milk together with some pepper.
12. Slice the tomato.
13. Place the onions, mushrooms and then the cheese in the baked pastry fl an case.
14. Carefully pour the milk and egg mixture over the top; do not overfi ll it.
15. Arrange the slices of tomato neatly on top.
16. Place in the oven for 20–25 minutes until coagulated and fi rm and golden brown on top.
17. Serve warm or cold with salad or vegetables.
2.2.1 Proteins – coagulationC
ha
pte
r 4
: Functio
na
l a
nd
che
mic
al p
rop
ert
ies o
f fo
od
10
5–11
5
Recipe: Egg, cheese and tomato fl an

© Illuminate Publishing Ltd AQA GCSE Food Preparation and Nutrition by Tull, Littlewood, Maitland, Worger
Cha
pte
r 4
: Functio
na
l a
nd
che
mic
al p
rop
ert
ies o
f fo
od
10
5–11
52.2.1 Proteins – coagulation
Ingredients:(serves 2)
2 pieces of fresh salmon fi llet, with or without skin
1 tbsp oilseasoning (salt and pepper)100g dried pasta, any type, such as penne
1 can chopped tomatoes (approximately 420 grams)
1 medium onion, fi nely diced2 tbsp oil2 cloves garlic, peeled and fi nely diced
a small handful of fresh basil leaves – torn into small pieces
or 2 tsp dried basil2 tbsp Parmesan or Cheddar cheese, fi nely grated
Storage instructions:Refrigerator: Best eaten on the day it is made, or allow to cool then cover and store in the refrigerator (0°C to below 5°C) for up to 2 days. Reheat thoroughly.
To save ingredients costs, this recipe can be halved.
See fi lm: Knife skills: preparing fruit and vegetables
See animations: Radiation and Conduction
Method:
1. Place the salmon fi llets on a piece of foil on a grill pan – if they have skin, leave it on.
2. Brush the salmon with the oil and season with salt and pepper.
3. Place the salmon fi llets under a hot grill and cook them until the protein has coagulated and the fi sh fl akes separate easily – approximately 10 minutes, depending on the thickness of the salmon fi llet.
4. Meanwhile, boil the pasta in a saucepan, until swollen and tender (about 10 minutes).
5. Sauté the onion and garlic in the oil in a saucepan, until the onion is tender.
6. Add the tomatoes and gently simmer until the tomato sauce has reduced and has thickened slightly.
7. Add some seasoning and the basil.
8. Drain the pasta and divide it between two serving plates.
9. Pour half of the tomato sauce neatly onto the pasta on each plate, then place a fi llet of grilled salmon on top.
10. Scatter with the grated cheese.
11. Garnish with basil and serve hot, with crusty bread and a green salad.
Recipe: Grilled salmon and tomato pasta

© Illuminate Publishing Ltd AQA GCSE Food Preparation and Nutrition by Tull, Littlewood, Maitland, Worger
Cha
pte
r 4
: Functio
na
l a
nd
che
mic
al p
rop
ert
ies o
f fo
od
10
5–11
5
Ingredients:(serves 8)
Pastry200g plain fl our100g butter10 tsp cold waterOr 20cm baked shortcrust pastry fl an case
Filling3 large eggs (yolks) 175ml water 2 level tablespoons cornfl our 50g caster sugar 25g butter or vegetable fat spread (optional)
2 lemons
Meringue3 egg whites (from the fi lling)150g caster sugar
You will need20–23cm fl an tin or dishbaking parchmentbaking beans
See fi lms: Lemon meringue pie and Making shortcrust pastry and Lining a � an tin with pastry and How to separate an egg and Meringues
See animations: Convection and Fat shortening gluten strands and Gas in liquid foams and Gelatinisation
Method:
1. Heat the oven to Gas 6/200°C (190°C if you are using a fan oven).
2. Prepare the pastryEither: Using your fi ngertips, rub the fat into the fl our until it looks like breadcrumbs. Add the water and mix until a dough forms.Or: Using a processor, put the fl our, butter and water in the processor and process for a few seconds until a dough forms.
3. Knead the pastry lightly until it is smooth.
4. Roll out the dough on a lightly fl oured surface.
5. Line the fl an tin or dish with the pastry – try not to stretch it.
6. Line the pastry case with baking parchment and put some baking beans on top.
7. Blind bake the pastry case for 15 minutes, then remove the baking parchment and baking beans and bake for a few more minutes if necessary.
8. Leave the pastry case to cool slightly.
9. Turn the oven temperature down to Gas ½/120°C (100°C if you are using a fan oven).
10. Make the fi lling:Grate the lemon zest fi nely.
11. In a small pan, carefully blend the cornfl our, water, sugar, egg yolks, lemon zest and juice together so that there are no lumps. Add the butter or vegetable fat spread.
12. Heat the fi lling, stirring all the time until the mixture boils and thickens.
13. Pour the fi lling slowly into the baked pastry case and leave to cool while you make the meringue.
14. Make the meringue: Place the egg whites in a clean, dry, grease-free bowl mixing bowl. Make sure there is no egg yolk in the egg whites or grease in the mixing bowl, otherwise they will not produce a foam when you whisk.
15. Whisk the egg whites until they are very stiff.
16. Gradually whisk the sugar, on a medium speed, into the whisked eggs whites. Continue to whisk for a few more seconds until the meringue is white and glossy.
17. Pile the meringue on top of the lemon fi lling.
18. Place in the oven for 30–50 minutes until the meringue is crisp and lightly browned on top.
19. Serve warm or chilled.
2.2.1 Proteins – coagulation
Recipe: Lemon meringue pie

© Illuminate Publishing Ltd AQA GCSE Food Preparation and Nutrition by Tull, Littlewood, Maitland, Worger
Cha
pte
r 4
: Functio
na
l a
nd
che
mic
al p
rop
ert
ies o
f fo
od
10
82.2.1 Proteins
Ingredients:(serves 12 people)
300ml double cream1 large can (~397g) of condensed milk – NOT evaporated milk
3 medium-sized or 2 large lemons – washed
250g plain digestive biscuits (1 small packet)
110g butter (preferably unsalted) or vegetable fat spread
fresh fruit to decoratea fl an dish – approx. 25cm diameter (glass, china or metal)
the recipe can be halved and put into a smaller fl an dish, approx. 16cm diameter.
Storage instructions:Refrigerator: Cover and store in the refrigerator (0°C to below 5°C) for up to 3 days.
Freezer: Can be frozen – best if it is not decorated with fruit. Cover the fl an carefully with suitably strong foil or plastic and freeze for up to 3 months. Defrost thoroughly and then decorate.
N.B. This recipe demonstrates very well how proteins are denatured and coagulated by acids, which is why it has been included here. However, it is an energy dense and fi lling recipe because of its high fat and sugar content. Therefore, only small portions should be served. This fl an will serve at least 12 people.
Method:
1. Melt the butter or vegetable fat spread in a small pan on a low heat or in the microwave oven. Do not let it boil or burn.
2. Crush the digestive biscuits (this can be done in a food processor) and mix them in a bowl with the melted butter.
3. Press the biscuit mixture into the fl an dish base and up the sides of the dish using the back of a metal spoon.
4. In a large bowl, whip the cream carefully, until it forms soft peaks.
5. Add the condensed milk and mix thoroughly.
6. Finely grate the zest (rind) of one of the lemons and squeeze out the juice of both.
7. Add the lemon juice and some of the zest to the cream and condensed milk mixture.
8. Mix together thoroughly – the mixture will thicken as you do this.
9. Put the mixture into the fl an base and spread it out evenly.
10. Put the fl an into the refrigerator to chill.
11. Decorate and serve.
NB This recipe does not work well with oranges as they are not acidic enough.You can use cream cheese instead of the double cream to make a cheesecake.
See fi lms: Whipped cream and Finishing techniques: coulis and Knife skills: cutting fruit and vegetables and Weighing and measuring
See animation: Coagulation
Recipe: Chilled lemon fl an

© Illuminate Publishing Ltd AQA GCSE Food Preparation and Nutrition by Tull, Littlewood, Maitland, Worger
Cha
pte
r 4
: Functio
na
l a
nd
che
mic
al p
rop
ert
ies o
f fo
od
11
22.2.1 Proteins
Ingredients:(serves 8 people)
450g strong plain white bread fl our
½ level teaspoon salt275ml warm water10g fresh yeast or 5g (1 level teaspoon) dried yeast
(if you are using fast action dried yeast, you will need 5g or one sachet from a box of fast acting dried yeast, and should add the yeast directly to the fl our – no need to activate it fi rst)
1 tsp sugar
Storage instructions:Home-made bread rolls are best eaten on the day they are made.
Cover and store them in a cool, dry place.
When they cool down after baking, the water they contain is absorbed back into the starch in the fl our. If they have dried out the next day, put them in a warm oven for a few minutes, and the water will be released as steam and will soften the rolls.
Freezer: Allow to cool. Place the rolls in a suitable container or cover carefully with suitably strong foil or plastic and freeze for up to 3 months.
Variations:You can use 450g strong plain wholemeal fl our instead of white, but you will need an extra 10ml of warm water because the dietary fi bre in the fl our absorbs more of it.
ORYou can use a mixture of 225g strong plain white fl our and 225g strong plain wholemeal fl our but you will need an extra 5ml of warm water because the dietary fi bre in the wholemeal fl our absorbs more of it.
Method:
1. Set the oven: Gas 7/220°C (200°C if you are using a fan oven).
2. If you are using ordinary dried or fresh yeast: Dissolve yeast in the warm water.
3. Add the sugar and stir well.
4. Leave the yeast liquid to activate (start producing bubbles of gas) in a warm place for approx. 5 minutes.
5. If you are using fast action dried yeast: stir the yeast directly into the fl our.
6. Add salt to the fl our in a large bowl and mix it in well.
7. Add the yeast liquid/warm water to the fl our and stir well with a wooden spoon until it is mixed to a dough.
8. Put a little fl our onto the work surface and knead the dough for at least 5 minutes. It should be stretchy and smooth.
9. Cut the dough into eight pieces and shape them into bread rolls. The rolls can be covered in greased cling fi lm to prevent a skin forming, which might prevent them from rising.
10. Put the rolls on a greased/lined baking tray and leave them to rise in a warm place for at least 15 minutes.
See fi lms: Bread making: bread rolls and Weighing and measuring
See animations: Yeast and Gluten and Convection and Conduction
11. Glaze with beaten egg and sprinkle with poppy or sesame seeds.
12. Bake the rolls for 15 minutes until they are well risen and golden brown. The cooked rolls should sound hollow when you tap them underneath with your fi nger.
Recipe: Bread rolls

© Illuminate Publishing Ltd AQA GCSE Food Preparation and Nutrition by Tull, Littlewood, Maitland, Worger
Ingredients:(makes 8–10)
500g strong white bread fl our
½ tsp salt1½ tsp easy-blend dry yeast (add directly to the fl our)
275ml warm water2 onions, fi nely diced30g butter or 2 tbsp oilground black or white pepper
vegetable or olive oil for glazing
You will needa baking tray
See fi lms: Bread making – bread rolls and Knife skills: preparing fruit and vegetables
See animations: Convection and Gluten formation
Method:
1. In a shallow frying pan, on a medium heat, sauté the onions in the butter or oil until they are golden and caramelised. Stir them frequently so that they do not burn.
2. Season the onions well and tip them, with the juices from the pan they were cooked in, into a bowl to cool for about 10 minutes.
3. Sieve the fl our, yeast and salt into a mixing bowl.
4. Add the caramelised onions.
5. Pour the warm water into the fl our.
6. Mix with a wooden spoon to an elastic dough and knead for 5 minutes. Depending on how juicy the onions are, you may fi nd that you need to add a little more fl our to the dough so that you can handle it easily.
7. Divide and shape the dough into 8–10 rolls and place them on a greased baking tray. Rub a little oil onto the outside of the rolls.
8. Leave the rolls in a warm place until risen well (around 15–20 minutes).
9. Bake at Gas 7/220°C (200°C if you are using a fan oven) for 15 minutes.
10. The rolls should sound hollow when they are cooked and be well risen and crusty.
When bread cools down after baking, the water they contain is absorbed back into the starch in the fl our. If the rolls have dried out the next day, put them in a warm oven for a few minutes – the water will be released as steam and will soften them.
2.2.2 Carbohydrates – caramelisationC
ha
pte
r 4
: Functio
na
l a
nd
che
mic
al p
rop
ert
ies o
f fo
od
11
6–12
6
Recipe: Caramelised onion bread rolls

© Illuminate Publishing Ltd AQA GCSE Food Preparation and Nutrition by Tull, Littlewood, Maitland, Worger
See fi lms: Knife skills: preparing fruit and vegetables and Making pasta and Béchamel sauce
See animations: Convection and Conduction and Gelatinisation of starch
Method:
1. Meat sauce: Fry the mince and chopped onion in a pan.
2. Add the tinned tomatoes, tomato purée, chopped mushrooms, vegetables and seasoning.
3. Simmer the meat sauce for 10 minutes.
4. Cheese sauce: Make the cheese sauce by the all-in-one method. Put the milk, fl our and fat in a pan. Bring to the boil, stirring all the time.
5. Add half the cheese.
6. Put a layer of meat sauce, then lasagne sheets, then cheese sauce, into an ovenproof dish. Repeat. Finish with a layer of cheese sauce.
7. Sprinkle the top with the remaining cheese.
8. Bake at Gas 6/200°C (190°C if you are using a fan oven) for 40 minutes until the top is golden brown.
Ingredients:
Meat sauce400g minced beef1 tin (400g) tomatoes50g tomato purée50g mushrooms1 onionherbs
Optionalpepper, carrot, courgette
Cheese sauce500ml milk50g soft fat or butter50g plain fl our100g cheese (grated)
Lasagne150g lasagne sheets
You will needa large ovenproof dish
Cha
pte
r 4
: Functio
na
l a
nd
che
mic
al p
rop
ert
ies o
f fo
od
11
6–12
62.2.2 Carbohydrates – gelatinisation
Recipe: Meat lasagne

© Illuminate Publishing Ltd AQA GCSE Food Preparation and Nutrition by Tull, Littlewood, Maitland, Worger
2.2.2 Carbohydrates – gelatinisationC
ha
pte
r 4
: Functio
na
l a
nd
che
mic
al p
rop
ert
ies o
f fo
od
11
6–12
5
See fi lms: Knife skills: preparing fruit and vegetables and Making pasta and Tomato sauce
See animation: Convection
Method:
1. To make the pasta: Weigh the fl our and add it to the food processor.
2. Add the egg and the egg yolk.
3. Pulse the machine until the mixture begins to look like breadcrumbs.
4. Process it until the mixture forms a soft ball of dough.
5. Place the dough onto a fl oured work top, knead it until it is smooth and form it into a ball.
6. Wrap the ball of dough in cling fi lm and leave it to rest in a cool place for 20 minutes before using it. This will allow the gluten to develop and the water from the eggs to be absorbed by the fl our. The longer you leave it, the more manageable it will become.
7. Cut the dough into two pieces. Flatten each piece with a rolling pin, or your hands, until it is about 5mm thick.
8. Fold the dough and pass it through the pasta machine at its widest setting, refolding and re-rolling several times without changing the setting. Do this until you have a rectangular shape approximately 7.5cm x 18cm. If you do not have a pasta machine, use a rolling pin to roll it thinly.
9. Repeat with the second piece of dough.
10. To thin the pasta, start with the pasta machine at its widest setting and pass the dough through the rollers.
11. Do not fold the pasta dough but repeat this process, decreasing the width setting of the roller each time, until you reach the narrowest setting.
12. For most uses, take the pasta down to the thinnest setting – especially for ravioli, as you will be sandwiching two layers together when it is folded.
13. Wrap the fresh pasta in a damp cloth if you are not using it straight away, so that it does not dry out and become diffi cult to use.
14. For the spinach and ricotta fi lling: Bring 100ml of water to the boil in a medium pan and add the spinach. Cook for 2 minutes, or until the spinach has wilted.
15. Remove the spinach from the pan and drain the water away through a sieve. Squeeze the spinach with the back of a wooden spoon in the sieve, then fi nely chop it on a board or plate.
16. Mix all of the fi lling ingredients with the spinach, except the whole beaten egg, until well combined. Leave it in the refrigerator to fi rm up slightly.
17. To make the ravioli: Put a pasta sheet onto the worktop and place a heaped teaspoon of the ricotta mixture at equal intervals in rows and columns along the pasta. Brush a little of the beaten egg around each heap of fi lling then lay another pasta sheet on top and carefully press down around each fi lling ball to remove any air.
18. Cut into squares or rounds with a pastry cutter or knife, then dust with semolina fl our and set aside while you fi nish making the rest of the ravioli.
19. To cook the spinach and ricotta ravioli: Half-fi ll a large pan with water and bring it to the boil. Drop the ravioli into the water in small batches and cook until they fl oat to the surface.
20. To prepare the sauce: Heat the oil in a medium pan and gently cook the garlic for just a minute – do not let it burn otherwise it will taste bitter.
21. Add the tomatoes, salt, pepper and pepper fl akes and cook over a medium to low heat for 10 minutes.
22. Turn off the heat, stir in the chopped basil an d mix well.
23. Keep the sauce warm while you cook the pasta.
24. Drain the ravioli and return to the pan. Pour half of the sauce mixture into the pan and carefully stir until the ravioli is lightly coated.
25. Serve the ravioli hot with some more sauce and grated cheese.
Ingredients:
For the pasta200g 00 pasta fl our1 egg1 egg yolk
For the fi lling100g spinach leaves – cooked in a little boiling water, drained thoroughly and chopped
100g ricotta or feta cheese – grated
100g fresh breadcrumbs1 egg yolk1 whole egg¼ tsp grated nutmegSeasoning
Tomato sauce1 tablespoon rapeseed or olive oil
1 garlic clove¼ tsp dried red pepper fl akes
1 can chopped tomatoes – approximately 400g
salt & pepper a small handful of fresh basil leaves – torn into small pieces
Recipe: Spinach and ricotta ravioli and tomato sauce
© Illuminate Publishing Ltd AQA GCSE Food Preparation and Nutrition by Tull, Littlewood, Maitland, Worger
Ingredients:
250g self-raising fl our50g vegetable fat spread or butter
150ml milk1 tsp dried mixed herbs50g sundried tomatoes, fi nely chopped
100g Cheddar cheese, fi nely grated
You will needa round cake tinbaking parchment
Storage instructions:Refrigerator: Best eaten on the day they are made, or, allow to cool then cover and store in an airtight box for 2–3 days.
Can be frozen for up to 6 months.
See fi lm: Shortcrust pastry
See animations: Convection and Fat shortening gluten strands
Method:
1. Heat the oven to Gas 5/190°C (180°C if you are using a fan oven.
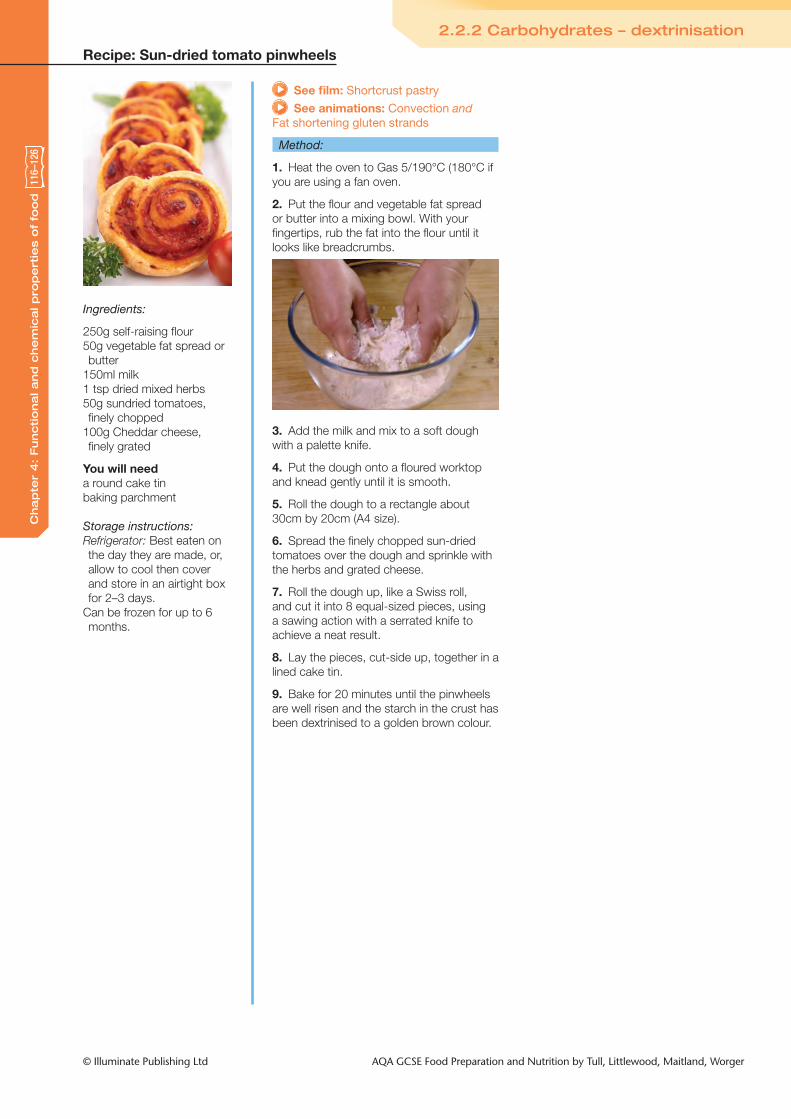
2. Put the fl our and vegetable fat spread or butter into a mixing bowl. With your fi ngertips, rub the fat into the fl our until it looks like breadcrumbs.
3. Add the milk and mix to a soft dough with a palette knife.
4. Put the dough onto a fl oured worktop and knead gently until it is smooth.
5. Roll the dough to a rectangle about 30cm by 20c m (A4 size).
6. Spread the fi nely chopped sun-dried tomatoes over the dough and sprinkle with the herbs and grated cheese.
7. Roll the dough up, like a Swiss roll, and cut it into 8 equal-sized pieces, using a sawing action with a serrated knife to achieve a neat result.
8. Lay the pieces, cut-side up, together in a lined cake tin.
9. Bake for 20 minutes until the pinwheels are well risen and the starch in the crust has been dextrinised to a golden brown colour.
2.2.2 Carbohydrates – dextrinisationC
ha
pte
r 4
: Functio
na
l a
nd
che
mic
al p
rop
ert
ies o
f fo
od
11
6–12
6
Recipe: Sun-dried tomato pinwheels
© Illuminate Publishing Ltd AQA GCSE Food Preparation and Nutrition by Tull, Littlewood, Maitland, Worger
Cha
pte
r 4
: Functio
na
l a
nd
che
mic
al p
rop
ert
ies o
f fo
od
12
02.2.2 Carbohydrates
Ingredients:(serves 4–6 people)
Tomato mixture1 tbsp oil1 medium onion – chopped fi nely
1 clove garlic – crushed1 aubergine (egg plant) – diced
1 pepper – diced1 courgette – diced1 400g can of chopped tomatoes
1 tsp dried mixed herbs
Spinach mixture150g spinach – washed well1 egg200g ricotta cheeseblack pepper and nutmeg
Béchamel sauce:25g butter or vegetable fat spread
25g plain fl our300ml milk70g Cheddar cheese – grated
8–10 sheets of dried lasagne pasta (depending on the size of your dish) (fresh pasta could be made)
You need a medium shallow ovenproof dish or baking tin.
Storage instructions:Refrigerator: Allow to cool then cover and store in the refrigerator (0°C to below 5°C) for up to 3 days.
Freezer: Can be frozen. Allow to cool completely then cover the dish with suitably strong foil or plastic and freeze for up to 3 months.
Method:
1. Preheat the oven to Gas 4/180°C (170°C if you are using a fan oven).
2. Heat the oil in a pan; add the chopped onion and garlic and sauté until softened.
3. Add the diced aubergine, pepper, courgette, tomatoes and dried herbs.
4. Season with salt and pepper and simmer for 20 minutes.
5. In a large saucepan, simmer the spinach in 100ml water for a few minutes until it has softened and wilted, then drain it and squeeze out any water.
6. Place the spinach in a food processor with the ricotta and egg and blend until smooth (or put these into a bowl and beat well with a wooden spoon). Season with black pepper and some grated nutmeg.
7. Make the Béchamel sauce by melting the butter in a small pan – do not let it burn.
8. Add the fl our and cook for 1 minute. Remove the pan from the heat and gradually add the milk to make a smooth liquid.
9. Reheat the sauce, stirring all the time until it has thickened. Simmer it for 3–4 minutes.
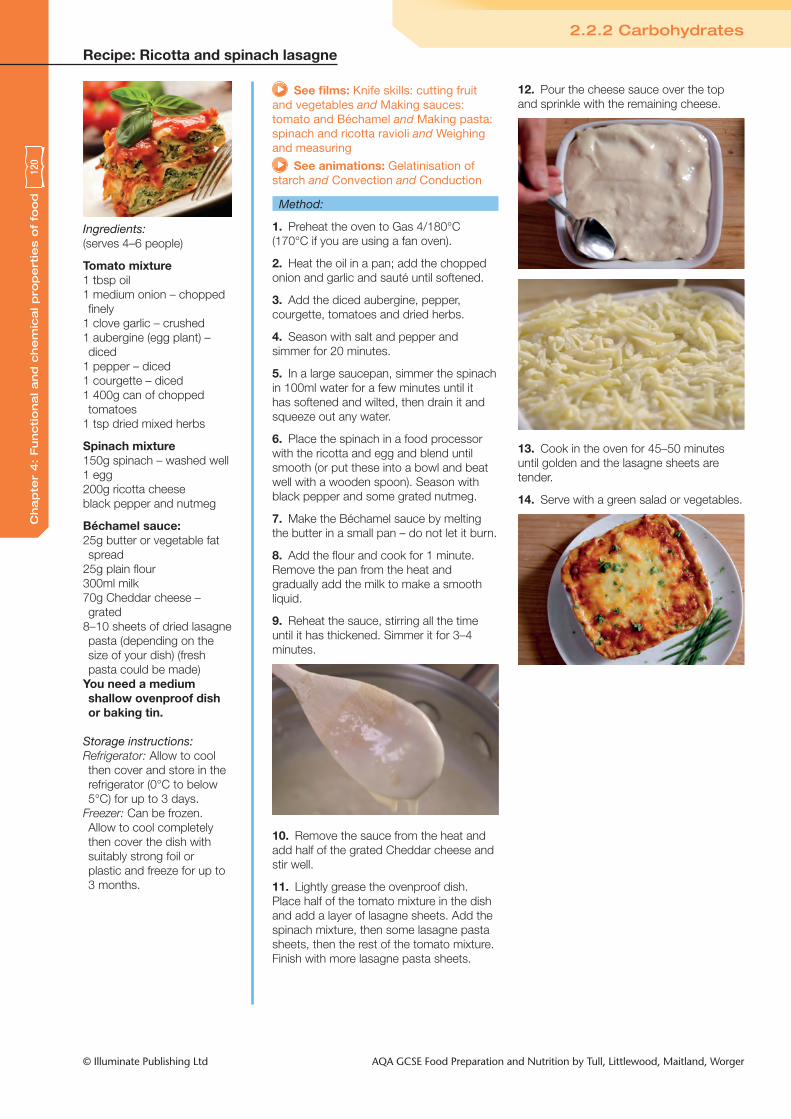
10. Remove the sauce from the heat and add half of the grated Cheddar cheese and stir well.
11. Lightly grease the ovenproof dish. Place half of the tomato mixture in the dish and add a layer of lasagne sheets. Add the spinach mixture, then some lasagne pasta sheets, then the rest of the tomato mixture. Finish with more lasagne pasta sheets.
See fi lms: Knife skills: cutting fruit and vegetables and Making sauces: tomato and Béchamel and Making pasta: spinach and ricotta ravioli and Weighing and measuring
See animations: Gelatinisation of starch and Convection and Conduction
12. Pour the cheese sauce over the top and sprinkle with the remaining cheese.
13. Cook in the oven for 45–50 minutes until golden and the lasagne sheets are tender.
14. Serve with a green salad or vegetables.
Recipe: Ricotta and spinach lasagne
© Illuminate Publishing Ltd AQA GCSE Food Preparation and Nutrition by Tull, Littlewood, Maitland, Worger
Cha
pte
r 4
: Functio
na
l a
nd
che
mic
al p
rop
ert
ies o
f fo
od
12
42.2.2 Carbohydrates
Ingredients:(serves 6 people)
1 tbsp oil2 onions, peeled and fi nely sliced
225g fi lo pastry sheets50g butter, melted gently75g goat’s cheese or feta cheese
1 tsp dried thyme or mixed herbs
Storage instructions:Refrigerator: Allow to cool then cover and refrigerate for up to 3 days.
Freezer: Allow to cool. Place in a suitable container or cover carefully with suitably strong foil or plastic and freeze for up to 3 months. Defrost thoroughly then warm the tart in the oven to crisp up the fi lo pastry.
Method:
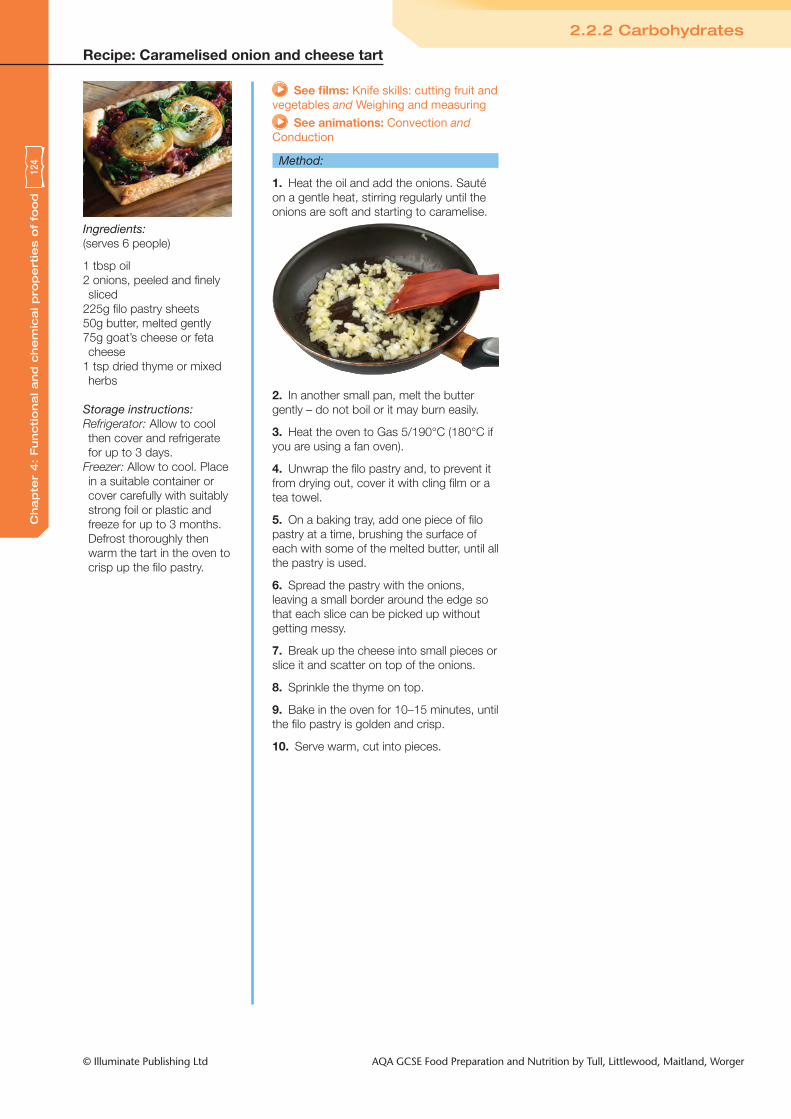
1. Heat the oil and add the onions. Sauté on a gentle heat, stirring regularly until the onions are soft and starting to caramelise.
2. In another small pan, melt the butter gently – do not boil or it may burn easily.
3. Heat the oven to Gas 5/190°C (180°C if you are using a fan oven).
4. Unwrap the fi lo pastry and, to prevent it from drying out, cover it with cling fi lm or a tea towel.
5. On a baking tray, add one piece of fi lo pastry at a time, brushing the surface of each with some of the melted butter, until all the pastry is used.
6. Spread the pastry with the onions, leaving a small border around the edge so that each slice can be picked up without getting messy.
7. Break up the cheese into small pieces or slice it and scatter on top of the onions.
8. Sprinkle the thyme on top.
9. Bake in the oven for 10–15 minutes, until the fi lo pastry is golden and crisp.
10. Serve warm, cut into pieces.
See fi lms: Knife skills: cutting fruit and vegetables and Weighing and measuring
See animations: Convection and Conduction
Recipe: Caramelised onion and cheese tart

© Illuminate Publishing Ltd AQA GCSE Food Preparation and Nutrition by Tull, Littlewood, Maitland, Worger
See fi lms: Hollandaise sauce and How to separate an egg
See animations: Emulsi� cation and Conduction
Method:
1. Separate the egg yolk from the egg white. The egg white can be frozen for later use.
2. Melt the butter in a small pan. When it is melted, transfer it to a measuring jug. Do not let the butter heat up too much, otherwise it will burn.
3. Beat the egg yolk in a bowl and place it over a pan of gently simmering water.
4. Add the lemon juice and mustard powder.
5. Whisk the ingredients vigorously, using a balloon whisk or an electric hand whisk. This process thoroughly mixes the acid in the lemon juice with the egg yolk, and helps the development of an oil-in-water emulsion. The mustard powder acts as a stabiliser, helping to prevent the emulsion from splitting.
6. Gradually add small amounts (approximately 1 tsp at a time) of melted butter to the egg yolk, whisking very well after each addition.
7. Continue adding the butter in stages, whisking well each time, until all the butter has been incorporated into the egg mixture. It is very important that this process is done slowly to allow the emulsion to form and to prevent the sauce from splitting. Whisking the egg and butter mixture over simmering water allows the gentle coagulation of the egg yolk and this helps to stabilise the emulsion as the butter is added.
8. When all the butter is added, the sauce should be smooth and thickened. If it is too thick, add a little white wine vinegar and whisk until the sauce is the right consistency.
9. The fi nished sauce should be thick and not separated, split or curdled. If this happens then the emulsion has not worked. The emulsifying agent lecithin in the egg yolk and the stabilising action of the mustard powder help to maintain the emulsion.
10. If you notice that the mixture is starting to split:Either: Remove it from the heat, drop in an ice cube and whisk it in. The ice cube cools the sauce down and allows the mixture to stabilise.Or: Add a tablespoon of boiling water and whisk vigorously. The boiling water will coagulate the egg yolk and stabilise the emulsion.
Cha
pte
r 4
: Functio
na
l a
nd
che
mic
al p
rop
ert
ies o
f fo
od
12
6–14
0
Ingredients:
1 egg50 g unsalted butter½ tbsp lemon juicepepper½ tsp mustard powder
Service suggestionsEggs Benedict: Pour the sauce over poached eggs, toasted muffi ns and smoked salmon.
As a sauce: Pour it over steamed vegetables (such as green beans, asparagus), roasted root vegetables (such as carrots, parsnips), boiled potatoes – or poached or baked fi sh such as salmon
As this sauce uses raw egg, it is very important to use it within 2 hours to avoid salmonella food poisoning. You could use pasteurised egg instead, which would reduce the risk.
2.2.3 Fats and oils – emulsifi cation
Recipe: Hollandaise sauce

© Illuminate Publishing Ltd AQA GCSE Food Preparation and Nutrition by Tull, Littlewood, Maitland, Worger
Cha
pte
r 4
: Functio
na
l a
nd
che
mic
al p
rop
ert
ies o
f fo
od
12
6–14
02.2.3 Fats and oils
Ingredients:
20g soft butter125g good dark chocolate(minimum 70% cocoa solids) – chopped into small pieces
30ml hot water (from a recently boiled kettle)
150ml double or whipping cream
½ teaspoon vanilla extract2 very fresh egg whites* or1½ tbsp dried egg white + 3 tbsp water
1 tbsp caster sugar
Storage instructions:Refrigerator: Cover and store in the refrigerator (0° to below 5°C) for up to 3 days.
Freezer: Can be frozen. Coverwith suitably strong foil or plastic
Method:
1. Put the butter, chocolate and hot water into a small saucepan.
2. Put the saucepan on the hob, over a low heat, to melt the butter and chocolate, stirring every now and again. When it has melted, remove the pan from the heat.
3. Meanwhile, whip the cream until thick and add the vanilla extract.
4. Fold the whipped cream into the cooling chocolate mixture until a smooth mixture forms.
5. Whisk the dried egg white and 3 tbsp water in a mixing bowl until thick and foamy, or whisk the egg whites* in a clean, dry mixing bowl until thick and foamy.
6. Whisk the caster sugar into the egg white meringue. Fold the meringue into the mixture until well combined.
7. Place the mixture into glasses or ramekins and chill.
8. Decorate with chocolate decorations, nuts, fruit or grated chocolate.
* It is very important to use fresh, good quality eggs for this recipe to avoid a food safety risk. When you buy eggs, look out for the British Lion Quality stamped eggs, which is an assurance that the eggs have been produced to the highest standards of food safety.
See fi lms: Whipped cream and Finishing techniques: chocolate leaves and Finishing techniques: melting chocolate and Weighing and measuring
See animation: Gas in liquid foams
Recipe: Easy chocolate mousse

© Illuminate Publishing Ltd AQA GCSE Food Preparation and Nutrition by Tull, Littlewood, Maitland, Worger
Cha
pte
r 4
: Functio
na
l a
nd
che
mic
al p
rop
ert
ies o
f fo
od
12
6–14
0
Ingredients:
4 level tbsp Parmesan cheese, grated
25g butter or vegetable fat spread
50g fresh white breadcrumbs
100g Gruyère or Cheddar cheese, grated
75g watercress or spinach3 large eggs, separated into yolks and whites
150ml single cream or whole milk
2 tbsp hot water
Filling200g salmon fi llet, pan fried, baked or steamed, and cooled
100g cream cheesejuice of 1 lemonblack pepper, freshly ground
You will needa Swiss roll tinbaking parchmenta clean, damp tea towelgreaseproof paper
Storage instructions:Refrigerator: Cover and store (0°C to below 5°C) for up to 2 days.
To save costs, this recipe can be halved and baked in a smaller baking tray.
See fi lms: How to separate an egg and Filleting a � sh
See animation: Gas in liquid foams
Method:
1. Heat the oven to Gas 6/200°C (190°C if you are using a fan oven).
2. Line a Swiss roll tin with baking parchment.
3. Spread the softened butter or vegetable fat spread over the paper and sprinkle with the Parmesan cheese.
4. In a bowl, mix the breadcrumbs with the grated Gruyère or Cheddar cheese.
5. Wash and dry the watercress or spinach and remove the tough stalks.
6. Chop the watercress or spinach fi nely and add to the cheese and breadcrumbs.
7. Stir in the egg yolks, cream or milk, the hot water and some ground black pepper.
8. In a clean, dry bowl, whisk the egg whites until they are stiff, then carefully fold them into the cheese and breadcrumb mixture.
9. Pour the mixture into the Swiss roll tin and level it carefully with a knife.
10. Bake for 10–15 minutes, until it is well risen and springy to the touch.
11. Remove the roulade from the oven and leave it to cool in the tin, covered with a clean sheet of baking parchment and a clean, damp tea towel.
12. Soften the cream cheese by stirring it with a wooden spoon.
13. Chop the cooked and cooled salmon into small pieces and mix it with the cheese.
14. Add the lemon juice and season to taste with black pepper.
15. Carefully tip out the roulade from the tin onto a piece of baking parchment.
16. Spread the salmon mixture over the roulade and roll it up from the long side. Wrap it in greaseproof paper and store in the fridge until required.
17. Cut into neat slices and garnish with lemon slices.
2.2.3 Fats and oils – aeration
Recipe: Watercress and salmon roulade

© Illuminate Publishing Ltd AQA GCSE Food Preparation and Nutrition by Tull, Littlewood, Maitland, Worger
2.2.3 Fats and oilsC
ha
pte
r 4
: Functio
na
l a
nd
che
mic
al p
rop
ert
ies o
f fo
od
12
8
Ingredients:
Basic cake mix225g self-raising fl our50g cocoa powder (not drinking chocolate)
1 tsp baking powder225g softened butter or vegetable fat spread
175g caster sugar3 large eggs2 tbsp milkgrated zest of an orange (optional)
Frosting175g icing sugar25g cocoa70g butter or vegetable fat spread (softened)
juice of the orange
Decorations, e.g. grated chocolate, chocolate leaves, orange glacé slices, fi nely chopped pistachio nuts or almonds
Storage instructions:Store the cake in an airtight tin or box at room temperature for up to 5 days.
Freezer: Can be frozen for up to 6 months, but must be well wrapped and protected from drying out and being damaged in the freezer.
Variations:Instead of using cocoa powder and orange zest in the cake and frosting, the following fl avourings could be used:
For the cake:Vanilla – add 1 tsp vanilla extract
Lemon drizzle – add the fi nely grated zest of 2 lemons to the mixture. To make the drizzle, squeeze the juice of the lemons and stir it into 2 tbsp icing or caster sugar, and pour over the top of the cakes as soon as they come out of the oven (make a few holes in the top of the cakes with a skewer fi rst).
Method:
1. Basic cake mix: place all the ingredients for the basic cake mix into a mixing bowl and whisk at medium speed with an electric whisk, or beat well with a wooden spoon until well mixed and light in texture and colour.
2. Divide the mixture evenly between two 20cm sandwich cake tins, which have been greased or lined with non-stick paper.
3. Spread the mixture out evenly using a palette knife or the back of a spoon.
4. Bake at Gas 4/190°C (180°C if you are using a fan oven) for 20–25 minutes until the cakes are well risen and spongy to the touch.
5. Turn the cakes out onto a cooling rack and allow them to cool.
6. Frosting: whisk or beat together the sieved icing sugar, cocoa and softened butter or vegetable fat spread until well mixed – it may be a bit dry at this stage but that is quite normal. Add the orange juice, a teaspoonful at a time, until the mixture is smooth, creamy and easy to spread.
7. Spread some of the frosting onto one of the cooled cakes and sandwich both of the cakes together.
8. Spread more frosting on the top of the cake and, if you have enough left, you can then pipe it onto the top of the cake with a star nozzle and piping bag to decorate.
9. Add your other decorations to fi nish the cake.
This cake can also be coated and decorated with chocolate ganache.
See fi lms: Finishing techniques: chocolate leaves and Weighing and measuring and Chocolate ganache and Making chocolate leaves
See animations: Coagulation of protein and Expansion of gases inside baked mixtures and Convection and Conduction
Chocolate ganache:
For a cake fi lling or for a thick glaze to go on the top of a cake, equal quantities of chocolate and double cream are needed, e.g. 300g of double cream and 300g of dark chocolate (70–75% cocoa solids is best).
1. Chop the chocolate into small pieces.
2. Pour the cream into a pan and heat it gently on a low heat on the hob for a few minutes.
It is important not to overheat the cream – it only needs to be warm enough to melt the chocolate. Carefully test – it should feel comfortably warm.
3. Remove the cream from the hob. Add the chocolate to the cream. Stir it gently then leave it for several minutes to give the chocolate time to melt.
4. Stir the ganache with a balloon whisk or wooden spoon until it all looks the same colour and consistency.
5. The longer it is allowed to cool, the thicker the ganache will get.
6. For piping decorations onto a cake, the ganache needs to be completely cold. Give it a thorough stir before you use it for piping.
Recipe: All-in-one chocolate and orange cake

© Illuminate Publishing Ltd AQA GCSE Food Preparation and Nutrition by Tull, Littlewood, Maitland, Worger
Cha
pte
r 4
: Functio
na
l a
nd
che
mic
al p
rop
ert
ies o
f fo
od
13
22.2.3 Fats and oils
Ingredients:(serves 6 people)
Pastry200g soft plain fl our (white or wholemeal)
100g block vegetable fat or butter
1 tsp mixed dried herbs10 tsp (50 ml) cold water1 egg, beaten (for glazing the pastry)
Filling1 small onion – fi nely chopped
1 stalk celery – fi nely diced1 small potato – peeled or unpeeled and fi nely diced
1 small carrot – peeled and fi nely diced
25g butter or 1½ tbsp vegetable oil
50g strong Cheddar cheese – grated
black pepper
Storage instructions:Refrigerator: Cover and store in the refrigerator (0°C to below 5°C) for up to 3 days.
Freezer: Can be frozen. Cover with suitably strong foil or plastic and freeze for up to 3 months, then defrost and warm before serving.
Method:
1. Heat oven to Gas 6/200°C (190°C if you are using a fan oven).
2. Filling: sauté the onion and celery in the butter or oil until softened in a saucepan.
3. In another pan, boil the potato and carrot in water until just tender (about 10 minutes) – drain and mix with the onion/celery. Remove the pan from the heat.
4. Add the cheese and mix well – season with the pepper. Allow the fi lling to cool while you make the pastry.
5. Pastry – rub the vegetable fat spread or butter into the fl our until it looks like breadcrumbs. Add the dried herbs, then the cold water and mix to a smooth dough. (The pastry can be made in a food processor to save time.)
6. Roll the pastry out carefully and cut it into 5–6 circles, each about the size of a saucer.
See fi lms: Shortcrust pastry and Knife skills: cutting fruit and vegetables and Weighing and measuring
See animations: Shortening and Convection and Conduction
7. Place some of the fi lling mixture in the centre of each of the circles of pastry – dampen the edges with water and fold and seal the edges together. Neaten the edges by pressing them with a fork or using your fi ngers to ‘fl ute’ them into a wavy line.
8. Glaze the pastry with beaten egg.
9. Bake in the oven for 12–15 minutes until crisp and golden.
10. Serve warm or cold with salad and a tomato salsa.
Variations:Meat version: instead of cheese, use 75g lean minced beef – dry fry in a pan until browned all the way through and add to the cooked vegetables.
Empanadas: these are a different version of pasties, traditional in countries such as Spain, Portugal and Argentina. The fi llings are usually meat-based and made using spices. The pastry ingredients can vary slightly but you can use the recipe below.
Spiced chicken empanadas
Ingredients:2 chicken thighs½ tbsp olive oil1 small onion – fi nely diced1 garlic clove – crushed50g chorizo sausage – fi nely diced¼ tsp cumin seeds¼ tsp paprika25g raisins, sultanas or fi nely diced dried apricots
salt and pepper
Method:
1. Roast the chicken in a preheated oven Gas 6/200°C (190°C if you are using a fan oven) for 20–25 minutes until cooked right through (minimum core temperature 70°C).
2. In a medium pan, sauté the onion in the oil until softened (about 8–10 minutes).
3. Add the other fi lling ingredients and heat through for 5 minutes.
4. Remove any bone and skin from the chicken and chop it into small pieces. Mix with the rest of the fi lling ingredients and turn into empanadas.
5. Bake for the same time as the pasties.
Recipe: Cheese and vegetable pasties
© Illuminate Publishing Ltd AQA GCSE Food Preparation and Nutrition by Tull, Littlewood, Maitland, Worger
Cha
pte
r 4
: Functio
na
l a
nd
che
mic
al p
rop
ert
ies o
f fo
od
14
22.2.4 Raising agents
Ingredients:(serves 8 people)
3 eggs75g caster sugar75g plain fl our
Filling3 tbsp jam
Storage instructions:Allow to cool then store in an airtight tin or box for up to 2 days.
Can be frozen for up to 3 months.
Method:
1. Heat the oven – Gas 6/200°C (190°C if you are using a fan oven).
2. Grease and line a Swiss roll tin.
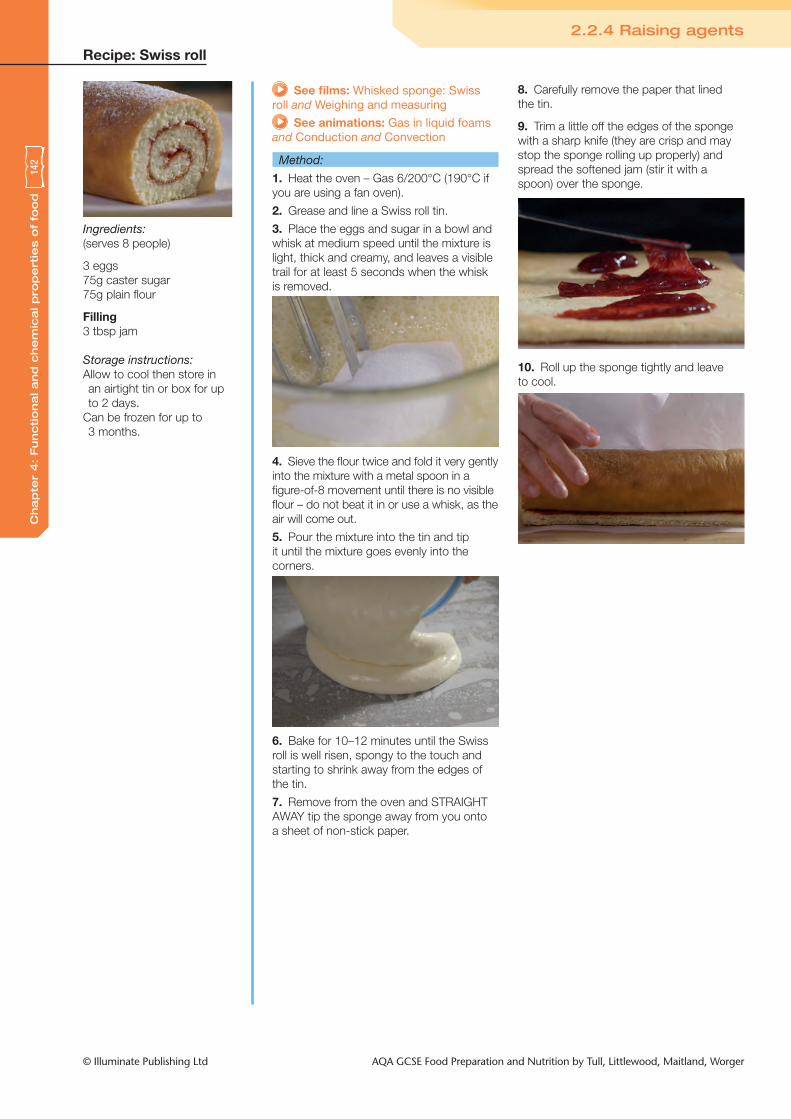
3. Place the eggs and sugar in a bowl and whisk at medium speed until the mixture is light, thick and creamy, and leaves a visible trail for at least 5 seconds when the whisk is removed.
4. Sieve the fl our twice and fold it very gently into the mixture with a metal spoon in a fi gure-of-8 movement until there is no visible fl our – do not beat it in or use a whisk, as the air will come out.
5. Pour the mixture into the tin and tip it until the mixture goes evenly into the corners.
6. Bake for 10–12 minutes until the Swiss roll is well risen, spongy to the touch and starting to shrink away from the edges of the tin.
7. Remove from the oven and STRAIGHT AWAY tip the sponge away from you onto a sheet of non-stick paper.
See fi lms: Whisked sponge: Swiss roll and Weighing and measuring
See animations: Gas in liquid foams and Conduction and Convection
8. Carefully remove the paper that lined the tin.
9. Trim a little off the edges of the sponge with a sharp knife (they are crisp and may stop the sponge rolling up properly) and spread the softened jam (stir it with a spoon) over the sponge.
10. Roll up the sponge tightly and leave to cool.
Recipe: Swiss roll

© Illuminate Publishing Ltd AQA GCSE Food Preparation and Nutrition by Tull, Littlewood, Maitland, Worger
Cha
pte
r 4
: Functio
na
l a
nd
che
mic
al p
rop
ert
ies o
f fo
od
14
42.2.4 Raising agents
Ingredients:(makes approximately 12–15 cheese twists)
250g puff pastry – ready-made or home made
150g fi nely grated Parmesan cheese or 150g fi nely grated Cheddar cheese or 75g fi nely grated Parmesan cheese and 75g fi nely grated strong Cheddar cheese
1 tsp paprika½ tsp cayenne pepper1 egg, beaten
Storage instructions:Best eaten on the day they are made.
OR allow to cool then cover and store in an airtight tin or box for up to 2 days.
Freezer: Can be frozen raw for up to 3 months, then bake from frozen in a hot oven, allowing an extra 5 minutes on the baking time.
Method:
1. Set the oven to Gas 6/200°C (190°C if you are using a fan oven).
2. Stir the paprika, cayenne pepper and grated Parmesan/Cheddar cheese together in a mixing bowl with a fork, or your fi ngers, until well mixed.
3. Roll out the puff pastry dough to about ½cm thickness, in a rectangle approximately the size of an A4 piece of paper.
4. Brush the top with egg wash and then sprinkle the cheese mixture on top. Press it down to make it stick to the pastry.
4.2.4 AQA FoodBarking Dog Art
2cm
4.2.4 AQA FoodBarking Dog Art
2cm
5. Turn the rectangle of puff pastry over and repeat the processes in point number 4 above, on the other side of the pastry.
4.2.4 AQA FoodBarking Dog Art
2cm
• Press the cheese mixture onto the pastry again, so that it sticks to it on both sides.
• Some of the cheese will fall off when you turn the pastry over, but that is quite normal.
6. Cut the pastry into strips about 2cm wide across the width of the rectangle.
See fi lm: Weighing and measuring
See animations: Rolling and folding to create layers and Steam as raising agent and Convection and Conduction
4.2.4 AQA FoodBarking Dog Art
2cm
7. Twist each of the strips all the way down their length.
4.2.4 AQA FoodBarking Dog Art
2cm
8. Place the cheese twists on a baking tray covered with baking paper and bake for about 15–20 minutes until they have puffed up and become crisp on the outside.
9. Place the baked twists on a cooling tray. They will become fi rmer and crisper when they cool down as the melted cheese hardens.
Recipe: Puff pastry cheese twists

© Illuminate Publishing Ltd AQA GCSE Food Preparation and Nutrition by Tull, Littlewood, Maitland, Worger
Cha
pte
r 4
: Functio
na
l a
nd
che
mic
al p
rop
ert
ies o
f fo
od
14
72.2.4 Raising agents
Ingredients:(serves 10–12 people)
225g plain fl our½ tbsp ground ginger½ tbsp baking powder½ tsp bicarbonate of soda100g Demerara sugar85g butter or vegetable fat spread
85g black treacle85g golden syrup125ml milk1 small egg, beaten
Storage instructions:Allow to cool then cover and store in an airtight tin or box for up to 7 days.
Can be frozen for up to 3 months.
Method:
1. Grease and line a shallow baking tray, approximately 22 × 26cm.
2. Sieve the fl our, ginger, baking powder and bicarbonate of soda together into a mixing bowl.
3. Melt the butter or vegetable fat spread, sugar, syrup and treacle in a saucepan over a low heat – do not let the mixture boil.
4. Remove the melted mixture from the heat, and leave it to cool for a few minutes.
5. Whisk the egg and milk together and add it to the melted mixture. Pour the liquid into the fl our and mix well with a wooden spoon until it is smooth.
6. Pour the mixture into the tin and bake at Gas 3/170°C (160°C if you are using a fan oven) for 25–35 minutes, until well risen and spongy to the touch.
7. You can put crystallised ginger on the top halfway through baking the gingerbread if you wish.
See fi lm: Weighing and measuring
See animations: Production of CO2 gas from bicarbonate of soda and Convection and Conduction
Recipe: Gingerbread cake

© Illuminate Publishing Ltd AQA GCSE Food Preparation and Nutrition by Tull, Littlewood, Maitland, Worger
Cha
pte
r 4
: Functio
na
l a
nd
che
mic
al p
rop
ert
ies o
f fo
od
14
82.2.4 Raising agents
Ingredients:(serves 8 people)
225g self-raising fl our – white or wholemeal or 50% of each
½ tsp baking powder¼ tsp cayenne pepper50g strong fl avoured Cheddar cheese – fi nely grated or 50g grated Parmesan cheese
1 tsp mixed dried herbs25g pumpkin seeds or sunfl ower seeds (optional)
50g butter or vegetable fat spread
150ml milk any type, e.g. goat’s, cow’s, soya, oat, almond
Storage instructions:Best eaten on the day it is made.
OR allow to cool then cover and store in an airtight tin or box for up to 2 days.
Can be frozen for up to 3 months.
Method:
1. Set the oven to Gas 6/200°C (190°C if you are using a fan oven).
2. Sieve the fl our, baking powder and cayenne pepper together into a mixing bowl.
3. Stir in the dried herbs.
4. Rub in the butter or vegetable fat spread with your fi ngertips until the mixture looks like breadcrumbs.
5. Stir in ¾ of the grated cheese and seeds.
6. Make a well in the centre and add the milk.
7. Stir the mixture together with a wooden spoon until it forms a soft dough.
8. Knead the dough lightly on a fl oured worktop and shape into a round either with your hands or a rolling pin, about 16–18cm diameter and 2cm thick.
9. Grease or line a baking sheet and place the scone round on it.
10. With a knife, mark the scone round into eight pieces – cut down so that the marks are clearly visible and will hold their shape when it is baked. Brush the top with some milk.
11. Sprinkle the remaining ¼ of the grated cheese on top.
12. Bake the scone round for 15–20 minutes until golden, well-risen, spongy to the touch but not doughy in the middle – check with a skewer.
13. Cool on a wire rack and cut into eight pieces where you marked it before baking.
14. Serve warm with soup or cheese/ham and pickles.
See fi lm: Weighing and measuring
See animations: Production of CO2 gas from bicarbonate of soda and Convection and Conduction
Recipe: Cheese and herb scone round

© Illuminate Publishing Ltd AQA GCSE Food Preparation and Nutrition by Tull, Littlewood, Maitland, Worger
2.2.4 Raising agentsC
ha
pte
r 4
: Functio
na
l a
nd
che
mic
al p
rop
ert
ies o
f fo
od
15
0
Ingredients:(serves 8 people)
450g strong plain white or wholemeal bread fl our
2 tsp (10g) dried yeast50g caster sugar50g butter or vegetable fat spread
2 eggsapprox. 250ml warm milk (you need 300ml liquid altogether including the eggs)
Filling1 level tsp mixed spice100g mixed dried fruit25g melted butter2 tsp Demerara sugar
Glaze2 tbsp water, 2 tbsp milk, 2 tbsp caster sugar – mixed together and boiled for 3 minutes.
Storage instructions:Best eaten on the day they are made
OR allow to cool then cover and store in an airtight tin or box for up to 2 days.
Can be frozen for up to 3 months.
Method:
1. Warm the milk and mix it with the yeast and 1 tsp sugar – leave it to activate (go frothy) for a few minutes.
2. Rub the butter into the fl our with your fi ngertips and add the sugar.
3. Whisk the eggs and yeast liquid together – remember you need a total of 300ml of liquid.
4. Mix to a soft dough using a wooden spoon.
5. Knead the dough for 5 minutes, until it becomes stretchy and smooth.
6. Roll out the dough into a rectangle approximately 30 × 25cm.
7. Brush the dough with the melted butter and scatter the fruit, spice and sugar over it.
8. Roll up the dough lengthways and cut it into eight even-sized pieces.
9. Place the pieces in a greased and lined round sandwich tin and leave to rise in a warm place for at least 30 minutes.
10. Bake the buns at Gas 6/200°C (190°C if you are using a fan oven) for 15–20 minutes, until well risen and golden brown.
11. Take them out of the oven and brush them with the glaze while they are still hot, and then separate them by tearing apart gently.
See fi lms: Bread making: bread rolls and Weighing and measuring
See animations: Yeast and Gluten formation and Conduction and Convection
Recipe: Chelsea buns

© Illuminate Publishing Ltd AQA GCSE Food Preparation and Nutrition by Tull, Littlewood, Maitland, Worger
Cha
pte
r 4
: Functio
na
l a
nd
che
mic
al p
rop
ert
ies o
f fo
od
15
22.2.4 Raising agents
Ingredients:(Éclairs – serves 10 peopleProfi teroles – serves 6 people)
Choux pastry – basic mixture150ml water50g butter or block vegetable fat spread
60g fl our (strong plain bread fl our is best)
2 medium eggs
For chocolate éclairs, in addition to the basic choux mixture, you need:
Filling200ml double or whipping cream – whipped until thick
To make Chantilly cream, add ½ tsp vanilla essence and 2 tbsp caster sugar after the cream is whipped.
Topping150g plain cooking chocolate – melted in a bowl over a pan of simmering water
For profi teroles, in addition to the basic choux mixture, you need:
Filling200ml double or whipping cream – whipped until thick
Chocolate sauce150ml milk1½ tbsp cocoa powder1 tbsp sugar1 tbsp golden syrup10g butter or margarine
For savoury éclairs, in addition to the basic choux mixture, you need:75g strong fl avoured Cheddar cheese or Parmesan cheese – grated
120g cream cheese mixed together with 1 tbsp chopped mixed fresh herbs
Storage instructions:Best eaten on the day they are made
OR cover and store in a refrigerator in an airtight tin or box for up to 2 days.
The éclairs can be frozen for up to 3 months, either as just the pastry shells or fi lled.
Method:
Making the choux pastry:
1. Heat the oven to Gas 6/200°C (190°C if you are using a fan oven) – you will need to use the top shelf in a gas oven.
2. Bring the water and butter (or vegetable fat spread) to the boil in a saucepan – make sure all the fat has melted.
3. Turn off the heat and, straightaway, add the sieved fl our and carefully mix it in with a wooden spoon and then beat it until a ball of choux paste is formed in the pan (you are developing the gluten strands when you beat it, which will help the choux pastry stretch when it rises).
4. Allow the choux paste to cool for a few minutes.
5. Gradually add the beaten eggs, a little at a time – you may not need them all – beating the mixture well. The paste should be a ‘dropping’ consistency – it must not be runny.
Filling and fi nishing:
Finishing the chocolate éclairs:
6. Fill each with whipped cream, either with a teaspoon or by piping the cream.
7. Melt the chocolate in a bowl over a pan of simmering water and dip the éclairs into it and leave them to set on a cooling tray.
Piping the mixture:
For the éclairs:
8. Pipe the mixture into éclair shapes onto a greased or lined baking tray. Allow some room for them to expand.
For the profi teroles:
9. Pipe the mixture into small, regular shaped mounds onto a greased or lined baking tray. Allow some room for them to expand.
See fi lms: Whipped cream and Finishing techniques: melting chocolate and Choux pastry and Weighing and measuring
See animations: Gelatinisation and Gluten formation and Steam as raising agent and Convection and Conduction
For the savoury éclairs:
10. Add the grated cheese to the mixture and beat well. Pipe the mixture into éclair shapes onto a greased or lined baking tray. Allow some room for them to expand.
Baking the choux pastry:
Baking the éclairs (chocolate or savoury):
11. Bake for 15 minutes, then turn the temperature down to Gas 5/190°C (180°C if you are using a fan oven) for another 10 minutes – DO NOT OPEN THE OVEN DOOR WHILE THE ECLAIRS ARE BAKING, OTHERWISE THEY WILL COLLAPSE, BECAUSE THEY ONLY SET IN THE LAST FEW MINUTES OF BAKING.
12. The éclairs should be crisp and well risen – make a slit along the length of each éclair at the side and let it cool. Carefully scrape out any doughy bits that are inside.
Baking the profi teroles:
13. Bake for 15 minutes until well risen and crisp and make a slit in the side of each one and allow to cool.
Finishing the profi teroles:
14. Make the chocolate sauce. Put all the ingredients into a medium saucepan and heat gently until the butter has melted. Bring to the boil, then simmer gently for approx.15–20 minutes to reduce the sauce until it is thick and glossy.
15. Carefully arrange 4–5 profi teroles into a serving bowl, then pour over a quantity of chocolate sauce and serve.
Finishing the savoury éclairs:
16. Fill each éclair with a mixture of cream cheese and fresh chopped herbs or another fi lling of your choice.
Recipe: Choux pastry

© Illuminate Publishing Ltd AQA GCSE Food Preparation and Nutrition by Tull, Littlewood, Maitland, Worger
Cha
pte
r 4
: Functio
na
l a
nd
che
mic
al p
rop
ert
ies o
f fo
od
10
5–15
7
See animation: Rolling and folding
Method:
1. Rub ¼ of the butter or block vegetable fat spread into the fl our.
2. Chop the rest of the butter or block vegetable fat spread into small pieces about 1cm3 (cubed) and stir them into the fl our.
3. Add the water and stir in to form a soft, stretchy, elastic dough that will be lumpy in texture because of the cubes of fat.
4. Carefully roll and fold the pastry (see diagrams) at least 4 times, allowing the pastry to rest in the refrigerator (covered) for at least 5 minutes each time after rolling and folding it.
5. Rest the pastry in the refrigerator before you use it.
6. The pastry must be cooked in a hot oven – Gas 6/200°C (190°C for fan ovens) – to allow the fat to be absorbed by the starch in the fl our and the air and steam to expand and raise the pastry.
7. Instructions for rolling and folding the pastry:
Rolling and folding a dough to create layers
1. The baked texture of some doughs, e.g. fl aky or puff pastry, Danish partries, get their texture from the dough being rolled out and folded several times. This process traps air, and along with the steam and layers of fat form light, crisp and thin layers of pastry to develop in the oven. This is what happens.
2. The dough is formed by rubbing some of the fat into the fl our until it looks like breadcrumbs, then adding the rest of the fat cut up into small dice and the water. A lumpy, stretchy dough is formed as the gluten in the fl our develops into long, stretchy molecules. The lumps are the pieces of diced fat.
The rough is rolled into a rectangle, 3 times as long as it is wide (use your hands as a measure). The rolling starts to squash the diced fat.
3. The dough is then folded into 3 and sealed at the edges and allowed to rest in the refrigerator for a few minutes to allow the gluten molecules to relax.
A
B
C
1st fold
2nd fold
Side view of folded pastry showing layers.
B
Fold3 layers
AC
Seal the edges with the rolling pin.
Rest pastry in the fridge.
Ingredients:
225g strong plain white fl our150g butter or block vegetable fat spread – either must be refrigerated and hard. DO NOT USE soft vegetable fat spread or soft butter spread.
9 tbsp (135ml) cold water
Uses of puff pastrySavoury plaitVol au ventsFruit mille feuillesCream hornsPastiesSausage rollsEccles cakesCream slicesFruit turnoversEtc.
2.2.4 Raising agents – steam
Recipe: Puff pastry

© Illuminate Publishing Ltd AQA GCSE Food Preparation and Nutrition by Tull, Littlewood, Maitland, Worger
Ingredients:
Base225g strong plain white or wholemeal bread fl our
¼ level teaspoon salt150ml warm water5g (1 level tsp) easy-blend dried yeast
Prepared toppings (diced or sliced into small pieces)sautéed red onionsautéed mushroomsroasted pepperssun-dried tomatoesolivesgrated mozzarella cheesefresh basil to garnish
You will needa shallow baking tin, approximately 16cm by 16cm
baking parchment
Storage instructions:Best eaten on the day it is made.
OR Allow to cool then cover and store in an airtight tin or box for up to 2 days.
Can be frozen for up to 3 months.
See fi lms: Knife skills: preparing fruit and vegetables and Bread making: bread rolls
See animations: Gluten formation and Convection and Conduction
Method:
1. Heat the oven to Gas 6/200°C (190°C if you are using a fan oven).
2. Stir the yeast into the fl our with the salt.
3. Add the warm water and stir well with a wooden spoon to form a dough.
4. Knead the dough on the worktop for at least 5 minutes. It should be stretchy and smooth.
5. Shape it into a square to fi t into the base of a lined shallow baking tin, approximately 16cm by 16cm.
6. Leave the dough to rise in a warm place for 20 minutes.
7. Arrange the chosen toppings (except for the basil) on top of the dough (grated cheese last) and then bake for 20–25 minutes until well risen and crusty.
8. Garnish with the basil.
9. Serve warm or cold.Cha
pte
r 4
: Functio
na
l a
nd
che
mic
al p
rop
ert
ies o
f fo
od
14
1–15
92.2.4 Raising agents – biological: yeast
Recipe: Tear-and-share tray bread