ReadyMade Primary Literacy Tut - Kurzweil Edu · 2003-03-07 · support a balanced literacy...
15
Transcript of ReadyMade Primary Literacy Tut - Kurzweil Edu · 2003-03-07 · support a balanced literacy...
Copyright NoticeCopyright 2003 by IntelliTools, Inc. All rights reserved. The distribution and sale of this software and manual areauthorized for the original purchaser only. Unauthorized duplication is a violation of federal copyright law.
TrademarksIntelliTools (and logo), IntelliKeys, IntelliMathics, IntelliPics, IntelliTalk II (and logo), Overlay Maker (and logo),SwitchIt!, and ClickIt! are registered trademarks of IntelliTools, Inc. All other IntelliTools product names and logos aretrademarks of IntelliTools, Inc. Other companies’ brand names, product names (including Windows, Macintosh,QuickTime, and Acrobat Reader), and logos mentioned herein are registered trademarks, trademarks, or brand namesof their respective holders and are hereby acknowledged.
CreditsReadyMade Primary Literacy was produced through the collaborative efforts of many staff members at IntelliTools.Design: Suzanne Feit, Lucinda Ray; Content Development: Suzanne Feit, Lucinda Ray; Software Engineering: ScottSchafer; ReadyMade Browser: Patty Kilroy, Jezra Lickter; Project Management: David Robertshaw, Lucinda Ray; User’sGuide/Teacher’s Guide: Lucinda Ray, Alan Rhody; Activities: Suzanne Feit, Lucinda Ray; Testing: Lisa Sheean; Artwork:Patty Kilroy, Chris Santeramo; Technical Assistance: Philip Nittenberg, Fred Ross-Perry. Tutorial: Suzanne Feit, LucindaRay.
Customer Service, Sales, and Technical Support
Hours: 8 a.m.– 5 p.m. Pacific Time, Monday through Friday
Phone: (800) 899-6687 (U.S. and Canada)(707) 773-2000 (local and international)
Fax: (707) 773-2001
Email: [email protected] (for technical information)
[email protected] (for general information)
World Wide Web: http://www.intellitools.com
Important note: To ensure that returns are handled correctly and without delays, please call us for a Return MerchandiseAuthorization (RMA) before returning any item.
RMPL - TUT printed 3/03
IntelliTools, Inc.1720 Corporate CirclePetaluma, CA 94954-9926U.S.A.
ReadyMade Primary Literacy provides instruction andpractice in important literacy concepts to help studentsread and write. These activities have been designed tosupport a balanced literacy approach to reading andwriting. They integrate reading comprehension,supported writing, word study, and phonics. PrimaryLiteracy includes 163 different activities targeting 40onsets, 32 rimes, and 27 writing exercises. Thismultisensory approach to reading and writing allowsstudents to explore and practice early literacy skills thatmeet grade one language arts standards across thenation. Use these activities to reinforce your readingprogram, build student portfolios, and promotetechnology and literacy skills for early learners.
ReadyMade Primary Literacy is designed to work withIntelliTools’ multimedia tool, IntelliPics Studio. PrimaryLiteracy adds 28 activity templates to IntelliPics Studio,thereby providing IntelliPics Studio users with manyadditional predesigned literacy-building activities.
About IntelliPics StudioIntelliPics Studio is a powerful, new, multimedia drawing,painting, presentation, and authoring program that isappropriate for students of all ages and abilities. Whenyou use IntelliPics Studio to create and explore activities,you will experience the immense potential of thisauthoring program.
• Students can open a coloring book activity and beginto paint.
• Students can use engaging pre-made activities tolearn curriculum and practice with concepts.
• Older students can create professional-qualitypresentations to communicate their learning.
• Teachers can open a template and author curriculum-based activities appropriate for preschool throughhigh school.
Universal Design: Access for AllReadyMade Primary Literacy and IntelliPics Studio aredesigned for all students, including those with physical orcognitive disabilities. They are ideal for use in inclusionclassrooms because students can use the program with amouse, an IntelliKeys, or a switch interchangeably. Thesoftware adjusts to whatever input device a student isusing.
IntelliKeys UsersAn electronic version of an overlay is attached to eachReadyMade Primary Literacy activity. It is automatically
Introduction
1ReadyMade Primary Literacy Tutorial
sent to the IntelliKeys keyboard when an activity isopened. Print the overlay using IntelliTools’ OverlayPrinter (included on the installation CD in the Utilitiesfolder) or Overlay Maker.
ReadyMade Primary Literacy ProgramOrganizationReadyMade Primary Writing activities are organized ineight topic areas:
• Onsets
• Rimes
• Books
Each topic includes nine units of interactive activities.Each activity provides practice related to that topic, usinga specific theme and a specific set of onsets, rimes, andsight words. The activities are arranged in graduallyincreasing units of difficulty. Unit 1 is the simplest; Unit 9is the most challenging. The themes, onsets, rimes, andsight words for each unit correlate with the content ofIntelliTools Reading: Balanced Literacy.
Each activity includes a title page, several pages ofexploratory practice, and opportunities for writing.Completing the activities gives students useful practiceand reinforces their growing literacy skills.
Terminology: Onset and RimeOnsets are consonant and consonant clusters found at thebeginning of words. The onset is most clearly defined asall the consonants that are found before the first vowel.Rimes are clusters of letters that begin with a vowel andcontinue to the end of the syllable. Rimes are traditionallyreferred to as phonograms, word families, or chunks.
This TutorialThis tutorial is designed to work in conjunction with a fullversion of IntelliTools’ IntelliPics Studio. By completingthis tutorial, you will:
• Become familiar with using the ReadyMade Browser.
• Explore the variety of topic areas.
• Create a student portfolio.
• Learn to modify activities (changing pictures,backgrounds, customizing books, and more).
• Explore the alternative access features.
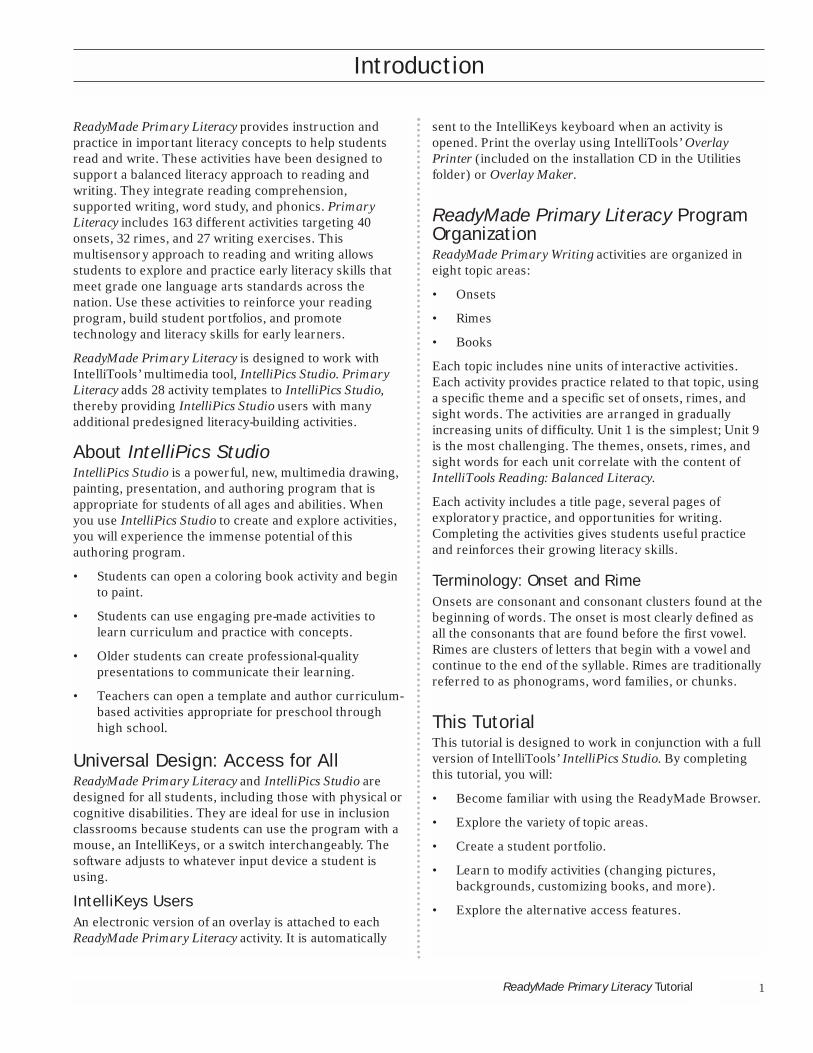
Using the ReadyMade BrowserThe best way to survey the variety of activities included inReadyMade Primary Literacy is to view A LiteracyOverview. You launch this preview activity, or anyReadyMade activity, using the ReadyMade Browser.
To display the ReadyMade Browser, double-click theReadyMade Browser icon (automatically placed on yourdesktop during a typical installation). Click Enter on thetitle screen to view the ReadyMade Browser.
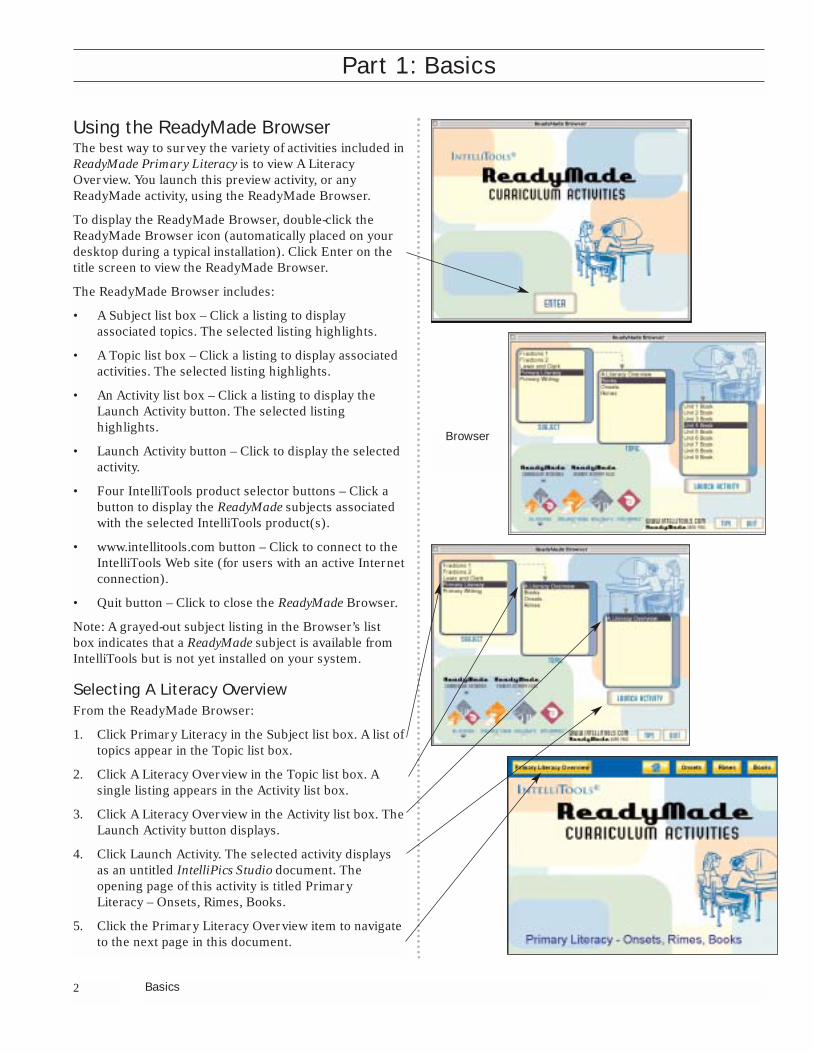
The ReadyMade Browser includes:
• A Subject list box – Click a listing to displayassociated topics. The selected listing highlights.
• A Topic list box – Click a listing to display associatedactivities. The selected listing highlights.
• An Activity list box – Click a listing to display theLaunch Activity button. The selected listinghighlights.
• Launch Activity button – Click to display the selectedactivity.
• Four IntelliTools product selector buttons – Click abutton to display the ReadyMade subjects associatedwith the selected IntelliTools product(s).
• www.intellitools.com button – Click to connect to theIntelliTools Web site (for users with an active Internetconnection).
• Quit button – Click to close the ReadyMade Browser.
Note: A grayed-out subject listing in the Browser’s listbox indicates that a ReadyMade subject is available fromIntelliTools but is not yet installed on your system.
Selecting A Literacy OverviewFrom the ReadyMade Browser:
1. Click Primary Literacy in the Subject list box. A list oftopics appear in the Topic list box.
2. Click A Literacy Overview in the Topic list box. Asingle listing appears in the Activity list box.
3. Click A Literacy Overview in the Activity list box. TheLaunch Activity button displays.
4. Click Launch Activity. The selected activity displaysas an untitled IntelliPics Studio document. Theopening page of this activity is titled Primary Literacy – Onsets, Rimes, Books.
5. Click the Primary Literacy Overview item to navigateto the next page in this document.
Part 1: Basics
Basics2
Browser
3
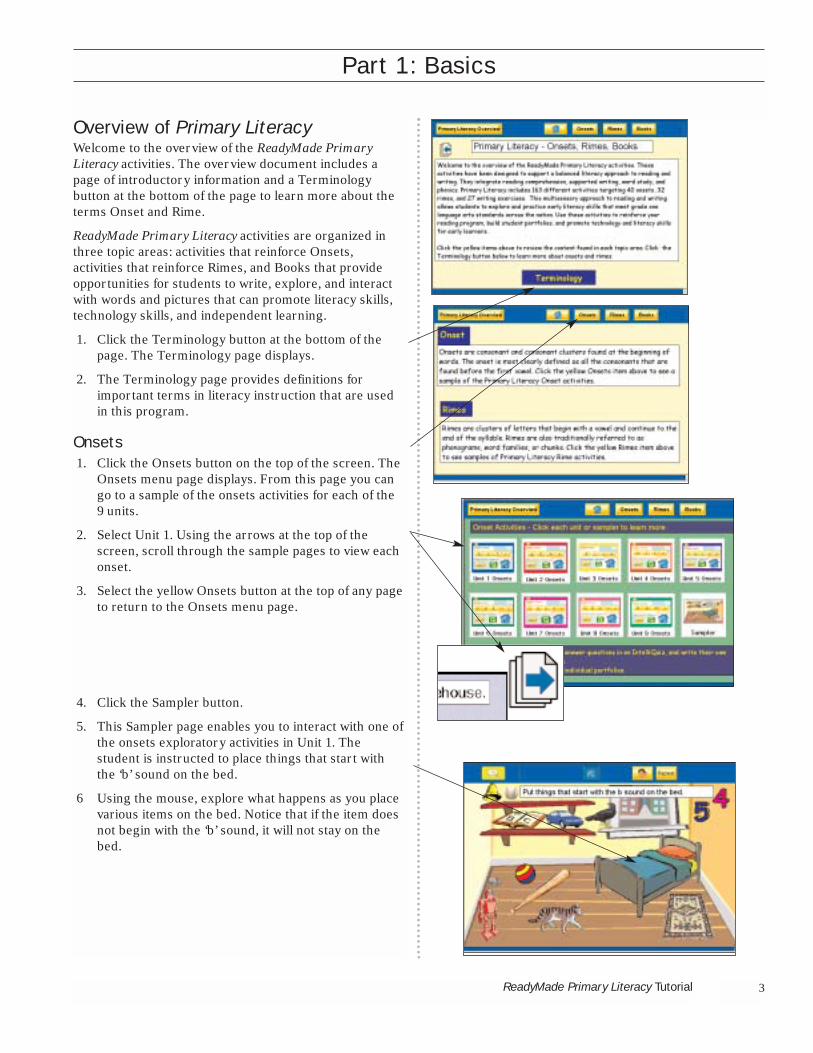
Overview of Primary LiteracyWelcome to the overview of the ReadyMade PrimaryLiteracy activities. The overview document includes apage of introductory information and a Terminologybutton at the bottom of the page to learn more about theterms Onset and Rime.
ReadyMade Primary Literacy activities are organized inthree topic areas: activities that reinforce Onsets,activities that reinforce Rimes, and Books that provideopportunities for students to write, explore, and interactwith words and pictures that can promote literacy skills,technology skills, and independent learning.
1. Click the Terminology button at the bottom of thepage. The Terminology page displays.
2. The Terminology page provides definitions forimportant terms in literacy instruction that are usedin this program.
Onsets1. Click the Onsets button on the top of the screen. The
Onsets menu page displays. From this page you cango to a sample of the onsets activities for each of the 9 units.
2. Select Unit 1. Using the arrows at the top of thescreen, scroll through the sample pages to view eachonset.
3. Select the yellow Onsets button at the top of any pageto return to the Onsets menu page.
4. Click the Sampler button.
5. This Sampler page enables you to interact with one ofthe onsets exploratory activities in Unit 1. Thestudent is instructed to place things that start withthe ‘b’ sound on the bed.
6 Using the mouse, explore what happens as you placevarious items on the bed. Notice that if the item doesnot begin with the ‘b’ sound, it will not stay on thebed.
Part 1: Basics
ReadyMade Primary Literacy Tutorial
Rimes
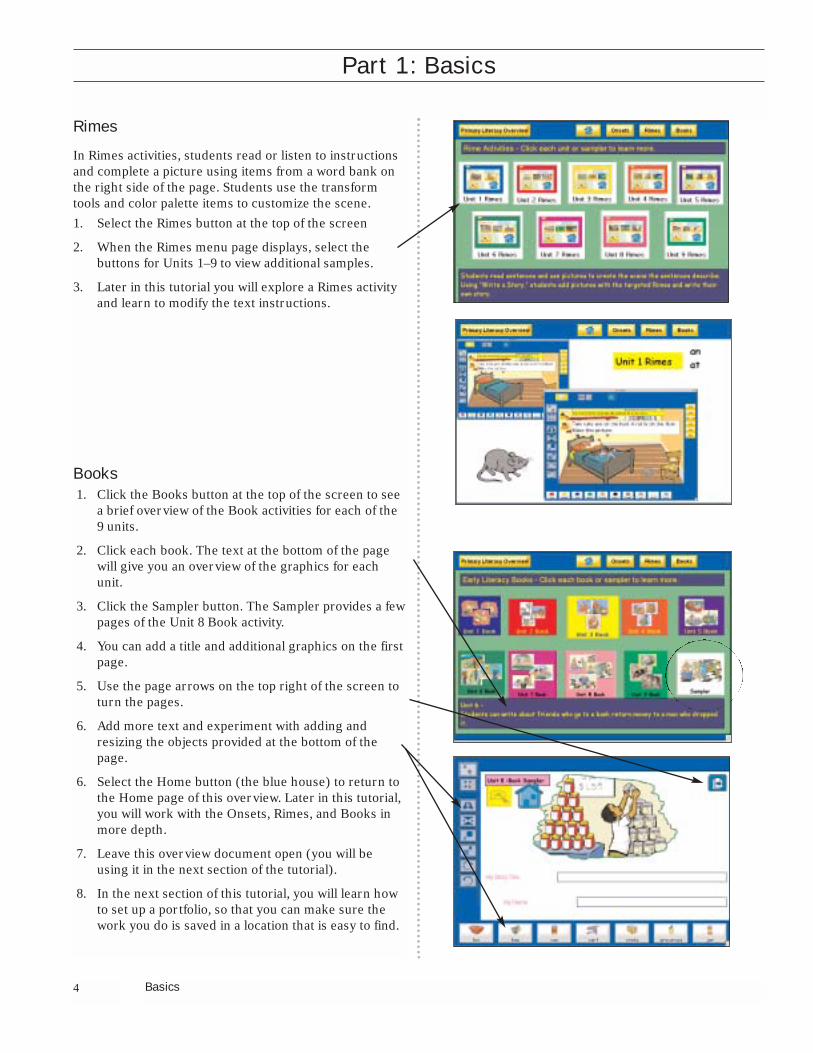
In Rimes activities, students read or listen to instructionsand complete a picture using items from a word bank onthe right side of the page. Students use the transformtools and color palette items to customize the scene. 1. Select the Rimes button at the top of the screen
2. When the Rimes menu page displays, select thebuttons for Units 1–9 to view additional samples.
3. Later in this tutorial you will explore a Rimes activityand learn to modify the text instructions.
Books 1. Click the Books button at the top of the screen to see
a brief overview of the Book activities for each of the 9 units.
2. Click each book. The text at the bottom of the pagewill give you an overview of the graphics for eachunit.
3. Click the Sampler button. The Sampler provides a fewpages of the Unit 8 Book activity.
4. You can add a title and additional graphics on the firstpage.
5. Use the page arrows on the top right of the screen toturn the pages.
6. Add more text and experiment with adding andresizing the objects provided at the bottom of thepage.
6. Select the Home button (the blue house) to return tothe Home page of this overview. Later in this tutorial,you will work with the Onsets, Rimes, and Books inmore depth.
7. Leave this overview document open (you will beusing it in the next section of the tutorial).
8. In the next section of this tutorial, you will learn howto set up a portfolio, so that you can make sure thework you do is saved in a location that is easy to find.
Part 1: Basics
Basics4
5
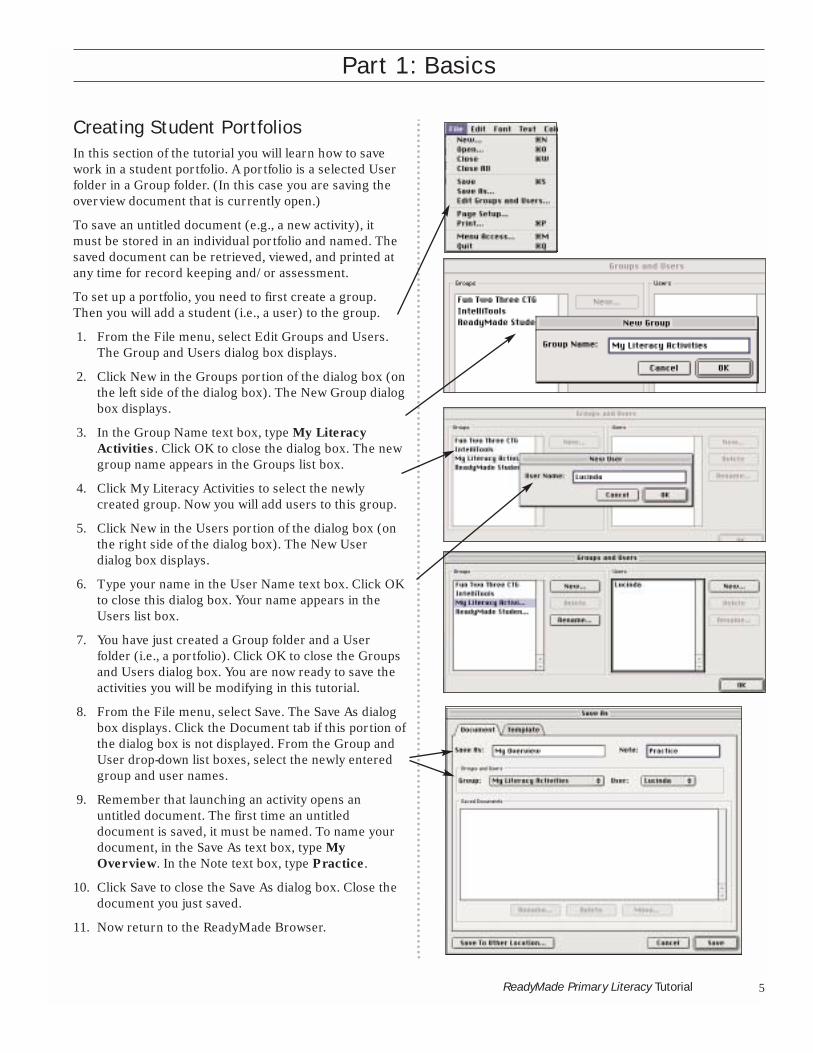
Creating Student PortfoliosIn this section of the tutorial you will learn how to savework in a student portfolio. A portfolio is a selected Userfolder in a Group folder. (In this case you are saving theoverview document that is currently open.)
To save an untitled document (e.g., a new activity), itmust be stored in an individual portfolio and named. Thesaved document can be retrieved, viewed, and printed atany time for record keeping and/or assessment.
To set up a portfolio, you need to first create a group.Then you will add a student (i.e., a user) to the group.
1. From the File menu, select Edit Groups and Users.The Group and Users dialog box displays.
2. Click New in the Groups portion of the dialog box (onthe left side of the dialog box). The New Group dialogbox displays.
3. In the Group Name text box, type My LiteracyActivities. Click OK to close the dialog box. The newgroup name appears in the Groups list box.
4. Click My Literacy Activities to select the newlycreated group. Now you will add users to this group.
5. Click New in the Users portion of the dialog box (onthe right side of the dialog box). The New Userdialog box displays.
6. Type your name in the User Name text box. Click OKto close this dialog box. Your name appears in theUsers list box.
7. You have just created a Group folder and a Userfolder (i.e., a portfolio). Click OK to close the Groupsand Users dialog box. You are now ready to save theactivities you will be modifying in this tutorial.
8. From the File menu, select Save. The Save As dialogbox displays. Click the Document tab if this portion ofthe dialog box is not displayed. From the Group andUser drop-down list boxes, select the newly enteredgroup and user names.
9. Remember that launching an activity opens anuntitled document. The first time an untitleddocument is saved, it must be named. To name yourdocument, in the Save As text box, type MyOverview. In the Note text box, type Practice.
10. Click Save to close the Save As dialog box. Close thedocument you just saved.
11. Now return to the ReadyMade Browser.
ReadyMade Primary Literacy Tutorial
Part 1: Basics
6
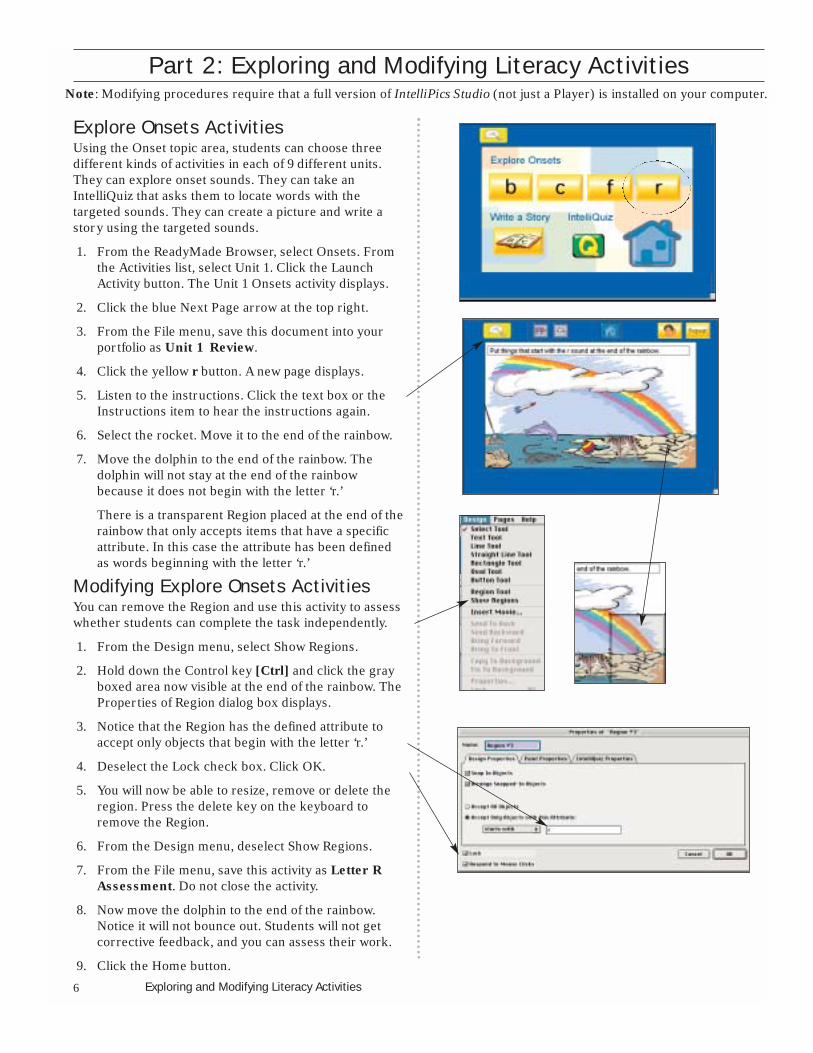
Explore Onsets ActivitiesUsing the Onset topic area, students can choose threedifferent kinds of activities in each of 9 different units.They can explore onset sounds. They can take anIntelliQuiz that asks them to locate words with thetargeted sounds. They can create a picture and write astory using the targeted sounds.
1. From the ReadyMade Browser, select Onsets. Fromthe Activities list, select Unit 1. Click the LaunchActivity button. The Unit 1 Onsets activity displays.
2. Click the blue Next Page arrow at the top right.
3. From the File menu, save this document into yourportfolio as Unit 1 Review.
4. Click the yellow r button. A new page displays.
5. Listen to the instructions. Click the text box or theInstructions item to hear the instructions again.
6. Select the rocket. Move it to the end of the rainbow.
7. Move the dolphin to the end of the rainbow. Thedolphin will not stay at the end of the rainbowbecause it does not begin with the letter ‘r.’
There is a transparent Region placed at the end of therainbow that only accepts items that have a specificattribute. In this case the attribute has been definedas words beginning with the letter ‘r.’
Modifying Explore Onsets ActivitiesYou can remove the Region and use this activity to assesswhether students can complete the task independently.
1. From the Design menu, select Show Regions.
2. Hold down the Control key [Ctrl] and click the grayboxed area now visible at the end of the rainbow. TheProperties of Region dialog box displays.
3. Notice that the Region has the defined attribute toaccept only objects that begin with the letter ‘r.’
4. Deselect the Lock check box. Click OK.
5. You will now be able to resize, remove or delete theregion. Press the delete key on the keyboard toremove the Region.
6. From the Design menu, deselect Show Regions.
7. From the File menu, save this activity as Letter RAssessment. Do not close the activity.
8. Now move the dolphin to the end of the rainbow.Notice it will not bounce out. Students will not getcorrective feedback, and you can assess their work.
9. Click the Home button.
Part 2: Exploring and Modifying Literacy Activities
Exploring and Modifying Literacy Activities
Note: Modifying procedures require that a full version of IntelliPics Studio (not just a Player) is installed on your computer.
7
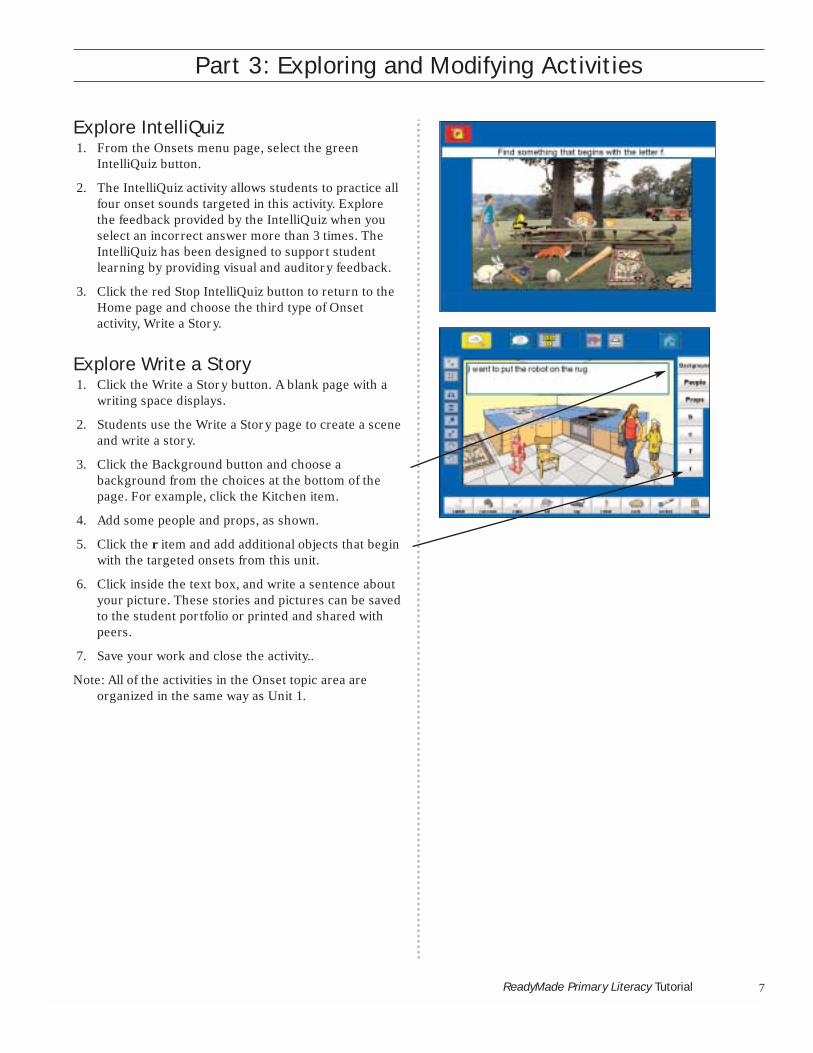
Explore IntelliQuiz1. From the Onsets menu page, select the green
IntelliQuiz button.
2. The IntelliQuiz activity allows students to practice allfour onset sounds targeted in this activity. Explorethe feedback provided by the IntelliQuiz when youselect an incorrect answer more than 3 times. TheIntelliQuiz has been designed to support studentlearning by providing visual and auditory feedback.
3. Click the red Stop IntelliQuiz button to return to theHome page and choose the third type of Onsetactivity, Write a Story.
Explore Write a Story1. Click the Write a Story button. A blank page with a
writing space displays.
2. Students use the Write a Story page to create a sceneand write a story.
3. Click the Background button and choose abackground from the choices at the bottom of thepage. For example, click the Kitchen item.
4. Add some people and props, as shown.
5. Click the r item and add additional objects that beginwith the targeted onsets from this unit.
6. Click inside the text box, and write a sentence aboutyour picture. These stories and pictures can be savedto the student portfolio or printed and shared withpeers.
7. Save your work and close the activity..
Note: All of the activities in the Onset topic area areorganized in the same way as Unit 1.
Part 3: Exploring and Modifying Activities
ReadyMade Primary Literacy Tutorial
8
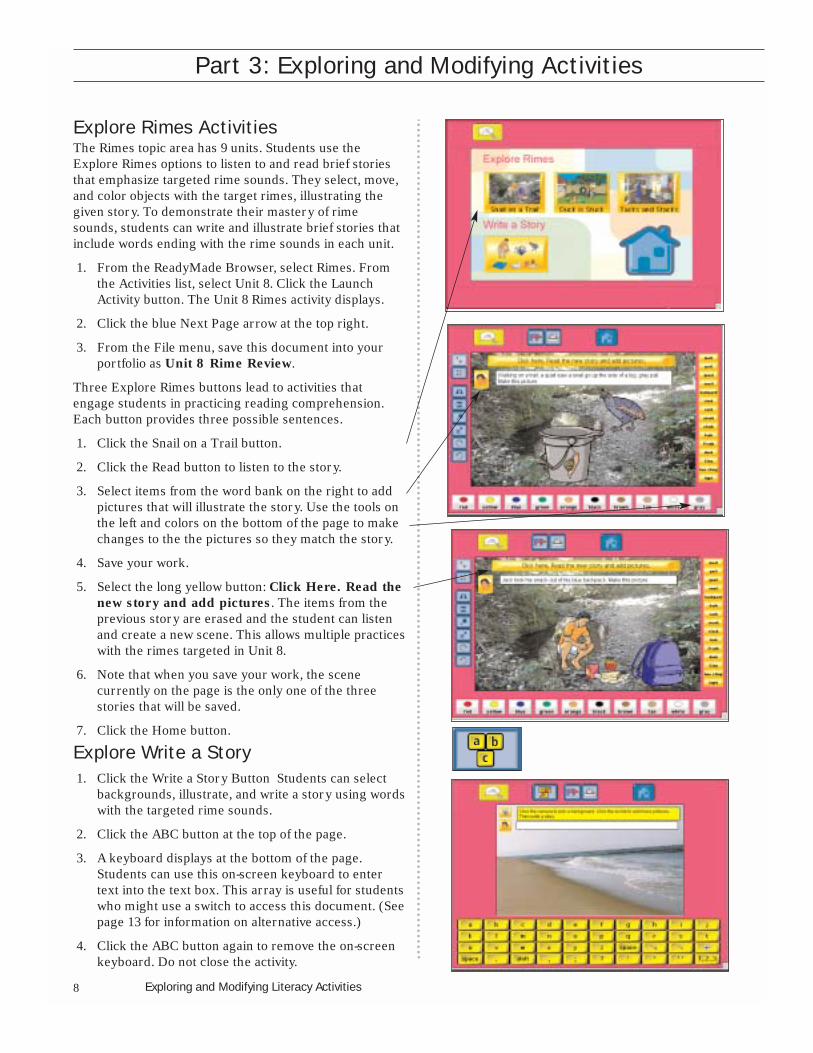
Explore Rimes ActivitiesThe Rimes topic area has 9 units. Students use theExplore Rimes options to listen to and read brief storiesthat emphasize targeted rime sounds. They select, move,and color objects with the target rimes, illustrating thegiven story. To demonstrate their mastery of rimesounds, students can write and illustrate brief stories thatinclude words ending with the rime sounds in each unit.
1. From the ReadyMade Browser, select Rimes. Fromthe Activities list, select Unit 8. Click the LaunchActivity button. The Unit 8 Rimes activity displays.
2. Click the blue Next Page arrow at the top right.
3. From the File menu, save this document into yourportfolio as Unit 8 Rime Review.
Three Explore Rimes buttons lead to activities thatengage students in practicing reading comprehension.Each button provides three possible sentences.
1. Click the Snail on a Trail button.
2. Click the Read button to listen to the story.
3. Select items from the word bank on the right to addpictures that will illustrate the story. Use the tools onthe left and colors on the bottom of the page to makechanges to the the pictures so they match the story.
4. Save your work.
5. Select the long yellow button: Click Here. Read thenew story and add pictures. The items from theprevious story are erased and the student can listenand create a new scene. This allows multiple practiceswith the rimes targeted in Unit 8.
6. Note that when you save your work, the scenecurrently on the page is the only one of the threestories that will be saved.
7. Click the Home button.
Explore Write a Story1. Click the Write a Story Button Students can select
backgrounds, illustrate, and write a story using wordswith the targeted rime sounds.
2. Click the ABC button at the top of the page.
3. A keyboard displays at the bottom of the page.Students can use this on-screen keyboard to entertext into the text box. This array is useful for studentswho might use a switch to access this document. (Seepage 13 for information on alternative access.)
4. Click the ABC button again to remove the on-screenkeyboard. Do not close the activity.
Part 3: Exploring and Modifying Activities
Exploring and Modifying Literacy Activities
9
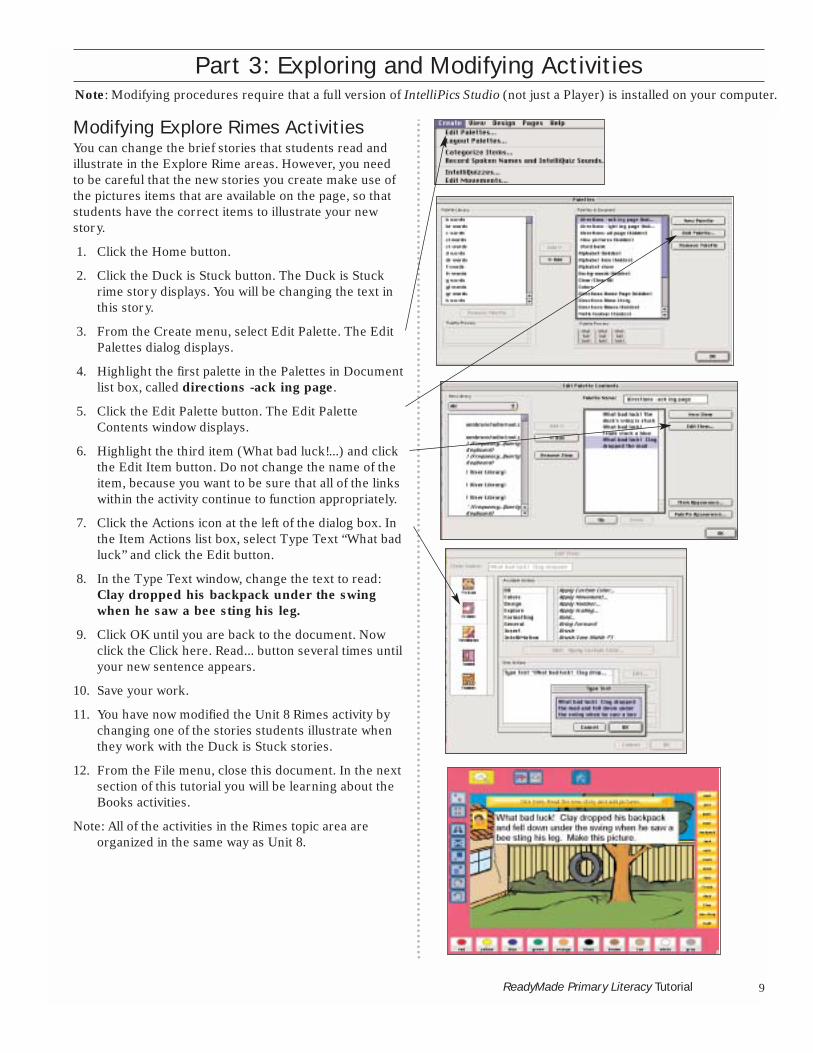
Modifying Explore Rimes ActivitiesYou can change the brief stories that students read andillustrate in the Explore Rime areas. However, you needto be careful that the new stories you create make use ofthe pictures items that are available on the page, so thatstudents have the correct items to illustrate your newstory.
1. Click the Home button.
2. Click the Duck is Stuck button. The Duck is Stuckrime story displays. You will be changing the text inthis story.
3. From the Create menu, select Edit Palette. The EditPalettes dialog displays.
4. Highlight the first palette in the Palettes in Documentlist box, called directions -ack ing page.
5. Click the Edit Palette button. The Edit PaletteContents window displays.
6. Highlight the third item (What bad luck!...) and clickthe Edit Item button. Do not change the name of theitem, because you want to be sure that all of the linkswithin the activity continue to function appropriately.
7. Click the Actions icon at the left of the dialog box. Inthe Item Actions list box, select Type Text “What badluck” and click the Edit button.
8. In the Type Text window, change the text to read:Clay dropped his backpack under the swingwhen he saw a bee sting his leg.
9. Click OK until you are back to the document. Nowclick the Click here. Read... button several times untilyour new sentence appears.
10. Save your work.
11. You have now modified the Unit 8 Rimes activity bychanging one of the stories students illustrate whenthey work with the Duck is Stuck stories.
12. From the File menu, close this document. In the nextsection of this tutorial you will be learning about theBooks activities.
Note: All of the activities in the Rimes topic area areorganized in the same way as Unit 8.
Part 3: Exploring and Modifying Activities
ReadyMade Primary Literacy Tutorial
Note: Modifying procedures require that a full version of IntelliPics Studio (not just a Player) is installed on your computer.
10
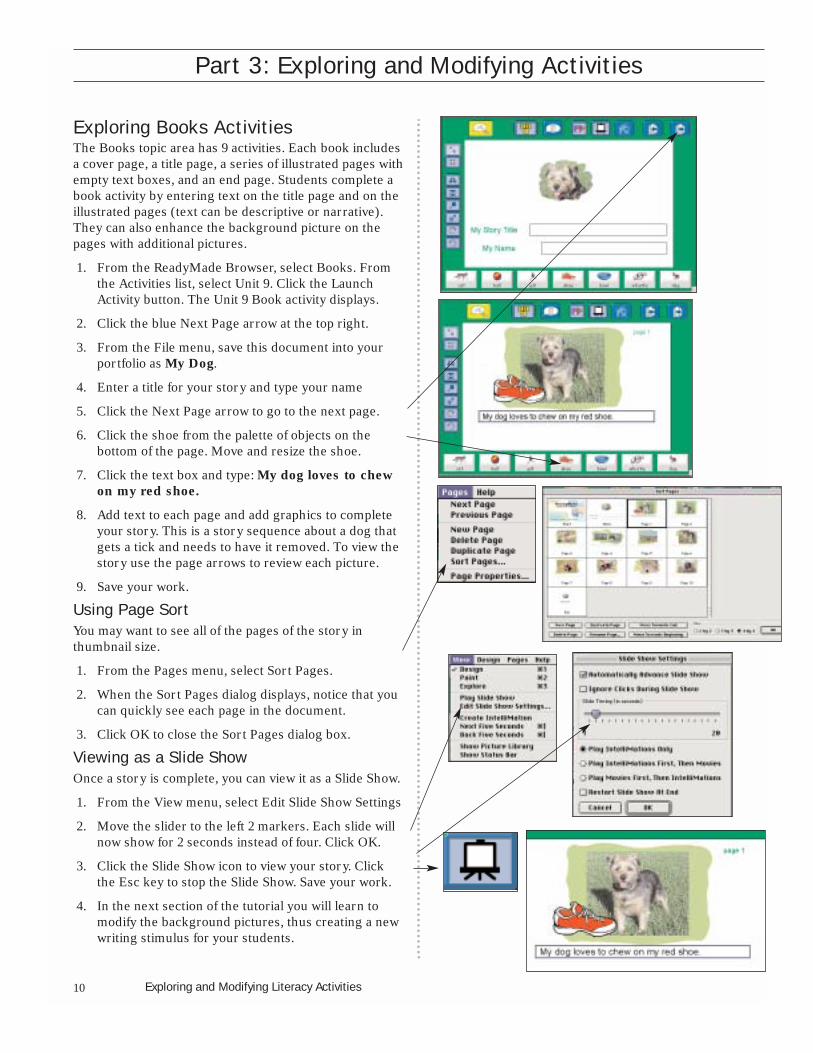
Exploring Books ActivitiesThe Books topic area has 9 activities. Each book includesa cover page, a title page, a series of illustrated pages withempty text boxes, and an end page. Students complete abook activity by entering text on the title page and on theillustrated pages (text can be descriptive or narrative).They can also enhance the background picture on thepages with additional pictures.
1. From the ReadyMade Browser, select Books. Fromthe Activities list, select Unit 9. Click the LaunchActivity button. The Unit 9 Book activity displays.
2. Click the blue Next Page arrow at the top right.
3. From the File menu, save this document into yourportfolio as My Dog.
4. Enter a title for your story and type your name
5. Click the Next Page arrow to go to the next page.
6. Click the shoe from the palette of objects on thebottom of the page. Move and resize the shoe.
7. Click the text box and type: My dog loves to chewon my red shoe.
8. Add text to each page and add graphics to completeyour story. This is a story sequence about a dog thatgets a tick and needs to have it removed. To view thestory use the page arrows to review each picture.
9. Save your work.
Using Page SortYou may want to see all of the pages of the story inthumbnail size.
1. From the Pages menu, select Sort Pages.
2. When the Sort Pages dialog displays, notice that youcan quickly see each page in the document.
3. Click OK to close the Sort Pages dialog box.
Viewing as a Slide ShowOnce a story is complete, you can view it as a Slide Show.
1. From the View menu, select Edit Slide Show Settings
2. Move the slider to the left 2 markers. Each slide willnow show for 2 seconds instead of four. Click OK.
3. Click the Slide Show icon to view your story. Clickthe Esc key to stop the Slide Show. Save your work.
4. In the next section of the tutorial you will learn tomodify the background pictures, thus creating a newwriting stimulus for your students.
Part 3: Exploring and Modifying Activities
Exploring and Modifying Literacy Activities
11ReadyMade Primary Literacy Tutorial
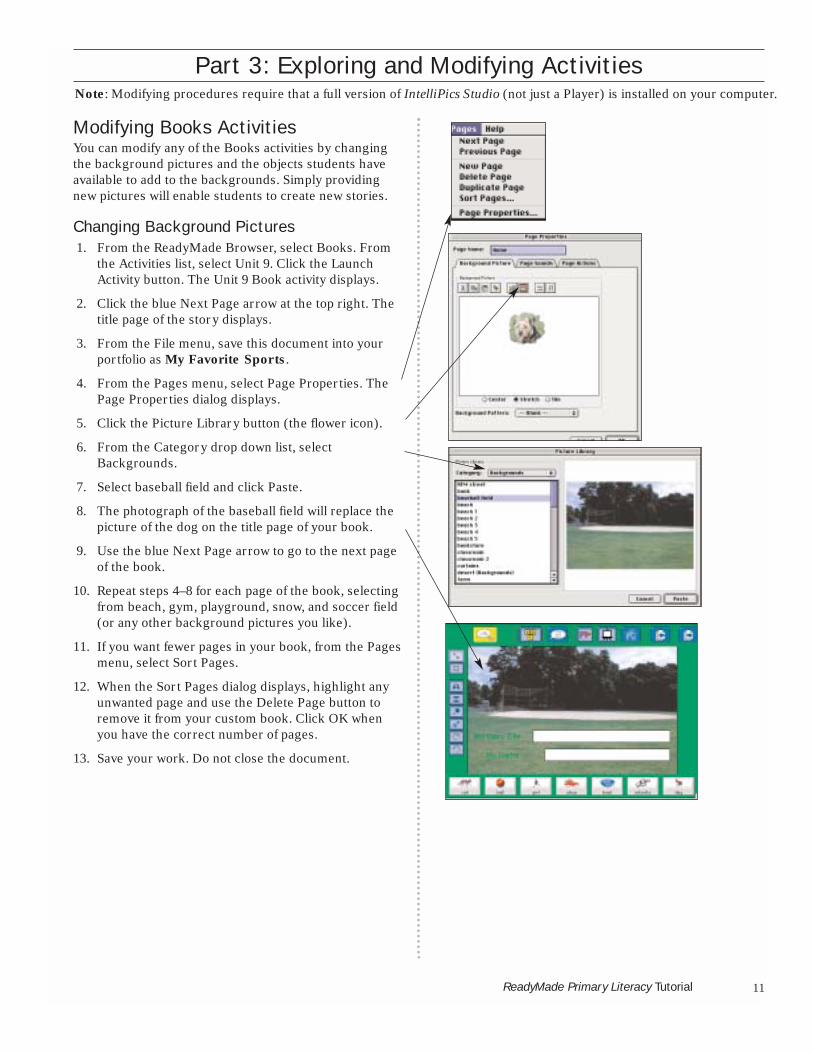
Modifying Books ActivitiesYou can modify any of the Books activities by changingthe background pictures and the objects students haveavailable to add to the backgrounds. Simply providingnew pictures will enable students to create new stories.
Changing Background Pictures1. From the ReadyMade Browser, select Books. From
the Activities list, select Unit 9. Click the LaunchActivity button. The Unit 9 Book activity displays.
2. Click the blue Next Page arrow at the top right. Thetitle page of the story displays.
3. From the File menu, save this document into yourportfolio as My Favorite Sports.
4. From the Pages menu, select Page Properties. ThePage Properties dialog displays.
5. Click the Picture Library button (the flower icon).
6. From the Category drop down list, selectBackgrounds.
7. Select baseball field and click Paste.
8. The photograph of the baseball field will replace thepicture of the dog on the title page of your book.
9. Use the blue Next Page arrow to go to the next pageof the book.
10. Repeat steps 4–8 for each page of the book, selectingfrom beach, gym, playground, snow, and soccer field(or any other background pictures you like).
11. If you want fewer pages in your book, from the Pagesmenu, select Sort Pages.
12. When the Sort Pages dialog displays, highlight anyunwanted page and use the Delete Page button toremove it from your custom book. Click OK whenyou have the correct number of pages.
13. Save your work. Do not close the document.
Part 3: Exploring and Modifying ActivitiesNote: Modifying procedures require that a full version of IntelliPics Studio (not just a Player) is installed on your computer.
12
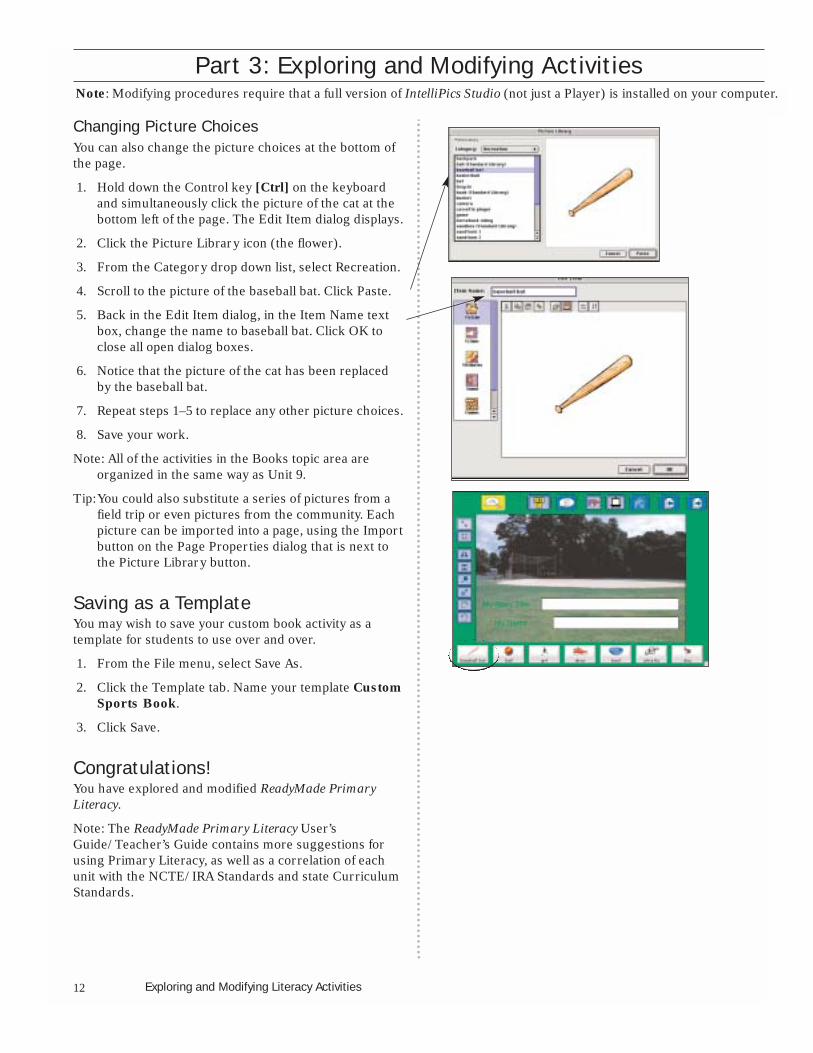
Changing Picture ChoicesYou can also change the picture choices at the bottom ofthe page.
1. Hold down the Control key [Ctrl] on the keyboardand simultaneously click the picture of the cat at thebottom left of the page. The Edit Item dialog displays.
2. Click the Picture Library icon (the flower).
3. From the Category drop down list, select Recreation.
4. Scroll to the picture of the baseball bat. Click Paste.
5. Back in the Edit Item dialog, in the Item Name textbox, change the name to baseball bat. Click OK toclose all open dialog boxes.
6. Notice that the picture of the cat has been replacedby the baseball bat.
7. Repeat steps 1–5 to replace any other picture choices.
8. Save your work.
Note: All of the activities in the Books topic area areorganized in the same way as Unit 9.
Tip:You could also substitute a series of pictures from afield trip or even pictures from the community. Eachpicture can be imported into a page, using the Importbutton on the Page Properties dialog that is next tothe Picture Library button.
Saving as a TemplateYou may wish to save your custom book activity as atemplate for students to use over and over.
1. From the File menu, select Save As.
2. Click the Template tab. Name your template CustomSports Book.
3. Click Save.
Congratulations! You have explored and modified ReadyMade PrimaryLiteracy.
Note: The ReadyMade Primary Literacy User’sGuide/Teacher’s Guide contains more suggestions forusing Primary Literacy, as well as a correlation of eachunit with the NCTE/IRA Standards and state CurriculumStandards.
Part 3: Exploring and Modifying Activities
Exploring and Modifying Literacy Activities
Note: Modifying procedures require that a full version of IntelliPics Studio (not just a Player) is installed on your computer.
13ReadyMade Primary Literacy Tutorial
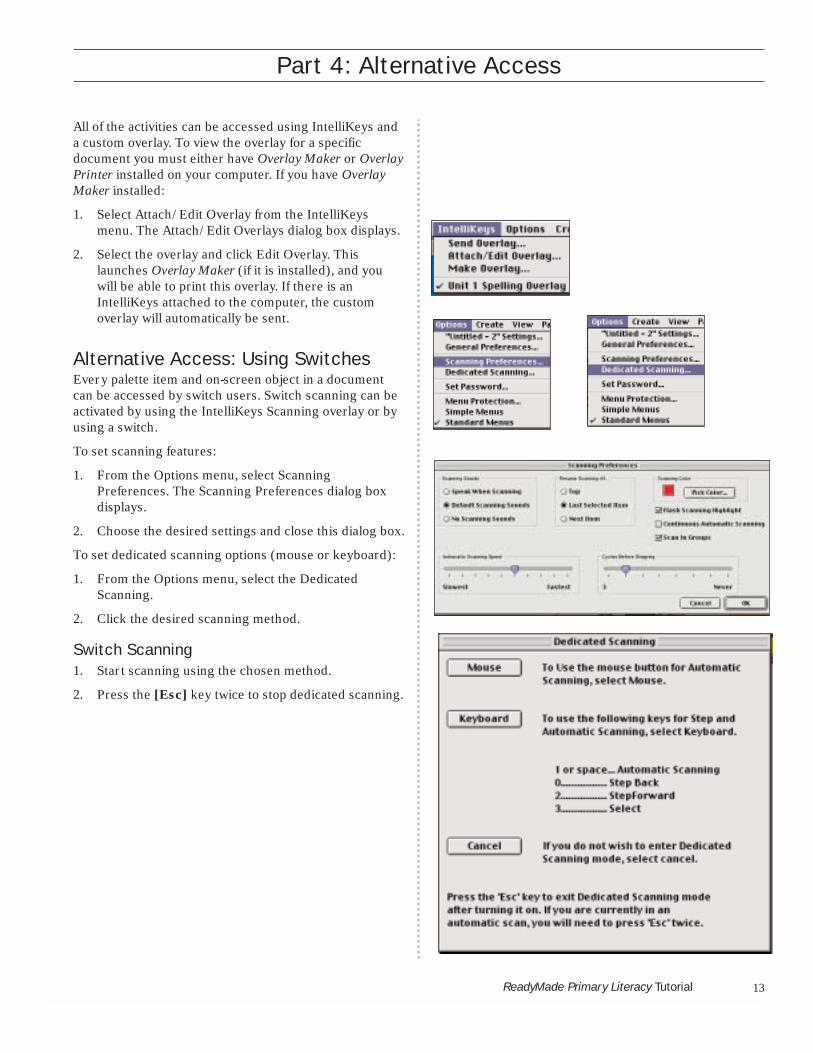
All of the activities can be accessed using IntelliKeys anda custom overlay. To view the overlay for a specificdocument you must either have Overlay Maker or OverlayPrinter installed on your computer. If you have OverlayMaker installed:
1. Select Attach/Edit Overlay from the IntelliKeysmenu. The Attach/Edit Overlays dialog box displays.
2. Select the overlay and click Edit Overlay. Thislaunches Overlay Maker (if it is installed), and youwill be able to print this overlay. If there is anIntelliKeys attached to the computer, the customoverlay will automatically be sent.
Alternative Access: Using SwitchesEvery palette item and on-screen object in a documentcan be accessed by switch users. Switch scanning can beactivated by using the IntelliKeys Scanning overlay or byusing a switch.
To set scanning features:
1. From the Options menu, select ScanningPreferences. The Scanning Preferences dialog boxdisplays.
2. Choose the desired settings and close this dialog box.
To set dedicated scanning options (mouse or keyboard):
1. From the Options menu, select the DedicatedScanning.
2. Click the desired scanning method.
Switch Scanning1. Start scanning using the chosen method.
2. Press the [Esc] key twice to stop dedicated scanning.
Part 4: Alternative Access