RCU Review: How to assemble a Race Pack - RCUniverse
8
RCU Review: How to assemble a Race Pack More On This Product Research Airplanes Research Boats Research Cars Research Helicopters Research Engines & Motors Research Radio Equipment Contributed by: Speed Munkey | Published: March 2005 | Views: 53432 | Email this Article | PDF One of the most frequently asked questions I get is “How do you assemble your own battery packs?” The answer is a rather lengthy one, but not difficult at all once you are comfortable with the steps involved. The biggest key to doing this right is to have all of your materials assembled and ready to go when you need them. Extra special thanks go to John at Team Scream for his very kind donation of the killer cells and build kit I used here. HOW-TO CLOSEUP Product Team Scream 6-cell race pack Goal Assemble the cells and go racing Organize your workspace One of the most important steps in any project is to organize all the tools and materials you will need, and make sure you have everything. Getting halfway through a project and realizing you are missing a tool, or something like the last battery bar, can be rather annoying. Preparation is the key to success, in all aspects of life.
Transcript of RCU Review: How to assemble a Race Pack - RCUniverse

RCU Review: How to assemble a Race Pack More On This Product
Research Airplanes Research Boats Research Cars Research Helicopters Research Engines & Motors Research Radio Equipment
Contributed by: Speed Munkey | Published: March 2005 | Views: 53432 | Email this Article | PDF
One of the most frequently asked questions I get is “How do you assemble your own battery packs?” Theanswer is a rather lengthy one, but not difficult at all once you are comfortable with the steps involved. Thebiggest key to doing this right is to have all of your materials assembled and ready to go when you needthem. Extra special thanks go to John at Team Scream for his very kind donation of the killer cells and buildkit I used here.
HOW-TO CLOSEUP
ProductTeam Scream6-cell race pack
Goal Assemble the cells and go racing
Organize your workspace
One of the most important steps in any project is toorganize all the tools and materials you will need, and makesure you have everything. Getting halfway through aproject and realizing you are missing a tool, or somethinglike the last battery bar, can be rather annoying.Preparation is the key to success, in all aspects of life.
Hint: Working on a mat can save the tablefrom being ruined by hot solder and stickyflux. Here, I'm working on a desktop matthat was purchased at Staples. It's arubber mat that is both non skid and hardto melt.
A few words on shop safety before webegin… Soldering is a very toxic hobby.The fumes and, in some cases, the leadin the solder can really mess with yourhealth. When soldering, I always havea fan blowing across my work area andI wear disposable vinyl gloves. Youcan't race from a hospital bed, so dothe right thing. Eye protection is also agood idea, because you also can't raceif you are blind from being splashedwith 400° molten solder. Again, do theright thing.
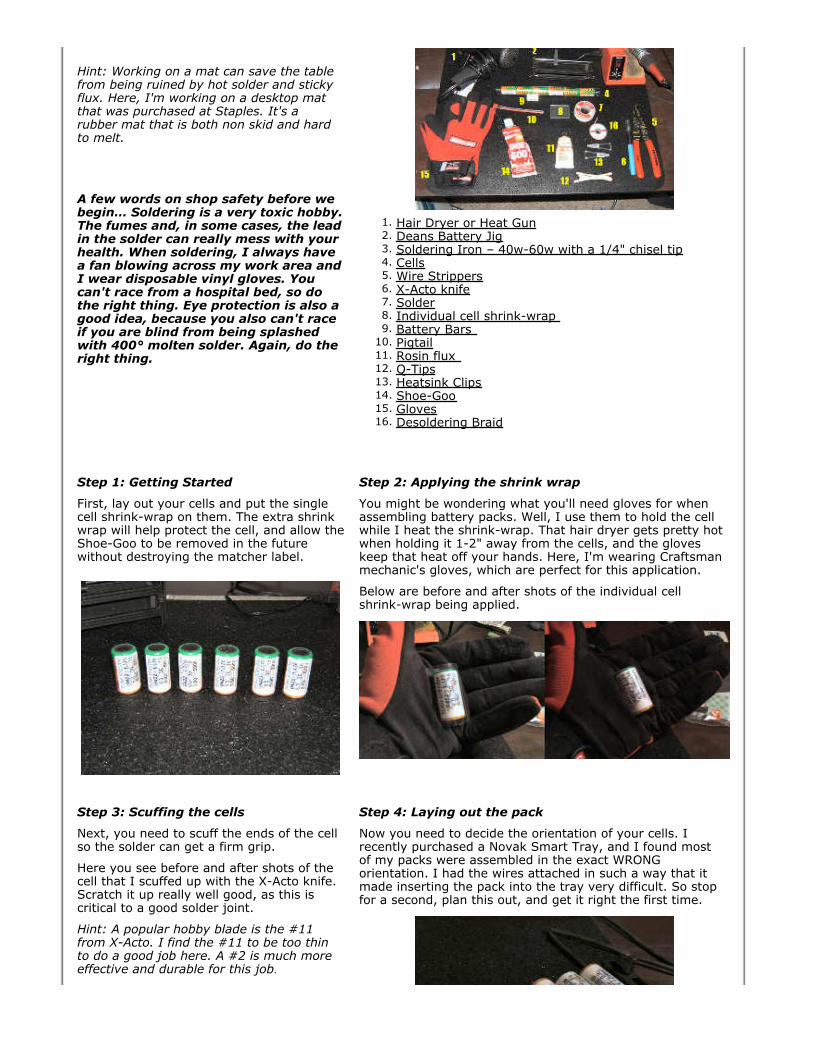
Hair Dryer or Heat Gun1.Deans Battery Jig2.Soldering Iron – 40w-60w with a 1/4" chisel tip 3.Cells4.Wire Strippers5.X-Acto knife6.Solder7.Individual cell shrink-wrap 8.Battery Bars 9.Pigtail10.Rosin flux 11.Q-Tips12.Heatsink Clips13.Shoe-Goo 14.Gloves 15.Desoldering Braid16.
Step 1: Getting Started
First, lay out your cells and put the singlecell shrink-wrap on them. The extra shrinkwrap will help protect the cell, and allow theShoe-Goo to be removed in the futurewithout destroying the matcher label.
Step 2: Applying the shrink wrap
You might be wondering what you'll need gloves for whenassembling battery packs. Well, I use them to hold the cellwhile I heat the shrink-wrap. That hair dryer gets pretty hotwhen holding it 1-2" away from the cells, and the gloveskeep that heat off your hands. Here, I'm wearing Craftsmanmechanic's gloves, which are perfect for this application.
Below are before and after shots of the individual cellshrink-wrap being applied.
Step 3: Scuffing the cells
Next, you need to scuff the ends of the cellso the solder can get a firm grip.
Here you see before and after shots of thecell that I scuffed up with the X-Acto knife.Scratch it up really well good, as this iscritical to a good solder joint.
Hint: A popular hobby blade is the #11from X-Acto. I find the #11 to be too thinto do a good job here. A #2 is much moreeffective and durable for this job.
Step 4: Laying out the pack
Now you need to decide the orientation of your cells. Irecently purchased a Novak Smart Tray, and I found mostof my packs were assembled in the exact WRONGorientation. I had the wires attached in such a way that itmade inserting the pack into the tray very difficult. So stopfor a second, plan this out, and get it right the first time.

Step 5: Preparing to solder
Next you need to apply a small amount offlux to the end of each cell. Use as little aspossible, as this stuff goes a long way andis quite messy. A Q-Tip is a great way tocontrol it. Toothpicks work too..
Step 6: Applying the solder
Now it's time to apply a 1/8" sized drop of solder to eachcell, which will promote good adhesion. Some people don'tdo this, but I find it to be the easiest way to build a strongpack. You can either apply it as a little ball, or spread itaround thinly. Either way works the same in the end. If youmanage to make too big a solder blob, then you can easilyremove it with the desoldering braid (Item #16). It's a goodidea to clean the tip of your iron everytime you make a newjoint by rubbing it on a damp sponge. This helps eliminatepollutants and gives you a cleaner joint.
Step 7: Attaching the bars
Now, place one of the bars across 2 cells and apply the bar holder to it. Try to center the holes of the baron the solder you just applied.
Never apply heat for more than 5 seconds, as that will damage the cell. If you must redo thesolder joint, move on to the next bar and then come back to it after the cell has cooled completely. Touchthe tip of your iron to the + or - on the bar for 2 seconds to heat it up, then, while still holding the iron onthe bar, apply just a bit of additional solder to get the joint to flow smoothly. Remove it as soon as thepressure from the bar holder is able to press the bar fully onto the cell. This will occur when the solder youapplied to the cell earlier melts.
Hint: Pressing on the bar holder with your finger will help ensure a strong mechanical connection betweenthe bar and the cell.
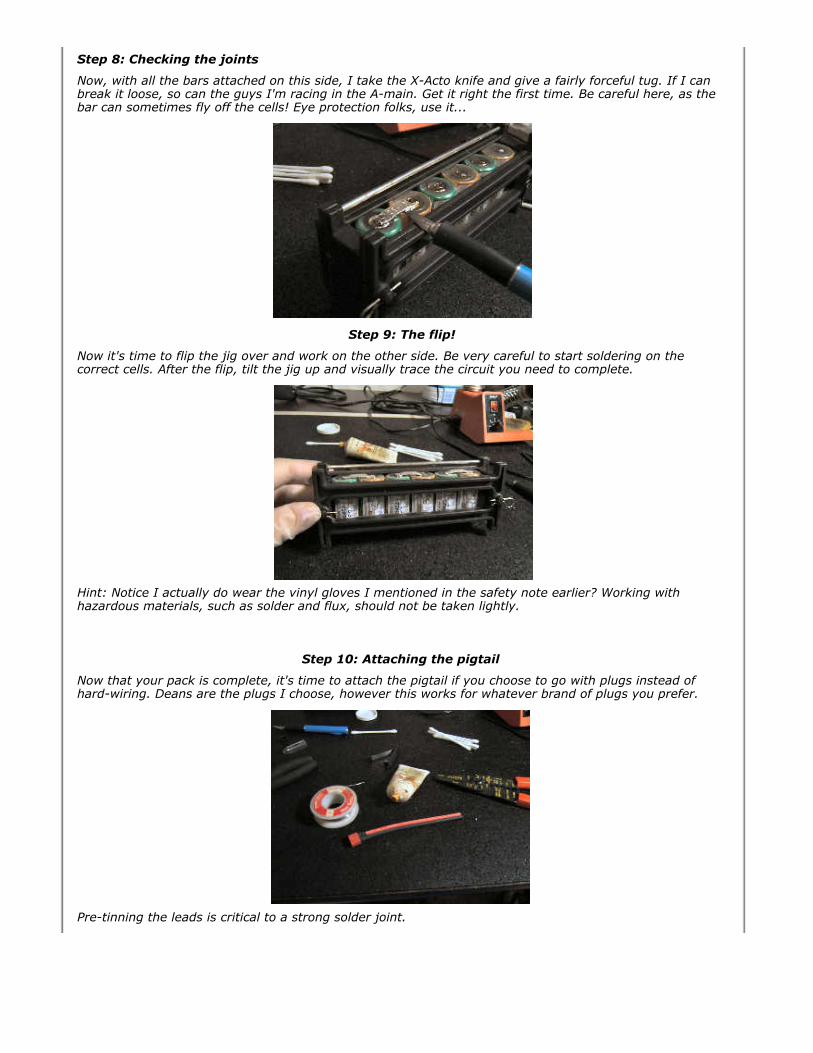
Step 8: Checking the joints
Now, with all the bars attached on this side, I take the X-Acto knife and give a fairly forceful tug. If I canbreak it loose, so can the guys I'm racing in the A-main. Get it right the first time. Be careful here, as thebar can sometimes fly off the cells! Eye protection folks, use it...
Step 9: The flip!
Now it's time to flip the jig over and work on the other side. Be very careful to start soldering on thecorrect cells. After the flip, tilt the jig up and visually trace the circuit you need to complete.
Hint: Notice I actually do wear the vinyl gloves I mentioned in the safety note earlier? Working withhazardous materials, such as solder and flux, should not be taken lightly.
Step 10: Attaching the pigtail
Now that your pack is complete, it's time to attach the pigtail if you choose to go with plugs instead ofhard-wiring. Deans are the plugs I choose, however this works for whatever brand of plugs you prefer.
Pre-tinning the leads is critical to a strong solder joint.

If the heat is too much for you to handle, use a heatsink clip to hold the wire. I don't use them, as I findmy own ability to handle the pain is about the same as what I'd want to inflict upon a valuable cell.Sometimes this is a difficult joint to complete and it takes a few tries. If I find it's getting too hot for me,then I stop so the cell can cool and try again in a few minutes.
Step 11: Shoe-Goo
I now apply a bead of Shoe-Goo between each pair of cells. I probably use too much, but I like a nice,strong joint. Your milleage may vary..
Final thoughts:There you have it, my simple steps to assembling a race pack. Others may have different techniques, andtheir work might look cleaner than mine, but this works for me. I hope someone learns something fromthis.
Good luck folks!
PRODUCTS USED
CellsGP3300 1.175+ cellsprovided by Team
Scream Cell Matching
Battery building kit provided by TeamScream Cell Matching
Manufacturer & Distributor Information
Team Scream Cell Matching119 Conant St.
Danvers, MA 01923Phone (978) 337-0429
Web: www.teamscreamcellmatching.comEmail: [email protected]
Comments on RCU Review: How to assemble a Race Pack
Profile Awesome instructional you did here. Thanks!
Profile Your timing for this article was perfect! Thank you. Instructions are very detailed and easy to understand
Profile
Page: 1
Posted by: MadManAndrew on 01/15/2009
Posted by: rcnitrorookie on 01/22/2009
Posted by: joe.robodad on 09/19/2009
EMAIL THIS ARTICLE OR CHECK OUT THESE OTHER GREAT REVIEWS!
Photo Manufacturer Product Summary Reviewed
MOTIV “M-Code”Brushless RC Moto
Ok, enough about Paul because this article isabout the MOTIV line of “M-Code” line of motors.The “M-Code” motors come in ma...
12/06/2015
Trinity D4 1SIn late June, 2014, Trinity released the D4 motorto replace the D3.5. Since that time, the D4 haspowered cars to 8 ROAR Nat...
12/06/2015
MattLemay
Airbrushing – TakeYour Painting To
I’ve decided to create a series of articlesdedicated to helping the average hobbyist getinto, or at least consider whether ...
12/06/2015
Tamiya Amarok Custom LiftAs an official vehicle of the 2014 Sochi Olympics,Volkswagen built specialized polar edition customlifted Amarok vehicles u...
11/24/2015
Traxxas Slash VXLBrushless with OBA
In June, I tested and wrote about the TraxxasSlash w/ OBA and how much I enjoyed what theSlash offers. It's been a goto veh...
11/23/2015
RCGF 21cc Twin CylinderGasoline Engine
RCGF, a Chinese manufacturer of gasolineengines, designs and manufactures enginesspecifically for 'the RC aircraft market. ...
11/23/2015
RCGF120cc Twin
Cylinder GasolineEngine
RCGF, a Chinese manufacturer of gasolineengines, designs and manufactures enginesspecifically for the RC aircraft market. T...
11/23/2015

TowerHobbies J-3 Cub
With its distinctive looks, it is probably safe to saythat the J-3 Cub is one of the most recognized andknown airplanes in ...
11/23/2015
Hobbico Estes Proto-ZThe Proto-Z is a Blast of micro-sized fun! It's theultimate user-friendly drone- The fastest, easisetand most economical wa...
11/22/2015
SeagullModels
Maule SuperRocket 10-15cc
ARF
When Seagull Models announced that they weregoing to produce not just a model, but an ARF ofthe Super Rocket, I just had to...
11/22/2015
Flitework Edge 540The Flitework Edge 540 is an electric only ARFairframe with a generous wing span of 66.9" andalso beautifully dressed up in...
11/21/2015
SeagullModels
Steen SuperSkybolt 15cc ARF
Seagull Models introduced this biplane early on in2015, and SIG mfg. had a pre-production sampleat the Toledo Expo. That pr...
11/20/2015
ST Model SaltoST model brings us a fun aerobatic glider with theH101 Salto. The self-launch electric glider has nobad tendency and will b...
11/19/2015
RCGF 10cc GasolineEngine
RCGF, a Chinese manufacturer of gasolineengines, designs and manufactures enginesspecifically for 'the RC aircraft market. ...
11/17/2015
SeagullModels
Funky Cub 10-15ccARF
The new Funky Cub has some really coolattributes, borrowed from scale aircraft, thatshould add up to make it a great flying...
11/16/2015
Return to Magazine Homepage
Copyright MH Sub I, LLC dba Internet Brands Copyright © 2001-2019.Terms of Service | Privacy Policy
GET FREE RC CONTENT FOR YOUR WEBSITE
Search | Marketplace | Event Central | Local Clubs | Magazine | Product Ratings | New Products | Discussion Forums
Photo Gallery | Instructor Search | Field|Track|Marina Search | RCU Youtube Channel | | RCU Twitter!
Member Locator | Advertisers | Hobby Vendor Resources | Rate Manufacturers | Sign In/Sign Up
Products Videos WattFlyer.com RC Classifieds

RCU2 | 10.17.133.22 | 0 | 1 | 07:53:29 AM EST | NC