RCP Development Environment Setup - For Core … there are compile no errors, you are ready to begin...
20
1. 1. a. b. c. 1. a. 2. 3. 4. a. i. ii. b. c. i. ii. iii. iv. v. d. e. 5. RCP Development Environment Setup - For Core Velo/Vanilla Velo RCP Prerequisites Install Java 7 Install Eclipse Import Your Project's Source Code Using Eclipse (Recommended) From outside Eclipse (Optional - Advanced developers only) Build Your Target Platform Setup the Runtime Environment for your RCP Application Create a repository.properties file for your Velo application Create a Run Configuration Launch Your Velo RCP Application Updating Your Target Platform Prerequisites Get the default repository.properties file from your Velo Server administrator. (see below for how it is used) Install Java 7 The Velo-RCP now works with Java 7. The architecture you choose (64-bit vs. 32-bit) match the architecture of Eclipse that you MUST install (see below). To determine if you have java installed and what version it is, run this from the command line: java -version If you get a "command not found" error - you do not have java installed If your version says anything except 1.7.*, you need to install Java 7 Install Eclipse Download ( ) (or Eclipse MARS for RCP developers https://www.eclipse.org/downloads/packages/eclipse-rcp-and-rap-developers/marsr for PNNL developers look in \\pnl\projects\CAT_Tools\Eclipse) Decide if you want to use a 32-bit Eclipse or 64-bit Eclipse (we hope 64 bit). You have the same version of Eclipse as the MUST Java you install! Start Eclipse and provide it with a workspace path. The workspace is where all Eclipse projects will be saved. We recommend using a name that matches your Velo deployment, since many Velo developers work on multiple projects. (For example, my Akuna workspace is saved to C:\Eclipse\Workspaces\Akuna.) Close the welcome page if it is opened. Set Java version to point to the java from Prerequisites #1 Open preferences (Mac) Eclipse->Preferences (Windows) Windows->Preferences From the left navigation bar, select Java->Installed JREs If the JDK is not found in the list you may add a new one Select Add... Select Standard VM Set JRE home (e.g. C:\Program Files\Java\jdk1.7.0_71) Set JRE name Finish Select the preferred JDK by checking the box on the left Click OK (Optional) Configure Proxy Settings. If you have a proxy at your site, you will need to configure those proxy settings in Eclipse so you will be able to access the plugin and svn repositories. Follow these instructions: http://help.eclipse.org/mars/index.jsp?topic=%2Forg.eclipse. We will hence refer to your workspace folder as $WORKSPACE
Transcript of RCP Development Environment Setup - For Core … there are compile no errors, you are ready to begin...

1.
1.
a.
b. c.
1.
a.
2.
3. 4.
a. i. ii.
b. c.
i. ii. iii. iv. v.
d. e.
5.
RCP Development Environment Setup - For Core Velo/VanillaVelo RCP
PrerequisitesInstall Java 7Install EclipseImport Your Project's Source Code
Using Eclipse (Recommended)From outside Eclipse (Optional - Advanced developers only)
Build Your Target Platform Setup the Runtime Environment for your RCP Application
Create a repository.properties file for your Velo applicationCreate a Run Configuration
Launch Your Velo RCP ApplicationUpdating Your Target Platform
Prerequisites
Get the default repository.properties file from your Velo Server administrator. (see below for how it is used)
Install Java 7
The Velo-RCP now works with Java 7. The architecture you choose (64-bit vs. 32-bit) match the architecture of Eclipse that youMUSTinstall (see below).
To determine if you have java installed and what version it is, run this from the command line:java -versionIf you get a "command not found" error - you do not have java installedIf your version says anything except 1.7.*, you need to install Java 7
Install Eclipse
Download ( ) (or Eclipse MARS for RCP developers https://www.eclipse.org/downloads/packages/eclipse-rcp-and-rap-developers/marsrfor PNNL developers look in \\pnl\projects\CAT_Tools\Eclipse)
Decide if you want to use a 32-bit Eclipse or 64-bit Eclipse (we hope 64 bit). You have the same version of Eclipse as theMUSTJava you install!
Start Eclipse and provide it with a workspace path. The workspace is where all Eclipse projects will be saved. We recommend using aname that matches your Velo deployment, since many Velo developers work on multiple projects. (For example, my Akuna workspace issaved to C:\Eclipse\Workspaces\Akuna.)
Close the welcome page if it is opened.Set Java version to point to the java from Prerequisites #1
Open preferences(Mac) Eclipse->Preferences(Windows) Windows->Preferences
From the left navigation bar, select Java->Installed JREsIf the JDK is not found in the list you may add a new one
Select Add...Select Standard VMSet JRE home (e.g. C:\Program Files\Java\jdk1.7.0_71)Set JRE nameFinish
Select the preferred JDK by checking the box on the leftClick OK
(Optional) Configure Proxy Settings. If you have a proxy at your site, you will need to configure those proxy settings in Eclipse so you willbe able to access the plugin and svn repositories. Follow these instructions: http://help.eclipse.org/mars/index.jsp?topic=%2Forg.eclipse.
We will hence refer to your workspace folder as $WORKSPACE

5.
6.
a. b. c. d.
e. f.
platform.doc.user%2Freference%2Fref-net-preferences.htm(Optional) Install the This is useful so you can check out/commit your code changes directly from Eclipse and viewsubversive plugin.changes in the compare editor. It is recommended for novice users.
In Eclipse, Help->Install New SoftwareIn the Work with: box, select "Mars - mars" from the dropdown listhttp://download.eclipse.org/releases/Expand the Collaboration boxSelect the three Subversive plugins shown below:
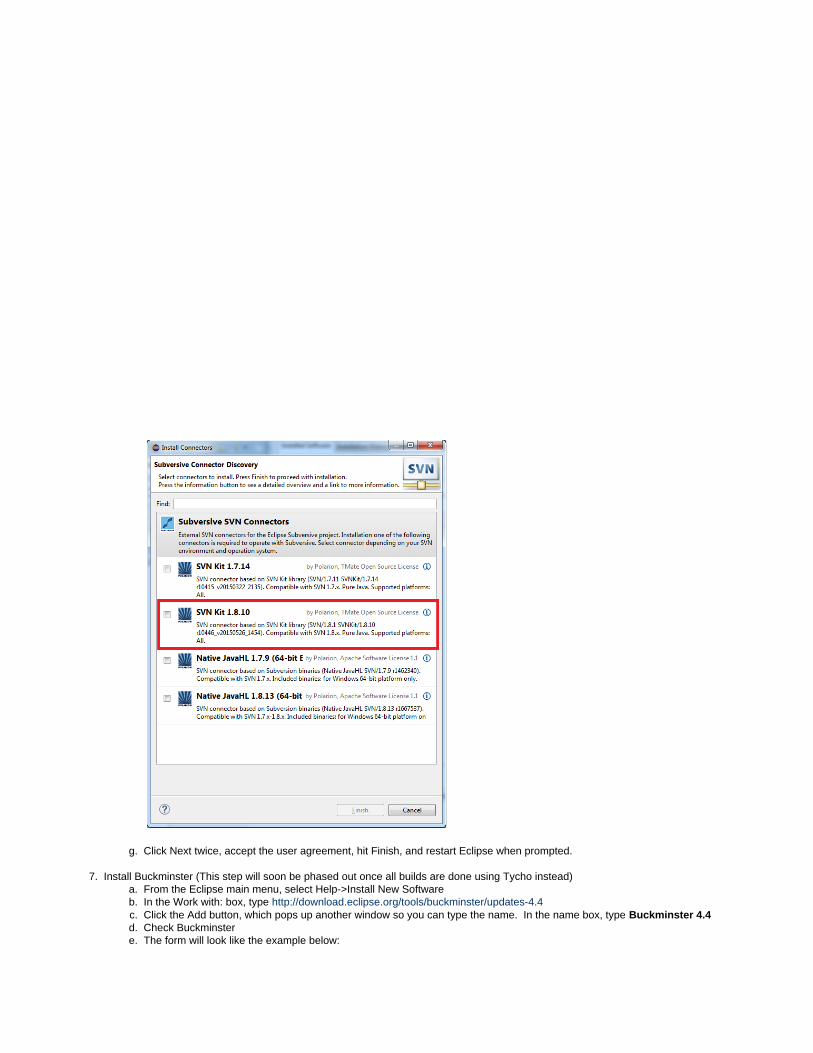
Click Next twice, accept the user agreement, hit Finish, and restart Eclipse when promptedThe first time you try to navigate to the SVN Repository Exploring perspective (Window->Open Perspective->Other, See belowwhen checking out source code), you will be automatically prompted to select an SVN Kit Connector. Select 1.8.10 as shown:
6.
f.
g.
7. a. b. c. d. e.
Click Next twice, accept the user agreement, hit Finish, and restart Eclipse when prompted.
Install Buckminster (This step will soon be phased out once all builds are done using Tycho instead)From the Eclipse main menu, select Help->Install New SoftwareIn the Work with: box, type http://download.eclipse.org/tools/buckminster/updates-4.4Click the Add button, which pops up another window so you can type the name. In the name box, type Buckminster 4.4Check Buckminster The form will look like the example below:

7.
e.
f. 8.
Click Next twice, accept the user agreement, hit Finish, and restart Eclipse when promptedAdd Tycho configurator to Maven. Go to Preferences->Maven->Discovery. Click on the Open Catalog button. Type Tycho in the filter

8.
1.
2.
box. Check Tycho and follow the steps to install, which will require a restart of Eclipse.
Import Your Project's Source Code
You can import source code from either Eclipse or outside Eclipse using a different svn tool. If you are new to Java development, we recommendthat you import your code from Eclipse.
Using Eclipse (Recommended)
Connect to the source code repository in eclipse.
Open the SVN Repository Exploring perspective. In Eclipse Window->Open Perspective->Other
Right Click in the SVN Repositories view in the upper left corner and select New->Repository Location.
2.
3. 4. 5.
a. b. c. d.
6. a. b. c. d. e.
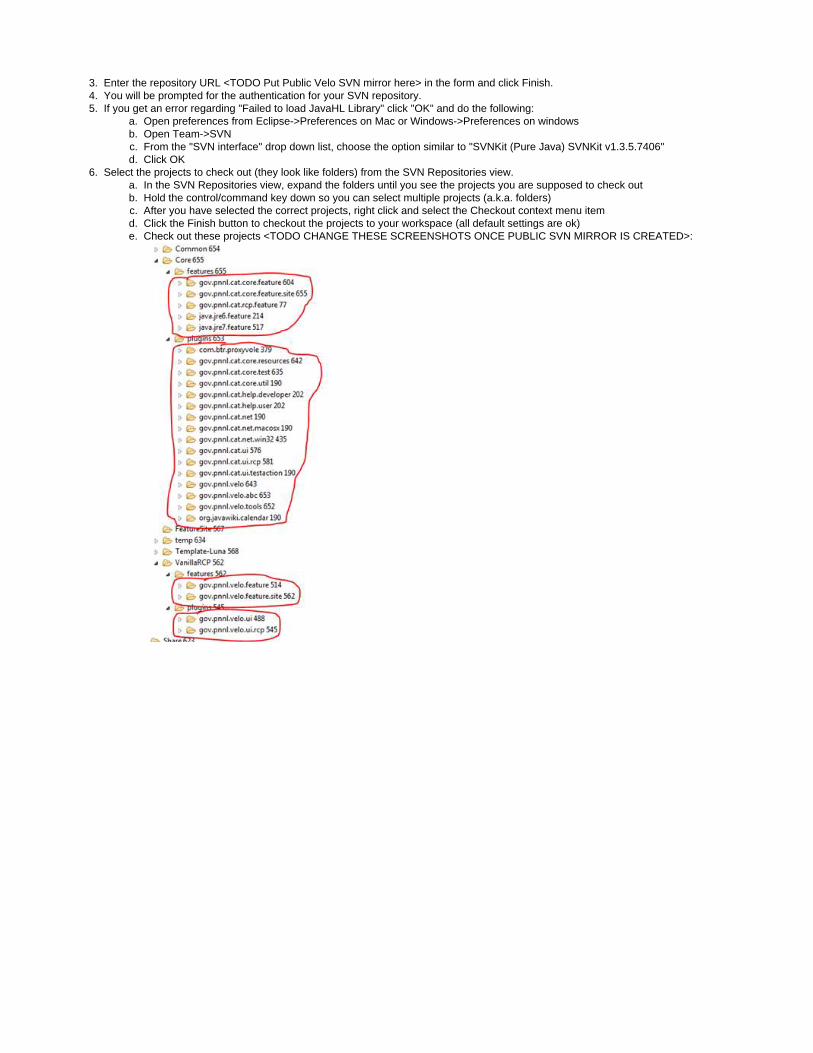
Enter the repository URL <TODO Put Public Velo SVN mirror here> in the form and click Finish.You will be prompted for the authentication for your SVN repository.If you get an error regarding "Failed to load JavaHL Library" click "OK" and do the following:
Open preferences from Eclipse->Preferences on Mac or Windows->Preferences on windowsOpen Team->SVNFrom the "SVN interface" drop down list, choose the option similar to "SVNKit (Pure Java) SVNKit v1.3.5.7406"Click OK
Select the projects to check out (they look like folders) from the SVN Repositories view.In the SVN Repositories view, expand the folders until you see the projects you are supposed to check outHold the control/command key down so you can select multiple projects (a.k.a. folders) After you have selected the correct projects, right click and select the Checkout context menu itemClick the Finish button to checkout the projects to your workspace (all default settings are ok)Check out these projects <TODO CHANGE THESE SCREENSHOTS ONCE PUBLIC SVN MIRROR IS CREATED>:

6.
e.
1. 2. 3. 4. 5. 6. 7. 8.
1.
From outside Eclipse (Optional - Advanced developers only)
Checkout the source using your preferred tool (e.g. Tortoise SVN)Open the Java Perspective. In Eclipse, Window->Open Perspective->OtherIn Eclipse, File -> ImportChoose General -> Existing Projects into Workspace and hit NextBrowse to the folder where the source files are checked out.Select the projects from step 6e aboveClick Finish.Projects are now imported into Eclipse and should appear in the Package Explorer view.
Build Your Target Platform
In Eclipse, the target platform contains the set of plugin library dependencies that your application needs in order to compile. The Velo targetplatform plugins are automatically downloaded from the Velo update site currently located at http://p2.velo.pnnl.gov/updates
Open the Java perspective. In Eclipse Window->Open Perspective->Other

1.
2. Update metadata cache. Right click on any velo maven plugin (you will see the M decorator in the upper left corner), then selectMaven->Update Project… Then in the dialog that pops up, click the Select All button, then click the OK button (shown in the following

2.
3.
screen shots). You only need to do this step once.
Double click on the build.targetplatform.target file in the build.targetplatform project. This should open a special editor as shown below.Click on the "Set as Target Platform" link. Close the build.targetplatform.target file.

3.
4.
1.
2.
If there are compile no errors, you are ready to begin development!
Setup the Runtime Environment for your RCP Application
Create a repository.properties file for your Velo application
The repository.properties file tells the Velo core plugins how to connect to your server. You MUST have a repository.properties file in order tostart your Velo application.
Create a new file called repository.properties.APPLICATION_NAME using any text editor, where APPLICATION_NAME is the name ofyour Velo application (e.g., Akuna, PremierNetwork, etc.). An example looks like the following (variables will change per deployment):
YOU ONLY NEED TO DO THIS THE FIRST TIME.
Get the repository.properties file from your project administrator.
2.
3.
1.
2. 3.
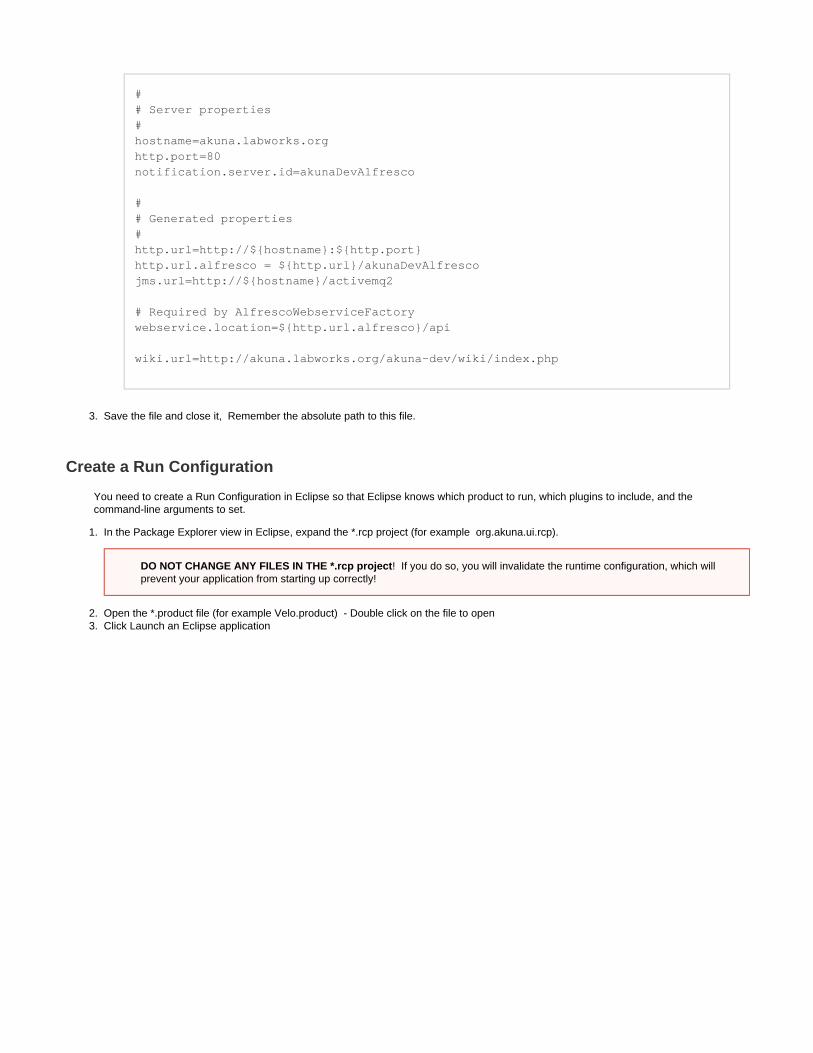
## Server properties#hostname=akuna.labworks.orghttp.port=80notification.server.id=akunaDevAlfresco
## Generated properties#http.url=http://${hostname}:${http.port}http.url.alfresco = ${http.url}/akunaDevAlfrescojms.url=http://${hostname}/activemq2
# Required by AlfrescoWebserviceFactorywebservice.location=${http.url.alfresco}/api
wiki.url=http://akuna.labworks.org/akuna-dev/wiki/index.php
Save the file and close it, Remember the absolute path to this file.
Create a Run Configuration
You need to create a Run Configuration in Eclipse so that Eclipse knows which product to run, which plugins to include, and thecommand-line arguments to set.
In the Package Explorer view in Eclipse, expand the *.rcp project (for example org.akuna.ui.rcp).
Open the *.product file (for example Velo.product) - Double click on the file to openClick Launch an Eclipse application
DO NOT CHANGE ANY FILES IN THE *.rcp project! If you do so, you will invalidate the runtime configuration, which willprevent your application from starting up correctly!

3.
4. 5.
6.
It will throw an error, which can be ignored. Click No when prompted to view the log file.From the Eclipse main menu, select Run -> Run Configurations

6.
7. a.
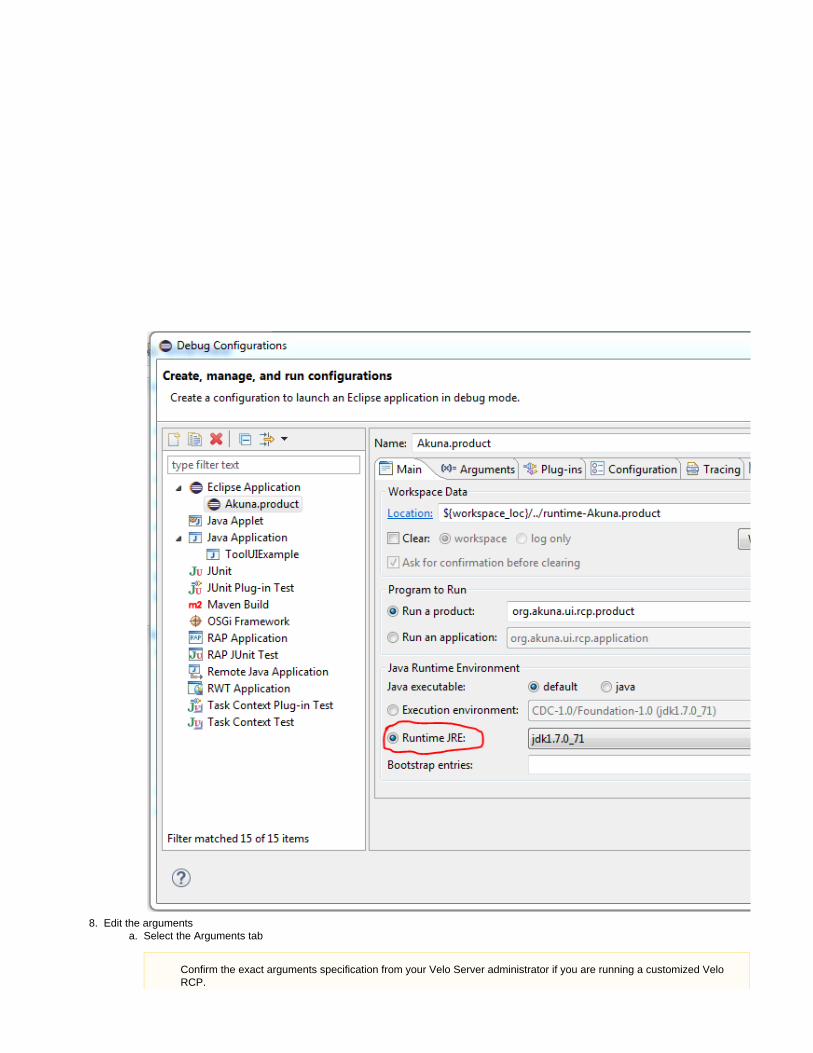
In the Run Configurations window, under Eclipse Application select the *.product for the project you are working on. An example isshown below
Edit the Main tabMake sure you are running in Java 7. Select the Runtime JRE radio as shown and make sure the dropdown has java 7 selected:
7. a.
8. a.
Edit the argumentsSelect the Arguments tab
Confirm the exact arguments specification from your Velo Server administrator if you are running a customized VeloRCP.

8. a.
b. Remove Variables. Due to variables used by the Velo installer, you should see some weird variables like below (specificvariables vary per deployment, but they consist of ALL CAPS and $). In general, from theit is safe to delete all variablesarguments
BEFORE
AFTER

8.
b.
c. Set the max memory. We recommend a minimum of 1024 MB

8.
c.
d. Set the path to the repository.properties file to point to where you saved it on your computer.

8.
d.
9.
a. b. c.
Edit the plugins
Select the Plugin-ins tab (you may need to resize the window in order to see everything in the plugins tab)Check the Workspace box so that all plugins in your workspace are seleced.Carefully de-select the plugins that don't apply to your operating system. For example, the akuna.codes plugin has versions forevery OS. I am only selecting the one for 64-bit Windows since that is my platform.

9.
c.
d. e.
10.
1.
2.
Click the Add Required Plugins button. This will check for required dependencies under the Target Platform. Validate the selection by clicking on the Validate Plugin-ins button. If you get errors, contact your project administrator for help.
Click Apply, then Close
Launch Your Velo RCP Application
In Eclipse, click the green Run button. This should automatically start the last Runtime Configuration you had used.
If per chance it tries to start a different appliction, then click the drop-down arrow on the Run button and choose the run configuration thatwas created in the previous section (for example, Akuna.product).
Updating Your Target Platform
From time to time, your project administrator may inform you that you need to update your target platform.

1. 2. 3. 4. 5.
This is because some of the code in the core Velo plugins has changed. If you update from SVN and seestrange errors, this is also a good indication that you need to update your target platform. To update yourtarget platform, perform the following steps.
Close EclipseDelete your $WORKSPACE/.buckminster/tp folderRestart EclipseIn the Package Explorer view, expand the *.feature.site project. (For example, org.akuna.feature.site)Double click on site.cquery file this should show the file content on the below. Click on the "Resolve and Materialize" button. Close thesite.cquery file.
p2.velo.pnnl.gov