RAS (Remote Administration System) - Honeywell · RAS (Remote Administration System) ... Server...
78
Document 900.0314 – 09/05 – Rev 2.00 User Guide RAS (Remote Administration System) Digital Video Recorder Software
Transcript of RAS (Remote Administration System) - Honeywell · RAS (Remote Administration System) ... Server...
Document 900.0314 – 09/05 – Rev 2.00
User Guide
RAS (RemoteAdministration System)
Digital Video Recorder Software

RAS User Guide

Revisions
Issue Date Revisions
1.00 08/04 New document.
1.01 04/05 Update template, styles and contact information.
2.00 09/05 Added Appendix B, DVR Name Service (DVRNS); added DVR Name Server information to System Setup to Configuration chapter; added OSD Setup and Data Source subsections to RAS Search chapter; revised Appendix A, MiniBank Self Player.
Updated screens: System, DVRNS Server Setup (new), Add Site.
Minor changes throughout
Contents
Rev 2.00 i Document 900.031409/05
ContentsContents. . . . . . . . . . . . . . . . . . . . . . . . . . . . . . . . . . . . . . . . . . . . . . . i
Figures . . . . . . . . . . . . . . . . . . . . . . . . . . . . . . . . . . . . . . . . . . . . . . . iii
Tables . . . . . . . . . . . . . . . . . . . . . . . . . . . . . . . . . . . . . . . . . . . . . . . . v
About This Document. . . . . . . . . . . . . . . . . . . . . . . . . . . . . . . . . . . . . . . viiOverview of Contents. . . . . . . . . . . . . . . . . . . . . . . . . . . . . . . . . . . . . . . viiRelated Documents. . . . . . . . . . . . . . . . . . . . . . . . . . . . . . . . . . . . . . . viii
1 Overview . . . . . . . . . . . . . . . . . . . . . . . . . . . . . . . . . . . . . . . . . . . 1
Features . . . . . . . . . . . . . . . . . . . . . . . . . . . . . . . . . . . . . . . . . . . . . 1Before You Begin . . . . . . . . . . . . . . . . . . . . . . . . . . . . . . . . . . . . . . . . . 2
Package Contents . . . . . . . . . . . . . . . . . . . . . . . . . . . . . . . . . . . 2System Requirements . . . . . . . . . . . . . . . . . . . . . . . . . . . . . . . . . 2
2 Installation and Operation . . . . . . . . . . . . . . . . . . . . . . . . . . . . . . . . . . 3
Installation Procedures . . . . . . . . . . . . . . . . . . . . . . . . . . . . . . . . . . . . . . 3Preliminary Procedures . . . . . . . . . . . . . . . . . . . . . . . . . . . . . . . . . 3Install the Software . . . . . . . . . . . . . . . . . . . . . . . . . . . . . . . . . . . 3
Operating Procedures . . . . . . . . . . . . . . . . . . . . . . . . . . . . . . . . . . . . . . 5
3 RAS Admin . . . . . . . . . . . . . . . . . . . . . . . . . . . . . . . . . . . . . . . . . . 7
Description . . . . . . . . . . . . . . . . . . . . . . . . . . . . . . . . . . . . . . . . . . . . 7Emergency Event List. . . . . . . . . . . . . . . . . . . . . . . . . . . . . . . . . . 10
Functions of the RAS Admin . . . . . . . . . . . . . . . . . . . . . . . . . . . . . . . . . . . 11Function Buttons . . . . . . . . . . . . . . . . . . . . . . . . . . . . . . . . . . . . 11Status Window for Remote Site. . . . . . . . . . . . . . . . . . . . . . . . . . . . . 15Batch Job Setup Button . . . . . . . . . . . . . . . . . . . . . . . . . . . . . . . . 17Local Setup Button . . . . . . . . . . . . . . . . . . . . . . . . . . . . . . . . . . . 21Log Buttons . . . . . . . . . . . . . . . . . . . . . . . . . . . . . . . . . . . . . . . 25
4 RAS Watch . . . . . . . . . . . . . . . . . . . . . . . . . . . . . . . . . . . . . . . . . 29
Description . . . . . . . . . . . . . . . . . . . . . . . . . . . . . . . . . . . . . . . . . . . . 29Functions of the RAS Watch . . . . . . . . . . . . . . . . . . . . . . . . . . . . . . . . . . . 31
Remote Sites/Connection Buttons . . . . . . . . . . . . . . . . . . . . . . . . . . . 31Screen Mode Buttons. . . . . . . . . . . . . . . . . . . . . . . . . . . . . . . . . . 33Full Screen Button . . . . . . . . . . . . . . . . . . . . . . . . . . . . . . . . . . . 33Camera Buttons. . . . . . . . . . . . . . . . . . . . . . . . . . . . . . . . . . . . . 33PTZ Control . . . . . . . . . . . . . . . . . . . . . . . . . . . . . . . . . . . . . . . 34Image Adjust Button . . . . . . . . . . . . . . . . . . . . . . . . . . . . . . . . . . 35Alarm Out Control. . . . . . . . . . . . . . . . . . . . . . . . . . . . . . . . . . . . 36Auto Sequencing Button . . . . . . . . . . . . . . . . . . . . . . . . . . . . . . . . 37
Contents
Rev 2.00 ii Document 900.031409/05
Auto Connection Button . . . . . . . . . . . . . . . . . . . . . . . . . . . . . . . . 37Setup Button . . . . . . . . . . . . . . . . . . . . . . . . . . . . . . . . . . . . . . 37
5 RAS Search . . . . . . . . . . . . . . . . . . . . . . . . . . . . . . . . . . . . . . . . . 41
Description . . . . . . . . . . . . . . . . . . . . . . . . . . . . . . . . . . . . . . . . . . . . 41Timelapse Search . . . . . . . . . . . . . . . . . . . . . . . . . . . . . . . . . . . . . . . . 42Event Search . . . . . . . . . . . . . . . . . . . . . . . . . . . . . . . . . . . . . . . . . . . 43Other Functions. . . . . . . . . . . . . . . . . . . . . . . . . . . . . . . . . . . . . . . . . .47
Playback Functions . . . . . . . . . . . . . . . . . . . . . . . . . . . . . . . . . . . 47Screen Modes . . . . . . . . . . . . . . . . . . . . . . . . . . . . . . . . . . . . . 48Image Enhancement . . . . . . . . . . . . . . . . . . . . . . . . . . . . . . . . . .48Save . . . . . . . . . . . . . . . . . . . . . . . . . . . . . . . . . . . . . . . . . . 50Print . . . . . . . . . . . . . . . . . . . . . . . . . . . . . . . . . . . . . . . . . . 53Display Setup . . . . . . . . . . . . . . . . . . . . . . . . . . . . . . . . . . . . . . 53Go To Date/Time . . . . . . . . . . . . . . . . . . . . . . . . . . . . . . . . . . . . 54
Appendix A MiniBank Self Player . . . . . . . . . . . . . . . . . . . . . . . . . . . . . . 55
Appendix B DVR Name Service . . . . . . . . . . . . . . . . . . . . . . . . . . . . . . . 59
System Configuration . . . . . . . . . . . . . . . . . . . . . . . . . . . . . . . . . . . . . . 59Error Code Notices . . . . . . . . . . . . . . . . . . . . . . . . . . . . . . . . . . . 60
Index. . . . . . . . . . . . . . . . . . . . . . . . . . . . . . . . . . . . . . . . . . . . . . . . . 1
Figures
Rev 2.00 iii Document 900.031409/05
FiguresFigure 2-1 Welcome to Installation Wizard Screen . . . . . . . . . . . . . . . . . . . . . . . . 4
Figure 2-2 Start Installation Screen . . . . . . . . . . . . . . . . . . . . . . . . . . . . . . . . 4
Figure 2-3 Finish Installation Screen . . . . . . . . . . . . . . . . . . . . . . . . . . . . . . . 5
Figure 2-4 RAS 3-Button Toolbox . . . . . . . . . . . . . . . . . . . . . . . . . . . . . . . . . 5
Figure 3-1 RAS Admin User Interface . . . . . . . . . . . . . . . . . . . . . . . . . . . . . . . 8
Figure 3-2 Emergency Event List . . . . . . . . . . . . . . . . . . . . . . . . . . . . . . . . . 10
Figure 3-3 Motion-Detecting Zone Setup Screen . . . . . . . . . . . . . . . . . . . . . . . . . 12
Figure 3-4 Remote System Log Screen . . . . . . . . . . . . . . . . . . . . . . . . . . . . . . 13
Figure 3-5 Remote Event Log Screen . . . . . . . . . . . . . . . . . . . . . . . . . . . . . . . 14
Figure 3-6 Batch Job System Check Screen . . . . . . . . . . . . . . . . . . . . . . . . . . . 18
Figure 3-7 Batch Job Upgrade Screen . . . . . . . . . . . . . . . . . . . . . . . . . . . . . . 19
Figure 3-8 Enter Filename Screen . . . . . . . . . . . . . . . . . . . . . . . . . . . . . . . .19
Figure 3-9 Batch Job Setup Screen. . . . . . . . . . . . . . . . . . . . . . . . . . . . . . . . 20
Figure 3-10 Admin System Setup Screen . . . . . . . . . . . . . . . . . . . . . . . . . . . . . 21
Figure 3-11 Admin Remote Site Setup . . . . . . . . . . . . . . . . . . . . . . . . . . . . . . . 22
Figure 3-12 Add a Site Screen . . . . . . . . . . . . . . . . . . . . . . . . . . . . . . . . . . . 23
Figure 3-13 IP Port Number Screen . . . . . . . . . . . . . . . . . . . . . . . . . . . . . . . . 24
Figure 3-14 Add a Group Screen . . . . . . . . . . . . . . . . . . . . . . . . . . . . . . . . . . 24
Figure 3-15 System Log Screen . . . . . . . . . . . . . . . . . . . . . . . . . . . . . . . . . . 25
Figure 3-16 Batch Job Log Screen . . . . . . . . . . . . . . . . . . . . . . . . . . . . . . . . . 26
Figure 3-17 Emergency Event Log Screen . . . . . . . . . . . . . . . . . . . . . . . . . . . . . 27
Figure 4-1 RAS Watch User Interface . . . . . . . . . . . . . . . . . . . . . . . . . . . . . . . 30
Figure 4-2 Remote Sites List . . . . . . . . . . . . . . . . . . . . . . . . . . . . . . . . . . . 32
Figure 4-3 Login Screen. . . . . . . . . . . . . . . . . . . . . . . . . . . . . . . . . . . . . . 32
Figure 4-4 PTZ Controls . . . . . . . . . . . . . . . . . . . . . . . . . . . . . . . . . . . . . . 34
Figure 4-5 Image Enhancement Controls . . . . . . . . . . . . . . . . . . . . . . . . . . . . . 35
Figure 4-6 Alarm Out Control Panel . . . . . . . . . . . . . . . . . . . . . . . . . . . . . . . . 36
Figure 4-7 Setup Favorites Screen . . . . . . . . . . . . . . . . . . . . . . . . . . . . . . . . 38
Figure 4-8 Setup Auto Sequencing Screen . . . . . . . . . . . . . . . . . . . . . . . . . . . . 39
Figure 5-1 Timelapse Search User Interface . . . . . . . . . . . . . . . . . . . . . . . . . . . 42
Figure 5-2 Go To Time Screen . . . . . . . . . . . . . . . . . . . . . . . . . . . . . . . . . . 43
Figure 5-3 Search By Event Screen . . . . . . . . . . . . . . . . . . . . . . . . . . . . . . . . 44
Figure 5-4 Search By Camera Screen . . . . . . . . . . . . . . . . . . . . . . . . . . . . . . 45
Figures
Rev 2.00 iv Document 900.031409/05
Figure 5-5 Event Search User Interface . . . . . . . . . . . . . . . . . . . . . . . . . . . . . . 46
Figure 5-6 Image Enhancement Options . . . . . . . . . . . . . . . . . . . . . . . . . . . . . 49
Figure 5-7 Choose Save Type Screen . . . . . . . . . . . . . . . . . . . . . . . . . . . . . . 50
Figure 5-8 Save as Video File Screen . . . . . . . . . . . . . . . . . . . . . . . . . . . . . . . 51
Figure 5-9 Save as MiniBank Screen . . . . . . . . . . . . . . . . . . . . . . . . . . . . . . . 52
Figure 5-10 On-Screen Display Setup Screen . . . . . . . . . . . . . . . . . . . . . . . . . . . 53
Figure 5-11 Data Source Setup Screen . . . . . . . . . . . . . . . . . . . . . . . . . . . . . . 54
Figure 5-12 Go To Time Screen . . . . . . . . . . . . . . . . . . . . . . . . . . . . . . . . . . 54
Figure A-1 MiniBank Self Player User Interface . . . . . . . . . . . . . . . . . . . . . . . . . . 56
Figure B-1 DVRNS Server System Configuration . . . . . . . . . . . . . . . . . . . . . . . . . 59
Tables
Rev 2.00 v Document 900.031409/05
TablesTable 3-1 RAS Admin Controls and Areas . . . . . . . . . . . . . . . . . . . . . . . . . . . . 8
Table 3-2 Emergency Event Icon Descriptions . . . . . . . . . . . . . . . . . . . . . . . . . . 10
Table 3-3 Motion-Detecting Zone Field Descriptions . . . . . . . . . . . . . . . . . . . . . . . 12
Table 3-4 System Log Icon Descriptions . . . . . . . . . . . . . . . . . . . . . . . . . . . . . 14
Table 3-5 Remote Event Log Icon Descriptions. . . . . . . . . . . . . . . . . . . . . . . . . . 15
Table 3-6 Event Status Icon Descriptions . . . . . . . . . . . . . . . . . . . . . . . . . . . . . 15
Table 3-7 Alarm Out Status Icon Descriptions . . . . . . . . . . . . . . . . . . . . . . . . . .16
Table 4-1 RAS Watch Controls and Areas . . . . . . . . . . . . . . . . . . . . . . . . . . . . 30
Table A-1 MiniBank Self Player Controls and Areas . . . . . . . . . . . . . . . . . . . . . . . 56

Tables
Rev 2.00 vi Document 900.031409/05
Rev 2.00 vii Document 900.031409/05
About This Document
This document introduces the Remote Administration System (RAS) software designed for the digital video recorder (DVR) and describes the procedures for operating and maintaining the software.
Overview of Contents
This document contains the following chapters and appendixes:
• Chapter 1, Overview, describes the Remote Administration System and lists its features.
• Chapter 2, Installation and Operation, provides the installation and operation procedures necessary for RAS use.
• Chapter 3, RAS Admin, covers the functions and features of the RAS Admin program.
• Chapter 4, RAS Watch, describes the functions and features of the RAS Watch program.
• Chapter 5, RAS Search, describes the functions and features of the RAS Search program.
• Appendix A, MiniBank Self Player, covers the functions and features of the MiniBank Self Player program.
• Chapter B, DVR Name Service, explains how to set up a remote DVR using a DVRNS server.

Rev 2.00 viii Document 900.031409/05
Related Documents
For more information about topics that are relevant to the subject of this manual, see the documents listed below.
Document title Part number
HRHD4+, HRHD9+, HRHD16+ Series DVR User Guide
900.0258
HRHD410 DVR User Guide 900.0315
HRHD1+ Single Channel DVR User Guide
900.0316
Overview
Rev 2.00 1 Document 900.031409/05
1
Overview
Remote Administration System (RAS) software consists of the following programs:
• RAS Admin. The main administration program• RAS Watch. A remote surveillance program• RAS Search. A remote search program
After a successful installation, each program may be selected from the Windows task bar or the 3-button program Graphical User Interface (GUI).
Features
The RAS program is the integrated software that controls system management, video monitoring, and image playback of multiple remotely connected Digital Video Recorders (DVRs). RAS offers the following features:
• Checking and reporting on the DVR status at a remote site• Notification of event detection from remote sites• Remote monitoring of live camera images• Searching timelapse and event recorded images• Remotely upgrading the software and programming the system
Overview
Rev 2.00 2 Document 900.031409/05
Before You Begin
Package Contents
Please read this guide carefully before you install the RAS software. Keep this guide for future reference.
Unpack everything. Check that the items you received match those listed on the order form and packing slip. The RAS packing box should include:
• One User Guide• Installation CD
System Requirements
Playing back digital video puts a high demand on your computer system. To use the RAS video monitoring and playback functions, your personal computer (PC) must meet the minimum system requirements listed below:
• Operating System: Microsoft® Windows® 98, Microsoft Windows ME, Microsoft Windows 2000, or Microsoft Windows XP
• CPU: Intel Pentium II (Celeron) 266 MHz or higher• RAM: 64 MB or higher• VGA: AGP, Video RAM 8 MB or higher (1024 x 768, 24 bpp or higher)
Installation and Operation
Rev 2.00 3 Document 900.031409/05
2
Installation and Operation
Installation Procedures
Caution If an older version of RAS has already been installed on your computer, you should uninstall the older version before installing the new one.
Preliminary Procedures
1. Under the Start menu in Windows, go to Settings and then to Control Panel.
2. Double click Power Options to open the Management Properties dialog box.
3. Select Never for the Turn off monitor and Turn off hard disks fields.
Install the Software
1. Insert the first installation CD.
2. Run the Setup.exe file.
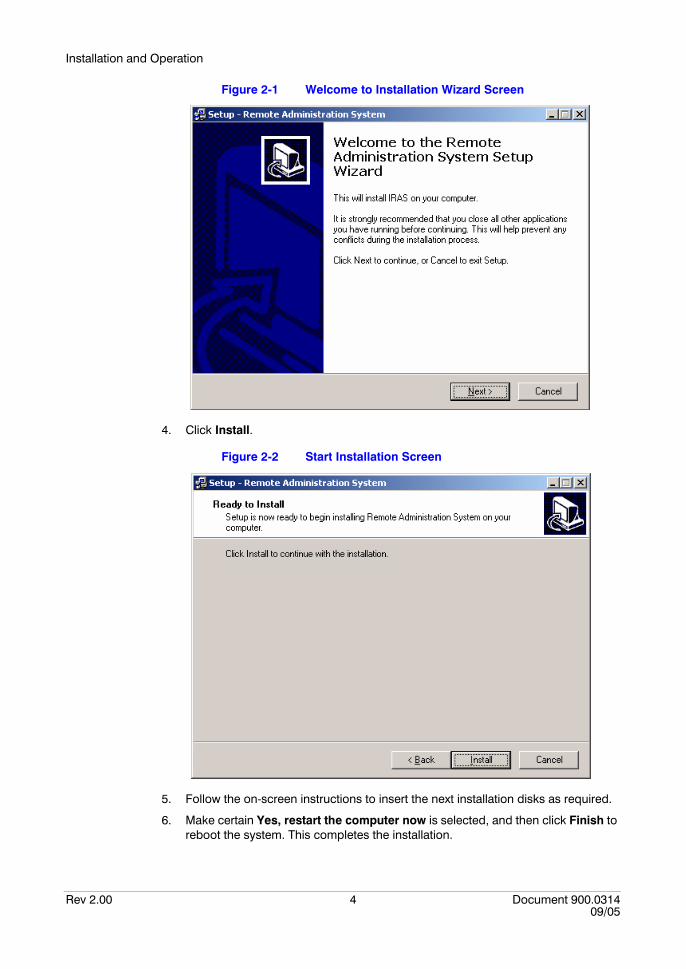
3. When Figure 2-1 appears, click Next.
Installation and Operation
Rev 2.00 4 Document 900.031409/05
Figure 2-1 Welcome to Installation Wizard Screen
4. Click Install.
Figure 2-2 Start Installation Screen
5. Follow the on-screen instructions to insert the next installation disks as required.
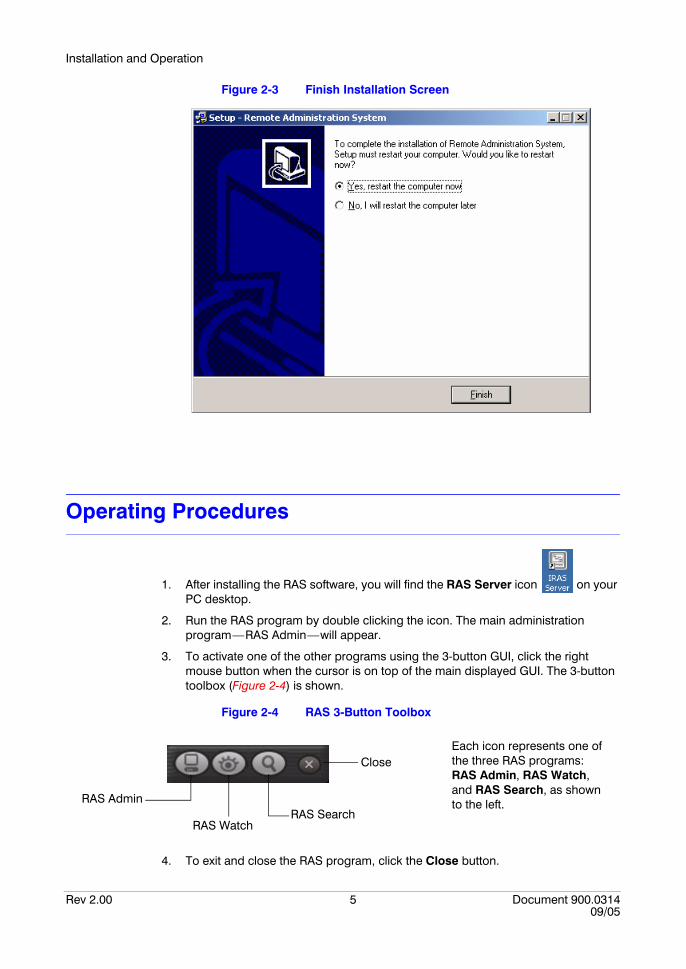
6. Make certain Yes, restart the computer now is selected, and then click Finish to reboot the system. This completes the installation.
Installation and Operation
Rev 2.00 5 Document 900.031409/05
Figure 2-3 Finish Installation Screen
Operating Procedures
1. After installing the RAS software, you will find the RAS Server icon on your PC desktop.
2. Run the RAS program by double clicking the icon. The main administration program—RAS Admin—will appear.
3. To activate one of the other programs using the 3-button GUI, click the right mouse button when the cursor is on top of the main displayed GUI. The 3-button toolbox (Figure 2-4) is shown.
Figure 2-4 RAS 3-Button Toolbox
4. To exit and close the RAS program, click the Close button.
Each icon represents one of the three RAS programs: RAS Admin, RAS Watch, and RAS Search, as shown to the left.
Close
RAS SearchRAS Watch
RAS Admin

Installation and Operation
Rev 2.00 6 Document 900.031409/05
RAS Admin
Rev 2.00 7 Document 900.031409/05
3
RAS Admin
Description
RAS Admin, the main administration software of RAS, provides reporting functions including:
• A live system status report and search• An event log search• A system log search and• Remote programming of the DVR.
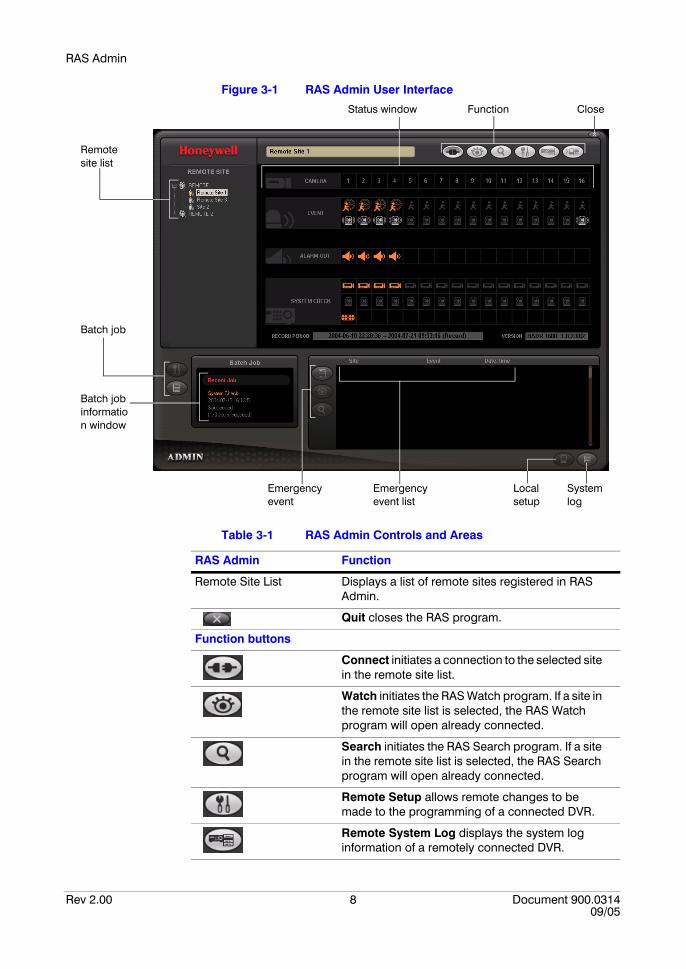
The Graphical User Interface (GUI) of the RAS Admin is shown in Figure 3-1 and the description of each control area follows.
RAS Admin
Rev 2.00 8 Document 900.031409/05
Figure 3-1 RAS Admin User Interface
Table 3-1 RAS Admin Controls and Areas
RAS Admin Function
Remote Site List Displays a list of remote sites registered in RAS Admin.
Quit closes the RAS program.
Function buttons
Connect initiates a connection to the selected site in the remote site list.
Watch initiates the RAS Watch program. If a site in the remote site list is selected, the RAS Watch program will open already connected.
Search initiates the RAS Search program. If a site in the remote site list is selected, the RAS Search program will open already connected.
Remote Setup allows remote changes to be made to the programming of a connected DVR.
Remote System Log displays the system log information of a remotely connected DVR.
CloseStatus window Function
Remote site list
Batch job information window
Batch job
Emergency event
Emergency event list
Local setup
System log
RAS Admin
Rev 2.00 9 Document 900.031409/05
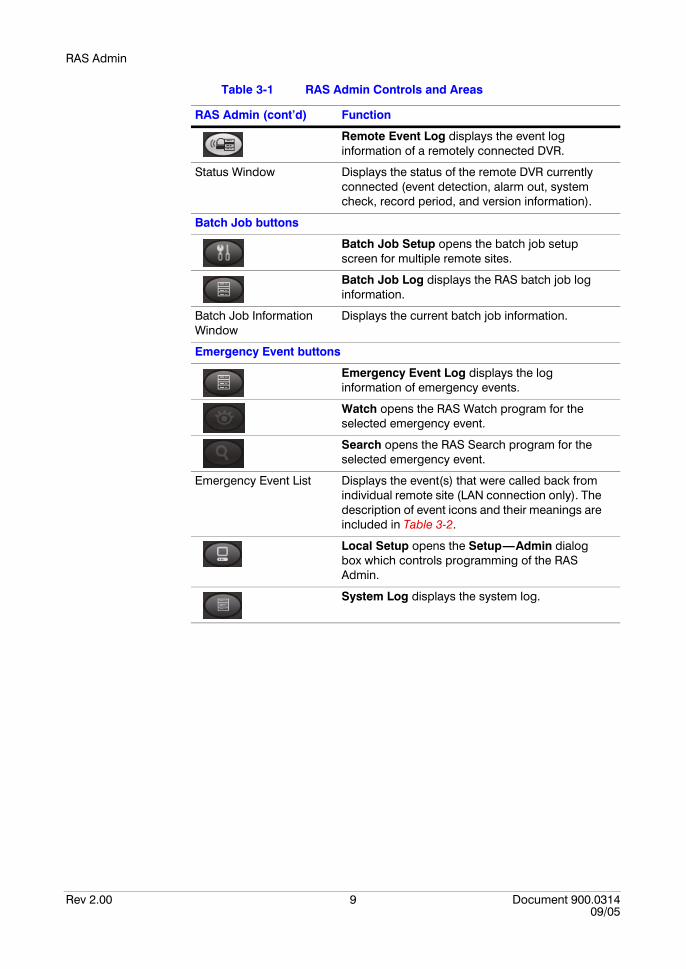
Remote Event Log displays the event log information of a remotely connected DVR.
Status Window Displays the status of the remote DVR currently connected (event detection, alarm out, system check, record period, and version information).
Batch Job buttons
Batch Job Setup opens the batch job setup screen for multiple remote sites.
Batch Job Log displays the RAS batch job log information.
Batch Job Information Window
Displays the current batch job information.
Emergency Event buttons
Emergency Event Log displays the log information of emergency events.
Watch opens the RAS Watch program for the selected emergency event.
Search opens the RAS Search program for the selected emergency event.
Emergency Event List Displays the event(s) that were called back from individual remote site (LAN connection only). The description of event icons and their meanings are included in Table 3-2.
Local Setup opens the Setup—Admin dialog box which controls programming of the RAS Admin.
System Log displays the system log.
Table 3-1 RAS Admin Controls and Areas
RAS Admin (cont’d) Function

RAS Admin
Rev 2.00 10 Document 900.031409/05
Emergency Event List
The Emergency Event list displays event information from a remotely connected DVR on RAS when the recorders event action has notification enabled (see your DVR User Guide for information on setting up event actions). RAS must be set for callback (see Local Setup Button on page 21) for the DVR to be able to send event information to the RAS server.
Figure 3-2 Emergency Event List
Note Event notification for Text In may not be supported, depending on the specifications of the remotely connected DVR.
Table 3-2 Emergency Event Icon Descriptions
Icon Meaning
Normal Event
Emergency Event (preset to be notified at the remote DVR)
Motion Detection
Video Loss
Alarm In
Text In
Alarm In Bad
Recorder Bad
Disk S.M.A.R.T.
Disk Bad
Disk Full
Disk Temperature
RAS Admin
Rev 2.00 11 Document 900.031409/05
Functions of the RAS Admin
Function Buttons
Connect Button
Select the site you want to connect to from the Remote Site List, and then click Connect to initiate a connection (if required) and to display the system status of the connected system. If you want to connect to another site, disconnect from the currently connected system by re-clicking Connect.
Watch/Search Buttons
Initiates the RAS Watch or RAS Search programs. Select the site from the Remote Site List, and then click the Watch or Search buttons to activate the RAS Watch or RAS Search programs. The site you select will be connected directly.
Note Clicking the Watch or Search buttons when no site is selected in the Remote Site List only activates the program without connecting to a site.
DVR Setup Button
Allows remote changes to be made to the programming of a connected DVR.
Note Refer to the manual for each applicable remote DVR for the details of system programming and setup.
To set up the Motion-Detecting Zone on your remotely connected DVR:
1. Press DVR Setup.
2. Click Device at the top of the setup screen.
3. Click Motion Detector.
4. Click the Zone field for the selected camera.
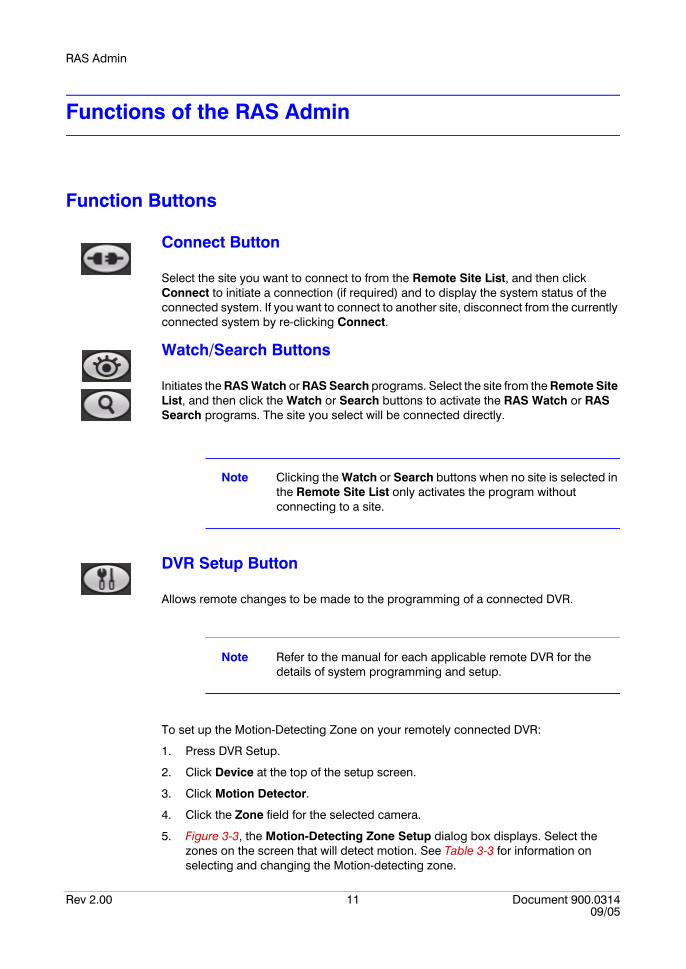
5. Figure 3-3, the Motion-Detecting Zone Setup dialog box displays. Select the zones on the screen that will detect motion. See Table 3-3 for information on selecting and changing the Motion-detecting zone.
RAS Admin
Rev 2.00 12 Document 900.031409/05
Figure 3-3 Motion-Detecting Zone Setup Screen
To select zones for motion detection:
1. Select the mode button between activating and releasing the target area to set up the motion-detecting zone.
2. Select the area to set or release using one of the three selection tools.
Caution When using a dial-up modem for remote connection, the current connection to the RAS Watch will be disconnected if you initiate the motion-detecting zone setup. After setting up the motion detection, connect to the target site again.
Table 3-3 Motion-Detecting Zone Field Descriptions
Icon Function
Activates the target area for the motion-detecting zone.
Releases the target area from the motion-detecting zone.
Select the block(s) for the motion-detecting zone by dragging the mouse.
Select the rectangle-shaped blocks for the motion-detecting zone.
Select all blocks for the motion-detecting zone.
RAS Admin
Rev 2.00 13 Document 900.031409/05
Remote System Log Button
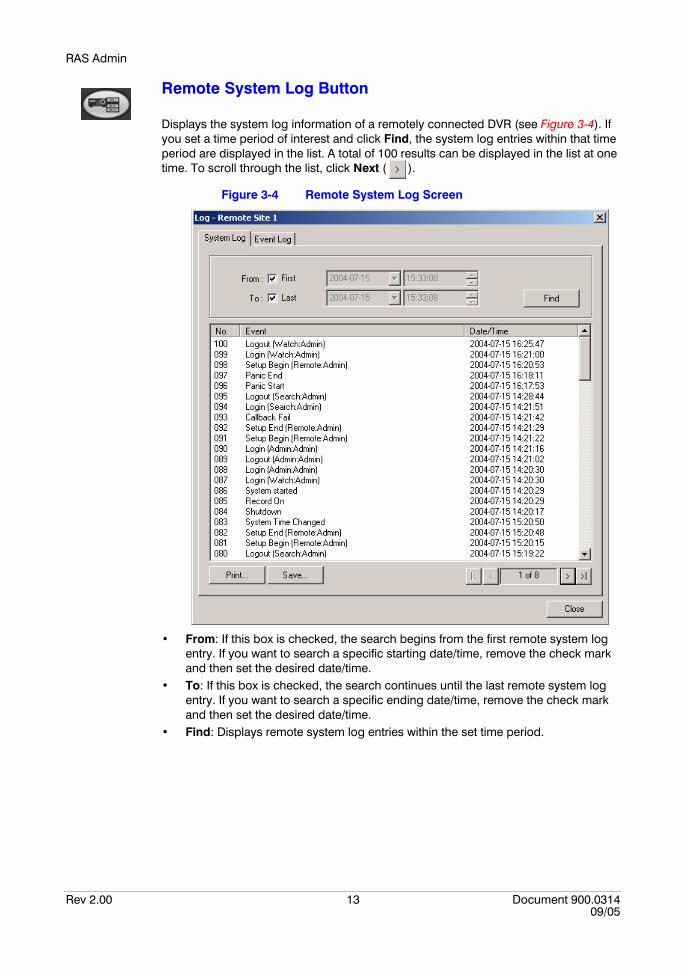
Displays the system log information of a remotely connected DVR (see Figure 3-4). If you set a time period of interest and click Find, the system log entries within that time period are displayed in the list. A total of 100 results can be displayed in the list at one time. To scroll through the list, click Next ( ).
Figure 3-4 Remote System Log Screen
• From: If this box is checked, the search begins from the first remote system log entry. If you want to search a specific starting date/time, remove the check mark and then set the desired date/time.
• To: If this box is checked, the search continues until the last remote system log entry. If you want to search a specific ending date/time, remove the check mark and then set the desired date/time.
• Find: Displays remote system log entries within the set time period.
RAS Admin
Rev 2.00 14 Document 900.031409/05
Table 3-4 System Log Icon Descriptions
• Save: Saves the log information to a text file.• Print: Prints the log information to a connected printer.• Close: Closes the dialog box.
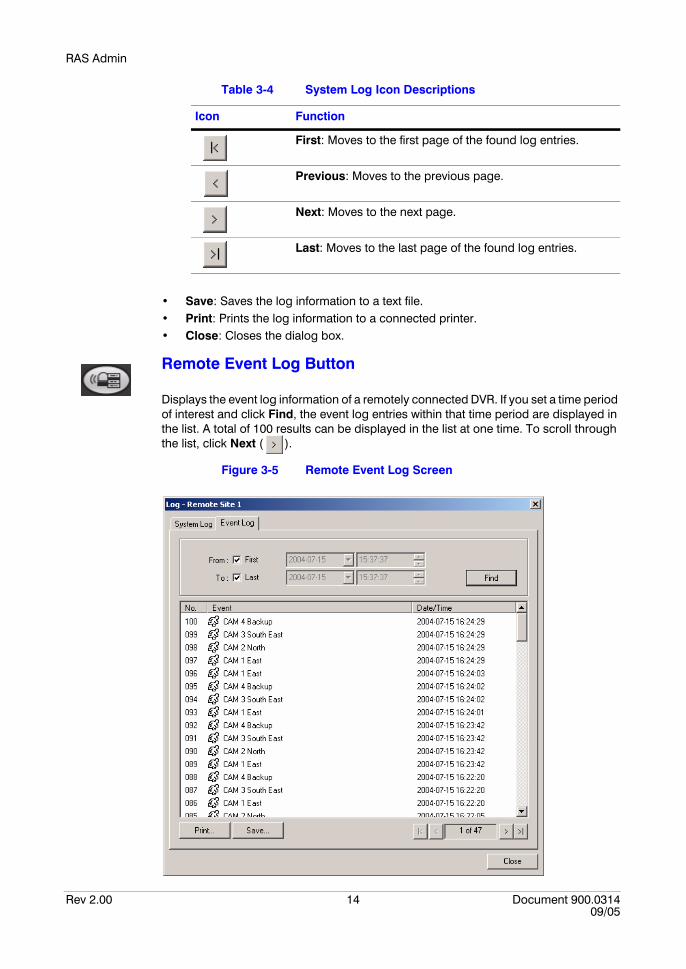
Remote Event Log Button
Displays the event log information of a remotely connected DVR. If you set a time period of interest and click Find, the event log entries within that time period are displayed in the list. A total of 100 results can be displayed in the list at one time. To scroll through the list, click Next ( ).
Figure 3-5 Remote Event Log Screen
Icon Function
First: Moves to the first page of the found log entries.
Previous: Moves to the previous page.
Next: Moves to the next page.
Last: Moves to the last page of the found log entries.

RAS Admin
Rev 2.00 15 Document 900.031409/05
• From: If this box is checked, the search begins from the first remote event log entry. If you want to search a specific starting date/time, remove the check mark and then set the desired date/time.
• To: If this box is checked, the search continues until the last remote event log entry. If you want to search a specific ending date/time, remove the check mark and then set the desired date/time.
• Find: Displays remote system log entries within the set time period.
Table 3-5 Remote Event Log Icon Descriptions
• Save: Saves the log information to a text file.• Print: Prints the log information to a connected printer.• Close: Closes the dialog box.
Status Window for Remote Site
Event
Displays the events detected by the internal motion detector, external sensor, or text-in transaction. The status display of event detection continues during the preset dwell time of the event-driven recording. The icons of each status are as follows:
Table 3-6 Event Status Icon Descriptions
Icon Function
First: Moves to the first page of the found log entries.
Previous: Moves to the previous page.
Next: Moves to the next page.
Last: Moves to the last page of the found log entries.
Event TypeEvent Status
Motion Detection Sensor
Event Detection(bright) (bright)
No Event Detection(dim) (dim)
Event Off(dark) (dark)
RAS Admin
Rev 2.00 16 Document 900.031409/05
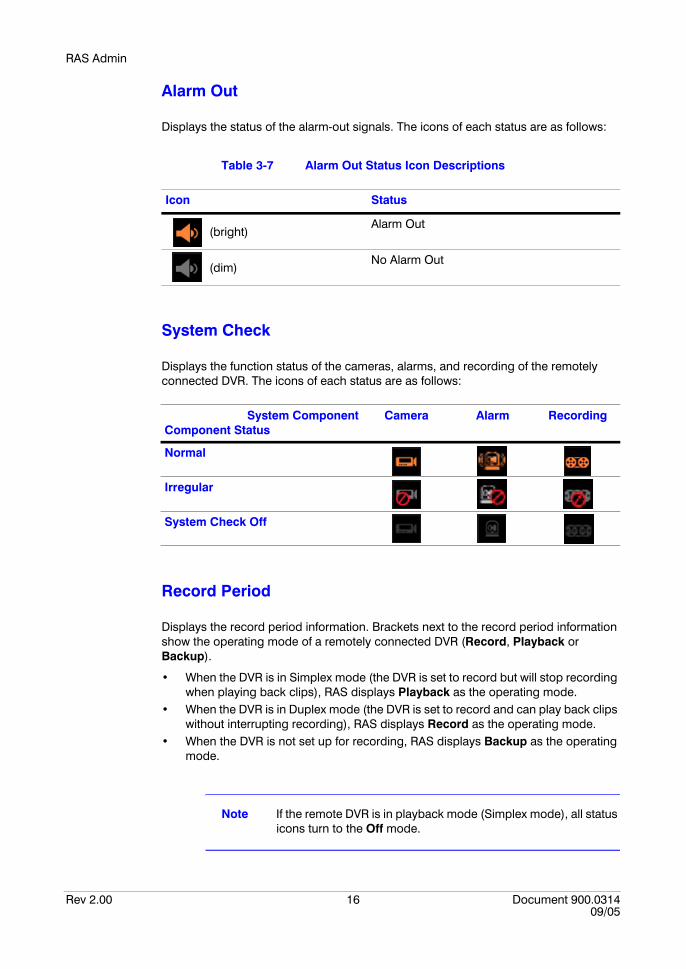
Alarm Out
Displays the status of the alarm-out signals. The icons of each status are as follows:
Table 3-7 Alarm Out Status Icon Descriptions
System Check
Displays the function status of the cameras, alarms, and recording of the remotely connected DVR. The icons of each status are as follows:
Record Period
Displays the record period information. Brackets next to the record period information show the operating mode of a remotely connected DVR (Record, Playback or Backup).
• When the DVR is in Simplex mode (the DVR is set to record but will stop recording when playing back clips), RAS displays Playback as the operating mode.
• When the DVR is in Duplex mode (the DVR is set to record and can play back clips without interrupting recording), RAS displays Record as the operating mode.
• When the DVR is not set up for recording, RAS displays Backup as the operating mode.
Note If the remote DVR is in playback mode (Simplex mode), all status icons turn to the Off mode.
Icon Status
(bright)Alarm Out
(dim)No Alarm Out
System ComponentComponent Status
Camera Alarm Recording
Normal
Irregular
System Check Off
RAS Admin
Rev 2.00 17 Document 900.031409/05
Version
Displays hardware and software version information.
Batch Job Setup Button
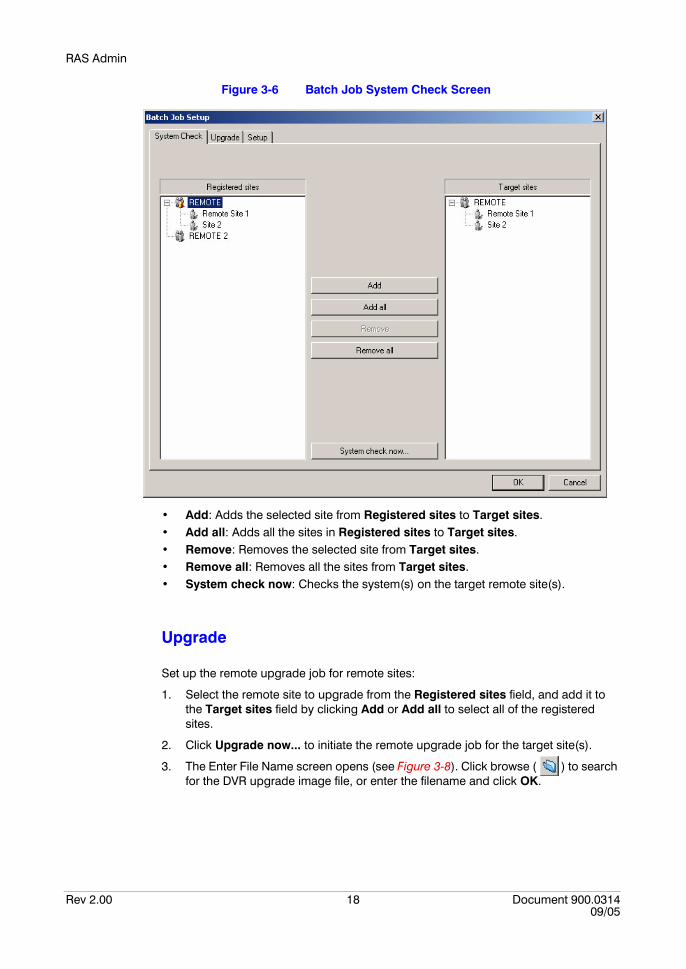
Set up the batch job of a System Check (Figure 3-6), remote Upgrade (Figure 3-7), and remote Setup (Figure 3-9) for multiple remote sites. Batch jobs are designed to perform a system check, upgrade recorder firmware or setup multiple remotely connected DVRs at one time.
For example, you could use the System Check batch job to check the status of all recorders in your system without having to connect to each one individually.
Note Batch jobs cannot be run or setup while you are connected to a site. Disconnect from any connected site to access the batch job options.
System Check
Set up the system check job for remote sites:
1. Select the remote site to check from the Registered sites field, and add it to the Target sites field by clicking Add or Add all to select all of the registered sites.
2. Click System check now... to initiate the system check job for the target site(s).
RAS Admin
Rev 2.00 18 Document 900.031409/05
Figure 3-6 Batch Job System Check Screen
• Add: Adds the selected site from Registered sites to Target sites.• Add all: Adds all the sites in Registered sites to Target sites.• Remove: Removes the selected site from Target sites.• Remove all: Removes all the sites from Target sites.• System check now: Checks the system(s) on the target remote site(s).
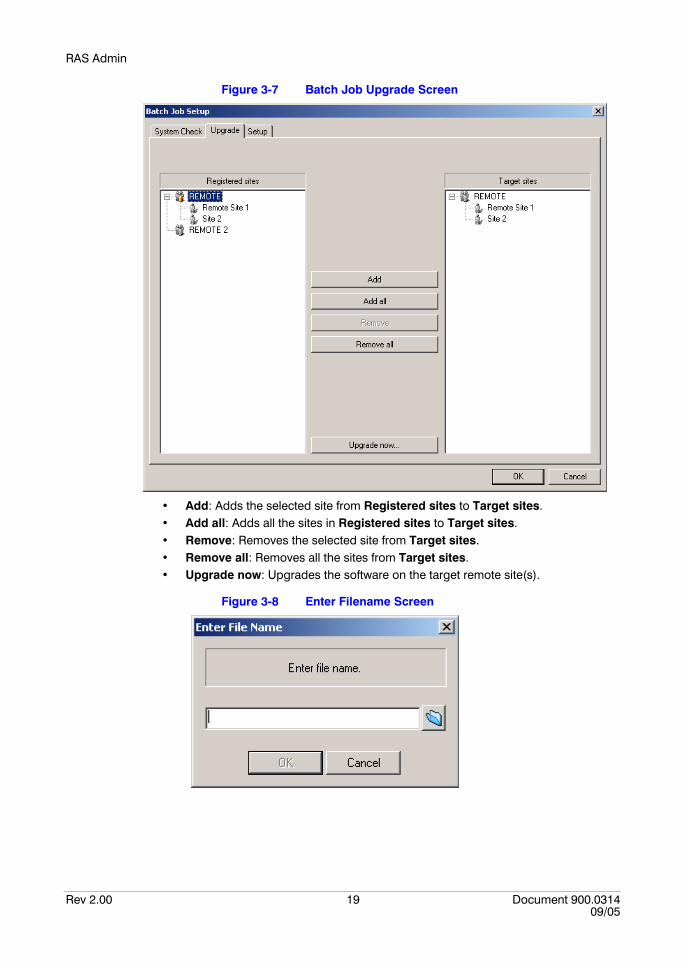
Upgrade
Set up the remote upgrade job for remote sites:
1. Select the remote site to upgrade from the Registered sites field, and add it to the Target sites field by clicking Add or Add all to select all of the registered sites.
2. Click Upgrade now... to initiate the remote upgrade job for the target site(s).
3. The Enter File Name screen opens (see Figure 3-8). Click browse ( ) to search for the DVR upgrade image file, or enter the filename and click OK.
RAS Admin
Rev 2.00 19 Document 900.031409/05
Figure 3-7 Batch Job Upgrade Screen
• Add: Adds the selected site from Registered sites to Target sites.• Add all: Adds all the sites in Registered sites to Target sites.• Remove: Removes the selected site from Target sites.• Remove all: Removes all the sites from Target sites.• Upgrade now: Upgrades the software on the target remote site(s).
Figure 3-8 Enter Filename Screen
RAS Admin
Rev 2.00 20 Document 900.031409/05
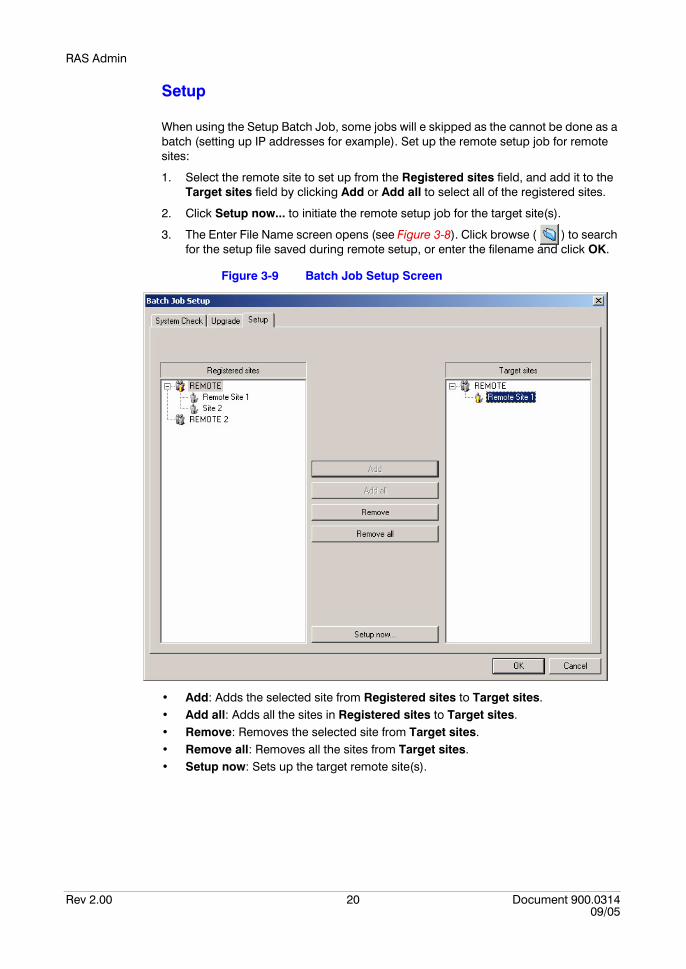
Setup
When using the Setup Batch Job, some jobs will e skipped as the cannot be done as a batch (setting up IP addresses for example). Set up the remote setup job for remote sites:
1. Select the remote site to set up from the Registered sites field, and add it to the Target sites field by clicking Add or Add all to select all of the registered sites.
2. Click Setup now... to initiate the remote setup job for the target site(s).
3. The Enter File Name screen opens (see Figure 3-8). Click browse ( ) to search for the setup file saved during remote setup, or enter the filename and click OK.
Figure 3-9 Batch Job Setup Screen
• Add: Adds the selected site from Registered sites to Target sites.• Add all: Adds all the sites in Registered sites to Target sites.• Remove: Removes the selected site from Target sites.• Remove all: Removes all the sites from Target sites.• Setup now: Sets up the target remote site(s).
RAS Admin
Rev 2.00 21 Document 900.031409/05
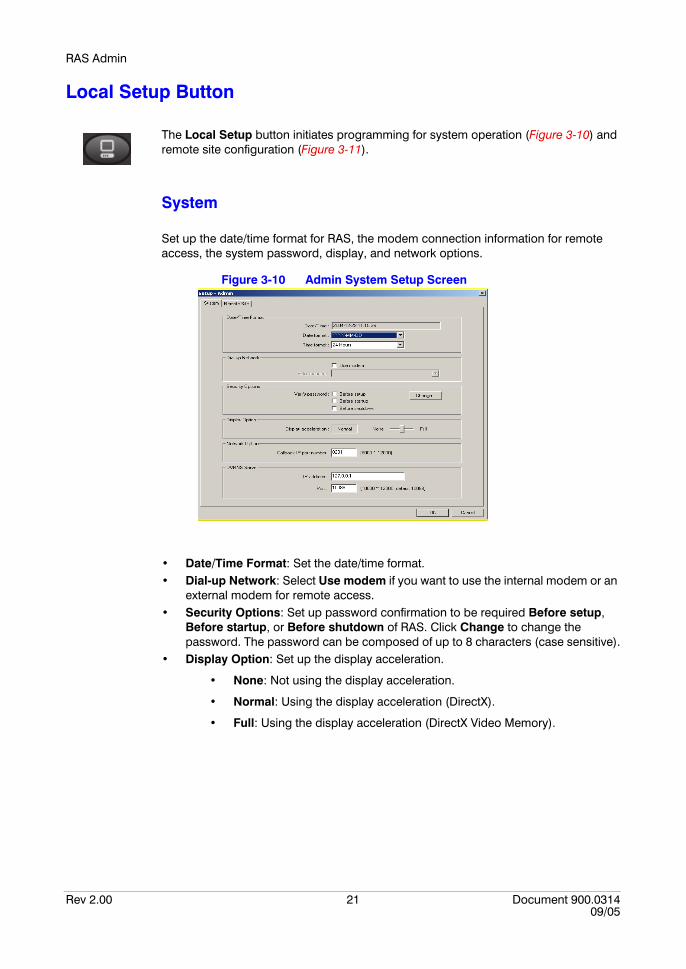
Local Setup Button
The Local Setup button initiates programming for system operation (Figure 3-10) and remote site configuration (Figure 3-11).
System
Set up the date/time format for RAS, the modem connection information for remote access, the system password, display, and network options.
Figure 3-10 Admin System Setup Screen
• Date/Time Format: Set the date/time format.• Dial-up Network: Select Use modem if you want to use the internal modem or an
external modem for remote access.• Security Options: Set up password confirmation to be required Before setup,
Before startup, or Before shutdown of RAS. Click Change to change the password. The password can be composed of up to 8 characters (case sensitive).
• Display Option: Set up the display acceleration.
• None: Not using the display acceleration.
• Normal: Using the display acceleration (DirectX).
• Full: Using the display acceleration (DirectX Video Memory).
RAS Admin
Rev 2.00 22 Document 900.031409/05
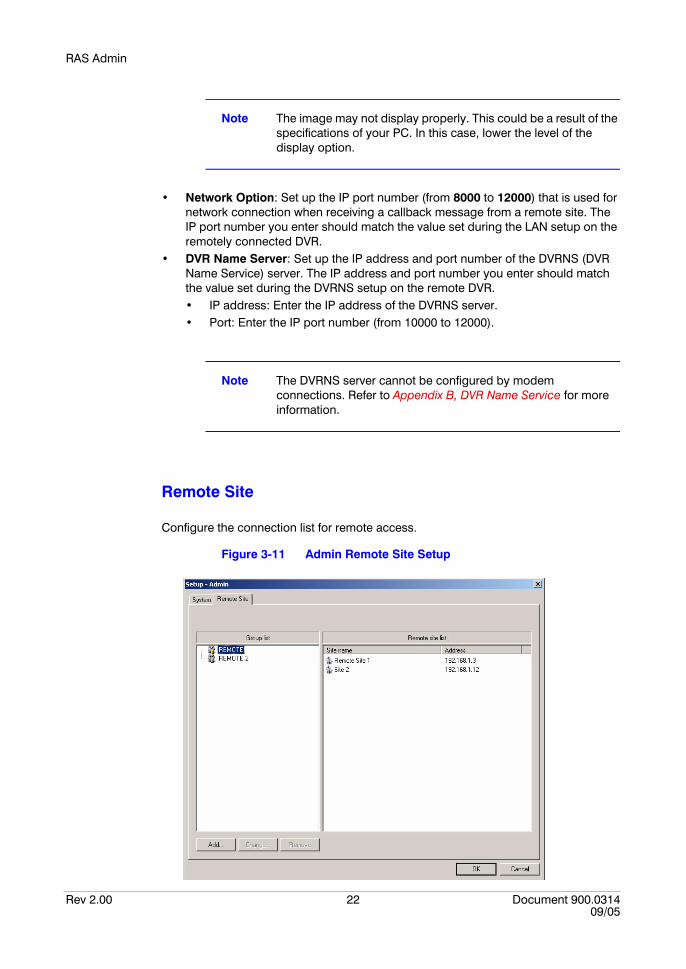
Note The image may not display properly. This could be a result of the specifications of your PC. In this case, lower the level of the display option.
• Network Option: Set up the IP port number (from 8000 to 12000) that is used for network connection when receiving a callback message from a remote site. The IP port number you enter should match the value set during the LAN setup on the remotely connected DVR.
• DVR Name Server: Set up the IP address and port number of the DVRNS (DVR Name Service) server. The IP address and port number you enter should match the value set during the DVRNS setup on the remote DVR.• IP address: Enter the IP address of the DVRNS server.• Port: Enter the IP port number (from 10000 to 12000).
Note The DVRNS server cannot be configured by modem connections. Refer to Appendix B, DVR Name Service for more information.
Remote Site
Configure the connection list for remote access.
Figure 3-11 Admin Remote Site Setup
RAS Admin
Rev 2.00 23 Document 900.031409/05
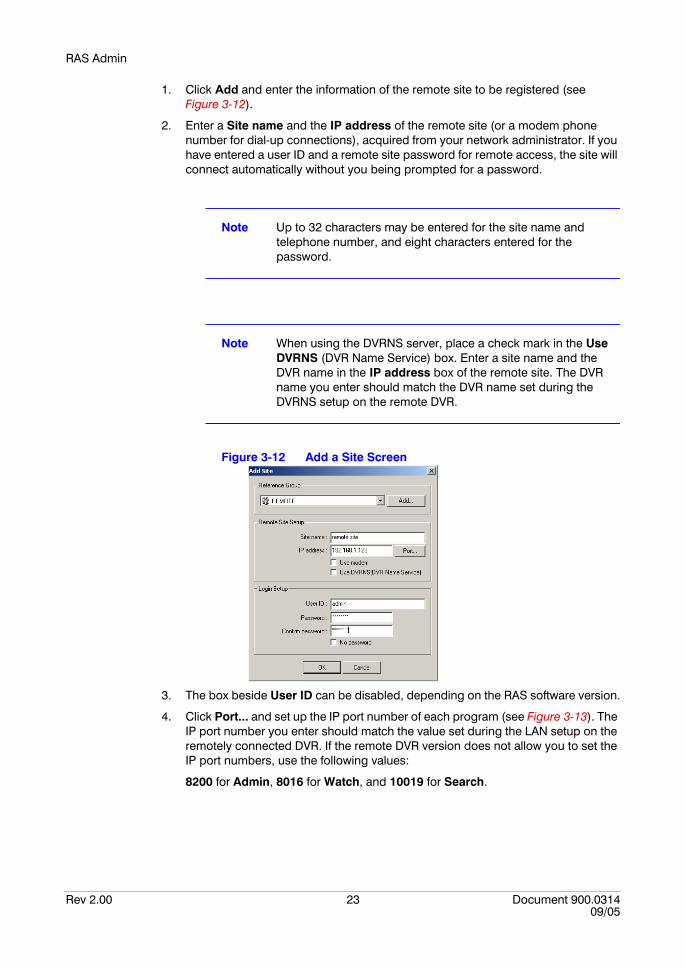
1. Click Add and enter the information of the remote site to be registered (see Figure 3-12).
2. Enter a Site name and the IP address of the remote site (or a modem phone number for dial-up connections), acquired from your network administrator. If you have entered a user ID and a remote site password for remote access, the site will connect automatically without you being prompted for a password.
Note Up to 32 characters may be entered for the site name and telephone number, and eight characters entered for the password.
Note When using the DVRNS server, place a check mark in the Use DVRNS (DVR Name Service) box. Enter a site name and the DVR name in the IP address box of the remote site. The DVR name you enter should match the DVR name set during the DVRNS setup on the remote DVR.
Figure 3-12 Add a Site Screen
3. The box beside User ID can be disabled, depending on the RAS software version.
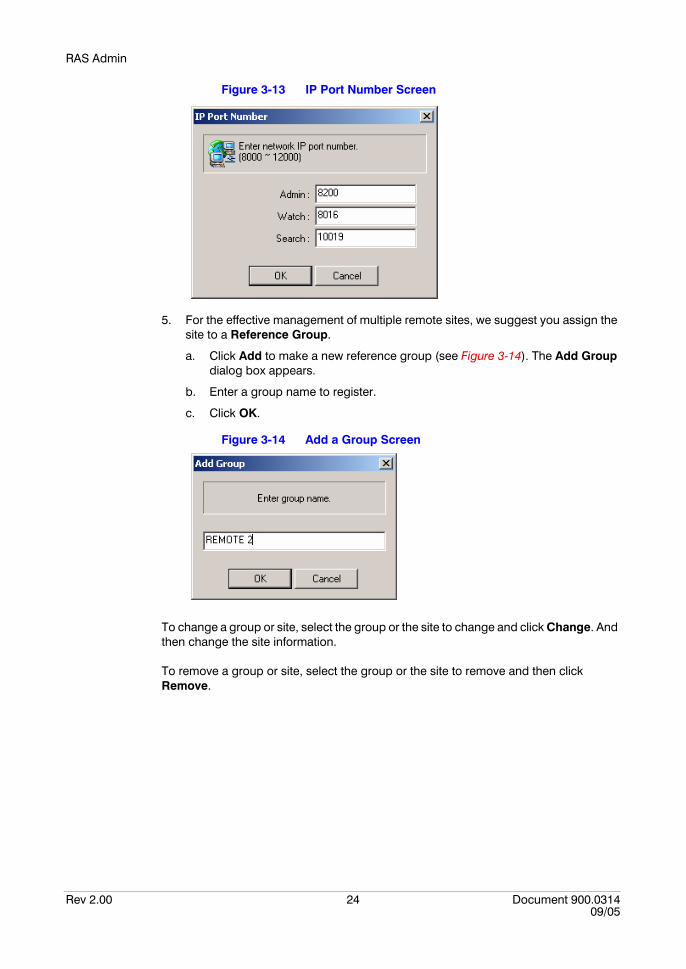
4. Click Port... and set up the IP port number of each program (see Figure 3-13). The IP port number you enter should match the value set during the LAN setup on the remotely connected DVR. If the remote DVR version does not allow you to set the IP port numbers, use the following values:
8200 for Admin, 8016 for Watch, and 10019 for Search.
RAS Admin
Rev 2.00 24 Document 900.031409/05
Figure 3-13 IP Port Number Screen
5. For the effective management of multiple remote sites, we suggest you assign the site to a Reference Group.
a. Click Add to make a new reference group (see Figure 3-14). The Add Group dialog box appears.
b. Enter a group name to register.
c. Click OK.
Figure 3-14 Add a Group Screen
To change a group or site, select the group or the site to change and click Change. And then change the site information.
To remove a group or site, select the group or the site to remove and then click Remove.
RAS Admin
Rev 2.00 25 Document 900.031409/05
Log Buttons
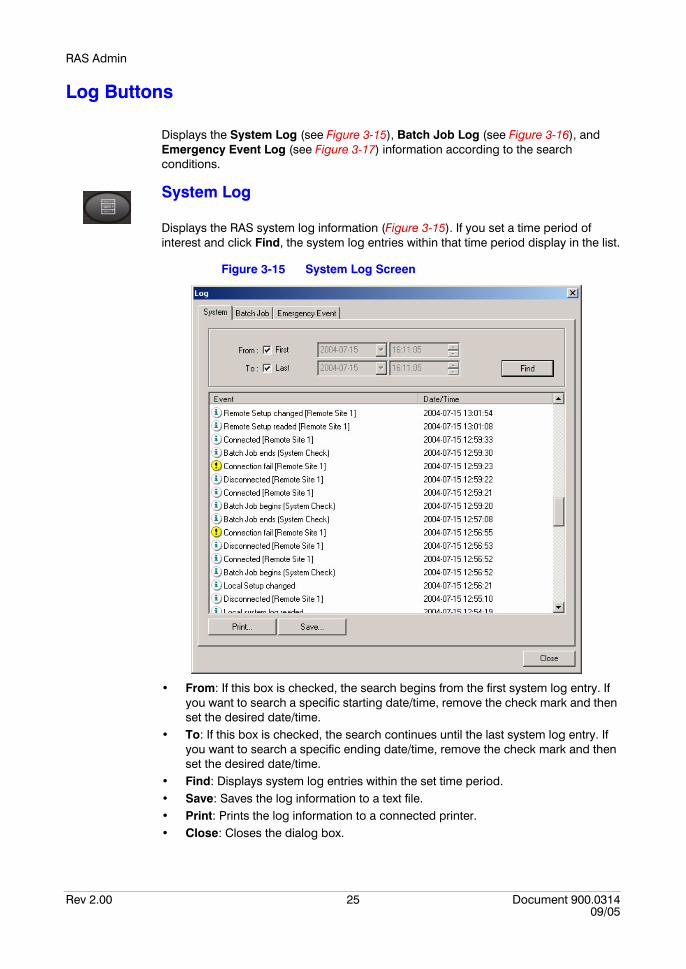
Displays the System Log (see Figure 3-15), Batch Job Log (see Figure 3-16), and Emergency Event Log (see Figure 3-17) information according to the search conditions.
System Log
Displays the RAS system log information (Figure 3-15). If you set a time period of interest and click Find, the system log entries within that time period display in the list.
Figure 3-15 System Log Screen
• From: If this box is checked, the search begins from the first system log entry. If you want to search a specific starting date/time, remove the check mark and then set the desired date/time.
• To: If this box is checked, the search continues until the last system log entry. If you want to search a specific ending date/time, remove the check mark and then set the desired date/time.
• Find: Displays system log entries within the set time period.• Save: Saves the log information to a text file.• Print: Prints the log information to a connected printer.• Close: Closes the dialog box.
RAS Admin
Rev 2.00 26 Document 900.031409/05
Batch Job Log
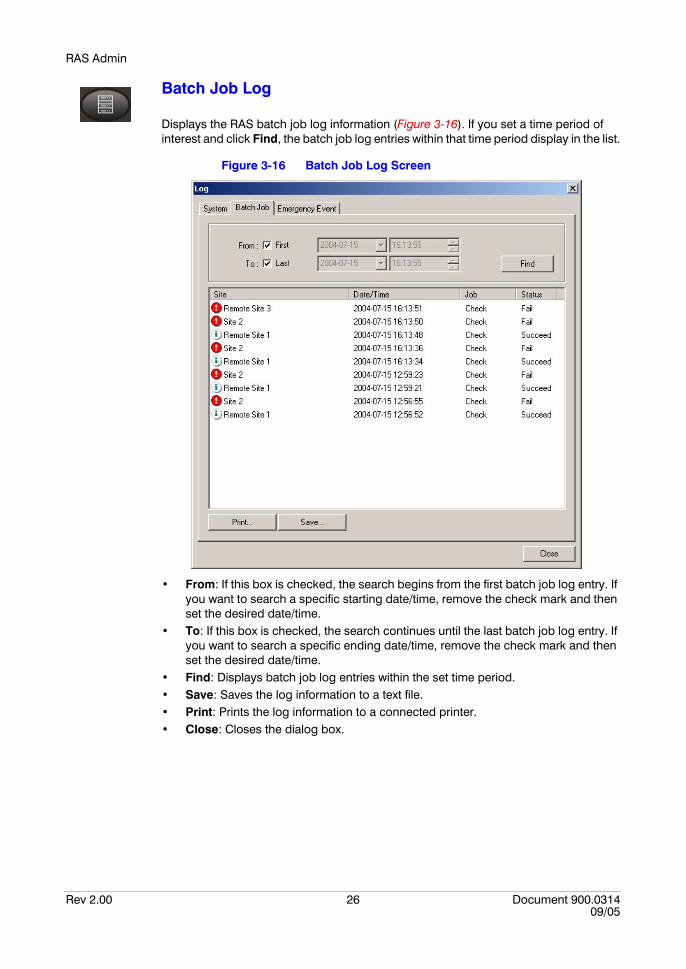
Displays the RAS batch job log information (Figure 3-16). If you set a time period of interest and click Find, the batch job log entries within that time period display in the list.
Figure 3-16 Batch Job Log Screen
• From: If this box is checked, the search begins from the first batch job log entry. If you want to search a specific starting date/time, remove the check mark and then set the desired date/time.
• To: If this box is checked, the search continues until the last batch job log entry. If you want to search a specific ending date/time, remove the check mark and then set the desired date/time.
• Find: Displays batch job log entries within the set time period.• Save: Saves the log information to a text file.• Print: Prints the log information to a connected printer.• Close: Closes the dialog box.
RAS Admin
Rev 2.00 27 Document 900.031409/05
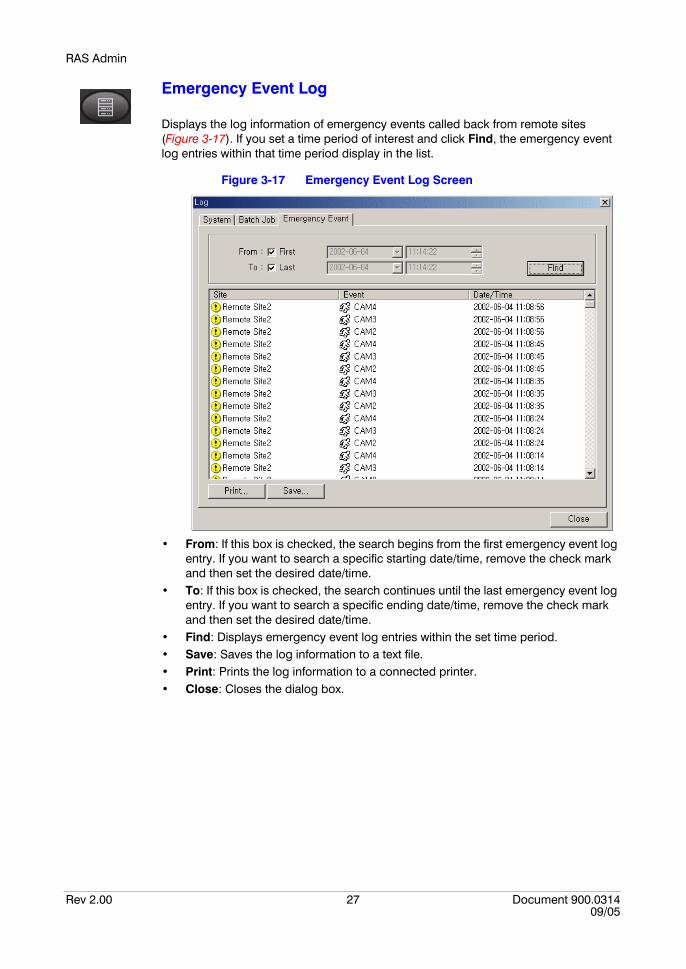
Emergency Event Log
Displays the log information of emergency events called back from remote sites (Figure 3-17). If you set a time period of interest and click Find, the emergency event log entries within that time period display in the list.
Figure 3-17 Emergency Event Log Screen
• From: If this box is checked, the search begins from the first emergency event log entry. If you want to search a specific starting date/time, remove the check mark and then set the desired date/time.
• To: If this box is checked, the search continues until the last emergency event log entry. If you want to search a specific ending date/time, remove the check mark and then set the desired date/time.
• Find: Displays emergency event log entries within the set time period.• Save: Saves the log information to a text file.• Print: Prints the log information to a connected printer.• Close: Closes the dialog box.

RAS Admin
Rev 2.00 28 Document 900.031409/05
RAS Watch
Rev 2.00 29 Document 900.031409/05
4
RAS Watch
Description
The RAS Watch is powerful and reliable remote surveillance software, that provides a remote monitoring function for video images in real time from either a single site or multiple sites. In addition, when events are detected at a remote site the RAS Watch displays the event information and allows you to access the remote site directly to search the images associated with the event.
The GUI of the RAS Watch is shown in Figure 4-1 and the description of each control area follows.
Note When used at a remote site, some DVR models will only transmit images while recording video.
RAS Watch
Rev 2.00 30 Document 900.031409/05
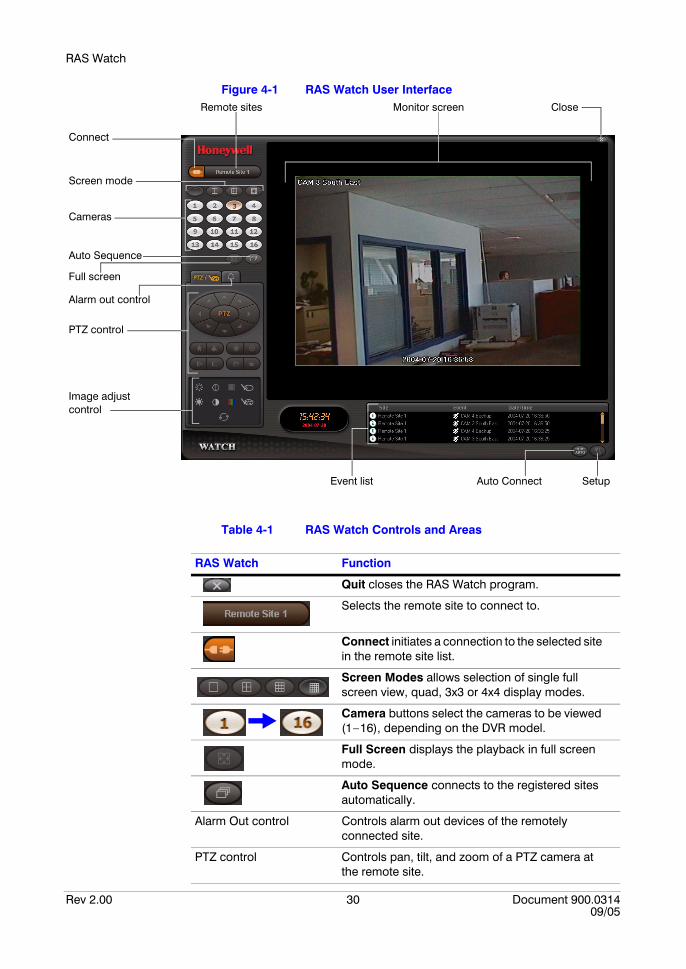
Figure 4-1 RAS Watch User Interface
Table 4-1 RAS Watch Controls and Areas
RAS Watch Function
Quit closes the RAS Watch program.
Selects the remote site to connect to.
Connect initiates a connection to the selected site in the remote site list.
Screen Modes allows selection of single full screen view, quad, 3x3 or 4x4 display modes.
Camera buttons select the cameras to be viewed (1–16), depending on the DVR model.
Full Screen displays the playback in full screen mode.
Auto Sequence connects to the registered sites automatically.
Alarm Out control Controls alarm out devices of the remotely connected site.
PTZ control Controls pan, tilt, and zoom of a PTZ camera at the remote site.
CloseMonitor screenRemote sites
Connect
Screen mode
Cameras
Full screen
Auto Sequence
Alarm out control
PTZ control
Image adjust control
Event list Auto Connect Setup
RAS Watch
Rev 2.00 31 Document 900.031409/05
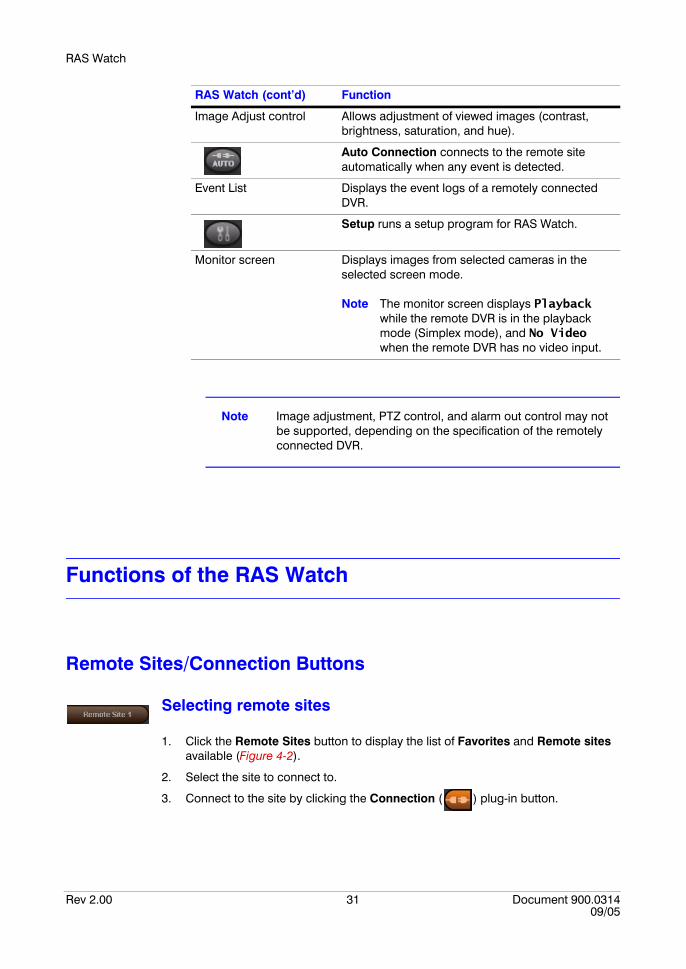
Note Image adjustment, PTZ control, and alarm out control may not be supported, depending on the specification of the remotely connected DVR.
Functions of the RAS Watch
Remote Sites/Connection Buttons
Selecting remote sites
1. Click the Remote Sites button to display the list of Favorites and Remote sites available (Figure 4-2).
2. Select the site to connect to.
3. Connect to the site by clicking the Connection ( ) plug-in button.
Image Adjust control Allows adjustment of viewed images (contrast, brightness, saturation, and hue).
Auto Connection connects to the remote site automatically when any event is detected.
Event List Displays the event logs of a remotely connected DVR.
Setup runs a setup program for RAS Watch.
Monitor screen Displays images from selected cameras in the selected screen mode.
Note The monitor screen displays Playback while the remote DVR is in the playback mode (Simplex mode), and No Video when the remote DVR has no video input.
RAS Watch (cont’d) Function
RAS Watch
Rev 2.00 32 Document 900.031409/05
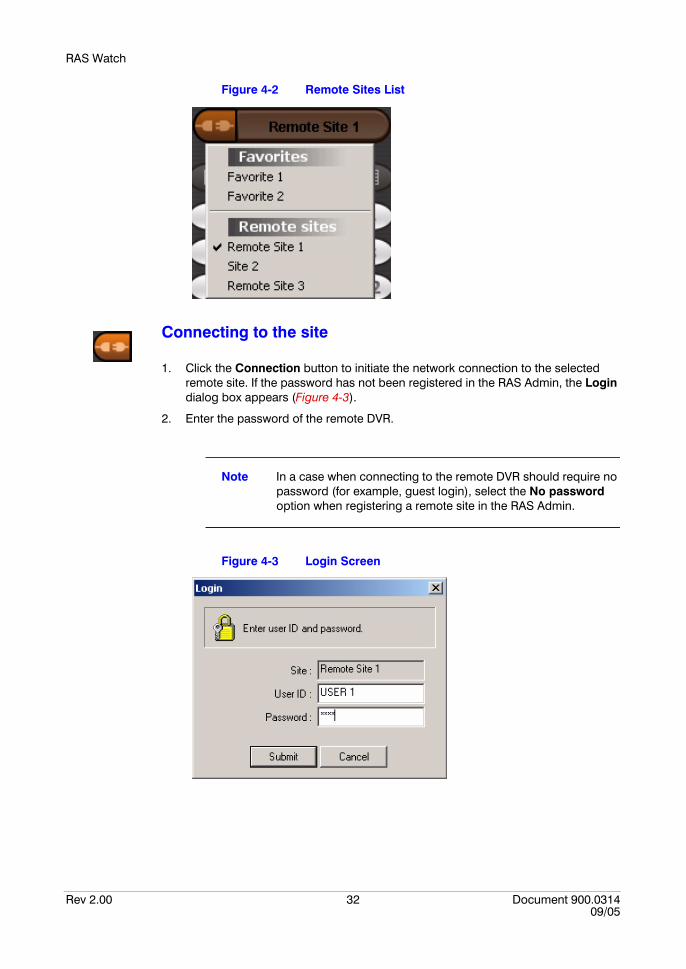
Figure 4-2 Remote Sites List
Connecting to the site
1. Click the Connection button to initiate the network connection to the selected remote site. If the password has not been registered in the RAS Admin, the Login dialog box appears (Figure 4-3).
2. Enter the password of the remote DVR.
Note In a case when connecting to the remote DVR should require no password (for example, guest login), select the No password option when registering a remote site in the RAS Admin.
Figure 4-3 Login Screen
RAS Watch
Rev 2.00 33 Document 900.031409/05
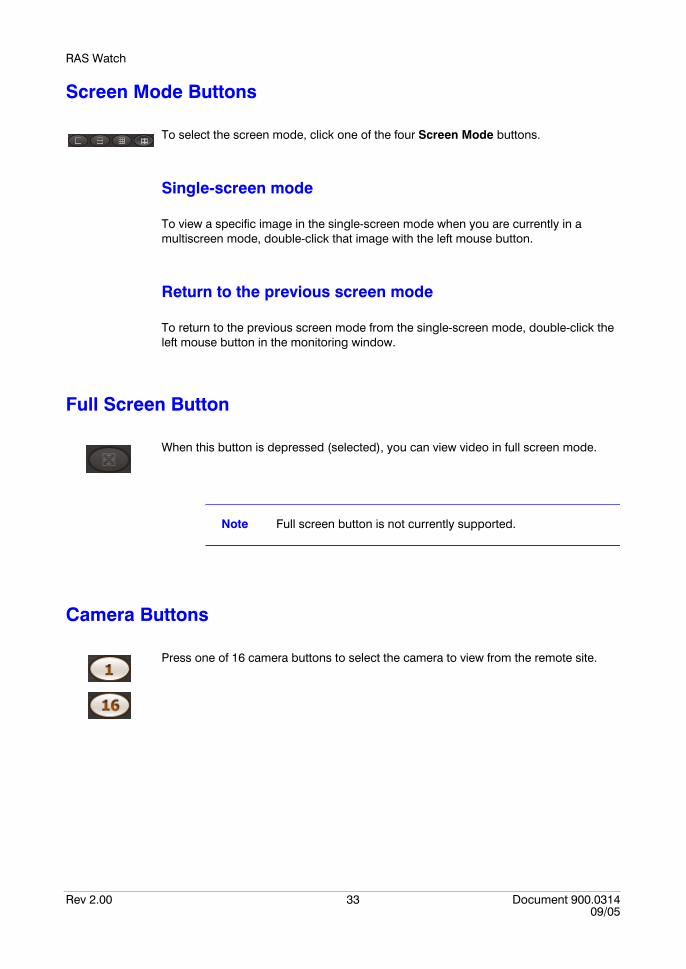
Screen Mode Buttons
To select the screen mode, click one of the four Screen Mode buttons.
Single-screen mode
To view a specific image in the single-screen mode when you are currently in a multiscreen mode, double-click that image with the left mouse button.
Return to the previous screen mode
To return to the previous screen mode from the single-screen mode, double-click the left mouse button in the monitoring window.
Full Screen Button
When this button is depressed (selected), you can view video in full screen mode.
Note Full screen button is not currently supported.
Camera Buttons
Press one of 16 camera buttons to select the camera to view from the remote site.
RAS Watch
Rev 2.00 34 Document 900.031409/05
PTZ Control
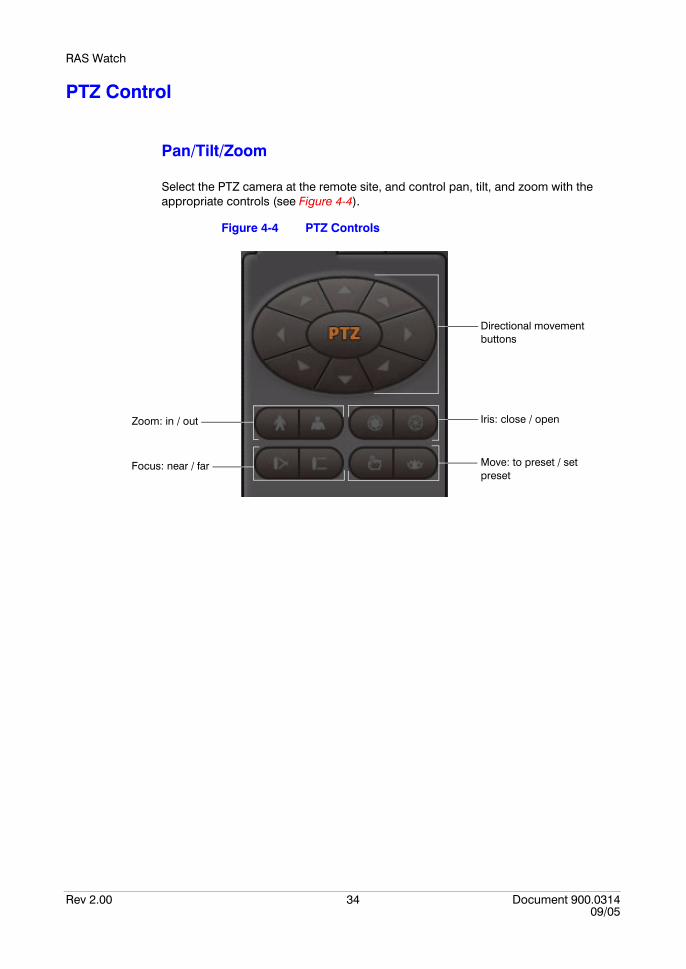
Pan/Tilt/Zoom
Select the PTZ camera at the remote site, and control pan, tilt, and zoom with the appropriate controls (see Figure 4-4).
Figure 4-4 PTZ Controls
Directional movement buttons
Move: to preset / set preset
Iris: close / open
Focus: near / far
Zoom: in / out
RAS Watch
Rev 2.00 35 Document 900.031409/05
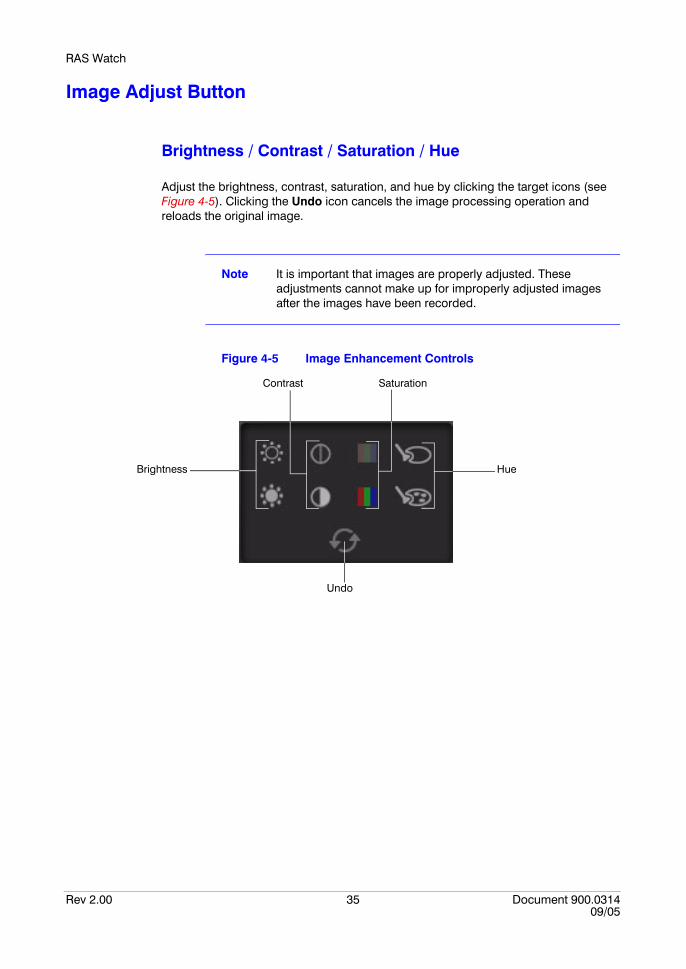
Image Adjust Button
Brightness / Contrast / Saturation / Hue
Adjust the brightness, contrast, saturation, and hue by clicking the target icons (see Figure 4-5). Clicking the Undo icon cancels the image processing operation and reloads the original image.
Note It is important that images are properly adjusted. These adjustments cannot make up for improperly adjusted images after the images have been recorded.
Figure 4-5 Image Enhancement Controls
Contrast Saturation
HueBrightness
Undo

RAS Watch
Rev 2.00 36 Document 900.031409/05
Alarm Out Control
Control the alarm out device of the remotely connected DVR by clicking the ON or OFF buttons (see Figure 4-6).
Figure 4-6 Alarm Out Control Panel
Note Image adjust, PTZ control, and alarm out control may not be supported, depending on the specifications of the remotely connected DVR.
Note Only the administrator can control a PTZ camera, adjust the image, and control the alarm out device from a remote site.
RAS Watch
Rev 2.00 37 Document 900.031409/05
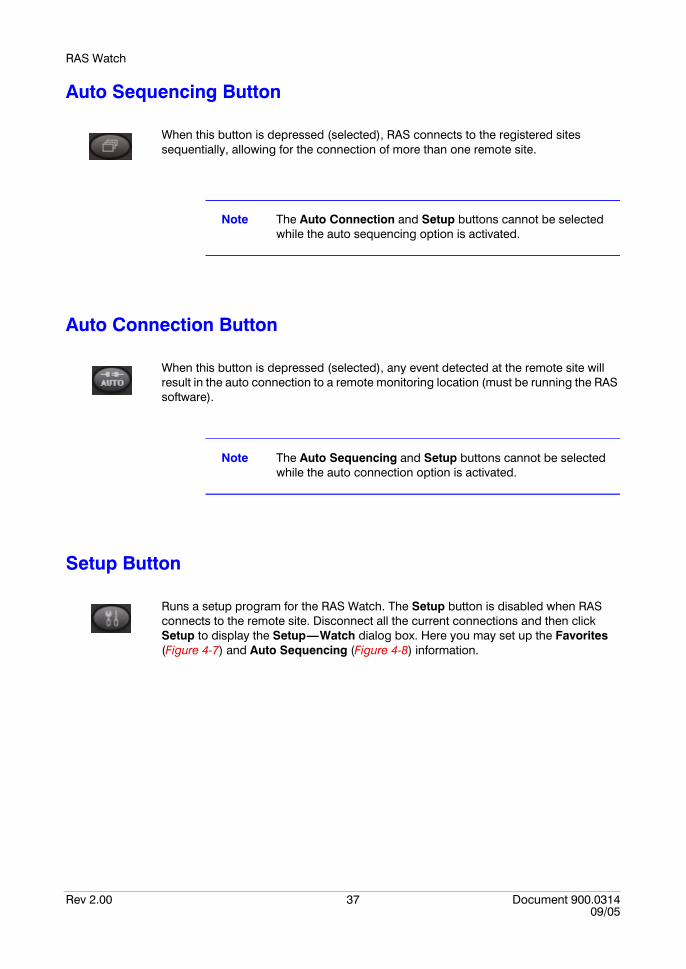
Auto Sequencing Button
When this button is depressed (selected), RAS connects to the registered sites sequentially, allowing for the connection of more than one remote site.
Note The Auto Connection and Setup buttons cannot be selected while the auto sequencing option is activated.
Auto Connection Button
When this button is depressed (selected), any event detected at the remote site will result in the auto connection to a remote monitoring location (must be running the RAS software).
Note The Auto Sequencing and Setup buttons cannot be selected while the auto connection option is activated.
Setup Button
Runs a setup program for the RAS Watch. The Setup button is disabled when RAS connects to the remote site. Disconnect all the current connections and then click Setup to display the Setup—Watch dialog box. Here you may set up the Favorites (Figure 4-7) and Auto Sequencing (Figure 4-8) information.
RAS Watch
Rev 2.00 38 Document 900.031409/05
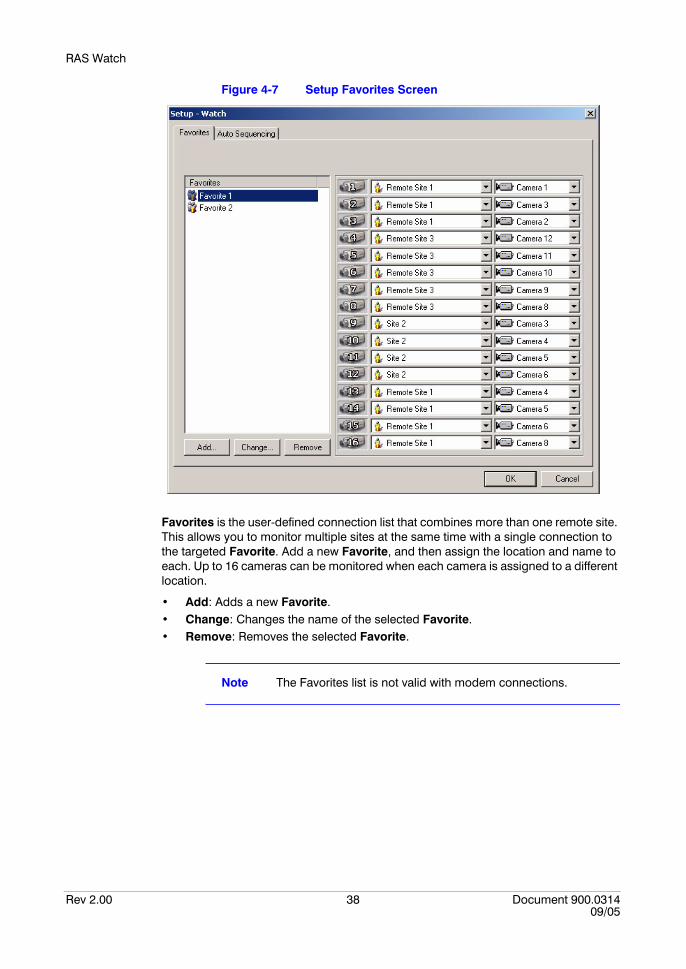
Figure 4-7 Setup Favorites Screen
Favorites is the user-defined connection list that combines more than one remote site. This allows you to monitor multiple sites at the same time with a single connection to the targeted Favorite. Add a new Favorite, and then assign the location and name to each. Up to 16 cameras can be monitored when each camera is assigned to a different location.
• Add: Adds a new Favorite.• Change: Changes the name of the selected Favorite.• Remove: Removes the selected Favorite.
Note The Favorites list is not valid with modem connections.
RAS Watch
Rev 2.00 39 Document 900.031409/05
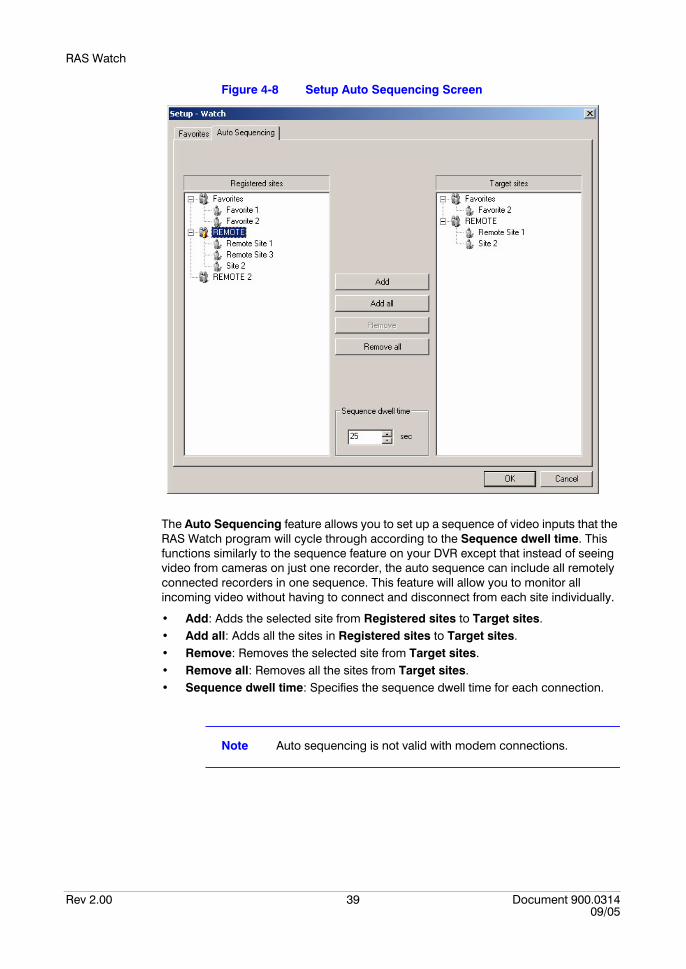
Figure 4-8 Setup Auto Sequencing Screen
The Auto Sequencing feature allows you to set up a sequence of video inputs that the RAS Watch program will cycle through according to the Sequence dwell time. This functions similarly to the sequence feature on your DVR except that instead of seeing video from cameras on just one recorder, the auto sequence can include all remotely connected recorders in one sequence. This feature will allow you to monitor all incoming video without having to connect and disconnect from each site individually.
• Add: Adds the selected site from Registered sites to Target sites.• Add all: Adds all the sites in Registered sites to Target sites.• Remove: Removes the selected site from Target sites.• Remove all: Removes all the sites from Target sites.• Sequence dwell time: Specifies the sequence dwell time for each connection.
Note Auto sequencing is not valid with modem connections.

RAS Watch
Rev 2.00 40 Document 900.031409/05
RAS Search
Rev 2.00 41 Document 900.031409/05
5
RAS Search
Description
The RAS Search is remote search software, that searches for recorded images on a remotely connected DVR and plays back the found images. In addition to the search and playback functions, RAS Search also provides additional functions such as zooming in/out and saving and printing images. Features of the RAS Search program include:
• Timelapse and event searching• Recording a status table• Zooming in and out of an image • Other various image enhancement• Saving the current image• Printing the current image
The search function is divided into two modes of operation: timelapse mode and event mode. A timelapse search is a process in which the system searches for recorded data according to specific time parameters and then plays back the found images. An event search is a process in which the system searches for event log entries using specific conditions and then plays back the images associated with those event log entries. These two modes are different in screen configuration and search method. The RAS Search default setting is the timelapse search mode. The last search mode used is automatically selected the next time the RAS search function is executed.
To search for and play back recorded images, select a remote site to access first. Click Remote Sites to display the list registered in RAS Admin, and then click Connect ( ) to connect to the selected site. Release (select a second time) Connect to disconnect from the current connection.
RAS Search
Rev 2.00 42 Document 900.031409/05
Timelapse Search
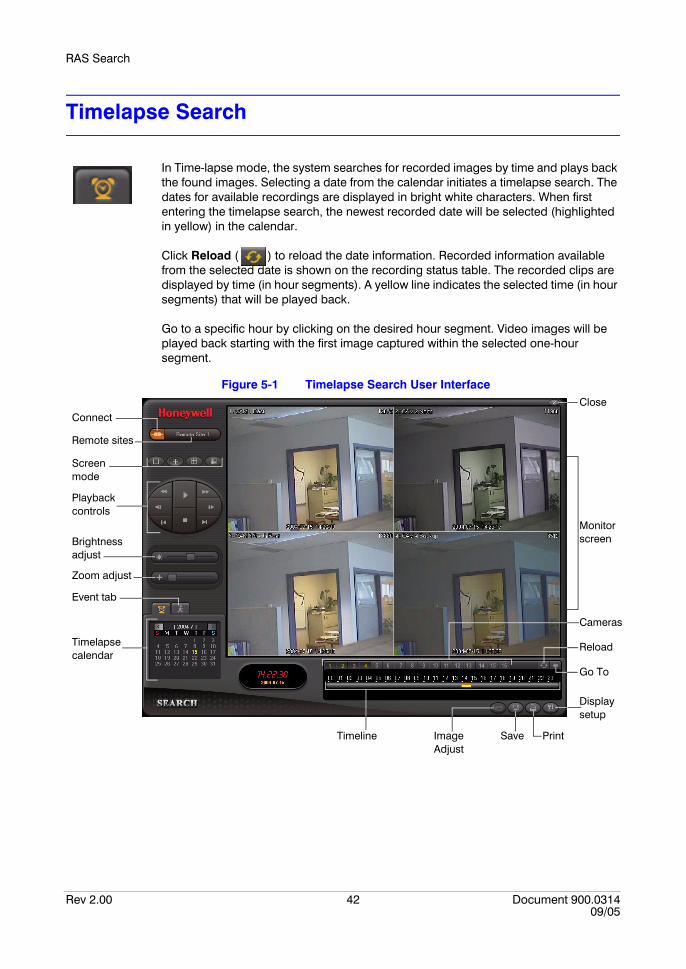
In Time-lapse mode, the system searches for recorded images by time and plays back the found images. Selecting a date from the calendar initiates a timelapse search. The dates for available recordings are displayed in bright white characters. When first entering the timelapse search, the newest recorded date will be selected (highlighted in yellow) in the calendar.
Click Reload ( ) to reload the date information. Recorded information available from the selected date is shown on the recording status table. The recorded clips are displayed by time (in hour segments). A yellow line indicates the selected time (in hour segments) that will be played back.
Go to a specific hour by clicking on the desired hour segment. Video images will be played back starting with the first image captured within the selected one-hour segment.
Figure 5-1 Timelapse Search User Interface
Connect
Remote sites
Screen mode
Playback controls
Brightness adjust
Zoom adjust
Timelapse calendar
Event tab
Close
Go To
Monitor screen
Reload
Cameras
Timeline
Display setup
PrintSaveImage Adjust
RAS Search
Rev 2.00 43 Document 900.031409/05
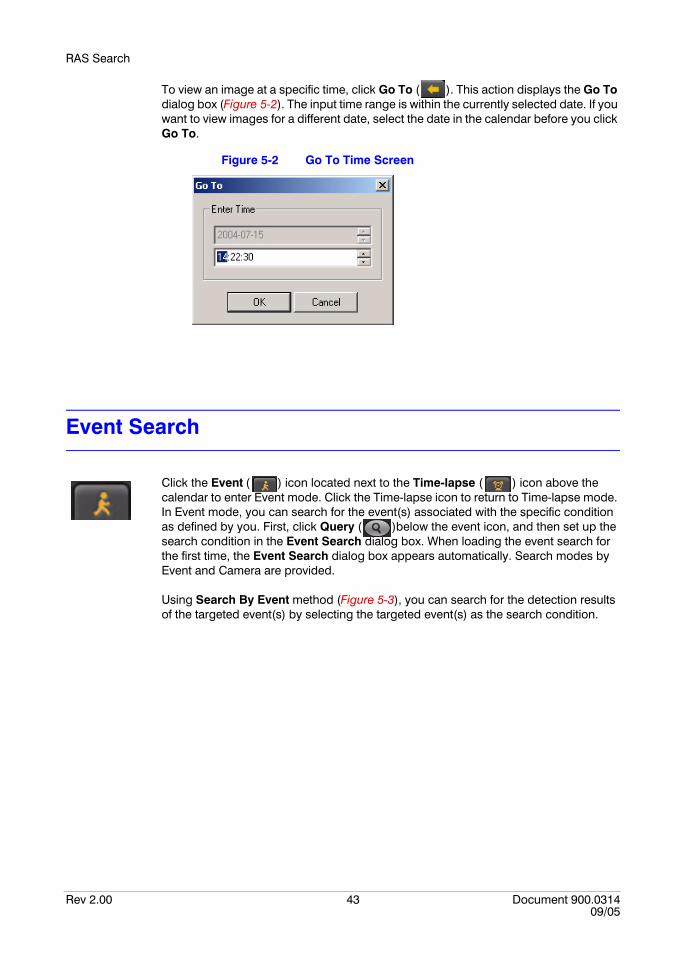
To view an image at a specific time, click Go To ( ). This action displays the Go To dialog box (Figure 5-2). The input time range is within the currently selected date. If you want to view images for a different date, select the date in the calendar before you click Go To.
Figure 5-2 Go To Time Screen
Event Search
Click the Event ( ) icon located next to the Time-lapse ( ) icon above the calendar to enter Event mode. Click the Time-lapse icon to return to Time-lapse mode. In Event mode, you can search for the event(s) associated with the specific condition as defined by you. First, click Query ( )below the event icon, and then set up the search condition in the Event Search dialog box. When loading the event search for the first time, the Event Search dialog box appears automatically. Search modes by Event and Camera are provided.
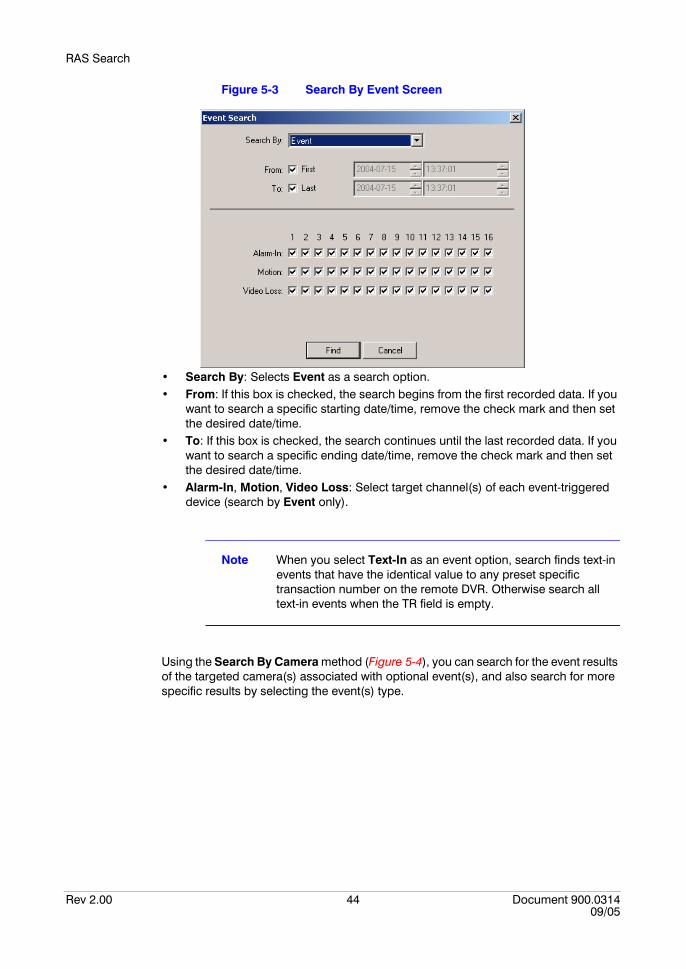
Using Search By Event method (Figure 5-3), you can search for the detection results of the targeted event(s) by selecting the targeted event(s) as the search condition.
RAS Search
Rev 2.00 44 Document 900.031409/05
Figure 5-3 Search By Event Screen
• Search By: Selects Event as a search option.• From: If this box is checked, the search begins from the first recorded data. If you
want to search a specific starting date/time, remove the check mark and then set the desired date/time.
• To: If this box is checked, the search continues until the last recorded data. If you want to search a specific ending date/time, remove the check mark and then set the desired date/time.
• Alarm-In, Motion, Video Loss: Select target channel(s) of each event-triggered device (search by Event only).
Note When you select Text-In as an event option, search finds text-in events that have the identical value to any preset specific transaction number on the remote DVR. Otherwise search all text-in events when the TR field is empty.
Using the Search By Camera method (Figure 5-4), you can search for the event results of the targeted camera(s) associated with optional event(s), and also search for more specific results by selecting the event(s) type.
RAS Search
Rev 2.00 45 Document 900.031409/05
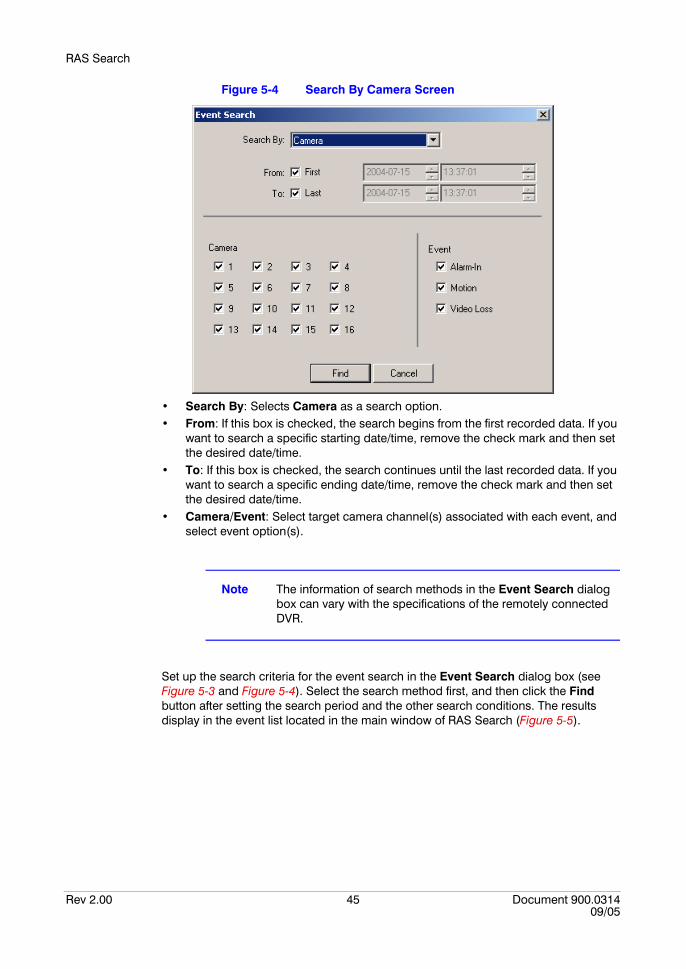
Figure 5-4 Search By Camera Screen
• Search By: Selects Camera as a search option.• From: If this box is checked, the search begins from the first recorded data. If you
want to search a specific starting date/time, remove the check mark and then set the desired date/time.
• To: If this box is checked, the search continues until the last recorded data. If you want to search a specific ending date/time, remove the check mark and then set the desired date/time.
• Camera/Event: Select target camera channel(s) associated with each event, and select event option(s).
Note The information of search methods in the Event Search dialog box can vary with the specifications of the remotely connected DVR.
Set up the search criteria for the event search in the Event Search dialog box (see Figure 5-3 and Figure 5-4). Select the search method first, and then click the Find button after setting the search period and the other search conditions. The results display in the event list located in the main window of RAS Search (Figure 5-5).
RAS Search
Rev 2.00 46 Document 900.031409/05
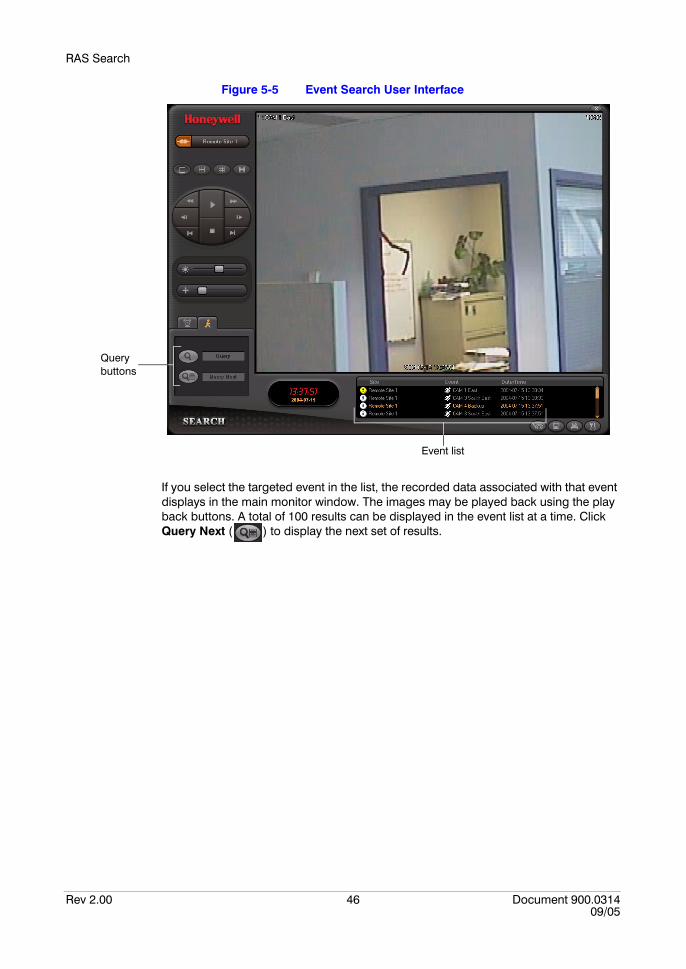
Figure 5-5 Event Search User Interface
If you select the targeted event in the list, the recorded data associated with that event displays in the main monitor window. The images may be played back using the play back buttons. A total of 100 results can be displayed in the event list at a time. Click Query Next ( ) to display the next set of results.
Event list
Query buttons
RAS Search
Rev 2.00 47 Document 900.031409/05
Other Functions
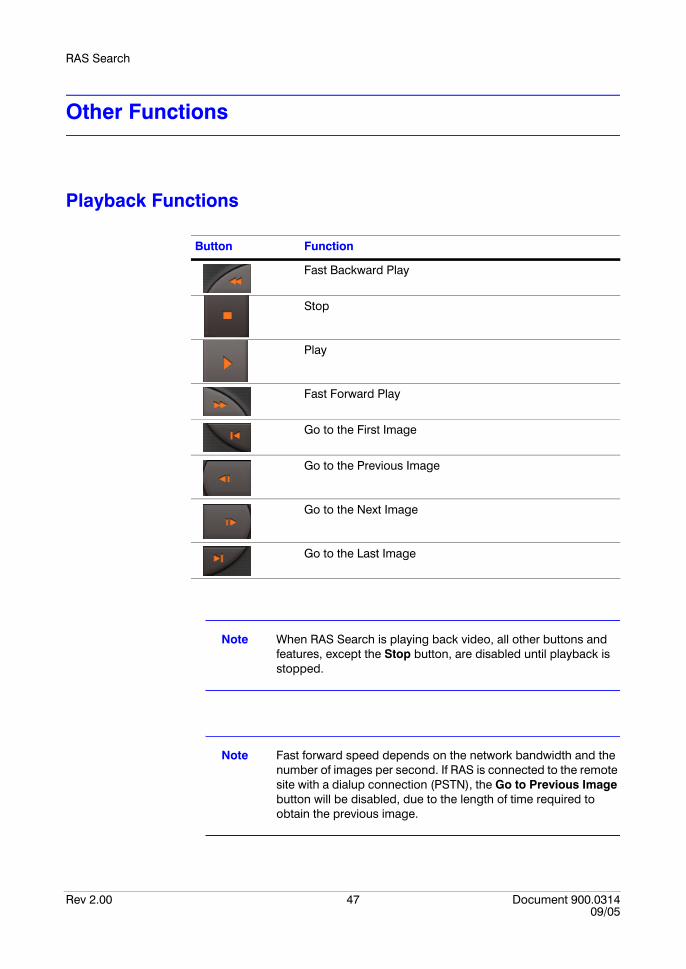
Playback Functions
Note When RAS Search is playing back video, all other buttons and features, except the Stop button, are disabled until playback is stopped.
Note Fast forward speed depends on the network bandwidth and the number of images per second. If RAS is connected to the remote site with a dialup connection (PSTN), the Go to Previous Image button will be disabled, due to the length of time required to obtain the previous image.
Button Function
Fast Backward Play
Stop
Play
Fast Forward Play
Go to the First Image
Go to the Previous Image
Go to the Next Image
Go to the Last Image
RAS Search
Rev 2.00 48 Document 900.031409/05
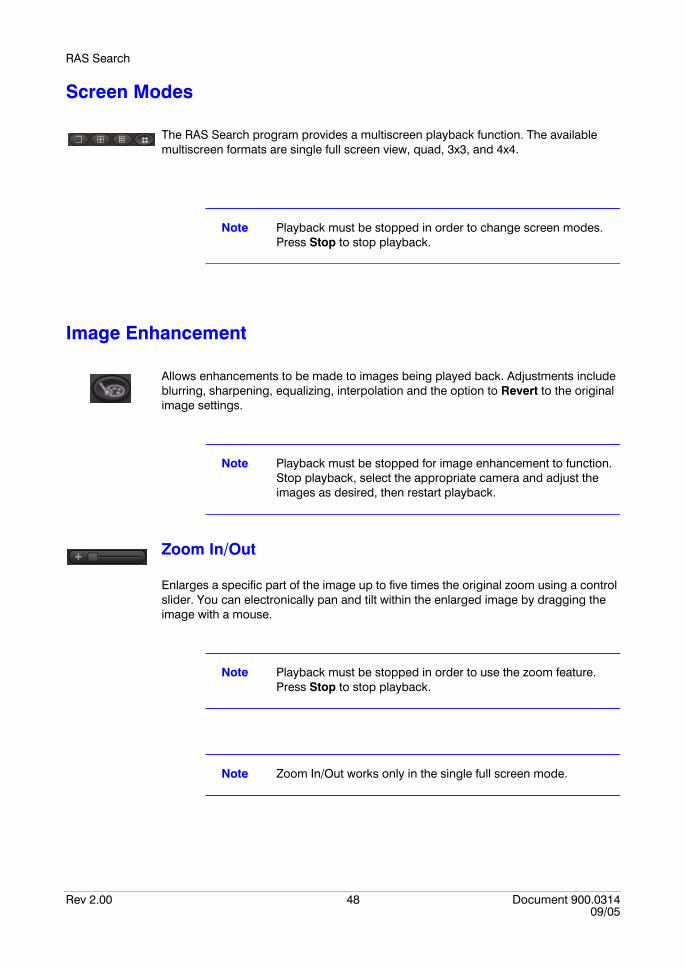
Screen Modes
The RAS Search program provides a multiscreen playback function. The available multiscreen formats are single full screen view, quad, 3x3, and 4x4.
Note Playback must be stopped in order to change screen modes. Press Stop to stop playback.
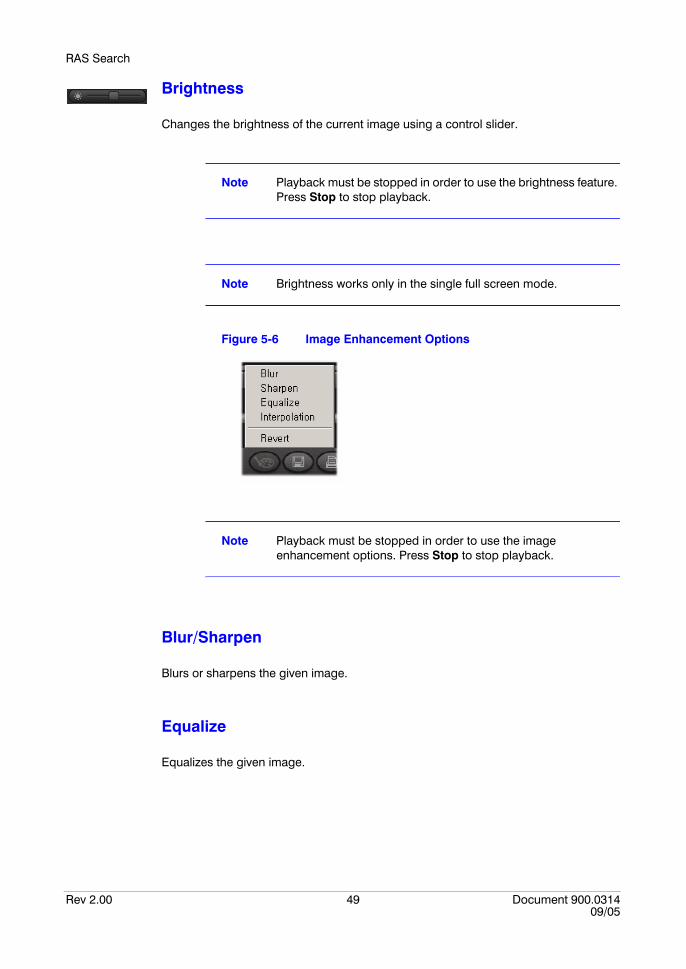
Image Enhancement
Allows enhancements to be made to images being played back. Adjustments include blurring, sharpening, equalizing, interpolation and the option to Revert to the original image settings.
Note Playback must be stopped for image enhancement to function. Stop playback, select the appropriate camera and adjust the images as desired, then restart playback.
Zoom In/Out
Enlarges a specific part of the image up to five times the original zoom using a control slider. You can electronically pan and tilt within the enlarged image by dragging the image with a mouse.
Note Playback must be stopped in order to use the zoom feature. Press Stop to stop playback.
Note Zoom In/Out works only in the single full screen mode.
RAS Search
Rev 2.00 49 Document 900.031409/05
Brightness
Changes the brightness of the current image using a control slider.
Note Playback must be stopped in order to use the brightness feature. Press Stop to stop playback.
Note Brightness works only in the single full screen mode.
Figure 5-6 Image Enhancement Options
Note Playback must be stopped in order to use the image enhancement options. Press Stop to stop playback.
Blur/Sharpen
Blurs or sharpens the given image.
Equalize
Equalizes the given image.
RAS Search
Rev 2.00 50 Document 900.031409/05
Interpolation
Reduces the alias effect that occurs when using the zoom function.
Note Interpolation works only for the enlarged image.
Revert
Reloads the original image.
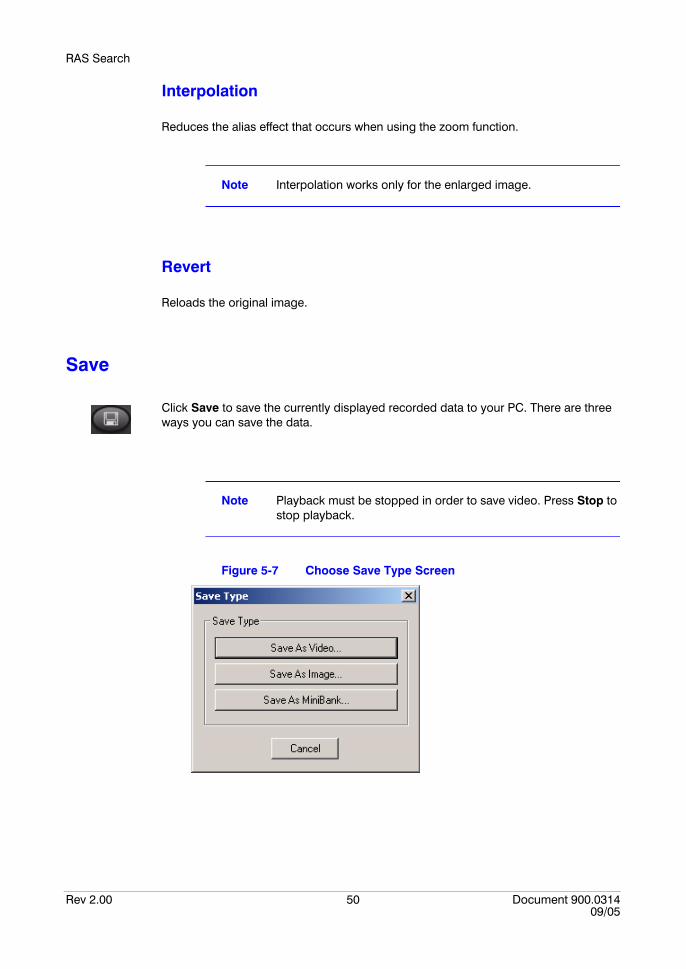
Save
Click Save to save the currently displayed recorded data to your PC. There are three ways you can save the data.
Note Playback must be stopped in order to save video. Press Stop to stop playback.
Figure 5-7 Choose Save Type Screen
RAS Search
Rev 2.00 51 Document 900.031409/05
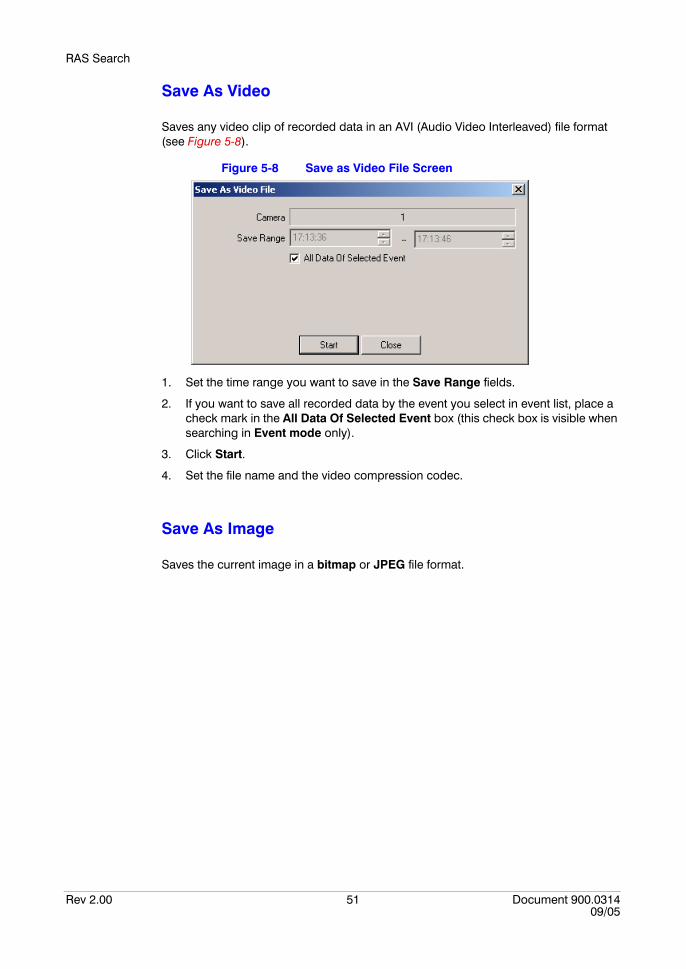
Save As Video
Saves any video clip of recorded data in an AVI (Audio Video Interleaved) file format (see Figure 5-8).
Figure 5-8 Save as Video File Screen
1. Set the time range you want to save in the Save Range fields.
2. If you want to save all recorded data by the event you select in event list, place a check mark in the All Data Of Selected Event box (this check box is visible when searching in Event mode only).
3. Click Start.
4. Set the file name and the video compression codec.
Save As Image
Saves the current image in a bitmap or JPEG file format.
RAS Search
Rev 2.00 52 Document 900.031409/05
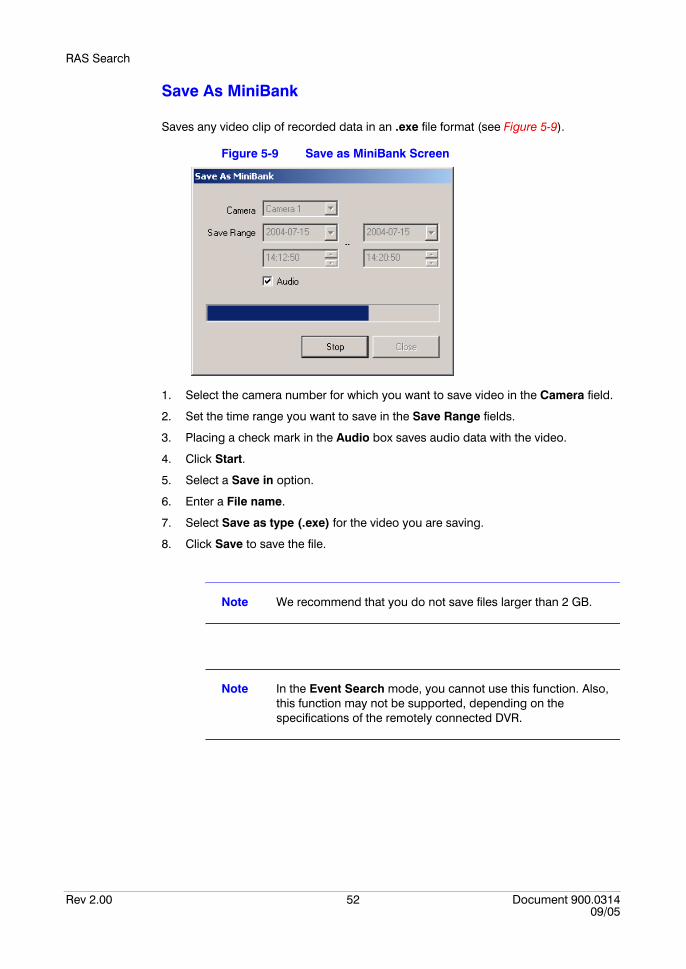
Save As MiniBank
Saves any video clip of recorded data in an .exe file format (see Figure 5-9).
Figure 5-9 Save as MiniBank Screen
1. Select the camera number for which you want to save video in the Camera field.
2. Set the time range you want to save in the Save Range fields.
3. Placing a check mark in the Audio box saves audio data with the video.
4. Click Start.
5. Select a Save in option.
6. Enter a File name.
7. Select Save as type (.exe) for the video you are saving.
8. Click Save to save the file.
Note We recommend that you do not save files larger than 2 GB.
Note In the Event Search mode, you cannot use this function. Also, this function may not be supported, depending on the specifications of the remotely connected DVR.
RAS Search
Rev 2.00 53 Document 900.031409/05
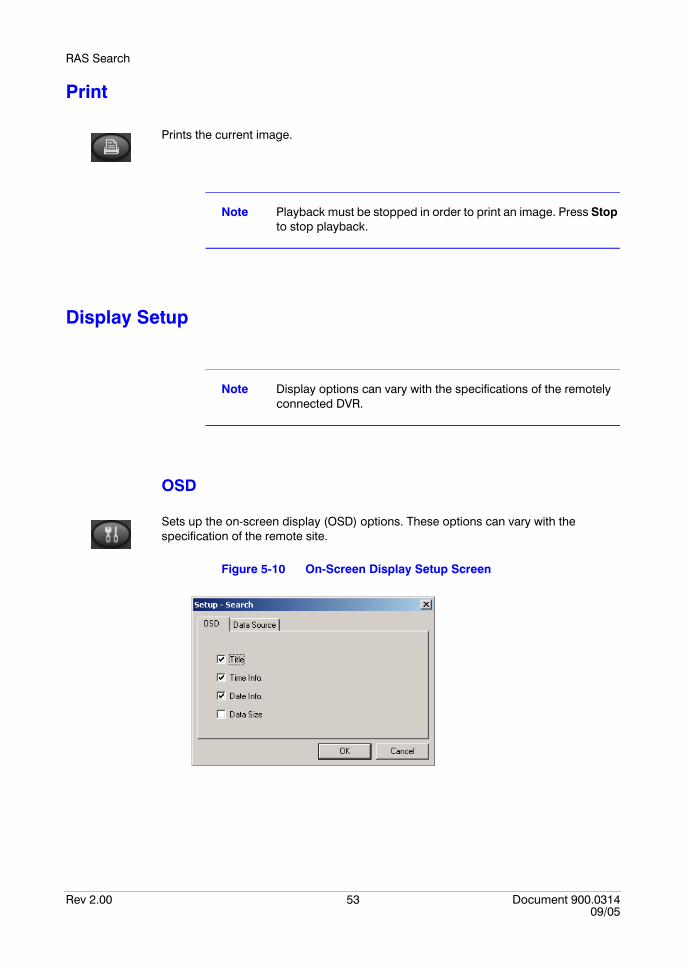
Prints the current image.
Note Playback must be stopped in order to print an image. Press Stop to stop playback.
Display Setup
Note Display options can vary with the specifications of the remotely connected DVR.
OSD
Sets up the on-screen display (OSD) options. These options can vary with the specification of the remote site.
Figure 5-10 On-Screen Display Setup Screen
RAS Search
Rev 2.00 54 Document 900.031409/05
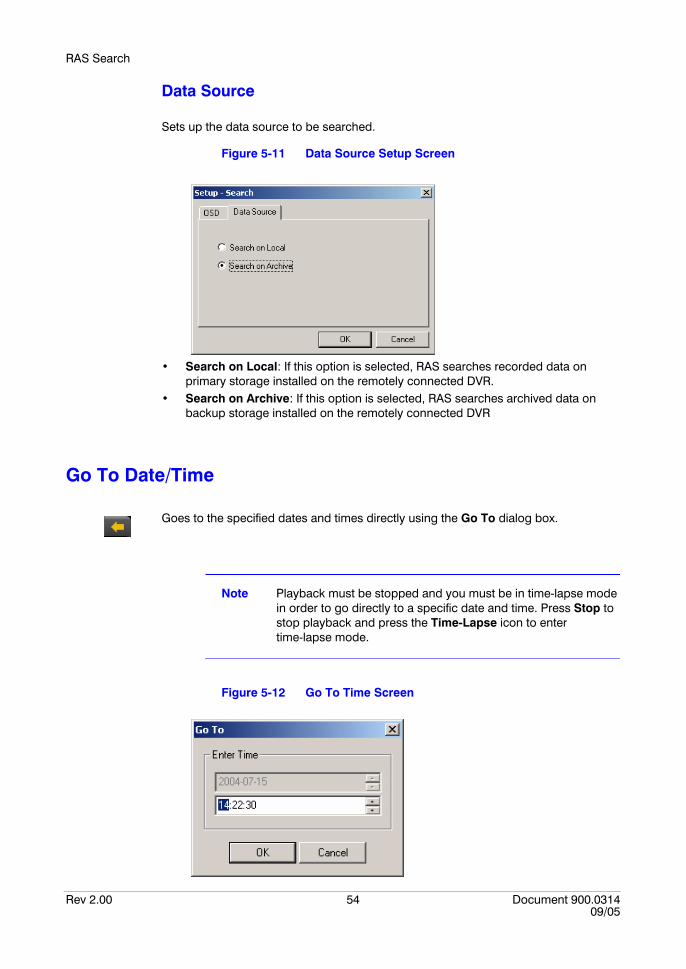
Data Source
Sets up the data source to be searched.
Figure 5-11 Data Source Setup Screen
• Search on Local: If this option is selected, RAS searches recorded data on primary storage installed on the remotely connected DVR.
• Search on Archive: If this option is selected, RAS searches archived data on backup storage installed on the remotely connected DVR
Go To Date/Time
Goes to the specified dates and times directly using the Go To dialog box.
Note Playback must be stopped and you must be in time-lapse mode in order to go directly to a specific date and time. Press Stop to stop playback and press the Time-Lapse icon to enter time-lapse mode.
Figure 5-12 Go To Time Screen
MiniBank Self Player
Rev 2.00 55 Document 900.031409/05
A
MiniBank Self PlayerYou do not need to install any special software on you PC to review the video saved as a MiniBank file. The backup file contains the Player program required for viewing. Double-clicking the target backup file starts the Player program.
Note It is suggested that the computer used for playing back a MiniBank file has at least a 800MHz Pentium III. If your CPU is slower than this, MiniBank files recorded at maximum speed with very high image quality will play back slowly.
Note Do NOT run the RAS Search and the Player programs at the same time using Windows 98 or ME operating systems; otherwise the system might not function normally.
MiniBank Self Player
Rev 2.00 56 Document 900.031409/05
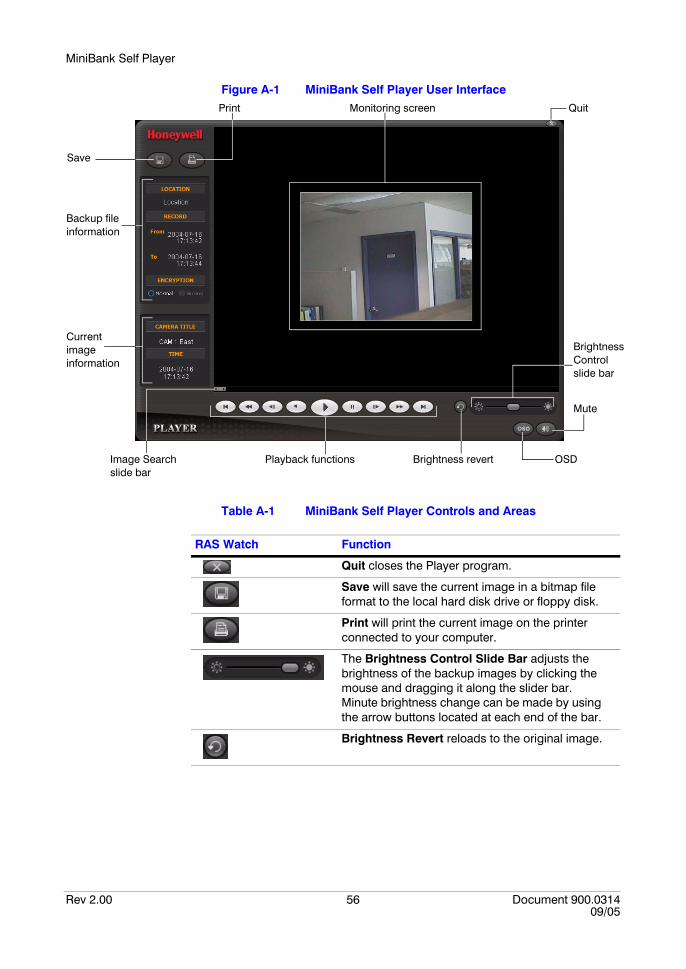
Figure A-1 MiniBank Self Player User Interface
Table A-1 MiniBank Self Player Controls and Areas
RAS Watch Function
Quit closes the Player program.
Save will save the current image in a bitmap file format to the local hard disk drive or floppy disk.
Print will print the current image on the printer connected to your computer.
The Brightness Control Slide Bar adjusts the brightness of the backup images by clicking the mouse and dragging it along the slider bar. Minute brightness change can be made by using the arrow buttons located at each end of the bar.
Brightness Revert reloads to the original image.
QuitPrint
Save
Backup file information
Current image information
Image Search slide bar
Playback functions
Mute
OSD
Brightness Control slide bar
Brightness revert
Monitoring screen
MiniBank Self Player
Rev 2.00 57 Document 900.031409/05
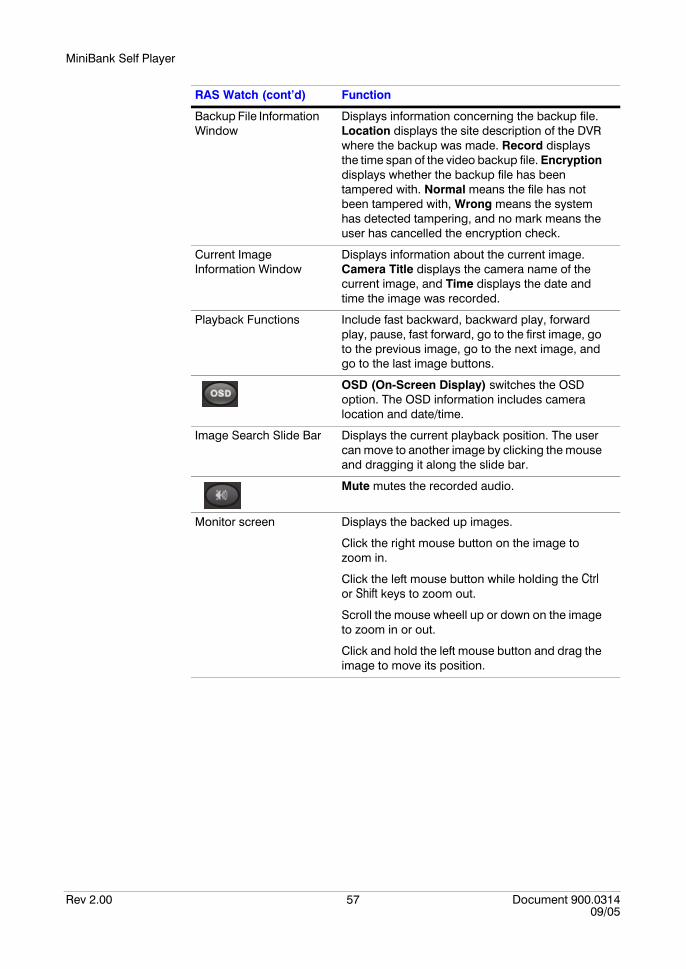
Backup File Information Window
Displays information concerning the backup file. Location displays the site description of the DVR where the backup was made. Record displays the time span of the video backup file. Encryption displays whether the backup file has been tampered with. Normal means the file has not been tampered with, Wrong means the system has detected tampering, and no mark means the user has cancelled the encryption check.
Current Image Information Window
Displays information about the current image. Camera Title displays the camera name of the current image, and Time displays the date and time the image was recorded.
Playback Functions Include fast backward, backward play, forward play, pause, fast forward, go to the first image, go to the previous image, go to the next image, and go to the last image buttons.
OSD (On-Screen Display) switches the OSD option. The OSD information includes camera location and date/time.
Image Search Slide Bar Displays the current playback position. The user can move to another image by clicking the mouse and dragging it along the slide bar.
Mute mutes the recorded audio.
Monitor screen Displays the backed up images.
Click the right mouse button on the image to zoom in.
Click the left mouse button while holding the Ctrl or Shift keys to zoom out.
Scroll the mouse wheell up or down on the image to zoom in or out.
Click and hold the left mouse button and drag the image to move its position.
RAS Watch (cont’d) Function

MiniBank Self Player
Rev 2.00 58 Document 900.031409/05
DVR Name Service
Rev 2.00 59 Document 900.031409/05
B
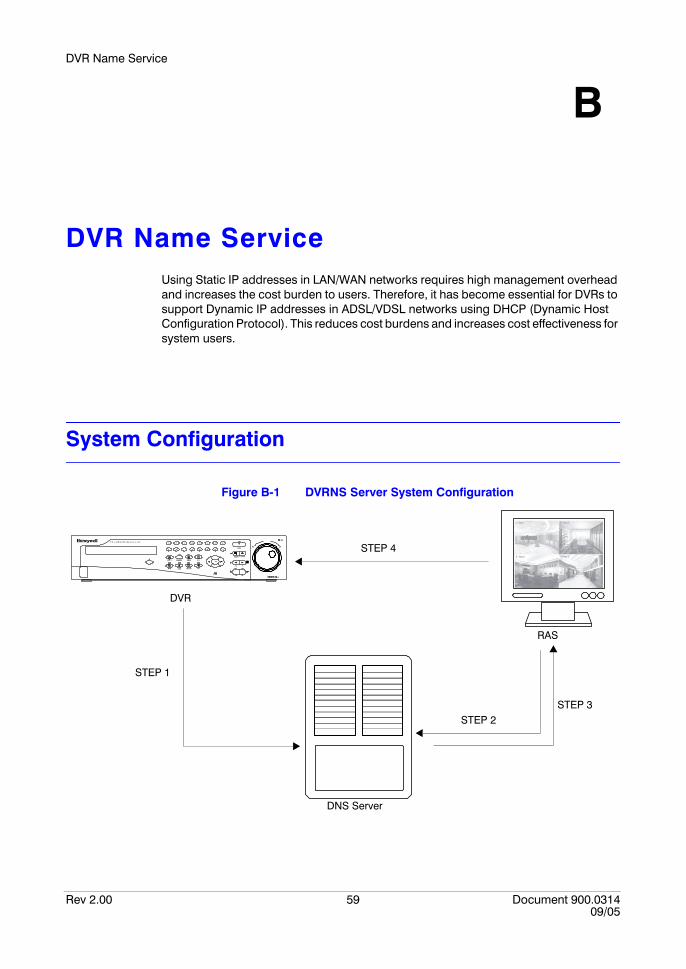
DVR Name ServiceUsing Static IP addresses in LAN/WAN networks requires high management overhead and increases the cost burden to users. Therefore, it has become essential for DVRs to support Dynamic IP addresses in ADSL/VDSL networks using DHCP (Dynamic Host Configuration Protocol). This reduces cost burdens and increases cost effectiveness for system users.
System Configuration
Figure B-1 DVRNS Server System Configuration
STEP 4
DNS Server
RAS
DVR
STEP 1
STEP 2STEP 3
DVR Name Service
Rev 2.00 60 Document 900.031409/05
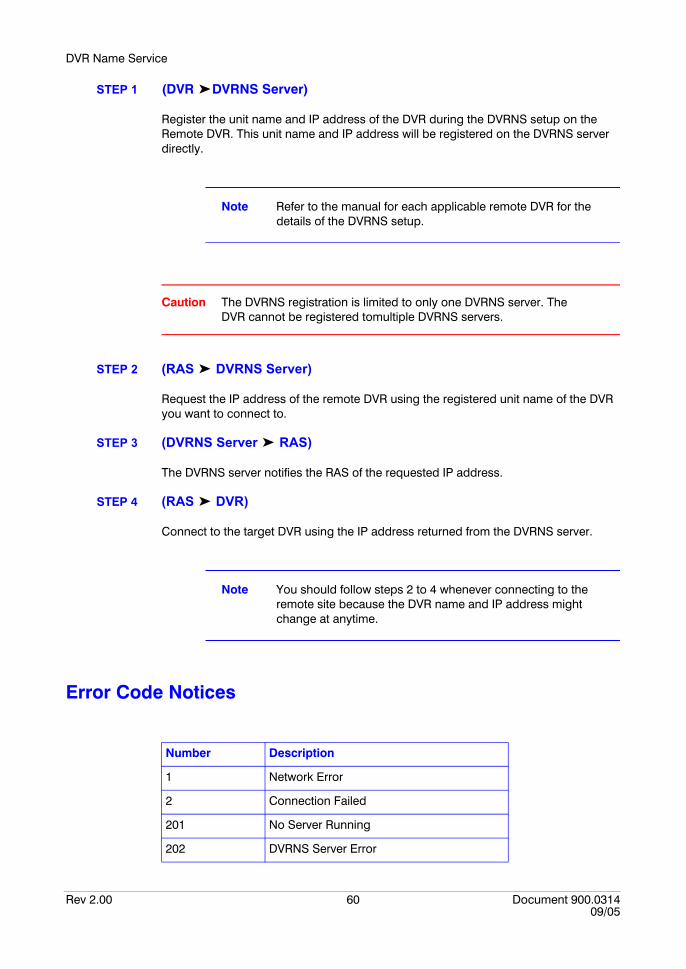
STEP 1 (DVR ➤DVRNS Server)
Register the unit name and IP address of the DVR during the DVRNS setup on the Remote DVR. This unit name and IP address will be registered on the DVRNS server directly.
Note Refer to the manual for each applicable remote DVR for the details of the DVRNS setup.
Caution The DVRNS registration is limited to only one DVRNS server. The DVR cannot be registered tomultiple DVRNS servers.
STEP 2 (RAS ➤ DVRNS Server)
Request the IP address of the remote DVR using the registered unit name of the DVR you want to connect to.
STEP 3 (DVRNS Server ➤ RAS)
The DVRNS server notifies the RAS of the requested IP address.
STEP 4 (RAS ➤ DVR)
Connect to the target DVR using the IP address returned from the DVRNS server.
Note You should follow steps 2 to 4 whenever connecting to the remote site because the DVR name and IP address might change at anytime.
Error Code Notices
Number Description
1 Network Error
2 Connection Failed
201 No Server Running
202 DVRNS Server Error
Rev 2.00 1 Document 900.031409/05
Index
AAdmin
controls 8features 7
alarms 36auto connection 37auto sequencing 37, 39
Bbatch jobs
remote setup 20system check 17upgrade 18
Ccameras 33connecting 11, 31, 41controls
Admin 8alarm out 36image enhancement 35MiniBank 56motion-detection 12playback 47PTZ 34remote event log 15system log 13Watch 30
Ddata source 54display setup 53DVRNS (DVR Name Service) 59
Ffavorites 38
featuresAdmin 7general 1MiniBank 55Search 41Watch 29
full screen mode 33
Ggo to date/time 54
Iicons
alarm-out status 16event 10event status 15system status 16
image enhancementblur 49brightness 49controls 35equalize 49interpolation 50revert 50sharpen 49zooming 48
installation 3–5
Llocal setup
remote sites 22system 21
login 32
Rev 2.00 2 Document 900.031409/05
logsbatch job 26emergency event 27remote events 14remote system 13system 25
MMiniBank self player
controls 56features 55saving as 52
mute 57
OOSD(on-screen display) 53
Pplayback controls 47printing 53procedures
adding a site 23adjusting images 35, 48auto connecting 37auto sequencing 37, 39batch job setup 17changing cameras 33connecting 11, 31, 41controlling alarm out 36controlling playback 47display setup 53event search 43favorites setup 38go to date/time 54installation 3–5local setup 21logging in 32motion-detection setup 11opening programs 5, 11printing 53programming DVR 11PTZ control 34saving as image 51saving as MiniBank 52saving as video 51selecting screen modes 33, 48timelapse search 42Watch setup 37
programmingauto sequencing 39DVR 11motion-detection 11RAS 21remote sites 22Watch 37
PTZ control 34
Qquit
Admin 8Watch 30, 56
Rremote setup 20
Ssaving 50
as image 51as MiniBank 52as video 51
screen modes 33, 48Search
features 41selecting screen modes 48
searchingby cameras 45by events 44event 43selecting source 54timelapse 42
statusalarm-out 16event 15record period 16system 16version 17window 15
system check 17system requirements 2
Uuninstall 3upgrade 18
WWatch
controls 30features 29setup 37

Rev 2.00 3 Document 900.031409/05
Zzoom 48

Rev 2.00 4 Document 900.031409/05

Video Systemswww.honeywellvideo.com
+1.800.796.CCTV (North America only)
© 2005 Honeywell International Inc.
All rights reserved. No part of this publication may be reproduced by any means without written permission from Honeywell Video Systems. The information in this publication is believed to be accurate in all respects. However, Honeywell Video Systems cannot assume responsibility for any consequences resulting from the use thereof. The information contained herein is subject to change without notice. Revisions or new editions to this publication may be issued to incorporate such changes.
Honeywell Security Australia Pty Ltd.Unit 5, Riverside Centre, 24-28 River Road WestParramatta, NSW 2150, Australiawww.ademco.com.au℡ +61.2.8837.9300
Honeywell Security Asia PacificFlat A, 16/F, CDW Building, 388 Castle Peak RoadTsuen Wan, N.T., Hong Kongwww.security.honeywell.com/hk℡ +852.2405.2323
Honeywell Security FranceParc Gutenberg, 13, Voie La Cardon91120, Palaiseau, Francewww.ademco.fr℡ +33.1.6932.1090
Honeywell Security Italia SpAVia della Resistenza 53/59, 20090 BuccinascoMilan, Italywww.ademco.it℡ +39.02.457.1791
Honeywell Security EspañaCalle Vivero, 5, 28040Madrid, Spainwww.security.honeywell.com/es℡ +34.91.102.5900
Honeywell Security NederlandAmperestraat 411446 TR Purmerend, Netherlandswww.SecurityHouse.nl℡ +31.299.419.000
Honeywell Video Systems (Head Office)2700 Blankenbaker Pkwy, Suite 150
Louisville, KY 40299, USAwww.honeywellvideo.com
℡ +1.800.796.2288
Honeywell Video Systems UK Ltd.Aston Fields Road, Whitehouse Ind EstRuncorn, Cheshire, WA7 3DL, UKwww.security.honeywell.com℡ +44.1928.754.000
Honeywell Security South AfricaUnit 6 Galaxy Park, Galaxy Avenue, Linbro Business ParkP.O. Box 59904, Kengray, 2100, South Africawww.honeywell.co.za℡ +27.11.574.2500
Honeywell Security GermanyGroßenbaumer Weg 840472 Düsseldorf, Germanywww.honeywell-security.de℡ +49.211.415.090
Honeywell Security PolandChmielewskiego 22a, 70-028Szczecin, Polskawww.ultrak.pl℡ +48.91.485.40.60
Honeywell Security Czech RepublicHavránkova 33, BrnoDolní Heršpice, 619 00, Czech Republicwww.olympo.cz℡ +420.543.558.111
Honeywell Security Slovakia RepublicVajnorskà 142, 83104 BratislavaSlovakiawww.olympo.sk℡ +421.2.444.54.660