Raglan Sleeves
76
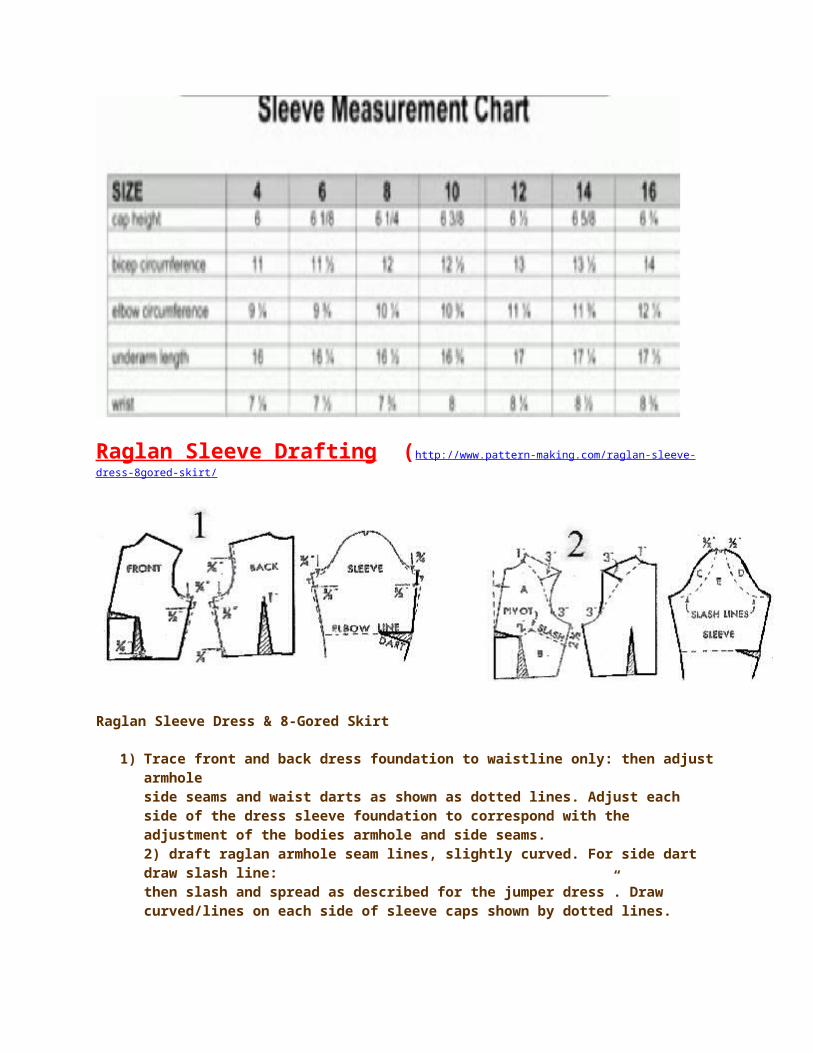
Raglan Sleeve Drafting (http://www.pattern-making.com/raglan-sleeve- dress-8gored-skirt/ Raglan Sleeve Dress & 8-Gored Skirt 1) Trace front and back dress foundation to waistline only: then adjust armhole side seams and waist darts as shown as dotted lines. Adjust each side of the dress sleeve foundation to correspond with the adjustment of the bodies armhole and side seams. 2) draft raglan armhole seam lines, slightly curved. For side dart draw slash line: then slash and spread as described for the jumper dress”. Draw curved/lines on each side of sleeve caps shown by dotted lines.
-
Upload
joy-chowdhury -
Category
Documents
-
view
59 -
download
3
description
fashion
Transcript of Raglan Sleeves
Raglan Sleeve Drafting (http://www.pattern-making.com/raglan-sleeve-dress-8gored-skirt/
Raglan Sleeve Dress & 8-Gored Skirt
1) Trace front and back dress foundation to waistline only: then adjust armholeside seams and waist darts as shown as dotted lines. Adjust each side of the dress sleeve foundation to correspond with the adjustment of the bodies armhole and side seams.2) draft raglan armhole seam lines, slightly curved. For side dart draw slash line:then slash and spread as described for the jumper dress”. Draw curved/lines on each side of sleeve caps shown by dotted lines.
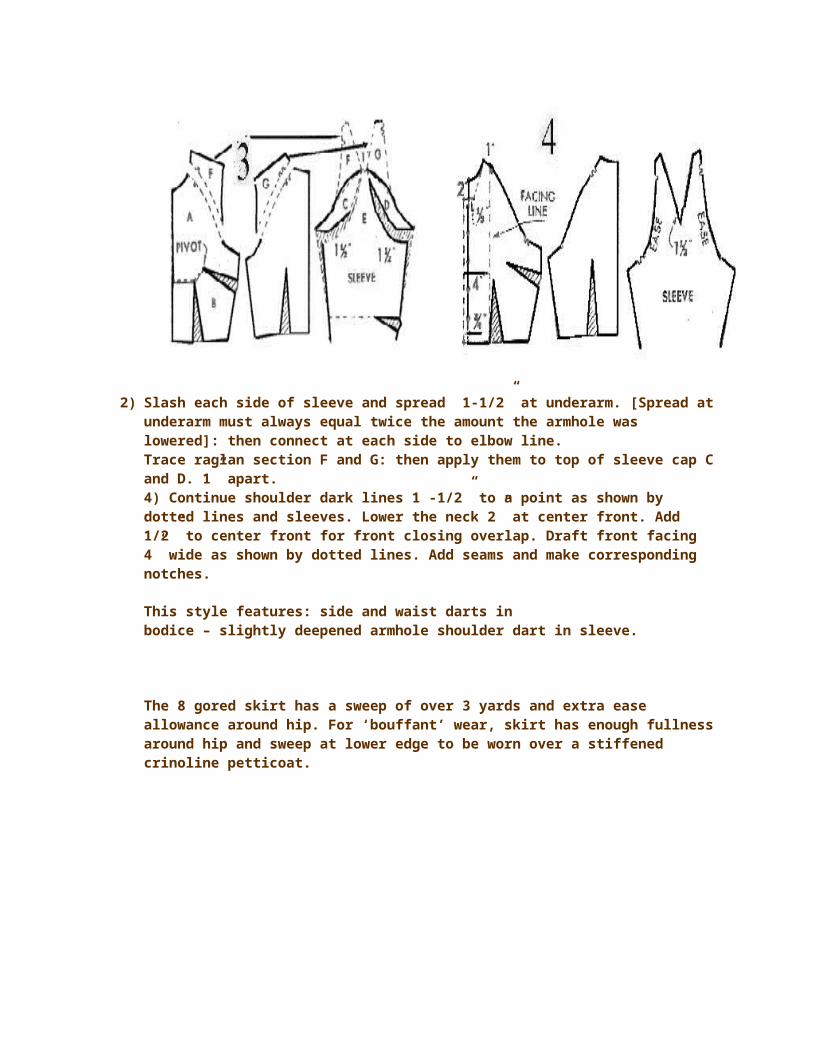
2) Slash each side of sleeve and spread 1-1/2” at underarm. [Spread at underarm must always equal twice the amount the armhole was lowered]: then connect at each side to elbow line.Trace raglan section F and G: then apply them to top of sleeve cap C and D. 1” apart.4) Continue shoulder dark lines 1 -1/2” to a point as shown by dotted lines and sleeves. Lower the neck 2” at center front. Add 1/2” to center front for front closing overlap. Draft front facing 4” wide as shown by dotted lines. Add seams and make corresponding notches.
This style features: side and waist darts inbodice – slightly deepened armhole shoulder dart in sleeve.
The 8 gored skirt has a sweep of over 3 yards and extra ease allowance around hip. For ‘bouffant’ wear, skirt has enough fullness around hip and sweep at lower edge to be worn over a stiffened crinoline petticoat.

HOW TO DRAFT SKIRT5)Trace hip section of the dress foundation: then curve hip and waist line up ¾ toward the side, and reducewaist line of inch at each side seams as shown by dotted lines6) Divide hip section into 4 parts by cutting along dart lines. Mark section A to D.7) Continue straight lines down below hip sections to required length: then curve bottom lines parallel to hip lines.8 ) For addition sweep ,Add about 2-1/2 at bottom of each seam.To nothing 3” below waistline.
HOW TO DRAFT PATTERN(http://www.pattern-making.com/dress-bodice-raglan-sleeve/)_The drafts on this page were developed by using the Junior Petite [Size 7]or the team’s [Size 12] Dress Bodice Foundation.
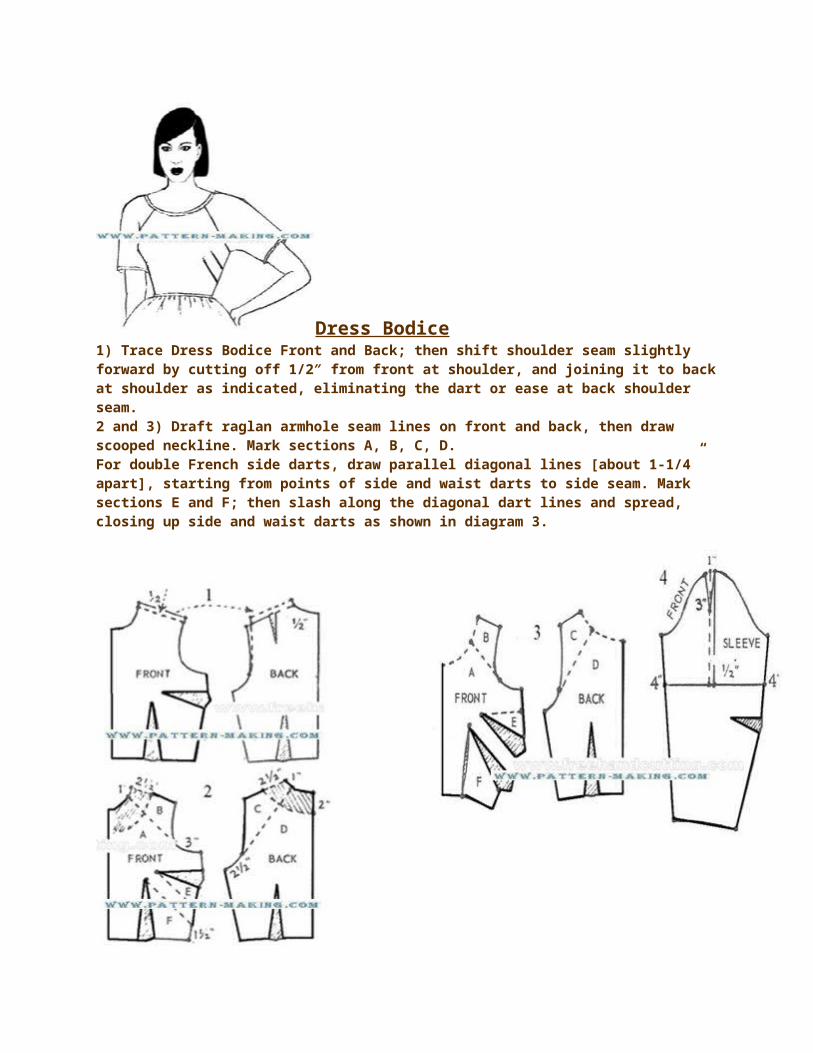
Dress Bodice1) Trace Dress Bodice Front and Back; then shift shoulder seam slightly forward by cutting off 1/2″ from front at shoulder, and joining it to back at shoulder as indicated, eliminating the dart or ease at back shoulder seam.2 and 3) Draft raglan armhole seam lines on front and back, then draw scooped neckline. Mark sections A, B, C, D.For double French side darts, draw parallel diagonal lines [about 1-1/4” apart], starting from points of side and waist darts to side seam. Mark sections E and F; then slash along the diagonal dart lines and spread, closing up side and waist darts as shown in diagram 3.
4 and 52-Piece Short Sleeve
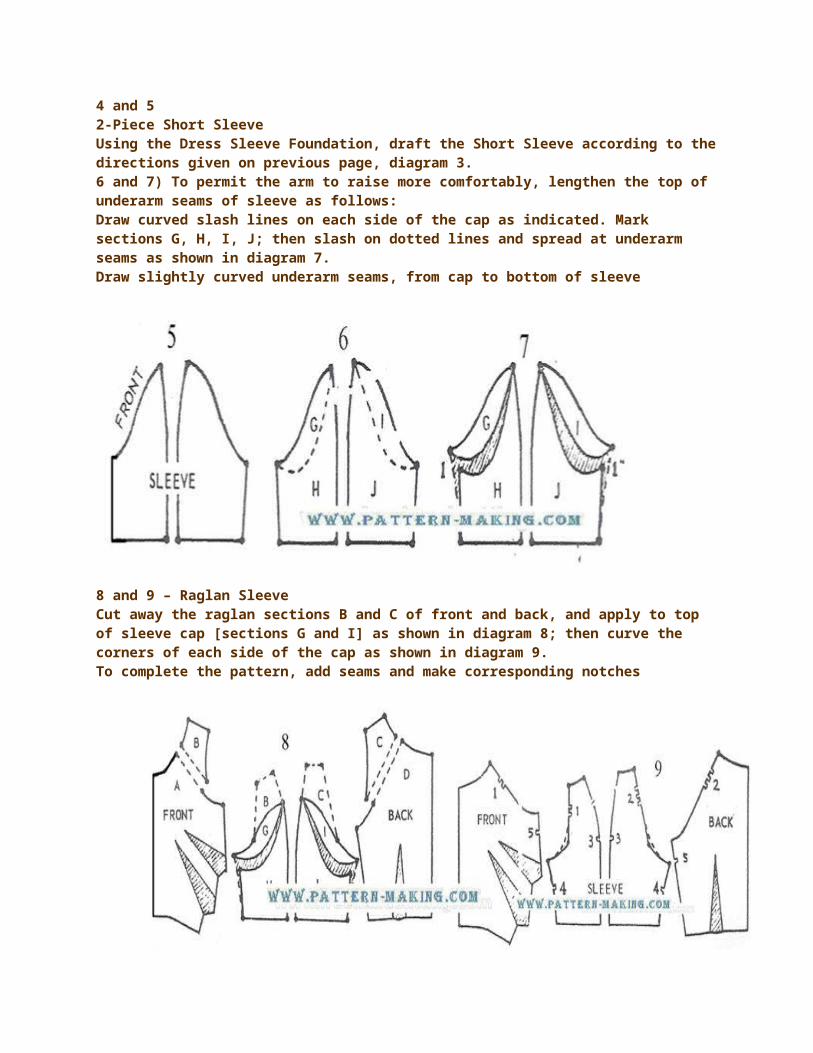
Using the Dress Sleeve Foundation, draft the Short Sleeve according to the directions given on previous page, diagram 3.6 and 7) To permit the arm to raise more comfortably, lengthen the top of underarm seams of sleeve as follows:Draw curved slash lines on each side of the cap as indicated. Mark sections G, H, I, J; then slash on dotted lines and spread at underarm seams as shown in diagram 7.Draw slightly curved underarm seams, from cap to bottom of sleeve
8 and 9 – Raglan SleeveCut away the raglan sections B and C of front and back, and apply to top of sleeve cap [sections G and I] as shown in diagram 8; then curve the corners of each side of the cap as shown in diagram 9.To complete the pattern, add seams and make corresponding notches
Drafting Raglan Sleeves (http://www.pattern-making.com/category/pattern-drafting/drafting-sleeve-patterns/page/2/)
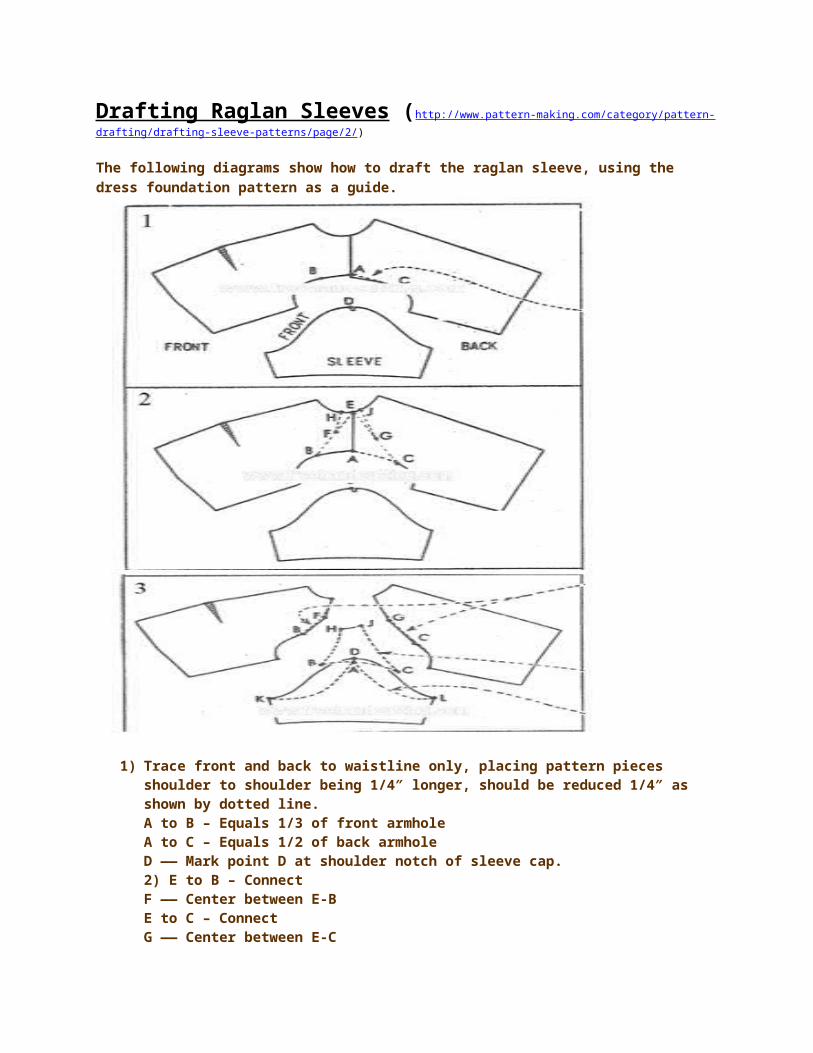
The following diagrams show how to draft the raglan sleeve, using the dress foundation pattern as a guide.
1) Trace front and back to waistline only, placing pattern pieces shoulder to shoulder being 1/4″ longer, should be reduced 1/4″ as shown by dotted line.A to B – Equals 1/3 of front armholeA to C – Equals 1/2 of back armholeD —— Mark point D at shoulder notch of sleeve cap.2) E to B – ConnectF —— Center between E-BE to C – ConnectG —— Center between E-CH to J – Equals width of sleeve at neckline, making E to H twice the width of E to J as follows:E to H – 1”; then draw line from H to FE to J – 1/2″; then draw line from J to GCurve the line at points F and B in front; at points G and C in backin diagram 3.
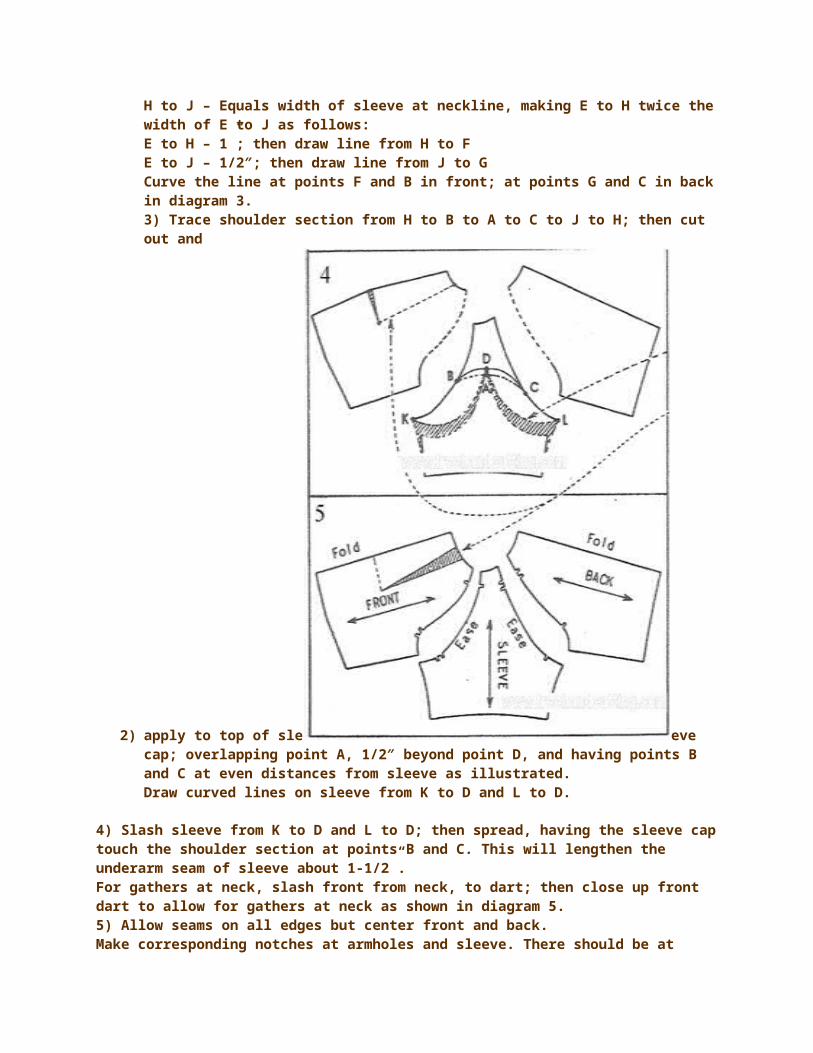
3) Trace shoulder section from H to B to A to C to J to H; then cut out and
2) apply to top of sle eve cap; overlapping point A, 1/2″ beyond point D, and having points B and C at even distances from sleeve as illustrated.Draw curved lines on sleeve from K to D and L to D.
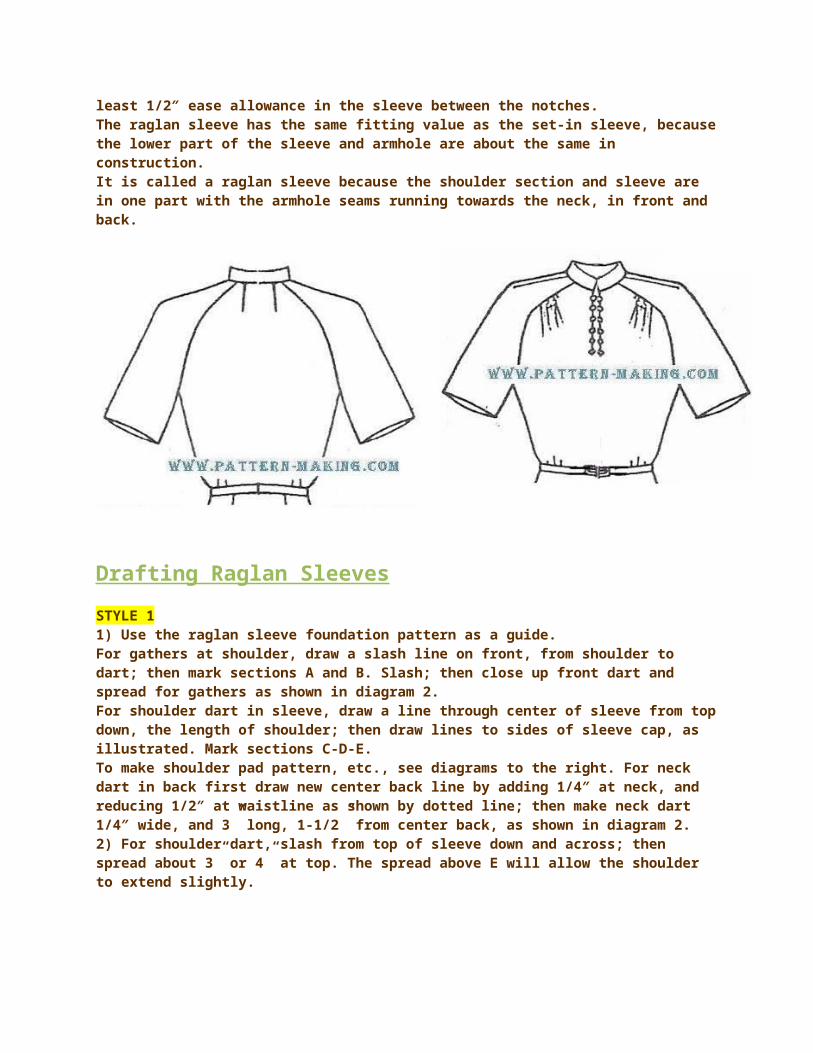
4) Slash sleeve from K to D and L to D; then spread, having the sleeve cap touch the shoulder section at points B and C. This will lengthen the underarm seam of sleeve about 1-1/2”.For gathers at neck, slash front from neck, to dart; then close up front dart to allow for gathers at neck as shown in diagram 5.5) Allow seams on all edges but center front and back.Make corresponding notches at armholes and sleeve. There should be at least 1/2″ ease allowance in the sleeve between the notches.The raglan sleeve has the same fitting value as the set-in sleeve, because the lower part of the sleeve and armhole are about the same in construction.It is called a raglan sleeve because the shoulder section and sleeve are in one part with the armhole seams running towards the neck, in front and back.
Drafting Raglan Sleeves
STYLE 11) Use the raglan sleeve foundation pattern as a guide.For gathers at shoulder, draw a slash line on front, from shoulder to dart; then mark sections A and B. Slash; then close up front dart and spread for gathers as shown in diagram 2.For shoulder dart in sleeve, draw a line through center of sleeve from top down, the length of shoulder; then draw lines to sides of sleeve cap, as illustrated. Mark sections C-D-E.To make shoulder pad pattern, etc., see diagrams to the right. For neck dart in back first draw new center back line by adding 1/4″ at neck, and reducing 1/2″ at waistline as shown by dotted line; then make neck dart 1/4″ wide, and 3” long, 1-1/2” from center back, as shown in diagram 2.2) For shoulder dart, slash from top of sleeve down and across; then spread about 3” or 4” at top. The spread above E will allow the shoulder to extend slightly.
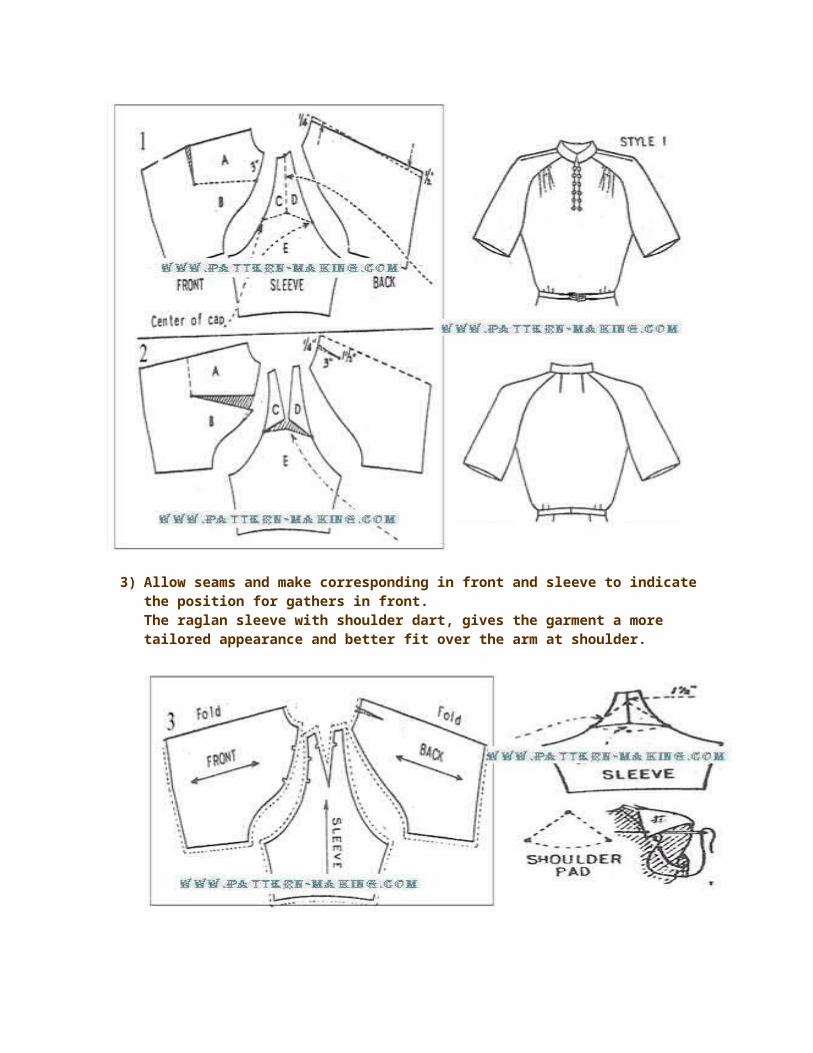
3) Allow seams and make corresponding in front and sleeve to indicate the position for gathers in front.The raglan sleeve with shoulder dart, gives the garment a more tailored appearance and better fit over the arm at shoulder.
STYLE 2

Illustration shows raglan sleeve and yoke in one section.1) Use the raglan front, back and sleeve foundation pattern as a guide.Draft the yoke on front and back as follows:
A to B – Equals 2/3 of front armholeC to D – on sleeve equals A to B on frontE to F – Equals 2/3 of back armholeG to H – on sleeve equals E to F on backDraw yoke lines on front and back2)Cut away yoke sections from front and back,and apply to sleeve at corresponding positions.For gathers in front, draw slash line as illustrated;then slash and spread as shown in diagram 3.3)Allow seams and make corresponding notches.Mark grain line arrow in yoke and sleeve parallel to center back.Draft cuff 1-1/2” wide at lower edge of sleeve.
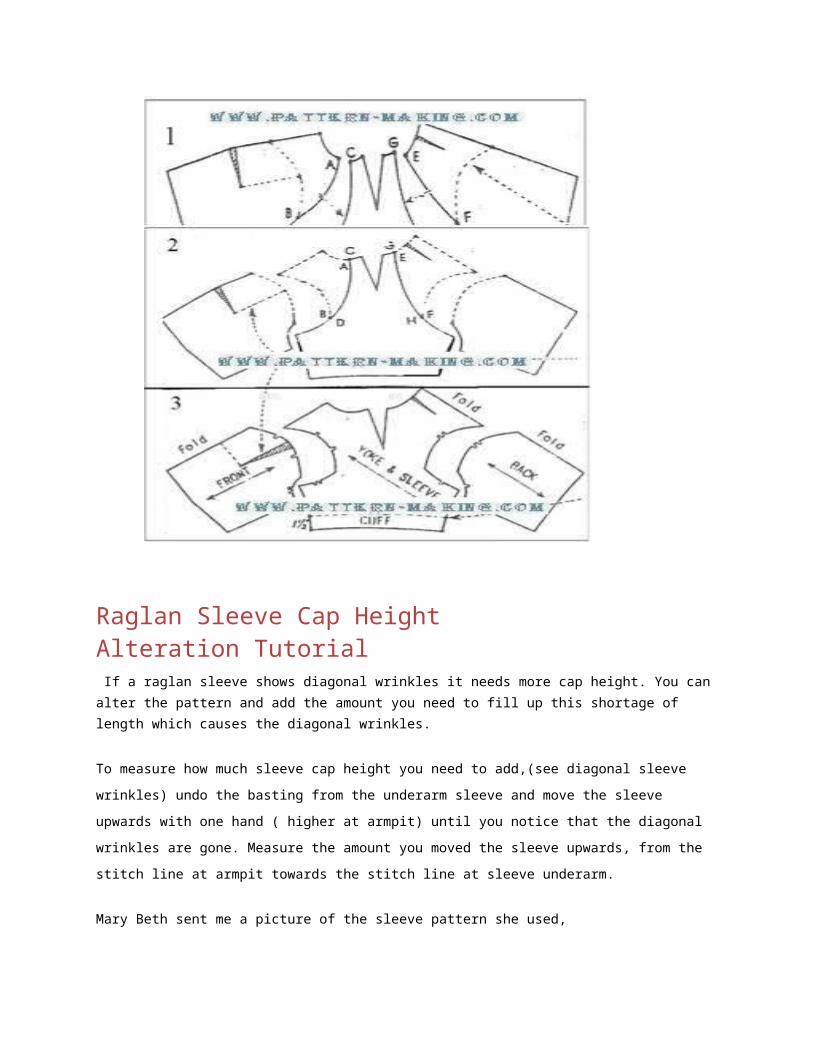
Raglan Sleeve Cap Height Alteration Tutorial If a raglan sleeve shows diagonal wrinkles it needs more cap height. You can alter the
pattern and add the amount you need to fill up this shortage of length which causes the
diagonal wrinkles.
To measure how much sleeve cap height you need to add,(see diagonal sleeve wrinkles)
undo the basting from the underarm sleeve and move the sleeve upwards with one hand
( higher at armpit) until you notice that the diagonal wrinkles are gone. Measure the amount
you moved the sleeve upwards, from the stitch line at armpit towards the stitch line at
sleeve underarm.
Mary Beth sent me a picture of the sleeve pattern she used,
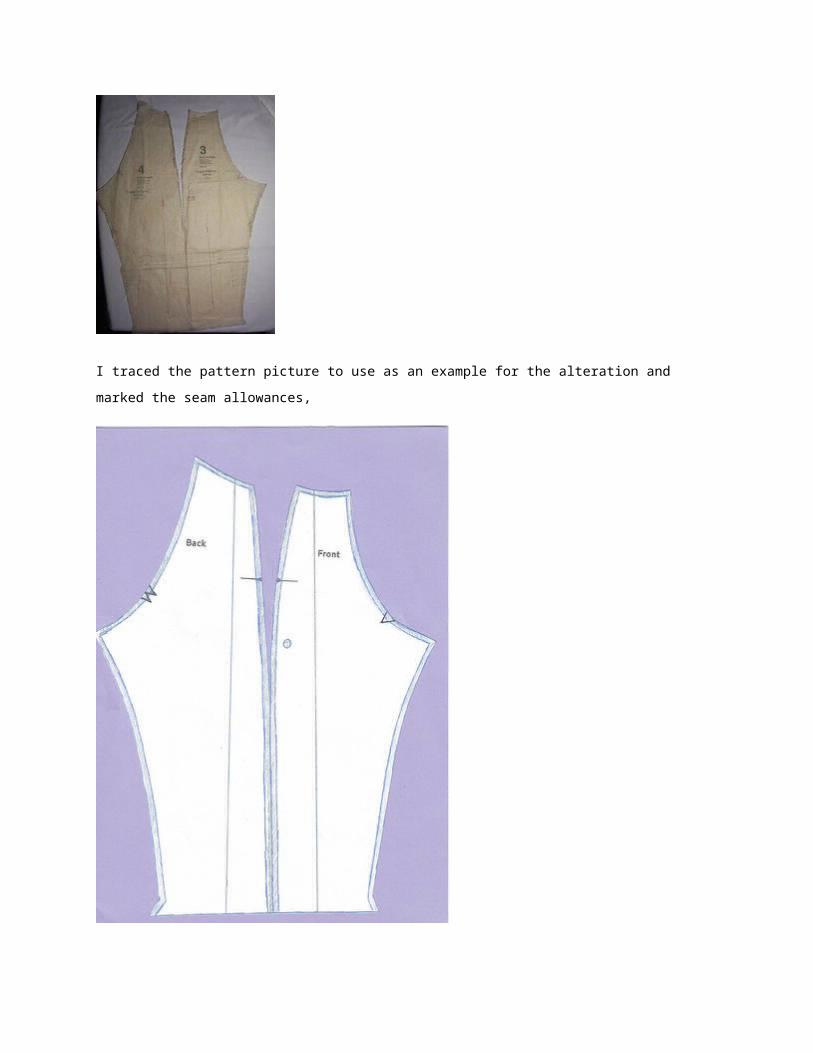
I traced the pattern picture to use as an example for the alteration and marked the seam
allowances,
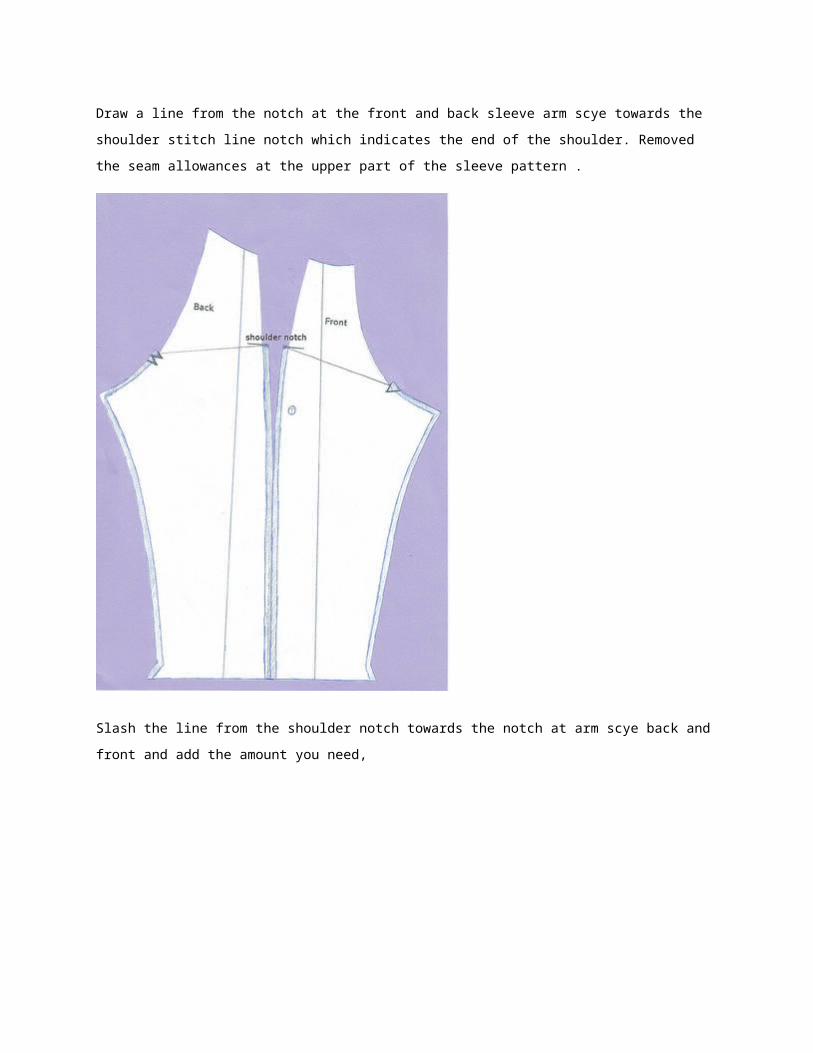
Draw a line from the notch at the front and back sleeve arm scye towards the shoulder
stitch line notch which indicates the end of the shoulder. Removed the seam allowances at
the upper part of the sleeve pattern .
Slash the line from the shoulder notch towards the notch at arm scye back and front and
add the amount you need,

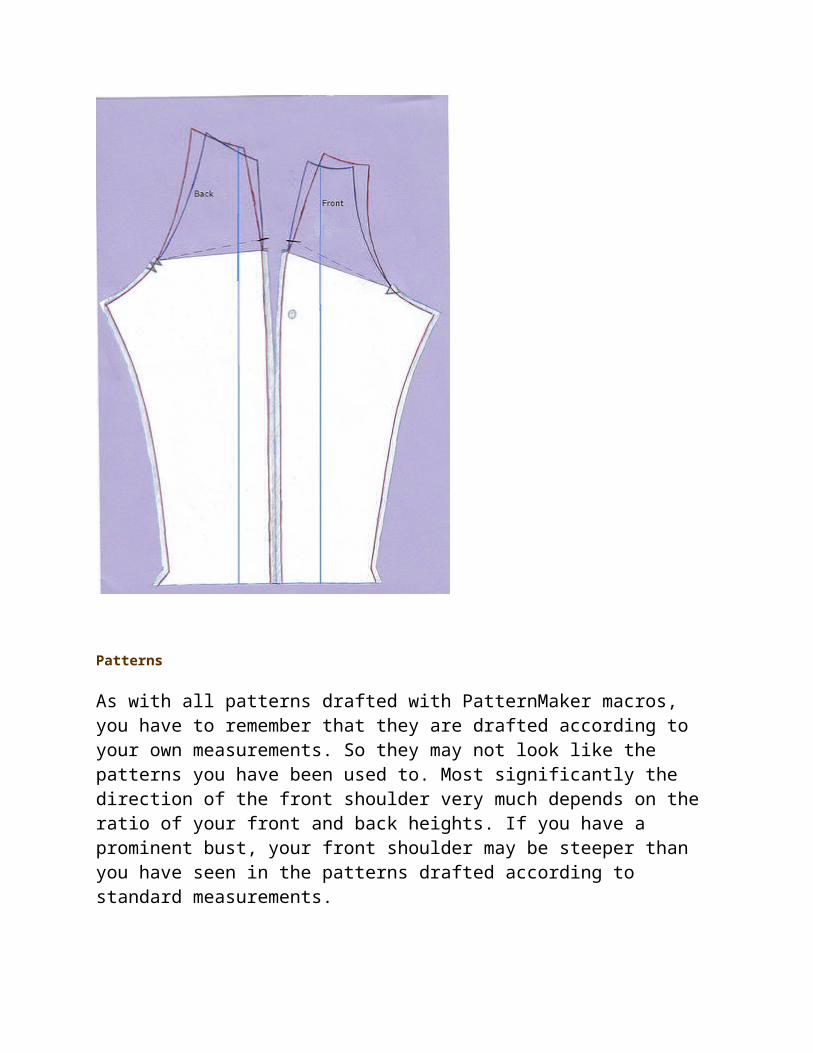
You can see how the added length for the sleeve cap height differs from the original used
pattern.
The red line shows the new altered raglan sleeve pattern, the blue line is the original one.
The straight of grain needs to be lenghtened for the upper part as well as adding the seam
allowances back on.
Patterns
As with all patterns drafted with PatternMaker macros, you have to remember that they are drafted according to your own measurements. So they may not look like the patterns you have been used to. Most significantly the direction of the front shoulder very much depends on the ratio of your front and back heights. If you have a prominent bust, your front shoulder may be steeper than you have seen in the patterns drafted according to standard measurements.
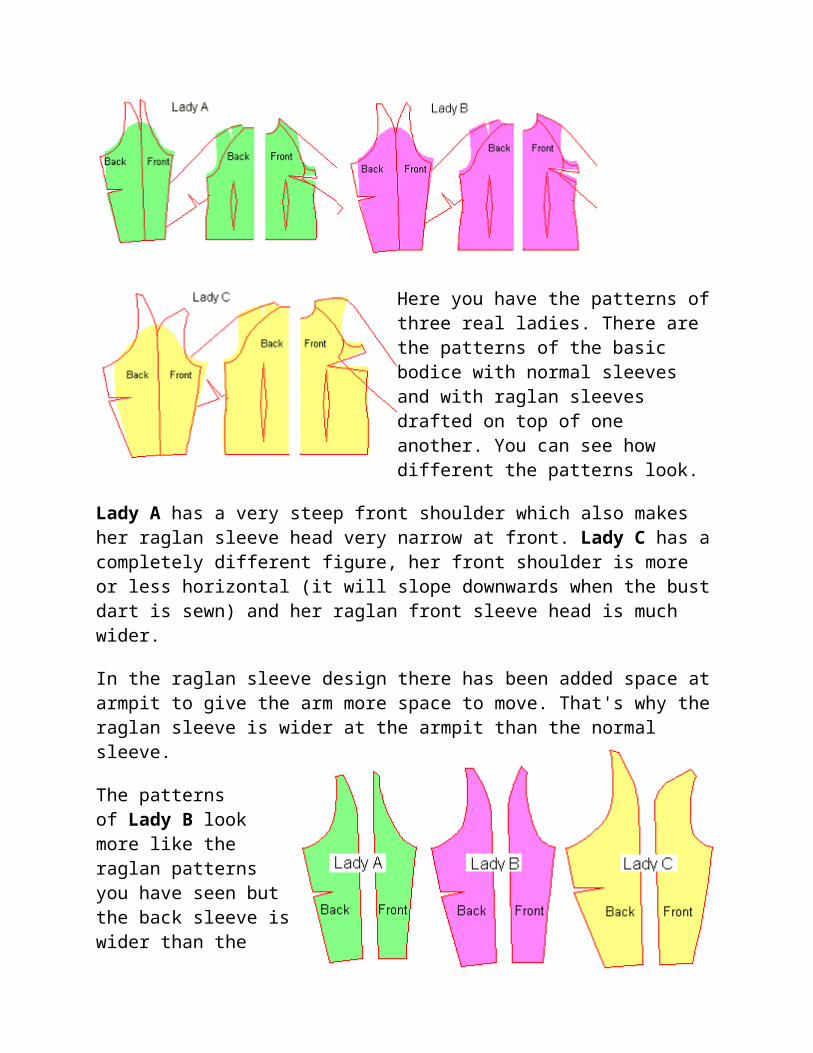
Here you have the patterns of three real ladies. There are the patterns of the basic bodice with normal sleeves and with raglan sleeves drafted on top of one another. You can see how different the patterns look.
Lady A has a very steep front shoulder which also makes her raglan sleeve head very narrow at front. Lady C has a
completely different figure, her front shoulder is more or less horizontal (it will slope downwards when the bust dart is sewn) and her raglan front sleeve head is much wider.
In the raglan sleeve design there has been added space at armpit to give the arm more space to move. That's why the raglan sleeve is wider at the armpit than the normal sleeve.
The patterns of Lady B look more like the raglan patterns you have seen but the back sleeve is wider than the front sleeve. Look at the above picture where the raglan sleeve has been drafted on top of the normal sleeve to verify that the sleeves are identical, only the armpit of the raglan sleeve has been lowered and made wider.
As always, if you have sewn a muslin with the patterns of the normal basic bodice and your measurements and if it fits, you can be sure that all patterns drafted with the
PatternMaker macros with those measurements, fit. If you need to, please read more
about sewing a muslin using the patterns of the basic bodice.
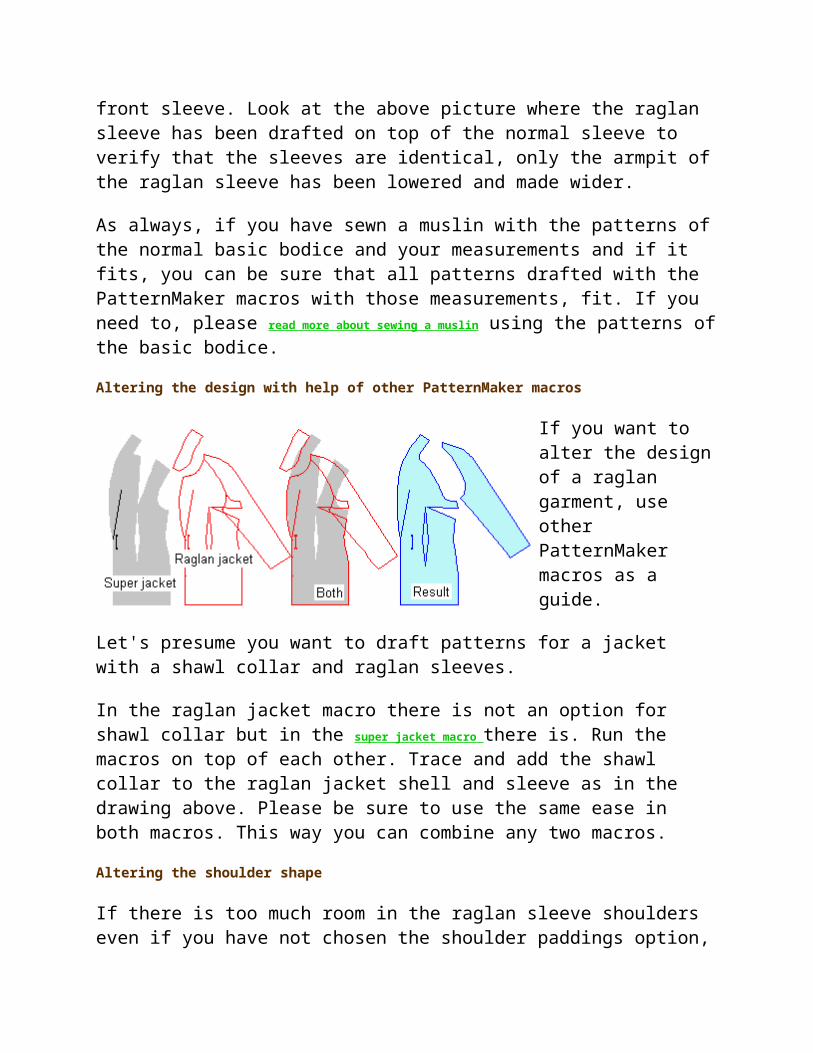
Altering the design with help of other PatternMaker macros
If you want to alter the design of a raglan garment, use other PatternMaker macros as a guide.
Let's presume you want to draft patterns for a jacket with a shawl collar and raglan
sleeves.
In the raglan jacket macro there is not an option for shawl collar but in the super jacket
macro there is. Run the macros on top of each other. Trace and add the shawl collar to the raglan jacket shell and sleeve as in the drawing above. Please be sure to use the same ease in both macros. This way you can combine any two macros.
Altering the shoulder shape
If there is too much room in the raglan sleeve shoulders even if you have not chosen the shoulder paddings option, try the garment on and pin the desired shoulder shape. Then re-sew the shoulder seam.
Drafting Bra Pattern
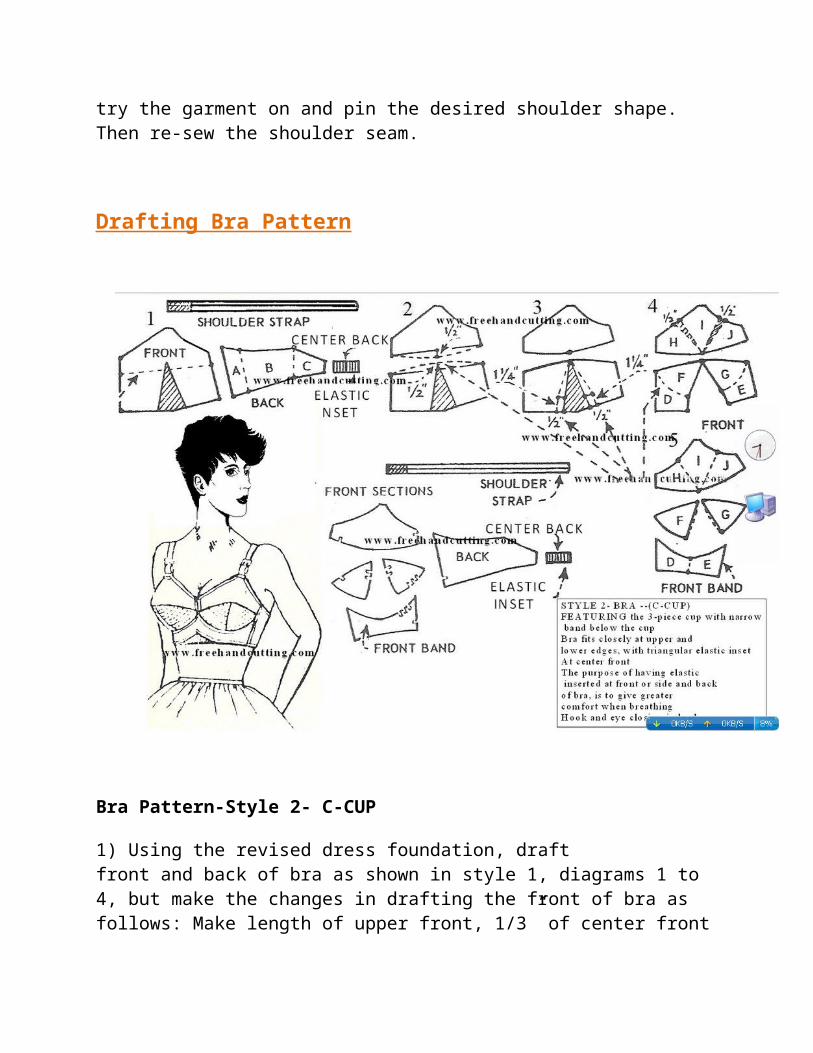
Bra Pattern-Style 2- C-CUP
1) Using the revised dress foundation, draftfront and back of bra as shown in style 1, diagrams 1 to 4, but make the changes in drafting the front of bra as follows: Make length of upper front, 1/3” of center front and side lengths; then separate as shown in diagram 2.2) For extra length over the bust, add 1/2″ to each front section at breast point, to nothing at front and side edges as shown by dotted lines.3) For closer fit at lower part of front, make dart 1” wider [1/2” at each side of dart] as shown by dotted lines.4 and 5) For lower front sections, draw circular lines as indicated. Mark sections D-E-F-G; then separate B and from front, and combine section D and E as shown in diagram 5. For closer fit at upper edge of front, make reduction in 2 places as indicated. Mark sections H-I-J; then close up sections as shown in diagram 5. Draw slightly curved lines at inner edges of sections F and G as shown by dotted lines in diagram 5.6) To complete pattern, add seams and make corresponding notches.
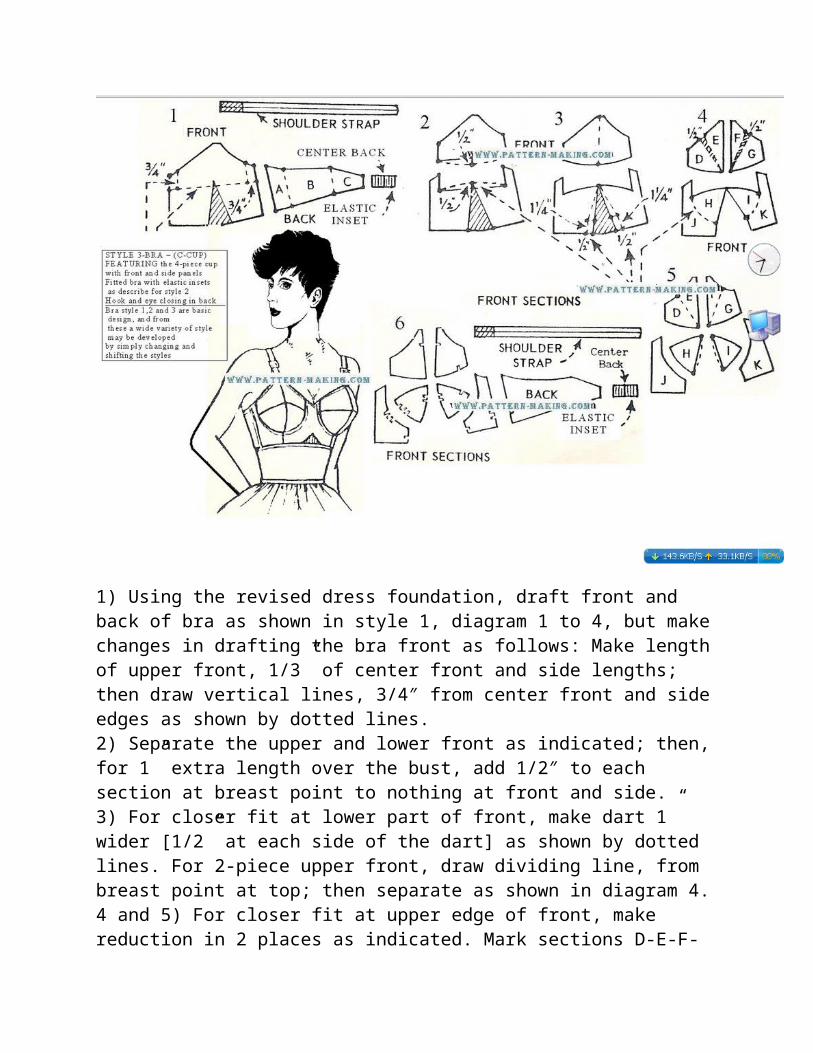
1) Using the revised dress foundation, draft front and back of bra as shown in style 1, diagram 1 to 4, but make changes in drafting the bra front as follows: Make length of upper front, 1/3” of center front and side lengths; then draw vertical lines, 3/4″ from center front and side edges as shown by dotted lines.2) Separate the upper and lower front as indicated; then, for 1” extra length over the bust, add 1/2″ to each section at breast point to nothing at front and side.3) For closer fit at lower part of front, make dart 1” wider [1/2” at each side of the dart] as shown by dotted lines. For 2-piece upper front, draw dividing line, from breast point at top; then separate as shown in diagram 4.4 and 5) For closer fit at upper edge of front, make reduction in 2 places as indicated. Mark sections D-E-F-G; then close up sections D and E, and F and G as shown in diagram 5. For lower front sections, draw circular lines as indicated. Mark sections H-I-J-K; then separate as shown in diagram 5. Draw slightly curved lines at inner edges of sections H and I as shown by dotted lines in diagram 5.6) To complete pattern, add seams and make matching notches.
Draft of the Bra Pattern
Bra Pattern Style 1-C-CUP
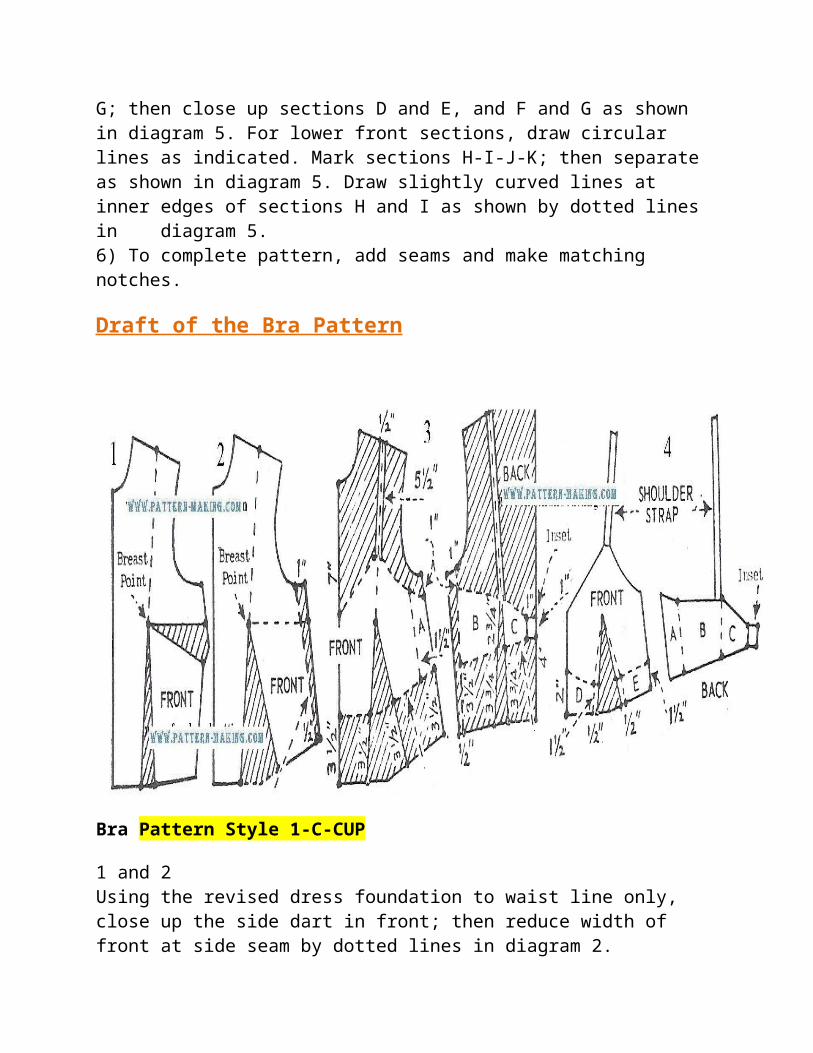
1 and 2Using the revised dress foundation to waist line only, close up the side dart in front; then reduce width of front at side seam by dotted lines in diagram 2.3) Reduce width of back at side seam; then draft bra front and back as shown by dotted lines.Shift side seam, 1-1/2” forward, and mark sections A-B-C; then combine them as shown in diagram 4. Make shoulder straps 1/2″ wide.
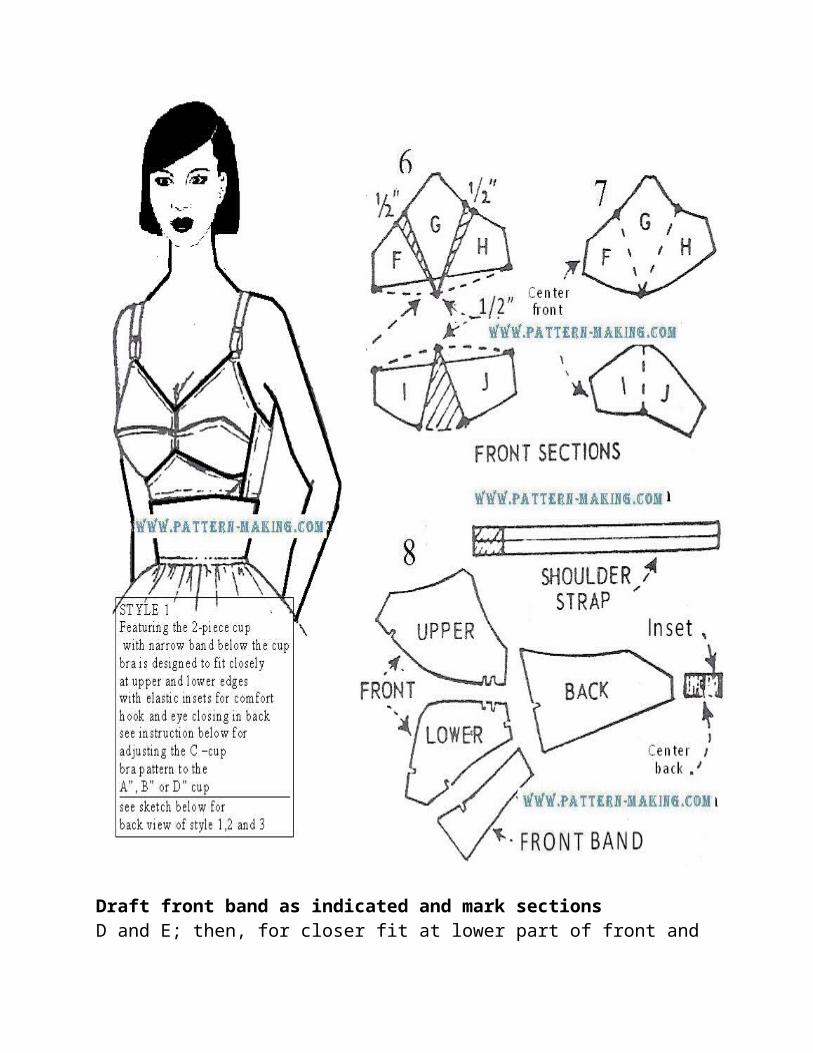
Draft front band as indicated and mark sectionsD and E; then, for closer fit at lower part of front and band, make waist dart, 1” wider [1/2” on each side of dart] as shown by dotted lines. Separate the band from front;
then combine section D and E as shown in diagram 5. [Triangular inset at side of band may be made of elastic, to revive the lower edge stain, when breathing]. Join front and back shoulder straps, adding 2” for adjustment; then make strap double, as shown in diagram 5.5 For 2-piece front, draw seam line across, from center of side seam to the middle of center front line; then separate as shown in diagram 6.
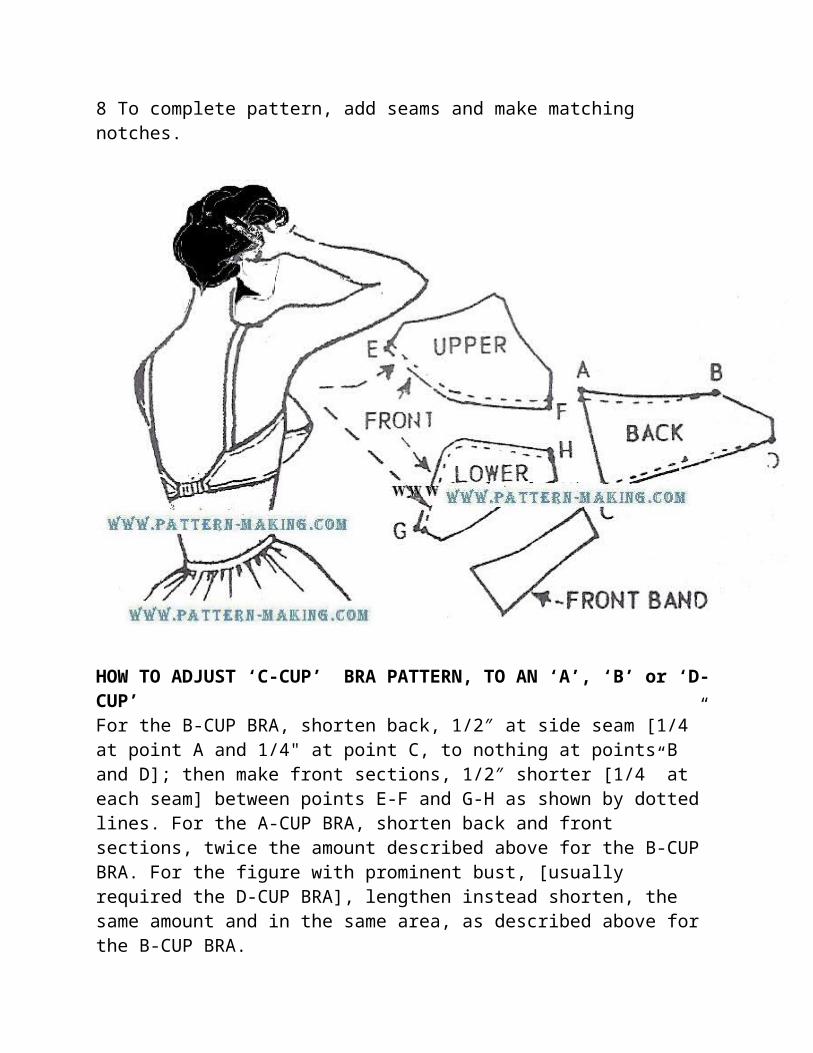
6 and 7For 1” extra length over the bust, add 1/2″ to each front section at breast point, to nothing at front and side edges as shown by dotted lines. For closer fit at upper edge of front, make reduction in 2 places as indicated. Mark sections F-G-H-I-J; then close up the upper and lower front sections as shown in diagram 7.8 To complete pattern, add seams and make matching notches.
HOW TO ADJUST ‘C-CUP’ BRA PATTERN, TO AN ‘A’, ‘B’ or ‘D-CUP’For the B-CUP BRA, shorten back, 1/2″ at side seam [1/4” at point A and 1/4" at point C, to nothing at points B and D]; then make front sections, 1/2″ shorter [1/4” at each seam] between points E-F and G-H as shown by dotted lines. For the A-CUP BRA, shorten back and front sections, twice the amount described above for the B-CUP BRA. For the figure with prominent bust, [usually required the D-CUP BRA], lengthen instead shorten, the same amount and in the same area, as described above for the B-CUP BRA.

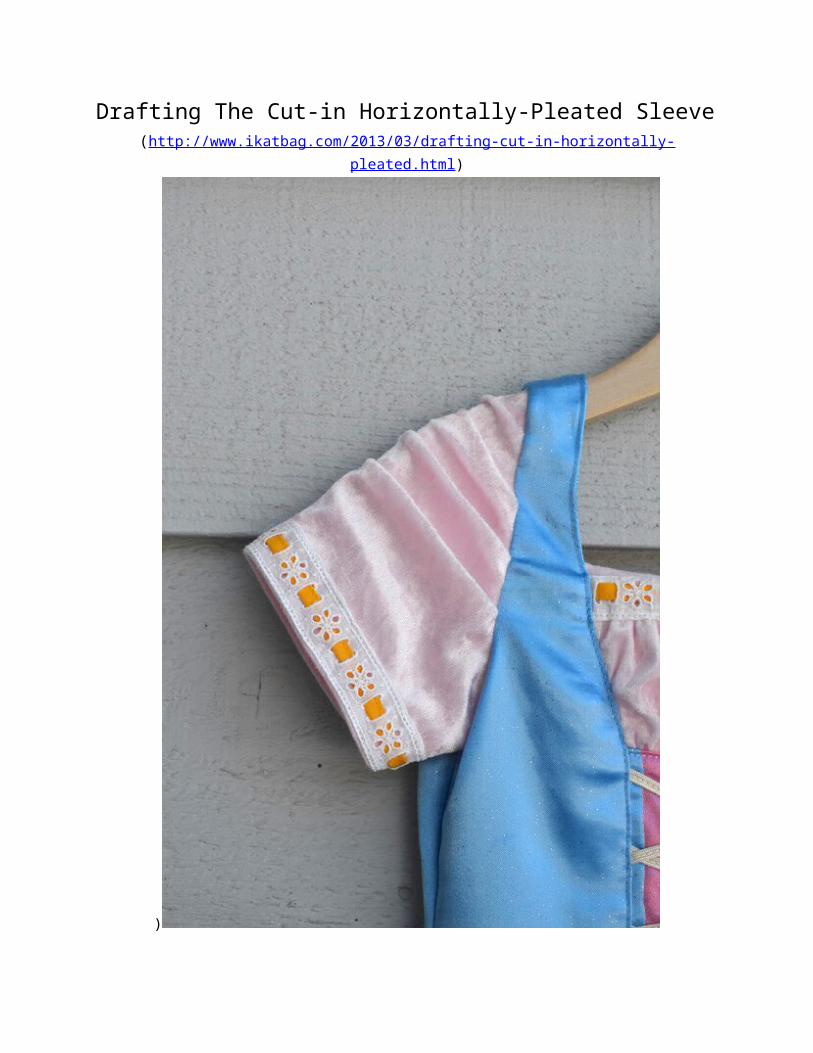
Drafting The Cut-in Horizontally-Pleated Sleeve(http://www.ikatbag.com/2013/03/drafting-cut-in-horizontally-pleated.html)
)
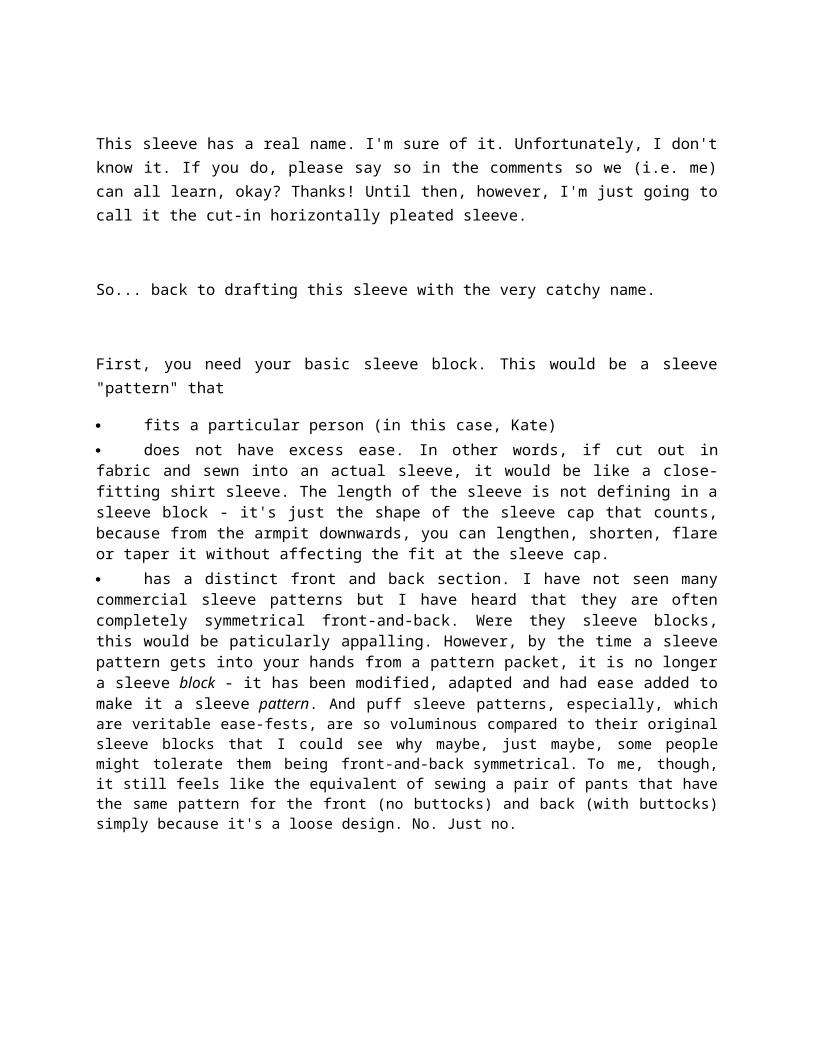
This sleeve has a real name. I'm sure of it. Unfortunately, I don't know it. If you do, please say so in the comments so we (i.e. me) can all learn, okay? Thanks! Until then, however, I'm just going to call it the cut-in horizontally pleated sleeve.
So... back to drafting this sleeve with the very catchy name.
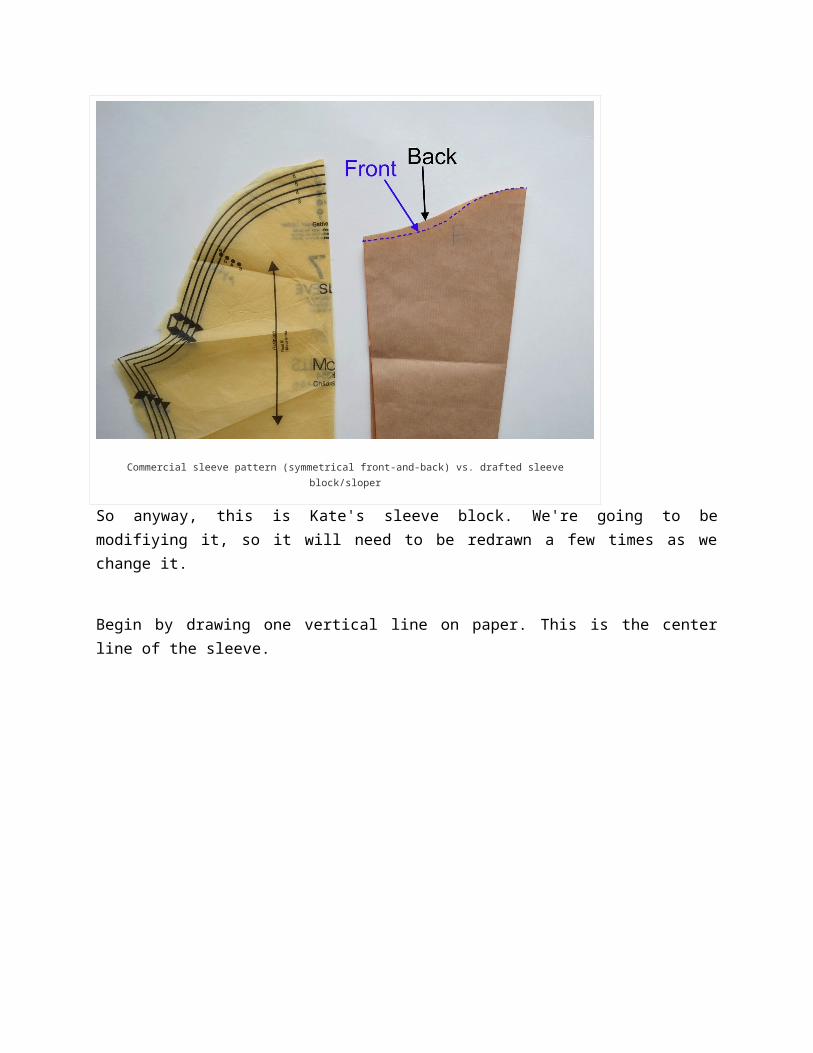
First, you need your basic sleeve block. This would be a sleeve "pattern" that
fits a particular person (in this case, Kate) does not have excess ease. In other words, if cut out in fabric and sewn into an actual sleeve, it would be like a close-fitting shirt sleeve. The length of the sleeve is not defining in a sleeve block - it's just the shape of the sleeve cap that counts, because from the armpit downwards, you can lengthen, shorten, flare or taper it without affecting the fit at the sleeve cap. has a distinct front and back section. I have not seen many commercial sleeve patterns but I have heard that they are often completely symmetrical front-and-back. Were they sleeve blocks, this would be paticularly appalling. However, by the time a sleeve pattern gets into your hands from a pattern packet, it is no longer a sleeve block - it has been modified, adapted and had ease added to make it a sleeve pattern. And puff sleeve patterns, especially, which are veritable ease-fests, are so voluminous compared to their original sleeve blocks that I could see why maybe, just maybe, some people might tolerate them being front-and-back symmetrical. To me, though, it still feels like the equivalent of sewing a pair of pants that have the same pattern for the front (no buttocks) and back (with buttocks) simply because it's a loose design. No. Just no.

Commercial sleeve pattern (symmetrical front-and-back) vs. drafted sleeve block/sloper
So anyway, this is Kate's sleeve block. We're going to be modifiying it, so it will need to be redrawn a few times as we change it.
Begin by drawing one vertical line on paper. This is the center line of the sleeve.
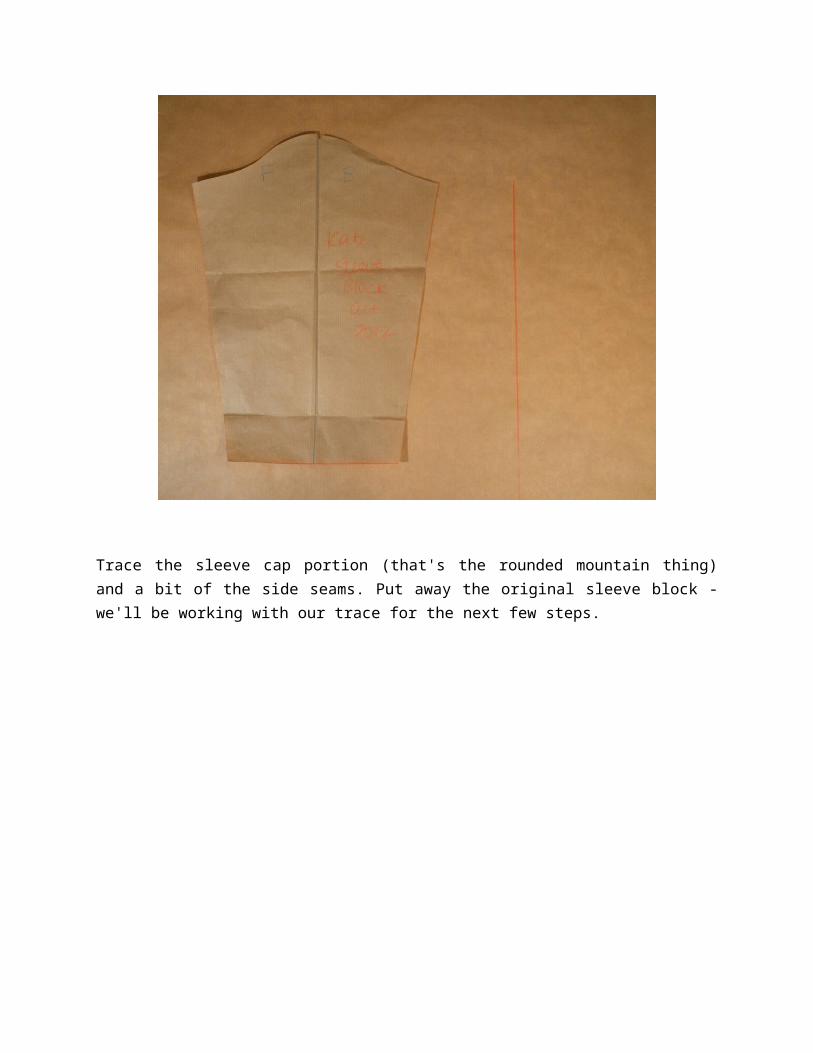
Trace the sleeve cap portion (that's the rounded mountain thing) and a bit of the side seams. Put away the original sleeve block - we'll be working with our trace for the next few steps.
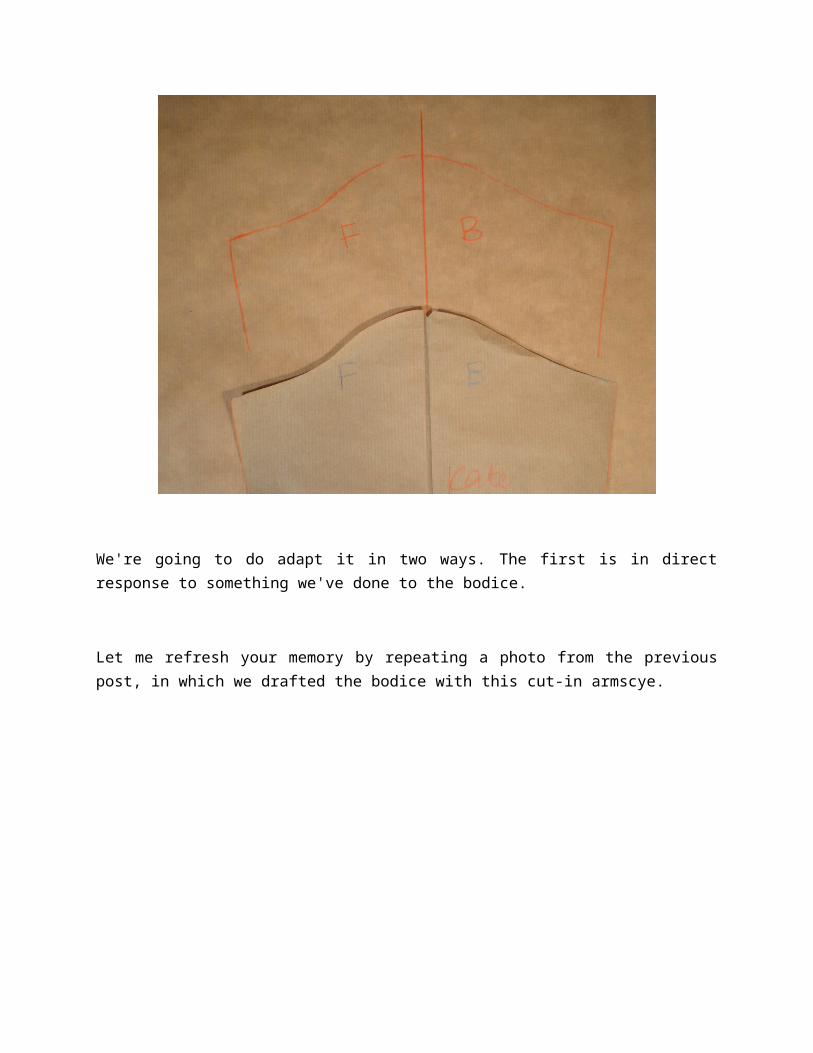
We're going to do adapt it in two ways. The first is in direct response to something we've done to the bodice.
Let me refresh your memory by repeating a photo from the previous post, in which we drafted the bodice with this cut-in armscye.
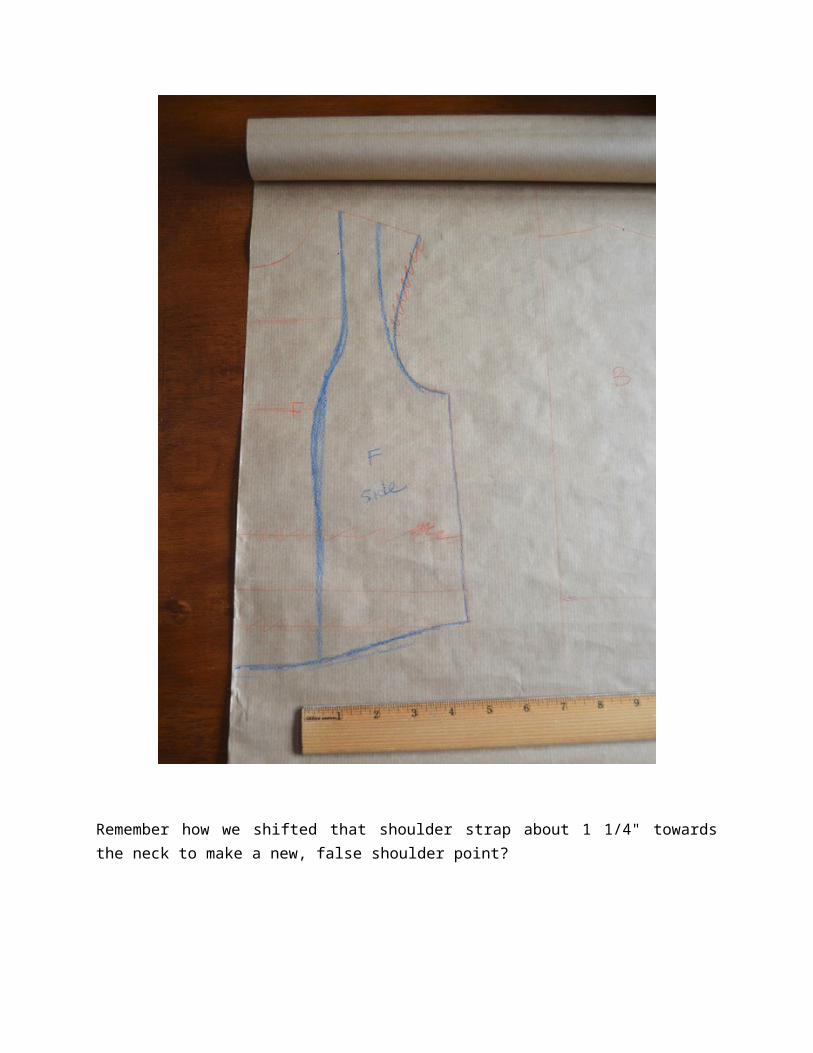
Remember how we shifted that shoulder strap about 1 1/4" towards the neck to make a new, false shoulder point?
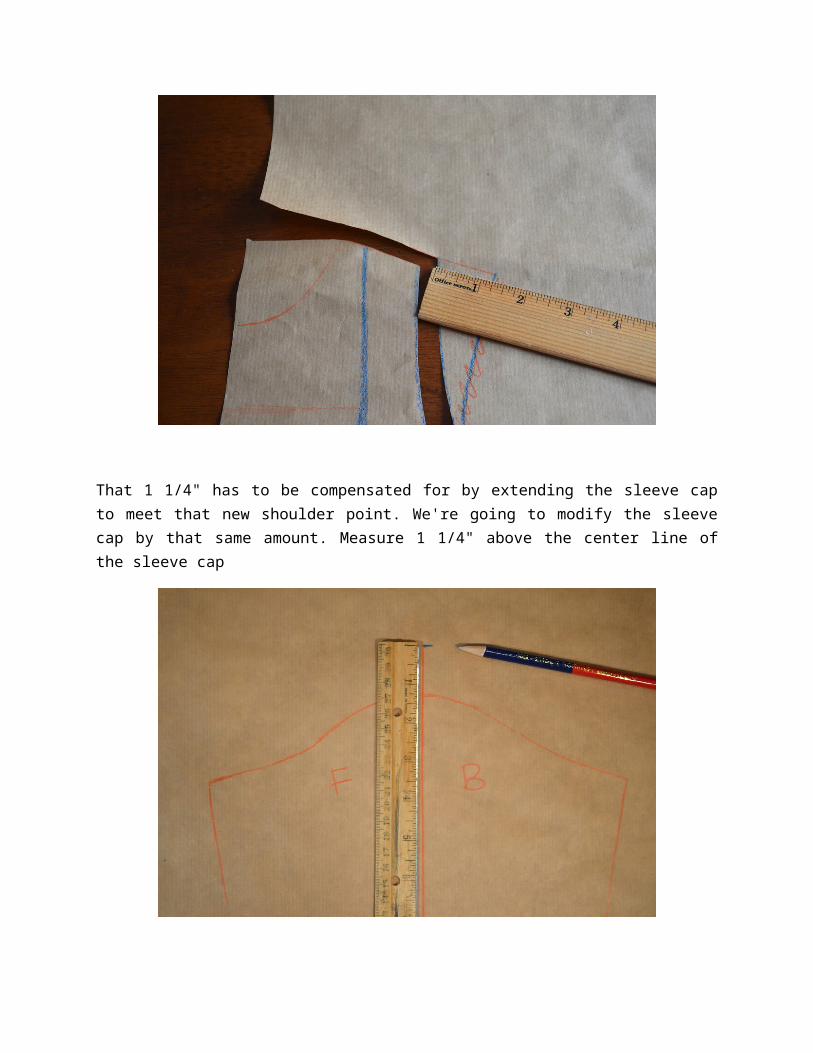
That 1 1/4" has to be compensated for by extending the sleeve cap to meet that new shoulder point. We're going to modify the sleeve cap by that same amount. Measure 1 1/4" above the center line of the sleeve cap
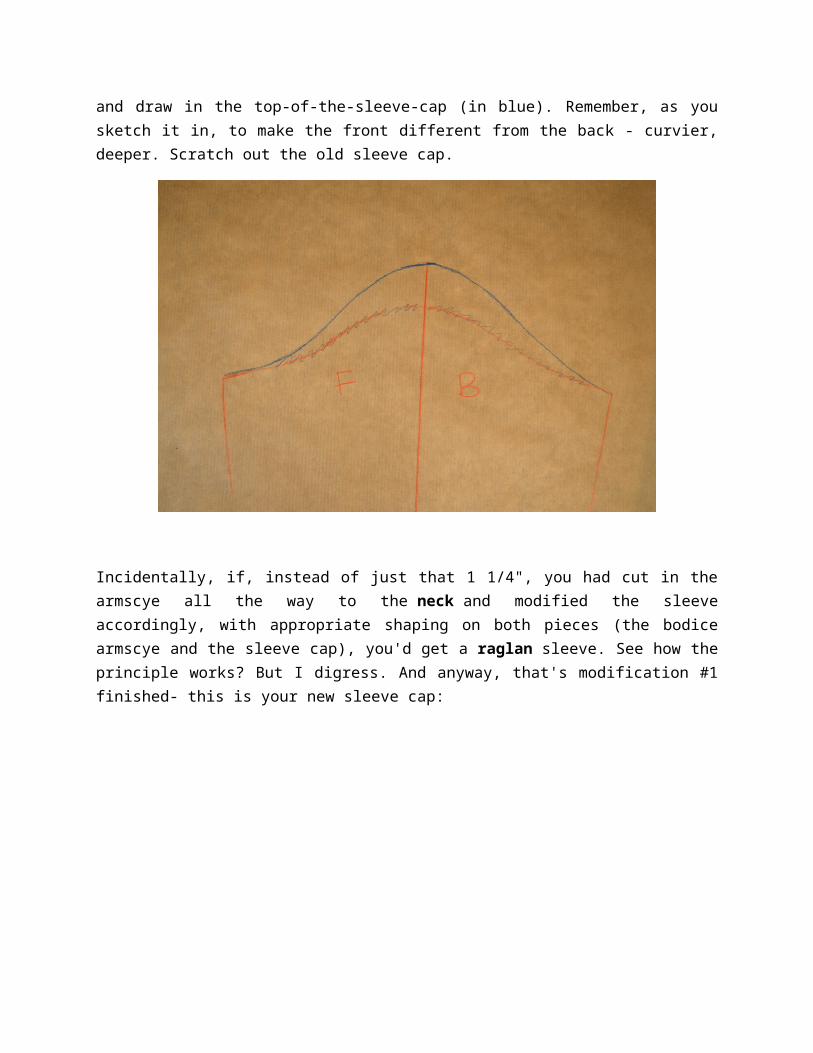
and draw in the top-of-the-sleeve-cap (in blue). Remember, as you sketch it in, to make the front different from the back - curvier, deeper. Scratch out the old sleeve cap.
Incidentally, if, instead of just that 1 1/4", you had cut in the armscye all the way to the neck and modified the sleeve accordingly, with appropriate shaping on both pieces (the bodice armscye and the sleeve cap), you'd get a raglan sleeve. See how the principle works? But I digress. And anyway, that's modification #1 finished- this is your new sleeve cap:
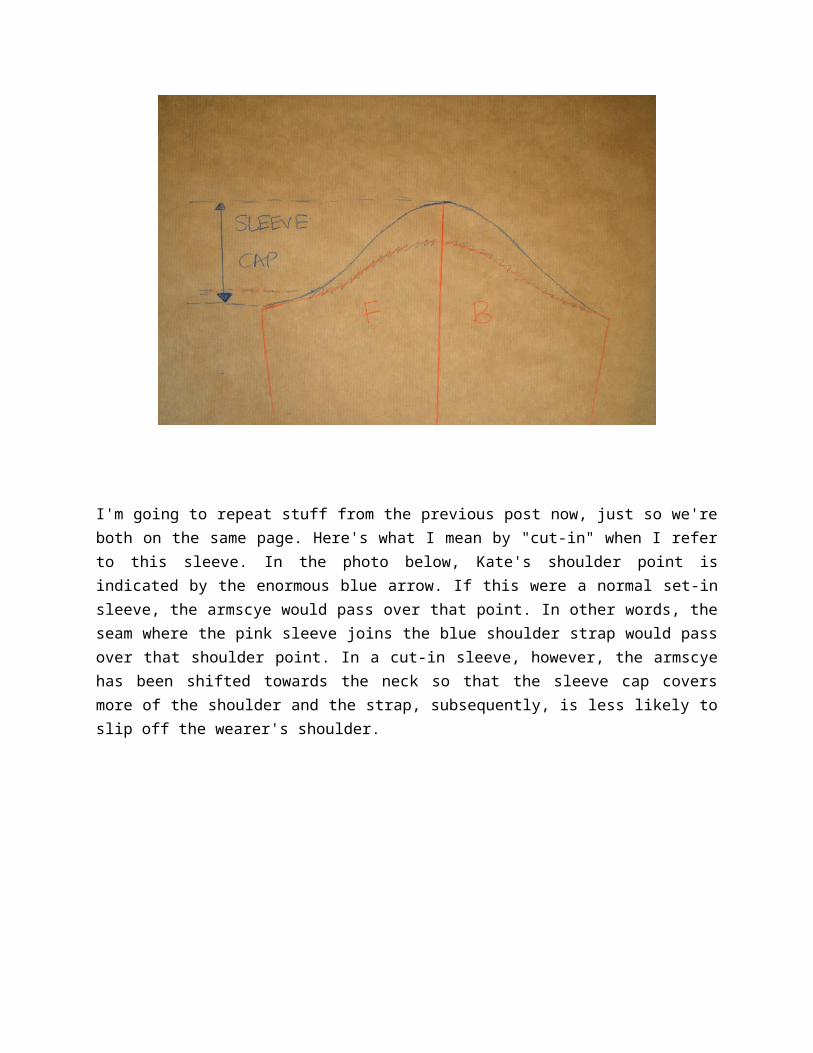
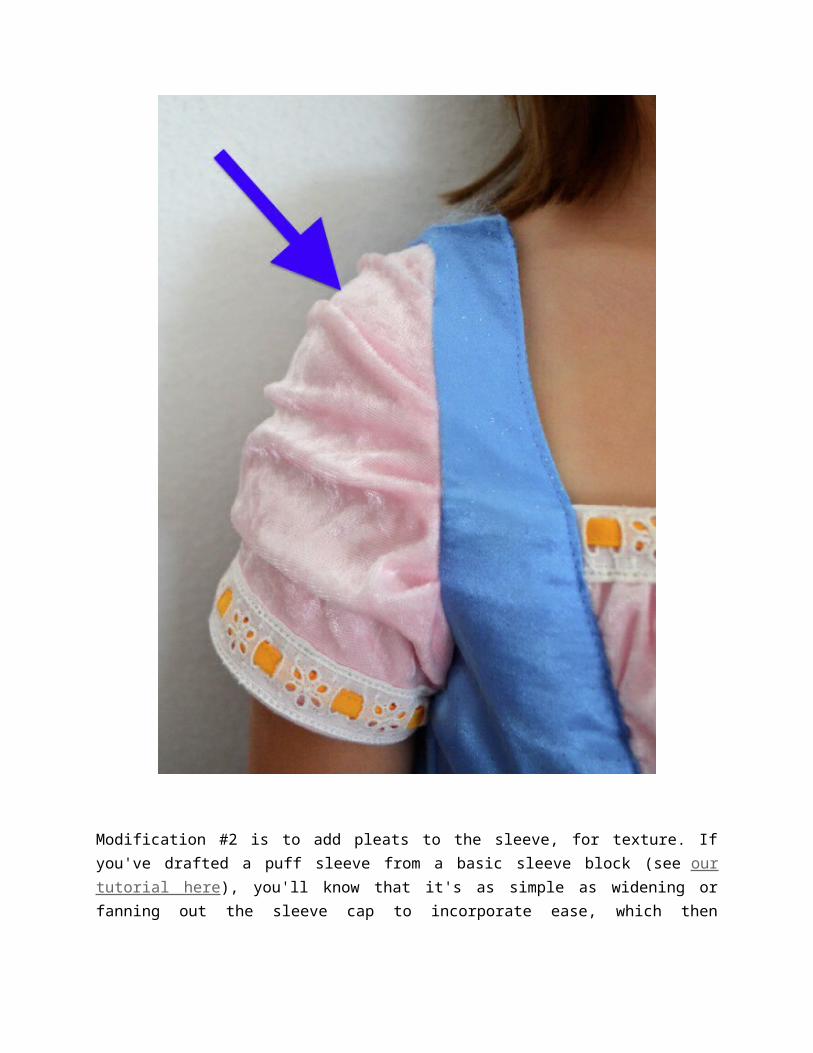
I'm going to repeat stuff from the previous post now, just so we're both on the same page. Here's what I mean by "cut-in" when I refer to this sleeve. In the photo below, Kate's shoulder point is indicated by the enormous blue arrow. If this were a normal set-in sleeve, the armscye would pass over that point. In other words, the seam where the pink sleeve joins the blue shoulder strap would pass over that shoulder point. In a cut-in sleeve, however, the armscye has been shifted towards the neck so that the sleeve cap covers more of the shoulder and the strap, subsequently, is less likely to slip off the wearer's shoulder.
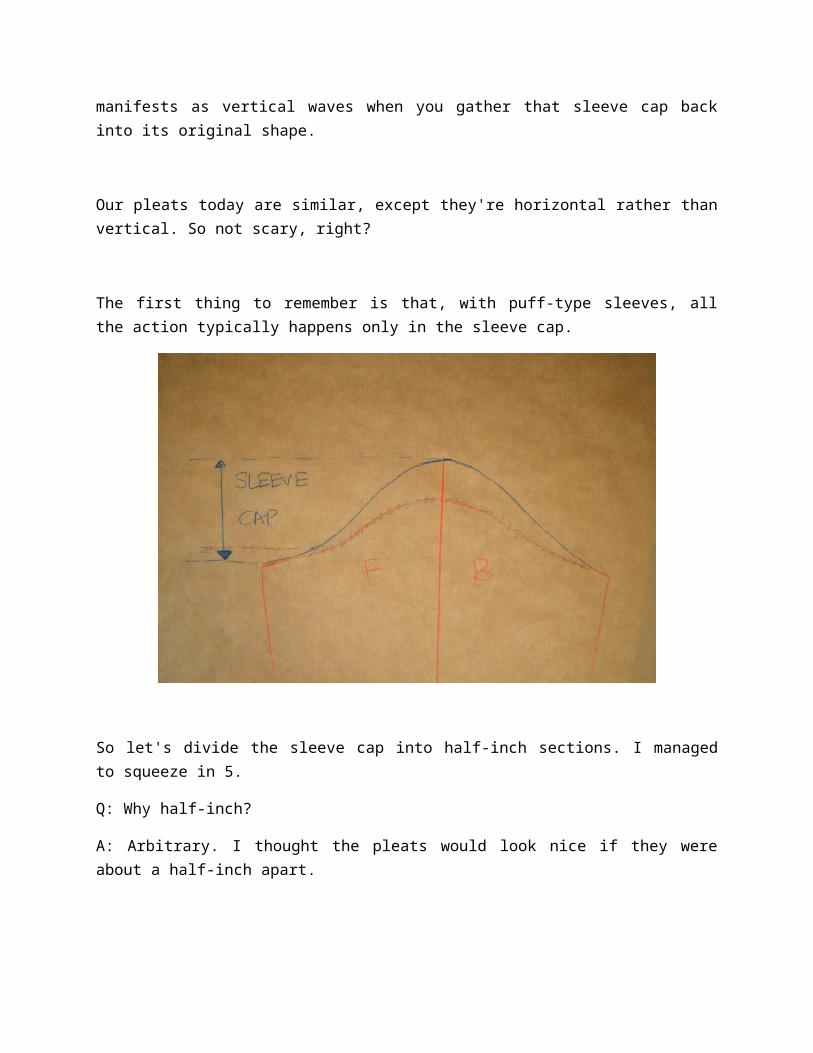
Modification #2 is to add pleats to the sleeve, for texture. If you've drafted a puff sleeve from a basic sleeve block (see our tutorial here), you'll know that it's as simple as widening or fanning out the sleeve cap to incorporate ease, which then manifests as vertical waves when you gather that sleeve cap back into its original shape.
Our pleats today are similar, except they're horizontal rather than vertical. So not scary, right?
The first thing to remember is that, with puff-type sleeves, all the action typically happens only in the sleeve cap.
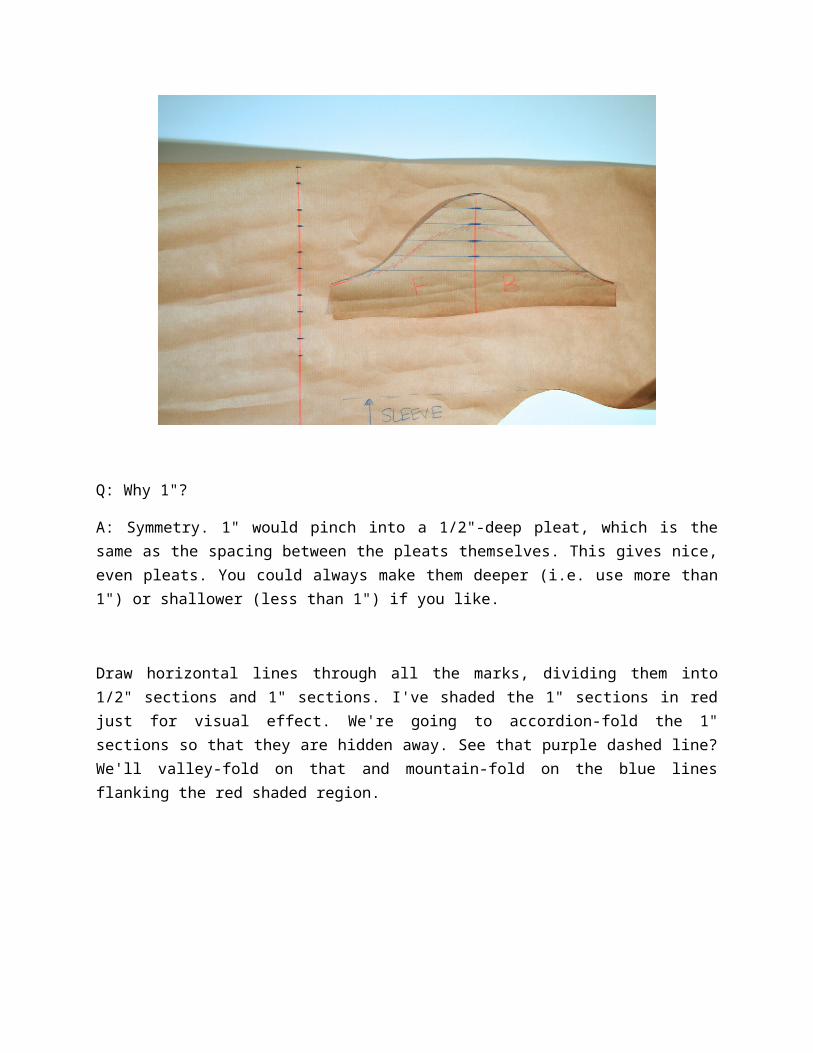
So let's divide the sleeve cap into half-inch sections. I managed to squeeze in 5.
Q: Why half-inch?
A: Arbitrary. I thought the pleats would look nice if they were about a half-inch apart.
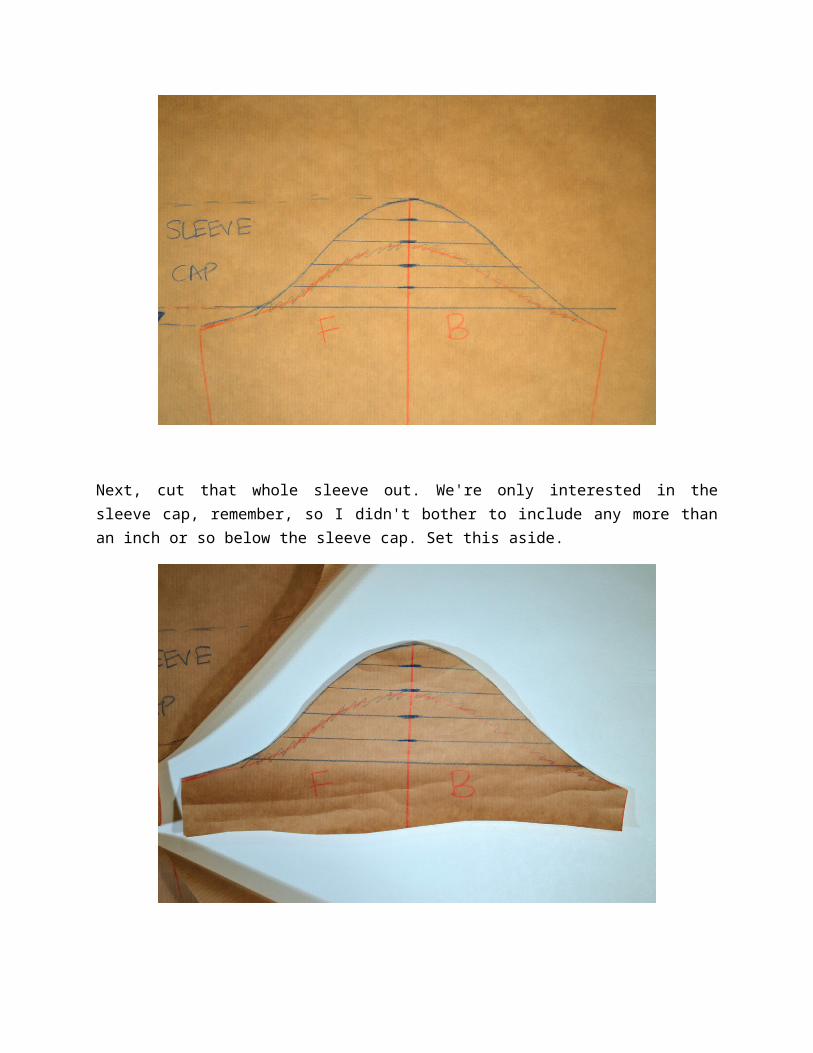
Next, cut that whole sleeve out. We're only interested in the sleeve cap, remember, so I didn't bother to include any more than an inch or so below the sleeve cap. Set this aside.
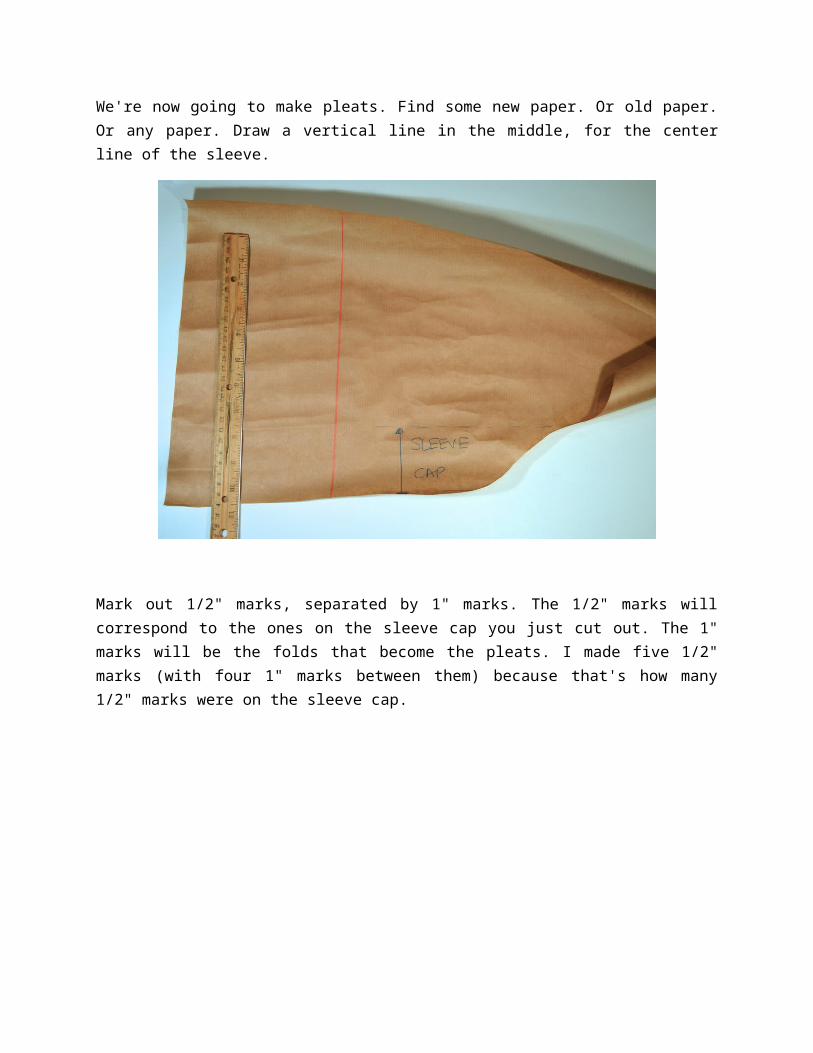
We're now going to make pleats. Find some new paper. Or old paper. Or any paper. Draw a vertical line in the middle, for the center line of the sleeve.
Mark out 1/2" marks, separated by 1" marks. The 1/2" marks will correspond to the ones on the sleeve cap you just cut out. The 1" marks will be the folds that become the pleats. I made five 1/2" marks (with four 1" marks between them) because that's how many 1/2" marks were on the sleeve cap.
Q: Why 1"?
A: Symmetry. 1" would pinch into a 1/2"-deep pleat, which is the same as the spacing between the pleats themselves. This gives nice, even pleats. You could always make them deeper (i.e. use more than 1") or shallower (less than 1") if you like.
Draw horizontal lines through all the marks, dividing them into 1/2" sections and 1" sections. I've shaded the 1" sections in red just for visual effect. We're going to accordion-fold the 1" sections so that they are hidden away. See that purple dashed line? We'll valley-fold on that and mountain-fold on the blue lines flanking the red shaded region.
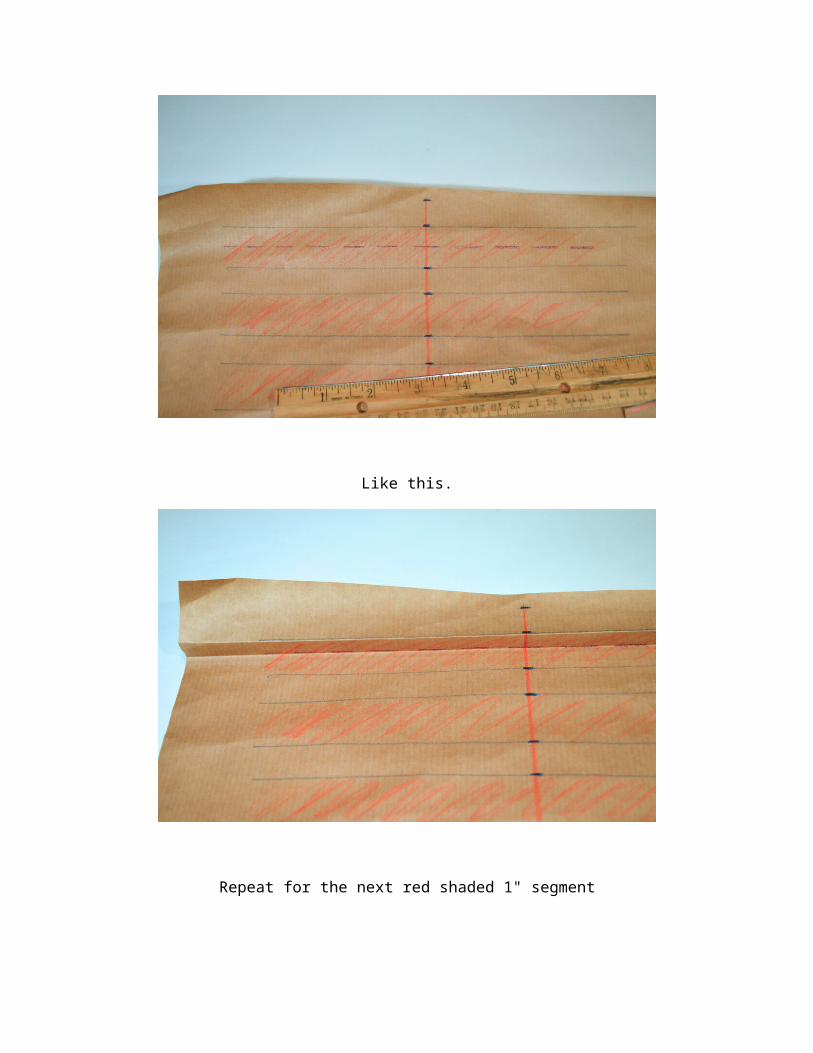
Like this.
Repeat for the next red shaded 1" segment
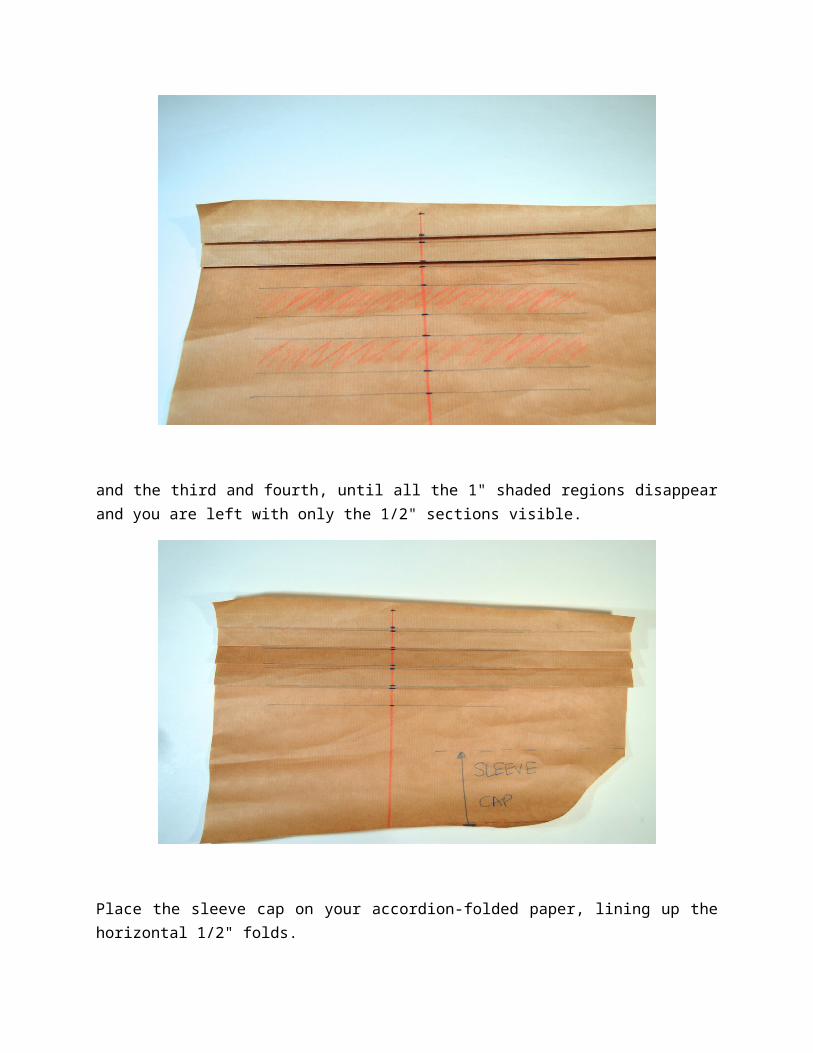
and the third and fourth, until all the 1" shaded regions disappear and you are left with only the 1/2" sections visible.
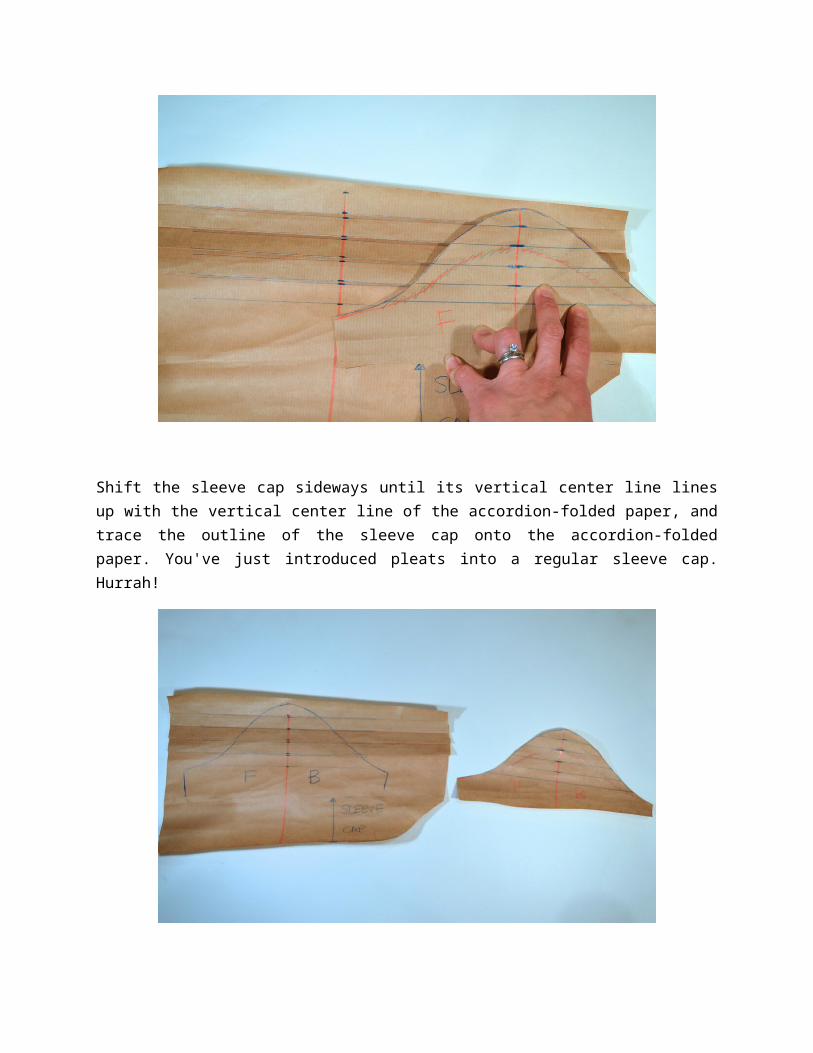
Place the sleeve cap on your accordion-folded paper, lining up the horizontal 1/2" folds.
Shift the sleeve cap sideways until its vertical center line lines up with the vertical center line of the accordion-folded paper, and trace the outline of the sleeve cap onto the accordion-folded paper. You've just introduced pleats into a regular sleeve cap. Hurrah!
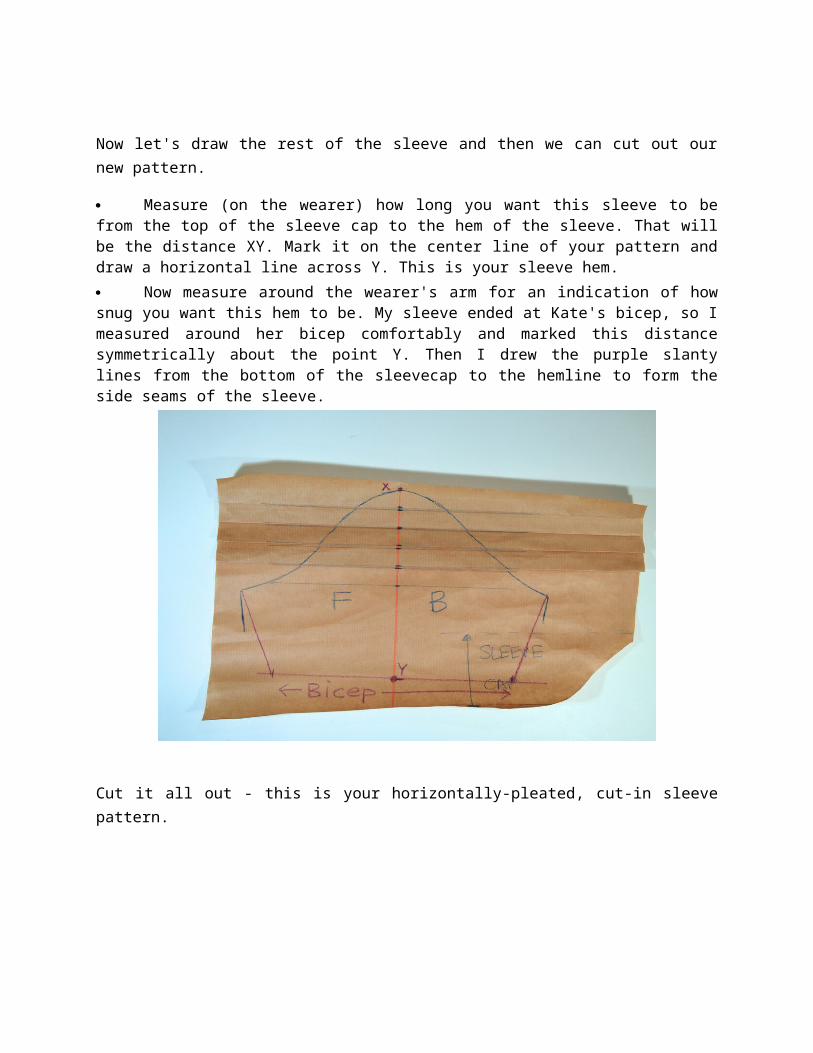
Now let's draw the rest of the sleeve and then we can cut out our new pattern.
Measure (on the wearer) how long you want this sleeve to be from the top of the sleeve cap to the hem of the sleeve. That will be the distance XY. Mark it on the center line of your pattern and draw a horizontal line across Y. This is your sleeve hem. Now measure around the wearer's arm for an indication of how snug you want this hem to be. My sleeve ended at Kate's bicep, so I measured around her bicep comfortably and marked this distance symmetrically about the point Y. Then I drew the purple slanty lines from the bottom of the sleevecap to the hemline to form the side seams of the sleeve.
Cut it all out - this is your horizontally-pleated, cut-in sleeve pattern.
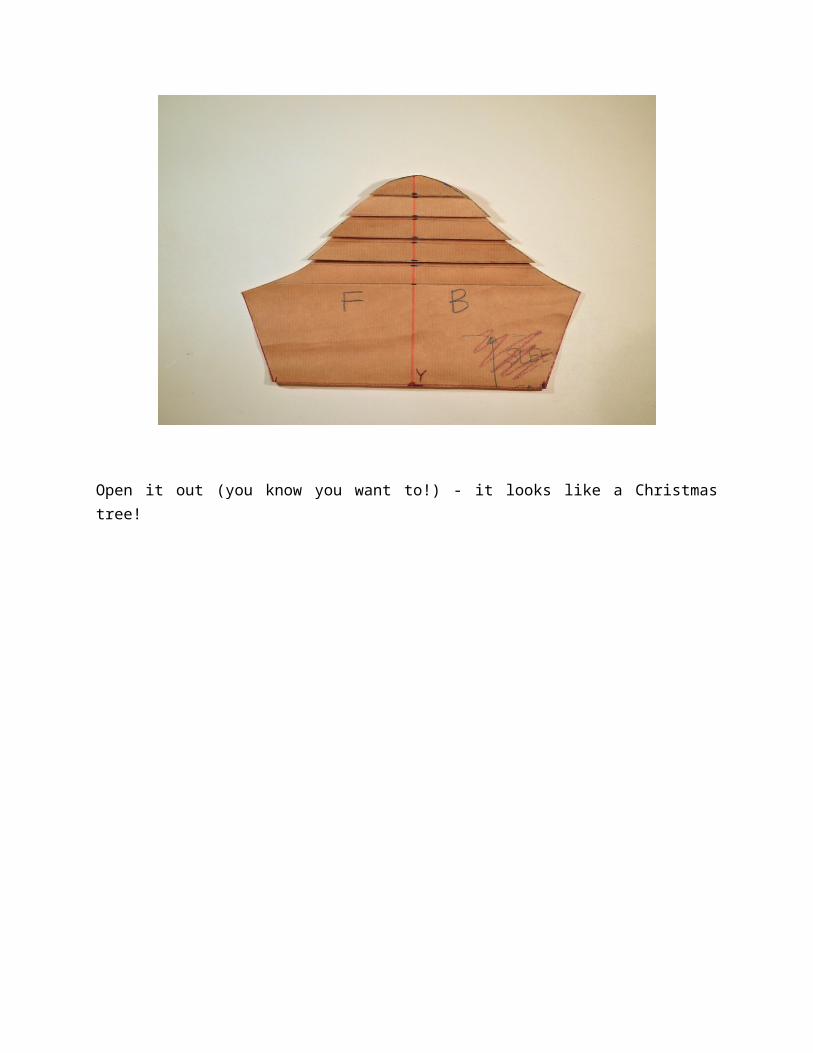
Open it out (you know you want to!) - it looks like a Christmas tree!
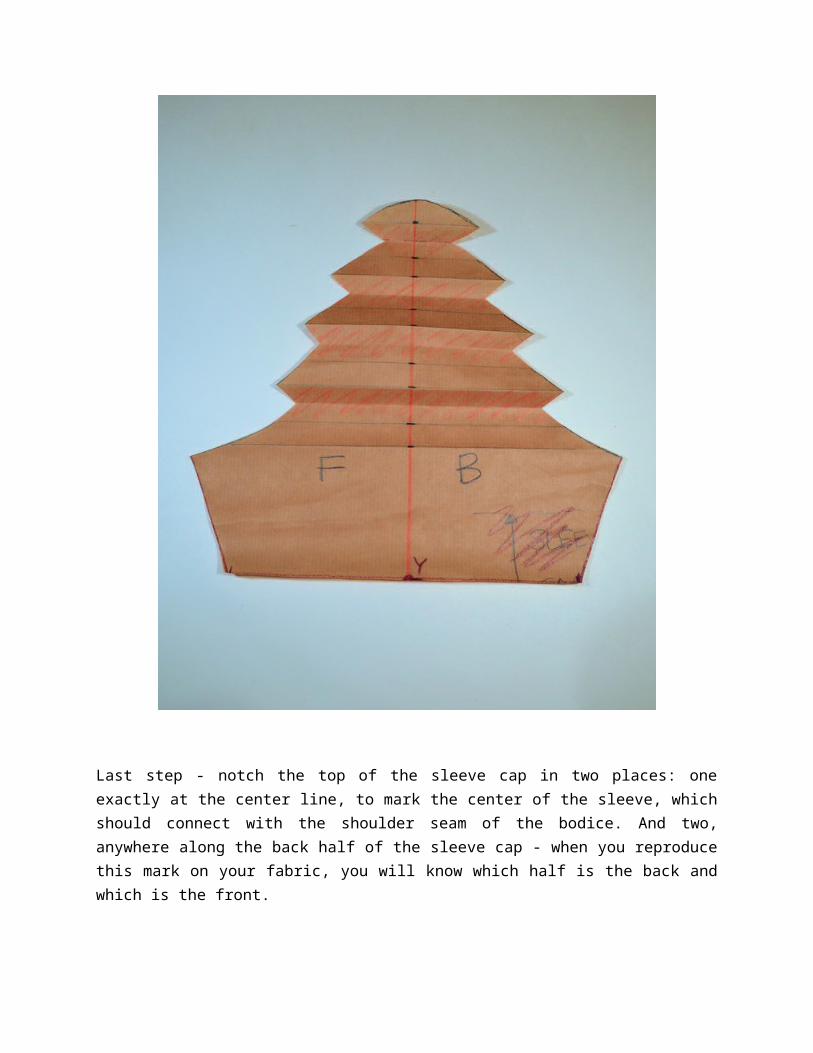
Last step - notch the top of the sleeve cap in two places: one exactly at the center line, to mark the center of the sleeve, which should connect with the shoulder seam of the bodice. And two, anywhere along the back half of the sleeve cap - when you reproduce this mark on your fabric, you will know which half is the back and which is the front.
Lay this unfolded pattern on your fabric and cut around it, adding seam allowances. The zigzag sides look unearthly but when you pleat your fabric and baste the pleats down, it will look correct:
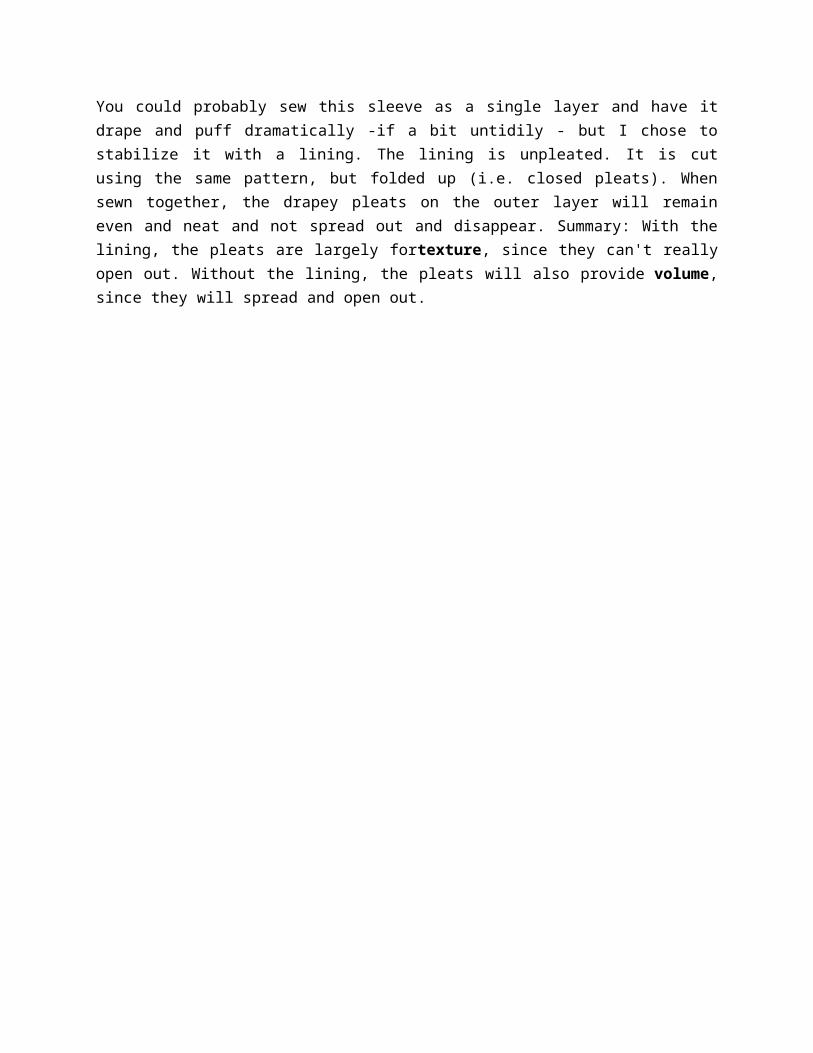
You could probably sew this sleeve as a single layer and have it drape and puff dramatically -if a bit untidily - but I chose to stabilize it with a lining. The lining is unpleated. It is cut using the same pattern, but folded up (i.e. closed pleats). When sewn together, the drapey pleats on the outer layer will remain even and neat and not spread out and disappear. Summary: With the lining, the pleats are largely fortexture, since they can't really open out. Without the lining, the pleats will also provide volume, since they will spread and open out.
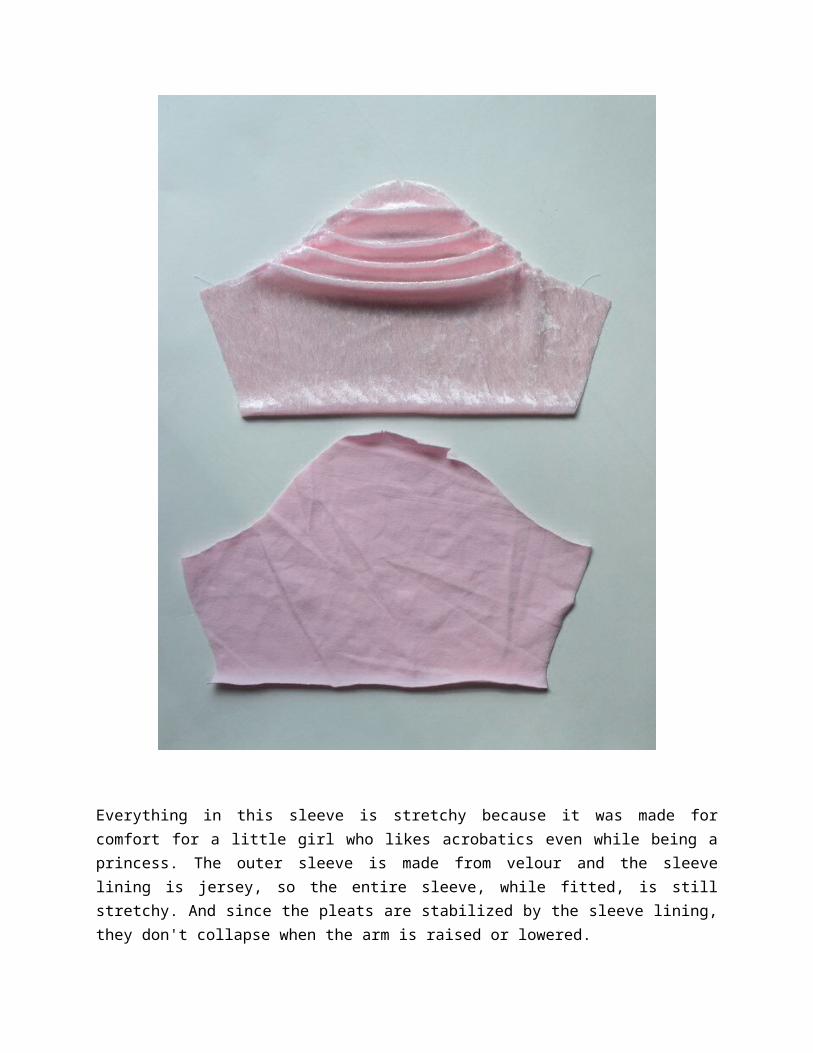
Everything in this sleeve is stretchy because it was made for comfort for a little girl who likes acrobatics even while being a princess. The outer sleeve is made from velour and the sleeve lining is jersey, so the entire sleeve, while fitted, is still stretchy. And since the pleats are stabilized by the sleeve lining, they don't collapse when the arm is raised or lowered.
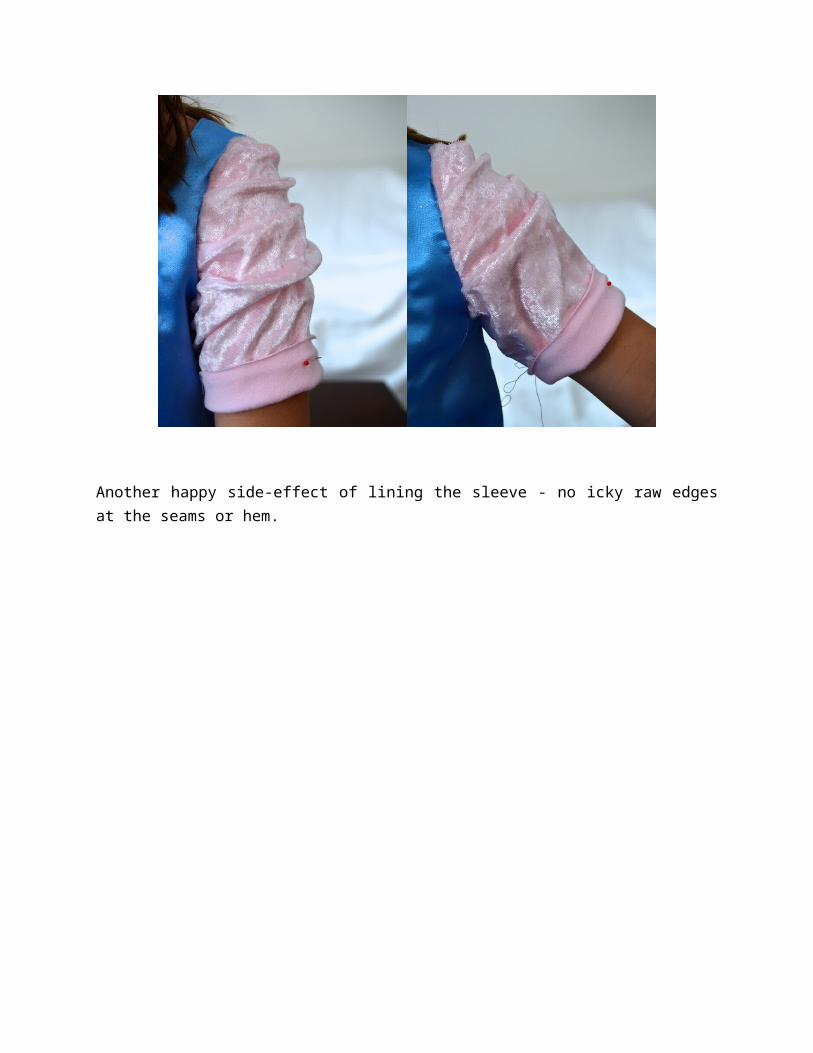
Another happy side-effect of lining the sleeve - no icky raw edges at the seams or hem.

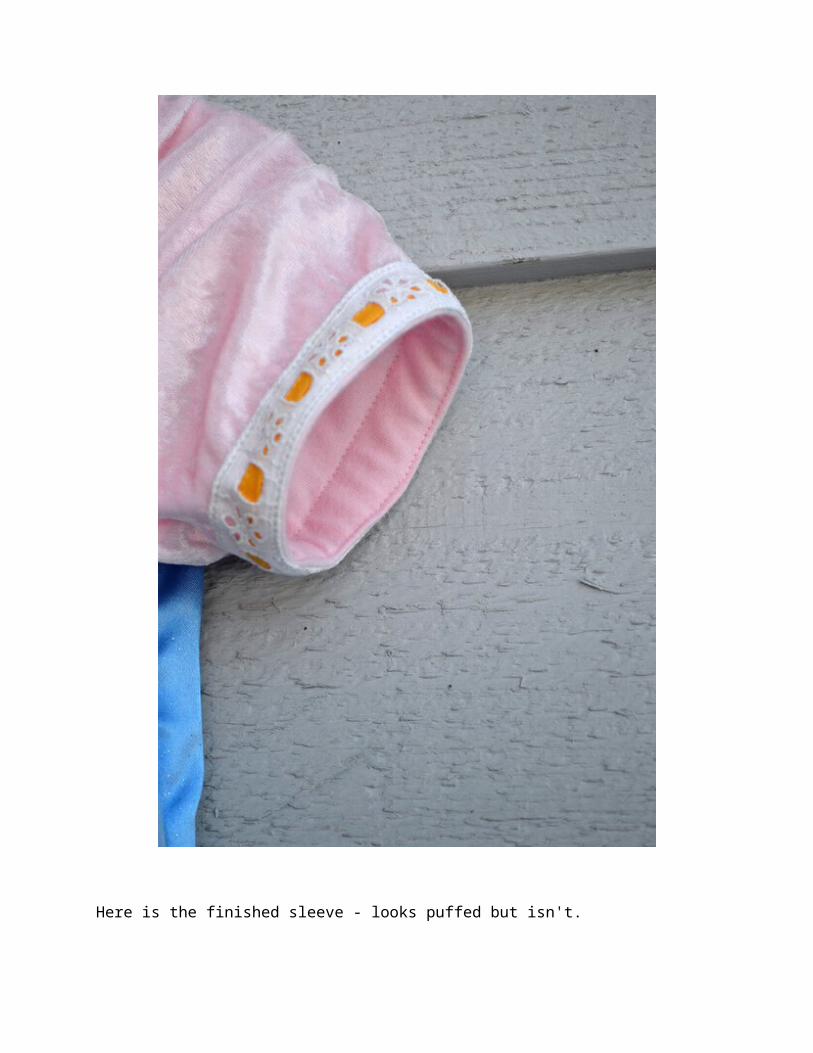
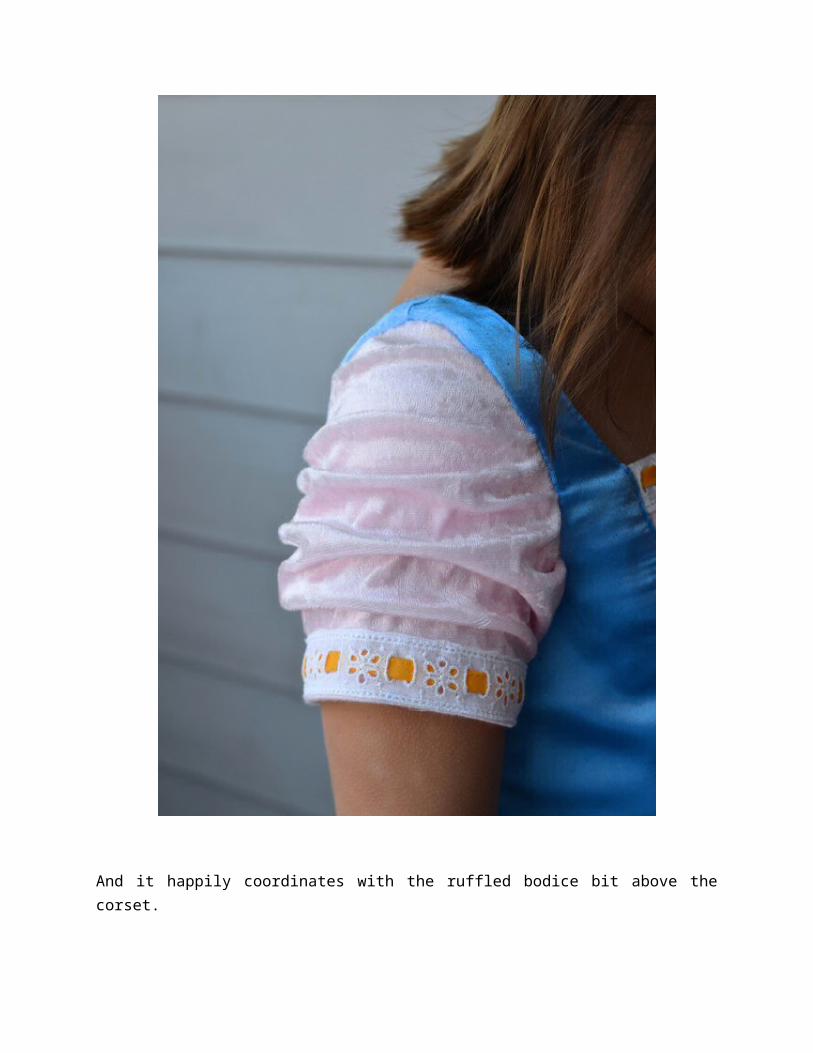
Here is the finished sleeve - looks puffed but isn't.
And it happily coordinates with the ruffled bodice bit above the corset.
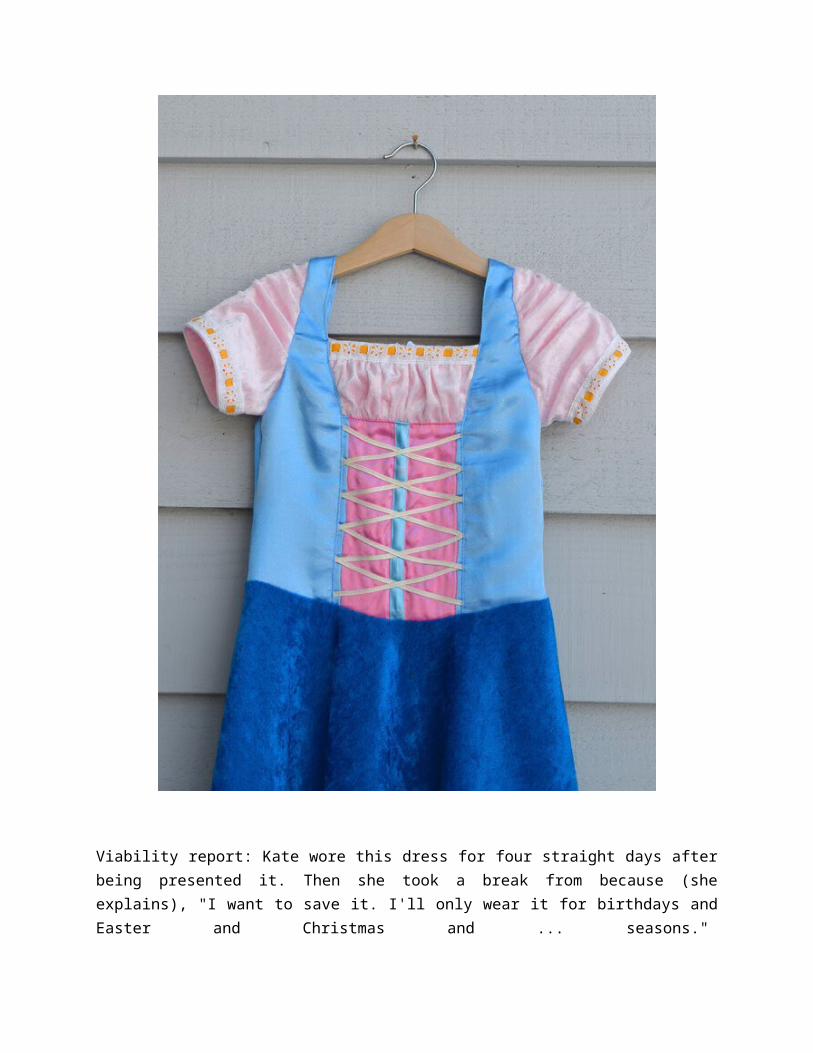
Viability report: Kate wore this dress for four straight days after being presented it. Then she took a break from because (she explains), "I want to save it. I'll only wear it for birthdays and Easter and Christmas and ... seasons."
I hope Halloween counts as a "season" because, if so, I've finished her costume 7 months in advance. Unheard of!
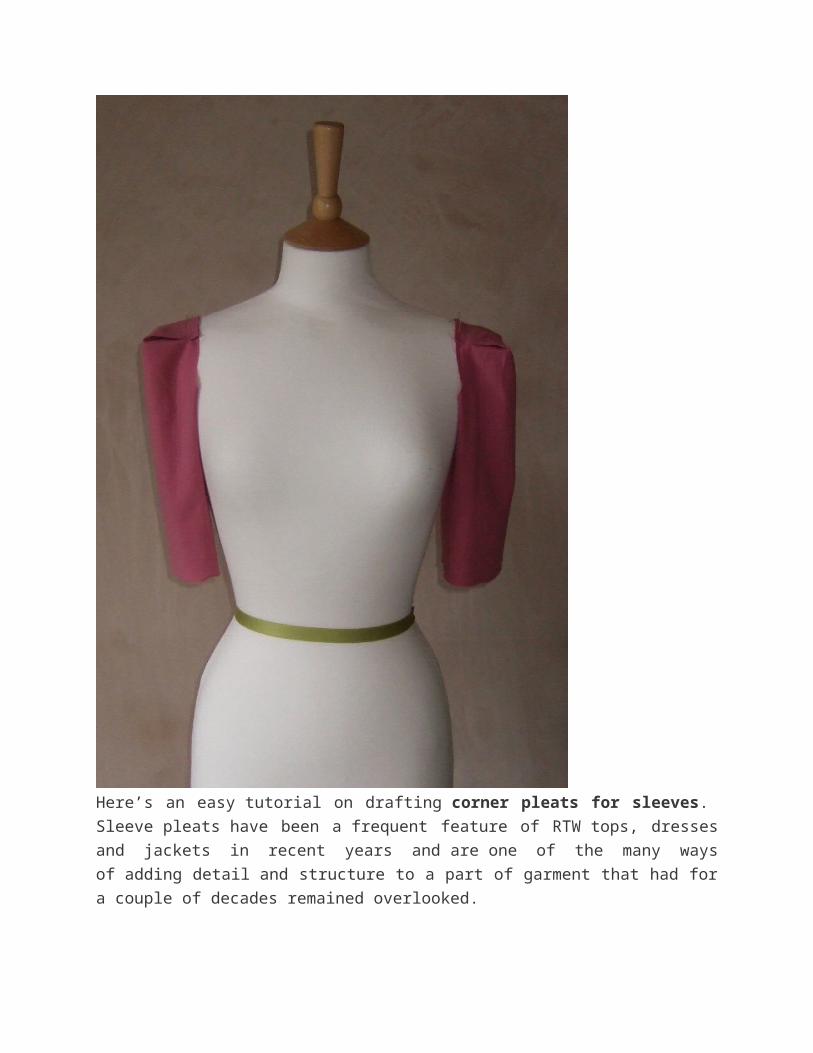
Status Sleeves, cont’d (http://www.sew2pro.com/tag/corner-
pleat-sleeve/)
Here’s an easy tutorial on drafting corner pleats for sleeves.
Sleeve pleats have been a frequent feature of RTW tops, dresses and jackets
in recent years and are one of the many ways of adding detail and structure
to a part of garment that had for a couple of decades remained overlooked.
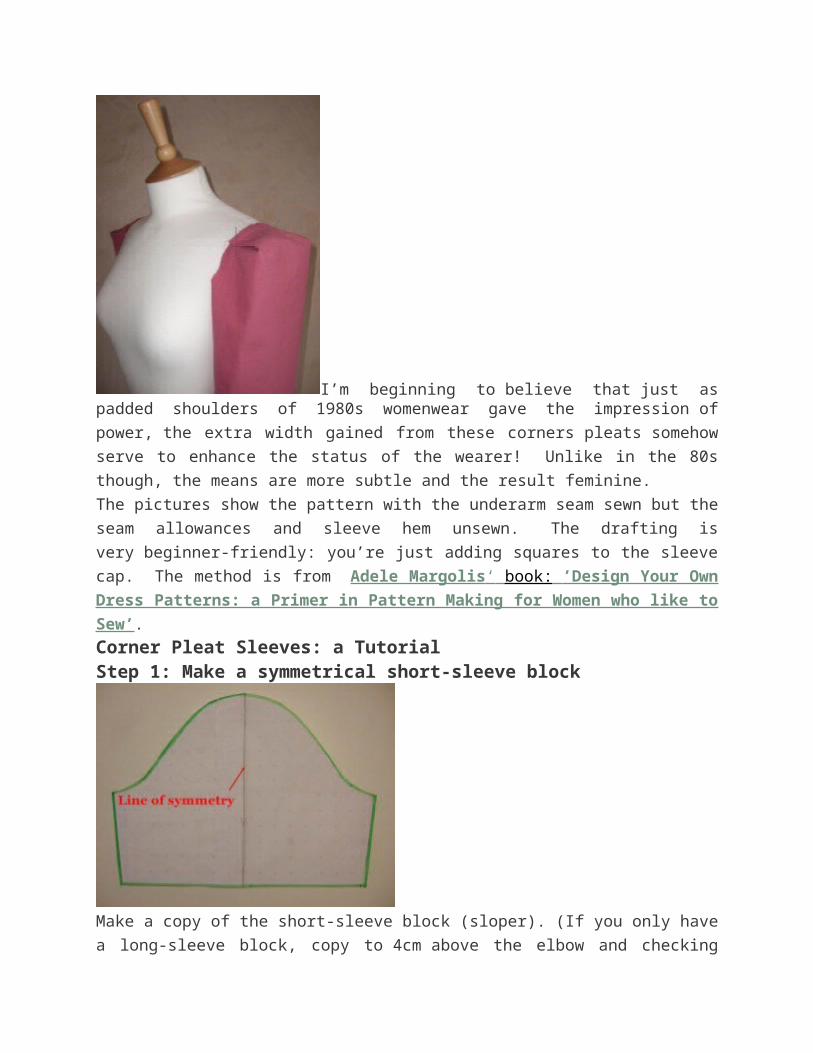
I’m beginning to believe that just as padded shoulders of 1980s womenwear gave the impression of power, the extra
width gained from these corners pleats somehow serve to enhance the
status of the wearer! Unlike in the 80s though, the means are more subtle
and the result feminine.
The pictures show the pattern with the underarm seam sewn but the seam
allowances and sleeve hem unsewn. The drafting is very beginner-friendly:
you’re just adding squares to the sleeve cap. The method is from Adele
Margolis ‘ book: ’Design Your Own Dress Patterns: a Primer in Pattern
Making for Women who like to Sew’.
Corner Pleat Sleeves: a TutorialStep 1: Make a symmetrical short-sleeve block
Make a copy of the short-sleeve block (sloper). (If you only have a long-
sleeve block, copy to 4cm above the elbow and checking your upper arm
measurement, ensure you have about 5cm of ease around the bicep.) Fold
at the centre and trim so the front and back of sleeve (left and right of centre
line) are symmetrical.
Yes, with this baby, it won’t matter if you put the sleeve in back to front!
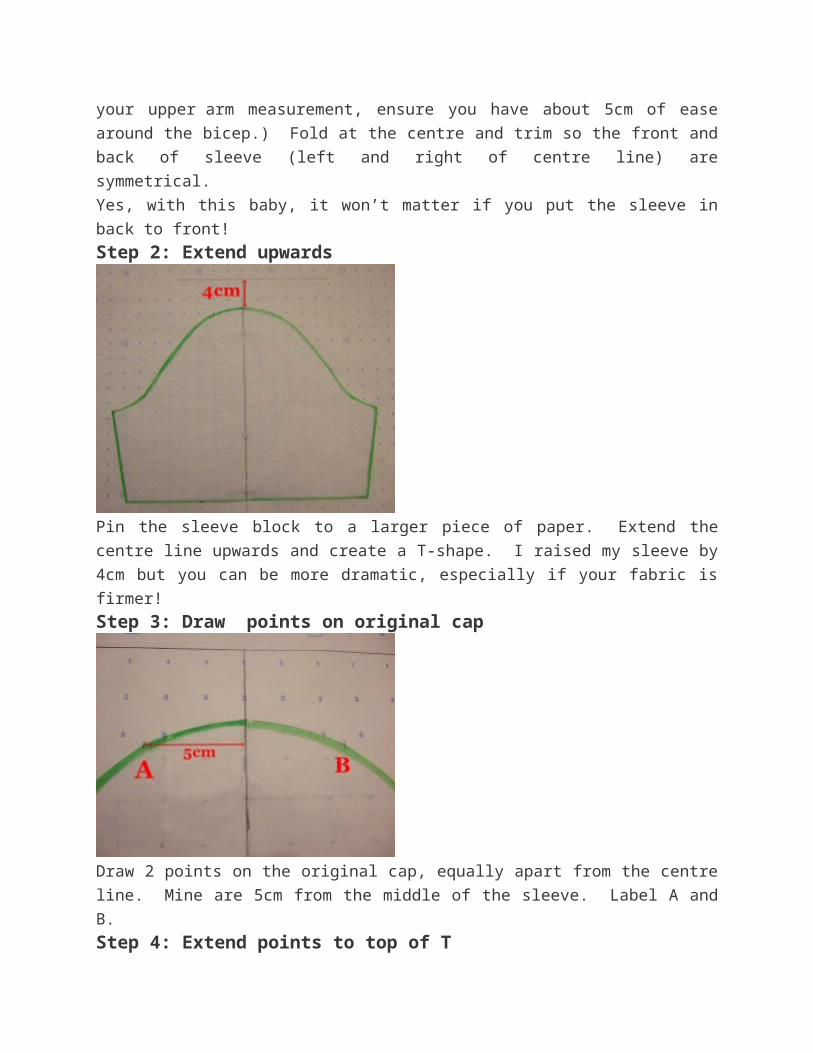
Step 2: Extend upwards
Pin the sleeve block to a larger piece of paper. Extend the centre line
upwards and create a T-shape. I raised my sleeve by 4cm but you can be
more dramatic, especially if your fabric is firmer!
Step 3: Draw points on original cap
Draw 2 points on the original cap, equally apart from the centre line. Mine
are 5cm from the middle of the sleeve. Label A and B.
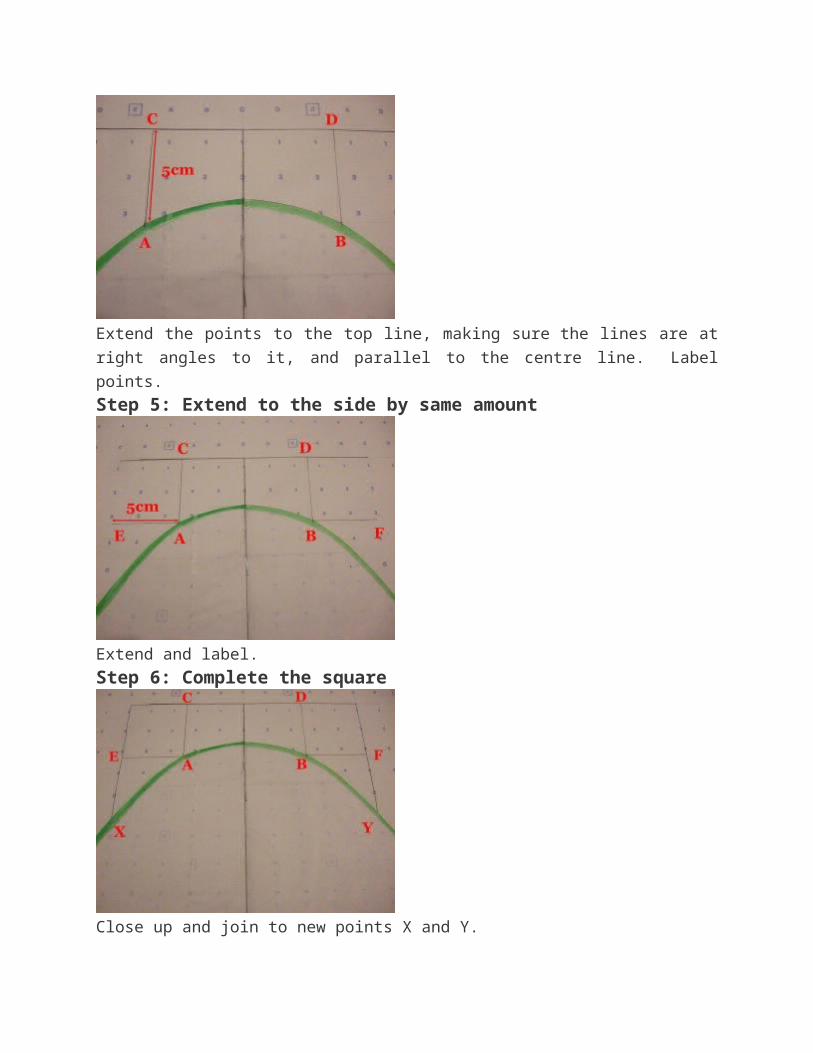
Step 4: Extend points to top of T
Extend the points to the top line, making sure the lines are at right angles to
it, and parallel to the centre line. Label points.
Step 5: Extend to the side by same amount
Extend and label.

Step 6: Complete the square
Close up and join to new points X and Y.
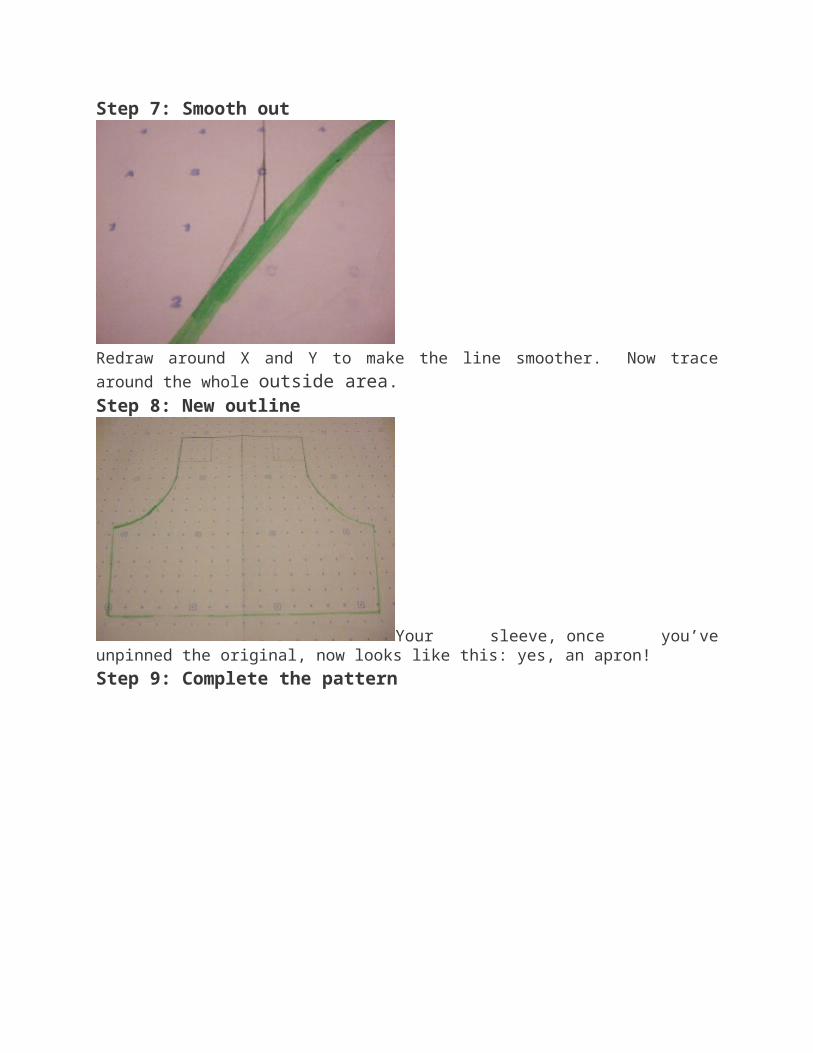
Step 7: Smooth out
Redraw around X and Y to make the line smoother. Now trace around the
whole outside area.Step 8: New outline
Your sleeve, once you’ve unpinned the original, now looks like this: yes, an apron!
Step 9: Complete the pattern
Add seam allowances, grainline, fold instructions (that is, the four points to each pleat square) and knotches.
As there are no balance lines, when it comes to attaching the sleeve to the
bodice, pin to the shoulder seam first then to underarm sleeve. The rest
should fit without tucks or gathers.
Step 10: Making upTo make the sleeve from your fabric, fold C to E and D to F. The fold should
stop at points A and B. Baste along the armscye.
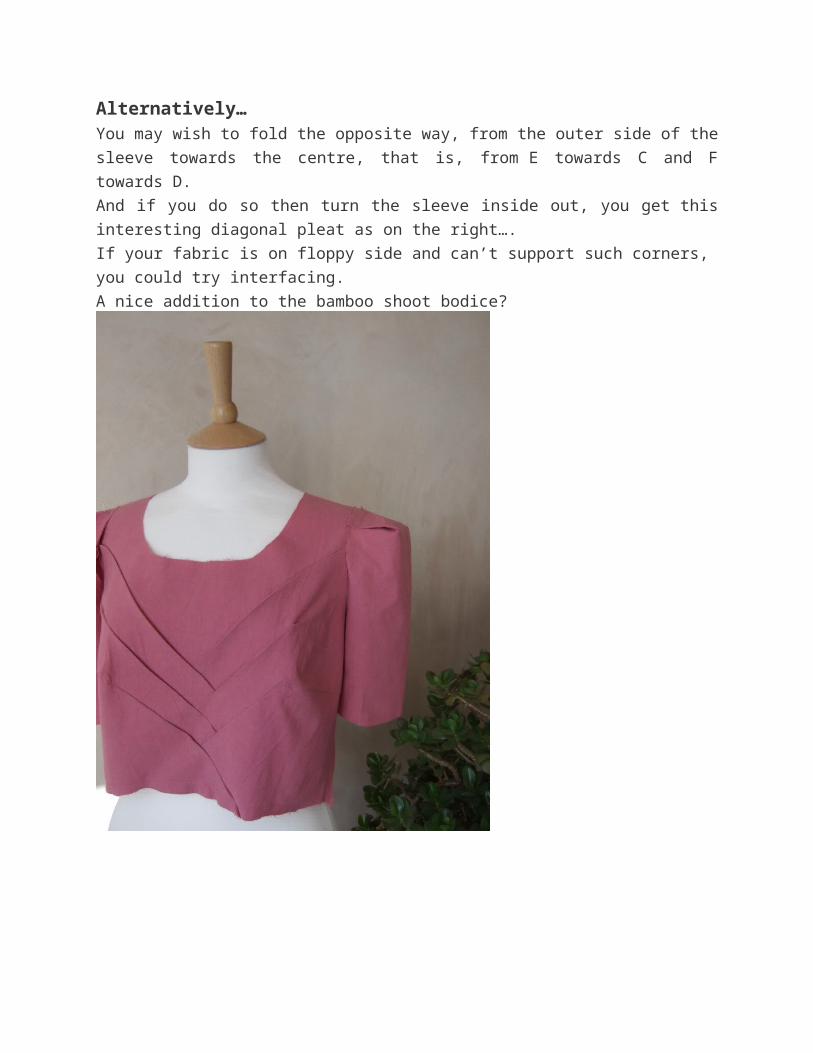
Alternatively…You may wish to fold the opposite way, from the outer side of the sleeve
towards the centre, that is, from E towards C and F towards D.
And if you do so then turn the sleeve inside out, you get this interesting
diagonal pleat as on the right….
If your fabric is on floppy side and can’t support such corners, you could try
interfacing.
A nice addition to the bamboo shoot bodice?
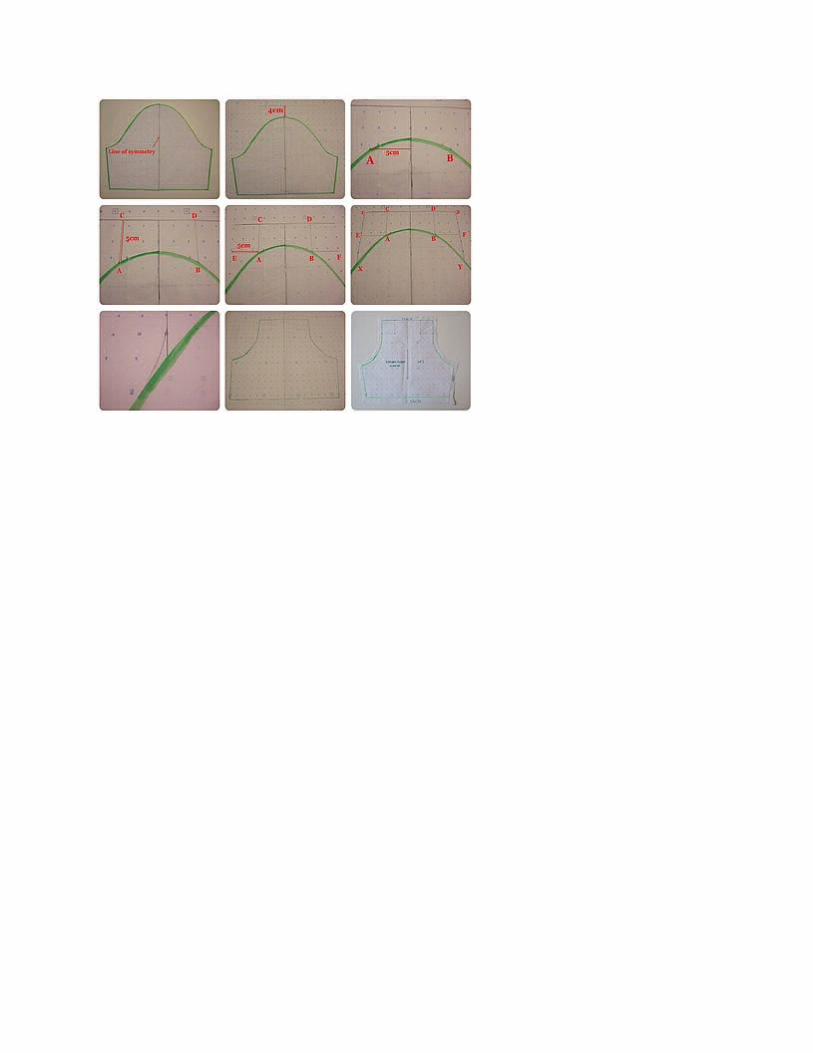
Making a Half Wrap Sleeve: like Legolas (http://www.alleycatscratch.com/lotr/PatternMod/Sleeve/HalfWrap.htm)
Note: there are more details specific to Legolas sleeves over in the character section. These include both how to create the wraps from draping and some more info on making to half-wrap sleeve.
The basic sleeve pattern First lay out the sleeve pattern that you will use with the body of the garment and prepare to trace it. You could either use tracing paper (or anything you can see through) laid on top of the piece, or cut the pattern out on the cutting lines and lay it on top of paper (opened out grocery bags, whatever) and draw around it.
A) Top of Sleeve Cap
Note, double notch designates the back of the sleeve and the single notch the front of the sleeve for all diagrams on this page.
You are going to make two pattern pieces copied/traced from the original sleeve pattern -- a front and a back. First make the front piece by tracing along the front of the sleeve (where the single notch is) down the sleeve as long as you want it to be, and then curve up to the mid-point on the back indicated by the pattern.
A) Sleeve Cap of frontF) Front pieceU) Underarm Seam of front
Then make the back piece by tracing along the back of the sleeve (double notch side) and curving up to the mid point on the front. Don't forget to transfer the top center marks.
A2) Sleeve Cap of backB) Back pieceU2) Underarm seam of back
Sew the underarm seam first, then baste the two pieces together so the back wraps to the front and lays over it, making sure the top centers match.
A) Sleeve Cap of frontA2) Sleeve Cap of backB) Back pieceF) Front pieceU/U2) Underarm seam joined
* note: Back piece wraps to Front
From there on, treat it as one piece and sew it into the armscye.
A/A2) Sleeve CapsB) Back piece wrapped over frontF) Front piece beneath Back piece
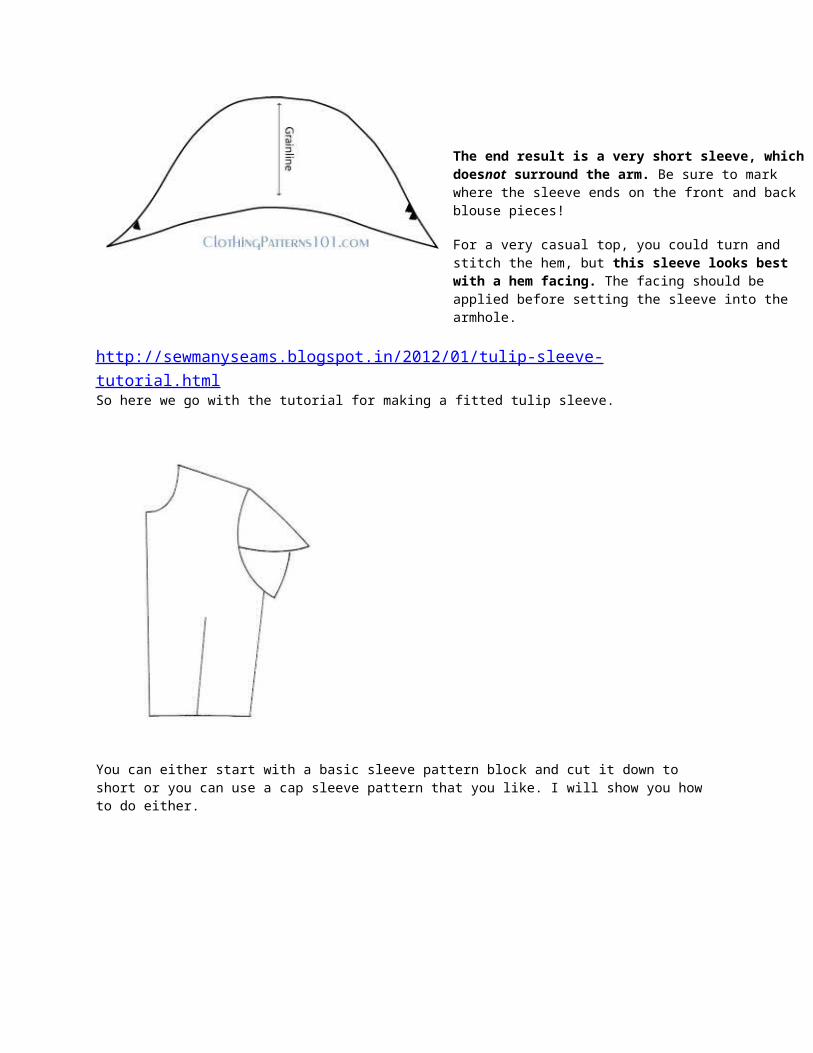
http://www.clothingpatterns101.com/cap-sleeve.html
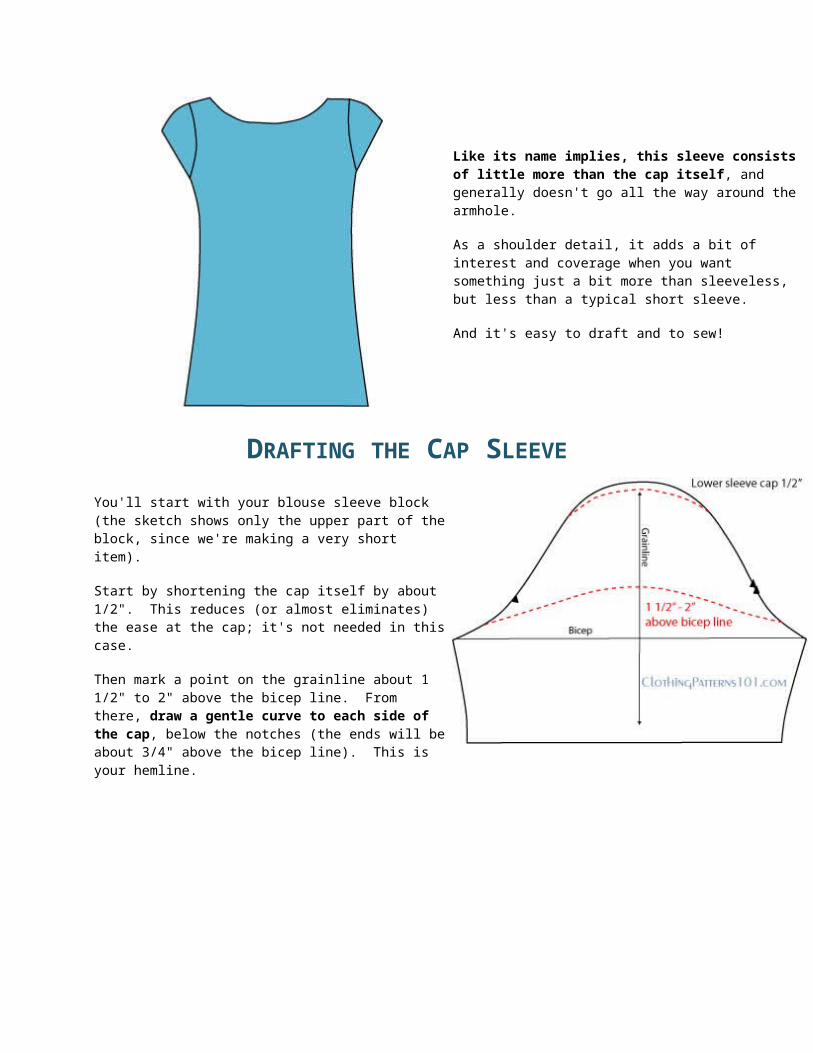
Like its name implies, this sleeve consists of little more than the cap itself, and generally doesn't go all the way around the armhole.
As a shoulder detail, it adds a bit of interest and coverage when you want something just a bit more than sleeveless, but less than a typical short sleeve.
And it's easy to draft and to sew!

DRAFTING THE CAP SLEEVE
You'll start with your blouse sleeve block (the sketch shows only the upper part of the block, since we're making a very short item).
Start by shortening the cap itself by about 1/2". This reduces (or almost eliminates) the ease at the cap; it's not needed in this case.
Then mark a point on the grainline about 1 1/2" to 2" above the bicep line. From there, draw a gentle curve to each side of the cap, below the notches (the ends will be about 3/4" above the bicep line). This is your hemline.
The end result is a very short sleeve, which doesnot surround the arm. Be sure to mark where the sleeve ends on the front and back blouse pieces!
For a very casual top, you could turn and stitch the hem, but this sleeve looks best with a hem facing. The facing should be applied before setting the sleeve into the armhole.
http://sewmanyseams.blogspot.in/2012/01/tulip-sleeve-tutorial.htmlSo here we go with the tutorial for making a fitted tulip sleeve.
You can either start with a basic sleeve pattern block and cut it down to short or you can use a cap sleeve pattern that you like. I will show you how to do either.
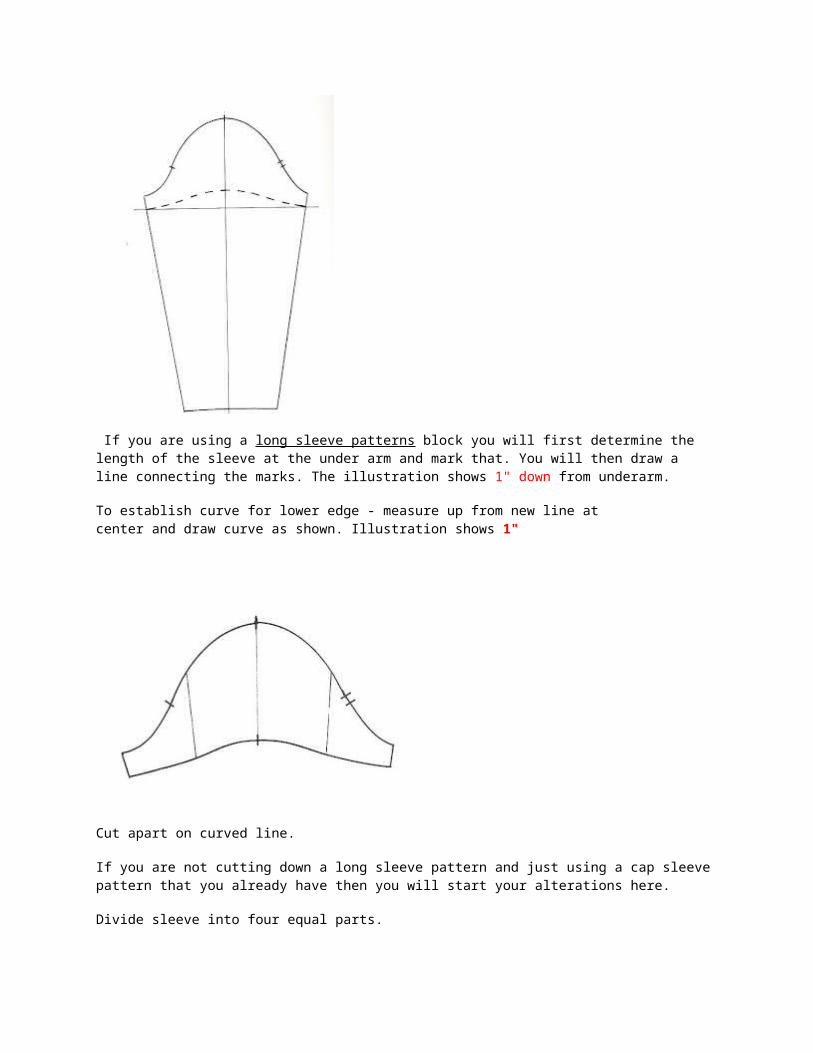
If you are using a long sleeve patterns block you will first determine the length of the sleeve at the under arm and mark that. You will then draw a line connecting the marks. The illustration shows 1" down from underarm.
To establish curve for lower edge - measure up from new line at center and draw curve as shown. Illustration shows 1"
Cut apart on curved line.
If you are not cutting down a long sleeve pattern and just using a cap sleeve pattern that you already have then you will start your alterations here.
Divide sleeve into four equal parts.
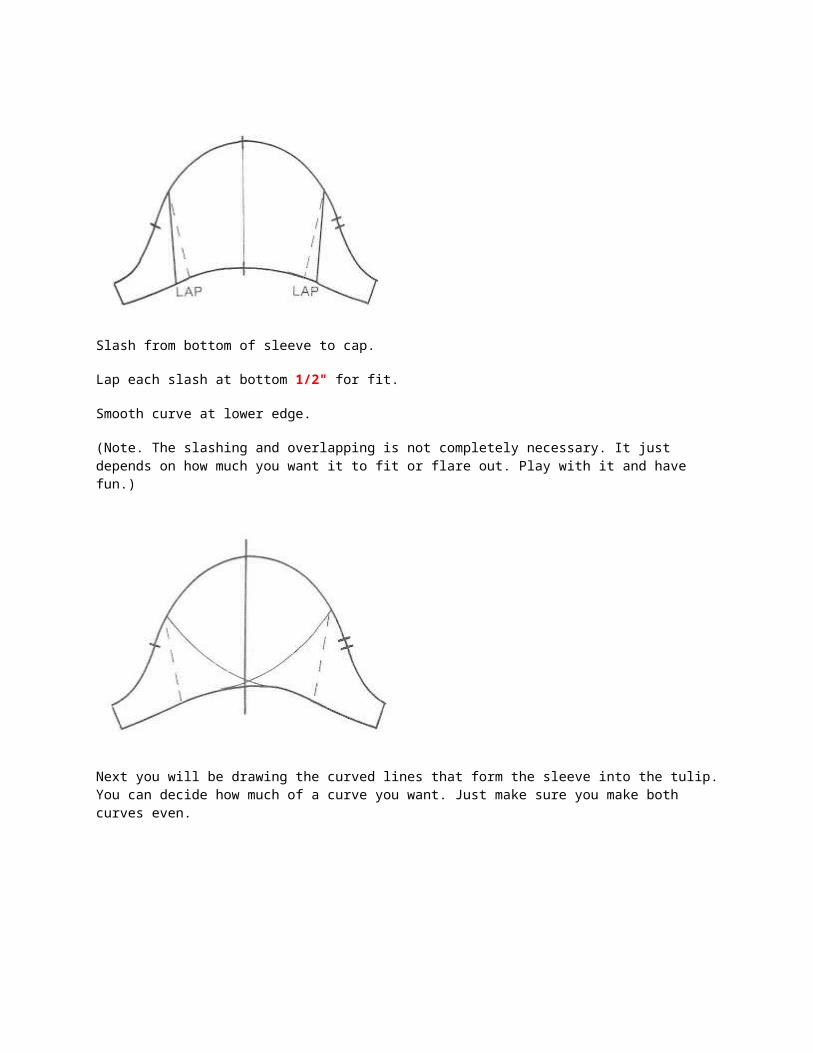
Slash from bottom of sleeve to cap.
Lap each slash at bottom 1/2" for fit.
Smooth curve at lower edge.
(Note. The slashing and overlapping is not completely necessary. It just depends on how much you want it to fit or flare out. Play with it and have fun.)
Next you will be drawing the curved lines that form the sleeve into the tulip. You can decide how much of a curve you want. Just make sure you make both curves even.
Trace around the entire front sleeve using the curved design line, making sure to mark the center top and the notches.
Trace around the entire back sleeve using curved design lines, making sure to mark the center top and the notches.
Label grain lines and make sure the seam allowances are what you want them to be to complete the patterns.
Now on to making a puffed tulip sleeve.
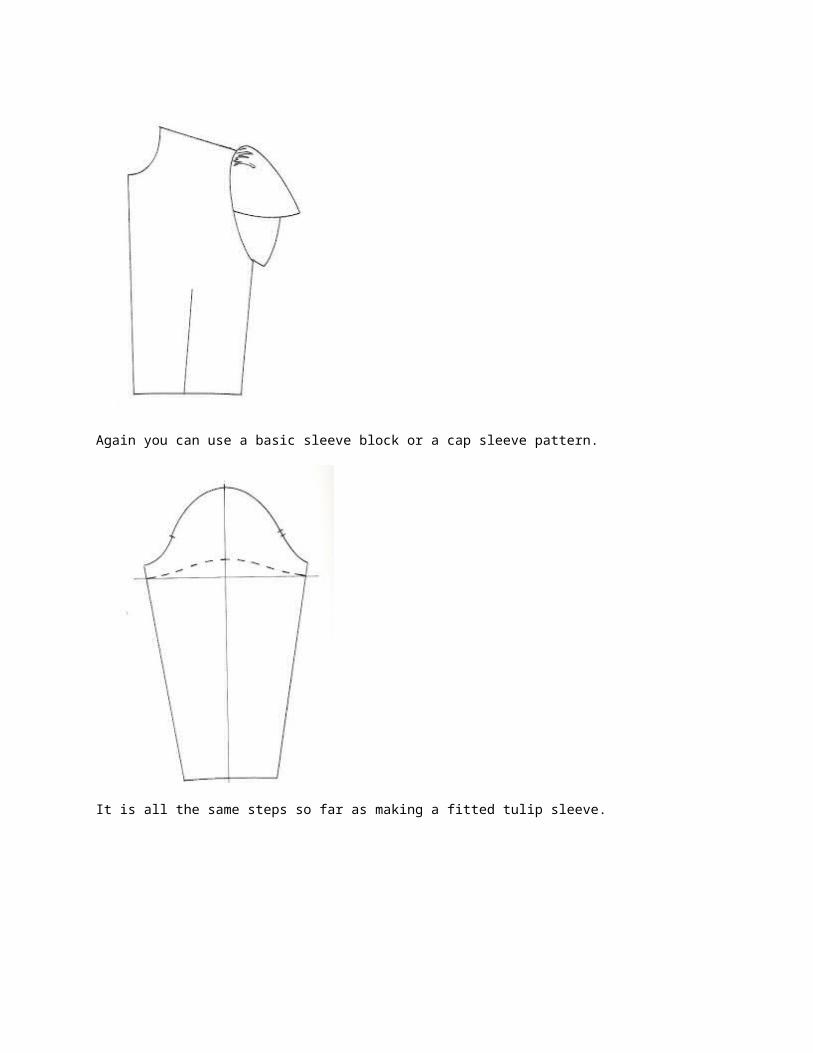
Again you can use a basic sleeve block or a cap sleeve pattern.
It is all the same steps so far as making a fitted tulip sleeve.
You are going to divide it into the four parts.
Do the optional overlapping.
Now you are going to divide the sleeve into 8 vertical parts.
Slassh the sleeve from top of cap to bottom of sleeve.
Spread for desired fullness.
Raise sleeve cap to allow sleeve to to "puff", adjust seam line as shown.
(Note: you can also just use a puffed sleeve pattern and draw the curve lines directly on to it. Just keep in mind if it is a puffed sleeve pattern were the fullness is. You will want all the fullness in the top of the sleeve and minimal fullness at the bottom.)
Draw curved design lines as shown. You can play around with it on exactly how you want the curve to look. Just make sure both lines are matching.
Trace both the entire sleeve front and back using the curved design lines, making sure to mark the top and notches.
And there you go, you have two different types of tulip sleeves.
As far as sewing them goes....
The first step in assembling the sleeves is to sew the underarm seams together.
You will then want to finish the edge of the sleeve.
You can either finish it with a rolled hem.
Or you can also finish it with a ruffle or a piping or whatever fits your design. Or you can line the sleeve as well.
Tulip sleeves are an overlapped sleeve that can be fitted or puffed. It allows for a greater range of motion than the normal cap sleeves and adds some variety. You can trim the edge of the sleeve with pleats, ruffles, braided or beaded trim or lace. I have used all of the above at different times. This is one of my favorite sleeve options when it comes to designing a dress.
It was popular in a lot of vintage patterns.
It goes especially well with the princess neckline.
I just love the added lines it gives to a dress. And I like to use it when I am making a dress for someone and don't have their upper arm measurement. This way it looks like a fitted sleeve but I don't have to worry about it being restrictive.
The overlap can be placed in the back or in the front. It is up to you on what you want to overall look to be.

I even found this picture of a four part tulip sleeve. I want to try this some time on a light filmy material for a formal.
It was also the sleeve pattern on the teal dress that Amy Adam's wore in The Muppets.
Btw, I blogged about all of the costumes that she wore back when the movie first came out. http://sewmanyseams.blogspot.com/2011/12/muppets-amy-adams-costumes.html