RADIUS and FreeRADIUS Frank Kuse Modification of Chris’ last year presentation and addition of...
75
RADIUS and FreeRADIUS Frank Kuse Modification of Chris’ last year presentation and addition of borrowed materials from Peter R. Egli of Indigoo.com Presented at AfNOG 2015
-
Upload
byron-summers -
Category
Documents
-
view
220 -
download
0
Transcript of RADIUS and FreeRADIUS Frank Kuse Modification of Chris’ last year presentation and addition of...
RADIUS and FreeRADIUS
Frank Kuse
Modification of Chris’ last year presentation and addition of borrowed materials from Peter R. Egli of Indigoo.com
Presented at AfNOG 2015

Ingredients
Theory What is RADIUS Why use RADIUS How RADIUS works User databases Attributes
Practical Installing FreeRADIUS Adding RADIUS users Network User Authenticating using Cisco IOS image

What is RADIUS?
Remote Authentication Dial In User Service Authentication
“Who are you?” Authorization
“What services am I allowed to give you?” Accounting
“What did you do with my services while you were using them?,,Accounting information may be used to track the user's usage for charging purposes

Why RADIUS?
What are the alternatives? LDAP, Kerberos, Active Directory
Advantages of RADIUS: Lightweight and efficient Supported by many clients, e.g. 802.1x, switches and
routers Disadvantages of RADIUS:
Limited attribute set, limited use for desktop authentication

How does RADIUS work?
Authentication Password authentication, plain text and hashed Lookup in various user databases: passwd, SQL, text
Authorization Using a set of rules or other templates
Accounting Measuring, communicating and recording resources
accessed by user See Wikipedia for list of RFCs

RADIUS Architecture (1)
RADIUS protocol is between NAS(Network Access Server) or a RAS(Remote Access server) and AAA server
NAS controls access to protected resource

RADIUS Architecture (2)
In this scenario, a front-end NAS (network access server) or RAS (remote access server)performs authentication of a user with a backend RADIUS server.The NAS/RAS sends user information (credentials) to the RADIUS server carried in RADIUS packets. The RADIUS server implements the access policy (who is granted access with what authorizations) or may retrieve policies from a database through LDAP (Lightweight Directory Access Protocol).
RADIUS server may optionally contain policy DB
RADIUS ServerLDAPSQL
Access Line(e.g. PPP)
Towards the Internet
UserNAS / RAS
LDAP/SQL
RADIUS
Scenario 1
RADIUS Architecture (3)
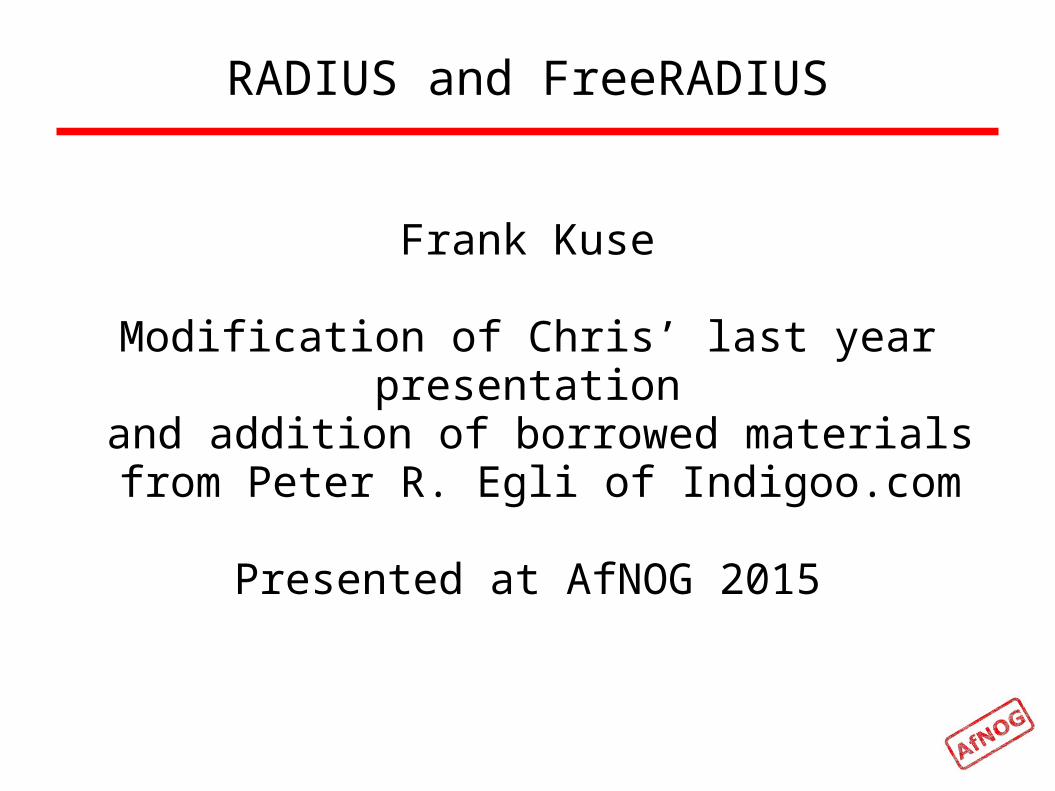
Scenario 2
In this scenario, a first RADIUS server does not perform authentication but acts as a proxy thatroutes RADIUS requests to the appropriate home RADIUS server. The routing is based on username and realm.The home RADIUS server performs the actual authentication by accessing a user DB.A concurrency RADIUS server may be employed to make sure that a user is not logged in morethan once, e.g. in scenarios with multiple RADIUS servers for redundancy / load balancing.
RADIUS Server #2Concurrency RADIUS Server
RADIUS Server #1Home RADIUS Server RADIUS Proxy Server
Access Line(e.g. PPP)
Towards the Internet
UserNAS / RAS
RADIUS
RADIUS

RADIUS Authentication
RADIUS transactionA RADIUS transaction typically starts with an Access-Request carrying user credentials followedby a RADIUS server response with a grant or denial of access.
Userr NAS DBRADIUS
with username and
Au
th. f
ailu
reA
uth
. su
cces
s
ser ver
User data packet
Reject access
Access-Request
hashed password (RSA MD5)
Access-Reject
Lookup credentials for authorization
'Wrong credentials'
User data packet
Grant access
Access-Request with username and
hashed password (RSA MD5)
Access-Accept
Lookup credentials for authorization. Create session
record.
'Correct credentials'

RADIUS Accounting (1)
RADIUS accountingOnce a network session is up and running (successful authentication), the NAS may requestto start counting network usage of the user.
User NAS DBRADIUS
User data packet Accounting-Request(Start) Start counting resour
usage (e.g. online time)
Accounting-Response
End of network session Accounting-Request(Stop) Stop counting resource
usage
Accounting-Response
ce
ser ver

RADIUS Accounting (2)
RADIUS accountingAccounting with RADIUS is specified in a separate RFC (RFC2866).A set of special accounting RADIUS attributes (attribute values 40 – 59) are used to transferaccounting data between the RADIUS client (NAS) and server.
Value Type Description
40 Acct-Status-Type Indicates start or stop of accounting.
41 Acct-Delay-Time
Delay between event causing accounting request and server response (used to compensate for processing delay time).
42 Acct-Input-Octets Used by client to report number of received octets to server.
43 Acct-Output-Octets Used by client to report number of transmitted octets to server.
44 Acct-Session-Id Used by client to identify user session to server.
45 Acct-Authentic
Used by client to report authentication method to server, e.g. user autenticated by NASitself, user authenticated by RADIUS or user authenticated by external protocol.
46 Acct-Session-Time Used by client to report to server how many seconds the user session is running.
47 Acct-Input-Packets Used by client to report number of packets received by a user.
48 Acct-Output-Packets Used by client to report number of packets sent by a user.
49 Acct-Terminate-Cause
Used by client to report cause of service termination (e.g. error, termination upon user request, timeout).
50 Acct-Multi-Session-Id
Similar to Acct-Session-Id, but used to link multiple sessions to one for correlation in log file.
51 Acct-Link-Count Used by client to report number of links used by user.

RADIUS Applications(1)
A user dials in on a NAS server run by the Internet provider.Prior to granting access to the Internet, the NAS authenticates the user with RADIUS.
RADIUS ServerDB
RADIUSAccess Line(e.g. PPP)
Internet
User NAS
RAS Intranet access (enterprise dial-in):This application is similar to the NAS scenario. The RAS (Remote Access Server) sits at theedge of the company network and authenticates a user prior to granting access to the network.
RADIUS ServerDB
RADIUSIntranet /company network
Internet /Intranet
User NAS
NAS network access (ISP):

RADIUS Applications(2)
802.1X backend control for Ethernet and WLAN network access:
IEEE 802.1X is a generic protocol for authentication and authorization in IEEE 802 basednetworks.The 802.1X supplicant ('the user') sends an EAPOL (Extensible Authentication Protocol OverLAN) message to the 802.1X authenticator (switch, access point).The switch or access point enables the Ethernet or WiFi port if the backend authenticationbased on credentials provided via 802.1X is successful.
Using a central server for authenticationadministration in large networks.
(username and password storage) eases
8
802.11 WLANwith 802.1X EAPOLRADIUS Server
Ethernet with02.1X EAPOL
RADIUS RADIUSPDALAN
* 802.1X capableEthernet switch* 802.1X authenticator* RADIUS client
* 802.11 Access point* 802.1X authenticator* RADIUS client
802.1X Supplicant

Why do we need RADIUS?
Many services require password authentication! Users don't want to remember many passwords Easier to change password regularly or if
compromised Easier to secure a single password database Enables user-password auth with 802.1x Alternative to TACACS for network equipment Used for PPP authentication in ISPs (PAP/CHAP)
RADIUS message types
Access-Request Access-Challenge Access-Accept Access-Reject Accounting-Request Accounting-Response Status-Server (experimental) Status-Client (experimental)

RADIUS attributes
Name=Value User-Name User-Password NAS-IP-Address NAS-Port Service-Type NAS-Identifier Framed-Protocol Vendor-Specific Calling-Station-ID Called-Station-Id

RADIUS users database (file)
Flat text file Easy to understand and edit Alternatives include Kerberos, LDAP and SQL
Each user entry has three parts: Username List of check items (requirements) List of reply items (assignments)

RADIUS users database (file)
Flat text file Easy to understand and edit Alternatives include Kerberos, LDAP and SQL
Each user entry has three parts: Username List of check items (requirements) List of reply items (assignments)
User name and check items
Username First part of each user entry Up to 63 printable, non-space, ASCII characters
Check Items Listed on the first line of a user entry, after username Multiple items are separated by commas Entry only matches if all check items are present in the
Access-Request and match Fall-Through = Yes allows server to try other entries
First line (user name + check items) must not exceed 255 characters.
Operators in user entries
The “=” and “==” operators mean different things in check items and reply items!
In check items: Use “=” for server configuration attributes (Password,
Auth-Type) Sets the value if not already set (set without override)
Use “==” for RADIUS protocol attributes True if value is present and has the same value, never sets
In reply items: Use “=” for RADIUS protocol attributes Do not use “==”, it is never valid

The Auth-Type check item
Used to specify where (how) to lookup the password:
Local (in the users file) System (query the OS, /etc/shadow or PAM) SecurID
Defaults to Local Example:Franko Auth-Type = Local, Password = 'test123'

Password expiration
Disable logins after a particular date Use the Expiration check item:Franko Password=”test12”, Expiration=“May 12 2009”
Date must be specified in “Mm dd yyyy” format! Use the Password-Warning check item to warn the
user before their password expires:VALUE Server-Config Password-Expiration 30
VALUE Server-Config Password-Warning 5

Checking the NAS IP address and port
NAS-IP-Address check item Matches a particular NAS (by IP address) Will only match if the user connected to (Access-
Request came from) that specific NAS. NAS-Port-Type check item
Will only match if the NAS reports that the user connected to a specify the type of port
Options include: Async, Sync, ISDN NAS-Port check item
Will only match if the NAS reports that the user connected to a specific port (ethernet or serial)

Reply items
If all check items in the user entry are satisfied by the access-request, then:
Radius server sends an Access-Accept packet to the NAS, containing the reply items
Gives information to the NAS about the user For example, which IP address to assign to them

The Service-Type reply item
Service Type Must be specified Login-User → User connects via telnet, rlogin Framed-User → User uses PPP or SLIP for connection Outbound-User → User uses telnet for outbound
connections. Framed-User is by far the most used now Framed-User requires a Framed-Protocol:Franko Auth-Type = System
Service-Type = Framed-User
Framed-Protocol = PPP

The Framed-IP-Address reply item
Specifies the user's IP address to the NAS Set to 255.255.255.255 to force the NAS to
negotiate the address with the end-node (dial-in user)
Set to 255.255.255.254, or leave out, to force the NAS to assign an IP address to the dial-in user from the assigned address pool
Franko Auth-Type = System
Service-Type = Framed-User
Framed-Protocol = PPP
Framed-IP-Address = 192.168.1.4

Netmask and Route reply items
Use Framed-IP-Netmask to specify a netmask for the user's IP address
The default subnet mask is 255.255.255.255 Use Framed-Route to add a route to NAS routing
table when service to the user begins Three pieces of information are required:
the destination IP address gateway IP address metric
For example: Framed-Route = “196.200.219.0 196.200.219.4 1”

Accounting records
FreeRADIUS writes to its Detail log file Typically Start and Stop accounting recordsTue May 12 14:12:14 2009
Acct-Session-Id = “25000005”User-Name = “franko”NAS-IP-Address = 196.200.219.2NAS-Port = 1NAS-Port-Type = AsyncAcct-Status-Type = StartAcct-Authentic = RADIUSService-Type = Login-UserLogin-Service = TelnetLogin-IP-Host = 196.200.219.254Acct-Delay-Time = 0Timestamp = 838763356
Accounting attributes
Acct-Status-Type attribute indicates whether the record was sent when the
connection began (Start) or when it ended (Stop) Acct-Session-Id attribute
ties the Start and Stop records together, indicating that it's the same session

What is FreeRADIUS?
The premier open source RADIUS server Similar to Livingston RADIUS 2.0 Many additional features Free!

Practical exercise overview
Build and install FreeRADIUS Configure and start FreeRADIUS Test authentication using FreeRADIUS Configure a service to authenticate using RADIUS

Installing FreeRADIUS
Installing a binary package: sudo apt-get install freeradius freeradius-utils
Check if FreeRadius is running using below command
Start FreeRADIUS server:

Running FreeRadius in debug mode
You should review the configuration files carefully /etc/freeradius/ *
Debugging mode is extremely useful: sudo /usr/sbin/freeradius -X (capital X)
Output should end with as shown below:
Server is now running in debugging mode Leave it running, and open another window/session on
the server to run more commands

Testing the default configuration(1)
FreeRADIUS should now respond to RADIUS requests
Test by running: radtest test test123 localhost 0 testing123
What happens? You should see the server receive the access-request and
respond with an access-accept in both cases

Testing the default configuration(2)
Try a local user that does exist, with password: radtest afnog afnog localhost 0 testing123
What happens? You should see the server receive the access-request
and respond with an access-reject in both cases

Changing the Shared Secret
We've been using the default shared secret, testing123
Not very secret, so let's change it!
Edit /etc/freeradius/clients.conf sudo vi /etc/freeradius/clients.conf Find the section client localhost Find the line secret = testing123 Generate a new secret and for our example use afnog123
Restart FreeRADIUS and test with the new secret: radtest afnog afnog localhost 0 afnog123

Secret (digression)
From RFC 2865: The secret (password shared between the client and the
RADIUS server) SHOULD be at least as large and unguessable as a well-chosen password. It is preferred that the secret be at least 16 octets. This is to ensure a sufficiently large range for the secret to provide protection against exhaustive search attacks. The secret MUST NOT be empty (length 0) since this would allow packets to be trivially forged.
How to generate a new, secure random key: dd if=/dev/random bs=16 count=1 | base64 eAiYEcnU/nxEsp6of5DaGQ== (for example)

Authenticating Cisco Devices using FreeRadius
Diagram Below is a GNS3 simulation topology for this exercise

Create A Windows Loopback Adapter (1)
On windows, the following guidelines below by click on Manage
Click here

Create A Windows Loopback Adapter (2)
Click on Device Manager
Click hereClick Here
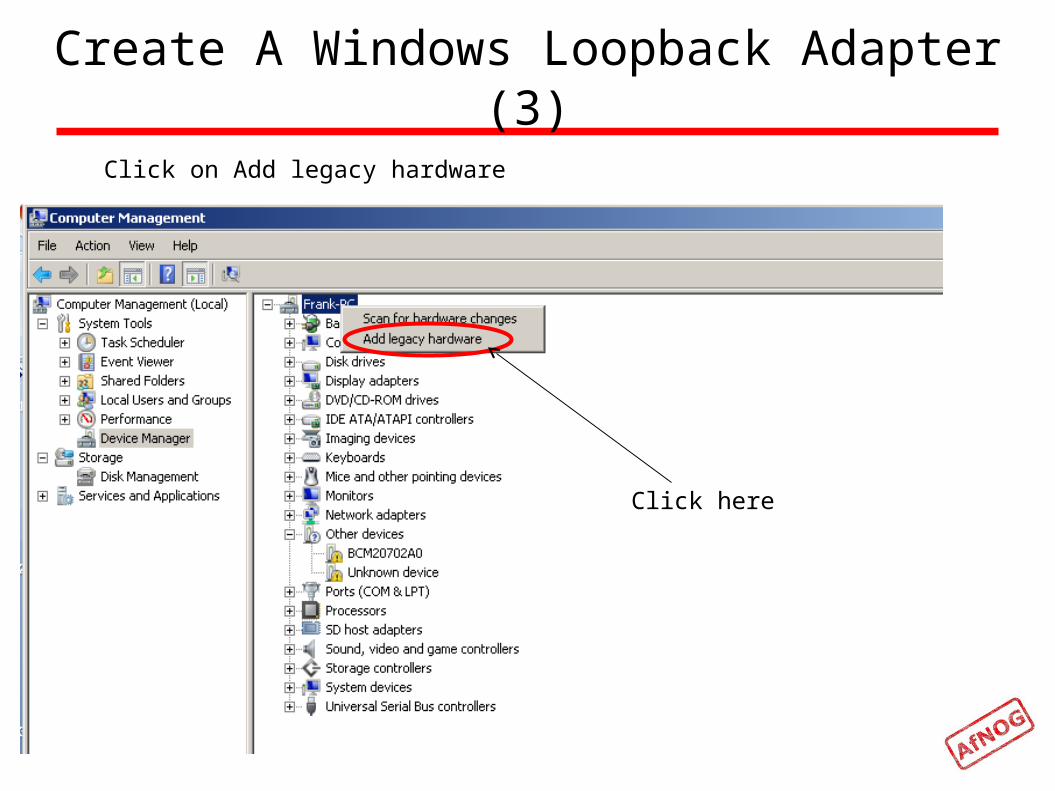
Create A Windows Loopback Adapter (3)
Click on Add legacy hardware
Click here

Create A Windows Loopback Adapter (4)
Click on Next
Click Here

Create A Windows Loopback Adapter (5)
Click on Radio Button ( install the hardware that I manually select from a list) and Click Next
Click Here
Click Here

Create A Windows Loopback Adapter (6)
Select Network Adapters from dopbox menu and Click Next
Click Here
Click Here

Create A Windows Loopback Adapter (7)
Select Microsoft Loopback Adapter from the second dopbox menu and Click Next
Click Here
Click Here
Select Microsoft from first dopbox menu
Click Here
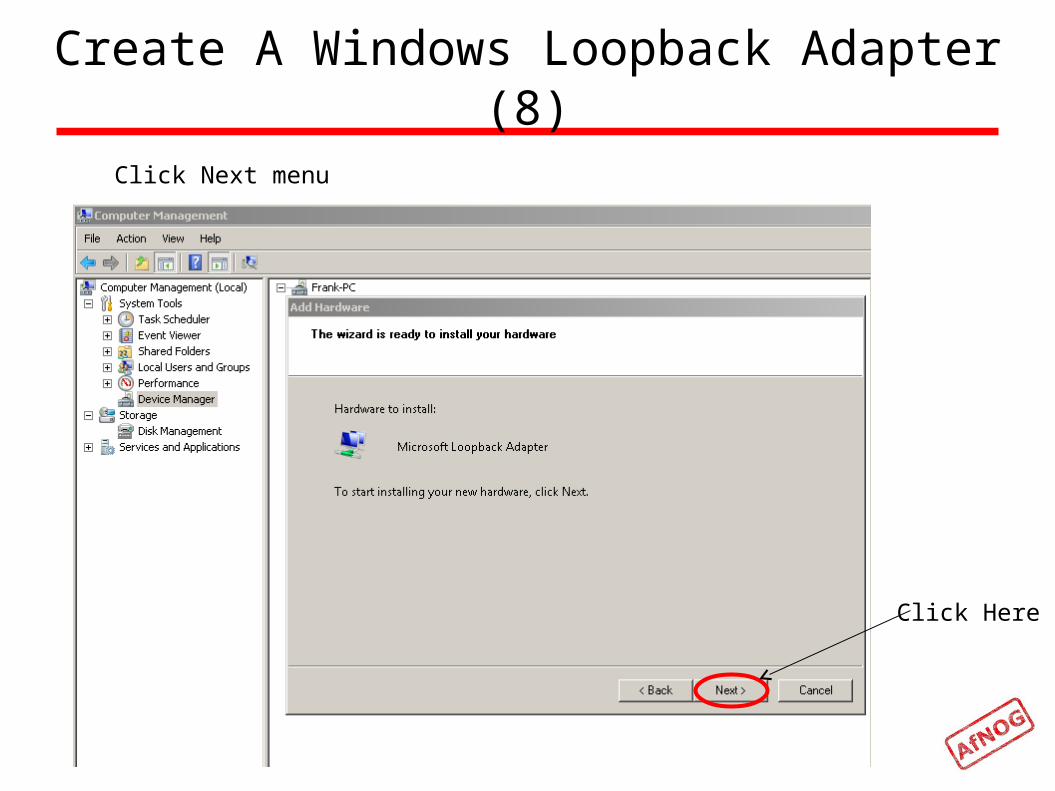
Create A Windows Loopback Adapter (8)
Click Here
Click Next menu

Create A Windows Loopback Adapter (9)
Click Here
Click Finish menu

Sharing Internet Connection over Wireless Adapter with Loopback
Adapter (1)
Click Here
Click Properties on the AIS-bgn Wireless Network Connection Adapter

Sharing Internet Connection over Wireless Adapter with Loopback
Adapter (2)Select Sharing Tab; Select Loopback Adapter and check Radio Buttons and click Ok menu
Click Here
Select Sharing Tab

Configuring Gns3 topology as above (1)
Select the Edit Menu and click on Preferences Button
Click Here

Configuring Gns3 topology as above (2)
Select the IOS routers and click on New Button Click Here
Click Here

Configuring Gns3 topology as above (3)
Select the IOS Image and click on Open Button N.B: Copy of it can be gotten from Afnog Site
Click Here
Click Here
Click Here

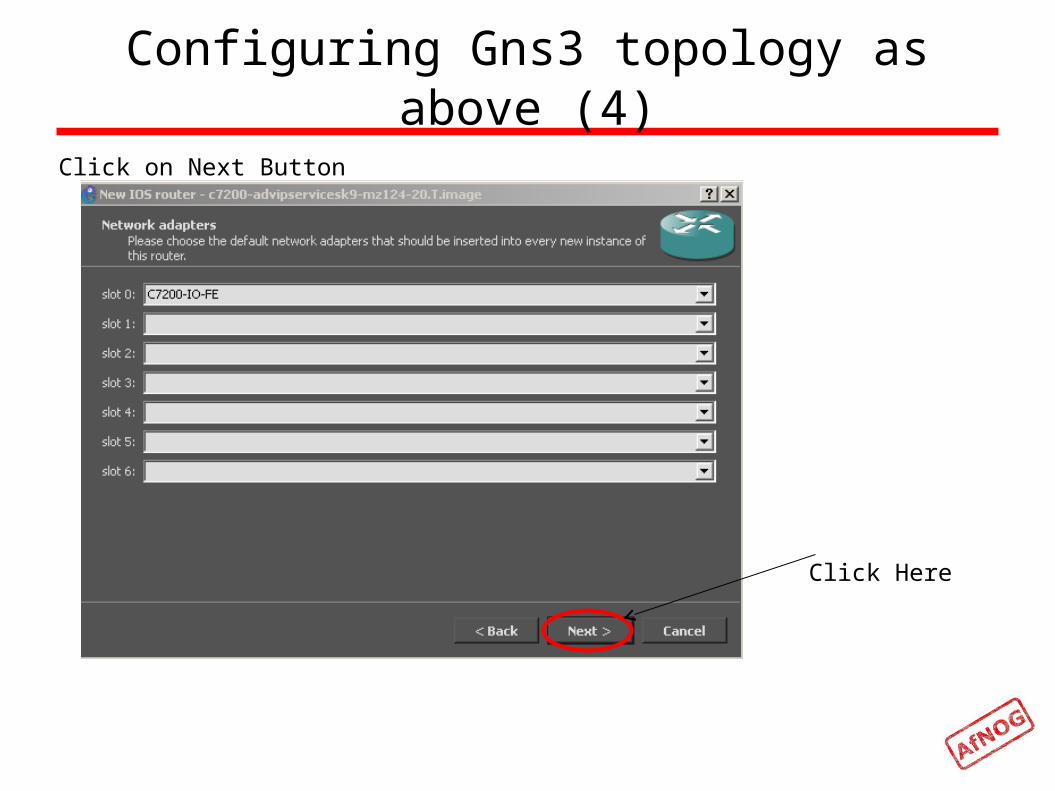
Configuring Gns3 topology as above (4)
Click on Next Button
Click Here

Configuring Gns3 topology as above (5)
Click on Next Button
Click Here
Configuring Gns3 topology as above (4)
Click on Next Button
Click Here

Configuring Gns3 topology as above (5)
Click on Finish Button
Click Here

Configuring Gns3 topology as above (6)
Click on Router sign and Drag c7200 image onto the Topology pane
Click Here
Drag Here

Configuring Gns3 topology as above (7)
You should see the c7200 image onto the Topology pane as shown below

Configuring Gns3 topology as above (8)
Click on Multiple Device Box and Drag a cloud image onto the Topology pane
Click Here
Drag Here
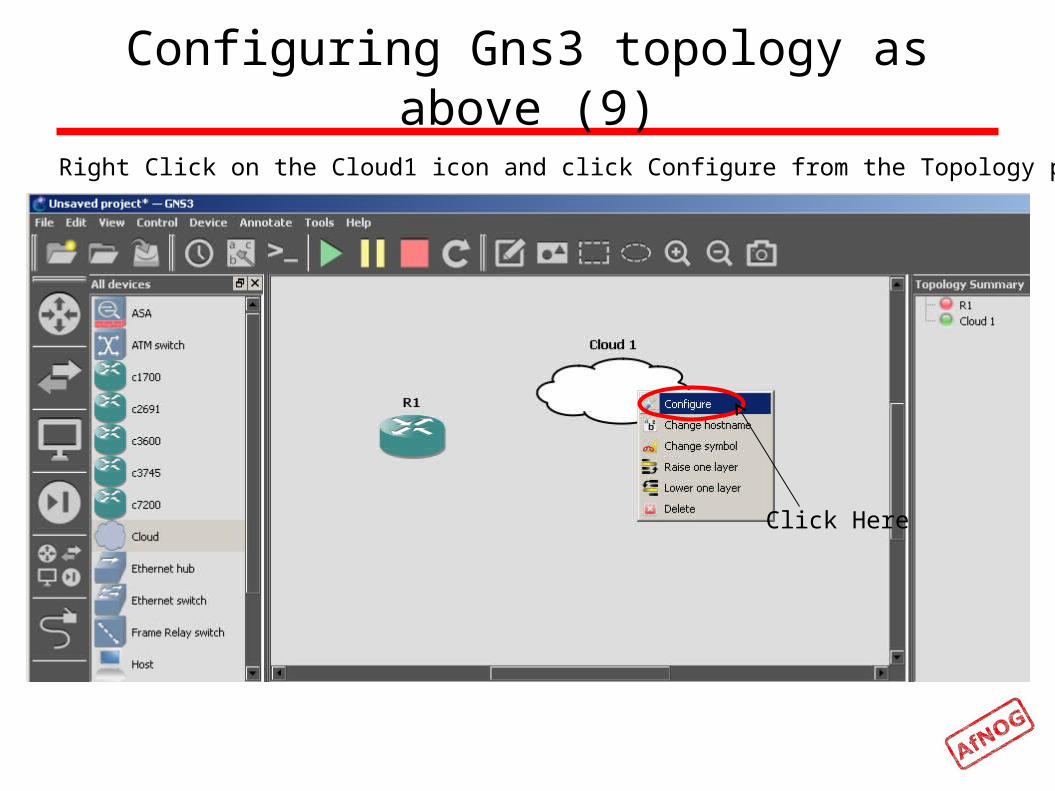
Configuring Gns3 topology as above (9)
Right Click on the Cloud1 icon and click Configure from the Topology pane
Click Here

Configuring Gns3 topology as above (10)
Click on Cloud1 icon from left pane and select the Local Loopback Adapter you configured
Click Here
Click Here

Configuring Gns3 topology as above (11)
Click Add Button to add Loopback Adapter to your Cloud1 you configured and click OK Button
Click Here
Click Here

Configuring Gns3 topology as above (12)
Change the symbol of the cloud1 into the PC symbol
Click Here

Configuring Gns3 topology as above (13)
Add a Link to Connect the Router F0/0 interface to the PC symbol
Click Here
Click Here

Configuring Gns3 topology as above (14)
Add a Link to Connect the Router F0/0 interface to the PC symbol
Click Here
Click Here

Configuring Gns3 topology as above (15)
A completed design should look like below and click on the start button to start the router
Click Here

Configuring Gns3 topology as above (16)
A completed design should look like below and click on the start button to start the router
Click Here

Router Configuration (1)
Connect to the Router by Right Clicking it and clicking on Console
Click Here

Router Configuration (2)
Configure the IP address for the interface connecting to the PC Configure an IP address for the router to enable remote connectivity
Check to ensure interface f0/0 has an IP address by running below command

Router Configuration (3)
Configure users authentication for remote access to the router Configure the Radius commands to allow authentication and accounting request
Ensure commands are entered using conf t Ensure you replace the 197.4.11.138 with your Server IP address
Configure the vty session to allow remote connection to the router Enable telnet and ssh session over it using the command below.

Testing Remote Connectivity (1)
Get the IP address of the f0/0 interface using the command below Configure an IP address for the router to enable remote connectivity
Configure Putty with the following features as below.

Testing Remote Connectivity (2)
Test user login using Accounts created above
Note, a Successful login will allow the created users inside the Radius access to the Router.

What have we achieved?
Debian RADIUS server answers authentication requests:
Flat text file (users file) Installation and configuration of Gns3 Mounting a Cisco Router image Network authentication for Cisco NAS equipment
We can deploy new services without having to create separate password databases

What more could we do?
Store credentials in: a database (MySQL, PostgreSQL) LDAP Kerberos
Integrate with network access control (802.1x) Generate accounting data
so that we could bill for timed access to resources for example a wireless hotspot or a hotel network
Generate reports from accounting data

Bibliography
FreeRADIUS website http://www.freeradius.org/
GNS3 www.gns3.net
Other resource http://www.indigoo.com/dox/itdp/09_Access/AAA_RA
DIUS.pdf