RADIO-ASSIST 8 Production tools · 2019-03-19 · RADIO-ASSIST 8 Production tools Record The RecoRd...
6
RADIO-ASSIST 8 Production tools Record THE RECORD TOOL COLLECTS AND ARRANGES MICROPHONE RECORDINGS. Play Recording Identity sheet 1 - Set the sound input level. 2 - Start recording. 3 - End the recording (stop). Several takes can be done by repeating the above operations. 4 - Select the best take. 5 - Fill in the identity sheet. 6 - Save. Recording a document Plays the recording from the playhead Stops playing Go back to previous marker Goes to next marker Deletes displayed data Deletes all displayed data Starts recording Puts recording on pause‑/ Resumes recording Ends recording Sets a marker Speaker playback Sound input level Creates a new term in the list F2
Transcript of RADIO-ASSIST 8 Production tools · 2019-03-19 · RADIO-ASSIST 8 Production tools Record The RecoRd...

RADIO-ASSIST 8Production tools
Record The RecoRd Tool collecTs and aRRanges micRophone RecoRdings.
Play
Recording
Identity sheet
1 - Set the sound input level. 2 - Start recording.3 - End the recording (stop). Several takes can be done by repeating
the above operations.4 - Select the best take. 5 - Fill in the identity sheet.6 - Save.
Recording a document
Plays the recording from the playhead
Stops playing
Go back to previous marker
Goes to next marker
Deletes displayed data
Deletes all displayed data
Starts recording
Puts recording on pause‑/ Resumes recording
Ends recording
Sets a marker
Speaker playback
Sound input levelCreates a new term in the list
F2

Snippet (monotrack)
Save as
Save Ctrl+S New document ‑ Ctrl+N
Cancel ‑ Ctrl+Z Redo ‑ Ctrl+Y
Recently used itemsfor the edit
Slow back play
Slow forward play
Start of cutSet blue line
End of cutSet yellow line
Cut selection (cut is binned)
Normal play Space bar
Pause
Stop Space bar
Go toend
Plays 2 secs after the yellow line
Plays 2 secs before the blue line
Plays 2 secs before the blue and after the yellow
Plays 2 secs after the blue and before the yellow
Horizontal zoom: Orange arrows.
Zoom up:Ctrl + right arrow
Zoom down:Ctrl + left arrow
Vertical Zoom: Orange arrows.
Zoom up:Ctrl + up arrow
Zoom down:Ctrl + down arrow
Playing speed Sound volume
Go tostart
Fast forwardFast rewind
Go to blue line
Go to yellow line
The snippeT Tool is a useR-fRiendly way To do simple oR complex ediT woRk.
Access to a range of functions with a right click on a sequence line: • play a cut sequence• rename it • paste it • save it with another name (it will be inserted in the database as a new file)
Change the beginof a cutChange the endof a cut
Just click and move it to the spectrum. The selected sequence turns black.
Selecting a sequence:
F11F10
Fin
Ctrl A Select all the track.
Places a marker on the spectrum (insertion at the red line)
F3
F4
Delete
F5or
F5shift
Cut (cutisn’t binned)
F6
F7
F1
F9
F8
+
To raise the level of the track,click on the button and gradually move the mouse upwards.
Cuts the selected sequence
Copies a sequence Ctrl+C
Listen to one isolated track (S) or mute the track (M)
Move the blue squares which start and end a sequence to adjust the fade levels.You can create or delete points with a right click of the mouse.
Modifying the sound level of a sequence
Pastes what was cut ‑ Ctrl+V
Snippet + (multitrack)
To lower the level, gradually move the mouse downwards.
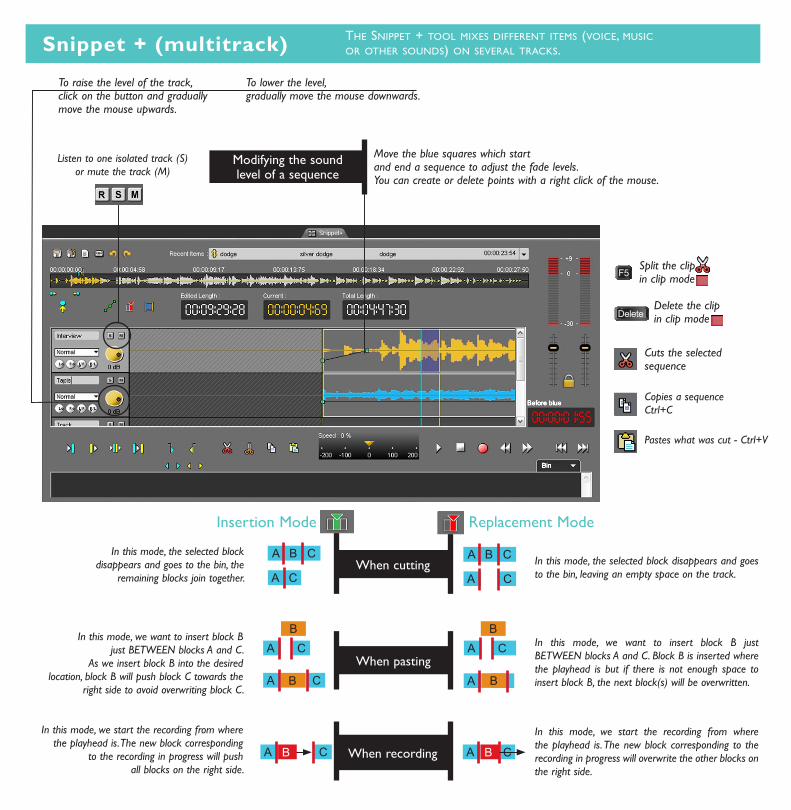
When cuttingIn this mode, the selected block
disappears and goes to the bin, the remaining blocks join together.
Insertion Mode
In this mode, the selected block disappears and goes to the bin, leaving an empty space on the track.
In this mode, we want to insert block B just BETWEEN blocks A and C.
As we insert block B into the desired location, block B will push block C towards the
right side to avoid overwriting block C.
When pastingIn this mode, we want to insert block B just BETWEEN blocks A and C. Block B is inserted where the playhead is but if there is not enough space to insert block B, the next block(s) will be overwritten.
When recording
In this mode, we start the recording from where the playhead is. The new block corresponding
to the recording in progress will push all blocks on the right side.
In this mode, we start the recording from where the playhead is. The new block corresponding to the recording in progress will overwrite the other blocks on the right side.
Replacement Mode
The snippeT + Tool mixes diffeRenT iTems (voice, music oR oTheR sounds) on seveRal TRacks.
Split the clip in clip mode
Delete the clip in clip modeDelete
F5

Marks the start of the outtro
Sets a lead‑in end point (play the item B over the current item A).
Sets the Fade‑In start point
Sets the Fade‑In end point
Sets the Fade‑Out start point
Sets the Fade‑Out end point
Sets a lead‑in start point (the end of the item A will play at the same time as the start of the item B).
Defines relays / GPI (for switchovers)
ProductionThe pRoducTion Tool pRepaRes documenTs foR bRoadcasTing. you can seT “music” documenT sound levels, woRk on fade-in and fade-ouT poinTs, specify inpuT and ouTpuT poinTs and Relays.
Information on Fade-In and Fade-Out positions
Marks the end of the intro (information on when the presenter comes in)
Information on relay modes and positions

Right side: external support drive tools (CD, MD, etc.)
You can:
Left side: list of documents to import
Left side: list of documents to export
Play the selected track
Select a target directory on the hard disk
Stop
Put on PauseDeletes the selected item from the list
Imports all documents in the list
Creates a new list
1 - Select a track in the right side (click on it)2 - Drag & drop the item from the right side to the left3 - Fill in its identity sheet (click on the save icon, which will change into an OK icon)4 - When all the documents are in the list, click on the Import button.
Importing a document
1 - Select the item in the Browser (single click).2 - Drag & drop the item from the Browser to the
left side of the Export tab.3 - When all the documents are in the list, click
on the Export button.
Exporter un document
Exports all documents in the list
Creates a new list
Deletes the selected item from the list
12
4
ImportThe impoRT Tab is used To impoRT inTo The Radio-assisT daTabase one oR moRe documenTs fRom an exTeRnal souRce. The new documenT, impoRTed fRom haRd disk, cd, md, nagRa oR fTp, can Then be accessed foR ediTing puRposes.
Export The expoRT Tab is used To expoRT fRom The Radio-assisT daTabase one oR moRe documenTs To an exTeRnal souRce.
3
Selects a target directory on the hard disk
Right side: to select the document target (hard disk, CD, MD, Nagra, FTP, etc.)
Format and technical data for document export. You can change the settings or use the default ones.
Fusion mode allows the user to generate a single imported or exported file
from various selected items.

Tabs for a search by document type
Click on any of these icons to display the corresponding documents (click again to deactivate them, otherwise a search will always be restricted to the criteria selected).
Raw item (original file) Edited documents (already edited)
Ready‑to‑Broadcast documents
Master documents
Broadcastable documents
Ready‑to‑Archive documents
Archivable documents Archived documents Locked documents (cannot be deleted)
Deletes the selected documentCtrl+D
Generates a MasterCtrl+G
Launches a search
Copies the selected documentCtrl+L
Marks the selected document as urgent
Modifies the settings of the selected document ‑ Ctrl+M
To speed up the search for a document, select a number of specific search criteria for each type of document (these are different in each tab).
To select a criterion:• choose a criterion in the dropdown list,• or enter the name you want in the field and validate (press Enter on the keyboard).
Search by alphabetical order or date: click on a column heading (a little arrow appears beside it and gives the classification order. You can reverse the order by giving another click on the column).
www.netia.com
Fiding a document
Document status
Search Zone tools