radar
241
User Guide &Training Manual
-
Upload
anurag-gupta -
Category
Documents
-
view
226 -
download
8
Transcript of radar

User Guide &Training Manual

Table of Contents TABLE OF CONTENTS ...........................................................................................................................................II
RADAR 10....................................................................................................................................................................1
GETTING STARTED.................................................................................................................................................1
CONFIDENCE LEVEL SETTING ...........................................................................................................................4
A TOUR THROUGH THE RADAR SCREEN ........................................................................................................4
KEYBOARD SHORTCUTS INSTEAD OF THE MOUSE ....................................................................................5 ALT AND THE UNDERLINED LETTER, ESCAPE AND ENTER KEYS .................................................. 5 FUNCTION KEYS........................................................................................................................... 7 TOOLBAR BUTTONS DEFINED ...................................................................................................... 8 SMART ICON BAR BUTTONS DEFINED........................................................................................ 11
FINDING RUBRICS.................................................................................................................................................12 THE QUICK COMMAND METHOD ............................................................................................... 12 FINDING CHAPTER TITLES.......................................................................................................... 15
SEARCHING FOR RUBRICS.................................................................................................................................16 VIEWING PREVIOUS SEARCH RESULTS AND VIEWING SUB RUBRICS.......................................... 19 CONDUCTING THE SAME SEARCH IN ENCYCLOPAEDIA HOMEOPATHICA (EH)........................... 19 FINDING RUBRICS USING RADAR CONCEPTS............................................................................ 19
THE REPERTORY WINDOW ...............................................................................................................................21 REPERTORY VIEWS .................................................................................................................... 21 CREATING YOUR OWN REPERTORY VIEW ................................................................................. 23 CONFIDENCE LEVEL................................................................................................................... 24
What does Confidence Level mean? ..................................................................................... 24 Choosing Confidence Levels ................................................................................................ 27 Confidence Level Settings..................................................................................................... 27 Explaining the meaning of the criteria ................................................................................. 28 Difference between Degrees of Remedies and Repertory Views .......................................... 29 More information about the Confidence Level of Remedies................................................. 29 Glossary of terms.................................................................................................................. 30
CHANGING REPERTORY WINDOW OPTIONS ............................................................................... 30 Remedies............................................................................................................................... 30 Degrees................................................................................................................................. 31 Authors ................................................................................................................................. 31 General Options ................................................................................................................... 31
IDENTIFYING AUTHORS.............................................................................................................. 32 KÜNZLI DOTS .........................................................................................................................................................33
PUTTING RUBRICS INTO THE CLIPBOARD...................................................................................................34 THE TAKE OPTIONS DIALOG BOX .............................................................................................. 36 CHANGING THE DEFAULT CLIPBOARD ....................................................................................... 39 OPENING THE CLIPBOARD.......................................................................................................... 39 EDITING THE OPTIONS ASSIGNED TO A RUBRIC ......................................................................... 40 HIGHLIGHTING SYMPTOMS ........................................................................................................ 41 MOVING RUBRICS FROM CLIPBOARD TO CLIPBOARD................................................................. 42 NAMING CLIPBOARDS ................................................................................................................ 43
SELECTING MULTIPLE ITEMS AT ONE TIME ..............................................................................................45 GROUPING RUBRICS................................................................................................................... 46 GROUPING RUBRICS WITH CROSS REFERENCES ......................................................................... 47
ANALYZING THE CASE........................................................................................................................................51
Page ii
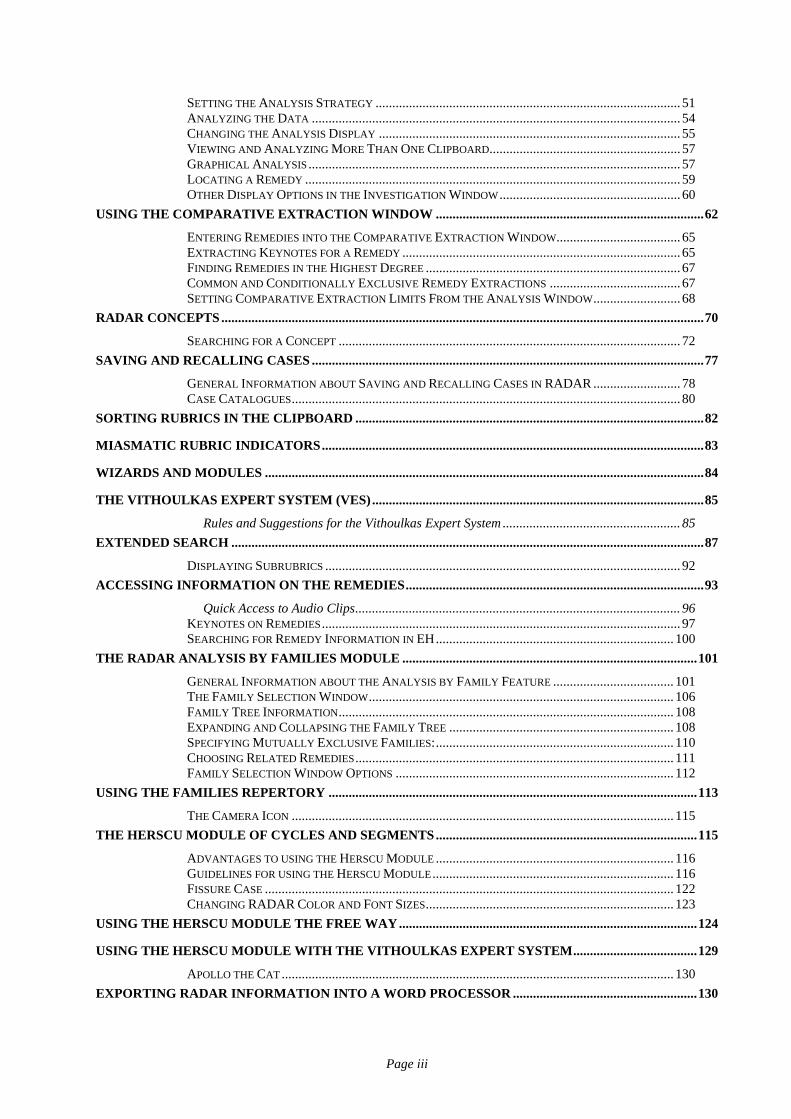
SETTING THE ANALYSIS STRATEGY ........................................................................................... 51 ANALYZING THE DATA .............................................................................................................. 54 CHANGING THE ANALYSIS DISPLAY .......................................................................................... 55 VIEWING AND ANALYZING MORE THAN ONE CLIPBOARD......................................................... 57 GRAPHICAL ANALYSIS ............................................................................................................... 57 LOCATING A REMEDY ................................................................................................................ 59 OTHER DISPLAY OPTIONS IN THE INVESTIGATION WINDOW...................................................... 60
USING THE COMPARATIVE EXTRACTION WINDOW ................................................................................62 ENTERING REMEDIES INTO THE COMPARATIVE EXTRACTION WINDOW..................................... 65 EXTRACTING KEYNOTES FOR A REMEDY ................................................................................... 65 FINDING REMEDIES IN THE HIGHEST DEGREE ............................................................................ 67 COMMON AND CONDITIONALLY EXCLUSIVE REMEDY EXTRACTIONS ....................................... 67 SETTING COMPARATIVE EXTRACTION LIMITS FROM THE ANALYSIS WINDOW.......................... 68
RADAR CONCEPTS................................................................................................................................................70 SEARCHING FOR A CONCEPT ...................................................................................................... 72
SAVING AND RECALLING CASES .....................................................................................................................77 GENERAL INFORMATION ABOUT SAVING AND RECALLING CASES IN RADAR .......................... 78 CASE CATALOGUES.................................................................................................................... 80
SORTING RUBRICS IN THE CLIPBOARD ........................................................................................................82
MIASMATIC RUBRIC INDICATORS..................................................................................................................83
WIZARDS AND MODULES ...................................................................................................................................84
THE VITHOULKAS EXPERT SYSTEM (VES)...................................................................................................85 Rules and Suggestions for the Vithoulkas Expert System ..................................................... 85
EXTENDED SEARCH .............................................................................................................................................87 DISPLAYING SUBRUBRICS .......................................................................................................... 92
ACCESSING INFORMATION ON THE REMEDIES.........................................................................................93 Quick Access to Audio Clips................................................................................................. 96
KEYNOTES ON REMEDIES........................................................................................................... 97 SEARCHING FOR REMEDY INFORMATION IN EH....................................................................... 100
THE RADAR ANALYSIS BY FAMILIES MODULE ........................................................................................101 GENERAL INFORMATION ABOUT THE ANALYSIS BY FAMILY FEATURE .................................... 101 THE FAMILY SELECTION WINDOW........................................................................................... 106 FAMILY TREE INFORMATION.................................................................................................... 108 EXPANDING AND COLLAPSING THE FAMILY TREE ................................................................... 108 SPECIFYING MUTUALLY EXCLUSIVE FAMILIES:....................................................................... 110 CHOOSING RELATED REMEDIES............................................................................................... 111 FAMILY SELECTION WINDOW OPTIONS ................................................................................... 112
USING THE FAMILIES REPERTORY ..............................................................................................................113 THE CAMERA ICON .................................................................................................................. 115
THE HERSCU MODULE OF CYCLES AND SEGMENTS..............................................................................115 ADVANTAGES TO USING THE HERSCU MODULE ....................................................................... 116 GUIDELINES FOR USING THE HERSCU MODULE........................................................................ 116 FISSURE CASE .......................................................................................................................... 122 CHANGING RADAR COLOR AND FONT SIZES.......................................................................... 123
USING THE HERSCU MODULE THE FREE WAY.........................................................................................124
USING THE HERSCU MODULE WITH THE VITHOULKAS EXPERT SYSTEM.....................................129 APOLLO THE CAT ..................................................................................................................... 130
EXPORTING RADAR INFORMATION INTO A WORD PROCESSOR .......................................................130
Page iii

ON-LINE HELP ......................................................................................................................................................133 GENERAL HELP INFORMATION................................................................................................. 133 USING CONTEXT SENSITIVE HELP............................................................................................ 134 SEARCHING IN HELP................................................................................................................. 136
BACKING UP RADAR FILES..............................................................................................................................138
MODIFYING THE REPERTORY........................................................................................................................141 ADDING REMEDIES TO A RUBRIC ............................................................................................. 141 ADDING AUTHORS ................................................................................................................... 143 SYNONYMS .............................................................................................................................. 146 MASTER SYNONYMS ................................................................................................................ 147 SYMPTOM NOTES ..................................................................................................................... 147 MULTI-MEDIA FILES................................................................................................................ 149 ADDING REMEDIES TO RADAR............................................................................................... 151 ADDING A RUBRIC ................................................................................................................... 152
RADAR LIVE UPDATE.........................................................................................................................................153
FREE NOTES..........................................................................................................................................................155 SHARING DOCUMENTS THROUGH FREE NOTES........................................................................ 156 RENAMING FREE NOTES DOCUMENTS: .................................................................................... 158 SHARING YOUR DOCUMENTS THROUGH FREE NOTES:............................................................. 159
REPERTORY UTILITIES.....................................................................................................................................160
ENCYCLOPAEDIA HOMEOPATHICA.............................................................................................................162
GETTING STARTED.............................................................................................................................................162
DOWNLOADING EH UPGRADES FROM THE INTERNET .........................................................................164
SETTING THE EH OPTIONS ..............................................................................................................................164 CHOOSING A DESKTOP THEME................................................................................................. 165
A TOUR THROUGH THE EH SCREEN.............................................................................................................166 VIEWING THE CONTENTS SCREEN ............................................................................................ 167 RESIZING THE WINDOWS.......................................................................................................... 168 THE STRUCTURE OF A BOOK .................................................................................................... 168 NAVIGATING THE WEB VIEW................................................................................................... 169 THE EH TOOLBAR.................................................................................................................... 170 TEXT SIZE ................................................................................................................................ 170
SEARCHING THE EH LIBRARY........................................................................................................................171 CHANGING SEARCH PARAMETERS ........................................................................................... 173 NAVIGATING THE SEARCH RESULTS ........................................................................................ 175 LIMITING THE BOOKS IN WHICH TO SEARCH............................................................................ 176 SHOWING TITLES WITH AND WITHOUT RESULTS..................................................................... 178
LIST OF SYNONYMS............................................................................................................................................180
ANALYZING THE SEARCH RESULTS.............................................................................................................184
HOMEOPATHIC FAMILIES ...............................................................................................................................185 FAMILIES OPTIONS................................................................................................................... 186 USING AND MODIFYING THE FUNCTIONS OF THE FAMILY TREE............................................... 188
Limiting the View of the Family Tree ................................................................................. 188 EXPANDING AND COLLAPSING THE FAMILY TREE ................................................................... 189 VIEWING THE ANALYSIS WINDOW........................................................................................... 190 LIST AND NUMBER OF REMEDIES............................................................................................. 190 LIMITING THE ANALYSIS WINDOW TO SELECTED FAMILIES.................................................... 192 HIGHLIGHTING REMEDY FAMILIES IN THE ANALYSIS WINDOW............................................... 196 SEARCHING THE FAMILY TREE................................................................................................. 197
Page iv

ADDING ADDITIONAL SYMPTOMS TO THE SEARCH...............................................................................199 EDITING A SEARCH................................................................................................................... 200
SAVING SEARCHES .............................................................................................................................................200
ANALYZING MORE THAN ONE SYMPTOM..................................................................................................201
SOME SHORTCUTS IN EH..................................................................................................................................204
EXPORTING AN EH SEARCH TO RADAR......................................................................................................205 EXPORTING FROM THE EH CLIPBOARD .................................................................................... 205 EXPORTING AN EH ANALYSIS TO RADAR.............................................................................. 207 EXPORTING A SINGLE SYMPTOM TO RADAR.......................................................................... 210 EXPORTING AUTHORS.............................................................................................................. 211
LAUNCHING A SEARCH IN EH FROM RADAR ............................................................................................212 BEFORE YOU START ................................................................................................................ 212 THE SEARCH PARAMETERS WINDOW....................................................................................... 213 EDITING THE SEARCH PARAMETERS WINDOW ......................................................................... 214 ADDING YOUR OWN KEYWORDS ............................................................................................. 216 ADDING AUTHORS TO THE SEARCH PARAMETERS WINDOW.................................................... 216 ADDING CROSS REFERENCES TO THE SEARCH PARAMETERS WINDOW.................................... 217 SAVING SEARCH PARAMETERS ................................................................................................ 217 CLEARING THE SEARCH PARAMETERS WINDOW...................................................................... 219 VIEWING THE SEARCH IN EH ................................................................................................... 219 EXPORTING RULES................................................................................................................... 220 SEARCHING A REMEDY FROM THE INVESTIGATION WINDOW FOR REMEDIES .......................... 220 MAKING THE SAME SEARCH IN EH AS IN RADAR .................................................................. 220
LIMITING SEARCH TITLES IN EH ..................................................................................................................221 LIMITING A SEARCH TO CERTAIN CHAPTERS OF SPECIFIED TITLES ......................................... 222 SAVING TITLES AS A GROUP USING EH MIXES ........................................................................ 224 USING A MIX FILE.................................................................................................................... 225 RENAMING AND DELETING MIX FILES ..................................................................................... 228 CHANGING THE DEFAULT MIX................................................................................................. 230
PRINTING IN EH...................................................................................................................................................230
USING EH HELP TO LEARN THE FUNCTIONS OF EH ...............................................................................231
EH REPERTORIZATION EXAMPLES..............................................................................................................232 ADVANTAGES TO USING EH TO REPERTORIZE ......................................................................... 233 EXERCISE 21 ............................................................................................................................ 233 SUGGESTIONS........................................................................................................................... 233 EXERCISE 22 ............................................................................................................................ 234 DOWNLOADING THE EH QUERIES FROM THE INTERNET........................................................... 235
Page v
RADAR 10
Congratulations! You have just purchased the premiere homeopathic software product available. It is important to spend time learning all the features of RADAR. Doing so will help you use the product more often and more efficiently. It will also help you become a better homeopath by helping you analyze your client cases in a variety of different ways, and assisting you in learning more about remedies.
When you have completed this course you will be able to do the following: • Find and enter rubrics into a clipboard. • Change the repertory you are using. • Understand and use RADAR Concepts • Analyze your case using several different options. • Perform a Comparative Extraction to understand how remedies and symptoms relate
to one another. • Access remedy Keynotes. • Use the Vithoulkas Expert System and the Herscu Module • Modify and edit the repertory. • Work with the Remedy Families feature. • Print using RADAR.
Getting Started Tape1—0:00:16
Before opening RADAR, it is useful to add a setting which will open up the same repertory each time you start RADAR. This is known as the default repertory. Once you have made this change to your system, you will not have to do it again, unless you wish to change the default repertory.
To open Synthesis 9.2 automatically: 1. Locate the RADAR 10 shortcut icon on your desktop. It looks like
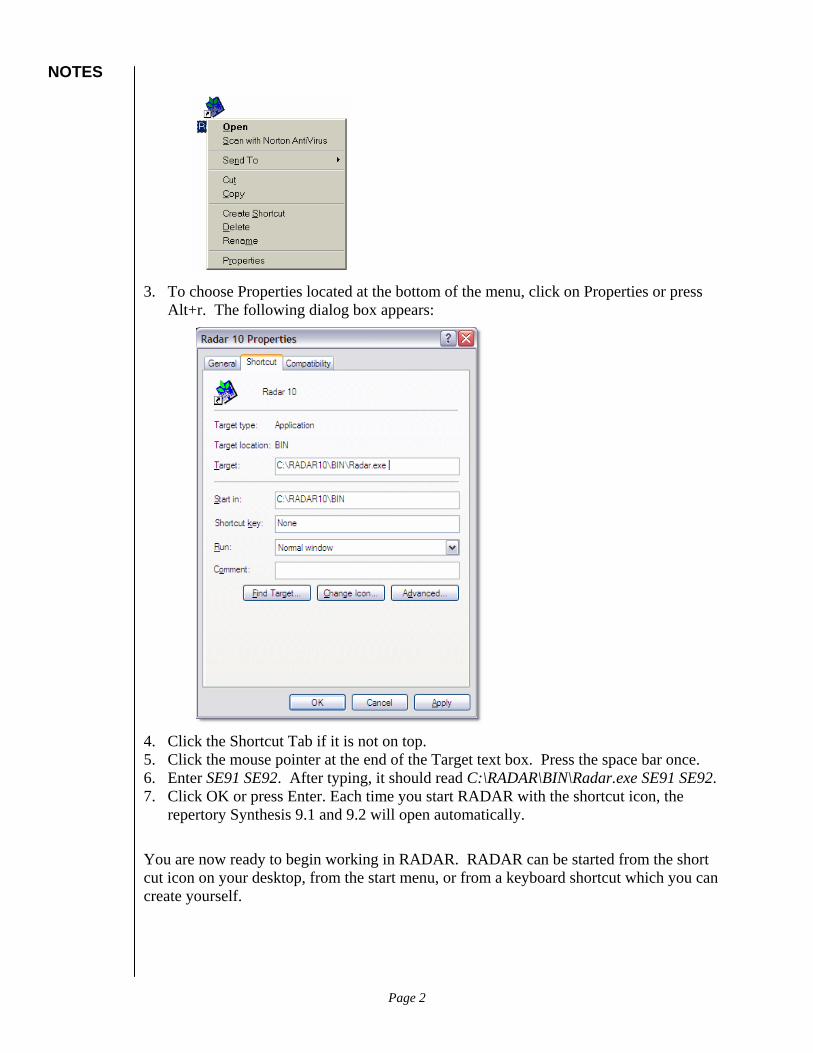
this: 2. Position the mouse pointer over the icon. Press the right mouse
button, or the alternate mouse button. A short cut menu appears.
NOTES
3. To choose Properties located at the bottom of the menu, click on Properties or press
Alt+r. The following dialog box appears:
4. Click the Shortcut Tab if it is not on top. 5. Click the mouse pointer at the end of the Target text box. Press the space bar once. 6. Enter SE91 SE92. After typing, it should read C:\RADAR\BIN\Radar.exe SE91 SE92. 7. Click OK or press Enter. Each time you start RADAR with the shortcut icon, the
repertory Synthesis 9.1 and 9.2 will open automatically.
You are now ready to begin working in RADAR. RADAR can be started from the short cut icon on your desktop, from the start menu, or from a keyboard shortcut which you can create yourself.
Page 2
NOTES
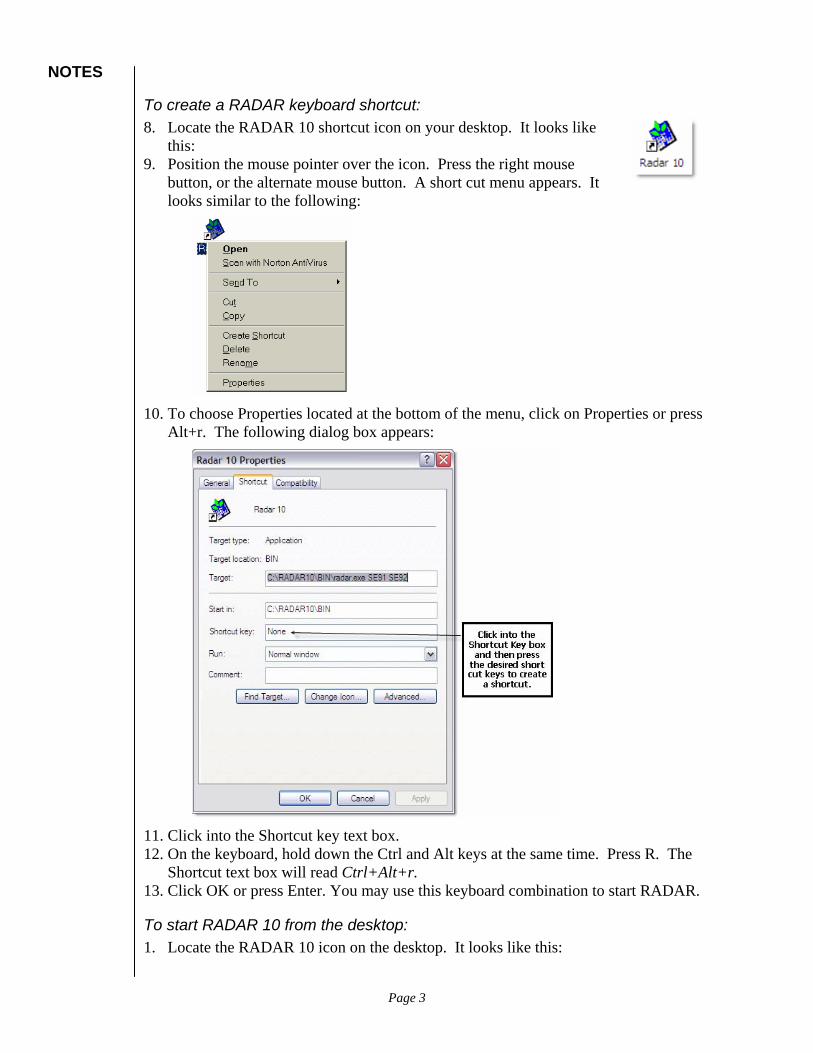
To create a RADAR keyboard shortcut: 8. Locate the RADAR 10 shortcut icon on your desktop. It looks like
this: 9. Position the mouse pointer over the icon. Press the right mouse
button, or the alternate mouse button. A short cut menu appears. It looks similar to the following:
10. To choose Properties located at the bottom of the menu, click on Properties or press
Alt+r. The following dialog box appears:
11. Click into the Shortcut key text box. 12. On the keyboard, hold down the Ctrl and Alt keys at the same time. Press R. The
Shortcut text box will read Ctrl+Alt+r. 13. Click OK or press Enter. You may use this keyboard combination to start RADAR.
To start RADAR 10 from the desktop: 1. Locate the RADAR 10 icon on the desktop. It looks like this:
Page 3
NOTES
2. Double click the icon with the left mouse button. RADAR opens with Synthesis 9.2 on the screen.
To start RADAR 10 from the Start button: 1. Click the Start button located in the lower left corner of the computer screen. The
main menu appears. 2. Click the Program option. The menu will expand to display program choices. If
necessary, click the expansion arrow to display additional program options. 3. Choose the Archibel Software program group. 4. Choose the RADAR 10 icon. RADAR opens with Synthesis 9.2 on the screen.
You can also use the keyboard shortcut which you just created to start RADAR. This keyboard shortcut will work from any application, providing the same key combination has not been assigned to operate differently within the program in which you are currently working.
To start RADAR 10 with the Keyboard Shortcut: 5. From within the program in which you are currently working, hold down the Ctrl key
plus the Alt key plus the letter R. RADAR 10 will begin with Synthesis 9.2 as the default repertory.
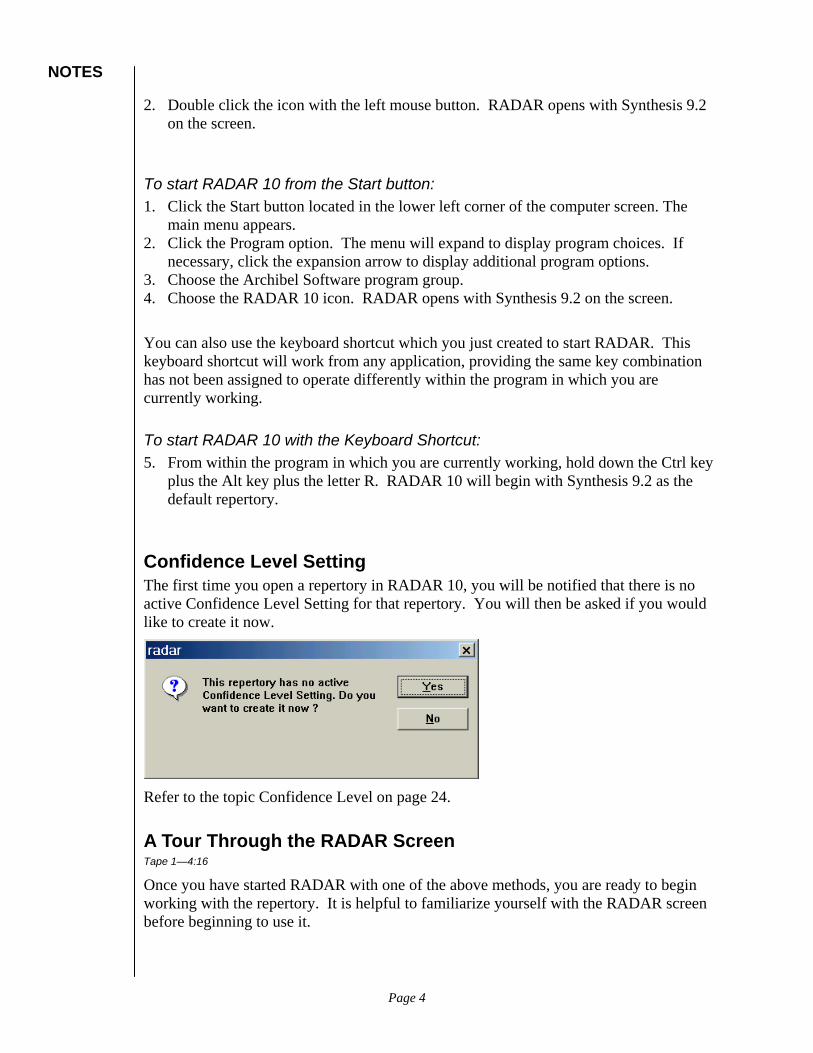
Confidence Level Setting The first time you open a repertory in RADAR 10, you will be notified that there is no active Confidence Level Setting for that repertory. You will then be asked if you would like to create it now.
Refer to the topic Confidence Level on page 24.
A Tour Through the RADAR Screen Tape 1—4:16
Once you have started RADAR with one of the above methods, you are ready to begin working with the repertory. It is helpful to familiarize yourself with the RADAR screen before beginning to use it.
Page 4

NOTES
By default, RADAR opens up to the Mind chapter of Synthesis.
Keyboard Shortcuts Instead of the Mouse Tape 1--4:00
RADAR is a windows based product. As such, it is designed to operate with a mouse. However, you can also use the keyboard to activate the commands in RADAR. If you are comfortable and familiar with a computer keyboard, you may find it is more efficient as you can keep your hands on the keyboard rather than moving your hands back and forth between the keyboard and the mouse.
Alt and the Underlined Letter, Escape and Enter keys Look closely at the RADAR menu at the top of the screen and you will notice that in each word on the menu there is an underlined letter (press the Alt key if you use Windows 2000 or XP). This indicates which letter on the keyboard must be pressed, in combination with the Alt key, to activate the desired menu selection without using the mouse.
Page 5

NOTES
This is a standard convention in the Windows Operating System. Most often it is the first letter in the word, but if more than one menu item begins with the same letter, then it is a different letter.
Once the main menu selection has been made and a sub menu appears, then each submenu selection is made by pressing the letter alone, rather than using the Alt key.
After the submenu selection has been made and a dialog box appears on the screen, you must once again use the Alt key in combination with the underlined letter to activate the desired areas of the dialog box.
NO
TE In all Windows applications, except for the pull down sub menu, you
must type Alt and the letter or number to activate a menu or dialog box from the keyboard.
To activate the RADAR menu with the keyboard: 1. While viewing the desired window, while pressing the Alt key, on the keyboard, press
the underlined letter in the desired menu selection. A submenu appears:
2. Without pressing the Alt key, on the keyboard, press the underlined letter
corresponding to the desired submenu selection. An appropriate dialog box appears.
3. To make a selection within a dialog box, you must again use the Alt key plus the
underlined letter. 4. To close the dialog box without making a selection, press Esc.
Page 6
NOTES
To close the dialog box after making a selection, press Enter. The button with the darker border will be activated. This is usually the OK button.
Type Alt + V to pull down the View submenu. Type C to open the symptom clipboard. Press Esc to close the Symptom Clipboard window.
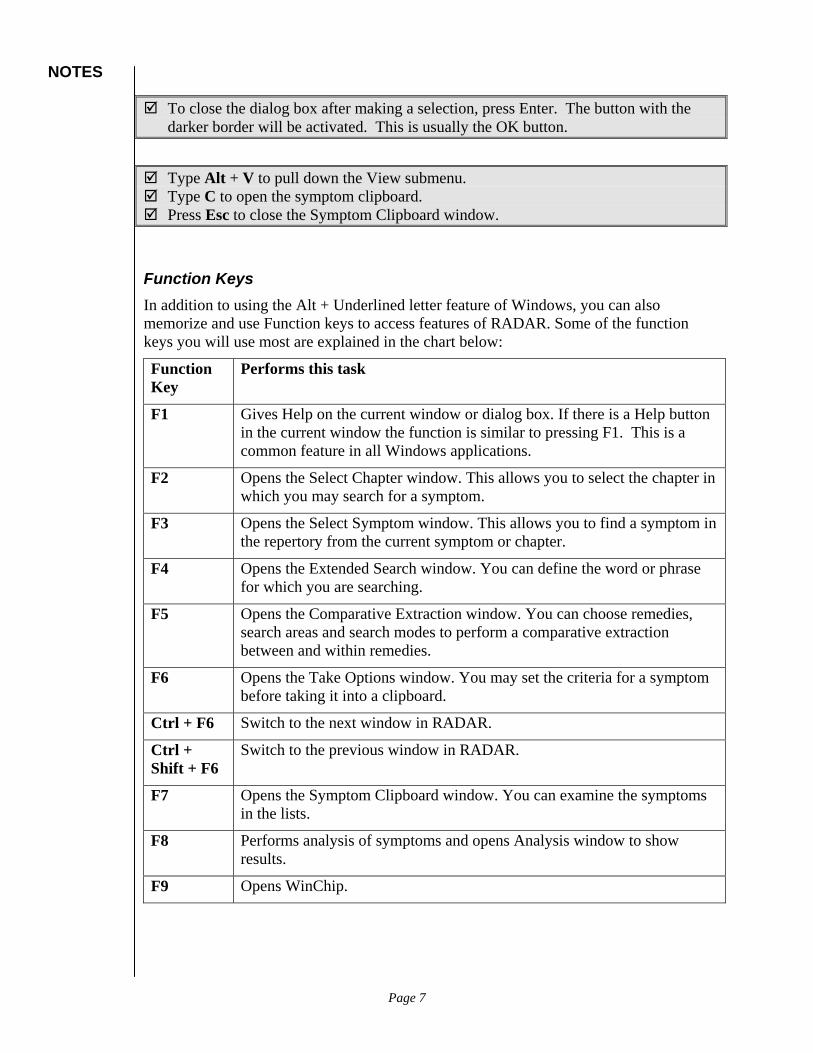
Function Keys In addition to using the Alt + Underlined letter feature of Windows, you can also memorize and use Function keys to access features of RADAR. Some of the function keys you will use most are explained in the chart below:
Function Key
Performs this task
F1 Gives Help on the current window or dialog box. If there is a Help button in the current window the function is similar to pressing F1. This is a common feature in all Windows applications.
F2 Opens the Select Chapter window. This allows you to select the chapter in which you may search for a symptom.
F3 Opens the Select Symptom window. This allows you to find a symptom in the repertory from the current symptom or chapter.
F4 Opens the Extended Search window. You can define the word or phrase for which you are searching.
F5 Opens the Comparative Extraction window. You can choose remedies, search areas and search modes to perform a comparative extraction between and within remedies.
F6 Opens the Take Options window. You may set the criteria for a symptom before taking it into a clipboard.
Ctrl + F6 Switch to the next window in RADAR.
Ctrl + Shift + F6
Switch to the previous window in RADAR.
F7 Opens the Symptom Clipboard window. You can examine the symptoms in the lists.
F8 Performs analysis of symptoms and opens Analysis window to show results.
F9 Opens WinChip.
Page 7
NOTES
You can also use the Help system to identify the uses of each of the Function keys. There are more function keys programmed into RADAR than are included in the above chart.
To identify the uses of the Function keys using the Help System: 1. Follow the Help instructions for the Toolbar Buttons beginning on page 9. 2. Follow the instructions through step 3. 3. Position the mouse pointer over the green underlined text Function Keys in the
Repertory Window. The mouse pointer changes to a hand again. 4. Click on the text and the Help screen topic jumps to Function Keys.
5. If you wish to print the explanation of the Function Keys, click the Print button at the
top of the screen.
Toolbar Buttons Defined Radar contains information about the function of each of the buttons that appears on the Toolbar that appears just below the menu. In addition, the Help system also identifies the purpose of each button.
To identify the function of the Toolbar Buttons: 1. Move the mouse pointer over the button of which you wish to identify the function. 2. Press the mouse button. In the lower left corner of the screen, a definition appears. 3. If you wish to make the definition disappear, without releasing the mouse button,
slide the mouse pointer off the toolbar. 4. If you wish to activate the button functions, release the mouse button without sliding
the mouse pointer off the toolbar. The toolbar button will be activated.
You can also use the Help system to read definitions of the Toolbar buttons. The Help system is context sensitive and in all situations, can be accessed by pressing F1.
Page 8
NOTES
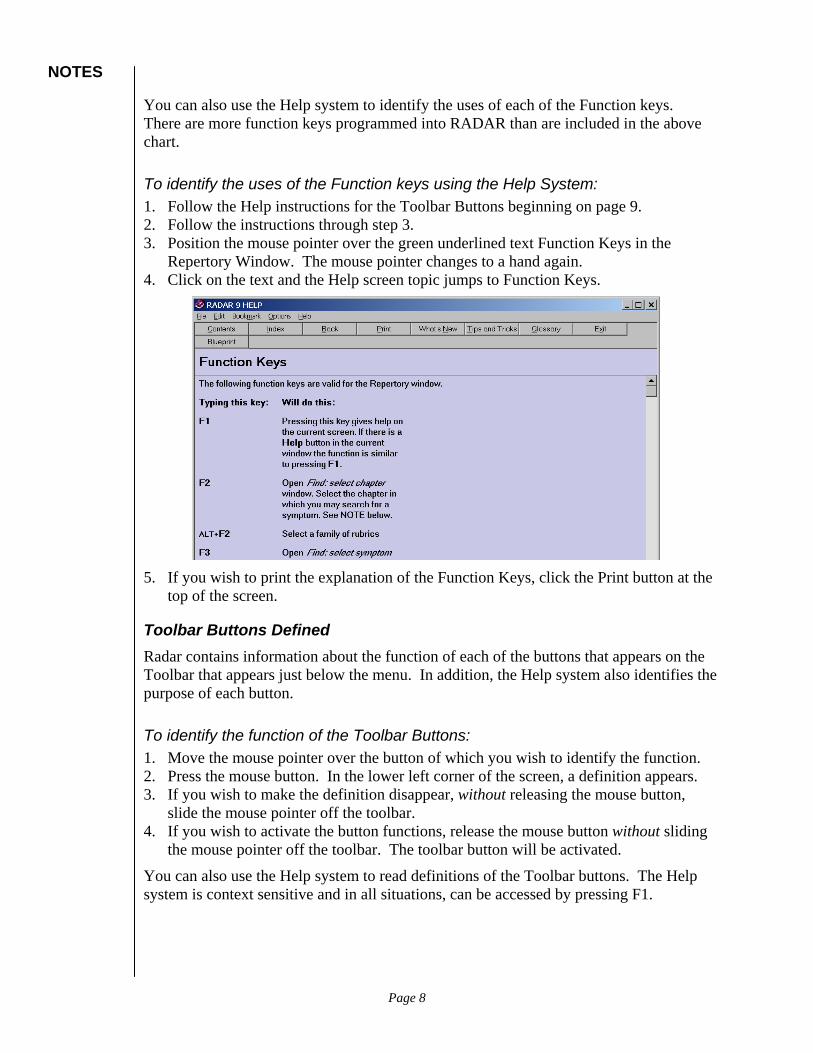
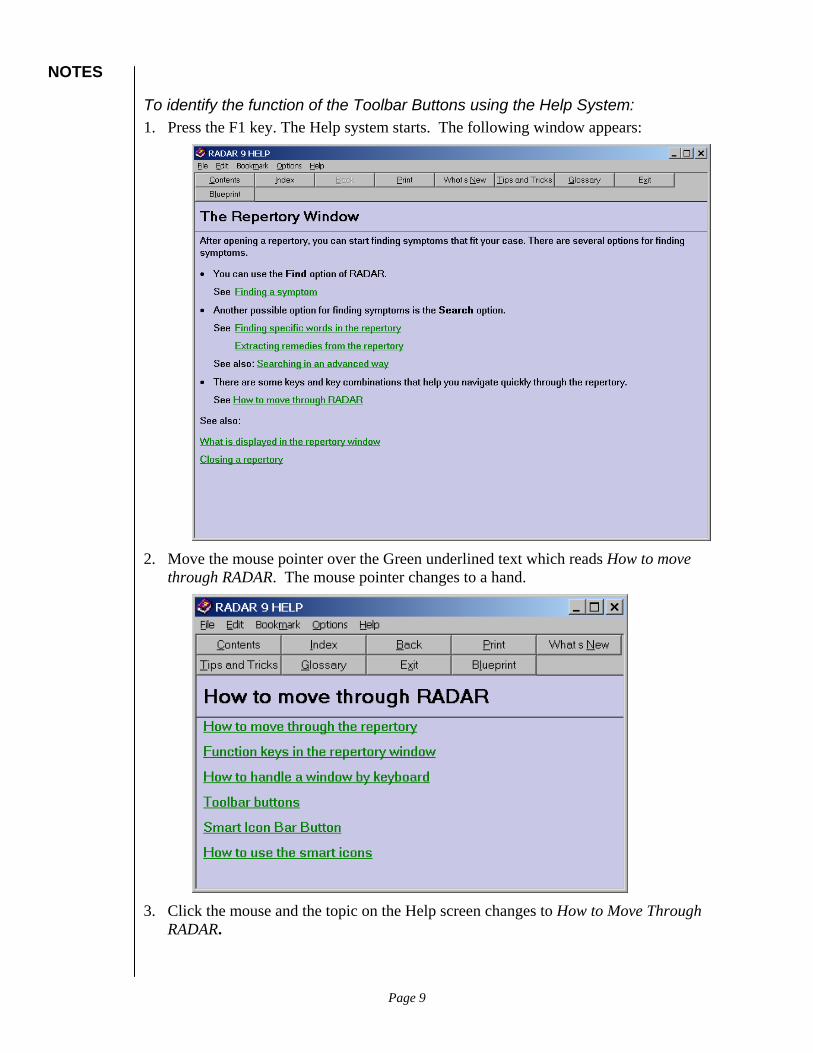
To identify the function of the Toolbar Buttons using the Help System: 1. Press the F1 key. The Help system starts. The following window appears:
2. Move the mouse pointer over the Green underlined text which reads How to move
through RADAR. The mouse pointer changes to a hand.
3. Click the mouse and the topic on the Help screen changes to How to Move Through
RADAR.
Page 9
NOTES
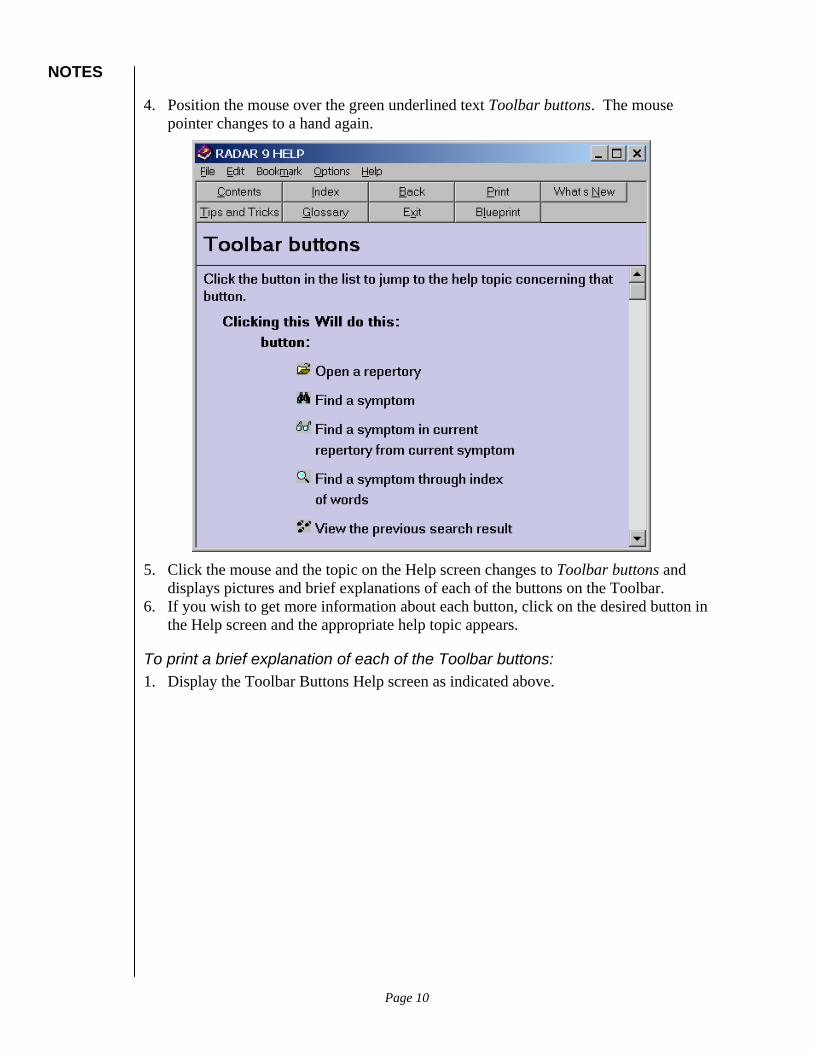
4. Position the mouse over the green underlined text Toolbar buttons. The mouse pointer changes to a hand again.
5. Click the mouse and the topic on the Help screen changes to Toolbar buttons and
displays pictures and brief explanations of each of the buttons on the Toolbar. 6. If you wish to get more information about each button, click on the desired button in
the Help screen and the appropriate help topic appears.
To print a brief explanation of each of the Toolbar buttons: 1. Display the Toolbar Buttons Help screen as indicated above.
Page 10
NOTES
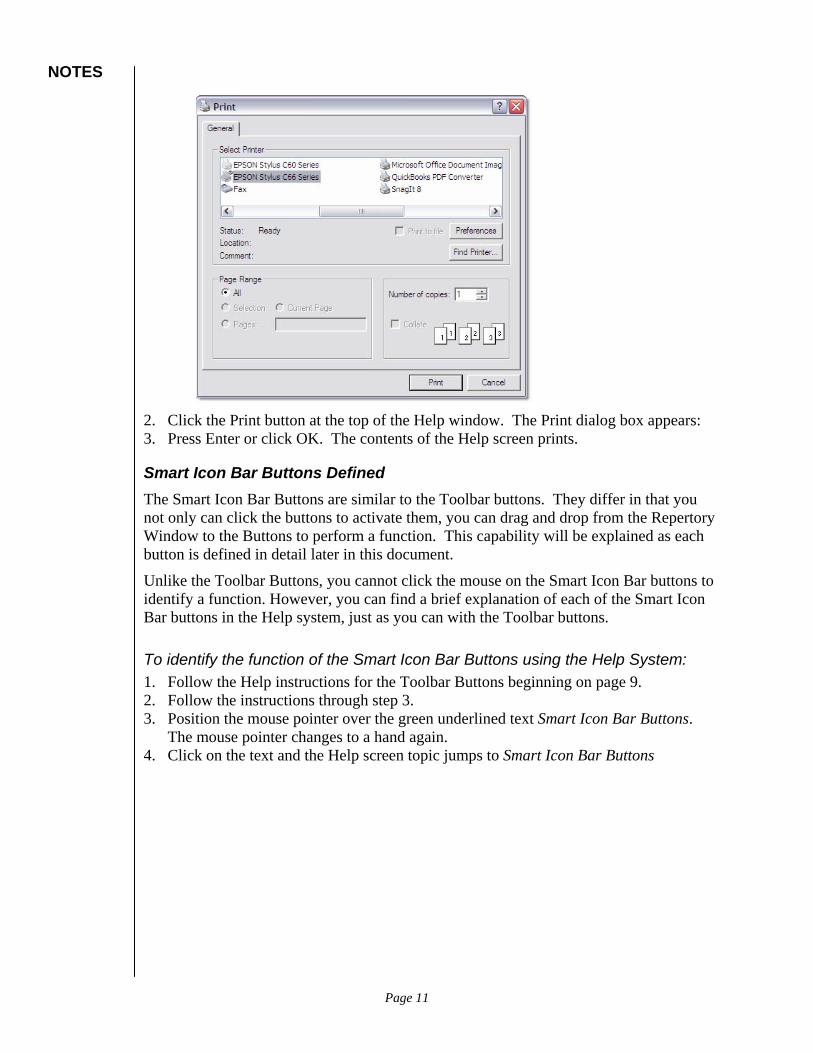
2. Click the Print button at the top of the Help window. The Print dialog box appears: 3. Press Enter or click OK. The contents of the Help screen prints.
Smart Icon Bar Buttons Defined The Smart Icon Bar Buttons are similar to the Toolbar buttons. They differ in that you not only can click the buttons to activate them, you can drag and drop from the Repertory Window to the Buttons to perform a function. This capability will be explained as each button is defined in detail later in this document.
Unlike the Toolbar Buttons, you cannot click the mouse on the Smart Icon Bar buttons to identify a function. However, you can find a brief explanation of each of the Smart Icon Bar buttons in the Help system, just as you can with the Toolbar buttons.
To identify the function of the Smart Icon Bar Buttons using the Help System: 1. Follow the Help instructions for the Toolbar Buttons beginning on page 9. 2. Follow the instructions through step 3. 3. Position the mouse pointer over the green underlined text Smart Icon Bar Buttons.
The mouse pointer changes to a hand again. 4. Click on the text and the Help screen topic jumps to Smart Icon Bar Buttons
Page 11
NOTES
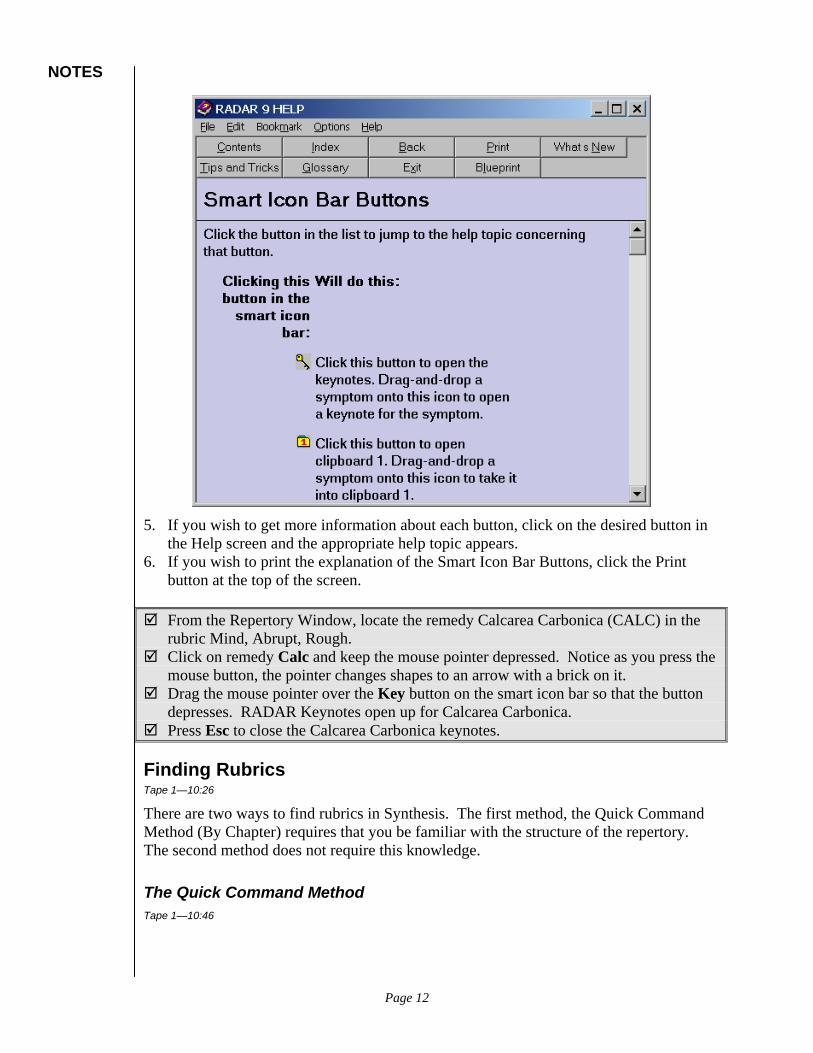
5. If you wish to get more information about each button, click on the desired button in
the Help screen and the appropriate help topic appears. 6. If you wish to print the explanation of the Smart Icon Bar Buttons, click the Print
button at the top of the screen.
From the Repertory Window, locate the remedy Calcarea Carbonica (CALC) in the rubric Mind, Abrupt, Rough.
Click on remedy Calc and keep the mouse pointer depressed. Notice as you press the mouse button, the pointer changes shapes to an arrow with a brick on it.
Drag the mouse pointer over the Key button on the smart icon bar so that the button depresses. RADAR Keynotes open up for Calcarea Carbonica.
Press Esc to close the Calcarea Carbonica keynotes.
Finding Rubrics Tape 1—10:26
There are two ways to find rubrics in Synthesis. The first method, the Quick Command Method (By Chapter) requires that you be familiar with the structure of the repertory. The second method does not require this knowledge.
The Quick Command Method Tape 1—10:46
Page 12
NOTES
As you become more familiar with RADAR, EH and WinChip, you will find that there are many similarities in how each functions. One of the consistent features throughout is the ability to quickly bring up a dialog box to perform a task without having to use the menu or tool bars. This is known as the Quick Command feature.
To find Rubrics with the Quick Command method:
NO
TE When finding rubrics with the Quick Command method, it doesn’t
matter which chapter your pointer is in when you begin typing. However, you do have to be in the Repertory Window view.
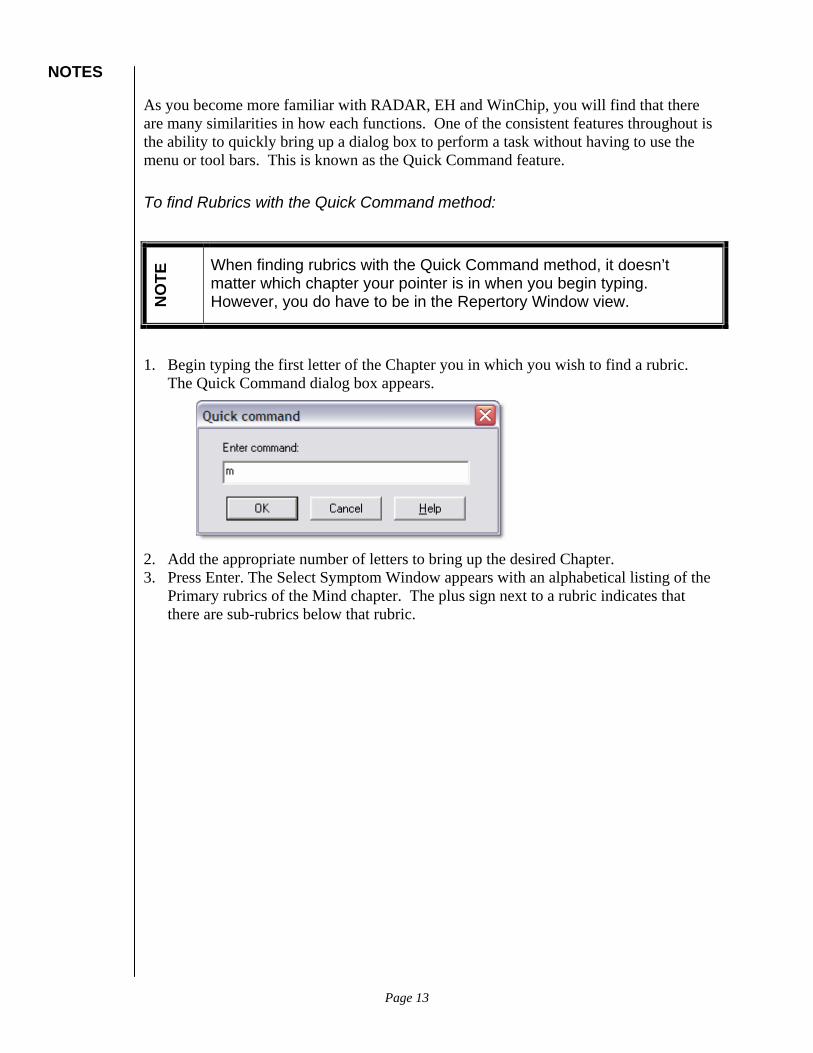
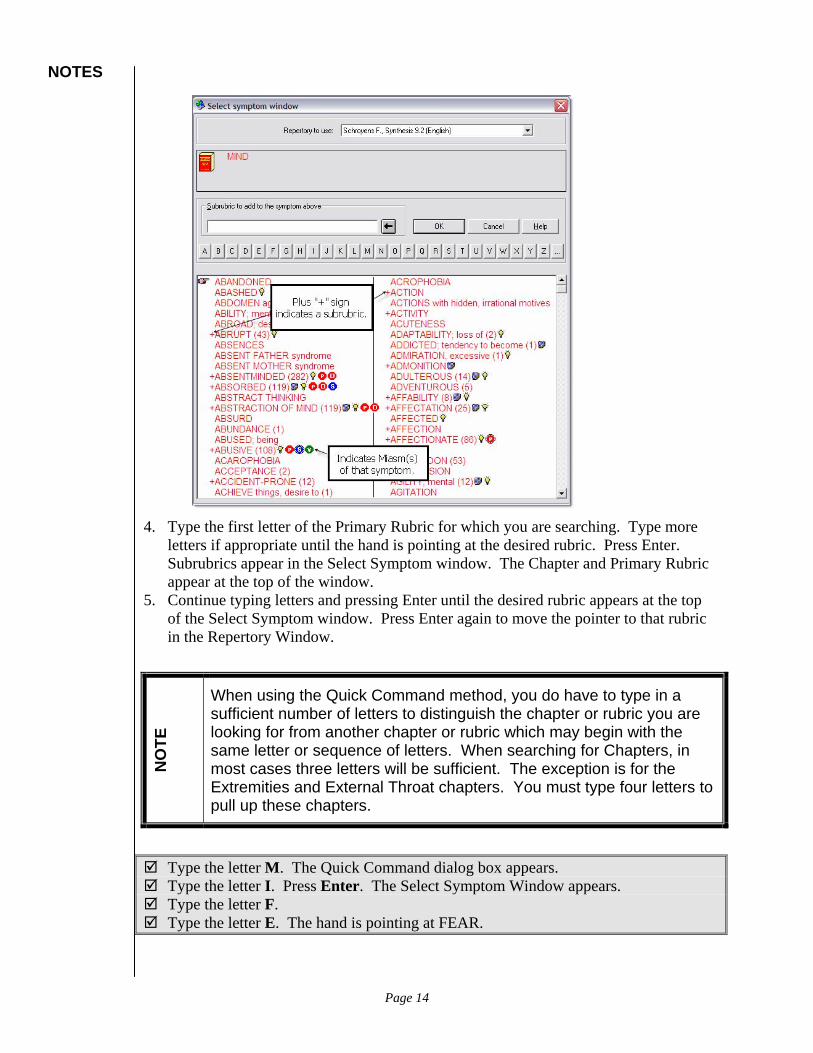
1. Begin typing the first letter of the Chapter you in which you wish to find a rubric. The Quick Command dialog box appears.
2. Add the appropriate number of letters to bring up the desired Chapter. 3. Press Enter. The Select Symptom Window appears with an alphabetical listing of the
Primary rubrics of the Mind chapter. The plus sign next to a rubric indicates that there are sub-rubrics below that rubric.
Page 13
NOTES
4. Type the first letter of the Primary Rubric for which you are searching. Type more
letters if appropriate until the hand is pointing at the desired rubric. Press Enter. Subrubrics appear in the Select Symptom window. The Chapter and Primary Rubric appear at the top of the window.
5. Continue typing letters and pressing Enter until the desired rubric appears at the top of the Select Symptom window. Press Enter again to move the pointer to that rubric in the Repertory Window.
NO
TE
When using the Quick Command method, you do have to type in a sufficient number of letters to distinguish the chapter or rubric you are looking for from another chapter or rubric which may begin with the same letter or sequence of letters. When searching for Chapters, in most cases three letters will be sufficient. The exception is for the Extremities and External Throat chapters. You must type four letters to pull up these chapters.
Type the letter M. The Quick Command dialog box appears. Type the letter I. Press Enter. The Select Symptom Window appears. Type the letter F. Type the letter E. The hand is pointing at FEAR.
Page 14
NOTES
Press Enter. Mind – Fear appears at the top of the Select Symptom window and the subrubrics appear at the bottom of the window.
Type AL. Press Enter twice. The symptom Mind-Fear-Aliens appears on the screen. Type G. Press Enter. The rubrics for the Generals chapter appear in the Select
Symptom window. Type FO. The hand is pointing at Food and Drinks. Press Enter for that rubric. Type Beer. Notice as you type each letter that the pointer gets more and more
specific with each letter. When the hand is pointing at Beer, press Enter. Type D. Press Enter twice. The symptom Generals - Food and Drinks - Beer – Desires appears on the screen.
If you are already in the Chapter in which you wish to search, you can return to the Select Symptom Window quickly without having to start the search from locating the Chapter. The backspace key changes the Select Symptom Window from Specific to General.
To use to the Select Symptom Window: 1. Press F3.
-or- Click the Find a Symptom in the Current Repertory button. The Select Symptom Window appears.
2. Press Backspace. The Select Symptom window changes to display one sub rubric up from where the hand is pointing in the Repertory window.
3. Continue to press Backspace until you have reached the desired sub rubric level. 4. Begin typing the first letters of the new sub-rubric for which you are searching.
Press F3. The Select Symptom window appears. Press Backspace. Notice the screen changes to display the sub-rubrics under Beer. Press Backspace again. Notice the screen changes to display the sub-rubrics under
Food and Drink. Type S A L T. Press Enter. Type D. Press Enter. The Select Symptom window displays the rubric Generals –
Food and Drink – Salt – Desires.
Finding Chapter Titles If you not completely familiar with the Chapter titles in the repertory, you can access them quickly and easily with the Function keys.
To find Chapter titles: 1. Press F2. The Select Chapter window appears. You can use this window to continue
your search for rubrics, if desired.
Page 15

NOTES
2. Begin typing the name of the chapter to select the desired chapter. 3. Press Enter. The Select Symptom window appears. Continue selecting desired
symptoms, as indicated above beginning on page 14, step 4.
Searching for Rubrics Tape 1—31:46
You may be trying to identify a rubric, but can’t locate one which fits your client’s symptom well. The Quick Command window will allow you to search for a particular word and will display all the rubrics which contain that word. This will allow you to find a useful rubric without having to browse through the entire repertory. This works in RADAR because every word in every rubric is indexed.
To search for a rubric: 1. With RADAR displaying the Repertory View, type a question mark (?). The Quick
Command window appears with a question mark in the text box.
2. Begin typing the word on which you wish to search. 3. Press Enter or click on OK. A dialog box appears briefly indicating that RADAR is
conducting a search. Then the Result of Search by Index window appears with the search results.
Page 16

NOTES
4. Scroll through the search result to see which rubrics appear. 5. Double click the desired rubric to display that rubric in the Repertory Window. 6. If you wish to return to the search result, click the View Previous Search Result
button on the toolbar.
Type ?. The Quick Command box appears. Type overboard. Press Enter. Notice the number of rubrics which appear in the Result of Search by Index window. With the finger still pointing to the first rubric in the Result window, press Enter.
That rubric appears in the repertory window. Notice that there is only one remedy in the rubric.
When performing a search in RADAR, the search result will include only the word you type into the Quick Command box, and if it is a noun, will often also include the plural form. However, it will not include other words which contain the word for which you searched unless you add a wildcard indicator. The Wild card indicator in the Quick Command search is an asterisk (*).
To search with a wild card indicator: 1. Type a question mark (?) to bring up the Quick Command window.
Page 17

NOTES
2. Type the word for which you wish to search. 3. Type an asterisk (*) at the end of the word. 4. Press Enter or click OK. RADAR will perform a search for any rubric which
contains the letters preceding the asterisk.
Press Esc to close the Result of Search window. Type ?. The Quick Command box appears. Type claust*. Press Enter. Only one rubric appears. Notice in the Size column, the number of remedies is zero (0). Press Enter. The rubric appears which says See Narrow. Press Enter again. The rubric Mind, Fear, Narrow Places, in appears.
You may also be searching for an expression using the index. For example, if you are searching for Fear of Cats, just using Cats may get you many more rubrics that are useful. But you can use parts of the expression to get rubrics which contain those words.
To search for an expression: 1. Type ?. The Quick Command window appears. 2. Without putting a space after the question mark, type the first word for which you
wish to search. Press the space bar. Type the second word. 3. If you wish to include additional words in the search, press the space bar between
each word. 4. Press Enter. The Result of Search window appears with options which contain the
words you entered in the Quick Command window.
Type?. Type fear Press Spacebar. Type cat*. Press Enter. Notice the rubrics which appear in the Search Result window. A
number of them include words which contain the character string CAT, but are not the Fear of Cats rubric.
Double click on the number 10 next to the Mind, Fear, Cats of rubric. A remedy window appears displaying the remedies with appear in that rubric.
Press Enter to close the remedy window. Press Enter on Mind, Cats, Fear of. In the Repertory window, notice that there is blue text under the rubric entry. This is
a Master Synonym. Press Enter. The screen displays the rubric Mind, Fear, Cats. We are going to look for a rubric which describes pain in the morning after eating. Type G Type P Type M.
Page 18
NOTES
Press Esc. This is not what we are looking for Type ? Type Pain. Press Spacebar. Type Morning. Press Spacebar. Type After. Press Spacebar. Type Eating. Press Enter.
Viewing Previous Search Results and Viewing Sub rubrics Tape 1—53:55
When you are viewing search results, you may wish to display a rubric in the repertory view and then display the search result again without having to recreate the previous search. This can be done with the View Previous Search Result button on the toolbar.
Sometimes the words you are looking for contain sub rubrics which relate to the main rubric. If you haven’t found an appropriate rubric in your search results, you may wish to display the sub rubrics in the search results window. Display the sub rubrics by clicking the Display Subrubrics button found in the Result of Search window.
View one of the rubrics in the repertory. Click the View Previous Search Result button (foot prints) to display the search
results again. Click the Display Subrubrics button. You will not see any different result with this
particular search.
Conducting the Same Search in Encyclopaedia Homeopathica (EH) RADAR 10 allows you to easily export your search to EH directly from the Result of Search Window.
To export a RADAR search to EH: 1. In the Results of Search window, click the Make the Same Search in EH
button. EH automatically begins and the search is conducted.
Finding Rubrics using RADAR Concepts Sometimes a patient will use a word or words to describe themselves that are not contained in the repertory. Or, you may think of a word or idea which describes your patient which isn’t contained in the repertory or its cross references. RADAR contains a feature called Concepts which groups rubrics together in a common theme. It is a useful way to see what rubrics may be available to help you best repertorize the feeling that your patient has expressed. RADAR Concepts will be described in greater detail in a later section.
Page 19

NOTES
To find rubrics using RADAR Concepts: 1. Type two question marks (??). The Quick Command box appears.
2. Type a word which expresses the idea your patient has expressed. 3. Press Enter or click OK. The Result of Search on Concepts window appears.
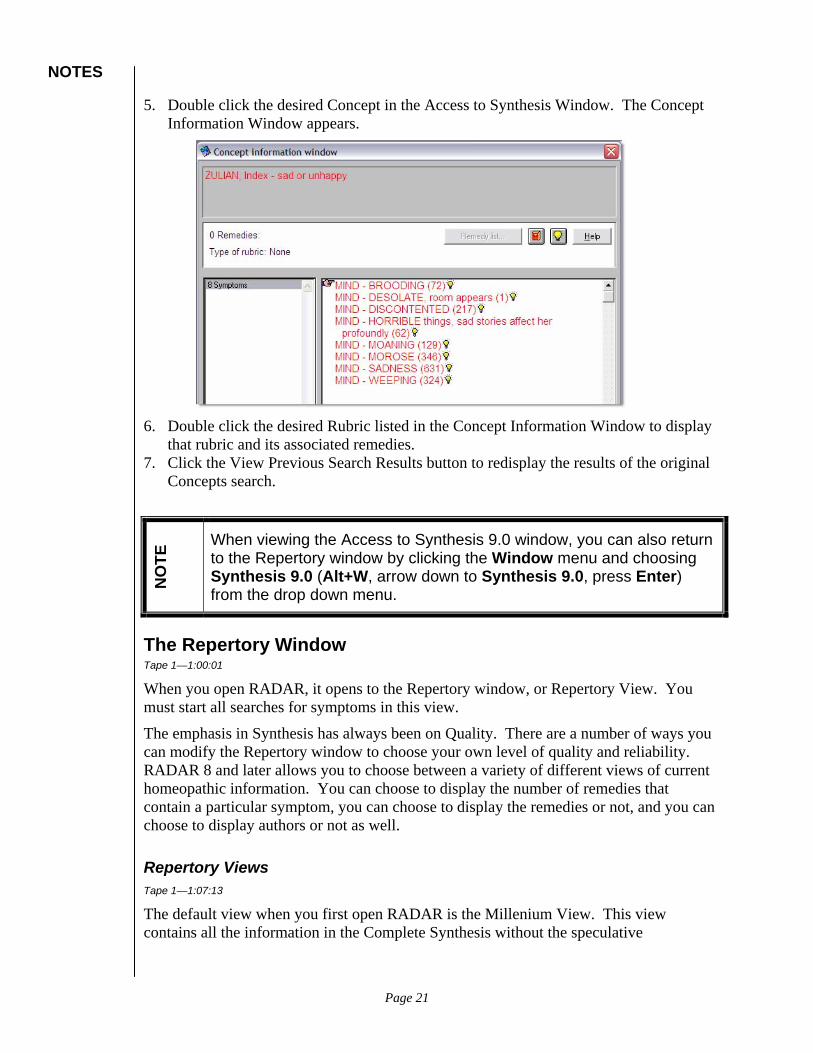
4. Double click the desired Concept (not the Concepts Icon). The Access to Synthesis
Window appears on top of the Synthesis window.
Page 20
NOTES
5. Double click the desired Concept in the Access to Synthesis Window. The Concept Information Window appears.
6. Double click the desired Rubric listed in the Concept Information Window to display
that rubric and its associated remedies. 7. Click the View Previous Search Results button to redisplay the results of the original
Concepts search.
NO
TE When viewing the Access to Synthesis 9.0 window, you can also return
to the Repertory window by clicking the Window menu and choosing Synthesis 9.0 (Alt+W, arrow down to Synthesis 9.0, press Enter) from the drop down menu.
The Repertory Window Tape 1—1:00:01
When you open RADAR, it opens to the Repertory window, or Repertory View. You must start all searches for symptoms in this view.
The emphasis in Synthesis has always been on Quality. There are a number of ways you can modify the Repertory window to choose your own level of quality and reliability. RADAR 8 and later allows you to choose between a variety of different views of current homeopathic information. You can choose to display the number of remedies that contain a particular symptom, you can choose to display the remedies or not, and you can choose to display authors or not as well.
Repertory Views Tape 1—1:07:13
The default view when you first open RADAR is the Millenium View. This view contains all the information in the Complete Synthesis without the speculative
Page 21

NOTES
information by Jan Scholten or dream provings or meditation provings. Information about this view and some of the more commonly used views are contained in the table below.
REPERTORY VIEW TABLE
Repertory View Contents
Millenium View Contains all the information in the Complete Synthesis without the speculative work by Jan Scholten or dream or meditation provings. It does contain all the information of recent provings.
Full View Contains the Complete Synthesis as well as the work of Jan Scholten and dream and meditation provings.
Quantum View Contains the Complete Synthesis without any of the more recent provings or the speculative work. It does contain contemporary clinical information. You may wish to use this view because it has the most reliable clinical information.
To change the Repertory View: 1. From the Repertory Window, click the Repertory View Changer. A drop down menu
appears.
2. Click the desired view from the menu choices.
Page 22

NOTES
To learn about all the Repertory Views: 1. From the Repertory Window, click the Repertory View Changer. A drop down menu
appears. 2. Click Help about views…. The Help system starts and opens to the Help About Views
page which contains information about each of the view choices on the drop down menu.
3. Click the green underlined text to find out which authors are contained in which view. 4. Click the Back button at the top of the screen to return to the Help About Views
Notice the number of remedies that appears in the symptom Mind, Absentminded. Click the Repertory View Changer. Choose the Full Synthesis. Notice the number
of remedies that appear in the symptom Mind, Absentminded. Click the Repertory View Changer. Choose the Millenium View. Notice the
number of remedies that appear in the symptom Mind, Absentminded. Click the Repertory View Changer. Choose the Quantum View. Notice the
number of remedies that appear in the symptom Mind, Absentminded. Click the Repertory View Changer. Choose Modern to 1987 view. Notice the
number of remedies that appear in the symptom Mind, Absentminded. Click the Repertory View Changer. Choose Help about views. Scroll through and
notice the information about each of the views. Scroll to the bottom of the Help About Views screen. Click the underlined green text Graphical Representation of Views to find out how
many homeopathic books are included in each view. Close the Help screen.
Creating Your Own Repertory View If you feel like you don’t like any of the views available, you can always create your own Repertory View, including only those authors you feel are reliable, or excluding those you feel are not reliable.
To create your own Repertory View: 1. Click the Repertory View Changer. Select Create a New View from the menu that
appears. 2. A dialog box appears to warn you that any repertories currently open will be closed.
Click Yes to continue. 3. The Views Selection for Synthesis 9.0 (English) dialog box appears. Click the Create
View button. 4. A dialog box appears prompting you to name the new view. Enter the desired name.
Press Enter or click Okay. 5. Click the authors you wish to include.
–or- Click the Select all button (Alt+a) to include all authors. Then click to deselect the authors you wish to exclude.
Page 23

NOTES
6. Click the Build button (Alt+B) to create a new view. The new view will now appear on the menu when you click the Repertory View Changer.
N
OTE
Once you have begun to create a new view, it will take 20 minutes to complete the creation of the new view. You must allow it to continue building the view.
Change the view to Full Synthesis.
Confidence Level
What does Confidence Level mean? Every single occurrence of a remedy in Synthesis is attributed with a Level of Confidence expressing the confidence that you have in the presence of the remedy in the rubric. This Confidence Level of Remedies (CLR) ranges from 0 to 100 and is the result of several criteria indicating reliability of information.
One such criterion is the "presence of a remedy in Kent's repertory". Many experienced homeopaths feel that, if a remedy is present in Kent's repertory, it has certain reliability. Therefore they consider that all Kentian remedies have a "high" Confidence Level. Other homeopaths may feel that we have to start from scratch and that Kentian remedies should not have a high confidence rate, but only a medium one. Depending on a homeopath’s view, the criterion "Present in Kent" may be valued from from 0 to 10.
The same reasoning applies to all other criteria and different homeopaths may have different levels of confidence in each criteria.
Several criteria may apply to the same remedy, because different authors may support one remedy. A formula is used so that each remedy receives a final Confidence Level that ranges between 0 and 100. The following graph shows the remedies of a rubric with their various Confidence Levels:
Page 24
NOTES
0
10
20
30
40
50
60
70
80
90
100
Con
fiden
ce L
evel
of R
emed
ies
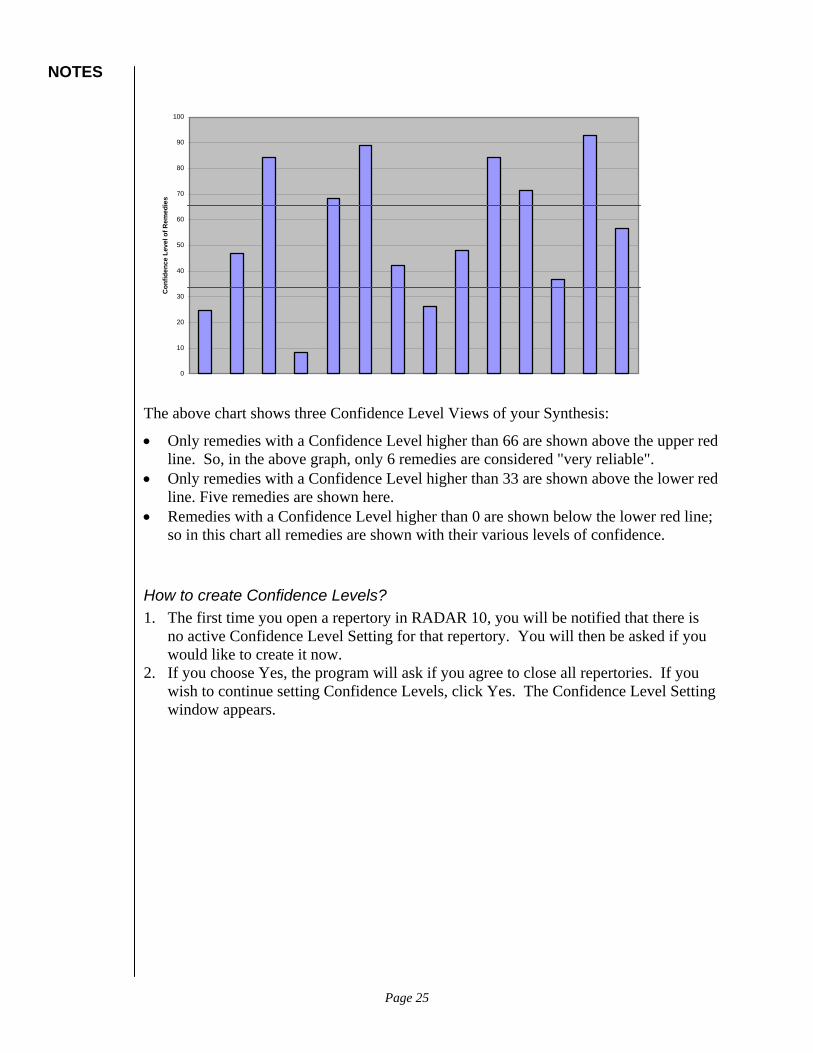
The above chart shows three Confidence Level Views of your Synthesis:
• Only remedies with a Confidence Level higher than 66 are shown above the upper red line. So, in the above graph, only 6 remedies are considered "very reliable".
• Only remedies with a Confidence Level higher than 33 are shown above the lower red line. Five remedies are shown here.
• Remedies with a Confidence Level higher than 0 are shown below the lower red line; so in this chart all remedies are shown with their various levels of confidence.
How to create Confidence Levels? 1. The first time you open a repertory in RADAR 10, you will be notified that there is
no active Confidence Level Setting for that repertory. You will then be asked if you would like to create it now.
2. If you choose Yes, the program will ask if you agree to close all repertories. If you wish to continue setting Confidence Levels, click Yes. The Confidence Level Setting window appears.
Page 25
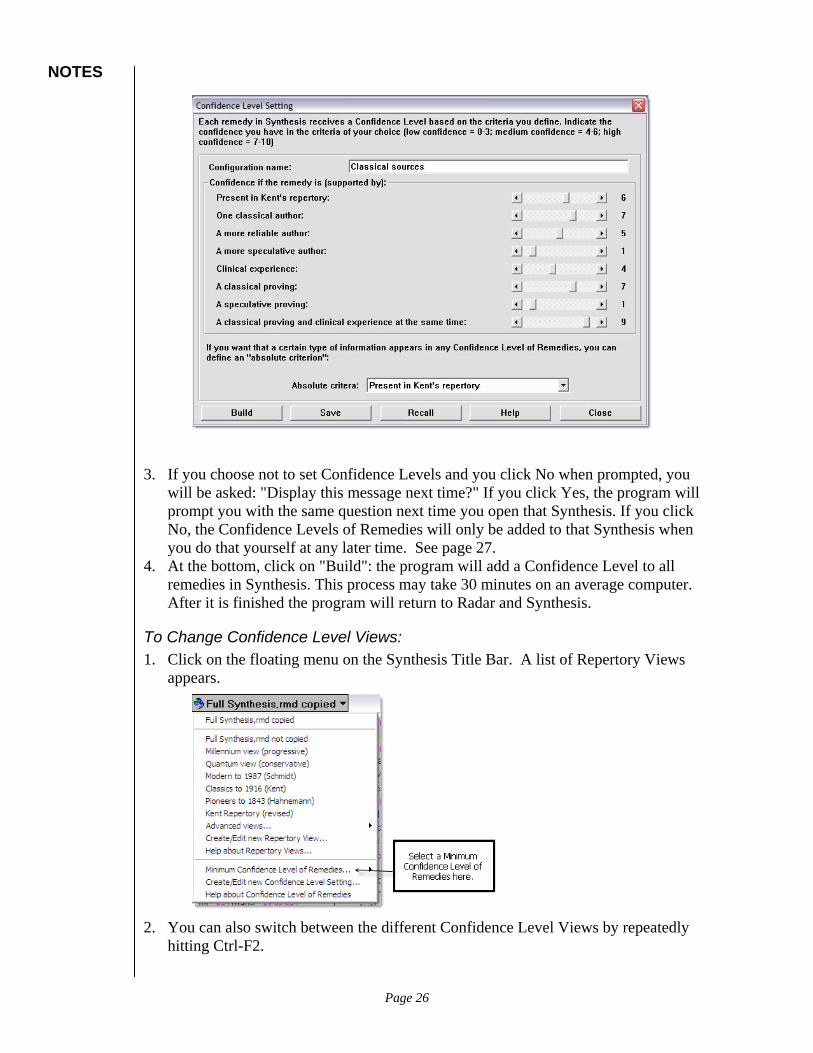
NOTES
3. If you choose not to set Confidence Levels and you click No when prompted, you will be asked: "Display this message next time?" If you click Yes, the program will prompt you with the same question next time you open that Synthesis. If you click No, the Confidence Levels of Remedies will only be added to that Synthesis when you do that yourself at any later time. See page 27.
4. At the bottom, click on "Build": the program will add a Confidence Level to all remedies in Synthesis. This process may take 30 minutes on an average computer. After it is finished the program will return to Radar and Synthesis.
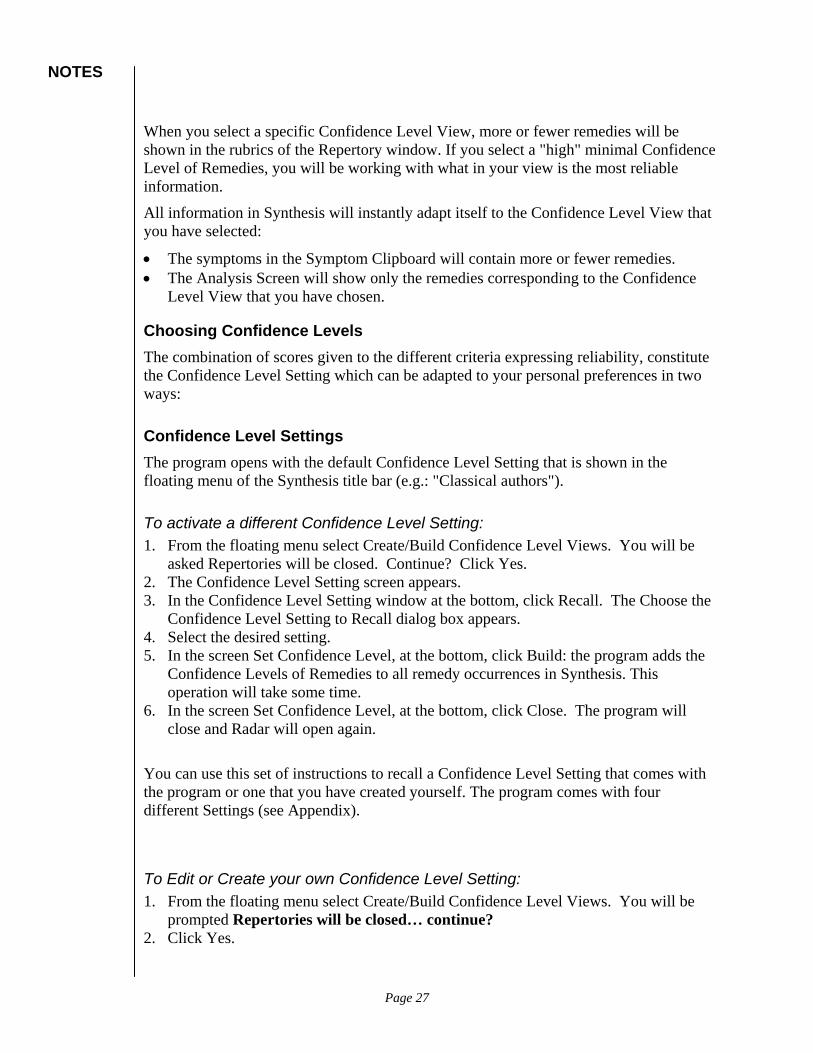
To Change Confidence Level Views: 1. Click on the floating menu on the Synthesis Title Bar. A list of Repertory Views
appears.
2. You can also switch between the different Confidence Level Views by repeatedly
hitting Ctrl-F2.
Page 26
NOTES
When you select a specific Confidence Level View, more or fewer remedies will be shown in the rubrics of the Repertory window. If you select a "high" minimal Confidence Level of Remedies, you will be working with what in your view is the most reliable information.
All information in Synthesis will instantly adapt itself to the Confidence Level View that you have selected:
• The symptoms in the Symptom Clipboard will contain more or fewer remedies. • The Analysis Screen will show only the remedies corresponding to the Confidence
Level View that you have chosen.
Choosing Confidence Levels The combination of scores given to the different criteria expressing reliability, constitute the Confidence Level Setting which can be adapted to your personal preferences in two ways:
Confidence Level Settings The program opens with the default Confidence Level Setting that is shown in the floating menu of the Synthesis title bar (e.g.: "Classical authors").
To activate a different Confidence Level Setting: 1. From the floating menu select Create/Build Confidence Level Views. You will be
asked Repertories will be closed. Continue? Click Yes. 2. The Confidence Level Setting screen appears. 3. In the Confidence Level Setting window at the bottom, click Recall. The Choose the
Confidence Level Setting to Recall dialog box appears. 4. Select the desired setting. 5. In the screen Set Confidence Level, at the bottom, click Build: the program adds the
Confidence Levels of Remedies to all remedy occurrences in Synthesis. This operation will take some time.
6. In the screen Set Confidence Level, at the bottom, click Close. The program will close and Radar will open again.
You can use this set of instructions to recall a Confidence Level Setting that comes with the program or one that you have created yourself. The program comes with four different Settings (see Appendix).
To Edit or Create your own Confidence Level Setting: 1. From the floating menu select Create/Build Confidence Level Views. You will be
prompted Repertories will be closed… continue? 2. Click Yes.
Page 27
NOTES
3. In the Set Confidence Level window, move the slides for each criterion to the position of your choice, but without putting all the slides to one extreme or the other!
4. If you wish you can create your choice starting from an existing Confidence Level. In this case, first recall the setting you want. Then move the slides as desired.
5. At the top, next to "Setting name" enter the name of the Confidence Level Setting that you just created (you can use up to 25 characters).
6. In the Set Confidence Level window, at the bottom, click Build. The program adds the Confidence Levels of Remedies to all remedy occurrences in Synthesis. This operation will take some time.
7. In the Set Confidence Level window, at the bottom, click Close. The program will close and Radar will open again.
In addition, you can give your interpretation of Confidence Level Settings to another Radar 10 user. From the folder ../radar/confid, take the file you created (ending with *.rcr) and ask your colleague to copy this file into his folder ../radar/confid. He should then follow the above procedure "Activate another Confidence Level Setting" to use your work.
The experienced user (only!) can also edit the categories related to the criteria themselves. For example, you can edit the list of classical authors using your choices. These are the files you can edit with NotePad, not with a Word Processor (experienced users only). All files are in ../radar/confid:
• - already in Kent crit1.txt • - classical author crit2.txt • - more reliable author crit3.txt • - more speculative author crit4.txt • - clinical experience crit5.txt • - classical proving crit6.txt • - speculative proving crit7.txt
Explaining the meaning of the criteria Criteria Explanation Classical Author An author who is no longer alive and is respected by the
majority of the homeopathic community. More Reliable Author versus More Speculative Author
These authors are most often still alive. Whether they are put in one or the other category does not imply a judgment on the quality of their ideas. It only states that their ideas follow the mainstream thinking of classical homeopathy or follow new approaches.
Clinical Experience
Includes author references that are based on clinical experience, cases, therapeutics, etc.
Classical Proving versus Speculative
This states that the methodology of the proving follows the mainstream thinking of classical homeopathy, or follows new approaches.
Page 28

NOTES
Criteria Explanation Proving Classical Proving and Clinical Experience at the same time
This criterion is based on a combination of these two criteria. It is mentioned as a separate criterion nevertheless because some homeopaths believe that confidence in a remedy really increases when these two elements are present at the same time. One could have a relatively low confidence in the proving and the clinical experience separately and only feel highly confident when they are both present.
Absolute Criterion
All remedies that correspond to this criterion will be displayed in all Confidence Level Views (low, medium and high).
Difference between Degrees of Remedies and Repertory Views Degrees in the Repertory express the frequency with which a remedy is present for that symptom in a proving or a clinical experience. If a remedy is present less frequently (low degree), it may still be reliable, so its Confidence Level may be high.
Repertory Views are based on showing remedies of an author reference. It is a black and white approach.
In Confidence Levels of Remedies, each author reference is attributed a specific confidence and when a remedy has several sources confirming it, these reasons are all considered to calculate a much more precise indication of reliability of that single remedy occurrence.
In addition, confidence is no longer expressed as “yes or no”, but plotted on a ten point scale which allows a much more refined expression of the confidence that you have.
If you want to change the setting in Repertory Views, you have to tick on or off all author references separately.
In Confidence Levels of Remedies you can define a group of references in one step, e.g.: the confidence you have if a “more speculative author” supports a remedy. At one time all such references are treated in the same way.
The different Repertory Views have been defined on a time scale.
Confidence Levels of Remedies allow you to look at categories without taking time into consideration, e.g. classical provings whether they were carried out 200 or just 2 years ago.
More information about the Confidence Level of Remedies These are the Confidence Level Settings that come with the program. The default Confidence Level Setting is "Classical authors".
Page 29

NOTES
Clinical experience
Provings Classical authors
Conservative
Kent 6 6 6 7
One Classical author 6 6 7 7
More reliable 6 3 5 8
More speculative 1 1 1 0
Clinical 7 5 4 7
Prov Class 6 7 7 6
Prov Spec 1 0 1 0
Prov + Clinic 8 8 9 10
Absolute crit - - Kent -
Glossary of terms • Confidence Level of Remedies (CLR): is a figure ranging from 0 to 100, which
expresses the confidence you have in the presence of a remedy in a rubric. • (Confidence) Criterion: is a rule indicating why a remedy in a rubric may gain more
or less confidence. A criterion can be set from 0 to 10. It can also be set as an absolute criterion.
• Absolute (Confidence) Criterion is a criterion with an absolute value so that the remedies corresponding to this criterion will always appear no matter which Confidence Level View is selected.
• Confidence Level Setting is the set of criteria with their respective values. With this setting you can define the reasons why you have confidence in a remedy in a rubric.
• Confidence Level View is a Repertory View of Synthesis where all remedies with a Confidence Level above a given threshold are shown. In this version the thresholds are 0 (= show all remedies), 33 and 66 (= only most reliable remedies).
Changing Repertory Window Options Tape 1—1:00:01
In addition to creating and changing Repertory Views, RADAR also allows you to specify what information you would like displayed in the Repertory Window. For example, you can choose to display the number of remedies contained in a rubric or you can choose to not see the remedies associated with rubrics.
The following briefly explains the options available to change in RADAR.
Remedies You can choose between No remedies, only the number of remedies, all the remedies and both number and remedies.
Page 30
NOTES
Some users choose to keep the names of the remedies hidden until after they have finished their repertorization so they are not influenced to choose a rubric based on what remedies are in the rubric.
Degrees Some users may choose to not include remedies for which the particular symptom is not strong.
Authors Tape 1—1:09:52
If you choose to show authors, more author options appear when the Show Authors box is checked. If you choose to show authors, you can choose to indicate if Kent was an author or not. You would also indicate whether to display notes by the author as well. In addition, you can display the authors in subscript or superscript and indicate how much lower or higher you would like the author abbreviations to appear.
Some users choose to not display the authors, only viewing them if they find it necessary for a particular symptom. Some users find the author abbreviations clutter up the screen, while others find that having the authors on the screen makes it easier to read which remedies appear in the rubric. Increasing the superscript or subscript value increases the space between the lines within each rubric.
General Options There are several options that can be changed in viewing RADAR, including synonyms, cross references, referring rubrics, concept information, and using multi-media. Each of these features will be explained in greater detail as the topics come up in the document.
You can choose to change the number of columns on the RADAR screen, how far to indent the remedies from the rubric name (if there are enough to take up more than one line), how far the sub rubrics are indented under the main rubrics, and how many levels of subrubrics are included in the display.
To change Repertory Window options: 1. From the Options menu, choose Repertory Window. (Alt+O, e). The Repertory
Window Options dialog box appears.
Page 31

NOTES
2. To change options on how remedies appear, click the appropriate radio button in the
Remedies area, or press Alt plus the underlined letter. 3. To indicate you want Authors to appear on the screen next to each remedy, click in
the Show Authors check box or press Alt+A. When you have selected the Show Authors check box, additional radio buttons appear. Choose the desired options.
4. To indicate how many columns you would like the information to appear in on the screen, select the radio button next to the desired number of columns, or press Alt and the number of columns desired.
5. To get additional information on the other options that appear in the Repertory Window Options dialog box, click the Help button contained in the dialog box, or press F1.
6. If you wish to save your changes to the view, click the Save button, or press Alt + S. 7. If at any time you wish to return to the Default settings from the original installation
of RADAR, click the Defaults button or press Alt+D. 8. When you have made the desired modifications, press Enter or click OK.
Identifying Authors If you choose to display author abbreviations, you will not likely be able to memorize all the authors in RADAR. However, it is easy to find what publications and authors those abbreviations represent.
To identify authors: 1. Double click on the author reference next to the remedy of interest. The Author
Information Window appears.
Page 32

NOTES
2. To close the window, press Esc or click the Close button.
The Author Information Window also allows you to add additional information about the source into User Notes or a Synthesis Window.
To add notes to the Author Information Window: 1. Double click the Author of interest. 2. Click into the area of the window you wish to add information. An insertion point
appears. 3. Enter the information you want to add. 4. Click Save. 5. Click Close. 6. In the Synthesis Window, the Reference to which you added information now appears
in bold and underline.
User Note added to this author reference.
Künzli Dots Tape 1—27:26
These dots are placed through out Synthesis, most often after a rubric, but sometimes after a remedy. If it is placed after a rubric, it indicates a pretty complete rubric. Based on Dr. Künzli’s clinical experience, he found that if a patient has one of these symptoms, most often the curative remedy is found in that rubric. These types of rubrics are safer to make into Elimination rubrics than those that are not Künzli dot rubrics.
Page 33
NOTES
If the Künzli dot is after the remedy, and a patient exhibits this symptom, there is a very strong chance that this is the curative remedy.
NO
TE The Künzli dots do not appear in all repertory views. The Künzli dots
after the remedies do not appear unless the Author references are displayed.
Go to the rubric Mind, Ailments from Mortification. Notice the Künzli dot after the rubric.
Go to the rubric Generals, Faintness, pain, from. Notice the Künzli dot after the remedy Chamomilla.
Putting Rubrics Into the Clipboard Tape 1—1:28:06
Once you have found the rubrics which best describe the symptoms expressed by your client, you can put them together to be analyzed. RADAR utilizes a feature called Clipboards to store and group the rubrics for analyzing. There are several ways to put rubrics into the clipboard. You can drag and drop them, use the tool bar, or use keystrokes.
Page 34
NOTES
NO
TE The clipboard used by RADAR for storing and analyzing rubrics is not
the same clipboard used by Windows when you use a cut, copy or paste command.
To put rubrics into the Clipboard with the Drag and Drop method. 1. Find the desired rubric using one of the methods described in the Finding Rubrics
section of this document. 2. Click on the rubric you wish to place in a clipboard. 3. While holding the mouse button down you will notice that a small rectangle appears
on the bottom of the mouse pointer. 4. Still holding the mouse button down, drag the desired rubric over to a numbered
clipboard on the left side of the Repertory Window. 5. Release the mouse button. A small number appears below the clipboard to indicate
how many rubrics are in that clipboard.
If you find the mouse to be a more efficient way to use RADAR, you can use the Take the Current Symptom tools to place the symptom in a clipboard. Using the Take Current Symptom Tool allows you to specify a variety of options with one dialog box. The Take the Current Symptom with Intensity X tools place the rubrics in the current clipboard with the specified intensity.
NO
TE When you first open RADAR 10, all the clipboards are yellow. However, once a rubric is added to a clipboard, it turns blue. If you wish to change the default clipboard, hold the Alt key and click the desired clipboard.
Page 35

NOTES
To put rubrics into the Clipboard with the ToolBar: 1. Find the desired rubric using one of the methods described in the Finding Rubrics
section of this document. Notice the finger pointing at the rubric. 2. Click the Take the Current Symptom tool on the toolbar. The Take Options
dialog box appears.
3. Click into the clipboard number to specify in which clipboard the symptom should
appear.
4. Specify the desired options in the dialog box and click Take. The rubric now appears in the specified clipboard.
The Take Options Dialog Box The following table explains the various features of the Take Options Dialog box. Even if you do not use this dialog box to put your rubrics into the clipboard, you may wish to use this dialog box to change some of the options after the rubrics have been placed in the clipboard.
Feature Definition
Intensity of Interrogation (Also known as Underlining)
How intense a symptom is this in the whole picture of the patient. For example, if the patient can not even say the word “snake”, you would probably choose 4 or higher. If he just get chills from seeing a snake, perhaps the intensity of the symptom is 1. The drop down box allows you to choose 0, 5, 6, or 7.
Qualification This feature allows you to specify if this symptom has been identified as the cause of the current symptom picture (causation). For example, if an injury caused a greater systemic reaction. If you feel the symptom is so important that it must be covered by a remedy that is listed in a particular rubric, then you would check Elimination.
Page 36

NOTES
Feature Definition
Create a Group A group allows you to use two or more rubrics that are very similar without over emphasizing the importance of that idea. Please see the section on Grouping Rubrics on page 46 for more information.
Degrees A degree refers to how strongly the symptom showed up in the proving. You can choose to only have remedies with higher or lower degrees included in the repertorization.
Subrubrics section If you want all the remedies in the subrubrics included in the repertorization, click With Remedies of Sub Rubrics. With subrubrics of a group is the same thing, only it includes all the subrubrics of all the rubrics in a group which you may have created.
Symptom Clipboards You can name the symptom clipboards in this area. Rather than having them numbered, you may wish to name them Mental/Emotional, Physical, etc. What ever makes sense to the how you understand the patient.
You can also use the Quick Command dialog box to place rubrics into the clipboard. The advantage of using this method is that you can also specify the intensity of the rubric as it is placed into the clipboard, as well as indicating that the rubric is an elimination rubric, a causation rubric. You can also place the rubric in any of the 10 possible clipboards with this method. If you do not specify a clipboard location, it will automatically appear in the default clipboard.
NO
TE The different clipboards do not represent different patients. They
represent different aspects of one patient.
The following is a table of the keystrokes used with the Quick Command dialog box for placing rubrics into a clipboard. Other Quick Command keystrokes are NOT included in this table.
QUICK COMMAND KEYSTROKES FOR PLACING RUBRICS IN A CLIPBOARD
Keystroke What it does Explanation (if relevant)
+ Takes the current symptom or rubric and places it into the clipboard.
1…10 Assigns an intensity level to the rubric.
Intensity signifies how strong the symptom is in the case. Is he very afraid or just a little afraid? You can assign a level of 0 through 10. An intensity of 0 means that the rubric will not be considered in the analysis. The Vithoulkas Expert System only recognizes intensity 1 – 4.
Page 37
NOTES
Keystroke What it does Explanation (if relevant)
# This makes the current rubric a Causation rubric. The rubric will appear Red in the clipboard. If you choose both Causation and Elimination, the rubric will be pink.
Use this when something has happened which supercedes the symptom picture, for example an injury which leads to more systemic pathology. It gives that symptom greater consideration and emphasis. It does not eliminate the other rubrics. This works only with the Vithoulkas Expert System.
! This makes the current rubric an Elimination rubric. The rubric will appear gray in the clipboard. If you choose both Causation and Elimination, the rubric will be pink.
Use this when the rubric is so important to the case that you feel you can only choose remedies that show up in that rubric. You do run the risk of missing the correct remedy using this symbol.
>1…10 Place the rubric in this clipboard.
If you do not specify a clipboard, RADAR automatically places the rubric in the default clipboard. The default clipboard icon has a small piece of paper showing in it.
To add rubrics to a clipboard with the Quick Command method: 1. With the either the Repertory window or the Select Symptom window open, type +.
The Quick Command dialog box opens. 2. Type a number representing the intensity if desired. 3. Enter symbols indicating Elimination or Causation, if desired. 4. Type > followed by a number, indicating in which clipboard the rubrics should be
placed. 5. Press Enter. Notice the small number below the specified clipboard.
Type Mi. Press Enter Type Fe. Press Enter Type Hi. Press Enter.
Page 38
NOTES
NO
TE
When putting a rubric into the clipboard, it doesn’t matter whether you are in the Repertory Window or the Select Symptom window. Either the hand must be pointing toward the rubric in the Repertory Window, or the desired rubric must be at the top of the Select Symptom window. The advantage of staying in the Select Symptom window is that you can quickly go to another rubric.
Type +. The Quick Command Window Appears. Type 3 to assign an intensity level. Type # to assign a quality of causation. Type ! to assign a quality of elimination. Type >4 to place in clipboard number four. Press Enter. Notice the little number that appears below Clipboard #4. Backspace once. Type Wat. Press Enter. Type + Type 3 Press Enter. The rubric appears under clipboard #1.
Changing the Default Clipboard In RADAR, the default clipboard is indicated on the Smart Icon bar by a blue clipboard. This is the location where rubrics appear unless otherwise specified when using the Quick Command method. You can change the default clipboard to save keystrokes, if you wish.
To change the default clipboard: 1. Position the mouse over the clipboard you wish to make the default clipboard. 2. Hold down the Alt keys.
Default Clipboard
3. Click the mouse on the clipboard. Notice a piece of paper is sticking out of the clipboard to indicate that this is now the default clipboard.
Opening the Clipboard Once you have some rubrics in a clipboard or clipboards, you may wish to open them to view the contents.
To open a clipboard: 1. On the Smart Icon bar, click on the clipboard you wish to view.
-or- Press F7. The Investigation Window opens..
Page 39
NOTES
NO
TE If you have put symptoms in only one clipboard, only one clipboard will
appear when you press F7.
Editing the Options Assigned to a Rubric After reconsidering the case, you may decide that a particular rubric was a greater or lesser intensity than you originally assigned to the rubric. Or you may wish to see the analysis without a particular rubric included. RADAR allows you to edit the options you have assigned to a rubric quickly and easily.
To edit the options assigned to a rubric: 1. Click on the clipboard on the Smart Icon Bar which contains the rubric you wish to
modify. 2. In the Investigation Window, click the rubric you wish to modify. 3. Leaving the mouse pointer on the rubric, click the right mouse button. A short cut
menu appears.
Page 40
NOTES
4. Select the desired menu choice. Please see the descriptions in the Take Options
Dialog box table beginning on page 36 for further information on menu choices.
Open Clipboard 4. Click the right mouse button on the rubric Fear of High Places. Choose Underlining from the Pop-up Menu. Change the Intensity to 2. Click the right mouse button on the rubric Fear of High Places once again. Select Qualification, Eliminative. Notice the color of the rubric has changed. Click the right mouse button on the rubric Fear of High Places a third time. Select Qualification, Causative to remove the Causation option. Notice the color of
the rubric has changed again, this time back to black.
Highlighting Symptoms When you are viewing the symptoms in the clipboard, you are somewhat limited in how small the Investigation Window can be sized. As a result, you may wish to highlight a symptom so you can more accurately read the number of remedies and intensity which appears directly across from it in the Investigation Window.
Highlighting symptoms can be done with the mouse for a temporary highlight or through the pop-up menu which allows the user to highlight more than one symptom and provides a means for the highlighting to remain on the screen for as long as desired.
To highlight one symptom temporarily: 1. Position the mouse on the symptom you wish to highlight.
Page 41
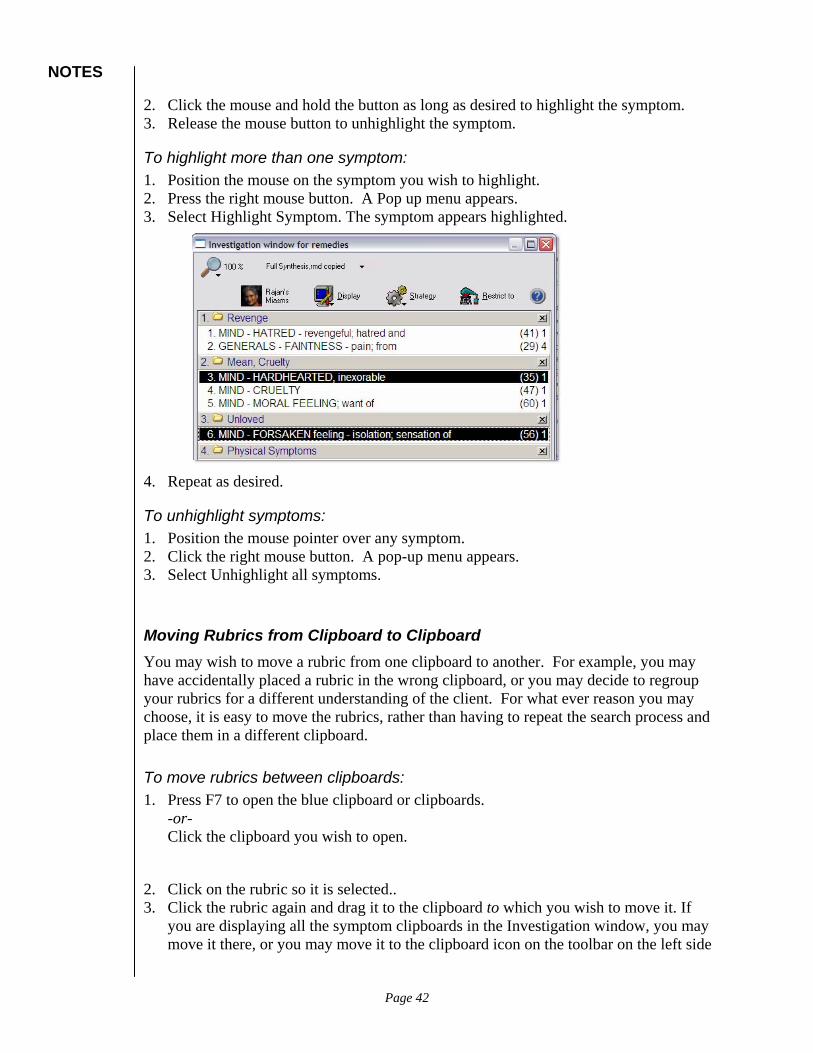
NOTES
2. Click the mouse and hold the button as long as desired to highlight the symptom. 3. Release the mouse button to unhighlight the symptom.
To highlight more than one symptom: 1. Position the mouse on the symptom you wish to highlight. 2. Press the right mouse button. A Pop up menu appears. 3. Select Highlight Symptom. The symptom appears highlighted.
4. Repeat as desired.
To unhighlight symptoms: 1. Position the mouse pointer over any symptom. 2. Click the right mouse button. A pop-up menu appears. 3. Select Unhighlight all symptoms.
Moving Rubrics from Clipboard to Clipboard You may wish to move a rubric from one clipboard to another. For example, you may have accidentally placed a rubric in the wrong clipboard, or you may decide to regroup your rubrics for a different understanding of the client. For what ever reason you may choose, it is easy to move the rubrics, rather than having to repeat the search process and place them in a different clipboard.
To move rubrics between clipboards: 1. Press F7 to open the blue clipboard or clipboards.
-or- Click the clipboard you wish to open.
2. Click on the rubric so it is selected.. 3. Click the rubric again and drag it to the clipboard to which you wish to move it. If
you are displaying all the symptom clipboards in the Investigation window, you may move it there, or you may move it to the clipboard icon on the toolbar on the left side
Page 42

NOTES
of the screen. -or- Press Ctrl+X to cut the rubric. Display the clipboard to which you wish to move the symptom. Press Ctrl+V to paste it into the new clipboard.
Click on the rubric Fear of High Places in Clipboard 4. Drag it to Clipboard 1.
Naming Clipboards Tape 1—1:53:40
You may wish to place symptoms in various clipboards to easily manipulate your analysis or to better understand your client. For example, you may put his physical symptoms in one clipboard and his mental/emotional symptoms in another. You may wish to place the fears in a clipboard on their own for a particularly fearful client. In order to keep track of which clipboard contains which symptoms, you can assign them each a name that describes the contents of the clipboard. Although it is not necessary to open the clipboard to rename it, it may be useful so you can chose an appropriate name for the clipboard based on the symptoms contained within it.
To name a clipboard: 1. Open the clipboard you wish to name, using one of the methods described above,
beginning on page 39. The Investigation Window opens.
Clipboard Title
2. Position the mouse pointer on the clipboard icon you wish to name. The current clipboard title appears near the clipboard icon.
Page 43

NOTES
3. Right click the clipboard icon. A pop-up menu appears.
4. Choose Change Clipboard Name. The Change Clipboard Name dialog box appears.
5. To enter a new name, highlight the default name in the text box, and begin typing a different name.
6. Click Save or Press Enter. 7. Click on the clipboard icon and the new clipboard name appears in the Investigation
Window.
Renamed Clipboards
Page 44

NOTES
Open Clipboard 1, if necessary. Right Click the title of the clipboard in the Investigation Window. Choose Change Clipboard Name Type Fears in the Change Clipboard Name dialog box. Press Enter.
Selecting Multiple Items at One Time You may perform a search which displays multiple rubrics or symptoms which you would like to include in a clipboard. Rather than dragging them to the clipboard one at a time, or searching for them individually again, you can place them in the clipboard with one command. This method of selecting non adjacent items works in many areas of all Windows-based software. By holding down the Control key when selecting, you can select or deselect without affecting what is already selected.
To select multiple Items at one time: 1. Perform desired search. The Search Results Window appears. 2. Hold down the Control key. 3. Click on the rubrics you wish to include in the clipboard. Notice that as long as the
Control key is held down, you can continue to add rubrics to the selection. When you release the control key and click on a rubric, only that rubric will be selected.
Page 45

NOTES
4. To add them to the same clipboard, follow the Quick Command directions on page 38.
Type ? The Quick Command window opens. Type animal* to do a search for all the rubrics which contain the word animal. Press Enter. The Result of Search window appears. Hold down the Control key. Select rubrics #2, 3, 6 and 7. Release the Control key and click on Rubric #5. Notice that it is now the only rubric
selected. Hold down the Control key again. Select rubrics #2, 3, 6 and 7. You should now have 2, 3, 5, 6, and 7 selected. Keep the Control key depressed and click on #3. Now 3 is deselected.
Grouping Rubrics Tape 1—1:54:36 and 2:10:36
RADAR allows you to group your rubrics in the clipboard in two different ways. You can combine two or more rubrics so that the remedies that appear in both are only counted once in the analysis. You can also create an intersection rubric, so only the remedies that appear in both are included. You may wish to group rubrics so you don’t miss remedies, but at the same time, not overemphasize remedies which appear in all rubrics. By not grouping, you may also give too much importance to the quality or idea behind the rubrics you are grouping.
Sulphur Calcarea Silica Hepar
Arsenicum Calc-Phos
Phosphorus Gelsemium
Kali Carb Kali Sil
Nat Mur Sepia
Grouped Intersection Rubric
Rubric 3
Arsenicum Calc-Phos
Phosphorus Gelsemium
Only remedies common to both rubrics are included in the new rubric
Rubric 2Rubric 1
Page 46

NOTES
Rubrics are grouped using the same letter to group the rubrics you wish to analyze together. A lower case letter will create a combination group, which will include all the remedies found in both rubrics. By creating this type of grouping, you are assuring that the remedies that appear in more than one rubric aren’t considered twice in the clipboard analysis. An upper case letter will create an intersection group. When you create this type of group, you are only including the remedies in the analysis that appear in all the rubrics that you have grouped together.
Rubric 1
Sulphur Calcarea Silica Hepar Arsenicum Calc-Phos Phosphorus Gelsemium
Rubric 2
Arsenicum Calc-Phos Phosphorus Gelsemium Kali Carb Kali Sil Nat Mur Sepia
All remedies are included, but none are repeated in the new rubric.
Rubric 3
Arsenicum Calc-Phos Phosphorus Gelsemium Kali Carb Kali Sil Nat Mur Sepia Sulphur Calcarea Silica Hepar
+ =
Grouped Combined Rubric
NO
TE When grouping rubrics, for either an intersection or combination
grouping, all rubrics must be entered with the same intensity.
Type +3a>2. (Be sure to use a lower case a.) Press Enter. Open Clipboard 2. Notice the intensity level on the right column is 3a. Close the symptom clipboard.
Grouping Rubrics with Cross References RADAR includes cross references to rubrics with similar meanings. These are located throughout the entire Synthesis. Sometimes the meanings of these rubrics are so similar, that it is hard to distinguish and determine which one should be used. So rather than leave out a remedy that might be in one, but not another, you may wish to create a group which will include all the similar rubrics and remedies, but not over emphasize remedies which appear in all the rubrics.
Page 47
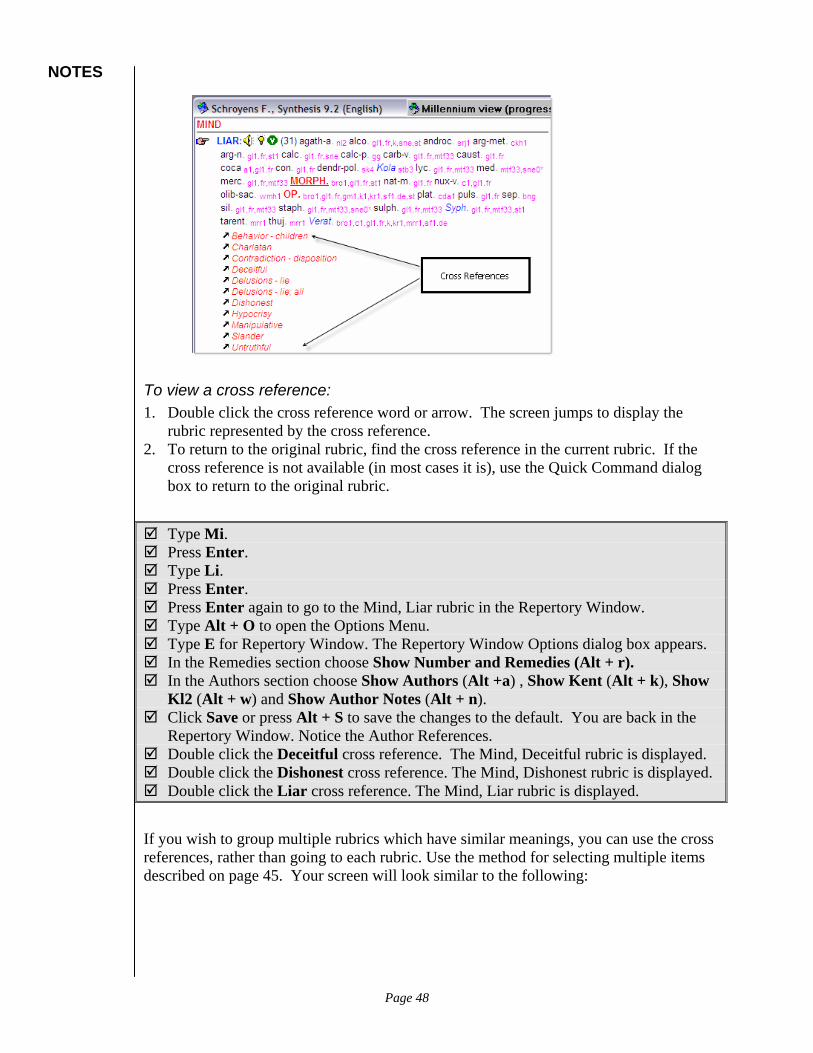
NOTES
To view a cross reference: 1. Double click the cross reference word or arrow. The screen jumps to display the
rubric represented by the cross reference. 2. To return to the original rubric, find the cross reference in the current rubric. If the
cross reference is not available (in most cases it is), use the Quick Command dialog box to return to the original rubric.
Type Mi. Press Enter. Type Li. Press Enter. Press Enter again to go to the Mind, Liar rubric in the Repertory Window. Type Alt + O to open the Options Menu. Type E for Repertory Window. The Repertory Window Options dialog box appears. In the Remedies section choose Show Number and Remedies (Alt + r). In the Authors section choose Show Authors (Alt +a) , Show Kent (Alt + k), Show
Kl2 (Alt + w) and Show Author Notes (Alt + n). Click Save or press Alt + S to save the changes to the default. You are back in the
Repertory Window. Notice the Author References. Double click the Deceitful cross reference. The Mind, Deceitful rubric is displayed. Double click the Dishonest cross reference. The Mind, Dishonest rubric is displayed. Double click the Liar cross reference. The Mind, Liar rubric is displayed.
If you wish to group multiple rubrics which have similar meanings, you can use the cross references, rather than going to each rubric. Use the method for selecting multiple items described on page 45. Your screen will look similar to the following:
Page 48
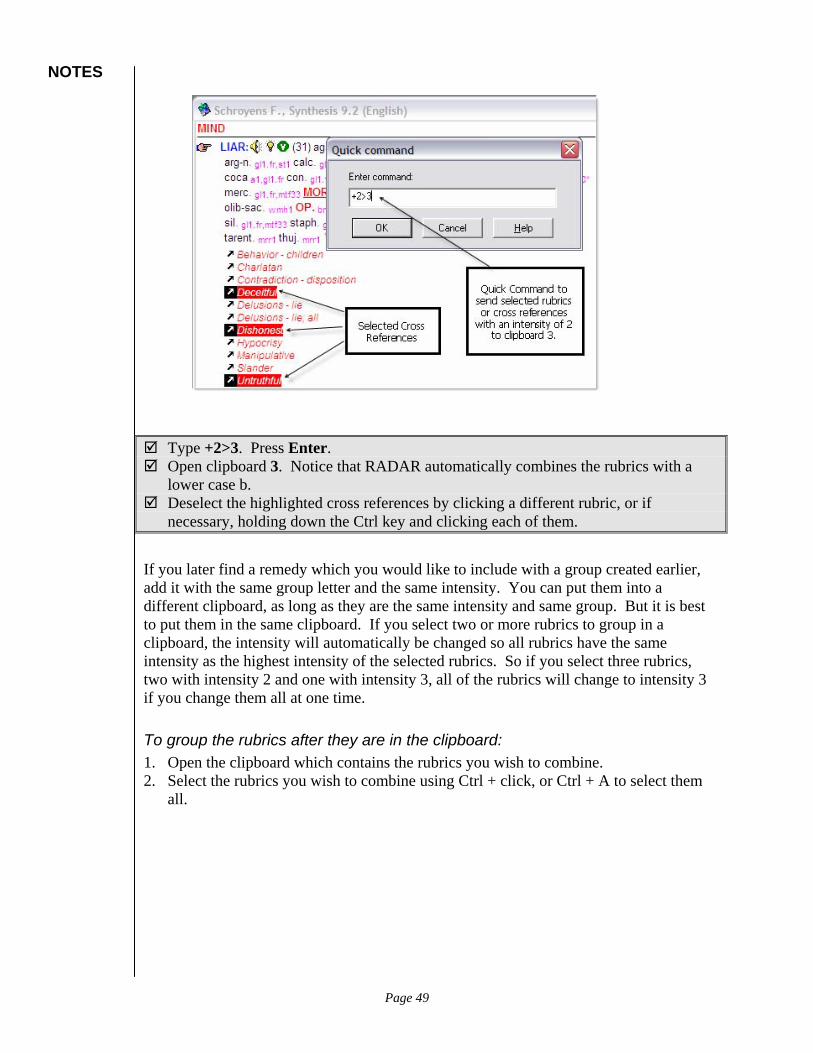
NOTES
Type +2>3. Press Enter. Open clipboard 3. Notice that RADAR automatically combines the rubrics with a
lower case b. Deselect the highlighted cross references by clicking a different rubric, or if
necessary, holding down the Ctrl key and clicking each of them.
If you later find a remedy which you would like to include with a group created earlier, add it with the same group letter and the same intensity. You can put them into a different clipboard, as long as they are the same intensity and same group. But it is best to put them in the same clipboard. If you select two or more rubrics to group in a clipboard, the intensity will automatically be changed so all rubrics have the same intensity as the highest intensity of the selected rubrics. So if you select three rubrics, two with intensity 2 and one with intensity 3, all of the rubrics will change to intensity 3 if you change them all at one time.
To group the rubrics after they are in the clipboard: 1. Open the clipboard which contains the rubrics you wish to combine. 2. Select the rubrics you wish to combine using Ctrl + click, or Ctrl + A to select them
all.
Page 49

NOTES
3. With the mouse over the selected rubrics, press the right mouse button. -or- On the keyboard, press Ctrl+Enter. A pop-up menu appears.
4. Select Combined Rubrics/Groups. The Combine/Group Rubrics dialog box appears.
5. If you wish to create a group identified by a common upper or lower case letter,
choose Add the selected symptoms to a group. You can either create a new group or add the rubrics to an existing group.
6. If you wish to create a brand new rubric, choose Create a New Symptom combining the remedies of the selected symptoms. You can choose the suggested name for the new rubric or you can enter your own name for the new rubric.
7. If you wish to delete the original rubrics from the clipboard, keeping only the new, combination rubric, click Delete the original rubrics.
8. Press Enter or click OK.
Page 50

NOTES
Open the clipboard which contains the rubrics Fear of High Places and Fear of
Water. Press Ctrl + A to select all the rubrics. Press Ctrl + Enter. Create a group with letter d. Press Enter. Notice the grouping has changed in the Symptom Clipboard. Display the current clipboard. Hold the Ctrl key and click the following rubrics:
MIND – MILDNESS MIND - QUIET disposition MIND - TIMIDITY – bashful
Press Ctrl + Enter. Press Enter to accept the default name. Noticed the new rubric at the bottom of the list in the clipboard and the old rubrics
with an intensity of zero.
Analyzing the Case Once you have placed the symptoms or rubrics into the clipboard, you can analyze the information in a variety of different ways. You can also set Preferences for analyzing the data, such as specifying which clipboards to include, whether to include polychrests, considering intensity, etc.
Setting the Analysis Strategy RADAR provides a variety of ways to analyze data. These methods are described briefly in this section. You can make your selections from the Investigation Window or through the Options, Analysis Dialog box.
The Options Analysis dialog box is broken into sections. The Display Preferences allows you to change the way the screen appears. The Analysis Preferences section allows you
Page 51
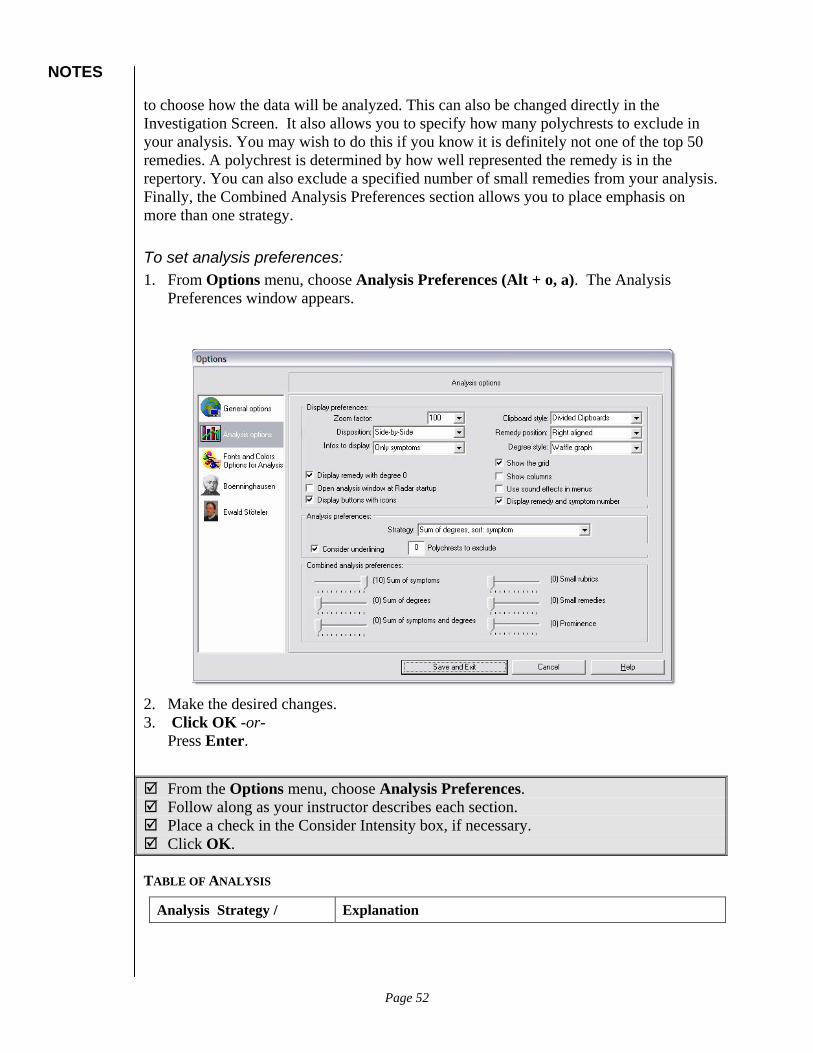
NOTES
to choose how the data will be analyzed. This can also be changed directly in the Investigation Screen. It also allows you to specify how many polychrests to exclude in your analysis. You may wish to do this if you know it is definitely not one of the top 50 remedies. A polychrest is determined by how well represented the remedy is in the repertory. You can also exclude a specified number of small remedies from your analysis. Finally, the Combined Analysis Preferences section allows you to place emphasis on more than one strategy.
To set analysis preferences: 1. From Options menu, choose Analysis Preferences (Alt + o, a). The Analysis
Preferences window appears.
2. Make the desired changes. 3. Click OK -or-
Press Enter.
From the Options menu, choose Analysis Preferences. Follow along as your instructor describes each section. Place a check in the Consider Intensity box, if necessary. Click OK.
TABLE OF ANALYSIS
Analysis Strategy / Explanation
Page 52
NOTES
Analysis Strategy / Explanation
Sum of Symptoms
Does not consider the degree assigned to the remedy in the rubric. It only looks to see if the remedy is in the rubric or not. If the remedy is in the rubric it receives a 1. If not, it receives no points. The intensity is considered. The intensity of the symptom is multiplied times 1 and that result for each rubric is added to come up with a total for each remedy. This tells you which remedies cover the greatest number of symptoms or rubrics. When the sum of symptoms is the same for more than one remedy, it is then sorted alphabetically.
Sum of Symptoms sorted by degree.
This analysis method produces two numbers. The first number is the sum of symptoms. The second number is the sum of the Intensity times the Degree for each rubric. The results are sorted first by the first number and then by the second number. Intensity of the symptom is considered in this analysis method. Which remedies cover the most number of rubrics and within those, sorted by degrees.
Sum of Degrees
This analysis method sorts the information by degrees, or the second number produced by the Sum of Symptoms sorted by degree. That is, it multiplies the intensity of each symptom times the degree that remedy shows up in a particular rubric. The remedies are then sorted by that number.
Sum of Degrees sorted by sum of symptoms.
This analysis method is a reverse of Sum of Symptoms sorted by degrees.
Sum of Symptoms and Degrees.
This analysis method adds the two numbers derived from Sum of Symptoms and Sum of Degrees. This analysis method says that both numbers are equally important.
Small Rubrics
It gives greater emphasis and weight to smaller rubrics. Strange, Rare and Peculiar symptoms are given the most importance, in accordance with aphorism 153 in the Organon.
Small Remedies
This is analysis method that gives greater emphasis and weight to smaller remedies, that is, ones that aren’t as well represented in the repertory.
Small Remedies + Small Rubrics
A combination of both the Small Rubrics and Small Remedies options.
Prominence
The remedy is in a high degree in a small rubric. Probably the most useful after the Sum of Symptoms sorted by degrees. This is also known as keynote prescribing.
VES Weighting This will access the Vithoulkas Expert System. Please see page 85 for more information on this feature.
Herscu Weighting Accesses the Herscu system. Please see page 115 for more information on this feature.
Page 53

NOTES
Analysis Strategy / Explanation
Giampetro Miasmatic Analysis
More information can be obtained on this Analysis Method by selecting the method. When the dialog box appears, click Help. Further explanation is available there, or at his web site at www.Drpietro.com. Please note that his web site is in Spanish.
PS Ortega Misamatic Analysis
Custom This option opens the Options Analysis Preference dialog box and allows you to specify Combined Analysis Preferences.
Consider Underlining Not all the options consider underlining (intensity) by default. You may choose it here.
Preferences Displays the Options, Analysis dialog box.
Analyzing the Data Once you have some rubrics in your clipboard, you will want to analyze the symptoms to narrow down your remedy selections.
To Analyze data from the repertory view: 1. Click the Show the Analysis button.
-or- Press F8. The Investigation Window appears.
2. Click Strategy. A menu appears.
Page 54
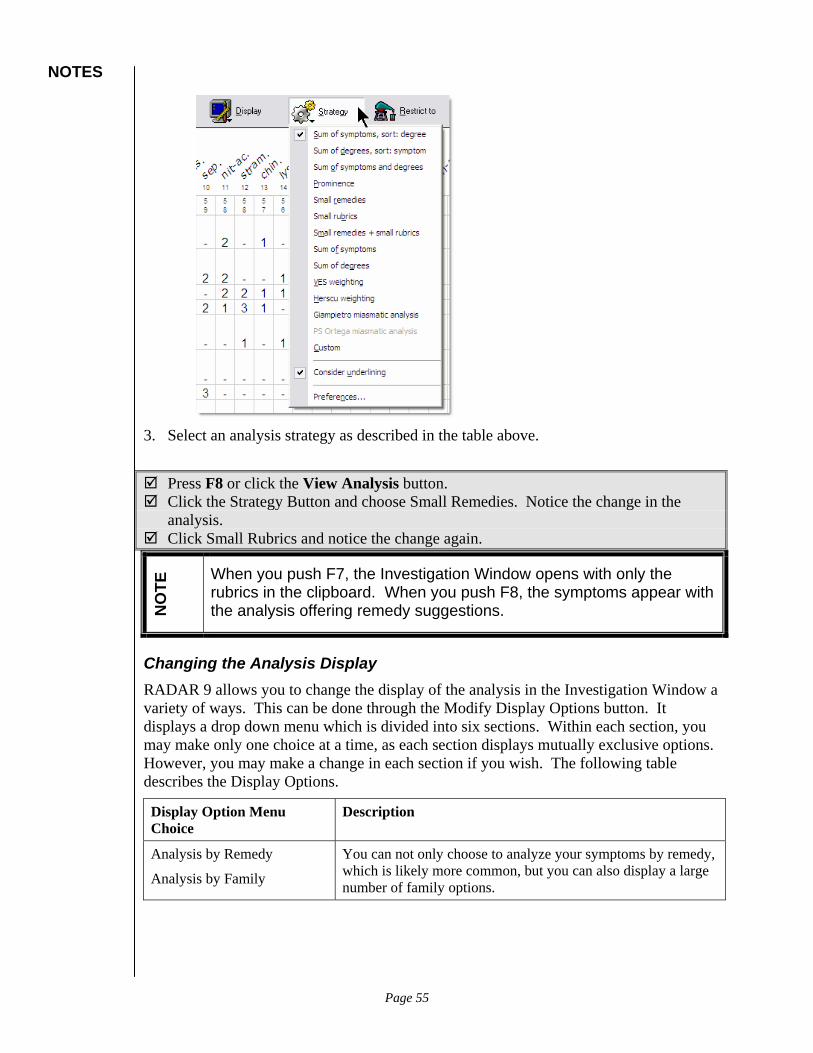
NOTES
3. Select an analysis strategy as described in the table above.
Press F8 or click the View Analysis button. Click the Strategy Button and choose Small Remedies. Notice the change in the
analysis. Click Small Rubrics and notice the change again.
NO
TE When you push F7, the Investigation Window opens with only the
rubrics in the clipboard. When you push F8, the symptoms appear with the analysis offering remedy suggestions.
Changing the Analysis Display RADAR 9 allows you to change the display of the analysis in the Investigation Window a variety of ways. This can be done through the Modify Display Options button. It displays a drop down menu which is divided into six sections. Within each section, you may make only one choice at a time, as each section displays mutually exclusive options. However, you may make a change in each section if you wish. The following table describes the Display Options.
Display Option Menu Choice
Description
Analysis by Remedy
Analysis by Family
You can not only choose to analyze your symptoms by remedy, which is likely more common, but you can also display a large number of family options.
Page 55
NOTES
Display Option Menu Choice
Description
Only Symptoms
Only Analysis
Symptoms and Analysis
This section allows you to display only the symptoms, only the suggested remedies, or both together (the most common option.)
Side-by side
Above/Below
When both the Symptoms and Analysis are displayed, you can choose to have the symptoms and recommended remedies side by side, so you can see how each remedy corresponds to each rubric, or you can have the Symptoms displayed above the remedies, which allows you to view more remedies on one screen.
Waffle Graph
Numbered Grid
Multiple Bar Graph by Clipboard
Multiple Bar Graph by Strategy
The numbered grid indicates how strong the symptom is listed in the repertory. The Waffle grid does the same thing, but rather than numbers, it uses colors with the darkest color representing 4 and the lightest color representing 1. The Multiple Bar Graph options are explained in the Graphical Analysis section, beginning on page 57.
Merge Clipboards
Divided Clipboards
Minimized Clipboard Division
Merged Clipboard displays all the clipboards together on the screen with no separation between the clipboards. Divided Clipboards displays each of the clipboards on the screen with a clear distinction between the symptoms of each clipboard. Minimized Clipboard Division shows a division, but it is fairly minor.
Select all symptom clipboards This allows you to select all the symptom clipboards for displaying and analyzing all the clipboards at one time in the Investigation Window. You can also select all the symptom clipboards by holding the Ctrl key and clicking all the clipboards which contain symptoms.
To change the Investigation window display: 1. In the Investigation window, click Modify Display Options. A multi-selection menu
appears:
Page 56

NOTES
2. Make the desired selections as indicated in the chart above. The Waffle Graph comes with a particular set of colors for each level. The darkest color corresponds to a level 4 symptom in a numbered grid and the lightest color represents a level 1 symptom. You can change the color to one that makes more sense to you, if desired.
To change the color of the Waffle Graph: 1. In the Analysis Window (F8), change the display to Waffle graph, if necessary.
(Display, Waffle Graph). 2. Position the mouse pointer of a square of the color you would like to change. 3. Click the right mouse button.
Page 57

NOTES
4. Click OK. All the grid squares representing the same Symptom level as the one you
selected will change color to the selected color.
Viewing and Analyzing More Than One Clipboard The Display menu provides a means to select all the clipboards at one time. But what if you have symptoms in five clipboards and you only want to analyze three clipboards? Perhaps you have put some minor, or confirmatory symptoms in a clipboard which you only want to include at the end.
To view or analyze more than one clipboard: 1. On the Side Toolbar, select one of the clipboards you wish to analyze or
view. 2. Hold the Ctrl key and select the next clipboard. 3. Continue holding the Ctrl key and clicking the clipboards until all the
clipboards you wish to analyze or view have been selected.
Graphical Analysis Why are there all these different analysis methods? The purpose of repertorization is not to tell you the remedy, it is to suggest a group of remedies which are then studied in the Materia Medica. The more options for viewing the data, the more remedy suggestions available to you. RADAR offers the ability to view several of the analysis methods on one screen using the Graphical Analysis feature. You can see how a particular remedy runs through the various analysis methods.
In the Graphical Analysis feature, you can either display the ranking of remedies by the available strategies (Multiple Bar Graph by Strategy), or you can display the ranking of
Page 58
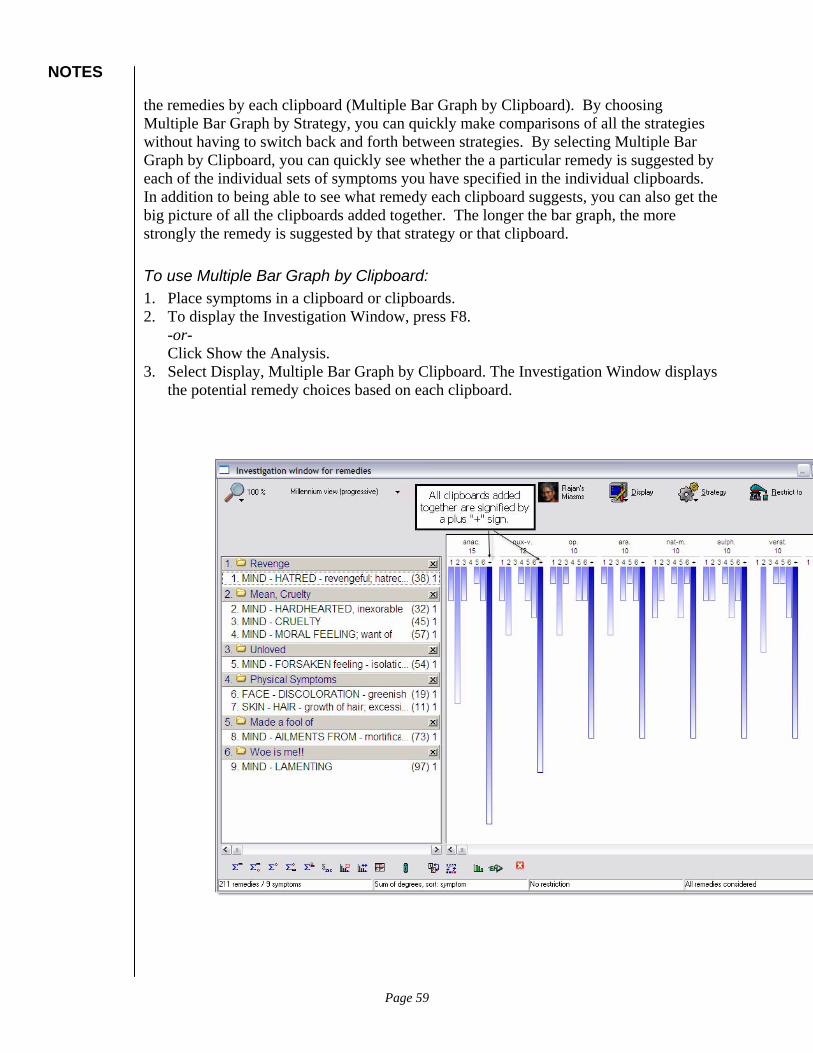
NOTES
the remedies by each clipboard (Multiple Bar Graph by Clipboard). By choosing Multiple Bar Graph by Strategy, you can quickly make comparisons of all the strategies without having to switch back and forth between strategies. By selecting Multiple Bar Graph by Clipboard, you can quickly see whether the a particular remedy is suggested by each of the individual sets of symptoms you have specified in the individual clipboards. In addition to being able to see what remedy each clipboard suggests, you can also get the big picture of all the clipboards added together. The longer the bar graph, the more strongly the remedy is suggested by that strategy or that clipboard.
To use Multiple Bar Graph by Clipboard: 1. Place symptoms in a clipboard or clipboards. 2. To display the Investigation Window, press F8.
-or- Click Show the Analysis.
3. Select Display, Multiple Bar Graph by Clipboard. The Investigation Window displays the potential remedy choices based on each clipboard.
Page 59

NOTES
To use Multiple Bar Graph by Strategy: 1. Place symptoms in a clipboard or clipboards. 2. To display the Investigation Window, press F8.
-or- Click Show the Analysis.
3. Select Display, Multiple Bar Graph by Strategy. The Investigation Window displays the potential remedy choices based on each strategy type.
4. To identify what strategy is being represented by which bar graph, right click the bar graph. An identifier appears on the screen.
5. To highlight a different strategy for each remedy, double click the strategy and that strategy will be highlighted for each remedy.
Locating a Remedy You may be considering a particular remedy for a case, but are unable to find the remedy listed in either the Analysis window or the Graphical Analysis window. You can scroll to try to find it, but there is an easier, less cumbersome method.
Page 60

NOTES
To find a remedy in the Analysis window: 1. From the Analysis window begin typing the abbreviation of the remedy for which
you are searching. -or- Click the Locating a Remedy in the Analysis button located on the toolbar at the bottom of the window. An alphabetical list of all the remedies that appear in the analysis appears. The remedy beginning with the first letter you typed is highlighted.
2. Scroll or continue to type until you locate the remedy you are considering. 3. When you locate the remedy you are considering and it is highlighted, press Enter or
Click OK. The Analysis window will automatically scroll to display that remedy. If the remedy for which you are searching is not included in the analysis, press Esc to close the remedy list.
Other Display Options in the Investigation Window In addition to the various analysis options, RADAR allows you to change how the Investigation window looks. There are also many shortcuts built into the Analysis window which make using the program more efficient. For example, you may wish to see larger fonts, or a different font type. You can even change colors in the Investigation window.
To change magnification: 1. In the Investigation Window, click the magnification button in the
upper left corner. A drop down menu appears, allowing you to choose the percentage of magnification. A check appears next to the currently selected magnification.
2. Select the desired magnification from the drop down menu. The new magnification appears on the screen and the letters appear in a corresponding size.
Page 61
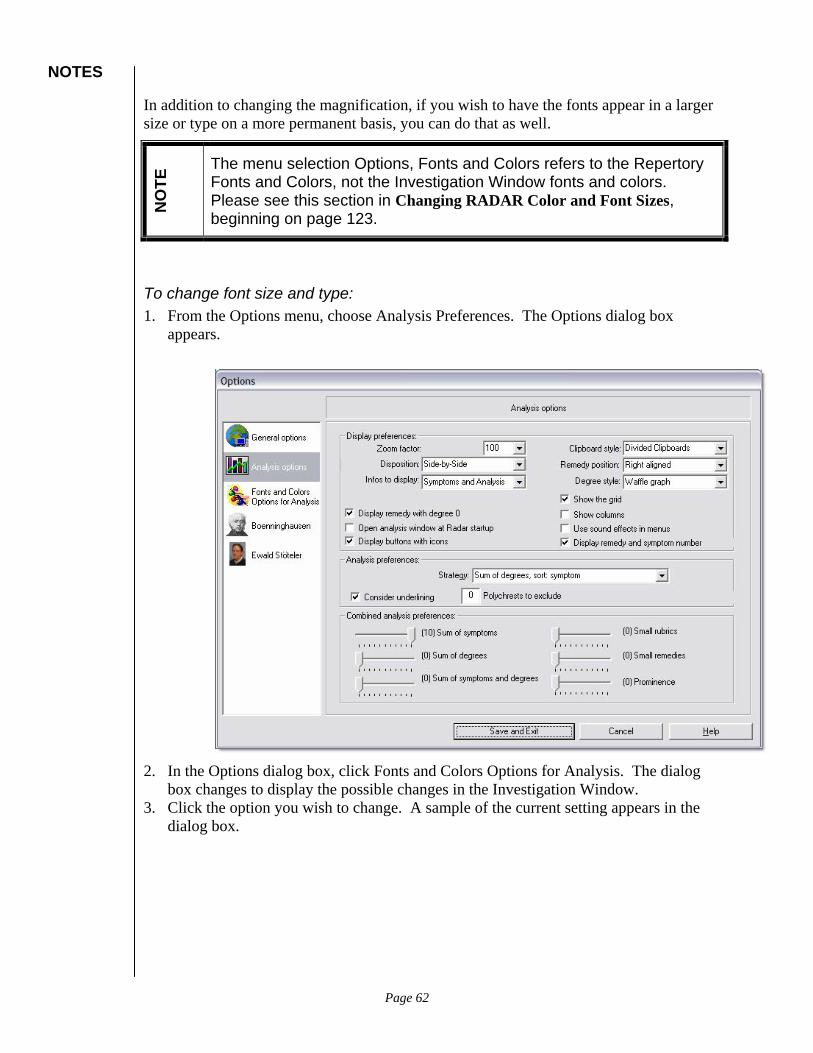
NOTES
In addition to changing the magnification, if you wish to have the fonts appear in a larger size or type on a more permanent basis, you can do that as well.
NO
TE The menu selection Options, Fonts and Colors refers to the Repertory
Fonts and Colors, not the Investigation Window fonts and colors. Please see this section in Changing RADAR Color and Font Sizes, beginning on page 123.
To change font size and type: 1. From the Options menu, choose Analysis Preferences. The Options dialog box
appears.
2. In the Options dialog box, click Fonts and Colors Options for Analysis. The dialog
box changes to display the possible changes in the Investigation Window. 3. Click the option you wish to change. A sample of the current setting appears in the
dialog box.
Page 62

NOTES
4. If you wish to change the font style or size, click the Choose Font button. A font
dialog box appears which allows you to choose a new font, font style, font size, or font color.
5. Make the desired changes and click OK or press Enter. Click OK again in the Options dialog box.
NO
TE Not all the options listed in the Options dialog box for fonts and colors
can be changed. For example, you cannot change the background color of the Remedy Names.
Select the Prominence View. Notice the remedies in the window change. Select the Millenium View. Click on the remedy Lyssin and drag it over to the Key button on the Smart Icon bar.
Notice the keynotes appear on the screen. Press Esc to close the Keynote window.
Using the Comparative Extraction Window Tape 2—0:00:10
If you have a patient for whom you are deciding between three different remedies, there are a number of ways to make your choice. You could drag each remedy over to the Keynote smart icon and read the Mental/Emotional symptoms for each. But, you may still find yourself in a dilemma if you have remedies which are very close. For example, you may be deciding between Hyoscyamus, Stramonium, and Lyssin for a very fearful patient. What you need to do to make a good remedy choice is to find out which fears
Page 63
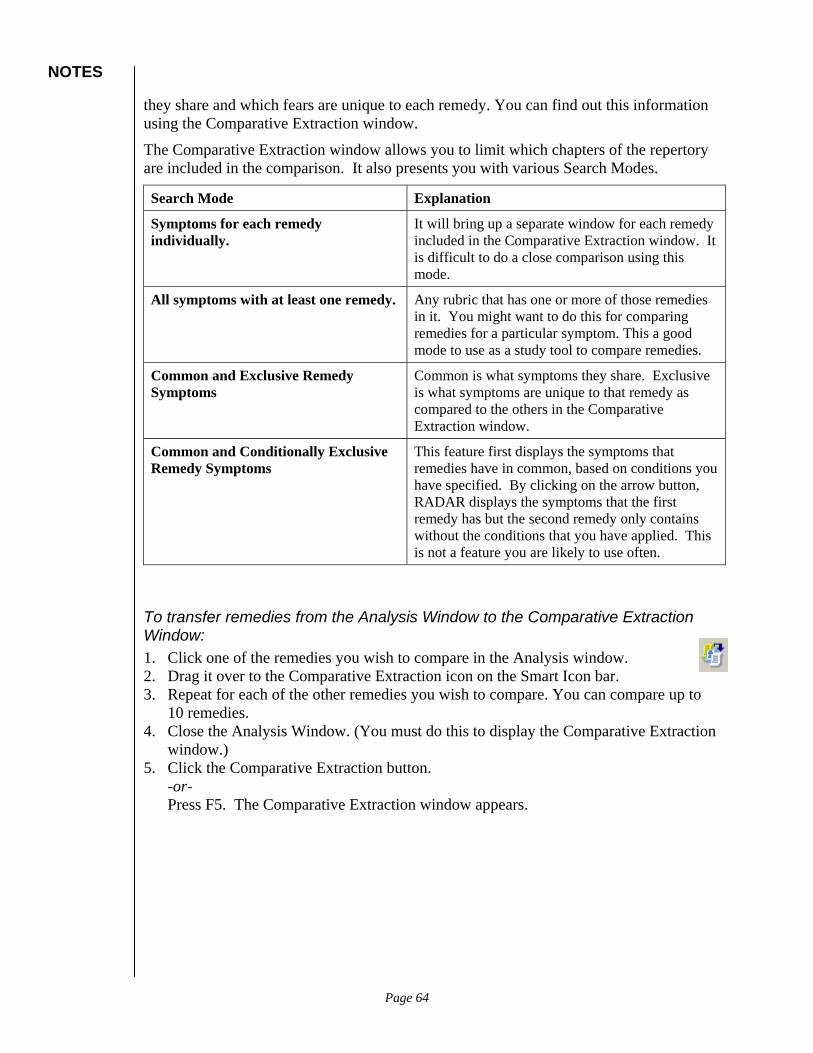
NOTES
they share and which fears are unique to each remedy. You can find out this information using the Comparative Extraction window.
The Comparative Extraction window allows you to limit which chapters of the repertory are included in the comparison. It also presents you with various Search Modes.
Search Mode Explanation
Symptoms for each remedy individually.
It will bring up a separate window for each remedy included in the Comparative Extraction window. It is difficult to do a close comparison using this mode.
All symptoms with at least one remedy. Any rubric that has one or more of those remedies in it. You might want to do this for comparing remedies for a particular symptom. This a good mode to use as a study tool to compare remedies.
Common and Exclusive Remedy Symptoms
Common is what symptoms they share. Exclusive is what symptoms are unique to that remedy as compared to the others in the Comparative Extraction window.
Common and Conditionally Exclusive Remedy Symptoms
This feature first displays the symptoms that remedies have in common, based on conditions you have specified. By clicking on the arrow button, RADAR displays the symptoms that the first remedy has but the second remedy only contains without the conditions that you have applied. This is not a feature you are likely to use often.
To transfer remedies from the Analysis Window to the Comparative Extraction Window: 1. Click one of the remedies you wish to compare in the Analysis window. 2. Drag it over to the Comparative Extraction icon on the Smart Icon bar. 3. Repeat for each of the other remedies you wish to compare. You can compare up to
10 remedies. 4. Close the Analysis Window. (You must do this to display the Comparative Extraction
window.) 5. Click the Comparative Extraction button.
-or- Press F5. The Comparative Extraction window appears.
Page 64
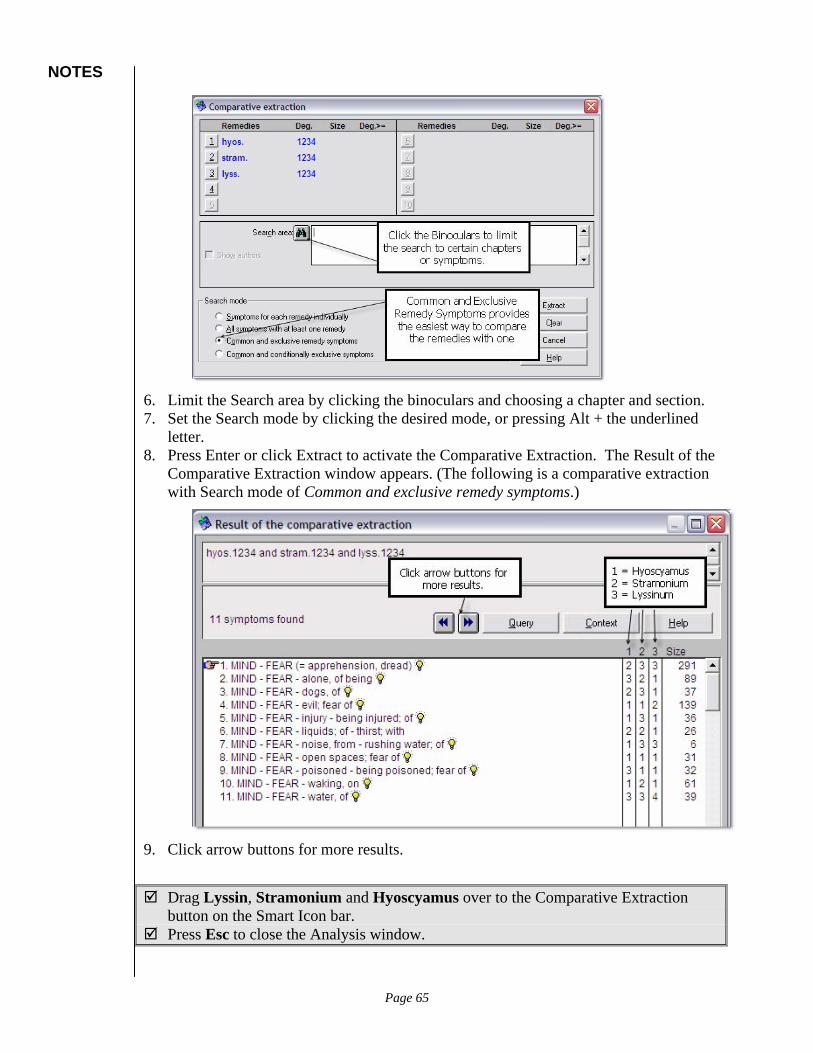
NOTES
6. Limit the Search area by clicking the binoculars and choosing a chapter and section. 7. Set the Search mode by clicking the desired mode, or pressing Alt + the underlined
letter. 8. Press Enter or click Extract to activate the Comparative Extraction. The Result of the
Comparative Extraction window appears. (The following is a comparative extraction with Search mode of Common and exclusive remedy symptoms.)
9. Click arrow buttons for more results.
Drag Lyssin, Stramonium and Hyoscyamus over to the Comparative Extraction button on the Smart Icon bar.
Press Esc to close the Analysis window.
Page 65

NOTES
Press F5. Click the Binoculars to limit the chapters to include only the Fear, Mind section. Set the Search Mode to Common and exclusive remedy symptoms. Press Enter. Click the Double arrow to the right to display the exclusive symptoms for the first
remedy on the list. Click the Double arrow again to display the symptoms for the next remedy. Click the Double arrow once more to display the symptoms for the third remedy.
Entering Remedies into the Comparative Extraction Window Tape 2—18:30
One way to get remedies into the Comparative Extraction window is to drag them from the Analysis window or the Repertory window to the Comparative Extraction button on the Smart Icon bar. You can also bring them into the Comparative Extraction window after the window is opened.
To enter remedies into the Comparative Extraction window: 1. Click the Comparative Extraction icon
-or- Press F5. The Comparative Extraction window appears.
2. In the Remedies box, click on the button with 1. -or- Press Alt + 1. The Remedy Selection window appears.
3. Begin typing the abbreviation of the remedy you wish to place into the Remedies box. 4. When the remedy name is highlighted, press Enter. It appears in the Remedies box.
Extracting Keynotes for a Remedy Tape 2—20:57
You can display the keynotes for a remedy by excluding rubrics from the Comparative Extraction. What levels you exclude depend on how well-represented the remedy is in the repertory. If a remedy only shows up in 30 or 40 rubrics, you may not want to exclude any rubrics. But if it shows up in 3400 rubrics, you will need to limit the size of the rubrics and the degree of the remedy within a rubric to get a list of keynotes for that remedy.
You can exclude rubrics by setting parameters in the Remedy Selection window. The following table explains the possible parameters available for extracting rubrics.
NO
TE The way to use this tool is to try different numbers and see what you get. If a rubric does not appear which you know is a keynote of a particular remedy, change the parameters for the rubrics allowed.
Page 66

NOTES
REMEDY SELECTION WINDOW PARAMETERS TABLE
Parameter Explanation
Degree The degree assigned to the remedy in the repertory for each rubric in which it appears. For a remedy that is well represented in the repertory, you may wish to limit this number to degrees 3 and 4 when extracting keynotes. For a remedy that appears in fewer rubrics, you may not want to modify this setting.
Maximum Rubric Size This indicates how many remedies appear in the rubrics that will be included. Again, for a well represented remedy, you may want to limit this number.
Degrees equal or > This number indicates many remedies can have any one of the degrees you have chosen for the extraction. For example, if you set this value to 3, only two other remedies in the rubric can have degrees greater than or equal to those of the chosen remedy. This excludes rubrics that have a lot of remedies. If you put this number too small, you may lose a very important symptom.
To specify parameters for selection of rubrics for keynotes: 1. Follow the directions through step 3 for entering Remedies into the Comparative
Extraction on page 65. 2. Specify the Degree for the remedy in each rubric by clicking into the box next to the
appropriate number (Alt + the underlined number). 3. Specify the Maximum Rubric Size by typing a number into the box (Alt+m). 4. Specify the Degrees equal or greater by typing a number into the box (Alt +r).
5. Press Enter.
Clear the remedies currently in the Remedy box in the Comparative Extraction Window.
Page 67

NOTES
Click the 1 button, or press Alt + 1. Type an. Anacardium is highlighted. Set degrees at 3 and 4 Set maximum rubric size at 100. Set Degrees equal or > at 3. Press Enter. The remedy Anacardium appears in the Remedy box in the
Comparative Extraction window with the parameters set above. Press Enter again to execute the Comparative Extraction.
Finding Remedies in the Highest Degree Tape 2—50:02
You can also use the Comparative Extraction to identify symptoms that a particular remedy has stronger than any other remedy. To do this, leave the degrees at the default of 1, 2, 3, and 4, the maximum rubric size blank, and Degrees equal or > set to 1. This doesn’t represent keynotes, but it does represent those symptoms that are stronger in the remedy of interest than in other remedies. This is probably more useful with smaller remedies.
Press F5 to display the Comparative Extraction screen. Clear the current setting, if neccesary. Click the 1 button (Alt +1). Choose Lachesis. Set Degrees equal or > at 1. Press Enter. Press Enter to execute the Comparative Extraction.
Common and Conditionally Exclusive Remedy Extractions Tape 2—46:07
This feature is less likely to be useful than the Common and Exclusive Remedy Symptoms option. At first glance, it appears to yield the same result, but by looking at additional results, shows it to be a bit different.
Common and Exclusive Remedy Symptoms Common and Conditionally Exclusive Remedy Symptoms
Press F5 to display the Comparative Extraction screen. Clear the current setting, if necessary. Click the 1 button (Alt + 1). Choose Natrum Muriaticum (Nat-M). Remove the check from Degree 1.
Page 68
NOTES
Press Enter Click the 2 button (Alt +2). Choose Staphysagria (Staph). Click Common and Exclusive Remedy Symptoms (Alt + M). Press Enter. Notice that nat-m 234 and staph 234 are displayed. Click the double arrow to advance to more results. Notice that Nat-m 234 without staph is displayed. Click the Query button (Alt + Q) to return to the Comparative Extraction screen. Change the search mode to Common and Conditionally Exclusive Remedy
Symptoms (Alt + O). Press Enter. Notice that the first screen displays the same result as the previous extraction. Click the double arrow to advance to more results. Notice that nat-m234 without staph 234 is displayed.
Setting Comparative Extraction Limits From the Analysis Window When analyzing potential remedy choices in the Investigation Window, you may be surprised to find that a certain remedy is not in a particular rubric. For example, you may be considering giving a patient the remedy Baryta Carbonica. The patient was quite shy and reserved during the interview, and you chose the rubric Mind, Reserved. However, in your analysis, you note that Baryta Carbonica does not show up in this rubric. One option is to perform a Search on all the mental Symptoms of Baryta Carbonica and see if there are any similar rubrics to Mind Reserved. RADAR presents a more efficient option that can be conducted from the Investigation Window with two clicks of a mouse. This feature automatically does a search on similar rubrics so you can see if the remedy shows up in rubrics with a similar meaning, and decide if such rubrics really describe your client accurately.
To extract similar rubrics from the Investigation Window: 1. From the Investigation Window display the Waffle Grid, if necessary. 2. Position the mouse pointer over the intersection of the remedy and rubric in question. 3. Click the right mouse button. A pop-up menu appears.
Page 69

NOTES
4. Select Repertory Extraction of Remedy in Related Rubrics. The Comparative Extraction window appears with similar rubrics in the Search Area.
Similar Rubrics
5. Click Extract or Press Enter. The Results of Comparative Extraction window appears with all the similar rubrics with contain the remedy in question.
Page 70

NOTES
6. If one of the rubrics in the Results window describes your client accurately, you may
drag it to the clipboard to include in the repertorization.
RADAR Concepts Tape 2—54:15
Concepts are the grouping of rubrics together based on a common idea or theme. Concepts are a broader groupings of rubrics together than are cross-references. There is a concept that groups these rubrics together. A concept can suggest to you other rubrics which more closely describe what your patient is saying. These may be rubrics you didn’t think of or didn’t know existed. When you see a light bulb next to a rubric, it means that rubric is part of one or more concepts. There are many different authors that have created concepts in RADAR. You can also create your own concepts.
There are three primary types of concepts.
Concept Analogic Groups. These concepts are over arching ideas that link various rubrics together.
Concept within a remedy. Every remedy has a number of ideas with it. The symptoms fit in with those ideas. It is a description of the remedy from the perspective of certain ideas that are contained in that remedy. These ideas are a concept with rubrics associated with it.
Disease concept. Diseases don’t all have the same symptoms, but there is some reality to the disease, some relationship between the symptoms that point to rubrics which might be useful.
The concepts are displayed in order of their Authors:
Fonseca has created concepts through out the Mind chapter.
Servais has created concepts within remedies.
Page 71

NOTES
Zulian has created a word index.
To use Concepts: 1. Double click on a lightbulb. The Symptom Information window opens.
2. Double click on the orange book next to the concept you wish to view. The Concept
Information window appears.
Page 72

NOTES
3. Double click the rubric and that rubric will appear in the Repertory window. 4. Double click the light bulb next to the rubric and the Symptom Information Window
appears listing the concepts to which that rubric belongs. To go back to the previous screen, double click on the orange book which appears next to the rubric in the Symptom Information Window.
Go to the rubric Mind, Liar. Double click the orange book next to the FONSECA concept. The Concept
Information window appears with 30 rubrics associated with being dishonest. Double click the light bulb next to Mind-Ambition-increased.
Searching for a Concept Tape 2—1:04:24
RADAR allows you to search for a concept using the quick command method, just as you have searched for rubrics. There is one main difference, in that you search for concepts using double question marks, as indicated below.
To search for a Concept: 1. Type two question marks (??). The Quick Command dialog box appears. 2. Type the first few letters of the concept for which you are searching, followed by an
asterisk. 3. Press Enter. The Result of Search on Concepts window appears.
Page 73

NOTES
4. Double click on the orange book which appears next to the desired Concept. A list or
rubrics appears.
In the Repertory window, type ??. Type alz* Press Enter to execute the search. Double click the orange book next to the first concept. Double click the light bulb next to any or the rubrics. Press Esc. Type ??. Type compulsive. Double click the orange book to display the rubrics.
RADAR Concepts is really a repertory of its own called Access to Synthesis. It has chapters just as Synthesis does. It opens automatically when you start RADAR. Its information is accessed the same way as the Synthesis repertory.
Page 74
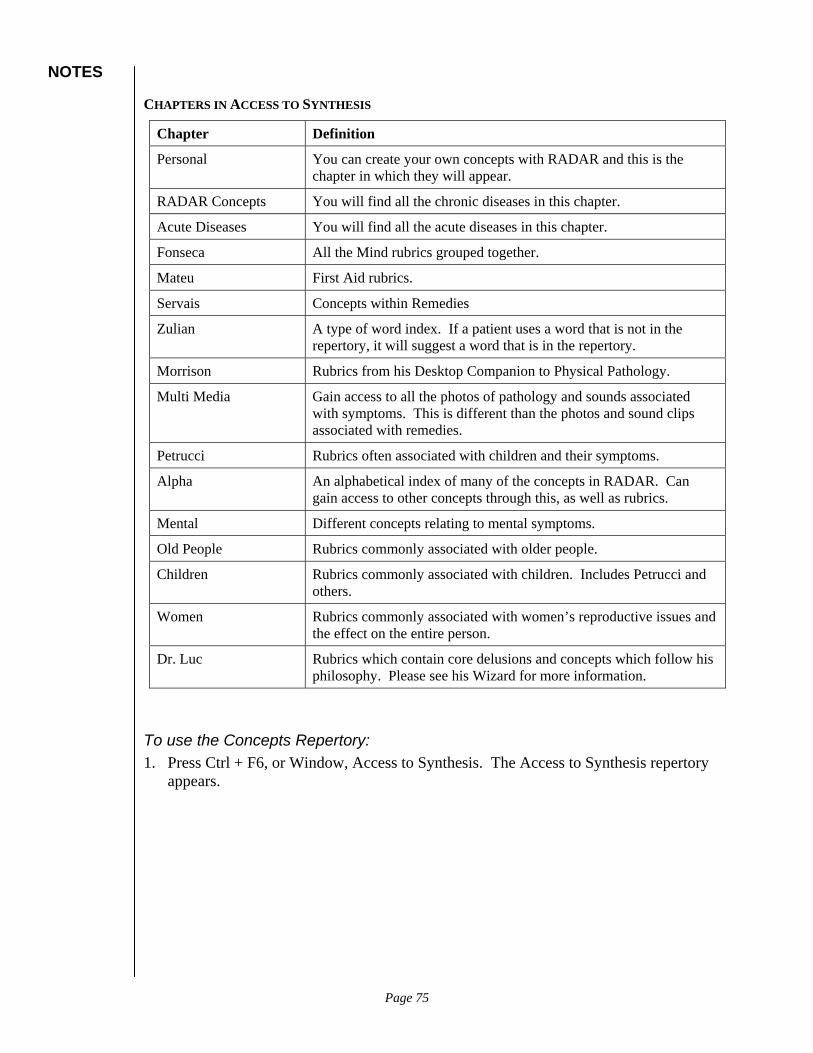
NOTES
CHAPTERS IN ACCESS TO SYNTHESIS
Chapter Definition
Personal You can create your own concepts with RADAR and this is the chapter in which they will appear.
RADAR Concepts You will find all the chronic diseases in this chapter.
Acute Diseases You will find all the acute diseases in this chapter.
Fonseca All the Mind rubrics grouped together.
Mateu First Aid rubrics.
Servais Concepts within Remedies
Zulian A type of word index. If a patient uses a word that is not in the repertory, it will suggest a word that is in the repertory.
Morrison Rubrics from his Desktop Companion to Physical Pathology.
Multi Media Gain access to all the photos of pathology and sounds associated with symptoms. This is different than the photos and sound clips associated with remedies.
Petrucci Rubrics often associated with children and their symptoms.
Alpha An alphabetical index of many of the concepts in RADAR. Can gain access to other concepts through this, as well as rubrics.
Mental Different concepts relating to mental symptoms.
Old People Rubrics commonly associated with older people.
Children Rubrics commonly associated with children. Includes Petrucci and others.
Women Rubrics commonly associated with women’s reproductive issues and the effect on the entire person.
Dr. Luc Rubrics which contain core delusions and concepts which follow his philosophy. Please see his Wizard for more information.
To use the Concepts Repertory: 1. Press Ctrl + F6, or Window, Access to Synthesis. The Access to Synthesis repertory
appears.
Page 75

NOTES
2. Press F2 to display the Chapters in Access to Synthesis. The Select concept window appears.
3. Select the desired chapter by typing the first letter of the chapter name. 4. Press Enter. The Select Concept Window appears. (Functionally, it is the same as
the Select Symptom window.) 5. Type the first few letters of the desired concept. 6. Press Enter. 7. Continue until you have located the desired concept. The Concept Information
window appears with symptoms related to the concept.
Press Ctrl + F6 to display Access to Synthesis. Press F2 to display the Concept Chapters. Type R. Press Enter. Type C. Press Enter. Type A. Press Enter. Press Enter. Press Esc to close the Concept Information Window.
Page 76
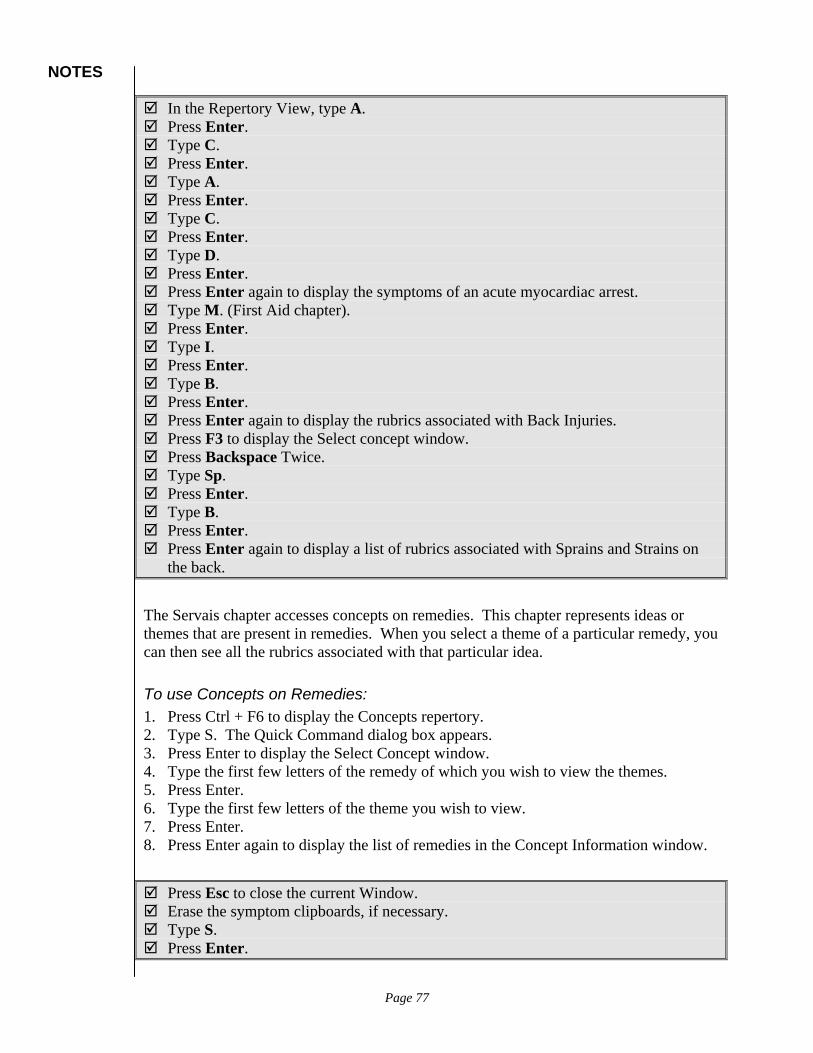
NOTES
In the Repertory View, type A. Press Enter. Type C. Press Enter. Type A. Press Enter. Type C. Press Enter. Type D. Press Enter. Press Enter again to display the symptoms of an acute myocardiac arrest. Type M. (First Aid chapter). Press Enter. Type I. Press Enter. Type B. Press Enter. Press Enter again to display the rubrics associated with Back Injuries. Press F3 to display the Select concept window. Press Backspace Twice. Type Sp. Press Enter. Type B. Press Enter. Press Enter again to display a list of rubrics associated with Sprains and Strains on
the back.
The Servais chapter accesses concepts on remedies. This chapter represents ideas or themes that are present in remedies. When you select a theme of a particular remedy, you can then see all the rubrics associated with that particular idea.
To use Concepts on Remedies: 1. Press Ctrl + F6 to display the Concepts repertory. 2. Type S. The Quick Command dialog box appears. 3. Press Enter to display the Select Concept window. 4. Type the first few letters of the remedy of which you wish to view the themes. 5. Press Enter. 6. Type the first few letters of the theme you wish to view. 7. Press Enter. 8. Press Enter again to display the list of remedies in the Concept Information window.
Press Esc to close the current Window. Erase the symptom clipboards, if necessary. Type S. Press Enter.
Page 77

NOTES
Type F (for Ferrum Metallicum). Press Enter. Type a (for Authority; inflexibility, rigidity). Press Enter. Press Enter again to display the Concept Information window. Press Ctrl+A to select all the rubrics in the Concept Information window. Type +1 to place all the rubrics in the default Symptom Clipboard. Close the Concept Information window. Press F8 to analyze the rubrics. Ferrum Metallicum should be among the first
remedies listed.
Saving and Recalling Cases Tape 3—0:00:10
RADAR allows you to save and recall (open) your cases at a later time. Clipboard cases are saved into one big file, unless you specify otherwise. The default name of the file in which your clipboards are saved is REPERT.da1. This is called a catalog. You can create other catalogs so you can categorize your cases in a way that makes sense to you.
Opening, closing and other tasks you may wish to perform on a clipboard are done through a pop up menu accessed through the right mouse button. The following table explains each selection in the pop-up menu and the results you will receive by making that selection.
Menu Choices Explanation
Change Clipboard Name
Change the name of the clipboard from the default, or from one that the user assigned.
Open this clipboard Open the clipboard on which the user right clicked.
Clear this clipboard Erases the information currently in the symptom clipboard. It does not effect information which may already be saved.
Cut the clipboard contents
Removes the information in the symptom clipboard and moves it to the Windows clipboard.
Copy the clipboard contents
Makes a copy of the symptom clipboard and places it in the Windows clipboard
Paste to this clipboard Pastes the contents of the Windows clipboard to the symptom Clipboard
Clear all clipboards Erases the information from all clipboards. It does not affect information which may already be saved.
Save this Case Saves the current clipboards to an assigned name saved in a catalog.
Recall a Case
Opens a previously saved set of clipboards.
Page 78
NOTES
Menu Choices Explanation
Delete a Case Removes a specified case from the current catalog. Once a case is deleted, it cannot be recalled, unless you have made a backup file of your cases.
Open another catalog of cases.
Opens a different collection of cases stored in a different catalog. The catalog is the actual Windows file into which many cases are stored.
Create another catalog of cases.
Allows the user to create a new catalog in which to store cases.
Open Patient File
Import from WinChip
Export to WinChip
These menu choices all relate to WinChip, which is explained in a later section of this manual.
Import a Case File
Export a Case File
Allows the user to export a repertorization in a text file
Allows the user to import a repertorization from a Case text file
General Information about Saving and Recalling Cases in RADAR Individual cases are not saved in individual files. They are saved together in a file called REPERT.da1. RADAR refers to this as a catalogue. You can create additional catalogues as well. For example, you may with to save your clients alphabetically in a separate catalogue for clients whose last names begin with letters A-D, etc. See page 81 for procedures to create new catalogues.
If you are placing symptoms into the clipboard and your computer system crashes or gets turned off accidentally, RADAR will automatically produce a back up copy of your clipboards when you restart RADAR. This is true even if you have not yet saved the clipboard. You will notice when you restart RADAR that there are symptoms in the clipboard. The name of the backup clipboard is SOS. If you have saved the clipboard, RADAR will still name the backup SOS. If you made changes to the clipboard after naming it, the SOS file may be more current than the saved version.
If you have an SOS file in your list of case names at the time of the crash, RADAR may choose to name the file LAST.
It is important to note, however, that if you place symptoms in the clipboard and then recall an existing patient clipboard without saving the data in the clipboard, the symptoms in the clipboard will be erased from memory. That is, you will overwrite the rubrics currently in the clipboard. No back up copy is available in this situation. The SOS backup copy is only available after an unplanned or improper shut down.
If you accidentally delete a case from a catalogue, there is no way to get it back unless you have made a back up copy of your files.
Page 79

NOTES
To recall a saved case: 1. Press the right mouse button while the mouse is over one of the clipboards. Select
Recall a Case from the pop-up menu. -or- Choose File, Recall a Case The Recall Case window appears.
Saved cases
2. Double click the case you wish to open or begin typing the name as it appears in the list.
3. When the name is highlighted, press Enter. The symptom clipboard icon will display the number of symptoms associated with that case.
Click the right mouse button an any clipboard icon. Choose Recall a Case from the pop-up menu. Begin typing the letters of any case that has been saved, or click on the case you wish
to open. Press Enter.
To delete a rubric from the clipboard: 1. In the symptom clipboard, select the rubric you wish to delete by clicking on it. 2. Press the delete key on the keyboard. The following dialog box appears, asking if
you are certain you wish to delete the rubric from the clipboard.
3. Click Yes or press Enter to erase the symptom.
Page 80

NOTES
To save a case: 1. Click the Right Mouse button on a clipboard. From the Pop up menu, choose Save
this Case -or- Choose File, Save a case. The Save Case window appears.
2. In the Case name box, enter the name you wish to give the case. For example, the
client name. You may use spaces and upper and lower case letters. 3. In the Case note box, enter any information you feel is important about the case. 4. Press Enter or click OK. The case is now saved.
You may wish to delete a case from the file. Perhaps this case has been resaved into another catalogue, or is a client you haven’t seen in 10 years. You may also have exported the case to WinChip.
To delete a case: 1. From the File menu, choose Delete a Case (Alt + F, d)
-or- Click the right mouse button on a clipboard and choose Delete a Case from the Pop-up menu. The Delete Case window appears.
2. Begin typing the name of the case you wish to delete, or click on it. 3. Press Enter or Click OK. You will be prompted to indicate whether you really want
to delete the case. 4. Press Enter or Click Yes. The case is deleted.
Case Catalogues Tape 3—0:04:50
Page 81
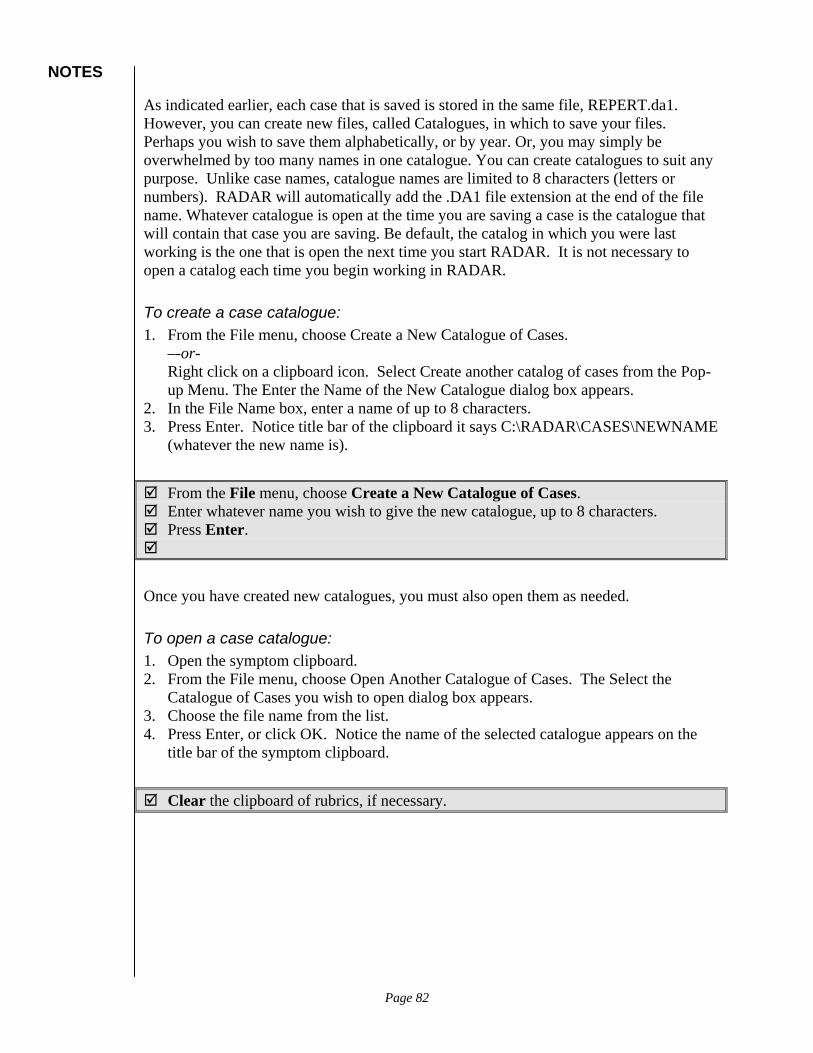
NOTES
As indicated earlier, each case that is saved is stored in the same file, REPERT.da1. However, you can create new files, called Catalogues, in which to save your files. Perhaps you wish to save them alphabetically, or by year. Or, you may simply be overwhelmed by too many names in one catalogue. You can create catalogues to suit any purpose. Unlike case names, catalogue names are limited to 8 characters (letters or numbers). RADAR will automatically add the .DA1 file extension at the end of the file name. Whatever catalogue is open at the time you are saving a case is the catalogue that will contain that case you are saving. Be default, the catalog in which you were last working is the one that is open the next time you start RADAR. It is not necessary to open a catalog each time you begin working in RADAR.
To create a case catalogue: 1. From the File menu, choose Create a New Catalogue of Cases.
–-or- Right click on a clipboard icon. Select Create another catalog of cases from the Pop-up Menu. The Enter the Name of the New Catalogue dialog box appears.
2. In the File Name box, enter a name of up to 8 characters. 3. Press Enter. Notice title bar of the clipboard it says C:\RADAR\CASES\NEWNAME
(whatever the new name is).
From the File menu, choose Create a New Catalogue of Cases. Enter whatever name you wish to give the new catalogue, up to 8 characters. Press Enter.
Once you have created new catalogues, you must also open them as needed.
To open a case catalogue: 1. Open the symptom clipboard. 2. From the File menu, choose Open Another Catalogue of Cases. The Select the
Catalogue of Cases you wish to open dialog box appears. 3. Choose the file name from the list. 4. Press Enter, or click OK. Notice the name of the selected catalogue appears on the
title bar of the symptom clipboard.
Clear the clipboard of rubrics, if necessary.
Page 82
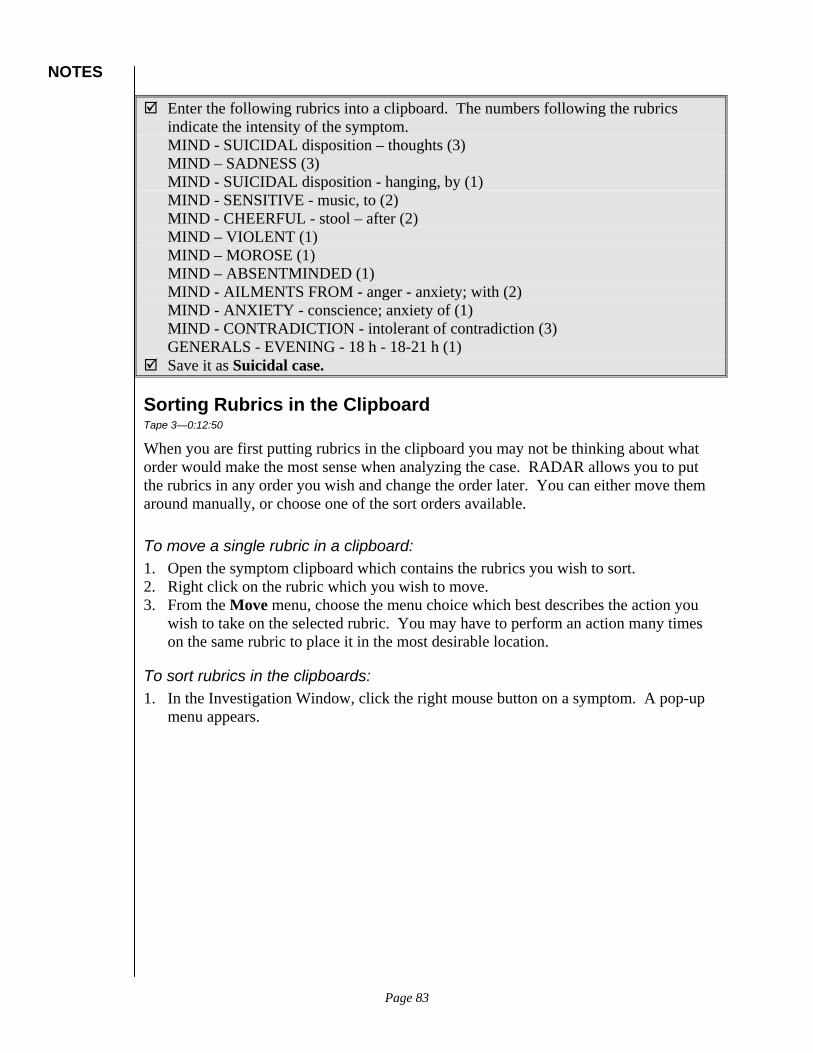
NOTES
Enter the following rubrics into a clipboard. The numbers following the rubrics indicate the intensity of the symptom. MIND - SUICIDAL disposition – thoughts (3) MIND – SADNESS (3) MIND - SUICIDAL disposition - hanging, by (1) MIND - SENSITIVE - music, to (2) MIND - CHEERFUL - stool – after (2) MIND – VIOLENT (1) MIND – MOROSE (1) MIND – ABSENTMINDED (1) MIND - AILMENTS FROM - anger - anxiety; with (2) MIND - ANXIETY - conscience; anxiety of (1) MIND - CONTRADICTION - intolerant of contradiction (3) GENERALS - EVENING - 18 h - 18-21 h (1)
Save it as Suicidal case.
Sorting Rubrics in the Clipboard Tape 3—0:12:50
When you are first putting rubrics in the clipboard you may not be thinking about what order would make the most sense when analyzing the case. RADAR allows you to put the rubrics in any order you wish and change the order later. You can either move them around manually, or choose one of the sort orders available.
To move a single rubric in a clipboard: 1. Open the symptom clipboard which contains the rubrics you wish to sort. 2. Right click on the rubric which you wish to move. 3. From the Move menu, choose the menu choice which best describes the action you
wish to take on the selected rubric. You may have to perform an action many times on the same rubric to place it in the most desirable location.
To sort rubrics in the clipboards: 1. In the Investigation Window, click the right mouse button on a symptom. A pop-up
menu appears.
Page 83
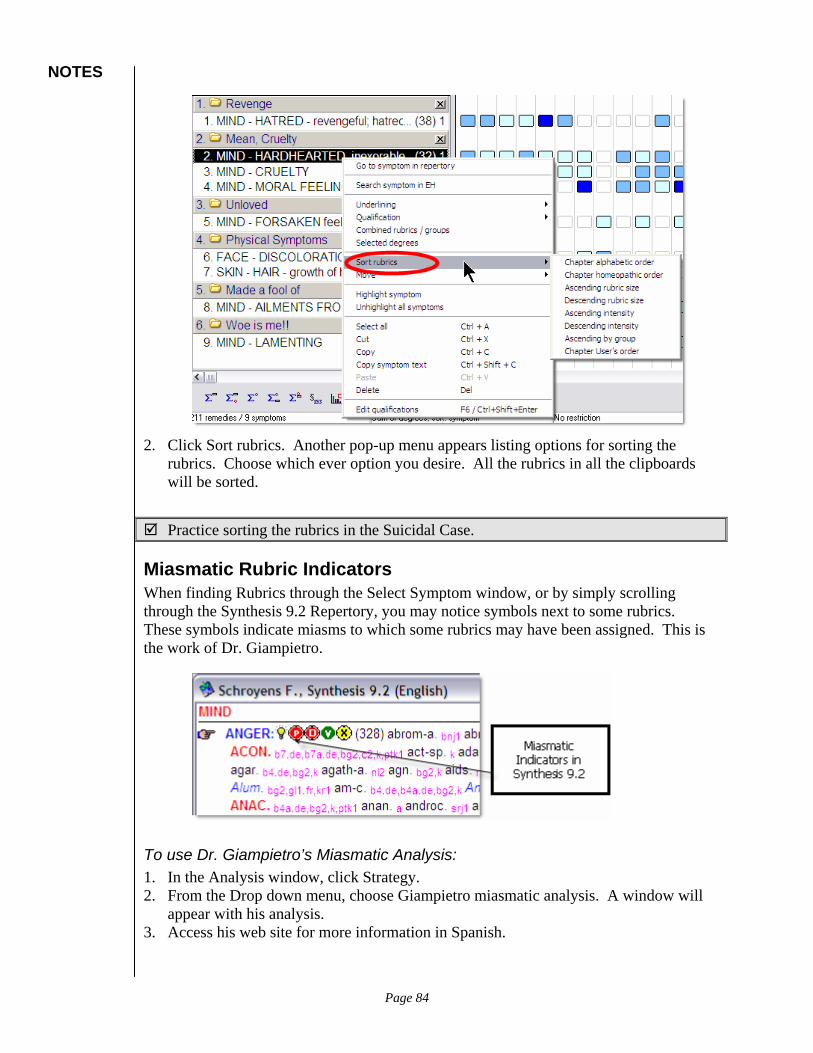
NOTES
2. Click Sort rubrics. Another pop-up menu appears listing options for sorting the
rubrics. Choose which ever option you desire. All the rubrics in all the clipboards will be sorted.
Practice sorting the rubrics in the Suicidal Case.
Miasmatic Rubric Indicators When finding Rubrics through the Select Symptom window, or by simply scrolling through the Synthesis 9.2 Repertory, you may notice symbols next to some rubrics. These symbols indicate miasms to which some rubrics may have been assigned. This is the work of Dr. Giampietro.
To use Dr. Giampietro’s Miasmatic Analysis: 1. In the Analysis window, click Strategy. 2. From the Drop down menu, choose Giampietro miasmatic analysis. A window will
appear with his analysis. 3. Access his web site for more information in Spanish.
Page 84
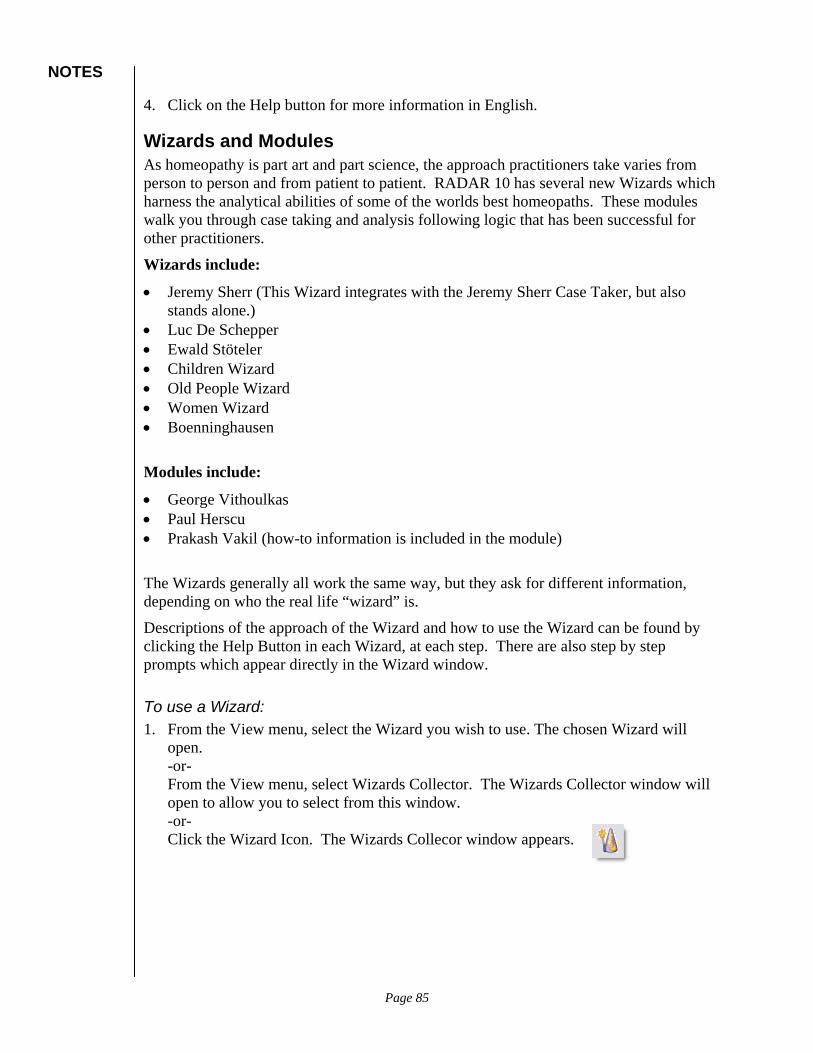
NOTES
4. Click on the Help button for more information in English.
Wizards and Modules As homeopathy is part art and part science, the approach practitioners take varies from person to person and from patient to patient. RADAR 10 has several new Wizards which harness the analytical abilities of some of the worlds best homeopaths. These modules walk you through case taking and analysis following logic that has been successful for other practitioners.
Wizards include:
• Jeremy Sherr (This Wizard integrates with the Jeremy Sherr Case Taker, but also stands alone.)
• Luc De Schepper • Ewald Stöteler • Children Wizard • Old People Wizard • Women Wizard • Boenninghausen
Modules include:
• George Vithoulkas • Paul Herscu • Prakash Vakil (how-to information is included in the module)
The Wizards generally all work the same way, but they ask for different information, depending on who the real life “wizard” is.
Descriptions of the approach of the Wizard and how to use the Wizard can be found by clicking the Help Button in each Wizard, at each step. There are also step by step prompts which appear directly in the Wizard window.
To use a Wizard: 1. From the View menu, select the Wizard you wish to use. The chosen Wizard will
open. -or- From the View menu, select Wizards Collector. The Wizards Collector window will open to allow you to select from this window. -or- Click the Wizard Icon. The Wizards Collecor window appears.
Page 85
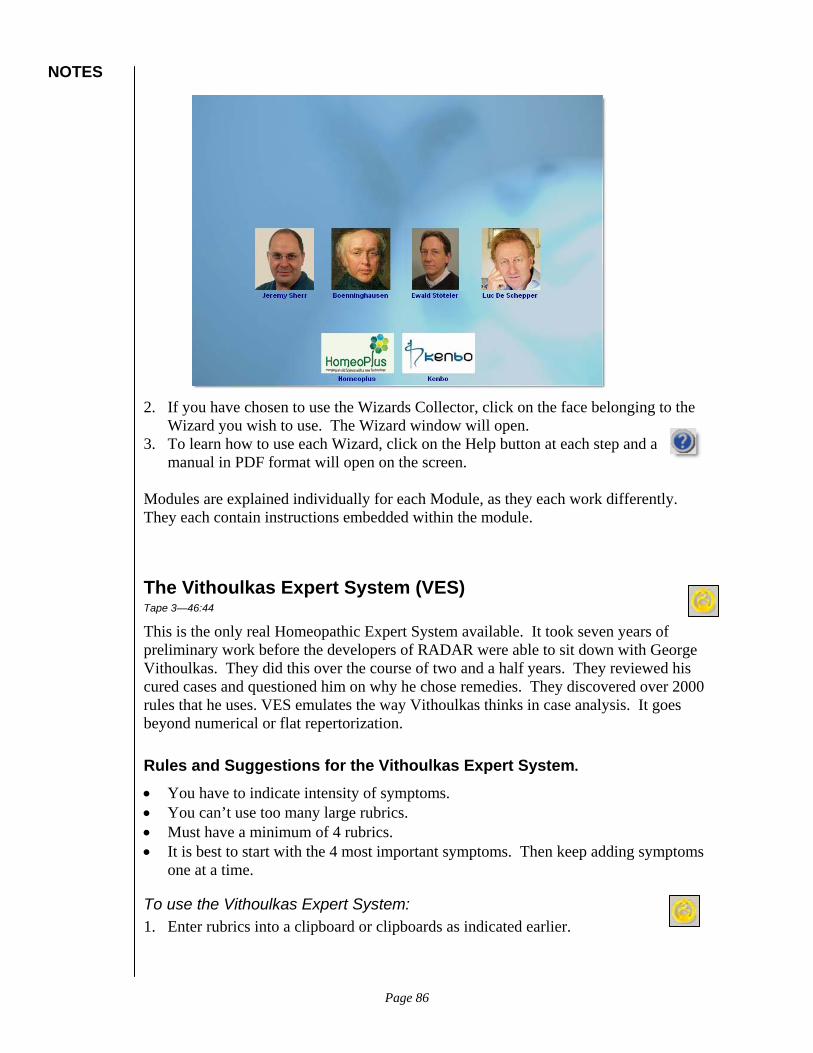
NOTES
2. If you have chosen to use the Wizards Collector, click on the face belonging to the
Wizard you wish to use. The Wizard window will open. 3. To learn how to use each Wizard, click on the Help button at each step and a
manual in PDF format will open on the screen. Modules are explained individually for each Module, as they each work differently. They each contain instructions embedded within the module.
The Vithoulkas Expert System (VES) Tape 3—46:44
This is the only real Homeopathic Expert System available. It took seven years of preliminary work before the developers of RADAR were able to sit down with George Vithoulkas. They did this over the course of two and a half years. They reviewed his cured cases and questioned him on why he chose remedies. They discovered over 2000 rules that he uses. VES emulates the way Vithoulkas thinks in case analysis. It goes beyond numerical or flat repertorization.
Rules and Suggestions for the Vithoulkas Expert System.
• You have to indicate intensity of symptoms. • You can’t use too many large rubrics. • Must have a minimum of 4 rubrics. • It is best to start with the 4 most important symptoms. Then keep adding symptoms
one at a time.
To use the Vithoulkas Expert System: 1. Enter rubrics into a clipboard or clipboards as indicated earlier.
Page 86

NOTES
2. Press Shift + F9 or click the Vithoulkas Expert System icon. The Vithoulkas Expert System window appears.
3. To display a break down of other remedy options based on large, medium and small
remedies, click the Remedies button (Alt + R). The suggested remedies can be dragged to the keynote smart icon to view keynotes on a remedy.
4. To change analysis options, click the Options button (Alt + O). 5. To view the symptom clipboard, click the Symptoms button (Alt + S). 6. Click Close or press Esc to close the VES window. Notice that the Repertory view is
set to the Vithoulkas View, and stays in that view, even after closing the VES window.
There are two numbers that appear in the VES window. The first number represents the overall confidence that the remedy is an accurate recommendation. This can go as high as 1000. The second number represents confidence relative to other remedies in the analysis. When this number is over 100, the other remedy recommendations disappear.
Press F7 to open a symptom clipboard. Open the Suicidal Disposition case, if necessary. Click the Vithoulkas View icon or press Shift + F9. Click the Remedies button to view the distribution of remedies. Close the VES Remedies window. Open a symptom clipboard. Clear the current clipboard.
Page 87

NOTES
Enter the following rubrics into the clipboard. The numbers following the rubrics indicate the intensity of the symptoms. MIND – TIMIDITY (2) MIND - CONFIDENCE - want of self-confidence (1) MIND - FEAR - people; of (2) MIND – RESTLESSNESS (2) MIND - CONCENTRATION – difficult (1) MIND - CONFUSION of mind (1) MIND - INDIFFERENCE, apathy (1) MIND - DWELLS - past disagreeable occurrences, on (2) EXTERNAL THROAT - INDURATION of glands (2) GENERALS - INDURATIONS - Glands, of (2) GENERALS - SWELLING - Glands; of (3) GENERALS - EMACIATION - appetite with emaciation; ravenous - children; in (2) GENERALS - WALKING - desire for - air, in open (2)
Save the case as Swollen Glands. Click the VES icon or press Shift + F9.
Extended Search Tape 3—1:14:56
As you learned earlier, the RADAR Concepts feature can be used to identify potentially useful rubrics. However, you can do a more detailed search on Synthesis 9.0 to locate rubrics using the Extended Search feature. For example, you can search for synonyms, root words and branches of those words, and words that appear in the repertory. While performing that search, you can limit the results to a particular chapter or chapters in the repertory so that you don’t pull up rubrics in sections that don’t apply to your patient. Finally, you can also use the Extended Search feature to display all the rubrics associated with a particular remedy. This feature is helpful in gaining a full understanding of a remedy, its mental/emotional picture, and where its major physical pathology is found in the body. For example, you could use this feature if you wish to see all the rubrics which contain the idea of forsakenness and the remedy Pulsatilla.
The following table lists potential Contexts for the search and an explanation of each option. The extended search can be activated by pressing F4.
Page 88
NOTES
Context for the Search Explanation
Roots and Branches Roots of words and their potential branches. For example, you might wish to search for the word abandoned. You would choose the root Abandon and it will also include abandoned as well as abandons.
Synonyms This selection searches for words with similar meanings to the word for which you are searching in the repertory. This is especially useful for some of the symptoms that are described in the repertory using terminology which is not contemporary.
Words in the Repertory This feature searches for words in the repertory, exactly as they appear.
Remedies This context selection limits the search to only those rubrics which contain the specified remedy or remedies.
Chapters This selection limits the search to only the specified Repertory chapters.
The Extended Search feature allows you to specify more than one qualifier in the search. In other words, you can include more than one rule that must be met in order for the data to be included in the search result. By default, the AND operator appears between the two qualifiers. The following table lists the operators and a definition of each.
Operator Definition
AND In order to be included in the search result, both of the qualifiers must be true. For example, if you are searching for the Root Pain, but you only want Pain if it is in the Mind chapter, you would want to have a statement of Root: Pain AND Chapter: Mind.
OR When using this operator, you are stating that either qualifier can be true in order for the rubric to be included in the search result. For example, you would use this to conduct a search on mutually exclusive symptoms such as Painful or Painless.
AND NOT This operator indicates that what follows should be excluded from the search result. For example, you may wish to find some physical symptoms but not the mental symptoms. You would include the AND NOT operator followed by the Mind chapter.
Page 89

NOTES
NO
TE There may be a slight delay while RADAR does the search. This is
especially true if you are including common symptoms or polychrest remedies.
To perform an Extended Search: 1. In the Repertory Window, press F4
-or- Click the Extended Search button -or- From the Search menu, choose Extended Search. The Extended Search window appears.
2. Set the Context for Search as desired. (Shift + F4 will set the Context to Remedies.) 3. Begin typing the word for which you wish to search. The Search Items will jump to
the letter you typed. 4. When you locate the desired word, press Enter. The word appears in the Search
Statement box. 5. If you wish to include another qualifier in the Search Statement box, set the context
and begin typing the first few letters in the word. 6. Press Enter to display the qualifier in the Search Statement box. 7. If you wish to change the operator between the two qualifiers from the default AND,
click into the operator in the Search Statement Box and change the operator with the drop down arrow in the operator box.
8. When you have completed the Search Statement, press Enter or Click Search to conduct the search. The Result of Extended Search dialog box appears.
Page 90
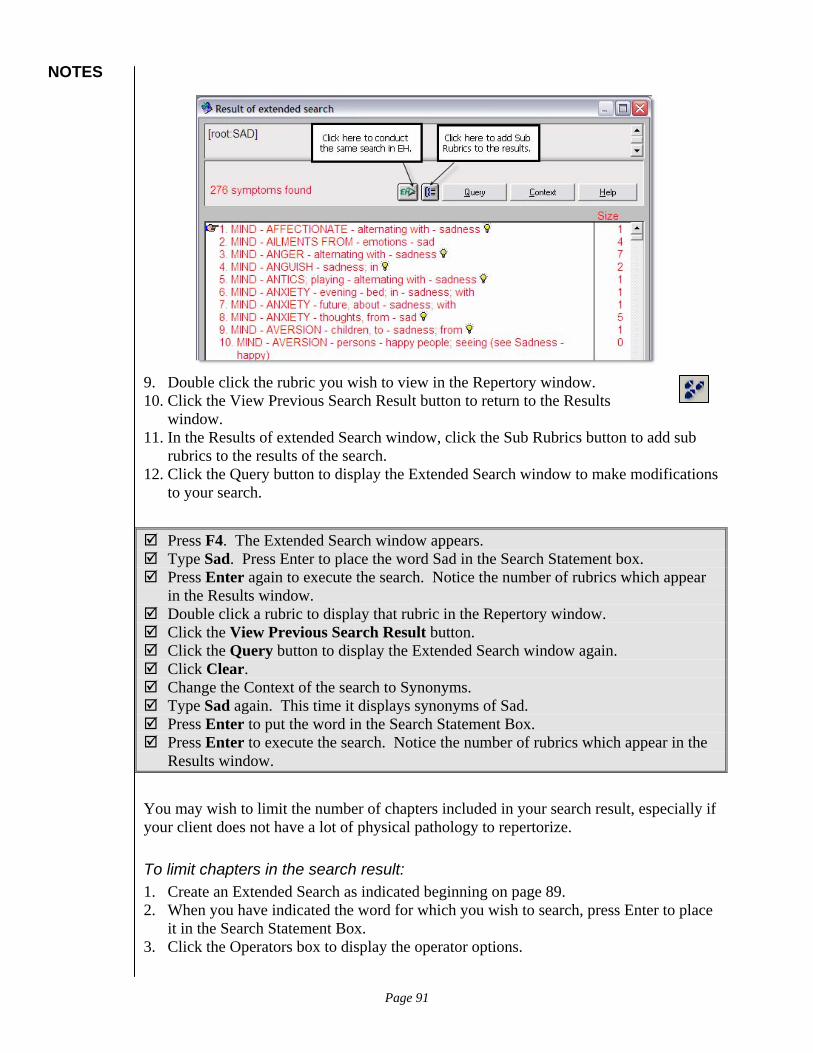
NOTES
9. Double click the rubric you wish to view in the Repertory window. 10. Click the View Previous Search Result button to return to the Results
window. 11. In the Results of extended Search window, click the Sub Rubrics button to add sub
rubrics to the results of the search. 12. Click the Query button to display the Extended Search window to make modifications
to your search.
Press F4. The Extended Search window appears. Type Sad. Press Enter to place the word Sad in the Search Statement box. Press Enter again to execute the search. Notice the number of rubrics which appear
in the Results window. Double click a rubric to display that rubric in the Repertory window. Click the View Previous Search Result button. Click the Query button to display the Extended Search window again. Click Clear. Change the Context of the search to Synonyms. Type Sad again. This time it displays synonyms of Sad. Press Enter to put the word in the Search Statement Box. Press Enter to execute the search. Notice the number of rubrics which appear in the
Results window.
You may wish to limit the number of chapters included in your search result, especially if your client does not have a lot of physical pathology to repertorize.
To limit chapters in the search result: 1. Create an Extended Search as indicated beginning on page 89. 2. When you have indicated the word for which you wish to search, press Enter to place
it in the Search Statement Box. 3. Click the Operators box to display the operator options.
Page 91

NOTES
4. Choose the operator AND. 5. Click the Context box to change the context to Chapters. 6. Select a chapter from the list by typing the name of the chapter. Press Enter to place
the chapter title in the Context box. 7. Press Enter again to perform the search. The Result of Extended Search window
appears. Only rubrics contained in the specified chapter will appear in the Results window.
Click the Query button in the Results window. Click Clear to remove the existing Query. Choose Roots and Branches for the context, if necessary. Type Pain, clicking into the Selection box, if necessary. Press Enter. Change the context to Chapter. Type Mind to query only the Mind chapter. Press Enter to add the Mind chapter to the Search Statement box. Press Enter again to execute the Search. The Search Results window appears. Scroll
through and notice that only the rubrics in the Mind chapter appear. Press Esc to close the Results window. Press F4 to display the Extended Search window. Clear the current query if necessary. Type Fors to search for the Root word Forsake. Press Enter to place it in the Search Statement Box. Press Shift + F4 to switch the context for the search to Remedies. Type Puls to search for Pulsatilla. Press Enter to place it in the Search Statement Box. Press Enter again to conduct the search. The Result of Extended Search window
appears. Click Query in the Result window to display the Extended Search window again. Click Clear (Alt+C). Type Fe. Press Enter to place Fear in the Search Statement box. Change the context to Chapters. Type Mi Press Enter to place Mind in the Search Statement box. Change the context to Remedies. Type Calc Press Enter to place Calcarea in to the Search Statement box. Press Enter again to conduct the search.
You can also use the Extended Search feature to display all the rubrics in which a particular remedy appears. While this does not give you the language of the proving, it does give you a summary of the proving.
Page 92
NOTES
To display all the rubrics associated with a remedy: 1. Create an Extended Search as indicated beginning on page 89. 2. Click Clear, if necessary, to remove any query which may exist. 3. Click the Context box and change it to Remedies. 4. Begin typing the name of the remedy on which you wish to search. 5. When you have found the remedy, press Enter to place the name in the Search
Statement. 6. Press Enter again to execute the search. 7. The results window appears with all the rubrics in which a particular remedy appears.
NO
TE When you begin typing the name of the remedy on which you wish to
search, RADAR lists them alphabetically by Remedy abbreviation, rather than full name. For example, if you are searching for Hepar Sulphur (abbreviation Hep.), and type Hepar, RADAR will bypass Hepar Sulphur, and go to the remedy Heparin.
Press F4 to bring up the Extended Search window. Click Clear. Click the Context box and change it to Remedies. Begin typing Hep. When the remedy Hepar Sulphur is highlighted, press Enter. Press Enter again to execute the search.
Displaying Subrubrics In many of the results windows, for example in the Results of Extended Search, a subrubric button will appears to allow you to display subrubrics as well as main rubrics. These subrubrics don’t contain the word for which you were searching, but they appear under a rubric which does include the desired word. This button appears only if applicable.
To display subrubrics: 1. In a Results of Search window, click the Subrubric button. RADAR executes the
search again, this time including Subrubrics. The window displays the new result. 2. Push the Subrubric button again to display only main rubrics.
Press F4 to display the Extended Search window. Clear the current search. Search for the root Beer. Press Enter to execute the search. Click the Subrubric button in the Result of Extended Search window. Notice the
number of symptoms changes.
Page 93

NOTES
Click it again to hide the subrubrics. Notice the number of symptoms changes again.
Accessing Information on the Remedies Tape 3—1:26:11
RADAR provides a variety of information about the remedies listed in the rubrics. Among the information you can access includes keynotes, families, pictures, authors, etc. All the information can be accessed by double clicking a remedy name within the synthesis. When the Remedy Information Window appears, you have access to all the information about a remedy available in RADAR.
To access information about a remedy: 1. Position the mouse pointer over the remedy you wish to investigate and click the
Right mouse button. A short cut menu appears.
Choose Remedy Information. -or- Double click the remedy for which you wish additional information.The Remedy Information Window appears:
2. The color of the remedy name indicates the degree it appears in the particular rubric
in which you double clicked.
Page 94

NOTES
3. The Keynotes button will open up the RADAR keynotes. (See Keynotes on Remedies section on page 97 for more information.)
4. The Picture button shows potentially many pictures of the remedy in its natural state. 5. Authors tells which authors felt it belonged in that particular rubric. 6. Family lists in what biological family the substance is classified. It also indicates to
which bowel nosodes the remedy is related, in which miasms it has been classified, and related remedies—i.e., which remedies it is followed well by, which ones are similar, and which are complementary.
7. Concepts indicates which concepts that remedy appears in. (See page 70 for more information on RADAR Concepts.)
RADAR has one central location to gain information about remedies through multi-media. This is accessible through the Remedy Information Window. Through this window, you can see pictures of many remedies, hear sound clips from lectures by well known, respected homeopaths and filter the remedies to compare similar remedies—for example, all the Kali’s.
To use Multi-media for remedies: 1. In the Repertory View or the Analysis View, position the pointer over the remedy you
wish to see. Click the right mouse button. A short cut menu appears.
Choose Pictures. -or- In the Remedy Information Window, click the Pictures button. A window opens with a picture of the remedy.
2. Click on the right or left arrow to see additional pictures of the same remedy.
Page 95

NOTES
3. To look at pictures or hear lectures on other remedies, click the Other Remedies
button. The Multimedia for Remedies window opens.
4. Double click the remedy name or the number in the picture column to see pictures of
other remedies.
Page 96
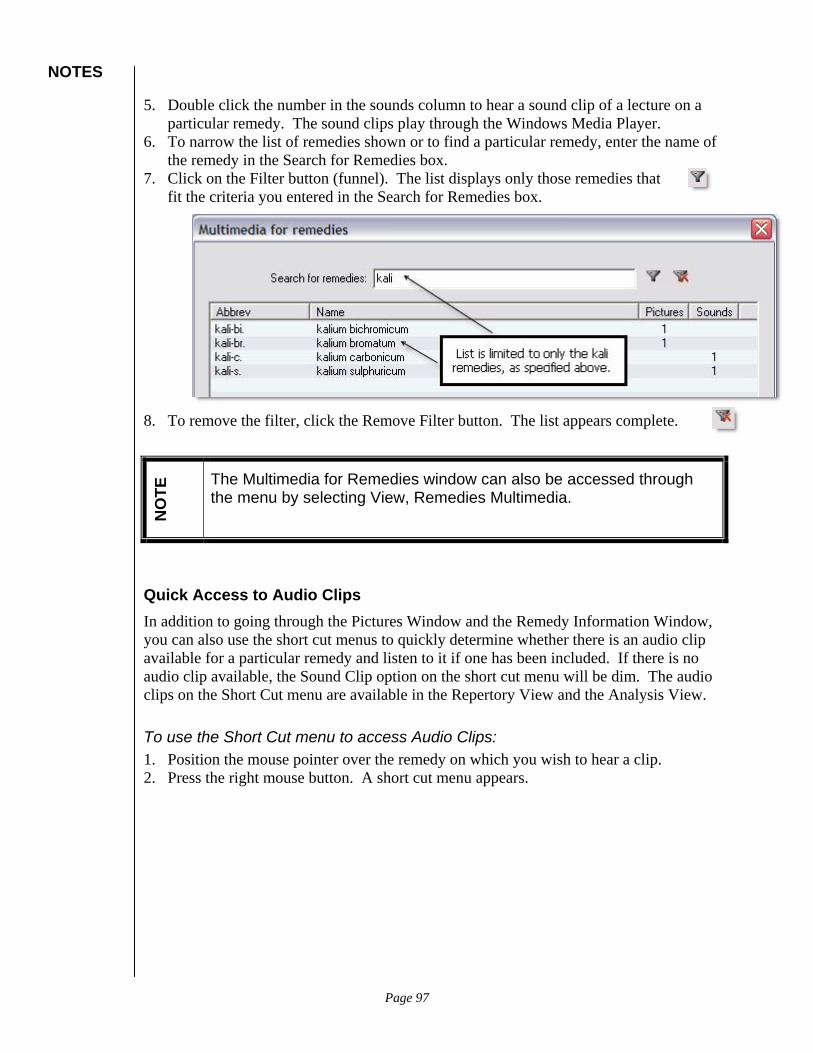
NOTES
5. Double click the number in the sounds column to hear a sound clip of a lecture on a particular remedy. The sound clips play through the Windows Media Player.
6. To narrow the list of remedies shown or to find a particular remedy, enter the name of the remedy in the Search for Remedies box.
7. Click on the Filter button (funnel). The list displays only those remedies that fit the criteria you entered in the Search for Remedies box.
8. To remove the filter, click the Remove Filter button. The list appears complete.
NO
TE The Multimedia for Remedies window can also be accessed through
the menu by selecting View, Remedies Multimedia.
Quick Access to Audio Clips In addition to going through the Pictures Window and the Remedy Information Window, you can also use the short cut menus to quickly determine whether there is an audio clip available for a particular remedy and listen to it if one has been included. If there is no audio clip available, the Sound Clip option on the short cut menu will be dim. The audio clips on the Short Cut menu are available in the Repertory View and the Analysis View.
To use the Short Cut menu to access Audio Clips: 1. Position the mouse pointer over the remedy on which you wish to hear a clip. 2. Press the right mouse button. A short cut menu appears.
Page 97
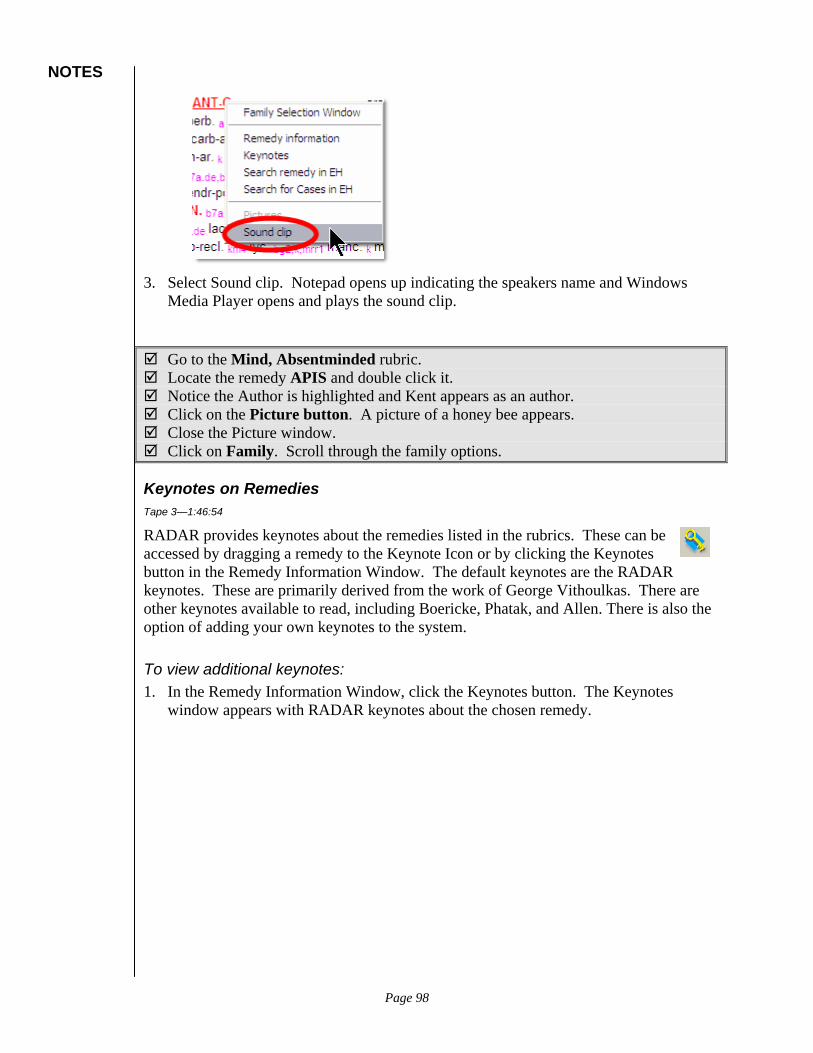
NOTES
3. Select Sound clip. Notepad opens up indicating the speakers name and Windows
Media Player opens and plays the sound clip.
Go to the Mind, Absentminded rubric. Locate the remedy APIS and double click it. Notice the Author is highlighted and Kent appears as an author. Click on the Picture button. A picture of a honey bee appears. Close the Picture window. Click on Family. Scroll through the family options.
Keynotes on Remedies Tape 3—1:46:54
RADAR provides keynotes about the remedies listed in the rubrics. These can be accessed by dragging a remedy to the Keynote Icon or by clicking the Keynotes button in the Remedy Information Window. The default keynotes are the RADAR keynotes. These are primarily derived from the work of George Vithoulkas. There are other keynotes available to read, including Boericke, Phatak, and Allen. There is also the option of adding your own keynotes to the system.
To view additional keynotes: 1. In the Remedy Information Window, click the Keynotes button. The Keynotes
window appears with RADAR keynotes about the chosen remedy.
Page 98
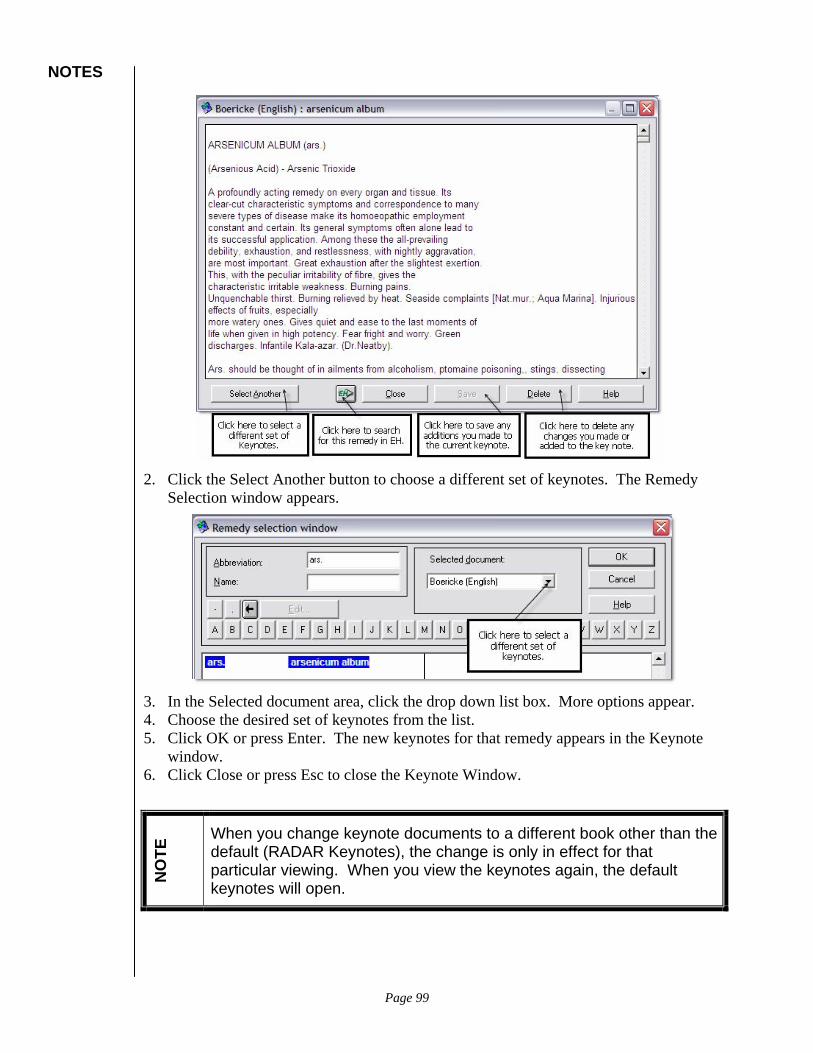
NOTES
2. Click the Select Another button to choose a different set of keynotes. The Remedy
Selection window appears.
3. In the Selected document area, click the drop down list box. More options appear. 4. Choose the desired set of keynotes from the list. 5. Click OK or press Enter. The new keynotes for that remedy appears in the Keynote
window. 6. Click Close or press Esc to close the Keynote Window.
NO
TE When you change keynote documents to a different book other than the default (RADAR Keynotes), the change is only in effect for that particular viewing. When you view the keynotes again, the default keynotes will open.
Page 99

NOTES
In the Remedy Information Window, click the Keynotes button. Scroll through the keynotes on Apis. Click the Select Another button. The Remedy Selection window appears. Click the Selected Document (RADAR Keynotes 4.0). Choose Boericke. Press Enter or click OK. Boericke’s Keynotes on Apis appear. Close the Keynote window.
As you become more experienced with a particular remedy, or as you study more about remedies, you may wish to add information you find useful into the Personal Keynotes section. For example, you have given a patient a fairly new remedy and want to add the results from that remedy to your keynotes. You may have attended a seminar or read about a remedy and gathered information that isn’t in EH, and would like to have those details at your fingertips—add it to the Personal Keynotes section, as follows:
To add your own keynotes: 1. From the Repertory Window, choose File, Open Keynotes (Alt + F, K). The Select
Keynotes to Open dialog box appears.
2. Click the All button (Alt + A) to open the keynotes for all remedies. The Remedy
Selection window appears.
Page 100
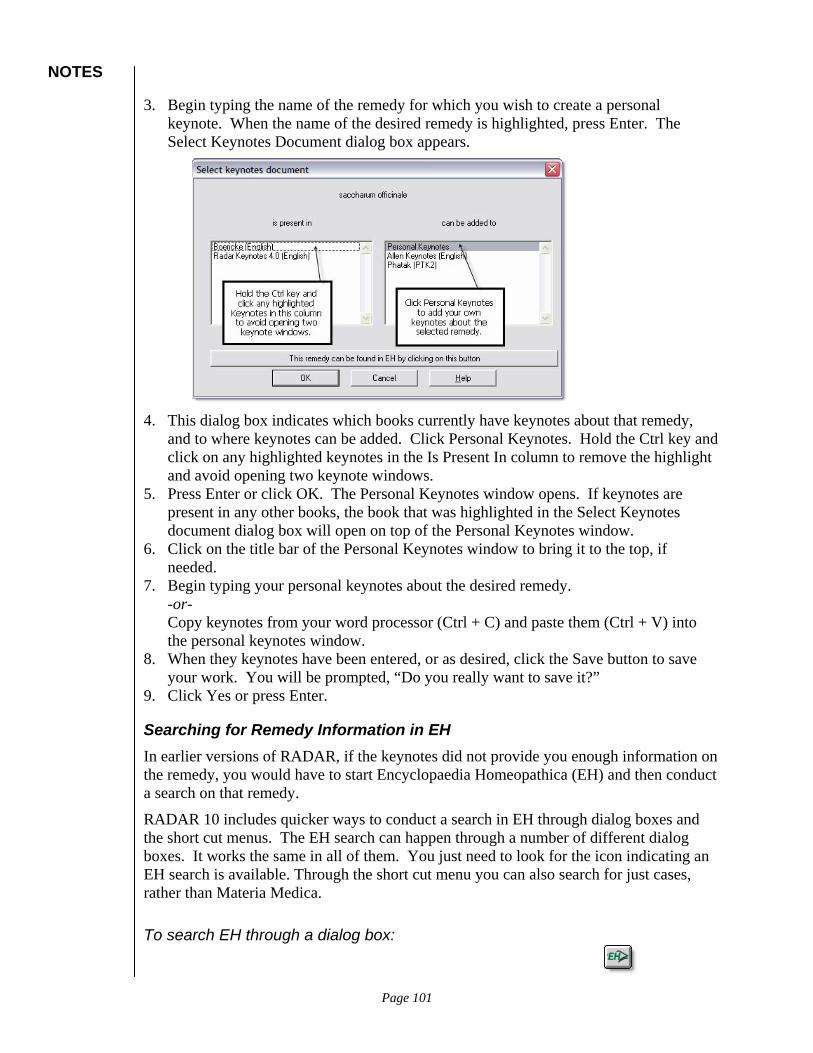
NOTES
3. Begin typing the name of the remedy for which you wish to create a personal keynote. When the name of the desired remedy is highlighted, press Enter. The Select Keynotes Document dialog box appears.
4. This dialog box indicates which books currently have keynotes about that remedy,
and to where keynotes can be added. Click Personal Keynotes. Hold the Ctrl key and click on any highlighted keynotes in the Is Present In column to remove the highlight and avoid opening two keynote windows.
5. Press Enter or click OK. The Personal Keynotes window opens. If keynotes are present in any other books, the book that was highlighted in the Select Keynotes document dialog box will open on top of the Personal Keynotes window.
6. Click on the title bar of the Personal Keynotes window to bring it to the top, if needed.
7. Begin typing your personal keynotes about the desired remedy. -or- Copy keynotes from your word processor (Ctrl + C) and paste them (Ctrl + V) into the personal keynotes window.
8. When they keynotes have been entered, or as desired, click the Save button to save your work. You will be prompted, “Do you really want to save it?”
9. Click Yes or press Enter.
Searching for Remedy Information in EH In earlier versions of RADAR, if the keynotes did not provide you enough information on the remedy, you would have to start Encyclopaedia Homeopathica (EH) and then conduct a search on that remedy.
RADAR 10 includes quicker ways to conduct a search in EH through dialog boxes and the short cut menus. The EH search can happen through a number of different dialog boxes. It works the same in all of them. You just need to look for the icon indicating an EH search is available. Through the short cut menu you can also search for just cases, rather than Materia Medica.
To search EH through a dialog box:
Page 101
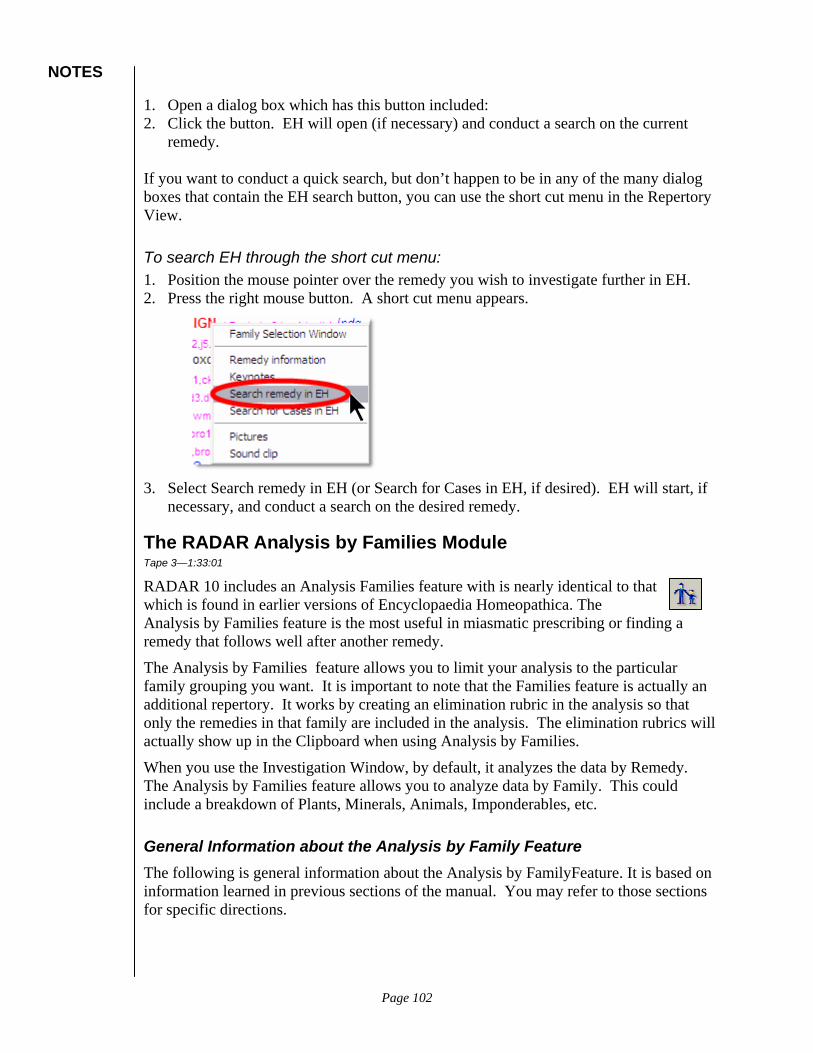
NOTES
1. Open a dialog box which has this button included: 2. Click the button. EH will open (if necessary) and conduct a search on the current
remedy. If you want to conduct a quick search, but don’t happen to be in any of the many dialog boxes that contain the EH search button, you can use the short cut menu in the Repertory View.
To search EH through the short cut menu: 1. Position the mouse pointer over the remedy you wish to investigate further in EH. 2. Press the right mouse button. A short cut menu appears.
3. Select Search remedy in EH (or Search for Cases in EH, if desired). EH will start, if
necessary, and conduct a search on the desired remedy.
The RADAR Analysis by Families Module Tape 3—1:33:01
RADAR 10 includes an Analysis Families feature with is nearly identical to that which is found in earlier versions of Encyclopaedia Homeopathica. The Analysis by Families feature is the most useful in miasmatic prescribing or finding a remedy that follows well after another remedy.
The Analysis by Families feature allows you to limit your analysis to the particular family grouping you want. It is important to note that the Families feature is actually an additional repertory. It works by creating an elimination rubric in the analysis so that only the remedies in that family are included in the analysis. The elimination rubrics will actually show up in the Clipboard when using Analysis by Families.
When you use the Investigation Window, by default, it analyzes the data by Remedy. The Analysis by Families feature allows you to analyze data by Family. This could include a breakdown of Plants, Minerals, Animals, Imponderables, etc.
General Information about the Analysis by Family Feature The following is general information about the Analysis by FamilyFeature. It is based on information learned in previous sections of the manual. You may refer to those sections for specific directions.
Page 102
NOTES
By default, Analysis by Family is limited to Kingdoms and the Periodic Table. However, there are ways to temporarily and permanently change this, as outlined below. You may, for example, feel that this is picture presents a plant remedy and can restrict the view to only plant remedies.
If you have decided that a case presents a picture of a particular Kingdom, such as Plants and you have added that restriction, you can also then display all the remedies in a particular plant family. This also works with Animals, Minerals, etc.
The Restrict To options can be used from either the Investigation Window for Remedies or the Investigation Window for Families. When you use it from the Investigation Window for Remedies, it limits the remedies to that large grouping. When you use it with the Investigation Window for Families, it presents more specific information, such as plant families, animal families, mineral salts, etc.
To make an analysis by family: 1. Open the Symptom Clipboard. Be sure there are rubrics in the clipboard. 2. Click the Analysis by Families button.
-or- Choose Display, Analysis by Families. The Investigation window for families opens. This looks like the Investigation Window explained earlier, but now it displays family groupings rather than remedies.
Page 103
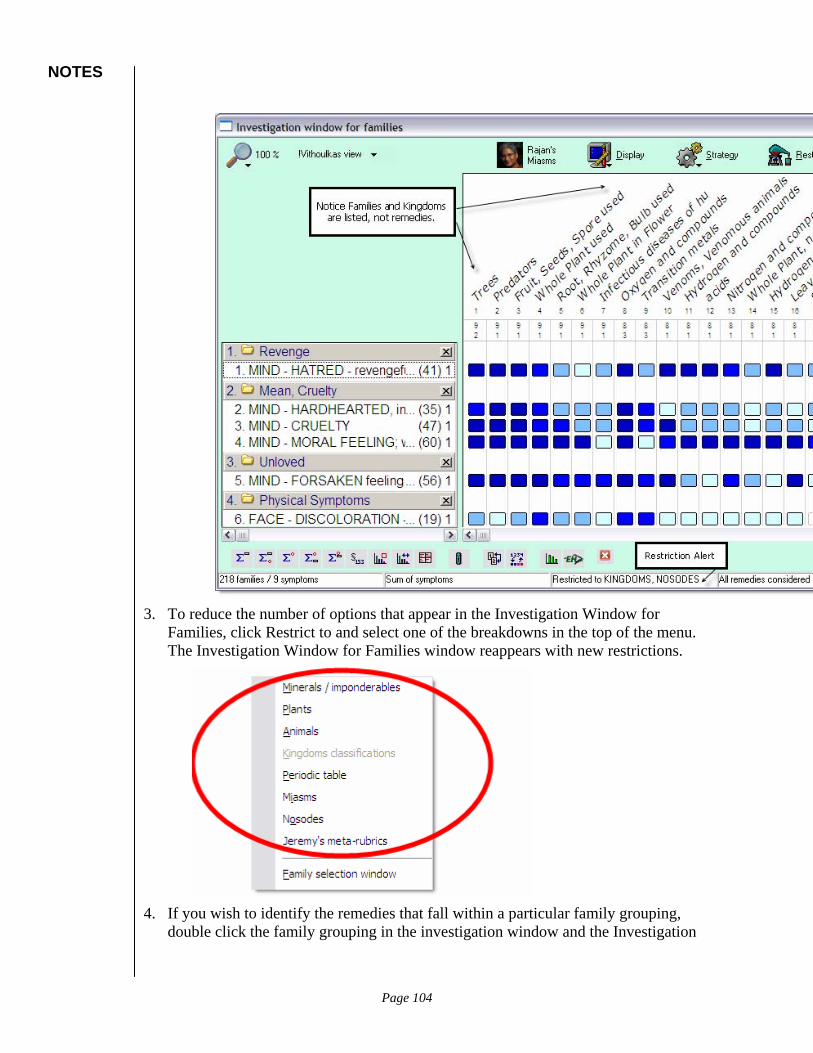
NOTES
3. To reduce the number of options that appear in the Investigation Window for Families, click Restrict to and select one of the breakdowns in the top of the menu. The Investigation Window for Families window reappears with new restrictions.
4. If you wish to identify the remedies that fall within a particular family grouping,
double click the family grouping in the investigation window and the Investigation
Page 104

NOTES
Window for Remedies appears with only those remedies which fit the family grouping of interest.
Page 105

NOTES
5. To return to the Investigation Window for Families, click the Analysis by Families
button.
Open the symptom clipboard. If there are any rubrics currently in the clipboard, erase them.
Page 106
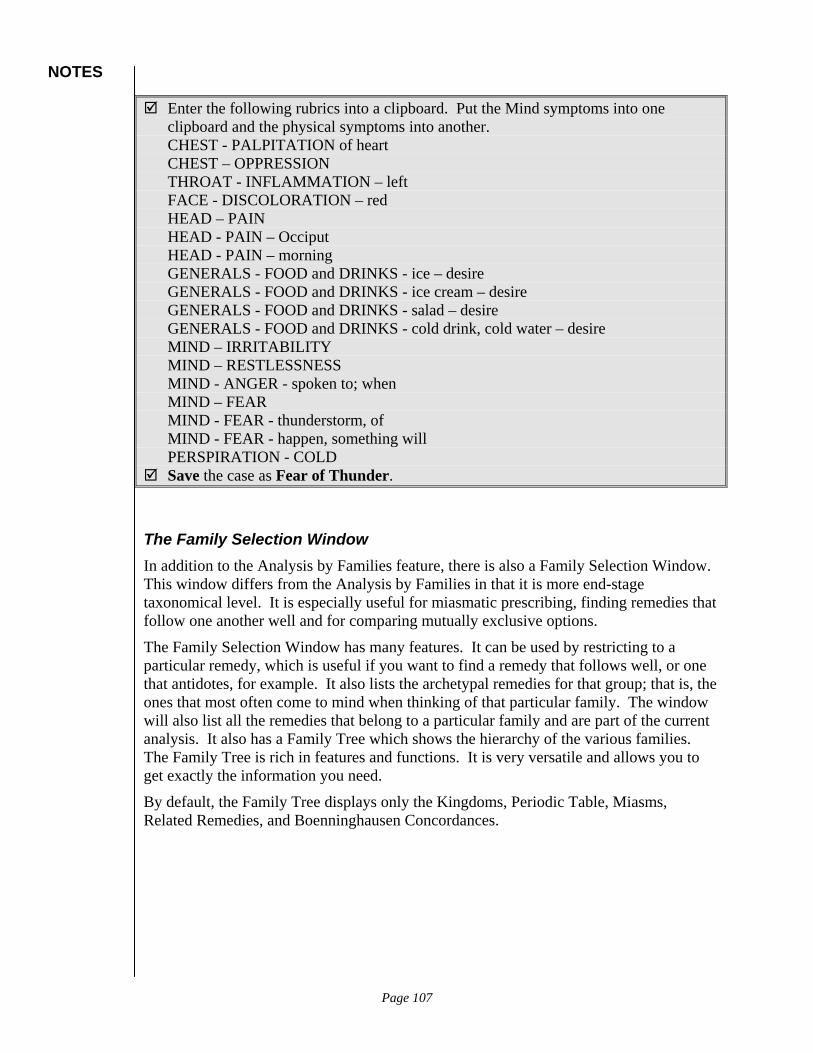
NOTES
Enter the following rubrics into a clipboard. Put the Mind symptoms into one clipboard and the physical symptoms into another. CHEST - PALPITATION of heart CHEST – OPPRESSION THROAT - INFLAMMATION – left FACE - DISCOLORATION – red HEAD – PAIN HEAD - PAIN – Occiput HEAD - PAIN – morning GENERALS - FOOD and DRINKS - ice – desire GENERALS - FOOD and DRINKS - ice cream – desire GENERALS - FOOD and DRINKS - salad – desire GENERALS - FOOD and DRINKS - cold drink, cold water – desire MIND – IRRITABILITY MIND – RESTLESSNESS MIND - ANGER - spoken to; when MIND – FEAR MIND - FEAR - thunderstorm, of MIND - FEAR - happen, something will PERSPIRATION - COLD
Save the case as Fear of Thunder.
The Family Selection Window In addition to the Analysis by Families feature, there is also a Family Selection Window. This window differs from the Analysis by Families in that it is more end-stage taxonomical level. It is especially useful for miasmatic prescribing, finding remedies that follow one another well and for comparing mutually exclusive options.
The Family Selection Window has many features. It can be used by restricting to a particular remedy, which is useful if you want to find a remedy that follows well, or one that antidotes, for example. It also lists the archetypal remedies for that group; that is, the ones that most often come to mind when thinking of that particular family. The window will also list all the remedies that belong to a particular family and are part of the current analysis. It also has a Family Tree which shows the hierarchy of the various families. The Family Tree is rich in features and functions. It is very versatile and allows you to get exactly the information you need.
By default, the Family Tree displays only the Kingdoms, Periodic Table, Miasms, Related Remedies, and Boenninghausen Concordances.
Page 107

NOTES
The following table describes the various areas on the right side of the Family Selection Window.
Area of Window Explanation
All remedies belonging to selected family level.
Includes all the remedies that belong to the family that you selected on the left and the remedy to which the family tree is limited. These remedies do not necessarily appear in the analysis window. For example, if you chose to bring Stramonium into the Family Selection window, expanded the Kingdom family and clicked on Solanaceae, you would see on the right, a list and the total number of all the remedies which belong to the Solanaceae family.
Archtypal remedies This section of the Family Selection window displays all the remedies in that family that are well known and about which there is a lot of information. The Upper Case remedies are found in more rubrics than the other remedies. This is a useful feature not only for selecting remedies for your patients, but for studying remedies. Finding a common thread between the Archtypal remedies will enable you to learn more about the family in general.
Common Name This displays the name by which most people recognize
Page 108

NOTES
Area of Window Explanation this family, if relevant.
Family Tree Information The left side of the Family Selection Window includes by default, five families. The following table explains those families.
Family Explanation
Kingdoms Includes all the potential classifications of remedies by the kingdom to which they belong. For example, plants are broken down to the Family level, with the remedies themselves representing the genus and species.
Periodic Table Includes breakdowns of mineral remedies in a variety of schema, including that of Jan Scholten.
Miasms Includes breakdowns into traditional miasms as well as more contemporary views. The number of miasms is controversial, but you can find a family to match your view point.
Related remedies Which remedies are similar, followed well by, follows well, inimicals, antidotes, complementary.
Boenninghausen Concordances
Boenninghausen was one of the first homeopaths to break down the Materia Medica into different parts of the body and to which part of the body certain remedies have an affinity.
Expanding and Collapsing the Family Tree The Family Tree in the Family Selection Window can be expanded and collapsed, to show more or less information as desired.
To expand and collapse the Family Tree: 1. In the Family Selection Window, click the plus sign next to the family name. The
tree structure expands to show the branches of the family tree.
Page 109
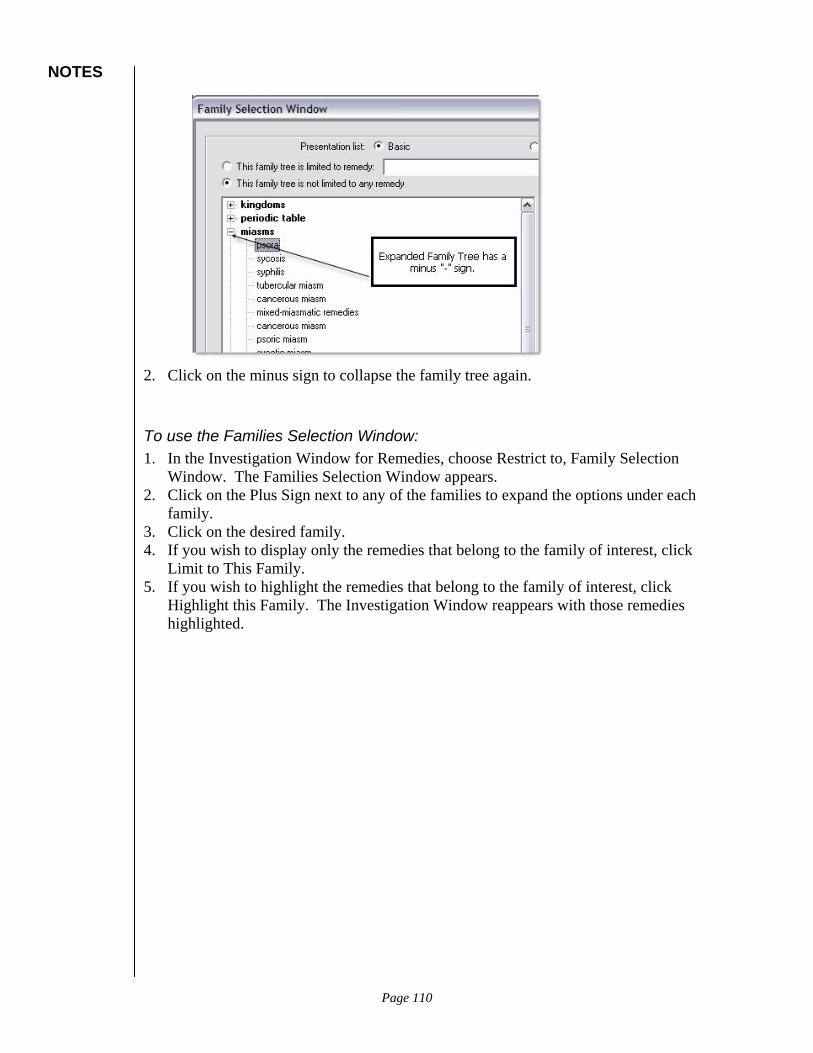
NOTES
2. Click on the minus sign to collapse the family tree again.
To use the Families Selection Window: 1. In the Investigation Window for Remedies, choose Restrict to, Family Selection
Window. The Families Selection Window appears. 2. Click on the Plus Sign next to any of the families to expand the options under each
family. 3. Click on the desired family. 4. If you wish to display only the remedies that belong to the family of interest, click
Limit to This Family. 5. If you wish to highlight the remedies that belong to the family of interest, click
Highlight this Family. The Investigation Window reappears with those remedies highlighted.
Page 110
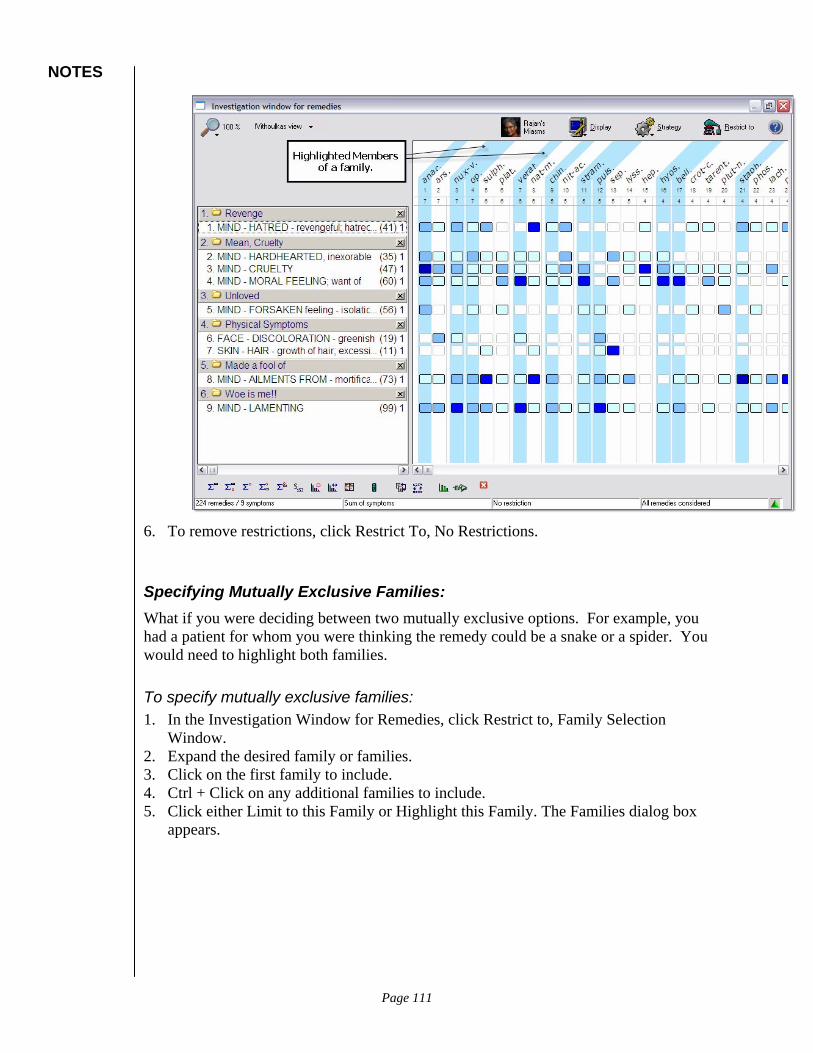
NOTES
6. To remove restrictions, click Restrict To, No Restrictions.
Specifying Mutually Exclusive Families: What if you were deciding between two mutually exclusive options. For example, you had a patient for whom you were thinking the remedy could be a snake or a spider. You would need to highlight both families.
To specify mutually exclusive families: 1. In the Investigation Window for Remedies, click Restrict to, Family Selection
Window. 2. Expand the desired family or families. 3. Click on the first family to include. 4. Ctrl + Click on any additional families to include. 5. Click either Limit to this Family or Highlight this Family. The Families dialog box
appears.
Page 111
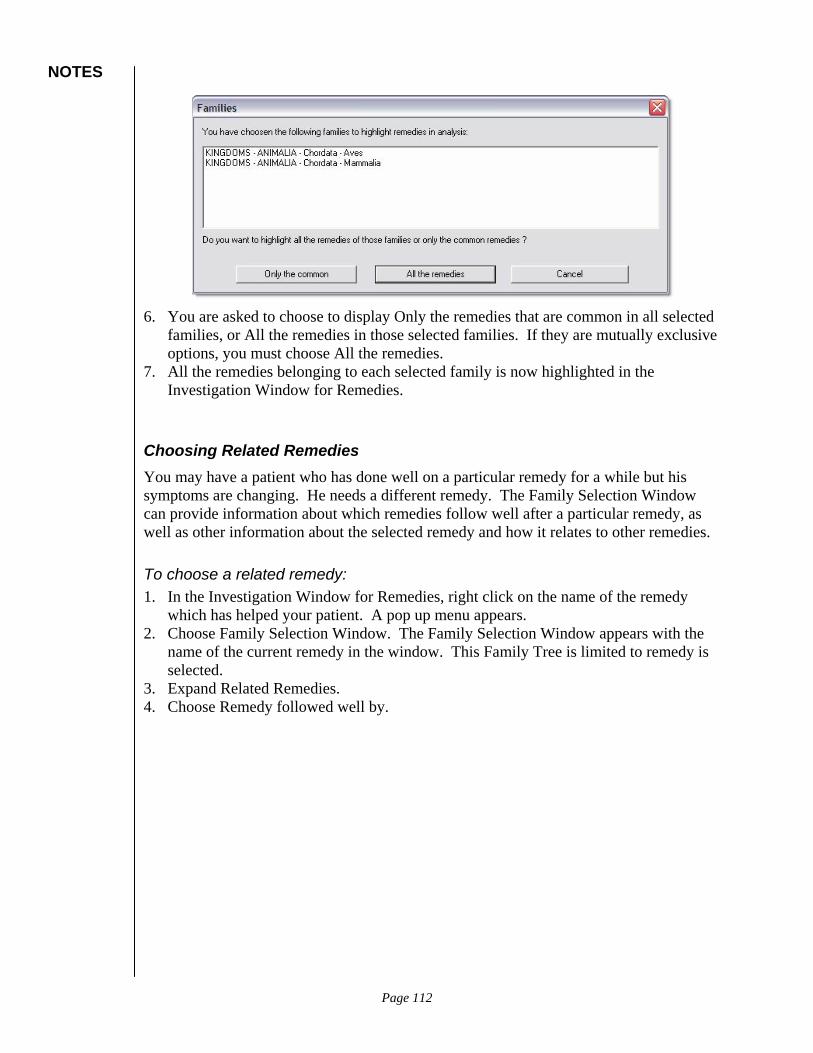
NOTES
6. You are asked to choose to display Only the remedies that are common in all selected
families, or All the remedies in those selected families. If they are mutually exclusive options, you must choose All the remedies.
7. All the remedies belonging to each selected family is now highlighted in the Investigation Window for Remedies.
Choosing Related Remedies You may have a patient who has done well on a particular remedy for a while but his symptoms are changing. He needs a different remedy. The Family Selection Window can provide information about which remedies follow well after a particular remedy, as well as other information about the selected remedy and how it relates to other remedies.
To choose a related remedy: 1. In the Investigation Window for Remedies, right click on the name of the remedy
which has helped your patient. A pop up menu appears. 2. Choose Family Selection Window. The Family Selection Window appears with the
name of the current remedy in the window. This Family Tree is limited to remedy is selected.
3. Expand Related Remedies. 4. Choose Remedy followed well by.
Page 112

NOTES
5. Click either Limit to this Family or Highlight this Family. All the remedies which are
good follow ups to the current remedy are highlighted.
Family Selection Window Options The Family Selection Window opens with certain defaults that are set but can be changed to suit the users preference or knowledge structure.
The following chart explains each of the choices in the Global Options for Families dialog box.
Options Explanation
Selected Families You can choose which families you would like to include in the analysis. Hold the Ctrl key and click the family name to select or deselect a family.
Families To Show In The List
In this area of the dialog box, you are able to choose to incorporate all the families, or only those which you previously selected. If you wish to include all families, click the All Families option in the dialog box.
How To Show The List You can choose between the Basic and the Advanced view of the trees. The basic view shows only the most important levels of the path under each family. The Advanced view shows the full path for each family.
Plant Family Used by Default
Cronquist and Dahlgren represent more traditional Plant Taxonomies. The APG Group, or Uppsala, represents a more contemporary view using genetic typing to categorize plants.
Page 113
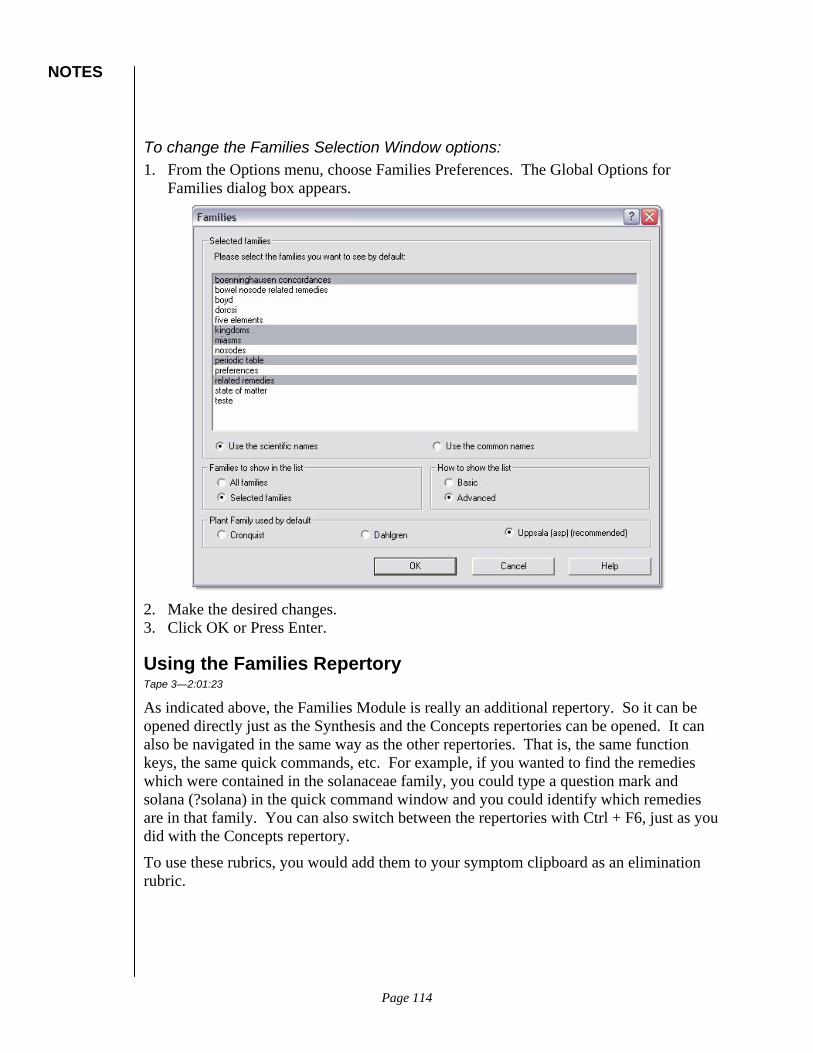
NOTES
To change the Families Selection Window options: 1. From the Options menu, choose Families Preferences. The Global Options for
Families dialog box appears.
2. Make the desired changes. 3. Click OK or Press Enter.
Using the Families Repertory Tape 3—2:01:23
As indicated above, the Families Module is really an additional repertory. So it can be opened directly just as the Synthesis and the Concepts repertories can be opened. It can also be navigated in the same way as the other repertories. That is, the same function keys, the same quick commands, etc. For example, if you wanted to find the remedies which were contained in the solanaceae family, you could type a question mark and solana (?solana) in the quick command window and you could identify which remedies are in that family. You can also switch between the repertories with Ctrl + F6, just as you did with the Concepts repertory.
To use these rubrics, you would add them to your symptom clipboard as an elimination rubric.
Page 114

NOTES
To open the Families Repertory: 1. From the Repertory Window, choose File, Open Repertory. The Select Repertory to
Open dialog box appears.
2. Click on or arrow down to Families of Remedies. 3. Press Enter or Click OK.
From the File menu, choose Open Repertory, or click the Open button. Choose Families of Remedies. Press Enter. Press F2 to open the Select Chapter window. Notice the titles of the chapters. Close the window by pressing Esc. Type K. Press Enter Type P Press Enter Type B Press Enter Type A Press Enter Type D Press Enter Type G Press Enter Type Po Press Enter Type S Press Enter Press Ctrl + Home to go to the beginning of the repertory. Type ?solana
Page 115
NOTES
Press Enter. Type R. Press Enter. Type Calc. Press Enter. Press Enter.
The Camera Icon When you scroll through the Families Repertory, you will notice a small icon in the repertory next to rubrics and sub rubrics. While this icon also appears in the Synthesis, it shows up frequently in the Families Repertory.
You can double click this icon to display pictures. What types of pictures display depends on what chapter you are in.
For example, in the Five Elements chapter, the camera icon displays a photo of either Air, Earth, Ether, Fire or Water. In the Periodic Table chapter, double clicking the camera icon will display a picture of the periodic table with the current remedy or family of remedies circled on the table.
Press F2 to look at the Chapter titles. Press Esc to close the window. Type P to choose the Periodic Tables chapter. Press Enter Type H4 to choose the Ferrum Series. Press Enter. Press Enter again. Double click the camera icon next to the Ferrum Series. It opens up a picture of the
periodic table and circles which elements are included in the series. Close the Families Repertory.
The Herscu Module of Cycles and Segments Tape 3—2:09:42 and Tape 4—00:00:10
Paul Herscu is a naturopathic doctor who has developed a theory or perspective on dealing with many of the problems which exist in homeopathy. Specifically, he tries to address the issue of the mathematical bias built into the repertory in which larger, well-known remedies always appear first in the repertorization. Careful study of the totality of the patient’s symptoms allows us to overcome this problem somewhat. There is also the issue of which symptoms to use. A related problem is that not all the patient’s symptoms can generally be matched to a single remedy. He has pointed out a number of other problems as well.
Dr. Herscu’s Module of Cycles and Segments is his theory of studying a patient and remedies by breaking the symptoms and the remedies and identifying the pattern of disease. His module is an attempt to understand homeopathy through the cycles or patterns each remedy expresses and it’s segments or sub-patterns.
Page 116

NOTES
Remedies have different states or segments in them. For example, Lachesis might appear differently depending on who gives the lecture you have heard or writes the article you have read. These aren’t right or wrong. The different views represent different states or segments of the process of the remedy. It is a process of changing from one state to another.
It has value from a repertorial point of view. You can break the symptoms into four to six segments. You can put rubrics into these four to six segments. If you have a small remedy that appears in only one rubric in each segment, it will receive more weight than traditional, flat repertorization. The question, Which remedies are found in all segments? is crucial to this model.
When using the Herscu Module you are grouping rubrics together and you are making the grouped rubric an elimination rubric.
Advantages to using the Herscu Module The Herscu Module has advantages over simple flat repertorization.
First, it brings organization and understanding to patients and the remedies. In order to use it, you must understand your patient well and the remedies which might help your patient.
Second, it resolves the issue of having 600 remedies appear. You either don’t know where to stop looking or you only look at the first few remedies. By combining rubrics and making each combined rubric and elimination rubric, more smaller remedies appear with a higher preference, and fewer polychrest remedies appear among the first choices.
Guidelines for using the Herscu Module • There cannot be any rubrics in the symptom clipboard when you are using the
Interactive version of the Herscu model. • You disregard intensity with the Herscu model. • The steps in the Herscu module can be done manually. You would simply place
different ideas in different clipboards. If you have more than one rubric which represents the same idea, you must group the rubrics (lower case). The rubrics must also be made into elimination rubrics.
• When creating a segment, you should have 150 – 200 remedies per segment. So, if you have small rubrics, you should have several rubrics in that particular segment. It is better to err on the side of too many remedies than too few.
NO
TE Please view the Herscu Module section on the video tape for a more detailed
explanation of this feature and the cases that are included in the hands on sections..
Page 117

NOTES
Changing the Herscu Options: 1. From the Options menu, choose Herscu Options. (Alt + O, H). The Herscu Options
dialog box appears.
2. Set the desired options. 3. Click Save (Alt + S). 4. Click OK or Press Enter.
Choose Options, Herscu Options. Set the options to Always display Introduction screen and work in an interactive
way. Click Save (Alt + S). Click OK or press Enter.
There are two ways to use the Herscu module, the free way and the interactive way. The Free way assumes that you have taken a case and you have grouped the rubrics together into modules. The Interactive way guides you through the questions to create modules. It is recommended that when you are new to the Herscu module that you use the Interactive way.
NO
TE If you already have rubrics in the symptom clipboard, you will be forced
into the Free way of using the Herscu module, rather than being able use the Interactive way. The Interactive way assumes you are starting with empty clipboards.
To start the Herscu module the Interactive Way: 1. Press F7 to open the symptom clipboard. 2. From the Edit menu, choose Clear All Clipboards to remove any symptoms that may
already be in clipboards. 3. Click the Herscu module button
-or- Press Alt + F9. The Herscu module Introduction screen appears.
Page 118

NOTES
Press F7. From the Edit menu, choose Clear All Clipboards. Click the Herscu module button or press Alt + F9.
To use the Herscu module: 1. After opening the Herscu module, click the Continue button on the Introductory
screen. The Herscu module opens:
Page 119
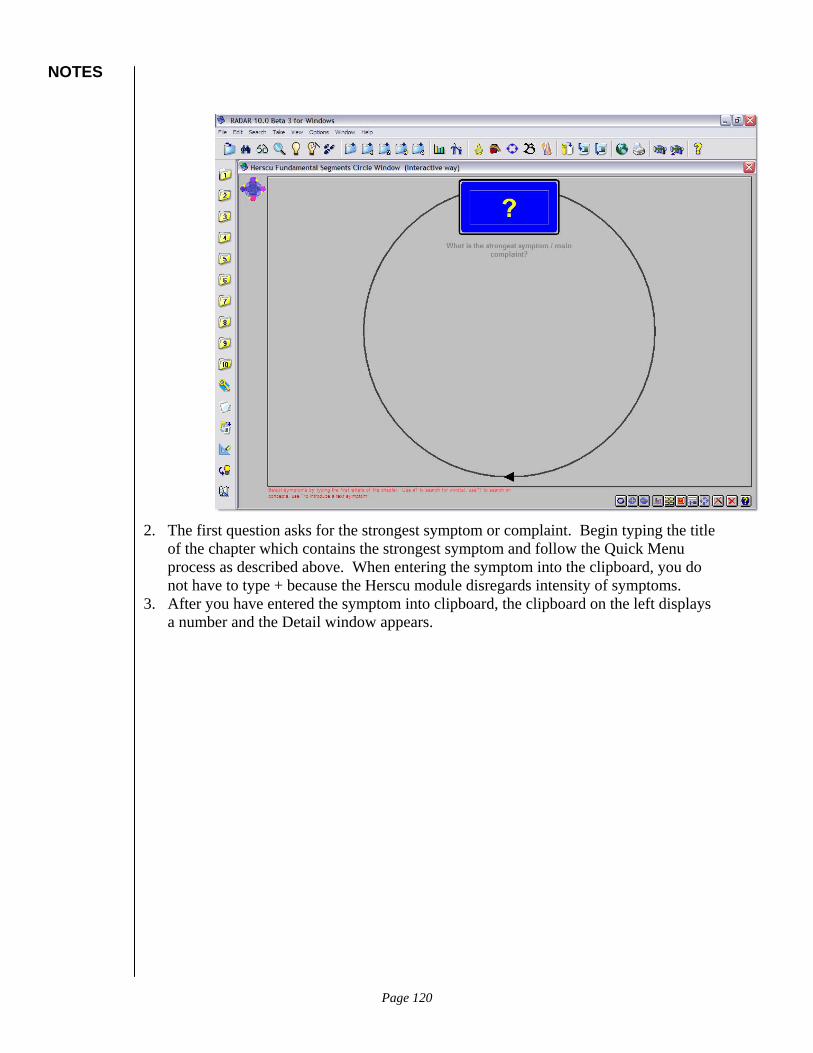
NOTES
2. The first question asks for the strongest symptom or complaint. Begin typing the title
of the chapter which contains the strongest symptom and follow the Quick Menu process as described above. When entering the symptom into the clipboard, you do not have to type + because the Herscu module disregards intensity of symptoms.
3. After you have entered the symptom into clipboard, the clipboard on the left displays a number and the Detail window appears.
Page 120

NOTES
4. If another symptom represents the same idea, begin typing the rubrics with the Quick
Command Window. If not, click None. You will be prompted to give a name to the clipboard.
5. Enter a new name or press Enter to accept the largest rubric as the name of the clipboard. The Segments Circle window appears, prompting you to answer the questions, What does this idea lead the patient to?
6. Begin entering rubrics as you did with the first clipboard. 7. When you have finished this idea, press Enter until prompted for the next question,
“What does this lead the patient to?” 8. Enter all the rubrics necessary to complete this idea. 9. When prompted by the next question, “What does this idea lead the patient to?”, enter
those rubrics. 10. When you have from four to six segments, you can discontinue entering rubrics. 11. Press Ctrl + End when you have finished entering rubrics.
-or- Click the Validate Case button. The Segments Detail window appears and asks “Is this your patient?”
12. If not, choose No and continue to add segments. If so, choose Yes. 13. If you have chosen Yes, the Segments Analysis Window appears with lists of possible
remedies.
Page 121
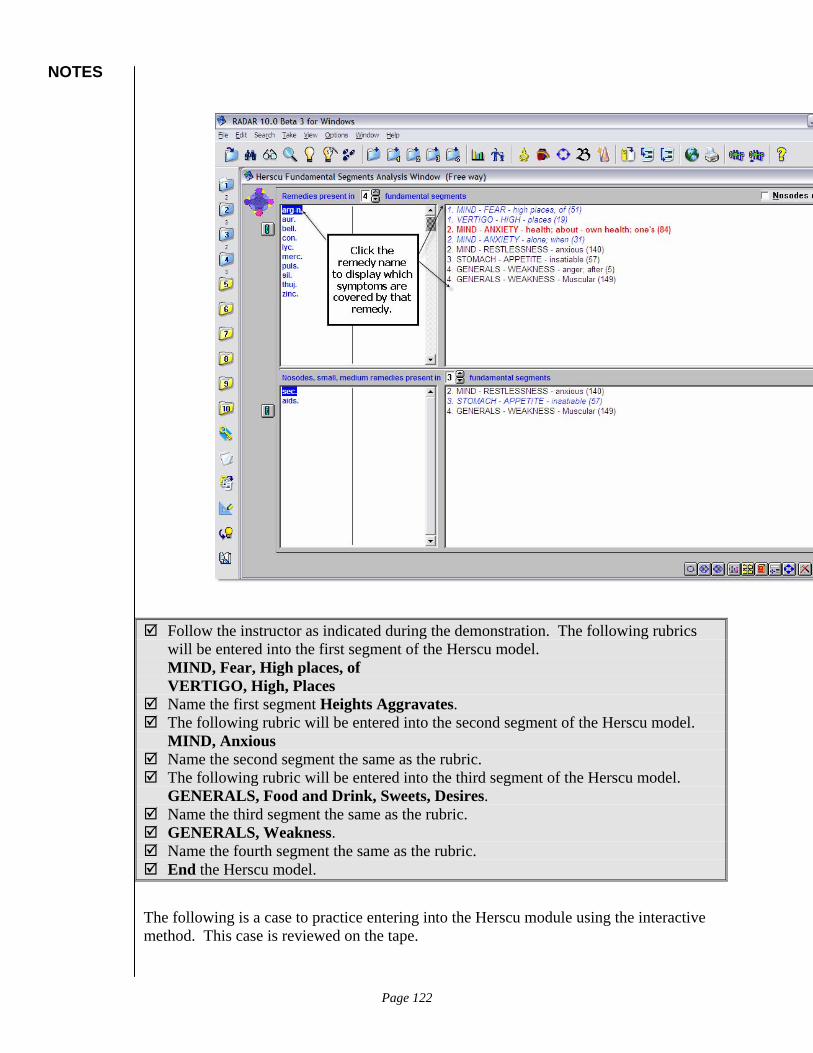
NOTES
Follow the instructor as indicated during the demonstration. The following rubrics will be entered into the first segment of the Herscu model. MIND, Fear, High places, of VERTIGO, High, Places
Name the first segment Heights Aggravates. The following rubric will be entered into the second segment of the Herscu model.
MIND, Anxious Name the second segment the same as the rubric. The following rubric will be entered into the third segment of the Herscu model.
GENERALS, Food and Drink, Sweets, Desires. Name the third segment the same as the rubric. GENERALS, Weakness. Name the fourth segment the same as the rubric. End the Herscu model.
The following is a case to practice entering into the Herscu module using the interactive method. This case is reviewed on the tape.
Page 122
NOTES
Enter the following rubrics in the Herscu module: Nose, Polypus Rectum, Hemorrhoids
Name the group of symptoms Obstructions. Enter the following rubrics into the next segment:
Nose, Smell, diminished Nose, Smell, wanting
Name the group of symptoms Poor Sensitivity Enter the following rubrics into the next segment:
Mind, Dullness Mind, Forgetful, Menopause, during Mind, Concentration, Difficult
Name the group of symptoms No Sensitivity Enter the following rubrics into the next segment:
Mind, Company, desire for Mind, Dancing
Name the group of symptoms Desires Connections Enter the following rubrics into the next segment:
Nose, Sneezing Perspiration, Perspiration in general
Name the group of symptoms Discharges Enter the following rubrics into the next segment:
Nose, Coryza, suppressed Mind, Menopause, agg Female Genitalia/Sex, Menopause
Name the group of symptoms Suppression of Discharges
Fissure Case Tape 4—00:58:11
The following case will provide additional practice on the Herscu module and understanding of another small remedy.
• 40 year old woman • Chief Complain: anal fissure • Better hot water, painful with bowel movements, may bleed. • Once it cuts, it may take 1 – 2 months to heal, then it cuts again. • Gets Constipated because she is scared to have a bowel movement. • Sleeps on the lighter side. The thoughts in her mind, she goes over and over them,
she worries about her job, people, especially if somebody did something wrong, all the thoughts and worry keep her up, eventually she will have to tell them.
• Has Heart palpitations and night sweats • Has menses every 30 days. What is going on with you?
Page 123

NOTES
“When I was a kid, until 25, had anxiety attacks, nothing seemed real, especially me, didn’t know what I wanted. I wasn’t there.
“If somebody didn’t like me, it was my fault. They don’t like me because there’s something wrong with me. Never express my opinion—always put my foot in my mouth, I always mess up. I feel flawed. When somebody does something to me, I don’t complain. I brood until I finally say something, but I say it wrong and get embarrassed. I have never been able to chit-chat.”
She is somewhat closed, she has a type of not knowing/confusion. Her expression of feelings and emotions come out wrong and then she feels embarrassed. She then retreats and gets into a closed state. She has an inability to know herself, but is concerned about people and right and wrong.
Emergent quality—every time she expresses herself, there’s a bad result. Bowel movement; when she speaks.
Enter the following rubric into the first segment of the interactive method of the Herscu Module: Mind, Company, aversion to
Name the first segment the same as the rubric. Enter the following rubrics into the next segment:
Mind, Confusion of mind, identity, as to his Mind, Confusion of mind, identity, as to his, duality, sense of Mind, Irresolution, indecision Mind, Confidence, want of self-confidence.
Name the segment Irresolution, Indecision. Enter the following rubric into the next segment:
Mind, Cares, full of Name the segment the same as the rubric. Enter the following rubric into the next segment:
Mind Loquacity Name the segment the same as the rubric. Enter the following rubric into the next segment:
Mind, Awkward Name the segment the same as the rubric. Enter the following rubric into the next segment:
Mind, Timidity Name the segment the same as the rubric.
Changing RADAR Color and Font Sizes Tape 4—1:10:46
As you have been watching the tape, you may have noticed that the fonts appear quite large on the instructor screen. If you have difficulty seeing the font sizes on your own screen, they can be changed, as well as modifying color preferences.
Page 124
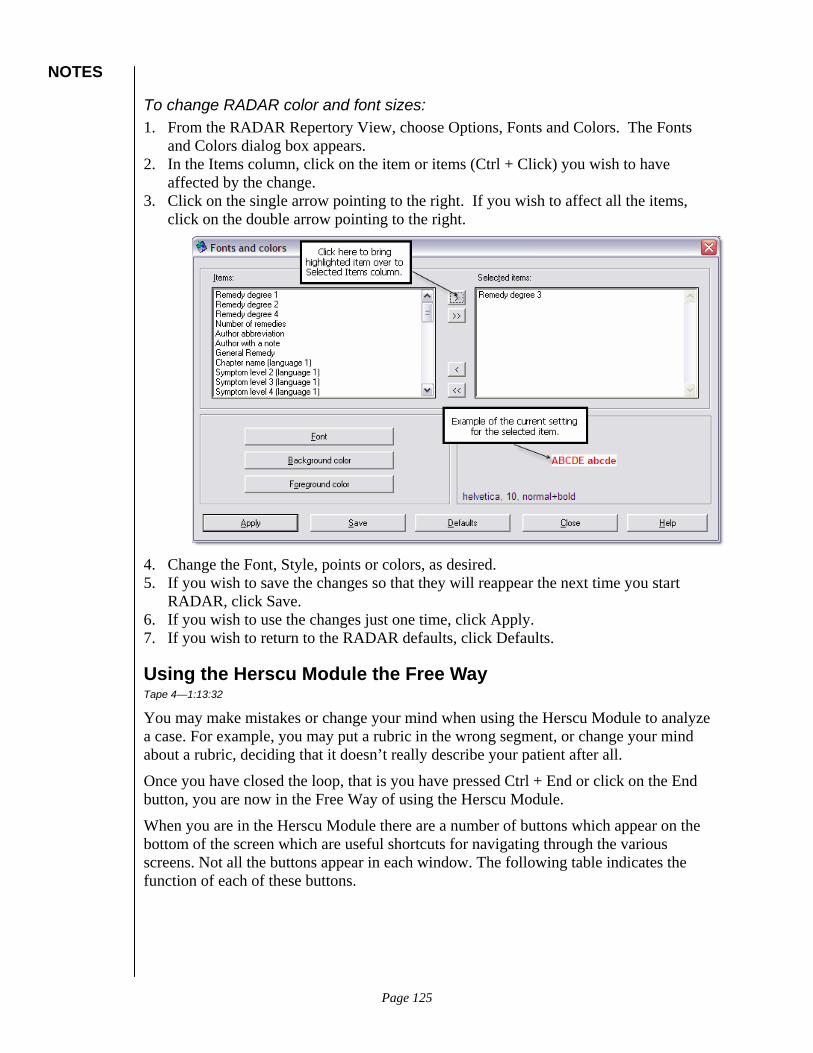
NOTES
To change RADAR color and font sizes: 1. From the RADAR Repertory View, choose Options, Fonts and Colors. The Fonts
and Colors dialog box appears. 2. In the Items column, click on the item or items (Ctrl + Click) you wish to have
affected by the change. 3. Click on the single arrow pointing to the right. If you wish to affect all the items,
click on the double arrow pointing to the right.
4. Change the Font, Style, points or colors, as desired. 5. If you wish to save the changes so that they will reappear the next time you start
RADAR, click Save. 6. If you wish to use the changes just one time, click Apply. 7. If you wish to return to the RADAR defaults, click Defaults.
Using the Herscu Module the Free Way Tape 4—1:13:32
You may make mistakes or change your mind when using the Herscu Module to analyze a case. For example, you may put a rubric in the wrong segment, or change your mind about a rubric, deciding that it doesn’t really describe your patient after all.
Once you have closed the loop, that is you have pressed Ctrl + End or click on the End button, you are now in the Free Way of using the Herscu Module.
When you are in the Herscu Module there are a number of buttons which appear on the bottom of the screen which are useful shortcuts for navigating through the various screens. Not all the buttons appear in each window. The following table indicates the function of each of these buttons.
Page 125
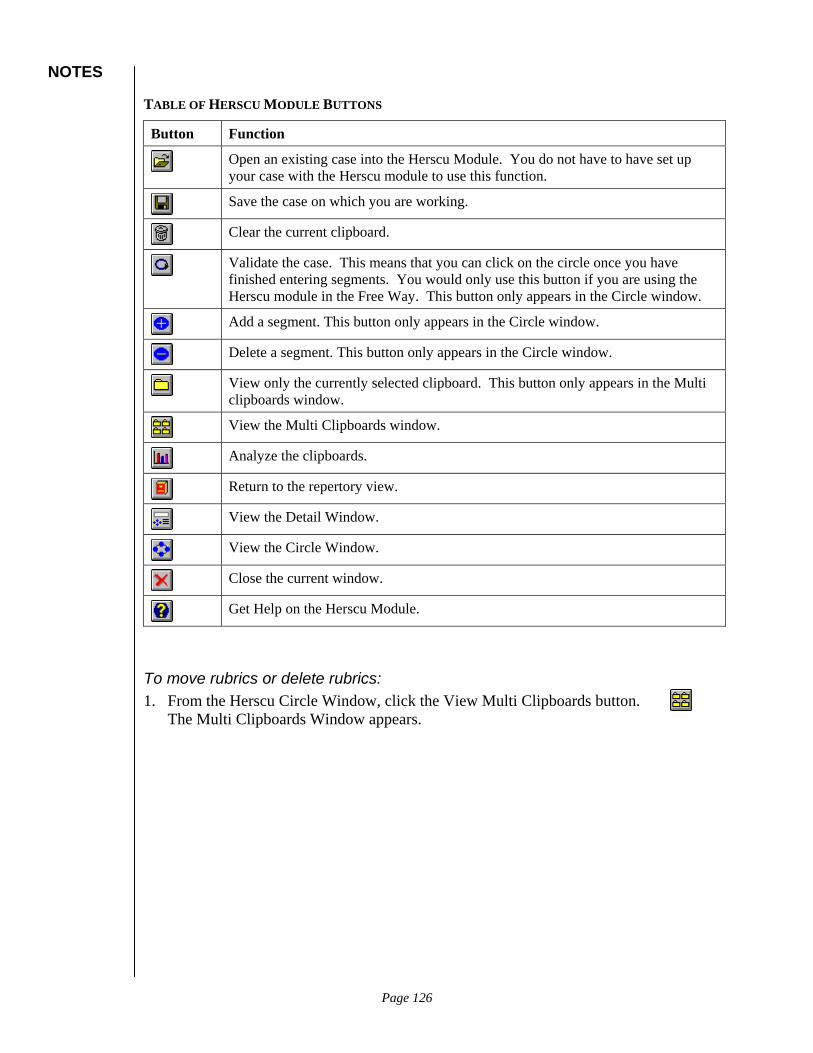
NOTES
TABLE OF HERSCU MODULE BUTTONS
Button Function
Open an existing case into the Herscu Module. You do not have to have set up your case with the Herscu module to use this function.
Save the case on which you are working.
Clear the current clipboard.
Validate the case. This means that you can click on the circle once you have finished entering segments. You would only use this button if you are using the Herscu module in the Free Way. This button only appears in the Circle window.
Add a segment. This button only appears in the Circle window.
Delete a segment. This button only appears in the Circle window.
View only the currently selected clipboard. This button only appears in the Multi clipboards window.
View the Multi Clipboards window.
Analyze the clipboards.
Return to the repertory view.
View the Detail Window.
View the Circle Window.
Close the current window.
Get Help on the Herscu Module.
To move rubrics or delete rubrics: 1. From the Herscu Circle Window, click the View Multi Clipboards button.
The Multi Clipboards Window appears.
Page 126
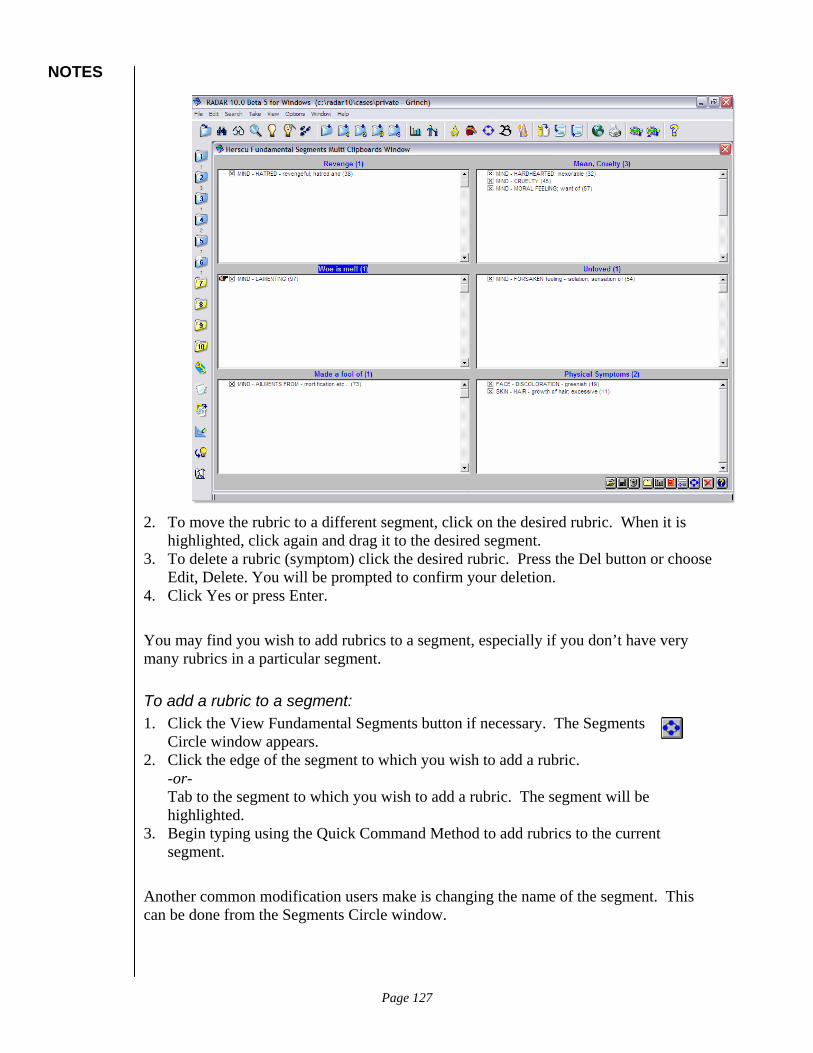
NOTES
2. To move the rubric to a different segment, click on the desired rubric. When it is
highlighted, click again and drag it to the desired segment. 3. To delete a rubric (symptom) click the desired rubric. Press the Del button or choose
Edit, Delete. You will be prompted to confirm your deletion. 4. Click Yes or press Enter.
You may find you wish to add rubrics to a segment, especially if you don’t have very many rubrics in a particular segment.
To add a rubric to a segment: 1. Click the View Fundamental Segments button if necessary. The Segments
Circle window appears. 2. Click the edge of the segment to which you wish to add a rubric.
-or- Tab to the segment to which you wish to add a rubric. The segment will be highlighted.
3. Begin typing using the Quick Command Method to add rubrics to the current segment.
Another common modification users make is changing the name of the segment. This can be done from the Segments Circle window.
Page 127
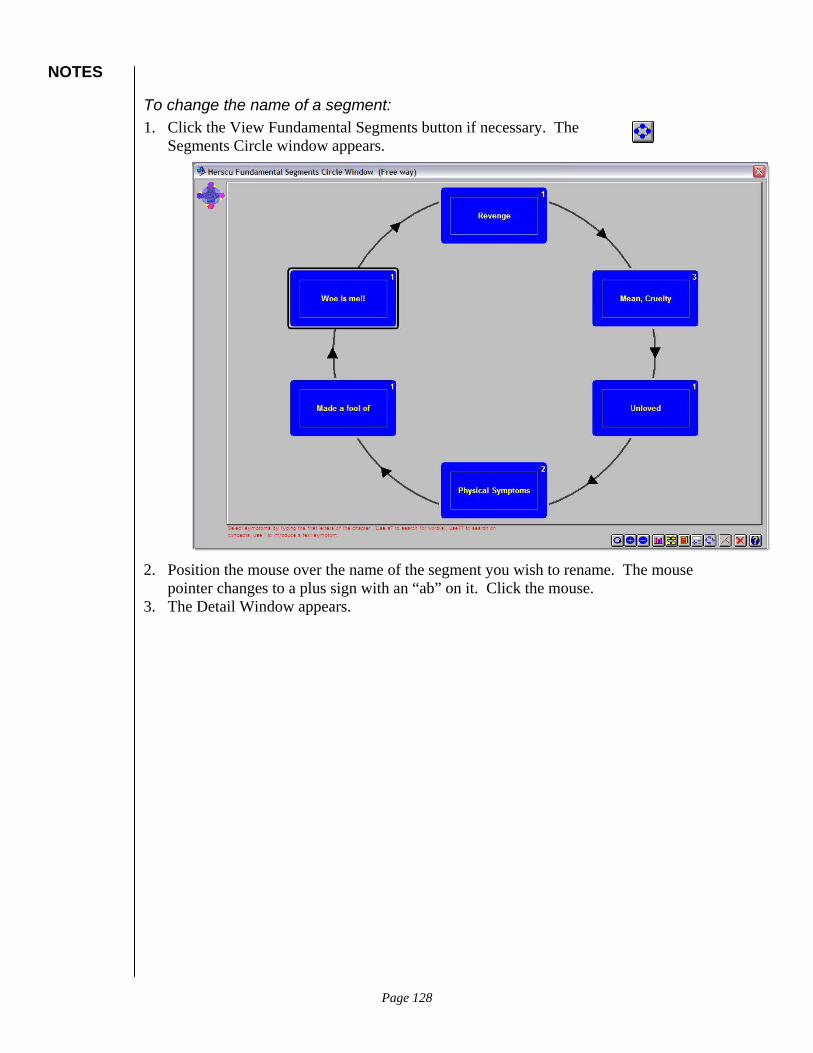
NOTES
To change the name of a segment: 1. Click the View Fundamental Segments button if necessary. The
Segments Circle window appears.
2. Position the mouse over the name of the segment you wish to rename. The mouse
pointer changes to a plus sign with an “ab” on it. Click the mouse. 3. The Detail Window appears.
Page 128
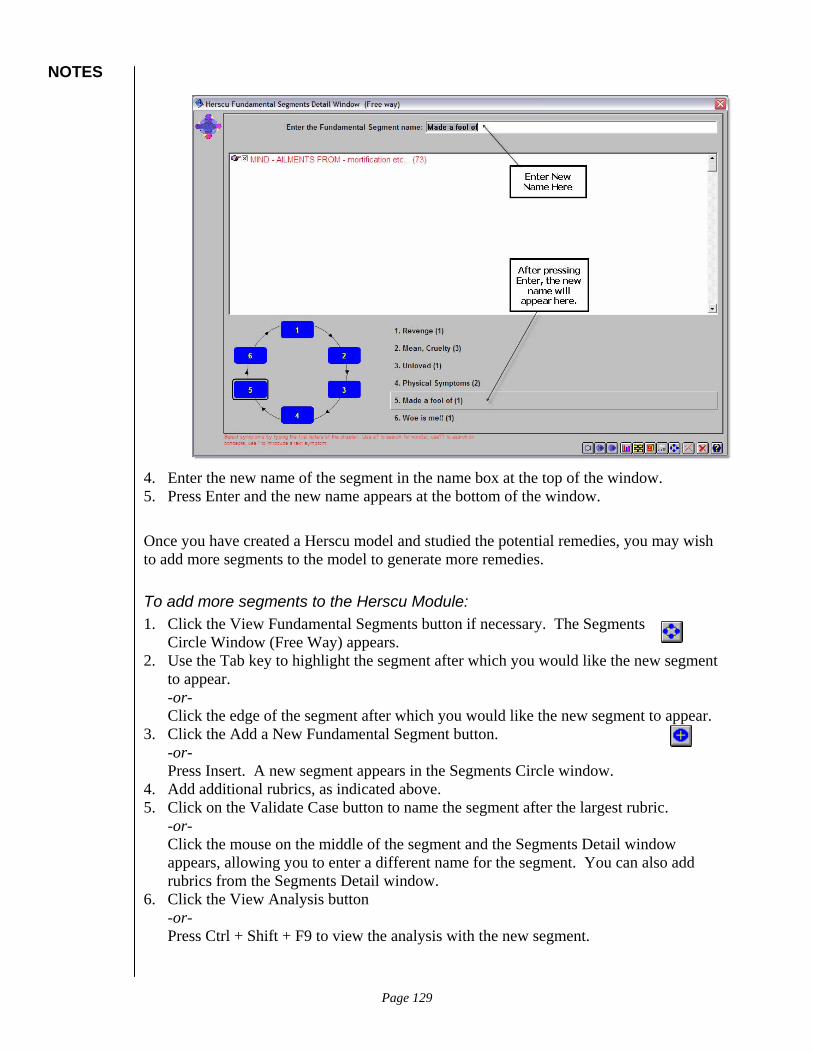
NOTES
4. Enter the new name of the segment in the name box at the top of the window. 5. Press Enter and the new name appears at the bottom of the window.
Once you have created a Herscu model and studied the potential remedies, you may wish to add more segments to the model to generate more remedies.
To add more segments to the Herscu Module: 1. Click the View Fundamental Segments button if necessary. The Segments
Circle Window (Free Way) appears. 2. Use the Tab key to highlight the segment after which you would like the new segment
to appear. -or- Click the edge of the segment after which you would like the new segment to appear.
3. Click the Add a New Fundamental Segment button. -or- Press Insert. A new segment appears in the Segments Circle window.
4. Add additional rubrics, as indicated above. 5. Click on the Validate Case button to name the segment after the largest rubric.
-or- Click the mouse on the middle of the segment and the Segments Detail window appears, allowing you to enter a different name for the segment. You can also add rubrics from the Segments Detail window.
6. Click the View Analysis button -or- Press Ctrl + Shift + F9 to view the analysis with the new segment.
Page 129

NOTES
You may also decide after analyzing the case that you wish to remove a segment.
To remove segments from the Herscu Module: 1. Click the View Fundamental Segments button if necessary. The Segments
Circle Window (Free Way) appears. 2. Use the Tab key to highlight the segment you wish to delete.
-or- Click the edge of the segment you wish to delete.
3. Press the Delete key. You will be prompted to confirm the deletion. 4. Click Yes or press Enter. The segment has been removed.
When analyzing a case, you may wonder how a particular rubric affects the result. You can temporarily remove a rubric from repertorization easily in the Herscu Module.
To temporarily remove a rubric: 1. From the Herscu Circle Window, click the View Multi Clipboards
button, if necessary. The Multi Clipboards Window appears.
2. Click into the box to remove the “X” from the box next to the rubric you wish to
temporarily remove from consideration in the analysis. 3. Click the Analysis button and view the results. 4. To replace the “X”, click the box again.
Using the Herscu Module with the Vithoulkas Expert System Tape 4—1:19:47
You can also use the Vithoulkas Expert System with the clipboards that have been set up using the Herscu Module. However, the VES requires that you add intensity to the symptoms and Herscu does not. If we try to use the VES without making some modifications, we would be instructed to add intensities and try again.
Page 130

NOTES
You can add the intensities using the + sign while adding rubrics in the Free Way to the Herscu Module. You may also go back to each clipboard and modify the intensity of rubrics by double clicking on the intensity column in each rubric row. Both of these procedures were covered in the adding rubrics to the clipboard section of this document.
Apollo the Cat Tape 4—1:33:26
The following are the symptoms of the case of Apollo the Cat who has a urinary tract infection. You may enter these symptoms in for practice if you wish.
Enter the following symptoms first into Herscu. Go back and add the intensity to the rubrics so you can also analyze the case in VES.
Male, Genitalia/Sex, Inflammation (2) Urethra, Inflammation (2)
Name this segment the same as the rubric. Bladder, Retention of urine (3) Name this segment the same as the rubric Bladder, urging to urinate, constant (2) Name this segment the same as the rubric. Generals, Restlessness (2) Name this segment the same as the rubric. Bladder, urination, frequent, daytime and night (1) Name this segment Frequent Urination Urine, Bloody (2)
Urethra, Discharge, bloody (2) Name this segment Bloody Discharge.
Exporting RADAR Information into a Word Processor Tape 4—1:38:32
Information from RADAR can be exported into a Word Processor using simple, standard Windows techniques. You can either Copy and Paste it, or you can take a picture and paste it into your word processor.
You should begin each procedure with both RADAR and your Word Processor running.
To Copy and Paste Rubrics into a word processor: 1. Locate the rubric you wish to paste into your word processor. 2. Making sure the finger is pointing at the rubric, choose Edit, Copy or Ctrl + C. 3. Press Alt + Tab. A small window appears in the middle of the screen. 4. Continue to press Tab until the box is around the word processor icon. Release the
Alt and Tab keys. 5. Position the insertion point in the word processing document where you wish the
rubric to appear. 6. Choose Edit, Paste or Ctrl + V to paste the rubric into the word processing document.
Page 131
NOTES
To Copy and Paste Rubrics and Remedies into a word processor: 1. Locate the rubric you wish to paste into your word processor. 2. Press Enter. The Remedy window appears. 3. Choose Edit, Copy or Ctrl + C.h 4. Press Alt + Tab. A small window appears in the middle of the screen. 5. Continue to press Tab until the box is around the word processor icon. Release the
Alt and Tab keys. 6. Position the insertion point in the word processing document where you wish the
rubric to appear. 7. Choose Edit, Paste or Ctrl + V to paste the rubric, remedies, intensity and author
reference into the word processing document. You can also paste in a photograph of a RADAR window into a word processing document. This is especially useful for the analysis window.
To Copy and Paste a copy of the screen into a word processing document: 1. View the screen you wish to paste into the word processing document. 2. Press the PrtSc (Print Screen) button. 3. Press Alt + Tab. A small window appears in the middle of the screen. 4. Continue to press Tab until the box is around the word processor icon. Release the
Alt and Tab keys. 5. Position the insertion point in the word processing document where you wish the
screen to appear. 6. Choose Edit, Paste or Ctrl + V to paste a copy of the screen into the word processing
document. The drawback of the preceding method is that you cannot easily modify the contents once you have pasted it into your document. You may also wish to present the contents of an analysis window in a text format so that you can modify it.
To export the contents of an Analysis window into a word processing document: 1. View the analysis window. 2. From the File menu, choose Export, Analysis. The Export Text Into File window
appears.
Page 132
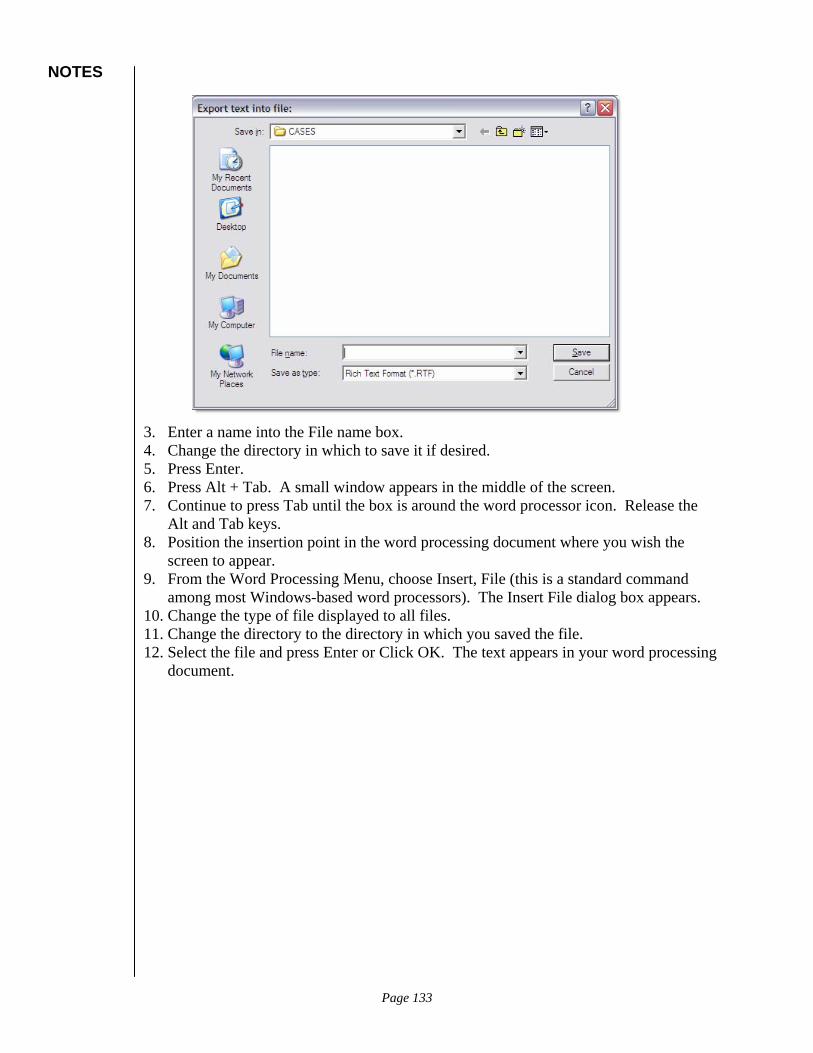
NOTES
3. Enter a name into the File name box. 4. Change the directory in which to save it if desired. 5. Press Enter. 6. Press Alt + Tab. A small window appears in the middle of the screen. 7. Continue to press Tab until the box is around the word processor icon. Release the
Alt and Tab keys. 8. Position the insertion point in the word processing document where you wish the
screen to appear. 9. From the Word Processing Menu, choose Insert, File (this is a standard command
among most Windows-based word processors). The Insert File dialog box appears. 10. Change the type of file displayed to all files. 11. Change the directory to the directory in which you saved the file. 12. Select the file and press Enter or Click OK. The text appears in your word processing
document.
Page 133

NOTES
On-Line Help Most products created for the Windows operating system are accompanied by a very sophisticated built in user guide called On-Line Help. The Help features generally work the same in all Windows programs. RADAR has over 1,300 pages of on-line help that can be accessed whenever you need it in a variety of ways.
General Help Information The following concepts are generally true about most Windows Help systems.
• Help can be accessed in a variety of ways. • Help can be accessed by pressing F1 from almost any screen or window. Which
screen or window you are viewing when you press F1 determines the content of the Help screen. This is called Context Sensitive help. Help is displayed related to the current window or dialog box.
• Most dialog boxes or windows have a context sensitive Help button which can be pressed to display Help on the dialog box you are viewing.
• Definitions in Help window are displayed with green letters and a dotted underline. A definition pops up on top of the current Help screen.
Page 134
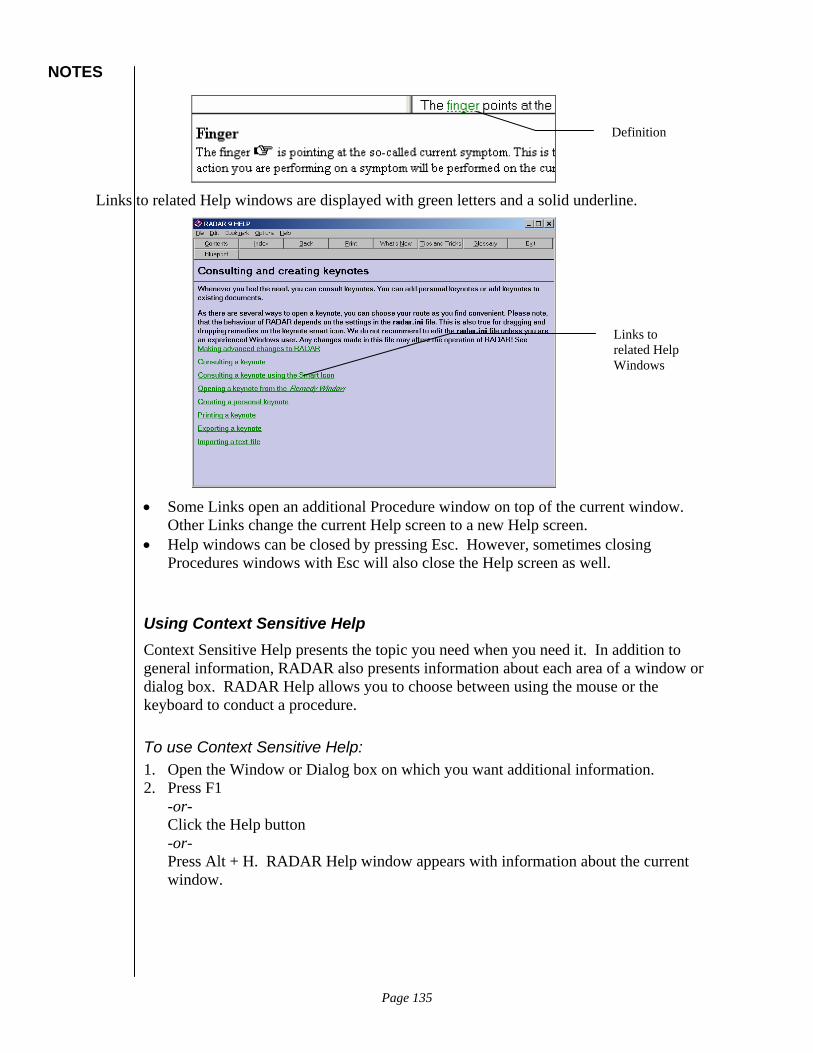
NOTES
Definition
Links to related Help windows are displayed with green letters and a solid underline.
Links to related Help Windows
• Some Links open an additional Procedure window on top of the current window. Other Links change the current Help screen to a new Help screen.
• Help windows can be closed by pressing Esc. However, sometimes closing Procedures windows with Esc will also close the Help screen as well.
Using Context Sensitive Help Context Sensitive Help presents the topic you need when you need it. In addition to general information, RADAR also presents information about each area of a window or dialog box. RADAR Help allows you to choose between using the mouse or the keyboard to conduct a procedure.
To use Context Sensitive Help: 1. Open the Window or Dialog box on which you want additional information. 2. Press F1
-or- Click the Help button -or- Press Alt + H. RADAR Help window appears with information about the current window.
Page 135

NOTES
Yellow Plus box
3. Click the appropriate Links for information on how to use the dialog box or window. A Procedure window appears.
4. Click the Close button (only present on Mouse Procedure windows)
-or- click the X on the upper right hand corner to close the procedure window -or- press Esc to close the Procedure window.
Page 136
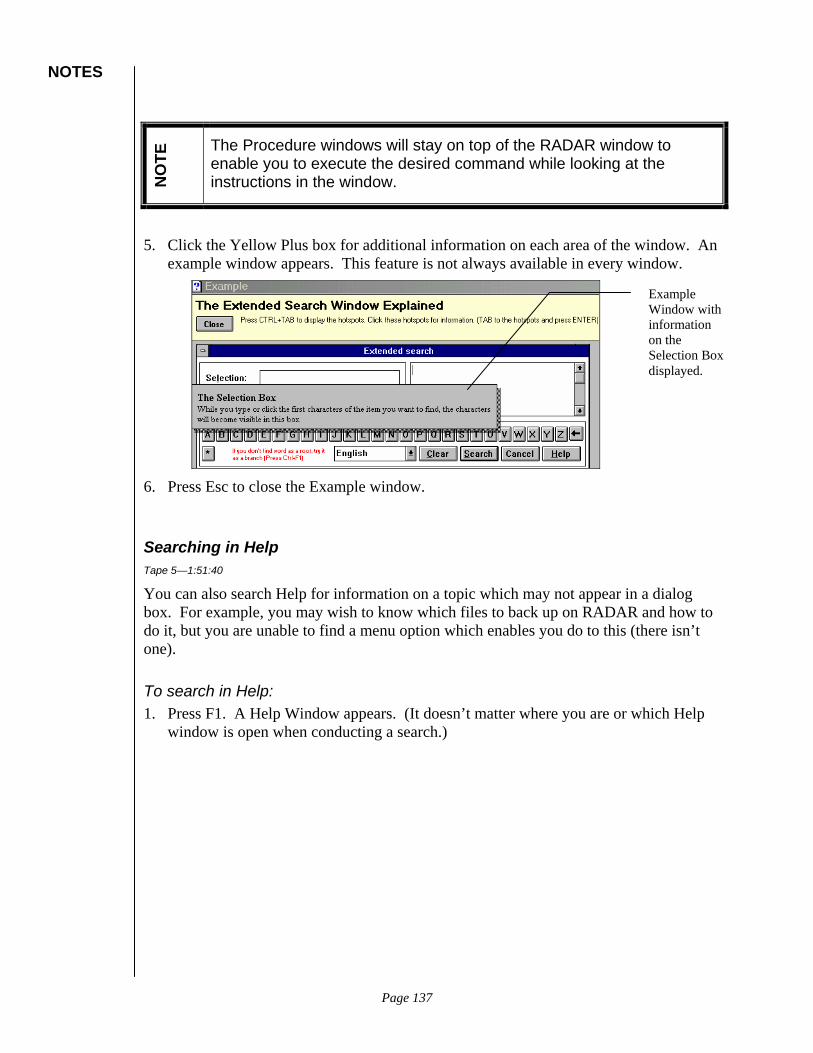
NOTES
NO
TE The Procedure windows will stay on top of the RADAR window to
enable you to execute the desired command while looking at the instructions in the window.
5. Click the Yellow Plus box for additional information on each area of the window. An example window appears. This feature is not always available in every window.
Example Window with information on the Selection Box displayed.
6. Press Esc to close the Example window.
Searching in Help Tape 5—1:51:40
You can also search Help for information on a topic which may not appear in a dialog box. For example, you may wish to know which files to back up on RADAR and how to do it, but you are unable to find a menu option which enables you do to this (there isn’t one).
To search in Help: 1. Press F1. A Help Window appears. (It doesn’t matter where you are or which Help
window is open when conducting a search.)
Page 137
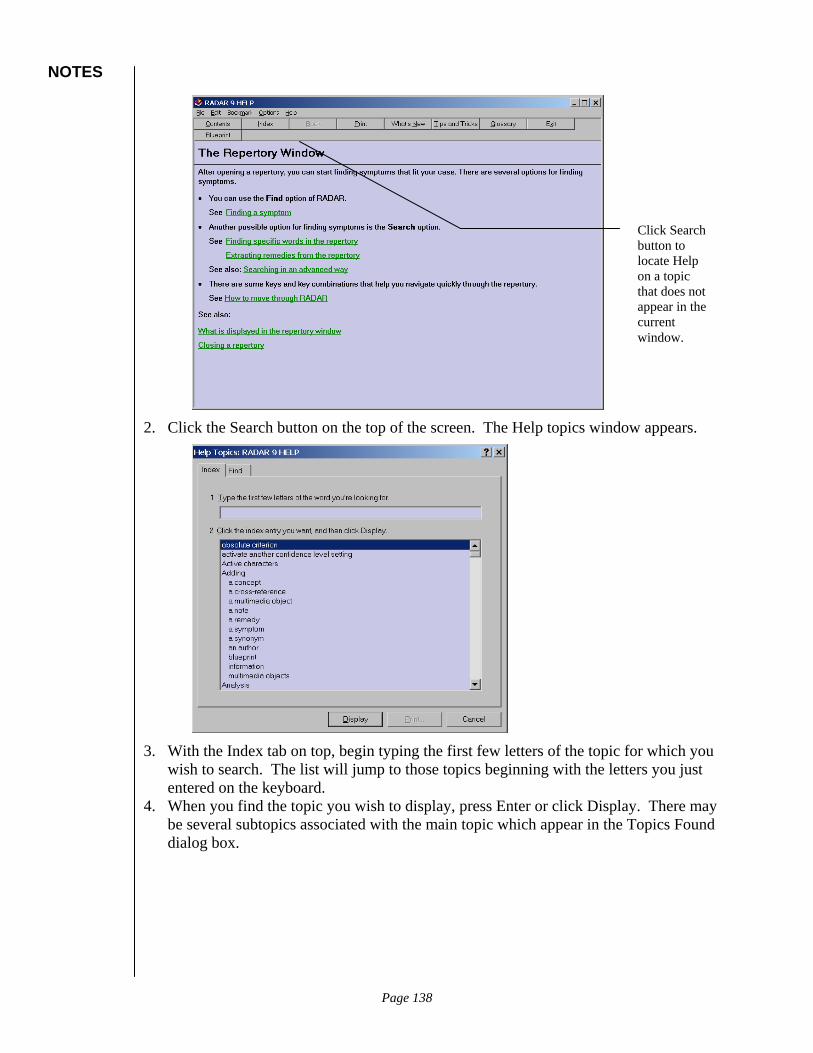
NOTES
Click Search button to locate Help on a topic that does not appear in the current window.
2. Click the Search button on the top of the screen. The Help topics window appears.
3. With the Index tab on top, begin typing the first few letters of the topic for which you
wish to search. The list will jump to those topics beginning with the letters you just entered on the keyboard.
4. When you find the topic you wish to display, press Enter or click Display. There may be several subtopics associated with the main topic which appear in the Topics Found dialog box.
Page 138

NOTES
5. Arrow down to or click on the topic you wish to display. Press Enter. The RADAR
Help screen appears with information related to the chosen topic.
Press F1 Click the Search button. Type B. Press Enter to display topics related to backups of files. Press Enter again to display Help on Making a Backup of Important RADAR
files.
Backing Up Radar Files RADAR 10 has an automated backup feature which reminds you to back your files up onto another medium when you exit RADAR. You can specify how often you want to be reminded. However, if you are using your RADAR and creating or modifying cases every day, it is advised that you back it up every day.
To automatically Back Up important Radar files: 1. Exit RADAR by clicking on the Red X in the upper right hand corner of the window.
Save any data you may be prompted to save. After saving, the following dialog box appears:
Page 139

NOTES
2. Click Start the back-up now. The Select Repertory to Open window appears.
3. Select the repertory you use most often. This not only allows you to back up the
repertory if necessary, but other changes you may have made associated with this repertory. Click OK.
4. The Back up Selection dialog box appears.
Page 140
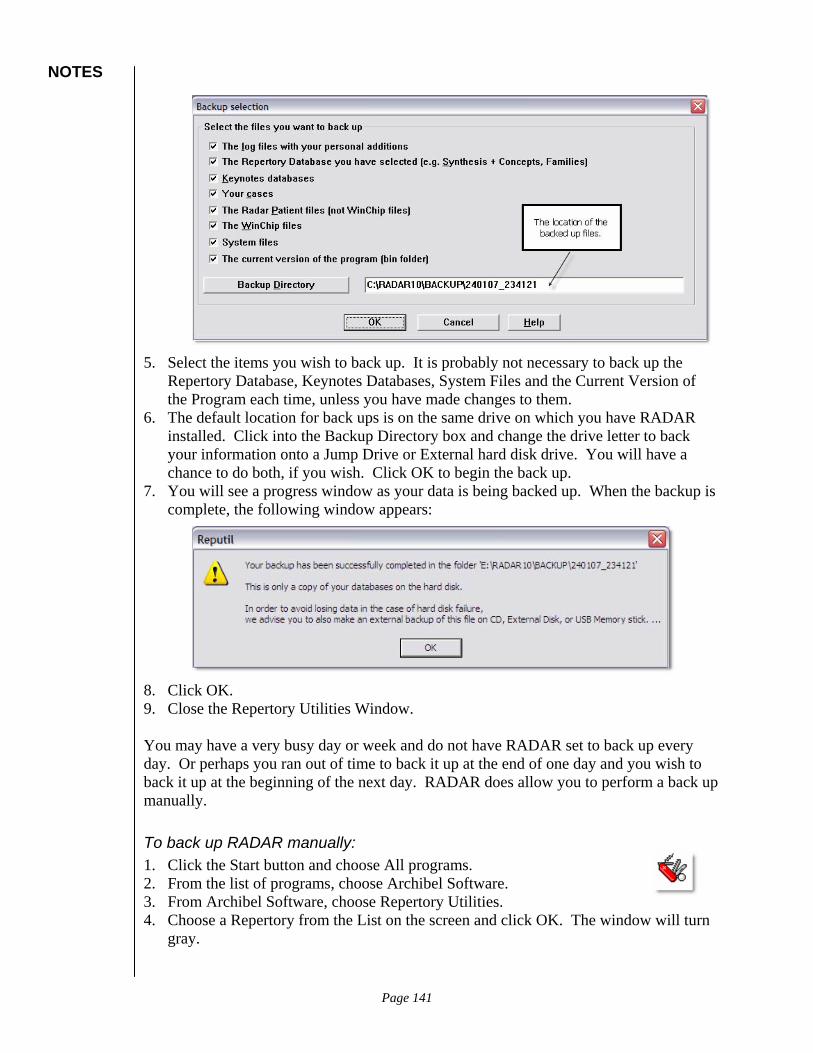
NOTES
5. Select the items you wish to back up. It is probably not necessary to back up the
Repertory Database, Keynotes Databases, System Files and the Current Version of the Program each time, unless you have made changes to them.
6. The default location for back ups is on the same drive on which you have RADAR installed. Click into the Backup Directory box and change the drive letter to back your information onto a Jump Drive or External hard disk drive. You will have a chance to do both, if you wish. Click OK to begin the back up.
7. You will see a progress window as your data is being backed up. When the backup is complete, the following window appears:
8. Click OK. 9. Close the Repertory Utilities Window. You may have a very busy day or week and do not have RADAR set to back up every day. Or perhaps you ran out of time to back it up at the end of one day and you wish to back it up at the beginning of the next day. RADAR does allow you to perform a back up manually.
To back up RADAR manually: 1. Click the Start button and choose All programs. 2. From the list of programs, choose Archibel Software. 3. From Archibel Software, choose Repertory Utilities. 4. Choose a Repertory from the List on the screen and click OK. The window will turn
gray.
Page 141

NOTES
5. In the Repertory Utilities window, click on the Backup menu. 6. Choose Backup Files. 7. Follow instructions for Automatic Backup as indicated on page 139.
Modifying the Repertory Tape 5—1:13:00
RADAR allows the user to modify the data in the repertory. You may wish to do this based on your own clinical experience or that of a respected colleague. Among the things that can be modified are adding remedies, authors, cross references, synonyms, author notes, multi-media links, concepts, rubrics, sub rubrics, keynotes, etc.
NO
TE You must be in Full Synthesis view to make any modifications to the
repertory.
Adding Remedies to a Rubric Tape 5—1:14:59
It is impossible for software to keep up with the provings that are conducted and published on a monthly basis. As a result, you may wish to add a remedy to a rubric based on a proving, or your own clinical experience.
To add a remedy to a rubric: 1. Go to the rubric you wish to modify. 2. Click the Symptom Editor button in the Smart Icon bar. The Symptom
Editor Window appears.
Page 142

NOTES
3. Click the Add remedy button or press Alt + A. The Remedy Selection window
appears. 4. Begin typing the abbreviation for the remedy. 5. When the desired remedy appears highlighted, press Enter. The Author Selection
window appears.
6. Begin typing the abbreviation of the author. If you are unfamiliar with how the
author is abbreviated in RADAR, you may scroll down to find the author. (If you need to add an author, see below.)
Page 143
NOTES
7. When you have located the author, double click or press Enter if the author is already selected. The Symptom Editor window reappears with the new remedy and author in the rubric. Notice that the author abbreviation has an asterisk after it. This indicates that you added the remedy to the rubric.
8. Click the Save button to save the changes to the rubric. 9. Click Close or press Esc to return to the repertory window.
Switch to Full Synthesis view, if necessary. Go to the rubric Mind, Liar. Click the Symptom Editor button or press Ctrl + Alt + F10. Click the Add Remedy button (Alt+A). The Remedy Selection window appears. Type Med for Medorrhinum. Leave it as degree 1. Press Enter. The Author Selection window appears. Type Hu2. Press Enter. Notice the remedy is now in the list with an asterisk appearing after it. Click Save (Alt + S). Close the Symptom Editor window. Notice the remedy is also in the repertory view.
Adding Authors Tape 5—1:48:07
When you are modifying or adding a symptom to the repertory, most of the time you will be making that addition based on a publication you have read. RADAR has hundreds of publications and authors listed in the Author Catalogue. However, you may wish to add yourself or a trusted colleague to the Author Catalogue, and RADAR allows you to do that.
To add your own authors to the Author List: 1. From the Repertory view, choose View, Author Catalogue. The Author Catalogue
window appears. 2. Begin typing AUT. The screen adjusts to display 99 possible user defined authors.
The next available user defined author will be highlighted.
Page 144

NOTES
3. Click the Edit button. The Edit User Defined Author dialog box appears.
4. Type in the initials of the author in the Abbreviation box. 5. Type in the name of the author in the Name box. 6. Click Save (Alt + S). If the author abbreviation already exists, you will be notified
and you must start over with a new abbreviation. When the new author is complete, the Author Catalogue reappears on the screen.
7. Click OK or Press Enter.
To modify the degree of a remedy in a rubric: 1. Find the rubric on which you wish to modify the degree. 2. Click the Symptom Editor Button or press Ctrl + Alt + F10. The Symptom
Editor window appears. 3. Find the remedy in the list on which you wish to change the degree. 4. Click on the desired degree number. 5. Click on Save or press Alt + S to save the changes. 6. Click on Close or press Esc to close the Symptom Editor window.
Page 145

NOTES
With the finger pointer still in the Mind, Liar rubric, click the Symptom Editor button.
Notice the remedy Alcohol (alco) is listed at degree 1. Click on 2 in the Symptom Editor window. Click on Save. Notice there are now asterisks after each of the three authors. Close the Symptom Editor window.
As indicated earlier, a cross reference is rubrics with very similar meanings that are linked together. While RADAR has many cross references, you may be able to identify some which make sense to you.
To create a cross reference: 1. Find the rubric to which you wish to add a cross reference. 2. Click the Symptom Editor button or press Ctrl + Alt + F10. The Symptom
Editor window appears. 3. On the Symptom Editor window, click on the phrase Cross References on the left side
of the window. A blank box with binoculars above it appears in the middle of the window.
4. Click on the binocular button to search for the rubric to which you wish to create a
cross reference. Search for the cross reference in the same way you would search for a rubric.
5. When you have found the rubric, press Enter to put the rubric in the search box in the Symptom Editor window.
6. Click Save. 7. Click Close.
Find the rubric Generals, Food and Drink, Beer, desires. Open the Symptom Editor window (Ctrl + Alt + F10). Click on Cross References. Click the binoculars.
Page 146

NOTES
Find the rubric Generals, Food and Drink, alcoholic, desires. Press Enter to place it in the Symptom Editor window. Click Save. Close the Symptom Editor window. Double click the cross reference to go to that rubric. Notice that there isn’t a cross
reference back to the rubric Generals, Food and Drink, Beer, desires. Open the Symptom Editor window. Click on Cross References. Click the binoculars. Find the rubric Generals, Food and Drink, Beer, desires. Create a cross reference back to that rubric. Save it. Close the Symptom Editor window.
Synonyms Much of the language used in the repertory is old English which includes words with which we are not familiar. For example, the rubric Mind, Avarice refers to being a miser. However, most of us are not familiar with that word. RADAR not only provides short definitions on the repertory screen, but allows you to create your own, called Synonyms. Whatever you type into a synonym can be searched for though the various search engines.
A Synonym for the symptom Consolation
To create a synonym: 1. Find the rubric to which you want to add a synonym. 2. Click the Symptom Editor button or press Ctrl + Alt + F10. The Symptom
Editor Window appears. 3. Click on Synonyms on the left side of the screen. The window displays a blank box
in the middle.
Page 147
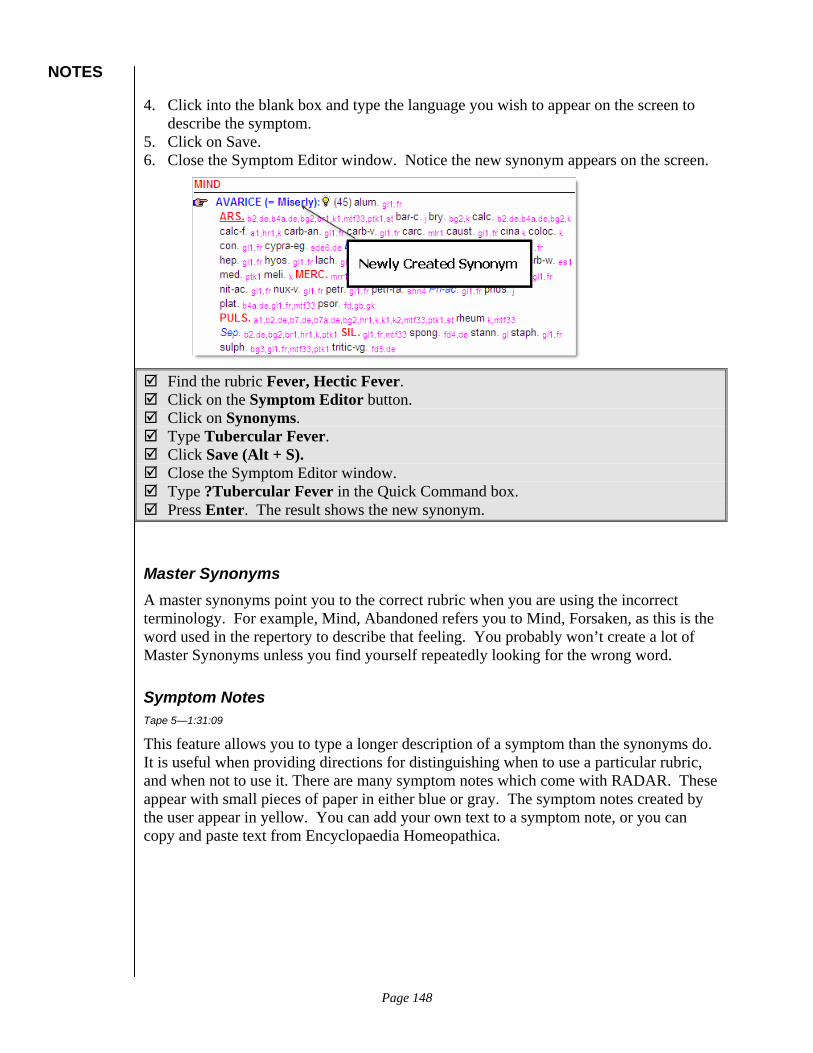
NOTES
4. Click into the blank box and type the language you wish to appear on the screen to describe the symptom.
5. Click on Save. 6. Close the Symptom Editor window. Notice the new synonym appears on the screen.
Find the rubric Fever, Hectic Fever. Click on the Symptom Editor button. Click on Synonyms. Type Tubercular Fever. Click Save (Alt + S). Close the Symptom Editor window. Type ?Tubercular Fever in the Quick Command box. Press Enter. The result shows the new synonym.
Master Synonyms A master synonyms point you to the correct rubric when you are using the incorrect terminology. For example, Mind, Abandoned refers you to Mind, Forsaken, as this is the word used in the repertory to describe that feeling. You probably won’t create a lot of Master Synonyms unless you find yourself repeatedly looking for the wrong word.
Symptom Notes Tape 5—1:31:09
This feature allows you to type a longer description of a symptom than the synonyms do. It is useful when providing directions for distinguishing when to use a particular rubric, and when not to use it. There are many symptom notes which come with RADAR. These appear with small pieces of paper in either blue or gray. The symptom notes created by the user appear in yellow. You can add your own text to a symptom note, or you can copy and paste text from Encyclopaedia Homeopathica.
Page 148

NOTES
To create a Symptom Note: 1. Find the rubric to which you wish to add a Symptom Note. 2. Click the Symptom Editor button or press Ctrl + Alt + F10. The Symptom
Editor window appears. 3. Click on Symptom Note (user) on the left side of the screen.
4. Type the symptom note in the box indicated above. If you are pasting symptom
notes, from the Edit menu, choose Paste, or press Ctrl + V. 5. Click Save or press Alt+S. 6. Close the Symptom Editor Window.
To read a Symptom Note: 1. Find the symptom note symbol for the note you wish to read. This can be either a
user note (yellow) or notes that come with RADAR (gray or blue). 2. Double click the symptom note. The Symptom Information window appears.
Page 149

NOTES
3. When you have finished reading, press Esc to close the Symptom Information
Window.
Multi-Media Files Tape 5--1:38:54
RADAR allows you to add multi-media files to your rubrics to help understand the rubrics better. These include video clips, photos, and sound files. WholeHealthNow has many multi-media files you can download for free. Some of the files are educational while others are purely entertainment. To download files, set your browser to http://www.wholehealthnow.com/homeopathy_pro/radar_mm.html. Choose the Educational or Entertainment link. Please read the web page for information on the types (i.e., file types) of multi-media files that work best with RADAR.
The following table lists the types of multi-media files you can add to symptoms, the symbol used in RADAR when the link is completed, and the preferred directory to which to download the files.
Multi-media type Symbol Preferred Directory
Sound (sound clips) C:\RADAR\SOUND
Video (movie clips) C:\RADAR\VIDEO
Images (photos, clipart, etc.) C:\RADAR\IMAGE C:\RADAR\PHOTO
To download a Multi-media file: 1. Log onto the WholeHealthNow web page listed above. 2. Click on the Educational or Entertaining link. A web page with a list of files appears. 3. You can play the file before downloading by clicking on the word Download next to
the desired file. 4. Right click on the word Download next to the file you wish to download. A quick
menu pops up from the mouse. 5. Choose Save Target As from the pop up menu. A File Download dialog appears
briefly and is then covered by a Save As dialog box.
Page 150

NOTES
6. Choose the desired directory in which to save the file. (See suggested directories above.)
7. Type in a new name, or use the name given by the web site. 8. Press Enter or click Save (Alt + S). The file begins to down load and a Progress
window appears.
9. When the download is complete, close the progress window and proceed with the
following directions.
To add a Multi-media File to a rubric: 1. Find the rubric to which you wish to add a multi-media file. 2. Click the Symptom Editor button or press Ctrl + Alt + F10. The Symptom Editor
window appears. 3. Click on Media on Symptom on the left side of the Symptom Editor window. 4. Click the Add link button (Alt + A). The Select Multi Media File dialog box appears.
5. Specify the type of file to be linked by clicking Video, Sound or Image. 6. Click the Browse button to specify the file to which you wish to link.
Page 151

NOTES
7. You may type a description in the Name box which will appear in the Symptom Editor window.
8. Press Enter or click OK. 9. Click Save (Alt + S). 10. Close the Symptom Editor window. The Repertory window appears with a symbol
next to the rubric indicating that a multi-media link is available for this rubric.
Adding Remedies to RADAR Tape 5—1:48:07
New remedies are being proven every week. It is impossible to get updated software as often as there are new remedies. RADAR allows you to add remedies to the repertory as often as you receive information about them. Remedies are stored in the Remedy Catalogue.
To add a remedy to the Remedy Catalogue: 1. From the Repertory view, choose View, Remedy Catalogue. The Remedy Catalogue
window appears. 2. Begin typing RMD and the user defined remedy spaces will appear. The first
available user defined remedy will be highlighted.
3. Click the Edit button. The Edit User Defined Remedy dialog box appears.
4. Type in an abbreviation for the new remedy in the Abbreviation box. 5. Type in a name for the new remedy in the Name box. 6. Click on Save or press Enter. If a remedy already exists with the same abbreviation
you have chosen, you will be notified and you must start the process over. When you
Page 152

NOTES
have a unique abbreviation, the Remedy Catalogue reappears displaying the new remedy in the list.
Adding a Rubric Tape 5—1:49:39
You may wish to add a rubric or a sub rubric based on a new proving you read or your own clinical experience. RADAR allows you to do this with many of the same procedures with which you are already familiar.
To add a sub rubric below the current rubric: 1. Click on the rubric to which you wish to add a sub rubric. 2. Click on the Add Sub Rubric button. The Symptom Editor window appears.
Text of Symptom is the only possible option on the left side of the screen.
3. Begin typing the text of the sub rubric where the cursor appears. 4. Click Save. The Symptom Editor window reappears with the Add Remedy button
available. 5. If desired, begin adding remedies as indicated on page 141.
To add a rubric below the current rubric: 1. Click on the rubric above the spot where you wish to add a rubric. 2. Click the Add Rubric button. The Symptom Addition window appears to
confirm that you want to add a rubric in that spot.
Page 153
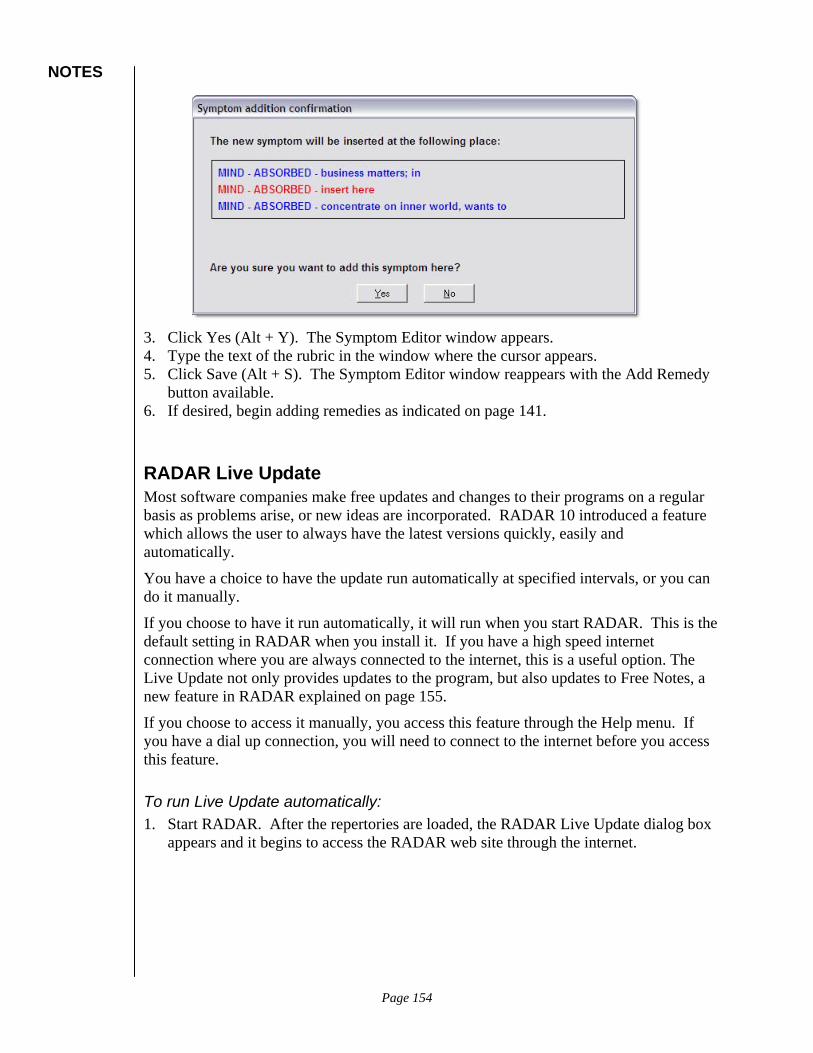
NOTES
3. Click Yes (Alt + Y). The Symptom Editor window appears. 4. Type the text of the rubric in the window where the cursor appears. 5. Click Save (Alt + S). The Symptom Editor window reappears with the Add Remedy
button available. 6. If desired, begin adding remedies as indicated on page 141.
RADAR Live Update Most software companies make free updates and changes to their programs on a regular basis as problems arise, or new ideas are incorporated. RADAR 10 introduced a feature which allows the user to always have the latest versions quickly, easily and automatically.
You have a choice to have the update run automatically at specified intervals, or you can do it manually.
If you choose to have it run automatically, it will run when you start RADAR. This is the default setting in RADAR when you install it. If you have a high speed internet connection where you are always connected to the internet, this is a useful option. The Live Update not only provides updates to the program, but also updates to Free Notes, a new feature in RADAR explained on page 155.
If you choose to access it manually, you access this feature through the Help menu. If you have a dial up connection, you will need to connect to the internet before you access this feature.
To run Live Update automatically: 1. Start RADAR. After the repertories are loaded, the RADAR Live Update dialog box
appears and it begins to access the RADAR web site through the internet.
Page 154

NOTES
2. When the list of updates appears on the screen, click Start Download. 3. When the Download is complete, you will be asked if you want to Install the update.
Choose Yes. You have a choice to run the Live Update Every day, Every week, Every month or Never. If you have chosen a less frequent interval, or you have a dial-up connection, you may wish to run the Live Update manually.
To run Live Update manually: 1. From the Help menu, choose Live Update. The RADAR Live Update window
appears. 2. Click Check for Updates. RADAR will use your internet connection to check for any
new updates from Archibel, the developer of RADAR. 3. If there are any updates, they will appear in the window. Make sure there is a check
next to the updates you want to download. 4. Click Start Download. 5. When the Download is complete, you will be asked if you want to Install the update.
Choose Yes.
Page 155

NOTES
Free Notes RADAR 10 introduced a feature called Free Notes. This enables homeopathic colleagues to share their documents with each other freely through the RADAR program. You can share your notes with all RADAR users, or only with specified users. Notes may also be shared by Archibel to explain some functionality of RADAR.
When a person wishes to share a document, it first goes to an FTP site and is checked for content to make sure there is nothing inappropriate in the document. It also goes through an anti-virus check. The file name is changed to reflect a standard file naming protocol and it is placed on a different server for sharing with other RADAR users.
To use Free Notes: 1. From the View menu, choose Free Notes. The Free Notes screen appears.
2. If you have the Live Update to check automatically for an update, the Freenotes may
also check for new papers that may have been made available. 3. Double click the document you wish to view.
-or- Click once on the document you wish to view and click Open. The application that is needed to open the document will start and the document will be displayed on the screen.
Page 156
NOTES
Sharing Documents Through Free Notes Free Notes allows you to share your documents with the entire homeopathic community or with only a few people. Before you can share your documents, they must be displayed on the list of documents in the Free Notes window.
You can add documents to the list by creating them new directly in Free Notes, or by importing a document that already exists.
There are several reasons you may want to choose either method.
1. If you already have the document created, you will likely want to simply add it through the Import function.
2. If you do not want to have other people modify your document, you will probably want to create a PDF file or PPS file and share that, rather than a Word document or a modifiable PPT file.
3. If you only want this yet uncreated document used in Free Notes, and you wish to let people take the document and make it their own, you can create the document through Free Notes.
4. If you plan to create your document in a non-standard software, you will need to make a PDF file to share.
To create a new Free Notes document from the Free Notes window: 1. In the Free Note window, click New. The Create a new freenote dialog box appears:
2. Enter the name of your new Free Note, following all the typical rules for naming
files. BE SURE TO INCLUDE THE FILE EXTENSION. If no file extension is included, it will automatically create a text (*.txt) file. If you specify a MS Word document (*.doc), it will create a Rich Text File (*.RTF) by default. You can format and save as a Word document if you wish. You will be prompted to do this.
3. Select a language by clicking the Select Languages button, if necessary. 4. Click Save. The application indicated by the file extension will open to a blank
screen so you can begin creating your Free Note. 5. Create your Free Note as you would normally use the software. Save it and the
software will use the name you gave the file when creating it. 6. When you return to RADAR and the Free Note window, your new document will
appear on the list of documents.
Page 157

NOTES
7. If you wish to edit your document, you can access your file from the Free Notes
Screen by opening as indicated above.
To import a previously created document into Free Notes. 1. In the Free Notes window, click Import. A dialog box appears prompting you to
choose the file to import.
2. Select the file you wish to import, and click Open. You will be prompted to rename
your document. This is optional. If you choose to rename the document, be sure to put the file extension on the name of the document. Click Save. The imported document appears in the list of available documents.
Page 158
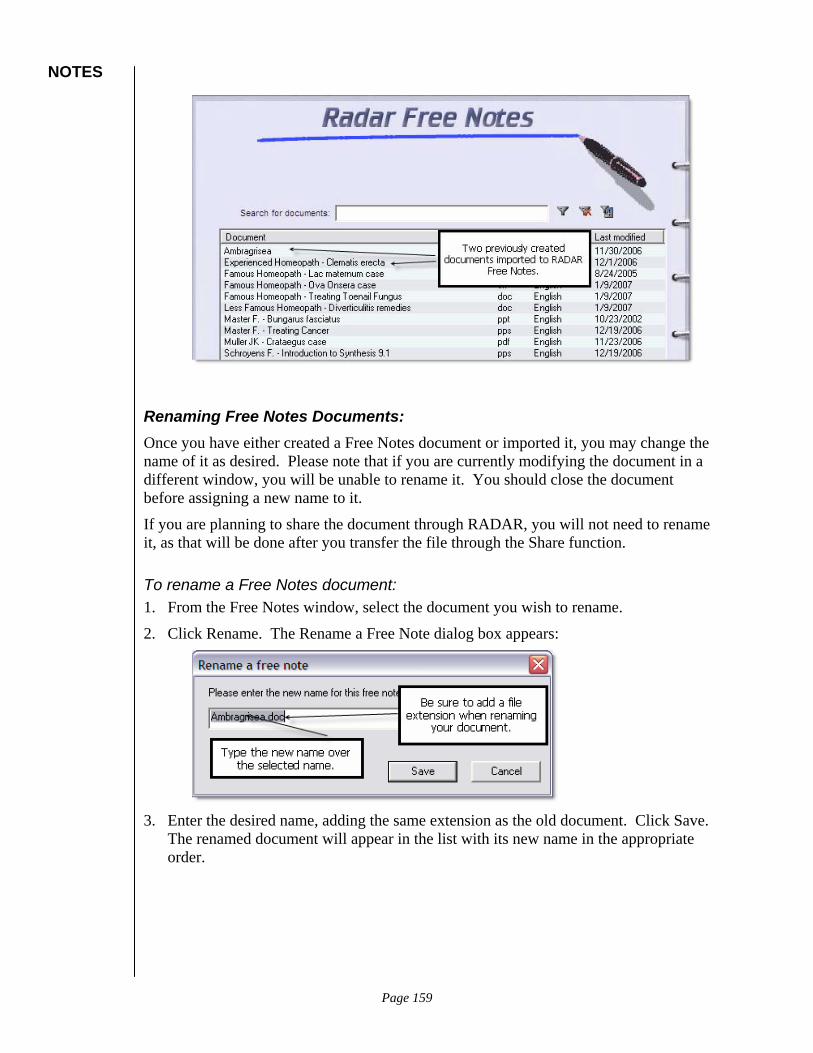
NOTES
Renaming Free Notes Documents: Once you have either created a Free Notes document or imported it, you may change the name of it as desired. Please note that if you are currently modifying the document in a different window, you will be unable to rename it. You should close the document before assigning a new name to it.
If you are planning to share the document through RADAR, you will not need to rename it, as that will be done after you transfer the file through the Share function.
To rename a Free Notes document: 1. From the Free Notes window, select the document you wish to rename.
2. Click Rename. The Rename a Free Note dialog box appears:
3. Enter the desired name, adding the same extension as the old document. Click Save.
The renamed document will appear in the list with its new name in the appropriate order.
Page 159
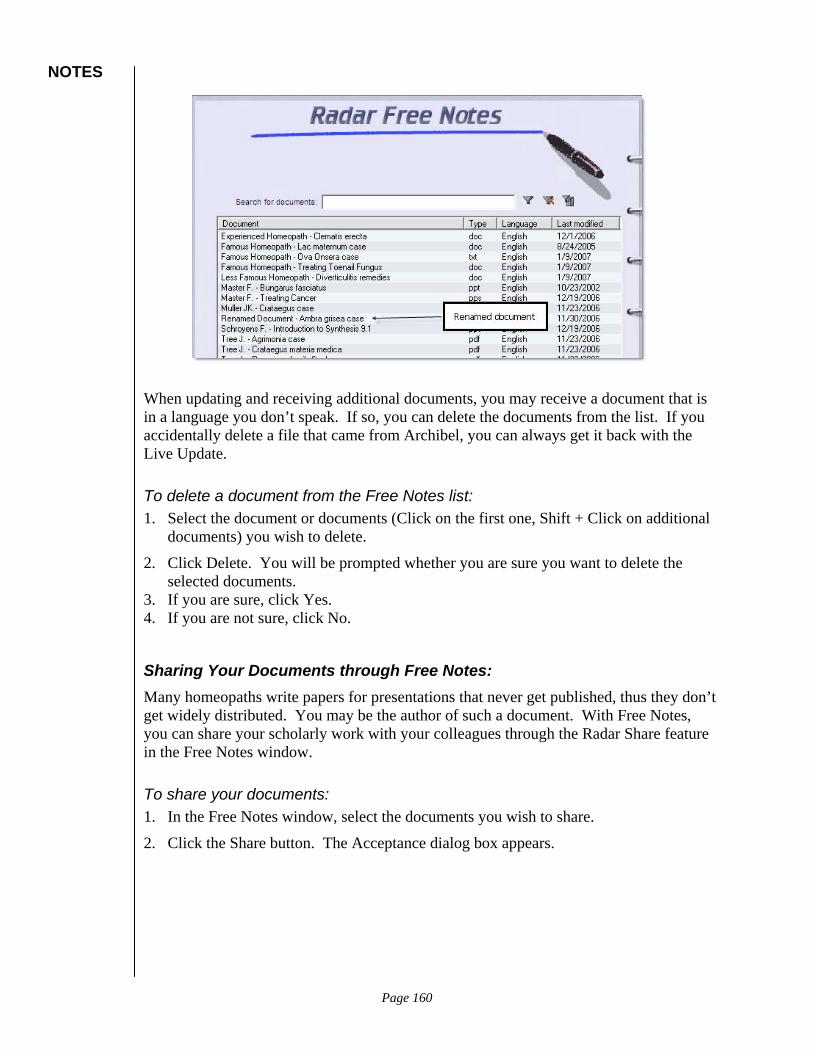
NOTES
When updating and receiving additional documents, you may receive a document that is in a language you don’t speak. If so, you can delete the documents from the list. If you accidentally delete a file that came from Archibel, you can always get it back with the Live Update.
To delete a document from the Free Notes list: 1. Select the document or documents (Click on the first one, Shift + Click on additional
documents) you wish to delete.
2. Click Delete. You will be prompted whether you are sure you want to delete the selected documents.
3. If you are sure, click Yes. 4. If you are not sure, click No.
Sharing Your Documents through Free Notes: Many homeopaths write papers for presentations that never get published, thus they don’t get widely distributed. You may be the author of such a document. With Free Notes, you can share your scholarly work with your colleagues through the Radar Share feature in the Free Notes window.
To share your documents: 1. In the Free Notes window, select the documents you wish to share.
2. Click the Share button. The Acceptance dialog box appears.
Page 160
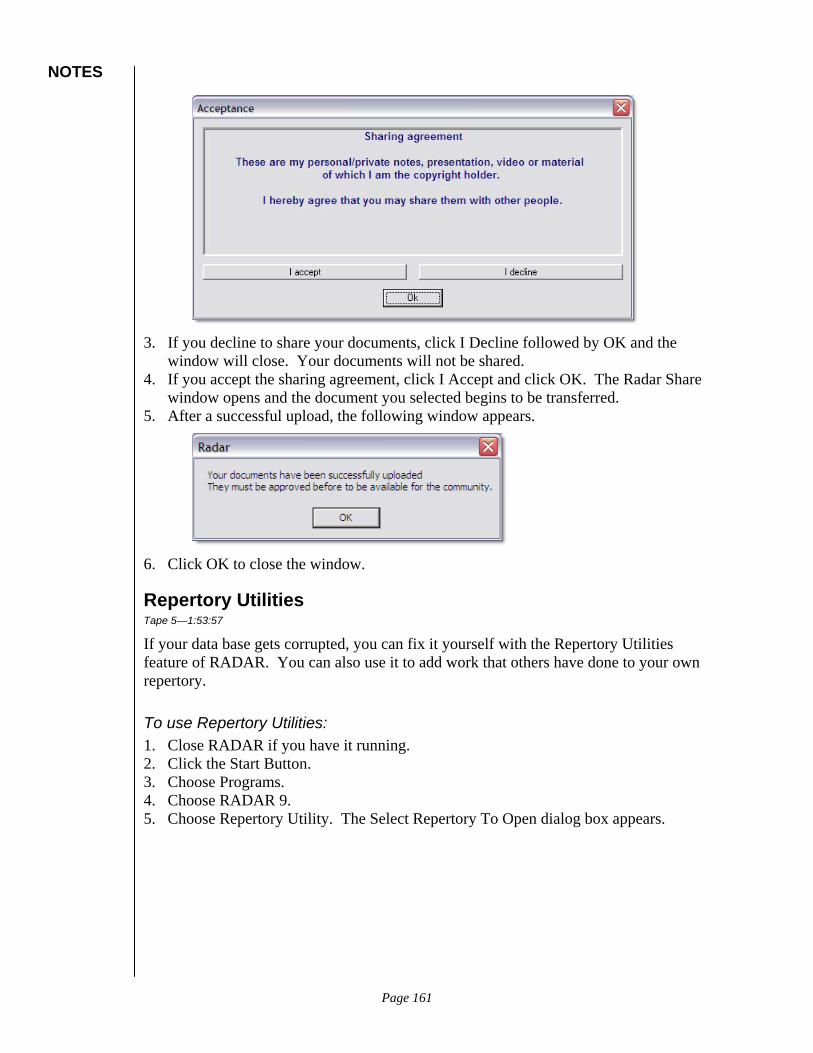
NOTES
3. If you decline to share your documents, click I Decline followed by OK and the
window will close. Your documents will not be shared. 4. If you accept the sharing agreement, click I Accept and click OK. The Radar Share
window opens and the document you selected begins to be transferred. 5. After a successful upload, the following window appears.
6. Click OK to close the window.
Repertory Utilities Tape 5—1:53:57
If your data base gets corrupted, you can fix it yourself with the Repertory Utilities feature of RADAR. You can also use it to add work that others have done to your own repertory.
To use Repertory Utilities: 1. Close RADAR if you have it running. 2. Click the Start Button. 3. Choose Programs. 4. Choose RADAR 9. 5. Choose Repertory Utility. The Select Repertory To Open dialog box appears.
Page 161

NOTES
6. Choose Synthesis 9.0 . 7. Press Enter. The screen will be blank.
The following table indicates which menu choices you should use to correct or change RADAR.
Menu Choice Action
Update, Update Repertory from another Log File.
By choosing a Log file from the dialog box, you can add someone else’s updates to your system.
Repair, All Tables Can fix corrupted files in the currently selected repertory.
Page 162

NOTES
Encyclopaedia Homeopathica Encyclopaedia Homeopathica (EH) is a full featured, companion product to RADAR. It contains hundreds of volumes of books, articles, and case studies pertaining to homeopathy. Subject matter includes Materia Medica, Philosophy, Cases, Therapeutics, and Provings.
Because it is associated with RADAR, you will find that many of the function keys provide the same services as RADAR. As such, it will not be necessary to memorize the uses of the function keys differently for EH and for RADAR. Much of the other functionality of EH is similar as well, so once you have become familiar with one product, the other is easier to learn.
At the conclusion of the Encyclopaedia Homeopathica training, you will be able to do the following: • Open and close EH. • Search for remedies, cases, pathologies and general text in EH documents. • Modify the EH screen. • Switch between the various Views available in EH. • Print documents from EH. • Make an analysis of the prominent remedies that appear in an EH search. • Export information from EH to RADAR. • Export information for RADAR to EH. • Limit your search to specified volumes in EH.
Getting Started Tape 4—1:44:41
As with RADAR, EH can be started by an icon on the desktop, a keyboard shortcut, or with the start button in the lower left corner of your screen. You may first wish to create a keyboard shortcut for EH.
To create an EH keyboard shortcut: 1. Locate the Encyclopaedia Homeopathica shortcut icon on your desktop.
It looks like this: 2. Position the mouse pointer over the icon. Press the right mouse button,
or the alternate mouse button. A short cut menu appears. It looks similar to the following:
Page 163
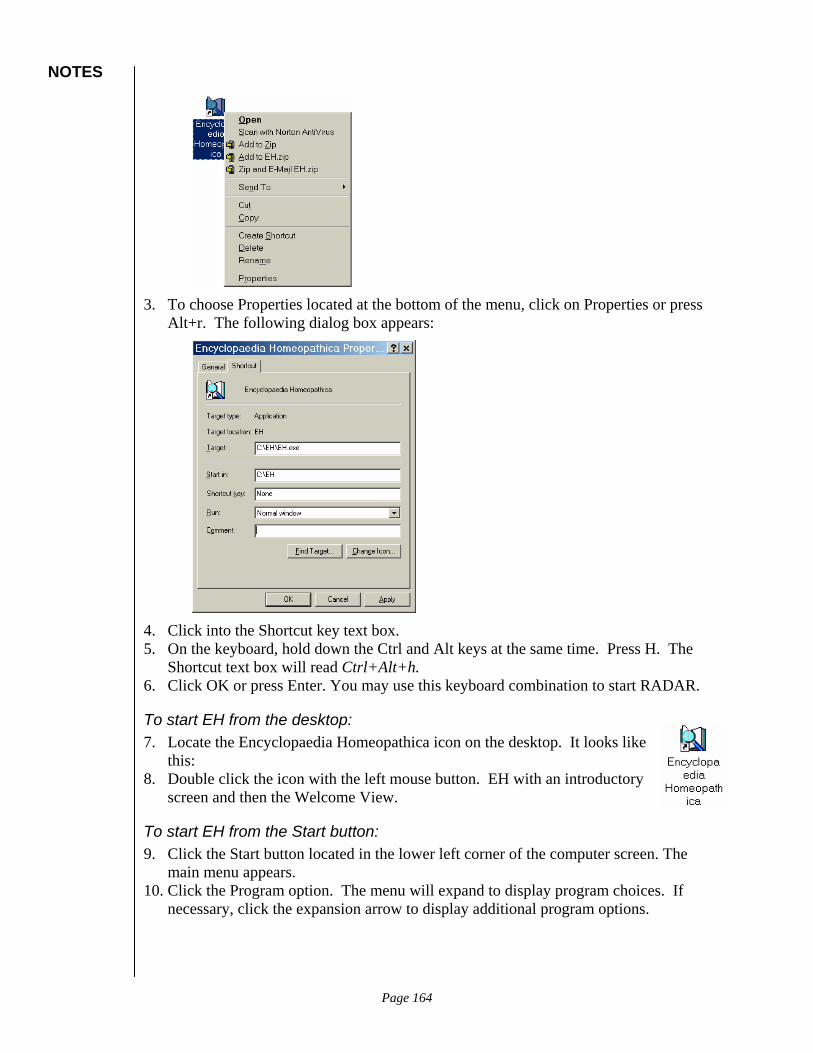
NOTES
3. To choose Properties located at the bottom of the menu, click on Properties or press
Alt+r. The following dialog box appears:
4. Click into the Shortcut key text box. 5. On the keyboard, hold down the Ctrl and Alt keys at the same time. Press H. The
Shortcut text box will read Ctrl+Alt+h. 6. Click OK or press Enter. You may use this keyboard combination to start RADAR.
To start EH from the desktop: 7. Locate the Encyclopaedia Homeopathica icon on the desktop. It looks like
this: 8. Double click the icon with the left mouse button. EH with an introductory
screen and then the Welcome View.
To start EH from the Start button: 9. Click the Start button located in the lower left corner of the computer screen. The
main menu appears. 10. Click the Program option. The menu will expand to display program choices. If
necessary, click the expansion arrow to display additional program options.
Page 164

NOTES Expansion
arrow
11. Choose the Encyclopaedia Homeopathica program group. 12. Choose the Encyclopaedia Homeopathica icon. EH opens with a brief introductory
screen, followed by a welcome screen.
You can also use the keyboard shortcut which you just created to start EH. This keyboard shortcut will work from any application, providing the same key combination has not been assigned to operate differently within the program in which you are currently working.
To start EH with the Keyboard Shortcut: 13. From within the program in which you are currently working, hold down the Ctrl key
plus the Alt key plus the letter H. Encyclopaedia Homeopathica begins with a brief introductory screen and then the Home screen appears.
Downloading EH Upgrades from the Internet Tape 4—1:47:41
The functionality of EH is continually being upgraded. These upgrades are available at the Whole Health Now web site on the internet for free. (Additional volumes not available for free on the internet.)
To download EH upgrades: 1. From you internet browser, go to www.wholehealthnow.com. 2. Click On-Line Tech Support at the top of the window. 3. Click Downloads. This will take you to the Archibel web site, the developer of
RADAR and EH. 4. Choose your operating system from the Choose an Operating System list. 5. Choose Encyclopaedia Homeopathica from the Choose a Program list. 6. Click Go next to the Program list. 7. Choose the download of your choice. 8. Click the Download button. Be sure to follow the instructions on the screen for
installing the upgrade once it has been downloaded.
Setting the EH Options Tape4—1:52:09
EH allows you to change the appearance and efficiency of the RADAR screen through an options setting. Some of these changes are merely cosmetic, while others make it easier
Page 165

NOTES
to be efficient with the program. The suggestions that are made in the following section are chosen to make RADAR the most fully functional for most users.
The easiest way to access the options is using the right mouse button. N
OTE
Through out this document, pictures of important screens have been included. If the pictures appear to be slightly different in the EH portion of the manual, it may be due to having a different background selected.
To access the EH Options screen: 1. If necessary, start EH from the desktop icon or with the keyboard shortcut. 2. Click the Right mouse on the background of the Welcome screen. A small Properties
menu appears. 3. Click Properties. The Options dialog box appears.
4. See the following sections for information on particular changes.
To access the Options window by other means: 5. From the Web view window, choose Tools, Options.
-or- From the Web view window, click the Options button.
Choosing a Desktop Theme There are basically three desktop themes to choose from in EH. There are two different sizes of each screen—regular and large. You would choose between them depending on the screen resolution you have set on your computer and whether you wish EH to fill up the screen.
Page 166

NOTES
If you have your screen resolution set to 800 x 600, you would choose regular. If you have your screen resolution set to 1024 x 768, you would choose large if you wish EH to fill the entire screen. Choose regular if you wish it to fill only part of the screen.
Start EH, if necessary. Click the right mouse button on the background screen. Click Properties. Change the Desktop Theme, experimenting with all the selections. Click OK between each choice to see the result. Set the Theme to Study Large. Return to the Options dialog box. Set the Toolbar to Advanced. Click on the General setting on the left of the Options window. Uncheck Show Welcome Window. In the Abbreviation of the repertory to open box type se90 if you are using
Synthesis 9.0. This will be the same abbreviation you entered when making the keyboard shortcut at the beginning of the RADAR training course.
If you wish to know more about the other settings, click the Help button. Click OK. In the Web Look view, choose Tools, Options. Click the Contents icon on the left side of the screen. Set Symbol to Plus and Minus. Be sure Show Selection boxes and Show Number of results are checked. Uncheck Show Only Titles With Results. Click OK. Click the Options button. Click Document. Uncheck both boxes, if necessary. Click OK. Click the Options button. Click Summary. Experiment with the colors a bit. Click OK. Click the Options button. Click Analysis. Change the Bar Chart color to the second row, fifth column color. (It works best.) Click OK. Click Options button. Click Families. Use Ctrl + Click to select Kingdoms, Miasms, Nosodes, and Periodic Table. Click OK.
A Tour Through the EH Screen Once you have started EH with one of the above methods, you are ready to begin working with the documents. It is helpful to familiarize yourself with the EH screens before beginning to use them.
Page 167
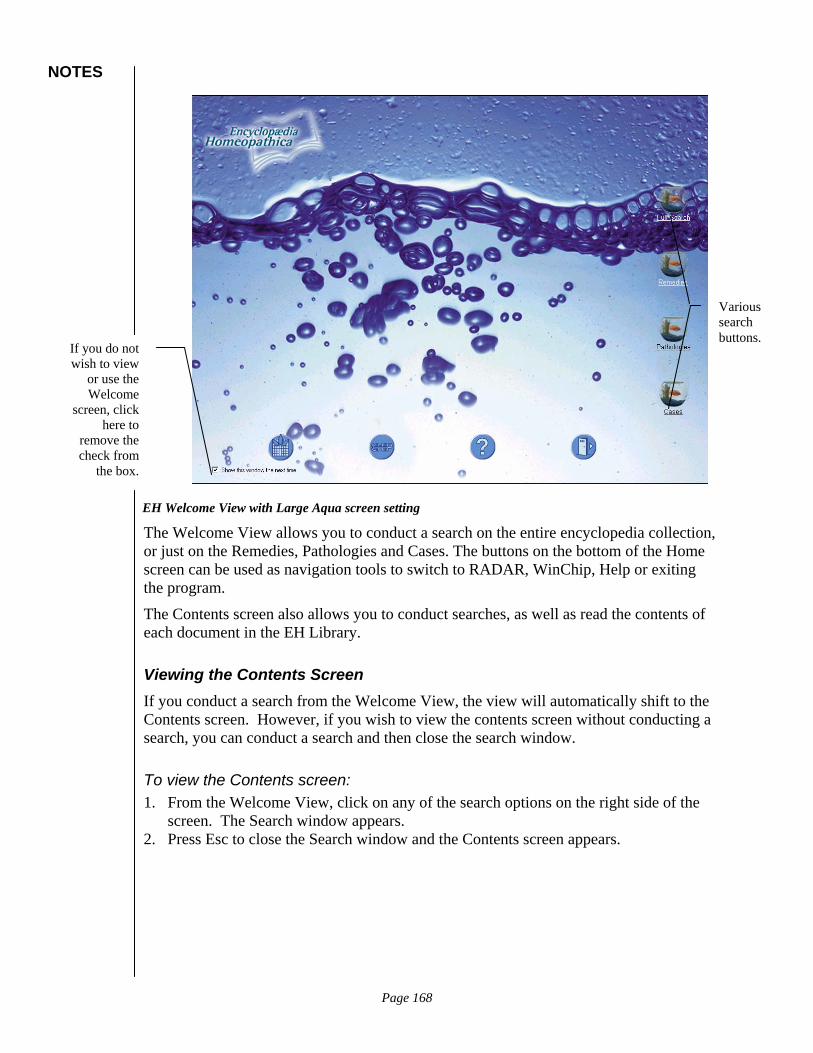
NOTES
Various search buttons.
If you do not wish to view
or use the Welcome
screen, click here to
remove the check from
the box.
EH Welcome View with Large Aqua screen setting
The Welcome View allows you to conduct a search on the entire encyclopedia collection, or just on the Remedies, Pathologies and Cases. The buttons on the bottom of the Home screen can be used as navigation tools to switch to RADAR, WinChip, Help or exiting the program.
The Contents screen also allows you to conduct searches, as well as read the contents of each document in the EH Library.
Viewing the Contents Screen If you conduct a search from the Welcome View, the view will automatically shift to the Contents screen. However, if you wish to view the contents screen without conducting a search, you can conduct a search and then close the search window.
To view the Contents screen: 1. From the Welcome View, click on any of the search options on the right side of the
screen. The Search window appears. 2. Press Esc to close the Search window and the Contents screen appears.
Page 168

NOTES
Toolbar
Highlighted document
Text of highlighted document
The EH Contents Screen with the Web Look setting.
Resizing the Windows The default setting in EH is to have the Source side of the window quite small. These windows can be sized, however. It is easier to read the source of the document if this side of the window is a bit larger.
To resize a window: 1. Position the mouse pointer on the space between the source window and the contents
window. The mouse pointer changes to a two headed arrow with arrows pointing to the left and the right.
2. Hold down the mouse pointer and drag the arrow to the right, making the source window bigger.
3. When the window is at the desired width, release the mouse button.
Resize the source window so it is wider. Quit EH so that all the settings are saved. Restart EH.
The Structure of a Book Unlike other Materia Medica search programs, you have the entire book. All the prefaces, introductions, etc. It is also structured as it is in the hard copy of the book. By
Page 169
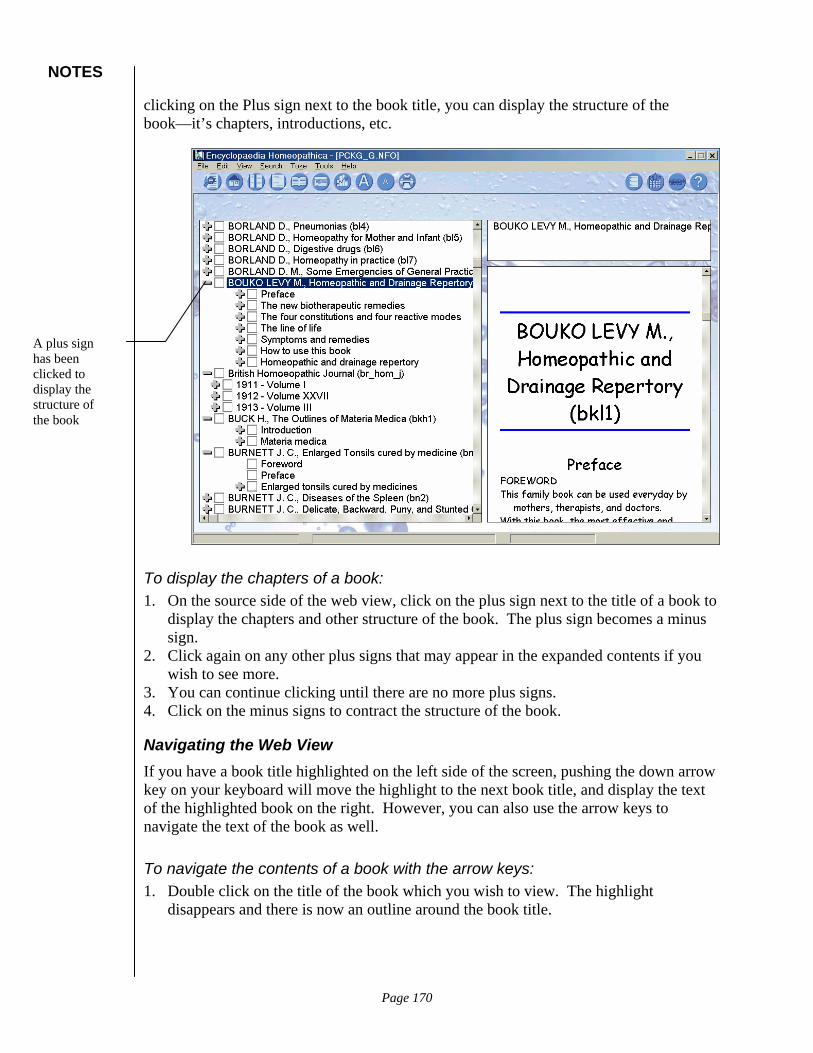
NOTES
clicking on the Plus sign next to the book title, you can display the structure of the book—it’s chapters, introductions, etc.
A plus sign has been clicked to display the structure of the book
To display the chapters of a book: 1. On the source side of the web view, click on the plus sign next to the title of a book to
display the chapters and other structure of the book. The plus sign becomes a minus sign.
2. Click again on any other plus signs that may appear in the expanded contents if you wish to see more.
3. You can continue clicking until there are no more plus signs. 4. Click on the minus signs to contract the structure of the book.
Navigating the Web View If you have a book title highlighted on the left side of the screen, pushing the down arrow key on your keyboard will move the highlight to the next book title, and display the text of the highlighted book on the right. However, you can also use the arrow keys to navigate the text of the book as well.
To navigate the contents of a book with the arrow keys: 1. Double click on the title of the book which you wish to view. The highlight
disappears and there is now an outline around the book title.
Page 170
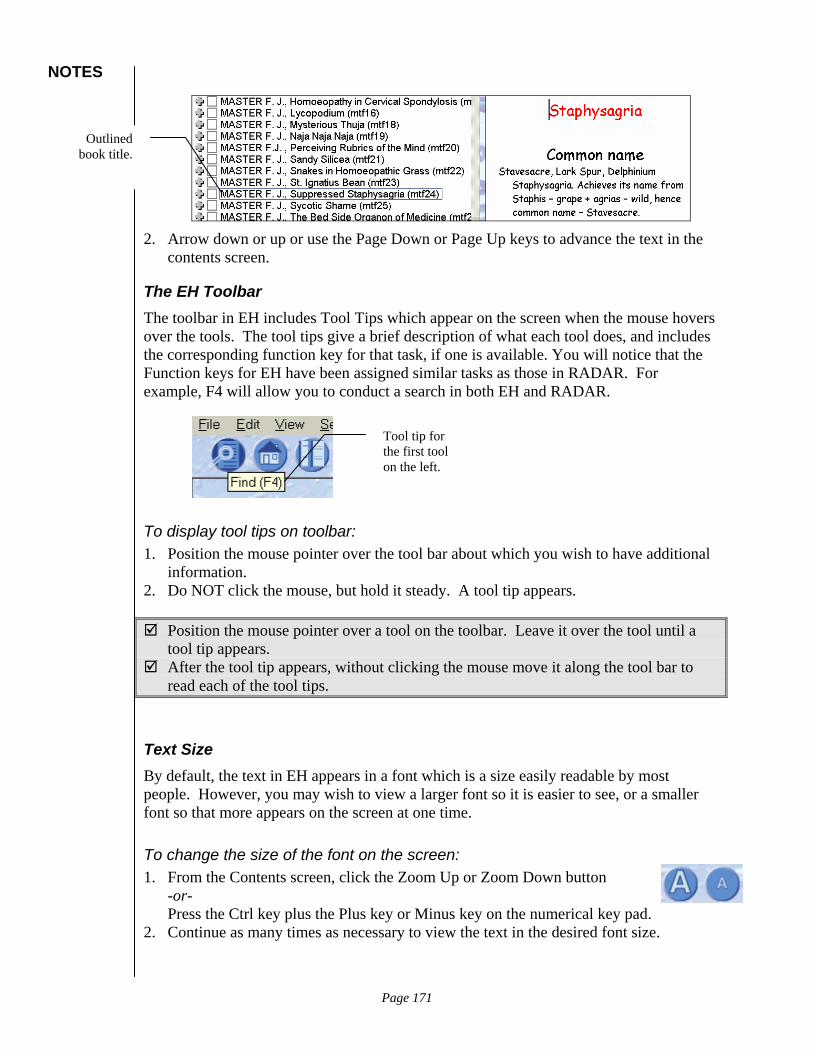
NOTES
Outlined book title.
2. Arrow down or up or use the Page Down or Page Up keys to advance the text in the contents screen.
The EH Toolbar The toolbar in EH includes Tool Tips which appear on the screen when the mouse hovers over the tools. The tool tips give a brief description of what each tool does, and includes the corresponding function key for that task, if one is available. You will notice that the Function keys for EH have been assigned similar tasks as those in RADAR. For example, F4 will allow you to conduct a search in both EH and RADAR.
Tool tip for the first tool on the left.
To display tool tips on toolbar: 1. Position the mouse pointer over the tool bar about which you wish to have additional
information. 2. Do NOT click the mouse, but hold it steady. A tool tip appears.
Position the mouse pointer over a tool on the toolbar. Leave it over the tool until a tool tip appears.
After the tool tip appears, without clicking the mouse move it along the tool bar to read each of the tool tips.
Text Size By default, the text in EH appears in a font which is a size easily readable by most people. However, you may wish to view a larger font so it is easier to see, or a smaller font so that more appears on the screen at one time.
To change the size of the font on the screen: 1. From the Contents screen, click the Zoom Up or Zoom Down button
-or- Press the Ctrl key plus the Plus key or Minus key on the numerical key pad.
2. Continue as many times as necessary to view the text in the desired font size.
Page 171

NOTES
NO
TE
If you use a notebook or laptop computer, and you do not have an external numerical key pad, you must use the Fn key to activate the numerical key pad. You will notice the color of the letters on the Fn key matches the color of the numbers on the side of some of the alphabetical keys. By pressing the Fn key, you change the function of the alphabetical keys so that they operate as a numerical key pad. You must keep the Fn key depressed the entire time you are using the numerical key pad, or the keys will once again function as alphabetical keys.
Press Ctrl + Plus or Ctrl + Minus to set the font to the desired size.
Searching the EH Library Tape 4—2:02:29
There are many ways to begin a search in EH. You can start from the Welcome View or the Contents screen. You can click tools or press F4. However, the easiest way to conduct a search in EH is to follow the directions you have learned in RADAR. Just begin typing.
To conduct a search in EH: 1. Press F4
-or- Begin typing the first letter of the word for which you are searching. (The word could be a remedy, a symptom, or just a word that appears in the text.) The Search window appears.
Page 172
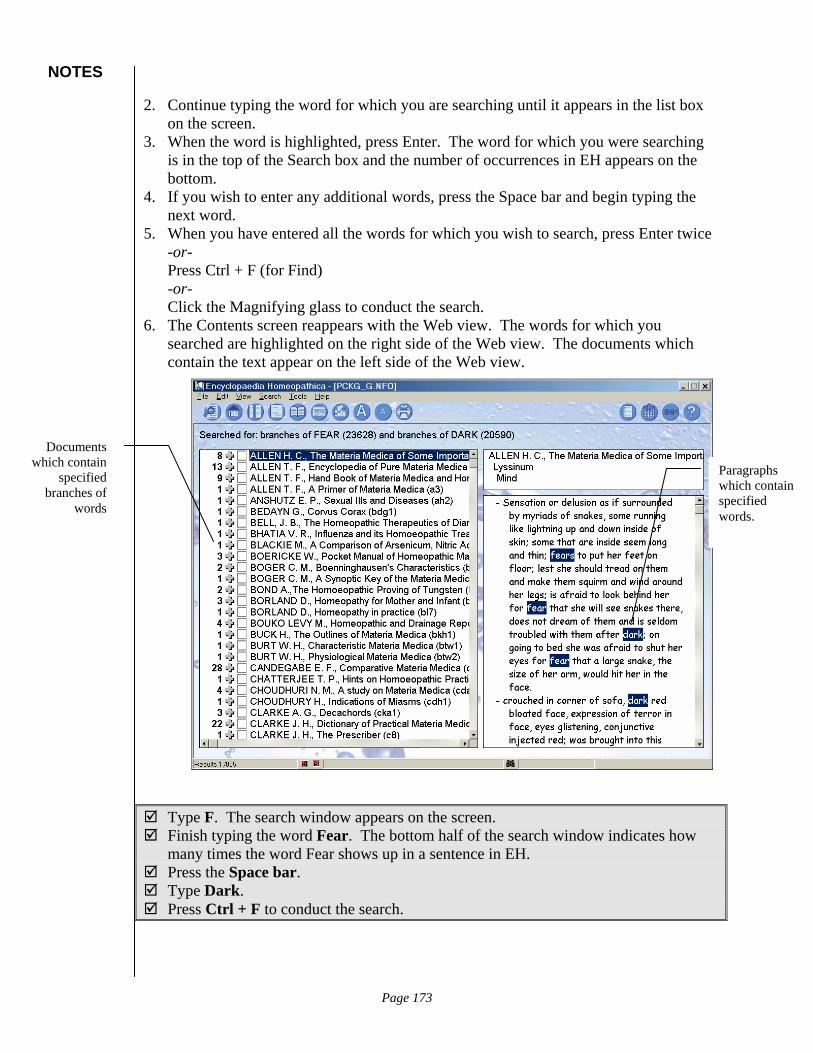
NOTES
2. Continue typing the word for which you are searching until it appears in the list box on the screen.
3. When the word is highlighted, press Enter. The word for which you were searching is in the top of the Search box and the number of occurrences in EH appears on the bottom.
4. If you wish to enter any additional words, press the Space bar and begin typing the next word.
5. When you have entered all the words for which you wish to search, press Enter twice -or- Press Ctrl + F (for Find) -or- Click the Magnifying glass to conduct the search.
6. The Contents screen reappears with the Web view. The words for which you searched are highlighted on the right side of the Web view. The documents which contain the text appear on the left side of the Web view.
Documents which contain
specified branches of
words
Paragraphs which contain specified words.
Type F. The search window appears on the screen. Finish typing the word Fear. The bottom half of the search window indicates how
many times the word Fear shows up in a sentence in EH. Press the Space bar. Type Dark. Press Ctrl + F to conduct the search.
Page 173
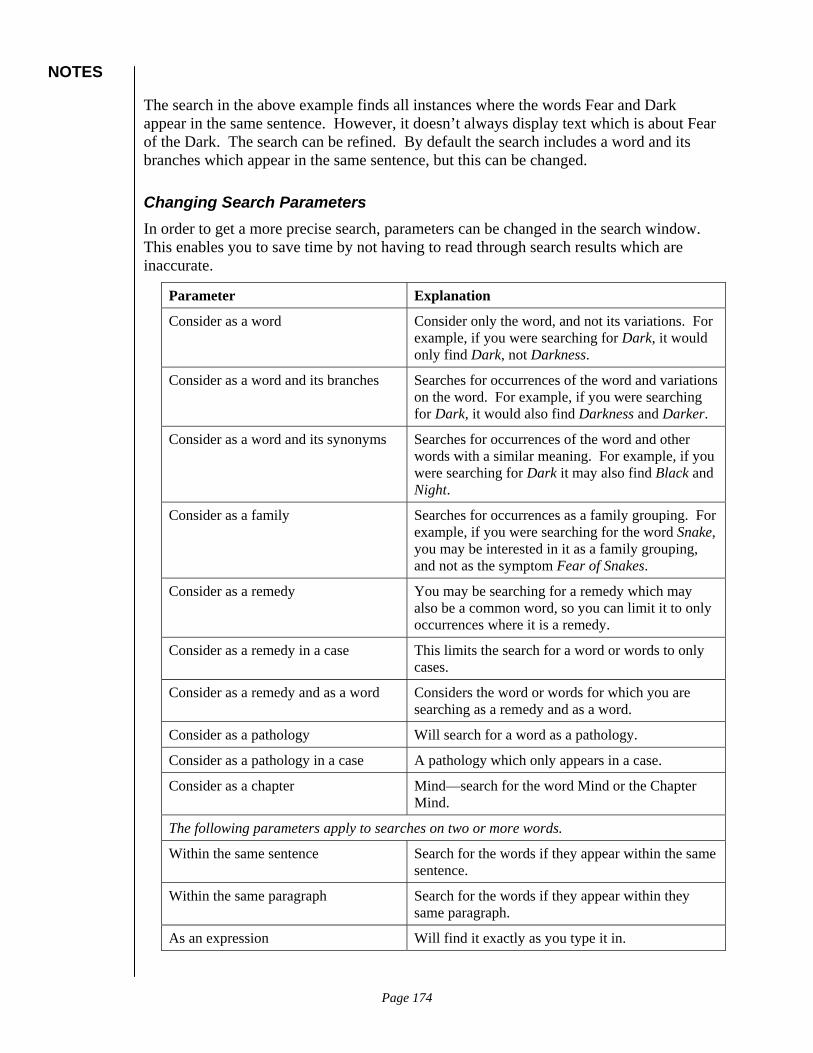
NOTES
The search in the above example finds all instances where the words Fear and Dark appear in the same sentence. However, it doesn’t always display text which is about Fear of the Dark. The search can be refined. By default the search includes a word and its branches which appear in the same sentence, but this can be changed.
Changing Search Parameters In order to get a more precise search, parameters can be changed in the search window. This enables you to save time by not having to read through search results which are inaccurate.
Parameter Explanation
Consider as a word Consider only the word, and not its variations. For example, if you were searching for Dark, it would only find Dark, not Darkness.
Consider as a word and its branches Searches for occurrences of the word and variations on the word. For example, if you were searching for Dark, it would also find Darkness and Darker.
Consider as a word and its synonyms Searches for occurrences of the word and other words with a similar meaning. For example, if you were searching for Dark it may also find Black and Night.
Consider as a family Searches for occurrences as a family grouping. For example, if you were searching for the word Snake, you may be interested in it as a family grouping, and not as the symptom Fear of Snakes.
Consider as a remedy You may be searching for a remedy which may also be a common word, so you can limit it to only occurrences where it is a remedy.
Consider as a remedy in a case This limits the search for a word or words to only cases.
Consider as a remedy and as a word Considers the word or words for which you are searching as a remedy and as a word.
Consider as a pathology Will search for a word as a pathology.
Consider as a pathology in a case A pathology which only appears in a case.
Consider as a chapter Mind—search for the word Mind or the Chapter Mind.
The following parameters apply to searches on two or more words.
Within the same sentence Search for the words if they appear within the same sentence.
Within the same paragraph Search for the words if they appear within they same paragraph.
As an expression Will find it exactly as you type it in.
Page 174
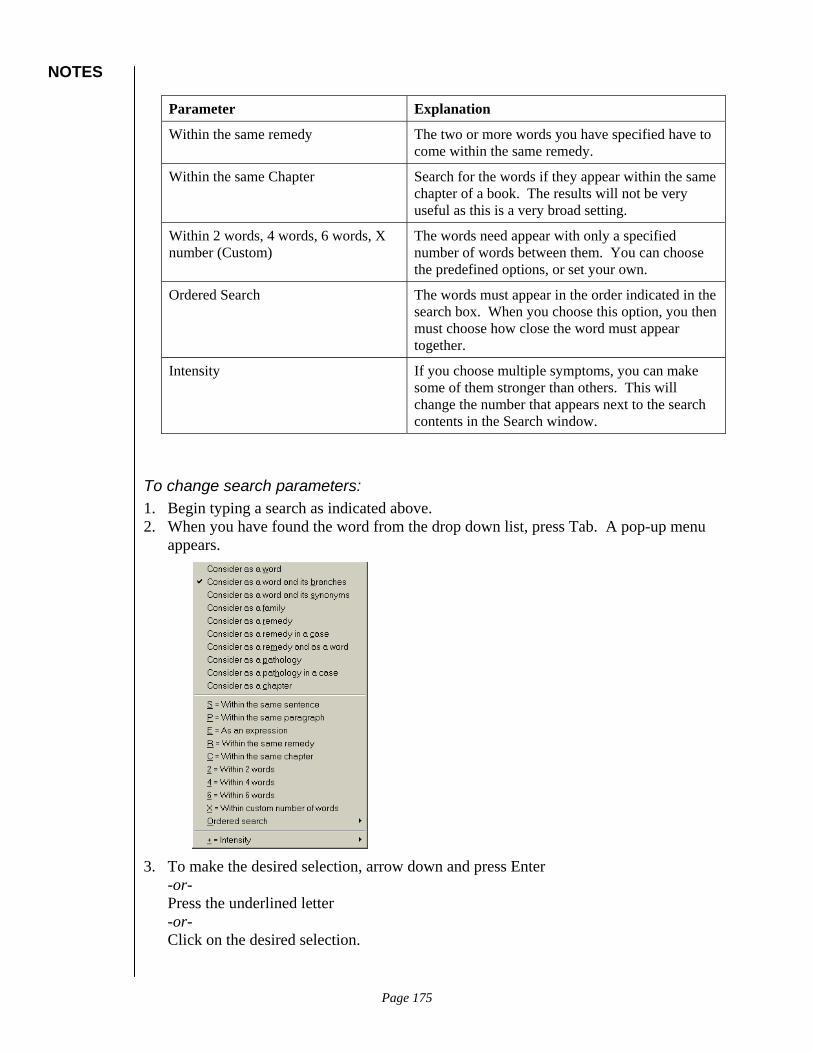
NOTES
Parameter Explanation
Within the same remedy The two or more words you have specified have to come within the same remedy.
Within the same Chapter Search for the words if they appear within the same chapter of a book. The results will not be very useful as this is a very broad setting.
Within 2 words, 4 words, 6 words, X number (Custom)
The words need appear with only a specified number of words between them. You can choose the predefined options, or set your own.
Ordered Search The words must appear in the order indicated in the search box. When you choose this option, you then must choose how close the word must appear together.
Intensity If you choose multiple symptoms, you can make some of them stronger than others. This will change the number that appears next to the search contents in the Search window.
To change search parameters: 1. Begin typing a search as indicated above. 2. When you have found the word from the drop down list, press Tab. A pop-up menu
appears.
3. To make the desired selection, arrow down and press Enter
-or- Press the underlined letter -or- Click on the desired selection.
Page 175

NOTES
4. Notice that the Search window changes to reflect the change in parameters.
Indicates an ordered
search within four words.
Click here or press Ctrl + F4 to conduct the search.
5. To conduct the search, click the Magnifying glass -or- Press Ctrl + F4.
Press F4 or click the Magnifying glass to bring the Search window to the top again. Press Tab. Choose Ordered Search, Within 4 words. Press Ctrl + F to conduct the search. Notice your results are fewer, but more refined.
Navigating the Search Results Once you have conducted a search, by default, the results appear in a Web view. This means that the Table of Contents (that is, documents which include the search results) appears on the left and the Text window (that is, actual contents) appears on the right. Above the Text window may be a Title window (Title and other information about the text you are currently viewing), depending on which options you have set.
Page 176
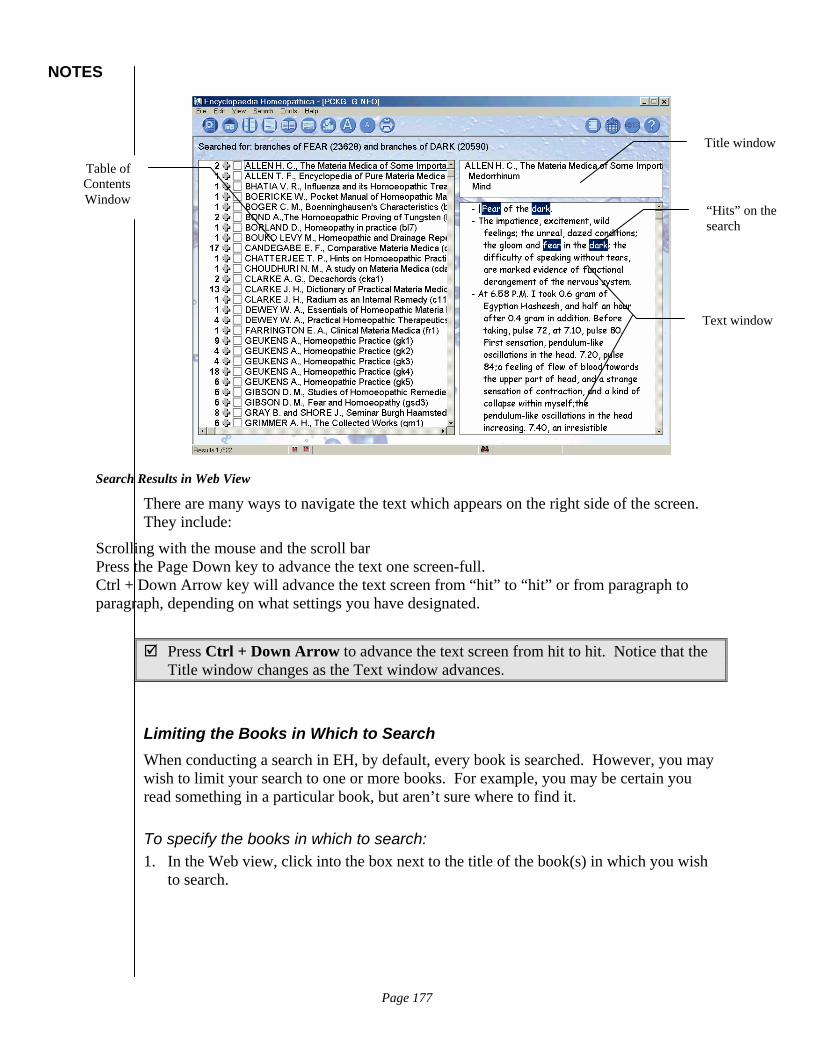
NOTES
Title window
Table of Contents Window
“Hits” on the search
Text window
Search Results in Web View
There are many ways to navigate the text which appears on the right side of the screen. They include:
Scrolling with the mouse and the scroll bar Press the Page Down key to advance the text one screen-full. Ctrl + Down Arrow key will advance the text screen from “hit” to “hit” or from paragraph to paragraph, depending on what settings you have designated.
Press Ctrl + Down Arrow to advance the text screen from hit to hit. Notice that the Title window changes as the Text window advances.
Limiting the Books in Which to Search When conducting a search in EH, by default, every book is searched. However, you may wish to limit your search to one or more books. For example, you may be certain you read something in a particular book, but aren’t sure where to find it.
To specify the books in which to search: 1. In the Web view, click into the box next to the title of the book(s) in which you wish
to search.
Page 177
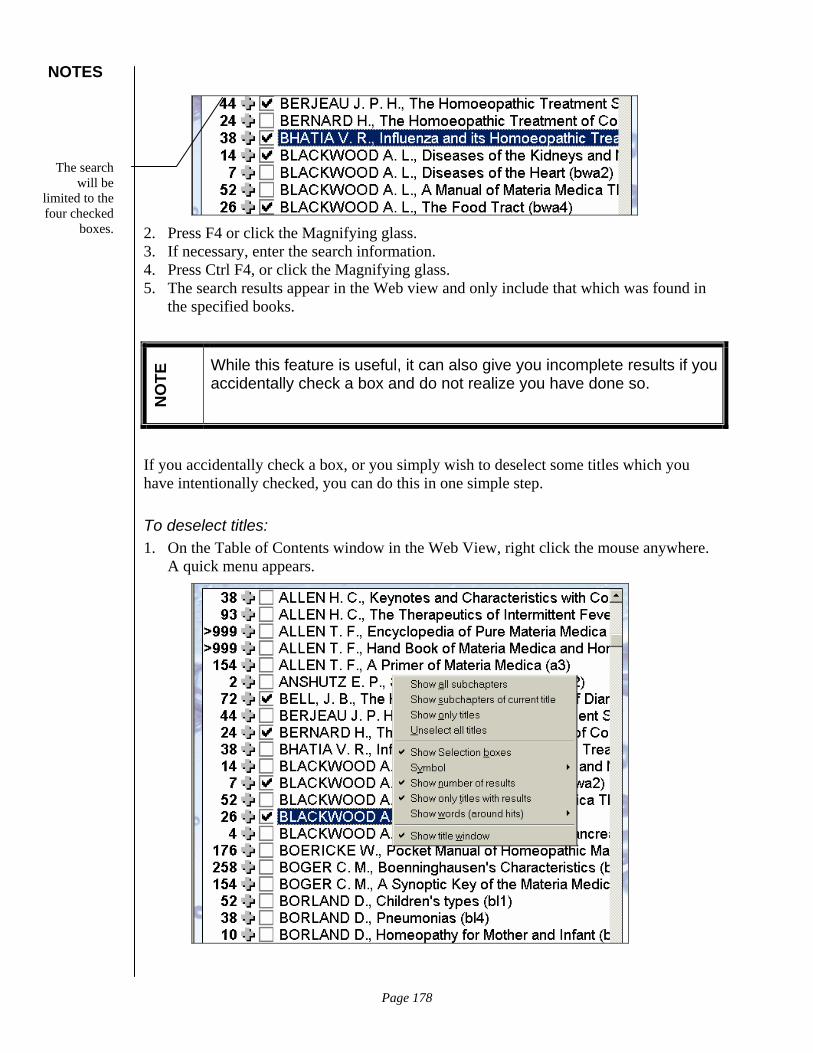
NOTES
2. Press F4 or click the Magnifying glass.
The search will be
limited to the four checked
boxes.
3. If necessary, enter the search information. 4. Press Ctrl F4, or click the Magnifying glass. 5. The search results appear in the Web view and only include that which was found in
the specified books.
NO
TE While this feature is useful, it can also give you incomplete results if you
accidentally check a box and do not realize you have done so.
If you accidentally check a box, or you simply wish to deselect some titles which you have intentionally checked, you can do this in one simple step.
To deselect titles: 1. On the Table of Contents window in the Web View, right click the mouse anywhere.
A quick menu appears.
Page 178

NOTES
2. Choose Unselect all titles.
Showing Titles With and Without Results When you conduct a search in EH, you may notice that only the books with results appear in the Table of Contents. Those books which do not yield results from the search are not included.
On the other hand, you may have noticed that all the books that are present in EH appear on in the Table of Contents, whether they contain results from the search or not.
You can switch back and forth between the two views, and there are reasons that you may wish to view your results one way or another.
If you are searching for a remedy, for example, you may wish to only show titles with results. This is because the Text window will display the entire book in you show all titles, not just the remedy for which you are searching. If you want to read about symptoms in Materia Medica and you want to read about them in their entire context, you will want to display all the books in the Table of Contents. When you only show books with results in the Table of Contents, you will only see the paragraphs with results in the Text view. You no longer have the entire book in the Text view. This does not allow you to read about a symptom in the context in which it was written.
Contextual results of the search.
Documents with results
have numbers next to them
Click here to display only those documents with results
Click here to display all documents
Page 179

NOTES
When viewing search results with all titles displayed in the Table of Contents, you can navigate between “hits” in the Text window by pressing Ctrl + Down arrow, as indicated earlier.
Click back and forth between the different views. Switch back to viewing all titles. Begin typing Bry to start a search for Bryonia. Arrow down to Bry Remedy. Press Enter. Press Ctrl + F to conduct the search. Click on a Bell’s Therapeutics in the Table of Contents. Notice that the Text
window displays the entire book. Switch to display only the titles with results. Begin typing Calc to search for Calcarea Carbonica in a Case. Arrow down to Calc Case Remedy. Press Enter. Press Ctrl + F to conduct the search. Right click on the Table of Contents. Choose Show All Sub Chapters. Type Agar. Arrow down to Agar (Remedy). Press Enter. Type Mind. Arrow down to Mind (Chapter). Press Enter. Press Ctrl + F to conduct the search. Right click the Table of Contents. Choose Show Only Titles. Switch to display all titles, not just those with results. Press Ctrl + Down Arrow to display each “hit” of the Mind Chapter with Agaricus
as the remedy. Type Fear Press Enter. Type Snakes Highlight Snakes (Family) Press Enter. Press Ctrl + F. Press Ctrl + Arrow down. Notice in the Title window that only snake remedies
appear.
Page 180
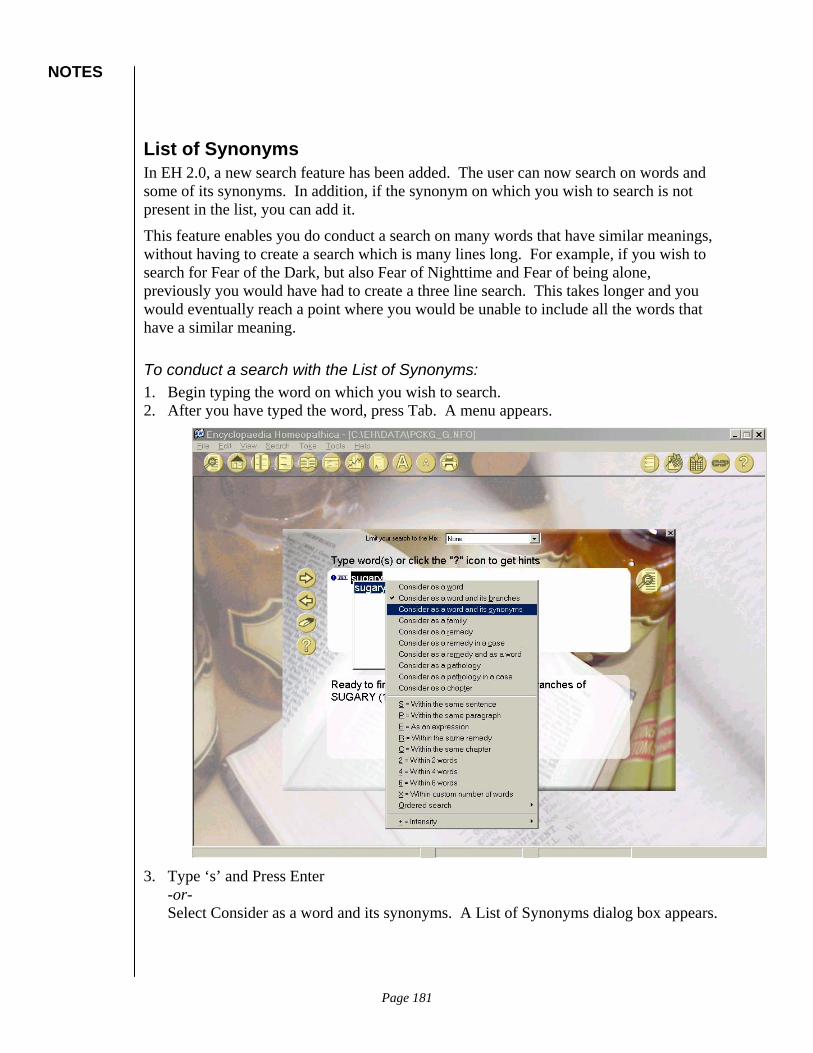
NOTES
List of Synonyms In EH 2.0, a new search feature has been added. The user can now search on words and some of its synonyms. In addition, if the synonym on which you wish to search is not present in the list, you can add it.
This feature enables you do conduct a search on many words that have similar meanings, without having to create a search which is many lines long. For example, if you wish to search for Fear of the Dark, but also Fear of Nighttime and Fear of being alone, previously you would have had to create a three line search. This takes longer and you would eventually reach a point where you would be unable to include all the words that have a similar meaning.
To conduct a search with the List of Synonyms: 1. Begin typing the word on which you wish to search. 2. After you have typed the word, press Tab. A menu appears.
3. Type ‘s’ and Press Enter
-or- Select Consider as a word and its synonyms. A List of Synonyms dialog box appears.
Page 181

NOTES
4. Hold the Ctrl key and select the synonyms you wish to include in the search. 5. Press Enter or click OK. 6. The Search window reappears with a modified number of hits displayed on the
bottom half of the window. 7. Press Ctrl+F or click the Search button to conduct the search.
If a word which you consider to be a synonym does not appear on the list, you can add it to the list and the search.
To add a synonym to the list: 1. Follow steps 1 – 4 as needed beginning on page 180. 2. Click into the Add a word to the List box.
Page 182
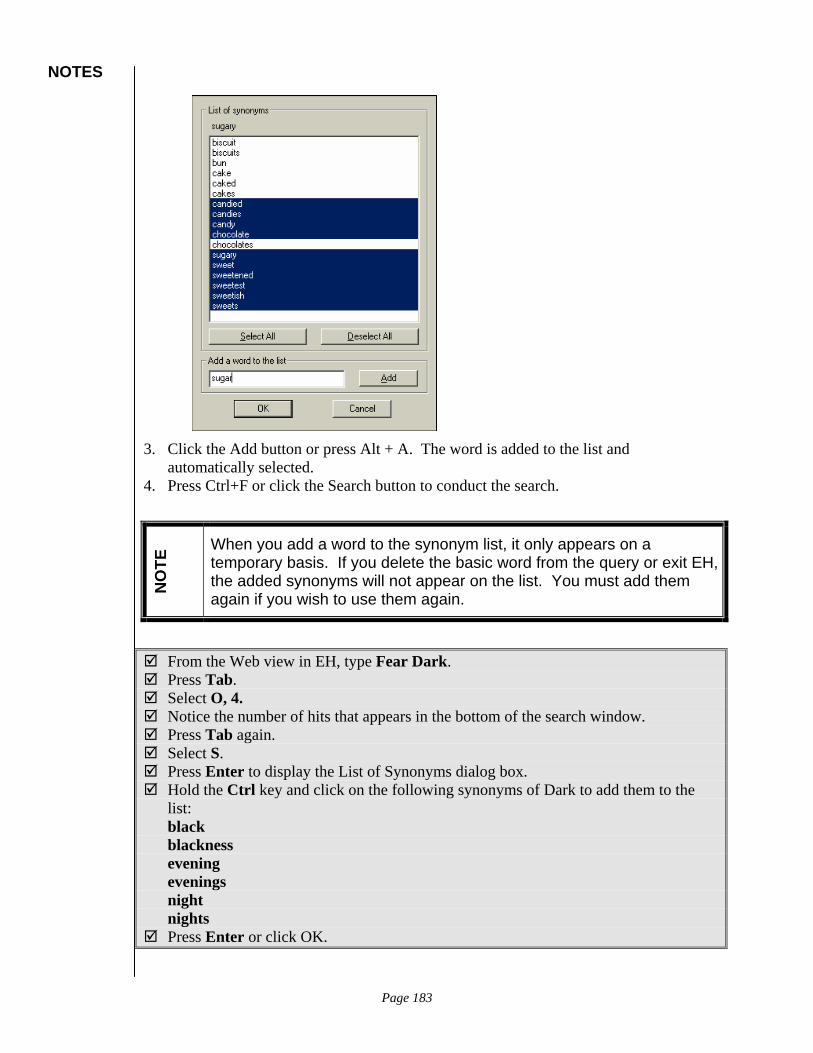
NOTES
3. Click the Add button or press Alt + A. The word is added to the list and
automatically selected. 4. Press Ctrl+F or click the Search button to conduct the search.
NO
TE When you add a word to the synonym list, it only appears on a
temporary basis. If you delete the basic word from the query or exit EH, the added synonyms will not appear on the list. You must add them again if you wish to use them again.
From the Web view in EH, type Fear Dark. Press Tab. Select O, 4. Notice the number of hits that appears in the bottom of the search window. Press Tab again. Select S. Press Enter to display the List of Synonyms dialog box. Hold the Ctrl key and click on the following synonyms of Dark to add them to the
list: black blackness evening evenings night nights
Press Enter or click OK.
Page 183
NOTES
Notice the increased number of hits that appears in the bottom of the search window. Press Ctrl + F or click the Find button to conduct the search. Scroll through the results of the search and notice the number of times the same idea
of Fear of the Dark is presented using the synonyms. Press F4 to display the current search window. Notice the current number of hits on
the synonym list of Dark. Add the word bedtime to the list. Click Add. Press Enter or click OK. Notice the number of hits on the synonym list of Dark has increased. Press Ctrl + F or click the Find button to conduct the search
Page 184
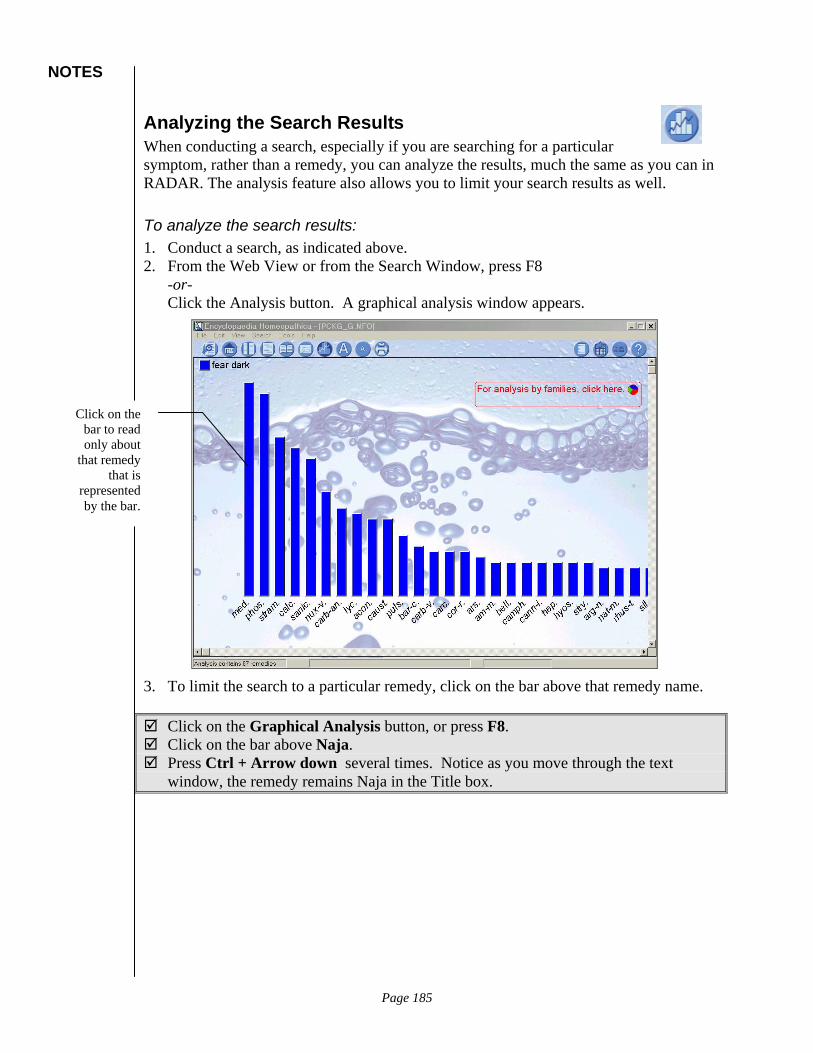
NOTES
Analyzing the Search Results When conducting a search, especially if you are searching for a particular symptom, rather than a remedy, you can analyze the results, much the same as you can in RADAR. The analysis feature also allows you to limit your search results as well.
To analyze the search results: 1. Conduct a search, as indicated above. 2. From the Web View or from the Search Window, press F8
-or- Click the Analysis button. A graphical analysis window appears.
Click on the bar to read only about
that remedy that is
represented by the bar.
3. To limit the search to a particular remedy, click on the bar above that remedy name.
Click on the Graphical Analysis button, or press F8. Click on the bar above Naja. Press Ctrl + Arrow down several times. Notice as you move through the text
window, the remedy remains Naja in the Title box.
Page 185

NOTES
Homeopathic Families EH 2.0 presents a new version of the families feature. The families are now presented in a tree format and is accessed through the analysis screen. This new feature enables much more sophisticated searches of the EH data base with the click of a mouse. Identifying which remedies are complementary, inimical, follow each other well, related, etc., has never been easier.
To display the Families Selection Window: 1. In the Web View screen of EH, begin typing the letters of the search you wish to
conduct. 2. Press F8 or click the Analysis button to display the analysis of the search.
Click on the remedy
abbreviation to display the
Families Selection Window.
3. Click on the remedy abbreviation (not the corresponding bar). The Families Selection Window appears.
Page 186
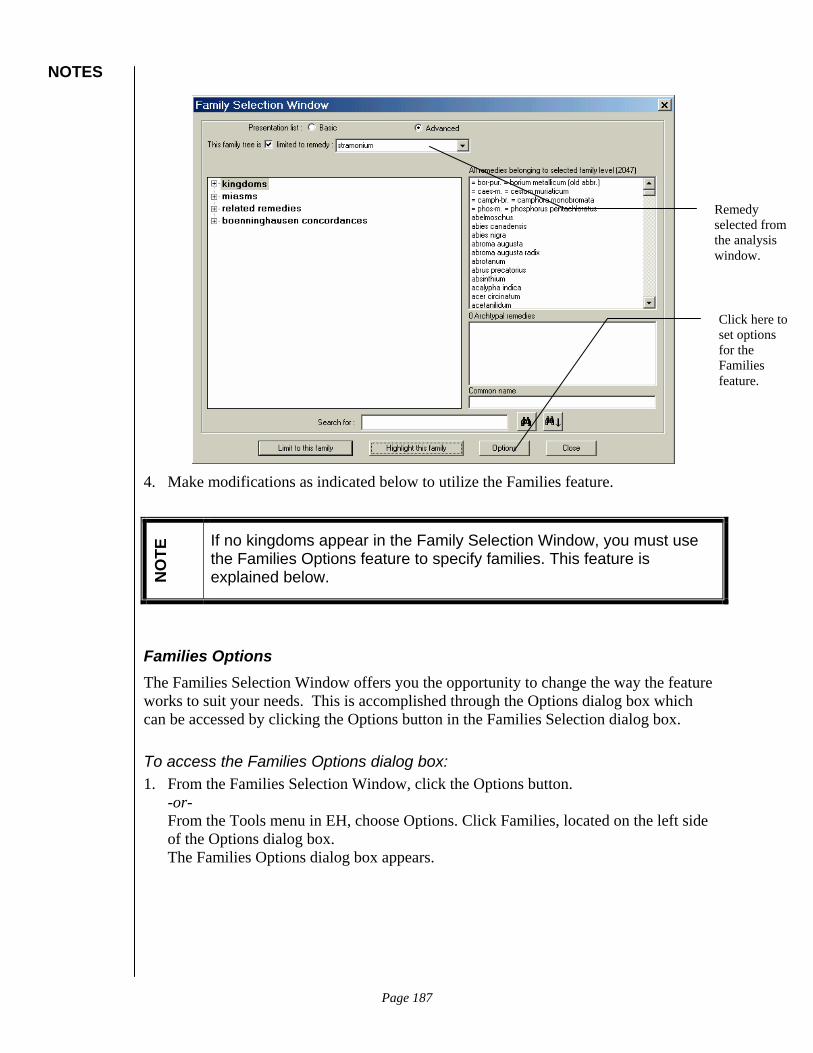
NOTES
Remedy selected from the analysis window.
Click here to set options for the Families feature.
4. Make modifications as indicated below to utilize the Families feature.
NO
TE If no kingdoms appear in the Family Selection Window, you must use
the Families Options feature to specify families. This feature is explained below.
Families Options The Families Selection Window offers you the opportunity to change the way the feature works to suit your needs. This is accomplished through the Options dialog box which can be accessed by clicking the Options button in the Families Selection dialog box.
To access the Families Options dialog box: 1. From the Families Selection Window, click the Options button.
-or- From the Tools menu in EH, choose Options. Click Families, located on the left side of the Options dialog box. The Families Options dialog box appears.
Page 187
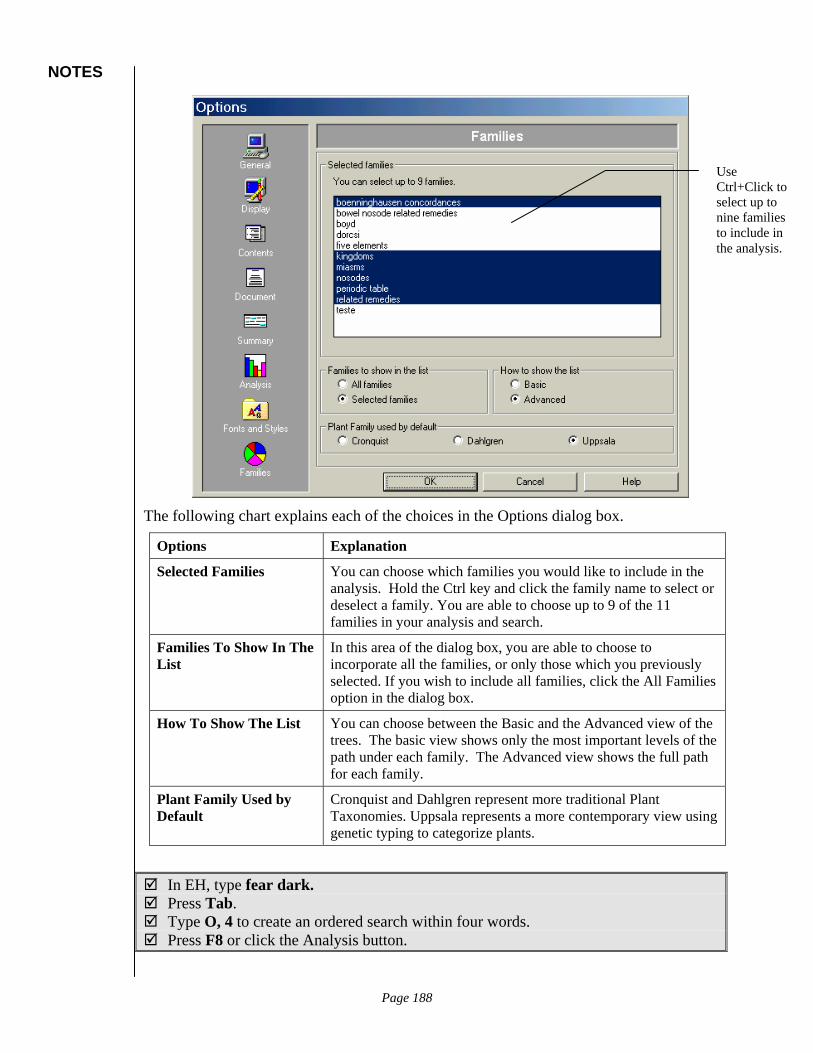
NOTES
The following chart explains each of the choices in the Options dialog box.
Options Explanation
Selected Families You can choose which families you would like to include in the analysis. Hold the Ctrl key and click the family name to select or deselect a family. You are able to choose up to 9 of the 11 families in your analysis and search.
Families To Show In The List
In this area of the dialog box, you are able to choose to incorporate all the families, or only those which you previously selected. If you wish to include all families, click the All Families option in the dialog box.
How To Show The List You can choose between the Basic and the Advanced view of the trees. The basic view shows only the most important levels of the path under each family. The Advanced view shows the full path for each family.
Plant Family Used by Default
Cronquist and Dahlgren represent more traditional Plant Taxonomies. Uppsala represents a more contemporary view using genetic typing to categorize plants.
In EH, type fear dark. Press Tab. Type O, 4 to create an ordered search within four words. Press F8 or click the Analysis button.
Use Ctrl+Click to select up to nine families to include in the analysis.
Page 188
NOTES
Click the abbreviation for Stramonium (Stram). In the Family Selection Window, click the Options button. Hold the Ctrl key and click the following families:
boenninghausen concordances kingdoms miasms nosodes periodic table related remedies
Indicate the following settings in the Options box, if necessary: Selected Families Advanced Uppsala
Click OK or press Enter. The Family Selection Window appears displaying only those families which are
relevant to the remedy you selected in the Analysis window.
Using and Modifying the Functions of the Family Tree The Family Tree is rich in features and functions. It is very versatile and allows you to get exactly the information you need.
Limiting the View of the Family Tree By default, the Family Tree displays only the families that are relevant to the remedy you chose in the analysis window. However, if you are trying to limit your remedy choice between a number of remedies, you may wish to look at the same information on several remedies.
Rather than having to go back to the analysis window and create a new Family Tree view for each remedy in the analysis, you can remove the limits applied to the Family Tree.
To view the families for all remedies in the analysis: 1. In the Family Tree Selection window, click into the check box which limits the
family tree display.
Page 189

NOTES
Click here to remove the
limits on the Family Tree.
2. The Family Tree will now display all the families that were chosen in the Options dialog box if they apply to the remedies in the analysis. The list box where the selected remedy once appeared now says Not in Analysis.
3. Click the remedy list box. 4. Choose a different remedy to view its family tree. 5. The Family Tree will now display only those families that are relevant to the new
remedy. The check reappears in the limit box.
Expanding and Collapsing the Family Tree The family tree can be expanded and collapsed, just as in older versions of EH.
To expand and collapse the Family Tree: 6. In the Family Selection Window, click the plus sign next to the family name. The
tree structure expands to show the branches of the family tree.
Page 190
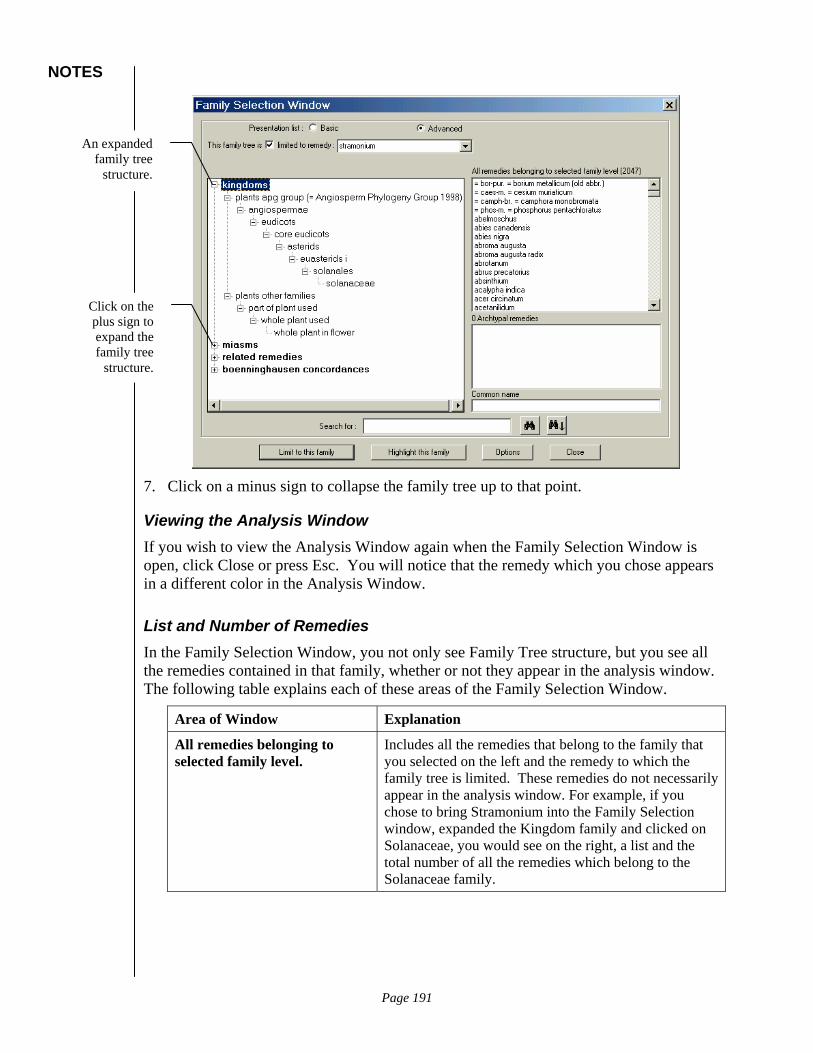
NOTES
7. Click on a minus sign to collapse the family tree up to that point.
Viewing the Analysis Window If you wish to view the Analysis Window again when the Family Selection Window is open, click Close or press Esc. You will notice that the remedy which you chose appears in a different color in the Analysis Window.
List and Number of Remedies In the Family Selection Window, you not only see Family Tree structure, but you see all the remedies contained in that family, whether or not they appear in the analysis window. The following table explains each of these areas of the Family Selection Window.
Area of Window Explanation
All remedies belonging to selected family level.
Includes all the remedies that belong to the family that you selected on the left and the remedy to which the family tree is limited. These remedies do not necessarily appear in the analysis window. For example, if you chose to bring Stramonium into the Family Selection window, expanded the Kingdom family and clicked on Solanaceae, you would see on the right, a list and the total number of all the remedies which belong to the Solanaceae family.
An expanded family tree
structure.
Click on the plus sign to expand the family tree
structure.
Page 191

NOTES
Area of Window Explanation
Archtypal remedies This section of the Family Selection window displays all the remedies in that family that are well known and about which there is a lot of information. The Upper Case remedies are found in more rubrics than the other remedies. This is a useful feature not only for selecting remedies for your patients, but for studying remedies. Finding a common thread between the Archtypal remedies will enable you to learn more about the family in general.
Common Name This displays the name by which most people recognize this family, if relevant.
Selected Family Tree
Branch Remedies in the selected family.
Well-known, typical remedies for that family.
How most people refer to this family.
While scrolling through the list of remedies which belong in the selected family branch, you may find a remedy which interests you, but which did not show up in the Analysis window. For example, you might wish to display the family structure of a different remedy to list remedies related to that remedy.
Double-clicking the remedy from a list on the right replaces the remedy for family limitation and displays the family structure for that remedy. It will also indicate that it is not in the analysis window.
Page 192

NOTES
Remedy from All remedies belonging to… list.
To display families from remedies not in the analysis: 1. In the All Remedies Belonging to Selected Family Level list, double click the remedy
name for which you wish to display its families. 2. After a slight delay, the family tree will be limited to that remedy, and the kingdoms
will appear in the kingdom box in a collapsed format.
In the Family Selection Window, practice expanding and collapsing the family trees currently displayed.
Expand the Kingdoms family. Click on Solanaceae. Notice the list of remedies in the Solanaceae family. Scroll down and find Dulcamara. Double click Dulcamara. Expand the Related Remedies family for Dulcamara. Remove the check from the Family Tree is Limited to remedy box. Notice all the selected families appear in the Family box. Scroll through the list of remedies to which to limit the family tree and choose
Lachesis Mutus.
Limiting the Analysis Window To Selected Families Through your thorough analysis of your patient’s case, you may conclude that the remedy appears to belong to a particular family of remedies. Rather than having to view the analysis window with all the remedies which you have excluded, you can limit the view of the analysis window through the Family Selection window.
To limit the Analysis window to selected families: 1. In the Family Selection Window, highlight the family to which you wish to limit the
analysis window. 2. At the bottom of the Family Selection Window, click Limit to the family.
Page 193
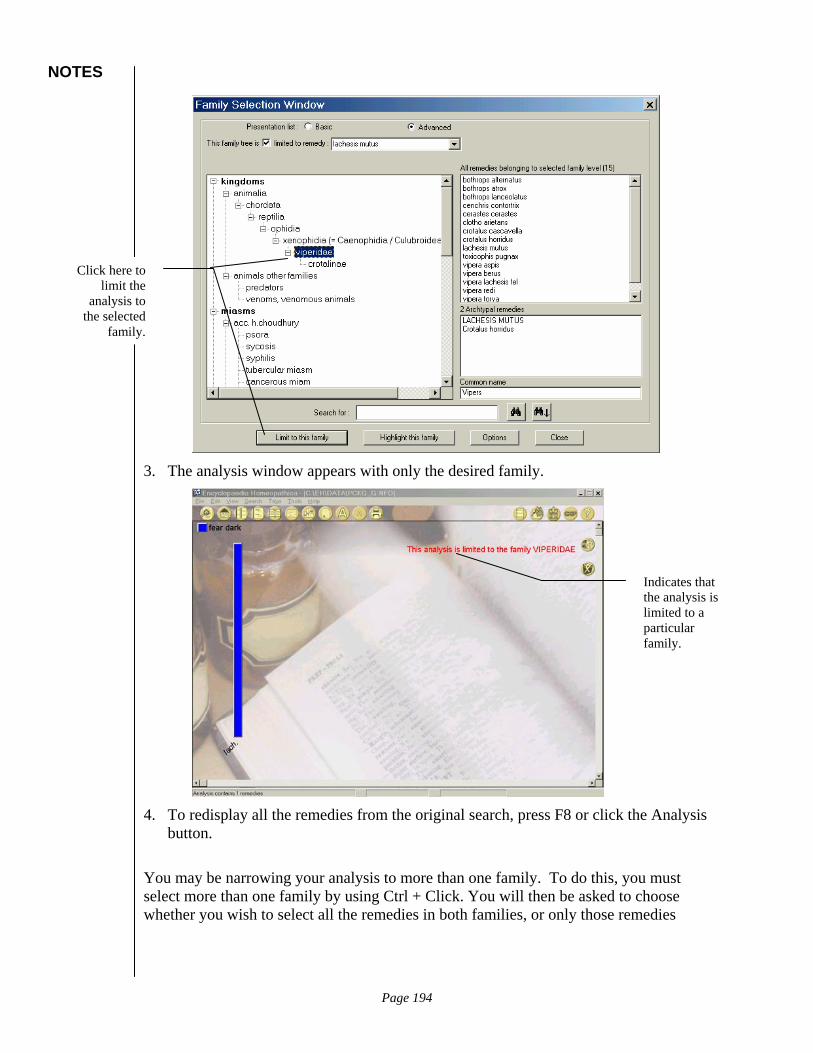
NOTES
Click here to limit the
analysis to the selected
family.
3. The analysis window appears with only the desired family.
Indicates that the analysis is limited to a particular family.
4. To redisplay all the remedies from the original search, press F8 or click the Analysis button.
You may be narrowing your analysis to more than one family. To do this, you must select more than one family by using Ctrl + Click. You will then be asked to choose whether you wish to select all the remedies in both families, or only those remedies
Page 194

NOTES
which are common to both families. The following table lists guidelines for deciding which button to choose.
Button Explanation
Only the common This is considered an ‘And’ operator. This means that the remedies to be included in the analysis must fall into all of the selected families. You would not typically use this button if the selected families are part of the same base family. For example, if the selected families were both under Kingdom, it would be impossible to find a remedy that appears under more than one Kingdom. A plant could not be part of both the solanaceae and apocynaceae families. But this button might be used to distinguish between parts of plants used or solanaceae remedies which also belong to a particular miasm.
All the remedies This is considered an ‘Or’ operator. This means that the remedies to be included in the analysis need only fall into one of the selected families. You would use this button if the selected families are part of the same base family. For example, if you wish to limit your analysis within the Kingdom family to Vipera and other Venomous animals.
To limit your analysis to more than one family: 1. In the Family Selection Window, expand the families you wish to include. 2. Click the first family to include. 3. Hold the Ctrl key and click the remaining families you wish to include. 4. At the bottom of the Family Selection Window, click Limit to this Family. The
following Families dialog box appears.
5. Click on the appropriate button. 6. The Analysis window appears with only the remedies that belong to the selected
families.
Page 195
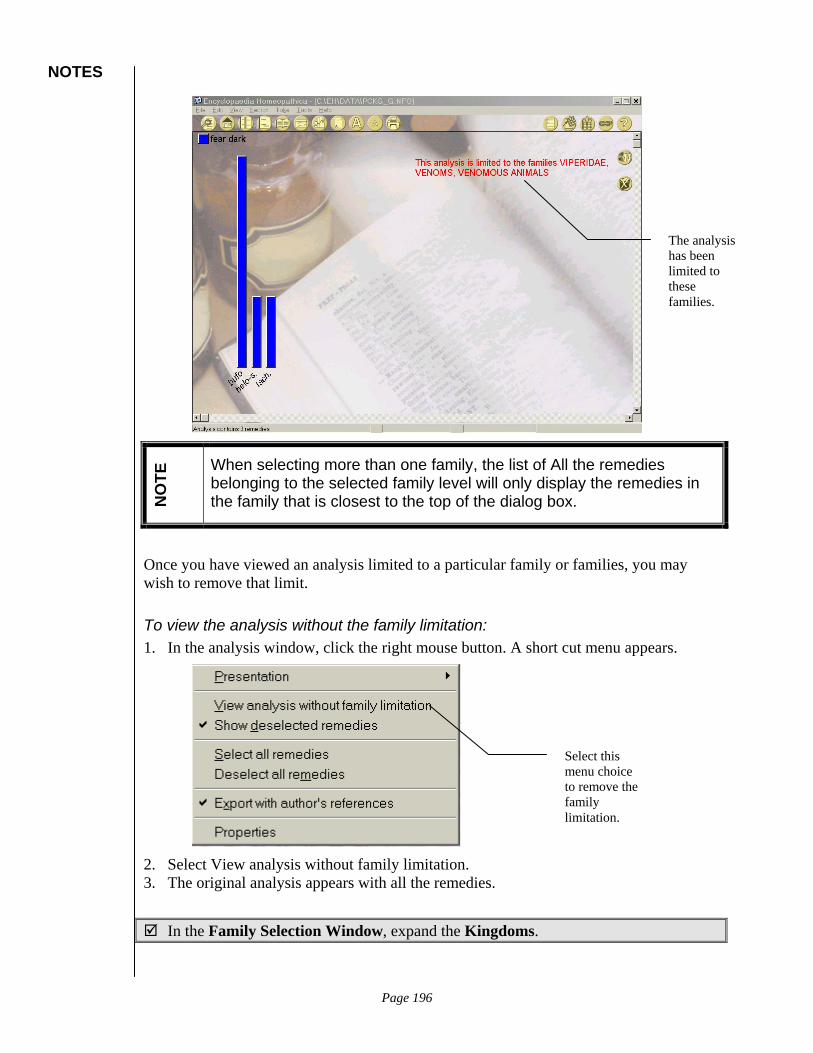
NOTES
NO
TE When selecting more than one family, the list of All the remedies
belonging to the selected family level will only display the remedies in the family that is closest to the top of the dialog box.
Once you have viewed an analysis limited to a particular family or families, you may wish to remove that limit.
To view the analysis without the family limitation: 1. In the analysis window, click the right mouse button. A short cut menu appears.
2. Select View analysis without family limitation. 3. The original analysis appears with all the remedies.
In the Family Selection Window, expand the Kingdoms.
The analysis has been limited to these families.
Select this menu choice to remove the family limitation.
Page 196
NOTES
Select Viperidae. Hold the Ctrl key and select Venoms, Venomous Animals. Click Limit to this Family. When prompted, choose the All the Remedies button. Notice that the analysis now includes only those remedies that belong to either of
those two families. Press the right mouse button. Select View analysis without family limitation. In the Analysis window, click Phos. Expand the Kingdom family. Select Non-metals and Compounds. Expand the Miasms family. Select Collected Sources, Psoric Miasms. Click Limit to this Family. When prompted, choose the Only the Common button.
Highlighting Remedy Families in the Analysis Window When viewing the Analysis, you may want to know which remedies fall into certain families, but you still want to see how they compare to other remedies which are not in those families. You can do this by highlighting those remedies in the analysis, rather than eliminating the ones that are not in the family.
To highlight the remedy families in the analysis window: 1. In the Family Selection Window, select the families to which you wish to limit your
analysis. 2. Click Highlight this Family. 3. If you have more than one family highlighted, you will be prompted to choose Only
the Common Remedies or All of the Remedies. 4. Choose the appropriate button. 5. The analysis appears with the selected families the same color or color scheme as the
text in the upper right hand corner.
Page 197
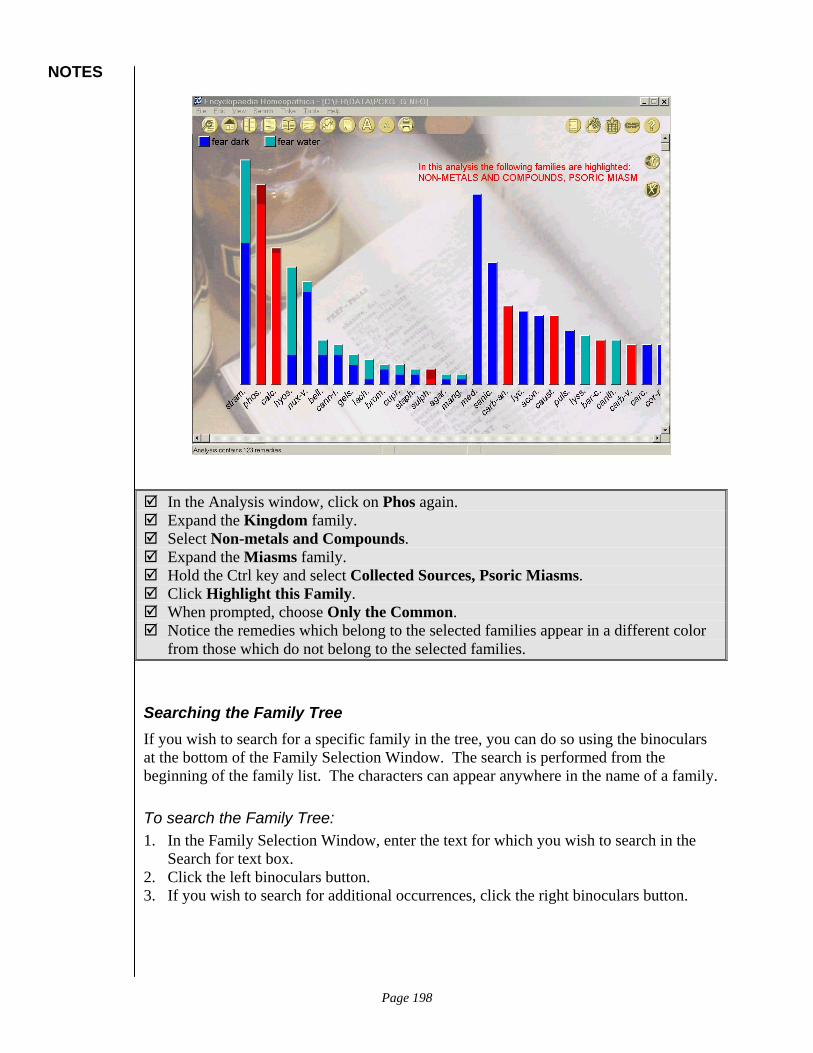
NOTES
In the Analysis window, click on Phos again. Expand the Kingdom family. Select Non-metals and Compounds. Expand the Miasms family. Hold the Ctrl key and select Collected Sources, Psoric Miasms. Click Highlight this Family. When prompted, choose Only the Common. Notice the remedies which belong to the selected families appear in a different color
from those which do not belong to the selected families.
Searching the Family Tree If you wish to search for a specific family in the tree, you can do so using the binoculars at the bottom of the Family Selection Window. The search is performed from the beginning of the family list. The characters can appear anywhere in the name of a family.
To search the Family Tree: 1. In the Family Selection Window, enter the text for which you wish to search in the
Search for text box. 2. Click the left binoculars button. 3. If you wish to search for additional occurrences, click the right binoculars button.
Page 198
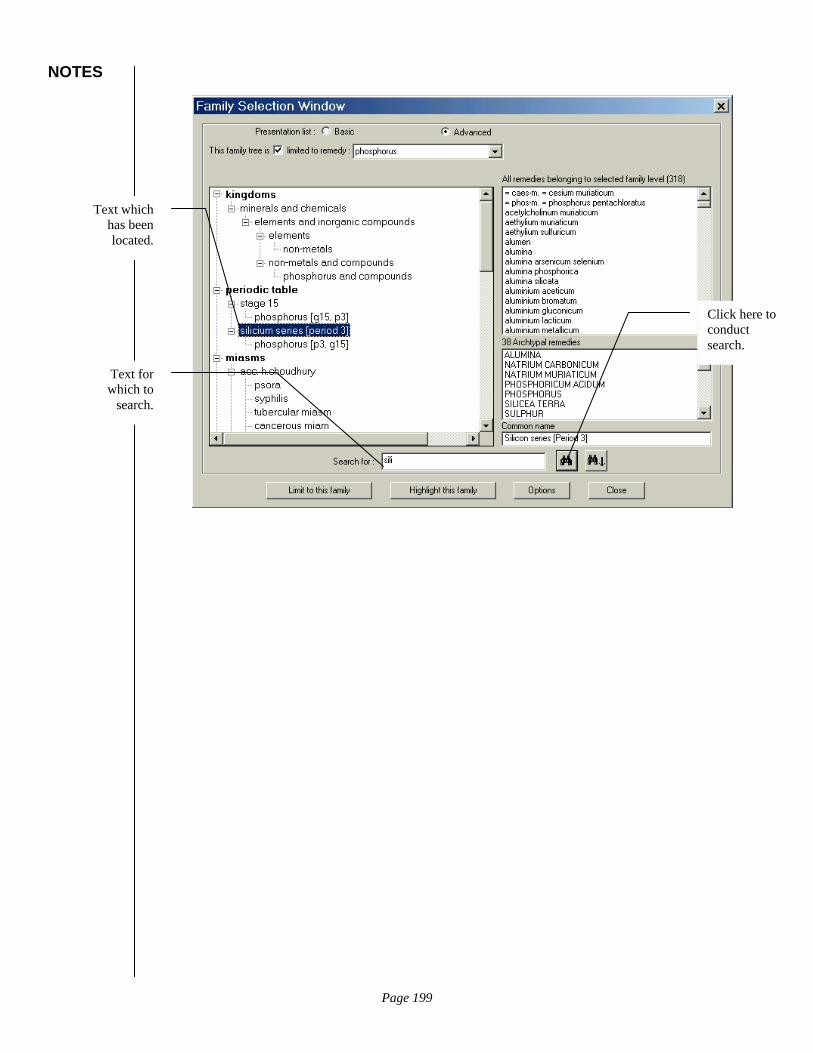
NOTES
Text which has been located.
Click here to conduct search.
Text for which to
search.
Page 199

NOTES
Adding Additional Symptoms to the Search Tape 5—0:21:04
If you add a symptom to the same line as the first symptom, it means AND. That is, both words must be found in the search for that text to show up as a result.
When you press Enter at the end of a symptom that you have entered into the Search window, it means OR. This means that either the first symptom or the second symptom must be found in the search for that text to show up as a result.
Search window with multiple symptoms
To add symptoms to a search: 1. Create a search as indicated above. 2. At the end of the line, press Enter. 3. Begin typing the next symptom.
Type Fear. Press Space. Type Dark Press Tab. Type O. Type 4. Press Enter. Type Fear. Press Space. Type Alone.
Page 200
NOTES
Press Tab. Type O. Type 4. Press Enter. Type Fear. Press Space Type Dogs. Press Tab. Type O Type 4. Press Enter. Type Fear. Press Space. Type Water. Press Tab. Type O. Type 4.
Editing a Search Most of us are in the habit of using the back space key for editing most anything. With EH, it works best to use the Right and Left arrow keys to move between the words of the search.
Editing a search: 1. In the Search window, press the left or right arrow key to move between the words of
the search. 2. When you arrive at the search you wish to edit, arrow down to the correct selection
-or- Press Delete if you wish to completely change the word or remove a symptom.
3. Press the End key to move the cursor to the end of the line and begin typing the new word.
Saving Searches Tape 5—0:33:35
You may wish to save a search for future reference. EH makes it simple. The saving process can occur in either the search window or the results window. However, the menu choices appear to be dim when the Search window is open. Click on the menu and it will be dark and activated.
To save a search: 1. From the menu bar choose Search, Save the Query (Alt + S, V). The Save the Query
dialog box appears.
Page 201

NOTES
2. Enter a name in the File name box. 3. Press Enter.
To use a saved search: 4. From the menu bar, choose Search, Recall a query. The Recall a query dialog box
appears. 5. Select the query you wish to recall. 6. Press Enter.
Analyzing More Than One Symptom Tape 5—0:21:04
On page 183, you learned a bit about analyzing the results of a search. This feature is especially powerful if you are searching for more than one symptom at a time. The analysis feature will indicate how strongly each symptom shows up in each remedy that the search locates.
If, after reviewing the graphical analysis, you wish to learn more about one of the remedies, you can click on the bar of that remedy, and EH will display the search results only of the chosen remedy. Click on F8 to return to the Graphical Analysis.
Page 202

NOTES
Click on the bar to read only about the remedy
that is represented by the bar.
Click on the remedy name to learn more
about the categories into which
the selected remedy falls.
Graphical Analysis of four symptoms in EH
EH also allows you to indicate which other remedies in the analysis fall into the same categories as a selected remedy. For example, you may be interested in a remedy, but want to know which remedies fall into the same plant family as the one you are considering. Or, you may wish to consider other remedies which are poisons. In this situation, EH considers any grouping of remedies a family grouping, even if it isn’t a plant family grouping or an animal family grouping. For example, seed plants or flowering plants is also considered a “family” in this grouping feature.
To view family groupings: 1. In the Graphical Analysis window, click on the remedy name that appears below the
bar. A family groupings dialog box appears:
2. Click on the desired grouping. If you wish to select more than one family, hold down
the control key and click the additional family groupings. 3. If you wish to view only the bars of the selected family, click the Limit to selected
families button. (You may wish to do this if there are many remedies in the various
Page 203
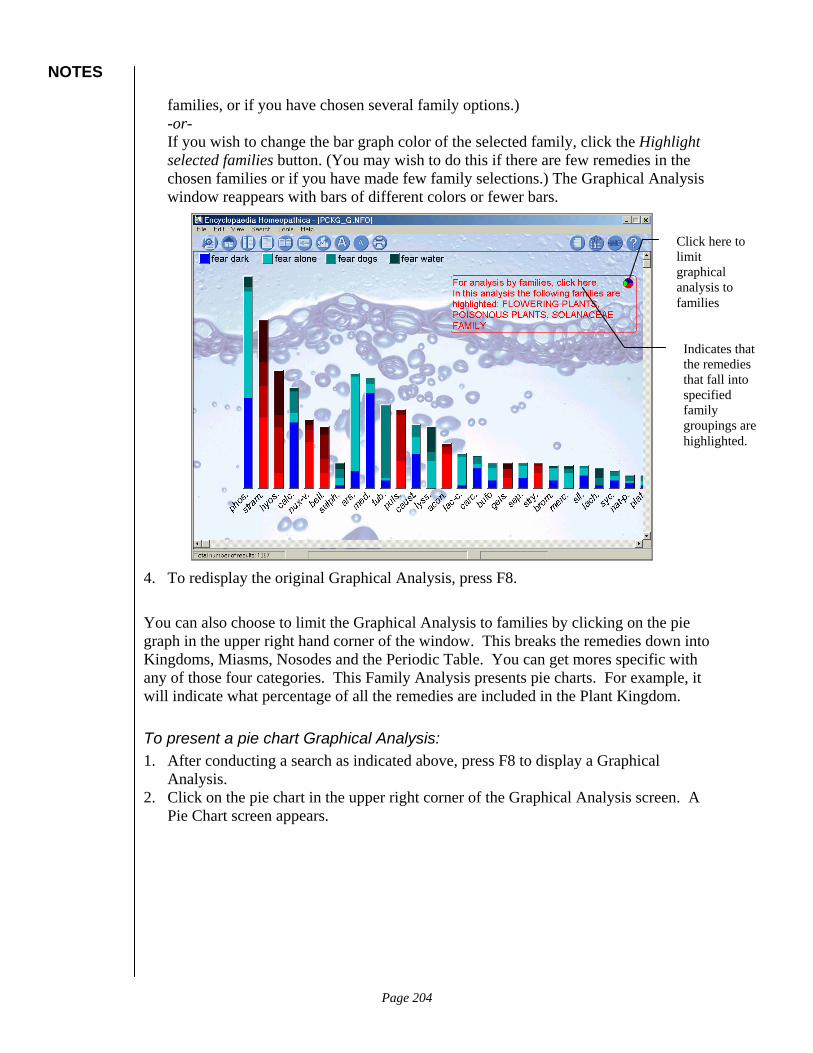
NOTES
families, or if you have chosen several family options.) -or- If you wish to change the bar graph color of the selected family, click the Highlight selected families button. (You may wish to do this if there are few remedies in the chosen families or if you have made few family selections.) The Graphical Analysis window reappears with bars of different colors or fewer bars.
Click here to limit graphical analysis to families
Indicates that the remedies that fall into specified family groupings are highlighted.
4. To redisplay the original Graphical Analysis, press F8.
You can also choose to limit the Graphical Analysis to families by clicking on the pie graph in the upper right hand corner of the window. This breaks the remedies down into Kingdoms, Miasms, Nosodes and the Periodic Table. You can get mores specific with any of those four categories. This Family Analysis presents pie charts. For example, it will indicate what percentage of all the remedies are included in the Plant Kingdom.
To present a pie chart Graphical Analysis: 1. After conducting a search as indicated above, press F8 to display a Graphical
Analysis. 2. Click on the pie chart in the upper right corner of the Graphical Analysis screen. A
Pie Chart screen appears.
Page 204
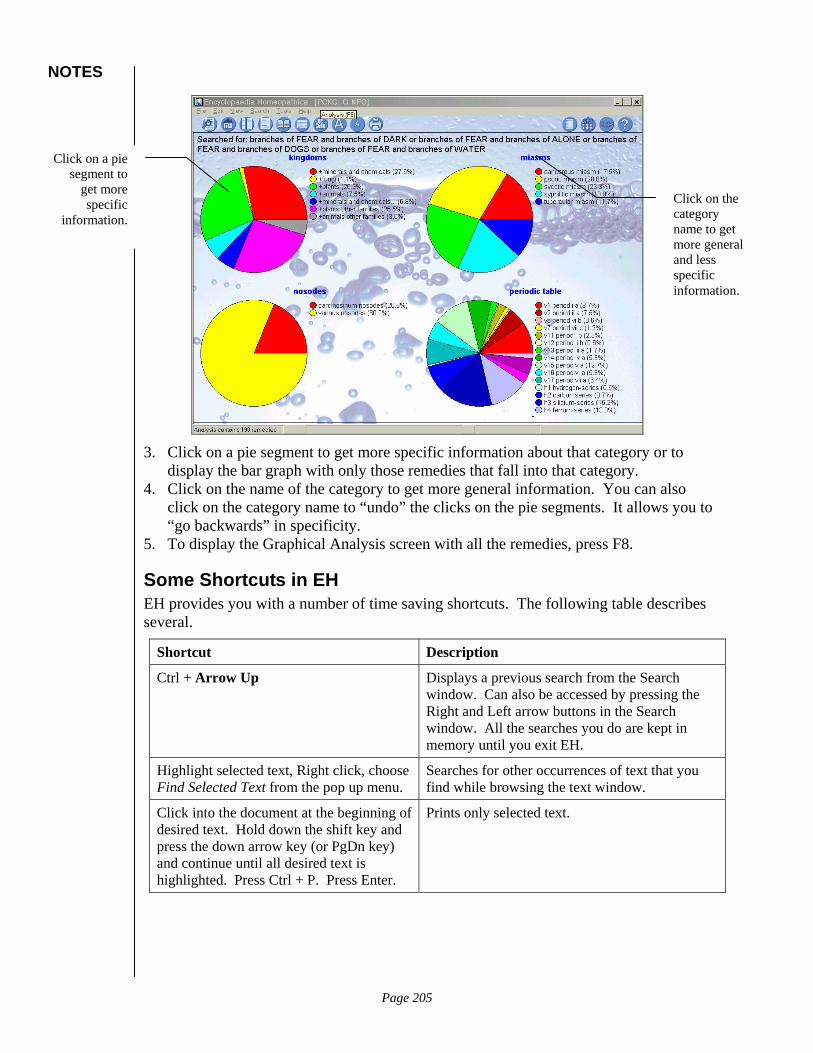
NOTES
3. Click on a pie segment to get more specific information about that category or to
display the bar graph with only those remedies that fall into that category. 4. Click on the name of the category to get more general information. You can also
click on the category name to “undo” the clicks on the pie segments. It allows you to “go backwards” in specificity.
5. To display the Graphical Analysis screen with all the remedies, press F8.
Some Shortcuts in EH EH provides you with a number of time saving shortcuts. The following table describes several.
Shortcut Description
Ctrl + Arrow Up Displays a previous search from the Search window. Can also be accessed by pressing the Right and Left arrow buttons in the Search window. All the searches you do are kept in memory until you exit EH.
Highlight selected text, Right click, choose Find Selected Text from the pop up menu.
Searches for other occurrences of text that you find while browsing the text window.
Click into the document at the beginning of desired text. Hold down the shift key and press the down arrow key (or PgDn key) and continue until all desired text is highlighted. Press Ctrl + P. Press Enter.
Prints only selected text.
Click on a pie segment to
get more specific
information. Click on the category name to get more general and less specific information.
Page 205
NOTES
Shortcut Description
Click Help, Contents.
Click the topic Right Mouse Button.
Click the Double arrow at the top of the help screen. Continue clicking to read every Help screen in EH.
Teaches you the entire EH program from the Help screens.
Exporting an EH Search to RADAR Tape 5—0:38:25
In RADAR version 8.1.40 and later and EH version 1.4 and later, you can now quickly and easily share information between the two programs. This will improve your efficiency in using the two products together, and can improve your effectiveness as a homeopath, by ensuring that all the information that is available about Materia Medica and Repertory are integrated.
EH allows you to export your searches into RADAR to be used in the analysis along with the rubrics you have chosen to put in the clipboard. The export appears in the clipboard once the export is complete.
You can choose to export from EH to RADAR in three ways: using the EH Clipboard (F12), using the Analysis window (F8) or simply exporting directly from the results window after executing a search.
Exporting from the EH Clipboard EH has a feature which allows you to export your search results as a rubric to RADAR. This is an especially useful feature when you have searched for words that don’t appear in the synthesis.
To export a search from EH to RADAR: 1. Create or recall a search in EH. 2. Execute the search. 3. From the Take menu, choose Take the Search Results (F12). This displays all the
symptoms in a clipboard in EH. This allows you to read through the symptoms and see if they are really appropriate to the search you conducted.
Page 206

NOTES
Remove the check to
exclude the reference in
the export to RADAR.
Deselect or select all
symptoms using these
buttons.
4. Once you have removed the questionable references from the search, from the Take menu, choose Export to RADAR (F11), -or- Click the Export icon.
5. RADAR opens up a symptom clipboard which contains the new EH rubric. 6. To change the name of the rubric, double click the rubric. A dialog box appears
prompting you to enter a new name.
Page 207
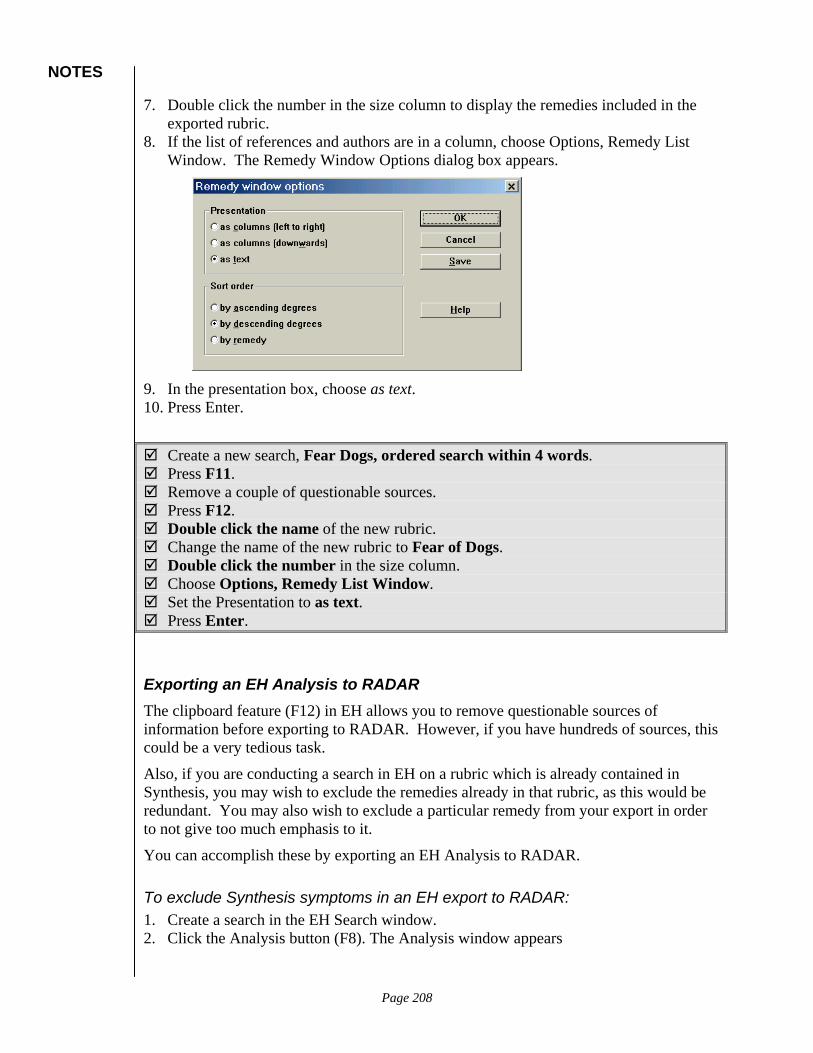
NOTES
7. Double click the number in the size column to display the remedies included in the exported rubric.
8. If the list of references and authors are in a column, choose Options, Remedy List Window. The Remedy Window Options dialog box appears.
9. In the presentation box, choose as text. 10. Press Enter.
Create a new search, Fear Dogs, ordered search within 4 words. Press F11. Remove a couple of questionable sources. Press F12. Double click the name of the new rubric. Change the name of the new rubric to Fear of Dogs. Double click the number in the size column. Choose Options, Remedy List Window. Set the Presentation to as text. Press Enter.
Exporting an EH Analysis to RADAR The clipboard feature (F12) in EH allows you to remove questionable sources of information before exporting to RADAR. However, if you have hundreds of sources, this could be a very tedious task.
Also, if you are conducting a search in EH on a rubric which is already contained in Synthesis, you may wish to exclude the remedies already in that rubric, as this would be redundant. You may also wish to exclude a particular remedy from your export in order to not give too much emphasis to it.
You can accomplish these by exporting an EH Analysis to RADAR.
To exclude Synthesis symptoms in an EH export to RADAR: 1. Create a search in the EH Search window. 2. Click the Analysis button (F8). The Analysis window appears
Page 208
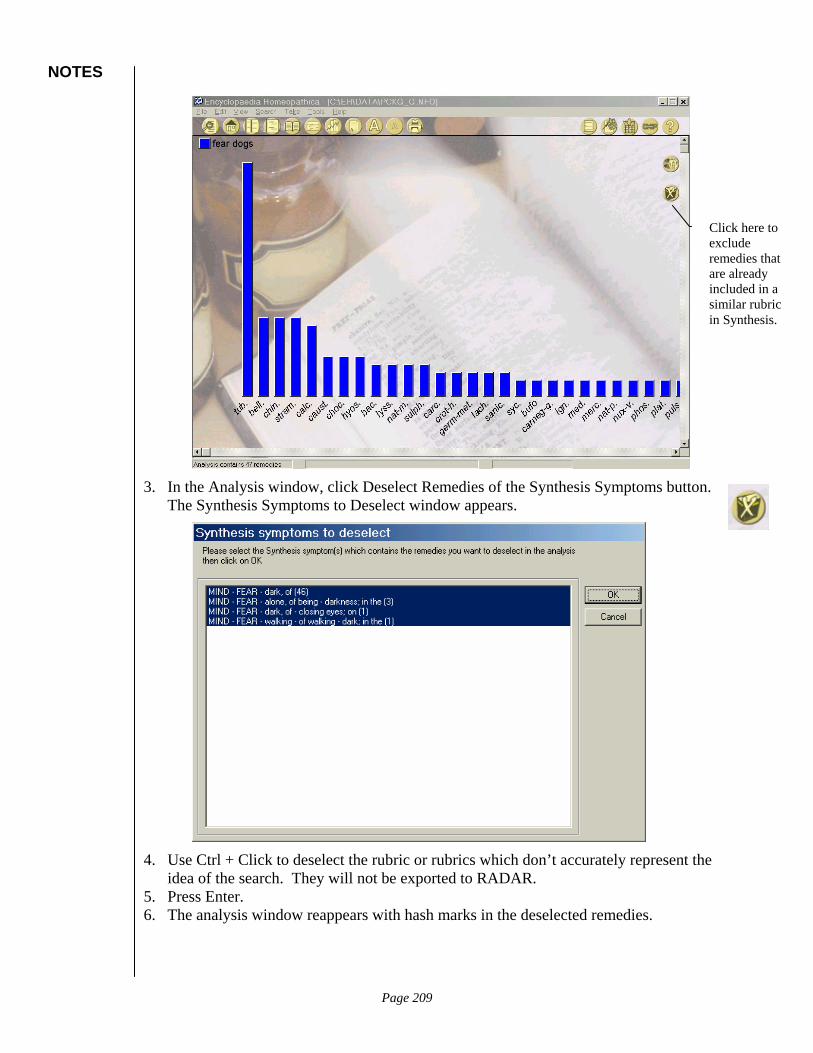
NOTES
Click here to exclude remedies that are already included in a similar rubric in Synthesis.
3. In the Analysis window, click Deselect Remedies of the Synthesis Symptoms button. The Synthesis Symptoms to Deselect window appears.
4. Use Ctrl + Click to deselect the rubric or rubrics which don’t accurately represent the
idea of the search. They will not be exported to RADAR. 5. Press Enter. 6. The analysis window reappears with hash marks in the deselected remedies.
Page 209

NOTES
7. If you wish to exclude any other remedies, hold the Ctrl key and click on the bar
above the remedy you wish to exclude. 8. If you want to hide the deselected remedies, rather than having them appear with hash
marks, you can do so by clicking the right mouse button on the Analysis screen. A pop-up menu appears.
9. Select Show Deselected Remedies. The screen will adjust and show only the
remedies that will be exported. Repeat to redisplay the deselected remedies. 10. Choose Take, Export to RADAR (F11)
-or- Click the Export tool.
In the EH Search window, conduct a search for the words Fear Dark. Press F8 or click the Analysis button. In the Analysis window, click the Deselect Symptoms of the Synthesis button.
Notice hash marks on remedy bar
Page 210
NOTES
Hold the Ctrl key and click Mind, Fear, dark, of, on closing eyes. Press Enter or Click OK to deselect the rest of the remedies. Notice the hash marks on the deselected remedies. Position the mouse pointer over one or the remedies. Press the right mouse button and choose Show Deselected Remedies from the pop-
up menu. The deselected remedies will no longer be displayed.
NO
TE The only difference between exporting from the Analysis window (F8)
and exporting from the clipboard (F12), is that with larger searches, it is easier to check the accuracy of results from the analysis window (F8).
Exporting a Single Symptom to RADAR You may find something really peculiar in EH which you wish to include in your analysis process in RADAR. EH allows you to export a symptom associated with a particular remedy.
To export a symptom to RADAR: 1. Highlight the text the contains the symptom you wish to export.
-or- Use text which is already highlighted from a search.
2. Choose Take, Export the Current Symptom to RADAR. RADAR displays the current symptom in a clipboard.
NO
TE
The Clipboard and the Analysis window do interact with one another. If you deselect remedies in the Analysis Window (F8), all the symptoms which contain those deselected remedies will also be deselected (unchecked) in the clipboard. If you deselect Synthesis symptoms in the clipboard, the remedies associated with those deselected symptoms will be deselected from the analysis window. The other symptoms in the clipboard which cover those remedies will be deselected as well.
Page 211

NOTES
Exporting Authors Once you have exported your analysis (F8) or Clipboard (F12) from EH to RADAR, you may wish to look at the authors associated with the particular remedies. If the result isn’t what you expected, you can set some options in EH to display the desired authors.
To change Author exportation options: 1. In EH, press F8 to analyze the search. 2. In the Analysis window, choose Tools, Options. The Options dialog box appears.
3. To export all the author references, place a check in the box next to Export with
author’s references. 4. If you wish to only export the author EH, remove the check from the box next to
Export with author’s references. 5. Click OK or press Enter. 6. You can also change the author references by clicking the right mouse button in the
Analysis window. A short cut menu appears.
7. Click Export with Author’s references to include or exclude the author references.
Page 212
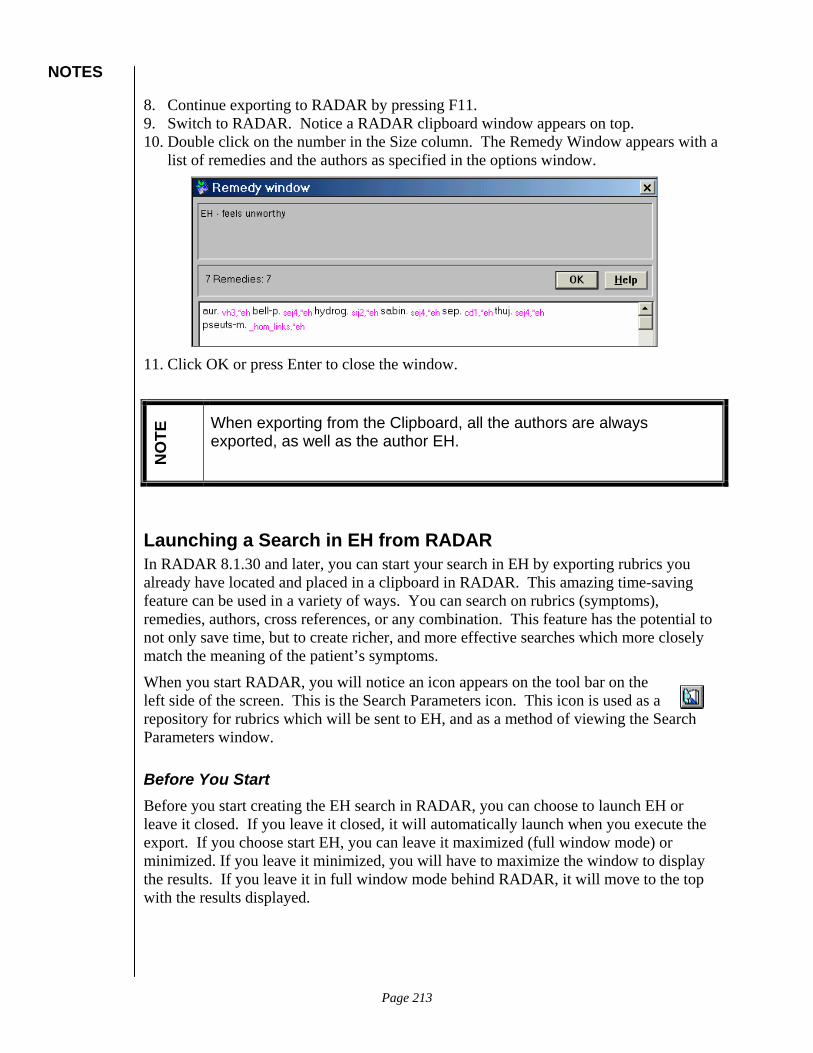
NOTES
8. Continue exporting to RADAR by pressing F11. 9. Switch to RADAR. Notice a RADAR clipboard window appears on top. 10. Double click on the number in the Size column. The Remedy Window appears with a
list of remedies and the authors as specified in the options window.
11. Click OK or press Enter to close the window.
NO
TE When exporting from the Clipboard, all the authors are always
exported, as well as the author EH.
Launching a Search in EH from RADAR In RADAR 8.1.30 and later, you can start your search in EH by exporting rubrics you already have located and placed in a clipboard in RADAR. This amazing time-saving feature can be used in a variety of ways. You can search on rubrics (symptoms), remedies, authors, cross references, or any combination. This feature has the potential to not only save time, but to create richer, and more effective searches which more closely match the meaning of the patient’s symptoms.
When you start RADAR, you will notice an icon appears on the tool bar on the left side of the screen. This is the Search Parameters icon. This icon is used as a repository for rubrics which will be sent to EH, and as a method of viewing the Search Parameters window.
Before You Start Before you start creating the EH search in RADAR, you can choose to launch EH or leave it closed. If you leave it closed, it will automatically launch when you execute the export. If you choose start EH, you can leave it maximized (full window mode) or minimized. If you leave it minimized, you will have to maximize the window to display the results. If you leave it in full window mode behind RADAR, it will move to the top with the results displayed.
Page 213

NOTES
The Search Parameters Window The Search Parameters window is the work space for reviewing and modifying information that you wish to export to EH.
To place symptoms in the Search Parameters window: 1. Find the Rubric on which you wish to search in EH. 2. Click on the rubric and drag the rubric to the Search Parameters icon on the left
side of the screen. You will notice the mouse pointer changes to display a mouse pointer with a rectangle below it.
3. Release the mouse button. It will seem as though nothing happened. 4. To include the Remedies associated with the Rubrics, hold down the Shift key while
dragging the Rubrics to the Search Parameters icon. 5. Click on the Search Parameters icon to display the window with the Rubrics and
Remedies (if the Shift key was held down).
NO
TE You should have no more than 10 rubrics or symptoms in the Keywords
area of the Search Parameters window when exporting to EH.
Find the rubric Mind, Answering, Incorrectly. Hold down the shift key and drag the rubric to the Search Parameters icon.
Rubrics (symptoms)
are displayed and can be
modified in the Keywords
section.
Remedies associated
with Rubrics.
Page 214
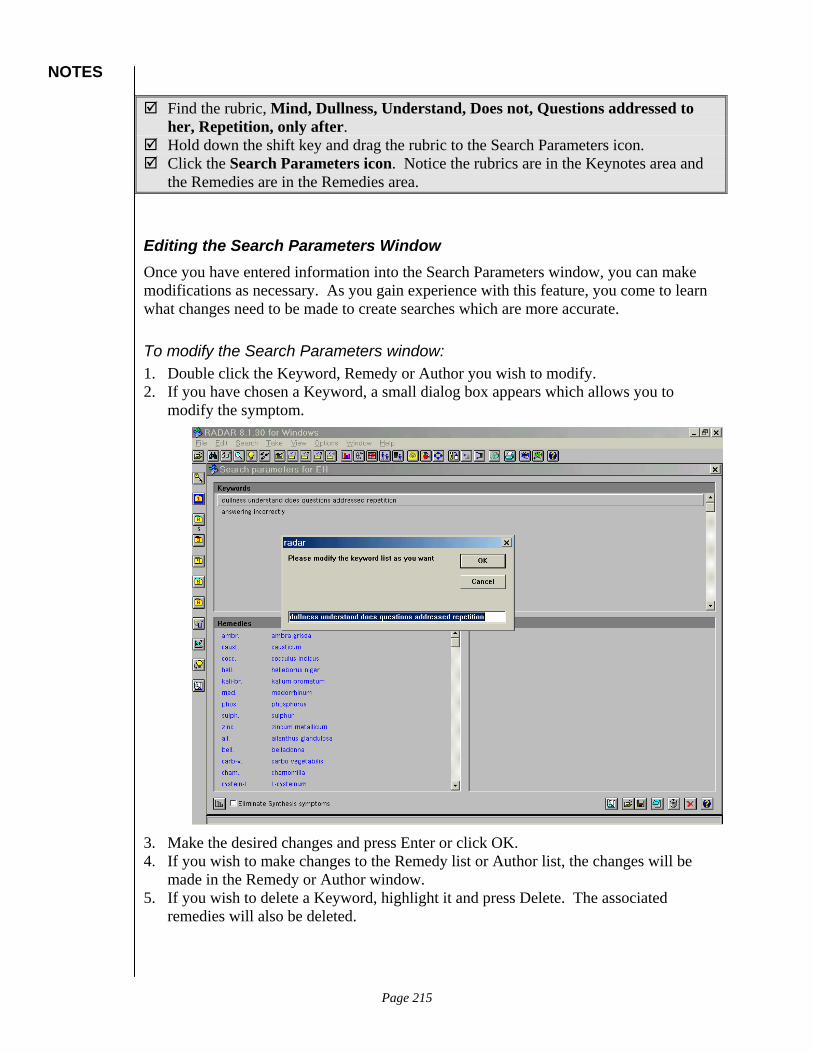
NOTES
Find the rubric, Mind, Dullness, Understand, Does not, Questions addressed to her, Repetition, only after.
Hold down the shift key and drag the rubric to the Search Parameters icon. Click the Search Parameters icon. Notice the rubrics are in the Keynotes area and
the Remedies are in the Remedies area.
Editing the Search Parameters Window Once you have entered information into the Search Parameters window, you can make modifications as necessary. As you gain experience with this feature, you come to learn what changes need to be made to create searches which are more accurate.
To modify the Search Parameters window: 1. Double click the Keyword, Remedy or Author you wish to modify. 2. If you have chosen a Keyword, a small dialog box appears which allows you to
modify the symptom.
3. Make the desired changes and press Enter or click OK. 4. If you wish to make changes to the Remedy list or Author list, the changes will be
made in the Remedy or Author window. 5. If you wish to delete a Keyword, highlight it and press Delete. The associated
remedies will also be deleted.
Page 215

NOTES
NO
TE When making changes in the Search Parameters window, be sure that
there is not a space in front of the first word in each key words entry.
Double click dullness understand does questions addressed repetition. Double click addressed. Press Delete. Press Enter.
When a symptom is dragged from RADAR to the Search Parameters window, it is automatically filtered. Words that are less useful to the search are removed from the text. These include common words such as Like, Of, The, Or, etc. It also includes some chapter headings including Mind, Generals. The list of filtered words can be viewed and modified.
To view or modify the filter list: 1. In the Search Parameters window, click on the Edit the Word Filter icon. 2. The Notepad application starts and appears on top of the Search Parameters window.
Page 216
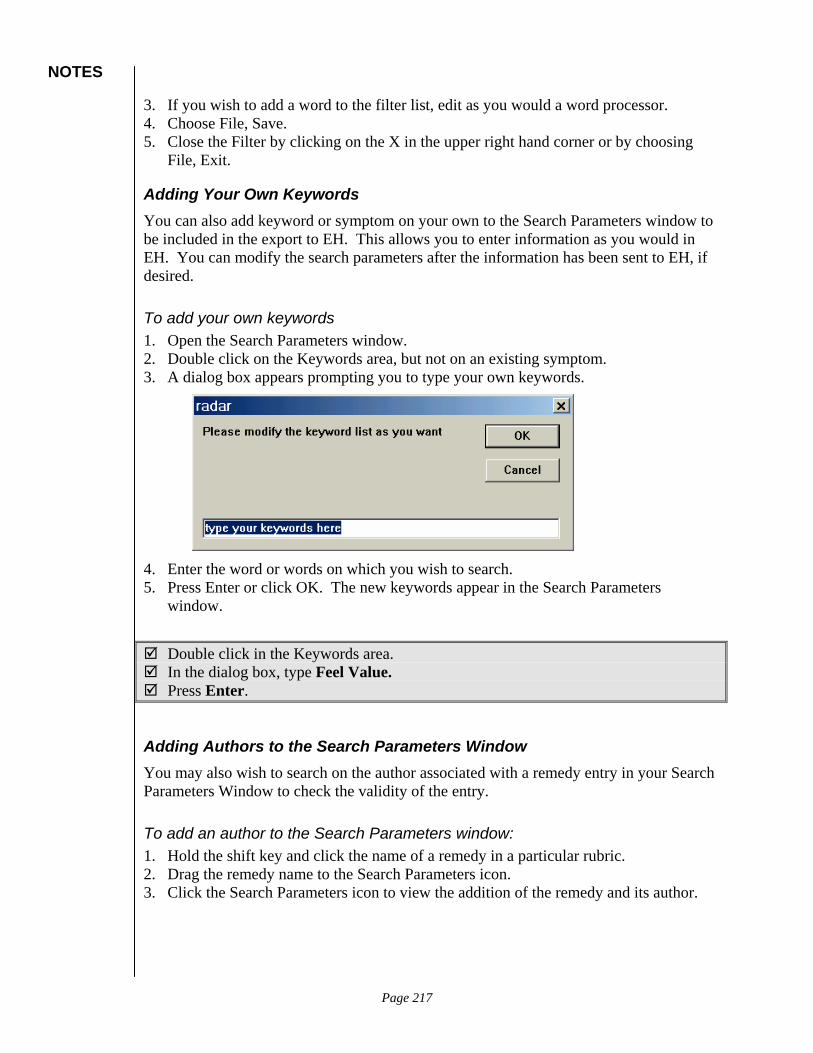
NOTES
3. If you wish to add a word to the filter list, edit as you would a word processor. 4. Choose File, Save. 5. Close the Filter by clicking on the X in the upper right hand corner or by choosing
File, Exit.
Adding Your Own Keywords You can also add keyword or symptom on your own to the Search Parameters window to be included in the export to EH. This allows you to enter information as you would in EH. You can modify the search parameters after the information has been sent to EH, if desired.
To add your own keywords 1. Open the Search Parameters window. 2. Double click on the Keywords area, but not on an existing symptom. 3. A dialog box appears prompting you to type your own keywords.
4. Enter the word or words on which you wish to search. 5. Press Enter or click OK. The new keywords appear in the Search Parameters
window.
Double click in the Keywords area. In the dialog box, type Feel Value. Press Enter.
Adding Authors to the Search Parameters Window You may also wish to search on the author associated with a remedy entry in your Search Parameters Window to check the validity of the entry.
To add an author to the Search Parameters window: 1. Hold the shift key and click the name of a remedy in a particular rubric. 2. Drag the remedy name to the Search Parameters icon. 3. Click the Search Parameters icon to view the addition of the remedy and its author.
Page 217
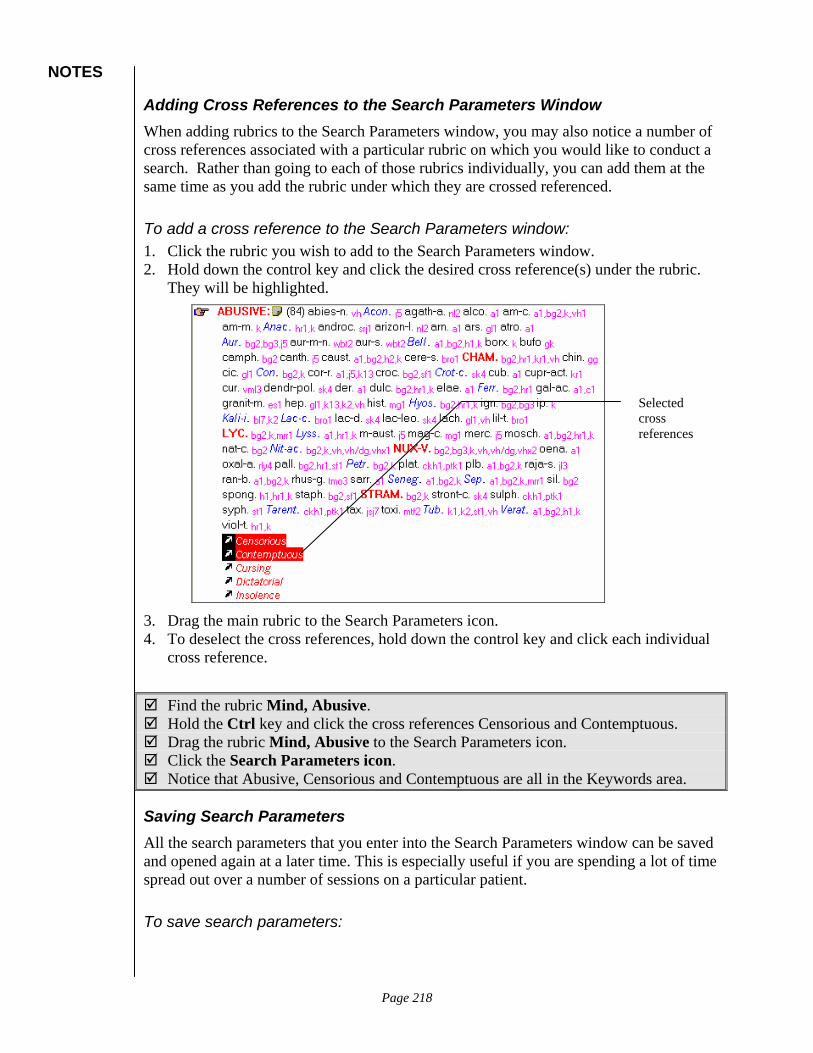
NOTES
Adding Cross References to the Search Parameters Window When adding rubrics to the Search Parameters window, you may also notice a number of cross references associated with a particular rubric on which you would like to conduct a search. Rather than going to each of those rubrics individually, you can add them at the same time as you add the rubric under which they are crossed referenced.
To add a cross reference to the Search Parameters window: 1. Click the rubric you wish to add to the Search Parameters window. 2. Hold down the control key and click the desired cross reference(s) under the rubric.
They will be highlighted.
Selected cross references
3. Drag the main rubric to the Search Parameters icon. 4. To deselect the cross references, hold down the control key and click each individual
cross reference.
Find the rubric Mind, Abusive. Hold the Ctrl key and click the cross references Censorious and Contemptuous. Drag the rubric Mind, Abusive to the Search Parameters icon. Click the Search Parameters icon. Notice that Abusive, Censorious and Contemptuous are all in the Keywords area.
Saving Search Parameters All the search parameters that you enter into the Search Parameters window can be saved and opened again at a later time. This is especially useful if you are spending a lot of time spread out over a number of sessions on a particular patient.
To save search parameters:
Page 218

NOTES
1. From the Search Parameters window, click on the Save Your Query icon. The Save Query In dialog box appears.
2. Enter the desired name of your query. You must use from one to eight letters or
numbers. 3. Press Enter.
Once you have saved your search parameters, you may wish to open them at a later time.
To recall search parameters: 1. In the Search Parameters window, click the Recall Your Query icon. The
Recall Query From dialog box appears.
2. Select the query name from the list. 3. Press Enter. The Search Parameters will appear in the Search Parameters window.
NO
TE If you have data in the Search Parameters window when you recall a
saved Search, the current data will be replaced by the saved Search. You will not be prompted or asked to confirm the opening of the saved Search.
Page 219

NOTES
Clearing the Search Parameters Window Closing the Search Parameters window does not clear the window. If you wish to create a new set of Search Parameters, you must clear the window first.
To clear the Search Parameters window: 1. From the Search Parameters window, click the Clear the Query icon at the
bottom of the screen. 2. All data in the Keywords, Remedies and Authors section is removed.
Viewing the Search in EH Once you have entered and modified your search parameters in RADAR, you can go to EH and run the query and view the results.
To run and view the search in EH: 1. From the Search Parameters window, click on the Run This Query in EH icon at
the bottom of the screen. There will be a slight delay as the query runs. 2. EH appears on the screen with the results of the query. If you have minimized EH,
you will need to maximize the screen to see the results of the query. 3. If you wish to not only run the query, but make
an Analysis in EH as well, click the Run This Query in EH and Analyze it icon.
4. If you wish to eliminate any symptoms from the analysis that also show up in the Synthesis, click into the box which indicates that.
5. Click the Analysis button. The Synthesis symptoms containing remedies to deselect dialog box appears.
Page 220

NOTES
6. All the rubrics are selected by default. If there are any you wish to have included in the analysis, hold the Ctrl key and click on the symptom. The symptom will not longer be highlighted and thus, will be included in the analysis.
7. Press Enter or click OK. The analysis continues. 8. You can choose to hide the remedies that were deselected following the instructions
starting in step 8 on page 209.
Exporting Rules In order to make the searches that are exported from RADAR to EH work as efficiently as possible and produce the most useable results, the following rules are applied automatically:
If 2 words are selected in the RADAR search, the corresponding EH query will limit the search to within 6 words. If 3 words are selected in the RADAR search, the corresponding EH query will limit the search to within 8 words. This will be indicated with an X in the EH query window. If more than 3 words are selected in the RADAR search, the corresponding EH query will be limited to the same sentence. If a remedy has been selected in the RADAR search, the corresponding EH query will be limited to the same sentence. If an author has been selected in the RADAR search, the corresponding EH query will be limited to the same paragraph.
Searching a Remedy from the Investigation Window for Remedies If you are considering a remedy that appears in the Investigation Window for Remedies, you can start the EH search from that location.
To search a remedy from the Investigation Window: 1. In the Investigation Window for Remedies, right click on the remedy of interest. A
pop up menu appears. 2. Select Search Remedy in EH. The Search parameters in EH window appears with the
remedy in the Remedies area of the window. 3. Click the Run this Query in EH button to execute the query.
Making the Same Search in EH as in RADAR RADAR also has search capabilities using the F4 key or the Quick Command. You can automatically export the same search to EH using the Make the Same Search in EH icon in the Search Results window. Using this feature allows you to immediately begin looking for Materia Medica to support the rubrics which appear in the Search Results window.
To make the same search in EH as in RADAR: 1. Create a search using either the F4 key or the Quick Command. 2. Execute the search. The Result of Extended Search window appears.
Page 221

NOTES
Click here to make the same search in EH as in RADAR
3. Click the Make the Same Search in EH icon which appears in the Result of Extended Search window.
4. EH appears on the screen and the search executes.
NO
TE If the search contains common words, such as restless or weakness
the search in EH will take a long time.
Limiting Search Titles in EH When you conduct a search in EH, it automatically searches all the volumes that you have installed on your system. EH version 1.3 and later allows you to specify an unlimited number of combinations of volumes to search rather than including all of them. For example, you may wish to only include materia medica volumes, or perhaps you wish to only search books which you have found to be useful to you in hard copy.
To limit search titles: 1. Open EH to the web view, if necessary. 2. Scroll through the Table of Contents on the left. Click the box next to the volume(s)
you wish to include in the search.
Page 222
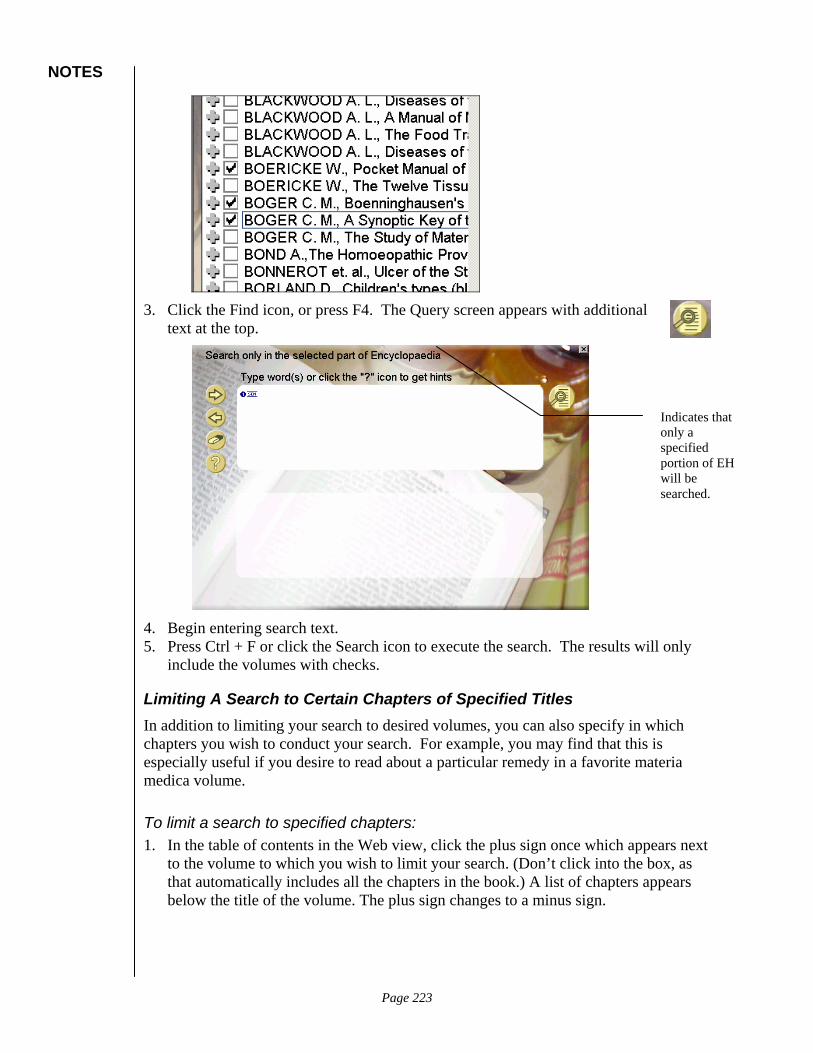
NOTES
3. Click the Find icon, or press F4. The Query screen appears with additional
text at the top.
Indicates that only a specified portion of EH will be searched.
4. Begin entering search text. 5. Press Ctrl + F or click the Search icon to execute the search. The results will only
include the volumes with checks.
Limiting A Search to Certain Chapters of Specified Titles In addition to limiting your search to desired volumes, you can also specify in which chapters you wish to conduct your search. For example, you may find that this is especially useful if you desire to read about a particular remedy in a favorite materia medica volume.
To limit a search to specified chapters: 1. In the table of contents in the Web view, click the plus sign once which appears next
to the volume to which you wish to limit your search. (Don’t click into the box, as that automatically includes all the chapters in the book.) A list of chapters appears below the title of the volume. The plus sign changes to a minus sign.
Page 223

NOTES
2. If you wish to choose from sub chapters, click into the plus sign next to the desired
chapter to display a list of sub chapters. Click into the box next to the content to which you wish to limit the search.
3. To hide the chapters and sub chapters, click the minus sign next to the volume title.
Once you have conducted your search, you may wish to search all volumes again.
To include all volumes: 1. Click into each box with a check to deselect the volumes.
-or- Position the mouse pointer over the Table of Contents. Press the right mouse button. A pop up menu appears.
2. Choose Unselect all Titles from the pop up menu. The checks will be automatically
removed from all titles.
Click into the box next to the following volumes: Boericke, Pocket Manual of Homeopathic Materia Medica Boger, Boenninghausen’s Characteristics Boger, A Synoptic Key of Materia Medica
Chapters and sub chapters displayed in Boericke’s MM.
Page 224
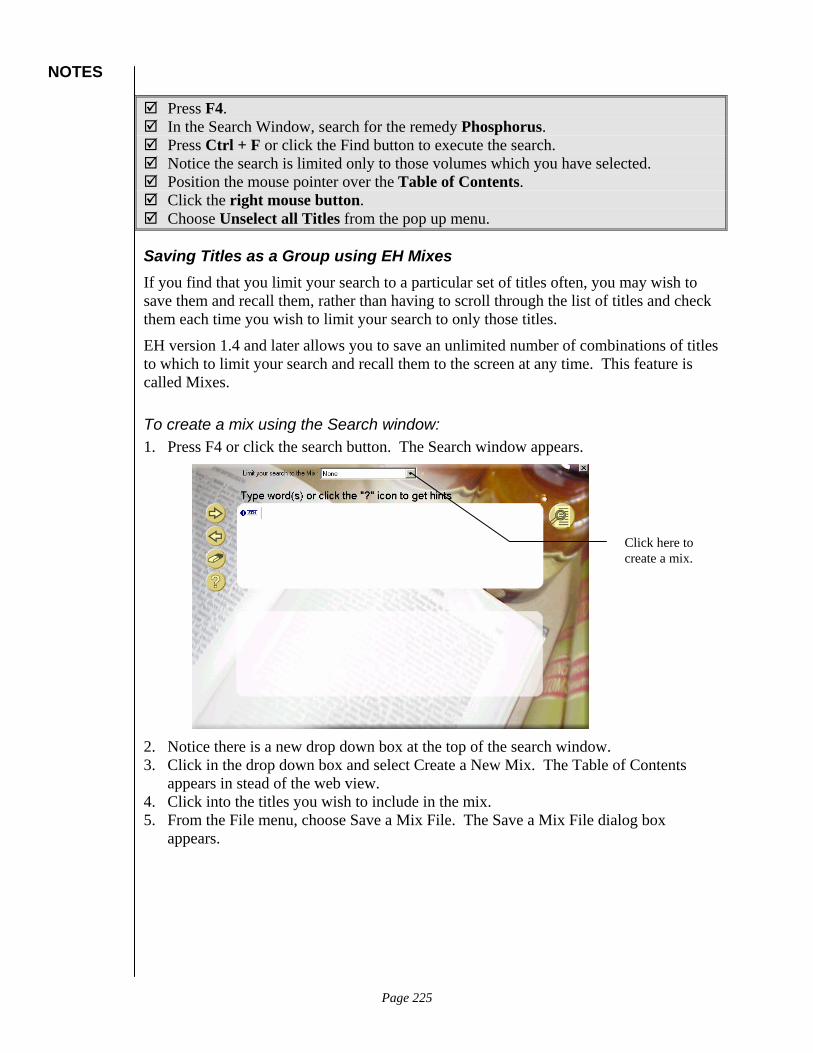
NOTES
Press F4. In the Search Window, search for the remedy Phosphorus. Press Ctrl + F or click the Find button to execute the search. Notice the search is limited only to those volumes which you have selected. Position the mouse pointer over the Table of Contents. Click the right mouse button. Choose Unselect all Titles from the pop up menu.
Saving Titles as a Group using EH Mixes If you find that you limit your search to a particular set of titles often, you may wish to save them and recall them, rather than having to scroll through the list of titles and check them each time you wish to limit your search to only those titles.
EH version 1.4 and later allows you to save an unlimited number of combinations of titles to which to limit your search and recall them to the screen at any time. This feature is called Mixes.
To create a mix using the Search window: 1. Press F4 or click the search button. The Search window appears.
Click here to create a mix.
2. Notice there is a new drop down box at the top of the search window. 3. Click in the drop down box and select Create a New Mix. The Table of Contents
appears in stead of the web view. 4. Click into the titles you wish to include in the mix. 5. From the File menu, choose Save a Mix File. The Save a Mix File dialog box
appears.
Page 225
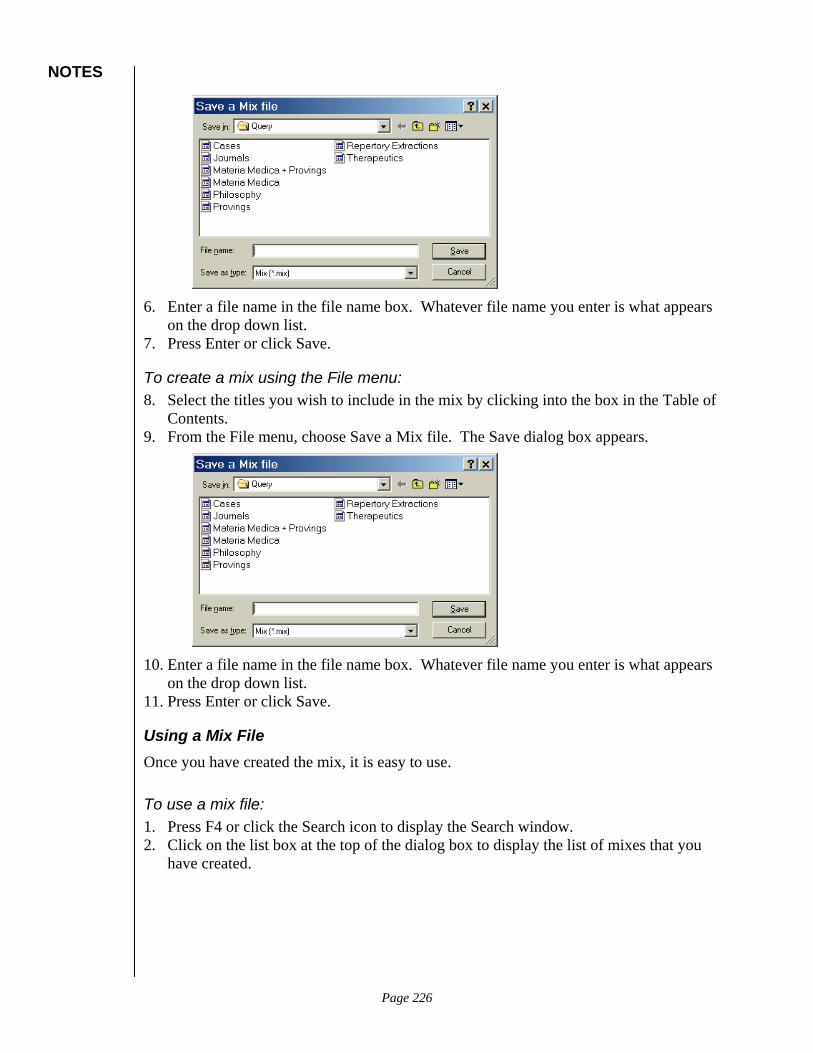
NOTES
6. Enter a file name in the file name box. Whatever file name you enter is what appears
on the drop down list. 7. Press Enter or click Save.
To create a mix using the File menu: 8. Select the titles you wish to include in the mix by clicking into the box in the Table of
Contents. 9. From the File menu, choose Save a Mix file. The Save dialog box appears.
10. Enter a file name in the file name box. Whatever file name you enter is what appears
on the drop down list. 11. Press Enter or click Save.
Using a Mix File Once you have created the mix, it is easy to use.
To use a mix file: 1. Press F4 or click the Search icon to display the Search window. 2. Click on the list box at the top of the dialog box to display the list of mixes that you
have created.
Page 226
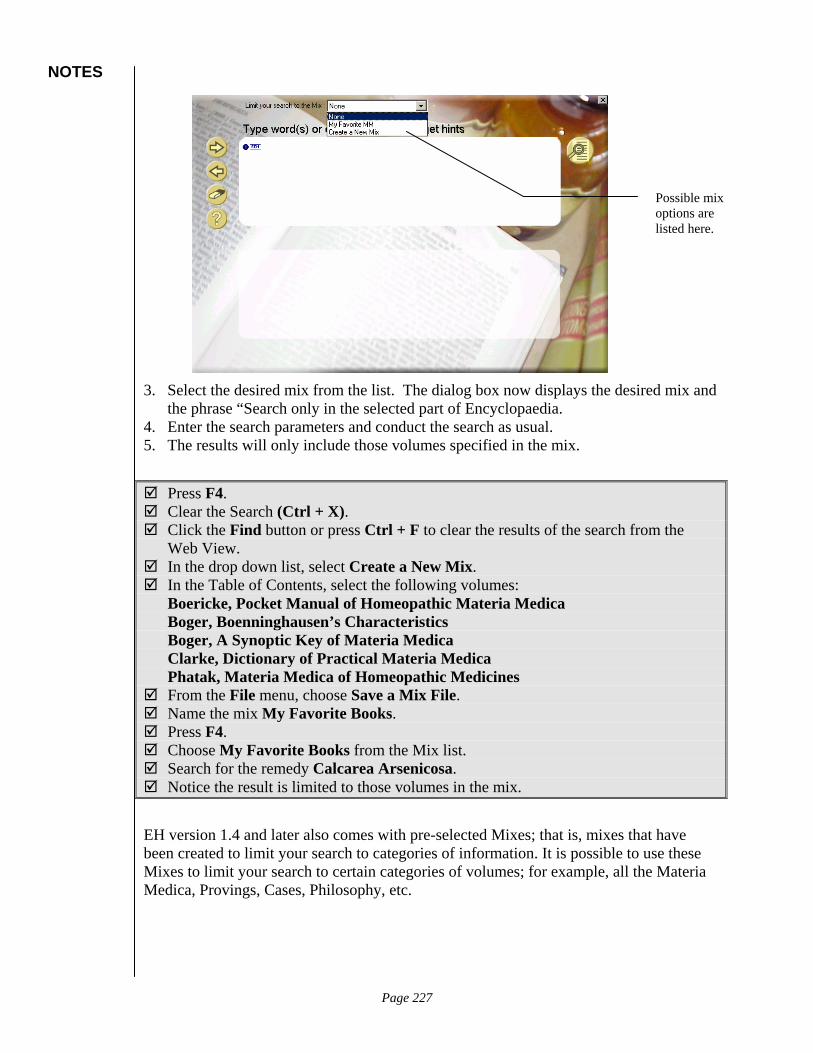
NOTES
Possible mix options are listed here.
3. Select the desired mix from the list. The dialog box now displays the desired mix and the phrase “Search only in the selected part of Encyclopaedia.
4. Enter the search parameters and conduct the search as usual. 5. The results will only include those volumes specified in the mix.
Press F4. Clear the Search (Ctrl + X). Click the Find button or press Ctrl + F to clear the results of the search from the
Web View. In the drop down list, select Create a New Mix. In the Table of Contents, select the following volumes:
Boericke, Pocket Manual of Homeopathic Materia Medica Boger, Boenninghausen’s Characteristics Boger, A Synoptic Key of Materia Medica Clarke, Dictionary of Practical Materia Medica Phatak, Materia Medica of Homeopathic Medicines
From the File menu, choose Save a Mix File. Name the mix My Favorite Books. Press F4. Choose My Favorite Books from the Mix list. Search for the remedy Calcarea Arsenicosa. Notice the result is limited to those volumes in the mix.
EH version 1.4 and later also comes with pre-selected Mixes; that is, mixes that have been created to limit your search to categories of information. It is possible to use these Mixes to limit your search to certain categories of volumes; for example, all the Materia Medica, Provings, Cases, Philosophy, etc.
Page 227
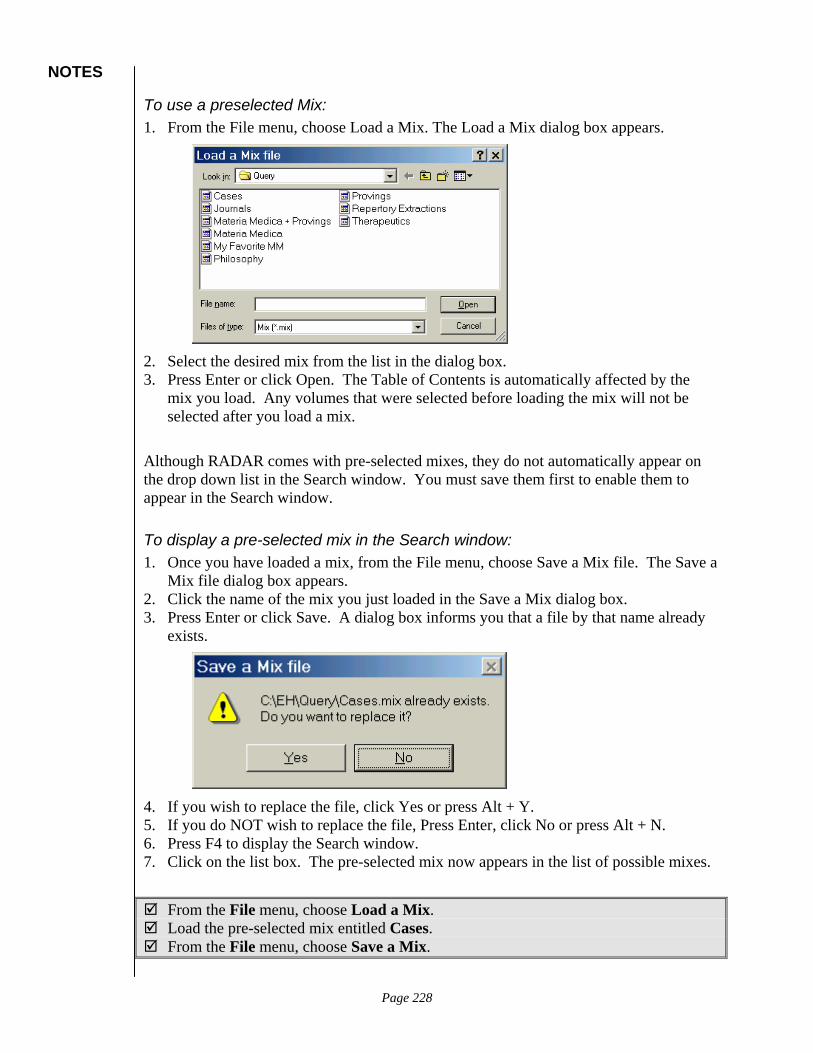
NOTES
To use a preselected Mix: 1. From the File menu, choose Load a Mix. The Load a Mix dialog box appears.
2. Select the desired mix from the list in the dialog box. 3. Press Enter or click Open. The Table of Contents is automatically affected by the
mix you load. Any volumes that were selected before loading the mix will not be selected after you load a mix.
Although RADAR comes with pre-selected mixes, they do not automatically appear on the drop down list in the Search window. You must save them first to enable them to appear in the Search window.
To display a pre-selected mix in the Search window: 1. Once you have loaded a mix, from the File menu, choose Save a Mix file. The Save a
Mix file dialog box appears. 2. Click the name of the mix you just loaded in the Save a Mix dialog box. 3. Press Enter or click Save. A dialog box informs you that a file by that name already
exists.
4. If you wish to replace the file, click Yes or press Alt + Y. 5. If you do NOT wish to replace the file, Press Enter, click No or press Alt + N. 6. Press F4 to display the Search window. 7. Click on the list box. The pre-selected mix now appears in the list of possible mixes.
From the File menu, choose Load a Mix. Load the pre-selected mix entitled Cases. From the File menu, choose Save a Mix.
Page 228

NOTES
Click on the name Cases in the dialog box. Press Enter. When prompted, choose Yes, you do wish to replace the file. Press F4. Click on the Mix list box. Notice that Cases now appears in the mix list.
NO
TE Mixes are important files that should be backed up to a separate
location. These files are found in the EH\Query directory and have a file extension .MIX. Be sure to back these up when you back up other important RADAR, EH and WinCHIP files.
Renaming and Deleting Mix Files After creating a mix, you may find that you have given the mix a name that doesn’t make sense to you, or you have misspelled the name, etc. You can rename a mix through the Save a Mix dialog box.
To rename a mix: 1. Load the mix you wish to rename. 2. From the File menu, choose Save a Mix. The Save a Mix dialog box appears. 3. Press the Right mouse button on the Mix you wish to rename. A pop-up menu
appears.
4. Select Rename from the Pop-up menu. The existing name appears with a box around
it, the name highlighted and a cursor at the end. 5. Enter the new name over the old name.
Page 229
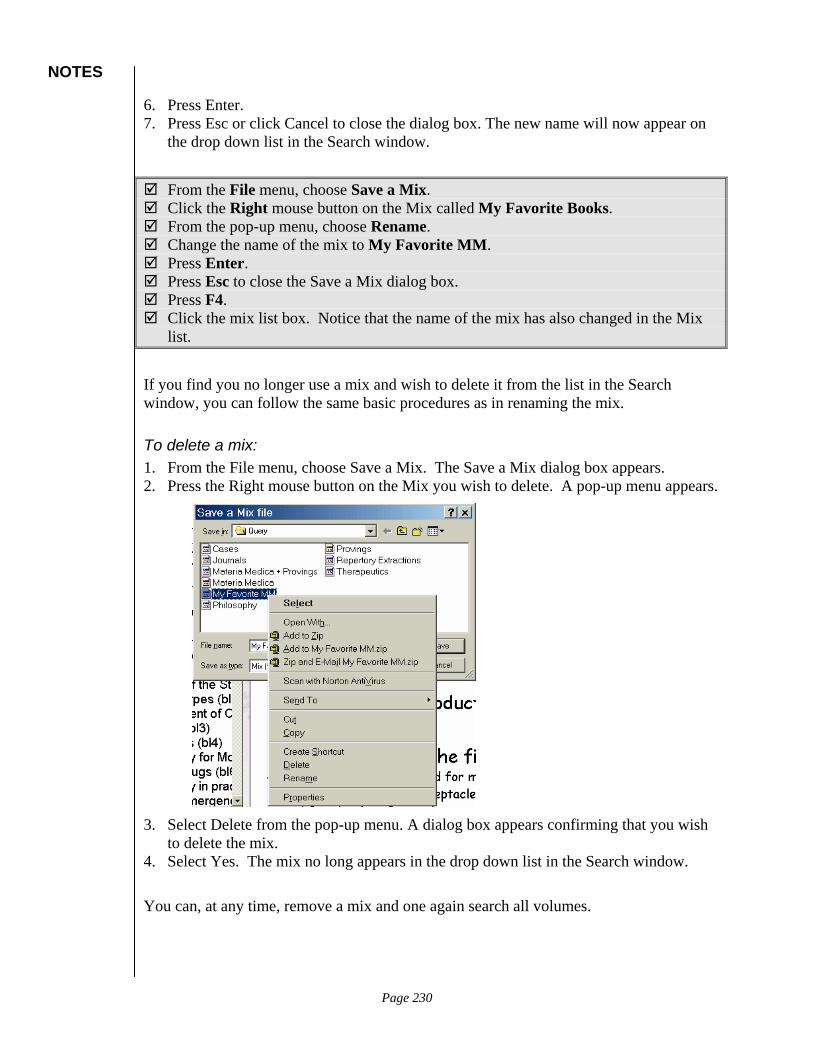
NOTES
6. Press Enter. 7. Press Esc or click Cancel to close the dialog box. The new name will now appear on
the drop down list in the Search window.
From the File menu, choose Save a Mix. Click the Right mouse button on the Mix called My Favorite Books. From the pop-up menu, choose Rename. Change the name of the mix to My Favorite MM. Press Enter. Press Esc to close the Save a Mix dialog box. Press F4. Click the mix list box. Notice that the name of the mix has also changed in the Mix
list.
If you find you no longer use a mix and wish to delete it from the list in the Search window, you can follow the same basic procedures as in renaming the mix.
To delete a mix: 1. From the File menu, choose Save a Mix. The Save a Mix dialog box appears. 2. Press the Right mouse button on the Mix you wish to delete. A pop-up menu appears.
3. Select Delete from the pop-up menu. A dialog box appears confirming that you wish
to delete the mix. 4. Select Yes. The mix no long appears in the drop down list in the Search window.
You can, at any time, remove a mix and one again search all volumes.
Page 230
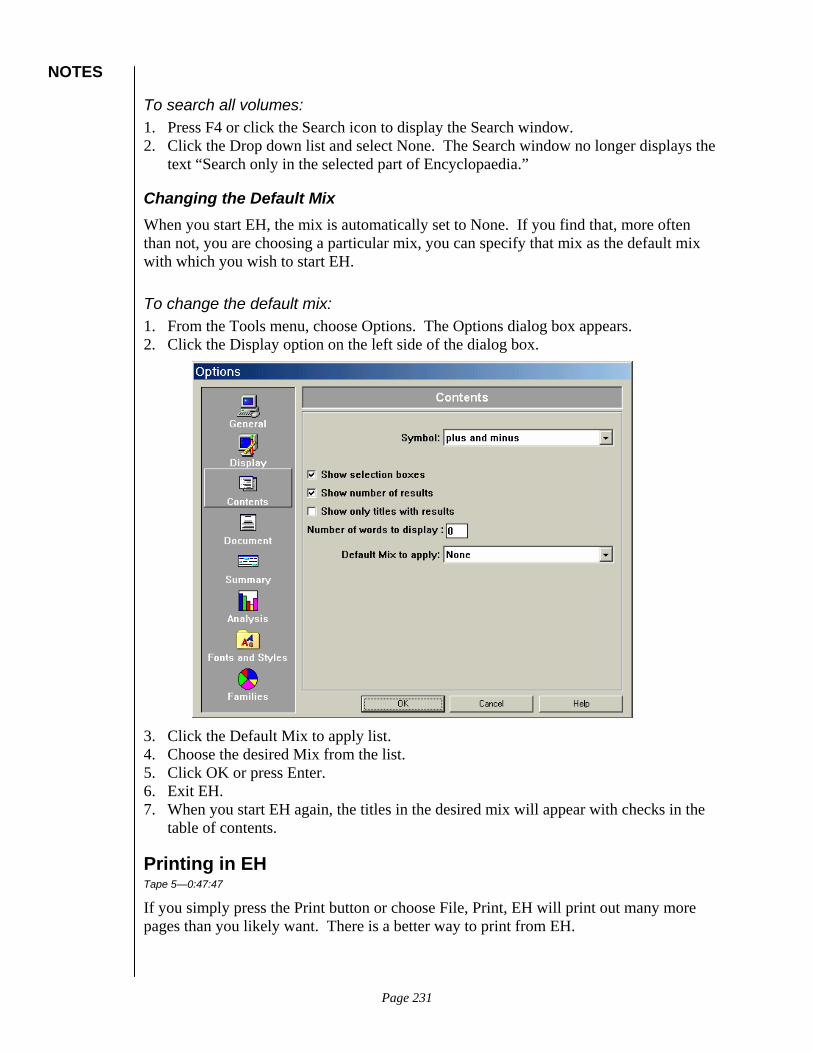
NOTES
To search all volumes: 1. Press F4 or click the Search icon to display the Search window. 2. Click the Drop down list and select None. The Search window no longer displays the
text “Search only in the selected part of Encyclopaedia.”
Changing the Default Mix When you start EH, the mix is automatically set to None. If you find that, more often than not, you are choosing a particular mix, you can specify that mix as the default mix with which you wish to start EH.
To change the default mix: 1. From the Tools menu, choose Options. The Options dialog box appears. 2. Click the Display option on the left side of the dialog box.
3. Click the Default Mix to apply list. 4. Choose the desired Mix from the list. 5. Click OK or press Enter. 6. Exit EH. 7. When you start EH again, the titles in the desired mix will appear with checks in the
table of contents.
Printing in EH Tape 5—0:47:47
If you simply press the Print button or choose File, Print, EH will print out many more pages than you likely want. There is a better way to print from EH.
Page 231

NOTES
To print from EH. 1. Select the text you wish to print by either dragging the mouse to highlight the text.
-or- Click at the beginning of the text. Scroll down to the end of the text you wish to print. Hold down the Shift key and click at the end of the desired selection.
2. To print only the selected text, press Ctrl + P. -or- Click the Print button -or- From the File menu, choose Print. The Print dialog box appears.
Notice the Print Range is
set to Selection.
3. Press Enter.
Using EH Help to Learn the Functions of EH Tape 5—0:48:10
Unlike RADAR help which has over 1,300 pages of Help screens, EH help is more compact and can be read through in a systematic way in a matter of 2 hours.
To use EH Help: 1. From the EH menu, choose Help, Contents. The EH Help Contents window appears.
Page 232

NOTES
2. Click on the topic Right Mouse Button. That topic appears in the Help window.
Click here to advance to the next topic.
3. Click on the Double arrow button to advance from topic to topic.
EH Repertorization Examples Tape 5—0:49:32
One of the things you have learned from the EH sections of this document, is that you are not limited to using only the repertory to determine the best remedy for your patient. You can also use EH and the Materia Medica.
The Whole Health Now web site has created a feature called Find the Remedy Name which gives a number of symptoms which you can enter into EH or RADAR and find the proper remedy which best fits the symptoms presented.
To use the Find the Remedy Name feature on the internet: 1. Start your internet browser. 2. Point your browser to www.wholehealthnow.com. 3. Click on HomeopathyInfo Pro.
Page 233
NOTES
4. Scroll down and click on Find the Remedy Name. 5. Click on the desired group number.
Once you have found the Find the Remedy Name exercise you wish to work on, you are ready to begin practicing using either RADAR or EH. Since this is the EH section, we will be using EH to determine the name of the remedy.
NO
TE When you are typing in the information in the Find window, look at the
numbers that appear at the bottom of the Find window. You should have 15 to 2,000 symptoms that appear.
Advantages to using EH to Repertorize You are repertorizing directly from the Materia Medica. You will also find other remedies that share some of the same symptoms. If you study remedies in relationship to each other, you can learn more. You can learn which remedies may be potentially related.
Exercise 21 One of the famous aspects of this remedy is hemorrhage. Hemorrhages are 'slow, oozing, of dark thin blood'. There is a decrease in the rate of coagulation of the blood. Blood may not clot. There may even be bloody sweat. Heart is also affected. There is a feeling of trembling in the heart. 'As if heart were loose; turns over'. It is often indicated in septic and malignant conditions when the symptoms agree. The patient is deathly sick, tremulous, weak, and sad with weeping mood.
Using the above example and EH, find the name of the remedy described above.
Suggestions Searching for Hemorrhage is a very general. But it would still yield the same result. It would be best to use Hem* as a wild card, as there are many variations on the spelling of Hemorrhage. If you use the word Septic, be sure to use it as a word, and not as a condition. You will get more limited search results using it coded as a condition. If doing a search on more than two words, it is best to leave the search as within a sentence rather than ordered within four words, which you might do with only two words in the search. If you use a characteristic word such as Hemorrhage or Hysterical, you can compare hemorrhage remedies together and hysterical remedies together.
Page 234

NOTES
Using your own search, or the one above, create a search to identify the remedy. Execute the search with Ctrl + F. Press F8 to analyze the search. Notice that Crotalus Horridus comes up first on the list.
Exercise 22 It is one of the hysterical remedies. The patient is nervous and oversensitive. Anxiety, restlessness and faintness are predominant. “Hysteria after sudden suppression of discharges” Throat symptoms are important. There is globus hystericus with a rising sensation. “Ball rises from stomach up throat; obliging frequent swallowing to keep it down”. Spasm and suffocative feeling in throat. There is also a sensation of spasmodic tightness in chest, “as if lungs could not be fully expanded”. There is severe flatulence causing explosive eructations “smelling like garlic”. There may be great difficulty in bringing up the wind. <night and <touch are two important modalities of this remedy.
Page 235
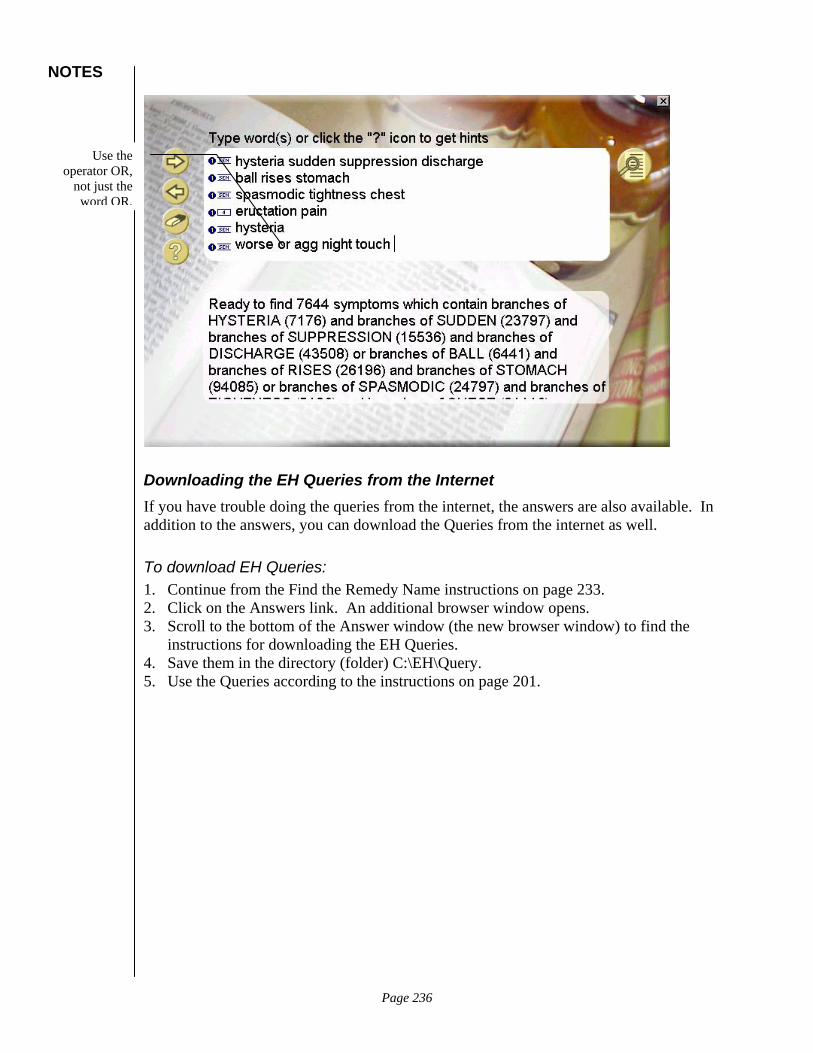
NOTES
Use the operator OR,
not just the word OR.
Downloading the EH Queries from the Internet If you have trouble doing the queries from the internet, the answers are also available. In addition to the answers, you can download the Queries from the internet as well.
To download EH Queries: 1. Continue from the Find the Remedy Name instructions on page 233. 2. Click on the Answers link. An additional browser window opens. 3. Scroll to the bottom of the Answer window (the new browser window) to find the
instructions for downloading the EH Queries. 4. Save them in the directory (folder) C:\EH\Query. 5. Use the Queries according to the instructions on page 201.
Page 236