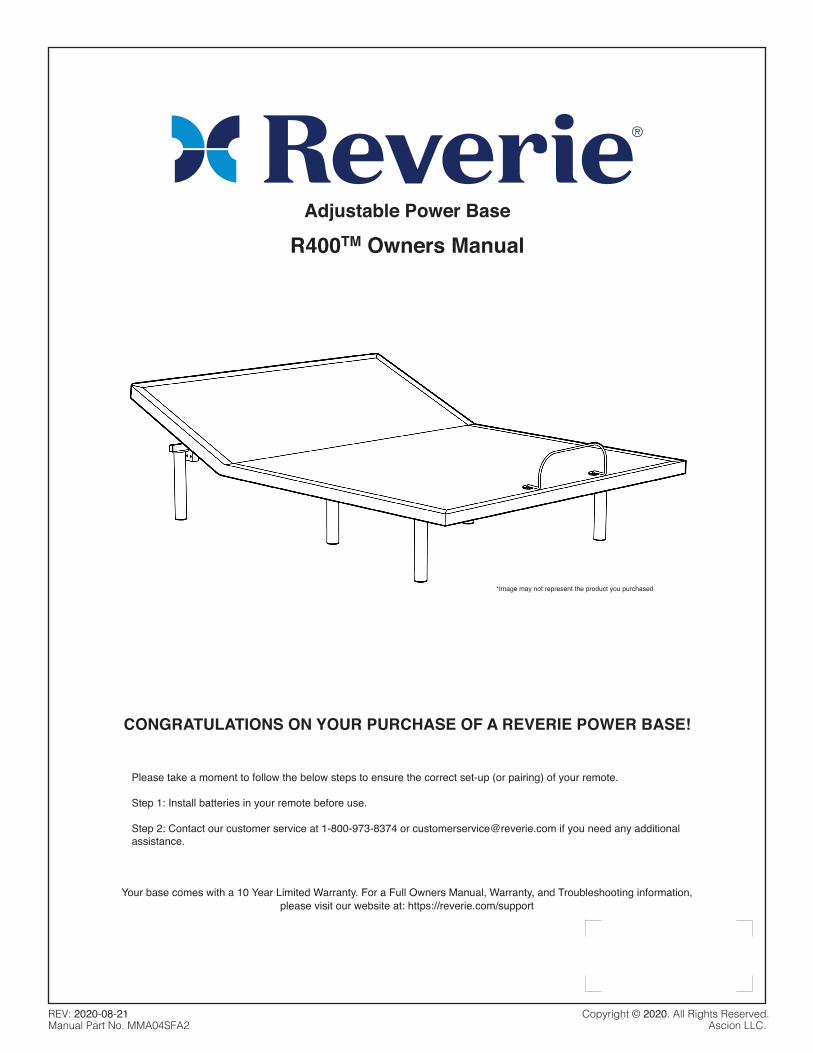
R400TM Owners Manual - Reverie
14
REV: 2020-08-21 Manual Part No. MMA04SFA2 Copyright © 2020. All Rights Reserved. Ascion LLC. CONGRATULATIONS ON YOUR PURCHASE OF A REVERIE POWER BASE! Please take a moment to follow the below steps to ensure the correct set-up (or pairing) of your remote. Step 1: Install batteries in your remote before use. Step 2: Contact our customer service at 1-800-973-8374 or [email protected] if you need any additional assistance. *Image may not represent the product you purchased Your base comes with a 10 Year Limited Warranty. For a Full Owners Manual, Warranty, and Troubleshooting information, please visit our website at: https://reverie.com/support Adjustable Power Base R400 TM Owners Manual
Transcript of R400TM Owners Manual - Reverie
REV: 2020-08-21Manual Part No. MMA04SFA2
Copyright © 2020. All Rights Reserved. Ascion LLC.
CONGRATULATIONS ON YOUR PURCHASE OF A REVERIE POWER BASE!
Please take a moment to follow the below steps to ensure the correct set-up (or pairing) of your remote.
Step 1: Install batteries in your remote before use.
Step 2: Contact our customer service at 1-800-973-8374 or [email protected] if you need any additional assistance.
*Image may not represent the product you purchased
Your base comes with a 10 Year Limited Warranty. For a Full Owners Manual, Warranty, and Troubleshooting information, please visit our website at: https://reverie.com/support
Adjustable Power Base
R400TM Owners Manual
2
Safety PrecautionsWARNING! IMPORTANT SAFETY INSTRUCTIONS. PLEASE READ THESE INSTRUCTIONS THOROUGHLY BEFORE USING THIS PRODUCT. SAVE THESE INSTRUCTIONS!
When using an electrical furnishing basic precautions should always be followed, including the following:READ ALL INSTRUCTIONS BEFORE USING (THIS FURNISHING)
DANGER: To reduce the risk of electric shock: Always unplug this furnishing from the electrical outlet before cleaning.
WARNING:To reduce the risk of burns, fire, electric shock, or injury to persons:
• Unplug from outlet before putting on ortaking off parts.
• Close supervision is necessary whenthis furnishing is used by or near children, invalids or disabled persons.
• Use this furnishing only for itsintended use as described in these instructions. Do not use attachments not recommended by the manufacturer.
• Never operate this furnishing if it has a damaged cord or plug, or if it is not working properly, dropped or damaged, or dropped into the water, call Reverie customer service.
• Keep the cord away from heatedsurfaces.
• Never drop or insert any object into anyopening.
• Do not use outdoors.• Do not operate where aerosol (spray)
products are being used or where oxygen is being administered.
• To disconnect, turn all controls to the offposition, then remove plug from outlet.
WARNING: Risk of Injury: Keep children away from under the head and foot of the base when moving.
WARNING: Risk of electric shock:Connect this furnishing to a properly grounded outlet only.
GROUNDING INSTRUCTIONS:
This product must be grounded. If it should malfunction or breakdown, grounding provides a path of least resistance for electric current to reduce the risk of electric shock. This product is equipped with a cord having an equipment-grounding conductor and a grounding plug. The plug must be plugged into an appropriate outlet that is properly installed and grounded in accordance with all local codes and ordinances.
Do not modify the plug provided with the product. If it will not fit the outlet, have a proper outlet installed by a qualified electrician.
DANGER:Improper connection of the equipment-grounding conductor can result in a risk of electric shock. Check with a qualified electrician or serviceman if you are in doubt as to whether the product is properly grounded.
FOR BEST RESULTS, YOUR POWER BASE SHOULD BE PLUGGED INTO A SURGE PROTECTOR (not included).
USER-SERVICEABLE PARTS:This product is specifically designed to have no maintenance by you, the user. Therefore, you are encouraged not to open any motors, alter the wiring, adjust, modify or change the structure of the product, as it will void the warranty.
IMPORTANT SAFETY FEATURES:Use this furnishing only for its intended use as described in these instructions. Do not use attachments not recommended by the manufacturer. If there is an overload weight condition on the head or foot mechanism, the control unit will automatically stop all functions. Once the excess weight is removed the control unit will automatically allow all functions to resume operation after 30 seconds. As with any product that produces a vibrating motion, it is possible that some pacemakers may interpret this motion as a false sense of movement and or exercise. This may or may not affect your pacemaker. If you have any concerns, please consult your physician. For more information please contact customer service by calling 800-973-8374.
WARNING!DO NOT USE NEAR PEOPLE USING OR WEARING MEDICAL DEVICES. FOR HOUSEHOLD / RESIDENTIAL USE ONLY. DO NOT USE OUTDOORS. This product conforms to UL STD 962
IN-HOME USE AND HOSPITAL DISCLAIMER:Your power base is strictly designed for in-home use only. It is NOT designed for hospital use and is NOT designed to meet hospital standards. Do not use this base with TENT TYPE oxygen therapy equipment or near explosive gases.
SMALL CHILDREN AND PETS WARNING: After your Power Base has been unboxed, immediately dispose of packaging as it can smother small children and pets. To avoid injury, children and pets should not be allowed to play on or under the power base.
Children should not operate this product without adult supervision. Close supervision is necessary when this furnishing is used by, or near children, invalids, or disabled persons.
SAVE THESE INSTRUCTIONS:Your Power Base has been designed to provide you with the reliable operation and durability you expect. This product has been inspected and tested prior to shipment.
For best performance, you should enter and exit the Power Base while it is in the flat or fully lowered position.DO NOT SIT ON THE HEAD OR FOOT SECTIONS WHILE IN THE RAISED POSITION.
INTENDED USAGEThe electric power base should be installed with the head board brackets and/or the head of the frame positioned close to a wall.
PRODUCT RATINGSThe lift motor in your Power Base is NOT designed for continuous use. Reliable operation and full life expectancy will be attained as long as the lift motor does not operate more than two (2) minutes over an eighteen (18) minute period, or approximately 10% duty cycle. Any attempt to circumvent or exceed this rating will shorten the life expectancy of this product and may void the warranty. The recommended weight restrictions for your Power Base is up to 710 lbs. total weight, including people and the mattress for all sizes of power bases. Lift speed will vary due to weight and mattress configuration, as well as the mattress type. The weight must be evenly distributed across the power base. This Product is not designed to support or lift 710 lbs of total weight in the head or foot sections of your Power Base alone, or in any unevenly distributed fashion. Some mattresses are not designed for Power Bases because they do not bend or flex well when adjusted. When using such a mattress with your Power Base the weight limits set forth herein do not apply, as the bending of the mattress requires significant force and puts significant strain on the motors and the Power Base itself.
WARRANTY PRECAUTION: Do not open control box, motors or wireless remote controls (with the exception of the battery compartment if equipped). The warranty is void if these units are tampered with. Any repair or replacement of power base parts must be performed by an authorized technician.
Note: Exceeding the recommended weight restrictions could damage your power base and void your warranty and using a mattress on top of your power base that is not designed for adjustability may also void your warranty.
WARNING: PINCH POINT! Do not reach under the base during operation.
This product is for use on a circuit having a standard rating of 120 volts and is factory equipped with a specific electric cord and plug to permit connection to a proper electric circuit. Make sure that the product is connected to an outlet having the same configuration as the plug. No adapter should be used with this product. If the product must be reconnected for use on a different type of electric circuit, the reconnection should be made by qualified service personnel.
Unauthorized modifications could void the electrical portion of your warranty. Failure to use a properly grounded outlet for this product or modification of the plug will compromise this important grounding safety feature and may result in electrical shock, electrical fire, or faulty operation of the product.
POWER RATINGS:INPUT: AC 100-240V - 50/60Hz, 1.5 AmpOUTPUT: DC 29V-2.24A

3
Package contents:Remote ControlMattress Retainer BarPower AdapterBase LegsY-cable (optional for Tandem control)Wireless Charging Pad (optionalaccessory)
IMPORTANT UNPACKING INSTRUCTIONSTo avoid damage to the power base, always open the carton while the power base is laying in the FLAT position on the floor.
OPEN FLAT
STEP 7
Manufactured by Reverie®
For Warranty and Service: 1-800-973-8374
[email protected] have your receipt ready and
available.
Thank you and enjoy your power base.
www.reverie.com
Register Online. For easy registration of your warranty visit
https://reverie.com/register-your-warranty
Please prepare a digital copy of your proof of purchase (invoice or sales receipt) when registering online.
You may be required to provide the Serial Number for registration, you
can find it on the Law Tags attached to the base.
Insert the mattress retainer bar into the two mount holes located at the foot end of the power base.
STEP 3
STEP 4 STEP 8
STEP 5
STEP 6
Assemble the power base legs. Screw them in a clockwise direction into the threaded holes in the frame.
Remove the zip ties securing the excess cord from the motors of the power base.
Carefully flip the power base over with 2 people, to the topside-up position.
Plug the power cord into a grounded electrical outlet.
NOTE: An electrical surge protection unit is recommended (not included)
WARNING: POWER CORDS MUST NOT INTERFERE
WITH ANY POWER BASE MECHANISMS.
ATTENTION!Improper handling
DO NOTlean the power base against the installed legs to flip it over.
If you are installing a headboard, proceed to follow the Headboard Bracket Assembly Guide on our website. If not, place your mattress on top of the power base. Power base assembly is now complete.
Frame Assembly Instructions
STEP 1
STEP 2
Remove the securing fasteners on the accessory components, and set them aside from the undercarriage of the base.
WARNING: PACKAGING MATERIAL MAY SMOTHER SMALL CHILDREN AND PETS
Carefully pull the folded power base unit out of the shipping carton. Remove and discard the plastic bag. Unfold the base keeping the unit top side down. For safety reasons, this should be performed by 2 people.

4
Remote PairingIF YOU HAVE A WIRELESS REMOTE
IF YOU HAVE A WIRED REMOTE
Your power base has an emergency lowering feature in the event that your power base is in the raised position and has lost power due to a power outage.
Emergency Power Down Feature
Locate and remove the cover for the 9 volt batteries on the control box or power supply box.
Press the “FLAT” button or the individual lowering buttons.
Once the bed returns to the flat position, remove the batteries from the Control box.
Install the two (2) alkaline 9 volt batteries and reinstall the battery cover.
NOTE: DO NOT raise the base when powered with only backup batteries. The batteries are only intended to lower the base in case of emergency.
STEP 1
STEP 2
STEP 3
STEP 4
STEP 1
STEP 2
STEP 3
STEP 4
STEP 5
STEP 6
STEP 7
Plug in the “A” output of the Y-Cable into Base A control port.
Unplug both wired remotecontrols from their lift motors and set aside.
Plug in the “B” output of the Y-Cable into Base B control port.
Remove and extend one of the provided Y-Cables.
Plug one of the provided hardwired remote controls into the “Control Input” side of the Y-Cable.
Route the control cable to your preferred side of the bed.
Make sure both Base A and Base Bare set up and positioned closelyside-by-side together. (Ignore this step for Split Top Queen setup. For the following steps, Base A/B will refer to Side A/B).
BControl Input
A
If you have a wired remote and want to connect to 2 power bases that will move in tandem as a single unit, follow the below instructions. For reference, bases will be refered to as “Base A” and “Base B”, but are not acutally label as such in person.
Your remote is already paired with your power base. Follow the below instructions for replacement remote pairing.
How To Unpair a Remote
Press any button on the remote control. When the control box light turns solid, the remote should be successfully paired.
Test and verify the remote is correctly paried by activating functions of the power base. You have now completed the pairing process.
To unpair a remote, simply pair another remote twice, to unpair the previously paired remote.
Place batteries into the remote control (3 x AAA batteries).
Ensure the power base is plugged into a functioning outlet.
Press and hold the pairing button on the control box until the indication light blinks.
STEP 1
STEP 2
STEP 3
STEP 4
STEP 5

HEAD AND FOOT MASSAGE CONTROLS (H,J)Turns on the corresponding massage unit and slowly increases or decreases massage intensity.
WAVE MASSAGE PATTERN (L)Turns on both head and foot massage motors to 3 different wave presets.
FULL BODY MASSAGE (K)Turns the Head and Foot Massage units on at the same time.
MASSAGE STOP (I)Press to stop all massage features.
NOTE: Any control button on the remote will interrupt and stop the FLAT, ZERO-G, Anti-Snore and Memory Position presets.
NOTE: The lowest setting will turn off the corresponding massage unit.
NOTE: The massage feature is designed to automatically shut off after 30 minutes of continuous use.
NOTE: Do not hold the memory position for more than 5 seconds or the setting will overwrite.
HEAD AND FOOT ADJUSTMENTS (A,C)Adjusts the head and foot sections to the desired positions.
FLAT (B)Returns both head and foot to the flat position.
MEMORY POSITION PRESETS (E,F)You can store 2 personalized memory positions. Press and hold the Memory button for 5 seconds until the LED light flashes 3 times to store the setting. To recall a Memory Position, press the corresponding button.
ZERO GRAVITY (D)Allows your legs to be lifted to a position slightly above the chest, which enables blood flow to easily circulate back to the heart, thus reducing stress and fatigue.
ANTI SNORE (G)Raises the HEAD slightly for easier breathing.
A. RAISE & LOWER HEAD SECTION
C. RAISE & LOWER FOOT SECTION
G. ANTI - SNORE
D. ZERO GRAVITY
B. FLAT
E. MEMORY POSITION 1F. MEMORY POSITION 2
H. HEAD MASSAGE INTENSITY
L. WAVE MASSAGE PATTERNS
K. FULL BODY MASSAGEJ. FOOT MASSAGE INTENSITYI. STOP MASSAGE
Remote Control Operation Guide
REMOTE LOCKOUT FEATURE (A,B)We created the remote lockout feature to help owners prevent unintended use of the base.
Activating Remote LockoutAt the same time, press and hold the HEAD UP and FLAT buttons for 3 seconds. The LED will flash twice to indicate activation. Pressing any buttons on the remote while in lockout mode will result in no movement from the power base.
Deactivating Remote Lockout Repeat the same process, press and hold the HEAD UP and FLAT buttons at the same time for 3 seconds. The LED will flash twice to indicate deactivation. The remote and power base will work normally.

NOTE: This power base may have minor intermittent performance due to RF Interference. This is a normal operation of the power base and is not a defect.
ADDITIONAL REMOTE FEATURES: • The buttons are back-lit when
a button is pressed, to aid the visibility of the remote in low light environments.
• Customers can control theremote without facing thereceiver (best transmissionrange is within 30 feet or 10meters).
• This Base uses a RF (RadioFrequency) remote controlsystem.
• The included remote is alreadypaired with your power base,so should be operational rightout of the box. Please testsome of the features to ensurefunctionality.
• Only replacement remotecontrols require pairinginstruction on following pages.If you find that your remote isnot paired with the bed, pleasefollow those Bluetooth pairinginstructions.
NOTE: Please remember to recycle all electronics.
NOTE: This device complies with part 15 of the fcc rules. Operation is subject to the following two conditions: (1) This device may not cause harmful interference (2) This device must accept anyinterference received, includinginterference that may causeundesired operation.
NOTICE: Changes or modifications not expressly approved by the party responsible for compliance could void the user’s authority to operate the equipment.
IMPORTANT NOTE:To comply with the FCC RF exposure compliance requirements, no change to the antenna or the device is permitted. Any change to the antenna or the device could result in the device exceeding the RF exposure requirements and void user’s authority to operate the device.
You’re remote should aready be paired to one of the control boxes. Identify which one this is before you begin. You must pair to the second control box in order to use the tandem feature. Repeat this process if you want 2 remotes paired to both sides.
Press the FLAT button 3 times to enter Tandem Mode. You will see a solid green light on the remote to confirm.
To now control both sides in tandem, press the FLAT button 3 times. The remote light will now flash between red and green.
To change between one side and tandem control, press the FLAT button three times, repeat this to toggle between sides and the Tandem Feature.
TO CHANGE BETWEEN ONE SIDE AND TANDEM CONTROL
STEP 1
STEP 3
STEP 2
If you want 2 sides to move in sync when using one remote (recommended for Split King/Cal King units) you can pair to both sides using the Tandem Feature. You can also pair two remotes to two sides, so that either remote can control both sides at the same time.
TANDEM FEATURE
Press and hold the pairing button on the second control box then press any button on the remote control. You are now paired to the second control box. The remote light will still be green.

How to Download the App Software
Use your iOS mobile device to log into the APP STORE.
Type “Reverie Nightstand” in the search column.
Select the Reverie Nighstand app.
Click install to download the app.
NOTE: Once the App is installed, when you open the app the Bluetooth module will connect to your device automatically.
NOTE: Make sure the Reverie Nightstand App is the last app open on your phone before locking (putting your phone in sleep mode)
Reverie Nightstand
iOS App User GuideDashboard/Home Screen• Condensed versions of key
features, functions and settingsare accessible and controllablefrom the Dashboard - Nightlight,Bluetooth status, Reverie Presets,Position control, Massage control,Comfort Settings, Routines,Memory Positions, Alarms
• The Dashboard and each PresetSection is customizable to displayyour favorite and most usedsettings.
• Expandable Toolbar gives accessto all app features - Dashboard,Position, Massage, Presets,Alarms, and Settings
• Nighttime Mode - Change thecolor scheme of the app to bettersuit nighttime use.
Position Control• Control your head and foot
elevation.• Adjust your base using the Slider
or press/hold the plus or minus symbols for micro adjustments.
• Switch between each adjustment(Head, Foot, Other) and view allsettings above each button.
• Save your current position and/or massage setting as a newComfort Setting.
Massage• Control your massage intensity
using the Slider or press/hold theplus or minus symbols for microadjustments.
• Full body - Turns on the full bodyfunction.
• Wave - Select one of 4 differentwave funtions
• Timer - Select your desiredmassage duration.
• Stop - Turns the massage off.
STEP 3
STEP 4
STEP 2
STEP 1

iOS App User Guide
Presets • Reverie Presets - Zero Gravity,
Anti-Snore, and Flat.• Comfort Setting - Press “+” to
program a unique head, foot and/or massage combination.
• Routines - Press “+” to program aset of saved comfort settings intoa series of timed positions.
• Memory Positions - Accessand overwrite previously savedMemory Positions from yourremote control.
• View details of each setting withthe expand arrow as well as Editand Delete.
Sleep Tracking
History
Log Last Nights’ Sleep
Zero Gravity
0:00
00/00/000000/00/0000
00/00/000000/00/0000
00/00/0000
Date
Hours Slept
Bed State
Sleep Rating
Sleep Tracking • Track your sleep daily using the
new Sleep Tracking Feature.• Today’s Date, Hours Slept, Bed
State and Post-Sleep FeedbackRating. (Today’s Date and BedState are automatically input).
• View your Sleep History to seewhat Bed State and Hours Sleptgives you your best sleep.
• This information can be used byour Sleep Coaching team to helpimprove your sleep.
Settings• Customize your app in settings.• User Profile - Define your user
profile to - The “Power Base” fieldis required and is important toallow the app to best representyoue specific power base.
• Bluetooth - Shows the bed yourapp is connected to. Showsnearby beds that you can connectto in order of proximity.
• Reverie Connect - If your baseis compatible with our ReverieConnect technology you canfollow the setup to control yourbase with 9 voice activatedcommands
• Set Start Screen - Set whatscreen you want the app to openup to.
• Mattress Configurations -Reconfigure your Reverie DreamSupreme mattress with thesefirmness guides.
• Login/Logout - Log in to youraccount
• Help - Contact info for technicalsupport.
• Update Bed - Update the softwareon your control box
• Factory Reset - Reset your app tooriginal settings.
Routines• Select which Comfort Settings
you want to use to create a newRoutine.
• Set the order of these ComfortSettings and the duration of each.
• Save your new Routine.
Alarm• Create an alarm setting to raise
and/or massage you awake.• Press “+” to create a new alarm
setting.• Set time - Scroll to select the
hour, minute and day.• Repeat - Select the days of the
week you would like the alarm toactivate.
• Assign - Select a comfort settingor routine to assignt the alarm to.
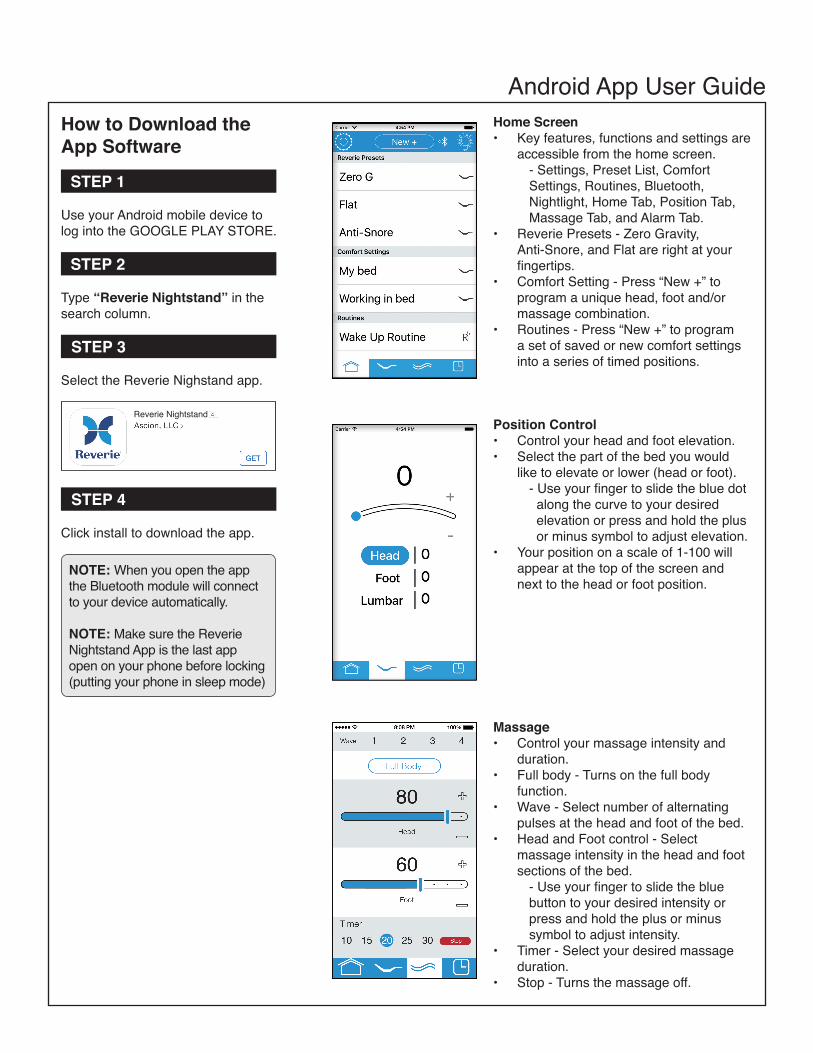
How to Download the App Software
Use your Android mobile device to log into the GOOGLE PLAY STORE.
Type “Reverie Nightstand” in the search column.
Select the Reverie Nighstand app.
Click install to download the app.
NOTE: When you open the app the Bluetooth module will connect to your device automatically.
NOTE: Make sure the Reverie Nightstand App is the last app open on your phone before locking (putting your phone in sleep mode)
Reverie Nightstand
Android App User Guide
STEP 3
STEP 4
STEP 2
STEP 1
Home Screen• Key features, functions and settings are
accessible from the home screen.- Settings, Preset List, ComfortSettings, Routines, Bluetooth,Nightlight, Home Tab, Position Tab,Massage Tab, and Alarm Tab.
• Reverie Presets - Zero Gravity, Anti-Snore, and Flat are right at yourfingertips.
• Comfort Setting - Press “New +” toprogram a unique head, foot and/ormassage combination.
• Routines - Press “New +” to programa set of saved or new comfort settingsinto a series of timed positions.
Position Control• Control your head and foot elevation.• Select the part of the bed you would
like to elevate or lower (head or foot).- Use your finger to slide the blue dotalong the curve to your desiredelevation or press and hold the plusor minus symbol to adjust elevation.
• Your position on a scale of 1-100 willappear at the top of the screen andnext to the head or foot position.
Massage• Control your massage intensity and
duration.• Full body - Turns on the full body
function.• Wave - Select number of alternating
pulses at the head and foot of the bed.• Head and Foot control - Select
massage intensity in the head and footsections of the bed.
- Use your finger to slide the bluebutton to your desired intensity orpress and hold the plus or minussymbol to adjust intensity.
• Timer - Select your desired massageduration.
• Stop - Turns the massage off.

Android App User GuideAlarm• Create an alarm setting to raise
and/or massage you awake. • Press “New +” to create a new
alarm setting.- Set time - Scroll to select the hour, minute and day.- Repeat - Select the days of the week you would like the alarm to activate.- Bed control - Select nothing or select a new or existing comfort setting or routine.- Snooze - Enable snooze.
Settings• Customize your app in settings. • User Profile - Define your user
profile to get recommendations on custom settings for you.
• Bluetooth - Shows the bed you are connected to and shows nearby beds that you can connect to in order of proximity.
• Help - Contact info for technical support.
• Mattress Configurator - Reconfigure your Reverie Dream Supreme mattress with these firmness guides.
• Factory Reset - Reset your app to original settings.
• Logout - Logout or create a new user.

Place the open side of the OuterHeadboard Bracket (B) onto theexposed square tube of the InnerHeadboard Bracket (A). This will create a tight fit between (A) and (B).Place 2 Headboard Bracket Bolts (C)with a Washer (D) through the OuterHeadboard Bracket (B) and into theInner Headboard Bracket (A). Threada Lock Nut (E) with a Washer (D) ontothe bolts without tightening it for lateradjustment.
Headboard Bracket AssemblyPARTS LISTA. Inner Headboard Brackets (2)B. Outer Headboard Brackets (2)C. Headboard Bracket Bolts (8)D. Washers (16)E. Lock Nuts (8)F. Wrench (1)G. Allen Key (1)
Bolt the Inner Headboard Bracket (A)to the headboard mount tube locatedon the steel frame crossbar using2 Headboard Bracket Bolts (C), 2Washers (D), and 2 Lock Nuts (E).Do not tighten the bolts yet for lateradjustment.
Use the remote control to raise thehead of the base in order to gainaccess to the power base frame.
STEP 1
STEP 2
STEP 3
STEP 4
STEP 5
Measure the distance from eachcenter of the mounting holes onyour headboard.
Measure the distance from eachcenter of the mounting holes in theOuter Headboard Brackets (B).
Adjust the position of the OuterHeadboard Brackets (B) so that themeasurement matches before youtighten the bolts in step 3.
Through the mounting holes in your headboard, fasten your headboard to the Outer Headboard Brackets (B) using the Headboard Bracket Bolts (C).
Lower the head section of yourpower base and check that there is sufficient distance between the edge of the power base and the Outer Headboard Brackets (B). Make adjustments to the Inner Headboard Bracket (A) if needed before tightening the bolts in step 2 attaching it to the frame. Repeat steps 2-4 for the opposing side of the power base.
To prepare to install the headboardbrackets to the power base, placeone set of brackets on the left-handside of the base and one set ofbrackets on the right-hand side of thebase.
STEP 6
B.
D.C.
A.
E. F.
G.
E
D AC
D
B
A
D
D
C
EC
B

TroubleshootingIn the event the Power Base fails to operate, investigate the symptoms and possible solutions provided in the chart below:
SYMPTOM SOLUTION
No features of the Power Base will activate.
• Make sure your remote is paired or plugged intothe bed.
• Your electrical circuit breaker may be tripped.• Verify the power cord is plugged into a working,
grounded electrical outlet. A grounded, electricalsurge protection device is recommended. Test theoutlet by plugging in another working appliance.
• This may be due to overload condition, remove theload and put the bed into the flat position and thenmove it all the way to maximum position to test thatthe functions are fully operational.
Lift function has minor interference during operation.
• There may be an overload of weight on your bed.• Press the lift buttons squarely & accurately.• The power base mechanism may be obstructed.
Elevate the power base and check for anobstruction. Remove the obstruction.
Head or foot section will elevate but will not return to the horizontal (flat) position.
• The power base mechanism may be obstructed.Elevate the power base and check for anobstruction. Remove the obstruction.
• The head section may be too close to the wall. Theheadboard may be too close to the edge of themattress. Adjust if required.
Noise when operating the bed.
• Check for obstructions under the bed.• The actuators make a light noise during operation,
this does not indicate any defect.• Squeaking noise could be caused by a loose bolt.
Identify and tighten the bolt.• If no solution can be found please call Customer
Service.
Excessive massage motor noise.
• Make sure the massage motor cable is not looseand hitting the base structures.
• Verify that the bed is not positioned against a wall,nightstand, or other object that may cause thevibration or noise.
• If this base is installed over a bed frame, verify themassage motors are not causing the bed frame (orbed frame components) to vibrate.
• Verify that the headboard attachment hardware isfirmly tightened.

TroubleshootingRemotes only
SYMPTOM SOLUTION
Remote readout doesn’t match actual bed position.• Recalibrate by pressing FLAT on the remote, then
lift all sections to maximum position until it shows 100 on the remote screen.
Remote states “No Bed Paired”.
• Allow the remote to go back to sleep by setting down, check if its connected after 3 minutes.
• If not resolved, go through the pairing process again.
Distorted image on the remote screen.• Let the remote go back to sleep and wake it up
again. Repeat this multiple times. If problem persists, contact customer service.
Remote states other remote connected.
• Either your phone is connected to the bed via the Reverie Nightstand app or another remote is connected. Disconnect from bluetooth in the app and make sure the other remote is asleep.
Remote states PLC battery error. • Please call Customer Service.
Remote Lockout Feature not working.
• Make sure you are correctly pressing both specified buttons at the same time.
• Verify that the remote has battery power.• Make sure there are no other devices causing RF
interference with the remote.• If cannot determine then please call customer
service.
20 Year Limited Warranty20 Year Limited Warranty for Reverie Power Bases
YEAR 1: FULL COVERAGE OF PARTS AND LABOR
YEARS 2-5: FULL COVERAGE OF PARTS ONLY
The Purchaser’s adjustable foundation may be equipped with a lumbar support feature. When the lumbar support feature is articulated or any other portion of the adjustable foundation is in an articulated position, any use that results in weight being distributed unevenly across the entire top of the foundation may damage the adjustable foundation and shall void this warranty.
This Limited Warranty does not include reimbursement for inconvenience, removal,installation, setup time, loss of use, shipping, or any other costs or expenses.
Some states may not allow the exclusion or limitation of incidental or consequential damages in some circumstances, so the above limitation or exclusion may not apply toevery Purchaser. This Limited Warranty gives the Purchaser specific legal rights, and thePurchaser may also have other rights, which may vary from state to state. This LimitedWarranty is valid in all states of the United States except Alaska, Hawaii and PuertoRico.
YEARS 6-20: FULL COVERAGE OF FRAME ONLY
ADDITIONAL TERMS AND CONDITIONS
Repairs to or replacement of the adjustable power base or its components under the terms of this Limited Warranty will apply to the original warranty period and will not serve to extend such period.
Ascion, L.L.C. d/b/a Reverie (hereinafter referred to as “Reverie”) warrants to the enduser (hereinafter referred to as “Purchaser”) that during the twenty (20) year term of thisLimited Warranty, Reverie will, at its sole discretion and option, repair or replacePurchaser’s motorized bed frame or motorized bed foundation parts (hereinafter referred to as “adjustable power base” or “adjustable power bases”) that are found to be defective due to faulty workmanship or materials, subject to the limitations set forth herein.
This Limited Warranty begins on the “warranty commencement date” which is the date of purchase for new unused adjustable power bases and the date of manufacture foradjustable power bases that have been used as floor or display models. Thus, on a floormodel adjustable power base, the warranty is a portion of the 20-year Limited Warranty.If original proof of purchase is not provided by Purchaser, Reverie reserves the right todetermine that the adjustable power base is not covered by this Limited Warranty or touse the manufacturing date as the warranty commencement date. This Limited Warrantyextends only to the original Purchaser and may not be transferred.
Upon receiving reasonable notice during the first year from the warranty commencementdate, Reverie will send replacement parts (at no cost to the Purchaser) for any defectiveadjustable power base part to the Purchaser, and Reverie will pay all pre-authorized laborand transportation costs associated with the repair or replacement of any parts Reveriedetermines to be defective. This one (1) year Limited Warranty shall not apply if Purchaser does not return any and all defective parts to Reverie within 15 days of Purchaser’s receipt of replacement part(s).
Upon receiving reasonable written notice at any point in time that is more than one (1)year and up to five (5) years from the warranty commencement date, Reverie will offer replacement parts for any defective adjustable power base part to the Purchaser. This four (4) year Limited Warranty shall not apply if Purchaser does not return any and alldefective parts to Reverie within 15 days of Purchaser’s receipt of replacement part.Purchaser shall bear all service, transportation, labor and shipping costs related to the delivery and/or replacement of the defective part.
Upon receiving reasonable written notice at any point in time that is more than five (5) years and up to twenty (20) years from the warranty commencement date, Reverie will offer replacement parts for any mechanical part of the frame found to be defective. Electronics, electrical components, drive motors and massage motors are excluded from this Limited Warranty. Purchaser shall bear all service, transportation, labor and shipping costs related to the delivery and/or replacement of the defective part.
This Limited Warranty does not apply: (a) to any damage caused by the Purchaser, including damage to or cracks in the remote or its LED screen, and peeling of the silicon rubber from remote; (b) if there has been any unauthorized repair or replacement of adjustable power base parts; (c) if the adjustable power base has been mishandled (whether in transit or by other means), subjected to physical or electrical abuse or misuse, or otherwise operated in any way inconsistent with the operation and maintenance procedures outlined in the Owner’s Manual, this Limited Warranty, and any otherapplicable document published or approved by Reverie; (d) to damage to mattresses, fabric, cables, electrical cords or items supplied by any Reseller of the adjustable power base, (contact the Reseller or other relevant party for warranty information on these items.); (e) if there have been any unnecessary service calls, including costs for in-home service calls solely for the purpose of educating the consumer about the adjustable power base or for finding an unsatisfactory power connection.
This adjustable power base may include the ProGrip™ mattress retainer-less retention technology. Depending on the mattress used by the Purchaser, Purchaser may experience varying degrees of shifting of their mattress. Such shifting shall not be considered a defect under this Limited Warranty. Should shifting persist, please install the supplied retainer bars.
The decision to repair or to replace defective parts under this Limited Warranty shall be made exclusively by Reverie in its sole and exclusive discretion.
REPAIR OR REPLACEMENT SHALL BE THE SOLE REMEDY OF THE PURCHASER. THERE SHALL BE NO LIABILITY ON THE PART OF REVERIE AND THEIR RESPECTIVE PARENTS, SUBSIDIARIES, DIVISIONS OR AFFILIATES FOR ANY SPECIAL, INDIRECT, INCIDENTAL, OR CONSEQUENTIAL DAMAGES OR FOR ANY OTHER DAMAGE, CLAIM, OR LOSS NOT EXPRESSLY COVERED BY THE TERMS OF THIS LIMITED WARRANTY.
UNLESS OTHERWISE EXPRESSLY STATED IN THIS DOCUMENT, REVERIEAND THEIR RESPECTIVE PARENTS, SUBSIDIARIES, DIVISIONS AND AFFILIATES EXPRESSLY DISCLAIM ANY OTHER WARRANTY WHATSOEVER,EXPRESS OR IMPLIED, INCLUDING BUT NOT LIMITED TO IMPLIED WARRANTIES OF MERCHANTABILITY, FITNESS FOR A PARTICULAR PURPOSE, AND FREEDOM FROM DEFECTS AND WORKMANSHIP.
If you experience any trouble with your adjustable power base during the warrantyperiod, please consult the troubleshooting guide provided with your adjustable powerbase and online (if applicable), or the troubleshooting video provided online (ifapplicable). If problems persist after following these instructions, please call: 800-973-8374.
Please have your receipt ready and available.Thank you and enjoy your adjustable power base.