R18 Colleague Financials Training Manual using UIocisweb/s/R18 Colleague Financials Training... ·...
34
User ID: cf___ Colleague Financials Training Manual Using Datatel User Interface Release 18 Created: February 3, 2004 Revised: December 5, 2007
Transcript of R18 Colleague Financials Training Manual using UIocisweb/s/R18 Colleague Financials Training... ·...

User ID: cf___
Colleague Financials
Training Manual
Using Datatel User Interface
Release 18
Created: February 3, 2004 Revised: December 5, 2007

2
Table of Contents
Getting Started • Steps to Log into Datatel User Interface 3-4 • Workspace functionality and Layout 6-8 • Report Browser 9
Financial System Screens • REQM - Requisition Maintenance 10-12• APRV - Approval Maintenance 13 • RQIL – Requisition Item List 13 • RQIM - Requisition Item Maintenance 14 • APPW – Approval Password Maintenance 15 • APRN - Approvals Needed 16 • RINQ – Requisition Inquiry 17 • PINQ – Purchase Order Inquiry 17 • BINQ – Blank PO Inquiry 18 • DINQ – Procurement Dates Inquiry 19 • PORC – Purchase Order Receiving 20 • PORL – Purchase Order Receiving List 21 • XCCI – Cost Center Inquiry 22 • ACBL - GL Account Balance Inquiry 23 • ENCI – GL Encumbrance Inquiry 24 • LGLA – List GL Activity 25
Appendix I
• Tips Sheet 26-27• Travel Authorization / Printing & Duplication 28 • The General Ledger Number 28 • Purchase Requisition Life Cycle 29 • Unofficial Listing of Budget Object Accounts 30
Appendix II • User Interface Function Keys 31 • How to use the PrintNow software 32-33 NOTES 34
3
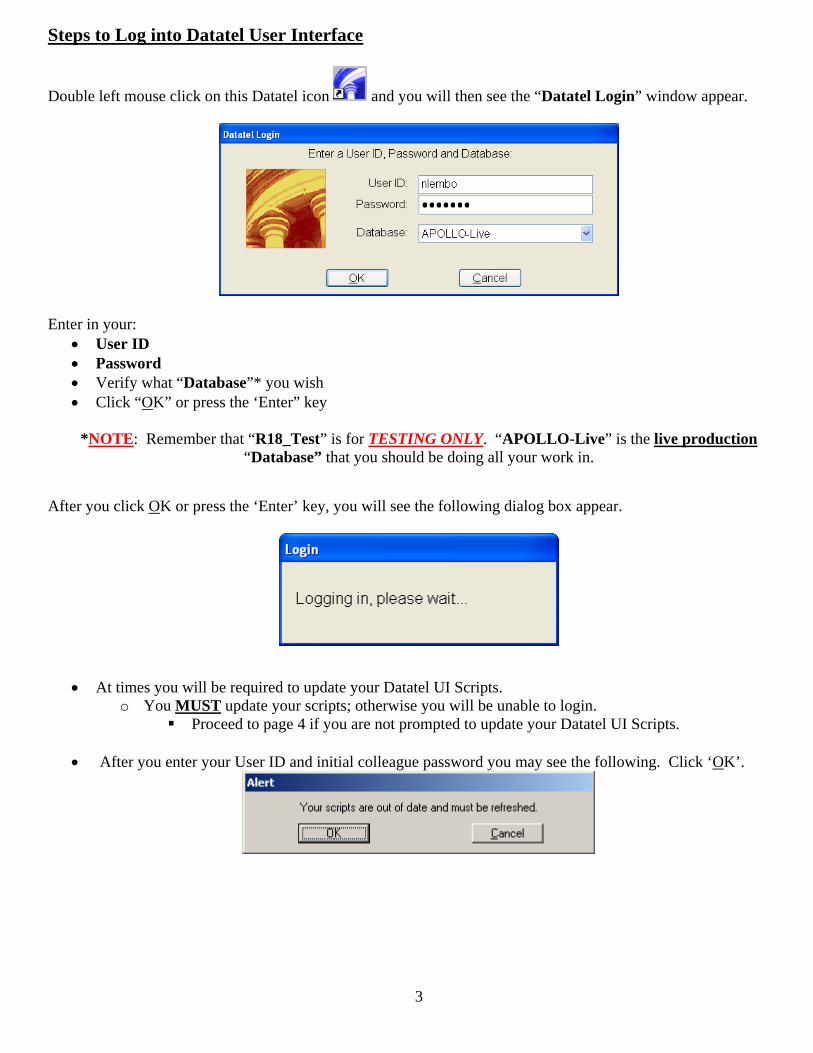
Steps to Log into Datatel User Interface
Double left mouse click on this Datatel icon and you will then see the “Datatel Login” window appear.
Enter in your:
• User ID • Password • Verify what “Database”* you wish • Click “OK” or press the ‘Enter” key
*NOTE: Remember that “R18_Test” is for TESTING ONLY. “APOLLO-Live” is the live production
“Database” that you should be doing all your work in. After you click OK or press the ‘Enter’ key, you will see the following dialog box appear.
• At times you will be required to update your Datatel UI Scripts. o You MUST update your scripts; otherwise you will be unable to login.
Proceed to page 4 if you are not prompted to update your Datatel UI Scripts. • After you enter your User ID and initial colleague password you may see the following. Click ‘OK’.

4
• You will then see the following windows appear.
• Once the script update is completed, you will see.
• Click OK and then double click your Datatel icon on your Desktop to login. o Enter in your:
User ID Password Verify what “Database” Click “OK” or press the ‘Enter” key
• When the ‘Privacy Statement’ appears, read and then click ‘OK’.
• Enter your second colleague password when prompted.
o Please note that the description may either say: ‘COLLEAGUE 18.0.5 password, please’ or ‘Envision Run-time 4.8.5 password, please’.
• Regardless of the description, this is your second Colleague password. • Each time you switch between applications, UT (Utilities), ST (Student System) or
CF (Colleague Financials) you will be ask for your second Colleague password.
• Click “OK” or press the ‘Enter” key

5
After you have entered your second colleague password, you will see the following dialog box appear.
You are now logged in and at the ‘Main Menu’. In this example to the “Student System” (ST). • To switch from one Application (ST) to another (CF) or between any other applications, click on ‘Apps’ on
the ‘Menu Bar’ an click on the application you wish to access. o NOTE: UT & TOOL are applications that ONLY Computer Services has rights to. CORE is an
application that has limited access. ST and CF are the primary application the majority of the community has rights to. Access could vary from person to person.
‘Quick Access’ Address Bar Current Database
& Application Button Bar Title Bar System Menu Bar Menu Bar
Current Application
Menu Tree Preview Window – Shows the content of the selected ‘Menu Tree’ Folder. (i.e.: ST)

6
Workspace functionality and Layout
Save All Cancel All Record Delete
Address Bar Exit Save Cancel Hide/Show Help
Menu Tree
1. ‘Quick Access’ Address Bar - The address bar enables you to access any screen directly by entering the mnemonic, or by using the drop-down button to select previously used mnemonics. Press “Enter” or click the “Go” button to display the select screen.
2. Exit - will exit you out of the User Interface. (You must be at the main menu to exit.) 3. Save - will save the changes you have done. 4. Save All – will save all changes made on all screens and bring you back to the main menu 5. Cancel - will cancel any changes you have made on the current screen. 6. Cancel All – will cancel all changes made on all screens (prior to you saving any changes) and bring you back to the main
menu. 7. Record Delete - is used to delete an entire record. When you click this button, you are prompted to confirm that you wish
to delete the entire record. (This only works for forms which have been defined to allow this option.) 8. Hide/Show Menu Tree – will allow you to hide or show the menu tree while you are on a screen. 9. Help - Provides an explanation for selected fields on a screen.
On any of the menu screens you may see one or more of the following icons:
Represent an expanded/open folder Represent an unexpanded/closed folder
Folder, Inquiry screens, Maintenance screens, Reporting screens, Processing screens

7
On any of the screens you may see one of the following icons:
- Detail Button - Window Operation Button - Date/Calendar Button
- Scroll Buttons - Calculator Button - Drop-Down Table Button Tab
Header
Detail Button
Window Data Button Section
Date/Calendar Button Scroll Buttons The type of access you have to any screen is determined by the security assigned to your account. You will see different field colors in the ‘Data Section’ of the screen that will help you determine the type of access you have to a particular screen or a particular field on a screen.
• Fields that are ‘Grayed’ indicate ‘Inquiry Only’ access. o You may see information, but not add, modify or delete.
• Fields that are ‘White’ indicate ‘Maintenance’ access. o You may add, modify and delete information.
• Fields that are ‘Red’ indicate ‘Mandatory’ information. o This field will not change its color regardless if it is ‘Inquiry Only’ or ‘Maintenance’. o The access to a field like this is determined based on the access you have to the screen.
• Fields that are ‘Black’ indicate ‘Restricted’ information.

8
‘Quick Access’ Address Bar From the menu screen, click on the drop down to display previously select mnemonics (shows last 10) or
enter a mnemonic. Press the “Enter” key or click the “Go” button to display the select screen.
How to Creating a list of Favorites
Click “Favorites” from the Menu Bar. Click “Add to Favorites” from the drop-down menu.
Type the mnemonic you wish to add to your list of favorites. Click “OK”
To view Favorites
Click “Favorites” from the Menu Bar. A drop-down menu appears showing your list of favorites that have been added.
You may also view your favorites in the ‘Favorites’ on the Menu Tree.

9
Report Browser
• When a report is generated and the results are set to display to the screen(H Hold/Browse File Output), you will see the following:
• In the upper right hand side of the report browser you will see the button bar used to navigate the screen and perform certain functions.
Exit Report First Page Page Up # of Pages Print to Local(AUX) printer
Import results to PC Page Down Last Page Print to a Remote(Network) printer as a Text File

10
REQM Requisition Maintenance The REQM screen is the initial screen to initiate a requisition. Most of the general information about the future order, such as, the vendor, shipping information and the date needed is record here. From the main menu double click on the REQM mnemonic.
• To enter a new requisition, type ‘A’dd o To view an existing requisition, type in the requisition number and click the OK button.
SPECIAL NOTE: If you have forgotten your requisition number, type in the following at the look up prompt. This will display all requisitions that have been done by a particular initiator.
• ;IN Brown,Mary (the initiator’s last name,first name.) • You can now find the requisition you are looking for by who entered it in to the
system • ;VN Dell (the vendor’s name. the name has to match what was entered into the system.)
• You can now find the requisition you are looking for by the name of the Vendor.
• Always click the OK button or press the Enter key to automatically assign a requisition number.

11
REQM Requisition Maintenance (continued)
• This window will appear to confirm the assignment. • Click the OK button or press the Enter key.
• Always click ‘Y’ when this window appears to accept the date. On the REQM screen, the following fields would need to be populated:
• Requisition Date: Automatically defaults in today’s date • Initiator: Is the code assigned by OCIS. (Same as your login to the colleague system or type you last name) • Desired Date: Enter the date items are needed. (i.e., 11/05/04) • Name: Type in the vendor name. (This field has multiple lines if needed.)
o Click on ‘C’ for Corporation, ‘P’ for Person.
• Address: Type in the vendor address. (This field has multiple lines if needed.) • CSZ: Enter in the City, State and Zip. • Terms: You would enter ‘PP’ in this field if you require ‘Pre-Payment’. • Approvals: You will set up the approval stream by clicking on the ‘detail’ button, which brings you to the
APRV screen. (shown on the next page) You need to enter in the approval stream under the ‘Next Approvals’ column. Please refer to Appendix I for additional information.

12
REQM Requisition Maintenance (continued)
• Line items: Details to RQIL & RQIM. (refer to pages 11-12 for more information) • Printed Comments: Enter the requesting department name here. • Comments: Enter BPO (Blanket Purchase Order) if you are using one to pay for the item(s). If you are
having a speaker coming in, you would need to record that speaker's Social Security Number here as well. • Priority: Enter ‘A’ for attachments. Make sure to forward copies to purchasing. • Requisition Done: After you have completed all the data entry, type ‘Y’. You can enter ‘N’ if you are not
finished and wish to come back to complete this requisition. Either way make sure to write down the requisition number the system will generate so you may go back and view this requisition.

13
APRV Approval Maintenance This screen allows the initiator of the requisition to setup the approval stream. This screen is also used to directly approve a requisition.
• ‘Approvals’ column: This is the column in which a person identified in the ‘Next Approvals’ column would okay/approve the requisition.
• ‘Next Approval’: This is where the initiator sets up the approval stream.
RQIL Requisition item List The RQIL screen is a summary page which shows items to be purchased. The screen will be blank when you first access the screen. Once you ‘detail’ to the RQIM (Requisition Item Maintenance) screen and enter the individual items you wish to purchase, you will then see that information on this summary screen.

14
RQIM Requisition Item Maintenance The RQIM screen is a ‘Line Item Detail Page’ where you enter a description, price and quantity of an item that you are placing. You also indicate the general ledger account to which the cost will be charged. You must fill out one entry on RQIM for each item purchased.
• Vendor name: Defaults from REQM • Description: Enter item description. Please be specific, include stock number if needed. There are multiple
lines if needed. • Est Price: enter the cost of the item. Do not use ‘$’ the amount is automatically formatted. (i.e.; 2200
becomes $2,200.0000) • Quantity: Enter the quantity. Do Not enter zero. • Unit of Issue: Refer to Appendix I for specific codes. (i.e.; EA = Each) • GL Account No: Mandatory. Enter in the GL account information. You can obtain this information from
the cost center director. o Do not type over an error. You need to delete the whole line. To do this, hold down the ‘Ctrl’ key
and press the ‘Backspace’ key. o NOTE: GL fund availability will automatically appear on the right hand corner of the screen. If the
GL account number is the same for subsequent line items, use the @ sign as a short cut for data entry.
• Desired Date: Defaults from information already entered on REQM. Save your information by clicking on the single ‘diskette’ icon at the top of the page and repeat the same steps to enter the next line item. If you have completed entering in all your line items, click the single red ‘X’ to cancel further entries on the ‘RQIM’ screen. This brings you back to RQIL and you will then click on the single ‘diskette’ icon to save your work and you will be brought back to the REQM screen. If you are complete with the requisition, make sure you place a ’Y’ in ‘Requisition Done’ field on REQM.

15
APPW Approvals Password Maintenance You must setup your own ‘Approvals Password’ before you will be able to approval any requisitions.
• Enter your approval ID.
• Enter in a password that you will remember. Then press the ‘Enter” key. o This password is your responsibility to create and change at your discretion.
• You will then be asked to re-enter the same password as a confirmation. Then press the ‘Enter” key. • Back at the “Approvals LookUp’, click the ‘Finish’ button to return to the main menu.

16
APRN Approvals Needed This screen lists requisitions that need approval from a specific person. When you enter an approval ID, the screen lists all the documents (if any) that need approval from that specific person.
• Enter your approval ID.
• Enter the Fiscal Year you wish to view.
• Enter your ‘Approval Password’ that you created on the APPW screen.
• Click on the ‘Detail’ button next to each Requisition listed that waiting for your approval. o When you ‘detail’ you are brought to the ‘REQM’ screen. You will then click on the detail button
next to the ‘Approvals’ field and type in your approval ID in the left hand column, then enter your approval password and then click on the ‘single diskette’ icon to save your work. Click the ‘single diskette’ icon again to return to the APRN screen to repeat these steps for each requisition listed.

17
RINQ Requisition Inquiry This screen is a summary of all information on the requisition. This screen also provides you with the status of the requisition.
• In Progress: The initiator has saved the requisition but has answered ‘No’ in the field ‘Requisition Done’ • Not Approved: The requisition
is in the approval stream but has not received all the necessary approvals yet. You may check to see what outstanding approvals there are by going to REQM and detailing on the ‘Approvals’ field
• Outstanding: The requisition is complete, but no purchase order has been generated.
• PO Created: Self explanatory. o You may detail on the
‘PO Numbers’ field to go to PINQ(Purchase Order Inquiry)
o You may detail on the ‘BPO Numbers’ field to go to BINQ(Blanket Purchase Order Inquiry)
PINQ Purchase Order Inquiry This screen allows you to view information on a purchase order. From this screen you are able to detail on the ‘PO Date’ field to DINQ(Procurement Dates Inquiry) for: purchase order number and status date, requisition information, purchase order date, check number issued, etc…

18
BINQ Blanket PO Inquiry This screen allows you to view information about a blanket purchase order (BPO).

19
DINQ Procurement Date Inquiry This screen allows you to view procurement information: purchase order number and status date, requisition date, contact date, purchase order date and approvals. You can view information for line order items, receiving dates, invoice dates and check number issued.
• PO Number: Displays the ID of the purchase order on the screen • PO Status: Displays the PO status:
o In Progress(unfinished) o Not approved o Outstanding o Accepted o Back ordered
o Invoiced o Paid o Reconciled o Voided o Closed
• Requisition: Use the scroll bar next to this field to scroll through the list of requisitions. • Contract Date: Date a contractual obligation was made with the vendor. (This date default to the ‘PO Date’
field • PO Date: Date of General Ledger posting. • Approvals Date: Name of person(s) who approved. Date of approval(s) will be to the left of this
information.

20
PORC Purchase Order Receiving This screen is used to indicate the receipt of goods and services. You must go to this screen once you have received any goods and services so the vendor can get paid.
• Date Received: Enter the date the goods/services were received. • Packing slip No: Enter the packing slip number or type ‘None’. • Description: Enter the quantity of each item received under the ‘Accepted’ column. • Accept all Items: Enter ‘Y’ to accept all items. Do not use this if any of the items are not received.

21
PORL Purchase Order Receiving List This screen allows you to view item activity for a purchase order regardless of that item’s status. Since this screen displays items with any status, it can be an effective tool to research all activity for a purchase order.
• Description/Item Status: This field displays the description of the item entered via the RQIM screen. This includes the status of the line item.
o A - Accepted o B - Backordered o C - Closed o H - Hold on voucher o I - Invoiced
o O - Outstanding o P - Paid o R - Reconciled o V - Voided
• Ordered – Displays the quantity originally entered via RQIM. • Received – This information is not currently maintained. • Accepted – Displays the status accepted via the PORC screen. • Rejected - This information is not currently maintained.

22
XCCI Cost Center Inquiry This allows you to view the current budget status for all the object accounts for a particular cost center. The information is displayed in summary format and includes the current budget, encumbrances, actual expenses and available balance. When you enter a cost center account number, the information is displayed for the select year. EXAMPLE Enter the 5-digit COST.CTR no. and press RETURN: 91110 Enter the 4-digit fiscal year and press RETURN: 2003
KEAN UNIVERSITY BUDGET STATUS INQUIRY XCCI PURCHASING-FINANCE SYSTEM 15:01:13 02-17-04 COST CENTER: 11-91110 FACILITIES & MAINT CURRENT ENCUM ACTUAL AVAILABLE OBJ. DESCRIPTION......... BUDGET....... BRANCES..... EXPENSES..... BALANCE..... 1914 DUE FROM FUND 14 2,955.00 2,955.00- 4995 RECOVERIES - GENERAL 1,060.00- 1,060.00 4996 RECOVERIES- GASOLINE 5,482.19- 5,482.19 5021 PRINTING-OFFICE SPLY 27,709.95 2,390.20 4,937.91 20,381.84 5022 VEHICULAR EXPENSES 62,397.00 26,341.17 28,977.33 7,078.50 5023 EDUCATIONAL SUPPLIES 1,225.43 0.00 910.36 315.07 5024 HOUSEHOLD & CLOTHING 150,595.54 38,730.51 71,179.73 40,685.30 5025 FUEL-UTILITIES 3,159,159.40 972,512.71 2,022,861.71 163,784.98 5030 TRAVEL 4,140.08 0.00 4,098.24 41.84 5031 TELEPHONE 1,210.86 424.87 775.13 10.86 5033 INSURANCE 997.50 997.50 5034 COMPUTER SERV & SOFT 7,080.00 960.00 2,657.10 3,462.90 5035 HOUSEHOLD & SECURITY 292,700.00 83,957.08 206,518.92 2,224.00 5036 PROFESSIONAL SERVICS 164,634.00 48,817.50 68,939.91 46,876.59 5038 OFFICIAL RECEPTION 97.89 97.89- 5039 MEMBRSHPS-FEES-SBSCR 1,460.00 0.00 620.00 840.00 5040 REPAIR-BLDG & GROUND 830,773.35 257,978.41 545,430.35 27,364.59 5041 REPAIR - EQUIPMENT 459.06 0.00 459.06 0.00 5042 MAINTENANCE-VEHICLES 144,899.00 40,343.81 56,658.70 47,896.49 5043 SNOW REMOVAL 145,200.00 32,575.71 75,643.68 36,980.61 5047 RENTALS 5050 EXTRAORDINARY 5057 CLAIMS-SETTLEMENTS 5060 SPECIAL PROJECTS 354,601.00 67,106.05 204,050.80 83,444.15 5070 IMPROV BUILD & GRNDS 23,725.50 0.00 9,500.00 14,225.50 5074 VEHICULAR EQUIPMENT 151,000.00 24,400.00 109,680.00 16,920.00 5076 EQUIPMENT-ALL OTHER 76,896.65 18,657.00 57,739.40 500.25 5077 COMPUTER EQUIPMENT 1,946.00 0.00 1,947.00 1.00- 5095 PENALTY AND INTEREST 5099 EXPEND- PRIOR YEAR 5112 SALARIES- REGULAR 5,020,415.71 2,392,570.89 2,627,844.82 5113 ADJUNCT SALARIES 5115 OVERTIME 153,222.75 93,461.82 59,760.93 5118 STUDENT AIDES 6,405.07 3,276.00 3,129.07 5143 SALARY-SNOW REMVL 46,857.57 46,857.57 6914 INTRAFUND-DEDICATED 15,000.00- 15,000.00- ------------- ------------ ------------- ------------ 10,814,711.42 1,615,195.02 5,959,404.74 3,240,111.66

23
ACBL GL Account Balance Inquiry This screen also you to determine whether or not funds are available for a specific account. The information is displayed in summary format. When you enter a General Ledger account number, information is displayed for any year that is open, frozen or authorized.
• Enter your GL number and click OK or press the Enter key.
• Press the Enter key to default the current fiscal year or type in a year.
• Allocated Budget: The allocated budget amount is the amount in the line item that has been released and is available to use.
• Actuals: Displays the cumulative amount of current, future and memo actual activity. o Encumbrances: The outstanding encumbrance amounts displayed. You can detail to ENCI9GL
Encumbrances Inquiry) for lists. • Unencumbered balance: The total unencumbered balance for the fiscal year is displayed. Includes current
and future balances posted as well as memo transactions. o Requisitions: the outstanding requisition amount is displayed. You can detail to GLRQ(GL
Requisition Inquiry). • Available Funds: The amount of the allocated budget that is not committed. • Budget Officer: Not used.

24
ENCI - GL Encumbrance Inquiry This screen allows you to view information about outstanding encumbrances for a specified GL account number. The screen lists all outstanding purchase orders (and payroll encumbrances) and shows a cumulative total of the encumbrances at the bottom of the screen. It is used in conjunction with the ACBL(Account Balance Inquiry) screen.
• Enter fiscal year
• Reference No: A list of reference numbers are displayed. To access additional information go to the item you wish to view and press the detail button. Depending on the type of item you are looking at, you will be brought to either the BINQ or PINQ screen.

25
LGLA – List General Ledger Activity This screen allows you to view the status of a particular account or group of accounts. You can obtain information about actuals, budgets or encumbrances. You can also print a report on all detail entries that have been posted to the account and current account balances.
• Fiscal Year: Enter the fiscal year to be viewed. The system will automatically default the current fiscal year. The start and end dates will automatically be displayed.
• Start Date: Enter the start date you wish you want to report on. • End Date: Enter the end date you wish you want to report on. • (A)ctuals, (B)udgets or (E)ncumbrances: Enter the activity type you wish to report on. (A, B or E) • Include GL Accounts: Enter the account you desire. • Source Codes: choose a source or press the enter key to include all sources. • Process with the Report: Enter ‘Y’ and press the Enter key.
o A new screen will appear just press the Enter key. • The report will then display on your screen.
The most frequently used source codes are: AA-Actual Open Balance, EP-PO Encumbrance, OS-Outstanding System(Payroll) AB-Approved Budget, IC-Inventory Chargeback, PJ-Purchase Journal(Payment Vouchers) BU-Budget Adjustments, IV-Invoices, CR-Cash Receipts, JE-General Journal, YE-Year end close entry.

26
APPENDIX I COLLEAGUE DISTRIBUTED FINANCIALS
TIP SHEET
PURCHASING: BUDGET GENERAL ACCT. For help call: Extension: 75056 Ext: 73120 Ext. 73180 Fax: 75055 @ KEY To repeat a number that was previously entered use the @ key = Shift Key + 2 key. Colleague will insert the last number typed in that field. PRE-PAYMENT Pre-payments are indicated by typing PP in TERMS field. This occurs when the check must accompany the purchase order being sent to the vendor, i.e. a subscription or membership. APPROVALS String
1) Cost Center Director – all requisitions. (*Enter Colleague User Name) 2) Budget – if purchase requisition is $500 or more. (Enter BUDGET) 3) OCIS -- if purchase requisition is: (Enter OCIS)
a) 5034 -- computer services and software. b) 5077 -- computer equipment.
4) VPAF -- if purchase requisition is $1,000 or more. (*Enter Colleague User Name) 5) Departmental VP – if requisition is $1,000 or more. (*Enter Colleague User Name) 6) College/School Dean –if requisition is $1,000 or more.(*Enter Colleague User Name) 7) Grant – Any purchase from a grant: (Enter GRANT)
(*Colleague User Name Format = First Letter of the First Name and up to Seven (7) characters of the Last Name. Example: Steven Jones – Colleague user name = sjones).
QUOTES Purchasing requires a written quote from the vendor for any item priced at $500 or more. ATTACHMENTS An attachment must be sent to purchasing in the following instances:
a. Memberships b. Subscriptions c. Quotes for items with a cost of $500 or more
Type the letter “A” in PRIORITY field Purchasing will not mail your purchase order to the vendor until the attachment is received. *** Please be sure to write the requisition number on the attachment so that it can be matched up with the correct requisition.

27
UNITS OF ISSUE These are the most commonly used units of issue: CODE FOR CODE FOR EA EACH LI LITER
BX BOX LT LOT CH CRATE RM REAM CN CAN RO ROLL CO COIL ST SET CS CASE TN TON CT CARTON UN UNIT DZ DOZEN WK WEEK FT FOOT YD YARD GL GALLON YR YEAR GR GROSS M THOUSAND (For additional codes, enter … (3 dots) in the field and press the Enter key. Select the code you wish to use
from the resolution screen and click the diskette in the lower right hand side of the resolution screen to save selection.) BPO’s & Confirming Orders BPO – a blanket purchase order is issued for recurring expenses. Funds are set aside and as the invoices are received, the amount of the invoice is deducted from the blanket. Blankets can be increased throughout the year. Type BPO in COMMENTS field. Confirming Orders – Confirming Orders are no longer permitted and Kean. There are no exceptions. REQUISITION STATUS
In Progress – The requisition was saved with REQUISITION DONE Field set to “NO”. The requisition has not yet been completed.
Not approved – The requisition is in the approval stream but hasn’t received all necessary approvals yet.
Outstanding – The requisition has been approved, but a purchase order has not yet been generated.
Purchase Order Created – Self-explanatory.
DO NOT USE THE PURCHASE REQUISITION SYSTEM FOR:
1. On-campus duplication and printing

28
Travel Authorization - Purchase Requisition is required Request for Travel Authorization:
Travel Authorization – Approved Forward G/A – Assigned number Complete Requisition for each vendor:
Hotel, Travel Agency, Conference registration, reimbursement Travel Authorization # must be entered on first line of description.
Travel Expense Voucher (Reimbursement)
Mileage: $0.31 per mile Meals: $36.00 per day ($8, $8 $20) Original receipts required except for meals
************************************************************* Printing & Duplication - No Purchase Requisition is required
For Printing and Duplication: Ext. 75350
Web: http://www.kean.edu Click “Faculty and Staff” Click “Intranet” Click “Print Center”
Fill out form Attach file
The General Ledger Number
The GL number has 3 components:
XX – XXXXX – XXXX Fund Cost Center Object Source Department Item/Service
Example 1: 11 - 12001 - 5021
Univ.& Gen. (U) School of Arts Office Supplies & Humanities
Example 2: 14 - 13176 - 5036
Univ. & Gen. Women in Prof. Services (Restricted) Mathematics
Example 3: 21 - 61513 - 5118 Federal Gear-Up Student Aides

29
Purchase Requisition Life Cycle
1. Create the requisition in Colleague Using REQM – Requisition Maintenance
2. Authorizations
Cost center director VP OCIS Budget
3. P.O. is created
Purchasing turns Requisition into a P.O. Purchasing issues P.O. to vendor PO encumbers funds
4. Vendor
Ships goods to the university Sends invoice to General Accounting
5. Acceptance (PORC)
Warehouse or department accepts item in Colleague. Sends a flag to General Accounting that item is received.
6. Invoice Is Paid
General Accounting issues a voucher for all accepted items. General Accounting cuts the check and pays the vendor.
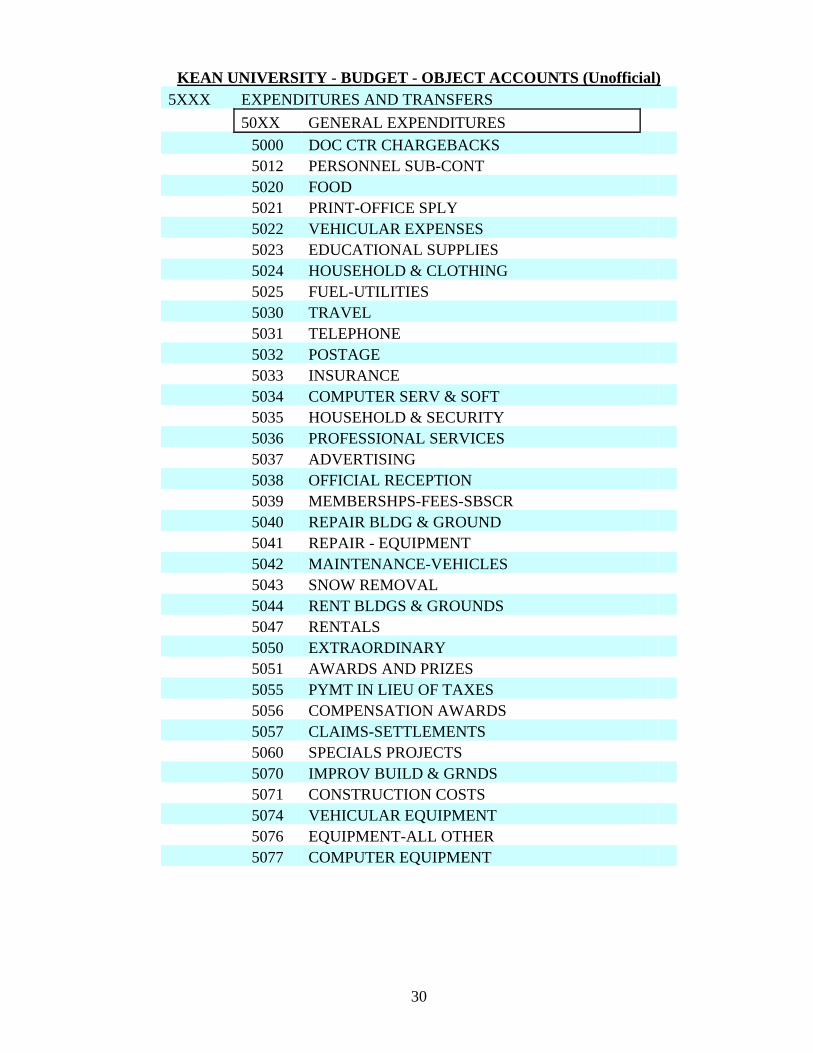
30
KEAN UNIVERSITY - BUDGET - OBJECT ACCOUNTS (Unofficial) 5XXX EXPENDITURES AND TRANSFERS 50XX GENERAL EXPENDITURES 5000 DOC CTR CHARGEBACKS 5012 PERSONNEL SUB-CONT 5020 FOOD 5021 PRINT-OFFICE SPLY 5022 VEHICULAR EXPENSES 5023 EDUCATIONAL SUPPLIES 5024 HOUSEHOLD & CLOTHING 5025 FUEL-UTILITIES 5030 TRAVEL 5031 TELEPHONE 5032 POSTAGE 5033 INSURANCE 5034 COMPUTER SERV & SOFT 5035 HOUSEHOLD & SECURITY 5036 PROFESSIONAL SERVICES 5037 ADVERTISING 5038 OFFICIAL RECEPTION 5039 MEMBERSHPS-FEES-SBSCR 5040 REPAIR BLDG & GROUND 5041 REPAIR - EQUIPMENT 5042 MAINTENANCE-VEHICLES 5043 SNOW REMOVAL 5044 RENT BLDGS & GROUNDS 5047 RENTALS 5050 EXTRAORDINARY 5051 AWARDS AND PRIZES 5055 PYMT IN LIEU OF TAXES 5056 COMPENSATION AWARDS 5057 CLAIMS-SETTLEMENTS 5060 SPECIALS PROJECTS 5070 IMPROV BUILD & GRNDS 5071 CONSTRUCTION COSTS 5074 VEHICULAR EQUIPMENT 5076 EQUIPMENT-ALL OTHER 5077 COMPUTER EQUIPMENT

31
APPENDIX II UI Function Keys
• To view valid function keys that may be use in the Datatel User Interface, click on ‘Help’ in the Menu Bar and then click on ‘Function Help’ to display.
o You may also visit the web site for the Office of Computer & Information Services, http://www.kean.edu/~ocisweb/documentation.htm and print out the new Datatel User Interface Function Key Template for your keyboard.
Move to the next field Tab Move to the previous field Shift+Tab Move forward one row Down Arrow Move back one row Up Arrow Move forward one screen Page Up Move backward one screen Page Down Move to the beginning of the current field Home Move to the end of the current field End Move to the first row of a window Ctrl+Home Move to the last row of a window Ctrl+End Field insert Ctrl+I | Insert | F3 Field delete Ctrl+D | Alt+F, F | Alt+E, D | F4 Open the File menu Alt+F Cancel Alt+F, C | Shift+F8 Save (Update) Alt+F, S | F10 Close (Finish) Alt+F, L | F9 Detail Alt+F, D | F2 Direct Access Alt+F, A | F8 Record Delete Alt+F, R | Shift+F10 Exit Alt+F, X | Shift+F9 Open the Edit menu Alt+E Open the Apps menu Alt+A Open the Help menu Alt+H Field Help Alt+H, F | F1 Process Help Alt+H, P | Shift+F1 Keyboard Shortcut Help Alt+H, U | Shift+F2 Pull down the Favorites menu Alt+V Pull down the Options menu Alt+O Pull down the Help menu Alt+H | F1

32
PrintNow Software
PrintNow is a shareware utility program that enables the ‘Print Screen’ button on your keyboard. Once launched, it runs in the background and provides the ability to take snapshots of either your desktop or a snapshot of the active screen. The program can maintain multiple instances and retain images in memory until over written by the user or the program is unloaded (shut down).
• Using PrintNow
1. Double-click the PrintNow icon on your desktop. 2. An icon is then placed on the system tray to let you know that it’s running in the
background.
Note: If you do not see a Desktop Shortcut as indicated in Step 1, look for a similar icon in your system tray as shown in Step 2.
3. To send an image to the printer:
a) Desktop image – Press the ‘Print Screen’ key on your keyboard b) Active Screen Only – Hold down the ‘Alt’ key and press the ‘Print Screen’ key.
4. A dialog box opens and closes, then the ‘Printer Window’ will open to the default printer. Click the OK button.
• Closing PrintNow
1. Right mouse click on the ‘PrintNow’ icon on the system tray (by the clock) and a menu will appear.
2. There are two options to close the program:
a) Click ‘Unload PrintNow (1)’to close a single instance of the program. b) To close multiple instances of the program, click ‘Unload all instances of
PrintNow’.

33
• Managing PrintNow PrintNow has a settings window that allows the user to customize their instance of PrintNow. To manage these settings, right mouse click on the PrintNow icon on the system tray (by the clock) and select the ‘Open PrintNow (1)’ option. The following window appears:
Category Type Description
Settings Screen Capture Enabled
Ability to enable/disable active screen capturing.
Settings Always show Print Dialog
Ability to enable/disable print dialog box.
Settings Center Image Ability to enable/disable the
centering of an image on your output.
Image Scaling Full Page, ¾ Page, etc… Ability to scale the image.
Print Clipboard Image Ability to send image to printer.
Current Printer Shows default print & its’ path.
Printer Setup Ability to change printer via PrintNow.
Unload PrintNow (1) Ability to shutdown a single instance of PrintNow.
Unload all instances of PrintNow Ability to shutdown all instances
of PrintNow.
Status Show the status of the PrintNow utility.

34
NOTES