R MicroBlaze Development Kit - Spartan-3E Edition
13
XAPP963 (v1.1) November 28, 2007 www.xilinx.com 1 © 2006-2007 Xilinx, Inc. All rights reserved. XILINX, the Xilinx logo, and other designated brands included herein are trademarks of Xilinx, Inc. All other trademarks are the property of their respective owners. Abstract This application note describes the files for programming the StrataFlash memory for the MicroBlaze™ Development Kit - Spartan™-3E 1600E Edition. The development kit includes a BlueCat Linux reference system. The development kit also includes two systems that are pre- loaded into the Intel StrataFlash on the SP3E1600E board that is included with the development kit. In the pre-loaded systems, the μClinux system is programmed to run in BPI Up configuration mode and the Web server system is programmed to run in BPI Down configuration mode. All files needed to run the BlueCat Linux reference system from the StrataFlash memory are provided for the user. This application note describes how to use the provided files, as well as create new files, to run the BlueCat Linux reference system from the StrataFlash memory. Introduction The SP3E1600E board supports a variety of FPGA configuration options. One of the options is to program the on-board Intel StrataFlash parallel NOR Flash PROM, then configure the FPGA from the image stored in the Flash PROM using either BPI Up or BPI Down configuration modes. For BPI Up mode, the FPGA configuration image source is stored in the StrataFlash parallel Flash PROM, starting at address 0x00000000 and incrementing through address space. For BPI Down mode, the FPGA configuration image source is stored in the StrataFlash parallel Flash PROM, starting at address 0x00FFFFFF and decrementing through address space. For the SP3E1600E board shipped with the MicroBlaze Development Kit - Spartan-3E 1600E Edition, two reference system configurations are pre-loaded into the StrataFlash PROM to show both BPI Up and BPI Down configuration modes. Warning: If the user downloads and updates the FLASH with the BlueCat Linux image, the μClinux image will be overwritten. Send email to sp3e1600@xilinx to get access to the μClinux Flash files. Hardware and Software Requirements The hardware and software requirements are: • SP3E1600E development board • USB download cable • RS232 null modem serial cable and serial communications utility (HyperTerminal) • Xilinx Platform Studio 9.2.01i • Xilinx Integrated Software Environment (ISE™) 9.2.03i Application Note: Embedded Processing XAPP963 (v1.1) November 28, 2007 Using and Creating Flash Files for the MicroBlaze Development Kit - Spartan-3E Edition Author: Casey Cain, Sundararajan Ananthakrishnan R
Transcript of R MicroBlaze Development Kit - Spartan-3E Edition

XAPP963 (v1.1) November 28, 2007 www.xilinx.com 1
© 2006-2007 Xilinx, Inc. All rights reserved. XILINX, the Xilinx logo, and other designated brands included herein are trademarks of Xilinx, Inc. All other trademarks are the property of their respective owners.
Abstract This application note describes the files for programming the StrataFlash memory for the MicroBlaze™ Development Kit - Spartan™-3E 1600E Edition. The development kit includes a BlueCat Linux reference system. The development kit also includes two systems that are pre-loaded into the Intel StrataFlash on the SP3E1600E board that is included with the development kit. In the pre-loaded systems, the μClinux system is programmed to run in BPI Up configuration mode and the Web server system is programmed to run in BPI Down configuration mode. All files needed to run the BlueCat Linux reference system from the StrataFlash memory are provided for the user. This application note describes how to use the provided files, as well as create new files, to run the BlueCat Linux reference system from the StrataFlash memory.
Introduction The SP3E1600E board supports a variety of FPGA configuration options. One of the options is to program the on-board Intel StrataFlash parallel NOR Flash PROM, then configure the FPGA from the image stored in the Flash PROM using either BPI Up or BPI Down configuration modes. For BPI Up mode, the FPGA configuration image source is stored in the StrataFlash parallel Flash PROM, starting at address 0x00000000 and incrementing through address space. For BPI Down mode, the FPGA configuration image source is stored in the StrataFlash parallel Flash PROM, starting at address 0x00FFFFFF and decrementing through address space. For the SP3E1600E board shipped with the MicroBlaze Development Kit - Spartan-3E 1600E Edition, two reference system configurations are pre-loaded into the StrataFlash PROM to show both BPI Up and BPI Down configuration modes.
Warning: If the user downloads and updates the FLASH with the BlueCat Linux image, the μClinux image will be overwritten. Send email to sp3e1600@xilinx to get access to the μClinux Flash files.
Hardware and Software Requirements
The hardware and software requirements are:
• SP3E1600E development board
• USB download cable
• RS232 null modem serial cable and serial communications utility (HyperTerminal)
• Xilinx Platform Studio 9.2.01i
• Xilinx Integrated Software Environment (ISE™) 9.2.03i
Application Note: Embedded Processing
XAPP963 (v1.1) November 28, 2007
Using and Creating Flash Files for the MicroBlaze Development Kit - Spartan-3E EditionAuthor: Casey Cain, Sundararajan Ananthakrishnan
R

Creating and Programming New Flash Files for the BlueCat Linux Demonstration
XAPP963 (v1.1) November 28, 2007 www.xilinx.com 2
R
Creating and Programming New Flash Files for the BlueCat Linux Demonstration
Steps to program the BlueCat Linux demonstration into Strata Flash
Following are the steps to program the BlueCat Linux demonstration into the Strata Flash in BPI Up mode configuration.
1. Erase the Strata Flash contents using the PicoBlaze Flash Programmer.
2. Download reference system bitstream, program the FLASH with KDI image, and create bootloader files.
3. Create MCS file for BPI Up Configuration Mode.
4. Load the MCS file into FLASH using PicoBlaze Flash programmer.
Each of these steps are explained in detail in the following sections.
Erasing the StrataFlash contents
The Xilinx PicoBlaze™ NOR Flash Programmer is used to program the StrataFlash. The Xilinx PicoBlaze NOR Flash Programmer design is implemented using a single PicoBlaze processor and UART macros and is used as a configuration bit file for immediate programming of the Spartan XC3S1600E on the Spartan-3E MicroBlaze Development kit.
To erase or program the Strata Flash, user must download the Flash Programmer configuration bitstream into the Spartan-3E FPGA and then communicate to it through the RS232 serial link using the Hyper Terminal. The Xilinx PicoBlaze NOR Flash Programmer design files are provided in the Spartan-3E development kit website.
To download the files for the PicoBlaze NOR Flash Programmer for the SP3E1600E board, go to the following link:
• http://www.xilinx.com/sp3e1600e
Select the Product Info tab, then click on Spartan-3E MicroBlaze Development Kit Design Examples under the Documentation section. Download the PicoBlaze RS-232 StrataFlash Programmer (zip file) from the webpage.
After downloading the PicoBlaze RS-232 StrataFlash Programmer zip file, follow these steps to load the MCS file into the Strata Flash:
1. Unzip all the files into a directory.
2. Check you have the USB cable connected and the SP3E1600E development board is turned on.
3. Double click on the PicoBlaze_NOR_Flash_programmer.ht Hyper Terminal file. This will open the Hyper Terminal with the following settings: Baud Rate of 115200, Data Bits to 8, Parity to None, and Flow Control to Xon/Xoff. The Hyper Terminal utility is used to talk to PicoBlaze StrataFlash Programmer.
4. Double click on the file install_SP3E1600E_parallel_flash_uart_prog.bat. This will open a DOS window and run iMPACT in batch mode to configure the Spartan device.
5. Erase the contents of the Flash by typing E (Erase All) command in the Hyperterminal. Make sure that all the contents of Flash is completely erased.
Note: Warning: The E (Erase All) command will erase the factory pre-loaded flash designs.

Creating and Programming New Flash Files for the BlueCat Linux Demonstration
XAPP963 (v1.1) November 28, 2007 www.xilinx.com 3
R
Programming the BlueCat Linux Image KDI File Into StrataFlash and Creating New Bootloader Files
Instead of using the existing bootloader file from the /ready_for_download/Flash_files folder under the root directory, new bootloader files can be created using the EDK tools.
To load a new BlueCat Linux image KDI file into the StrataFlash and to create new bootloader files, follow these steps:
1. Open the reference system project in XPS.
2. Connect the USB programming cable, the serial cable, and the power supply to the SP3E1600E development board. Power on the board.
3. The target board must be configured with the project bitstream before XPS can program the SREC file into the flash memory. Select Device Configuration → Download Bitstream in XPS.
Note: The Jumper (J30) settings does not affect the bitstream download operation.
4. In XPS, select Device Configuration → Program Flash Memory.
5. In the Program Flash Memory dialog box, choose the file to program to be /bclinux_images/standalone.kdi under the project root directory. Change the program offset to the desired value, allowing enough room for the MCS file, which will be programmed at 0x00000000. The provided example files use an offset of 0x00800000. The external DDR memory is set as the Scratch Memory. A bootloader is created by clicking the Create Flash Bootloader Application check box in the Program Flash Memory dialog box.

Creating and Programming New Flash Files for the BlueCat Linux Demonstration
XAPP963 (v1.1) November 28, 2007 www.xilinx.com 4
R
The Program Flash Memory settings are shown in Figure 1.
6. Click the OK button. This will program the flash memory with the BlueCat Linux image and will create a bootloader software application project.
Note: The Program Flash Memory application will take a long time as the application must program the image of size approximately 6 MB.
7. After creating the bootloader files, it is strongly suggested to disable the bootloader from displaying its progress. This is done by commenting out the following line in the bootloader.c generated file:
#define VERBOSE
X-Ref Target - Figure 1
Figure 1: Program Flash Memory Dialog Box for the BlueCat Linux ELF
X963_01_112107

Creating and Programming New Flash Files for the BlueCat Linux Demonstration
XAPP963 (v1.1) November 28, 2007 www.xilinx.com 5
R
The line to comment out to allow non-verbose bootloading is shown in Figure 2.
8. The bootloader must be modified to copy the KDI image from flash into DDR for the BlueCat Linux demonstration to fully operate. This is done by adding lines of code to the bootloader.c file that the EDK generates. To modify the newly created bootloader, add the following pieces of code:
a. Code is required to define the location in flash where the KDI image resides and the location in DDR to put the KDI image. This code is shown in Figure 3. The KDI_FLASH_LOC parameter should be set to the location in flash memory of where the KDI image will be placed.The KDI_DDR_LOC parameter should be set to the location in DDR memory where the KDI image is to be copied. The KDI_LENGTH parameter should be set to the length of the KDI image in bytes.
X-Ref Target - Figure 2
Figure 2: Code to Select Non-Verbose Bootloading
X-Ref Target - Figure 3
Figure 3: BlueCat Linux Bootloader Code Definitions and Declarations
X963_02_112107
X963_03_112107

Creating and Programming New Flash Files for the BlueCat Linux Demonstration
XAPP963 (v1.1) November 28, 2007 www.xilinx.com 6
R
b. Comment the SREC function load_exec in the source file as the KDI image is loaded as it is to the FLASH memory and so these functions are not required. Code is also required for the bootloader to copy the KDI image from flash into DDR when the bootloader runs. This code is shown in Figure 4. After modifying the C file, be sure to recompile the software application.
Generating a MCS File for BPI Up Configuration Mode
Once the bootloader application is created, the next step is to create a MCS file for the BlueCat Linux reference system using the iMPACT tool. A MCS file is used to program the StrataFlash with the system bitstream and bootloader loaded in the bitstream. For BPI Up configuration mode, the BlueCat Linux MCS file is loaded at address 0x00000000, incrementing in address space. To generate a new MCS file for BPI up configuration mode, follow these steps:
1. In XPS, compile a bitstream, download.bit, that includes the system configuration and the bootloader application. This is done by marking the bootloader application to Initialize BRAM’s and then by selecting Device Configuration → Update Bitstream in XPS.
2. Launch the iMPACT GUI and create a new project.
X-Ref Target - Figure 4
Figure 4: BlueCat Linux Bootloader Code to Copy the KDI Image
X963_04_112107

Creating and Programming New Flash Files for the BlueCat Linux Demonstration
XAPP963 (v1.1) November 28, 2007 www.xilinx.com 7
R
3. In the iMPACT - Welcome to iMPACT dialog box, select the Prepare a PROM file option, as shown in Figure 5. Click the Next button.
4. In the iMPACT - Prepare PROM Files dialog box, select the target to be a Generic Parallel PROM. Ensure that the file format is selected to be MCS. Enter an appropriate PROM file name and location. The dialog box is shown in Figure 6. Click Next.
X-Ref Target - Figure 5
Figure 5: Welcome to iMPACT Screen
X-Ref Target - Figure 6
Figure 6: Prepare PROM Files Dialog Box
X963_05_112107
X963_06_112107
Creating and Programming New Flash Files for the BlueCat Linux Demonstration
XAPP963 (v1.1) November 28, 2007 www.xilinx.com 8
R
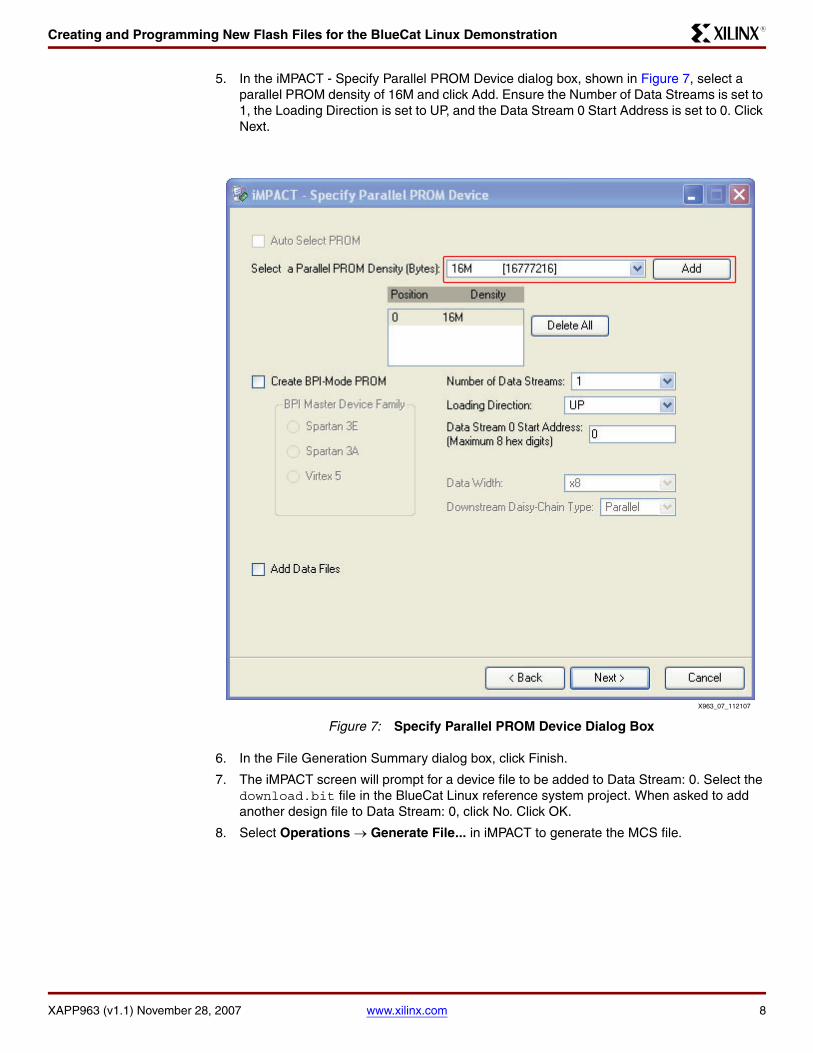
5. In the iMPACT - Specify Parallel PROM Device dialog box, shown in Figure 7, select a parallel PROM density of 16M and click Add. Ensure the Number of Data Streams is set to 1, the Loading Direction is set to UP, and the Data Stream 0 Start Address is set to 0. Click Next.
6. In the File Generation Summary dialog box, click Finish.
7. The iMPACT screen will prompt for a device file to be added to Data Stream: 0. Select the download.bit file in the BlueCat Linux reference system project. When asked to add another design file to Data Stream: 0, click No. Click OK.
8. Select Operations → Generate File... in iMPACT to generate the MCS file.
X-Ref Target - Figure 7
Figure 7: Specify Parallel PROM Device Dialog Box
X963_07_112107
Using the Provided Flash Files
XAPP963 (v1.1) November 28, 2007 www.xilinx.com 9
R
Loading the MCS File into StrataFlash
The PicoBlaze NOR Flash programmer must be used again to load the Flash with the generated MCS file
1. Double click on the Hyper Terminal file ‘PicoBlaze_NOR_Flash_programmer.ht’. This will open the Hyper Terminal with the following settings Baud Rate of 115200, Data Bits to 8, Parity to None, and Flow Control to Xon/Xoff. The Hyper Terminal utility is used to talk to PicoBlaze StrataFlash Programmer.
2. Configure the Spartan device with the PicoBlaze NOR Flash programmer again by double clicking on the file install_SP3E1600E_parallel_flash_uart_prog.bat. This will open a DOS window and run iMPACT in batch mode and configure the Spartan device.
3. Program the flash by using P (Program) command in the Hyperterminal.
4. In the HyperTerminal, select the Transfer → Send Text File... and Navigate to the appropriate directory and select the generated bootloader_bclinux.mcs file for programming.
Note: Do not use the Transfer → Send File... option in step 4.
For further details, refer to the PicoBlaze StrataFlash Programmer document.
After following those steps, the MCS file will be loaded into the StrataFlash memory and the BlueCat Linux demonstration is ready to be run in BPI Up mode. Proceed to the section, “Running the Demonstrations out of Flash”, to run the demonstration.
Using the Provided Flash Files
This section includes details on how to use the flash files provided in the reference system to boot the BlueCat Linux demonstration out of the StrataFlash.
The files required to run the BlueCat Linux demonstration out of the StrataFlash memory are provided at the following link:
http://www.xilinx.com/sp3e1600e
Select the Product Info tab and then click on Spartan-3E MicroBlaze Development Kit Design Examples under the Documentation section and download the Getting Started and Linux Reference System.
Loading the BlueCat Linux KDI Image into Flash
To run the BlueCat Linux demonstration properly, the KDI image must be loaded into the StrataFlash. To load the KDI image into the StrataFlash memory, follow these steps:
1. Erase the pre-loaded Strata Flash contents first as mentioned in “Erasing the StrataFlash contents” section.
1. Unzip the contents of the reference system into a directory.
2. Change directories to the ready_for_download directory under the unzipped directory.
3. Use iMPACT to download the bitstream by using the following:
impact -batch sp3an_isf.cmd
4. Open the reference system project system.xmp in the root directory using XPS.
5. In XPS, select Device Configuration → Program Flash Memory.
Using the Provided Flash Files
XAPP963 (v1.1) November 28, 2007 www.xilinx.com 10
R
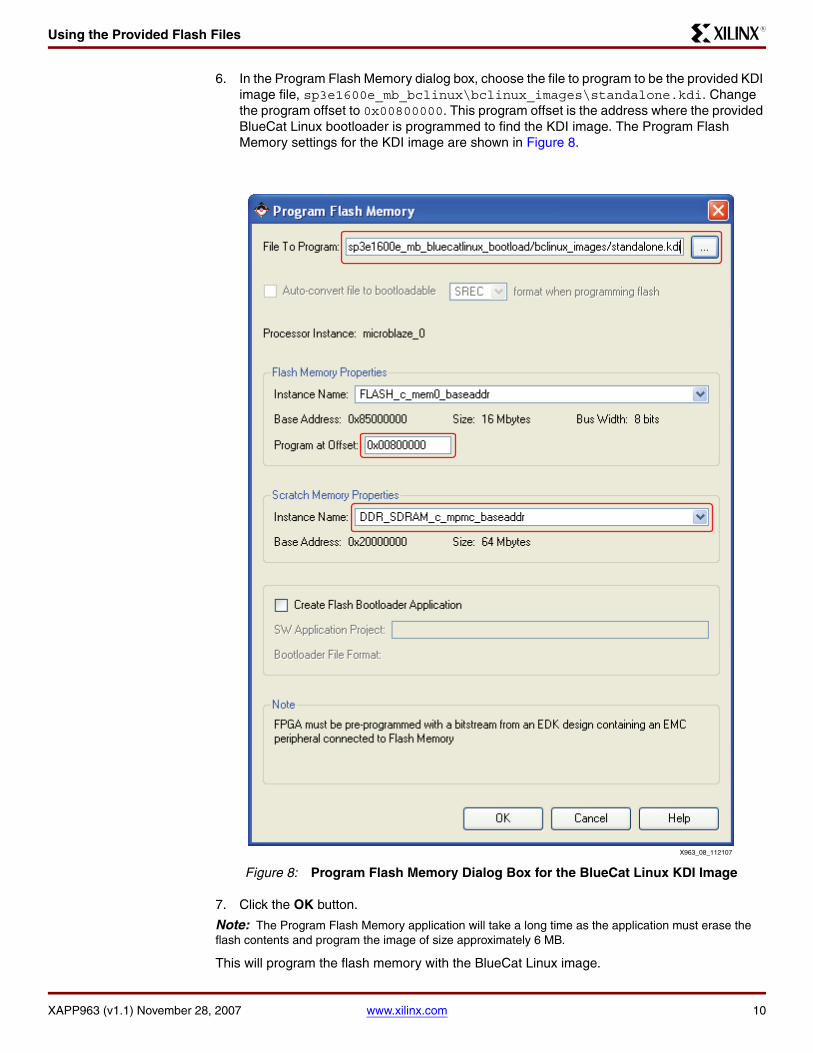
6. In the Program Flash Memory dialog box, choose the file to program to be the provided KDI image file, sp3e1600e_mb_bclinux\bclinux_images\standalone.kdi. Change the program offset to 0x00800000. This program offset is the address where the provided BlueCat Linux bootloader is programmed to find the KDI image. The Program Flash Memory settings for the KDI image are shown in Figure 8.
7. Click the OK button.
Note: The Program Flash Memory application will take a long time as the application must erase the flash contents and program the image of size approximately 6 MB.
This will program the flash memory with the BlueCat Linux image.
X-Ref Target - Figure 8
Figure 8: Program Flash Memory Dialog Box for the BlueCat Linux KDI Image
X963_08_112107

Running the Demonstrations out of Flash
XAPP963 (v1.1) November 28, 2007 www.xilinx.com 11
R
Loading the provided MCS File into StrataFlash
To load the MCS file provided with the BlueCat Linux Reference system:
1. Download the PicoBlaze NOR Flash programmer again to configure the Spartan device.
2. Program the flash with the MCS file by using P (Program) command in the Hyperterminal.
3. In the HyperTerminal, select the Transfer → Send Text File... and select the provided bootloader_bclinux.mcs file from the sp3e1600e_mb_bclinux\ready_for_download\Flash_files directory for programming.
Note: Do not use the Transfer → Send File... option step 3.
After following these steps, the MCS file will be loaded into the StrataFlash memory and the BlueCat Linux demonstration is ready to be run in BPI Up mode. Proceed to the section, “Running the Demonstrations out of Flash”, to run the demonstration.
Running the Demonstrations out of Flash
Once all the files are loaded into the StrataFlash memory as detailed in the previous sections, the BlueCat Linux demonstration can be run out of flash. The following section details how to run the BlueCat Linux demonstration out of the StrataFlash.
Preparing to Run the Demonstrations out of Flash
To run the demonstration, ensure that the SP3E1600E development board is set up properly with the serial cable and power supply connected. A serial terminal program, such as HyperTerminal must be set up to view the output of the demonstrations. The serial terminal program should be set to Baud Rate of 115200, Data Bits to 8, Parity to None, and Flow Control to None, as shown in Figure 9.
X-Ref Target - Figure 9
Figure 9: HyperTerminal Settings for the Demonstrations
X963_09_112107

Running the Demonstrations out of Flash
XAPP963 (v1.1) November 28, 2007 www.xilinx.com 12
R
Running the BlueCat Linux Demonstration in BPI Up Mode
To run the files out of the StrataFlash in BPI Up mode, set the J30 configuration jumpers as shown in Figure 10. Once the configuration jumpers are set properly, power cycle the development board or press the PROG button to start the BlueCat Linux demonstration.
Once the BlueCat Linux kernel boots up, the output on the HyperTerminal will be as shown in Figure 11.
X-Ref Target - Figure 10
Figure 10: Configuration Jumper Settings for BPI Up Mode
X-Ref Target - Figure 11
Figure 11: BlueCat Linux Boot-Up Screen
M0
M1
M2
J30X963_10_112107
X963_11_112107
References
XAPP963 (v1.1) November 28, 2007 www.xilinx.com 13
R
References UG257, MicroBlaze Development Kit Spartan-3E 1600E Edition User Guide
UG258, Getting Started with the MicroBlaze Development Kit - Spartan-3E 1600E Edition
Conclusion The BlueCat Linux reference system is provided with the MicroBlaze Development Kit - Spartan-3E Edition. This application note describes how to use the files provided and create new files for programming the Intel StrataFlash PROM with the BlueCat Linux demonstrations in the BPI UP mode configuration.
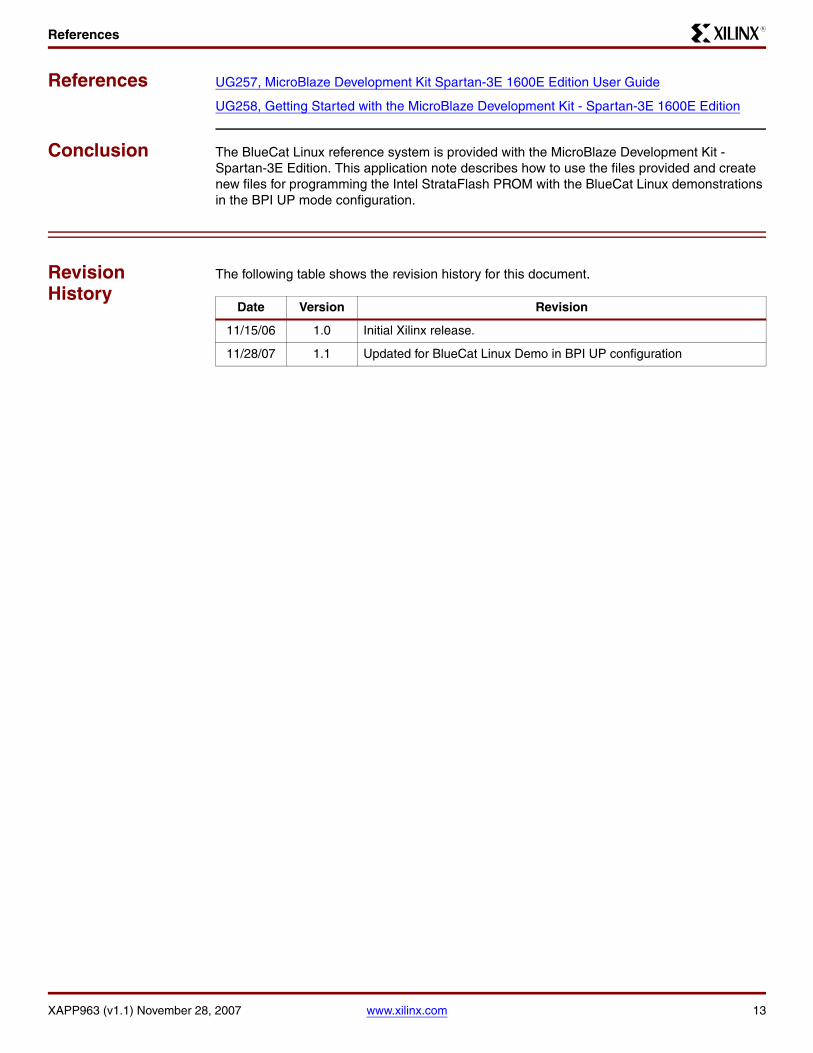
Revision History
The following table shows the revision history for this document.
Date Version Revision
11/15/06 1.0 Initial Xilinx release.
11/28/07 1.1 Updated for BlueCat Linux Demo in BPI UP configuration