R e m o ve a n d d i sca r d t h e F D S - OEM1Stop
32
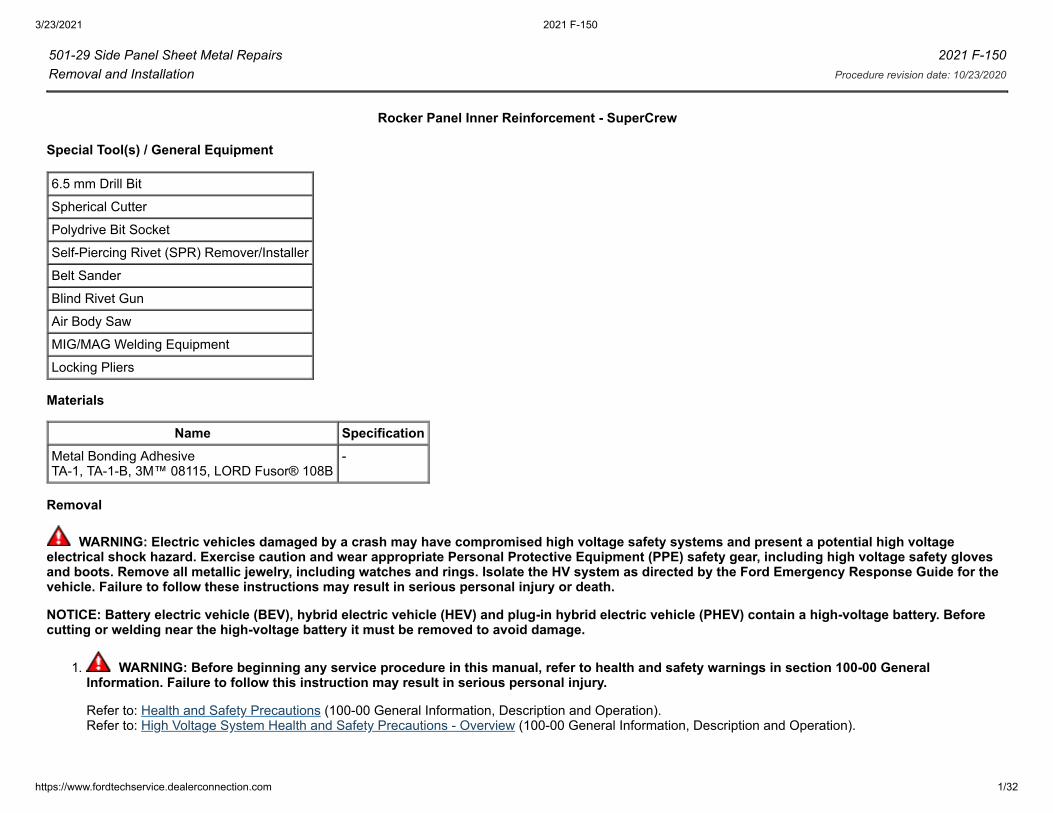
3/23/2021 2021 F-150 https://www.fordtechservice.dealerconnection.com 1/32 501-29 Side Panel Sheet Metal Repairs 2021 F-150 Removal and Installation Procedure revision date: 10/23/2020 Rocker Panel Inner Reinforcement - SuperCrew Special Tool(s) / General Equipment 6.5 mm Drill Bit Spherical Cutter Polydrive Bit Socket Self-Piercing Rivet (SPR) Remover/Installer Belt Sander Blind Rivet Gun Air Body Saw MIG/MAG Welding Equipment Locking Pliers Materials Name Specification Metal Bonding Adhesive TA-1, TA-1-B, 3M™ 08115, LORD Fusor® 108B - Removal WARNING: Electric vehicles damaged by a crash may have compromised high voltage safety systems and present a potential high voltage electrical shock hazard. Exercise caution and wear appropriate Personal Protective Equipment (PPE) safety gear, including high voltage safety gloves and boots. Remove all metallic jewelry, including watches and rings. Isolate the HV system as directed by the Ford Emergency Response Guide for the vehicle. Failure to follow these instructions may result in serious personal injury or death. NOTICE: Battery electric vehicle (BEV), hybrid electric vehicle (HEV) and plug-in hybrid electric vehicle (PHEV) contain a high-voltage battery. Before cutting or welding near the high-voltage battery it must be removed to avoid damage. 1. WARNING: Before beginning any service procedure in this manual, refer to health and safety warnings in section 100-00 General Information. Failure to follow this instruction may result in serious personal injury. Refer to: Health and Safety Precautions (100-00 General Information, Description and Operation). Refer to: High Voltage System Health and Safety Precautions - Overview (100-00 General Information, Description and Operation).
Transcript of R e m o ve a n d d i sca r d t h e F D S - OEM1Stop
3/23/2021 2021 F-150
https://www.fordtechservice.dealerconnection.com 1/32
501-29 Side Panel Sheet Metal Repairs 2021 F-150Removal and Installation Procedure revision date: 10/23/2020
Rocker Panel Inner Reinforcement - SuperCrew
Special Tool(s) / General Equipment
6.5 mm Drill Bit
Spherical Cutter
Polydrive Bit Socket
Self-Piercing Rivet (SPR) Remover/Installer
Belt Sander
Blind Rivet Gun
Air Body Saw
MIG/MAG Welding Equipment
Locking Pliers
Materials
Name SpecificationMetal Bonding Adhesive TA-1, TA-1-B, 3M™ 08115, LORD Fusor® 108B
-
Removal
WARNING: Electric vehicles damaged by a crash may have compromised high voltage safety systems and present a potential high voltageelectrical shock hazard. Exercise caution and wear appropriate Personal Protective Equipment (PPE) safety gear, including high voltage safety glovesand boots. Remove all metallic jewelry, including watches and rings. Isolate the HV system as directed by the Ford Emergency Response Guide for thevehicle. Failure to follow these instructions may result in serious personal injury or death.
NOTICE: Battery electric vehicle (BEV), hybrid electric vehicle (HEV) and plug-in hybrid electric vehicle (PHEV) contain a high-voltage battery. Beforecutting or welding near the high-voltage battery it must be removed to avoid damage.
1. WARNING: Before beginning any service procedure in this manual, refer to health and safety warnings in section 100-00 GeneralInformation. Failure to follow this instruction may result in serious personal injury.
Refer to: Health and Safety Precautions (100-00 General Information, Description and Operation). Refer to: High Voltage System Health and Safety Precautions - Overview (100-00 General Information, Description and Operation).
3/23/2021 2021 F-150
https://www.fordtechservice.dealerconnection.com 2/32
NOTE: The rocker panel inner reinforcement on the SuperCrew Cab is a two-piece component consisting of a front and rear sections. The front portion is anextrusion casting and may not be sectioned. The rear portion only may be sectioned using a backer plate, adhesive and blind rivets. The following procedureassumes full component replacement.
NOTE: Body side sectioning is prohibited within 50 mm of door hinge, door striker and restraints anchoring points.
2. Depower the SRS. Refer to: Supplemental Restraint System (SRS) Depowering (501-20B Supplemental Restraint System, General Procedures).
3. Verify the vehicle is dimensionally correct. Refer to: Body and Frame (501-26 Body Repairs - Vehicle Specific Information and Tolerance Checks, Description and Operation).
4. Remove the front fender. Refer to: Fender (501-02 Front End Body Panels, Removal and Installation).
5. Remove the front and rear doors. Refer to: Front Door - Regular Cab/SuperCrew (501-03 Body Closures, Removal and Installation). Refer to: Rear Door - SuperCrew (501-03 Body Closures, Removal and Installation).
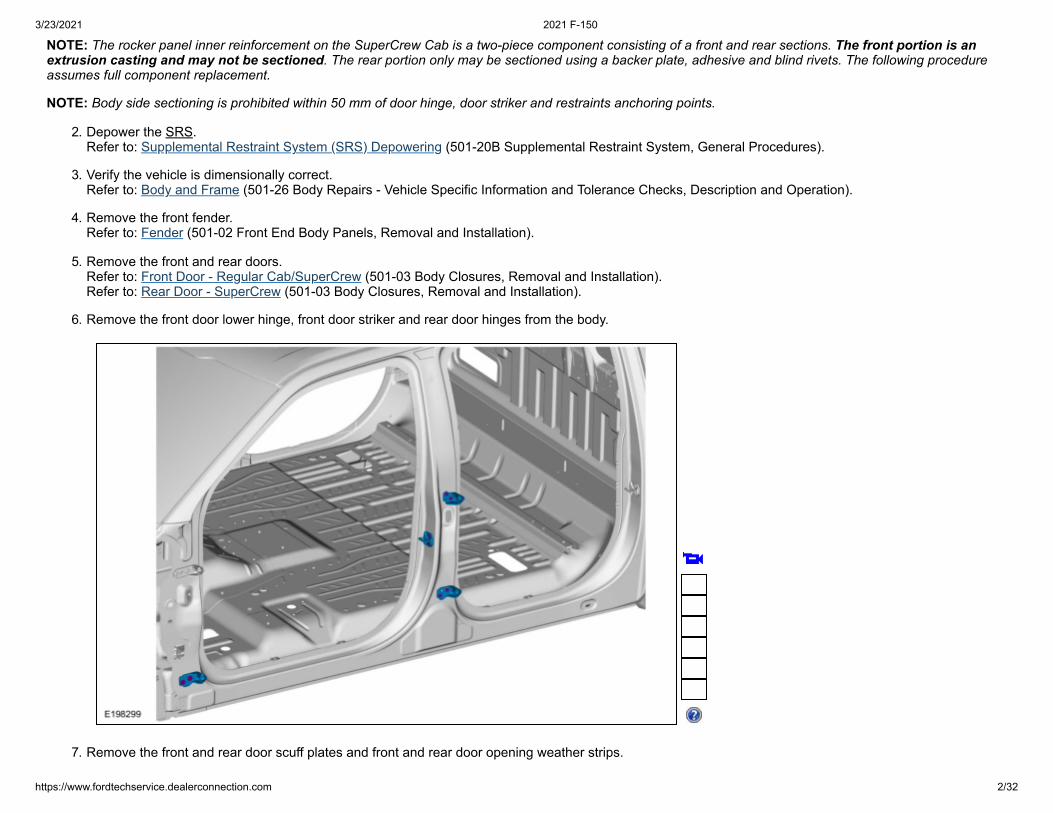
6. Remove the front door lower hinge, front door striker and rear door hinges from the body.
7. Remove the front and rear door scuff plates and front and rear door opening weather strips.
3/23/2021 2021 F-150
https://www.fordtechservice.dealerconnection.com 3/32
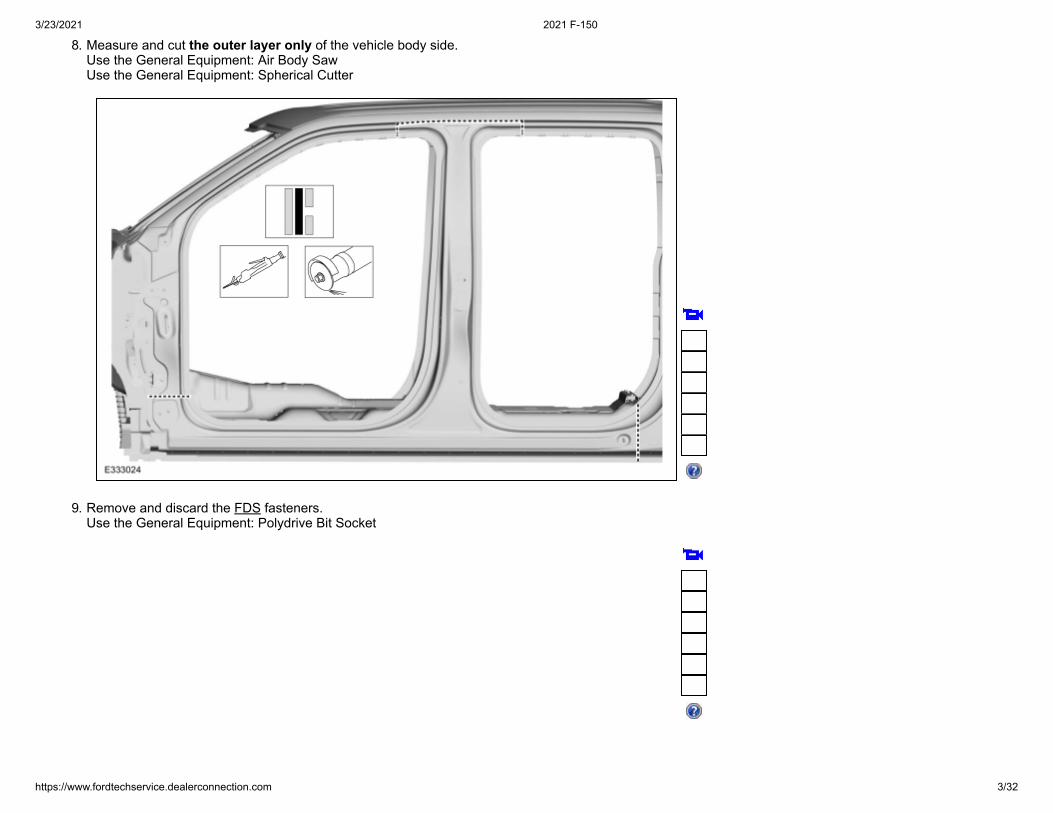
8. Measure and cut the outer layer only of the vehicle body side. Use the General Equipment: Air Body Saw Use the General Equipment: Spherical Cutter
9. Remove and discard the FDS fasteners. Use the General Equipment: Polydrive Bit Socket
3/23/2021 2021 F-150
https://www.fordtechservice.dealerconnection.com 4/32
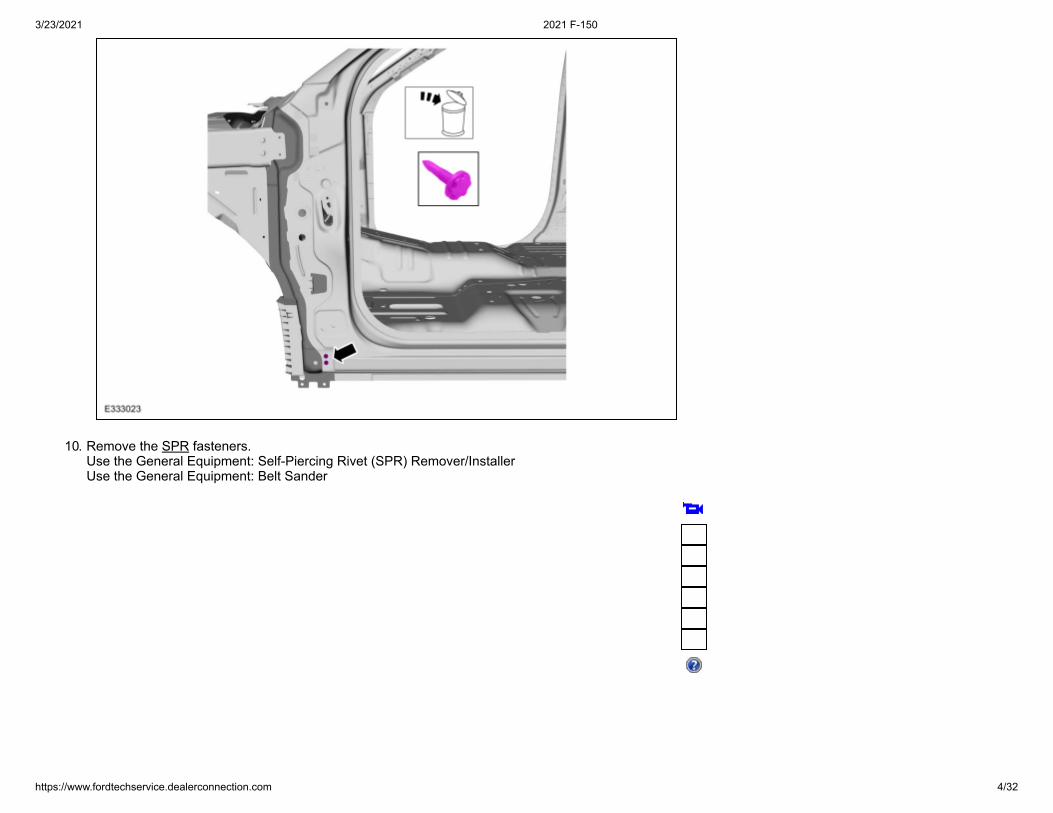
10. Remove the SPR fasteners. Use the General Equipment: Self-Piercing Rivet (SPR) Remover/Installer Use the General Equipment: Belt Sander
3/23/2021 2021 F-150
https://www.fordtechservice.dealerconnection.com 5/32
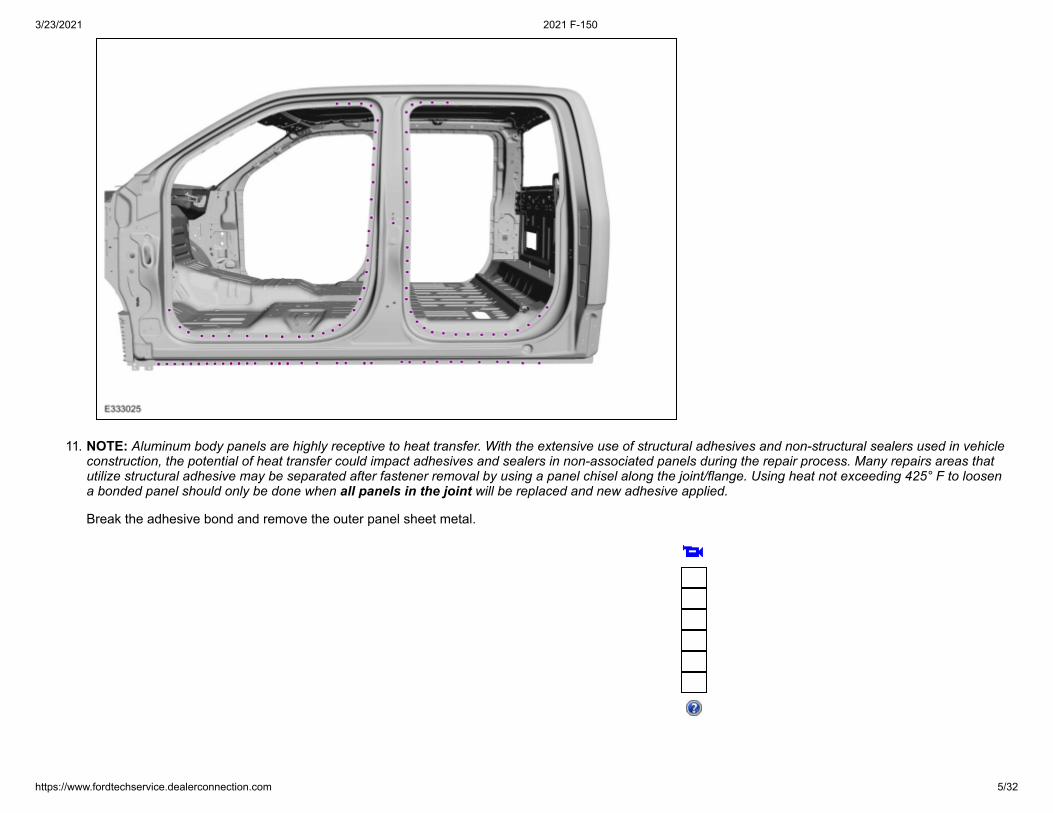
11. NOTE: Aluminum body panels are highly receptive to heat transfer. With the extensive use of structural adhesives and non-structural sealers used in vehicleconstruction, the potential of heat transfer could impact adhesives and sealers in non-associated panels during the repair process. Many repairs areas thatutilize structural adhesive may be separated after fastener removal by using a panel chisel along the joint/flange. Using heat not exceeding 425° F to loosena bonded panel should only be done when all panels in the joint will be replaced and new adhesive applied.
Break the adhesive bond and remove the outer panel sheet metal.

3/23/2021 2021 F-150
https://www.fordtechservice.dealerconnection.com 6/32
12. Remove and discard the FDS fasteners. Use the General Equipment: Polydrive Bit Socket

3/23/2021 2021 F-150
https://www.fordtechservice.dealerconnection.com 7/32
13. Remove the SPR fasteners in the B-pillar reinforcement. Use the General Equipment: Self-Piercing Rivet (SPR) Remover/Installer Use the General Equipment: Belt Sander
3/23/2021 2021 F-150
https://www.fordtechservice.dealerconnection.com 8/32
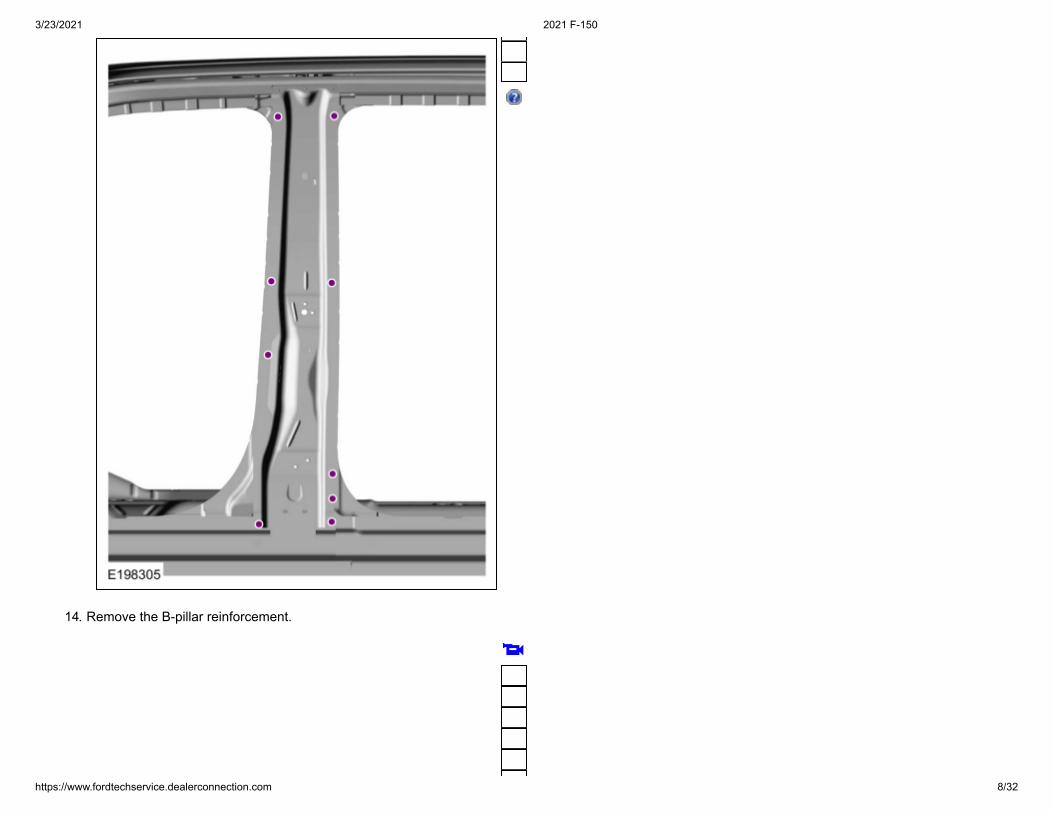
14. Remove the B-pillar reinforcement.

3/23/2021 2021 F-150
https://www.fordtechservice.dealerconnection.com 9/32
15. Remove the SPR fasteners in the rocker panel inner reinforcement. Use the General Equipment: Self-Piercing Rivet (SPR) Remover/Installer Use the General Equipment: Belt Sander

3/23/2021 2021 F-150
https://www.fordtechservice.dealerconnection.com 10/32
16. Remove the rocker panel inner reinforcement.
Installation
NOTICE: Body side sectioning is prohibited within 50 mm of door hinge, door striker and restraints anchoring points.
NOTE: SPR fasteners may not be placed directly over original SPR location. They must be placed adjacent to original location matching original quantity.
1. 80-120 grit sand paper. Sand to remove old adhesive and clean the B-pillar reinforcement mating surfaces.
3/23/2021 2021 F-150
https://www.fordtechservice.dealerconnection.com 11/32
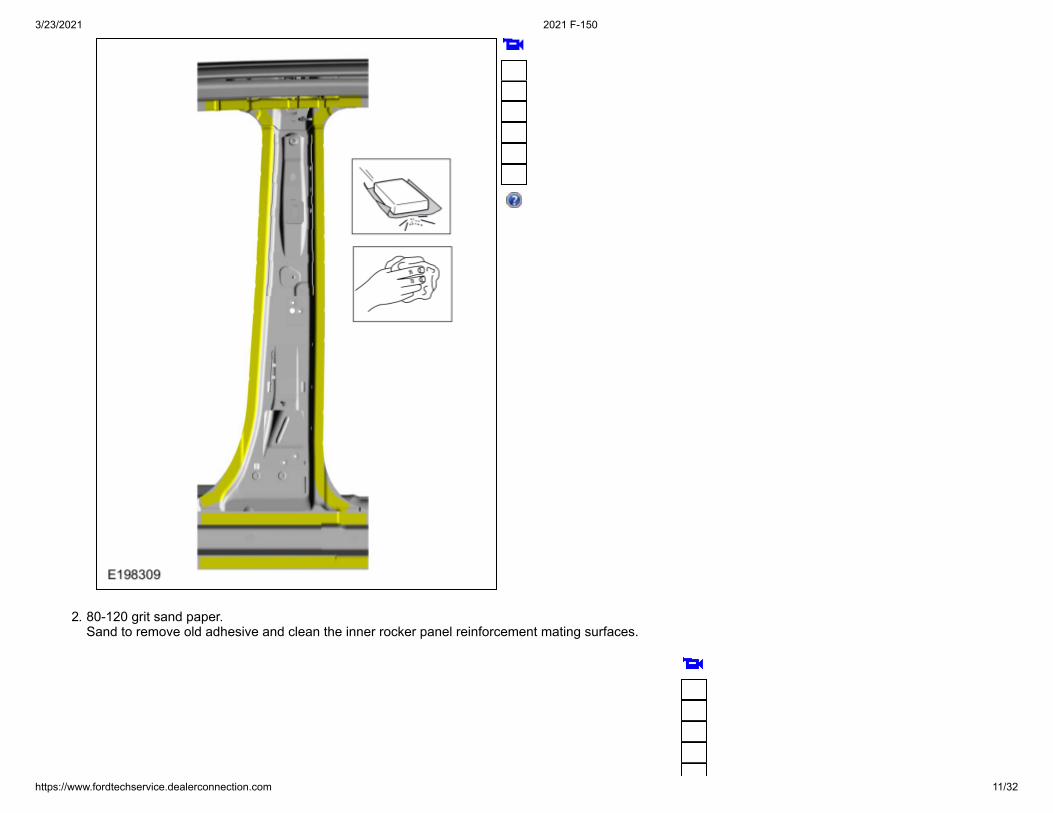
2. 80-120 grit sand paper. Sand to remove old adhesive and clean the inner rocker panel reinforcement mating surfaces.
3/23/2021 2021 F-150
https://www.fordtechservice.dealerconnection.com 12/32
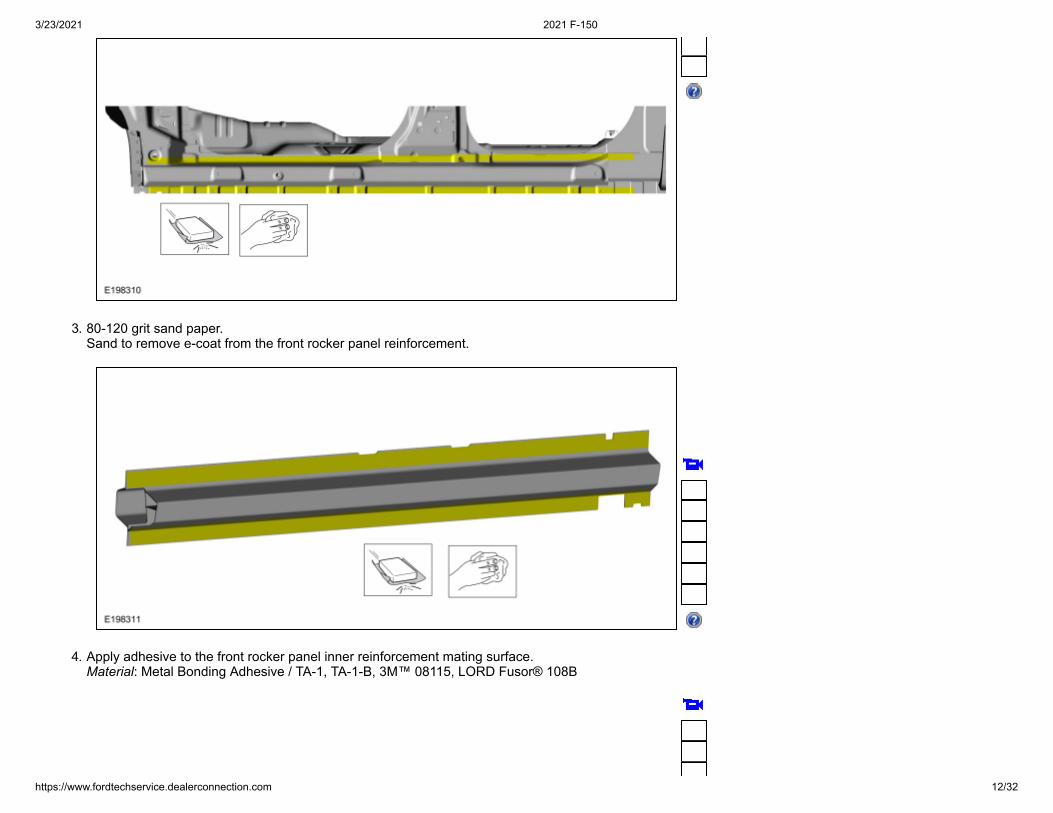
3. 80-120 grit sand paper. Sand to remove e-coat from the front rocker panel reinforcement.
4. Apply adhesive to the front rocker panel inner reinforcement mating surface. Material: Metal Bonding Adhesive / TA-1, TA-1-B, 3M™ 08115, LORD Fusor® 108B

3/23/2021 2021 F-150
https://www.fordtechservice.dealerconnection.com 13/32
5. Install and clamp the front rocker panel inner reinforcement. Use the General Equipment: Locking Pliers
6. 80-120 grit sand paper. Sand to remove e-coat from the rear rocker panel reinforcement.

3/23/2021 2021 F-150
https://www.fordtechservice.dealerconnection.com 14/32
7. Apply adhesive for the rear rocker panel reinforcement. Material: Metal Bonding Adhesive / TA-1, TA-1-B, 3M™ 08115, LORD Fusor® 108B

3/23/2021 2021 F-150
https://www.fordtechservice.dealerconnection.com 15/32
8. Install and clamp the rear rocker panel inner reinforcement. Use the General Equipment: Locking Pliers
9. Drill for blind rivet installation. Use the General Equipment: 6.5 mm Drill Bit
10. Install blind rivet fasteners.
Item SPR SPR Henrob® Car-O- Liner®, CMO®, Chief®, Spanesi® Wielande and Pro-Spot® Blind Rivet Solid Rivnut®

3/23/2021 2021 F-150
https://www.fordtechservice.dealerconnection.com 16/32
Number Code Schill® Mandrel Mandrel Rivet
1 - - - - W708777-S900C
- -
2 - - - - W702512-S900C
- -
3 - - - - W702512-S900C
- -
Use the General Equipment: Blind Rivet Gun
11. 80-120 grit sand paper. Sand to remove e-coat from the B-pillar reinforcement mating surfaces.
3/23/2021 2021 F-150
https://www.fordtechservice.dealerconnection.com 17/32
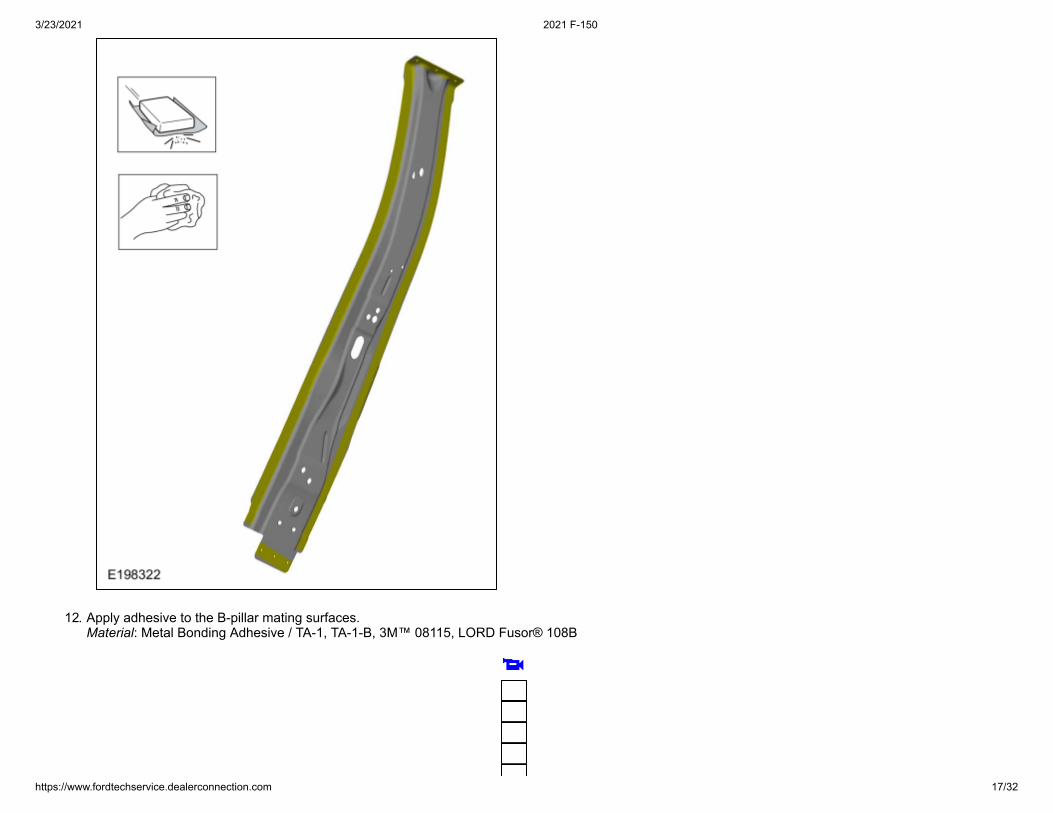
12. Apply adhesive to the B-pillar mating surfaces. Material: Metal Bonding Adhesive / TA-1, TA-1-B, 3M™ 08115, LORD Fusor® 108B
3/23/2021 2021 F-150
https://www.fordtechservice.dealerconnection.com 18/32
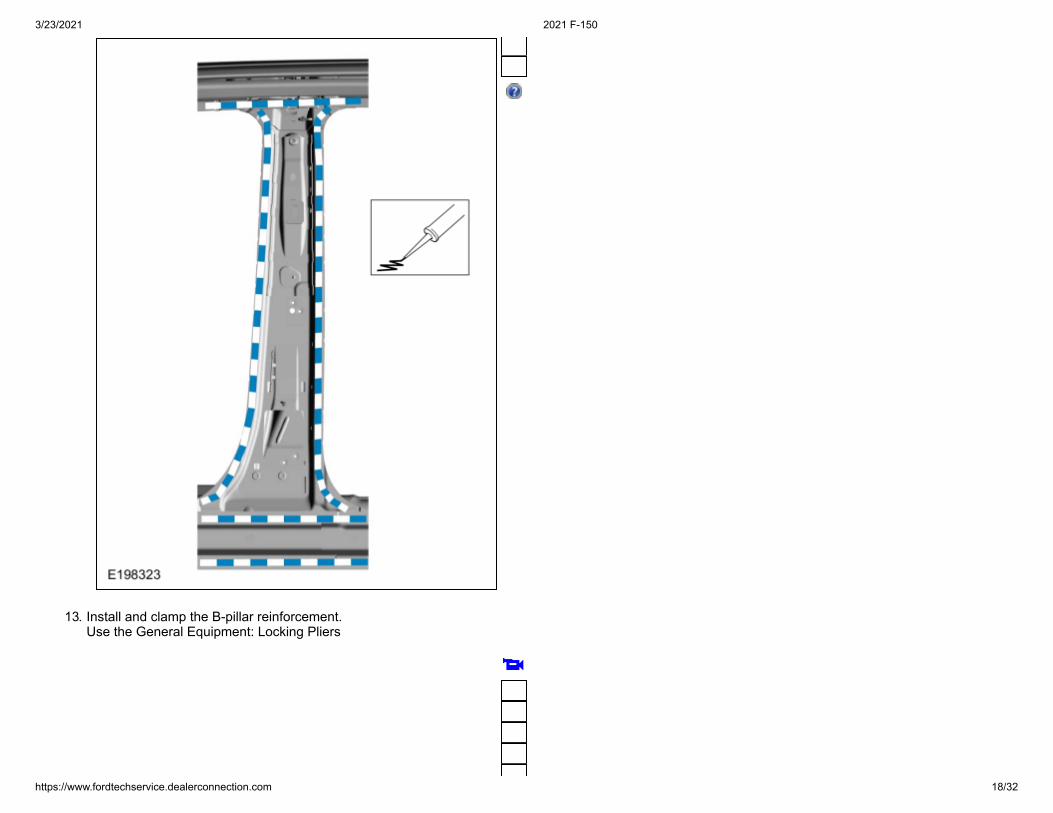
13. Install and clamp the B-pillar reinforcement. Use the General Equipment: Locking Pliers

3/23/2021 2021 F-150
https://www.fordtechservice.dealerconnection.com 19/32
14. Drill for blind rivet installation. Use the General Equipment: 6.5 mm Drill Bit

3/23/2021 2021 F-150
https://www.fordtechservice.dealerconnection.com 20/32
15. Install blind rivet fasteners in B-pillar reinforcement.
Item SPRNumber
SPRCode
Henrob® Car-O- Liner®, CMO®, Chief®, Spanesi® Wielande andSchill® Mandrel
Pro-Spot®Mandrel
Blind Rivet SolidRivet
Rivnut®
1 - - - - W708777-S900C
- -
2 - - - - W702512- - -
3/23/2021 2021 F-150
https://www.fordtechservice.dealerconnection.com 21/32
S900C
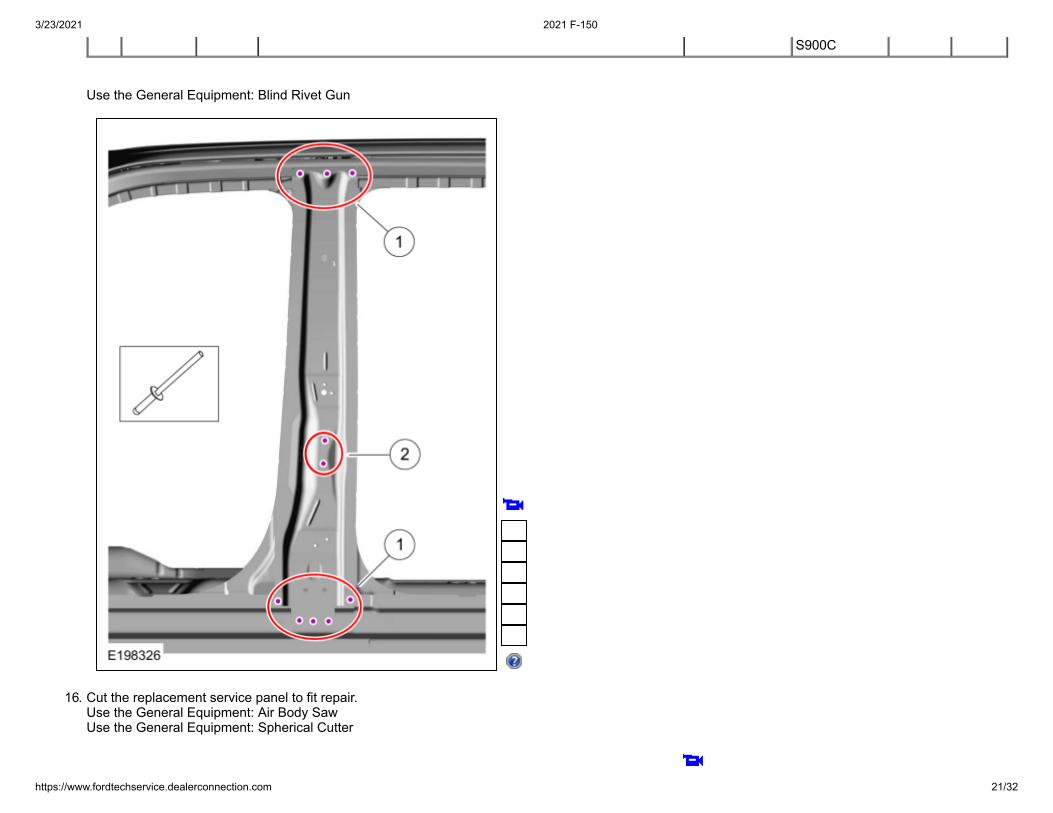
Use the General Equipment: Blind Rivet Gun
16. Cut the replacement service panel to fit repair. Use the General Equipment: Air Body Saw Use the General Equipment: Spherical Cutter

3/23/2021 2021 F-150
https://www.fordtechservice.dealerconnection.com 22/32
17. 80-120 grit sand paper. Sand to remove old adhesive and e-coat in the body side mating panel surfaces and clean.

3/23/2021 2021 F-150
https://www.fordtechservice.dealerconnection.com 23/32
18. 80-120 grit sand paper. Sand to remove e-coat in the replacement body side mating panel surfaces and clean.
3/23/2021 2021 F-150
https://www.fordtechservice.dealerconnection.com 24/32
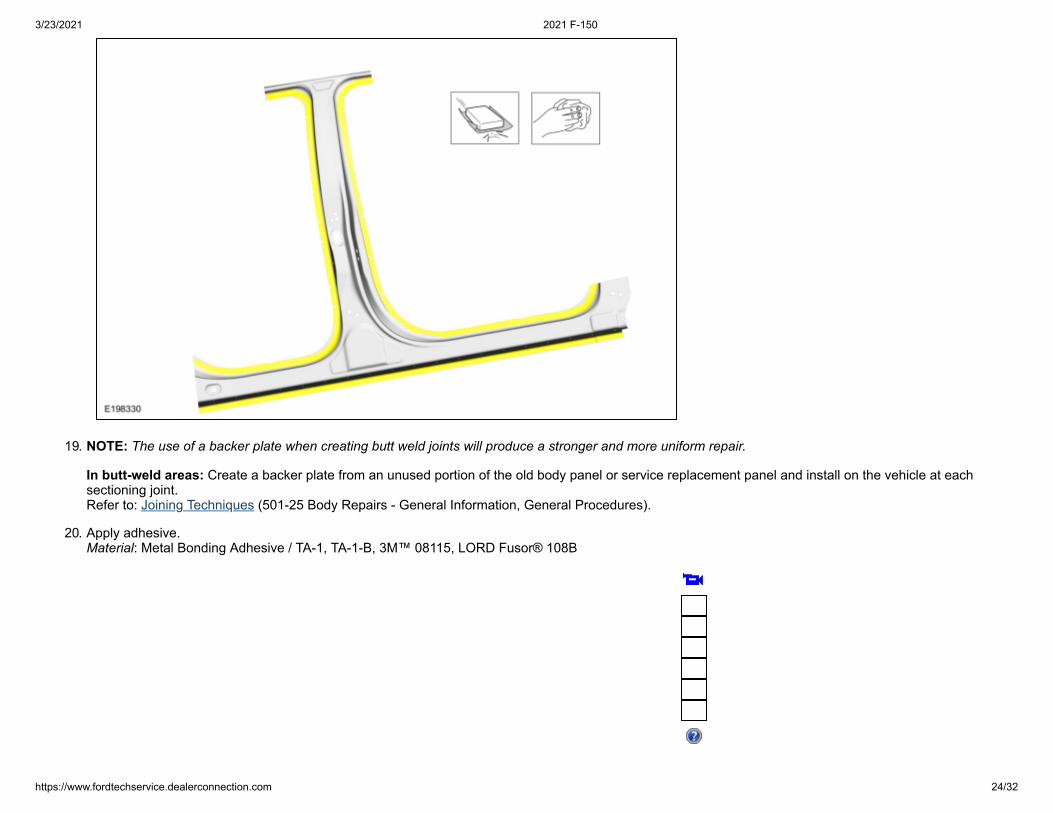
19. NOTE: The use of a backer plate when creating butt weld joints will produce a stronger and more uniform repair.
In butt-weld areas: Create a backer plate from an unused portion of the old body panel or service replacement panel and install on the vehicle at eachsectioning joint. Refer to: Joining Techniques (501-25 Body Repairs - General Information, General Procedures).
20. Apply adhesive. Material: Metal Bonding Adhesive / TA-1, TA-1-B, 3M™ 08115, LORD Fusor® 108B

3/23/2021 2021 F-150
https://www.fordtechservice.dealerconnection.com 25/32
21. Install and clamp in position the service panel section. Use the General Equipment: Locking Pliers

3/23/2021 2021 F-150
https://www.fordtechservice.dealerconnection.com 26/32
22. Complete the backer plate attachment at all sectioning joints. Refer to: Joining Techniques (501-25 Body Repairs - General Information, General Procedures).
23. Seam weld all sectioning joints using a MIG welder set up for aluminum repairs. Use the General Equipment: MIG/MAG Welding Equipment

3/23/2021 2021 F-150
https://www.fordtechservice.dealerconnection.com 27/32
24. Drill for fastener installation. Use the General Equipment: 6.5 mm Drill Bit

3/23/2021 2021 F-150
https://www.fordtechservice.dealerconnection.com 28/32
25. Install fasteners.
Item SPRNumber
SPRCode
Henrob® Car-O- Liner®, CMO®, Chief®, Spanesi® Wielande andSchill® Mandrel
Pro-Spot®Mandrel
Blind Rivet SolidRivet
Rivnut®
1 - - - - W707638-S900C
- -
2 - - - - W702512-S900C
- -
3 - - - - W708777-S900C
- -
4 - - - - W702554-S900C
- -
Use the General Equipment: Blind Rivet Gun
3/23/2021 2021 F-150
https://www.fordtechservice.dealerconnection.com 29/32
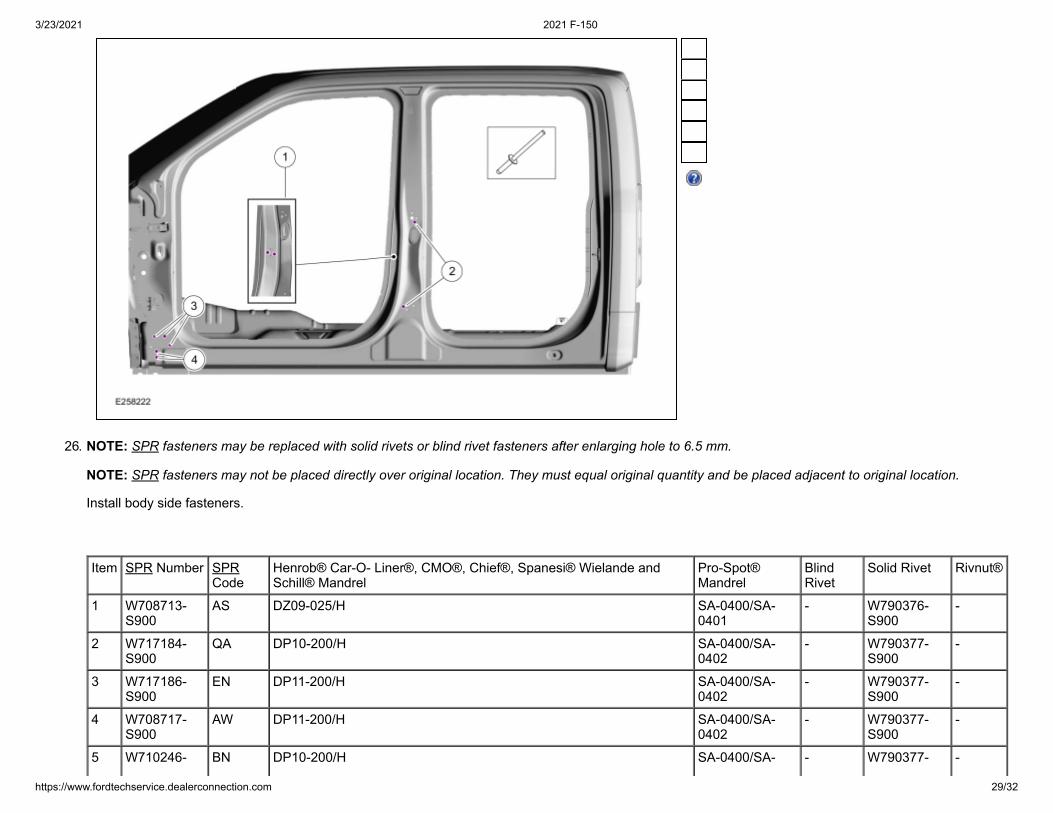
26. NOTE: SPR fasteners may be replaced with solid rivets or blind rivet fasteners after enlarging hole to 6.5 mm.
NOTE: SPR fasteners may not be placed directly over original location. They must equal original quantity and be placed adjacent to original location.
Install body side fasteners.
Item SPR Number SPRCode
Henrob® Car-O- Liner®, CMO®, Chief®, Spanesi® Wielande andSchill® Mandrel
Pro-Spot®Mandrel
BlindRivet
Solid Rivet Rivnut®
1 W708713-S900
AS DZ09-025/H SA-0400/SA-0401
- W790376-S900
-
2 W717184-S900
QA DP10-200/H SA-0400/SA-0402
- W790377-S900
-
3 W717186-S900
EN DP11-200/H SA-0400/SA-0402
- W790377-S900
-
4 W708717-S900
AW DP11-200/H SA-0400/SA-0402
- W790377-S900
-
5 W710246- BN DP10-200/H SA-0400/SA- - W790377- -
3/23/2021 2021 F-150
https://www.fordtechservice.dealerconnection.com 30/32
S900 0402 S900
6 W708717-S900
AW DG10-220/H SA-0400/SA-0402
- W790377-S900
-
7 W717186-S900
EN DG11-220/H SA-0400/SA-0402
- W790377-S900
-
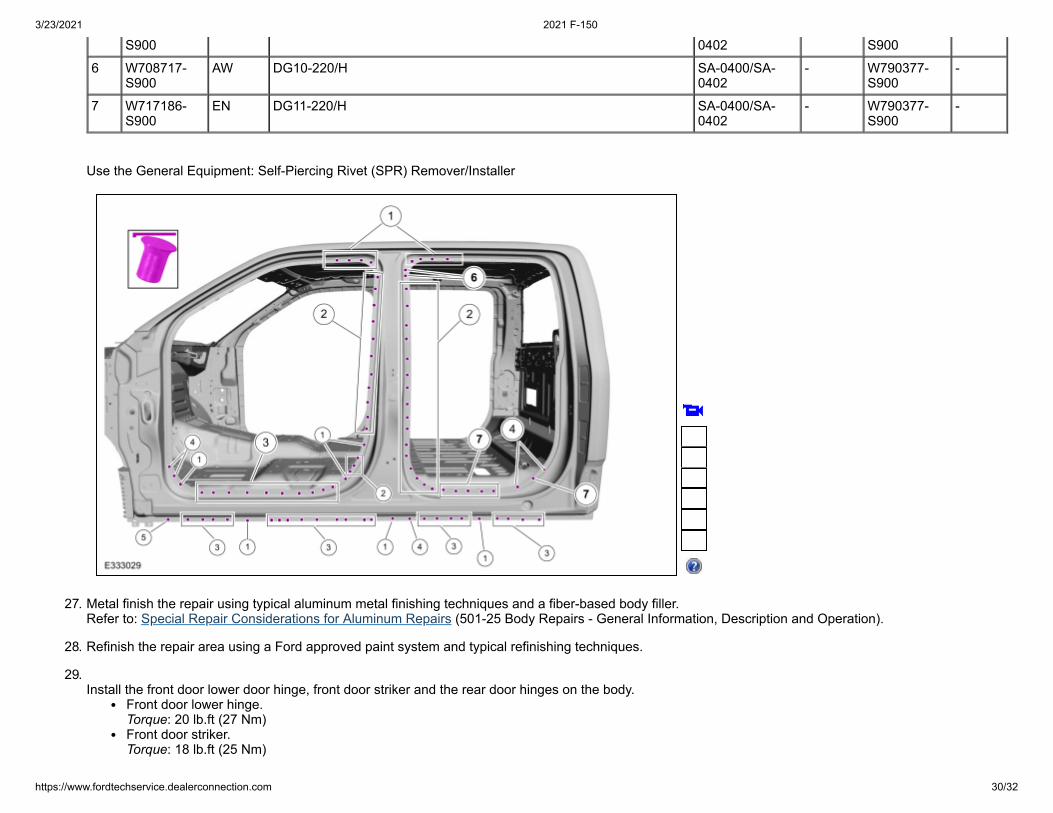
Use the General Equipment: Self-Piercing Rivet (SPR) Remover/Installer
27. Metal finish the repair using typical aluminum metal finishing techniques and a fiber-based body filler. Refer to: Special Repair Considerations for Aluminum Repairs (501-25 Body Repairs - General Information, Description and Operation).
28. Refinish the repair area using a Ford approved paint system and typical refinishing techniques.
29. Install the front door lower door hinge, front door striker and the rear door hinges on the body.
Front door lower hinge. Torque: 20 lb.ft (27 Nm)Front door striker. Torque: 18 lb.ft (25 Nm)

3/23/2021 2021 F-150
https://www.fordtechservice.dealerconnection.com 31/32
Rear door hinges. Torque: 22 lb.ft (30 Nm)
30. Install the front and rear door opening weather strips and scuff plates.
31. Install the front and rear doors. Refer to: Front Door - Regular Cab/SuperCrew (501-03 Body Closures, Removal and Installation). Refer to: Rear Door - SuperCrew (501-03 Body Closures, Removal and Installation).
32. Install the front fender. Refer to: Fender (501-02 Front End Body Panels, Removal and Installation).
33. Align the front and rear doors. Refer to: Front Door Alignment - Regular Cab/SuperCrew (501-03 Body Closures, General Procedures). Refer to: Rear Door Alignment - SuperCrew (501-03 Body Closures, General Procedures).
34. Repower the SRS. Refer to: Supplemental Restraint System (SRS) Repowering (501-20B Supplemental Restraint System, General Procedures).
© Copyright 2021, Ford Motor Company.

3/23/2021 2021 F-150
https://www.fordtechservice.dealerconnection.com 32/32