R-55TS Operation Manualec1.images-amazon.com/media/i3d/01/A/man-migrate/MANUAL000021… · SEC...
28
TM ® READ ALL INSTRUCTIONS CAREFULLY BEFORE USING CONTENTS • Precautions to Avoid Possible Exposure to Excessive Microwave Energy ................................ Inside Front Cover • For Customer Assistance ... Inside Front Cover • Consumer Limited Warranty ................... 1 • Product Information Card ........................ 1 • Important Safety Instructions .................. 2 • Unpacking and Installation Instructions ... 3 • Grounding Instructions ............................ 3 • Information You Need to Know ............... 4-7 • Part Names ............................................. 8- 9 • Before Operating ..................................... 10 • Manual Operation .................................... 10-12 • Special Features ..................................... 12-20 Automatic Cooking ................................ 12 Microwave Options ............................... 16 Express Defrost .................................... 18 Manual Defrost ..................................... 19 • Other Convenient Features ..................... 21-22 • Cleaning and Care .................................. 23 • Service Call Check .................................. 24 • Specifications .......................................... 24 TOASTER OVEN WITH MICROWAVE OPERATION MANUAL MODEL R-55TS
Transcript of R-55TS Operation Manualec1.images-amazon.com/media/i3d/01/A/man-migrate/MANUAL000021… · SEC...

SEC R55TS
TINSEA983WRRZ-D32 SEC R55TS
TM
®
R E A D A L L I N S T R U C T I O N S C A R E F U L L Y B E F O R E U S I N G
C O N T E N T S• Precautions to Avoid Possible
Exposure to Excessive MicrowaveEnergy ................................ Inside Front Cover
• For Customer Assistance ... Inside Front Cover• Consumer Limited Warranty ................... 1• Product Information Card ........................ 1• Important Safety Instructions .................. 2• Unpacking and Installation Instructions... 3• Grounding Instructions ............................ 3• Information You Need to Know ............... 4 - 7• Part Names ............................................. 8- 9• Before Operating ..................................... 10• Manual Operation.................................... 10-12• Special Features ..................................... 12-20
Automatic Cooking ................................ 12Microwave Options ............................... 16Express Defrost .................................... 18Manual Defrost ..................................... 19
• Other Convenient Features ..................... 21-22• Cleaning and Care .................................. 23• Service Call Check .................................. 24• Specifications .......................................... 24
TOASTER OVENWITH MICROWAVEOPERATION MANUAL
MODEL
R-55TS

SEC R55TS
TINSEA983WRRZ-D32 SEC R55TS
TO PHONE:DIAL 1-800- BE-SHARP ( 237-4277 ) for :
SERVICE (for your nearest Sharp Authorized Servicer)PARTS (for your authorized parts distributor)ADDITIONAL CUSTOMER INFORMATION
DIAL 1-800-642-2122 for :ACCESSORIES
TO WRITE:Sharp Electronics CorporationCustomer Assistance Center1300 Naperville DriveRomeoville, IL 60446-1091
TO ACCESS INTERNET: www.sharpusa.com
To aid in reporting this toaster oven with microwave in case of loss or theft, please record below the model numberand serial number located on the unit. We also suggest you record all the information listed and retain for futurereference.
Please provide the following information when you write or call: model number, serialnumber, date of purchase, your complete mailing address (including zip code), yourdaytime telephone number (including area code) and description of the problem.
MODEL NUMBER ________________________ SERIAL NUMBER ______________DATE OF PURCHASE ______________________Dealer _____________________________ Telephone _________________Servicer ____________________________ Telephone _________________
PRECAUTIONS TO AVOID POSSIBLEEXPOSURE TO EXCESSIVE
MICROWAVE ENERGY(a) Do not attempt to operate this oven with the door open since open-door operation can result in
harmful exposure to microwave energy. It is important not to defeat or tamper with the safetyinterlocks.
(b) Do not place any object between the oven front face and the door or allow soil or cleanerresidue to accumulate on sealing surfaces.
(c) Do not operate the oven if it is damaged. It is particularly important that the oven door closeproperly and that there is no damage to the: (1) door (bent), (2) hinges and latches (broken orloosened), (3) door seals and sealing surfaces.
(d) The oven should not be adjusted or repaired by anyone except properly qualified servicepersonnel.
F O R C U S T O M E R A S S I S T A N C E

1
SEC R55TS
TINSEA983WRRZ-D32 SEC R55TS
C O N S U M E R L I M I T E D W A R R A N T YSHARP ELECTRONICS CORPORATION warrants to the first consumer purchaser that this Sharp brand product(the “Product”), when shipped in its original container, will be free from defective workmanship and materials, andagrees that it will, at its option, either repair the defect or replace the defective Product or part thereof with a newor remanufactured equivalent at no charge to the purchaser for parts or labor for the period(s) set forth below.
This warranty does not apply to any appearance items of the Product nor to the additional excluded item(s) setforth below nor to any Product the exterior of which has been damaged or defaced, which has been subjected toimproper voltage or other misuse, abnormal service or handling, or which has been altered or modified in designor construction.
In order to enforce the rights under this limited warranty, the purchaser should follow the steps set forth below andprovide proof of purchase to the servicer.
The limited warranty described herein is in addition to whatever implied warranties may be granted to purchasersby law. ALL IMPLIED WARRANTIES INCLUDING THE WARRANTIES OF MERCHANTABILITY AND FITNESSFOR USE ARE LIMITED TO THE PERIOD(S) FROM THE DATE OF PURCHASE SET FORTH BELOW. Somestates do not allow limitations on how long an implied warranty lasts, so the above limitation may not apply to you.
Neither the sales personnel of the seller nor any other person is authorized to make any warranties other thanthose described herein, or to extend the duration of any warranties beyond the time period described herein onbehalf of Sharp.
The warranties described herein shall be the sole and exclusive warranties granted by Sharp and shall be thesole and exclusive remedy available to the purchaser. Correction of defects, in the manner and for the period oftime described herein, shall constitute complete fulfillment of all liabilities and responsibilities of Sharp to thepurchaser with respect to the Product, and shall constitute full satisfaction of all claims, whether based on con-tract, negligence, strict liability or otherwise. In no event shall Sharp be liable, or in any way responsible, for anydamages or defects in the Product which were caused by repairs or attempted repairs performed by anyoneother than an authorized servicer. Nor shall Sharp be liable or in any way responsible for any incidental orconsequential economic or property damage. Some states do not allow the exclusion of incidental or consequen-tial damages, so the above exclusion may not apply to you.
THIS WARRANTY GIVES YOU SPECIFIC LEGAL RIGHTS. YOU MAY ALSO HAVE OTHER RIGHTS WHICHVARY FROM STATE TO STATE.
Your Product Model Number& Description:
Warranty Period for this Product:
Additional Item(s) Excluded fromWarranty Coverage (if any):
Where to Obtain Service:
What to do to Obtain Service:
R-55TS, Home Use Carousel Microwave Oven. (Be sure to have this in-formation available when you need service for your Product.)
One (1) year parts and labor. The warranty period continues for an addi-tional four (4) years, for a total of five (5) years, with respect to the magne-tron tube in the Product for parts only; labor and service are not providedfree of charge for this additional period.
Non-functional accessories, turntable, turntable support and light bulb.
From a Sharp Authorized Servicer located In the United States. To find thelocation of the nearest Sharp Authorized Servicer, call Sharp toll free at 1-800-BE-SHARP (1-800-237-4277).
Ship prepaid or carry in your Product to a Sharp Authorized Servicer. Besure to have Proof of Purchase available. If you ship the Product, be sureit is insured and packaged securely.
P R O D U C T I N F O R M A T I O N C A R DThe product information card which is on the inside of the microwave oven carton should be completed within ten daysof purchase and returned. We will keep it on file and help you access the information in case of loss, damage or theft.This will also enable us to contact you in the unlikely event that any adjustments or modifications are ever required foryour oven.
TO OBTAIN SUPPLY, ACCESSORY OR PRODUCT INFORMATION, CALL1-800-BE-SHARP OR VISIT www.sharpusa.com.
Save the proof of purchase as it is needed should your oven ever require warranty service.

2
SEC R55TS
TINSEA983WRRZ-D32 SEC R55TS
SAVE THESEINSTRUCTIONS
I M P O R T A N T S A F E T Y I N S T R U C T I O N SWhen using electrical appliances basic safety precautions should be followed, including the following:
WARNING - To reduce the risk of burns, electric shock, fire, injury to persons or exposure to excessivemicrowave energy:
1. Read all instructions before using the ap-pliance.
2. Read and follow the specific “PRECAU-TIONS TO AVOID POSSIBLE EXPO-SURE TO EXCESSIVE MICROWAVEENERGY” on inside front cover.
3. This appliance must be grounded. Connect onlyto properly grounded outlet. See “GROUND-ING INSTRUCTIONS” on page 3.
4. Install or locate this appliance only in accordance with the provided installation instruc-tions.
5. Some products such as whole eggs and sealedcontainers —for example, closed glass jars —are able to explode and should not be heatedin this oven.
6. Use this appliance only for its intended use asdescribed in this manual. Do not use corrosivechemicals or vapors in this appliance. This typeof oven is specifically designed to heat, cookor dry food. It is not designed for industrial orlaboratory use.
7. As with any appliance, close supervision isnecessary when used by children.
8. Do not operate this appliance if it has a dam-aged cord or plug, if it is not working properlyor if it has been damaged or dropped.
9. This appliance should be serviced only by quali-fied service personnel. Contact nearest SharpAuthorized Servicer for examination, repair oradjustment.
10. Do not cover or block any openings on the ap-pliance.
11. Do not store or use this appliance outdoors. Donot use this product near water—for example,near a kitchen sink, in a wet basement, near aswimming pool or similar locations.
12. Do not immerse cord or plug in water.13. Keep cord away from heated surfaces.14. Do not let cord hang over edge of table or
counter.15. See door surface cleaning instructions on page
23.16. To reduce the risk of fire in the oven cavity:
a. Do not overcook food. Carefully attendappliance when paper, plastic or othercombustible materials are placed insidethe oven to facilitate cooking.
b. Remove wire twist-ties from paper or plas-tic bags before placing bag in oven.
c. If materials inside the oven ignite, keepoven door closed, turn oven off anddisconnect the power cord or shut offpower at the fuse or circuit breakerpanel.
d. Do not use the cavity for storage purposes.Do not leave paper products, cooking uten-sils or food in the cavity when not in use.
17. Liquids, such as water, coffee or tea are able tobe overheated beyond the boiling point withoutappearing to be boiling. Visible bubbling or boil-ing when the container is removed from the mi-crowave oven is not always present. THISCOULD RESULT IN VERY HOT LIQUIDS SUD-DENLY BOILING OVER WHEN A SPOON OROTHER UTENSIL IS INSERTED INTO THELIQUID. To reduce the risk of injury to persons:
a. Do not overheat the liquid.b. Stir the liquid both before and halfway
through heating it.c. Do not use straight-sided containers with
narrow necks. Use a wide-mouthed con-tainer.
d. After heating, allow the container to standin the microwave oven at least for 20 sec-onds before removing the container.
e. Use extreme care when inserting a spoonor other utensil into the container.
18. If the oven light fails, consult a SHARP AU-THORIZED SERVICER.
19. Oversized foods or oversized metal utensilsshould not be inserted in this oven as theymay create a fire or risk of electric shock.
20. Do not clean with metal scouring pads. Piecescan burn off the pad and touch electrical partsinvolving a risk of electric shock.
21. Do not use paper products when appliance isoperated in the GRILL, BAKE and AUTO-MATIC COOKING modes.
22. Do not store any materials, other thanmanufacture’s recommended accessories, inthis oven when not in use.
23. Do not cover any parts of the oven with metalfoil. This will cause overheating of the oven.
24. Do not place anything on the top of the oven.

3
SEC R55TS
TINSEA983WRRZ-D32 SEC R55TS
Unpacking and Examining Your OvenRemove:1. all packing materials from inside the oven cavity;
however, DO NOT REMOVE THE WAVEGUIDECOVER, which is located on the right cavity wall.
Read enclosures andSAVE the OperationManual.2. the feature sticker, ifthere is one, from theoutside of the door.Check the oven for anydamage, such as mis-aligned or bent door,damaged door seals and
sealing surfaces, broken or loose door hinges and
This appliance must be grounded. This oven is equipped with a cord having a grounding wire with a ground-ing plug. It must be plugged into a wall receptacle that is properly installed and grounded in accordance withthe National Electrical Code and local codes and ordinances. In the event of an electrical short circuit,grounding reduces risk of electric shock by providing an escape wire for the electric current.
WARNING – Improper use of the grounding plug can result in a risk of electric shock.
Electrical RequirementsThe electrical requirements are a 120 volt 60 Hz, AC only, 15 amp. or moreprotected electrical supply. It is recommended that a separate circuit serv-ing only this appliance be provided.The oven is equipped with a 3-prong grounding plug. It must be pluggedinto a wall receptacle that is properly installed and grounded. Should youonly have a 2-prong outlet, have a qualified electrician install a correct wallreceptacle.A 3-prong adapter may be purchased and used temporarily if local codesallow. Follow package directions.A short power-supply cord is provided to reduce risk of becoming entangledin or tripping over a longer cord.
Extension CordIf it is necessary to use an extension cord, use only a 3-wire extension cordthat has a 3-blade grounding plug and a 3-slot receptacle that will acceptthe plug on the microwave oven. The marked rating of the extension cordshould be AC 115-120 volt, 15 amp. or more.Be careful not to drape the cord over the countertop or table where it can bepulled on by children or tripped over accidentally.Notes:1. If you have any questions about the grounding or electrical in-
structions, consult a qualified electrician or service person.2. Neither Sharp nor the dealer can accept any liability for damage
to the oven or personal injury resulting from failure to observe thecorrect electrical connection procedures.
Radio or TV InterferenceShould there be any interference caused by the microwave oven to your radio or TV, check that the micro-wave oven is on a different electrical circuit, relocate the radio or TV as far away from the oven as feasibleor check position and signal of receiving antenna.
U N P A C K I N G A N D I N S T A L L A T I O N I N S T R U C T I O N S
G R O U N D I N G I N S T R U C T I O N S
latches and dents inside the cavity or on the door. Ifthere is any damage, do not operate the oven andcontact your dealer or SHARPAUTHORIZED SERVICER.Choosing a Location for Your OvenYou will use the oven frequently so plan its locationfor ease of use. The oven must be placed on acountertop which is a minimum of 36 inches from thefloor. It's wise, if possible, to have counter space onat least one side of the oven. Allow at least 2 incheson the sides, top and at the rear of the oven for aircirculation. Do not place or install the oven in anyarea where heat and steam are generated; for ex-ample, next to or above a conventional gas or elec-tric range or above a conventional wall oven. Heatand steam may damage the electronics or the me-chanical parts of the oven.

4
SEC R55TS
TINSEA983WRRZ-D32 SEC R55TS
I N F O R M A T I O N Y O U N E E D T O K N O WABOUT YOUR OVEN
Eggs, sausages,nuts, seedsfruits &vegetables
Popcorn
Baby food
Gemneral
ABOUT FOOD
• Puncture egg yolks before cooking toprevent “explosion”.
• Pierce skins of potatoes, apples, squash,hot dogs and sausages so that steam es-capes.
• Use specially bagged popcorn for the microwave oven.
• Listen while popping corn for the popping toslow to 1 or 2 seconds or use special POP-CORN pad.
• To pop popcorn using the special POPCORNpad, place a pie plate on the turntable. Thenplace a bag on the pie plate.
• Place carefully so bag does not touch ovenwalls. The corners of the bag may be foldeddown.
• Transfer baby food to small dish and heatcarefully, stirring often. Check temperaturebefore serving.
• Put nipples on bottles after heating andshake thoroughly. “Wrist” test before feed-ing.
• Cut baked goods with filling after heatingto release steam and avoid burns.
• Stir liquids briskly before heating and allow to stand at least for 20 seconds afterheating before stirring or drinking to avoideruption.
• Use deep bowl, when cooking liquids or cere-als, to prevent boilovers.
• Cook eggs in shells.
• Reheat whole eggs.
• Dry nuts or seeds in shells.
• Pop popcorn in regular brown bagsor glass bowls.
• Exceed maximum time on popcornpackage.
• Heat baby food in original jars.
• Heat disposable bottles.
• Heat bottles with nipples on.
• Heat or cook in closed glass jars orair tight containers.
• Can in the microwave as harmfulbacteria may not be destroyed.
• Deep fat fry.
• Dry wood, gourds, herbs or wet papers.
DO DON’TFOOD
This Operation Manual is valuable: read it carefully andalways save it for reference.
Check recipes included in this operation manual as wellas this section for cooking principles, techniques andhints.
NEVER use the oven without the turntable and supportnor turn the turntable over so that a large dish could beplaced in the oven. Only remove for cleaning or for thefoods specified in this manual. The turntable will turn bothclockwise and counterclockwise.
ALWAYS have food in the oven when it is on to absorbthe microwave energy.
When using the oven at power levels below MICRO 100%,you may hear the magnetron cycling on and off. It is nor-mal for the exterior of the oven to be warm to the touchwhen cooking or reheating.
Condensation is a normal part of microwave cooking.Room humidity and the moisture in food will influence theamount of moisture that condenses in the oven. Gener-ally, covered foods will not have as much condensationas uncovered ones. Vents on the oven back must not beblocked.
After using, the cooling fan may come on to cool theoven cavity. The display will show COOLING, and youwill hear the sound of the fan.
Unlike microwave-only ovens, your oven may becomehot during cooking. Be cautious.
The oven is for food preparation only. It should not beused to dry clothes or newspapers.
Your oven is rated 650 watts by using the IEC TestProcedure. Check food as it cooks and remove when done.

5
SEC R55TS
TINSEA983WRRZ-D32 SEC R55TS
ABOUT UTENSILS AND COVERINGS
Aluminum foil
Microwave Only Grill, BakeUtensils andCoverings
It is not necessary to buy all new cookware. Many pieces already in your kitchen can be used successfully in your newtoaster oven with microwave. The chart below will help you decide what utensils and coverings should be used in eachmode.
Aluminum containers
Glass ceramic(Pyroceram. ® )
Glass, heat-resistant
Glass, non-heat-resistant
Lids, glass
Lids, metal
Metal cookware
Metal, misc: disheswith metallic trim,screws, bands,handles. Metal twistties
Oven cooking bags
Paper plates
Paper towels
Microwave-safeplastic containers
Plastic wrap
Yes Small flat pieces of aluminum foilplaced smoothly on food can be used toshield areas from cooking or defrosting tooquickly. Keep foil at least 1 inch from wallsof oven. Be sure foil does not touch the turn-table.
Yes Can be used if 3/4 filled with food. Keep1 inch away from walls and do not cover withfoil.
Yes Excellent
Yes Excellent. A pie plate is necessaryfor popping popcorn.
No
Yes Excellent
No
No
No
Yes Good for meats or foods that needtenderizing. DO NOT use metal twist ties.
Yes For reheating
Yes To cover for reheating and cooking.Do not use recycled paper towels which maycontain metal filings.
Yes Use for reheating and defrosting. Someplastics are not suitable for cooking foods withhigh fat and sugar content.Follow manufacturer's directions.
Yes Use brands specially marked for micro-wave use. DO NOT allow plastic wrap to touchfood. Vent so steam can escape.
I N F O R M A T I O N Y O U N E E D T O K N O W
Yes
Yes
YesExcellent
YesExcellent
No
Yes
No
Yes
No
Yes
No
No
No
No
6
SEC R55TS
TINSEA983WRRZ-D32 SEC R55TS
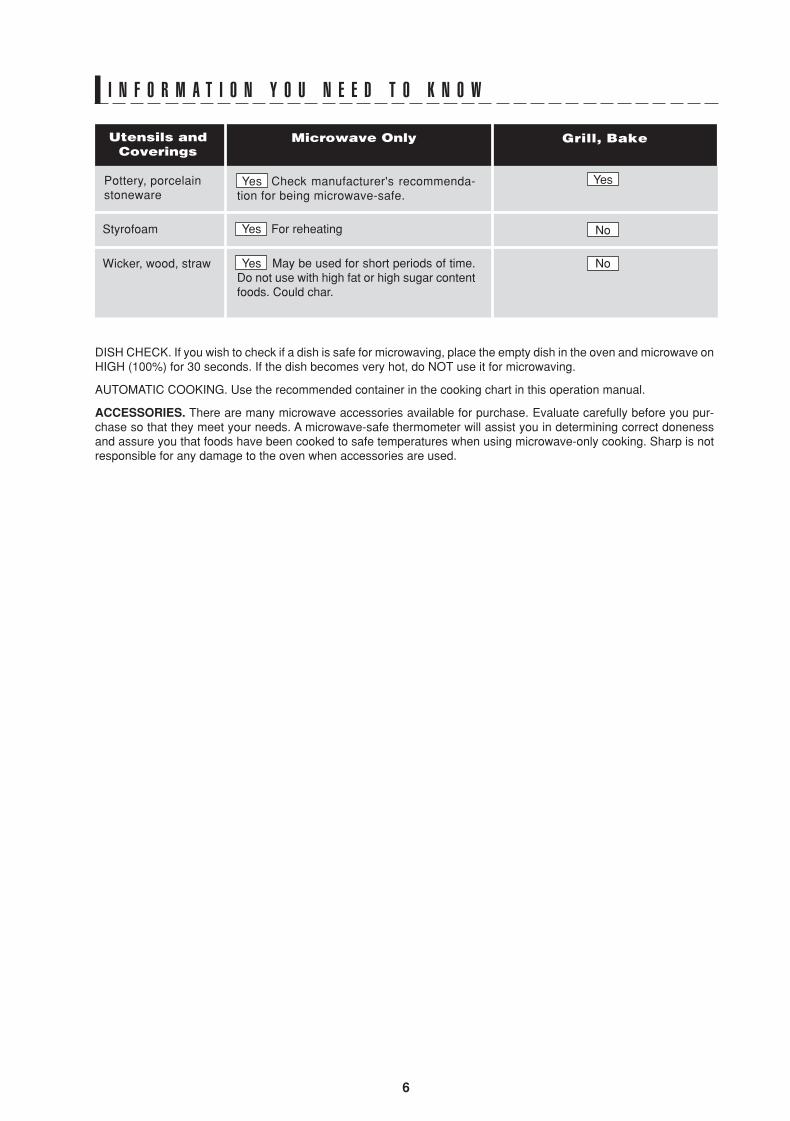
Yes Check manufacturer's recommenda-tion for being microwave-safe.
Yes For reheating
Yes May be used for short periods of time.Do not use with high fat or high sugar contentfoods. Could char.
Pottery, porcelainstoneware
Microwave Only Grill, BakeUtensils andCoverings
Styrofoam
Wicker, wood, straw
I N F O R M A T I O N Y O U N E E D T O K N O W
DISH CHECK. If you wish to check if a dish is safe for microwaving, place the empty dish in the oven and microwave onHIGH (100%) for 30 seconds. If the dish becomes very hot, do NOT use it for microwaving.
AUTOMATIC COOKING. Use the recommended container in the cooking chart in this operation manual.
ACCESSORIES. There are many microwave accessories available for purchase. Evaluate carefully before you pur-chase so that they meet your needs. A microwave-safe thermometer will assist you in determining correct donenessand assure you that foods have been cooked to safe temperatures when using microwave-only cooking. Sharp is notresponsible for any damage to the oven when accessories are used.
Yes
No
No
7
SEC R55TS
TINSEA983WRRZ-D32 SEC R55TS
160°F
ABOUT MICROWAVE COOKING• Arrange food carefully. Place thickest areas towards
outside of dish.
• Watch cooking time. Cook for the shortest amount oftime indicated and add more as needed. Food severelyovercooked can smoke or ignite.
• Cover foods while cooking. Check recipe or cookbookfor suggestions: paper towels, wax paper, microwaveplastic wrap or a lid. Covers prevent spattering andhelp foods to cook evenly.
• Shield with small flat pieces of aluminum foil anythin areas of meat or poultry to prevent overcookingbefore dense, thick areas are cooked thoroughly.
• Stir foods from outside to center of dish once or twiceduring cooking, if possible.
• Turn foods over once during microwaving tospeed cooking of such foods as chicken and hamburg-ers. Large items like roasts must be turned over atleast once.
I N F O R M A T I O N Y O U N E E D T O K N O W
• Rearrange foods such as meatballs halfway throughcooking both from top to bottom and from the center ofthe dish to the outside.
• Add standing time. Remove food from oven and stir, ifpossible. Cover for standing time which allows the foodto finish cooking without overcooking.
• Check for doneness. Look for signs indicating thatcooking temperatures have been reached.
Doneness signs include:
- Food steams throughout, not just at edge.
- Center bottom of dish is very hot to the touch.
- Poultry thigh joints move easily.
- Meat and poultry show no pinkness.
- Fish is opaque and flakes easily with a fork.
• After cooking, accessories and dishes may be hot.Be careful when removing food.
• Check foods to see that they are cooked to the UnitedStates Department of Agriculture's recommendedtemperatures.
To test for doneness, insert a meat thermometer in a thickor dense area away from fat or bone. NEVER leave thethermometer in the food during cooking, unless using amicrowave thermometer when cooking with onlymicrowave power.
• ALWAYS use potholders to prevent burns whenhandling utensils that are in contact with hot food.Enough heat from the food can transfer through utensilsto cause skin burns.
• Avoid steam burns by directing steam away from theface and hands. Slowly lift the farthest edge of a dish'scovering and carefully open popcorn and oven cookingbags away from the face.
• Stay near the oven while it's in use and check cooking progressfrequently so that there is no chance of overcooking food.
• NEVER use the cavity for storing cookbooks or other items.
• Select, store and handle food carefully to preserveits high quality and minimize the spread of foodbornebacteria.
• Keep waveguide cover clean. Food residue can causearcing and/or fires.
• Use care when removing items from the oven so thatthe utensil, your clothes or accessories do not touch thesafety door latches.
ABOUT SAFETY
... for fresh pork, ground meat,boneless white poultry, fish,seafood, egg dishes and frozenprepared food.
... for leftover, ready-to-reheatrefrigerated, and deli and carry-out“fresh” food.
... white meat of poultry.
... dark meat of poultry.
T E M P F O O D
165°F
170°F
180°F
Children should be taught all safety precautions: usepotholders, remove coverings carefully, pay special atten-tion to packages that crisp food because they may be extrahot.
Don’t assume that because a child has mastered onecooking skill he/she can cook everything.
Children need to learn that this oven is not a toy. Seepage 22 for Child Lock feature.
ABOUT CHILDREN AND THE MICROWAVEChildren below the age of 7 should use the microwaveoven with a supervising person very near to them. Be-tween the ages of 7 and 12, the supervising person shouldbe in the same room.
The child must be able to reach the oven comfortably; ifnot, he/she should stand on a sturdy stool.
At no time should anyone be allowed to lean or swing onthe oven door.
• The oven cabinet, cavity, door, accessories anddishes will become hot. To PREVENT BURNS, usethick oven gloves when removing the food orturntable from the oven.
• We recommend leaving the turntable in the oven duringpreheating unless it will be used as the baking pan,such as with biscuits. When preheat is over, open ovendoor and quickly place foods to be baked inside.
• Do not cover turntable with aluminum foil.
ABOUT GRILL, BAKE AND AUTOMATIC COOKING

8
SEC R55TS
TINSEA983WRRZ-D32 SEC R55TS
P A R T N A M E S
1 Door opening button
Push to open door.
2 Oven door with see-through window
3 Safety door latches
The oven will not operate unless thedoor is securely closed.
4 Door hinges
5 Door seals and sealing surfaces
6 Turntable motor shaft
7 Removable turntable support
Carefully place the turntable support onthe turntable motor shaft(6) in thecenter of the oven floor.
8 Removable turntable
Place the turntable securely on theturntable support. The turntable willrotate clockwise or counterclockwise.Only remove for cleaning or for thefoods specified in this manual.
9 Top grill heater (top heater)
10 Bottom grill heater (bottom heater)
The bottom heater is under the cavityfloor.
11 Ventilation openings (rear)
12 Oven light
It will light when oven is operating ordoor is open.
13 Waveguide cover: DO NOT REMOVE.
14 Rotary dial
15 Control panel
16 Time display: 95 minutes
17 Food label
The food label in English and inSpanish is packed in the oven. Attachthe selected one to the oven top.
OVEN PARTS
DISPLAY
Indicators will light to indicate what function is in process and when quantity should beentered.
More/less bars will light to indicate the length of automatic cooking or the desireddoneness for automatic cooking.
8
7
12
16
14
1
13
9
10
3
5
4
3
26
11
15
17
Indicators
More/less bars

9
SEC R55TS
TINSEA983WRRZ-D32 SEC R55TS
P A R T N A M E S
Number next to the control panel illustration indicates page onwhich there are a feature description and usage information.
R - 5 5 T S
10, 21, 22
10
16 - 17
10 1211
12, 13
12, 14
12, 15
10, 12, 22
10, 21
18

10
SEC R55TS
TINSEA983WRRZ-D32 SEC R55TS
P R O C E D U R E D I S P L A Y
• If the electrical power supply to your microwave ovenshould be interrupted, the display will intermittentlyshow 88:88 after the power is reinstated. If this oc-curs during cooking, the program will be erased. Thetime of day will also be erased. Simply touch STOP/CLEAR and reset the clock for the correct time of day.
00 (hour) will flash.
B E F O R E O P E R A T I N G• Before operating your new toaster oven with micro-
wave make sure you read and understand this opera-tion manual completely.
• Before the oven can be used, follow these procedures:1. Plug in the oven. Close the door. The oven display
will begin flashing 88:88 .2. Touch STOP/CLEAR.
will appear.3. Set clock. See below.4. Condition the heaters by heating oven without food.
See page 11.
:::::
TO SET THE CLOCK• Suppose you want to enter the correct time of day 12:30
(A.M. or P.M.).
1
Touch CLOCK.
Enter the correct hour byrotating the rotary dial.
2
3
Touch CLOCK again.
STOP/CLEARTouch STOP/CLEAR to:
1. Erase if you make a mistake during programming.
2. Cancel timer.
3. Stop the oven temporarily during cooking.
4. Return the time of day to the display.
5. Cancel a program during cooking, touch twice.
M A N U A L O P E R A T I O N
Your oven can be programmed for 95 minutes (95.00)using the rotary dial. The increments for time entry varyfrom 10 seconds to 5 minutes, depending on the totallength of the cooking /defrosting time as shown in the tablebelow:
MICROWAVE TIME COOKING
P R O C E D U R E D I S P L A Y
1
Enter cooking time.
Touch START.
2
There are six preset power levels. Using lower powerlevels increases the cooking time, which is recom-mended for foods such as cheese, milk and long slowcooking of meats. Consult cookbook or recipes forspecific recommendations.
• Suppose you want to defrost for 5 minutes at 30%.
once 100% High
twice 70% Medium High3 times 50% Medium
4 times 30% Med Low/Defrost5 times 10% Low
6 times 0%
P R O C E D U R E D I S P L A Y
1
Touch MICRO 4 times orhold down until the desiredpower level appears.
2
3
Enter defrost time.
Touch START.
4 When the defrost time is complete, a long tonewill sound and will appear in the display.
x 4
Enter the correct minute byrotating the rotary dial.
Touch CLOCK again.
4
5
• Suppose you want to cook for 5 minutes at 100%.
Cooking Time Time Increments0-5 minutes 10 seconds5-10 seconds 30 seconds10-30 minutes 1 minute30-95 minutes 5 minutes
TO SET POWER LEVEL
You can program up to 3 cooking sequences.Follow directions on page 21. Note that the power levelmust be entered first when programming multiple sequences.
00 (minute) will flash. Touch MICROApproximate
Percentage ofPower
Commmon Wordsfor
Power Level
You can turn the rotary dial clockwise or counter-clockwise. If you turn it counter-clockwise, the cookingtime will decrease from 95 minutes.

11
SEC R55TS
TINSEA983WRRZ-D32 SEC R55TS
GRILLUse the GRILL setting for steaks, chops, chickenpieces and many other foods. Your oven has 2 grillheaters and 2 grill cooking options. Select the desiredoptions by touching GRILL. See chart below. You canenter cooking time up to 30 minutes.
Option TouchGRILL
Cookingmethod
Display
GRILL 1
GRILL 2
Top heater
Top and bottomheaters
Once
Twice
• Suppose you want to grill a steak for 15 minutes onGRILL 2 ( Top and bottom heaters)
P R O C E D U R E D I S P L A Y
1
2
3
Enter cooking time.
Touch START.
x 2
Touch GRILL twice.
Condition the oven before cooking in it for the first timeto eliminate any smoke or burning odor. To condition,follow procedure below with nothing in the oven.Operate both top and bottom heaters without food for20 minutes.
CONDITION THE HEATERS
CAUTION:The oven cabinet, cavity, door, turntable, turntablesupport and dishes will become hot. To PREVENTBURNS, use thick oven gloves when removing thefood or turntable.
P R O C E D U R E D I S P L A Y
1
2
3
Enter cooking time.
Touch START.
4
x 2
Touch GRILL twice.
The oven will count down. When the oven hasfinished cooking, open the door to cool theoven cavity.
HINT:Turning food over at two-thirds of the cooking time isrecommended.
NOTE:• After cooking is complete, the cooling fan will continue for a short time to lower the temperature of the oven.
M A N U A L O P E R A T I O N
CAUTION:The oven cabinet, cavity, door, turntable and turntablesupport will become hot.
NOTE:When conditioning the heaters, be sure that the roomis ventilated well by opening a window or using acirculating fan.

12
SEC R55TS
TINSEA983WRRZ-D32 SEC R55TS
BAKEUse the BAKE setting for cakes, breads and many otherfoods. This oven has 4 pre-set oven temperatures whichuse a combination of the top and bottom heaters. TheBAKE is preprogrammed to include preheating.
Your oven has 3 special features:
• AUTOMATIC TOAST • AUTOMATIC SNACK • AUTOMATIC BAKE
AUTOMATIC COOKING
Touch BAKE
OvenTemperature
(° F)
Once Twice 3 times 4 times
400 375 350 325
CAUTION:The oven cabinet, cavity, door, turntable, turntable supportand dishes will become hot. To PREVENT BURNS, use thickoven gloves when removing the food or turntable.
P R O C E D U R E D I S P L A Y
1
2
3
Enter cooking time.
Touch START.Preheat starts.No food in oven.
4
x 3
Touch BAKE 3 times.
Open the door. Place food in the oven.Close the door.Touch START.
* Suppose you want to bake a cake for 25 minutes at350° F.
When the oven reaches the programmed temperature, asignal will sound 4 times and the oven will display 350F.*
* If the oven door is not opened, the oven willautomatically hold at the preheat temperature for 30minutes. After this time has elapsed, an audiblesignal will sound and the oven will turn off.
S P E C I A L F E A T U R E S
CAUTION:The oven cabinet, cavity, door, turntable, turntablesupport and dishes will become hot. To PREVENTBURNS, use thick oven gloves when removing thefood or turntable.
Example:* Suppose you want to toast 2 frozen waffles.
P R O C E D U R E D I S P L A Y
1x 3
Select desired food bytouching AUTOMATICTOAST. Ex: Touch 3times for waffles.
FoodNumber
More/Less Bar
The AUTOMATIC COOKING features have both the idealheater settings and the ideal cooking times preprogrammed.5 popular foods are included in each feature. To select afood, touch desired AUTOMATIC COOKING feature until thedesired food number appears in the display.
Each food has 5 different time settings. They are shownas the number of the More/Less bars in the display. The 3More/Less bar setting is programmed as the originalsetting. You can choose desired time setting with therotary dial. Refer to each AUTOMATIC COOKING chartson pages 13 - 15.
2
3
Select desired setting byrotating the rotary dial.Ex: Select 5 bars for 2 frozenwaffles.
Touch START.
x1
NOTE:• Touching BAKE during cooking will display the
programmed temperature. It will not affect theprogram or cooking time.
• The oven regulates the oven temperature by turning thetop and bottom heaters on and off. Though the actualoven temperature may differ from the set temperature,simply set the desired oven temperature by touchingBAKE. Follow the operation manual, recipes andpackage suggestions carefully. Do not use an oventhermometer.
• After cooking is complete, the cooling fan willcontinue for a short time to lower the temperature.
We recommend leaving the turntable in the oven duringpreheating unless it will be used as the baking pan,such as with biscuits.
M A N U A L O P E R A T I O N

13
SEC R55TS
TINSEA983WRRZ-D32 SEC R55TS
AUTOMATIC TOAST CHARTF O O D P R O C E D U R E
AT-1 Bread
3 min. 40 sec.4 min.4 min. 20 sec.4 min. 40 sec.5 min.
AT-2 Bagels
4min.4 min. 15 sec.4 min. 30 sec.4 min. 50 sec.5 min. 20sec.
Numberof Bars
12345
Cooking Time Recommended Quantity
Numberof Bars
12345
Cooking Time Recommended Quantity
AT-3 Waffles
5 min. 1 room temp. or frozen waffle5 min. 30 sec.6 min. 2 room temp. waffles6 min. 30 sec.7 min. 2 frozen waffles
Numberof Bars
12345
Cooking Time Recommended Quantity
AT-4 French Toast
7 min. 3-6 sticks7 min. 20 sec.8 min. 1-2 slices8 min. 20 sec.8 min. 40 sec.
Numberof Bars
12345
Cooking Time Recommended Quantity
AT-5 Toaster Pastries
3 min.3 min. 15 sec.3 min. 30 sec. 1-2 room temp. pastries4 min.6 min. 1-2 frozen pastries
Numberof Bars
12345
Cooking Time Recommended Quantity
Special note for AUTOMATIC TOAST:Place items to be toasted directly on the turntable support. Do not use the turntable for the AUTOMATIC TOAST foods.
Remove the turntable from the oven.Place food directly around the center of the turntablesupport but not on the exact center.
NOTE:Cooking time is adjusted by initial oven temperature.After touching START, the oven will show AT-1, for thefirst 10 seconds, to check the initial temperature.
Remove the turntable from the oven. Place fooddirectly on turntable support.
Put cut side of bagel up.
Remove the turntable from the oven. Place fooddirectly on turntable support.
Remove the turntable from the oven. Place fooddirectly on turntable support.
If sticks are very greasy, place a flat piece of foil on theturntable support with sticks on top to prevent greasefrom falling on to the oven floor.
Remove the turntable from the oven. Place food directlyon turntable support.
1 - 4 slices
1 half
2 halves
S P E C I A L F E A T U R E S

14
SEC R55TS
TINSEA983WRRZ-D32 SEC R55TS
AUTOMATIC SNACK CHARTF O O D P R O C E D U R E
AS-1 French Fries
AS-2 Frozen Pizza
13 min.14 min.15 min. 5-7 oz frozen pizza16 min.20 min. 14 oz frozen pizza
Numberof Bars
Cooking Time Recommended Quantity
Numberof Bars
12345
Cooking Time Recommended Quantity
AS-3 Hamburgers
15 min. 1 medium16 min. 2 medium
1 well done18 min. 3 medium20 min. 4 medium
3 well done21 min. 4 well done
Numberof Bars
12
34
5
Cooking Time Recommended Quantity
AS-4 Frozen Appetizers
7 min.7 min. 30 sec.8 min. 4 - 8 pieces9 min.10 min.
Numberof Bars
12345
Cooking Time Recommended Quantity
AS-5 Hot Dogs and Sausage
8 min. 1-2 pieces8 min. 30 sec.9 min. 3-4 pieces9 min. 30 sec.10 min.
Numberof Bars
12345
Cooking Time Recommended Quantity
15 min. 30 sec.16 min. 30 sec.17 min. 30 sec. 1/2 pound French fries18 min.18 min. 30 sec.
12345
Cook directly on turntable.Can spray with cooking spray to make clean-up easier.
S P E C I A L F E A T U R E S
Cook directly on turntable.Can spray with cooking spray to make clean-up easier.
Cook directly on turntable.Can spray with cooking spray to make clean-up easier.
Cook directly on turntable.Can spray with cooking spray to make clean-up easier.
Cook directly on turntable.Can spray with cooking spray to make clean-up easier.

15
SEC R55TS
TINSEA983WRRZ-D32 SEC R55TS
AUTOMATIC BAKE CHARTM E N U P R O C E D U R E
AB-1 Baked Potatoes
14 min. 1 medium16 min.17 min. 2 medium18 min.20 min.
AB-2 Biscuits
8 min.9 min. Convenience refrigerated
baked at 400 or 450°F10 min. Home made11 min. Convenience frozen12 min.
Numberof Bars
12345
Cooking Time Recommended Quantity
Numberof Bars
12
345
Cooking Time Recommended Quantity
AB-3 Muffins
14 min.15 min.16 min. 6-cup pan17 min.18 min.
Numberof Bars
12345
Cooking Time Recommended Quantity
AB-4 Brownies
28 min.29 min.30 min. 8-inch pan31 min.32 min.
Numberof Bars
12345
Cooking Time Recommended Quantity
AB-5 Cakes
25 min. 6 cupcakes28 min.30 min. 8 or 9-inch pan32 min.34 min.
Numberof Bars
12345
Cooking Time Recommended Quantity
Preheat is preprogrammed for this food.
ADD FOOD AFTER PREHEATING.
Bake directly on turntable.
Preheat is preprogrammed for this food.
ADD FOOD AFTER PREHEATING.
Use 6-cup muffin pan. Be sure to check that it turnsfreely.
Preheat is preprogrammed for this food.
ADD FOOD AFTER PREHEATING.
Can use disposable foil pan. Bend corners underslightly so pan will turn freely.
Grease skin with butter or shortening.
Preheat is preprogrammed for this food.
ADD FOOD AFTER PREHEATING.
Can use disposable foil pan. Bend corners underslightly so pan will turn freely.
S P E C I A L F E A T U R E S

16
SEC R55TS
TINSEA983WRRZ-D32 SEC R55TS
P R O C E D U R E
1 Select desired setting.Touch BEVERAGE 2 timesor hold down until thedesired quantity appears.
Microwave options allow you to cook or reheat many ofyour favorite foods by touching just one pad.
• Suppose you want to reheat 1 cup of beverage.
NOTE:
1. To increase quantity, touch chosen pad until number indisplay is same as desired quantity.
Ex: touch FRESH VEGETABLES pad twice for 2 cupsof fresh vegetables. More or less food than the quan-tity listed in the chart should be cooked following theguidelines in any microwave cookbook.
2. Microwave options can be programmed with More orLess Time Adjustment. See page 22.
3. The final cooking result will vary according to the foodcondition (e.g. initial temperature, shape, quality).Check food for temperature after cooking. If additionaltime is needed, continue to cook manually.
4. After cooking is complete, the cooling fan maycontinue for a short time to lower the temperature.
MICROWAVE OPTIONS
MICROWAVE OPTIONS CHARTF O O D P R O C E D U R EA M O U N T
x 2
2 Touch START.
Try several brands to decide which is most acceptable for yourtaste. Place a pie plate on the turntable. Place bag with only one foldslightly off center and place bag with two folds in the center of thepie plate.You should fold down the corners of the bag like the illustrationso it turns freely.After popping, the pie plate, turntable and turntable support willbe hot. Be careful when removing the bag.
POPCORN 1 bag
3.5 oz bag (Regular)
2.85 - 3.5 oz bag(Regular Light)
1.5 - 1.75 oz bag
Touch POPCORN once for regular. .
Touch POPCORN twice for regular light. .
Touch POPCORN three times for snack. .
Use to reheat precooked foods from the refrigerator. Place meatyportions and bulky vegetables to outside of plate. Cut large itemslike baked potatoes in smaller pieces. Flatten foods such asmashed potatoes and other dense foods. Cover with lid or plasticwrap. ONE PLATE ONLY.After cooking, check that food is very hot throughout and that thebottom center of the plate is very hot. If not, continue heating usingtime and power level. Allow to stand, covered, 1 to 2 minutes.
Touch REHEAT once for a smaller amount of food on a dinnerplate. will appear in the display.
Touch REHEAT twice for a regular amount of food on a dinnerplate. will appear in the display.
Use to reheat refrigerated canned or homemade pasta with sauceor other cooked casserole. For room temperature pasta or casserole,use Less option. For pasta without sauce double the quantity persetting. For example, measure 2 cups of cooked noodles andprogram for 1 cup. Cover with lid or plastic wrap.After cooking, stir and let stand, covered, 2 to 3 minutes.
1 - 2 cupsREHEAT:
Casserole
1 plateDinner Plate
1 Small
1 Regular
Touch REHEAT once, will appear in the display.
Touch REHEAT twice, will appear in the display.
1cup
2 cups
S P E C I A L F E A T U R E S
1
2
3
1
2
1
2

17
SEC R55TS
TINSEA983WRRZ-D32 SEC R55TS
Use for frozen, convenience foods. It will give satisfactory results formost brands. You may wish to try several and choose your favorite.Remove package from outer wrapping and follow package directionsfor covering. After cooking, let stand, covered, for 1 to 3 minutes.
Touch FROZEN ENTREES once for packages weighing 3-6 oz.will appear in the display.
Touch FROZEN ENTREES twice for packages weighing 7-10 oz.will appear in the display.
MICROWAVE OPTIONS CHART (continued)
F O O D A M O U N T P R O C E D U R E
Frozen Entrees
3-6 oz.
3-10 oz.
7-10 oz.
For beans, carrots, corn and peas, add 1 tablespoon of water per cup.For broccoli, Brussels sprouts, cabbage and cauliflower, cook immediatelyafter washing with no additional water. Cover with a glass lid.
If you like tender crisp vegetables, double measured quantity persetting. For example, use 2 cups of zucchini but touch FRESHVEGETABLES only once. After cooking, remove from oven, stir, coverand let stand 3 to 5 minutes before serving.
Fresh Vegetables 1- 2 cups
BEVERAGE This setting is good for restoring cooled beverage to a better drinkingtemperature. Stir liquid briskly before and after heating to avoid“eruption”.You can reheat .5 cup, 1 cup, 1.5 cups and 2 cups by touchingBEVERAGE.
.5 - 2 cups
S P E C I A L F E A T U R E S
3- 6
7- 10

18
SEC R55TS
TINSEA983WRRZ-D32 SEC R55TS
After the 2nd stage, open the door and shieldany warm portions. Close the door.
After the 1st stage, open the door, turn steakover and shield any warm portions. Close thedoor.
After the defrost cycle ends, cover and letstand as indicated in chart below.
5
4
Express Defrost automatically defrosts all the foodsshown in the EXPRESS DEFROST CHART below.
You can defrost .5 lb, .7 lb, 1.0 lb, 1.3 lb, 1.5 lb, 1.7 lband 2.0 lb by touching EXPRESS DEFROST.Ex: touch twice for .7 lb.
• Suppose you want to defrost a 2.0 pound steak.
EXPRESS DEFROSTNOTE:
1. Express Defrost can be programmed with More orLess Time Adjustment. See page 22.
2. To defrost other foods or foods above or below theweights allowed in the EXPRESS DEFROSTCHART, use time and 30% power. See MANUALDEFROST on page 19.
NOTE: Check foods when oven signals. After final stage, small sections may still be icy. Let stand to continue thawing.Do not defrost until all ice crystals are thawed.Shielding prevents cooking from occurring before the center of the food is defrosted. Use small smooth stripsof aluminum foil to cover edges and thinner sections of the food.
F O O D A M O U N T
EXPRESS DEFROST CHARTP R O C E D U R E
Pull apart and remove any thawed pieces after each stage.Let stand, covered, for 5 to 10 minutes.
Ground Meat .5 - 2.0 lb
After each stage, rearrange and if there are warm or thawed por-tions, shield with small flat pieces of aluminum foil. Remove anymeat that is nearly defrosted. Let stand, covered, for 10 to 20 min-utes.
Steaks/Chops
Use boneless breast of chicken or turkey. After each stage, if thereare warm or thawed portions, rearrange or remove. Let stand,covered, for 10 to 20 minutes.
Boneless Poultry .5 - 1.5 lb
.5 - 2.0 lb
P R O C E D U R E
1
3
Arrange pieces with meatiest portions toward outside of glass dishor microwave safe rack. After each stage, if there are warm orthawed portions, rearrange or remove. Let stand, covered, for 10to 20 minutes.
Bone-in Poultry .5 - 2.0 lb
x 7
2 Touch START.
Enter desired weight bytouching EXPRESSDEFROST.Ex: Touch 7 times for 2.0 lb.
Touch START.
Touch START.
S P E C I A L F E A T U R E S

19
SEC R55TS
TINSEA983WRRZ-D32 SEC R55TS
MANUAL DEFROSTIf the food that you wish to defrost is not listed on theEXPRESS DEFROST CHART or is above or below thelimits in the “Amount” column on the EXPRESS DEFROSTCHART, you will need to defrost manually.
You can defrost any frozen food, either raw or previouslycooked, by using MICRO 30% Power Level. See page10. Estimate defrosting time and press MICRO 4 timesfor 30% when you select the power level.
For either raw or previously cooked frozen food the ruleof thumb is approximately 5 minutes per pound. For ex-ample, defrost 5 minutes for 1 pound of frozen spaghettisauce.
R E C I P E S
DINNER FOR TWO USING THE WARM AND TOASTY OVEN
Fresh Strawberry Shortbread Dessert
1/3 cup all-purpose flour2 tablespoons cornstarch1/4 teaspoon baking powder5 tablespoons unsalted butter1/4 cup sugar
Make shortbread a few hours before serving time.
Sift flour, cornstarch, baking powder and salt together. Place butter, sugar, vanilla and orange peel into large bowland beat with an electric mixer until fluffy. Add flour mixture and beat just until moist clumps form. Gather doughinto ball and flatten into round circle. Wrap in plastic wrap and refrigerate until just firm.
Remove turntable from oven. Touch BAKE 4 times to preheat to 325 F. and enter 15 minutes.
Cut a circle of wax paper to fit into the turntable. Place shortbread dough on lightly floured surface and roll withfloured rolling pin into a circle 1/4-inch thick. Using 3-inch cookie cutter, cut dough into 4 shortbreads. Place onwax paper lined turntable and bake in preheated oven until lightly browned. Remove from oven and allow to stand2 minutes for shortbreads to become firm. Remove from turntable and allow to cool completely.
At serving time, microwave strawberry jelly for 1 minute at MICRO HIGH (100%) or until melted but not hot. Stir.Place 2 shortbreads on each dessert plate. Top with 5 strawberries, bottom side up, and then drizzle melted jellyon strawberries. Serve topped with whipped cream, if desired.
1 tablespoon packed brown sugar1 teaspoon vanilla1/2 teaspoon grated fresh orange peel1/4 cup strawberry jelly10 small strawberries with stems removed
Always stop the oven periodically to remove or separatethe portions that are defrosted. If food is not defrosted atthe end of the estimated defrosting time, program the ovenin 1 minute increments at 30% until totally defrosted.
When using plastic containers from the freezer, defrostonly long enough to remove from the plastic in order toplace in a microwave-safe dish.
S P E C I A L F E A T U R E S

20
SEC R55TS
TINSEA983WRRZ-D32 SEC R55TS
Italian Portabello Appetizers
1 cup sweet Italian sausage meat, about 6 ounces3 tablespoons chopped bell pepper3 tablespoons chopped red onion2 cloves garlic, chopped2 shredded basil leaves
Combine sausage, bell pepper, onion, garlic and basil in a 2-quart casserole. Cover and cook at MICRO HIGH(100%) for 14 minutes. Break up large sausage pieces, add bread crumbs and cheese and stir well. Set aside.
Touch BAKE 2 times to preheat to 375 F. and enter 20 minutes.
Remove stems from mushrooms and use elsewhere. Wipe remaining mushrooms with a damp cloth being sure toremove any traces of dirt or debris. Rub mushrooms on both sides with olive oil. Stuff mushrooms with sausagemixture. Place on turntable and bake in the preheated oven.
The appetizers can be prepared ahead and refrigerated until serving time. To reheat, place stuffed mushrooms onserving plate and cover lightly with wax paper. Touch REHEAT once.
1/4 cup dry Italian bread crumbs1/4 cup shredded Romano cheese2 Portobello mushrooms (4 1/2-inch diameter)2 tablespoons olive oil
Super Potato Supper
1/2 pound boneless pork loin, 1/2”- 3/4” thick2 baking potatoes, 8-ounces each2 teaspoons butter
Season pork loin with salt and pepper and place on turntable. Touch GRILL twice and enter 8 minutes. At end ofgrilling time, remove pork and clean turntable. Cut pork into thin strips and set aside.
Pierce baking potatoes in several places and put on the turntable. Touch AUTOMATIC BAKE once and see thatthe dial is set at the third bar, which is for 2 potatoes. At end, remove potatoes, cut lengthwise about 1-inch deep.Put 1 teaspoon of butter and half of the pork strips, cheese, pepper and onions in each potato. Place on turntablein oven. Touch GRILL once and enter 10 minutes.
1/2 cup grated Swiss cheese1/4 bell pepper, cut into 8 thin strips3 tablespoons chopped onion
R E C I P E S

21
SEC R55TS
TINSEA983WRRZ-D32 SEC R55TS
O T H E R C O N V E N I E N T F E A T U R E S
P R O C E D U R E
1
Touch GRILL once forGRILL1.
Then enter secondcooking time.
2
First touch MICROtwice for 70% power.
Then enter cooking time.
Touch START.3
MULTIPLE SEQUENCECOOKINGYour oven can be programmed for up to 3 cooking se-quences, switching from one power level setting or otheroption to another automatically.Sometimes cooking directions tell you to start on onepower level and then change to a different powerlevel. Your oven can do this automatically.
• Suppose you want to cook for 5 minutes at MICRO 70%and then continue to cook for 10 minutes on GRILL1.
NOTE:1. You can program BAKE for the first sequence only.2. If you wish to know the power level, simply touch MICRO.
As long as your finger is touching MICRO, the power levelwill be displayed.
P R O C E D U R E D I S P L A Y
1
Enter desired extending timeby rotating the rotary dial.
2
After cooking, End isflashing in the display.
Touch START.
EXTEND THE COOKINGTIMEAfter cooking, you can extend the cooking time with thelast setting.The maximum time that can be extended is 10 minutes.
• Suppose you want to extend the cooking time for 5 min-utes after completing the GRILL 1 cooking.
NOTE:1. To use MINUTE PLUS for MICRO HIGH (100%) cook-
ing, touch MINUTE PLUS within 3 minutes after touch-ing STOP/CLEAR or closing the door. Be sure the dis-play shows the time of day or a colon (:) before touchingMINUTE PLUS.
2. If you touch MINUTE PLUS within 3 minutes after cook-ing and the display shows a zero (.0), the previouscooking program can be extended. The oven WILLNOT microwave for minutes using MICRO HIGH(100%). See Note 2 in EXTEND THE COOKING TIME.
Touch MINUTEPLUS.
1
MINUTE PLUSMinute Plus allows you to microwave for a minute at MI-CRO HIGH (100%) by simply touching MINUTE PLUS.You can also extend cooking time in multiples of 1 minuteby repeatedly touching MINUTE PLUS during manual cook-ing.• Suppose you want to heat a cup of soup for one minute
at MICRO HIGH (100%).
P R O C E D U R E
Open and close the door.
NOTE:1. To use the extend function, rotate the rotary dial within 3
minutes after closing the door.2. You can extend the cooking time using the MINUTE PLUS, which extends cooking time in multiples of 1 minute. Touch the MINUTE PLUS within 3 minutes after closing the door. After touching MINUTE PLUS, the cooking starts automatically.3. The extend function cannot be used for Popcorn.
TIMER• Suppose you want to time a 3-minute long distance
phone call.
Enter time.1
P R O C E D U R E
2 Touch TIMER.
X 2
X 1

22
SEC R55TS
TINSEA983WRRZ-D32 SEC R55TS
DEMONSTRATION MODETo demonstrate, touch TIMER/CLOCK, adjust rotary dial to 0 and then touch the START and hold for 3 seconds.
S HO will appear in the display. Cooking operationsand special features can now be demonstrated with nopower in the oven. For example, touch MINUTE PLUSand the display will show 1.00 and count down quicklyto .
To cancel, touch TIMER/CLOCK, adjust rotary dial to 0 and touch STOP/CLEAR. If easier, unplug theoven from the electrical outlet and replug.
AUDIBLE SIGNALELIMINATIONIf you wish to have the oven operate with no audible sig-nals, touch TIMER/CLOCK, adjust rotary dial to 5and then touch the START and hold for three seconds.To cancel, touch TIMER/CLOCK, adjust rotary dial to 5 and touch STOP/CLEAR.
MORE OR LESS TIMEADJUSTMENTShould you discover that you like any of the Microwaveoptions or Express Defrost settings slightly more done,rotate the rotary dial clockwise until desired time bar ap-pears before touching START.
Should you discover that you like any of the Microwaveoptions or Express Defrost settings slightly less done, ro-tate the rotary dial counterclockwise until desired timebar appears before touching START.
The number of the more/less bars shows the doneness:Original setting = 3 barsMore = 5 barsLess = 1 bar
CHILD LOCKThe Child Lock prevents unwanted oven operation suchas by small children. The oven can be set so that thecontrol panel is deactivated or locked. To set, touch TIMER/CLOCK, adjust the rotary dial to 1 and then touchthe START and hold for three seconds. Should a but-ton be touched, SA FE will appear in the display.
To cancel, touch TIMER/CLOCK, adjust rotary dial to
1 and touch STOP/CLEAR.
O T H E R C O N V E N I E N T F E A T U R E S

23
SEC R55TS
TINSEA983WRRZ-D32 SEC R55TS
Disconnect the power cord before cleaning orleave the door open to inactivate the oven dur-ing cleaning. Ensure the oven is completly coolbefore cleaning.
ExteriorThe outside surface is painted. Clean the outsidewith mild soap and water; rinse and dry with a softcloth. Do not use any type of household or abrasivecleaner.
DoorWipe the window on both sides with a damp clothto remove any spills or spatters. Metal parts will beeasier to maintain if wiped frequently with a dampcloth and polished dry with a soft cloth. Avoid theuse of spray and other harsh cleaners as they maystain, streak or dull the door surface.
Control PanelWipe the panel with a cloth dampened slightly withwater only. Dry with a soft cloth. Do not scrub oruse any sort of chemical cleaners. Close door andtouch STOP/CLEAR.
InteriorCleaning is easy because little heat is generated tothe interior surfaces; therefore, there is no bakingand setting of spills or spattering. To clean the inte-rior surfaces, wipe with a soft cloth and warm wa-ter. DO NOT USE ABRASIVE OR HARSH CLEAN-ERS OR SCOURING PADS. For heavier soil, usebaking soda or a mild soap; rinse thoroughly withhot water. NEVER SPRAY OVEN CLEANERS DI-RECTLY ONTO ANY PART OF THE OVEN.
InteriorSpatters may occur because of moisture andgrease. Wash immediately after use with hot,soapy water. Rinse and polish dry. Harder toremove spatters may occur if oven is notthoroughly cleaned or if there is long time/hightemperature cooking. If so, you may wish topurchase an oven cleaner pad with liquid cleanerwithin it--not a soap filled steel pad--for use onstainless or porcelain surfaces. Followmanufacturer's directions carefully and beespecially cautious not to get any of the liquidcleaner in the perforations on the wall or ceilingor any door surfaces.
Rinse thoroughly and polish dry. After cleaningthe interior thoroughly, residual grease may beremoved from the interior ducts and heater bysimply operating the oven using both top andbottom heaters for 20 minutes without food. SeeCONDITION THE HEATER on page 11. Ventilatethe room if necessary.
C L E A N I N G A N D C A R E
- after microwave cooking.
- after grill, bake or automatic cookings.
Waveguide CoverThe waveguide cover is made from mica so requiresspecial care. Keep the waveguide cover clean toassure good oven performance. Carefully wipe witha damp cloth any food spatters from the surface ofthe cover immediately after they occur. Built-upsplashes may overheat and cause smoke or possi-bly catch fire. Do not remove the waveguide cover.
Odor RemovalOccasionally, a cooking odor may remain in theoven. To remove, combine 1 cup water, grated peeland juice of 1 lemon and several whole cloves in a2-cup glass measuring cup. Boil for several minutesusing 100% power. Allow to set in oven until cool.Wipe interior with a soft cloth.
Turntable/Turntable SupportThe turntable and turntable support can be removedfor easy cleaning. Place your fingers tightly over thecenter of the turntable support and lift to remove itcarefully to prevent touching the top heater. If the turn-table support fits firmly on to the turntable motor shaft,it may be necessary to twist the turntable supportgently to remove it. Wash in mild, sudsy water; forstubborn stains use a mild cleanser and a non-abra-sive scouring sponge. They are also dishwasher-proof. Use upper rack of dishwasher. The turntablemotor shaft is not sealed, so excess water or spillsshould be wiped up immediately.

24
SEC R55TS
TINSEA983WRRZ-D32 SEC R55TS
Please check the following before calling for service:
1. Place one cup of water in a glass measuring cup in the oven and close the door securely. Operate the oven for one minute at MICRO 100%.
A Does the oven light come on? YES _______ NO _______
B Does the cooling fan work? YES _______ NO _______(Put your hand over the rear ventilating openings.)
C Does the turntable rotate? YES _______ NO _______(It is normal for the turntable to turn in either direction.)
D Is the water in the oven warm? YES _______ NO _______
2. Remove water from the oven and operate the oven for 5 minutes at BAKE 400°F. A Do HEATER and COOK indicators light? YES _______ NO _______ B After the oven shuts off, is inside of the oven hot? YES _______ NO _______
If “NO” is the answer to any of the above questions, please check electrical outlet, fuse and/or circuit breaker.If they are functioning properly, CONTACT YOUR NEAREST SHARP AUTHORIZED SERVICER.A microwave oven should never be serviced by a “do-it-yourself” repair person.
NOTE: 1. If time appearing in the display is counting down very rapidly, check DEMONSTRATION MODE on page22 and cancel.
2. If the oven is set for more than 20 minutes at MICRO 100 percent power level, after the first 20 minutesthe power level will automatically adjust to 70 percent power to avoid overcooking.
3. This oven adjusts GRILL, BAKE and AUTOMATIC COOKING by turning the top and bottom heaters onand off. It is normal to observe the top heater change from red to dark gray.
4. After cooking is completed, the cooling fan may run for a short time to lower the temperature.
S E R V I C E C A L L C H E C K
� The International Electrotechnical Commission’s standardized method for measuring output wattage. This testmethod is widely recognized.
�� Internal capacity is calculated by measuring maximum width, depth and height. Actual capacity for holdingfood is less.
In compliance with standards set by:
FCC – Federal Communications Commission Authorized.
DHHS – Complies with Department of Health and Human Services (DHHS) rule, CFR, Title 21, Chapter I,Subchapter J.
– This symbol on the nameplate means the product is listed by Underwriters Laboratories, Inc.
S P E C I F I C A T I O N SSingle phase 120V, 60Hz, AC only
980 W 8.5A1300W 10.8 A
650 W* (IEC Test Procedure)760 W510 W
2450 MHz
17-3/4"(W) x 11-3/8"(H) x 15-1/8"(D)
11-1/4"(W) x 5-7/8"(H) x 11-5/8"(D)
Approx. 0.5 Cu. Ft.
Turntable system, 101/2" diameter
Approx. 31lb
AC Line Voltage:
AC Power Required:MicrowaveGrill/Bake
Output Power:MicrowaveTop heater
Bottom heater
Frequency:
Outside Dimensions:
Cavity Dimensions��:
Oven Capacity��:
Cooking Uniformity:
Weight:

25
SEC R55TS
TINSEA983WRRZ-D32 SEC R55TS
1 Toque el botón POPCORN una vezpara palomitas de maiz regular.2 veces--tamaño regular ligero3 veces--tamaño de snack
2 Toque START
G U I A A U T O - T O U C H
1. Seleccione la comida deseada pulsando repetidamente TOAST/SNACKS/BAKE(TOSTADA/REFRIGERIOS/COCCIÓN).2. Ajuste la intensidad de cocinado, si es necesario, ajustando el mando rotativo. Toque el botón START.
MENOS TIEMPO/MENOS HECHO
1-4 rodajas
MÁS TIEMPO/MÁS HECHO
2 mitades2 temperatura
ambiental
1-2 rodajas1-2 temperatura
ambiental
1/2 libra5-7 onzas
3 medio hecho
2 congelado
14 onzas
1-2 congelado
4 bien hecho4-8 piezas
3-42 medio hechohecho en casa
4 medio hecho 3 bien hecho
vendido congelado
2 medio hecho 1 bien hecho
vendido congeladorecipiente de 6 tazas
recipiente de 8 pulgadas
recipiente de 8 o 9 pulgadas
1 mitad1 temperatura
ambiental o congelado
3-6 barras
1 medio hecho
1-21 medio hecho
6 pasteles en forma de taza
AJUSTESORIGINALESGire 2 barras hacia
la izquierdaGire 1 barra hacia la izquierda
Gire 5 barras hacia la derecha
Gire 4 barras hacia la derecha
AJUSTE VISUALIZACIÓN COMIDA
TOAST(TOSTADA)
Emplee el soporte rotativo solamente.
AT- 1(Pulse 1 vez) Pan
SNACKS(REFRIGERIOS)�
AS- 1(Pulse 1 vez) Patatas fritas
BAKE(COCCIÓN)�
AB- 1(Pulse 1 vez) Papas asadas
AT- 2(Pulse 2 veces) Rosquillas
AS- 2(Pulse 2 veces) Pizza congelada
AB- 2(Pulse 2 veces) Bizcochos
AT- 3(Pulse 3 veces) Wafle
AS- 3(Pulse 3 veces) Hamburguesas
AB- 3(Pulse 3 veces) Panecillos
AT- 4(Pulse 4 veces) Tostadas francesas
AS- 4(Pulse 4 veces) Aperitivos congelados
AB- 4(Pulse 4 veces) Biscochos de chocolate y nueces
AT- 5(Pulse 5 veces) Pasteles tostados
AS- 5(Pulse 5 veces) Perros calientes / Salchichas
AB- 5(Pulse 5 veces) Tartas
AUTOMATIC COOKING (COCINADO AUTOMÁTICO)
Para mayor información y precauciones de seguridad, consulte el Manual de Operaciones.
TIEMPO DE COCINADOPOR MICROONDACocinado Micro 100%
FIJACION DEL RELOJ
1 Pulse CLOCK e introduzca la horaempleando el mando giratorio.
2 Pulse CLOCK e introduzca los minutosempleando el mando giratorio.
3 Touch CLOCK.
A L I M E N T O C A N T I D A DGround meat (Carne picada) .5-2.0 librasSteaks/Chops (Filetes, chuletas) .5-2.0 librasBoneless Poultry (Sin hueso aves) .5-1.5 librasBone-in Poultry (Con hueso aves) .5-2.0 libras
1 Introduzca el peso deseado pulsandoEXPRESS DEFROST.Ej. Pulse EXPRESS DEFROST 7 vecespara 2.0lb.
2 Toque START.
EXPRESS DEFROST(DESCONGELACIÓN RÁPIDA)
MINUTE PLUS (MINUTO EXTRA)Pulse MINUTE PLUS para un minuto acocinado MICRO 100% o para añadir unminuto durante el cocinado manual.Siga pulsándolo para minutos adicionales.
A L I M E N T O C A N T I D A DPopcorn (Palomitas de maiz) 3.5 onzas. (Normal)
2.85-3.5 onzas. (Normal ligero)1.5 o 1.75 onzas. (Refrigerio)
Reheat (Recalentamiento)Casserole (Caserola) 1-2 tazasDinner plate (Plato principal) 1plato: pequeño, normal
Beverage (Bebida) .5-2.0 tazasFrozen Entrees (Plato fuerte congelado) 3-6, 7-10 onzas.Fresh Vegetables (Verduras frescas) 1-2 tazas
OPCIONES DE MICROONDAS
BAKE (COCCIÓN)1 Seleccione la temperatura deseada pulsando
BAKE. Ej . Pulse BAKE 3 veces para 350FLos ajustes de la temperatura son400, 375, 350, 325F.
2 Introduzca el tiempo de cocinado empleandoel mando giratorio.
3 Toque START.Se inicia el precalentamiento.
4 Después del precalentamiento, ponga lacomida en el horno y pulse START.
1 Toque GRILL.Una vez G-1 Calentador superiorDos veces G-2 Calentadores superior e inferior
GRILL (ASADO)
2 Introduzca el tiempo de cocinadoempleando el mando giratorio.
3 Toque START.
x 4
Cocción de Potencia Variable1 Después del paso 1 anterior, toque el botón
POWER LEVEL 4 veces.Ej. 30%
2 Toque START.
1 Introduzca el tiempo de cocinado.
2 Toque START.
x 3
x 7
Si en la pantalla aparece 88:88 toque primeroSTOP/CLEAR.

26
SEC R55TS
TINSEA983WRRZ-D32 SEC R55TS
®
SHARP ELECTRONICS CORPORATIONSharp Plaza, Mahwah, NJ 07430-2135
TINSEA983WRRZ-D32Printed in China
A U T O - T O U C H G U I D EFor more complete information and safety precautions, refer to your Operation Manual.
1. Select the desired food by touching TOAST/SNACKS/BAKE repeatedly.2. Adjust cooking doneness, if necessary, by turning rotary dial. Touch START.
LESS TIME/LIGHTER
1-4 slices
MORE TIME/DARKER
2 halves2 room temp
1-2 slices1-2 room temp
1/2 pound5-7 oz
3 medium
2 frozen
14 oz
1-2 frozen
4 well done4-8 pieces
3-42 medium
home made
4 medium 3 well done
convenience frozen
2 medium 1 well done
convenience refrigerated6-cup pan8-inch pan
8 or 9-inch pan
1 half1 room temp or frozen
3-6 sticks
1 medium
1-21 medium
6 cupcakes
ORIGINALSETTINGS
Turn left to 2 barsTurn left to 1 bar Turn right to 5 barsTurn right to 4 bars
SETTING DISPLAY FOOD
TOASTUse turntablesupportonly.
AT- 1(Press 1 time) Bread
SNACKS AS- 1(Press 1 time) French Fries
BAKE AB- 1(Press 1 time) Baked Potatoes
AT- 2(Press 2 times) Bagels
AS- 2(Press 2 times) Frozen Pizza
AB- 2(Press 2 times) Biscuits
AT- 3(Press 3 times) Waffles
AS- 3(Press 3 times) Hamburgers
AB- 3(Press 3 times) Muffins
AT- 4(Press 4 times) French Toast
AS- 4(Press 4 times) Frozen Appetizers
AB- 4(Press 4 times) Brownies
AT- 5(Press 5 times) Toaster Pastries
AS- 5(Press 5 times) Hot Dogs/Sausage
AB- 5(Press 5 times) Cakes
AUTOMATIC COOKING
MICROWAVE TIME COOKINGMicro 100% Cooking
SET CLOCK
1 Touch CLOCK and enter the hour byusing the rotary dial.
2 Touch CLOCK and enter the minutesby using the rotary dial.
3 Touch CLOCK again.
If 88:88 is in display, first touch STOP/CLEAR pad.
F O O D A M O U N TGround meat .5-2.0 lbSteaks/Chops .5-2.0 lbBoneless Poultry .5-1.5 lbBone-in Poultry .5-2.0 lb
1 Enter desired weight by touchingEXPRESS DEFROST.Ex. Touch EXPRESS DEFROST 7 timesfor 2.0lb.
2 Touch START.
EXPRESS DEFROST
MINUTE PLUSTouch MINUTE PLUS pad for oneminute at MICRO 100 % cooking or toadd a minute during manual cooking.Continue to touch for additional minutes.
F O O D A M O U N TPopcorn 3.5 oz. (Regular)
2.85-3.5 oz. (Regular Light)1.5 or 1.75 oz. (Snack)
ReheatCasserole 1-2 cupsDinner plate 1plate: small, regular
Beverage .5-2.0 cupsFrozen Entrees 3-6, 7-10 oz.Fresh Vegetables 1-2 cups
MICROWAVE OPTIONS
BAKE1 Select desired temperature by touching
BAKE. Ex. Touch BAKE 3 times for 350FTemperature settings are 400, 375, 350, 325F.
2 Enter cooking time by using the rotary dial.
3 Touch START. Preheat starts.
4 After preheat, place food in the oven andtouch START.
1 Touch GRILL.Once G-1 Top heaterTwice G-2 Top and bottom heaters
GRILL1 Touch POPCORN pad:Once for regular sizeTwice for regular size light3 times for snack size
2 Touch START
2 Enter cooking time by using therotary dial.
3 Touch START.
x 4
Variable Power Cooking1 After Step 1 above, touch MICRO pad
4 times.Ex. 30%
2 Touch START.
1 Enter cooking time by using the rotary dial.
2 Touch START.
x 3
x 7