Quilled Fan - Custom Quilling Supplies · Quilled Fan By Hazel Lee 4 MATERIALS REQUIRED: 2mm...
3
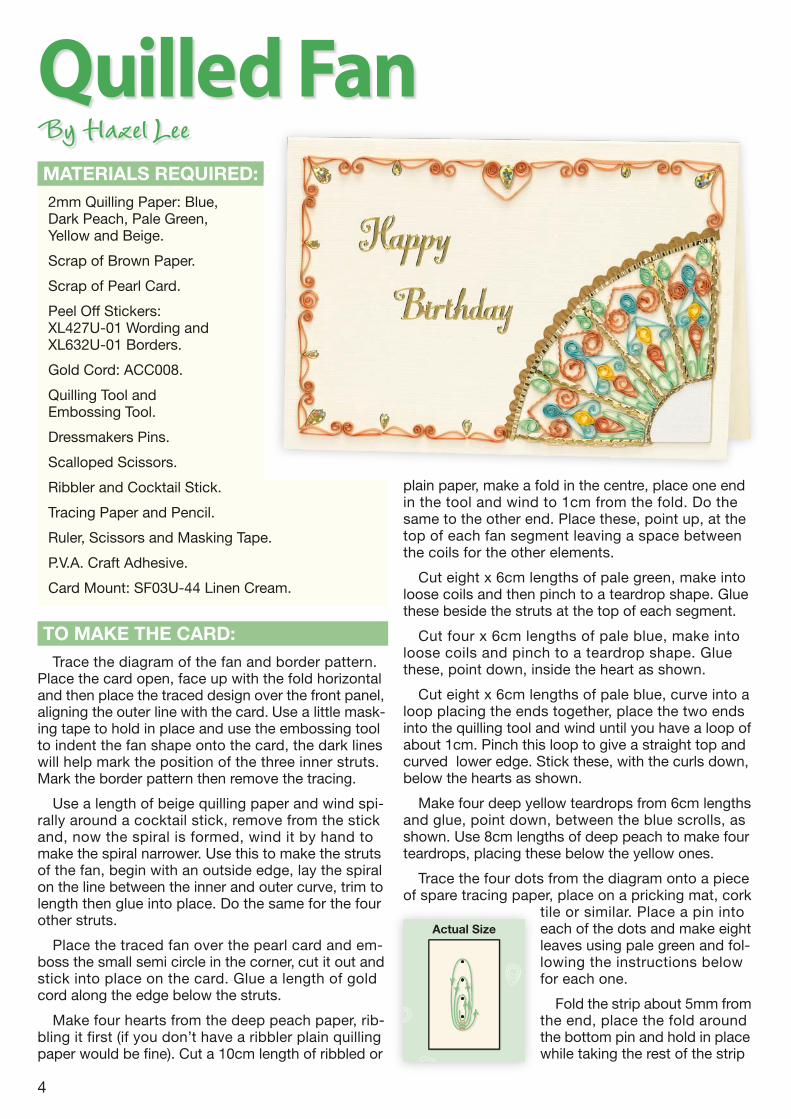
Quilled Fan By Hazel Lee 4 MATERIALS REQUIRED: 2mm Quilling Paper: Blue, Dark Peach, Pale Green, Yellow and Beige. Scrap of Brown Paper. Scrap of Pearl Card. Peel Off Stickers: XL427U-01 Wording and XL632U-01 Borders. Gold Cord: ACC008. Quilling Tool and Embossing Tool. Dressmakers Pins. Scalloped Scissors. Ribbler and Cocktail Stick. Tracing Paper and Pencil. Ruler, Scissors and Masking Tape. P.V.A. Craft Adhesive. Card Mount: SF03U-44 Linen Cream. TO MAKE THE CARD: Trace the diagram of the fan and border pattern. Place the card open, face up with the fold horizontal and then place the traced design over the front panel, aligning the outer line with the card. Use a little mask- ing tape to hold in place and use the embossing tool to indent the fan shape onto the card, the dark lines will help mark the position of the three inner struts. Mark the border pattern then remove the tracing. Use a length of beige quilling paper and wind spi- rally around a cocktail stick, remove from the stick and, now the spiral is formed, wind it by hand to make the spiral narrower. Use this to make the struts of the fan, begin with an outside edge, lay the spiral on the line between the inner and outer curve, trim to length then glue into place. Do the same for the four other struts. Place the traced fan over the pearl card and em- boss the small semi circle in the corner, cut it out and stick into place on the card. Glue a length of gold cord along the edge below the struts. Make four hearts from the deep peach paper, rib- bling it first (if you don’t have a ribbler plain quilling paper would be fine). Cut a 10cm length of ribbled or plain paper, make a fold in the centre, place one end in the tool and wind to 1cm from the fold. Do the same to the other end. Place these, point up, at the top of each fan segment leaving a space between the coils for the other elements. Cut eight x 6cm lengths of pale green, make into loose coils and then pinch to a teardrop shape. Glue these beside the struts at the top of each segment. Cut four x 6cm lengths of pale blue, make into loose coils and pinch to a teardrop shape. Glue these, point down, inside the heart as shown. Cut eight x 6cm lengths of pale blue, curve into a loop placing the ends together, place the two ends into the quilling tool and wind until you have a loop of about 1cm. Pinch this loop to give a straight top and curved lower edge. Stick these, with the curls down, below the hearts as shown. Make four deep yellow teardrops from 6cm lengths and glue, point down, between the blue scrolls, as shown. Use 8cm lengths of deep peach to make four teardrops, placing these below the yellow ones. Trace the four dots from the diagram onto a piece of spare tracing paper, place on a pricking mat, cork tile or similar. Place a pin into each of the dots and make eight leaves using pale green and fol- lowing the instructions below for each one. Fold the strip about 5mm from the end, place the fold around the bottom pin and hold in place while taking the rest of the strip Actual Size
Transcript of Quilled Fan - Custom Quilling Supplies · Quilled Fan By Hazel Lee 4 MATERIALS REQUIRED: 2mm...
Quilled FanBy Hazel Lee
4
MATERIALS REQUIRED:2mm Quilling Paper: Blue, Dark Peach, Pale Green, Yellow and Beige.
Scrap of Brown Paper.
Scrap of Pearl Card.
Peel Off Stickers: XL427U-01 Wording andXL632U-01 Borders.
Gold Cord: ACC008.
Quilling Tool and Embossing Tool.
Dressmakers Pins.
Scalloped Scissors.
Ribbler and Cocktail Stick.
Tracing Paper and Pencil.
Ruler, Scissors and Masking Tape.
P.V.A. Craft Adhesive.
Card Mount: SF03U-44 Linen Cream.
TO MAKE THE CARD:Trace the diagram of the fan and border pattern.
Place the card open, face up with the fold horizontaland then place the traced design over the front panel,aligning the outer line with the card. Use a little mask-ing tape to hold in place and use the embossing toolto indent the fan shape onto the card, the dark lineswill help mark the position of the three inner struts.Mark the border pattern then remove the tracing.
Use a length of beige quilling paper and wind spi-rally around a cocktail stick, remove from the stickand, now the spiral is formed, wind it by hand tomake the spiral narrower. Use this to make the strutsof the fan, begin with an outside edge, lay the spiralon the line between the inner and outer curve, trim tolength then glue into place. Do the same for the fourother struts.
Place the traced fan over the pearl card and em-boss the small semi circle in the corner, cut it out andstick into place on the card. Glue a length of goldcord along the edge below the struts.
Make four hearts from the deep peach paper, rib-bling it first (if you don’t have a ribbler plain quillingpaper would be fine). Cut a 10cm length of ribbled or
plain paper, make a fold in the centre, place one endin the tool and wind to 1cm from the fold. Do thesame to the other end. Place these, point up, at thetop of each fan segment leaving a space between the coils for the other elements.
Cut eight x 6cm lengths of pale green, make intoloose coils and then pinch to a teardrop shape. Gluethese beside the struts at the top of each segment.
Cut four x 6cm lengths of pale blue, make intoloose coils and pinch to a teardrop shape. Gluethese, point down, inside the heart as shown.
Cut eight x 6cm lengths of pale blue, curve into aloop placing the ends together, place the two endsinto the quilling tool and wind until you have a loop ofabout 1cm. Pinch this loop to give a straight top andcurved lower edge. Stick these, with the curls down,below the hearts as shown.
Make four deep yellow teardrops from 6cm lengthsand glue, point down, between the blue scrolls, asshown. Use 8cm lengths of deep peach to make fourteardrops, placing these below the yellow ones.
Trace the four dots from the diagram onto a pieceof spare tracing paper, place on a pricking mat, cork
tile or similar. Place a pin intoeach of the dots and make eightleaves using pale green and fol-lowing the instructions below for each one.
Fold the strip about 5mm fromthe end, place the fold aroundthe bottom pin and hold in placewhile taking the rest of the strip
Actual Size

5
Actual Size
All the scrolls are made using 6cm lengths, in thesame way as for the blue scrolls earlier, and adjustingthe length of the straight part to suit the space on the card.
Add teardrop stickers or any tiny motifs, like heartsor flowers, then finish off with the wording stickers.
Above: This Easter version uses Curious Translucentfor the fan and a backing of opal Stardream with afrilled edge. The fan is lifted from the card at the topedge. The border is worked around a panel beforebeing mounted onto the card.
up around the second pin and down to the first again.
Add a dab of glue to the fold (shown orange) and take the strip below the first pin, pressing onto the glue and up and around the third pin. Bring it back down to the bottom, add glue at the bot-tom pin then take the strip up and around the 4th pin, bringing back to the bottom and gluing before cutting off the excess.
Remove the pins and pinch the bottom to form a point. Glue the leaves each side of the peach drops as shown.
Add a rope border sticker over each fan strut and press the top of each to flatten slightly.
Trace the fan frill and transfer to the brown paper.Cut the outer curve of the fan using scalloped scis-sors, cutting the inner curve with straight scissors.Glue this into place on the fan and add a strip of goldpaper as shown or use a sticker border instead.
The border is worked in deep peach. Make a heartfrom a 10cm length, glue into place using the twodots either side of the centre, embossed from thepattern, for placement of the coils of the heart.
Make two loose coils from 4cm lengths. Place onebetween the heart coils and one on the centre left dot.

Issue 56Spring 2010
The UK’s Original Greetings Card Making Magazine - Full Of Creative Ideas
We hope you enjoy this free article taken from a back issue of the Craft CreationsMagazine. You may hand make copies of the card(s) featured in this project, togive away or sell, as many times as you like. You may not use the project, text,pattern or pictures for any other purpose nor make the project using any kind ofautomated process.
All the free articles available for download on our web site are at least one yearold. If you want the latest projects, designer profiles, gallery pages and more,then you need to subscribe to the quarterly Craft Creations Magazine.
Subscription Benefits:
* A free gift with every issue.
* 10% off every order placed with Craft Creations*.
* £2.50 off post and packing on orders over £20*.
* Prize competitions in every issue.
You can subscribe to the quarterly Craft Creations Magazine or purchase any ofthe back issues from our online shop - www.craftcreations.com
* All Craft Creations Magazine subscribers will receive an additional 10% discount off their orders duringtheir subscription period only. Subscribers will also receive £2.50 off post and packing on orders over £20(after discount). These benefits are not applicable on certain items such as: Magazine Subscriptions, GiftVouchers, Products already on Promotion, Special Offers or 'SPOF' packs and cannot be combined withany other vouchers or offers.
Craft Creations LimitedIngersoll House, Delamare Road, Cheshunt, Hertfordshire, EN8 9HD, England.
Tel: 01992 781900 Fax: 01992 634339 Web: www.craftcreations.com
The details above are correct as of 1st March 2011, but are subject to change without prior notice.
Hello,