QuickServer with ThingWorx Adapter Setup Guide...QuickServer with ThingWorx Adapter Setup Guide 6...
15
QuickServer with ThingWorx Adapter Setup Guide
Transcript of QuickServer with ThingWorx Adapter Setup Guide...QuickServer with ThingWorx Adapter Setup Guide 6...

QuickServer with ThingWorx Adapter
Setup Guide
QuickServer with ThingWorx Adapter Setup Guide
1
Introduction ................................................................................................................................................... 2
About the FieldServer ............................................................................................................................... 2
Overview and Terminology .................................................................................................................. 2
FieldServer Overview Diagram ............................................................................................................ 3
Application Diagram ............................................................................................................................. 3
Installation..................................................................................................................................................... 4
Connect to the QuickServer ...................................................................................................................... 4
Configuration and Setup ............................................................................................................................... 5
Network Settings ....................................................................................................................................... 5
ThingWorx Settings .................................................................................................................................. 5
Protocol Settings ....................................................................................................................................... 5
Profiles ...................................................................................................................................................... 6
Adding Profile Instances ....................................................................................................................... 6
Modifying Existing Profile Instances ................................................................................................... 7
Import New Profiles .............................................................................................................................. 7
Data Point Settings ................................................................................................................................ 8
Confirm Communication .......................................................................................................................... 9
System Status Window ......................................................................................................................... 9
FS-GUI ................................................................................................................................................ 10
Troubleshooting .......................................................................................................................................... 11
Common Problems and Solutions ........................................................................................................... 11
Take a Diagnostic Capture with FieldServer Toolbox ............................................................................ 11
Open FieldServer Toolbox .................................................................................................................. 11
Take a Diagnostic Capture .................................................................................................................. 12
Compatibility .............................................................................................................................................. 14
Document Revision History ........................................................................................................................ 14

QuickServer with ThingWorx Adapter Setup Guide
2
Introduction Sierra Monitor’s QuickServer IIoT gateway with ThingWorx Adapter provides a connection path between
field devices and the ThingWorx cloud. ThingWorx is an enterprise-ready technology platform that
enables innovators to develop and deploy smart, connected solutions for the Industrial Internet of Things
(IIoT).
The QuickServer has many southbound protocol interfaces that are available on the QuickServer
hardware as a connection to the ThingWorx platform. Device protocols supported include: BACnet,
Modbus, LonWorks, M-Bus, KNX, Metasys N2, SNMP, XML, and 140 other protocols. With the
unmatched multi-protocol versatility of the QuickServer gateway, connecting devices to ThingWorx is
simple.
After identifying the device to connect to ThingWorx and obtaining its details, Sierra Monitor
Corporation (SMC) will assist to ensure seamless device integration to the ThingWorx platform. The
gateway also ships with an easy-to-use web configurator that maps field devices into ThingWorx
“things”.
This document provides installation and usage instructions for setting up the QuickServer with
ThingWorx Adapter.
About the FieldServer
Sierra Monitor’s FieldServer brand of fully configurable protocol gateways is used by system integrators
to enable local and remote connectivity, monitoring, and control of assets and facilities. Protocol drivers
are pre-loaded onto the QuickServer by user selection, with support for over 140 different protocols.
Overview and Terminology
ThingWorx is an object oriented platform which allows the integrator to define re-usable components and
then use those components to define “Things”, which represent real world devices. “ThingTemplates”
contain pre-defined properties which are inherited into every Thing Instance created from the template.
FieldServer ThingWorx Function
Profile ThingTemplate Provides a base functionality which includes the
properties for the device.
Profile
Instance Thing
Modeled representation of a physical device that
has properties.
Data Point Thing Property Representation of a parameter or variable in the
device.
QuickServer with ThingWorx Adapter Setup Guide
3
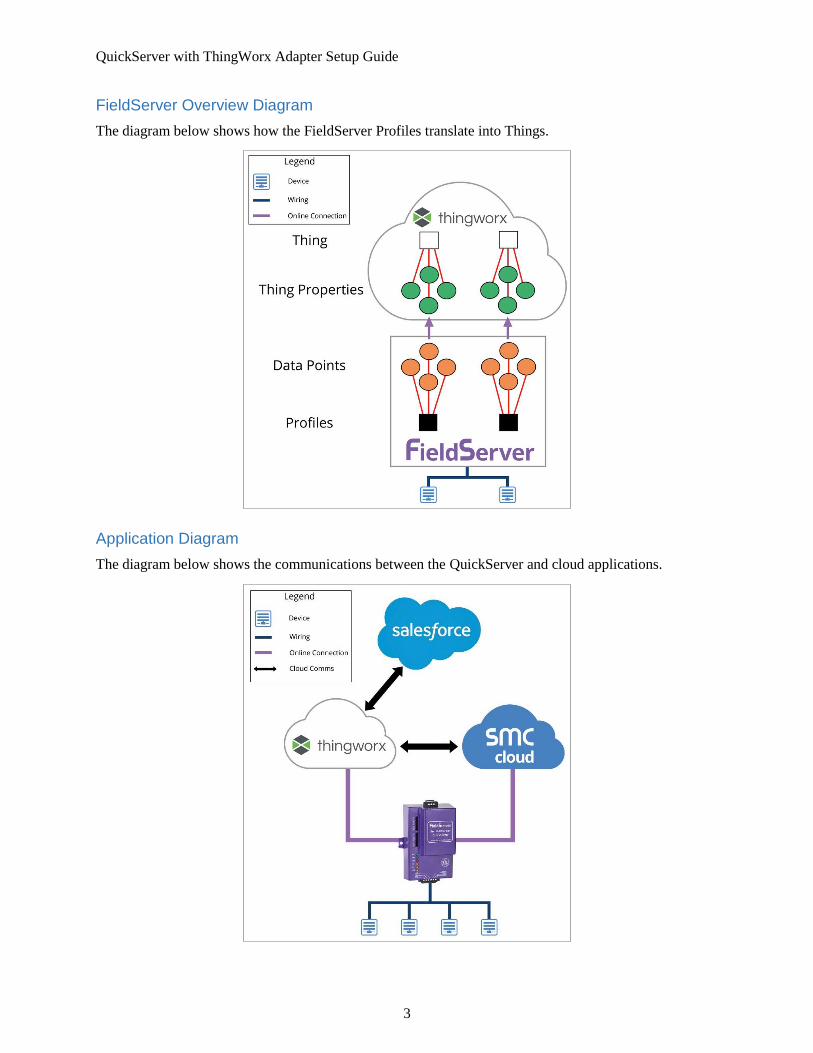
FieldServer Overview Diagram
The diagram below shows how the FieldServer Profiles translate into Things.
Application Diagram
The diagram below shows the communications between the QuickServer and cloud applications.
QuickServer with ThingWorx Adapter Setup Guide
4
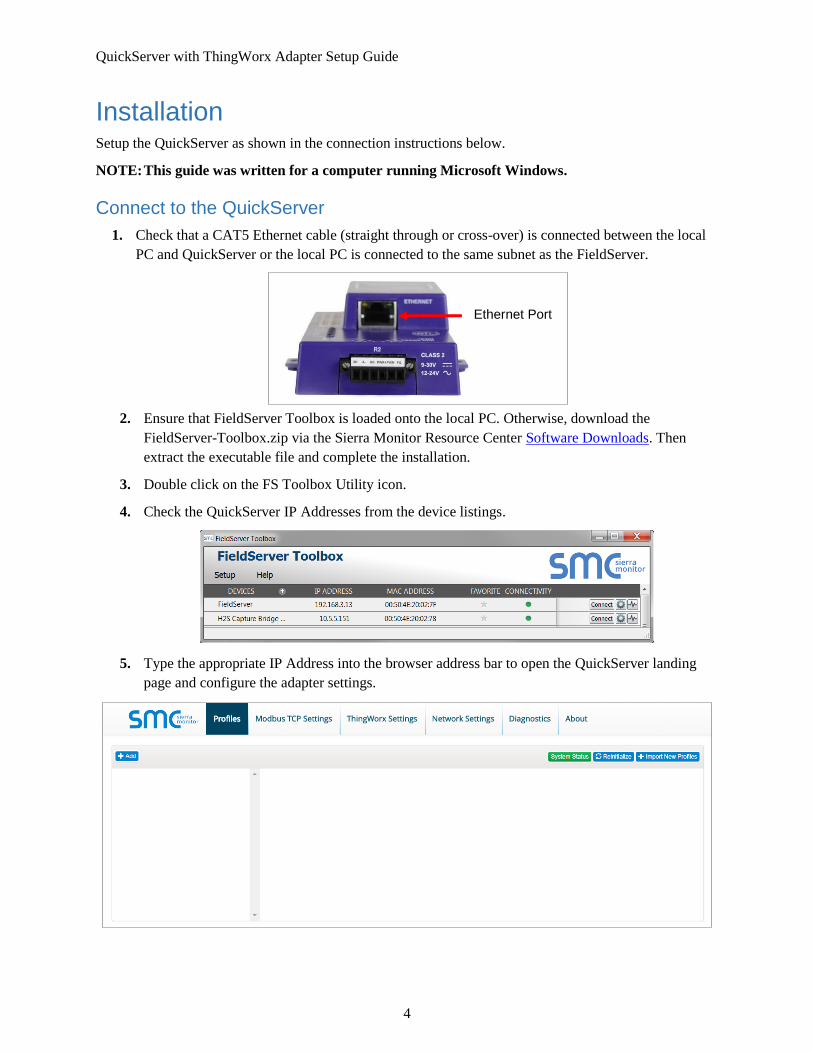
Installation Setup the QuickServer as shown in the connection instructions below.
NOTE: This guide was written for a computer running Microsoft Windows.
Connect to the QuickServer
1. Check that a CAT5 Ethernet cable (straight through or cross-over) is connected between the local
PC and QuickServer or the local PC is connected to the same subnet as the FieldServer.
2. Ensure that FieldServer Toolbox is loaded onto the local PC. Otherwise, download the
FieldServer-Toolbox.zip via the Sierra Monitor Resource Center Software Downloads. Then
extract the executable file and complete the installation.
3. Double click on the FS Toolbox Utility icon.
4. Check the QuickServer IP Addresses from the device listings.
5. Type the appropriate IP Address into the browser address bar to open the QuickServer landing
page and configure the adapter settings.
Ethernet Port

QuickServer with ThingWorx Adapter Setup Guide
5
Configuration and Setup To configure the QuickServer:
1. Connect to the QuickServer.
2. Enter the ThingWorx Server information: server name, port number and application key.
3. Enter protocol specific settings.
4. Specify profiles.
5. Confirm communication:
a. ThingWorx Server
b. QuickServer node status
For details on any step, continue to applicable section.
Network Settings
Once on the QuickServer landing page, click the Network Settings tab to modify the QuickServer
Network Settings.
ThingWorx Settings
Click the ThingWorx Setting tab to specify the Cloud Server host (ThingWorx Server Name), Cloud
Server Port (ThingWorx Port Number), and Cloud Server Key (ThingWorx Application Key).
Protocol Settings
Click the protocol settings tab (the current protocol is displayed in the tab field) to view or edit relevant
protocol settings. In this example, this is where the SNMP Community of the SNMP device is specified.
QuickServer with ThingWorx Adapter Setup Guide
6
Profiles
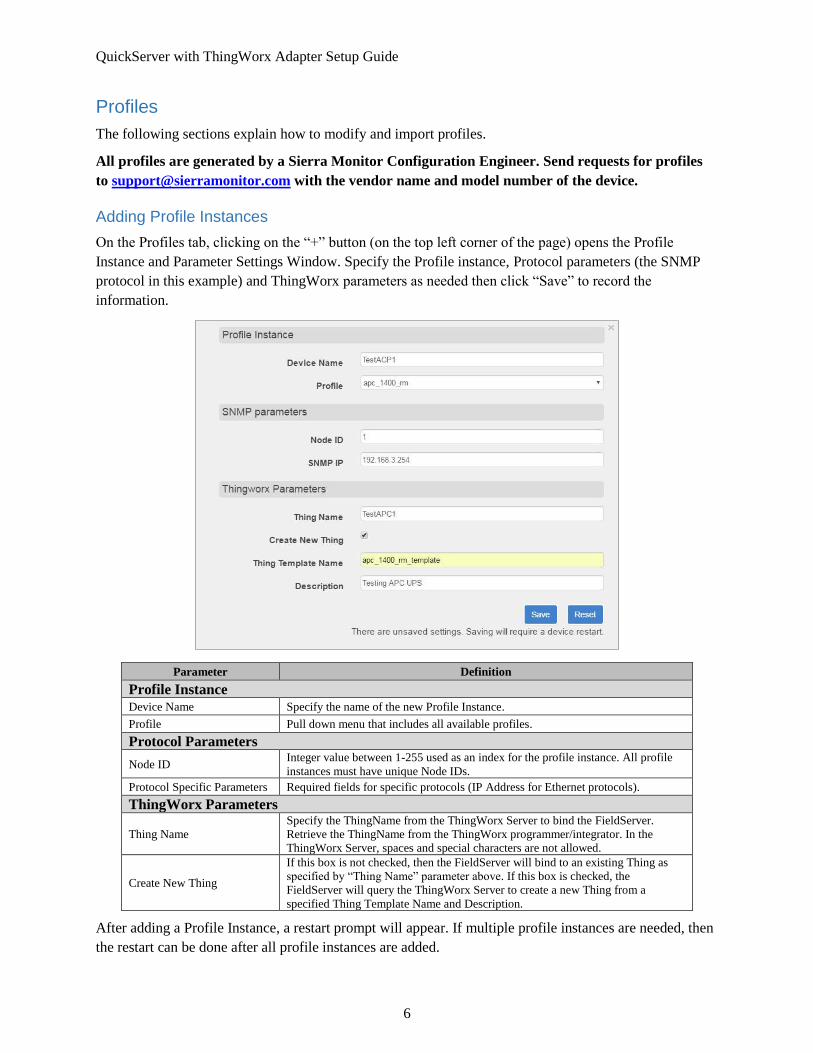
The following sections explain how to modify and import profiles.
All profiles are generated by a Sierra Monitor Configuration Engineer. Send requests for profiles
to [email protected] with the vendor name and model number of the device.
Adding Profile Instances
On the Profiles tab, clicking on the “+” button (on the top left corner of the page) opens the Profile
Instance and Parameter Settings Window. Specify the Profile instance, Protocol parameters (the SNMP
protocol in this example) and ThingWorx parameters as needed then click “Save” to record the
information.
Parameter Definition
Profile Instance
Device Name Specify the name of the new Profile Instance.
Profile Pull down menu that includes all available profiles.
Protocol Parameters
Node ID Integer value between 1-255 used as an index for the profile instance. All profile
instances must have unique Node IDs.
Protocol Specific Parameters Required fields for specific protocols (IP Address for Ethernet protocols).
ThingWorx Parameters
Thing Name
Specify the ThingName from the ThingWorx Server to bind the FieldServer.
Retrieve the ThingName from the ThingWorx programmer/integrator. In the
ThingWorx Server, spaces and special characters are not allowed.
Create New Thing
If this box is not checked, then the FieldServer will bind to an existing Thing as
specified by “Thing Name” parameter above. If this box is checked, the
FieldServer will query the ThingWorx Server to create a new Thing from a
specified Thing Template Name and Description.
After adding a Profile Instance, a restart prompt will appear. If multiple profile instances are needed, then
the restart can be done after all profile instances are added.
QuickServer with ThingWorx Adapter Setup Guide
7
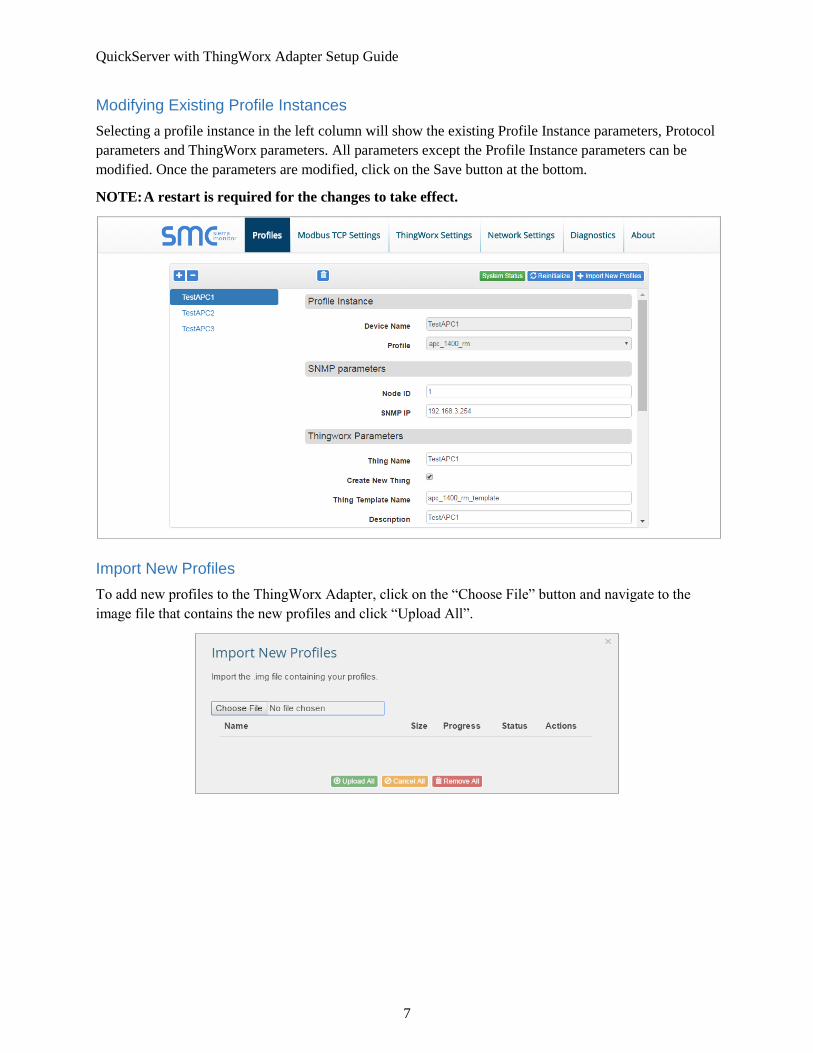
Modifying Existing Profile Instances
Selecting a profile instance in the left column will show the existing Profile Instance parameters, Protocol
parameters and ThingWorx parameters. All parameters except the Profile Instance parameters can be
modified. Once the parameters are modified, click on the Save button at the bottom.
NOTE: A restart is required for the changes to take effect.
Import New Profiles
To add new profiles to the ThingWorx Adapter, click on the “Choose File” button and navigate to the
image file that contains the new profiles and click “Upload All”.
QuickServer with ThingWorx Adapter Setup Guide
8
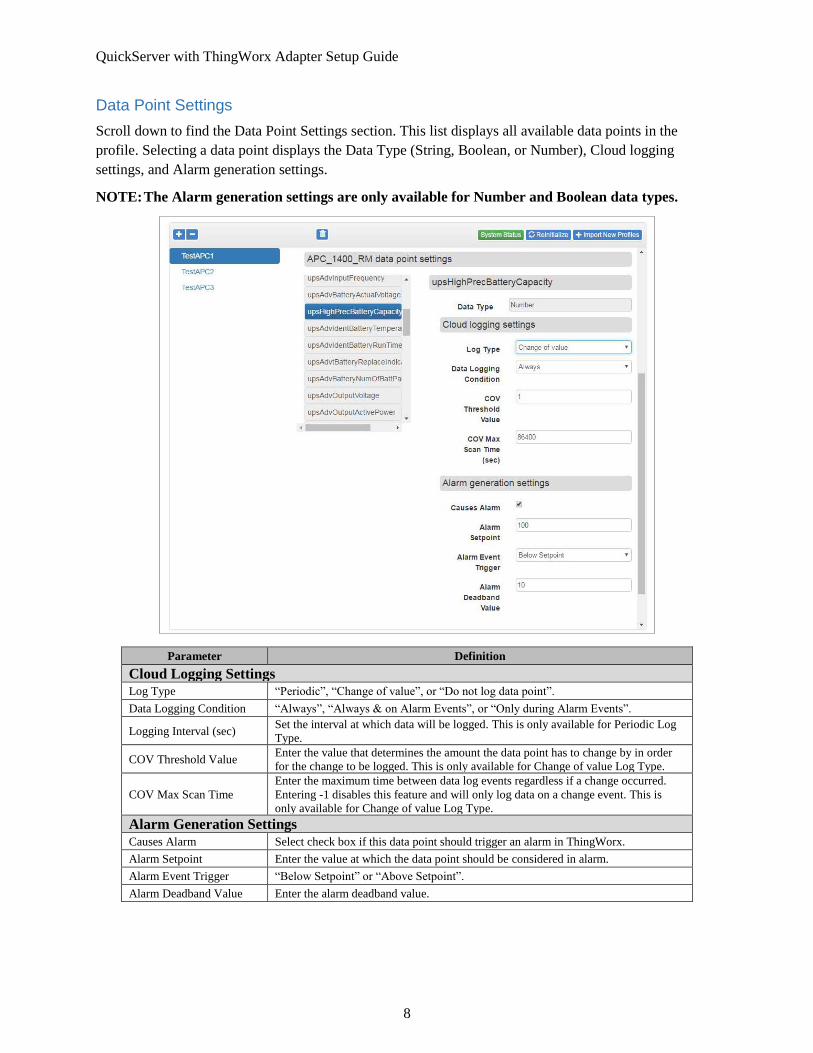
Data Point Settings
Scroll down to find the Data Point Settings section. This list displays all available data points in the
profile. Selecting a data point displays the Data Type (String, Boolean, or Number), Cloud logging
settings, and Alarm generation settings.
NOTE: The Alarm generation settings are only available for Number and Boolean data types.
Parameter Definition
Cloud Logging Settings
Log Type “Periodic”, “Change of value”, or “Do not log data point”.
Data Logging Condition “Always”, “Always & on Alarm Events”, or “Only during Alarm Events”.
Logging Interval (sec) Set the interval at which data will be logged. This is only available for Periodic Log
Type.
COV Threshold Value Enter the value that determines the amount the data point has to change by in order
for the change to be logged. This is only available for Change of value Log Type.
COV Max Scan Time
Enter the maximum time between data log events regardless if a change occurred.
Entering -1 disables this feature and will only log data on a change event. This is
only available for Change of value Log Type.
Alarm Generation Settings
Causes Alarm Select check box if this data point should trigger an alarm in ThingWorx.
Alarm Setpoint Enter the value at which the data point should be considered in alarm.
Alarm Event Trigger “Below Setpoint” or “Above Setpoint”.
Alarm Deadband Value Enter the alarm deadband value.
QuickServer with ThingWorx Adapter Setup Guide
9
Confirm Communication
The following sections describe how to check that communications are functioning properly via the
System Status Window and FS-GUI.
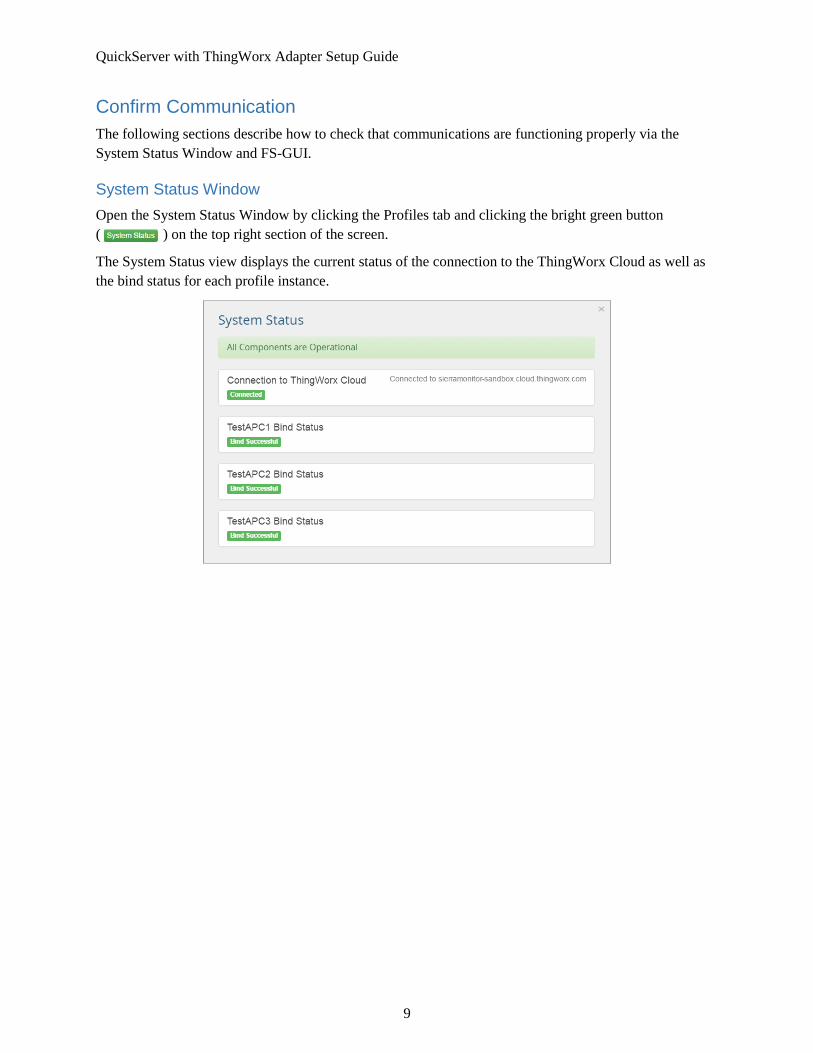
System Status Window
Open the System Status Window by clicking the Profiles tab and clicking the bright green button
( ) on the top right section of the screen.
The System Status view displays the current status of the connection to the ThingWorx Cloud as well as
the bind status for each profile instance.
QuickServer with ThingWorx Adapter Setup Guide
10
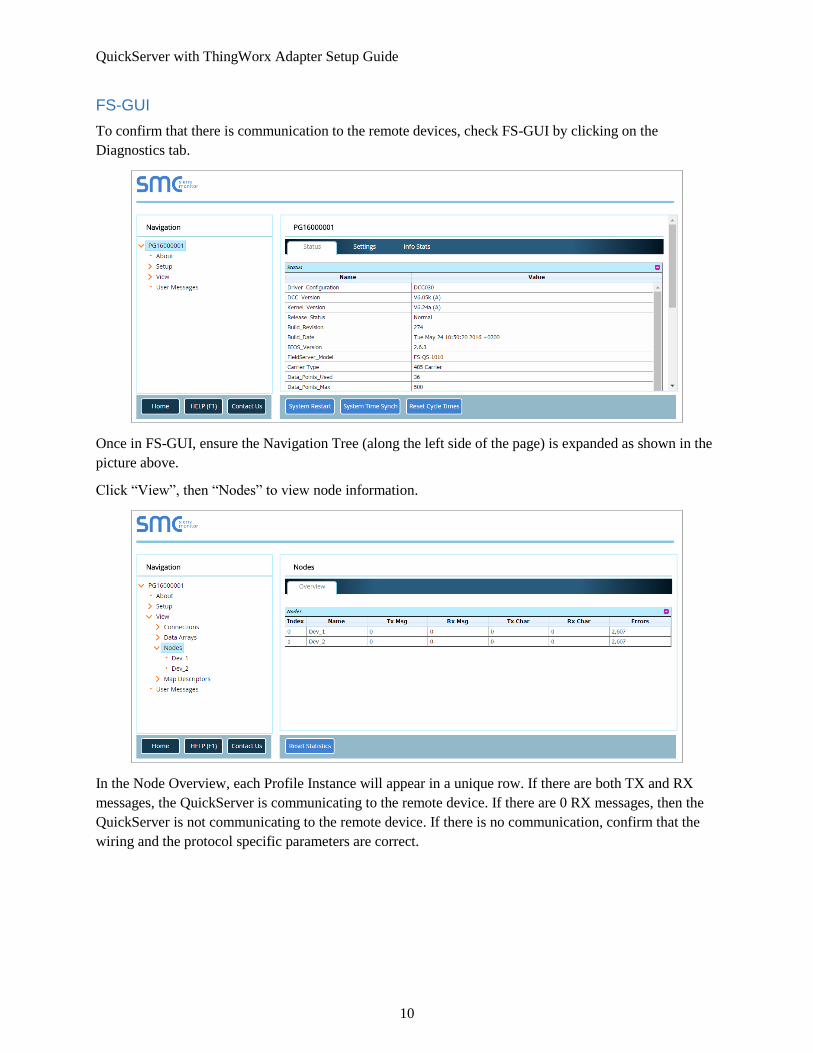
FS-GUI
To confirm that there is communication to the remote devices, check FS-GUI by clicking on the
Diagnostics tab.
Once in FS-GUI, ensure the Navigation Tree (along the left side of the page) is expanded as shown in the
picture above.
Click “View”, then “Nodes” to view node information.
In the Node Overview, each Profile Instance will appear in a unique row. If there are both TX and RX
messages, the QuickServer is communicating to the remote device. If there are 0 RX messages, then the
QuickServer is not communicating to the remote device. If there is no communication, confirm that the
wiring and the protocol specific parameters are correct.
QuickServer with ThingWorx Adapter Setup Guide
11
Troubleshooting
Common Problems and Solutions
Connection to ThingWorx Cloud failed: check Cloud Server host (ThingWorx Server Name), Cloud
Server Port (ThingWorx Port Number), and Cloud Server Key (ThingWorx Application Key). Also, make
sure DNS1 and DNS2 addresses are specified.
Profile bind status failed: Check ThingWorx to make sure that thing is not already bound to another
remote thing.
Node is not communicating to the device: Verify that the protocol specific parameters are entered
correctly.
Take a Diagnostic Capture with FieldServer Toolbox
When a problem occurs that cannot be resolved with regular troubleshooting, take a log via the
FieldServer Toolbox before contacting Sierra Monitor Technical Support. Once the diagnostic
capture is complete, email it to [email protected]. The diagnostic capture will accelerate
diagnosis of the problem.
Follow the instructions below to perform a diagnostic capture.
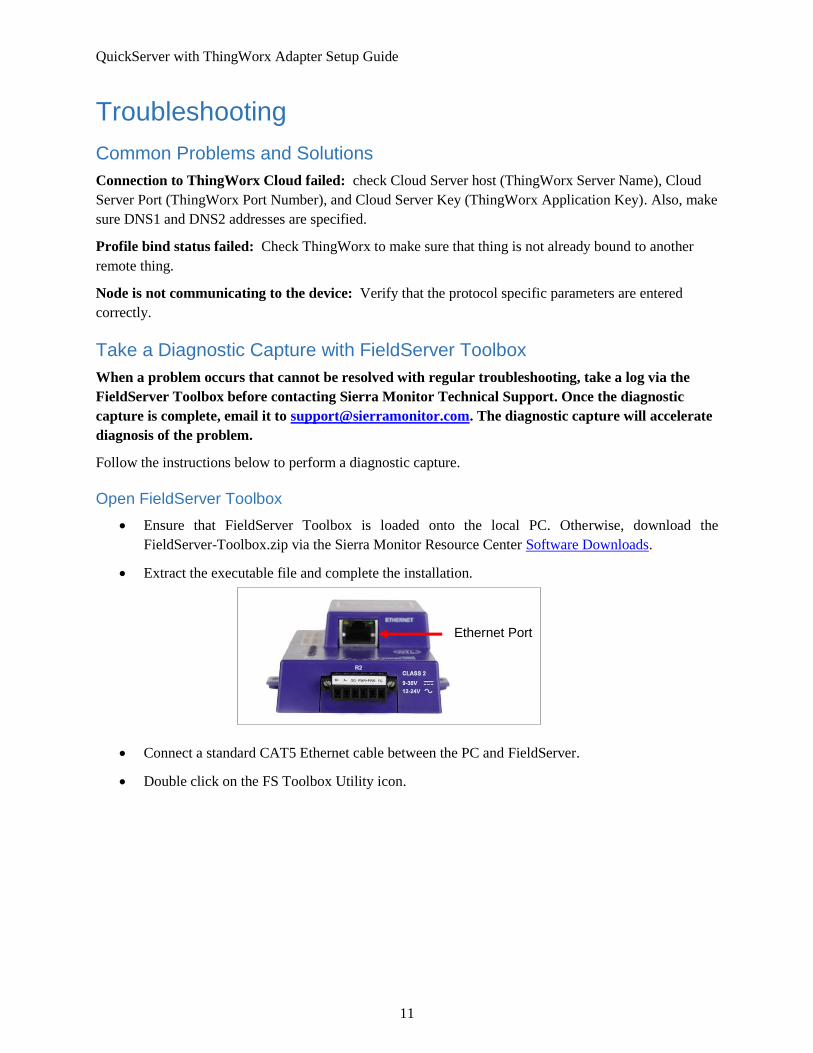
Open FieldServer Toolbox
• Ensure that FieldServer Toolbox is loaded onto the local PC. Otherwise, download the
FieldServer-Toolbox.zip via the Sierra Monitor Resource Center Software Downloads.
• Extract the executable file and complete the installation.
• Connect a standard CAT5 Ethernet cable between the PC and FieldServer.
• Double click on the FS Toolbox Utility icon.
Ethernet Port
QuickServer with ThingWorx Adapter Setup Guide
12
Take a Diagnostic Capture
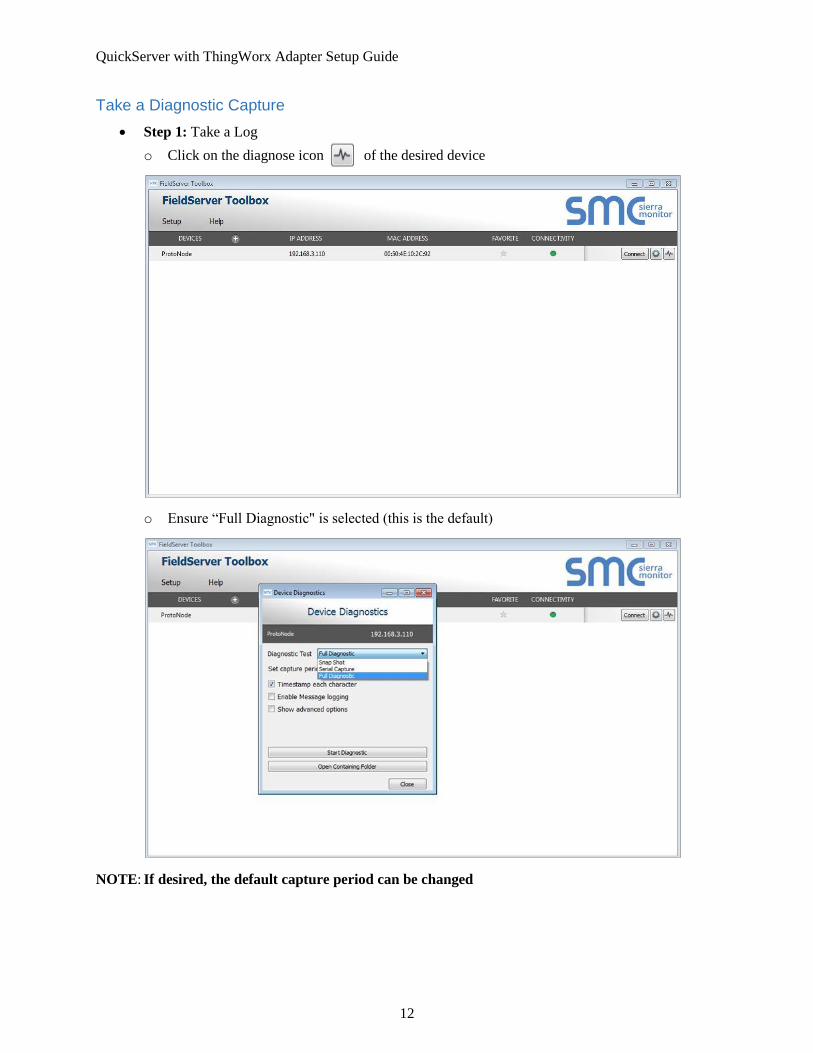
• Step 1: Take a Log
o Click on the diagnose icon of the desired device
o Ensure “Full Diagnostic" is selected (this is the default)
NOTE: If desired, the default capture period can be changed
QuickServer with ThingWorx Adapter Setup Guide
13
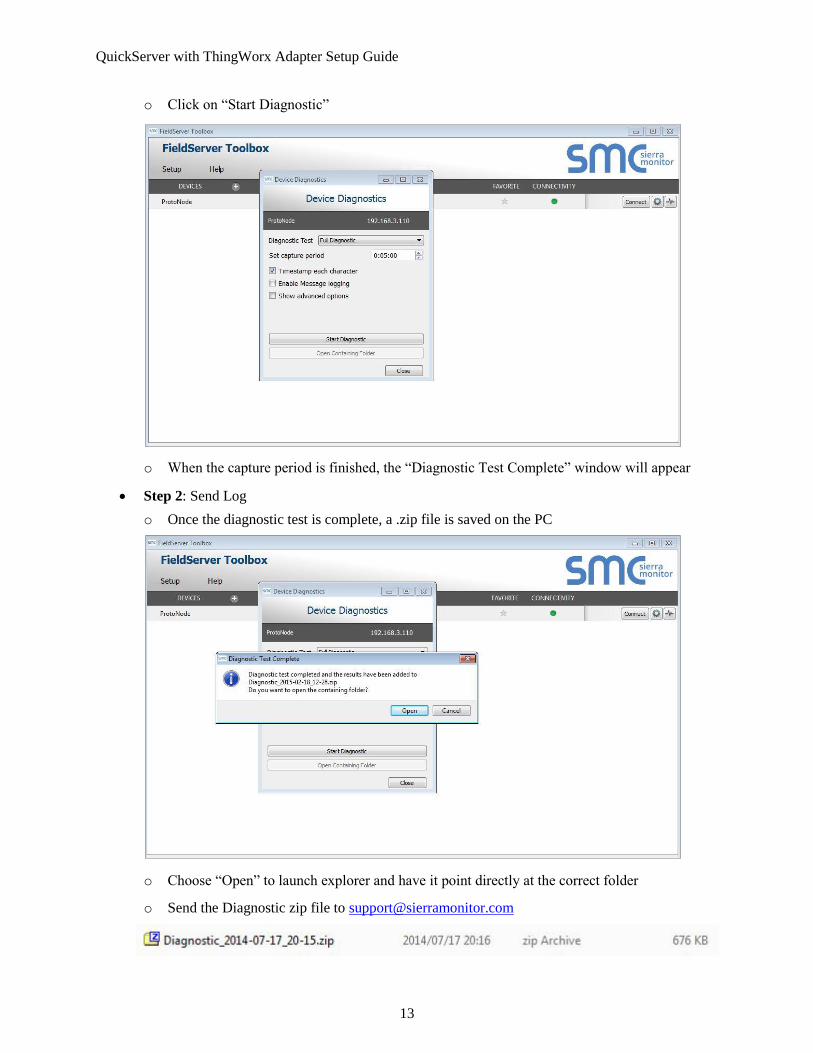
o Click on “Start Diagnostic”
o When the capture period is finished, the “Diagnostic Test Complete” window will appear
• Step 2: Send Log
o Once the diagnostic test is complete, a .zip file is saved on the PC
o Choose “Open” to launch explorer and have it point directly at the correct folder
o Send the Diagnostic zip file to [email protected]
QuickServer with ThingWorx Adapter Setup Guide
14
Compatibility This guide has been tested for compatibility with the QuickServer and the following ThingWorx platform
and operating system:
ThingWorx Platform Version ThingWorx 7.2.3
Document Revision History
Revision Date Version Description of Change
10/13/16 1.0 Created
11/3/16 1.0 Platform Version updated
12/20/16 1.1 Minor updates to pages 2-3
10/24/17 1.2 Specify the QuickServer type FieldServer, updated FS
Toolbox instructions
1/31/18 1.3 Copyright language removed
3/9/18 1.4 Cover and TOC logo updated