Quickbookswallners-quickbooks.weebly.com/.../introduction_to_quickbooks.pdf · Select Local Backup...
112
Transcript of Quickbookswallners-quickbooks.weebly.com/.../introduction_to_quickbooks.pdf · Select Local Backup...

Accounting Is…
IT SHOWS YOU…
Your business in terms of money
How much your business is worth
A way to measure profit and loss
A record of financial events
IT IS USED TO
Understand historical events
Plan for the future
Apply for a loan
Know how much to pay in taxed
2

Keeping Good Records
WHY
Information In = Information out
WHAT
Dates and monetary values
Who was involved
Why money was spent
Why money was received
HOW
Timely
Accurate
Reliable
3

What is QuickBooks?
A full-featured accounting program that’s very powerful and
easy to use
A double-entry accounting system
An estimating, invoicing, and accounts receivable system
A bill paying, check printing, and accounts payable system
A fixed asset management system
A purchase order and inventory management system
A job-costing system
A sales tax tracking system
A time tracking and billing system
A payroll system 9
4

About QuickBooks Files
QBs has two primary types of files:
Data files (extension “.QBW”)
These files are used to enter data or create reports
To use these files, select File Menu and then select Open Company
Backup files (extension “.QBB”) Backing up compresses data files
Backing up files means copying files to a second medium in case the first medium fails
Backing up can backed up to any of the following storage types:
Hard disks (internal or external)
Removable disks (flash drives)
Writeable DVDs/CDs
Network locations
Once Backed up they must be “restored” or decompressed so you can use it again
3
5

Steps for Backing Up
Choose File > Back Up Company > Create Local Backup
Select Local Backup
Click the Options button. ...
Click Browse and select the location where you want to save your
backup copy. ...
Select the additional options as needed. ...
Click Next
Select Save It Now, and click Finish
5
6
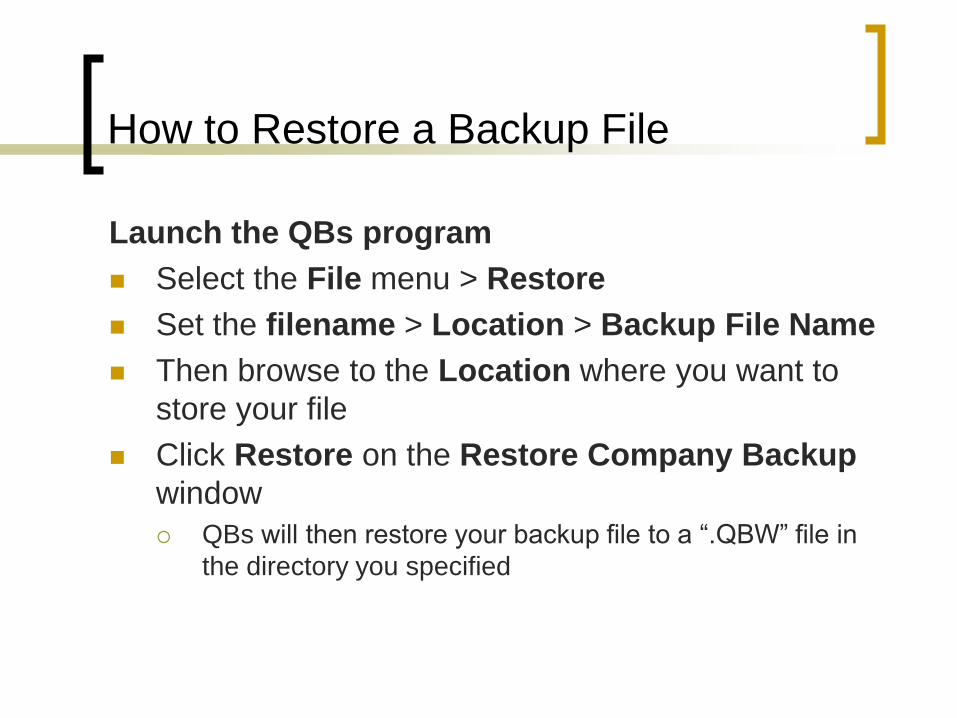
How to Restore a Backup File
Launch the QBs program
Select the File menu > Restore
Set the filename > Location > Backup File Name
Then browse to the Location where you want to
store your file
Click Restore on the Restore Company Backup
window
QBs will then restore your backup file to a “.QBW” file in
the directory you specified

Double-Entry Accounting
The rule of double-entry accounting is that total debits must always equal total credits
Every transaction creates a debit in one or more accounts and a credit in one or more accounts to handle double-entry accounting
Depending on the type of account, a debit might increase the account or decrease it, the same is true of credits
Therefore, debits are not always bad and credits are not always good
14
8

9
Understanding Basic Accounting
Introducing Behind the Scenes
In “Behind the Scenes” you will see the accounting that
QuickBooks performs for you when you record a
transaction.
Debits are
on the left
side of the
T account,
whereas
credits are
on the right.

Cash Versus Accrual
Accrual Basis Method
Income is recorded when a sale is made
Expenses are recorded when they arise
This method is used by firms and businesses with large inventories
Cash Basis Method
Income is recorded when cash is received Expenses are recorded when cash is paid.
This method is used by small businesses and professionals
14
10

Good News!!
With QBs, you can create reports for either method regardless of the method you use for taxes
11
Special Note for Cash Based Businesses!!
Since cash has not exchanged hands you do not need to display Accounts Receivable or Payable on financial statements

Understanding Basic Accounting
Assets – What you have & what other people owe you Cash
Bank Accounts
Equipment
QBs uses Accounts Receivable to track all the money owed you
Liabilities – Everything your business owes
Credit cards
Sales tax
Loans
QBs uses Accounts Payable to track all the money you owe
Equity –What the business is worth to you
Equity equals that company’s total assets minus its total liabilities
Reflects the owner’s investment in the company
Assets = Liabilities + Equity
or
Equity = Assets – Liabilities
Positive number if revenue exceeds expenses and a negative number if it is the other way around 12

What Makes Up the Chart of Accounts
Profit & Loss accounts
Income
Sales Delivery Fees
Interest
Expense
Supplies Rent
Utilities
Balance Sheet Accounts
Assets
Bank account Accounts receivable
Equipment
Liability
Accounts payable Credit Cards
Sales tax payable Loans
Equity
Capital Investment Retained Earnings
13

Profit & Loss Statement
Tracks Income and Expenses: Income
Labor 6,685.00
Job Materials 1,862.27
Total Income $8,547.27
Expenses
Supplies 247.54
Utilities 327.43
Rent 1,725.50
Payroll 4,425.56
Total Expenses $6,726.03
Net Profit $1,821.24 14

Balance Sheet Tracks Accumulated Net Wealth:
Assets
Current Assets
Checking 12,483.27
Accounts Receivable 1,380
Total Current Assets 13,863.27
Equipment 12,462.83
Total Assets 26,326.10
Liabilities & Equity
Liabilities
Current Liabilities
Credit Cards 2,178.34
Sales Tax Payable 819.60
Total Current Liabilities 2,997.94
Bank Loans 10,817.24
Total Liabilities 13,815.18
Equity 12,510.92
Total Liabilities & Equity 26,326.10 15

Equity Account
After you create the 1st Balance sheet account,
usually the checking account QB will automatically
create an Opening Balance Equity Account
The Asset Accounts you created are “credit” the Opening
Balance Equity Account
The Liability Accounts you created are “debit” the Opening
Balance Equity Account
The Opening Balance Equity Account is created so
the company can have a balance sheet that is
accurate
16

17
Choosing Your Start Date
Enter all transactions for your company from the start
date forward
If you choose a date too far in the past, the process can be
very time consuming
Keep in mind you have to enter ALL the transactions for your
company
Ask your accountant to help you determine the best
start date for your business
Ideal dates are:
Beginning of the month, quarter, fiscal year

18 18
Choosing a Setup Path
EasyStep Interview
Company creation occurs as you progress through a
series of questions
Skip Interview
Provide basic information and set up other aspects later
18

Setup Checklist
Gather information before setting up a new
company file
Legal name
Contact information
Fiscal Year
Tax year
Tax Form
Start Date
Accrual or Cash Basis
Federal EIN
State ID #
Customers
Vendors Items
19 19

The Starter Chart of Accounts
Choose the business type that most closely
resembles your company
Modify the starter Chart of Accounts as needed
QBs creates profile lists based on business type
Choose carefully! You cannot
change the business type later!!
20

Account Beginning Balances
If you have an existing company you
should enter the account balances for
all: Asset
Liability
These account balances are termed
“opening balances”
CHECK with your accountant
21

22
Entering in Historical Transactions
Five methods to enter opening balances:
1. EasyStep Interview (bank accounts only)
2. Journal entries
3. Forms (individuals transactions)
4. Registers
5. Lists
Two ways to enter historical transactions:
1. Individually
2. Summary journal entry
22

5 Steps for Entering Transactions
Enter these Transactions 1st Accounts Receivable
•Invoices
•Statement Charges
•Cash Sales
•Returns
•Customer Payments
•Deposit of Customer Payment
Enter these Transactions 2nd Accounts Payable
•Bills
•Credits from Vendors
•Bill Payments
Enter these Transactions 3nd •Payroll Information
Enter these Transactions 4th Bank and Other Transactions:
• Checks (make sure to not duplicate
bill payments)
• Deposits (make sure to not duplicate
customer deposits
• Bank fees and transfers
• Credit card transaction
Enter these Transactions 5th •Reconcile each bank account and
credit card each month
23

How QBs terminology applies to your
business
QBs is based on four key concepts: Customers,
Vendors, Items, and Accounts.
Customer: A customer is anyone who pays you.
Vendor: A vendor is anyone you pay, except for
employees.
Item: An item is anything you want to put on an
invoice. This includes parts, services, labor,
discounts, and taxes.
Account: There are two types of accounts
Real world accounts, such as checking accounts
Income and expense accounts that you use to group
transactions for reporting purposes. 24

QBs User Interface Features
QBs provides a number of shortcuts and aids that
assist the user in entering information and data
There are five methods of accessing the data entry
windows: Centers
Menus
Icon Bar
Shortcut List
Shortcut Keys
17
25

Centers
QBs has several Centers that help you work through the program
These Centers guide you through functions
20
•Vendors
•Customers
•Employees
•Company
•Banking
26

Menus
Menus run along the
top of the screen
To open a Menu
button select the menu
name and then choose
the option desired
18
27
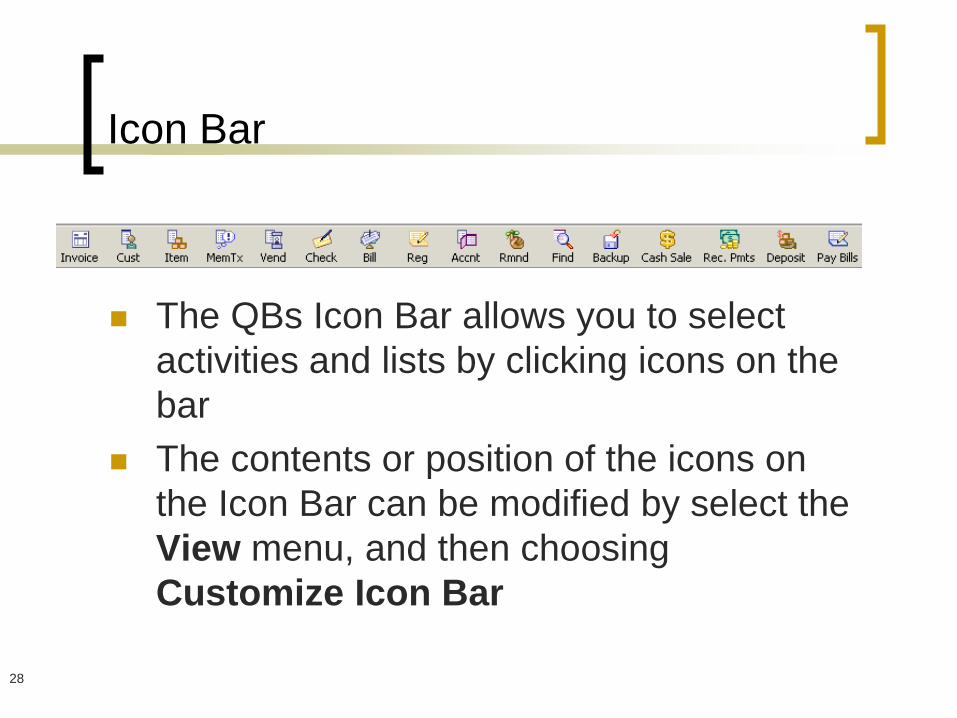
Icon Bar
The QBs Icon Bar allows you to select
activities and lists by clicking icons on the
bar
The contents or position of the icons on
the Icon Bar can be modified by select the
View menu, and then choosing
Customize Icon Bar 19
28

Customizing the Icon Bar
When you create a new
company, the Icon bar has
only 6 standard Icons
In the Customize Icon Bar
window, you can add, edit,
delete, or reorder the icons
29

Shortcut List - Viewing What is Open
Through the Open Window List you can see all the windows you have left open
To access this list click on View > then Open Window List This list will then be visible on the
left side of the Home window
20
To close this
window just
click on the
black “X”
30

Shortcut Keys
You may use your mouse
or the keyboard shortcut
keys
To use the keyboard,
press the ALT key then
press the underlined letter
Some of the menu items
have control-key shortcuts
22
31
To open a register, you can
press CTRL+R as indicated
on the Edit menu

Entering Data In Forms
Transactions are created by filling out familiar-looking forms invoices, bills, and checks
When you fill out forms, you choose names from lists Customer list
Item list
Account list
When you finish a form REMEMBER to click the save button 32

Making Global Changes
Customize how you interact with QBs
Editing Your QBs Preferences
You can change the
preferences for the
19 categories
33

34 34
Company vs. Personal Preferences
Company Preferences
Administrator makes changes
Personal Preferences
Individual users make changes
e.g., using account
numbers for your
company file
e.g., how to use
windows
34

Using QuickBooks

Training Purposes
Throughout this course we will be entering and
changing a sample company in the same flow you
would need to follow if you were starting a company:
Personalize the Chart of Accounts
Setting up the Service/Product Lists (items)
Creating Invoice/Sales Receipts
Receiving Payments
Enter - Paying Bills – Writing Checks
Checking Account Reconciliation
36

Chart of Accounts
Is the complete list of a business's accounts
Used to track how much money your company has, how much
money it owes, how much money is coming in, and how much is
going out
Account Types are:
Bank Other Current Liability
Accounts Receivable Long Term Liability
Other Current Asset Equity
Fixed Asset Income
Other Asset Other Income
Accounts Payable Expense
Credit Card Other Expense
Cost of Goods Sold
37

Chart of Accounts Window
Provides account balance for Balance
Sheets accounts:
Assets
Liabilities
Equity
Does not provide account balance for
Profit & Loss:
Income
Expense
Accounts are listed alphabetically by type
The highlighted account is the selected
account
38

39
Customizing the Chart of Accounts
You can create
new accounts…
…or edit the
provided accounts to
suit your needs…
Fine tune the starter Chart of Accounts
39

Creating a New Account
Open the Chart of Accounts
Click the Account menu button
Choose New from the menu
Make sure you choose the correct account type, and
then click Continue
Enter all necessary information
Click Save & Close to accept the new account
Or Click Save & New if you have additional accounts to create
We use the same area for
deleting and editing accounts 40

41
Using Subaccounts
Offer increased flexibility
More detail is good but….you should only have the
level of detail that is useful for your business
Subaccounts of
Telephone Expense
41

Understanding & Creating Service Items
Before you can create an invoice, you must 1st
create Items
When creating a new Item, you need enter the
following information:
Type of item (Service, Inventory, Non-inventory part, Other
Charge, Subtotal, Group, Discount, Payment)
Description and Rate
Account
Which is connected to the Chart of Accounts
42

Creating a New Service Item
Click on Items & Services button in the Company
Center
Choose Service as the type of item
Enter an Item Name
Your name for the item
Enter in Item Description
This description appears on invoices
Enter the Standard Rate for the item
Select the Income Account to which you want the
sales directed
Click OK
This is repeated
again..and again until
all items are entered
including Sales Tax
43

Creating Inventory Items
Click the Item & Services link in the
Company center
Click the Item menu button and
choose New
In the Type drop-down box choose
Inventory Part
Then complete all fields correctly
44
Inventory Part window

Purchase Orders
It is VERY important to use the Purchase Orders System
This systems helps you: Tracks what you sale
Creates reports that show what is on order and when it is due to arrive
Helps you pay the bills associated with the inventory
274 P.O.s do not post to the Chart of Accounts, however, QBs tracks PO in a non-posting account called Purchase Orders
45
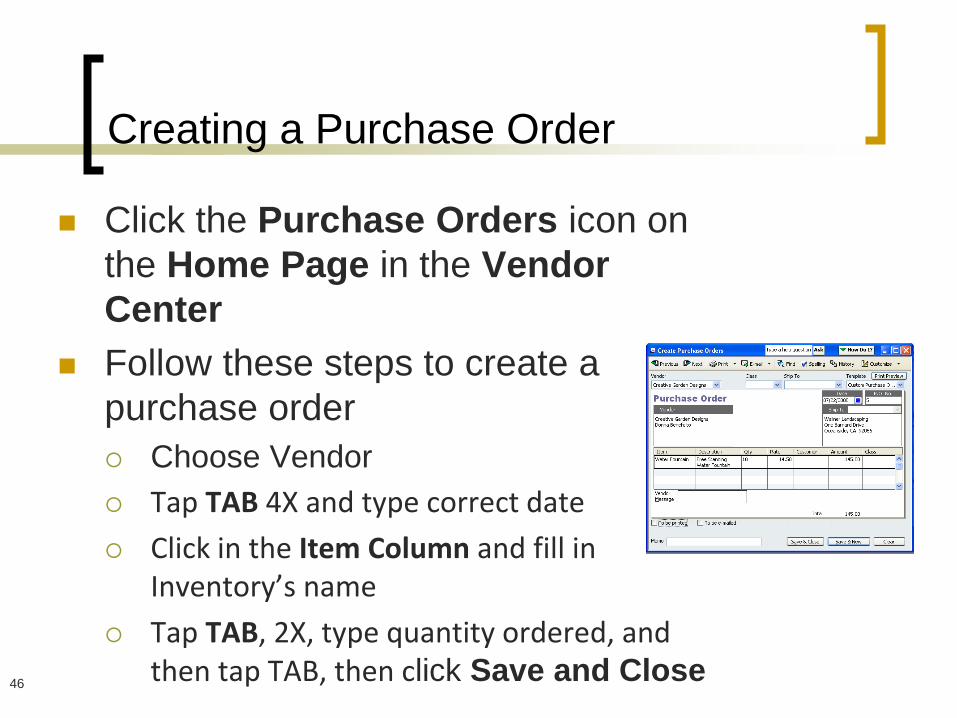
Creating a Purchase Order
Click the Purchase Orders icon on
the Home Page in the Vendor
Center
Follow these steps to create a
purchase order
Choose Vendor
Tap TAB 4X and type correct date
Click in the Item Column and fill in Inventory’s name
Tap TAB, 2X, type quantity ordered, and then tap TAB, then click Save and Close
46

Receiving Inventory Items
When you receive the items on a P.O., you need to
enter them into inventory
There are 2 ways to record the inventory items you
receive depending on the vendor you pay for the
items:
1. Receive items without a bill
2. Receive items with the bill included
If you are going to pay a bill with a credit card, use the
ENTER CREDIT CARD CHARGES window, so that QBs
will prompt you to receive against open POs.
47

Receiving the Items
On the Home page > Vendor Center – Click on
“RECEIVE INVENTORY’ button. Then choose:
• Receive Inventory with Bill or
• Receive Inventory without Bill 48

From the Vendor Center
Enter
Vendor’s
Name &
tap TAB
49
If there are open
P.O. for this vendor,
QB gives you a
chance to receive
against them

Receiving Items Against Purchase
Orders
Prompt to
receive items
against order
50
Everything
Else Will Be
Filled In!

Entering a Bill for Inventory Items
Enter purchased Inventory Items on the Items tab
Enter Bills window
Write Checks window
Inventory is placed on the Items tab in the Pay Bills window
51

Including Expenses on a Bill for Items
When you receive the items, QBs will use the Items
tab rather than the Expenses tab
Since Inventory is considered an Asset Account
For all additional shipping and handling charges
you incur – you must use the Expense tab
52

Activating Sales Tax and Setting
Preferences
You must set up your
Sales Tax Preferences
before using the Sales
Tax feature
Select the Edit menu and
then select Preferences
Scroll to and select Sales
Tax and then click the
Company Preferences tab
310
53

Setting Preferences
Choose
the Yes
Option
You will then need to make sure you chose when
you owe sales tax and how often you pay it
You will add
additional Sales Tax
Items from the Items
& Services icon on
the Home Page
54

Sales Tax Item
Choose Sales
Tax Item as
Type
Type San
Diego as the
Tax Name
Type CA sales
tax, San
Diego County
as the
Description
If you do business in different cities/counties be sure
you collect the correct tax amount
Type correct
rate for each
Location
Type Board of
Equalization &
Quick Add
55

Using Sales Tax Items on Sales
Forms
The Sales
Tax Item
calculates the
tax for this
sale
313
56

The Manage Sales Tax Window
As of 2007 QBs has a new feature that helps you
manage all your sales tax activities
The Manage Sales Tax window provides links to all
the tasks you will be performing
From setting it up to paying the taxes
57

The Sales Tax Liability Report
To view the
report click
the Sales
Tax
Liability
Link
Report helps you determine
how much you owe
It is imperative to use the
Pay Sales Tax window
when remitting tax so the
current liability account
it properly debited
58

Paying Sales Tax
Collected sales tax is held by QBs
It is held in the Current Liability
Account until time to paid
These taxes are never actually the
property of your business
Payments made to the BofE will never
show up on the Profit & Loss Report
59

60
Paying Sales Tax
Click the Pay Sales Tax button in the Manage
Sales Tax window
Once you click the OK button, the liability check has
been entered into the queue of checks to be printed

QBs and Your Sales Tax Return
The Sales Tax Liability report provides you with the information you need to prepare your sales tax return Breakdown of sales
Sales tax collected by county/agency
The amount of sales tax you owe on the sales tax return will often not match the amount accrued in QBs for several reasons: Some sales tax agencies
Round sales tax to the nearest dollar
Offer discounts for timely filing
Charge interest and penalties for filing late 321
61

62
The Customer Center
The Customers & Jobs List in the Customer Center
displays all customers with their jobs indented beneath
The right side of
the Customer
Center displays
information
about the
customer
currently
selected in the
Customers &
Jobs List

Setting Up Customers
For each of your
customers, create a
record in the Customer
List
From the Home window
select the Customer
Center then select New
Customer & Job Button
Then select the New
Customer
35
New customer window 63

To View a Particular Customer
64

Tracking Company Sales
Invoice
Used for Credit Customers (pay on a date after the sale date)
Tracks detailed information about each sale
Sales Receipt
Used when a customer pays in full
Tracks detailed information about each sale
Statements
Used if you need to track how much your customers owe you
Tracks customer histories of their account activity
Charges
Payments
balance
65

Creating Invoices
From the Customers
Center select Invoices Icon
In the Invoice form start
typing the customer’s name System will display all “like” names
Select name and tap “Tab”
key All needed information will be added
50 Select the
customer
name from the
drop-down list 66

Invoicing a Customer
Next, you
need to
choose the
type of Item
or billable
service
Let’s talk about how you will be given this
invoice to your clients…
Make
sure the
date and
Invoice #
is correct
67

Where Does the Invoice Go?
Once you have create and save the invoice:
1. The Accounts Receivable is automatically
increased by the amount of the invoice
2. The new Invoice appears in the Open Invoices
Report
3. The Income account on the Chart of Accounts is
increase from the items
4. Finally, it is reflected in your Profit and Loss
Report
68

Recording Sales Receipts
Sales Receipts are use when customers pay at the time of the sale
From the Customers Center, select Enter Sales Receipts icon
You create a sales receipt just like an invoice
43
Enter the name of the customer
here, or choose an existing
customer from the list by clicking
the down-arrow
69

Where to Sales Receipts Go?
When you enter a Sales Receipt
1. QBs tracks your sales & income from the sales
receipt in the customers account
2. The sales by Item Summary Report will reflect the
items that you sold
3. The Income account on the Chart of Accounts is
increase from the items
4. Finally, it is reflected in your Profit and Loss
Report
Important difference!! You do not need to choose a
particular customer to enter a Sales Receipt 70

Sales by Item Report
Select the Reports menu, then select Sales, and then
select Sales by Item Summary
96
71

Creating Customer Statements
Customer Statements provide a summary of the activity for an invoiced customer
You can show either all of the customer’s activity or just the transactions that are currently open
Useful tool for letting your customer know exactly what is recorded
92
72

Creating Customer Statements
From the Customer Center select Statements icon button
Enter the date, statement period, select customers and other relevant options
Click Preview button to review the statements in Print Preview window
Print the statements and then close
73

Sales by Customer Summary Report
Select the Reports menu, then select Sales, and then
select Sales by Customer Summary report
96
74

Receiving Payments
To record payments from
invoiced customers for
invoices, use Receive
Payments option
From the Customers Center,
select the Receive Payments
icon
As in the other forms, start to
enter the clients name
All open invoices will appear 57
75

Where to Payments Go? Receiving payments
Reduces the balance in Accounts Receivable
Increases the Income balance
Increases the balance in Undeposited Funds
76

Recording Deposits Order
To help with reconciling your bank
ALWAYS choose which payments
were deposited together
Depositing Checks and Cash
Depositing Credit Card Payments
77
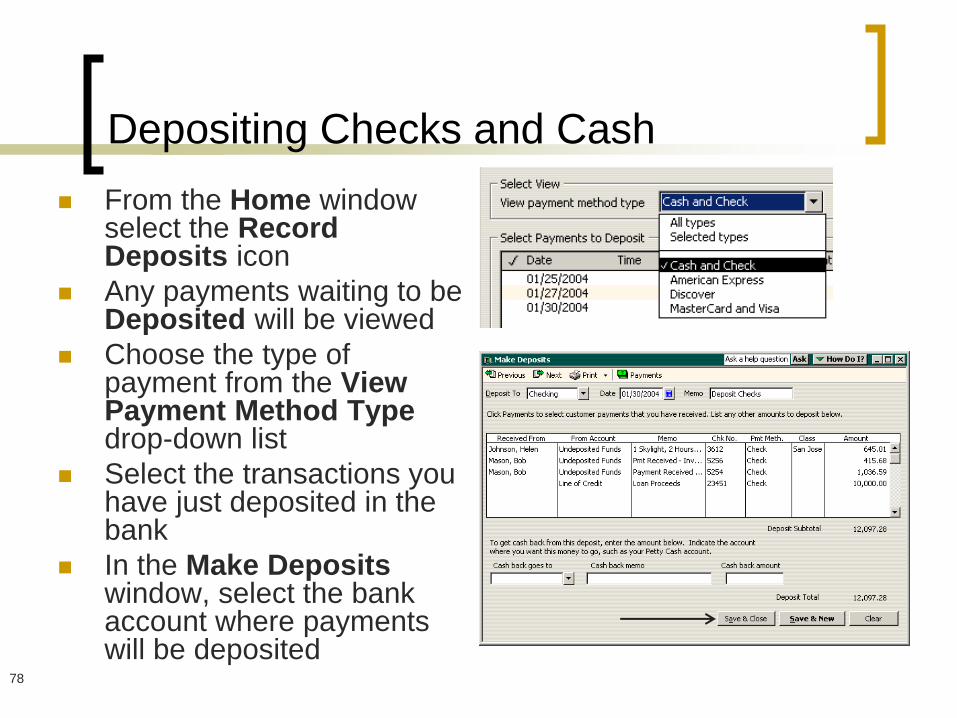
Depositing Checks and Cash
From the Home window select the Record Deposits icon
Any payments waiting to be Deposited will be viewed
Choose the type of payment from the View Payment Method Type drop-down list
Select the transactions you have just deposited in the bank
In the Make Deposits window, select the bank account where payments will be deposited
67
78

Depositing Credit Card Payments
From the Home window select the Undeposited Funds icon
Click in the left column on the line to select the Credit
Card receipt, then click OK
The Make Deposits window opens
73
Be sure to record your credit card processing company fee on
each credit card deposit
79

Where to Deposits Go?
Making Deposits
The Accounts Receivable account decreases by
the amount of the payment
The balance for the customer who paid decreases
by the amount of the payment
The paid invoices are removed from the Open
Invoices Report
80
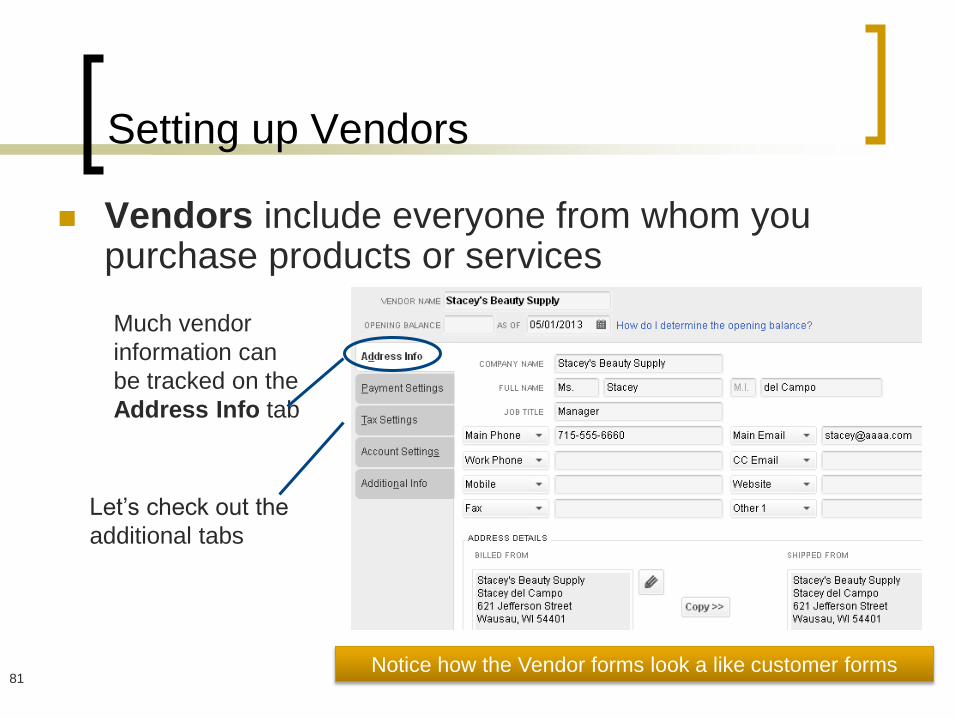
Setting up Vendors
Vendors include everyone from whom you purchase products or services
111
Notice how the Vendor forms look a like customer forms
Much vendor
information can
be tracked on the
Address Info tab
Let’s check out the
additional tabs
81

What Happens When a Vendor is also
a Customer
Vendors and Customers have to be named differently
When your vendor is also your customer: Setup a vendor record in the Vendor list
Setup a customer record in the Customer: Job list
The customer name must be slightly different from the vendor name Usually the middle initial is included
82

Entering Bills
Transactions entered into the Enter Bills window
credit Accounts Payable
126
83
For a bill to
be paid, you
must pay it
using the
Pay Bills
window
The Items tab is used for inventory you will resell to
customers or for non-inventory items you purchase

Paying Vendors
Vendors can be paid in the
following ways:
Check
Credit card or electronic funds
transfer
Or in cash (although cash is not
recommended) 120
84

Paying Vendors
The three most common situations are:
1. Manually write a check or initiate an electronic
funds transfer and then record the transaction in
the Checking register
2. Use the Write Checks window to write and print
checks
3. Use the Enter Bills window to record Accounts
Payable and then use the Pay Bills window to pay
the bill

Paying Bills
QBs keeps track of all your bills in the Accounts Payable account
When you pay your bills using Pay Bills function, the balance in Accounts Payable is reduced
To use Pay Bills function: Select the Vendors menu and then select Pay Bills
129
86

Writing Checks
The top portion of
the Write Checks
window looks similar
to a handwritten
check
The bottom portion of the Write Checks window
resembles the bottom portion of the Enter Bills
window
87

Printing Checks
Print checks
via the
File menu, or
the Home page
After printing
checks, you
must confirm
they printed
correctly 88

Where Does This Payment Go?
89
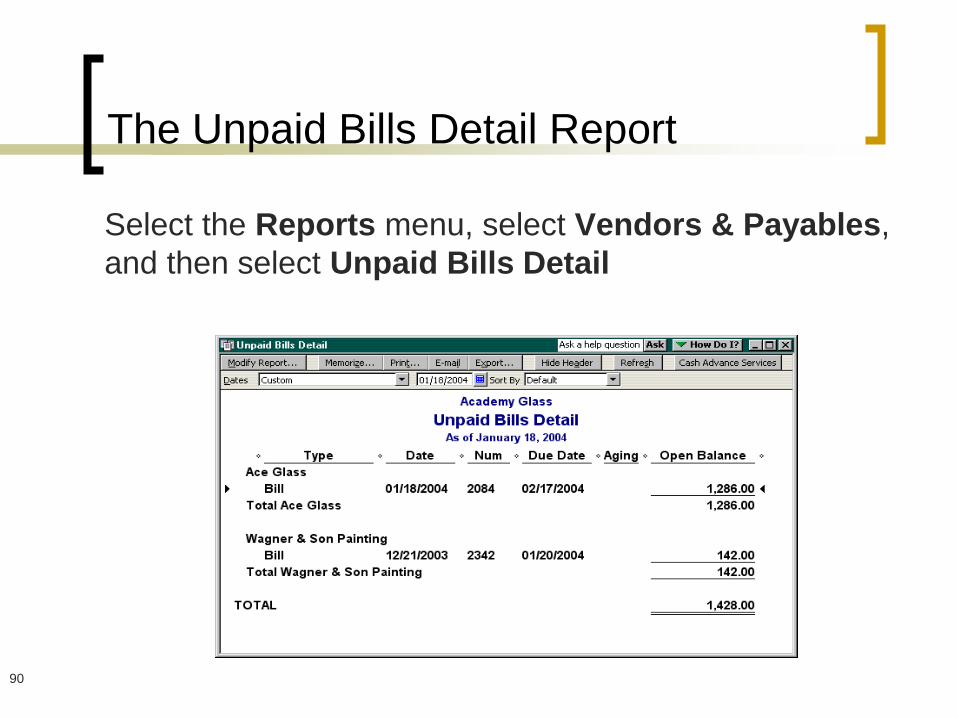
The Unpaid Bills Detail Report
Select the Reports menu, select Vendors & Payables,
and then select Unpaid Bills Detail
129
90

Vendor-Related Reports
Preset reports will aid you in working with vendors
91
The Vendor Balance Detail report shows all transactions
related to each vendor; the totals in the Balance column are
your company's unpaid balances

Passing on Expenses to Customers
The Customer:Job field allows
you to choose a customer to
whom you want to pass along
an expense
A checkmark means an
expense can be passed
on to a customer or job
92

Invoicing for Billable Costs
This window appears when you choose to create an
invoice for a customer with outstanding billable time
or costs.
93

Using Registers
From the Company Center select Chart of Accounts
To display the Checking account register, double-click the Checking account QBs displays an area below the check where you can add several
lines, memos, and amounts for splitting the expenses among multiple accounts
Enter the transaction and press Record 121
94
To apply your purchase to
more than one account
click the Splits button
Reconciling Bank Accounts
It is important to reconcile your bank accounts with the bank statements
It is through reconciliation you Identify
Correct discrepancies between your records and bank accounts
95

How to Reconcile
To reconcile a bank account From the Banking Center Reconciliation icon
Select the correct account to be reconciled
Check Beginning Balance with the bank statement
Then enter the following information: Statement date
Ending balance
Service charge
Interest earned
Then select the Continue button
96

Reconciling Bank Accounts (contd.)
In the Reconcile window Match ALL checks and deposits by clicking on each line to
mark it as a cleared transaction
After you’ve clicked next to each check and deposit, look at the Difference field which should be 0.00
This indicates that your bank account is reconciled Click Reconcile Now button
175
97

Bank Reconciliation Reports
Upon completion, Select
Reconciliation Report
window is displayed
Select Summary or Detail
option
Click Display to view the
report
Click Print button to print
the report 184
98

Locating Previous Bank Reports
To create bank reconciliation reports at any time:
Select the Reports menu
Select Banking
Then select Previous Reconciliation

Voiding Checks
QBs allows you to keep the information about voided checks
To retain a record of these checks
It’s important to enter each check into your register even if the check is voided
Preventing gaps in your check sequence
138
100
How to Void a Check
Steps to Voiding Open the Checking account register
Select check to be voided
Select the Edit menu
Then select Void check option
When you void a check the amount is changed to zero and it marks the check cleared Click Record to save your change

Transferring Funds Between Accounts
Transfer Funds window
Choose the account to transfer from
Choose the account to transfer to
The Transfer
Funds window
displays the
balance in each
account
102

Types of Reports
There are two major types of reports in QBs
Accounting Reports
These reports contain information about transactions and
accounts
Example: the Profit & Loss Report
Is a summary report of all transactions coded to income and
expense accounts for a specified period of time
Business Management Reports
These reports are used to monitor different activities of a
business to help plan workflow and review transactions that have
already occurred and provide critical information
Example: the Customer Contact List Report
Shows addresses, phone numbers, fax numbers, and other
information about Customers
214
103
QBs Preset Reports
Profit and loss reports give you a global view of your company’s income, expenses, and net profit or loss over a specific period of time.
Balance Sheet reports show the financial position of your business by listing assets, liabilities, and equity.
A/R (accounts receivable) reports give you information about the “receivables” side of your business; which invoices are due, how much each customer owes your company, and so on.
Sales reports give you information about what you have sold and to whom.
Inventory reports give you information about the status (such as the quantities you have on hand or on order) and the value to your inventory.
214
104

continued
A/P (accounts payable) reports give you information about the “payables’ side of your business, including
which bills are due, your sales tax liability, and your current balance with each vendor.
Budget reports show how your income and expenses compare to the budgets you have
set up.
Payroll reports give you detailed information on each employee’s payroll amounts and
how much you owe for payroll liabilities.
List reports allow you to report on any information stored in any of the QBs lists.
Other reports include the following: cash flow forecast, income tax summary, income tax detail, check detail, missing checks, deposit detail, general ledger, trial balance, journal, transaction journal, transaction history, and audit trail.
105

Inventory-Related Reports
QBs provides pre-set reports to help you work with
your inventory
The Inventory Stock
Status by Item report
indicates items that need to
be reordered with a
checkmark
106
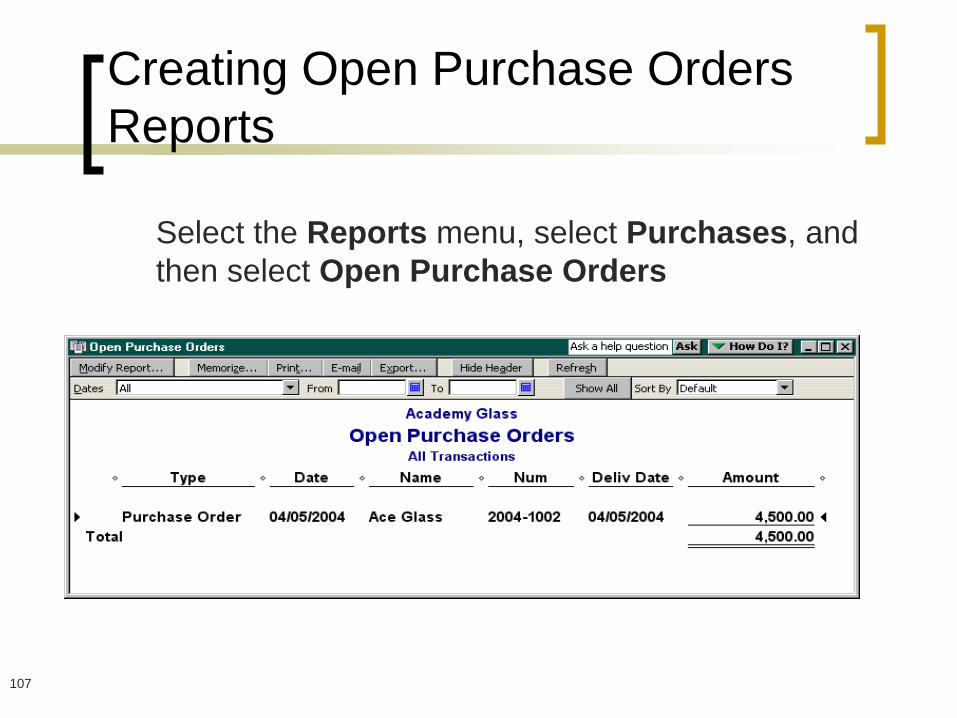
Creating Open Purchase Orders
Reports
Select the Reports menu, select Purchases, and
then select Open Purchase Orders
281
107

QuickReports
A QuickReport can quickly give you information about a
customer, vendor, or Item
You can generate QuickReports from account registers,
forms, or lists
251
108

Memorizing Reports
Memorizing Reports doesn’t memorize the data
on the report only:
Format
Dates
Filtering
After you’ve Modified a report it can be Saved In QBs the term is Memorizing
With your report displayed, click Memorize at the
top of the Report Menu 241
109

Printing Reports
Every report in QBs is
Printable
Emailable
Created as a PDF
To print the report, click Print at the top of the
window
When you print reports you can specify:
Orientation (landscape or portrait)
Page-count characteristics for the reports
All reports can be Fit report to 1 pages wide option 244
110

Finding Transactions
Finding Transactions in Registers
If you know that the transaction you’re looking for is in the
Checking account register, display the register and scroll up or
down until you find it
Using the Find Command you can search by several criteria
in order to find the transactions you want
There are 2 tabs on the Find window: Simple and Advanced
Simple
Use this tab if you want to search for the transaction type,
Customer: Job name, approximate date of the transaction,
number of the transaction or Amount
Advanced
If you need to search based on any other criteria (e.g., account
name, Item name, or memo), use the Advanced tab
248
111

112
Finding Help in QBs
QBs Help offers two ways by which you can find
answers to your questions:
Index tab
Search tab
112