QuickBooks Basics - East Brunswick Public Library | … Classes at The Library East Brunswick Public...
14
Computer Classes at The Library East Brunswick Public Library Introduction to QuickBooks Level I Spring 2011 Page1 QuickBooks Basics Part I - Introduction An overview of the major QuickBooks components and interface follows. Parts Forms The QuickBooks database is based on customized forms for data entry. They are generally easy to fill out. The beauty of QuickBooks is that once you fill out a form it does all of the accounting tasks for you in the background. Lists These are another QuickBooks basic. You access forms by selecting a form from a list of forms organized by type - customer, vendor, employee, inventory… However, first you have to enter the data. Registers Your QuickBooks checkbook register is where you record all of your transactions, deposits, checks, withdrawals. Each account has its own register. Navigation - Moving around in QuickBooks: Menu Bar Icon Bar Home page with Centers and work flow diagram
Transcript of QuickBooks Basics - East Brunswick Public Library | … Classes at The Library East Brunswick Public...

Computer Classes at The Library East Brunswick Public Library
Introduction to QuickBooks Level I Spring 2011
Pag
e1
QuickBooks Basics
Part I - Introduction An overview of the major QuickBooks components and interface follows.
Parts
Forms
The QuickBooks database is based on customized forms for data entry. They are generally easy to fill
out. The beauty of QuickBooks is that once you fill out a form it does all of the accounting tasks for you
in the background.
Lists
These are another QuickBooks basic. You access forms by selecting a form from a list of forms organized
by type - customer, vendor, employee, inventory… However, first you have to enter the data.
Registers
Your QuickBooks checkbook register is where you record all of your transactions, deposits, checks,
withdrawals. Each account has its own register.
Navigation - Moving around in QuickBooks:
Menu Bar
Icon Bar
Home page with Centers and
work flow diagram

Computer Classes at The Library East Brunswick Public Library
Introduction to QuickBooks Level I Spring 2011
Pag
e2
Menu Bar
The Menu Bar contains all of QuickBooks commands. Click on any item on the menu bar to see available
commands by subject area.
Icon Bar The Icon Bar is another QuickBooks navigation tool. This gives you quick and easy access to the various
QuickBooks centers such as the Customer Center, Vendor Center, Employee Center and more. It also
contains shortcuts to several of the most commonly used features in QuickBooks, such as Create
Invoices, Enter Bills….
Centers
Centers supply quick access to all of the common tasks by type, whether vendor, employee, customer
related… This is also where you go to update information about any of them, to add new customers,
vendors, employees and transactions. Each Center will open in a new window with 2 tabs: (1) the list of
employees, vendors, customers… and (2) transactions types for each center. Also available in the top
right corner of each center are links to Quick Reports and Open Balances for each.
Customer:
Access to all of your customers and jobs, with contact and billing info, as well as each customer’s jobs.
QuickBooks contains historical information about each customer as well, not just current transactions.
Vendor:
Here you can find all of the information that you input about your vendors – contact and billing
information, and any transactions that you may have with them.
Employee:
All of the basic information about each of your employees is stored here, from contact information to
Social Security numbers, to payroll deductions…
Home page
The home page in QuickBooks gives you a visual picture of your essential business tasks in a work flow
order. It is organized into 5 groups: Vendors, Customers, Employees, Company and Banking. The
arrows on the screen indicate the logical flow of input. This is where you return when you hit the Home
button on the Icon Bar. The Right column also contains a quick link to your company’s account
balances (which can be hidden or displayed depending upon the logon permissions), reminders and
alerts and links to more information.
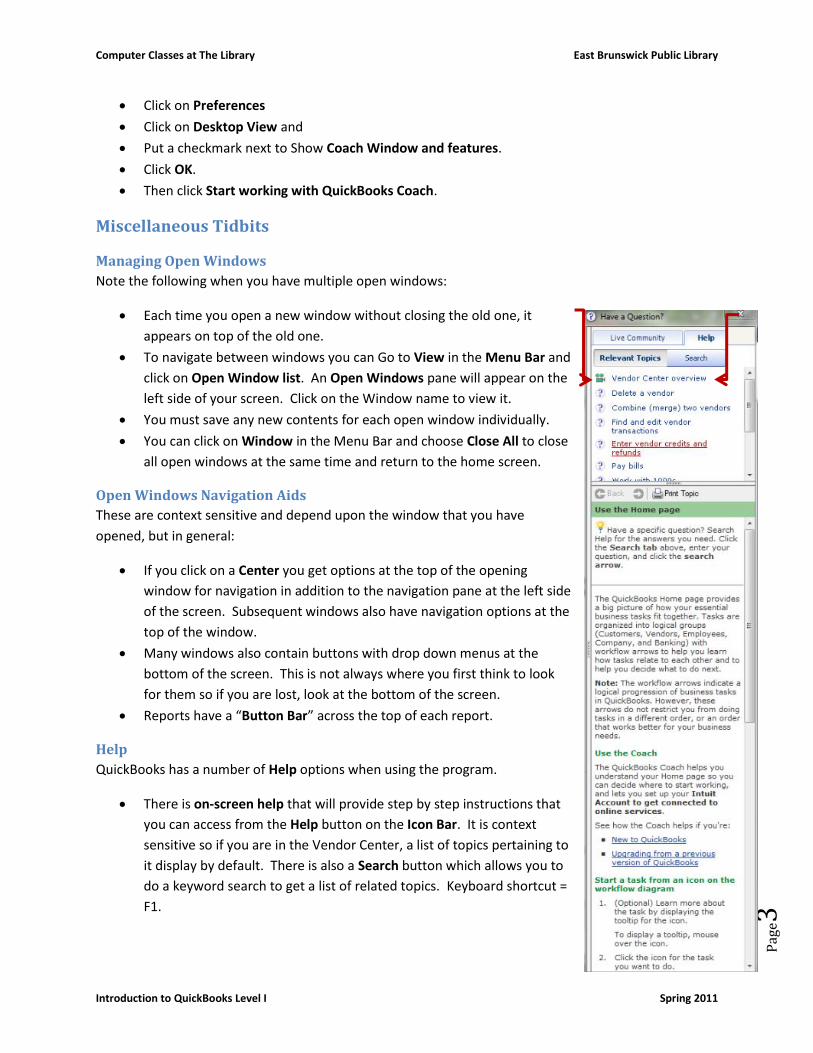
QB Coach
QuickBooks also has a coaching feature called the QuickBooks Coach to guide users thru business
workflows using the home page. When you turn it on you will see a Coach icon (a little i in a circle next
to each workflow item.) When you hover over the icon instructions and the proper workflow for
entering transactions appear on the screen. To turn this feature on:
Go to Edit in the Menu Bar
Computer Classes at The Library East Brunswick Public Library
Introduction to QuickBooks Level I Spring 2011
Pag
e3
Click on Preferences
Click on Desktop View and
Put a checkmark next to Show Coach Window and features.
Click OK.
Then click Start working with QuickBooks Coach.
Miscellaneous Tidbits
Managing Open Windows
Note the following when you have multiple open windows:
Each time you open a new window without closing the old one, it
appears on top of the old one.
To navigate between windows you can Go to View in the Menu Bar and
click on Open Window list. An Open Windows pane will appear on the
left side of your screen. Click on the Window name to view it.
You must save any new contents for each open window individually.
You can click on Window in the Menu Bar and choose Close All to close
all open windows at the same time and return to the home screen.
Open Windows Navigation Aids
These are context sensitive and depend upon the window that you have
opened, but in general:
If you click on a Center you get options at the top of the opening
window for navigation in addition to the navigation pane at the left side
of the screen. Subsequent windows also have navigation options at the
top of the window.
Many windows also contain buttons with drop down menus at the
bottom of the screen. This is not always where you first think to look
for them so if you are lost, look at the bottom of the screen.
Reports have a “Button Bar” across the top of each report.
Help
QuickBooks has a number of Help options when using the program.
There is on-screen help that will provide step by step instructions that
you can access from the Help button on the Icon Bar. It is context
sensitive so if you are in the Vendor Center, a list of topics pertaining to
it display by default. There is also a Search button which allows you to
do a keyword search to get a list of related topics. Keyboard shortcut =
F1.

Computer Classes at The Library East Brunswick Public Library
Introduction to QuickBooks Level I Spring 2011
Pag
e4
Tutorials are also available from the QuickBooks Learning Center by topic. In QuickBooks Coach
in the right column
click View Tutorials.
Choose the area
with which you
need additional
help. A list of topics
and the running
time for each video
will appear in the
window. Click on
the item of your
choice to view.
Live Community is a
third type of
QuickBooks help.
Click on the Live
Community tab in
the Help Bar and type in your question in the box to solicit answers from the other QuickBooks
users or share in the responses from the online Intuit Community on previously answered
questions.
Accounting Basics for Non Accountants
Basic Business Terms
Chart of Accounts – This is your business’s flow of money through various accounts. It shows you where
the income come from, where you put it, what your expenses are for and what you use to pay them.
Two types of accounts:
1. Balance Sheet – Checking and Savings accounts –
2. Income and Expenses – where your transactions are recorded and grouped by type to report on
them.
Assets – This is what you have and what your customers owe you. Money owed to you is accounted for
in Accounts Receivable. What you have can be in various accounts – checking, savings, petty cash,
monies received that are yet to be deposited and fixed assets like equipment such as computers or
company vehicles and your inventory.
Liabilities – This is what you owe – all of your outgoing monies. Money you owe is accounted for in
Accounts Payable. This can include loans, outstanding bills, sales or payroll taxes you owe to the state
and the federal government.

Computer Classes at The Library East Brunswick Public Library
Introduction to QuickBooks Level I Spring 2011
Pag
e5
Make a backup copy of your database!
Equity – Assets minus Liabilities - your company’s net worth. This comes from 3 sources. Investors, net
profit and retained earnings from earlier period not yet distributed.
Bookkeeping methods –
Cash - with this method you enter any income and expenses at the time that the money actually
changes hands.
Accrual – With this you record income and expenses at the actual time the transaction takes
place. Not when you receive the money or pay for an expense.
Many accountants feel that accrual gives you a better picture of your company’s financials.
Related reports:
Balance sheet gives you a measure of your company’s profitability.
Profit and Loss Statement shows income expenses and net profit and loss.
EXITING QUICKBOOKS Choose Exit from the File Menu or Click on the X in the top right hand corner.
To make a backup copy, go to the File Menu and choose Save Copy or Backup. Choose a storage
location on your network that is not in the same location as the original file on the computer you are
using.
Moving between company files
o Go to File in Menu Bar
o Click on Open
Previous
Company
o Choose from the
list of companies
in the submenu.
o You can customize
the number of
companies that
you want to
display in this list.

Computer Classes at The Library East Brunswick Public Library
Introduction to QuickBooks Level I Spring 2011
Pag
e6
Part II – Creating your company in QB You need to make a number of decisions to make ahead of time:
Select a start date for your company. Once you select a start date you will need to enter ALL of
your company’s transactions since that date. So you should choose a start date that is not too
far back in the past. You could choose the last day of a financial period, such as the end of the
fiscal year, last quarter or last month. If having a lot of historical data is important to you (such
as for your end of the year accounting for tax purposes), then you need to choose a start date as
close to the beginning of your fiscal year as possible. Click on Help in the Menu Bar, click on the
Search Button and then type in Start Date. Click on QuickBooks start date definition.
QuickBooks will give you a lengthy explanation of what to consider in setting up your start date.
QuickBooks can be used to set up a number of companies. It is usually best to set up each
company individually. One company for each business enterprise you report on your tax forms.
The Interview Very easy. It’s guided. I.e. it walks you thru it step by step. You need to gather up the info about your
company and have it ready. (Although you can leave the Interview and return to it later. QB will
remember what you have already entered for that company.)The answers that you give will affect the
display of your Home page and options. Some decisions are changeable after the fact.
Set Up – Tip You will need a large block of time to enter your data into your company files once you have gone thru
the interview. You will want to make your data as complete as possible. This includes entering all of
your customer information, vendor information, employee information, as well as invoices and monies
paid and received, your product lists and more. However, if you have a large amount of data, you might
want to enter your largest customers and vendors, or most recent customers and vendors first. Or hire
someone to do the data entry for you.
Add Your Data – Customers – Vendors – Employees – Accounts – Items Use the Customer centers to do this. You can enter your data as you do your daily business such as
entering a vendor name and other info when you fill out an invoice, or, you can enter your old data up
front. There is a Quick Add and Set up. Quick add simply adds the new name to the list and you can
add the rest later. When you use Set Up you can enter all of the details up front.
The types of info you add for:
Customers
Name and address, contact, phone number(s) ship to, email address, customer type, any special terms,
tax code, payment info, and job info. You don’t have to add all of this information in one sitting if you
are pressed for time. You can add more information later on as you have the time.

Computer Classes at The Library East Brunswick Public Library
Introduction to QuickBooks Level I Spring 2011
Pag
e7
Vendors
Enter the same type of information
for each vendor. You can include a
company contact, your account
number, terms …
Items
You need to add anything that your
company buys, sells or resells. This
also includes shipping charges,
discounts, and sales taxes. Rule of
thumb - include anything that
shows up as a line item in an invoice
or purchase order.
Accounts
You can add new accounts to track different
types of monies – e.g. petty cash may not be
set up, new credit card accounts, new bank
accounts, new expense accounts…
Enter historical transactions. Depending upon your start date,
you will also need to enter all past
transactions so that you have
complete financial record from the
start date forward.
Enter historical info in this order:
All sales (sales receipts,
invoices, or statement
charges)
Customer payments
received for outstanding
invoices after your start
date
Bills received since the
start date
Deposits made to any of the accounts since the start date
Any other checks written (other than to bills) since the start date.
BREAK

Computer Classes at The Library East Brunswick Public Library
Introduction to QuickBooks Level I Spring 2011
Pag
e8
Part III – Lists Use lists to organize the wide variety of information that you are storing in QuickBooks. This includes
customer data, vendor info, products and services that you are either buying or selling and more. Using
the list feature allows you to enter multiple entries at one seating so that you never have to enter it
again.
Editing Accounts in the Chart of Accounts Go to Lists in the Menu Bar OR – go the Company section on the Home page
Select Chart of Accounts
At the bottom left corner of the
window click on the down arrow
in the Account button
Select Edit.
Choose the type of account
Choose the account name
Add a description if desired.
Click Save & Close
Adding Subaccounts
Go to Lists in the Menu Bar OR –
go the Company section on the
Home page
Select Chart of Accounts
At the bottom left corner of the
window click on the down arrow
in the Account button
Select New.
Choose the Account Type – Note the description in the right column as you click on the radio button
next to each type. Click on the More… link for even more information.
Click Continue
Type in the name in the Account Name field.
Click on the Subaccount checkbox and then select the account from the drop down menu
Type in a description if desired.
Click Save and Close.
Close the Chart of Accounts.
Lists of Customers and Jobs How to add new customers:
Click on the Customer Center on the
Icon Bar

Computer Classes at The Library East Brunswick Public Library
Introduction to QuickBooks Level I Spring 2011
Pag
e9
Click on the New Customer and Job Menu button
Select New Customer (the new customer window displays – see program title bar)
Type in the Company/Customer Name in the Customer name field (for residential customers enter
last name, first name for correct alphabetical sorting within QuickBooks).
Press TAB to navigate to the next field
Click in the bill to field
Click Enter to put your cursor in the next line after the company name which was automatically
supplied
Type in the company address
Note that you press TAB to navigate from field to field, but enter to move down a line within a field on a
form.
Click the copy button to have QuickBooks fill in the Ship to information
Click OK.
Enter additional information as you have it.
Click the Additional Info tab. This is where you can add other information about the customer for
reporting purposes, or provide terms for payment and more.
The Payment Info tab is where you add customer account numbers and credit limits
When you have finished entering the customer data in the form, click OK.
Close the Customer Center.
Lists of Employees – the Employee
Center
Add a New Employee
Click on the Employee Center in the Icon
Bar
Click New Employee – the new employee
window displays
There are 3 tabs – Personal, Address &
Contact, and Additional Info
Use Personal to enter the employee title,
first name, last name, middle initial, how
the name should be printed on checks, the
SSN, gender and date of birth
Click on Address and Contact to fill out the home address and contact information
Click on Additional to add Employee ID Number (if used) and other possible personal info.
Now that the basic information about the employee has been filled out, click on the Change tabs down
arrow and select Employment Info from the drop down menu. Here you will fill out Hire date and
release date and employment details.
Computer Classes at The Library East Brunswick Public Library
Introduction to QuickBooks Level I Spring 2011
Pag
e10
(We will fill out Payroll and Compensation information in lesson 12.)
Click OK.
Close the Employee Center
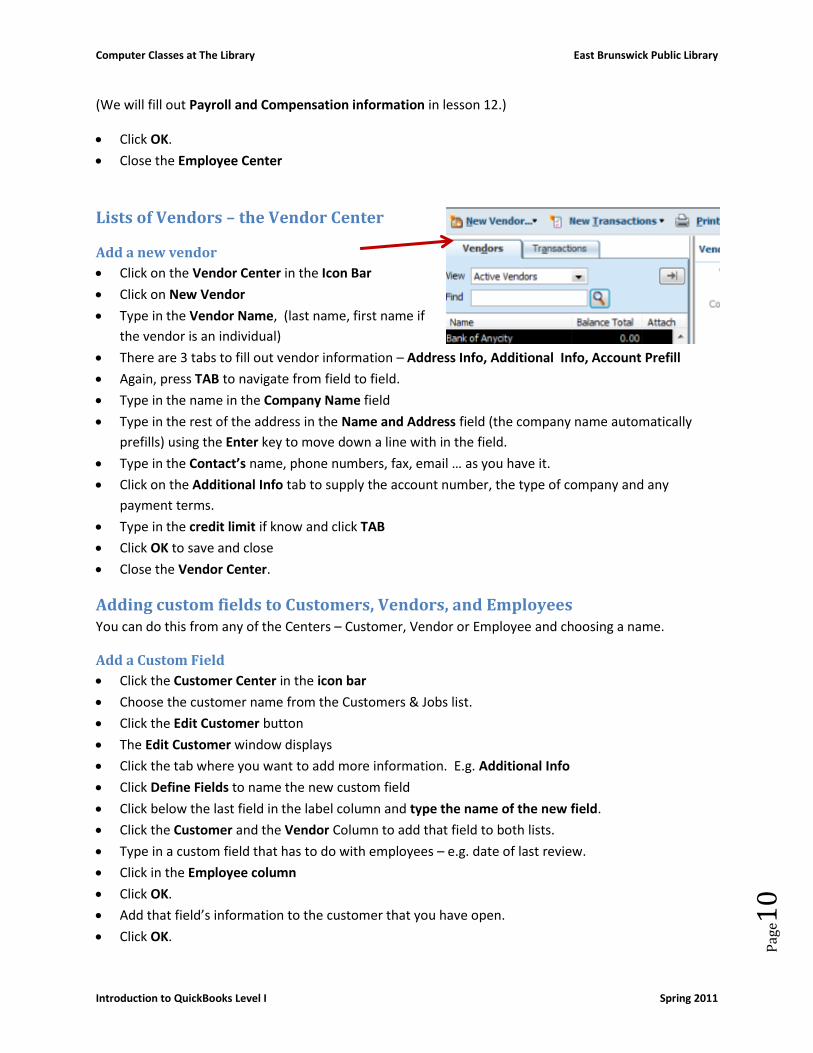
Lists of Vendors – the Vendor Center
Add a new vendor
Click on the Vendor Center in the Icon Bar
Click on New Vendor
Type in the Vendor Name, (last name, first name if
the vendor is an individual)
There are 3 tabs to fill out vendor information – Address Info, Additional Info, Account Prefill
Again, press TAB to navigate from field to field.
Type in the name in the Company Name field
Type in the rest of the address in the Name and Address field (the company name automatically
prefills) using the Enter key to move down a line with in the field.
Type in the Contact’s name, phone numbers, fax, email … as you have it.
Click on the Additional Info tab to supply the account number, the type of company and any
payment terms.
Type in the credit limit if know and click TAB
Click OK to save and close
Close the Vendor Center.
Adding custom fields to Customers, Vendors, and Employees You can do this from any of the Centers – Customer, Vendor or Employee and choosing a name.
Add a Custom Field
Click the Customer Center in the icon bar
Choose the customer name from the Customers & Jobs list.
Click the Edit Customer button
The Edit Customer window displays
Click the tab where you want to add more information. E.g. Additional Info
Click Define Fields to name the new custom field
Click below the last field in the label column and type the name of the new field.
Click the Customer and the Vendor Column to add that field to both lists.
Type in a custom field that has to do with employees – e.g. date of last review.
Click in the Employee column
Click OK.
Add that field’s information to the customer that you have open.
Click OK.

Computer Classes at The Library East Brunswick Public Library
Introduction to QuickBooks Level I Spring 2011
Pag
e11
Close the Customer Center.
Adding Customer Fields for
Items Perhaps you want to further refine how
you track your items by adding a Style field
for an item.
Click on Lists in the Menu Bar
Choose Item List
Choose the type of item you are
refining the description and tracking of
The Edit Item window opens
Click the Custom Fields button on the
right.
Any custom fields already defined for
this item appear.
Click Define Fields.
Click in the first empty field under label and type in the field name
Click the Use column next to the field name to allow this new field to be used.
Click OK.
Now in the Custom Fields for the items the newly defined style appears.
Fill it in and click OK.
Close the item list.
List Management
Sorting
There are two ways to sort an open list –
clicking and dragging the list item using the
diamond to the left of the name to the
location on the list where you want it
(manually), or alphabetically, by clicking on either the up or down arrow displaying next to the Name
(Balance, Attach,…) column headers… (To see all of the fields available for sorting in, for example, the
Customer and Jobs list, click on the Collapse arrow to the right of the Active Customers drop down
window. Re-clicking the arrow will return the list to its original
display.
To return the list to its original order click on the Account button
in the bottom left corner of the window and select Re-sort List.
Click OK.

Computer Classes at The Library East Brunswick Public Library
Introduction to QuickBooks Level I Spring 2011
Pag
e12
Merging List Items
It is possible to combine list items into one. You might need to do this if you find that you have entered
two customers because of different spellings when you really need only one. Note that once items have
been merged, it is permanent. You cannot unmerge them. QuickBooks recommends that you back up
your file before you merge any lists items.
To merge Vendors:
Click on the Vendor Center
Double click in one of the vendors to be merged.
The Edit Vendor window appears.
In the Vendor name field, type in the name of the vendor that you want to merge with.
Click OK.
QuickBooks asks if you want to merge the names.
Click Yes.
There is a Note field. I would put in a note with a date stamp about the merge.
Click OK
Close the Vendor Center.
Renaming List Items
FYI, when you do this, QuickBooks automatically updates all
transactions containing the item.
Click on Lists in the Menu Bar
Choose a list (for Example) Chart of Accounts
Click on an account (e.g. Checking)
Click on the Account button at the bottom left on the
page.
Select Edit Account
In the Account Name box type in the new name.
Click Save and Close.
Note the new name in the list.
Close the list.
Deleting List Items and Making Them Inactive
This can only be done if you haven’t used them in any transactions. If you want to delete something
that has already been used you can make it inactive instead.
Click the List type on the home page – E.g. Click the Customer button on the left side of the home
page.
The Customer Center opens.

Computer Classes at The Library East Brunswick Public Library
Introduction to QuickBooks Level I Spring 2011
Pag
e13
Choose a name on the list.
Right click on the name and choose Make Customer: Job
inactive.
The customer name has an X next to it on the list.
You can see inactive items in your lists. Note that the View fields
shows Active Customers by default. To see all customers, including
those who are inactive click on the drop down arrow in the View field and choose All Customers.
Close the Customer Center.
Printing Lists
You can print lists of customers,
vendors … from QuickBooks. To see
how this is done.
Open the Customer Center.
Note the Printer icon in the
menu at the top of the window.
From the drop down menu there, choose the list type that you want printed.
QuickBooks suggests that you print a list report instead so that you can alter the formatting.
The Print Reports window opens. You can print to a printer or save to a file; you can select
orientation, and other options that normally appear on the print dialog box.
Click Print.
To print information on only one customer, select the printer whose account information you want
to print. Click the Print Button
Make your selections from the printer dialog box.
Click Print.
To print details for
selected customers
(plural) do the following:
Click on the Reports in
the Menu Bar
Click on List
Click on the type of list
you want in the
submenu. The Report
opens.
Click on the Modify
Report button in the
button bar at the top of
the window.

Computer Classes at The Library East Brunswick Public Library
Introduction to QuickBooks Level I Spring 2011
Pag
e14
Click on the Filters Tab.
Select Customers in the filter list on the left.
In the drop down menu choose Multiple Customers/jobs
Using the scroll bar, go thru the list of customer names, clicking on the ones to put a checkmark on
the ones that you want included.
Click OK.
Click OK again
Now, click the Print button in the button bar.
Select the printer settings from the printer dialog box.
Click Print
Close the report answering NO if you don’t want to memorize the report.
Close the Customer Center.
Editing Multiple Items at once
Making changes to multiple items
at one time is possible for certain
items in the Customers, Vendors,
Service Items and Non- inventory
Parts in QuickBooks.
E.g. You can change the zip code
for multiple items.
Go to Lists in the Menu Bar.
Click on Add/Edit Multiple List
entries.
In the Add/Edit Multiple List Entries window choose the List from the drop down box. (In this
example – customers.
In the View drop down – select All …
Use the Find field to type in the selection criteria from the list of all ….
Use the horizontal scroll bar at the bottom to navigate to the field that you want to change. In this
case Bill to 3.
Click in the field and change the zip code
Right click on that enter and select Copy Down
This will change every Bill to 3 field displaying.
Click Save Changes
If you change the zip codes for the customers living in a town, you also will need to do the same to the
vendor list. Repeat the process above for the vendor list.