Quick Surface Reconstructionyvonet.florent.free.fr/SERVEUR/COURS CATIA/CATIA Shape...Part used:...
46
Student Notes: Quick Surface Reconstruction Copyright DASSAULT SYSTEMES 1 Copyright DASSAULT SYSTEMES Quick Surface Reconstruction CATIA V5 Training Exercises Version 5 Release 19 August 2008 EDU_CAT_EN_QSR_FX_V5R19
Transcript of Quick Surface Reconstructionyvonet.florent.free.fr/SERVEUR/COURS CATIA/CATIA Shape...Part used:...

Student Notes:
Quick Surface Reconstruction����������
Copyright DASSAULT SYSTEMES 1
Cop
yrig
ht D
AS
SA
ULT
SY
ST
EM
ES
Quick Surface Reconstruction
CATIA V5 TrainingExercises
Version 5 Release 19August 2008
EDU_CAT_EN_QSR_FX_V5R19

Student Notes:
Quick Surface Reconstruction����������
Copyright DASSAULT SYSTEMES 2
Cop
yrig
ht D
AS
SA
ULT
SY
ST
EM
ES
Table of Contents
Master Exercise Presentation:Plastic Bottle 3Design Intent - Plastic Bottle 4Design Process - Plastic Bottle 5
Master Exercise Step 1: Creating Scans 6Do It Yourself 7
Master Exercise Step 2: Creating Curves 9Do It Yourself 10
Master Exercise Step 3: Creating Surfaces 13Do It Yourself 14
Master Exercise Step 4: Creating the Rough Model 18Do It Yourself 19
Master Exercise Step 5: Filleting the Model 21Do It Yourself 22
Additional Exercises 23Exercise: Car Body 25Exercise: Toy Plastic Part 33Exercise:Washing Powder Bottle 39
Student Notes:
Quick Surface Reconstruction����������
Copyright DASSAULT SYSTEMES 3
Cop
yrig
ht D
AS
SA
ULT
SY
ST
EM
ES
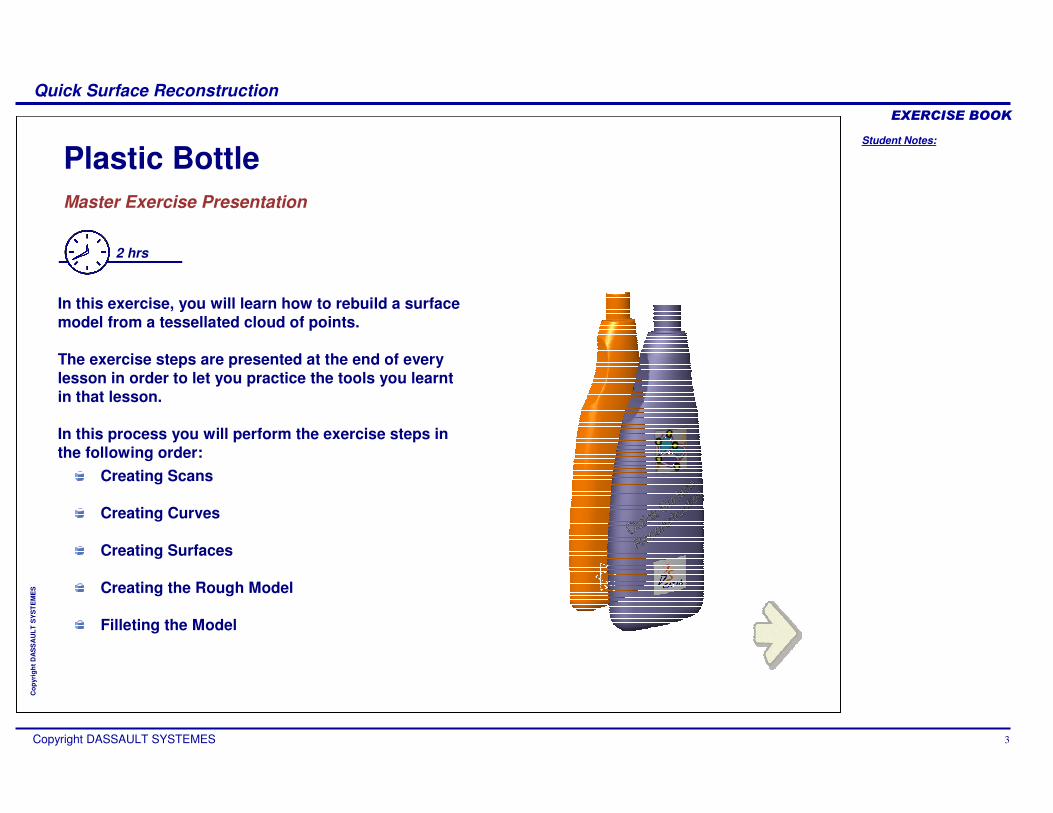
Plastic BottleMaster Exercise Presentation
2 hrs
In this exercise, you will learn how to rebuild a surface model from a tessellated cloud of points.
The exercise steps are presented at the end of every lesson in order to let you practice the tools you learnt in that lesson.
In this process you will perform the exercise steps in the following order:
Creating Scans
Creating Curves
Creating Surfaces
Creating the Rough Model
Filleting the Model
Student Notes:
Quick Surface Reconstruction����������
Copyright DASSAULT SYSTEMES 4
Cop
yrig
ht D
AS
SA
ULT
SY
ST
EM
ES
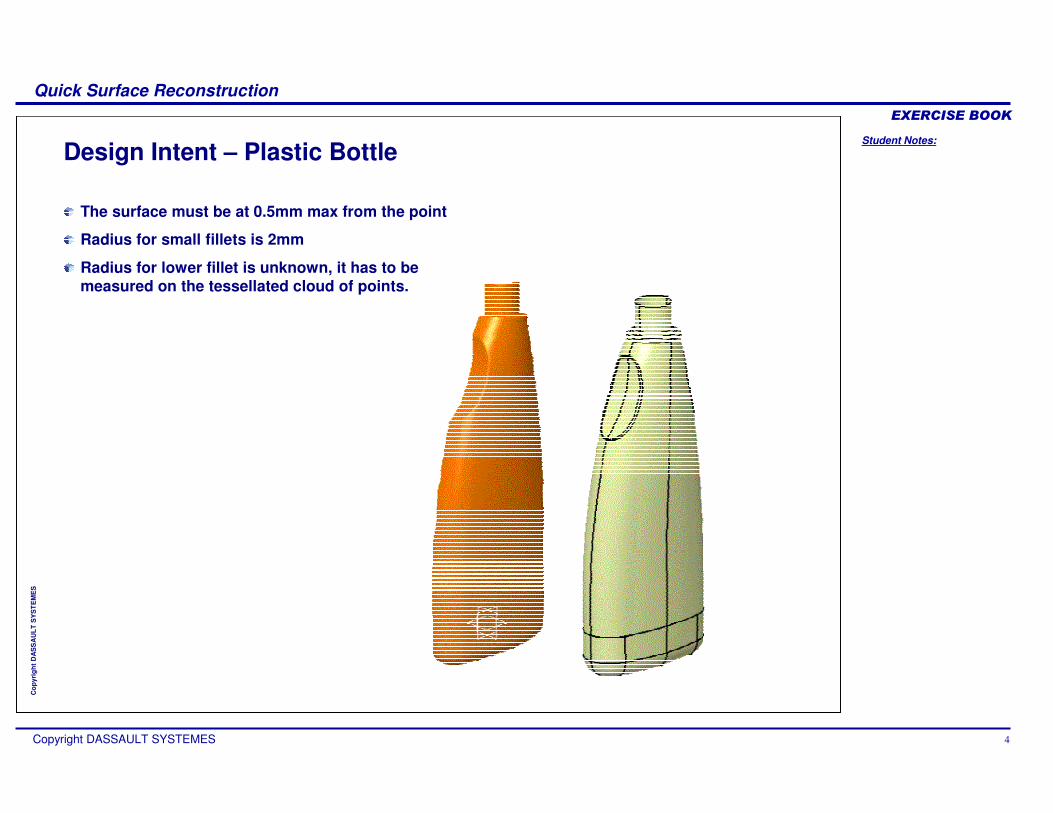
Design Intent – Plastic Bottle
The surface must be at 0.5mm max from the point
Radius for small fillets is 2mm
Radius for lower fillet is unknown, it has to be measured on the tessellated cloud of points.

Student Notes:
Quick Surface Reconstruction����������
Copyright DASSAULT SYSTEMES 5
Cop
yrig
ht D
AS
SA
ULT
SY
ST
EM
ES
Creating Curves
Creating the Rough Models
Creating Surfaces
Creating Scans
Design Process – Plastic Bottle
Filleting the Model
1
2
3
4
5
Student Notes:
Quick Surface Reconstruction����������
Copyright DASSAULT SYSTEMES 6
Cop
yrig
ht D
AS
SA
ULT
SY
ST
EM
ES
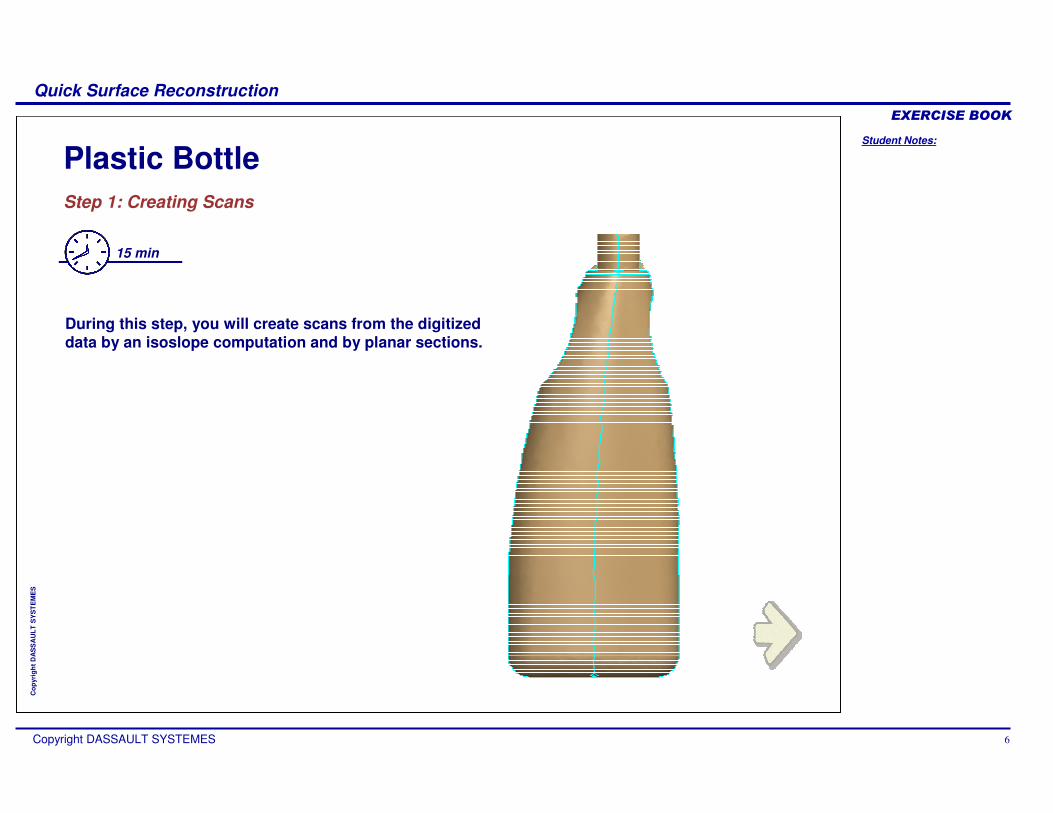
Plastic BottleStep 1: Creating Scans
15 min
During this step, you will create scans from the digitized data by an isoslope computation and by planar sections.
Student Notes:
Quick Surface Reconstruction����������
Copyright DASSAULT SYSTEMES 7
Cop
yrig
ht D
AS
SA
ULT
SY
ST
EM
ES
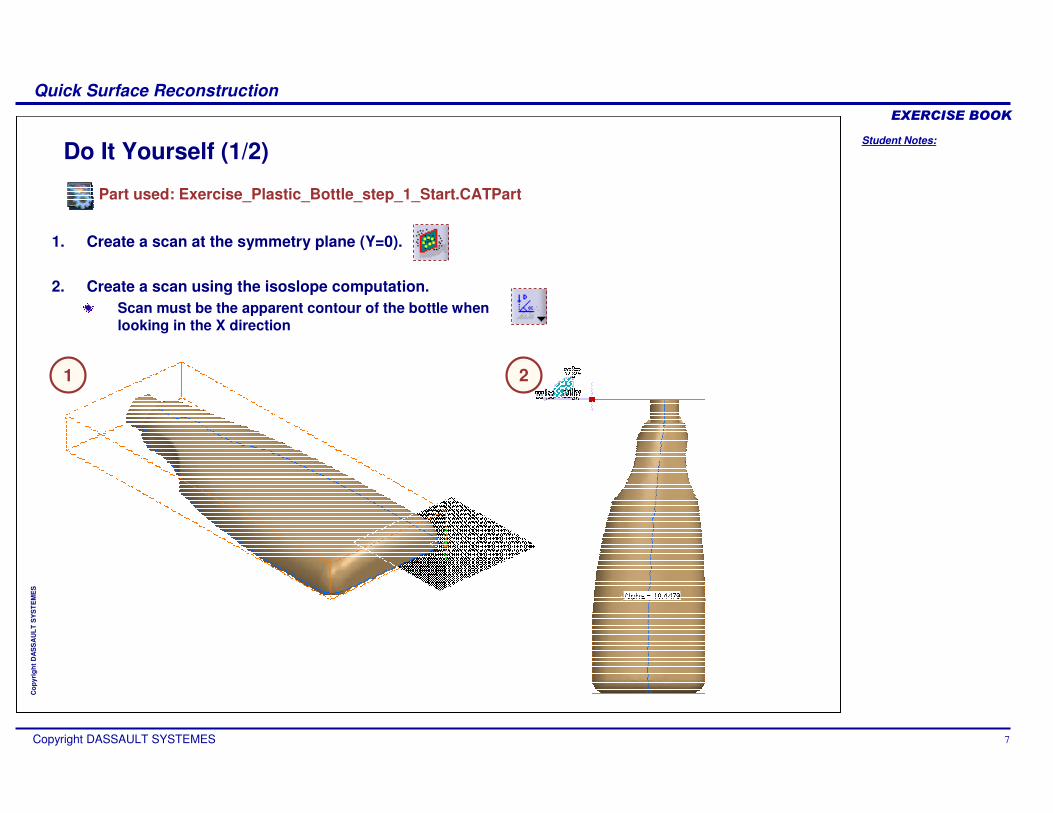
Do It Yourself (1/2)
Part used: Exercise_Plastic_Bottle_step_1_Start.CATPart
1. Create a scan at the symmetry plane (Y=0).
2. Create a scan using the isoslope computation.Scan must be the apparent contour of the bottle when looking in the X direction
21
Student Notes:
Quick Surface Reconstruction����������
Copyright DASSAULT SYSTEMES 8
Cop
yrig
ht D
AS
SA
ULT
SY
ST
EM
ES
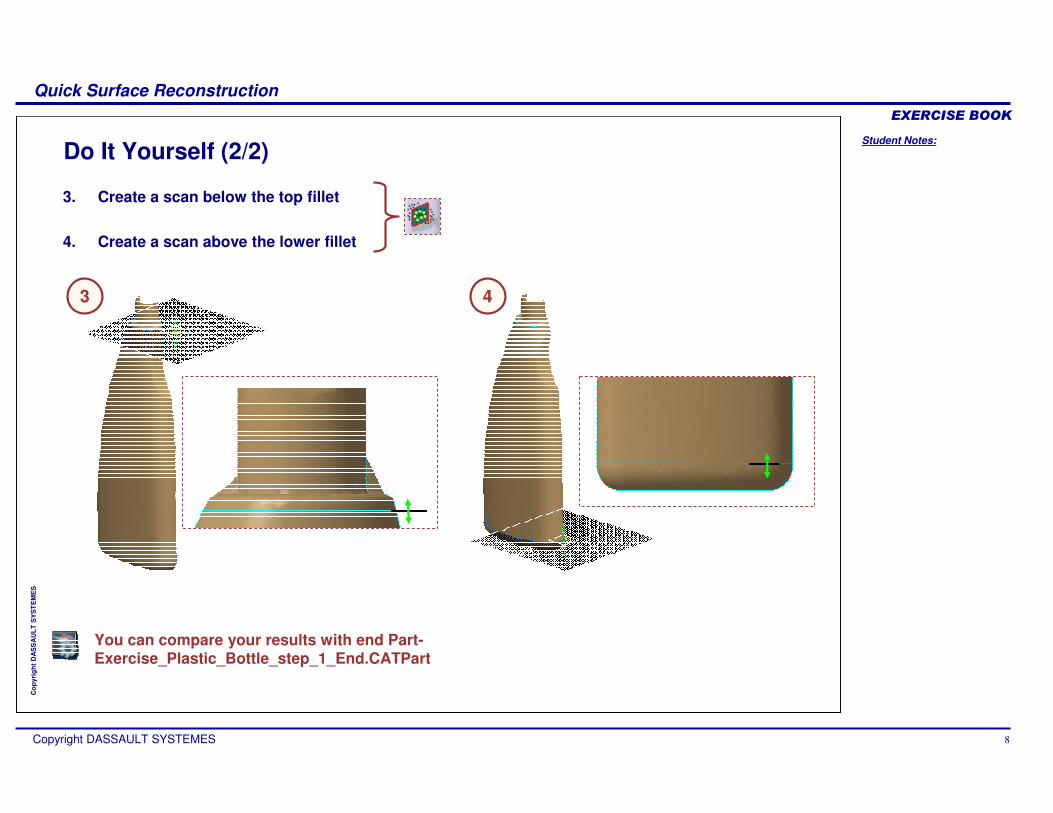
Do It Yourself (2/2)
3. Create a scan below the top fillet
4. Create a scan above the lower fillet
You can compare your results with end Part-Exercise_Plastic_Bottle_step_1_End.CATPart
3 4

Student Notes:
Quick Surface Reconstruction����������
Copyright DASSAULT SYSTEMES 9
Cop
yrig
ht D
AS
SA
ULT
SY
ST
EM
ES
Plastic BottleStep 2: Creating Curves
30 min
In this step, you will create curves on the digitized data by smoothing the scans created in step 1 and modifying the resulting curves with Wireframe and Surfaces.
Student Notes:
Quick Surface Reconstruction����������
Copyright DASSAULT SYSTEMES 10
Cop
yrig
ht D
AS
SA
ULT
SY
ST
EM
ES
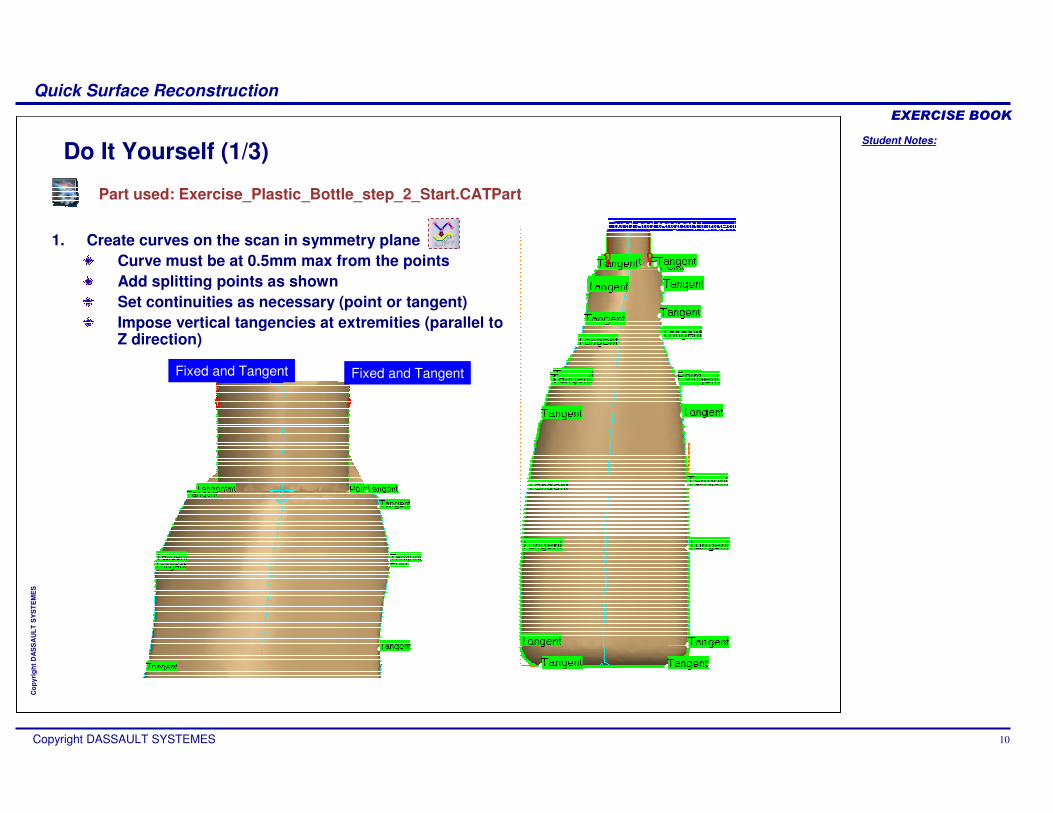
Do It Yourself (1/3)
Part used: Exercise_Plastic_Bottle_step_2_Start.CATPart
1. Create curves on the scan in symmetry planeCurve must be at 0.5mm max from the pointsAdd splitting points as shownSet continuities as necessary (point or tangent)Impose vertical tangencies at extremities (parallel to Z direction)
Fixed and TangentFixed and Tangent

Student Notes:
Quick Surface Reconstruction����������
Copyright DASSAULT SYSTEMES 11
Cop
yrig
ht D
AS
SA
ULT
SY
ST
EM
ES
Do It Yourself (2/3)
2. Create a curve on the isoslope scanCurve must be at 1mm max from the pointsFirst remove all points and then select two endpoints to create the curve on the body of the bottleCheck the curvature evolution
3. Create curves or sketches on the two last scansCurves must be at 0.5mm max from the points
3
2
Student Notes:
Quick Surface Reconstruction����������
Copyright DASSAULT SYSTEMES 12
Cop
yrig
ht D
AS
SA
ULT
SY
ST
EM
ES
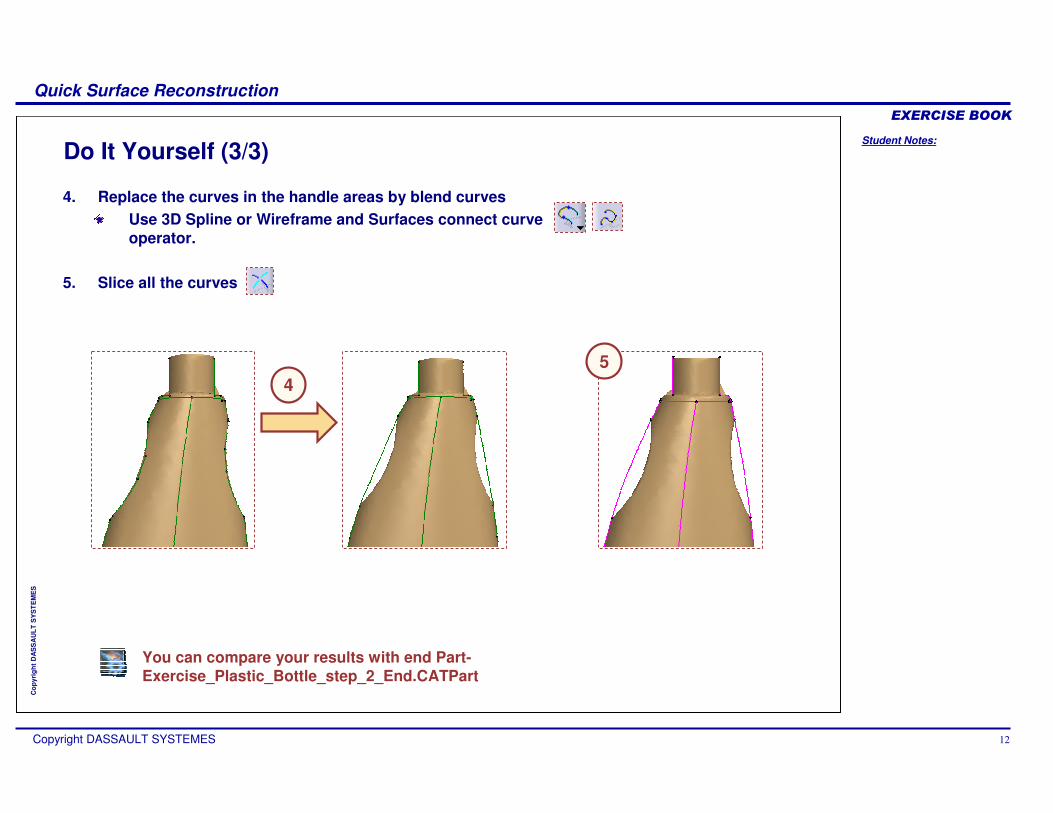
Do It Yourself (3/3)
4. Replace the curves in the handle areas by blend curvesUse 3D Spline or Wireframe and Surfaces connect curve operator.
5. Slice all the curves
You can compare your results with end Part-Exercise_Plastic_Bottle_step_2_End.CATPart
45
Student Notes:
Quick Surface Reconstruction����������
Copyright DASSAULT SYSTEMES 13
Cop
yrig
ht D
AS
SA
ULT
SY
ST
EM
ES
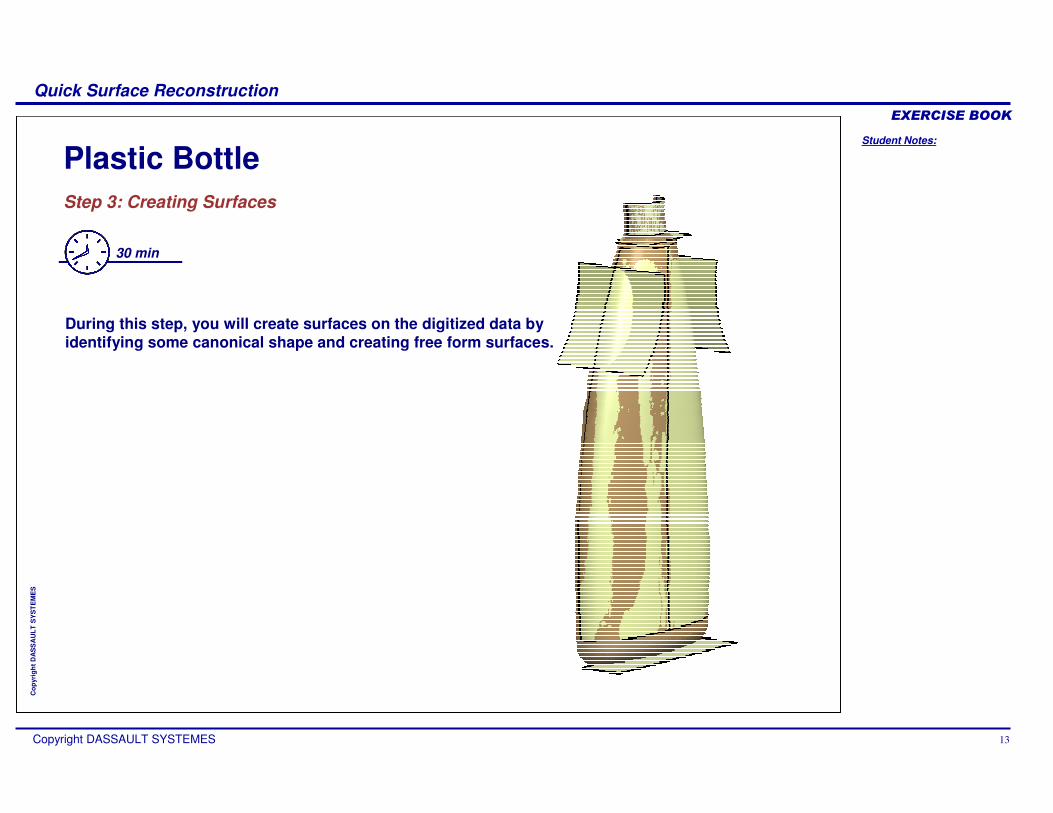
Plastic BottleStep 3: Creating Surfaces
30 min
During this step, you will create surfaces on the digitized data by identifying some canonical shape and creating free form surfaces.
Student Notes:
Quick Surface Reconstruction����������
Copyright DASSAULT SYSTEMES 14
Cop
yrig
ht D
AS
SA
ULT
SY
ST
EM
ES
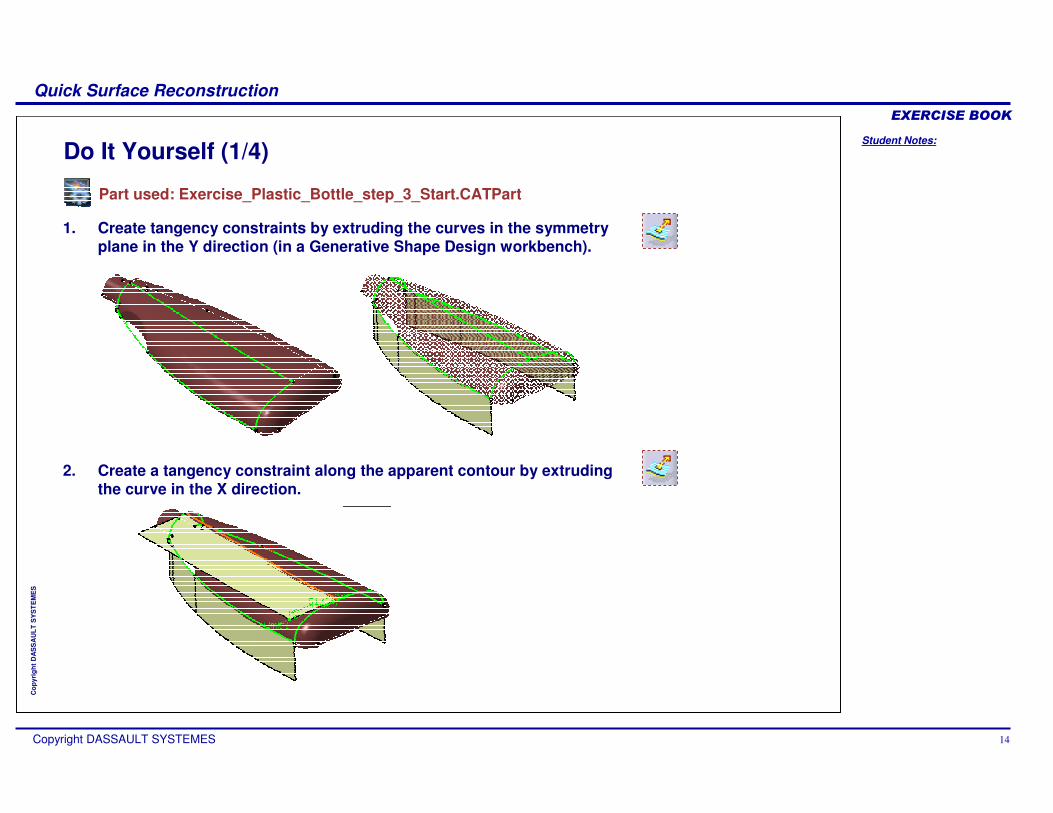
Do It Yourself (1/4)
1. Create tangency constraints by extruding the curves in the symmetry plane in the Y direction (in a Generative Shape Design workbench).
2. Create a tangency constraint along the apparent contour by extruding the curve in the X direction.
Part used: Exercise_Plastic_Bottle_step_3_Start.CATPart
Student Notes:
Quick Surface Reconstruction����������
Copyright DASSAULT SYSTEMES 15
Cop
yrig
ht D
AS
SA
ULT
SY
ST
EM
ES
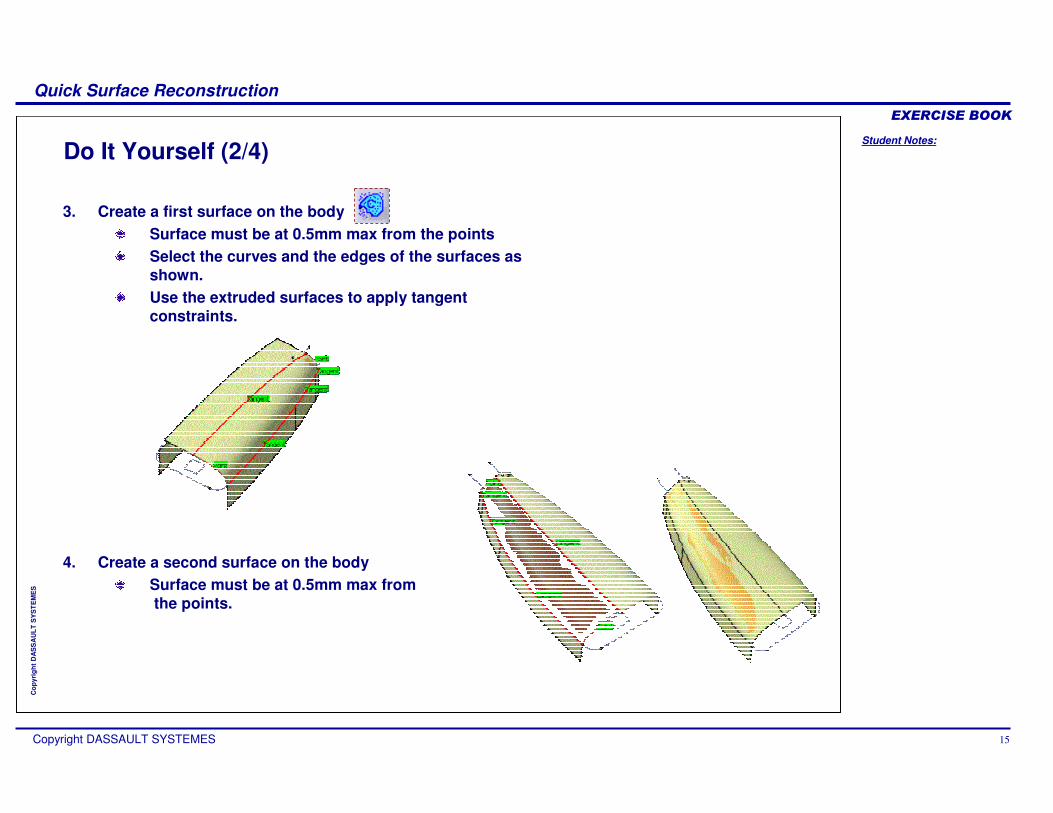
Do It Yourself (2/4)
3. Create a first surface on the bodySurface must be at 0.5mm max from the pointsSelect the curves and the edges of the surfaces as shown.Use the extruded surfaces to apply tangent constraints.
4. Create a second surface on the bodySurface must be at 0.5mm max fromthe points.
Student Notes:
Quick Surface Reconstruction����������
Copyright DASSAULT SYSTEMES 16
Cop
yrig
ht D
AS
SA
ULT
SY
ST
EM
ES
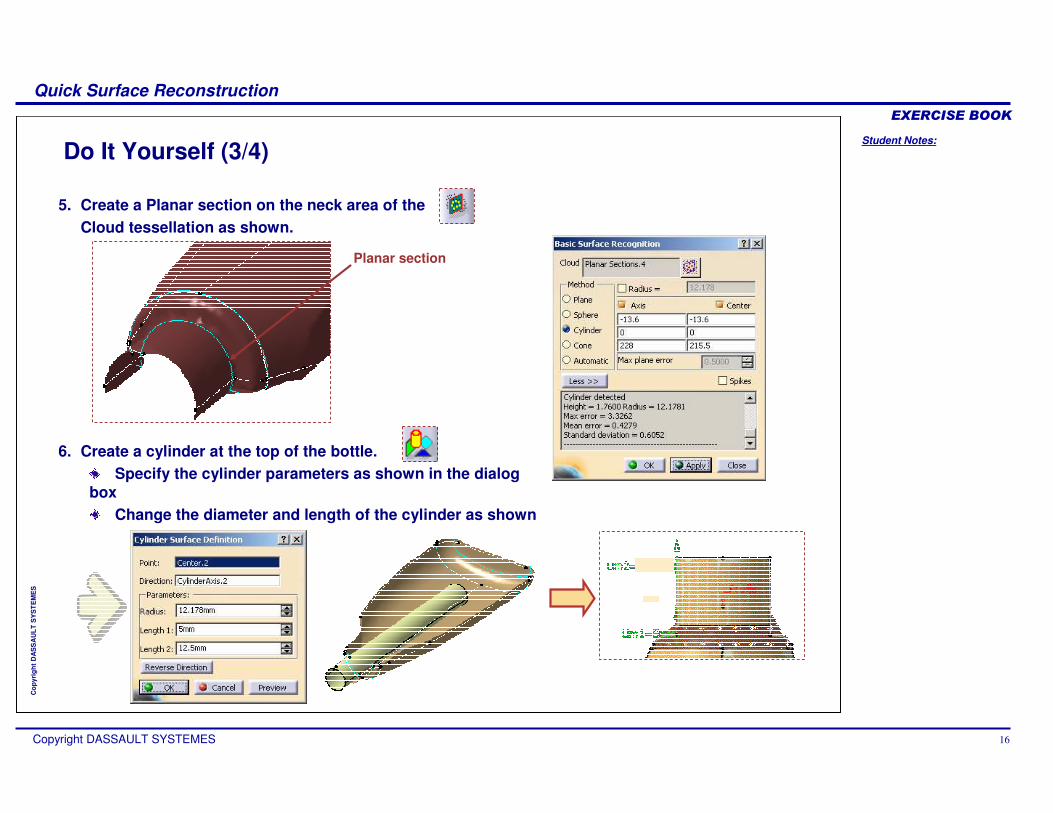
5. Create a Planar section on the neck area of the Cloud tessellation as shown.
6. Create a cylinder at the top of the bottle.Specify the cylinder parameters as shown in the dialog
boxChange the diameter and length of the cylinder as shown
Do It Yourself (3/4)
Planar section
Student Notes:
Quick Surface Reconstruction����������
Copyright DASSAULT SYSTEMES 17
Cop
yrig
ht D
AS
SA
ULT
SY
ST
EM
ES
Do It Yourself (4/4)
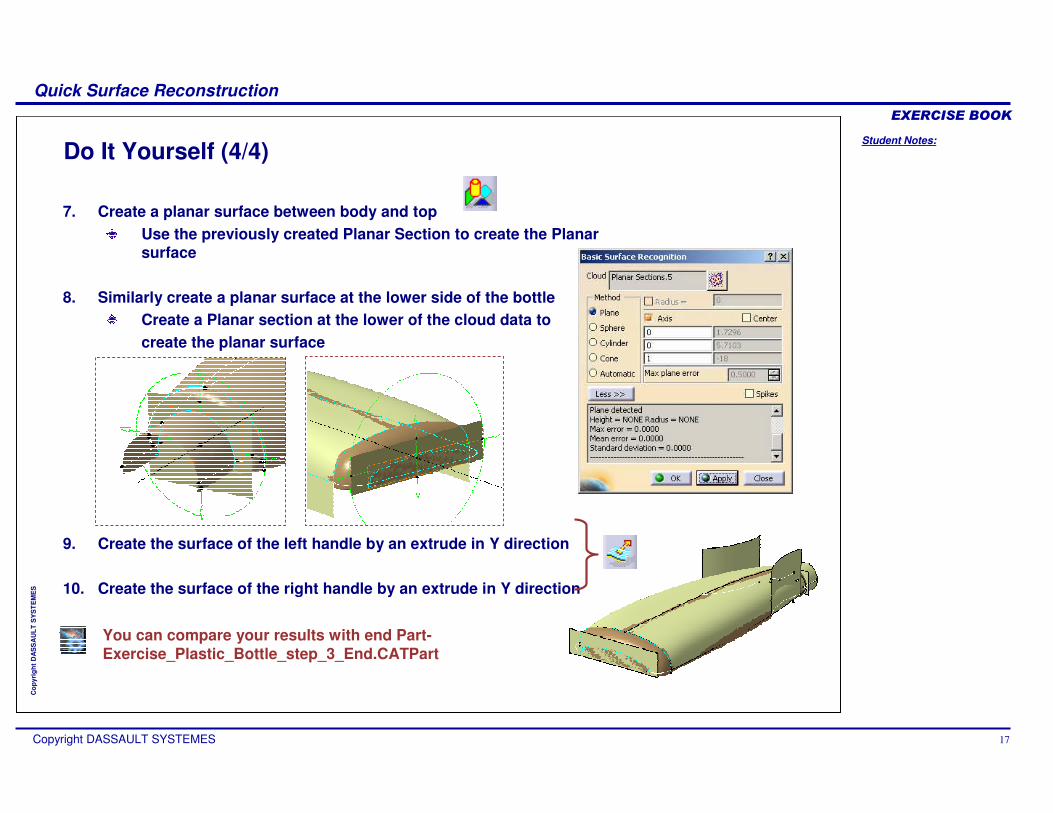
7. Create a planar surface between body and topUse the previously created Planar Section to create the Planar surface
8. Similarly create a planar surface at the lower side of the bottleCreate a Planar section at the lower of the cloud data tocreate the planar surface
9. Create the surface of the left handle by an extrude in Y direction
10. Create the surface of the right handle by an extrude in Y direction
You can compare your results with end Part-Exercise_Plastic_Bottle_step_3_End.CATPart
Student Notes:
Quick Surface Reconstruction����������
Copyright DASSAULT SYSTEMES 18
Cop
yrig
ht D
AS
SA
ULT
SY
ST
EM
ES
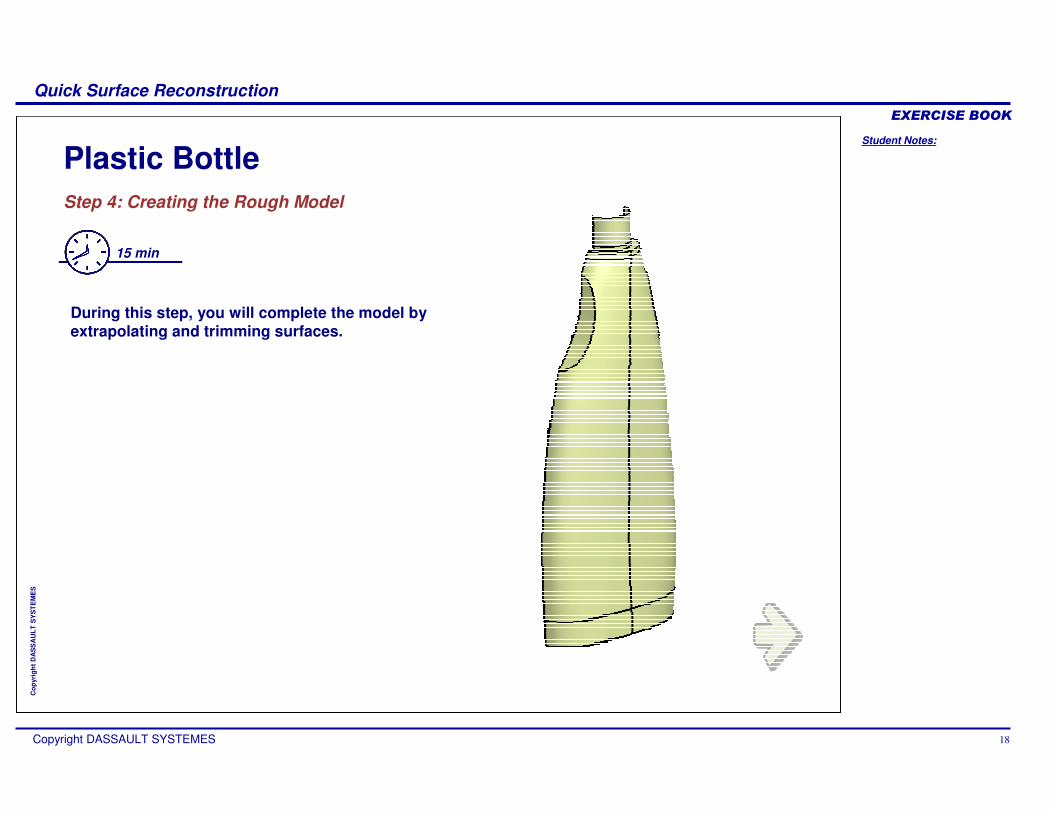
Plastic BottleStep 4: Creating the Rough Model
15 min
During this step, you will complete the model by extrapolating and trimming surfaces.
Student Notes:
Quick Surface Reconstruction����������
Copyright DASSAULT SYSTEMES 19
Cop
yrig
ht D
AS
SA
ULT
SY
ST
EM
ES
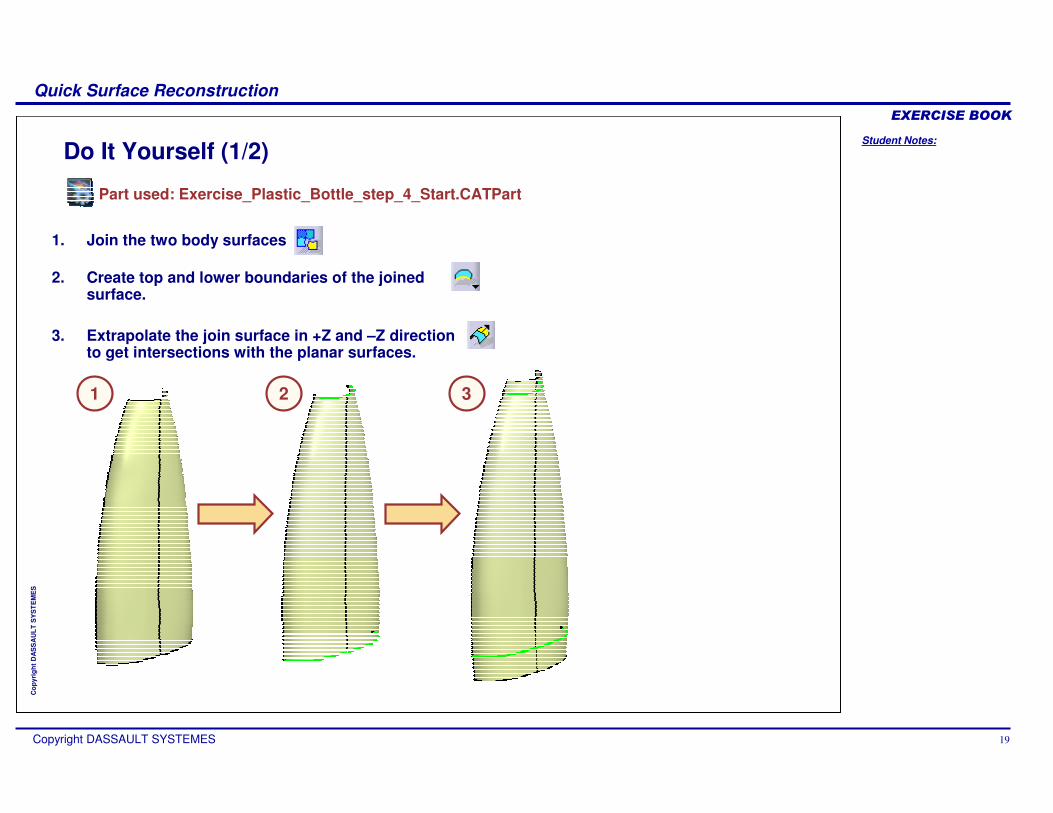
Do It Yourself (1/2)
1. Join the two body surfaces
2. Create top and lower boundaries of the joined surface.
3. Extrapolate the join surface in +Z and –Z direction to get intersections with the planar surfaces.
Part used: Exercise_Plastic_Bottle_step_4_Start.CATPart
1 2 3

Student Notes:
Quick Surface Reconstruction����������
Copyright DASSAULT SYSTEMES 20
Cop
yrig
ht D
AS
SA
ULT
SY
ST
EM
ES
Do It Yourself (2/2)
4. Trim all the elements with each other
5. Split the final surface by the ZX plane
You can compare your results with end Part-Exercise_Plastic_Bottle_step_4_End.CATPart
4 5
Student Notes:
Quick Surface Reconstruction����������
Copyright DASSAULT SYSTEMES 21
Cop
yrig
ht D
AS
SA
ULT
SY
ST
EM
ES
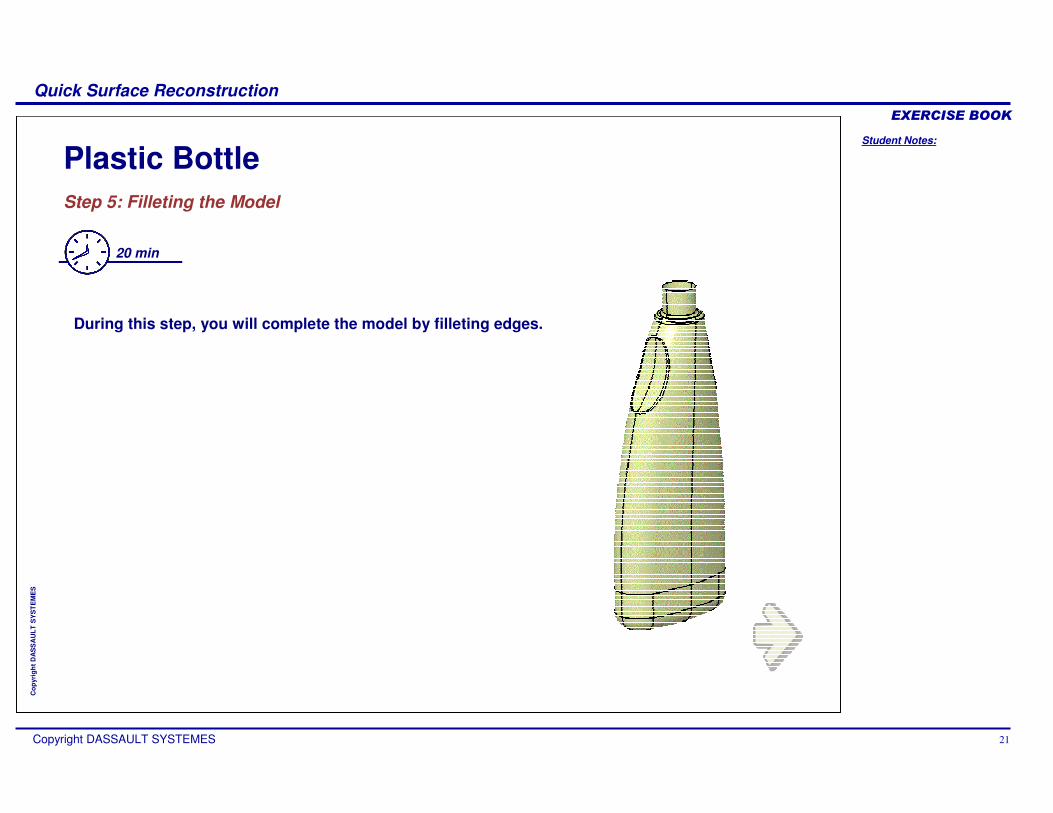
Plastic BottleStep 5: Filleting the Model
20 min
During this step, you will complete the model by filleting edges.

Student Notes:
Quick Surface Reconstruction����������
Copyright DASSAULT SYSTEMES 22
Cop
yrig
ht D
AS
SA
ULT
SY
ST
EM
ES
Do It Yourself
1. Create two 2mm fillets on the top of the bottle in a Generative Shape Design workbench
2. Create two 2mm fillets around the handles
3. Create a 13mm fillet at the bottom.
4. Create a symmetry about ZX plane in a new geometrical set.
You can compare your results with end Part-Exercise_Plastic_Bottle_step_5_End.CATPart
Part used: Exercise_Plastic_Bottle_step_5_Start.CATPart
1
234
Student Notes:
Quick Surface Reconstruction����������
Copyright DASSAULT SYSTEMES 23
Cop
yrig
ht D
AS
SA
ULT
SY
ST
EM
ES
Additional ExercisesIn this lesson, you will be presented with additional exercices for practice.
Exercise: Car BodyExercise: Toy Plastic PartExercise:Washing Powder Bottle

Student Notes:
Quick Surface Reconstruction����������
Copyright DASSAULT SYSTEMES 24
Cop
yrig
ht D
AS
SA
ULT
SY
ST
EM
ES
Title of First Lesson%tag_text%
%tag_child%
Student Notes:
Quick Surface Reconstruction����������
Copyright DASSAULT SYSTEMES 25
Cop
yrig
ht D
AS
SA
ULT
SY
ST
EM
ES
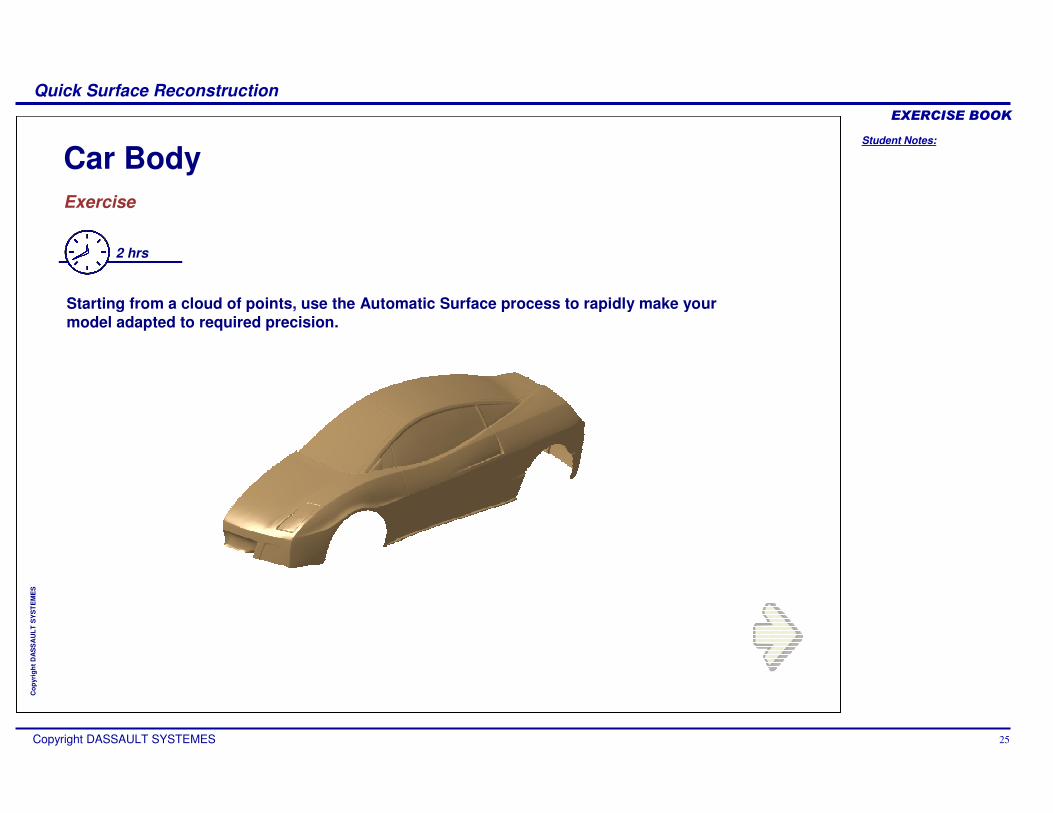
Car BodyExercise
2 hrs
Starting from a cloud of points, use the Automatic Surface process to rapidly make your model adapted to required precision.
Student Notes:
Quick Surface Reconstruction����������
Copyright DASSAULT SYSTEMES 26
Cop
yrig
ht D
AS
SA
ULT
SY
ST
EM
ES
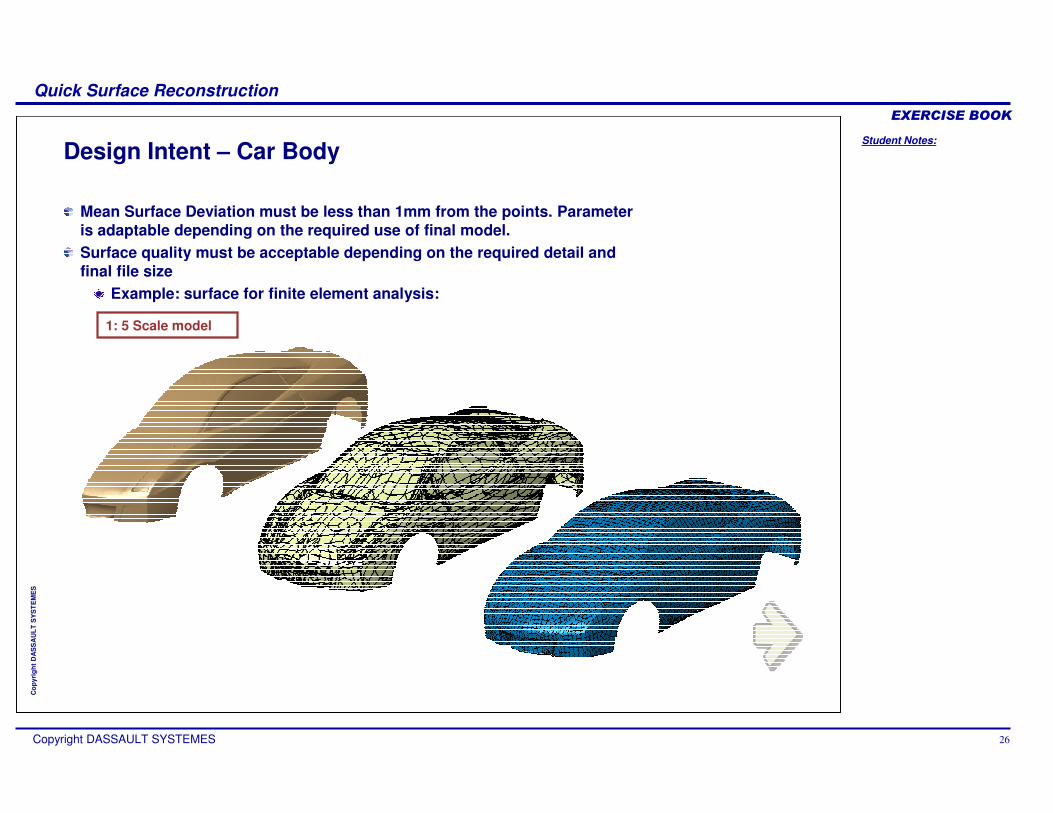
Design Intent – Car Body
Mean Surface Deviation must be less than 1mm from the points. Parameter is adaptable depending on the required use of final model.Surface quality must be acceptable depending on the required detail and final file size
Example: surface for finite element analysis:
1: 5 Scale model

Student Notes:
Quick Surface Reconstruction����������
Copyright DASSAULT SYSTEMES 27
Cop
yrig
ht D
AS
SA
ULT
SY
ST
EM
ES
Automatic Surface
Decimation of Meshed model
Design Process- Car Body
Tune Parameters
1
2
3

Student Notes:
Quick Surface Reconstruction����������
Copyright DASSAULT SYSTEMES 28
Cop
yrig
ht D
AS
SA
ULT
SY
ST
EM
ES
Do It Yourself (1/5)
Part used: Exercise_car_Start.CATPart
In Digitized Shape Editor select Decimation.1. Select the meshed model2. Set the Target Percentage to 50%Note: advantages of decimating mesh first
Processor timeFile size
WARNING: Impossible to reverse the decimation after OK except by Undo.

Student Notes:
Quick Surface Reconstruction����������
Copyright DASSAULT SYSTEMES 29
Cop
yrig
ht D
AS
SA
ULT
SY
ST
EM
ES
3. Create a Surface Use default setting of Mean Surface Deviation (0.5mm) then adjust to 0.1mm to compare surface tolerance enhancement around small detail objectsClick More to display details of the process and control display of surface deviations.
Do It Yourself (2/5)
Computational Limit dialog box may appear if no surface can be computed with the selected combination of parameters.
Student Notes:
Quick Surface Reconstruction����������
Copyright DASSAULT SYSTEMES 30
Cop
yrig
ht D
AS
SA
ULT
SY
ST
EM
ES
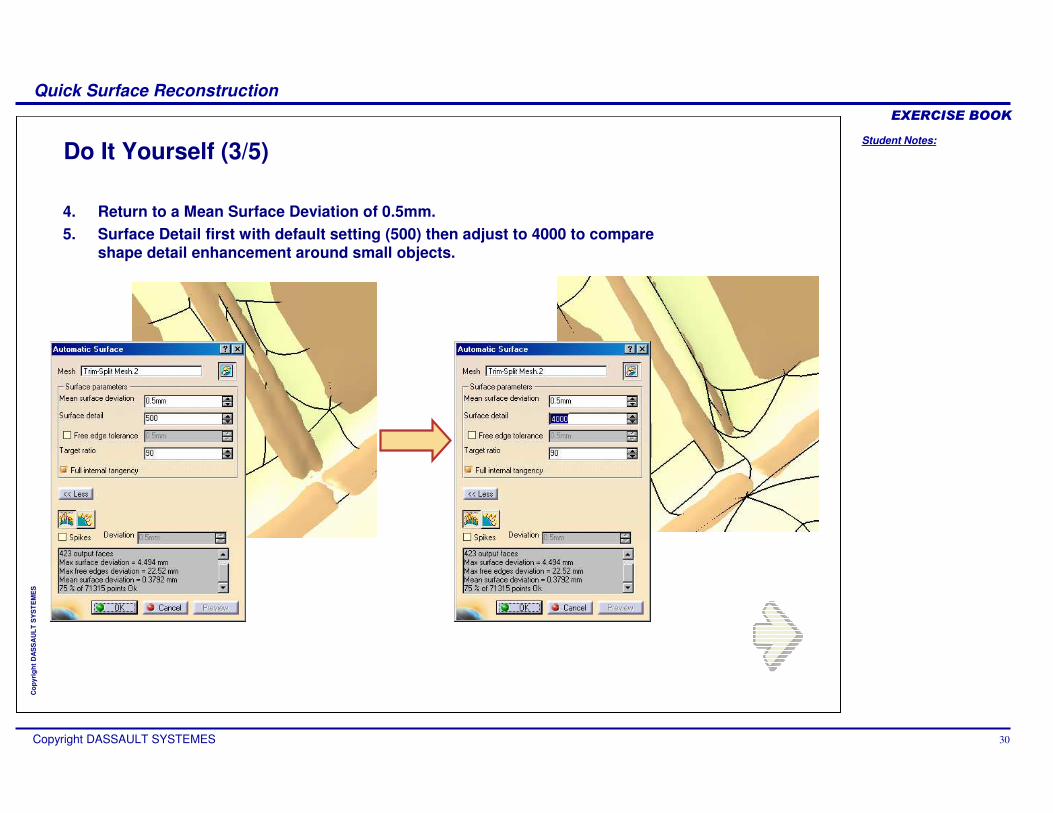
Do It Yourself (3/5)
4. Return to a Mean Surface Deviation of 0.5mm.5. Surface Detail first with default setting (500) then adjust to 4000 to compare
shape detail enhancement around small objects.
Student Notes:
Quick Surface Reconstruction����������
Copyright DASSAULT SYSTEMES 31
Cop
yrig
ht D
AS
SA
ULT
SY
ST
EM
ES
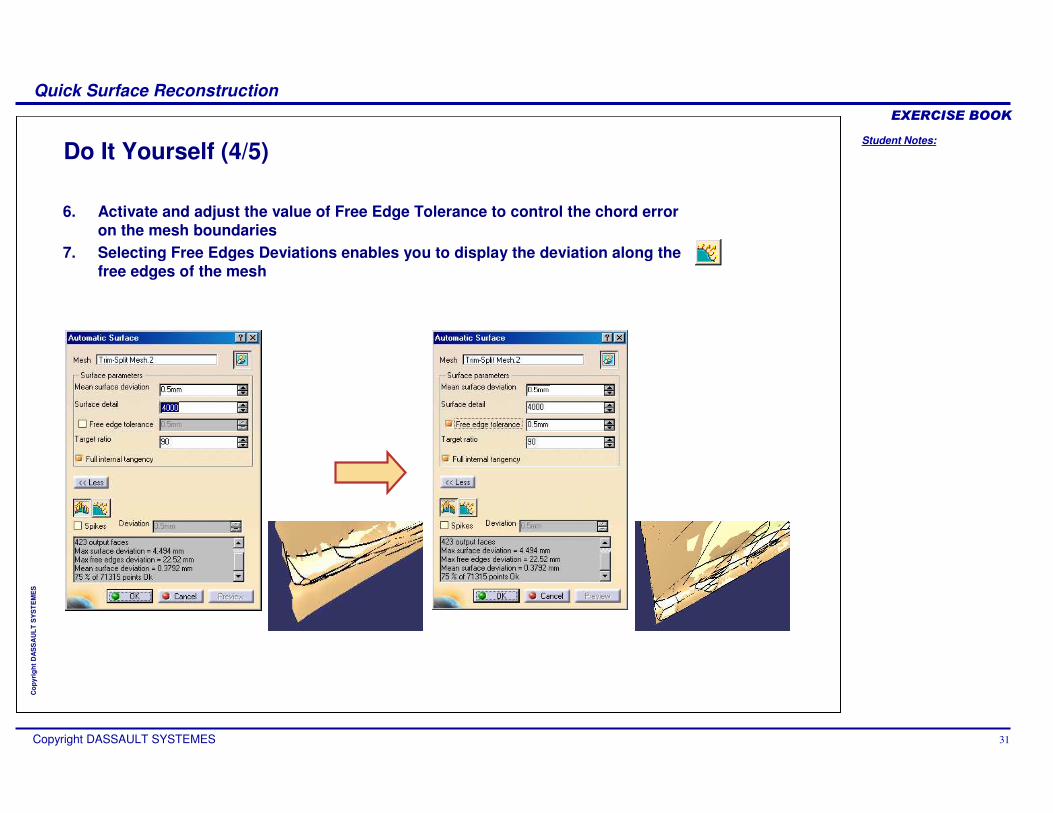
Do It Yourself (4/5)
6. Activate and adjust the value of Free Edge Tolerance to control the chord error on the mesh boundaries
7. Selecting Free Edges Deviations enables you to display the deviation along the free edges of the mesh

Student Notes:
Quick Surface Reconstruction����������
Copyright DASSAULT SYSTEMES 32
Cop
yrig
ht D
AS
SA
ULT
SY
ST
EM
ES
8. Perform a Deviation Analysis Select the Reference cloud and the created surfaceClick OK
Do It Yourself (5/5)
You can compare your results with the end part: Exercise_car_end.CATPart
9. Apply Annotations to show maximum values 10. Create the Deviation Report to document the
information
Student Notes:
Quick Surface Reconstruction����������
Copyright DASSAULT SYSTEMES 33
Cop
yrig
ht D
AS
SA
ULT
SY
ST
EM
ES
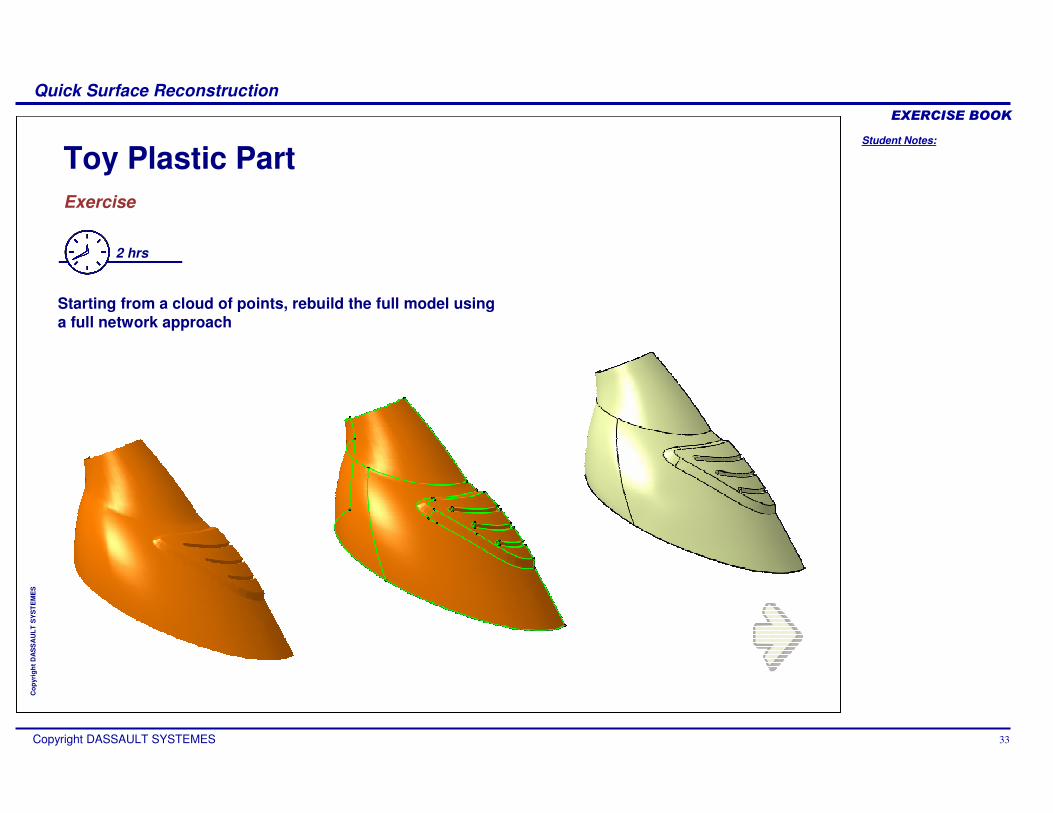
Toy Plastic PartExercise
2 hrs
Starting from a cloud of points, rebuild the full model using a full network approach
Student Notes:
Quick Surface Reconstruction����������
Copyright DASSAULT SYSTEMES 34
Cop
yrig
ht D
AS
SA
ULT
SY
ST
EM
ES
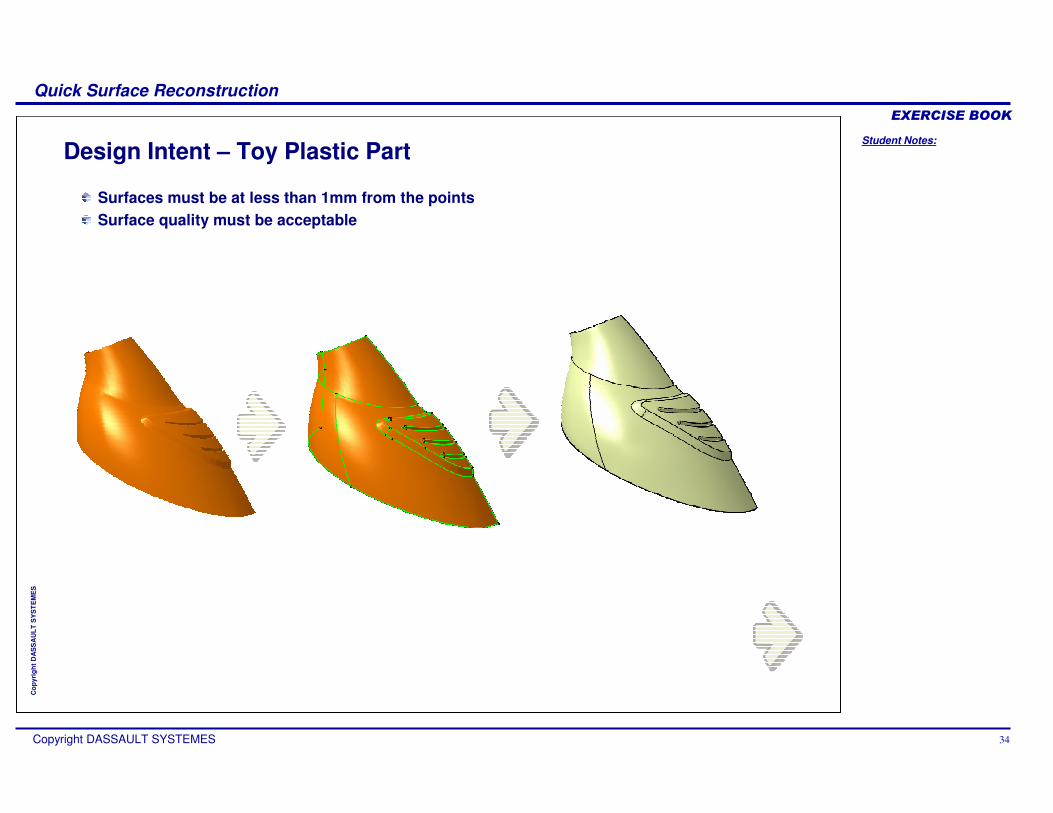
Design Intent – Toy Plastic Part
Surfaces must be at less than 1mm from the pointsSurface quality must be acceptable
Student Notes:
Quick Surface Reconstruction����������
Copyright DASSAULT SYSTEMES 35
Cop
yrig
ht D
AS
SA
ULT
SY
ST
EM
ES
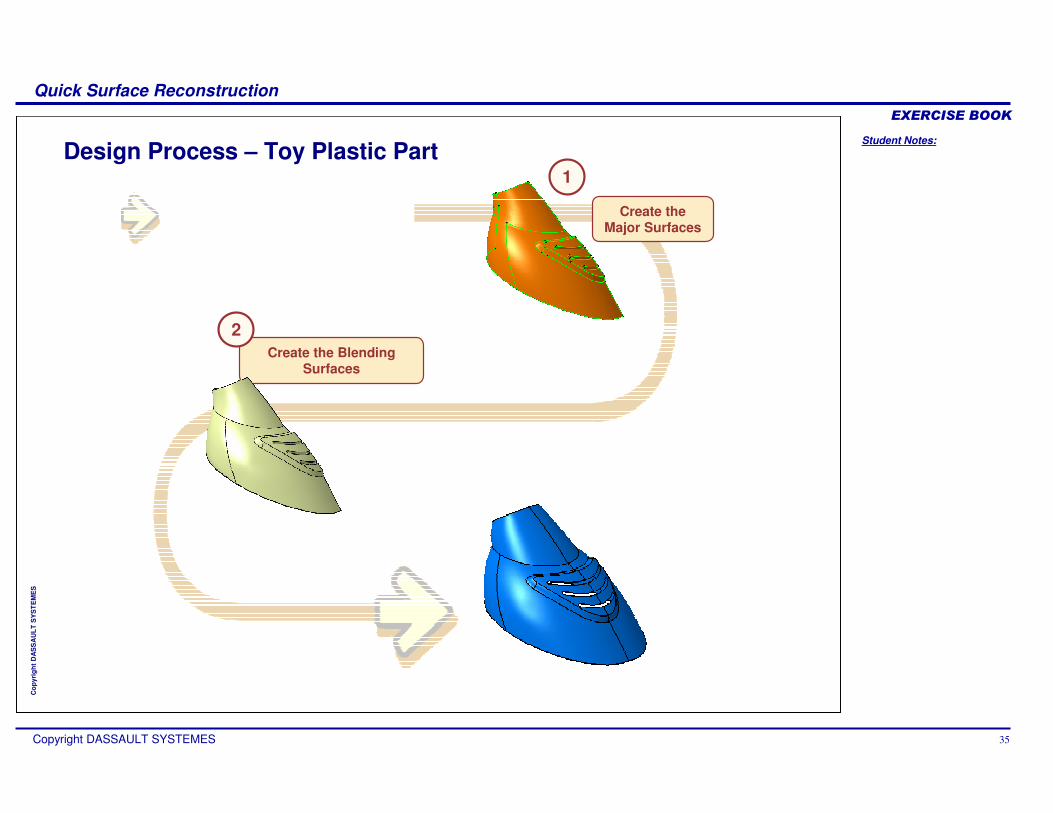
Create the Major Surfaces
Create the Blending Surfaces
Design Process – Toy Plastic Part1
2
Student Notes:
Quick Surface Reconstruction����������
Copyright DASSAULT SYSTEMES 36
Cop
yrig
ht D
AS
SA
ULT
SY
ST
EM
ES
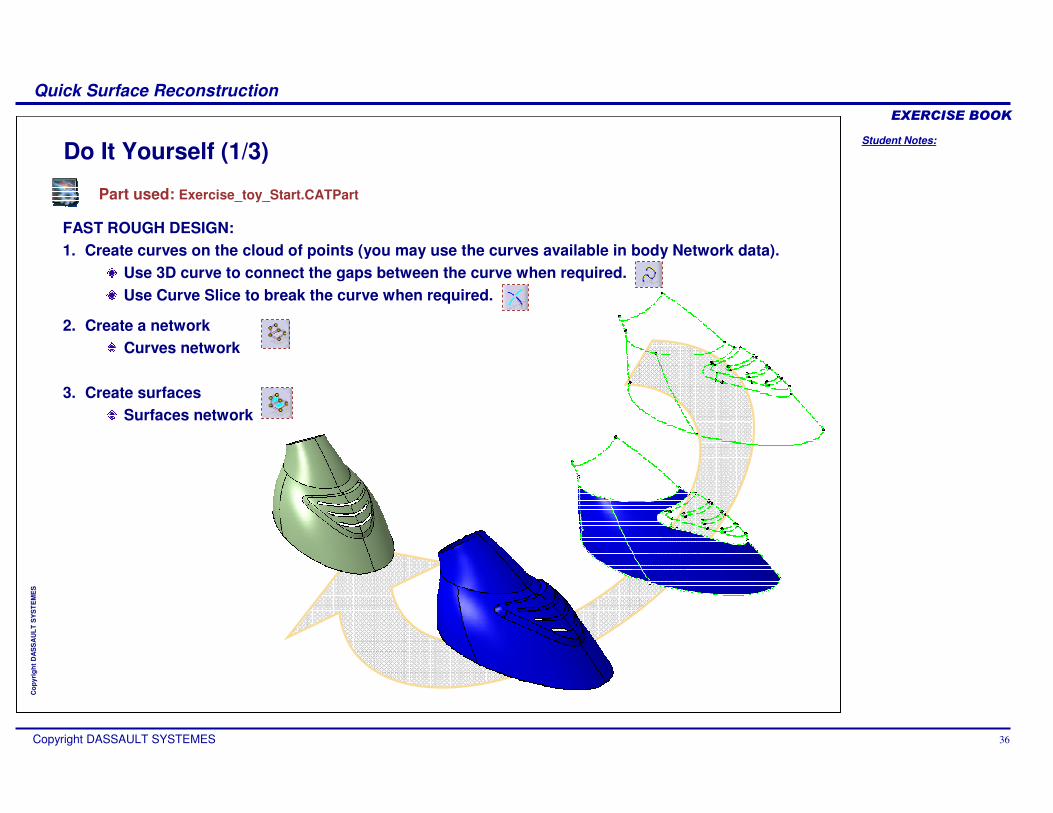
2. Create a networkCurves network
3. Create surfacesSurfaces network
Do It Yourself (1/3)
Part used: Exercise_toy_Start.CATPart
FAST ROUGH DESIGN:1. Create curves on the cloud of points (you may use the curves available in body Network data).
Use 3D curve to connect the gaps between the curve when required.Use Curve Slice to break the curve when required.
Student Notes:
Quick Surface Reconstruction����������
Copyright DASSAULT SYSTEMES 37
Cop
yrig
ht D
AS
SA
ULT
SY
ST
EM
ES
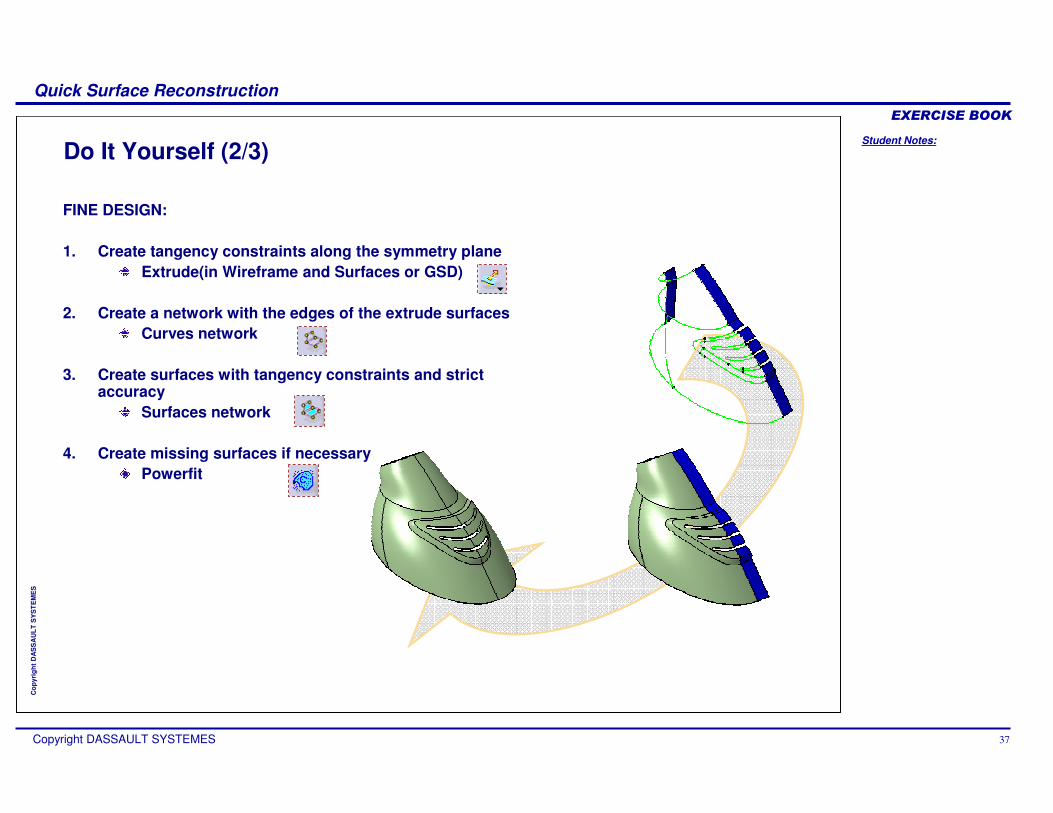
Do It Yourself (2/3)
FINE DESIGN:
1. Create tangency constraints along the symmetry plane Extrude(in Wireframe and Surfaces or GSD)
2. Create a network with the edges of the extrude surfacesCurves network
3. Create surfaces with tangency constraints and strict accuracy
Surfaces network
4. Create missing surfaces if necessaryPowerfit

Student Notes:
Quick Surface Reconstruction����������
Copyright DASSAULT SYSTEMES 38
Cop
yrig
ht D
AS
SA
ULT
SY
ST
EM
ES
Do It Yourself (3/3)
Deviation Analysis, Annotations and Deviation Report:
1. Perform Deviation Analysis between Cloud and final data
2. Apply Annotations to show the Maximum and minimum deviation
3. Create Deviation Report to document the information
You can compare your results with the end part:For results of Fast Rough Design (Method 1): Exercise_toy_End_Fast_Rough_Design.CATParttFor results of Fine Design (Method 2): Exercise_toy_End_Fine_Design.CATPart
Student Notes:
Quick Surface Reconstruction����������
Copyright DASSAULT SYSTEMES 39
Cop
yrig
ht D
AS
SA
ULT
SY
ST
EM
ES
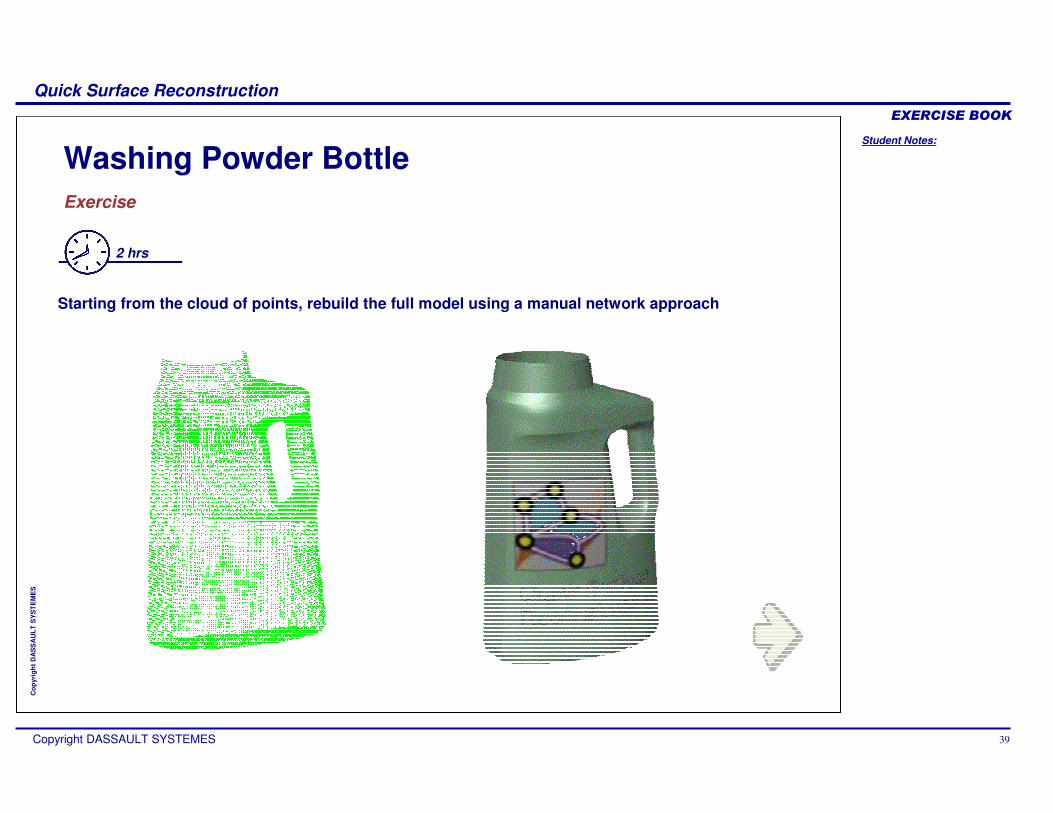
Washing Powder BottleExercise
2 hrs
Starting from the cloud of points, rebuild the full model using a manual network approach
Student Notes:
Quick Surface Reconstruction����������
Copyright DASSAULT SYSTEMES 40
Cop
yrig
ht D
AS
SA
ULT
SY
ST
EM
ES
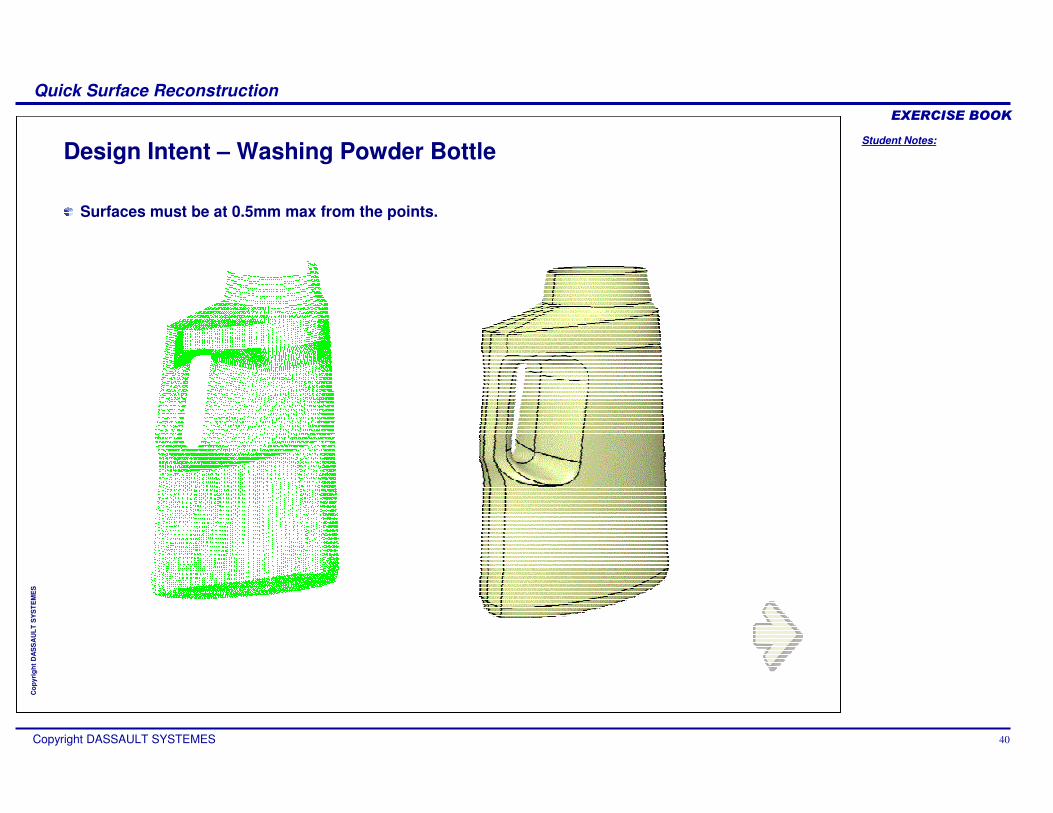
Design Intent – Washing Powder Bottle
Surfaces must be at 0.5mm max from the points.
Student Notes:
Quick Surface Reconstruction����������
Copyright DASSAULT SYSTEMES 41
Cop
yrig
ht D
AS
SA
ULT
SY
ST
EM
ES
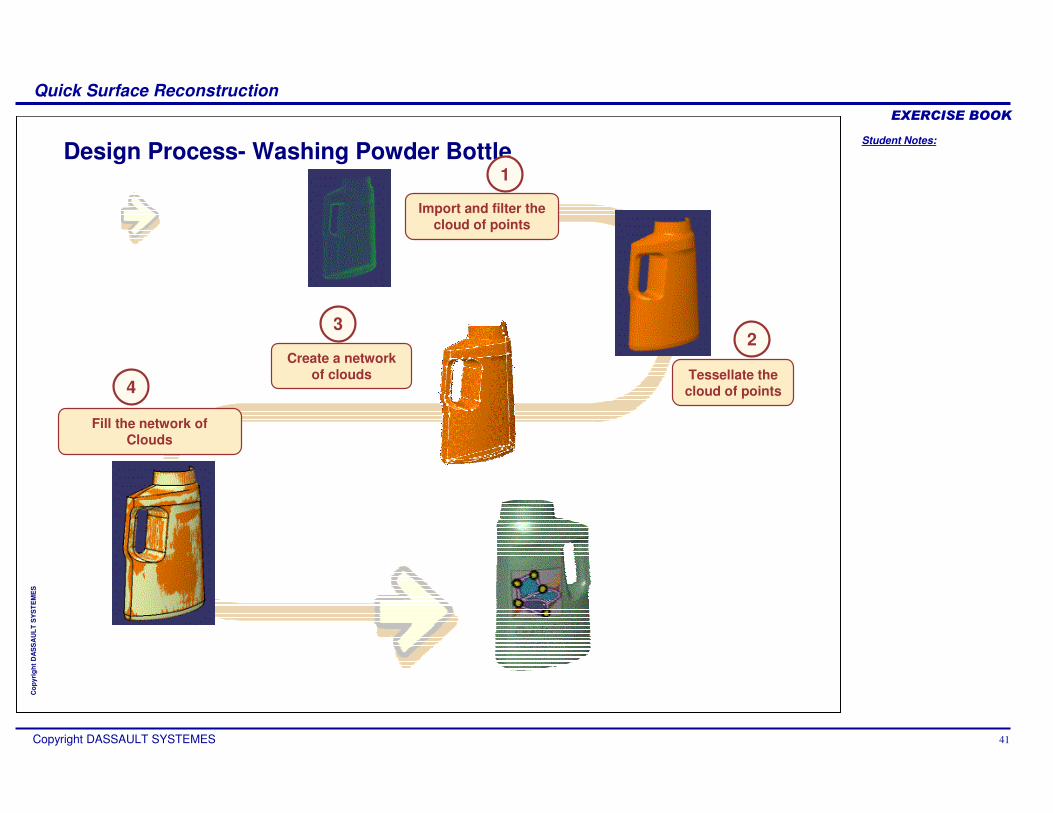
Fill the network of Clouds
Create a network of clouds
Import and filter the cloud of points
Design Process- Washing Powder Bottle
Tessellate the cloud of points
1
23
4

Student Notes:
Quick Surface Reconstruction����������
Copyright DASSAULT SYSTEMES 42
Cop
yrig
ht D
AS
SA
ULT
SY
ST
EM
ES
Do It Yourself (1/5)
1. Import the cloud of points in Digitized Shape Editor workbenchFile to import is “Exercise_washing_powder_Bottle_Start.asc”
2. Filter the cloud of points in Digitized Shape Editor workbenchUse an adaptative filter for the bodyRefine filtering on the bottom using an homogeneous filter
Part used: Exercise_washing_powder_Bottle_Start.asc
Student Notes:
Quick Surface Reconstruction����������
Copyright DASSAULT SYSTEMES 43
Cop
yrig
ht D
AS
SA
ULT
SY
ST
EM
ES
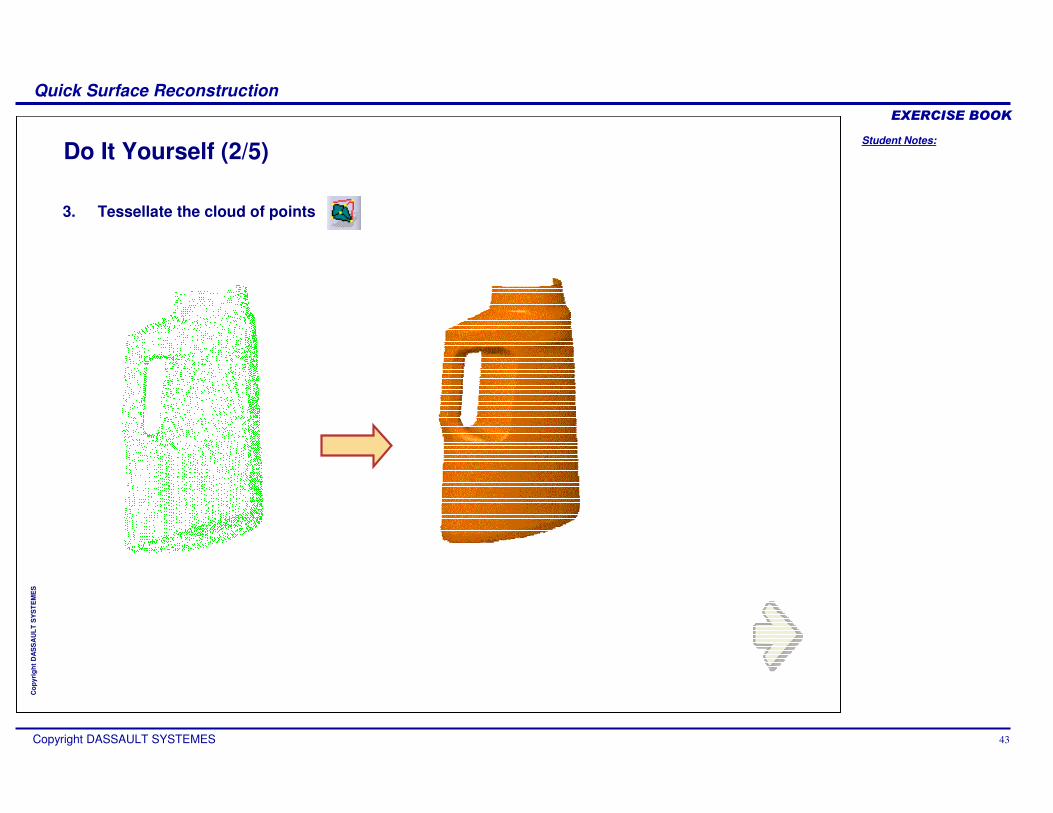
3. Tessellate the cloud of points
Do It Yourself (2/5)
Student Notes:
Quick Surface Reconstruction����������
Copyright DASSAULT SYSTEMES 44
Cop
yrig
ht D
AS
SA
ULT
SY
ST
EM
ES
Do It Yourself (3/5)
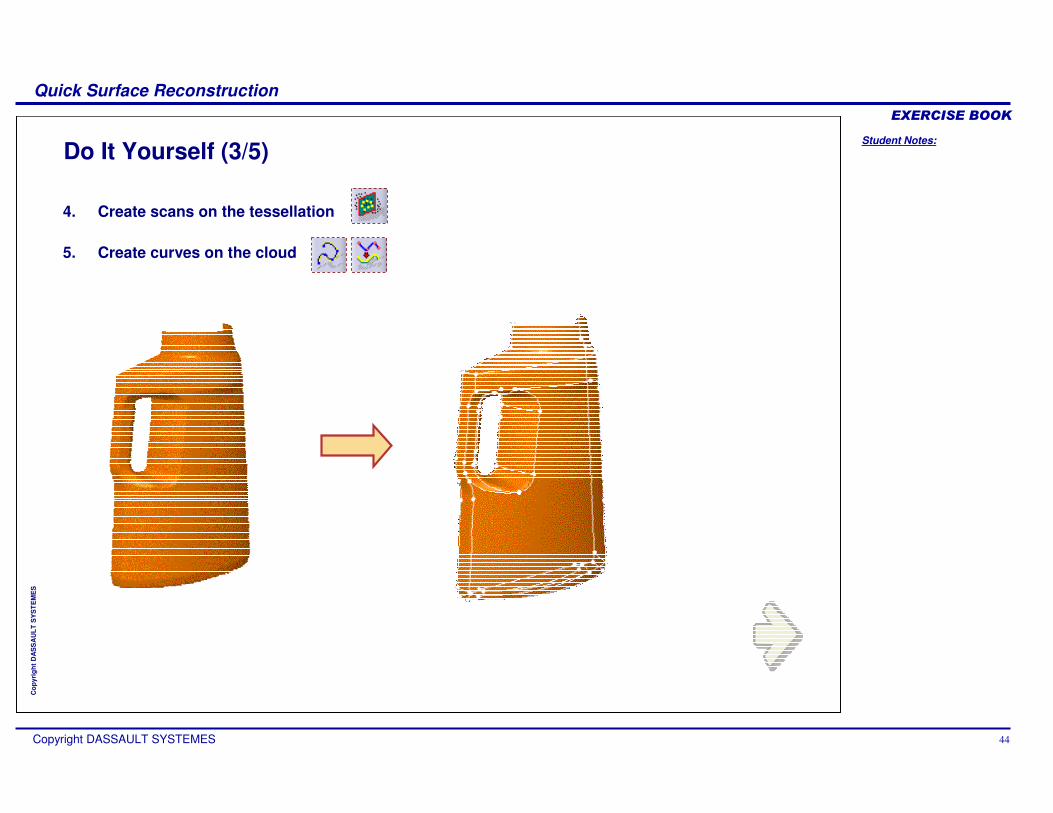
4. Create scans on the tessellation
5. Create curves on the cloud
Student Notes:
Quick Surface Reconstruction����������
Copyright DASSAULT SYSTEMES 45
Cop
yrig
ht D
AS
SA
ULT
SY
ST
EM
ES
Do It Yourself (4/5)
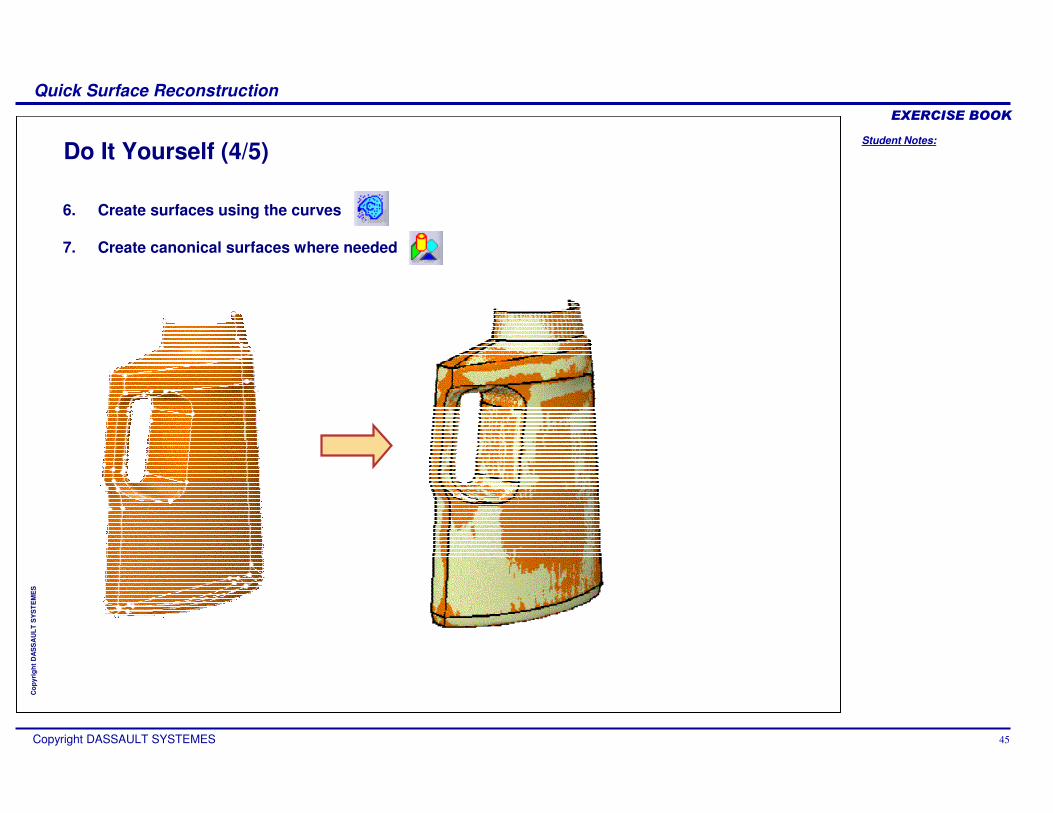
6. Create surfaces using the curves
7. Create canonical surfaces where needed

Student Notes:
Quick Surface Reconstruction����������
Copyright DASSAULT SYSTEMES 46
Cop
yrig
ht D
AS
SA
ULT
SY
ST
EM
ES
Do It Yourself (5/5)
You can compare your results with the end part: Exercise_Washing_powder_Bottle_End.CATPart
1. Perform Deviation Analysis between Cloud and final data
2. Apply Annotations to show the Maximum and minimum deviation
3. Create Deviation Report to document the information