Quick Start Up Guide I-Rent
8
Quick Start-up Guide I-Rent.net
-
Upload
juan-gabriel-belmonte-cantero -
Category
Documents
-
view
219 -
download
0
Transcript of Quick Start Up Guide I-Rent

7/31/2019 Quick Start Up Guide I-Rent
http://slidepdf.com/reader/full/quick-start-up-guide-i-rent 1/7
Quick Start-up Guide I-Rent.net

7/31/2019 Quick Start Up Guide I-Rent
http://slidepdf.com/reader/full/quick-start-up-guide-i-rent 2/7
QUICK START‐UP GUIDE
Version 1.2
I‐Rent Client Support T: +34 96 579 6741 / +31 (0)88 2021225 @: info@i‐rent.net
7/31/2019 Quick Start Up Guide I-Rent
http://slidepdf.com/reader/full/quick-start-up-guide-i-rent 3/7
Quick start up guide I‐Rent.net
Welcome at I‐Rent
We would like to extend a warm welcome to you at I‐Rent.net and thank you for making use of
our service.
Before starting with our system, we recommend you collect as much information as possible,
including company details, bank data and payment terms, rent conditions, accommodation
information, photos, seasons, prices, etc. Please see the checklist attached.
It is most likely you already arranged all (or most) of the information and having it prepared
will make it quicker to enter it into the system. Are you new to the rental business and
therefore do not have all information yet? Don’t worry! By following the menus mentioned in
the steps below, you will get to every step of the process and therefore, you will not forget a
thing.
1) I‐Rent.net system – Log in
Enter the online booking system at http://sys.i‐rent.net with your login and password; this will
give you access to your business account. To give you a first impression of the menus, you will
see the following:
• Home: the homepage will show you in real time the system notifications: new contact
forms, phone call requests, expired options, pending client payments, cancellation
requests, expired
publications.
In
short;
things
that
need
your
immediate
attention.
• Bookings: here you can find everything regarding the reservations and options of
clients, information requests, availability calendars, etc.
• Management: the menus for the internal management, here you can find e.g.
arrivals/departures lists, as well as the financial part in sales and balances and the part
for the owner’s management.
• People: a database of all the people introduced to your account; your clients as well as
owners, key holders, local contacts, maintenance team, etc. This is also the section
where you can provide your owners with their personal login.
• Administrator: here, you introduce all your company details: contact information,
logins, (online) payment system, rental conditions and other texts. In this part you also
create your collaborations with other companies.
• Accommodations: is where (among other things) you upload and manage your
accommodations. Also, ‘Accommodations’ gives you the overviews on how and where
they are distributed online.
2) Fill out your company details – Menu Administrator
Starting with the I‐Rent.net system is completed by filling out all your company details in the
menu Administrator.
Fill
out,
one
by
one,
from
top
to
bottom,
every
menu
and
submenu
below Administrator (that apply for your company). Some menus are text editors, the texts
introduced here will, for example, be shown online or added to the rental form (rental
7/31/2019 Quick Start Up Guide I-Rent
http://slidepdf.com/reader/full/quick-start-up-guide-i-rent 4/7
conditions). Other menus will ask you to determine certain dates (e.g. airco seasons, heating
seasons) or ways of working within your company (payment calendars).
Make sure that all is filled out correctly and completely from the beginning, then the system
will do the actual work for you; you can create reservation forms automatically and calculate
all amounts that apply for a booking (client, owner, agent, commissions, discounts etc).
3) Upload credit – Menu Administrator
Some parts of the system require payment, such as: uploading an accommodation, publishing
an accommodation on certain websites, translations, sms service, the use of specific icons and
there is a small fee for each booking made. These payments are automatically deducted from
your I‐Rent Credit. So before continuing you first need to upload credit.
Go to Administrator ‐> I‐Rent Credit. To add credit, click on “New Credit”. Next, you can choose
which amount
you
wish
to
add,
then
click
“Continue”.
You
will
be
redirected
to
our
secure
bank environment, where you can select the preferred method of payment and pay directly
online. In the overview you can check the status of your balance and there’s an overview of
the depreciations.
4) Upload your properties – Menu List Accommodations
After filling out your company details, including the seasons, and adding credit to your
account, you continue by uploading your properties. Go to the menu Accommodations ‐> List
Accommodations; on
the
top
click
on
“New
Accommodation”
to
create
your
accommodation.
For each uploaded accommodation an amount will be debited from your balance.
Once created and shown in the list, right mouse click on the name of the accommodation to
open the Accommodation menu. Enter all the accommodation details asked: Accommodation
Information, Descriptions, Pictures, Prices and Extras.
5) Update the calendars – Menu Management and Bookings
To be able to make online bookings and work in real time, it is very important to always have
the availability of your accommodations up to date. Therefore, before publishing the
accommodations online, you need to check the calendars and available rental periods.
• First, make sure that the periods when the accommodation is not offered for rent (this
could be for any reason, but usually involves a period outside the agreement between
the owner and your company) are blocked by using “Non available periods”.
• Then, block the periods for the owner by declaring them as “Owner booking”. An
“Owner booking” is a (private) booking of the owner, for himself or for friends and
family.
• In case that there’s still some doubt whether the accommodation can be booked
online or if the rental periods are upon request (e.g. because you need to verify
availability with the owner or key holder), you can indicate them as “On demand
periods”. Please note, however, that when using on demand periods, during these

7/31/2019 Quick Start Up Guide I-Rent
http://slidepdf.com/reader/full/quick-start-up-guide-i-rent 5/7
dates, the accommodation cannot be booked directly online and you will thus miss a
possibility of obtaining bookings.
New Non Available periods, Owner Bookings and On demand periods can be created from the
menu Management, but also directly on the calendars (in the menu Bookings), using the right
mouse click.
If you already have bookings from clients, you can enter them using “New option” and “New
Booking” in the menu Bookings, but also directly in the calendar as described above.
6) Publish accommodations online – Menu Accommodations
Now that the company details are introduced, credit is added, the accommodation(s)
uploaded and the availability determined you are ready to publish online.
Go back to the menu Accommodations ‐> List Accommodations, click with the right mouse
button on the accommodation you want to publish. From here, you can publish the
accommodation on: your website, collaborators websites, I‐Rent websites and external
websites, using the corresponding menus. Publications can also be managed from the menu
called WEB distribution, available under Accommodations. This menu is especially useful if you
wish to publish multiple properties at once, or if you need to edit or check publications.
Need more information?
Please check
out
the
Starters
guide
for
the
booking
system
or
contact
our:
I‐Rent Client Support
Telephone: +31 (0)88‐2021225 or: +34 96 579 6741
E‐mail: info@i‐rent.net
7/31/2019 Quick Start Up Guide I-Rent
http://slidepdf.com/reader/full/quick-start-up-guide-i-rent 6/7
Checklist before starting with I‐Rent
Company details – for both contact information as well as payment information
(shown on invoices); Address, email, telephone number, fiscal number, website
Bank details – rental amount is payable by client using these account details
Including IBAN and SWIFT/BIC for international bank transfers.
Logo:
‐ in GIF format with white background
‐ 90mm width by 20mm height (255px width by 57px height at 72ppp).
‐ the file size is limited to 20 kB
Geographic coordinates of your office.
Payment details – under which conditions do you charge the rental amount and when?
General extra costs, both mandatory and optional (e.g. reservation costs or cots) and
how and when these have to be paid.
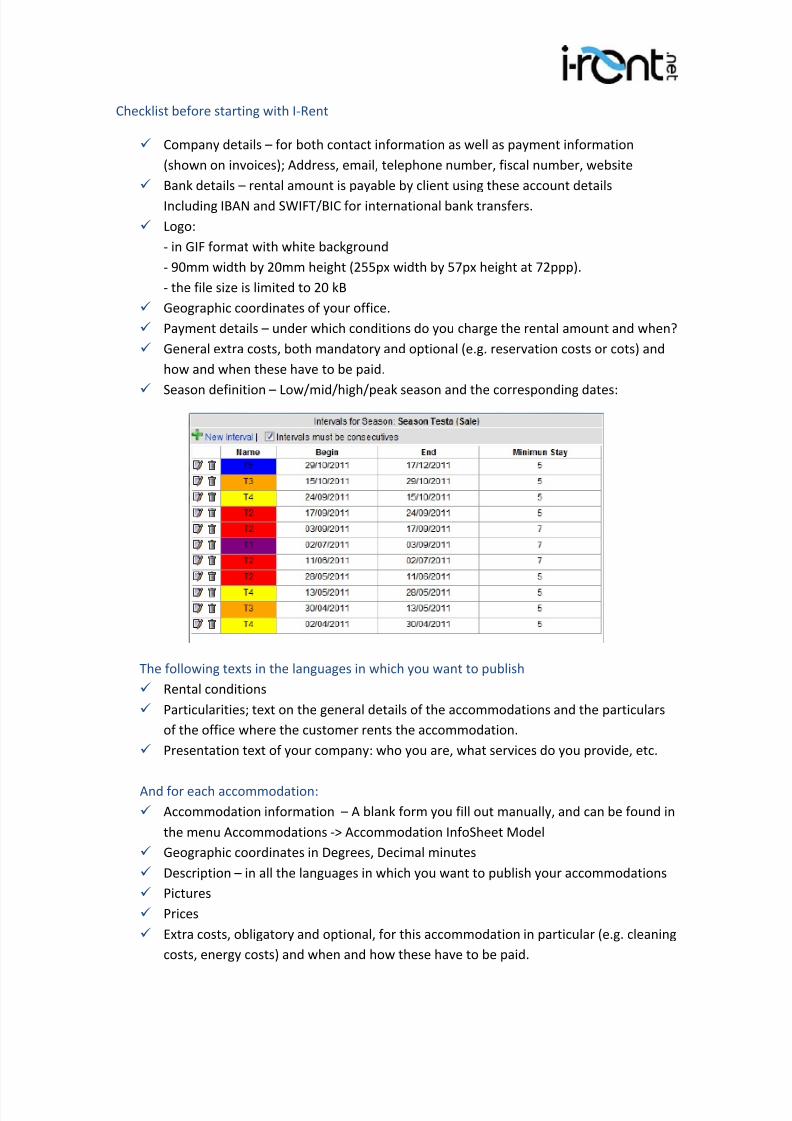
Season definition
–
Low/mid/high/peak
season
and
the
corresponding
dates:
The following texts in the languages in which you want to publish
Rental conditions
Particularities; text on the general details of the accommodations and the particulars
of the office where the customer rents the accommodation.
Presentation text of your company: who you are, what services do you provide, etc.
And for
each
accommodation:
Accommodation information – A blank form you fill out manually, and can be found in
the menu Accommodations ‐> Accommodation InfoSheet Model
Geographic coordinates in Degrees, Decimal minutes
Description – in all the languages in which you want to publish your accommodations
Pictures
Prices
Extra costs, obligatory and optional, for this accommodation in particular (e.g. cleaning
costs, energy costs) and when and how these have to be paid.
7/31/2019 Quick Start Up Guide I-Rent
http://slidepdf.com/reader/full/quick-start-up-guide-i-rent 7/7
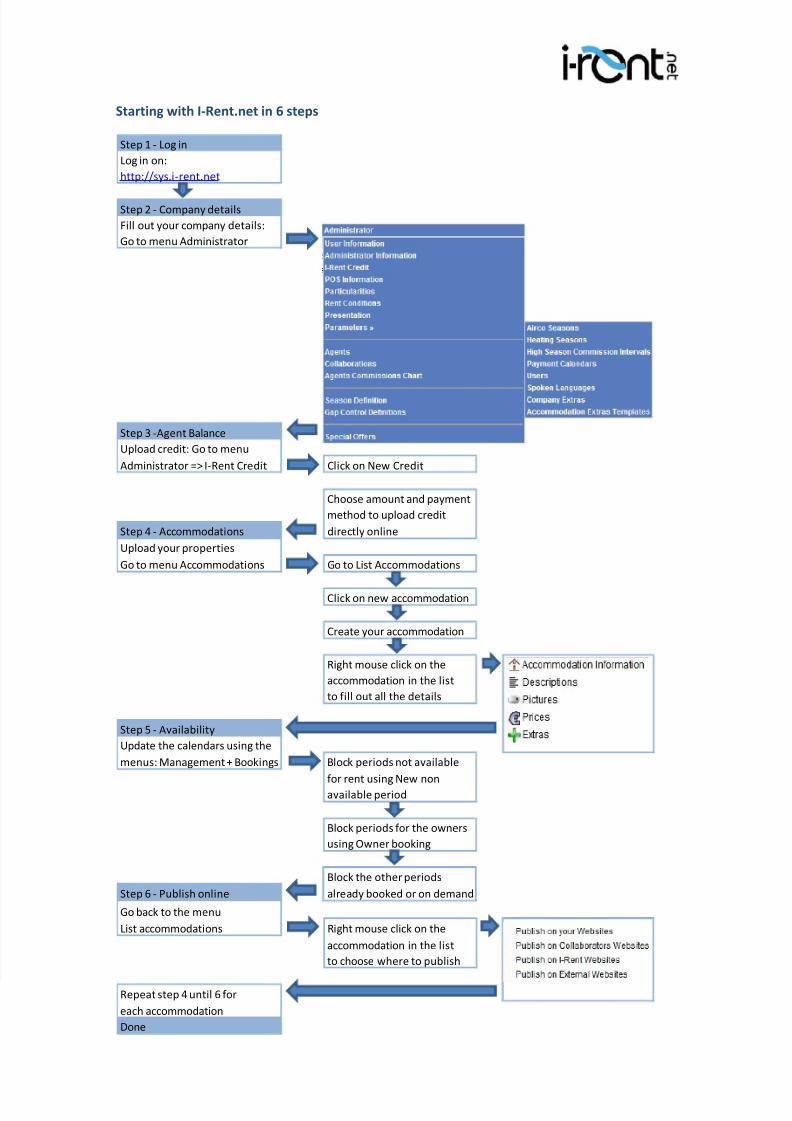
Starting with I‐Rent.net in 6 steps
Step 1 ‐ Log in
Log in on:
http://sys.i‐rent.net
Step 2 ‐ Company details
Fill out your company details:
Go to menu Administrator
Step 3 ‐Agent Balance
Upload credit: Go to menu
Administrator => I‐Rent Credit Click on New Credit
Choose amount and payment
method to upload credit
Step 4 ‐ Accommodations directly online
Upload your properties
Go to menu Accommodations Go to List Accommodations
Click on new accommodation
Create your accommodation
Right mouse click on the
accommodation in the list
to fill out all the details
Step 5 ‐ Availability
Update the calendars using the
menus: Management + Bookings Block periods not available
for rent using New non
available period
Block periods for the owners
using Owner booking
Block the other periods
Step 6 ‐ Publish online already booked or on demand
Go back to the menu
List accommodations Right mouse click on the
accommodation in the list
to choose where to publish
Repeat step 4 until 6 for
each accommodation
Done