Quick Start Guide - Steinberg · Deutsch. Cristina Bachmann, Heiko Bischoff, Christina Kaboth, Insa...
114
Transcript of Quick Start Guide - Steinberg · Deutsch. Cristina Bachmann, Heiko Bischoff, Christina Kaboth, Insa...


English
Cristina Bachmann, Heiko Bischoff, Christina Kaboth, Insa Mingers,Matthias Obrecht, Sabine Pfeifer, Benjamin Schütte, Marita Sladek
This PDF provides improved access for vision-impaired users. Please notethat due to the complexity and number of images in this document, it is notpossible to include text descriptions of images.
The information in this document is subject to change without noticeand does not represent a commitment on the part of Steinberg MediaTechnologies GmbH. The software described by this document is subjectto a License Agreement and may not be copied to other media except asspecifically allowed in the License Agreement. No part of this publicationmay be copied, reproduced, or otherwise transmitted or recorded,for any purpose, without prior written permission by Steinberg MediaTechnologies GmbH. Registered licensees of the product described hereinmay print one copy of this document for their personal use.
All product and company names are ™ or ® trademarks of their respectiveowners. For more information, please visit www.steinberg.net/trademarks.© Steinberg Media Technologies GmbH, 2016.
All rights reserved.

Table of Contents
5 Introduction5 About the Documentation5 Key Commands5 Conventions6 How You Can Reach Us7 System Requirements and Installation7 System Requirements8 Installing the Program8 Activating Your License9 Hardware Installation11 System Setup
4

Introduction
About the Documentation• The documentation for this product is provided at
www.steinberg.help.
Key CommandsMany of the default key commands, also known as keyboard shortcuts,use modifier keys, some of which are different depending on the operatingsystem.
For example, the default key command for Undo is Ctrl-Z on Windows andCmd-Z on Mac OS. When key commands with modifier keys are describedin this manual, they are shown with the Windows modifier key first, in thefollowing way:
• Windows modifier key/Mac OS modifier key-key
EXAMPLE
Ctrl/Cmd-Z means: press Ctrl on Windows or Cmd on Mac OS, then pressZ.
ConventionsIn our documentation, we use typographical and markup elements tostructure information.
5
IntroductionHow You Can Reach Us
How You Can Reach UsOn the Steinberg Hub menu in Cubase you find items linking to additionalinformation.
The menu contains links to various Steinberg web pages. Selecting amenu item automatically launches your browser and opens the page.On these pages you can find support and compatibility information,answers to frequently asked questions, information about updates andother Steinberg products, etc. This requires that you have a web browserinstalled on your computer, and a working internet connection.
6

System Requirements andInstallation
System RequirementsYour computer must meet the following minimum requirements for theWindows and Mac OS versions of Cubase:
64-bit Windows 7/8.x/10— OS X 10.11/macOS Sierra• 64-bit Intel or AMD multi-core CPU (Intel i5 or faster recommended)• 4 GB RAM (8 GB or more recommended)• 12 GB free HD space• 1366 x 768 display resolution (1920 x 1080 recommended)• Graphics card with DirectX 10 and WDDM 1.1 support (Windows only)• OS compatible audio hardware (ASIO compatible audio hardware
recommended for low latency performance)• DVD ROM dual-layer drive (if you do not use the download version)• Internet connection required for activation, account setup, and
personal/product registration. Additional downloads may be requiredfor the installation.
For recommended systems and support of future operating systems,please refer to the Support section on our website www.steinberg.net.
7

System Requirements and InstallationInstalling the Program
Installing the Program
Launching Installation
PROCEDURE
1. Double-click Start Installation.
2. Follow the instructions on screen.
Activating Your LicenseYou must activate your license.
PREREQUISITE
You have a working Internet connection and an activation code to downloadyour license to your eLicenser.
NOTE
You can find the license activation code in an e-mail, if you purchasedyour product via the Steinberg online shop or on the Essential ProductLicense Information sheet, if your product was delivered on an installationmedium.
PROCEDURE
1. Go to www.steinberg.net/activate for information aboutactivation.
2. Follow the instructions on screen.
RESULT
The license is downloaded to your eLicenser and activated.
8

System Requirements and InstallationHardware Installation
Hardware Installation
Installing the Audio Hardware and its Driver
PROCEDURE
1. Install the audio hardware and related equipment on the computer, asdescribed in the hardware documentation.
2. Install the driver for the audio hardware.A driver is a piece of software that allows a program to communicatewith a certain piece of hardware. In this case, the driver allows Cubaseto use the audio hardware. Depending on the operating system of yourcomputer, there are different types of drivers that can be used.
Dedicated ASIO Drivers
Professional audio hardware often comes with an ASIO driver writtenespecially for the device. This allows for direct communication betweenCubase and the audio hardware. As a result, the devices with specific ASIOdrivers can provide lower latency (input-output delay), which is crucialwhen monitoring audio via Cubase or using VST instruments. The ASIOdriver may also provide special support for multiple inputs and outputs,routing, synchronization, etc.
ASIO drivers are provided by the audio hardware manufacturers. Makesure to check the manufacturer’s web site for the latest driver versions.
IMPORTANT
If your audio hardware comes with a specific ASIO driver, we stronglyrecommend that you use this.
9

System Requirements and InstallationHardware Installation
Generic Low Latency ASIO Driver (Windows Only)
On Windows systems, you can use the Generic Low Latency ASIO driver.This driver provides ASIO support for any audio hardware supportedby Windows, thus allowing for low latency. The Generic Low LatencyASIO driver provides the Windows Core Audio technology in Cubase. Noadditional driver is needed. This driver is included with Cubase and doesnot require any special installation.
NOTE
This driver should be used if no specific ASIO driver is available. Althoughthe Generic Low Latency ASIO driver supports all audio devices, you mightget better results with on-board audio cards than with external USB audiointerfaces.
macOS Drivers (macOS only)
If you are using a Macintosh computer, make sure that you are using thelatest macOS drivers for your audio hardware. Follow the instructions ofthe manufacturer to install the driver.
Testing the Audio Hardware
To make sure that the audio device works as expected, perform thefollowing tests.
• Use any software included with the hardware to make sure that youcan record and play back audio without problems.
• If the hardware is accessed via a standard operating system driver,try playing back audio using the standard audio application of thecomputer, for example, Windows Media Player or Apple iTunes.
10

System Requirements and InstallationSystem Setup
Installing a MIDI Interface or USB MIDI Keyboard
Although many USB MIDI keyboards and MIDI interfaces are plug&playdevices, you may have to install a dedicated device driver. Follow theinstallation procedure described in the documentation that came with thedevice.
NOTE
You should also check the web site of the manufacturer for the latestdriver updates.
System Setup
Selecting the Driver for Your Audio Device
Before you can set up the routing for your audio signals and startrecording, you need to make sure that the correct ASIO driver is selected.
PROCEDURE
1. Select Devices > Device Setup.
2. In the Device Setup dialog, click the VST Audio System entry on theleft.The VST Audio System page is shown on the right.
3. On the ASIO Driver pop-up menu, select the driver that you want touse.
4. Click OK.
11

System Requirements and InstallationSystem Setup
Setting Up the VST Connections
The VST Connections dialog allows you to set up the routing of inputand output signals between Cubase and your audio hardware. Theseconnections are called busses. In this section you learn how to set up thebusses for playback and recording.
Removing Busses
Before you add busses, it is recommended to remove any outputs thatwere automatically added by Cubase.
PROCEDURE
1. Select Devices > VST Connections.
2. In the VST Connections dialog, select the Outputs tab.
3. In the Bus Name column, right-click the top entry and select RemoveBus from the context menu.
If necessary, repeat this step for any further busses.
12
System Requirements and InstallationSystem Setup
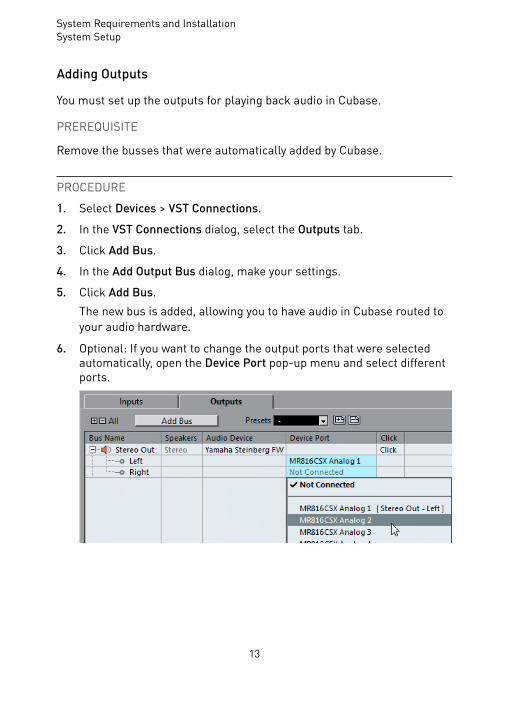
Adding Outputs
You must set up the outputs for playing back audio in Cubase.
PREREQUISITE
Remove the busses that were automatically added by Cubase.
PROCEDURE
1. Select Devices > VST Connections.
2. In the VST Connections dialog, select the Outputs tab.
3. Click Add Bus.
4. In the Add Output Bus dialog, make your settings.
5. Click Add Bus.The new bus is added, allowing you to have audio in Cubase routed toyour audio hardware.
6. Optional: If you want to change the output ports that were selectedautomatically, open the Device Port pop-up menu and select differentports.
13

System Requirements and InstallationSystem Setup
Depending on your audio hardware, more than two output ports mightbe available. For most cases we recommend to use the main stereooutputs.
RELATED LINKSRemoving Busses on page 12
Adding Inputs
You must set up the inputs for recording into Cubase.
PROCEDURE
1. Select Devices > VST Connections.
2. In the VST Connections dialog, select the Inputs tab.
3. In the Bus Name column, right-click the top entry and select RemoveBus from the context menu.If necessary, repeat this step for any further busses.
4. Click Add Bus.
5. In the Add Input Bus dialog, make your settings.
6. Click Add Bus.The new bus is added, allowing you to have audio from the input ofyour audio device routed to Cubase for recording.
7. Optional: If you want to change the input ports that were selectedautomatically, open the Device Port pop-up menu and select differentports.
RESULT
You are now ready to record audio in Cubase and play it back.
14

System Requirements and InstallationSystem Setup
NOTE
To get started with Cubase, we recommend watching the video tutorialson the Steinberg YouTube Channel including a demonstration of the newfeatures of Cubase.
15

Deutsch
Cristina Bachmann, Heiko Bischoff, Christina Kaboth, Insa Mingers,Matthias Obrecht, Sabine Pfeifer, Benjamin Schütte, Marita Sladek
Übersetzung: Boris Rogowski
Diese PDF wurde für die Verwendung von Screenreader-Softwareoptimiert. Beachten Sie, dass es aufgrund der Komplexität und großenAnzahl von Bildern in diesem Dokument nicht möglich ist, alternativeBildbeschreibungen einzufügen.
Die in diesem Dokument enthaltenen Informationen können ohneVorankündigung geändert werden und stellen keine Verpflichtung seitensder Steinberg Media Technologies GmbH dar. Die hier beschriebeneSoftware wird unter einer Lizenzvereinbarung zur Verfügung gestellt unddarf ausschließlich nach Maßgabe der Bedingungen der Vereinbarung(Sicherheitskopie) kopiert werden. Ohne ausdrückliche schriftlicheErlaubnis durch die Steinberg Media Technologies GmbH darf kein Teildieses Handbuchs für irgendwelche Zwecke oder in irgendeiner Form mitirgendwelchen Mitteln reproduziert oder übertragen werden. RegistrierteLizenznehmer des Produkts dürfen eine Kopie dieses Dokuments zurpersönlichen Nutzung ausdrucken.
Alle Produkt- und Firmennamen sind ™ oder ® Marken derentsprechenden Firmen. Weitere Informationen hierzu finden Sie auf derSteinberg-Website unter www.steinberg.net/trademarks.© Steinberg Media Technologies GmbH, 2016.
Alle Rechte vorbehalten.

Inhaltsverzeichnis
19 Einleitung19 Über diese Dokumentation19 Tastaturbefehle20 Konventionen20 So können Sie uns erreichen21 Systemanforderungen und Installation21 Systemanforderungen22 Programm installieren22 Lizenzaktivierung23 Hardware-Installation25 Systemeinrichtung
18

Einleitung
Über diese Dokumentation• Die Dokumentation für dieses Produkt findet sich auf
www.steinberg.help.
TastaturbefehleBei vielen Standardtastaturbefehlen werden Sondertasten verwendet, vondenen einige je nach Betriebssystem abweichen können.
Der Standardtastaturbefehl für Rückgängig ist z. B. unter Windows [Strg]-[Z] und unter Mac OS X [Befehlstaste]-[Z]. Wenn in diesem HandbuchTastaturbefehle mit Sondertasten beschrieben werden, stehen dieWindows-Sondertasten an erster Stelle:
• [Windows-Sondertaste]/[Mac-Sondertaste]-[Taste]
BEISPIEL
[Strg]-Taste/[Befehlstaste]-[Z] bedeutet: Drücken Sie [Strg] unterWindows oder [Befehlstaste] unter Mac OS X, und drücken Sie dann [Z].
Entsprechend bedeutet [Alt]-Taste-[X]: Drücken Sie [Alt] unter Windowsoder [Wahltaste] unter Mac OS X, und drücken Sie dann [X].
19

EinleitungKonventionen
KonventionenIn unserer Dokumentation verwenden wir typografische Elemente undKennzeichnungen, um Informationen zu strukturieren.
So können Sie uns erreichenIm Menü »Steinberg Hub« von Cubase finden Sie Optionen, über die Sieauf weitere Informationen zugreifen können.
Das Menü enthält Links zu diversen Steinberg-Seiten im Internet. BeimAuswählen einer Menüoption wird automatisch Ihr Browser gestartetund die entsprechende Seite geöffnet. Hier erhalten Sie technischeUnterstützung und Informationen zur Kompatibilität, Antworten auf häufiggestellte Fragen, Informationen über Updates und andere Steinberg-Produkte usw. Um auf sie zuzugreifen, ist auf Ihrem Computer einWebbrowser und eine funktionierende Internetverbindung erforderlich.
20

Systemanforderungen undInstallation
SystemanforderungenIhr Computer muss die folgenden Mindestanforderungen für die Windows-bzw. Mac OS-Version von Cubase erfüllen:
64-Bit Windows 7/8.x/10 – OS X 10.11/macOS Sierra• 64-Bit Intel- oder AMD-Mehrkern-CPU (Intel i5 oder schneller
empfohlen)• 4 GB RAM (8 GB oder mehr empfohlen)• 12 GB freier Speicherplatz• Bildschirmauflösung von 1366 x 768 Pixeln (1920 x 1080 empfohlen)• Grafikkarte mit DirectX 10- und WDDM 1.1-Unterstützung (Nur
Windows)• OS-kompatible Audio-Hardware (ASIO-kompatible Audio-Hardware für
geringe Latenz empfohlen)• DVD-ROM Double-Layer-Laufwerk (falls Sie nicht die Download-
Version verwenden)• Internetverbindung für die Aktivierung und Einrichtung eines
Benutzerkontos sowie die persönliche und die Produktregistrierung.Die Installation kann zusätzliche Downloads erfordern.
Informationen zu den empfohlenen Systemen und der Unterstützungzukünftiger Betriebssysteme finden Sie im Support-Bereich unterwww.steinberg.net.
21

Systemanforderungen und InstallationProgramm installieren
Programm installieren
Installation starten
VORGEHENSWEISE
1. Doppelklicken Sie auf Installation starten.
2. Befolgen Sie die Anweisungen auf dem Bildschirm.
LizenzaktivierungSie müssen die Lizenz für Ihr Steinberg-Produkt aktivieren.
VORAUSSETZUNGEN
Sie haben eine funktionierende Internetverbindung und einenAktivierungscode, um Ihre Lizenz auf Ihren eLicenser herunterzuladen.
HINWEIS
Wenn Sie Ihr Produkt im Online-Shop von Steinberg gekauft haben, habenSie den Lizenzaktivierungscode in einer E-Mail erhalten. Wenn Sie IhrProdukt auf einem Installationsmedium erhalten haben, finden Sie denCode auf dem Beiblatt »Essential Product License Information«.
VORGEHENSWEISE
1. Auf www.steinberg.net/activate finden Sie Informationen zurAktivierung.
2. Befolgen Sie die Anweisungen auf dem Bildschirm.
ERGEBNIS
Die Lizenz wird auf Ihren eLicenser heruntergeladen und aktiviert.
22

Systemanforderungen und InstallationHardware-Installation
Hardware-Installation
Audio-Hardware und Treiber installieren
VORGEHENSWEISE
1. Installieren Sie die Audiokarte und die dazugehörige Software wie inder Bedienungsanleitung für die Karte beschrieben.
2. Installieren Sie den Treiber für die Audio-Hardware.Mit Hilfe von Treiber-Software kann das Programm mit einerbestimmten Hardware kommunizieren. In diesem Fall ermöglichtder Treiber Cubase den Zugriff auf die Audio-Hardware. Je nachBetriebssystem Ihres Computers können Sie unterschiedlicheTreiberarten verwenden.
Spezielle ASIO-Treiber
Professionelle Audio-Hardware wird oft mit einem ASIO-Treibergeliefert, der speziell für diese Hardware ausgelegt ist. So kann Cubasedirekt mit der Audio-Hardware kommunizieren. Daher kann Audio-Hardware mit speziellen ASIO-Treibern die Latenzzeiten (Eingangs-/Ausgangsverzögerung) verkürzen, was beim Mithören von Audiomaterialüber Cubase oder beim Verwenden von VST-Instrumenten entscheidendist. Der ASIO-Treiber bietet eventuell auch spezielle Unterstützung fürKarten mit mehreren Ein- und Ausgängen, Routing, Synchronisation usw.
ASIO-Treiber werden vom Hersteller der Audio-Hardware geliefert.Informieren Sie sich auf der Website des Herstellers über die neuestenTreiberversionen.
WICHTIG
Wenn es für Ihre Audiokarte einen eigenen ASIO-Treiber gibt, sollten Siediesen verwenden.
23

Systemanforderungen und InstallationHardware-Installation
Generischer ASIO Treiber für geringe Latenz (nur Windows)
Auf Windows-Systemen können Sie den generischen ASIO-Treiber fürgeringe Latenz verwenden. Dabei handelt es sich um einen generischenASIO-Treiber, der ASIO-Unterstützung für jegliche von Windowsunterstützte Audio-Hardware bereitstellt und für kurze Latenzzeitensorgt. Über diesen Treiber kann in Cubase die Core-Audio-Technologievon Windows genutzt werden. Sie benötigen keinen zusätzlichen Treiber.Dieser Treiber wird mit Cubase mitgeliefert und muss nicht extrainstalliert werden.
HINWEIS
Verwenden Sie diesen Treiber, wenn kein spezieller ASIO-Treiber zurVerfügung steht. Obwohl der generische ASIO-Treiber für geringeLatenz jegliche Audio-Hardware unterstützt, erzielen Sie mit Onboard-Audiokarten möglicherweise bessere Ergebnisse als mit externen USB-Audioschnittstellen.
Mac OS X Treiber (nur Mac)
Wenn Sie einen Macintosh-Computer verwenden, stellen Sie sicher, dassSie den aktuellen Mac OS X Treiber für Ihre Audio-Hardware verwenden.Beachten Sie die Anleitungen des Herstellers zur Treiber-Installation.
Audio-Hardware überprüfen
Führen Sie folgende Tests durch, um sicherzustellen, dass Ihre Audio-Hardware wie gewünscht funktioniert.
• Verwenden Sie die mit der Audio-Hardware gelieferte Software, umzu überprüfen, ob Sie problemlos Audiomaterial aufnehmen undwiedergeben können.
24

Systemanforderungen und InstallationSystemeinrichtung
• Wenn Sie mit einem Betriebssystem-Treiber auf die Karte zugreifen,geben Sie Audiomaterial mit der Standard-Audioanwendung wieder (z. B. Windows Media Player oder Apple iTunes).
MIDI-Schnittstelle oder USB-MIDI-Keyboard installieren
Auch wenn es sich bei vielen USB-MIDI-Keyboards und MIDI-Schnittstellen um Plug&Play-Geräte handelt, müssen Sie eventuelleinen speziellen Gerätetreiber installieren. Befolgen Sie dieInstallationsanweisung in der Dokumentation zu Ihrem Gerät.
HINWEIS
Informieren Sie sich auf der Website des Herstellers über die neuestenTreiberversionen.
Systemeinrichtung
Treiber für Ihr Audiogerät auswählen
Bevor Sie das Routing für Ihre Audiosignale festlegen und mit derAufnahme beginnen, sollten Sie sicherstellen, dass der richtige ASIO-Treiber ausgewählt ist.
VORGEHENSWEISE
1. Wählen Sie Geräte > Geräte konfigurieren.
2. Klicken Sie im Dialog Geräte konfigurieren in der Liste links auf dieOption VST-Audiosystem.Die Seite VST-Audiosystem wird rechts angezeigt.
3. Wählen Sie im Einblendmenü ASIO-Treiber den Treiber, den Sieverwenden möchten.
25

Systemanforderungen und InstallationSystemeinrichtung
4. Klicken Sie auf OK.
VST-Verbindungen einrichten
Im Dialog VST-Verbindungen können Sie Einstellungen zum Routing vonEingangs- und Ausgangssignalen zwischen Cubase und Ihrer Audio-Hardware vornehmen. Diese Verbindungen werden Busse genannt. Imfolgenden Abschnitt lernen Sie, wie Sie die Eingangs- und Ausgangsbussezum Aufnehmen bzw. zur Wiedergabe einrichten.
Busse entfernen
Bevor Sie Busse hinzufügen, sollten Sie zunächst alle automatisch vonCubase erzeugten Busse löschen.
VORGEHENSWEISE
1. Wählen Sie Geräte > VST-Verbindungen.
2. Wählen Sie im Dialog VST-Verbindungen die Ausgänge-Registerkarte.
3. Klicken Sie in der Spalte Bus-Name mit der rechten Maustaste aufden obersten Eintrag und wählen Sie im Kontextmenü den Befehl Busentfernen.
26

Systemanforderungen und InstallationSystemeinrichtung
Wiederholen Sie den Schritt ggf. für alle weiteren angezeigten Busse.
Ausgänge hinzufügen
Sie müssen die Ausgänge für die Wiedergabe von Audiomaterial in Cubaseeinrichten.
VORAUSSETZUNGEN
Löschen Sie die automatisch von Cubase hinzugefügten Busse.
VORGEHENSWEISE
1. Wählen Sie Geräte > VST-Verbindungen.
2. Wählen Sie im Dialog VST-Verbindungen die Ausgänge-Registerkarte.
3. Klicken Sie auf Bus hinzufügen.
4. Nehmen Sie im Dialog Ausgangsbus hinzufügen Ihre Einstellungenvor.
5. Klicken Sie auf Bus hinzufügen.Der neue Bus wird hinzugefügt, so dass Audiomaterial von Cubase anihre Audio-Hardware geleitet wird.
6. Optional: Wenn Sie die automatisch ausgewählten Ausgangs-Portsändern möchten, öffnen Sie das Einblendmenü Geräte-Port undwählen Sie andere Ports aus.
27

Systemanforderungen und InstallationSystemeinrichtung
Je nachdem, welche Audio-Hardware Sie verwenden, können mehrals zwei Ausgänge verfügbar sein. In den meisten Fällen werden dieHaupt-Stereo-Ausgänge benötigt.
WEITERFÜHRENDE LINKSBusse entfernen auf Seite 26
Eingänge hinzufügen
Im folgenden Abschnitt lernen Sie, wie Sie die Eingänge zum Aufnehmenin Cubase einrichten.
VORGEHENSWEISE
1. Wählen Sie Geräte > VST-Verbindungen.
2. Wählen Sie im Dialog VST-Verbindungen die Eingänge-Registerkarte.
3. Klicken Sie in der Spalte Bus-Name mit der rechten Maustaste aufden obersten Eintrag und wählen Sie im Kontextmenü den Befehl Busentfernen.Wiederholen Sie den Schritt ggf. für alle weiteren angezeigten Busse.
4. Klicken Sie auf Bus hinzufügen.
5. Nehmen Sie im Dialog Eingangsbus hinzufügen Ihre Einstellungenvor.
28

Systemanforderungen und InstallationSystemeinrichtung
6. Klicken Sie auf Bus hinzufügen.Der neue Bus wird hinzugefügt, so dass Sie über den Eingang IhresAudiogeräts empfangene Audiosignale in Cubase aufnehmen können.
7. Optional: Wenn Sie die automatisch ausgewählten Eingangs-Portsändern möchten, öffnen Sie das Einblendmenü Geräte-Port undwählen Sie andere Ports aus.
ERGEBNIS
Sie können jetzt in Cubase Audiomaterial aufnehmen und wiedergeben.
HINWEIS
Für einen schnellen Einstieg in die Arbeit mit Cubase empfehlen wirIhnen, sich im Steinberg-Kanal auf YouTube die Video-Lehrgänge und dieDemos der neuen Funktionen in Cubase anzuschauen.
29

Français
Cristina Bachmann, Heiko Bischoff, Christina Kaboth, Insa Mingers,Matthias Obrecht, Sabine Pfeifer, Benjamin Schütte, Marita Sladek
Traduction : Gaël Vigouroux
Ce document PDF a été amélioré pour être plus facile d’accès auxpersonnes malvoyantes. En raison du grand nombre d’images qu’ilcontient et de leur complexité, veuillez noter qu’il n’a pas été possibled’intégrer de descriptions textuelles des images.
Les informations contenues dans ce document sont sujettes à modificationsans préavis et n’engagent aucunement la responsabilité de SteinbergMedia Technologies GmbH. Le logiciel décrit dans ce document fait l’objetd’un Accord de Licence et ne peut être copié sur un autre support sauf sicela est autorisé spécifiquement par l’Accord de Licence. Aucune partiede cette publication ne peut être copiée, reproduite ni même transmiseou enregistrée, sans la permission écrite préalable de Steinberg MediaTechnologies GmbH. Les détenteurs enregistrés de la licence du produitdécrit ci-après sont autorisés à imprimer une copie du présent documentpour leur usage personnel.
Tous les noms de produits et de sociétés sont des marques déposées ™ou ® de leurs propriétaires respectifs. Pour de plus amples informations,rendez-vous sur le site www.steinberg.net/trademarks.© Steinberg Media Technologies GmbH, 2016.
Tous droits réservés.

Table des Matières
33 Introduction33 À propos de la documentation33 Raccourcis clavier33 Conventions34 Comment nous contacter35 Système requis et installation35 Configuration minimale36 Installation du programme36 Activation de votre licence37 Installation du matériel39 Configuration système
32

Introduction
À propos de la documentation• La documentation de ce produit peut être téléchargée sur le site
www.steinberg.help.
Raccourcis clavierDe nombreux raccourcis clavier par défaut utilisent des touches mortesdont certaines changent en fonction du système d’exploitation utilisé.
Par exemple, le raccourci clavier par défaut de la fonction Annuler estCtrl-Z sous Windows et Cmd-Z sous Mac OS. Lorsque des raccourcisclavier employant des touches mortes sont mentionnés dans ce manuel,ils sont d’abord indiqués avec la touche morte de Windows, selon laformule suivante :
• touche morte Windows / touche morte Mac OS - touche
EXEMPLE
Ctrl/Cmd-Z signifie : appuyez sur Ctrl sous Windows ou Cmd sous Mac OS,puis appuyez sur Z.
ConventionsNous avons utilisé des éléments typographiques et des balises pourstructurer les informations contenues dans cette documentation.
33

IntroductionComment nous contacter
Comment nous contacterDans le menu Steinberg Hub de Cubase, plusieurs options vouspermettent d’accéder à des informations supplémentaires.
Ce menu contient des liens vers diverses pages du site Web de Steinberg.Quand vous sélectionnez un élément du menu, votre navigateur s’ouvreautomatiquement à la page correspondante. Dans ces pages, voustrouverez de l'assistance technique, des informations sur la compatibilité,des réponses aux questions fréquemment posées, des informations surles mises à jour et les autres produits de Steinberg, etc. Pour y accéder,vous devez avoir un navigateur installé sur votre ordinateur et disposerd'une connexion Internet.
34

Système requis et installation
Configuration minimaleLes caractéristiques de votre ordinateur doivent être supérieures ouégales aux suivantes pour que les versions Windows et Mac OS de Cubasesoient prises en charge :
64 bits Windows 7/8.x/10— OS X 10.11/macOS Sierra• Processeur multi-cœur 64 bits Intel ou AMD (Intel i5 ou supérieur
recommandé)• 4 Go de RAM (8 Go ou plus recommandés)• 12 Go d'espace libre sur le disque dur• Une résolution d'affichage de 1366 x 768 (1920 x 1080 recommandé)• Une carte graphique compatible DirectX 10 et WDDM 1.1 (Windows
uniquement)• Une interface audio compatible avec le système d'exploitation
(interface audio compatible ASIO recommandée pour moins delatence)
• Un lecteur de DVD ROM double couche (si vous n'utilisez pas laversion téléchargée)
• Une connexion internet pour l’activation, la configuration du compte etl’enregistrement personnel/du produit. Il peut s'avérer nécessaire detélécharger des fichiers supplémentaires pour l'installation.
Pour en savoir plus sur les systèmes recommandés et la prise en chargedes prochains systèmes d'exploitation, veuillez vous référer à la sectionSupport de notre site www.steinberg.net.
35

Système requis et installationInstallation du programme
Installation du programme
Lancement de l'installation
PROCÉDER AINSI
1. Double-cliquez sur Commencer l'installation.
2. Suivez les instructions à l’écran.
Activation de votre licenceIl est obligatoire d’activer la licence.
CONDITION PRÉALABLE
Vous disposez d'une connexion internet et d'un code d'activation vouspermettant de télécharger la licence sur votre eLicenser.
À NOTER
Le code d'activation de licence vous a été envoyé par e-mail si vous avezacheté votre produit sur la boutique en ligne Steinberg, ou sur la feuilleEssential Product License Information, si le produit vous a été fourni surun support d'installation.
PROCÉDER AINSI
1. Rendez-vous sur www.steinberg.net/activate pour de plusamples informations sur l'activation.
2. Suivez les instructions à l’écran.
RÉSULTAT
La licence est alors téléchargée sur votre eLicenser, puis activée.
36

Système requis et installationInstallation du matériel
Installation du matériel
Installation de l’interface audio et de son pilote
PROCÉDER AINSI
1. Installez l’interface audio et ses accessoires sur l’ordinateur enprocédant comme indiqué dans la documentation du matériel.
2. Installez le pilote de l’interface audio.Un pilote est un élément logiciel qui permettant au programme decommuniquer avec un périphérique en particulier. Ici, le pilote permetà Cubase d’utiliser l'interface audio. Selon le système d’exploitationde votre ordinateur, il est possible que vous ayez le choix entreplusieurs types de pilotes.
Pilotes ASIO dédiés
Les interfaces audio professionnelles sont souvent livrées avec un piloteASIO spécialement conçu pour le périphérique. Ce pilote assure lacommunication directe entre Cubase et l’interface audio. Par conséquent,les interfaces dotées de pilotes ASIO spécifiques bénéficient d’une latence(retard entre entrée et sortie) moins élevée, ce qui est essentiel pourpouvoir écouter un signal audio via Cubase ou utiliser des instrumentsVST. D’autre part, le pilote ASIO prend parfois en charge les entrées etsorties multiples, le routage, la synchronisation, etc.
Les pilotes ASIO sont fournis par le fabricant de l’interface audio. Vérifiezsur le site Web du fabricant que vous possédez bien la dernière version dupilote.
IMPORTANT
Si votre interface audio est livrée avec un pilote ASIO spécifique, nous vousrecommandons fortement d’utiliser celui-ci.
37

Système requis et installationInstallation du matériel
Pilote ASIO générique à faible latence (Windows uniquement)
Sur les systèmes Windows, vous pouvez utiliser le pilote ASIO génériqueà faible latence. Ce pilote ASIO assure la compatibilité ASIO avec toutesles interfaces audio prises en charge par Windows, ce qui permet debénéficier d’une latence plus faible. Le pilote ASIO générique à faiblelatence intègre la technologie Windows Core Audio à Cubase. Aucun autrepilote n’est nécessaire. Ce pilote est fourni avec Cubase et ne nécessiteaucune installation particulière.
À NOTER
En l’absence de pilote ASIO spécifique, il est recommandé d’utiliser cepilote. Bien que le pilote ASIO générique à faible latence prenne en chargetoutes les interfaces audio, il se peut que vous obteniez de meilleursrésultats avec une carte audio intégrée qu’avec une interface audio USBexterne.
Pilotes Mac OS X (Mac uniquement)
Si vous utilisez un ordinateur Macintosh, veillez à installer les toutderniers pilotes Mac OS X pour votre interface audio. Suivez lesinstructions d’installation fournies par le fabricant pour installer le pilote.
Test de l’interface audio
Pour vérifier si votre interface audio fonctionne correctement, effectuezles tests suivants.
• Utilisez l’un des logiciels fournis avec votre matériel pour vousassurer que la lecture et l’enregistrement audio fonctionnent sansproblèmes.
• Si l’accès à l’interface se fait via un pilote standard du systèmed’exploitation, essayez de lire les données audio en utilisant
38

Système requis et installationConfiguration système
l’application audio standard du système (par ex. Windows MediaPlayer ou Apple iTunes).
Installation d’une interface MIDI ou d’un clavier MIDI USB
Bien que la plupart des claviers MIDI USB et des interfaces MIDIfonctionnent en plug&play, vous devrez peut-être installer un pilote dédiéà votre périphérique. Veillez alors à bien suivre la procédure d’installationdécrite dans la documentation fournie avec le périphérique.
À NOTER
Veuillez aussi vérifier sur le site Web du fabricant que vous disposez biende la dernière version du pilote.
Configuration système
Sélection du pilote de votre interface audio
Avant de configurer le routage de vos signaux audio et de commencerà enregistrer, il vous faut vérifier si le pilote ASIO approprié est biensélectionné.
PROCÉDER AINSI
1. Sélectionnez Périphériques > Configuration des périphériques.
2. Dans la boîte de dialogue Configuration des périphériques, cliquezsur l’entrée Système audio VST à gauche.La page Système audio VST se trouve à droite.
3. Dans le menu local Pilote ASIO, sélectionnez le pilote que voussouhaitez utiliser.
4. Cliquez sur OK.
39

Système requis et installationConfiguration système
Configuration des connexions VST
La boîte de dialogue VST Connexions vous permet de configurer leroutage des signaux d’entrée et de sortie entre Cubase et votre interfaceaudio. Ces connexions sont appelées bus. Dans cette section, vous allezdécouvrir comment configurer les bus pour la lecture et l’enregistrement.
Supprimer des bus
Avant de créer des bus, il est recommandé de supprimer les sortiesautomatiquement créées par Cubase.
PROCÉDER AINSI
1. Sélectionnez Périphériques > VST Connexions.
2. Dans la boîte de dialogue VST Connexions, sélectionnez l’ongletSorties.
3. Dans la colonne Nom de bus, faites un clic droit sur la premièreentrée et sélectionnez Supprimer bus dans le menu contextuel.
Si nécessaire répétez la procédure pour tous les autres bus.
40

Système requis et installationConfiguration système
Ajouter des sorties
Il vous faut configurer les sorties qui seront utilisées pour la lecture audiodans Cubase.
CONDITION PRÉALABLE
Supprimez les bus qui ont été ajoutés automatiquement par Cubase.
PROCÉDER AINSI
1. Sélectionnez Périphériques > VST Connexions.
2. Dans la boîte de dialogue VST Connexions, sélectionnez l’ongletSorties.
3. Cliquez sur Ajouter bus.
4. Dans la boîte de dialogue Ajouter bus de sortie, configurez lesparamètres à votre convenance.
5. Cliquez sur Ajouter bus.Le bus qui est créé vous permet de router le signal audio de Cubasevers votre interface audio.
6. Facultatif : Si vous désirez changer les ports de sortie qui ontété sélectionnés automatiquement, ouvrez le menu local Portpériphérique et sélectionnez d’autres ports.
41

Système requis et installationConfiguration système
Selon votre interface audio, plus de deux ports de sortie peuventêtre disponibles. Dans la plupart des cas nous vous recommandonsd’utiliser les sorties stéréo générales.
LIENS ASSOCIÉSSupprimer des bus à la page 40
Ajouter des entrées
Vous devez configurer les entrées pour l’enregistrement dans Cubase.
PROCÉDER AINSI
1. Sélectionnez Périphériques > VST Connexions.
2. Dans la boîte de dialogue VST Connexions, sélectionnez l’ongletEntrées.
3. Dans la colonne Nom de bus, faites un clic droit sur la premièreentrée et sélectionnez Supprimer bus dans le menu contextuel.Si nécessaire répétez ce pas pour tous les autres bus.
4. Cliquez sur Ajouter bus.
5. Dans la boîte de dialogue Ajouter bus d’entrée, configurez lesparamètres à votre convenance.
6. Cliquez sur Ajouter bus.Le nouveau bus qui est ajouté vous permet de router le signalaudio de l’entrée de votre périphérique audio vers Cubase pourl’enregistrement.
7. Facultatif : Si vous désirez changer les ports d’entrée qui ontété sélectionnés automatiquement, ouvrez le menu local Portpériphérique et sélectionnez d’autres ports.
42

Système requis et installationConfiguration système
RÉSULTAT
Vous êtes maintenant prêt à enregistrer et lire des données audio dansCubase.
À NOTER
Pour vous familiariser avec Cubase, nous vous recommandons devisionner les didacticiels vidéo sur la chaîne Youtube de Steinberg. Cesdidacticiels vous permettront de découvrir les nouvelles fonctions deCubase.
43

Italiano

Cristina Bachmann, Heiko Bischoff, Christina Kaboth, Insa Mingers,Matthias Obrecht, Sabine Pfeifer, Benjamin Schütte, Marita Sladek
Traduzione: Filippo Manfredi
Il presente PDF offre un accesso facilitato per utenti portatori di handicapvisivi. Si noti che a causa della complessità del documento e dell’elevatonumero di immagini in esso presenti non è stato possibile includere delledescrizioni testuali delle stesse.
Le informazioni contenute in questo manuale sono soggette a variazionisenza preavviso e non rappresentano un obbligo da parte di SteinbergMedia Technologies GmbH. Il software descritto in questo manualeè soggetto ad un Contratto di Licenza e non può essere copiato sualtri supporti multimediali, tranne quelli specificamente consentitidal Contratto di Licenza. Nessuna parte di questa pubblicazione puòessere copiata, riprodotta o in altro modo trasmessa o registrata, perqualsiasi motivo, senza un consenso scritto da parte di Steinberg MediaTechnologies GmbH. I licenziatari registrati del prodotto descritto diseguito, hanno diritto a stampare una copia del presente documento peruso personale.
Tutti i nomi dei prodotti e delle case costruttrici sono marchi registrati (™ o®) dei rispettivi proprietari. Per maggiori informazioni, visitare il sito webwww.steinberg.net/trademarks.© Steinberg Media Technologies GmbH, 2016.
Tutti i diritti riservati.

Indice
47 Introduzione47 Informazioni sulla documentazione47 Comandi da tastiera48 Convenzioni48 Come contattare Steinberg49 Requisiti di sistema e installazione49 Requisiti di sistema50 Installazione del programma50 Attivazione delle licenze51 Installazione dell’hardware53 Configurazione del sistema
46
Introduzione
Informazioni sulla documentazione• La documentazione relativa al presente prodotto è disponibile
all’indirizzo web www.steinberg.help.
Comandi da tastieraMolti dei comandi da tastiera di default fanno uso dei cosiddetti tastimodificatori, alcuni dei quali differiscono a seconda del sistema operativoutilizzato.
Ad esempio, il comando da tastiera predefinito per la funzione Annullaè Ctrl-Z in Windows e Cmd-Z in Mac OS. Quando nel presente manualevengono descritti dei comandi da tastiera con i tasti modificatori, questivengono visualizzati con davanti i tasti modificatori per Windows, nellamaniera seguente:
• Tasto modificatore di Mac OS/ Tasto modificatore di Windows-comando da tastiera
ESEMPIO
Ctrl/Cmd-Z significa: premere Ctrl in Windows o Cmd in Mac OS, quindipremere Z.
47

IntroduzioneConvenzioni
ConvenzioniNella documentazione fornita si fa ampio utilizzo degli elementi tipograficie dei mark-up per strutturare meglio e rendere più accessibili leinformazioni.
Come contattare SteinbergNel menu Steinberg Hub in Cubase sono disponibili delle voci dicollegamento a una serie di informazioni aggiuntive.
Questo menu contiene dei link a diverse pagine del sito web di Steinberg.La selezione di una voce del menu lancia automaticamente il browserweb e apre la rispettiva pagina. In queste pagine sono disponibili varieinformazioni di supporto e compatibilità, risposte a FAQs (frequently askedquestions), informazioni riguardo ad aggiornamenti e ad altri prodotti diSteinberg, ecc. Per poter utilizzare questa funzione è necessario che sulproprio computer sia installato un browser web e che si disponga di unaconnessione internet funzionante.
48

Requisiti di sistema e installazione
Requisiti di sistemaIl computer utilizzato deve soddisfare i seguenti requisiti minimi per leversioni Windows e Mac OS di Cubase:
Windows 7/8.x/10 a 64-bit — OS X 10.11/macOS Sierra• CPU Intel o AMD multi-core a 64-bit (Intel i5 o superiore consigliato)• 4 GB di RAM (8 GB o superiore consigliato)• 12 GB di spazio libero su hard disk• Risoluzione dello schermo di almeno 1366 x 768 (risoluzione
consigliata: 1920 x 1080)• Scheda grafica con supporto per DirectX 10 e WDDM 1.1 (solo
Windows)• Hardware audio compatibile con OS (si consiglia l’utilizzo di
periferiche compatibili con il formato ASIO per una operatività a bassalatenza)
• Lettore DVD dual-layer (nel caso non si utilizzi la versione download)• Connessione internet necessaria per le operazioni di attivazione,
configurazione dell’account e per la registrazione personale/delprodotto. Per completare il processo di installazione potrebberoessere necessari dei download aggiuntivi.
Per ottenere informazioni sui sistemi consigliati e sul supporto per isistemi operativi futuri, fare riferimento alla sezione Support del nostrosito web all'indirizzo www.steinberg.net.
49

Requisiti di sistema e installazioneInstallazione del programma
Installazione del programma
Lanciare l’installazione
PROCEDIMENTO
1. Fare doppio-clic su Avvia l’installazione2. Seguire le istruzioni a schermo.
Attivazione delle licenzeÈ necessario attivare la propria licenza.
PREREQUISITI
Si dispone di una connessione a internet funzionante e di un codice diattivazione per scaricare la licenza sul proprio eLicenser.
NOTA
Il codice di attivazione della licenza viene generalmente ricevuto via mailnel caso in cui il prodotto sia stato acquistato tramite lo shop onlinedi Steinberg. Se invece avete ricevuto il prodotto su un supporto diinstallazione, la licenza si trova nel foglio chiamato Essential ProductLicense Information che trovate nella confezione d’acquisto.
PROCEDIMENTO
1. Visitate la pagina web www.steinberg.net/activate permaggiori informazioni sul processo di attivazione della licenza.
2. Seguite le istruzioni a schermo.
50

Requisiti di sistema e installazioneInstallazione dell’hardware
RISULTATO
La licenza viene scaricata nella memoria dell’USB-eLicenser e attivata.
Installazione dell’hardware
Installazione dell’hardware audio e dei relativi driver
PROCEDIMENTO
1. Installare nel computer l’hardware audio e le apparecchiature ad essoconnesse, come indicato nella documentazione fornita dai rispettiviproduttori.
2. Installare il driver della periferica hardware audio.Un driver è un componente software che consente ad un programmadi comunicare con uno specifico dispositivo hardware. In questo caso,il driver permette a Cubase di utilizzare l’hardware audio. A secondadel sistema operativo installato sul proprio computer, possono essereutilizzati diversi tipi di driver.
Driver ASIO dedicati
Le apparecchiature audio professionali dispongono spesso di un driverASIO dedicato, progettato in maniera specifica per le singole periferiche.Questo rende possibile una comunicazione diretta tra Cubase e l’hardwareaudio. Di conseguenza, le periferiche dotate di driver ASIO specificisono in grado di offrire un livello ridotto di latenza (ritardo ingresso-uscita), caratteristica di fondamentale importanza quando si esegueil monitoraggio dell’audio in Cubase o quando si utilizzano dei VSTInstrument. I driver ASIO possono inoltre fornire un supporto speciale peringressi e uscite multipli, per le assegnazioni, per la sincronizzazione, ecc.
51
Requisiti di sistema e installazioneInstallazione dell’hardware
I driver ASIO vengono forniti direttamente dalle case produttrici delleperiferiche audio. Si consiglia di visitare periodicamente il sito web deirelativi produttori per scaricare le ultime versioni dei driver.
IMPORTANTE
Se la propria periferica audio è dotata di un driver ASIO specifico, siraccomanda sempre di utilizzarlo.
Driver ASIO generico a bassa latenza (solo Windows)
Su sistemi Windows, è anche possibile utilizzare il Driver ASIO genericoa bassa latenza. Questo driver offre il supporto allo standard ASIO pertutte le periferiche hardware audio supportate da Windows, garantendoun’operatività a bassa latenza. Il driver ASIO generico a bassa latenzamette a disposizione la tecnologia Core Audio di Windows all’interno diCubase. Non sono necessari ulteriori driver. Questo driver è incluso inCubase e non richiede alcuna procedura di installazione particolare.
NOTA
Questo driver andrebbe utilizzato nel caso in cui non fosse disponibile undriver ASIO specifico. Sebbene il Driver ASIO generico a bassa latenzasupporti qualsiasi tipo e modello di periferiche audio, si potrebberoottenere dei risultati migliori se usato con schede audio integrate piuttostoche con interfacce audio USB esterne.
Driver Mac OS X (solo Mac)
Se si usa un computer Macintosh, assicurarsi di utilizzare per l’hardwareaudio i driver Mac OS X più recenti. Per installare i driver seguire leistruzioni del costruttore.
52

Requisiti di sistema e installazioneConfigurazione del sistema
Testare l’hardware audio
Per assicurarsi che la periferica audio funzioni correttamente, occorreeseguire i seguenti test.
• Utilizzare il software di controllo fornito con la periferica audio perassicurarsi di riuscire a registrare e riprodurre l’audio senza problemi.
• Se si esegue l’accesso all’hardware audio tramite un driver standarddel sistema operativo, provare a riprodurre l’audio con l’applicazioneaudio standard del computer (ad esempio Windows Media Player oiTunes di Apple).
Installare un’interfaccia MIDI o una tastiera MIDI USB
Sebbene molti modelli di tastiere MIDI USB e interfacce MIDI sianoplug and play, potrebbe essere necessario installare un driver dedicato.Si prega di seguire le procedure di installazione descritte nelladocumentazione fornita con la periferica.
NOTA
Si raccomanda di consultare il sito web del costruttore per verificare ladisponibilità di driver più aggiornati.
Configurazione del sistema
Selezionare il driver per la propria periferica audio
Prima di poter configurare le assegnazioni dei segnali audio e iniziarea registrare, è necessario assicurarsi che sia selezionato il driver ASIOcorretto.
53

Requisiti di sistema e installazioneConfigurazione del sistema
PROCEDIMENTO
1. Selezionare Periferiche > Impostazioni periferiche.
2. Nella finestra di dialogo Impostazioni periferiche, fare clic sulla voceVST Audio System sulla sinistra.A destra viene visualizzata la pagina VST Audio System.
3. Dal menu a tendina Driver ASIO, selezionare il driver che si desiderautilizzare.
4. Fare clic su OK.
Configurare le connessioni VST
La finestra di dialogo Connessioni VST consente di configurarel’assegnazione dei segnali di ingresso e uscita tra Cubase e il propriohardware audio. Queste connessioni sono chiamate bus. In questasezione vengono descritte le modalità di configurazione dei bus per laregistrazione e per la riproduzione audio.
Rimuovere i bus
Prima di aggiungere dei bus, si raccomanda di rimuovere qualsiasi uscitache era stata aggiunta automaticamente da parte di Cubase.
PROCEDIMENTO
1. Selezionare Periferiche > Connessioni VST.
2. Nella finestra di dialogo Connessioni VST, selezionare la schedaUscite.
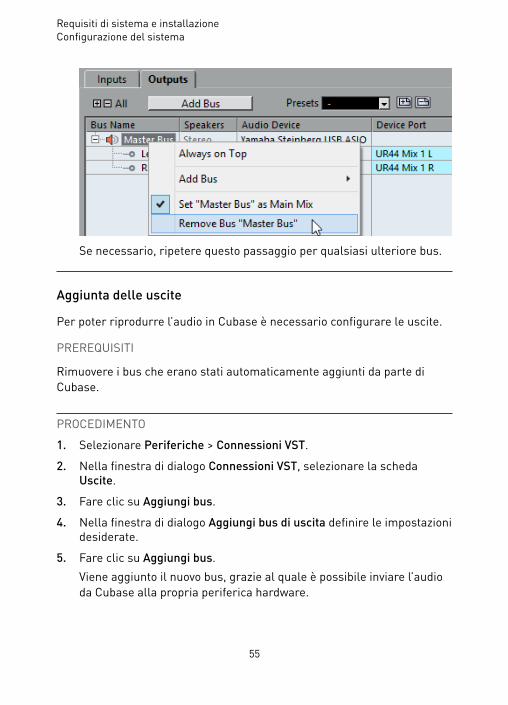
3. Nella colonna Nome bus, fare clic destro sulla prima voce in alto eselezionare Elimina bus dal menu contestuale.
54
Requisiti di sistema e installazioneConfigurazione del sistema
Se necessario, ripetere questo passaggio per qualsiasi ulteriore bus.
Aggiunta delle uscite
Per poter riprodurre l’audio in Cubase è necessario configurare le uscite.
PREREQUISITI
Rimuovere i bus che erano stati automaticamente aggiunti da parte diCubase.
PROCEDIMENTO
1. Selezionare Periferiche > Connessioni VST.
2. Nella finestra di dialogo Connessioni VST, selezionare la schedaUscite.
3. Fare clic su Aggiungi bus.
4. Nella finestra di dialogo Aggiungi bus di uscita definire le impostazionidesiderate.
5. Fare clic su Aggiungi bus.Viene aggiunto il nuovo bus, grazie al quale è possibile inviare l’audioda Cubase alla propria periferica hardware.
55

Requisiti di sistema e installazioneConfigurazione del sistema
6. Opzionale: Se si desidera modificare le porte di uscita che eranostate selezionate automaticamente, aprire il menu a tendina Portaperiferica e selezionare delle porte differenti.
A seconda della periferica audio utilizzata, potrebbero esseredisponibili più di due porte di uscita. Nella maggior parte dei casi, siraccomanda di utilizzare le uscite stereo principali.
LINK CORRELATIRimuovere i bus a pag. 54
Aggiunta degli ingressi
È necessario configurare gli ingressi per poter eseguire una registrazionein Cubase.
PROCEDIMENTO
1. Selezionare Periferiche > Connessioni VST.
2. Nella finestra di dialogo Connessioni VST, selezionare la schedaIngressi.
3. Nella colonna Nome bus, fare clic destro sulla prima voce in alto eselezionare Elimina bus dal menu contestuale.Se necessario, ripetere questo passaggio per qualsiasi ulteriore bus.
56

Requisiti di sistema e installazioneConfigurazione del sistema
4. Fare clic su Aggiungi bus.
5. Nella finestra di dialogo Aggiungi bus di ingresso definire leimpostazioni desiderate.
6. Fare clic su Aggiungi bus.Viene aggiunto il nuovo bus, tramite il quale è possibile inviare aCubase l’audio proveniente dall’ingresso della propria periferica audioper la registrazione.
7. Opzionale: Se si desidera modificare le porte di ingresso che eranostate selezionate automaticamente, aprire il menu a tendina Portaperiferica e selezionare le porte desiderate.
RISULTATO
Siete ora pronti per registrare e riprodurre l’audio in Cubase.
NOTA
Per muovere i primi passi con Cubase, si raccomanda di visionare i videotutorial di introduzione alle nuove funzioni di Cubase, disponibili sul canaleSteinberg di YouTube.
57

Español

Cristina Bachmann, Heiko Bischoff, Christina Kaboth, Insa Mingers,Matthias Obrecht, Sabine Pfeifer, Benjamin Schütte, Marita Sladek
Traducción por Josep Llodrá
Este PDF ofrece un acceso mejorado para usuarios con problemas devisión. Por favor, tenga en cuenta que debido a la complejidad y al númerode imágenes en este documento, no es posible incluir textos descriptivos alas imágenes.
La información en este documento está sujeta a cambios sin notificaciónprevia y no representa un compromiso por parte de Steinberg MediaTechnologies GmbH. El software descrito en este documento está sujetoal Acuerdo de Licencia y no se puede copiar a otros medios excepto queesté permitido específicamente en el Acuerdo de Licencia. Ninguna partede esta publicación se puede copiar, reproducir, retransmitir o grabar,bajo ningún propósito, sin previo permiso escrito de Steinberg MediaTechnologies GmbH. Los titulares de una licencia registrada del productodescrito aquí pueden imprimir una copia de este documento para su usopersonal.
Todos los nombres de productos y compañías son marcas registradas ™ o® por sus respectivos propietarios. Para más información, visite por favorwww.steinberg.net/trademarks.© Steinberg Media Technologies GmbH, 2016.
Todos los derechos reservados.

Tabla de Contenidos
61 Introducción61 Acerca de la documentación61 Comandos de teclado61 Convenciones62 Cómo puede contactar con nosotros63 Requisitos del sistema e instalación63 Requisitos de sistema64 Instalar el programa64 Activar su licencia65 Instalación del hardware67 Configuración de sistema
60
Introducción
Acerca de la documentación• La documentación de este producto se encuentra en
www.steinberg.help.
Comandos de tecladoMuchos de los comandos de teclado usan teclas modificadoras, algunasde ellas son diferentes dependiendo del sistema operativo.
Por ejemplo, el comando de teclado por defecto para Deshacer es Ctrl-Zen Windows y Cmd-Z en Mac OS. Cuando se describen en este manual loscomandos de teclado con teclas modificadoras, se muestran primero conla tecla modificadora de Windows, de la siguiente manera:
• Tecla modificadora de Windows/tecla modificadora de Mac OS-tecla
EJEMPLO
Ctrl/Cmd-Z significa: pulsar Ctrl en Windows o Cmd en Mac OS, luegopulsar Z.
ConvencionesEn nuestra documentación usamos elementos tipográficos y marcas paraestructurar la información.
61

IntroducciónCómo puede contactar con nosotros
Cómo puede contactar con nosotrosEn el menú Steinberg Hub de Cubase encontrará elementos que enlazan ainformación adicional.
El menú contiene enlaces a varias páginas web de Steinberg. El hecho deseleccionar un elemento del menú abre automáticamente su navegadorweb y carga la página. En estas páginas puede encontrar información desoporte y compatibilidad, respuestas a preguntas frecuentes, informaciónacerca de actualizaciones y otros productos de Steinberg, etc. Esnecesario que tenga instalado un navegador web en su ordenador, ytambién una conexión a internet que funcione.
62

Requisitos del sistema e instalación
Requisitos de sistemaSu ordenador debe cumplir con los siguientes requisitos mínimos para lasversiones Windows y Mac OS de Cubase:
Windows 7/8.x/10 de 64 bits— OS X10.11/macOS Sierra• Procesador multinúcleo Intel o AMD de 64 bits (Intel i5 o más rápido
recomendado)• 4 GB de RAM (8 GB o más recomendado)• 12 GB de espacio libre en el disco duro• Resolución de pantalla de 1366 x 768 (1920 x 1080 recomendado)• Tarjeta gráfica con soporte para DirectX 10 y WDDM 1.1 (solo
Windows)• Tarjeta de audio compatible con el sistema operativo (se recomienda
una tarjeta de audio compatible con ASIO para un rendimiento de bajalatencia)
• Unidad DVD ROM de doble capa (si no usa la versión descargable)• Se requiere conexión a internet para la activación, configuración de la
cuenta y registro personal/del producto. Es posible que se necesitendescargas adicionales para la instalación.
Para recomendaciones de sistemas y soporte para futurossistemas operativos, vea la sección de Soporte en nuestro sitio webwww.steinberg.net por favor.
63

Requisitos del sistema e instalaciónInstalar el programa
Instalar el programa
Arrancar instalación
PROCEDIMIENTO
1. Haga doble clic en Empezar instalación.
2. Siga las instrucciones en la pantalla.
Activar su licenciaDebe activar su licencia.
PREREQUISITO
Usted dispone de una conexión a internet y de un código de activación paradescargar su licencia a su eLicenser.
NOTA
Puede encontrar el código de activación de la licencia en un correoelectrónico si compró su producto a través de la tienda en línea deSteinberg, o en la hoja de información esencial de la licencia del productosi su producto le fue entregado en un medio de instalación.
PROCEDIMIENTO
1. Visite la página www.steinberg.net/activate para informaciónacerca de la activación.
2. Siga las instrucciones en la pantalla.
RESULTADO
La licencia se descarga a su eLicenser y se activa.
64

Requisitos del sistema e instalaciónInstalación del hardware
Instalación del hardware
Instalar el hardware de audio y sus controladores
PROCEDIMIENTO
1. Instale la tarjeta de audio y el hardware relacionado en el ordenador,tal como se describe en la documentación de la tarjeta.
2. Instale el controlador para la tarjeta de audio.Un controlador es un componente de software que permite a unprograma comunicarse con un determinado hardware. En estecaso, el controlador permite que Cubase utilice la tarjeta de sonido.Dependiendo del sistema operativo de su ordenador, hay diferentestipos de controladores que se pueden usar.
Controladores ASIO dedicados
Las tarjetas de audio profesionales vienen a menudo con un controladorASIO diseñado especialmente para el dispositivo. Esto permite lacomunicación directa entre Cubase y la tarjeta de sonido. Como resultado,los dispositivos con controladores ASIO específicos pueden proporcionaruna latencia menor (retardo de entrada-salida), lo que es fundamentalal monitorizar audio a través de Cubase o al usar instrumentos VST.El controlador ASIO también puede ofrecer un soporte especial paramúltiples entradas y salidas, enrutamiento, sincronización, etc.
Los controladores ASIO los proporcionan los fabricantes de tarjetas deaudio. Asegúrese de comprobar el sitio web del fabricante para obtenerlas versiones más recientes del controlador.
IMPORTANTE
Si su hardware de audio viene con un controlador ASIO específico, lerecomendamos que lo utilice.
65
Requisitos del sistema e instalaciónInstalación del hardware
Controlador Generic Low Latency ASIO (solo Windows)
En sistemas Windows, puede usar el controlador Generic Low LatencyASIO (controlador de ASIO genérico de baja latencia). Este controladorASIO proporciona soporte ASIO para cualquier tarjeta de audio soportadapor Windows, permitiendo por tanto una baja latencia. El controladorGeneric Low Latency ASIO Driver proporciona la tecnología Core Audiode Windows a Cubase. No se requiere ningún controlador adicional. Estecontrolador se incluye con Cubase y no requiere ninguna instalaciónespecial.
NOTA
Use este controlador si no hay ningún controlador ASIO específicodisponible. Aunque el controlador Generic Low Latency ASIO soporta todoslos dispositivos de audio, quizás obtenga mejores resultados con tarjetasinternas que con interfaces de audio USB externas.
Controladores Mac OS X (solo Mac)
Si está usando un ordenador Macintosh, asegúrese de que está usando laúltima versión de los controladores Mac OS X con su tarjeta de audio. Sigalas instrucciones del fabricante para instalar el controlador.
Probar la tarjeta de audio
Para asegurarse de que el dispositivo de audio funciona perfectamente,realice las siguientes pruebas.
• Utilice cualquier software incluido junto con la tarjeta para asegurarsede que es posible grabar y reproducir audio sin problemas.
• Si el acceso a la tarjeta se realiza a través de un controlador estándardel sistema operativo, intente reproducir la señal de audio usando laaplicación de sonido estándar del sistema operativo, Windows MediaPlayer o Apple iTunes, por ejemplo.
66

Requisitos del sistema e instalaciónConfiguración de sistema
Instalar una interfaz MIDI o un teclado MIDI USB
Aunque muchos teclados MIDI USB e interfaces MIDI son dispositivosplug&play, puede que tenga que instalar un controlador dedicadopara el dispositivo. Siga el procedimiento de instalación descrito en ladocumentación que vino con su dispositivo.
NOTA
También debería comprobar el sitio web del fabricante para ver si hayactualizaciones más recientes de los controladores.
Configuración de sistema
Seleccionar el controlador para su tarjeta de audio
Antes de poder configurar el enrutamiento de sus señales de audio ycomenzar a grabar, es necesario que se asegure de que está seleccionadoel controlador ASIO correcto.
PROCEDIMIENTO
1. Seleccione Dispositivos > Configuración de dispositivos.
2. En el diálogo Configuración de dispositivos, haga clic en la entradaSistema de audio VST a la izquierda.La página Sistema de audio VST se muestra a la derecha.
3. En el menú emergente Controlador ASIO, seleccione el controladorque quiera usar.
4. Haga clic en Aceptar.
67

Requisitos del sistema e instalaciónConfiguración de sistema
Configurar las conexiones VST
El diálogo Conexiones VST le permite configurar el enrutamiento de lasseñales de entrada y de salida entre Cubase y su tarjeta de audio. Estasconexiones se llaman buses. En esta sección aprende a cómo configurarlos buses para la reproducción y la grabación.
Eliminar buses
Antes de añadir buses, se le recomienda eliminar cualquier salida queCubase hubiera añadido automáticamente.
PROCEDIMIENTO
1. Seleccione Dispositivos > Conexiones VST.
2. En el diálogo Conexiones VST, seleccione la pestaña Salidas.
3. En la columna Nombre de bus, haga clic derecho en la primeraentrada y seleccione Eliminar bus en el menú contextual.
Si fuese necesario repita esta acción para los demás buses.
68

Requisitos del sistema e instalaciónConfiguración de sistema
Añadir salidas
Debe configurar las salidas para reproducir audio en Cubase.
PREREQUISITO
Elimine los buses que Cubase añadió automáticamente.
PROCEDIMIENTO
1. Seleccione Dispositivos > Conexiones VST.
2. En el diálogo Conexiones VST, seleccione la pestaña Salidas.
3. Haga clic en Añadir bus.
4. En el diálogo Añadir bus de salida, haga sus ajustes.
5. Haga clic en Añadir bus.Se añade el nuevo bus, permitiéndole tener audio en Cubase enrutadoa su tarjeta de audio.
6. Opcional: Si quiere cambiar los puertos de salida que seseleccionaron automáticamente, abra el menú emergente Puerto deldispositivo y seleccione puertos diferentes.
69

Requisitos del sistema e instalaciónConfiguración de sistema
Dependiendo de su tarjeta de audio, puede tener disponibles más dedos puertos de salida. En la mayoría de los casos recomendamos queuse las salidas estéreo principales.
VÍNCULOS RELACIONADOSEliminar buses en la página 68
Añadir entradas
Debe configurar las entradas para grabar en Cubase.
PROCEDIMIENTO
1. Seleccione Dispositivos > Conexiones VST.
2. En el diálogo Conexiones VST, seleccione la pestaña Entradas.
3. En la columna Nombre de bus, haga clic derecho en la primeraentrada y seleccione Eliminar bus en el menú contextual.Si fuese necesario repita esta acción para los demás buses.
4. Haga clic en Añadir bus.
5. En el diálogo Añadir bus de entrada, haga sus ajustes.
6. Haga clic en Añadir bus.Se añade el nuevo bus, permitiéndole enrutar audio de la entrada desu dispositivo de audio a Cubase para su grabación.
7. Opcional: Si quiere cambiar los puertos de entrada que seseleccionaron automáticamente, abra el menú emergente Puerto deldispositivo y seleccione puertos diferentes.
RESULTADO
Ahora está preparado para grabar audio en Cubase y reproducirlo.
70
Requisitos del sistema e instalaciónConfiguración de sistema
NOTA
Para empezar con Cubase, le recomendamos vea los tutoriales de videodel canal YouTube de Steinberg que incluyen una demostración de lasnuevas características de Cubase.
71

⽇本語

Cristina Bachmann, Heiko Bischoff, Christina Kaboth, Insa Mingers,Matthias Obrecht, Sabine Pfeifer, Benjamin Schütte, Marita Sladek
この PDF マニュアルでは、⽬の不⾃由な⽅のための⾼度なアクセシビリティ機能を提供しています。このマニュアルは複雑かつ多くの 図が使⽤されているため、図の説明は省略されていることをご了承ください。
本書の記載事項は、Steinberg Media Technologies GmbH 社によって予告なしに変更されることがあり、同社は記載内容に対する責任を 負いません。 本書に掲載されている画⾯は、すべて操作説明のためのもので、実際の画⾯と異なる場合があります。本書で取扱われているソフトウェアは、ライセンス契約に基づいて供与されるもので、ソフトウェアの複製は、ライセンス契約の範囲内でのみ許可されます (バックアッ プコピー)。 Steinberg Media Technologies GmbH 社の書⾯による承諾がない限り、⽬的や形式の如何にかかわらず、本書のいかなる部分も記録、複製、翻訳することは禁じられています。本製品のライセンス所有者は、個⼈利⽤⽬的に限り、本書を 1 部複製することができます。
本書に記載されている製品名および会社名は、すべて各社の商標、および登録商標です。© Steinberg Media Technologies GmbH, 2016.
All rights reserved.

⽬次
75 はじめに75 マニュアルについて75 キーボードショートカット75 表記規則76 Steinberg 社の Web サイトへのアクセス⽅法77 システム要件とインストール77 最⼩システム要件78 プログラムのインストール78 ライセンスのアクティベート79 ハードウェアの取り付け82 システム設定
74

はじめに
マニュアルについて• 本製品のマニュアルはwww.steinberg.helpで⼊⼿できます。
キーボードショートカット初期設定のキーボードショートカットの多くは修飾キーを使⽤しますが、修飾キーの⼀部はオペレーティングシステムによって異なります。
たとえば、取り消し操作のデフォルトキーボードショートカットはWindows の場合、[Ctrl]+[Z] ですが、Mac OS では [command]+[Z] です([command] はアップルマークのついたキー)。本書では、修飾キーを伴うキーボードショートカットを記述する場合、まず Windows の修飾キーを挙げ、次のように記載します。
• [Windows 修飾キー]/[Mac OS 修飾キー]+[キー]
例
[Ctrl]/[command]+[Z] と記載されている場合、Windows では [Ctrl]キー、Mac OS では [command] キーを押したままで、[Z] キーを押すことを指しています。
表記規則本書では、表記上の要素およびマークアップを使⽤して説明しています。
75

はじめにSteinberg 社の Web サイトへのアクセス⽅法
Steinberg 社の Web サイトへのアクセス⽅法Cubase の「Hub」メニューから追加情報にアクセスできます。
このメニューには、Steinberg 社のさまざまな Web サイトへのリンクが表⽰されます。いずれかのメニューを選択すると、ブラウザーが⾃動的に起動し、該当のページが開きます。製品に関するサポートや互換性の情報、FAQ、更新情報、他の Steinberg 製品の情報などにアクセスできます。Web サイトにアクセスするには、コンピューターに Web ブラウザーがインストールされ、インターネットに接続されている必要があります。
76

システム要件とインストール
最⼩システム要件Windows/Mac OS 版の Cubase をインストールするには、コンピューターが以下の最⼩システム要件を満たす必要があります。
64 ビット版 Windows 7/8.x/10 — OS X 10.11/Mac Sierra• 64 ビット Intel/AMD マルチコア CPU (Intel Core i5 以上推奨)• 4 GB の RAM (8 GB 以上推奨)• 12 GB の HD 空き容量• 1366 x 768 のディスプレイ解像度 (1920 x 1080 推奨)• DirectX 10 および WDDM 1.1 に対応するグラフィックスカード
(Windows のみ)• OS 互換のオーディオデバイス (低レイテンシーのパフォーマンスには
ASIO 準拠のオーディオデバイス推奨)• デュアルレイヤー対応 DVD-ROM ドライブ (ダウンロード版を使⽤し
ない場合)• インターネット接続環境 (アクティベーション、アカウント設定、お
よびユーザー/製品登録⽤)。インストール時に、追加のダウンロードが必要になる場合があります。
推奨システムおよび今後のオペレーティングシステムのサポートについては、Steinberg 社の Web サイト (www.steinberg.net) の「サポート(Support)」セクションを参照してください。
77

システム要件とインストールプログラムのインストール
プログラムのインストール
インストール
⼿順1. 「インストール (Start Installation)」をダブルクリックします。2. 画⾯に表⽰される指⽰に従って操作します。
ライセンスのアクティベートライセンスをアクティベートする必要があります。
前提
インターネットに接続できることを確認し、eLicenser にライセンスをダウンロードするためのアクティベーションコードを準備します。
補⾜
アクティベーションコードは、Steinberg Online Shop で製品を購⼊した場合、Steinberg 社から送られた電⼦メールに記載されています。インストールメディアで購⼊した場合は、同梱の「Essential Product LicenseInformation」シートに記載されています。
⼿順1. アクティベートの詳細についてはwww.steinberg.net/
activateにアクセスしてください。2. 画⾯に表⽰される指⽰に従って操作します。
78

システム要件とインストールハードウェアの取り付け
結果
ライセンスが eLicenser にダウンロードされ、アクティベートされます。
ハードウェアの取り付け
オーディオデバイスの取り付けとドライバーのインストール
⼿順1. 各ハードウェアのマニュアルを参照して、オーディオデバイスと関連
機器をコンピューターに取り付けます。2. オーディオデバイスのドライバーをインストールします。
ドライバーは、プログラムが特定のハードウェアと通信するのに必要なソフトウェアです。Cubase では、オーディオデバイスを使⽤するのにドライバーが必要です。ご使⽤のオペレーティングシステムによって、使⽤できるドライバーの種類が異なります。ハードウェアによっては、ドライバーをインストールしてからコンピューターに接続するものもあります。詳しくは、各ハードウェアのマニュアルをご参照ください。
専⽤の ASIO ドライバー
プロ⽤オーディオデバイスの多くには、デバイス専⽤に作成された ASIOドライバーが付属しています。このドライバーによって、Cubase がオーディオデバイスと直接通信できます。そのため、専⽤の ASIO ドライバーを使⽤するデバイスは、レイテンシー (⼊出⼒の遅れ) が低くなります。これは、Cubase でオーディオをモニタリングしたり、VST インストゥルメントを使⽤したりするのに⾮常に重要です。ASIO ドライバーは、複数の⼊出⼒、ルーティング、同期などの特別なサポートを提供する場合もあります。
79
システム要件とインストールハードウェアの取り付け
ASIO ドライバーは、オーディオデバイスのメーカーが提供します。メーカーの Web サイトでドライバーの最新バージョンを確認してください。
重要
オーディオデバイスに専⽤の ASIO ドライバーが付属している場合、それを使⽤してください。
Generic Low Latency ASIO Driver (Windows のみ)
Windows システムでは、Generic Low Latency ASIO Driver を使⽤できます。このドライバーでは、Windows でサポートされているすべてのオーディオデバイスの ASIO サポートが提供され、低レイテンシーを実現できます。Generic Low Latency ASIO Driver は、Cubase に Windows CoreAudio テクノロジーを提供します。追加のドライバーは不要です。このドライバーは Cubase に付属しており、ほかに特別なソフトウェアをインストールする必要はありません。
補⾜
このドライバーは、専⽤の ASIO ドライバーがない場合に使⽤します。Generic Low Latency ASIO Driver ではすべてのオーディオデバイスがサポートされていますが、内蔵型オーディオカードの⽅が外付けの USBオーディオインターフェースよりパフォーマンスが⾼くなります。
Mac ドライバー (macOS のみ)
Mac コンピューターを使⽤している場合、オーディオデバイス⽤の最新の Mac ドライバーを使⽤していることを確認してください。ドライバー
80

システム要件とインストールハードウェアの取り付け
のインストール⽅法については、メーカーのマニュアルを参照してください。
オーディオデバイスのテスト
オーディオデバイスが適切に動作しているかどうかを確認するには、以下のテストを⾏ないます。
• デバイスに付属するソフトウェアを使⽤して、オーディオの録⾳および再⽣が問題なくできることを確認します。
• オペレーティングシステム標準のドライバーでデバイスにアクセスしている場合、Windows Media Player や Apple iTunes などのコンピューターの標準オーディオアプリケーションを使⽤して、オーディオを再⽣してみます。
MIDI インターフェースまたは USB MIDI キーボードの接続
多くの USB MIDI キーボードや MIDI インターフェースはプラグアンドプレイに対応していますが、専⽤のデバイスドライバーのインストールが必要な場合があります。インストール⼿順については、そのデバイスのマニュアルを参照してください。
補⾜
メーカーの Web サイトでドライバーの最新バージョンを確認してください。
81

システム要件とインストールシステム設定
システム設定
オーディオデバイス⽤ドライバーの選択
オーディオ信号のルーティングを設定して録⾳を開始する前に、正しいASIO ドライバーが選択されていることを確認する必要があります。
⼿順1. 「デバイス (Devices)」 > 「デバイス設定 (Device Setup)」を選択しま
す。2. 「デバイス設定 (Device Setup)」ダイアログで、左側にある「VST
オーディオシステム (VST Audio System)」エントリーをクリックします。右側に、「VST オーディオシステム (VST Audio System)」ページが表⽰されます。
3. 「ASIO ドライバー (ASIO Driver)」ポップアップメニューから、使⽤するドライバーを選択します。
4. 「OK」をクリックします。
VST コネクションの設定
「VST コネクション (VST Connections)」ダイアログでは、Cubase とオーディオデバイス間の⼊出⼒信号のルーティングを設定できます。このよう
82

システム要件とインストールシステム設定
なオーディオ信号の流れる経路を「バス」といいます。この項では、再⽣と録⾳⽤のバスを設定する⽅法を説明します。
バスの削除
バスを追加する前に、Cubase.によって⾃動的に追加されたすべての出⼒バスを削除しておくことをおすすめします。
⼿順1. 「デバイス (Devices)」 > 「VST コネクション (VST Connections)」を
選択します。2. 「VST コネクション (VST Connections)」ダイアログで、「出⼒
(Outputs)」タブを選択します。3. 「バス名 (Bus Name)」コラムで最上位エントリーを右クリックし、
コンテキストメニューから「バスを削除 (Remove Bus)」を選択します。
必要に応じて、その他のバスにもこの⼿順を繰り返します。
83

システム要件とインストールシステム設定
出⼒バスの追加
Cubase でオーディオを再⽣するための出⼒バスを設定する必要があります。
前提
Cubase によって⾃動的に追加されたバスを削除します。
⼿順1. 「デバイス (Devices)」 > 「VST コネクション (VST Connections)」を
選択します。2. 「VST コネクション (VST Connections)」ダイアログで、「出⼒
(Outputs)」タブを選択します。3. 「バスを追加 (Add Bus)」をクリックします。4. 「出⼒バスを追加 (Add Output Bus)」ダイアログで、設定を⾏ないま
す。5. 「バスを追加 (Add Bus)」をクリックします。
新しいバスが追加され、Cubase のオーディオをオーディオデバイスにルーティングできます。
6. ⾃動的に選択された出⼒ポートを変更したい場合は、「デバイスポート (Device Port)」ポップアップメニューを開き、別のポートを選択します。
84

システム要件とインストールシステム設定
オーディオデバイスによっては、3 つ以上の出⼒ポートを使⽤できる場合があります。ほとんどの場合、メインのステレオ出⼒を使⽤することをおすすめします。
関連リンクバスの削除 (83 ページ)
⼊⼒バスの追加
Cubase.に録⾳するための⼊⼒バスを設定する必要があります。
⼿順1. 「デバイス (Devices)」 > 「VST コネクション (VST Connections)」を
選択します。2. 「VST コネクション (VST Connections)」ダイアログで、「⼊⼒
(Inputs)」タブを選択します。3. 「バス名 (Bus Name)」コラムで最上位エントリーを右クリックし、
コンテキストメニューから「バスを削除 (Remove Bus)」を選択します。必要に応じて、その他のバスにもこの⼿順を繰り返します。
4. 「バスを追加 (Add Bus)」をクリックします。
85

システム要件とインストールシステム設定
5. 「⼊⼒バスを追加 (Add Input Bus)」ダイアログで、設定を⾏ないます。
6. 「バスを追加 (Add Bus)」をクリックします。新しいバスが追加され、オーディオデバイスから⼊⼒したオーディオを、録⾳⽤に Cubase にルーティングできます。
7. ⾃動的に選択された⼊⼒ポートを変更したい場合は、「デバイスポート (Device Port)」ポップアップメニューを開き、別のポートを選択します。
結果
これで、Cubase でオーディオを録⾳および再⽣する準備ができました。
補⾜
Cubase を使⽤する前に、YouTube の Steinberg チャンネルでチュートリアル動画を観ることをおすすめします。このチャンネルでは、Cubase の新機能のデモなども観られます。
86

Português

Cristina Bachmann, Heiko Bischoff, Christina Kaboth, Insa Mingers,Matthias Obrecht, Sabine Pfeifer, Benjamin Schütte, Marita Sladek
Rosa Freitag
Este PDF fornece acesso melhorado para usuários com dificuldade devisão. Observe que, devido à complexidade e ao número de imagens nestedocumento, não é possível incluir descrições em texto das imagens.
As informações neste documento estão sujeitas a alterações sem avisoprévio e não representam um compromisso por parte da Steinberg MediaTechnologies GmbH. O software descrito por este documento está sujeitoa um Acordo de Licença e não pode ser copiado para outras mídias, salvose especificamente permitido no Acordo de Licença. Nenhuma parte destapublicação pode ser copiada, reproduzida, transmitida ou gravada, paraqualquer finalidade, sem a permissão prévia por escrito da SteinbergMedia Technologies GmbH. Os licenciados registrados do produto aquidescrito podem imprimir uma cópia deste documento para uso pessoal.
Todos os nomes de produtos e empresas são marcas comerciais ™ou ® de seus respectivos proprietários. Para mais informações, visitewww.steinberg.net/trademarks.© Steinberg Media Technologies GmbH, 2016.
Todos os direitos reservados.

Sumário
90 Introdução90 Sobre a documentação90 Comandos de teclas90 Convenções91 Como entrar em contato conosco92 Requisitos de sistema e instalação92 Requisitos de sistema93 Instalando o programa93 Ativando sua licença94 Instalação de hardware96 Configuração do sistema
89
Introdução
Sobre a documentação• A documentação para este produto é fornecida
emwww.steinberg.help.
Comandos de teclasVários comandos de teclas padrão usam teclas modificadoras, algumasdelas diferentes de acordo com o sistema operacional.
Por exemplo, o comando de tecla padrão para Desfazer éCtrl-ZnoWindows e Cmd-Z noMac OS. Quando comandos de teclas com teclasmodificadoras são descritos neste manual, eles são mostrados primeirocom a tecla modificadora do Windows, da seguinte maneira:
• Windows tecla modificadora/Mac OS modificador tecla-tecla
EXEMPLO
Ctrl/Cmd-Z significa: pressione Ctrl noWindows ou Cmd no Mac OS,depois pressione Z.
ConvençõesEm nossa documentação, usamos elementos tipográficos e marcaçõespara estruturar informações.
90

IntroduçãoComo entrar em contato conosco
Como entrar em contato conoscoNo menu Steinberg Hub no Cubase há itens com links para informaçõesadicionais.
O menu contém links para várias páginas do site da Steinberg. Aoselecionar um item do menu, o navegador automaticamente é iniciado eabre a página. Nessas páginas você encontra informações de suporte ecompatibilidade, respostas a perguntas frequentes, informações sobreatualizações e outros produtos Steinberg, etc. Isso requer um navegadorda Web instalado no computador e uma conexão ativa com a Internet.
91

Requisitos de sistema e instalação
Requisitos de sistemaO seu computador deve atender aos requisitos mínimos a seguir para asversões para Windows e Mac OS do Cubase:
64-bit Windows 7/8.x/10— OS X 10.11/macOS Sierra• Intel 64 bits ou AMD com CPU multicore (Intel i5 ou mais rápido é
recomendado)• 4 GB RAM (8 GB ou mais recomendados)• 12 GB de espaço livre no HD• Resolução da tela de 1366 x 768 (1920 x 1080 é recomendada)• Placa gráfica com DirectX 10 e suporte a WDDM 1.1 (Somente
Windows)• Hardware de áudio compatível com o OS (hardware de áudio
compatível com ASIO é recomendado para desempenho com baixalatência)
• Unidade de DVD ROM de camada dupla (se você não usar a versão dedownload)
• Conexão com a Internet necessária para ativação, configuração daconta e registro pessoal/do produto. Downloads adicionais poderãoser necessários para a instalação.
Para sistemas recomendados e suporte de futuros sistemas operacionais,consulte a seção Support em nosso website www.steinberg.net.
92
Requisitos de sistema e instalaçãoInstalando o programa
Instalando o programa
Iniciando a instalação
PROCEDIMENTO
1. Clique duas vezes em Iniciar instalação.
2. Siga as instruções na tela.
Ativando sua licençaÉ necessário ativar sua licença.
PRÉ-REQUISITO
Você tem uma conexão ativa com a Internet e um código de ativação parabaixar sua licença para o seu eLicenser.
OBSERVAÇÃO
Você encontra o código de ativação da licença em um email. se comprouseu produto através da loja online Steinberg, ou na fola InformaçõesEssenciais sobre Licença de Produto, se o produto foi fornecido em umamídia de instalação.
PROCEDIMENTO
1. Acesse www.steinberg.net/activate para obter informaçõessobre ativação.
2. Siga as instruções na tela.
RESULTADO
A licença será baixada para o eLicenser e ativada.
93

Requisitos de sistema e instalaçãoInstalação de hardware
Instalação de hardware
Instalando o hardware de áudio e seu driver
PROCEDIMENTO
1. Instale o hardware de áudio e equipamentos associados nocomputador confirme descrito na documentação do hardware.
2. Instalando o driver para o hardware de áudio.Um driver é um software que permite que um programa secomunique com um determinado hardware. Neste caso, o driverpermite que o Cubase use o hardware de áudio. Dependendo dosistema operacional do seu computador, há diferentes tipos de driversque podem ser usados.
Drivers ASIO dedicados
Equipamentos de áudio profissional costumam vir com um driverASIO desenvolvido especialmente para o dispositivo. Isso permitea comunicação direta entre o Cubase e o hardware de áudio. Comoresultado, os dispositivos com drivers ASIO específicos podemproporcionar menor latência (atraso de entrada-saída), que é fundamentalao monitorar áudio através do Cubase ou usando instrumentos VST. Odriver ASIO também pode oferecer suporte especial para várias entradas esaídas, roteamento, sincronização, etc.
Drivers ASIO são fornecidos pelos fabricantes de hardware de áudio.Verifique no site do fabricante as versões mais recentes dos drivers.
IMPORTANTE
Se o seu hardware de áudio vem com um driver ASIO específico,recomendamos o uso do mesmo.
94

Requisitos de sistema e instalaçãoInstalação de hardware
Driver ASIO genérico de baixa latência (somente Windows)
Em sistemas Windows, você pode usar o driver ASIO genérico de baixalatência. Esse driver oferece suporte a ASIO para qualquer hardware deáudio suportado pelo Windows, assim possibilitando a baixa latência. Odriver ASIO genérico de baixa latência oferece a tecnologia WindowsCoreAudio no Cubase. Não é necessário um driver adicional. Esse driveracompanha o Cubase e não requer instalação especial.
OBSERVAÇÃO
Esse driver deve ser usado se não estiver disponível um driver ASIOespecífico. Embora o driver ASIO genérico de baixa latência ofereçasuporte a todos os dispositivos de áudio, talvez você obtenha melhoresresultados com placas de áudio internas do que com interfaces de áudioUSB externas.
macOS Drivers (somente macOS)
Se você está usando um computador Macintosh, certifique-se de ter osdrivers mais recentes para macOS para o seu hardware de áudio. Siga asinstruções do fabricante para instalar o driver.
Testando o hardware de áudio
Para assegurar que o dispositivo de áudio funcione conforme o esperado,faça os testes a seguir.
• Use qualquer software incluso com o hardware para certificar-se deque você consegue gravar e reproduzir áudio sem problemas.
• Se o hardware for acessado através de um driver de sistemaoperacional padrão, experimente reproduzir áudio usando o aplicativode áudio padrão do computador, como Windows Media Player ou AppleiTunes.
95

Requisitos de sistema e instalaçãoConfiguração do sistema
Instalando uma interface MIDI ou um teclado USB MIDI
Embora vários teclados USB MIDI e interfaces MIDI sejam dispositivosplug-and-play, talvez seja preciso instalar um driver de dispositivodedicado. Siga o procedimento de instalação descrito na documentaçãoque acompanha o dispositivo.
OBSERVAÇÃO
Verifique também no site do fabricante as versões mais recentes dosdrivers.
Configuração do sistema
Seleção do driver para o seu dispositivo de áudio
Antes de configurar o roteamento para os sinais de áudio e iniciar asgravações, é necessário selecionar o driver ASIO correto.
PROCEDIMENTO
1. Selecione Dispositivos > Configuração de dispositivo.
2. Na caixa de diálogo Configuração de dispositivo clique â esquerda emSistema de áudio VST.A página Sistema de áudio VST é exibida à direita.
3. No menu suspenso Driver ASIO, selecione o driver que deseja usar.
4. Clique em OK.
Configurando as conexões VST
A caixa de diálogo Conexões VST permite configurar o roteamento desinais de entrada e saída entre o Cubase e o seu hardware de áudio.
96

Requisitos de sistema e instalaçãoConfiguração do sistema
Estas conexões são chamadas de caminhos. Nesta seção você aprende aconfigurar os caminhos para reprodução e gravação.
Removendo caminhos
Antes de você adicionar caminhos, recomenda-se a remoção das saídasque foram adicionadas automaticamente pelo Cubase.
PROCEDIMENTO
1. Selecione Dispositivos > Conexões VST.
2. Na caixa de diálogo Conexões VST, selecione a aba Saídas.
3. Na coluna Nome do caminho, clique com o botão direito na entradasuperior e selecione Remover caminho no menu contextual.
Caso necessário, repita este passo para outros caminhos.
97

Requisitos de sistema e instalaçãoConfiguração do sistema
Adição de saídas
É preciso configurar as saídas para reproduzir áudio no Cubase.
PRÉ-REQUISITO
Remova os caminhos que foram adicionados automaticamente peloCubase.
PROCEDIMENTO
1. Selecione Dispositivos > Conexões VST.
2. Na caixa de diálogo Conexões VST, selecione a aba Saídas.
3. Clique em Adicionar caminho.
4. Na caixa de diálogo Adicionar caminho de saída, faça os ajustes.
5. Clique em Adicionar caminho.O novo caminho é adicionado, permitindo que o áudio de entrada noCubase seja roteado para o seu hardware de áudio.
6. Opcional: se quiser mudar as portas de saída que foram selecionadasautomaticamente, abra o menu suspenso Porta do dispositivo eselecione portas diferentes.
98

Requisitos de sistema e instalaçãoConfiguração do sistema
Dependendo do seu hardware de áudio, mais de duas portas de saídapoderão estar disponíveis. Para a maioria dos casos, recomendamos ouso das saídas estéreo principais.
LINKS RELACIONADOSRemovendo caminhos na página 97
Adição de entradas
É preciso configurar as entradas para gravar no Cubase.
PROCEDIMENTO
1. Selecione Dispositivos > Conexões VST.
2. Na caixa de diálogo Conexões VST, selecione a aba Entradas.
3. Na coluna Nome do caminho, clique com o botão direito na entradasuperior e selecione Remover caminho no menu contextual.Caso necessário, repita este passo para outros caminhos.
4. Clique em Adicionar caminho.
5. Na caixa de diálogo Adicionar caminho de entrada, crie suasconfigurações.
6. Clique em Adicionar caminho.O novo caminho é adicionado, permitindo receber áudio da entrada doseu dispositivo de áudio roteado para o Cubase para gravação.
7. Opcional: se quiser mudar as portas de entrada que foramselecionadas automaticamente, abra o menu suspenso Porta dodispositivo e selecione portas diferentes.
RESULTADO
Agora está pronto para gravar áudio no Cubase e reproduzi-lo.
99

Requisitos de sistema e instalaçãoConfiguração do sistema
OBSERVAÇÃO
Para iniciar o uso do Cubase, recomendamos assistir aos tutoriais emvídeo no canal da Steinberg no YouTube, inclusive uma demonstração dosnovos recursos do Cubase.
100

Русский

Cristina Bachmann, Heiko Bischoff, Christina Kaboth, Insa Mingers,Matthias Obrecht, Sabine Pfeifer, Benjamin Schütte, Marita Sladek
перевод Vadim Kupriyanov
В этом PDF-документе установлена повышенная чёткость текста дляслабовидящих пользователей. Обратите внимание на то, что из-засложности и количества изображений в данном документе включить внего их текстовые описания не представляется возможным.
Информация в этом документе может быть изменена без уведомленияпользователя и не является обязательством со стороны компанииSteinberg Media Technologies GmbH. Программное обеспечение,описанное в данном документе, является субъектом лицензионногосоглашения и не может быть скопировано на другой носитель, кромеспециально оговорённых в лицензионном cоглашении. Полное иличастичное копирование, воспроизведение, передача иным способомили запись для любых целей данной публикации без предварительногописьменного разрешения компании Steinberg Media Technologies GmbHзапрещены. Зарегистрированные владельцы лицензий продукта,описанного здесь, могут напечатать одну копию этого документа дляличного использования.
Все названия продуктов и компаний являются торговыми марками ихвладельцев. За дополнительной информацией обращайтесь на сайтwww.steinberg.net/trademarks.© Steinberg Media Technologies GmbH, 2016.
Все права защищены.

оглавление
104 Введение104 О документации104 Горячие клавиши104 Соглашения105 Как с нами связаться106 Системные требования и установка106 Системные требования107 Установка программы107 Активация вашей лицензии108 Установка оборудования111 Настройка системы
103

Введение
О документации• Документация по данному продукту размещена на сайте
www.steinberg.help.
Горячие клавишиМногие горячие клавиши используются с клавишами-модификаторами,которые отличаются в зависимости от операционной системы.
Например, стандартное сочетание клавиш для команды Отменить -это Ctrl-Z в Windows и Cmd-Z в Mac OS. Когда команды с клавишами-модификаторами описываются в данном руководстве, первым показанмодификатор для Windows:
• Windows модификатор/Mac OS модификатор-клавиша
ПРИМЕР
Ctrl/Cmd-Z означает: нажмите Ctrl в Windows или Cmd в Mac OS инажмите Z.
СоглашенияВ нашей документации мы используем типографские элементы ивыделения для структурирования информации.
104

ВведениеКак с нами связаться
Как с нами связатьсяПункты меню Steinberg Hub программы Cubase содержат ссылки надополнительную информацию.
Это ссылки на различные страницы сайта Steinberg. При выборепункта меню автоматически открывается браузер и загружаетсянужная страница. На этих страницах вы можете найти информациюпо поддержке, совместимости, ответы на часто задаваемые вопросы,информацию об обновлениях, о других продуктах фирмы Steinberg ит. д. Для пользования всем этим нужно, чтобы на вашем компьютеребыл установлен интернет-браузер и имелось работающее интернет-соединение.
105

Системные требования иустановка
Системные требованияВаш компьютер должен удовлетворять следующим минимальнымтребованиям для установки версий Cubase для Windowsи Mac OS:
64-разрядная Windows 7/8.x/10— OS X 10.11/macOS Sierra• 64-разрядный Intel или AMD многоядерный процессор
(рекомендуется Intel i5 или более быстрый)• 4 ГБ ОЗУ (рекомендуется 8 ГБ или более)• 12 ГБ свободного места на жёстком диске• Разрешение экрана 1366 x 768 (рекомендуется 1920 x 1080)• Графическая карта с поддержкой DirectX 10 и WDDM 1.1 (Только
Windows)• Аудио оборудование совместимое с операционной системой (для
работы с низкими задержками рекомендуется оборудование споддержкой ASIO)
• Привод DVD ROM для двухслойных дисков (если вы не используетезагруженную версию)
• Интернет соединение для активации, настройки аккаунта,персональной регистрации и регистрации продукта. Для установкиможет потребоваться дополнительная загрузка файлов.
Для получения информации о рекомендуемых системах и поддержкесистем в будущем, пожалуйста, обратитесь к разделу Поддержка(Support) на сайте www.steinberg.net.
106

Системные требования и установкаУстановка программы
Установка программы
Запуск установки
ПОРЯДОК ДЕЙСТВИЙ
1. Дважды щёлкните по кнопке Начало установки.
2. Следуйте инструкциям на экране.
Активация вашей лицензииВы должны активировать вашу лицензию.
ПРЕДВАРИТЕЛЬНЫЕ ТРЕБОВАНИЯ
У вас есть работающее интернет-соединение и вы имеете кодактивации для загрузки лицензии на ваш eLicenser.
ПРИМЕЧАНИЕ
Вы можете получить код активации по электронной почте при покупкепродукции через интернет-магазин Steinberg или этот код находитсяна листке Essential Product License Information в случае приобретениякоробочной версии.
ПОРЯДОК ДЕЙСТВИЙ
1. Зайдите на страничку www.steinberg.net/activate дляполучения информации об активации.
2. Следуйте инструкциям на экране.
РЕЗУЛЬТАТ
Лицензия загружена на ваш eLicenser и активирована.
107

Системные требования и установкаУстановка оборудования
Установка оборудования
Установка аудио оборудования и драйверов
ПОРЯДОК ДЕЙСТВИЙ
1. Установите аудио оборудование и другое связанное сним оборудование в соответствии с прилагаемой к немудокументацией.
2. Установите драйвер для аудио оборудования.Драйвер представляет собой часть программного обеспечения,которое позволяет программе взаимодействовать с определеннымоборудованием. В данном случае драйвер позволяет Cubaseиспользовать аудио оборудование. В зависимости от операционнойсистемы существуют различные типы используемых драйверов.
ASIO драйверы
Профессиональное аудио оборудование поставляется со специальнонаписанным для него ASIO драйвером. Он позволяет выполнитьпрямое соединение Cubase с аудио оборудованием. Устройства соспецифическими ASIO драйверами обеспечивают низкую задержку(между входом и выходом), которая очень важна для мониторингачерез Cubase или при использовании VST инструментов. ASIO драйверможет обеспечивать поддержку множества входов и выходов,маршрутизацию, синхронизацию и т. д.
ASIO поставляются производителями аудио оборудования. Последниеверсии драйверов можно скачать на сайте производителя аудиооборудования.
108

Системные требования и установкаУстановка оборудования
ВАЖНО
Если для вашего оборудования существует ASIO драйвер, мынастоятельно рекомендуем использовать именно его.
Универсальный ASIO драйвер с низкой задержкой (только дляWindows)
На системах Windows вы можете использовать универсальныйASIO драйвер с низкой задержкой. Данный драйвер обеспечиваетподдержку протокола ASIO для любого звукового оборудования,поддерживаемого Windows, что позволяет обеспечить низкуюзадержку. Универсальный ASIO драйвер с низкой задержкойобеспечивает работу технологии Windows Core Audio в программеCubase. Не требуются дополнительные драйверы. Этот драйвер идёт всоставе Cubase и не требует дополнительной установки.
ПРИМЕЧАНИЕ
Этот драйвер должен использоваться в случае, если нет специальногодрайвера ASIO для конкретного устройства. Хотя универсальный ASIOдрайвер с низкой задержкой поддерживает все аудио устройства, выможете достичь лучших результатов на встроенных аудио платах, чемпри использовании внешних USB аудио интерфейсов.
macOS Драйверы (Только macOS)
Если вы используете компьютер Apple Macintosh, убедитесь в том,что вы используете для аудио оборудования драйверы macOSпоследней версии. Чтобы установить драйвер, следуйте инструкциямизготовителя.
109
Системные требования и установкаУстановка оборудования
Проверка аудио оборудования
Чтобы убедиться, что аудио устройство работает должным образом,выполните следующие тесты.
• Используйте любое программное обеспечение, поставляемое соборудованием, чтобы убедиться, что вы можете записывать ивоспроизводить аудио без проблем.
• Если доступ к оборудованию осуществляется через стандартныйдрайвер операционной системы, попробуйте воспроизвести аудиос помощью стандартных аудио приложений компьютера, например,Windows Media или iTunes компании Apple.
Установка MIDI интерфейса или MIDI клавиатуры
Хотя многие USB MIDI клавиатуры и MIDI интерфейсы работаютсразу при подключении, без дополнительных действий, вам можетпонадобиться установка соответствующего драйвера устройства.Следуйте процедуре установки, описанной в документации,поставляемой с устройством.
ПРИМЕЧАНИЕ
Вам также необходимо проверить веб-сайт производителя дляобновления драйвера.
110

Системные требования и установкаНастройка системы
Настройка системы
Выбор драйвера для вашего аудио устройства
Перед настройкой маршрутизации аудио сигналов и началом записивы должны убедиться, что выбран правильный ASIO драйвер.
ПОРЯДОК ДЕЙСТВИЙ
1. Выберите Оборудование > Настройка оборудования.
2. В окне Настройка оборудования щёлкните по надписи VST АудиоСистема слева.Справа появится страница VST Аудио Система.
3. Во всплывающем меню ASIO Driver выберите драйвер, который выхотите использовать.
4. Нажмите OK.
Настройка VST подключений
Окно VST подключения позволяет вам настроить коммутацию входящихи выходящих сигналов между программой Cubase и вашим аудиооборудованием. Эти подключения называются шинами. В этом разделевы узнаете, как настроить шины для воспроизведения и записи.
Удаление шин
Перед добавлением шин, рекомендуется удалить любые выходы,которые были автоматически добавлены программой Cubase.
ПОРЯДОК ДЕЙСТВИЙ
1. Выберите в меню Оборудование > VST подключения.
2. В окне VST подключения выберите вкладку Выходы.
111

Системные требования и установкаНастройка системы
3. В столбце Название Шины, щёлкните правой кнопкой мыши поверхней строчке и выберите Удалить шину из контекстного меню.
При необходимости повторите этот шаг для всех последующих шин.
Добавление выходов
Вам необходимо создать выходные шины для воспроизведения аудио впрограмме Cubase.
ПРЕДВАРИТЕЛЬНЫЕ ТРЕБОВАНИЯ
Удалите все шины, автоматически добавленные программой Cubase.
ПОРЯДОК ДЕЙСТВИЙ
1. Выберите в меню Оборудование > VST подключения.
2. В окне VST подключения выберите вкладку Выходы.
3. Щёлкните по кнопке Добавить Шину.
4. В окне Добавить выходную шину выберите необходимыепараметры.
5. Щёлкните по кнопке Добавить Шину.
112

Системные требования и установкаНастройка системы
Будет добавлена новая шина, позволяющая вам направлятьаудиосигнал, производимый в программе Cubase, на ваше аудиооборудование.
6. Дополнительно: если вам необходимо поменять выходные порты,которые были выбраны автоматически, откройте всплывающееменю Порт устройства и выберите другие порты.
В зависимости от используемого вами аудио оборудования, дляиспользования могут быть доступны более двух выходных портов.Для большинства случаев мы рекомендуем вам использоватьосновной стереовыход.
ПОЛЕЗНЫЕ ССЫЛКИУдаление шин на странице 111
Добавление входов
Для записи в программе Cubase вам необходимо настроить входныешины.
ПОРЯДОК ДЕЙСТВИЙ
1. Выберите в меню Оборудование > VST подключения.
2. В окне VST подключения выберите вкладку Входы.
113

Системные требования и установкаНастройка системы
3. В столбце Название Шины, щёлкните правой кнопкой мыши поверхней строчке и выберите Удалить шину из контекстного меню.При необходимости повторите этот шаг для всех последующих шин.
4. Щёлкните по кнопке Добавить Шину.
5. В окне Добавить входную шину выберите необходимыепараметры.
6. Щёлкните по кнопке Добавить Шину.Будет добавлена новая шина, позволяющая вам направлятьаудиосигнал со входов вашего аудио оборудования в программуCubase для записи.
7. Дополнительно: если вам необходимо поменять входные порты,которые были выбраны автоматически, откройте всплывающееменю Порт устройства и выберите другие порты.
РЕЗУЛЬТАТ
Теперь вы готовы записывать и воспроизводить аудио в Cubase.
ПРИМЕЧАНИЕ
Чтобы начать работать с Cubase, мы рекомендуем посмотретьвидеоуроки на канале Steinberg сайта YouTube. В них демонстрируютсяновые возможности программы Cubase.
114