Quick Start Guide for Cisco Secure Access Control Server ... · PDF fileQuick Start Guide for...
44
QUICK START GUIDE Quick Start Guide for Cisco Secure Access Control Server View 4.0 This guide provides you with the information that you need to set up, install, and configure Cisco Secure Access Control Server (ACS) View. It contains: 1. Supplemental License Agreement, page 2 2. Notices, page 3 3. About Cisco Secure Access Control Server View, page 5 4. Licensing, page 6 5. System Specifications, page 11 6. Package Contents, page 12 7. Safety and Regulatory Compliance Information, page 12 8. Before Configuring ACS View, page 12 9. Running Setup to Configure ACS View, page 14 10. Accessing the ACS View CLI, page 16 11. Working with ACS View, page 19 12. Re-imaging the ACS View Appliance, page 41 13. FAQs, page 42
Transcript of Quick Start Guide for Cisco Secure Access Control Server ... · PDF fileQuick Start Guide for...

QUICK START GUIDE
Quick Start Guide for Cisco Secure Access Control Server View 4.0This guide provides you with the information that you need to set up, install, and configure Cisco Secure Access Control Server (ACS) View. It contains:
1. Supplemental License Agreement, page 2
2. Notices, page 3
3. About Cisco Secure Access Control Server View, page 5
4. Licensing, page 6
5. System Specifications, page 11
6. Package Contents, page 12
7. Safety and Regulatory Compliance Information, page 12
8. Before Configuring ACS View, page 12
9. Running Setup to Configure ACS View, page 14
10. Accessing the ACS View CLI, page 16
11. Working with ACS View, page 19
12. Re-imaging the ACS View Appliance, page 41
13. FAQs, page 42

14. Related Documentation, page 42
15. Obtaining Documentation and Submitting a Service Request, page 42
1 Supplemental License Agreement
SUPPLEMENTAL LICENSE AGREEMENT FOR CISCO SYSTEMS NETWORK MANAGEMENT SOFTWARE RUNNING ON THE CISCO 2120 HARDWARE PLATFORMIMPORTANT—READ CAREFULLY: This Supplemental License Agreement (SLA) contains additional limitations on the license to the Software provided to Customer under the End User License Agreement between Customer and Cisco. Capitalized terms used in this SLA and not otherwise defined herein shall have the meanings assigned to them in the Software License Agreement. To the extent that there is a conflict among any of these terms and conditions applicable to the Software, the terms and conditions in this SLA shall take precedence.
By installing, downloading, accessing or otherwise using the Software, Customer agrees to be bound by the terms of this SLA. If Customer does not agree to the terms of this SLA, Customer may not install, download, or otherwise use the Software.
ADDITIONAL LICENSE RESTRICTIONSInstallation and Use.
The Cisco Secure Access Control Server View Software component of the Cisco 2120 Hardware Platform is pre-installed. CDs containing tools to restore this Software to the 2120 hardware are provided to Customer for reinstallation purposes only. Customer may only run the supported Cisco Secure Access Control Server View Software on the Cisco 2120 Hardware Platform designed for its use. No unsupported Software product or component may be installed on the Cisco 2120 Hardware Platform.
Software Upgrades, Major and Minor Releases.
Cisco may provide Cisco Secure Access Control Server View Software updates and new version releases for the Cisco ADE 2120 Hardware Platform. If the Software update and new version releases can be purchased through Cisco or a recognized partner or reseller, the Customer should purchase one Software update for each Cisco ADE 2120 Platform. If the Customer is eligible to receive the Software update or new version release through a Cisco extended service program, the Customer should request to receive only one Software update or new version release per valid service contract.
2

Reproduction and Distribution.
Customer may not reproduce nor distribute software.
DESCRIPTION OF OTHER RIGHTS AND LIMITATIONSPlease refer to the Cisco Systems, Inc., End User License Agreement.
http://www.cisco.com/en/US/docs/general/warranty/English/EU1KEN_.html
2 NoticesThe following notices pertain to this software license.
OpenSSL/Open SSL ProjectThis product includes software developed by the OpenSSL Project for use in the OpenSSL Toolkit (http://www.openssl.org/).
This product includes cryptographic software written by Eric Young ([email protected]).
This product includes software written by Tim Hudson ([email protected]).
License Issues
The OpenSSL toolkit stays under a dual license, i.e. both the conditions of the OpenSSL License and the original SSLeay license apply to the toolkit. See below for the actual license texts. Actually both licenses are BSD-style Open Source licenses. In case of any license issues related to OpenSSL please contact [email protected].
OpenSSL License:Copyright © 1998-2007 The OpenSSL Project. All rights reserved.
Redistribution and use in source and binary forms, with or without modification, are permitted provided that the following conditions are met:
1. Redistributions of source code must retain the copyright notice, this list of conditions and the following disclaimer.
2. Redistributions in binary form must reproduce the above copyright notice, this list of conditions, and the following disclaimer in the documentation and/or other materials provided with the distribution.
3

3. All advertising materials mentioning features or use of this software must display the following acknowledgment: “This product includes software developed by the OpenSSL Project for use in the OpenSSL Toolkit (http://www.openssl.org/)”.
4. The names “OpenSSL Toolkit” and “OpenSSL Project” must not be used to endorse or promote products derived from this software without prior written permission. For written permission, please contact [email protected].
5. Products derived from this software may not be called “OpenSSL” nor may “OpenSSL” appear in their names without prior written permission of the OpenSSL Project.
6. Redistributions of any form whatsoever must retain the following acknowledgment:
“This product includes software developed by the OpenSSL Project for use in the OpenSSL Toolkit (http://www.openssl.org/)”.
THIS SOFTWARE IS PROVIDED BY THE OpenSSL PROJECT “AS IS”' AND ANY EXPRESSED OR IMPLIED WARRANTIES, INCLUDING, BUT NOT LIMITED TO, THE IMPLIED WARRANTIES OF MERCHANTABILITY AND FITNESS FOR A PARTICULAR PURPOSE ARE DISCLAIMED. IN NO EVENT SHALL THE OpenSSL PROJECT OR ITS CONTRIBUTORS BE LIABLE FOR ANY DIRECT, INDIRECT, INCIDENTAL, SPECIAL, EXEMPLARY, OR CONSEQUENTIAL DAMAGES (INCLUDING, BUT NOT LIMITED TO, PROCUREMENT OF SUBSTITUTE GOODS OR SERVICES; LOSS OF USE, DATA, OR PROFITS; OR BUSINESS INTERRUPTION) HOWEVER CAUSED AND ON ANY THEORY OF LIABILITY, WHETHER IN CONTRACT, STRICT LIABILITY, OR TORT (INCLUDING NEGLIGENCE OR OTHERWISE) ARISING IN ANY WAY OUT OF THE USE OF THIS SOFTWARE, EVEN IF ADVISED OF THE POSSIBILITY OF SUCH DAMAGE.
This product includes cryptographic software written by Eric Young ([email protected]). This product includes software written by Tim Hudson ([email protected]).
Original SSLeay License:Copyright © 1995-1998 Eric Young ([email protected]). All rights reserved.
This package is an SSL implementation written by Eric Young ([email protected]).
The implementation was written so as to conform with Netscapes SSL.
This library is free for commercial and non-commercial use as long as the following conditions are adhered to. The following conditions apply to all code found in this distribution, be it the RC4, RSA, lhash, DES, etc., code; not just the SSL code. The SSL documentation included with this distribution is covered by the same copyright terms except that the holder is Tim Hudson ([email protected]).
Copyright remains Eric Young’s, and as such any Copyright notices in the code are not to be removed. If this package is used in a product, Eric Young should be given attribution as the author of the parts of the library used. This can be in the form of a textual message at program startup or in documentation (online or textual) provided with the package.
4

Redistribution and use in source and binary forms, with or without modification, are permitted provided that the following conditions are met:
1. Redistributions of source code must retain the copyright notice, this list of conditions and the following disclaimer.
2. Redistributions in binary form must reproduce the above copyright notice, this list of conditions and the following disclaimer in the documentation and/or other materials provided with the distribution.
3. All advertising materials mentioning features or use of this software must display the following acknowledgement:
“This product includes cryptographic software written by Eric Young ([email protected])”.
The word ‘cryptographic’ can be left out if the routines from the library being used are not cryptography-related.
4. If you include any Windows specific code (or a derivative thereof) from the apps directory (application code) you must include an acknowledgement: “This product includes software written by Tim Hudson ([email protected])”.
THIS SOFTWARE IS PROVIDED BY ERIC YOUNG “AS IS” AND ANY EXPRESS OR IMPLIED WARRANTIES, INCLUDING, BUT NOT LIMITED TO, THE IMPLIED WARRANTIES OF MERCHANTABILITY AND FITNESS FOR A PARTICULAR PURPOSE ARE DISCLAIMED. IN NO EVENT SHALL THE AUTHOR OR CONTRIBUTORS BE LIABLE FOR ANY DIRECT, INDIRECT, INCIDENTAL, SPECIAL, EXEMPLARY, OR CONSEQUENTIAL DAMAGES (INCLUDING, BUT NOT LIMITED TO, PROCUREMENT OF SUBSTITUTE GOODS OR SERVICES; LOSS OF USE, DATA, OR PROFITS; OR BUSINESS INTERRUPTION) HOWEVER CAUSED AND ON ANY THEORY OF LIABILITY, WHETHER IN CONTRACT, STRICT LIABILITY, OR TORT (INCLUDING NEGLIGENCE OR OTHERWISE) ARISING IN ANY WAY OUT OF THE USE OF THIS SOFTWARE, EVEN IF ADVISED OF THE POSSIBILITY OF SUCH DAMAGE.
The license and distribution terms for any publicly available version or derivative of this code cannot be changed. i.e. this code cannot simply be copied and put under another distribution license [including the GNU Public License].
3 About Cisco Secure Access Control Server ViewACS View is a comprehensive reporting and event notification application that extracts core logging information from ACS servers. It retrieves log and configuration data from one or more ACS servers in your network to provide reports and event notification.
5

Key Features of ACS ViewTable 1 lists the key features of ACS View.
4 LicensingYou must have a valid license to add the ACS servers in your network to ACS View. ACS View performs a license check to verify that the total number of ACS servers that are registered with ACS View falls within the number of ACS servers specified in the license file. If the number of ACS servers registered with ACS View is higher than the ACS servers that you are licensed to use, ACS View stops collecting data from the additional ACS servers, starting from the first ACS server that you registered with ACS View.
ACS View supports two types of licenses:
• Evaluation—Offers a free 90-day trial. ACS View stops collecting data from ACS serves after the evaluation period of 90 days. You do not require the Unique Device Identifier (UDI) for obtaining an evaluation license.
• Purchase—Offers a permanent, node-locked license that you can install only on the appliance for which the license was issued, by using its UDI.
Table 1 Key Features of ACS View
Feature Description
Report Generation Provides a variety of interactive reports, which are formatted as tables, graphs, and charts, that help you analyze and correlate log, configuration, and diagnostic data from ACS servers.
Allows you to schedule reports to be generated at specific periods, and to design your own dynamic reports based on your requirements.
Configurable triggers or threshold conditions against ACS data to generate alerts
Triggers alerts based on data thresholds that you define to track critical conditions in ACS servers.
Troubleshooting Provides reports, tools, and utility that help troubleshooting ACS servers.
Real-Time and Historical Data Collection
Collects live as well as historical data from ACS servers on demand and at scheduled intervals.
6

Each ACS server in your network counts as one license in ACS View. A secondary or backup ACS server also counts as one license. If you have an ACS server in your network that sends logs to a remote ACS server, this remote ACS server also counts as one license.
The license file that you receive indicates the number of servers that you are licensed to use, in the ACS count (COUNT) column. The ACS Count column in the license file appears:
• For an Evaluation license:
INCREMENT ACSCOUNT cisco 4.0 31-may-2008 uncounted \ VENDOR_STRING="<COUNT>10</COUNT> <UDI>ANY</UDI>" HOSTID=ANY \ NOTICE="<LicFileID>12345</LicFileID><LicLineID>0</LicLineID> \ <PAK>dummyPak</PAK>" SIGN="0059 E534 CBFF A6AC F1C0 7F48 A8F4 \ 024A 7DA9 83CE EC3E C807 480E 83F0 4E81 0403 20F5 DB68 D50A \ 74C6 8AD8 CB4D 9988 ED15 218D E90C 49DA 0C2A 9E46 5615"
• For a Purchase license:
INCREMENT ACSCOUNT cisco 4.0 permanent uncounted \ VENDOR_STRING="<COUNT>10</COUNT> <UDI>ADE-1010123455</UDI>" \ HOSTID=ANY \ NOTICE="<LicFileID>23456</LicFileID><LicLineID>0</LicLineID> \ <PAK>dummyPak</PAK>" SIGN="0ED3 F00C 2175 6EDA EF19 199C 33D6 \ 0DFD A880 7640 96CC E3FC 81D0 A122 E03A 0C14 FF72 8037 3497 \ 266D E669 3B36 17D2 9823 0357 50FD 03A2 14CE FDCD DA39"
Note Ensure that you back up a version of your license file for use if you have to re-image your ACS View appliance.
For more information, see:
• Evaluation License
• Purchase License
• How to Obtain and Install Your Licenses
Evaluation LicenseAn Evaluation license is a trial license that you can use to evaluate ACS View over a period of 90 days. Using the ACS View evaluation license, you can manage up to 10 ACS servers.
After the 90-day validity period expires, you cannot use the data-collection feature. You can, however, log in to ACS View and generate reports on the available data. To continue to effectively use ACS View, you must obtain a Purchase license.
7

Note If you overwrite an evaluation license with a purchase license, the evaluation license is deactivated. You cannot install more than one evaluation license on ACS View.
Purchase LicenseA Purchase license is a permanent license that you can use to deploy ACS View. This license is node-locked with the UDI of the appliance; it ensures that this license is used only on the appliance for which it is issued.
The two types of purchase licenses are:
• Base—When you obtain a base purchase license, you can collect data from two ACS servers in your network.
• Add-On—After you receive a base purchase license, you must purchase an add-on license to collect and process data from more ACS servers in your network. You can request any number of licenses to match your server requirements.
How to Obtain and Install Your LicensesThis section describes how you can obtain an Evaluation or a Purchase license and deploy it in your network:
• Obtaining Licenses
• Installing Licenses
Obtaining Licenses
To obtain your license file, you must provide the UDI. However, you do not require the UDI for obtaining an evaluation license. Follow this procedure to obtain your UDI from the CLI, and generate a license file.
Step 1 Access the ACS View CLI.
Step 2 In the exec mode, enter:
acsview/admin# show udi
This command returns information on the Serial Product ID (SPID), Version ID (VPID), and the appliance serial number.
8

For example:
acsview/admin# show udiSPID: CiscoAcsViewVPID: V01Serial: 123455
Here, the UDI is CiscoAcsView123455.
Note The UDI includes SPID and the serial number of the appliance. It does not include the Version ID.
Step 3 Decide if you want to obtain an Evaluation license or a Purchase license.
• To obtain an Evaluation license, follow this:
a. Access this link: http://www.cisco.com/go/license. You must have a valid Cisco.com account to log in to this site.
The Product License Registration website appears.
b. Click the link under the Licenses Not Requiring a Product Authorization Key (PAK) section.
c. From the list of available licenses, choose the Evaluation license for ACS View.
d. Review the information, and click Submit.
After you complete the procedure, an evaluation license is generated and sent to you by e-mail.
• To obtain a Purchase license, follow this procedure:
a. Keep your PAK handy. The PAK is an alphanumeric number that is available on the Claims Certificate.
b. Access this link: http://www.cisco.com/go/license.
You must have a valid Cisco.com account to log in to this site.
The Product License Registration website appears.
c. Complete the steps on the Product License Registration page.
After you provide your PAK, UDI, and e-mail address in the Product License Registration page, a license file is generated and sent to you by e-mail.
Step 4 After you receive your license file, log in to ACS View and install the license file by using the procedure in the subsequent section.
Installing Licenses
After obtaining a license file, you must install the file on the ACS View server.
9

Note Before installing your license file, ensure that you back up your licenses in case you have to re-image ACS View.
To install an Evaluation or a Purchase license file:
Step 1 Once you receive your license file, save each file to the server on which you plan to access the ACS View GUI.
Step 2 Launch your web browser on that system.
Step 3 In the browser address bar, enter:
https://{servername.domain | ip_address}
• servername—Identifies the server on which you installed ACS View by its hostname.
• domain—Identifies the domain name. Enter this parameter only when you specify the ACS View server by its hostname.
• ip_address—Identifies the server on which you installed ACS View by its IP address.
Step 4 Log in with the administrator credentials.
Step 5 Choose System Administration > Server Management > License.
Step 6 Enter the path to the local directory in which you saved the license file; optionally, click Browse.
Step 7 Click Upload.
The License Details area summarizes your:
• License ID—Your unique license ID.
• Licensed Host—The UDI of the ACS View appliance.
• ACS Server Count—The number of ACS servers the license supports.
• Expiry Days—The license expiry period. An Evaluation license expires in 90 days; a Purchase license never expires.
Note You can view the number of ACS Server licensed in a ACS View server by clicking About on the top-right corner of the ACS View Dashboard.
10

5 System SpecificationsACS View comprises an appliance, the Cisco Application Deployment Engine (ADE) 2120, which runs on a Linux operating system, and the ACS View server software. The software for ACS View is preloaded on the appliance.
Table 2 lists the system specifications for ACS View:
Table 3 lists the operating systems and browsers that support ACS View.
Table 2 System Specifications for ACS View
Component Specification
Hard Disk Drive 500 GB
System Memory 4 GB
Microprocessor Intel Core 2 Duo 2.13-GHz processor with an 1066-MHz front side bus (FSB) and 2 MB of Layer 2 cache
I/O Ports USB and Serial Ports
Media DVD-ROM
Server Requirements N/A
Table 3 Supported Operating Systems and Browsers
Component Version
Client Operating System Windows XP
Windows Vista Business Edition
Supported Browsers • Windows Vista Business Edition
– Mozilla Firefox 2.0.0.11
– Microsoft Internet Explorer Version 7.0
• Windows XP
– Mozilla Firefox 2.0.0.11
– Microsoft Internet Explorer Version 6.0 and 7.0
11

6 Package ContentsThe package includes:
• ACS View appliance that is loaded with the software
• Power cord
• Rack mount kit
• A Recovery CD-ROM
• Regulatory Compliance and Safety Information (RCSI) Document
• Cisco Information Packet
• Warranty Card
• Quick Start Guide
7 Safety and Regulatory Compliance InformationBefore working with ACS View, read the Regulatory Compliance and Safety Information (RCSI) for the Application Deployment Engine 1010/2120 document that ships with your appliance. This document is also available on Cisco.com at:
http://www.cisco.com/en/US/docs/net_mgmt/application_deployment_engine/ade/1010_2120/regulatory/compliance/adercsi.html
8 Before Configuring ACS ViewYou will need to use a serial console, or keyboard and monitor that are connected to the appliance to set up the Cisco Secure ACS View appliance. Figure 1 shows the front panel of the ACS View appliance.
12

Figure 1 Front Panel View of ACS View Appliance
Note The unlabeled LED to the left of the callout #3 is the hazard or warning light.
1 USB port 4 Hard disk drive activity LED
2 Power button 5 NIC1 LED
3 ACS View appliance power LED 6 NIC2 LED
1 23 5
4 6 2311
08
13

Figure 2 shows the cable connectors that are available on the rear panel of the ACS View appliance.
Figure 2 Cable Connectors on Rear of ACS View Appliance
Push the power button (See callout #2 in Figure 1) on the front panel of the appliance to power up the appliance. After the appliance boots, you can run setup to configure basic bootstrap parameters.
For more information on installing the ACS View appliance, see the Installation and Setup Guide for ACS View 4.0; pay special attention to the safety warnings and safety guidelines in the document.
9 Running Setup to Configure ACS ViewThe setup process is a one-time configuration task. You must power up the appliance before you configure ACS View.
1 AC power receptacle 7 Network Interface Card 2 port LED (activity)
2 Mouse receptacle 8 Network Interface Card 2 port LED (link)
3 Keyboard receptacle 9 Two USB ports
4 Serial console port (EIA/TIA-232)
10 Network Interface Card 1 port (10/100/1000 Mbps) or Ethernet 0
5 Video (VGA) port 11 PCI adapter card slot (expansion)
6 Network Interface Card 2 (10/100/1000 Mbps) port or Ethernet 1
1 2 4 107 8 11
9653 2311
07
14
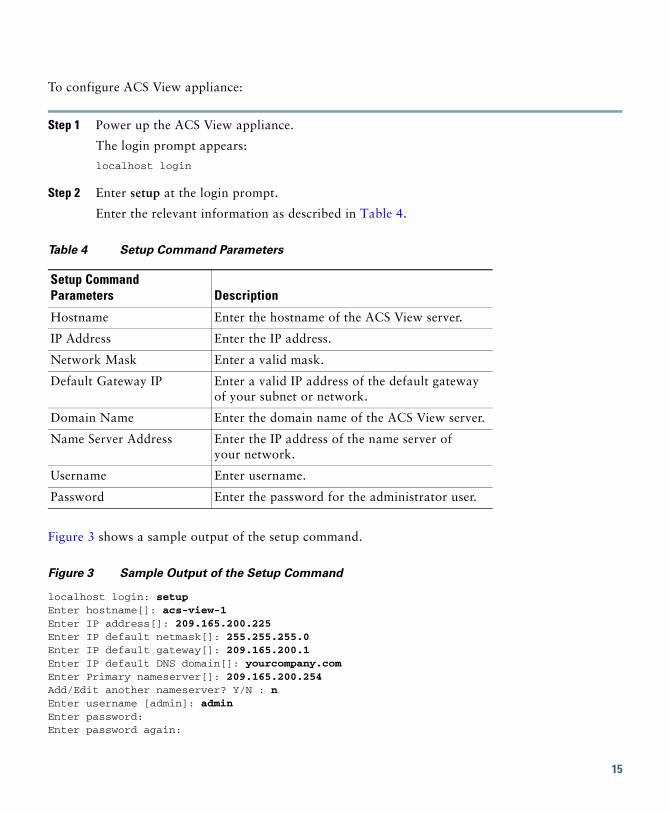
To configure ACS View appliance:
Step 1 Power up the ACS View appliance.
The login prompt appears:
localhost login
Step 2 Enter setup at the login prompt.
Enter the relevant information as described in Table 4.
Table 4 Setup Command Parameters
Figure 3 shows a sample output of the setup command.
Figure 3 Sample Output of the Setup Command
localhost login: setupEnter hostname[]: acs-view-1Enter IP address[]: 209.165.200.225Enter IP default netmask[]: 255.255.255.0Enter IP default gateway[]: 209.165.200.1Enter IP default DNS domain[]: yourcompany.comEnter Primary nameserver[]: 209.165.200.254Add/Edit another nameserver? Y/N : nEnter username [admin]: adminEnter password:Enter password again:
Setup Command Parameters Description
Hostname Enter the hostname of the ACS View server.
IP Address Enter the IP address.
Network Mask Enter a valid mask.
Default Gateway IP Enter a valid IP address of the default gateway of your subnet or network.
Domain Name Enter the domain name of the ACS View server.
Name Server Address Enter the IP address of the name server of your network.
Username Enter username.
Password Enter the password for the administrator user.
15
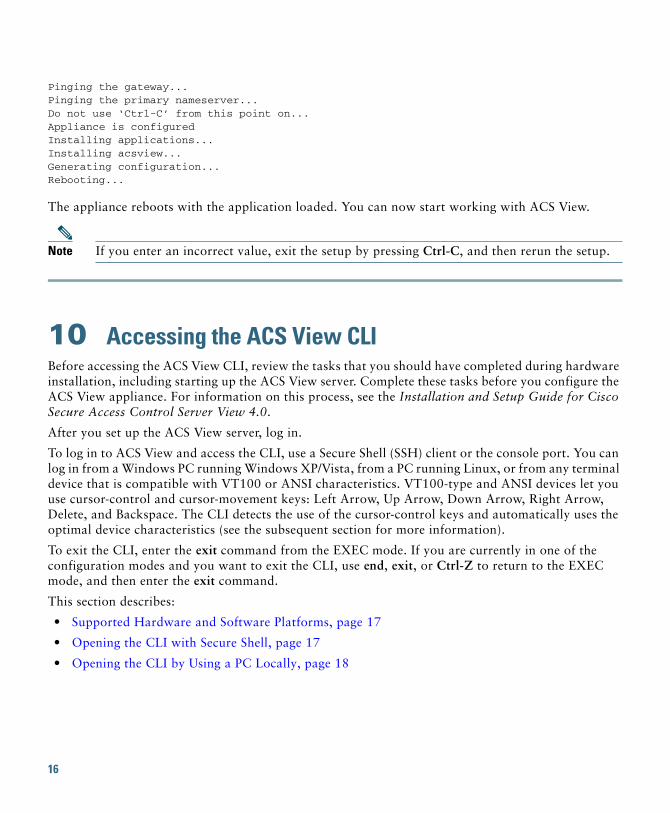
Pinging the gateway...Pinging the primary nameserver...Do not use ‘Ctrl-C’ from this point on...Appliance is configuredInstalling applications...Installing acsview...Generating configuration...Rebooting...
The appliance reboots with the application loaded. You can now start working with ACS View.
Note If you enter an incorrect value, exit the setup by pressing Ctrl-C, and then rerun the setup.
10 Accessing the ACS View CLIBefore accessing the ACS View CLI, review the tasks that you should have completed during hardware installation, including starting up the ACS View server. Complete these tasks before you configure the ACS View appliance. For information on this process, see the Installation and Setup Guide for Cisco Secure Access Control Server View 4.0.
After you set up the ACS View server, log in.
To log in to ACS View and access the CLI, use a Secure Shell (SSH) client or the console port. You can log in from a Windows PC running Windows XP/Vista, from a PC running Linux, or from any terminal device that is compatible with VT100 or ANSI characteristics. VT100-type and ANSI devices let you use cursor-control and cursor-movement keys: Left Arrow, Up Arrow, Down Arrow, Right Arrow, Delete, and Backspace. The CLI detects the use of the cursor-control keys and automatically uses the optimal device characteristics (see the subsequent section for more information).
To exit the CLI, enter the exit command from the EXEC mode. If you are currently in one of the configuration modes and you want to exit the CLI, use end, exit, or Ctrl-Z to return to the EXEC mode, and then enter the exit command.
This section describes:
• Supported Hardware and Software Platforms, page 17
• Opening the CLI with Secure Shell, page 17
• Opening the CLI by Using a PC Locally, page 18
16

Supported Hardware and Software Platforms
The following valid terminal types can access the ACS View appliance running the ACS View server:
• 1178
• 2621
• 5051
• 6053
• 8510
• altos5
• amiga
• ansi
• apollo
• Apple_Terminal
• att5425
• ibm327x
• kaypro
• vt100 and so on (see the terminfo database for a complete listing).
You can also access the ACS View server via an SSH client or through a console.
Opening the CLI with Secure Shell
The following example shows you how to log in with a Secure Shell (SSH) client (connecting to a wired WAN) via a PC by using Windows XP. Assuming that the ACS View server has already been preconfigured through the setup utility to accept an Admin user, log in as Admin.
To log in:
Step 1 Use any SSH client and start an SSH session.
The SSH window appears.
Step 2 Press Enter or the Spacebar to connect.
The Connect to Remote Host window appears.
Step 3 Enter the Host Name, User Name, Port Number, and Authentication Method.
Step 4 Click Connect, or press Enter.
The Enter Password window appears overlapping the Connect to Remote Host window.
17

Step 5 Enter your assigned password for the administrator.
The SSH with the Add Profile window appears.
Step 6 You can also enter a profile name in the text box and click Add to Profile. Otherwise, click the Close button on the Add Profile window.
The ACS View server prompt acsview/admin# appears. You can now enter ACS View CLI commands.
Opening the CLI by Using a PC Locally
If you need to configure the ACS View appliance locally (without connecting to a wired LAN), you can connect a PC to the ACS View appliance console port by using a null-modem cable.
To open the CLI by connecting to the console port:
Step 1 Connect a null-modem cable to the console port on the ACS View server and to COM port on your PC.
Step 2 Set up a terminal emulator to communicate with the ACS View server. Use the following settings for the terminal emulator connection: 9600 baud, 8 data bits, no parity, 1 stop bit, and no flow control.
Step 3 When the terminal emulator appears, press Enter.
Step 4 At the window, enter your username, then press Enter.
Step 5 Enter the password, then press Enter.
When the CLI appears, you can enter CLI commands to configure the ACS View appliance.
Note For more information on the ACS View commands, see the User Guide for Cisco Secure Access Control Server View 4.0.
18

11 Working with ACS ViewThis section describes various functionalities available in ACS View. It contains:
• Getting Started with ACS View, page 19
• Configuring ACS View for Data Collection, page 33
• Generating Reports and Alerts in ACS View, page 39
• Managing Data, page 39
Getting Started with ACS ViewThis section describes how to get started with ACS View. It contains:
• Logging In and Logging Out, page 19
• Installing Licenses, page 20
• Adding ACS Servers to ACS View, page 21
• Checking Status of ACS Servers, page 24
• Generating Certificates, page 25
• Adding Users to ACS View, page 28
• Defining Password Policy, page 30
• Configuring ACS View for E-mail Notifications, page 31
Logging In and Logging Out
To log in to ACS View:
Step 1 Launch a web browser.
Step 2 In the browser address bar, enter:
https://{servername.domain | ip_address}
– servername—Identifies the server on which you installed ACS View using its hostname.
– domain—Identifies the domain name. You must mention this parameter only when you specify the hostname of the ACS View server.
– ip_address—Identifies the server on which you installed ACS View using IP address.
19

Figure 4 shows the ACS View login screen that appears.
Figure 4 Login Screen
Step 3 Log in with the administrator credentials that you entered while initially configuring ACS View.
To log out, click Logout in the upper-right corner of the ACS View window.
Installing Licenses
Before installing your license file, ensure that you back up your licenses in case you have to re-image ACS View. To install an Evaluation or a Purchase license file:
Step 1 Choose System Administration > Server Management > License.
Step 2 Enter the path to the local directory in which you saved the license file; or, click Browse.
Step 3 Click Upload.
2038
27
20

Figure 5 shows the License page.
Figure 5 Installing License
Adding ACS Servers to ACS View
To add ACS servers to ACS View:
Step 1 Choose System Administration > ACS Servers Configuration > Server List.
The ACS Servers page appears.
Step 2 Click Add.
21

Figure 6 shows the Add ACS Server page that appears.
Figure 6 Add ACS servers
Step 3 Enter the relevant information as described in Table 5.
22
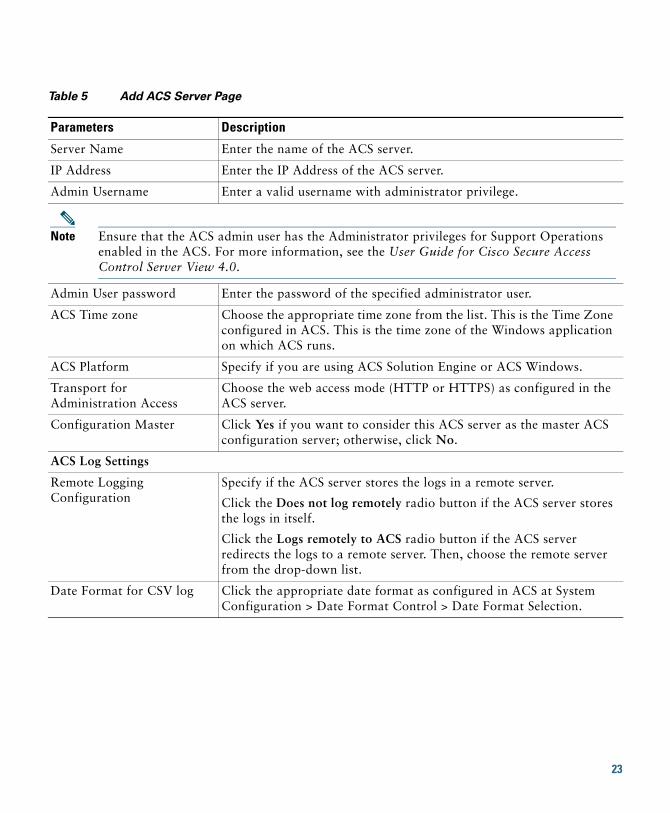
Table 5 Add ACS Server Page
Parameters Description
Server Name Enter the name of the ACS server.
IP Address Enter the IP Address of the ACS server.
Admin Username Enter a valid username with administrator privilege.
Note Ensure that the ACS admin user has the Administrator privileges for Support Operations enabled in the ACS. For more information, see the User Guide for Cisco Secure Access Control Server View 4.0.
Admin User password Enter the password of the specified administrator user.
ACS Time zone Choose the appropriate time zone from the list. This is the Time Zone configured in ACS. This is the time zone of the Windows application on which ACS runs.
ACS Platform Specify if you are using ACS Solution Engine or ACS Windows.
Transport for Administration Access
Choose the web access mode (HTTP or HTTPS) as configured in the ACS server.
Configuration Master Click Yes if you want to consider this ACS server as the master ACS configuration server; otherwise, click No.
ACS Log Settings
Remote Logging Configuration
Specify if the ACS server stores the logs in a remote server.
Click the Does not log remotely radio button if the ACS server stores the logs in itself.
Click the Logs remotely to ACS radio button if the ACS server redirects the logs to a remote server. Then, choose the remote server from the drop-down list.
Date Format for CSV log Click the appropriate date format as configured in ACS at System Configuration > Date Format Control > Date Format Selection.
23

Step 4 Click Save to finish.
Checking Status of ACS Servers
After you add an ACS server to ACS View, we recommend that you verify the connectivity of the ACS server.
To verify the status:
Step 1 Choose System Administration > ACS Server Configuration > Server List.
The ACS Servers page appears.
Step 2 Click the radio button corresponding to the ACS server whose status you want to verify.
Time Zone for Syslog Click GMT Time or Local Time for syslog depending on the time zone as configured in the ACS server at System Configuration > Date Format Control > Time Zone Selection For Syslog. This version is only available from ACS 4.2 onwards. For earlier ACS versions, choose GMT.
Note You must configure the Date Format and the Syslog Time Zone in ACS View as configured in ACS. If you click the wrong options, the data that ACS View generates will be skewed. For more information, see the User Guide for Cisco Secure Access Control Server 4.2.
Table 5 Add ACS Server Page (continued)
Parameters Description
24

Step 3 Click Get Status.
Figure 7 shows a sample of the Server Connectivity page that appears.
Figure 7 ACS Server Status
Generating Certificates
The initial installation and setup process for ACS View creates a self-signed certificate that the ACS View server uses for secure SSL communication with the client browser. This certificate uses the hostname of the ACS View appliance as the common name (issuer and subject).
During the initial setup process, only the hostname is populated in the certificate. Subsequently, you can update other certificate parameters, such as country, state, hostname, and e-mail address, from the GUI. The certificate that ACS View generates is valid for five years. If you are an admin user, you can also install a signed certificate that a third-party Certification Authority (CA) might issue.
This section describes:
• Generating a Self-Signed Certificate, page 26
• Installing a Third-Party Certificate, page 27
25

Generating a Self-Signed CertificateTo generate a self-signed certificate:
Step 1 Choose System Administration > Server Management > Certificate.
The Certificate page appears.
Step 2 Click Generate Self-Signed Certificate.
Figure 8 shows the Generate Certificate page that appears.
Figure 8 Generate Certificate
Step 3 Enter the relevant information as shown in Table 6.
Step 4 Click Generate.
Table 6 Generating a Self-signed a Certificate
Field Description
Common Name Enter your hostname
Organization Name Enter the name of the organization
Organization Unit Enter the unit of the organization
Output Password Enter the password that you want to assign for this certificate.
Challenge Password Confirm the output password again
26

Step 5 To activate the certificate, restart all the processes on the ACS View server. To restart the server from the:
• GUI—Choose System Administration > System Reports > Process Status, and click Restart ACS View Server.
• CLI—Access the CLI in the EXEC mode, and run these commands:
process stop all process start all
Note The process start all command may at times span more than one instance of the same process. We recommend, therefore, that to restart all processes, you enter: process stop allprocess start AppServerBy using the process start AppServer command, you can restart all processes related to the ACS View server.
Installing a Third-Party CertificateYou can install a security certificate that a third-party Certification Authority might have issued.
This ACS View release only supports PKCS12 certificates. Before installing a third-party certificate, ensure that the certificate is of this type.
To install a signed third-party certificate:
Step 1 Choose System Administration > Server Management > Certificate.
The Certificate page appears.
Step 2 Click Install Certificate.
27

Figure 9 shows the Install Certificate page that appears.
Figure 9 Install Certificate
Step 3 Enter the relevant information as described in Table 7.
Step 4 Click Install.
Adding Users to ACS View
ACS View supports two kinds of user roles: Administrator and operator. While the administrator can perform all the tasks in ACS View, the operator can only configure thresholds for alerts and run reports.
Table 7 Installing a Third-Party Certificate
Field Description
Server Certificate Format Display only. Shows the PKCS12 certificate type.
Server Certificate File Enter the path to the local directory in which you saved the certificate file; or, click Browse.
Private Key Password Enter a private password key, which can be up to 32 characters.
Confirm Private Key Password Confirm the private key password.
28

To add a new user to ACS View:
Step 1 Choose System Administration > User Management > Users.
The User Management page appears.
Step 2 Click the Add.
Figure 10 shows the User Information dialog box that appears.
Figure 10 Add User
Step 3 Enter the relevant information as described in Table 8.
Table 8 Adding Users
Parameters Descriptions
Name Specify a username. Username is an alphanumeric string that can take up to 31 characters.
Password Specify a password. Password should comply to the password policy as described in the Defining Password Policy, page 30.
Confirm Password Specify the password that you entered in the password field.
State Select Enable to enable this user. Else, select Disable.
Role Select a role from the drop-down list.
E-mail Address Specify the e-mail address of the user.
29

Step 4 Click Save to finish.
Defining Password Policy
Password policy configuration is stored in the ACS View server. You can use ACS View to define and update the password policy information.
To define a password policy:
Step 1 Choose System Administration > User Management > Password Policy.
Figure 11 shows the Password Policy page that appears.
Figure 11 Password Policy
Step 2 Enter the relevant information as described in Table 9.
30

Step 3 Click Save to finish.
Configuring ACS View for E-mail Notifications
You can configure ACS View to notify you via e-mail when reports are generated based on a schedule, when alerts are generated based on a threshold condition, or both.
Table 9 Password Policy
Password Policy Description
Minimum length Specifies the minimum length of the password. The password can contain up to 40 alphanumeric characters.
Required Characters Specifies that the password must:
• Not contain the username as part of it.
• Contain lowercase and uppercase characters.
• Contain numeric characters.
• Contain non-alphanumeric characters.
Check the check boxes to select each option.
Password Never Expiry Check the check box to set the password never to expire.
Password Validity Enter the validity of the password in terms of the number of days. For an Evaluation license it is by default 90 days.
Password Expiry Warning Days Enter the number of days in advance you require to be warned on password expiry to take the necessary action.
Previous Password Allowed Check the check box to allow login using the previous password.
Password never locked out Check the check box to not to lock the account following invalid logins.
Number of Invalid logins Enter the number of invalid logins allowed before the account is locked.
31
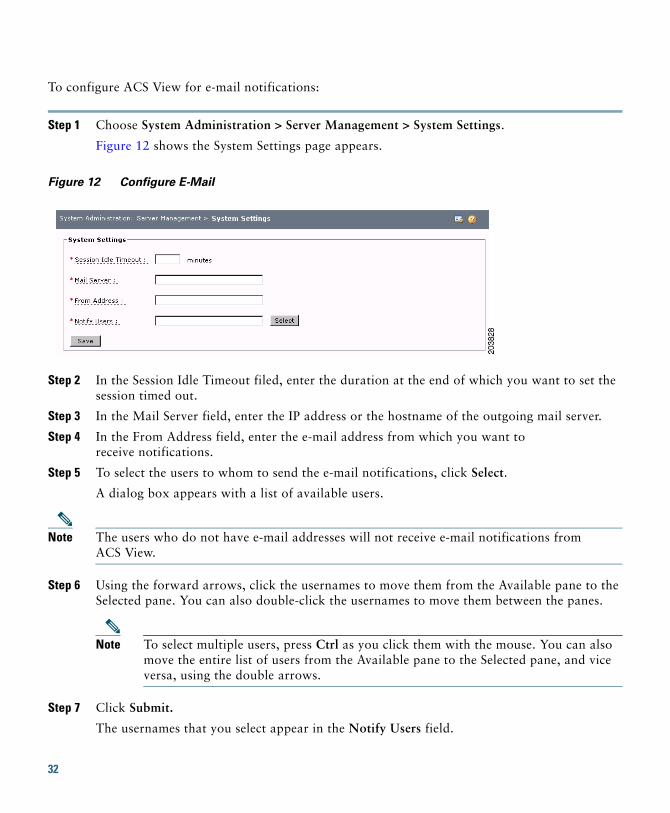
To configure ACS View for e-mail notifications:
Step 1 Choose System Administration > Server Management > System Settings.
Figure 12 shows the System Settings page appears.
Figure 12 Configure E-Mail
Step 2 In the Session Idle Timeout filed, enter the duration at the end of which you want to set the session timed out.
Step 3 In the Mail Server field, enter the IP address or the hostname of the outgoing mail server.
Step 4 In the From Address field, enter the e-mail address from which you want to receive notifications.
Step 5 To select the users to whom to send the e-mail notifications, click Select.
A dialog box appears with a list of available users.
Note The users who do not have e-mail addresses will not receive e-mail notifications from ACS View.
Step 6 Using the forward arrows, click the usernames to move them from the Available pane to the Selected pane. You can also double-click the usernames to move them between the panes.
Note To select multiple users, press Ctrl as you click them with the mouse. You can also move the entire list of users from the Available pane to the Selected pane, and vice versa, using the double arrows.
Step 7 Click Submit.
The usernames that you select appear in the Notify Users field.
32

Step 8 Click Save to finish.
You have now configured ACS View to send e-mail to the specified users.
Configuring ACS View for Data CollectionACS View collects log and configuration data from ACS servers. ACS View retrieves:
• Log data via syslog, which is the primary mechanism for data retrieval.
• Log and configuration data via package.cab downloads by using HTTP.
Log data refers to information related to the functioning of ACS servers, such as starting or stopping of the server, requests to the server, and internal events. Some events that the ACS logs capture are failed attempts, passed authentication, RADIUS accounting, and TACACS accounting.
Configuration data refers to information on ACS configuration that ACS View retrieves from the ACS server that is designated as Config Master. Configuration data includes Network Access Profile (NAP), Network Access Device (NAD), Network Device Group (NDG), and information on ACS users and administrators. ACS View does not receive any configuration data if you do not specify any ACS server as Config Master.
ACS View stores log and configuration data in its database, and uses it to generate various reports and alerts.
Caution You need to configure syslogs and comma-separated value CSV logs properly in ACS. Else, the report that you get will contain wrong data. For ACS View to collect data, you must also enable the mandatory attributes in ACS. For more information, see the User Guide for Cisco Secure Access Control Server View 4.0.
This section describes:
• Data Collection Using Syslog, page 33
• Data Collection Using package.cab, page 34
Data Collection Using Syslog
Syslog is the primary mechanism that ACS View uses to collect dynamic data from ACS servers. The ACS servers that are configured in ACS View sends syslogs to ACS View for every new log record in ACS servers. You need to configure syslog in ACS for this.
You need to configure ACS View in ACS to receive syslog messages for every new log record from ACS servers.
33

To configure ACS to send syslog messages to ACS View:
Step 1 Log in to ACS 4.1.4 or ACS 4.2.
Step 2 Choose System Configuration > Logging.
The Logging Configuration page appears.
Step 3 In the Syslog column of the ACS Reports area, click Configure corresponding to the specific report.
The Edit page appears.
Step 4 For each syslog report that you enable, check the check box in the Enable Logging area. For example, when configuring the Failed Attempts report, check the Log to Syslog Failed Attempts Report check box.
Note We recommend that you enable all syslog reports in ACS.
Step 5 In the Select Columns To Log area, choose an attribute from the Attributes column, and move it to the Logged Attributes column. For a list of the mandatory attributes that you must enable for ACS View, see Mandatory ACS Attributes for ACS View, page A-1.
Step 6 In the Syslog Servers area, enter:
• IP—Enter the ACS View IP address to configure ACS View as a syslog server for receiving this syslog report.
• Port—Enter the port number. The default port for syslog is 514.
• Max Message Length—Enter the length of the syslog message in bytes. The recommended length is 1024 bytes.
Step 7 Click Submit.
ACS View can now collect data from the ACS server using syslog.
Note Ensure that you choose all the mandatory attributes from the ACS logging page for syslog. See the User Guide for Cisco Secure Access Control Server View 4.0, for further information.
Data Collection Using package.cab
ACS View might lose some syslog messages from ACS servers due to network problem, or when ACS View is unreachable. In such events, the package.cab files serve as a backup option through which you can retrieve any missing information on any log that ACS View collects via syslog.
34

The package.cab file contains:
• Logs related to AAA, such as TACACS+ accounting, RADIUS accounting, passed authentication, and failed attempts.
• ACS audit logs, such as those related to ACS backup and restore, RDBMS synchronization, and database replication.
• Configuration information of ACS, if you chose to download configuration information from ACS servers.
You can download package.cab to the ACS View database, which in turn processes the downloads to identify and retrieve the missing logs.
Additionally, you can upload package.cab files to ACS View. To upload package.cab files, you must first have downloaded these files from an ACS server that is registered to ACS View.
This section describes:
• Downloading Data from ACS Servers, page 35
• Uploading package.cab to ACS View Servers, page 38
Downloading Data from ACS Servers
ACS View collects historical data from ACS servers using package.cab. You can configure ACS View to collect this data at specified intervals, or as and when you require data (also known as collecting data on demand). This section describes:
• Enabling CSV Logging in ACS, page 35
• Collecting Data At Scheduled Intervals, page 37
• Collecting Data On Demand, page 38
Enabling CSV Logging in ACSFor ACS View to extract the package.cab files from ACS, you must enable CSV logging in ACS. CSV logging in ACS servers is enabled by default.
Note If you are installing the ACS server for the first time, ensure that you enable CSV logging. Ensure that you choose all the mandatory attributes from the ACS logging page for CSV. See the User Guide for Cisco Secure Access Control Server View 4.0, for further information.
35
To schedule CSV logging in ACS:
Step 1 Log in to ACS 4.1.4 or ACS 4.2.
Step 2 Choose System Configuration > Logging.
The Logging Configuration page appears.
Step 3 In the CSV column of the ACS Reports area, click Configure corresponding to a specific report.
The Edit page appears.
Note We recommend that you enable all CSV reports in ACS.
Step 4 For each CSV report that you enable, check the check box in the Enable Logging area. For example when configuring the Failed Attempts report check the Log to CSV Failed Attempts Report check box.
Step 5 In the Select Columns To Log area, choose an attribute from the Attributes column, and move it to the Logged Attributes column. For a list of the mandatory attributes that you must enable for ACS View, see User Guide for Cisco Secure Access Control Server View 4.0.
Step 6 In the Log File Management area:
• Under Generate New File, click one of the options to configure when ACS should generate a new log file
• Under Directory, enter the full path to the directory where you want ACS to place the log files.
• If you want ACS to control which log files are retained, check the Manage Directory check box and then click either of these radio buttons:
– Keep only the last X files—Enter the maximum number of log files that ACS should retain in the log directory. The default is 7 files.
– Delete files older than X days— Enter the maximum number of days that ACS should retain the log files in the log directory. The default is 7 days.
Step 7 For AAA-related reports, configure the attributes that you want ACS to log. For information about the mandatory attributes, see User Guide for Cisco Secure Access Control Server View 4.0.
Note When you use ACS Windows, ensure that you specify file management options for the CSV files.
36

Step 8 Click Submit.
Collecting Data At Scheduled IntervalsYou can configure ACS View to download the package.cab at specific intervals. By default, this runs at 12.01 am.
To change the default schedule of data collection from ACS servers:
Step 1 Choose System Administration > ACS Servers Configuration > Data Collection. Figure 13 shows the Data Collection page that appears.
Figure 13 Collecting Data
Step 2 In the Daily Schedule area, specify the time (24-hour format). The schedule that you specify is based on the ACS View system time zone.
Step 3 Click Update.
Note To disable a scheduled job, click the Disable radio button in the Daily Schedule area, and click Update.
37

Collecting Data On DemandTo download package.cab on demand:
Step 1 Choose System Administration > ACS Servers Configuration > Data Collection.
Figure 13 shows the Data Collection page that appears.
Step 2 In the On Demand area, choose Download package.cab from the Choose Action drop-down list. This downloads package.cab from all individual and remote logging ACS servers.
Step 3 In the ACS Server field, click Select; a list of available ACS servers appears. Click the right arrow to transfer a server name from the Available to the Selected list. You can choose multiple servers here.
Step 4 Based on the data that you want to download, whether log or configuration data, check one or both of these check boxes:
• Retrieve ACS Logs for—For ACS log data. Also, specify the number of days in the corresponding field.
• Retrieve ACS Config—For ACS configuration data.
Step 5 Click Collect to download package.cab.
Uploading package.cab to ACS View Servers
You can upload the package.cab files that you have previously generated to ACS View.
To upload package.cab:
Step 1 Choose System Administration > ACS Servers Configuration > Data Collection.
Figure 13 shows the Data Collection page that appears.
Step 2 In the On Demand area, choose Upload Package.cab from the drop-down list.
Step 3 In the Local Directory, click Browse and navigate to the package.cab file on your system.
Step 4 Based on the data that you want to upload, whether log or configuration data, check one or both of these check boxes:
– Retrieve ACS Logs—For ACS log data.
– Retrieve ACS Config—For ACS configuration data.
Step 5 Click Collect to upload package.cab to all ACS servers that are registered with ACS View.
38

Generating Reports and Alerts in ACS ViewACS View generates various reports based on the log and configuration data that it receives from ACS servers. ACS View generates alerts when a threshold condition, which you can configure, is met on ACS servers.
This section gives an overview of:
• Generating Reports in ACS View, page 39
• Generating Alerts in ACS View, page 39
Generating Reports in ACS View
Generating reports is the most important function of ACS View. You can generate various types of reports in ACS View. ACS View generates reports based on the log and configuration data of the ACS server. You can generate two kinds of reports: system and custom.
Based on your requirement, you can run either immediate reports or scheduled reports. Additionally, you can save these reports for future use.
Note To know how to generate various reports in ACS View, see the “Reports” section in the User Guide for Cisco Secure Access Control Server View 4.0.
Generating Alerts in ACS View
You can configure alerts to be triggered when a rule or a threshold is met.
The ACS View generates alerts based on:
• ACS server data
• The ACS View system
Note For more information about configuring thresholds and generating alerts in ACS View, see the User Guide for Cisco Secure Access Control Server View 4.0.
Managing DataUsing ACS View, you can back up, restore, or delete data from ACS servers. You can back up the database and restore this data to ACS View. Optionally, you can back up the data before deleting(or purging) it.
39

Note You must have Administrator rights to perform these actions. For more information, see the User Guide for Cisco Secure ACS View 4.0.
ACS View manages data by:
• Setting Up Repositories, page 40
• Backing Up Data, page 40
• Purging Data, page 40
• Exporting the Data, page 40
• Restoring Data, page 40
Setting Up Repositories
The data in ACS View is backed up in repositories. Before you back up data, you must set up repositories from the GUI or the command-line interface (CLI). For more information on how to set up repositories, see the User Guide for Cisco Secure Access Control Server View 4.0.
Backing Up Data
You can back up the database, which includes log and configuration files, and the data related to scheduled reports. You can either schedule a backup or run it on demand. While you can schedule a backup or run it on demand using the GUI, you can only run a backup on demand using the CLI.
Purging Data
Purging data is the process of removing data from the ACS View database. When the disk-space reaches the size limit that you have configured, ACS View automatically removes the existing data to free space for incoming data. You can also run the database purge on demand.
Exporting the Data
You can export the logs in the ACS View database to a remote or local repository, in a CSV format. To do this, you must configure a repository in a remote or a local server before exporting the log data.You can then use the exported data as the basis for future reports.
Restoring Data
With restoring data, you can overwrite existing data with backed-up data. You can restore the data to ACS View only from the CLI. You can restore data only to an appliance from where you received it.
40

12 Re-imaging the ACS View ApplianceWhile unlikely, the failure of the application software or hardware components requires that you restore the application on the appliance. Based on the nature of the system failure (application software corruption or hardware component failure), you will have to re-image the appliance to the system-configuration state or the out-of-the-box state.
This section describes:
• Required Tools and Equipment, page 41
• Re-imaging Process, page 41
Required Tools and Equipment
To re-image your ACS View appliance, you need:
• ACS View Restore CD-ROM
• Peripherals— Serial console; or, a keyboard and mouse.
Re-imaging Process
To re-image your appliance:
Step 1 Power up your appliance.
Step 2 Insert the ACS View Recovery CD to the CD drive.
The appliance displays the Recovery CD message:
Welcome to Cisco Secure ACS View 4.0 Recovery - Cisco ADE 2120To boot from hard disk press <Enter>Available boot options:[1] Cisco Secure ACS View 4.0 Installation (Keyboard/Monitor)[2] Cisco Secure ACS View 4.0 Installation (Serial Console)[3] Reset Administrator Password (Keyboard/Monitor)[4] Reset Administrator Password (Serial Console)<Enter> Boot from hard diskPlease enter boot option and press <Enter>.boot:
Note You use:
Option 1 to install the application through keyboard and monitor.Option 2 to install the application through an attached serial console.Option 3 to reset the administrator password through an attached keyboard and mouse.Option 4 to reset the administrator password through an attached serial console.
41

Step 3 Enter the bootup option and press Enter to re-image the application.
13 FAQsFor the frequently asked questions, see the User Guide for Cisco Secure Access Control Server. View 4.0.
14 Related DocumentationFor more information, see:
• Installation and Setup Guide for Access Control Server View 4.0 at http://www.cisco.com/en/US/docs/net_mgmt/cisco_secure_access_control_server_view/4.0/install/guide/acsviewig.html
• User Guide for Cisco Secure Access Control Server View 4.0 at http://www.cisco.com/en/US/docs/net_mgmt/cisco_secure_access_control_server_view/4.0/user/guide/UserGuide40.html
• Release Notes for Cisco Secure Access Control Server View at http://www.cisco.com/en/US/docs/net_mgmt/cisco_secure_access_control_server_view/4.0/release/notes/acsview4.0_RNE.html
• Regulatory Compliance and Safety Information for the Cisco Application Deployment Engine (ADE) 1010 and 2120 Series Appliance athttp://cisco.com/en/US/products/ps8340/prod_installation_guides_list.html
• Cisco Application Deployment Engine (ADE) 1010 and 2120 Series Appliance Hardware Installation Guide athttp://cisco.com/en/US/products/ps8340/prod_installation_guides_list.html
15 Obtaining Documentation and Submitting a Service RequestFor information on obtaining documentation, submitting a service request, and gathering additional information, see the monthly What’s New in Cisco Product Documentation, which also lists all new and revised Cisco technical documentation, at:
http://www.cisco.com/en/US/docs/general/whatsnew/whatsnew.html
42

Subscribe to the What’s New in Cisco Product Documentation as a Really Simple Syndication (RSS) feed and set content to be delivered directly to your desktop using a reader application. The RSS feeds are a free service and Cisco currently supports RSS version 2.0.
43

Americas HeadquartersCisco Systems, Inc.San Jose, CA
Asia Pacific HeadquartersCisco Systems (USA) Pte. Ltd.Singapore
Europe HeadquartersCisco Systems International BVAmsterdam, The Netherlands
Cisco has more than 200 offices worldwide. Addresses, phone numbers, and fax numbers are listed on the Cisco Website at www.cisco.com/go/offices.
CCDE, CCENT, Cisco Eos, Cisco Lumin, Cisco StadiumVision, the Cisco logo, DCE, and Welcome to the Human Network are trademarks;Changing the Way We Work, Live, Play, and Learn is a service mark; and Access Registrar, Aironet, AsyncOS, Bringing the Meeting To You,Catalyst, CCDA, CCDP, CCIE, CCIP, CCNA, CCNP, CCSP, CCVP, Cisco, the Cisco Certified Internetwork Expert logo, Cisco IOS, Cisco Press,Cisco Systems, Cisco Systems Capital, the Cisco Systems logo, Cisco Unity, Collaboration Without Limitation, EtherFast, EtherSwitch, EventCenter, Fast Step, Follow Me Browsing, FormShare, GigaDrive, HomeLink, Internet Quotient, IOS, iPhone, iQ Expertise, the iQ logo, iQ NetReadiness Scorecard, iQuick Study, IronPort, the IronPort logo, LightStream, Linksys, MediaTone, MeetingPlace, MGX, Networkers, NetworkingAcademy, Network Registrar, PCNow, PIX, PowerPanels, ProConnect, ScriptShare, SenderBase, SMARTnet, Spectrum Expert, StackWise, TheFastest Way to Increase Your Internet Quotient, TransPath, WebEx, and the WebEx logo are registered trademarks of Cisco Systems, Inc. and/or itsaffiliates in the United States and certain other countries.
All other trademarks mentioned in this document or Website are the property of their respective owners. The use of the word partner does not implya partnership relationship between Cisco and any other company. (0804R)
Quick Start Guide for Cisco Secure Access Control Server View 4.0 © 2008 Cisco Systems, Inc. All rights reserved.
Printed in the USA on recycled paper containing 10% postconsumer waste.
78-18204-01