QUICK START GUIDE - Analog Way · Vertige™ -Ref. VRC300 QUICK START GUIDE Thank you for choosing...
3
Verge™ - Ref. VRC300 QUICK START GUIDE Thank you for choosing Analog Way and the Verge™. By following these simple steps, you will be able to setup and use your powerful high end Remote Controller within minutes. Verge™ is a revoluonary Remote Controller integrang new ways to create and manage large events and mul-venues. The Verge™ brings a simple and flexible approach to show creaon and management. Verge™ can control several screens and devices such as Ascender 48, Ascender 32, Ascender 16, SmartMatriX Ultra, NeXtage 16 or NeXtage 08 systems, independently or simultaneously in any kind of combinaon, including Soſt Edge blending. Verge™ also supports linked LiveCore™ devices (addive modularity), LiveCore™ Expansion modules and synchronized LiveCore™ devices (associave modularity). • 1 x Verge™ (VRC300) • 2 x Power supply cord • 1 x User manual (PDF version)* • 1 x Quick start guide (PDF version)* * User manual and Quick start guide are available on www.analogway.com. WHAT’S IN THE BOX VERTIGE™ SETTINGS REAR PANEL DESCRIPTION Before starng with Verge™ please see the following steps: • Rear panel descripon • Front panel descripon • Seng up the Verge™ • Configuring the Show • Running the Show If connecng the Verge™ and device directly, be sure to use an Ethernet crossover cable (the Verge™ connects to the controlled devices with standard Ethernet LAN networking equipment). Otherwise you can use a standard Ethernet hub and straight cables. 1. Power Supply: Dual, redundant power supply with fuse as standard equipment. 2. On/Off buon: Switch on/off the device. 3. Connecon panel: Ethernet LAN adapters to control devices. 1 2 3 Go on our website to register your product(s) and be nofied about new firmware versions: hp://bit.ly/AW-Register
Transcript of QUICK START GUIDE - Analog Way · Vertige™ -Ref. VRC300 QUICK START GUIDE Thank you for choosing...
Analog Way SAS - HeadquartersTel.: +33 (0)1 81 89 08 60Fax: +33 (0)1 57 19 04 542/4 rue Georges Besse 92160 Antony FRANCE
Sales/General information: [email protected]
Technical support: [email protected].: +33 (0)1 81 89 08 76
Analog Way Inc.Tel.: +1 212 269 1902Fax: +1 212 269 1943 299 Broadway, Suite 1620 New York, NY 10007 USA
Sales/General information:[email protected]
Technical support: [email protected]
Analog Way Pte LtdTel.: +65 6292 5800Fax: +65 6292 5205152 Beach Road #15-03 Gateway East SINGAPORE 189721 Sales/General information: [email protected]
Technical support: [email protected]
Vertige™ - Ref. VRC300QUICK START GUIDE
Thank you for choosing Analog Way and the Vertige™. By following these simple steps, you will be able to setup and use your powerful high end Remote Controller within minutes. Vertige™ is a revolutionary Remote Controller integrating new ways to create and manage large events and multi-venues. The Vertige™ brings a simple and flexible approach to show creation and management. Vertige™ can control several screens and devices such as Ascender 48, Ascender 32, Ascender 16, SmartMatriX Ultra, NeXtage 16 or NeXtage 08 systems, independently or simultaneously in any kind of combination, including Soft Edge blending. Vertige™ also supports linked LiveCore™ devices (additive modularity), LiveCore™ Expansion modules and synchronized LiveCore™ devices (associative modularity).
• 1 x Vertige™ (VRC300)• 2 x Power supply cord• 1 x User manual (PDF version)*• 1 x Quick start guide (PDF version)*
* User manual and Quick start guide are available on www.analogway.com.
WHAT’S IN THE BOX
VERTIGE™ SETTINGS
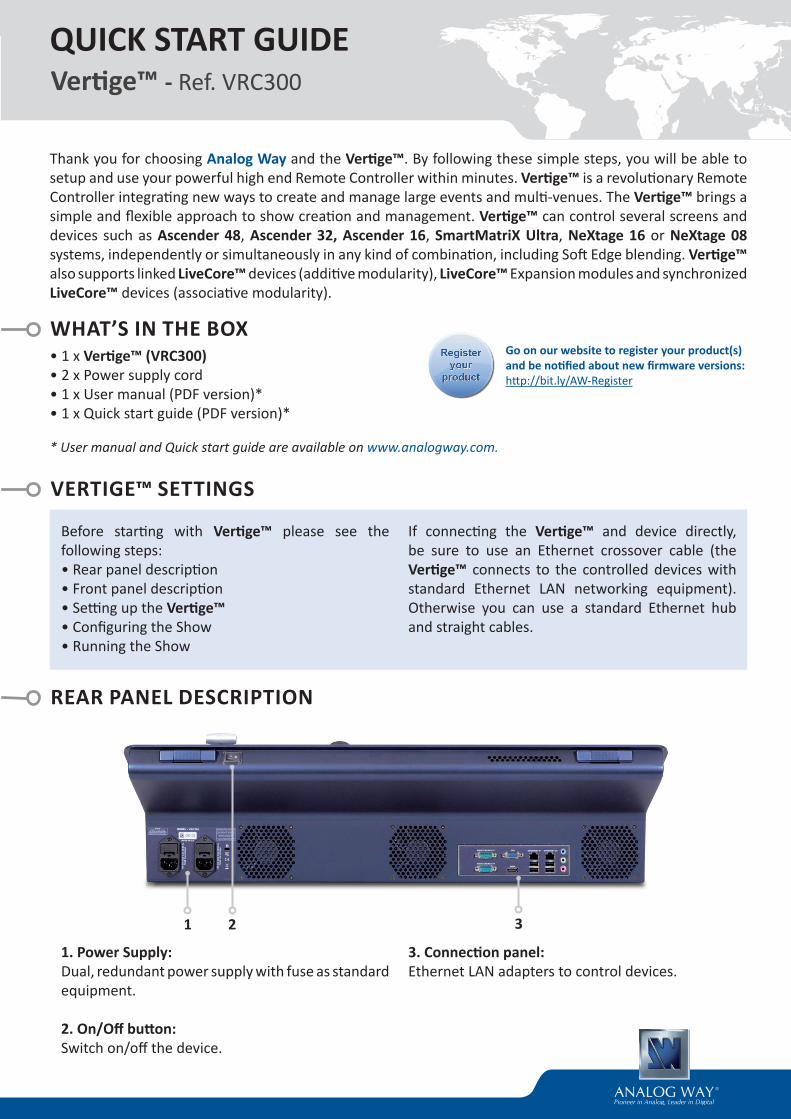
REAR PANEL DESCRIPTION
Before starting with Vertige™ please see the following steps:• Rear panel description• Front panel description• Setting up the Vertige™• Configuring the Show • Running the Show
If connecting the Vertige™ and device directly, be sure to use an Ethernet crossover cable (the Vertige™ connects to the controlled devices with standard Ethernet LAN networking equipment). Otherwise you can use a standard Ethernet hub and straight cables.
1. Power Supply:Dual, redundant power supply with fuse as standard equipment.
2. On/Off button:Switch on/off the device.
3. Connection panel:Ethernet LAN adapters to control devices.
1 2 3
RUNNING THE SHOWLayer SelectionBackgrounds, frames, PIPs, and logos are all considered layers. Layers which are selected will be highlighted on the touchscreen. To select a layer, there are several options:
• Selecting Layers from the touchscreen: At any time when the Preset Page screen is open, a layer may be selected by directly touching it on the touchscreen. Touching another layer will release your current selection and select the new layer. To select multiple layers, or remove a layer from your selection, you will need to use the selection modifier keys on the Vertige™ keyboard, i.e. [+] or [-].
• Selecting Layers from the Layer Selection buttons: At any time, a layer or group of layers may be selected by directly pressing one of the Layer Selection buttons (please read the user manual for more information on this topic).
Source selectionThe Source section allows you to:• Fill any layer or group of layer with a source. • Fill any native layer or group of native layer with a native
source (the native mode must be enabled).All sources and native sources have to be defined before (sources and their corresponding key bindings are usually created automatically by the Iteration Wizard whereas native sources have to be created manually).Use the left/right arrow to navigate into the source page. Then simply press the desired source in order to fill the selected layer(s).
Transition sectionYou have different options to transition from Preview to Program:- The T-Bar for a manual smooth transition- The Take button for an automatic timed transition- Independent faders for a manual transition per screen.
Below each fader you will find a screen button, you can use the left/right arrow to move this screen list. Each fader will take the screen which is written on the button.
Preset selectionA Preset contains all of the layer information about all of the layers on all of the selected screens. Presets stored using the Vertige™ console are stored within the Vertige™ show, and can be exported and imported to another console. By default, the unit will operate in preset Load mode.
To save a preset, first create the content that you wish to save on either the program or preview screens. To save a preset from Program, make sure that the Program button is selected. To save a preset from Preview, make sure that the Preview button is selected. To save a preset, press the SAVE button next to the preset bank and page navigation buttons. Then navigate to the preset slot that you wish to save to, and press once on the desired preset button. The preset will turn yellow, indicating a successful save then the system will automatically switch back to Load mode. If the preset slot was not empty, press twice to overwrite.
To load a preset, first be sure that the Preview button is selected if you wish to load the preset to Preview, or that the Program button is selected if you wish to load the preset to Program. To Load a preset, make sure that the LOAD button next to the preset bank and navigation buttons is selected. Next, select the desired preset that you wish to load. The preset will be loaded to program or preview, depending on which button
has been selected. If you have loaded your preset to preview, you will need to press TAKE to view it on the Program screens. If you load a preset directly to program, the new attributes including sources, size, position, border, etc will cut into place. Presets can be saved, loaded and renamed directly from the Preset page. (Please read the user manual for more information on this topic).
For complete details and operations procedures, please refer to the Vertige™ User’s manual and our website for further information: www.analogway.com
140154 - 11/09/2015Firmware: V02.02.05 - VRC300-QSG
All Analog Way products have a 3 year warranty on parts and labor, return to factory, but do not include faults resulting from user negligence, any unauthorized modifications, electrical surges, mishandling (drop/crush), and/or any other damage caused by misuse. Please note: The included carrying case and protective foam is not covered under warranty.
WARRANTY AND SERVICE
CONTACT INFORMATION
GOING FURTHER WITH THE VERTIGE™
UNITED STATES
FRANCE
ITALY
SINGAPORE
GERMANY
UNITED KINGDOM
UNITED STATES
FRANCE
ITALY
SINGAPORE
GERMANY
UNITED KINGDOM
UNITED STATES
FRANCE
ITALY
SINGAPORE
GERMANY
UNITED KINGDOM
UNITED STATES
FRANCE
ITALY
SINGAPORE
GERMANY
UNITED KINGDOM
The AmericasEurope, Middle East & AfricaAsia Pacific
Go on our website to register your product(s) and be notified about new firmware versions:http://bit.ly/AW-Register

FRONT PANEL DESCRIPTION SETTING UP THE VERTIGE™ & CONFIGURING THE SHOW
1- Touch screen The touch screen 15’’6 Wide displays comfortably on the same page, the representation of the Program & Preview but also of a typical scene (Blend + 2 satellites). It is important to have the whole scene represented to work on multiple layers from different screens at the same time (change of source of background, for example). It is useful to have both states Program/Preview shown at the same time as the LiveCore™ series allows you to change one or the other at any time (even during an effect).
2- Preset sectionThis section allows the operator to save/load its scene presets (10 direct access presets and a page mechanism to organize them).
3- Layer sectionThis section enables the operator to select a set of layers which belong to different screens in order to edit them simultaneously. Various criteria are used to perform advanced combinations. It will be possible to save those combinations for later use.
4- Source sectionThis section allows assigning sources to the selected layers in Program or Preview. Twelve contextual buttons display the name of source. The capability to change a page allows benefiting from numerous sources.
5- Control sectionThis section enables the operator to select which preset to work with, and have direct access to basic functions applied to all selected layers (Freeze, Clear, Unify...).
6- Edit sectionThis section allows the operator to edit the selected layers in three different ways: roughly by the joystick, finely by coders or directly by numpad. The block displaying the numpad is contextual: it also provides access to pages of shortcuts, tools, layer presets (Position, Size, Border, Effect …).
7- Transition sectionThis section enables to use the T-Bar for transitions. Sliders can be used like T-Bar (Effects) or like Faders (Alpha). Sliders are motorized in order to see the current state of the selection.
8- Control TransitionThe ALPHA button is used to give a specific role to the sliders:• If the ALPHA mode is disabled (key backlight turned
off), sliders allow to individually mix each screen• If the ALPHA mode is enabled (key illuminates in
RED), different layers of different screens can be assigned to a slider, they will allow to control the layer opacity (transparency).
The CUE SEQUENCE mode allows buttons to be used for controlling cue sequence playback.
1
2
3
4 8
7
5
6
Starting the Vertige™Press Start
Creating a UserSelect the CREATE option.Enter a name and a password (optional)Press Create
Configuring the Vertige™ NetworkPress the SETTINGS button in the upper-right cornerSelect the Network tabSelect the Ethernet port you want to useEnter the desired IP address, subnet mask and gatewayPress Apply
Logging inSelect the LOGIN optionSelect a userPress Login
Creating a ShowSelect the CREATE optionEnter a namePress CreateNote: Creating a show will automatically create a default iteration
Loading a ShowSelect the LOAD optionSelect a showPress Load
Wizard Step 1 (Assembly)In the Device Type field, select the type of device that will be handled by this assembly. In the Device Extension field, select the option that matches you assembly configuration (Single, Linked with Slave, Linked with LOE or Synchronized). If your device(s) have an option (4K or 4K - PL), then make sure to select it in the Device Option field.
Wizard Step 2 (Devices)Enter the IP address of the Master device. If you have selected the Synchronized option, then check the Slave #X boxes to enable up to three additional devices that will be synchronized with the Master device. Then adjust each device IP address to match your network configuration. Press the Next button to continue.
Wizard Step 4 (Screens)Rename each screen if necessary. If some of the screens will be used for a blend, adjust their size accordingly. Press Create.Note 1: The wizard will automatically create an assembly with its devices and streams, the screens, the sources and the front panel key bindings.Note 2: If your event requires creating other devices and screens, use the wizard as many times as necessary.Note 3: After using the wizard, you may have to adjust some default settings in the assemblies/ screens/sources.
Wizard Step 3 (Scene)Select the total number of screens wired to your devices.
Configuring an AssemblySelect the ASSEMBLY tabSelect an assembly
Configuring a SourceSelect the SOURCE tabSelect a source
Running the ShowSelect the PRESET tabEnjoy!
Configuring a ScreenSelect the SCREEN tabSelect a screen
Configuring the Internal RateSelect the PRECONFIG/RATE option. Choose the desired mode (Internal, Follow or Framelock).Adjust the settings.
Renaming the SourceSelect the EDIT optionEnter a name / Press ApplyNote: Use a short name with a maximum of two words to ensure readability on LCD buttons.
Configuring the SceneSelect the SCENE option.Press Move left or Move right to move your screen in the scene.
Configuring the InputsSelect the IN/OUT/INPUT option.Press All Inputs to set up automatically all the inputs of the devices.
Configuring the Source key bindingSelect the EDIT optionNavigate to an empty keyPress the corresponding button on the touch screen.Press Apply
Configuring a Native SourceSelect the NATIVE tab then select the CREATE optionEnter a name. Navigate to an empty key.Press the corresponding button on the touch screen.Press Create
Configuring the Native Source key bindingSelect the EDIT option. Navigate to an empty keyPress the corresponding button
Configuring the streams mappingSelect the MAP / QUICK option.Select the native stream that will get displayed on the selected native layers when the corresponding source key is pressed in the front panel.
Configuring the Screen MappingSelect the MAP optionMake sure each screen area is mapped to the correct device output.
Note: If some mappings don’t match your wiring, remove them and create new ones.
Configuring the StreamsSelect the STREAM/ LIVE option.Make sure each "Live" stream matches the correct input plug. Select the STREAM/NATIVE option to create native streams.
Configuring the Soft Edge blendingSelect the BLENDING option. Adjust the coveringAdjust the black levels Adjust the blending curves
Loading an IterationSelect the LOAD optionSelect an iteration Press Load
5
8 9
6 7
1 2 3 4

Analog Way SAS - HeadquartersTel.: +33 (0)1 81 89 08 60Fax: +33 (0)1 57 19 04 542/4 rue Georges Besse 92160 Antony FRANCE
Sales/General information: [email protected]
Technical support: [email protected].: +33 (0)1 81 89 08 76
Analog Way Inc.Tel.: +1 212 269 1902Fax: +1 212 269 1943 299 Broadway, Suite 1620 New York, NY 10007 USA
Sales/General information:[email protected]
Technical support: [email protected]
Analog Way Pte LtdTel.: +65 6292 5800Fax: +65 6292 5205152 Beach Road #15-03 Gateway East SINGAPORE 189721 Sales/General information: [email protected]
Technical support: [email protected]
Vertige™ - Ref. VRC300QUICK START GUIDE
Thank you for choosing Analog Way and the Vertige™. By following these simple steps, you will be able to setup and use your powerful high end Remote Controller within minutes. Vertige™ is a revolutionary Remote Controller integrating new ways to create and manage large events and multi-venues. The Vertige™ brings a simple and flexible approach to show creation and management. Vertige™ can control several screens and devices such as Ascender 48, Ascender 32, Ascender 16, SmartMatriX Ultra, NeXtage 16 or NeXtage 08 systems, independently or simultaneously in any kind of combination, including Soft Edge blending. Vertige™ also supports linked LiveCore™ devices (additive modularity), LiveCore™ Expansion modules and synchronized LiveCore™ devices (associative modularity).
• 1 x Vertige™ (VRC300)• 2 x Power supply cord• 1 x User manual (PDF version)*• 1 x Quick start guide (PDF version)*
* User manual and Quick start guide are available on www.analogway.com.
WHAT’S IN THE BOX
VERTIGE™ SETTINGS
REAR PANEL DESCRIPTION
Before starting with Vertige™ please see the following steps:• Rear panel description• Front panel description• Setting up the Vertige™• Configuring the Show • Running the Show
If connecting the Vertige™ and device directly, be sure to use an Ethernet crossover cable (the Vertige™ connects to the controlled devices with standard Ethernet LAN networking equipment). Otherwise you can use a standard Ethernet hub and straight cables.
1. Power Supply:Dual, redundant power supply with fuse as standard equipment.
2. On/Off button:Switch on/off the device.
3. Connection panel:Ethernet LAN adapters to control devices.
1 2 3
RUNNING THE SHOWLayer SelectionBackgrounds, frames, PIPs, and logos are all considered layers. Layers which are selected will be highlighted on the touchscreen. To select a layer, there are several options:
• Selecting Layers from the touchscreen: At any time when the Preset Page screen is open, a layer may be selected by directly touching it on the touchscreen. Touching another layer will release your current selection and select the new layer. To select multiple layers, or remove a layer from your selection, you will need to use the selection modifier keys on the Vertige™ keyboard, i.e. [+] or [-].
• Selecting Layers from the Layer Selection buttons: At any time, a layer or group of layers may be selected by directly pressing one of the Layer Selection buttons (please read the user manual for more information on this topic).
Source selectionThe Source section allows you to:• Fill any layer or group of layer with a source. • Fill any native layer or group of native layer with a native
source (the native mode must be enabled).All sources and native sources have to be defined before (sources and their corresponding key bindings are usually created automatically by the Iteration Wizard whereas native sources have to be created manually).Use the left/right arrow to navigate into the source page. Then simply press the desired source in order to fill the selected layer(s).
Transition sectionYou have different options to transition from Preview to Program:- The T-Bar for a manual smooth transition- The Take button for an automatic timed transition- Independent faders for a manual transition per screen.
Below each fader you will find a screen button, you can use the left/right arrow to move this screen list. Each fader will take the screen which is written on the button.
Preset selectionA Preset contains all of the layer information about all of the layers on all of the selected screens. Presets stored using the Vertige™ console are stored within the Vertige™ show, and can be exported and imported to another console. By default, the unit will operate in preset Load mode.
To save a preset, first create the content that you wish to save on either the program or preview screens. To save a preset from Program, make sure that the Program button is selected. To save a preset from Preview, make sure that the Preview button is selected. To save a preset, press the SAVE button next to the preset bank and page navigation buttons. Then navigate to the preset slot that you wish to save to, and press once on the desired preset button. The preset will turn yellow, indicating a successful save then the system will automatically switch back to Load mode. If the preset slot was not empty, press twice to overwrite.
To load a preset, first be sure that the Preview button is selected if you wish to load the preset to Preview, or that the Program button is selected if you wish to load the preset to Program. To Load a preset, make sure that the LOAD button next to the preset bank and navigation buttons is selected. Next, select the desired preset that you wish to load. The preset will be loaded to program or preview, depending on which button
has been selected. If you have loaded your preset to preview, you will need to press TAKE to view it on the Program screens. If you load a preset directly to program, the new attributes including sources, size, position, border, etc will cut into place. Presets can be saved, loaded and renamed directly from the Preset page. (Please read the user manual for more information on this topic).
For complete details and operations procedures, please refer to the Vertige™ User’s manual and our website for further information: www.analogway.com
140154 - 11/09/2015Firmware: V02.02.05 - VRC300-QSG
All Analog Way products have a 3 year warranty on parts and labor, return to factory, but do not include faults resulting from user negligence, any unauthorized modifications, electrical surges, mishandling (drop/crush), and/or any other damage caused by misuse. Please note: The included carrying case and protective foam is not covered under warranty.
WARRANTY AND SERVICE
CONTACT INFORMATION
GOING FURTHER WITH THE VERTIGE™
UNITED STATES
FRANCE
ITALY
SINGAPORE
GERMANY
UNITED KINGDOM
UNITED STATES
FRANCE
ITALY
SINGAPORE
GERMANY
UNITED KINGDOM
UNITED STATES
FRANCE
ITALY
SINGAPORE
GERMANY
UNITED KINGDOM
UNITED STATES
FRANCE
ITALY
SINGAPORE
GERMANY
UNITED KINGDOM
The AmericasEurope, Middle East & AfricaAsia Pacific
Go on our website to register your product(s) and be notified about new firmware versions:http://bit.ly/AW-Register