Quick Start Guide - Amazon S3 · 2017-01-09 · your hands are dirty while inserting the sensor,...
72
Quick Start Guide CONTINUOUS GLUCOSE MONITORING SYSTEM
Transcript of Quick Start Guide - Amazon S3 · 2017-01-09 · your hands are dirty while inserting the sensor,...

Quick Start Guide
CONTINUOUS GLUCOSE MONITORING SYSTEM


Table of Contents
Section 1: Welcome........................................................................................................41.1 Learning How to Learn....................................................................................................4
Section 2: Indications for Use and Safety Statement.........................................5
Section 3: Risks and Benefits...................................................................................133.1 Risks..............................................................................................................................13
3.2 Benefits.........................................................................................................................14
Section 4: System Overview.........................................................................164.1 Components...................................................................................................................16
4.2 Choose Display Device..................................................................................................17
Section 5: App Setup and Operation...........................................................205.1 Install App.....................................................................................................................20
5.2 Enter Initial BG Meter Values........................................................................................22
5.3 Enter BG Meter Value Every 12 Hours...........................................................................23
5.4 View Home Screen........................................................................................................24
5.5 End Sensor Session.......................................................................................................26
5.6 Remove Sensor Pod and Transmitter............................................................................26
5.7 Smart Device Settings..................................................................................................27
Section 6: Receiver Setup and Operation...................................................286.1 Receiver Overview.........................................................................................................28
6.2 Set Up Receiver.............................................................................................................28
6.3 Insert Sensor.................................................................................................................30
6.4 Attach Transmitter........................................................................................................32
6.5 Confirm Transmitter and Receiver Are Communicating..............................................33
6.6 Start Sensor...................................................................................................................33
6.7 Set Up Alert Sounds......................................................................................................34
Dexcom G5 Mobile CGM System Quick Start Guide • 1

6.8 Enter Initial BG Meter Values.........................................................................................36
6.9 Enter BG Meter Values Every 12 Hours..........................................................................37
6.10 View Receiver Trend Screen.........................................................................................38
6.11 End Sensor Session......................................................................................................40
6.12 Remove Sensor Pod and Transmitter...........................................................................40
Section 7: Alarm, Alerts and Advanced Alerts............................................417.1 Low Glucose Alarm.........................................................................................................41
7.2 Change Low/High Alerts.................................................................................................41
7.3 Advanced Alerts.............................................................................................................41
Section 8: Troubleshooting...........................................................................428.1 No Alarm/Alerts..............................................................................................................42
8.2 Sensor Glucose Readings..............................................................................................44
8.3 Adhesive.........................................................................................................................47
8.4 Hardware Errors.............................................................................................................47
8.5 Calibration Errors...........................................................................................................48
8.6 Transmitter Errors..........................................................................................................49
8.7 Sensor Errors.................................................................................................................50
8.8 Ending Sensor Session Early..........................................................................................50
Section 9: Warranty.......................................................................................539.1 Receiver Warranty Information......................................................................................53
9.2 Transmitter Warranty Information.................................................................................55
Section 10: Travel..........................................................................................5810.1 Going Through Security................................................................................................58
Section 11: Need Help? You’re Not Alone!....................................................6011.1 Dexcom Technical Support...........................................................................................60
11.2 Patient Care Team........................................................................................................61
11.3 Sales Support Team.....................................................................................................61
11.4 Corporate......................................................................................................................62
2 • Dexcom G5 Mobile CGM System Quick Start Guide
11.5 Explore Web Based Education......................................................................................62
11.6 Explore Share/Follow....................................................................................................62
11.7 Frequently Asked Questions.........................................................................................62
Dexcom G5 Mobile CGM System Quick Start Guide • 3

Congratulations on making the Dexcom G5 Mobile Continuous Glucose Monitoring (CGM) System part of your life!
The Dexcom G5 Mobile CGM System (Dexcom G5 Mobile) allows you to see real-time continuous sensor glucose readings every five minutes for up to seven days. These readings can help you find trends and patterns in your glucose levels, allowing you to see where your glucose levels have been, which direction they are headed, and how fast they are rising or falling.
1.1 Learning How to Learn
Knowing about the Dexcom G5 Mobile is your first step in creating a successful CGM experience. Before using it, learn about it.
You can train on the Dexcom G5 Mobile in the following ways:
Self train with the Dexcom G5 Mobile Tutorial
Train with our Dexcom Care Team (1-877-339-2664, Monday through Friday, 6 am to 5 pm PST)
Train with your healthcare professional using this Quick Start Guide
Before you begin and anytime you have questions, review the Dexcom G5 Mobile CGM User Guide (user guide). Your options to get the full user guide:
Download as an eBook or view/print in a .pdf format dexcom.com/guides
Online request form to receive a free printed copy dexcom.com/guides
Request a free copy by mail Using the business reply card found in the back of this guide
Request a free copy by phone 1-888-738-3646
Section 1
Welcome
1
2
3
4 • Dexcom G5 Mobile CGM System Quick Start Guide
1
2
3
4

Section 2
Indications for Use and Safety Statement
Indications for Use
The Dexcom G5 Mobile Continuous Glucose Monitoring (CGM) System is a glucose monitoring system indicated for detecting trends and tracking patterns in persons (age 2 years and older) with diabetes. The system is intended for single patient use and requires a prescription.
The Dexcom G5 Mobile CGM System is indicated for use as an adjunctive device to complement, not replace, information obtained from standard home glucose monitoring devices.
The Dexcom G5 Mobile CGM System aids in the detection of episodes of hyperglycemia and hypoglycemia, facilitating both acute and long-term therapy adjustments, which may minimize these excursions. Interpretation of the Dexcom G5 Mobile CGM System results should be based on the trends and patterns seen with several sequentialreadings over time.
Contraindications
MRI/CT/ Diathermy
Remove the Dexcom G5 Mobile CGM System (sensor, transmitter, and receiver)before Magnetic Resonance Imaging (MRI), Computed Tomography (CT) scan, orhigh-frequency electrical heat (diathermy) treatment.
The system hasn’t been tested during MRI, CT scans, or with diathermy treatment. Magnetic fields and heat could damage the components, stopping sensor glucose readings or Alarm/Alert notifications. Without sensor glucose readings or Alarm/Alert notifications, you might miss a severe low or high glucose event.
MedicationsTaking medications with acetaminophen (such as Tylenol® or Excedrin Extra Strength®) while wearing the sensor may falsely raise your sensor glucose readings. The level of inaccuracy depends on the amount of acetaminophen active in your body and is different for each person.
Dexcom G5 Mobile CGM System Quick Start Guide • 5
General CGM System WarningsWarnings
Review Training MaterialsThoroughly review the training materials included with your Dexcom G5 Mobile CGM System before using.
Incorrect use could lead you to misunderstand system information or might affect its performance and you might miss a severe low or high glucose event.
Treatment DecisionsThe Dexcom G5 Mobile CGM System does not replace your blood glucose (BG) meter.
When making treatment decisions, such as the amount of insulin you need, only use your BG value. Don’t use the Dexcom G5 Mobile CGM System sensor glucose readings because readings can be different from your BG value. If sensor glucose readings are used in determining treatments, it could result in you missing a severe low or high glucose event.
Don’t Ignore Low/High SymptomsIf your sensor glucose readings don’t match your symptoms, measure your BG with a fingerstick. Otherwise, you may miss a severe low or high glucose event.
Who Shouldn’t UseThe Dexcom G5 Mobile CGM System was not evaluated, nor approved for the following persons:
• Pregnant women
• Persons on dialysis
• Persons who are critically ill
The system’s accuracy hasn’t been tested in people falling into these groups and sensor glucose readings may be inaccurate, resulting in missing a severe low or high glucose event.
Calibration Warning and Precautions
Warning
Calibrate on ScheduleCalibrate at least once every 12 hours. Calibrating less often than every 12 hours mightcause sensor glucose readings to be inaccurate, resulting in you missing a severe low
6 • Dexcom G5 Mobile CGM System Quick Start Guide

or high glucose event.
Precautions
Be Accurate, Be QuickEnter the exact BG value displayed on your BG meter within five minutes of afingerstick.
Entering the wrong BG values, or waiting more than five minutes before entry, might affect sensor performance, resulting in you missing a severe low or high glucose event.
Significant Glucose Rate ChangesDon’t calibrate when your BG is changing at a significant rate: more than 2 mg/dL per minute.
Look for rate of change arrows on your display device screen and don’t calibrate when you see:
• A single arrow, pointing up- Rising 2-3 mg/dL each minute
• Two arrows pointing up- Rising more than 3 mg/dL each minute
• Single arrow pointing down- Falling 2-3 mg/dL each minute
• Two arrows pointing down- Falling more than 3 mg/dL each minute
Calibrating during a significant rise/fall of your BG may affect accuracy of sensorglucose readings, resulting in you missing a severe low or high glucose event.
Fingerstick OnlyOnly use fingerstick measurements from your BG meter for calibration.
Alternative site BG values from your arms, palm of your hand, etc., may be different and less accurate than your fingerstick BG values. Using alternative site BG values for calibration might affect sensor performance, resulting in you missing a severe low or high glucose event.
Prior to Initial Calibration: Data/Alarm/AlertAfter starting a new sensor session, until completing your initial calibrations, you won’t receive any sensor information such as readings, Alarm or Alerts. Without these, you may miss a severe low or high glucose event.
Continue to take fingerstick measurements during a new sensor warmup period.
Dexcom G5 Mobile CGM System Quick Start Guide • 7

System/Hardware/Software Warnings and Precautions
Sensor/Sensor Pod Warnings and Precautions
Warnings
Sensor Breaking OffOn rare occasions, the sensor wire may break or detach from the sensor pod.Within 24 hours of experiencing a broken sensor wire, please call our 24/7 Technical Support department, toll free at 1.877.339.2664 or toll at 1.858.200.0200.
If a sensor wire breaks under the skin with no portion of it visible, don’t remove it. Contact your healthcare professional if you have redness, swelling, or pain at the insertion site.
PlacementDo not insert the sensor component of the G5 Mobile System in a site other than the belly/abdomen (ages 2 years and older) or the upper buttocks (ages 2 to 17 years). The placement and insertion of the sensor component of the G5 Mobile System is not approved for other sites.
If placed in other areas, the G5 Mobile System may not function properly.
StorageDuring a sensor’s shelf life, store it between 36° F-77° F. While you don’t need to keep your sensor in a refrigerator, you can as long as the refrigerator is between 36° F-77° F.
Never store sensors and/or sensor packages in a freezer.
Storing the sensor incorrectly might cause the sensor glucose readings to be incorrect, resulting in you missing a severe low or high glucose event.
Precautions
Expiration DateDon’t use expired sensors. Before inserting, always check the package label for the expiration date using the YYYY-MM-DD format.
If past the expiration date, don’t use because the sensor glucose readings might not be accurate, resulting in you missing a severe low or high glucose event.
Sensor PackageDon’t use sensor if its sterile package has been damaged or opened. Using anon-sterile sensor might cause infection.
8 • Dexcom G5 Mobile CGM System Quick Start Guide
Clean and Dry Before UsingBefore opening the sensor package, wash your hands with soap and water, then dry. If your hands are dirty while inserting the sensor, you may contaminate the insertion site and get an infection.
Before sensor insertion, clean the skin with alcohol wipes to prevent infections. Don’t insert the sensor until the cleaned insertion site is dry, and free from any lotions or perfumes.
If your insertion site is not clean and completely dry, you run the risk of infection or the sensor pod not sticking and falling off.
Sensor PlacementChange the site where you place the sensor with each new insertion. Using the same site too often might not allow the skin to heal, causing scarring or skin irritation.Sensor placement is important. Make sure the area you place your sensor won’t:
• Be bumped, pushed, or squeezed
• Have scars, tattoos, or irritation
Insertion in these areas might affect sensor performance, resulting in you missing a severe low or high glucose event.
Avoid injecting insulin or placing an insulin pump infusion set within three inches of the sensor. The insulin might affect sensor performance, resulting in you missing a severe low or high glucose event.
Transmitter Warnings and Precautions
Warnings
Inspect TransmitterIf your transmitter is damaged or cracked in any way, don’t use it. Damagedcomponents could create an electrical safety hazard or malfunction, which might cause electrical shocks.
ChokingThe transmitter is small and may pose a choking hazard. Don’t put it in your mouth or allow children to play with it.
PrecautionsReusable: Don’t Throw Away
Dexcom G5 Mobile CGM System Quick Start Guide • 9

When ending a session, don’t throw away the transmitter.The transmitter is reusable and can be used in multiple sensor sessions. Keep using it until the system notifies you the transmitter battery is about to expire.
Don’t Share Your TransmitterNever share your transmitter with another person. The Dexcom G5 Mobile CGM System is a prescription-only medical device and is meant, or indicated, for your use only.Your transmitter is tied to your readings. If used by someone else, your reports, Alarm and Alerts, etc., would be wrong, resulting in you missing a severe low or high glucose event.
System Precautions
Precautions
Use Correct Transmitter, Receiver, and SensorDifferent generations’ transmitters and receivers aren’t interchangeable with each other.
The Dexcom G5 Mobile CGM System’s transmitter and receiver are not compatible with the Dexcom G4® PLATINUM CGM System’s transmitter and receiver. The Dexcom G5 Mobile CGM System won’t work if you mix receiver and transmitter components from different generations, resulting in you missing a severe low or high glucose event.You can use a Dexcom G4 PLATINUM Sensor with the Dexcom G5 Mobile CGM System. Before using the sensor, make sure the sensor label says G5 Mobile or G4 PLATINUM Sensor.
System AccuracySystem accuracy may be affected when your glucose is changing at a significant rate such as during exercise or after a meal.
Significant glucose rise/fall rates:• Rising 2-3 mg/dL each minute• Rising more than 3 mg/dL each minute• Falling 2-3 mg/dL each minute• Falling more than 3 mg/dL each minute
Receiver and Smart Device Precautions
Precautions
Communication Range
10 • Dexcom G5 Mobile CGM System Quick Start Guide

Do not separate the transmitter from the receiver or smart device by more than 20 feet. The transmission range from the transmitter to receiver or smart device is up to 20 feet without obstruction.
Types of obstruction differ and not all have been tested. Obstructions can include water, walls, metal, etc. If your transmitter and display device(s) are more than 20 feet from each other or are separated by an obstruction, they might not communicate, resulting in you missing a severe low or high glucose event.
Water is often the biggest culprit in reducing the communication distance between the transmitter and display devices. Take special care when swimming, taking a bath, or getting into a hot tub.
Setting Alarm/Alert NotificationsWhen using both a receiver and a smart device, you must set your settings separately in each. If you set up one device and then use another device with different settings, you might not get an Alarm or Alerts, causing you to miss a severe low or high glucose event.
Using an accessory device (like a smart watch) might override your smart device sounds. Alarms or Alerts might vibrate or be heard on the accessory instead of your smart device. After connecting any accessories, make sure that the smart device settings allow you to continue receiving Alarms or Alerts on the smart device.
Is It On?If the receiver or smart device is turned off (Shut Down), it will not display sensor information, Alarm or Alerts. Make sure they are turned on; otherwise you won’t get sensor glucose readings or Alarm or Alerts, causing you to miss a severe low or high glucose event.
Smart Device Warnings
Warnings
Smart Device SettingsThe Dexcom G5 Mobile App cannot override your smart device’s internal settings. Also, accessory devices (like a smart watch or other wearable smart devices) might override your smart device’s Alerts, Alarm, and notification settings.
To receive Alarm or Alerts you must:1. Make sure Dexcom G5 Mobile App Notifications are turned on in your smart device’s settings2. Verify app hasn’t been shut down
Dexcom G5 Mobile CGM System Quick Start Guide • 11

3. Turn Bluetooth on 4. Turn off Do Not Disturb (if available on your smart device)5. Restart app after device is restarted6. Set Volume at a level you can hear 7. Do not close app, always run app in the background 8. Make sure accessory devices do not override your smart device settings.
If your settings are incorrect, you might miss a severe low or high glucose event.Dexcom G5 Mobile CGM System Alarm/Alert vibrations aren’t any different from othervibrating apps on your smart device. Medical device apps, like the Dexcom G5 Mobile App, don’t have any special priorities over your smart device’s features. Dexcom G5 Mobile App notifications or alerts may sound or feel the same as notifications from another app. The only way to know is to look at the screen.
Missed an Alarm or Alert?An Alarm or Alert can’t be heard through your smart device’s speakers if headphones are plugged in.
Make sure you unplug your headphones when you are done using them, otherwise you might not hear an Alarm or Alert, causing you to miss a severe low or high glucose event.
Receiver Warning and Precaution
Warning
Don’t Use Damaged GoodsIf your receiver is damaged or cracked, don’t use it. This could create an electrical safety hazard or malfunction, causing possible electrical shocks.
Precaution
Keep Receiver DryKeep the USB port cover on the receiver closed whenever the USB cable is not attached and do not submerge in water.
If water gets into the USB port, the receiver could become damaged and stopdisplaying readings or providing alerts; you might miss a severe low or high glucose event.
Caution
U.S. law restricts the sale of the Dexcom G5 Mobile CGM System to sale by or on order of a physician.
12 • Dexcom G5 Mobile CGM System Quick Start Guide

Section 3
Risks and Benefits
3.1 RisksThere are some risks with using real-time CGM.
Not Receiving Alarm/AlertsIf you aren’t getting your CGM Alarm/Alerts, you run the risk of not knowing you are having a severe glucose low or high.
Some hardware issues preventing Alarm/Alerts:
• Alert function is turned off• Transmitter and display device is out of range• Receiver or smart device isn’t showing sensor glucose readings• Receiver or smart device battery is dead• Unable to hear Alarm/Alerts or feel vibration• App not running in the background• Smart device is in Do Not Disturb
Sensor Glucose Reading Different from Meter’sThe sensor glucose reading can be different than your meter’s BG value.
If you’re not receiving an Alarm/Alert, and not taking fingerstick BG measurements, you may be unaware of low or high glucose levels.
Sensor Insertion RisksInserting the sensor and wearing the adhesive patch might cause infection, bleeding, pain or skin irritations (e.g., redness, swelling, bruising, itching, scarring or skin discoloration).
There is a remote chance sensor fragments could remain under your skin if the sensor breaks during normal wear. Sterile broken sensor wires don’t pose a significant medical risk.
If a sensor wire breaks off or detaches and remains under your skin, contact your healthcare professional and call Dexcom’s Technical Support toll free, 24/7, at 1.877.339.2664 or toll at 1.858.200.0200 within 24 hours.
Dexcom G5 Mobile CGM System Quick Start Guide • 13

3.2 BenefitsDaily habits impact your glucose levels. With the Dexcom G5 Mobile CGM System, you can track how your exercise, carbs, stress levels, medication, or illness, influence your glucose levels.
Knowing Your TrendsProviding sensor glucose readings every five minutes, for up to seven days, the Dexcom G5 Mobile CGM System helps you detect trends and patterns. Trend information reveals where your glucose is now, where your glucose is heading, and how fast it’s changing.
Helps in Your Diabetes ManagementThe Alarm/Alerts features keep you aware of your glucose levels. Alerts notify you when your glucose goes outside your target range or is rapidly falling or rising, informing you to take action before you get too low or too high. The Urgent Low Alarm lets you know when you are dangerously or urgently low, going below 55 mg/dL. By taking corrective measures, you lessen the time spent in your low/high range, while increasing time in your targeted range (Garg, 2006; Battelino, 2011).
Real-time CGM can help improve your A1C as well as improve the quality of your glucose control. If you are at or below 7%, using a CGM such as Dexcom’s G5 Mobile CGM System, helps reduce hypoglycemia (Tamborlane, 2008).
Lowering your A1C, increasing your time in your target range while decreasing time in low/high BG range is believed to reduce your risk of diabetes related complications (Ohkubo, 1995).
When you use your CGM device regularly, you get peace of mind. (Juvenile Diabetes Research Foundation Continuous Glucose Monitoring Study Group. 2010)
References:Battelino, T., Phillip, M., Bratina, N., Nimri, R., Oskarsson, P., & Bolinder, J. (2011). Effect of Continuous Glucose Monitoring on Hypoglycemia in Type 1 Diabetes. Diabetes Care, 34(4), 795-800.
Garg, S., Zisser, H., Schwartz, S., Bailey, T., Kaplan, R., Ellis, S., & Jovanovic, L. (2005). Improvement in Glycemic Excursions With a Transcutaneous, Real-Time Continuous Glucose Sensor: A randomized controlled trial. Diabetes Care, 29(1), 44-50.
Juvenile Diabetes Research Foundation Continuous Glucose Monitoring Study Group (2010). Quality-of-Life Measures in Children and Adults with Type 1 Diabetes. Diabetes Care, 33(10), 2175-2177.
14 • Dexcom G5 Mobile CGM System Quick Start Guide 14 • Dexcom G5 Mobile CGM System Quick Start Guide

Ohkubo, Y., Kishikawa, H., Araki, E., Miyata, T., Isami, S., Motoyoshi, S., & Shichiri, M. (1995). Intensive Insulin Therapy Prevents the Progression of Diabetic Microvascular Complications in Japanese Patients with Non-insulin-dependent Diabetes Mellitus: A Randomized Prospective 6-year Study. Diabetes Research and Clinical Practice, 28(2), 103-117.
Tamborlane, W. V., Beck, R. W., Bode, B. W., Buckingham, B., Chase, H. P., Clemons, R., & Xing, D. (2008). Continuous Glucose Monitoring and Intensive Treatment Of Type 1 Diabetes. The New England Journal of Medicine, 359(14), 1464-1476.
Dexcom G5 Mobile CGM System Quick Start Guide • 15Dexcom G5 Mobile CGM System Quick Start Guide • 15

4.1 ComponentsYour Dexcom G5 Mobile is made up of the following:
16 • Dexcom G5 Mobile CGM System Quick Start Guide
The Dexcom G5 Mobile App on your smart device* and/or your receiver can be used as your display device.
• Displays your sensor glucose readings
• Allows you to set and receive Alarm/Alerts
• Your display device and transmitter must be kept within 20 feet of each other
3. Display Device(s)
• Placed into the sensor pod
• Wirelessly sends sensor glucose information to either your Dexcom G5 Mobile App, your receiver, or both
• Reusable during three month battery life
2. Transmitter
• The sensor is inserted using the applicator
• Small sensor wire measures sensor glucose levels just below the skin
• Worn for up to seven days
• The sensor and applicator are disposable after use
1. Sensor and Applicator
* For a list of compatible devices see: dexcom.com/compatibility
Section 4
System Overview
Overview

4.2 Choose Display Device
To set up your Dexcom G5 Mobile, first choose the display device(s) you want to receive your CGM data and alerts. You have three choices, the next pages will help you make your decision.
• Your smart device only• Your receiver only• A combination of both
For app setup see Section 5.
Smart Device Only
Dexcom G5 Mobile CGM System Quick Start Guide • 17
3. Smart Device
2. Transmitter
1. Sensor(Below the Skin)
Your transmitter sends sensor glucose information directly to your smart device using Bluetooth®
wireless technology.
Bluetooth on your smart device must be ON in order to receive CGM data and alerts.
Ove
rvie
w
For receiver setup see Section 6.
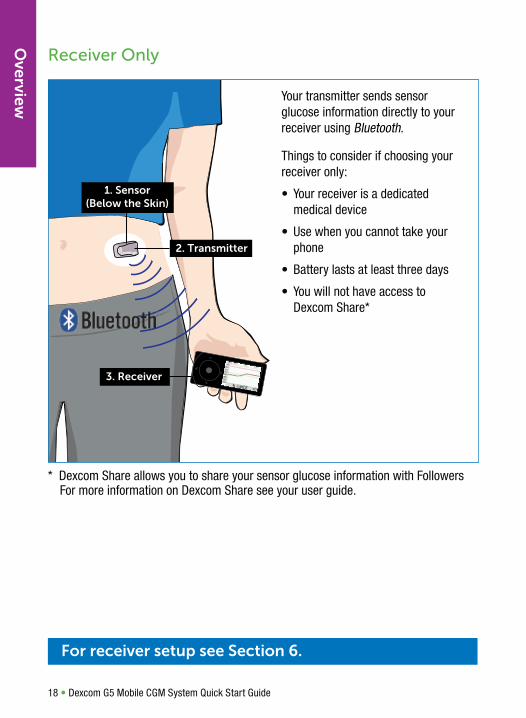
Receiver Only
18 • Dexcom G5 Mobile CGM System Quick Start Guide
3. Receiver
2. Transmitter
1. Sensor(Below the Skin)
Your transmitter sends sensor glucose information directly to your receiver using Bluetooth.
Things to consider if choosing your receiver only:
• Your receiver is a dedicated medical device
• Use when you cannot take your phone
• Battery lasts at least three days
• You will not have access to Dexcom Share*
* Dexcom Share allows you to share your sensor glucose information with Followers For more information on Dexcom Share see your user guide.
Overview

For app setup see Section 5.
For receiver setup see Section 6.
Dexcom G5 Mobile CGM System Quick Start Guide • 19
3. Smart Deviceor Receiver
2. Transmitter
1. Sensor(Below the Skin)
Your transmitter sends sensor glucose information directly to your app and/or your receiver, at the same time, using Bluetooth.
Your app and receiver do not “talk” to each other.
You can choose to use both devices at once or switch between devices.
Things to consider if choosing both devices:
• Use your app during daily activities where you already take your smart device
• Use your receiver during activities where your smart device may not be allowed (work or school)
• When you are sleeping you can, silence your smart device and use your receiver for alerts
• If you carry both devices, you will receive alerts and must clear alerts on both devices
Smart Device and Receiver
Ove
rvie
w

20 • Dexcom G5 Mobile CGM System Quick Start Guide
Install the Dexcom G5 Mobile App from your app store.
Log in to the app (with your existing Dexcom account) or sign up for a new account.
A
B
Section 5
App Setup and Operation
5.1 Install App
Ap
p Setu
p &
Op
eration

Once you log in, this screen displays and the app guides you through the setup process.
This takes about 20 minutes and includes:
• Setting your high and low alerts
• Adjusting your device setting
• Entering your transmitter serial number
• Inserting your sensor and attaching your transmitter
• Pairing your transmitter with your app
• Starting your 2-hour sensor warmup
Dexcom G5 Mobile CGM System Quick Start Guide • 21
Ap
p S
etu
p &
Op
erat
ion

22 • Dexcom G5 Mobile CGM System Quick Start Guide
At the end of the 2-hour warmup, you must enter two separate BG meter values before sensor glucose readings begin.
E
Enter the exact value from your BG meter.
Tap SAVE.
B
Wash and dry your hands.
C
Take a fingerstick BG measurement using your BG meter.
Your app alerts you when you need to enter your two BG meter values.
Go to your app to enter values.A
D
Tap the circle to enter your BG meter value within five minutes of obtaining the value.
F
Repeat steps above to enter a second BG meter value.
Entering two separate BG meter values will ensure an accurate reading.
5.2 Enter Initial BG Meter Values
Ap
p Setu
p &
Op
eration

Tips for Entering BG Meter Values
Dexcom G5 Mobile CGM System Quick Start Guide • 23
WARNING: Calibrate at least once every 12 hours. Calibrating less often than every 12 hours might cause sensor glucose readings to be inaccurate, resulting in you missing a severe low or high glucose event.
The meter icon shows a red badge when a BG meter value is needed.
See your user guide for more details.
Do enter BG Meter Values:
Don’t enter BG Meter Values:
• After washing and drying your hands• Within 5 minutes of obtaining the value from your BG meter• Using the exact number from your BG meter• Using only fingerstick blood glucose values
• If you see a ??? (question mark) or signal loss error on the screen• After you have taken acetaminophen (such as Tylenol®)• If your BG meter value is higher than 400 mg/dL or lower than 40 mg/dL
After your initial BG meter values, BG meter values must be entered once every 12 hours at a minimum.
When using both the app and the receiver at the same time, you should enter BG meter value in only 1 device. When you enter a value into one device, the sensor glucose values may be different on the other display device until the transmitter shares the entered value.
5.3 Enter BG Meter Value Every 12 Hours
Ap
p S
etu
p &
Op
erat
ion

24 • Dexcom G5 Mobile CGM System Quick Start Guide
To know where you are now, look at the color and number.
Where You Are
Your system can have issues or errors. These show up on your home screen as black circles with information related to the issue or error. You won’t get sensor glucose readings or alerts when a black circle is shown. Tap the blue question mark for more information.
Trend ArrowGlucoseReading
Trend GraphLow Glucose
Alert Level
High GlucoseAlert Level
Dexcom Share
Events
Main Menu
Enter BGMeter Value
CurrentGlucoseReading
GlucoseRanges
Red = Low Yellow = High Gray = In Target
5.4 View Home Screen
Ap
p Setu
p &
Op
eration

Where You Are Going
Dexcom G5 Mobile CGM System Quick Start Guide • 25
Steady: Not increasing/decreasing more than1 mg/dL each minute.
Slowly falling: Glucosecould decrease up to30 mg/dL in 15 minutes.
Falling: Glucose coulddecrease up to 45 mg/dL in 15 minutes.
Rapidly falling: Glucosecould decrease more than 45 mg/dL in 15 minutes.
To know where you are going, look at your trend arrows. Remember it is not all about the number. Pay attention to the direction and speed of your glucose change.
To know where you were, look at your trend graph. Turn your smart device sideways for a larger view of your trend screen.
Where You Were
CGM measures the mg/dL per minute, this chart calculates what that could mean per 15 minutes.
Slowly rising: Glucose could increase up to 30 mg/dL in 15 minutes.
Rising: Glucosecould increase up to45 mg/dL in 15 minutes.
Rapidly rising: Your glucose could increase more than 45 mg/dL in 15 minutes.
Ap
p S
etu
p &
Op
erat
ion

26 • Dexcom G5 Mobile CGM System Quick Start Guide
Your sensor automatically shuts off after 7 days. The app alerts you at 6 hours, 2 hours, and 30 minutes before your sensor session ends.
The Replace Sensor Now screen shows when it is time to remove your sensor.
A
Use your fingers to spread the back tabs of the sensor pod.
Transmitter will pop out.
Keep your transmitter to use again with your next sensor.
B
C
Keep
NOTE: Do not remove the transmitter from the sensor pod until all components (sensor, sensor pod) are removed from your body.
Dispose of the sensor following your local guidelines for disposal of blood-contacting components.D
Peel the adhesive off your body like a Band-Aid®. The sensor, sensor pod and transmitter will all be removed.A
5.5 End Sensor Session
5.6 Remove Sensor Pod and Transmitter
Ap
p Setu
p &
Op
eration
Dexcom G5 Mobile CGM System Quick Start Guide • 27
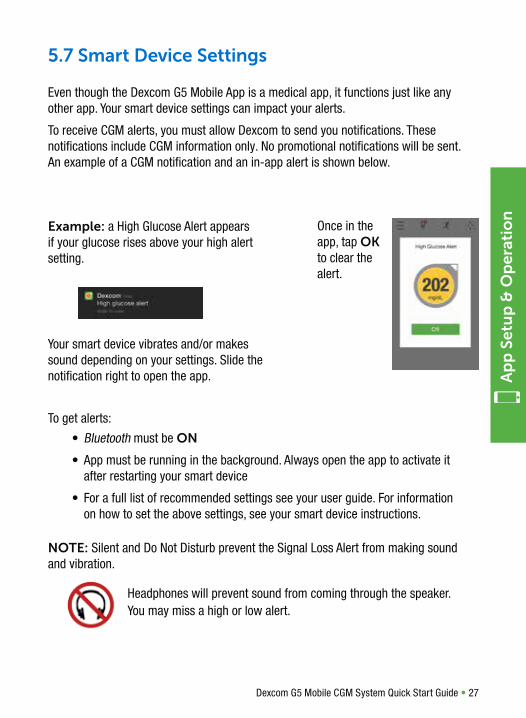
To get alerts:
• Bluetooth must be ON
• App must be running in the background. Always open the app to activate it after restarting your smart device
• For a full list of recommended settings see your user guide. For information on how to set the above settings, see your smart device instructions.
NOTE: Silent and Do Not Disturb prevent the Signal Loss Alert from making sound and vibration.
Once in the app, tap OK to clear the alert.
Example: a High Glucose Alert appears if your glucose rises above your high alert setting.
Your smart device vibrates and/or makes sound depending on your settings. Slide the notification right to open the app.
Even though the Dexcom G5 Mobile App is a medical app, it functions just like any other app. Your smart device settings can impact your alerts.
To receive CGM alerts, you must allow Dexcom to send you notifications. These notifications include CGM information only. No promotional notifications will be sent. An example of a CGM notification and an in-app alert is shown below.
Headphones will prevent sound from coming through the speaker. You may miss a high or low alert.
5.7 Smart Device Settings
Ap
p S
etu
p &
Op
erat
ion
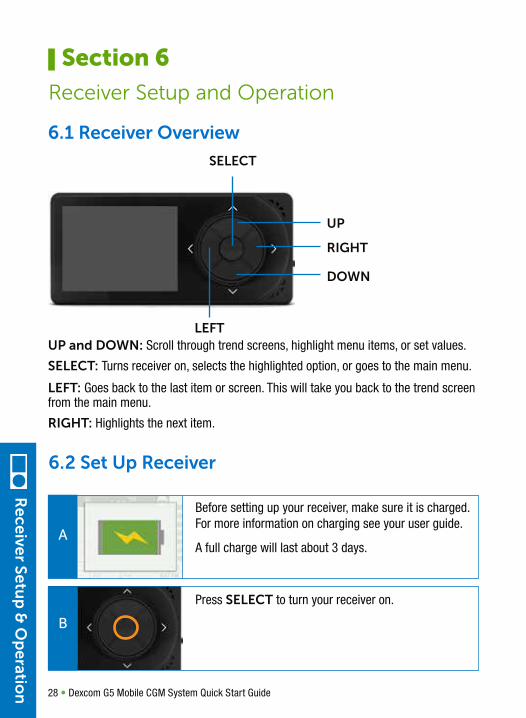
UP and DOWN: Scroll through trend screens, highlight menu items, or set values.
SELECT: Turns receiver on, selects the highlighted option, or goes to the main menu.
LEFT: Goes back to the last item or screen. This will take you back to the trend screen from the main menu.
RIGHT: Highlights the next item.
UP
DOWN
RIGHT
SELECT
LEFT
A
Before setting up your receiver, make sure it is charged. For more information on charging see your user guide.
A full charge will last about 3 days.
B
Press SELECT to turn your receiver on.
28 • Dexcom G5 Mobile CGM System Quick Start Guide
Section 6
Receiver Setup and Operation
6.1 Receiver Overview
6.2 Set Up Receiver
Receiver Setu
p &
Op
eration

The setup wizard walks you through entering your time/date, transmitter SN, and setting up your Low/High Alerts.
Press UP and DOWN to change a value.
Press RIGHT or SELECT to move to the next space.
Press SELECT to accept changes.
n Time/Date
n Transmitter SN
n Low Alert (Set between 60-100 mg/dL)
n High Alert (Set between 120-400 mg/dL)
Your transmitter SN makes it possible for your transmitter and receiver toshare your glucose information.
Your transmitter SN can be found on the back of your transmitter or on the back of your transmitter box.
C
The setup wizard will only start the first time you set up your receiver.
When your glucose is at or below your low alert setting, your device will alert you.
When your glucose is at or above your high alert setting, your device will alert you.
Year/Month/Day
Dexcom G5 Mobile CGM System Quick Start Guide • 29
Rec
eive
r Se
tup
& O
per
atio
n

30 • Dexcom G5 Mobile CGM System Quick Start Guide
Before you begin, make sure you have alcohol wipes, a sensor, and a transmitter. Skin preparation or adhesive products (Mastisol®, Skin Tac™) are optional. Wash and dry your hands.
Choose a site at least 3 inches from your insulin pump infusion set or injection site and out of the way of your waistband. Avoid areas likely to be bumped, pushed, with scarring, tattoos or irritation.
Plunger
Applicator barrel (Contains small
introducer needle and sensor)
Transmitter Latch
Safety Lock
Collar
Sensor PodRelease Tab Adhesive
Ages 18 years or older:
Insert in the belly
Ages 2 to 17 years:
Insert in the belly or the upper buttocks
Clean your skin at the sensor placement site with an alcohol wipe.
Let dry.A
If you use an optional skin prep or adhesive product, place it on the skin in a “doughnut” shape where you will place the sensor adhesive patch. Let dry (skin may feel slightly sticky). Insert the sensor through the clean skin at the center of the doughnut where it is free of skin preparation or adhesive products.
B
6.3 Insert Sensor
Receiver Setu
p &
Op
eration
Dexcom G5 Mobile CGM System Quick Start Guide • 31
Place the sensor pod horizontally on your skin.
Move your fingers around the adhesive patch to secure the tape to your skin.
D
Hold the applicator, and pull the safety lock straight out.
E
Place the fingers of one hand at the edge of the white adhesive.
You may pinch up on your skin using this hand. F
Place two fingers ABOVE the collar and your thumb on the white plunger. Push down the plunger. You should hear 2 clicks.
G
Move your two fingers from above the collar to below the collar. Pull the collar back towards your thumb until you hear 2 clicks or cannot pull back any more.
2 “clicks”
H
While squeezing the tabs, rock the applicator barrel forward and away from your body. J
Squeeze the ribbed tabs on the sides of the sensor pod.I
Remove the adhesive backing from the sensor pod one half at a time.
C
Rec
eive
r Se
tup
& O
per
atio
n

32 • Dexcom G5 Mobile CGM System Quick Start Guide
Once you have inserted the sensor, you need to attach your transmitter to the sensor pod.
Clean the back of your transmitter with an alcohol wipe.
Let dry. A
Place the transmitter in the sensor pod with the flat side down, and thinner side away from the transmitter latch.B
Hold the sides of your sensor pod with one hand. Remove the transmitter latch with the other hand by quickly twisting off the latch away from your body.D
Place one finger on the transmitter to keep it in place. With your other hand, pull the transmitter latch up and forward until you hear 2 clicks.C
Wider Side Thinner Side
6.4 Attach Transmitter
Receiver Setu
p &
Op
eration
6.6 Start Sensor
Rec
eive
r Se
tup
& O
per
atio
n
A
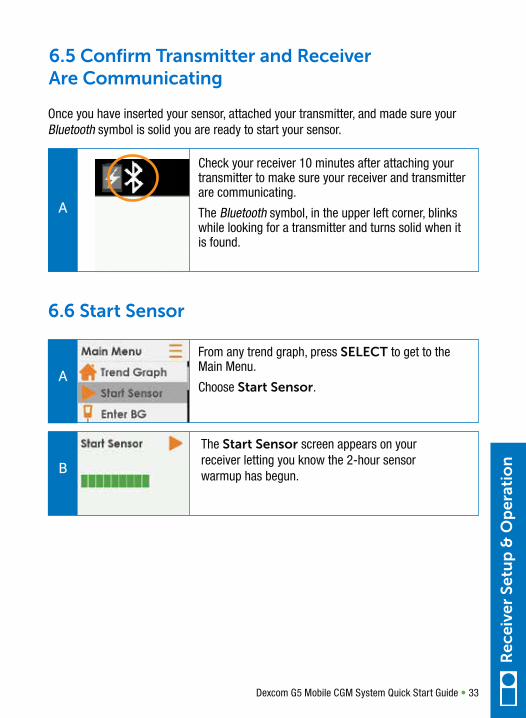
Check your receiver 10 minutes after attaching your transmitter to make sure your receiver and transmitter are communicating.
The Bluetooth symbol, in the upper left corner, blinks while looking for a transmitter and turns solid when it is found.
A
6.5 Confirm Transmitter and Receiver Are Communicating
Dexcom G5 Mobile CGM System Quick Start Guide • 33
Once you have inserted your sensor, attached your transmitter, and made sure your Bluetooth symbol is solid you are ready to start your sensor.
From any trend graph, press SELECT to get to the Main Menu.
Choose Start Sensor.
The Start Sensor screen appears on your receiver letting you know the 2-hour sensor warmup has begun.
A
B

34 • Dexcom G5 Mobile CGM System Quick Start Guide
You can choose your receiver alert profiles. The sound you choose will apply to all alerts (low and high). The default alert is Normal. See below for an overview of the different sound options.
Vibrate: Can be used when you want to be alerted by vibration.
The fixed low alarm at 55 mg/dL will still make a sound. It will alert you by vibration first, followed by audible beeps 5 minutes later if not confirmed.
Soft: Can be used when you want your alert to be discreet.
This sets all the alerts and alarms to lower volume beeps.
Normal: This is the default and sets all the alerts and alarms to higher volume beeps.
6.7 Set Up Alert Sounds
Receiver Setu
p &
Op
eration
[0-24minutes]
[24-48minutes]
[72-96minutes]
Ready for calibration
[48-72minutes]
Start
You will NOT receive sensor glucose readings or alerts until your 2-hour sensor warmup and two BG meter values are complete. During this time you might miss severe hypoglycemia (low blood glucose) or hyperglycemia (high blood glucose) events.
A 2-hour countdown symbol will show on the receiver trend screen and will fill in during the 2-hour sensor warmup.
CKeep your receiver within 20 feet during the 2-hour sensor warmup.

Attentive: Can be used when you want your alert to be noticeable.
This sets all the alerts and alarms to loud with distinctive melodies.
HypoRepeat: Can be used when you want extra alerts for severe low sensor glucose readings.
This profile will keep repeating the fixed low alarm every 5 seconds until confirmed or until your reading rises above 55 mg/dL.
Follow these steps to choose your sound profile.
NOTE: No matter what profile you set, all alerts will notify you by vibrating first. There will be no audible beep if you confirm the alert after the first vibration.
From any trend graph, press SELECT to get to the Main Menu.
Choose Profiles.A
Highlight the alert profile you want to use.
Press SELECT.
A check mark appears to the right of the profile you choose.
B
Choose Try It to hear an example of your selected alert profile.
C
Dexcom G5 Mobile CGM System Quick Start Guide • 35
Rec
eive
r Se
tup
& O
per
atio
n

36 • Dexcom G5 Mobile CGM System Quick Start Guide
D
C
After the 2-hour warmup, a double blood drop prompt will show on the receiver screen.
Take a fingerstick blood glucose measurement using your BG meter.
Choose Enter BG.
Press SELECT.
A
At the end of the 2-hour sensor warmup, you must enter two BG meter values before any sensor glucose readings will show.
B
Wash and dry your hands.
E
Enter the exact blood glucose value from your BG meter. Press SELECT.
Press SELECT again to confirm.
FRepeat steps above to enter a second meter value.
Entering two separate BG meter values will ensure an accurate reading.
6.8 Enter Initial BG Meter Values
Receiver Setu
p &
Op
eration

Tips for Entering BG Meter Values
See your user guide for more details.
Dexcom G5 Mobile CGM System Quick Start Guide • 37
Do enter BG Meter Values:
Don’t enter BG Meter Values:
After your initial BG meter values, BG meter values must be entered once every 12 hours at a minimum.
• If you see a ??? (question mark) or signal loss error on the screen• After you have taken acetaminophen (such as Tylenol®)• If your BG meter value is higher than 400 mg/dL or lower than 40 mg/dL
• After washing and drying your hands• Within five minutes of testing with your meter• Using the exact number from your meter• Using only fingerstick blood glucose values
A single blood drop prompt will appear when a BG meter value is needed.
Press SELECT to confirm.
After you press SELECT, you will see a single blood drop in the upper right corner of the trend graph screen. Go to the Enter BG menu item to enter your BG meter value.
When using both the app and the receiver at the same time, you should enter BG meter value on only 1 device. When you enter a value into one device, the sensor glucose values may be different on the other display device until the transmitter shares the entered value.
6.9 Enter BG Meter Values Every 12 Hours
WARNING: Calibrate at least once every 12 hours. Calibrating less often than every 12 hours might cause sensor glucose readings to be inaccurate, resulting in you missing a severe low or high glucose event.
Rec
eive
r Se
tup
& O
per
atio
n

Trend Arrow
Trend Graph
LowGlucose
Alert Level
HighGlucose
Alert Level
GlucoseReading
Where You Are Now
Red = Low Yellow = High Gray = In Target
To know where you are now, look at the color and number on your receivers top bar.
Bluetooth
Battery
Current Time
Your system can have issues or errors. These show up as icons in the status area of your top bar. When you have an issue or error, your top bar will turn black. You won’t get sensor glucose readings when a black bar is shown. See your user guide for more information on the issue or error.
StatusArea
38 • Dexcom G5 Mobile CGM System Quick Start Guide
6.10 View Receiver Trend Screen
Receiver Setu
p &
Op
eration

Steady: Glucose is steady (not increasing/decreasing more than 1 mg/dL each minute).
Slowly rising: Your glucose could increase up to30 mg/dL in 15 minutes.
Rising: Your glucose could increase up to 45 mg/dLin 15 minutes.
Rapidly rising: Your glucose could increase more than45 mg/dL in 15 minutes.
Slowly falling: Your glucose could decrease up to30 mg/dL in 15 minutes.
Falling: Your glucose could decrease up to 45 mg/dLin 15 minutes.
Rapidly falling: Your glucose could decrease more than45 mg/dL in 15 minutes.
CGM measures the mg/dL per minute, this chart calculates what that could mean per 15 minutes.
Where You Are Going
Where You Were
To know where you are going, look at your trend arrows. Remember it is not all about the number. Pay attention to the direction and speed of your glucose change.
To know where you were, look at your trend graph.
Trend Graph
Dexcom G5 Mobile CGM System Quick Start Guide • 39
Rec
eive
r Se
tup
& O
per
atio
n

40 • Dexcom G5 Mobile CGM System Quick Start Guide
The sensor automatically shuts off after 7 days. The receiver alerts you at 6 hours, 2 hours, and 30 minutes before the sensor session ends.
The Replace Sensor Now screen shows when it is time to remove your sensor.
A
Peel the adhesive off your body like a Band-Aid®. The sensor, sensor pod and transmitter will be removed.
Use your fingers to spread the back tabs of the sensor pod.
The transmitter will pop out.
Keep the transmitter to use again with your next sensor.
A
B
C
Keep
NOTE: Do not remove the transmitter from the sensor pod until all components (sensor, sensor pod) are removed from your body.
Dispose of the sensor following your local guidelines for disposal of blood-contacting components.D
6.11 End Sensor Session
6.12 Remove Sensor Pod and Transmitter
Receiver Setu
p &
Op
eration

Dexcom G5 Mobile CGM System Quick Start Guide • 41
The Dexcom G5 Mobile has an automatic Low Glucose alarm set at 55 mg/dL. You can’t change or turn off this alarm or its re-alert settings.
By default, these Alerts are turned OFF, but they can be turned ON, and customized:
Rise Rate: Your device alerts you when your glucose is rising at a rapid (2 mg/dL/min) or very rapid (3 mg/dL/min) rate. This feature helps you avoid staying high over a long period of time.
Fall Rate: Your device alerts you when your glucose is falling at a rapid (-2 mg/dL/min) or very rapid (-3 mg/dL/min) rate. This feature helps you avoid low glucose events.
By default, the following alert is turned ON, but can be turned OFF, and customized:
Signal Loss: Your device alerts you when you aren’t receiving sensor glucose readings. Signal loss happens when your display device and transmitter stop communicating; make sure you are within range (20 feet), without obstruction.
When using both the app and the receiver at the same time, you need to clear alerts on each device separately
Section 7
Alarm, Alerts and Advanced Alerts
Part of your initial set up included setting your Low/High Alerts, you can change these settings at any time. To change your Low/High Alert go to Menu < Alerts in your app or receiver. For detailed steps see your user guide.
When using both the app and the receiver at the same time, change Alerts on each device separately
7.1 Low Glucose Alarm
7.2 Change Low/High Alerts
7.3 Advanced Alerts

Section 8
Troubleshooting
The solutions here are meant to be brief and not all inclusive. For full troubleshooting information view the user guide at dexcom.com/guide.
8.1 No Alarm/Alerts
Device What you see Problem What you do
Smart Device
Not receiving Alerts
Check if notifications are on.
Check that your smart device is not on Silent (if applicable).
Turn Alert to On Receiver
(Continued on next page)
In your app tap the blue question mark for more information on any issue or error you see.
42 • Dexcom G5 Mobile CGM System Quick Start Guide
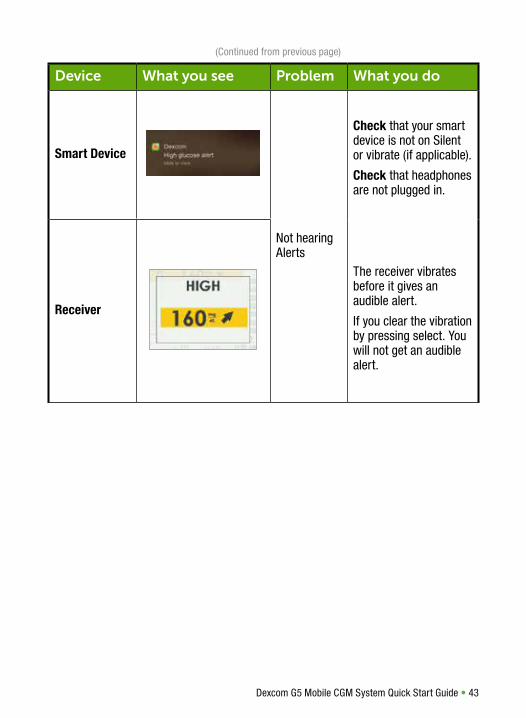
(Continued from previous page)
Device What you see Problem What you do
Smart Device
Not hearing Alerts
Check that your smart device is not on Silent or vibrate (if applicable).
Check that headphones are not plugged in.
The receiver vibrates before it gives an audible alert.
If you clear the vibration by pressing select. You will not get an audible alert.
Receiver
Dexcom G5 Mobile CGM System Quick Start Guide • 43
8.2 Sensor Glucose Readings
Device What you see Problem What you do
BG Meter
Sensor readings and BG meter glucose values often don’t show the same
Differences are not uncommon.
Readings from different body fluids may be slightly different:Meter - from bloodSensor - from interstitial fluid
20/20 RuleIf the meter shows 80 or less, CGM should read within ± 20 points.
If the meter shows 80 or above, the CGM should read ± 20%.
Example: a 202 mg/dL sensor reading and a 188 mg/dL glucose meter value = a 7% difference (this is still considered accurate). In this example, the Dexcom could show up to 225 and still be considered accurate
Outside of 20/20 rule: Calibrate again.
Smart Device
Receiver
(Continued on next page)
44 • Dexcom G5 Mobile CGM System Quick Start Guide

(Continued from previous page)
Device What you see Problem What you do
Smart Device
Not getting sensor glucose readings
Wait
System will often resolve itself.
Check transmitter—is it properly inserted into sensor pod?
Make sure you haven’t taken acetaminophen.
Don’t calibrate.
If this continues for over 3 hours, call Technical Support.
Receiver
Smart Device
Not getting sensor glucose readings
Wait
System will often resolve itself.
Don’t calibrate.
Check transmitter—is it properly inserted into sensor pod?
Make sure you haven’t taken acetaminophen.
Don’t calibrate.
If this continues for over 3 hours, call Technical Support.
Receiver
(Continued on next page)
Dexcom G5 Mobile CGM System Quick Start Guide • 45

(Continued from previous page)
Device What you see Problem What you do
Smart Device
System display device and transmitter not communicating
Don’t calibrate.
Wait 10 minutes.
Move display device and transmitter within 20 feet of each other without obstruction.
Wait another 10 minutes.
Smart device (if not resolved):
1. Restart smart device.
If problem remains:
1. Open your device Bluetooth Settings.
2. Delete all Dexcom entries.
3. Pair your Transmitter.
Receiver
46 • Dexcom G5 Mobile CGM System Quick Start Guide

8.3 Adhesive
Picture Problem What you do
Sensor pod won’t stick
Use adhesive products (Mastisol®, Skin Tac™). Make sure adhesive is not placed where the needle inserts.
Put medical tape over sensor pod’s white adhesive patch (e.g., Blenderm).
Don’t place tape over the transmitter.
8.4 Hardware Errors
Device What you see Problem What you do
ReceiverWon’t turn on: Battery dead
Charge receiver using electrical outlet, not computer/laptop.
Full charge may take up to five hours.
Receiver
After full charge session:
Won’t turn on
Reset receiver.
Connect receiver to charger.
Insert end of paper clip into small circular hole on receiver’s back.
Push down on paper clip.
Receiver will vibrate.
Processing screen appears.
Charge receiver.
Receiver System Recovery
Do nothing.
Receiver is able to continue to work and recover from an error.
App: Tap OK to clear Alert.
Receiver: Press Select to clear Alert.
Dexcom G5 Mobile CGM System Quick Start Guide • 47
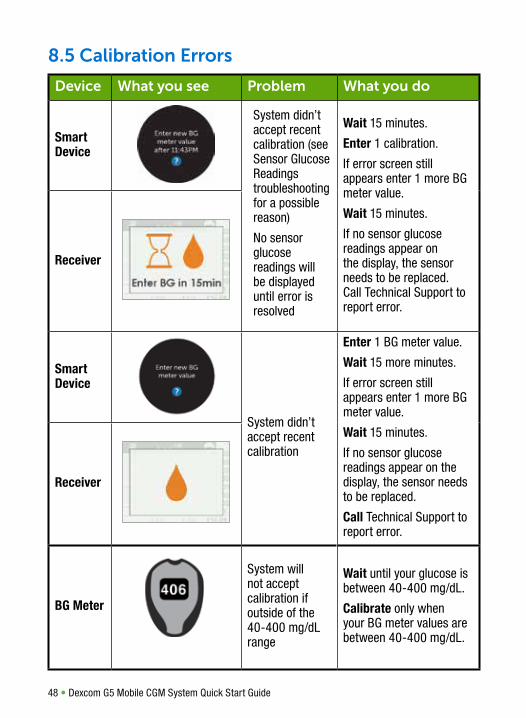
8.5 Calibration Errors
Device What you see Problem What you do
Smart Device
System didn’t accept recent calibration (see Sensor Glucose Readings troubleshooting for a possible reason)
No sensor glucose readings will be displayed until error is resolved
Wait 15 minutes.
Enter 1 calibration.
If error screen still appears enter 1 more BG meter value.
Wait 15 minutes.
If no sensor glucose readings appear on the display, the sensor needs to be replaced. Call Technical Support to report error.
Receiver
Smart Device
System didn’t accept recent calibration
Enter 1 BG meter value.
Wait 15 more minutes.
If error screen still appears enter 1 more BG meter value.
Wait 15 minutes.
If no sensor glucose readings appear on the display, the sensor needs to be replaced.
Call Technical Support to report error.
Receiver
BG Meter
System will not accept calibration if outside of the 40-400 mg/dL range
Wait until your glucose is between 40-400 mg/dL.
Calibrate only when your BG meter values are between 40-400 mg/dL.
48 • Dexcom G5 Mobile CGM System Quick Start Guide

8.6 Transmitter Errors
Device What you see Problem What you do
Smart Device Transmitter not
working
Sensor session automatically stopped
No sensor glucose readings displayed
Contact Technical Support to report issue.
Start checking BG value using BG meter.
App:Tap OK to clear Alert.
Receiver:Press Select to clear.
Will not re-alert once cleared.
Order new transmitter.
Receiver
Smart Device
Pairing Failed
Check Transmitter SN in display device is correct.
If wrong:Stop sensor session.
Re-Enter correct transmitter SN.
App:Menu > Trans SN> Enter correct SN
Receiver:Settings >Trans SN >Enter correct SN
If correct:Call Tech Support.
Receiver
Dexcom G5 Mobile CGM System Quick Start Guide • 49

8.8 Ending Sensor Session EarlyYou may want to force quit a sensor session early.
While the end result is the same (ending a sensor session), the steps differ between the app and receiver. If you’re using both, there is no need to stop the sensor session in each: the other display will see the session has stopped.
8.7 Sensor Errors
Device What you see Problem What you do
Smart Device
Sensor not working
Contact Technical Support to report issue.
Start checking BG value using BG meter.
App:Tap OK to clear Alert.
Receiver:Press Select to clear.
Will not re-alert once cleared.
Replace sensor.Receiver
50 • Dexcom G5 Mobile CGM System Quick Start Guide
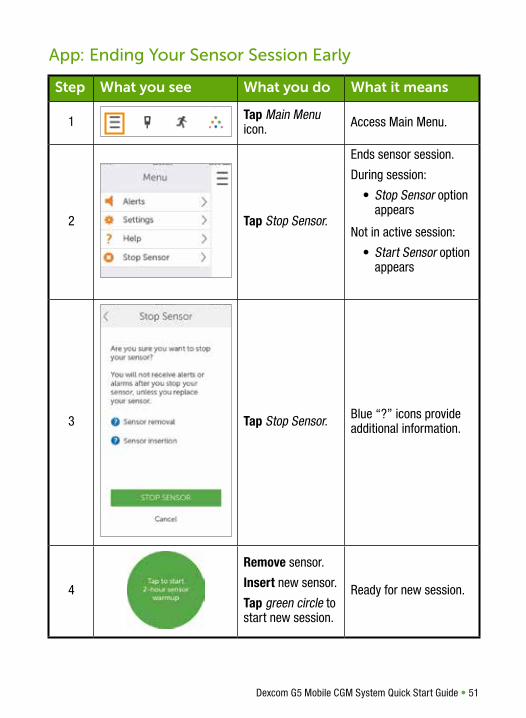
Step What you see What you do What it means
1 Tap Main Menu icon. Access Main Menu.
2 Tap Stop Sensor.
Ends sensor session.
During session:
• Stop Sensor option appears
Not in active session:
• Start Sensor option appears
3 Tap Stop Sensor. Blue “?” icons provide additional information.
4
Remove sensor.
Insert new sensor.
Tap green circle to start new session.
Ready for new session.
App: Ending Your Sensor Session Early
Dexcom G5 Mobile CGM System Quick Start Guide • 51

Receiver: Ending a Sensor Session Early
Step What you see What you do What it means
1 Press Select. Go to Main Menu.
2
Press Down Arrow to Stop Sensor.
Press Select.
Ends sensor session.
During session, Stop Sensor option appears.
3 Wait. Thinking screen.
4 Press Select.Allows you to confirm stop sensor.
Return to Main Menu.
5
Remove sensor.
Insert new sensor.
Press Start Sensor when ready for new session.
Ready to start a new session.
Not in active session, Start Sensor option appears.
52 • Dexcom G5 Mobile CGM System Quick Start Guide
Please call the Dexcom Technical Support Team, 24/7, toll free at 1.877.339.2664 or toll at 1.858.200.0200 if any of these errors continue and the instructions don’t resolve the issue.

Section 9
Warranty
9.1 Receiver Warranty Information Dexcom G5 Mobile CGM System’s Limited Warranty
What’s Covered and for How Long?Dexcom, Inc. (“Dexcom”) provides a limited warranty to the original purchaser (“you” or “Purchaser”) that the Dexcom G5 Mobile Receiver (the “Receiver”) is free from defects in material and workmanship under normal use (“Limited Warranty”) for the period starting from the shipment date and continuing for a year following the shipment date (“Warranty Period”):
Dexcom G5 Mobile Receiver: 1 year from shipment date
NOTE: If you received this Receiver as a replacement for an in-warranty Receiver, the Limited Warranty for the original Receiver shall continue for the Warranty Period on the original Receiver, but the replacement is not subject to any other warranty.
What’s Not Covered?This Limited Warranty is based on the Purchaser properly using the CGM system in accordance with the documentation provided by Dexcom. You are not permitted to use the CGM system otherwise. You understand that misusing the CGM system, improperly accessing it or the information it processes and transmits, “jailbreaking” your CGM system or cell phone, and taking other unauthorized actions may put you at risk, cause the CGM system to malfunction, is not permitted and voids your Limited Warranty.
This Limited Warranty does not cover: 1. Defects or damage resulting from accident, misuse, abuse, neglect, unusual
physical, electrical or electromechanical stress, modification of any part of the product, or cosmetic damage.
2. Equipment with the ID number removed or made illegible.3. All surfaces and other externally exposed parts that are scratched or damaged
due to normal use.4. Malfunctions resulting from the use of the Receiver in conjunction with
accessories, ancillary products, and peripheral equipment, whether hardware or software, not furnished or approved by Dexcom.
5. Defects or damage from improper testing, operation, maintenance, installation, or adjustment.
Dexcom G5 Mobile CGM System Quick Start Guide • 53

6. Installation, maintenance, and service of products or services other than the CGM system (which may be subject to a separate limited warranty), whether provided by Dexcom or any other party; this includes your cell phone or smart device and your connection to the Internet.
7. Equipment which has been taken apart physically or which has had any of its software accessed in any unauthorized manner.
8. Water damage to the Receiver.a. Receiver is not water resistant.b. Do not get the receiver wet at any time.
Dexcom’s Obligations Under the Limited WarrantyDuring the Warranty Period, Dexcom will replace, without charge to purchaser, any defective Dexcom G5 Mobile Receiver.
To return, you must send the Receiver to an authorized Dexcom Technical Support Department. Make sure you package the Receiver adequately for shipping.
The return package needs to include:1. Receiver2. Sales receipt or comparable substitute proof of sale showing the date of
purchase 3. Receiver’s Serial Number 4. Seller’s name and address
Call Dexcom Technical Support Department for delivery information help:
• Toll free: 1.877.339.2664• Charges may apply: 1.858.200.0200
Upon receipt, Dexcom will promptly replace the defective Receiver.
If Dexcom determines the Receiver isn’t covered by this Limited Warranty, Purchaser must pay all shipping charges for the Receiver’s return by Dexcom.
Limits on Dexcom’s Warranty and Liability ObligationsThe Limited Warranty described above is the exclusive warranty for the Receiver, and in lieu of all other warranties, expressed or implied, either in fact or by operation of law, statutory or otherwise.
Dexcom expressly excludes and disclaims all other warranties, including without limitation any warranty of merchantability, fitness for a particular purpose, or non-infringement, except to the extent prohibited by applicable law.
Dexcom shall not be liable for any special, incidental, consequential, or indirect damages, however caused, and on any theory of liability, arising in any way out of the sale, use, misuse, or inability to use, any Dexcom G5 Mobile CGM System or
54 • Dexcom G5 Mobile CGM System Quick Start Guide

any feature or service provided by Dexcom for use with the Dexcom G5 Mobile CGM System.
These limits on Dexcom’s warranty and liability obligations apply even if Dexcom, or its agent, has been advised of such damages and notwithstanding any failure of essential purpose of this Limited Warranty and the limited remedy provided by Dexcom.
This Limited Warranty is only provided to the original Purchaser and can’t be transferred to anyone else, and states Purchaser’s exclusive remedy.
If any portion of this Limited Warranty is illegal or unenforceable by reason of any law, such partial illegality or enforceability shall not affect the enforceability of the remainder of this Limited Warranty. This Limited Warranty will be enforced to the maximum extent permitted by law.
9.2 Transmitter Warranty Information Dexcom G5 Mobile Transmitter Limited Warranty
What’s Covered and for How Long?Dexcom, Inc. (“Dexcom”) provides a limited warranty to the original purchaser that the Dexcom G5 Mobile Transmitter is free from defects in material and workmanship under normal use for the period commencing on the date of first use by the original purchaser (the “Date of First Use”) and expiring three (3) months thereafter; provided, that, the Date of First use occurs within five (5) months of the date of shipment (or disbursement) of the transmitter to the original purchaser.
NOTE: If you received this Transmitter as a replacement for an in-warranty Transmitter, the Limited Warranty for the original Transmitter shall continue for the Warranty Period on the original Transmitter, but the replacement is not subject to any other warranty.
What’s Not Covered?This Limited Warranty is based on the Purchaser properly using the CGM system in a timely manner and in accordance with the documentation provided by Dexcom. You are not permitted to use the CGM system otherwise. You understand that misusing the CGM system, improperly accessing it or the information it processes and transmits, “jailbreaking” your CGM system or cell phone, and taking other unauthorized actions may put you at risk, cause the CGM system to malfunction, is not permitted and voids your Limited Warranty.
This Limited Warranty does not cover: 1. Defects or damage resulting from accident, misuse, abuse, neglect, unusual
physical, electrical or electromechanical stress, modification of any part of the product, or cosmetic damage.
2. Equipment with the ID number removed or made illegible.
Dexcom G5 Mobile CGM System Quick Start Guide • 55

3. All surfaces and other externally exposed parts that are scratched or damaged due to normal use.
4. Malfunctions resulting from the use of the Transmitter in conjunction with accessories, ancillary products, and peripheral equipment, whether hardware or software, not furnished or approved by Dexcom.
5. Defects or damage from improper testing, operation, maintenance, installation, or adjustment.
6. Installation, maintenance, and service of products or services other than the CGM system (which may be subject to a separate limited warranty), whether provided by Dexcom or any other party; this includes your cell phone or smart device and your connection to the Internet.
7. Equipment which has been taken apart physically or which has had any of its software accessed in any unauthorized manner.
8. Water damage to Transmitter.a. Beyond specifications listed in Dexcom G5 Mobile CGM System’s User
Guide.b. User Guide is included in the Dexcom G5 Mobile System’s Receiver
package.c. Located on dexcom.com.
Dexcom’s Obligations Under the Limited WarrantyDuring the Warranty Period, Dexcom will replace, without charge to purchaser, any defective Dexcom G5 Mobile Transmitter.
To return, you must send the Transmitter to an authorized Dexcom Technical Support Department. Make sure you package the Transmitter adequately for shipping.
The return package needs to include:1. Transmitter2. Sales receipt or comparable substitute proof of sale showing the date of
purchase 3. Transmitter’s Serial Number 4. Seller’s name and address
Call Dexcom Technical Support Department for delivery information or help:
• Toll free: 1.877.339.2664• Charges may apply: 1.858.200.0200
Upon receipt, Dexcom will promptly replace the defective Transmitter.
If Dexcom determines the Transmitter isn’t covered by this Limited Warranty, Purchaser must pay all shipping charges for the Transmitter’s return by Dexcom.
56 • Dexcom G5 Mobile CGM System Quick Start Guide
Limits on Dexcom’s Warranty and Liability ObligationsThe Limited Warranty described above is the exclusive warranty for the Transmitter, and in lieu of all other warranties, expressed or implied, either in fact or by operations of law, statutory or otherwise.
Dexcom expressly excludes and disclaims all other warranties, including without limitation any warranty merchantability, fitness for a particular purpose, or non-infringement, except to the extent prohibited by applicable law.
Dexcom shall not be liable for any special, incidental, consequential, or indirect damages, however caused, and on any theory of liability, arising in any way out of the sale, use, misuse, or inability to use, any Dexcom G5 Mobile CGM System or any feature or service provided by Dexcom for use with the Dexcom G5 Mobile CGM System.
These limits on Dexcom’s warranty and liability obligations apply even if Dexcom, or its agent, has been advised of such damages and notwithstanding any failure of essential purpose of this Limited Warranty and the limited remedy provided by Dexcom.
This Limited Warranty is only provided to the original Purchaser and can’t be transferred to anyone else, and states Purchaser’s exclusive remedy.
If any portion of this Limited Warranty is illegal or unenforceable by reason of any law, such partial illegality or enforceability shall not affect the enforceability of the remainder of this Limited Warranty.
This Limited Warranty will be enforced to the maximum extent permitted by law.
Dexcom G5 Mobile CGM System Quick Start Guide • 57

Section 10
Travel
Dexcom G5 Mobile can be a great travel companion; you can go through metal detectors, be handwanded, and even keep your receiver on during your flight.
This section only covers the Dexcom G5 Mobile CGM System. It doesn’t cover steps you need to take when traveling with your smart device. See your smart device’s user guide for travel tips.
10.1 Going Through Security
Walk-Through Metal DetectorsTransmitter and Sensor
Go through walk-in metal detectors or be handwanded without worrying about damaging your transmitter or sensor.
If you’re concerned or uncomfortable about walking through the metal detector, the Transportation Security Administration (TSA) requests you tell the Security Officer you’re wearing a continuous glucose monitor and want a full-body pat-down with a visual inspection of your sensor and transmitter.
Let the Security Officer know the sensor can’t be removed because it’s inserted under the skin.
X-Ray MachinesReceiver, Extra Sensors
Don’t put your Dexcom G5 Mobile CGM System components through baggage x-ray machines.
Before your screening process begins, ask the TSA Officer to perform a visual inspection of the receiver and your extra sensors. Place all Dexcom G5 Mobile components in a separate bag before handing over to the Security Officer.
For other medical supplies, such as medications, meters, and strips, check manufacturer’s instructions or the TSA website.
Body ScannersUse of AIT body scanners has not been studied and therefore we recommendhand-wanding or full body pat down and visual inspection in that situation.
58 • Dexcom G5 Mobile CGM System Quick Start Guide

In the Plane You may keep the receiver on:
1. Before take-off2. While in flight 3. After landing
The Dexcom G5 Mobile CGM System is safe for use on U.S. commercial airlines.
If you choose to use your smart device, the airlines request you put your smart devices in airplane mode. You can do this, but still keep your Bluetooth on and you will be able to receive sensor glucose information on your smart device.
Technical InformationThe Dexcom G5 Mobile Transmitter is an M-PED with emission levels that meet RTCA/DO160, Section 21, Category M. Per FAA Advisory, Circular #91-21, 1B, dated 8/25/06.
Any M-PED that meets this standard in all modes may be used onboard the aircraft without any further testing by the operator.
This device can withstand exposure to common electrostatic (ESD) and electromagnetic interference (EMI).
Still Have Questions?Visit the TSA’s website if you have any questions or concerns at tsa.gov.
Email: [email protected]
Phone: Call 1.866.289.9673
Dexcom G5 Mobile CGM System Quick Start Guide • 59

Section 11
Need Help? You’re Not Alone!
Dexcom has three support teams to help you, each with their own specialty:
• Technical Support Team• Patient Care Team• Sales Support Team
Want more information? Dexcom has numerous resources on its website.
11.1 Dexcom Technical SupportProvides replacement units, resolves technical issues or takes product complaints.
Call your Dexcom Technical Support Team, 24 hours a day, 7 days a week, if something is wrong with your Dexcom G5 Mobile.
By PhoneDexcom Technical Support Phone Numbers:
Toll Free: 1.877.339.2664
Toll Call: 1.858.200.0200
By EmailEmail: [email protected]
If you prefer to email, to help us help you best, include the following information in your email:
• Name of patient• Date of Birth• The technical issue you• When the problem happened (date and time)• Patient’s address • Patient’s phone number• Item SKU number and description (e.g., name of the device)• Lot number and/or serial number(s) of affected devices (e.g., sensor)
60 • Dexcom G5 Mobile CGM System Quick Start Guide

Dexcom G5 Mobile CGM System Quick Start Guide • 61
What Can They Help Me With?The Dexcom Technical Support Team helps you with all CGM system related issues including CGM software issues.
Dexcom Technical Support does not offer medical advice.
11.2 Patient Care TeamThe Patient Care Team (PCT) is a group of Certified Diabetes Educators (CDE®) and Registered Nurses (RNs) offering you customer care and individualized education services around Dexcom CGM.
Your PCT provides education and support throughout your CGM experience, such as:
• Initial CGM Product Training• Ongoing Dexcom product education (e.g., how to use a specific feature) • How to maximize Dexcom CGM use• Dexcom CGM reporting software and features• How to review and understand Dexcom CGM reports
By PhoneAvailable Monday-Friday 5:30 am-8:00 pm PST (subject to change)
Toll Free: 1.877.339.2664
Toll Call: 1.858.200.0200
By EmailEmail: [email protected]
If you prefer to email, to help us help you best, include the following information in your email:
• Name• DOB• Contact phone number• Reason for inquiry or education needed
11.3 Sales Support Team
Inside Sales Support TeamFor help with:
• First-time orders

• Re-orders• Tracking shipments • Locating a local Dexcom representative
By PhoneDexcom Inside Sales Support Phone Numbers:
Toll Free: 1.877.339.2664
Toll Call: 1.858.200.0200
By EmailDexcom Inside Sales Support Email: [email protected]
By Fax1.877.633.9266
11.4 Corporate Dexcom Website:dexcom.com
Dexcom Address:6340 Sequence Drive
San Diego, CA 92121
11.5 Explore Web Based EducationDexcom makes CGM education easier for you with interactive web-based education programs.
dexcom.com/web-based-education
11.6 Explore Share/FollowSee how you can share your CGM data with friends and family with Dexcom Share/Follow.
dexcom.com/apps
11.7 Frequently Asked QuestionsHave questions? It may be answered in the FAQ section on the Dexcom website.
62 • Dexcom G5 Mobile CGM System Quick Start Guide

Index
Dexcom G5 Mobile CGM System Quick Start Guide • 63
A
Alarm or Alerts 34Advanced Alerts 41Change Low/High Alerts 41Low Glucose Alarm 41No Alarm/Alerts 42Set Up Alert Sounds 34
AppDetailed Trend Screen 25End Sensor Session 26Home Screen 24Initial Calibration 22Install App 20Recommended Settings 27Trend Arrows 25Update Calibrations 23
B
Benefits 14
C
Calibration 7Data/Alarm/Alert 7Enter BG Meter Value Every 12 Hours 23Errors 48How Often? 22Precautions 7Receiver Initial Calibrations 36Receiver Update Calibrations 37Tips for Entering 23Warning 6
Change Low/High Alerts 41Choose Display Device 17Components 16
E
Ending Sensor Session Early 50End Sensor Session 26, 40Enter Initial BG Meter Values 22
F
Fingerstick 7
H
Help Desk 60Hourglass 45
I
Install App 20
L
Low Glucose Alarm 41
M
MRI/CT/ Diathermy 5
P
Precaution 7, 8, 9, 10, 12
Q
Question Marks 45
R
Receiver 10, 33Ending a Sensor Session Early 52End Sensor Session 40Enter BG Meter Values 36
64 • Dexcom G5 Mobile CGM System Quick Start Guide
Precaution 10, 12Receiver Overview 28Set Up 28Trend Arrows 39Trend Graph 38Trend Screen 38Update Calibrations 37Warning 12Warranty Information 53
Remove Sensor Pod /Transmitter 26Risks 13
S
Safety Statement 5Contraindications 5Indications for Use 5Precautions 7, 10Warnings 9
SensorChoose a Site 30Ending Sensor Session Early 50
App 51Receiver 52
End Sensor Session 40Errors 50Insert Sensor 30Optional Skin Adhesive 30Sensor Glucose Readings 44Start 33
Set Up Alert Sounds 34Smart Device 10
Precautions 10Settings 27Warnings 11
System Overview 16Choose Display Device 17Components 16
System Warnings 6
T
Training Options 4Transmitter 9
Attach 32Communicating with Receiver 33Errors 49Precautions 9Warnings 9Warranty Information 55
Traveling with CGM System 58Trend Arrows 25, 39
App Trend Screen 24Receiver Trend Arrows 39
Trend Graph 38Troubleshooting 42
Adhesive 47Calibration Errors 48Hardware Errors 47No Alarm/Alerts 42Sensor Errors 50Sensor Glucose Readings 44Three Question Marks 45Transmitter Errors 49
U
Update Calibrations 37
W
Warnings 6, 8, 9, 11, 12Warranty 53
Limits 53, 55Obligations 54, 56Receiver Warranty Information 53Transmitter Warranty Information 55

Complete, sign, and return card to Dexcom via:
• Fax: 1.866.348.6030
• Email: [email protected]
• US mail
I have trained on the following:
Patient Name: __________________________________________
Patient Email: __________________________________________
Trained by:
Self-Training/Tutorial Diabetes Center/Doctor’s Office
Dexcom Staff ________________________________________
Date: _________________________________________________
Physician Name: ________________________________________
Patient Signature:________________________________________
Dexcom G5 MobileComponents
Display Device Options
Setting High/Low Alerts
fold here
seal
seal
seal for privacy
Fold over with the Business Reply Mail facing up and back is blank.
For your privacy, seal edges with tape.
Be eligible to participate in a monthly drawing for a free box of sensors by completing this training business reply card within 14 days of training.
Inserting Sensor
Starting Sensor Session
Entering BG Meter Value
Ending Sensor Session
Individuals are limited to a one-time prize redemption for a box of sensors. Health care professionals and Medicare patients who purchase the Dexcom G5 Mobile System are not eligible to participate. Winners will be notified by email.
ATTN.: TRAINING DEPT. DEXCOM, INC. 6340 SEQUENCE DR. SAN DIEGO, CA 92121-9942
NO POSTAGENECESSARY
IF MAILEDIN THE
UNITED STATES
BUSINESS REPLY MAIL FIRST-CLASS MAILSAN DIEGO CA PERMIT NO 28592
POSTAGE WILL BE PAID BY ADDRESSEE
Artwork for User Defined (4.25" x 6")Layout: dex com.LYTMarch 15, 2010
Produced by DAZzle Designer, Version 9.0.05(c) 1993-2009, Endicia, www.Endicia.comU.S. Postal Service, Serial #
IMPORTANT: DO NOT ENLARGE, REDUCE OR MOVE the FIM and POSTNET barcodes. They are only valid as printed! Special care must be taken to ensure FIM and POSTNET barcode are actual size AND placed properly on the mail piece to meet both USPS regulations and automation compatibility standards.

Your options to get the full Dexcom G5 Mobile User Guide:
Mail-In Request for Dexcom G5 Mobile User Guide
YES! Please send me a printed Dexcom G5 Mobile User Guide
Patient Name: __________________________________________
Patient Address: _________________________________________
Address Line #2: ________________________________________
City: _______________________State:_____Zip _______-_______
Phone Number:_(_____)__________________________________
Download as an eBook or view/print in a .pdf format dexcom.com/guides
Online request form to receive a free printed copy dexcom.com/guides
Request a free copy by mail Cut this page along the dotted lines on the left.
Request a free copy by phone 1-888-738-3646
seal for privacy
Fold over with the Business Reply Mail facing up and back is blank.
For your privacy, seal edges with tape.
seal
seal
fold here
1
2
3
4

ATTN.: TRAINING DEPT. DEXCOM, INC. 6340 SEQUENCE DR. SAN DIEGO, CA 92121-9942
NO POSTAGENECESSARY
IF MAILEDIN THE
UNITED STATES
BUSINESS REPLY MAIL FIRST-CLASS MAILSAN DIEGO CA PERMIT NO 28592
POSTAGE WILL BE PAID BY ADDRESSEE
Artwork for User Defined (4.25" x 6")Layout: dex com.LYTMarch 15, 2010
Produced by DAZzle Designer, Version 9.0.05(c) 1993-2009, Endicia, www.Endicia.comU.S. Postal Service, Serial #
IMPORTANT: DO NOT ENLARGE, REDUCE OR MOVE the FIM and POSTNET barcodes. They are only valid as printed! Special care must be taken to ensure FIM and POSTNET barcode are actual size AND placed properly on the mail piece to meet both USPS regulations and automation compatibility standards.

© 2016 Dexcom, Inc. All rights reserved.
Covered by patents www.dexcom.com/patents.Dexcom, Dexcom Follow, Dexcom G4, Dexcom G4 PLATINUM, Dexcom G5, Dexcom G5 Mobile, Dexcom Share, Follow Dashboard, G5 and SEVEN are either registered trademarks or trademarks of Dexcom, Inc. in the United States and/or other countries. All other product or company names that may be mentioned in this publication are tradenames, trademarks or registered trademarks of their respective owners.

LBL012789 Rev 007 MT22866
Dexcom, Inc.6340 Sequence Drive
San Diego, CA 92121 USA
Phone: 1.858.200.0200Tech Support: 1.877.339.2664
Web: dexcom.com