Quick Reference Guide: Working with CommVault® … · 4 Creating Maintenance Advantage Accounts...
26
Quick Reference Guide: Working with CommVault® Customer Support
Transcript of Quick Reference Guide: Working with CommVault® … · 4 Creating Maintenance Advantage Accounts...
Quick Reference Guide:Working with CommVault® Customer Support

2
Contents
Creating Maintenance Advantage Accounts for your Organization ...................................................... 4
Accessing the Maintenance Advantage Site ....................................................................................... 8
Logon .......................................................................................................................................... 8
Issues with Logon ........................................................................................................................ 8
Change my Password ................................................................................................................... 9
Maintenance Advantage Profile ...................................................................................................... 10
Contact Details .......................................................................................................................... 11
Product Information ................................................................................................................... 11
Alerting Preferences ................................................................................................................... 11
Company Information ................................................................................................................. 12
Submitting an Incident Using Maintenance Advantage .................................................................... 13
The Maintenance Advantage Incident Creation Process ................................................................ 13
Solution Content ........................................................................................................................ 15
Capturing Log Files to Upload with Your Incident ............................................................................ 16
Uploading Logs via HTTP ............................................................................................................ 16
Enabling Remote Support ........................................................................................................... 17
Phone ....................................................................................................................................... 18
Support Chat ............................................................................................................................. 18
Email ......................................................................................................................................... 18
Commvault Support APSS – Automated Proactive Solution System ................................................... 19
Requirements for APSS ............................................................................................................... 19
How to Access APSS ................................................................................................................... 21
APSS Dashboard ........................................................................................................................ 22

3
APSS Solution Data .................................................................................................................... 23
Remote Troubleshooting ............................................................................................................. 23
Commvault Support Chat .............................................................................................................. 25
Knowledge Base and Support Forum .............................................................................................. 26
4
Creating Maintenance Advantage Accounts for your Organization Users that are new to the Commvault Maintenance Advantage site must have a Sub-Account created before being allowed access. The Parent Account is responsible for the creation of any new sub-accounts.
The instructions outlined in this section are for the primary Maintenance Advantage account holder. If you are the Main Account holder for your CommVault estate, please follow the instructions outlined here. If you have problems or are not sure if you are the Main Account holder for your site, please contact the CommVault Support Hotline.
New Master Account User Once the requested account has been created, and the information for the main account has been sent to you in a separate email from [email protected].
As a valued maintenance customer note that this is the main/parent account used only to create and maintain user sub-accounts for your organization. The sub-accounts have full access to our knowledge base, documentation, release notes, product help, software patches, service packs, the software resource pack and more from any web browser.
To create a user sub-account, please log in and follow the instructions below.
Set up an Existing User or Add a New User to the Web Access Accounts On the Maintenance Advantage (MA) Customer Support Portal, follow the sequence of steps below to setup an existing user or add a new user to the website access accounts for your organization.
Creating your personal account
Before you can create your personal account, you must first log in to your main Maintenance Advantage Website (MA) account using your CommCell-ID and password. If you do not remember your MA password, and you are the registered user for the Main account use the password reset on the login screen to receive the new login password, be sure to enter the CommCell-ID, not your email when requested.

5
Once logged into your MA account, select the User Services menu option and select Manage Sub-Accounts. You can also select this option by clicking the ‘Manage Sub-Accounts’ icon from the Common Portal Functions section of the page.
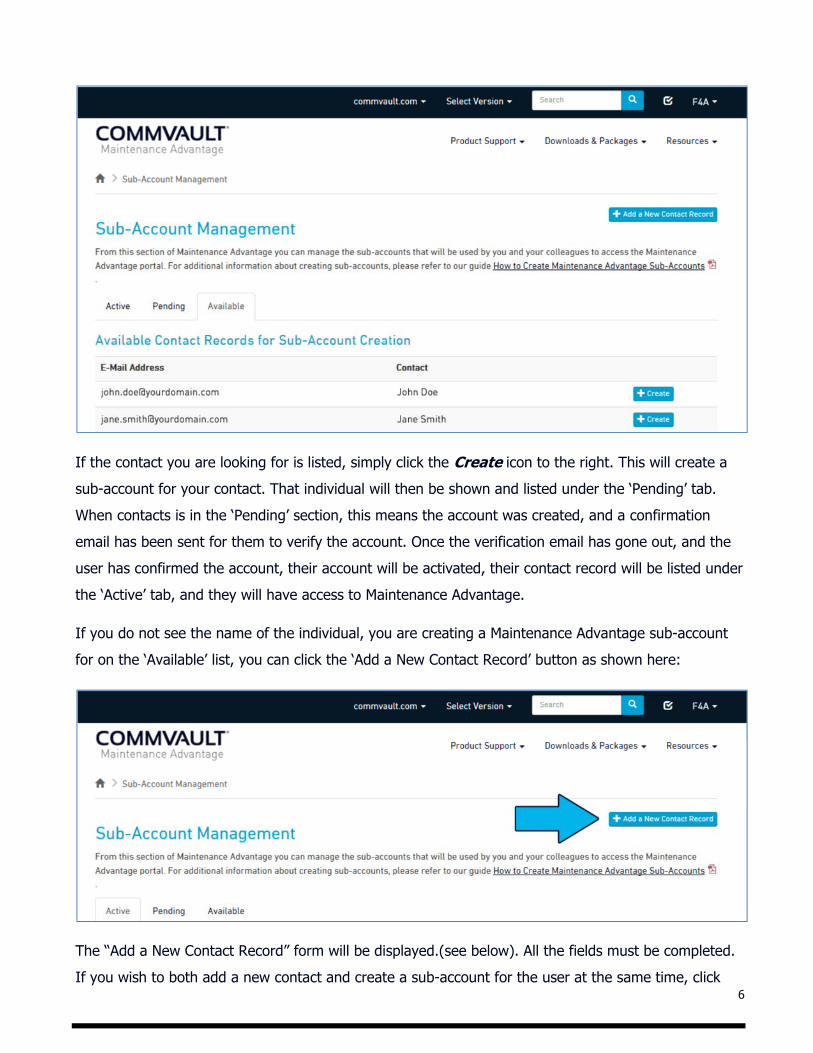
This is the process you would use when creating sub-accounts for yourself or additional employees of your organization. As you can see from the screenshot below, you have three sub-tabs, ‘Active’ ‘Pending’ and ‘Available,' if you need to create an account for a contact look for them in the ‘Available’ tab first as shown below:
6
If the contact you are looking for is listed, simply click the Create icon to the right. This will create a sub-account for your contact. That individual will then be shown and listed under the ‘Pending’ tab. When contacts is in the ‘Pending’ section, this means the account was created, and a confirmation email has been sent for them to verify the account. Once the verification email has gone out, and the user has confirmed the account, their account will be activated, their contact record will be listed under the ‘Active’ tab, and they will have access to Maintenance Advantage.
If you do not see the name of the individual, you are creating a Maintenance Advantage sub-account for on the ‘Available’ list, you can click the ‘Add a New Contact Record’ button as shown here:
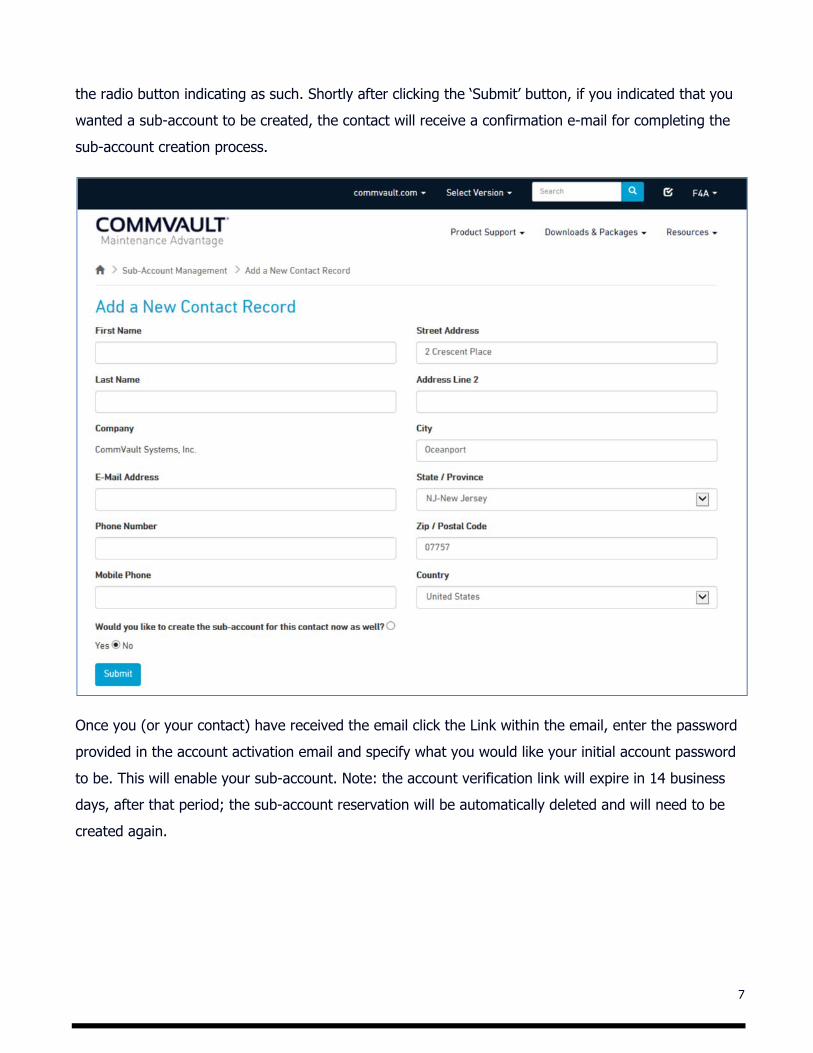
The “Add a New Contact Record” form will be displayed.(see below). All the fields must be completed. If you wish to both add a new contact and create a sub-account for the user at the same time, click
7
the radio button indicating as such. Shortly after clicking the ‘Submit’ button, if you indicated that you wanted a sub-account to be created, the contact will receive a confirmation e-mail for completing the sub-account creation process.
Once you (or your contact) have received the email click the Link within the email, enter the password provided in the account activation email and specify what you would like your initial account password to be. This will enable your sub-account. Note: the account verification link will expire in 14 business days, after that period; the sub-account reservation will be automatically deleted and will need to be created again.

8
Accessing the Maintenance Advantage Site Once the site administrator has created the new user's sub-account, you will now able to access the Maintenance Advantage site. From here, it is possible to set up and manage support incidents, chat with the support staff, access proactive support tools (APSS), download software/updates and much more
Logon Navigate to the Maintenance Advantage website https://ma.commvault.com/Account/Login?ReturnUrl=%2F and enter your username and password
Issues with Logon If you have any issues with your Maintenance Advantage account, you should contact your site administrator. Please note that you also have the ability to reset your account password. Password reset can be accomplished by selecting the Click Here option next to the Forgot you Password?.

9
You will then be prompted to enter your username and to click RESET MY PASSWORD. One these steps are completed you will receive an email with your new (temporary) password.
Change my Password After a password reset, it is important to update your password. Passwords are updated by utilizing the Change my Password tool that can be found on the main page of the Maintenance Advantage Customer support Portal.
Please note: To modify credentials, you are required to provide your current password.

10
Maintenance Advantage Profile Now that you have created your Account Credentials use your newly created account as opposed to using the Primary Maintenance Advantage Web Site (MA) ID to access Maintenance Advantage.
After logging on with your new account, it is important that you set up your personal profile. Click the Edit User Profile icon as noted in the image below to start personalizing your account.
When the user profile page opens, there are some fields that are automatically populated. To get the most out of the support tools available, please fully update each section of your profile.
11
Contact Details In the Contact Details, you can update your contact information including:
Contact Information (Name, Phone Number, and Address) Preferred Language / Cultural Setting – When you update this information the support
team is alerted that you may require translation on your support incident if English is not your first language
Preferred Hours – In this section, you can establish your primary contact hours to ensure that we reach you when you are available.
Product Information In the Product information section, you can add all associated Comcells that you manage, software versions you run in your environment, and Installed platforms/Agents. This information directly ties to the alert information you and your team proactively receive from Commvault Support.
Alerting Preferences In Alert Preferences, you can enable and disable what types of alerts and messages you would like to receive from the support team. You can also setup the time and frequency you receive these alerts from Commvault Support. These sections include:
Receive Critical Alert Messages Receive Update Alert Messages Receive Service Pack Alert Messages Receive KB Alert Messages
You can also register to receive additional information on:
Forums Virtual User Groups Support Reporting White Papers Logo Upload from Main Site Training Videos

12
Company Information In the Company Information section, you can provide us a better understanding of your use of Commvault software and your environment. With this information, Commvault can tailor information that is sent to you by relevance.
13
Submitting an Incident Using Maintenance Advantage
To electronically submit an incident to Commvault Customer Support you must, first, have access to the Maintenance Advantage Website at https://ma.commvault.com/
Note that an incident with a CRITICAL Severity cannot be opened via the Maintenance Advantage website. To open a CRITICAL Severity incident, please contact Customer Support via the Support Hotline The maximum severity of a Web-opened incident is a High. Note, also, that the default severity for a Web-opened incident is Medium. To increase the severity of an existing incident, please contact Customer Support via telephone, or refer to the incident number in a separate email to [email protected] requesting an increase in Severity to any level OTHER THAN Critical.
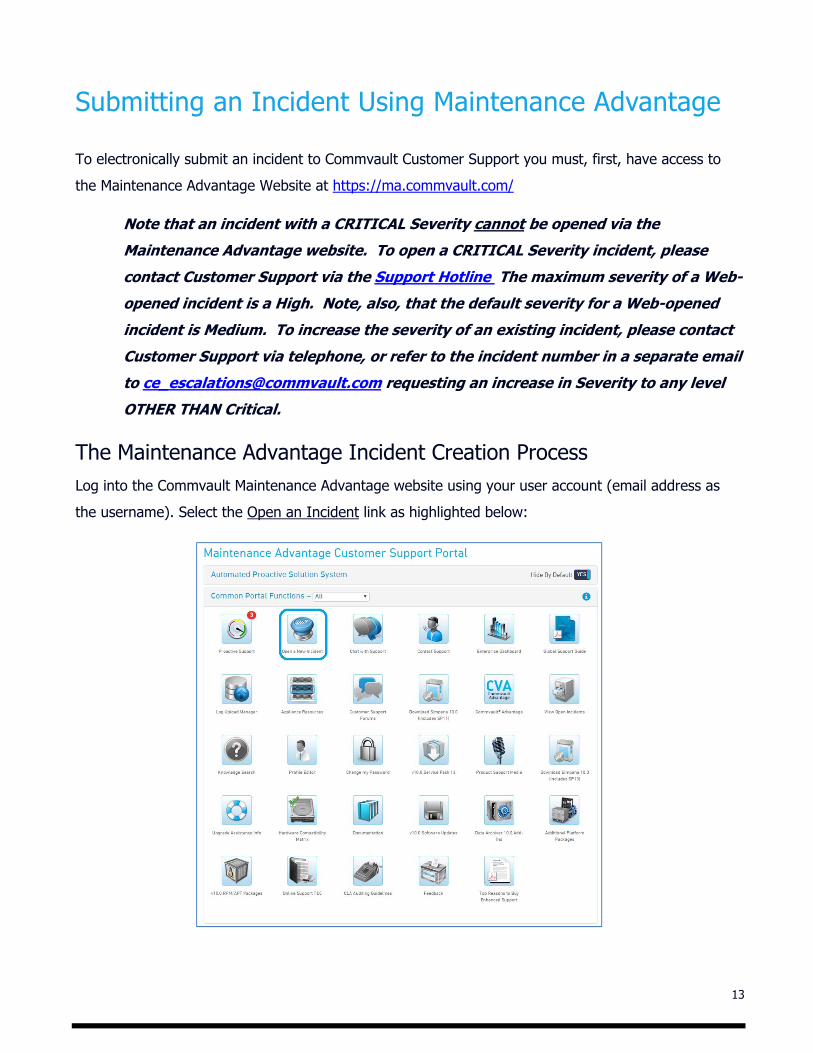
The Maintenance Advantage Incident Creation Process Log into the Commvault Maintenance Advantage website using your user account (email address as the username). Select the Open an Incident link as highlighted below:
14
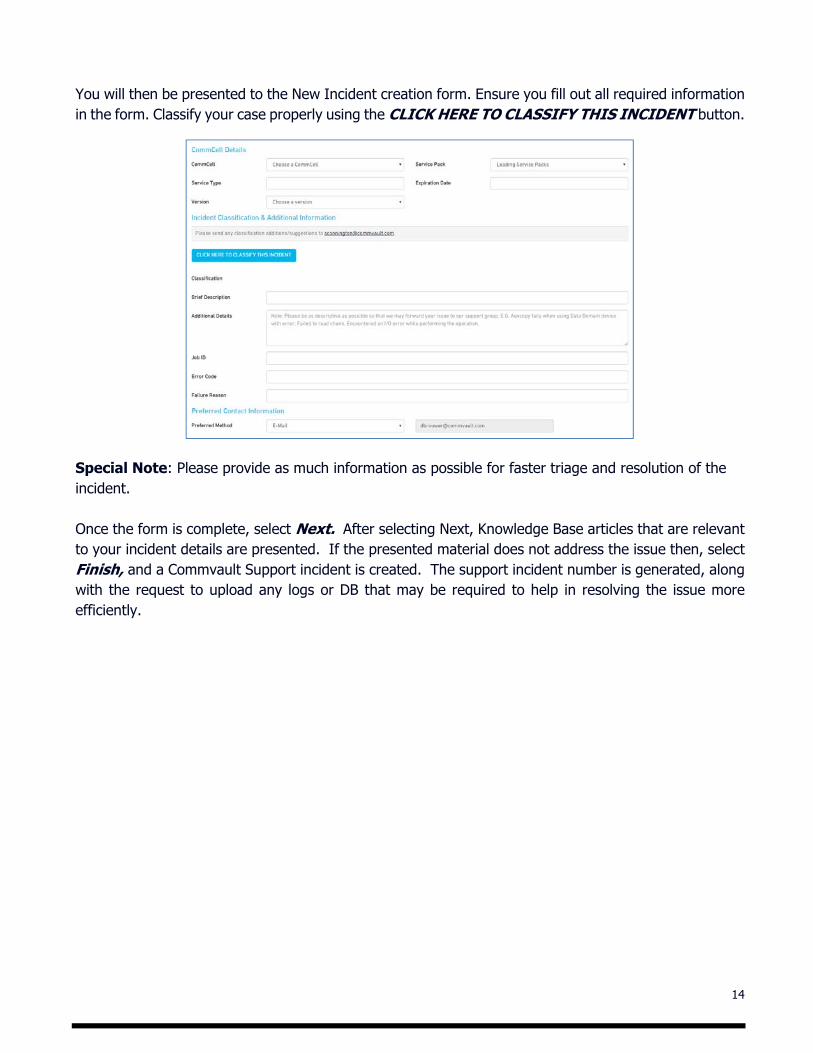
You will then be presented to the New Incident creation form. Ensure you fill out all required information in the form. Classify your case properly using the CLICK HERE TO CLASSIFY THIS INCIDENT button.
Special Note: Please provide as much information as possible for faster triage and resolution of the incident.
Once the form is complete, select Next. After selecting Next, Knowledge Base articles that are relevant to your incident details are presented. If the presented material does not address the issue then, select Finish, and a Commvault Support incident is created. The support incident number is generated, along with the request to upload any logs or DB that may be required to help in resolving the issue more efficiently.

15
Solution Content After the creation of your case, you are presented solution content created by the support team to help you resolve your issue. The support team creates this content to provide possible solutions to resolve issues quickly within your environment.
This material is presented in the web form and sent to the incident creator via email.
NOTE: The incident is placed in our solution queue for 24 hours to allow you time to complete the provided suggested actions. If you require additional support assistance, you can select the No option in the email, and dispatched the incident to the next available engineer for review.
16
Capturing Log Files to Upload with Your Incident Commvault log files provide the processing details of operations that occur in a CommCell system. These log files are used by the Commvault support team to analyze and diagnose any problems within the CommCell system. Providing the logs will assist in ensuring a swift resolution to your incident.How to Capture and Send Logs Commvault software can automatically gather job logs and upload them to the Commvault Support FTP site. Information on upload methods:
V10 - http://documentation.commvault.com/commvault/v10/article?p=features/log_files/log_files_overview.htm
V11- http://documentation.commvault.com/commvault/v11/article?p=features/log_files/log_files_overview.htm
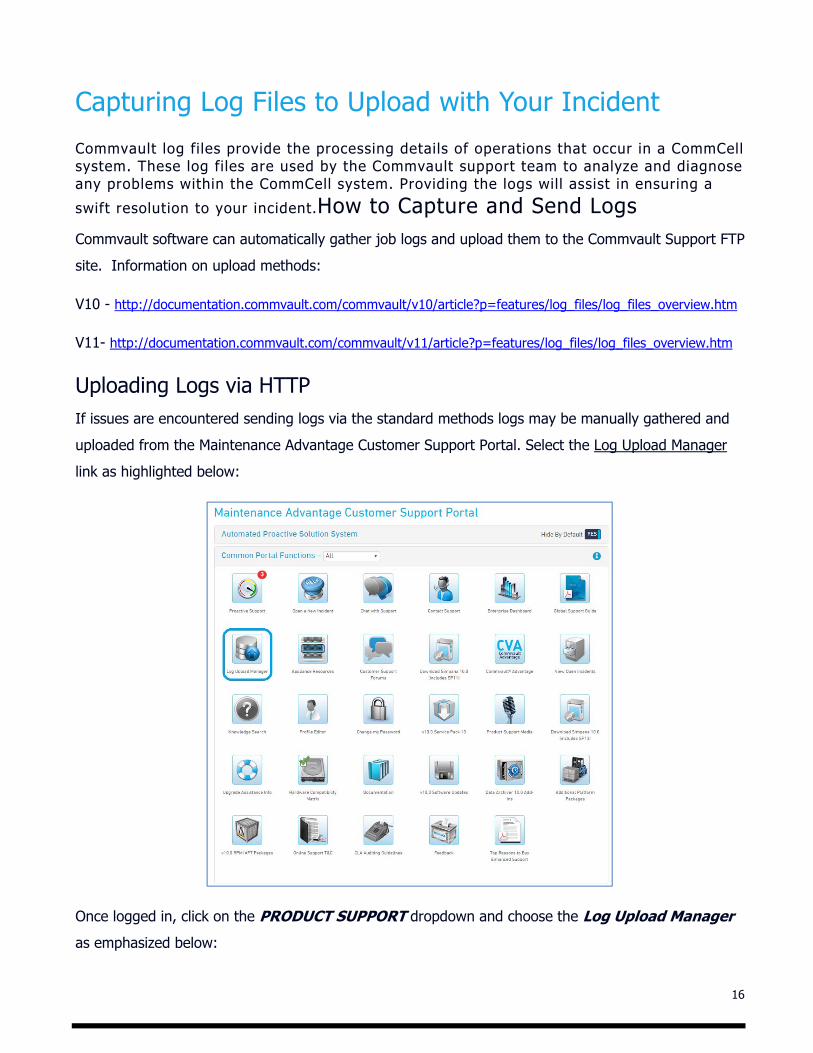
Uploading Logs via HTTP If issues are encountered sending logs via the standard methods logs may be manually gathered and uploaded from the Maintenance Advantage Customer Support Portal. Select the Log Upload Manager link as highlighted below:
Once logged in, click on the PRODUCT SUPPORT dropdown and choose the Log Upload Manager as emphasized below:

17
The Upload Manager applet is used to upload these logs.
Enter your incident number in the presented field, and browse to the correct file location. After log upload, an automated email sent to Support by the Upload Manager Software notifying the Support Engineer that the logs are now present.
Enabling Remote Support To expedite your support experience, you can allow the Commvault Enterprise Support Team to capture log and database information proactively from your CommCell. The information obtained is:
CommServe log files and database (.dmp) files MediaAgent logs files and Index Cache Client log files
The above information is collected and hosted on an FTP or HTTP location for troubleshooting problems in your CommCell environment.
Enabling and disabling remote troubleshooting information:
Version 10 - http://documentation.commvault.com/commvault/v10/article?p=features/troubleshooting/commcell_how_to.htm
Version 11 - http://documentation.commvault.com/commvault/v11/article?p=features/troubleshooting/commcell_how_to.htm
18
Escalating a Support Incident During the life cycle of a support incident, you may require additional management review of the support event. Commvault offers multiple methods to contact the support management team.
Phone Contact the support hotline at https://ma.commvault.com/Support/TelephoneSupport and request to speak to a manager. Ensure that you have your current incident number.
Support Chat You may contact the team that manages Support Chat and ask for escalation of your support request. The support management team is notified and will contact you to gather more details and set forth a plan to resolve your support request.
Email Email the support management alias CE_Escalations [email protected]. This escalation process is monitored 24 hours a day seven days a week. You can expect to get a written response within 15 minutes of your email. Ensure that you note the incident number in the subject of your email.
19
Commvault Support APSS – Automated Proactive Solution System
APSS is a state-of-the-art workflow engine module that provides automated, proactive support solutions for Commvault environments. Based on a service-oriented architecture, integrated with the CommServe, APSS proactively detects failure points in Commvault environments and intelligently maps personalized solutions to address those issues.
Unlike typical alerting systems that only inform end-users of issues, APSS alerts end-users to events and provides potential solutions that are deployed quickly and easily through a variety of interfaces. The APSS installer and dashboard are available within the Maintenance Advantage portal. APSS is available at no additional cost to all Commvault customers with active maintenance agreements. APSS helps to:
Reduce the number of events that create issues Improve service levels and data availability Reduce time and effort spent on reporting and resolving problems Reduce operating costs and business risk Enable greater focus on higher-value, strategic activities
Requirements for APSS The following is a checklist of requirements needed for the APSS:
Commvault Software Version and Service Pack: The APSS system is available for both V10 and V11 versions. The CommServe and the Workflow Engine is recommended to be within two major service packs from the most current Service Pack. V11 Commservers must be on SP5 or higher to use APSS.
Workflow Engine: A workflow engine must be installed on the CommServe to support the APSS installer. To offload workflow execution tasks an additional workflow engine may be installed on another server. This is an optional configuration that will move any resource or load contentions from the CommServe to the alternate workflow server.
Workflow Engine Installation Steps: http://documentation.commvault.com/commvault/v10/article?p=features/workflow/workflow_overview.htm

20
Powershell: Most modern Windows Operating systems will have Powershell installed, and enabled by default. PowerShell 2.0 or above must be installed and enabled on the CommServe and Workflow Engine server.
For the process associated with the manual detection of this configuration, please review this link: http://blogs.msdn.com/b/powershell/archive/2009/06/25/detection-logic-poweshell-installation.aspx
To install Powershell: https://technet.microsoft.com/en-us/library/hh847837.aspx
Internet Access: Ensure that you have opened port 443 between the CommServe and the following sites:
cloud.commvault.com – this is the standard cloud server
edc.commvault.com – scripts location for the standard Cloud server
Additionally, a "gateway" CommCell client may be used for clu and cloud Upload and Downloads. The gateway server must have HTTPS access to clu.commvault.com , cloud.commvault.com, and edc.commvault.com
Additional configuration information is found in documentation here: http://documentation.commvault.com/commvault/v10/article?p=features/reports/metrics/troubleshooting.htm
Documentation on setting up a Metrics Gateway is located here: http://documentation.commvault.com/commvault/v10/article?p=features/reports/metrics/metrics_using_gateway_computer.htm
Remote Troubleshooting: By default in V10 SP9 and above remote troubleshooting is enabled. Verify this option is enabled by viewing the Cloud Metrics Reporting control panel, and selecting Allow Remote Troubleshooting (More information on Remote Troubleshooting is available on page 13)
New Log Upload Access: The APSS installation will automatically configure any V10 CommCells to use the new HTTP log upload server. V11 already has this configuration in place. Firewalls must be configured to allow HTTP access to http://upload.commvault.com/httplogupload/
Log Monitoring: To take advantage of advanced automated solutions, configure a Log Monitoring engine. The log monitoring engine will have a modest impact on the server’s CPU, and
21
memory. Create the engine on any Media Agent that has free space to host the index. The drive hosting the index should be at least 100GB. If additional content outside of APSS is indexed, then additional hard drive space may be required.
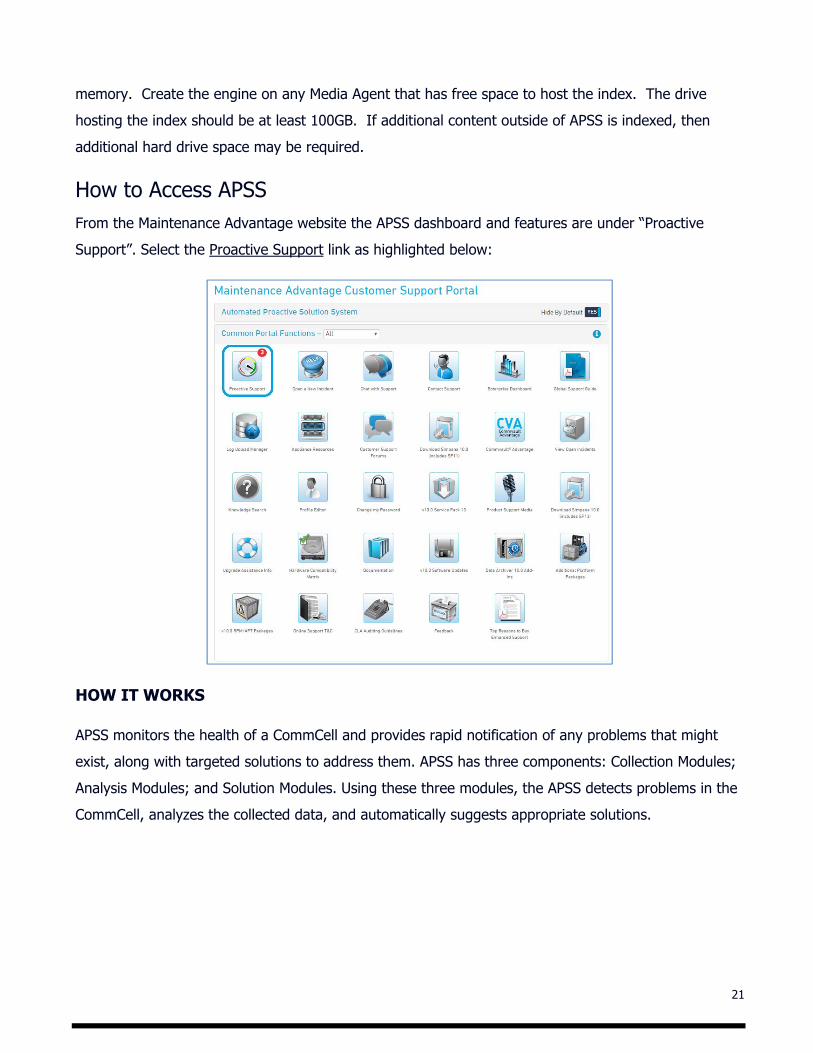
How to Access APSS From the Maintenance Advantage website the APSS dashboard and features are under “Proactive Support”. Select the Proactive Support link as highlighted below:
HOW IT WORKS
APSS monitors the health of a CommCell and provides rapid notification of any problems that might exist, along with targeted solutions to address them. APSS has three components: Collection Modules; Analysis Modules; and Solution Modules. Using these three modules, the APSS detects problems in the CommCell, analyzes the collected data, and automatically suggests appropriate solutions.

22
APSS Dashboard The APPS dashboard contains reporting of the health of your Commvault environment. Multiple widgets can be added and removed from the dashboard to meet you or your team's needs.
Some of these APSS widgets include:
Critical Alerts Database Health Job Summary Open Incidents Secondary Copy Fallen Behind SLA Percentage Solutions Workflows Run
23
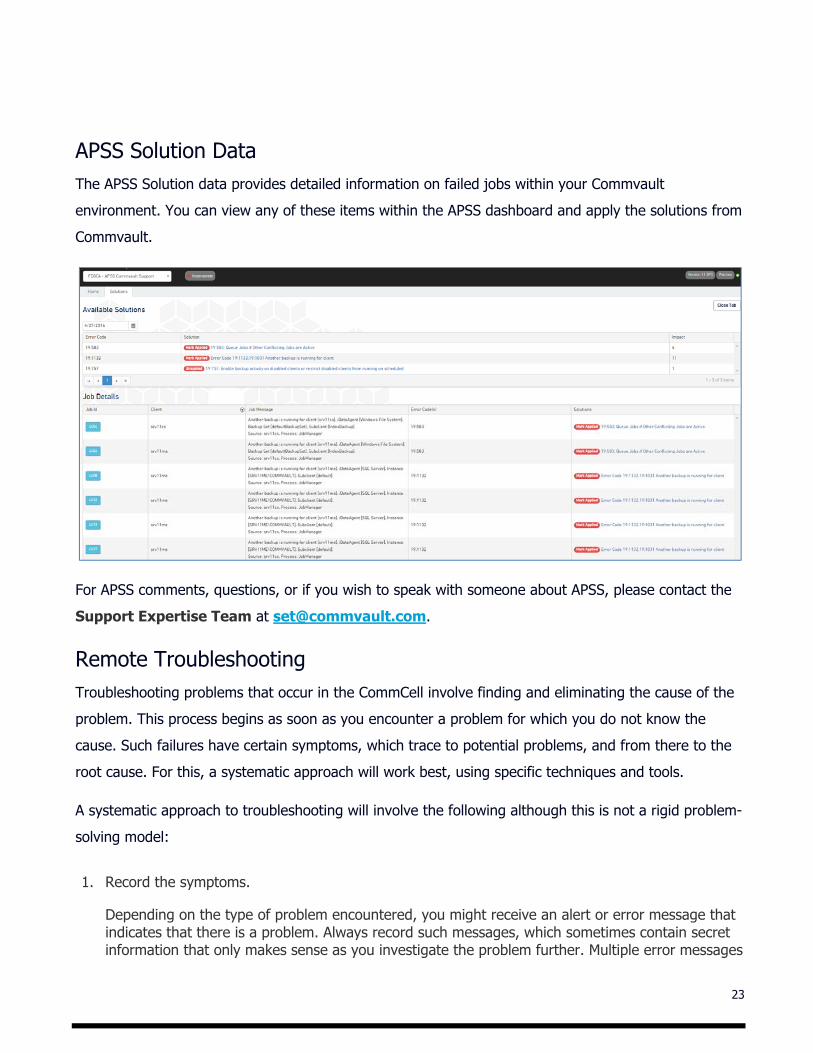
APSS Solution Data The APSS Solution data provides detailed information on failed jobs within your Commvault environment. You can view any of these items within the APSS dashboard and apply the solutions from Commvault.
For APSS comments, questions, or if you wish to speak with someone about APSS, please contact the Support Expertise Team at [email protected].
Remote Troubleshooting Troubleshooting problems that occur in the CommCell involve finding and eliminating the cause of the problem. This process begins as soon as you encounter a problem for which you do not know the cause. Such failures have certain symptoms, which trace to potential problems, and from there to the root cause. For this, a systematic approach will work best, using specific techniques and tools.
A systematic approach to troubleshooting will involve the following although this is not a rigid problem-solving model:
1. Record the symptoms.
Depending on the type of problem encountered, you might receive an alert or error message that indicates that there is a problem. Always record such messages, which sometimes contain secret information that only makes sense as you investigate the problem further. Multiple error messages

24
that look similar can include subtle differences, and by recording the details of each one, you can learn more about where the problem exists.
2. Use diagnostic tools and techniques to identify the root cause.
Narrow the scope of your problem by eliminating components that are not causing the problem. By using a process of elimination, you can simplify your problem and avoid wasting time. For instance, you might investigate whether anyone else has experienced the problem, or verify that you have applied any updates that might solve the problem you have encountered. As a more advanced task, log files and tools can be used to analyze and diagnose problems with the CommCell.
3. Implement the solution.
Depending on the root cause of the problem, this might be as simple as applying an update, or in the worst case might require Disaster Recovery.
It is always easier to recover from a failure if you prepare in advance. Possibly the most important requirement in any environment is to have current and accurate information about the enterprise, and the CommCell in particular, available to the operations and support personnel. Only with complete information can intelligent decisions be made based on the diagnostic efforts, and only with complete information can troubleshooting be done as quickly and as smoothly as possible. Also, it is important to have a proper plan for disaster recovery, including regular Performing a Disaster Recovery Backup.
The following tools are available and can be helpful in diagnosing problems encountered in the CommCell group.
25
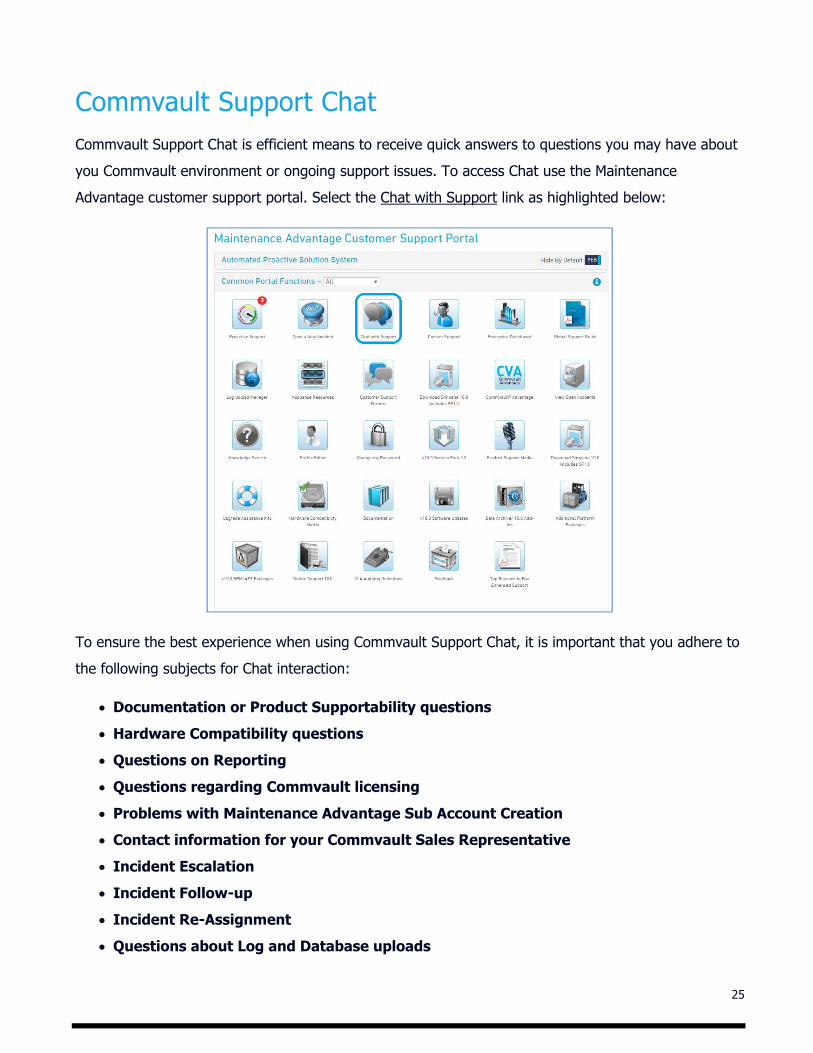
Commvault Support Chat Commvault Support Chat is efficient means to receive quick answers to questions you may have about you Commvault environment or ongoing support issues. To access Chat use the Maintenance Advantage customer support portal. Select the Chat with Support link as highlighted below:
To ensure the best experience when using Commvault Support Chat, it is important that you adhere to the following subjects for Chat interaction:
Documentation or Product Supportability questions Hardware Compatibility questions Questions on Reporting Questions regarding Commvault licensing Problems with Maintenance Advantage Sub Account Creation Contact information for your Commvault Sales Representative Incident Escalation Incident Follow-up Incident Re-Assignment Questions about Log and Database uploads

26
Knowledge Base and Support Forum Accessing the Commvault Knowledge Base and Support Forum requires access to the Maintenance Advantage Web Site.
Whereas the Support forum is readable without a requirement to log in to the Maintenance Advantage eSupport site via all the key search engines, AUTHOR and REVIEWER access is provided to the Knowledge Base and Support Forums only via Maintenance Advantage. Here you can run searches for known issues, error messages, join the Forums to participate or ask questions.