Quick Reference Guide - Home - OHAUS Extranet Reference Guide-2013.pdf · Quick Reference Guide For...
15
Quick Reference Guide For Microsoft Office SharePoint 2013 For all Users 1. Microsoft Office SharePoint – Overview 2. Common Functions 3. How to use Document Libraries 4. How to use Lists 5. List and Library Functions 6. Document Approval (Workflows) For Site Administrators 7. Create/delete Subsites 8. Create/delete Pages 9. List and Library Functions for Site Administrators 10. User Management for Site Administrators Microsoft Office SharePoint is highly customizable. Some of the options and features in this booklet may not be available to you.
-
Upload
phungkhuong -
Category
Documents
-
view
219 -
download
2
Transcript of Quick Reference Guide - Home - OHAUS Extranet Reference Guide-2013.pdf · Quick Reference Guide For...

Quick Reference Guide For Microsoft Office SharePoint 2013
For all Users
1. Microsoft Office SharePoint – Overview
2. Common Functions
3. How to use Document Libraries
4. How to use Lists
5. List and Library Functions
6. Document Approval (Workflows)
For Site Administrators
7. Create/delete Subsites
8. Create/delete Pages
9. List and Library Functions for Site Administrators
10. User Management for Site Administrators Microsoft Office SharePoint is highly customizable. Some of the options and features in this booklet may not be available to you.

1. Microsoft Office SharePoint - Overview
Accessing a SharePoint site
To see a list of all sites where you have access to type the URL https://partner.ohaus.com/
Navigation to and within a site
[Click] on OHAUS logo to get to home page of the actual site
[Click] on Home to go to the home page of the current site
[Click] on to navigate to upper level sites
[Click] on a site name in the top navigation to navigate to a sub site
[Click] on a sub site of the Quick Launch area
To see a list/library/etc. [click] a link in the Quick Launch area Or, to see all content of one type, [click] one of the headings (e.g. Documents, Lists).
To see all the content of the current site, [click] Site Content.

2. Common Functions
Using email alerts
Use email alerts to be notified when a change happens in a list or library, or when a specific item changes.
1. For a list/library, [click] on LIST or LIBRAY in the ribbon tab on the top and then open the Alert Me menu. On the drop down menu select SET ALERT ON THIS LIST or LIBRAY
2. For a specific item, [click] on the item left beside the icon and check it. Then [Click] on FILES or ITEMS in the ribbon tab on the top and then ALERT ME. Open the Alert Me menu. On the drop down menu select SET ALERT ON THIS DOCUMENT or ITEM.
3. Modify alert settings.
4. [Click] OK.
To manage your alerts, choose the WELCOME menu (your name) in the top right, then [Click] on MY SETTINGS. Then [Click] on MY ALERTS.
Using the Recycle Bin
By default, deleted items are kept for 30 days. To view the recycle bin, [click] on Site Content in the Quick Launch area and
then .
To restore an item, check the items, then [click] .
To delete items, check the items, then [click]

3. How to use Document Libraries
Using document libraries
Document libraries allow you to manage files such as documents, spreadsheets, and presentations. DOCUMENTS is a common default document library
Opening a file
To open a file, [click] on the filename. If prompted select READ ONLY or EDIT, then OK.
Or, in your application (e.g. MS Word…), [click] FILE then OPEN. For browsing for filename, type in the address of your SharePoint site (e.g. https://partner.ohaus.mtnet/sites/teamsite1/subsite1), then [click] OPEN. Select a SharePoint site/library, then the file to open.
Creating a new document
To create a new document, [click] on
in the ribbon. Open drop-down menu New Document and then select New Document. The document type is determined by the document library's settings. (Default setting is "New Document" in MS Word format)"
Instead of using/creating folders, you can also make use of metadata and views, (See section "4. List and Library functions" for sorting, filtering, and views.)
To drag & drop a file from your desktop, choose ACTIONS, then OPEN WITH WINDOWS EXPLORER. A new explorer window opens displaying the content of the library. [Drag] the file to the destination, or select the item and use CUT/COPY and PASTE commands.
3. How to use Document Libraries (continued)
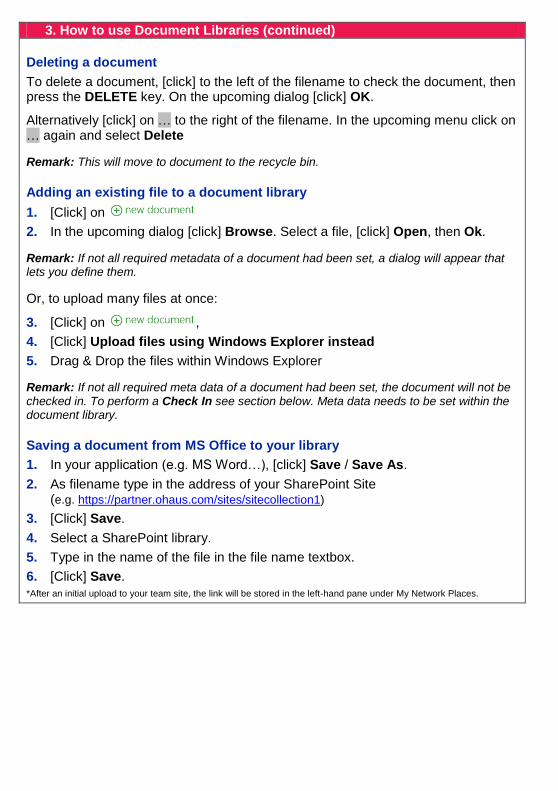
Deleting a document
To delete a document, [click] to the left of the filename to check the document, then press the DELETE key. On the upcoming dialog [click] OK.
Alternatively [click] on … to the right of the filename. In the upcoming menu click on … again and select Delete
Remark: This will move to document to the recycle bin.
Adding an existing file to a document library
1. [Click] on
2. In the upcoming dialog [click] Browse. Select a file, [click] Open, then Ok.
Remark: If not all required metadata of a document had been set, a dialog will appear that lets you define them.
Or, to upload many files at once:
3. [Click] on ,
4. [Click] Upload files using Windows Explorer instead
5. Drag & Drop the files within Windows Explorer
Remark: If not all required meta data of a document had been set, the document will not be checked in. To perform a Check In see section below. Meta data needs to be set within the document library.
Saving a document from MS Office to your library
1. In your application (e.g. MS Word…), [click] Save / Save As.
2. As filename type in the address of your SharePoint Site (e.g. https://partner.ohaus.com/sites/sitecollection1)
3. [Click] Save.
4. Select a SharePoint library.
5. Type in the name of the file in the file name textbox.
6. [Click] Save.
*After an initial upload to your team site, the link will be stored in the left-hand pane under My Network Places.

3. How to use Document Libraries (continued)
Checking documents Out/In
Checking out a file prevents other users from editing the file while you are working on it. New edits you make do not show until you check the file back in.
Checked out files have a green arrow on their icon
> To check out a single document
1. [Click] on … to the right of the filename. In the upcoming menu click on … again and select Check Out.
2. To edit the document, [click] on the document.
> To check out a multiple documents
1. [Click] on … to the right of the filenames, to select multiple files.
2. Then [click] on the FILES tab in the ribbon then click on Check Out.
3. In the upcoming dialog [click] OK
> To check in a single document
1. Save and close the file.
2. In SharePoint, [click] on … to the right of the filename. In the upcoming menu click on … again and select Check In.
3. Type in a descriptive comment and choose the other options. [click] OK.
> To check in multiple document
1. [Click] on … to the right of the filenames, to select multiple files.
2. Then [click] on the FILES tab in the ribbon then click on Check In.
>To discard a checked out document
3. [Click] on … to the right of the filename. In the upcoming menu click on … again and choose Discard Check Out.
> How versioning works with file check-out
Checking out files make the most of versioning. When you check out a file, a version is created only when you check the file back in, so that you can specifically designate when a version is created. When check-out is not required, a version is created when you first save a file, and then this version is updated when you close it.
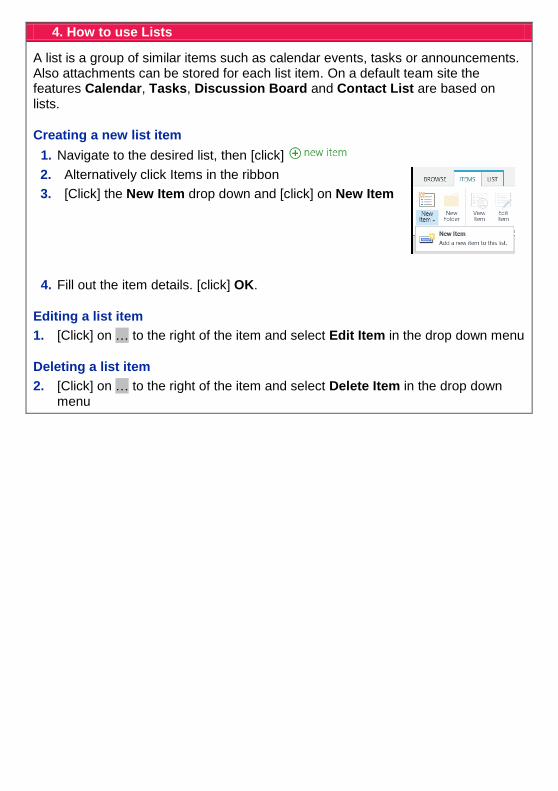
4. How to use Lists
A list is a group of similar items such as calendar events, tasks or announcements. Also attachments can be stored for each list item. On a default team site the features Calendar, Tasks, Discussion Board and Contact List are based on lists.
Creating a new list item
1. Navigate to the desired list, then [click]
2. Alternatively click Items in the ribbon
3. [Click] the New Item drop down and [click] on New Item
4. Fill out the item details. [click] OK.
Editing a list item
1. [Click] on … to the right of the item and select Edit Item in the drop down menu
Deleting a list item
2. [Click] on … to the right of the item and select Delete Item in the drop down menu

5. List and Library Functions
Sorting
1. [Click] on a column heading
2. [Click] again to reverse the sort order.
Or, hover over the column heading. [Click] , then select a sort order.
Filtering
1. Hover over a column heading, then [click]
2. From the bottom part of the drop down list, select the criteria from the available values
3. Repeat the steps 1 and 2 to filter by any additional column.
When filtered, appears next to the column name.
To remove a filter from a column, [click] , then select Clear Filter From (column
name) e.g.
Changing views
In the list [click] on the name of the view (e.g. All Documents).
Creating a view
1. [Click] on … beside the name of the most right name of a view.
2. In the dropdown [click] Create View.
3. Select the view of your choice (e.g. Standard View).
4. Type in the name of your view and do the modifications.
5. [Click] Ok.
Remark: If you are NOT the Site Owner, this view is a personal view only and not visible to other users. Only Site Owners can create and modify public views.

5. List and Library Functions (continued)
Exporting to a spreadsheet
1. [Click] on LIST in the ribbon
2. [Click] on Export to Excel
3. [Click] on OK in the upcoming dialog
4. [Click] Open.
5. [Click] Enable in the security warning.
Using Quick Edit view
Use the Quick Edit view to work with a list/library in a manner similar to Microsoft Excel (not available for all lists/libraries).
To change to datasheet view:
1. [Click] on LIST in the ribbon, [click] Edit In Datasheet.
2. [Click] on Quick Edit in the View Format ribbon
To exit datasheet view,[Click] on LIST in the ribbon, then [click] on

7. Create/delete Sub sites
You can create a new sub site within the existing site structure if you have the Design permission level.
The sub site have navigation, elements and search in common with the same site collection, and you want them to share.
Creating a new sub site
Before creating a site, make sure that you are at the location on your site where you want to create a new sub site.
1. To create a new sub site, [click] then [click] on Site Contents.
2. [Click] on
3. In the Title and Description section, type a title for your site.
4. In the Web Site Address section, type a URL for your site. The first part is provided for you.
To avoid potential problems with updating or modifying the site, do not enter a space or any of the following special characters as part of the Web address.
\\ : * ? " < > | # \t { } %
5. In the Template Selection section, click the tab that you want, and then select the site template that you want.
6. In the Permissions section, select whether you want to provide access to the same users who have access to this parent site or to a unique set of users.
7. In the Navigation section whether the new site should be displayed in the quick launch or top navigation of the parent site
8. In the Navigation Inheritance section, specify whether you want the site to inherit its top link bar from the parent site or to have its own set of links on the top link bar.
9. [Click] CREATE
Editing a sub site
1. [Click] then [click] on Site Settings
2. [Click] on Title, description, and logo
3. Change Title, Description, Logo and/or URL name
Deleting a sub site
Before delete a site, make sure that you are at the location on your site where you want to delete.
1. [Click] then Site Settings
2. Under section Site Actions [click] Delete this Site
8. Create/delete Pages
You can create a new page if you have the Design permission level.
A Web page in a site can display lists of information, enabling team members to organize the information any way they want, such as by subject, due date, or author.
Creating a new Wiki page
1. [Click] then Add a Page
2. Enter the name of the page and [click] on OK
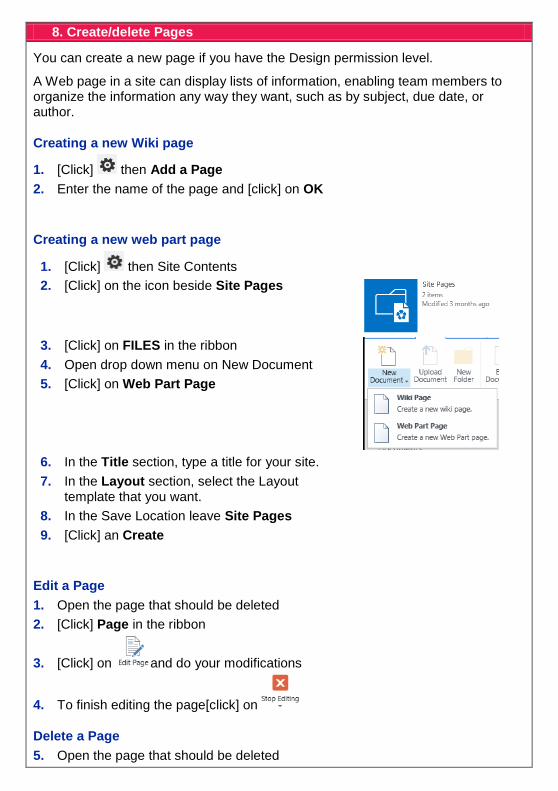
Creating a new web part page
1. [Click] then Site Contents
2. [Click] on the icon beside Site Pages
3. [Click] on FILES in the ribbon
4. Open drop down menu on New Document
5. [Click] on Web Part Page
6. In the Title section, type a title for your site.
7. In the Layout section, select the Layout template that you want.
8. In the Save Location leave Site Pages
9. [Click] an Create
Edit a Page
1. Open the page that should be deleted
2. [Click] Page in the ribbon
3. [Click] on and do your modifications
4. To finish editing the page[click] on
Delete a Page
5. Open the page that should be deleted

6. [Click] Page in the ribbon
7. [Click] on
8. In the upcoming dialog [click] on OK

9. List and Library Functions for Site Administrators
Creating a list or library
1. [Click] Site Content then [click]
2. Select the type of list or library to create.
3. Type in a Name. If a description is necessary [click] on Advanced Options
4. [Click] Create.
Deleting a list or library
1. In the list/library, choose LIST in the ribbon
2. [Click] on List Settings
3. [Click] on Delete this list or Delete this Document Library
4. In the upcoming dialog [click] on OK
Creating a list or library column
1. In the list/library, choose LIST in the ribbon
2. [Click] on List Settings
3. Under Columns, [click] Create Column.
4. Enter the name of the new column and select the type of information.
5. Fill out the Additional Column Settings.
6. [Click] OK.
Deleting a list or library column
1. In the list/library, choose LIST in the ribbon
2. [Click] on List Settings
3. Under Columns, [click] on the column which should be deleted
4. [Click] Delete.
5. [Click] OK.
Attention: A deleted column (and its content) cannot be restored!

10. User Management for Site Administrators
Per default all new sites are created with 3 different user groups/roles
Site Owners – Full control (enables users to view, add, update and delete documents and items, design new and existing lists and libraries, as well as control access to the site)
Site Members – Contribute (enables users to view, add, update and delete documents and items)
Site Visitors – Read (enables users to view documents and items)
To add a user to one of the groups above
1. [Click] on
2. Under Site Settings [click] on Site Permissions
3. In the edit files beside User Finder enter the e-mail address or part of it of the user and [click] on Find Users
4. If the user will be displayed in the list [click] on Manage
a. Check all groups where the user should be a member of
5. If the user will be displayed in the list [click] on Create new user
a. Enter the e-mail address of the user(s)
b. [Click] on Preview. A list of users will be displayed
c. Check all groups where the user should be a member of and check e-mail invitation if the user(s) should get an invitation via e-mail

d. [Click] on Create Users
To delete a user from one of the groups above
1. [Click] on
2. Under Site Settings [click] on Site Permissions
3. In the edit files beside User Finder enter the e-mail address or part of it of the user and [click] on Find Users
4. If the user will be displayed in the list [click] on Manage
5. Uncheck the group where the user shouldn’t be a member anymore
6. [Click] on Change
To remove a user from the site
1. Click] on
2. Under Site Settings [click] on Site Permissions
3. In the edit files beside User Finder enter the e-mail address or part of it of the user and [click] on Find Users
4. If the user will be displayed in the list [click] on Manage
5. [Click] on Remove User from this site
To remove a user from the site collection
1. Click] on
2. Under Site Settings [click] on Site Permissions
3. In the edit files beside User Finder enter the e-mail address or part of it of the user and [click] on Find Users
4. If the user will be displayed in the list [click] on Manage
5. [Click] on Remove User from all sites
Version 1.0, Nov. 2013 Contact: [email protected]
IS Services