Quick-and-Easy Deployment of a Ceph Storage Cluster with SLES · Quick-and-Easy Deployment of a...
57
Quick-and-Easy Deployment of a Ceph Storage Cluster with SLES With a look at SUSE Studio, Manager and Build Service Jan Kalcic Sales Engineer [email protected] Flavio Castelli Senior Software Engineer [email protected]
Transcript of Quick-and-Easy Deployment of a Ceph Storage Cluster with SLES · Quick-and-Easy Deployment of a...

Quick-and-Easy Deployment of a Ceph Storage Cluster with SLESWith a look at SUSE Studio, Manager and Build Service
Jan KalcicSales [email protected]
Flavio CastelliSenior Software [email protected]

2
Agenda
Ceph Introduction
System Provisioning with SLES
System Provisioning with SUMa

3
Agenda
Ceph Introduction
System Provisioning with SLES
System Provisioning with SUMa
SUSE Studio
SUSE Manager

Ceph Introduction

5
What is Ceph
• Open-source software-defined storage‒ It delivers object, block, and file storage in one unified system
• It runs on commodity hardware‒ To provide an infinitely scalable Ceph Storage Cluster‒ Where nodes communicate with each other to replicate and
redistribute data dynamically
• It is based upon RADOS‒ Reliable, Autonomic, Distributed Object Store‒ Self-healing, self-managing, intelligent storage nodes

6
Ceph Components
Monitor
Object Storage Device (OSD)
Ceph Metadata Server (MDS)Ceph Storage Cluster
Ceph Clients
Ceph Block Device (RBD)
Ceph Object Storage (RGW)
Ceph Filesystem
Custom implementation

7
Ceph Storage Cluster
• Ceph Monitor ‒ It maintains a master copy of the cluster map (i.e. cluster
members, state, changes, and overall health of the cluster)
• Ceph Object Storage Device (OSD)‒ It interacts with a logical disk (e.g. LUN) to store data (i.e.
handle the read/write operations on the storage disks).
• Ceph Metadata Server (MDS)‒ It provides the Ceph Filesystem service. Purpose is to store
filesystem metadata (directories, file ownership, access modes, etc) in high-availability Ceph Metadata Servers

8
Architectural Overview

9
Architectural Overview

10
Deployment Overview
• All Ceph clusters require:‒ at least one monitor‒ at least as many OSDs as copies of an object stored on the
cluster
• Bootstrapping the initial monitor is the first step‒ This also sets important criteria for the cluster, (i.e. number of
replicas for pools, number of placement groups per OSD, heartbeat intervals, etc.)
• Add further Monitors and OSDs to expand the cluster

11
Monitor Bootstrapping
• On mon node, create “/etc/ceph/ceph.conf”[global] fsid = a7f64266-0894-4f1e-a635-d0aeaca0e993 mon initial members = node1 mon host = 192.168.0.1 public network = 192.168.0.0/24 auth cluster required = cephx auth service required = cephx auth client required = cephx osd journal size = 1024 filestore xattr use omap = true osd pool default size = 2 osd pool default min size = 1 osd pool default pg num = 333 osd pool default pgp num = 333 osd crush chooseleaf type = 1
• Create a keyring for your cluster and generate a monitor secret key.
ceph-authtool --create-keyring /tmp/ceph.mon.keyring --gen-key -n mon. --cap mon 'allow *'
Add UUID: `uuidgen`
Add mon
Add IP
...
12
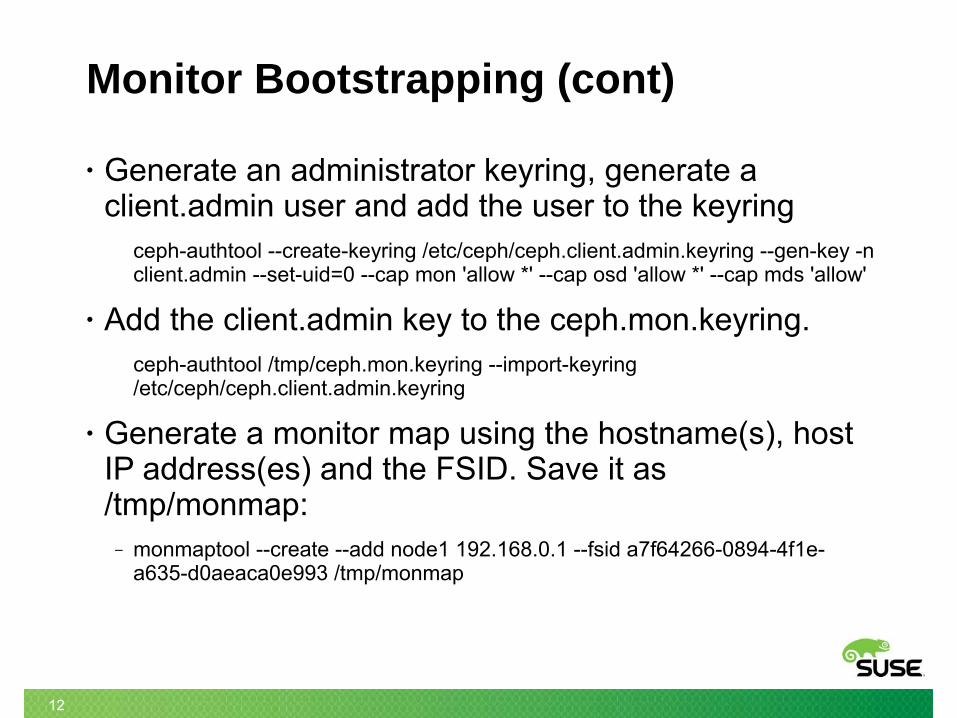
Monitor Bootstrapping (cont)
• Generate an administrator keyring, generate a client.admin user and add the user to the keyring
ceph-authtool --create-keyring /etc/ceph/ceph.client.admin.keyring --gen-key -n client.admin --set-uid=0 --cap mon 'allow *' --cap osd 'allow *' --cap mds 'allow'
• Add the client.admin key to the ceph.mon.keyring.ceph-authtool /tmp/ceph.mon.keyring --import-keyring /etc/ceph/ceph.client.admin.keyring
• Generate a monitor map using the hostname(s), host IP address(es) and the FSID. Save it as /tmp/monmap:‒ monmaptool --create --add node1 192.168.0.1 --fsid a7f64266-0894-4f1e-
a635-d0aeaca0e993 /tmp/monmap

13
Monitor Bootstrapping (cont)
• Create a default data directory (or directories) on the monitor host(s).
sudo mkdir /var/lib/ceph/mon/ceph-node1
• Populate the monitor daemon(s) with the monitor map and keyring.
ceph-mon --mkfs -i node1 --monmap /tmp/monmap --keyring /tmp/ceph.mon.keyring
• Start the monitor(s).sudo /etc/init.d/ceph start mon.node1
• Verify that the monitor is running:ceph -s

14
Adding OSDs
• Once you have your initial monitor(s) running, you should add OSDs‒ Your cluster cannot reach an active + clean state until you
have enough OSDs to handle the number of copies of an object (e.g., osd pool default size = 2 requires at least two OSDs).
• Ceph provides the ceph-disk utility, which can prepare a disk, partition or directory for use with Ceph‒ The ceph-disk utility creates the OSD ID by incrementing the
index. ‒ ceph-disk will add the new OSD to the CRUSH map under the
host for you.

15
Adding OSDs (cont)
• Prepare the OSD.sudo ceph-disk prepare --cluster ceph --cluster-uuid a7f64266-0894-4f1e-a635-d0aeaca0e993 --fs-type ext4 /dev/hdd1
• Activate the OSD:sudo ceph-disk activate /dev/hdd1
• To watch the placement groups peer:ceph -w
• To view the tree, execute the following:ceph osd tree

Lab

SUSE Studio

18
SUSE Studio
• Web application• Makes it easy to create appliances• Targets different versions of openSUSE and SLE• Supports different output formats:
‒ ISO, Preload ISO‒ USB disk/ hard disk image‒ Virtual machines (VMware, Xen, KVM, Hyper-V)‒ Cloud (AWS, OpenStack, SUSE Cloud, Azure)

19
Add packages from OBS project

20
Use LVM

21
Add custom files to the appliance

22
Build a preload ISO

23
What is a “preload ISO”
Bootable ISO which:1)Asks user permission to wipe the disk.2)Erase the contents of the disk.3)Partitions the disk (using LVM in our case).4)Dumps the contents of the appliance to the disk.

SLES as PXE Boot Server

25
Introduction
• A PXE boot server allows you to boot up a system over the network instead of a DVD.
• A key requirement of system provisioning.• When used in conjunction with AutoYaST you can
have a fully automated installation of SUSE Linux Enterprise.
• Components needed:‒ DHCP server‒ TFTP server‒ PXE boot server (syslinux)‒ Software repositories

26
DHCP Server
• Install, configure and enable the DHCP Server as usual.
• /etc/dhcpd.confsubnet 192.168.43.0 netmask 255.255.255.0 { range 192.168.43.1 192.168.43.254; filename "pxelinux.0"; next-server 192.168.43.100;}
• Two parameters:‒ next-server - used to specify the host address of the server
from which the initial boot file is to be loaded.‒ filename: used to specify the name of the initial boot file which
is to be loaded by a client.

27
TFTP Server
• Install and enable tftp server.• /etc/xinetd.d/tftpdservice tftp{ socket_type = dgram protocol = udp wait = yes flags = IPv6 IPv4 user = root server = /usr/sbin/in.tftpd server_args = -v -s /srv/tftp disable = no}

28
PXE Boot Server
• Install “syslinux” and configure the PXE boot server/srv/tftp/pxelinux.cfg/default/srv/tftp/f1/srv/tftp/initrd/srv/tftp/linux/srv/tftp/pxelinux.0
• /srv/tftp/pxelinux.cfg/default# hard disklabel harddisk kernel linux append SLX=0x202
# ceph installationlabel cephosd kernel linux append initrd=initrd splash=silent showopts \ install=http://192.168.43.100/repo/JeOS-SLES11-SP3-x86_64/CD1 \ autoyast=http://192.168.43.100/autoyast/osd.xml
implicit 0display f1prompt 1timeout 0

29
PXE Boot Server (cont)
• /srv/tftp/f1harddisk - Boot from Harddiskcephosd - Add a new Ceph OSD to the existing Ceph Storage Clustercephmon - TODO Add a new Ceph Mon to the existing Ceph Storage Clustercephmds - TODO Add a new Ceph MDS to the existing Ceph Storage Cluster
• Copy files “initrd” and “linux” from SLES DVD# cp /media/cdrom/boot/i386/loader/initrd /srv/tftpboot/# cp /media/cdrom/boot/i386/loader/linux /srv/tftpboot/
• man syslinux

30
PXE Boot Server (cont)
• Example for more complex scenarios/srv/tftp/pxelinux.cfg/default/srv/tftp/f1/srv/tftp/initrd-SLES11SP2/srv/tftp/linux-SLES11SP2/srv/tftp/initrd-SLES11SP3/srv/tftp/linux-SLES11SP3/srv/tftp/initrd-SLES12/srv/tftp/linux-SLES12/srv/tftp/pxelinux.0___________________
# ceph on SLES11 SP2label cephosd-sles11sp2 kernel linux append initrd=initrd splash=silent showopts \ install=http://192.168.43.100/repo/SLES11-SP2-x86_64/CD1 \ autoyast=http://192.168.43.100/autoyast/osd.xml
# ceph on SLES11 SP3label cephosd-sles11sp3 kernel linux append initrd=initrd splash=silent showopts \ install=http://192.168.43.100/repo/SLES11-SP3-x86_64/CD1 \ autoyast=http://192.168.43.100/autoyast/osd.xml
# ceph on SLES12label cephosd-sles12 kernel linux append initrd=initrd splash=silent showopts \ install=http://192.168.43.100/repo/SLES12-x86_64/CD1 \ autoyast=http://192.168.43.100/autoyast/osd.xml
Copy “initrd” and “linux” from more distributions. Unique names are needed!
Create entries in “/srv/tftp/pxelinux.cfg/default” and then update file “f1” accordingly.

31
Installation Server
• It used to create and manage the repositories hosted on the system and used by clients for network installation.
• It is basically about:‒ Configure initial server options (i.e. directory, protocol, alias)‒ Import DVD content (or ISO) for each distribution
• YaST is your friend‒ yast2 insserver

LAB

AutoYaST

34
Introduction
• AutoYaST is a system for installing one or more SUSE Linux systems automatically‒ without user intervention ‒ or when customization is required
• Installations are performed using an AutoYaST profile (XML) with installation and configuration data.
• Use cases:‒ Massive deployment‒ Deployment on demand‒ Custom installation‒ Changing hardware or a wide variety of hardware

35
Add-on and Partitions <add-on> <add_on_products config:type="list"> <listentry> <media_url><![CDATA[http://@MASTER_IP@/repo/SLES11-SP3-x86_64-CEPH]]></media_url> <product>SLES11-SP3-x86_64-CEPH</product> <product_dir>/</product_dir> <ask_on_error config:type="boolean">true</ask_on_error> </listentry> </add_on_products> </add-on>
<partitioning config:type="list"> <drive> <initialize config:type="boolean">true</initialize> <partitions config:type="list"> <partition> <create config:type="boolean">true</create> <crypt_fs config:type="boolean">false</crypt_fs> <filesystem config:type="symbol">xfs</filesystem> <format config:type="boolean">true</format> <fstopt>defaults</fstopt> <loop_fs config:type="boolean">false</loop_fs> <lv_name>LVceph</lv_name> <mount>/ceph</mount> <mountby config:type="symbol">device</mountby> <partition_id config:type="integer">131</partition_id> <resize config:type="boolean">false</resize> <size>max</size> </partition>

36
Networking <networking> <dhcp_options> <dhclient_client_id></dhclient_client_id> <dhclient_hostname_option>AUTO</dhclient_hostname_option> </dhcp_options> <dns> <dhcp_hostname config:type="boolean">true</dhcp_hostname> <hostname>@HOSTNAME@</hostname> <domain>@DOMAIN@</domain> <resolv_conf_policy></resolv_conf_policy> <write_hostname config:type="boolean">true</write_hostname> </dns> <interfaces config:type="list"> <interface> <bootproto>static</bootproto> <device>eth0</device> <ipaddr>@IPADDRESS@</ipaddr> <netmask>@NETMASK@</netmask> <startmode>auto</startmode> <usercontrol>no</usercontrol> </interface> </interfaces> <managed config:type="boolean">false</managed> </networking>

37
Ask # 1 <ask-list config:type="list"> <ask> <title>Basic Host Configuration</title> <dialog config:type="integer">0</dialog> <element config:type="integer">1</element> <pathlist config:type="list"> <path>networking,dns,hostname</path> </pathlist> <question>Full hostname (i.g. linux.site)</question> <stage>initial</stage> <script> <filename>hostname.sh</filename> <rerun_on_error config:type="boolean">false</rerun_on_error> <environment config:type="boolean">true</environment> <source><![CDATA[#!/bin/bashecho $VAL > /tmp/answer_hostname]]> </source> <debug config:type="boolean">false</debug> <feedback config:type="boolean">true</feedback> </script> </ask>[...]

38
Ask # 2 <ask> <title>Basic Host Configuration</title> <dialog config:type="integer">0</dialog> <element config:type="integer">2</element> <pathlist config:type="list"> <path>networking,interfaces,0,ipaddr</path> </pathlist> <question>IP Address and CIDR prefix (i.g. 192.168.1.1/24)</question> <stage>initial</stage> <script> <filename>ip.sh</filename> <rerun_on_error config:type="boolean">true</rerun_on_error> <environment config:type="boolean">true</environment> <source><![CDATA[#!/bin/bashfunction check_host() { local host=$1 [ -z "$host" ] && echo "You must provide a valid hostname!" && exit 1 [ -z "${host//[A-Za-z0-9]/}" ] && echo -e "Is this a valid full hostname? (i.g. linux.site)\nCould not find the domain name in \"${host}\"" && exit 1 tmp="$(echo "$host" | awk -F "." '{print $2}')" [ -z "$tmp" ] && echo -e "Is this a valid full hostname? (i.g. linux.site)\nCould not find the domain name in \"${host}\"" && exit 1 tmp="${host//[A-Za-z0-9]/}" [ "${#tmp}" -ne 1 ] && echo -e "Is this a valid full hostname? (i.g. linux.site)\nA full hostname can contain only one dot" && exit 1
return 0}
cidr2mask (){ # Number of args to shift, 255..255, first non-255 byte, zeroes set -- $(( 5 - ($1 / 8) )) 255 255 255 255 $(( (255 << (8 - ($1 % 8))) & 255 )) 0 0 0 [ $1 -gt 1 ] && shift $1 || shift echo ${1-0}.${2-0}.${3-0}.${4-0}}[...]

39
Ask # 2 (cont)function check_ip() { local ip=$1 tmp
[ -z "$ip" ] && echo "You must provide a valid IP address plus CIDR prefix!" && exit 1 [ "${#ip}" -lt 9 ] && echo -e "Is this a valid IP address plus CIDR prefix?\nYou entered only '${#ip}' chars." && exit 1 [ -n "${ip//[0-9.\/]/}" ] && echo -e "Is this a valid IP address plus CIDR prefix?\nFound unvalid character: '${ip//[0-9.]/}'." && exit 1 tmp="$(echo "$ip" | awk -F "/" '{print $2}')" [ -z "$tmp" ] && echo -e "The CIDR prefix must be provided too!\n(i.g. 192.168.1.1/24)\n" && exit 1
return 0}
HOSTNAME="$(cat /tmp/answer_hostname)"check_host "$HOSTNAME"check_ip "$VAL"
DOMAIN=$(echo "$HOSTNAME" | awk -F "." '{print $2}')HOSTNAME=$(echo "$HOSTNAME" | awk -F "." '{print $1}')IPADDRESS=$(echo "$VAL" | cut -d "/" -f1)CIDR=$(echo "$VAL" | awk -F "/" '{print $2}')NETMASK=$(cidr2mask "$CIDR")
sed -e "s/@HOSTNAME@/$HOSTNAME/g" \ -e "s/@DOMAIN@/$DOMAIN/g" \ -e "s/@IPADDRESS@/$IPADDRESS/g" \ -e "s/@NETMASK@/$NETMASK/g" \ -e "/^\s*<ask-list/,/ask-list>$/d" \ /tmp/profile/autoinst.xml > /tmp/profile/modified.xml]]> </source> <debug config:type="boolean">false</debug> <feedback config:type="boolean">true</feedback> </script> </ask> </ask-list>

40
Post-script <post-scripts config:type="list"> <script> <debug config:type="boolean">true</debug> <feedback config:type="boolean">false</feedback> <filename>initialize</filename> <interpreter>shell</interpreter> <location><![CDATA[]]></location> <network_needed config:type="boolean">false</network_needed> <notification></notification> <source><![CDATA[#!/bin/bash
cd /etc/cephwget http://@MASTER_IP@/ceph/ceph.confwget http://@MASTER_IP@/ceph/ceph.mon.keyringwget http://@MASTER_IP@/ceph/ceph.client.admin.keyring
# Create a new OSDosdid=$(ceph osd create)
# If the OSD is for a drive other than the OS drive, prepare it for use with Ceph, and mount it to the directory you just created:ln -s /ceph /var/lib/ceph/osd/ceph-${osdid}
# Initialize the OSD data directory.ceph-osd -i $osdid --mkfs –mkkey[...]

41
Post-script (cont)# Register the OSD authentication key. The value of ceph for ceph-{osd-num} in the path is the $cluster-$id. If your cluster name differs from ceph, use your cluster name instead.:ceph auth add osd.${osdid} osd 'allow *' mon 'allow rwx' -i /var/lib/ceph/osd/ceph-${osdid}/keyring
# WORKAROUND issue "Error EINVAL: entity osd.1 exists but key does not match"ceph auth del osd.${osdid}ceph auth add osd.${osdid} osd 'allow *' mon 'allow rwx' -i /var/lib/ceph/osd/ceph-${osdid}/keyring
# Add the OSD to the CRUSH map so that the OSD can begin receiving data.ceph osd crush add osd.${osdid} 1 root=default
# WORKAROUND issue with mon not found:touch /var/lib/ceph/osd/ceph-${osdid}/sysvinit
# Starting the OSD/etc/init.d/ceph start osd.${osdid}
# Enabling Ceph at boot/sbin/insserv ceph
# Otherecho "@MASTER_HOSTS@" >> /etc/hosts/usr/bin/zypper ar http://@MASTER_HOSTNAME@/repo/SLES11-SP3-x86_64-CEPH/ SLES11-SP3-x86_64-CEPH
]]></source> </script> </post-scripts> </scripts>

SUSE Manager

43
Automated Linux systems management that enables you to comprehensively manage SUSE Linux Enterprise and Red Hat Enterprise Linux systems with a single, centralized solution across physical, virtual and cloud environments.
● Reduce complexity with automation. ● Control, standardize and optimize
converged, virtualized and cloud data centers.
● Reduce risk and avoidable downtime through better change control, discovery and compliance tracking.
SUSE Manager

44
Gain control Optimize Make room
for innovation
Manage the Full Life-Cycle

System Provisioning with SUMa

46
PXE - steps
• SUMa does not provide the dhcpd server‒ Either use the one available in your network‒ Or install and configure it on SUMa
‒ zypper in dhcp-server
‒ Edit /etc/sysconfig/dhcpd
‒ Edit /etc/dhcpd.conf
• Enable Bare-metal system management in SUMa‒ Admin > SUSE Manager Configuration > Bare-metal systems
> Enable adding to this organization

47
Channel - Steps
• Add SLES11 SP3 as SUSE Product‒ Admin > Setup Wizard > SUSE Products > add product
• Add Ceph Channel from OBS‒ Channels > Manage Software Channels > create new channel
• Add Ceph Repository‒ Channels > Manage Software Channels > Manage
Repositories > create new repository
• Assign Ceph Repository to Channel‒ Channels > Manage Software Channels > select channel >
Repositories > assign repo to channel > trigger sync for repo

48
Distribution - Steps
• Copy SLES DVD on SUMa‒ scp SLES-11-SP3-DVD-x86_64-GM-DVD1.iso
• Mount it via a loop device‒ mount -o /root/SLES-11-SP3-DVD-x86_64-GM-DVD1.iso
/media/sles11sp3-x86_64
• Add the entry in /etc/fstab ‒ /root/SLES-11-SP3-DVD-x86_64-GM-DVD1.iso
/media/sles11sp3-x86_64 iso9660 loop 0 0
• Create new Autoinstallable Distribution‒ Systems > Autoinstallation > Distributions > create new
distribution

49
Profile – Steps
• Create new Autoinstallation profile‒ Systems > Autoinstallation > Profiles > upload new autoyast
profile‒ Use Autoinstallation snippets to store common blocks of code
that can be shared across multiple autoinstallation profiles
• Add variables for registration‒ Systems > Autoinstallation > Profiles > select profile >
Variables‒ For example:
‒ registration_key=1-sles11sp3-x86_64

50
Profile – Steps (cont)
• Create profile:‒ Systems > Autoinstallation > Profiles > select profile > Details
> File Contents‒ Enclose scripts within “#raw” and “#end raw”
‒ Add needed snippets $SNIPPET('spacewalk/sles_no_signature_checks')
$SNIPPET('spacewalk/sles_register_script')
‒ Add add-on for child channels:<add-on> <add_on_products config:type="list"> <listentry> <ask_on_error config:type="boolean">true</ask_on_error> <media_url>http://$redhat_management_server/ks/dist/child/sles11-sp3-updates-x86_64/sles11sp3-x86_64</media_url> <name>SLES11-SP3-updates</name> <product>SLES11 SP3 updates</product> <product_dir>/</product_dir> </listentry> <listentry> <ask_on_error config:type="boolean">true</ask_on_error> <media_url>http://$redhat_management_server/ks/dist/child/ceph-sles11sp3-x86_64/sles11sp3-x86_64</media_url> <name>Ceph-SLES11-SP3</name> <product>Ceph SLES11 SP3</product> <product_dir>/</product_dir> </listentry> </add_on_products> </add-on>

51
Client Registration – Steps
• Create Group for Ceph Nodes‒ Systems > System Groups > create new group
• Create Activation Key‒ Systems > Activation Keys
• Add group to the Activation Key‒ Systems > Activation Keys > Groups > join to the group
• Generate generic Bootstrap Script‒ Admin > SUSE Manager Configuration > Bootstrap Script >
update

52
Client Registration – Steps (cont)
• Generate Bootstrap Script‒ /srv/www/htdocs/pub/bootstrap
• Create Bootstrap Repositories‒ mgr-create-bootstrap-repo
• Make sure the installation source is available‒ YaST > Software > Software Repositories > Add > select DVD
• Execute Bootstrap Script‒ cat bootstrap-EDITED-NAME.sh | ssh root@CLIENT_MACHINE1 /bin/bash

Lab

Thank you.
54
Call to action line oneand call to action line twowww.calltoaction.com

55

Corporate HeadquartersMaxfeldstrasse 590409 NurembergGermany
+49 911 740 53 0 (Worldwide)www.suse.com
Join us on:www.opensuse.org
56

Unpublished Work of SUSE LLC. All Rights Reserved.This work is an unpublished work and contains confidential, proprietary and trade secret information of SUSE LLC. Access to this work is restricted to SUSE employees who have a need to know to perform tasks within the scope of their assignments. No part of this work may be practiced, performed, copied, distributed, revised, modified, translated, abridged, condensed, expanded, collected, or adapted without the prior written consent of SUSE. Any use or exploitation of this work without authorization could subject the perpetrator to criminal and civil liability.
General DisclaimerThis document is not to be construed as a promise by any participating company to develop, deliver, or market a product. It is not a commitment to deliver any material, code, or functionality, and should not be relied upon in making purchasing decisions. SUSE makes no representations or warranties with respect to the contents of this document, and specifically disclaims any express or implied warranties of merchantability or fitness for any particular purpose. The development, release, and timing of features or functionality described for SUSE products remains at the sole discretion of SUSE. Further, SUSE reserves the right to revise this document and to make changes to its content, at any time, without obligation to notify any person or entity of such revisions or changes. All SUSE marks referenced in this presentation are trademarks or registered trademarks of Novell, Inc. in the United States and other countries. All third-party trademarks are the property of their respective owners.