Quest Knowledge Portal 2.6 - User Guide - Dell
55
User Guide 2.6 Knowledge Portal
Transcript of Quest Knowledge Portal 2.6 - User Guide - Dell

User Guide
2.6Knowledge Portal

© 2012 Quest Software, Inc. ALL RIGHTS RESERVED.
This guide contains proprietary information protected by copyright. The software described in this guide is furnished under a software license or nondisclosure agreement. This software may be used or copied only in accordance with the terms of the applicable agreement. No part of this guide may be reproduced or transmitted in any form or by any means, electronic or mechanical, including photocopying and recording for any purpose other than the purchaser’s personal use without the written permission of Quest Software, Inc.
If you have any questions regarding your potential use of this material, contact:
Quest Software World Headquarters LEGAL Dept 5 Polaris Way Aliso Viejo, CA 92656 www.quest.com Email: [email protected]
Refer to our Web site (www.quest.com) for regional and international office information.
TRADEMARKS
Quest, Quest Software, the Quest Software logo, Simplicity at Work are trademarks and registered trademarks of Quest Software, Inc. For a complete list of Quest Software's trademarks, please see http://www.quest.com/legal/trademark-information.aspx. Other trademarks and registered trademarks are property of their respective owners.
DISCLAIMER
The information in this document is provided in connection with Quest products. No license, express or implied, by estoppel or otherwise, to any intellectual property right is granted by this document or in connection with the sale of Quest products. EXCEPT AS SET FORTH IN QUEST'S TERMS AND CONDITIONS AS SPECIFIED IN THE LICENSE AGREEMENT FOR THIS PRODUCT, QUEST ASSUMES NO LIABILITY WHATSOEVER AND DISCLAIMS ANY EXPRESS, IMPLIED OR STATUTORY WARRANTY RELATING TO ITS PRODUCTS INCLUDING, BUT NOT LIMITED TO, THE IMPLIED WARRANTY OF MERCHANTABILITY, FITNESS FOR A PARTICULAR PURPOSE, OR NON-INFRINGEMENT. IN NO EVENT SHALL QUEST BE LIABLE FOR ANY DIRECT, INDIRECT, CONSEQUENTIAL, PUNITIVE, SPECIAL OR INCIDENTAL DAMAGES (INCLUDING, WITHOUT LIMITATION, DAMAGES FOR LOSS OF PROFITS, BUSINESS INTERRUPTION OR LOSS OF INFORMATION) ARISING OUT OF THE USE OR INABILITY TO USE THIS DOCUMENT, EVEN IF QUEST HAS BEEN ADVISED OF THE POSSIBILITY OF SUCH DAMAGES. Quest makes no representations or warranties with respect to the accuracy or completeness of the contents of this document and reserves the right to make changes to specifications and product descriptions at any time without notice. Quest does not make any commitment to update the information contained in this document.
Quest Knowledge Portal Version 2.6 Last updated – September 10, 2012
3
Contents
About This Guide ..................................................................................................... 5
Overview ............................................................................................................................ 5
Conventions ............................................................................................................... 5
Introduction ............................................................................................................. 6
Working with the Knowledge Portal ...................................................................... 8
Working with Data Sources ............................................................................................... 8
Creating or Modifying a Data Source ........................................................................ 9
Renaming a Data Source ........................................................................................ 10
Removing a Data Source ........................................................................................ 10
Configuring Data Source Security Settings ............................................................. 10
Cleaning Temporary Tables .................................................................................... 12
Managing Access to Reports........................................................................................... 13
Access to All Reports ............................................................................................... 13
Access to Specific Reports ...................................................................................... 13
Access to Report Builder ......................................................................................... 14
Viewing Reports ............................................................................................................... 14
Regular Reports ....................................................................................................... 14
Dashboard Reports .................................................................................................. 15
Speeding Up Regularly-Used Reports .................................................................... 15
Exporting a Report as a Different File Type ............................................................ 16
Filtering Reports ...................................................................................................... 17
Searching For Reports .................................................................................................... 22
Managing Report Properties............................................................................................ 23
Parameter Properties ............................................................................................... 24
Data Source Properties ........................................................................................... 26
Security Settings ...................................................................................................... 27
History Properties .................................................................................................... 30
Execution Properties ................................................................................................ 32
Cover Page .............................................................................................................. 33
Property Management Exceptions .......................................................................... 33
Managing Subreport Properties ............................................................................... 34
Product-Specific Properties ..................................................................................... 34
Scheduling Reports ......................................................................................................... 34
Scheduling Dashboard Updates .............................................................................. 35
Subscribing to Reports .................................................................................................... 35
What is a Subscription? ........................................................................................... 35
Creating a Subscription ........................................................................................... 36
Delivering Reports to SharePoint ............................................................................ 36
Customizing Report View ................................................................................................ 37
Organizing Reports .......................................................................................................... 38
Creating Reports ................................................................................................... 40
Understanding Models ..................................................................................................... 40
What is a Model? ..................................................................................................... 40
Working with Models ................................................................................................ 43
Creating a Model-based Report ...................................................................................... 44

4
Saving a Report ............................................................................................................... 44
Troubleshooting the Knowledge Portal ............................................................... 46
Enabling Remote Errors Handling on Report Server ...................................................... 46
Report Failed to Process. Reasons and Solutions ......................................................... 47
About Quest Software, Inc. ................................................................................... 55
Contacting Quest Software.............................................................................................. 55
Contacting Quest Support ............................................................................................... 55

Quest Knowledge Portal 2.6 - User Guide
5
About This Guide
Overview
This document has been prepared to assist you in becoming familiar with Quest Knowledge Portal. It is intended for network administrators, consultants, analysts, and any other IT professionals using the product.
Conventions
In order to help you get the most out of this guide, we have used specific formatting conventions. These conventions apply to procedures, icons, keystrokes and cross-references.
ELEMENT CONVENTION
Select This word refers to actions such as choosing or highlighting various interface elements, such as files and radio buttons.
Bolded text Interface elements that appear in Quest products, such as menus and commands.
Italic text Used for comments.
Bold Italic text Introduces a series of procedures.
Blue text Indicates a cross-reference. When viewed in Adobe® Acrobat®, this format can be used as a hyperlink.
Used to highlight additional information pertinent to the process being described.
Used to provide Best Practice information. A best practice details the recommended course of action for the best result.
Used to highlight processes that should be performed with care.
+ A plus sign between two keystrokes means that you must press them at the same time.
| A pipe sign between elements means that you must select the elements in that particular sequence.

Quest Knowledge Portal 2.6 - User Guide
6
Introduction
What is Quest Knowledge Portal?
Quest Knowledge Portal is a reporting solution based on Microsoft SQL Server Reporting Services, extending its functionality to provide easy report management and delivery. All together improving and expanding SQL Server Reporting Services (SSRS) functionality and usability, the Knowledge Portal enables you to:
View the reports on data collected by Quest products
Facilitate data source management
Subscribe to the reports
Search through the report names and descriptions for the ones you need
Create custom reports using Report Builder and predefined report models
Organize the structure of the folders that reports are stored in
Easily apply the necessary properties (settings) to reports and folders
Modify report presentation on the fly (sorting order, fields visibility)
Starting Quest Knowledge Portal
To install and configure the Knowledge Portal and Report Packs, follow the instructions provided in the Installation Guide.
After installation you can open the Knowledge Portal home page by clicking Start | Programs | Quest Software | Quest Knowledge Portal| Quest Knowledge Portal.
Also, you can connect to the Knowledge Portal by typing its URL in the Internet Explorer address bar in the following format:
http://<report_server_name>/<QKP_virtual_folder>
OR
https://<report_server_name>/<QKP_virtual_folder>
For example:
http://myreportserver/QuestKnowledgePortal

Quest Knowledge Portal 2.6 - User Guide
7
When supplying the URL, you can enter the path to Knowledge Portal's sub-entity (for example, Reporter) you want to be displayed as the root node of the treeview. For that, use the following format when entering the URL:
http://<report_server_name>/<QKP_virtual_folder>/?path=<path_to_QKP_sub-entity>
For example:
http://myreportserver/QuestKnowledgePortal/?path=/QKP/Reporter
Knowledge Portal main page is displayed; for example, to work with Reporter reports, select Reporter in the tree on the left, and browse for the report you need. To work with the data sources, click the corresponding tab.
Quest Knowledge Portal 2.6 - User Guide
8
Working with the Knowledge Portal
Working with Data Sources
Managing Access to Reports
Viewing Reports
Searching For Reports
Managing Report Properties
Scheduling Reports
Customizing Report View
Organizing Reports
Working with Data Sources
In the reporting solutions based on Reporting Services, data sources are databases that store the information used in reports. The Knowledge Portal uses the concept of shared data sources defined by Microsoft SQL Server Reporting Services. For more information about shared data sources, see Microsoft SQL Server Reporting Services documentation (for example, Shared Data Sources and Report-Specific Data Sources MSDN article).
During the Report Pack setup process, predefined data sources are configured so that they point to corresponding databases (for example, InTrust Audit data source is associated with InTrust Audit database.
If the data sources were not configured during the Report Pack setup, you should do it manually before you start generating reports. Sample procedure described below helps you associate predefined data source with your product database. You can take similar steps to associate other data sources with the product databases.
To associate a data source with a database:
1. Click Data Sources in the left pane and select the desired data source.
2. In the right pane, select Modify Data Source from the Manage Data Source menu to start the wizard.
3. On the Specify Data Source Name step, click Next.
4. On the Select Authentication Mode step of the wizard, specify the SQL Server where the product database resides, and select authentication method to be used for database access. Supply access credentials if required.

Quest Knowledge Portal 2.6 - User Guide
9
To use Windows authentication, make sure the account you supply has the following rights:
Logon as a service right if QKP is running on Windows 2003-based computer or later.
Logon as a service and Act as part of operating system right if QKP is running on Windows-based computer.
If you select Integrated Windows authentication, the SQL server will be accessed under the account of user currently logged on. In this case, however, the Temporary Tables Clean-up job cannot be scheduled. For details, see the Cleaning Temporary Tables section in this document.
5. On the Select Database step, select the database you want to be associated with the data source.
6. On the Select Products step, select the product that collects data to this database.
7. Finish the wizard.
Creating or Modifying a Data Source
If you need, you can create an additional data source, or modify an existing one. For example, to associate Reporter data source with a different database, you have to modify this data source.
To create or modify a data source:
1. Click the Data Sources tab in the left pane.
2. To create a new data source, in the right pane select New Data Source. To modify an existing data source, select it in the tree, and in the right pane, select Modify Data Source from the Manage Data Source menu.

Quest Knowledge Portal 2.6 - User Guide
10
3. Follow the steps of the wizard, specifying the data source properties. Note that data source name cannot be changed using the wizard; to rename a data source, use the procedure described below.
Renaming a Data Source
To rename a data source, take the following steps:
1. Select the data source you want to rename.
2. Select Change Data Source Properties from Manage Data Source menu options.
3. Edit the data source name, and click Apply.
4. Click Back to return to the Knowledge Portal.
Removing a Data Source
To remove a data source, select it in the tree and click Remove Data Source in the right pane.
Configuring Data Source Security Settings
SQL Server Reporting Services implements a flexible, role-based security model to protect reports and reporting resources. To provide an account with access rights to a report, a folder, a model, or a data source, you need to assign it an SSRS role.
By default, the account used to install the Knowledge Portal has the Content Manager role for the Home folder and all its subfolders, including Home\QKP\SharedDatasources. All security settings are inherited from parent item.
For example, to be able to work with the predefined Reporter data source in the Knowledge Portal, an account should be granted the View Data Sources permission on Home\QKP\SharedDatasources\Reporter folder in SQL Reporting Services. This can be achieved through assigning the Content Manager role to the account you need.
To assign the Content Manager role to an account:
1. In the Knowledge Portal, click the Data Sources tab.
2. Select Reporter data source
3. Click Change Security Settings from the Manage Data Source in the right pane. You are taken to the data source property page in the Reporting Services Report Manager window.

Quest Knowledge Portal 2.6 - User Guide
11
4. Click Edit Item Security; then click New Role Assignment.
5. Enter the user or group account you need, and select the check box next to the Content Manager role.
6. Click OK in the bottom of the page to save the settings and close the window.
7. Click Back to return to the Knowledge Portal.
The SSRS roles are intended to control user access to data presentation way (that is, reports), not the data itself (that is, data kept in the SQL Server database tables). To work with data actually stored in the SQL Server database associated with the data source, the account you will use to access the product database should be assigned the appropriate database role.
Therefore, to successfully generate a report and fill it with data, an account should be granted appropriate permissions in both of the following ways:
Via the Reporting Services role assigned in the security settings—to work with data presentation form (Reporting Services entities like reports, folders, data sources, etc.)
Via the SQL Server database role assigned by your database administrator using SQL Server Management Studio —to work with the data itself (SQL Server database tables).

Quest Knowledge Portal 2.6 - User Guide
12
For more details on report security and user access rights, refer to Managing Report Properties topic.
Cleaning Temporary Tables
Some reports may create temporary tables (with T_ or TEMP_ prefix) in the data sources they work with. To avoid excessive database size growth, you can periodically remove temporary tables from the databases assigned to your data sources. For that, you can schedule a special Temporary Tables Clean-Up job for the data source you need.
When you create a new data source, a clean-up job is automatically created and scheduled (using a default schedule). However, consider that it uses stored credentials to access the database, so you should select SQL Server authentication or Windows authentication (with explicitly specified credentials) when configuring database access settings
To schedule data source clean-up:
1. Click the Data Sources tab, and select the required data source from the tree.
2. Click Modify Temp Tables Clean-up Job Schedule from Manage Data Source menu options in the right pane. In the dialog box displayed, select the type of schedule you want to use.
3. If you want to use a Shared schedule, then you can either select any from the list, or click New Schedule to create a new one.
4. If you want to use a job-specific schedule option, click Set schedule to specify schedule details.
For more details on SSRS scheduling feature, see Creating, Modifying, and Deleting Schedules.

Quest Knowledge Portal 2.6 - User Guide
13
Managing Access to Reports
This section describes common administrative tasks that involve granting access to reports. This is done through the Property Manager Wizard, which starts when you click its name in the toolbar. The Property Manager Wizard is also used for other management tasks; for more details about the wizard, see the Managing Report Properties topic.
Access to All Reports
To give one or more users access to all available reports, complete the Property Manager Wizard as follows:
1. On the Select Property Application Mode step, select Apply specific values.
2. On the Select Target Reports step, select the top-level folder or folders. All of the subfolders and reports are selected automatically.
3. On the Select Properties to Apply step, select Security properties.
4. On the Specify Security Properties step, select the account or accounts you want to grant the privileges to, and the Browser (for read-only access) or Content Manager (for read-and-write access) role, as necessary.
5. Complete the wizard.
Access to Specific Reports
To give one or more users access to a subset of the reports, you need to complete a two-step procedure. First, enable the user or users to browse to these reports in the report tree using the Property Manager Wizard, as follows:
1. On the Select Property Application Mode step, select Apply specific values.
2. On the Select Target Reports step, select the top-level folder whose hierarchy contains the reports you need. All of the subfolders and reports are selected automatically. If you want to limit the access strictly to the folders in the reports' paths, then deselect the unnecessary folders, but make sure all folders in the reports' paths are selected.
3. On the Select Properties to Apply step, select Security properties.
4. On the Specify Security Properties step, select the account or accounts you want to grant the privilege to, and the QKP — Traverse Folders role.
5. Complete the wizard.
Next, grant the same user or users the required access privileges to the reports themselves, as follows:
1. Run the Property Manager Wizard again and select Apply specific values on the Select Property Application Mode step.
2. On the Select Target Reports step, select only the reports you need.
3. On the Select Properties to Apply step, select Security properties.
4. On the Specify Security Properties step, select the same account or accounts as in the previous procedure, and the Browser (for read-only access) or Content Manager (for read-and-write access) role, as necessary.
5. Complete the wizard.

Quest Knowledge Portal 2.6 - User Guide
14
Access to Report Builder
To enable one or more users to create custom reports, complete the Property Manager Wizard as follows:
1. On the Select Property Application Mode step, select Apply specific values.
2. On the Select Target Reports step, select the top-level folder or folders. All of the subfolders and reports are selected automatically. If you want to restrict the users' report-building activity to specific folders, then select only those folders, but remember to also enable the users to browse to these folders, as described in the Access to Specific Reports topic.
3. On the Select Properties to Apply step, select Security properties.
4. On the Specify Security Properties step, select the account or accounts you want to grant the privilege to, and the Report Builder role.
5. Complete the wizard.
Viewing Reports
Published reports can be viewed using Report Manager's built-in HTML viewer. To view a report, select it in the tree and then select the View Report option in the right pane. Wait for report generation to complete. The report is then displayed in a new window.
Regular Reports
As shown in the figure, there are three areas in the report page:
Report preview pane, where data is displayed
Parameter section, which shows report filters and parameters
Report toolbar, which you can use to navigate through the pages in a report, zoom in or out, search for specific report content, and so on. The report toolbar also appears in a browser window at the top of a report when you access reports through a URL.
Preview pane
Parameter section Report toolbar

Quest Knowledge Portal 2.6 - User Guide
15
In particular, the report toolbar provides the following report generation options:
A list of formats, which allows you to select a format for the report you generate.
To print your report, click Print .
To add the report to your favorites, click Add to My Reports.
To generate the report anew and save your personal filter settings, click View Report.
Dashboard Reports
A dashboard report offers a chart view of statistical data, where you can click headings and counters to view related subreports. Links in the subreports take you to lower levels for further details.
Note that the dashboard report is generated after its schedule starts. For details about scheduling the dashboard report, see the Scheduling Dashboard Updates topic.
Speeding Up Regularly-Used Reports
If a report is analyzed on a regular basis, it makes sense to have its data ready before the time the report is usually viewed, especially if the report takes a long time to prepare. For that, schedule a snapshot of the report a little in advance of its expected viewing time.
To begin, select the report you need and click Change Report Properties in the Manage Report menu. On the page that opens, on the Properties tab, go to the Execution section, and configure the schedule as necessary.

Quest Knowledge Portal 2.6 - User Guide
16
For details about scheduling report snapshots, see the Scheduling Snapshots topic.
You may want to keep a history of the scheduled snapshots for later comparison and analysis. For that, switch to the History section and select the Store all report execution snapshots in history option.
For details about managing report and snapshot history, see the History Properties topic and Managing Report History.
Exporting a Report as a Different File Type
Available formats are determined by the rendering extensions installed on the report server. The default set of rendering extensions for SQL Server 2005 and 2008 Reporting Services includes:
Web archive
HTML
XML
CSV
Excel
Image (default format is TIFF)
Quest Knowledge Portal 2.6 - User Guide
17
To save the report in the selected format, click Export. The report will be opened or saved to the location you specify.
For more information on exporting reports in different formats, refer to Exporting Reports MSDN article.
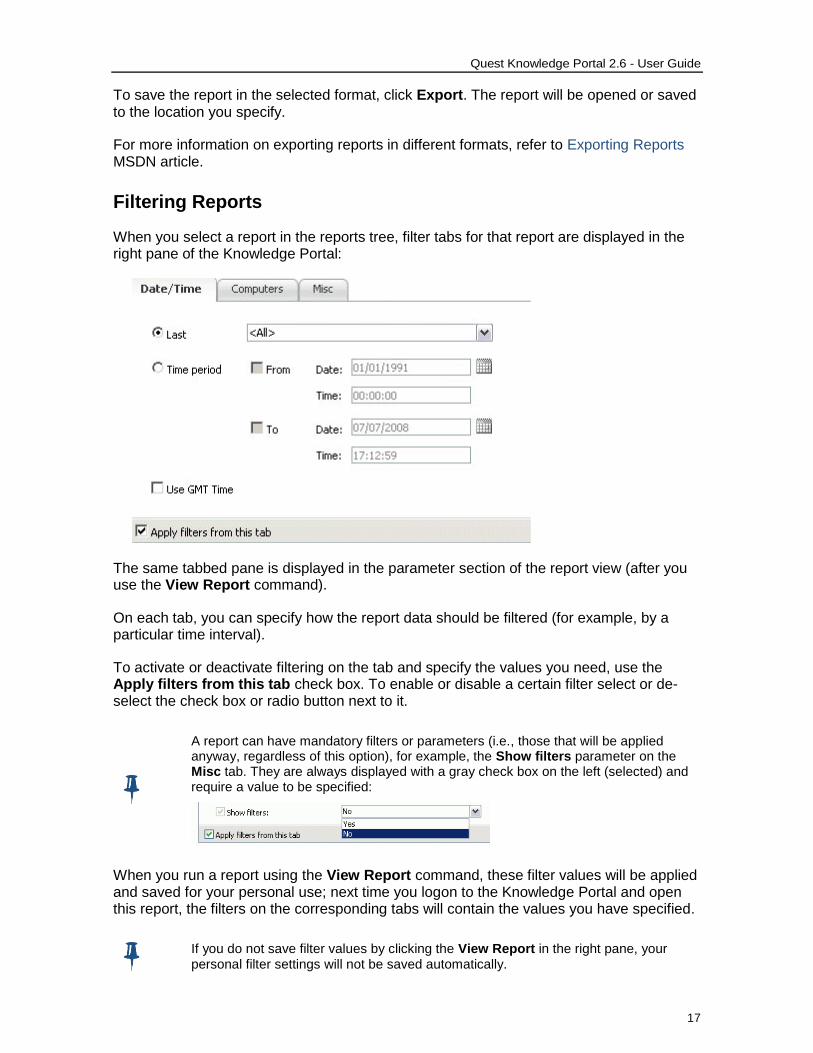
Filtering Reports
When you select a report in the reports tree, filter tabs for that report are displayed in the right pane of the Knowledge Portal:
The same tabbed pane is displayed in the parameter section of the report view (after you use the View Report command).
On each tab, you can specify how the report data should be filtered (for example, by a particular time interval).
To activate or deactivate filtering on the tab and specify the values you need, use the Apply filters from this tab check box. To enable or disable a certain filter select or de-select the check box or radio button next to it.
A report can have mandatory filters or parameters (i.e., those that will be applied anyway, regardless of this option), for example, the Show filters parameter on the Misc tab. They are always displayed with a gray check box on the left (selected) and require a value to be specified:
When you run a report using the View Report command, these filter values will be applied and saved for your personal use; next time you logon to the Knowledge Portal and open this report, the filters on the corresponding tabs will contain the values you have specified.
If you do not save filter values by clicking the View Report in the right pane, your personal filter settings will not be saved automatically.

Quest Knowledge Portal 2.6 - User Guide
18
Every report has the default filter values stored in the SQL Server Reporting Services database, use the following commands to work with default filter settings:
Save filters to defaults
Use the Save filters to defaults command from Manage Filters menu to save the specified values as the default ones for all report users. This means that when a user opens this report, the filter values will be the ones you specified. If a user makes no changes to these filters, they will be applied to the report at generation time.
Load filters from defaults
Use the Load filters from defaults from Manage Filters menu to apply the default (predefined) filter values.
The Save filters to defaults/Load filters from defaults commands allow you to keep your user-defined filter values even if you deactivate the filter (by clearing the Apply filters from this tab option). You can deactivate the filter you configured, and save it to default - then, after you use the Load command, the value you specified will be shown as the default one (configuration will not be lost even though the filter remains inactive)
If you do not want filters to be shown within the generated report, then on the Misc filter tab, in the Show filters list select No.
Typical filter tabs for the reports (where applicable) are as follows:
Date/Time—you can specify value for this filter using either a Last period (e.g., Last 2 Days) or a Time period specified by From and To date and time values (you can also use the calendar control to select the date). If necessary, select the Use GMT Time check box to modify the way data is presented in the report (the date and time will be converted to GMT).
Computers—use this filter tab to include or exclude data from particular computers.

Quest Knowledge Portal 2.6 - User Guide
19
To populate the list of computers to include or exclude:
1. Click the Add button on the right.
2. In the Select Computers dialog, select the computers or the whole domains you need.
3. Click OK to return to the filter tab; wait for computer list to be loaded.
Alternatively, you can enter the required values manually in the field or read them in from a text file by clicking the Load File button. For details, see the Loading Values from a File section below.
The Add button does not appear on the filter tab if you have Report Packs that were released before Quest Knowledge Portal 1.1, and the Select Computers dialog cannot be invoked to add computers from the tree view. If so, adding them manually is the only option available.
If you select a domain, its content will be displayed in the Computer tab as a list.
The values in the Computer filter tab will be refreshed each time you activate the Select Computers dialog
To remove an item from one of the lists, use the Delete or Backspace key.
If the Date/Time and Computer filter tabs are not displayed, this means they are not applicable to the report; in this case, all available filters are located on the Filters tab
The Misc (Filters) tab offers a variety of filters you can apply to the report. To supply a filter value, select the check box next to the filter name; remember to select Apply filters from this tab check box when you configure all the filters you need.
Filter Types
Some report filter values can be specified using a text box (for example, you can enter computer names in the text boxes on the Computers tab). Dates can be specified using the calendar control.
But many values are specified using filters of list type.

Quest Knowledge Portal 2.6 - User Guide
20
A filter of the list type can be either of the following:
A list of check boxes:
A list of items:
Lists (on any filter tab) can be of the following logical types:
LOGICAL TYPE
DESCRIPTION EXAMPLE
Like Allow users to enter certain values.
Usually are captioned using the word "like", that is, "<item_name> like" or "<item_name> not like"
Include domains like:
In Allow users to select items from the list.
Usually are captioned like "Select <item_name>:"
Select objects:
If you are using a filter of Like type, then you can use wildcards to enter filter value. For instance, if you are filtering report data by domain and need to report on the domains Accounting_NY, Sales_NY and IT_NY, you can enter the following in the "Domain like:" filter:
%_NY
The '%' symbol is used in Microsoft SQL Server Reporting Services to represent any set of characters (instead of the commonly used '*' symbol).
Supplying Multiple Values to Filter by
Filters of the list type can be multi-valued, that is, you can supply a range of necessary values (for example, computer names) in a text file (one value per line). To filter data by the values listed in the file, go to the Load a file link and provide a file name in the following format: \\comp\share\filter.txt. Some reports

Quest Knowledge Portal 2.6 - User Guide
21
cannot load the file content automatically, for these reports, you should select the Load file content option.
It is not recommended to specify a local file path.
The type of value data—integer, string, and so on—is guessed automatically from the field's content. However, you may need to explicitly specify that you want the values to be treated as strings (for example, in IP addresses) to avoid type mismatch errors. For that, create a file called schema.ini in the same folder as your value list file and specify the value type in this file, as in the following example:
[\\MyComp\MyShare\MyFilterValueList.txt]
Col1="F1" Char
In this sample schema.ini file, MyFilterValueList.txt is the name of the filter value list file and must be enclosed in square brackets. Char sets the data type to text. The Col1 and “F1” parts do not need modification in this case.
To use a filter value list file saved as UNICODE, make sure the following is specified within schema.ini file:
[\\MyComp\MyShare\MyFilterValuesList.txt]
…
ChracterSet=UNICODE
For more details about the schema.ini file format, see the Schema.ini File (Text File Driver) article.
Make sure the account that is used to connect to InTrust Server has enough rights to access the file.
To enable access to the schema.ini file for the SQL Server's account, make sure the advanced option Ad Hoc Distributed Queries is enabled. This value can be set using SQL Server Management Studio or the sp_configure system stored procedure.
Loading Values from a File
In some filters you have the option of specifying the value in a file. For that, click the Load File button or Load from file link, where available. This opens the file selection dialog box with options.

Quest Knowledge Portal 2.6 - User Guide
22
Select the options that suit you, and specify the file. For example, if you want to use the file repeatedly with this report and intend to update the file sometimes, use the Link to file option.
Searching For Reports
Using the Knowledge Portal’s search capabilities, you can look for keywords within report titles, report folder names and descriptions, as follows:
1. In the Search for field in the toolbar enter the keyword you want to look for, and in the report tree, select the folder to start the search from.
2. Click Go.
3. The search results will be displayed like shown in the figure:

Quest Knowledge Portal 2.6 - User Guide
23
For the matches found, you can select the reports you want to work with, and use the following options:
Manage properties of the reports selected (Property Manager Wizard is started; note that the changes you make with will affect all selected reports)
Copy selected reports to another folder
To select all reports in bulk, use the Select All Reports checkbox.
Managing Report Properties
A report has several properties you can customize, including the following:
Report parameters
Data source
Security properties
History properties
Execution properties
Subscription settings
Cover page

Quest Knowledge Portal 2.6 - User Guide
24
If you need to change a property for single report, you can use Change Report Properties command from Manage Report menu, for multiple reports - use the Property Manager Wizard. Refer to the corresponding sections below to learn about certain report properties.
When you change report properties using the Property Manager Wizard, its subreports' are not change automatically. You should have them as described in the Managing Subreport Properties topic. For example, using the Property Manager Wizard, you can change the predefined data source to a custom one for a parent report (a report with subreports). However, for these subreports, data source property will not be changed.
You can use the Property Manager Wizard to change report properties in two ways:
Apply specific values
Copy properties from a source report
To apply specific property values:
1. Click Property Manager Wizard in the Knowledge Portal toolbar.
2. On the Select Property Application Mode step, select the Apply specific values option.
3. Select the reports you want.
4. Select the properties to change. You will be prompted to provide values for the properties.
5. Click Finish to apply your changes.
To copy values of properties from a source report:
1. Click Property Manager Wizard in the Knowledge Portal toolbar.
2. On the Select Property Application Mode step, select the Copy properties from a source report option.
3. Select the source report.
4. Select the reports you want to change.
5. Select the properties whose values you want to copy.
6. Click Finish to apply your changes.
Parameter Properties
You can use Property Manager Wizard to apply values to report filtering parameters. For these values to be applied properly, you need to know parameter name and position in the list of parameters, as well as parameter type—to supply a value of the proper type using correct syntax. This is even more important when you need to apply parameter values to multiple reports.
The Property Manager Wizard lets you propagate default filter values to reports.
To discover parameter name and value type:

Quest Knowledge Portal 2.6 - User Guide
25
1. In the Knowledge Portal, on the Reports tab select the report whose parameters you need to edit or copy.
2. Select Change Report Properties from the Manage Report menu in the right pane. You are taken to Report Manager displaying report Properties page.
3. Click Parameters. A list of report parameters is displayed like shown below:
4. For the parameters you need, find our Parameter Name and Data Type. For example, parameter labeled Computer Name like in the 'Local Groups by Computer' report has Param0 name and String type.
Special considerations for the parameters presented as drop-down lists were described in the Filtering Reports topic.
5. Click Back to return to the Knowledge Portal.
6. Launch Property Manager Wizard and follow its steps to the Select Properties to Apply step.
7. On the Select Properties to Apply step of the wizard, select Parameters.

Quest Knowledge Portal 2.6 - User Guide
26
8. On the Select Parameters step, click Add, and enter the parameter name (for example, Initiator_like), and the value you want to apply (for example, LAB\Admin).
9. Complete the wizard.
Data Source Properties
Changing Data Source of Selected Report
To change a data source for the certain report, do the following:
1. On the Reports tab, select the report you need.
2. In the Manage Report menu, select the Change Data Source option.
3. In the dialog box displayed, select a data source from the list. If you want to show data source for subreports, select the corresponding checkbox; then you can change that data source, too.
4. When finished, click OK to save the settings and close the dialog.
You can also specify a data source for multiple reports at once, or specify a data source for the reports belonging to a product (for example, Reporter). For that, use Property Manager Wizard to apply data source properties.
However, if a report has no model (for information on models, refer to the Understanding Models topic), the properties of the selected report and the properties of the data source are checked to find out what products are associated with that report and data source. You can see the name of the product to which a report (or its data source) is linked if you select a report (or a data source) and view its description in the right pane.

Quest Knowledge Portal 2.6 - User Guide
27
Consider the data source properties application to work as follows:
Specify a data source for all reports option
If a report and a data source are associated with different products, then this option will not take effect, and the data source will not be associated with the report.
If either the report or the data source has no product associated with it, then the data source can be associated with the report successfully.
Specify a data source for each product option
If a report and a data source are associated with different products, then Specify a data source for each product (actually, for the reports associated with the certain product) option will take effect. That is, the data source you select from the list on this step will be assigned to that report (no matter what product the selected data source was associated with). This also applies to the situation when a data source is not associated with any product.
If a report is not associated with any product, then using the Specify a data source for each product option will lead to incorrect data source assignment to that report—the report will be assigned the data source specified for the last product in the list of products.
Security Settings
Security settings allow you to provide report users with access rights for the reports or folders they need.
Note that the security settings are by default inherited from the report's parent folder, so you may want to proceed with the report folder rather than with individual reports
To apply security settings to a single report:
1. Select the report you need.
2. Use the Change Security Settings command from Manage Report menu in the right pane.
Selecting this option takes you to the Security tab of the Report Properties page in SSRS Report Manager.

Quest Knowledge Portal 2.6 - User Guide
28
3. Click Edit Item Security to specify roles for the user accounts as needed.
4. When finished with security settings, click the Knowledge Portal Back button to return.
You can also specify security settings for multiple reports or folders using Property Manager Wizard, or SSRS Report Manager.
For example, there is a special role named "QKP—Traverse Folders" that allows users to view child folders or reports using their full path in the folder hierarchy, but prevents these users from viewing parent folders contents. You can use Property Manager Wizard to assign this role to user accounts you need.
Custom roles can be created and automatically included into roles list in Report Manager only in SSRS 2005. To work with custom roles in SSRS 2008, follow the instructions provided in How to: Create, Delete, or Modify a Role (Management Studio)
To specify security settings using Property Manager Wizard:
1. Start the wizard by clicking its tool button on the Knowledge Portal toolbar.
2. On the Select Property Application Mode step, select the Apply specific values option.
3. Select the reports or folders you need.
4. On the Select Properties to Apply step, select Security properties.
5. On the Specify Security Properties step, specify the accounts and the roles for them to grant the users access to the reports or folders they need, as follows:
a) Click Add to add an account to the list. In the Select User or Group dialog, enter the first letters of the account name to look for, and click Search.
b) In the list of accounts found, select the account you need, and click OK.
c) From the list of SRS roles, select the roles to be assigned.

Quest Knowledge Portal 2.6 - User Guide
29
1. To exclude an account from role assignment, select it in the list, and click Remove.
2. If you select to Replace previously assigned roles, then security settings being configured will take precedence over the ones you might have set for selected reports and user accounts with Reporting Services (as described below).
3. If you explicitly grant a user some role for a report, then Everyone is automatically granted the Browser role for all SharedResources folders anywhere in the Home/QKP subtree in Reporting Services.
6. Finish the wizard.
SSRS roles are intended to control user access to data presentation way (reports), not the data itself (data stored in the SQL Server database tables). So, to obtain data from a database and fill in the report fields, the account should have an appropriate database role. Refer to the Installation Guide for more details on assigning the SRS and SQL Server roles
Example
We assume that Reporter data source is associated with Reporter_DB database on the SQL Server named SQLSRV. To provide a sample user account Alex from the IT domain with access the ‘All Local Groups' report from the Groups folder, you need ensure the following:
1. Within SSRS, this user (or the group this user belongs to) has a Browser role for the ‘All Local Groups’ report and its parent folders.
2. The account specified in the Reporter data source properties for the ‘All Local Groups’ report was granted access to the Reporter_DB database on SQLSRV server.
This can be achieved by taking the steps described below.

Quest Knowledge Portal 2.6 - User Guide
30
To provide an account with access rights required for report generation:
1. In the report tree, select the ‘All Local Groups’ report from the 'Groups' folder, and all folders up the tree to the root one.
For the certain reports or folders to be displayed properly, you may need to assign the QKP—Traverse Folders role (or the one with not less privileges for viewing the reports) to user who is to get access to these reports or folders in the reports tree.
2. Click Change Security Settings from the Manage Report menu on the right.
3. In the Report Manager window, assign the IT\Alex account the Browser role to this report.
4. When finished, click the Knowledge Portal's Back button.
5. In the Knowledge Portal, click the Data Sources tab.
6. Select Reporter data source and select Modify Data Source from the options on the right.
7. In the Select Authentication Mode step of the wizard, select Windows Integrated authentication option.
8. Finish the wizard.
To test access rights, you can connect to the Knowledge Portal under the sample IT\Alex account, click the Reports tab, select the 'All Local Groups' report and click View Report option. The report should be generated and displayed in the right pane.
History Properties
Report history is a collection of previously run copies (snapshots) of a report; each snapshot in report history captures a report as it was when the snapshot was created. History can be used to maintain a record of a report over time.
For more details on report history feature, refer to Managing Report History.
You can use the Property Manager Wizard to apply history properties to your reports. For example, the report server administrator controls a master setting (number of snapshots) for report history storage. However, if you are authorized to manage history properties, you can use settings other than default.
To specify history properties using Property Manager Wizard:
1. Start the wizard by clicking its tool button on the Knowledge Portal toolbar.
2. On the Select Property Application Mode step, select the Apply specific values option.
3. Select the reports or folders you want.
4. On the Select Properties to Apply step, select History properties.
5. On the Specify History Properties step, select the options you need (they are described in the table below).

Quest Knowledge Portal 2.6 - User Guide
31
OPTION DESCRIPTION
Allow history to be created manually
Select this option to add snapshots to report history on ad-hoc basis. If this option is selected, the New Snapshot button will appear on the History page in Report Manager.
Store all report execution snapshots in report history
Select this option to keep a record of all reports snapshots generated over time by automatically placing their copies in report history.
Use the following schedule to add snapshots to report history
Select this option to add snapshots to report history on a scheduled basis. You can create a schedule that is used exclusively for this purpose, or you can select a predefined shared schedule if one contains the schedule information you want.
Select the number of snapshots to keep
Use the options described below to control the number of reports that are kept in report history.
Use the default setting Select this option to obtain the number of snapshots (that should be retained) from the master setting (set by report server administrator).
Keep an unlimited number of snapshots in report history
Select this option to retain all report history snapshots generated over time. If so, you will have to manually delete snapshots in order to reduce the size of report history.
Limit the copies of report history
Select this option to retain certain number of snapshots. When the limit is reached, older copies are removed from report history to free space for newer copies.
6. Finish the wizard.

Quest Knowledge Portal 2.6 - User Guide
32
Execution Properties
Report execution properties control how and when report processing occurs. (To learn about report processing in detail, refer to Report Processing Overview.)
For example, you may use report snapshots and keep their copies in history. Alternatively, you can run the reports on demand. Refer to Setting Report Execution Properties for more details on report execution modes.
Besides, if you have a report that is accessed frequently, you can temporarily cache copies of it to eliminate wait time if multiple users are accessing the same report within minutes of each other.
You can use the Property Manager Wizard to apply execution properties to your reports.
To specify execution properties using Property Manager Wizard:
1. Start the wizard by clicking on its tool button in the Knowledge Portal toolbar.
2. On the Select Property Application Mode step, select the Apply specific values option.
3. Select the reports or folders you want.
4. On the Select Properties to Apply step, select Execution properties.
5. On the Specify Execution Properties step, select the options you need (they are described in the table below).

Quest Knowledge Portal 2.6 - User Guide
33
OPTION DESCRIPTION
Render this report with the most recent data
Use this option when you want the report to run on-demand, or when the user selects the report. If a cached copy is not available, data retrieval and rendering occurs when a user opens the report.
Do not cache temporary copies of this report
Use this option to always run the report with the most recent data. Each user who opens the report triggers a query against the data source that contains data used in the report.
Cache a temporary copy of the report
Use this option to place a temporary copy of the report in a cache when the first user opens the report. Performance is faster for subsequent users who open the report because the report is returned from cache instead of being processing again.
Expire copy of report after a number of minutes
Type the number of minutes after which the temporary copy of the report is no longer valid. Once a temporary copy is invalidated, it is no longer returned from cache. The next time a user opens the report, the report server processes the report again, and places a copy of the refreshed report back in the cache.
Expire copy of report on the following schedule
Use a schedule to expire a cached report using a frequency other than minutes. For example, to expire a cached report at the end of the day, you can pick a specific hour at night after which the copy expires.
Render this report from an execution snapshot
Use this option to process this report as a snapshot, at a time that you schedule. Selecting this option is recommended when you want a report to run during off-peak hours. Unlike cached copies that are created when a user opens the report, a snapshot is created and subsequent refreshed on a schedule. Snapshots do not expire; they remain in service until they are replaced by newer versions.
6. Finish the wizard.
Cover Page
Use this option to attach a cover page to selected reports.
To display cover page when viewing the reports, select Show cover page.
To display a logo on cover page, select it from the list.
For a new logo to appear in the list of available ones, you should store it in the \Home\QKP\SharedResources\Logos folder in Reporting Services. The following formats are supported: .GIF, .JPG, .PNG.
Property Management Exceptions
This section lists some exceptions from property management with the Property Manager Wizard:
1. The Report Execution Timeout property is not copied from the source report. The value of this property for target reports is not changed.
2. Report parameters configured as multi-valued lists of check boxes (described in detail in Filtering Reports topic) cannot be managed using the Property Manager

Quest Knowledge Portal 2.6 - User Guide
34
Wizard. You can modify filter values using the parameter section of the report, as described in the Filtering Reports topic.
Managing Subreport Properties
A report can have several subreports linked to the parent by hyperlinks. When you click on a hyperlink within a parent report, you are taken to the corresponding subreport.
All predefined subreports are stored in one folder named \QKP\<Product>\Subreports, so you can change subreport properties only by explicitly selecting the required subreports in this folder, as you do for ordinary reports.
To change the properties of a report and all its subreports at a time, you can do the following:
1. Copy the report and all its subreports into one folder
2. Change the properties using the Property Manager Wizard
Copying a report with subreports to another location (using Organize Reports dialog) automatically modifies the links to these subreports to make them work properly.
Product-Specific Properties
When you work with the reports designed for the certain Quest products, you can see Specific Actions on the right. Currently, this refers to InTrust reports only—for them, Run Data Import option is available. Use it to configure import of data required for selected InTrust report from InTrust repository to Audit database. For more information on this opportunity, refer to the Working with InTrust Reports document.
Scheduling Reports
Scheduling allows you to automatically retrieve data and deliver reports at specific times or during off-peak hours.
When you create a schedule, its preferences are saved in the report server database. Schedule processing is based on the local time of the report server that contains the schedule.
For more details on SSRS scheduling feature, see Creating, Modifying, and Deleting Schedules.
Before you start creating schedules, check the following security requirements:
If you use default SSRS security settings (role assignment), local administrators can create and manage any schedule.
If you use custom role assignments, the role assignment must include tasks that support scheduled operations:
To create, modify, or delete report-specific schedules in a user-defined
subscription, the role must include Manage individual subscriptions
task.

Quest Knowledge Portal 2.6 - User Guide
35
To create, modify, or delete report-specific schedules (snapshots), the
following tasks must be included in the role: Manage report history,
Manage all subscriptions, and Manage reports.
Scheduling Dashboard Updates
To schedule updates for a dashboard report, select the report and click Schedule dashboard update in the Manage Report menu. This will open a configuration dialog box that lets you reuse an existing schedule or create a new one.
Subscribing to Reports
What is a Subscription?
Creating a Subscription
Delivering Reports to SharePoint
What is a Subscription?
Microsoft SQL Server Reporting Services allows you to schedule and automate delivery of reports by creating subscriptions. A subscription is a request to deliver a report at a specific time and present the reports the way you defined.
A subscription consists of the following parts:
A report to be delivered; this report must be able to run unattended (that is, a report should use stored credentials or no credentials for database access).
A delivery method (email or file share) and settings for the mode of delivery (such as an e-mail address or path to the file share).
A rendering extension to present the report in a specific format (for example, PDF).
Conditions for processing the subscription, which is expressed as an event.
Usually, the conditions for running a report are time-based. For example, you may want to run a particular report every Tuesday at 3:00 P.M. GMT. However, if the report runs as a snapshot, you can specify that the subscription runs whenever the snapshot is refreshed.
Parameters used when running the report.
Parameters are optional and are specified only for reports that accept parameter values. Because a subscription is typically user-owned, the parameter values that are specified vary from subscription to subscription. All parameters must have a value explicitly defined, or have a valid default value.
Subscription information is stored with individual reports in a report server database, so you cannot manage subscriptions separately from the report they are associated with.
Before you start creating a subscription, check the following security requirements:
You must have access to the report (at least, permission to view it).

Quest Knowledge Portal 2.6 - User Guide
36
Your SSRS role assignment must have the Manage individual subscriptions included. This can be achieved, for example, through assigning Content Manager role to your account. For more information about role assignment, refer to Installation Guide. Also, see Tasks and Permissions.
The report must use stored credentials or no credentials to retrieve data at run time.
For more details on SRS subscription feature, refer to Creating, Modifying, and Deleting Standard Subscriptions.
Creating a Subscription
To create a report subscription, perform the following
1. Click the My Subscription tab in the left pane.
2. To create a new subscription, in the right pane, select Create Subscription from the New Subscription menu to start the New Subscription wizard.
3. On the Specify Subscription Name step, specify the name and the description for the new subscription.
4. On the Select Delivery Method step of the wizard, specify the delivery method (email or file share) and settings for the mode of delivery.
For the subscription with the delivery method set to Report Server File Share: you will have to enter the password for the account used to access that file share
5. On the Specify Schedule step, specify subscription processing options (schedule).
6. On the Select Reports step, select report or reports and configure filters.
7. Click Finish to complete the wizard.
Delivering Reports to SharePoint
You can configure your subscriptions so that your reports are delivered to a Document Library on SharePoint 2007. The following scenario can be recommended:
1. Configure the delivery of e-mail messages with attachments to the Document Library where the reports are to be stored. Follow the instructions provided in the Sharepoint Special : Incoming Email Configuration - MOSS.
2. Install the SMTP service on the computer hosting SQL Server Reporting Services (2005 or 2008).
3. Run the Reporting Services Configuration Manager. Go to the Email Settings tab and enter the necessary settings: Sender Address (for example, [email protected]), and SMTP Server - your SharePoint Server 2007, for example, sharepointsrv.mydomain.myorg

Quest Knowledge Portal 2.6 - User Guide
37
4. Then you can use Report Manager to create a subscription that uses e-mail as report delivery method, as described in How to: Subscribe to a Report (Report Manager).
Note that Documentation Library content is update periodically (depending on your SharePoint configuration settings), so the reports may not appear in the Library right after they are received.
Customizing Report View
The Knowledge Portal allows you to modify the way data is presented in a report. You can manage the visibility of table fields, the order of the fields, and the sort order within the tables; also, you can show cover page with desired logo.
Not all tables and table fields can be customized with the Customize Report View option.
To modify report appearance:
1. Select the required report in the tree and click the Customize Report View option to open the Customize Report View dialog box.
2. If you wish, select the View the report when customization is completed check box.
3. Click Report View tab. Modify the appropriate section of the report. If the report contains several tables, select the necessary table from the list and customize its appearance.
To make a field invisible, clear the Visible check box to the left of the field
name.
To specify the sort order for a field, select the field and use the Sort Order
drop-down list.
Quest Knowledge Portal 2.6 - User Guide
38
To change the order of the fields in the table, select a field and move it
using the Up and Down arrows.
4. Click Cover page tab. To display cover page when viewing the reports, select Show cover page. To display custom logo on cover page, select it from the list.
For a new logo to appear in the list of available ones, you should store it in the \Home\QKP\SharedResources\Logos folder in Reporting Services. The following formats are supported: .GIF, .JPG, .PNG
5. To change report name and description to custom ones, enter them into edit boxes.
6. Click OK to save your changes.
7. Wait for report to be shown in the customized view (if you selected this option in step 2).
Organizing Reports
You can organize the reports and report folders in the way you like. To manage reports and folders:
1. Click the Reports tab in the left tabbed pane.
2. Select any folder in the tree, and click the Organize Reports option.
3. In the Organize Reports dialog box displayed, use the New and Delete buttons to create and delete folders in the New folders structure box.
4. To copy a report, in the Current folders structure box, select the report or folder you want to be copied. In the New folders structure box, select the folder where the copy should be placed, and then click Copy To.
To create the copies of subreports when copying a parent report, select the Copy reports with subreports check box. Creating copies is recommended in order to leave the original reports untouched (in particular, if one subreport is used by several parent reports).
When copying a report whose data source property has been changed incorrectly (data source was not specified), the copy of the report will have original data source property.
Subreports are copied to a hidden folder named Subreports which is created in the target folder (where parent report copy is placed); so if several reports contain links to the same subreports, and you plan to run them over different data collections, then it is recommended to copy such parent reports to different target locations.
5. Click OK to save your changes.
Using My Reports Folder
When you are on the Reports tab of the Knowledge Portal, you can see the My Reports folder in the reports tree on the left. Use this folder to store your favorite, most frequently used reports.
By default, the My Reports folder is not shown in the reports tree. To display it, do the following:
1. Go the SSRS Report Manager (for example, by typing http://MyReportServer/Reports in the web browser), and on the Home page

Quest Knowledge Portal 2.6 - User Guide
39
click Site Settings.
2. Select the Enable My Reports to support user-owned folders for publishing and running personalized reports option and click the Apply button.
3. Return to the Knowledge Portal.
The Create New Folder and Organize Reports options are offered in the Manage Folder menu for My Reports.
Besides, you can select any report you need, and then use Add to My Reports option from the Manage Report menu to add the report to your favorites. After selecting this option, you can provide a name under which the selected report's copy will be stored in My Reports folder. This command is also available in the report toolbar (shown when you view the report).

Quest Knowledge Portal 2.6 - User Guide
40
Creating Reports
This section explains how you can use Report Builder tool to create a custom report on data collected by Quest products. To make a report of your own, Report Builder uses the predefined structure description (model) described below. By the way of example, this section explains how the Reporter model is organized. To learn about InTrust model, refer to Working with InTrust Reports document.
Note, however, that Report Builder can be used only if .NET 2.0 Framework is installed on the client computer.
Understanding Models
What is a Model?
Working with Models
What is a Model?
A report model helps Report Builder users to explore and select the data that they want to use from the underlying data source. Report models provide familiar business names for database fields and tables, logically grouped model items, and predefined relationships between items within the data source. Models are used by Report Server to automatically generate a query for retrieving the requested data, thus facilitating ad-hoc reporting. Generally, a model defines the following:
The product that provides data for the reports
The data source the data should be obtained from.
Predefined models are brought in by the Report Pack or Knowledge Pack you install. In the Knowledge Portal, models are displayed on the Data Source tab:

Quest Knowledge Portal 2.6 - User Guide
41
To explore selected model in detail, you can click Report Builder in the Knowledge Portal toolbar. Report Builder is downloaded to the client computer and launched as a web application, and the models tree is displayed in the right pane.
The Report Builder tool button is displayed if you have Microsoft .NET Framework 2.0 installed on the client computer.
For system requirements that must be met on server side and on client side to provide for report creation, refer to the Installation Guide.

Quest Knowledge Portal 2.6 - User Guide
42
What is a Perspective?
As shown in the figure above, under the Reporter Model node, the following items are displayed:
AD Objects
Computers
Domains
Groups
NTFS Folders and Shares
Users
These items are the perspectives of the model. A perspective is a subset of a model. For example, the whole model allows you to create reports on any kind of events stored in Reporter database, and its AD Objects perspective can be used to report on Active Directory objects.
After you select a model or any of its perspectives on the right and click OK, a number of entities and their fields are displayed in the left pane, as shown below:
What is an Entity?
In the most common case, an entity corresponds to a database table (or named query). An entity consists of fields that correspond to the fields of the database table. On the figure above, you can see, for instance, that the Users entity includes such fields as Employee ID, Domain, Division, etc.
Report layout area
Fields
Entities

Quest Knowledge Portal 2.6 - User Guide
43
You can view the database table fields using, for example, SQL Server Manager.
Working with Models
To build a report using the model, drag and drop the fields you need, placing them into report layout area on the right. In addition, you can use the Knowledge Portal to create new models and to change the data source for model-based reports.
To create a model:
1. In the Knowledge Portal, click the Data Sources tab, select Models node from the tree, and click Create Model from menu options in the right pane. The New Model Wizard starts.
2. On the Select Model Type step, select the type of model you want to create (generally, the model type corresponds to the product that will provide data for reports built using the model).
3. On the Select Data Source step, select the data source that stores data for reports you will build on this model (each model is assigned one data source).
4. Finally, specify a name and description for the model. Review the settings and finish the wizard. Then the new model appears in the tree.
Each model is intended to work with a particular data source; to change the data source for model-based reports in bulk, you should take the steps described below.
To change the data source for multiple reports:
1. Select the corresponding model in the tree
2. Select Change Data Source from Manage Model.
3. Specify the data source that will provide data for the reports based on this model.
You can also change model and data source for a single model-based report.
To change the model or data source for a single report:
1. Select the report you need from the report tree
2. Select Change Data Source from Manage Report menu options

Quest Knowledge Portal 2.6 - User Guide
44
3. Specify the data source you want to use for selected report.
You can create a copy of existing model that you can use to create reports on the same product and the same data source as the original.
To create a copy of a model:
1. Select the model you want to copy.
2. Select Clone from Manage Model menu.
3. Specify the new model's name and description.
Now you can create a custom report using any available model and Microsoft SQL Server Reporting Services report building capabilities.
Creating a Model-based Report
To create a model-based report:
1. Select a model and click the Report Builder button in the Knowledge Portal toolbar.
Any custom report you create will get data from the data source assigned to the selected model.
2. From the panes on the left, select the objects you are interested in and the fields to obtain the data you need on these objects.
3. Drag and drop the objects or fields to the layout area.
4. To add filters, click Filter in the Report Builder toolbar, and drag and drop the fields you want report data to be filtered by.
5. Run your report or save it.
Saving a Report
When saving a report created with Report Builder, the report (RDL file) is saved to the default target location on report server where the Report Builder application runs. To make your custom report appear in the report tree in the Knowledge Portal, specify QKP\<product>\Reports as target location.
After you get back to the Knowledge Portal, the report you created will appear in the reports tree. By default, this report will use the data source prescribed by the model it was built on. You can use the Change Data Source option for your custom reports.
4. Customize Report View option is unavailable for custom reports.
5. Unlike predefined reports whose filtering parameters can be changed when you view the reports, custom report’s filtering parameters are available for modification only via Report Builder. That is, to modify filtering parameters for a custom report, you should to the following:
Select report in the tree, and click Report Builder.
Make the necessary changes to report filters.
After you finish the modification, save the changes and go back to the Knowledge Portal.

Quest Knowledge Portal 2.6 - User Guide
45
For more information about working with models in Report Builder, refer to the Microsoft article, Ad Hoc Reporting with Report Models, and to Report Builder Help.

Quest Knowledge Portal 2.6 - User Guide
46
Troubleshooting the Knowledge Portal
Enabling Remote Errors Handling on Report Server
Report Failed to Process. Reasons and Solutions
Enabling Remote Errors Handling on Report Server
In case the Knowledge Portal is installed remotely from SQL Server Reporting Services, the error messages you may get while using the Knowledge Portal can containing the following text:
"For more information about this error, navigate to the report server on the local server machine, or enable remote errors".
So, to access additional information that can help you troubleshoot the problem, you can set the EnableRemoteError server property as described below.
You can edit the ConfigurationInfo table in the report server database to set EnableRemoteError to True, but if the report server is actively used, you should use script to modify the settings.
To enable remote errors through script:
1. Create a text file and copy the following script into the file.
Public Sub Main()
Dim P As New [Property]()
P.Name = "EnableRemoteErrors"
P.Value = True
Dim Properties(0) As [Property]
Properties(0) = P
Try
rs.SetSystemProperties(Properties)
Console.WriteLine("Remote errors enabled.")
Catch SE As SoapException
Console.WriteLine(SE.Detail.OuterXml)

Quest Knowledge Portal 2.6 - User Guide
47
End Try
End Sub
2. Save the file as EnableRemoteErrors.rss.
3. Click Start, point to Run, type cmd, and click OK to open a command prompt window.
4. Navigate to the directory that contains the .rss file you just created.
5. Type the following command line, replacing servername with the actual name of your server:
rs -i EnableRemoteErrors.rss -s http://servername/ReportServer
Using Reporting Service Trace Logs
The following sections name the problems you may face during the Knowledge Portal operation. To discover the problem cause, it is recommended to examine the error messages in the Microsoft SQL Reporting Service trace logs. (The cases described below include the examples of corresponding error messages.) Log files containing detailed information about report server operations are located at \Microsoft SQL Server\<SQL Server Instance>\Reporting Services\LogFiles. The files you should examine are the following:
ReportServerService_<timestamp>.log—trace log for the Report Server Web service
ReportServer_<timestamp>.log—trace log for the Report Server Windows service worker threads
For more details about these logs, refer to Reporting Service Trace Logs MSDN article.
Report Failed to Process. Reasons and Solutions
If a report failed to process, examine the messages displayed, and look for the corresponding error message in the Reporting Services trace log. Typical reasons and solutions are provided below.
Error message displayed:
Report "[report_name]" failed to process: An error has occurred during report processing. Query execution failed for data set 'MainDataSet'.
Error written to Microsoft SQL Server Reporting Services trace log:
ERROR: Throwing Microsoft.ReportingServices.ReportProcessing.ReportProcessingException: Query execution failed for data set 'MainDataSet'., ; Info: Microsoft.ReportingServices.ReportProcessing.ReportProcessingException: Query execution failed for data set 'MainDataSet'. ---> System.Data.SqlClient.SqlException: Line 1: Incorrect syntax near ')'.
Reason:
Parameter value was specified in the report filters using incorrect syntax.

Quest Knowledge Portal 2.6 - User Guide
48
Solution:
Select the report in the tree, and click View Report from the Run Report options in the right pane. On the filter tabs, correct report parameter values’ syntax.
Syntax that should be used when specifying report filtering parameter values is described in the Filtering Reports topic.
Error message displayed:
Report "[report_name]" failed to process: An error has occurred during report processing. Cannot create a connection to data source 'MainDataSource'
Error written to Microsoft SQL Server Reporting Services trace log:
ERROR: An exception has occurred. Trying to abort processing. Details: Microsoft.ReportingServices.ReportProcessing.ReportProcessingException: Cannot create a connection to data source 'MainDataSource'. ---> System.Data.SqlClient.SqlException: Login failed for user '(null)'. Reason: Not associated with a trusted SQL Server connection.
Reason:
Invalid credentials for database access were specified in the report's data source properties.
Solution:
Open the report properties, click Data Sources and verify account and authentication method set for connection with the data source (product database). For details, refer to the Configuring Data Source Security Settings topic.
If your product database and SSRS are located on different computers, an attempt to use integrated Windows authentication to access the database under current user account can lead to the error described above. To avoid this problem, configure the SSRS hosting the Knowledge Portal as trusted for delegation.
Error message displayed:
Connecting to reporting server: The permissions granted to user ‘[domain\user]’ are insufficient for performing this operation.
Error written to Microsoft SQL Server Reporting Services trace log:
Microsoft.ReportingServices.Diagnostics.Utilities.AccessDeniedException: The permissions granted to user ‘[domain\user]’ are insufficient for performing this operation., ; Info: Microsoft.ReportingServices.Diagnostics.Utilities.AccessDeniedException: The permissions granted to user ‘[domain\user]’ are insufficient for performing this operation.

Quest Knowledge Portal 2.6 - User Guide
49
Reason:
You tried to process the report using an account with insufficient access rights to the SRS server.
Solution:
Check the minimal rights and permissions assigned to the account used to access reports on SRS server. They are described in the Minimal Rights and Permissions section of the Installation Guide. You can, for example, configure security settings through item-level role assignment in Reporting Services Report Manager.
Error message displayed:
Report "[report_name]" failed to process: An error has occurred during report processing. Cannot create a connection to data source 'MainDataSource'.
Error written to Microsoft SQL Server Reporting Services trace log:
w3wp!webserver!1454!09/08/2006-12:59:25:: e ERROR: Reporting Services error Microsoft.ReportingServices.Diagnostics.Utilities.RSException: An error has occurred during report processing. ---> Microsoft.ReportingServices.ReportProcessing.ProcessingAbortedException: An error has occurred during report processing. ---> Microsoft.ReportingServices.ReportProcessing.ReportProcessingException: Cannot create a connection to data source 'MainDataSource'. ---> System.Data.SqlClient.SqlException: Cannot open database requested in login '[sqlserver]'. Login fails. Login failed for user '[domain\user]'.
Reason:
The problem may occur due to the following reasons:
Data source (specified for the report) does not exist.
OR
The account used to connect to the database was not granted the necessary access rights to the product database.
Solution:
Specify a valid database as a data source; provide the necessary access rights for the account used to connect to the database, as described in the Configuring Data Sources section of the Installation Guide.
Error message displayed:
Report "[report_name]" failed to process: Access to the path "[\\reporting_share]" is denied.
Error written to Microsoft SQL Server Reporting Services trace log:

Quest Knowledge Portal 2.6 - User Guide
50
None
Reason:
Report's delivery options were configured to use Windows File Share but the account used to generate the report was not granted the Write permission on that shared folder.
Solution:
Grant the Write permission on the shared folder with reports to the required account.
Error message displayed:
Report "[report_name]" failed to process: There is not enough space on the disk.
Error written to Microsoft SQL Server Reporting Services trace log:
None
Reason:
Lack of space on the disk where the shared folder with reports is located.
Solution:
Free the disk space on target computer.
Error message displayed:
Report “[report_name]” failed to process: An error has occurred during report processing. Query execution failed for data set 'MainDataSet'
Error written to Microsoft SQL Server Reporting Services trace log:
ERROR: Reporting Services error Microsoft.ReportingServices.Diagnostics.Utilities.RSException: An error has occurred during report processing. ---> Microsoft.ReportingServices.ReportProcessing.ProcessingAbortedException: An error has occurred during report processing. ---> Microsoft.ReportingServices.ReportProcessing.ReportProcessingException: Query execution failed for data set 'MainDataSet'. ---> System.Data.SqlClient.SqlException: Line 1: Incorrect syntax near ','.
Reason:
Mandatory default report parameter/filter was not applied when processing the report; typically, this error occurs if certain parameters/filters were deactivated in the report settings.
Solution:
In the report filter pane, activate the report parameter(s) required for processing.
Error message displayed:

Quest Knowledge Portal 2.6 - User Guide
51
Report “[report_name]” failed to process: Default value or value provided for the report parameter '[parameter_name]' is not a valid value.
Error written to Microsoft SQL Server Reporting Services trace log:
ERROR: Throwing Microsoft.ReportingServices.Diagnostics.Utilities. InvalidReportParameterException: Default value or value provided for the report parameter '[parameter_name]' is not a valid value., ; Info: Microsoft.ReportingServices.Diagnostics.Utilities. InvalidReportParameterException: Default value or value provided for the report parameter '[parameter_name]' is not a valid value
Reason:
Mandatory report parameter was not applied when processing the report; this error occurs if certain parameters/filters were deactivated in the report settings.
Solution:
In the report filter pane, activate the report parameter(s) required for processing.
Error message displayed:
Report "[report_name]" failed to process: An error has occurred during report processing. Query execution failed for data set 'MainDataSet'.
Error written to Microsoft SQL Server Reporting Services trace log:
w3wp!processing!930!9/14/2006-19:33:47:: e ERROR: Throwing Microsoft.ReportingServices.ReportProcessing.ReportProcessingException: Query execution failed for data set 'MainDataSet'., ; Info: Microsoft.ReportingServices.ReportProcessing.ReportProcessingException: Query execution failed for data set 'MainDataSet'. ---> System.Data.SqlClient.SqlException: Operation cancelled by user.
Reason:
The problem occurs if report processing time extends the specified limit (default SSRS server setting is 30 min). This may happen due to a too large amount of data included in the report.
Solution:
To cut off the unnecessary data, apply filters to the report; if needed, change the SRS server limit for report processing time. For that, report execution time-out values can be specified in Report Manager:
To set a default value for all reports, in the Site Settings page, specify the Report Execution Timeout value
To set this value for a specific report, go to the report’s Execution properties page. Note that the value you specify there will override the one configured in the Site Settings.

Quest Knowledge Portal 2.6 - User Guide
52
Report execution timeout value applies to report processing on a report server. It does not affect data processing on the database server that provides the data for your report.
The report processing timer clock begins when the report is selected and ends when the report opens. When you set this value, specify enough time to complete both data processing and report processing
Error message displayed:
Report "[report_name]" failed to process: An error has occurred during report processing. Query execution failed for data set 'MainDataSet'
Error written to Microsoft SQL Server Reporting Services trace log:
ERROR: Throwing Microsoft.ReportingServices.ReportProcessing.ReportProcessingException: Query execution failed for data set 'MainDataSet'., ; Info: Microsoft.ReportingServices.ReportProcessing.ReportProcessingException: Query execution failed for data set 'MainDataSet'. ---> System.Data.SqlClient.SqlException: Invalid object name '[object_name]'.
Reason:
The problem occurs if the database specified in the report properties does not correspond to actual database where the required data is stored. Another possible reason is that database does not exist.
Solution:
Make sure the database exists on the SQL server and stores the necessary data; in the report properties, verify the database name.
Error message displayed:
Report "[report_name]" failed to process: An error has occurred during report processing. Cannot create a connection to data source 'MainDataSource'. The feature: "Remote access to report data sources and/or the report server database" is not supported in this edition of Reporting Services.
Error written to Microsoft SQL Server Reporting Services trace log:
ERROR: Throwing Microsoft.ReportingServices.ReportProcessing.ProcessingAbortedException: An error has occurred during report processing., ; Info: Microsoft.ReportingServices.ReportProcessing.ProcessingAbortedException: An error has occurred during report processing. ---> Microsoft.ReportingServices.ReportProcessing.ReportProcessingException: Cannot create a connection to data source 'MainDataSource'. ---> Microsoft.ReportingServices.Diagnostics.Utilities.OperationNotSupportedException: The feature: "Remote access to report data sources and/or the report server database" is not supported in this edition of Reporting Services.
Reason:

Quest Knowledge Portal 2.6 - User Guide
53
The problem occurs if you use Microsoft SQL Server 2005 Express Edition Reporting Services installed remotely from the SQL server hosting the product database.
Solution:
This problem is caused by limited functionality of SQL Server 2005 Express Edition Reporting Services.
Note that Knowledge Portal operation on this edition of SQL Server 2005 is not supported; we strongly recommend that you follow the system requirements specified in the Knowledge Portal Installation Guide.
To allow for remote connections to the product database located on SQL Server 2005 Express Edition, you should take the following steps:
1. Run SQL Server Configuration Manager.
2. In SQL Server 2005 Services, start the SQL Server Browser service.
3. In SQL Server 2005 Network Configuration, select Protocols for SQLEXPRESS; in the protocols list, right-click the TCP/IP protocol, and from its shortcut menu select Enable.
4. In SQL Server 2005 Services, restart the SQL Server service and SQL Server Reporting Services service by using the Restart command from their shortcut menu.
Error message displayed:
Connecting to reporting server: The request failed with HTTP status 403: Forbidden.
Error written to Microsoft SQL Server Reporting Services trace log
None
Reason:
Access from the client computer’s IP address to the virtual directory where Report Server is installed is prohibited by Microsoft IIS settings.
Solution:
Provide client computer with the access to the Report Server virtual directory, using IIS Manager.
Error message displayed:
Connecting to reporting server: The request failed with HTTP status 401: Unauthorized.
Error written to Microsoft SQL Server Reporting Services trace log
None
Reason:

Quest Knowledge Portal 2.6 - User Guide
54
The account under which the report runs was not granted access rights to the SSRS web service, or it was not included into the Authenticated Users group for the domain where SSRS is installed.
Solution:
Make sure the account belongs to the domain where SSRS runs; if you want to use an account from other domain, include this account into the Authenticated Users group in the domain where SSRS is installed.

Quest Knowledge Portal 2.6 - User Guide
55
About Quest Software, Inc.
Established in 1987, Quest Software (Nasdaq: QSFT) provides simple and innovative IT management solutions that enable more than 100,000 global customers to save time and money across physical and virtual environments. Quest products solve complex IT challenges ranging from database management, data protection, identity and access management, monitoring, user workspace management to Windows management. For more information, visit www.quest.com.
Contacting Quest Software
Email [email protected]
Mail Quest Software, Inc. World Headquarters 5 Polaris Way Aliso Viejo, CA 92656 USA
Web site www.quest.com
Refer to our Web site for regional and international office information.
Contacting Quest Support
Quest Support is available to customers who have a trial version of a Quest product or who have purchased a Quest product and have a valid maintenance contract. Quest Support provides unlimited 24x7 access to our Support Portal at www.quest.com/support
From our Support Portal, you can do the following:
Retrieve thousands of solutions from our online Knowledge Base
Download the latest releases and service packs
Create, update and review Support cases
View the Global Support Guide for a detailed explanation of support programs, online services, contact information, policies and procedures. The guide is available at: www.quest.com/support.