
Quarter 2 – Module 3: PREPARING AND INTERPRETING …
31
10 TLE – ICT - CSS Quarter 2 – Module 3: PREPARING AND INTERPRETING TECHNICAL DRAWING (PITD) (Prepare/make changes to electrical/electronic schematics and drawings and Store technical drawings and equipment/instruments) (SUPPORT MATERIAL FOR INDEPENDENT LEARNING EN- GAGEMENT) A Joint Project of SCHOOLS DIVISION OF DIPOLOG CITY and the DIPOLOG CITY GOVERNMENT
Transcript of Quarter 2 – Module 3: PREPARING AND INTERPRETING …
10
TLE – ICT - CSS Quarter 2 – Module 3: PREPARING AND
INTERPRETING TECHNICAL DRAWING (PITD)
(Prepare/make changes to electrical/electronic schematics and drawings and Store technical drawings and equipment/instruments)
(SUPPORT MATERIAL FOR INDEPENDENT LEARNING EN-GAGEMENT)
A Joint Project ofSCHOOLS DIVISION OF DIPOLOG CITY
and theDIPOLOG CITY GOVERNMENT

TLE – ICT – CSS – Grade 9 Alternative Delivery Mode Quarter 2 – Module 3: Preparing and Interpreting Technical Drawing (PITD) First Edition, 2020
Printed in the Philippines by ________________________
Department of Education – Region IX – Dipolog City Division
Office Address: Purok Farmers’,Olingan,Dipolog CityTel #: Fax No.: 065-212-6968Tel. No.: 065-212-5828Tel. No.: 065-212-2777
Email Address: [email protected]
Development Team of the Module
Writer: Marojelou A. Magbuhos
Editor: Marojelou A. Magbuhos
Reviewer: Lynne B. Gahisan
Management Team: Virgilio P. Batan Jr. - Schools Division Superintendent Lourma I. Poculan - Asst. Schools Division Superintendent Amelinda D. Montero - Chief, CID Nur N. Hussien - Chief, SGOD Ronillo S. Yarag - EPS PVR – LRMDS Leo Martinno O. Alejo - PDO II - LRMDS

2
Introductory Message For the facilitator:
Welcome to the TLE-Computer Systems Servicing Grade 10 Alternative Delivery Mode (ADM) Module on Install and Configure Computer System (Install Operating System)!
This module was collaboratively designed, developed and reviewed by educators both from public and private institutions to assist you, the teacher or facilitator in helping the learners meet the standards set by the K to 12 Curriculum while overcoming their personal, social, and economic constraints in schooling.
This learning resource hopes to engage the learners into guided and independent learning activities at their own pace and time. Furthermore, this also aims to help learners acquire the needed 21st century skills while taking into consideration their needs and circumstances.
In addition to the material in the main text, you will also see this box in the body of the module:
As a facilitator, you are expected to orient the learners on how to use this module. You also need to keep track of the learners' progress while allowing them to manage their own learning. Furthermore, you are expected to encourage and assist the learners as they do the tasks included in the module.
Notes to the Teacher
This contains helpful tips or strategies that will help you in guiding the learners.

3
For the learner:
Welcome to the TLE-Computer Systems Servicing Grade 10 Alternative Delivery Mode (ADM) Module on Install and Configure Computer System (Install Operating System)!
This module was designed to provide you with fun and meaningful opportunities for guided and independent learning at your own pace and time. You will be enabled to process the contents of the learning resource while being an active learner.
This module has the following parts and corresponding icons:
What I Need to Know
This will give you an idea of the skills or competencies you are expected to learn in the module.
What I Know
This part includes an activity that aims to check what you already know about the lesson to take. If you get all the answers correct (100%), you may decide to skip this module.
What’s In
This is a brief drill or review to help you link the current lesson with the previous one.
What’s New
In this portion, the new lesson will be introduced to you in various ways; a story, a song, a poem, a problem opener, an activity or a situation.
What is It
This section provides a brief discussion of the lesson. This aims to help you discover and understand new concepts and skills.
What’s More
This comprises activities for independent practice to solidify your understanding and skills of the topic. You may check the answers to the exercises using the Answer Key at the end of the module.
What I Have Learned
This includes questions or blank sentence/paragraph to be filled in to process what you learned from the lesson.

4
What I Can Do
This section provides an activity which will help you transfer your new knowledge or skill into real life situations or concerns.
Assessment
This is a task which aims to evaluate your level of mastery in achieving the learning competency.
Additional Activities
In this portion, another activity will be given to you to enrich your knowledge or skill of the lesson learned.
Answer Key
This contains answers to all activities in the module.
At the end of this module you will also find:
References This is a list of all sources used in developing this module.
The following are some reminders in using this module:
1. Use the module with care. Do not put unnecessary mark/s on any part of the module. Use a separate sheet of paper in answering the exercises.
2. Don’t forget to answer What I Know before moving on to the other activities included in the module.
3. Read the instruction carefully before doing each task. 4. Observe honesty and integrity in doing the tasks and checking your
answers. 5. Finish the task at hand before proceeding to the next. 6. Return this module to your teacher/facilitator once you are through
with it.
If you encounter any difficulty in answering the tasks in this module, do not hesitate to consult your teacher or facilitator. Always bear in mind that you are not alone.
We hope that through this material, you will experience meaningful learning and gain deep understanding of the relevant competencies. You can do it!

1
What I Need to Know
This module was designed and written with you in mind. It is here to help you master the Install and Configure Computer System (Install Operating System). The scope of this module permits it to be used in many different learning situations. The language used recognizes the diverse vocabulary level of students. The lessons are arranged to follow the standard sequence of the course. But the order in which you read them can be changed to correspond with the textbook you are now using.
The module is divided into three lessons, namely:
● Lesson 1 – Install Operating System (Window 7) ● Lesson 2 – Install Operating System (Window 2008 server)
After going through this module, you are expected to:
1. Install Operating System (OS) in accordance with established installation procedures and to comply with end-user requirements.
2. Check the quality of the work undertaken in accordance with established procedures.

2
What I Know
Direction: Choose the letter of your best answer. Write your answers in your notebook.
1. _____GB is available hard disk space (32-bit) or 20 GB (64-bit) to run Windows 7 on your PC. a. 16 c. 512 b. 9 d. 10
2. _____MB is the minimum requirements to run window server 2008 on your PC. a. 16 c. 512 b. 9 d. 10
3. DirectX ____ graphics device with WDDM 1.0 or higher driver to run Windows 7 on your PC. a. 16 c. 512 b. 9 d. 10
4. _____ minimum disk space requirement needs in Window server 2008 to run on your PC. a. 16 c. 512 b. 9 d. 10
5. _____ recommended RAM requirements to run Window server 2008 to your PC. a. 1 gigabyte c. 1 gigahertz b. 2 gigabyte d. 2 gigahertz
6. _____ or faster 32-bit (x86) or 64-bit (x64) processor to run Window 7 to your PC. a. 1 gigabyte c. 1 gigahertz b. 2 gigabyte d. 2 gigahertz
7. ___recommended Processor requirements to run Window server 2008 to a PC. a. 1 gigabyte c. 1 gigahertz b. 2 gigabyte d. 2 gigahertz 8. _____ RAM (32-bit) or 2 GB RAM (64-bit) to run Window 7 to a PC. a. 1 gigabyte c. 1 gigahertz b. 2 gigabyte d. 2 gigahertz 9. It followed Windows Vista and featured various changes from prior operating systems.
a. Drivers c. Window server b. Windows 7 d. Window Vista 10. It enables a computer to handle network roles such as print server, domain controller, web server, and file server.
a. Drivers c. Window server b. Windows 7 d. Window Vista Note: If you get 100% correct in this pre- assessment, skip the lesson but if not and only get 50% to 99% correct, then proceed with the lesson.

3
Lesson
1 Installing Operating Systems (Windows 7)
An operating system, or "OS," is software that communicates with the hardware and allows other programs to run. It is comprised of system software, or the fundamental files your computer needs to boot up and function. Every desktop computer, tablet, and smartphone include an operating system that provides basic functionality for the device.
What’s In
In the past module you learn about Prepare Installer which include bootable device using CD/DVD, rufus and diskpart/ CMD for computer systems servicing. The next lesson will help you how to Install Windows 7 Operating System that will be use in performing the work plan.
What’s New
Direction: Unscramble the letters to form a word. Write your answers on your notebook.
1. DWNIWOS – 2. LALITNS – 3. RGNAPOEIT TSSMYE -
What is It
Windows 7 is an operating system from Microsoft released in 2009. It followed Windows Vista and featured various changes from prior operating systems. One of these was the Quick Launch Toolbar, which revolutionized how the users find various commands and menu options. Windows 7 also includes items like support for virtual hard disks, gaming additions, and other new features.

4
Windows 7 system requirements
If you want to run Windows 7 on your PC, here's what it takes:
c. 1 gigahertz (GHz) or faster 32-bit (x86) or 64-bit (x64) processor* d. 1 gigabyte (GB) RAM (32-bit) or 2 GB RAM (64-bit) e. 16 GB available hard disk space (32-bit) or 20 GB (64-bit) f. DirectX 9 graphics device with WDDM 1.0 or higher driver
Additional requirements to use certain features:
● Internet access (fees may apply) ● Depending on resolution, video playback may require additional memory and
advanced graphics hardware ● Some games and programs might require a graphics card compatible
with DirectX 10 or higher for optimal performance ● For some Windows Media Center functionality, a TV tuner and additional
hardware may be required ● Windows Touch and Tablet PCs require specific hardware ● HomeGroup requires a network and PCs running Windows 7 ● DVD/CD authoring requires a compatible optical drive ● BitLocker requires Trusted Platform Module (TPM) 1.2 ● BitLocker To Go requires a USB flash drive ● Windows XP Mode requires an additional 1 GB of RAM and an additional 15
GB of available hard disk space. ● Music and sound require audio output
Product functionality and graphics may vary based on your system configuration. Some features may require advanced or additional hardware.
How to Install Windows 7
This step-by-step guide demonstrates how to install Windows 7 Ultimate. The guide is similar for other versions of Windows 7 such as Home Premium.
Step 1 - Place Windows 7 DVD in your dvd-rom drive and start your PC. Windows 7 will start to boot up and you will get the following progress bar.
Step 2 - The next screen allows you to setup your language, time and currency format, keyboard or input method. Choose your required settings and click next to continue.
5
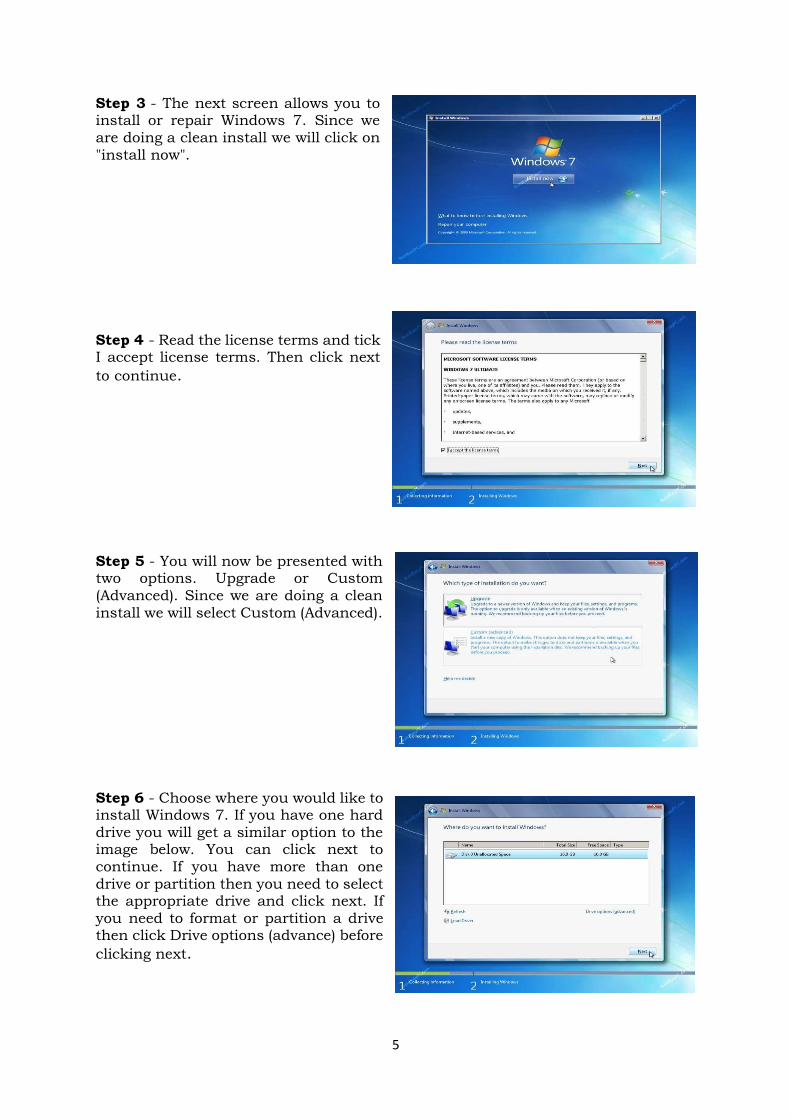
Step 3 - The next screen allows you to install or repair Windows 7. Since we are doing a clean install we will click on "install now".
Step 4 - Read the license terms and tick I accept license terms. Then click next to continue.
Step 5 - You will now be presented with two options. Upgrade or Custom (Advanced). Since we are doing a clean install we will select Custom (Advanced).
Step 6 - Choose where you would like to install Windows 7. If you have one hard drive you will get a similar option to the image below. You can click next to continue. If you have more than one drive or partition then you need to select the appropriate drive and click next. If you need to format or partition a drive then click Drive options (advance) before clicking next.

6
Step 7 - Windows 7 starts the installation process and starts copying all the necessary files to your hard drive as shown on the image below.
Step 8 - It will go through various stages of the setup and will reboot your system few times.
Step 9 - When your PC reboots it attempts to boot from DVD as its the first boot device. Do not press any key during the boot prompt so Windows 7 will continue with the installation by booting from the hard drive.
Step 10 - After the reboot your computer will be prepared for first use.

7
Step 11 - At this stage you need to choose a user name and computer name. Click next to continue. The user account you create here is the Administrator account which is the main account for your Windows 7 that has all the privileges.
Step 12 - Choose your password and password hint just in case you forget your password and need to jog your memory.
Step 13 - You can now type the product key that came with Windows 7 and click next. If you do not enter the product key you can still proceed to the next stage. However, Windows 7 will run in trial mode for 30 days. You must therefore activate Windows within 30 days otherwise you cannot access your computer after 30 days.
Step 14 - Help protect your computer and improve Windows automatically. Choose Use recommended settings.

8
Step 15 - Review your time and date settings. Select your time zone, correct the date and time and click next to continue.
Step 16 - Select your computer's current location. If you are a home user then choose Home network otherwise select the appropriate option.
Step 17 - Windows will now finalize the settings for your computer and restart.
Step 18 - After the final restart Windows 7 will start to boot up.

9
Step 19 - Finally you have the logon screen. Just type your password and press enter or click on the arrow to logon to Windows 7 for the first time.
Step 20 - After you have logged on to Windows 7 for the first time, you will see similar desktop to the image below. At this point you can start using your computer.
What’s More
Direction: Enumerate the steps how to Install Windows 7 Operating Systems. (20pts)
What I Have Learned
What I Can Do
Install Window 7 Operating System
I have learned that ____________________________________________
I have realized that ____________________________________________
I will apply ___________________________________________________

10
Note: This activity is optional only.
Rubrics Adherence to the Procedure executing against a defined set of standards in a particular way, even when it's possible that alternative approaches could achieve the same result.
20- executed all the procedures correctly and systematically
15 – executed most of the procedures correctly and systematically
10 - executed some of the procedures correctly and systematically
5 – executed fair of the of the procedures correctly and systematically
Workmanship quality of a handmade object that is skillfully crafted.
20– displayed very high skills in achieving desired result
15 -displayed high skills in achieving desired result
10-displayed average skills in achieving desired result
5- displayed fair skills in achieving desired result
Speed Perform the task in given time
10 – accomplished task ahead of time
8 – accomplished task on time
5- accomplished task beyond the given time
Total 50
Assessment
Direction: Arrange the flowchart into proper order by writing number. Write your answers in your notebook.
Step ___ Step ___ Step ___ Step ___
Step ___ Step ___ Step ___ Step ___

11
Step ___ Step ___ Step ___ Step ___
Step ___ Step ___ Step ___ Step ___
Step ___ Step ___ Step ___ Step ___
Additional Activities
Direction: For the preparation of the next activity read or watch a video about how to Installing Operating Systems Windows Server 2008 R2.

12
Answer Key
What I Know a c b d b c d a b c
What's New Windows Install Operatin
g System
Assessment

13
What's More Step 1 - Place Windows 7 DVD in your dvd-rom drive and start your PC. Windows 7 will start to boot up and you will get the following progress bar. Step 2 - The next screen allows you to setup your language, time and currency format, keyboard or input method. Choose your required settings and click next to continue. Step 3 - The next screen allows you to install or repair Windows 7. Since we are doing a clean install we will click on "install now". Step 4 - Read the license terms and tick I accept license terms. Then click next to continue. Step 5 - You will now be presented with two options. Upgrade or Custom (Advanced). Step 6 - Choose where you would like to install Windows 7. If you have one hard drive you will get a similar option to the image below. Step 7 - Windows 7 starts the installation process and starts copying all the necessary files to your hard drive as shown on the image below. Step 8 - It will go through various stages of the setup and will reboot your system few times. Step 9 - When your PC reboots it attempts to boot from DVD as its the first boot device. Step 10 - After the reboot your computer will be prepared for first use. Step 11 - At this stage you need to choose a user name and computer name. Step 12 - Choose your password and password hint just in case you forget your password and need to jog your memory. Step 13 - You can now type the product key that came with Windows 7 and click next. Step 14 - Help protect your computer and improve Windows automatically. Choose Use recommended settings. Step 15 - Review your time and date settings. Select your time zone, correct the date and time and click next to continue. Step 16 - Select your computer's current location. Step 17 - Windows will now finalize the settings for your computer and restart. Step 18 - After the final restart Windows 7 will start to boot up. Step 19 - Finally you have the logon screen. Just type your password and press enter or click on the arrow to logon to Windows 7 for the first time Step 20 - After you have logged on to Windows 7 for the first time, you will see similar desktop to the image below. At this point you can start using your computer.

References Content
https://techterms.com/definition/operating_system
https://www.buildeasypc.com/sw/windows_7/install_windows_7.htm
https://support.microsoft.com/en-us/windows/windows-7-system-requirements-df0900f2-3513-a851-13e7-0d50bc24e15f https://www.techopedia.com/definition/5016/windows-7
Image
https://www.buildeasypc.com/sw/windows_7/install_windows_7.htm
15
Lesson 2 Installing Operating Systems
(Windows Server 2008)
Windows Server is a server operating system that enables a computer to handle network roles such as print server, domain controller, web server, and file server. As a server operating system, it is also the platform for separately acquired server applications such as Exchange Server or SQL Server.
What’s In
In the past lesson you learn about Install Windows 7 Operating Systems for computer systems servicing. The next lesson will help you how to Install Windows Server 2008 Operating System that will be use in performing the work plan.
What’s New
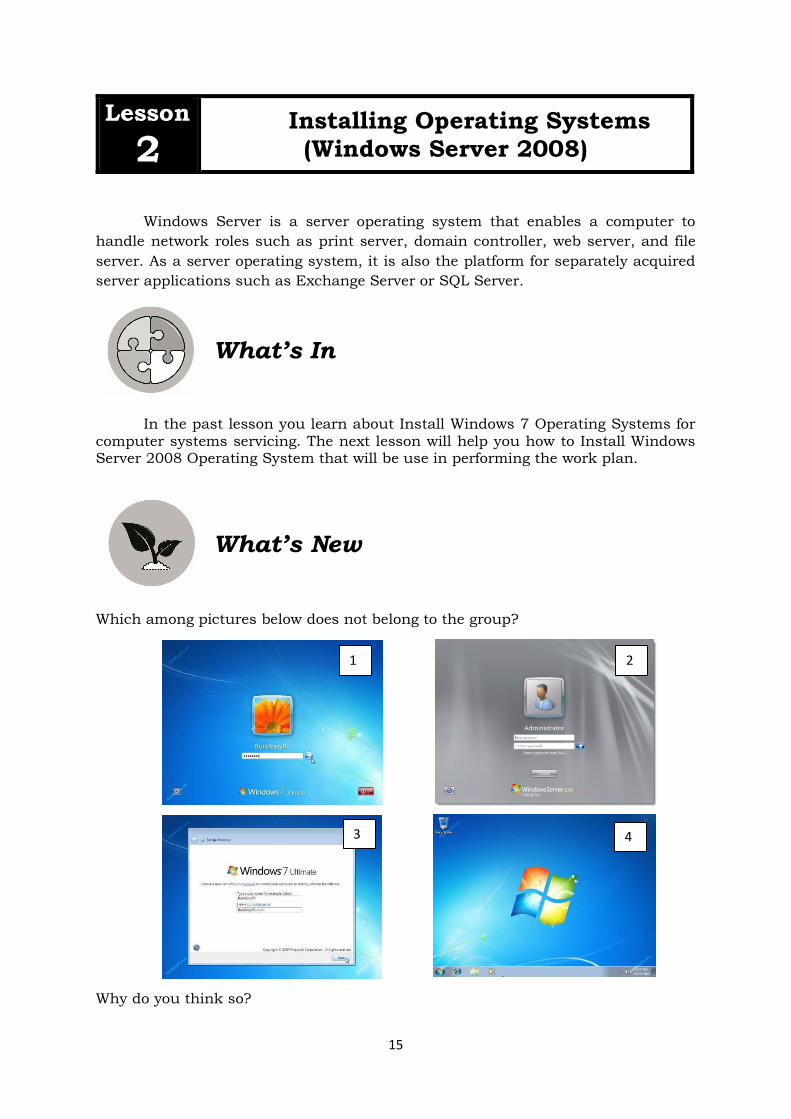
Which among pictures below does not belong to the group?
Why do you think so?
1 2
3 4

16
What is It
Hardware Requirements
Processor — Processor performance depends not only on the clock frequency of the processor, but also on the number of processor cores and the size of the processor cache. The following are the processor requirements:
● Minimum: 1 GHz (for x86 processors) or 1.4 GHz (for x64 processors) ● Recommended: 2 GHz or faster
RAM — The following are the RAM requirements:
● Minimum: 512 MB ● Recommended: 2 GB or more ● Maximum (32-bit systems): 4 GB (for Windows Server 2008 Standard) or 64
GB (for Windows Server 2008 Enterprise or Windows Server 2008 Datacenter) ● Maximum (64-bit systems): 32 GB (for Windows Server 2008 Standard) or 2
terabyte (for Windows Server 2008 Enterprise, Windows Server 2008 Datacenter, or Windows Server® 2008 for Itanium-Based Systems)
Disk space requirements —The following are the approximate disk space requirements for the system partition. Itanium-based and x64-based operating systems will vary from these estimates. Additional disk space may be required if you install the system over a network:
● Minimum: 10 GB ● Recommended: 40 GB or more ● Note
Computers with more than 16 GB of RAM require more disk space for paging, hibernation, and dump files.
● DVD-ROM drive ● Super VGA (800 x 600) or higher-resolution monitor ● Keyboard and mouse (or other compatible pointing device)
Install Windows Server 2008 R2
1. Insert the installation media for Windows Server 2008 R2. After the installer runs, the Install Windows screen appears.

17
2. Enter language and other preferences. Click Next.
3. Click Install now. The setup begins.
The installer prompts to select an operation system.
4. Select Windows Server 2008 R2 Enterprise (Full Installation) and click Next.

18
The installer prompts to read the license terms.
5. Read the license terms. If you agree to the license terms, select I accept the license terms and click Next.
6. The installer asks you which type of installation. For a new installation, click Custom (advanced).
7. The installer asks for disk location information. Make your selection and click Next.

19
8. The installation begins.
Figure 1 Figure 2
Figure 4 Figure 3
Figure 5 Figure 6
Figure 7 Figure 8

20
9. The installer prompts to change the password. Click OK.
10. Enter a new password, re-enter the password to confirm it, and click the right-arrow.
Figure 9 Figure 10
Figure 2 Figure 1
Figure 3 Figure 4

21
11. After you click OK on the confirmation screen, the operating system prepares your desktop.
What’s More
Direction: Enumerate the steps in how to Install Windows Server 2008 r2 Operating Systems.
What I Have Learned
What I Can Do
Direction: Perform Install Window Server 2008 R2 Operating System. Write your answer in your notebook. (Note: This activity is optional only.)
Rubrics Adherence to the Procedure executing against a defined set of standards in a particular way, even when it's possible that alternative approaches could achieve the same result.
20- executed all the procedures correctly and systematically
15 – executed most of the procedures correctly and systematically
10 - executed some of the procedures correctly and systematically
5 – executed less of the of the procedures correctly and systematically
Workmanship quality of a handmade object that is skillfully crafted.
20– displayed very high skills in achieving desired result
15 -displayed high skills in achieving desired result
10-displayed average skills in achieving desired result
5- displayed less skills in achieving desired result
Speed Perform the task in given time
10 – accomplished task ahead of time
8 – accomplished task on time
5- accomplished task beyond the given time
Total 50
I have learned that ____________________________________________
I have realized that ____________________________________________
I will apply ___________________________________________________

22
Assessment
Direction: Arrange the flowchart into proper order by writing number. Write your answers in your notebook.
Step ___ Step ___ Step ___ Step ___
Step ___ Step ___ Step ___ Step ___
Step ___ Step ___ Step ___
Additional Activities
Direction: For the preparation of the next module read or watch a video about how to Install drivers.

23
Answer Key
Whats New 2
The Operating system use is Windows Server
What's More Step 1: Insert the installation media for Windows Server 2008 R2. After the installer runs, the Install Windows screen appears. Step 2: Enter language and other preferences. Click Next. Step 3 Click Install now. The setup begins. Step 4 Select Windows Server 2008 R2 Enterprise (Full Installation) and click Next. Step 5 Read the license terms. If you agree to the license terms, select I accept the license terms and click Next. Step 6 The installer asks you which type of installation. For a new installation, click Custom (advanced). Step 7 The installer asks for disk location information. Make your selection and click Next. Step 8 The installation begins. Step 9 The installer prompts to change the password. Click OK. Step 10 Enter a new password, re-enter the password to confirm it, and click the right-arrow. Step 11: After you click OK on the confirmation screen, the operating system prepares your desktop.
Assessment

24
References Content
https://www.blackbaud.com/files/support/infinityinstaller/content/installermaster/tkinstallwindowsserver2008r2.htm
https://docs.microsoft.com/en-us/iis/install/installing-iis-7/install-windows-server-2008-and-windows-server-2008-r2#main
Image
https://www.blackbaud.com/files/support/infinityinstaller/content/installermaster/tkinstallwindowsserver2008r2.htm

References
Alashka, Europez. “Computer System Servicing NC II”. kupdf.net (2017). Ipinanumbalik June 19, 2020, mula sa/kay https://kupdf.net/download/computer-system-servicing ncii_59107eb3dc0d60e933959e80_pdf
Dahl, Oyvind Nydal “Electronic Schematic Symbols”. build-electronic-circuits.com (2012). Ipinanumbalik June 15, 2020, mula sa/kay https://www.build-electronic-circuits.com/schematic-symbols/
Industrial-electronics.com (n.d.). Ipinanumbalik June 15, 2020, mula sa/kay http://www.industrial-electronics.com/eed5th_7.html
https://www.buildelectroniccircuits.com/electronicschematics/#:~:text=Electronic%20schematics%20are%20like%20recipes,are%20aso%20called%20circuit%20diagrams.
Alashka, Europez. “Computer System Servicing NC II”. kupdf.net (2017). Ipinanumbalik June 19, 2020, mula sa/kay https://kupdf.net/download/computer-system-servicing-ncii_59107eb3dc0d60e933959e80_pdf
Haynes, Sarah. “How to Take Care of Drafting Tools”. homesteady.com (2020). Ipinanumbalik
June 15, 2020, mula sa/kay https://homesteady.com/12170358/how-to-take-care-of-drafting-tools
https://imgaws.ehowcdn.com/877x500p/s3.amazonaws.com/cme_public_images/www_eh
ow_com/i.ehow.com/images/a04/m8/24/care-drafting-tools-800x800.jpg leefrancesemery. “Proper Care of Drafting Instruments”. philnews.ph (2009). Ipinanumbalik
June 15, 2020, mula sa/kay https://hubpages.com/art/Proper-Care-of-Drafting-Instruments
Millis, Ned. “What Tools Are Used for Technical Drawings?”. careertrend.com. (2019).
Ipinanumbalik June 19, 2020, mula sa/kay https://careertrend.com/list-7388801-list-architect-tools.html
Valle Rey, Maestro. “What Are The Drawing Instruments And Their Uses”. philnews.ph.
(2019). Ipinanumbalik June 19, 2020, mula sa/kay https://philnews.ph/2019/10/09/what-are-the-drawing-instruments-and-their-uses/
www. steemit.com. (2018). Ipinanumbalik June 15, 2020, mula sa/kay
https://steemit.com/art/@steemph.cebu/drafting-materials-and-their-proper-maintenance-or-steemph-cebu-s-5th-art-guide
www. quizlet.comhttps://quizlet.com/347774747/drafting-materials-and-tools-its-usesfunctions-flash-cards/ https://www.buildelectroniccircuits.com/electronicschematics/#:~:text=Electronic%20schematics%20are%20like%20recipes,are%20aso%20called%20circuit%20diagrams. www.5.imimg.com. Ipinanumbalik August 14, 2020, mula sa/kay
https://5.imimg.com/data5/MV/EY/MY-10099192/flipbooks-500x500.jpg
https://www.build-electronic-circuits.com/power-supply-circuit/

For inquiries or feedback, please write or call: Department of Education – City Schools Division of Dipolog City, Zamboanga del Norte. Tel #: Fax No.: 065-212-6968Tel. No.: 065-212-5828Tel. No.: 065-212-2777
Email Address: [email protected]