Qualys Getting Web Application started guide
32
QUALYSGUARD® WAS 2.3 GETTING STARTED GUIDE July 20, 2012
-
date post
19-Oct-2014 -
Category
Technology
-
view
1.178 -
download
16
description
Getting started guide for vulnerability management for Web Applications.
Transcript of Qualys Getting Web Application started guide
QUALYSGUARD® WAS 2.3 GETTING STARTED GUIDE
July 20, 2012
Verity Confidential
Copyright 2011-2012 by Qualys, Inc. All Rights Reserved.
Qualys, the Qualys logo and QualysGuard are registered trademarks of Qualys, Inc. All other trademarks are the property of their respective owners.
Qualys, Inc.1600 Bridge ParkwayRedwood Shores, CA 940651 (650) 801 6100
3
Table of Contents
Welcome to WAS v2 ....................................................................................... 4
QualysGuard WAS v2 Features ............................................................................................................ 4About the New Platform: Benefits for Users....................................................................................... 5
Let’s Begin ....................................................................................................... 6
Access WAS ............................................................................................................................................. 6Add New Web Application ................................................................................................................... 7Launch Discovery Scan .......................................................................................................................... 8View Discovery Scan Results .............................................................................................................. 10Launch Vulnerability Scan................................................................................................................... 13View Vulnerability Scan Results......................................................................................................... 15Create Schedules ................................................................................................................................... 17
Your Dashboard............................................................................................. 18
Reporting ....................................................................................................... 20
Available Reports .................................................................................................................................. 21Generating a Report.............................................................................................................................. 21Sample Scan Report .............................................................................................................................. 22
Using Tags ..................................................................................................... 24
Tags You Start With .............................................................................................................................. 24Create a New Tag.................................................................................................................................. 25Assign a Tag to a Web Application .................................................................................................... 26Assign a Tag to a Report ...................................................................................................................... 27Assign a Tag to a User .......................................................................................................................... 27
User Accounts ............................................................................................... 28
Overview ................................................................................................................................................ 28Assigned User Roles ............................................................................................................................. 30Assigned Scopes .................................................................................................................................... 30Edit User Roles and Scopes.................................................................................................................. 31
Contact Support ............................................................................................ 32
Welcome to WAS v2
QualysGuard® Web Application Scanning (WAS) enables organizations to assess, track and remediate web application vulnerabilities. Delivered on demand, the service allows users to:
• Crawl web applications and scan them for vulnerabilities
• Identify web applications’ handling of sensitive or secret data
• Customization: authentication, black/white lists, robots.txt, sitemap.xml and more
• View reports with recommended security coding practice and configuration
QualysGuard WAS v2 provides several major enhancements to help customers catalog their web applications on a global scale and scan them for vulnerabilities that can lead to exploitation. The new release, delivered via the QualysGuard Cloud Platform and its new Java-based backend comes with a new Web User Interface (UI) that raises the bar in terms of ease-of-use, flexible reporting and automation of scanning tasks.
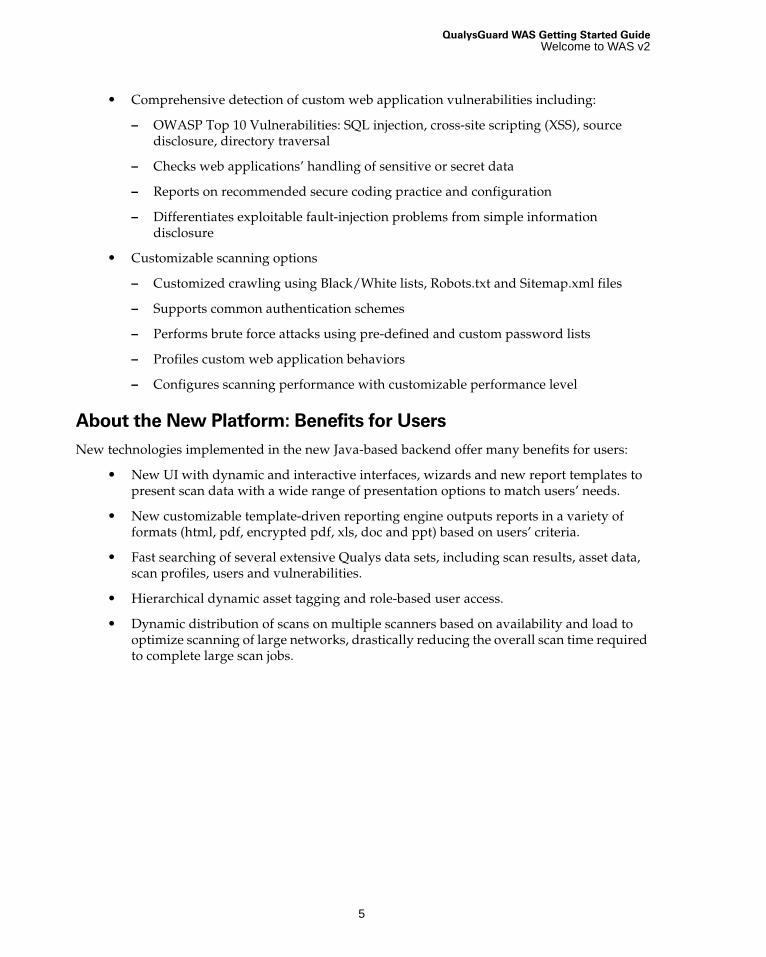
Web Application Scanning Lifecycle
The web application scanning lifecycle assists users with managing security and compliance through web application creation, scanning, reporting and remediation.
QualysGuard WAS v2 Features
Major features in QualysGuard WAS v2 include:
• Cataloging and scanning of web applications in the enterprise (Intranet, Internet)
• Fully interactive UI with flexible workflows and reporting
• Supports scanning HTML web applications with JavaScript and embedded Flash
4
QualysGuard WAS Getting Started GuideWelcome to WAS v2
• Comprehensive detection of custom web application vulnerabilities including:
– OWASP Top 10 Vulnerabilities: SQL injection, cross-site scripting (XSS), source disclosure, directory traversal
– Checks web applications’ handling of sensitive or secret data
– Reports on recommended secure coding practice and configuration
– Differentiates exploitable fault-injection problems from simple information disclosure
• Customizable scanning options
– Customized crawling using Black/White lists, Robots.txt and Sitemap.xml files
– Supports common authentication schemes
– Performs brute force attacks using pre-defined and custom password lists
– Profiles custom web application behaviors
– Configures scanning performance with customizable performance level
About the New Platform: Benefits for Users
New technologies implemented in the new Java-based backend offer many benefits for users:
• New UI with dynamic and interactive interfaces, wizards and new report templates to present scan data with a wide range of presentation options to match users’ needs.
• New customizable template-driven reporting engine outputs reports in a variety of formats (html, pdf, encrypted pdf, xls, doc and ppt) based on users’ criteria.
• Fast searching of several extensive Qualys data sets, including scan results, asset data, scan profiles, users and vulnerabilities.
• Hierarchical dynamic asset tagging and role-based user access.
• Dynamic distribution of scans on multiple scanners based on availability and load to optimize scanning of large networks, drastically reducing the overall scan time required to complete large scan jobs.
5
Let’s Begin
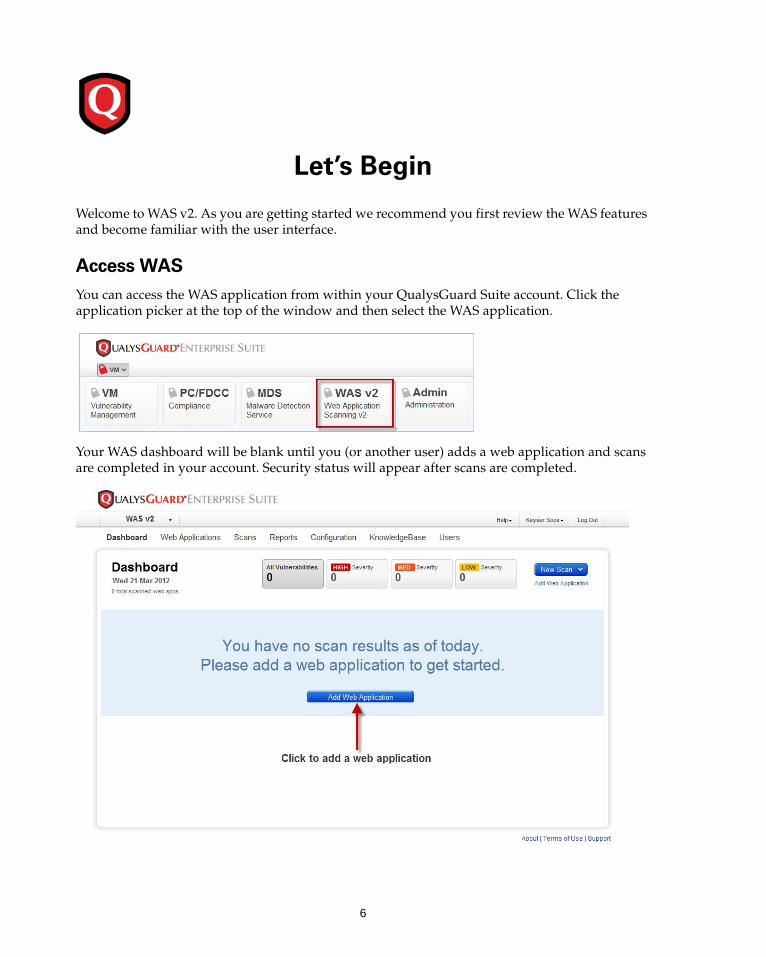
Welcome to WAS v2. As you are getting started we recommend you first review the WAS features and become familiar with the user interface.
Access WAS
You can access the WAS application from within your QualysGuard Suite account. Click the application picker at the top of the window and then select the WAS application.
Your WAS dashboard will be blank until you (or another user) adds a web application and scans are completed in your account. Security status will appear after scans are completed.
6

QualysGuard WAS Getting Started GuideLet’s Begin
Add New Web Application
Use the wizard to add your first web application.
1. Application detailsEnter the starting URL (required) and specify the crawling scope for scanning the web application. Assign tags to the web application so you can grant users access to it.
2. Scan settingsDefine scan settings (optional): a.) Default option profile. An option profile is a set of scan options. The service provides the profile “Initial WAS Options” to help you get started. If you select this profile as the default, it is applied to scans automatically. b.) Default scanner appliance. Select cloud scanner for external scanning or a scanner appliance for internal scanning. c.) Observe robot.txt, sitemap.xml, and to use header injection.
3. Crawl SettingsUpload Selenium scripts to configure crawling (optional). Each script has recorded paths through the application that you want the scanning engine to crawl in addition to standard crawling performed by the service. This enables the service to crawl complex workflows, such as selecting user input combinations that require certain knowledge and/or user interaction.
4. AuthenticationSupply authentication credentials if authenticated scanning will be used (optional). You can define both form and server authentication records. Form and Server authentication is supported.
5. Crawl exclusion listsAdd black & white lists as appropriate (optional).
6. CommentsAdd comments to be saved with the web application (optional).
Turn help tips on in the title bar and get help for each setting while walking through the wizard. As you mouse over each field name, help tips appear in a yellow bubble.
7
QualysGuard WAS Getting Started GuideLet’s Begin
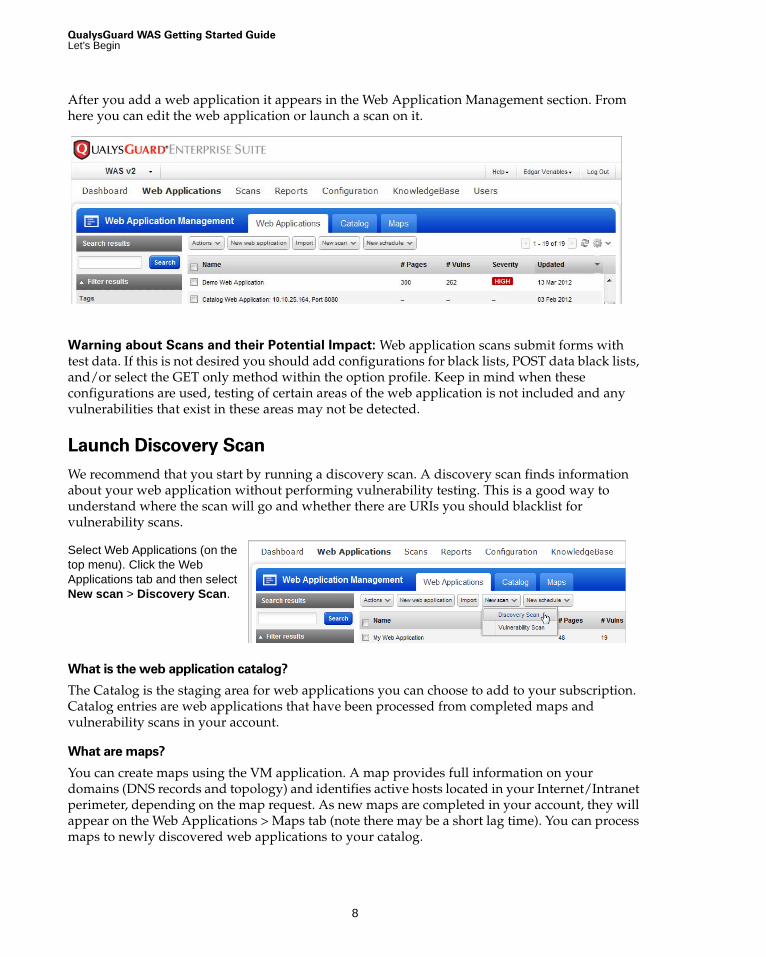
After you add a web application it appears in the Web Application Management section. From here you can edit the web application or launch a scan on it.
Warning about Scans and their Potential Impact: Web application scans submit forms with test data. If this is not desired you should add configurations for black lists, POST data black lists, and/or select the GET only method within the option profile. Keep in mind when these configurations are used, testing of certain areas of the web application is not included and any vulnerabilities that exist in these areas may not be detected.
Launch Discovery Scan
We recommend that you start by running a discovery scan. A discovery scan finds information about your web application without performing vulnerability testing. This is a good way to understand where the scan will go and whether there are URIs you should blacklist for vulnerability scans.
What is the web application catalog?
The Catalog is the staging area for web applications you can choose to add to your subscription. Catalog entries are web applications that have been processed from completed maps and vulnerability scans in your account.
What are maps?
You can create maps using the VM application. A map provides full information on your domains (DNS records and topology) and identifies active hosts located in your Internet/Intranet perimeter, depending on the map request. As new maps are completed in your account, they will appear on the Web Applications > Maps tab (note there may be a short lag time). You can process maps to newly discovered web applications to your catalog.
Select Web Applications (on the top menu). Click the Web Applications tab and then select New scan > Discovery Scan.
8
QualysGuard WAS Getting Started GuideLet’s Begin
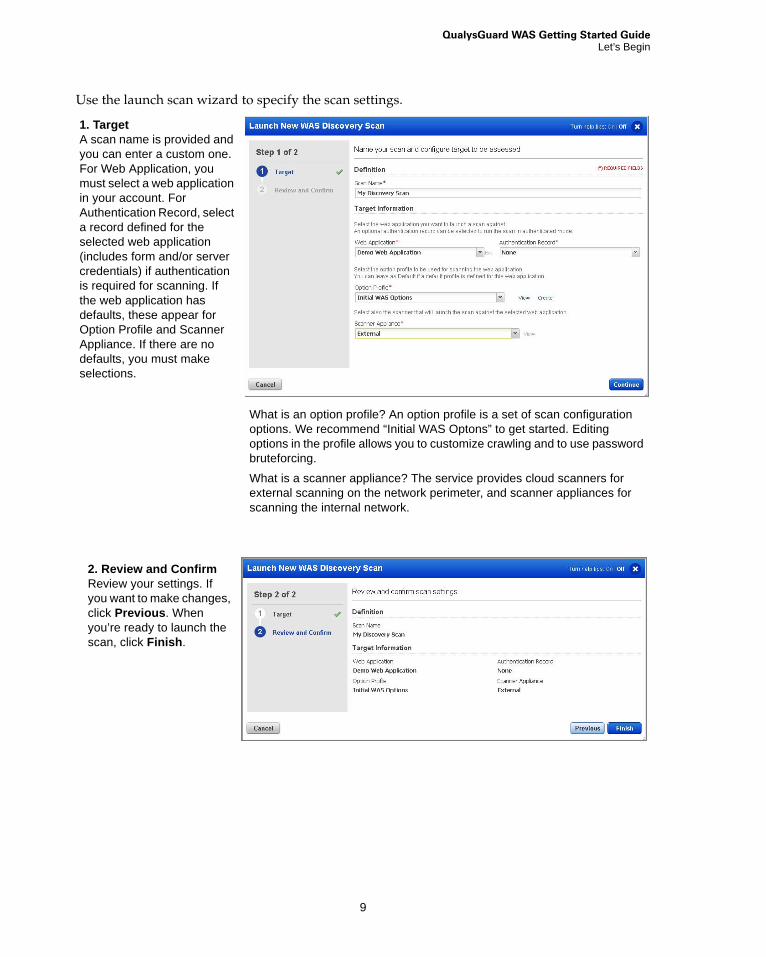
Use the launch scan wizard to specify the scan settings.
1. TargetA scan name is provided and you can enter a custom one. For Web Application, you must select a web application in your account. For Authentication Record, select a record defined for the selected web application (includes form and/or server credentials) if authentication is required for scanning. If the web application has defaults, these appear for Option Profile and Scanner Appliance. If there are no defaults, you must make selections.
What is an option profile? An option profile is a set of scan configuration options. We recommend “Initial WAS Optons” to get started. Editing options in the profile allows you to customize crawling and to use password bruteforcing.
What is a scanner appliance? The service provides cloud scanners for external scanning on the network perimeter, and scanner appliances for scanning the internal network.
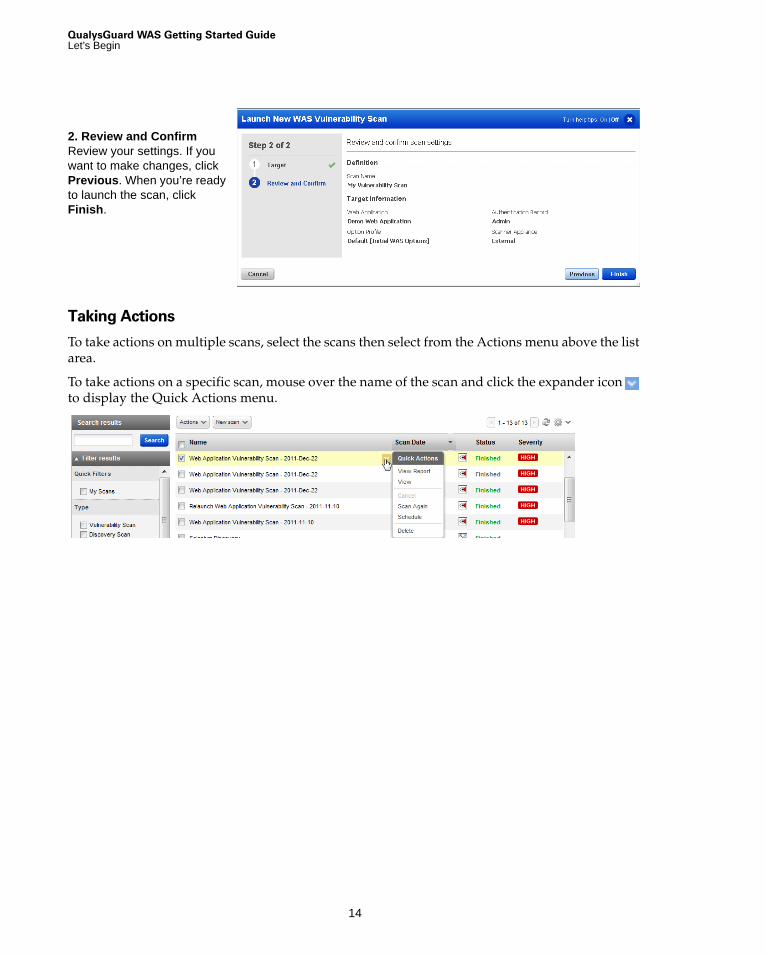
2. Review and ConfirmReview your settings. If you want to make changes, click Previous. When you’re ready to launch the scan, click Finish.
9

QualysGuard WAS Getting Started GuideLet’s Begin
Monitor Status
Your scan appears in the scan list where you can view its status.
View Discovery Scan Results
When the scan is completed, the scan status changes from Running to Finished. There are multiple ways to view discovery scan results.
WAS Scan View
Double click the finished discovery scan in the scan list to display the scan view.
The status “Running” indicates the scan is in progress. You can cancel a running scan at any time. To do this click to select the scan and then select Actions > Cancel.
OverviewShows the scan findings and graphs depicting the total number of sensitive content and information gathered found by the scan.
Information gathered identifies information gathered during the scan process, such as links crawled, the external links discovered, external form actions discovered, host information, and scan diagnostics.
Click the View Report button to launch an interactive scan results report.
10
QualysGuard WAS Getting Started GuideLet’s Begin
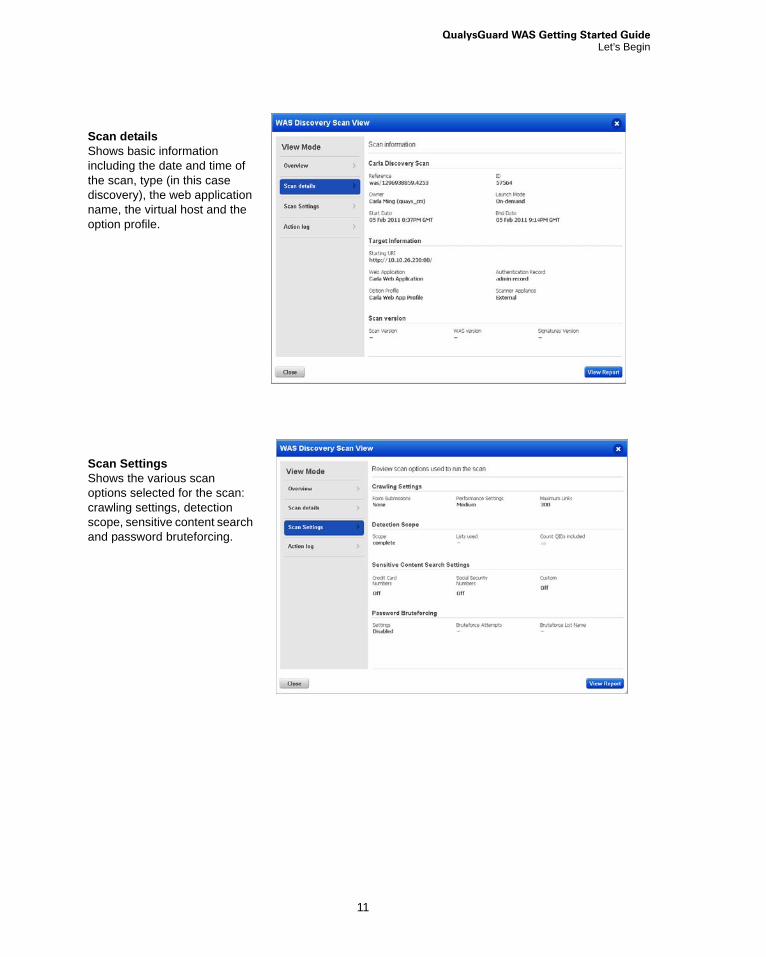
Scan detailsShows basic information including the date and time of the scan, type (in this case discovery), the web application name, the virtual host and the option profile.
Scan SettingsShows the various scan options selected for the scan: crawling settings, detection scope, sensitive content search and password bruteforcing.
11
QualysGuard WAS Getting Started GuideLet’s Begin
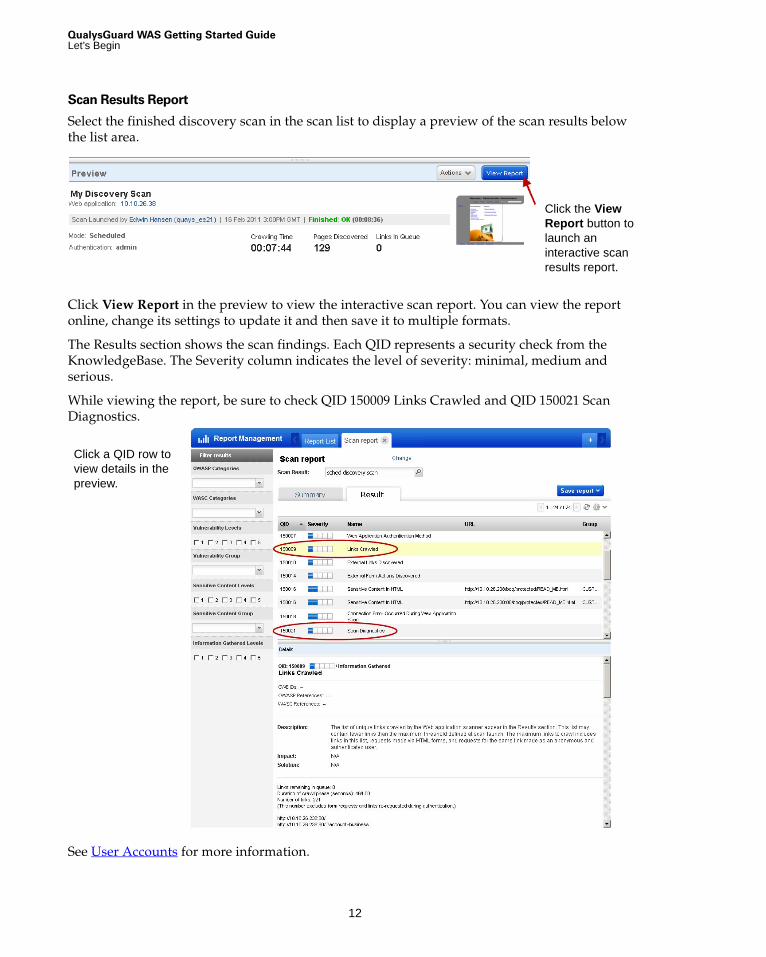
Scan Results Report
Select the finished discovery scan in the scan list to display a preview of the scan results below the list area.
Click View Report in the preview to view the interactive scan report. You can view the report online, change its settings to update it and then save it to multiple formats.
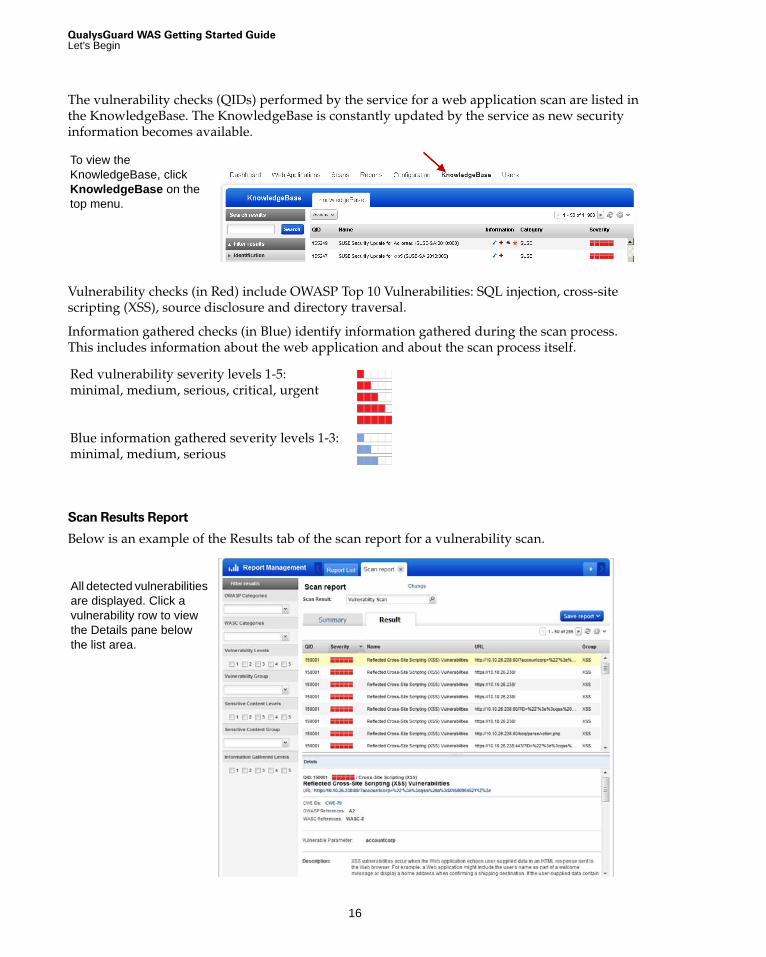
The Results section shows the scan findings. Each QID represents a security check from the KnowledgeBase. The Severity column indicates the level of severity: minimal, medium and serious.
While viewing the report, be sure to check QID 150009 Links Crawled and QID 150021 Scan Diagnostics.
See User Accounts for more information.
Click the View Report button to launch an interactive scan results report.
Click a QID row to view details in the preview.
12
QualysGuard WAS Getting Started GuideLet’s Begin
Launch Vulnerability Scan
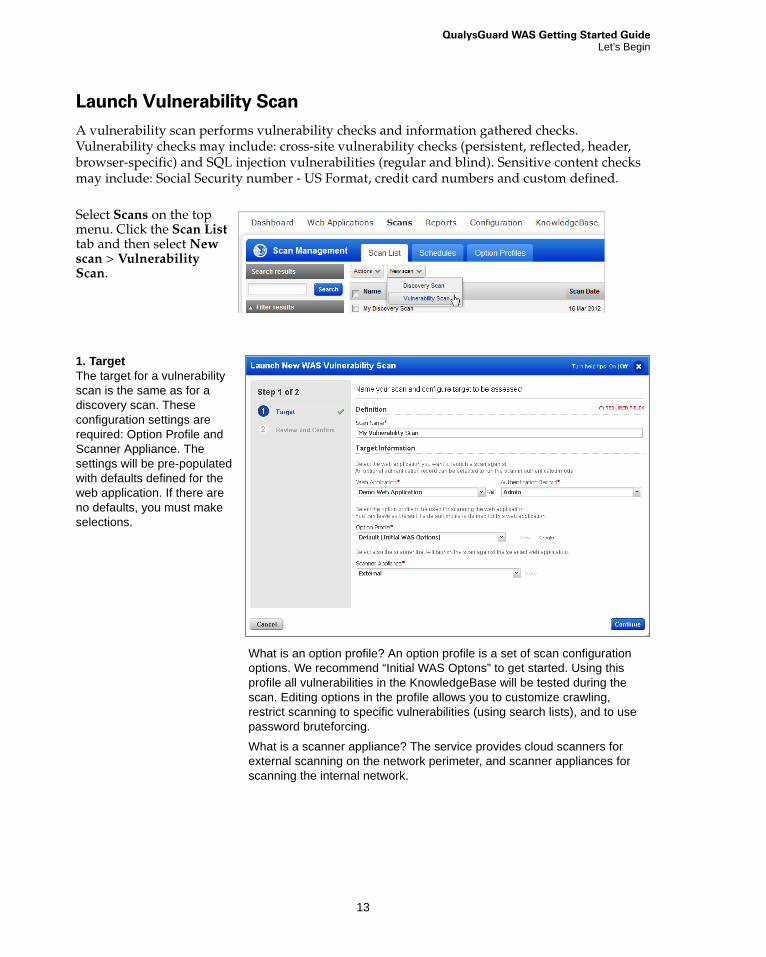
A vulnerability scan performs vulnerability checks and information gathered checks. Vulnerability checks may include: cross-site vulnerability checks (persistent, reflected, header, browser-specific) and SQL injection vulnerabilities (regular and blind). Sensitive content checks may include: Social Security number - US Format, credit card numbers and custom defined.
Select Scans on the top menu. Click the Scan List tab and then select New scan > Vulnerability Scan.
1. TargetThe target for a vulnerability scan is the same as for a discovery scan. These configuration settings are required: Option Profile and Scanner Appliance. The settings will be pre-populated with defaults defined for the web application. If there are no defaults, you must make selections.
What is an option profile? An option profile is a set of scan configuration options. We recommend “Initial WAS Optons” to get started. Using this profile all vulnerabilities in the KnowledgeBase will be tested during the scan. Editing options in the profile allows you to customize crawling, restrict scanning to specific vulnerabilities (using search lists), and to use password bruteforcing.
What is a scanner appliance? The service provides cloud scanners for external scanning on the network perimeter, and scanner appliances for scanning the internal network.
13
QualysGuard WAS Getting Started GuideLet’s Begin
Taking Actions
To take actions on multiple scans, select the scans then select from the Actions menu above the list area.
To take actions on a specific scan, mouse over the name of the scan and click the expander icon to display the Quick Actions menu.
2. Review and ConfirmReview your settings. If you want to make changes, click Previous. When you’re ready to launch the scan, click Finish.
14
QualysGuard WAS Getting Started GuideLet’s Begin
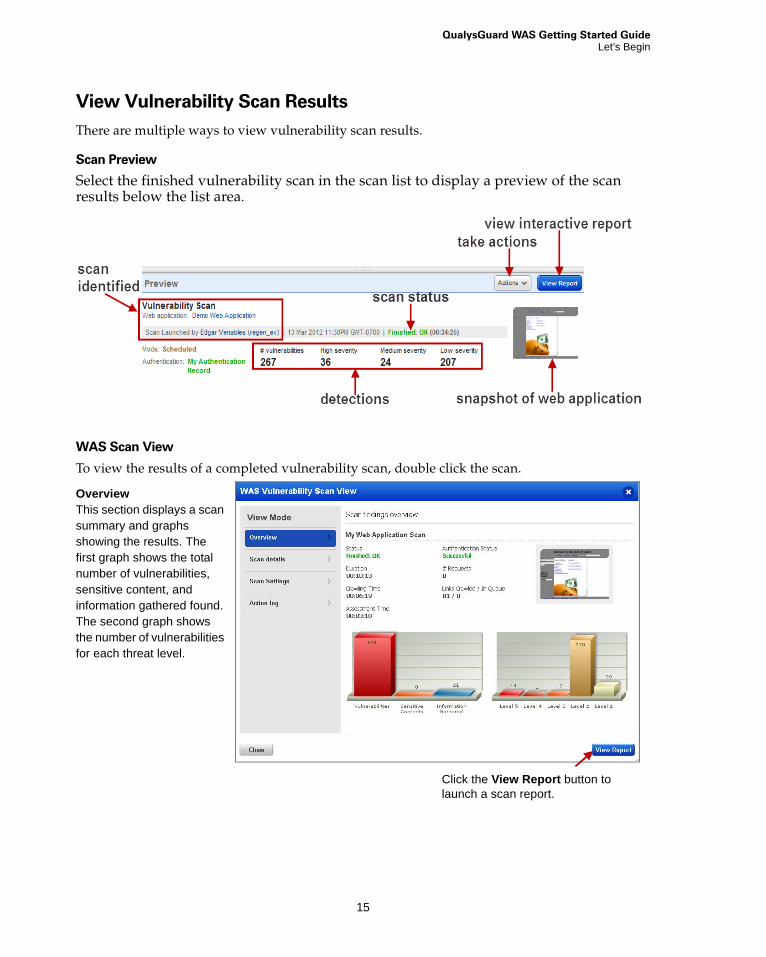
View Vulnerability Scan Results
There are multiple ways to view vulnerability scan results.
Scan Preview
Select the finished vulnerability scan in the scan list to display a preview of the scan results below the list area.
WAS Scan View
To view the results of a completed vulnerability scan, double click the scan.
OverviewThis section displays a scan summary and graphs showing the results. The first graph shows the total number of vulnerabilities, sensitive content, and information gathered found. The second graph shows the number of vulnerabilities for each threat level.
Click the View Report button to launch a scan report.
15
QualysGuard WAS Getting Started GuideLet’s Begin
The vulnerability checks (QIDs) performed by the service for a web application scan are listed in the KnowledgeBase. The KnowledgeBase is constantly updated by the service as new security information becomes available.
Vulnerability checks (in Red) include OWASP Top 10 Vulnerabilities: SQL injection, cross-site scripting (XSS), source disclosure and directory traversal.
Information gathered checks (in Blue) identify information gathered during the scan process. This includes information about the web application and about the scan process itself.
Scan Results Report
Below is an example of the Results tab of the scan report for a vulnerability scan.
To view the KnowledgeBase, click KnowledgeBase on the top menu.
Red vulnerability severity levels 1-5: minimal, medium, serious, critical, urgent
Blue information gathered severity levels 1-3: minimal, medium, serious
All detected vulnerabilities are displayed. Click a vulnerability row to view the Details pane below the list area.
16
QualysGuard WAS Getting Started GuideLet’s Begin
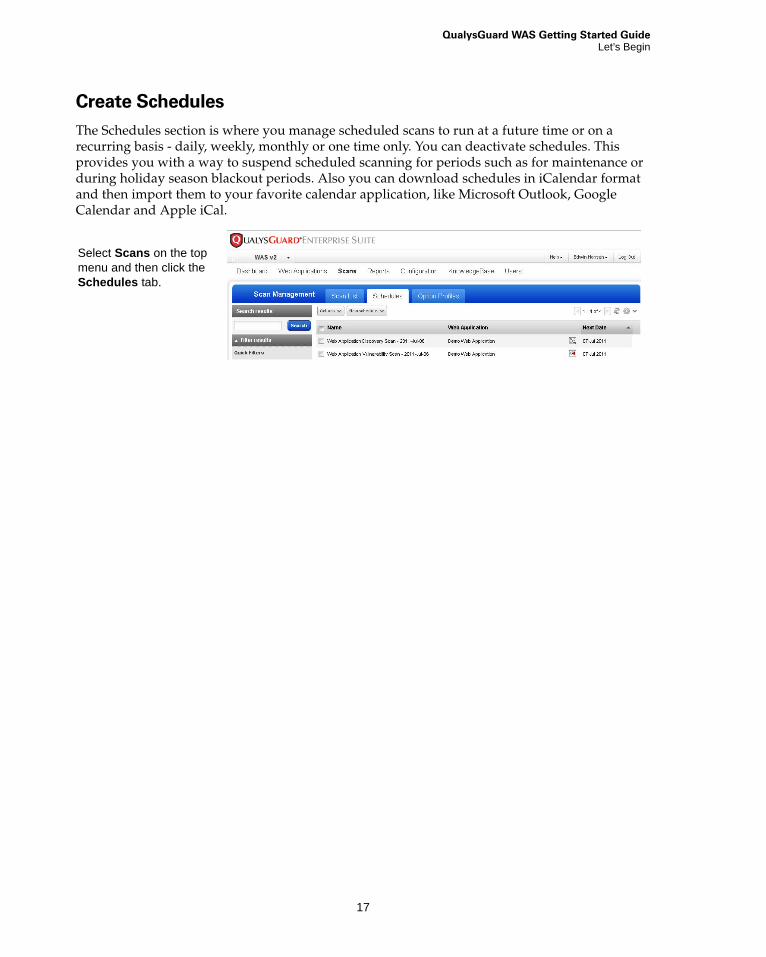
Create Schedules
The Schedules section is where you manage scheduled scans to run at a future time or on a recurring basis - daily, weekly, monthly or one time only. You can deactivate schedules. This provides you with a way to suspend scheduled scanning for periods such as for maintenance or during holiday season blackout periods. Also you can download schedules in iCalendar format and then import them to your favorite calendar application, like Microsoft Outlook, Google Calendar and Apple iCal.
Select Scans on the top menu and then click the Schedules tab.
17
Your Dashboard
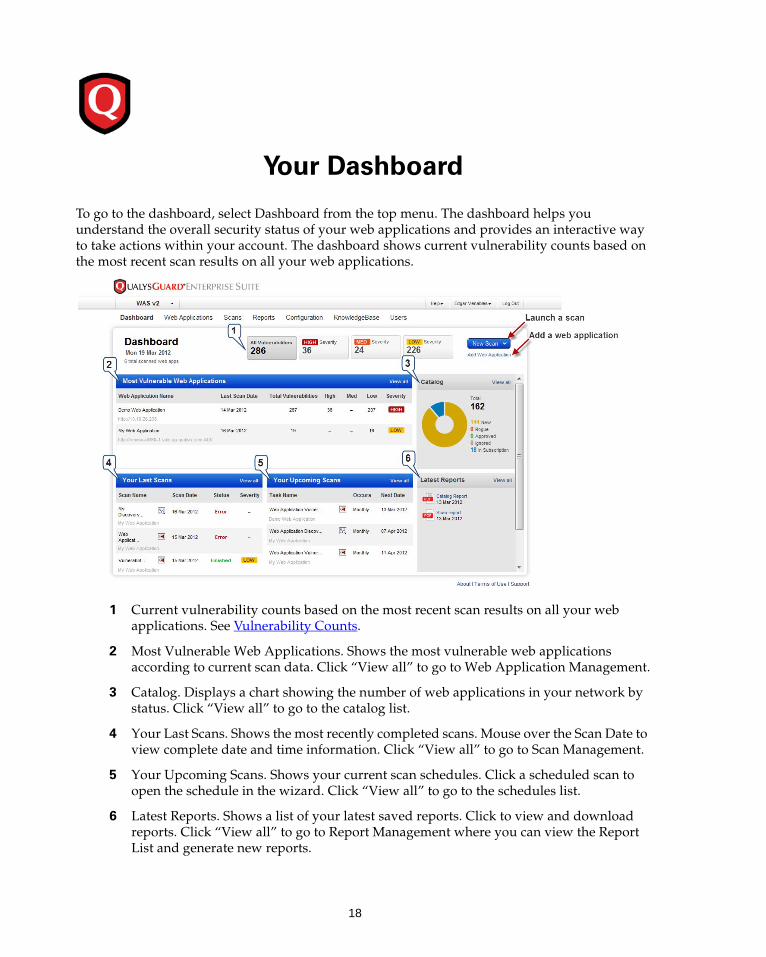
To go to the dashboard, select Dashboard from the top menu. The dashboard helps you understand the overall security status of your web applications and provides an interactive way to take actions within your account. The dashboard shows current vulnerability counts based on the most recent scan results on all your web applications.
1 Current vulnerability counts based on the most recent scan results on all your web applications. See Vulnerability Counts.
2 Most Vulnerable Web Applications. Shows the most vulnerable web applications according to current scan data. Click “View all” to go to Web Application Management.
3 Catalog. Displays a chart showing the number of web applications in your network by status. Click “View all” to go to the catalog list.
4 Your Last Scans. Shows the most recently completed scans. Mouse over the Scan Date to view complete date and time information. Click “View all” to go to Scan Management.
5 Your Upcoming Scans. Shows your current scan schedules. Click a scheduled scan to open the schedule in the wizard. Click “View all” to go to the schedules list.
6 Latest Reports. Shows a list of your latest saved reports. Click to view and download reports. Click “View all” to go to Report Management where you can view the Report List and generate new reports.
18
QualysGuard WAS Getting Started GuideYour Dashboard
Vulnerability Counts
All Vulnerabilities shows the total number of current vulnerabilities. High Severity shows the total current vulnerabilities assigned severity levels 4 and 5, Med Severity shows the total current vulnerabilities assigned severity level 3, and Low Severity shows the total current vulnerabilities assigned severity levels 1 and 2. Current vulnerability counts are refreshed as web application scans are completed.
19
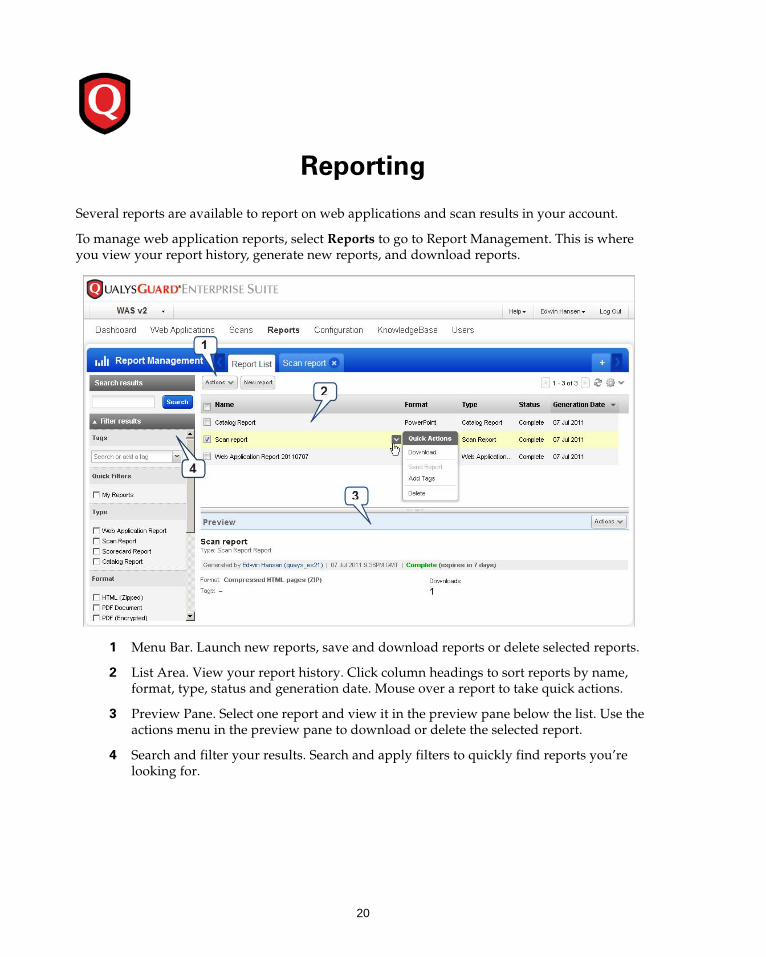
Reporting
Several reports are available to report on web applications and scan results in your account.
To manage web application reports, select Reports to go to Report Management. This is where you view your report history, generate new reports, and download reports.
1 Menu Bar. Launch new reports, save and download reports or delete selected reports.
2 List Area. View your report history. Click column headings to sort reports by name, format, type, status and generation date. Mouse over a report to take quick actions.
3 Preview Pane. Select one report and view it in the preview pane below the list. Use the actions menu in the preview pane to download or delete the selected report.
4 Search and filter your results. Search and apply filters to quickly find reports you’re looking for.
20
QualysGuard WAS Getting Started GuideReporting
Available Reports
All WAS reports are interactive. Interactive reports are reports you can generate online. You can change the report parameters and settings and see results instantly. This enables you to view your data in various ways. You can save reports and download them in multiple formats.
Scan Report. The Scan Report identifies vulnerabilities and sensitive content detected by a scan. You select a particular scan task to report on.
Web Application Report. The Web Application Report identifies vulnerabilities and sensitive content detected by the most recent scan of a selected web application. This report allows you to keep changing the report settings to get different views of your web application scan data.
Scorecard Report. The Scorecard Report is provided by the service for reporting on web application scan data for different business groups and functions. You may run the scorecard report with its predefined report settings and/or user-defined scorecard reports with customized settings. A scorecard report identifies the vulnerabilities and sensitive contents detected for one or more target web applications. The scorecard report includes the most recent scan data for the target web applications.
Catalog Report. The Catalog Report provides a listing of catalog entries that match your report criteria. You can report on entries added during a specific time period and select a catalog entry status to include in the report: New, Rogue, Approved, Ignored or Subscription.
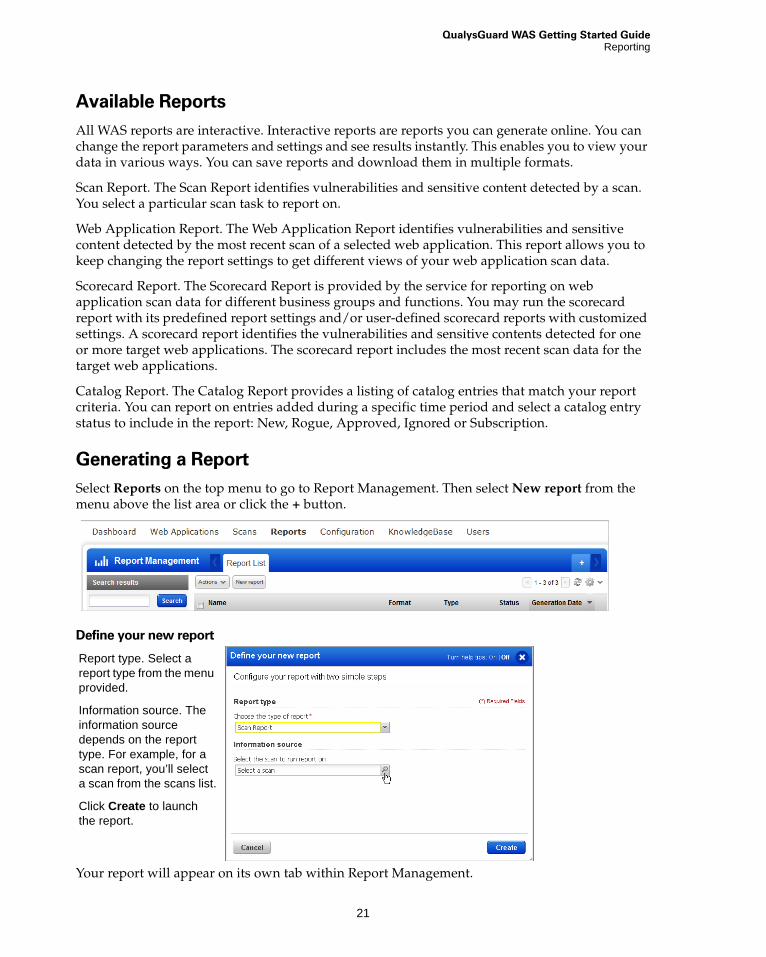
Generating a Report
Select Reports on the top menu to go to Report Management. Then select New report from the menu above the list area or click the + button.
Define your new report
Your report will appear on its own tab within Report Management.
Report type. Select a report type from the menu provided.
Information source. The information source depends on the report type. For example, for a scan report, you’ll select a scan from the scans list.
Click Create to launch the report.
21
QualysGuard WAS Getting Started GuideReporting
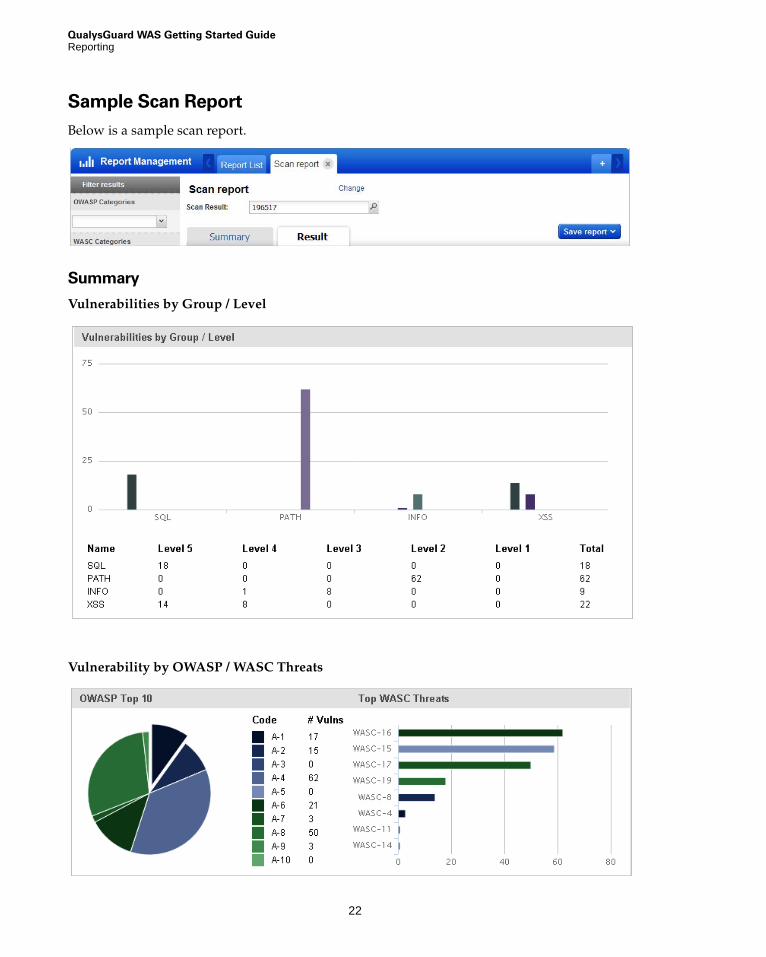
Sample Scan Report
Below is a sample scan report.
Summary
Vulnerabilities by Group / Level
Vulnerability by OWASP / WASC Threats
22

QualysGuard WAS Getting Started GuideReporting
Results
The Results tab of the scan report includes each vulnerability (QID) detected along with its description. Click a vulnerability row to view the impact, payload and result in the Details pane below the QID list.
23
Using Tags
Tags are keywords that you assign to objects in your subscription. Business units have unique tags and you can apply tags to users, web applications, option profiles, search lists and scanner appliances. You can link tags together in a hierarchy to organize objects. For example a business unit tag may have child tags assigned to groups of objects that belong to that business unit. Users assigned to that business unit will have access to those objects.
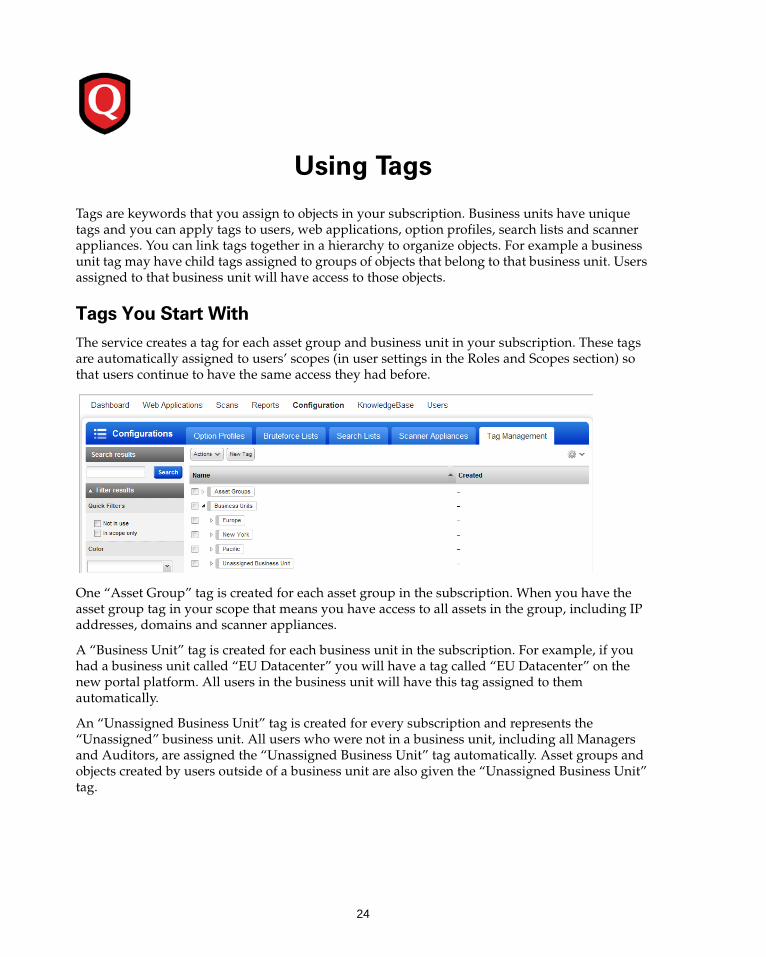
Tags You Start With
The service creates a tag for each asset group and business unit in your subscription. These tags are automatically assigned to users’ scopes (in user settings in the Roles and Scopes section) so that users continue to have the same access they had before.
One “Asset Group” tag is created for each asset group in the subscription. When you have the asset group tag in your scope that means you have access to all assets in the group, including IP addresses, domains and scanner appliances.
A “Business Unit” tag is created for each business unit in the subscription. For example, if you had a business unit called “EU Datacenter” you will have a tag called “EU Datacenter” on the new portal platform. All users in the business unit will have this tag assigned to them automatically.
An “Unassigned Business Unit” tag is created for every subscription and represents the “Unassigned” business unit. All users who were not in a business unit, including all Managers and Auditors, are assigned the “Unassigned Business Unit” tag automatically. Asset groups and objects created by users outside of a business unit are also given the “Unassigned Business Unit” tag.
24
QualysGuard WAS Getting Started GuideUsing Tags
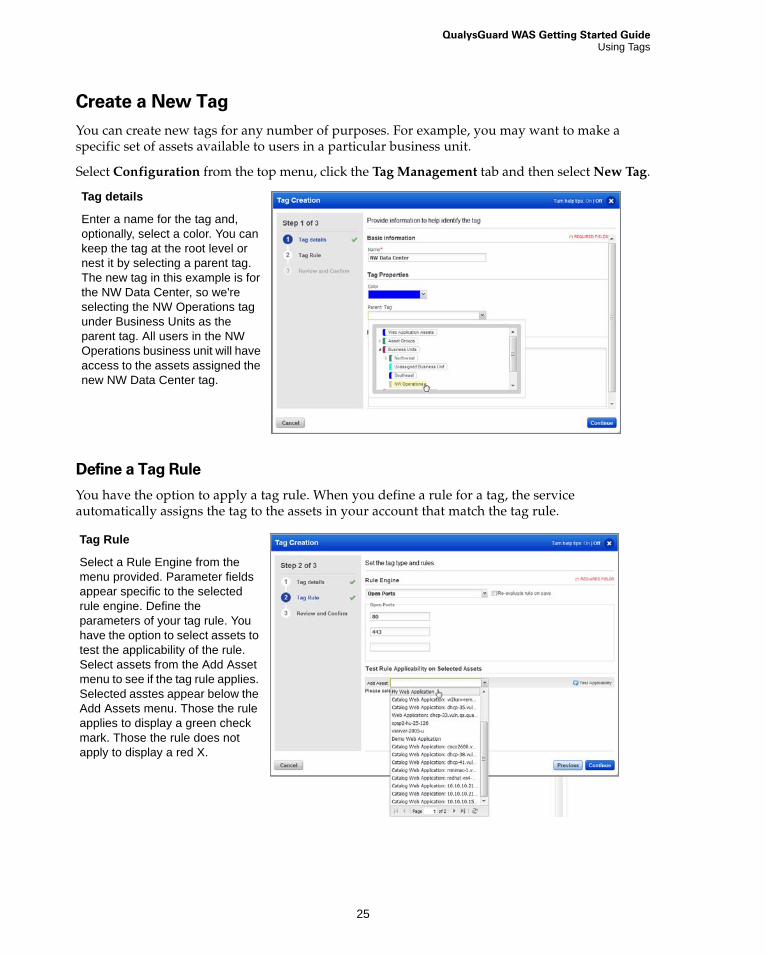
Create a New Tag
You can create new tags for any number of purposes. For example, you may want to make a specific set of assets available to users in a particular business unit.
Select Configuration from the top menu, click the Tag Management tab and then select New Tag.
Define a Tag Rule
You have the option to apply a tag rule. When you define a rule for a tag, the service automatically assigns the tag to the assets in your account that match the tag rule.
Tag details
Enter a name for the tag and, optionally, select a color. You can keep the tag at the root level or nest it by selecting a parent tag. The new tag in this example is for the NW Data Center, so we're selecting the NW Operations tag under Business Units as the parent tag. All users in the NW Operations business unit will have access to the assets assigned the new NW Data Center tag.
Tag Rule
Select a Rule Engine from the menu provided. Parameter fields appear specific to the selected rule engine. Define the parameters of your tag rule. You have the option to select assets to test the applicability of the rule. Select assets from the Add Asset menu to see if the tag rule applies. Selected asstes appear below the Add Assets menu. Those the rule applies to display a green check mark. Those the rule does not apply to display a red X.
25
QualysGuard WAS Getting Started GuideUsing Tags
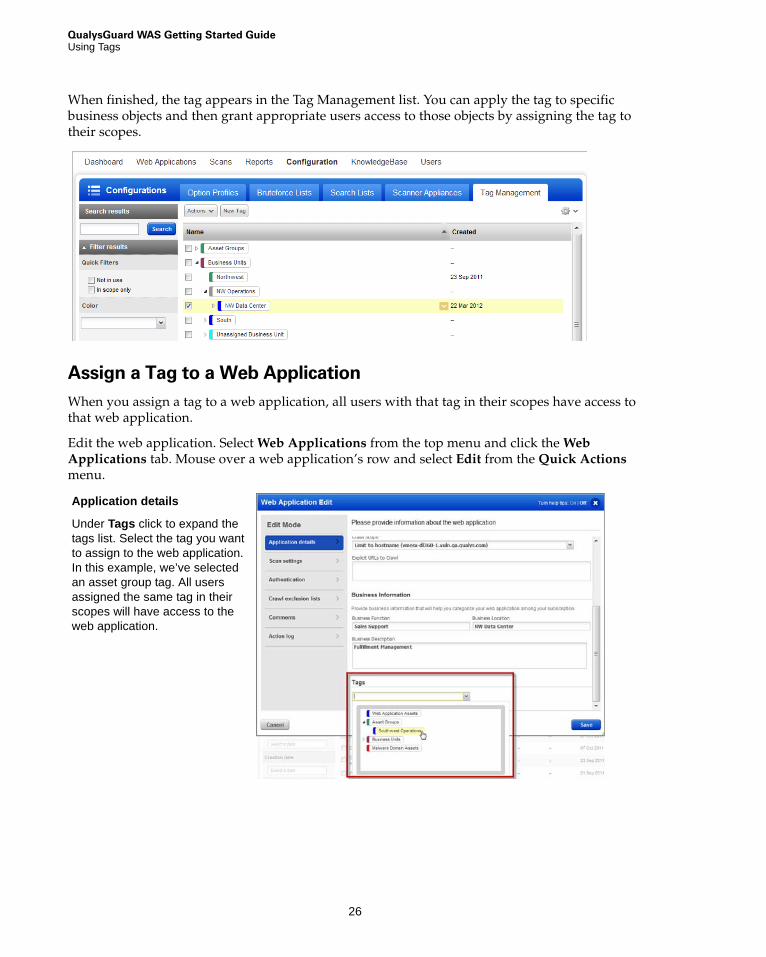
When finished, the tag appears in the Tag Management list. You can apply the tag to specific business objects and then grant appropriate users access to those objects by assigning the tag to their scopes.
Assign a Tag to a Web Application
When you assign a tag to a web application, all users with that tag in their scopes have access to that web application.
Edit the web application. Select Web Applications from the top menu and click the Web Applications tab. Mouse over a web application’s row and select Edit from the Quick Actions menu.
Application details
Under Tags click to expand the tags list. Select the tag you want to assign to the web application. In this example, we’ve selected an asset group tag. All users assigned the same tag in their scopes will have access to the web application.
26
QualysGuard WAS Getting Started GuideUsing Tags
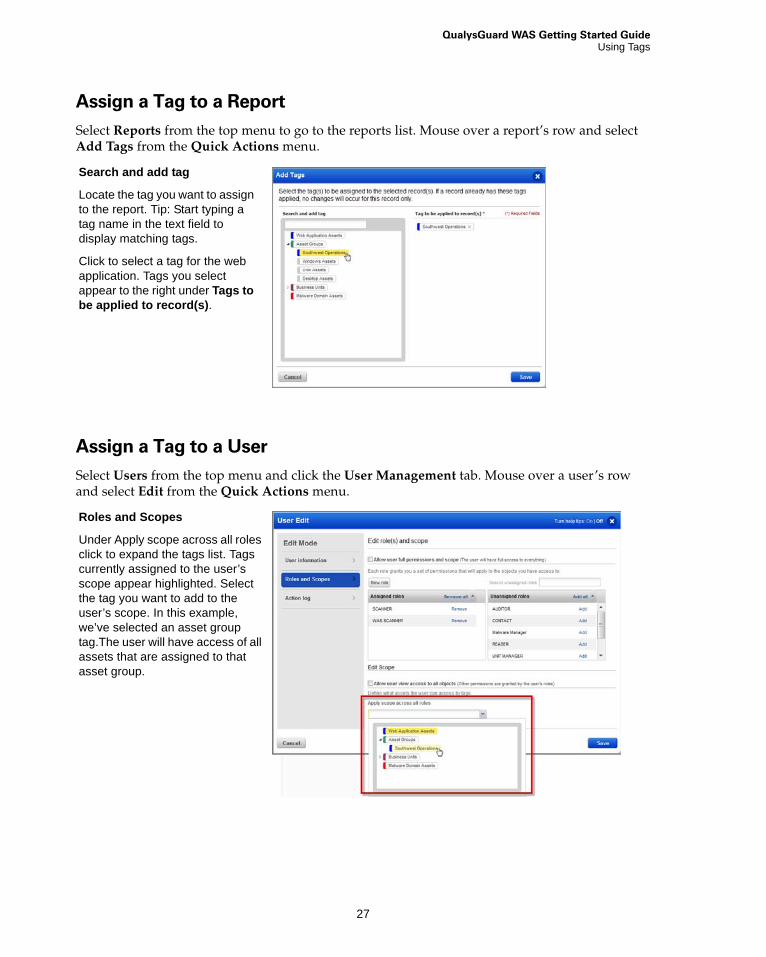
Assign a Tag to a Report
Select Reports from the top menu to go to the reports list. Mouse over a report’s row and select Add Tags from the Quick Actions menu.
Assign a Tag to a User
Select Users from the top menu and click the User Management tab. Mouse over a user’s row and select Edit from the Quick Actions menu.
Search and add tag
Locate the tag you want to assign to the report. Tip: Start typing a tag name in the text field to display matching tags.
Click to select a tag for the web application. Tags you select appear to the right under Tags to be applied to record(s).
Roles and Scopes
Under Apply scope across all roles click to expand the tags list. Tags currently assigned to the user’s scope appear highlighted. Select the tag you want to add to the user’s scope. In this example, we’ve selected an asset group tag.The user will have access of all assets that are assigned to that asset group.
27
User Accounts
The WAS v2 application gives users much greater control over managing each user’s permissions and granting them access to various parts of the application. Each user account is defined by roles containing multiple permissions (what the user can do) and scopes (what the user can access).
Users are defined in the VM application and user account updates are reflected in the WAS v2 application.
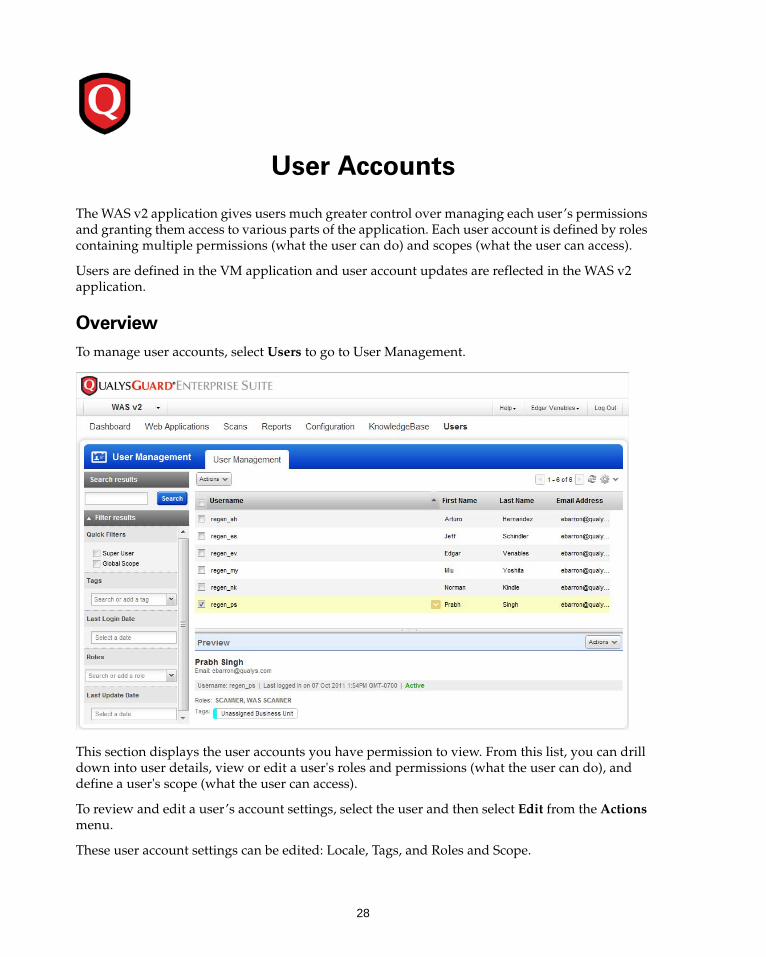
Overview
To manage user accounts, select Users to go to User Management.
This section displays the user accounts you have permission to view. From this list, you can drill down into user details, view or edit a user's roles and permissions (what the user can do), and define a user's scope (what the user can access).
To review and edit a user’s account settings, select the user and then select Edit from the Actions menu.
These user account settings can be edited: Locale, Tags, and Roles and Scope.
28
QualysGuard WAS Getting Started GuideUser Accounts
Initially Managers and Unit Managers have permision to edit user account settings, unless this permission is removed using the WAS or Admin applications. Managers can edit all user accounts in the subscription. Unit Managers can edit the user accounts in their business units.
WAS v2 user permissions granted within user roles determine whether users have permission to edit user account settings. Managers have permision to edit user account settings, unless this permission is removed using the WAS or Admin applications.
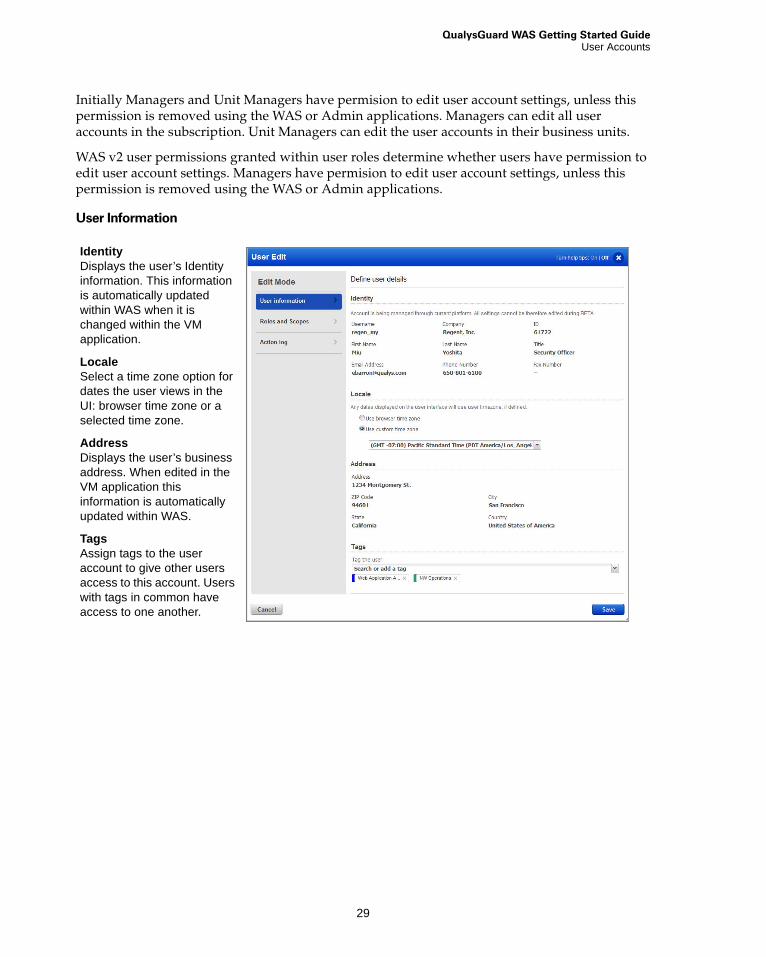
User Information
IdentityDisplays the user’s Identity information. This information is automatically updated within WAS when it is changed within the VM application.
LocaleSelect a time zone option for dates the user views in the UI: browser time zone or a selected time zone.
AddressDisplays the user’s business address. When edited in the VM application this information is automatically updated within WAS.
TagsAssign tags to the user account to give other users access to this account. Users with tags in common have access to one another.
29
QualysGuard WAS Getting Started GuideUser Accounts
Assigned User Roles
Each user is automatically assigned one or more user roles. User roles contain sets of permissions and they can be edited to grant users more or fewer privileges, at a very granular level. See the table below to see the role assigned.
Assigned Scopes
Scopes define the business objects users are able to access within the application. Each user is assigned an initial scope as described below.
Managers
Managers are not assigned a role or scope initially. They have full permissions and all scopes.
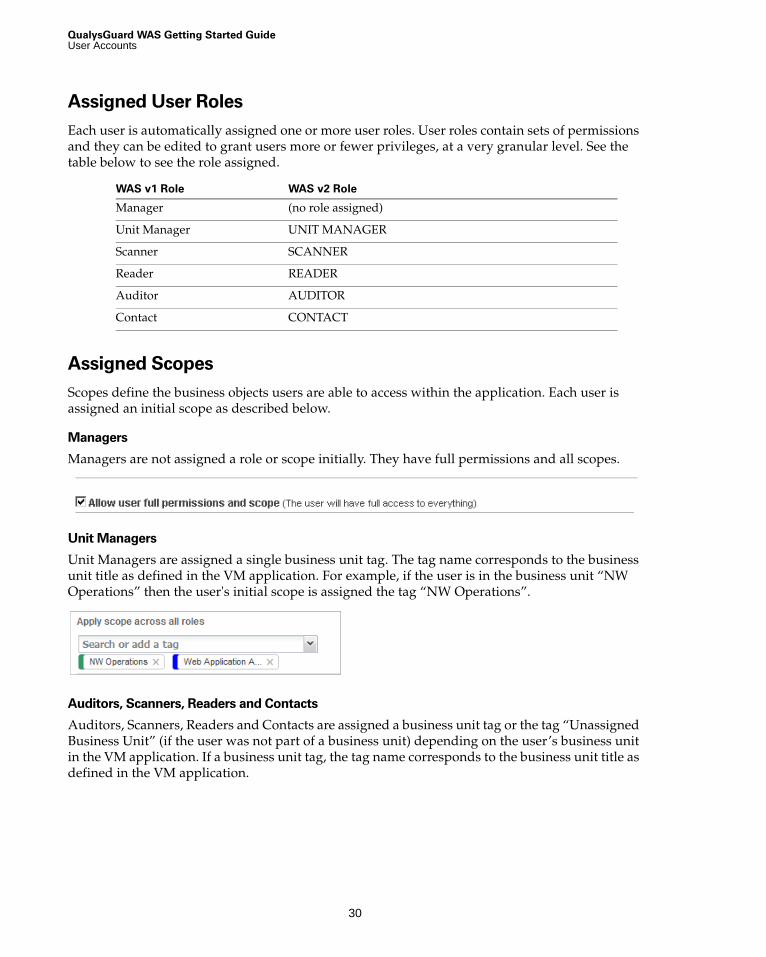
Unit Managers
Unit Managers are assigned a single business unit tag. The tag name corresponds to the business unit title as defined in the VM application. For example, if the user is in the business unit “NW Operations” then the user's initial scope is assigned the tag “NW Operations”.
Auditors, Scanners, Readers and Contacts
Auditors, Scanners, Readers and Contacts are assigned a business unit tag or the tag “Unassigned Business Unit” (if the user was not part of a business unit) depending on the user’s business unit in the VM application. If a business unit tag, the tag name corresponds to the business unit title as defined in the VM application.
WAS v1 Role WAS v2 Role
Manager (no role assigned)
Unit Manager UNIT MANAGER
Scanner SCANNER
Reader READER
Auditor AUDITOR
Contact CONTACT
30

QualysGuard WAS Getting Started GuideUser Accounts
Edit User Roles and Scopes
Roles define the user's permissions to act on the business objects in the subscription. Each role includes a specified set of permissions.
Scope determines which business objects the user can access in the subscription. Business objects that can be added to the scope include assets (web applications and scanner appliances), users, option profiles, search lists, password bruteforce lists and reports. Each user is assigned an initial scope to get started. Managers and users whose scopes include the “Edit User Role” permission can edit user roles and scopes.
Edit Role(s) and Scopes
Allow user full permissions and scopeSelect to grant the user unlimited permissions to all business objects in the subscription.
New roleClick to define a new role and select the permissions it provides.
Assigned rolesEach assigned role grants the user specific permissions. You can add and remove assigned roles, create new roles and change a role’s permissions.
Edit Scope
Allow user view access to all objectsSelect to allow the user view access to all assets in the subscription.
Apply scope across all rolesAssign tags to specify the business objects the user can
31
QualysGuard WAS Getting Started GuideContact Support
Warnings about Editing Roles
Please note the following when editing roles. 1) Some roles do not allow UI access and are assigned with other roles which do allow UI access. If you remove a user's role that includes UI access without assigning another role that includes UI access to the user, this may cause the user to lose the ability to use the application except the API. 2) If you delete a role from the subscription and that role is currently assigned to users, the role is automatically deleted from these users' accounts and they may lose the ability to perform functions that were permitted in the role that was deleted.
Managing Assigned Permissions
Contact Support
Qualys is committed to providing you with the most thorough support. Through online documentation, telephone help, and direct email support, Qualys ensures that your questions will be answered in the fastest time possible. We support you 7 days a week, 24 hours a day. Access online support information at www.qualys.com/support/.
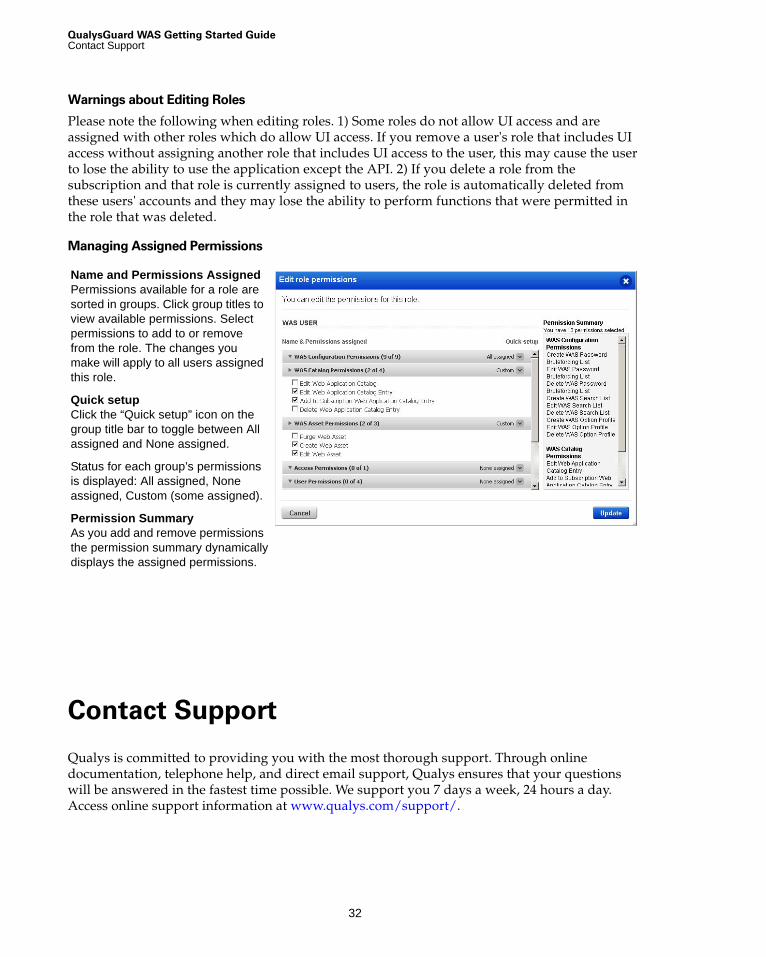
Name and Permissions AssignedPermissions available for a role are sorted in groups. Click group titles to view available permissions. Select permissions to add to or remove from the role. The changes you make will apply to all users assigned this role.
Quick setupClick the “Quick setup” icon on the group title bar to toggle between All assigned and None assigned.
Status for each group’s permissions is displayed: All assigned, None assigned, Custom (some assigned).
Permission SummaryAs you add and remove permissions the permission summary dynamically displays the assigned permissions.
32


![Skaffold - storage.googleapis.com · [getting-started getting-started] Hello world! [getting-started getting-started] Hello world! [getting-started getting-started] Hello world! 5.](https://static.fdocuments.in/doc/165x107/5ec939f2a76a033f091c5ac7/skaffold-getting-started-getting-started-hello-world-getting-started-getting-started.jpg)