
QTP New Feature Version 10.0
23
QTP Environment variable The variables that are commonly used across the environment in many tests by different resources are know as Environment Variables. There are Two types of Environment va riables 1. Built-in-variables 2. User Defined Variables 1.Built-in-variables :- These variables will be by default available in every test and can be directly used in any test with help of following syntax. Syntax: Environment.value(“Built-in-variables”) Example : var=environment.Value("OS") : to display the Operating System msgbox var 2. User Defined Variables :- The variables which are required commonly in number of test apart from the Built-in-variables need to be created by the user which are kn own as User Defined Variables. User Defined Variables are created in environment file, any body in that environment can Associate this file and use the variables in it. There are Two types of User Defined Variables i. Internal User Defined Variables : These Variables are used in the same file. See below example: • Open the Cal application • Put the tool under recording mode • Capture the objects properties of Cal application to Object Repository • Stop recording Steps for Declaring the Environment Variables in QTP: • Activate the menu item Test • Go to Settings • Select the Environment tab
-
Upload
shakeel-ahmed-iqbal -
Category
Documents
-
view
229 -
download
0
Transcript of QTP New Feature Version 10.0

8/6/2019 QTP New Feature Version 10.0
http://slidepdf.com/reader/full/qtp-new-feature-version-100 1/23
QTP Environment variable
The variables that are commonly used across the environment in many tests by different
resources are know as Environment Variables.
There are Two types of Environment variables
1. Built-in-variables
2. User Defined Variables
1.Built-in-variables :- These variables will be by default available in every test and can be directly used in any test with help of following syntax.
Syntax : Environment.value(“Built-in-variables”)
Example :
var=environment.Value("OS") : to display the Operating System
msgbox var
2. User Defined Variables :- The variables which are required commonly in number of test apart from the Built-in-variables need to be created by the user which are known asUser Defined Variables.
User Defined Variables are created in environment file, any body in that environment canAssociate this file and use the variables in it.
There are Two types of User Defined Variables
i. Internal User Defined Variables : These Variables are used in the same file. See below example:
• Open the Cal application• Put the tool under recording mode•
Capture the objects properties of Cal application to Object Repository• Stop recording
Steps for Declaring the Environment Variables in QTP:
• Activate the menu item Test• Go to Settings• Select the Environment tab
8/6/2019 QTP New Feature Version 10.0
http://slidepdf.com/reader/full/qtp-new-feature-version-100 2/23

8/6/2019 QTP New Feature Version 10.0
http://slidepdf.com/reader/full/qtp-new-feature-version-100 3/23
• Select variable type as User-defined• Select the check box of ‘load variables and values from an external file’
If you want you can make use of Exported data or you can create your own data in a filewith .xml extention file in the Environment folder
• Browse that file• Click on Apply• Click on OK
Associating the Environment Variables ( by parameterizing )
• Develop the script in test pane as below
' Setting the declered environment value (a ) to value1 edit button
VbWindow("Form1").VbEdit("val1").Set environment.Value("a")
' Setting the declered environment value (b ) to value2 edit button
VbWindow("Form1").VbEdit("val2").Set environment.Value("b")
' clicking on ADD button
VbWindow("Form1").VbButton("ADD").Click
• Run the test•
Analyze the results
Simple code to vadilate all the links of web page(DP and child object)
‘***********************************************************************
‘SCENARIO NAME :Check all links‘DESCRIPTION :This code Check all links in any web page‘PRECONDITIONS :This Assume that when click on Link the new page will open on
current window but not in new window‘AUTHOR :Mohan kumar ‘***********************************************************************
Set oDesc = Description.Create()‘ Retrieve HTML tagoDesc(”html tag”).Value = “A”Set rc = Browser(”title:=.*”).Page(”title:=.*”).ChildObjects(oDesc)
8/6/2019 QTP New Feature Version 10.0
http://slidepdf.com/reader/full/qtp-new-feature-version-100 4/23
num = rc.Count() ’get the number of link in a pageFor i=0 to num-1Set rc = Browser(”title:=.*”).Page(”title:=.*”).ChildObjects(oDesc)ref = rc(i).GetROProperty(”href”) ’get the “href”propety of the i th link Browser(”title:=.*”).Page(”title:=.*”).link(”text:=.*”,”index:=”&i).click ’click on i th
link Browser(”title:=.*”).synctitle1=Browser(”title:=.*”).getRoproperty(”title”) ’get the tile of the target pageMsgBox title1Browser(”title:=.*”).navigate(ref)’Navigates to the url taken from “href” propertyBrowser(”title:=.*”).synctitle2=Browser(”title:=.*”).getRoproperty(”title”)’get the tile of the tNavigated pageMsgBox title2If title1=title2 Then’condition to check for the targetted page and Navigated pageReporter.ReportEvent 0, “Navigated To Correct Page”,”"&title1′Reports if correctelse
Reporter.ReportEvent 1,”"&title1,”"&title2End If Browser(”title:=.*”).back’Navigates back to main pageBrowser(”title:=.*”).sync
Count number of links and objects in web page by child method objects
To count the number of links in a web page, We can use ChildObjects to get the link collection, then retrieve the properties for example number of links or any other objectson page.
Dim oDesc, oAllLinks, iNumberOfLinksset oDesc = Description.Create()oDesc("micclass").Value = "Link"Set oAllLinks = Browser("creationtime:=0").Page("micclass:=Page").ChildObjects(oDesc)iNumberOfLinks = aAllLinks.Countmsgbox iNumberOfLinks
QTP script to send Keyboard Input to an Application
Sending Keyboard Input to an Application
The example below uses the PressKey method to send keyboard input to an application.
'An example that presses a key using DeviceReplay.
Set obj = CreateObject("Mercury.DeviceReplay")

8/6/2019 QTP New Feature Version 10.0
http://slidepdf.com/reader/full/qtp-new-feature-version-100 5/23
Window("Notepad").Activate
obj.PressKey 63
The PressKey method uses the ASCII value for the key.63 is the ASCII value for F5.
ASCII values for other keys:F1 - 59F2 - 60F3 - 61F4 - 62F5 - 63F6 - 64F7 - 65
F8 - 66F9 - 67F10 - 68F11 - 87F12 – 88
QTP script for Message Boxes That Close Automatically
Using Message Boxes That Close Automatically
The function below shows a message box that disappears after the specified timeout (in
seconds). The script execution then continues.
Public Sub MsgBoxTimeout (Text, Title, TimeOut)
Set WshShell = CreateObject("WScript.Shell")
WshShell.Popup Text, TimeOut, Title
End Sub
If TimeOut is 0, it behaves just like a normal message box. If TimeOut is greater than 0,
the dialog box disappears after the specified number of seconds.
Note: When you are using this code.Don't use Msgbox separately and MsgBoxTimeout separately. It should be used onlyonce.What ever you want in msgbox should be 'text' for MsgBoxTimeout.E.g. MsgBoxTimeout variable name , ""(if title is blank), 2

8/6/2019 QTP New Feature Version 10.0
http://slidepdf.com/reader/full/qtp-new-feature-version-100 6/23
QTP script Debugging using file operations
The following are some file operations which are useful for debugging scripts in QTP.
The following examples can be downloaded from here .
' Creates a specified file and returns a TextStream object that can be used to read from or write to the file.
' Example of usage:
' Set f = CreateFile("d: emp\beenhere.txt", True)
' f.WriteLine Now
' f.Close
Function CreateFile(sFilename, bOverwrite)
Set fso = CreateObject("Scripting.FileSystemObject")
Set CreateFile = fso.CreateTextFile(sFilename, bOverwrite)
End Function
' Opens a specified file and returns a TextStream object that can be used to read from,
write to, or append to the file.
' iomode: 1 - ForReading, 2 - ForWriting, 8 - ForAppending
' Example of usage
' Set f = OpenFile("d: emp\beenhere.txt", 2, True)
' f.WriteLine Now
' f.Close
Function OpenFile(sFilename, iomode, create)
Set fso = CreateObject("Scripting.FileSystemObject")
Set OpenFile = fso.OpenTextFile(sFilename, iomode, create)
End Function

8/6/2019 QTP New Feature Version 10.0
http://slidepdf.com/reader/full/qtp-new-feature-version-100 7/23
' Appends a line to a file.
' Example of usage:
' AppendToFile "d: emp\beenhere.txt", Now
Function AppendToFile(sFilename, sLine)
Const ForAppending = 8
If sFilename = "" Then
sFilename = Environment("SystemTempDir") & "\QTDebug.txt"
End If
Set f = OpenFile(sFilename, ForAppending, True)
f.WriteLine sLine
f.Close
End Function
' Writes a line to a file.
' Destroys the current content of the file .
' Example of usage:
' WriteToFile "d: emp\beenhere.txt", Now
Function WriteToFile(sFilename, sLine)
Const ForWriting = 2
If sFilename = "" Then
sFilename = Environment("SystemTempDir") & "\QTDebug.txt"
End If
Set f = OpenFile(sFilename, ForWriting, True)
f.WriteLine sLine

8/6/2019 QTP New Feature Version 10.0
http://slidepdf.com/reader/full/qtp-new-feature-version-100 8/23
f.Close
End Function
QTP script Normalizing stringsThe NormalizeString function receives a string and returns the equivalent string in aregular expression.
Function NormalizeString(OrgStr)
Dim TempStr
TempStr = Replace(OrgStr, "\", "\\")
TempStr = Replace(TempStr, "*", "\*")
TempStr = Replace(TempStr, "+", "\+")
TempStr = Replace(TempStr, ".", "\.")
NormalizeString = Replace(TempStr, "?", "\?")
End function
msgbox NormalizeString ("a+b*c.d?e")
Considrations for debugging tests and function libraries in QTP
You must have the Microsoft Script Debugger installed to run tests in debug mode. If it isnot installed, you can use the QuickTest Additional Installation Requirements Utility toinstall it. (Select Start > Programs > QuickTest Professional > Tools > AdditionalInstallation Requirements.)
While the test and function libraries are running in debug mode, they are read-only. Youcan modify the content after you stop the debug session (not when you pause it). If needed, you can enable the function library for editing (File > Enable Editing) after you
stop the session. For more information, see Editing a Read-Only Function Library. After you implement your changes, you can continue debugging your test and functionlibraries.
If you perform a file operation (for example, you open a different test or create a newtest), the debug session stops.

8/6/2019 QTP New Feature Version 10.0
http://slidepdf.com/reader/full/qtp-new-feature-version-100 9/23
If a file is called using an ExecuteFile statement, you cannot debug the file or any of thefunctions contained in the file. In addition, when debugging a test that contains anExecuteFile statement, the execution marker may not be displayed correctly.
In QuickTest, when you open a test, QuickTest creates a local copy of the externalresources that are saved to your Quality Center project. Therefore, any changes you applyto any external resource that is saved in your Quality Center project, such as a functionlibrary, will not be recognized in the test until the test is closed and reopened. (Anexternal resource is any resource that can be saved separately from the test, such as afunction library, a shared object repository, or a recovery scenario.)
In contrast with this, any changes you apply to external resources saved in the filesystem, such as function libraries, are implemented immediately, as these files areaccessed directly and are not saved as local copies when you open your test.
Debugging QTP Tests and Function LibrariesAbout Debugging Tests and Function Libraries
After you create a test or function library (including registered user functions), youshould check that they run smoothly, without errors in syntax or logic. To debug afunction library, you must first associate it with a test and then debug it from that test.
QuickTest Professional provides different options that you can use to detect and isolatedefects in a test or function library. For example:
You can control the run session using the Pause command, breakpoints, and various stepcommands that enable you to step into, over, and out of a specific step.
If QTP displays a run error message during a run session, you can click the Debug buttonon the error message to suspend the run and debug the test or function library.
When a run session is paused (suspended), you can use the Debug Viewer to check andmodify the values of VBScript objects and variables and to manually run VBScriptcommands.
You can use the Debug from Step command to begin (and pause) your debug session at a
specific point in your test. You can also use the Run to Step command to pause the run ata specific point in your test. You can set breakpoints, and then enable and disable them asyou debug different parts of your test or function library.
You can also use the Run from Step command to run your test from a selected step. Thisenables you to check a specific section of your application or to confirm that a certain
part of your test or function library runs smoothly.
8/6/2019 QTP New Feature Version 10.0
http://slidepdf.com/reader/full/qtp-new-feature-version-100 10/23
Programming the Filesystemobject in QTP
To program with the FileSystemObject (FSO) object model:
Use the CreateObject method to create a FileSystemObject object.
Use the appropriate method on the newly created object.
Access the object's properties.
The FSO object model is contained in the Scripting type library, which is located in theScrrun.dll file. Therefore, you must have Scrrun.dll in the appropriate system directory onyour Web server to use the FSO object model.
Creating a FileSystemObject Object
First, create a FileSystemObject object by using the CreateObject method.
The following code displays how to create an instance of the FileSystemObject:
[VBScript]Dim fsoSet fso = CreateObject("Scripting.FileSystemObject")[JScript]var fso;
fso = new ActiveXObject("Scripting.FileSystemObject");
In both of these examples, Scripting is the name of the type library and FileSystemObjectis the name of the object that you want to create. You can create only one instance of theFileSystemObject object, regardless of how many times you try to create another.
Using the Appropriate Method
Second, use the appropriate method of the FileSystemObject object. For example, tocreate a new object, use either CreateTextFile or CreateFolder (the FSO object modeldoesn't support the creation or deletion of drives).
To delete objects, use the DeleteFile and DeleteFolder methods of the FileSystemObjectobject, or the Delete method of the File and Folder objects. You can also copy and movefiles and folders, by using the appropriate methods.
Accessing Existing Drives, Files, and Folders

8/6/2019 QTP New Feature Version 10.0
http://slidepdf.com/reader/full/qtp-new-feature-version-100 11/23
To gain access to an existing drive, file, or folder, use the appropriate "get" method of theFileSystemObject object:
GetDrive
GetFolder
GetFile
To gain access to an existing file:
[VBScript]Dim fso, f1Set fso = CreateObject("Scripting.FileSystemObject")Set f1 = fso.GetFile("c:\test.txt")[JScript]
var fso, f1;fso = new ActiveXObject("Scripting.FileSystemObject");f1 = fso.GetFile("c:\\test.txt");
Do not use the "get" methods for newly created objects, since the "create" functionsalready return a handle to that object. For example, if you create a new folder using theCreateFolder method, don't use the GetFolder method to access its properties, such as
Name, Path, Size, and so forth. Just set a variable to the CreateFolder function to gain ahandle to the newly created folder, then access its properties, methods, and events.
To set a variable to the CreateFolder function, use this syntax:
[VBScript]Sub CreateFolder Dim fso, fldr Set fso = CreateObject("Scripting.FileSystemObject")Set fldr = fso.CreateFolder("C:\MyTest")Response.Write "Created folder: " & fldr.NameEnd Sub[JScript]function CreateFolder(){var fso, fldr;fso = new ActiveXObject("Scripting.FileSystemObject");fldr = fso.CreateFolder("C:\\MyTest");Response.Write("Created folder: " + fldr.Name);}
Accessing the Object's Properties

8/6/2019 QTP New Feature Version 10.0
http://slidepdf.com/reader/full/qtp-new-feature-version-100 12/23
Once you have a handle to an object, you can access its properties. For example, to getthe name of a particular folder, first create an instance of the object, then get a handle to itwith the appropriate method (in this case, the GetFolder method, since the folder alreadyexists).
Use this code to get a handle to the GetFolder method:
[VBScript]Set fldr = fso.GetFolder("c:\")[JScript]var fldr = fso.GetFolder("c:\\");
Now that you have a handle to a Folder object, you can check its Name property.
[VBScript]Response.Write "Folder name is: " & fldr.Name[JScript]
Response.Write("Folder name is: " + fldr.Name);To find out the last time a file was modified, use the following syntax:
[VBScript]Dim fso, f1Set fso = CreateObject("Scripting.FileSystemObject")' Get a File object to query.Set f1 = fso.GetFile("c:\detlog.txt")' Print information.Response.Write "File last modified: " & f1.DateLastModified[JScript]var fso, f1;fso = new ActiveXObject("Scripting.FileSystemObject");// Get a File object to query.f1 = fso.GetFile("c:\\detlog.txt");// Print information.Response.Write("File last modified: " + f1.DateLastModified);
QTP & FSO Model
The FileSystemObject (FSO) object model allows you to use the familiar object.methodsyntax with a rich set of properties, methods, and events to process folders and files.
Use this object-based tool with:
HTML to create Web pages
Windows Scripting Host to create batch files for Microsoft Windows
8/6/2019 QTP New Feature Version 10.0
http://slidepdf.com/reader/full/qtp-new-feature-version-100 13/23
Script Control to provide a scripting capability to applications developed in other languages
Because use of the FSO on the client side raises serious security issues about providing potentially unwelcome access to a client's local file system, this documentation assumes
use of the FSO object model to create scripts executed by Internet Web pages on theserver side. Since the server side is used, the Internet Explorer default security settings donot allow client-side use of the FileSystemObject object. Overriding those defaults couldsubject a local computer to unwelcome access to the file system, which could result intotal destruction of the file system's integrity, causing loss of data, or worse.
The FSO object model gives your server-side applications the ability to create, alter,move, and delete folders, or to detect if particular folders exist, and if so, where. You canalso find out information about folders, such as their names, the date they were created or last modified, and so forth.
The FSO object model also makes it easy to process files. When processing files, the primary goal is to store data in a space- and resource-efficient, easy-to-access format.You need to be able to create files, insert and change the data, and output (read) the data.Since storing data in a database, such as Access or SQL Server, adds a significant amountof overhead to your application, storing your data in a binary or text file may be the mostefficient solution. You may prefer not to have this overhead, or your data accessrequirements may not require all the extra features associated with a full-featureddatabase
The FSO object model, which is contained in the Scripting type library (Scrrun.dll),supports text file creation and manipulation through the TextStream object. Although it
does not yet support the creation or manipulation of binary files, future support of binaryfiles is planned.
QTP tests using keyword-driven testing
Keyword-driven testing advantages include the following:
1. In QTP, Keyword-driven testing enables you to design your tests at a business levelrather than at the object level. For example, QTP may recognize a single option selectionin your application as several steps: a click on a button object, a mouse operation on a listobject, and then a keyboard operation on a list sub-item. You can create an appropriately-
named function to represent all of these lower-level operations in a single, business-levelkeyword.
2. By incorporating technical operations, such as a synchronization statement that waitsfor client-server communications to finish, into higher level keywords, tests are easier toread and easier for less technical application testers to maintain when the applicationchanges.
8/6/2019 QTP New Feature Version 10.0
http://slidepdf.com/reader/full/qtp-new-feature-version-100 14/23
8/6/2019 QTP New Feature Version 10.0
http://slidepdf.com/reader/full/qtp-new-feature-version-100 15/23
7.Can i record a web based application on Mozilla??
8.What is the difference between Repository Parameter and Repositories Collection ??
9.How to copy Virtual Object Manager from one computer to another computer??
10.Can we use GetRoProperty method to get index or location of link in webapplication??
Answer 1: In QTP point of view we automation applications where there is proper addin.There are few cases where we can use win32 API and shell programming toacheive.
EX use win32 query to get the handle or processid of the app and use some api to act onit...this will be a work around not a solution.
Answer 2: Ans: use DHTML properties ....uses object.attributes...u will get all DHTML properties of that particular element in a collection.
Answer 3: Disadvantages of Smart Identification: There are many out of which is timeconsuming it eats lot of time and some times it yields wrong results also in case of dynamic environment.
If u enable smart identification when particular object description is mismatched it willtake much time torecognize that object.And for identifying which object decryption is mismatched we haveto verify the qtp results.
If disable smart identification qtp will through error in that particular statement
Answer 4: I think Space and time may be the constraints, because i never used it. it is pretty waste of time to use it.
Answer 5: HKEY_LOCAL_MACHINE\SOFTWARE\Mercury Interactive\QuickTestProfessional\Configuration_UI\ScriptMgr
Create a new String value with name AltProgID and value "Mercury.JSScriptMgr" andchange the value of "Create" to 1
Create a new child key inside the keyHKEY_LOCAL_MACHINE\SOFTWARE\Mercury Interactive\QuickTestProfessional\Configuration_UI\ScriptConstants{0ECD5785-BE7D-11d4-8EAF-11135659EC56}
Repeat the same steps for the below keyHKEY_LOCAL_MACHINE\SOFTWARE\Mercury Interactive\QuickTest

8/6/2019 QTP New Feature Version 10.0
http://slidepdf.com/reader/full/qtp-new-feature-version-100 16/23
Professional\Configuration
OpenC:\Program Files\Mercury Interactive\QuickTest Professional\bin\QTEditor.iniAdd the below parameter to [General options]
AllowJavaScript = 1DisableVBScript = 1
Answer 7: U can record but not as a web application but a standard windows application
ex:Window("Mozilla Firefox").WinObject("MozillaWindowClass").Type "naveen"
Answer 8: Repository parameters enable you to specify that certain property valuesshould be parameterized, but leave the actual parameterization to be defined in each testthat is associated with the object repository that contains the parameterized test object
property values.Repository parameters are useful when you want to create and run tests on an object thatchanges dynamically
repositoriescollection is a collection object that enables you to programmatically managethe run-time collection of shared object repository files associated with the current action
for more details refere QTP Help file.
Answer 9: checkout for .VOT files in dat foler of the installation
Answer 10: NO
QTP Test Results Analysis with New Reporting Functionality
Test Results Analysis with New Reporting Functionality
QuickTest 10.00 includes a powerful set of new reporting options that help you analyzeand manage your run results more thoroughly and efficiently. These include:
Jump to step . When you want to know more about a particular node in the Test Results
window, right-click it and select Jump to Step in QuickTest . The QuickTest mainwindow comes into focus, and the cursor jumps to the relevant step. For moreinformation, see Jumping to a Step.
Export Test Results to Microsoft Word or PDF Formats . In addition to HTMLformat, you can now select to save your QuickTest run results in Microsoft Word or PDFformats. You can then share this information, together with any local system monitoring

8/6/2019 QTP New Feature Version 10.0
http://slidepdf.com/reader/full/qtp-new-feature-version-100 17/23
data, with your developers and performance testing teams. For more information, seeExporting Test Results .
New Image Reporting Options:
Add Images to the Test Results . When you use the Reporter.ReportEvent method toadd information to the run results, you can now specify an image file as the fourthargument. When you view the results, the image is displayed in the Result Details tab of the Test Results window. For example, you can include an image returned by aCaptureBitmap step in the run results. For more information, see ReportEvent Methodin the Utility section .
View Bitmaps Differences in Bitmap Checkpoints. In addition to the expected andactual bitmaps that are displayed in the Test Results window, you can also select to view
the differences between the two. The difference bitmap is a black-and-white image thatcontains one black pixel for every pixel that is different between the two images. For more information, see Analyzing Bitmap Checkpoint Results .
Include Images in Exported and Printed Test Results . When you choose the Detailedoption for printing or exporting, the document now includes all images. These includescreen captures of steps, expected, actual, and difference bitmaps for bitmap checkpoints,and any images sent to the run results using the ReportEvent method. For moreinformation, see Printing Test Results .
Additional Quality Center Details . The run results for tests and components that are run
as part of a Quality Center test set now include the Quality Center server and projectname
NEW To Do pane
The new To Do pane that is now available in the QTP, enables you to create and manageself-defined tasks, and to view a compiled set of the TODO comments from your tests,components, and associated function libraries.
For example, you can use the Tasks tab to provide instructions to someone else during ahandover, or to create reminders for yourself. The Tasks tab provides check boxes in
which you can mark off each task as you complete it. In the Comments tab, you canview and sort all your TODO comments. You can also jump directly to a selected TODOcomment in the testing document.

8/6/2019 QTP New Feature Version 10.0
http://slidepdf.com/reader/full/qtp-new-feature-version-100 18/23
If you use the Maintenance Run Wizard to detect updates needed to your steps or objectrepository, then you can use the To Do pane to track and manage the TODO commentsadded during the maintenance run session.
You can also export your tasks and TODO comments from the To Do pane to an XLS(Excel), CSV (comma separated), or XML file

8/6/2019 QTP New Feature Version 10.0
http://slidepdf.com/reader/full/qtp-new-feature-version-100 19/23
Custom Bitmap checkpoint comparision algorithm in QTP 10
You (or a third party) can now develop custom comparers for bitmap checkpoints. Acustom comparer is a COM object that performs the bitmap comparison for thecheckpoint according to your testing requirements. For example, you could define a
custom comparer that allows a bitmap checkpoint to pass even if the image in theapplication shifts by an amount specified when the checkpoint is defined.
After you install and register a custom comparer on the QTP computer, your comparer isavailable for selection in the Bitmap Checkpoint Properties dialog box. The dialog box
provides space for specifying additional configuration preferences expected by your comparer.
When QTP a bitmap checkpoint that uses a custom comparer, it supplies the expectedand actual bitmaps to the custom comparer object. It then receives and reports the resultsthat the custom compares returns
Load and run actions- Call Actions Dynamically During the Test Run
Call Actions Dynamically During the Test Run
Generally, when you insert a call to an external action, the action call becomes part of thetest, and the called action is loaded each time you open the test.
In some situations, you may want to take advantage of the new LoadAndRunActionstatement to load an action only when the step runs, and then run that action.
This is useful, for example, if you use many conditional statements that call externalactions, and you do not want to load all of these actions each time you open the test, sincethese actions may not be necessary during the run session.
Save tests with resources in QTP 10
Improve Portability by Saving Copies of Tests Together with Their Resource Files
Tests and their resource files are often stored on a network drive or in Quality Center.However, you may need to open or run a test when you do not have access to the network drive or QC. For example, you may need to create a portable copy of a test for use whentraveling to other sites.
You can save a standalone copy of your test and its resource files to a local drive or toanother storage device using the File > Save Test with Resources command. When yousave a test in this manner, QTP a copy of your test, all associated resource files, and anycalled actions.

8/6/2019 QTP New Feature Version 10.0
http://slidepdf.com/reader/full/qtp-new-feature-version-100 20/23
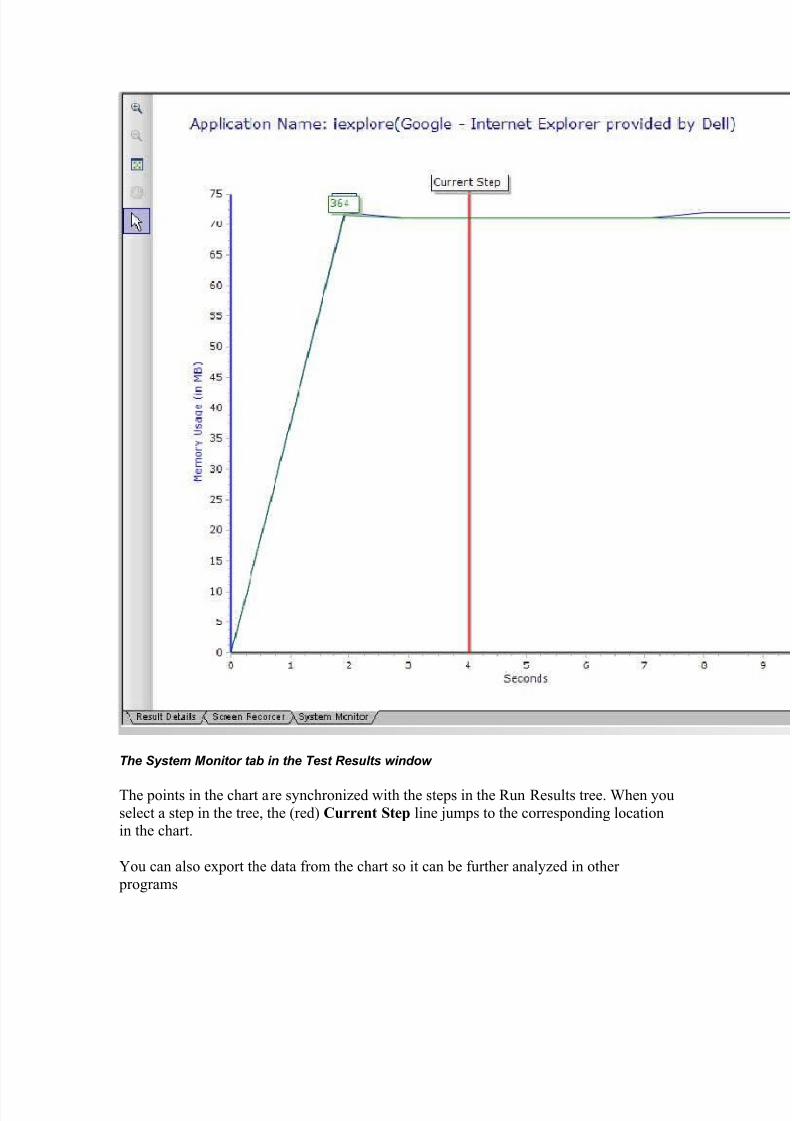
local system monitoring in QTP
The new local system monitoring feature in QTP ( File > Settings > Local SystemMonitor ) enables you to monitor the local (client-side) computer resources used by theapplication instance you are testing during a run session.
You can monitor a number of different system counters to view the effects your application has on the system. You can also define upper limits for the counters. If any of the specified counters exceed these limits, the test run will fail.
Additionally, you can export the data from the System Monitor tab to a variety of filetypes.
The results generated for the counters you monitor are displayed as a line chart in aspecial System Monitor tab in the Test Results window.
8/6/2019 QTP New Feature Version 10.0
http://slidepdf.com/reader/full/qtp-new-feature-version-100 21/23
The System Monitor tab in the Test Results window
The points in the chart are synchronized with the steps in the Run Results tree. When youselect a step in the tree, the (red) Current Step line jumps to the corresponding locationin the chart.
You can also export the data from the chart so it can be further analyzed in other programs

8/6/2019 QTP New Feature Version 10.0
http://slidepdf.com/reader/full/qtp-new-feature-version-100 22/23
New resources and dependencies of model of QC with QTP
The new Quality Center resources and dependencies model enables you to store your tests, components, and resources such that you can manage the relationships betweenthem and you can analyze the impact on all your assets when one asset changes.
If you are working with a Premier edition Quality Center server, then you can also importand share your resources across different projects. You can synchronize these assets in
both projects when changes are made. This functionality also enables you to reuse your existing assets instead of creating new assets whenever you create a new project. For example, you can create a set of template assets to use as a basis for new projects.
Using the Resources and Dependencies Model
In previous versions of QTP and Quality Center, a test's associated resource files (such asshared object repositories, function libraries, recovery scenarios, and external data
tables), were stored in Quality Center as attachments, while files associated with anapplication area were stored in a standalone Resources folder in the BusinessComponents module.
Quality Center 10.00 introduces a new Test Resources module. This module enables youto store all of these resources as separate entities that are linked to their owners andmarked as dependencies . Tests or actions that call other tests are also linked asdependencies.
When you select a QTP test, business process test, or individual component in the QualityCenter test or component tree, you can view these dependent resources and tests in a new
Dependencies tab. The Dependencies tab shows all Quality Center entities that are usedby your testing document as well as all entities that are using it. For example, if your QTP test is associated with two function libraries, and the actions in your test areassociated with three object repositories, these entities will be displayed in the Usingtable of the test's Dependencies tab. If one of the actions in your test is called by another test, then that calling test will be displayed in the Used by table.
In QTP, you can also view the action-specific dependencies in the Used By tab of theAction Properties dialog box.
Quality Center recognizes assets that are linked as owned by or owner dependencies and
ensures that these important relationships are maintained when you import or create baselines, rename or move resources, select to delete resources, or perform other operations that can impact these relationships.
Note: If required, you can continue using the previous attachments model for all or someof your QTP assets. However, if you use the old model, you will not be able to takeadvantage of many of the features associated with the resources and dependencies model.

8/6/2019 QTP New Feature Version 10.0
http://slidepdf.com/reader/full/qtp-new-feature-version-100 23/23
Ques :How can we associate an excel file from QTP 10.0 to QC 10.0 - Where can i add itin QC or QTP to make it dependent on the particular business component or particular test.
Ans: To export testscript/Excel from QTP to QC, you first need to establish QTP-QC
connection
1) In QTP , Go to File > Quality Center Connection.
2) Enter QC URL project name/domain/username/password and click on Login. QTP isnow connected to QC.
Next you can select the save the QTP Script in QC.
3) In QTP, Select File Menu > Save As > Save in QC
4 ) Select the Folder in QC where you wan to save the QTP Script
6) Click OK to Save