Q80 Quick Start Guide - Qualstar Corporation · Q80 Quick Start Guide ... xzxzxzx . Unpacking the...
4
R Q80 Quick Start Guide This Quick Start Guide is designed to be used with either the Q80 Base Library or Expansion Module. It will explain how to unpack the units and install them in a standard 19 inch rack. Setup and configuration information can be Required Tools: • Utility Knife or Scissors • Tape measure • Pencil • No. 2 Phillips screwdriver xzxzxzx Unpacking the Library Warning: Due to the weight of the library, at least two people are required to lift the unit. Cut and remove the bands on the outside of the container. Lift up the outer cardboard box – it is not secured to the pallet. Remove the inner cardboard sleeve surrounding the module. Remove the rack rails. Remove the accessory kit box. Remove the foam pieces from the top of the module. With assistance, lift the module out of the bottom foam nest, remove the wrapping from the module and then place the module on the work surface. Remove any packaging materials and tape. The Q80 comes with a rack kit for easy installation and securing of the library into a 19-inch (EIA-310) rack. Important: Two-post telco-style or other racks less than 29 inches in depth will NOT support this unit. Cut and Remove Lift off Remove Remove Lift and Remove 511023 Rev. 1 1
Transcript of Q80 Quick Start Guide - Qualstar Corporation · Q80 Quick Start Guide ... xzxzxzx . Unpacking the...

R
Q80 Quick Start Guide This Quick Start Guide is designed to be used with either the Q80 Base Library or Expansion Module. It will explain how to unpack the units and install them in a standard 19 inch rack. Setup and configuration information can be
Required Tools:
• Utility Knife or Scissors • Tape measure • Pencil • No. 2 Phillips screwdriver
xzxzxzx
Unpacking the Library
Warning: Due to the weight of the library, at least two people are required to lift the unit.
Cut and remove the bands on the outside of the container.
Lift up the outer cardboard box – it is not secured to the pallet.
Remove the inner cardboard sleeve surrounding the module.
Remove the rack rails.
Remove the accessory kit box.
Remove the foam pieces from the top of the module.
With assistance, lift the module out of the bottom foam nest, remove the wrapping from the module and then place the module on the work surface.
Remove any packaging materials and tape.
The Q80 comes with a rack kit for easy installation and securing of the library into a 19-inch (EIA-310) rack. Important: Two-post telco-style or other racks less than 29 inches in depth will NOT support this unit.
Cut and Remove
Lift off
Remove
Remove
Lift and Remove
511023 Rev. 1 1

R
Q80 Quick Start Guide
Positioning & Mounting the Rack Rail Assemblies
Determine the location in your rack for your library to be installed and, using a pencil, mark the location on each vertical rail in your rack. It is recommended to start at the lowest position of the rack for stability. The bottom mark should be at the lowest narrow gap in that position. Note: The library requires 6U (10.5 in.) of rack space.
A
B
C
D
6U (10.5 in.)
Each EIA unit (1U)starts at a narrowgap and has threeholes and two widegaps above it
Wide Gaps withinthe EIA unit
Narrow Gapsbetween EIA units
A B
C
D
From the front of the rack, insert the rack rails into the back and then front vertical supports. a) Position a rail according to the orientation information
stamped on the rail (1).
b) Rotate the front of the rail up while inserting the rear rail
hanger into the rear vertical support, and then lower the front of the rail until it is nearly level.
c) Extend the front of the rail until the hangers come through the holes in the vertical support and the retention spring snaps into place (2).
d) Repeat Steps a–c for the other rail.
On the front of both rails in a square-hole lock, install a clip nut above the mounting bracket as shown (1). For racks which have round mounting holes Qualstar offers an optional round hole mounting kit P/N 376 142 483-01. The round hole kit must be used in installations which are using racks with round holes to insure proper unit alignment, one kit per module is required.
Mounting the Library in the Rack
Warning: Due to the weight of the library, at least two people are required to lift the unit.
Extend the middle rails until they lock into place (1). Move the sliding assembly to the front of the middle rails. Position the library in front of the rack, aligned with the extended rails. Slide the library onto the middle rails and into the rack until it stops (2). Secure it to the rack with the captive screws on the front of the library.
Warning: To reduce the risk of electric shock or damage to equipment, always remove any power cords while working with the unit.
511023 Rev. 1 2
R
Q80 Quick Start Guide
The Q80 libraries are expandable and accept add-on components to enhance performance:
• The library base modules come with one uninstalled tape drive. Additional tape drives can also be installed. Always install the drives from the bottom up.
• Expansion library units can be added to the stack.
Once the library is secure in the rack, the additional items should then be installed before hooking up the system. Follow the instructions enclosed with the expansion unit.
Cable Attachment
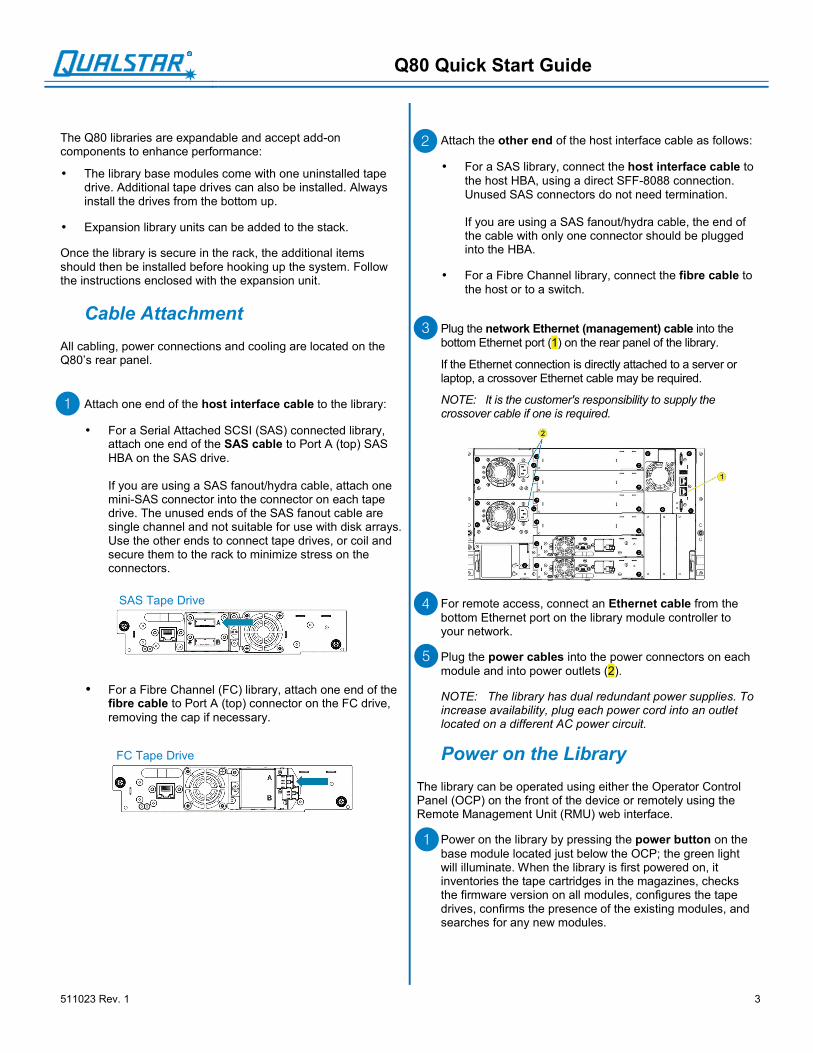
All cabling, power connections and cooling are located on the Q80’s rear panel.
Attach one end of the host interface cable to the library:
• For a Serial Attached SCSI (SAS) connected library, attach one end of the SAS cable to Port A (top) SAS HBA on the SAS drive. If you are using a SAS fanout/hydra cable, attach one mini-SAS connector into the connector on each tape drive. The unused ends of the SAS fanout cable are single channel and not suitable for use with disk arrays. Use the other ends to connect tape drives, or coil and secure them to the rack to minimize stress on the connectors.
• For a Fibre Channel (FC) library, attach one end of the fibre cable to Port A (top) connector on the FC drive, removing the cap if necessary.
Attach the other end of the host interface cable as follows:
• For a SAS library, connect the host interface cable to the host HBA, using a direct SFF-8088 connection. Unused SAS connectors do not need termination. If you are using a SAS fanout/hydra cable, the end of the cable with only one connector should be plugged into the HBA.
• For a Fibre Channel library, connect the fibre cable to the host or to a switch.
Plug the network Ethernet (management) cable into the bottom Ethernet port (1) on the rear panel of the library.
If the Ethernet connection is directly attached to a server or laptop, a crossover Ethernet cable may be required.
NOTE: It is the customer's responsibility to supply the crossover cable if one is required.
For remote access, connect an Ethernet cable from the bottom Ethernet port on the library module controller to your network.
Plug the power cables into the power connectors on each module and into power outlets (2).
NOTE: The library has dual redundant power supplies. To increase availability, plug each power cord into an outlet located on a different AC power circuit.
Power on the Library
The library can be operated using either the Operator Control Panel (OCP) on the front of the device or remotely using the Remote Management Unit (RMU) web interface.
Power on the library by pressing the power button on the base module located just below the OCP; the green light will illuminate. When the library is first powered on, it inventories the tape cartridges in the magazines, checks the firmware version on all modules, configures the tape drives, confirms the presence of the existing modules, and searches for any new modules.
SAS Tape Drive
FC Tape Drive
511023 Rev. 1 3

R
Q80 Quick Start Guide
Start the Initial Configuration Wizard from the OCP. If the wizard does not start automatically or you want to restart the wizard, navigate to Configuration > Configuration Wizard to initiate it manually. The wizard will guide you through configuring the time zone, date and time, and network settings, setting the administrator password, and then start an initial system test. You can skip items and stop the wizard at any time. Once you have configured the network settings and set the administrator password, you can initiate the wizard from the RMU to complete the remaining configurations.
Verify the host connection.
Label and Load Tape Cartridges While the library will power on without cartridges, cartridges are needed before performing data read and write operations, or any tests or operations that transfer cartridges. Bar code labels are recommended in production environments to improve inventory time in the library and ease cartridge handling processes outside the library.
• Using Mailslot Magazine for Loading – If the mail slot is enabled, you can use it to load cartridges into the library. On the Home screen, tap Open Mailslot, open the magazine access door, and then pull the mailslot out for loading.
• Using Bulk Loading Magazines for Loading – Extend one or more of the tape magazines from the library for loading:
a. From the OCP or RMU, select the module and then select Open Magazine.
b. Open the magazine access door and pull out the magazine.
c. Load the tape cartridges into the magazine starting with the back of the magazine, pushing the magazine in the library slightly as each bin is filled.
d. Push the magazine handle in slowly until the magazine release latch snaps into place, locking it.
e. Repeat Steps a–d for each of the other magazines.
User Guide For detailed information on your Q80, refer to the Q80 Installation and Operation Manual available online at:
https://www.qualstar.com//qsr-manuals/Q80-Install-and-Ops-Manual.pdf
Technical Support Available 7:00am – 4:00pm PST Tel: 877-444-1744 (USA) 805-583-7744 (International) Help Desk support after hours: Tel: 805-526-7480 For non-urgent questions, please use the form on our website at: https://www.qualstar.com//qsr-dmss_svc.php
511023 Rev. 1 4