Q UICK CONNECTING TO DEVICES HDTV TIPS START YOU …
2
CONNECTING TO DEVICES *Tested and certified by VIZIO engineers for compatibility with your TV. What’s In the Box • VIZIO HDTV • Base Plate • VIZIO Remote Control (including 2 AA batteries) • User Manual (read Safety Guidelines) • Registration Card • Quickstart Guide • Power Cord BEFORE YOU BEGIN BEFORE YOU BEGIN HDMI DTV/TV HDTV TIPS HIGH DEFINITION HOME THEATER BACK OF TV 1. Get a VIZIO Blu-ray ™ Disc Player. 2. Contact your cable company or satellite provider to learn more about HD programming in your local area (an HD cable box or satellite receiver may be required. 3. You may be able to get HD signals using an off-air antenna. To see if you can receive off-air HD signals, and for help choosing the right antenna, visit www.antennaweb.org ©2009 VIZIO Inc. HIGHEST DIGITAL QUALITY PICTURE PICTURE QUALITY CONNECTION TYPE CONNECTOR IMAGE ANALOG HD QUALITY PICTURE LOW RESOLUTION NOT RECOMMENDED CONNECTION ADVICE GOOD COMPATIBLE Visit www.VIZIO.com or call 888-849-4623. For more information about VIZIO Certified* High Definition cables please visit us at: www.VIZIO.com HIGH-DEFINITION SOUND Complete your total Home Theatre experience with stunning audio from VIZIO accessories such as the Sound Bar with Wireless Subwoofer. Make sure you have components with HDMI outputs to ensure the BEST possible picture. SATELLITE / CABLE GAMING CONSOLE BLU-RAY ™ / DVD 1 3 POWER THE TV 2 MAKE THE BEST HIGH DEFINITION CONNECTION! VIZIO HIGH DEFINITION CABLES Turn on your TV by pressing the Power button on either the TV or the remote control. COMPONENT AV/S-VIDEO YOU DESERVE THE BEST! VIZIO Blu-ray ™ Bring your movies to life! 1080p Full HD playback delivers crystal clear images with lifelike detail and High Definition Audio puts you in the center of the action. Visit www.VIZIO.com for more details. 4 Preparing the TV for Wall Mounting - please refer to "Wall mounting your HDTV" in your User Manual for more information. The GREEN inputs are OPTIMIZED for High Definition Video and Audio. Connect using these inputs wherever possible. 3 WAYS TO WATCH HIGH DEFINITION VIDEO VL260M HDTV QUICK START GUIDE We provide professional installation services. Visit www.VIZIO.com or call 888-849-4623 to order today! INSTALLING YOUR HDTV Attaching the Stand Base to the TV 1. Place the TV face down on a flat surface with a soft cloth protecting the screen. 2. Line up the base plate with the stand neck (attached to the TV) and carefully push the base onto the neck. 3. On the bottom of the base plate, insert the thumb screw and tighten snugly (See Fig. 1). 4. Move the TV into an upright position and place so that the rear connectors remain accessible. Fig. 1 TILT MOUNT VMT13-30 SWING MOUNT VMA13-26 MATCH YOUR VIZIO TO A CERTIFIED* WALL MOUNT VIDEO S-VIDEO S-VIDEO / AV AUDIO RGB PC RGB PC COMPONENT Y Pr/Cr Pb/Cb L R HDMI ONLY SERVICE CABLE / ANTENNA DTV / TV L R R L OPTICAL OUT BE SURE TO UTILIZE THE HDMI INPUTS FOR THE BEST CONNECTION
Transcript of Q UICK CONNECTING TO DEVICES HDTV TIPS START YOU …

CONNECTING TO DEVICES
*Tested and certified by VIZIO engineers for compatibility with your TV.
What’s In the Box• VIZIO HDTV• Base Plate• VIZIO Remote Control (including 2 AA batteries)
• User Manual (read Safety Guidelines)
• Registration Card• Quickstart Guide• Power Cord
BEFORE YOU BEGINBEFORE YOU BEGIN
HDMI DTV/TV
HDTV TIPS
HIGH DEFINITIONHOME THEATER
BACK OF TV
1. Get a VIZIO Blu-ray™ Disc Player.
2. Contact your cable company or satellite provider to learn more about HD programming in your local area (an HD cable box or satellite receiver may be required.
3. You may be able to get HD signals using an off-air antenna. To see if you can receive off-air HD signals, and for help choosing the right antenna, visit
www.antennaweb.org
©2009 VIZIO Inc.
HIGHEST DIGITALQUALITY PICTUREPICTURE QUALITY
CONNECTION TYPE
CONNECTOR IMAGE
ANALOG HDQUALITY PICTURE
LOW RESOLUTIONNOT RECOMMENDED
CONNECTIONADVICE GOOD COMPATIBLE
Visit www.VIZIO.com or call 888-849-4623.
For more information about VIZIO Certified* High Definitioncables please visit us at: www.VIZIO.com
HIGH-DEFINITION SOUNDComplete your total Home Theatre experience with stunning audio from VIZIO accessories such as the Sound Bar with Wireless Subwoofer.
Make sure you have components with HDMI outputs to ensure the BEST possible picture.
SATELLITE / CABLE GAMING CONSOLE BLU-RAY™ / DVD
1
3
POWER THE TV
2
MAKE THE BESTHIGH DEFINITIONCONNECTION!
VIZIO HIGH DEFINITION CABLES
Turn on your TV by pressing the Power button on either the TV or the remote control.
COMPONENT AV/S-VIDEO
YOU DESERVETHE BEST!
VIZIO Blu-ray™
Bring your movies to life! 1080p Full HD playback delivers crystal clear images with lifelike detail and High Definition Audio puts you in the center of the action. Visit www.VIZIO.com for more details.
4
Preparing the TV for Wall Mounting - please refer to "Wall mounting your HDTV" in your User Manual for more information.
The GREEN inputs are OPTIMIZED for High Definition Video and Audio. Connect using these inputs wherever possible.
3 WAYS TO WATCHHIGH DEFINITION VIDEO
VL260M HDTV
Q U I C KS T A R TG U I D E
We provide professional installation services. Visit www.VIZIO.com or call 888-849-4623 to order today!
INSTALLING YOUR HDTV
Attaching the Stand Base to the TV1. Place the TV face down on a flat surface with a soft cloth protecting the screen.2. Line up the base plate with the stand neck (attached to the TV) and carefully push the base onto the neck.3. On the bottom of the base plate, insert the thumb screw and tighten snugly (See Fig. 1).4. Move the TV into an upright position and place so that the rear connectors remain accessible.
Fig. 1
TILT MOUNT VMT13-30 SWING MOUNT VMA13-26
MATCH YOUR VIZIO TO ACERTIFIED* WALL MOUNT
VIDEOS-VIDEO
S-VIDEO / AV
AUDIO
RGB PC
RGB PC
COMPONENT
Y Pr/CrPb/Cb L R
HDMI
ONLYSERVICE
CABLE / ANTENNADTV / TV
L R
RL
OPTICAL OUT
BE SURE TO UTILIZE THE HDMI INPUTS FOR THE BEST CONNECTION
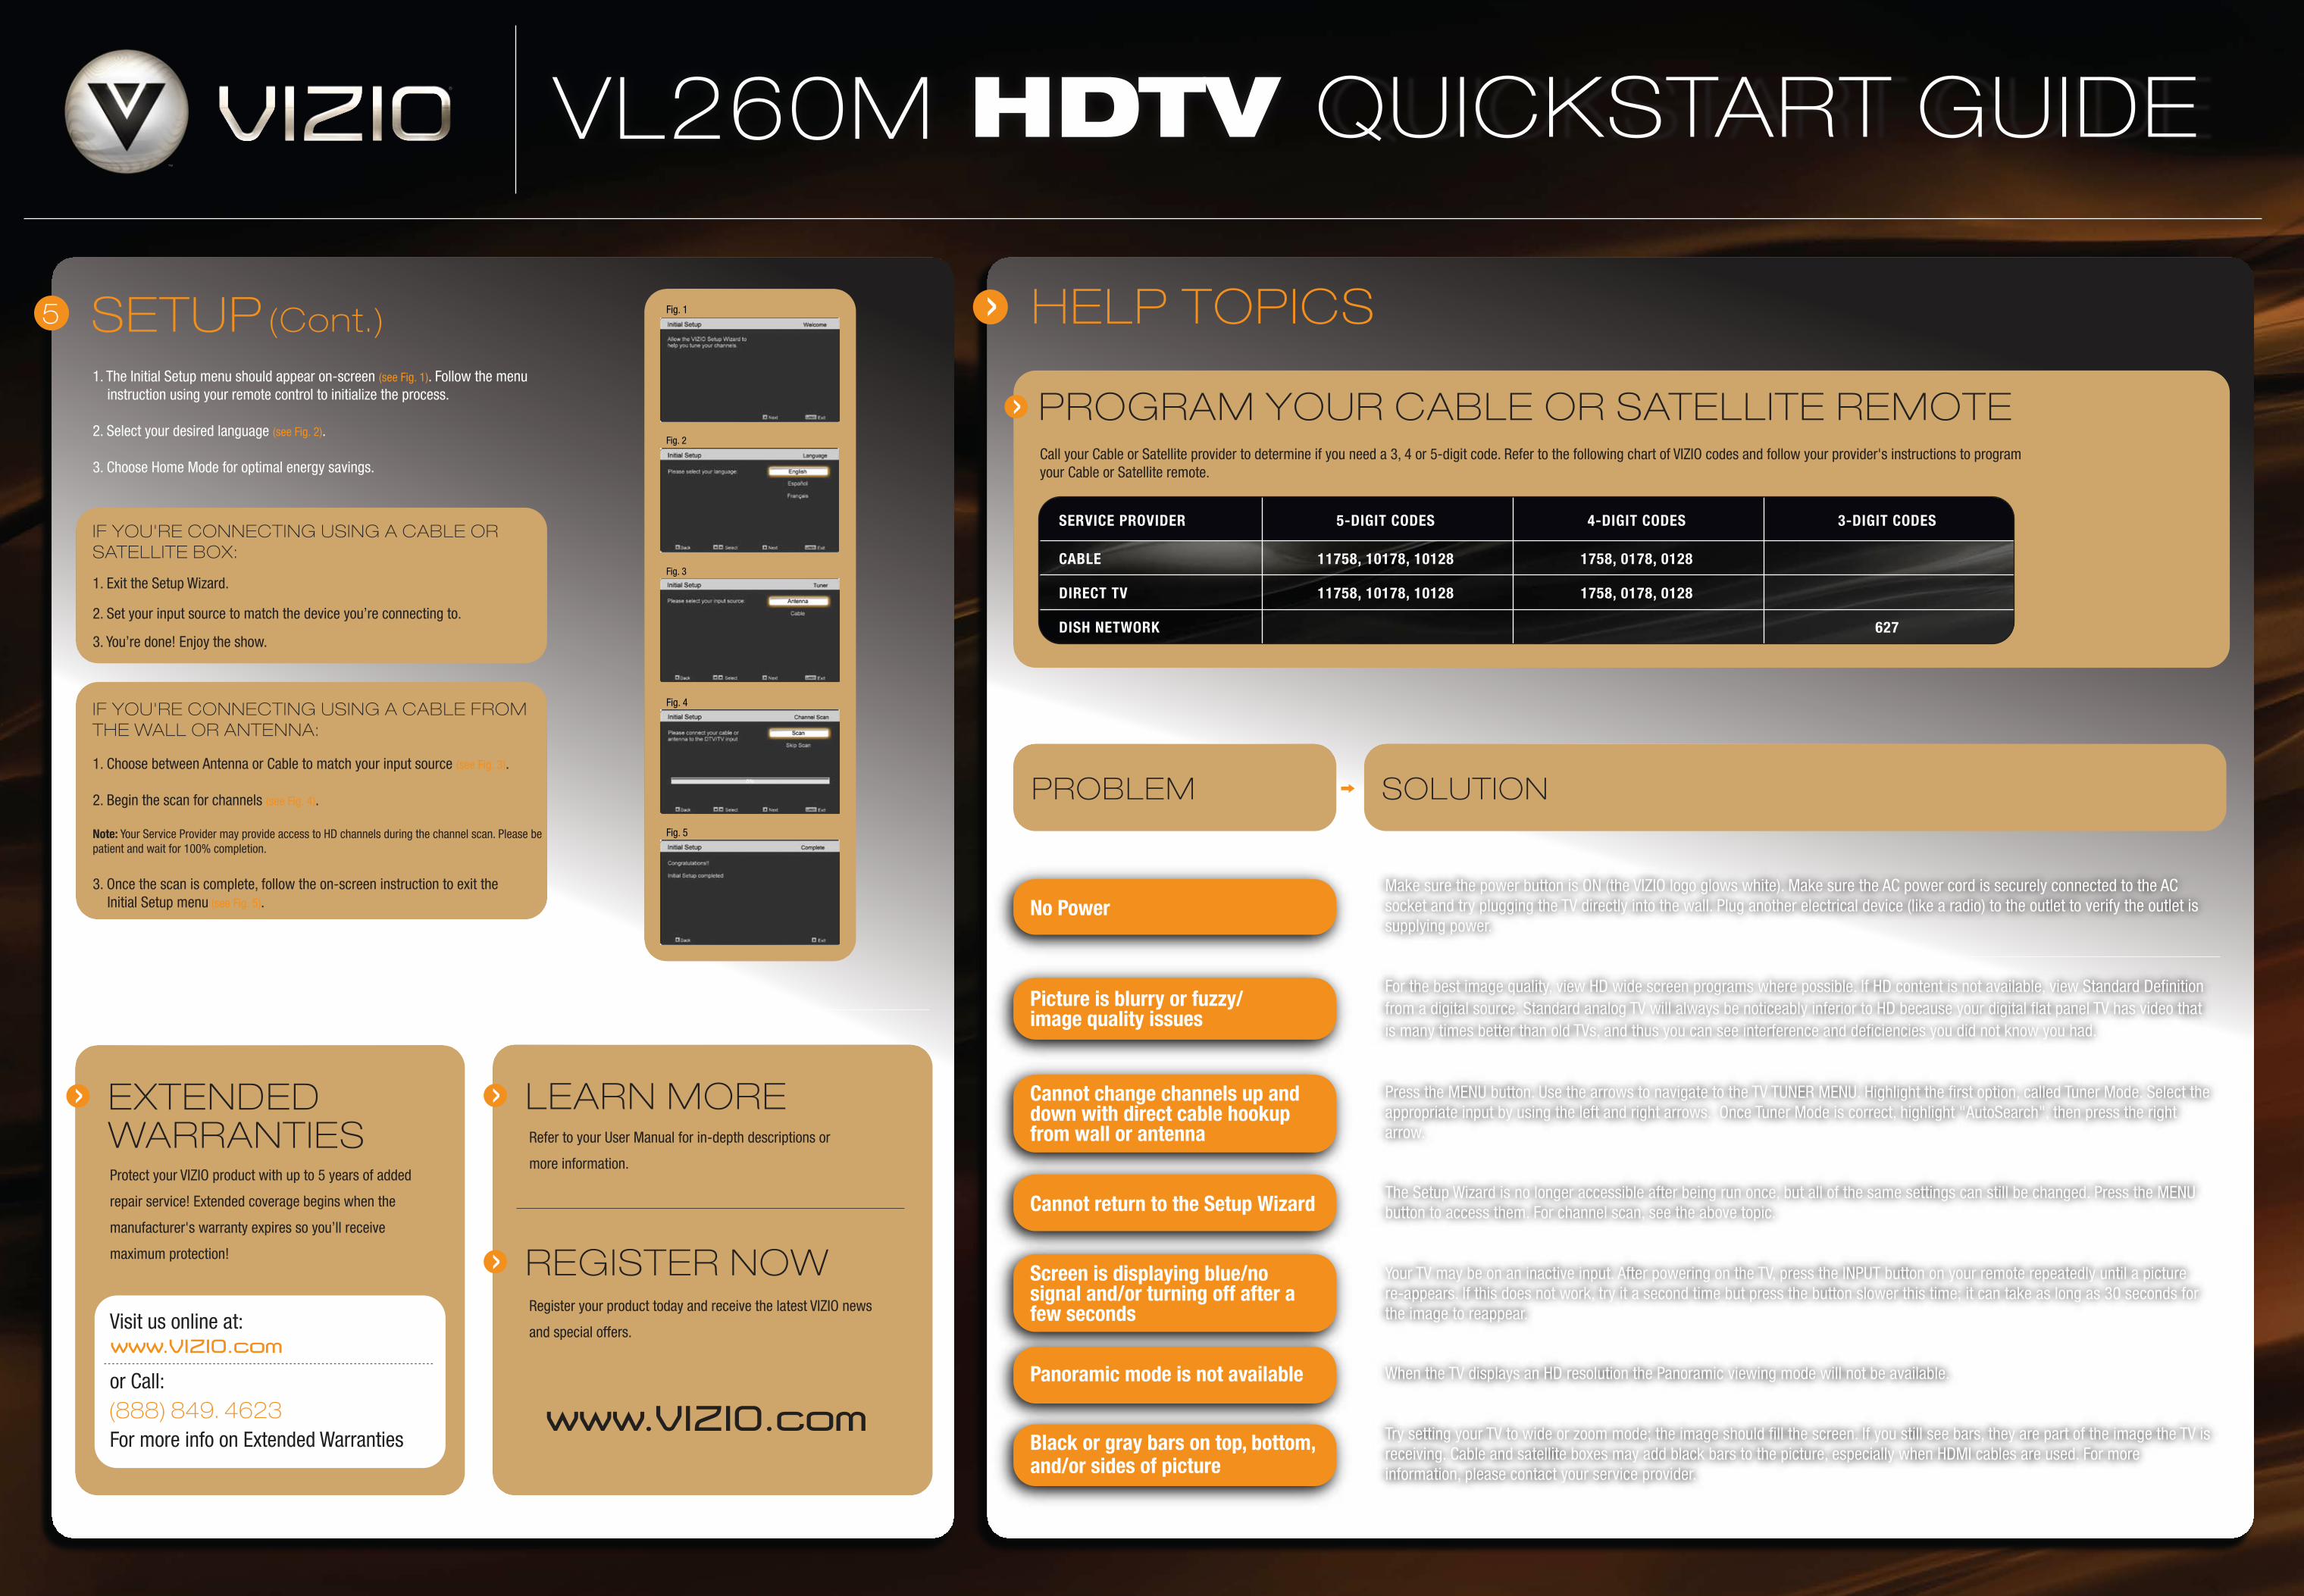
Fig. 1
Fig. 2
Fig. 3
Fig. 4
Fig. 5
SETUP (Cont.)
VL260M
HELP TOPICS1. The Initial Setup menu should appear on-screen (see Fig. 1). Follow the menu instruction using your remote control to initialize the process.
2. Select your desired language (see Fig. 2).
3. Choose Home Mode for optimal energy savings.
IF YOU'RE CONNECTING USING A CABLE OR SATELLITE BOX:
1. Exit the Setup Wizard.
2. Set your input source to match the device you’re connecting to.
3. You’re done! Enjoy the show.
IF YOU'RE CONNECTING USING A CABLE FROM THE WALL OR ANTENNA:
1. Choose between Antenna or Cable to match your input source (see Fig. 3).
2. Begin the scan for channels (see Fig. 4).
Note: Your Service Provider may provide access to HD channels during the channel scan. Please be patient and wait for 100% completion.
3. Once the scan is complete, follow the on-screen instruction to exit the Initial Setup menu (see Fig. 5).
5
EXTENDEDWARRANTIES
LEARN MORE
REGISTER NOWRegister your product today and receive the latest VIZIO news
and special offers.
Protect your VIZIO product with up to 5 years of added
repair service! Extended coverage begins when the
manufacturer's warranty expires so you’ll receive
maximum protection!
Visit us online at:
or Call:
For more info on Extended Warranties
Refer to your User Manual for in-depth descriptions or
more information.
(888) 849. 4623 www.VIZIO.com
www.VIZIO.com
No Power
Picture is blurry or fuzzy/image quality issues
Cannot change channels up and down with direct cable hookup from wall or antenna
Cannot return to the Setup Wizard
Screen is displaying blue/no signal and/or turning off after a few seconds
Panoramic mode is not available
Black or gray bars on top, bottom, and/or sides of picture
PROBLEM SOLUTION
Make sure the power button is ON (the VIZIO logo glows white). Make sure the AC power cord is securely connected to the AC socket and try plugging the TV directly into the wall. Plug another electrical device (like a radio) to the outlet to verify the outlet is supplying power.
For the best image quality, view HD wide screen programs where possible. If HD content is not available, view Standard Definition from a digital source. Standard analog TV will always be noticeably inferior to HD because your digital flat panel TV has video that is many times better than old TVs, and thus you can see interference and deficiencies you did not know you had.
Press the MENU button. Use the arrows to navigate to the TV TUNER MENU. Highlight the first option, called Tuner Mode. Select the appropriate input by using the left and right arrows. Once Tuner Mode is correct, highlight "AutoSearch", then press the right arrow.
The Setup Wizard is no longer accessible after being run once, but all of the same settings can still be changed. Press the MENU button to access them. For channel scan, see the above topic.
Your TV may be on an inactive input. After powering on the TV, press the INPUT button on your remote repeatedly until a picture re-appears. If this does not work, try it a second time but press the button slower this time; it can take as long as 30 seconds for the image to reappear.
When the TV displays an HD resolution the Panoramic viewing mode will not be available.
Try setting your TV to wide or zoom mode; the image should fill the screen. If you still see bars, they are part of the image the TV is receiving. Cable and satellite boxes may add black bars to the picture, especially when HDMI cables are used. For more information, please contact your service provider.
PROGRAM YOUR CABLE OR SATELLITE REMOTECall your Cable or Satellite provider to determine if you need a 3, 4 or 5-digit code. Refer to the following chart of VIZIO codes and follow your provider's instructions to program your Cable or Satellite remote.
SERVICE PROVIDER
CABLE 11758, 10178, 10128 1758, 0178, 0128
DIRECT TV
DISH NETWORK 627
11758, 10178, 10128 1758, 0178, 0128
5-DIGIT CODES 4-DIGIT CODES 3-DIGIT CODES