PURE IRE Gas Conversion Instructions for Propane or ... Propane or Natural Gas Stop! Read these...
4
1 ITEMS REQUIRED FOR CONVERSION • “Valve Converted to LP” Label (9349, included) • “Valve Converted to Natural Gas” Label (9350, included) • Boiler Conversion Label (9486, included) • Flat Blade Screwdriver • Combustion Analyzer with Carbon Dioxide and Carbon • Monoxide Reading Capability (Testo 325-M or equivalent) • 21/64" Drill • 1/8" NPT Tap and plug (PVC and CPVC venting only) The boiler conversion must be done by a qualified installer or service technician in accordance with these instructions and must meet all local codes and requirements of the authority having jurisdiction. The qualified installer or technician performing this work assumes full responsibility for this conversion. It is important that you follow the conversion procedure in the proper sequence. We have enclosed for your convenience three conversion labels, one of which will be attached to the inside of the boiler and one which will be placed near the rating label on the outside of the boiler. One will not be used. Note: Failure to do so will void your warranty. STEP 1 Turn off all power to the unit. Shut the gas off with the manual shutoff valve. Make sure that the gas supply is connected. Check gas pressure and gas piping to assure proper sizing to the boiler firing rate. If connecting to LP gas, it is recommended that you contact your gas supplier to size the piping and the tank. It may also be necessary to install a 100% lockup gas pressure regulator of sufficient capacity to supply an adequate gas flow. STEP 2 – PVC & CPVC ONLY Drill and tap a 21/64" diameter, 1/8" NPT hole into exhaust piping 1 foot from unit to be used as a test port for the combustion analyzer. See Figure 2. This conversion shall be done by a qualified service agency in accordance with the manufacturer's instructions and all applicable codes and requirements of the authority having jurisdiction. A qualified service agency is responsible for the proper installation of this kit. The installation is not proper and complete until the operation of the converted appliance is checked as specified in the manufacturer's instructions supplied with the kit. WARNING Figure 1 It is very important that you carefully follow the instructions below correctly. Death or serious injury could result. WARNING PUREFIRE ® Gas Conversion Instructions for Propane or Natural Gas Stop! Read these instructions or warranty will be void! If the information in these instructions is not followed exactly, a fire, an explosion or production of carbon monoxide may result causing property damage, personal injury or loss of life. WARNING Figure 2
Transcript of PURE IRE Gas Conversion Instructions for Propane or ... Propane or Natural Gas Stop! Read these...

1
ITEMS REQUIRED FOR CONVERSION
• “Valve Converted to LP” Label (9349, included)
• “Valve Converted to Natural Gas” Label (9350, included)
• Boiler Conversion Label (9486, included)
• Flat Blade Screwdriver
• Combustion Analyzer with Carbon Dioxide and Carbon • Monoxide Reading Capability (Testo 325-M or equivalent)
• 21/64" Drill
• 1/8" NPT Tap and plug (PVC and CPVC venting only)
The boiler conversion must be done by a qualified installer orservice technician in accordance with these instructions andmust meet all local codes and requirements of the authorityhaving jurisdiction. The qualified installer or technicianperforming this work assumes full responsibility for thisconversion.
It is important that you follow the conversion procedure in theproper sequence. We have enclosed for your conveniencethree conversion labels, one of which will be attached to theinside of the boiler and one which will be placed near therating label on the outside of the boiler. One will not be used.
Note: Failure to do so will void your warranty.
STEP 1Turn off all power to the unit. Shut the gas off with themanual shutoff valve. Make sure that the gas supply isconnected. Check gas pressure and gas piping to assureproper sizing to the boiler firing rate.
If connecting to LP gas, it is recommended that youcontact your gas supplier to size the piping and the tank.It may also be necessary to install a 100% lockup gaspressure regulator of sufficient capacity to supply anadequate gas flow.
STEP 2 – PVC & CPVC ONLYDrill and tap a 21/64" diameter, 1/8" NPT hole intoexhaust piping 1 foot from unit to be used as a test portfor the combustion analyzer. See Figure 2.
This conversion shall be done by a qualified service agency in accordance with the manufacturer's instructionsand all applicable codes and requirements of the authority having jurisdiction. A qualified service agency isresponsible for the proper installation of this kit. The installation is not proper and complete until the operationof the converted appliance is checked as specified in the manufacturer's instructions supplied with the kit.
WARNING
Figure 1
It is very important that you carefully follow theinstructions below correctly. Death or serious injurycould result.
WARNING
PUREFIRE® Gas Conversion Instructionsfor Propane or Natural Gas
Stop! Read these instructions or warranty will be void!
If the information in these instructions is not followed exactly, a fire, an explosion or production of carbonmonoxide may result causing property damage, personal injury or loss of life.
WARNING
Figure 2
2
STEP 3Turn on the manual gas shut off valve. Check for gas leaks.If leaks are found, turn off the gas and repair the leaks.
STEP 4NOTE: When converting a Natural Gas Boiler to an LP
Gas Boiler, turn the gas valve throttle screwclockwise 1 to 2 turns.
When converting an LP Gas Boiler to a NaturalGas Boiler, turn the gas throttle screwcounterclockwise 1 to 2 turns.
These adjustments are not final. Follow theprocedure below for final adjustments.
Turn on the power to the boiler. Place the Control Boardinto System Test Mode by holding down the “Menu”and “Select” keys simultaneously for 10 seconds. Thenpress the “q” key until the “¢” indicates System Test.Press the “Select” key to choose the menu.
Select Maximum Power on the System Test menu. Insertthe combustion analyzer probe into the test port. SeeFigure 3. The combustion readings should agree withTable 1.
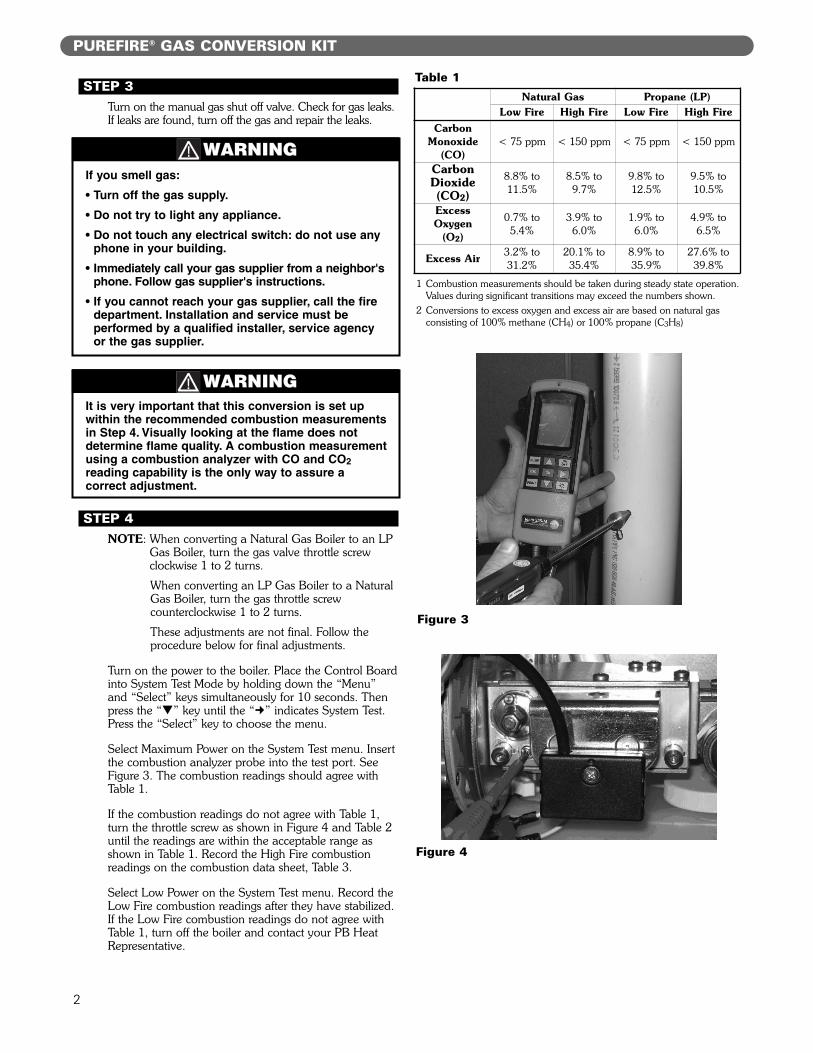
If the combustion readings do not agree with Table 1,turn the throttle screw as shown in Figure 4 and Table 2until the readings are within the acceptable range asshown in Table 1. Record the High Fire combustionreadings on the combustion data sheet, Table 3.
Select Low Power on the System Test menu. Record theLow Fire combustion readings after they have stabilized.If the Low Fire combustion readings do not agree withTable 1, turn off the boiler and contact your PB HeatRepresentative.
Figure 4
It is very important that this conversion is set upwithin the recommended combustion measurementsin Step 4. Visually looking at the flame does notdetermine flame quality. A combustion measurementusing a combustion analyzer with CO and CO2reading capability is the only way to assure acorrect adjustment.
WARNING
PUREFIRE® GAS CONVERSION KIT
If you smell gas:
• Turn off the gas supply.
• Do not try to light any appliance.
• Do not touch any electrical switch: do not use anyphone in your building.
• Immediately call your gas supplier from a neighbor'sphone. Follow gas supplier's instructions.
• If you cannot reach your gas supplier, call the firedepartment. Installation and service must beperformed by a qualified installer, service agencyor the gas supplier.
WARNING
Figure 3
Table 1
Natural Gas Propane (LP)Low Fire High Fire Low Fire High Fire
CarbonMonoxide
(CO)< 75 ppm < 150 ppm < 75 ppm < 150 ppm
CarbonDioxide(CO2)
8.8% to11.5%
8.5% to9.7%
9.8% to12.5%
9.5% to10.5%
Excess Oxygen
(O2)
0.7% to5.4%
3.9% to6.0%
1.9% to6.0%
4.9% to6.5%
Excess Air3.2% to31.2%
20.1% to35.4%
8.9% to35.9%
27.6% to39.8%
1 Combustion measurements should be taken during steady state operation.Values during significant transitions may exceed the numbers shown.
2 Conversions to excess oxygen and excess air are based on natural gas consisting of 100% methane (CH4) or 100% propane (C3H8)

3
STEP 5After the combustion test is complete, exit the SystemTest mode and return to normal operation. Plug the testport. For PVC and CPVC venting, use a standard 1/8"NPT pipe plug. See Figure 5.
STEP 6Place labels provided with the conversion instructions inthe proper locations.
• Place the appropriate valve conversion label as closeto the adjusted gas valve as possible, inside the boilerenclosure. See Figure 6.
• Fill in required information on the appropriate boilerconversion label. Place label next to rating label. See Figure 7.
Figure 5
Figure 6
Figure 7
PUREFIRE® GAS CONVERSION KIT
It is extremely important that all enclosed conversion labels are placed in the proper locations shown. Notfollowing these instructions correctly could result in death or serious injury.
WARNING
Table 2
*Very high CO with low CO2 indicates possible unburned gas due toinsufficient air
Turning Gas Valve Throttle Screw
If CO is not too high
If CO is too high
If CO2 is too high
Turn Clockwise (–) Turn Clockwise (–)
If CO2 is too low
Turn Counterclockwise(+)
Turn Clockwise (–)*

PF8032 R2 (3/16-1M)Printed in U.S.A.©2016 PB Heat, LLC. All rights reserved.
PB HEAT, LLC131 S. CHURCH STREET • BALLY, PA 19503
Combustion Test RecordInstallation Information
Contact: Phone Number:
Company Name: Fax Number:
Address: Email Address:
Job Name: Jobsite Address:
Boiler Model: Boiler Serial No.:
Manufacture Date: Conversion Date:
Pressure Readings
Intake Gas Pressure(in. w.c.):
Intake Gas PressureDrop at Startup:
High Fire OutletGas Pressure (in. w.c.):
Low Fire OutletGas Pressure (in. w.c.):
Combustion Readings
Flame SignalHigh Fire (µA):
Flame SignalLow Fire (µA):
CO2 High Fire (%): CO2 Low Fire (%):
CO High Fire(ppm):
CO Low Fire(ppm):
Fan SpeedHigh Fire (ºF):
Fan SpeedLow Fire (ºF):
Excess AirHigh Fire (%):
Excess AirLow Fire (%):
Exhaust TempHigh Fire (ºF):
Exhaust TempLow Fire (ºF):
Table 3