Publishing - Learn VB
337
-
Upload
api-3748867 -
Category
Documents
-
view
766 -
download
1
Transcript of Publishing - Learn VB


Learn VB.NET
by Chuck Easttom
Wordware Publishing, Inc.

Copyright © 2002, Wordware Publishing, Inc.
All Rights Reserved
2320 Los Rios BoulevardPlano, Texas 75074
No part of this book may be reproduced in any form or byany means without permission in writing from
Wordware Publishing, Inc.
Printed in the United States of America
1-55622-952-610 9 8 7 6 5 4 3 2 1
0201
Product names mentioned are used for identification purposes only and may be trademarks of their respective
companies.
All inquiries for volume purchases of this book should be addressed toWordware Publishing, Inc., at theabove address. Telephone inquiries may be made by calling:
(972) 423-0090

Contents Summary
Chapter 1 Windows Applications with VB.NET. . . . . . . . . . . 1
Chapter 2 Fundamentals of Programming with VB.NET. . . . . 23
Chapter 3 Object-Oriented Programming . . . . . . . . . . . . 51
Chapter 4 The .NET Architecture . . . . . . . . . . . . . . . . . 65
Chapter 5 Introduction to Database Programming . . . . . . . 81
Chapter 6 More Windows Programming with VB.NET . . . . . 107
Chapter 7 ADO.NET . . . . . . . . . . . . . . . . . . . . . . . . 139
Chapter 8 Web Development with VB.NET . . . . . . . . . . . 149
Chapter 9 Creating Custom Windows Controls . . . . . . . . . 171
Chapter 10 Console Applications . . . . . . . . . . . . . . . . . 183
Chapter 11 TCP/IP Programming . . . . . . . . . . . . . . . . . 193
Chapter 12 Software Design with VB.NET . . . . . . . . . . . . 207
Chapter 13 Computer Science with VB.NET. . . . . . . . . . . . 221
Chapter 14 Object Models . . . . . . . . . . . . . . . . . . . . . 239
Chapter 15 Encryption in VB.NET . . . . . . . . . . . . . . . . . 251
Chapter 16 Deploying Your Application . . . . . . . . . . . . . 261
Chapter 17 Converting Existing Applications. . . . . . . . . . . 271
Appendix AKeywords . . . . . . . . . . . . . . . . . . . . . . . 283
Appendix BOther Resources. . . . . . . . . . . . . . . . . . . . 289
Appendix CAnswers to Review Questions . . . . . . . . . . . . 291
Appendix DHTML Primer . . . . . . . . . . . . . . . . . . . . . 305
Index . . . . . . . . . . . . . . . . . . . . . . . . . . . . . . . . 313
iii


Contents
Introduction . . . . . . . . . . . . . . . . . . . . . . . . . . . . . . . . . . xiii
Chapter 1 Windows Applications with VB.NET . . . . . . . . . . 1Introduction . . . . . . . . . . . . . . . . . . . . . . . . . . . . . . . . . . . 1
Getting Started with VB.NET . . . . . . . . . . . . . . . . . . . . . . . . . 1
Common Components and Their Properties . . . . . . . . . . . . . . . . . 11
Components . . . . . . . . . . . . . . . . . . . . . . . . . . . . . . . 11
Component Properties . . . . . . . . . . . . . . . . . . . . . . . . . . 14
Common Programming Terms . . . . . . . . . . . . . . . . . . . . . . . . 17
The Drop-Down Menu. . . . . . . . . . . . . . . . . . . . . . . . . . . . . 18
File . . . . . . . . . . . . . . . . . . . . . . . . . . . . . . . . . . . . 18
Edit . . . . . . . . . . . . . . . . . . . . . . . . . . . . . . . . . . . . 18
View . . . . . . . . . . . . . . . . . . . . . . . . . . . . . . . . . . . 19
Project . . . . . . . . . . . . . . . . . . . . . . . . . . . . . . . . . . 19
Build . . . . . . . . . . . . . . . . . . . . . . . . . . . . . . . . . . . 20
Debug. . . . . . . . . . . . . . . . . . . . . . . . . . . . . . . . . . . 20
Shortcut Keys . . . . . . . . . . . . . . . . . . . . . . . . . . . . . . . . . 21
Naming Conventions . . . . . . . . . . . . . . . . . . . . . . . . . . . . . 21
Summary . . . . . . . . . . . . . . . . . . . . . . . . . . . . . . . . . . . . 22
Review Questions . . . . . . . . . . . . . . . . . . . . . . . . . . . . . . . 22
Chapter 2 Fundamentals of Programming with VB.NET . . . . 23Introduction . . . . . . . . . . . . . . . . . . . . . . . . . . . . . . . . . . 23
Programming Terms . . . . . . . . . . . . . . . . . . . . . . . . . . . . . . 24
Variables . . . . . . . . . . . . . . . . . . . . . . . . . . . . . . . . . 24
Operators and Statements . . . . . . . . . . . . . . . . . . . . . . . . 28
Functions and Procedures . . . . . . . . . . . . . . . . . . . . . . . . 29
Comments . . . . . . . . . . . . . . . . . . . . . . . . . . . . . . . . 32
Decision Structures . . . . . . . . . . . . . . . . . . . . . . . . . . . . . . 32
If-Then . . . . . . . . . . . . . . . . . . . . . . . . . . . . . . . . . . 32
Select Case . . . . . . . . . . . . . . . . . . . . . . . . . . . . . . . . 35
Loops . . . . . . . . . . . . . . . . . . . . . . . . . . . . . . . . . . . 36
The Message Box . . . . . . . . . . . . . . . . . . . . . . . . . . . . 37
Input Box . . . . . . . . . . . . . . . . . . . . . . . . . . . . . . . . . 39
v

Keywords . . . . . . . . . . . . . . . . . . . . . . . . . . . . . . . . . . . 40
Menus . . . . . . . . . . . . . . . . . . . . . . . . . . . . . . . . . . . . . 47
Summary . . . . . . . . . . . . . . . . . . . . . . . . . . . . . . . . . . . . 49
Review Questions . . . . . . . . . . . . . . . . . . . . . . . . . . . . . . . 49
Chapter 3 Object-Oriented Programming. . . . . . . . . . . . 51Introduction . . . . . . . . . . . . . . . . . . . . . . . . . . . . . . . . . . 51
Programming Terms . . . . . . . . . . . . . . . . . . . . . . . . . . . . . . 52
Classes . . . . . . . . . . . . . . . . . . . . . . . . . . . . . . . . . . . . . 53
Events . . . . . . . . . . . . . . . . . . . . . . . . . . . . . . . . . . . . . 58
Access Modifiers . . . . . . . . . . . . . . . . . . . . . . . . . . . . . . . 59
Inheritance . . . . . . . . . . . . . . . . . . . . . . . . . . . . . . . . . . . 60
Collections . . . . . . . . . . . . . . . . . . . . . . . . . . . . . . . . . . . 60
Shared Members . . . . . . . . . . . . . . . . . . . . . . . . . . . . . . . . 61
Interfaces . . . . . . . . . . . . . . . . . . . . . . . . . . . . . . . . . . . . 62
Summary . . . . . . . . . . . . . . . . . . . . . . . . . . . . . . . . . . . . 62
Review Questions . . . . . . . . . . . . . . . . . . . . . . . . . . . . . . . 63
Chapter 4 The .NET Architecture . . . . . . . . . . . . . . . . . 65Introduction . . . . . . . . . . . . . . . . . . . . . . . . . . . . . . . . . . 65
Virtual Execution System . . . . . . . . . . . . . . . . . . . . . . . . . . . 67
Component Architecture . . . . . . . . . . . . . . . . . . . . . . . . . 67
Metadata . . . . . . . . . . . . . . . . . . . . . . . . . . . . . . . . . 68
Managed Code . . . . . . . . . . . . . . . . . . . . . . . . . . . . . . 69
Garbage Collection and Object Management . . . . . . . . . . . . . . 69
Language Fundamentals of VB.NET . . . . . . . . . . . . . . . . . . . . . 71
Event Handling. . . . . . . . . . . . . . . . . . . . . . . . . . . . . . 71
Error Handling . . . . . . . . . . . . . . . . . . . . . . . . . . . . . . 71
System Namespace. . . . . . . . . . . . . . . . . . . . . . . . . . . . 72
File I/O . . . . . . . . . . . . . . . . . . . . . . . . . . . . . . . . . . 72
Drawing . . . . . . . . . . . . . . . . . . . . . . . . . . . . . . . . . . . . 73
Printing . . . . . . . . . . . . . . . . . . . . . . . . . . . . . . . . . . . . . 75
Data Types and the Common Type System . . . . . . . . . . . . . . . . . . 77
Summary . . . . . . . . . . . . . . . . . . . . . . . . . . . . . . . . . . . . 79
Review Questions . . . . . . . . . . . . . . . . . . . . . . . . . . . . . . . 79
Chapter 5 Introduction to Database Programming . . . . . . . 81Introduction to Databases . . . . . . . . . . . . . . . . . . . . . . . . . . . 81
Creating a Database and Tables . . . . . . . . . . . . . . . . . . . . . . . . 82
Database Practice . . . . . . . . . . . . . . . . . . . . . . . . . . . . . . . 85
SQL . . . . . . . . . . . . . . . . . . . . . . . . . . . . . . . . . . . . . . 86
A Brief History of SQL . . . . . . . . . . . . . . . . . . . . . . . . . 89
vi
Contents

The Basics of Data Binding . . . . . . . . . . . . . . . . . . . . . . . . . . 89
A Basic Data-bound Application . . . . . . . . . . . . . . . . . . . . . . . 90
Complex Data Binding . . . . . . . . . . . . . . . . . . . . . . . . . . . . 104
Summary . . . . . . . . . . . . . . . . . . . . . . . . . . . . . . . . . . . 105
Review Questions . . . . . . . . . . . . . . . . . . . . . . . . . . . . . . 106
Chapter 6 More Windows Programming with VB.NET . . . . . 107Introduction . . . . . . . . . . . . . . . . . . . . . . . . . . . . . . . . . . 107
Components. . . . . . . . . . . . . . . . . . . . . . . . . . . . . . . . . . 107
Common Components . . . . . . . . . . . . . . . . . . . . . . . . . 108
MDI Applications . . . . . . . . . . . . . . . . . . . . . . . . . . . . . . 132
Built-in Functions . . . . . . . . . . . . . . . . . . . . . . . . . . . . . . 133
String Functions . . . . . . . . . . . . . . . . . . . . . . . . . . . . 133
Math Functions . . . . . . . . . . . . . . . . . . . . . . . . . . . . . 135
Summary . . . . . . . . . . . . . . . . . . . . . . . . . . . . . . . . . . . 137
Review Questions . . . . . . . . . . . . . . . . . . . . . . . . . . . . . . 137
Chapter 7 ADO.NET . . . . . . . . . . . . . . . . . . . . . . . 139Introduction . . . . . . . . . . . . . . . . . . . . . . . . . . . . . . . . . . 139
XML . . . . . . . . . . . . . . . . . . . . . . . . . . . . . . . . . . . . . 140
XML Documents . . . . . . . . . . . . . . . . . . . . . . . . . . . . 141
XSL . . . . . . . . . . . . . . . . . . . . . . . . . . . . . . . . . . . . . . 141
XPath . . . . . . . . . . . . . . . . . . . . . . . . . . . . . . . . . . . . . 141
ADO.NET Architecture . . . . . . . . . . . . . . . . . . . . . . . . . . . 141
Remoting . . . . . . . . . . . . . . . . . . . . . . . . . . . . . . . . . . . 142
Maintaining State . . . . . . . . . . . . . . . . . . . . . . . . . . . . . . . 142
Managed Providers . . . . . . . . . . . . . . . . . . . . . . . . . . . . . . 143
Connection . . . . . . . . . . . . . . . . . . . . . . . . . . . . . . . . . . 143
Command . . . . . . . . . . . . . . . . . . . . . . . . . . . . . . . . . . . 143
DataReader . . . . . . . . . . . . . . . . . . . . . . . . . . . . . . . . . . 144
DataSet . . . . . . . . . . . . . . . . . . . . . . . . . . . . . . . . . . . . 145
Disconnected Layer . . . . . . . . . . . . . . . . . . . . . . . . . . . . . 145
State of Data . . . . . . . . . . . . . . . . . . . . . . . . . . . . . . . . . 145
Populating Programmatically . . . . . . . . . . . . . . . . . . . . . . . . 146
Summary . . . . . . . . . . . . . . . . . . . . . . . . . . . . . . . . . . . 147
Review Questions . . . . . . . . . . . . . . . . . . . . . . . . . . . . . . 147
Chapter 8 Web Development with VB.NET . . . . . . . . . . . 149Introduction . . . . . . . . . . . . . . . . . . . . . . . . . . . . . . . . . . 149
Technological Background . . . . . . . . . . . . . . . . . . . . . . . . . . 150
Web Forms . . . . . . . . . . . . . . . . . . . . . . . . . . . . . . . . . . 151
A Simple Web Form . . . . . . . . . . . . . . . . . . . . . . . . . . . . . 152
HTML Components . . . . . . . . . . . . . . . . . . . . . . . . . . . . . 156
vii
Contents

Button . . . . . . . . . . . . . . . . . . . . . . . . . . . . . . . . . . 156
Text Field . . . . . . . . . . . . . . . . . . . . . . . . . . . . . . . . 157
Text Area . . . . . . . . . . . . . . . . . . . . . . . . . . . . . . . . 158
Table . . . . . . . . . . . . . . . . . . . . . . . . . . . . . . . . . . 159
Image . . . . . . . . . . . . . . . . . . . . . . . . . . . . . . . . . . 160
List Box . . . . . . . . . . . . . . . . . . . . . . . . . . . . . . . . . 161
Check Box . . . . . . . . . . . . . . . . . . . . . . . . . . . . . . . 161
Form. . . . . . . . . . . . . . . . . . . . . . . . . . . . . . . . . . . 162
ASP.NET vs. Windows Forms . . . . . . . . . . . . . . . . . . . . . . . . 165
Web Forms vs. Traditional ASP . . . . . . . . . . . . . . . . . . . . . . . 165
Data-bound Web Forms . . . . . . . . . . . . . . . . . . . . . . . . . . . 167
Web Services . . . . . . . . . . . . . . . . . . . . . . . . . . . . . . . . . 168
How Web Services Work . . . . . . . . . . . . . . . . . . . . . . . . 168
Summary . . . . . . . . . . . . . . . . . . . . . . . . . . . . . . . . . . . 169
Review Questions . . . . . . . . . . . . . . . . . . . . . . . . . . . . . . 170
Chapter 9 Creating Custom Windows Controls . . . . . . . . . 171Introduction . . . . . . . . . . . . . . . . . . . . . . . . . . . . . . . . . . 171
Modifying an Existing Component . . . . . . . . . . . . . . . . . . . . . 172
Background . . . . . . . . . . . . . . . . . . . . . . . . . . . . . . . . . . 173
Compound Components . . . . . . . . . . . . . . . . . . . . . . . . . . . 174
Creating Components from Scratch . . . . . . . . . . . . . . . . . . . . . 178
Components without a User Interface . . . . . . . . . . . . . . . . . . . . 179
Web Controls . . . . . . . . . . . . . . . . . . . . . . . . . . . . . . . . . 181
Summary . . . . . . . . . . . . . . . . . . . . . . . . . . . . . . . . . . . 182
Review Questions . . . . . . . . . . . . . . . . . . . . . . . . . . . . . . 182
Chapter 10 Console Applications . . . . . . . . . . . . . . . . 183Introduction . . . . . . . . . . . . . . . . . . . . . . . . . . . . . . . . . . 183
Console Application Objects . . . . . . . . . . . . . . . . . . . . . . . . . 185
Console . . . . . . . . . . . . . . . . . . . . . . . . . . . . . . . . . 185
In . . . . . . . . . . . . . . . . . . . . . . . . . . . . . . . . . . . . 186
Out . . . . . . . . . . . . . . . . . . . . . . . . . . . . . . . . . . . 186
Error. . . . . . . . . . . . . . . . . . . . . . . . . . . . . . . . . . . 187
Complex Console Applications . . . . . . . . . . . . . . . . . . . . . . . 187
Summary . . . . . . . . . . . . . . . . . . . . . . . . . . . . . . . . . . . 191
Review Questions . . . . . . . . . . . . . . . . . . . . . . . . . . . . . . 191
Chapter 11 TCP/IP Programming . . . . . . . . . . . . . . . . 193Introduction . . . . . . . . . . . . . . . . . . . . . . . . . . . . . . . . . . 193
The Winsock Control . . . . . . . . . . . . . . . . . . . . . . . . . . . . . 194
More About the Winsock . . . . . . . . . . . . . . . . . . . . . . . . 198
viii
Contents

UDP Applications . . . . . . . . . . . . . . . . . . . . . . . . . . . . . . 199
The Bind Method . . . . . . . . . . . . . . . . . . . . . . . . . . . . . . . 201
OSI Model . . . . . . . . . . . . . . . . . . . . . . . . . . . . . . . . . . 201
Network Connectivity . . . . . . . . . . . . . . . . . . . . . . . . . . . . 203
Summary . . . . . . . . . . . . . . . . . . . . . . . . . . . . . . . . . . . 204
Review Questions . . . . . . . . . . . . . . . . . . . . . . . . . . . . . . 205
Chapter 12 Software Design with VB.NET . . . . . . . . . . . . 207Introduction . . . . . . . . . . . . . . . . . . . . . . . . . . . . . . . . . . 207
Types of Errors . . . . . . . . . . . . . . . . . . . . . . . . . . . . . . . . 207
Planning. . . . . . . . . . . . . . . . . . . . . . . . . . . . . . . . . . . . 208
Testing . . . . . . . . . . . . . . . . . . . . . . . . . . . . . . . . . . . . 209
Microsoft Solutions Framework . . . . . . . . . . . . . . . . . . . . . . . 210
Envisioning . . . . . . . . . . . . . . . . . . . . . . . . . . . . . . . 210
Planning. . . . . . . . . . . . . . . . . . . . . . . . . . . . . . . . . 210
Coding. . . . . . . . . . . . . . . . . . . . . . . . . . . . . . . . . . 211
Stabilizing. . . . . . . . . . . . . . . . . . . . . . . . . . . . . . . . 211
UML . . . . . . . . . . . . . . . . . . . . . . . . . . . . . . . . . . . . . 211
Three-Step Plan. . . . . . . . . . . . . . . . . . . . . . . . . . . . . . . . 214
Planning. . . . . . . . . . . . . . . . . . . . . . . . . . . . . . . . . 214
Coding . . . . . . . . . . . . . . . . . . . . . . . . . . . . . . . . . 215
Testing . . . . . . . . . . . . . . . . . . . . . . . . . . . . . . . . . 215
Debugging . . . . . . . . . . . . . . . . . . . . . . . . . . . . . . . . . . 216
Setting Project Debugging Options . . . . . . . . . . . . . . . . . . 216
The Build Window . . . . . . . . . . . . . . . . . . . . . . . . . . . 217
Breakpoints . . . . . . . . . . . . . . . . . . . . . . . . . . . . . . . 218
Summary . . . . . . . . . . . . . . . . . . . . . . . . . . . . . . . . . . . 219
Review Questions . . . . . . . . . . . . . . . . . . . . . . . . . . . . . . 220
Chapter 13 Computer Science with VB.NET . . . . . . . . . . . 221Introduction . . . . . . . . . . . . . . . . . . . . . . . . . . . . . . . . . . 221
Data Structures . . . . . . . . . . . . . . . . . . . . . . . . . . . . . . . . 222
Queue . . . . . . . . . . . . . . . . . . . . . . . . . . . . . . . . . . 222
Stacks . . . . . . . . . . . . . . . . . . . . . . . . . . . . . . . . . . 224
Other Structures . . . . . . . . . . . . . . . . . . . . . . . . . . . . 225
Recursion . . . . . . . . . . . . . . . . . . . . . . . . . . . . . . . . . . . 226
Algorithms . . . . . . . . . . . . . . . . . . . . . . . . . . . . . . . . . . 228
Sorting Algorithms . . . . . . . . . . . . . . . . . . . . . . . . . . . 229
Other Algorithms . . . . . . . . . . . . . . . . . . . . . . . . . . . . 233
Optimizing for Speed. . . . . . . . . . . . . . . . . . . . . . . . . . . . . 234
Summary . . . . . . . . . . . . . . . . . . . . . . . . . . . . . . . . . . . 236
Review Questions . . . . . . . . . . . . . . . . . . . . . . . . . . . . . . 237
ix
Contents

Chapter 14 Object Models . . . . . . . . . . . . . . . . . . . . 239Outlook’s Object Model . . . . . . . . . . . . . . . . . . . . . . . . . . . 241
Internet Information Server . . . . . . . . . . . . . . . . . . . . . . . . . 245
The ASP Request Object . . . . . . . . . . . . . . . . . . . . . . . . 246
The ASP Response Object . . . . . . . . . . . . . . . . . . . . . . . 247
The ASP Session and Application Objects . . . . . . . . . . . . . . 247
The ASP Server Object . . . . . . . . . . . . . . . . . . . . . . . . . 248
The ASP BrowserType Object . . . . . . . . . . . . . . . . . . . . . 248
Summary . . . . . . . . . . . . . . . . . . . . . . . . . . . . . . . . . . . 248
Review Questions . . . . . . . . . . . . . . . . . . . . . . . . . . . . . . 249
Chapter 15 Encryption in VB.NET . . . . . . . . . . . . . . . . 251History of Encryption . . . . . . . . . . . . . . . . . . . . . . . . . . . . 251
VB Simple Substitution Encryption . . . . . . . . . . . . . . . . . . . . . 252
Advanced Encryption Concepts . . . . . . . . . . . . . . . . . . . . . . . 254
My Cryptography Algorithm for More Serious Cryptographers . . . . . . 255
More Encryption . . . . . . . . . . . . . . . . . . . . . . . . . . . . . . . 255
Creating Secure Applications . . . . . . . . . . . . . . . . . . . . . . . . 258
Summary . . . . . . . . . . . . . . . . . . . . . . . . . . . . . . . . . . . 259
Review Questions . . . . . . . . . . . . . . . . . . . . . . . . . . . . . . 259
Chapter 16 Deploying Your Application . . . . . . . . . . . . . 261Introduction . . . . . . . . . . . . . . . . . . . . . . . . . . . . . . . . . . 261
Packaging Code. . . . . . . . . . . . . . . . . . . . . . . . . . . . . . . . 263
Creating Cabinet Files . . . . . . . . . . . . . . . . . . . . . . . . . . . . 263
Configuring the .NET Framework . . . . . . . . . . . . . . . . . . . . . . 265
Creating Configuration Files . . . . . . . . . . . . . . . . . . . . . . . . . 266
Application Configuration Files . . . . . . . . . . . . . . . . . . . . 266
Machine/Administrator Configuration Files . . . . . . . . . . . . . . 267
Security Configuration Files . . . . . . . . . . . . . . . . . . . . . . 268
Summary . . . . . . . . . . . . . . . . . . . . . . . . . . . . . . . . . . . 269
Review Questions . . . . . . . . . . . . . . . . . . . . . . . . . . . . . . 269
Chapter 17 Converting Existing Applications . . . . . . . . . . 271Introduction . . . . . . . . . . . . . . . . . . . . . . . . . . . . . . . . . . 271
Upgrade Considerations . . . . . . . . . . . . . . . . . . . . . . . . . . . 272
Early Binding . . . . . . . . . . . . . . . . . . . . . . . . . . . . . . 273
ADO Data Access . . . . . . . . . . . . . . . . . . . . . . . . . . . 273
The Date Data Type . . . . . . . . . . . . . . . . . . . . . . . . . . 274
Variants . . . . . . . . . . . . . . . . . . . . . . . . . . . . . . . . . 274
Integers . . . . . . . . . . . . . . . . . . . . . . . . . . . . . . . . . 275
Fixed-Length Strings . . . . . . . . . . . . . . . . . . . . . . . . . . 275
Arrays . . . . . . . . . . . . . . . . . . . . . . . . . . . . . . . . . . 275
x
Contents

Internet Information Server (IIS) Applications . . . . . . . . . . . . . . . 276
Converting Forms. . . . . . . . . . . . . . . . . . . . . . . . . . . . 276
Windows API . . . . . . . . . . . . . . . . . . . . . . . . . . . . . . 276
AND/OR/NOT . . . . . . . . . . . . . . . . . . . . . . . . . . . . . 276
Error Handling . . . . . . . . . . . . . . . . . . . . . . . . . . . . . 277
Using Constants. . . . . . . . . . . . . . . . . . . . . . . . . . . . . 278
The Upgrade Wizard . . . . . . . . . . . . . . . . . . . . . . . . . . . . . 278
Summary . . . . . . . . . . . . . . . . . . . . . . . . . . . . . . . . . . . 282
Appendix AKeywords . . . . . . . . . . . . . . . . . . . . . . 283
Appendix BOther Resources . . . . . . . . . . . . . . . . . . . 289
Appendix CAnswers to Review Questions . . . . . . . . . . . . 291
Appendix DHTML Primer . . . . . . . . . . . . . . . . . . . . . 305
Index . . . . . . . . . . . . . . . . . . . . . . . . . . . . . . . 313
xi
Contents

Acknowledgments
This book has been a tremendous undertaking, and I could not have done
it alone. I have several people to thank for this.
First of all the people at Wordware Publishing. Jim Hill and Wes Beckwith
have always been absolutely wonderful to work with. Without them, I
would not be writing programming books today. I also owe a great debt to
Beth Kohler. She edits the rough drafts and saves me from embarrassing
myself!
I also wish to thank students who looked at rough drafts of chapters and
examined source code. They allowed me to confirm that this book truly
could teach the beginner how to use VB.NET.
Finally, my wife, Misty, and my son, AJ, who are always patient when I am
laboring in the den for hours on a book. Their understanding allows all this
to be possible
xii

Introduction
When Visual Basic 1.0 was introduced in 1991, it revolutionized Windows
programming. Before the advent of Visual Basic, programmers had to code
everything by hand, the hard way. A simple task such as placing a button
on the screen required some rather intricate programming. Visual Basic
changed all this. It allowed the programmer to use components to build
the GUI (Graphical User Interface) and then they could simply concen-
trate on the actual application.
Versions 2 and 3 of Visual Basic simply added some more components and
a bit more functionality; however, version 3.0 was still quite limited. Most
programmers simply used it for creating user interfaces or for prototyping.
Version 4.0 introduced a whole new world to Visual Basic programmers. It
brought the concept of classes and object-oriented programming, as well
as a host of other innovations. Versions 5.0 and 6.0 continued this evolu-
tion, although Visual Basic 6.0 added several Internet programming
options, as well as the ability to create your own ActiveX DLLs and com-
ponents. However, in essence, the Visual Basic language had not changed
a great deal since version 1.0. Code written in an older version still ran
just fine, even if some of it was now superfluous.
VB.NET, however, is a radical departure from past versions of Visual
Basic. I must admit that at first I thought this radical shift in programming
paradigms would be a very bad mistake, until I got a chance to begin work-
ing with VB.NET. I first began working with the public beta version 1.0
and kept up with each successive beta release. What I saw amazed me.
Visual Basic now has all the power and functionality of any other main-
stream language including C++ and Java. It now has 100% true object
orientation, inheritance, and many of the features that have made Java a
great language.
This book is primarily designed to help a beginning programmer under-
stand VB.NET. It is not assumed that you have any programming
experience at all. However, an experienced VB programmer who wishes
to become acclimated with the new VB.NET will also find this book useful.
Each chapter contains graphics to illustrate what is happening as well as
xiii

step-by-step instructions on how to write the code. The first chapter has
you jump right in and develop some simple code. Then we go back and
explain the theoretical and conceptual underpinnings. In my experience
teaching programming, I have found that students tend to better under-
stand concepts they have seen in action.
In this book you will learn the basics of writing VB.NET applications as
well as the fundamentals of the .NET architecture. You will also be
exposed to some object-oriented theory. In addition, I will show you
how to access databases using ADO.NET, and how to write Internet
applications with ASP.NET. By the end of the book you should have a
firm grasp of VB.NET. Be sure to download the example files from
www.wordware.com/VBNET as they contain fully working applications
written in VB.NET. This gives you working examples to use as guides to
your studies.
The first chapter dives right in and has you writing code. There is also a
separate chapter that covers the actual details of the .NET architecture
and how this relates to Visual Basic programming. Most of the chapters
are concerned with simply showing you how to do things in VB.NET.
However, certain chapters (notably Chapters 4 and 7) delve into the
underlying architecture behind VB.NET. Those chapters might be a bit
overwhelming for the novice programmer. The good news is that you don’t
have to grasp everything in them in order to use VB.NET. If you are a
complete novice (new to VB and new to programming) I suggest you read
them but don’t worry too much. After about six months of actually work-
ing with VB.NET, come back and read them again.
There are a couple of items in this book that I don’t think are in any other
beginners book. The first is an entire chapter devoted to software design.
There is also a chapter devoted to basic computer science. Many people
come to VB from backgrounds other than computer science. These two
chapters endeavor to help you “catch up” with some fundamental com-
puter science and software engineering topics.
xiv
Introduction

Chapter 1
WindowsApplicationswith VB.NET
Introduction
This chapter is designed to introduce you to the essentials
of Visual Basic.NET. By the end of this chapter, you should
have a basic understanding of developing a Windows appli-
cation using VB.NET. This includes the use of forms,
components, properties, and events. You should also be
getting comfortable with the programming interface and
know how to move around in the toolbar, toolbox, and
drop-down menus.
Getting Started with VB.NET
When you first launch Visual Basic, you will see the follow-
ing screen.
1
In this
chapter, you
learn about:
� Getting
started with
VB.NET
� Common
components
and their
properties
� Common
programming
terms
� Drop-down
menus
� Shortcut keys
� Naming
conventions

This screen is common to all the Visual Studio.NET products. In order to
start a new project you will need to go to the drop-down menu at the top of
the screen and click on File, New, then Project. You can also accomplish
the same thing by pressing Ctrl+N on your keyboard (the Control key and
the N key simultaneously).
You will then see the following screen.
The first option you see on the left side should be Visual Basic. As I indi-
cated before, this same environment is used for all the Visual Studio.NET
products, but for the purposes of this book we will only be concerning our-
selves with Visual Basic.NET projects. You will further notice that on the
2 Chapter 1 / Windows Applications with VB.NET

right-hand side you have several Visual Basic templates to choose from.
For this chapter, we will focus on Windows applications; however, later
chapters will introduce you to other types of Visual Basic projects.
On this screen you can also choose the name for your project as well as
the location in which you place it. At the bottom of this screen you will
notice a field called “Name,” and just below that a field called “Location.”
You will notice that in our example we have named our project
“ExampleOne” and placed it in a folder called “Examples\Chapter One\.”
Once you have selected the project type, name, and location you will then
be able to view the actual development area. This is referred to as the
IDE, or integrated development environment.
The top of the screen shows the drop-down menus and the toolbar. These
contain various functions you will use when programming, such as saving,
running, and debugging your program. There are a lot of interesting and
useful features you will need to become familiar with in the IDE, but for
the time being we are going to concentrate on getting a few simple
VB.NET programs to compile and run successfully.
Chapter 1 / Windows Applications with VB.NET 3
Ch
ap
ter1

In the center of the screen you should see a blank form. The form is the
cornerstone of Windows applications written with Visual Basic. This is
what will be visually displayed to the user of your application. Beginning
with version 1.0 of Visual Basic and continuing through to VB.NET, devel-
opers can simply place a variety of components directly on the form, and
resize and reposition them. This makes designing the graphical user
interface (GUI) much easier.
The form itself, as well as all the components you might place on it, have
certain properties you can manipulate. They also have events that occur in
response to user and system actions. We are going to create a few simple
applications that illustrate this point. If you look on the left side of the
screen, you should see a toolbox that displays all the components you ini-
tially have available. You have two methods for placing a component on a
form. The first is to simply double-click on the component you wish to use
in the toolbox. It will then appear in the upper left-hand corner of the cur-
rently active form. The second method is to click on the component you
wish to add, then drag your mouse on the form, literally drawing the
component.
The first example I am going to show you is quite simple but it is a good
place to start. If you wish to follow along, you merely need to open Visual
Basic.NET, start a new Windows application project, and then follow the
steps provided below.
Example 1-1
For our example, place a single command button on the form, then move
the button to the middle of the form. Then place a single text box directly
above it. Your screen should look like the following when you are done.
4 Chapter 1 / Windows Applications with VB.NET

If you look to the lower right side of your screen you should see a window
called Properties. If you do not see this, you can click on the form or any
components on it and press F4; you should then see the Properties win-
dow. This window allows you to set the properties of the form itself or any
component on the form. In order to do this, you must first select the indi-
vidual component in question (by clicking on it), or you can use the
drop-down box at the top of the Properties window to select any compo-
nent on the form.
We are first going to set several properties of the command button.
The first property we will set is the background color. For most business
applications the standard gray background is perfect; however, I want to
illustrate to you what you can do with Visual Basic.NET. When you dou-
ble-click the BackgroundColor property, you will be presented with three
tabs. Select the one called Custom Color. Upon selecting this tab you will
be shown a palette of colors. Simply double-clicking on one of the colors
will change the command button’s background to the color you choose. For
our example, I am choosing a light blue color. You should note that just
below the BackgroundColor property is the BackgroundImage property.
You can use images as the background for the command button, as well as
many other components.
Chapter 1 / Windows Applications with VB.NET 5
Ch
ap
ter1

Next we are going to set the Text property. This property determines
what will display as the caption on the button. We are going to change this
to read “Click Me.” Obviously, there are many other properties we could
set, and we will examine all of them in time. However, at this point I would
like to turn your attention to how to handle user events. If you double-
click on the command button, a window will open showing you the code
for the button’s Click event.
There is a lot of code here that needs to be explained, but first I would like
to show you a Windows application in action. With that in mind, we are
going to type in a single line of code (the line beginning with “Me.Text”):
Private Sub Button1_Click(ByVal Sender as System.Object, ByVal e as
System.EventArgs) Handles Button1.Click
Me.Text = TextBox1.Text()
End Sub
In order to see what our application does, you must run the program. You
can do this by using any of the following methods:
� Press the F5 key.
� Press the arrow-shaped button on the toolbar (it looks like a play but-
ton on a CD player).
6 Chapter 1 / Windows Applications with VB.NET

� Select Debug | Start from the drop-down menu at the top of the IDE.
Whichever method you choose, when you run the example you will see a
screen with our command button and our text box located on it. If you then
type some text in the text box and click the command button, you will find
that the caption for the form is changed to the text you put in the text box.
This simple application illustrates many of the basic principles of Visual
Basic.NET. The first thing you should notice is that you can easily place
any components you wish on a form and design a user interface. The next
thing you should notice is that when you are developing your application
(referred to as “design time”) you can change the properties of any com-
ponent you wish using the Properties window. Finally, you should notice
that when your application is running (referred to as “run time”) you can
have your code written in such a way that it changes the properties of var-
ious components.
In our single line of code we did two very interesting things. First, we
extracted the value contained in the Text property of the text box, then we
placed that value into the Text property of the form (the “Me” keyword
refers to the current form you are working with). All of this was accom-
plished in response to a user clicking the command button.
Chapter 1 / Windows Applications with VB.NET 7
Ch
ap
ter1

At this point a bit more explanation of an event is in order. When you write
code in any programming language (be it Visual Basic, C, Java, Perl, etc.),
you don’t simply write line after line of code. You usually organize the
code into logical sections that perform some action. These sections are
referred to as functions or subroutines. Basically, when you place a section
of code in one place with a common name to refer to that section of code,
you have a function. For example, if I wish to write a function that divides
two numbers, I might write something like this:
Public Sub Divide(Num1 as Single, Num2 as Single)
Dim Answer as Single
Answer = Num1 / Num2
End Sub
The first line of this code is referred to as the function declaration line. It
contains several elements, namely the access modifier (whether it is pub-
lic or private), the word “sub,” the name you wish to give your function,
and any parameters you want to pass to your function.
An event is simply a function, usually connected with some component,
that is called in response to some user or system action. One example is
the Click event, which is a function that is called when the user clicks on a
button.
You will find that a great deal of Visual Basic code is concerned with
manipulating the properties of components and responding to events.
Before I begin a more detailed examination of what is occurring, I would
like to show you one more example.
Example 1-2
1. Start a new project as a Windows application.
2. Place one text box and four labels on the form. Set the labels’ Text
properties to blank and the BorderStyle to Fixed3D.
3. Place one command button on the form.
4. Change your form’s caption to read String Stuff.
Now your form should look like this:
8 Chapter 1 / Windows Applications with VB.NET

5. In the Click event of the command button place the following code:
Dim MyString as String
MyString = Textbox1.Text
Label1.Text = Ucase(MyString) 'display uppercase version of the string
Label2.Text = Lcase(MyString) 'display lowercase version of the string
Label3.Text = Len(MyString) 'display length of the string
Remember that the way you access the Click event is to double-click on
the command button.
6. Using one of the procedures explained earlier in this chapter, run the
application.
7. When the application is running, type your first name into the text box and
press the command button. You will see something like the following
image.
Chapter 1 / Windows Applications with VB.NET 9
Ch
ap
ter1

This second example has you once again manipulating the properties of
text boxes and labels, both at design time and run time. It also has you
returning to the Click event of the command button. The text box, label,
and command button are perhaps the most ubiquitous components in
Visual Basic, so it behooves us to begin our examinations with them.
Now that you have seen some simple Windows applications work in
VB.NET, it is time for us to go back and examine that cryptic looking code
we saw when we looked in the Click event of our command button. To
refresh your memory, what you should have seen would be something like
this:
Public Class Form1
Inherits System.Windows.Forms.Form
Private Sub Button1_Click(ByVal Sender as System.Object, ByVal e
as System.EventArgs) Handles Button1.Click
End Sub
End Class
The first thing you may notice is the Public Class Form1 line. You might
be asking what that means. Let me explain. VB.NET has implemented a
purely object-oriented paradigm (unlike previous versions of Visual Basic).
What this means is that all the forms (as well as most other portions of
your Visual Basic application) are really made from classes. A class is sim-
ply a code template for creating an object. Every component you put on a
form (and, incidentally, the form itself) is an object. When you change the
placement of a text box on a form and change one of its properties, what
you have actually done is created an instance of the textbox object and
changed one of its members.
10 Chapter 1 / Windows Applications with VB.NET

I will go into more depth on object-oriented theory and practice in a later
chapter, but for the time being it is simply necessary for you to realize that
a class is a template for creating an object, and that an object has proper-
ties and methods.
So what our code example is telling us is that there is a class called
“Form1” and one of the methods for that class is our button1 Click event.
It is also telling us that this event takes several parameters (that are
passed by the system; you don’t have to write code for them). You don’t
have to do anything with parameters that are passed to your function or
event if you don’t wish to. In our case, we did not.
Common Components and Their Properties
You have already seen how easy it is to create the user interface using the
components that Visual Basic.NET provides you with. There are many
components you can utilize in your applications. In this section, I will
describe to you, in brief, some of the most commonly used components,
what they are used for, and their most important properties. I should note
here that you will often hear the words “component” and “control” used
interchangeably. Don’t let this confuse you.
Some components are used more often than others. The form is the most
basic component. It is the container in which you place all the other com-
ponents. It is also what your user will see. The most important properties
you will set for a form are its name (what the computer will call it), its text
(what appears in the title bar that the user will see), and its back color
(what color you want the background to be). You may also wish to set its
border style (this determines if it can be resized by the user or not).
Below are listed some other common components and the properties you
will be most concerned with.
Components
Text Box
This component allows the end user to enter data. You will want to set its
name (what the computer will call it), its text (the default text that initially
appears when you run the program), and possibly its font if you wish a dif-
ferent font in the text box. You can also enter something into the Text
property as a default text. Finally, you may want to set its max length
Chapter 1 / Windows Applications with VB.NET 11
Ch
ap
ter1
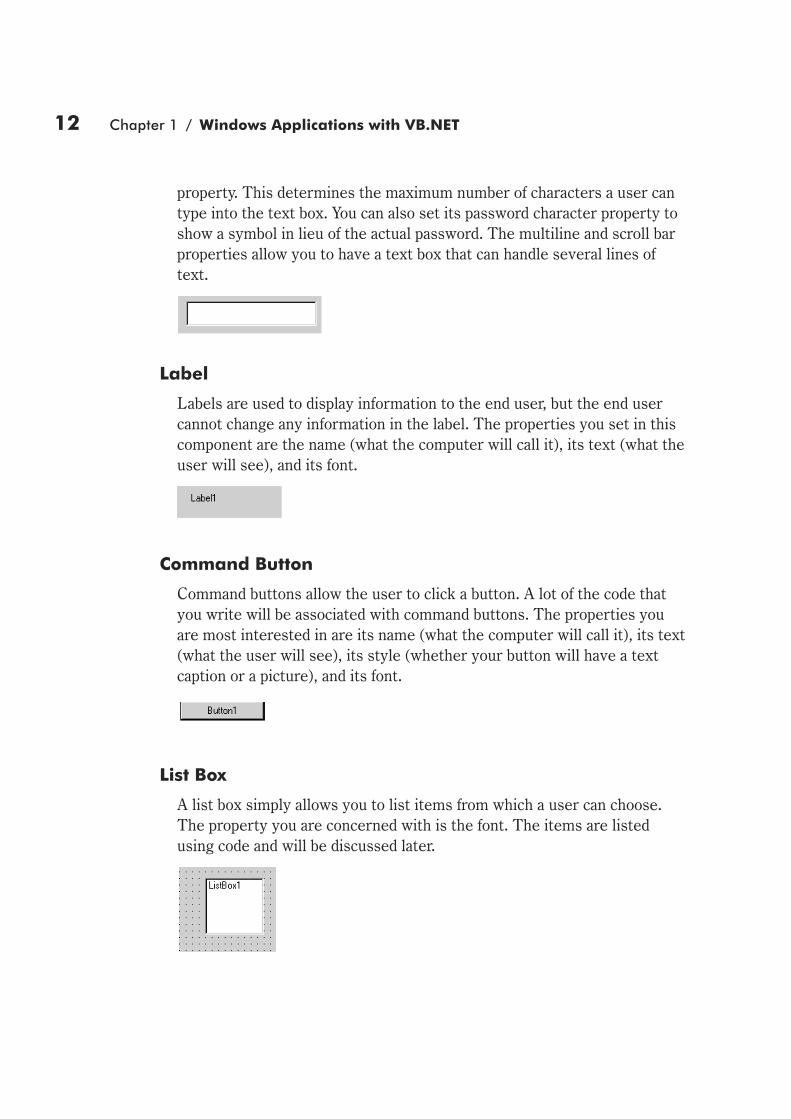
property. This determines the maximum number of characters a user can
type into the text box. You can also set its password character property to
show a symbol in lieu of the actual password. The multiline and scroll bar
properties allow you to have a text box that can handle several lines of
text.
Label
Labels are used to display information to the end user, but the end user
cannot change any information in the label. The properties you set in this
component are the name (what the computer will call it), its text (what the
user will see), and its font.
Command Button
Command buttons allow the user to click a button. A lot of the code that
you write will be associated with command buttons. The properties you
are most interested in are its name (what the computer will call it), its text
(what the user will see), its style (whether your button will have a text
caption or a picture), and its font.
List Box
A list box simply allows you to list items from which a user can choose.
The property you are concerned with is the font. The items are listed
using code and will be discussed later.
12 Chapter 1 / Windows Applications with VB.NET

Combo Box
This is like a list box but you can set more options.
Picture Box
Using this component, you can place any bitmap (*.bmp), Windows
metafile (*.wmf), or icon (*.ico) on your form. Starting with Visual Basic
version 5.0, you can also add in JPEG (*.jpg) and GIF (*.gif) image files.
All you do is set the stretch property to true (this ensures that the picture
you insert will be the size of your picture box) and then use the picture
property to select the picture you want to use.
Group Box
A frame is basically a container component. It is used to group other com-
ponents. The property you will use most with it is its caption.
Chapter 1 / Windows Applications with VB.NET 13
Ch
ap
ter1

Component Properties
Font
Many components have a font property that lets you select the font for
that component. Below is what you will see if you select the font property
of any component:
Using this screen you can easily change the font settings for most
components.
A lot of the programming you do will be concerned with using code to alter
the properties of some component. To do this, you write the component
name you wish to alter followed by a period and the name of the property
you want to change. The syntax for this is:
ComponentName.Property = “whatever”
Some specific examples are:
Textbox1.Text = “Howdy”
Me.Text = “This is my form”
Picturebox1.Image = “c:\folder\image.bmp”
Label1.Text = “This is a label”
14 Chapter 1 / Windows Applications with VB.NET

Tip: If your code referencing a property does not work, it is most
likely because you misspelled either the component or property
name.
Using this basic technique, you can write code to change the properties of
any component you wish. This is important to remember since much of
the code you write in Visual Basic is concerned with altering the proper-
ties of various components.
Example 1-3
Let’s try one more example to illustrate the use of components and prop-
erties. Start up a new Windows application. I will call mine example3.
Now, on that form place one list box, one text box, and one command but-
ton. In the Properties window (either select View | Properties or press
the F4 key) change the command button’s caption to Add Text. Your form
should look like the image below.
If you double-click on the command button you will get its code window.
This will show you the Click event, just as we saw in the previous two
examples.
Chapter 1 / Windows Applications with VB.NET 15
Ch
ap
ter1

In it place this code:
ListBox1.Items().Add(TextBox1.Text)
Run your program. Remember that you can do this by clicking on the Run
button in the toolbar or by pressing the F5 key. Now every time you click
on the command button, whatever you have typed into the text box will be
added to the list box!
16 Chapter 1 / Windows Applications with VB.NET

Common Programming Terms
The following is a list of standard Visual Basic and programming terms
that you will need to be familiar with. In programming, proper nomencla-
ture (or naming) is vital. You cannot understand instructions or
communicate with other programmers without an understanding of
proper nomenclature.
Application A fancy word for the program you write.
Bug An error in your program.
Code The actual program instructions that you write.
Code module A module of separate subroutines completely separate
from a form.
Compile The process of taking your source code and creating an
executable program from it.
Components The various objects that Visual Basic has for you to use in
your graphical user interface. Examples are the text box,
command button, list box, combo box, and picture box.
Many Visual Basic books call these components “controls.”
That was the name used in previous versions of Visual
Basic.
Debug To remove errors in your program.
Event A function that responds to an action taken by the user or
the system itself. The Click event is a good example.
Form The component on which you place other components and
design the user interface.
Function A group of related statements that perform some action.
IDE Integrated development environment.
Project What contains all the files in your program. It includes
forms, code modules, class modules, etc. In Visual
Basic.NET this idea has been expanded to the notion of the
assembly, which also includes information about all the
other items, such as DLLs, that your application may
depend on.
Statement A single line of code that performs an action.
Chapter 1 / Windows Applications with VB.NET 17
Ch
ap
ter1

Subroutine A subsection of code. Events are premade subroutines in
Visual Basic.
Variable A place in memory set aside to hold data of a particular
type.
The Drop-Down Menu
The drop-down menu gives you access to several possible functions. The
following is a list of the main drop-down options you see at the top of your
screen and several of the suboptions along with their functions. I do not
cover all the drop-down menu options here, only the ones that you as a
beginner need. We will cover others later in this book.
File
New Project Opens a new blank project for you to begin working with.
Open Project Allows you to open an existing project. When you select
this option, you will see a dialog box that you can use to
browse your computer to find the project.
Close Closes the currently open project.
Save All Saves changes made to all the modules in your project.
Save Form Saves the specific form that currently has focus.
Save Form As Allows you to save a specific form under a name of your
choosing and in the folder/directory that you select.
Exit Exits Visual Basic
Edit
Undo Allows you to undo whatever action you last performed.
Tip: The Undo option exists in most Windows programs. If you do
something you wish you hadn’t done, don’t panic; simply select
“Undo.”
Redo Allows you to redo the last action performed or the action
on which you used Undo.
18 Chapter 1 / Windows Applications with VB.NET

Cut Removes the code or component you have selected and
places it on the clipboard. You can also use the shortcut
keys Ctrl+X to accomplish this task.
Copy Places a copy of the code or component you have selected
on the clipboard. You can also use the shortcut keys
Ctrl+C to accomplish this task.
Paste Inserts something that you have previously copied or cut.
You can also use the shortcut keys Ctrl+V to accomplish
this task.
View
Tip: I always hear at least one student in panic yelling “I can’t find
my project/form/code module/etc.” The solution to this problem is
usually to go to View and select that object.
Code Displays the underlying code for any object that currently
has focus.
Designer Allows you to view the object of the code you are currently
viewing.
Solution Displays a window containing a listing of all files in your
Explorer project.
Properties Displays the Properties window. It will usually appear to
Window the right of the IDE. You can get to it by selecting View |
Properties or by pressing F4. It will display the properties
of whatever component currently has focus.
Tool Box You can use this to make your toolbox visible. The toolbox
contains all the components you might use in your project.
This is usually on the left side of the IDE.
Project
Add Windows Adds a new form to your project. When you select
Form this, you will be prompted as to what type of form you
wish to add. You will usually select the Windows Form
option, but Visual Basic has a number of premade forms
you may want to use.
Chapter 1 / Windows Applications with VB.NET 19
Ch
ap
ter1

Add Module Adds a blank code module.
Add Class Adds a class module.
Add Adds new components to your toolbox so that you can use
Component them in your project. Visual Basic has many more
components than you see in your toolbox. This option lets
you select which components you want to be visible. If
you select this option you will see a window like
the one below from which you can choose the
components you want available for your project.
Build
This menu gives you a variety of options for compiling your project. This
will be discussed in depth in later chapters.
Debug
This menu gives you a variety of options for finding bugs in your program,
and we will discuss them at some length later in this book. For now, the
only option under this menu you should be concerned with is the Start
option. It simply causes your program to run.
20 Chapter 1 / Windows Applications with VB.NET

Shortcut Keys
The following are a few of the most commonly used shortcut keys. You
may want to memorize them.
F3 Find
F4 View an object’s Properties window
F5 Run
F7 View the Code window of an object
Ctrl+Z Undo
Ctrl+C Copy
Ctrl+X Cut
Ctrl+V Paste
Naming Conventions
Microsoft has established some naming conventions that you should use
when naming components. This makes for more uniform code that is easy
to read. By default, each of your components will have a name like: text1,
label1, command4, etc. You must go to the Name property of each compo-
nent to change its name. Naming conventions simply make it much easier
for another programmer to see what you are doing. Following are some
examples of Microsoft naming conventions:
Component Type Naming Convention
Text Box TxtWhatever
Button BtnWhatever
Label LblWhatever
Panel PnlWhatever
Frame FraWhatever
Combo box CmboWhatever
List box LstWhatever
Using these naming conventions will make reading your code much easier.
I realize that it is even easier and faster to just leave your components
with the default name. While you are working on simple projects it won’t
really matter, but when you have to work on real-world applications, you
Chapter 1 / Windows Applications with VB.NET 21
Ch
ap
ter1

don’t really want to spend time trying to figure out that Text1 refers to the
account number.
Summary
The purpose of this chapter was to give you a jump start on learning
Visual Basic.NET. I wanted to introduce you to the IDE as well as common
programming terms and concepts. You were also given the opportunity to
begin actually writing some simple Windows applications using VB.NET.
While none of these applications are likely to be the next “must have”
application of the year, they did allow you to get a feel for developing Win-
dows applications using VB.NET.
Review Questions
1. What is a GUI?
2. List two ways to run an application inside the IDE.
3. Write a line of code that will display the length of a string called
“MyString” in a text box named “Textbox1.”
4. What is a variable?
5. What is a statement?
6. What does the F7 key do?
7. List four components.
8. What is an event?
9. What does the F4 key do for you in the IDE?
10. What is an IDE?
22 Chapter 1 / Windows Applications with VB.NET

Chapter 2
FundamentalsofProgrammingwith VB.NET
Introduction
In Chapter 1, I introduced you to writing a few simple
Windows applications with VB.NET. The point of those
applications was to allow you to get comfortable with using
VB.NET and the IDE. However, before we can expand
your knowledge of VB.NET programming, I need to
introduce you to a variety of programming concepts and
techniques as they apply to Visual Basic.NET. Using these
techniques, you will be able to begin to do more serious
programming.
23
In this
chapter, you
learn about:
� Programming
terms
� Decision
structures
� Keywords
� Menus

Programming Terms
I am amazed at the number of beginning programming books that never
explicitly introduce the reader to some standard programming terminol-
ogy. Before we get too far into this chapter, I would like to introduce you to
the necessary terminology.
Variables
A variable is a place in memory set aside to hold data of a particular type.
Essentially, when you declare a variable, a given number of bytes of mem-
ory are set aside to hold data of the type specified.
A variable is declared in the following manner:
Dim VariableName as Datatype
Some more specific examples would include:
Dim iCounter as Integer
Dim Lname as String
Each data type is designed to hold variables of a specific kind and for a
specific purpose.
Boolean Holds a true or false value. This is often used in program-
ming and you will find it most useful.
Byte, Short,
Integer, Long
These four data types hold whole numbers of varying size.
The Byte holds the smallest size and the Long holds the
largest. Examples would include numbers such as 0, 17,
450, and 98756.
Single and
Double
These two data types hold decimal value numbers. Single
holds the smaller values, and Double the larger. Examples
would include numbers such as 1.098, 4444.989, and
–989.88.
Char A Char can hold a single character such as an “a” or “b”
and an integer value as well.
String As you can probably surmise, a string variable holds string
values. This is simply text such as “VB.NET is cool” or “I
like this book.”
24 Chapter 2 / Fundamentals of Programming with VB.NET

Date Holds date values, such as 09/10/2001.
Object We will discuss objects in more depth in a later chapter, but
you should know that an object variable can represent any
object in Visual Basic, including classes you create, forms,
and components.
User-defined
types
This useful data type is actually a compound data type you
create by grouping related variables together. An example
might be a user-defined type (also called a structure) used
to hold information about students in a class:
Structure Student
Dim No as Long
Dim Name as String
Dim Address as String
Dim Average as Single
End Structure
Now you can use this variable anywhere in code just like
you would use any other data type.
Dim StudentA as Student
Dim StudentB as Student
StudentA.Grade = 97.44
StudentB.Grade = 87.33
The table below summarizes the various data types, the amount of mem-
ory they occupy, and the range of values they can hold.
Data Type Size Range
Boolean 4 Bytes True or False
Byte 1 Byte 0 to 255 unsigned
Char 2 Bytes 0 to 65,535 unsigned
Date 8 Bytes 1/1/1 to 12/31/9999
Short 2 Bytes –32,768 to 32,767
Integer 4 Bytes –2,147,483,648 to 2,147,483,647
Long 8 Bytes –9,223,372,036,854,775,808 to
9,223,372,036,854,775,807
Single 4 Bytes –3.402823E38 to –1.401298E-45 for negative values;
1.401298E-45 to 3.402823E38 for positive values
Chapter 2 / Fundamentals of Programming with VB.NET 25
Chapter2

Data Type Size Range
Double 8 Bytes –1.79769313486231E308 to –4.94065645841247E-324
for negative values; 4.94065645841247E-324 to
1.79769313486232E308 for positive values
String 10 Bytes +
(characters in
string * 2)
0 to approximately 2 billion Unicode characters
Object 4 Bytes Any object type
Structure Sum of the size
of its members
Range-dependent data type for each member
Another important issue regarding variables is what to name them. It is
possible to simply give your variables numeric or letter designations such
as:
Dim A as String
Dim B as Single
Dim C as Integer
However, this presents some serious problems in that when you read the
code (or anyone else reads it) you will have no idea what A is supposed to
hold, or B or C. It is a much better idea to give your variables names that
indicate what kind of data they will hold:
Dim Lastname as String
Dim GradeAverage as Single
Dim Age as Integer
Now it is abundantly clear to anyone reading your code what each of these
variables are meant to hold, but there is still a small problem. As your code
gets larger (and it certainly will as we move into more complex applica-
tions), you won’t remember if GradeAverage is a Single or a Double. For
this reason, many programmers preface their variable names with a one-
to three-letter designation that shows what type of variable it is. For
example:
Dim StrLastname as String or Dim SLastname as String
Dim SngGrade Average as Single
Dim iAge as Integer or Dim IntAge as Integer
Following is a table summarizing various naming conventions you may opt
to utilize.
26 Chapter 2 / Fundamentals of Programming with VB.NET

Variable Naming Convention
Integer IntName or iName
Long LngName or lName
Double Dname or dblName
Object ObjName or oName
Tip: Some programming languages allow you to dimension several
variables on one line like this example from C that dimensions four
integers:
Int AccountNum, IndexNum, LoopCounter, J
In Visual Basic this will not work. Only the first variable will be an
integer; all the rest will be variants. In Visual Basic you must use this
method:
Private AccountNum as Integer, IndexNum as Integer, LoopCounter as
Integer, J as Integer
I still have one last issue to show you regarding variables, and that is
scope. Scope refers to the range in which a variable can be used. If you
declare a variable within a subroutine, function, or event, it will only be
accessible inside that subroutine, function, or event. Outside of that area,
the variable is out of scope and essentially does not exist.
Any variable declared in the Declarations section of the form module
should also be Private. However, any variable declared in a code module
that you may wish to use in more than one form should be declared public.
Earlier versions of Visual Basic used the terms “Dim” and “Global”
instead of “Private” and “Public.” You will still see these used by many
programmers and they do work, but Microsoft discourages their use. Pri-
vate just means that only that level and below can use that variable. For
example, a privately declared variable in an event can only be accessed
within that event. A privately declared variable in a form can be accessed
by events within that form.
Note: You cannot declare a variable as public or private within
an event, subroutine, or function. You must use the Dim statement.
Chapter 2 / Fundamentals of Programming with VB.NET 27
Chapter2

Operators and Statements
I have already introduced you to variables, and you can think of those as
the “nouns” of programming. Next I would like to introduce you to opera-
tors, which you can think of as the verbs of programming. Most of the
operators are related to mathematical operations.
I trust that you are familiar with the four basic mathematical operators of
addition, subtraction, multiplication, and division. However, I frequently
encounter novice programmers who are not familiar with some of the
other operators so I will discuss them briefly here.
The modulus operator takes two numbers and divides the first number by
the second, but it only returns the remainder. The symbol for this (in all
programming languages with which I am familiar) is the percent sign (%).
For example, if I write:
Dim Answer as Integer
Answer = 5 % 3
The value placed in Answer will be 2, since 5 divided by 3 yields 1 with a
remainder of 2. This operator can be useful in determining if any given
variable holds an even number. If any variable modulus 2 is 0, that number
is even.
Some beginning programmers are also unfamiliar with concatenation. This
is the process of taking two strings and simply linking the second to the
end of the first. The symbol for this is the ampersand (&).
In some programming languages (such as C, C++, and Java) a single equal
sign indicates assignment. In other words, take the value on the right side
and place it into the variable on the left. And a double equal sign (==) is
the evaluation operator. It asks, “is the variable on the left equal to the
value on the right?” In Visual Basic, the single equal sign acts as both the
assignment and the evaluator, depending upon the situation.
These operators are summarized in the table below.
Operation Operator Example
Evaluator — Evaluates if
two items are of equal value
= If iaccount = 49898
Assignment — Assigns a
value to a variable
= SngBalance = 345.98
28 Chapter 2 / Fundamentals of Programming with VB.NET

Operation Operator Example
Addition + SngBalance = sngBalance + 299.44
Subtraction – SngBalance = sngBalance – 29.98
Multiplication * DblAnswer = 393 * 22.99
Division / DblAnswer = sngNumber / 33.43
Modulus % DblRemainder = 5 % 4
Concatenation & StrNew = strold1 & strold2
Now that I have shown you variables (nouns) and operators (verbs), I
should probably show you complete statements (sentences). You have
actually already written several statements. A statement is merely a line
of code that performs some action. Any action at all, in fact. All of the fol-
lowing are statements:
Dim Answer as Integer
Answer = 5 + 4
If Answer > 3 then
The first performs the action of declaring a variable. The second performs
the operations of addition and assignment. The third example evaluates
the value of a variable against a given value. All three perform an action.
Functions and Procedures
A function is simply a block of code that can be called to perform some
type of action. Another way of defining a function would be to call it a
group of related statements grouped together under a common name that
can be called as a unit. A procedure is simply a function that does not
return any value. If we think of variables as nouns and statements as sen-
tences, functions would be chapters.
Note that in other programming languages there is often no distinction
between functions and procedures (also called subroutines).
The basic structure of a function is that it begins with a declaration line,
which tells you a great deal about the function. Then we have all the state-
ments that make up the function. Finally, the function is terminated. Here
is a generic example of the declaration line of a function:
Access modifier function name (parameters) as type
Chapter 2 / Fundamentals of Programming with VB.NET 29
Chapter2

The access modifier simply tells us who can access this function. If that
modifier is private, only other functions in the same class can access it. If
it’s public, it can be called from outside that class. There are other access
modifiers that we will discuss later in this book. The function name is any
name you wish to give the function. It’s a good idea to give it a name that
reflects what it is going to be accomplishing. Then, inside parentheses
there are the parameters. Parameters are simply variables you wish to
pass to the function. Consider them raw materials for the function to work
with. The “as type” segment at the end simply tells us what type of value
the function will return.
Here is an example of a function:
Public Function Divide_Integers(iNum1 as integer, iNum2 as integer)
as Single
Dim Answer as Single
Answer = iNum1/iNum2
Return Answer
End Function
You see we have a group of related statements, three to be precise. They
all work together to perform the task of dividing two integers, and they
are grouped under the common name Divide_Integers. Now, if I wish to
call this function from somewhere else in my code, it’s really simple:
Dim SomeValue as Single
SomeValue = Divide_Integers(12,5)
That’s all there is to it.
Note that in previous versions of Visual Basic, to return a value of a func-
tion you set the name of the function equal to the value you wished to
return. In Visual Basic.NET, you can still use this method or use the
Return keyword to return a value from a function. I highly recommend
that you use the Return keyword. This is the method used in most pro-
gramming languages and Microsoft will eventually phase out the older
method.
There are two other keywords with function parameters: Optional and
ParamArray. The Optional keyword is used for parameters that are not
required when calling a function. It is important to remember two things
about optional parameters. First, when a parameter is declared as optional,
all parameters after it must also be optional. You cannot have an optional
parameter and after it have a required parameter. You must also supply a
30 Chapter 2 / Fundamentals of Programming with VB.NET

default value for the optional parameter. If this parameter is not specified,
the default value is used when the function is called. Let’s look at an
example:
Function Multiply(ByVal Num1 as Integer, ByVal Num2 as Integer,
Optional ByVal Num3 as Integer = 1) as Integer
Return Num1 * Num2 * Num3
End Function
In this example, you only have to pass in values for Num1 and Num2. If
you don’t provide a value for Num3, it defaults to 1. Let’s look at two calls
to this function:
i = Multiply(2, 3)
i = Multiply(2, 3, 4)
In the first call, no optional parameter is provided, and the function returns
the value 6. In the second call, the value 4 is provided, and the function
returns the value 24.
Now let’s take a look at how to use ParamArray. You can only use this key-
word as the last parameter and with only one parameter. This means you
can only have one ParamArray per function. This keyword allows the func-
tion to be called with any number of arguments. The limitation is that all
values must be passed by value. Let’s modify our Multiply function to use
ParamArray:
Function Multiply(ByVal ParamArray Args() as Integer) as Integer
Dim iCount as Integer
Dim Answer as Integer = 1
For iCount = 0 to Args.Length() - 1
Answer = Answer * Args(i)
Next
Return Answer
End Function
Notice that the Args array is an object and that we have used the Length
property to determine how many arguments were passed into the func-
tion. We then used a For loop to multiply all of the arguments together and
return the result. If some of this seems a bit odd, don’t worry. We will be
discussing For loops later in this chapter.
Chapter 2 / Fundamentals of Programming with VB.NET 31
Chapter2

Comments
One critical item to introduce you to is the comment. A comment is a line
that the computer will ignore but that another programmer viewing your
source code can read. Comments are vital to good programming. They
allow people reading your code to get an idea of what you were thinking
when you wrote the code. You can put a comment anywhere by simply
placing an apostrophe before the line such as:
' This is a comment
Commented lines will appear in green in the IDE. Actual keywords that
Visual Basic recognizes will show up in blue and errors will be in red.
Note: It is absolutely vital that you use comments in your code.
Comments can explain to other programmers what you intended to
accomplish. As a rule there is no such thing as too many comments
in your code. Here are some examples:
Dim X as Integer 'this X is simply used as a loop counter
Let iAcct = left(iAccountNum,4)'get the first 4 digits of iAccount Num
' and put them in the variable "iAcct"
From here on, I will use comments in my code examples so that
you can become acquainted with commenting.
Decision Structures
Frequently, you will need to execute different sections of code depending
on some condition. The mechanisms by which you accomplish this are
referred to as decision structures. A decision structure is simply a section
of code that will evaluate some value and take different action based on
what that value is.
If-Then
If-Then statements are perhaps the most common method by which your
program can make decisions based on either the conditions existing or on
user input. Let me first give you a generic example, and then I will use a
specific example:
32 Chapter 2 / Fundamentals of Programming with VB.NET

If some condition exists then
Do this code
End If
A specific example would be:
If Textbox1.Text = "Howdy" then
Textbox1.Text = "Hi back at ya"
End If
Basically, this code looks at the text in the textbox1 component and checks
its value. If that value is “Howdy,” it changes the text to say “Hi back at
ya.” If not, it simply proceeds with the rest of the program.
Another example would be:
If MyAge > 21 then
Textbox1.Text = "come on in"
Else
Textbox1.Text = "Sorry, you are not old enough to enter"
End If
The concept is simple and is found in all programming languages. If some
condition is true, execute the specified code.
Of course, you may have a need for more options in your If-Then loop.
This is where the Else and Else-If statements come in. You could rewrite
the above loop like this:
If MyAge < 21 then
Textbox1.Text = "Sorry, you are not old enough to enter"
ElseIf MyAge < 65 then
Textbox1.Text = "come on in"
Else
Textbox1.Text = "you get a seniors discount"
End If
Example 2-1
Let’s try placing a text box and a button on a form. Your form should look
much like what you see in the following image.
Chapter 2 / Fundamentals of Programming with VB.NET 33
Chapter2

Given that we have discussed proper naming conventions in this chapter,
we will rename the button, the form, and the text box to something more
appropriate. Using the Properties window, change the text box name to
txtgreeting as you see in the following image.
34 Chapter 2 / Fundamentals of Programming with VB.NET

Then change the button’s name to btngreet. In the button’s Click event,
place the following code:
If Txtgreeting.Text = "AM" then
Txtgreeting.Text = "Good Morning"
Else
Txtgreeting.Text = "Good Afternoon"
End If
You can continue to add many Else-If statements if you so desire, but
remember that too many will make your program hard to read.
Select Case
When you are faced with multiple choices, an If-Elseif-End If scheme can
get very convoluted. For that purpose we use the Select Case statement.
Most programming languages have some construct similar to Select Case.
Assume you have some variable called TempValue and it is an integer.
Depending on the value of that integer, you wish to take some action.
Select Case TempValue
Case 1
' Place code here
Case 2
' Place code here
Case 3
' Place code here
Case 4
' Place code here
Case Else
End Select
If TempValue is 1, the first case will be executed and the others ignored.
If, however, it is 3, then Case 3 will be executed and the others ignored.
You can have a virtually unlimited number of cases. Essentially, the Select
Case is looking at the value in TempValue and if it is 1, Case 1 is executed.
If the value is 2, Case 2 is executed. We have a case for each and every
value we expect to get. The Case Else statement is a catchall for any other
value we might get.
Unlike many other programming languages, which limit you to whole
numbers as the basis for a Select Case, Visual Basic allows you to make
switches based on strings as well as numeric values.
Chapter 2 / Fundamentals of Programming with VB.NET 35
Chapter2

Loops
It frequently becomes necessary for you to execute a given segment of
code repeatedly until either a certain number of executions have been
completed or some condition has been met. The way you accomplish this
in code is through some type of loop. A loop will simply keep executing
the same code segment until the right conditions have been met for it to
cease execution.
For Loops
For loops are very common and exist in all programming languages (at
least all that I have ever seen). The basic structure of a For loop is as
follows:
For somevariable = somestartingpoint to somestoppingpoint
' code to execute goes here
next somevariable
A more concrete example would be:
Dim iCount as Integer
For iCount = 0 to 10
Textbox1.Text = iCount
Next iCount
This code will loop from zero to ten, and place the current value into
Textbox1 on each loop.
Do Loops (Do-Until and Do-While)
The Do-While and Do-Until loops can be very useful. Unlike the For loop,
which will execute a set number of times, the Do loop executes until some
condition is met. To illustrate this concept, I will simply rewrite the previ-
ous For loop as both a Do-Until loop and a Do-While loop, so you can see
how each of these different loop structures can be used to accomplish the
same goal.
Do until iCount = 10
Textbox1.Text = iCount
iCount = iCount + 1
Loop
36 Chapter 2 / Fundamentals of Programming with VB.NET

Alternatively, I can write the loop like this:
Do while iCount < 10
Textbox1.Text = iCount
iCount = iCount +1
Loop
Each of these loop structures accomplishes the same goal. Which one you
use will depend on a combination of the problem you are attempting to
overcome and your own personal inclinations.
With-End Loops
The With-End loop is a bit different than the other loop structures I have
shown you. It does not progressively execute a section of code a given
number of times or until some condition is met. Instead, it allows you to
reduce the amount of code you must write in order to utilize multiple
properties and methods of a given object. For example, you might wish to
set several different properties of a button. You could do this in the follow-
ing manner:
Button1.Text = "something"
Button1.Flatstyle = Popup
Button1.Visible = true
You might notice in our example you are continuously writing “Button1,”
which gets a bit redundant. This is where the With-End loop comes in
handy.
With Button1
.Text = "something"
.Flatstyle = Popup
.Visible = true
End With
Essentially, the With-End loop allows you to access all the properties and
methods of any given object without having to continuously rewrite the
object’s name.
The Message Box
The message box is a wonderful tool available to you in Visual Basic. With
it, you can give the user a tremendous amount of feedback and you can get
responses. To use the message box function, you must first declare an
Chapter 2 / Fundamentals of Programming with VB.NET 37
Chapter2

integer variable to hold the response code from your message box. It is a
good idea to name it something like iMessage or iResponse.
You declare the message box function in the following manner:
iMessage = MsgBox("your message", buttons, "Your title")
This code simply has instructions to make a message box using the
built-in msgbox function. Give it whatever message you decide, the but-
tons you want, and your title. Whatever button the user presses will
return a code to the variable iMessage. Now for the really great part: you
don’t have to memorize any numeric codes. In version 4.0, Visual Basic
began implementing names for you to use. For example, if you only want
an OK button, then in the above code place “VBOKOnly” where I have the
word “buttons.” If you want a Yes button and a No button, place
“VBYesNo” where I have the word “buttons.”
If you want a complete listing, look up “msgbox” in the Help files. The
most common names, however, are VBOKOnly, VBYesNo, and
VBOKCancel. Also, when you begin typing in the message box code, the
list of available button types will be shown to you.
When the user clicks a button, it will return a code to your variable
iMessage that will indicate what button was pushed. For example, you can
put in an Exit button to see if the user really wants to exit. Place this code
in the Click event of a button with the caption “Exit”:
Private iMessage as Integer
iMessage = MsgBox("Are you sure you want to quit?",vbyesno, "Exiting")
If iMessage = vbyes then 'if the user types in the word end
'then stop the program
End
End If
There are many settings you can use with the message box function in
order to control what buttons are displayed and how they behave. The fol-
lowing table summarizes the settings and their use.
Settings Description Message Box or
Return Value
AbortRetryIgnore This value means the message box will display
three buttons: Abort, Retry, and Ignore.
Message box
38 Chapter 2 / Fundamentals of Programming with VB.NET

Settings Description Message Box or
Return Value
ApplicationModal This means the message box will be application
modal. The user will not be able to click on anything
else in the application until the message box goes
away.
Message box
Critical This will display the critical icon. Message box
Default button1 This will make the first button the default button. Message box
Default button 2 This will cause the second button to be the
default button.
Message box
Exclamation This will cause the exclamation icon to be displayed
in the message box.
Message box
Information This will cause the information icon to be
displayed in the message box.
Message box
OKCancel This will display the OK and Cancel buttons in
the message box.
Message box
OKOnly This will display only the OK button. Message box
RetryCancel This will display Retry and Cancel buttons in the
message box.
Message box
SystemModel This means the user cannot click on anything else in
the system until the message box is
dismissed.
Message box
YesNo This will display Yes and No buttons in the message
box.
Message box
YesNoCancel This will display Yes, No, and Cancel buttons in the
message box.
Message box
VBYes This indicates that the user selected the Yes button. Return value
VBNo This indicates that the user selected the No button. Return value
VBRetry This indicates that the user selected the Retry button. Return value
VBCancel This indicates that the user selected the Cancel
button.
Return value
Input Box
The input box is very much like the message box except that it prompts
the user to input data. I don’t see this function used that much, but I have
personally found it to be very useful. Here is an example:
Dim s_Name as String
s_Name = InputBox("Please Enter Your Name")
Chapter 2 / Fundamentals of Programming with VB.NET 39
Chapter2

You can expand the call using more variables. The three most commonly
used parts of the input box are prompt, title, and default value.
Keywords
Keywords are programming terms that Visual Basic recognizes as a com-
mand. You can also think of them as commands. Visual Basic has many
such words that can be used to execute various built-in functions. The fol-
lowing are several of these functions that you will need, along with an
example of each.
Len If you want to get the length of some variable or text, you
can use the Len command. For example:
iLength = Len(txtname)
'this will take the length of the text in
'txtname and place it in the variable iLength
iLength = Len(iAccount)
'This will take the length of the variable
'iAccount and place it in the variable iLength
Hide This makes whatever you are referring to invisible. For
example:
FrmOrders.Hide
The form is still loaded but not visible.
Show This shows something that is hidden. If you use it in con-
junction with a form that is not loaded, it will first load the
form then show it.
FrmOrders.Show
Ucase What if you wish to compare two values but you don’t care
if their case matches (lower- or uppercase)? You can com-
pare the uppercase values of both.
If Ucase(sSearchValue) = Ucase(txtLastName) then…
You can also compare the lowercase values using the same
technique with the keyword Lcase.
SetFocus This tells the program to change focus to another control.
You might place something in your CmdAddNew button
that sets focus to the first text box on your form:
40 Chapter 2 / Fundamentals of Programming with VB.NET
CmdAddnew_Click()
TxtFirst.setfocus
Date This simply returns the current system date.
Let Txtdate.Text = Date
Time This returns the current system time. You can display this
to the user with the following code:
Let Lbltime.Text = Time
Format This allows you to change the format of any variable, text
box, or label.
If I want the date to be yymmdd, I use the format command
like this:
Let Txtdate.Text = Format(date,"yymmdd")
As you can see, I place an open parenthesis after the for-
mat command then I tell it what I wish to format. In this
case, that is “date.” In the quotation marks, I tell it how to
format the date. We can also format numbers. For example,
if you want a number to appear as a dollar amount:
Let TxtMyNumber = Format(TxtMyNumber,"$###,###.##")
Your number will show a dollar sign, six digits, a decimal
point, and two additional digits.
Following are some examples of Date formats and their
outputs:
Format Output
Format(Now, "m/d/yy") 1/21/98
Format(Now, "dddd,mmmm,dd,yy") Wednesday, January 21,
1998
Format(Now, "d-mmmm") 21 Jan
Format(Now, "mmmm-yy") January 1998
Format(Now, "hh:mm am/pm") 08:45 AM
Format(Now, "h:mm:ss a/p") 7:15:04 a
Format(Now, "d-mmmm h:mm") 3-January 7:18
Chapter 2 / Fundamentals of Programming with VB.NET 41
Chapter2
Shell This is a very useful keyword. Using the Shell command,
you can start other programs. Look at this example:
Private lShell as Long
lShell = Shell("c:\path\name.exe",1)
This tells the computer to take the path name and start the
program name.exe in standard mode (1) and return its
Windows handle to the variable entitled lShell.
Tip: You must use a Long in 32-bit operating systems like Windows
95, 98, or NT because they return a Long Windows handle. Windows
3.1 was 16-bit and returned an Integer handle.
App.activate This statement allows you to activate a program that is
already running. You can either activate a program by using
its name as it appears in the toolbar or by using the Win-
dows handle returned to lShell. For example:
App.Activate lShell
or
App.Activate "MS Word"
Sendkeys After you have used app.activate you can send keystrokes
to a program. For example, if you have activated the Note-
pad.exe, you can then enter the code:
Sendkeys "My Dog Has Fleas"
and that phrase will appear in Notepad!
Left This command allows you to get the left portion of a string.
For example, if you want to get the left three characters in
a text box you can use this code:
Private sMyString as String
sMyString = left(TxtMyText,3)
This will place the leftmost three characters of txtMyText
into the string sMyString. So, if the text box txtMyText
had the word “Hello” in it, sMyString would now have
“Hel” in it.
42 Chapter 2 / Fundamentals of Programming with VB.NET
Right This is very similar to the Left command, except that it
returns the right side characters requested. For example:
Private sMyString as String
sMyString = right(TxtMyText,2)
would result in “lo.”
Trim This command will remove all blank spaces from a string.
For example:
MyString=trim(Textbox1.Text)
Ltrim This command will remove all trailing spaces from the left
side of a string.
This is by no means an exhaustive look at the built-in functions you have
available to you in Visual Basic. It is meant simply to introduce you to
some common commands that you are likely to need.
Example 2-2
In this example, we are going to combine many of the coding techniques
you have covered so far in this book with the mathematical functions you
have just learned to create a Windows calculator.
1. Create a new project with a single form.
2. Change the form’s text to VB Calculator.
3. You are going to place two control arrays of buttons on the form. You will
place the buttons on separate group components. This will be your first
time using this component. Its purpose is simply to group other compo-
nents into logical places. Each frame will have its Text property set to
blank.
At this point your form should look like the following illustration.
Chapter 2 / Fundamentals of Programming with VB.NET 43
Chapter2

First create ten buttons (0 through 9). Make sure that the text for each of
the numeric buttons matches the button’s array index. Then, on a separate
frame, create a second set of six buttons (+, –, *, /, ., =).
4. Next, place a label across the top of your form and set its text to 0. Set its
border style to fixed single and its background color to white. Its align-
ment should be set to right justify. Assign it the name display. At this
point, your form should look like the following.
44 Chapter 2 / Fundamentals of Programming with VB.NET

5. Now that we have created our graphical user interface (GUI) we have to
add the code so that our calculator will actually accomplish something. In
the general declarations section of the code for the form, place the follow-
ing declarations.
Dim FirstNum as Single
Dim SecondNum as Single
Dim Answer as Double
Dim Operation as Integer
Const PLUS = 0
Const MINUS = 1
Const MULTIPLY = 2
Const DIVIDE = 3
Const DECPOINT = 4
Const EQUALS = 5
Note: The keyword Const simply identifies a constant. A constant
is a value that cannot change.
6. The next step is to add appropriate code to each of the numeric buttons.
Display = Display.Text & "button number"
So Button1 will have:
Display.Text = Display.Text & "1"
Button2 will have:
Display.Text = Display.Text & "2"
And so on through all ten buttons.
7. Now we need to add some code in the Click event of the function buttons.
What our code will do is capture the current value in the display, convert it
to a single value (decimal point), and then set a flag indicating what mathe-
matical function is going to be performed. When the equal sign button is
pressed, the flag that had previously been set will be read to determine
what mathematical operation is to be performed.
The addition button needs the following code:
Firstnum = Val(Display.Text)
Display.Text = "0"
Operation = PLUS
Chapter 2 / Fundamentals of Programming with VB.NET 45
Chapter2

Next, we place this code in the Click event of the minus button:
Firstnum = Val(Display.Text)
Display.Text = "0"
Operation = MINUS
The multiplication button will have this code:
Firstnum = Val(Display.Text)
Display.Text = "0"
Operation = MULTIPLY
The following code will be put into the division button:
Firstnum = Val(Display.Text)
Display.Text = "0"
Operation = DIVIDE
The decimal point button is much like the numeric buttons:
Display.Text = Display.Text & "."
The equal sign button will read the previously set flag as well as the first
number that was entered. It will then do the appropriate math with the
two numbers entered.
Secondnum = Val(Display.Text)
Do_Math
8. Finally, for the subroutine Do_Math that we referenced above, enter the
following code into the general declarations section of your form module.
Public Sub Do_Math()
Select Case Operation
Case PLUS
Answer = Firstnum + Secondnum
Display.Text = CStr(Answer)
Case MINUS
Answer = Firstnum + Secondnum
Display.Text = CStr(Answer)
Case MULTIPLY
Answer = Firstnum + Secondnum
Display.Text = CStr(Answer)
Case DIVIDE
Answer = Firstnum + Secondnum
Display.Text = CStr(Answer)
End Select
End Sub
46 Chapter 2 / Fundamentals of Programming with VB.NET
This example has brought together the declaration of variables, creation of
procedures, use of components, and the use of the Select Case statement.
It has also introduced two new Visual Basic functions. The first, Val, takes
a string argument and returns the numeric value. The second, CStr, does
exactly the opposite, taking the numeric value and returning a string.
Menus
Most Windows applications have drop-down menus that allow the user to
make various selections. Usually the drop-down menu is offered in addi-
tion to the toolbar or buttons, rather than in lieu of them. Fortunately,
creating drop-down menus in VB.NET is a very simple matter.
In previous versions of Visual Basic there was a drop-down menu in the
IDE that allowed you to create menus for your application. The problem
with this approach was that it could be difficult to tell which form was
being associated with what menu. Now, in VB.NET, the menu is a compo-
nent in your toolbox.
Example 2-3
This example is simply going to create a series of drop-down menus on a
single form that will perform some simple action.
1. Start a new project of the Windows Forms type.
2. In the toolbox, locate the main menu component and place one on your
form in the upper left corner. Type File directly on the menu.
3. You will notice that another menu has appeared to the right and below the
one you just typed in.
4. In the menu item just below the one you labeled File, change the caption
to read Exit.
5. Double-click on the Exit menu item and place the following code there:
Dim iMessage as Integer
iMessage = MsgBox("Are you sure you want to exit",
vbYesNo, "Confirm Exit")
If iMessage = vbYes then
End
End If
Chapter 2 / Fundamentals of Programming with VB.NET 47
Chapter2

When you run this application you will be able to click on the File menu
and the Exit menu will drop down below. This is fairly simple and direct.
You can have as many submenus as you like, and you can have submenus
for the submenus. Each menu has certain properties you can set to alter
its behavior should you so desire.
Property Description
Checked Whether or not this menu item has a check mark by it.
Radio Check Whether or not this menu item behaves like a radio button.
Shortcut Any shortcut key that will also trigger the Click event of this
menu item.
CtlparText The text the user will see.
Visible This property determines if the menu item is visible at run time.
With these properties you can enhance the appearance and the behavior of
your menus. Since most professional applications include menus, it is rec-
ommended that you use them and become familiar with how they work.
48 Chapter 2 / Fundamentals of Programming with VB.NET
Summary
In this chapter, I took the foundation we laid in Chapter 1 and built upon it.
By now you should be getting quite comfortable with the basics of writing
Windows applications using Visual Basic.NET. If you are not totally com-
fortable with all the material presented so far, it is imperative that you go
back and review the first two chapters of this book. Without this knowl-
edge you will be unable to continue with the rest of the book.
Review Questions
1. What does the Val() function do?
2. What does the Ucase function do?
3. What is the purpose of the Format function?
4. List four VB.NET data types.
5. List four VB.NET operators.
6. What is the purpose of the modulus operator?
7. What is a parameter?
8. What are the three parts to the message box function call?
9. What is a function?
10. What is the purpose of a Select Case statement?
Chapter 2 / Fundamentals of Programming with VB.NET 49
Chapter2


Chapter 3
Object-OrientedProgramming
Introduction
The term “object-oriented programming” tends to bring
fear to the hearts of novice programmers. The concept
seems difficult to understand, and the new jargon makes it
look quite mysterious. However, you have been doing
object-oriented programming since you started working
with this book. An object is simply a thing with properties
and methods. In programming, a class is just a template for
creating objects. When you place a text box on a form and
change one of its properties, what you have actually done
is created an instance of the textbox object and changed
one of its properties.
As I said in Chapter 1, it is important to realize that you
deal with objects every single day. The car you drive is an
object. It has properties such as size, shape, color, etc. It
also has methods such as accelerate, brake, etc. You don’t
have to know how a car works, you just have to know how
to call its methods. That is how an object works in
programming.
You can create a text box, manipulate its properties, and
utilize its events without having the slightest idea how a
text box is made. This is often referred to as the “black
box” approach. You can utilize the black box without know-
ing how it works inside. You just have to know what data to
51
In this
chapter, you
learn about:
� Programming
terms
� Classes
� Events
� Access
modifiers
� Inheritance
� Collections
� Shared
members
� Interfaces

feed it. You do this with a car every day. You can turn on the ignition,
accelerate, brake, etc., all with only a vague idea of what the internal
mechanisms behind these methods are.
Programming Terms
Before I move forward into showing you how to create your own objects
using Visual Basic.NET, I would like to introduce you to a little object-
oriented terminology:
OOP Object-oriented programming.
OOD Closely related to OOP, this term means object-oriented
design.
Instance The current incarnation of your object’s template. For
example, if there were a general class called “car,” you
would own a car as a specific instance of the Car class.
Class A special kind of code module that you use to make your
own objects. It is a template for objects you create.
Encapsulation This is probably the single most important part of object-
oriented programming. It basically refers to the fact that an
object stores both data and the methods to manipulate that
data in the same place. This way, you deal with both func-
tions and data simultaneously and all the relevant code is
in a single place.
Inheritance The ability to make classes from other classes. When one
class inherits from another, it receives all the public and
protected methods and properties of that class. Private
methods and properties are not inherited. The class that is
being inherited from is often called the parent or base
class. The class doing the inheriting is usually referred to
as the child or subclass.
Multiple
inheritance
An arrangement in which a class can inherit from more
than one parent class. This feature is not available in
VB.NET (nor in Java for that matter) but is available in
Visual C++.
52 Chapter 3 / Object-Oriented Programming

Polymorphism The ability to define a new object based on an existing
object, and then simply altering the new object. When you
inherit a class, you can either keep the methods you
inherit as they are, or you can override them and change
them. The word “polymorphism” literally means there are
many forms.
New This keyword denotes a new instance of an object. For
example:
Dim MyClass as new OriginalClass
This will allocate the appropriate amount of memory, then
use the class OriginalClass as a template for creating an
object called MyClass. You can then call any public meth-
ods or properties of this class. A method is simply another
name for a function that is a part of a class.
Interface An interface is a lot like a class. It has methods, but those
methods have no code in them.
Classes
Let’s begin by talking about classes, since that is how you do object-
oriented programming. The simplest definition I can think of is that a class
is a template for creating objects. In Visual Basic, a class is a special kind
of code module. Any subroutines or functions that you add will be your
class’s methods. Any variables you add that are accessible from outside
the class are called properties.
In order to add a new class to a Visual Basic.NET project you simply go to
the drop-down menu and choose Project | Class. This will give you a blank
class code module you can then fill in with your own code.
When you first add a class to your project, it will have a declarations sec-
tion and a class section. Under the general declarations section you will
declare any variables (properties) of your class that you might need. All
variables should be declared as private. One of the reasons you use a class
is to protect data. The variables should only be accessible via methods
(subroutines and functions). Using this approach allows you to validate the
data before actually setting it into a variable. For example, if you have a
class that handles employee records with a property called Salary, instead
of making the Salary variable public, thus allowing anyone to directly set
Chapter 3 / Object-Oriented Programming 53
Chapter3

the salary, you would want to create special methods (which I will show
you later in this chapter) to set the property. Then in those methods you
can see that the new salary meets any parameters you need to check.
Such parameters might include making sure the salary is not ridiculously
high or low. This is the embodiment of encapsulation.
Class modules are the only modules in VB.NET (even the form is really an
instance of the Form class). However, all the previous versions of Visual
Basic included standard code modules. That means it is highly likely you
will see these, so let me take a brief moment to explain the difference.
Class modules are different from standard modules primarily in the way
their data is stored. There’s only one copy of a standard module’s data,
since you cannot create separate instances of a standard module. This
means that when one part of your program changes, such as a public vari-
able in a standard module, and another part of your program subsequently
reads that variable, it will get the same value. This means that the stan-
dard code module’s variables are global and that any change done to them
is made for the entire application.
Class data, on the other hand, exists separately for each instance of the
class. Each instance of a class is a separate entity. Remember that the
class module itself is simply a template for the class objects you create.
Therefore, if you have more than one instance of a class module, a change
in the data of one module has absolutely no bearing on the data in other
class modules.
The usual way to access the variables in your class is via Get and Set
properties. These are simply specialized functions with the explicit pur-
pose of giving you access to the class’s data. Set properties are used to
change the value of a class variable. Get properties are used to retrieve
the value of a class’s variable. The following table summarizes the two
property types.
Property Description
Get The Get property is used when you want to get the value of a
property (variable).
Set The Set property is very much like the Get property, but is used
with object variables.
54 Chapter 3 / Object-Oriented Programming

Note: In earlier versions of Visual Basic there was a Set and a
Let property.
You will also note that as soon as you create a class, it already has blank
New and Finalize methods. The New method is where you put any code
that is required as soon as your class is initialized. The Finalize method is
where you put “cleanup” code, to be executed when you dispose of the
object you create from this class.
The New method is essentially what other programming languages refer
to as a constructor. A constructor is a function that is executed automati-
cally when an instance of a class is created. It is a useful place to put any
code that must be executed in order to make the class fully functional. Per-
haps the best way to illustrate the utilization of a class is by example.
Example 3-1
1. Start a new Windows application project.
2. From the drop-down menu select Project | Add new class.
3. In the class module you have just created, place the following code:
Public Class Class1
Private iAge as Integer
Private sName as String
Private sJobTitle as String
Private sSalary as Single
Public Sub New()
' Set default values for all of the
' data in this class
iAge = 30
sName = "John Doe"
sJobTitle = "Programmer"
sSalary = 40 ' Hourly salary
End Sub
Public Property Age()
Get
Return iAge
End Get
Set(ByVal Value)
iAge = Value
End Set
Chapter 3 / Object-Oriented Programming 55
Chapter3

End Property
Public Property Name()
Get
Return sName
End Get
Set(ByVal Value)
sName = Value
End Set
End Property
Public Property JobTitle()
Get
Return sJobTitle
End Get
Set(ByVal Value)
sJobTitle = Value
End Set
End Property
Public Property Salary()
Get
Return sSalary
End Get
Set(ByVal Value)
sSalary = Value
End Set
End Property
Public Function ComputePay(ByVal HoursWorked as Single) as Single
Dim Answer as Single
Answer = sSalary * HoursWorked
Return Answer
End Function
End Class
4. On the form module, place four text boxes and two buttons. Also place one
label to the left of each of the text boxes, labeling the content of each box.
The first text box should be labeled Name, the second Job Title, the third
Hourly Wage, and the fourth Pay. One text box should have its text field
set to Compute Pay and the second to Save Changes. Your form should
look like the following:
56 Chapter 3 / Object-Oriented Programming

In the Form Load event of this form place the following code:
Textbox1.Text = Employee.Name
Textbox2.Text = Employee.Age
Textbox3.Text = Employee.Salary
5. At the very beginning of the Form1 class place this code:
Dim Employee as new Class1()
It should appear immediately after this code:
Public Class Form1
Inherits System.Windows.Forms.Form
Note: If you run your application at this point, the default values
that we set in the constructor function of Class1 will be displayed in
the first three text boxes.
6. Place the following code in the button with the caption “Compute Pay.”
Dim Hours as Single
Dim Pay as Single
Hours = CSng(TextBox4.Text)
Pay = Employee.ComputePay(Hours)
MsgBox("The pay for this employee is " & CStr(Pay))
Chapter 3 / Object-Oriented Programming 57
Chapter3

7. Place the following code in the Click event of the button with the caption
“Save Changes.”
Employee.Name = Textbox1.Text
Employee.JobTitle = Textbox2.Text
Employee.Salary = Textbox3.Text
8. In the form’s Finalize event place this code:
Set Employee = Nothing
In this example, we create a class with four private variables. We then use
the public properties Get and Set to access those variables. We also
include a method called ComputeSalary. Then, from the form module we
create an instance of this class and utilize its properties and methods. This
illustrates several key points in object-oriented programming:
� The data regarding an employee, such as salary, and the methods that
manipulate that data, such as ComputeSalary, are contained together in
a single class. This is the very essence of encapsulation.
� We utilize a constructor method to give default values to our class’s
properties.
� We instantiate the class, utilize it, then destroy it.
In our example, we did not directly utilize inheritance, but via inheritance,
we could make any number of classes that inherit from Class1. Remember
that when one class inherits from another, it gets all the public and pro-
tected properties and methods of the parent class.
Events
You might have noticed that other classes (such as the Form class) have
events associated with them. Remember that an event is simply a function
that is executed in response to some user action, such as clicking a mouse.
You can create your own events for your Visual Basic classes.
Consider Example 3-2. We are going to hypothesize that our employer
wants to make sure that no salary is raised beyond a certain limit. With
this in mind, we are going to add an event to our class, and trigger that
event whenever someone attempts to raise a salary beyond this cutoff
point.
58 Chapter 3 / Object-Oriented Programming

Example 3-2
1. We begin by exactly duplicating the code for Class1 in Example 3-1.
2. Add this event declaration right after declaring the four private variables.
Public Event SalaryLimitExceeded(ByVal Salary as Single)
3. Change the Set property of the Salary property to look like this:
If sSalary > 75 Then
RaiseEvent SalaryLimitExceeded(Value)
Else
sSalary = Value
End If
Now, in the Form1 class where you create the instance of Class1, we are
only going to add one small piece:
Private WithEvents Employee as Class1
The WithEvents keyword causes blank event functions to be generated for
all of the events that are declared inside that class. If someone attempts to
raise an hourly rate beyond 75 dollars, they will not be able to and an
event will be triggered. You can then write code for that event just as you
do for other events like the Click event of a button.
Access Modifiers
All variables and all functions have access modifiers. You have already
seen public and private used in previous chapters. Let me refresh your
memory concerning these two. The public access modifier means that this
variable or function can be accessed from outside the module it is in. The
private modifier means that the variable or function cannot be accessed
from outside that module. When you inherit a class, you will not inherit
the private variables and functions. This brings us to the subject of pro-
tected variables and functions. A protected variable or function works just
like a private one, except that it can be inherited.
It is customary to have all variables in a class as private or protected. The
only way you should be able to access the variables is via public functions
such as Get and Set. In this way you can do some validation of the data
prior to storing it in a variable.
Chapter 3 / Object-Oriented Programming 59
Chapter3
Inheritance
This is perhaps the most powerful feature that has been added to VB.NET.
Inheritance is literally the process whereby one class inherits all the pub-
lic and protected variables and functions from another class. This keeps
you from having to rewrite code. You can inherit the functions you need
from an existing class, then simply add on additional functionality.
In Visual Basic.NET, inheritance is easy to accomplish. It only requires
two simple steps. The first step is to make sure that the namespace that
contains the class you wish to inherit has been imported. For example,
when you wish to access some of the VB.NET classes for file manipula-
tion, you import system.io. The second step is done immediately after the
initial declaration line of the class:
Class SomeClass
Inherits MyClass
You simply tell Visual Basic what class you wish to inherit. Remember that
if you don’t import the namespace that contains the class you wish to
inherit, the code that is attempting to do the inheritance will fail.
Collections
Collections are basically object-oriented arrays. Visual Basic has several
built-in collections. The forms collection contains a reference to all the
forms in a project and the controls collection contains a reference to all the
controls on a given form. For example, if you wanted to disable all the text
boxes on a given form you could use the controls collection like this:
Private Sub Disable_Text()
Dim I as Integer ‘used as a counter
Dim C as Control ‘use c as the generic control object
For each C in controls
If typeof C is textbox then
C.enabled = false
End If
next C
You can also create your own collections by simply dimensioning a collec-
tion variable then adding stuff to it:
Dim myCollection as new Collection
60 Chapter 3 / Object-Oriented Programming

Now add items to your collection using the add method:
myCollection.add somevariable
Now, you may ask why you would use a collection instead of an array. The
answer is that a collection is far more flexible. In an array, all the elements
must be of a single data type. You can have an array of Integers, an array of
Strings, or an array of Doubles, but you cannot have a single array that
contains more than one type of variable. A collection can contain diverse
types of variables. Let’s look at another example.
Dim EmpCollection as new Collection
Let sName = "Employee Name"
Let iNum = 3848457
Let sPhone = "1-555-555-5555"
EmpCollection.add sName
EmpCollection.add iNum
EmpCollection.add sPhone
This added flexibility makes the collection a far better alternative to the
array. In the real world, it is often necessary to use several different data
types. In my personal programming, I now only use arrays with controls;
in code, I use only collections.
Shared Members
In previous versions of Visual Basic, any functions that did not require the
creation of an object were placed into standard modules. Visual Basic.NET
implements this functionality by allowing you to create shared members in
your classes. Shared members are methods of a class that can be called
without actually creating an instance of the class.
When you add a shared method to a class, the method is accessed directly
rather than through an object instance. A common use for shared methods
is a utility class. In the following example, we create a utility class called
MathStuff with a shared method Square:
Public Class MathStuff
Shared Function Square(ByVal num as Integer) ss Integer
Return Num * Num
End Function
End Class
Chapter 3 / Object-Oriented Programming 61
Chapter3

To use the Square function that we just created in the Math class, you
don’t need to create an instance of the MathStuff class. We can call the
function directly from the MathStuff class as follows:
Dim Answer as Integer
Answer = MathStuff.Square(7)
It is important for you to notice that no object of type Math was created.
The Square method was called directly, just as it would have been called
from a standard module in previous versions of Visual Basic. This tech-
nique can be quite useful. However, from my point of view, it is cleaner
coding to simply use classes in the usual way, creating instances of them. I
included this technique here simply because I would be remiss as an
author if I did not share this knowledge with you.
Interfaces
An interface is a template for class members. An interface simply gives
you a framework for a class. It defines the methods of the class but not the
implementation. In previous versions of Visual Basic, you could only cre-
ate an interface by creating a class with all the methods left empty and
then implement it. The process is cleaner in Visual Basic.NET. You can
explicitly create interfaces using the Interface keyword. You can also
implement interfaces using the Implements keyword. This is very similar
to the way interfaces are created in other languages, such as Java. Inter-
faces allow you to design the interaction between components before you
actually develop them.
Summary
This chapter is not meant to be an exhaustive coverage of object-oriented
theory or programming. Entire volumes have been written on those sub-
jects. However, if you carefully study this chapter you should have the
rudimentary understanding of object orientation required to follow the rest
of this text, and to successfully utilize Visual Basic.NET. It is imperative
that you fully understand the concepts in this chapter. Since Visual
Basic.NET is now totally object oriented, you will have great difficulty pro-
ceeding without a firm understanding of this chapter.
62 Chapter 3 / Object-Oriented Programming

Review Questions
1. What does the term “encapsulation” mean?
2. What is a term for a class that is being inherited from?
3. Can you inherit private functions?
4. What is a method?
5. What is an access modifier?
6. What is the purpose of the protected modifier?
7. What is the purpose of a Set property?
8. What does the WithEvents keyword do?
9. What is the code to raise an event?
10. What is the code to create a new event?
Chapter 3 / Object-Oriented Programming 63
Chapter3


Chapter 4
The .NETArchitecture
Introduction
So far, I have focused simply on how to get things done in
VB.NET. Now that you have had an opportunity to work
with VB.NET, and to get comfortable with it, it’s time to
introduce you to the architecture behind it all. This chapter
is essential for those readers wishing to truly master
VB.NET. However, for the casual programmer or hobbyist,
a simple, quick familiarization with these concepts will be
sufficient.
VB.NET is a radical departure from previous versions of
Visual Basic. In previous versions of Visual Studio, each
different development tool (Visual Basic, Visual C++, etc.)
had a separate run-time environment. With .NET all the
development tools share a common run-time environment.
This environment is referred to as the Common Language
Runtime (CLR). This means that Visual Basic has access
to the same powerful features that Visual C++ does. It
also means that Visual C++ programmers have access to
the many easy-to-use tools that Visual Basic programmers
have grown to expect.
In .NET, the CLR controls or manages the execution of a
program. When you develop code using VB.NET, the code
will be compiled for use under the control of the CLR. This
design strategy is referred to as managed code. The
65
In this
chapter, you
learn about:
� The Virtual
Execution
System
� Language
fundamentals
of VB.NET
� Drawing
� Printing
� Data types
and the
Common Type
System

Common Language Runtime (CLR) is the foundation of the entire .NET
platform. The table below illustrates the basic architecture of .NET.
Component Description
Common Type System Provides support for various types and operations
on those types.
Metadata Defines the references and types used in the
Common Type System.
Virtual Execution System Loads and runs programs written for the CLR, uses
metadata to execute the managed code, and
performs garbage collection.
In the previous chapter, I introduced you to the concepts of object-oriented
programming. These concepts are vital to understanding the .NET archi-
tecture. In previous versions of Visual Basic, object orientation was quite
limited. First of all, the object orientation in previous versions of Visual
Basic was not complete. The most obvious missing piece was the lack of
inheritance. Another difference is that in previous versions of Visual
Basic, the object orientation was optional. You could write programs in
Visual Basic 6.0 without ever seeing a class module or any object-oriented
programming. This has all changed with VB.NET. The new .NET architec-
ture is purely object oriented. As you saw in Chapters 1 and 2, even your
form is really a form class. The various methods for components on your
form are now public methods added to that form class. You cannot do any
.NET programming without object orientation.
Every object is now inherited from a single class called the System.Object
class. Almost all of the system functionality is included in the System
namespace. All tasks are available from within the System namespace.
The System namespace also contains the various data types. This feature
allows a common type system for all .NET programming languages. This
makes passing data between components developed in different languages
(such as Visual C++ and Visual Basic) much easier.
66 Chapter 4 / The .NET Architecture

Virtual Execution System
The Virtual Execution System is a fundamental part of the new .NET
architecture. This system handles the execution of applications as well as
memory management. Your application is actually being run by the Virtual
Execution System, rather than being run by the operating system directly.
The CLR provides an execution engine that creates what is known as the
Virtual Execution System (VES). The VES is what handles and maintains
all of the code. The VES loads managed code at run time and, by inspect-
ing the metadata of that code, performs all of the required tasks. Some of
the more important tasks are:
� Converting MSIL code into native code
� Garbage collection
� Security services
� Profiling and debugging services
� Thread management
Code written in VB.NET, or any of the .NET languages, is actually con-
verted to native code at run time by the VES. This means that it is at least
possible for any operating system to support the VES, and therefore be
able to run Visual Studio.NET code.
One of the most important innovations in the new .NET architecture is the
addition of garbage collection. Garbage collection means that the Virtual
Execution System monitors memory and object usage, and, when appro-
priate, removes objects from memory. This relieves the programmer of
having to directly monitor memory, remove objects from memory, and
manage object allocation and deallocation.
Component Architecture
Reusable code in the form of distributable components has been a critical
factor in the success of Visual Basic. One of the best features of Visual
Basic 6.0 was that it allowed you to easily create ActiveX DLLs and com-
ponents. Similar component creation capabilities exist in VB.NET.
However, the means of effecting the creation of these reusable compo-
nents is quite different in Visual Basic.NET than it was with COM.
Chapter 4 / The .NET Architecture 67
Chapter4

Assemblies
One of the primary architectural changes that affects component creation
is the use of assemblies. In Visual Basic.NET, when you create a new
application or reusable component you also create an assembly for it.
Assemblies are reusable, self-describing packages that are self contained.
Everything you need to run that application is contained or described in
the assembly. This means that if you use a particular dynamic-link library
(DLL) with one assembly, and a different version of that same DLL is used
with a different application, there will be no conflict. Each assembly con-
tains an assembly manifest that contains all the information describing the
contents of the assembly. For those of you who have used Visual Basic 6.0,
this is a big change. With traditional COM (Component Object Model)
components, all information about the component was kept in the Win-
dows registry. With the new .NET architecture, information about any
component or application is kept in the assembly manifest. This makes
installing and uninstalling much easier. The assembly manifest contains
the following information describing the assembly itself:
� The assembly’s identity. This may include the assembly’s name, as
well as a version number.
� A file table, which describes all of the files that make up the assembly,
including other graphics files (.gifs, .jpgs, etc.), text files, and even
other assemblies.
� An assembly reference, which lists all external dependencies, such as
DLLs and other files that your assembly requires in order to execute.
The Common Language Runtime can then use the information contained
within the assemblies at run time to determine what dependencies the
application may require and where to look for those dependencies.
Metadata
Metadata is simply binary information that describes just about every
aspect of your code. It contains information about every type defined and
referenced within your assembly.
68 Chapter 4 / The .NET Architecture

Managed Code
Simply put, managed code is code that runs within and is managed by the
CLR. All .NET languages will produce managed code that will run under
control of the CLR.
As I previously told you, all code in Visual Studio.NET uses a Common
Language Runtime. The implications of this are twofold. The first implica-
tion is that all the languages producing managed code can interoperate
with one another. For example, you write a class in Visual Basic that can
be inherited inside a Visual C++ application and vice versa. If you recall,
all of our examples in Chapters 1 and 2 included an import statement. All
the classes we looked at (primarily the form classes) began with an import
statement. The import statement allows you to import already existing
assemblies. Many of these assemblies are built into Visual Studio.NET. If
you wish to use a class created in any assembly, regardless of the language
used to create the assembly, simply import the namespaces you wish to
use and start working with the classes they define. I must say that I found
this to be one of the greatest innovations in Visual Studio.NET.
This feature means that you can literally use Visual C++ code inside
Visual Basic and vice versa.
Garbage Collection and Object Management
Garbage collection is a new feature for Microsoft development tools, but
Java programmers will be quite familiar with it. Essentially, any program-
ming language that utilizes garbage collection is one that manages its own
memory. The garbage collector is routinely monitoring the system to see
if there are any unused objects still in memory. If it finds any, it destroys
the object and releases that memory. This can be a great asset, as it can
prevent memory leaks.
Microsoft’s implementation of garbage collection utilizes generational gar-
bage collecting. A generational approach categorizes objects on the heap
into sections called “generations.” The idea behind this is that the longer
an object “stays alive,” the older the generation it exists in becomes and
the more likely that object is to be required by the application. Objects that
have been running for some time are assumed to be more important to the
application than objects that have just been created. Research and experi-
ence shows that this is the usual trend. Currently, garbage collection
Chapter 4 / The .NET Architecture 69
Chapter4

under the CLR supports only three levels of generations: 0, 1, and 2. Gen-
eration 0 is where new objects are placed, generation 1 is for those that
have survived a single collection, and generation 2 is for those that have
survived two or more collections. Garbage collection performs a collection
when generation 0 becomes full. It can then decide if it should perform a
collection on all the objects on the heap or just the newer ones located
within generation 0. For applications that may contain many objects in
generations 1 and 2, this can greatly reduce the overhead encountered
during a collection. This method is significantly different from the mark
sweep algorithm implemented by most Java compilers.
When a process is first initialized, the CLR reserves some contiguous
space in memory for the process. This space in memory will be used to
manage the entire process. This is the managed heap. When objects are
created via the New keyword, they are placed onto the heap. This process
continues until there is not enough memory left on the heap to allocate
memory for the next object requesting resources. At this point, a collec-
tion must be performed. The garbage collector then applies its algorithm
for determining which objects are no longer in use on the managed heap
and clears them accordingly.
In previous versions of Visual Basic, the programmer was responsible for
destroying all objects; therefore, the process of object deallocation was
clearly defined. When writing classes, a programmer wrote code in the
Terminate event of the class in order to perform any cleanup necessary
when that object was destroyed. With the introduction of garbage collec-
tion, this has changed. Now programmers are utilizing a language that
implements non-deterministic finalization, which means that we cannot
predetermine the exact time when the finalization for an object will occur.
The finalization will occur when the garbage collector sees fit to finalize
the object. In fact, the Terminate event no longer exists and has instead
been replaced by the Finalize event. The Finalize event does not offer the
same functionality as the Terminate event, though both events fire when
the object is released from memory.
Since the Terminate event no longer exists and the Finalize method will
be called at an undetermined time, many programmers choose to create
Close or Dispose methods to ensure that their classes perform proper
cleanup immediately.
70 Chapter 4 / The .NET Architecture

It is recommended that you use Close if you want to allow the object to be
able to be reopened or reused in future operations. You should utilize a
Dispose method if you do not wish the object to be reusable in a future
operation. The Dispose method is called to completely destroy your
object. This is the same as setting an object to Nothing in previous ver-
sions of Visual Basic.
Now that I have shown you some of the architectural basis for VB.NET, it
is time to begin discussing some of the language fundamentals.
Language Fundamentals of VB.NET
Event Handling
Event handling has changed in Visual Basic.NET. One change has been the
new concept of delegates. Delegates can be thought of as function pointers
that are typesafe. A function pointer is literally what the name suggests, a
pointer to a function. This has been a technique used in other program-
ming languages for some time, but is just now available to Visual Basic
developers. All events will be handled using delegates. For the most part,
Visual Basic.NET will create all the delegates you need, but you will now
have the power to override some event handlers. You can still create your
own custom events as in previous versions of Visual Basic.
Error Handling
Errors are going to occur in applications. That is simply a fact of life. Even
if you could write perfect code, errors would still occur. For example, if
you ask a user to enter the name of a file, and he enters an erroneous
name, you will get an error. Another good example is division by zero. If
you ask a user to enter two numbers to divide, and she provides zero as
the second number, your application will generate an error. Previous ver-
sions of Visual Basic had a rather odd method of error handling not found
in any other programming language. Visual Basic.NET utilizes the same
type of error handling as Java and C++. Let’s look at division as we did in
Chapter 2 and add some error handling to it.
Dim Answer as Single
Try
Answer = Firstnum / Secondnum
Catch Err as Exception
Chapter 4 / The .NET Architecture 71
Chapter4

MsgBox("Error printing file: " & err.ToString)
End Try
The Try block is referred to as a guarded space. This means that should
any exception occur inside that code section (such as division by zero), the
code will stop executing and jump to the matching Catch block. Think of
the Try block as literally meaning “try this code.”
The Catch block will “catch” any exception the Try block generates. If no
error is generated, the code inside of the Catch block will never be exe-
cuted. When an error is generated, there is an error class that tells you
about that error. The main or primary error class is the Exception class.
This is why the first line of the Catch block also creates an instance of the
Exception class with “Err as Exception.” This class has several useful
methods, one of which is the ToString method. This method generates a
text message describing the error that has occurred.
System Namespace
With VB.NET, Microsoft has introduced the idea of namespaces.
Namespaces organize all of the objects that are defined within an assem-
bly. The assembly can contain multiple namespaces, which can, in turn,
contain other namespaces. Under VB.NET, all objects derive from the
System namespace. The System namespace contains the classes that
define most of the common data types, events, interfaces, and exceptions.
All other objects derive from the System.Object class, which, in turn,
derives from the System namespace. Most of the classes you write will
inherit from System.Object rather than directly from System.Namespace.
File I/O
A commonly encountered programming task is working with files, and
often text files. Over the years, Visual Basic has gradually been evolving
into a better and better file access methodology. In VB.NET, file I/O is
encapsulated in the System.IO namespace.
Consider the following example.
Example 4-1
1. Open a new Windows application project.
2. Place a single button on the form.
72 Chapter 4 / The .NET Architecture
3. In the Click event of that command place the following import statement
before the Public Class Form1:
Imports System.IO
Then place the following code into the Click event function:
Dim MyFile as FileStream = New FileStream _
"C:\vb.net\examples\chapter 04\example1\mytext.txt”, FileMode.Open,
FileAccess.Read)
Dim MyStream as StreamReader = New StreamReader(MyFile)
MsgBox(MyStream.ReadLine)
MyFile.Close()
MyStream.Close()
Note: You will need to replace the above path with the actual
path to your code. The downloadable companion files, available at
www.wordware.com/VBNET, contain the entire project and the
sample text file.
As you can see, the first step in the process is to import the System.IO.
Within the System.IO namespace are the two classes we are using in the
example, namely FileStream and StreamReader. The FileStream class
allows us to open a stream to a file, and the StreamReader class allows us
to read from that stream. With these two classes you can easily open any
standard text file, read from it, write to it, and even create a new one.
Drawing
In previous versions of Visual Basic, if you wished to do any graphics pro-
gramming, you had to work with the Windows Graphical Device Interface
(GDI) API. Visual Basic.NET provides a number of very useful classes
that encapsulate all of the functionality of the Windows GDI API. You can
have access to these classes by importing the System.Drawing
namespace. The new functions provided in this namespace have often
been referred to as the GDI+ functions. The Graphics class in the Sys-
tem.Drawing namespace is where most of the important functionality is
located. Let us consider a relatively simple example.
Chapter 4 / The .NET Architecture 73
Chapter4

Example 4-2
1. Start a new Windows application project.
2. Place a button on the form. Change its name to btndrawline and its cap-
tion to Draw Line.
3. Place two other buttons on the form named btndrawcircle and
btndrawrec. Give them the captions Draw Ellipse and Draw
Rectangle.
Your form should look like the one in the following picture.
4. In the btndrawline Click event, place this code:
Dim G as Graphics = Me.CreateGraphics()
G.DrawLine(New Pen(Color.Blue), New Point(10, 10), New Point(50, 75))
In btndrawcircle, place this code:
Dim G as Graphics = Me.CreateGraphics()
G.DrawEllipse(New Pen(Color.Purple), New RectangleF(60, 40, 40, 40))
In btndrawrec, place this code:
Dim G as Graphics = Me.CreateGraphics()
G.DrawRectangle(New Pen(Color.Red), New Rectangle(75, 75, 100, 100))
74 Chapter 4 / The .NET Architecture

If you run this example, you will see that each button you have added cre-
ates a different basic graphics component. There are several drawing
methods associated with the System.Graphics class that you can use to
create graphics for your applications. If you have never used previous ver-
sions of Visual Basic, let me assure you that these methods are much
easier to use than previous methods.
These examples introduced you to the DrawRectangle, DrawLine, and
DrawEllipse methods of the Graphics class. The Graphics class has many
other drawing methods including:
� DrawArc
� DrawBeziers
� DrawCurve
� DrawClosedCurve
� DrawIcon
� DrawPolygon
� DrawString
Each of these drawing methods can be quite useful in rendering graphics
in your applications.
Printing
The Printer object has been replaced by the System.Drawing.Printing
namespace, which is contained within the System.Drawing namespace. As
I have previously mentioned, a namespace can contain other namespaces,
and this is a good example of that. Let us consider an example that illus-
trates the basic concepts in printing.
Example 4-3
1. Create a new Windows application. Place a single button on the form and
change the button’s Text property to read Print Doc.
It should look like the following image.
Chapter 4 / The .NET Architecture 75
Chapter4
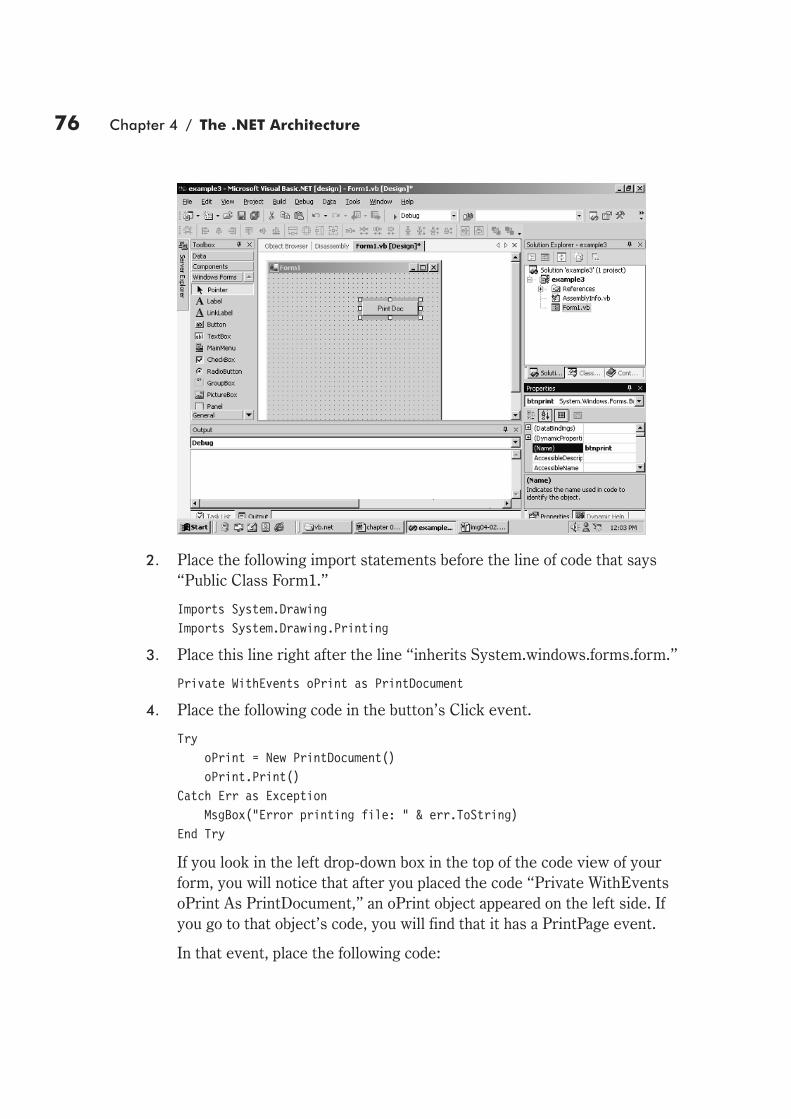
2. Place the following import statements before the line of code that says
“Public Class Form1.”
Imports System.Drawing
Imports System.Drawing.Printing
3. Place this line right after the line “inherits System.windows.forms.form.”
Private WithEvents oPrint as PrintDocument
4. Place the following code in the button’s Click event.
Try
oPrint = New PrintDocument()
oPrint.Print()
Catch Err as Exception
MsgBox("Error printing file: " & err.ToString)
End Try
If you look in the left drop-down box in the top of the code view of your
form, you will notice that after you placed the code “Private WithEvents
oPrint As PrintDocument,” an oPrint object appeared on the left side. If
you go to that object’s code, you will find that it has a PrintPage event.
In that event, place the following code:
76 Chapter 4 / The .NET Architecture

Try
e.Graphics.DrawString("Print test", New Font("Arial", 10),
New SolidBrush(Color.Black), 100, 100)
Catch Err as Exception
MsgBox("Error: " & err.ToString)
End Try
Now you have the basic code required to print out a document to your
printer. If you run this application, it will print a test page to your default
printer.
Data Types and the Common Type System
I have previously mentioned the fact that .NET languages can be used in
conjunction with each other. You can inherit a class made with one .NET
language in a different .NET language. One of the .NET architectural fea-
tures that makes this possible is the Common Type System (CTS, also
referred to as the Universal Type System). The CTS provides for data
types that are universal across the various .NET languages.
The CTS defines the rules that the various .NET language compilers must
implement. The fact that each .NET language must treat types in a consis-
tent manner is the basis on which the CTS exists and allows for objects
created in the different languages to correctly interact with one another.
The .NET platform provides a programming model that is based on the
CTS. As I have already mentioned, everything derives from the Sys-
tem.Object class. Some data types (namely String and Array) inherit
directly from System.Object, and some inherit from other classes that
have inherited from .NET.
The adjacent chart shows
the relationship between
various classes and data
types.
Chapter 4 / The .NET Architecture 77
Chapter4

Typecasting is the process of changing the data type of a given variable.
This is a very common practice in all programming languages. The ability
to convert values from one type to another is essential to the usefulness of
any programming language. At times, you may be getting data from some-
where in one data type, but need to use it in a different context from
within your code. A good example of this is when you extract data from a
text file. When you read data from a text file, it is most likely read in as a
string. However, you may need to read in numeric values. To do this, you
will have to convert them to numeric values after you have read them in.
VB.NET still supports all of the explicit type conversion functions that
existed in previous versions of Visual Basic, such as CStr, CDbl, CSng. In
case you have never used Visual Basic before, let me give you a brief
introduction to using these functions. If, for example, you have a string
called MyString that contains “123.45” and you wish to convert that to a
Single, you would use the following code:
Dim Num as Single
Num = CStr(MyString)
This is a fairly simple way to convert data types and will serve most of
your data type conversion needs. However, you should also be aware that
all of the primitive data types in Visual Basic.NET now have an associated
wrapper class. These wrapper classes have a number of properties and
methods you can use, including methods for type conversion. Let me illus-
trate how you would accomplish typecasting with these wrapper classes:
Dim I as Integer
Dim MyString as String
MyString = "12345"
I = MyString.ToInt32
MsgBox(i)
In this example, I am using the String object’s intrinsic type conversion
method, ToInt32, to convert the string to a 32-bit (4-byte) integer. It is
important to note that integers are 32 bits by default in VB.NET. (They
were 16 bit in previous versions of Visual Basic.) You can even wrap all
this code up in a single line:
Dim I as Integer = New String("12345").ToInt32
MsgBox(I)
As you might have guessed, there are conversion methods to convert to
any of the primitive data types.
78 Chapter 4 / The .NET Architecture

Summary
In this chapter, I have shown you the basics of the underlying architecture
behind .NET programming. You have been introduced to the Common
Language Runtime, data types and data type conversion, garbage collec-
tion, and some commonly used classes found in Visual Basic.NET. This
knowledge, coupled with the information provided in the preceding three
chapters, should provide you with a solid foundation for continuing to learn
Visual Basic.NET.
Review Questions
1. What is generational garbage collection?
2. What class do VB.NET primitive data types inherit from?
3. List three methods of the Graphics class.
4. What is an assembly?
5. What is typecasting?
6. What is metadata?
7. What package must you import in order to utilize the File and FileStream
classes?
8. What is the purpose of the Common Type System?
9. What method of a class do you utilize if you wish to destroy that class?
10. What method of a class do you use if you wish to finalize the class, but still
have it eligible for reuse?
Chapter 4 / The .NET Architecture 79
Chapter4


Chapter 5
Introduction toDatabaseProgramming
Most business programming is, at some level, database
programming. What is an employee control program but a
database program? What is a point-of-sale or inventory
control program but a database program? In order to do the
exercises in this chapter, you need to be able to create a
table in Access or in the Data Manager. If you know how to
do this you can skip the “Introduction to Databases” sec-
tion. If not, the following section will provide you a quick
introduction to database concepts and to Microsoft Access.
Introduction to Databases
This section is designed to give you a very brief introduc-
tion to creating tables using Microsoft Access. Access is
one of the most popular relational database systems on the
market today (at least for small to medium-sized data-
bases). But first let me define some database terms.
Field A particular piece of data like last name,
address, phone, etc. In SQL Server or Ora-
cle, this is referred to as a “column.”
81
In this
chapter, you
learn about:
� Creating a
database and
tables
� SQL
� The basics of
data binding
� Complex data
binding

Record All the fields for a particular entry. For example, all the
fields that make up a single employee’s file are a record.
Table Related records stored together. For example, all the
records of all the employees might be stored in an
“Employee” table.
Database Related tables stored together. For example the Employee
table, Inventory table, and Finance table might be stored
together in a common small business database.
The Relational Database Management System (RDBMS) refers to data that
is related. Let’s say you have a database that includes employee data. For
each employee you would want a job description. But what if you have 20
people with the same job description (20 Visual Basic programmers, for
example)? Do you really want to rewrite the job description 20 times? In
the relational database model you simply have a table of job descriptions,
and each employee’s record in the Employee table is related or linked to
their job description. This drastically reduces the amount of overhead a
database requires. It also makes for a very logical layout to your database.
This method of storing data is different than the previously used flat file. A
flat file simply stores information one record after another. A text docu-
ment is an example of a flat file. There is no relationship between records
or fields. This makes for an inordinately large data file and one that has a
lot of duplication. It is also quite difficult to perform searches in such a file.
Creating a Database and Tables
To create a database in Access, you first open Access. You will see a dialog
box like the one shown below.
82 Chapter 5 / Introduction to Database Programming

For our purposes, choose the first option, Blank Access database, and click
OK. (Note: You could choose the database wizard to have Access create an
entire database for you!) You will then be asked where to create that data-
base and what to name it. This is the dialog box you will see:
Click the Create button and a new database will be created according to
your specifications.
Tips: In case you are not familiar with dialog boxes, here are
some tips:
� The Look in drop-down allows you to change directories and
drives searching for files.
� The small folder button to the right of that drop-down box will
allow you to go up one level in the directory structure.
� The large white box in the middle of the dialog box will dis-
play files and folders that are in the location you are viewing.
� The small box towards the bottom that says “File name” is
where you place the name of your file.
� The small box that says “File Type” is where you can select a
variety of file types.
This dialog box is the same for opening files or saving them. The only dif-
ference will be the two buttons on the right and the caption at the top. If
you are saving files, the two buttons will be Save and Cancel and the cap-
tion will be Save As. If you are attempting to open files, the two buttons
will be Open and Cancel and the caption will be Open.
Chapter 5 / Introduction to Database Programming 83
Chapter5

To create a new table, select Create table in Design view.
You are now looking at a grid for designing a database table.
84 Chapter 5 / Introduction to Database Programming

Put in the names of the fields you want to include and what data types you
want the fields to hold. When you have added in all the fields you need,
you can close Access. Note that each field needs a name and data type.
The description is optional, but is a good idea.
MS Access will allow you to do a number of interesting things with data-
base design. Unfortunately, a thorough coverage of Access is not within
the scope of this book. However, if you intend to truly maximize your
Visual Basic programming skills, I strongly recommend that you become
at least moderately familiar with Microsoft Access. Some recommended
books on MS Access are listed in Appendix B.
It is also important to remember that Access 2000 has a number of wizards
that automate the process of developing tables, queries, or even entire
databases.
Database Practice
Continuing with the table we created in the previous paragraphs, we will
now create the following fields: Last Name, First Name, Street Address,
City, State, Zip Code, Phone Number, and Email. You can also either add a
field here, such as Entry Key, and then right-click on it and select Primary
Key, or you can wait until you close the design view and be prompted to let
Access create a primary key for you. A primary key is a unique field used
to uniquely identify each record in the database. We will use this table
later in this chapter when we write Windows applications that connect to
this database. Your table should look something like this:
Chapter 5 / Introduction to Database Programming 85
Chapter5

When you close the design window you will be asked to give your table a
name. Call your table Contacts. After you have saved it, double-click on
the table to open it, and add in one or more sample records.
SQL
Before we go any further into database programming, it is necessary to
introduce you to SQL, or Structured Query Language. This is basically the
language of databases. You can use Visual Basic to write SQL statements.
For example:
Dim sSQL as String 'used to hold the sql statement
sSQL = "SELECT * FROM [MYTABLE]"
Let Data1.RecordSource = sSQL
Data1.Recordset.Refresh
This statement will select all files from the table.
What we did here is take a string variable and set it equal to an SQL (pro-
nounced S-Q-L or sequel) statement. We then set the data control’s
RecordSource property equal to that SQL statement. The brackets are
used to denote a table within the database. The asterisk (*) symbol is
computer shorthand for “everything.” So basically we told the data control
86 Chapter 5 / Introduction to Database Programming

to give us all the files in the table named “MyTable.” The capitalization is
not absolutely necessary, but is a frequently used convention.
Before we go any further, you should realize that the Structured Query
Language is not a part of Visual Basic. That’s why we have to put SQL
statements in a string. It is the language used by relational databases.
Most relational databases utilize SQL, not just MS Access. It is a good idea
to become very comfortable with SQL since it is used by MS SQL Server,
Oracle, MS Access, SYBASE SQL Anywhere, and many other relational
database systems.
More often you will have a complex SQL statement with clauses like:
"...WHERE [state] =California"
The basic format for this is:
"SELECT [field1],[field2],.... FROM [sometable] WHERE [somefield]
= SomeCriteria"
The Where clause denotes some condition. Basically, you are saying that
you want all the specified fields if a certain criteria is met.
For SQL, you will have to declare a string variable (most people just call it
strSQL) and then you will assign SQL statements to that variable. You can
then assign the SQL statement’s value to whatever data access object you
are using, be it a data control or a Recordset object. For example:
SELECT: strSQL = "SELECT Publishers.[Company Name], Publishers.State
FROM Publishers WHERE Publishers.State ="
strSQL = strSQL & Chr(34) & txtVariable & Chr(34)
Data1.RecordSource = strSQL
Data1.Refresh
Note: Chr(34) inserts quotes into your string. You have to do it
this way because if you try to literally place a quote into a string,
the quote will terminate the string!
Please notice several things about this statement:
� You can have lines added to each other by making the next line of
SQL:
SQL = SQL + "...."
Chapter 5 / Introduction to Database Programming 87
Chapter5

� You can add in a variable contained within a text box. This is vital as
this is how you will most often do searches.
� Once you have built your SQL statement you merely have to set an
object equal to it. You can set Recordset objects or data controls equal
to an SQL statement.
You can also build a variable into your SQL statement like this:
"SELECT * FROM [Employees] WHERE [State] = '" & sState & "'"
The above statement will let you select the company names of publishers
from a database based upon the state the company is in. (For example, you
can select all the publishing companies in Texas.) Also notice that we used
two different examples of including a variable in an SQL statement. In the
first example, we used ASCII character codes (Chr(34)) to place in the
proper quotation marks, and in the second example we used a combination
of single quotes ('), double quotes ("), and the ampersand (&) to accom-
plish the same goal. This is just another reminder that there is often more
than one way to accomplish a desired task.
ORDER BY: This statement simply orders the records based on a particu-
lar field you wish to order by. Here is an example:
strSQL = strSQL & "ORDER BY[Publishers.State]"
This statement says to sort the records returned by our SQL query by the
state of the publisher. I frequently use this statement simply to arrange
data in a particular manner. For example, I might add this statement to an
employee database:
strSQL = strSQL & “ORDER BY [Employee ID]
This way all the records are now in order by employee ID number. I use
this statement a lot since it is the quickest and easiest way to sort records.
In some cases I will create drop-down menus or command buttons that
each sort by a different criteria. Using the Order By statement in this way,
I let my users sort their data in any fashion they wish.
INNER JOIN: What if you want to search more than one table for the pub-
lisher’s records? SQL offers the INNER JOIN statement:
SELECT Publishers.[company Name] FROM Publishers
INNER JOIN Titles ON Publishers.PubID = Titles.PubID
This statement just says to get all the company names of publishers from
either the Publishers table or the Titles table, if the publisher IDs match!
88 Chapter 5 / Introduction to Database Programming

DISTINCT: What about duplicate records? In the previous examples, the
same record may be duplicated many times. One way around this is to
simply add the DISTINCT statement to your SELECT statement such as:
strSQL = "SELECT DISTINCT..."
I have just covered the SELECT, INNER JOIN, and DISTINCT state-
ments. While there is certainly a great deal more to SQL, this will give
you a start. You will probably use the SELECT statement on a regular
basis. Consider the ORDER BY statement a good way to sort the records
in your data control in any way you wish.
Tip: Always double-check the spelling of your SQL statements. A
single misspelling will cause it to not work.
A Brief History of SQL
SQL, or Structured Query Language, is the language used to talk to rela-
tional databases. The relational database model for database design was
invented by Dr. E.F. Cobb in 1969 and published in Computer World in
1985.
SQL was first implemented in 1974 at IBM’s San Jose Research Labora-
tory. SQL is essentially a non-procedural language that uses English-like
words to talk to a database. The American National Standards Institute
(ANSI) is continually updating its versions of SQL standards.
This is just a brief working introduction to Structured Query Language. It
should get you up and running so that you can use SQL in your programs.
I strongly suggest that early on in your programming career you make a
point of learning more about SQL. You can find some good resources for
SQL and other programming topics in Appendix B.
The Basics of Data Binding
Data binding refers to the process of setting properties of one or more
form components so that they are connected directly to a field or fields in
a database recordset. Windows forms utilize ADO.NET in order to accom-
plish this, but with data binding, you do not need to write the code that
connects to and communicates with the database.
Chapter 5 / Introduction to Database Programming 89
Chapter5

Windows forms allow you to bind easily to just about any structure that
contains data. This means that you can use ADO.NET to bind to traditional
databases, such as Microsoft Access, Microsoft SQL Server, and Oracle. It
also means that you can bind to the result of data read from a file, con-
tained in other components, or even stored in an array.
There are two types of bound components. These types are simple and
complex. Simple data binding occurs when a single component (such as a
text box) is bound to a single field. Complex data binding allows you to
bind more than one field to a control. A good example of this is the
data-bound grid, which displays an entire recordset.
A Basic Data-bound Application
For this example, we are going to rely on the database table you created in
the beginning of this chapter.
Example 5-1
1. On the toolbox there is a tab labeled Data. On that tab you have several
options. Select the Data tab, then select the OLEDatabaseAdapter
option. This should be the third option from the top.
90 Chapter 5 / Introduction to Database Programming

When you place this on the form you will immediately launch a wizard that
will walk you through all the steps required to connect to a database.
2. On the second screen of the wizard select the New Connection button.
You will then be shown a window like the one below:
Chapter5
Chapter 5 / Introduction to Database Programming 91

3. Choose the Provider tab so that you can select the settings for an MS
Access database. By default, the wizard initially displays the Connection
tab, which has settings for an SQL Server database. SelectMicrosoft Jet
3.51 OLE DB Provider and click the Next button.
4. On this screen you will click on the button to the right of the Select or
Enter database name field.
92 Chapter 5 / Introduction to Database Programming

5. This will take you to a dialog box that you can use to browse your PC’s
drives. Locate the database you made at the beginning of this chapter and
select it. Once you have selected your database you should click on the
Test Connection button to ensure that the connection to your database is
correct. If there is a problem, it is almost always due to an improper driver
being used. If you encounter an error, go back to the screen where you
selected the provider and try another database driver.
6. Once your connection is working properly, the wizard will take you to
more screens. On the next screen just keep the default settings. The
screen after that will ask you to define an SQL statement that will retrieve
the initial recordset you wish to connect to. In our case, we will use
Select * From [Contacts].
7. Then, click the Next button and you will be taken to the final screen of the
wizard, which will report to you the status of its various operations.
Once you have created the connection, you will have to create a dataset to
be used by components on your Windows forms. If you highlight the con-
nection you have just created, you will see several options on the lower
right portion of the screen, under the Properties window.
Chapter 5 / Introduction to Database Programming 93
Chapter5

8. Select the Generate Dataset option. This will take you to the following
screen:
Click the OK button.
If you now place a single text box on your form, you can go to its Prop-
erties window and select Data Bindings. You will be presented with a
drop-down list of choices, one of which should be the Dataset you just cre-
ated. You can then go through its choices to set this text box’s Text
property equal to a single field in one of that dataset’s tables.
94 Chapter 5 / Introduction to Database Programming

This is the essence of data binding. You have just made a connection
between your text box and a field in a database table.
9. Connect this text box to the Last Name field in your table. It would also be
a good idea to change the text box name to txtFirstName. Now create a
text box for every field in the database. You will not have to create any
more datasets. You can bind each text box to a different field in the dataset
you already created. Remember to give each text box a name that indi-
cates what data it holds. Also, place a label next to each text box so that
users can see what kind of data is held in that text box. When you are fin-
ished, your form should look something like this:
If you run your application now, the default values you placed in the data-
base table will show in all the fields. However, this is still not much of a
database program. What about adding new records? Deleting records?
Moving around in the database? Well, don’t fear; we will cover these topics
next.
Chapter 5 / Introduction to Database Programming 95
Chapter5

You could simply place buttons on your form and use those for your vari-
ous database operations. However, most professional programs utilize
some sort of toolbar. For this reason, before I show you the database code
to put in the toolbar, I am going to show you how to create your own
toolbar.
1. First, you will need to add an image list and a toolbar. You will find both of
these in the toolbox. The image list will appear outside the actual form in
the same area your dataset appeared. The toolbar will go to the top of your
form and stretch from one end to the other by default. Now click on the
Images property of the image list to be presented with the Image Collec-
tion Editor for the image list.
2. From this screen, using the Add button, you can add any images on your
system to the image list. For our purposes you will want to add five icons.
The graphics files were installed when you installed Visual Studio.NET. In
the folder where you installed Visual Studio there is a subfolder named
Common and it will, in turn, have a subfolder named Graphics.
3. Once you have added your images, your image collection screen will look
like the following image. Simply press the OK button when you are done.
96 Chapter 5 / Introduction to Database Programming

4. Once you have the images you will use stored in the image list compo-
nent, it is time to concentrate on the toolbar itself. The first property of
the toolbar you will need to set is the Image List property. If you click on
that property, a drop-down box will show you all the image lists associated
with this form. There should be only one at this point. After you have
selected the image list, click the Buttons Collection property of the
toolbar. You will then be shown a screen much like the Images collection
of the image list.
5. When you add a button, you must set the following properties. First, set
the image index to match one of the images in your image list. Then, set
Chapter 5 / Introduction to Database Programming 97
Chapter5

the ToolTipText properties. You are going to add five buttons. The first
will have the tag tip Add New Record. The second will be Delete Current
Record. The third will be Save Current Record. The fourth will be Move
Previous. The fifth will be Move Next. With the first three buttons you
will set the Text property to be empty. The last two will have “<<” and
“>>” respectively. Each button must also have its Tag property set. This
will be used later to process code in the toolbar. Set the tags to Add,
Delete, Save, Previous, and Next. Once you have added these five but-
tons, simply click OK. At this point your form should look very much like
the image you see here. Of course, the images you place on your buttons
are likely to be very different.
6. Now we are ready to place code in the toolbar’s Click event in order to
handle our database functions. Double-click on the toolbar and you will be
presented with the code window for the Click event. You will then place
the following code there.
Select Case e.Button.Tag
Case "add" 'add
Try
'Clear out the current edits
Me.BindingContext(Dataset11, "contacts").EndCurrentEdit()
Me.BindingContext(Dataset11, "contacts").AddNew()
98 Chapter 5 / Introduction to Database Programming
Catch eEndEdit as System.Exception
System.Windows.Forms.MessageBox.Show(eEndEdit.Message)
End Try
Case "delete" 'delete
If (Me.BindingContext(Dataset11, "contacts").Count > 0) Then
Me.BindingContext(Dataset11, "contacts").RemoveAt
(Me.BindingContext(Dataset11, "contacts").Position)
End If
Case "save" 'save
Me.BindingContext(Dataset11, "contacts").CancelCurrentEdit()
Case "previous" 'move previous
Me.BindingContext(Dataset11, "contacts").Position =
(Me.BindingContext(Dataset11, "contacts").Position - 1)
Case "next" 'move next
Me.BindingContext(Dataset11, "contacts").Position =
(Me.BindingContext(Dataset11, "contacts").Position + 1)
Case Else 'catch all
End Select
I realize that this code looks very convoluted. To be perfectly honest, I
think the new methods of data binding introduced in VB.NET are not an
improvement over VB 6.0. Data binding was much easier and quicker in
VB 6.0, but don’t panic. Next, I will show you how to use a very simple
wizard that will generate the form, components, and code you need for a
data-bound application.
Example 5-2
1. Start a new Windows application.
2. Select Project | Add Form.
3. Select Data Form Wizard.
Now this is where we get to the really easy way to develop data-bound
forms. The wizard I will now walk you through does everything you need
to have a fully working database application.
4. You should now see the first screen of the Data Form Wizard.
Chapter 5 / Introduction to Database Programming 99
Chapter5

5. Press the Next button to begin the process. That will take you to the sec-
ond screen of the Data Form Wizard.
6. You will select the option to create a dataset. For our example, give it the
nameMyDataSet. Then press the Next button to continue.
100 Chapter 5 / Introduction to Database Programming
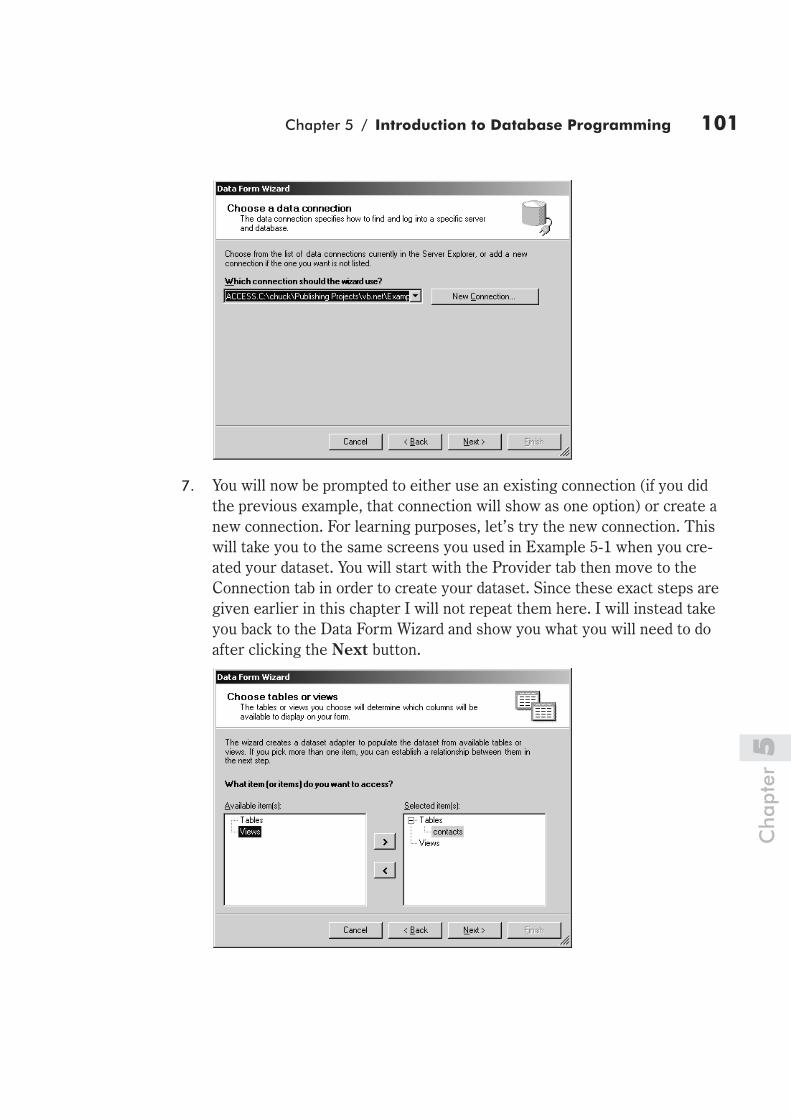
7. You will now be prompted to either use an existing connection (if you did
the previous example, that connection will show as one option) or create a
new connection. For learning purposes, let’s try the new connection. This
will take you to the same screens you used in Example 5-1 when you cre-
ated your dataset. You will start with the Provider tab then move to the
Connection tab in order to create your dataset. Since these exact steps are
given earlier in this chapter I will not repeat them here. I will instead take
you back to the Data Form Wizard and show you what you will need to do
after clicking the Next button.
Chapter 5 / Introduction to Database Programming 101
Chapter5

8. You will need to add the Tables option to the right side as you saw in the
previous image. Then, of course, you will click the Next button.
9. On this screen you will simply select which fields from your table you
wish to display on your form. For this exercise, you should select all of
them.
10. After pressing the Next button you will be taken to the screen that allows
you to choose how you wish to display the records and what buttons (con-
trols) you wish to add. For this example, select Single record and all the
buttons available.
102 Chapter 5 / Introduction to Database Programming
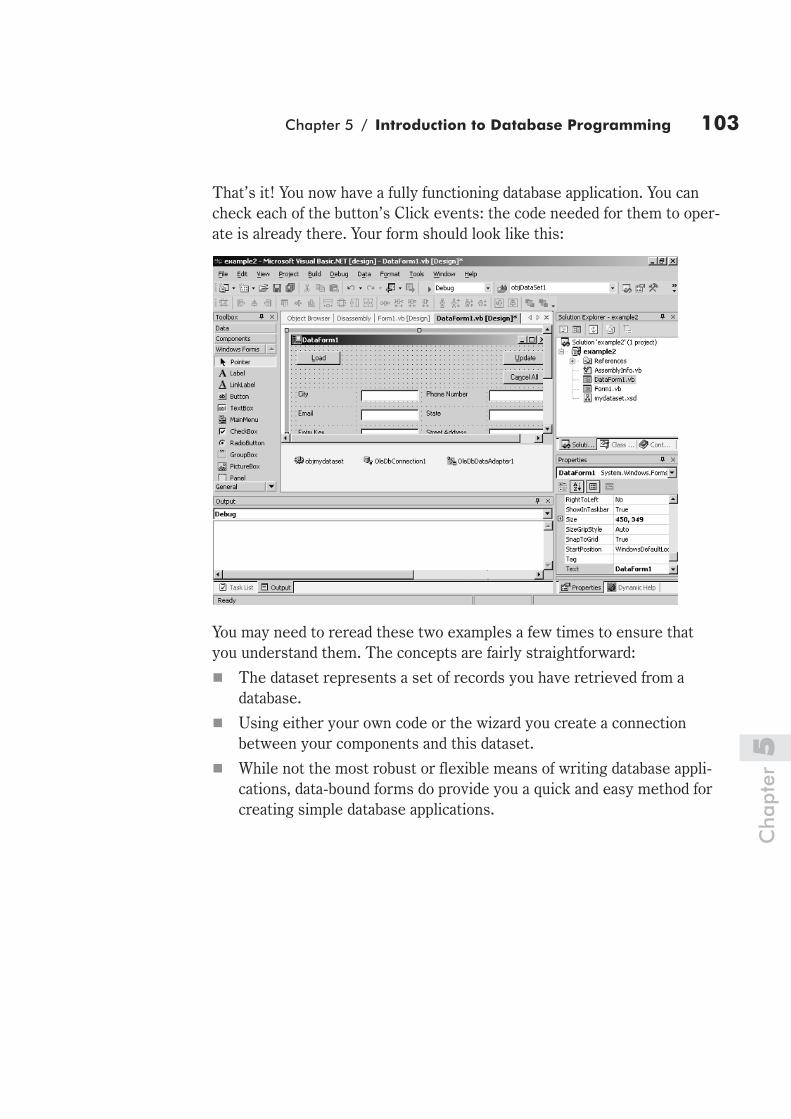
That’s it! You now have a fully functioning database application. You can
check each of the button’s Click events: the code needed for them to oper-
ate is already there. Your form should look like this:
You may need to reread these two examples a few times to ensure that
you understand them. The concepts are fairly straightforward:
� The dataset represents a set of records you have retrieved from a
database.
� Using either your own code or the wizard you create a connection
between your components and this dataset.
� While not the most robust or flexible means of writing database appli-
cations, data-bound forms do provide you a quick and easy method for
creating simple database applications.
Chapter 5 / Introduction to Database Programming 103
Chapter5

Complex Data Binding
While the previous examples have been very helpful and instructive, they
have only shown you one of the two types of data binding. So far you have
dealt only with simple-bound components. Now it is time to show you
complex-bound components. The term “complex” merely denotes that the
component will display more than one field. This does not mean that it will
be more complicated to work with. In fact, complex-bound components can
be easier to work with.
Example 5-3
1. The first thing we will want to do is to start a new Windows forms
application.
2. We will then create an OLEDBConnection. Remember that when you
place an OLEDBAdapter on the form it will automatically launch the wiz-
ard that will guide you through the process. Also recall that when you have
finished creating your connection, you will then go to the Properties win-
dow and click Generate Dataset.
3. Now we will go to the toolbox and place a DataGrid component on the
form. Set its Data Source property to the dataset object you created. Your
form should now look like the image you see here.
104 Chapter 5 / Introduction to Database Programming

When you run the application, the entire table that your connection object
represents will be displayed in the grid.
As you can see, creating data-bound applications is not a very difficult
task. Both simple-bound and complex-bound components can be used to
display data. Essentially, any component that has a Data Source property
can be bound to a dataset. Below is a table summarizing the primary com-
ponents used in data binding and whether they are simple or complex
bound.
Component Data Binding Behavior
TextBox Simple bound
Label Simple bound
PictureBox Simple bound
DataGrid Complex bound
ListBox Simple bound
ComboBox Simple bound
Each of these components can be bound to either an individual field or an
entire recordset. This makes working with databases a much easier task
than it would be if you had to manually manage all database connections
and activity.
Summary
In this chapter I have shown you the basics of database programming. It is
absolutely vital that you fully understand the material in this chapter
before proceeding. Virtually all business programming involves database
programming. Later chapters will expand upon these concepts and intro-
duce you to more robust and professional methods for creating database
applications. Without the foundation provided in this chapter, however, you
are unlikely to be able to effectively utilize the later chapters.
Chapter 5 / Introduction to Database Programming 105
Chapter5

Review Questions
1. What are the two types of data-bound components?
2. What is SQL?
3. List four SQL commands.
4. What is a field?
5. What is a relational database?
6. What is a dataset?
7. What does “simple bound” mean?
8. What does “complex bound” mean?
9. What is a record?
10. What is a table?
106 Chapter 5 / Introduction to Database Programming

Chapter 6
More WindowsProgrammingwith VB.NET
Introduction
The previous five chapters have shown you the essentials
of Windows programming in VB.NET. This has included
object orientation, file manipulation, .NET architecture,
and database programming. This chapter will now add a bit
of depth to these concepts and show you some other inter-
esting things you can do to enhance your Windows
development. One important task we will work with in this
chapter is how to use various components available to you
in Visual Basic.NET, as well as how to create MDI
projects.
Components
In the first chapter of this book, I showed you how to place
components onto forms, manipulate their properties, and
respond to their events. One of the greatest strengths of
Visual Basic has always been the ease with which one can
use it to develop the graphical user interface. This is still
true with Visual Basic.NET. So far, I have shown you only a
few components and discussed only a small number of
107
In this
chapter, you
learn about:
� Components
� MDI
applications
� Built-in
functions

their properties. It’s time now to give you a more thorough look at the
most commonly used components.
Common Components
Visual Basic.NET offers numerous components you can use to build your
applications. Each of these components has a specific purpose. My goal, in
this section, is to acquaint you with these various components, thus allow-
ing you to decide which one to use in a given situation. The following table
is a summary of the basic components and their primary functions.
Control Function
Label Displays read-only text
LinkLabel Displays text that is a link to another window or Web
address
TextBox Displays text that can be edited by the user
RichTextBox Displays text in Rich Text Format (RTF)
ListBox Displays a list of items
DomainUpDown Displays a list of text items a user can scroll through with a
spin button
NumericUpDown Displays a list of numeric items a user can scroll through
with a spin button
ComboBox Displays a drop-down list of items, much like a list box
ListView Displays text in text-only, text with icons, or report view
TreeView Displays information in a hierarchical display
PictureBox Displays graphics (*.bmp, *.gif, *.jpg)
CheckBox Presents options that are not mutually exclusive (as opposed
to a radio button, which displays items that are mutually
exclusive)
CheckedListBox Displays a list of items, each with a check mark
RadioButton Presents mutually exclusive options
TrackBar Displays a scale on which the user can set a value
DateTimePicker Displays a graphical calendar from which the user can set a
date
Button A button the user can click
Panel Holds a scrollable group of controls
GroupBox Holds a captioned group of controls
108 Chapter 6 / More Windows Programming with VB.NET

Control Function
TabControl Provides a tabbed page for organizing and efficiently
accessing grouped objects
Some properties are common to many controls. It’s important that you be
aware of these properties and what they can do for you.
Property Description
Bindings This collection holds all the bindings of properties of this
control to data sources. You used this in Chapter 5.
Name Indicates the name used in code to identify the component.
This is not necessarily the caption the user will see.
Anchor The anchor of the control. Anchors define to which edges of
the container a certain control is bound. When a control is
anchored to an edge, the distance between the component’s
closest edge and the specified edge will remain constant.
ContextMenu The shortcut menu to display when the user right-clicks the
control.
Dock The docking location of the component, indicating which
borders are docked to the container.
Enabled Indicates whether the component is enabled.
Location The position of the upper-left corner of the control with
respect to its container.
Locked Determines if the control can be moved or resized.
Modifiers Indicates the visibility level of the object.
Size The size of the control in pixels. There are two parameters:
height and width.
Visible Determines whether the control is visible or hidden.
Label
The Windows Forms Label control allows you to display text in a read-only
format. The most common use of the label is to provide descriptive labels
for other components such as text boxes. The following table summarizes
the most commonly used properties of the Label component.
Chapter 6 / More Windows Programming with VB.NET 109
Chapte
r6

Property Description
AutoSize Enables automatic resizing based on font size. Note that this
is only valid for labels that don’t wrap text. The AutoSize
property helps you size a label to fit smaller or larger
captions, which is useful if the caption changes at run time.
BackColor The background color of the label.
BorderStyle Determines if the label has a visible border, and if so, what
type.
Cursor The cursor that appears when the mouse passes over the
label.
Font The font used in the label.
ForeColor The foreground color used in the label.
Image The image that will be displayed on the face of the label.
This is new to VB.NET; previous versions of Visual Basic did
not have this property.
ImageAlign The alignment of the image.
ImageIndex The index of the image in the image list to display in the
label.
ImageList The image list that contains the image you want to display
in the label.
TabIndex Determines the index in the tab order for this label.
Text The text contained in the label.
TextAlign Determines the position of the text within the label.
UseMnemonic If true, the first character preceded by an ampersand (&) will
be used as the label’s mnemonic key.
Perhaps the most important property of the Label control is the Text prop-
erty, which contains the label’s caption. In previous versions of Visual
Basic, the Caption property was used to specify the text displayed in the
label. As with most properties of the label, you can set the caption at
design time or run time. To set a label’s caption at design time, use the
Properties window to set the Text property to an appropriate string. To set
a label’s caption at run time, set the Text property programmatically, as
shown here:
lbltest.Text = "Cool stuff"
110 Chapter 6 / More Windows Programming with VB.NET

LinkLabel
The Windows Forms LinkLabel component allows you to add Web-style
links to your Windows Forms applications. The LinkLabel component has
all the properties, methods, and events of the Label control. In addition,
the LinkLabel component allows you to set its caption as a link to an
object or Web page. One good use of LinkLabel would be in the About box
of your application to provide a link to your company’s Web page. The fol-
lowing table shows the properties of the LinkLabel (not including the
properties it has in common with a standard label).
Property Description
ActiveLinkColor Determines the color of the hyperlink when the user is
clicking the link. Just like the active link property in an
HTML document.
DisabledLinkColor Determines the color of the hyperlink when the link is
disabled.
LinkArea Portion of the text in the label that is a hyperlink.
LinkBehavior Determines the underline behavior of the hyperlink.
LinkColor Determines the color of the hyperlink. Just like the link
property in an HTML document.
You can set the various link properties using the color constants defined in
Visual Basic. These constants are implemented as properties of the Color
object.
'Set the link color using defined color constants
with lnkWebSite
.ActiveLinkColor = color.Green
.DisabledLinkColor = color.Blue
.LinkColor = color.Blue
.VisitedLinkColor = color.Purple
end with
You can also change the color of a link using decimal values for red, green,
and blue. If you wish to mix color values in order to achieve a different
shade than the Color object provides, you may use the following decimal
method.
Chapter 6 / More Windows Programming with VB.NET 111
Chapte
r6

'Set the link color using decimal values for red, green, and blue
with lnkWebSite
.ActiveLinkColor = Color.FromARGB(255, 0, 0)
.DisabledLinkColor = Color.FromARGB(100, 0, 255)
.LinkColor = Color.FromARGB(15, 0, 255)
.VisitedLinkColor = Color.FromARGB(128, 0, 128)
end with
The LinkArea property holds the portion of the LinkLabel’s caption that
activates the link. The LinkArea.X property determines the start of the
link area, and the LinkArea.Y property determines the length of the link
area. Here is an example that sets all of a LinkLabel’s text to be a link.
Mylinklabel.LinkArea.X = 0
Mylinklabel.LinkArea.Y = Len(linklabel1.Text)
The Click event of the LinkLabel is an important one, since the Click
event determines what happens when the link is selected. The following
example shows how to start the default Web browser and link to the
Wordware Publishing Web site.
Example 6-1
1. Start a new Windows application project.
2. Place a single LinkLabel on the form.
3. Name that label lnktopublisher. Also change the text toWordware
Publishing.
4. Place the following code in the Click event.
Private Sub lnktopublisher_LinkClicked (ByVal Sender As Object, _
ByVal e As EventArgs)
'Open the default Web browser and link to the Microsoft Web site
System.Diagnostics.Process.Start("http://www.wordware.com")
lnktopublisher.LinkVisited = True
End Sub
Now that is pretty easy. The LinkLabel control is new to VB.NET. Previ-
ous versions did not include any way to put links in your applications. I
think this is a very good addition to Visual Basic and one you will find very
useful.
112 Chapter 6 / More Windows Programming with VB.NET

Button
The Windows Forms Button control performs an action when a button is
clicked, making it look as if the button is being pushed in and released.
When the user clicks the button, the Click event handler is invoked. This
is one of the first components I showed you, but I did not show you many
of its properties. The following table summarizes the major properties of
the Button component.
Property Description
BackColor The background color of the button.
BackgroundImage The background image of the button.
Cursor The cursor that appears when the mouse passes over the
component.
FlatStyle Determines the display of the button when the user moves
the mouse over the button and clicks.
Font The font used to display text in the button.
ForeColor The foreground color of the button’s text.
Image The image that will be displayed on the face of the button.
ImageAlign The alignment of the image that will be displayed on the
face of the button.
ImageIndex The index of the image in the image list to display on the
face of the button.
ImageList The image list to get the image to display on the face of the
button.
TabIndex Determines the index in the tab order that the button will
occupy.
Text The text contained on the button.
TextAlign The alignment of the text that will be displayed on the
button.
In Visual Basic.NET, there are a variety of ways in which a user can click
the Button control:
� The user uses a mouse to click the button.
� The user selects the button by pressing the Enter key while the but-
ton has focus.
� The user presses the access key (Alt + the underlined letter) for the
button.
Chapter 6 / More Windows Programming with VB.NET 113
Chapte
r6

TextBox
The text box has been around in Visual Basic since the beginning. Each
version of VB simply adds more flexibility to it. In single-line mode a text
box can hold up to 2,048 characters, but when displaying multiple lines, a
text box can hold up to 32 K of text. Text boxes are most commonly used
for editable text, but they can also be made read-only. The following table
shows the most commonly used properties of the text box.
Property Description
AcceptsReturn Determines if return characters are accepted as input for
multiline edit components.
AcceptsTab Determines if tab characters are accepted as input for
multiline edit components.
AutoSize Enables automatic resizing based on font size for single-line
edit controls.
BackColor The background color for the text box.
BorderStyle Indicates if there is a border and what type if there is one.
Cursor The cursor that appears when the mouse passes over the
text box.
Font The font used in the text box.
ForeColor The foreground color used in the text box.
Lines The lines of text in a multiline edit control.
MaxLength Sets the maximum number of characters that can be entered
into the edit control. Zero means there is no maximum.
MultiLine Determines if the text of the edit control can span more than
one line.
PasswordChar Determines the character to display for password input
(most people use an asterisk).
ReadOnly Controls whether the text in the edit control can be changed
or not.
ScrollBars Indicates which scroll bars will be shown for this control. This
only works for multiline text boxes.
TabIndex Determines the index in the tab order for the text box.
Text The text contained in the text box.
TextAlign Indicates how the text should be aligned.
WordWrap Indicates if lines are automatically word-wrapped for
multiline text boxes.
114 Chapter 6 / More Windows Programming with VB.NET

You can display multiple lines in a TextBox control by using the MultiLine,
WordWrap, and ScrollBars properties. To display multiple lines in a
TextBox control:
1. Set the MultiLine property to True.
2. Set the ScrollBars property to None, Horizontal, or Both.
3. Set the WordWrap property to False or True.
CheckBox
The Windows Forms CheckBox component is a non-exclusive option
selection component. This means that you can choose to select more than
one check box. You have, undoubtedly, used check boxes in various soft-
ware packages before. Use the CheckBox control to present a True/False
or Yes/No selection to the user. You can group multiple check boxes using
a GroupBox control to display multiple choices from which the user may
select more than one.
Grouped controls can be moved around together on the form designer. For
this reason, and others, it is a good idea to group multiple boxes using the
GroupBox component.
Property Description
Appearance Controls the appearance of the check box.
AutoCheck Causes the check box to automatically change state when
clicked.
BackColor The background color for the check box.
BackgroundImage The background image used for the check box.
CheckAlign Determines the location of the check box inside the
component.
Checked Indicates whether the check box is checked or unchecked.
Cursor The cursor that appears when the mouse passes over the
check box.
FlatStyle Determines the display of the check box when users move
the mouse over the check box and when it is clicked.
Font The font used in the check box.
ForeColor The foreground color used in the check box.
Image The image that will be displayed on the face of the check
box.
Chapter 6 / More Windows Programming with VB.NET 115
Chapte
r6

Property Description
ImageAlign The alignment of the image that will be displayed on the
face of the check box.
ImageIndex The index of the image in the image list to display on the
face of the check box.
ImageList The image list to get the image to display on the face of the
check box.
TabIndex Determines the index in the tab order that the check box will
occupy.
TabStop Indicates whether the user can use the Tab key to give focus
to the check box.
Text The text contained in the check box.
TextAlign The alignment of the text that will be displayed in the face of
the check box.
ThreeState Controls whether or not the user can select the
indeterminate state of the check box.
RadioButton
The Windows Forms RadioButton component is used to give the user a
single choice within a set of two or more mutually exclusive choices. It is a
lot like the check box, except that you can choose only a single option.
Radio buttons appear as a set of small circles. When an option button
choice is set, a dot appears in the middle of the circle.
The radio button and the check box are used for different functions. Use a
radio button when you want the user to choose only one option. When you
want the user to be able to choose multiple options, use a check box.
Property Description
Appearance Controls whether the radio button appears as normal or as
a Windows push button.
AutoCheck Causes the radio button to automatically change state when
clicked.
BackColor The background color used in the radio button.
BackgroundImage The background image used in the radio button.
CheckAlign Determines the location of the check box inside the radio
button.
Checked Indicates whether the radio button is checked or not.
116 Chapter 6 / More Windows Programming with VB.NET

Property Description
Cursor The cursor that appears when the mouse passes over the
radio button.
FlatStyle Determines the display of the radio button when users move
the mouse over the radio button and click the radio button.
Font The font used in the radio button.
ForeColor The foreground color used in the radio button.
Image The image that will be displayed on the face of the radio
button.
ImageAlign The alignment of the image that will be displayed on the
face of the radio button.
ImageIndex The index of the image in the image list to display on the
face of the radio button.
ImageList The image list to get the image to display on the face of the
radio button.
TabIndex Determines the index in the tab order that the radio button
will occupy.
Text The text contained on the radio button.
TextAlign The alignment of the text that will be displayed on the face
of the radio button.
RichTextBox
The RichTextBox is very much like the standard text box with one major
exception. It allows you to display all the variations of font you can show in
any Rich Text document. This provides a much richer array of display
options, similar to what you get when you use WordPad.
Property Description
AcceptsTab Indicates if tab characters are accepted as input for the
RichTextBox.
AutoSize Enables automatic resizing based on font size for a
single-line RichTextBox.
BackColor The background color used in the RichTextBox.
BorderStyle Indicates whether or not the RichTextBox should have a
border.
Cursor The cursor that appears when the mouse passes over the
RichTextBox.
DetectURLs Turns on/off automatic URL highlighting.
Chapter 6 / More Windows Programming with VB.NET 117
Chapte
r6

Property Description
Font The font used in the RichTextBox.
ForeColor The foreground color used in the RichTextBox.
Lines The lines of text in a multiline RichTextBox.
MaxLength Specifies the maximum number of characters that can be
entered into the RichTextBox. Zero implies no maximum.
Multiline Controls whether the text of the RichTextBox can span more
than one line.
ReadOnly Controls whether the text in the RichTextBox can be changed
or not.
RightMargin Defines the right margin.
ScrollBars Defines the behavior of the scroll bars of the RichTextBox.
TabIndex Determines the index in the tab order that the RichTextBox
will occupy.
Text The text contained in the RichTextBox.
WordWrap Indicates if lines are automatically word-wrapped for
multiline RichTextBox.
You can change the font, size, and color of text in the RichTextBox compo-
nent by using the SelFont, SelFontSize, and SelColor properties. This
gives you a much richer set of display options for text than you can get
from a standard text box. Because of this flexibility, you can even use a
RichTextBox in conjunction with an OpenFileDialog component to open a
Rich Text document and load it.
Example 6-2
1. Start a new Windows application.
2. Place one button, one OpenFileDialog component, and one RichTextBox
as shown in the following illustration.
3. Give the button the text Open RTF and place the following code in its
Click event:
with OpenFileDialog1
.Filter = "Rich Text Format|*.rtf"
.ShowDialog()
end with
Richtextbox1.LoadFile(openfiledialog1.FileName)
118 Chapter 6 / More Windows Programming with VB.NET

As you can see, you can easily view rich text format (RTF) documents. In
the downloadable files available at www.wordware.com/VBNET, the folder
Example\Chapter 06 contains an RTF file you can open to illustrate this.
ListBox
A Windows Forms ListBox control displays a list of items. It is commonly
used to display longer lists of data. You can also use the Click event of the
ListBox to respond to the user clicking an item in the list. This allows you
to use the ListBox in a similar fashion to a radio button or check box.
A vertical scroll bar is displayed if the items displayed exceed the height of
the box. A ListBox will also display a horizontal scroll bar if the
MultiColumn property is set to True. In that case, values are displayed in
columns horizontally.
Property Description
BackColor The background color used in the list box.
BorderStyle Determines what type of border is drawn around the list
box.
ColumnWidth Indicates how wide each column should be in a
multicolumn list box.
Chapter 6 / More Windows Programming with VB.NET 119
Chapte
r6

Property Description
Cursor The cursor that appears when the mouse passes over the
list box.
DataSource Determines the list that the list box will use to get its items.
DisplayMember Determines the property to display for the items in the list
box.
Font The font used in the list box.
ForeColor The foreground color used in the list box.
Items The items in the list box.
MultiColumn Determines if values should be displayed in columns
horizontally.
ScrollAlwaysVisible Determines if the list box should always have a scroll bar
present, regardless of how many items are in it.
SelectionMode Determines if the list box is to be single-select,
multi-select, or unselectable.
Sorted Determines whether or not the list is sorted.
TabIndex Determines the index in the tab order that the list box will
occupy.
The SelectionMode property determines how many items in the list can
be selected at a time. If the SelectionMode property is set to Selection-
Mode.MultiSimple, the user can select more than one item by simply
clicking the items in the list. If the SelectionMode property is set to
SelectionMode.MultiExtended, the user can select more than one item by
holding down the Ctrl key or Shift key and clicking items in the list.
You use the Add or Insert method to place items in a list box. The Add
method adds new items at the end of an unsorted list box. The Insert
method allows you to specify where to insert the item you are adding. The
following code illustrates this:
'Add to the end
mylist.Items.Add("VB Is Cool")
'insert at a given position
mylist.Items.Insert(0, "C is cool too")
You can use the Remove method to remove an item from a list box. To
remove all items from a list box, you use the Clear method of the Items
collection.
120 Chapter 6 / More Windows Programming with VB.NET

'Remove all names from the Employees list box
mylist.Items.Clear()
CheckedListBox
The Windows Forms CheckedListBox control, a type of ListBox, gives you
all the capability of a list box and also allows you to display a check mark
next to the items in the list box.
ListView
The ListView is able to display text in four different ways: text only, text
with small icons, text with large icons, or report. It is really a special case
of the ListBox.
Property Description
Alignment Determines how items are aligned within the list view.
AllowColumnReorder Determines if the user can reorder columns in the Report
view.
AutoArrange Determines if items are kept arranged automatically.
BackColor The background color in the list view.
BorderStyle The border style of the list view.
CheckBoxes Determines if check boxes are displayed beside items.
Columns The columns shown in Report view.
Cursor The cursor that appears when the mouse passes over the
list view.
Font The font used in the list view.
ForeColor The foreground color used in the list view.
FullRowSelect Indicates whether all the subitems are highlighted along
with the item clicked when selected.
GridLines Displays grid lines around items and subitems.
HeaderStyle The style of the column headers in Report view.
HoverSelection This option allows items to be selected by hovering over
them with the mouse.
LabelEdit Allows item labels to be edited in place by the user.
LabelWrap Determines whether label text can wrap to a new line.
LargeImageList The image list used by the list view for images in Large
Icon view.
ListItems The items in the list view.
Chapter 6 / More Windows Programming with VB.NET 121
Chapte
r6

Property Description
MultiSelect Allows multiple items to be selected simultaneously.
Scrollable Determines if the list view will display scroll bars when
the data goes beyond the component’s dimensions.
SmallImageList The image list used by the list view for images in all
views except for the Large Icon view.
Sorting Determines the manner in which items are to be sorted.
TabIndex Determines the index in the tab order that the list view
will occupy.
View Selects one of four different views in which items can be
shown.
The View property is perhaps the most important property of the
ListView, since it determines which of four different views items will be
shown in: text only, text with small icons, text with large icons, or report.
The text-only view renders items in much the same manner as a list box.
Frankly, if you intend to use the text-only view you might as well just use
the Label component. The text with small icons, text with large icons, and
report views are similar to the Small Icons, Large Icons, and Detail views
you see in Windows Explorer.
The ListItems property holds the items in a list view. If a ListView control
has multiple columns, the items have subitems that hold information in
the columns beyond the first. For example, a list view with one row and
three columns has one item (to hold the information in the first column)
and two subitems (to hold the information in the second and third
columns).
ComboBox
The Windows Forms ComboBox control displays a list from which the
user can select one or more choices. The ComboBox control appears as a
text box and an associated list box. Essentially, it is much like the ListBox
except the list is displayed as a single text box until you click it. Then, the
list drops down for the user to view.
The ComboBox has three different styles you can use: simple, drop-down,
and drop-down list. With the simple style, the combo box has an edit box
along with a list box. Using the drop-down style, the combo box looks like
a text box, but you can click it to see a drop-down list containing its items.
The drop-down list style is similar to the drop-down style. The one
122 Chapter 6 / More Windows Programming with VB.NET

exception is that, in the drop-down list style, the user can only choose an
item in the list. No item can be entered that does not appear in the list.
Property Description
BackColor The background color used in the combo box.
Cursor The cursor that appears when the mouse passes over the
combo box.
DataSource Indicates the list that the combo box will use to get its
items.
DisplayMember Indicates the property to display for the items in the
combo box.
Font The font used in the combo box.
ForeColor The foreground color used in the combo box.
Items The items in the combo box.
MaxDropDownItems The maximum number of entries to display in the
drop-down list.
MaxLength Specifies the maximum number of characters that can be
entered into the combo box.
Sorted Determines if items in the list portion are sorted.
Style Determines the appearance and functionality of the
combo box.
TabIndex Determines the index in the tab order that the combo box
will occupy.
Text The text contained in the combo box.
You can add items to the combo box at design time the same way you add
them to a list box. You also remove items from the combo box the same
way you remove them from the list box.
DomainUpDown
The DomainUpDown control displays a list from which the user can select
a single choice. This is much like the combo box. However, a
DomainUpDown control is used when the items have an inherent order,
like days of the week or months of the year.
Chapter 6 / More Windows Programming with VB.NET 123
Chapte
r6

NumericUpDown
The NumericUpDown control allows the user to change a numeric value
by a chosen increment. The NumericUpDown component is very similar
to the DomainUpDown component, except that it is used to display num-
bers instead of text.
PictureBox
The Windows Forms PictureBox control is used to display images in
bitmap, JPEG, icon, or GIF formats. The image can be set at design time
or at run time.
Property Description
BackColor The background color in the picture box.
BackgroundImage The background image used for the component.
BorderStyle Controls what type of border the component should have.
Cursor The cursor that appears when the mouse passes over the
picture box.
Image The image in the picture box.
SizeMode Controls how the picture box will handle image placement
and component sizing.
TabIndex Determines the index in the tab order that the picture box
will occupy.
You can change the picture displayed at design time or at run time. To set
the picture at run time, use the FromFile method of the Image class as
shown here:
Dim strimagepath As String = "somepic.gif"
As you can see, it is relatively easy to change the picture that you display
in a picture box.
TrackBar
The Windows Forms TrackBar component is very similar to the scroll bar.
The track bar is often used for tasks such as adjusting volume. It consists
of a slider with a range of tick marks. The user can adjust the value of the
track bar by dragging the slider to the desired value.
124 Chapter 6 / More Windows Programming with VB.NET

Property Description
AutoSize Determines if the track bar will resize itself automatically.
BackColor The background color in the track bar.
Cursor The cursor that appears when the mouse passes over the
track bar.
LargeChange The number of positions the slider moves in response to the
mouse.
Maximum The maximum value for the slider on the track bar.
Minimum The minimum value for the slider on the track bar.
Orientation The orientation of the track bar (i.e., vertical or horizontal).
SmallChange The number of positions the slider moves in response to
keyboard input from the arrow keys.
TabIndex Determines the index in the tab order that the track bar will
occupy.
TickFrequency The number of positions between tick marks.
TickStyle Indicates where the ticks appear on the track bar.
Value The position of the slider.
The track bar’s most important property is the Value property. It indicates
the position of the slider. You should also be aware of the SmallChange and
LargeChange properties. The SmallChange property determines the num-
ber of positions the slider will move when the user uses the arrow keys on
the keyboard. The LargeChange property determines the number of posi-
tions the slider will move in response to mouse clicks or when the Page
Up and Page Down keys are pressed.
DateTimePicker
The Windows Forms DateTimePicker control allows you to display dates
and times to the user. The DateTimePicker will allow the user to view the
days of the week around a particular day selected, or to view different
months, just as they would when perusing through a calendar.
The DateTimePicker looks very much like a text box with an accompany-
ing calendar drop-down. The user can input a date in several ways. First,
the user can enter a date by just typing it into the text box. Secondly, the
user can use the drop-down to navigate to a particular date. Finally, the
user can use the drop-down, and simply click on Today’s Date to enter the
current date, regardless of the month displayed in the drop-down.
Chapter 6 / More Windows Programming with VB.NET 125
Chapte
r6

The DateTimePicker can also be used to show time. The DateTimePicker
shows time when the Format property is set to Time. In this mode, the
DateTimePicker does not show a drop-down calendar, but you can still use
it to collect times from the user.
The most important property of the DateTimePicker is the Value property.
It holds the currently selected date and time. The Value property is set to
the current date by default. If you wish to change the date before display-
ing the control, use the Value property as follows:
dtpmydate.Value = _DateAdd(Microsoft.VisualBasic.DateInterval.Day,
1, Date.Today)
Property Description
CalendarFont The font used in the calendar.
CalendarForeColor The foreground color.
CalendarMonthBackground The background color.
CalendarTitleBackColor The background color of the calendar’s title.
CalendarTitleForeColor The color used within the calendar’s title.
Cursor The cursor that appears when the mouse passes
over the control.
CustomFormat The custom format string used to format the date
or time displayed in the date-time picker.
DropDownAlign Controls whether the month drop-down is aligned
to the left or right.
Font The font used in the DateTimePicker.
Format Determines the format of the display.
MaxDate The maximum date selectable.
MinDate The minimum date selectable.
ShowCheckBox Determines if a check box is displayed in the
DateTimePicker. If the check box is unchecked, no
value is selected.
ShowUpDown Determines if an up-down button is used to modify
dates instead of a drop-down calendar.
TabIndex Determines the index in the tab order that this
control will occupy.
TabStop Indicates whether the user can use the Tab key to
give focus to the DateTimePicker.
126 Chapter 6 / More Windows Programming with VB.NET

Panel
The Windows Forms Panel control is used to group other components. It
is a “container” component. A panel allows you to give the user a logical
visual cue of components that belong together. Essentially, you place com-
ponents that logically belong together on the same panel.
Property Description
AutoScroll Determines if scroll bars will automatically appear when
controls are placed outside the form’s client area.
AutoScrollMargin The margin around components during autoscrolls.
AutoScrollMinSize The minimum size for the autoscroll region.
BackColor The background color in the panel.
BackgroundImage The background image used in the panel.
BorderStyle Determines if the panel will have a border, and if so, what
type.
Cursor The cursor that appears when the mouse passes over the
panel.
DockPadding Determines the size of the border for docked controls.
DrawGrid Determines whether or not to draw the positioning grid.
Font The font used in the panel.
ForeColor The foreground color in the panel.
GridSize Determines the size of the positioning grid.
RightToLeft Indicates whether the panel should draw right-to-left for RTL
languages.
SnapToGrid Determines if controls should snap to the positioning grid.
TabIndex Determines the index in the order that the panel will occupy.
Basically you place panels on your form, then place other components on
those panels. The panel is used to provide a visual grouping of compo-
nents that matches their logical function.
GroupBox
The GroupBox control is used to group other controls. However, unlike
the Panel control, the GroupBox cannot have scroll bars and only the
GroupBox allows you to display a caption with a group of controls. The
GroupBox is very similar to the Frame component used in earlier versions
of Visual Basic. You can use the Add method to create a group of controls.
Chapter 6 / More Windows Programming with VB.NET 127
Chapte
r6

Property Description
BackColor The background color used in the group box.
BackgroundImage The background image used for the group box.
DrawGrid Determines whether or not to draw the positioning grid.
Font The font used in the group box.
ForeColor The foreground color used in the group box.
GridSize Determines the size of the positioning grid.
SnapToGrid Determines if controls should snap to the positioning grid.
TabIndex Determines the index in the tab order that this control will
occupy.
Text The text displayed in the group box.
TabControl
The Windows Forms TabControl control is used to hold controls separated
by tabs. You can place different groups of information on separate tabs of
the tab control.
Property Description
Alignment Determines whether the tabs appear on the top, bottom,
left, or right side of the tab component.
Appearance Determines if the tabs are painted as buttons or regular
tabs.
JustRightCursor The cursor that appears when the mouse passes over the tab
control.
DrawGrid Determines whether or not to draw the positioning grid.
Font The font used in the tab component.
GridSize Determines the size of the positioning grid.
HotTrack Determines if the tabs visually change when the mouse
passes over them.
ImageList The image list from which the tab control takes its images.
ItemSize Determines the width of fixed-width or owner-drawn tabs
and the height of all tabs.
Locked Determines if the user can move or resize the component.
MultiLine Determines if more than one row of tabs is allowed.
ShowToolTips Determines if tooltips will be shown for tables that have their
ToolTips property set.
SizeMode Determines how tabs are sized.
128 Chapter 6 / More Windows Programming with VB.NET

Property Description
SnapToGrid Determines if components will snap to the positioning grid.
TabIndex Determines the index in the tab order that the tab control
will occupy.
TabPages The number of tab pages in the tab control.
Example 6-3
I would like to show you an example now that uses some of the compo-
nents you have just seen as well as a variety of simple programming
techniques. At this stage in your learning of Visual Basic.NET, this exam-
ple should be fairly easy for you to follow.
1. Start a new Windows application project.
2. Place eleven numeric buttons and five function buttons on two separate
panels; label them as shown below. Your form should look something like
this.
Note: I changed the panel’s border to fixed3d.
Chapter 6 / More Windows Programming with VB.NET 129
Chapte
r6

3. Change the form text to readMy Calculator.
4. Add a label at the top with a white background, fixed3d border, text align
to center right, and give it a text value of 0. Change the label’s name to
Display.
5. At the top of the form class’s code window (just after Inherits Sys-
tem.Windows.Forms.Form) place the following code:
Dim FirstNum as Single
Dim SecondNum as Single
Dim Answer as Double
Dim Operation as Integer
Const PLUS = 0
Const MINUS = 1
Const MULTIPLY = 2
Const DIVIDE = 3
Const DECPOINT = 4
Const EQUALS = 5
6. Now in each of the numeric buttons, place code that will set the display
label to show its current value plus the value of the button pressed. For
example, for the number 9 button you would enter:
Display.Text = Display.Text & “9”
7. You will now have to place code in each of the function buttons. The code
for each button is shown here.
Add button:
FirstNum = Val(Display.Text)
Display.Text = "0"
Operation = PLUS
Subtract button:
FirstNum = Val(Display.Text)
Display.Text = "0"
Operation = MINUS
Multiply button:
FirstNum = Val(Display.Text)
Display.Text = "0"
Operation = MULTIPLY
130 Chapter 6 / More Windows Programming with VB.NET

Divide button:
FirstNum = Val(Display.Text)
Display.Text = "0"
Operation = DIVIDE
Equals button:
SecondNum = Val(Display.Text)
Select Case Operation
Case PLUS
Answer = FirstNum + SecondNum
Display.Text = Answer
Case MINUS
Answer = FirstNum - SecondNum
Display.Text = Answer
Case MULTIPLY
Answer = FirstNum * SecondNum
Display.Text = Answer
Case DIVIDE
Answer = FirstNum / SecondNum
Display.Text = Answer
End Select
While this simple calculator is unlikely to go down in the annals of com-
puter science, it does illustrate several useful points. The first is that it
gives you practice using panels. Secondly, it exposes you to more proper-
ties of the label. You are also given additional practice with Select Case
statements. An entirely new concept is introduced as well—the constant.
A constant is a value that you assign to some word. For example, I used an
integer to determine what operation had been selected, and then used
constants such as PLUS, MINUS, etc. to represent the integers used. This
is a very common practice in programming. It prevents other program-
mers from having to try and figure out what a particular value references.
Chapter 6 / More Windows Programming with VB.NET 131
Chapte
r6

MDI Applications
MDI is an acronym for multiple-document interface. It means an applica-
tion that can have multiple screens open at one time. To illustrate this
concept, consider Notepad. This is a single document interface application.
You can only view one text document at a time. However, MS Word is a
multiple-document interface application that allows you to view multiple
Word documents simultaneously.
To create an MDI application, you will require one central form that acts as
a container for all the other forms. To do this, simply take a standard form
and change its IsMDIContainer property to true. Any children forms of
this container will have their property left as false. Only certain compo-
nents can be placed on an MDI container form, the most common being
the picture box and the toolbar. To illustrate the entire MDI concept, fol-
low along with this example.
Example 6-4
1. Create a new Windows project.
2. Change the first form to be an MDI container.
3. Add a new form.
4. Add a toolbar to the MDI container form. At this point your form should
look a bit like this:
132 Chapter 6 / More Windows Programming with VB.NET

5. Add a single button to the toolbar (remember that Chapter 5 walked you
through the process of creating a toolbar in detail).
6. Give that button a text value of New and set its tag value to New as well.
7. Place the following code in the Click event of the toolbar.
Dim X as Form
Select Case e.Button.Tag
Case "New"
X = New Form2()
X.Show()
Case Else
End Select
When you run this application and press the New button, an instance of
Form2 will be created. A new instance will be created each time you press
the button again. This simple example illustrates several points. The first
being, of course, how to make an MDI container form. The second thing
you should note is that the variable X is of the type Form rather than Sin-
gle, Integer, etc. You can have a variable that represents any object you
wish, including forms. That’s how I am able to create new copies of
Form2.
Built-in Functions
In addition to interesting components that allow you to create dynamic
user interfaces, Visual Basic offers a plethora of built-in functions. There
are functions to perform operations on strings, do math, etc. I would like
to introduce you to a few of those functions here.
String Functions
There are many functions built into Visual Basic.NET that make manipula-
tion of strings really very easy. Following is a table listing many of those
functions and their purpose.
Function Purpose
Trim(string value) Takes whatever string is passed to it, removes the leading
and trailing spaces, and returns a string.
Len(string value) Returns the length of a string, including spaces.
Chapter 6 / More Windows Programming with VB.NET 133
Chapte
r6

Function Purpose
Ucase(string value) Returns a string that is the all-uppercase version of the
string passed to it.
Lcase(string value) Returns a string that is the lowercase version of the string
passed to it.
Ltrim(string value) Removes blank spaces from the left side of the string.
Rtrim(string value) Removes blank spaces from the right side of the string.
mid(string value,
starting point, end)
Returns a substring of the string value passed to it,
beginning at the first number passed and stopping at the
last.
Example 6-5
This example illustrates the use of some of the built-in string functions.
1. Start a new Windows project.
2. Place one text box and four labels on the form. Set the label text to blank
and border style to fixed3D.
3. Place one button on the form, and set its text to String Func().
4. Change your form’s text to read String Stuff. Now your form should look
like this:
134 Chapter 6 / More Windows Programming with VB.NET

5. In the Click event of the button, place this code:
Dim MyString as String
MyString = TextBox1.Text
Label1.Text = Ucase(MyString)
Label2.Text = Lcase(MyString)
Label3.Text = Len(MyString)
When you run this application, whatever text you enter into the text box
will be displayed in the labels showing it in uppercase and lowercase. Its
length will also be shown.
Math Functions
Computers are renowned for their ability to process mathematics very
quickly. Visual Basic.NET has a rich set of math functions you can use in
your applications. You access each of these functions via the Math class.
Function Purpose
Sin(number value) Returns the sine of the angle you pass to it.
Cos(number value) Returns the cosine of the angle you pass to it.
Tan(number value) Returns the tangent of the number you pass to it.
Pow(number, power) Returns a double. That double is the value of the number
you pass to the function raised to the power you pass.
Abs(number value) Returns the absolute value of the number you pass to it.
Sqrt(number value) Returns the square root of the number you pass to it.
Example 6-6
1. Create a new Windows project with a single form. This form’s Text prop-
erty should readMath Made easy.
2. Place one text box on the form and two panels. The first panel’s text will
be Trig Functions, the second Other Math. Both panels will have four
labels. Those labels will be given a border (Fixed3D).
3. You will place two buttons on the form, one with the text Trig Functions
and the other with the text Other. Your form should then look like this:
Chapter 6 / More Windows Programming with VB.NET 135
Chapte
r6

4. In the Click event of the button labeled “Trig,” place this code:
Dim Num as Single
Num = Val(TextBox1.Text)
Label1.Text = Math.Sin(num)
Label2.Text = Math.Cos(num)
Label3.Text = Math.Tan(num)
Label4.Text = Math.Acos(num)
End Sub
5. In the Click event of the button labeled “Other,” place this code:
Dim Num as Single
Num = Val(TextBox1.Text)
Label5.Text = Math.Pow(num, 2)
Label6.Text = Math.Pow(num, 3)
Label7.Text = Math.Log(num)
Label8.Text = Math.Abs(num)
This example should show you how easy it is to utilize the Math class to
accomplish a variety of mathematical operations.
136 Chapter 6 / More Windows Programming with VB.NET

Summary
In this chapter, I gave you an introduction to the most common compo-
nents used in VB.NET. You were also given an opportunity for more
practice with basic Windows applications. The entire focus of these first
six chapters has been to give you the basic tools to be able to produce
Windows applications. Before you proceed to the later chapters please be
certain that you are very comfortable with the material in these first six
chapters. Make sure that you have done the examples and that you have
carefully studied the material in the chapters.
Also remember that I did not attempt to cover all of the components a
VB.NET programmer has at his or her disposal. I just wanted to ensure
that you were familiar with the essential ones.
Review Questions
1. List two container components.
2. What method is used to add items to the end of a list box or combo box?
3. What method is used to add items to some specific position in a list box or
combo box?
4. What is the purpose of a link label?
5. What is the primary difference between a check box and a radio button?
6. What types of graphics can a picture box display?
7. What is the purpose of the PasswordChar property of a text box?
8. What does the Value property of a track bar tell you?
9. What is the primary difference between a text box and a label?
10. Name five components.
Chapter 6 / More Windows Programming with VB.NET 137
Chapte
r6


Chapter 7
ADO.NET
Introduction
ADO, or Active Data Objects, was first introduced with
Visual Basic 6.0. It proved to be a more robust and flexible
answer to database programming than the previous tech-
nologies (DAO—Data Access Objects, RDO—Remote Data
Objects). The new .NET architecture takes this same con-
cept and builds upon it. Whatever technology is being
used, the idea is the same: connect to a database and get
the data you need, or conversely put in the appropriate
data.
The ADO.NET architecture uses XML as its native data
format. XML, or Extensible Markup Language, is a very
popular Web-based technology, similar to HTML (Hyper-
text Markup Language). This means that ADO.NET is
fundamentally different from ADO 2.x. ADO.NET is filled
with XML functionality, including XML document objects.
In this chapter, I will demonstrate to you how to connect to
databases, manipulate data, and disconnect from the data
source.
ADO.NET utilizes a connectionless principle that is very
useful when working with a distributed architecture. This
basically means that you don’t need to keep the connection
active. Simply connect to the database, get the data you
want, and then disconnect. You will reconnect when you
are ready to send your data. You are no longer required to
maintain an open connection.
139
In this
chapter, you
learn about:
� XML
� XML
documents
� XSL
� XPath
� ADO.NET
architecture
� Remoting
� Maintaining
state
� Managed
providers
� Data states

Namespace Description
System.Data Provides the core ADO objects such as DataTable,
DataColumn, DataView, and Constraints. This
namespace provides the foundation for all the others.
System.Data.Common This namespace defines the generic objects shared by
various data providers. This includes DataAdapter,
DataColumnMapping, and DataTableMapping.
System.Data.OleDb This namespace defines the objects that we use to
connect to and modify data in various data sources.
This class is particularly useful if your project connects
to many different data sources.
System.Data.SqlClient This namespace is designed specifically for Microsoft
SQL Server versions 7.0 and later. This namespace is
able to use the Microsoft SQL Server API directly.
System.Data.SQLTypes Provides classes for data types specific to Microsoft
SQL Server. These classes are designed specifically for
SQL.
System.Data.ODBC This namespace is intended to work with all compliant
ODBC drivers. It is available as a separate download
from Microsoft.
Connection, Command, DataReader, and DataAdapter are the core objects
in ADO.NET. These objects form the basis for all data operations in .NET.
They are created from the System.Data.OleDb, System.Data.SqlClient,
and System.Data.ODBC namespaces.
XML
A little background on XML is in order before we continue. It is not neces-
sary that you be an XML expert in order to use ADO.NET since the .NET
architecture will handle most of the XML details for you. However, at least
a passing familiarity with the technology will be helpful to you. XML is a
self-describing data format and many tools are already available to auto-
matically create the schemas and documents.
XML stands for Extensible Markup Language. XML is a standard for
formatting data that is extensible and self-describing. XML uses a docu-
ment-based architecture whereby a document contains a few basic
elements that are easy to understand and grasp. Moving data using XML
is similar to moving data in ASCII. ASCII documents are not processed
directly, but are transformed into another format such as HTML.
140 Chapter 7 / ADO.NET

XML Documents
XML documents are the heart of the XML standard. An XML document
has at least one element that is delimited with one Start tag and one End
tag. XML documents are similar to HTML, except that the tags are made
up by the author. They may have attributes designated by name-value
pairs to further allow for data description:
<?xml version="1.0" standalone="yes"?>
<NewXMLDocument>
<MyTable>
<Column1>Data1</Column1>
<Column2>Data2</Column2>
</MyData>
</NewXMLDocument>
XSL
XSL is an acronym for Extensible Stylesheet Language. XSL documents
are XML documents that, when combined with other XML documents,
transform data into a more useful format. This allows a developer to sepa-
rate the logic of data presentation and the actual data into two independent
objects. XSL documents use special format objects to control the transfor-
mation of data from one format (XML) to another (HTML).
XPath
XPath describes location paths of data between XML documents and can
be used to query other XML documents. Using a syntax that is similar to
navigating a file system, it allows you to select parts of a document. This
may be useful for developers familiar with creating XPath queries.
ADO.NET Architecture
Now that you have had a brief tour of XML, one of the technologies under-
lying the new ADO.NET, it is time to introduce you to the architecture of
ADO.NET itself. ADO.NET is the latest extension of the Universal Data
Access technology. In the early days of Visual Basic, Microsoft realized
that data access was an important tool. Visual Basic version 3.0 included
DAO (Data Access Objects). This was a very useful tool, but one with
Chapter 7 / ADO.NET 141
Chapter7

limitations. Visual Basic 6.0 introduced ADO (Active Data Objects). This
technology was quite powerful, but still had some limitations. ADO.NET is
much simpler, less dependent on the data source, more flexible, and uses a
textual data format instead of binary. Textual formatted data is more ver-
bose than binary formatted data, which makes it comparably larger.
However, textual data does improve the ease of transportation through
disconnected networks, flexibility, and speed. Because ADO.NET is based
on XML, it only requires that a managed provider serve up the data in
XML. Once you write your data access code, you will only need to change
a few parameters to connect to a different data source.
Remoting
Remoting, as the name suggests, is simply the process of accessing data
and applications that are remotely located. Under Visual Studio 6.0, this
was accomplished using DCOM (Distributed Component Object Model)
and MTS (Microsoft Transaction Server). XML is ADO.NET’s foundation
for remoting. XML and HTML together can be used to create services
based on SOAP (Simple Object Access Protocol). Remoting uses the
HTTP protocol to communicate.
Maintaining State
ADO.NET uses a connectionless, XML document methodology to handle
data access. This means that it connects to the data source, retrieves the
information, then disconnects. It does not stay connected between opera-
tions. However, this means that maintaining state is not optional when
using the DataSet object. When you populate the DataSet, we are retriev-
ing a populated XML document that is a copy of the data stored in the
original data source.
You can create a DataSet at application startup and populate it with
DataTables that we can use to populate drop-down boxes, list boxes, and
other components in our application without having to access the database
each time the list needs populating. If you simply add some code to refresh
the cache after an update, you will have an in-memory database that we
can use to ease the burden on the database server.
142 Chapter 7 / ADO.NET

Managed Providers
Managed providers are written specifically for a particular database. Sys-
tem.Data.SqlClient is an example of a managed provider that is written
specifically for access to Microsoft SQL Server. This provider takes advan-
tage of SQL Server in ways that are unique to Microsoft SQL Server. It is
written to use the SQL Server API directly and is thus more efficient than
using the more generic providers.
Connection
Connections in ADO.NET are somewhat different than under ADO in
Visual Basic 6.0. You simply dimension and instantiate a Connection
object, set a connection string and that is all.
Command
The Command objects allow you to execute statements directly against
the database. These objects are OleDbCommand and SqlCommand. They
provide for a simple and direct route to your data, regardless of where the
data resides. If you need to get the return value of a stored procedure, the
Command object is the appropriate object to use. Here is an example using
a Command object:
Dim strSql as String = "SELECT * FROM Orders"
Dim sConn as String = "Provider=SQLOLEDB.1;" & _
"Password=password;" & _
"Persist Security Info=True;" & _
"User ID=sa;" & _
"Initial Catalog=Northwind;" & _
"Data Source=localhost"
Dim MyConnection = New OleDbConnection(sConn)
Dim MyCmd as OleDbCommand = New OleDbCommand(strSql,
myOleDbConnection)
Command objects are useful for database operations that do not require
records to be returned. They also provide the developer with an object to
use for parameterized stored procedures.
Chapter 7 / ADO.NET 143
Chapter7

Member Name Description
Input This parameter is an input parameter. It allows for data to be
passed into the command, but not out. You can have more
than one.
Output This parameter is an output parameter. It is used to return
variables, but cannot be used to pass data into a command.
You can have more than one.
InputOutput The parameter is capable of both input and output. It is used
when we need to pass data into and out of a command in
one object. It performs both the input and the output
operations. You can have more than one.
ReturnValue The parameter represents a return value. This is similar to the
output parameter, except that you can only have one.
DataReader
The DataReader is a read-only, forward-scrolling Data object that allows
you to gain access to rows in a streaming fashion. It is typically used when
we need read-only access to data because it is much faster than using a
DataSet. A DataSet is populated behind the scenes using a DataReader, so
if you do not require the features of a DataSet, you should not create one.
A DataReader is created either from the OLE DB libraries or from the
SqlClient libraries. Here is a simple example of creating an OleDbData-
Reader from a Command object:
Dim rReader as OleDbDataReader = myCmd.ExecuteReader()
That is all that is required; you now have a populated DataReader object.
Here is an example of using that DataReader:
While rReader.Read
'// do some row level data manipulation here
End While
The DataReader object allows for much greater speed, especially if you
need to access a large amount of data. However, it does not allow us to
update information, nor does it allow us to store information as the
DataSet object does. This means that for all its speed and ease of use, it
has severe limitations.
144 Chapter 7 / ADO.NET
DataSet
A DataSet is an in-memory copy of a portion of the database. This may be
one table or many tables. A good way to envision this is to picture a small
relational database stored in a variable. This is a complete copy of the
requested data, but it is completely disconnected from the original data.
When you have completed your various operations, the entire DataSet is
submitted to the data source for processing. It handles all the standard
data processing such as updating, deleting, and inserting records. The
DataSet object is an integral part in the ADO.NET object model. A
DataSet holds a copy of the data you request.
DataSets are populated from a DataReader implicitly. ADO.NET creates a
DataReader and populates the DataSet for you. You are not required to do
any manual coding to cause this to happen. The DataSet will temporarily
hold data until you pass it along in the form of a DataTable or DataView.
Disconnected Layer
ADO.NET operates in a disconnected mode. This means that it does not
maintain a connection to the data source. It will open a connection,
retrieve the data, and then close the connection. This allows the data
source to free up resources and respond to the next user. This feature is
particularly useful for high-traffic database servers.
State of Data
When we change data, ADO.NET maintains the various states and ver-
sions of our data as we manipulate it. This allows you to perform a variety
of validation operations based on previous values since the last
AcceptChanges call. As data is added, updated, or deleted in our applica-
tion, you can access the versions of the data, display it to the user, and
give them undo functionality. It is important to note that this is available
until we accept the changes and send them back to the data source.
A table is comprised of DataRow objects. The DataRow objects allow
access to the entire row of data. You also have versioning capability built
into the row.
Chapter 7 / ADO.NET 145
Chapter7

Member Name Description
Default Default values for a row that was added.
Original Values in the DataTable are added to the data set.
Proposed Data that has been added or updated, but has not yet been
committed.
Current Current data in the row as of the last time the row was
committed.
In addition to row versions, you also have a RowState property that can
give you more information about the condition of a row.
Member Name Description
Unchanged No changes since last AcceptChanges call.
New The row was added to the table, but AcceptChanges has not
yet been called.
Modified A change has been made, but AcceptChanges has not yet
been called.
Deleted The Delete method was used to delete the row from the table.
Detached The row has either been deleted but AcceptChanges has not
been called, or the row has been created but not added to
the table. In either case, the row is not currently associated
with the table.
In addition to providing the user with the capability to undo changes, this
type of versioning allows you to more easily enforce business rules. You
can return to a previous state if an attempted operation would violate
some business rule that has been established. This versioning capability
was not present in previous versions of Visual Basic.
Populating Programmatically
You can create a DataTable object and populate it directly with VB.NET
code. You can construct an empty DataTable, and then, using the
DataTable methods, populate a DataTable without having to connect to a
database. In short, this table is used to hold local data, not data from an
external database.
146 Chapter 7 / ADO.NET

Summary
This chapter took you much deeper into the architecture of ADO.NET and
showed you how to work with ADO.NET independently of the data-bound
techniques discussed in Chapter 5. I showed you the essential concepts of
the underlying architecture supporting ADO.NET and worked through a
few examples illustrating how you might use ADO.NET to solve your
database access problems. Frankly, hobbyist programmers might choose to
ignore the details of the ADO.NET architecture, but professionals cannot.
Review Questions
1. What is a DataSet?
2. Does ADO.NET stay connected to the data source?
3. What is the underlying technology behind ADO.NET?
4. What protocols support remoting in ADO.NET?
5. What is used to populate a DataSet?
6. Is data in ADO.NET stored in binary or text format?
7. Until ______________ has been executed, it is possible to return to a pre-
vious data state.
8. What is the best object for executing stored procedures?
9. What type of data providers are written explicitly for a particular database?
Chapter 7 / ADO.NET 147
Chapter7


Chapter 8
WebDevelopmentwith VB.NET
Introduction
In the first seven chapters I’ve shown you the essentials of
developing Windows applications. These applications are
designed to run on a single client machine. However, this
is not all that Visual Basic.NET is able to do for you. It can
also help you develop Web-based applications. This chapter
is intended to show you how to use Visual Basic.NET as a
development tool for Web applications. The primary way to
develop Web pages with Visual Basic.NET is through the
use of ASP.NET. ASP (Active Server Pages) was first intro-
duced in Visual Basic 6.0, but the .NET version is much
easier to use and offers a great deal of functionality.
Web forms are a part of ASP.NET that make Web develop-
ment relatively easy. They integrate HTML with
server-side and client-side programming logic. Web form
applications run equally well in either MS Internet
Explorer or Netscape. Web forms will automatically deter-
mine the client’s browser type and create the appropriate
client-side code for that browser.
Web form components are server-side components that
provide the user interface as well as programmatic
149
In this
chapter, you
learn about:
� Technological
background
� Web forms
� HTML
components
� ASP.NET vs.
Windows
forms
� Web forms vs.
traditional
ASP
� Data-bound
Web forms
� Web services

functionality. “Server-side” refers to objects that reside on the Web server
and are run on the Web server.
“Client-side” refers to objects that run on the client’s machine in their
browser. Web form components are different from Windows components in
that they are designed to work with ASP.NET. Web form components even
have built-in data validation capabilities.
Technological Background
Before I show you how to create Web pages using ASP.NET, it would prob-
ably be a good idea to give you an overview of the technologies involved.
It will be important for you to understand the problems that ASP.NET is
designed to solve, and how it goes about solving them.
The following definitions will be very helpful if you don’t have a strong
Web development background:
HTTP Hypertext Transfer Protocol. This is the protocol that is
used to transmit Web pages.
HTML Hypertext Markup Language. This is the language used to
write Web pages.
Script Mini programs, or scripts, can be inserted into HTML to
add functionality to otherwise static HTML pages. Popular
server-side scripting languages include CGI and Perl. Pop-
ular client-side scripting languages include JavaScript and
VBScript.
XML Extensible Markup Language. This is a markup language,
quite similar to HTML. It is much more versatile and has
become a de facto standard for e-commerce development.
Distributed
Applications
These are applications that have components residing in
different locations. All the components work together to
accomplish the goals of the application.
Firewall A device that provides a barrier between your network and
the outside world.
150 Chapter 8 / Web Development with VB.NET

Web services are a technology that facilitates distributing Web applications
across the Internet. Web services are object-based components that use
XML and HTTP. This means they are using the standard Internet commu-
nication protocols already in place, which means that there will be no need
to make any changes to your network in order to implement them. Web
services are based on open Internet standards and are able to communi-
cate with components that reside on different operating systems,
regardless of what programming languages they are written in.
Another very useful feature of .NET is the ability to use a Windows form
as a client-side user interface in a distributed application. This literally
means that you can create a rich and dynamic user interface as easily as
you create a user interface in a standard Windows Forms project. This is a
great advantage: in fact, if I had to list the five best things about .NET this
would certainly make my list. If you have used traditional technologies,
such as cascading style sheets, to create dynamic Web-based user inter-
faces, you are aware how tedious this process can be. Web forms make the
design of the user interface a simple matter of placing the correct compo-
nents on the form.
Web Forms
Web forms bring the rapid application development capabilities of Visual
Basic to Web applications. Web forms allow you to create Web applications
the same way Windows forms are used for Windows applications.
Web forms have their own components, called Web controls. These are
very similar to Windows components; however, Web controls are more
limited than their Windows counterparts. For example, some of the events
found in Windows form controls, such as mouse events, do not exist in
Web components.
The integrated development environment (IDE) for Web forms is quite
similar to that for Windows forms. However, there are some differences
you should take note of. The first item you should note is that the design
area does not have a form window. It simply has a blank Web page with a
white background and two tabs (labeled Design and HTML) at the bottom.
The HTML tab allows you to view and edit the HTML code for the page.
Assuming you have some experience with HTML, you will be able to man-
ually edit the HTML code that is generated for you. (Appendix D is a brief
introduction to basic HTML.)
Chapter 8 / Web Development with VB.NET 151
Chapter8

On the Design tab you can set two options: absolute positioning (grid lay-
out) and flow layout. Flow layout is the default layout. You can change the
layout by using the PageLayout property in the Properties dialog box. The
difference between flow layout and grid layout is that in flow layout, the
control is dropped where the cursor is currently positioned, whereas in
grid layout, the control is placed in the exact x,y position, much like in
Windows forms.
With this background, it’s time to write a simple Web page using Web
forms.
A Simple Web Form
Now that we have discussed the background and the technology behind
Web forms, I think it is time we create our first Web form project. Note
that for Web projects you will need to have some Web server operating on
your PC. You can use the Microsoft Personal Web Server if you wish. Win-
dows 2000 Professional comes with IIS (Internet Information Services), a
built-in Web server. In either case, you must have a Web server that sup-
ports FrontPage extensions and it must be running when you attempt to
create Web form applications.
Note: To use the example included in the downloadable files, it
will have to be in the wwwroot directory of your Web server. For IIS,
this is in C:\Inetpub\wwwroot.
Example 8-1
1. Start a new project. Choose ASP.NET Web Application.
152 Chapter 8 / Web Development with VB.NET

2. Depending on your processor speed and RAM it may take several seconds
to create the initial Web application. Once it is created, you will see a
screen like this one:
As you can see, you have access to many of the same components you
might use in a standard Windows Forms application. If you click on the
HTML button in the toolbox, you will be presented with components that
are, in actuality, standard HTML objects.
3. For this example we are going to create a project using only HTML ele-
ments. Place a label on the form and change some of its style properties.
When you click on the Style property in the Properties window you are
presented with a plethora of choices as shown in the illustration at the top
of the following page.
Chapter 8 / Web Development with VB.NET 153
Chapter8

4. Set this label to use a large blue font. Place the text VB.Net is cool! in
the label.
5. Place a text field and a button on the form and set their properties as fol-
lows: Set the text field’s max length property to 20. This limits the
number of characters that can be typed in. Set the tab index to 1. Change
its value to Enter Your Name. The last thing to do with the text field is
to right-click on it and choose Run as server control.
Change the button’s Value property to Click Me and its tab index to 2.
Right-click on the button and choose the Run as server control option.
This will allow you to write standard Visual Basic code in the button’s
Click event which will be executed on the server side. The rest of the
page will still be HTML code that will run on the client side.
Next, change one of the form’s properties. Set its background to the
wware.jpg image included with the downloadable files. At this point, your
form should look something like the following picture.
154 Chapter 8 / Web Development with VB.NET
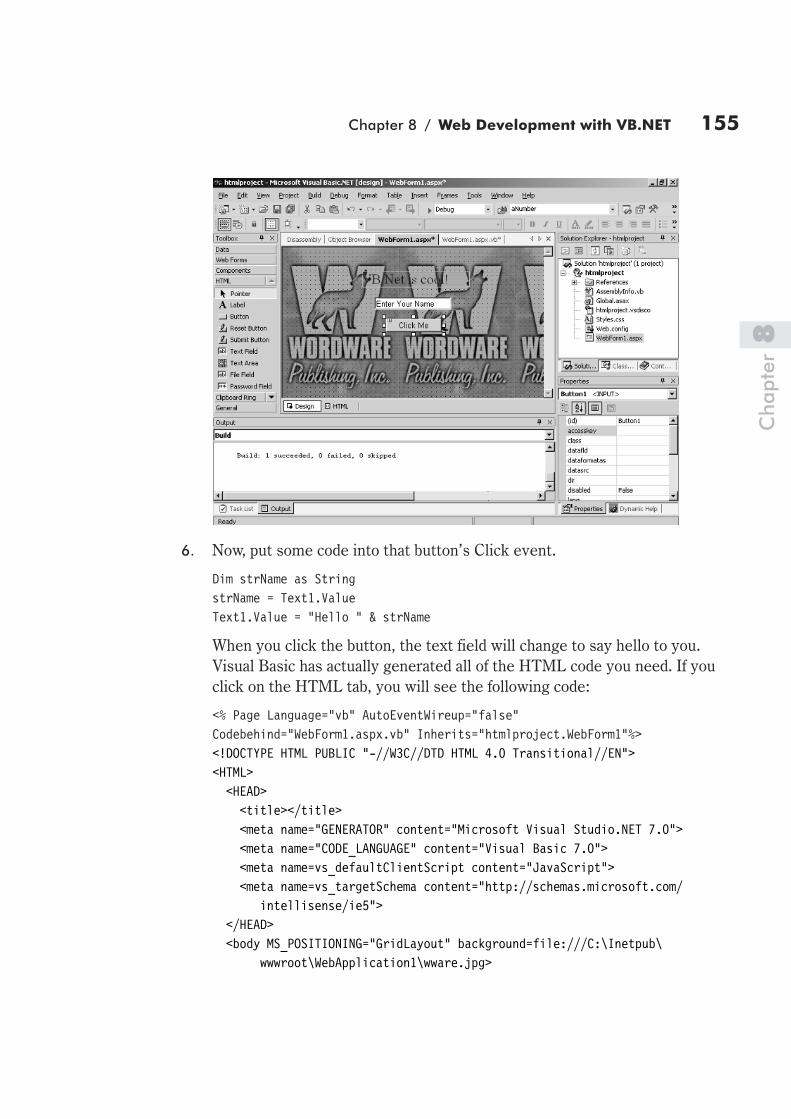
6. Now, put some code into that button’s Click event.
Dim strName as String
strName = Text1.Value
Text1.Value = "Hello " & strName
When you click the button, the text field will change to say hello to you.
Visual Basic has actually generated all of the HTML code you need. If you
click on the HTML tab, you will see the following code:
<% Page Language="vb" AutoEventWireup="false"
Codebehind="WebForm1.aspx.vb" Inherits="htmlproject.WebForm1"%>
<!DOCTYPE HTML PUBLIC "-//W3C//DTD HTML 4.0 Transitional//EN">
<HTML>
<HEAD>
<title></title>
<meta name="GENERATOR" content="Microsoft Visual Studio.NET 7.0">
<meta name="CODE_LANGUAGE" content="Visual Basic 7.0">
<meta name=vs_defaultClientScript content="JavaScript">
<meta name=vs_targetSchema content="http://schemas.microsoft.com/
intellisense/ie5">
</HEAD>
<body MS_POSITIONING="GridLayout" background=file:///C:\Inetpub\
wwwroot\WebApplication1\wware.jpg>
Chapter 8 / Web Development with VB.NET 155
Chapter8

<form id="Form1" method="post" runat="server">
<DIV
style="DISPLAY: inline; FONT-SIZE: large; Z-INDEX: 101; LEFT: 137px;
WIDTH: 185px; COLOR: blue; POSITION: absolute; TOP: 42px; HEIGHT: 21px"
ms_positioning="FlowLayout">VB.Net is cool!</DIV>
<INPUT
style="Z-INDEX: 102; LEFT: 158px; WIDTH: 132px; POSITION: absolute;
TOP: 86px; HEIGHT: 21px"
tabIndex=1 type=text maxLength=20 size=16 value="Enter Your Name" id=Text1
name=Text1 runat="server">
<INPUT id=Button1 style="Z-INDEX: 103; LEFT: 178px; WIDTH: 96px; POSITION:
absolute; TOP: 123px; HEIGHT: 23px" tabIndex=2 type=button value="Click
Me" name=Button1 runat="server">
</form>
</body>
</HTML>
Now, I will be the first to admit that this is very trivial. However, this sim-
ple example illustrates some important points about VB.NET’s Web
development capabilities. To begin, with you can write HTML code,
including server-side components, without knowing much about HTML
(for more details on HTML, see Appendix D). Even if you don’t under-
stand any of the HTML code this example generated, you can still write
Web applications. In my opinion this is one of the most useful features of
VB.NET, though I would still recommend you acquire at least a cursory
knowledge of HTML. The other point this example should have illustrated
to you is that the HTML components can be manipulated via properties in
much the same way as standard Windows components. With that in mind, I
would like to introduce you to the most commonly used HTML compo-
nents and explain their properties.
HTML Components
Button
The HTML button is used in much the same way as a standard Windows
Forms button. You click it to have some action take place. In HTML, the
possible actions are more limited than in a Windows form and the proper-
ties you can set are also somewhat limited. The following table
summarizes the major properties of the HTML button that you can
use in VB.NET.
156 Chapter 8 / Web Development with VB.NET

Property Description
Datafld Used to determine what field from the data source will be
displayed.
Data format Used to determine the format of the data displayed.
Datasrc Used to designate a standard data source for this button.
Disabled Determines whether or not this button is able to be used.
Name The name of the button.
Style This allows you to set a variety of font properties that will be
used when displaying the button’s Value property.
Tab index The tab order for this button.
Value This is the caption displayed on the button. It is the same as
the Text property in a standard Windows button.
Note: The Submit and Reset buttons are just special cases of the
button.
Text Field
The text field behaves much like the text box in a standard Windows form.
It is used to allow the user to input information. It can also be used to
allow you to display information to the user. In my Web development expe-
rience, the text field and the button have been the two HTML form
components that I have used the most. The table below summarizes the
major properties of the HTML text field.
Property Description
Datafld Used to determine what field from the data source will be
displayed.
Data format Used to determine the format of the data displayed.
Datasrc Used to designate a standard data source for this text field.
Disabled Indicates whether or not this text field can be used.
MaxLength The maximum number of characters that can be entered
into the text field. This is very useful in making sure that the
user does not enter too much information.
Name The name of the text field.
Size The size of the text field.
Chapter 8 / Web Development with VB.NET 157
Chapter8
Property Description
Style This allows you to set a variety of font properties that will be
used when displaying the text field Value property.
Tab index The tab order for this text field.
Value This is the caption displayed in the text field. It is the same
as the Text property in a standard Windows text box.
Note: The Password field is merely a special case of the text
field. It works just like the text field except that the user will only
see some character such as an asterisk appear when they type in
text.
Text Area
The text area is much like the text field, except that it is usually used for
entering longer blocks of information. The text field is appropriate for hav-
ing a user enter information such as their name, e-mail address, or any
data that uses only a few words. The text area is for lengthy data, even a
few paragraphs worth of text. The following table summarizes the primary
properties of the text area.
Property Description
Datafld Used to determine what field from the data source will be
displayed.
Data format Used to determine the format of the data displayed.
Datasrc Used to designate a standard data source for this text area.
Disabled Determines whether or not this text area can be used.
MaxLength The maximum number of characters that can be entered
into the text area. This is very useful in making sure that the
user does not enter too much information.
TrightName The name of the text area.
Read Only Determines if the text area is editable or not.
Rows The number of rows that the text area will have.
Style This allows you to set a variety of font properties that will be
used when displaying the text area Value property.
Size The size of the text field.
Tab index The tab order for this text area.
158 Chapter 8 / Web Development with VB.NET
Property Description
Value The text displayed in the text area.
Wrap Determines if text will be wrapped to the next line and how
it will be wrapped.
Table
Those readers who have done any HTML coding will be intimately famil-
iar with the table. The table works much as it does in any word processing
software. It allows you to organize data into clearly defined areas and
makes your Web page much more readable. The HTML table is very flexi-
ble and has a number of properties you can set. Remember that in any cell
in the table you can place any valid HTML code, including an image, but-
ton, or even another table. The following table provides you with a brief
description of the most important properties of a table.
Property Description
Background If you wish to use an image as the background for your
table, this property will allow you to set an image.
Bgcolor This property allows you to set the background color of your
table. Note that if you set a background image, it will
override the background color you set.
Border color The color of the border of your table.
Cell padding Determines how thick the padding on the individual table
cells are.
Cell spacing Determines the spacing between adjacent cells.
Cols Sets how many columns your table has.
Rules Determines if there are rule lines and where to place them.
Style Allows you to set a number of font settings.
Tab index Determines the tab order of your table.
Title This is the title that appears at the top of the table.
Width This property determines how wide the table will be.
Chapter 8 / Web Development with VB.NET 159
Chapter8
Image
I, for one, cannot imagine creating a Web site that does not display images.
The HTML image control works very much like the standard picture box.
It allows you to display an image on your Web form and to set the parame-
ters of how that image will be displayed. This table summarizes some of
the more commonly used properties of the image control.
Property Description
Align Determines the alignment of the image.
Alt Allows you to set some text to display if, for some reason,
the image does not.
Border Allows you to set the border of the image.
Datafld Used to determine what field from the data source will be
displayed.
Data format Used to determine the format of the data displayed.
Datasrc Used to designate a standard data source for the image.
Height Sets the height of the image.
Hspace Sets a buffer space horizontally on the image.
Ismap Determines if this image is an image map (i.e., different
parts of the image map to different links).
Lowsrc Allows you to set a smaller image to display for those users
who have a slower connection.
Src Lets you set the standard source for your image.
Tab index Determines the tab order of your image.
Title Allows you to set a title to display with your image.
Usemap Allows you to set a map to use.
Vspace Allows you to establish a vertical buffer zone around your
image.
Width Allows you to determine the width of your image.
I am certain you will utilize this HTML component frequently if you
develop any Web applications at all.
160 Chapter 8 / Web Development with VB.NET

List Box
This component is almost identical in purpose and function to the standard
Windows list box. It is used to display a list of items and to respond when
the user clicks on one of them. The following table summarizes the most
important properties of this component.
Property Description
Align Determines the alignment of the list box.
Datafld Used to determine what field from the data source will be
displayed.
Data format Used to determine the format of the data displayed.
Datasrc Used to designate a standard data source for this list box.
Disabled Whether or not this list box can be used.
Multiple Determines whether or not the user can select multiple items
from the list.
Selected index Tells you what item is currently selected.
Size Determines the size of the list box.
Tab index Determines the tab order of the list box.
Title Allows you to set a title for your list box.
The list box is a very useful HTML component. The combo box is simply
a list box that initially appears as a single text field with an arrow on the
right side. When the user clicks on that arrow, the other options drop
down.
Check Box
The HTML check box is very much like the standard Windows check box.
It allows the user to make multiple selections. This component is ideal
when you want the user to select one or more options from a list of possi-
ble choices. This next table shows you the most commonly used
properties of the check box.
Property Description
Checked Determines if the check box is checked or not.
Datafld Used to determine what field from the data source will be
displayed.
Chapter 8 / Web Development with VB.NET 161
Chapter8

Property Description
Data format Used to determine the format of the data displayed.
Datasrc Used to designate a standard data source for this check box.
Disabled Determines whether or not this check box can be used.
Name Used in code to refer to this particular check box.
Style Allows you to set the various font properties of the check
box.
Tab Index Allows you to set the tab order of the check box.
Value Whether or not the user has checked the box.
The radio button is very much like the check box, except that the user can
only select one option. This is very useful if you wish the user to make a
single, unique selection from several choices.
Form
Just as you can set the properties of the various HTML components, you
can also set the properties for the HTML document itself. These proper-
ties allow you to alter the form’s appearance and behavior. The following
table summarizes the most important properties of the form.
Property Description
Alink Determines what color active links are displayed in on this
page.
Background Sets a background image for the document.
Bg color Sets a background color for the document. Note that if you
also set a background image, the image will override this
color.
Bg properties Determines if the background is fixed or not.
Charset Determines what character set to use with this document.
Default client
script
Sets what scripting language to use by default with this Web
document.
Description Provides a description of the Web document.
Error Page Sets an error page to display when errors occur.
Keywords Allows various search engines to find and list your Web site.
Link Sets the color of links on the page.
162 Chapter 8 / Web Development with VB.NET

Property Description
Page Layout Setting the page layout style to either grid or flow will
determine how components are arranged and displayed on
the Web page.
Show Grid Allows you to either show or hide the grid.
Target Schema Optimizes the HTML code generated for either Internet
Explorer or for Netscape.
Title Sets the title that will appear in the top of the browser when
this page is displayed.
VLink Determines what color visited links will have.
The HTML components I have just covered are by no means all of the
components available. They are the most commonly used, and with them
you can create some very impressive Web applications. So far, I have con-
centrated only on HTML components. These are components that you
could make and utilize with standard HTML. Personally, I think that if this
is all VB.NET has to offer to Web development, it is still quite useful.
However, we have just begun to scratch the surface.
You can also utilize Web form components. Web form components, unlike
HTML, actually run on the Web server. They do not run on the client’s
machine. With Web form components you can use standard Visual Basic
code. Let’s look at an example that uses Web form components and HTML
form components in conjunction.
Example 8-2
In this project, I would like to combine some standard HTML form ele-
ments with some server-side Web form elements. I believe that this will
illustrate to you the true power of ASP.NET.
1. Start a new ASP.NET Web application project.
2. Change the form’s bgcolor to white and its Title toWeb Form.
3. Place an HTML table on the form and set its Title to VB.NET Features.
Also set its bgcolor to gray, its Cols property to 2, and its border color to
blue. In each of the cells of the table, list one feature of VB.NET (you do
this by simply clicking once in the cell then typing.
4. Place a label above the table. Set the label’s text to VB.NET, its back-
ground to light blue, its border to ridge, and its border color to blue.
Chapter 8 / Web Development with VB.NET 163
Chapter8

Also, set its ToolTip property to VB.NET is pretty cool. At this point,
your form should look like the image you see here.
5. Place a hyperlink Web form control on the form. Set its Text property to
My Home Page, its ToolTip property to Click here to go to my home
page, and its Navigate URL property to http://www.chuckeasttom.com.
This simple example should illustrate several key points about Web forms.
First, you can combine standard HTML elements with server-side Web
form elements. It is also important, however, to note that what you will be
able to accomplish with this depends a great deal on the Web server soft-
ware you use. Microsoft development tools work best with Microsoft Web
servers. I recommend you utilize Microsoft’s Internet Information Server
with Web form applications.
164 Chapter 8 / Web Development with VB.NET
ASP.NET vs. Windows Forms
Now that you have had an opportunity to experiment a bit with Web forms,
it might be a good idea to compare how Web form applications differ from
standard Windows applications. There are several areas in which Web
form functionality differs from standard Windows forms functionality:
� Operating Systems — All clients in Windows forms require the .NET
framework. Web forms require only a browser, so they can be utilized
on any client platform. Of course, the Web server must be running the
.NET framework.
� Resources — Forms are resource-intensive clients, so they rely on the
client processor. Web forms are usually thin clients and thus their cli-
ents don’t have to use high-performance machines since much of the
work is concentrated on the server.
� Speed — Since Web forms run on a server, the client must communi-
cate with that server. That makes response time somewhat slower
than with standard Windows applications.
� Deployment — Since Windows forms run on the client machine, they
need to be installed on all user desktops. As the users grow in number,
with each new release, the deployment becomes more tedious. Web
forms have no client deployment at all. The client requires only a
browser to utilize the application. This makes updates very easy.
The primary difference between Web forms and Windows forms is the dif-
ference between client/server applications and Web applications. There
are arguments to be made for both application development approaches.
Fortunately, VB.NET provides you with both technologies.
Web Forms vs. Traditional ASP
Whether you have used VB 6.0 Active Server Pages or not, it may be use-
ful for you to know how traditional ASP compares to ASP.NET. ASP.NET
makes it much easier to create Web applications. The basic syntax of tradi-
tional ASP is essentially compatible with ASP.NET. However, the
underlying architecture has been completely changed to take advantage of
the .NET framework. ASP.NET pages are compiled using the Common
Language Runtime (CLR). This means that you can use any .NET-compat-
ible language you prefer, including Visual Basic, C#, or JScript.NET.
Chapter 8 / Web Development with VB.NET 165
Chapter8

If you have ever developed applications using traditional ASP, you should
be familiar with its limitations. ASP.NET addresses all of these limitations
and provides a greatly simplified development environment. The following
list summarizes some of the more important differences between
ASP.NET and traditional ASP.
� Performance — Since ASP.NET is compiled to CLR, it can take advan-
tage of early binding and JIT (just-in-time) compiling, thus having sig-
nificant performance gains over traditional ASP’s interpreted code.
� Simplicity — ASP.NET makes it easy to perform many common tasks
including form submission, client authentication, and site
configuration.
� Strong typed language — ASP.NET uses Visual Basic as the program-
ming language rather than VBScript, which supports only the Variant
data type. This means that ASP.NET can utilize various data types.
� Event-driven model — ASP.NET supports an event-driven model, just
like standard Visual Basic, thus eliminating the need to write exten-
sive segments of code simply to determine which component the user
has interacted with.
� State management — ASP.NET provides relatively easy-to-use Appli-
cation and Session states. In ASP, the Session state resides in the
memory of the server. ASP.NET uses a dedicated state server process
that runs as a Windows NT service. This state server listens on a port
(default port 42424).
� Configuration — ASP.NET uses an XML file to store configuration set-
tings rather than depending on the IIS metabase.
� Web services — ASP.NET allows you to expose your business func-
tions to your business partners over standard Web protocols. This is
very important for multi-tiered applications that wish one or more
tiers to be accessed via the Internet.
� Security — ASP.NET provides authorization and authentication ser-
vices in addition to the services provided by IIS. ASP.NET takes the
responsibility from you to authenticate and authorize users stored in a
database or in a file. Users can be authenticated and authorized using
CookieAuthenticationModule and URLAuthorizationModule, which
sets a cookie that contains the user authorization and is checked dur-
ing any subsequent logon attempts.
166 Chapter 8 / Web Development with VB.NET

� Deployment — Deployment of VB.NET Web applications is very sim-
ple. You just copy the files to any server supporting .NET. This is
because all the configuration settings of the site are in an XML file.
� Compatibility — ASP.NET is backward compatible. This means you
can place your ASP.NET solutions on the same server as traditional
ASP solutions without any conflict.
Data-bound Web Forms
So far, I have just shown you simple applications you can do with ASP.NET.
However, most business applications will, at some level, involve data-
bases. The good news is that you can use database connections and
data-bound components in Web forms in much the same way you used
them in standard Windows forms. If you need a refresher in how to use the
data connection tools available to you, I suggest you reread Chapter 5.
Example 8-3
We are going to create a simple data-bound Web application. For this
example, I will be using the small database created in Chapter 5.
1. Start a new application of the type ASP.NET Web Application.
2. Place an OLEDBDataAdapter on the form. This will launch the connection
wizard. The steps you follow to connect to the database are the same ones
we used in Chapter 5, but I will summarize them here:
a. On the second screen (immediately after the introduction) choose a
connection. If you do not have a previous connection, then use the
New Connection button to establish a new one.
b. Select the Use SQL Statements option.
c. Use the query builder to select all fields from the data source.
3. Select the OLEDBAdapter. This will cause several options to display in
the bottom of the Properties window. Click the Generate DataSet
option. You will then have a dataset you can bind components to.
4. In the toolbox, selectWeb Form so that you can view Web form compo-
nents. Place a data-bound grid on the form. Set its data source property to
the dataset you just created.
Chapter 8 / Web Development with VB.NET 167
Chapter8

That is literally all it takes to create simple database applications on the
Web. The ease of displaying data on the Web is a very strong feature of
VB.NET—one which I am quite certain you will use frequently.
Web Services
With the advent of the next generation of the Internet, the Internet is no
longer used just to display graphical interfaces to user. Now it is also used
as a bridge between many applications, such as the business-to-business
(B2B) marketplace and e-procurement. Programmable Web site companies
can expose their software as a service over the Internet to their business
partners and even customers. Such services are called Web services.
A Web service is a component that provides service to a consumer, who
uses standard Internet protocols (HTTP, XML) to access these services.
These Web services are the custom business components that have no
user interface and are meant to be utilized by other applications, rather
than directly by users. These are somewhat similar to the ActiveX DLLs
that were developed with Visual Basic 6.0. However, Web services, as the
name implies, work over the Internet. Any client application that under-
stands HTTP and XML can use Web services. Because Web services use
HTTP, they are firewall friendly and have tremendous advantages over the
previous distributed technology DCOM (Distributed Component Object
Model). One scenario that comes to mind is using Web services to calcu-
late sales tax for an e-commerce application. This application requires
maintaining tables for calculating tax and frequently upgrading the data
received from the vendor. Instead, if the vendor makes this a Web service
accessible over the Internet, it can be accessed easily from anywhere in
the world, and any updates can be done in a single location.
How Web Services Work
Web services are programmable components that can be accessed over the
Internet using standard Internet protocols. They use XML and Simple
Object Access Protocol (SOAP) to communicate with client applications.
XML provides a standardized language to exchange data in a format com-
monly used throughout the IT industry. SOAP is a lightweight protocol
based on XML that runs over HTTP. It is used for exchanging information
in a distributed environment. In other words, SOAP is a technology based
on XML and HTTP working in conjunction.
168 Chapter 8 / Web Development with VB.NET

The basic architecture of Web services is rather simple. The client applica-
tion sends requests to the Web service over the Internet using the SOAP
message format. Once the request arrives, the Web server (usually IIS)
that is listening on TCP port 80 routes the request to the ASP.NET han-
dler. ASP.NET, in turn, locates the Web service, creates the business
component, and calls the specified method in the object, passing it the
data. This business component processes the request and, if necessary,
gets data from the database or from other Web services. It then returns
results to ASP.NET. The data is then packaged in a SOAP envelope and
sent back to the client application. On the client application side, .NET
provides a proxy class that converts this SOAP message to a data type.
This proxy class also packages the request into a SOAP envelope and
sends it to the Web service. SOAP is the default communication protocol
for Web services. However, Web services can also be accessed using
HTTP-GET and HTTP-POST protocols.
When using Visual Studio.NET to create and utilize Web services, you do
not need an in-depth knowledge of the supporting architecture. The .NET
framework handles all the underlying processing without your having to
directly write code for it. You can create and consume Web services with-
out any in-depth knowledge of XML or SOAP.
Summary
In this chapter, I have shown you how to create basic HTML solutions, and
Web form solutions using ASP.NET. I have also shown you how to connect
to a database and display data on the Web. The good news is that even all
of the material in this chapter is just an introduction to what you can do
with ASP.NET. There are a number of books that go into great depth on
how to properly and effectively utilize ASP.NET in order to create very
innovative Web solutions.
Chapter 8 / Web Development with VB.NET 169
Chapter8

Review Questions
1. Where do Web form components run?
2. Where do HTML form components run?
3. What operating systems can be used with ASP.NET applications?
4. What must the Web server support in order to host ASP.NET applications?
5. What is ASP?
6. What is XML?
7. List five HTML components.
8. Which is faster, a Windows Forms application or a Web Forms application?
9. Which requires more resources from the client?
10. How do you deploy an ASP.NET solution to a Web server?
170 Chapter 8 / Web Development with VB.NET

Chapter 9
CreatingCustomWindowsControls
Introduction
Components, in many ways, are the ultimate realization of
the potential of object-oriented programming. Two princi-
ples of object-oriented programming that are of paramount
importance are encapsulation and code reuse. The compo-
nent completely encapsulates the code it has, with no
external dependencies at all. It also can easily be reused by
simply adding it to any project. For this reason, even if you
do not wish to create your own components, it is important
that you at least have some familiarity with how compo-
nents are created.
By this point in this book, you have had an opportunity to
use several different components. However, you may have
found that some don’t do everything you would like them
to. You may have also wished for some functionality that no
component provides. Well, there is an answer to your
dilemma. You can create your own components that can
171
In this
chapter, you
learn about:
� Modifying an
existing
component
� Compound
components
� Creating
components
from scratch
� Components
without a user
interface
� Web controls

then be reused by any VB.NET programmer. There are basically three
ways to create a component:
� Extend or modify an existing component
� Create a compound component from two or more existing components
� Create a brand new component from scratch
Modifying an Existing Component
One way to create a new component is to inherit from an existing compo-
nent and then modify it. For example, let’s consider the Button
component. You can create your own button to be placed in the Toolbox
window. To keep it simple, I will assume that you want to create a custom
control that inherits from the Button control but has a different back-
ground color and font. This is a small change, but it illustrates all the basic
principles of component creation.
Example 9-1
1. Start a new project and selectWindows Control Library for the project
type.
2. Using the Properties window, change the name of your component to
MyNewButton.
3. Place a button on the component form. Change the button’s background
color and font to any value you wish.
4. Your new button is basically created now, but you will have to add events
and methods to it. In the left drop-down box, choose base class. Any
events you wish to propagate down to the underlying button or that you
wish to write code for will go here.
In our example, we merely want to transmit the call to a few events down
to the underlying button so we will add this code:
Private Sub MyNewButton_Click(ByVal sender as Object, ByVal e as
System.EventArgs) Handles MyBase.Click
Button1_Click(sender, e)
End Sub
Private Sub MyNewButton_Resize(ByVal sender as Object, ByVal e as
System.EventArgs) Handles MyBase.Resize
Button1_Resize(sender, e)
End Sub
172 Chapter 9 / Creating Custom Windows Controls

5. Now our task is relatively simple. You compile the new component. Then
start a new Windows Forms project and use this component to test it. You
can also go to the File menu and add a new project. The new project
should be a Windows Forms project. Then go to the Project Explorer win-
dow and right-click on the name of the new project and choose Set as
start up project.
What you have just done is create a project group. This is a group of two
or more projects that you have open in the same IDE. This is ideal for
testing new components. Whether you use the project group or just start a
brand new project, you will still be able to test your new component. In
the new Windows Forms project, select Project and Add reference. You
will then select the Projects tab. From here, you can select your compo-
nent’s project. Your new component will then be in the toolbar, and you
can use it as you would any other component.
If you will notice in the code you created, the user control framework
begins with “Inherits System.Windows.Forms.UserControl.” This means
that when you create a new component you are inheriting from the sys-
tem’s user control class. You have all the standard methods and properties
of the default Windows component. This means that rather than starting
from scratch in your component development, you start with a well-estab-
lished foundation.
Background
It is important, before we proceed, to elaborate somewhat on Windows
Forms components, and the creation of new components. The Windows
Forms framework offers numerous components that you can use to build
applications. You have already worked with many of these components and
should be familiar with them. However, there are several instances where
you may wish to develop your own components. In advanced applications,
these components may not provide the functionality you want. Should this
be the case, you can create your own components to provide exactly what
you need. Or you may find that you use two or more components in tan-
dem frequently, and decide to simply create a compound component of
your own.
All of this begs the question, exactly what is a component? A component is
a class that is completely self contained and can be used independently.
Components provide reusable code in the form of objects. A component
Chapter 9 / Creating Custom Windows Controls 173
Chapter9

may or may not have a user interface. In previous versions of Visual Basic
(and Visual C++), the components were either ActiveX controls or
ActiveX DLLs. A control is a component with a user interface (such as a
button), whereas a DLL is essentially a bag of functions you can utilize as
if they were written in your program.
Compound Components
Compound components simply combine the functionality of two or more
existing components. To create a compound control you simply take two or
more existing controls, combine their features, and perhaps add some new
features.
Example 9-2
1. Open a new Windows Control Library project.
2. Set the background image to any image you wish.
3. In the Properties window, change the name to SliderText.
4. In the Project Explorer window, locate UserControl1.vb. Right-click on it
and change its name to SliderText.vb.
5. On the User Control window, place a text box and a trackbar control. When
you have done this, your screen should look like the image shown here:
174 Chapter 9 / Creating Custom Windows Controls

6. Now, let’s put some code in a few places. In the section at the beginning of
the class, just after the Inherits statement, put this variable declaration:
Private bFlagExtreme as Boolean
Public Property FlagExtreme() as Boolean
Get
Return bFlagExtreme
End Get
Set(ByVal Value as Boolean)
bFlagExtreme = Value
End Set
End Property
Public Property Max() as Integer
Get
Return TrackBar1.Maximum
End Get
Set(ByVal Value as Integer)
TrackBar1.Maximum = Value
End Set
End Property
In the trackbar’s Scroll event place this code:
Private Sub TrackBar1_Scroll(ByVal sender as System.Object, ByVal e as
System.EventArgs) Handles TrackBar1.Scroll
TextBox1.Text = TrackBar1.Value
If bFlagExtreme = True Then
If ((TrackBar1.Value) >= (0.9 * (TrackBar1.maximum)) Then
TextBox1.ForeColor = Color.Red
Else
TextBox1.ForeColor = Color.Black
End If
Else
TextBox1.ForeColor = Color.Black
End If
End Sub
In the text box’s TextChanged event place the following code:
Private Sub TextBox1_TextChanged(ByVal sender as System.Object, ByVal e
as System.EventArgs) Handles TextBox1.TextChanged
TrackBar1.Value = Val(TextBox1.Text)
End Sub
Private Sub UserControl_Resize()
Chapter 9 / Creating Custom Windows Controls 175
Chapter9

Text1.Width = UserControl.Width
Slider1.Width = UserControl.Width
End Sub
7. Make sure you set the anchor properties of both the text box and the
trackbar. The text box should be anchored to the upper-left corner, and the
trackbar to the lower-left corner.
It is now time to test your component. Make a new project that is a stan-
dard Windows form application, or you can add a project to this group (as
we did in Example 9-1). Once you have a client project to use your compo-
nent, you only have to add a reference to your component in order to
utilize it. Right-click Reference in the Project Explorer and add a refer-
ence to the component project. You should now see the SliderText in the
toolbar.
The next step is to use the component we have just created. Place the
SliderText on the form.
176 Chapter 9 / Creating Custom Windows Controls

Then in the Form Load event, you need to set a few of the properties of
the SliderText.
SliderText1.max = 50
SliderText1.flagextreme = True
Now you can run the application and see how the component works in
action. You should be able to see that whenever you enter a number in the
text box, the trackbar moves to match that value. Also, when you move
the trackbar, the current value is shown in the text box. Furthermore,
since we set the FlagExtreme property to true, if the value you enter is
within 10% of the maximum you have set, the text turns red.
As you can see, modifying an existing component and creating a compound
component are not particularly difficult and can be quite useful. The next
option is to create a component from scratch.
Chapter 9 / Creating Custom Windows Controls 177
Chapter9

Creating Components from Scratch
This is the most difficult way to create a component. To be honest, it is
unlikely that a novice programmer will need to create components from
scratch. It is hard to imagine a need for which a component does not
already exist or for which an existing one could not be easily modified.
However, it is important that I at least show you how this is done, should
you ever have the desire.
The only real difference between creating a component from scratch and
using existing components as a base is the fact that you start with noth-
ing. By nothing I mean no pre-existing user interface, properties, or
methods. However, you will still be inheriting from the System.Win-
dows.Forms.UserControl class so you will have those default methods.
Example 9-3
This component is designed simply to show you how to create your own
components, not for any direct practical value in the component itself. We
are going to create a component that tells the user everything they might
need to know about circles.
1. Start a new Windows Control Library project. Change the component’s
name to Circle. Change the filename to circle.vb.
2. We have a new problem. We have to create our own graphic user interface.
You can use the Graphics class to create an image if you wish. In our case,
that will be perfectly fine. We want our interface to be a circle.
In the load event of the user control place this code:
Dim G as Graphics
G.DrawEllipse(New Pen(Color.Red), New Rectangle(50, 50, 100, 100))
3. Immediately after the Inherits statement at the beginning of the class,
create some properties and methods for this component. You will need to
place the following code at that location.
Public Function CircleArea(ByVal Radius as Single)
Dim Area as Single
' I use the math object here to get a more accurate
' version of pi. I then use the math object's 'pow'
' method to square the radius. The formula used here
' is A = pi * r^2
Area = Math.PI * (Math.Pow(radius, 2))
178 Chapter 9 / Creating Custom Windows Controls

Return Area
End Function
Public Function DrawCircle(ByVal MyColor as Color)
Dim G as Graphics
G.DrawEllipse(New Pen(mycolor), New Rectangle(50, 50, 100, 100))
End Function
4. Now, compile your component.
5. Create a new Windows form application (as you did with the first two
examples) so that you can test your component.
This component is really quite simple, and probably not of much practical
value. But it should illustrate two points to you. The first is that it is possi-
ble to start from scratch and to create your own components. The second
point is that this is a complex process. In most cases, you will probably
simply modify an existing component or you will create a compound
component.
Components without a User Interface
It is possible that you will require a given piece of code to be accessible
and reusable in many applications. However, you may not require any type
of user interface. You may have code that will be used only by the client
program. What you are describing is, in essence, a DLL, or dynamic-link
library. Visual Basic 6.0 introduced the ActiveX DLL. This was a relatively
easy-to-use and easy-to-create DLL. However, it was based on COM and
subject to the same limitations as all other DLLs (particularly version
compatibility issues). In VB.NET, you simply have a component without a
visual interface. This has the same effect as a DLL, but it does not have
any compatibility issues.
Example 9-4
For this example, I am going to encapsulate a number of simple conversion
functions into a component. That component can then be added to any pro-
ject that might need to perform any of the conversions provided.
1. Start a new Windows Control Library project.
2. Change the name of the component to Conversion and the filename to
convert.vb.
Chapter 9 / Creating Custom Windows Controls 179
Chapter9

3. Add the following functions immediately after the Inherits statement.
Private Answer as Single
Public Function KGToLB(ByVal KG as Single) as Single
Answer = KG * 2.2
Return Answer
End Function
Public Function LbToKG(ByVal LB as Single) as Single
Answer = LB / 2.2
Return Answer
End Function
Public Function CmToInch(ByVal CM as Single) as Single
Answer = CM / 2.54
Return Answer
End Function
Public Function InchToCM(ByVal Inch as Single) as Single
Answer = Inch * 2.54
Return Answer
End Function
At this point the component has the necessary functions. However, this is
a good opportunity to introduce you to events. You will notice that all the
components in your toolbox have events such as Click, Mouse Move, etc.
You can create custom events for your components as well. We are going
to create an event to notify the client application of any errors.
4. Immediately after the Inherits statement at the beginning of the class,
place this event declaration:
Public Event ConvertError(Message as String)
Now in each of our functions add basic error handling using Try-Catch
blocks. However, the Catch block will raise the event we just created. So,
for example, the InchToCM function now becomes:
Public Function InchToCM(ByVal Inch as Single) as Single
try
Answer = Inch * 2.54
Return Answer
Catch
RaiseEvent ConvertError(“An error occurred in the InchToCM function”)
End try
End Function
180 Chapter 9 / Creating Custom Windows Controls

You can create any events you like at the beginning of your class. Simply
use the Public Event EventName(parameters) format. When you are ready
to trigger that event simply use the RaiseEvent command. This leaves
only one step—testing this component.
5. As you probably guessed, you will need a Windows Forms application to
test this component. The big difference is that after you have made a ref-
erence to this component, you will not have any way to place it on a form.
Instead, inside the Form class you place this code:
Dim MyConvert as New Conversion
If you want to be able to use the events created inside this component,
you need to change it to:
Dim WithEvents MyConvert as Conversion
Set MyConvert = New Conversion
When you declare an object as WithEvents you will have access to its
event procedures just as you have access to the events in a button or
text box.
Web Controls
You probably noticed when you created a new project that there is another
project option, Web Controls. Web controls are components designed spe-
cifically for use with Web applications. Web components are a bit more
complex than Windows components. Their creation and function are very
similar to Windows controls but with a few differences. The first is the
packages that they import:
Imports System.ComponentModel
Imports System.Web.UI
The second major difference is that this component does not start with
any default area for you to create the GUI portion of the component. This
must be done manually.
Chapter 9 / Creating Custom Windows Controls 181
Chapter9

Note: Given that this book is targeted at novice programmers, I
will not be illustrating the development of a Web component.
These components are more complex, and probably should not be
done until you have some more experience with Visual Basic. How-
ever, I felt it was important to at least introduce you to the concept
so that you would be aware of what they are.
Summary
The ability to create your own reusable components was first introduced
to Visual Basic programmers, in a limited fashion, with Visual Basic 5.0.
However, with VB.NET you have the ability to create any type of compo-
nent that a C++ programmer might create—in short, any component you
want. The creation and use of components will also give you insight into
how Visual Basic works and why object orientation is such an important
advance in programming. Even if you have no need to create your own
components, it would be a good idea to work through the examples in this
chapter, just for the educational value.
Review Questions
1. List three ways to create a new control.
2. Do all components have a user interface?
3. What class do all components inherit from?
4. What two concepts of object-oriented programming do components best
illustrate?
5. What COM component are non-GUI VB.NET components most like?
6. How do you declare an instance of an object so that you have access to its
events?
7. How do you create a new event for your component or class?
8. How do you raise an event you have created?
9. What two packages do all Web controls import?
182 Chapter 9 / Creating Custom Windows Controls
Chapter 10
ConsoleApplications
Introduction
Most of this book focuses on how to create attractive
graphical applications. However, there are times when a
console application is more appropriate. A console applica-
tion runs from the command or DOS prompt. It has no
graphical user interface. These types of applications are
ideal for any of the following situations:
� The middle tier of a multitiered application
� A service running in the background
� A test application
There are several differences between a console applica-
tion and a standard Windows form application. To begin
with, since there is no graphical user interface, the IDE
looks a bit different. You begin with a standard code module
that has a Sub Main. That subroutine is the starting point
for the console application. You can then create any other
standard functions you wish to create.
Input and output with the user is accomplished differently.
You cannot display information in labels, message boxes,
etc. Instead, you use the System.console.out object’s Write
and WriteLine methods. To get input back from the user,
use the System.console.in object’s Read and ReadLine
methods.
183
In this
chapter, you
learn about:
� Console
application
objects
� Complex
console
applications

Before we dive head first into the various nuances of console applications,
it might be a good idea to try a simple one.
Example 10-1
I am going to walk you through the process of creating a console applica-
tion step by step. This simple console application merely converts weight
given in pounds to kilograms.
1. Start a new application, and choose Console Application.
2. Place the following code in the module.
Sub Main()
Dim Weight as String
Dim LBs as Single
Dim KG as Single
System.Console.Out.WriteLine("What is your weight")
Weight = System.Console.In.ReadLine()
LBs = CSng(Weight)
KG = Convert(LBs)
System.Console.Out.WriteLine("Your weight in kilograms is " & KG)
System.Console.In.ReadLine()
End Sub
Function Convert(ByVal LBs as Single) as Single
Dim Answer as Single
Answer = LBs / 2.2
Return Answer
End Function
184 Chapter 10 / Console Applications

This simple program should illustrate for you just how a console applica-
tion works. If you have ever used Java or C++ to create console
applications, then this should be old news to you.
As with everything else in VB.NET, console applications depend on
objects and their methods. We have already seen the ReadLine and
WriteLine methods used. Before we continue our examination of console
applications, I would like to introduce you to the major objects involved
and some of their more important methods.
Console Application Objects
Console
This object represents the console window itself. It is through subobjects
and methods of this object that you will accomplish virtually everything
you wish to do in a console application. This object is, in turn, a subobject
of the system object. It has a variety of methods, some of which are sum-
marized in this table.
Property Description
Out Encapsulates all the output functions.
In Encapsulates all of the input functions.
Read Reads a single character from the prompt.
Write Writes a single character to the console prompt.
Error Represents any errors that occur.
Note: The Console object has read and write methods that
accomplish the same task as the In and Out objects’ Read and
Write methods.
Chapter 10 / Console Applications 185
Chapter1
0

In
The In object is used to encapsulate all input. It is very diverse in the
methods it gives you for reading in data. It also has methods to assist in
creating multithreaded applications.
Property or Method Description
Close Closes the input stream and releases any resources.
Peak Returns the next character without actually reading it out
of the input stream.
Read Reads the next character from the input stream.
ReadLine Reads an entire line from the input stream.
Readblock Reads the maximum block available from the input
stream.
ReadtoEnd Reads from the current position to the end of the input
stream.
Synchronize Creates a threadsafe wrapper around the input stream.
Out
Just as the In object encapsulates all the input in your console application,
so the Out object encapsulates any output. It is a flexible object that gives
you a variety of methods for outputting data to the user. Like the In object,
the Out object provides a method to assist in creating multithreaded
applications.
Property or Method Description
Close Closes the output stream and releases any resources.
NewLine Moves the cursor to the next line.
Write Writes the next character to the output stream.
WriteLine Writes an entire line to the output stream.
Synchronize Creates a threadsafe wrapper around the output
stream.
186 Chapter 10 / Console Applications

Error
The Error object provides you with all the information you will need to
manage and handle errors that occur in your console applications. This
object is flexible and quite easy to use.
Property or Method Description
Close Closes streams.
Flush Flushes input/output streams of errors.
Write Writes the current error message.
Complex Console Applications
The objects and methods discussed in the previous section are the core
parts of the console object that you will need in order to make console
applications. With them, you can acquire data from the user, provide output
to the user, and manage errors. The code that you use to manipulate the
data is the same code you would use in a standard application. You can
even use classes inside console applications. Let me illustrate by giving
you a more complex console application.
Example 10-2
1. Start a new application of the console type.
2. Add a class module by selecting Project | Add Class Module. You will
then be presented with the following screen. Click OK.
Chapter 10 / Console Applications 187
Chapter1
0

3. We are going to add several methods and properties to our class. Place the
following code into your class module.
Public Class Class1
Private Answer as Single
Public Function KGToLB(ByVal KG as Single) as Single
Answer = KG * 2.2
Return Answer
End Function
Public Function LBToKG(ByVal LB as Single) as Single
Answer = LB / 2.2
Return Answer
End Function
Public Function CMToInch(ByVal CM as Single) as Single
Answer = CM / 2.54
Return Answer
End Function
Public Function InchToCM(ByVal Inch as Single) as Single
Answer = Inch * 2.54
Return Answer
End Function
End Class
Note: You should recognize this class from Chapter 9.
4. We will now place code into the code module.
Module Module1
Private ClsConvert as New Class1()
Sub Main()
Make_Menu()
End Sub
Sub Make_Menu()
Dim Menu as String
Dim iMenu as Integer
Dim Answer as Single
Dim nResponse as Single
Dim Response as String
System.Console.Out.WriteLine(" ")
System.Console.Out.WriteLine("*****Converter Menu*****")
System.Console.Out.WriteLine("1. CM to Inches")
System.Console.Out.WriteLine("2. Inches to CM")
System.Console.Out.WriteLine("3. LBS to KG")
188 Chapter 10 / Console Applications

System.Console.Out.WriteLine("4. KG to LBS")
System.Console.Out.WriteLine("5. Exit")
Menu = System.Console.In.ReadLine
iMenu = CInt(Menu)
Select Case iMenu
Case 1
System.Console.Out.WriteLine("Enter CM")
Response = System.Console.ReadLine()
nResponse = CSng(Response)
Answer = clsConvert.CMToInch(nResponse)
System.Console.Out.WriteLine(nResponse & " Centimeters
= " & Answer & " inches")
Make_Menu()
Case 2
System.Console.Out.WriteLine("Enter inches")
Response = System.Console.ReadLine()
nResponse = CSng(Response)
Answer = clsConvert.InchTocm(nResponse)
System.Console.Out.WriteLine(nResponse & " inches = "
& answer & " centimeters")
Make_Menu()
Case 3
System.Console.Out.WriteLine("Enter LBs")
Response = System.Console.ReadLine()
nResponse = CSng(Response)
Answer = clsConvert.lbtokg(nResponse)
System.Console.Out.WriteLine(nResponse & " pounds = "
& Answer & " kilograms")
Make_Menu()
Case 4
System.Console.Out.WriteLine("Enter KG")
Response = System.Console.ReadLine()
nResponse = CSng(Response)
Answer = clsConvert.kgtolb(nResponse)
System.Console.Out.WriteLine(nResponse & " Kilograms =
" & Answer & " pounds")
Make_Menu()
Case 5
Return
Chapter 10 / Console Applications 189
Chapter1
0

Case Else
System.Console.Out.WriteLine("Invalid Selection")
Make_Menu()
End Select
End Sub
End Module
When you run this application you will see a basic menu appear in the
Console window.
Viewing this code you should be aware of several issues (besides it being
significantly longer than the previous console application example). The
first is that we placed all of the conversion code in a class module. This
illustrates one very common use for console applications—testing a class.
If you have a class you are developing and wish to test its functionality,
you can create a quick console application to call the various methods of
the class and ensure you get the appropriate results.
The next thing I would like you to be aware of is the use of the menu func-
tion. By placing the code to create and handle the menu in a separate
subroutine, I can then recall the menu each time an operation is per-
formed. This allows the user to continue to work with the application until
they press Exit. Details like this are probably something you have not
encountered before when writing standard Windows applications.
Pay particular attention to the menu itself. A command-line menu where
the user simply types in their choice is just about the only way to provide
any dynamic interaction with the user inside a console application.
190 Chapter 10 / Console Applications

Summary
This chapter has introduced you to console applications. These are appli-
cations that work in the command prompt or DOS window (depending on
the version of Windows you are using). They have a variety of purposes.
After reading this chapter and working through the examples, you should
be comfortable writing console applications yourself. They are actually sig-
nificantly less complicated (and hence easier) than Windows applications.
Review Questions
1. What is a console application?
2. What are three uses for a console application?
3. Can you use a button in a console application?
4. Can you use a class in a console application?
5. What is the starting point for a console application?
6. How do you print to the console screen?
7. How do you receive input from the user?
8. How do you provide an interactive user interface in a console application?
Chapter 10 / Console Applications 191
Chapter1
0

Chapter 11
TCP/IPProgramming
Introduction
TCP/IP (Transmission Control Protocol/Internet Protocol)
is a suite of protocols that are used for most network and
Internet communications. HTTP (Hypertext Transfer Pro-
tocol), which is used by browsers to view Web pages, is a
part of the TCP/IP suite of protocols, as is FTP (File
Transfer Protocol). TCP/IP is the way your computer com-
municates when you visit a Web page, transfer a file, or log
on to the network at your job. The ubiquitous nature of
TCP/IP alone makes it an important topic for study.
The way that TCP/IP communication is conducted is that
the client machine creates a packet. That packet has a
header section that is 20 bytes long and contains informa-
tion regarding the source IP address of the packet. The
header indicates the destination IP and port as well. This
packet is then sent to a specific IP address and a specific
port on that machine. Assuming there is some type of soft-
ware listening to that port, the packet is received and the
data can be extracted and processed.
193
In this
chapter, you
learn about:
� The Winsock
control
� UDP
applications
� The Bind
method
� OSI model
� Network
connectivity

Fortunately, you don’t have to know many details about TCP/IP in order to
write IP clients and servers in Visual Basic.NET. The Winsock component
handles all the details; you simply need to access its relevant properties,
methods, and events in order to send and receive TCP/IP packets.
The Winsock Control
Creating TCP/IP communications inside of Visual Basic is remarkably
easy. The first step is to add the Winsock control to your project. To do
this, select Project | References and add in the Winsock control:
Note: Some versions of Windows did not include the
Winsock.ocx. If yours does not, you may be able to obtain a copy
from the Microsoft Web site.
In order for TCP/IP communications to work there needs to be a client on
one machine and a server on the other. In order to make a server, you
place the following code in the Form Load event of the form that has the
Winsock component on it.
Winsock1.LocalPort = 100
Winsock1.Listen
I picked port 100 at random. TCP/IP ports can be anywhere from 1 to a lit-
tle over 32,000. However, for custom applications, you will want to avoid
194 Chapter 11 / TCP/IP Programming

certain ports, such as 21 (always used for FTP) and 80 (used for HTTP).
Now what you have is a Winsock that is listening. But what do you do
when someone wants to send it a packet?
In the Winsock_ConnectionRequest event place this code:
If Winsock1.State <> sckClosed Then _
Winsock1.Close
' Accept the request with the requestID
' parameter.
Winsock1.Accept requested
This allows your Winsock to accept packets from that particular TCP/IP
client.
Now how do you get the data? You go to the Winsock_DataArrival event
and place this code:
Dim strBuffer as String
Winsock1.getdata strBuffer
Now the entire data portion of the incoming TCP/IP packet will be placed
in the string strBuffer.
Note: If you open a socket but don’t close it, you will have to
reboot that machine before you can use that socket again. When
you are done, place a statement that closes the socket
(Winsock1.close).
Now what about sending data? Well, that’s pretty easy:
Winsock1.remoteport ' What port do you want to send it too. It has
' to match the port
' that the server is listening in on.
Winsock1.remoteip ' What IP are you sending it to?
Winsock1.senddata strBuffer ' Just put your data into the string
' and away it goes!
Example 11-1
First we will create a TCP client.
1. Start a new Windows application.
2. Add a reference to the Winsock.ocx as indicated at the beginning of this
chapter.
Chapter 11 / TCP/IP Programming 195
Chapter1
1

3. Add this declaration to the beginning of the Form1 class module:
Dim WithEvents MyWinsock as MSWinsockLib.Winsock
You will now have a MyWinsock item with events in your Form1 class
module.
4. On the form, place three text box components, three labels, and one but-
ton. It should look like the following:
5. In the Click event of the button, place the following code.
' set remote ip and port to send to
MyWinsock.RemoteHost = Textbox1.Text
MyWinsock.RemotePort = Val(Textbox2.Text)
' connect
MyWinsock.Connect()
MyWinsock.SendData(Textbox3.Text)
To test this code you have to have a server listening. This is best done on
multiple PCs. You can place the client on your PC, and the server on
another. To create the server, we will have to create a second application.
196 Chapter 11 / TCP/IP Programming

Example 11-2
1. Start a new Windows application.
2. Create a reference to the Microsoft Winsock component as follows:
a. Select Project | Add References.
b. Choose the COM tab and find MSWinsock.ocx.
c. At the beginning of the Form1 class module, place this code:
Dim WithEvents WinsockServer as MSWinsockLib.Winsock
3. Place one text box on the form with its multiline property set to true.
4. Place one button on the form with its text set to Listen.
5. Place another text box on the form and a label identifying it as Port (this
will be the port the server listens to).
Your form should look like this:
6. In the button, place this code:
WinsockServer.LocalPort = Val(Textbox1.Text)
WinsockServer.Listen()
Chapter 11 / TCP/IP Programming 197
Chapter1
1

7. In the Winsockserver_Connectionrequest event place this code:
WinsockServer.Close()
' Accept the request with the requestID
' parameter.
WinsockServer.Accept(requestID)
8. Finally, in the Winsockserver_Dataarrival event, place this code:
Dim strBuffer as String
WinsockServer.GetData(strBuffer)
Textbox2.Text = strBuffer
Some would say that the Winsock component is a COM component and is
not, strictly speaking, VB.NET. I include this chapter on using the
Winsock component for several reasons. The first is that it illustrates an
important point. Even though the entire .NET architecture is moving away
from COM and ActiveX, you can still use those technologies inside your
VB.NET applications. I also included this section because socket program-
ming has been an important topic in programming since the advent of
Windows.
When you have a port and an IP address, and create a connection, you
have created a socket. Once a socket is created, the two ends can freely
pass TCP packets back and forth. Doing this in C or C++ can be quite
tedious. Using the Winsock component, a Visual Basic programmer can
easily set up socket communications. I have found socket communications
quite useful in my professional career.
More About the Winsock
So far, I have shown you how to use the Winsock object specifically to
send TCP packets. However, you can send UDP (User Datagram Protocol)
packets with the Winsock. The major difference between the two proto-
cols lies in their connection state:
� The TCP protocol control is a connection-based protocol. That means
the reception of one packet is confirmed prior to sending the next
packet.
� The UDP protocol is a connectionless protocol. This means that each
packet is sent without confirming the receipt of the last packet. Also,
the maximum data size of individual packets is determined by the
network.
198 Chapter 11 / TCP/IP Programming

The nature of the application you are creating should determine which
protocol you select. The following are a couple of questions that may help
you select the appropriate protocol:
� Will the application require acknowledgment from the server or client
when data is sent or received? If so, the TCP protocol requires an
explicit connection before sending or receiving data.
� Is speed of transmission of great concern? Since TCP confirms the
reception of each packet, it moves a bit slower.
Applications that use multimedia often use UDP. Since missing a single
packet in the transmission is unlikely to even be noticeable by the user,
the confirmation of each packet is unnecessary. The time lost confirming
each packet would, however, be detrimental to the application’s
performance.
To set the protocol that your application will use, implement the following
code.
Winsock1.Protocol = sckTCPProtocol
or
Winsock1.Protocol = sckUDPProtocol
UDP Applications
Creating a UDP application is even simpler than creating a TCP applica-
tion because the UDP protocol doesn’t require an explicit connection. In
the TCP application I previously showed you, one Winsock control must
explicitly be set to listen for packets, while the other must initiate a con-
nection with the Connect method and send packets. Basically the TCP
protocol requires one end to be acting as a server and the other to act as a
client. In UDP applications, both sides are equal. To send data between
two controls, three steps must be completed:
1. Set the RemoteHost property to the name of the other computer.
2. Set the RemotePort property to the LocalPort property of the second
control.
3. Invoke the Bind method specifying the LocalPort to be used.
Because both computers can be considered “equal” in the relationship, it
could be called a peer-to-peer application. To demonstrate this, the code
Chapter 11 / TCP/IP Programming 199
Chapter1
1

below creates a “chat” application that allows two people to “talk” to each
other in real time:
Example 11-3
1. Create a new Windows Forms application.
2. Change the name of the default form to frmUDPA. Change the caption of
the form to UDP Peer A.
3. Add a reference to the Winsock object (as you did in Example 11-1).
4. Create an instance of the Winsock object:
Dim WithEvents UDPPeer as MSWinsockLib.Winsock
5. In the Form Load event set the UDPPeer protocol to UDP.
6. Place two TextBox components on the form. Name the first txtSend, and
the second txtOutput.
7. Add the following code:
Private Sub Form_Load()
' The control's name is udpPeerA
With UDPPeer
' Note be sure to change the RemoteHost value to the name of your
computer.
.RemoteHost= "PeerB"
.RemotePort = 1001 ' Port to connect to.
.Bind 1002 ' Bind to the local port.
End With
frmPeerB.Show ' Show the second form.
End Sub
Private Sub TxtSend_Change()
' Send text as soon as it's typed.
UDPPeer.SendData TxtSend.Text
End Sub
Private Sub UDPPeer_DataArrival (ByVal bytesTotal as Long)
Dim strData as String
UDPPeer.GetData strData
TxtOutput.Text = strData
End Sub
Remember that the primary difference between UDP and TCP is the
connectionless nature of UDP. You also do not need a separate client and
server as you do with TCP.
200 Chapter 11 / TCP/IP Programming

The Bind Method
In Example 11-3, we utilized the Bind method. You must invoke the Bind
method when creating UDP applications. The Bind method “reserves” a
local port for use by the Winsock component. For example, when you bind
the control to port number 1001, no other application can use that port.
This may be useful if you wish to prevent another application from using
that port.
The Bind method also has an optional second argument. A machine may
have more than one NIC (network interface card). If there is more than
one network adapter present on the machine, the LocalIP argument allows
you to specify which adapter to use. If you omit the argument, the control
uses the first network adapter listed in the Network Control Panel dialog
box of the computer’s Control Panel Settings.
The UDP protocol allows your Winsock object to freely switch the
RemoteHost and RemotePort properties while remaining bound to the
same LocalPort. However, with the TCP protocol, you must close the con-
nection before changing the RemoteHost and RemotePort properties.
Note: While it is not necessary to go beyond what I have shown
you, it may prove useful for you to have more in-depth knowledge
of TCP/IP and Internet communications. Even the ASP.NET that I
covered in Chapter 8 depends on this protocol; it simply hides the
details from you. If you are not particularly interested in obtaining
more depth in your knowledge of Internet communications, feel
free to skip the rest of this chapter.
OSI Model
To begin with, all communications, protocols, etc., on the Internet and on
local networks take place within the framework of the OSI model. The
OSI model is a model for understanding various Internet protocols, net-
working hardware, and networking communications. OSI stands for Open
Systems Interconnection. It is the world-wide standard for networking
and the Internet. The following table summarizes the OSI model’s seven
layers.
Chapter 11 / TCP/IP Programming 201
Chapter1
1

Layer Protocols Description Hardware
Physical This is the actual physical
connection. This is where
the NIC and the cable
are located.
NIC (network interface
card), repeater, hub
Datalink Interface between the
Physical layer and the
Network layer.
Bridge and switch
Network IP, ARP (Address
Resolution Protocol),
ICMP (Internet Control
Message Protocol
Divides blocks of data
into segments called
datapackets or
datagrams.
Router, BRouter
Transport TCP, UDP Error checking
Session Responsible for establishing
and maintaining a network
session.
Presentation HTTP, SMTP, POP, IRC Facilitates communication
between Session and
Application layer
Application Interfacing with application
software
For our purposes, it is not necessary that you become intimately familiar
with the entire OSI model, or that you memorize the seven layers. How-
ever, you should note that TCP itself operates at the Transport layer while
IP operates at the Network layer. Essentially this means that the packets
you send and receive via Winsock are predominantly concerned with TCP
and the Transport layer, whereas the address you send them to deals with
the Network layer.
What is happening when you create and send a packet is that the Winsock
component takes the string you pass it and divides it up into segments or
packets. The number of packets depends on the size of the string. It may
only send a single packet, if the data you pass to it is small enough. Each
packet is given a 20-byte header. That header contains many pieces of
information. It contains the IP address from which the packet is sent and
the port. It also contains the destination IP address and its port. A com-
plete address includes the IP address and the port number. In essence, the
IP address tells the packet what machine to go to, and the port tells it
where on that machine to connect.
202 Chapter 11 / TCP/IP Programming

It is common for people to use the same port for a particular protocol. This
port is referred to as the default port for that protocol. Below is a list of
protocols and their default ports, as well as a description of the protocol.
Protocol Description Default Port
FTP File Transfer Protocol: used to transfer text
and binary files over the Internet.
21
NNTP Network News Transfer Protocol: used
to read usenet newsgroups.
119
SMTP Simple Mail Transfer Protocol: used to send
e-mail.
25
POP3 Post Office Protocol (version 3): used to
retrieve e-mail from a server.
110
TCP Transmission Control Protocol *
HTTP Hypertext Transfer Protocol: used to view
HTML documents.
80
DNS Domain Name Service: translates domain
names into IP addresses.
53
* Varies depending on packet type
While you can use any port you wish, using non-standard ports would
make it very difficult for people to communicate with you. For example, if
you set up a Web server to listen on port 177, very few people would ever
find your Web site. Their browser, by default, will attempt to connect on
port 80. On the other hand, you may wish to use a non-standard port to
enhance security. Some hackers simply try to get at various standard
ports. For example, if your application uses FTP to transfer data, and you
do it on port 400, intruders would be trying on port 21.
Network Connectivity
Before you design your Web application you will need to consider the con-
nection speeds of those most likely to visit your Web site. Essentially, if
you create a Web site that is too resource intensive and requires lots of
download, users with slower connections will not be able to effectively use
your applications. Even with intranet applications this can be a serious
problem. The primary areas that place demands on connection speed are
graphics, multimedia, and database operations.
Chapter 11 / TCP/IP Programming 203
Chapter1
1

If your application uses very large graphics files, they must each be down-
loaded to the client’s machine before the Web page will finish loading. This
will cause users to be very dissatisfied with your application. Multimedia
files (music or video) are also very large and take quite some time to load.
Finally, if your application is continually going out to retrieve data from a
database, this will seriously impact your performance. You may wish to
consider the various connection speeds available.
Connection Type Speed
56.6 K standard modem 56,600 bits per second
DSL Up to 256,000 bits per second
Cable Up to 1,544,000 bits per second (1.54 mbps)
T-1 1,544,000 bits per second (1.54 mbps)
T-3 44,700,000 bits per second (44.7 mbps)
While it is highly unlikely that you will be working with clients that have a
T-3 or better connection, you will likely have Web site visitors that do use
cable modems or T-1 connections. With those speeds, you need not be
overly concerned about your application appearing sluggish. However, if
you are concerned about users who are accessing the Internet (and hence
your Web application) with a 56.6 K modem, then you should take care to
make sure your Web site does not unnecessarily use intensive graphics,
multimedia, and database access.
Summary
TCP/IP communication can be very easy to implement and an effective
way to communicate small pieces of data between remotely located
machines. It is not suited to large segments of data, since that data cannot
easily be placed in a single packet. A basic knowledge of TCP/IP program-
ming is critical for understanding distributed applications as well as
Web-based applications.
204 Chapter 11 / TCP/IP Programming

Review Questions
1. What is TCP/IP?
2. What two properties must you set before you can send a packet via the
Winsock control?
3. What data type does the Winsock control receive data as?
4. What happens if one end of a connection is left open?
5. What event is triggered in the Winsock control when data arrives?
6. What method of the Winsock control is used to send data?
7. What data type is used to send data via the Winsock?
8. What port do Web pages usually operate on?
9. Name two protocols that are part of the TCP/IP suite.
10. What method of the Winsock control is called to accept a request for a
TCP/IP connection?
Chapter 11 / TCP/IP Programming 205
Chapter1
1

Chapter 12
SoftwareDesign withVB.NET
Introduction
Proper software design and planning are perhaps the most
important skills for a programmer to learn. Unfortunately,
they are rarely even mentioned in beginning programming
books. Most program “bugs” can be traced to poor plan-
ning and poor design. This chapter will not make you an
expert in software design, but hopefully it will give you a
basic working knowledge of planning, design, and testing.
Types of Errors
Software bugs can be categorized into three distinct types.
There are syntax errors, run-time errors, and logic errors.
Syntax errors are problems with your use of the program-
ming language. Your program will not compile until you
correct your syntax errors. This type of error is the easiest
to catch and fix, and it will never be in applications you
distribute (since you cannot finish compiling until you fix
them). Visual Basic is especially helpful with syntax
language for two reasons. The first feature is the
auto-complete feature. Visual Basic will show you what
207
In this
chapter, you
learn about:
� Types of
errors
� Planning
� Testing
� Microsoft
Solutions
Framework
� UML
� Debugging

options you can use in many cases. The second feature VB.NET provides
to help you avoid syntax errors is Visual Basic’s ongoing syntax checking.
Visual Basic will let you know if a line of code is not appropriate syntax as
soon as you move off that line.
Run-time errors are caused by attempting to do something that is literally
impossible. An attempt to divide by zero or to open a file that does not
exist will generate run-time errors. Proper error handling (Try...Catch
blocks) and data validation will prevent this. Error handling was intro-
duced earlier in this book and used throughout the book. A good rule of
thumb is that you cannot have too much error handling. A second approach
that will help you avoid run-time errors is data validation. Data validation
is the process of simply making sure data is appropriate before trying to
use it. This will be covered in some detail later in this chapter.
Logic errors are the ones that are truly problematic. A logic error occurs
when your program compiles and executes, but the data it returns is inac-
curate. This inaccuracy may not be immediately obvious. In fact it may not
become apparent for quite some time. Not only are these types of errors
the hardest to find, they are also potentially the most damaging. If your
program computes payroll checks and makes a 10¢ miscalculation on each
check, by the time you find the error, you may have cost the company a
very large sum of money. This is not likely to enhance your career
opportunities.
Fortunately, proper design, planning, and testing can eliminate many if not
most logic errors. If you have properly designed your program, checked
the logic, and done proper testing, you will catch most logic errors. There
are several different approaches to design and planning. I will endeavor to
introduce you to a few of them here.
Planning
There are formal planning methodologies we will discuss in this chapter,
but first I want to introduce you to some basic concepts. Before you write
a single line of code, try planning your project out. There are a number of
formal planning strategies available, but at a minimum, you should try the
following:
208 Chapter 12 / Software Design with VB.NET

1. Clearly write out the end user needs of your application. Make sure you
have clearly defined the goals. Ensure that you have clearly understood
what is required of your application. It is also a good idea to make sure you
understand the priorities of your application. Some features may be abso-
lutely critical, while others may simply be nice to have.
2. Write out a plan for the major points in the flow of your application. Clearly
plan out all the most important facets of your application.
3. Research any new technologies or techniques you may require.
4. Plan out your code in moderate detail. Decide how many forms and what
content those forms will have. Decide what code should be in events and
what should be in code modules. Decide on the scope of variables. Decide
on what methods and algorithms you will use.
5. Now you can start writing code.
Testing
You have to test your code! It does not matter how simple the application
is, bugs can and probably will arise. There are a number of sophisticated
formal testing strategies available but beginners should just try to follow
these steps:
1. First reread your code. Make sure you have proper error handling. Make
sure there are no obvious flaws in your logic.
2. Refer back to your user-defined goals and check to see that your applica-
tion meets them.
3. Now run the program. You should have a written table showing the exact
testing conditions (the PC, operating system, etc.) and exactly what items
you will test.
4. Try everything. Specifically, try doing things the wrong way—trust me,
users will.
Chapter 12 / Software Design with VB.NET 209
Chapte
r1
2
Microsoft Solutions Framework
Microsoft defines a relatively straightforward approach to software devel-
opment that is called the Microsoft Solutions Framework (MSF). This
model consists of four stages in the development process:
� Envisioning
� Planning
� Coding
� Stabilizing
Envisioning
It is imperative to have a clear idea of what you are trying to accomplish
before you begin writing code. This means having a clear vision of the
goals you want your software to reach. This will also often include some
brainstorming regarding the possible methods of attaining those goals.
During the envisioning process you should create (if you don’t already
have) a clear list of requirements for the software and establish the param-
eters of successful development.
Establishing the parameters of successful development is a step often
overlooked even by professional developers. It’s really fairly simple. What
you need to do, before you even begin detailed planning, is decide what
criteria you will use for deciding your project is a success. Do you require
99% uptime, or is 95% sufficient? Should your application be able to han-
dle 100 simultaneous users, or perhaps 1,000? All of these criteria should
be developed in this initial phase.
This phase is also the time to do some brainstorming regarding the tools
and methods you will use to develop this project. First, you will have to
decide on what development tools to use, and then what types of develop-
ment techniques are most appropriate. Do you want to do this project in
Visual C++, Visual Basic, Java?
Planning
Once you have a clear idea of what you wish to accomplish and what tools
you wish to use, it is then time to develop a specific plan. This plan may be
as simple as a few pages of notes, or as complex as hundreds of UML dia-
grams (UML is discussed later in this chapter). The specific planning
210 Chapter 12 / Software Design with VB.NET

methods used and the level of detail will depend on the project and on
your team’s abilities. A novice programmer should be fairly detailed in his
or her planning. This allows you to examine your programming logic
before you write the code.
Even an experienced developer will have to do extensive planning if the
project in question is in an area that he or she is unfamiliar with. Some
projects, by their very nature, require extensive planning. You might not
need very detailed planning to write a POS (point-of-sale) program for a
mom and pop grocery store, but you had better do some serious planning
if you wish to develop an inventory system for a nationwide food chain.
Coding
This should actually be a relatively short portion of the development cycle.
If you have properly conducted the first two phases of the development
process, the coding is simply a matter of typing it in. You should not have
to make any fundamental changes to the program’s logic or flow in this
phase. If you do, you have not performed the first two phases adequately.
Stabilizing
This is the process of testing and debugging. Rigorous testing is a key ele-
ment to successful software development. Make sure you test every facet
of your program. Try to do everything you can to break the software. It’s
much better to find a bug now than after you have distributed the program
to 200 users!
UML
You will also find that there are specific design strategies for object-ori-
ented programming. One very popular strategy that I personally use is the
Unified Modeling Language. UML is essentially a methodology for creat-
ing a serious of diagrams to plan out your project. It is a tool for designing
object-oriented programs. Each diagram becomes successively more
detailed. Following is a brief outline of the various UML diagrams. This is
not meant to make you proficient at UML but to give you enough informa-
tion so that you can decide whether or not you wish to invest the time to
learn UML.
Chapter 12 / Software Design with VB.NET 211
Chapte
r1
2

Unified Modeling Language is a methodology of systematically planning
large-scale object-oriented development. With this method you gradually
proceed from very general user needs to very specific programming
criteria. Each model either concentrates on a different view of the devel-
opment process or takes the previous model and adds more detail.
The UML process is an iterative design process whereby you begin with
user-defined goals and business rules in the Use-Case model and move
down to actually programming specifications in class diagrams, activity
diagrams, state charts, and deployment diagrams. This approach allows
you to begin with general ideas of the desired function of the application
and gradually develop specifications based on the desired functionality.
Most UML experts encourage iterative development to proceed concur-
rently with the latter stages of UML design. For example, by the time you
begin making class diagrams, you can actually begin coding the framework
of your application. As the design becomes more detailed, so will the code.
Below are the various models used in UML.
Use-Case models: This is a diagram showing the actual functionality of an
application from a user’s perspective. The elements in this diagram are
actors (anything that can act on the application) and the business rules
that govern the application.
Interaction diagrams: This is the next stop in UML modeling. This basi-
cally shows how the elements of this application, such as the user,
database, etc., interact.
Sequence diagrams: This diagram basically takes the interaction diagram
and begins to translate that into actual objects that correspond directly to
programming objects.
Collaboration diagrams: This diagram concentrates on the actual distribu-
tion of the objects involved.
Class diagrams: This is where you take the data from previous diagrams
and actually plan the classes you will use in your application.
Activity diagrams: These diagrams show the actual flow and function of the
application.
State charts: This is a model of the various states the application’s objects
may be in.
212 Chapter 12 / Software Design with VB.NET

Component diagrams: These diagrams show the various components of a
distributed application.
Deployment diagrams: This model shows the actual physical location of
various components.
While each of these diagram types has its purposes, the one I find most
often used is the class diagram. A class diagram is simply a box with three
sections. The first section contains the name of the class. The second sec-
tion holds the declarations for all member variables. The third section
holds the declarations for the class’s methods. Since UML diagrams are
not specific to any language, symbols are used to denote the access modifi-
ers. A plus sign (+) denotes public, a pound sign (#) denotes protected,
and a minus sign (–) denotes private. If we were to create a class diagram
for the class used in Example 3-1, it would look something like this:
This is merely a cursory introduction to the topic of the Unified Modeling
Language, but it is important that you at least have some familiarity with
the subject. Of course, a hobbyist or amateur programmer can feel free to
ignore this topic altogether. But for a professional programmer, or one
aspiring to be such, a knowledge of UML is vital. I strongly suggest you
delve deeper into this topic. One excellent book on the subject is Iterative
UML Development Using Visual Basic 6.0 by Patrick W. Sheridan and Jean
M. Sekula, published by Wordware Publishing. Though it is designed with
an earlier version of Visual Basic in mind, the UML is applicable to any
object-oriented programming language.
Chapter 12 / Software Design with VB.NET 213
Chapte
r1
2

Three-Step Plan
This is my own development plan that I have slowly put together over the
past two years. I find it to be relatively easy to follow and easy to remem-
ber, and it meshes well with other design methodologies like UML. This
plan consists of three phases, each of which has three steps.
1. Planning
� Notes and requirements
� Diagrams
� Testing plan
2. Coding
� Framework
� Complete coding
� Desk check
3. Testing
� Valid data
� Invalid data
� Extreme data
I have been teaching this methodology to programming students for over a
year now with some success. I will illustrate and explain each of the
phases to you in the following pages.
Planning
Planning is the most important phase, just as it is in the MSF model. I fur-
ther divide planning into three steps. The first step, notes and
requirements, sets the foundation for the rest of the development process.
The very first thing to do is to clearly define the requirements for your
software. You might get these from a client or from a supervisor. When
they give you these requirements, you will need to ask lots of questions.
Make certain you are crystal clear on exactly what is required of your
application. During this questioning, you should begin taking notes to clar-
ify the requirements.
After you have defined and clarified the requirements, you should then
develop some brief notes regarding your design strategy. This is quite
similar to the envisioning process in the MSF model. You will need to
214 Chapter 12 / Software Design with VB.NET

decide on what development tools to use, how to store data (MS Access,
SQL, Oracle), how to communicate with other components, and any other
details about your development approach.
Once you have completed the notes and requirements you are ready to do
your diagramming. This can be any type of diagram you prefer. I personally
like to use UML diagrams, but some people stick to an old-fashioned
flowchart. It really does not matter what diagrams you use. What is impor-
tant is that the diagrams are clear enough and detailed enough to guide
your coding.
Coding
Obviously, you will need to actually write the code. I find it helpful to
divide this into three distinct steps as well. I find it helpful to first write
out a simple framework. Then I declare variables, and write functions with
just the declaration and the error handling. Next, I create the GUI and
write calls to the functions I have written. Essentially, I build a skeleton
for the program. This is exactly how buildings are built—first a frame-
work, then the details. After you have the framework, go back and fill in
the coding details. I would recommend that you do this one function at a
time and make sure that function is correct. This is where the third step,
desk check, comes in. After you have completed coding any function, give
it a quick read through. Make sure you have not made any simple mis-
takes. Make certain the logic of the function works. If you follow this
coding procedure, you are unlikely to find many errors in your testing
phase.
Testing
Testing is really a matter of running your program and entering data to
ensure that it works properly. If you have properly executed the preceding
two phases, this phase will go quickly. How you test is really the key. This
will be determined, in large part, by the criteria you established during the
planning phase. You will have to test all the criteria you established. How-
ever, there are three things you must always test:
� Valid data
� Invalid data
� Extreme data
Chapter 12 / Software Design with VB.NET 215
Chapte
r1
2
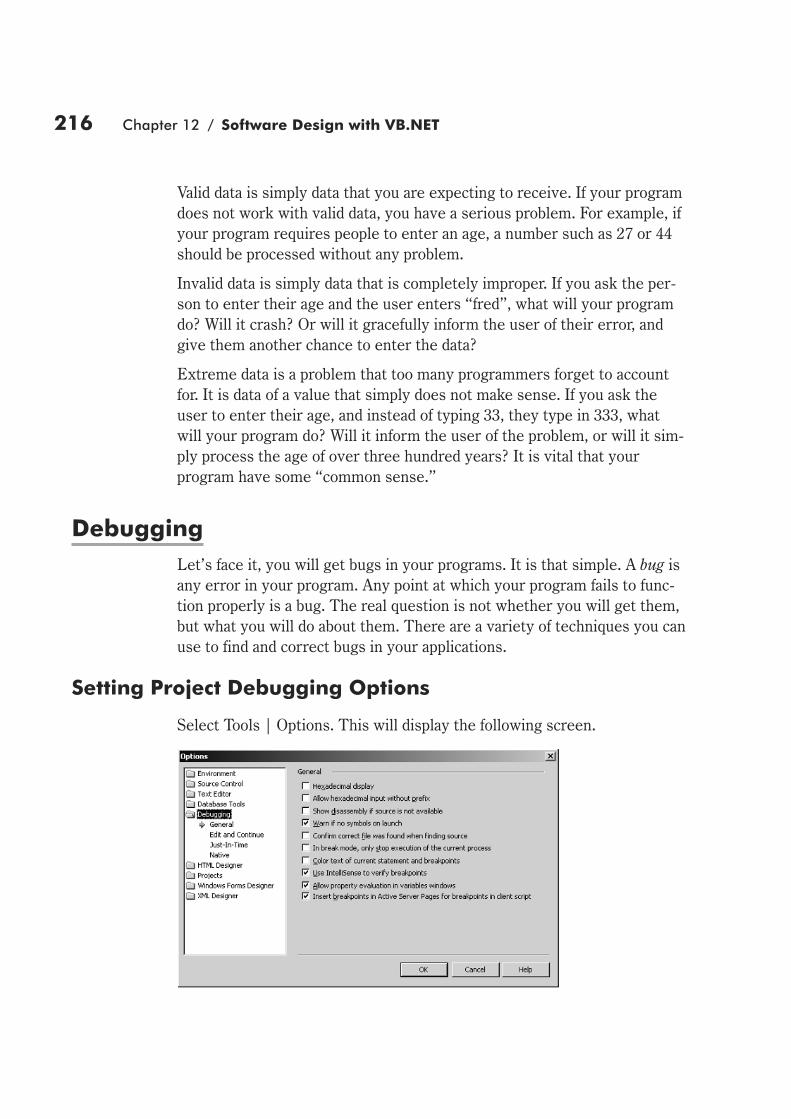
Valid data is simply data that you are expecting to receive. If your program
does not work with valid data, you have a serious problem. For example, if
your program requires people to enter an age, a number such as 27 or 44
should be processed without any problem.
Invalid data is simply data that is completely improper. If you ask the per-
son to enter their age and the user enters “fred”, what will your program
do? Will it crash? Or will it gracefully inform the user of their error, and
give them another chance to enter the data?
Extreme data is a problem that too many programmers forget to account
for. It is data of a value that simply does not make sense. If you ask the
user to enter their age, and instead of typing 33, they type in 333, what
will your program do? Will it inform the user of the problem, or will it sim-
ply process the age of over three hundred years? It is vital that your
program have some “common sense.”
Debugging
Let’s face it, you will get bugs in your programs. It is that simple. A bug is
any error in your program. Any point at which your program fails to func-
tion properly is a bug. The real question is not whether you will get them,
but what you will do about them. There are a variety of techniques you can
use to find and correct bugs in your applications.
Setting Project Debugging Options
Select Tools | Options. This will display the following screen.
216 Chapter 12 / Software Design with VB.NET

If you select Debugging, you will see several items to choose from. The
first section, General, gives you some general items you might wish to
select. The first three options are somewhat advanced and would probably
not be of much use to you at this point in your Visual Basic learning. You
can probably leave the default values for this screen.
In the Edit and Continue section are options that will affect how you uti-
lize debugging when your program is stopped at a breakpoint.
Two options you would want to select on this screen are Allow me to edit
VB files while debugging and Warn me if I make changes. The first option
will allow you to directly change your code when it is stopped at a break-
point. The second will warn you if you have changed anything. That will
keep you from inadvertently saving changes you did not intend to make.
Appropriate utilization of these options will make your development and
debugging process a bit simpler.
The Build Window
As you must have noticed by now, when you compile a program, a window
at the bottom shows you the steps in the compilation process. If you have
ever used Visual C++ then this window will be very familiar to you. If
not, let me introduce it to you. When you select Build for your project,
either all will go well or you will get errors. If all goes well you will see a
Build window like the following at the bottom of your IDE.
Chapter 12 / Software Design with VB.NET 217
Chapte
r1
2

However, if you receive any errors you will see a Build window like this:
What you are looking at is a list of all the errors detected in your program.
Remember that during compilation, only syntax errors can be checked. If
you click on a given error, the code window where that error was gener-
ated will open, allowing you to see the problem. This is a vast
improvement over previous versions of Visual Basic and gives you a very
useful tool for debugging syntax errors.
Breakpoints
If you have an error in a subroutine you can “step through” your program.
The way you do this is to go to the last line of code that you are sure
works and highlight it. Then you go to the drop-down menu and select
Debug | Toggle Breakpoint. Now when you run the program it will stop at
this line of code. You can then go through the code line by line simply by
selecting Debug and Step Into. The program will execute one line at a
time. At each line you can highlight any variable and select Debug |
Instant Watch. This will tell you what is currently in this variable.
218 Chapter 12 / Software Design with VB.NET

These simple debugging techniques allow you to more thoroughly check
out your program before you make an executable and distribute it. One of
the biggest problems in software development today is software that has
not been thoroughly tested.
Don’t forget a few other concepts:
Structure: Too often beginning programmers just slap together some forms
and code modules in a goo they call code. You must have some structure
and design to your program. Lack of structure is one of the most common
causes of bugs. Take the time to sit down and think out a program before
you start to develop, and maybe even draw out a chart of the major rou-
tines and how they connect to each other and to the data. Think about how
you want the program to flow.
If you carefully follow the concepts outlined in this chapter on software
planning and design, you will have far fewer bugs to track down, and it will
be much simpler for you to locate and fix those bugs.
Spaghetti code: This is a term for code that is so convoluted that it is nearly
impossible for someone to follow its flow. An example of spaghetti code
would be a routine that calls another routine, which, in turn, calls another
routine…you get the idea. You would be better off having each routine
called from the main event that triggers them (like the Click event of a
command button).
Summary
This is by no means an exhaustive look at planning, designing, and testing.
I am merely trying to get you acquainted with the concept. I do hope that
you will include at least some level of planning and testing in your devel-
opment. I must confess that earlier in my programming career I gave too
little importance to planning. I merely did a small amount of cursory plan-
ning that was simply not adequate. I was able to get away with that for
several years, until I started developing telecommunications software.
After a couple of major faux pas I decided that planning was very vital.
Chapter 12 / Software Design with VB.NET 219
Chapte
r1
2
Review Questions
1. What is UML?
2. What are the three sections in a class diagram?
3. What is MSF?
4. What are the phases in MSF?
5. What three things must be covered in the testing phase of the three-step
plan?
6. What are the three main phases of the three-step plan?
7. What are the three types of errors?
8. List four types of UML diagrams.
9. What is the most difficult type of error to fix?
10. What is a syntax error?
220 Chapter 12 / Software Design with VB.NET
Chapter 13
ComputerScience withVB.NET
Introduction
Hopefully, you have seen that Visual Basic is an easy-to-
use software development tool. It allows you to create
powerful business applications with relative ease. If you
have ever programmed in other languages like C++ this
difference becomes abundantly clear. This is one reason
Visual Basic is the language of choice for so many business
applications. However, this leads to a problem. Many
Visual Basic programmers lack any background in com-
puter science. Concepts and techniques familiar to any
college sophomore majoring in computer science may be
unknown to some professional Visual Basic programmers
with several years of experience.
This gap in knowledge for many (but certainly not all)
Visual Basic programmers has led to two serious issues.
The first is that there are situations in which this knowl-
edge would be quite helpful in developing more stable and
efficient applications. The other is the lack of respect other
developers (such as C++ and Java programmers) some-
times show to Visual Basic programmers. Go to any online
221
In this
chapter, you
learn about:
� Data
structures
� Recursion
� Algorithms
� Optimizing
for speed

programming discussion board and you will see at least some Visual Basic
bashing.
This chapter strives to ameliorate that situation. My goal in this chapter is
not to make you a computer science guru. Even an entire book could not
achieve such a lofty goal. What I do hope to accomplish is to give you a
basic familiarity with some essential computer science concepts as they
apply to Visual Basic. I would further hope that the material in this chap-
ter, coupled with the chapter on software design, would allow you to begin
taking your programming skills beyond simply putting together business
solutions. Hopefully, you will begin to understand how software engineer-
ing is meant to work. Obviously, if you have a strong computer science
background, you should feel free to skip this chapter.
Data Structures
Data has to be stored in some format. This should not be a great revelation
to you at this point. You have already seen data stored in variables, arrays,
and even in relational databases. However, what you have not seen is the
underlying format of the data storage. There are specific structures used
to hold data. Some data is simply not appropriate to store in a simple vari-
able or in a simple array. Data structures also define the way in which data
will be processed into and out of the structure.
Technically, an array is a data structure. However, we will be working with
more complex data structures. I am going to start with two data structures
that you have already worked with (even if you did not realize it).
Queue
A queue is a data structure that stores items sequentially, much like an
array. In fact, the only real difference between a queue and an array is the
way data is moved into and out of storage. In a queue, data is placed into
the queue in the order it is received. Data is then processed from the
queue in a first-in/last-out process (referred to as FILO). Usually an array
of some type is used to store the data that is in the queue. Then two vari-
ables (usually an Integer or a Long) are used as placeholders. The first
variable, called the “head,” will show the position on the array where the
last entry was added. The second variable, called the “tail,” will show the
position in the array where the last entry was processed.
222 Chapter 13 / Computer Science with VB.NET

When you print to a network printer, a print queue is used. Documents are
added to the print queue sequentially, and then removed and processed in
a FILO order. When the head reaches the end of the queue it starts over at
the beginning. This is referred to as a circular queue. If your head should
catch up to the tail, you will have a problem. Essentially, if you are putting
in data faster than it can be processed, eventually the head will circle back
to the beginning and catch up to the tail. If you have ever gotten the “print
queue full” error message, this is the cause.
A queue is very easy to set up in Visual Basic. Simply create an array of
whatever data type you need to store, and then create two integers to
track where in the queue you are currently processing. Let’s look at an
example.
Assume that your application receives TCP/IP packets and the data in
those packets is a string that you need to add to a database. A TCP socket
can receive a large number of packets in a single second. However, your
data processing is likely to be significantly slower. It would, therefore, be a
good idea to store that data in a queue and process it as you can.
Declare these variables in the general declarations section of the form that
has your Winsock control on it:
Dim MyQueue as String(100) ' create an array that can hold up to
' 100 strings.
Dim iTail as Integer
Dim iHead as Integer
Chapter 13 / Computer Science with VB.NET 223
Chapter1
3

Now in the Winsock’s data arrival event we place this code:
If iHead < 100 then
IHead = iHead + 1
Else
IHead = 0
End If
Winsock1.getdata myqueue(iHead)
In the function you build to actually process the data from the queue into
the database, you simply increment the tail:
If iTail < 100 then
ITail = iTail +1
Else
ITail = 0
End If
Then, you process MyQueue(iTail).
This is a fairly straightforward and easy-to-comprehend data structure
arrangement. It is a good place to begin your study of data structures. The
queue is a commonly used data structure that clearly defines how the data
is to be stored and in what order it will be processed (thus fulfilling our
definition of a data structure). I have found many instances as a profes-
sional programmer where a queue was an ideal data structure to use in my
programs.
Stacks
Another common data structure is the stack. The registers in your com-
puter’s CPU use stacks to store data. A stack is so named because it
stores data like a stack of plates. The first item you process from the stack
is the last item you put on. This is referred to as a last-in/first-out, or
LIFO, arrangement. This would, again, be implemented with an array, but
you would only need one pointer, since it would point to the last item you
placed on the stack and hence the first item you processed. If you wished
to rewrite the previous code as a stack, use the following code:
Dim MyQueue as String(100) ‘ create an array that can hold up to
' 100 strings.
Dim iHead as Integer
224 Chapter 13 / Computer Science with VB.NET

Now in the Winsock’s data arrival event we place this code:
If iHead < 100 then
IHead = iHead + 1
Else
IHead = 0
End If
Winsock1.getdata MyQueue(iHead)
In the function you build to actually process the data from the queue into
the database, you simply process the current item pointed to by the head:
MyQueue(iHead)
Personally, I very much prefer the queue to the stack. However, both are
very important data structures and provide a foundation for your continued
study of this topic.
Other Structures
There are many other data structures you can use in your programs,
including lists, linked lists, binary trees, double linked lists, and hash
tables. While the scope of this book prevents me from giving in-depth cov-
erage of all the commonly used data structures, I would like to provide you
with a brief definition of a few of the most popular.
Tree A data structure accessed beginning at the root node.
Each node is either a leaf or an interior node. An inte-
rior node has one or more child nodes and is called
the parent of its child nodes. Unlike a physical tree,
the root is usually shown at the top of the structure,
and the leaves are represented at the bottom.
Binary tree A tree with at most two children for each node.
List A set of items accessible one after another beginning
at the head and ending at the tail.
Linked list A list implemented by each item having a link to the
next item.
Double linked list A variant of a linked list in which each item has a link
to the previous item as well as the next. This allows
easy access to list items backwards as well as
forwards.
Chapter 13 / Computer Science with VB.NET 225
Chapter1
3
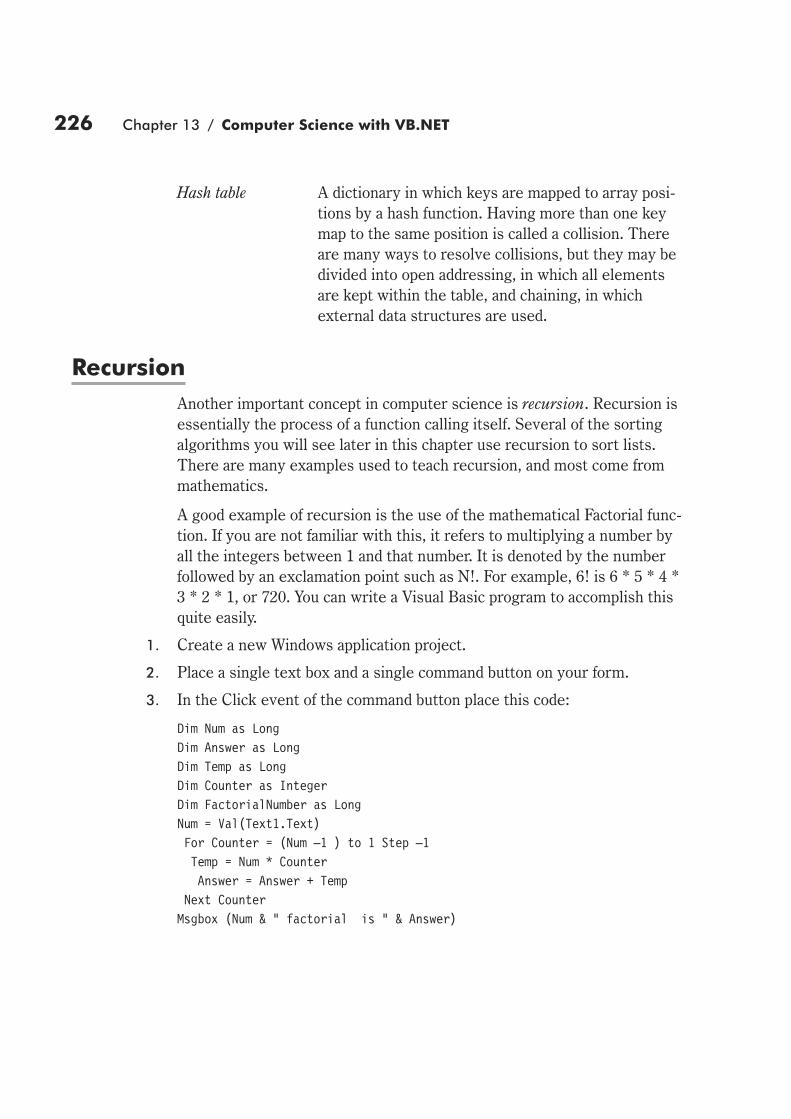
Hash table A dictionary in which keys are mapped to array posi-
tions by a hash function. Having more than one key
map to the same position is called a collision. There
are many ways to resolve collisions, but they may be
divided into open addressing, in which all elements
are kept within the table, and chaining, in which
external data structures are used.
Recursion
Another important concept in computer science is recursion. Recursion is
essentially the process of a function calling itself. Several of the sorting
algorithms you will see later in this chapter use recursion to sort lists.
There are many examples used to teach recursion, and most come from
mathematics.
A good example of recursion is the use of the mathematical Factorial func-
tion. If you are not familiar with this, it refers to multiplying a number by
all the integers between 1 and that number. It is denoted by the number
followed by an exclamation point such as N!. For example, 6! is 6 * 5 * 4 *
3 * 2 * 1, or 720. You can write a Visual Basic program to accomplish this
quite easily.
1. Create a new Windows application project.
2. Place a single text box and a single command button on your form.
3. In the Click event of the command button place this code:
Dim Num as Long
Dim Answer as Long
Dim Temp as Long
Dim Counter as Integer
Dim FactorialNumber as Long
Num = Val(Text1.Text)
For Counter = (Num –1 ) to 1 Step –1
Temp = Num * Counter
Answer = Answer + Temp
Next Counter
Msgbox (Num & “ factorial is “ & Answer)
226 Chapter 13 / Computer Science with VB.NET

This simple program will give you the factorial of any integer you enter
into the text box. It also shows you a slightly different approach to
recursion. In this case you use a loop to continually execute the same line
of code until the answer is reached.
Now that example simply used a loop to calculate the answer, but the same
thing can be accomplished with a recursive function. Let’s look at an
example of this.
Example 13-1
1. Start a new Windows Forms project.
2. On the form, place two text boxes and one command button, labeled as
you see here.
3. Place the following code in the button’s Click event.
Dim Number as Double
Dim dFactorial as Double
Dim Status as Integer
If Not IsNumeric(Textbox1.Text) Then
Beep()
Exit Sub
End If
Chapter 13 / Computer Science with VB.NET 227
Chapter1
3

Number = CInt(Textbox1.Text)
dFactorial = Factorial(Number)
Textbox2.Text = CStr(dFactorial)
4. Place the following function at the beginning of the Form class.
Public Function Factorial(ByVal Num as Integer) as Double
Dim Value as Double
Value = 1
Do While Num > 1
Value = Value * Num
Num = Num - 1
Loop
Return Value
End Function
When you run this application you will be able to enter any integer into
the first text box, and see its factorial value in the second text box.
Algorithms
The American Heritage Dictionary defines an algorithm as “A step-by-step
problem-solving procedure, especially an established, recursive computa-
tional procedure for solving a problem in a finite number of steps.” I
usually tell beginning students that an algorithm is a systematic method
for solving a problem. In either case, an algorithm is a problem solving
tool. Given that the entire reason for having computers and computer pro-
grams is to solve problems, the study of algorithms is a very important
topic for computer science.
228 Chapter 13 / Computer Science with VB.NET

Sorting Algorithms
One of the most common types of algorithms for computer scientists to
study are sorting algorithms. A sorting algorithm is used to sort a set of
data. This may sound like a trivial thing, but it can be quite demanding. If
the list of items you wish to sort is only 10 or 20 items long, it really does
not matter what type of sorting algorithm you use. However, if it is
100,000 items long, the sorting algorithm you choose will be crucial to
your application’s performance.
Before I introduce you to specific algorithms, I want to introduce you to
the concept of algorithm analysis. There is a very definite way to evaluate
the efficacy of an algorithm. You can evaluate it based on the amount of
memory it uses and/or the amount of time it takes to complete. For our
purposes, we will concentrate on speed.
If an algorithm can completely sort a list by passing through it one time,
that algorithm is a 1N algorithm (where N is the number of items in the
list). If the algorithm requires two passes through the list to sort it, that
algorithm is said to be a 2N algorithm. You can have a variety of algorithm
speeds. An algorithm can require a number of passes equal to the number
of elements in the list squared. This would be considered an N2 algorithm.
This type of notation of algorithms is called Big O notation.
With Big O notation, we are only concerned with the most time-consum-
ing part of an algorithm. For example, if an algorithm takes 2N + 1 passes
to sort, it would still be considered a 2N algorithm. The reason for this is
that as the list grows, the constant factor (+ 1) is really not affecting the
speed of the algorithm. If, for example, you had 100 items in your list, a
2N + 1 algorithm would take 201 passes to sort. The one extra pass
hardly makes any difference. Even when the list grows to 1,000 elements,
the difference between 2,000 and 2,001 passes is hardly measurable.
Bubble Sort
Regardless of what programming language you use to implement a bubble
sort, the mechanism is the same. The sorting is accomplished by compar-
ing each adjacent pair of items in the list in turn, swapping the items if
necessary. It continues, repeating the pass through the list until no swaps
are left. Its name comes from the fact that it “bubbles” through the list,
swapping entries as needed.
Chapter 13 / Computer Science with VB.NET 229
Chapter1
3
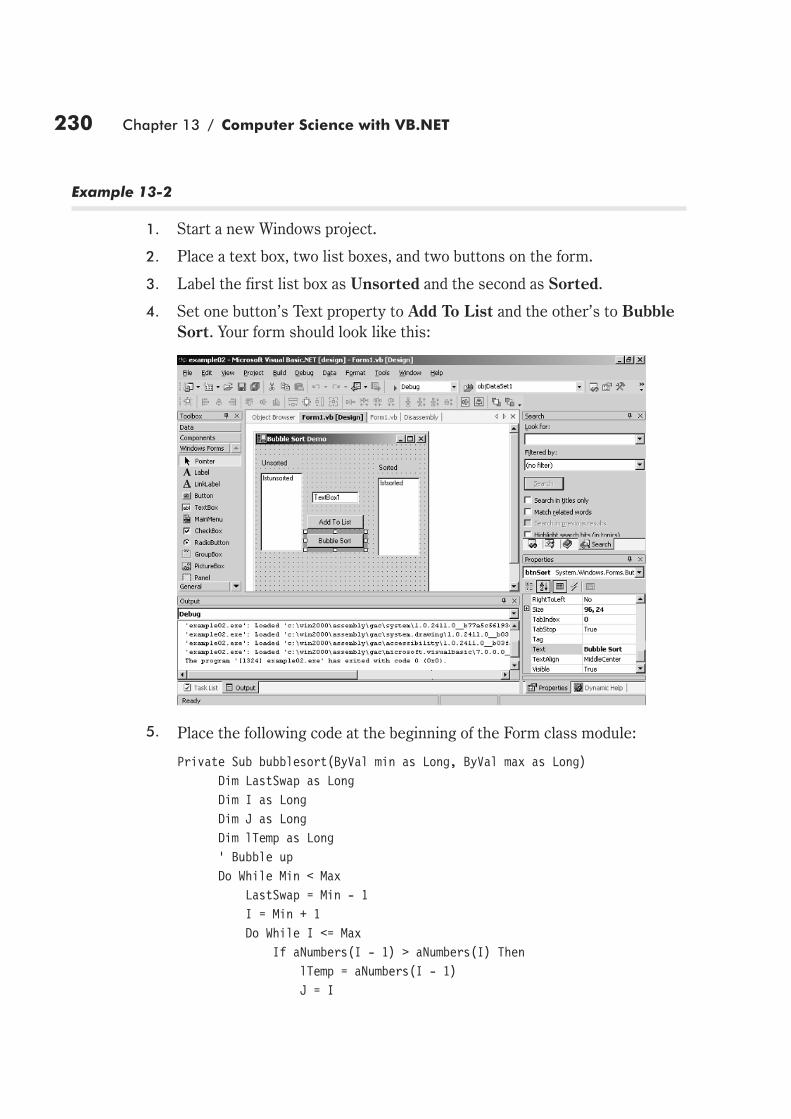
Example 13-2
1. Start a new Windows project.
2. Place a text box, two list boxes, and two buttons on the form.
3. Label the first list box as Unsorted and the second as Sorted.
4. Set one button’s Text property to Add To List and the other’s to Bubble
Sort. Your form should look like this:
5. Place the following code at the beginning of the Form class module:
Private Sub bubblesort(ByVal min as Long, ByVal max as Long)
Dim LastSwap as Long
Dim I as Long
Dim J as Long
Dim lTemp as Long
' Bubble up
Do While Min < Max
LastSwap = Min - 1
I = Min + 1
Do While I <= Max
If aNumbers(I - 1) > aNumbers(I) Then
lTemp = aNumbers(I - 1)
J = I
230 Chapter 13 / Computer Science with VB.NET
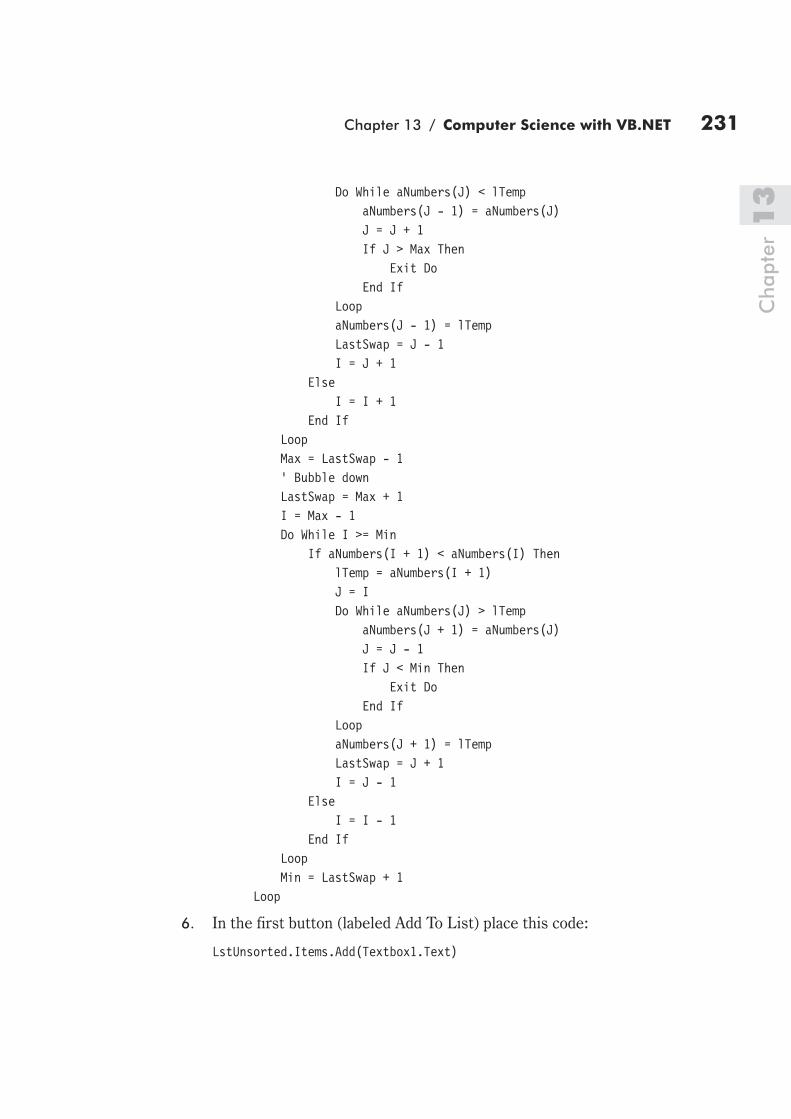
Do While aNumbers(J) < lTemp
aNumbers(J - 1) = aNumbers(J)
J = J + 1
If J > Max Then
Exit Do
End If
Loop
aNumbers(J - 1) = lTemp
LastSwap = J - 1
I = J + 1
Else
I = I + 1
End If
Loop
Max = LastSwap - 1
' Bubble down
LastSwap = Max + 1
I = Max - 1
Do While I >= Min
If aNumbers(I + 1) < aNumbers(I) Then
lTemp = aNumbers(I + 1)
J = I
Do While aNumbers(J) > lTemp
aNumbers(J + 1) = aNumbers(J)
J = J - 1
If J < Min Then
Exit Do
End If
Loop
aNumbers(J + 1) = lTemp
LastSwap = J + 1
I = J - 1
Else
I = I - 1
End If
Loop
Min = LastSwap + 1
Loop
6. In the first button (labeled Add To List) place this code:
LstUnsorted.Items.Add(Textbox1.Text)
Chapter 13 / Computer Science with VB.NET 231
Chapter1
3

7. In the second button (labeled Bubble Sort) add this code:
Dim I as Integer
' redim the array to equal the number of
' items in the unsorted list.
ReDim aNumbers(LstUnsorted.Items.Count)
' now retrieve all the numbers in the unsorted
' list and place them in the array.
For I = 0 to (LstUnsorted.Items.Count - 1)
aNumbers(I) = LstUnsorted.Items(I)
Next I
' Pass that array to the bubblesort function
bubblesort(1, 5)
For I = 0 to (LstUnsorted.Items.Count - 1)
LstSorted.Items.Add(aNumbers(I))
Next I
Note that the second number passed to bubble sort is the total number of
items in the list.
This algorithm is an easy-to-implement sorting algorithm that you may
find quite helpful. But most importantly for us, this algorithm illustrates
the basic concepts of algorithms. It takes a systematic approach to sorting
an array or list of items. That same procedure can be applied to any array
or list of items and get the same results.
The basic principle behind the bubble sort is quite simple. It just compares
two items in the list and if they are not in proper order, it switches them.
It continues this process until there are no more swaps to be made. This
algorithm usually works at a speed of O(n2), but if the list is already some-
what sorted, it may approach O(n).
Quicksort
Another popular sorting algorithm is the quicksort. This is a recursive
algorithm. It basically uses a divide and conquer approach. It divides the
list into smaller sublists, and tackles them each separately.
Public Sub Quicksort(lArray () as Long, Min as Long, Max as Long)
dim MedianValue as Long
Dim Hi as Long
Dim Lo as Long
if Min >= Max then
Exit Sub
MedianValue = lArray (Min)
232 Chapter 13 / Computer Science with VB.NET

Lo = Min
Hi = Max
Do
Do While lArray (hi) >= MedianValue
Hi = Hi - 1
If Hi <= Lo Then Exit Do
Loop
If Hi<= Lo Then
lArray (Lo) = MedianValue
Exit Do
End If
lArray (Lo) = lArray (hi)
Lo = Lo + 1
Do While lArray (lo) < MedianValue
Lo = Lo + 1
If Lo >= Hi Then Exit Do
Loop
If Lo >= Hi Then
Lo = Hi
lArray (hi) = MedianValue
Exit Do
End If
List (hi) = List(Lo)
Quicksort( List(),Min,Lo -1)
Quicksort( List(),Lo + 1, Max)
End Sub
The quicksort picks an element from the array (the pivot point), partitions
the remaining elements into those greater than and less than this pivot,
and then recursively sorts the partitions. There are many variants of this
basic approach. The quicksort has a worst-case run time of O(n2), but it
will usually work at O(n log n). This means that it usually executes faster
than the bubble sort.
Other Algorithms
It is beyond the scope of this book to go into depth on all the sorting
algorithms that are commonly used, but I would like to give you a brief
introduction to and definition of some of the more commonly encountered
sorting algorithms.
Chapter 13 / Computer Science with VB.NET 233
Chapter1
3

Merge sort A sort algorithm that splits the items to be sorted into two
groups, then recursively sorts each group, and merges
them into a final, sorted sequence
Selection sort An algorithm that orders items by repeatedly looking
through remaining items to find the least one and moving it
to a final location.
Bingo sort A variation of the selection sort that orders items by
repeatedly looking through remaining items to find the
greatest value and moving all items with that value to their
final location.
Optimizing for Speed
At times, you will need to improve the speed of execution for your applica-
tion. There are a number of techniques you may find useful. The first and
most important technique is to use integers whenever possible. Visual
Basic considers all variables to be of the default Variant type. Unless you
specify otherwise, everything, text and numeric, will be a Variant.
The following code illustrates the variations in speed you will have with
different data types. It does this by implementing a very long loop and
showing the time it takes to complete the loop depending on what data
type is used as a loop counter.
A 50-Million-Loop Time Test
Dim I as Long
Dim B as Byte
Dim Start as Double
Dim Elapse as Double
Start = Timer
For I = 1 To 200000
For B = 1 To 254
Next B
Next I
Elapse = Timer – Start
MsgBox( "The time elapsed was " & Elapse)
End Sub
When this form loads, the inner loop counter B is defined as a Byte vari-
able type for the first test. The starting and ending times are held in the
variables Start and Elapse. We make them so they will permit great
234 Chapter 13 / Computer Science with VB.NET

precision. Then we begin with Start = Timer to get the current time. We
use the Timer function in VB (unrelated to Timer controls). It calculates
elapsed time since midnight each day and then resets. Then, we start run-
ning the nested loop. When the loop finishes, we subtract the starting time
from the current (Timer) time and print the results on the form.
To test each variable type, all we have to do is change the type of J in the
first line of the program: Dim J as Integer, Dim J as Long, and so forth.
Below you can see which variable is fastest. (Actual times will vary on dif-
ferent machines.)
Data Type Time
Integer 1
Long 2
Byte 3
Currency 4
Variant 5
Single 6
Double 7
As you can see, the type of variable you use can make a difference in appli-
cation performance. The Integer variable type runs quite a bit faster than
the floating-point types.
Obviously, you can’t use integers everywhere in all your programs. Calcu-
lations requiring greater precision (such as a result including a fraction)
must be made with floating-point variable types (Single or Double). Calcu-
lations requiring a large range cannot be made with integers (which can
manipulate only the numbers between –32,768 and 32,767). In that case,
you have to resort to “long integers” (Long), floating-point (Single or Dou-
ble), or Currency data types.
There are a number of ways to increase the user’s perception of the appli-
cation’s speed. One method is to load all forms at the outset of the
program. For example, if your application has five forms in it, rather than
simply loading only the main form and loading each additional form when
you need it, load them all. Just set the Visible property of all forms to false.
Then, when you need the form, set its Visible property to true. This will
make it appear to load instantly.
Chapter 13 / Computer Science with VB.NET 235
Chapter1
3
The AutoRedraw property is available only for a form or a picture box.
AutoRedraw is false by default. Set it to true, and VB will create every-
thing in the form or picture box. Nothing will be redrawn on the fly. VB
will keep a copy, a bitmap picture, of the entire form or picture box in
memory. This will increase the speed of the application, but remember
that, like the method of loading the forms all at once, this does tax the
memory of the machine. Fortunately, most modern machines have plenty
of RAM!
Remember that an image box displays faster than a picture box. Also, do
not use subroutines for code that is not being called from multiple places.
If code will only be used in one event, put that code in that event. It is
faster for an event to execute code that is in the event than to call out to
an external (external to the control, that is) subroutine.
Summary
In this chapter you have been introduced to data structures, recursion,
algorithm analysis, specific algorithms, and optimizing for speed. It is my
hope that this knowledge will allow you to become a more effective pro-
grammer. Yes, it is true that you can make a career out of simply putting
some Visual Basic forms together and making interesting user interfaces;
however, without at least a cursory familiarity with the material in this
chapter you are unlikely to progress far. For a typical bachelor’s degree in
computer science, students take an entire course in data structures and an
entire course in algorithm analysis. Obviously, this chapter cannot make
up for two semesters of college work, but it should at least give you a
foundation from which to start.
236 Chapter 13 / Computer Science with VB.NET

Review Questions
1. What is a data structure?
2. How does a queue process data?
3. What is Big O notation?
4. Is there a difference in the Big O notation for an algorithm that requires
2N passes and one that requires 2N + 1 passes?
5. How does a stack process data?
6. How does a quicksort work?
7. Is an array a type of data structure?
8. List four different data structures.
9. What happens if the head pointer on a queue reaches the same value as
the tail pointer?
10. Which variable is usually the fastest in any speed test?
Chapter 13 / Computer Science with VB.NET 237
Chapter1
3


Chapter 14
Object Models
Object-oriented programming has been one of the hottest
buzzwords in programming for the past four or five years.
Unfortunately, most programmers are not sure why it’s
such a cool thing, they just want it on their resume. Per-
haps the best example of why object orientation is such a
powerful technology can be seen by examining object mod-
els. An object model is simply a hierarchical representation
of the objects that are exposed by a given application. All
Microsoft Office products, Internet Explorer, many
BackOffice products, and Visual Basic all have an object
model that you can utilize to manipulate that application in
any way you wish.
Object models provide structure to an object-oriented pro-
gram. By defining the relationships between the objects
you use in your program, an object model organizes your
objects in a hierarchical fashion. This facilitates program-
ming with the objects in the model.
Typically, an object model illustrates the fact that some
objects in the model are more important than others.
These objects can be viewed as containing other objects,
or as being made up of other objects.
For example, you might create a business object as the
core of your program. You might want the business object
to have other types of objects associated with it. You might
have a product object, an employee object, etc. Each of
these objects is subordinate, too, and dependent on the
business object.
239
In this
chapter, you
learn about:
� Outlook’s
object model
� Internet
Information
Server
A root object is at the base of an object model. It is the object that contains
all the other objects in the object model. Root objects are usually exter-
nally creatable. This means that clients can create instances of the root
class. The creation of a root object is accomplished by using the New oper-
ator or the CreateObject function.
Most programs use objects that are private to that program. You can create
objects from any class the program defines. However, client applications
cannot create any objects from your application. Externally creatable
objects are those that a client application can create. You create an
instance of such an object by using the New operator with the Set state-
ment (by declaring a variable As New) or by calling the CreateObject
function.
The externally created object actually simply gives a reference to the cli-
ent. When a client uses one of these mechanisms to request an externally
creatable object, the component returns a reference the client can use to
manipulate the object. The life cycle of the object the client is using is
clearly defined. When the client sets the last variable containing this refer-
ence to Nothing, the component destroys the object. The object is also
destroyed if it goes out of scope. You can make a public object externally
creatable by setting the Instancing property of the class module to any
value other than Private or PublicNotCreatable.
When an object is contained within another object, it is referred to as a
dependent object. Client applications can manipulate dependent objects,
just as they can manipulate externally creatable objects, but they cannot
create dependent objects using CreateObject or New. Usually, the exter-
nally creatable objects also have methods to create their dependent
objects.
If you want to make an object dependent on another, set the Instancing
property of a class module to PublicNotCreatable. You then create a
method in the externally creatable object that your class is dependent on;
that method will allow for the creation of the dependent object. Dependent
objects are sometimes referred to as nested objects.
For example purposes, we will examine the Outlook object model.
240 Chapter 14 / Object Models

Outlook’s Object Model
An extensive discussion of the Outlook object model is beyond the scope
of this book. However, we are going to address some of the most impor-
tant objects and a few of the things you can do with them.
Application This object represents Outlook itself. With this object you
can access and gain control of a currently running instance
of Outlook, or you can launch an instance of Outlook.
Namespace This object represents the current MAPI session. It allows
you to manipulate, start, or end a MAPI session.
Explorer This object represents the current window.
Folders This object represents all of the folders in Outlook.
Folder This object represents the currently selected folder.
Items This object represents all the items in a folder.
Item This object represents a specific item in a folder.
Example 14-1
This example utilizes the Outlook object model. The code is simply to give
you an idea of what you can do with this particular object model. Obvi-
ously, it is dependent on having MS Outlook installed on your machine.
1. Start a new Windows application.
2. Select Project | Add Reference.
3. On the COM tab, select Microsoft Outlook 9.0 Object Library and
click OK.
Chapter 14 / Object Models 241
Chapte
r1
4

4. Just after the class declaration for the Form1 class, place the following
code:
Dim WithEvents ObjApp as Outlook.Application
Private Sub Outlook_Object_Model_Demo()
Dim ObjNameSpace as Outlook.NameSpace
Dim ObjFolders as Outlook.Folders
Dim ObjExplorer as Outlook.Explorer
Dim ObjItem as Outlook.MailItem
Dim MyItem(10) as Outlook.MailItem
Dim ObjItems as Outlook.Items
Dim ObjFolder as Outlook.MAPIFolder
Dim iCount as Integer
' Set your application object equal to the current instance of
' Outlook.
Set ObjApp = GetObject("", "Outlook.Application")
' Set your namespace object equal to the mapi session
Set ObjNameSpace = ObjApp.GetNamespace("MAPI")
' Set the explorer object to the active view
Set ObjExplorer = ObjApp.ActiveExplorer
' Get the collection of all folders
Set ObjFolders = ObjNameSpace.Folders
' Set your folder object to the current folder
Set ObjFolder = ObjApp.ActiveExplorer
' set your items object equal to the collection of items in the current
' folder
Set ObjItems = ObjFolder.Items
For iCount = 1 to ObjItems.count
Set MyItem(iCount) = ObjItems.Item(iCount)
iCount = iCount + 1
Next iCount
‘ Now the array MyItem contains all the mail items in your inbox.
End Sub
Following are examples of some of the ways you can access MS Outlook
via your code. To make things easier, in this table I use the same variable
names that were created in Example 14-1.
242 Chapter 14 / Object Models

Item Object Description
objItem.Attachments View any attachments
objItem.BCC Find out who was BCC’d on the message
objItem.CC Find out who was CC’d on the message
objItem.CreationTime Get the item’s creation time
objItem.MessageClass Find out what kind of message it was
objItem.Subject Get the subject line
objItem.Size Find out how big the message is
objItem.Move
(destinationfolder)
Move the message to another folder
Folder Object
objFolder.MoveTo
(someotherfolder)
Move an item to another folder
objFolder.Items Get a collection of all the items in a folder
Explorer Object
objExplorer.Caption The current caption being displayed
objExplorer.CurrentFolder The Current folder being displayed
objExplorer.CommandBars The command bars currently being displayed
Namespace Object
objNameSpace.AddressLists Retrieve address lists
objNameSpace.CreateRecipient Create a new recipient
objNameSpace.GetDefaultFolder Retrieve the default folder
objNameSpace.Logoff Logout
Application Object
objApp.CreateObject
(objectsname)
Create an instance of the Outlook object
objApp.CreateItem
(typeofitem)
Create any item
All the Office applications have objects representing their various items
and functions. The coding can be a little bit tricky, and it’s important to use
the object hierarchy in the proper fashion. I will use the Outlook model as
an example, but the same principles can be extrapolated to the rest of
Office. To do any of this, however, you must manually set a reference to
the Office object’s DLL.
Chapter 14 / Object Models 243
Chapte
r1
4

At the top level of the hierarchy we have the Application object. This rep-
resents the Outlook application. You can create a new instance of Outlook
using the CreateObject method:
Set OutApp = CreateObject(Outlook.Application")
You can access a currently running instance of Outlook with:
Set outApp = GetObject("", "Outlook.Application")
Once you have the Application object set, you then set the Namespace
object. That object represents the actual folders contained in Outlook. It
has default properties for accessing any default folders. However, you
need to do a little more to access custom folders.
Set OutNamespace = OutApp.GetNamespace("MAPI")
The next object in the hierarchy is the Explorer object. This represents
the window that is currently open:
Set OutExplorer = OutApp.ActiveExplorer
The current folder is represented by:
Set OutView = OutApp.ActiveExplorer.CurrentFolder
You have a fairly large array of other objects you can use, which are in the
following table.
Object Purpose
Application object Represents the actual Outlook application
Namespace object Represents the application’s working area
Explorer object Represents the currently active window
Folder object Represents any folder
Item object Can represent any item
Command bar object Represents the Outlook toolbar
Exception object Represents errors
The objects in this model are arranged in a hierarchical fashion.
244 Chapter 14 / Object Models

These are just a few of the objects you have access to. Each object has a
host of methods and properties. Essentially, if you familiarize yourself with
Outlook’s object model, you can do anything in your code that Outlook
might do. You can take complete control of Outlook.
The important thing to realize is that each of the products in the Microsoft
Office suite has an object model you can access in similar fashion, as does
Internet Explorer. In each case you simply create a reference to that appli-
cation and begin creating items in the object hierarchy.
Internet Information Server
Internet Information Server (IIS) is Microsoft’s Web server. When you
read the chapter on Web forms and ASP.NET you were introduced to this
application. As you might expect, IIS has an object model that you can
manipulate in your programs.
Note: With VB.NET much of this is handled behind the scenes by
ASP.NET. With previous versions of Visual Basic you had to directly
interact with this entire object model in order to create Web
applications.
This section is provided for two purposes. The first is to give you a second
example of object models. The second is to give you a more thorough
understanding of how IIS works. Fortunately, with ASP.NET much of what
is described in this section is handled for you, but it is useful for you to
understand what is happening in the background.
Chapter 14 / Object Models 245
Chapte
r1
4

IIS applications are hosted by an ASP (Active Server Pages) file and make
use of several of the objects in the Active Server Pages object model. In
previous versions of Visual Basic, you had to create Web classes that
would work with these objects. ASP objects that a Web class can use
include:
� Request — Receives requests from end users in the browser.
� Response — Sends information to the browser in order to display it to
the user.
� Session — Maintains information about the current user session and
stores and retrieves state information.
� Application — Manages state that is shared across multiple Web class
instances.
� Server — Creates other objects and determines server-specific prop-
erties that might influence the Web class’s processing.
� BrowserType — Determines the capabilities of the user’s browser and
makes processing decisions based on that information.
The ASP Request Object
The Request object is used to retrieve information from or about the cur-
rent user. The Request object provides you with access to all of the
information passed in any request. HTTP requests contain information
about the current user and any data they entered.
The most frequent use of the Request object is to retrieve information
from an HTML form. This would include retrieving all of the form ele-
ments passed in a Submit event.
You can also use the Request object’s associated collections to access
information. These collections include:
� QueryString — This will retrieve the values of additional arguments in
a URL when a request is passed using the Get method. Get is used by
the Web server to retrieve objects from an HTML form.
� Cookies — This will retrieve any data contained in cookies sent with
the form request. Cookies are small parcels of information used to
store data about the current user.
246 Chapter 14 / Object Models

� Form — Retrieves the value of form elements passed in an HTTP
request when the request is passed using the Post method. Post is a
method used by the Web browser to send the information from an
HTML form. Post is the most commonly used method for sending
form information.
� ServerVariables — Retrieves information such as header values, logon
name, or server protocols in use.
� ClientCertificate — Retrieves information stored in certificate fields
when the browser sending the request supports client certificates.
Certificates identify a user to the Web server.
The ASP Response Object
The Response object is used to return information to the browser. For
example, you might use the object’s Respond event to write HTML to the
browser. There are several methods you can use with the Response
object:
� Use the Write or BinaryWrite method to send information directly to a
browser.
� Use the Redirect method to direct the user to a different URL than the
one the user requested.
� Use the Cookies collection to set cookie values to return to the
browser and store these values for future use.
� Use the Buffer property to postpone a response while the entire page
is processed.
The ASP Session and Application Objects
The Session and Application objects both store state information about the
end users. The Session object is used with a single user in the current
session and the Application object is used with multiple users.
You use the Session object to maintain information about the current user
session and to store and retrieve state information. You can even use the
Session object to retain information about where the user has already
been.
Chapter 14 / Object Models 247
Chapte
r1
4

The Application object is used to store information about multiple users.
For example, suppose you want to keep track of the number of users who
access a Web site. You can do this by storing a count in the Application
object and incrementing it each time a user accesses a part of the Web
site.
The ASP Server Object
The Server object is used to create objects and determine server-specific
properties that might influence processing. It is the central, or root, object
for this object model.
The ASP BrowserType Object
The BrowserType object provides you with information about the specific
browser the user has. It can be used to determine the capabilities of the
user’s browser and make processing decisions based on that information.
For example, suppose you have an application that contains a button called
ChkInventory which allows the user to check available inventory. You pro-
vide two versions of the event procedure for this button in your code. You
might use the two versions to handle code specific to a given browser.
With this scenario, you could use the BrowserType object to determine
which procedure to use by determining the browser’s capabilities.
Summary
This chapter showed you, briefly, how to access and utilize the inherent
object models in various applications in order to write your own integrated
applications. Writing Visual Basic applications that integrate with MS
Office is a common task. After you have a solid mastery of the basic ele-
ments of Visual Basic.NET you will probably want to work on expanding
your knowledge of the various Office product object models.
248 Chapter 14 / Object Models

Review Questions
1. What is the purpose of the Application object in the Outlook model?
2. How do you create a reference to the Outlook object model?
3. What is the code to create an instance of the object model that references
a currently running instance of the application?
4. What object represents the current window?
5. What object represents the toolbar?
6. What is the code to create an instance of the object model that starts the
application running?
7. List three properties of the Item object.
Chapter 14 / Object Models 249
Chapte
r1
4

Chapter 15
Encryption inVB.NET
Encryption is an exciting word in programming, but also a
daunting one. It probably brings up visions of complex
mathematics and machine-level programming. Encryption
and cryptography have long been important topics, espe-
cially in this day of increasing computer security concerns.
History of Encryption
As far back as the Roman Caesars, history records people
attempting to obfuscate the meanings of their written com-
munications. This can be for many reasons, including
military and political. Frequently, people have found it
advantageous to have others not be able to read their
writings.
During World War II, mathematician Alan Turing developed
a method to decrypt Nazi military messages. He employed
the aid of dozens of women in the Women’s Royal Naval
Service to each perform a very simple task, repeated many
times on each shift around the clock. Each day these
women were given a template that contained a word or
phrase that was likely to be embedded within a German
message. These women basically worked assembly line
style to decrypt messages.
251
In this chapter,
you learn
about:
� History of
encryption
� VB simple
substitution
encryption
� Advanced
encryption
concepts
� Creating secure
applications

Computer programs that perform encryption and decryption have sup-
planted this kind of assembly line work. But Alan Turing’s work with
mathematical concepts has earned him a valued place in the history of
encryption.
VB Simple Substitution Encryption
A number of methods have been developed through the years to encrypt a
message. We will look at a practical method to do this in Visual Basic.
Let’s say we have some message we wish to encrypt. We have placed this
message in a variable we will call sMessage.
Example 15-1
1. Start a new Windows application.
2. Place two text boxes on the form, one named txtinput and the other
txtoutput. Make sure you change their Text properties to be blank.
3. Place one button on the form and change its text property to Encrypt.
Your form should look like this:
252 Chapter 15 / Encryption in VB.NET

4. In the button’s Click event place this code:
Dim I as Integer 'counter
Dim X as Integer 'used in encryption
Dim sMessage as String
Dim Z as Char
Dim Y as Integer
sMessage = Txtinput.text
For I = 1 to Len(sMessage)
Z = Mid(sMessage,I,1)
Y = Asc (Z)
y = y +1
Txtoutput.Text = Txtoutput.Text & Chr(Y)
Next I
When you run this code, whatever text you enter into the first text box
will be altered.
This subroutine takes your message, grabs one character of it, changes it
to ASCII format (with the Asc() function), adds one to that ASCII code,
and then changes it back to a character and displays the new message.
To decrypt messages, you would simply reverse this process. This is
basically an elementary substitution code. It will work fine for most basic
encryption needs, but don’t think that this kind of encryption will foil the
CIA for more than a few milliseconds! This just gives you an idea of how
computer encryption works. You create an encryption key, which you
provide to those people you want to be able to decrypt your encoded mes-
sages. You could easily write a simple program with a form that allows a
person to input a message and then click on either an Encryption or
Decryption button.
Chapter 15 / Encryption in VB.NET 253
Chapter1
5

This simple substitution algorithm is referred to as a Caesar cipher. It is
alleged that the Roman Caesars used this algorithm. However, it would
not do much to keep a modern cryptographer from unraveling the mes-
sage’s secrets.
You could complicate your encryption in many ways. You could change the
increment step (Z + 1) to something more complex. You could make your
output backward (last character first). There are a vast number of methods
you could use to make your own message encryption far more effective.
Advanced Encryption Concepts
Encryption is basically a form of substitution. For example, if I use the
number 1 in place of A and 2 in place of B and 3 in place of C, etc., I am
using the simplest form of encryption. A more complex sequence might be
to take the number corresponding to the place in the alphabet (such as A
= 1) and perform some mathematical operation on it. I might add 2 and
divide by 3 or take the arc cosine of the number. No matter what the pro-
cess, the idea is to have some new symbol for the letter. The problem with
basic encryption such as this is that it still leaves a back door to crack the
code. That back door is frequency. Basically, certain letters appear in the
English language with a certain frequency. For example, if I use the basic
encryption (a = 1, b = 2, etc.) with the phrase “a dog eats the bone,” I get
1- 4 - 15 - 7 - 5 - 1 - 20 - 19 - 20 - 8 - 5 - 2 - 15 - 14 - 5. The vowels “a” and
“e” are most likely giving my code away due to their frequency. How can
we prevent this from happening? The answer is multiple encryption alpha-
bets. For example:
A B C D E F
1 2 3 4 5 6
4 5 7 R T y
Z X 4 3 2 W
Now if I attempt to encrypt the phrase “A Cab” using just a simple substi-
tution I get:
1 - 3 - 1 - 2
254 Chapter 15 / Encryption in VB.NET

What multiple alphabet substitution says is that I will use the first substi-
tution alphabet for the first letter, the second alphabet for the second
letter, and so forth. Thus “A Cab” becomes:
1 - 7 - Z - 2
Now there is no frequency for any decoder to pick up on. You can utilize
this with as many substitution alphabets as you like, but I think five would
be sufficient to stop most snoopers.
My Cryptography Algorithm forMore Serious Cryptographers
My encryption algorithm is actually simply a variation on traditional
multiple alphabet encryption. I simply use the following steps:
1. Convert the character to its ASCII equivalent.
2. Adjust that value according to the first substitution alphabet.
3. Convert that value to hexadecimal.
4. Adjust that value according to the first substitution alphabet.
5. Repeat the process for each character.
I also encrypt the key and place a value inside the encrypted message
denoting what key will match it. This last part makes having an exact key
essential to decoding the message.
More Encryption
The techniques I have shown you are ideal for putting simple encryption
algorithms into your Visual Basic.NET programs. However, this is not
how secure messages are usually encrypted. What normally happens is
that the message is converted into ASCII codes, and those codes are then
converted into binary numbers. Each character becomes an 8-bit binary
number. Those numbers are then encrypted with an encryption key. That
key is also in binary format. The way the message is encrypted is using
what is called an exclusive OR operation. Let me explain to you what OR,
AND, and XOR (exclusive OR) operations are. Let’s assume we have two
binary numbers 01110 and 11101. Now let’s examine each of the afore-
mentioned operations on this pair.
Chapter 15 / Encryption in VB.NET 255
Chapter1
5

AND
01110
11101
01100
Any place that has a 1 in both numbers becomes a 1, otherwise it becomes
a 0.
OR
01110
11101
11111
Any place where there is a 1 in the top or bottom number (or even in both)
becomes a 1.
XOR
01110
11101
10011
Any place where there is a 1 in either number but not in both becomes a 1.
Now imagine that your message, when converted from characters to
ASCII codes and then to binary is 110101010. It would actually be quite a
bit longer since it takes eight binary digits to represent any character, but
this will allow us to illustrate the point. Now assuming your encryption
key is 1101, here is how you encrypt the message:
110101010
XOR 110111011
000010001
To decrypt it you simply apply the key again:
000010001
XOR 110111011
110101010
256 Chapter 15 / Encryption in VB.NET

As you can see, you get back your original message!
Note that the key is only four digits, so it must be repeated to encrypt the
whole message.
Now here is the really tricky part. The size of the key used to encrypt the
message is the entire secret. A computer can simply try various combina-
tions of 1s and 0s until something breaks it. The longer the key, the more
attempts it will take to break it. Let me illustrate it with this table.
Digits Number of Possibilities 2n
1 2 (0, 1) 21
2 4 (00, 01, 10, 11) 22
3 8 (000, 001, 010, 011, 100, 101, 110, 111) 23
4 16 24
5 32 25
There is an obvious pattern here. Essentially the number of possibilities
for any given key is the 2 raised to the power equal to the number of digits
in the key. If you have any, even passing, familiarity with encryption, you
will have heard of 128-bit encryption. This is encryption that uses a
128-bit key—2128 possibilities, or 3.024 * 1028 possible combinations. Even
a supercomputer will have a difficult time with this.
A very popular encryption algorithm is the PGP, or Pretty Good Privacy,
algorithm. You can download software on the Internet, for free, that imple-
ments PGP encryption on your messages. Following are a few Web sites
that will allow you to download a free copy of software that implements
PGP. You can also learn more about PGP at these sites:
� http://web.mit.edu/network/pgp.html
� http://www.mccune.cc/PGP.htm
� http://www.pgp.net/pgpnet/
Chapter 15 / Encryption in VB.NET 257
Chapter1
5

Creating Secure Applications
It is a fact that there will be intruders that will attempt to gain access to a
company’s network. It does not matter whether they are attempting to
send a virus, steal data, or are just curious, it will happen. You might be
thinking that this is the responsibility of the network administrator, not
you, a programmer. If so, you couldn’t be more wrong.
The way in which intruders usually gain access to a system is via “holes,”
or flaws in software products. Web server software is often the target of
hackers attempting to exploit flaws. Another good example is Microsoft
Outlook. This particular product has vulnerabilities that have been
exploited by several virus attacks. The real question is what can you do to
make your applications secure.
The first step you can take is to implement some type of encryption. If an
intruder does gain access to the system, the data should not be easily
read. It should require some decrypting. If you have sensitive data, then
store it in an encrypted fashion. This includes passwords. I have actually
seen applications that go to the trouble of having a logon and password,
but then they store that information in a simple flat file (initialization or
.ini file) that can be easily opened and read in Notepad. It does take addi-
tional work to encrypt and decrypt such information, but it is well worth
the effort.
Also, consider the transmissions we talked about in Chapter 11. We put
simple text data into a packet and sent it across a network or perhaps the
Internet. Anyone using a “packet sniffer” can get a copy of that packet,
open it up, and read it. If you are sending any sensitive data, including
passwords, that data is vulnerable to intruders. If you combine the encryp-
tion techniques we have discussed in this chapter with the socket
programming discussed in Chapter 11, you will have reasonably secure
Internet communications.
Another area of application security involves the use of object models. In
Chapter 14, I introduced you to the subject of object models. These useful
items are also useful to hackers. When you are exposing the functionality
of your application you must ensure that what you are exposing is either
not sensitive data or cannot be exploited. Most viruses that target
Microsoft Outlook do so by manipulating its object model. Outlook
exposes all of its functionality via objects, and it is a relatively simple mat-
ter to write a script that will utilize and exploit this object model.
258 Chapter 15 / Encryption in VB.NET

When you create applications that have an object model that is exposed for
others to utilize, make certain that you have not exposed features that
might be exploited by a hacker. You do not want your application, or its
data, to be the door through which an intruder walks.
Summary
This topic is a very complex one, and a single chapter will hardly make you
a master of cryptography. However, this chapter should give you the skills
required to understand encryption and even to implement simple encryp-
tion methods in your own programs. If you wish to delve deeper into the
subject, particularly from a Visual Basic perspective, check out Appendix
B for some recommendations for further reading.
Review Questions
1. How many possible combinations are there for a 4-bit key?
2. What do you call an encryption algorithm that simply replaces each charac-
ter with a different character?
3. What do you call an encryption algorithm that uses several different sub-
stitution schemes?
4. What is another term for encrypting a message?
5. What is another term for decrypting a message?
6. What is so special about 128-bit encryption?
7. What is PGP?
Chapter 15 / Encryption in VB.NET 259
Chapter1
5


Chapter 16
Deploying YourApplication
Introduction
After you have successfully developed and tested your
application, there is still another step left in the develop-
ment process. The final stage in developing an application
is preparing it for deployment. Your application will not be
of much use if you do not deploy it to users. The first
impression a user gets from your application is the installa-
tion. If problems arise during installation, the user already
has a negative perception of your application. Luckily for
you, deploying your application in Visual Basic.NET is rel-
atively simple. To begin with, .NET applications will not
have conflicts with other applications or components. This
is a major improvement over previous versions of Visual
Studio. Windows applications can get complicated with
many DLLs needed and so many different versions avail-
able. The .NET framework will allow different versions of
a component on the same computer without any conflict.
Packaging your application can be as simple as copying all
of the files into a common directory. Your application is
comprised of one or more assemblies. Because assemblies
are self-describing, you are not required to provide any
information to the operating system about your application.
You do not need to register your application or the compo-
nents with the Windows Registry.
261
In this chapter,
you learn
about:
� Packaging
code
� Creating cab
files
� Configuring the
.NET
framework
� Creating
configuration
files

If you want your application to set up the Start menu or to create an icon
in the Quick Launch toolbar, you may want to package your application to
be installed by the Windows Installer. This way the Windows Installer can
create the Start menu item or the icon for your user.
As I stated, for simple applications, installation is as easy as simply copy-
ing your files over to the destination drive. Much of this book was written
using the Beta 2 and the release candidates of Visual Basic.NET. Neither
of those came with any deployment wizard. So far, every version of VB has
had a deployment wizard, so it is a fairly safe bet that the final release of
VB.NET will have a fairly easy-to-use deployment wizard as well. The
bulk of this chapter is concerned with preparing deployments of your
applications manually, using a variety of command-line utilities. No matter
what the final release of Visual Basic.NET has or does not have, you will
be ready to deploy your applications.
You can also write a simple batch file that copies all the required files from
a source (such as a CD) to a destination. You can write batch files in any
text editor; I use Notepad. You then save them with a .bat extension. A
sample install.bat is included in the downloadable file in \Examples\Chap-
ter 16\. It copies the files for Example 2-1 onto the C drive.
The complexity of configuring your application will vary depending on how
you develop the application. If you use private assemblies, then all you
have to do is copy all the files to the same directory. If you want to use
public assemblies or use different directories for some assemblies, you
will need to create a configuration file. This is just an XML file that con-
tains configuration information. The applications we have done in this
book simply used a single private assembly, so they should present no
complications when installing. Remember, however, that the client
machine must support .NET or your .NET application will not run.
Deploying your application can be as simple as copying the files from a
CD-ROM or across the network to a directory on the user’s computer.
Because the assemblies in your application are self-describing and contain
all necessary references internally, the application executes, and it will
search for these references itself. However, this simple installation may
not always be suitable for your needs. In this chapter, I will show you how
to install your Visual Basic.NET applications using the Windows Installer
and creating Web downloads. When deploying controls, you need to take
some additional factors into account.
262 Chapter 16 / Deploying Your Application

Packaging Code
The first step in getting your VB.NET application deployed is getting it
packaged. Depending on the complexity of your application, it will consist
of one or more DLL and/or EXE (executable) files. You have to package
them into one or more assemblies. An assembly consists of two to four
parts:
� Assembly manifest — This is mandatory because it contains the
metadata that the CLR needs to execute the code.
� Type metadata — This describes the types (class and methods) that
are contained in the assembly.
� Executables — The .exe you compiled (mandatory).
� Resources — This can be any type of non-executable file that needs to
be used by code in the assembly.
The first thing we will need to examine is the manifest. This part is vital
since it provides all the information about your application. By using the
Intermediate Language Disassembler (ildasm.exe), you can see what is
contained in an assembly.
Creating Cabinet Files
The installation utility uses Cabinet (Cab) files to store everything your
application needs to run. You will need to create these cab files. You can do
this with the utility Makecab.exe. Cab files also compress the files they
contain, thus reducing the amount of data you have to distribute. Cabinet
files are often used to download controls over the Internet using a Web
browser.
You can also use Visual Studio.NET to create MSI files for the
deployment of your application. An MSI file is a Microsoft Installation file.
It is what Microsoft needs to run its built-in installation program. If your
user double-clicks on an .MSI file the Microsoft Installer will automatically
launch.
Version numbers have always been important. Have you ever seen a dia-
log box that told you that you needed a DLL with version 1.2.3456 or
higher? You may have originally had the correct version of the DLL, but
some other application you subsequently installed overwrote that DLL
with a different version. This was often referred to as “DLL Hell.” This
Chapter 16 / Deploying Your Application 263
Chapte
r1
6

has changed with the .NET framework because you can have as many dif-
ferent versions of an assembly on your system as you like. Each is self
contained and does not conflict with any other. You can even have different
applications that use an assembly with the same name, but with a different
version. This means that the version number has become more of a “com-
patibility number” and controls the way the CLR locates the appropriate
assembly.
A version number must have the following structure:
Major.Minor[.Build[.Revision]]
This means that the Major and Minor are mandatory, and that Build and
Revision are optional. However, if you want to use Revision, you must
have Build. The value of all the four parts can range from 0 to 65,534.
This will be enough, especially with the speed at which Microsoft changes
technologies. However, you will not usually see numbers go this high.
The Major version number is usually used to denote a major change and
release of a product. The Minor version number is usually used when
some improvement or bug fix has been done to a Major revision. The
Build number is simply a record of how many times you have compiled a
product and which compilation this is. The Build number is often omitted
in commercial products but can be very useful for beta testers. Revision
numbers are often used when a quick bug fix is implemented. It should not
be used if any significant change has been made in the program.
Remember, the version number can also be thought of as a compatibility
number, so a change in version number can reflect the following compati-
bility phases:
Compatible Only the Revision number changes. Change of revi-
sion is seen as a quick fix engineering (QFE) update
and the assemblies are assumed to still be compatible.
Possibly compatible The Build number has changed. There is no guaran-
tee for backward compatibility. It will be up to you, as
the programmer, to decide if different Build numbers
will be compatible.
Incompatible Minor and/or Major changes.
The versioning is essential for the CLR to find a compatible assembly.
Consider this process step by step:
264 Chapter 16 / Deploying Your Application

1. The CLR reads the application configuration file, the machine configura-
tion file, and the publisher policy configuration file to determine what the
correct version number is for the assembly that is referenced, and thus
needs to be loaded.
2. The CLR checks to determine if this assembly has already been requested
in the application domain. If that is the case, the already loaded assembly
is used. Note that this check is based on the assembly’s full name: name,
version, etc.
You can get in trouble if you have two assemblies with the same name,
although one has the .dll extension and the other .exe. After the .exe ver-
sion is loaded and another assembly makes a reference to the .dll version,
the CLR will conclude that that assembly is already loaded because the
CLR makes the distinction based on the full name, which does not include
a file extension.
3. If the assembly is not loaded, the CLR checks the Global Assembly Cache
(GAC). If the assembly is not located in the GAC, the CLR checks the con-
figuration file if a <codeBase> is provided. If so, this directory is checked
for the presence of the assembly. In case the assembly is not located in the
<codeBase> directory, the lookup fails. If no <codeBase> is provided,
the application base is checked. If no match can be found, it checks the
privatePath directories.
Configuring the .NET Framework
It is vital when deploying an application to make sure that the installation
process on a computer goes smoothly and that the application executes as
you intended it to. You should also remember how and where the CLR
finds the right assemblies, how it chooses which assembly version to use,
and how it sets security. The list goes on and on. Before .NET, you mainly
needed the Registry to accomplish this. Now, you create the same infor-
mation in XML-coded configuration files. These configuration files contain
all the information needed. There are three types of configuration
files—machine, application, and security.
Chapter 16 / Deploying Your Application 265
Chapte
r1
6

Creating Configuration Files
Obviously, if configuration files are required for you to install your applica-
tion, you will need to understand how to create them. The configuration
files, like nearly all other setting files within the .NET framework, are
XML-coded, adhering to a well-formed XML schema. In general, a config-
uration file consists of the following sections:
� Startup — Holds settings that are related to the CLR to use.
� Runtime — Holds settings that are related to the CLR working, espe-
cially how and where the CLR can find the proper assemblies.
� Remoting — Holds settings related to the remoting system.
� Security — Holds the settings of the security policy.
� Class API — Holds the settings related to the use of Windows API.
� Configuration — Holds the settings that are used by the application.
Technically speaking, you could find or put any of these sections in any
configuration file. However, if a section does not apply to the use of the
configuration file, it will be ignored. Therefore, it is recommended that you
only place configuration data in the configuration file designed for that
purpose.
It is important to realize that configuration files have an impact on the
workings of all applications that make use of the .NET framework. This is
especially true for the machine and security configuration files. For this
reason, you must be very careful with making changes to these files before
assessing the impact they will have. A good rule of thumb is to only alter
the files you absolutely must alter, and then only as much as you need to,
no more.
Application Configuration Files
The application configuration file should be located in the installation
directory of the application and named after the application’s program exe-
cutable name with .config added after the extension. An example would be
myprogram.exe.config. The CLR checks the application directory for this
file. Because an application does not need its own configuration file, it can
completely depend on the machine configuration file. Application configu-
ration files are not required. They are only necessary if you want your
application to use something other than the default values. However, the
CLR will only look in the program’s installation directory for the file. If
266 Chapter 16 / Deploying Your Application

you place it somewhere else or use a different suffix, the CLR will not find
it, which may mean that the CLR will not be able to load the application. In
the case of a browser-based application, the HTML page should use a link
element to give the location of the configuration file, which resides in a
directory on the Web server.
The application configuration file can be useful for assembly binding set-
tings that relate to specific assembly versions an application needs and the
places the CLR has to look for the application’s private assemblies. This is
referred to as probing.
Machine/Administrator Configuration Files
When the .NET run-time system is installed on a machine, the
machine.config file is also installed. You will find this file in the Config
subdirectory of the .NET installation directory. For example, on my
machine, this config file is located at C:\WIN2000\Microsoft.NET\Frame-
work\v1.0.2914\CONFIG\. This file is important since it contains the
correct assembly binding policy of that machine. The file also contains the
settings for remoting channels. The settings in the machine configuration
file take precedence over those in any other configuration file and cannot
be overridden by any other file. The machine.config file is expected to
reflect the entire machine; any change to it may result in the disruption of
the functionality of the CLR. You are unlikely to need to alter these config-
uration files, but it is useful for you to know what they are.
The following is an excerpt from a machine.config file so that you will be
familiar with the content.
<?xml version="1.0" encoding="UTF-8" ?>
<configuration>
<configSections>
<!-- tell .NET Framework to ignore CLR sections -->
<section name="runtime" type="System.Configuration.
IgnoreSectionHandler, System, Version=1.0.2411.0,
Culture=neutral, PublicKeyToken=b77a5c561934e089"
allowLocation="false" />
<section name="mscorlib" type="System.Configuration.
IgnoreSectionHandler, System, Version=1.0.2411.0,
Culture=neutral, PublicKeyToken=b77a5c561934e089"
allowLocation="false" />
Chapter 16 / Deploying Your Application 267
Chapte
r1
6

<section name="startup" type="System.Configuration.
IgnoreSectionHandler, System, Version=1.0.2411.0,
Culture=neutral, PublicKeyToken=b77a5c561934e089"
allowLocation="false" />
<section name="system.runtime.remoting" type="System.
Configuration.IgnoreSectionHandler, System,
Version=1.0.2411.0, Culture=neutral,
PublicKeyToken=b77a5c561934e089" allowLocation="false" />
<section name="system.diagnostics" type="System.Diagnostics.
DiagnosticsConfigurationHandler, System, Version=1.0.2411.0,
Culture=neutral, PublicKeyToken=b77a5c561934e089" />
<section name="appSettings" type="System.Configuration.
NameValueFileSectionHandler, System, Version=1.0.2411.0,
Culture=neutral, PublicKeyToken=b77a5c561934e089" />
<sectionGroup name="system.net">
<section name="authenticationModules" type="System.Net.
Configuration.NetAuthenticationModuleHandler, System,
Version=1.0.2411.0, Culture=neutral,
PublicKeyToken=b77a5c561934e089" />
Let me point out a few vital items you should take note of. The foremost
is that what you see here is only a fragment of a machine.config file. This
file is somewhat large and quite complex. I would encourage you not to
make any changes to this file unless you are absolutely certain of what
you are doing. It might also be a good idea to make a backup copy of your
machine.config file. Then I would further suggest that you keep a log of
any changes you make to your main machine.config. In a worst-case
scenario, this information will be helpful should you need to call technical
support due to inappropriate changes you may have made to the config
file.
Security Configuration Files
Security configuration files describe the security policy settings. There
are at least three applicable security configuration files:
� Enterprise — This file resides in the same location as the
machine.config and is called Enterprise.config.
� User — Resides in the directory %USERPROFILE%\Application
Data\Microsoft\CLR and is called Security.config.
� Machine — Resides in the same directory as the machine.config and is
called Security.config.
268 Chapter 16 / Deploying Your Application

These files determine the security settings for your entire .NET frame-
work. I strongly caution you against altering them unless you know
exactly what you are doing and why. I also recommend that you make
backup copies of these files.
Summary
This chapter introduced you to the various nuances of application deploy-
ment. The most critical piece to remember is that most simple
applications can be deployed by simply copying the required files to the
destination machine. You can write a batch file to accomplish this for you.
However, if your application does require more complex configuration, you
can manually create or edit configuration files to accomplish what you
need. As a beginning VB.NET programmer, it is very unlikely that you will
need to do this, but I would be remiss if I did not even mention the
subject.
Review Questions
1. Where is machine.config located?
2. When should you reconfigure the security config files?
3. Must all applications have an application config file to be distributed?
4. If I use only private assemblies, what must I do to install my application?
5. How do I account for DLL version conflicts when installing my .NET
application?
6. Where does the CLR check for application config files?
7. How many security config files are there?
Chapter 16 / Deploying Your Application 269
Chapte
r1
6


Chapter 17
ConvertingExistingApplications
Introduction
This book has focused on giving you the basic skills to
develop VB.NET applications. However, just as no person
is an island, neither is any technology. VB.NET does not
exist in a programming vacuum. Visual Basic has been
around for ten years, and VB 6.0 has been around since
1998. That means that a lot of code done in previous ver-
sions of VB is still out there. If you are an experienced VB
programmer making the transition to VB.NET then you
undoubtedly have some old code you will be considering
upgrading. If you are new to Visual Basic, you are likely to
encounter older code written by other programmers that
you may choose to upgrade. In either case, you should be
aware of the various factors that are involved in upgrading
an existing application to VB.NET. However, I am certain
that this chapter will be of greatest interest to those read-
ers who have experience with previous versions of Visual
Basic.
The .NET architecture is quite a departure from previous
versions of Visual Basic and many applications will require
significant changes if you choose to upgrade them. Visual
271
In this chapter,
you learn
about:
� Upgrade
considerations
� Internet
Information
Server (IIS)
applications
� The Upgrade
wizard

Basic.NET has transitioned to making everything an object, prompting
significant programming changes. You will have to modify data types to
match the new Common Type System (CTS), which will impact applica-
tions using the Variant data type. There are other considerations. Some
keywords have been changed or even removed, and your Visual Basic
forms will need to be upgraded to Windows forms. Error handling will be
completely different as well, and you will have to convert all existing error
handling to the new exception-based format.
As you have seen, data access has changed drastically and is based on
XML. This is a fundamental paradigm shift, and addressing these issues
can take considerable effort. Interfaces and events have changed from pre-
vious versions of Visual Basic. Fortunately, Microsoft has provided Visual
Studio.NET with an upgrade tool. If you open a VB 6.0 project with
VB.NET, the upgrade tool will attempt to upgrade your application from
Visual Basic 6.0 to Visual Basic.NET. Unfortunately, not all aspects of your
application can be automatically upgraded. The sections of your application
that the upgrade utility cannot upgrade will be commented out. You will
then have to manually convert them. Some applications will still require a
large development effort in order to upgrade.
Upgrade Considerations
As I already mentioned, some applications will be very difficult for you to
upgrade. There are some key points to examine when deciding whether or
not upgrading the application is even feasible, and if so, how much effort
will be required. The following are considerations you should carefully
look at before deciding on upgrading. Each of these issues will be
explained in detail.
� Early binding of variables
� ADO Data Access
� Using the Date data type to store dates
� Using constants instead of actual values
272 Chapter 17 / Converting Existing Applications
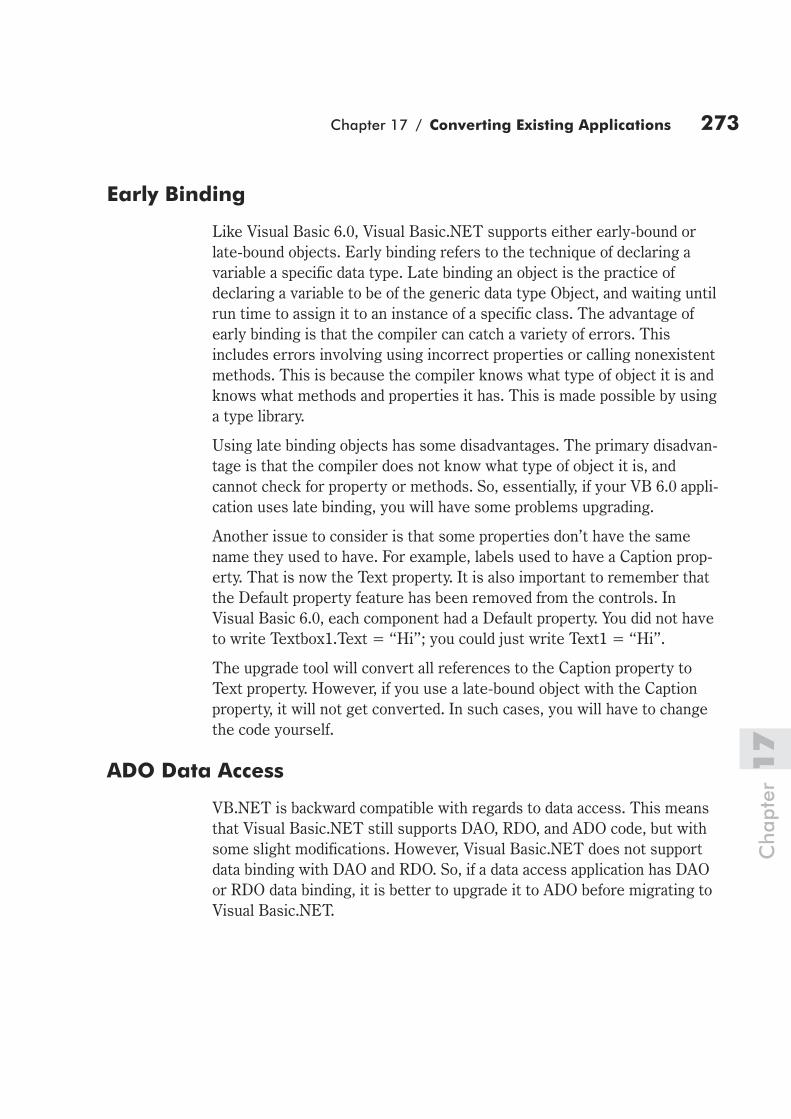
Early Binding
Like Visual Basic 6.0, Visual Basic.NET supports either early-bound or
late-bound objects. Early binding refers to the technique of declaring a
variable a specific data type. Late binding an object is the practice of
declaring a variable to be of the generic data type Object, and waiting until
run time to assign it to an instance of a specific class. The advantage of
early binding is that the compiler can catch a variety of errors. This
includes errors involving using incorrect properties or calling nonexistent
methods. This is because the compiler knows what type of object it is and
knows what methods and properties it has. This is made possible by using
a type library.
Using late binding objects has some disadvantages. The primary disadvan-
tage is that the compiler does not know what type of object it is, and
cannot check for property or methods. So, essentially, if your VB 6.0 appli-
cation uses late binding, you will have some problems upgrading.
Another issue to consider is that some properties don’t have the same
name they used to have. For example, labels used to have a Caption prop-
erty. That is now the Text property. It is also important to remember that
the Default property feature has been removed from the controls. In
Visual Basic 6.0, each component had a Default property. You did not have
to write Textbox1.Text = “Hi”; you could just write Text1 = “Hi”.
The upgrade tool will convert all references to the Caption property to
Text property. However, if you use a late-bound object with the Caption
property, it will not get converted. In such cases, you will have to change
the code yourself.
ADO Data Access
VB.NET is backward compatible with regards to data access. This means
that Visual Basic.NET still supports DAO, RDO, and ADO code, but with
some slight modifications. However, Visual Basic.NET does not support
data binding with DAO and RDO. So, if a data access application has DAO
or RDO data binding, it is better to upgrade it to ADO before migrating to
Visual Basic.NET.
Chapter 17 / Converting Existing Applications 273
Chapte
r1
7

It is even possible to run existing data access applications that utilize VB
6.0-style ADO using Visual Basic.NET with only minor modifications. In
order to accomplish this, right-click the Reference node in the Solution
Explorer and choose Add Reference. In the References window, choose
ADO library from the supplied list of registered COM components.
The Date Data Type
In Visual Basic 6.0, you could use the Double data type to store and manip-
ulate dates. This is no longer supported in Visual Basic.NET; therefore,
the following code is invalid in Visual Basic.NET:
Dim dblVal as Double
Dim dtVal as Date
dtVal = now
dblVal = dtVal 'This is invalid in Visual Basic.NET
However, VB.NET provides two methods that do the conversion
between Dates and Doubles. The functions are FromOADate and
ToOADate. The ToOADate function converts a Date type value to a
Double and FromOADate converts a Double value to Date.
Variants
A Variant is a special data type. What makes the Variant data type so
unique is that it can be assigned to any primitive data type such as Empty,
Nothing, Integer, String, Boolean, etc. The only limitation with the Variant
data type is that it cannot be assigned to fixed-length strings. However,
the Variant data type is no longer supported in VB.NET.
Visual Basic.NET uses the Object data type, which effectively replaces the
Visual Basic 6.0 Variant data type. The Object data type can also be
assigned to any primitive data type, Empty, Nothing, Error, Null, and as a
pointer to an object. The default data type in Visual Basic.NET is Object.
When a project is migrated to Visual Basic.NET, all variables of type Vari-
ant are converted to Object.
274 Chapter 17 / Converting Existing Applications

Integers
In Visual Basic 6.0, the Long data type was used to represent signed 32-bit
numbers, while the Integer data type was used to store 16-bit numbers.
This has been changed in Visual Basic.NET. In Visual Basic.NET, the Long
data type is used to store signed 64-bit numbers, Integer to store 32-bit
numbers, and Short to store 16-bit numbers.
Fixed-Length Strings
In Visual Basic 6.0, variables can be declared with fixed-length strings
except for public variables in class modules. Fixed-length strings are not
supported in Visual Basic.NET. If the application contains fixed-length
strings, the Upgrade Wizard uses a wrapper function to implement the
functionality. This is shown in the following Visual Basic 6.0 code, where:
Dim MyString as String * 20
becomes:
Dim MyString as New VB6.FixedLengthString(50)
Arrays
In Visual Basic 6.0, it was possible to declare arrays with any lower or
upper boundary numbers you liked. The Option Base statement was used
to determine the lower boundary number if a range was not specified in
the declaration. In VB.NET all arrays start with zero. This makes VB.NET
compatible with all other programming languages. However, it means that
the Option Base statement is obsolete.
During the upgrade process, all Option Base statements are removed. All
arrays that have their lower boundary as zero are left as is while those
that are non-zero based are upgraded to an array wrapper class.
Chapter 17 / Converting Existing Applications 275
Chapte
r1
7

Internet Information Server (IIS) Applications
The WebClass is the building block of all IIS applications in VB 6.0. It is a
Visual Basic component that resides on a Web server, responding to input
from the browser. WebClasses no longer exist in Visual Basic.NET. The
migration tool upgrades all WebClass applications to Web forms instead.
As a result, migrated applications have to undergo some modifications
before they are ready to run.
Converting Forms
Visual Basic forms have been replaced with Windows forms in Visual
Basic.NET. The object model of Windows forms is different from Visual
Basic 6.0 forms. However, the object models are compatible. The Upgrade
Wizard converts Visual Basic forms to Windows forms during the upgrade
operation. User controls are then upgraded to Windows controls. How-
ever, custom property tags and accelerator key settings are not upgraded.
Windows API
A majority of the Windows API functions can be used as they are in Visual
Basic.NET. The only modification you will have to make is to change the
data types accordingly.
AND/OR/NOT
In Visual Basic 6.0, the AND, OR, XOR, and NOT operators perform both
logical and bitwise operations depending on the expressions. In Visual
Basic.NET, AND, OR, XOR, and NOT operators only apply to the Boolean
type. Visual Basic.NET uses new bitwise operators for bitwise operations.
They are BitOr, BitAnd, and BitXor.
The Upgrade Wizard upgrades an AND/OR statement which is
non-Boolean or contains functions, methods, or properties that use a com-
patibility function with the same behavior as that in Visual Basic 6.0.
Boolean statements are upgraded to use the native Visual Basic.NET
statement.
276 Chapter 17 / Converting Existing Applications

Error Handling
In Visual Basic 6.0 the On Error statement was used to handle errors. The
Err object was provided to give diagnostic information about the error.
The Number and Description properties provided the error code and a
description of the error. The main drawback of this kind of error handling
is the inability to trap errors raised by Windows DLLs. System errors that
arise during calls to Windows DLLs do not raise exceptions and cannot be
trapped by this style of error handling.
Visual Basic.NET uses structured exception handling to handle errors
and exceptions. Most programming languages (C, C++, Java, etc.) use
this technique to handle errors. This handling is accomplished via the
Try. . . Catch blocks you have already seen in this book. The Common
Language Runtime (CLR) uses structured exception handling based on
exception objects and protected blocks of code. When an exception or an
error occurs, an object is created to represent the exception. The excep-
tion objects created are objects of Exception classes derived from
System.Exception. It is also possible to create custom exception classes.
It is possible to code multiple Catch blocks for a Try block. A Catch block
that contains a filter for a specific exception type is invoked when that
exception is thrown. You can then have separate Catch blocks to handle
different types of errors. The Catch block that contains no parameters,
also called a general exception handler, is invoked for all other exceptions.
The Finally block follows the Catch block and contains the cleanup code.
It is important to note the order of the Catch statements if you are coding
a general exception handler as well as specific exception handlers. The
general handler should be the last if you are coding Catch blocks to handle
specific exceptions. If the general handler is coded first followed by other
specific handlers, the runtime invokes the general handler by default since
the general handler handles all exceptions. The rule of thumb is to go from
specific exception handlers to general exception handlers.
Chapter 17 / Converting Existing Applications 277
Chapte
r1
7

Using Constants
It is a good programming practice to use constants rather than the actual
values that represent the constants or variables that store these values. In
Visual Basic.NET, the value of True has been changed from –1 to 1. The
usage of constants ensures that the correct values are replaced when your
project is upgraded. However, even if an actual value is used, it is quite
possible your project will be upgraded properly.
The Upgrade Wizard
As soon as you attempt to open a Visual Basic 6.0 project in Visual
Basic.NET, the Upgrade Wizard will launch.
The first step in the wizard summarizes the actions that will be done
throughout the Upgrade Wizard. It then creates a new Visual Basic.NET
project in a separate folder that you specify. This means you will still have
the original unchanged project you can return to if need be. This is a very
important feature.
After the initial screen is displayed, the next step in the upgrade process
is to choose what kind of project the existing project should be upgraded
to. The Upgrade Wizard will determine the project type of the existing
Visual Basic 6.0 project and selects the appropriate option.
278 Chapter 17 / Converting Existing Applications

Next, you will specify where the new upgraded project should be created.
Note that your existing project will be left unchanged.
Next you will see the screen informing you that the project is ready to be
upgraded. If you are set to proceed, click Next.
Chapter 17 / Converting Existing Applications 279
Chapte
r1
7
When the project is upgraded, the language is modified for any syntax
changes and Visual Basic forms are converted to Windows forms. More
often than not, you will have to make changes to the code after it is
upgraded. This is necessary because certain objects either have no equiva-
lents, or the properties of some objects have been erased or renamed.
The last screen will display the current status of the upgrade process.
After the project is upgraded, the Upgrade Wizard creates an upgrade
report that itemizes problems and inserts comments in the code, inform-
ing the programmer of what changes should be made. It is not difficult to
find the parts of the code that need updating, because the Upgrade wizard
marks the code that needs changing, even including comments with the
designation. The comments begin with the text TODO, and the IDE picks
up these statements and lists them in the TaskList window. (Notice that
the TODO is borrowed from Visual C++ wizards. They have been doing
this for quite some time.) Navigating to the appropriate line is as easy as
double-clicking the item in the TaskList window. Each item in the upgrade
report is even associated with a related online help topic, which not only
explains the need to change the code, but how to do it.
280 Chapter 17 / Converting Existing Applications

Once the upgrade is completed, the Upgrade Wizard will attach various
comments to the upgraded code. These can be categorized into the follow-
ing four types, based on their severity:
� UPGRADE_ISSUE — These errors will generate build errors and
prevent the application from compiling. As a result, they are marked as
compiler errors. It is absolutely necessary to correct them before run-
ning the project.
� UPGRADE_TODO — These errors will not hinder the compilation
process, but may result in run-time errors.
� UPGRADE_WARNING — These are errors that will not result in
compiler errors but that might still cause an error when referencing
the item during run time. It is not absolutely necessary to rectify
them, but it is highly recommended that you at least review them.
� UPGRADE_NOTE — This indicates serious changes in the code.
Upgrade notes are added when there is a major structural change in
the code. You will have to look closely at these to make sure that the
conversion went smoothly.
After the Visual Basic 6.0 project has been upgraded to Visual Basic.NET,
an upgrade report is added to the project. This report contains the follow-
ing details and is named _Upgradereport.htm:
� Project name
� Time of upgrade
Chapter 17 / Converting Existing Applications 281
Chapte
r1
7

� Upgrade settings: Upgrade settings consist of the following key-value
pairs:
A Boolean value indicating whether ADO+ was used
A Boolean value indicating whether the user requested the
Upgrade Wizard to generate public interfaces for classes
The name of the logfile
The kind of project this project migrated from
A Boolean value to indicate if the user preferred to change the
arrays to zero-based
The path to the output directory
The name of the project that was created
The actual path to the project that was created
� A list of project files with information regarding the new filename, the
old filename, file type, status, errors, warnings, as well as other issues.
Summary
Clearly, upgrading from Visual Basic 6.0 to VB.NET can be a difficult task.
It is recommended that you seriously consider the difficulties involved
before you embark on this process. In some cases you may determine that
a project should simply be left in VB 6.0. I should also point out that you
should not attempt to upgrade earlier versions of VB to VB.NET.
282 Chapter 17 / Converting Existing Applications

Appendix A
Keywords
This list is by no means exhaustive. It is simply a quick
reference of those keywords covered in this book. These
are the keywords that I have found beginners are most
likely to use.
Abs This method of the Math class returns the
absolute value of the number passed to it.
Acos This method of the Math class returns the
arc cosine of the number passed to it.
App.Activate This statement allows you to activate a pro-
gram that is already running. You can
activate a program either by using its name
as it appears in the toolbar or by using the
Windows handle returned to lShell.
App.Activate lShell
or
App.Activate "MS Word"
Cbyte This converts a variable of one type into a
byte. If the expression you are converting
lies outside the acceptable range for a byte,
you will get an error. The syntax is:
Cbyte(MyVariable)
Cdate Much like Cbyte, this expression converts
a variable to the Data type. Its syntax is:
Cdate (MyVariable)
283

There are also statements like Clong, Cint, etc., to convert
a variable to an Integer or a Long value.
Chr This returns the actual character denoted by an ASCII
character number. For example, chr(65) returns “A”.
Clear This keyword can be applied to the Clipboard object, a
combo box, or a list box. It causes all items stored therein
to be cleared. Example:
List1.Clear
Cos This will return the cosine of a number. For example, you
can use Cos(15) to get the cosine of 15.
Date This simply returns the current system date. Example:
Let TxtDate.Text = Date
Extends This very important keyword allows the class on the left to
inherit the class on the right. Example:
childclass Extends parentclass
FileCopy This command causes a file to be copied from its source to
a destination file. Example:
FileCopy "sourcefile.txt" ,"destinationfile.txt"
FileLen This function returns the length of a file in bytes. Syntax:
FileLen("myfile.txt")
Format This allows you to change the format of any variable, text
box, or label. Let’s look at some examples.
If I want the date to be yymmdd, I use the Format com-
mand like this:
Let TxtDate.Text = Format(date,"yymmdd")
I place an open parenthesis after the Format command and
then tell it what I wish to format. In this case, that is
“date.” The letters in quotation marks tell it how to format
it. We can also format numbers. For example, if you want a
number to appear as a dollar amount:
Let TxtMyNumber.Text =
Format(TxtMyNumber.Text,"$###,###.##")
284 Appendix A / Keywords

Your number will show a dollar sign, six digits, a decimal
point, and two additional digits.
Hide This makes whatever you are referring to invisible.
Example:
FrmOrders.Hide
The form is still loaded, but it’s not visible.
Import This keyword allows you to import other namespaces.
Once you have imported a namespace, you can instantiate
classes that are defined in that namespace, or you can
inherit from them and create your own classes.
IsDate This function will return a Boolean value (True/False) indi-
cating whether or not a variable can be converted to a date.
Example:
IsDate(MyVariable)
IsNull This function is used to see if another variable is null.
Example:
IsNull(MyVariable)
IsNumeric This function is used to see if a variable is numeric. It
returns a Boolean.
Left This command allows you to get the left portion of a string.
For example, if you want to get the left three characters in
a text box you can use this code:
Private sMyString as String
Let sMyString = Left(TxtMyText.Test,3)
This will place the left three characters of TxtMyText into
the string sMyString. If the text box TxtMyText had the
word “Hello” in it, sMyString would now have “Hel” in it.
Len If you want to get the length of some variable or text, you
can use the Len command to get that value. Here are two
examples:
Let iLength = Len(TxtName.Text) 'this will take the length
'of the text in txtname
'and place it in the
'variable iLength
Appendix A / Keywords 285
Appendix
A

Let iLength = Len(iAccount) 'This will take the length of
'the variable iAccount
'and place it in the variable
'iLength
Load This will load a form. If you have a main form and you wish
to load other forms, you can use this command. For exam-
ple, if you have a form called frmOrders and you have a
command button you wish to use to load it in, place the fol-
lowing code in that command button’s Click event:
Load frmOrders
Ltrim This command will remove all trailing spaces from the left
side of a string.
Mid This command will return the substring of a string passed
to it. Example:
MyString = Mid(somestring, 3,5)
Returns the substring of “somestring” beginning at the
third character and going to the fifth character.
Msgbox This keyword simply tells the computer that you want to
display a message box.
Pow This method of the Math class returns a Double that is the
number passed to it, raised to the power passed to it;
Pow(5,2) returns 5 squared, or 25.
Right This is very similar to the Left command, except that it
returns the right side of the string requested. For example:
Private sMyString as String
Let sMyString = Right(TxtMyText.Text,2)
If the text box TxtMyText had the word “Hello” in it,
sMyString would now have “lo” in it.
Sendkeys After using App.Activate, you can send keystrokes to a
program. For example, if you have activated Notepad.exe
you can then use the code:
Sendkeys "My Dog Has Fleas"
And the phrase in quotes will appear in Notepad.
286 Appendix A / Keywords

SetFocus This tells the program to change focus to another control.
You might place something in your cmdAddNew button
that sets focus to the first text box on your form. Example:
btnAddnew_Click()
TxtFirst.SetFocus
End Sub
Shell This is a very useful keyword. By using the Shell com-
mand, you can start other programs. Example:
Private lShell as Long
lShell = Shell("c:\path\name.exe",1)
This tells the computer to take the pathname and start the
program Name.exe in standard mode (1) and return its
Windows handle to the variable entitled lShell.
Show This shows something that is hidden. If you use it in con-
junction with a form that is not loaded, it will first load the
form then show it. Example:
FrmOrders.Show
Sin This will return the sine of a variable such as Sin(45)
returns the sine of 45.
Time This returns the current system time. You can display this
to the user with some code like:
Let LblTime.Text = Time
Tan This method of the Math class returns the tangent of the
angle passed to it.
Trim This command will remove all blank spaces from a string.
Ucase If you wish to compare two values but you don’t care if
their cases match (lower- or uppercase), you can compare
the uppercase values of both. Example:
If Ucase(sSearchValue) = Ucase(TxtLastName.Text) then…
You can also compare the lowercase values using the same
technique with the keyword Lcase.
Appendix A / Keywords 287
Appendix
A


Appendix B
Other Resources
This book is simply meant to get you started with Visual
Basic.NET. There is a lot more you can learn. Below is a
list of some of my favorite resources. This list is not
exhaustive, but most of the Web pages listed have links to
other Web pages.
Web Pages
Comp.lang.basic.visual.misc: This is a usenet newsgroup
where you can ask questions and usually get answers.
Chuck Easttom’s Visual Basic Page
(http://www.geocities/~chuckeasttom/vb/Vb.htm): This is
my own page for Visual Basic beginners.
Carl and Gary’s VB Page (http://www.cgvb.com): This is
the mother of all Visual Basic pages.
Ed’s VB Page (http://www.tiac.net/users/efields/vbhp.htm):
This is a pretty good page with lots of resources.
Microsoft Certification Page
(http://www.microsoft.com/mcp/ie30.htm): If you are inter-
ested in getting certified from Microsoft, this is the page
for you.
Zarr’s VB Site (www.zarr.net): An excellent Visual Basic
Web site with lots of content and links.
Visual Basic Web Magazine (www.vbwm.com): This is an
online magazine.
289

Visual Basic Developers Corner (http://www.mvps.org/vbnet/): A really
top-notch site.
Other Books
I think my book is a good start for you. However, that is all it is—a start. It
is not meant to make you an expert in all things Visual Basic or all things
programming. Let me recommend a few books you might consider reading
in the future to expand your knowledge a bit.
Iterative UML Development Using Visual Basic 6.0 by Patrick Sheridan and
Jean M. Sekula from Wordware Publishing. While this book was designed
with VB 6.0 in mind, UML is not language specific. It is a design method-
ology and can be applied to any programming language.
Learn MS Access 2000 Programming by Example by Julitta Korol from
Wordware Publishing. As I’ve mentioned, it is vital that you have a good
grounding in MS Access in order to be a professional VB programmer. You
should also consider learning about SQL Server or Oracle.
Learn SQL in Three Days by José Ramalho from Wordware Publishing. A
thorough knowledge of Structured Query Language is a critical thing for
professional business programming.
Learn Encryption Techniques with Visual Basic and C++ by Gilbert Held
from Wordware Publishing. This book will give you a pretty good ground-
ing in encryption and show you applications in both Visual Basic and C++.
The Practical SQL Handbook by Judith S. Bowman, Sandra L. Emerson,
and Marcy Darnovsky from Addison-Wesley Developers Press. This book
gives a very thorough coverage of SQL.
Ready to Run Visual Basic Algorithms by Rod Stephens from Wiley Com-
puter Publishing. Rod Stephens’ book is the most thorough coverage of
data structures and algorithms for VB programmers that I have ever seen.
I highly recommend this book.
Magazines/Journals
The premier Visual Basic developers magazine is Visual Basic Program-
mers Journal. You may wish to seriously consider getting a subscription to
it, which you can do at http://www.windx.com/.
290 Appendix B / Other Resources

Appendix C
Answers toReviewQuestions
Chapter 1
1. What is a GUI?
Graphical User Interface; it is the part of your application
that a user sees and interacts with.
2. List two ways to run an application inside the IDE.
a. Use the F5 key.
b. Press the Play button on the toolbar.
c. Use the drop-down menu.
3. Write a line of code that will display the length of a string
called “MyString” in a text box named “Textbox1.”
Textbox1.Text = len(MyString)
4. What is a variable?
A place in memory set aside to hold data of a particular
type.
291

5. What is a statement?
A line of code that performs an action.
6. What does the F7 key do?
It shows the Code window for the currently selected object.
7. List four components.
Button, label, list box, picture box, combo box, text box, command button,
group box
8. What is an event?
An event is a function that is called automatically in response to either a
user or a system action.
9. What does the F4 key do for you in the IDE?
It displays the Properties window for the currently selected component.
10. What is an IDE?
Integrated development environment
Chapter 2
1. What does the Val() function do?
It takes a string argument and returns its numeric value.
2. What does the Ucase function do?
It returns the uppercase equivalent of a string.
3. What is the purpose of the Format function?
To display a string in a specific format.
4. List four VB.NET data types.
Integer, Long, Single, Double, String, Boolean, Byte, Short, Char, Date,
Object
5. List four VB.NET operators
+, –, *, /, =, %, &
6. What is the purpose of the modulus operator?
It divides the number on the left by the number on the right, and returns
the remainder.
292 Appendix C / Answers to Review Questions

7. What is a parameter?
It is a variable that is passed to a function when that function is called.
Sometimes parameters are also referred to as arguments.
8. What are the three parts to the message box function called?
Message, buttons, and title
9. What is a function?
It is a group of related statements that work together to perform some
task.
10. What is the purpose of a Select Case statement?
It works much like an If-Then statement, except that it is more useful
when there are multiple options. It literally selects the path of code execu-
tion based on the status of the variable upon which the Select Case is
based.
Chapter 3
1. What does the term “encapsulation” mean?
It refers to the data and the functions that work on that data being
wrapped together into a class.
2. What is a term for a class that is being inherited from?
It can be called a base class or a parent class. Some developers even call it
a superclass.
3. Can you inherit private functions?
No, you can only inherit public and protected functions.
4. What is a method?
It is a function that is inside a class.
5. What is an access modifier?
A keyword that determines if a variable or function can be accessed from
outside the module it is in.
6. What is the purpose of the protected modifier?
It causes a variable or a function to behave just like a private one, but it
allows it to be inherited.
Appendix C / Answers to Review Questions 293
Appendix
C

7. What is the purpose of a Set property?
To change the value of a class’s property.
8. What does the WithEvents keyword do?
It causes the events associated with a class to also be generated.
9. What is the code to raise an event?
RaiseEvent Event_Name(Event Parameters)
10. What is the code to create a new event?
Public Event Event_Name(Event Parameters)
Note: This should be declared in the general declarations sec-
tion of the class module.
Chapter 4
1. What is generational garbage collection?
This is a garbage collection algorithm based on looking at how old an
object is. The newer the object, the more likely it is to be eligible for gar-
bage collection.
2. What class do VB.NET primitive data types inherit from?
Value
3. List three methods of the Graphics class.
DrawEllipse, DrawRectangle, DrawLine, DrawArc, DrawIcon,
DrawBeziers, DrawCurve, DrawClosedCurve, DrawPolygon, DrawString
4. What is an assembly?
Reusable, self-describing packages that are self contained. Everything you
need to run a particular application is contained or described in the
assembly.
5. What is typecasting?
Changing a variable from one data type into another data type.
294 Appendix C / Answers to Review Questions

6. What is metadata?
Metadata is simply binary information that describes just about every
aspect of your code. It contains information about every type defined and
referenced within your assembly.
7. What package must you import in order to utilize the File and FileStream
classes?
Imports System.IO
8. What is the purpose of the Common Type System?
It has many purposes but the one most discussed in this chapter was the
ability to have data types that are consistent throughout all the .NET
languages.
9. What method of a class do you utilize if you wish to destroy that class?
Dispose
10. What method of a class do you use if you wish to finalize the class, but still
have it eligible for reuse?
Close
Chapter 5
1. What are the two types of data-bound components?
Simple and complex
2. What is SQL?
Structured Query Language. It is the language of databases.
3. List four SQL commands.
INNER JOIN, DISTINCT, SELECT, FROM, ORDER BY
4. What is a field?
A single piece of data in a database (such as a first name).
5. What is a relational database?
This is a method of storing data where various records and tables can be
related to each other based on the values held in certain fields.
6. What is a dataset?
It is a Visual Basic object that represents a set of records.
Appendix C / Answers to Review Questions 295
Appendix
C
7. What does “simple bound” mean?
A single Windows component is bound to a single field in the database.
8. What does “complex bound” mean?
A single Windows component is bound to a group of records in a database.
9. What is a record?
A set of fields that represent one item in a database.
10. What is a table?
A set of related records.
Chapter 6
1. List two container components.
Panel and Groupbox
2. What method is used to add items to the end of a list box or combo box?
Add
3. What method is used to add items to some specific position in a list box or
combo box?
Insert
4. What is the purpose of a link label?
To provide a link to a Web site.
5. What is the primary difference between a check box and a radio button?
A checkbox is non-exclusive. A radio button is exclusive.
6. What types of graphics can a picture box display?
Bitmap (bmp), Graphics Interchange Format (gif), and Joint Photographic
Experts Group (jpg).
7. What it the purpose of the PasswordChar property of a text box?
If you wish to create a password screen where the user’s password is hid-
den from anyone looking over their shoulder, this property provides an
easy means to do that.
8. What does the Value property of a track bar tell you?
The current value of the slider.
296 Appendix C / Answers to Review Questions

9. What is the primary difference between a text box and a label?
A label displays text as read-only. A text box can display either read-only
or read and write.
10. Name five components.
Button, TextBox, Label, LinkLabel, PictureBox, ComboBox, ListBox,
DateTimePicker, TrackBar, TabControl
Chapter 7
1. What is a DataSet?
The data returned from a request to a data source.
2. Does ADO.NET stay connected to the data source?
No, ADO.NET does not stay connected.
3. What is the underlying technology behind ADO.NET?
XML
4. What protocols support remoting in ADO.NET?
SOAP and HTTP
5. What is used to populate a DataSet?
A data reader
6. Is data in ADO.NET stored in Binary or Text format?
Text
7. Until ______________ has been executed it is possible to return to a pre-
vious data state.
AcceptChanges
8. What is the best object for executing stored procedures?
The Command object.
9. What type of data providers are written explicitly for a particular database?
Managed providers
Appendix C / Answers to Review Questions 297
Appendix
C

Chapter 8
1. Where do Web form components run?
On the server.
2. Where do HTML form components run?
On the client in the browser.
3. What operating systems can be used with ASP.NET applications?
Any
4. What must the Web server support in order to host ASP.NET applications?
.NET
5. What is ASP?
Active Server Pages
6. What is XML?
Extensible Markup Language
7. List five HTML components.
Button, text field, text area, submit button, reset button, table
8. Which is faster, a Windows Forms application or a Web Forms application?
The Windows Forms application will run faster.
9. Which requires more resources from the client?
The Windows Forms application requires more resources from the client.
10. How do you deploy an ASP.NET solution to a Web server?
Simply copy all the files over.
Chapter 9
1. List three ways to create a new control.
a. Modify an existing component.
b. Create a compound component from two or more existing
components.
c. Create a component from scratch.
298 Appendix C / Answers to Review Questions

2. Do all components have a user interface?
No
3. What class do all components inherit from?
System.Windows.Forms.UserControl
4. What two concepts of object-oriented programming do components best
illustrate?
Encapsulation and code reuse
5. What COM components are non-GUI VB.NET components most like?
ActiveX DLLs
6. How do you declare an instance of an object so that you have access to its
events?
Dim WithEvents MyObject as Someclass
7. How do you create a new event for your component or class?
Public Event MyEvent(parameters)
8. How do you raise an event you have created?
RaiseEvent MyEvent(parameters)
9. What two packages do all Web controls import?
Imports System.ComponentModel and Imports System.Web.UI
Chapter 10
1. What is a console application?
An application that runs in the command or DOS prompt and has no graph-
ical user interface.
2. What are three uses for a console application?
NT Services, testing a class, or simple applications.
3. Can you use a button in a console application?
No
4. Can you use a class in a console application?
Yes
Appendix C / Answers to Review Questions 299
Appendix
C

5. What is the starting point for a console application?
Sub Main()
6. How do you print to the console screen?
System.console.out.writeline and system.console.out.write
7. How do you receive input from the user?
System.console.in.readline and system.console.in.read
8. How do you provide an interactive user interface inside a console
application?
By creating a menu.
Chapter 11
1. What is TCP/IP?
A suite of protocols used on networks and the Internet.
2. What two properties must you set before you can send a packet via the
Winsock control?
RemoteIP and Port
3. What data type does the Winsock control receive data as?
String
4. What happens if one end of a connection is left open?
That port will become “hung” and unusable.
5. What event is triggered in the Winsock control when data arrives?
Winsock_DataArrival
6. What method of the Winsock control is used to send data?
SendData
7. What data type is used to send data via the Winsock?
String
8. What port do Web pages usually operate on?
80
9. Name two protocols that are part of the TCP/IP suite.
HTTP and FTP
300 Appendix C / Answers to Review Questions

10. What method of the Winsock control is called to accept a request for a
TCP/IP connection?
Winsock1.Accept requested
Chapter 12
1. What is UML?
Unified Modeling Language — it is a tool for designing object-oriented
programs.
2. What are the three sections in a class diagram?
Name, member variables, and member functions
3. What is MSF?
Microsoft Solutions Framework
4. What are the phases in MSF?
Envisioning, planning, coding, stabilizing
5. What three things must be covered in the testing phase of the three-step
plan?
Valid data, invalid data, and extreme data
6. What are the three main phases of the three-step plan?
Planning, coding, and testing
7. What are the three types of errors?
Syntax, run-time, logic
8. List four types of UML diagrams.
Class, use-case, activity, component, deployment, interaction, sequence,
collaboration, state
9. What is the most difficult type of error to fix?
Logic error
10. What is a syntax error?
An error in the use of the language itself.
Appendix C / Answers to Review Questions 301
Appendix
C

Chapter 13
1. What is a data structure?
A structured way of storing and processing data.
2. How does a queue process data?
Data that is first in is also the first to be processed (FIFO).
3. What is Big O notation?
A methodology for noting the speed of an algorithm.
4. Is there a difference in the Big O notation for an algorithm that requires
2N passes and one that requires 2N + 1 passes?
No, since the constant value +1 will not significantly alter the algorithm’s
speed, both algorithms would be considered 2N.
5. How does a stack process data?
The last data put into the stack will be the first to be processed (LIFO).
6. How does a quicksort work?
By dividing a list in half and recursively working through each half.
7. Is an array a type of data structure?
Yes
8. List four different data structures.
Stack, queue, list, linked list, double linked list, list tree, binary tree, hash
table
9. What happens if the head pointer on a queue reaches the same value as
the tail pointer?
If there is proper error handling and validation, the user will get a message
indicating that the queue is full. If not, the queue will begin to overwrite
unprocessed data with new data.
10. Which variable is usually the fastest in any speed test?
Integer
302 Appendix C / Answers to Review Questions

Chapter 14
1. What is the purpose of the Application object in the Outlook model?
It represents the Outlook application.
2. How do you create a reference to the Outlook object model?
Select Project | Add Reference
3. What is the code to create an instance of the object model that references
a currently running instance of the application?
Set OutApp = GetObject("", "Outlook.Application")
4. What object represents the current window?
Explorer
5. What object represents the toolbar?
Command bar
6. What is the code to create an instance of the object model that starts the
application running?
Set OutApp = CreateObject("Outlook.Application")
7. List three properties of the Item object.
CC, BCC, CreationTime, MessageClass, Subject, Size
Chapter 15
1. How many possible combinations are there for a 4-bit key?
16
2. What do you call an encryption algorithm that simply replaces each charac-
ter with a different character?
Caesar cipher
3. What do you call an encryption algorithm that uses several different sub-
stitution schemes?
Multiple alphabet encryption
4. What is another term for encrypting a message?
Enciphering
Appendix C / Answers to Review Questions 303
Appendix
C

5. What is another term for decrypting a message?
Deciphering
6. What is so special about 128-bit encryption?
The longer the key, the more difficult it will be to break.
7. What is PGP?
Pretty Good Privacy; it is a 128-bit encryption algorithm.
Chapter 16
1. Where is machine.config located?
In the operating system’s Microsoft.NET\config directory.
2. When should you reconfigure the security config files?
Never, unless you are absolutely certain of what you are doing.
3. Must all applications have an application config file to be distributed?
No, they only need an application config file if they require some non-stan-
dard configuration.
4. If I use only private assemblies, what must I do to install my application?
Simply copy the files to the destination directory.
5. How do I account for DLL version conflicts when installing my .NET
application?
You don’t; in .NET there are no DLL conflicts.
6. Where does the CLR check for application config files?
In the application’s directory.
7. How many security config files are there?
Three
304 Appendix C / Answers to Review Questions

Appendix D
HTML Primer
It is certainly not necessary for you to know HTML in
order to do Visual Basic programming. However, Web
applications are a major focus of the .NET architecture.
Thus, it seems prudent to give you a brief introduction to
HTML, the language of the Web, so that you have a better
understanding of what is being done. The Web Forms
application will generate HTML code for you, but if you
should need to “tweak” that code, a knowledge of HTML
will be most helpful.
HTML, or Hypertext Markup Language, is a relatively
simple markup language that Web browsers can use to dis-
play Web pages. You can write HTML code in any text
editor; I personally use Windows Notepad. When you save
the file, remember to save it as an .htm or .html file. The
browser recognizes files with the .htm and .html exten-
sions and will look in them for valid HTML code. HTML
has had a long history and has gone through a number of
revisions. Each successive revision adds more functional-
ity to HTML and with the current version (as of this
writing Version 4.0), HTML is a very powerful language
that can take some time to learn. Fortunately, most work
on Web pages can be done with just the essentials of
HTML, and that is what this appendix will teach you.
305

Note: Many tags in HTML must be closed. The <B> tag must be
closed with </B>. However, some tags such as <TD> and <TR>
do not have to be closed. Some HTML programmers prefer to close
them anyway. I do not. This is simply a style difference, but one you
will see throughout this book.
The first question is how to get the Web browser to know that the docu-
ment has HTML codes for it to read. HTML code is composed of tags that
let the browser know what is to be done with certain text. At the begin-
ning of your document, place the command <HTML> and at the end put
</HTML>, and the Web browser will know that the codes in between are
supposed to be HTML.
<HTML>
put HTML code here
</HTML>
You have to admit that this is pretty simple, but this Web page won’t do
much of anything at all. So let’s do the obligatory “Hello, World” sample
that every programming book starts off with. It will show you how to do
text and some basic HTML.
<HTML>
<HEAD>
<TITLE>My First HTML Page</TITLE>
</HEAD>
<BODY>
<P><CENTER>
<B><FONT SIZE="+2">Hello World</FONT></B>
</CENTER>
</BODY>
</HTML>
Believe it or not, this little snippet shows you most of what you need to
know about HTML. To begin with, note that everything is contained
between the <HTML> and </HTML> tags. These two commands
define the beginning and the end of the HTML document. The Web
browser will ignore any items outside these commands. Next, we have a
section that is contained between the <HEAD> and </HEAD> com-
mands. This is the header portion of your HTML document. The
<TITLE> and </TITLE> commands contain the title that will actually
appear in the title bar of your browser. Much more can be done in the
HEAD section, but that will be addressed later.
306 Appendix D / HTML Primer

Then, we have the <BODY> </BODY> commands. As you might have
guessed, this is the body of your HTML document. This is where most of
your Web page’s code goes. Inside the BODY section, we have some text
and some additional information that will define how the text will appear in
the browser. The <P> command defines the beginning and the end of a
paragraph. The <B> and </B> commands tell the browser to make
whatever text is between them bold. The <FONT SIZE="+2"> tells the
browser how big the text should be (there are a variety of methods for
doing this, as we shall see). The </FONT> command ends the Font sec-
tion of the HTML code.
By now, I trust you have noticed a pattern. All the commands have an
opening command and a closing command. Well, this is true for all but a
very few HTML commands. Just remember this rule: you close the com-
mands in opposite order of how you opened them. Notice that in the
sample code I opened the commands before the text like this:
<P><CENTER> <B><FONT SIZE="+2">, and then closed them
like this: </FONT></B></CENTER>. (<P> does not need to be
closed.) This is important to remember. You can think of this as “backing
out” of your commands.
Images and Hyperlinks
The code we have written so far gives you a very simple Web page that
displays one phrase in bold text. Admittedly, this is not very impressive,
but if you understand the concepts involved with using these HTML
commands, you conceptually understand HTML. Now let’s expand your
knowledge of HTML. Usually Web pages contain more than simply a title
and some text. Other items you might put in a Web page would include
images and links to other Web pages. Placing an image on an HTML
document is rather simple.
<IMG SRC="imagepath\imagename" WIDTH=52 HEIGHT=88 ALIGN=bottom>
You simply provide the path to the image and the name of the image,
including its file extension (such as .gif, .bmp, .jpg, etc.). The other proper-
ties in this command allow you to alter the placement and size of the
image. You can alter its width and height as well as its alignment.
Appendix D / HTML Primer 307
Appendix
D

You will also note that when you first place an image on an HTML page it
has a border around it. You can get rid of this by adding “border = 0” into
the tag, as in this example:
<IMG SRC="somepic.gif" BORDER =0>
Putting a hyperlink to another Web site or to an e-mail address is just as
simple:
<A HREF="http://www.wordware.com">
This link will connect to the URL (Uniform Resource Locator) contained
inside the quotation marks. In order to use this methodology to create an
e-mail link, simply use this:
<A HREF="mailto:[email protected]">
You simply have to change the “http://” portion to “mailto:”. Notice that all
three of the preceding methods have one thing in common: they do not
close the command in the typical manner that other HTML commands are
closed. Now let’s examine the source code for a simple but complete
HTML document:
<HTML>
<HEAD>
<TITLE>Test HTML Page</TITLE>
</HEAD>
<BODY BGCOLOR="blue">
<P>
<CENTER><B><FONT SIZE="+2">My First Web Page </FONT></B></CENTER>
<P>I am learning HTML !. I <B><I>LOVE</I></B> HTML!
<P><CENTER><IMG SRC="java.gif" ></CENTER>
<P>
<P><CENTER>You can email me at</CENTER>
<P>
<CENTER><A HREF="mailto:[email protected]">Email ME</A>
</CENTER><
<P><CENTER>Or go to this publisher's Web Site </CENTER>
<P><CENTER><A HREF="http://www.wordware.com">Wordware
Publishing</A></CENTER>
</BODY>
</HTML>
First, let me make a few clarifications. You should note a new command at
the beginning:
308 Appendix D / HTML Primer

<BODY BGCOLOR="blue">
You can change the background color of your page using this command and
any standard color. You can also set a background image for your HTML
document with a similar command:
<BODY background="mypicture.gif">
Now, I will be the first to admit that this sample Web page is very trivial.
But it does contain the basics of HTML. With the material we have
covered so far, you can display images, text, links, e-mail links, back-
ground colors, and background images—not too bad for just a few short
pages. You may also want to look at the Sample HTML folder in the down-
loadable files to see several sample HTML documents for various
purposes. These can be used as templates for your own Web pages. Exam-
ining these can give you a deeper understanding of basic HTML.
Colors and Backgrounds
Let’s examine a few other simple items we can add to our HTML docu-
ments. The first is altering text color. You can set the default text color for
the entire document, and you can alter the color of specific text. You alter
the default text color for the entire document using a technique very simi-
lar to the one used to alter the background color of the document:
<BODY TEXT="blue">
This text simply tells the browser that unless otherwise specified, all text
in this document should be blue. In addition to changing the default color
of all text in a document, you may wish to simply change the color of a
specific section of text. This is fairly easy to do as well. Instead of using
the BODY TEXT command, we use the FONT command:
<FONT COLOR="red">This is red text</FONT>
This, like the other color commands, can be used with any standard color.
There are a wide variety of tags you can use to alter the appearance and
behavior of text and images. Just a few others for you to consider would be
the <BLINK></BLINK> tags which, as the name implies, causes the
text to blink (this is only supported by Netscape and will not work in
Internet Explorer). Another example is <STRIKE></STRIKE>, which
causes the text to appear with a line through it (a strikethrough). The tags
Appendix D / HTML Primer 309
Appendix
D

we have covered so far are enough to allow you to accomplish what you
need in HTML.
Tables
The next HTML command we are going to examine is the table. You fre-
quently see tables on Web pages and they are a very good way to organize
data. You can use the tables with or without a border, and I will explain the
various reasons to use one method or the other.
First, I will show you how to create a table with a border:
<TABLE BORDER=1>
<TR>
<TD>
<P>This
<P>Is a
<TR>
<TD>
<P>Table
<TD>
<P>With a border
</TABLE>
By now, you should be able to recognize that the <TABLE> and
</TABLE> tags actually contain the table. Each <TR> tag designates
another row in the table. The <TD></TD> create a cell within that row
(TD refers to Table Data). Using those three tags you can create a table
with any number of rows or columns you wish. Notice that in the first line
of this code the BORDER property is set to 1. This means the border has
a width and is therefore visible. In some instances you may not want the
border to show. Tables can be used simply to hold images and text in rela-
tive positions. In cases such as this, you may not wish the border to show.
Below is an example of a table whose borders will not show.
<P><TABLE BORDER=0 CELLSPACING=0 CELLPADDING=0>
<TR>
<TD>
<P>This
<TD>
<P>is a
<TR>
<TD>
310 Appendix D / HTML Primer

<P>Table
<TD>
<P>With no borders or padding
</TABLE>
Notice that BORDER, CELLPADDING, and CELLSPACING are all set to
0. This causes the table itself to not be displayed. However, the contents
of the table will display. You should also notice that in both examples I
have placed text in each cell.
Lists
It is common to present data in lists. With HTML, you have access to a
variety of types of lists. The first we will discuss is the unordered list.
<UL>
<LI> First Item
<LI> Second Item
</UL>
The <UL> and </UL> tags define the code that lies between them as
being part of an unordered list. The <LI> tags identify list items. An
unordered list item will simply appear as a bullet.
An ordered list is not much different. The <LI> list item stays the same,
but the <UL> is going to change somewhat.
<OL type = I>
<LI> First Item
<LI> Second Item
</OL>
The “type =” portion of the tag tells the browser what type of list this is.
We used a capital I in our example, which will give you capital roman
numerals for your list items.
Here is a table containing all the types of ordered lists and how they
appear in your browser.
Type Result
I I. First item
II. Second item
Appendix D / HTML Primer 311
Appendix
D

Type Result
i i. First item
ii. Second item
1 1. First item
2. Second item
a a. First item
b. Second item
A A. Second item
B. Second item
Marquee
A fascinating item you can add to your Web page is the marquee. A scroll-
ing marquee takes a message or an image and scrolls it across the screen.
The basic format is this:
<MARQUEE LOOP = INFINITE> Hey this is really cool </MARQUEE>
In addition to text, you can place an image in the marquee that you can
scroll across the screen like so:
<MARQUEE LOOP = INFINITE> <IMG SRC = "mypic.gif"></MARQUEE>
You can also change the direction the marquee moves. The
<DIRECTION> tag will tell the marquee which direction to scroll to, not
from.
<MARQEE LOOP = INFINITE DIRECTION = RIGHT>Hey this is a cool marquee
</MARQUEE>
You can choose from the following directions: left, right, up, and down.
Marquees provide an interesting and relatively easy way to display
eye-catching information on your Web page.
312 Appendix D / HTML Primer

Index
A
Abs function, 135Access, creating database in, 82-83access modifiers, 8, 30, 59
Active Data Objects, see ADOActiveX DLL, 179addition operator, 29administrator configuration files, 267-268ADO (Active Data Objects), 139ADO data access, 273-274ADO.NET, 139-140
architecture, 141-142algorithm analysis, 229algorithms, 228
encryption, 255sorting, 229-234
Anchor property, 109AND, 255-256, 276App.activate statement, 42application configuration files, 266-267Application layer, 202Application object, 241applications, 17
considerations for upgrading, 272-275creating secure, 258-259deploying, 261-262packaging, 263
arrays, 60-61, 275ASP objects, 246
Application object, 247-248BrowserType object, 248Request object, 246-247Response object, 247Server object, 248Session object, 247
ASP vs. ASP.NET, 165-167ASP.NET
vs. ASP, 165-167
vs. Windows forms, 165assembly, 17, 263assembly manifest, 68assignment operator, 28
B
backgrounds, adding to HTML document,309-310
base class, 52Big O notation, 229binary tree, 225Bind method, 201binding, 273Bindings property, 109bingo sort, 234“black box” approach, 51-52Boolean data type, 24breakpoints, 218-219bubble sort, 229
example, 230-232bug, 17, 216Build window, 217-218button, 156
properties, 157Button component, 108, 113
properties, 113selecting, 113
Byte data type, 24
C
cab files, creating, 263Caesar cipher, 254calculator, creating, 43-47Catch block, 71-72, 277Char data type, 24check box, 115, 161
properties, 161-162CheckBox component, 108, 115-116
properties, 115-116
313

CheckedListBox component, 108, 121child, 52class diagram, 213class modules, 54classes, 10, 52, 53-55
adding to project, 53-54creating, 55-58
Click event code, 10-11adding, 6
client-side components, 150Close method, 70-71CLR (Common Language Runtime), 65-66code, 17
module, 17structure, 219testing, 209
coding phase, 215collections, 60-61
creating, 60-61colors, adding to HTML document, 309-310
column, see fieldcombo box, 13ComboBox component, 108, 122-123
properties, 123command button, 12
setting properties of, 4-6Command objects, 143-144comments, 32
Common Language Runtime, see CLR
Common Type System, see CTScompile, 17complex console applications, 187
creating, 187-190complex data binding, 90, 104
example, 104-105component naming conventions, 21-22component properties, 14-15, 109components
Button, 108, 113CheckBox, 108, 115-116CheckedListBox, 108, 121combo box, 13ComboBox, 108, 122-123command button, 12DateTimePicker, 108, 125-126DomainUpDown, 108, 123group box, 13
GroupBox, 108, 127-128label, 12Label, 108, 109-110LinkLabel, 108, 111-112list box, 12ListBox, 108, 119-121ListView, 108, 121-122NumericUpDown, 108, 124Panel, 108, 127picture box, 13PictureBox, 108, 124RadioButton, 108, 116-117RichTextBox, 108, 117-118TabControl, 109, 128-129text box, 11-12TextBox, 108, 114-115TrackBar, 108, 124-125TreeView, 108
components, 11-13, 17, 108-109, 173-174compound, 174creating, 178-179example, 129-131modifying, 172-173placing on a form, 4using, 15-16without user interface, 179
compound components, 174creating, 174-178
concatenation, 28operator, 29
configuration files, creating, 266configuring .NET framework, 265Connection object, 143connection speed considerations, 203-204console application, 183
complex, 187creating, 184-185objects, 185
Console object, 185Const keyword, 45constants, 45
using, 278constructor, 55ContextMenu property, 109
controls, see componentsconversion functions example, 179-181
314
Index

convertingdata types, 78VB applications to VB.NET, 271-272
Cos function, 135CTS (Common Type System), 66, 77-78Custom Color tab, 5
D
data, adding to table, 85-86data access, 273-274data binding, 89-90
complex, 90, 104example of, 90-95, 99-103, 104-105
Data Form Wizard, using, 99-103Data object, 144data state, 145-146data structures, 222, 225-226data types, 24-26
Boolean, 24Byte, 24Char, 24Date, 25Double, 24Integer, 24Long, 24Object, 25Short, 24Single, 24String, 24structure, 25user-defined, 25
data types,and speed considerations, 234-236converting, 78
database, 82creating in Access, 82-83
Datalink layer, 202DataReader object, 144DataRow object, 145DataSet object, 142, 145DataTable, 142, 146Date data type, 25, 274Date function, 41DateTimePicker component, 108, 125-126
properties, 126debug, 17Debug menu, 20
debugging, 216-219setting options for, 216-217
decision structures, 32-37decryption, 253default ports, 203delegates, 71dependent object, 240design time, 7dialog boxes, working with, 83Dim statement, 27disconnected mode, 145Dispose method, 70-71DISTINCT statement, 89distributed applications, 150division operator, 29Dock property, 109DomainUpDown component, 108, 123double linked list, 225Double data type, 24Do-Until loops, 36-37Do-While loops, 36-37drawing, 73
example, 74-75drop-down menus, 18-20
creating, 47-48
E
early binding, 273Edit menu, 18-19Else statement, 33Else-If statement, 33
using, 33-35Enabled property, 109encapsulation, 52encryption, 251, 254-255
algorithm, 255example, 252-254
equal sign, 28error handling, 71-72, 277Error object, 187errors, types of, 207-208evaluator operator, 28event handling, 71events, 4, 8, 17, 58
creating, 58-59
315
Index

examplescreating a calculator, 43-47creating a data-bound application, 90-95,
99-103, 104-105creating classes, 55-58creating complex console application,
187-190creating components from scratch, 178-179creating compound components, 174-178creating console application, 184-185creating events, 58-59creating MDI application, 132-133creating menus, 47-48creating TCP client, 195-196creating TCP server, 197-198creating UDP application, 200creating Web forms, 152-156drawing, 74-75encapsulating conversion functions, 179-181file I/O, 72-73manipulating properties, 8-10modifying components, 172-173printing, 75-77setting properties, 4-6simple substitution encryption, 252-254using bubble sort, 230-232using components, 129-131using components and properties, 15-16using Else-If, 33-35using HTML components, 163-164using LinkLabel component, 112using math functions, 135-136using recursive functions, 227-228using RichTextBox component, 118-119using string functions, 134-135using the Outlook object model, 241-245using Web forms, 167-168
Exception class, 72Explorer object, 241
Extensible Markup Language, see XML
Extensible Stylesheet Language, see XSLextreme data, 216
F
field, 81file I/O, 72
example, 72-73
File menu, 18
File Transfer Protocol, see FTPFileStream class, 73FILO (first-in/last-out), 222-223Finalize method, 55, 70firewall, 150
first-in/last-out, see FILOfixed-length strings, 275flat file, 82Folder object, 241Folders object, 241For loops, 36Format function, 41forms, 4, 17, 162
converting, 276placing components on, 4properties of, 162-163
FTP (File Transfer Protocol), 193function declaration, 8function pointer, 71functions
Abs, 135Cos, 135Date, 41Format, 41Hide, 40InputBox, 39-40Lcase, 134Left, 42Len, 40, 133Ltrim, 43, 134mid, 134MsgBox, 37-39Pow, 135Right, 43Rtrim, 134Sendkeys, 42SetFocus, 40-41Shell, 40Show, 40Sin, 135Sqrt, 135Tan, 135Time, 41Trim, 43, 133Ucase, 40, 134
316
Index

functions, 8, 17, 29declaring, 29-30math, 135string, 133-134using, 134-135, 135-136
G
garbage collection, 67, 69-70generational garbage collection, 69-70Get property, 54Graphical Device Interface (GDI) API, 73
graphical user interface, see GUIGraphics class, 73
methods of, 75group box, 13GroupBox component, 108, 127-128
properties, 128GUI (graphical user interface), 4
H
hash table, 226Hide function, 40HTML (Hypertext Markup Language), 150, 305
document elements, 307-312tags, 306
HTML componentsbutton, 156check box, 161-162form, 162-163image, 160list box, 161table, 159text area, 158text field, 157-158
HTML components, using, 163-164HTTP (Hypertext Transfer Protocol), 150, 193hyperlinks, adding to HTML document,
307-309
Hypertext Markup Language, see HTML
Hypertext Transfer Protocol, see HTTP
I
IDE (integrated development environment), 3,17
If-Then statement, 32-33IIS, 245-246IIS applications, upgrading, 276-278image component, 160
properties, 160images, adding to HTML document, 307-309Implements keyword, 62In object, 186inheritance, 52, 60INNER JOIN statement, 88input box, 39-40InputBox function, 39-40instance, 51, 52Integer data type, 24, 275
integrated development environment, see IDEinterface, 53, 62Interface keyword, 62
Internet Information Server, see IISinvalid data, 216Item object, 241Items object, 241
K
keywords glossary, 283-287
L
label, 12Label component, 108, 109-110
properties, 110
last-in/first-out, see LIFOlate binding, 73Lcase function, 134Left function, 42Len function, 40, 133LIFO (last-in/first-out), 224linked list, 225LinkLabel component, 108, 111-112
example, 112properties, 111
list, 225list box, 12, 161
properties, 161ListBox component, 108, 119-121
properties, 119-120lists, adding to HTML document, 311-312ListView component, 108, 121-122
properties, 121-122Location property, 109Locked property, 109logic errors, 208Long data type, 24loops, 36-37
317
Index

Ltrim function, 43, 134
M
machine configuration files, 267-268managed code, 69managed heap, 70managed providers, 143marquee, adding to HTML document, 312math functions, 135
using, 135-136MDI (multiple-document interface), 132MDI application, 132
creating, 131-133menus, 18-20, 47
creating, 47-48merge sort, 234message box, 37-38metadata, 66, 68methods, shared, 61-62
Microsoft Solutions Framework, see MSFmid function, 134Modifiers property, 109modules,
class, 54standard, 54
modulus operator, 28, 29MSF (Microsoft Solutions Framework),
210-211MsgBox function, 37-39multiple alphabet substitution, 254-255
multiple-document interface, see MDImultiple inheritance, 52multiple lines, displaying in text box, 115multiplication operator, 29
N
Name property, 109Namespace object, 241namespaces, 72naming conventions
for components, 21-22for variables, 27
.NET, 65architecture, 66configuring framework of, 265platform, 77
network connectivity, 203-204Network layer, 202
New keyword, 53New method, 55non-deterministic finalization, 70NOT, 276NumericUpDown component, 108, 124
O
object, 51dependent, 240
Object data type, 25object management, 70-71object model, 239-240
object-oriented design, see OODobject-oriented programming, (OOP), 51
design strategies, 211-213OleDbCommand object, 143OOD (object-oriented design), 52OOP (object-oriented programming), 51, 52
Open Systems Interconnection model, see OSImodel
operatorsaddition, 29assignment, 28concatenation, 29division, 29evaluator, 28modulus, 29multiplication, 29subtraction, 29
optimization, 234-236Optional keyword, 30-31optional parameters, 30-31OR, 255-256, 276ORDER BY statement, 88OSI model, 201-202Out object, 186Outlook object model, 241
using, 241-245
P
Panel component, 108, 127properties, 127
ParamArray keyword, 30-31parameters, 30
optional, 30-31parent, 52peer-to-peer application, 199PGP (Pretty Good Privacy), 257
318
Index

Physical layer, 202picture box, 13PictureBox component, 108, 124
properties, 124planning phase, 208-209, 214-215polymorphism, 53ports, default, 203Pow function, 135Presentation layer, 202
Pretty Good Privacy, see PGPprimary key, 85printing, 75
example, 75-77private modifier, 59private variable, 27procedure, 29program structure, 219project, 17Project menu, 19-20properties
Anchor, 109Bindings, 109ContextMenu, 109Dock, 109Enabled, 109Get, 54Location, 109Locked, 109Modifiers, 109Name, 109Set, 54Size, 109Text, 6, 110Visible, 109
properties,manipulating, 8-10setting, 4-6using, 15-16
Properties window, 5protected modifier, 59public modifier, 59public variable, 27
Q
queue, 222-224quicksort, 232-233
R
radio button, 116RadioButton component, 108, 116-117
properties, 116-117RDBMS (Relational Database Management
System), 82record, 82recursion, 226
example, 227-228
Relational Database Management System, see
RDBMSremoting, 142resources, 289-290Return keyword, 30reusable code, 67RichTextBox component, 108, 117-118
example, 118-119properties, 117-118
Right function, 43root object, 240Rtrim function, 134run time, 7running program, 6-7run-time errors, 208
S
scope, 27script, 150secure applications, creating, 258-259security configuration files, 268-269Select Case, 35SELECT statement, 87selection sort, 234Sendkeys function, 42server-side components, 149-150Session layer, 202Set property, 54SetFocus function, 40-41shared members, 61-62shared methods, 61-62Shell function, 42Short data type, 24shortcut keys, 21Show function, 40simple data binding, 90
example, 90-95, 99-103
Simple Object Access Protocol, see SOAP
319
Index

simple substitution encryption, 252-254Sin function, 135Single data type, 24Size property, 109SOAP (Simple Object Access Protocol),
168-169software design, 208-209software development plan, 214-216sorting algorithms, 229-234spaghetti code, 219speed considerations and data types, 234-236SQL (Structured Query Language), 86-89
statements, 87-89SqlCommand object, 143Sqrt function, 135stack, 224-225standard modules, 54state, 145-146
maintaining, 142statements, 17, 29StreamReader class, 73String data type, 24string functions, 133-134
using, 134-135structure data type, 25
Structured Query Language, see SQLsubclass, 52subroutines, 8, 18subtraction operator, 29syntax errors, 207-208System namespace, 66, 72System namespaces, 140
System.Drawing, 73System.Drawing.Printing, 75
T
TabControl component, 109, 128-129properties, 128-129
tables, 82, 159adding data to, 85-86adding to HTML document, 310-311creating, 84-85properties of, 159
Tan function, 135TCP client, creating, 195-196TCP server, creating, 197-198TCP vs. UDP, 198-199
TCP/IP (Transmission ControlProtocol/Internet Protocol), 193
testing phase, 209, 215-216text area, 158
properties, 158-159text box, 11-12
displaying multiple lines in, 115text field, 157-158
properties, 157-158Text property, setting, 6, 110TextBox component, 108, 114-115
properties, 114Time function, 41toolbar, creating, 96-99toolbox, 4TrackBar component, 108, 124-125
properties, 125Transmission Control Protocol/Internet
Protocol, see TCP/IPTransport layer, 202tree, 225TreeView component, 108Trim function, 43, 133Try block, 71-72, 277typecasting, 78
U
Ucase function, 40, 134UDP (User Datagram Protocol), 198
vs. TCP, 198-199UDP application, 199
creating, 200UML (Unified Modeling Language), 211-213Undo option, 18
Unified Modeling Language, see UMLUpgrade Wizard, 278-282upgrading applications, considerations for,
272-275
User Datagram Protocol, see UDPuser-defined data type, 25
V
valid data, 216value, returning, 30variables, 18, 24-27
declaring, 24dimensioning, 27naming, 26
320
Index

naming conventions for, 27private, 27public, 27
Variant data type, 274VB.NET, 65
and Web development, 149-150converting VB applications to, 271-272starting, 1-4
versioning, 263-265VES (Virtual Execution System), 67View menu, 19
Virtual Execution System, see VESVisible property, 109
Visual Basic.NET, see VB.NET
W
Web controls, 151, 181, see also HTMLcomponents
Web development and VB.NET, 149-150Web forms, 149, 151-152
creating, 152-156using, 167-168
Web services, 151, 168-169Where clause, 87Windows forms vs. ASP.NET, 165Winsock control, 194-195With-End loops, 37
X
XML (Extensible Markup Language), 140, 150documents, 141
XOR, 255-256, 276XPath, 141XSL (Extensible Stylesheet Language), 141
321
Index
Note:
The example files can be downloaded from www.wordware.com/VBNET.

AdvancedJavaScript 2ndEdition
1-55622-852-X
$54.95
7½ x 9¼
736 pp.
Search EnginePositioning
1-55622-804-X
$49.95
7½ x 9¼
576 pp.
The Official Guide to
Miva Merchant 4.X
1-55622-923-2
$42.95
7½ x 9¼
350 pp.
Delphi InternetDeveloper’s GuideDeveloper’s Guide
1-55622-801-5
$59.95
7½ x 9¼
600 pp.
Search EngineOptimization withWeb Positioning Gold
1-55622-873-2
$36.95
7½ x 9¼
400 pp.
The Official Guide to
Miva Script
Programming
1-55622-872-4
$59.95
7½ x 9¼
400 pp.
Looking for more?
Check out Wordware’s market-leadingWeb Programming/Development Library
featuring the following new releases and upcoming titles.