Publishing JavaScript Applications Writing Server-Side … 5 Session Management Service.....97 This...
324
comp.sys TCP/IP directory server World Wide Web ww Personal IStore Proxy merchant system HTML http://www Internet server security news URL HTML mail Inter navigator community system electronic commerce LiveScript Proxy Mozilla certificate ublishing Publishing Cha encryption secure sockets layer SSL Writing Server-Side JavaScript Applications December 19, 1997
Transcript of Publishing JavaScript Applications Writing Server-Side … 5 Session Management Service.....97 This...

World Wide Web
wwPerso
ore
y
merchant systemML
Int
serversecurity
ne
URL
HT
r
nacommunity system
Li
Mozill
Publis
Chat
encryp
SS
TCP/IP
nal
ISt
Prox
HT
Inte
vigator
a
hing
L
Writing Server-Side JavaScript Applications
December 19, 1997
comp.sysdirectory server
http://wwwernet
ws
ML
electronic commerce
veScript Proxycertificate
Publishing
tion
secure sockets layer

ms ware is ly allow
ay be t be
in
F
oration in f Netscape veloped
rights
mputer ata and /
n
Netscape Communications Corporation ("Netscape") and its licensors retain all ownership rights to the software prograoffered by Netscape (referred to herein as "Netscape Software") and related documentation. Use of the Netscape Softgoverned by the license agreement accompanying such Netscape Software. The Netscape Software source code is aconfidential trade secret of Netscape and you may not attempt to decipher or decompile Netscape Software or knowingothers to do so. Information necessary to achieve the interoperability of the Netscape Software with other programs mobtained from Netscape upon request. Netscape Software and its documentation may not be sublicensed and may notransferred without the prior written consent of Netscape.
Your right to copy Netscape Software and this documentation is limited by copyright law. Making unauthorized copies,adaptations, or compilation works (except for archival purposes or as an essential step in the utilization of the programconjunction with certain equipment) is prohibited and constitutes a punishable violation of the law.
THIS DOCUMENTATION IS PROVIDED "AS IS" WITHOUT WARRANTY OF ANY KIND. IN NO EVENT SHALL NETSCAPE BE LIABLE FOR ANY LOSS OF PROFITS, LOSS OF BUSINESS, LOSS OF USE OR DATA, INTERRUPTION OF BUSINESS, OR FOR INDIRECT, SPECIAL, INCIDENTAL, OR CONSEQUENTIAL DAMAGES OANY KIND, ARISING FROM ANY ERROR IN THIS DOCUMENTATION.
Netscape may revise this documentation from time to time without notice.
Copyright © 1995-97 Netscape Communications Corporation. All rights reserved.
Netscape, Netscape Navigator, and the Netscape N logo are registered trademarks of Netscape Communications Corpthe United States and other countries. Other Netscape logos, product names, and service names are also trademarks oCommunications Corporation, which may be registered in other countries. The Netscape Software includes software deby Rich Salz, and security software from RSA Data Security, Inc. Copyright © 1994, 1995 RSA Data Security, Inc. All reserved. Other product or brand names are trademarks or registered trademarks of their respective companies.
Any provision of Netscape Software to the U.S. Government is with "Restricted rights" as follows: Use, duplication or disclosure by the Government is subject to restrictions set forth in subparagraphs (a) through (d) of the Commercial CoRestricted Rights clause at FAR 52.227-19 when applicable, or in subparagraph (c) (1) (ii) of the Rights in Technical DComputer Software clause at DFARS 252.227-7013, and in similar clauses in the NASA FAR Supplement. Contractormanufacturer is Netscape Communications Corporation, 501 East Middlefield Road, Mountain View, California 94043.
You may not export the Software except in compliance with applicable export controls. In particular, if the Software is identified as not for export, then you may not export the Software outside the United States except in very limited circumstances. See the end user license agreement accompanying the Software for more details.
.
The Team:Publications: Victoria Gilbert, Antonio Padial, Sandee KarrEngineering: Ken Smith, Jawahar Malhotra, Philip Chang, Santosh Hasani, Satish Viswanatham, Timothy ChaQuality Assurance: Christine Ingalls, Irene MendozaMarketing: Basil Hashem
©Netscape Communications Corporation 1997All Rights Reserved
Printed in USA97 96 95 10 9 8 7 6 5 4 3 2 1
Netscape Communications Corporation 501 East Middlefield Road, Mountain View, CA 94043
Recycled and Recyclable Paper
Contents
Getting Started ................................................................................................ xi
What You Should Already Know ................................................................... xi
Where to Find JavaScript Information .......................................................... xii
What’s New in this Release .......................................................................... xiii
Upgrading from an Earlier Release ................................................................xv
Backward Compatibility with Earlier Releases .............................................xvi
Document Conventions ................................................................................ xix
About Sample Code ...................................................................................... xix
Part 1 Basics of JavaScript Application DevelopmentChapter 1 Introduction ................................................................................3
This chapter introduces server-side JavaScript and explains how it fits into the entire JavaScript language. It details what hardware and soft-ware you must have to use server-side JavaScript and how you must configure your web server to use server-side JavaScript.
The JavaScript Language ...................................................................................4
Client-Side JavaScript ....................................................................................5
Server-Side JavaScript ...................................................................................7
Writing Server-Side JavaScript Applications i
Architecture of JavaScript Applications ........................................................... 9
System Requirements ..................................................................................... 13
Configuration Information ............................................................................. 14
Enabling Server-Side JavaScript ................................................................. 14
Protecting the Application Manager ......................................................... 15
Setting Up for LiveConnect ....................................................................... 15
Locating the Compiler ............................................................................... 16
Chapter 2 Introduction to the Sample Applications ....................... 17
This chapter describes the sample server-side JavaScript applications that ship with Netscape web servers. It introduces using server-side Jav-aScript by working with two of the simpler sample applications.
Hello World .................................................................................................... 19
What Hello World Does ............................................................................ 20
Looking at the Source Script ..................................................................... 21
Modifying Hello World .............................................................................. 24
Hangman ......................................................................................................... 25
Looking at the Source Files ....................................................................... 26
Debugging Hangman ................................................................................ 29
Chapter 3 Mechanics of Developing JavaScript Applications ..... 31
This chapter describes the process of developing your application, such as how to use the JavaScript application compiler and how to use the Application Manager of Netscape servers to install or debug your ap-plication. For information on using only client-side JavaScript, see the JavaScript Guide.
Basic Steps in Building an Application ......................................................... 31
JavaScript Application Manager Overview .................................................... 33
Creating Application Source Files .................................................................. 35
Compiling an Application .............................................................................. 36
Installing a New Application ......................................................................... 39
Application URLs ....................................................................................... 42
ii Writing Server-Side JavaScript Applications
Controlling Access to an Application ............................................................ 43
Modifying Installation Fields .......................................................................... 43
Removing an Application ............................................................................... 44
Starting, Stopping, and Restarting an Application ........................................ 44
Running an Application ................................................................................. 45
Debugging an Application ............................................................................. 45
Using the Application Manager ................................................................. 46
Using Debug URLs ..................................................................................... 47
Using the debug Function ......................................................................... 48
Deploying an Application .............................................................................. 48
Application Manager Details .......................................................................... 49
Configuring Default Settings ...................................................................... 49
Under the Hood ......................................................................................... 51
Part 2 Server-Side JavaScript FeaturesChapter 4 Basics of Server-Side JavaScript ......................................... 55
This chapter describes the basics of server-side JavaScript. It introduces server-side functionality and the differences between client-side and server-side JavaScript. The chapter describes how to embed server-side JavaScript in HTML files. It discusses what happens at runtime on the client and on the server, so that you can understand what to do when. The chapter describes how you use JavaScript to change the HTML page sent to the client and, finally, how to share information between the client and server processes.
What to Do Where ......................................................................................... 56
Overview of Runtime Processing .................................................................. 58
Server-Side Language Overview .................................................................... 60
Core Language ........................................................................................... 61
Usage .......................................................................................................... 63
Environment ............................................................................................... 64
Classes and Objects ................................................................................... 66
Embedding JavaScript in HTML ..................................................................... 68
The SERVER tag ......................................................................................... 69
Backquotes ................................................................................................. 70
When to Use Each Technique ................................................................... 72
Writing Server-Side JavaScript Applications iii
Runtime Processing on the Server ................................................................. 72
Constructing the HTML Page ......................................................................... 77
Generating HTML ...................................................................................... 77
Flushing the Output Buffer ....................................................................... 78
Changing to a New Client Request ........................................................... 79
Accessing CGI Variables ................................................................................ 80
Communicating Between Server and Client ................................................. 84
Sending Values from Client to Server ....................................................... 84
Sending Values from Server to Client ....................................................... 89
Using Cookies ............................................................................................ 91
Garbage Collection ......................................................................................... 94
Chapter 5 Session Management Service .............................................. 97
This chapter describes the Session Management Service objects avail-able in server-side JavaScript for sharing data among multiple client requests to an application, among multiple users of a single applica-tion, or even among multiple applications on a server.
Overview of the Predefined Objects ............................................................. 97
The request Object ....................................................................................... 101
Properties ................................................................................................. 102
Working with Image Maps ...................................................................... 104
The client Object .......................................................................................... 104
Properties ................................................................................................. 105
Uniquely Referring to the client Object .................................................. 107
Creating a Custom client Object ............................................................. 108
The project Object ........................................................................................ 112
Properties ................................................................................................. 112
Sharing the project Object ....................................................................... 113
The server Object ......................................................................................... 113
Properties ................................................................................................. 114
Sharing the server Object ........................................................................ 115
Techniques for Maintaining the client Object ............................................. 115
Comparing Client-Maintenance Techniques ........................................... 116
Client-side Techniques ............................................................................ 120
iv Writing Server-Side JavaScript Applications
Server-Side Techniques ........................................................................... 123
The Lifetime of the client Object ............................................................ 126
Manually Appending client Properties to URLs ...................................... 128
Sharing Objects Safely with Locking ........................................................... 130
Using Instances of Lock ........................................................................... 132
Special Locks for project and server Objects ......................................... 134
Avoiding Deadlock .................................................................................. 135
Chapter 6 Working with Java and CORBA Objects Through
LiveConnect ................................................................................................... 139
This chapter describes using LiveConnect to connect your server-side JavaScript application to Java components or classes on the server. Through Java you can connect to CORBA-compliant distributed ob-jects using Netscape Internet Service Broker for Java.
Predefined Java Classes ................................................................................ 141
Data Type Conversion .................................................................................. 141
Calling Java from JavaScript ......................................................................... 143
Referring to a Java Object in JavaScript .................................................. 143
Example of JavaScript Calling Java ......................................................... 145
Calling JavaScript from Java ......................................................................... 146
Referring to a JavaScript Object in Java .................................................. 147
Threading ................................................................................................. 147
Example of Java Calling JavaScript ......................................................... 148
Accessing CORBA Services .......................................................................... 149
Flexi Sample Application ......................................................................... 151
Deployment Alternatives ......................................................................... 159
Chapter 7 Other JavaScript Functionality ......................................... 161
This chapter describes additional server-side JavaScript functionality you can use to send email messages from you application, access the server file system, include external libraries in your application, or di-rectly manipulate client requests and client responses.
Mail Service ................................................................................................... 161
File System Service ....................................................................................... 164
Security Considerations ........................................................................... 164
Writing Server-Side JavaScript Applications v

Creating a File Object .............................................................................. 165
Opening and Closing a File .................................................................... 165
Locking Files ............................................................................................ 166
Working with Files ................................................................................... 167
Example .................................................................................................... 171
Working with External Libraries .................................................................. 171
Guidelines for Writing Native Functions ................................................ 173
Identifying Library Files ........................................................................... 173
Registering Native Functions ................................................................... 174
Using Native Functions in JavaScript ...................................................... 174
Request and Response Manipulation .......................................................... 176
Request Header ........................................................................................ 177
Request Body ........................................................................................... 178
Response Header ..................................................................................... 179
Part 3 LiveWire Database ServiceChapter 8 Connecting to a Database ................................................... 183
This chapter discusses how to use the LiveWire Database Service to connect your application to DB2, Informix, ODBC, Oracle, or Sybase relational databases. It describes how to choose the best connection methodology for your application.
Interactions with Databases ......................................................................... 183
Approaches to Connecting .......................................................................... 185
Database Connection Pools ......................................................................... 187
Single-Threaded and Multithreaded Databases .......................................... 189
Managing Connection Pools ........................................................................ 191
Sharing a Fixed Set of Connection Pools ............................................... 192
Sharing an Array of Connection Pools ................................................... 194
Individual Database Connections ................................................................ 196
Maintaining a Connection Across Requests ............................................ 198
Waiting for a Connection ........................................................................ 200
Retrieving an Idle Connection ................................................................ 201
vi Writing Server-Side JavaScript Applications
Chapter 9 Working with a Database ................................................... 207
This chapter discusses working with DB2, Informix, ODBC, Oracle, or Sybase relational databases. It describes how to retrieve information from the database and use it in your application, how to work with database transactions, and how to execute database stored proce-dures.
Automatically Displaying Query Results ..................................................... 208
Executing Arbitrary SQL Statements ............................................................ 209
Manipulating Query Results with Cursors ................................................... 210
Creating a Cursor ..................................................................................... 211
Displaying Record Values ........................................................................ 212
Displaying Expressions and Aggregate Functions ................................. 214
Navigating with Cursors .......................................................................... 215
Working with Columns ............................................................................ 216
Changing Database Information ............................................................. 217
Managing Transactions ................................................................................. 219
Using the Transaction-Control Methods ................................................. 220
Working with Binary Data ........................................................................... 222
Calling Stored Procedures ............................................................................ 225
Exchanging Information .......................................................................... 225
Steps for Using Stored Procedures .......................................................... 227
Registering the Stored Procedure ............................................................ 228
Defining a Prototype for a Stored Procedure ......................................... 229
Executing the Stored Procedure .............................................................. 229
Working with Result Sets ......................................................................... 231
Working with Return Values ................................................................... 237
Working with Output Parameters ........................................................... 238
Informix and Sybase Exceptions ............................................................. 239
Chapter 10 Configuring Your Database ............................................. 241
This chapter describes how to set up your database to run with the LiveWire Database Service. You should read this chapter and “Config-uration Information” on page 14 before you try to use LiveWire with
Writing Server-Side JavaScript Applications vii
your JavaScript applications.
Checking Your Database Configuration ...................................................... 242
Supported Database Clients and ODBC Drivers ........................................ 244
DB2 ............................................................................................................... 247
DB2 Remote ............................................................................................. 247
DB2 Local ................................................................................................. 248
Informix ........................................................................................................ 249
Informix Remote ...................................................................................... 250
Informix Local .......................................................................................... 251
ODBC ............................................................................................................ 252
ODBC Data Source Names (NT only) .................................................... 252
OpenLink ODBC Driver (Solaris only) ................................................... 254
Visigenic ODBC Driver (Unix only) ....................................................... 255
Oracle ............................................................................................................ 255
Oracle Remote ......................................................................................... 256
Oracle Local ............................................................................................. 257
Sybase ........................................................................................................... 258
Sybase Remote ......................................................................................... 258
Sybase Local ............................................................................................. 259
Sybase (Unix only) .................................................................................. 260
Chapter 11 Data Type Conversion ....................................................... 263
This chapter describes how the JavaScript runtime engine on the server converts between the more complex data types used in relational da-tabases and the simpler ones defined for JavaScript.
Working with Dates and Databases ............................................................ 264
Data-Type Conversion by Database ............................................................ 264
Chapter 12 Error Handling for LiveWire .......................................... 267
This chapter describes the types of errors you can encounter when working with relational databases.
Return Values ................................................................................................ 268
Number ..................................................................................................... 268
Object ....................................................................................................... 269
viii Writing Server-Side JavaScript Applications
Boolean .................................................................................................... 270
String ......................................................................................................... 271
Void .......................................................................................................... 271
Error Methods ............................................................................................... 272
Status Codes .................................................................................................. 273
Chapter 13 Videoapp and Oldvideo Sample Applications .......... 275
This chapter describes the videoapp sample application, which illus-trates the use of the LiveWire Database Service. It describes how to con-figure your environment to run the videoapp and oldvideo sample applications.
Configuring Your Environment ................................................................... 276
Connecting to the Database and Recompiling ....................................... 276
Creating the Database .............................................................................. 277
Running Videoapp ........................................................................................ 281
Looking at the Source Files .......................................................................... 283
Application Architecture .......................................................................... 284
Modifying videoapp ................................................................................. 286
Index ................................................................................................................ 287
Writing Server-Side JavaScript Applications ix

x Writing Server-Side JavaScript Applications
Getting Started
This book describes creating server-side JavaScript applications. JavaScript is Netscape’s cross-platform, object-based scripting language for client and server applications.
What You Should Already KnowThis book assumes you have this basic background:
• A general understanding of the Internet and the World Wide Web (WWW).
• A general understanding of client-side JavaScript. This book does not duplicate core or client-side language information.
• Good working knowledge of Hypertext Markup Language (HTML). Experience with forms and the Common Gateway Interface (CGI) is also useful.
• Some programming experience in Pascal, C, Perl, Visual Basic, or a similar language.
• If you’re going to use the LiveWire Database Service, familiarity with relational databases and a working knowledge of Structured Query Language (SQL).
Getting Started xi
Where to Find JavaScript Information
Where to Find JavaScript InformationBecause JavaScript can be approached on several levels, its documentation has been split across several books to facilitate your introduction. The suite of online JavaScript books includes:
• JavaScript Guide1 provides information about the core JavaScript language and its client-side objects. You should be familiar with the information about the core language contained in the JavaScript Guide before you read this book.
• JavaScript Reference2 provides reference material for the entire JavaScript language, including both client-side and server-side JavaScript.
• What’s New in JavaScript 1.23 contains a summary of what’s changed in core and client-side JavaScript between JavaScript 1.1 and JavaScript 1.2 (corresponding to the changes between Navigator 3 and Navigator 4).
• Writing Server-Side JavaScript Applications4 (this book) provides information about JavaScript’s server-side objects and functions. In some cases, core language features work differently on the client than on the server. These differences are also discussed in this book. Finally, this book provides extra information you need to create an entire JavaScript application.
• Enterprise Server 3.x Release Notes5 provides late-breaking information on Enterprise Server 3.x, including some information relevant to server-side JavaScript.
The Netscape Enterprise Server Programmer’s Bookshelf6 summarizes the different programming interfaces available with the 3.x versions of Netscape web servers. Use this guide as a roadmap or starting point for exploring the Enterprise Server documentation for developers.
1. http://developer.netscape.com/library/documentation/communicator/jsguide4/index.htm
2. http://developer.netscape.com/library/documentation/communicator/jsref/index.htm3. http://developer.netscape.com/library/documentation/communicator/jsguide/
js1_2.htm4. http://developer.netscape.com/library/documentation/enterprise/wrijsap/index.htm 5. http://home.netscape.com/eng/server/webserver/3.0/6. http://developer.netscape.com/library/documentation/enterprise/bookshelf/
index.htm
xii Writing Server-Side JavaScript Applications
What’s New in this Release
In addition, other Netscape books discuss certain aspects of JavaScript particularly relevant to their topic area. These books are mentioned where relevant throughout this book.
The Netscape web site contains much information that can be useful when you’re creating JavaScript applications. Some URLs of particular interest include:
• http://home.netscape.com/one_stop/intranet_apps/index.html
This is the Netscape AppFoundry Online home page. Netscape AppFoundry Online is a source for starter applications, technical information, tools, and expert forums for quickly building and dynamically deploying open intranet applications. This site also includes troubleshooting information in the resources section and extra help on setting up your JavaScript environment.
• http://help.netscape.com/products/tools/livewire
This is Netscape’s technical support page for information on the LiveWire Database Service. It contains lots of useful pointers to information on using LiveWire in your JavaScript applications.
• http://developer.netscape.com/one/javascript/ssjs/index.html
This is Netscape’s support page for information on server-side JavaScript. For quick access to this URL, click the Documentation link on the Netscape Enterprise Server Application Manager.
• http://developer.netscape.com/news/viewsource/index.html
This is View Source Magazine, Netscape’s online technical magazine for developers. It is updated every other week and frequently contains articles of interest to JavaScript developers.
What’s New in this ReleaseWith the release of the 3.x versions of Netscape web servers, Netscape LiveWire 1.01 is fully integrated into the web servers. Since LiveWire database connectivity is now integrated as the LiveWire Database Service portion of server-side JavaScript, developers do not have to install LiveWire as a separate product. Simply turn on the JavaScript support in the Administration Server to make the necessary components available.
Getting Started xiii
What’s New in this Release
The following improvements have been made to server-side JavaScript:
• Support for JavaScript 1.2. See What’s New in JavaScript 1.2.
• New Lock class allows safe sharing of information with multiple incoming requests. See “Sharing Objects Safely with Locking” on page 130.
• New SendMail class lets you generate email from JavaScript. See “Mail Service” on page 161.
• Property values can be of any data type, rather than just strings, for the project , server , and request objects. In particular, you can now use project and server objects to store references to other objects. See “The project Object” on page 112, “The server Object” on page 113, and “The request Object” on page 101.
• Direct access to HTTP request and response headers. See “Request and Response Manipulation” on page 176.
• Access to Java classes using LiveConnect. See Chapter 6, “Working with Java and CORBA Objects Through LiveConnect.”
• Access to legacy applications using IIOP. See Chapter 6, “Working with Java and CORBA Objects Through LiveConnect.”
• LiveWire has support for multiple simultaneous connections to multiple databases. See Chapter 8, “Connecting to a Database.”
• LiveWire database connections and transactions (and the objects used with them) can span multiple client requests instead of having to be restarted for each request. See “Individual Database Connections” on page 196 and “Managing Transactions” on page 219.
• LiveWire has support for stored procedures. See “Calling Stored Procedures” on page 225.
• LiveWire now has ODBC support under Unix. See “Supported Database Clients and ODBC Drivers” on page 244.
• LiveWire supports multithreading of Informix, Oracle, and Sybase database client libraries for improved performance and scalability. See “Supported Database Clients and ODBC Drivers” on page 244. This support is available only if the underlying platform supports multithreading. For information on which platforms support it, see Enterprise Server 3.x Release Notes
xiv Writing Server-Side JavaScript Applications
Upgrading from an Earlier Release
Upgrading from an Earlier ReleaseIf you have previously installed a 2.0 version of a Netscape web server, you should migrate the server settings when you install a 3.x version of a Netscape web server. For information on how to install the server and migrate settings, see the administrator’s guide for your web server. If you do not migrate old server settings when you install the server, you can migrate them later, using the “Migrate from previous version” link on the Netscape Server Administration Page. Information on this link is also in the administrator’s guide for your web server.
If you have previously created JavaScript applications using LiveWire 1.x, you should be aware of these changes that occur when you upgrade to 3.x and migrate old server settings:
• If the 2.x server had LiveWire turned on, the 3.x server will have server-side JavaScript turned on. Whether or not the Application Manager requires a password is also preserved. For more information, see “Configuration Information” on page 14.
• The existing livewire.conf file is upgraded and renamed jsa.conf . The new jsa.conf file points to the new Application Manager and the new sample applications. It also contains entries for all other applications you had in the old livewire.conf file. For details of the jsa.conf file, see “Application Manager Details” on page 49.
• However, upgrading server settings does not move your applications nor does it recompile them for use with the 3.x web server. If your existing applications are in the LiveWire/docs directory, you must move (or copy) them to a new directory. In addition, you must manually recompile user-defined applications before you can use them with a 3.x web server, as described in “Backward Compatibility with Earlier Releases” on page xvi. Be aware that an application can’t be used with Enterprise Server 2.0 after recompiling. If you want to use an application with both servers, you should copy the application instead of moving it.
• Many of the sample applications that shipped with LiveWire 1.x have been changed. The upgrade process installs new versions of the world , hangman, cipher , dbadmin , and viewer sample applications. In addition, the sample application lwccall has been updated and renamed jsaccall . The sample application video has been updated and renamed oldvideo ; a new version of this application, using new LiveWire Database Service features, is
Getting Started xv
Backward Compatibility with Earlier Releases
named videoapp . Finally, there are several new sample applications, bank , bugbase , flexi , and sendmail , that demonstrate other new server-side JavaScript features. For information on the sample applications, see Chapter 2, “Introduction to the Sample Applications.”
If you modified the old sample applications in the old samples directory and you want to transfer your changes to the new server, you must move (or copy) them and recompile them, as you do your own applications.
• For information on changes you may have to make in your code when upgrading, see the next section.
Backward Compatibility with Earlier ReleasesYou must also be aware of these changes in the behavior of server-side JavaScript applications.
• Web files compiled with the earlier version will not run with 3.x Netscape web servers. You must recompile all of your existing JavaScript applications. In earlier releases, the JavaScript application compiler was called lwcomp . It is now called jsac and has additional options. For information on using the compiler, see “Compiling an Application” on page 36. Once you recompile your applications, they will not work under LiveWire 1.x.
• Some changes in core and client-side JavaScript may require you to change your JavaScript source code. For information on these changes, see What’s New in JavaScript 1.2. This section describes only the changes in server-side JavaScript.
• In earlier releases, you could refer to an object’s properties by their property name or by their ordinal index. In this release, however, if you initially define a property by its name, you must always refer to it by its name, and if you initially define a property by an index, you must always refer to it by its index. So, the following code is now illegal:
obj = new Object();obj.prop = 42;write(obj[0] == 42); //Illegal! Cannot refer to obj.prop as obj[0]
• In earlier releases, if you referred to a defined variable for which you had provided no value, it returned NULL. In this release, it returns undefined . Consider this code:
xvi Writing Server-Side JavaScript Applications
Backward Compatibility with Earlier Releases
<server>var myVar;write("The value of myVar is: " + myVar);<server>
In earlier releases, that code would produce this output:
The value of myVar is: NULL
Now it produces this output:
The value of myVar is: undefined
• In earlier releases, the runtime engine created client and request objects for an application’s initial page. The properties of this client object were not available on other pages. In this release, the runtime engine creates neither a client object nor a request object for an application’s initial page. You can use the following statements to create these objects:
client = new Object();request = new Object();
Note, however, that if you create these objects, their properties are still not available on any other pages of the application.
• LiveWire 1.x included Site Manager for managing your web sites. This functionality was removed from the 3.x web servers. You can instead use the Web Publisher to publish your documents, and you must use the command-line compiler, jsac , to compile your applications.
• The behavior of the lock method for the project and server objects has changed. In earlier releases, if you called project.lock or server.lock , no other thread (for either the same or a different application) could make any changes to the project or server object until you called project.unlock or server.unlock . That is, the locking did not require any cooperation.
In this release, cooperation among different applications or pages in the same application is required. If one thread calls project.lock or server.lock , and if another thread then calls the same method, that method will wait until the first thread calls project.unlock or server.unlock or until a specified timeout period has elapsed. If, however, the second thread does not call project.lock or server.lock , it can make changes to those objects. For more information on locking, see “Sharing Objects Safely with Locking” on page 130.
• There are several changes in how you can use the LiveWire Database Service to connect your JavaScript application to a relational database:
Getting Started xvii
Backward Compatibility with Earlier Releases
— Very Important: In this release, if your database server and web server are not on the same machine, you must install a database client to use the LiveWire Database Service. In earlier releases, this was optional. In addition, the required version of the client library may be newer than that required in LiveWire 1.x. For more information, see “Supported Database Clients and ODBC Drivers” on page 244.
— In earlier releases, you could leave a database connection or cursor open and allow the system to close it for you. In this release, the system no longer does this. When finished with them, your code must release all connections opened with DbPool objects and close all cursors opened either with database or Connection objects. For information on managing connections, see Chapter 8, “Connecting to a Database.” For information on cursors, see “Manipulating Query Results with Cursors” on page 210.
— In earlier releases, you could choose to modify a row with an updatable cursor without first starting an explicit transaction by calling beginTransaction . In this release, you must always use explicit transaction control (with the beginTransaction , commitTransaction , and rollbackTransaction methods) when using an updatable cursor and making changes to the database. For information on cursors, see “Manipulating Query Results with Cursors” on page 210. For information on transactions, see “Managing Transactions” on page 219.
— In earlier releases, if a JavaScript error occurred while a transaction was in progress, that transaction was committed. In this release, if the transaction is through the database object, the transaction is rolled back. If the transaction is through a DbPool object, the value of the commitFlag parameter when the connection was established determines whether the transaction is committed or rolled back. For information on establishing connections, see Chapter 8, “Connecting to a Database.”
xviii Writing Server-Side JavaScript Applications
Document Conventions
Document ConventionsJavaScript applications run on many operating systems; the information here applies to all versions. File and directory paths are given in Windows format (with backslashes separating directory names). For Unix versions, the directory paths are the same, except that you use slashes instead of backslashes to separate directories.
This book uses uniform resource locators (URLs) of the form
http:// server.domain / path / file .html
In these URLs, server represents the name of the server on which you run your application, such as research1 or www; domain represents your Internet domain name, such as netscape.com or uiuc.edu ; path represents the directory structure on the server; and file .html represents an individual filename. In general, items in italics in URLs are placeholders and items in normal monospace font are literals. If your server has Secure Sockets Layer (SSL) enabled, you would use https instead of http in the URL.
This book uses the following font conventions:
• The monospace font is used for sample code and code listings, API and language elements (such as function names and class names), filenames, pathnames, directory names, HTML tags, and any text that must be typed on the screen. (Monospace italic font is used for placeholders embedded in code.)
• Italic type is used for book titles, emphasis, variables and placeholders, and words used in the literal sense.
• Boldface type is used for glossary terms.
About Sample CodeThis book contains sample JavaScript code. This code was tested running Netscape Communicator on a Windows 95 machine and Netscape Enterprise Server 3.0 on a Unix machine, and connected to an Informix database.
Getting Started xix

About Sample Code
xx Writing Server-Side JavaScript Applications
1
Basics of JavaScript Application Development• Introduction
• Introduction to the Sample Applications
• Mechanics of Developing JavaScript Applications
Chapter 1IntroductionChapter 2Introduction to the Sample ApplicationsChapter 3Mechanics of Developing JavaScript Applications

2 Writing Server-Side JavaScript Applications
C h a p t e r
1Introduction
JavaScript is Netscape’s cross-platform, object-based scripting language for client and server applications. JavaScript lets you create applications that run over the Internet. Using JavaScript, you can create dynamic HTML pages that process user input and maintain persistent data using special objects, files, and relational databases. You can build applications ranging from internal corporate information management and intranet publishing to mass-market electronic transactions and commerce. Through JavaScript’s LiveConnect functionality, your applications can access Java and CORBA distributed-object applications.
This chapter introduces server-side JavaScript and explains how it fits into the entire JavaScript language. It details what hardware and software you must have to use server-side JavaScript and how you must configure your web server to use server-side JavaScript.
Chapter 1, Introduction 3

The JavaScript Language
The JavaScript LanguageSome developers choose to use JavaScript solely on the client (in Navigator or another web browser). Larger-scale applications frequently have more complex needs, such as communicating with a relational database, providing continuity of information from one invocation to another of the application, or performing file manipulations on a server. For these more demanding situations, Netscape web servers contain server-side JavaScript, which has extra JavaScript objects to support server-side capabilities.
Some aspects of the core language act differently when run on a server. In addition, to support the increased performance demands in these situations, JavaScript run on the server is compiled before installation, whereas the runtime engine compiles each client-side JavaScript script at runtime.
The components of JavaScript are illustrated in Figure 1.1.
Figure 1.1 The JavaScript language
CLIENT-SIDE JAVASCRIPT
Core JavaScript
Core language features (suchas variables, functions, andLiveConnect)
Client-sideadditions(such as window and history)
Server-side additions(such as serverand database
SERVER-SIDE JAVASCRIPT
Client-side
Server-side
4 Writing Server-Side JavaScript Applications
The JavaScript Language
Client-side JavaScript (or Navigator JavaScript) encompasses the core language plus extras such as the predefined objects only relevant to running JavaScript in a browser. Server-side JavaScript encompasses the same core language plus extras such as the predefined objects and functions only relevant to running JavaScript on a server. For a complete list of the differences, see “Server-Side Language Overview” on page 60.
In this manual, the term JavaScript application refers to an application created using the full capabilities of JavaScript, that is, both client-side JavaScript and server-side JavaScript.
Client-side JavaScript is embedded directly in HTML pages and is interpreted by the browser completely at runtime. Because production applications frequently have greater performance demands upon them, JavaScript applications that take advantage of its server-side capabilities are compiled before they are deployed. The next two sections introduce you to the workings of JavaScript on the client and on the server.
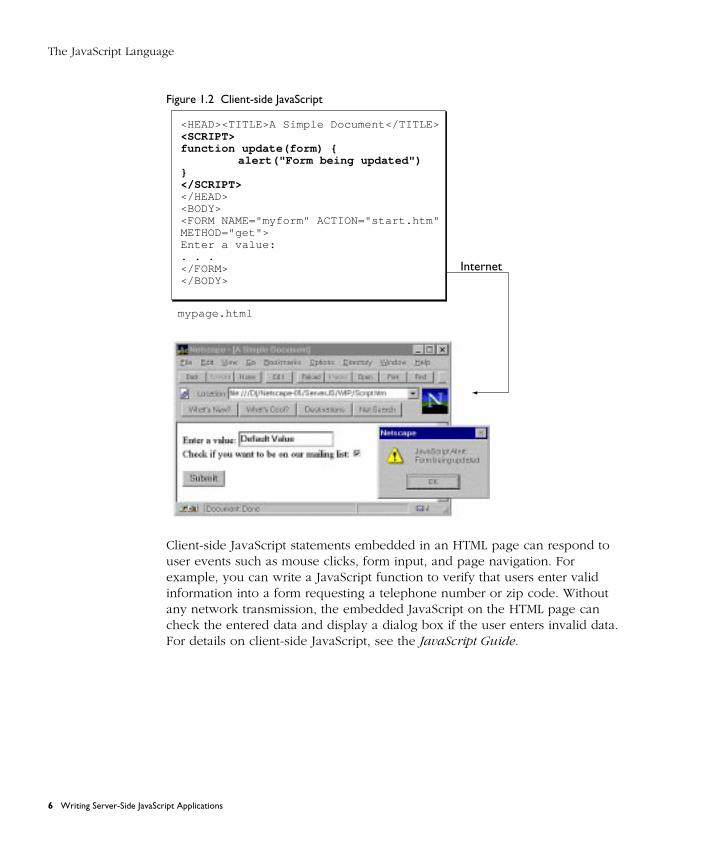
Client-Side JavaScriptWeb browsers such as Netscape Navigator 2.0 (and later versions) can interpret client-side JavaScript statements embedded in an HTML page. When the browser (or client) requests such a page, the server sends the full content of the document, including HTML and JavaScript statements, over the network to the client. The client reads the page from top to bottom, displaying the results of the HTML and executing JavaScript statements as it goes. This process, illustrated in Figure 1.2, produces the results that the user sees.
Chapter 1, Introduction 5
The JavaScript Language
Figure 1.2 Client-side JavaScript
Client-side JavaScript statements embedded in an HTML page can respond to user events such as mouse clicks, form input, and page navigation. For example, you can write a JavaScript function to verify that users enter valid information into a form requesting a telephone number or zip code. Without any network transmission, the embedded JavaScript on the HTML page can check the entered data and display a dialog box if the user enters invalid data. For details on client-side JavaScript, see the JavaScript Guide.
<HEAD><TITLE>A Simple Document</TITLE><SCRIPT>function update(form) {
alert("Form being updated")}</SCRIPT></HEAD><BODY><FORM NAME="myform" ACTION="start.htm"METHOD="get">Enter a value:. . .</FORM></BODY>
mypage.html
Internet
6 Writing Server-Side JavaScript Applications

The JavaScript Language
Server-Side JavaScript
On the server, you also embed JavaScript in HTML pages. The server-side statements can connect to relational databases from different vendors, share information across users of an application, access the file system on the server, or communicate with other applications through LiveConnect and Java. HTML pages with server-side JavaScript can also include client-side JavaScript.
In contrast to pure client-side JavaScript scripts, HTML pages that use server-side JavaScript are compiled into bytecode executable files. These application executables are run in concert with a web server that contains the JavaScript runtime engine. For this reason, creating JavaScript applications is a two-stage process.
In the first stage, shown in Figure 1.3, you (the developer) create HTML pages (which can contain both client-side and server-side JavaScript statements) and JavaScript files. You then compile all of those files into a single executable.
Figure 1.3 Server-side JavaScript during development
Web file(bytecodeexecutable)
JavaScriptapplicationcompiler
...function Substitute( guess, word, answer) {
var result = "";var len = word.length;var pos = 0;while( pos < len ) {
var word_char = word.substring( pos, pos + 1);var answer_char = answer.substring( pos, pos + 1 );if ( word_char == guess ) result = result + guess;else result = result + answer_char;pos = pos + 1;
}return result;
}
hangman.js
hangman.htm
<HTML> <HEAD> <TITLE> Hangman </TITLE></HEAD><BODY> </H1> Hangman </H1>
<SERVER>if (client.gameno == null) {
client.gameno = 1client.newgame = "true"
}</SERVER>You have used the following letters so far:<SERVER>write(client.used)</SERVER><FORM METHOD="post" ACTION="hangman.htm"><P>What is your guess?<INPUT TYPE="text" NAME="guess" SIZE="1">...</BODY></HTML>
Chapter 1, Introduction 7
The JavaScript Language
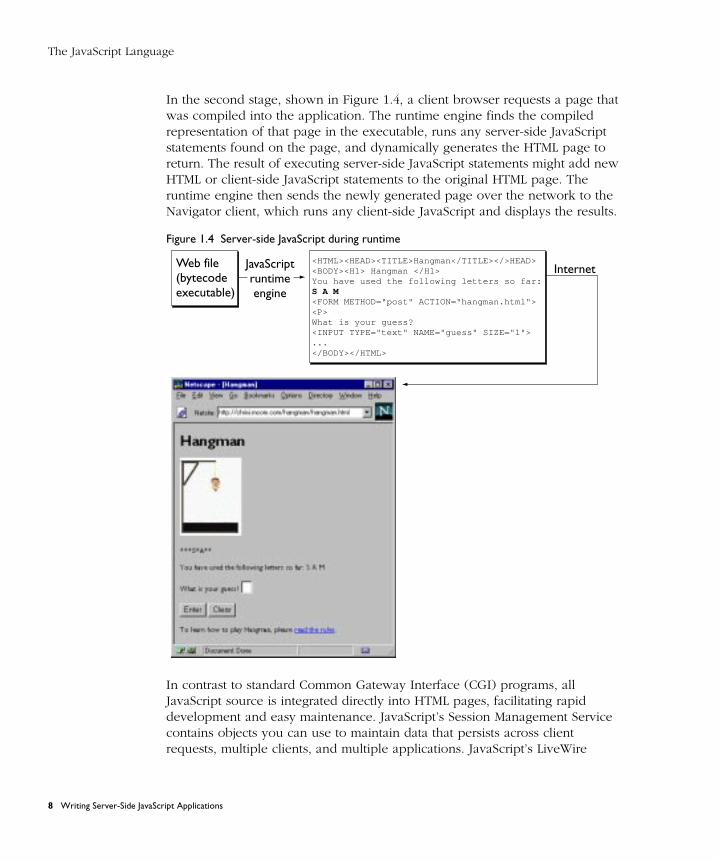
In the second stage, shown in Figure 1.4, a client browser requests a page that was compiled into the application. The runtime engine finds the compiled representation of that page in the executable, runs any server-side JavaScript statements found on the page, and dynamically generates the HTML page to return. The result of executing server-side JavaScript statements might add new HTML or client-side JavaScript statements to the original HTML page. The runtime engine then sends the newly generated page over the network to the Navigator client, which runs any client-side JavaScript and displays the results.
Figure 1.4 Server-side JavaScript during runtime
In contrast to standard Common Gateway Interface (CGI) programs, all JavaScript source is integrated directly into HTML pages, facilitating rapid development and easy maintenance. JavaScript’s Session Management Service contains objects you can use to maintain data that persists across client requests, multiple clients, and multiple applications. JavaScript’s LiveWire
Web file(bytecodeexecutable)
JavaScriptruntimeengine
Internet<HTML><HEAD><TITLE>Hangman</TITLE></>HEAD><BODY><H1> Hangman </H1>You have used the following letters so far:S A M<FORM METHOD="post" ACTION="hangman.html"><P>What is your guess?<INPUT TYPE="text" NAME="guess" SIZE="1">...</BODY></HTML>
8 Writing Server-Side JavaScript Applications
Architecture of JavaScript Applications
Database Service provides objects for database access that serve as an interface to Structured Query Language (SQL) database servers. For more details on the server-side language, see Chapter 4, “Basics of Server-Side JavaScript.”
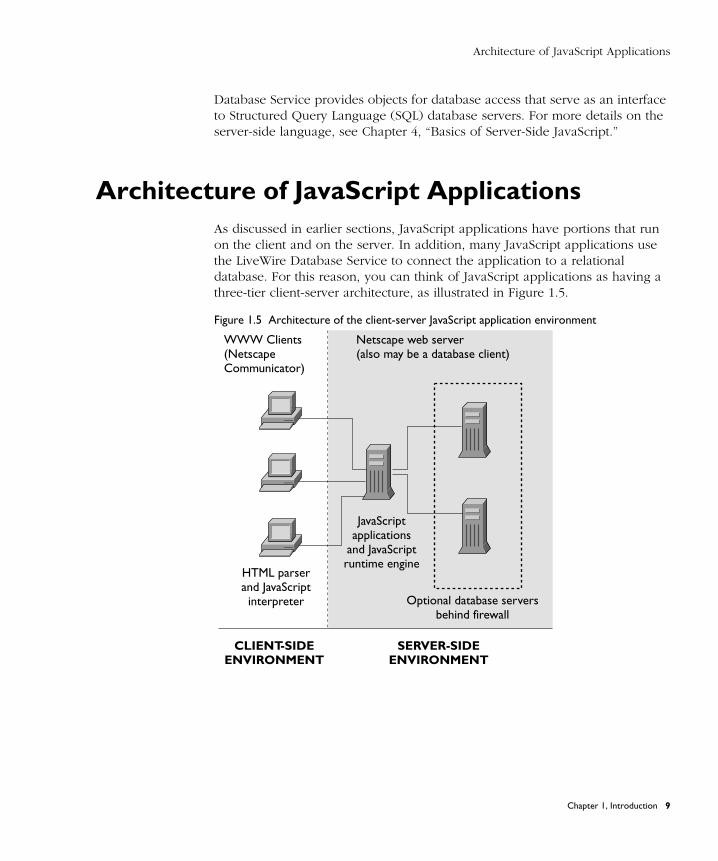
Architecture of JavaScript ApplicationsAs discussed in earlier sections, JavaScript applications have portions that run on the client and on the server. In addition, many JavaScript applications use the LiveWire Database Service to connect the application to a relational database. For this reason, you can think of JavaScript applications as having a three-tier client-server architecture, as illustrated in Figure 1.5.
Figure 1.5 Architecture of the client-server JavaScript application environment
WWW Clients(NetscapeCommunicator)
Netscape web server(also may be a database client)
CLIENT-SIDEENVIRONMENT
SERVER-SIDEENVIRONMENT
HTML parserand JavaScriptinterpreter Optional database servers
behind firewall
JavaScriptapplications
and JavaScriptruntime engine
Chapter 1, Introduction 9

Architecture of JavaScript Applications
The three tiers are:
• WWW clients (such as Netscape Navigator clients): This tier provides a cross-platform end-user interface to the application. This tier can also contain some application logic, such as data-validation rules implemented in client-side JavaScript. Clients can be inside or outside the corporate firewall.
• Netscape WWW server/database client: This tier consists of a Netscape server, with server-side JavaScript enabled. It contains the application logic, manages security, and controls access to the application by multiple users, using server-side JavaScript. This tier allows clients both inside and outside the firewall to access the application. The WWW server also acts as a client to any installed database servers.
• Database servers: This tier consists of SQL database servers, typically running on high-performance workstations. It contains all the database data, metadata, and referential integrity rules required by the application. This tier typically is inside the corporate firewall and can provide a layer of security in addition to that provided by the WWW server. Netscape Enterprise Server supports the use of ODBC, DB2, Informix, Oracle, and Sybase database servers. Netscape FastTrack Server supports only ODBC. For further information about the LiveWire Database Service, see Part 3, “LiveWire Database Service.”
The JavaScript client-side environment runs as part of WWW clients, and the JavaScript server-side environment runs as part of a Netscape web server with access to one or more database servers. Figure 1.6 shows more detail of how the server-side JavaScript environment, and applications built for this environment, fit into the Netscape web server.
The top part of Figure 1.6 shows how server-side JavaScript fits into a Netscape web server. Inside the web server, the server-side JavaScript runtime environment is built from three main components which are listed below. The JavaScript Application Manager then runs on top of server-side JavaScript, as do the sample applications provided by Netscape (such as the videoapp application) and any applications you create.
10 Writing Server-Side JavaScript Applications
Architecture of JavaScript Applications
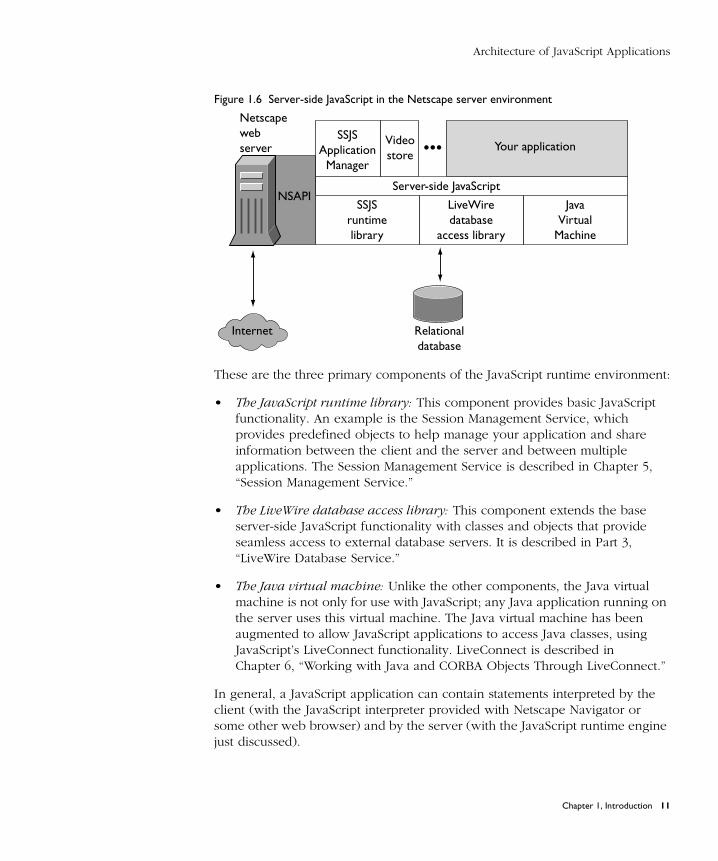
Figure 1.6 Server-side JavaScript in the Netscape server environment
These are the three primary components of the JavaScript runtime environment:
• The JavaScript runtime library: This component provides basic JavaScript functionality. An example is the Session Management Service, which provides predefined objects to help manage your application and share information between the client and the server and between multiple applications. The Session Management Service is described in Chapter 5, “Session Management Service.”
• The LiveWire database access library: This component extends the base server-side JavaScript functionality with classes and objects that provide seamless access to external database servers. It is described in Part 3, “LiveWire Database Service.”
• The Java virtual machine: Unlike the other components, the Java virtual machine is not only for use with JavaScript; any Java application running on the server uses this virtual machine. The Java virtual machine has been augmented to allow JavaScript applications to access Java classes, using JavaScript’s LiveConnect functionality. LiveConnect is described in Chapter 6, “Working with Java and CORBA Objects Through LiveConnect.”
In general, a JavaScript application can contain statements interpreted by the client (with the JavaScript interpreter provided with Netscape Navigator or some other web browser) and by the server (with the JavaScript runtime engine just discussed).
Internet
Netscapewebserver
Relationaldatabase
NSAPI
SSJSApplication
Manager
SSJSruntimelibrary
LiveWiredatabase
access library
JavaVirtual
Machine
Videostore
Server-side JavaScript
Your application•••
Chapter 1, Introduction 11
Architecture of JavaScript Applications
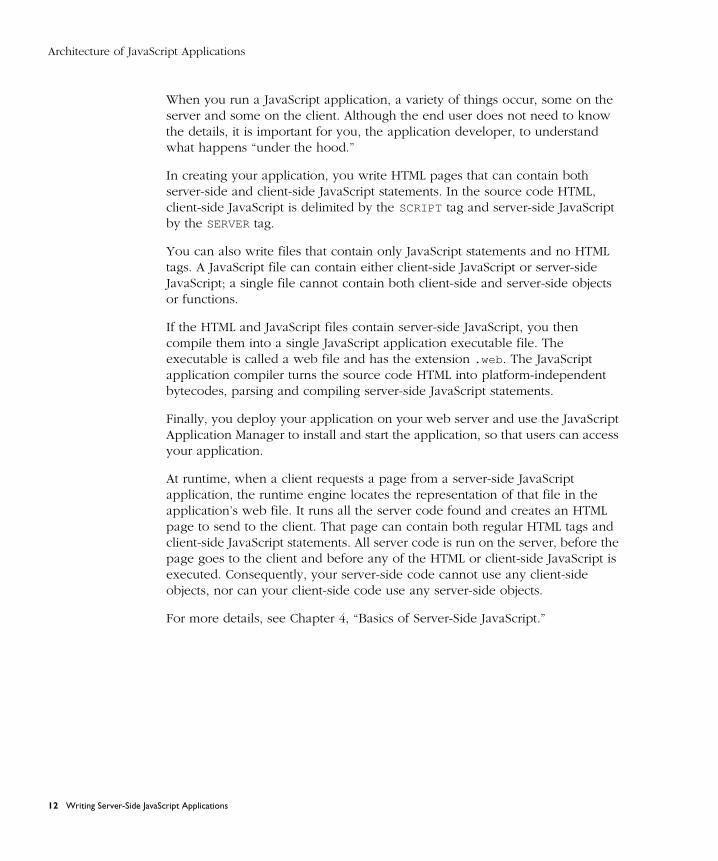
When you run a JavaScript application, a variety of things occur, some on the server and some on the client. Although the end user does not need to know the details, it is important for you, the application developer, to understand what happens “under the hood.”
In creating your application, you write HTML pages that can contain both server-side and client-side JavaScript statements. In the source code HTML, client-side JavaScript is delimited by the SCRIPT tag and server-side JavaScript by the SERVER tag.
You can also write files that contain only JavaScript statements and no HTML tags. A JavaScript file can contain either client-side JavaScript or server-side JavaScript; a single file cannot contain both client-side and server-side objects or functions.
If the HTML and JavaScript files contain server-side JavaScript, you then compile them into a single JavaScript application executable file. The executable is called a web file and has the extension .web . The JavaScript application compiler turns the source code HTML into platform-independent bytecodes, parsing and compiling server-side JavaScript statements.
Finally, you deploy your application on your web server and use the JavaScript Application Manager to install and start the application, so that users can access your application.
At runtime, when a client requests a page from a server-side JavaScript application, the runtime engine locates the representation of that file in the application’s web file. It runs all the server code found and creates an HTML page to send to the client. That page can contain both regular HTML tags and client-side JavaScript statements. All server code is run on the server, before the page goes to the client and before any of the HTML or client-side JavaScript is executed. Consequently, your server-side code cannot use any client-side objects, nor can your client-side code use any server-side objects.
For more details, see Chapter 4, “Basics of Server-Side JavaScript.”
12 Writing Server-Side JavaScript Applications

System Requirements
System RequirementsTo develop and run JavaScript applications that take advantage of both client-side and server-side JavaScript, you need appropriate development and deployment environments. In general, it is recommended that you develop applications on a system other than your deployment (production) server because development consumes resources (for example, communications ports, bandwidth, processor cycles, and memory). Development might also disrupt end-user applications that have already been deployed.
A JavaScript development environment consists of
• Development tools for authoring and compiling JavaScript applications. These tools typically are resident on the development machine.
• A development machine with a web server for running JavaScript applications that are under development.
• A deployment machine with a web server for deploying finished applications. End users access completed applications on this server.
The development tools needed include:
• A JavaScript-enabled browser, such as Netscape Navigator, included in Netscape Communicator.
• A JavaScript application compiler, such as the one bundled with Netscape web servers.
• An editor, such as Emacs or Notepad.
The development and deployment machines require the following software:
• A web server.
• A JavaScript runtime engine, such as the one bundled with Netscape web servers.
• A way to configure your server to run JavaScript applications, as provided in the JavaScript Application Manager bundled with Netscape web servers.
Chapter 1, Introduction 13
Configuration Information
In addition, if your application uses JavaScript’s LiveWire Database Service, you need the following:
• Relational database server software on your database server machine. For more information, refer to your database server documentation. In some cases, you may want to install the web server and the database server on the same machine. For specific requirements for server-side JavaScript, see Chapter 10, “Configuring Your Database.”
• Your database’s client and networking software on your web server machine. If you use one machine as both your database server and web server, typically the necessary database client software is installed when the database server is installed. Otherwise, you must ensure that the database client software is installed on the same machine as the web server, so that it can access the database as a client. For more information on database client software requirements, refer to the database vendor’s documentation.
Configuration InformationThis section provides configuration information for using server-side JavaScript. For additional information on setting up your database to work with the LiveWire Database Service, see Chapter 10, “Configuring Your Database.”
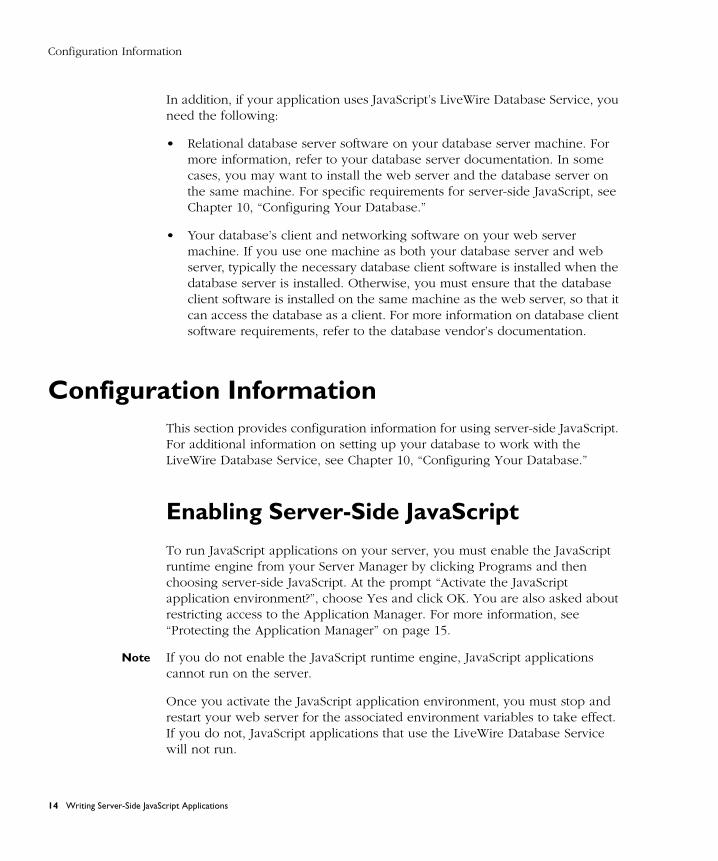
Enabling Server-Side JavaScript
To run JavaScript applications on your server, you must enable the JavaScript runtime engine from your Server Manager by clicking Programs and then choosing server-side JavaScript. At the prompt “Activate the JavaScript application environment?”, choose Yes and click OK. You are also asked about restricting access to the Application Manager. For more information, see “Protecting the Application Manager” on page 15.
Note If you do not enable the JavaScript runtime engine, JavaScript applications cannot run on the server.
Once you activate the JavaScript application environment, you must stop and restart your web server for the associated environment variables to take effect. If you do not, JavaScript applications that use the LiveWire Database Service will not run.
14 Writing Server-Side JavaScript Applications
Configuration Information
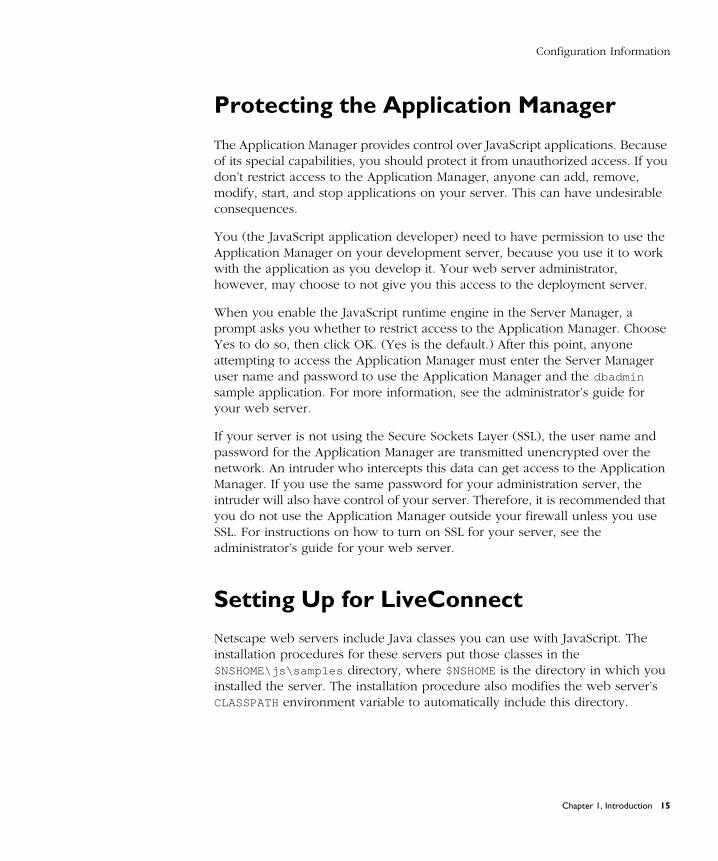
Protecting the Application Manager
The Application Manager provides control over JavaScript applications. Because of its special capabilities, you should protect it from unauthorized access. If you don’t restrict access to the Application Manager, anyone can add, remove, modify, start, and stop applications on your server. This can have undesirable consequences.
You (the JavaScript application developer) need to have permission to use the Application Manager on your development server, because you use it to work with the application as you develop it. Your web server administrator, however, may choose to not give you this access to the deployment server.
When you enable the JavaScript runtime engine in the Server Manager, a prompt asks you whether to restrict access to the Application Manager. Choose Yes to do so, then click OK. (Yes is the default.) After this point, anyone attempting to access the Application Manager must enter the Server Manager user name and password to use the Application Manager and the dbadmin sample application. For more information, see the administrator’s guide for your web server.
If your server is not using the Secure Sockets Layer (SSL), the user name and password for the Application Manager are transmitted unencrypted over the network. An intruder who intercepts this data can get access to the Application Manager. If you use the same password for your administration server, the intruder will also have control of your server. Therefore, it is recommended that you do not use the Application Manager outside your firewall unless you use SSL. For instructions on how to turn on SSL for your server, see the administrator’s guide for your web server.
Setting Up for LiveConnectNetscape web servers include Java classes you can use with JavaScript. The installation procedures for these servers put those classes in the $NSHOME\js\samples directory, where $NSHOME is the directory in which you installed the server. The installation procedure also modifies the web server’s CLASSPATH environment variable to automatically include this directory.
Chapter 1, Introduction 15
Configuration Information
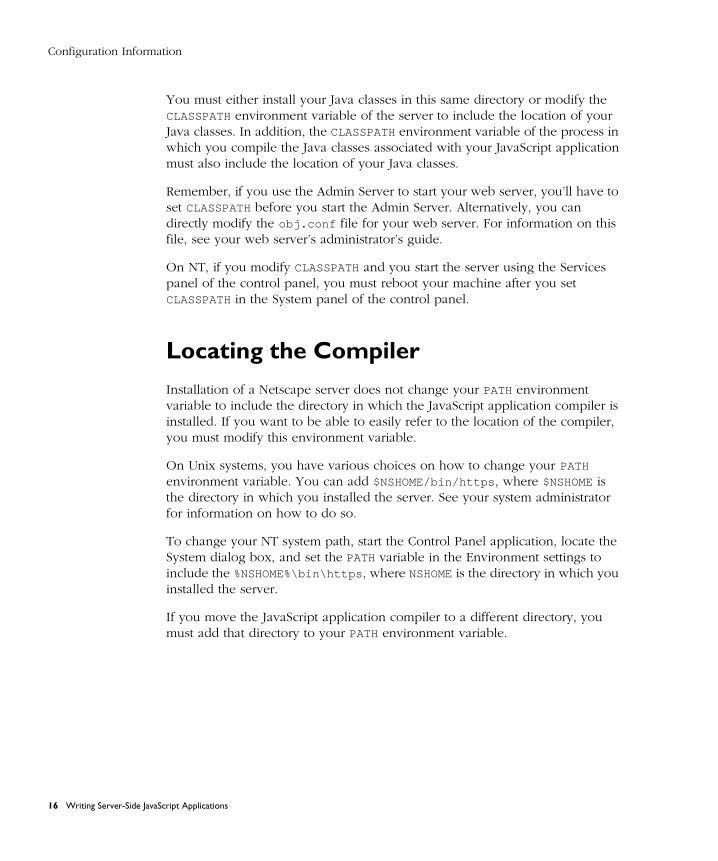
You must either install your Java classes in this same directory or modify the CLASSPATH environment variable of the server to include the location of your Java classes. In addition, the CLASSPATH environment variable of the process in which you compile the Java classes associated with your JavaScript application must also include the location of your Java classes.
Remember, if you use the Admin Server to start your web server, you’ll have to set CLASSPATH before you start the Admin Server. Alternatively, you can directly modify the obj.conf file for your web server. For information on this file, see your web server’s administrator’s guide.
On NT, if you modify CLASSPATH and you start the server using the Services panel of the control panel, you must reboot your machine after you set CLASSPATH in the System panel of the control panel.
Locating the CompilerInstallation of a Netscape server does not change your PATH environment variable to include the directory in which the JavaScript application compiler is installed. If you want to be able to easily refer to the location of the compiler, you must modify this environment variable.
On Unix systems, you have various choices on how to change your PATH environment variable. You can add $NSHOME/bin/https , where $NSHOME is the directory in which you installed the server. See your system administrator for information on how to do so.
To change your NT system path, start the Control Panel application, locate the System dialog box, and set the PATH variable in the Environment settings to include the %NSHOME%\bin\https , where NSHOME is the directory in which you installed the server.
If you move the JavaScript application compiler to a different directory, you must add that directory to your PATH environment variable.
16 Writing Server-Side JavaScript Applications
C h a p t e r
2Introduction to the Sample
Applications
This chapter describes the sample server-side JavaScript applications that ship with Netscape web servers. It introduces using server-side JavaScript by working with two of the simpler sample applications.
When you install a Netscape web server, several sample JavaScript applications are also installed. For an introduction to the full capabilities of JavaScript applications, run them and browse their source code. You can also modify these applications as you learn about JavaScript’s capabilities. Both the source files and the application executables for these applications are installed in the $NSHOME\js\samples directory, where $NSHOME is the directory in which you installed the server. Table 2.1 lists the sample applications.
Table 2.1 Sample JavaScript applications
Basic concepts
world “Hello World” application.
hangman The word-guessing game.
cipher Word game that has the player guess a cipher.
LiveWire Database Servicea
dbadmin Simple interactive SQL access using LiveWire.If you have restricted access to the Application Manager, this sample is also protected with the server administrator’s user name and password.
Chapter 2, Introduction to the Sample Applications 17
a. These sample applications work only if you have a supported database server installed on your network and have configured the client software correctly. For more information, see Chapter 10, “Configuring Your Database.” These applications are discussed in Chapter 13, “Videoapp and Oldvideo Sample Applications.” Before using videoapp or oldvideo , follow the instructions to set them up found in that chapter.
b. These applications are discussed in Chapter 6, “Working with Java and CORBA Objects Through LiveConnect.”
videoapp Complete video store application using a relational database of videos.
oldvideo An alternative version of the video store application.
LiveConnectb
bugbase Simple bug entry sample using LiveConnect.
flexi Accessing remote services running on an IIOP-enabled ORB through LiveConnect.This sample is not automatically added to the list of applications in the Application Manager; you must add it before you can use it.
bank Another IIOP sample. This sample is not automatically added to the list of applications in the Application Manager; you must add it before you can use it.
Other sample applications
sendmail Demonstrates the ability to send email messages from your JavaScript application.
viewer Allows you to view files on the server, using JavaScript’s File class.For security reasons this application is not automatically installed with the Netscape server. If you install it, be sure to restrict access. Otherwise, unauthorized persons may be able to read and write files on your server. For information on restricting access to an application, see the administrator’s guide for your web server.
jsaccall Sample using external native libraries and providing access to CGI variables.
Table 2.1 Sample JavaScript applications (Continued)
18 Writing Server-Side JavaScript Applications
Hello World
Note In addition to sample applications, the $NSHOME\js\samples directory also contains an application named metadata . This application is used by Visual JavaScript. While you are welcome to browse its source code, do not modify the executable.
For more advanced sample applications, you can visit the Netscape AppFoundry Online home page at http://home.netscape.com/one_stop/
intranet_apps/index.html .
The rest of this chapter walks you through two of the simpler samples, giving you a feel for working with JavaScript applications. For now, don’t worry about any of the details. This discussion is intended only to give you a rough idea of the capabilities of JavaScript applications. Details are discussed in later chapters.
Chapter 13, “Videoapp and Oldvideo Sample Applications,” discusses the videoapp application in detail. You should read that chapter when you’re ready to start working with the LiveWire Database Service.
Hello WorldIn this section, you run Hello World, the simplest sample application, and get an introduction to• reading JavaScript source files• embedding JavaScript in HTML• building and restarting an application
To get started with the sample applications, you need to access the JavaScript Application Manager. You can do so by loading the following URL in Navigator:
http:// server.domain /appmgr
In this and other URLs throughout this manual, server represents the name of the server on which you run your application, such as research1 or www, and domain represents your Internet domain name, such as netscape.com or uiuc.edu . If your server has Secure Sockets Layer (SSL) enabled, use https instead of http in the URL.
Chapter 2, Introduction to the Sample Applications 19
Hello World
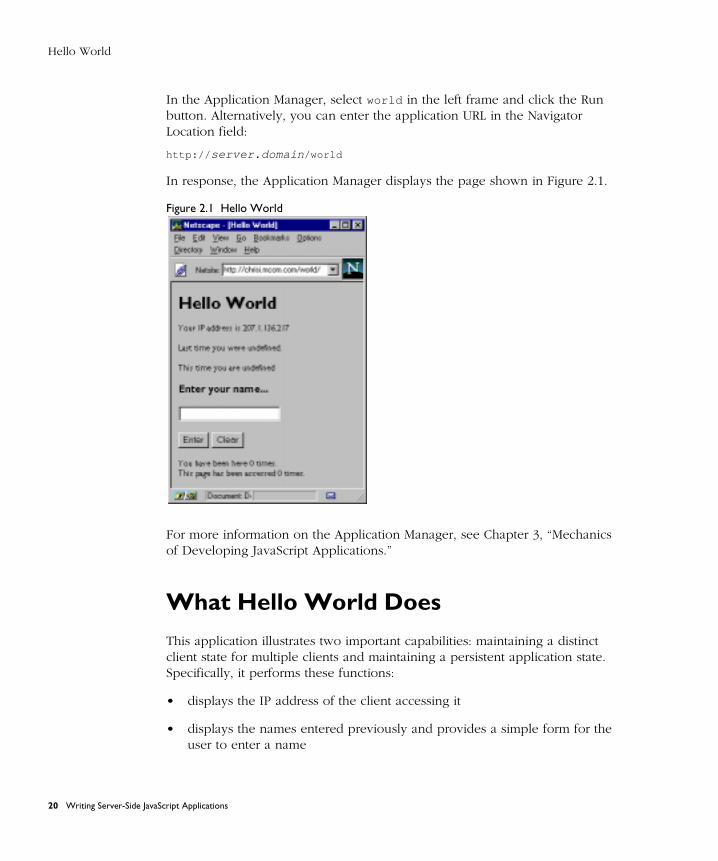
In the Application Manager, select world in the left frame and click the Run button. Alternatively, you can enter the application URL in the Navigator Location field:
http:// server.domain /world
In response, the Application Manager displays the page shown in Figure 2.1.
Figure 2.1 Hello World
For more information on the Application Manager, see Chapter 3, “Mechanics of Developing JavaScript Applications.”
What Hello World Does
This application illustrates two important capabilities: maintaining a distinct client state for multiple clients and maintaining a persistent application state. Specifically, it performs these functions:
• displays the IP address of the client accessing it
• displays the names entered previously and provides a simple form for the user to enter a name
20 Writing Server-Side JavaScript Applications
Hello World
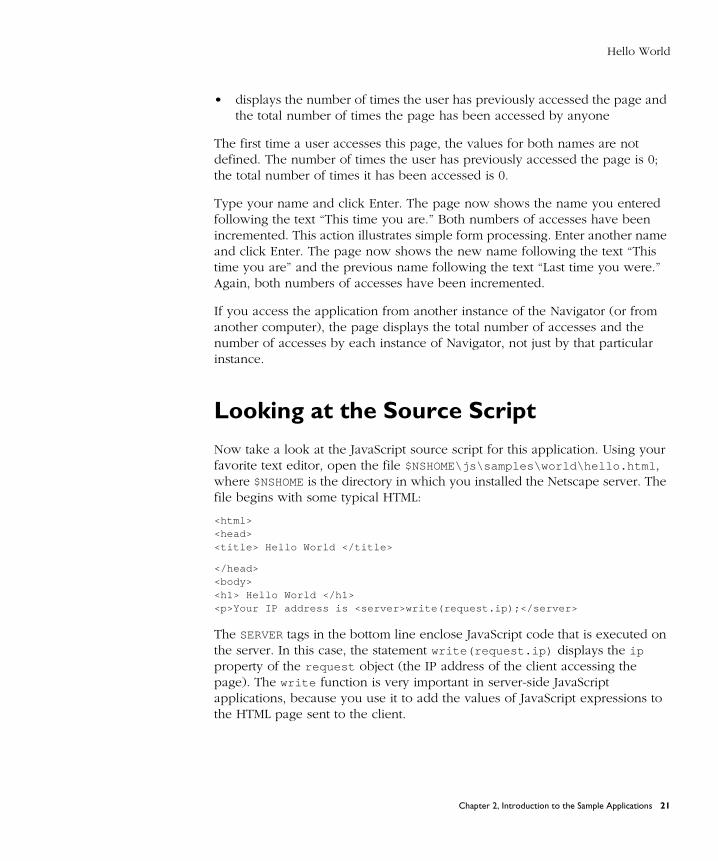
• displays the number of times the user has previously accessed the page and the total number of times the page has been accessed by anyone
The first time a user accesses this page, the values for both names are not defined. The number of times the user has previously accessed the page is 0; the total number of times it has been accessed is 0.
Type your name and click Enter. The page now shows the name you entered following the text “This time you are.” Both numbers of accesses have been incremented. This action illustrates simple form processing. Enter another name and click Enter. The page now shows the new name following the text “This time you are” and the previous name following the text “Last time you were.” Again, both numbers of accesses have been incremented.
If you access the application from another instance of the Navigator (or from another computer), the page displays the total number of accesses and the number of accesses by each instance of Navigator, not just by that particular instance.
Looking at the Source ScriptNow take a look at the JavaScript source script for this application. Using your favorite text editor, open the file $NSHOME\js\samples\world\hello.html , where $NSHOME is the directory in which you installed the Netscape server. The file begins with some typical HTML:
<html><head> <title> Hello World </title>
</head><body><h1> Hello World </h1><p>Your IP address is <server>write(request.ip);</server>
The SERVER tags in the bottom line enclose JavaScript code that is executed on the server. In this case, the statement write(request.ip) displays the ip property of the request object (the IP address of the client accessing the page). The write function is very important in server-side JavaScript applications, because you use it to add the values of JavaScript expressions to the HTML page sent to the client.
Chapter 2, Introduction to the Sample Applications 21
Hello World
The request object is part of the JavaScript Session Management Service. For a full description of it, see Chapter 5, “Session Management Service.” The write function is one of the functions JavaScript defines that is not associated with a specific object. For information on the write function, see “Constructing the HTML Page” on page 77.
Then come some statements you shouldn’t worry about quite yet. These are the next statements of interest:
<server> client.oldname = request.newname;</server>
This statement assigns the value of the newname property of the request object to the oldname property of the client object. The client object is also part of the JavaScript Session Management Service. For a full description of it, see Chapter 5, “Session Management Service.” For now, just realize that client can hold information about an application specific to a particular browser running that application.
The value of request.newname is set when a user enters a value in the form. Later in the file you’ll find these form statements:
<form method="post" action="hello.html"><input type="text" name="newname" size="20">
The value of the form’s ACTION attribute is hello.html (the current filename). This means that when the user submits the form by clicking Enter or pressing the Enter key, Navigator reloads the current page. In general, ACTION can be any page in a JavaScript application.
The value of the NAME attribute of the text field is newname. When the page is submitted, this statement assigns whatever the user has entered in the text field to the newname property of the request object, referred to in JavaScript as request.newname. The values of form elements always correspond to properties of the request object. Properties of the request object last only for a single client request.
A few lines down, there is another SERVER tag, indicating that the following lines are server-side JavaScript statements. Here is the first group of statements:
if (client.number == null)client.number = 0
elseclient.number = 1 + parseInt (client.number, 10)
22 Writing Server-Side JavaScript Applications
Hello World
This conditional statement checks whether the number property of the client object has been initialized. If not, then the code initializes it to 0; otherwise, it increments number by 1 using the JavaScript parseInt function, which converts the string value to a number. Because the predefined client object converts all property values to strings, you must use parseInt or parseFloat to convert these values to numbers.
Because number is a property of the client object, it is distinct for each different client that accesses the application. This value indicates the number of times “you have been here.”
To track the total number of accesses, you use the project object, because it is shared by all clients accessing the application. Properties of the project object persist until the application is stopped. The next group of statements tracks accesses:
project.lock() if (project.number == null)
project.number = 0else
project.number = 1 + project.numberproject.unlock()
The first statement uses the lock method of the project object. This gives the client temporary exclusive access to the project object. Another if statement checks whether project.number has been defined. If not, then the code initializes it to 0; otherwise, the code increments it by 1. Finally, the unlock method releases the project object so that other clients can access it.
The final statements in the file display the values of client.number and project.number .
<p>You have been here <server>write(client.number);</server> times.<br>This page has been accessed <server>write(project.number);</server> times.
Chapter 2, Introduction to the Sample Applications 23
Hello World
Modifying Hello World
In this section, you modify, recompile, and restart this sample application. To edit the source file, you must first determine where it is. In case you don’t remember, the Application Manager shows the directory path of the application executable (the file that has the suffix .web ). The source file, hello.html , should be in the same directory. Edit the file with your favorite text editor. The HTML file starts with these statements:
<html><head> <title> Hello World </title> </head>
<body><h1> Hello World </h1><p>Your IP address is <server>write(request.ip);</server>
<server>write ("<P>Last time you were " + client.oldname + ".");</server><p>This time you are <server>write(request.newname);</server>
<server>client.oldname = request.newname; </server>
Add a line that displays the type of browser the user has:
<p>You are using <server>write(request.agent)</server>
If you want, you can also personalize the heading of the page; for example, you could make the title “Fred’s Hello World.”
When you’ve finished modifying the file, run the JavaScript application compiler. At the command prompt, change to the directory containing the source code. Type this line at the command prompt to compile the application:
jsac -v -o hello.web hello.html
Alternatively, from that directory you can run the build script (for Unix) or build.bat script (for NT). In either case, the compiler starts and displays messages. The final message should be “Compiled and linked successfully.”
Publish the application’s files on your development server. To restart, access the Application Manager, select Hello World, then choose Restart. This loads the newly compiled version of the application into the server. You can then run the application by choosing Run. A window opens with Hello World. You see the changes you made to the application.
24 Writing Server-Side JavaScript Applications

Hangman
HangmanIn this section, you run and modify the Hangman sample application and get an introduction to:• using a JavaScript-only source file• correcting compile-time errors• using the trace utility for runtime debugging
Hangman is a classic word game in which the players try to guess a secret word. The unknown letters in the word are displayed on the screen as asterisks; the asterisks are replaced as a player guesses the correct letters. When the guess is incorrect, one more part of the hanged man is drawn. The game also shows the incorrect letters you have guessed.
When the hanged man is completely drawn, the player loses the game. The player wins by guessing all the letters in the word before the man is hanged. In this simple version of the game, there are only three possible secret words. After a game, the player can choose to play again (and use the next secret word) or quit.
Run the Hangman application by selecting Hangman in the Application Manager and clicking Run. Alternatively, you can load the application URL in Navigator:
http:// server.domain /hangman
In response, the Application Manager displays the page shown in Figure 2.2.
Chapter 2, Introduction to the Sample Applications 25
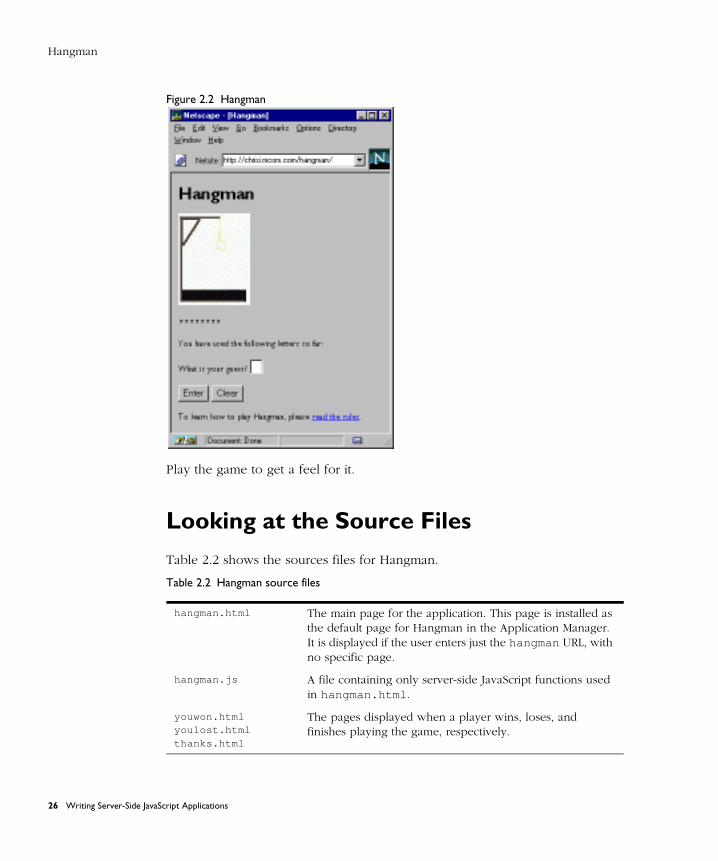
Hangman
Figure 2.2 Hangman
Play the game to get a feel for it.
Looking at the Source Files
Table 2.2 shows the sources files for Hangman.
Table 2.2 Hangman source files
hangman.html The main page for the application. This page is installed as the default page for Hangman in the Application Manager. It is displayed if the user enters just the hangman URL, with no specific page.
hangman.js A file containing only server-side JavaScript functions used in hangman.html .
youwon.html youlost.html thanks.html
The pages displayed when a player wins, loses, and finishes playing the game, respectively.
26 Writing Server-Side JavaScript Applications

Hangman
Most of the application logic is in hangman.html . The basic logic is simple:
1. For a new game, initialize the secret word and other variables.
2. If the player correctly guessed a letter, substitute it into the answer.
3. If the guess was wrong, increment the number of wrong (missed) guesses.
4. Check whether the user has won or lost.
5. Draw the current version of the hanged man, using a GIF image based on the number of wrong guesses.
The body of the HTML file hangman.html starts with some JavaScript code inside a SERVER tag. First comes code to initialize a new game:
if (client.gameno == null) {client.gameno = 1;client.newgame = "true";
}
if (client.newgame == "true") {if (client.gameno % 3 == 1)
client.word = "LIVEWIRE";if (client.gameno % 3 == 2)
client.word = "NETSCAPE";if (client.gameno % 3 == 0)
client.word = "JAVASCRIPT";client.answer = InitAnswer(client.word);client.used = "";client.num_misses = 0;
}
client.newgame = "false";
images directory Contains the Hangman images, hang0.gif , hang1.gif , and so on.
rules.html Contains text explaining the game. This file is not compiled with the application; it is included as an example of an uncompiled application page that is part of the same site.
Table 2.2 Hangman source files (Continued)
Chapter 2, Introduction to the Sample Applications 27

Hangman
This code makes extensive use of the client object to store information about this client playing the game. Because there is no state that needs to be saved between uses of this same application by different clients, the code doesn’t use the project or server objects.
The first statement determines whether the player has played before, by checking if client.gameno exists; if not, the code initializes it to 1 and sets client.newgame to true . Then, some simple logic assigns the “secret word” to client.word; there are just three secret words that players cycle through as they play the game. The client.gameno property keeps track of how many times a particular player has played. The final part of initialization uses InitAnswer , a function defined in hangman.js , to initialize client.answer to a string of asterisks.
Then comes a block of statements to process the player’s guess:
if (request.guess != null) {request.guess = request.guess.toUpperCase().substring(0,1);client.used = client.used + request.guess + " ";request.old_answer = client.answer;client.answer = Substitute (request.guess, client.word,
client.answer);if (request.old_answer == client.answer)
client.num_misses = parseInt(client.num_misses) + 1;}
The if statement determines whether the player has made a guess (entered a letter in the form field). If so, the code calls Substitute (another function defined in hangman.js ) to substitute the guessed letter into client.answer . This makes client.answer the answer so far (for example, “N*T**AP*”).
The second if statement checks whether client.answer has changed since the last guess; if not, then the code increments client.num_misses to keep track of the number of incorrect guesses. You must always use parseInt to work with integer property values of the predefined client object.
As shown in the following code, the final if statement in the JavaScript code checks whether the player has won or lost, and redirects the client accordingly. The redirect function opens the specified HTML file and passes control to it.
if (client.answer == client.word)redirect(addClient("youwon.html"));
else if (client.num_misses > 6)redirect(addClient("youlost.html"));
28 Writing Server-Side JavaScript Applications
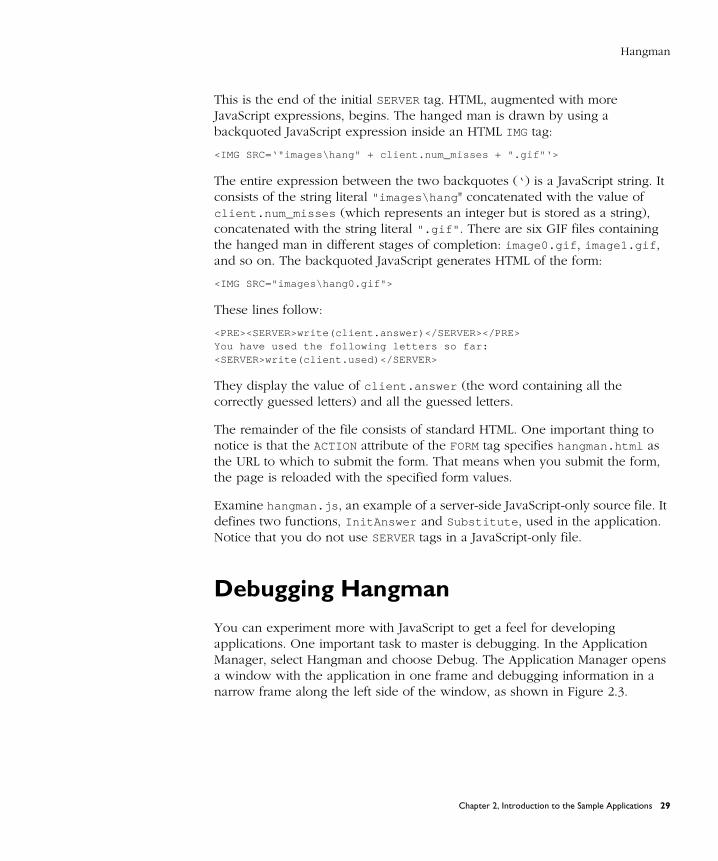
Hangman
This is the end of the initial SERVER tag. HTML, augmented with more JavaScript expressions, begins. The hanged man is drawn by using a backquoted JavaScript expression inside an HTML IMG tag:
<IMG SRC=‘"images\hang" + client.num_misses + ".gif"‘>
The entire expression between the two backquotes (‘ ) is a JavaScript string. It consists of the string literal "images\hang " concatenated with the value of client.num_misses (which represents an integer but is stored as a string), concatenated with the string literal ".gif" . There are six GIF files containing the hanged man in different stages of completion: image0.gif , image1.gif , and so on. The backquoted JavaScript generates HTML of the form:
<IMG SRC="images\hang0.gif">
These lines follow:
<PRE><SERVER>write(client.answer)</SERVER></PRE>You have used the following letters so far: <SERVER>write(client.used)</SERVER>
They display the value of client.answer (the word containing all the correctly guessed letters) and all the guessed letters.
The remainder of the file consists of standard HTML. One important thing to notice is that the ACTION attribute of the FORM tag specifies hangman.html as the URL to which to submit the form. That means when you submit the form, the page is reloaded with the specified form values.
Examine hangman.js , an example of a server-side JavaScript-only source file. It defines two functions, InitAnswer and Substitute , used in the application. Notice that you do not use SERVER tags in a JavaScript-only file.
Debugging Hangman
You can experiment more with JavaScript to get a feel for developing applications. One important task to master is debugging. In the Application Manager, select Hangman and choose Debug. The Application Manager opens a window with the application in one frame and debugging information in a narrow frame along the left side of the window, as shown in Figure 2.3.
Chapter 2, Introduction to the Sample Applications 29
Hangman
Figure 2.3 Debugging Hangman
Notice that the URL is
http:// server.domain /appmgr/debug.html?name=hangman
You can add a bookmark for this URL as a convenience while you work on Hangman. Then you don’t have to go through the Application Manager.
Try adding a function to Hangman verifying that a player’s guess is a letter (not a number or punctuation mark). You can use the function InitAnswer defined in hangman.js as a starting point. After compiling and restarting the application, use your bookmark to run the application in debug mode.
30 Writing Server-Side JavaScript Applications
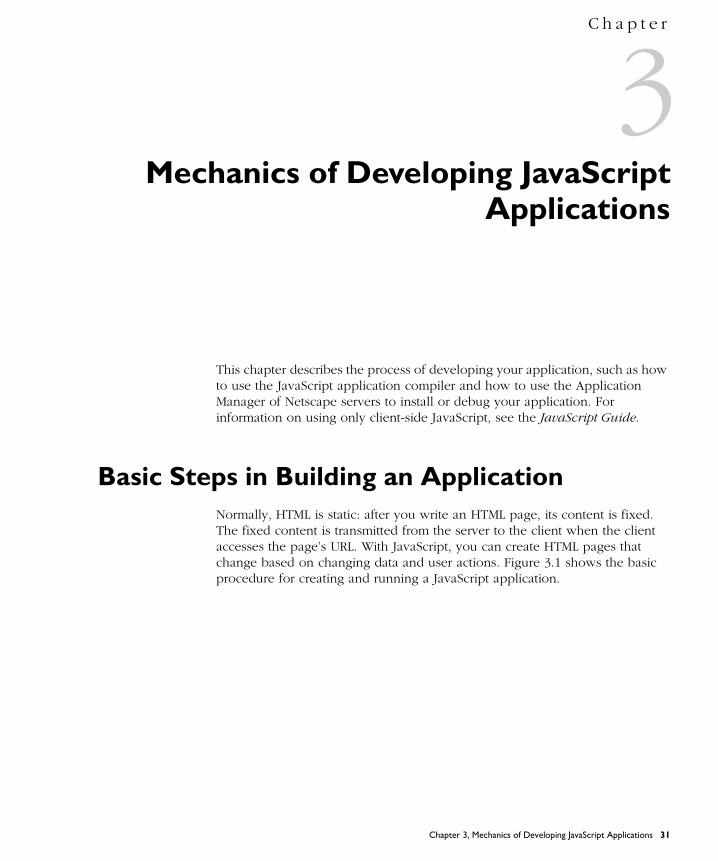
C h a p t e r
3Mechanics of Developing JavaScript
Applications
This chapter describes the process of developing your application, such as how to use the JavaScript application compiler and how to use the Application Manager of Netscape servers to install or debug your application. For information on using only client-side JavaScript, see the JavaScript Guide.
Basic Steps in Building an ApplicationNormally, HTML is static: after you write an HTML page, its content is fixed. The fixed content is transmitted from the server to the client when the client accesses the page’s URL. With JavaScript, you can create HTML pages that change based on changing data and user actions. Figure 3.1 shows the basic procedure for creating and running a JavaScript application.
Chapter 3, Mechanics of Developing JavaScript Applications 31
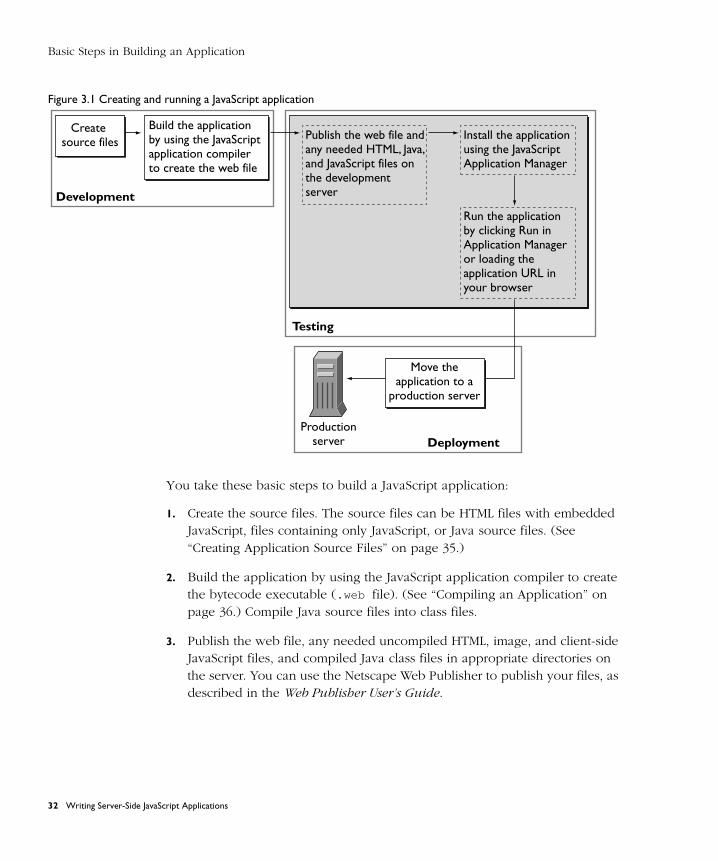
Basic Steps in Building an Application
Figure 3.1 Creating and running a JavaScript application
You take these basic steps to build a JavaScript application:
1. Create the source files. The source files can be HTML files with embedded JavaScript, files containing only JavaScript, or Java source files. (See “Creating Application Source Files” on page 35.)
2. Build the application by using the JavaScript application compiler to create the bytecode executable (.web file). (See “Compiling an Application” on page 36.) Compile Java source files into class files.
3. Publish the web file, any needed uncompiled HTML, image, and client-side JavaScript files, and compiled Java class files in appropriate directories on the server. You can use the Netscape Web Publisher to publish your files, as described in the Web Publisher User’s Guide.
Create source files
Development
Testing
Move theapplication to a
production server
Build the applicationby using the JavaScriptapplication compilerto create the web file
Productionserver
Publish the web file and any needed HTML, Java, and JavaScript files on the development server
Install the application using the JavaScript Application Manager
Run the application by clicking Run in Application Manager or loading the application URL in your browser
Deployment
32 Writing Server-Side JavaScript Applications
JavaScript Application Manager Overview
4. Install the application for the first time (see “Installing a New Application” on page 39) using the JavaScript Application Manager. You also use the Application Manager to restart an application after rebuilding it (see “Starting, Stopping, and Restarting an Application” on page 44). Installing or restarting the application enables the JavaScript runtime engine to run it.
After installing an application, you may want to protect it. See “Deploying an Application” on page 48. You do not need to restart an application after you initially install it.
5. Run the application by clicking Run in the Application Manager or loading the application URL in your browser. (See “Running an Application” on page 45 and “Application URLs” on page 42.) For example, to run Hello World, load http:// server.domain /world/ . You can also debug the application by clicking Debug in the Application Manager. (See “Debugging an Application” on page 45.)
6. After you have completed developing and testing your application, you need to deploy it to make it available to users. Deploying generally involves installing it on a production server and changing access restrictions. (See “Deploying an Application” on page 48.)
Before you can develop JavaScript applications, you need to enable the runtime engine on the server and should protect the JavaScript Application Manager from unauthorized access. For more information, see “Configuration Information” on page 14.
JavaScript Application Manager OverviewBefore learning how to create JavaScript applications, you should become familiar with the JavaScript Application Manager. You can use the Application Manager to accomplish these tasks: • Add a new JavaScript application. • Modify any of the attributes of an installed application.• Stop, start, and restart an installed application.• Run and debug an active application.• Remove an installed application.
Chapter 3, Mechanics of Developing JavaScript Applications 33
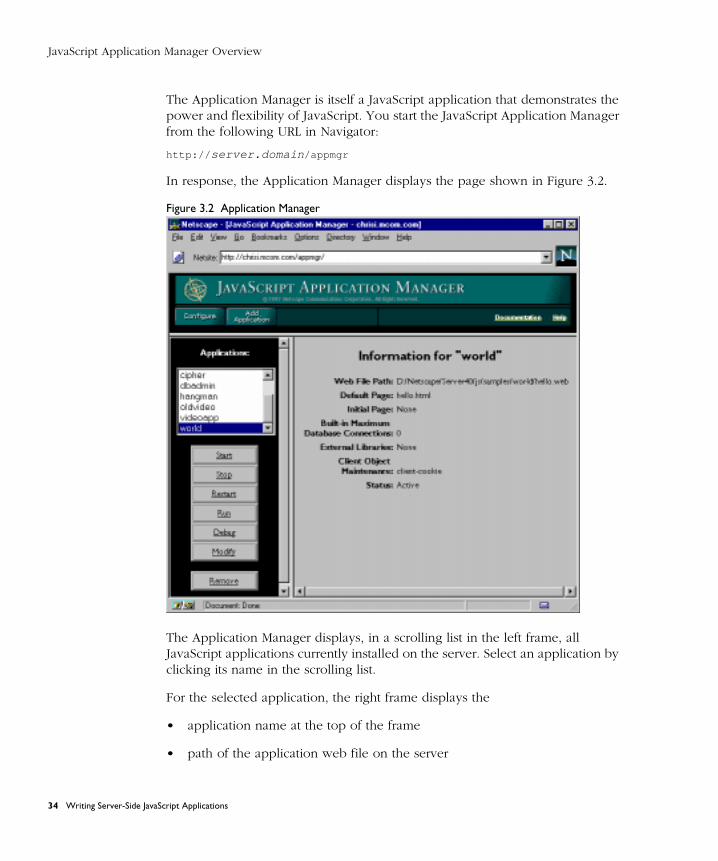
JavaScript Application Manager Overview
The Application Manager is itself a JavaScript application that demonstrates the power and flexibility of JavaScript. You start the JavaScript Application Manager from the following URL in Navigator:
http:// server.domain /appmgr
In response, the Application Manager displays the page shown in Figure 3.2.
Figure 3.2 Application Manager
The Application Manager displays, in a scrolling list in the left frame, all JavaScript applications currently installed on the server. Select an application by clicking its name in the scrolling list.
For the selected application, the right frame displays the
• application name at the top of the frame
• path of the application web file on the server
34 Writing Server-Side JavaScript Applications
Creating Application Source Files
• default and initial pages for the application
• maximum number of database connections allowed for the predefined database object
• external libraries (if any)
• client object maintenance technique
• status of the application: active or stopped (Users can run only active applications. Stopped applications are not accessible.)
For a description of these fields, see “Installing a New Application” on page 39.
Click the Add Application button in the top frame to add a new application. Click the task buttons in the left frame to perform the indicated action on the selected application. For example, to modify the installation fields of the selected application, click Modify.
Click Configure to configure the default settings for the Application Manager. Click Documentation to reach Netscape’s technical support page for server-side JavaScript, including links to all sorts of documentation about it. Click Help for more instructions on using the Application Manager.
Creating Application Source FilesThe first step in building a JavaScript application is to create and edit the source files. The web file for a JavaScript application can contain two kinds of source files:
• Files with standard HTML or JavaScript embedded in HTML. These files have the file extension (suffix) .html or .htm .
• Files with JavaScript functions only. These files have the file extension .js .
When you use JavaScript in an HTML file, you must follow the rules outlined in “Embedding JavaScript in HTML” on page 68.
Do not use any special tags in .js files; the JavaScript application compiler on the server and the JavaScript interpreter on the client assume everything in the file is JavaScript. While an HTML file is used on both the client and the server, a single JavaScript file must be either for use on the server or on the client; it
Chapter 3, Mechanics of Developing JavaScript Applications 35
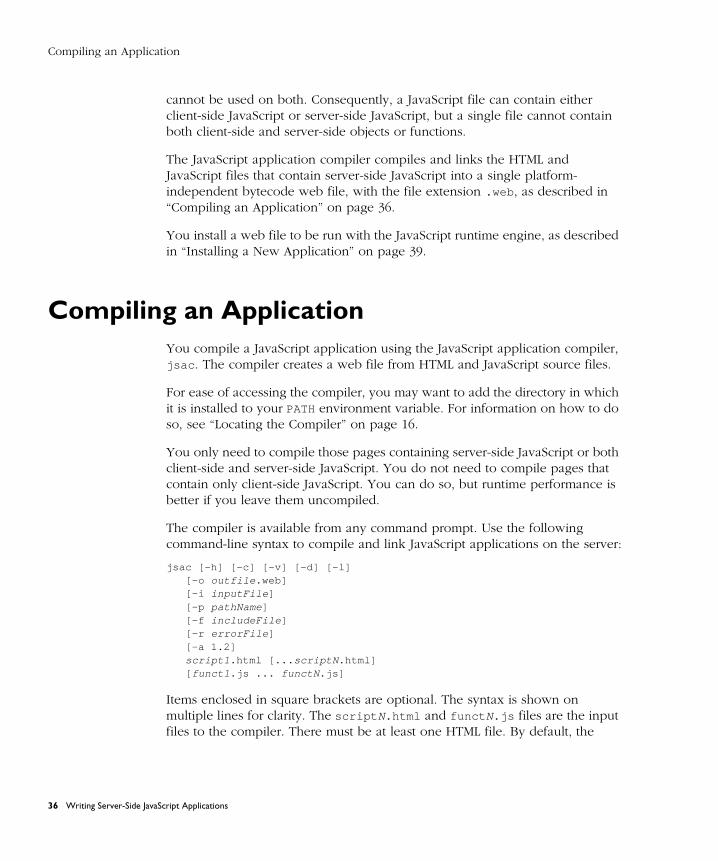
Compiling an Application
cannot be used on both. Consequently, a JavaScript file can contain either client-side JavaScript or server-side JavaScript, but a single file cannot contain both client-side and server-side objects or functions.
The JavaScript application compiler compiles and links the HTML and JavaScript files that contain server-side JavaScript into a single platform-independent bytecode web file, with the file extension .web , as described in “Compiling an Application” on page 36.
You install a web file to be run with the JavaScript runtime engine, as described in “Installing a New Application” on page 39.
Compiling an ApplicationYou compile a JavaScript application using the JavaScript application compiler, jsac . The compiler creates a web file from HTML and JavaScript source files.
For ease of accessing the compiler, you may want to add the directory in which it is installed to your PATH environment variable. For information on how to do so, see “Locating the Compiler” on page 16.
You only need to compile those pages containing server-side JavaScript or both client-side and server-side JavaScript. You do not need to compile pages that contain only client-side JavaScript. You can do so, but runtime performance is better if you leave them uncompiled.
The compiler is available from any command prompt. Use the following command-line syntax to compile and link JavaScript applications on the server:
jsac [-h] [-c] [-v] [-d] [-l][-o outfile .web][-i inputFile ][-p pathName ][-f includeFile ][-r errorFile ][-a 1.2]script1 .html [... scriptN .html] [ funct1 .js ... functN .js]
Items enclosed in square brackets are optional. The syntax is shown on multiple lines for clarity. The script N.html and funct N.js files are the input files to the compiler. There must be at least one HTML file. By default, the
36 Writing Server-Side JavaScript Applications
Compiling an Application
HTML and JavaScript files are relative to the current directory. Files you specify must be either JavaScript files or HTML files; you cannot specify other files, such as GIF files.
On all platforms, you may use either the dash (- ) or the forward slash (/ ) to indicate a command-line option. That is, the following lines are equivalent:
jsac -hjsac /h
Note that because the forward slash indicates a command-line option, an input file cannot start with a forward slash to indicate that it is an absolute pathname. That is, the following call is illegal:
jsac -o myapp.web /usr/vpg/myapp.html
This restriction does not apply to any of the pathnames you supply as arguments to command-line options; only to the input files. On NT, you can instead use backslash (\ ) to indicate an absolute pathname in an input file, as in the following call:
jsac -o myapp.web \usr\vpg\myapp.html
On Unix, you must use the -i command-line option to specify an absolute pathname, as described below.
The following command-line options are available:
• -h : Displays compiler syntax help. If you supply this option, don’t use any other options.
• -c : Checks syntax only; does not generate a web file. If you supply this option, you do not need to supply the -o option.
• -v : (Verbose) Displays information about the running of the compiler.
• -d : Displays generated JavaScript contents.
• -l : Specifies the character set to use when compiling (such as iso-8859-1 , x-sjis , or euc-kr )
• -o outfile : Creates a bytecode-format web file, named outfile.web . If you do not supply this option, the compiler does not generate a web file. (Omit this option only if you’re using the -c option to check syntax or -h to get help.)
Chapter 3, Mechanics of Developing JavaScript Applications 37
Compiling an Application
• -i inputFile : Allows you to specify an input file using its full pathname instead of a relative pathname. You can provide only one filename to this option. If you need to specify multiple filenames using full pathnames, use the -f option.
• -p pathName : Specifies a directory to be the root of all relative pathnames used during compilation. (Use before the -f option.) You can provide only one pathname to this option.
• -f includeFile : Specifies a file that is actually a list of input files, allowing you to circumvent the character limit for a command line. You can provide only one filename to this option. The list of input files in includeFile is white-space delimited. If a filename contains a space, you must enclose the filename in double quotes.
• -r errorFile : Redirects standard output (including error messages) to the specified file. You can provide only one filename to this option.
• -a 1.2 : Changes how the compiler handles comparison operators on the server. For more information, see “Comparison Operators” on page 61.
For example, the following command compiles and links two JavaScript-enhanced HTML pages, main.html and hello.html , and a server-side JavaScript file, support.js , creating a binary executable named myapp.web . In addition, during compilation, the compiler prints progress information to the command line.
jsac -v -o myapp.web main.html hello.html support.js
As a second example, the following command compiles the files listed in the file looksee.txt into a binary executable called looksee.web :
jsac -f looksee.txt -o looksee.web
Here, looksee.txt might contain the following:
looksee1.htmllooksee2.html\myapps\jsplace\common.jslooksee3.html
38 Writing Server-Side JavaScript Applications
Installing a New Application
Installing a New ApplicationYou cannot run an application and clients cannot access it until you install it. Installing an application identifies it to the server. After you have installed the application, you can rebuild and run it any number of times. You need to reinstall it only if you subsequently remove it. You can install up to 120 JavaScript applications on one server.
Before you install, you must move all application-related files to the correct directory, by publishing the files. Otherwise, you’ll get an error when you install the application. For security reasons, you may not want to publish your JavaScript source files on your deployment server. See “Application URLs” on page 42 for restrictions on where you can place your files.
Important For security reasons, you should never store sensitive information such as passwords in your .web file. If you do, someone can potentially access that information.
To install a new application with the Application Manager, click Add Application. In response, the Application Manager displays, in its right frame, the form shown in Figure 3.3.
Chapter 3, Mechanics of Developing JavaScript Applications 39
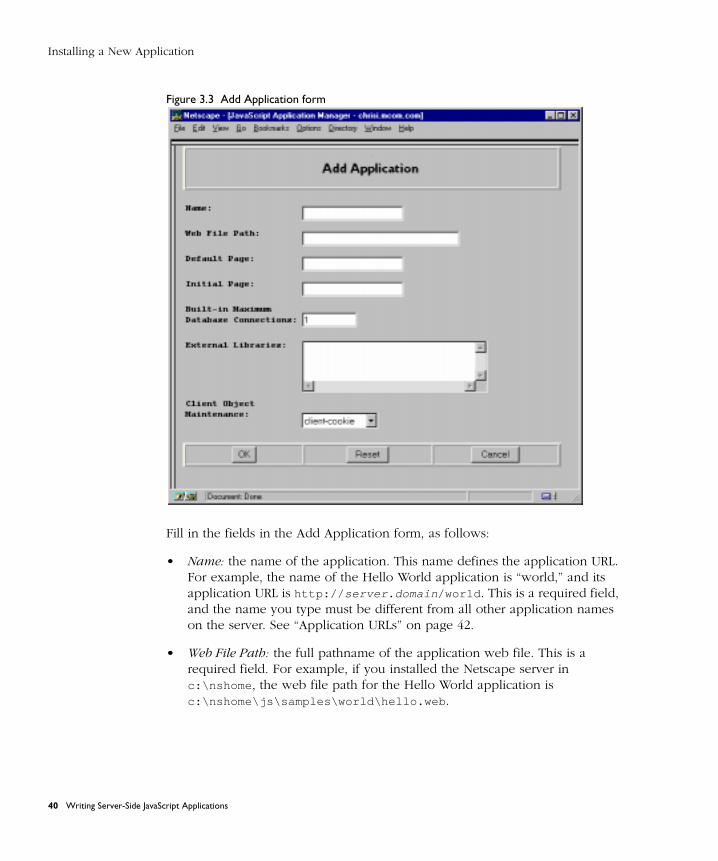
Installing a New Application
Figure 3.3 Add Application form
Fill in the fields in the Add Application form, as follows:
• Name: the name of the application. This name defines the application URL. For example, the name of the Hello World application is “world,” and its application URL is http:// server.domain /world . This is a required field, and the name you type must be different from all other application names on the server. See “Application URLs” on page 42.
• Web File Path: the full pathname of the application web file. This is a required field. For example, if you installed the Netscape server in c:\nshome , the web file path for the Hello World application is c:\nshome\js\samples\world\hello.web .
40 Writing Server-Side JavaScript Applications
Installing a New Application
• Default Page: the page that the JavaScript runtime engine serves if the user does not indicate a specific page in the application. This page is analogous to index.html for a standard URL.
• Initial Page: the page that the JavaScript runtime engine executes when you start the application in the Application Manager. This page is executed exactly once per running of the application. It is generally used to initialize values, create locks, and establish database connections. Any JavaScript source on this page cannot use either of the predefined request or client objects. This is an optional field.
• Built-in Maximum Database Connections: the default value for the maximum number of database connections that this application can have at one time using the predefined database object. JavaScript code can override what you specify in this setting when it calls the database.connect method.
• External Libraries: the pathnames of external libraries to be used with the application. If you specify multiple libraries, delimit the names with either commas or semicolons. This is an optional field. Libraries installed for one application can be used by all applications on the server. See “Working with External Libraries” on page 171.
• Client Object Maintenance: the technique used to save the properties of the client object. This can be client cookie, client URL, server IP, server cookie, or server URL. See “Techniques for Maintaining the client Object” on page 115.
After you have provided all the required information, click Enter to install the application, Reset to clear all the fields, or Cancel to cancel the operation.
You must stop and restart your server after you add or change the external libraries for an application. You can restart a server from your Server Manager; see the administrator’s guide for your web server for more information.
Chapter 3, Mechanics of Developing JavaScript Applications 41
Installing a New Application
Application URLs
When you install an application, you must supply a name for it. This name determines the base application URL, the URL that clients use to access the default page of a JavaScript application. The base application URL is of the form
http:// server.domain/appName
Here, server is the name of the HTTP server, domain is the Internet domain (including any subdomains), and appName is the application name you enter when you install it. Individual pages within the application are accessed by application URLs of the form
http:// server.domain/appName/page. html
Here, page is the name of a page in the application. For example, if your server is named coyote and your domain name is royalairways.com, the base application URL for the hangman sample application is
http://coyote.royalairways.com/hangman
When a client requests this URL, the server generates HTML for the default page in the application and sends it to the client. The application URL for the winning page in this application is
http://coyote.royalairways.com/hangman/youwon.html
Important Before you install an application, be sure the application name you choose does not usurp an existing URL on your server. The JavaScript runtime engine routes all client requests for URLs that match the application URL to the directory specified for the web file. This circumvents the server’s normal document root.
For instance, suppose a client requests a URL that starts with this prefix from the previous example:
http://coyote.royalairways.com/hangman
In this case, the runtime engine on the server looks for a document in the samples\hangman directory and not in your server’s normal document root. The server also serves pages in the directory that are not compiled into the application.
You can place your source (uncompiled) server-side JavaScript files in the same directory as the web file; however, you should do so only for debugging purposes.
42 Writing Server-Side JavaScript Applications
Controlling Access to an Application
Important When you deploy your application to the public, for security reasons, you should not publish uncompiled server-side JavaScript files. In addition, you should never store sensitive information such as passwords in your .web file. If you do, someone can potentially access that information.
Controlling Access to an ApplicationWhen you install an application, you may want to restrict the users who can access it, particularly if the application provides access to sensitive information or capabilities.
If you work on a development server inside a firewall, then you may not need to worry about restricting access while developing the application. It is convenient to have unrestricted access during development, and you may be able to assume that the application is safe from attack inside the firewall. If you use sample data during the development phase, then the risk is even less. However, if you leave your application open, you should be aware that anyone who knows or guesses the application URL can use the application.
When you finish development and are ready to deploy your application, you should reconsider how you want to protect it. You can restrict access by applying a server configuration style to the application. For information on configuration styles, see the administrator’s guide for your web server.
Note Controlling access to applications with configuration styles is available only with Netscape 2.0 servers and later versions.
Modifying Installation FieldsTo modify an application’s installation fields, select the application name in the left frame of the Application Manager and click Modify.
You can change any of the fields defined when you installed the application, except the application name. To change the name of an application, you must remove the application and then reinstall it.
If you modify the fields of a stopped application, the Application Manager automatically starts it. When you modify fields of an active application, the Application Manager automatically stops and restarts it.
Chapter 3, Mechanics of Developing JavaScript Applications 43
Removing an Application
Removing an ApplicationTo remove the selected application, click Remove in the Application Manager. The Application Manager removes the application so that it cannot be run on the server. Clients are no longer able to access the application. If you delete an application and subsequently want to run it, you must install it again.
Although clients can no longer use the application, removing it with the Application Manager does not delete the application’s files from the server. If you want to delete them as well, you must do so manually.
Starting, Stopping, and Restarting an Application
After you first install an application, you must start it to run it. Select the application in the Application Manager and click Start. If the application successfully starts, its status, indicated in the right frame, changes from Stopped to Active.
You can also start an application by loading the following URL:
http:// server.domain /appmgr/control.html?name= appName&cmd=start
Here, appName is the application name. You cannot use this URL unless you have access privileges for the Application Manager.
If you want to stop an application and thereby make it inaccessible to users, select the application name in the Application Manager and click Stop. The application’s status changes to Stopped and clients can no longer run the application. You must stop an application if you want to move the web file or update an application from a development server to a deployment server.
You can also stop an application by loading the following URL:
http:// server.domain /appmgr/control.html?name= appName&cmd=stop
Here, appName is the application name. You cannot use this URL unless you have access privileges for the Application Manager.
44 Writing Server-Side JavaScript Applications
Running an Application
You must restart an application each time you rebuild it. To restart an active application, select it in the Application Manager and click Restart. Restarting essentially reinstalls the application; the software looks for the specified web file. If there is not a valid web file, then the Application Manager generates an error.
You can also restart an application by loading the following URL:
http:// server.domain /appmgr/control.html?name= appName&cmd=restart
Here, appName is the application name. You cannot use this URL unless you have access privileges for the Application Manager.
Running an ApplicationOnce you have compiled and installed an application, you can run it in one of two ways:
• Select the application name in the Application Manager, and then click Run. In response, the Application Manager opens a new Navigator window to access the application.
• Load the base application URL in Navigator by typing it in the Location field.
The server then generates HTML for the specified application page and sends it to the client.
Debugging an ApplicationTo debug an application, do one of the following:
• Select the application name in the Application Manager, and then click Debug, as described in “Using the Application Manager” on page 46.
• Load the application’s debug URL, as described in “Using Debug URLs” on page 47.
You can use the debug function to display debugging information, as described in “Using the debug Function” on page 48.
Chapter 3, Mechanics of Developing JavaScript Applications 45
Debugging an Application
Once you’ve started debugging a JavaScript application in this way, you may not be able to stop or restart it. In this situation, the Application Manager displays the warning “Trace is active.” If this occurs, do the following:
1. Close any windows running the debugger.
2. Close any windows running the affected application.
3. In the Application Manager, select the affect application and click Run.
You can now stop or restart the application.
Using the Application ManagerTo debug an application, select it in the left frame of the Application Manager and then click Debug. In response, the Application Manger opens a new Navigator window in which the application runs. The trace utility also appears, either in a separate frame of the window containing the application or in another window altogether. (You can determine the appearance of the debug window when you configure the default settings for the Application Manager, as described in “Configuring Default Settings” on page 49.)
The trace utility displays this debugging information:
• values of object properties and arguments of debug functions called by the application
• property values of the request and client objects, before and after generating HTML for the page
• property values of the project and server objects
• indication of when the application assigns new values to properties
• indication of when the runtime engine sends content to the client
Figure 3.4 shows what you might see if you debug the Hangman application.
46 Writing Server-Side JavaScript Applications
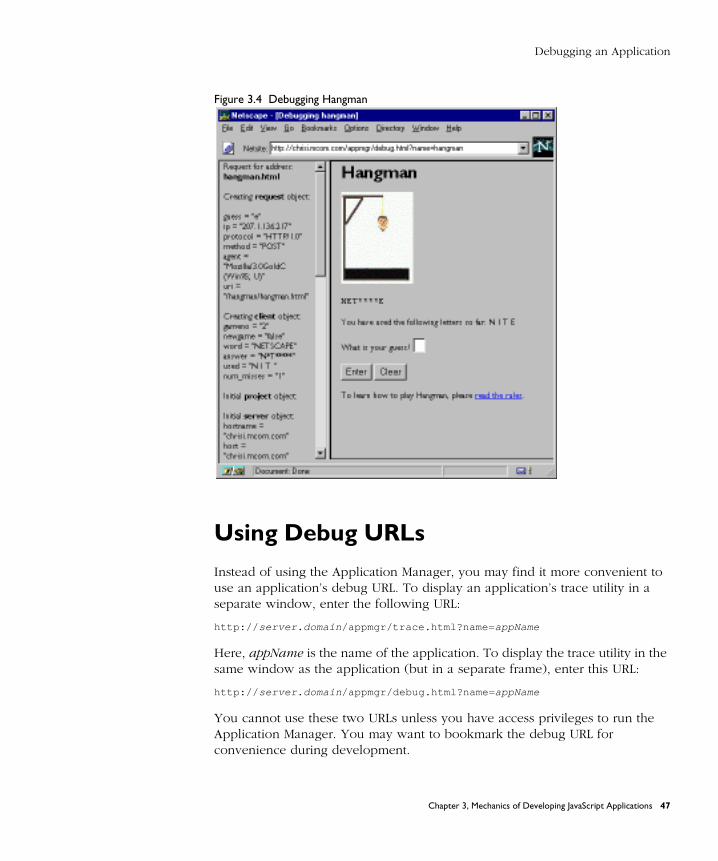
Debugging an Application
Figure 3.4 Debugging Hangman
Using Debug URLs
Instead of using the Application Manager, you may find it more convenient to use an application’s debug URL. To display an application’s trace utility in a separate window, enter the following URL:
http:// server.domain /appmgr/trace.html?name= appName
Here, appName is the name of the application. To display the trace utility in the same window as the application (but in a separate frame), enter this URL:
http:// server.domain /appmgr/debug.html?name= appName
You cannot use these two URLs unless you have access privileges to run the Application Manager. You may want to bookmark the debug URL for convenience during development.
Chapter 3, Mechanics of Developing JavaScript Applications 47
Deploying an Application
Using the debug Function
You can use the debug function in your JavaScript application to help trace problems with the application. The debug function displays values to the application trace utility. For example, the following statement displays the value of the guess property of the request object in the trace window along with some identifying text:
debug ("Current Guess is ", request.guess);
Deploying an ApplicationAfter you have finished developing and testing your application, you are ready to deploy it so that it is available to its intended users. This involves two steps:
• moving the application from the development server to the deployment (production) server that is accessible to end users
• applying or changing access restrictions to the application, as appropriate
You should move the application web file to the deployment server, along with any images and uncompiled HTML and JavaScript files that are needed. For more information on how to deploy your application files, see the Web Publisher User’s Guide.
Important When you deploy your application to the public, for security reasons, you should not publish uncompiled server-side JavaScript files. In addition, you should never store sensitive information such as passwords in your .web file. If you do, someone can potentially access that information.
Depending on the application, you might want to restrict access to certain groups or individuals. In some cases, you might want anyone to be able to run the application; in these cases you don’t need to apply any restrictions at all. If the application displays sensitive information or provides access to the server file system, you should restrict access to authorized users who have the proper user name and password.
You restrict access to an application by applying a server configuration style from your Server Manager. For information on using Server Manager and configuration styles, see the administrator’s guide for your web server.
48 Writing Server-Side JavaScript Applications
Application Manager Details
Application Manager DetailsThis section shows how to change default settings for the Application Manager. In addition, it talks about the format of the underlying file in which the Application Manager stores information.
Configuring Default Settings
To configure default settings for the Application Manager, click Configure in the Application Manager’s top frame. In response, the Application Manager displays the form shown in Figure 3.5.
You can specify these default values:
• Web File Path: A default directory path for your development area.
• Default Page: A default name for the default page of a new application.
• Initial Page: A default name for the initial page of a new application.
• Built-in Maximum Database Connections: A default value for the maximum number of database connections you can make for the predefined database object.
• External Libraries: A default directory path for native executables libraries.
• Client Object Maintenance: A default maintenance technique for the client object properties.
When you install a new application, the default installation fields are used for the initial settings.
In addition, you can specify these preferences:
• Confirm on: Whether you are prompted to confirm your action when you remove, start, stop, or restart an application.
• Debug Output: Whether, when debugging an application, the application trace appears in the same window as the application but in another frame, or in a window separate from the application.
Chapter 3, Mechanics of Developing JavaScript Applications 49

Application Manager Details
Figure 3.5 Default Settings form
50 Writing Server-Side JavaScript Applications
Application Manager Details
Under the Hood
The Application Manager is a convenient interface for modifying the configuration file $NSHOME\https- serverID \config\jsa.conf , where $NSHOME is the directory in which you installed the server and serverID is the server’s ID. In case of catastrophic errors, you may need to edit this file yourself. In general, this is not recommended, but the information is provided here for troubleshooting purposes.
Each line in jsa.conf corresponds to an application. The first item on each line is the application name. The remaining items are in the format name=value , where name is the name of the installation field, and value is its value. The possible values for name are:
• uri : the application name portion of the base application URL
• object : path to the application web file
• home: application default page
• start : application initial page
• maxdbconnect : default maximum number of database connections allowed for the predefined database object
library : paths to external libraries, separated by commas or semicolons
• client-mode : technique for maintaining the client object
The jsa.conf file is limited to 1024 lines, and each line is limited to 1024 characters. If the fields entered in the Application Manager cause a line to exceed this limit, the line is truncated. This usually results in loss of the last item, external library files. If this occurs, reduce the number of external libraries entered for the application, and add the libraries to other applications. Because installed libraries are accessible to all applications, the application can still use them.
A line that starts with # indicates a comment. That entire line is ignored. You can also include empty lines in the file.
Do not include multiple lines specifying the same application name. Doing so causes errors in the Application Manager.
Chapter 3, Mechanics of Developing JavaScript Applications 51

Application Manager Details
52 Writing Server-Side JavaScript Applications
2
Server-Side JavaScript Features• Basics of Server-Side JavaScript
• Session Management Service
• Working with Java and CORBA Objects Through LiveConnect
• Other JavaScript Functionality
Chapter 4Basics of Server-Side JavaScriptChapter 5Session Management ServiceChapter 6Working with Java and CORBA Objects Through LiveConnectChapter 7Other JavaScript Functionality

54 Writing Server-Side JavaScript Applications
C h a p t e r
4Basics of Server-Side JavaScript
This chapter describes the basics of server-side JavaScript. It introduces server-side functionality and the differences between client-side and server-side JavaScript. The chapter describes how to embed server-side JavaScript in HTML files. It discusses what happens at runtime on the client and on the server, so that you can understand what to do when. The chapter describes how you use JavaScript to change the HTML page sent to the client and, finally, how to share information between the client and server processes.
Server-side JavaScript contains the same core language as the client-side JavaScript with which you may already be familiar. The tasks you perform when running JavaScript on a server are quite different from those you perform when running JavaScript on a client. The different environments and tasks call for different objects.
Chapter 4, Basics of Server-Side JavaScript 55
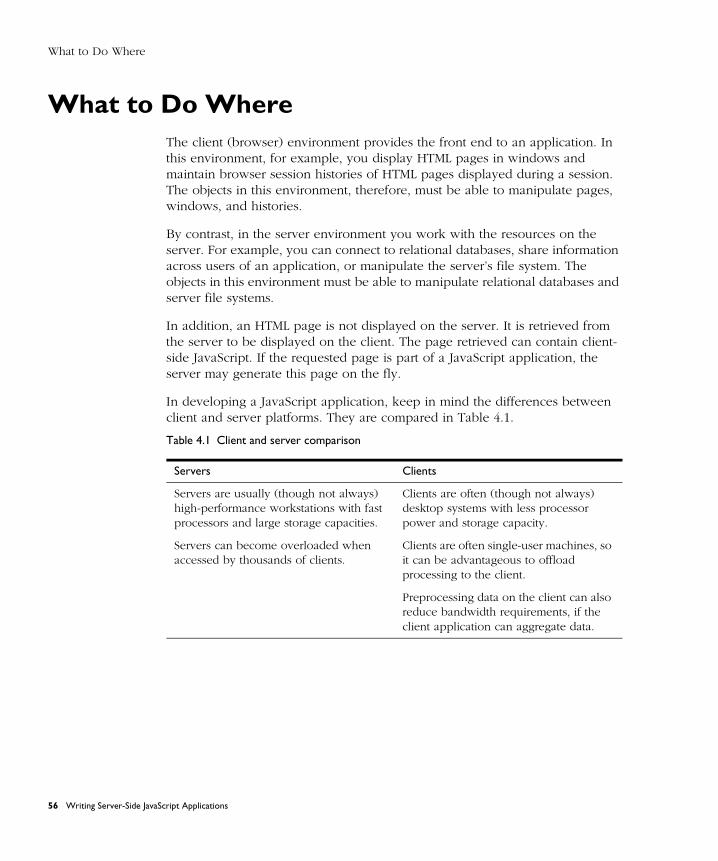
What to Do Where
What to Do WhereThe client (browser) environment provides the front end to an application. In this environment, for example, you display HTML pages in windows and maintain browser session histories of HTML pages displayed during a session. The objects in this environment, therefore, must be able to manipulate pages, windows, and histories.
By contrast, in the server environment you work with the resources on the server. For example, you can connect to relational databases, share information across users of an application, or manipulate the server’s file system. The objects in this environment must be able to manipulate relational databases and server file systems.
In addition, an HTML page is not displayed on the server. It is retrieved from the server to be displayed on the client. The page retrieved can contain client-side JavaScript. If the requested page is part of a JavaScript application, the server may generate this page on the fly.
In developing a JavaScript application, keep in mind the differences between client and server platforms. They are compared in Table 4.1.
Table 4.1 Client and server comparison
Servers Clients
Servers are usually (though not always) high-performance workstations with fast processors and large storage capacities.
Clients are often (though not always) desktop systems with less processor power and storage capacity.
Servers can become overloaded when accessed by thousands of clients.
Clients are often single-user machines, so it can be advantageous to offload processing to the client.
Preprocessing data on the client can also reduce bandwidth requirements, if the client application can aggregate data.
56 Writing Server-Side JavaScript Applications
What to Do Where
There are usually a variety of ways to partition an application between client and server. Some tasks can be performed only on the client or on the server; others can be performed on either. Although there is no definitive way to know what to do where, you can follow these general guidelines:
As a rule of thumb, use client processing (the SCRIPT tag) for these tasks:
• validating user input; that is, checking that values entered in forms are valid
• prompting a user for confirmation and displaying error or informational dialog boxes
• performing aggregate calculations (such as sums or averages) or other processing on data retrieved from the server
• conditionalizing HTML
• performing other functions that do not require information from the server
Use server processing (the SERVER tag) for these tasks:
• maintaining information through a series of client accesses
• maintaining data shared among several clients or applications
• accessing a database or files on the server
• calling external libraries on the server
• dynamically customizing Java applets; for example, visualizing data using a Java applet
JavaScript’s Session Management Service provides objects to preserve information over time, but client-side JavaScript is more ephemeral. Client-side objects exist only as the user accesses a page. Also, servers can aggregate information from many clients and many applications and can store large amounts of data in databases. It is important to keep these characteristics in mind when partitioning functionality between client and server.
Chapter 4, Basics of Server-Side JavaScript 57
Overview of Runtime Processing
Overview of Runtime ProcessingOnce you’ve installed and started a JavaScript application, users can access it. The basic procedure is as follows:
1. A user accesses the application URL with a web browser, such as Netscape Communicator. The web browser sends a client request to the server for a page in the application.
2. If the request is to a page under the application URL, the JavaScript runtime engine running on the server finds information in the web file corresponding to that URL. For details on what happens in this and the next two steps, see “Runtime Processing on the Server” on page 72.
3. The runtime engine constructs an HTML page to send to the client in response. It runs the bytecodes associated with SERVER tags from the original source code HTML, creating an HTML page based on those bytecodes and any other HTML found in the original. For information on how you can influence that page that is constructed, see “Constructing the HTML Page” on page 77.
4. The runtime engine sends the new HTML page (which may contain client-side JavaScript statements) to the client.
5. The JavaScript runtime engine inside the web browser interprets any client-side JavaScript statements, formats HTML output, and displays results to the user.
Figure 4.1 illustrates this process.
58 Writing Server-Side JavaScript Applications
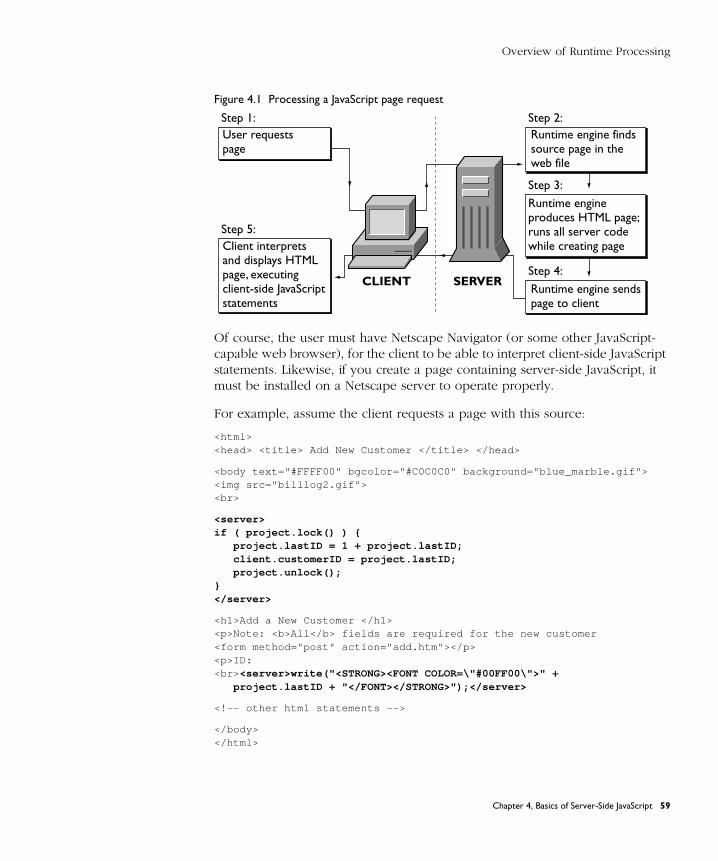
Overview of Runtime Processing
Figure 4.1 Processing a JavaScript page request
Of course, the user must have Netscape Navigator (or some other JavaScript-capable web browser), for the client to be able to interpret client-side JavaScript statements. Likewise, if you create a page containing server-side JavaScript, it must be installed on a Netscape server to operate properly.
For example, assume the client requests a page with this source:
<html><head> <title> Add New Customer </title> </head>
<body text="#FFFF00" bgcolor="#C0C0C0" background="blue_marble.gif"><img src="billlog2.gif"><br>
<server>if ( project.lock() ) {
project.lastID = 1 + project.lastID;client.customerID = project.lastID;project.unlock();
}</server>
<h1>Add a New Customer </h1><p>Note: <b>All</b> fields are required for the new customer<form method="post" action="add.htm"></p><p>ID:<br> <server>write("<STRONG><FONT COLOR=\"#00FF00\">" +
project.lastID + "</FONT></STRONG>");</server>
<!-- other html statements -->
</body></html>
User requestspage
Step 1:
Client interpretsand displays HTMLpage, executingclient-side JavaScriptstatements
Step 5:
Runtime engine findssource page in theweb file
Runtime engine sendspage to client
Step 2:
Runtime engine produces HTML page;runs all server codewhile creating page
Step 3:
Step 4:CLIENT SERVER
Chapter 4, Basics of Server-Side JavaScript 59
Server-Side Language Overview
When this page is accessed, the runtime engine on the server executes the code associated with the SERVER tags. (The code shown in bold.) If the new customer ID is 42, the server sends this HTML page to the client to be displayed:
<html><head> <title> Add New Customer </title> </head>
<body text="#FFFF00" bgcolor="#C0C0C0" background="blue_marble.gif"><img src="billlog2.gif"><br>
<h1>Add a New Customer </h1><p>Note: <b>All</b> fields are required for the new customer<form method="post" action="add.htm"></p><p>ID:<br> <STRONG><FONT COLOR="#00FF00">42</FONT></STRONG>
<!-- other html statements -->
</body></html>
Server-Side Language OverviewClient-side and server-side JavaScript both implement the JavaScript 1.2 language. In addition, each adds objects and functions specific to working in the client or the server environment. For example, client-side JavaScript includes the form object to represent a form on an HTML page, whereas server-side JavaScript includes the database object for connecting to an external relational database.
The JavaScript Guide discusses in detail the core JavaScript language and the additions specific to client-side JavaScript.
ECMA, the European standards organization for standardizing information and communication systems, derived its ECMA-262 standard from the JavaScript language. You can download the standard specification from ECMA’s web site at http://www.ecma.ch .
60 Writing Server-Side JavaScript Applications
Server-Side Language Overview
Core Language
For the most part, server-side JavaScript implements the JavaScript 1.2 language completely, as does client-side JavaScript. By default, however, server-side JavaScript differs from the JavaScript 1.2 specification in its treatment of comparison operators. Also, server-side JavaScript implements prototypes as defined in the specification, but the implications are somewhat different in the server environment than in the client environment. This section discusses these differences.
Comparison Operators
The behavior of comparison operators changed between JavaScript 1.1 and JavaScript 1.2. JavaScript 1.1 provided automatic conversion of operands for comparison operators. In particular:
• If both operands are objects, JavaScript 1.1 compares object references.
• If either operand is null, JavaScript 1.1 converts the other operand to an object and compares references.
• If one operand is a string and the other is an object, JavaScript 1.1 converts the object to a string and compares string characters.
• Otherwise, JavaScript 1.1 converts both operands to numbers and compares numeric identity.
JavaScript 1.2 does not provide automatic conversion. In particular:
• JavaScript 1.2 never attempts to convert operands from one type to another.
• JavaScript 1.2 always compares the identity of operands of like type. If the operands are not of like type, they are not equal.
Server-side JavaScript can provide either behavior. By default, server-side JavaScript provides the automatic conversion of operands as was done in JavaScript 1.1. If you want to have server-side JavaScript have the JavaScript 1.2 behavior, you can specify the -a 1.2 option to jsac , the JavaScript compiler. The compiler is described in “Compiling an Application” on page 36.
Chapter 4, Basics of Server-Side JavaScript 61
Server-Side Language Overview
Prototypes
As described in the JavaScript Reference, you can use the prototype property of many classes to add new properties to a class and to all of its instances. As described in “Classes and Objects” on page 66, server-side JavaScript adds several classes and predefined objects. For the new classes that have the prototype property, it works for server-side JavaScript exactly as for client-side JavaScript.
You can use the prototype property to add new properties to the Blob , Connection , Cursor , DbPool , File , Lock , Resultset , SendMail , and Stproc classes. In addition, you can use the prototype property of the DbBuiltin class to add properties to the predefined database object. Note that you cannot create an instance of the DbBuiltin class; instead, you use the database object provided by the JavaScript runtime engine.
You cannot use prototype with the client , project , request , and server objects.
Also, as for client-side JavaScript, you can use the prototype property for any class that you define for your application.
Remember that all JavaScript applications on a server run in the same environment. This is why you can share information between clients and applications. One consequence of this, however, is that if you use the prototype property to add a new property to any of the server-side classes added by JavaScript, the new property is available to all applications running on the server, not just the application in which the property was added. This provides you with an easy mechanism for adding functionality to all JavaScript applications on your server.
By contrast, if you add a property to a class you define in your application, that property is available only to the application in which it was created.
62 Writing Server-Side JavaScript Applications
Server-Side Language Overview
Usage
You need to be aware of how the JavaScript application compiler recognizes client-side and server-side JavaScript in an HTML file.
Client-side JavaScript statements can occur in several situations:
• by including them as statements and functions within a SCRIPT tag
• by specifying a file as JavaScript source to the SCRIPT tag
• by specifying a JavaScript expression as the value of an HTML attribute
• by including statements as event handlers within certain other HTML tags
For detailed information, see the JavaScript Guide.
Server-side JavaScript statements can occur in these situations:
• by including them as statements and functions within a SERVER tag
• by specifying a file as JavaScript source to the JavaScript application compiler
• by specifying a JavaScript expression as the value or name of an HTML attribute
Notice that you cannot specify a server-side JavaScript statement as an event handler. For more information, see “Embedding JavaScript in HTML” on page 68.
Chapter 4, Basics of Server-Side JavaScript 63
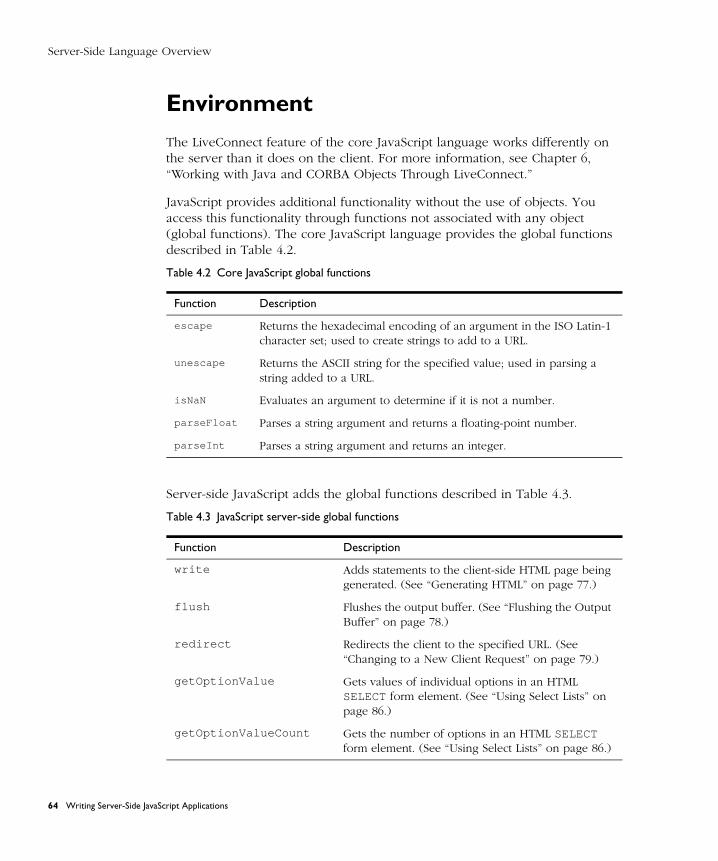
Server-Side Language Overview
Environment
The LiveConnect feature of the core JavaScript language works differently on the server than it does on the client. For more information, see Chapter 6, “Working with Java and CORBA Objects Through LiveConnect.”
JavaScript provides additional functionality without the use of objects. You access this functionality through functions not associated with any object (global functions). The core JavaScript language provides the global functions described in Table 4.2.
Server-side JavaScript adds the global functions described in Table 4.3.
Table 4.2 Core JavaScript global functions
Function Description
escape Returns the hexadecimal encoding of an argument in the ISO Latin-1 character set; used to create strings to add to a URL.
unescape Returns the ASCII string for the specified value; used in parsing a string added to a URL.
isNaN Evaluates an argument to determine if it is not a number.
parseFloat Parses a string argument and returns a floating-point number.
parseInt Parses a string argument and returns an integer.
Table 4.3 JavaScript server-side global functions
Function Description
write Adds statements to the client-side HTML page being generated. (See “Generating HTML” on page 77.)
flush Flushes the output buffer. (See “Flushing the Output Buffer” on page 78.)
redirect Redirects the client to the specified URL. (See “Changing to a New Client Request” on page 79.)
getOptionValue Gets values of individual options in an HTML SELECT form element. (See “Using Select Lists” on page 86.)
getOptionValueCount Gets the number of options in an HTML SELECT form element. (See “Using Select Lists” on page 86.)
64 Writing Server-Side JavaScript Applications
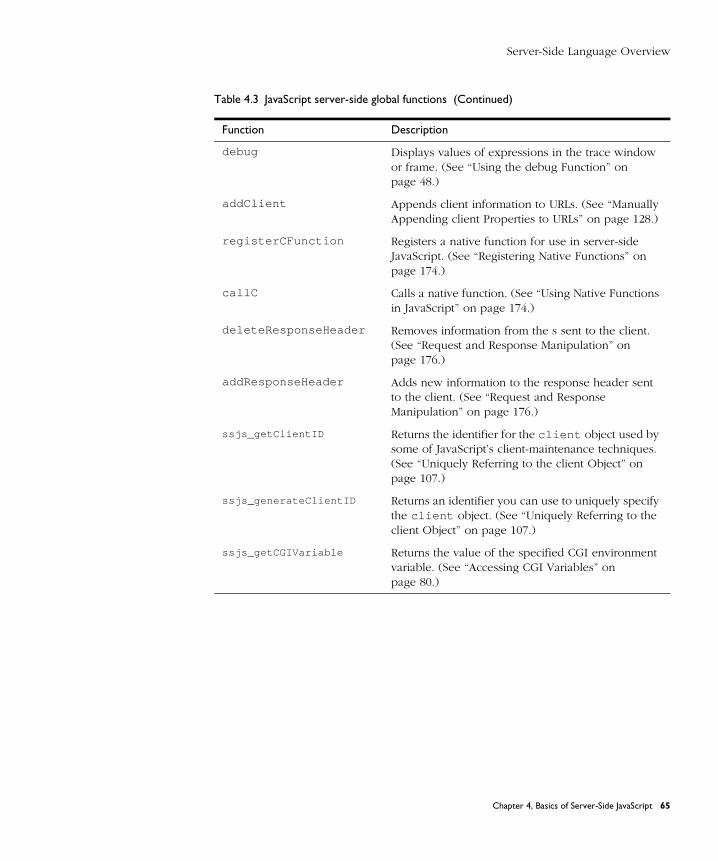
Server-Side Language Overview
debug Displays values of expressions in the trace window or frame. (See “Using the debug Function” on page 48.)
addClient Appends client information to URLs. (See “Manually Appending client Properties to URLs” on page 128.)
registerCFunction Registers a native function for use in server-side JavaScript. (See “Registering Native Functions” on page 174.)
callC Calls a native function. (See “Using Native Functions in JavaScript” on page 174.)
deleteResponseHeader Removes information from the s sent to the client. (See “Request and Response Manipulation” on page 176.)
addResponseHeader Adds new information to the response header sent to the client. (See “Request and Response Manipulation” on page 176.)
ssjs_getClientID Returns the identifier for the client object used by some of JavaScript’s client-maintenance techniques. (See “Uniquely Referring to the client Object” on page 107.)
ssjs_generateClientID Returns an identifier you can use to uniquely specify the client object. (See “Uniquely Referring to the client Object” on page 107.)
ssjs_getCGIVariable Returns the value of the specified CGI environment variable. (See “Accessing CGI Variables” on page 80.)
Table 4.3 JavaScript server-side global functions (Continued)
Function Description
Chapter 4, Basics of Server-Side JavaScript 65
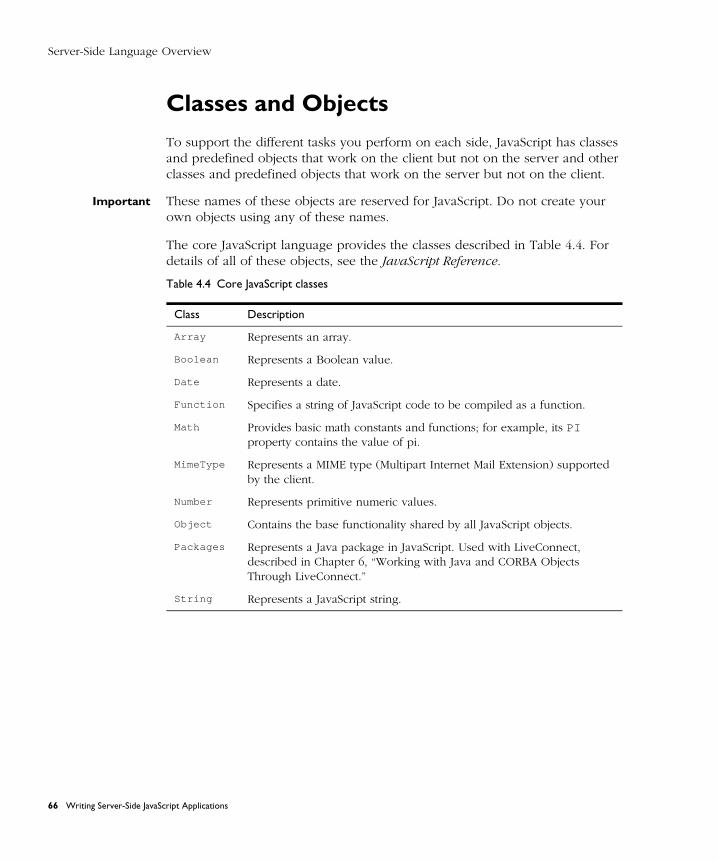
Server-Side Language Overview
Classes and Objects
To support the different tasks you perform on each side, JavaScript has classes and predefined objects that work on the client but not on the server and other classes and predefined objects that work on the server but not on the client.
Important These names of these objects are reserved for JavaScript. Do not create your own objects using any of these names.
The core JavaScript language provides the classes described in Table 4.4. For details of all of these objects, see the JavaScript Reference.
Table 4.4 Core JavaScript classes
Class Description
Array Represents an array.
Boolean Represents a Boolean value.
Date Represents a date.
Function Specifies a string of JavaScript code to be compiled as a function.
Math Provides basic math constants and functions; for example, its PI property contains the value of pi.
MimeType Represents a MIME type (Multipart Internet Mail Extension) supported by the client.
Number Represents primitive numeric values.
Object Contains the base functionality shared by all JavaScript objects.
Packages Represents a Java package in JavaScript. Used with LiveConnect, described in Chapter 6, “Working with Java and CORBA Objects Through LiveConnect.”
String Represents a JavaScript string.
66 Writing Server-Side JavaScript Applications
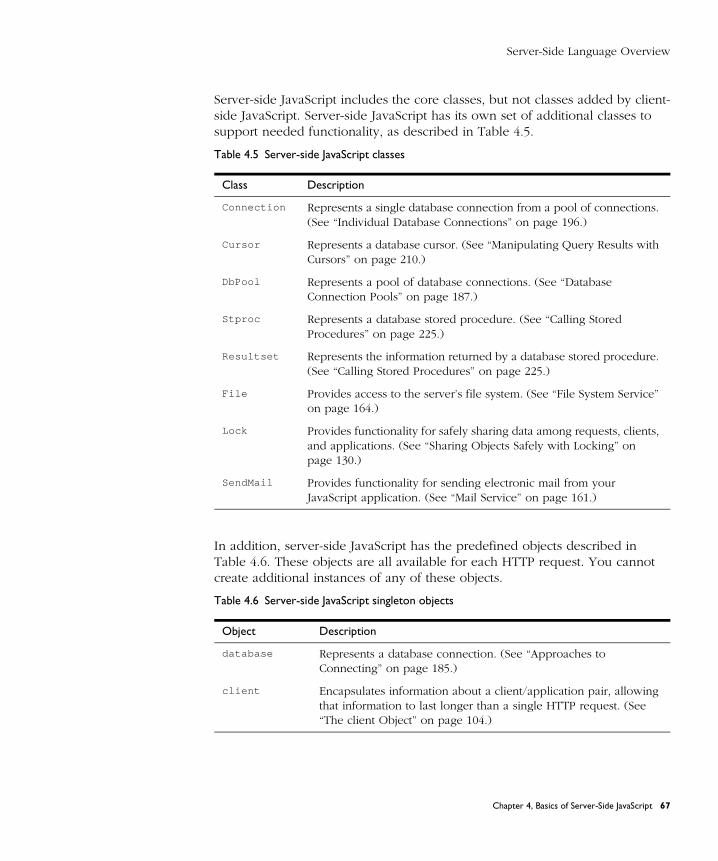
Server-Side Language Overview
Server-side JavaScript includes the core classes, but not classes added by client-side JavaScript. Server-side JavaScript has its own set of additional classes to support needed functionality, as described in Table 4.5.
In addition, server-side JavaScript has the predefined objects described in Table 4.6. These objects are all available for each HTTP request. You cannot create additional instances of any of these objects.
Table 4.5 Server-side JavaScript classes
Class Description
Connection Represents a single database connection from a pool of connections. (See “Individual Database Connections” on page 196.)
Cursor Represents a database cursor. (See “Manipulating Query Results with Cursors” on page 210.)
DbPool Represents a pool of database connections. (See “Database Connection Pools” on page 187.)
Stproc Represents a database stored procedure. (See “Calling Stored Procedures” on page 225.)
Resultset Represents the information returned by a database stored procedure. (See “Calling Stored Procedures” on page 225.)
File Provides access to the server’s file system. (See “File System Service” on page 164.)
Lock Provides functionality for safely sharing data among requests, clients, and applications. (See “Sharing Objects Safely with Locking” on page 130.)
SendMail Provides functionality for sending electronic mail from your JavaScript application. (See “Mail Service” on page 161.)
Table 4.6 Server-side JavaScript singleton objects
Object Description
database Represents a database connection. (See “Approaches to Connecting” on page 185.)
client Encapsulates information about a client/application pair, allowing that information to last longer than a single HTTP request. (See “The client Object” on page 104.)
Chapter 4, Basics of Server-Side JavaScript 67
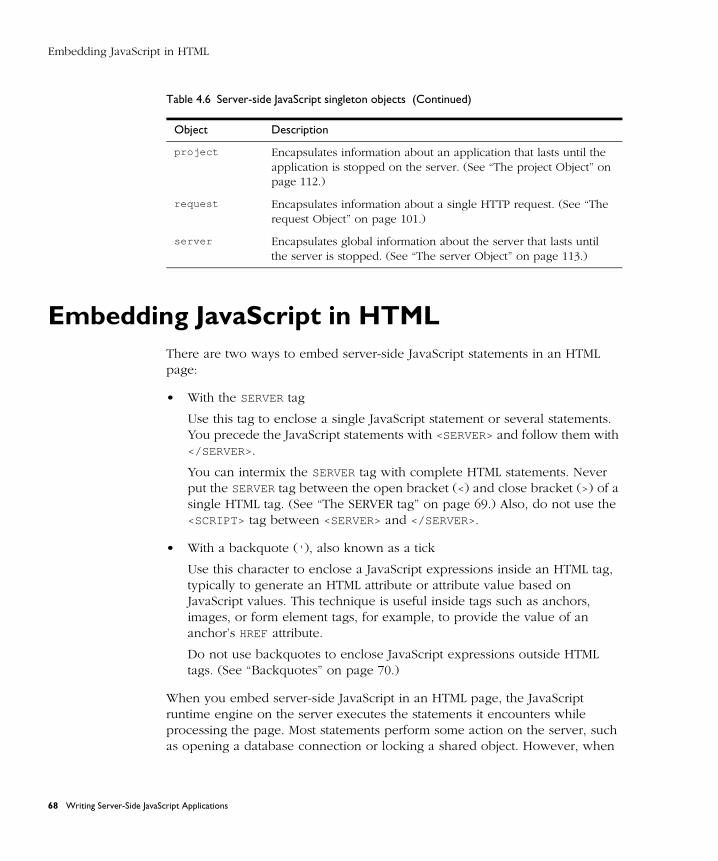
Embedding JavaScript in HTML
Embedding JavaScript in HTMLThere are two ways to embed server-side JavaScript statements in an HTML page:
• With the SERVER tag
Use this tag to enclose a single JavaScript statement or several statements. You precede the JavaScript statements with <SERVER> and follow them with </SERVER>.
You can intermix the SERVER tag with complete HTML statements. Never put the SERVER tag between the open bracket (<) and close bracket (>) of a single HTML tag. (See “The SERVER tag” on page 69.) Also, do not use the <SCRIPT> tag between <SERVER> and </SERVER>.
• With a backquote (‘ ), also known as a tick
Use this character to enclose a JavaScript expressions inside an HTML tag, typically to generate an HTML attribute or attribute value based on JavaScript values. This technique is useful inside tags such as anchors, images, or form element tags, for example, to provide the value of an anchor’s HREF attribute.
Do not use backquotes to enclose JavaScript expressions outside HTML tags. (See “Backquotes” on page 70.)
When you embed server-side JavaScript in an HTML page, the JavaScript runtime engine on the server executes the statements it encounters while processing the page. Most statements perform some action on the server, such as opening a database connection or locking a shared object. However, when
project Encapsulates information about an application that lasts until the application is stopped on the server. (See “The project Object” on page 112.)
request Encapsulates information about a single HTTP request. (See “The request Object” on page 101.)
server Encapsulates global information about the server that lasts until the server is stopped. (See “The server Object” on page 113.)
Table 4.6 Server-side JavaScript singleton objects (Continued)
Object Description
68 Writing Server-Side JavaScript Applications
Embedding JavaScript in HTML
you use the write function in a SERVER tag or enclose statements in backquotes, the runtime engine dynamically generates new HTML to modify the page it sends to the client.
The SERVER tag
The SERVER tag is the most common way to embed server-side JavaScript in an HTML page. You can use the SERVER tag in any situation; typically, however, you use backquotes instead if you’re generating attributes names or values for the HTML page.
Most statements between the <SERVER> and </SERVER> tags do not appear on the HTML page sent to the client. Instead, the statements are executed on the server. However, the output from any calls to the write function do appear in the resulting HTML.
The following excerpt from the Hello World sample application illustrates these uses:
<P>This time you are <SERVER>write(request.newname);client.oldname = request.newname;</SERVER><h3>Enter your name</h3>
When given this code snippet, the runtime engine on the server generates HTML based on the value of request.newname in the write statement. In the second statement, it simply performs a JavaScript operation, assigning the value of request.newname to client.oldname . It does not generate any HTML. So, if request.newname is “Mr. Ed,” the runtime engine generates the following HTML for the previous snippet:
<P>This time you are Mr. Ed<h3>Enter your name</h3>
Chapter 4, Basics of Server-Side JavaScript 69
Embedding JavaScript in HTML
Backquotes
Use backquotes (‘ ) to enclose server-side JavaScript expressions as substitutes for HTML attribute names or attribute values. JavaScript embedded in HTML with backquotes automatically generates HTML; you do not need to use write .
In general, HTML tags are of the form
<TAG ATTRIB=" value " [... ATTRIB=" value "]>
where ATTRIB is an attribute and " value " is its value. The bracketed expression indicates that any number of attribute/value pairs is possible.
When you enclose a JavaScript expression in backquotes to be used as an attribute value, the JavaScript runtime engine automatically adds quotation marks for you around the entire value. You do not provide quotation marks yourself for this purpose, although you may need them to delimit string literals in the expression, as in the example that follows. The runtime engine does not do this for attribute names, because attribute names are not supposed to be enclosed in quotation marks.
For example, consider the following line from the Hangman sample application:
<IMG SRC=‘"images\hang" + client.num_misses + ".gif"‘>
This line dynamically generates the name of the image to use based on the value of client.num_misses . The backquotes enclose a JavaScript expression that concatenates the string "images\hang" with the integer value of client.num_misses and the string ".gif" , producing a string such as "images\hang0.gif" . The result is HTML such as
<IMG SRC="images\hang0.gif">
The order of the quotation marks is critical. The backquote comes first, indicating that the following value is a JavaScript expression, consisting of a string ("images\hang" ), concatenated with an integer (client.num_misses ), concatenated with another string (".gif" ). JavaScript converts the entire expression to a string and adds the necessary quotation marks around the attribute value.
70 Writing Server-Side JavaScript Applications
Embedding JavaScript in HTML
You need to be careful about using double quotation marks inside backquotes, because the value they enclose is interpreted as a literal value. For this reason, do not surround JavaScript expressions you want evaluated with quotation marks. For example, if the value of client.val is NetHead, then this statement:
<A NAME=‘client.val‘>
generates this HTML:
<A NAME="NetHead">
But this statement:
<A NAME=‘"client.val"‘>
generates this HTML:
<A NAME="client.val">
As another example, two of the ANCHOR tag’s attributes are HREF and NAME. HREF makes the tag a hyperlink, and NAME makes it a named anchor. The following statements use the choice variable to set the attrib and val properties of the client object and then create either a hyperlink or a target, depending on those values:
<SERVER>if (choice == "link") {
client.attrib = "HREF";client.val = "http://www.netscape.com";
}if (choice == "target") {
client.attrib = "NAME";client.val = "NetHead";
}</SERVER>
<A ‘client.attrib‘=‘client.val‘>Netscape Communications</A>
If the value of choice is "link" , the result is
<A HREF="http://home.netscape.com">Netscape Communications</A>
If the value of choice is "target" , the result is
<A NAME="NetHead">Netscape Communications</A>
Chapter 4, Basics of Server-Side JavaScript 71
Runtime Processing on the Server
When to Use Each Technique
In most cases, it is clear when to use the SERVER tag and when to use backquotes. However, sometimes you can achieve the same result either way. In general, it is best to use backquotes to embed JavaScript values inside HTML tags, and to use the SERVER tag elsewhere.
For example, in Hangman, instead of writing
<IMG SRC=‘"images\hang" + client.num_misses + ".gif"‘>
you could write
<SERVER>write("<IMG SRC=\"images\hang");write(client.num_misses);write(".gif\">");</SERVER>
Notice the backslash that lets you use a quotation mark inside a literal string. Although the resulting HTML is the same, in this case backquotes are preferable because the source is easier to read and edit.
Runtime Processing on the Server“Overview of Runtime Processing” on page 58 gives an overview of what happens at runtime when a single user accesses a page in a JavaScript application. This section provides more details about steps 2 through 4 of this process, so you can better see what happens at each stage. This description provides a context for understanding what you can do on the client and on the server.
One of the most important things to remember when thinking about JavaScript applications is the asynchronous nature of processing on the Web. JavaScript applications are designed to be used by many people at the same time. The JavaScript runtime engine on the server handles requests from many different users as they come in and processes them in the order received.
72 Writing Server-Side JavaScript Applications
Runtime Processing on the Server
Unlike a traditional application that is run by a single user on a single machine, your application must support the interleaving of multiple simultaneous users. In fact, since each frame in an HTML document with multiple frames generates its own request, what might seem to be a single request to the end user can appear as several requests to the runtime engine.
HTTP (Hypertext Transfer Protocol) is the protocol by which an HTML page is sent to a client. This protocol is stateless, that is, information is not preserved between requests. In general, any information needed to process an HTTP request needs to be sent with the request. This poses problems for many applications. How do you share information between different users of an application or even between different requests by the same user? JavaScript’s Session Management Service was designed to help with this problem. This service is discussed in detail in Chapter 5, “Session Management Service.” For now simply remember that the runtime engine automatically maintains the client , server , project , and request objects for you.
When the Netscape server receives a client request for an application page, it first performs authorization. This step is part of the basic server administration functions. If the request fails server authorization, then no subsequent steps are performed. If the request receives server authorization, then the JavaScript runtime engine continues. The runtime engine performs these steps, described in the following sections:
1. Constructs a new request object and constructs or restores the client object.
2. Finds the page for the request and starts constructing an HTML page to send to the client.
3. For each piece of the source HTML page, adds to the buffer or executes code.
4. Saves the client object properties.
5. Sends HTML to the client.
6. Destroys the request object and saves or destroys the client object.
Chapter 4, Basics of Server-Side JavaScript 73
Runtime Processing on the Server
Step 1. Construct request object and construct or restore client object
It initializes the built-in properties of the request object, such as the request’s IP address and any form input elements associated with the request. If the URL for the request specifies other properties, those are initialized for the request object, as described in “Encoding Information in a URL” on page 87.
If the client object already exists, the runtime engine retrieves it based on the specified client-maintenance technique. (See “Techniques for Maintaining the client Object” on page 115.) If no client object exists, the runtime engine constructs a new object with no properties.
You cannot count on the order in which these objects are constructed.
Step 2. Find source page and start constructing HTML page
When you compiled your JavaScript application, the source included HTML pages containing server-side JavaScript statements. The main goal of the runtime engine is to construct, from one of those source pages, an HTML page containing only HTML and client-side JavaScript statements. As it creates this HTML page, the runtime engine stores the partially created page in a special area of memory called a buffer until it is time to send the buffered contents to the client.
Step 3. Add to output buffer or execute code
This step is performed for each piece of code on the source page. The details of the effects of various server-side statements are covered in other sections of this manual. For more information, see “Constructing the HTML Page” on page 77.
For a given request, the runtime engine keeps performing this step until one of these things happens:
• The buffer contains 64KB of HTML.
In this situation, the runtime engine performs steps 4 and 5 and then returns to step 3 with a newly emptied buffer and continues processing the same request. (Step 4 is only executed once, even if steps 3 and 5 are repeated.)
74 Writing Server-Side JavaScript Applications
Runtime Processing on the Server
• The server executes the flush function.
In this situation, the runtime engine performs steps 4 and 5 and then returns to step 3 with a newly emptied buffer and continues processing the same request. (Step 4 is only executed once, even if steps 3 and 5 are repeated.)
• The server executes the redirect function.
In this situation, the runtime engine finishes this request by performing steps 4 through 6. It ignores anything occurring after the redirect function in the source file and starts a new request for the page specified in the call to redirect .
• It reaches the end of the page.
In this situation, the runtime engine finishes this request by performing steps 4 through 6.
Step 4. Save client object properties
The runtime engine saves the client object’s properties immediately before the first time it sends part of the HTML page to the client. It only saves these properties once. The runtime engine can repeat steps 3 and 5, but it cannot repeat this step.
The runtime engine saves the properties at this point to support some of the maintenance techniques for the client object. For example, the client URL encoding scheme sends the client properties in the header of the HTML file. Because the header is sent as the first part of the file, the client properties must be sent then.
As a consequence, you should be careful of where in your source file you set client properties. You should always change client properties in the file before any call to redirect or flush and before generating 64KB of HTML output.
If you change property values for the client object in the code after HTML has been sent to the client, those changes remain in effect for the rest of that client request, but they are then discarded. Hence, the next client request does not get those values for the properties; it gets the values that were in effect when content was first sent to the client. For example, assume your code contains these statements:
<HTML><P>The current customer is <SERVER>
Chapter 4, Basics of Server-Side JavaScript 75
Runtime Processing on the Server
client.customerName = "Mr. Ed";write(client.customerName);client.customerName = "Mr. Bill";</SERVER>
<P>The current customer really is <SERVER>write(client.customerName);</SERVER></HTML>
This series of statements results in this HTML being sent to the client:
<P>The current customer is Mr. Ed<P>The current customer really is Mr. Bill
And when the next client request occurs, the value of client.customerName is “Mr. Bill”. This very similar set of statements results in the same HTML:
<HTML><P>The current customer is <SERVER>client.customerName = "Mr. Ed";write(client.customerName);flush();client.customerName = "Mr. Bill";</SERVER><P>The current customer really is <SERVER>write(client.customerName);</SERVER></HTML>
However, when the next client request occurs, the value of client.customerName is “Mr. Ed”; it is not “Mr. Bill”.
For more information, see “Techniques for Maintaining the client Object” on page 115.
Step 5. Send HTML to client
The server sends the page content to the client. For pages with no server-side JavaScript statements, the server simply transfers HTML to the client. For other pages, the runtime engine performs the application logic to construct HTML and then sends the generated page to the client.
76 Writing Server-Side JavaScript Applications
Constructing the HTML Page
Step 6. Destroy request object and save or destroy client object
The runtime engine destroys the request object constructed for this client request. It saves the values of the client object and then destroys the physical JavaScript object. It does not destroy either the project or the server object.
Constructing the HTML PageWhen you compile your JavaScript application, the source includes HTML pages that contain server-side JavaScript statements and perhaps also HTML pages that do not contain server-side JavaScript statements. When a user accesses a page in an application that does not contain server-side JavaScript statements, the server sends the page back as it would any other HTML page. When a user accesses a page that does contain server-side JavaScript statements, the runtime engine on the server constructs an HTML page to send in response, using one of the source pages of your application.
The runtime engine scans the source page. As it encounters HTML statements or client-side JavaScript statements, it appends them to the page being created. As it encounters server-side JavaScript statements, it executes them. Although most server-side JavaScript statements perform processing on the server, some affect the page being constructed. The following sections discuss three functions—write , flush , and redirect —that affect the HTML page served.
Generating HTML
As discussed earlier in this chapter, the write function generates HTML based on the value of JavaScript expression given as its argument. For example, consider this statement
write("<P>Customer Name is:" + project.custname + ".");
In response to this statement, JavaScript generates HTML including a paragraph tag and some text, concatenated with the value of the custname property of the project object. For example, if this property is “Fred’s software company”, the client would receive the following HTML:
<P>Customer Name is: Fred’s software company.
Chapter 4, Basics of Server-Side JavaScript 77
Constructing the HTML Page
As far as the client is concerned, this is normal HTML on the page. However, it is actually generated dynamically by the JavaScript runtime engine.
Flushing the Output Buffer
To improve performance, JavaScript buffers the HTML page it constructs. The flush function immediately sends data from the internal buffer to the client. If you do not explicitly call the flush function, JavaScript sends data to the client after each 64KB of content in the constructed HTML page.
Don’t confuse the flush function with the flush method of the File class. (For information on using the File class to perform file input and output, see “File System Service” on page 164.)
You can use flush to control the timing of data transfer to the client. For example, you might choose to flush the buffer before an operation that creates a delay, such as a database query. Also, if a database query retrieves a large number of rows, flushing the buffer every few rows prevents long delays in displaying data.
Note If you use the client cookie technique to maintain the properties of the client object, you must make all changes to the client object before flushing the buffer. For more information, see “Techniques for Maintaining the client Object” on page 115.
The following code fragment shows how flush is used. Assume that your application needs to perform some action on every customer in your customer database. If you have a lot of customers, this could result in a lengthy delay. So that the user doesn’t have to wait in front of an unchanging screen, your application could send output to the client before starting the processing and then again after processing each row. To do so, you could use code similar to the following:
flush();conn.beginTransaction();cursor = conn.cursor ("SELECT * FROM CUSTOMER", true);while ( cursor.next() ) {
// ... process the row ...flush();
}conn.commitTransaction();cursor.close();
78 Writing Server-Side JavaScript Applications
Constructing the HTML Page
Changing to a New Client Request
The redirect function terminates the current client request and starts another for the specified URL. For example, assume you have this statement:
redirect("http://www.royalairways.com/apps/page2.html");
When the runtime engine executes this statement, it terminates the current request. The runtime engine does not continue to process the original page. Therefore any HTML or JavaScript statements that follow the call to redirect on the original page are lost. The client immediately loads the indicated page, discarding any previous content.
The parameter to redirect can be any server-side JavaScript statement that evaluates to a URL. In this way, you can dynamically generate the URL used in redirect . For example, if a page defines a variable choice , you can redirect the client to a page based on the value of choice , as follows:
redirect ("http://www.royalairways.com/apps/page" + choice + ".html");
If you want to be certain that the current client properties are available in the new request, and you’re using one of the URL-based maintenance techniques for the client object, you should encode the properties in the URL you pass to redirect . For information on doing so, see “Manually Appending client Properties to URLs” on page 128.
In general, properties of the request object and top-level JavaScript variables last only for a single client request. When you redirect to a new page, you may want to maintain some of this information for multiple requests. You can do so by appending the property names and values to the URL, as described in “Encoding Information in a URL” on page 87.
Chapter 4, Basics of Server-Side JavaScript 79
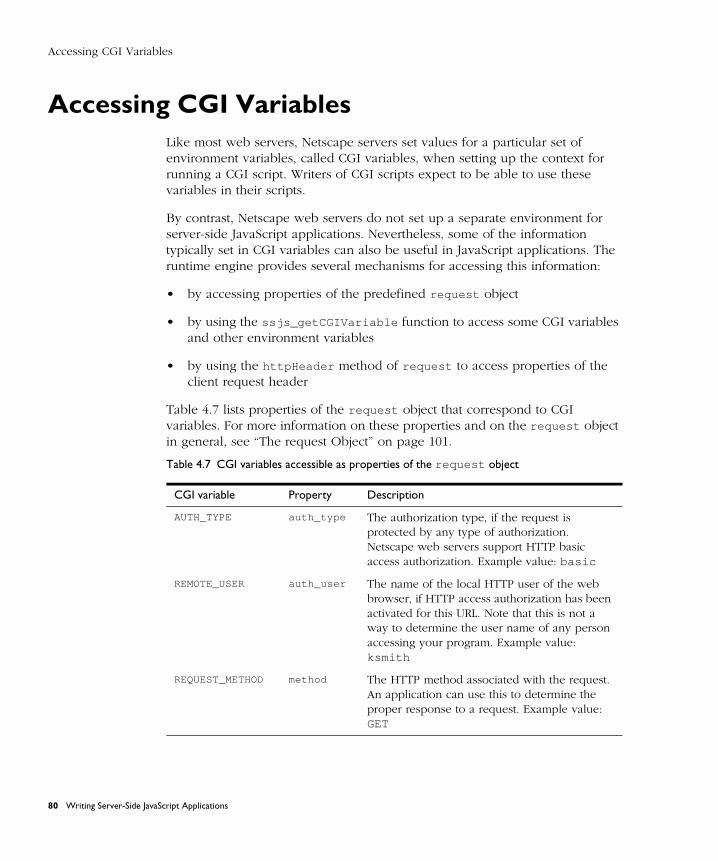
Accessing CGI Variables
Accessing CGI VariablesLike most web servers, Netscape servers set values for a particular set of environment variables, called CGI variables, when setting up the context for running a CGI script. Writers of CGI scripts expect to be able to use these variables in their scripts.
By contrast, Netscape web servers do not set up a separate environment for server-side JavaScript applications. Nevertheless, some of the information typically set in CGI variables can also be useful in JavaScript applications. The runtime engine provides several mechanisms for accessing this information:
• by accessing properties of the predefined request object
• by using the ssjs_getCGIVariable function to access some CGI variables and other environment variables
• by using the httpHeader method of request to access properties of the client request header
Table 4.7 lists properties of the request object that correspond to CGI variables. For more information on these properties and on the request object in general, see “The request Object” on page 101.
Table 4.7 CGI variables accessible as properties of the request object
CGI variable Property Description
AUTH_TYPE auth_type The authorization type, if the request is protected by any type of authorization. Netscape web servers support HTTP basic access authorization. Example value: basic
REMOTE_USER auth_user The name of the local HTTP user of the web browser, if HTTP access authorization has been activated for this URL. Note that this is not a way to determine the user name of any person accessing your program. Example value: ksmith
REQUEST_METHOD method The HTTP method associated with the request. An application can use this to determine the proper response to a request. Example value: GET
80 Writing Server-Side JavaScript Applications

Accessing CGI Variables
The server-side function ssjs_getCGIVariable lets you access the environment variables set in the server process, including the CGI variables listed in Table 4.8.
SERVER_PROTOCOL protocol The HTTP protocol level supported by the client’s software. Example value: HTTP/1.0
QUERY_STRING query Information from the requesting HTML page; if “?” is present, the information in the URL that comes after the “?”. Example value: x=42
Table 4.8 CGI variables accessible through ssjs_getCGIVariable
Variable Description
AUTH_TYPE The authorization type, if the request is protected by any type of authorization. Netscape web servers support HTTP basic access authorization. Example value: basic
HTTPS If security is active on the server, the value of this variable is ON; otherwise, it is OFF. Example value: ON
HTTPS_KEYSIZE The number of bits in the session key used to encrypt the session, if security is on. Example value: 128
HTTPS_SECRETKEYSIZE The number of bits used to generate the server’s private key. Example value: 128
PATH_INFO Path information, as sent by the browser. Example value: /cgivars/cgivars.html
PATH_TRANSLATED The actual system-specific pathname of the path contained in PATH_INFO. Example value: /usr/ns-home/myhttpd/js/samples/cgivars/cgivars.html
QUERY_STRING Information from the requesting HTML page; if “?” is present, the information in the URL that comes after the “?”. Example value: x=42
REMOTE_ADDR The IP address of the host that submitted the request. Example value: 198.93.95.47
REMOTE_HOST If DNS is turned on for the server, the name of the host that submitted the request; otherwise, its IP address. Example value: www.netscape.com
Table 4.7 CGI variables accessible as properties of the request object (Continued)
CGI variable Property Description
Chapter 4, Basics of Server-Side JavaScript 81
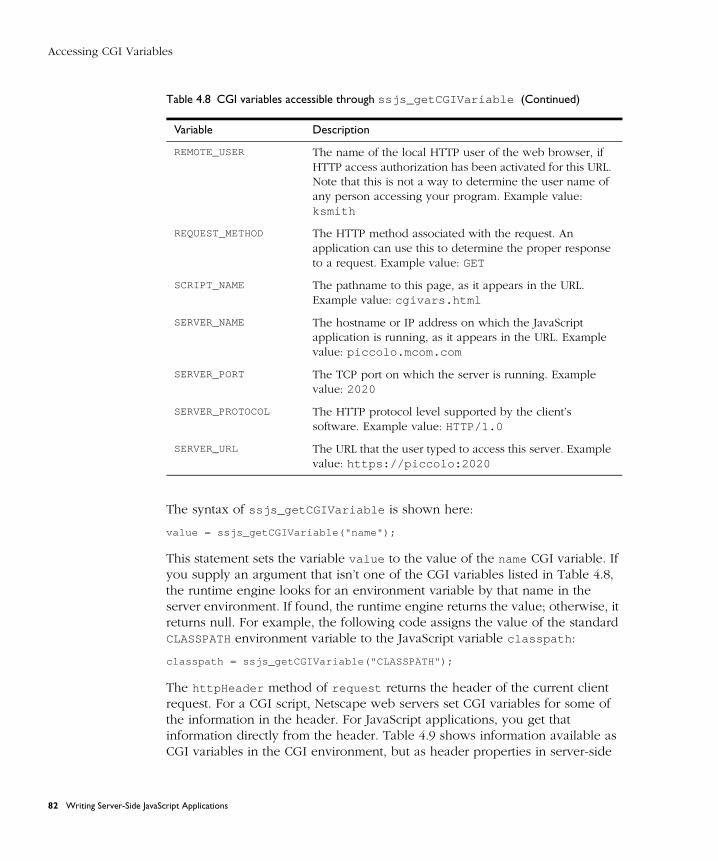
Accessing CGI Variables
The syntax of ssjs_getCGIVariable is shown here:
value = ssjs_getCGIVariable("name");
This statement sets the variable value to the value of the name CGI variable. If you supply an argument that isn’t one of the CGI variables listed in Table 4.8, the runtime engine looks for an environment variable by that name in the server environment. If found, the runtime engine returns the value; otherwise, it returns null. For example, the following code assigns the value of the standard CLASSPATH environment variable to the JavaScript variable classpath :
classpath = ssjs_getCGIVariable("CLASSPATH");
The httpHeader method of request returns the header of the current client request. For a CGI script, Netscape web servers set CGI variables for some of the information in the header. For JavaScript applications, you get that information directly from the header. Table 4.9 shows information available as CGI variables in the CGI environment, but as header properties in server-side
REMOTE_USER The name of the local HTTP user of the web browser, if HTTP access authorization has been activated for this URL. Note that this is not a way to determine the user name of any person accessing your program. Example value: ksmith
REQUEST_METHOD The HTTP method associated with the request. An application can use this to determine the proper response to a request. Example value: GET
SCRIPT_NAME The pathname to this page, as it appears in the URL. Example value: cgivars.html
SERVER_NAME The hostname or IP address on which the JavaScript application is running, as it appears in the URL. Example value: piccolo.mcom.com
SERVER_PORT The TCP port on which the server is running. Example value: 2020
SERVER_PROTOCOL The HTTP protocol level supported by the client’s software. Example value: HTTP/1.0
SERVER_URL The URL that the user typed to access this server. Example value: https://piccolo:2020
Table 4.8 CGI variables accessible through ssjs_getCGIVariable (Continued)
Variable Description
82 Writing Server-Side JavaScript Applications
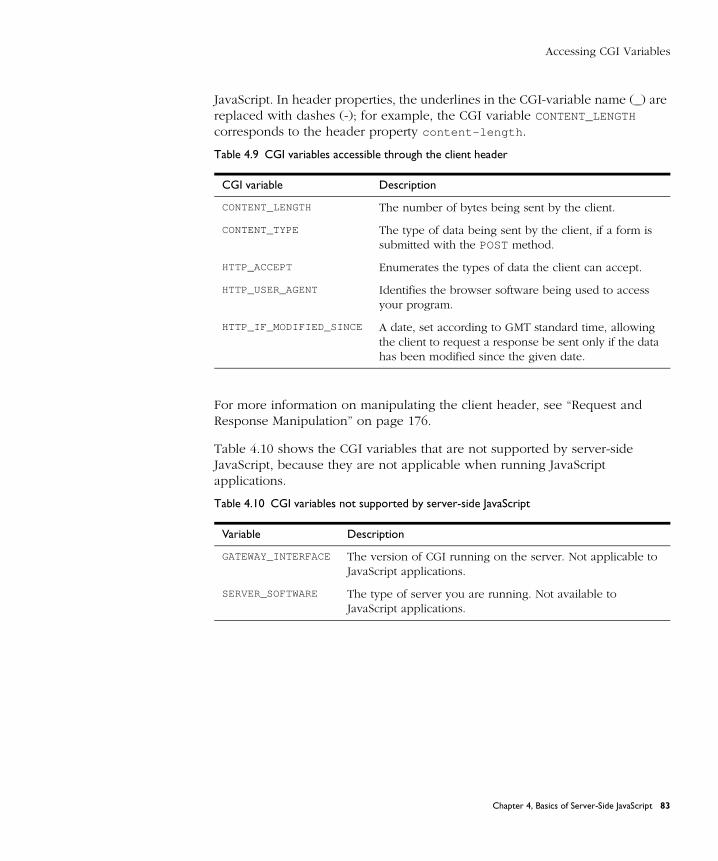
Accessing CGI Variables
JavaScript. In header properties, the underlines in the CGI-variable name (_) are replaced with dashes (-); for example, the CGI variable CONTENT_LENGTH corresponds to the header property content-length .
For more information on manipulating the client header, see “Request and Response Manipulation” on page 176.
Table 4.10 shows the CGI variables that are not supported by server-side JavaScript, because they are not applicable when running JavaScript applications.
Table 4.9 CGI variables accessible through the client header
CGI variable Description
CONTENT_LENGTH The number of bytes being sent by the client.
CONTENT_TYPE The type of data being sent by the client, if a form is submitted with the POST method.
HTTP_ACCEPT Enumerates the types of data the client can accept.
HTTP_USER_AGENT Identifies the browser software being used to access your program.
HTTP_IF_MODIFIED_SINCE A date, set according to GMT standard time, allowing the client to request a response be sent only if the data has been modified since the given date.
Table 4.10 CGI variables not supported by server-side JavaScript
Variable Description
GATEWAY_INTERFACE The version of CGI running on the server. Not applicable to JavaScript applications.
SERVER_SOFTWARE The type of server you are running. Not available to JavaScript applications.
Chapter 4, Basics of Server-Side JavaScript 83
Communicating Between Server and Client
Communicating Between Server and ClientFrequently your JavaScript application needs to communicate information either from the server to the client or from the client to the server. For example, when a user first accesses the videoapp application, the application dynamically generates the list of movie categories from the current database contents. That information, generated on the server, needs to be communicated back to the client. Conversely, when the user picks a category from that list, the user’s choice must be communicated back to the server so that it can generate the set of movies.
Sending Values from Client to Server
Here are several ways to send information from the client to the server:
• The runtime engine automatically creates properties of the request object for each value in an HTML form. (See “Accessing Form Values” on page 85.)
• If you’re using a URL-based maintenance technique for properties of the client object, you can modify the URL sent to the server to include property values for the client and request objects. (See “Encoding Information in a URL” on page 87.)
• You can use cookies to set property values for the client and request objects. (See “Using Cookies” on page 91.)
• On the client, you can modify the header of the client request. You can then use the httpHeader method of the request object to manipulate the header and possibly the body of the request. (See “Request and Response Manipulation” on page 176.)
• You can use LiveConnect with CORBA services to communicate between client and server. (See Chapter 6, “Working with Java and CORBA Objects Through LiveConnect.”)
84 Writing Server-Side JavaScript Applications
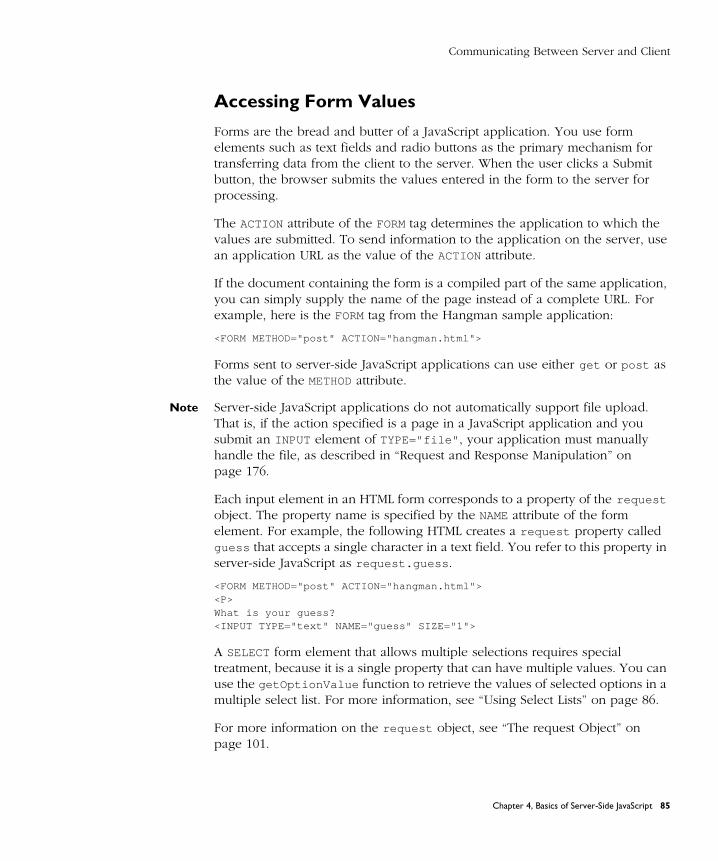
Communicating Between Server and Client
Accessing Form Values
Forms are the bread and butter of a JavaScript application. You use form elements such as text fields and radio buttons as the primary mechanism for transferring data from the client to the server. When the user clicks a Submit button, the browser submits the values entered in the form to the server for processing.
The ACTION attribute of the FORM tag determines the application to which the values are submitted. To send information to the application on the server, use an application URL as the value of the ACTION attribute.
If the document containing the form is a compiled part of the same application, you can simply supply the name of the page instead of a complete URL. For example, here is the FORM tag from the Hangman sample application:
<FORM METHOD="post" ACTION="hangman.html">
Forms sent to server-side JavaScript applications can use either get or post as the value of the METHOD attribute.
Note Server-side JavaScript applications do not automatically support file upload. That is, if the action specified is a page in a JavaScript application and you submit an INPUT element of TYPE="file" , your application must manually handle the file, as described in “Request and Response Manipulation” on page 176.
Each input element in an HTML form corresponds to a property of the request object. The property name is specified by the NAME attribute of the form element. For example, the following HTML creates a request property called guess that accepts a single character in a text field. You refer to this property in server-side JavaScript as request.guess .
<FORM METHOD="post" ACTION="hangman.html"> <P> What is your guess? <INPUT TYPE="text" NAME="guess" SIZE="1">
A SELECT form element that allows multiple selections requires special treatment, because it is a single property that can have multiple values. You can use the getOptionValue function to retrieve the values of selected options in a multiple select list. For more information, see “Using Select Lists” on page 86.
For more information on the request object, see “The request Object” on page 101.
Chapter 4, Basics of Server-Side JavaScript 85
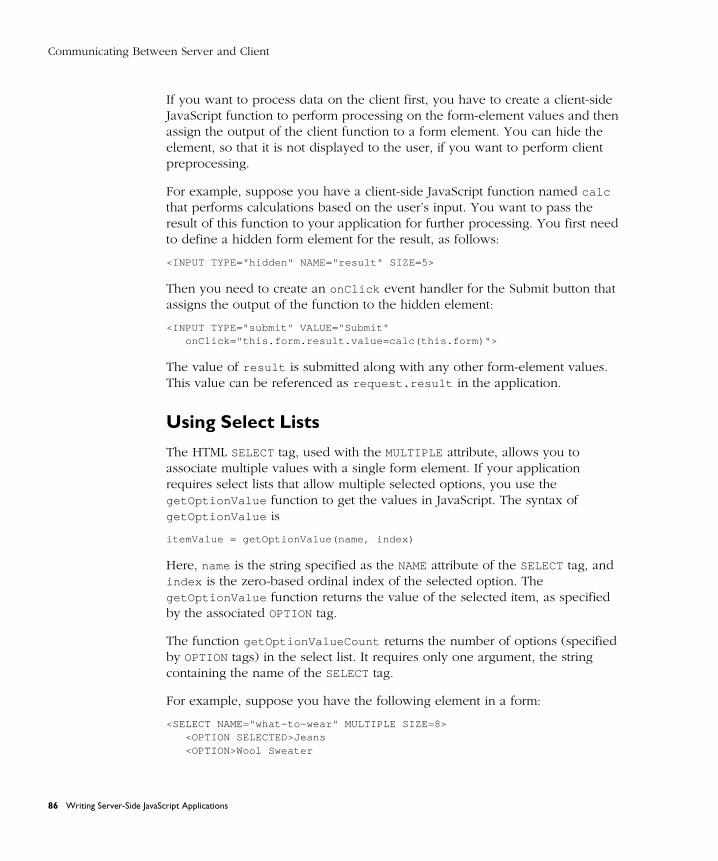
Communicating Between Server and Client
If you want to process data on the client first, you have to create a client-side JavaScript function to perform processing on the form-element values and then assign the output of the client function to a form element. You can hide the element, so that it is not displayed to the user, if you want to perform client preprocessing.
For example, suppose you have a client-side JavaScript function named calc that performs calculations based on the user’s input. You want to pass the result of this function to your application for further processing. You first need to define a hidden form element for the result, as follows:
<INPUT TYPE="hidden" NAME="result" SIZE=5>
Then you need to create an onClick event handler for the Submit button that assigns the output of the function to the hidden element:
<INPUT TYPE="submit" VALUE="Submit"onClick="this.form.result.value=calc(this.form)">
The value of result is submitted along with any other form-element values. This value can be referenced as request.result in the application.
Using Select Lists
The HTML SELECT tag, used with the MULTIPLE attribute, allows you to associate multiple values with a single form element. If your application requires select lists that allow multiple selected options, you use the getOptionValue function to get the values in JavaScript. The syntax of getOptionValue is
itemValue = getOptionValue(name, index)
Here, name is the string specified as the NAME attribute of the SELECT tag, and index is the zero-based ordinal index of the selected option. The getOptionValue function returns the value of the selected item, as specified by the associated OPTION tag.
The function getOptionValueCount returns the number of options (specified by OPTION tags) in the select list. It requires only one argument, the string containing the name of the SELECT tag.
For example, suppose you have the following element in a form:
<SELECT NAME="what-to-wear" MULTIPLE SIZE=8><OPTION SELECTED>Jeans<OPTION>Wool Sweater
86 Writing Server-Side JavaScript Applications

Communicating Between Server and Client
<OPTION SELECTED>Sweatshirt<OPTION SELECTED>Socks<OPTION>Leather Jacket<OPTION>Boots<OPTION>Running Shoes<OPTION>Cape
</SELECT>
You could process the input from this select list as follows:
<SERVER>var i = 0;var howmany = getOptionValueCount("what-to-wear");while ( i < howmany ) {
var optionValue = getOptionValue("what-to-wear", i);
write ("<br>Item #" + i + ": " + optionValue + "\n");i++;
}</SERVER>
If the user kept the default selections, this script would return:
Item #0: JeansItem #1: SweatshirtItem #2: Socks
Encoding Information in a URL
You can manually encode properties of the request object into a URL that accesses a page of your application. In creating the URL, you use the following syntax:
URL?varName1=value1[&varName2=value2...]
Here, URL is the base URL, each varName N is a property name, and each value N is the corresponding property value (with special characters escaped). In this scheme, the base URL is followed by a question mark (?) which is in turn followed by pairs of property names and their values. Separate each pair with an ampersand (&). When the runtime engine on the server receives the resultant URL as a client request, it creates a request property named varName N for each listed variable.
For example, the following HTML defines a hyperlink to a page that instantiates the request properties i and j to 1 and 2, respectively. JavaScript statements in refpage.html can then refer to these variables as request.i and request.j .
Chapter 4, Basics of Server-Side JavaScript 87
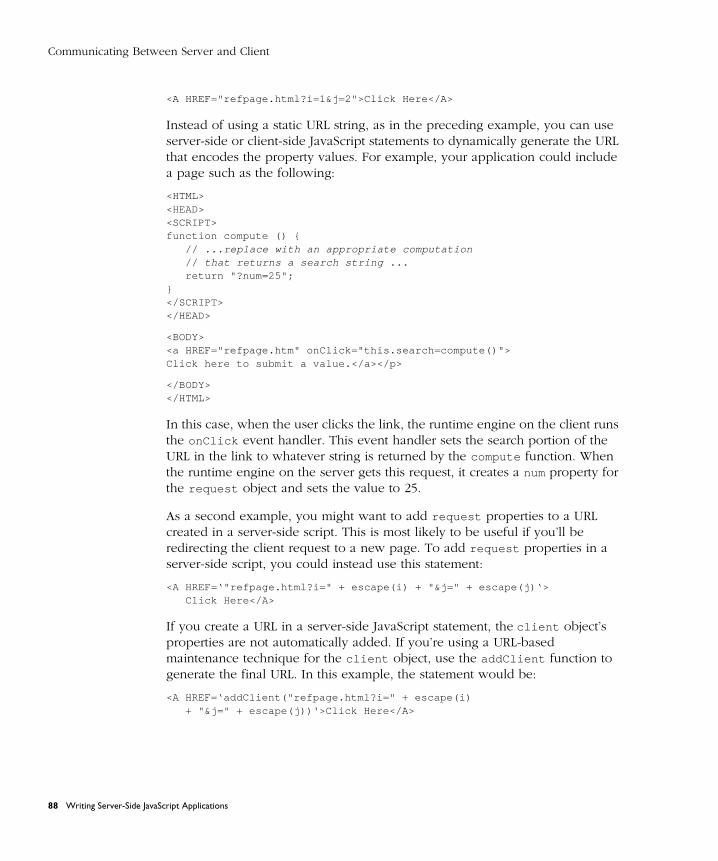
Communicating Between Server and Client
<A HREF="refpage.html?i=1&j=2">Click Here</A>
Instead of using a static URL string, as in the preceding example, you can use server-side or client-side JavaScript statements to dynamically generate the URL that encodes the property values. For example, your application could include a page such as the following:
<HTML><HEAD><SCRIPT>function compute () {
// ...replace with an appropriate computation // that returns a search string ...return "?num=25";
}</SCRIPT></HEAD>
<BODY><a HREF="refpage.htm" onClick="this.search=compute()">Click here to submit a value.</a></p>
</BODY></HTML>
In this case, when the user clicks the link, the runtime engine on the client runs the onClick event handler. This event handler sets the search portion of the URL in the link to whatever string is returned by the compute function. When the runtime engine on the server gets this request, it creates a num property for the request object and sets the value to 25.
As a second example, you might want to add request properties to a URL created in a server-side script. This is most likely to be useful if you’ll be redirecting the client request to a new page. To add request properties in a server-side script, you could instead use this statement:
<A HREF=‘"refpage.html?i=" + escape(i) + "&j=" + escape(j)‘>Click Here</A>
If you create a URL in a server-side JavaScript statement, the client object’s properties are not automatically added. If you’re using a URL-based maintenance technique for the client object, use the addClient function to generate the final URL. In this example, the statement would be:
<A HREF=‘addClient("refpage.html?i=" + escape(i)+ "&j=" + escape(j))‘>Click Here</A>
88 Writing Server-Side JavaScript Applications
Communicating Between Server and Client
For information on using addClient , see “Manually Appending client Properties to URLs” on page 128.
The core JavaScript escape function allows you to encode names or values appended to a URL that may include special characters. In general, if an application needs to generate its own property names and values in a URL request, you should use escape , to ensure that all values are interpreted properly. For more information, see the JavaScript Reference.
Remember that a URL does not change when a user reloads it, although the page’s contents may change. Any properties sent in the original URL are restored to their values in the URL as it was first sent, regardless of any changes that may have been made during processing. For example, if the user clicks the Reload button to reload the URL in the previous example, i and j are again set to 1 and 2, respectively.
Sending Values from Server to ClientA JavaScript application communicates with the client through HTML and client-side JavaScript. If you simply want to display information to the user, there is no subtlety: you create the HTML to format the information as you want it displayed.
However, you may want to send values to client scripts directly. You can do this in a variety of ways, including these three:
• You can set default form values and values for hidden form elements. (See “Default Form Values and Hidden Form Elements” on page 90.)
• You can directly substitute information in client-side SCRIPT statements or event handlers. (See “Direct Substitution” on page 90.)
• You can use cookies to send client property values or other values to the client. (See “Using Cookies” on page 91.)
• You can modify the header of the response sent to the client, using the deleteResponseHeader and addResponseHeader functions. (See “Request and Response Manipulation” on page 176.)
• You can use LiveConnect with CORBA services to communicate between client and server. (See Chapter 6, “Working with Java and CORBA Objects Through LiveConnect.”)
Chapter 4, Basics of Server-Side JavaScript 89
Communicating Between Server and Client
Default Form Values and Hidden Form Elements
To display an HTML form with default values set in the form elements, use the INPUT tag to create the desired form element, substituting a server-side JavaScript expression for the VALUE attribute. For example, you can use the following statement to display a text element and set the default value based on the value of client.custname :
<INPUT TYPE="text" NAME="customerName" SIZE="30"VALUE=‘client.custname‘>
The initial value of this text field is set to the value of the variable client.custname . So, if the value of client.custname is Victoria, this statement is sent to the client:
<INPUT TYPE="text" NAME="customerName" SIZE="30" VALUE="Victoria">
You can use a similar technique with hidden form elements if you do not want to display the value to the user, as in this example:
<INPUT TYPE="hidden" NAME="custID" SIZE=5 VALUE=‘client.custID‘>
In both cases, you can use these values in client-side JavaScript in property values of objects available on the client. If these two elements are in a form named entryForm , then these values become the JavaScript properties document.entryForm.customerName and document.entryForm.custID , respectively. You can then perform client processing on these values in client-side scripts. For more information, see the JavaScript Guide.
Direct Substitution
You can also use server-side JavaScript to generate client-side scripts. These values can be used in subsequent statements on the client. As a simple example, you could initialize a client-side variable named budget based on the value of client.amount as follows:
<p>The budget is:<SCRIPT><SERVER>write("var budget = " + client.amount);</SERVER>document.write(budget);</SCRIPT>
90 Writing Server-Side JavaScript Applications
Communicating Between Server and Client
If the value of client.amount is 50, this would generate the following JavaScript:
<p>The budget is:<SCRIPT>var budget = 50document.write(budget);</SCRIPT>
When run on the client, this appears as follows:
The budget is: 50
Using CookiesCookies are a mechanism you can use on the client to maintain information between requests. This information resides in a file called cookie.txt (the cookie file) stored on the client machine. The Netscape cookie protocol is described in detail in the JavaScript Guide.
You can use cookies to send information in both directions, from the client to the server and from the server to the client. Cookies you send from the client become properties of either the client object or of the request object. Although you can send any string value to the client from the server as a cookie, the simplest method involves sending client object properties.
Properties of the client Object as Cookies
If an application uses the client cookie technique to maintain the client object, the runtime engine on the server stores the names and values of properties of the client object as cookies on the client. For information on using cookies to maintain the client object, see “Techniques for Maintaining the client Object” on page 115.
Chapter 4, Basics of Server-Side JavaScript 91

Communicating Between Server and Client
For a client property called propName , the runtime engine automatically creates a cookie named NETSCAPE_LIVEWIRE.propName , assuming the application uses the client cookie maintenance technique. The runtime engine encodes property values as required by the Netscape cookie protocol.
To access these cookies in a client-side JavaScript script, you can extract the information using the document.cookie property and a function such as the getSSCookie function shown here:
function getSSCookie(name) {var search = "NETSCAPE_LIVEWIRE." + name + "=";var retstr = "";var offset = 0;var end = 0;if (document.cookie.length > 0) {
offset = document.cookie.indexOf(search);if (offset != -1) {
offset += search.length;end = document.cookie.indexOf(";", offset);if (end == -1)
end = document.cookie.length;retstr = unescape(document.cookie.substring(offset, end));
}}return(retstr)
}
The getSSCookie function is not a predefined JavaScript function. If you need similar functionality, you must define it for your application.
To send information to the server to become a property of the client object, add a cookie whose name is of the form NETSCAPE_LIVEWIRE.propName. Assuming your application uses the client cookie maintenance technique, the runtime engine on the server creates a client property named propName for this cookie.
To do so, you can use a function such as the following:
function setSSCookie (name, value, expire) {document.cookie =
"NETSCAPE_LIVEWIRE." + name + "=" + escape(value)+ ((expire == null) ? "" : ("; expires=" + expire.toGMTString()));
}
92 Writing Server-Side JavaScript Applications
Communicating Between Server and Client
Here, too, the setSSCookie function is not a predefined JavaScript function. If you need similar functionality, you must define it for your application.
You can call these functions in client-side JavaScript to get and set property values for the client object, as in the following example:
var value = getSSCookie ("answer"); if (value == "") {
var expires = new Date();expires.setDate(expires.getDate() + 7);setSSCookie ("answer", "42", Expires);
}else
document.write ("The answer is ", value);
This group of statements checks whether there is a client property called answer . If not, the code creates it and sets its value to 42; if so, it displays its value.
Other Cookies
When a request is sent to the server for a page in a JavaScript application, the header of the request includes all cookies currently set for the application. You can use the request.httpHeader method to access these cookies from server-side JavaScript and assign them to server-side variables. Conversely, you can use the addResponseHeader function to add new cookies to the response sent back to the client. This functionality is described in “Request and Response Manipulation” on page 176.
On the client, you can use a function such as the following to access a particular cookie:
function GetCookie (name) {var arg = name + "=";var alen = arg.length;var clen = document.cookie.length;var i = 0;while (i < clen) {
var j = i + alen; if (document.cookie.substring(i, j) == arg) {
var end = document.cookie.indexOf (";", j); if (end == -1)
end = document.cookie.length; return unescape(document.cookie.substring(j, end));
}i = document.cookie.indexOf(" ", i) + 1; if (i == 0) break;
Chapter 4, Basics of Server-Side JavaScript 93
Garbage Collection
} return null;
}
And you can use a function such as the following to set a cookie on the client:
function setCookie (name, value, expires, path, domain, secure) {document.cookie =
name + "="+ escape(value)+ ((expires) ? "; expires=" + expires.toGMTString() : "")+ ((path) ? "; path=" + path : "")+ ((domain) ? "; domain=" + domain : "")+ ((secure) ? "; secure" : "");
}
If the path you specify for a cookie is in your JavaScript application, then that cookie will be sent in any request sent to the application.
You can use this technique for passing cookie information between the client and the server regardless of the client object maintenance technique you use.
Garbage CollectionServer-side JavaScript contains a garbage collector that automatically frees memory allocated to objects no longer in use. Most users do not need to understand the details of the garbage collector. This section gives an overview of the garbage collector and information on when it is invoked.
Important This section provides advanced users with a peek into the internal workings of server-side JavaScript. Netscape does not guarantee that these algorithms will remain the same in future releases.
The JavaScript object space consists of arenas. That is, the JavaScript runtime engine allocates a set of arenas from which it allocates objects. When the runtime engine receives a request for a new object, it first looks on the free list. If the free list has available space, the engine allocates that space. Otherwise, the runtime engine allocates space from the arena currently in use. If all arenas are in use, the runtime engine allocates a new arena. When all the objects from an arena are garbage, the garbage collector frees the arena.
A JavaScript string is typically allocated as a GC object. The string has a reference to the bytes of the string which are also allocated in the process heap. When a string object is garbage collected, the string’s bytes are freed.
94 Writing Server-Side JavaScript Applications
Garbage Collection
The JavaScript garbage collector is a based on mark and sweep. It does not relocate objects. The garbage collector maintains a root set of objects at all times. This root set includes the JavaScript stack, the global object for the JavaScript context, and any JavaScript objects which have been explicitly added to the root set. During the mark phase, the garbage collector marks all objects that are reachable from the root set. At the end of this phase, all unmarked objects are garbage. All garbage objects are collected into a free list.
A garbage collection is considered necessary if the number of bytes currently in use is 1.5 times the number of bytes that were in use at the end of the last garbage collection. The runtime engine checks for this condition at the following points and starts the garbage collector if it needs to:
• At the end of every request.
• During a long JavaScript computation after a predetermined number of JavaScript bytecode operations have executed, and only when a branch operation is executed. If you have code with no branch operations, garbage collection won’t occur simply because a predetermined number of operations have executed. (A branch operation can be an if statement, while statement, function call, and so on.)
• When an attempt is made to allocate a new JavaScript object but JavaScript has no available memory and no additional memory can be obtained from the operation system.
• When the lw_ForceGarbageCollection function is called.
Chapter 4, Basics of Server-Side JavaScript 95

Garbage Collection
96 Writing Server-Side JavaScript Applications
C h a p t e r
5Session Management Service
This chapter describes the Session Management Service objects available in server-side JavaScript for sharing data among multiple client requests to an application, among multiple users of a single application, or even among multiple applications on a server.
The Session Management Service is a set of capabilities that control the construction and destruction of various predefined objects during any server session. These capabilities are provided in the predefined objects request , client , project , and server .
In addition, you can construct instances of Lock to control access during the sharing of information. Lock instances provide you with fine-grained control over information sharing by getting exclusive access to specified objects.
Overview of the Predefined ObjectsThe predefined request , client , project , and server objects contain data that persists for different periods and is available to different clients and applications. There is one server object shared by all running applications on the server. There is a separate project object for each running application. There is one client object for each browser (client) accessing a particular
Chapter 5, Session Management Service 97
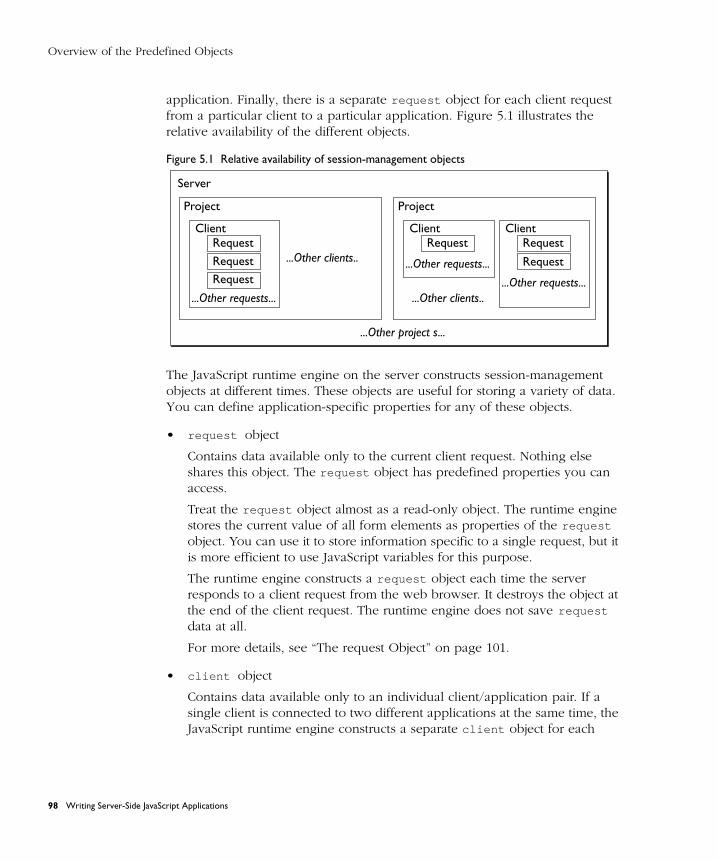
Overview of the Predefined Objects
application. Finally, there is a separate request object for each client request from a particular client to a particular application. Figure 5.1 illustrates the relative availability of the different objects.
Figure 5.1 Relative availability of session-management objects
The JavaScript runtime engine on the server constructs session-management objects at different times. These objects are useful for storing a variety of data. You can define application-specific properties for any of these objects.
• request object
Contains data available only to the current client request. Nothing else shares this object. The request object has predefined properties you can access.
Treat the request object almost as a read-only object. The runtime engine stores the current value of all form elements as properties of the request object. You can use it to store information specific to a single request, but it is more efficient to use JavaScript variables for this purpose.
The runtime engine constructs a request object each time the server responds to a client request from the web browser. It destroys the object at the end of the client request. The runtime engine does not save request data at all.
For more details, see “The request Object” on page 101.
• client object
Contains data available only to an individual client/application pair. If a single client is connected to two different applications at the same time, the JavaScript runtime engine constructs a separate client object for each
Server
Project
ClientRequest
RequestRequest
...Other requests...
ClientRequest
Request
...Other requests...
...Other requests...
...Other project s...
Project
ClientRequest
...Other clients..
...Other clients..
98 Writing Server-Side JavaScript Applications
Overview of the Predefined Objects
client/application pair. All requests from a single client to the same application share the same client object. The client object has no predefined properties.
In general, use the client object for data that should be shared across multiple requests from the same client (user) but that should not be shared across multiple clients of the application. For example, you can store a user’s customer ID as a property of the client object.
The runtime engine physically constructs the client object for each client request, but properties persist across the lifetime of the client’s connection to the application. Therefore, although the physical client object exists only for a single client request, conceptually you can think of it as being constructed when the client is first connected to the application, and not destroyed until the client stops accessing the application. There are several approaches to maintaining the properties of the client object across multiple requests. For more information, see “Techniques for Maintaining the client Object” on page 115.
The runtime engine destroys the client object when the client has finished using the application. In practice, it is tricky for the JavaScript runtime engine to determine when the client object and its properties should be destroyed. For information on how it makes this determination, see “The Lifetime of the client Object” on page 126. Also, see “The client Object” on page 104.
• project object
Contains data that is available to all clients accessing any part of the application. All clients accessing the same application share the same project object. The project object has no predefined properties.
In general, use the project object to share data among multiple clients accessing the same application. For example, you can store the next available customer ID as a property of the project object. When you use the project object to share data, you need to be careful about simultaneous access to that data; see “Sharing Objects Safely with Locking” on page 130. Because of limitations on the client object’s properties, you sometimes use the project object to store data for a single client.
The runtime engine constructs the project object when the application is started by the Application Manager or when the server is started. It destroys the object when the application or the server is stopped.
For more details, see “The project Object” on page 112.
Chapter 5, Session Management Service 99
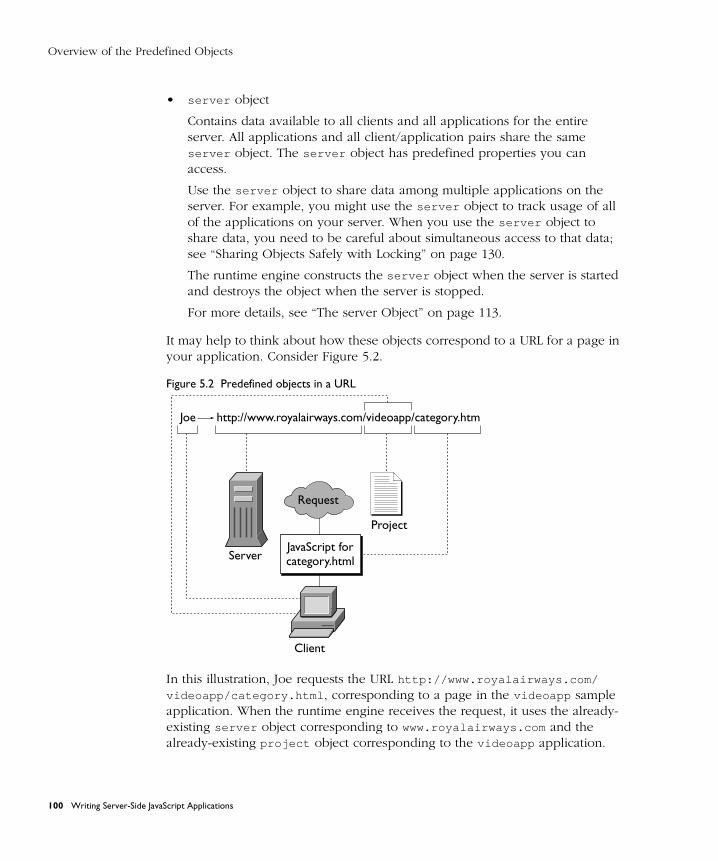
Overview of the Predefined Objects
• server object
Contains data available to all clients and all applications for the entire server. All applications and all client/application pairs share the same server object. The server object has predefined properties you can access.
Use the server object to share data among multiple applications on the server. For example, you might use the server object to track usage of all of the applications on your server. When you use the server object to share data, you need to be careful about simultaneous access to that data; see “Sharing Objects Safely with Locking” on page 130.
The runtime engine constructs the server object when the server is started and destroys the object when the server is stopped.
For more details, see “The server Object” on page 113.
It may help to think about how these objects correspond to a URL for a page in your application. Consider Figure 5.2.
Figure 5.2 Predefined objects in a URL
In this illustration, Joe requests the URL http://www.royalairways.com/
videoapp/category.html , corresponding to a page in the videoapp sample application. When the runtime engine receives the request, it uses the already-existing server object corresponding to www.royalairways.com and the already-existing project object corresponding to the videoapp application.
Joe
Server
Client
Project
http://www.royalairways.com/videoapp/category.htm
Request
JavaScript forcategory.html
100 Writing Server-Side JavaScript Applications
The request Object
The engine creates a client object corresponding to the combination of Joe and the videoapp application. If Joe has already accessed other pages of this application, this new client object uses any stored properties. Finally, the engine creates a new request object for the specific request for the category.html page.
The request ObjectThe request object contains data specific to the current client request. It has the shortest lifetime of any of the objects. JavaScript constructs a new request object for each client request it receives; for example, it creates an object when
• A user manually requests a URL by typing it in or choosing a bookmark.
• A user clicks a hyperlink or otherwise requests a document that refers to another page.
• Client-side JavaScript sets the property document.location or navigates to the page using the history method.
• Server-side JavaScript calls the redirect function.
The JavaScript runtime engine on the server destroys the request object when it finishes responding to the request (typically by providing the requested page). Therefore, the typical lifetime of a request object can be less than one second.
Note You cannot use the request object on your application’s initial page. This page is run when the application is started on the server. At this time, there is no client request, and so there is no available request object. For more information on initial pages, see “Installing a New Application” on page 39.
For summary information on the request object, see “Overview of the Predefined Objects” on page 97.
Chapter 5, Session Management Service 101
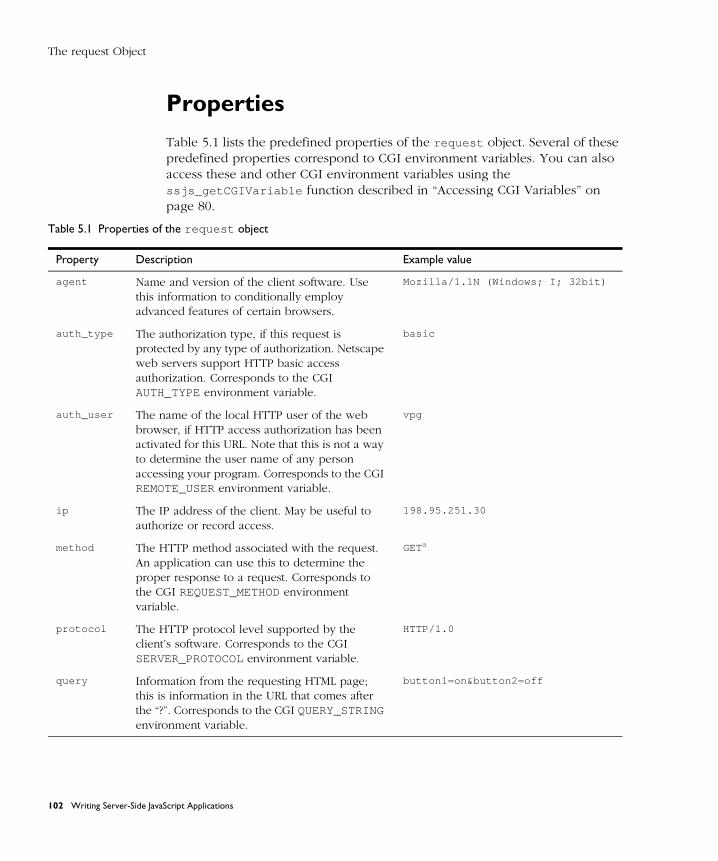
The request Object
Properties
Table 5.1 lists the predefined properties of the request object. Several of these predefined properties correspond to CGI environment variables. You can also access these and other CGI environment variables using the ssjs_getCGIVariable function described in “Accessing CGI Variables” on page 80.
Table 5.1 Properties of the request object
Property Description Example value
agent Name and version of the client software. Use this information to conditionally employ advanced features of certain browsers.
Mozilla/1.1N (Windows; I; 32bit)
auth_type The authorization type, if this request is protected by any type of authorization. Netscape web servers support HTTP basic access authorization. Corresponds to the CGI AUTH_TYPE environment variable.
basic
auth_user The name of the local HTTP user of the web browser, if HTTP access authorization has been activated for this URL. Note that this is not a way to determine the user name of any person accessing your program. Corresponds to the CGI REMOTE_USER environment variable.
vpg
ip The IP address of the client. May be useful to authorize or record access.
198.95.251.30
method The HTTP method associated with the request. An application can use this to determine the proper response to a request. Corresponds to the CGI REQUEST_METHOD environment variable.
GETa
protocol The HTTP protocol level supported by the client’s software. Corresponds to the CGI SERVER_PROTOCOL environment variable.
HTTP/1.0
query Information from the requesting HTML page; this is information in the URL that comes after the “?”. Corresponds to the CGI QUERY_STRING environment variable.
button1=on&button2=off
102 Writing Server-Side JavaScript Applications
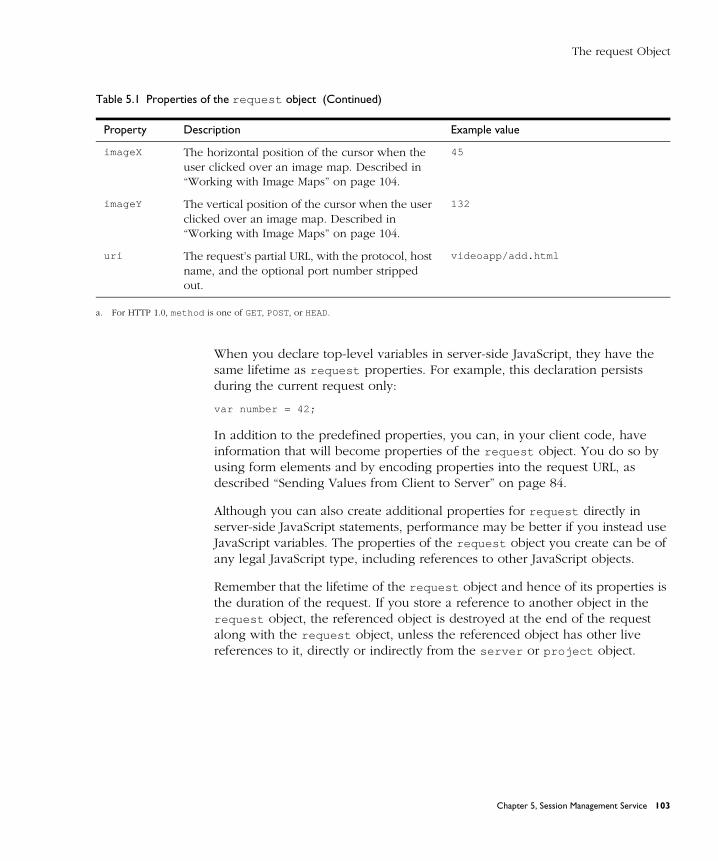
The request Object
a. For HTTP 1.0, method is one of GET, POST, or HEAD.
When you declare top-level variables in server-side JavaScript, they have the same lifetime as request properties. For example, this declaration persists during the current request only:
var number = 42;
In addition to the predefined properties, you can, in your client code, have information that will become properties of the request object. You do so by using form elements and by encoding properties into the request URL, as described “Sending Values from Client to Server” on page 84.
Although you can also create additional properties for request directly in server-side JavaScript statements, performance may be better if you instead use JavaScript variables. The properties of the request object you create can be of any legal JavaScript type, including references to other JavaScript objects.
Remember that the lifetime of the request object and hence of its properties is the duration of the request. If you store a reference to another object in the request object, the referenced object is destroyed at the end of the request along with the request object, unless the referenced object has other live references to it, directly or indirectly from the server or project object.
imageX The horizontal position of the cursor when the user clicked over an image map. Described in “Working with Image Maps” on page 104.
45
imageY The vertical position of the cursor when the user clicked over an image map. Described in “Working with Image Maps” on page 104.
132
uri The request’s partial URL, with the protocol, host name, and the optional port number stripped out.
videoapp/add.html
Table 5.1 Properties of the request object (Continued)
Property Description Example value
Chapter 5, Session Management Service 103
The client Object
Working with Image Maps
The ISMAP attribute of the IMG tag indicates a server-based image map. If the user clicks on an image map, the horizontal and vertical positions of the cursor are sent to the server. The imageX and imageY properties return these horizontal and vertical positions. Consider this HTML:
<A HREF="mapchoice.html"><IMG SRC="images\map.gif" HEIGHT=599 WIDTH=424 BORDER=0
ISMAP ALT="SANTA CRUZ COUNTY"></A>
The page mapchoice.html has properties request.imageX and request.imageY based on the cursor position at the time the user clicked.
The client ObjectMany browser clients can access a JavaScript application simultaneously. The client object provides a method for dealing with each browser client individually. It also provides a technique for tracking each browser client’s progress through an application across multiple requests.
The JavaScript runtime engine on the server constructs a client object for every client/application pair. A browser client connected to one application has a different client object from the same browser client connected to a different application. The runtime engine constructs a new client object each time a user accesses an application; there can be hundreds or thousands of client objects active at the same time.
Note You cannot use the client object on your application’s initial page. This page is run when the application is started on the server. At this time, there is no client request, and so there is no available client object. For more information on initial pages, see “Installing a New Application” on page 39.
The runtime engine constructs and destroys the client object for each client request. However, while processing a request, the runtime engine saves the names and values of the client object’s properties. In this way, the runtime engine can construct a new client object from the saved data when the same user returns to the application with a subsequent request. Thus, conceptually you can think of the client object as remaining for the duration of a client’s session with the application.
104 Writing Server-Side JavaScript Applications
The client Object
JavaScript does not save client objects that have no property values. Therefore, if an application does not need client objects and does not assign any client object property values, it incurs no additional overhead.
You have several options for how and where the runtime engine saves client object properties. These options are discussed in “Techniques for Maintaining the client Object” on page 115.
For summary information on the client object, see “Overview of the Predefined Objects” on page 97.
PropertiesThere are no predefined property values in the client object, because it is intended to contain data specific to the application. JavaScript statements can assign application-specific properties and values to the client object. A good example of a client object property is a customer ID number. When the user first accesses the application, the application might assign a customer ID, as in the following example:
client.custID = getNextCustID();
This example uses the application-defined getNextCustID function to compute a customer ID. The runtime engine then assigns this ID to the client object’s custID property.
Once the customer ID has been established, it would be inconvenient to require the user to reenter the ID on each page of the application. However, without the client object, there would be no way to associate the correct customer ID with subsequent requests from a client.
Because of the techniques used to maintain client properties across multiple client requests, there is one major restriction on client property values. The JavaScript runtime engine on the server converts the values of all of the client object’s properties to strings.
Do not assign an object as the value of a client property. If you do so, the runtime engine converts that object to a string; once this happens, you won’t be able to work with it as an object anymore. If a client property value represents
Chapter 5, Session Management Service 105
The client Object
another data type, such as a number, you must convert the value from a string before using it. For example, you can create an integer client property as follows:
client.totalNumber = 17;
You could then use parseInt to increment the value of totalNumber as follows:
client.totalNumber = parseInt(client.totalNumber) + 1;
Similarly, you can create a Boolean client property as follows:
client.bool = true;
Then you can check it as follows:
if (client.bool == "true")write("It’s true!");
elsewrite("It’s false!");
Notice that the conditional expression compares client.bool to the string "true" . You can use other techniques to handle Boolean expressions. For example, to negate a Boolean property, you can use code like this:
client.bool = (client.bool == "true") ? false : true;
Although you can work with client properties directly, you incur some overhead doing so. If you repeatedly use the value of a client property, consider using top-level JavaScript variables. Before using the client property, assign it to a variable. When you have finished working with that variable, assign the resulting value back to the appropriate client property. This technique can result in a substantial performance improvement.
As noted previously, you cannot store references to other objects in the client object. You can, however, store object references in either the project or the server object. If you want a property associated with the client to have object values, create an array indexed by client ID and store a reference to the array in the project or server object. You can use that array to store object values associated with the client. Consider the following code:
if (client.id == null)client.id = ssjs_generateClientID();
project.clientDates[client.id] = new Date();
106 Writing Server-Side JavaScript Applications
The client Object
This code uses the ssjs_generateClientID function, described next, to create a unique ID for this client object. It uses that ID as an index into the clientDates array on the project object and stores a new Date object in that array associated with the current client object.
Uniquely Referring to the client Object
For some applications, you may want to store information specific to a client/application pair in the project or server objects. Two common cases are storing a database connection between client requests (described in Chapter 8, “Connecting to a Database”) or storing a custom object that has the same lifetime as the predefined client object and that contains object values (described in “Creating a Custom client Object” on page 108).
In these situations, you need a way to refer uniquely to the client/application pair. JavaScript provides two functions for this purpose, ssjs_getClientID and ssjs_generateClientID . Neither function takes any arguments; both return a unique string you can use to identify the pair.
Each time you call ssjs_generateClientID , the runtime engine returns a new identifier. For this reason, if you use this function and want the identifier to last longer than a single client request, you need to store the identifier, possibly as a property of the client object. For an example of using this function, see “Sharing an Array of Connection Pools” on page 194.
If you use this function and store the ID in the client object, you may need to be careful that an intruder cannot get access to that ID and hence to sensitive information.
An alternative approach is to use the ssjs_getClientID function. If you use one of the server-side maintenance techniques for the client object, the JavaScript runtime engine generates and uses a identifier to access the information for a particular client/application pair. (For information on maintaining the client object, see “Techniques for Maintaining the client Object” on page 115.)
When you use these maintenance techniques, ssjs_getClientID returns the identifier used by the runtime engine. Every time you call this function from a particular client/application pair, you get the same identifier. Therefore, you do not need to store the identifier returned by ssjs_getClientID . However, if
Chapter 5, Session Management Service 107
The client Object
you use any of the other maintenance techniques, this function returns “undefined”; if you use those techniques you must instead use the ssjs_generateClientID function.
If you need an identifier and you’re using a server-side maintenance technique, you probably should use the ssjs_getClientID function. If you use this function, you do not need to store and track the identifier yourself; the runtime engine does it for you. However, if you use a client-side maintenance technique, you cannot use the ssjs_getClientID function; you must use the ssjs_generateClientID function.
Creating a Custom client ObjectAs discussed in earlier sections, properties of the predefined client object can have only string values. This restriction can be problematic for some applications. For instance, your application may require an object that persists for the same lifetime as the predefined client object, but that can have objects or other data types as property values. In this case, you can create your own object and store it as a property of the client object.
This section provides an example of creating such an object. You can include the code in this section as a JavaScript file in your application. Then, at the beginning of pages that need to use this object, include the following statement:
var customClient = getCustomClient()
(Of course, you can use a different variable name.) If this is the first page that requests the object, getCustomClient creates a new object. On other pages, it returns the existing object.
This code stores an array of all the custom client objects defined for an application as the value of the customClients property of the predefined project object. It stores the index in this array as a string value of the customClientID property of the predefined client object. In addition, the code uses a lock stored in the customClientLock property of project to ensure safe access to that array. For information on locking, see “Sharing Objects Safely with Locking” on page 130.
The timeout variable in the getCustomClient function hard-codes the expiration period for this object. If you want a different expiration time, specify a different value for that variable. Whatever expiration time you use, you
108 Writing Server-Side JavaScript Applications
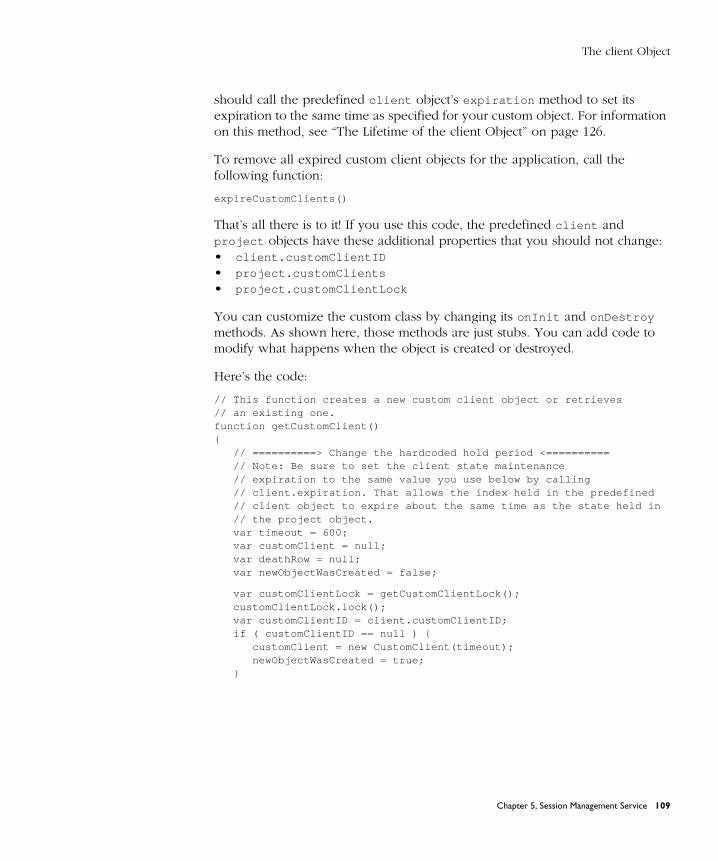
The client Object
should call the predefined client object’s expiration method to set its expiration to the same time as specified for your custom object. For information on this method, see “The Lifetime of the client Object” on page 126.
To remove all expired custom client objects for the application, call the following function:
expireCustomClients()
That’s all there is to it! If you use this code, the predefined client and project objects have these additional properties that you should not change:• client.customClientID • project.customClients • project.customClientLock
You can customize the custom class by changing its onInit and onDestroy methods. As shown here, those methods are just stubs. You can add code to modify what happens when the object is created or destroyed.
Here’s the code:
// This function creates a new custom client object or retrieves // an existing one.function getCustomClient(){
// ==========> Change the hardcoded hold period <==========// Note: Be sure to set the client state maintenance // expiration to the same value you use below by calling// client.expiration. That allows the index held in the predefined// client object to expire about the same time as the state held in// the project object.var timeout = 600;var customClient = null;var deathRow = null;var newObjectWasCreated = false;
var customClientLock = getCustomClientLock();customClientLock.lock();var customClientID = client.customClientID;if ( customClientID == null ) {
customClient = new CustomClient(timeout);newObjectWasCreated = true;
}
Chapter 5, Session Management Service 109
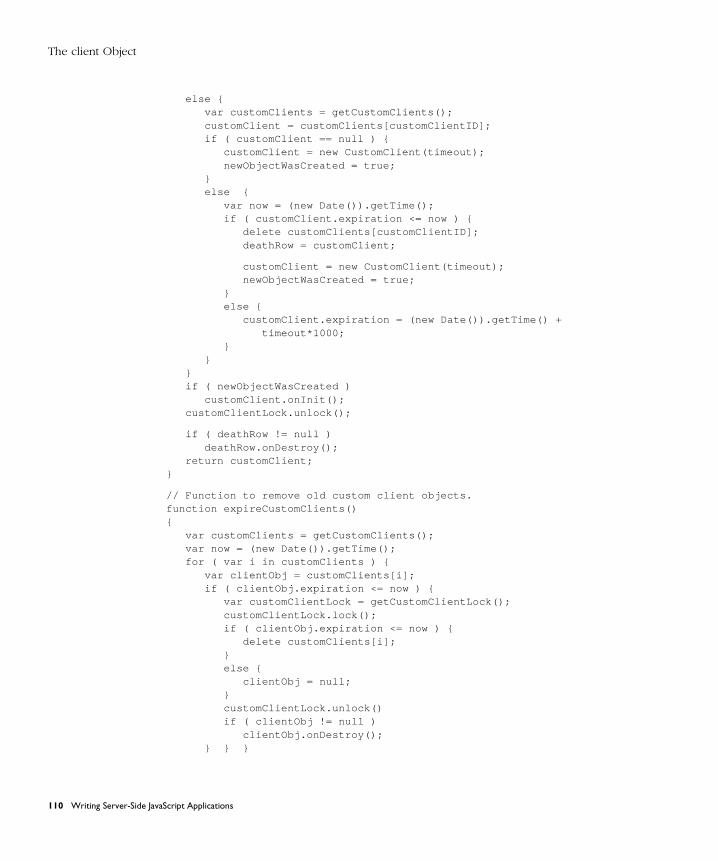
The client Object
else {var customClients = getCustomClients();customClient = customClients[customClientID];if ( customClient == null ) {
customClient = new CustomClient(timeout);newObjectWasCreated = true;
}else {
var now = (new Date()).getTime();if ( customClient.expiration <= now ) {
delete customClients[customClientID];deathRow = customClient;
customClient = new CustomClient(timeout);newObjectWasCreated = true;
}else {
customClient.expiration = (new Date()).getTime() + timeout*1000;
}}
}if ( newObjectWasCreated )
customClient.onInit();customClientLock.unlock();
if ( deathRow != null )deathRow.onDestroy();
return customClient;}
// Function to remove old custom client objects.function expireCustomClients(){
var customClients = getCustomClients();var now = (new Date()).getTime();for ( var i in customClients ) {
var clientObj = customClients[i];if ( clientObj.expiration <= now ) {
var customClientLock = getCustomClientLock();customClientLock.lock();if ( clientObj.expiration <= now ) {
delete customClients[i];}else {
clientObj = null;}customClientLock.unlock()if ( clientObj != null )
clientObj.onDestroy();} } }
110 Writing Server-Side JavaScript Applications
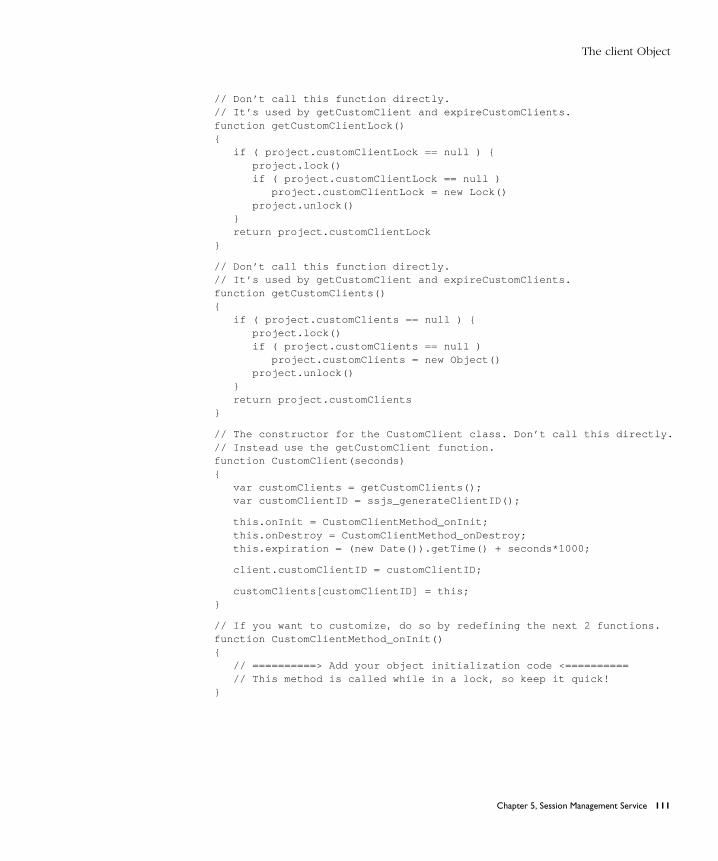
The client Object
// Don’t call this function directly. // It’s used by getCustomClient and expireCustomClients.function getCustomClientLock(){
if ( project.customClientLock == null ) {project.lock()if ( project.customClientLock == null )
project.customClientLock = new Lock()project.unlock()
}return project.customClientLock
}
// Don’t call this function directly. // It’s used by getCustomClient and expireCustomClients.function getCustomClients(){
if ( project.customClients == null ) {project.lock()if ( project.customClients == null )
project.customClients = new Object()project.unlock()
}return project.customClients
}
// The constructor for the CustomClient class. Don’t call this directly.// Instead use the getCustomClient function.function CustomClient(seconds){
var customClients = getCustomClients();var customClientID = ssjs_generateClientID();
this.onInit = CustomClientMethod_onInit;this.onDestroy = CustomClientMethod_onDestroy;this.expiration = (new Date()).getTime() + seconds*1000;
client.customClientID = customClientID;
customClients[customClientID] = this;}
// If you want to customize, do so by redefining the next 2 functions.function CustomClientMethod_onInit(){
// ==========> Add your object initialization code <==========// This method is called while in a lock, so keep it quick!
}
Chapter 5, Session Management Service 111
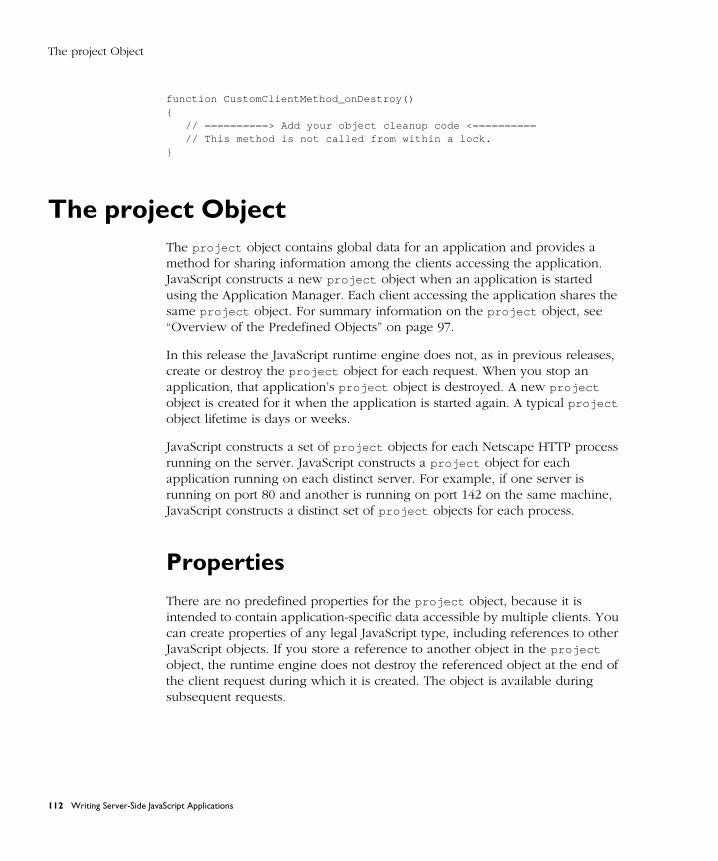
The project Object
function CustomClientMethod_onDestroy(){
// ==========> Add your object cleanup code <==========// This method is not called from within a lock.
}
The project ObjectThe project object contains global data for an application and provides a method for sharing information among the clients accessing the application. JavaScript constructs a new project object when an application is started using the Application Manager. Each client accessing the application shares the same project object. For summary information on the project object, see “Overview of the Predefined Objects” on page 97.
In this release the JavaScript runtime engine does not, as in previous releases, create or destroy the project object for each request. When you stop an application, that application’s project object is destroyed. A new project object is created for it when the application is started again. A typical project object lifetime is days or weeks.
JavaScript constructs a set of project objects for each Netscape HTTP process running on the server. JavaScript constructs a project object for each application running on each distinct server. For example, if one server is running on port 80 and another is running on port 142 on the same machine, JavaScript constructs a distinct set of project objects for each process.
PropertiesThere are no predefined properties for the project object, because it is intended to contain application-specific data accessible by multiple clients. You can create properties of any legal JavaScript type, including references to other JavaScript objects. If you store a reference to another object in the project object, the runtime engine does not destroy the referenced object at the end of the client request during which it is created. The object is available during subsequent requests.
112 Writing Server-Side JavaScript Applications
The server Object
A good example of a project object property is the next available customer ID. An application could use this property to track sequentially assigned customer IDs. Any client that accesses the application without a customer ID would be assigned an ID, and the value would be incremented for each initial access.
Remember that the project object exists only as long as the application is running on the server. When the application is stopped, the project object is destroyed, along with all of its property values. For this reason, if you have application data that needs to be stored permanently, you should store it either in a database (see Part 3, “LiveWire Database Service”) or in a file on the server (see “File System Service” on page 164).
Sharing the project ObjectThere is one project object for each application. Thus, code executing in any request for a given application can access the same project object. Because the server is multithreaded, there can be multiple requests active at any given time, either from the same client or from several clients.
To maintain data integrity, you must make sure that you have exclusive access to a property of the project object when you change the property’s value. There is no implicit locking as in previous releases; you must request exclusive access. The simplest way to do this is to use the project object’s lock and unlock methods. For details, see “Sharing Objects Safely with Locking” on page 130.
The server ObjectThe server object contains global data for the entire server and provides a method for sharing information between several applications running on a server. The server object is also automatically initialized with information about the server. For summary information on the server object, see “Overview of the Predefined Objects” on page 97.
The JavaScript runtime engine constructs a new server object when the server is started and destroys the server object when the server is stopped. Every application that runs on the server shares the same server object.
Chapter 5, Session Management Service 113
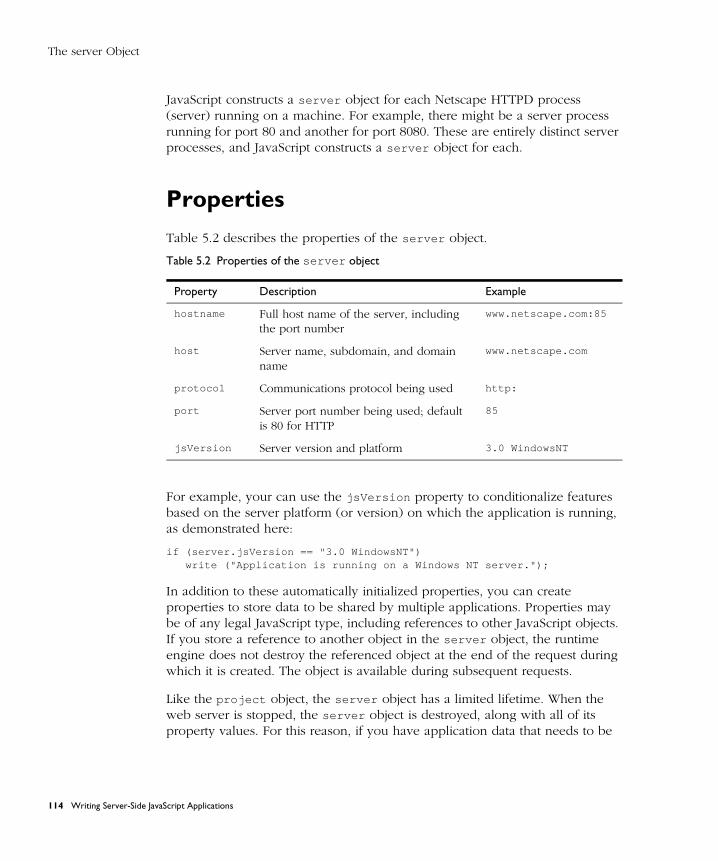
The server Object
JavaScript constructs a server object for each Netscape HTTPD process (server) running on a machine. For example, there might be a server process running for port 80 and another for port 8080. These are entirely distinct server processes, and JavaScript constructs a server object for each.
Properties
Table 5.2 describes the properties of the server object.
For example, your can use the jsVersion property to conditionalize features based on the server platform (or version) on which the application is running, as demonstrated here:
if (server.jsVersion == "3.0 WindowsNT")write ("Application is running on a Windows NT server.");
In addition to these automatically initialized properties, you can create properties to store data to be shared by multiple applications. Properties may be of any legal JavaScript type, including references to other JavaScript objects. If you store a reference to another object in the server object, the runtime engine does not destroy the referenced object at the end of the request during which it is created. The object is available during subsequent requests.
Like the project object, the server object has a limited lifetime. When the web server is stopped, the server object is destroyed, along with all of its property values. For this reason, if you have application data that needs to be
Table 5.2 Properties of the server object
Property Description Example
hostname Full host name of the server, including the port number
www.netscape.com:85
host Server name, subdomain, and domain name
www.netscape.com
protocol Communications protocol being used http:
port Server port number being used; default is 80 for HTTP
85
jsVersion Server version and platform 3.0 WindowsNT
114 Writing Server-Side JavaScript Applications
Techniques for Maintaining the client Object
stored permanently, you should store it either in a database (see Part 3, “LiveWire Database Service”) or in a file on the server (see “File System Service” on page 164).
Sharing the server Object
There is one server object for the entire server. Thus, code executing in any request, in any application, can access the same server object. Because the server is multithreaded, there can be multiple requests active at any given time. To maintain data integrity, you must make sure that you have exclusive access to the server object when you make changes to it.
Also, you must make sure that you have exclusive access to a property of the server object when you change the property’s value. There is no implicit locking as in previous releases; you must request exclusive access. The simplest way to do this is to use the server object’s lock and unlock methods. For details, see “Sharing Objects Safely with Locking” on page 130.
Techniques for Maintaining the client ObjectThe client object is associated with both a particular application and a particular client. As discussed in “The client Object” on page 104, the runtime engine creates a new client object each time a new request comes from the client to the server. However, the intent is to preserve client object properties from one request to the next. In order to do so, the runtime engine needs to store client properties between requests.
There are two basic approaches for maintaining the properties of the client object; you can maintain them either on the client or on the server. The two client-side techniques either store the property names and their values as cookies on the client or store the names and values directly in URLs on the generated HTML page. The three server-side techniques all store the property names and their values in a data structure in server memory, but they differ in the scheme used to index that data structure.
You select the technique to use when you use the JavaScript Application Manager to install or modify the application, as explained in “Installing a New Application” on page 39. This allows you (or the site manager) to change the maintenance technique without recompiling the application. However, the
Chapter 5, Session Management Service 115
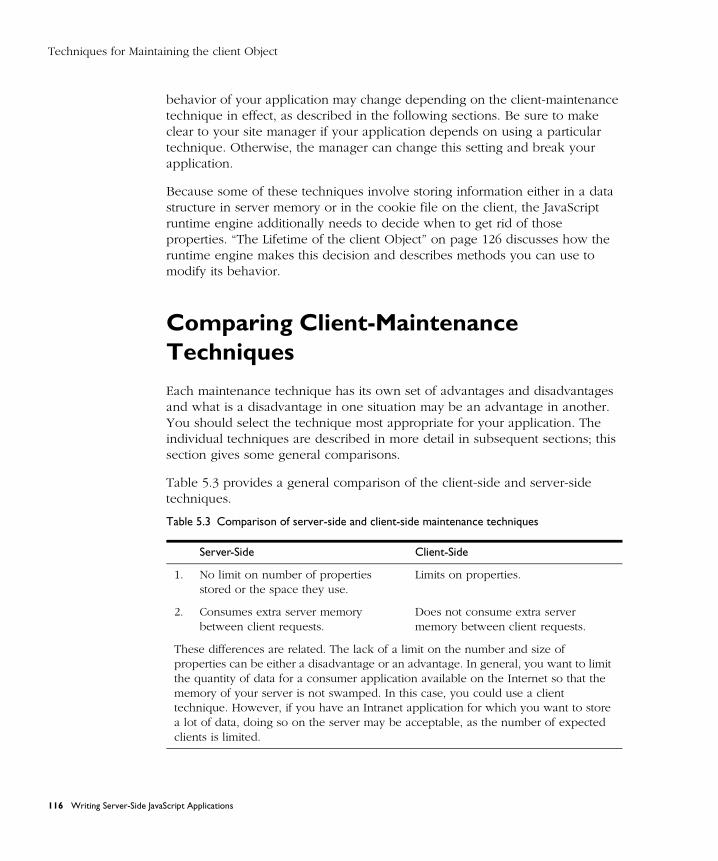
Techniques for Maintaining the client Object
behavior of your application may change depending on the client-maintenance technique in effect, as described in the following sections. Be sure to make clear to your site manager if your application depends on using a particular technique. Otherwise, the manager can change this setting and break your application.
Because some of these techniques involve storing information either in a data structure in server memory or in the cookie file on the client, the JavaScript runtime engine additionally needs to decide when to get rid of those properties. “The Lifetime of the client Object” on page 126 discusses how the runtime engine makes this decision and describes methods you can use to modify its behavior.
Comparing Client-Maintenance Techniques
Each maintenance technique has its own set of advantages and disadvantages and what is a disadvantage in one situation may be an advantage in another. You should select the technique most appropriate for your application. The individual techniques are described in more detail in subsequent sections; this section gives some general comparisons.
Table 5.3 provides a general comparison of the client-side and server-side techniques.
Table 5.3 Comparison of server-side and client-side maintenance techniques
Server-Side Client-Side
1. No limit on number of properties stored or the space they use.
Limits on properties.
2. Consumes extra server memory between client requests.
Does not consume extra server memory between client requests.
These differences are related. The lack of a limit on the number and size of properties can be either a disadvantage or an advantage. In general, you want to limit the quantity of data for a consumer application available on the Internet so that the memory of your server is not swamped. In this case, you could use a client technique. However, if you have an Intranet application for which you want to store a lot of data, doing so on the server may be acceptable, as the number of expected clients is limited.
116 Writing Server-Side JavaScript Applications
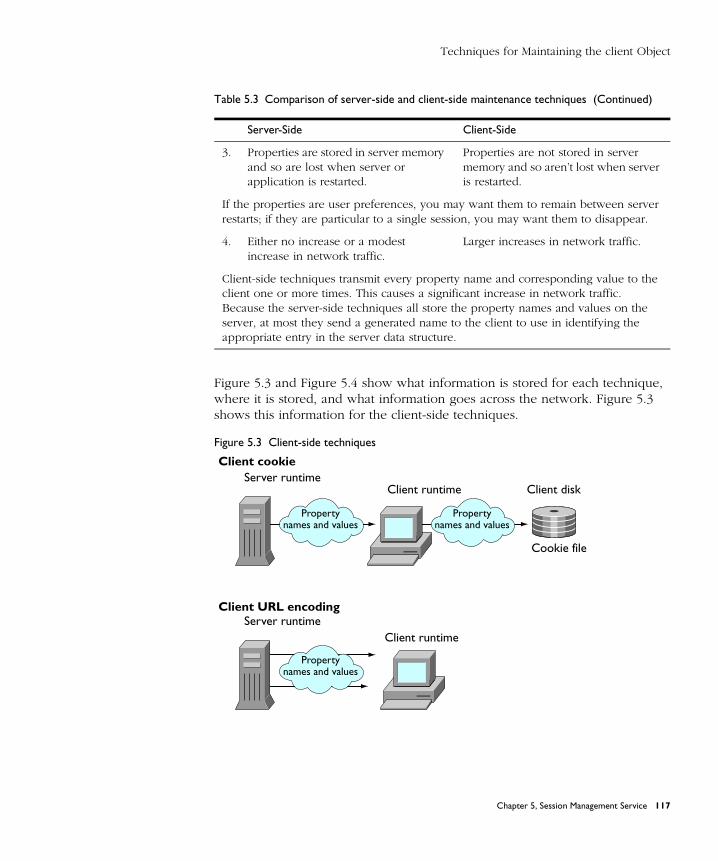
Techniques for Maintaining the client Object
Figure 5.3 and Figure 5.4 show what information is stored for each technique, where it is stored, and what information goes across the network. Figure 5.3 shows this information for the client-side techniques.
Figure 5.3 Client-side techniques
3. Properties are stored in server memory and so are lost when server or application is restarted.
Properties are not stored in server memory and so aren’t lost when server is restarted.
If the properties are user preferences, you may want them to remain between server restarts; if they are particular to a single session, you may want them to disappear.
4. Either no increase or a modest increase in network traffic.
Larger increases in network traffic.
Client-side techniques transmit every property name and corresponding value to the client one or more times. This causes a significant increase in network traffic.Because the server-side techniques all store the property names and values on the server, at most they send a generated name to the client to use in identifying the appropriate entry in the server data structure.
Table 5.3 Comparison of server-side and client-side maintenance techniques (Continued)
Server-Side Client-Side
Client cookieServer runtime
Client runtime Client disk
Client URL encodingServer runtime
Client runtime
Propertynames and values
Propertynames and values
Propertynames and values
Cookie file
Chapter 5, Session Management Service 117
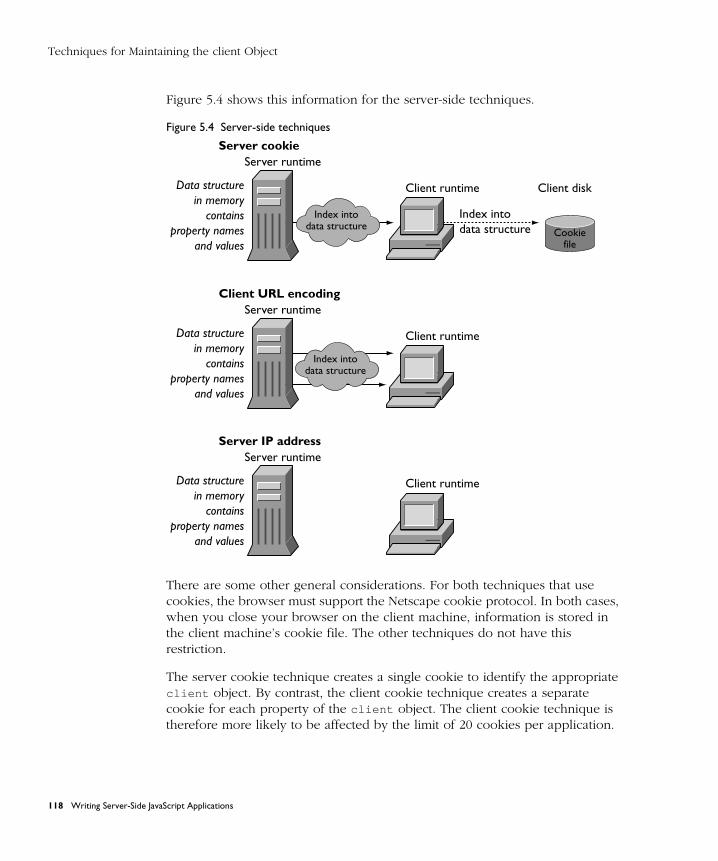
Techniques for Maintaining the client Object
Figure 5.4 shows this information for the server-side techniques.
Figure 5.4 Server-side techniques
There are some other general considerations. For both techniques that use cookies, the browser must support the Netscape cookie protocol. In both cases, when you close your browser on the client machine, information is stored in the client machine’s cookie file. The other techniques do not have this restriction.
The server cookie technique creates a single cookie to identify the appropriate client object. By contrast, the client cookie technique creates a separate cookie for each property of the client object. The client cookie technique is therefore more likely to be affected by the limit of 20 cookies per application.
Index intodata structure
Server cookieServer runtime
Client runtime Client diskData structurein memory
containsproperty names
and values
Data structurein memory
containsproperty names
and values
Client URL encodingServer runtime
Client runtime
Data structurein memory
containsproperty names
and values
Server IP addressServer runtime
Client runtime
Cookiefile
Index intodata structure
Index intodata structure
118 Writing Server-Side JavaScript Applications
Techniques for Maintaining the client Object
With the client cookie technique, the client object properties are sent to the client when the first piece of the HTML page is sent. If you change client property values later in the execution of that page, those changes are not sent to the client and so are lost. This restriction does not apply to any other maintenance technique.
For both techniques that use URL encoding, if your application constructs a URL at runtime or uses the redirect function, it must either manually append any client properties that need to be saved or use addClient to have the runtime engine append the properties. Although appending properties is not required for other techniques, you might want to do it anyway, so that changing the maintenance technique does not break your application.
In addition, for the URL encoding techniques, as soon as the browser accesses any page outside the application, or even submits a form to the application using the GET method, all client properties are lost. Properties are not lost this way for the other techniques. Your choice of technique should be partially guided by whether or not you want client properties to be persist in these situations.
Your choice of maintenance technique rests with the requirements of your application. The client cookie technique does not use extra server memory (as do the server-side techniques) and sends information only once per page (in contrast to the client URL encoding technique). These facts may make the client cookie technique appropriate for high-volume Internet applications. However, there are circumstances under which another technique is more suitable. For example, server IP address is the fastest technique, causing no increase in network traffic. You may use it for a speed-critical application running on your intranet.
Chapter 5, Session Management Service 119

Techniques for Maintaining the client Object
Client-side Techniques
There are two client-side maintenance techniques:• client cookie• client URL encoding
For a comparison of all of the maintenance techniques, see “Comparing Client-Maintenance Techniques” on page 116.
When an application uses client-side maintenance techniques, the runtime engine encodes properties of the client object into its response to a client request, either in the header of the response (for client cookie) or in URLs in the body of the response (for client URL encoding).
Because the actual property names and values are sent between the client and the server, restarting the server does not cause the client information to be lost. However, sending this information causes an increase of network traffic.
Using Client Cookie
In the client cookie technique, the JavaScript runtime engine on the server uses the Netscape cookie protocol to transfer the properties of the client object and their values to the client. It creates one cookie per client property. The properties are sent to the client once, in the response header of the generated HTML page. The Netscape cookie protocol is described in the JavaScript Guide.
To avoid conflicts with other cookies you might create for your application, the runtime engine creates a cookie name by adding NETSCAPE_LIVEWIRE. to the front of the name of a client property. For example, if client has a property called custID , the runtime engine creates a cookie named NETSCAPE_LIVEWIRE.custID . When it sends the cookie information to the client, the runtime engine performs any needed encoding of special characters in a property value, as described in the JavaScript Guide.
Sometimes your application needs to communicate information between its JavaScript statements running on the client and those running on the server. Because this maintenance technique sends client object properties as cookies to the client, you can use it as a way to facilitate this communication. For more information, see “Communicating Between Server and Client” on page 84.
120 Writing Server-Side JavaScript Applications

Techniques for Maintaining the client Object
With this technique, the runtime engine stores client properties the first time it flushes the internal buffer containing the generated HTML page. For this reason, to prevent losing any information, you should assign all client property values early in the scripts on each page. In particular, you should ensure that client properties are set before (1) the runtime engine generates 64KB of content for the HTML page (it automatically flushes the output buffer at this point), (2) you call the flush function to clear the output buffer, or (3) you call the redirect function to change client requests. For more information, see “Flushing the Output Buffer” on page 78 and “Runtime Processing on the Server” on page 72.
By default, when you use the client cookie technique, the runtime engine does not explicitly set the expiration of the cookies. In this case, the cookies expire when the user exits the browser. (This is the default behavior for all cookies.) As described in “The Lifetime of the client Object” on page 126, you can use the client object’s expiration method to change this expiration period. If you use client.expiration , the runtime engine sets the cookie expiration appropriately in the cookie file.
When using the client cookie technique, client.destroy eliminates all client property values but does not affect what is stored in the cookie file on the client machine. To remove the cookies from the cookie file or browser memory, do not use client.destroy ; instead, use client.expiration with an argument of 0 seconds.
In general, Netscape cookies have the following limitations. These limitations apply when you use cookies to store client properties:
• 4KB for each cookie (including both the cookie’s name and its value). If a single cookie is longer than 4KB, the cookie entry is truncated to 4KB. This may result in an invalid client property value.
• 20 cookies for each application. If you create more than 20 cookies for an application, the oldest (first created) cookies are eliminated. Because the client cookie technique creates a separate cookie for each client property, the client object can store at most 20 properties. If you want to use other cookies in your application as well, the total number of cookies is still limited to 20.
• 300 total cookies in the cookie file. If you create more than 300 cookies, the oldest (first created) cookies are eliminated.
Chapter 5, Session Management Service 121
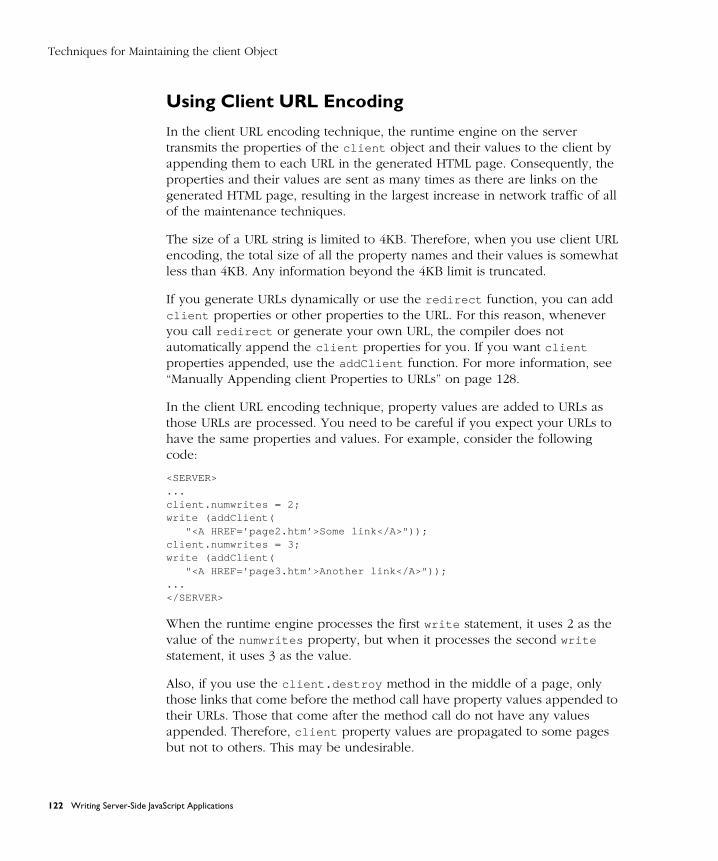
Techniques for Maintaining the client Object
Using Client URL Encoding
In the client URL encoding technique, the runtime engine on the server transmits the properties of the client object and their values to the client by appending them to each URL in the generated HTML page. Consequently, the properties and their values are sent as many times as there are links on the generated HTML page, resulting in the largest increase in network traffic of all of the maintenance techniques.
The size of a URL string is limited to 4KB. Therefore, when you use client URL encoding, the total size of all the property names and their values is somewhat less than 4KB. Any information beyond the 4KB limit is truncated.
If you generate URLs dynamically or use the redirect function, you can add client properties or other properties to the URL. For this reason, whenever you call redirect or generate your own URL, the compiler does not automatically append the client properties for you. If you want client properties appended, use the addClient function. For more information, see “Manually Appending client Properties to URLs” on page 128.
In the client URL encoding technique, property values are added to URLs as those URLs are processed. You need to be careful if you expect your URLs to have the same properties and values. For example, consider the following code:
<SERVER>...client.numwrites = 2;write (addClient(
"<A HREF=’page2.htm’>Some link</A>"));client.numwrites = 3;write (addClient(
"<A HREF=’page3.htm’>Another link</A>"));...</SERVER>
When the runtime engine processes the first write statement, it uses 2 as the value of the numwrites property, but when it processes the second write statement, it uses 3 as the value.
Also, if you use the client.destroy method in the middle of a page, only those links that come before the method call have property values appended to their URLs. Those that come after the method call do not have any values appended. Therefore, client property values are propagated to some pages but not to others. This may be undesirable.
122 Writing Server-Side JavaScript Applications
Techniques for Maintaining the client Object
If your page has a link to a URL outside of your application, you may not want the client state appended. In this situation, do not use a static string as the HREF value. Instead, compute the value. This prevents the runtime engine from automatically appending the client state to the URL. For example, assume you have this link:
<A HREF="mailto:[email protected]">
In this case, the runtime engine appends the client object properties. To instead have it not do so, use this very similar link:
<A HREF=‘"mailto:[email protected]"‘>
In this technique, the client object does not expire, because it exists solely in the URL string residing on the client. Therefore, the client.expiration method does nothing.
In client URL encoding, you lose all client properties when you submit a form using the GET method and when you access another application,. Once again, you may or may not want to lose these properties, depending on your application’s needs.
In contrast to the client cookie technique, client URL encoding does not require the web browser support the Netscape cookie protocol, nor does it require writing information on the client machine.
Server-Side Techniques
There are three server-side maintenance techniques:• IP addresses• server cookie• server URL encoding
For a comparison of all of the maintenance techniques, see “Comparing Client-Maintenance Techniques” on page 116.
In all of these techniques, the runtime engine on the server stores the properties of the client object and their values in a data structure in server memory. A single data structure, preserved between client requests, is used for all applications running on the server. These techniques differ only in the index used to access the information in that data structure, ensuring that each client/application pair gets the appropriate properties and values for the client object.
Chapter 5, Session Management Service 123
Techniques for Maintaining the client Object
None of these techniques writes information to the server disk. Only the server cookie technique can cause information to be written to the client machine’s disk, when the browser is exited.
Because these techniques store client object information in server memory between client requests, there is little or no network traffic increase. The property names and values are never sent to the client. Additionally, there are no restrictions on the number of properties a client object can have nor on the size of the individual properties.
The trade-off, of course, is that these techniques consume server memory between client requests. For applications that are accessed by a large number of clients, this memory consumption could become significant. Of course, this can be considered an advantage as well, in that you can store as much information as you need.
Using IP Address
The IP address technique indexes the data structure based on the application and the client’s IP address. This simple technique is also the fastest, because it doesn’t require sending any information to the client at all. Since the index is based on both the application and the IP address, this technique does still create a separate index for every application/client pair running on the server.
This technique works well when all clients have fixed IP addresses. It does not work reliably if the client is not guaranteed to have a fixed IP address, for example, if the client uses the Dynamic Host Configuration Protocol (DHCP) or an Internet service provider that dynamically allocates IP addresses. This technique also does not work for clients that use a proxy server, because all users of the proxy report the same IP address. For this reason, this technique is probably useful only for intranet applications.
Using Server Cookie
The server cookie technique uses a long unique name, generated by the runtime engine, to index the data structure on the server. The runtime engine uses the Netscape cookie protocol to store the generated name as a cookie on the client. It does not store the property names and values as cookies. For this reason, this technique creates a single cookie, whereas the client cookie technique creates a separate cookie for each property of the client object.
124 Writing Server-Side JavaScript Applications
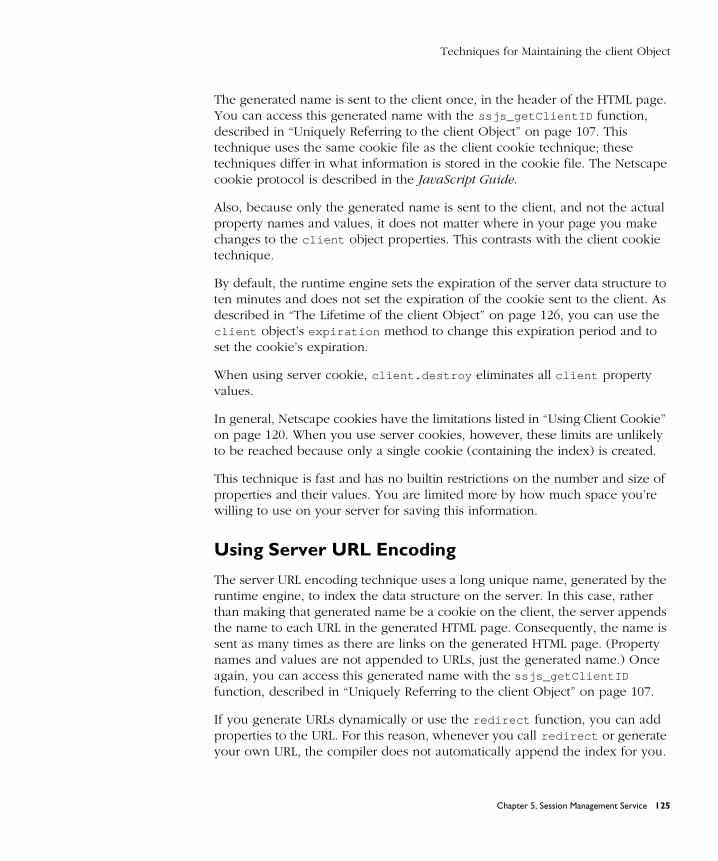
Techniques for Maintaining the client Object
The generated name is sent to the client once, in the header of the HTML page. You can access this generated name with the ssjs_getClientID function, described in “Uniquely Referring to the client Object” on page 107. This technique uses the same cookie file as the client cookie technique; these techniques differ in what information is stored in the cookie file. The Netscape cookie protocol is described in the JavaScript Guide.
Also, because only the generated name is sent to the client, and not the actual property names and values, it does not matter where in your page you make changes to the client object properties. This contrasts with the client cookie technique.
By default, the runtime engine sets the expiration of the server data structure to ten minutes and does not set the expiration of the cookie sent to the client. As described in “The Lifetime of the client Object” on page 126, you can use the client object’s expiration method to change this expiration period and to set the cookie’s expiration.
When using server cookie, client.destroy eliminates all client property values.
In general, Netscape cookies have the limitations listed in “Using Client Cookie” on page 120. When you use server cookies, however, these limits are unlikely to be reached because only a single cookie (containing the index) is created.
This technique is fast and has no builtin restrictions on the number and size of properties and their values. You are limited more by how much space you’re willing to use on your server for saving this information.
Using Server URL Encoding
The server URL encoding technique uses a long unique name, generated by the runtime engine, to index the data structure on the server. In this case, rather than making that generated name be a cookie on the client, the server appends the name to each URL in the generated HTML page. Consequently, the name is sent as many times as there are links on the generated HTML page. (Property names and values are not appended to URLs, just the generated name.) Once again, you can access this generated name with the ssjs_getClientID function, described in “Uniquely Referring to the client Object” on page 107.
If you generate URLs dynamically or use the redirect function, you can add properties to the URL. For this reason, whenever you call redirect or generate your own URL, the compiler does not automatically append the index for you.
Chapter 5, Session Management Service 125
Techniques for Maintaining the client Object
If you want to retain the index for the client properties, use the addClient function. For more information, see “Manually Appending client Properties to URLs” on page 128.
If your page has a link to a URL outside of your application, you may not want the client index appended. In this situation, do not use a static string for the HREF value. Instead, compute the value. This prevents the runtime engine from automatically appending the client index to the URL. For example, assume you have this link:
<A HREF="mailto:[email protected]">
In this case, the runtime engine appends the client index. To instead have it not do so, use this very similar link:
<A HREF=‘"mailto:[email protected]"‘>
In server URL encoding, you lose the client identifier (and hence its properties and values) when you submit a form using the GET method. You may or may not want to lose these properties, depending on your application’s needs.
The Lifetime of the client Object
Once a client accesses an application, there is no guarantee that it will request further processing or will continue to a logical end point. For this reason, the client object has a built-in expiration mechanism. This mechanism allows JavaScript to occasionally “clean up” old client objects that are no longer necessary. Each time the server receives a request for a page in an application, JavaScript resets the lifetime of the client object.
Causing client Object Properties to Expire
The default behavior of the expiration mechanism varies, depending on the client object maintenance technique you use, as shown in Table 5.4.
126 Writing Server-Side JavaScript Applications
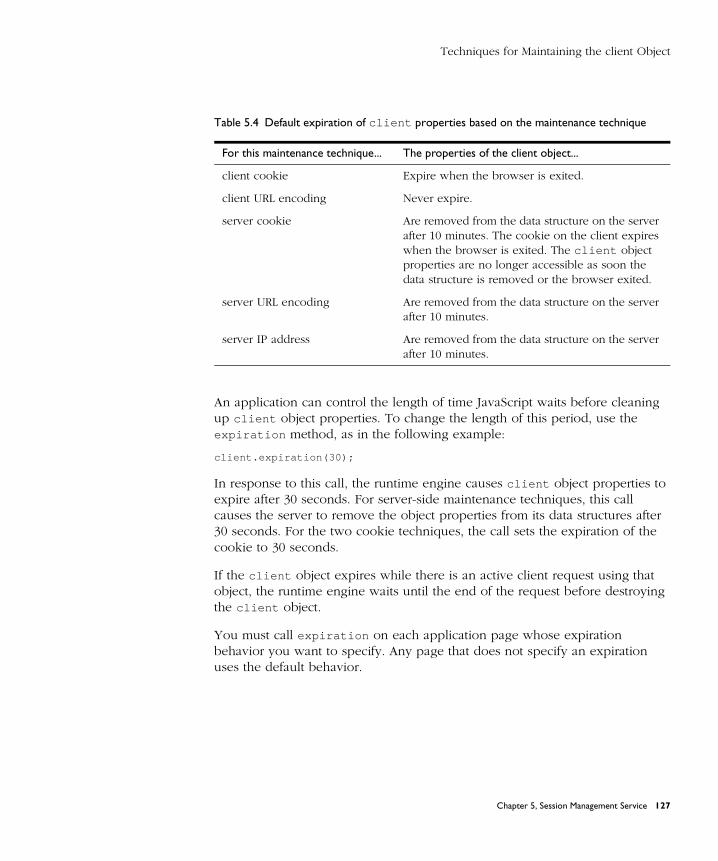
Techniques for Maintaining the client Object
An application can control the length of time JavaScript waits before cleaning up client object properties. To change the length of this period, use the expiration method, as in the following example:
client.expiration(30);
In response to this call, the runtime engine causes client object properties to expire after 30 seconds. For server-side maintenance techniques, this call causes the server to remove the object properties from its data structures after 30 seconds. For the two cookie techniques, the call sets the expiration of the cookie to 30 seconds.
If the client object expires while there is an active client request using that object, the runtime engine waits until the end of the request before destroying the client object.
You must call expiration on each application page whose expiration behavior you want to specify. Any page that does not specify an expiration uses the default behavior.
Table 5.4 Default expiration of client properties based on the maintenance technique
For this maintenance technique... The properties of the client object...
client cookie Expire when the browser is exited.
client URL encoding Never expire.
server cookie Are removed from the data structure on the server after 10 minutes. The cookie on the client expires when the browser is exited. The client object properties are no longer accessible as soon the data structure is removed or the browser exited.
server URL encoding Are removed from the data structure on the server after 10 minutes.
server IP address Are removed from the data structure on the server after 10 minutes.
Chapter 5, Session Management Service 127
Techniques for Maintaining the client Object
Destroying the client Object
An application can explicitly destroy a client object with the destroy
method, as follows:
client.destroy();
When an application calls destroy , JavaScript removes all properties from the client object.
If you use the client cookie technique to maintain the client object, destroy eliminates all client property values but has no effect on what is stored in the client cookie file. To also eliminate property values from the cookie file, do not use destroy ; instead, use expiration with an argument of 0 seconds.
When you use client URL encoding to maintain the client object, the destroy method removes all client properties. Links on the page before the call to destroy retain the client properties in their URLs, but links after the call have no properties. Because it is unlikely that you will want only some of the URLs from the page to contain client properties, you probably should call destroy either at the top or bottom of the page when using client URL maintenance. For more information, see “Using Client URL Encoding” on page 122.
Manually Appending client Properties to URLs
When using URL encoding either on the client or on the server to maintain the client object, in general the runtime engine should store the appropriate information (client property names and values or the server data structure’s index) in all URLs sent to the client, whether those URLs were presented as static HTML or were generated by server-side JavaScript statements.
The runtime engine automatically appends the appropriate information to HTML hyperlinks that do not occur inside the SERVER tag. So, for example, assume your HTML page contains the following statements:
<HTML>For more information, contact<A HREF="http://royalairways.com/contact_info.html">Royal Airways</a>...</HTML>
128 Writing Server-Side JavaScript Applications
Techniques for Maintaining the client Object
If the application uses URL encoding for the client object, the runtime engine automatically appends the client information to the end of the URL. You do not have to do anything special to support this behavior.
However, your application may use the write function to dynamically generate an HTML statement containing a URL. You can also use the redirect function to start a new request. Whenever you use server-side JavaScript statements to add a URL to the HTML page being generated, the runtime engine assumes that you have specified the complete URL as you want it sent. It does not automatically append client information, even when using URL encoding to maintain the client object. If you want client information appended, you must do so yourself.
You use the addClient function to manually add the appropriate client information. This function takes a URL and returns a new URL with the information appended. For example, suppose the appropriate contact URL varies based on the value of the client.contact property. Instead of the HTML above, you might have the following:
<HTML>For more information, contact<server>if (client.contact == "VIP") {
write ("<A HREF=’http://royalairways.com/vip_contact_info.html’>");write ("Royal Airways VIP Contact</a>");
}else {
write ("<A HREF=’http://royalairways.com/contact_info.html’>");write ("Royal Airways</a>");
}</server>...</HTML>
In this case, the runtime engine does not append client properties to the URLs. If you use one of the URL-encoding client maintenance techniques, this may be a problem. If you want the client properties sent with this URL, instead use this code:
<HTML>For more information, contact<server>if (client.contact == "VIP") {
write (addClient("<A HREF=’http://royalairways.com/vip_contact_info.html’>"));
write ("Royal Airways VIP Contact</a>");}
Chapter 5, Session Management Service 129
Sharing Objects Safely with Locking
else {write (addClient(
"<A HREF=’http://royalairways.com/contact_info.html’>"));write ("Royal Airways</a>");
}</server>...</HTML>
Similarly, any time you use the redirect function to change the client request, you should use addClient to append the information, as in this example:
redirect(addClient("mypage.html"));
Conversely, if your page has a link to a URL outside of your application, you may not want client information appended. In this situation, do not use a static string for the HREF value. Instead, compute the value. This prevents the runtime engine from automatically appending the client index or properties to the URL. For example, assume you have this link:
<A HREF="mailto:[email protected]">
In this case, the runtime engine appends client information. To instead have it not do so, use this very similar link:
<A HREF=‘"mailto:[email protected]"‘>
Even though an application is initially installed to use a technique that does not use URL encoding to maintain client , it may be modified later to use a URL encoding technique. Therefore, if your application generates dynamic URLs or uses redirect , you may always want to use addClient .
Sharing Objects Safely with LockingThe execution environment for a 3.x version of a Netscape server is multithreaded; this is, it processes more than one request at the same time. Because these requests could require JavaScript execution, more than one thread of JavaScript execution can be active at the same time.
If multiple threads simultaneously attempt to change a property of the same JavaScript object, they could leave the object in an inconsistent state. A section of code in which you want one and only one thread executing at any time is called a critical section.
130 Writing Server-Side JavaScript Applications
Sharing Objects Safely with Locking
One server object is shared by all clients and all applications running on the server. One project object is shared by all clients accessing the same application on the server. In addition, your application may create other objects it shares among client requests, or it may even share objects with other applications. To maintain data integrity within any of these shared objects, you must get exclusive access to the object before changing any of its properties.
Important There is no implicit locking for the project and server objects as there was in previous releases.
To better understand what can happen, consider the following example. Assume you create a shared object project.orders to keep track of customer orders. You update project.orders.count every time there is a new order, using the following code:
var x = project.orders.count; x = x + 1; project.orders.count = x;
Assume that project.orders.count is initially set to 1 and two new orders come in, in two separate threads. The following events occur:
1. The first thread stores project.orders.count into x .
2. Before it can continue, the second thread runs and stores the same value in its copy of x .
3. At this point, both threads have a value of 1 in x .
4. The second thread completes its execution and sets project.orders.count to 2.
5. The first thread continues, unaware that the value of project.orders.count has changed, and also sets it to 2.
So, the end value of project.orders.count is 2 rather than the correct value, 3.
To prevent problems of this kind, you need to obtain exclusive access to the properties of shared objects when writing to them. You can construct your own instances of Lock for this purpose that work with any shared object. In addition, the server and project objects have lock and unlock methods you can use to restrict access to those objects.
Chapter 5, Session Management Service 131
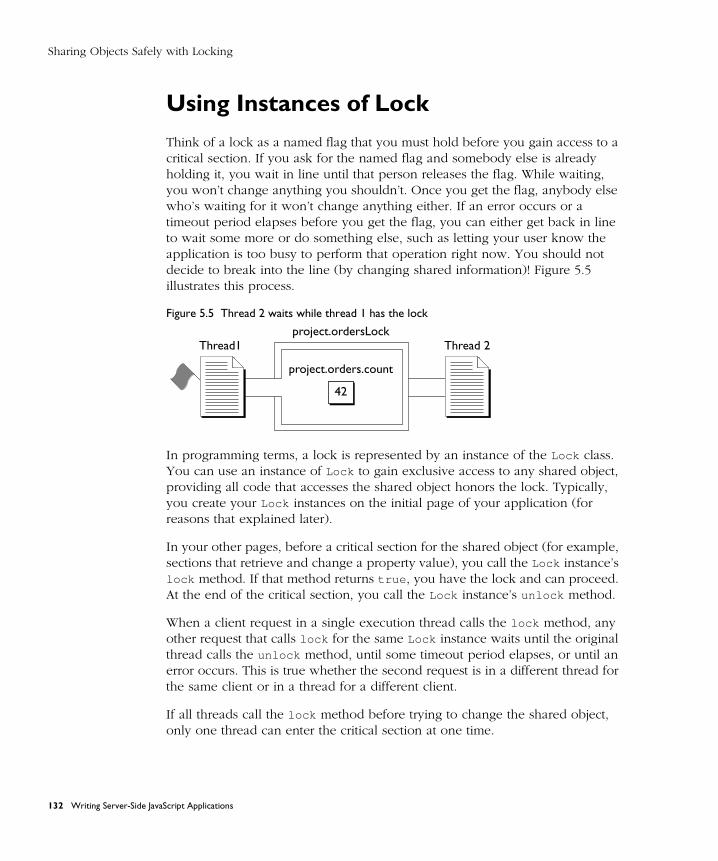
Sharing Objects Safely with Locking
Using Instances of Lock
Think of a lock as a named flag that you must hold before you gain access to a critical section. If you ask for the named flag and somebody else is already holding it, you wait in line until that person releases the flag. While waiting, you won’t change anything you shouldn’t. Once you get the flag, anybody else who’s waiting for it won’t change anything either. If an error occurs or a timeout period elapses before you get the flag, you can either get back in line to wait some more or do something else, such as letting your user know the application is too busy to perform that operation right now. You should not decide to break into the line (by changing shared information)! Figure 5.5 illustrates this process.
Figure 5.5 Thread 2 waits while thread 1 has the lock
In programming terms, a lock is represented by an instance of the Lock class. You can use an instance of Lock to gain exclusive access to any shared object, providing all code that accesses the shared object honors the lock. Typically, you create your Lock instances on the initial page of your application (for reasons that explained later).
In your other pages, before a critical section for the shared object (for example, sections that retrieve and change a property value), you call the Lock instance’s lock method. If that method returns true , you have the lock and can proceed. At the end of the critical section, you call the Lock instance’s unlock method.
When a client request in a single execution thread calls the lock method, any other request that calls lock for the same Lock instance waits until the original thread calls the unlock method, until some timeout period elapses, or until an error occurs. This is true whether the second request is in a different thread for the same client or in a thread for a different client.
If all threads call the lock method before trying to change the shared object, only one thread can enter the critical section at one time.
Thread1
project.orders.count
project.ordersLock
42
Thread 2
132 Writing Server-Side JavaScript Applications
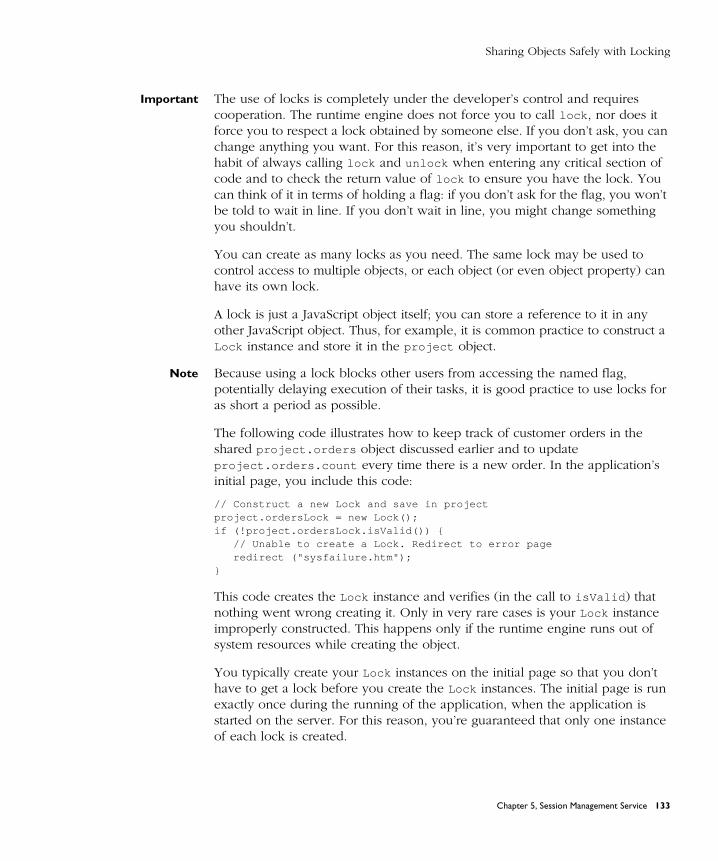
Sharing Objects Safely with Locking
Important The use of locks is completely under the developer’s control and requires cooperation. The runtime engine does not force you to call lock , nor does it force you to respect a lock obtained by someone else. If you don’t ask, you can change anything you want. For this reason, it’s very important to get into the habit of always calling lock and unlock when entering any critical section of code and to check the return value of lock to ensure you have the lock. You can think of it in terms of holding a flag: if you don’t ask for the flag, you won’t be told to wait in line. If you don’t wait in line, you might change something you shouldn’t.
You can create as many locks as you need. The same lock may be used to control access to multiple objects, or each object (or even object property) can have its own lock.
A lock is just a JavaScript object itself; you can store a reference to it in any other JavaScript object. Thus, for example, it is common practice to construct a Lock instance and store it in the project object.
Note Because using a lock blocks other users from accessing the named flag, potentially delaying execution of their tasks, it is good practice to use locks for as short a period as possible.
The following code illustrates how to keep track of customer orders in the shared project.orders object discussed earlier and to update project.orders.count every time there is a new order. In the application’s initial page, you include this code:
// Construct a new Lock and save in project project.ordersLock = new Lock(); if (!project.ordersLock.isValid()) {
// Unable to create a Lock. Redirect to error pageredirect ("sysfailure.htm");
}
This code creates the Lock instance and verifies (in the call to isValid ) that nothing went wrong creating it. Only in very rare cases is your Lock instance improperly constructed. This happens only if the runtime engine runs out of system resources while creating the object.
You typically create your Lock instances on the initial page so that you don’t have to get a lock before you create the Lock instances. The initial page is run exactly once during the running of the application, when the application is started on the server. For this reason, you’re guaranteed that only one instance of each lock is created.
Chapter 5, Session Management Service 133
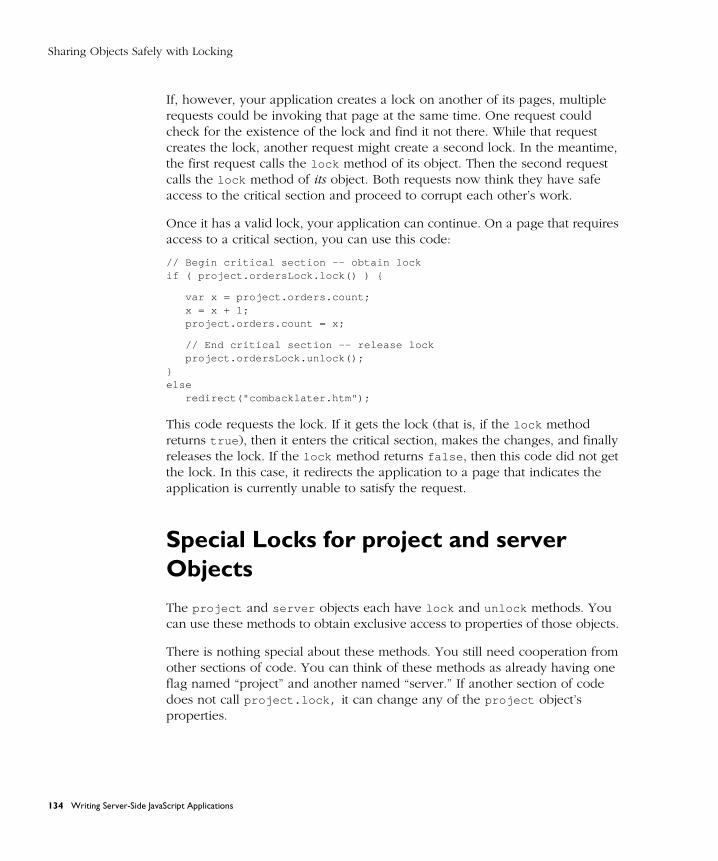
Sharing Objects Safely with Locking
If, however, your application creates a lock on another of its pages, multiple requests could be invoking that page at the same time. One request could check for the existence of the lock and find it not there. While that request creates the lock, another request might create a second lock. In the meantime, the first request calls the lock method of its object. Then the second request calls the lock method of its object. Both requests now think they have safe access to the critical section and proceed to corrupt each other’s work.
Once it has a valid lock, your application can continue. On a page that requires access to a critical section, you can use this code:
// Begin critical section -- obtain lock if ( project.ordersLock.lock() ) {
var x = project.orders.count; x = x + 1; project.orders.count = x;
// End critical section -- release lock project.ordersLock.unlock();
}else
redirect("combacklater.htm");
This code requests the lock. If it gets the lock (that is, if the lock method returns true ), then it enters the critical section, makes the changes, and finally releases the lock. If the lock method returns false , then this code did not get the lock. In this case, it redirects the application to a page that indicates the application is currently unable to satisfy the request.
Special Locks for project and server Objects
The project and server objects each have lock and unlock methods. You can use these methods to obtain exclusive access to properties of those objects.
There is nothing special about these methods. You still need cooperation from other sections of code. You can think of these methods as already having one flag named “project” and another named “server.” If another section of code does not call project.lock, it can change any of the project object’s properties.
134 Writing Server-Side JavaScript Applications
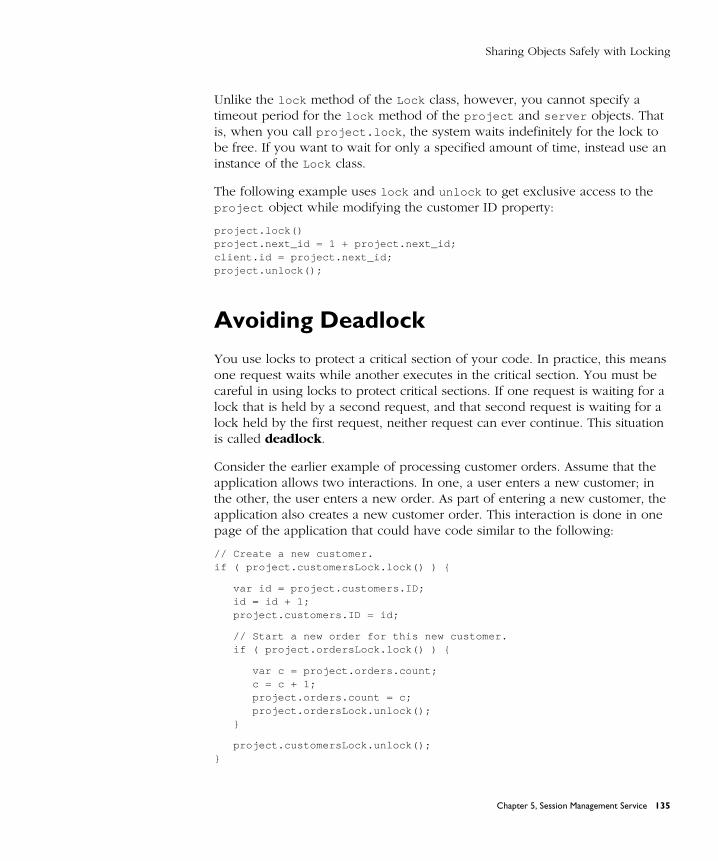
Sharing Objects Safely with Locking
Unlike the lock method of the Lock class, however, you cannot specify a timeout period for the lock method of the project and server objects. That is, when you call project.lock , the system waits indefinitely for the lock to be free. If you want to wait for only a specified amount of time, instead use an instance of the Lock class.
The following example uses lock and unlock to get exclusive access to the project object while modifying the customer ID property:
project.lock()project.next_id = 1 + project.next_id;client.id = project.next_id;project.unlock();
Avoiding Deadlock
You use locks to protect a critical section of your code. In practice, this means one request waits while another executes in the critical section. You must be careful in using locks to protect critical sections. If one request is waiting for a lock that is held by a second request, and that second request is waiting for a lock held by the first request, neither request can ever continue. This situation is called deadlock.
Consider the earlier example of processing customer orders. Assume that the application allows two interactions. In one, a user enters a new customer; in the other, the user enters a new order. As part of entering a new customer, the application also creates a new customer order. This interaction is done in one page of the application that could have code similar to the following:
// Create a new customer.if ( project.customersLock.lock() ) {
var id = project.customers.ID; id = id + 1; project.customers.ID = id;
// Start a new order for this new customer.if ( project.ordersLock.lock() ) {
var c = project.orders.count; c = c + 1; project.orders.count = c; project.ordersLock.unlock();
}
project.customersLock.unlock();}
Chapter 5, Session Management Service 135

Sharing Objects Safely with Locking
In the second type of interaction, a user enters a new customer order. As part of entering the order, if the customer is not already a registered customer, the application creates a new customer. This interaction is done in a different page of the application that could have code similar to the following:
// Start a new order.if ( project.ordersLock.lock() ) {
var c = project.orders.count; c = c + 1; project.orders.count = c;
if ( ...code to establish unknown customer... ) {
// Create a new customer.// This internal lock is going to cause trouble!if ( project.customersLock.lock() ) {
var id = project.customers.ID; id = id + 1; project.customers.ID = id;
project.customersLock.unlock();}
}
project.ordersLock.unlock();}
Notice that each of these code fragments tries to get a second lock while already holding a lock. That can cause trouble. Assume that one thread starts to create a new customer; it obtains the customersLock lock. At the same time, another thread starts to create a new order; it obtains the ordersLock lock. Now, the first thread requests the ordersLock lock. Since the second thread has this lock, the first thread must wait. However, assume the second thread now asks for the customersLock lock. The first thread holds that lock, so the second thread must wait. The threads are now waiting for each other. Because neither specified a timeout period, they will both wait indefinitely.
136 Writing Server-Side JavaScript Applications

Sharing Objects Safely with Locking
In this case, it is easy to avoid the problem. Since the values of the customer ID and the order number do not depend on each other, there is no real reason to nest the locks. You could avoid potential deadlock by rewriting both code fragments. Rewrite the first fragment as follows:
// Create a new customer.if ( project.customersLock.lock() ) {
var id = project.customers.ID; id = id + 1; project.customers.ID = id;
project.customersLock.unlock();}
// Start a new order for this new customer.if ( project.ordersLock.lock() ) {
var c = project.orders.count; c = c + 1; project.orders.count = c;
project.ordersLock.unlock();}
The second fragment looks like this:
// Start a new order.if ( project.ordersLock.lock() ) {
var c = project.orders.count; c = c + 1; project.orders.count = c;
project.ordersLock.unlock();}
if ( ...code to establish unknown customer... ) {
// Create a new customer.if ( project.customersLock.lock() ) {
var id = project.customers.ID; id = id + 1; project.customers.ID = id;
project.customersLock.unlock();}
}
Chapter 5, Session Management Service 137
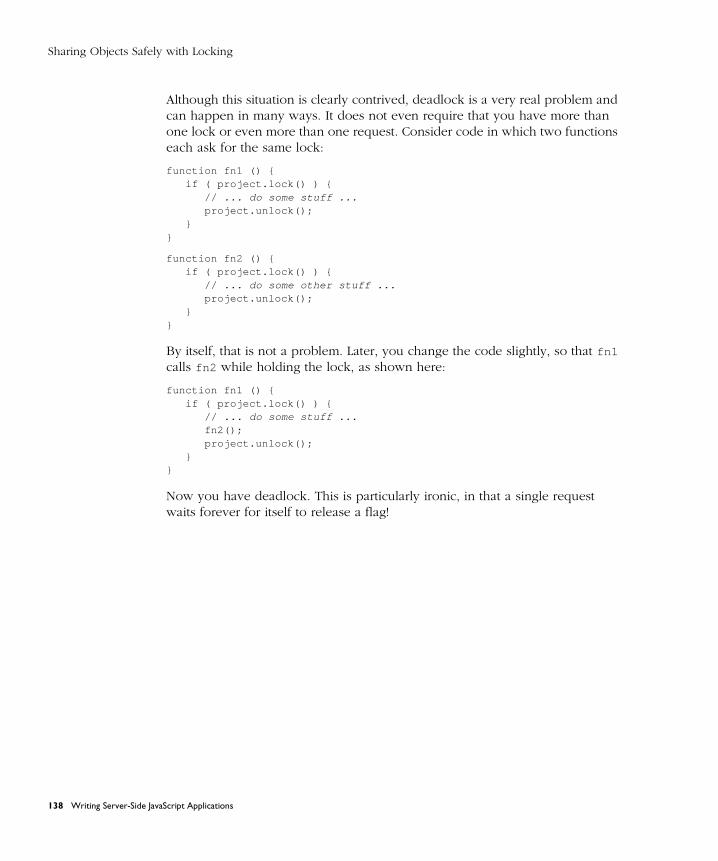
Sharing Objects Safely with Locking
Although this situation is clearly contrived, deadlock is a very real problem and can happen in many ways. It does not even require that you have more than one lock or even more than one request. Consider code in which two functions each ask for the same lock:
function fn1 () {if ( project.lock() ) {
// ... do some stuff ...project.unlock();
}}
function fn2 () {if ( project.lock() ) {
// ... do some other stuff ...project.unlock();
}}
By itself, that is not a problem. Later, you change the code slightly, so that fn1 calls fn2 while holding the lock, as shown here:
function fn1 () {if ( project.lock() ) {
// ... do some stuff ...fn2();project.unlock();
}}
Now you have deadlock. This is particularly ironic, in that a single request waits forever for itself to release a flag!
138 Writing Server-Side JavaScript Applications
C h a p t e r
6Working with Java and CORBAObjects Through LiveConnect
This chapter describes using LiveConnect to connect your server-side JavaScript application to Java components or classes on the server. Through Java you can connect to CORBA-compliant distributed objects using Netscape Internet Service Broker for Java.
Your JavaScript application may want to communicate with code written in other languages, such as Java or C. To communicate with Java code, you use JavaScript’s LiveConnect functionality. To communicate with code written in other languages, you have several choices:
• You can wrap your code as a Java object and use LiveConnect directly.
• You can wrap your code as a CORBA-compliant distributed object and use LiveConnect in association with an object request broker.
• You can directly include external libraries in your application.
For information on including external libraries, see “Working with External Libraries” on page 171. This chapter discusses using LiveConnect to access non-JavaScript code from JavaScript applications.
Ultimately, LiveConnect allows the JavaScript objects in your application to interact with Java objects. These Java objects are instances of classes on the server’s CLASSPATH. See “Setting Up for LiveConnect” on page 15 for
Chapter 6, Working with Java and CORBA Objects Through LiveConnect 139
information on setting CLASSPATH appropriately. LiveConnect works for both client-side and server-side JavaScript but has different capabilities appropriate to each environment.
If you have a CORBA service and you have the IDL for it, you can generate Java stubs. The Java stubs can then be accessed from JavaScript using LiveConnect, thus giving you access to your service from JavaScript. For the most part, connecting to CORBA services in this way is just like accessing any other Java code. For this reason, this chapter first talks about using LiveConnect to communicate between Java and JavaScript. Later, it describes what you need to do to access CORBA services.
This chapter assumes you are familiar with Java programming. For information on using LiveConnect with client-side JavaScript, see the JavaScript Guide. For information on using Java with Netscape servers, see Enterprise Server 3.0: Notes for Java Programmers1. For other information on LiveConnect, see the DevEdge Library2.
For all available Java classes, you can access static public properties or methods of the class, or create instances of the class and access public properties and methods of those instances. Unlike on the client, however, you can access only those Java objects that were created by your application or created by another JavaScript application and then stored as a property of the server object.
If a Java object was created by a server application other than a server-side JavaScript application, you cannot access that Java object. For example, you cannot access a Java object created by a WAI plug-in, NSAPI extension, or an HTTP applet.
When you call a method of a Java object, you can pass JavaScript objects to that method. Java code can set properties and call methods of those JavaScript objects. In this way, you can have both JavaScript code that calls Java code and Java code that calls JavaScript code.
Java code can access a JavaScript application only in this fashion. That is, a Java object cannot invoke a JavaScript application unless that JavaScript application (or another JavaScript application) has itself accessed an appropriate Java object and invoked one of its methods.
1. http://developer.netscape.com/library/documentation/enterprise/javanote/index.html2. http://developer.netscape.com/library/index.htm
140 Writing Server-Side JavaScript Applications
Predefined Java Classes
Predefined Java ClassesNetscape servers include a file of Java packages called serv3_0.zip . You can access these packages in your JavaScript application. These Java included packages can be used with JavaScript:
• netscape.javascript implements the JSObject and JSException classes to allow your Java code to access JavaScript methods and properties and to handle JavaScript errors.
• netscape.server implements some server-side Java classes. The only one of these classes you can use with JavaScript is netscape.server.serverenv .
• netscape.net is a replacement for the Sun JDK package sun.net .
• java and sun packages replace packages in the Sun 1.1 Java Development Kit (JDK) classes.zip .
The netscape.javascript package is documented in the JavaScript Guide. The netscape.net package is not documented because it is implemented in the same way as the original Sun package.
Data Type ConversionWhen JavaScript code calls Java or Java code calls JavaScript, the JavaScript runtime engine converts argument values into the appropriate data types for the other language. It performs the same conversions on the server as it does on the client. Figure 6.1 illustrates the data-type conversions.
Chapter 6, Working with Java and CORBA Objects Through LiveConnect 141
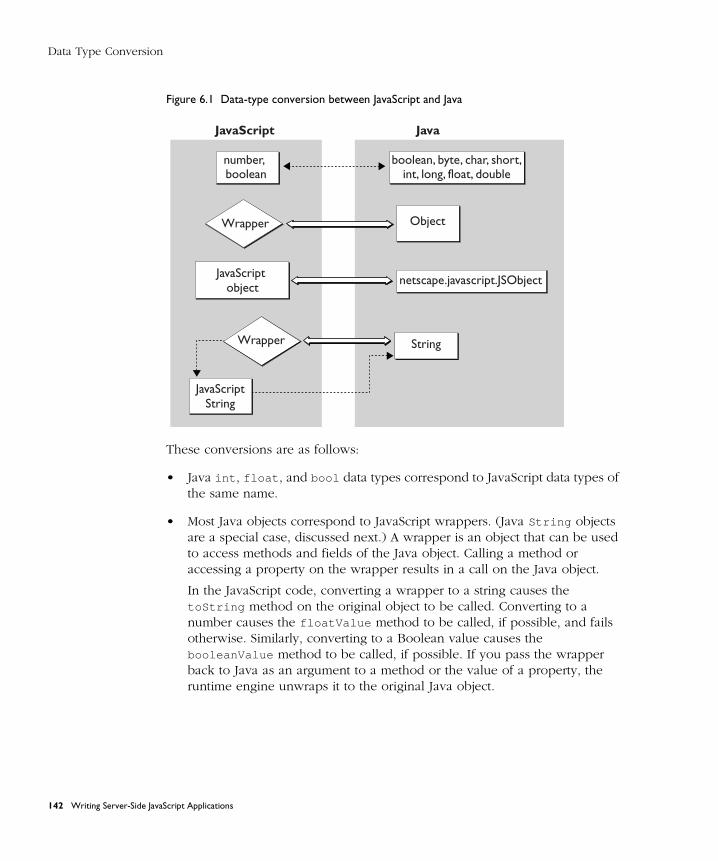
Data Type Conversion
Figure 6.1 Data-type conversion between JavaScript and Java
These conversions are as follows:
• Java int , float , and bool data types correspond to JavaScript data types of the same name.
• Most Java objects correspond to JavaScript wrappers. (Java String objects are a special case, discussed next.) A wrapper is an object that can be used to access methods and fields of the Java object. Calling a method or accessing a property on the wrapper results in a call on the Java object.
In the JavaScript code, converting a wrapper to a string causes the toString method on the original object to be called. Converting to a number causes the floatValue method to be called, if possible, and fails otherwise. Similarly, converting to a Boolean value causes the booleanValue method to be called, if possible. If you pass the wrapper back to Java as an argument to a method or the value of a property, the runtime engine unwraps it to the original Java object.
JavaScript Java
String
Object
netscape.javascript.JSObjectJavaScript object
Wrapper
JavaScriptString
Wrapper
number,boolean
boolean, byte, char, short,int, long, float, double
142 Writing Server-Side JavaScript Applications
Calling Java from JavaScript
• Java String objects also correspond to JavaScript wrappers. If you call a JavaScript method that requires a JavaScript string and pass it this wrapper, you’ll get an error. Instead, convert the wrapper to a JavaScript string by appending the empty string to it, as shown here:
var JavaString = JavaObj.methodThatReturnsAString();var JavaScriptString = JavaString + "";
Conversely, JavaScript strings correspond to Java String objects. When you pass a JavaScript string to Java, it is converted to a Java String object. When passed by to JavaScript, the String object is converted back to a JavaScript string.
• JavaScript objects correspond to Java netscape.javascript.JSObject objects. That is, when a JavaScript object is sent to Java, the runtime engine creates a Java wrapper of type JSObject ; when a JSObject is sent from Java to JavaScript, the runtime engine unwraps it to its original JavaScript object type. The JSObject class provides an interface for invoking JavaScript methods and examining JavaScript properties.
Calling Java from JavaScriptTo access Java code from JavaScript, you either access a static method or property of the Java class or you create an instance of the Java class and then access its methods or properties. If a method of a Java object requires another Java object as a parameter, you must first get access to that Java object in your JavaScript environment. You can do so, for example, by creating the Java object or by having it returned by a Java method.
Referring to a Java Object in JavaScriptJavaScript has the following predefined top-level objects to provide access to Java packages from within JavaScript:
Packagessunnetscapejava
Chapter 6, Working with Java and CORBA Objects Through LiveConnect 143

Calling Java from JavaScript
In JavaScript, to refer to a Java class named javaClassName, where javaClassName is either a simple or a qualified class name, use the following syntax:
Packages. javaClassName
To refer to the constructors, static methods, or static properties of this class, use this syntax:
Packages. javaClasName ( arguments )Packages. javaClasName . staticMethod ( arguments )Packages. javaClasName . staticProperty
For example, consider the qualified Java class name bugbase.Bug . To access its constructor, use:
new Packages.bugbase.Bug( arguments );
If you access a class that belongs directly or indirectly to the java , sun , or netscape package, then the Packages prefix is optional. For example, you can refer to the java.lang.System class in either of the following ways:
Packages.java.lang.Systemjava.lang.System
You access constructors, fields, and methods in a class with the same syntax that you use in Java. For example, the following JavaScript code uses properties of the request object to create a new instance of the Bug class and then assigns that new instance to the JavaScript variable bug . Because the Java class requires an integer for its first field, this code first converts the request string property to an integer before passing it to the constructor.
var bug = new Packages.bugbase.Bug(parseInt(request.bugId),request.bugPriority,request);
By default, $NSHOME\js\samples directory, where $NSHOME is the directory in which the server was installed, is on the server’s CLASSPATH. You can put your packages in this directory. Alternatively, you can choose to put your Java packages and classes in any other directory. If you do so, make sure the directory is on your CLASSPATH. For example, assume you have a Java class called MyClass in a package called MyPkg in the \MyDir directory. In this case, you would include \MyDir on your CLASSPATH and refer to the package as MyPkg.MyClass .
144 Writing Server-Side JavaScript Applications
Calling Java from JavaScript
You can also access packages in the default package (that is, classes that don’t explicitly name a package). Directories containing classes in the default package must be on the CLASSPATH. To refer to these classes, use this syntax:
Packages. javaClassName
Here, javaClassName is a simple (non-qualified) class name.
Example of JavaScript Calling JavaThe $NSHOME\js\samples\bugbase directory includes a simple application illustrating the use of LiveConnect. This section describes the JavaScript code in that sample application. See “Example of Java Calling JavaScript” on page 148 for a description of this application’s Java code.
The bugbase application represents a simple bug database. You enter a bug by filling in a client-side form with the bug number, priority, affected product, and a short description. Another form allows you to view an existing bug.
The following JavaScript processes the enter action:
// Step 1. Verify that ID was entered.if (request.bugId != "") {
// Step 2. Create Bug instance and assign to variable.var bug = new Packages.bugbase.Bug(parseInt(request.bugId),
request.bugPriority, request);
// Step 3. Get access to shared array and store instance there.project.bugsLock.lock();project.bugs[parseInt(request.bugId)] = bug;project.bugsLock.unlock();
// Step 4. Display information.write("<P><b><I>====>Committed bug: </I></b>");write(bug, "<BR>");
}// Step 5. If no ID was entered, alert user.else {
write("<P><b><I>====>Couldn't commit bug: please complete all fields.</I></b>");
}
Chapter 6, Working with Java and CORBA Objects Through LiveConnect 145
Calling JavaScript from Java
The steps in this code are:
1. Verify that the user entered an ID for the bug. Enter the bug only in this case.
2. Create an instance of the Java class Bug, and assign that instance to the bug variable. The Bug class constructor takes three parameters: two of them are properties of the request object; the third is the JavaScript request object itself. Because they are form elements, these request properties are both JavaScript strings. The code changes the ID to an integer before passing it to the Java constructor. Having passed the request object to the Java constructor, that constructor can then call its methods. This process is discussed in “Example of Java Calling JavaScript” on page 148.
3. Use project.bugsLock to get exclusive access to the shared project.bugs array and then store the new Bug instance in that array, indexed by the bug number specified in the form. Notice that this code stores a Java object reference as the value of a property of a JavaScript object. For information on locking, see “Sharing Objects Safely with Locking” on page 130.
4. Display information to the client about the bug you have just stored.
5. If no bug ID was entered, display a message indicating that the bug couldn’t be entered in the database.
Calling JavaScript from JavaFor a Java method to access server-side JavaScript objects, it must have been called from a server-side JavaScript application. In client-side JavaScript, Java can initiate an interaction with JavaScript. On the server, Java cannot initiate this interaction.
Note When you recompile a Java class that is used in a JavaScript application, the new definition may not take effect immediately. If any JavaScript application running on the web server has a live reference to an object created from the old class definition, all applications continue to use the old definition. For this reason, when you recompile a Java class, you should restart any JavaScript applications that accesses that class.
146 Writing Server-Side JavaScript Applications
Calling JavaScript from Java
Referring to a JavaScript Object in Java
If you want to use JavaScript objects in Java, you must import the netscape.javascript package into your Java file. This package defines the JSObject and JSException classes to allow your Java code to access JavaScript methods and properties and to handle errors returned by the JavaScript code.
The JSObject and JSException classes are described in the JavaScript Guide. Methods of these classes work the same on the client and on the server, with one exception: the GetWindow method of the JSObject class is not available on the server.
When you call a Java method, you can pass a JavaScript object as one of its arguments. To do so, you must define the corresponding formal parameter of the method to be of type JSObject . Also, any time you use JavaScript objects in your Java code, you should put the call to the JavaScript object inside a JSException wrapper. This allows your Java code to handle errors in JavaScript code execution which appear in Java as exceptions of type JSException .
Threading
Java allows you to create separate threads of execution. You need to be careful using this feature when your Java code interacts with JavaScript code.
Every server-side JavaScript request is processed in a thread known as the request thread. This request thread is associated with state information such as the JavaScript context being used to process the request, the HTTP request information, and the HTTP response buffer.
When you call Java code from a JavaScript application, that Java code runs in the same request thread as the original JavaScript application. The Java code in that thread can interact with the JavaScript application and be guaranteed that the environment is as it expects. In particular, it can rely on the associated state information.
However, you can create a new thread from your Java code. If you do, that new thread cannot interact with the JavaScript application and cannot rely on the state information associated with the original request thread. If it attempts to do so, the behavior is undefined. For example, a Java thread you create cannot
Chapter 6, Working with Java and CORBA Objects Through LiveConnect 147
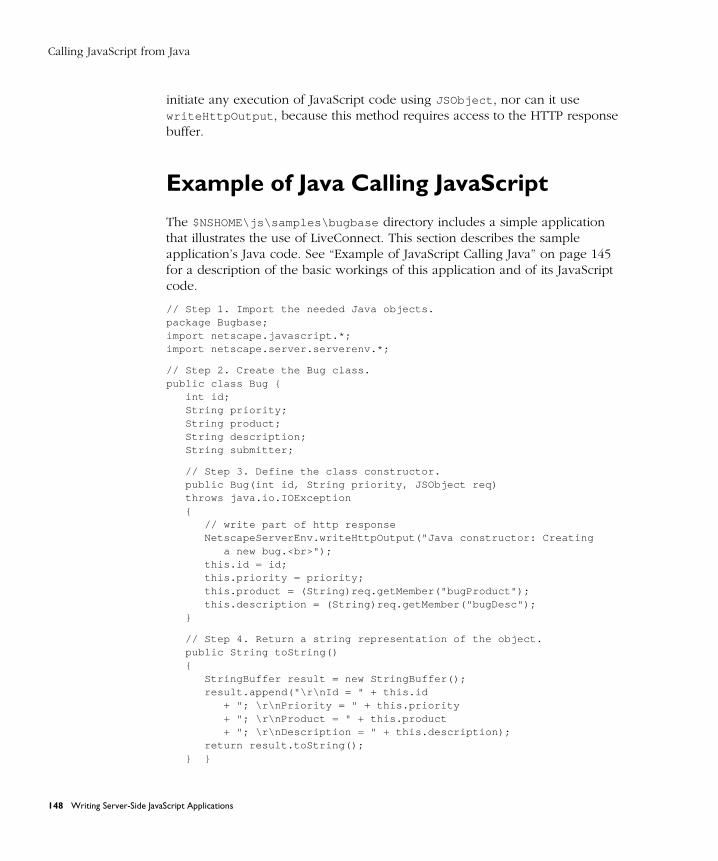
Calling JavaScript from Java
initiate any execution of JavaScript code using JSObject , nor can it use writeHttpOutput , because this method requires access to the HTTP response buffer.
Example of Java Calling JavaScript
The $NSHOME\js\samples\bugbase directory includes a simple application that illustrates the use of LiveConnect. This section describes the sample application’s Java code. See “Example of JavaScript Calling Java” on page 145 for a description of the basic workings of this application and of its JavaScript code.
// Step 1. Import the needed Java objects.package Bugbase;import netscape.javascript.*;import netscape.server.serverenv.*;
// Step 2. Create the Bug class.public class Bug {
int id;String priority;String product;String description; String submitter;
// Step 3. Define the class constructor.public Bug(int id, String priority, JSObject req) throws java.io.IOException{
// write part of http responseNetscapeServerEnv.writeHttpOutput("Java constructor: Creating
a new bug.<br>");this.id = id;this.priority = priority;this.product = (String)req.getMember("bugProduct");this.description = (String)req.getMember("bugDesc");
}
// Step 4. Return a string representation of the object.public String toString(){
StringBuffer result = new StringBuffer();result.append("\r\nId = " + this.id
+ "; \r\nPriority = " + this.priority + "; \r\nProduct = " + this.product+ "; \r\nDescription = " + this.description);
return result.toString();} }
148 Writing Server-Side JavaScript Applications
Accessing CORBA Services
Most of the steps in this code are not specific to communicating with JavaScript. It is only in steps 1 and 3 that JavaScript is relevant.
1. Specify the package being used in this file and import the netscape.javascript and netscape.server.serverenv packages. If you omit this step, you cannot use JavaScript objects.
2. Create the Java Bug class, specifying its fields.
3. Define the constructor for this class. This constructor takes three parameters: an integer, a string, and an object of type JSObject . This final parameter is the representation of a JavaScript object in Java. Through the methods of this object, the constructor can access properties and call methods of the JavaScript object. In this case, it uses the getMember method of JSObject to get property values from the JavaScript object. Also, this method uses the writeHttpOutput method of the predefined NetscapeServerEnv object (from the netscape.server.serverenv
package) to print information during object construction. This method writes a byte array to the same output stream used by the JavaScript write function.
4. Define the toString method. This is a standard method for a Java object that returns a string representation of the fields of the object.
Accessing CORBA ServicesNetscape Internet Service Broker for Java (ISB for Java) is Netscape’s object request broker. ISB for Java communicates with itself and with other object request brokers (ORBs) using the Internet InterORB Protocol (IIOP).
ISB for Java enables your JavaScript application to access CORBA-compliant distributed objects deployed in an IIOP-capable ORB (including ISB for Java itself). These objects may be part of a distributed application. To access such a distributed object, you must have a Java stub, and that stub class must be on your CLASSPATH. Conversely, you can use Java and LiveConnect to expose parts of your server-side JavaScript application as CORBA-compliant distributed objects.
Chapter 6, Working with Java and CORBA Objects Through LiveConnect 149

Accessing CORBA Services
It is beyond the scope of this manual to tell you how to create CORBA-compliant distributed objects using ISB for Java or how to make Java stubs for such objects. For this information, see the Netscape Internet Service Broker for Java Programmer’s Guide1.
Server-side JavaScript applications can access a distributed object regardless of how it is deployed. The simplest alternative to consider is that the distributed object is created and run as a separate process, as illustrated in Figure 6.2.
Figure 6.2 A JavaScript application as a CORBA client
As shown in this illustration, the Java and JavaScript runtime environments are together in the same web server. They communicate using LiveConnect in the standard way described earlier in this chapter. Methods called on the stub wrapper in JavaScript result in method calls on the Java stub object in Java. The stub uses the Java ORB to communicate with the remote service. With this architecture, the object server process can be on any machine that has an ORB and can be written in any language.
1. http://developer.netscape.com/library/documentation/enterprise/javapg
CORBA clientapplication process
(web server)
JavaScript runtime
Java stubwrappers
Java runtime
Java stubs
LiveConnect
ORB(ISB for Java) IIOP
CORBA objectserver process
Objectimplementations
ORB
150 Writing Server-Side JavaScript Applications
Accessing CORBA Services
The flexi sample application illustrates this. In this sample, FlexiServer is a stand-alone Java application that has implementations of a number of distributed objects. This example is discussed in “Flexi Sample Application” on page 151.
After you have worked with flexi , read “Deployment Alternatives” on page 159 for a discussion of more complicated deployment alternatives.
Flexi Sample ApplicationThe flexi sample application illustrates using server-side JavaScript to access remote services running on an IIOP-enabled ORB and also illustrates a remote service written entirely in Java using ISB for Java. Both the source files and the application executables for the flexi sample application are installed in the $NSHOME\js\samples\flexi directory.
A flexible spending account (FSA) is an account in which employees may deposit pretax dollars to be used for medical expenses. Employees typically elect to sign up for this plan with the administrator of the plan and select a dollar amount that they want deposited into their account. When an employee incurs a medical expense, the employee submits a claim which, if approved, results in a withdrawal from the account and the remittance of the approved amount to the employee.
The flexi sample application provides support for managing flexible spending accounts. With this application, an administrator has these options:
• Create a new account with a given balance.
• Select an existing account by providing the employee’s name.
• Deposit more funds into a selected account.
• Close a selected account.
• Accept or reject a pending claim submitted by the employee.
The employee has these options:
• View the status of the account, including the status of any pending claim.
• Submit a new claim by filling out the provided form.
Chapter 6, Working with Java and CORBA Objects Through LiveConnect 151
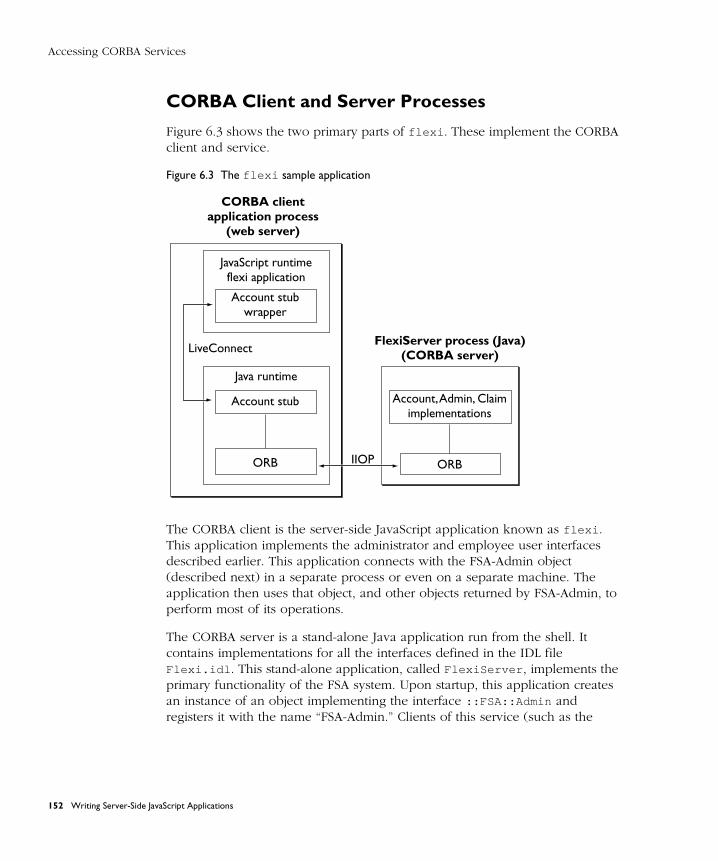
Accessing CORBA Services
CORBA Client and Server Processes
Figure 6.3 shows the two primary parts of flexi . These implement the CORBA client and service.
Figure 6.3 The flexi sample application
The CORBA client is the server-side JavaScript application known as flexi . This application implements the administrator and employee user interfaces described earlier. This application connects with the FSA-Admin object (described next) in a separate process or even on a separate machine. The application then uses that object, and other objects returned by FSA-Admin, to perform most of its operations.
The CORBA server is a stand-alone Java application run from the shell. It contains implementations for all the interfaces defined in the IDL file Flexi.idl . This stand-alone application, called FlexiServer , implements the primary functionality of the FSA system. Upon startup, this application creates an instance of an object implementing the interface ::FSA::Admin and registers it with the name “FSA-Admin.” Clients of this service (such as the
LiveConnect
Account stubwrapper
IIOP
JavaScript runtimeflexi application
Account stub
ORB
Java runtime
Account, Admin, Claimimplementations
ORB
FlexiServer process (Java)(CORBA server)
CORBA clientapplication process
(web server)
152 Writing Server-Side JavaScript Applications
Accessing CORBA Services
flexi JavaScript application) obtain access to this object first by resolving its name. Clients use this object to create other objects and to get remote references to them.
Starting FlexiServer
FlexiServer is a stand-alone Java application. You can run it on any machine that has JDK 1.0.2. In Enterprise Server 3.01 and FastTrack Server 3.01, you can also run it on a machine that has JDK 1.1.2. Before running FlexiServer , you need to ensure that your environment is correct.
From the shell where you’re going to start FlexiServer , make sure that your PATH environment variable includes $JDK\bin and that CLASSPATH includes the following:
... $NSHOME\js\samples\flexi $NSHOME\wai\java\nisb.zip $JDK\lib\classes.zip
In these variables, $JDK is the directory in which the JDK is installed and $NSHOME is the directory in which your web server is installed.
Once the environment is correct, you can start FlexiServer as follows:
cd $NSHOME\js\samples\flexi\impl java FlexiServer
You should see a message such as the following:
Started FSA Admin: Admin[Server,oid=PersistentId[repId=IDL:Flexi/Admin:1.0,objectName=FSA-Admin]]
At this point, FlexiServer has started as a CORBA service and registered with the ORB an object with interface ::FSA::Admin and name FSA-Admin. FlexiServer runs in the background, waiting for service requests.
Chapter 6, Working with Java and CORBA Objects Through LiveConnect 153
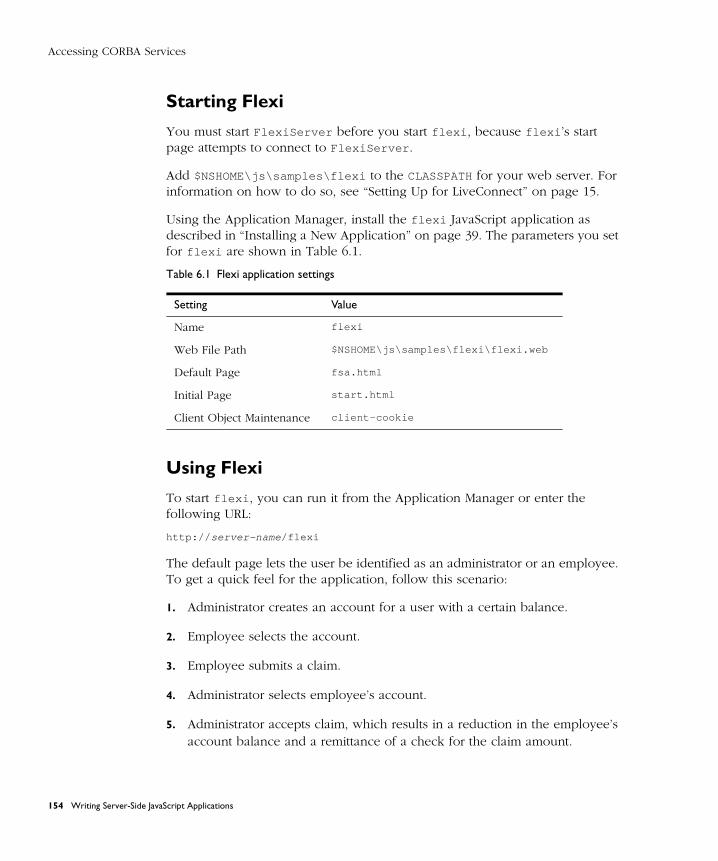
Accessing CORBA Services
Starting Flexi
You must start FlexiServer before you start flexi , because flexi ’s start page attempts to connect to FlexiServer .
Add $NSHOME\js\samples\flexi to the CLASSPATH for your web server. For information on how to do so, see “Setting Up for LiveConnect” on page 15.
Using the Application Manager, install the flexi JavaScript application as described in “Installing a New Application” on page 39. The parameters you set for flexi are shown in Table 6.1.
Using Flexi
To start flexi , you can run it from the Application Manager or enter the following URL:
http:// server-name /flexi
The default page lets the user be identified as an administrator or an employee. To get a quick feel for the application, follow this scenario:
1. Administrator creates an account for a user with a certain balance.
2. Employee selects the account.
3. Employee submits a claim.
4. Administrator selects employee’s account.
5. Administrator accepts claim, which results in a reduction in the employee’s account balance and a remittance of a check for the claim amount.
Table 6.1 Flexi application settings
Setting Value
Name flexi
Web File Path $NSHOME\js\samples\flexi\flexi.web
Default Page fsa.html
Initial Page start.html
Client Object Maintenance client-cookie
154 Writing Server-Side JavaScript Applications
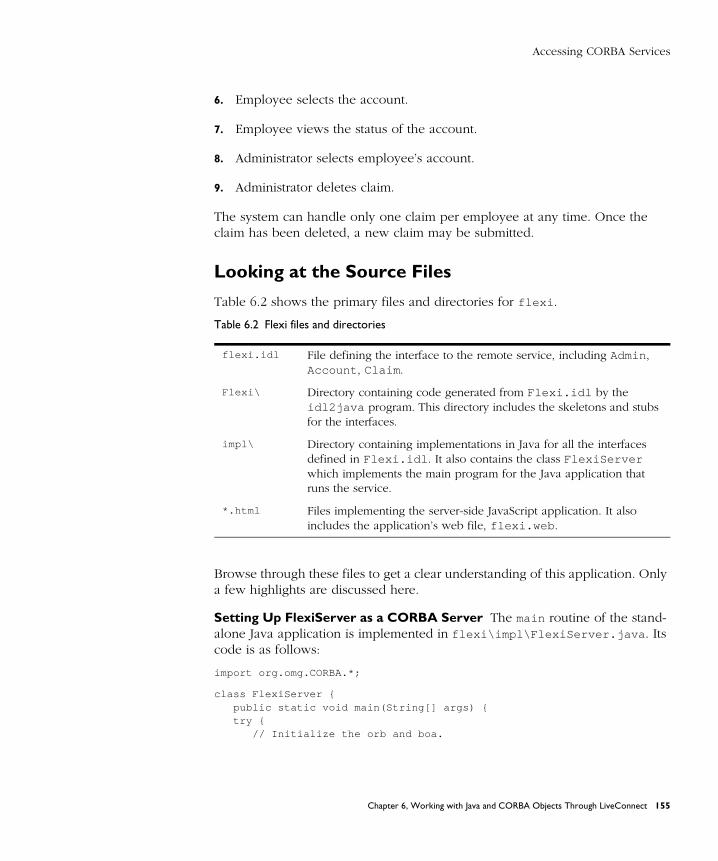
Accessing CORBA Services
6. Employee selects the account.
7. Employee views the status of the account.
8. Administrator selects employee’s account.
9. Administrator deletes claim.
The system can handle only one claim per employee at any time. Once the claim has been deleted, a new claim may be submitted.
Looking at the Source Files
Table 6.2 shows the primary files and directories for flexi .
Browse through these files to get a clear understanding of this application. Only a few highlights are discussed here.
Setting Up FlexiServer as a CORBA Server The main routine of the stand-alone Java application is implemented in flexi\impl\FlexiServer.java . Its code is as follows:
import org.omg.CORBA.*;
class FlexiServer {public static void main(String[] args) {try {
// Initialize the orb and boa.
Table 6.2 Flexi files and directories
flexi.idl File defining the interface to the remote service, including Admin , Account , Claim .
Flexi\ Directory containing code generated from Flexi.idl by the idl2java program. This directory includes the skeletons and stubs for the interfaces.
impl\ Directory containing implementations in Java for all the interfaces defined in Flexi.idl . It also contains the class FlexiServer which implements the main program for the Java application that runs the service.
*.html Files implementing the server-side JavaScript application. It also includes the application’s web file, flexi.web .
Chapter 6, Working with Java and CORBA Objects Through LiveConnect 155
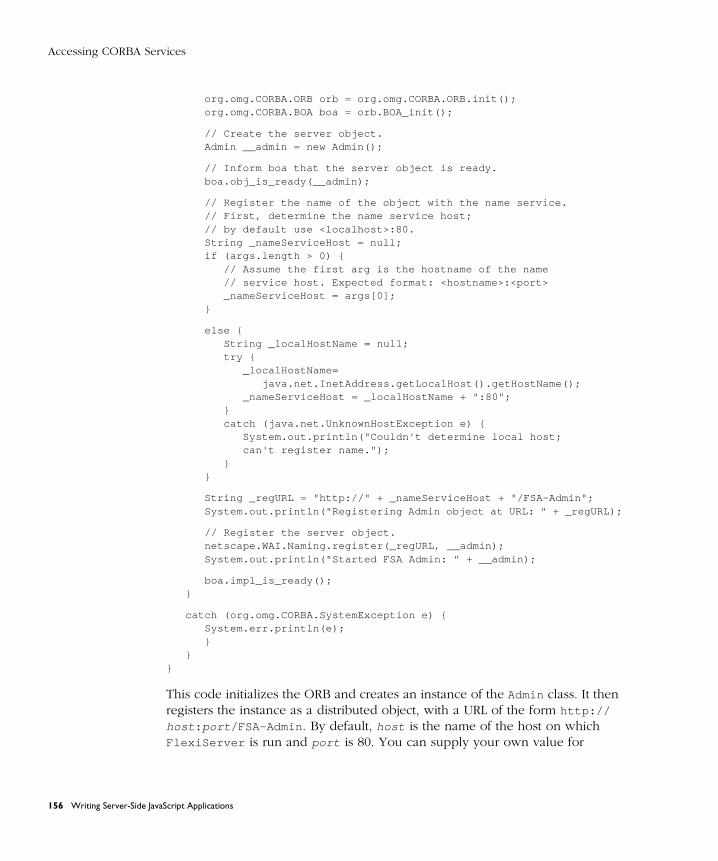
Accessing CORBA Services
org.omg.CORBA.ORB orb = org.omg.CORBA.ORB.init();org.omg.CORBA.BOA boa = orb.BOA_init();
// Create the server object.Admin __admin = new Admin();
// Inform boa that the server object is ready.boa.obj_is_ready(__admin);
// Register the name of the object with the name service.// First, determine the name service host;// by default use <localhost>:80.String _nameServiceHost = null;if (args.length > 0) {
// Assume the first arg is the hostname of the name // service host. Expected format: <hostname>:<port>_nameServiceHost = args[0];
}
else {String _localHostName = null;try {
_localHostName= java.net.InetAddress.getLocalHost().getHostName();
_nameServiceHost = _localHostName + ":80";}catch (java.net.UnknownHostException e) {
System.out.println("Couldn't determine local host; can't register name.");
}}
String _regURL = "http://" + _nameServiceHost + "/FSA-Admin";System.out.println("Registering Admin object at URL: " + _regURL);
// Register the server object.netscape.WAI.Naming.register(_regURL, __admin);System.out.println("Started FSA Admin: " + __admin);
boa.impl_is_ready();}
catch (org.omg.CORBA.SystemException e) {System.err.println(e);}
}}
This code initializes the ORB and creates an instance of the Admin class. It then registers the instance as a distributed object, with a URL of the form http://
host : port /FSA-Admin . By default, host is the name of the host on which FlexiServer is run and port is 80. You can supply your own value for
156 Writing Server-Side JavaScript Applications
Accessing CORBA Services
host:port by passing it as an argument to FlexiServer when you start it. To use the local host but a different port number, you need to change the sample code and recompile. Once the code has an appropriate name, it registers the object using the register method of the netscape.WAI.Naming object. For more information, see Netscape Internet Service Broker for Java Reference Guide1.
Finally, if successful the code prints a message to the console and then waits for requests from CORBA clients. In this case, the only CORBA client that knows about it is the flexi JavaScript application.
Setting up flexi as a CORBA client The file start.html is the initial page of the JavaScript flexi application. This page uses LiveConnect to initialize ISB for Java and establish the connection to FSA-Admin.
<server>// Initialize the orb.project.orb = Packages.org.omg.CORBA.ORB.init();
// Establish connection to the "FSA-Admin" service.// By default, assume name service is running on this server.nameHost = "http://" + server.hostname;serviceName = "/FSA-Admin";serviceURL = nameHost + serviceName;
// Resolve name and obtain reference to Admin stub.project.fsa_admin = Packages.Flexi.AdminHelper.narrow(
netscape.WAI.Naming.resolve(serviceURL));
</server>
The first statement initializes ISB for Java by calling the static init method of the Java class org.omg.CORBA.ORB . It stores the returned object as a property on the project object, so that it lasts for the entire application.
The second set of statements determine the URL that was used to register the FSA-Admin object. If you used a different URL when you registered this object (as described in the last section), you need to make appropriate changes to these statements. The URL used in the CORBA server must be exactly the same as the URL used in the CORBA client.
The code then calls the resolve method of the netscape.WAI.Naming object to establish the connection to the Admin object that was registered by FlexiServer as FSA-Admin. Finally, it calls the narrow method of AdminHelper to cast the returned object to the appropriate Java object type.
1. http://developer.netscape.com/library/documentation/enterprise/javaref/title.htm
Chapter 6, Working with Java and CORBA Objects Through LiveConnect 157
Accessing CORBA Services
That Java method returns a Java object corresponding to the distributed object. The JavaScript runtime engine wraps the Java object as a JavaScript object and then stores that object as a property on the project object. At this point, you can call methods and access properties of that returned object as you would any other Java object. The other pages in flexi work through this object.
Once again, for more details on how the CORBA objects work, see Netscape Internet Service Broker for Java Reference Guide1.
Using the Admin Object to Administer and View Accounts Other code in flexi creates and then accesses objects in FlexiServer other than the Admin object. These other objects are created by calls to methods of the Admin object. For example, if the employee chooses to submit a claim, a new claim is created in the account-empl.html with the following statement:
__claim = __account.submitClaim(parseFloat(request.claimAmount),request.serviceDate,request.providerName,request.details);
This code calls the submitClaim method of the Account object to create a new employee claim. The implementation of that method, in the file impl\Account.java , creates a new Claim object, which the code registers with the ORB and then returns, as follows:
public Flexi.Claim submitClaim(float amount, String serviceDate,String providerName, String details)
{Claim __clm = new Claim(this, amount, serviceDate,
providerName, details);org.omg.CORBA.ORB.init().BOA_init().obj_is_ready(__clm);_current_clm = __clm;System.out.println("***Created a new claim: " + __clm);return __clm;
};
1. http://developer.netscape.com/library/documentation/enterprise/javaref/title.htm
158 Writing Server-Side JavaScript Applications
Accessing CORBA Services
Deployment Alternatives
There are two other alternatives for deployment of a CORBA-compliant distributed object that are of interest when working with server-side JavaScript:
• The object may be created by the web server (but not by a JavaScript application) and run in the web server.
• The object may be created by a JavaScript application and run in the web server.
In these alternatives, the CORBA client and the CORBA server both run in the same web server process.
From the point of view of JavaScript, if the CORBA client is not a JavaScript application, the first alternative is for all practical purposes the same as having the CORBA server run as a separate process.
However, the second alternative, creating a distributed object in a JavaScript application, in effect makes that application the CORBA service. Figure 6.4 illustrates this alternative.
Chapter 6, Working with Java and CORBA Objects Through LiveConnect 159
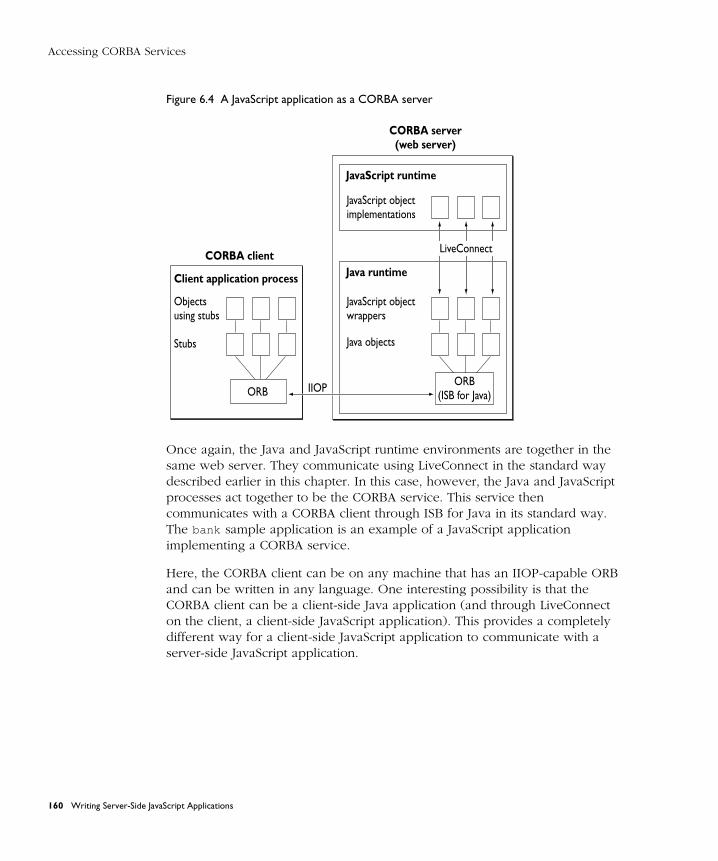
Accessing CORBA Services
Figure 6.4 A JavaScript application as a CORBA server
Once again, the Java and JavaScript runtime environments are together in the same web server. They communicate using LiveConnect in the standard way described earlier in this chapter. In this case, however, the Java and JavaScript processes act together to be the CORBA service. This service then communicates with a CORBA client through ISB for Java in its standard way. The bank sample application is an example of a JavaScript application implementing a CORBA service.
Here, the CORBA client can be on any machine that has an IIOP-capable ORB and can be written in any language. One interesting possibility is that the CORBA client can be a client-side Java application (and through LiveConnect on the client, a client-side JavaScript application). This provides a completely different way for a client-side JavaScript application to communicate with a server-side JavaScript application.
Objectsusing stubs
Stubs
CORBA server(web server)
JavaScript runtime
CORBA client
Client application process
JavaScript objectimplementations
Java runtime
JavaScript objectwrappers
Java objects
LiveConnect
ORBORB
(ISB for Java)IIOP
160 Writing Server-Side JavaScript Applications
C h a p t e r
7Other JavaScript Functionality
This chapter describes additional server-side JavaScript functionality you can use to send email messages from you application, access the server file system, include external libraries in your application, or directly manipulate client requests and client responses.
Mail ServiceYour application may need to send an email message. You use an instance of the SendMail class for this purpose. The only methods of SendMail are send , to send the message, and errorCode and errorMessage , to interpret an error.
For example, the following script sends mail to vpg with the specified subject and body for the message:
<server>SMName = new SendMail();SMName.To = "[email protected]";SMName.From = "[email protected]";SMName.Subject = "Here’s the information you wanted";SMName.Body = "sharm, maldives, phuket, coral sea, taveuni, maui,
cocos island, marathon cay, san salvador";SMName.send();</server>
Chapter 7, Other JavaScript Functionality 161
Mail Service
Table 7.1 describes the properties of the SendMail class. The To and From properties are required; all other properties are optional.
In addition to these properties, you can add any other properties you wish. All properties of the SendMail class are included in the header of the message when it is actually sent. For example, the following code sends a message to bill from vpg , setting vpg ’s organization field to Royal Airways. Replies to the message go to vpgboss .
mailObj["Reply-to"] = "vpgboss";mailObj.Organization = "Royal Airways";mailObj.From = "vpg";mailObj.To = "bill";mailObj.send();
For more information on predefined header fields, refer to RFC 8221, the standard for the format of internet text messages.
The SendMail class allows you to send either simple text-only mail messages or complex MIME-compliant mail. You can also add attachments to your message. To send a MIME message, add a Content-type property to the SendMail object and set its value to the MIME type of the message.
For example, the following code segment sends a GIF image:
<server>SMName = new SendMail();SMName.To = "[email protected]";SMName.From = "[email protected]";
1. http://www.internic.net/rfc/rfc822.txt
Table 7.1 Properties of the SendMail class
To A comma-delimited list of primary recipients of the message.
From The user name of the person sending the message.
Cc A comma-delimited list of additional recipients of the message.
Bcc A comma-delimited list of recipients of the message whose names should not be visible in the message.
Smtpserver The mail (SMTP) server name. This property defaults to the value specified through the setting in the administration server.
Subject The subject of the message.
Body The text of the message.
162 Writing Server-Side JavaScript Applications
Mail Service
SMName.Subject = "Here's the image file you wanted";SMName["Content-type"] = "image/gif"; SMName["Content-Transfer-Encoding"] = "base64";
// In this next statement, image2.gif must be base 64 encoded.// If you use uuencode to encode the GIF file, delete the header// (for example, "begin 644 image2.gif") and the trailer ("end").fileObj = new File("/usr/somebody/image2.gif");
openFlag = fileObj.open("r"); if ( openFlag ) {
len = fileObj.getLength(); SMName.Body = fileObj.read(len); SMName.send(); }
</server>
Some MIME types may need more information. For example, if the content type is multipart/mixed , you must also specify a boundary separator for one or more different sets of data in the body. For example, the following code sends a multipart message containing two parts, both of which are plain text:
<server>SMName = new SendMail();SMName.To = "[email protected]";SMName.From = "[email protected]";SMName.Subject = "Here's the information you wanted";SMName["Content-type"]
= "multipart/mixed; boundary=\"simple boundary\""; fileObj = new File("/usr/vpg/multi.txt"); openFlag = fileObj.open("r"); if ( openFlag ) {
len = fileObj.getLength(); SMName.Body = fileObj.read(len); SMName.send(); }
</server>
Here the file multi.txt contains the following multipart message:
This is the place for preamble. It is to be ignored.It is a handy place for an explanatory note to non-MIME compliant readers. --simple boundary
This is the first part of the body. This does NOT end with a line break.
--simple boundary Content-Type: text/plain; charset=us-ascii
Chapter 7, Other JavaScript Functionality 163
File System Service
This is the second part of the body. It DOES end with a line break
--simple boundary-- This is the epilogue. It is also to be ignored.
You can nest multipart messages. That is, if you have a message whose content type is multipart, you can include another multipart message in its body. In such cases, be careful to ensure that each nested multipart entity uses a different boundary delimiter.
For details on MIME types, refer to RFC 13411, the MIME standard. For more information on sending mail messages with JavaScript, see the description of this class in the JavaScript Reference.
1. http://www.internic.net/rfc/rfc1341.txt
File System ServiceJavaScript provides a File class that enables applications to write to the server’s file system. This is useful for generating persistent HTML files and for storing information without using a database server. One of the main advantages of storing information in a file instead of in JavaScript objects is that the information is preserved even if the server goes down.
Security Considerations
Exercise caution when using the File class. A JavaScript application can read or write files anywhere the operating system allows, potentially including sensitive system files. You should be sure your application does not allow an intruder to read password files or other sensitive information or to write files at will. Take care that the filenames you pass to its methods cannot be modified by an intruder.
For example, do not use client or request properties as filenames, because the values may be accessible to an intruder through cookies or URLs. In such cases, the intruder can modify cookie or URL values to gain access to sensitive files.
164 Writing Server-Side JavaScript Applications
File System Service
For similar security reasons, Navigator does not provide automatic access to the file system of client machines. If needed, the user can save information directly to the client file system by making appropriate menu choices in Navigator.
Creating a File Object
To create an instance of the File class, use the standard JavaScript syntax for object creation:
fileObjectName = new File("path");
Here, fileObjectName is the name by which you refer to the file, and path is the complete file path. The path should be in the format of the server’s file system, not a URL path.
You can display the name of a file by using the write function, with the File object as its argument. For example, the following statement displays the filename:
x = new File("\path\file.txt");write(x);
Opening and Closing a File
Once you have created a File object, you use the open method to open the file so that you can read from it or write to it. The open method has the following syntax:
result = fileObjectName .open(" mode");
This method returns true if the operation is a success and false otherwise. If the file is already open, the operation fails and the original file remains open.
Chapter 7, Other JavaScript Functionality 165
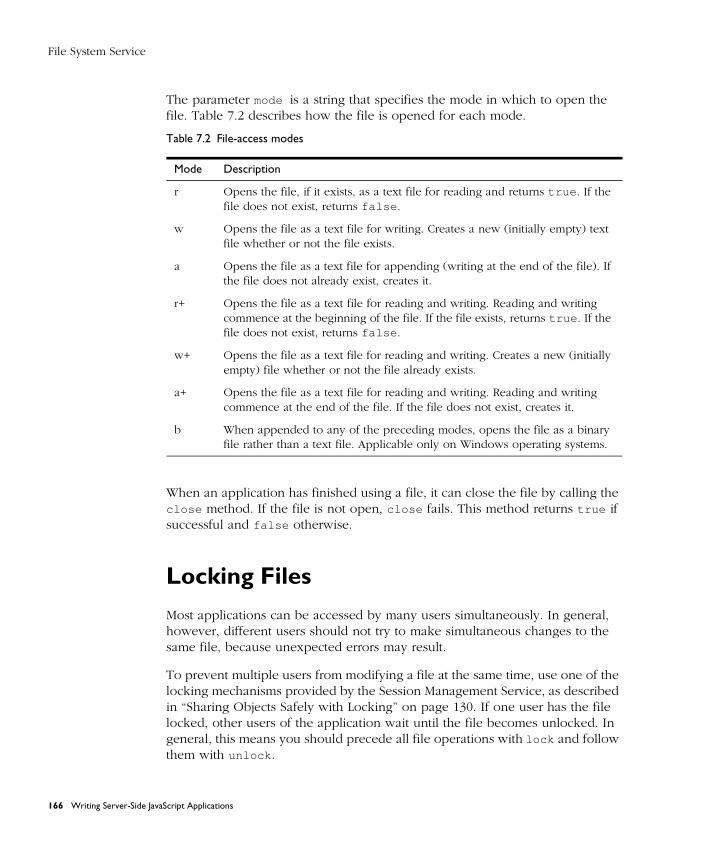
File System Service
The parameter mode is a string that specifies the mode in which to open the file. Table 7.2 describes how the file is opened for each mode.
When an application has finished using a file, it can close the file by calling the close method. If the file is not open, close fails. This method returns true if successful and false otherwise.
Locking Files
Most applications can be accessed by many users simultaneously. In general, however, different users should not try to make simultaneous changes to the same file, because unexpected errors may result.
To prevent multiple users from modifying a file at the same time, use one of the locking mechanisms provided by the Session Management Service, as described in “Sharing Objects Safely with Locking” on page 130. If one user has the file locked, other users of the application wait until the file becomes unlocked. In general, this means you should precede all file operations with lock and follow them with unlock .
Table 7.2 File-access modes
Mode Description
r Opens the file, if it exists, as a text file for reading and returns true . If the file does not exist, returns false .
w Opens the file as a text file for writing. Creates a new (initially empty) text file whether or not the file exists.
a Opens the file as a text file for appending (writing at the end of the file). If the file does not already exist, creates it.
r+ Opens the file as a text file for reading and writing. Reading and writing commence at the beginning of the file. If the file exists, returns true . If the file does not exist, returns false .
w+ Opens the file as a text file for reading and writing. Creates a new (initially empty) file whether or not the file already exists.
a+ Opens the file as a text file for reading and writing. Reading and writing commence at the end of the file. If the file does not exist, creates it.
b When appended to any of the preceding modes, opens the file as a binary file rather than a text file. Applicable only on Windows operating systems.
166 Writing Server-Side JavaScript Applications
File System Service
If only one application can modify the same file, you can obtain the lock within the project object. If more than one application can access the same file, however, obtain the lock within the server object.
For example, suppose you have created a file called myFile . Then you could use it as follows:
if ( project.lock() ) {myFile.open("r");// ... use the file as needed ...myFile.close();project.unlock();
}
In this way, only one user of the application has modify to the file at one time. Alternatively, for finer locking control you could create your own instance of the Lock class to control access to a file. This is described in “Using Instances of Lock” on page 132.
Working with FilesThe File class has a number of methods that you can use once a file is open:
• Positioning: setPosition , getPosition , eof . Use these methods to set and get the current pointer position in the file and determine whether the pointer is at the end of the file.
• Reading from a file: read , readln , readByte .
• Writing to a file: write , writeln , writeByte , flush .
• Converting between binary and text formats: byteToString , stringToByte . Use these methods to convert a single number to a character and vice versa.
• Informational methods: getLength , exists , error , clearError . Use these methods to get information about a file and to get and clear error status.
The following sections describe these methods.
Chapter 7, Other JavaScript Functionality 167
File System Service
Positioning Within a File
The physical file associated with a File object has a pointer that indicates the current position in the file. When you open a file, the pointer is either at the beginning or at the end of the file, depending on the mode you used to open it. In an empty file, the beginning and end of the file are the same.
The setPosition method positions the pointer within the file, returning true if successful and false otherwise.
fileObj.setPosition(position);fileObj.setPosition(position, reference);
Here, fileObj is a File object, position is an integer indicating where to position the pointer, and reference indicates the reference point for position , as follows:• 0: relative to beginning of file• 1: relative to current position• 2: relative to end of file• Other (or unspecified): relative to beginning of file
The getPosition method returns the current position in the file, where the first byte in the file is always byte 0. This method returns -1 if there is an error.
fileObj.getPosition();
The eof method returns true if the pointer is at the end of the file and false otherwise. This method returns true after the first read operation that attempts to read past the end of the file.
fileObj.eof();
Reading from a File
Use the read , readln , and readByte methods to read from a file.
The read method reads the specified number of bytes from a file and returns a string.
fileObj.read(count);
Here, fileObj is a File object, and count is an integer specifying the number of bytes to read. If count specifies more bytes than are left in the file, then the method reads to the end of the file.
168 Writing Server-Side JavaScript Applications
File System Service
The readln method reads the next line from the file and returns it as a string.
fileObj.readln();
Here, fileObj is a File object. The line-separator characters (either \r\n on Windows or just \n on Unix or Macintosh) are not included in the string. The character \r is skipped; \n determines the actual end of the line. This compromise gets reasonable behavior on all platforms.
The readByte method reads the next byte from the file and returns the numeric value of the next byte, or -1.
fileObj.readByte();
Writing to a File
The methods for writing to a file are write , writeln , writeByte , and flush .
The write method writes a string to the file. It returns true if successful and false otherwise.
fileObj.write(string);
Here, fileObj is a File object, and string is a JavaScript string.
The writeln method writes a string to the file, followed by \n (\r\n in text mode on Windows). It returns true if the write was successful and false otherwise.
fileObj.writeln(string);
The writeByte method writes a byte to the file. It returns true if successful and false otherwise.
fileObj.writeByte(number);
Here, fileObj is a File object and number is a number.
When you use any of these methods, the file contents are buffered internally. The flush method writes the buffer to the file on disk. This method returns true if successful and false otherwise.
fileObj.flush();
Chapter 7, Other JavaScript Functionality 169
File System Service
Converting Data
There are two primary file formats: ASCII text and binary. The byteToString and stringToByte methods of the File class convert data between these formats.
The byteToString method converts a number into a one-character string. This method is static. You can use the File class object itself, and not an instance, to call this method.
File.byteToString(number);
If the argument is not a number, the method returns the empty string.
The stringToByte method converts the first character of its argument, a string, into a number. This method is also static.
File.stringToByte(string);
The method returns the numeric value of the first character, or 0.
Getting File Information
You can use several File methods to get information on files and to work with the error status.
The getLength method returns the number characters in a text file or the number of bytes in any other file. It returns -1 if there is an error.
fileObj.getLength();
The exists method returns true if the file exists and false otherwise.
fileObj.exists();
The error method returns the error status, or -1 if the file is not open or cannot be opened. The error status is a nonzero value if an error occurred and 0 otherwise (no error). Error status codes are platform dependent; refer to your operating system documentation.
fileObj.error();
The clearError method clears both the error status (the value of error ) and the value of eof .
fileObj.clearError();
170 Writing Server-Side JavaScript Applications
Working with External Libraries
Example
Netscape servers include the Viewer sample application in its directory structure. Because this application allows you to view any files on the server, it is not automatically installed.
Viewer gives a good example of how to use the File class. If you install it, be sure to restrict access so that unauthorized persons cannot view files on your server. For information on restricting access to an application, see “Deploying an Application” on page 48.
The following code from the viewer sample application creates a File class, opens it for reading, and generates HTML that echoes the lines in the file, with a hard line break after each line.
x = new File("\tmp\names.txt");fileIsOpen = x.open("r");if (fileIsOpen) {
write("file name: " + x + "<BR>");while (!x.eof()) {
line = x.readln();if (!x.eof())
write(line+"<br>");}if (x.error() != 0)
write("error reading file" + "<BR>");x.close();
}
Working with External LibrariesThe recommended way to communicate with external applications is using LiveConnect, as described in Chapter 6, “Working with Java and CORBA Objects Through LiveConnect.” However, you can also call functions written in languages such as C, C++, or Pascal and compiled into libraries on the server. Such functions are called native functions or external functions. Libraries of native functions, called external libraries, are dynamic link libraries on Windows operating systems and shared objects on Unix operating systems.
Important Be careful when using native functions with your application. Native functions can compromise security if the native program processes a command-line entry from the user (for example, a program that allows users to enter operating
Chapter 7, Other JavaScript Functionality 171
Working with External Libraries
system or shell commands). This functionality is dangerous because an intruder can attach additional commands using semicolons to append multiple statements. It is best to avoid command-line input, unless you strictly check it.
Using native functions in an application is useful in these cases:
• If you already have complex functions written in native code that you can use in your application.
• If the application requires computation-intensive functions. In general, functions written in native code run faster than those written in JavaScript.
• If the application requires some other task you cannot do in JavaScript.
The sample directory jsaccall contains source and header files illustrating how to call functions in external libraries from a JavaScript application.
In the Application Manager, you associate an external library with a particular application. However, once associated with any installed application, an external library can be used by all installed applications.
Follow these steps to use a native function library in a JavaScript application:
1. Write and compile an external library of native functions in a form compatible with JavaScript. (See “Guidelines for Writing Native Functions” on page 173.)
2. With the Application Manager, identify the library to be used by installing a new application or modifying installation parameters for an existing application. Once you identify an external library using the Application Manager, all applications on the server can call external functions in that library. (See “Identifying Library Files” on page 173.)
3. Restart the server to load the library with your application. The functions in the external library are now available to all applications on the server.
4. In your application, use the JavaScript functions registerCFunction to identify the library functions to be called and callC to call those functions. (See “Registering Native Functions” on page 174 and “Using Native Functions in JavaScript” on page 174.)
5. Recompile and restart your application for the changes to take effect.
172 Writing Server-Side JavaScript Applications
Working with External Libraries
Important You must restart your server to install a library to use with an application. You must restart the server any time you add new library files or change the names of the library files used by an application.
Guidelines for Writing Native Functions
Although you can write external libraries in any language, JavaScript uses C calling conventions. Your code must include the header file jsaccall.h
provided in js\samples\jsaccall\ .
This directory also includes the source code for a sample application that calls a C function defined in jsaccall.c . Refer to these files for more specific guidelines on writing C functions for use with JavaScript.
Functions to be called from JavaScript must be exported and must conform to this type definition:
typedef void (*LivewireUserCFunction)(int argc, struct LivewireCCallData argv[], struct LivewireCCallData* result, pblock* pb, Session* sn, Request* rq);
Identifying Library FilesBefore you can run an application that uses native functions in external libraries, you must identify the library files. Using the Application Manager, you can identify libraries when you initially install an application (by clicking Add) or when you modify an application’s installation parameters (by clicking Modify). For more information on identifying library files with the Application Manager, see “Installing a New Application” on page 39.
Important After you enter the paths of library files in the Application Manager, you must restart your server for the changes to take effect. You must then be sure to compile and restart your application.
Once you have identified an external library using the Application Manager, all applications running on the server can call functions in the library (by using registerCFunction and callC ).
Chapter 7, Other JavaScript Functionality 173
Working with External Libraries
Registering Native Functions
Use the JavaScript function registerCFunction to register a native function for use with a JavaScript application. This function has the following syntax:
registerCFunction(JSFunctionName, libraryPath, CFunctionName);
Here, JSFunctionName is the name of the function as it will be called in JavaScript with the callC function. The libraryPath parameter is the full pathname of the library, using the conventions of your operating system and the CFunctionName parameter is the name of the C function as it is defined in the library. In this method call, you must use the exact case shown in the Application Manager, even on NT.
Note Backslash (\) is a special character in JavaScript, so you must use either forward slash (/) or a double backslash (\\) to separate Windows directory and filenames in libraryPath .
This function returns true if it registers the function successfully and false otherwise. The function might fail if JavaScript cannot find the library at the specified location or the specified function inside the library.
An application must use registerCFunction to register a function before it can use callC to call it. Once the application registers the function, it can call the function any number of times. A good place to register functions is in an application’s initial page.
Using Native Functions in JavaScriptOnce your application has registered a function, it can use callC to call it. This function has the following syntax:
callC(JSFunctionName, arguments);
Here, JSFunctionName is the name of the function as it was identified with registerCFunction and arguments is a comma-delimited list of arguments to the native function. The arguments can be any JavaScript values: strings, numbers, Boolean values, objects, or null. The number of arguments must match the number of arguments required by the external function. Although you can specify a JavaScript object as an argument, doing so is rarely useful, because the object is converted to a string before being passed to the external function.
174 Writing Server-Side JavaScript Applications
Working with External Libraries
This function returns a string value returned by the external function. The callC function can return only string values.
The jsaccall sample JavaScript application illustrates the use of native functions. The jsaccall directory includes C source code (in jsaccall.c ) that defines a C function named mystuff_EchoCCallArguments . This function accepts any number of arguments and then returns a string containing HTML listing the arguments. This sample illustrates calling C functions from a JavaScript application and returning values.
To run jsaccall , you must compile jsaccall.c with your C compiler. Command lines for several common compilers are provided in the comments in the file.
The following JavaScript statements (taken from jsaccall.html ) register the C function as echoCCallArguments in JavaScript, call the function echoCCallArguments , and then generate HTML based on the value returned by the function.
var isRegistered = registerCFunction("echoCCallArguments","c:\\mycode\\mystuff.dll", "mystuff_EchoCCallArguments");
if (isRegistered == true) {var returnValue = callC("echoCCallArguments",
"first arg", 42,true, "last arg");
write(returnValue);}else {
write("registerCFunction() returned false, " + "check server error log for details")
}
The echoCCallArguments function creates a string result containing HTML that reports both the type and the value of each of the JavaScript arguments passed to it. If the registerCFunction returns true, the code above generates this HTML:
argc = 4<BR>argv[0].tag: string; value = first arg<BR>argv[1].tag: double; value = 42<BR>argv[2].tag: boolean; value = true<BR>argv[3].tag: string; value = last arg<BR>
Chapter 7, Other JavaScript Functionality 175
Request and Response Manipulation
Request and Response ManipulationA typical request sent by the client to the server has no content type. The JavaScript runtime engine automatically handles such requests. However, if the user submits a form, then the client automatically puts a content type into the header to tell the server how to interpret the extra form data. That content type is usually application/x-www-form-urlencoded . The runtime engine also automatically handles requests with this content type. In these situations, you rarely need direct access to the request or response header. If, however, your application uses a different content type, it must be able to manipulate the request header itself.
Conversely, the typical response sent from the server to the client has the text/html content type. The runtime engine automatically adds that content type to its responses. If you want a different content type in the response, you must provide it yourself.
To support these needs, the JavaScript runtime engine on the server allows your application to access (1) the header of any request and (2) the raw body of a request that has a nonstandard content type. You already control the body of the response through the SERVER tag and your HTML tags. The functionality described in this section also allows you to control the header of the response.
You can use this functionality for various purposes. For example, as described in “Using Cookies” on page 91, you can communicate between the client and server processes using cookies. Also, you can use this functionality to support a file upload.
The World Wide Web Consortium publishes online information about the HTTP protocol and information that can be sent using that protocol. See, for example, HTTP - Specifications, Drafts and Reports1.
1. http://www.w3.org/pub/WWW/Protocols/Specs.htm
176 Writing Server-Side JavaScript Applications
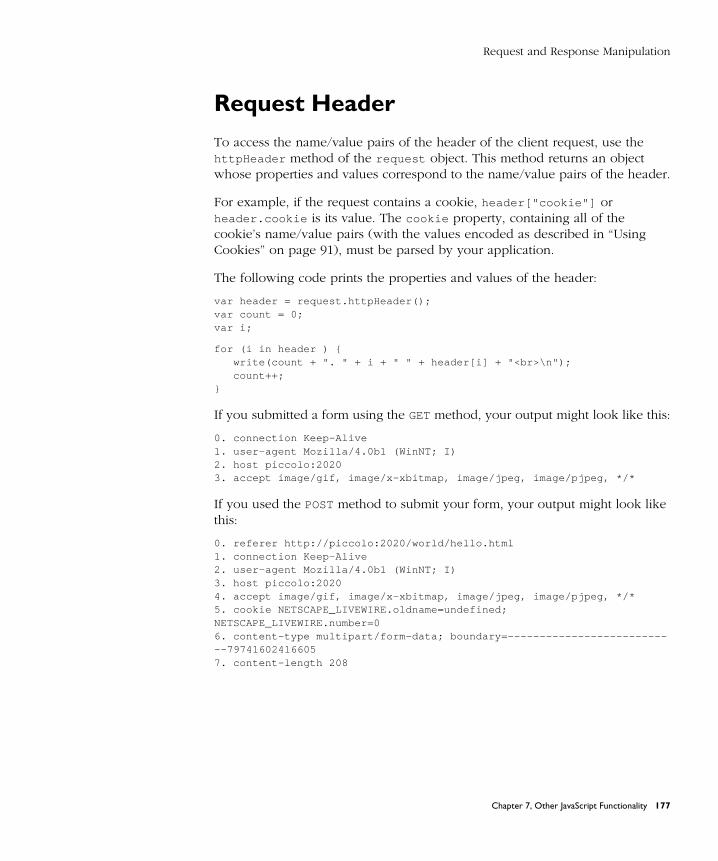
Request and Response Manipulation
Request Header
To access the name/value pairs of the header of the client request, use the httpHeader method of the request object. This method returns an object whose properties and values correspond to the name/value pairs of the header.
For example, if the request contains a cookie, header["cookie"] or header.cookie is its value. The cookie property, containing all of the cookie’s name/value pairs (with the values encoded as described in “Using Cookies” on page 91), must be parsed by your application.
The following code prints the properties and values of the header:
var header = request.httpHeader();var count = 0;var i;
for (i in header ) {write(count + ". " + i + " " + header[i] + "<br>\n");count++;
}
If you submitted a form using the GET method, your output might look like this:
0. connection Keep-Alive 1. user-agent Mozilla/4.0b1 (WinNT; I) 2. host piccolo:2020 3. accept image/gif, image/x-xbitmap, image/jpeg, image/pjpeg, */*
If you used the POST method to submit your form, your output might look like this:
0. referer http://piccolo:2020/world/hello.html 1. connection Keep-Alive 2. user-agent Mozilla/4.0b1 (WinNT; I) 3. host piccolo:2020 4. accept image/gif, image/x-xbitmap, image/jpeg, image/pjpeg, */* 5. cookie NETSCAPE_LIVEWIRE.oldname=undefined; NETSCAPE_LIVEWIRE.number=0 6. content-type multipart/form-data; boundary=---------------------------79741602416605 7. content-length 208
Chapter 7, Other JavaScript Functionality 177
Request and Response Manipulation
Request Body
For normal HTML requests, the content type of the request is application/
x-www-form-urlencoded . Upon receiving a request with this content type, the JavaScript runtime engine on the server processes the request using the data in the body of the request. In this situation, you cannot directly access the raw data of the request body. (Of course, you can access its content through the request and client objects constructed by the runtime engine.)
If, however, the request has any other content type, the runtime engine does not automatically process the request body. In this situation, it is up to your application to decide what to do with the content.
Presumably, another page of your application posted the request for this page. Therefore, your application must expect to receive unusual content types and should know how to handle them.
To access the body of a request, you use the getPostData method of the request object. This method takes as its parameter the number of characters of the body to return. If you specify 0, it returns the entire body. The return value is a string containing the requested characters. If there is no available data, the method returns the empty string.
You can use this method to get all of the characters at once, or you can read chunks of data. Think of the body of the request as a stream of characters. As you read them, you can only go forward; you can’t read the same characters multiple times.
To assign the entire request body to the postData variable, you can use the following statement:
postData = request.getPostData(0);
If you specify 0 as the parameter, the method gets the entire request. You can explicitly find out how many characters are in the information using the header’s content-length property, as follows:
length = parseInt(header["content-length"], 10);
To get the request body in smaller chunks, you can specify a different parameter. For example, the following code processes the request body in chunks of 20 characters:
var length = parseInt(header["content-length"], 10);var i = 0;
178 Writing Server-Side JavaScript Applications
Request and Response Manipulation
while (i < length) {postData = request.getPostData(20);// ...process postData...i = i + 20;
}
Of course, this would be a sensible approach only if you knew that chunks consisting of 20 characters of information were meaningful in the request body.
Response Header
If the response you send to the client uses a custom content type, you should encode this content type in the response header. The JavaScript runtime engine automatically adds the default content type (text/html ) to the response header. If you want a custom header, you must first remove the old default content type from the header and then add the new one. You do so with the addResponseHeader and deleteResponseHeader functions.
For example, if your response uses royalairways-format as a custom content type, you would specify it this way:
deleteResponseHeader("content-type");addResponseHeader("content-type","royalairways-format");
You can use the addResponseHeader function to add any other information you want to the response header.
Important Remember that the header is sent with the first part of the response. Therefore, you should call these functions early in the script on each page. In particular, you should ensure that the response header is set before any of these happen:
• The runtime engine generates 64KB of content for the HTML page (it automatically flushes the output buffer at this point).
• You call the flush function to clear the output buffer.
• You call the redirect function to change client requests.
For more information, see “Flushing the Output Buffer” on page 78 and “Runtime Processing on the Server” on page 72.
Chapter 7, Other JavaScript Functionality 179

Request and Response Manipulation
180 Writing Server-Side JavaScript Applications
3
LiveWire Database Service• Connecting to a Database
• Working with a Database
• Configuring Your Database
• Data Type Conversion
• Error Handling for LiveWire
• Videoapp and Oldvideo Sample Applications
Chapter 8Connecting to a DatabaseChapter 9Working with a DatabaseChapter 10Configuring Your DatabaseChapter 11Data Type ConversionChapter 12Error Handling for LiveWireChapter 13Videoapp and Oldvideo Sample Applications

182 Writing Server-Side JavaScript Applications
C h a p t e r
8Connecting to a Database
This chapter discusses how to use the LiveWire Database Service to connect your application to DB2, Informix, ODBC, Oracle, or Sybase relational databases. It describes how to choose the best connection methodology for your application.
Interactions with DatabasesYour JavaScript applications running on Netscape Enterprise Server can use the LiveWire Database Service to access databases on Informix, Oracle, Sybase, and DB2 servers and on servers using the Open Database Connectivity (ODBC) standard. Your applications running on Netscape FastTrack Server can access only databases on servers using the ODBC standard.
The following discussions assume you are familiar with relational databases and Structured Query Language (SQL).
Before you create a JavaScript application that uses LiveWire, the database or databases you plan to connect to should already exist on the database server. Also, you should be familiar with their structure. If you create an entirely new application, including the database, you should design, create, and populate the database (at least in prototype form) before creating the application to access it.
Chapter 8, Connecting to a Database 183
Interactions with Databases
Before you try to use LiveWire, be sure your environment is properly configured. For information on how to configure it, see Chapter 10, “Configuring Your Database.” Also, you can use the videoapp sample application, described in Chapter 13, “Videoapp and Oldvideo Sample Applications,” to explore some of LiveWire’s capabilities.
Typically, to interact with a database, you follow these general steps:
1. Use the database object or create a DbPool object to establish a pool of database connections. This is typically done on the initial page of the application, unless your application requires that users have a special database connection.
2. Connect the pool to the database. Again, this is typically done on the application’s initial page.
3. Retrieve a connection from the pool. This is done implicitly when you use the database object or explicitly when you use the connection method of a DbPool object.
4. If you’re going to change information in the database, begin a transaction. Database transactions are discussed in “Managing Transactions” on page 219.
5. Either create a cursor or call a database stored procedure to work with information from the database. This could involve, for example, displaying results from a query or updating database contents. Close any open cursors, results sets, and stored procedures when you have finished using them. Cursors are discussed in “Manipulating Query Results with Cursors” on page 210; Stored procedures are discussed in “Calling Stored Procedures” on page 225.
6. Commit or rollback an open transaction.
7. Release the database connection (if you’re using Connection objects).
This chapter discusses the first three of these steps. Chapter 9, “Working with a Database,” discusses the remaining steps.
184 Writing Server-Side JavaScript Applications
Approaches to Connecting
Approaches to ConnectingThere are two basic ways to connect to a database with the LiveWire Database Service. You can use DbPool and Connection objects, or you can use the database object.
Connecting with DbPool and Connection objects. In this approach, you create a pool of database connections for working with a relational database. You create an instance of the DbPool class and then access Connection objects through that DbPool object. DbPool and Connection objects separate the activities of connecting to a database and managing a set of connections from the activities of accessing the database through a connection.
This approach offers a lot of flexibility. Your application can have several database pools, each with its own configuration of database and user. Each pool can have multiple connections for that configuration. This allows simultaneous access to multiple databases or to the same database from multiple accounts. You can also associate the connection pool with the application itself instead of with a single client request and thus have transactions that span multiple client requests. You make this association by assigning the pool to a property of the project object and then removing the assignment when you’re finished with the pool.
Connecting with the database object. In this approach, you use the predefined database object for connecting to a database with a single connection configuration of database and user. The database object performs all activities related to working with a database. You can think of the database object as a single pool of database connections.
This approach is somewhat simpler, as it involves using only the single database object and not multiple DbPool and Connection objects. However, it lacks the flexibility of the first approach. If you use only the database object and want to connect to different databases or to different accounts, you must disconnect from one configuration before connecting to another. Also, when you use the database object, a single transaction cannot span multiple client requests, and connections to multiple database sources cannot be simultaneously open.
Chapter 8, Connecting to a Database 185
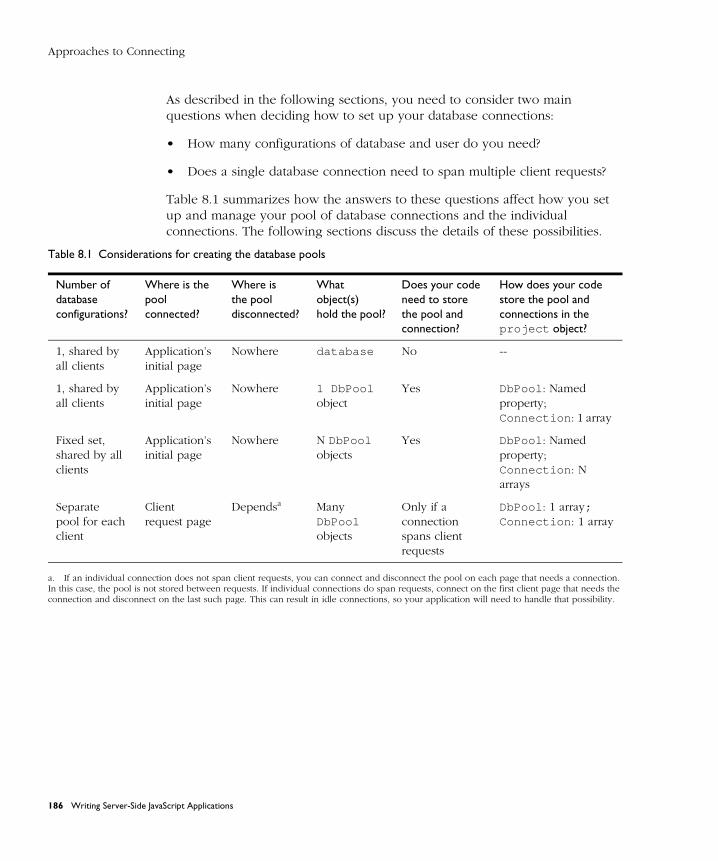
Approaches to Connecting
As described in the following sections, you need to consider two main questions when deciding how to set up your database connections:
• How many configurations of database and user do you need?
• Does a single database connection need to span multiple client requests?
Table 8.1 summarizes how the answers to these questions affect how you set up and manage your pool of database connections and the individual connections. The following sections discuss the details of these possibilities.
a. If an individual connection does not span client requests, you can connect and disconnect the pool on each page that needs a connection. In this case, the pool is not stored between requests. If individual connections do span requests, connect on the first client page that needs the connection and disconnect on the last such page. This can result in idle connections, so your application will need to handle that possibility.
Table 8.1 Considerations for creating the database pools
Number of database configurations?
Where is the pool connected?
Where is the pooldisconnected?
What object(s) hold the pool?
Does your code need to store the pool and connection?
How does your code store the pool and connections in the project object?
1, shared by all clients
Application’s initial page
Nowhere database No --
1, shared by all clients
Application’s initial page
Nowhere 1 DbPool object
Yes DbPool : Named property;Connection : 1 array
Fixed set, shared by all clients
Application’s initial page
Nowhere N DbPool objects
Yes DbPool : Named property;Connection : N arrays
Separate pool for each client
Client request page
Dependsa Many DbPool objects
Only if a connection spans client requests
DbPool : 1 array;Connection : 1 array
186 Writing Server-Side JavaScript Applications

Database Connection Pools
Database Connection PoolsIf you want to use the database object, you do not have to create it. It is a predefined object provided for you by the JavaScript runtime engine. Alternatively, if you want the additional capabilities of the DbPool class, you create an instance of the DbPool class and connect that object to a particular database which creates a pool of connections.
You can either create a generic DbPool object and later specify the connection information (using its connect method) or you can specify the connection information when you create the pool. A generic DbPool object doesn’t have any available connections at the time it is created. For this reason, you may want to connect when you create the object. If you use the database object, you must always make the connection by calling database.connect .
connect (dbtype, serverName, userName, password, databaseName, maxConnections, commitFlag);
You can specify the following information when you make a connection, either when creating a DbPool object or when calling the connect method of DbPool or database :
• dbtype : The database type. This must be either "DB2" , "INFORMIX" , "ODBC", "ORACLE", or "SYBASE" . (For applications running on Netscape FastTrack Server, it must be "ODBC".)
• serverName : The name of the database server to which to connect. The server name typically is established when the database is installed. If in doubt, see your database or system administrator. For more information on this parameter, see the description of the connect method or the DbPool constructor in the JavaScript Reference.
• username : The name of the user to connect to the database.
• password : The user’s password.
• databaseName : The name of the database to connect to for the given server. If your database server supports the notion of multiple databases on a single server, supply the name of the database to use. If you provide an empty string, the default database is connected. For Oracle, ODBC, and DB2, you must always provide an empty string.
Chapter 8, Connecting to a Database 187

Database Connection Pools
• maxConnections : (Optional) The number of connections to have available in the database pool. Remember that your database client license probably specifies a maximum number of connections. Do not set this parameter to a number higher than your license allows. If you do not supply this parameter for the DbPool object, its value is 1. If you do not supply this parameter for the database object, its value is whatever you specify in the Application Manager as the value for Built-in Maximum Database Connections when you install the application. (See “Installing a New Application” on page 39 for more information on this parameter.) See “Single-Threaded and Multithreaded Databases” on page 189 for things you should consider before setting this parameter.
• commitflag : (Optional) A Boolean value indicating whether to commit or to roll back open transactions when the connection is finalized. Specify true to commit open transactions and false to roll them back. If you do not supply this parameter for the DbPool object, its value is false . If you do not supply this parameter for the database object, its value is true .
For example, the following statement creates a new database pool of five connections to an Oracle database. With this pool, uncommitted transactions are rolled back:
pool = new DbPool ("ORACLE", "myserver1", "ENG", "pwd1", "", 5);
The dbadmin sample application lets you experiment with connecting to different databases as different users.
For many applications, you want to share the set of connections among clients or have a connection span multiple client requests. In these situations, you should make the connection on your application’s initial page. This avoids potential problems that can occur when individual clients make shared database connections.
However, for some applications each client needs to make its own connection. As discussed in “Sharing an Array of Connection Pools” on page 194, the clients may still be sharing objects. If so, be sure to use locks to control the data sharing, as discussed in “Sharing Objects Safely with Locking” on page 130.
188 Writing Server-Side JavaScript Applications
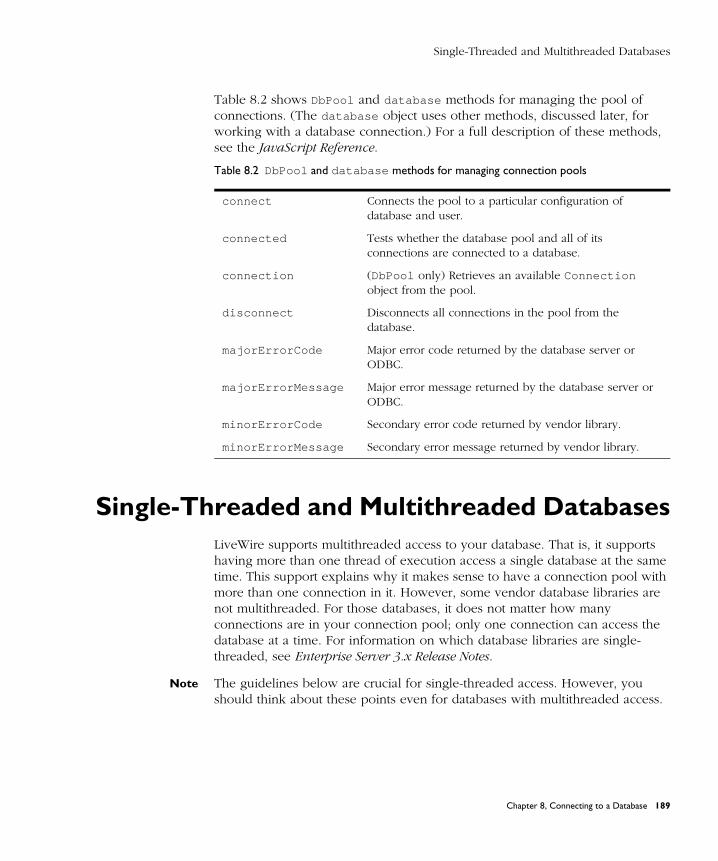
Single-Threaded and Multithreaded Databases
Table 8.2 shows DbPool and database methods for managing the pool of connections. (The database object uses other methods, discussed later, for working with a database connection.) For a full description of these methods, see the JavaScript Reference.
Single-Threaded and Multithreaded DatabasesLiveWire supports multithreaded access to your database. That is, it supports having more than one thread of execution access a single database at the same time. This support explains why it makes sense to have a connection pool with more than one connection in it. However, some vendor database libraries are not multithreaded. For those databases, it does not matter how many connections are in your connection pool; only one connection can access the database at a time. For information on which database libraries are single-threaded, see Enterprise Server 3.x Release Notes.
Note The guidelines below are crucial for single-threaded access. However, you should think about these points even for databases with multithreaded access.
Table 8.2 DbPool and database methods for managing connection pools
connect Connects the pool to a particular configuration of database and user.
connected Tests whether the database pool and all of its connections are connected to a database.
connection (DbPool only) Retrieves an available Connection object from the pool.
disconnect Disconnects all connections in the pool from the database.
majorErrorCode Major error code returned by the database server or ODBC.
majorErrorMessage Major error message returned by the database server or ODBC.
minorErrorCode Secondary error code returned by vendor library.
minorErrorMessage Secondary error message returned by vendor library.
Chapter 8, Connecting to a Database 189
Single-Threaded and Multithreaded Databases
A single-threaded database library has possible serious performance ramifications. Because only one thread can access the database at a time, all other threads must wait for the first thread to stop using the connection before they can access the database. If many threads want to access the database, each could be in for a long wait. You should consider the following when designing your database access:
• Keep your database interactions very short.
Every thread must wait for every other thread. The shorter your interaction, the shorter the wait.
• Always release connections and close open cursors and stored procedures.
You should do this anyway. In the case of a single-threaded database, however, it becomes absolutely essential to prevent needless waiting.
• Always use explicit transaction control.
With explicit transaction control, it is clearer when you’re done with a connection.
• Do not keep a connection open while waiting for input from the user.
Users don’t always complete what they start. If a user browses away from your application while it has an open connection, the system won’t know when to release the connection. Unless you’ve implemented a scheme for retrieving idle connections (as discussed in “Retrieving an Idle Connection” on page 201), that connection could be tied up for a very long time, thus restricting other users from accessing the database.
• Do not keep a cursor or transaction open across multiple pages of your application.
Any time a database interaction spans multiple pages of an application, the risk of a user not completing the transaction becomes even greater.
190 Writing Server-Side JavaScript Applications
Managing Connection Pools
Managing Connection PoolsAt any given time, a connected DbPool or database object and all the connections in the pool are associated with a particular database configuration. That is, everything in a pool is connected to a particular database server, as a particular user, with a particular password, and to a particular database.
If your application always uses the same configuration, then you can easily use a single DbPool object or use the database object and connect exactly once. In this case, you should make the connection on your application’s initial page.
If your application requires multiple configurations, either because it must connect to different databases, or to the same database as different users, or both, you need to decide how to manage those configurations.
If you use the database object and have multiple configurations, you have no choice. You must connect, disconnect, and reconnect the database object each time you need to change something about the configuration. You do so under the control of the client requests. In this situation, be sure you use locks, as discussed in “Sharing Objects Safely with Locking” on page 130, to gain exclusive access to the database object. Otherwise, another client request can disconnect the object before this client request is finished with it. Although you can use the database object this way, you’re probably better off using DbPool objects.
If you use DbPool objects and have multiple configurations, you could still connect, disconnect, and reconnect the same DbPool object. However, with DbPool objects you have more flexibility. You can create as many pools as you need and place them under the control of the project object. (See Chapter 5, “Session Management Service,” for information on the project object.) Using multiple database pools is more efficient and is generally safer than reusing a single pool (either with the database object or with a single DbPool object).
In deciding how to manage your pools, you must consider two factors: how many different configurations you want your pools to be able to access, and whether a single connection needs to span multiple client requests. If you have a small number of possible configurations, you can create a separate pool for each configuration. “Sharing a Fixed Set of Connection Pools” on page 192 discusses this approach.
Chapter 8, Connecting to a Database 191
Managing Connection Pools
If you have a very large or unknown number of configurations (for example, if all users get their own database user ID), there are two situations to consider. If each connection needs to last for only one client request, then you can create individual database pools on a client page.
However, sometimes a connection must span multiple client requests (for example, if a single database transaction spans multiple client requests). Also, you may just not want to reconnect to the database on each page of the application. If so, you can create an array of pools that is shared. “Sharing an Array of Connection Pools” on page 194 discusses this approach.
Whichever approach you use, when you no longer need an individual connection in a pool, clean up the resources used by the connection so that it is available for another user. To do so, close all open cursors, stored procedures, and result sets. Release the connection back to the pool. (You don’t have to release the connection if you’re using the database object.)
If you do not release the connection, when you try to disconnect the pool, the system waits before actually disconnecting for one of two conditions to occur:
• you do release all connections
• the connections go out of scope and get collected by the garbage collector
If you create individual database pools for each user, be sure to disconnect the pool when you’re finished with it. For information on cursors, see “Manipulating Query Results with Cursors” on page 210. For information on stored procedures and result sets, see “Calling Stored Procedures” on page 225.
Sharing a Fixed Set of Connection PoolsFrequently, an application shares a small set of connection pools among all users of the application. For example, your application might need to connect to three different databases, or it might need to connect to a single database using four different user IDs corresponding to four different departments. If you have a small set of possible connection configurations, you can create separate pools for each configuration. You use DbPool objects for this purpose.
192 Writing Server-Side JavaScript Applications
Managing Connection Pools
In this case, you want the pool of connections to exist for the entire life of the application, not just the life of a client or an individual client request. You can accomplish this by creating each database pool as a property of the project object. For example, the application’s initial page could contain these statements:
project.engpool = new DbPool ("ORACLE", "myserver1", "ENG", "pwd1", "", 5, true);
project.salespool = new DbPool ("INFORMIX", "myserver2", "SALES","pwd2", "salsmktg", 2);
project.supppool = new DbPool ("SYBASE","myserver3","SUPPORT", "pwd3", "suppdb", 3, false);
These statements create three pools for different groups who use the application. The project.eng pool has five Oracle connections and commits any uncommitted transactions when a connection is released back to the pool. The project.sales pool has two Informix connections and rolls back any uncommitted transactions at the end of a connection. The project.supp pool has three Sybase connections and rolls back any uncommitted transactions at the end of a connection.
You should create this pool as part of the application’s initial page. That page is run only when the application starts. On user-accessible pages, you don’t create a pool, and you don’t change the connection. Instead, these pages determine which group the current user belongs to and uses an already established connection from the appropriate pool. For example, the following code determines which database to use (based on the value of the userGroup property of the request object), looks up some information in the database and displays it to the user, and then releases the connection:
if (request.userGroup == "SALES") {salesconn = project.salespool.connection("A sales connection");salesconn.SQLTable ("select * from dept");salesconn.release();
}
Alternatively, you can choose to create the pool and change the connection on a user-accessible page. If you do so, you’ll have to be careful that multiple users accessing that page at the same time do not interfere with each other. For example, only one user should be able to create the pool that will be shared by all users. For information on safe sharing of information, see “Sharing Objects Safely with Locking” on page 130.
Chapter 8, Connecting to a Database 193
Managing Connection Pools
Sharing an Array of Connection Pools
“Sharing a Fixed Set of Connection Pools” on page 192 describes how you can use properties of the project object to share a fixed set of connection pools. This approach is useful if you know how many connection pools you will need at the time you develop the application and furthermore you need only a small number of connections.
For some applications, you cannot predict in advance how many connection pools you will need. For others, you can predict, but the number is prohibitively large. For example, assume that, for each customer who accesses your application, the application consults a user profile to determine what information to display from the database. You might give each customer a unique user ID for the database. Such an application requires each user to have a different set of connection parameters (corresponding to the different database user IDs) and hence a different connection pool.
You could create the DbPool object and connect and disconnect it on every page of the application. This works only if a single connection does not need to span multiple client requests. Otherwise, you can handle this situation differently.
For this application, instead of creating a fixed set of connection pools during the application’s initial page or a pool on each client page, you create a single property of the project object that will contain an array of connection pools. The elements of that array are accessed by a key based on the particular user. At initialization time, you create the array but do not put any elements in the array (since nobody has yet tried to use the application), as shown here:
project.sharedPools = new Object();
The first time a customer starts the application, the application obtains a key identifying that customer. Based on the key, the application creates a DbPool pool object and stores it in the array of pools. With this connection pool, it can either reconnect on each page or set up the connection as described in “Maintaining a Connection Across Requests” on page 198. The following code either creates the pool and or obtains the already created pool, makes sure it is connected, and then works with the database:
// Generate a unique index to refer to this client, if that // hasn’t already been done on another page. For information// on the ssjs_generateClientID function, see// “Uniquely Referring to the client Object” on page 107if (client.id == null) {
194 Writing Server-Side JavaScript Applications
Managing Connection Pools
client.id = ssjs_generateClientID();}
// If there isn't already a pool for this client, create one and// connect it to the database. project.lock();if (project.sharedPools[client.id] == null) {
project.sharedPools[client.id] = new DbPool ("ORACLE","myserver", user, password, "", 5, false);
}project.unlock();
// Set a variable to this pool, for convenience.var clientPool = project.sharedPools[client.id];
// You've got a pool: see if it's connected. If not, try to // connect it. If that fails, redirect to a special page to// inform the user.project.lock();if (!clientPool.connected()) {
clientPool.connect("ORACLE", "myserver", user, password, "", 5, false);
if (!clientPool.connected()) {delete project.sharedPools[client.id];project.unlock(); redirect("noconnection.htm");
}}project.unlock();
// If you've got this far, you're successfully connected and // can work with the database.clientConn = clientPool.connection();clientConn.SQLTable("select * from customers");// ... more database operations ...
// Always release a connection when you no longer need it.clientConn.release();}
The next time the customer accesses the application (for example, from another page in the application), it uses the same code and obtains the stored connection pool and (possibly a stored Connection object) from the project object.
If you use ssjs_generateClientID and store the ID on the client object, you may need to protect against an intruder getting access to that ID and hence to sensitive information.
Chapter 8, Connecting to a Database 195
Individual Database Connections
Note The sharedConns object used in this sample code is not a predefined JavaScript object. It is simply created by this sample and could be called anything you choose.
Individual Database ConnectionsOnce you’ve created a pool of connections, a client page can access an individual connection from the pool. If you’re using the database object, the connection is implicit in that object; that is, you use methods of the database object to access the connection. If, however, you’re using DbPool objects, a connection is encapsulated in a Connection object, which you get by calling a method of the DbPool object. For example, suppose you have this pool:
project.eng = new DbPool ("ORACLE", "myserver", "ENG", "pwd1", "", 5);
You can get a connection from the pool with this method call:
myconn = project.eng.connection ("My Connection", 60);
The parameters to this method are both optional. The first is a name for the connection (used for debugging); the second is an integer indicating a timeout period, in seconds. In this example, if the pool has an available connection, or if one becomes available within 60 seconds, that connection is assigned to the variable myconn . If no connection becomes available during this period, the method returns without a connection. For more information on waiting to get a connection from a pool, see “Waiting for a Connection” on page 200. For information on what to do if you don’t get one, see “Retrieving an Idle Connection” on page 201.
When you have finished using a connection, return it to the pool by calling the Connection object’s release method. (If you’re using the database object, you do not have to release the connection yourself.) Before calling the release method, close all open cursors, stored procedures, and result sets. When you call the release method, the system waits for these to be closed and then returns the connection to the database pool. The connection is then available to the next user. (For information on cursors, see “Manipulating Query Results with Cursors” on page 210. For information on stored procedures and result sets, see “Calling Stored Procedures” on page 225.)
196 Writing Server-Side JavaScript Applications
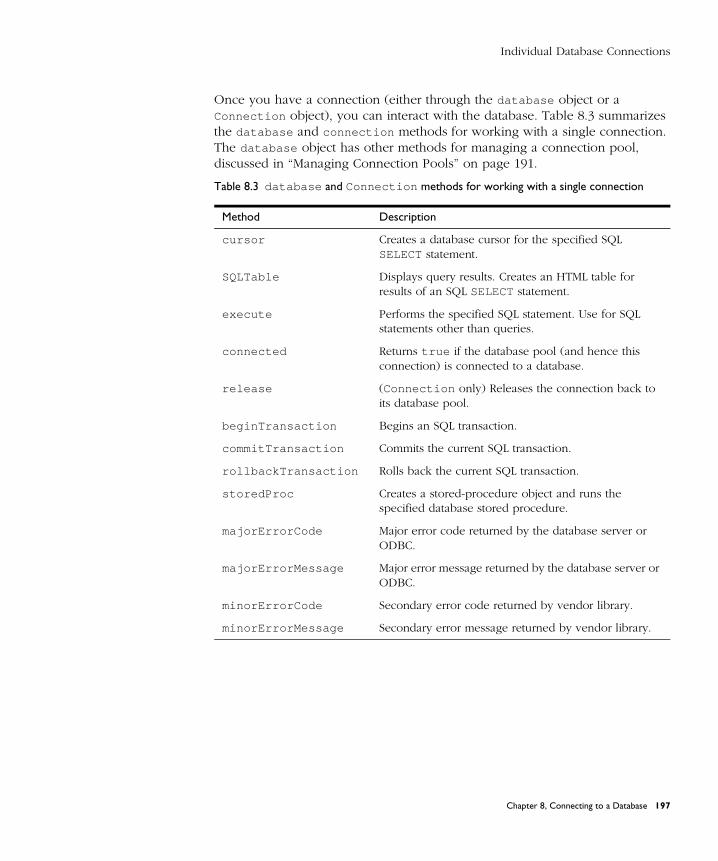
Individual Database Connections
Once you have a connection (either through the database object or a Connection object), you can interact with the database. Table 8.3 summarizes the database and connection methods for working with a single connection. The database object has other methods for managing a connection pool, discussed in “Managing Connection Pools” on page 191.
Table 8.3 database and Connection methods for working with a single connection
Method Description
cursor Creates a database cursor for the specified SQL SELECT statement.
SQLTable Displays query results. Creates an HTML table for results of an SQL SELECT statement.
execute Performs the specified SQL statement. Use for SQL statements other than queries.
connected Returns true if the database pool (and hence this connection) is connected to a database.
release (Connection only) Releases the connection back to its database pool.
beginTransaction Begins an SQL transaction.
commitTransaction Commits the current SQL transaction.
rollbackTransaction Rolls back the current SQL transaction.
storedProc Creates a stored-procedure object and runs the specified database stored procedure.
majorErrorCode Major error code returned by the database server or ODBC.
majorErrorMessage Major error message returned by the database server or ODBC.
minorErrorCode Secondary error code returned by vendor library.
minorErrorMessage Secondary error message returned by vendor library.
Chapter 8, Connecting to a Database 197
Individual Database Connections
Maintaining a Connection Across RequestsIn some situations, you may want a single connection to span multiple client requests. That is, you might want to use the same connection on multiple HTML pages.
Typically, you use properties of the client object for information that spans client requests. However, the value of a client property cannot be an object. For that reason, you cannot store a pool of database connections in the client object. Instead, you use a pool of connections stored with the project object, managing them as described in this section. If you use this approach, you may want to encrypt user information for security reasons.
Warning Take special care with this approach because storing the connection in this way makes it unavailable for other users. If all the connections are unavailable, new requests wait until someone explicitly releases a connection or until a connection times out. This is especially problematic for single-threaded database libraries. (For information setting up connections so that they are retrieved when idle for a long time, see “Retrieving an Idle Connection” on page 201.)
In the following example, a connection and a transaction span multiple client requests. The code saves the connection as a property of the sharedConns
object, which is itself a property of the project object. The sharedConns
object is not a predefined JavaScript object. It is simply created by this sample and could have any name you choose.
Because the same pool is used by all clients, you should create the sharedConns object and create and connect the pool itself on the application’s initial page, with code similar to this:
project.sharedConns = new Object();project.sharedConns.conns = new Object();project.sharedConns.pool = new DbPool ("SYBASE", "sybaseserver",
"user", "password", "sybdb", 10, false);
Then, on the first client page that accesses the pool, follow this strategy:
// Generate a unique index to refer to this client, if that hasn’t// already been done on another page.if (client.id == null) {
client.id = ssjs_generateClientID();}
198 Writing Server-Side JavaScript Applications
Individual Database Connections
// Set a variable to this pool, for convenience. var clientPool = project.sharedConns.pool;
// See whether the pool is connected. If not, redirect to a // special page to inform the user.project.lock();if (!clientPool.connected()) {
delete project.sharedConns.pool;project.unlock();redirect("noconnection.htm");
}project.unlock();
// Get a connection from the pool and store it in the project objectproject.sharedConns.conns[client.id] = clientPool.connection();var clientConn = project.sharedConns.conns[client.id];
clientConn.beginTransaction();cursor = clientConn.cursor("select * from customers", true");// ... more database statements ... cursor.close();
}
Notice that this page does not roll back or commit the transaction. The connection remains open and the transaction continues. (Transactions are discussed in “Managing Transactions” on page 219.) The second HTML page retrieves the connection, based on the value of client.id and continues working with the database as follows:
// Retrieve the connection. var clientConn = project.sharedConns.conns[client.id];
// ... Do some more database operations ...// In here, if the database operations succeed, set okay to 1.// If there was a database error, set okay to 0. At the end,// either commit or roll back the transaction on the basis of // its value.if (okay)
clientConn.commitTransaction();else
clientConn.rollbackTransaction();
// Return the connection to the pool.clientConn.release();
// Get rid of the object property value. You no longer need it. delete project.sharedConns.conns[client.id];
In this sample, the sharedConns object stores a single DbPool object and the connections for that pool that are currently in use. Your situation could be significantly more complex. If you have a fixed set of database pools, you
Chapter 8, Connecting to a Database 199
Individual Database Connections
might predefine a separate object to store the connections for each pool. Alternatively, if you have an array of pools and each pool needs connections that span multiple requests, you need to create an array of objects, each of which stores a pool and an array of its connections. As another wrinkle, instead of immediately redirecting if the pool isn’t connected, a client page might try to reestablish the connection.
If you use ssjs_generateClientID and store the ID in the client object, you may need to protect against an intruder getting access to that ID and hence to sensitive information.
Waiting for a Connection There are a fixed number of connections in a connection pool created with DbPool . If all connections are in use during an access attempt, then your application waits a specified timeout period for a connection to become free. You can control how long your application waits.
Assume that you’ve defined the following pool containing three connections:
pool = new DbPool ("ORACLE", "myserv", "user", "password", "", 3);
Further assume that three clients access the application at the same time, each using one of these connections. Now, a fourth client requests a connection with the following call:
myconnection = pool.connection();
This client must wait for one of the other clients to release a connection. In this case, because the call to connection does not specify a timeout period, the client waits indefinitely until a connection is freed, and then returns that connection.
You can specify a different timeout period by supplying arguments to the connection method. The second argument to the connection method is a timeout period, expressed in seconds. If you specify 0 as the timeout, the system waits indefinitely. For example, the following code has the connection wait only 30 seconds before timing out:
myconnection = pool.connection ("Name of Connection", 30);
If no connection becomes available within the specified timeout period, the method returns null, and an error message is set in the minor error message. You can obtain this message by calling the minorErrorMessage method of
200 Writing Server-Side JavaScript Applications
Individual Database Connections
pool . If your call to connection times out, you may want to free one by disconnecting an existing connection. For more information, see “Retrieving an Idle Connection” on page 201.
Retrieving an Idle Connection
When your application requests a connection from a DbPool object, it may not get one. Your options at this point depend on the architecture of your application.
If each connection lasts only for the lifetime of a single client request, the unavailability of connections cannot be due to a user’s leaving an application idle for a significant period of time. It can only be because all the code on a single page of JavaScript has not finished executing. In this situation, you should not try to terminate connection that is in use and reuse it. If you terminate the connection at this time, you run a significant risk of leaving that thread of execution in an inconsistent state. Instead, you should make sure that your application releases each connection as soon as it is finished using it. If you don’t want to wait for a connection, you’ll have to present your user with another choice.
If, by contrast, a connection spans multiple client requests, you may want to retrieve idle connections. In this situation, a connection can become idle because the user did not finish a transaction. For example, assume that a user submits data on the first page of an application and that the data starts a multipage database transaction. Instead of submitting data for the continuation of the transaction on the next page, the user visits another site and never returns to this application. By default, the connection remains open and cannot be used by other clients that access the application.
You can manually retrieve the connection by cleaning up after it and releasing it to the database pool. To do so, write functions such as the following to perform these activities:
• Bucket : Define an object type (called bucket in this example) to hold a connection and a timestamp.
• MarkBucket : Mark a bucket object with the current timestamp.
• RetrieveConnections : Traverse an array of connections looking for Connection objects that haven’t been accessed within a certain time limit and use CleanBucket (described next) to retrieve the object.
Chapter 8, Connecting to a Database 201
Individual Database Connections
• CleanBucket : Close cursors (and possibly stored procedures and result sets), roll back or commit any open transaction, and return the connection back to the pool.
Your application could use these functions as follows:
1. When you get a new connection, call Bucket to create a bucket object.
2. On any page that accesses the connection, call MarkBucket to update the timestamp.
3. If the application times out trying to get a connection from the pool, call RetrieveConnection to look for idle connections, close any open cursors, commit or rollback pending transactions, and release idle connections back to the pool.
4. If a connection was returned to the pool, then try and get the connection from the pool.
Also, on each page where your application uses a connection, it needs to be aware that another thread may have disconnected the connection before this page was reached by this client.
Creating a Bucket. The bucket holds a connection and a timestamp. This sample constructor function takes a connection as its only parameter:
// Constructor for Bucket function Bucket(c){
this.connection = c;this.lastModified = new Date();
}
You call this function to create a bucket for the connection as soon as you get the connection from the connection pool. You might add other properties to the connection bucket. For instance, your application may contain a cursor that spans client requests. In this case, you could use a property to add the cursor to the bucket, so that you can close an open cursor when retrieving the connection. You store the cursor in the bucket at the time you create it, as shown in the following statement:
myBucket.openCursor = myBucket.connection.cursor("select * from customer", true);
202 Writing Server-Side JavaScript Applications
Individual Database Connections
Marking the Bucket. The MarkBucket function takes a Bucket object as a parameter and sets the lastModified field to the current time.
function MarkBucket(bucket) {
bucket.lastModified = new Date();}
Call MarkBucket on each page of the application that uses the connection contained in the bucket. This resets lastModified to the current date and prevents the connection from appearing idle and hence ripe for retrieval.
Retrieving Old Connections. RetrieveConnections scans an array of Bucket objects, searching for connection buckets whose timestamp predates a certain time. If one is found, then the function calls CleanBucket (described next) to return the connection to the database pool.
// Retrieve connections idle for the specified number of minutes. function RetrieveConnections(BucketArray, timeout) {
var i;var count = 0;var now;
now = new Date();
// Do this loop for each bucket in the array. for (i in BucketArray) {
// Compute the time difference between now and the last// modified date. This difference is expressed in milliseconds.// If it is greater than the timeout value, then call the clean// out function.
if ((now - i.lastModified)/60000) > timeout) {CleanBucket(i);
// Get rid of the bucket, because it’s no longer being used. delete i;
count = count + 1;}
}return count;
}
Chapter 8, Connecting to a Database 203
Individual Database Connections
Cleaning Up a Bucket. Once it has been determined that a connection should be retrieved (with the RetrieveConnections function), you need a function to clean up the details of the connection and then release it back to the database pool. This sample function closes open cursors, rolls back open transactions, and then releases the connection.
function CleanBucket(bucket){
bucket.openCursor.close();bucket.connection.rollbackTransaction();bucket.connection.release();
}
CleanBucket assumes that this bucket contains an open cursor and its connection has an open transaction. It also assumes no stored procedures or result sets exist. In your application, you may want to do some other checking.
Pulling It All Together. The following sample code uses the functions just defined to retrieve connections that haven’t been referenced within 10 minutes. First, create a shared connections array and a database pool with five connections:
if ( project.sharedConns == null ) {project.sharedConns = new Object(); project.sharedConns.pool = new DbPool ("ORACLE", "mydb",
"user", "password", "", 5, false);if ( project.sharedConns.pool.connected() ) {
project.sharedConns.connections = new Object();}
else {delete project.sharedConns;
}}
Now use the following code to try to get a connection. After creating the pool, generate a client ID and use that as an index into the connection array. Next, try to get a connection. If a timeout occurs, then call RetrieveConnections to return old connections to the pool. If RetrieveConnections returns a connection to the pool, try to get the connection again. If you still can’t get a connection, redirect to another page saying there are no more free connections. If a connection is retrieved, store it in a new connection bucket and store that connection bucket in the shared connections array.
204 Writing Server-Side JavaScript Applications
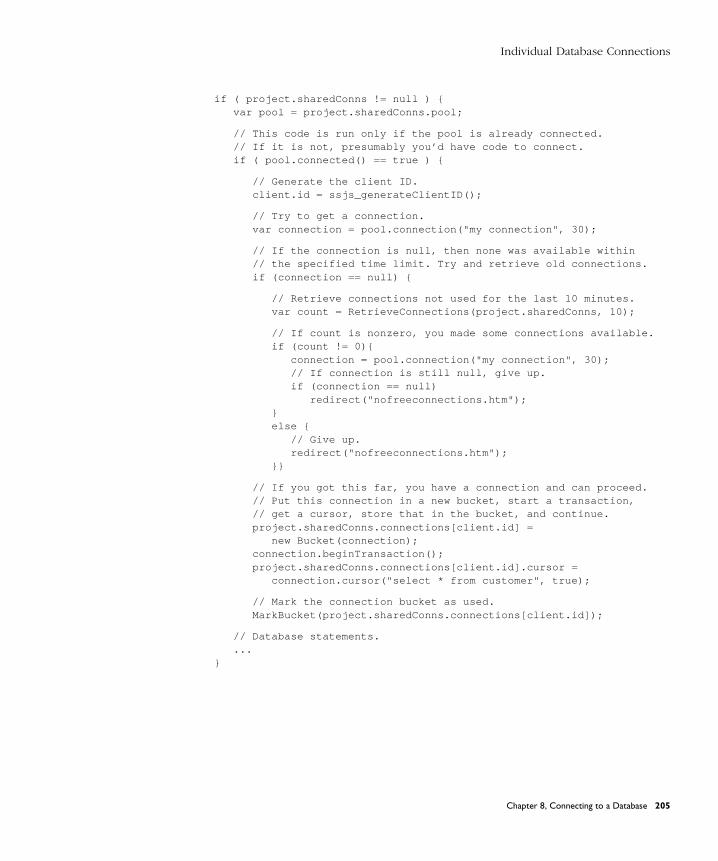
Individual Database Connections
if ( project.sharedConns != null ) {var pool = project.sharedConns.pool;
// This code is run only if the pool is already connected. // If it is not, presumably you’d have code to connect. if ( pool.connected() == true ) {
// Generate the client ID. client.id = ssjs_generateClientID();
// Try to get a connection. var connection = pool.connection("my connection", 30);
// If the connection is null, then none was available within// the specified time limit. Try and retrieve old connections. if (connection == null) {
// Retrieve connections not used for the last 10 minutes.var count = RetrieveConnections(project.sharedConns, 10);
// If count is nonzero, you made some connections available.if (count != 0){
connection = pool.connection("my connection", 30);// If connection is still null, give up. if (connection == null)
redirect("nofreeconnections.htm");}else {
// Give up. redirect("nofreeconnections.htm");
}}
// If you got this far, you have a connection and can proceed.// Put this connection in a new bucket, start a transaction,// get a cursor, store that in the bucket, and continue. project.sharedConns.connections[client.id] =
new Bucket(connection);connection.beginTransaction();project.sharedConns.connections[client.id].cursor =
connection.cursor("select * from customer", true);
// Mark the connection bucket as used. MarkBucket(project.sharedConns.connections[client.id]);
// Database statements. ...
}
Chapter 8, Connecting to a Database 205
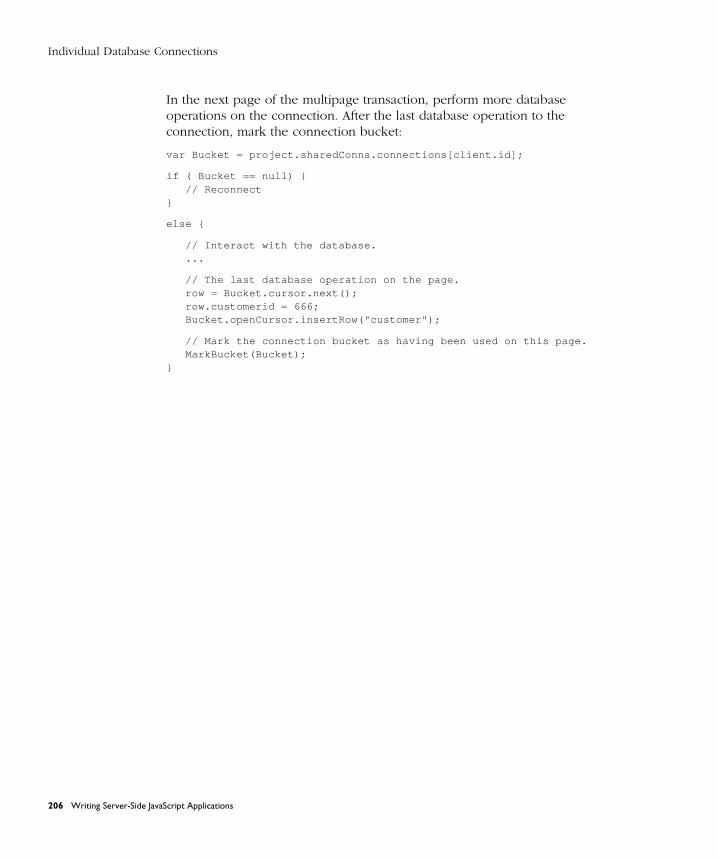
Individual Database Connections
In the next page of the multipage transaction, perform more database operations on the connection. After the last database operation to the connection, mark the connection bucket:
var Bucket = project.sharedConns.connections[client.id];
if ( Bucket == null) {// Reconnect
}
else {
// Interact with the database. ...
// The last database operation on the page. row = Bucket.cursor.next();row.customerid = 666;Bucket.openCursor.insertRow("customer");
// Mark the connection bucket as having been used on this page. MarkBucket(Bucket);
}
206 Writing Server-Side JavaScript Applications
C h a p t e r
9Working with a Database
This chapter discusses working with DB2, Informix, ODBC, Oracle, or Sybase relational databases. It describes how to retrieve information from the database and use it in your application, how to work with database transactions, and how to execute database stored procedures.
Remember that if your application runs on Netscape FastTrack Server instead of Netscape Enterprise Server, it can access only databases on servers using the ODBC standard.
The LiveWire Database Service allows you to interact with a relational database in many ways. You can do all of the following:
• Perform database queries and have the runtime engine automatically format the results for you.
• Use cursors to perform database queries and present the results in an application-specific way or use the results in performing calculations.
• Use cursors to change information in your database.
• Use transactions to manage your database interactions.
• Perform SQL processing not involving cursors.
• Run database stored procedures.
Chapter 9, Working with a Database 207
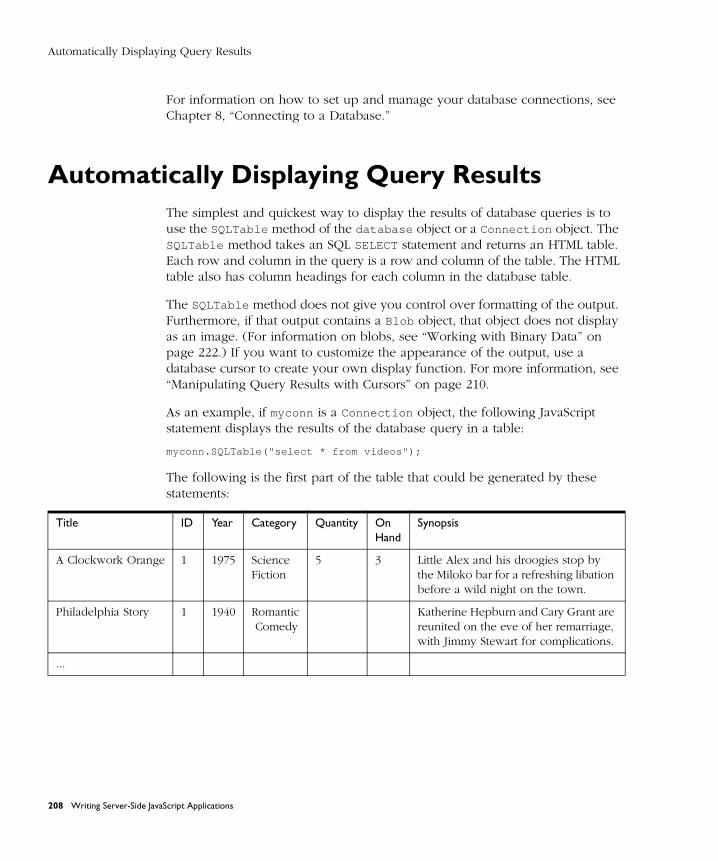
Automatically Displaying Query Results
For information on how to set up and manage your database connections, see Chapter 8, “Connecting to a Database.”
Automatically Displaying Query ResultsThe simplest and quickest way to display the results of database queries is to use the SQLTable method of the database object or a Connection object. The SQLTable method takes an SQL SELECT statement and returns an HTML table. Each row and column in the query is a row and column of the table. The HTML table also has column headings for each column in the database table.
The SQLTable method does not give you control over formatting of the output. Furthermore, if that output contains a Blob object, that object does not display as an image. (For information on blobs, see “Working with Binary Data” on page 222.) If you want to customize the appearance of the output, use a database cursor to create your own display function. For more information, see “Manipulating Query Results with Cursors” on page 210.
As an example, if myconn is a Connection object, the following JavaScript statement displays the results of the database query in a table:
myconn.SQLTable("select * from videos");
The following is the first part of the table that could be generated by these statements:
Title ID Year Category Quantity On Hand
Synopsis
A Clockwork Orange 1 1975 Science Fiction
5 3 Little Alex and his droogies stop by the Miloko bar for a refreshing libation before a wild night on the town.
Philadelphia Story 1 1940 Romantic Comedy
Katherine Hepburn and Cary Grant are reunited on the eve of her remarriage, with Jimmy Stewart for complications.
...
208 Writing Server-Side JavaScript Applications
Executing Arbitrary SQL Statements
Executing Arbitrary SQL StatementsThe execute method of the database object or a Connection object enables an application to execute an arbitrary SQL statement. Using execute is referred to as performing passthrough SQL, because it passes SQL directly to the server.
You can use execute for any data definition language (DDL) or data manipulation language (DML) SQL statement supported by the database server. Examples include CREATE, ALTER, and DROP. While you can use it to execute any SQL statement, you cannot return data with the execute method.
Notice that execute is for performing standard SQL statements, not for performing extensions to SQL provided by a particular database vendor. For example, you cannot call the Oracle describe function or the Informix load function from the execute method.
To perform passthrough SQL statements, simply provide the SQL statement as the parameter to the execute method. For example, you might want to remove a table from the database that is referred to by the project object’s oldtable property. To do so, you can use this method call:
connobj.execute("DROP TABLE " + project.oldtable);
Important When using execute , your SQL statement must strictly conform to the SQL syntax requirements of the database server. For example, some servers require each SQL statement to be terminated by a semicolon. For more information, see your database server documentation.
If you have not explicitly started a transaction, the single statement is committed automatically. For more information on transaction control, see “Managing Transactions” on page 219.
To perform some actions, such as creating or deleting a table, you may need to have privileges granted by your database administrator. Refer to your database server documentation for more information, or ask your database administrator.
Chapter 9, Working with a Database 209
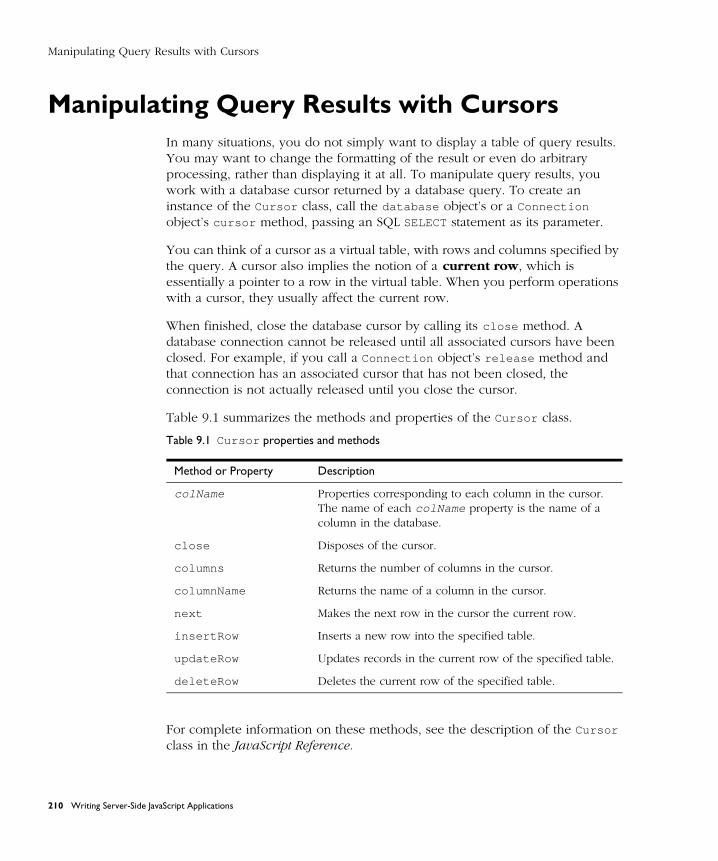
Manipulating Query Results with Cursors
Manipulating Query Results with CursorsIn many situations, you do not simply want to display a table of query results. You may want to change the formatting of the result or even do arbitrary processing, rather than displaying it at all. To manipulate query results, you work with a database cursor returned by a database query. To create an instance of the Cursor class, call the database object’s or a Connection object’s cursor method, passing an SQL SELECT statement as its parameter.
You can think of a cursor as a virtual table, with rows and columns specified by the query. A cursor also implies the notion of a current row, which is essentially a pointer to a row in the virtual table. When you perform operations with a cursor, they usually affect the current row.
When finished, close the database cursor by calling its close method. A database connection cannot be released until all associated cursors have been closed. For example, if you call a Connection object’s release method and that connection has an associated cursor that has not been closed, the connection is not actually released until you close the cursor.
Table 9.1 summarizes the methods and properties of the Cursor class.
For complete information on these methods, see the description of the Cursor class in the JavaScript Reference.
Table 9.1 Cursor properties and methods
Method or Property Description
colName Properties corresponding to each column in the cursor. The name of each colName property is the name of a column in the database.
close Disposes of the cursor.
columns Returns the number of columns in the cursor.
columnName Returns the name of a column in the cursor.
next Makes the next row in the cursor the current row.
insertRow Inserts a new row into the specified table.
updateRow Updates records in the current row of the specified table.
deleteRow Deletes the current row of the specified table.
210 Writing Server-Side JavaScript Applications

Manipulating Query Results with Cursors
Creating a Cursor
Once an application is connected to a database, you can create a cursor by calling the cursor method of the associated database or Connection object. Creating the Cursor object also opens the cursor in the database. You do not need a separate open command. You can supply the following information when creating a Cursor object:
• An SQL SELECT statement supported by the database server. To ensure database independence, use SQL 89/92-compliant syntax. The cursor is created as a virtual table of the results of this SQL statement.
• An optional Boolean parameter indicating whether you want an updatable cursor. Use this parameter only if you want to change the content of the database, as described in “Changing Database Information” on page 217. It is not always possible to create an updatable cursor for every SQL statement; this is controlled by the database. For example, if the SELECT statement is "select count(*) from videos" , you cannot create an updatable cursor.
For example, the following statement creates a cursor for records from the CUSTOMER table. The records contain the columns id , name, and city and are ordered by the value of the id column.
custs = connobj.cursor ("select id, name, cityfrom customer order by id");
This statement sets the variable custs to a Cursor object. The SQL query might return the following rows:
1 Sally Smith Suva2 Jane Doe Cupertino3 John Brown Harper’s Ferry
You can then access this information using methods of the custs Cursor object. This object has id , name, and city properties, corresponding to the columns in the virtual table.
When you initially create a Cursor object, the pointer is positioned just before the first row in the virtual table. The following sections describe how you can get information from the virtual table.
Chapter 9, Working with a Database 211
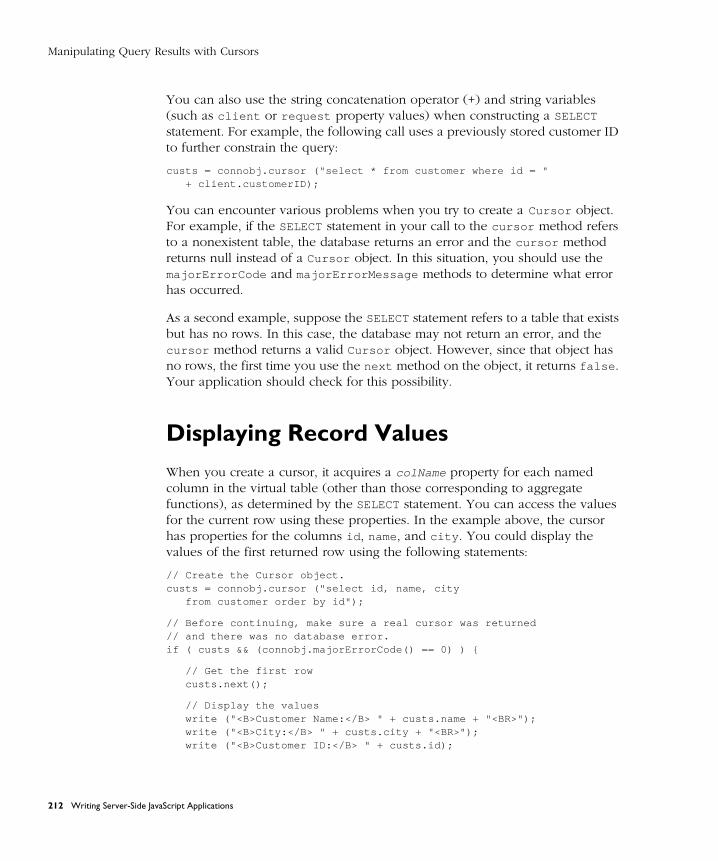
Manipulating Query Results with Cursors
You can also use the string concatenation operator (+) and string variables (such as client or request property values) when constructing a SELECT statement. For example, the following call uses a previously stored customer ID to further constrain the query:
custs = connobj.cursor ("select * from customer where id = "+ client.customerID);
You can encounter various problems when you try to create a Cursor object. For example, if the SELECT statement in your call to the cursor method refers to a nonexistent table, the database returns an error and the cursor method returns null instead of a Cursor object. In this situation, you should use the majorErrorCode and majorErrorMessage methods to determine what error has occurred.
As a second example, suppose the SELECT statement refers to a table that exists but has no rows. In this case, the database may not return an error, and the cursor method returns a valid Cursor object. However, since that object has no rows, the first time you use the next method on the object, it returns false . Your application should check for this possibility.
Displaying Record Values
When you create a cursor, it acquires a colName property for each named column in the virtual table (other than those corresponding to aggregate functions), as determined by the SELECT statement. You can access the values for the current row using these properties. In the example above, the cursor has properties for the columns id , name, and city . You could display the values of the first returned row using the following statements:
// Create the Cursor object.custs = connobj.cursor ("select id, name, city
from customer order by id");
// Before continuing, make sure a real cursor was returned// and there was no database error.if ( custs && (connobj.majorErrorCode() == 0) ) {
// Get the first rowcusts.next();
// Display the valueswrite ("<B>Customer Name:</B> " + custs.name + "<BR>");write ("<B>City:</B> " + custs.city + "<BR>");write ("<B>Customer ID:</B> " + custs.id);
212 Writing Server-Side JavaScript Applications
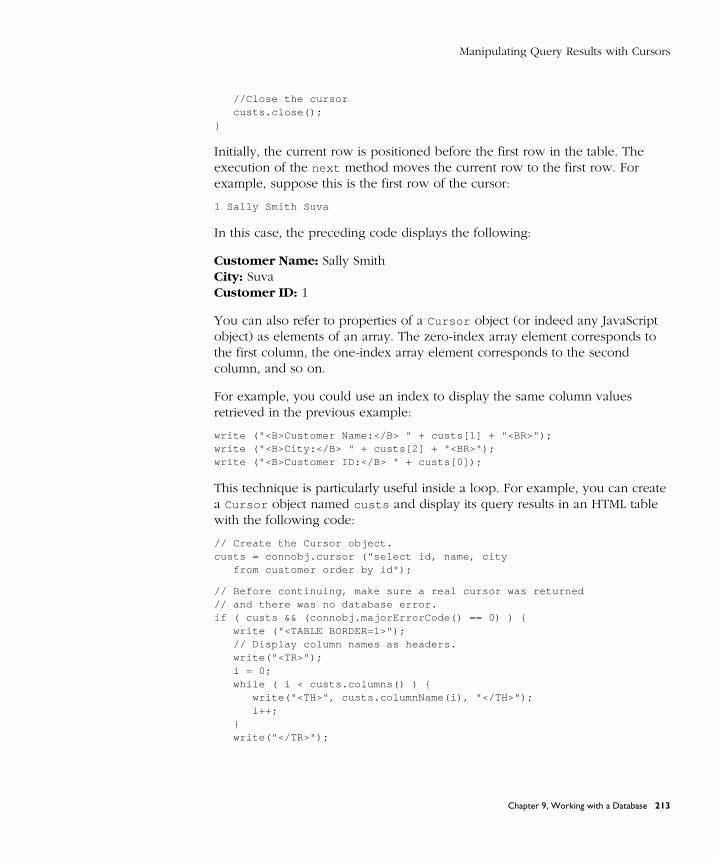
Manipulating Query Results with Cursors
//Close the cursorcusts.close();
}
Initially, the current row is positioned before the first row in the table. The execution of the next method moves the current row to the first row. For example, suppose this is the first row of the cursor:
1 Sally Smith Suva
In this case, the preceding code displays the following:
Customer Name: Sally Smith City: SuvaCustomer ID: 1
You can also refer to properties of a Cursor object (or indeed any JavaScript object) as elements of an array. The zero-index array element corresponds to the first column, the one-index array element corresponds to the second column, and so on.
For example, you could use an index to display the same column values retrieved in the previous example:
write ("<B>Customer Name:</B> " + custs[1] + "<BR>");write ("<B>City:</B> " + custs[2] + "<BR>");write ("<B>Customer ID:</B> " + custs[0]);
This technique is particularly useful inside a loop. For example, you can create a Cursor object named custs and display its query results in an HTML table with the following code:
// Create the Cursor object.custs = connobj.cursor ("select id, name, city
from customer order by id");
// Before continuing, make sure a real cursor was returned// and there was no database error.if ( custs && (connobj.majorErrorCode() == 0) ) {
write ("<TABLE BORDER=1>");// Display column names as headers.write("<TR>");i = 0;while ( i < custs.columns() ) {
write("<TH>", custs.columnName(i), "</TH>");i++;
}write("</TR>");
Chapter 9, Working with a Database 213
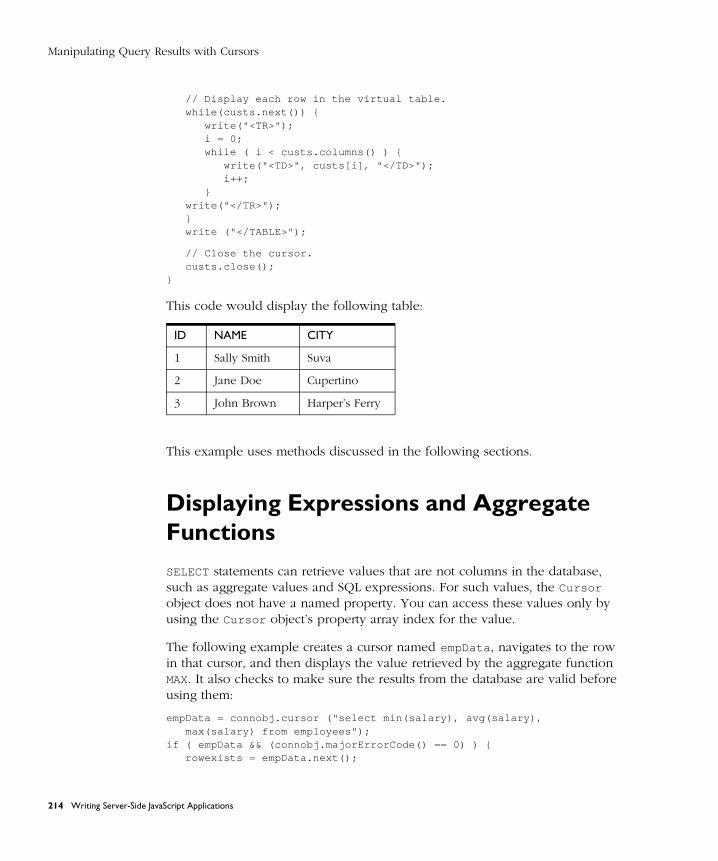
Manipulating Query Results with Cursors
// Display each row in the virtual table.while(custs.next()) {
write("<TR>");i = 0;while ( i < custs.columns() ) {
write("<TD>", custs[i], "</TD>");i++;
}write("</TR>");}write ("</TABLE>");
// Close the cursor.custs.close();
}
This code would display the following table:
This example uses methods discussed in the following sections.
Displaying Expressions and Aggregate Functions
SELECT statements can retrieve values that are not columns in the database, such as aggregate values and SQL expressions. For such values, the Cursor object does not have a named property. You can access these values only by using the Cursor object’s property array index for the value.
The following example creates a cursor named empData , navigates to the row in that cursor, and then displays the value retrieved by the aggregate function MAX. It also checks to make sure the results from the database are valid before using them:
empData = connobj.cursor ("select min(salary), avg(salary),max(salary) from employees");
if ( empData && (connobj.majorErrorCode() == 0) ) {rowexists = empData.next();
ID NAME CITY
1 Sally Smith Suva
2 Jane Doe Cupertino
3 John Brown Harper’s Ferry
214 Writing Server-Side JavaScript Applications
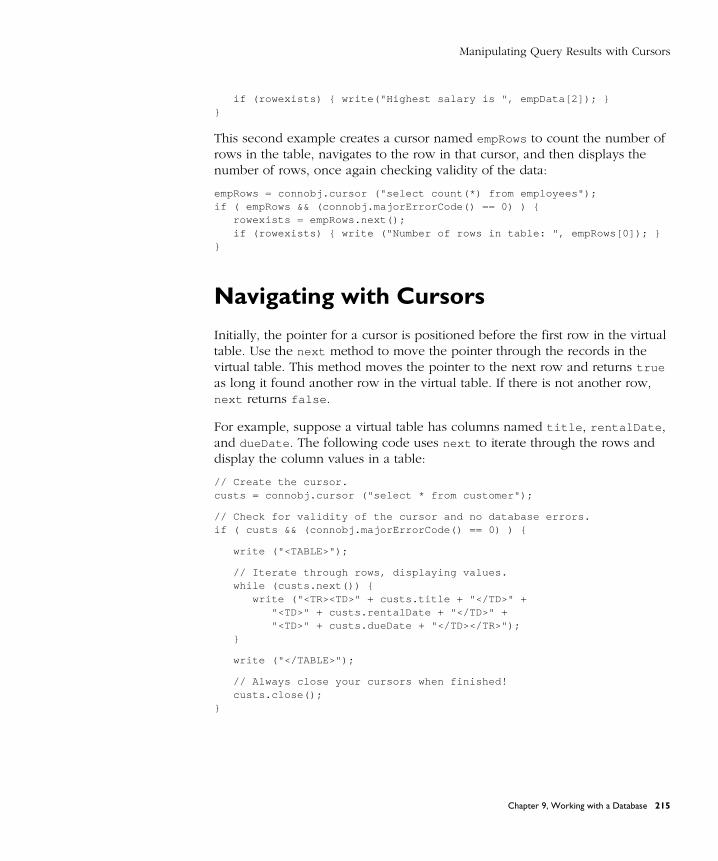
Manipulating Query Results with Cursors
if (rowexists) { write("Highest salary is ", empData[2]); }}
This second example creates a cursor named empRows to count the number of rows in the table, navigates to the row in that cursor, and then displays the number of rows, once again checking validity of the data:
empRows = connobj.cursor ("select count(*) from employees");if ( empRows && (connobj.majorErrorCode() == 0) ) {
rowexists = empRows.next();if (rowexists) { write ("Number of rows in table: ", empRows[0]); }
}
Navigating with Cursors
Initially, the pointer for a cursor is positioned before the first row in the virtual table. Use the next method to move the pointer through the records in the virtual table. This method moves the pointer to the next row and returns true as long it found another row in the virtual table. If there is not another row, next returns false .
For example, suppose a virtual table has columns named title , rentalDate , and dueDate . The following code uses next to iterate through the rows and display the column values in a table:
// Create the cursor.custs = connobj.cursor ("select * from customer");
// Check for validity of the cursor and no database errors.if ( custs && (connobj.majorErrorCode() == 0) ) {
write ("<TABLE>");
// Iterate through rows, displaying values.while (custs.next()) {
write ("<TR><TD>" + custs.title + "</TD>" + "<TD>" + custs.rentalDate + "</TD>" + "<TD>" + custs.dueDate + "</TD></TR>");
}
write ("</TABLE>");
// Always close your cursors when finished!custs.close();
}
Chapter 9, Working with a Database 215
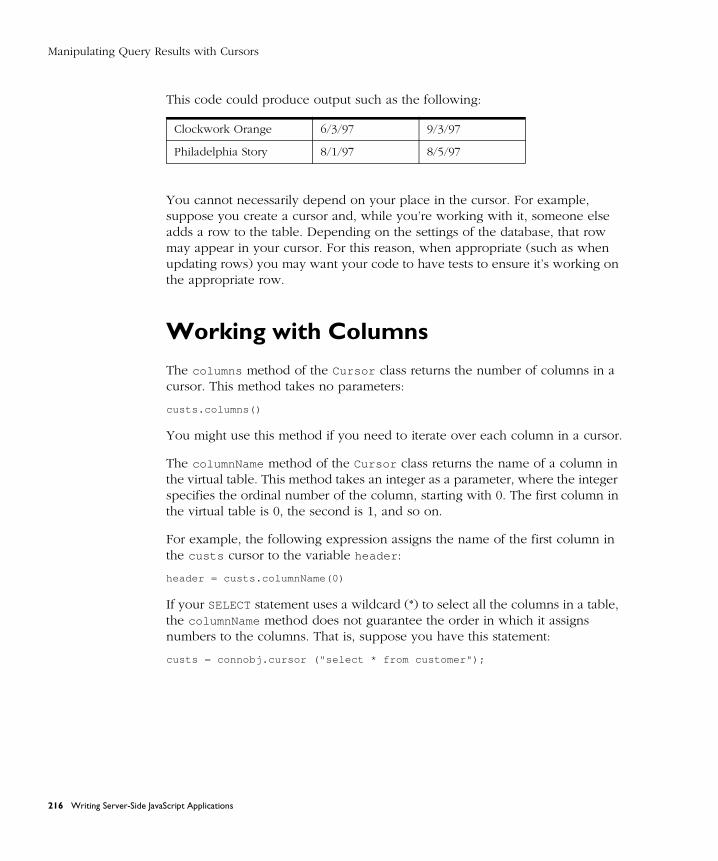
Manipulating Query Results with Cursors
This code could produce output such as the following:
You cannot necessarily depend on your place in the cursor. For example, suppose you create a cursor and, while you’re working with it, someone else adds a row to the table. Depending on the settings of the database, that row may appear in your cursor. For this reason, when appropriate (such as when updating rows) you may want your code to have tests to ensure it’s working on the appropriate row.
Working with ColumnsThe columns method of the Cursor class returns the number of columns in a cursor. This method takes no parameters:
custs.columns()
You might use this method if you need to iterate over each column in a cursor.
The columnName method of the Cursor class returns the name of a column in the virtual table. This method takes an integer as a parameter, where the integer specifies the ordinal number of the column, starting with 0. The first column in the virtual table is 0, the second is 1, and so on.
For example, the following expression assigns the name of the first column in the custs cursor to the variable header :
header = custs.columnName(0)
If your SELECT statement uses a wildcard (*) to select all the columns in a table, the columnName method does not guarantee the order in which it assigns numbers to the columns. That is, suppose you have this statement:
custs = connobj.cursor ("select * from customer");
Clockwork Orange 6/3/97 9/3/97
Philadelphia Story 8/1/97 8/5/97
216 Writing Server-Side JavaScript Applications
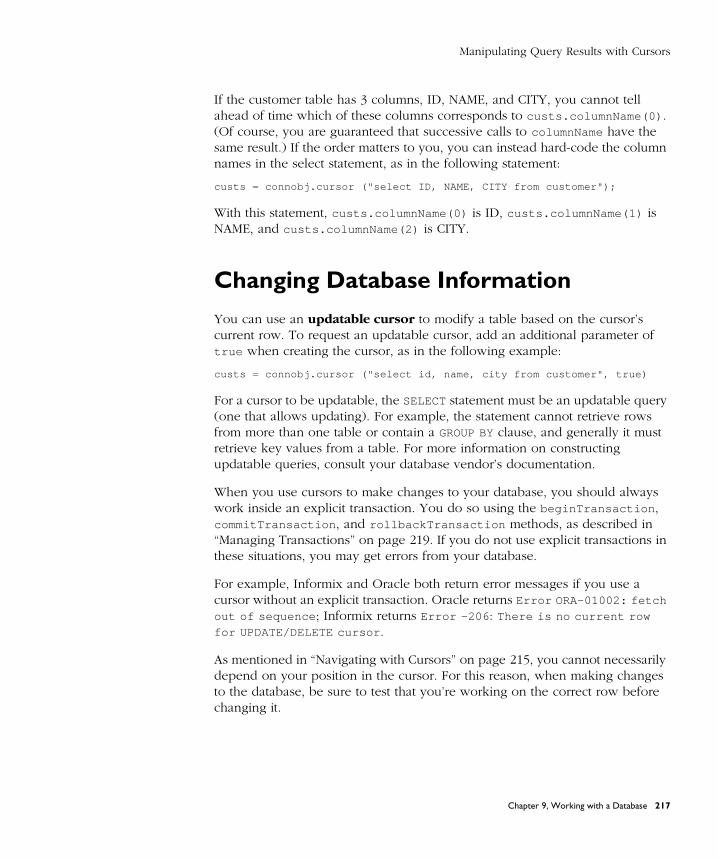
Manipulating Query Results with Cursors
If the customer table has 3 columns, ID, NAME, and CITY, you cannot tell ahead of time which of these columns corresponds to custs.columnName(0) . (Of course, you are guaranteed that successive calls to columnName have the same result.) If the order matters to you, you can instead hard-code the column names in the select statement, as in the following statement:
custs = connobj.cursor ("select ID, NAME, CITY from customer");
With this statement, custs.columnName(0) is ID, custs.columnName(1) is NAME, and custs.columnName(2) is CITY.
Changing Database Information
You can use an updatable cursor to modify a table based on the cursor’s current row. To request an updatable cursor, add an additional parameter of true when creating the cursor, as in the following example:
custs = connobj.cursor ("select id, name, city from customer", true)
For a cursor to be updatable, the SELECT statement must be an updatable query (one that allows updating). For example, the statement cannot retrieve rows from more than one table or contain a GROUP BY clause, and generally it must retrieve key values from a table. For more information on constructing updatable queries, consult your database vendor’s documentation.
When you use cursors to make changes to your database, you should always work inside an explicit transaction. You do so using the beginTransaction , commitTransaction , and rollbackTransaction methods, as described in “Managing Transactions” on page 219. If you do not use explicit transactions in these situations, you may get errors from your database.
For example, Informix and Oracle both return error messages if you use a cursor without an explicit transaction. Oracle returns Error ORA-01002: fetch out of sequence ; Informix returns Error -206 : There is no current row for UPDATE/DELETE cursor .
As mentioned in “Navigating with Cursors” on page 215, you cannot necessarily depend on your position in the cursor. For this reason, when making changes to the database, be sure to test that you’re working on the correct row before changing it.
Chapter 9, Working with a Database 217
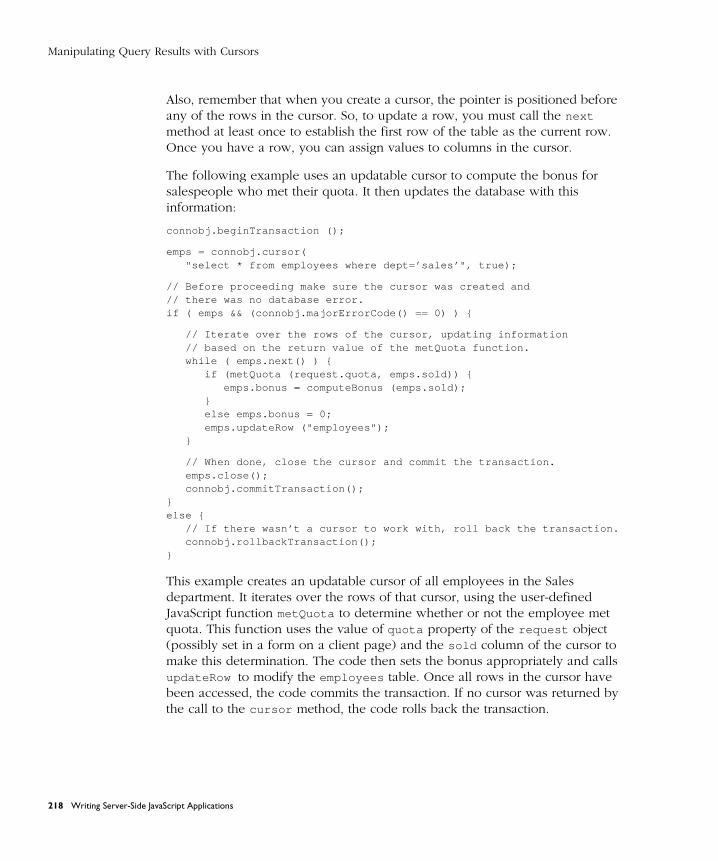
Manipulating Query Results with Cursors
Also, remember that when you create a cursor, the pointer is positioned before any of the rows in the cursor. So, to update a row, you must call the next method at least once to establish the first row of the table as the current row. Once you have a row, you can assign values to columns in the cursor.
The following example uses an updatable cursor to compute the bonus for salespeople who met their quota. It then updates the database with this information:
connobj.beginTransaction ();
emps = connobj.cursor("select * from employees where dept=’sales’", true);
// Before proceeding make sure the cursor was created and// there was no database error.if ( emps && (connobj.majorErrorCode() == 0) ) {
// Iterate over the rows of the cursor, updating information// based on the return value of the metQuota function.while ( emps.next() ) {
if (metQuota (request.quota, emps.sold)) {emps.bonus = computeBonus (emps.sold);
}else emps.bonus = 0;emps.updateRow ("employees");
}
// When done, close the cursor and commit the transaction.emps.close();connobj.commitTransaction();
}else {
// If there wasn’t a cursor to work with, roll back the transaction.connobj.rollbackTransaction();
}
This example creates an updatable cursor of all employees in the Sales department. It iterates over the rows of that cursor, using the user-defined JavaScript function metQuota to determine whether or not the employee met quota. This function uses the value of quota property of the request object (possibly set in a form on a client page) and the sold column of the cursor to make this determination. The code then sets the bonus appropriately and calls updateRow to modify the employees table. Once all rows in the cursor have been accessed, the code commits the transaction. If no cursor was returned by the call to the cursor method, the code rolls back the transaction.
218 Writing Server-Side JavaScript Applications
Managing Transactions
In addition to the updateRow method, you can use the insertRow and deleteRow methods to insert a new row or delete the current row. You do not need to assign values when you use deleteRow , because it simply deletes an entire row.
When you use insertRow , the values you assign to columns are used for the new row. If you have previously called the cursor’s next method, then the values of the current row are used for any columns without assigned values; otherwise, the unassigned columns are null. Also, if some columns in the table are not in the cursor, then insertRow inserts null in these columns. The location of the inserted row depends on the database vendor library. If you need to access the row after you call the insertRow method, you must first close the existing cursor and then open a new cursor.
Note DB2 has a Time data type. JavaScript does not have a corresponding data type. For this reason, you cannot update rows with values that use the DB2 Time data type
Managing TransactionsA transaction is a group of database actions that are performed together. Either all the actions succeed together or all fail together. When you apply all actions, making permanent changes to the database, you are said to commit a transaction. You can also roll back a transaction that you have not committed; this cancels all the actions.
Transactions are important for maintaining data integrity and consistency. Although the various database servers implement transactions slightly differently, the LiveWire Database Service provides the same methods for transaction management with all databases. Refer to the database vendor documentation for information on data consistency and isolation levels in transactions.
You can use explicit transaction control for any set of actions. For example, actions that modify a database should come under transaction control. These actions correspond to SQL INSERT, UPDATE, and DELETE statements. Transactions can also be used to control the consistency of the data you refer to in your application.
Chapter 9, Working with a Database 219
Managing Transactions
For most databases, if you do not control transactions explicitly, the runtime engine uses the underlying database’s autocommit feature to treat each database statement as a separate transaction. Each statement is either committed or rolled back immediately, based on the success or failure of the individual statement. Explicitly managing transactions overrides this default behavior.
In some databases, such as Oracle, autocommit is an explicit feature that LiveWire turns on for individual statements. In others, such as Informix, autocommit is the default behavior when you do not create a transaction. In general, LiveWire hides these differences and puts an application in autocommit mode whenever the application does not use beginTransaction to explicitly start a transaction.
For Informix ANSI databases, LiveWire does not use autocommit. For these databases, an application always uses transactions even if it never explicitly calls beginTransaction . The application must use commitTransaction or rollbackTransaction to finish the transaction.
Note You are strongly encouraged to use explicit transaction control any time you make changes to a database. This ensures that the changes succeed or fail together. In addition, any time you use updatable cursors, you should use explicit transactions to control the consistency of your data between the time you read the data (with next ) and the time you change it (with insertRow , updateRow , or deleteRow ). As described in “Changing Database Information” on page 217, using explicit transaction control with updatable cursors is necessary to avoid errors in some databases such as Oracle and Informix.
Using the Transaction-Control MethodsUse the following methods of the database object or a Connection object to explicitly manage transactions:
• beginTransaction starts a new transaction. All actions that modify the database are grouped with this transaction, known as the current transaction.
• commitTransaction commits the current transaction. This method attempts to commit all the actions since the last call to beginTransaction .
• rollbackTransaction rolls back the current transaction. This method undoes all modifications since the last call to beginTransaction .
220 Writing Server-Side JavaScript Applications

Managing Transactions
Of course, if your database does not support transactions, you cannot use them. For example, an Informix database created using the NO LOG option does not support transactions, and you will get an error if you use these methods.
The LiveWire Database Service does not support nested transactions. If you call beginTransaction multiple times before committing or rolling back the first transaction you opened, you’ll get an error.
For the database object, the maximum scope of a transaction is limited to the current client request (HTML page) in the application. If the application exits the page before calling the commitTransaction or rollbackTransaction method, then the transaction is automatically either committed or rolled back, based on the setting of the commitflag parameter provided when you connected to the database.
For Connection objects, the scope of a transaction is limited to the lifetime of that object. If you release the connection or close the pool of connections before calling the commitTransaction or rollbackTransaction method, then the transaction is automatically either committed or rolled back, based on the setting of the commitflag parameter provided when you made the connection, either with the connect method or in the DbPool constructor.
If there is no current transaction (that is, if the application has not called beginTransaction ), calls to commitTransaction and rollbackTransaction can result in an error from the database.
You can set your transaction to work at different levels of granularity. The example described in “Changing Database Information” on page 217 creates a single transaction for modifying all rows of the cursor. If your cursor has a small number of rows, this approach is sensible.
If, however, your cursor returns thousands of rows, you may want to process the cursor in multiple transactions. This approach can both cut down the transaction size and improve the concurrency of access to that information.
If you do break down your processing into multiple transactions, be certain that a call to next and an associated call to updateRow or deleteRow happen within the same transaction. If you get a row in one transaction, finish that transaction, and then attempt to either update or delete the row, you may get an error from your database.
How you choose to handle transactions depends on the goals of your application. You should refer to your database vendor documentation for more information on how to use transactions appropriately for that database type.
Chapter 9, Working with a Database 221
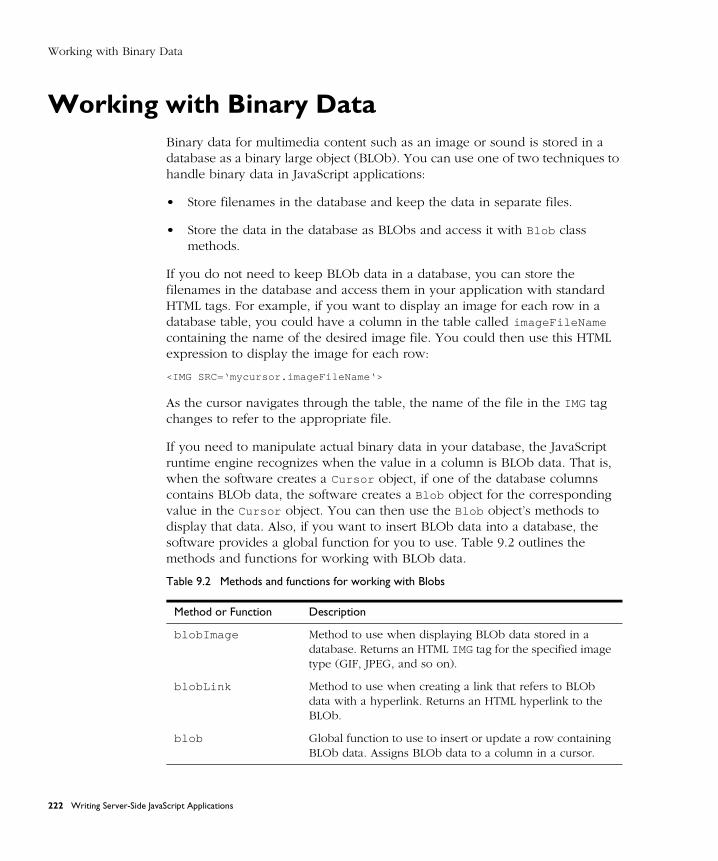
Working with Binary Data
Working with Binary DataBinary data for multimedia content such as an image or sound is stored in a database as a binary large object (BLOb). You can use one of two techniques to handle binary data in JavaScript applications:
• Store filenames in the database and keep the data in separate files.
• Store the data in the database as BLObs and access it with Blob class methods.
If you do not need to keep BLOb data in a database, you can store the filenames in the database and access them in your application with standard HTML tags. For example, if you want to display an image for each row in a database table, you could have a column in the table called imageFileName containing the name of the desired image file. You could then use this HTML expression to display the image for each row:
<IMG SRC=‘mycursor.imageFileName‘>
As the cursor navigates through the table, the name of the file in the IMG tag changes to refer to the appropriate file.
If you need to manipulate actual binary data in your database, the JavaScript runtime engine recognizes when the value in a column is BLOb data. That is, when the software creates a Cursor object, if one of the database columns contains BLOb data, the software creates a Blob object for the corresponding value in the Cursor object. You can then use the Blob object’s methods to display that data. Also, if you want to insert BLOb data into a database, the software provides a global function for you to use. Table 9.2 outlines the methods and functions for working with BLOb data.
Table 9.2 Methods and functions for working with Blobs
Method or Function Description
blobImage Method to use when displaying BLOb data stored in a database. Returns an HTML IMG tag for the specified image type (GIF, JPEG, and so on).
blobLink Method to use when creating a link that refers to BLOb data with a hyperlink. Returns an HTML hyperlink to the BLOb.
blob Global function to use to insert or update a row containing BLOb data. Assigns BLOb data to a column in a cursor.
222 Writing Server-Side JavaScript Applications
Working with Binary Data
The blobImage method fetches a BLOb from the database, creates a temporary file of the specified format, and generates an HTML IMG tag that refers to the temporary file. The runtime engine removes the temporary file after the page is generated and sent to the client.
The blobLink method fetches BLOb data from the database, creates a temporary file, and generates an HTML hypertext link to the temporary file. The runtime engine removes the temporary file after the user clicks the link or 60 seconds after the request has been processed.
The following example illustrates using blobImage and blobLink to create temporary files. In this case, the FISHTBL table has four columns: an ID, a name, and two images. One of these is a small thumbnail image; the other is a larger image. The example code writes HTML for displaying the name, the thumbnail, and a link to the larger image.
cursor = connobj.cursor ("select * from fishtbl");
if ( cursor && (connobj.majorErrorCode() == 0) ) {while (cursor.next()) {
write (cursor.name);write (cursor.picture.blobImage("gif"));write (cursor.picture.blobLink("image\gif", "Link" + cursor.id));write ("<BR>");
}cursor.close();
}
If FISHTBL contains rows for four fish, the example could produce the following HTML:
Cod <IMG SRC="LIVEWIRE_TEMP9"> <A HREF="LIVEWIRE_TEMP10">Link1 </A> <BR>
Anthia <IMG SRC="LIVEWIRE_TEMP11"><A HREF="LIVEWIRE_TEMP12">Link2 </A> <BR>
Scorpion <IMG SRC="LIVEWIRE_TEMP13"><A HREF="LIVEWIRE_TEMP14">Link3 </A> <BR>
Surgeon <IMG SRC="LIVEWIRE_TEMP15"><A HREF="LIVEWIRE_TEMP16">Link4 </A> <BR>
If you want to add BLOb data to a database, use the blob global function. This function assigns BLOb data to a column in an updatable cursor. As opposed to blobImage and blobLink , blob is a top-level function, not a method.
Chapter 9, Working with a Database 223
Working with Binary Data
The following statements assign BLOb data to one of the columns in a row and then update that row in the FISHTBL table of the database. The cursor contains a single row.
// Begin a transaction.database.beginTransaction();
// Create a cursor.fishCursor = database.cursor ("select * from fishtbl where
name=’Harlequin Ghost Pipefish’", true);
// Make sure cursor was created.if ( fishCursor && (database.majorErrorCode() == 0) ) {
// Position the pointer on the row.rowexists = fishCursor.next();
if ( rowexists ) {
// Assign the blob data.fishCursor.picture = blob ("c:\\data\\fish\\photo\\pipe.gif");
// Update the row.fishCursor.updateRow ("fishtbl");
// Close the cursor and commit the changes.fishCursor.close();database.commitTransaction();
}else {
// Close the cursor and roll back the transaction.fishCursor.close();database.rollbackTransaction();
}}else {
// Never got a cursor; rollback the transaction.database.rollbackTransaction();
}
Remember that the backslash (\) is the escape character in JavaScript. For this reason, you must use two backslashes in NT filenames, as shown in the example.
224 Writing Server-Side JavaScript Applications

Calling Stored Procedures
Calling Stored ProceduresStored procedures are an integral part of operating and maintaining a relational database. They offer convenience by giving you a way to automate processes that you do often, but they offer other benefits as well:
• Limited access. You can limit access to a sensitive database by giving users access only through a stored procedure. A user has access to the data, but only within the stored procedure. Any other access is denied.
• Data integrity. Stored procedures help you make sure that information is provided and entered in a consistent way. By automating complicated transactions, you can reduce the possibility of user error.
• Efficiency. A stored procedure is compiled once, when executed for the first time. Later executions run faster because they skip the compilation step. This also helps lighten the load on your network, because the stored procedure code is downloaded only once.
The LiveWire Database Service provides two classes for working with stored procedures, Stproc and Resultset . With the methods of these classes you can call a stored procedure and manipulate the results of that procedure.
Exchanging Information
Stored procedures work differently for the various databases supported by the LiveWire Database Service. The most important distinction for LiveWire is how you pass information to and from the stored procedure in a JavaScript application. You always use input parameters to the stored procedure to pass information into a stored procedure.
However, conceptually there are several distinct ways you might want to retrieve information from a stored procedure. Not every database vendor lets you retrieve information in all of these ways.
Chapter 9, Working with a Database 225
Calling Stored Procedures
Result Sets
A stored procedure can execute one or more SELECT statements, retrieving information from the database. You can think of this information as a virtual table, very similar to a read-only cursor. (For information on cursors, see “Manipulating Query Results with Cursors” on page 210.)
LiveWire uses an instance of the Resultset class to contain the rows returned by a single SELECT statement of a stored procedure. If the stored procedure allows multiple SELECT statements, you get a separate Resultset object for each SELECT statement. You use the resultSet method of the Stproc class to obtain a result set object and then you use that object’s methods to manipulate the result set.
Different database vendors return a result set in these varying ways:
• Sybase stored procedures can directly return the result of executing one or more SELECT statements.
• Informix stored procedures can have multiple return values. Multiple return values are like the columns in a single row of a table, except that these columns are not named. In addition, if you use the RESUME feature, the stored procedure can have a set of these multiple return values. This set is like the rows of a table. LiveWire creates a single result set to contain this virtual table.
• Oracle stored procedures use ref cursors to contain the rows returned by a SELECT statement. You can open multiple ref cursors in an Oracle stored procedure to contain rows returned by several SELECT statements. LiveWire creates a separate Resultset object for each ref cursor.
• DB2 stored procedures use open cursors to return result sets.
Output and Input/Output Parameters
In addition to standard input parameters, some database vendors allow other types of parameters for their stored procedures. Output parameters store information on return from the procedure and input/output parameters both pass in information and return information.
226 Writing Server-Side JavaScript Applications
Calling Stored Procedures
For most databases, you use the outParamCount and outParameters methods of the Stproc class to access output and input/output parameters. However, Informix does not allow output or input/output parameters. Therefore, you should not use the outParamCount and outParameters methods with Informix stored procedures.
Return Values
Seen as a simple function call, a stored procedure can have a return value. For Oracle and Sybase, this return value is in addition to any result sets it returns.
You use the returnValue method of the Stproc class to access the return value. However, the return values for Informix stored procedures are used to generate its result set. For this reason, returnValue always returns null for Informix stored procedures. In addition, return values are not available for ODBC and DB2 stored procedures.
Steps for Using Stored Procedures
Once you have a database connection, the steps for using a stored procedure in your application vary slightly for the different databases:
1. (DB2 only) Register the stored procedure in the appropriate system tables. (You do this outside of JavaScript.)
2. (DB2, ODBC, and Sybase) Define a prototype for your stored procedure.
3. (All databases) Execute the stored procedure.
4. (All databases) Create a resultSet object and get the data from that object.
5. (DB2, ODBC, and Sybase) Complete the execution by accessing the return value.
6. (DB2, ODBC, Oracle, and Sybase) Complete the execution by getting the output parameters.
Notice that for several databases you can complete execution of your stored procedure either by getting the return value or by accessing the output parameters. Once you have done either of these things, you can no longer work with any result sets created by execution of the stored procedure.
Chapter 9, Working with a Database 227
Calling Stored Procedures
The following sections describe each of these steps in more detail.
Registering the Stored Procedure
This step applies only to DB2.
DB2 has various system tables in which you can record your stored procedure. In general, entering a stored procedure in these tables is optional. However, to use your stored procedure with LiveWire, you must make entries in these tables. You perform this step outside of the JavaScript application.
For DB2 common server, you must create the DB2CLI.PROCEDURES system table and enter your DB2 stored procedures in it. DB2CLI.PROCEDURES is a pseudo-catalog table.
If your DB2 is for IBM MVS/EA version 4.1 or later, you must define the name of your stored procedures in the SYSIBM.SYSPROCEDURES catalog table.
Remember you use C, C++, or another source language to write a DB2 stored procedure. The data types you use with those languages do not match the data types available in DB2. Therefore, when you add the stored procedure to DB2CLI.PROCEDURES or SYSIBM.SYSPROCEDURES, be sure to record the corresponding DB2 data type for the stored procedure parameters and not the data types of the source language.
For information on DB2 data types and on how to make entries in these tables, see your DB2 documentation.
228 Writing Server-Side JavaScript Applications
Calling Stored Procedures
Defining a Prototype for a Stored ProcedureThis step is relevant only for DB2, ODBC, and Sybase stored procedures, both user-defined and system stored procedures. You do not need to define a prototype for stored procedures for Oracle or Informix databases.
For DB2, ODBC, and Sybase, the software cannot determine at runtime whether a particular parameter is for input, for output, or for both. Consequently, after you connect to the database, you must create a prototype providing information about the stored procedure you want to use, using the storedProcArgs method of the database or DbPool object.
You need exactly one prototype for each stored procedure in your application. The software ignores additional prototypes for the same stored procedure.
In the prototype, you provide the name of the stored procedure and the type of each of its parameters. A parameter must be for input (IN ), output (OUT), or input and output (INOUT). For example, to create a prototype for a stored procedure called newhire that has two input parameters and one output parameter, you could use this method call:
poolobj.storedProcArgs("newhire", "IN", "IN", "OUT");
Executing the Stored Procedure
This step is relevant to all stored procedures.
To execute a stored procedure, you create a Stproc object using the database or Connection object’s storedProc method. Creating the object automatically invokes the stored procedure. When creating a stored-procedure object, you specify the name of the procedure and any parameters to the procedure.
For example, assume you have a stored procedure called newhire that takes one string and one integer parameter. The following method call creates the spObj stored-procedure object and invokes the newhire stored procedure:
spObj = connobj.storedProc("newhire", "Fred Jones", 1996);
Chapter 9, Working with a Database 229
Calling Stored Procedures
In general, you must provide values for all input and input/output parameters to the stored procedure. If a stored procedure has a default value defined for one of its parameters, you can use the "/Default/" directive to specify that default value. Similarly, if a stored procedure can take a null value for one of its parameters, you can specify the null value either with the "/Null/" directive or by passing in the null value itself.
For example, assume the demosp stored procedure takes two string parameters and one integer parameter. You could supply all the parameters as follows:
spobj = connobj.storedProc("demosp", "Param_1", "Param_2", 1);
Alternatively, to pass null for the second parameter and to use the default value for third parameter, you could use either of these statements:
spobj = connobj.storedProc("demosp", "Param_1", "/Null/", "/Default/");spobj = connobj.storedProc("demosp", "Param_1", null, "/Default/");
Note On Informix, default values must occur only after all specified values. For example, you cannot use /Default/ for the second parameter of a stored procedure and then specify a value for the third parameter.
You can also use the "/Default/" and "/Null/" directives for input/output parameters.
An Oracle stored procedure can take ref cursors as input/output or output parameters. For example, assume you have an Oracle stored procedure named proc1 that takes four parameters: a ref cursor, an integer value, another ref cursor, and another integer value. The call to that stored procedure from SQL Plus might look as follows:
execute proc1 (refcursor1 , 3, refcursor2 , 5);
When you call this stored procedure from within a JavaScript application, however, you do not supply the ref cursor parameters. Instead, the equivalent call would be:
spobj = connobj.storedProc("proc1", 3, 5);
For information on output parameters, see “Working with Output Parameters” on page 238. Output parameters cannot be null; however, you can assign a null value to input or input/output parameters.
230 Writing Server-Side JavaScript Applications
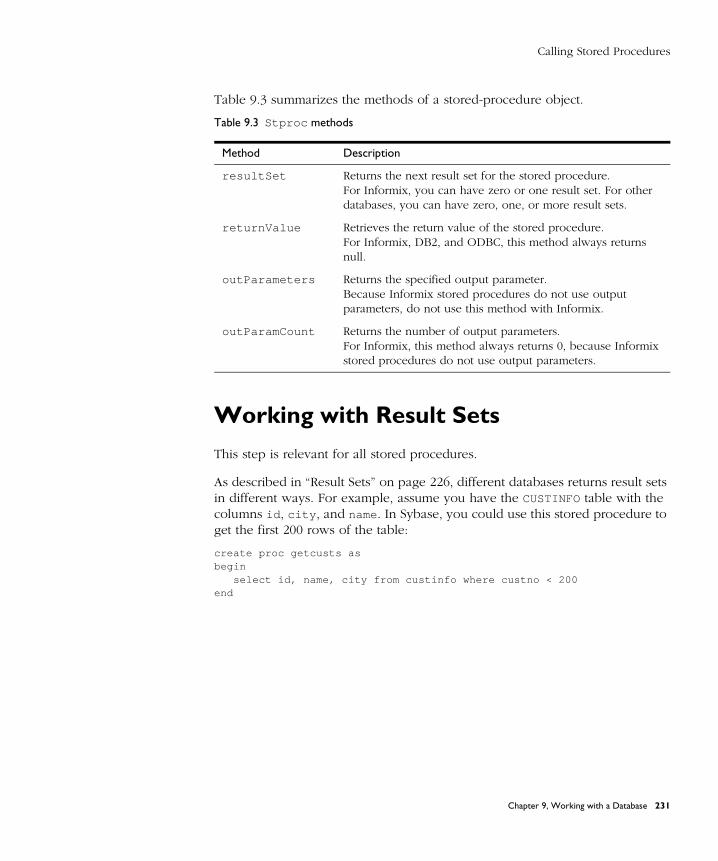
Calling Stored Procedures
Table 9.3 summarizes the methods of a stored-procedure object.
Working with Result SetsThis step is relevant for all stored procedures.
As described in “Result Sets” on page 226, different databases returns result sets in different ways. For example, assume you have the CUSTINFO table with the columns id , city , and name. In Sybase, you could use this stored procedure to get the first 200 rows of the table:
create proc getcusts asbegin
select id, name, city from custinfo where custno < 200end
Table 9.3 Stproc methods
Method Description
resultSet Returns the next result set for the stored procedure. For Informix, you can have zero or one result set. For other databases, you can have zero, one, or more result sets.
returnValue Retrieves the return value of the stored procedure.For Informix, DB2, and ODBC, this method always returns null.
outParameters Returns the specified output parameter. Because Informix stored procedures do not use output parameters, do not use this method with Informix.
outParamCount Returns the number of output parameters.For Informix, this method always returns 0, because Informix stored procedures do not use output parameters.
Chapter 9, Working with a Database 231
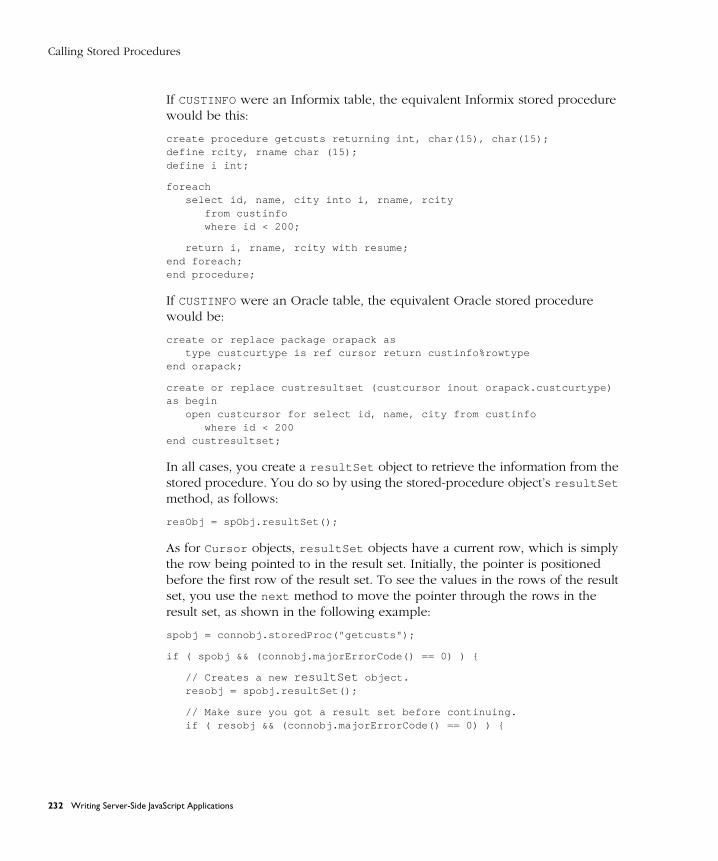
Calling Stored Procedures
If CUSTINFO were an Informix table, the equivalent Informix stored procedure would be this:
create procedure getcusts returning int, char(15), char(15);define rcity, rname char (15);define i int;
foreachselect id, name, city into i, rname, rcity
from custinfowhere id < 200;
return i, rname, rcity with resume;end foreach;end procedure;
If CUSTINFO were an Oracle table, the equivalent Oracle stored procedure would be:
create or replace package orapack astype custcurtype is ref cursor return custinfo%rowtype
end orapack;
create or replace custresultset (custcursor inout orapack.custcurtype)as begin
open custcursor for select id, name, city from custinfo where id < 200
end custresultset;
In all cases, you create a resultSet object to retrieve the information from the stored procedure. You do so by using the stored-procedure object’s resultSet method, as follows:
resObj = spObj.resultSet();
As for Cursor objects, resultSet objects have a current row, which is simply the row being pointed to in the result set. Initially, the pointer is positioned before the first row of the result set. To see the values in the rows of the result set, you use the next method to move the pointer through the rows in the result set, as shown in the following example:
spobj = connobj.storedProc("getcusts");
if ( spobj && (connobj.majorErrorCode() == 0) ) {
// Creates a new resultSet object.resobj = spobj.resultSet();
// Make sure you got a result set before continuing.if ( resobj && (connobj.majorErrorCode() == 0) ) {
232 Writing Server-Side JavaScript Applications
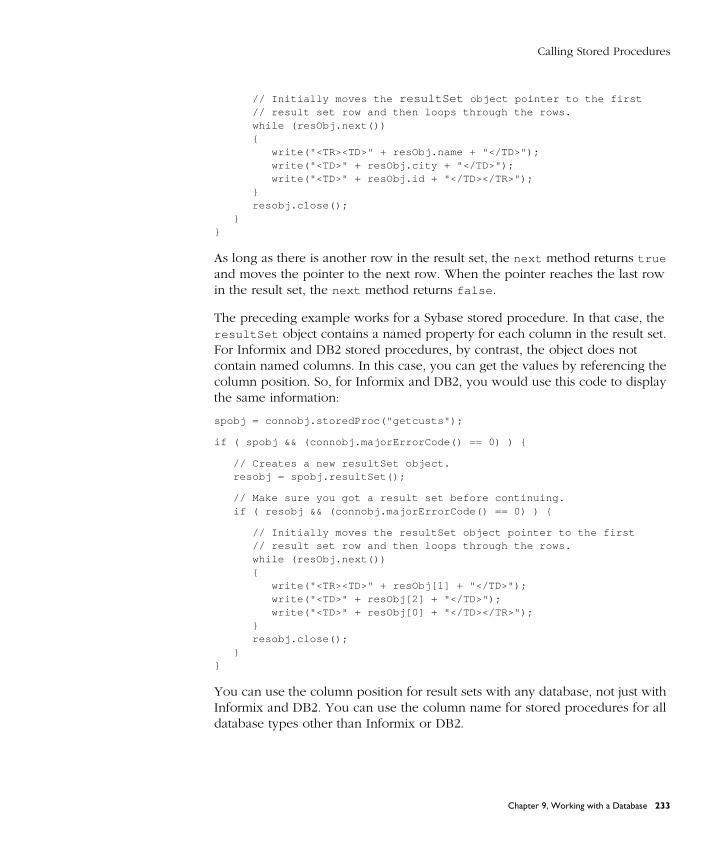
Calling Stored Procedures
// Initially moves the resultSet object pointer to the first // result set row and then loops through the rows.while (resObj.next()){
write("<TR><TD>" + resObj.name + "</TD>");write("<TD>" + resObj.city + "</TD>");write("<TD>" + resObj.id + "</TD></TR>");
}resobj.close();
}}
As long as there is another row in the result set, the next method returns true and moves the pointer to the next row. When the pointer reaches the last row in the result set, the next method returns false .
The preceding example works for a Sybase stored procedure. In that case, the resultSet object contains a named property for each column in the result set. For Informix and DB2 stored procedures, by contrast, the object does not contain named columns. In this case, you can get the values by referencing the column position. So, for Informix and DB2, you would use this code to display the same information:
spobj = connobj.storedProc("getcusts");
if ( spobj && (connobj.majorErrorCode() == 0) ) {
// Creates a new resultSet object.resobj = spobj.resultSet();
// Make sure you got a result set before continuing.if ( resobj && (connobj.majorErrorCode() == 0) ) {
// Initially moves the resultSet object pointer to the first // result set row and then loops through the rows.while (resObj.next()){
write("<TR><TD>" + resObj[1] + "</TD>");write("<TD>" + resObj[2] + "</TD>");write("<TD>" + resObj[0] + "</TD></TR>");
}resobj.close();
}}
You can use the column position for result sets with any database, not just with Informix and DB2. You can use the column name for stored procedures for all database types other than Informix or DB2.
Chapter 9, Working with a Database 233
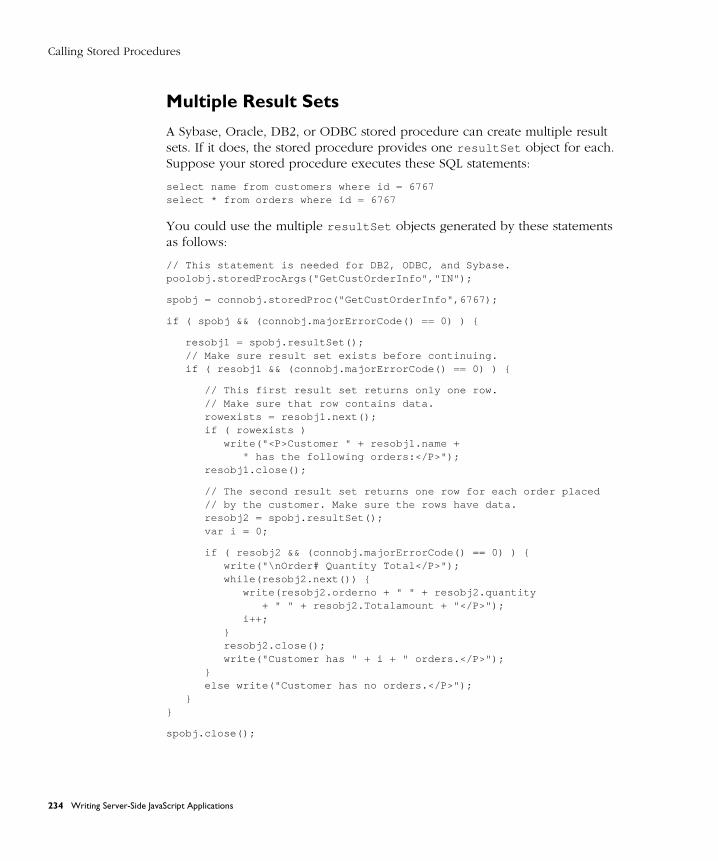
Calling Stored Procedures
Multiple Result Sets
A Sybase, Oracle, DB2, or ODBC stored procedure can create multiple result sets. If it does, the stored procedure provides one resultSet object for each. Suppose your stored procedure executes these SQL statements:
select name from customers where id = 6767select * from orders where id = 6767
You could use the multiple resultSet objects generated by these statements as follows:
// This statement is needed for DB2, ODBC, and Sybase. poolobj.storedProcArgs("GetCustOrderInfo","IN");
spobj = connobj.storedProc("GetCustOrderInfo",6767);
if ( spobj && (connobj.majorErrorCode() == 0) ) {
resobj1 = spobj.resultSet();// Make sure result set exists before continuing.if ( resobj1 && (connobj.majorErrorCode() == 0) ) {
// This first result set returns only one row. // Make sure that row contains data.rowexists = resobj1.next();if ( rowexists )
write("<P>Customer " + resobj1.name + " has the following orders:</P>");
resobj1.close();
// The second result set returns one row for each order placed // by the customer. Make sure the rows have data.resobj2 = spobj.resultSet();var i = 0;
if ( resobj2 && (connobj.majorErrorCode() == 0) ) {write("\nOrder# Quantity Total</P>");while(resobj2.next()) {
write(resobj2.orderno + " " + resobj2.quantity + " " + resobj2.Totalamount + "</P>");
i++;}resobj2.close();write("Customer has " + i + " orders.</P>");
}else write("Customer has no orders.</P>");
}}
spobj.close();
234 Writing Server-Side JavaScript Applications
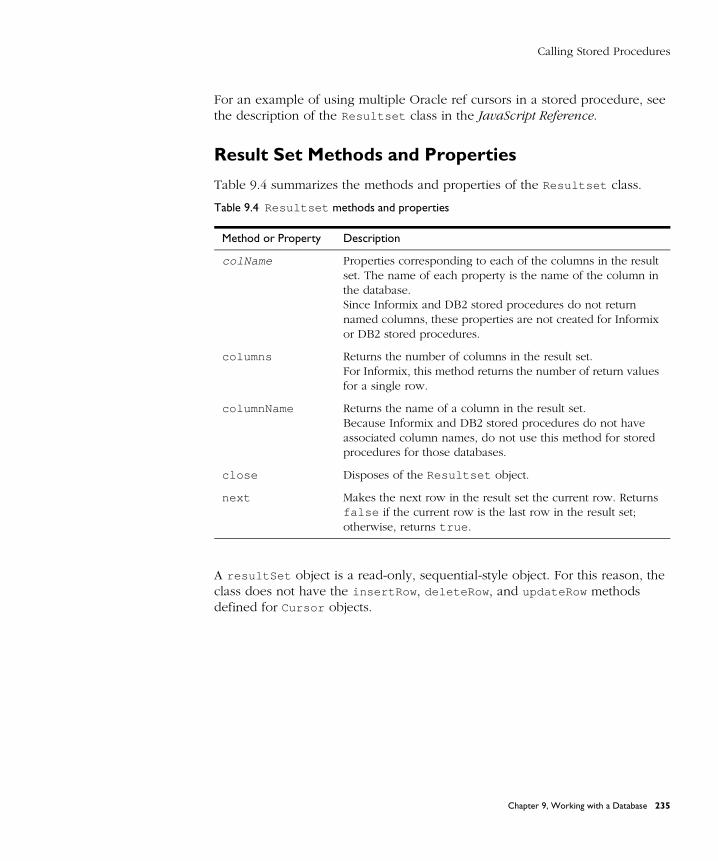
Calling Stored Procedures
For an example of using multiple Oracle ref cursors in a stored procedure, see the description of the Resultset class in the JavaScript Reference.
Result Set Methods and Properties
Table 9.4 summarizes the methods and properties of the Resultset class.
A resultSet object is a read-only, sequential-style object. For this reason, the class does not have the insertRow , deleteRow , and updateRow methods defined for Cursor objects.
Table 9.4 Resultset methods and properties
Method or Property Description
colName Properties corresponding to each of the columns in the result set. The name of each property is the name of the column in the database.Since Informix and DB2 stored procedures do not return named columns, these properties are not created for Informix or DB2 stored procedures.
columns Returns the number of columns in the result set.For Informix, this method returns the number of return values for a single row.
columnName Returns the name of a column in the result set.Because Informix and DB2 stored procedures do not have associated column names, do not use this method for stored procedures for those databases.
close Disposes of the Resultset object.
next Makes the next row in the result set the current row. Returns false if the current row is the last row in the result set; otherwise, returns true .
Chapter 9, Working with a Database 235
Calling Stored Procedures
When You Can Use Result Sets
A resultSet object is not valid indefinitely. In general, once a stored procedure starts, no interactions are allowed between the database client and the database server until the stored procedure has completed. In particular, there are three circumstances that cause a result set to be invalid.
1. If you create a result set as part of a transaction, you must finish using the result set during that transaction. Once you either commit or roll back the transaction, you can’t get any more data from a result set, and you can’t get any additional result sets. For example, the following code is illegal:
database.beginTransaction();spobj = database.storedProc("getcusts");resobj = spobj.resultSet();database.commitTransaction();// Illegal! Result set no longer valid! col1 = resobj[0];
2. For Sybase, ODBC, and DB2, you must retrieve resultSet objects before you call a stored-procedure object’s returnValue or outParameters methods. Once you call either of these methods, you can’t get any more data from a result set, and you can’t get any additional result sets. See “Working with Return Values” on page 237, for more information about these methods.
spobj = database.storedProc("getcusts");resobj = spobj.resultSet();retval = spobj.returnValue();// Illegal! Result set no longer valid! col1 = resobj[0];
3. For Sybase, you must retrieve resultSet objects before you call the cursor or SQLTable method of the associated connection. Once you call cursor or SQLTable , the result set is no longer available. For example, the following code is illegal:
spobj = database.storedProc("getcusts");resobj = spobj.resultSet();curobj = database.cursor ("select * from orders");// Illegal! The result set is no longer available! col1 = resobj[0];
236 Writing Server-Side JavaScript Applications
Calling Stored Procedures
4. For ODBC, a slightly different restriction holds. Again, you must work with the resultSet objects before you call the associated connection’s cursor or SQLTable method. For ODBC, if you get a cursor, then access the result set, and then use the cursor, the Cursor object is no longer available. For example, the following code is illegal:
spbobj = database.storedProc("getcusts");resobj = spobj.resulSet();curobj = database.cursor ("select * from orders");col1 = resobj[0];// Illegal! The cursor is no longer available.curobj.next();
Working with Return Values
This step is relevant to Sybase and Oracle stored procedures. For Informix, ODBC, and DB2 stored procedures, the returnValue method always returns null.
If your stored procedure has a return value, you can access that value with the returnValue method.
On DB2, ODBC, and Sybase, you must use stored procedures and cursors sequentially. You cannot intermix them. For this reason, you must let the system know that you have finished using the stored procedure before you can work with a cursor. You do this by calling the returnValue method of the stored procedure object. This method provides the stored procedure’s return value (if it has one) and completes the execution of the stored procedure. You should also close all objects related to stored procedures when you have finished using them.
Note For DB2, ODBC, and Sybase, you must retrieve resultSet objects before you call the returnValue method. Once you call returnValue , you can’t get any more data from a result set, and you can’t get any additional result sets. You should call returnValue after you have processed the result set and before you retrieve the output parameters.
Chapter 9, Working with a Database 237
Calling Stored Procedures
Working with Output Parameters
This step is relevant to Sybase, Oracle, DB2, or ODBC stored procedures. For Informix stored procedures, the methods discussed here are not applicable.
To determine how many output parameters the procedure has (including both output and input/output parameters), you use the outParamCount method. You can work with the output parameters of a stored procedure by using the object’s outParameters method. If outParamCount returns 0, the stored procedure has no output parameters. In this situation, do not call outParameters .
For example, suppose you created a stored procedure that finds the name of an employee when given an ID. If there is an employee name associated with the given ID, the stored procedure returns 1, and its output parameter contains the employee name. Otherwise, the output parameter is empty. The following code either displays the employee name or a message indicating the name wasn’t found:
id = 100;getNameProc = connobj.storedProc("getName", id);returnValue = getNameProc.returnValue();if (returnValue == 1)
write ("Name of employee is " + getNameProc.outParameters(0));else
write ("No employee with id = " + id);
Assume a stored procedure has one input parameter, one input/output parameter, and one output parameter. Further, assume the call to the stored procedure sends a value for the input parameter and the input/output parameter as shown here:
spobj = connobj.storedProc("myinout", 34, 56);
The outParameters method returns any input/output parameters before it returns the first output parameter.
In the preceding example, if you call outParameters(1) , it returns the value returned from the stored procedure. By contrast, if you call outParameters(0) , the method returns 56. This is the value passed to the stored procedure in the input/output parameter position.
Note Output parameters cannot be null; however, you can assign a null value to input or input/output parameters.
238 Writing Server-Side JavaScript Applications
Calling Stored Procedures
For DB2, ODBC, and Sybase, you must retrieve resultSet objects and use the returnValue method before you call outParameters . Once you call returnValue or outParameters , you can’t get any more data from a result set, and you can’t get any additional result sets. You should call outParameters after you have processed the result set and any return values.
Informix and Sybase Exceptions
Informix and Sybase stored procedures can return error codes using exceptions. After you run the stored procedure, you can retrieve these error codes and error messages using the majorErrorCode and majorErrorMessage methods of the associated database or Connection object.
For example, assume you have the following Informix stored procedure:
create procedure usercheck (user varchar(20))if user = 'LiveWire' thenraise exception -746, 0, 'User not Allowed';endifend procedure
When you run this stored procedure, you could check whether an error occurred and then access the error code and message as follows:
spobj = connobj.storedProc("usercheck");
if ( connobj.majorErrorCode() ) {write("The procedure returned this error code: " +
connobj.majorErrorCode());write("The procedure returned this error message: " +
connobj.majorErrorMessage());}
Chapter 9, Working with a Database 239

Calling Stored Procedures
240 Writing Server-Side JavaScript Applications
C h a p t e r
10Configuring Your Database
This chapter describes how to set up your database to run with the LiveWire Database Service. You should read this chapter and “Configuration Information” on page 14 before you try to use LiveWire with your JavaScript applications.
Note The information in this chapter is accurate as of its writing (12/19/97). Since then, there may have been changes to the database clients that are supported. For the latest information, see the Enterprise Server 3.x Release Notes.
Unlike in earlier releases, 3.x versions of Netscape servers require that you install a database client library (and a particular version of that library) if you wish to use the LiveWire Database Service. You must also configure the client library for use with LiveWire.
Netscape servers do not ship with any database client libraries. You must contact your database vendor for the appropriate library. You need only install and configure the database client libraries for the databases you will use.
If you install your database on a machine other than the one on which the web server is installed, you must have a client database library installed on the machine that has the web server. You must obtain the proper license arrangements directly from your database vendor. Netscape does not make these arrangements for you.
Chapter 10, Configuring Your Database 241
Checking Your Database Configuration
The requirements for configuring your database may differ if your database and your web server are installed on the same machine or on different machines. If they are on the same machine, the following information refers to it as a local configuration; if on different machines, as a remote configuration.
This chapter describes only those aspects of installing the database client that are specific to installing it for use with LiveWire. For general information on installing a database client, refer to the appropriate database vendor documentation.
Checking Your Database ConfigurationAfter you’ve done the setup described in this chapter, you can use the dbadmin sample application to verify that your database connection works properly. You use this JavaScript sample application to connect to your database server and perform various simple tasks such as executing a SELECT statement and displaying the results or sending an arbitrary SQL command to the server.
Because you can use dbadmin to modify and delete database tables, access to it is automatically restricted if you choose to protect the Application Manager. For more information on restricting the Application Manager, see “Controlling Access to an Application” on page 43.
The first thing you must do when using dbadmin is to connect to a database. Choose Connect to Database. A form, shown in Figure 10.1, appears in which you can enter connection information. Enter the parameters, and click Connect to attempt to connect to the server. For information on the parameters you use to connect, see “Database Connection Pools” on page 187; for further information, see the description of the connect method in the JavaScript Reference.
242 Writing Server-Side JavaScript Applications
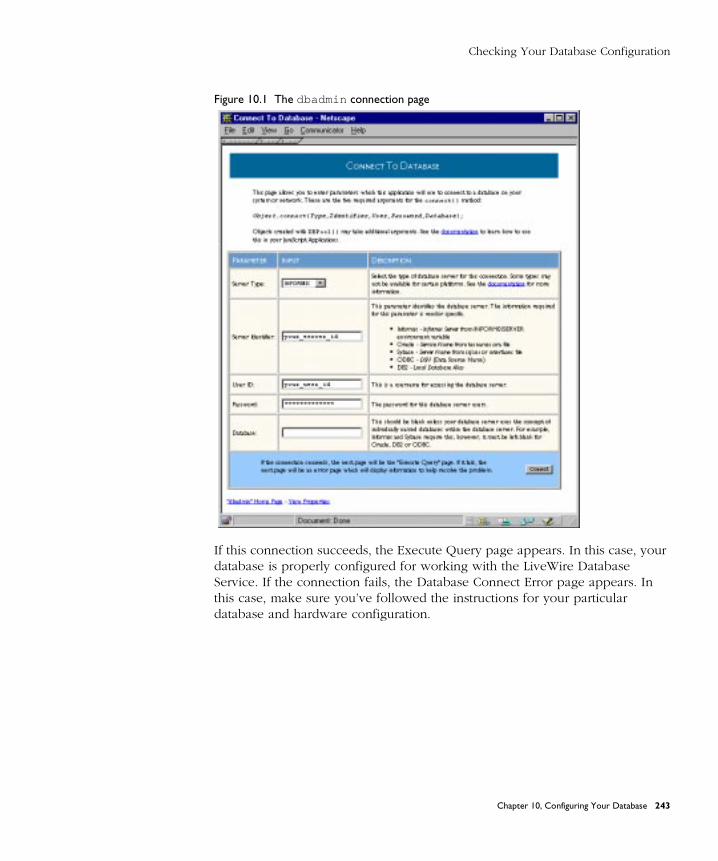
Checking Your Database Configuration
Figure 10.1 The dbadmin connection page
If this connection succeeds, the Execute Query page appears. In this case, your database is properly configured for working with the LiveWire Database Service. If the connection fails, the Database Connect Error page appears. In this case, make sure you’ve followed the instructions for your particular database and hardware configuration.
Chapter 10, Configuring Your Database 243

Supported Database Clients and ODBC Drivers
Supported Database Clients and ODBC Drivers
Table 10.1 summarizes the specific database vendors supported on each platform for Netscape Enterprise Server. These database vendors are not supported for Netscape FastTrack Server.
a. Oracle SQL*Net version 1.1 is no longer supported.
Table 10.2 summarizes support for ODBC on Windows NT for both Netscape Enterprise Server and Netscape FastTrack Server.
Table 10.1 Database vendor client libraries supported on each platform by Netscape Enterprise Server
Database Vendor
AIX DEC Irix 6.2 HP-UX Solaris 2.5/2.5.1
Windows NT 3.51/4.0
DB2 CAE 2.1.2 Not supported
CAE 2.1.2 CAE 2.1.2 CAE 2.1.2 with APAR #JR10150
CAE 2.1.2
Informix Informix Client 7.22
Informix Client 7.22
Informix Client 7.22
Informix Client 7.22
Informix Client 7.22
Informix Client 7.20
Oraclea Oracle Client 7.3.x
Oracle Client 7.3.x
Oracle Client 7.3.x
Oracle Client 7.3.x
Oracle Client 7.3.x
Oracle Client 7.3.2
Sybase OpenClient/C 11.1
OpenClient/C 11.1
OpenClient/C 10.0.3sC
OpenClient/C 11.1
OpenClient/C 11.1
OpenClient/C 10.0.3 and 11.1
Table 10.2 Windows NT ODBC Support
ODBC Component Windows NT 3.51/4.0
ODBC Manager MS ODBC Manager 2.5
ODBC Drivers
MS SQL Server 6.5 MS SQL Server Driver 2.65 (sqlsrv32.dll)
MS SQL Server 6.0 MS SQL Server Driver 2.50.0121 (sqlsrv32.dll)
MS Access 7.0 MS Access Driver 3.5 (odbcjt32.dll) with patch WX1350 from Microsoft
Sybase SQL Anywhere 5.0 Sybase SQL Anywhere Driver 5.5.01 (wod50t.dll)
MS FoxPro x.0 MS FoxPro Driver 3.5 (odbcjt32.dll) with patch WX1350 from Microsoft
MS Excel 7.0 MS Excel Driver 3.5 (odbcjt32.dll) with patch WX1350 from Microsoft
244 Writing Server-Side JavaScript Applications

Supported Database Clients and ODBC Drivers
Table 10.3 summarizes support for ODBC on each Unix platform for both Netscape Enterprise Server and Netscape FastTrack Server. ODBC is not supported on DEC or AIX.
a. For important information on the availability of Visigenic ODBC drivers, see “ODBC” on page 252.
Table 10.4 lists the capabilities of the supported ODBC drivers on NT.
Table 10.3 Unix ODBC Support
ODBC Component AIX and HP-UX Irix 6.2 Solaris 2.5/2.5.1
ODBC Manager Visigenica 2.0 Visigenic 2.0 Visigenic 2.0
ODBC Drivers
MS SQL Server 6.5 Visigenic MS SQL Server Driver version 2.00.100 (vsmsssql.so.1)
Visigenic MS SQL Server Driver version 2.00.1200 (vsmsssql.so.1)
Visigenic MS SQL Server Driver version 2.00.0600 (vsmsssql.so.1) and version 2.00.1200or OpenLink Generic ODBC client version 1.5 (using this client requires the request broker from the OpenLink Workgroup Edition ODBC Driver on the NT server)
MS SQL Server 6.0 Visigenic MS SQL Server Driver version 2.00.100 (vsmsssql.so.1)
Visigenic MS SQL Server Driver 2.00.0200 (vsmsssql.so.1)
Visigenic MS SQL Server Driver 2.00.0600 (vsmsssql.so.1)or OpenLink Generic ODBC client version 1.5 (using this client requires the request broker from the OpenLink Workgroup Edition ODBC Driver on the NT server)
Table 10.4 ODBC driver capabilities on NT
SQL Database Connect SQL passthrough
Read-only cursor
Updatable cursor
Stored procedures
MS-SQL Server 6.0/6.5 Yes Yes Yes Yes Yes
Sybase SQL Anywhere Yes Yes Yes Yes Not tested
Access Yes Yes Yes No N/A
Foxpro Yes Yes Yes No N/A
Excel Yes Yes Yes No N/A
Chapter 10, Configuring Your Database 245

Supported Database Clients and ODBC Drivers
Table 10.5 lists the capabilities of the supported ODBC drivers on Unix platforms.
Table 10.5 ODBC driver capabilities on Unix
Unix Connect SQL passthrough
Read-only cursor
Updatable cursor
Stored procedures
AIX Yes Yes Yes Yes Yes
HP-UX Yes Yes Yes Yes Yes
Irix Yes Yes Yes Yes Yes
Solaris (Visigenics) Yes Yes Yes Yes Yes
Solaris (OpenLink) Yes Yes Yes No No
246 Writing Server-Side JavaScript Applications
DB2
DB2To use a DB2 server, you must have Netscape Enterprise Server. You cannot access DB2 from Netscape FastTrack Server.
If the database and the web server are on different machines, follow the instructions in “DB2 Remote” on page 247.
If the database and the web server are on the same machine, follow the instructions in “DB2 Local” on page 248.
DB2 Remote
All platforms: Install the DB2 client, version 2.1.2. For Solaris, you need APAR #JR10150. For information, see the DB2 documentation at http://
www.software.ibm.com/data/db2 .
To determine if you can connect to the DB2 server, you can issue the following command from the DB2 command line:
DB2 TERMINATE # this command allows the catalog command to take effectDB2 CONNECT TO databasename USERID userid USING password
If you use the BLOB or CLOB data types in your application, you must set the longdatacompat option in your $DB2PATH/db2cli.ini file to 1. For example:
[Database name]longdatacompat=1
If more than one user will access DB2 concurrently, you must set the disablemultithread option in your $DB2PATH/db2cli.ini file to 0. For example:
[common]disablemultithread=0
If you make changes to the db2cli.ini file, you must restart your web server for them to take effect.
Chapter 10, Configuring Your Database 247
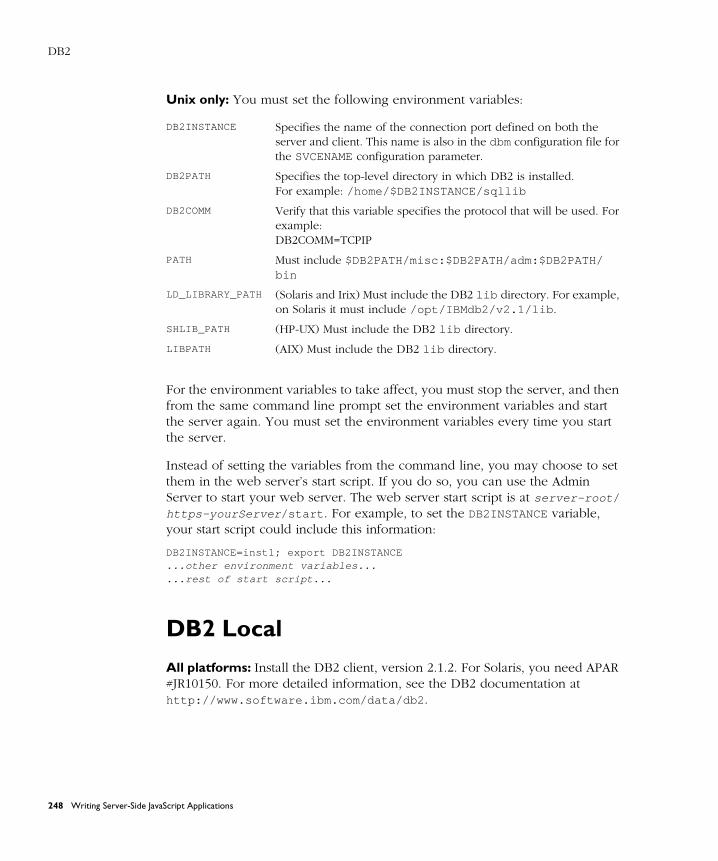
DB2
Unix only: You must set the following environment variables:
For the environment variables to take affect, you must stop the server, and then from the same command line prompt set the environment variables and start the server again. You must set the environment variables every time you start the server.
Instead of setting the variables from the command line, you may choose to set them in the web server’s start script. If you do so, you can use the Admin Server to start your web server. The web server start script is at server-root /
https-yourServer /start . For example, to set the DB2INSTANCE variable, your start script could include this information:
DB2INSTANCE=inst1; export DB2INSTANCE...other environment variables......rest of start script...
DB2 Local
All platforms: Install the DB2 client, version 2.1.2. For Solaris, you need APAR #JR10150. For more detailed information, see the DB2 documentation at http://www.software.ibm.com/data/db2 .
DB2INSTANCE Specifies the name of the connection port defined on both the server and client. This name is also in the dbm configuration file for the SVCENAME configuration parameter.
DB2PATH Specifies the top-level directory in which DB2 is installed.For example: /home/$DB2INSTANCE/sqllib
DB2COMM Verify that this variable specifies the protocol that will be used. For example:DB2COMM=TCPIP
PATH Must include $DB2PATH/misc:$DB2PATH/adm:$DB2PATH/bin
LD_LIBRARY_PATH (Solaris and Irix) Must include the DB2 lib directory. For example, on Solaris it must include /opt/IBMdb2/v2.1/lib .
SHLIB_PATH (HP-UX) Must include the DB2 lib directory.
LIBPATH (AIX) Must include the DB2 lib directory.
248 Writing Server-Side JavaScript Applications
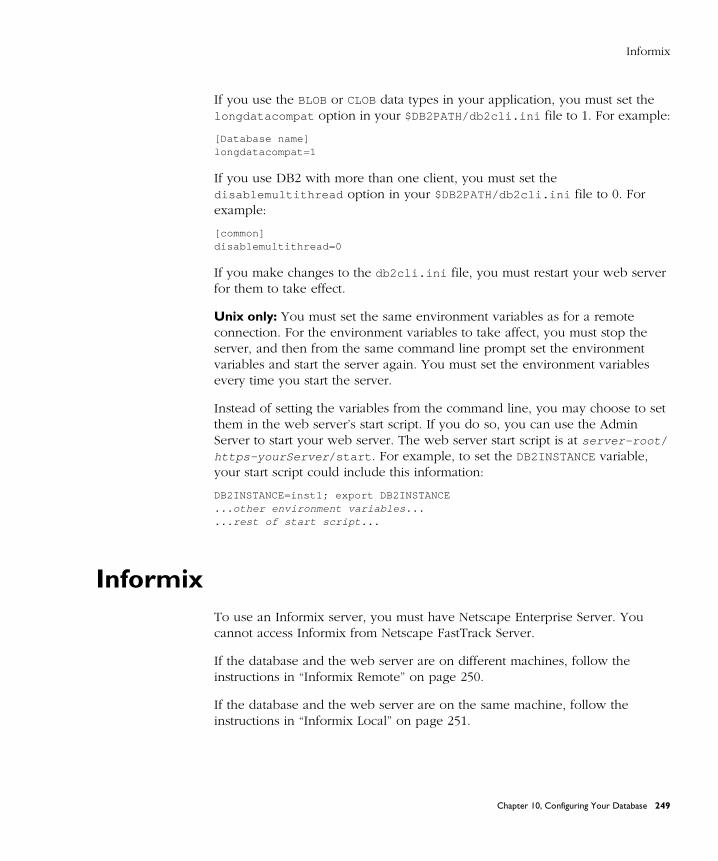
Informix
If you use the BLOB or CLOB data types in your application, you must set the longdatacompat option in your $DB2PATH/db2cli.ini file to 1. For example:
[Database name]longdatacompat=1
If you use DB2 with more than one client, you must set the disablemultithread option in your $DB2PATH/db2cli.ini file to 0. For example:
[common]disablemultithread=0
If you make changes to the db2cli.ini file, you must restart your web server for them to take effect.
Unix only: You must set the same environment variables as for a remote connection. For the environment variables to take affect, you must stop the server, and then from the same command line prompt set the environment variables and start the server again. You must set the environment variables every time you start the server.
Instead of setting the variables from the command line, you may choose to set them in the web server’s start script. If you do so, you can use the Admin Server to start your web server. The web server start script is at server-root /
https-yourServer /start . For example, to set the DB2INSTANCE variable, your start script could include this information:
DB2INSTANCE=inst1; export DB2INSTANCE...other environment variables......rest of start script.. .
InformixTo use an Informix server, you must have Netscape Enterprise Server. You cannot access Informix from Netscape FastTrack Server.
If the database and the web server are on different machines, follow the instructions in “Informix Remote” on page 250.
If the database and the web server are on the same machine, follow the instructions in “Informix Local” on page 251.
Chapter 10, Configuring Your Database 249
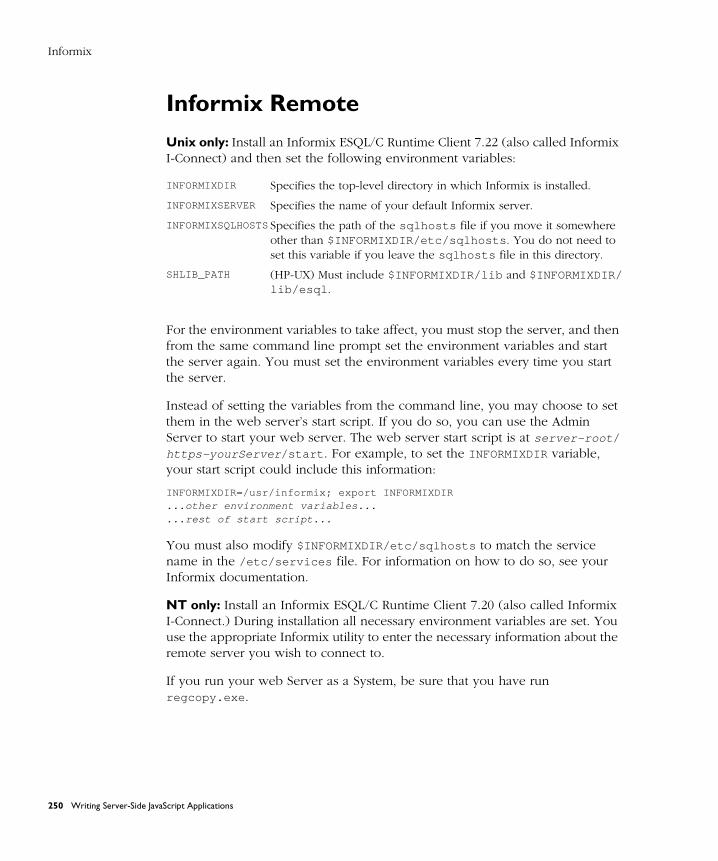
Informix
Informix Remote
Unix only: Install an Informix ESQL/C Runtime Client 7.22 (also called Informix I-Connect) and then set the following environment variables:
For the environment variables to take affect, you must stop the server, and then from the same command line prompt set the environment variables and start the server again. You must set the environment variables every time you start the server.
Instead of setting the variables from the command line, you may choose to set them in the web server’s start script. If you do so, you can use the Admin Server to start your web server. The web server start script is at server-root /
https-yourServer /start . For example, to set the INFORMIXDIR variable, your start script could include this information:
INFORMIXDIR=/usr/informix; export INFORMIXDIR...other environment variables......rest of start script...
You must also modify $INFORMIXDIR/etc/sqlhosts to match the service name in the /etc/services file. For information on how to do so, see your Informix documentation.
NT only: Install an Informix ESQL/C Runtime Client 7.20 (also called Informix I-Connect.) During installation all necessary environment variables are set. You use the appropriate Informix utility to enter the necessary information about the remote server you wish to connect to.
If you run your web Server as a System, be sure that you have run regcopy.exe .
INFORMIXDIR Specifies the top-level directory in which Informix is installed.
INFORMIXSERVER Specifies the name of your default Informix server.
INFORMIXSQLHOSTSSpecifies the path of the sqlhosts file if you move it somewhere other than $INFORMIXDIR/etc/sqlhosts . You do not need to set this variable if you leave the sqlhosts file in this directory.
SHLIB_PATH (HP-UX) Must include $INFORMIXDIR/lib and $INFORMIXDIR/lib/esql .
250 Writing Server-Side JavaScript Applications
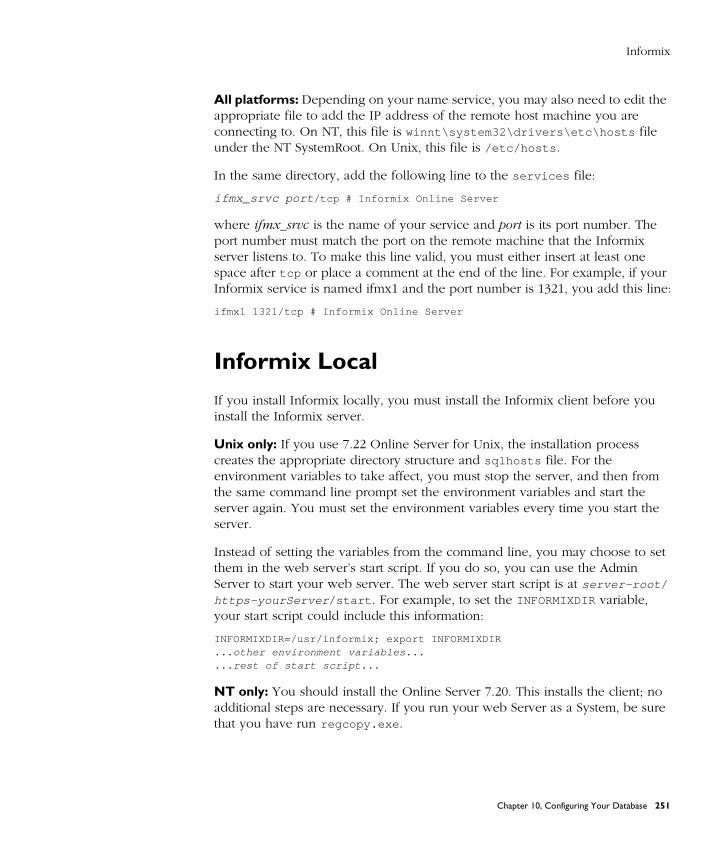
Informix
All platforms: Depending on your name service, you may also need to edit the appropriate file to add the IP address of the remote host machine you are connecting to. On NT, this file is winnt\system32\drivers\etc\hosts file under the NT SystemRoot. On Unix, this file is /etc/hosts .
In the same directory, add the following line to the services file:
ifmx_srvc port /tcp # Informix Online Server
where ifmx_srvc is the name of your service and port is its port number. The port number must match the port on the remote machine that the Informix server listens to. To make this line valid, you must either insert at least one space after tcp or place a comment at the end of the line. For example, if your Informix service is named ifmx1 and the port number is 1321, you add this line:
ifmx1 1321/tcp # Informix Online Server
Informix Local
If you install Informix locally, you must install the Informix client before you install the Informix server.
Unix only: If you use 7.22 Online Server for Unix, the installation process creates the appropriate directory structure and sqlhosts file. For the environment variables to take affect, you must stop the server, and then from the same command line prompt set the environment variables and start the server again. You must set the environment variables every time you start the server.
Instead of setting the variables from the command line, you may choose to set them in the web server’s start script. If you do so, you can use the Admin Server to start your web server. The web server start script is at server-root /
https-yourServer /start . For example, to set the INFORMIXDIR variable, your start script could include this information:
INFORMIXDIR=/usr/informix; export INFORMIXDIR...other environment variables......rest of start script...
NT only: You should install the Online Server 7.20. This installs the client; no additional steps are necessary. If you run your web Server as a System, be sure that you have run regcopy.exe .
Chapter 10, Configuring Your Database 251
ODBC
ODBCAll platforms: For information on the capabilities of the supported ODBC drivers, see “Supported Database Clients and ODBC Drivers” on page 244.
You need to have the appropriate ODBC drivers for the database you are connecting to. You also need to have additional ODBC connectivity files.
Most software products that provide (or advertise) ODBC connectivity supply an ODBC driver or drivers and ODBC connectivity.
NT only: Currently Netscape has certified with ODBC Manager version 2.5. If you have access to an ODBC driver, but not to the ODBC connectivity files, you can obtain them from the MS ODBC SDK. To get updated files for Access, Foxpro, and Excel, you may need patch WX1350 from Microsoft.
Unix only: For ODBC on Unix, you can use either the driver from Visigenic or from OpenLink. If you’re using the Visigenic driver, follow the instructions in “Visigenic ODBC Driver (Unix only)” on page 255. If you’re using the OpenLink driver, follow the instructions in “OpenLink ODBC Driver (Solaris only)” on page 254.
Important Visigenic will no longer enhance their existing ODBC drivers or SDK products. Instead, Visigenic has selected INTERSOLV to provide an upgrade path for these drivers and products. Visigenic will continue to support existing ODBC drivers and SDK products until August 31, 1998. Visigenic ODBC customers can renew their current maintenance contract for a prorated, discounted amount through that date. Through December 31, 1997, customers can obtain, at a reduced cost, an INTERSOLV 3.0-level ODBC driver for the equivalent Visigenic driver they’re using today, provided they have a current Visigenic maintenance contract. In the near future, Visigenic will provide a document covering the operational differences between Visigenic and INTERSOLV ODBC drivers.
ODBC Data Source Names (NT only)
Two types of data sources can be created:
• System DSN: If you’re using a system DSN, the web server must be started using the System account.
252 Writing Server-Side JavaScript Applications

ODBC
• User DSN: If you’re using a user DSN, the web server must be started using an appropriate NT user account.
The data source describes the connection parameter for each database needing ODBC connectivity. The data source is defined using the ODBC administrator. When ODBC is installed, an administrator is also installed. Each ODBC driver requires different pieces of information to set up the data source.
Chapter 10, Configuring Your Database 253
ODBC
OpenLink ODBC Driver (Solaris only)
Install the request broker, OpenLink Workgroup Edition ODBC Driver, on the database server. This must be running before you can connect to the database using the OpenLink request agent.
Install the request agent, in OpenLink Generic ODBC client version 1.5, on the database client machine.
Rename or copy the request agent’s driver manager file from libiodbc.so to libodbc.so in the $ODBCDIR/lib directory, where $ODBCDIR is the directory in which ODBC is installed.
When you installed your server, you installed it to run as some user, either root, nobody, or a particular server user. The user you pick must have a real home directory, which you may have to create. For example, the default home directory for the nobody user on Irix is /dev/null . If you install your server on Irix as nobody, you must give the nobody user a different home directory.
In that home directory, you must have an .odbc.ini file. For example, if you run the server as root, this file is under the root (/) directory.
Set the following environment variables:
For the environment variables to take affect, you must stop the server, and then from the same command line prompt set the environment variables and start the server again. You must set the environment variables every time you start the server.
Instead of setting the variables from the command line, you may choose to set them in the web server’s start script. If you do so, you can use the Admin Server to start your web server. The web server start script is at server-root /
https-yourServer /start . For example, to set the LD_LIBRARY_PATH variable, your start script could include this information:
LD_LIBRARY_PATH=$LD_LIBRARY_PATH:/home/odbcsdk/lib; export LD_LIBRARY_PATH...other environment variables......rest of start script...
LD_LIBRARY_PATH (Solaris and Irix) Add the location of the ODBC libraries to this variable.
UDBCINI Specifies the location of the .odbc.ini file.
254 Writing Server-Side JavaScript Applications
Oracle
Visigenic ODBC Driver (Unix only)
When you installed your server, you installed it to run as some user, either root, nobody, or a particular server user. The user you pick must have a real home directory, which you may have to create. For example, the default home directory for the nobody user on Irix is /dev/null . If you install your server on Irix as nobody, you must give the nobody user a different home directory.
In that home directory, you must have an .odbc.ini file. For example, if you run the server as root, this file is under the root (/) directory.
Set the following environment variable:
For the environment variables to take affect, you must stop the server, and then from the same command line prompt set the environment variables and start the server again. You must set the environment variables every time you start the server.
Instead of setting the variables from the command line, you may choose to set them in the web server’s start script. If you do so, you can use the Admin Server to start your web server. The web server start script is at server-root /
https-yourServer /start . For example, to set the LD_LIBRARY_PATH variable, your start script could include this information:
LD_LIBRARY_PATH=$LD_LIBRARY_PATH:/home/odbcsdk/lib; export LD_LIBRARY_PATH...other environment variables......rest of start script...
OracleTo use an Oracle server, you must have Netscape Enterprise Server. You cannot access Oracle from Netscape FastTrack Server.
LD_LIBRARY_PATH (Solaris and Irix) Add the location of the ODBC libraries to this variable. In the preceding example, this would be /u/my-user/odbcsdk/lib.
SHLIB_PATH (HP-UX) Add the location of the ODBC libraries to this variable.
LIBPATH (AIX) Add the location of the ODBC libraries to this variable.
Chapter 10, Configuring Your Database 255
Oracle
If the database and the web server are on different machines, follow the instructions in “Oracle Remote” on page 256.
If the database and the web server are on the same machine, follow the instructions in “Oracle Local” on page 257.
Unix only: Make sure you can connect to your Oracle database via SQL*Net. When you have finished installation, you can use a loopback test to verify that you connected correctly. For example, from within sqlplus , you can try to connect to your database with the following command:
connect username / password @service_name
Or, from the Unix command line, you could use this command:
sqlplus username / password @service_name
In these commands, you use the service_name from your tnsnames.ora file.
Oracle Remote
NT only: You must install the Oracle 7.3.2 client software for NT. Oracle 7.1 and 7.2 clients are not supported. You must also create the Oracle configuration files using the appropriate Oracle configuration utility.
Unix only: Before you can connect to Oracle under Irix, you must have the appropriate Irix patches. See Enterprise Server 3.x Release Notes for information on the patches you need.
You must install the Oracle 7.3.x client software for Unix. Oracle 7.1 and 7.2 clients are not supported.
You must set the following environment variables:
ORACLE_HOME Specifies the top-level directory in which Oracle is installed.
TNS_ADMIN Specifies the location of configuration files, for example, $ORACLE_HOME/network/admin . After installation Oracle creates the configuration files under /var/opt/oracle . If listener.ora and tnsnames.ora are in this directory, you might not need to set TNS_ADMIN, because by default Oracle uses /var/opt/oracle .
256 Writing Server-Side JavaScript Applications
Oracle
For the environment variables to take affect, you must stop the server, and then from the same command line prompt set the environment variables and start the server again. You must set the environment variables every time you start the server.
Instead of setting the variables from the command line, you may choose to set them in the web server’s start script. If you do so, you can use the Admin Server to start your web server. The web server start script is at server-root /
https-yourServer /start . For example, to set the ORACLE_HOME variable, your start script could include this information:
ORACLE_HOME=/export/oracle73; export ORACLE_HOME...other environment variables......rest of start script...
If you do not set these environment variables properly, Oracle returns the ORA-1019 error code the first time you attempt to connect. For information on error handling, see Chapter 12, “Error Handling for LiveWire.”
Oracle Local
Unix only: Before you can connect to Oracle under Irix, you must have the appropriate Irix patches. See Enterprise Server 3.x Release Notes for information on the patches you need.
All platforms: You must install an Oracle Workgroup, Enterprise Server 7.3.2 (NT), or Enterprise Server 7.3.x (Unix). Oracle 7.1 and 7.2 clients are not supported. Check with your server vendor to verify that the Oracle server version is compatible with the Oracle client.
You must set the following environment variables:
For the environment variables to take affect, you must stop the server, and then from the same command line prompt set the environment variables and start the server again. You must set the environment variables every time you start the server.
ORACLE_HOME Specifies the top-level directory in which Oracle is installed.
ORACLE_SID Specifies the Oracle System Identifier.
Chapter 10, Configuring Your Database 257
Sybase
Instead of setting the variables from the command line, you may choose to set them in the web server’s start script. If you do so, you can use the Admin Server to start your web server. The web server start script is at server-root /
https-yourServer /start . For example, to set the ORACLE_HOME variable, your start script could include this information:
ORACLE_HOME=/export/oracle73; export ORACLE_HOME...other environment variables......rest of start script...
When your Oracle database server is local, you must pass the empty string as the second argument to the connect method of the database or DbPool object or to the DbPool constructor. This way, those methods use the value of the ORACLE_SID environment variable. For example:
database.connect ("ORACLE", "" "user", "password", "");
For more information on Oracle installation, see Oracle’s documentation.
SybaseTo use a Sybase server, you must have Netscape Enterprise Server. You cannot access Sybase from Netscape FastTrack Server.
If the database and the web server are on different machines, follow the instructions in “Sybase Remote” on page 258.
If the database and the web server are on the same machine, follow the instructions in “Sybase Local” on page 259.
In addition, if you’re using a Unix platform and Sybase has a multithreaded driver for that platform, follow the instructions in “Sybase (Unix only)” on page 260. See Enterprise Server 3.x Release Notes for a list of the Unix platforms on which Sybase has a multithreaded driver.
Sybase Remote
Unix only: Set the following environment variable:
SYBASE The top-level directory in which Sybase is installed
LD_LIBRARY_PATH (DEC) Must include $SYBASE/lib .
258 Writing Server-Side JavaScript Applications

Sybase
For the environment variables to take affect, you must stop the server, and then from the same command line prompt set the environment variables and start the server again. You must set the environment variables every time you start the server.
Instead of setting the variables from the command line, you may choose to set them in the web server’s start script. If you do so, you can use the Admin Server to start your web server. The web server start script is at server-root /
https-yourServer /start . For example, to set the SYBASE variable, your start script could include this information:
SYBASE=/home/sybase; export SYBASE...other environment variables......rest of start script...
For Solaris, you must also follow the instructions in “Sybase (Unix only)” on page 260.
All platforms: You must install SYBASE Open Client/C. Supported versions are listed in “Supported Database Clients and ODBC Drivers” on page 244.
You can use the appropriate Sybase utility to enter, in the sql.ini file (NT) and the interfaces file (all platforms), the information about the remote server you want to connect to. For more information, see your Sybase documentation.
Sybase Local
Unix only: Set the following environment variable:
For the environment variables to take affect, you must stop the server, and then from the same command line prompt set the environment variables and start the server again. You must set the environment variables every time you start the server.
SYBASE The top-level directory in which Sybase is installed
LD_LIBRARY_PATH (DEC) Must include $SYBASE/lib .
Chapter 10, Configuring Your Database 259
Sybase
Instead of setting the variables from the command line, you may choose to set them in the web server’s start script. If you do so, you can use the Admin Server to start your web server. The web server start script is at server-root /
https-yourServer /start . For example, to set the SYBASE variable, your start script could include this information:
SYBASE=/home/sybase; export SYBASE...other environment variables......rest of start script...
For Solaris, you must also follow the instructions in “Sybase (Unix only)” on page 260.
All platforms: Install a Sybase SQL Server, version 11.1; the client portion is installed with the server. Supported versions are listed in “Supported Database Clients and ODBC Drivers” on page 244.
You can use the appropriate Sybase utility to enter the information about the remote server you want to connect to in the sql.ini file (NT) and the interfaces file (all platforms). For more information, see your Sybase documentation.
Sybase (Unix only)On some Unix platforms, Sybase has both a single-threaded driver and a multithreaded driver. If Sybase has a multithreaded driver for a particular Unix machine, you must use the multithreaded driver with LiveWire. On these platforms, your web server will behave unpredictably with the single-threaded driver. This requirement applies for both a local and a remote connection. It does not apply to Windows platforms.
See Enterprise Server 3.x Release Notes for a list of the Unix platforms on which Sybase has a multithreaded driver.
To ensure that you use the multithreaded driver, you must edit your $SYBASE/
config/libtcl.cfg file. This file contains a pair of lines that enable either the single-threaded or the multithreaded driver. You must have one of these lines commented out and the other active. For example, on Solaris locate these lines:
[DRIVERS];libtli.so=tcp unused ; This is the nonthreaded tli driver.libtli_r.so=tcp unused ; This is the threaded tli driver.
260 Writing Server-Side JavaScript Applications
Sybase
Make sure that the line for the single-threaded driver is commented out and that the line for the multithreaded driver is not commented out. The filename differs on each platform, but the lines are always in the DRIVERS section and are always commented to indicate which is the single-threaded and which the multithreaded driver.
Note If you wish to use the Sybase isql utility, you must use the nonthreaded tli driver. In this case, the line for libtli_r.so must be commented out. For information on using this driver, see your Sybase documentation.
Chapter 10, Configuring Your Database 261

Sybase
262 Writing Server-Side JavaScript Applications
C h a p t e r
11Data Type Conversion
This chapter describes how the JavaScript runtime engine on the server converts between the more complex data types used in relational databases and the simpler ones defined for JavaScript.
Databases have a rich set of data types. The JavaScript runtime engine on the server converts these data types to JavaScript values, primarily either strings or numbers. A JavaScript number is stored as a double-precision floating-point value. In general, the runtime engine converts character data types to strings, numeric data types to numbers, and dates to JavaScript Date objects. It converts null values to JavaScript null.
Note Because JavaScript does not support fixed or packed decimal notation, some precision may be lost when reading and writing packed decimal data types. Be sure to check results before inserting values back into a database, and use appropriate mathematical functions to correct for any loss of precision.
Chapter 11, Data Type Conversion 263
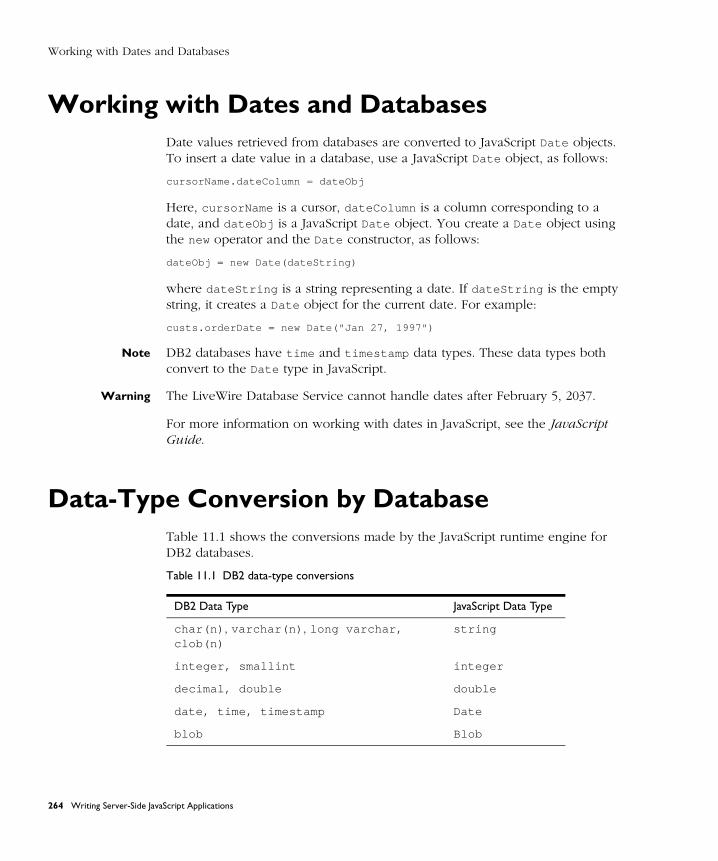
Working with Dates and Databases
Working with Dates and DatabasesDate values retrieved from databases are converted to JavaScript Date objects. To insert a date value in a database, use a JavaScript Date object, as follows:
cursorName.dateColumn = dateObj
Here, cursorName is a cursor, dateColumn is a column corresponding to a date, and dateObj is a JavaScript Date object. You create a Date object using the new operator and the Date constructor, as follows:
dateObj = new Date(dateString)
where dateString is a string representing a date. If dateString is the empty string, it creates a Date object for the current date. For example:
custs.orderDate = new Date("Jan 27, 1997")
Note DB2 databases have time and timestamp data types. These data types both convert to the Date type in JavaScript.
Warning The LiveWire Database Service cannot handle dates after February 5, 2037.
For more information on working with dates in JavaScript, see the JavaScript Guide.
Data-Type Conversion by DatabaseTable 11.1 shows the conversions made by the JavaScript runtime engine for DB2 databases.
Table 11.1 DB2 data-type conversions
DB2 Data Type JavaScript Data Type
char(n) , varchar(n) , long varchar, clob(n)
string
integer, smallint integer
decimal, double double
date, time, timestamp Date
blob Blob
264 Writing Server-Side JavaScript Applications

Data-Type Conversion by Database
Table 11.2 shows the conversions made by the JavaScript runtime engine for Informix databases.
ODBC translates a vendor’s data types to ODBC data types. For example, the Microsoft SQL Server varchar data type is converted to the ODBC SQL_VARCHAR data type. For more information, see the ODBC SDK documentation. Table 11.3 shows the conversions made by the JavaScript runtime engine for ODBC databases.
a. The Informix datetime data type has variable precision defined by the user. Server-side JavaScript displays datetime data with the format of YEAR to SECOND. If a datetime variable has been defined with another precision, such as MONTH to DAY, it may display incorrectly. In this situation, the data is not corrupted by the incorrect display.
Table 11.2 Informix data-type conversions
Informix Data Type JavaScript Data Type
char , nchar , text , varchar , nvarchar string
decimal(p,s) , double precision , float , integer , money(p,s) , serial , smallfloat , smallint
number
date , datetime a Date
byte Blob
interval Not supported
Table 11.3 ODBC data-type conversions
ODBC Data Type JavaScript Data Type
SQL_LONGVARCHAR, SQL_VARCHAR, SQL_CHAR string
SQL_SMALLINT, SQL_INTEGER, SQL_DOUBLE, SQL_FLOAT, SQL_REAL, SQL_BIGINT , SQL_NUMERIC, SQL_DECIMAL
number
SQL_DATE, SQL_TIME, SQL_TIMESTAMP Date
SQL_BINARY, SQL_VARBINARY, SQL_LONGBINARY
Blob
Chapter 11, Data Type Conversion 265
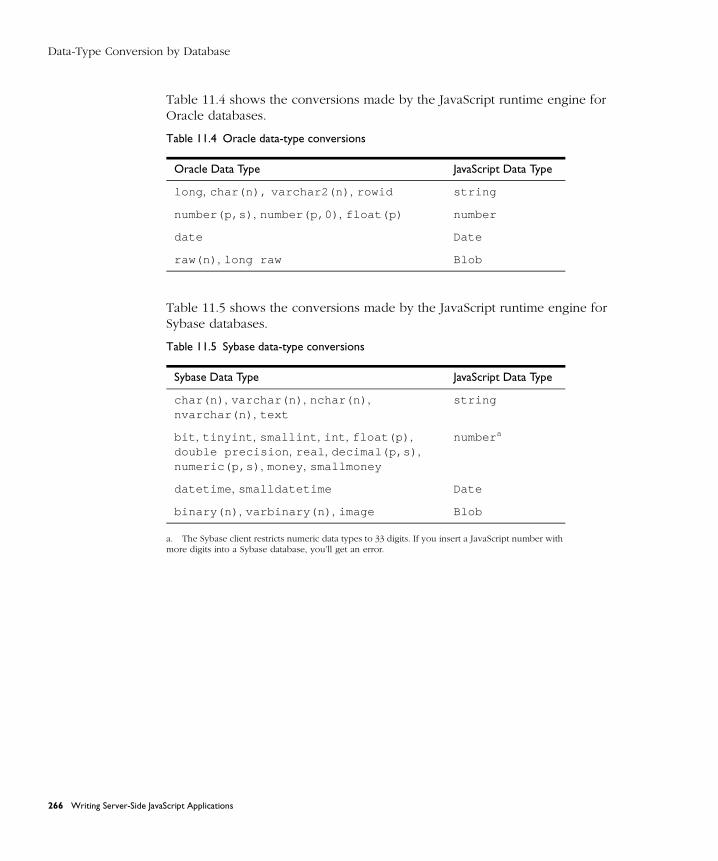
Data-Type Conversion by Database
Table 11.4 shows the conversions made by the JavaScript runtime engine for Oracle databases.
Table 11.5 shows the conversions made by the JavaScript runtime engine for Sybase databases.
a. The Sybase client restricts numeric data types to 33 digits. If you insert a JavaScript number with more digits into a Sybase database, you’ll get an error.
Table 11.4 Oracle data-type conversions
Oracle Data Type JavaScript Data Type
long , char(n), varchar2(n) , rowid string
number(p,s) , number(p,0) , float(p) number
date Date
raw(n) , long raw Blob
Table 11.5 Sybase data-type conversions
Sybase Data Type JavaScript Data Type
char(n) , varchar(n) , nchar(n) , nvarchar(n) , text
string
bit , tinyint , smallint , int , float(p) , double precision , real , decimal(p,s) , numeric(p,s) , money, smallmoney
number a
datetime , smalldatetime Date
binary(n) , varbinary(n) , image Blob
266 Writing Server-Side JavaScript Applications

C h a p t e r
12Error Handling for LiveWire
This chapter describes the types of errors you can encounter when working with relational databases.
When writing a JavaScript application, you should be aware of the various error conditions that can occur. In particular, when you use the LiveWire Database Service to interact with a relational database, errors can occur for a variety of reasons. For example, SQL statements can fail because of referential integrity constraints, lack of user privileges, record or table locking in a multiuser database, and so on. When an action fails, the database server returns an error message indicating the reason for failure.
Your code should check for error conditions and handle them appropriately.
Chapter 12, Error Handling for LiveWire 267
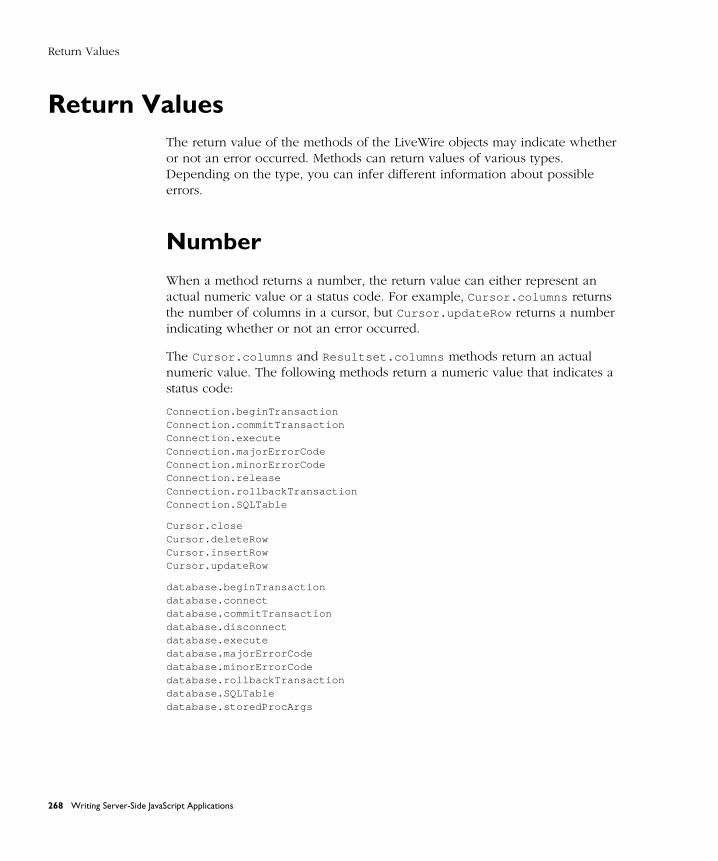
Return Values
Return ValuesThe return value of the methods of the LiveWire objects may indicate whether or not an error occurred. Methods can return values of various types. Depending on the type, you can infer different information about possible errors.
Number
When a method returns a number, the return value can either represent an actual numeric value or a status code. For example, Cursor.columns returns the number of columns in a cursor, but Cursor.updateRow returns a number indicating whether or not an error occurred.
The Cursor.columns and Resultset.columns methods return an actual numeric value. The following methods return a numeric value that indicates a status code:
Connection.beginTransactionConnection.commitTransactionConnection.executeConnection.majorErrorCodeConnection.minorErrorCodeConnection.releaseConnection.rollbackTransactionConnection.SQLTable
Cursor.closeCursor.deleteRowCursor.insertRowCursor.updateRow
database.beginTransactiondatabase.connectdatabase.commitTransactiondatabase.disconnectdatabase.executedatabase.majorErrorCodedatabase.minorErrorCodedatabase.rollbackTransactiondatabase.SQLTabledatabase.storedProcArgs
268 Writing Server-Side JavaScript Applications
Return Values
DbPool.connectDbPool.disconnectDbPool.majorErrorCodeDbPool.minorErrorCodeDbPool.storedProcArgs
Resultset.close
Stproc.close
If the numeric return value of a method indicates a status code, 0 indicates successful completion and a nonzero number indicates an error. If the status code is nonzero, you can use the majorErrorCode and majorErrorMessage methods of the associated Connection , database , or DbPool object to find out information about the error. In some cases, the minorErrorCode and minorErrorMessage methods provide additional information about the error. For information on the return values of these error methods, see “Error Methods” on page 272.
Object
When a method returns an object, it can either be a real object or it can be null. If the method returns null, a JavaScript error probably occurred. In most cases, if an error occurred in the database, the method returns a valid object, but the software sets an error code.
The blob global function returns an object. In addition, the following methods return an object:
Connection.cursorConnection.storedProcdatabase.cursordatabase.storedProcDbPool (constructor)DbPool.connectionStproc.resultSet
Whenever you create a cursor, result set, or stored procedure, you should check for both the existence of the created object and for a possible return code. You can use the majorErrorCode and majorErrorMessage methods to examine an error.
Chapter 12, Error Handling for LiveWire 269
Return Values
For example, you might create a cursor and verify its correctness with code similar to the following:
// Create the Cursor object.custs = connobj.cursor ("select id, name, city
from customer order by id");
// Before continuing, make sure a real cursor was returned// and there was no database error.if ( custs && (connobj.majorErrorCode() == 0) ) {
// Get the first rowcusts.next();
// ... process the cursor rows ...
//Close the cursorcusts.close();
}
else // ... handle the error condition ...
Boolean
The following methods return Boolean values:
Connection.connectedCursor.nextdatabase.connectedDbPool.connectedResultset.next
When a method returns a Boolean value, true usually indicates successful completion, whereas false indicates some other condition. A return value of false does not indicate an actual error; it may indicate a successful termination condition.
For example, Connection.connected returns false to indicate the Connection object is not currently connected. This can mean that an error occurred when the Connection object was created, or it can indicate that a previously used connection was intentionally disconnected. Neither of these is an error of the connected method. If an error occurred when the connection was created, your code should catch the error with that method. If the connection was terminated, you can reconnect.
270 Writing Server-Side JavaScript Applications
Return Values
As a second example, Cursor.next returns false when you get to the end of the rows in the cursor. If the SELECT statement used to create the Cursor object finds the table but no rows match the conditions of the SELECT statement, then an empty cursor is created. The first time you call the next method for that cursor, it returns false . Your code should anticipate this possibility.
String
When a method returns a string, you usually do not get any error information. If, however, the method returns null, check the associated error method.
The following methods return a string:
Connection.majorErrorMessageConnection.minorErrorMessageCursor.columnNamedatabase.majorErrorMessagedatabase.minorErrorMessageDbPool.majorErrorMessageDbPool.minorErrorMessageResultset.columnName
Void
Some methods do not return a value. You cannot tell anything about possible errors from such methods. The following methods do not return a value:
Connection.releaseCursor.closedatabase.disconnectDbPool.disconnectResulset.close
Chapter 12, Error Handling for LiveWire 271
Error Methods
Error MethodsAs discussed earlier, many methods return a numeric status code. When a method returns a status code, there may be a corresponding error code and message from the database server. LiveWire provides four methods for the Connection , DbPool , and database objects to access database error codes and messages. The methods are:
• majorErrorMessage : major error message returned by the database.
• minorErrorMessage : secondary message returned by the database.
• majorErrorCode : major error code returned by the database. This typically corresponds to the server’s SQLCODE.
• minorErrorCode : secondary error code returned by the database.
The results returned by these methods depend on the database server being used and the database status code. Most of the time you need to consider only the major error code or error message to understand a particular error. The minor error code and minor error message are used in only a small number of situations.
Note Calling another method of Connection , DbPool , or database can reset the error codes and messages. To avoid losing error information, be sure to check these methods before proceeding.
After receiving an error message, your application may want to display a message to the user. Your message may include the string returned by majorErrorMessage or minorErrorMessage or the number returned by majorErrorCode or minorErrorCode . Additionally, you may want to process the string or number before displaying it.
In computing the string returned by majorErrorMessage and minorErrorMessage , LiveWire returns the database vendor string, with additional text prepended. For details on the returned text, see the descriptions of these methods in the JavaScript Reference.
272 Writing Server-Side JavaScript Applications
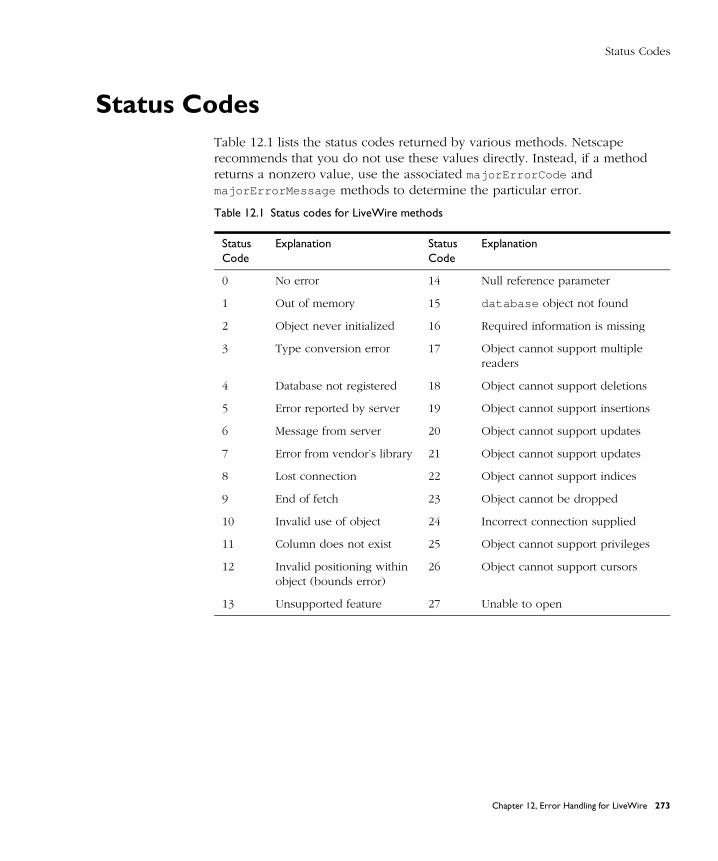
Status Codes
Status CodesTable 12.1 lists the status codes returned by various methods. Netscape recommends that you do not use these values directly. Instead, if a method returns a nonzero value, use the associated majorErrorCode and majorErrorMessage methods to determine the particular error.
Table 12.1 Status codes for LiveWire methods
Status Code
Explanation Status Code
Explanation
0 No error 14 Null reference parameter
1 Out of memory 15 database object not found
2 Object never initialized 16 Required information is missing
3 Type conversion error 17 Object cannot support multiple readers
4 Database not registered 18 Object cannot support deletions
5 Error reported by server 19 Object cannot support insertions
6 Message from server 20 Object cannot support updates
7 Error from vendor’s library 21 Object cannot support updates
8 Lost connection 22 Object cannot support indices
9 End of fetch 23 Object cannot be dropped
10 Invalid use of object 24 Incorrect connection supplied
11 Column does not exist 25 Object cannot support privileges
12 Invalid positioning within object (bounds error)
26 Object cannot support cursors
13 Unsupported feature 27 Unable to open
Chapter 12, Error Handling for LiveWire 273

Status Codes
274 Writing Server-Side JavaScript Applications
C h a p t e r
13Videoapp and Oldvideo Sample
Applications
This chapter describes the videoapp sample application, which illustrates the use of the LiveWire Database Service. It describes how to configure your environment to run the videoapp and oldvideo sample applications.
Netscape servers come with two sample database applications, videoapp and oldvideo , that illustrate the LiveWire Database Service. These applications are quite similar; they track video rentals at a fictional video store. The videoapp application demonstrates the use of the DbPool and Connection objects. The oldvideo application demonstrates the use of the predefined database object.
There are a small number of restrictions on the use of these applications:
• The videoapp application cannot currently be used with the Informix database. The oldvideo application, however, can be used with Informix.
• While these sample applications can be used with ODBC and SQL Server, if the driver on your platform does not support updatable cursors, the applications will not work. For information on which drivers support updatable cursors, see “Supported Database Clients and ODBC Drivers” on page 244.
• The videoapp application uses cursors that span multiple HTML pages. If your database driver is single-threaded, these cursors may hold locks on the database and prevent other users from accessing it. For information on which database drivers are single-threaded, see the Enterprise Server 3.x Release Notes.
Chapter 13, Videoapp and Oldvideo Sample Applications 275
Configuring Your Environment
Configuring Your EnvironmentBefore you can run these applications, you must make minor changes to the source files and create a database of videos. This section tells you which files you must change and which procedures you use to make these changes and to create the database for each of the supported database servers. See the section for your database server for specific information.
Note Your database server must be up and running before you can create your video database, and you must configure your database server and client as described in Chapter 10, “Configuring Your Database.”
In addition, the database-creation scripts use database utilities provided by your database vendor. You should be familiar with how to use these utilities.
Connecting to the Database and RecompilingThe videoapp application is in the $NSHOME\js\samples\videoapp directory, where $NSHOME is the directory in which you installed the Netscape server. The oldvideo application is in the $NSHOME\js\samples\oldvideo directory.
For each application, you must change the connect string in the HTML source file, start.htm , to match your database environment. For information on the parameters you use to connect, see “Database Connection Pools” on page 187; for even more information, see the description of the connect method in the JavaScript Reference.
For the videoapp application, change this line:
project.sharedConnections.pool = new DbPool ("<Server Type>", "<Server Identifier>",
"<User>", "<Password>", "<Database>", 2, false)
For the oldvideo application, change this line:
database.connect ("INFORMIX", "yourserver", "informix","informix", "lw_video")
276 Writing Server-Side JavaScript Applications
Configuring Your Environment
Save your changes and recompile the application. To recompile one of the applications from the command line, run its build file, located in the application’s directory. Be sure your PATH environment variable includes the path to the compiler (usually $NSHOME\bin\https ).
Restart the application in the JavaScript Application Manager.
Creating the Database
There are two sets of creation scripts for videoapp and oldvideo , in their respective application directories. The sets of scripts are identical. If you run one set, both applications will be able to use the database.
The first time you run the scripts you might see errors about dropping databases or tables that do not exist. These error messages are normal; you can safely ignore them.
Informix
Before using the following instructions, you must configure your Informix client as described in “Informix” on page 249. In addition, make sure your PATH environment variable includes $INFORMIXDIR\bin and that your client is configured to use the Informix utilities.
The SQL files for creating the video database (lw_video ) on Informix are in these two directories:
$NSHOME\js\samples\videoapp\ifx $NSHOME\js\samples\oldvideo\ifx
Note Remember that pathnames in this manual are given in NT format if they are for both NT and Unix. On Unix, you would use $NSHOME/js/samples/videoapp/
ifx.
1. On Unix, log in as “informix” user and run the ifx_load.csh shell script for videoapp and for oldvideo .
Chapter 13, Videoapp and Oldvideo Sample Applications 277
Configuring Your Environment
On NT, in the Informix Server program group, double-click the Command-Line Utilities icon to open a DOS window, and then run the following commands:
cd c:\netscape\server\js\samples\videoapp\ifxifx_load.bat
You can also run the commands from the oldvideo\ifx directory:
2. You can now run the application by making the changes described in “Connecting to the Database and Recompiling” on page 276.
Oracle
Before using the following instructions, you must configure your Oracle client as described in “Oracle” on page 255. In addition, your client must be configured to run the Oracle utilities. To run SQLPlus, you may need to set the ORACLE_SID environment variable.
The SQL files for creating the video database on Oracle are in these two directories:
$NSHOME\js\samples\videoapp\ora$NSHOME\js\samples\oldvideo\ora
1. On both Unix and NT, start SQL Plus. From the SQL> prompt, enter this command:
Start $NSHOME\js\samples\videoapp\ora\ora_video.sql
You can also run the script from the oldvideo directory. This SQL script does not create a new database. Instead, it creates the Oracle tables in the current instance.
2. On Unix, run the ora_load script file to load the video tables with data. On NT, run the ora_load.bat batch file to load the video tables with data. You must edit the appropriate file to connect to your server; the instructions for doing so are in the file.
3. You can now run the application by making the changes described in “Connecting to the Database and Recompiling” on page 276.
278 Writing Server-Side JavaScript Applications
Configuring Your Environment
Sybase
Before using the following instructions, you must configure your Sybase client as described in “Sybase” on page 258. In addition, on Unix be sure your PATH environment variable includes $SYBASE\bin and set DSQUERY to point to your server.
The SQL files for creating the video database on Sybase are in these two directories:
$NSHOME\js\samples\videoapp\syb$NSHOME\js\samples\oldvideo\syb
1. Run the appropriate script from the command line. On Unix, the script is:
syb_video.csh userid password
For example:
$NSHOME\js\samples\videoapp\syb\syb_load.csh sa
On NT, the script is:
syb_load userid password
For example:
c:\netscape\server\js\samples\videoapp\syb\syb_load sa
Alternatively, you can run the script from the oldvideo directory.
2. You can now run the application by making the changes described in “Connecting to the Database and Recompiling” on page 276.
Note If you have both Sybase and MS SQL Server or DB2 installed on your machine, there is a potential naming confusion. These vendors have utilities with the same name (bcp and isql ). When running this script, be certain that your environment variables are set so that you run the correct utility.
Chapter 13, Videoapp and Oldvideo Sample Applications 279
Configuring Your Environment
Microsoft SQL Server (NT only)
Before using the following instructions, you must configure your Sybase client as described in “ODBC” on page 252. In addition on Unix, set DSQUERY to point to your server.
The SQL files for creating the video database on MS SQL Server are in these two directories:
$NSHOME\js\samples\videoapp\mss$NSHOME\js\samples\oldvideo\mss
1. From a DOS prompt, run this batch file:
mss_load userid password
For example:
c:\netscape\server\js\samples\videoapp\mss\mss_load sa
2. You can now run the application by making the changes described in “Connecting to the Database and Recompiling” on page 276.
Note If you have both MS SQL Server and Sybase or DB2 installed on your machine, there is a potential naming confusion. These vendors have utilities with the same name (bcp and isql ). When running this script, be certain that your environment variables are set so that you run the correct utility.
DB2
The SQL files for creating the video database on DB2 are in these two directories:
$NSHOME\js\samples\videoapp\db2$NSHOME\js\samples\oldvideo\db2
1. (Unix only) Your PATH environment variable must include the $DB2PATH/
bin , $DB2PATH/misc , and $DB2PATH/adm directories.
2. Before you can run these scripts, you must have installed the DB2 Software Developer’s Kit (DB2 SDK).
3. Also, before you can run the script to create the tables, you must edit it to modify some parameters. On Unix, the script is in db2_load.csh ; on NT, it is in db2_load.bat . Edit the appropriate db2_load file and modify the following parameters to reflect your environment:
280 Writing Server-Side JavaScript Applications
Running Videoapp
— <nodename> : node name alias
— <hostname> : host name of the node where the target database resides
— <service-name> : service name or instance name from the services file
— <database-name> : database name
— <user> : authorized user
— <password> : user’s password
4. Make sure your /etc/services file has entries for your instance or service name if you are creating the database in a remote DB2 server.
5. Run the appropriate version of the script from the DB2 command window. The db2_load script runs the db2_video.sql and import.sql scripts. These subsidiary scripts create the video tables and load them with data from the *.del files. They do not create a new database. Instead, they create the DB2 tables in the local database alias specified in the db2_load script.
Note If you have both DB2 and Sybase or MS SQL Server installed on your machine, there is a potential naming confusion. These vendors have utilities with the same name (bcp and isql ). When running this script, be certain that your environment variables are set so that you run the correct utility.
Running VideoappIn this section, you get the videoapp sample application up and running. This sample is significantly more complex than the samples discussed in Chapter 2, “Introduction to the Sample Applications.” This chapter only gives an overview of it. You should look at some of the files to start familiarizing yourself with it.
Once you have created the video database and changed the database connection parameters, you can access the application here:
http:// server.domain /videoapp
After connecting to the database, the Application Manager displays the videoapp home page, as shown in Figure 13.1.
Chapter 13, Videoapp and Oldvideo Sample Applications 281
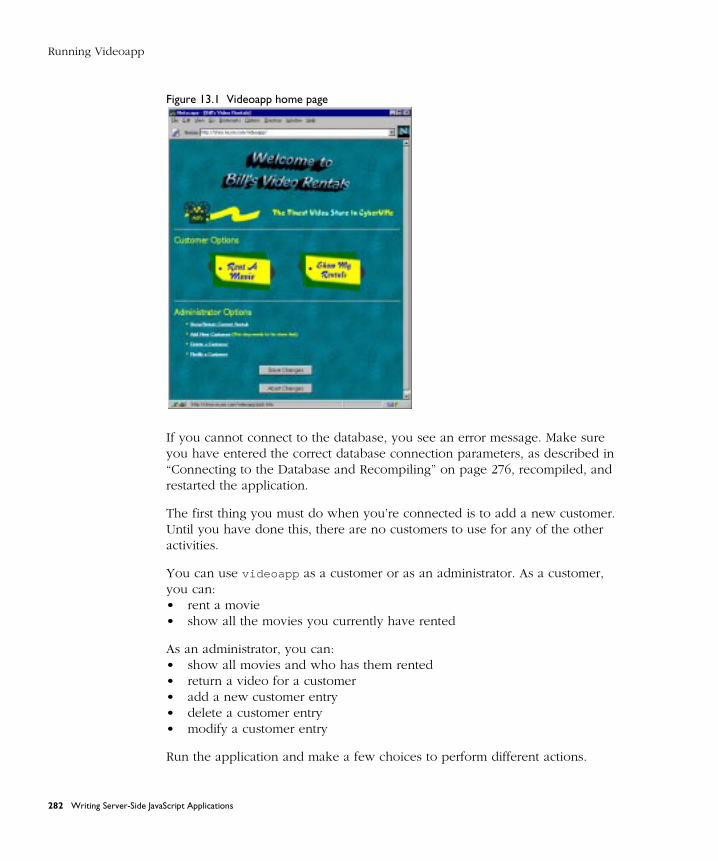
Running Videoapp
Figure 13.1 Videoapp home page
If you cannot connect to the database, you see an error message. Make sure you have entered the correct database connection parameters, as described in “Connecting to the Database and Recompiling” on page 276, recompiled, and restarted the application.
The first thing you must do when you’re connected is to add a new customer. Until you have done this, there are no customers to use for any of the other activities.
You can use videoapp as a customer or as an administrator. As a customer, you can:• rent a movie• show all the movies you currently have rented
As an administrator, you can:• show all movies and who has them rented• return a video for a customer• add a new customer entry• delete a customer entry• modify a customer entry
Run the application and make a few choices to perform different actions.
282 Writing Server-Side JavaScript Applications
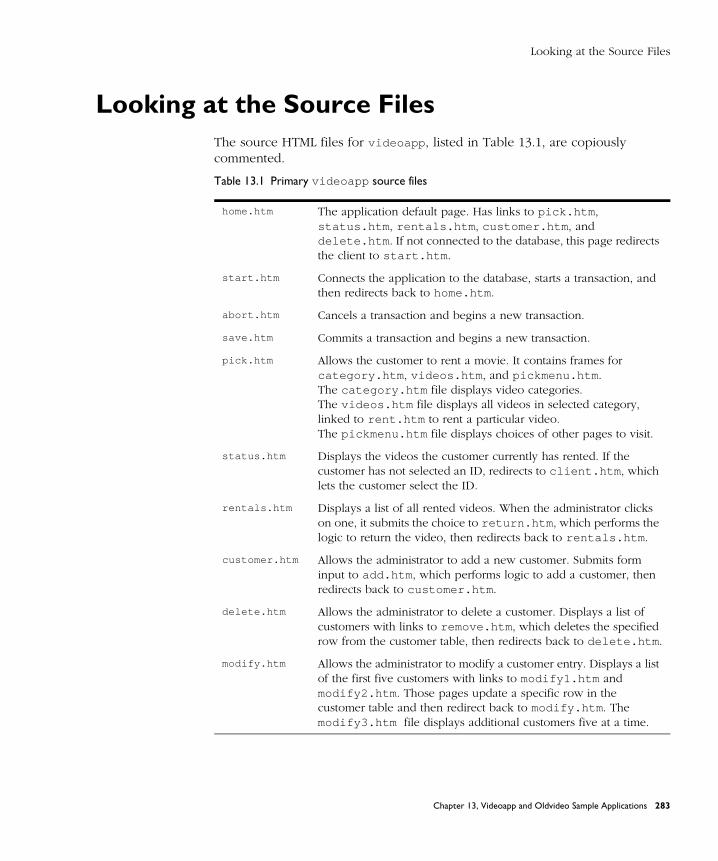
Looking at the Source Files
Looking at the Source FilesThe source HTML files for videoapp , listed in Table 13.1, are copiously commented.
Table 13.1 Primary videoapp source files
home.htm The application default page. Has links to pick.htm , status.htm , rentals.htm , customer.htm , and delete.htm . If not connected to the database, this page redirects the client to start.htm .
start.htm Connects the application to the database, starts a transaction, and then redirects back to home.htm .
abort.htm Cancels a transaction and begins a new transaction.
save.htm Commits a transaction and begins a new transaction.
pick.htm Allows the customer to rent a movie. It contains frames for category.htm , videos.htm , and pickmenu.htm .The category.htm file displays video categories.The videos.htm file displays all videos in selected category, linked to rent.htm to rent a particular video.The pickmenu.htm file displays choices of other pages to visit.
status.htm Displays the videos the customer currently has rented. If the customer has not selected an ID, redirects to client.htm , which lets the customer select the ID.
rentals.htm Displays a list of all rented videos. When the administrator clicks on one, it submits the choice to return.htm , which performs the logic to return the video, then redirects back to rentals.htm .
customer.htm Allows the administrator to add a new customer. Submits form input to add.htm , which performs logic to add a customer, then redirects back to customer.htm .
delete.htm Allows the administrator to delete a customer. Displays a list of customers with links to remove.htm , which deletes the specified row from the customer table, then redirects back to delete.htm .
modify.htm Allows the administrator to modify a customer entry. Displays a list of the first five customers with links to modify1.htm and modify2.htm . Those pages update a specific row in the customer table and then redirect back to modify.htm . The modify3.htm file displays additional customers five at a time.
Chapter 13, Videoapp and Oldvideo Sample Applications 283
Looking at the Source Files
Application Architecture
This section orients you to the implementation of some of the functionality in videoapp . It describes only how the application works with the database and details the procedure for renting a movie. Other tasks are similar.
Connection and Workflow
When a user initiates a session with videoapp by accessing its default page (home.htm ), videoapp checks whether it is already connected to the database. If so, videoapp assumes not only that the application is connected, but also that this user is already connected, and it proceeds from there.
If not connected, videoapp redirects to start.htm . On this page, it creates a single pool of database connections to be used by all customers, gets a connection for the user, and starts a database transaction for that connection. It then redirects back to home.htm to continue. The user never sees the redirection.
The database transaction started on start.htm stays open until the user explicitly chooses either to save or discard changes, by clicking the Save Changes or Abort Changes button. When the user clicks one of those buttons, save.htm or abort.htm is run. These pages commit or roll back the open transaction and then immediately start another transaction. In this way, the customer’s connection always stays open.
Once it has a database connection, videoapp presents the main page to the user. From that page, the user makes various choices, such as renting a movie or adding a new customer. Each of those options involves displaying various pages that contain server-side JavaScript statements. Many of those pages include statements that use the connection to interact with the database, displaying information or making changes to the database.
The first thing you must do when you’re connected is to add a new customer. Until you have done this, there are no customers to use for any of the other activities.
284 Writing Server-Side JavaScript Applications
Looking at the Source Files
Renting a Movie
The pick.htm page contains a frameset for allowing a customer to rent a movie. The frameset consists of the pages category.htm , videos.htm , and pickmenu.htm .
The category.htm page queries the database for a list of the known categories of movie. It then displays those categories as links in a table in the left frame. If the user clicks one of those links, videoapp displays video.htm in the right frame. There are a few interesting things about the server-side code that accomplishes these tasks. If you look at this page early on, you see these lines:
var userId = unscramble(client.userId)var bucket = project.sharedConnections.connections[userId]var connection = bucket.connection
These statements occur in most of videoapp ’s pages. They retrieve the connection from where it is stored in the project object. The next line then gets a new cursor applicable for this task:
cursor = connection.cursor("select * from categories");
A variant of this statement occurs at the beginning of most tasks.
Here is the next interesting set of statements:
<SERVER>...while (cursor.next()) {
catstr = escape(cursor.category)</SERVER>
<TR><TD><A HREF=‘"videos.htm?category=" + catstr‘ TARGET="myright"><SERVER>write(cursor.category);</SERVER></A></TD></TR><SERVER>
} // bottom of while loop
This loop creates a link for every category in the cursor. Notice this statement in particular:
<A HREF=‘"videos.htm?category=" + catstr‘ TARGET="myright">
This line creates the link to videos.htm . It includes the name of the category in the URL. Assume the category is Comedy. This statement produces the following link:
<A HREF="videos.htm?category=Comedy" TARGET="myright">
Chapter 13, Videoapp and Oldvideo Sample Applications 285
Looking at the Source Files
When the user clicks this link, the server goes to videos.htm and sets the value of the request object’s category property to Comedy.
The videos.htm page can be served either from pick.htm or from category.htm . In the first case, the category property is not set, so the page displays a message requesting the user choose a category. If the category property is set, videos.htm accesses the database to display information about all the movies in that category. This page uses the same technique as category.htm to construct that information and create links to the rent.htm page.
The rent.htm page actually records the rental for the customer. It gets information from the request and then updates a table in the database to reflect the new rental. This page performs the update, but does not commit the change. That doesn’t happen until the user chooses Save Changes or Abort Changes.
The pickmenu.htm page simply displays buttons that let you either return to the home page or to the page for adding a new customer.
Modifying videoappAs way of getting used to the LiveWire functionality, consider modifying videoapp . Here are some features you might add:
• Change the assumption that the existence of the sharedConnections array implies that this particular user is connected. You can change start.htm to check whether there is an ID for this user in that array and whether the connection stored in that location is currently valid. See “Sharing an Array of Connection Pools” on page 194.
• This application never releases connections back to the pool. Consequently, once a small number of users have connected, nobody else can connect. You can modify this in a couple of ways: add a new command that lets the user indicate completion or implement a scheme to cleanup unused connections. See “Retrieving an Idle Connection” on page 201.
286 Writing Server-Side JavaScript Applications
Index
Symbols$NSHOME\js\samplesand CLASSPATH 144
&, in URLs 87
.htm file extension 35
.html file extension 35
.js file extension 35
?, in URLs 87
\ 174
‘ (backquote). See backquotes.
A-a compiler directive 38, 61
ACTION attribute 85in sample application 22
addClient function 65, 89, 126, 129
addResponseHeader function 65, 89, 93, 179
agent property 102
anchors, creating 71
application executable 7
Application Managercapabilities of 33and client object 115configuring default settings 49debugging applications 45figure of 34identifying library files 173installing applications 39–41modifying installation
parameters 43overview 33–35protecting 15
removing applications 44running applications 45specifying database
connections 188starting, stopping, and
restarting 44
application name 42changing 43specifying 40
application status, defined 35
application URLs 42, 58
application/x-www-form-urlencoded content type 176, 178
applicationsarchitecture of 9–12as CORBA clients 150, 159as CORBA servers 159bank sample application 18bugbase sample application 18building 32–33cipher sample application 17compiling xvi, 36–38configuration 14–16creating 31creating source files 35–36dbadmin sample application 17debugging 45–48defined 5deleting 44deploying 12, 48and file upload 85flexi sample application 18hangman sample application 17and HTML 12installing 39–41jsaccall sample application 18metadata sample application 19modifying installation
Index 287

parameters 43oldvideo sample application 18partitioning tasks 57publishing 39removing 44restricting access to 43, 48running 12, 45at runtime 12sample 17–30sendmail sample application 18sharing data 112, 113starting, stopping, and restarting 44statement types 11system requirements for 13videoapp sample application 18viewer sample application 18
arenas, in garbage collection 94
Array objects 66
ASCII format 170
AUTH_TYPE CGI variable 80, 81, 102
auth_type property 80, 102
auth_user property 80, 102
authorization 73
Bbackground needed xi
backquotes 68, 70–72enclosing JavaScript in 70when to use 72
backward compatibility xvi–xviii
bank application 18
Bcc property 162
beginTransaction method 197, 220, 268
binary data type 266
binary format 170
binary large objects. See BLObs.
bit data type 266
blob data type 247, 264
blob function 222
Blob objects 62, 264, 265, 266
blobImage method 222
blobLink method 222
BLObsoverview 222working with 222–224
Body property 162
Boolean expressions 106
Boolean objects 66
booleanValue method 142
bugbase application 18
Built-in Maximum Database Connections 188
byte data type 265
bytecode files 7
bytecodes 12building 32
byteToString method 167, 170
C-c compiler directive 37
C functionscalling 65registering 65
C libraries 171calling 57
C++ libraries 171
callC function 65, 172, 174
Cc property 162
CGI programs 8
CGI variablesaccessing 80–83AUTH_TYPE 80, 81, 102CONTENT_LENGTH 83CONTENT_TYPE 83GATEWAY_INTERFACE 83HTTP_ACCEPT 83HTTP_IF_MODIFIED_SINCE 83HTTPS 81
288 Writing Server-Side JavaScript Applications

HTTPS_KEYSIZE 81HTTPS_SECRETKEYSIZE 81PATH_TRANSLATED 81QUERY_STRING 81, 102REMOTE_ADDR 81REMOTE_HOST 81REMOTE_USER 80, 82, 102REQUEST_METHOD 80, 82, 102SCRIPT_NAME 82SERVER_NAME 82SERVER_PORT 82SERVER_PROTOCOL 81, 82, 102SERVER_SOFTWARE 83SERVER_URL 82
char data type 264, 265, 266
cipher application 17
CLASSPATH 16, 144, 149
clearError method 167, 170
clientcharacteristics of 56communicating with server 84maintaining client object on 120–
123preprocessing data on 56, 86, 90
client cookies 78, 91, 118, 119, 120, 120–121
lifetime of properties 127
client object 62, 67, 73, 77, 89, 104–112
adding properties to URLs 128–130changes xviicreating custom 107custom 108–112description of 104destroying 128getting identifier 65id for maintaining 107in sample application 22lifetime 104lifetime of 99, 126–128maintaining 49, 65, 73, 75, 78, 84,
88, 91, 115–130comparing techniques 116–119on the client 120–123
on the server 123–126with client cookies 120–121with client-URL encoding 122–
123with IP address 124with server cookie 124–125with server-URL encoding 125–
126overview 98–99in page processing 73, 74properties 105–107properties of 105properties, expiring 126–127properties, overhead from 106properties, restrictions on 105restrictions 108storing properties on project or
server 107–108uniquely referring to 107–108
client object maintenance, specifying 41
client propertiesassigning 121Boolean 106changing 75
client requests, sharing a connection 198
client requests. See requests.
client scriptscommunicating with server 57generating 90sending values to 89when to use 57
client URL encoding 75
client-mode field, of jsa.conf 51
client-server communication 84–94using cookies for 91–93
client-side JavaScript 5, 5–6, 58overview 5
client-side objectslifetime 57
client-URL encoding 79, 84, 88, 120,
Index 289

122–123lifetime of properties 127
clob data type 247, 264
close method 166, 210, 235, 268, 269, 271
colName property 210, 235
column names, displaying 216
columnName method 210, 216, 235, 271
columns method 210, 216, 235
commitTransaction method 197, 220, 268
Common Gateway Interface programs 8
communicationbetween client and server 84–94
comparison operatorson client and server 61
compiler 32, 61options 37and PATH environment variable 16using 36–38
configuration styles 43, 48
confirmation prompts, configuring 49
connect method 268, 269
connected method 197, 270
connection method 269of DbPool objects 196
Connection objects 62, 67, 185, 189, 196, 268, 269, 270, 271, 272
creating 196error methods of 272methods 197storedProc method 229
connection poolsmanaging 191sharing 192storing with project object 191, 193
connection pools. See also DbPool objects.
connections xivapproaches to 185–197DbPool objects 187disconnecting 189establishing 185–197releasing xviiiretrieving 189, 201spanning multiple client
requests 198specifying number of 41, 49specifying the number of 188storing 107waiting for 200
content typesmanaging custom 176–179
CONTENT_LENGTH CGI variable 83
CONTENT_TYPE CGI variable 83
content-length property 178
cookie protocol 118, 120, 124
cookie protocol. See also client cookies.
cookie.txt 91
cookies 84, 89
cookies, defined 91
CORBA 84, 89, 139–140, 149–160
CORBA. See also LiveConnect.
core JavaScript 4, 60differences on client and server 61
creating 65
critical section 130
current row 210
cursor method 197, 269
Cursor objects 62, 67, 268, 270, 271methods 210overview 210properties 210
cursorsclosing xviiicreating 211customizing display functions 208determining number of
290 Writing Server-Side JavaScript Applications

columns 216displaying aggregate functions 214displaying column names 216displaying expressions 214displaying record values 212navigating with 215overview 210updatable 211, 217–219, 223using 210–219
D-d compiler directive 37
dataconverting between formats 170sharing between client and
server 84
data persistence 57
data sharing 57, 67, 73, 99, 113, 115, 130–138, 166, 188, 191
data typesconverting for LiveWire 263–266converting with LiveConnect 141–
143Informix 266ODBC 265Oracle 265Sybase 264, 266
database access 57
database client librariesconfiguring 241–261
database clientsinstalling xviiisupported 244–245
database configurationverifying 242–243
database connection pools. See connection pools.
database connections. See connections.
database librariesmultithreading xiv
database name 187
database object 62, 67, 268, 269, 270, 271
restrictions 191using 183–239
database pools. See also DbPool objects.
database queriesand flush function 78
database server name 187
database serversin JavaScript application
architecture 10
database transactions. See transactions.
database type 187
databases 181–286configuring 241–261connecting to 189converting data types 263–266and dates 264error handling 267–273guidelines for managing
connections and threads 190multithreaded 189single-threaded 189typical interactions 184verifying connection 189
databases. See also LiveWire Database Service.
date data type 264, 265, 266
Date objectconverting dates to 264
Date object, converting dates to 263
Date objects 66, 264, 265, 266
datesconverting to Date objects 263and databases 264inserting in database 264
datetime data type 265, 266
DB2
Index 291

configuring 247–249data types 264
DB2COMM environment variable 248
DB2INSTANCE environment variable 248
DB2PATH environment variable 248
dbadmin application 17, 242
DbBuiltin objects 62
DbPool constructor 269
DbPool objects 62, 67, 185, 187, 229, 269, 270, 271
connection method 196creating 187using 183–239
DbPool objects. See also connection pools.
DbPool objects. See also database pools.
deadlock 135–138
debug function 65
debug functions 46
debug URLs, using 47
decimal data type 264, 265, 266
default form values 89
default pagespecifying 41, 49
default settings, Application Manager 49
DELETE SQL statement 219
deleteResponseHeader function 65, 89, 179
deleteRow method 210, 219, 268
deployment serverdefined 13updating files to 44
destroy method 121, 122, 128
development environment, components of 13
development platform, defined 13
development serverdefined 13updating files from 44
DHCP 124
directoriesconventions used xix
disconnect method 268, 269, 271
DNS 81
document conventions xix
document root 42
documentation, other xii–xiii
double data type 264
double precision data type 265, 266
Dynamic Host Configuration Protocol 124
dynamic link libraries 171
EECMA-262 60
email. Seemail.
environment variablesaccessing 81
eof method 167, 168
equalityon client and server 61
error handlingfor LiveWire 267–273
error messagesretrieving 189
error method 167, 170
error status, for File object 170
errorCode method 161
errorMessage method 161
escape function 64, 89
event handlers 63direct substitution 89onClick 86
292 Writing Server-Side JavaScript Applications

execute method 197, 209, 268
exists method 167, 170
expiration method 121, 127
external functionscalling 172defined 171example of use 175guidelines for writing 173registering 174using in JavaScript 174when to use 172
external libraries 171–175calling 57identifying files 173security 171specifying 41, 49
F-f compiler directive 38
features, new xiii–xiv
file access modes 166
File class 78, 164–171
file formats 170
file I/O 171
File objectcreating 165, 171described 164methods of 167security considerations 164
File objects 62, 67
file upload 176
filesaccessing with JavaScript 164–171closing 165getting information for 170locking 166opening 165positioning within 168reading from 168writing to 169
fixed decimal notation 263
flexi application 18, 151, 151–158
FlexiServer 151, 153
float data type 265, 266
floatValue method 142
flush function 64, 75, 77, 121, 179described 78
flush method 78, 169example of use 78
for the compiler 16
form elementshidden 86, 89, 90using as request properties 85
FORM HTML tag 85
formsand client maintenance 119client scripts for 57default values 89GET method 177hidden elements 89POST method 177processing 21and the request object 98statements 22variables 103
From property 162
Function objects 66
functions 64debug 46redirect 79write 69, 70
Ggarbage collection, in JavaScript 94–
95
GATEWAY_INTERFACE CGI variable 83
get value of method attribute 85
getLength method 167, 170
getOptionValue function 64, 85, 86
getOptionValueCount function 64
Index 293

getPosition method 167, 168
getPostData method 178
H-h compiler directive 37
hangman application 17
headerof request 82
headers 89, 93
Hello World application 17
hidden form elements 89
history method 101
home field, of jsa.conf 51
host property 114
hostname 82
hostname property 114
HREF attribute 71
HTML 56, 58attributes 63, 70conditionalizing 57embedding JavaScript in 68–72generating 64and JavaScript 55, 68–72sample source code 21
HTML pageconstructing 58, 73, 74, 77–79sending to client 76, 119
HTML tagsFORM 85IMG 222INPUT 90
HTTP 67, 73
HTTP applets 140
HTTP method 80, 82
HTTP protocol level 81, 82
HTTP request headers xiv
HTTP request information 147
HTTP request. See requests.
HTTP response buffer 147
HTTP response headers xiv
HTTP user 80, 82
HTTP_ACCEPT CGI variable 83
HTTP_IF_MODIFIED_SINCE CGI variable 83
HTTPD processes, objects for 114
httpHeader method 82, 84, 93, 177
HTTPS CGI variable 81
HTTPS_KEYSIZE CGI variable 81
HTTPS_SECRETKEYSIZE CGI variable 81
I-i compiler directive 38
if...else statementin sample application 23
IIOP xiv, 139–140, 149–160
IIOP. See also LiveConnect.
image data type 266
image maps 104
image maps, using 104
imageX property 103, 104
imageY property 103, 104
IMG HTML tag 222
index.htmland default page 41
Informix 183configuring 249–251data types 265, 266
INFORMIXDIR environment variable 250
INFORMIXSERVER environment variable 250
INFORMIXSQLHOSTS environment variable 250
initial page 104, 191and request object 101
294 Writing Server-Side JavaScript Applications
specifying 41, 49
INPUT HTML tag 90
input validation 57
INSERT SQL statement 219
insertRow method 210, 219, 268
installation parametersconfiguring 49modifying 43
Installing an application 39
int data type 266
integer data type 264, 265
Internet InterORB Protocol 149
interval data type 265
IP address 119, 124lifetime of properties 127
IP addresses 123
ip property 102
ISB for Java 139, 149
ISMAP attribute, of IMG tag 104
isNaN function 64
JJava
calling from JavaScript 143–146example of calling from
JavaScript 145–146object wrappers 142predefined classes 141
Java applets, server scripts for 57
Java Development Kit 141
Java objectsnaming in JavaScript 143
java package 143
Java virtual machine 11
Java. See also LiveConnect.
JavaScript 4–9basics 55–95calling from Java 146–149
debugging 65differences between server and
client 5example of calling from Java 148–
149garbage collection 94–95and HTML 68–72object wrappers 143overview 9referring to objects in Java 147runtime processing 58–60, 72–77server-side overview 60–67tasks on client 56–57tasks on server 56–57where it can occur 63
JavaScript 1.2 xiv, 60
JavaScript application executable files 12
JavaScript applications. See applications.
JavaScript files 12, 63compiling 12
JavaScript variablesand request properties 103
JDK 141
js files 12
jsa.conf file xv, 51
jsac. See compiler.
jsaccall application 18, 172
jsaccall.c 173
jsaccall.h 173
JSObject class 143
jsVersion property 114
L-l compiler directive 37
LD_LIBRARY_PATH environment variable 248, 254, 255, 258, 259
LIBPATH environment variable 248,
Index 295

255
libraries, external 171–175
library field, of jsa.conf 51
linksfor BLOb data 222, 223creating 71
140
LiveConnect xiv, 64, 66, 84, 89, 139–160
and NSAPI applications 140capabilities 140configuration for 15converting data types 141–143and HTTP applets 140restrictions 140and WAI plug-ins 140
LiveConnect. See also Java.
LiveWire database access library 11
LiveWire Database Service xvii, 8, 181–286
system requirements for 14
LiveWire Database Service. See also databases.
livewire.conf file xv
Lock class xiv
lock method 113, 130–138in sample application 23of project and server objects xvii
Lock objects 62, 67, 130–138
locking 130–138
long data type 266
long raw data type 266
longdatacompat 247
Mmail
MIME-compliant 162sending with JavaScript 67, 161–
164
mail, sending xiv
majorErrorCode method 189, 197, 268, 269, 272
majorErrorMessage method 189, 197, 271, 272, 273
mark and sweep 95
Math objects 66
mathematical constants and functions 263
maxdbconnect field, of jsa.conf 51
metadata application 19
METHOD attribute 85
method property 80, 102
methodsclose 166destroy 128expiration 127flush 78history 101open 165setPosition 168
migrating applications xv–xvi
MIME types 164
MIME-compliant mail 162
MimeType objects 66
minorErrorCode method 189, 197, 268, 269, 272
minorErrorMessage method 189, 197, 271, 272
money data type 265, 266
multimediausing BLObs 222
MULTIPLE attributeof SELECT tag 86
multithreaded databases 189
multi-threadingand Sybase 260
NNAME attribute 71, 85
296 Writing Server-Side JavaScript Applications

in sample application 22of SELECT tag 86
native functions 171–175
Navigator JavaScript. See client-side JavaScript
nchar data type 265, 266
Netscape cookie protocol 120, 124
Netscape Internet Service Broker for Java 139, 149
Netscape Navigator clientin JavaScript application
architecture 10
netscape package 143
Netscape web serversconfiguration style support 43in JavaScript application
architecture 10sample applications installed
with 17See also web servers.
netscape.javascript package 141
netscape.javascript.JSObject 143
netscape.net package 141
netscape.server package 141
NETSCAPE_LIVEWIRE 92, 120
next method 210, 213, 215, 233, 235, 270
NSAPI applications 140
NSHOME 15
number data type 265, 266
Number objects 66
number property 23
numbersconverting to characters 167, 170identifying 64storing 263
numeric data type 266
nvarchar data type 265, 266
O-o compiler directive 37
object field, of jsa.conf 51
Object objects 66
object prototypes 62
object request brokers 149
ObjectsCursor 210DbPool 187
objectsadding properties to 62lifetimes of 98
ODBCconfiguring 252–255data types 265on Unix xiv
ODBC driverssupported 244–245
oldvideo application 18, 275–286and Informix 275
onClick event handler 86
Open DataBase Connectivity standard. See ODBC.
open method 165
OpenLinkconfiguring 254
OPTION tag 86
Oracle 183configuring 255–258data types 265, 266
ORACLE_HOME environment variable 256, 257
ORACLE_SID environment variable 257
ORBs 149
outParamCount method 231, 238
outParameters method 227, 231, 236, 238
output buffer 74
Index 297

flushing 64, 78
output parametersof stored procedures 238
P-p compiler directive 38
Packages object 66
Packages package 143
packed decimal notation 263
parseFloat function 64
parseInt function 64
Pascal functions 171
passthrough SQLexecuting 209
PATH environment variable 16, 248
PATH_INFO CGI variable 81
PATH_TRANSLATED CGI variable 81
pointers 168
pools of database connections. See connection pools.
popups, client scripts for 57
port property 114
post value of method attribute 85
project object xiv, 62, 68, 73, 112–113
description of 112in sample application 23lifetime 112lifetime of 99, 112locking 113, 131, 134–135, 166overview 99properties 112–113properties of 112sharing 113storing connection pools on 191,
193
protocol property 81, 102, 114
prototypes 62
Qqueries
customizing output 208displaying 208
query property 81, 102
QUERY_STRING CGI variable 81, 102
quotation markswith backslash 72order of 70
R-r compiler directive 38
raw data type 266
read method 167, 168
readByte method 167, 169
readln method 167, 169
real data type 266
record valuesdisplaying 212
redirect function 64, 75, 77, 79, 101, 119, 121, 122, 125, 129, 179
described 79
registerCFunction function 65, 172, 174
release method 196, 197, 268, 271
REMOTE_ADDR CGI variable 81
REMOTE_HOST CGI variable 81
REMOTE_USER CGI variable 80, 82, 102
requestchanging 64
request bodiesmanipulating 178–179
request headers 82, 84, 93manipulating 177
request object xiv, 62, 68, 73, 77, 84, 101–104, 177, 178
changes xvii
298 Writing Server-Side JavaScript Applications

creation 101description of 101example of property creation 85and forms 103in sample application 22lifetime of 98, 101overview 98in page processing 73, 74propertes, and JavaScript
variables 103properties 80, 102–103properties of 102–103saving properties 79setting properties with form
elements 85
request propertiesencoding in URLs 87
request thread 147
REQUEST_METHOD CGI variable 80, 82, 102
requestschanging 79header 89manipulating raw data 176–179redirecting 88terminating 79
response headersmanipulating 65, 179
responsesmanipulating raw data 176–179
Resulset objects 271
result sets 231creating 232Resultset objects 231
result sets. See also Resultset objects.
resultSet method 226, 231, 232, 269
Resultset objects 62, 67, 225, 269, 270, 271
methods of 235
Resultset objects. See also result sets.
return valuesof stored procedures 237
returnValue method 227, 231, 236, 237
rollbackTransaction method 197, 220, 268
rowid data type 266
runtime environmentcomponents 11
runtime library 11
runtime processing 68, 72–77example 59
Ssample applications
Hangman 25–30Hello World 19–24
sample applications. See applications, sample.
sample code, about xix
SCRIPT tag 12, 63direct substitution in 89when to use
SCRIPT tag. See also client scripts.
SCRIPT_NAME CGI variable 82
scriptschanging client properties 75
security 39, 43, 48external libraries and 171File object and 164
select lists 86
SELECT SQL statement 211, 212, 214, 217
SELECT tag 64, 85, 86
send method 161
sendmail application 18
SendMail class xiv, 161–164
SendMail objects 62, 67
serial data type 265
serv3_0.zip 141
Index 299

servercharacteristics of 56communicating with client 89maintaining client object on 123–
126restarting 173
server administration functions 73
server authorization 73
server cookie 118
server cookies 123, 124–125lifetime of properties 127
server object xiv, 62, 68, 73, 113–115description of 113lifetime 114lifetime of 100locking 131, 134–135, 166overview 100properties 114–115properties of 114sharing data 115
server processes, objects for 114
server routing 42
server scriptscommunicating with client 57when to use 57
SERVER tag 12, 57, 58, 63, 68, 69, 72in sample application 21, 22when to use 72
SERVER tag. See also server scripts.
SERVER_NAME CGI variable 82
SERVER_PORT CGI variable 82
SERVER_PROTOCOL CGI variable 81, 82, 102
SERVER_SOFTWARE CGI variable 83
SERVER_URL CGI variable 82
server-client communication 84–94
server-side JavaScript 7–9development 7enabling 14executing 77runtime 8
server-side JavaScript applications. See applications
server-side objectslifetime 57
server-URL encoding 79, 84, 88, 123, 125–126
lifetime of properties 127
session key 81
Session Management Service 57, 73, 97–138
object overview 97–101
setPosition method 167, 168
sharing data xiv
SHLIB_PATH environment variable 248, 250, 255
single-threaded databases 189
Site Manager xvii
smalldatetime data type 266
smallfloat data type 265
smallint data type 264, 265, 266
smallmoney data type 266
Smtpserver property 162
source filescreating 35–36
source files, components of 35
source script, example of 21
special charactersin URLs 89
SQL 183error handling 267–273executing 209See also individual statements
SQL_BIGINT data type 265
SQL_BINARY data type 265
SQL_CHAR data type 265
SQL_DATE data type 265
SQL_DECIMAL data type 265
SQL_DOUBLE data type 265
300 Writing Server-Side JavaScript Applications

SQL_FLOAT data type 265
SQL_INTEGER data type 265
SQL_LONGBINARY data type 265
SQL_LONGVARCHAR data type 265
SQL_NUMERIC data type 265
SQL_REAL data type 265
SQL_SMALLINT data type 265
SQL_TIME data type 265
SQL_TIMESTAMP data type 265
SQL_VARBINARY data type 265
SQL_VARCHAR data type 265
SQLTable method 197, 208, 268
ssjs_generateClientID function 65, 107, 200
ssjs_getCGIVariable function 65, 80, 81, 102
ssjs_getClientID function 65, 107, 125
start field, of jsa.conf 51
stored procedures xiv, 225–239arguments to 226output parameters 238result sets 226return values 227, 237Stproc objects 225, 227
stored procedures. See also Stproc objects.
storedProc method 197, 229, 269
storedProcArgs method 229, 268, 269
Stproc objects 62, 67, 225, 227, 269creating 229methods of 231
Stproc objects. See also stored procedures.
string data type 264, 265, 266
String objects 66, 142
stringsparsing 64
stringToByte method 167, 170
stubs 150
styles, configuration 43, 48
Subject property 162
sun package 143
Sybase 183configuring 258–261data types 264, 266
SYBASE environment variable 258, 259
Ttargets, creating 71
TCP port 82
text data type 265, 266
text/html content type 176
threadsand databases 189and Java 147
ticks. See backquotes.
time data type 264
timestamp data type 264
tinyint data type 266
TNS_ADMIN environment variable 256
To property 162
toString method 142
trace utility 46, 47, 48configuring 49
transactions xiv, xviiicommitting 188controlling 220managing 219–221overview 219rolling back 188scope of 221
Uunescape function 64
Index 301

unique identifier 65
unlock method 113, 130–138in sample application 23
UPDATE SQL statement 219
updateRow method 210, 219, 268
upgrading applications xv–xvi
uri field, of jsa.conf 51
uri property 103
URLredirecting to 64
URL encoding, maintaining client object with 120, 122, 123
URL encoding. See also client-URL encoding, server-URL encoding.
URL-encoded variablesand request object 103resetting 89
URLs 82adding client properties to 128–130adding information to 65application 42changing 79and client maintenance 122–123,
125–126conventions used xixcreating 119debug 47dynamically generating 87encoding information in 87–94escaping characters in 64including special characters 89modifying 84and redirect function 79and reloading a page 89and Session Management
objects 100to start and stop applications 44
V-v compiler directive 37
VALUE attribute 90
varbinary data type 266
varchar data type 264, 265, 266
varchar2 data type 266
VDBCINI environment variable 254
video application. See videoapp application.
videoapp application 18, 275–286and Informix 275and ODBC 275and SQL Server 275
viewer application 18
Visigenicconfiguring 255
WWAI plug-ins 140
web files 12, 45building 32defined 36moving 44specifying path 40, 49
Web Publisher xvii
world applicationapplications
world sample application 17
wrappersfor Java objects 142for JavaScript objects 143
write function 21, 64, 69, 77, 129, 165with backquotes 70and client maintenance 122described 77and flush 78with SERVER tag 69
write method 167, 169
writeByte method 167, 169
writeln method 167, 169
302 Writing Server-Side JavaScript Applications