Publications No. INSTALLATION ... - Bernardi Parts Honda
8
Publications No. Issue Date INSTALLATION INSTRUCTIONS Accessory Application © 2021 American Honda Motor Co., Inc. – All Rights Reserved. AII14293-07 (2101) 1 of 8 08P47-T6Z-1A00-90 VERSION 1 HOOD PROTECTOR 2021 RIDGELINE JAN 2021 GENERAL VIEW FOR YOUR SAFETY (Read carefully.) Warning Symbols Safety: Your safety, and the safety of others, is important. To help you make informed decisions about service procedures, we have provided safety messages where appropriate. Of course, it is not practical or possible to warn you about all the hazards associated with servicing a vehicle - you must use your own good judgment. You will find important safety messages preceded by one of following symbols: *All symbols are not used in all installation instructions. HOOD PROTECTOR
Transcript of Publications No. INSTALLATION ... - Bernardi Parts Honda
Publications No.
Issue DateINSTALLATIONINSTRUCTIONS
Accessory Application
© 2021 American Honda Motor Co., Inc. – All Rights Reserved. AII14293-07 (2101) 1 of 808P47-T6Z-1A00-90
VERSION 1HOOD PROTECTOR 2021 RIDGELINE
JAN 2021
GENERAL VIEW
FOR YOUR SAFETY (Read carefully.)
Warning SymbolsSafety: Your safety, and the safety of others, is important. To help you make informed decisions about service procedures, we have provided safety messages where appropriate. Of course, it is not practical or possible to warn you about all the hazards associated with servicing a vehicle - you must use your own good judgment.You will find important safety messages preceded by one of following symbols:*All symbols are not used in all installation instructions.
HOOD PROTECTOR
2 of 8 AII14293-07 (2101) © 2021 American Honda Motor Co., Inc. – All Rights Reserved.
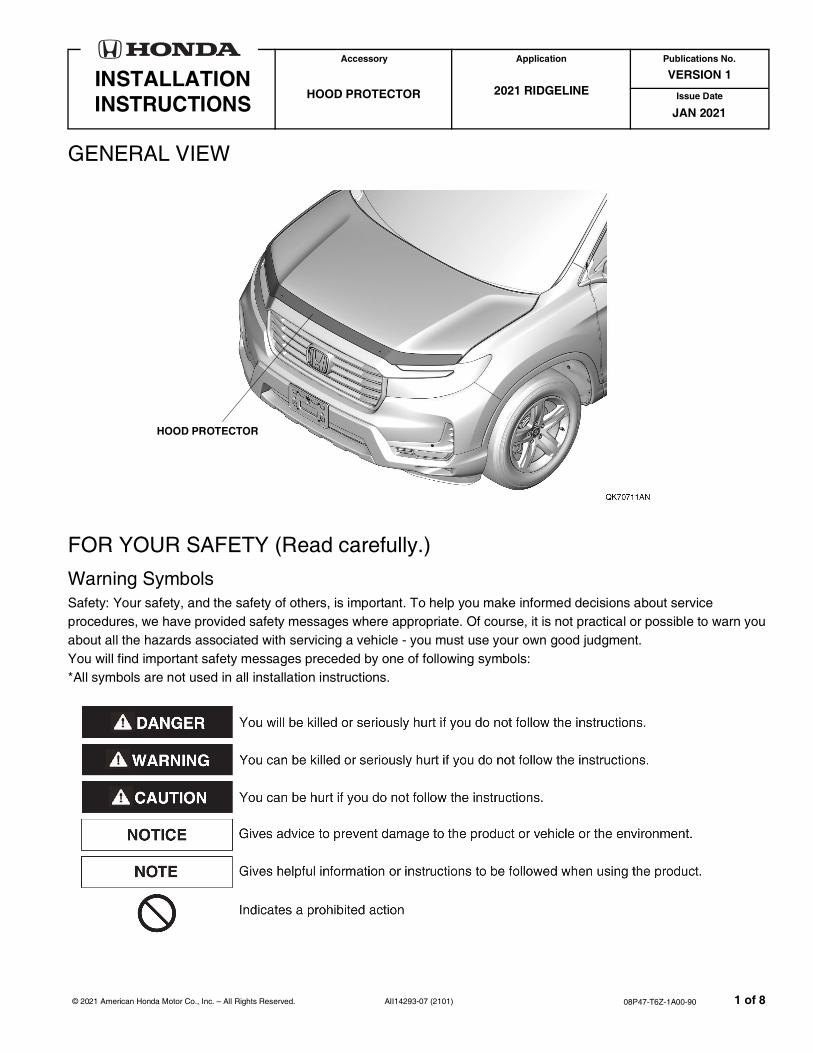
Procedure and Location IconsThese icons indicate the work location and the worker’s point of view.*All icons are not used in all installation instructions.
Safety: General• Be careful not to damage the vehicle or the parts.• The illustrations may differ slightly from the actual accessory.
Safety: For the Accessory• Do not install the accessory on a dirty surface or in direct sunlight.• Make sure the ambient air temperature is 60°F (15°C) or above when installing accessories that use a bonding
material.• When pressing the accessory firmly with the palm of your hand, be careful not to damage it or the vehicle.• When applying adhesive material, make sure it is lined up properly before attaching. Once the adhesive material
touches the surface, do not try to remove it. If you do, you could damage the part before the adhesive releases.• Not to wash the vehicle for 24 hours to allow the adhesive to cure.
© 2021 American Honda Motor Co., Inc. – All Rights Reserved. AII14293-07 (2101) 3 of 8
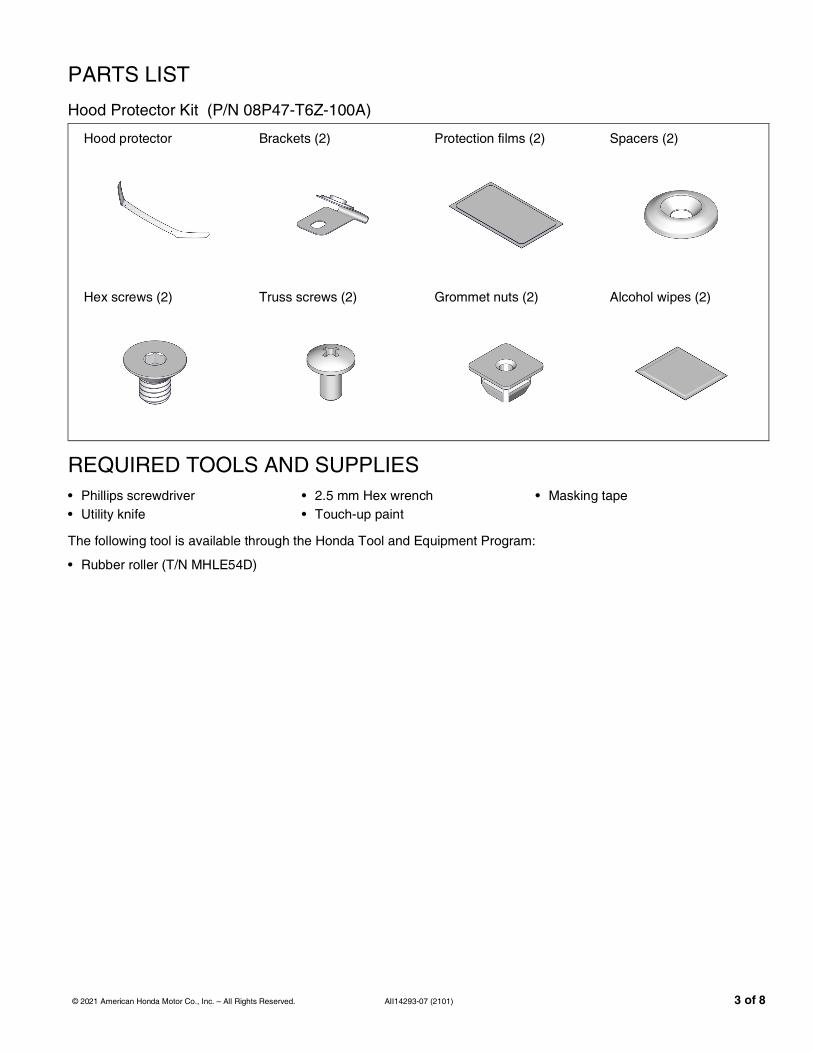
PARTS LIST
Hood Protector Kit (P/N 08P47-T6Z-100A)
REQUIRED TOOLS AND SUPPLIES
The following tool is available through the Honda Tool and Equipment Program:
Hood protector Brackets (2) Protection films (2) Spacers (2)
Hex screws (2) Truss screws (2) Grommet nuts (2) Alcohol wipes (2)
• Phillips screwdriver • 2.5 mm Hex wrench • Masking tape• Utility knife • Touch-up paint
• Rubber roller (T/N MHLE54D)
4 of 8 AII14293-07 (2101) © 2021 American Honda Motor Co., Inc. – All Rights Reserved.
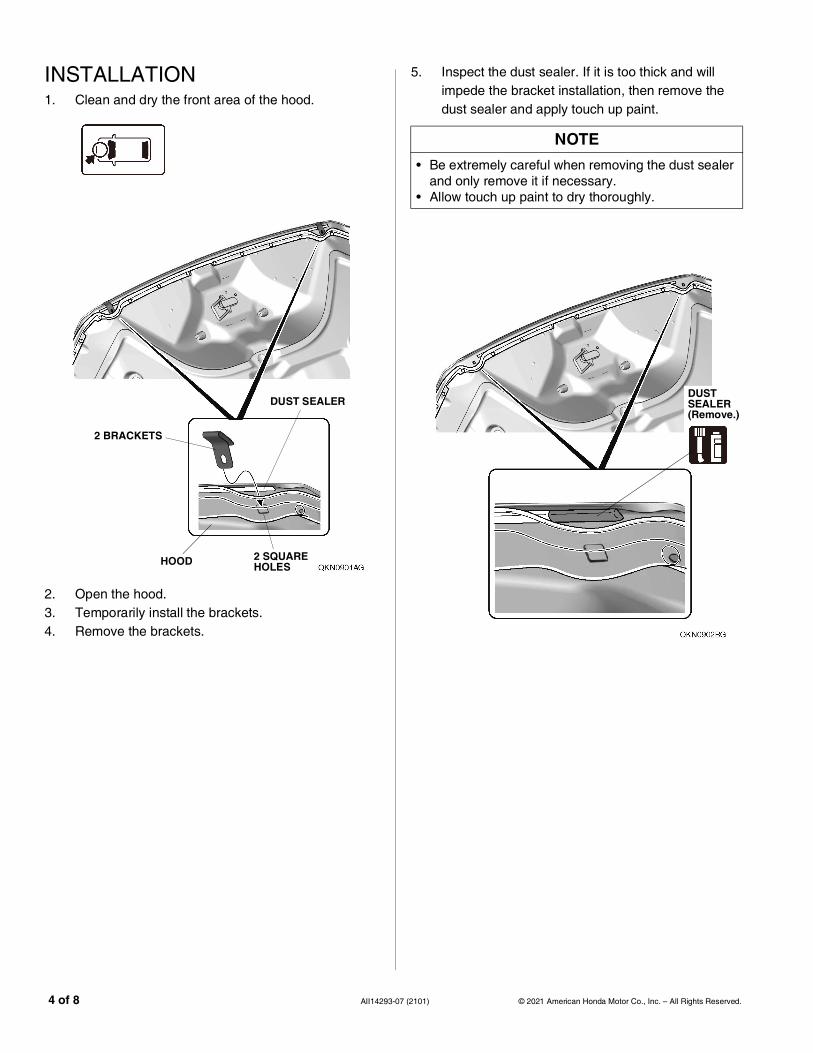
INSTALLATION1. Clean and dry the front area of the hood.
2. Open the hood.3. Temporarily install the brackets.4. Remove the brackets.
DUST SEALER
2 SQUARE HOLES
2 BRACKETS
HOOD
5. Inspect the dust sealer. If it is too thick and will impede the bracket installation, then remove the dust sealer and apply touch up paint.
NOTE• Be extremely careful when removing the dust sealer
and only remove it if necessary.• Allow touch up paint to dry thoroughly.
DUST SEALER(Remove.)
© 2021 American Honda Motor Co., Inc. – All Rights Reserved. AII14293-07 (2101) 5 of 8
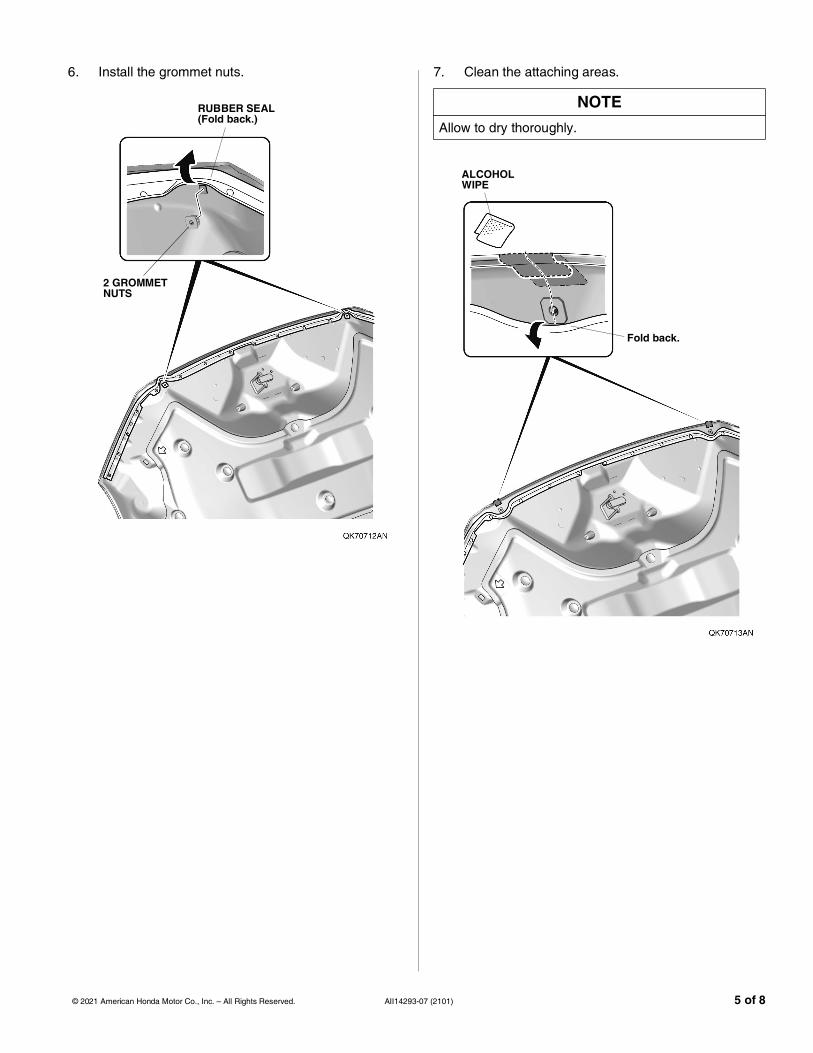
6. Install the grommet nuts.
RUBBER SEAL(Fold back.)
2 GROMMET NUTS
7. Clean the attaching areas.
NOTEAllow to dry thoroughly.
ALCOHOL WIPE
Fold back.
6 of 8 AII14293-07 (2101) © 2021 American Honda Motor Co., Inc. – All Rights Reserved.
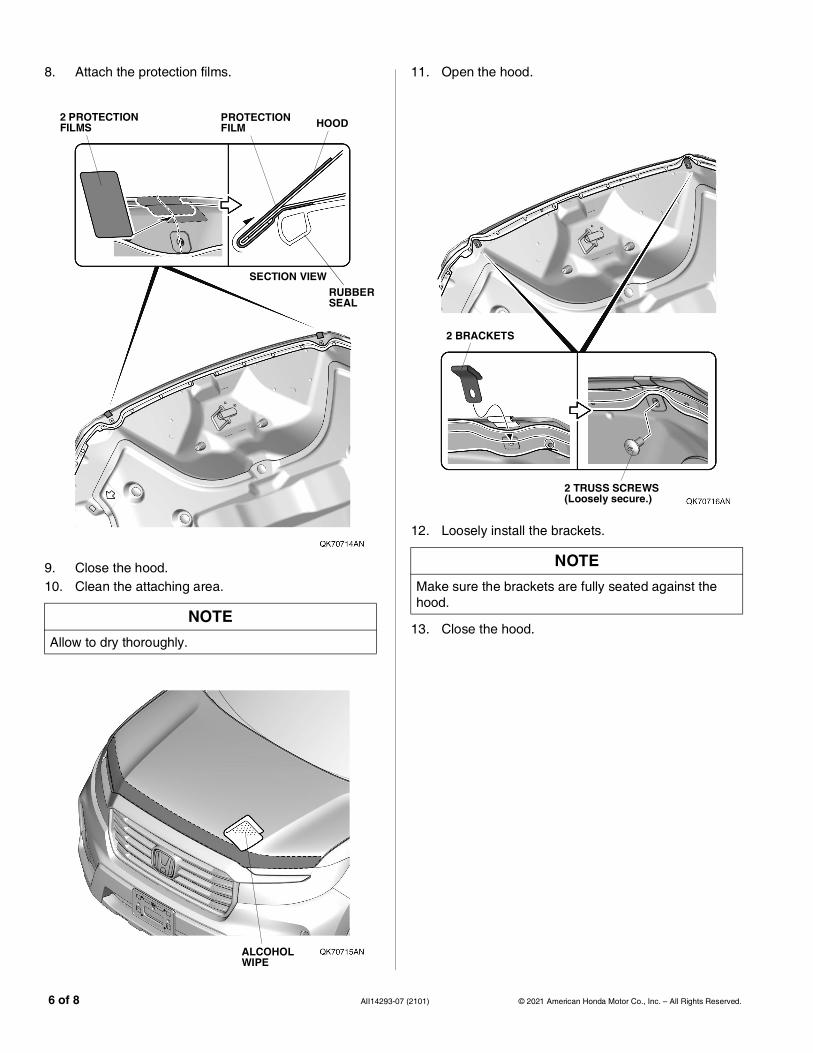
8. Attach the protection films.
9. Close the hood.10. Clean the attaching area.
NOTEAllow to dry thoroughly.
2 PROTECTION FILMS
PROTECTION FILM HOOD
SECTION VIEWRUBBER SEAL
ALCOHOL WIPE
11. Open the hood.
12. Loosely install the brackets.
13. Close the hood.
NOTEMake sure the brackets are fully seated against the hood.
2 TRUSS SCREWS(Loosely secure.)
2 BRACKETS
© 2021 American Honda Motor Co., Inc. – All Rights Reserved. AII14293-07 (2101) 7 of 8
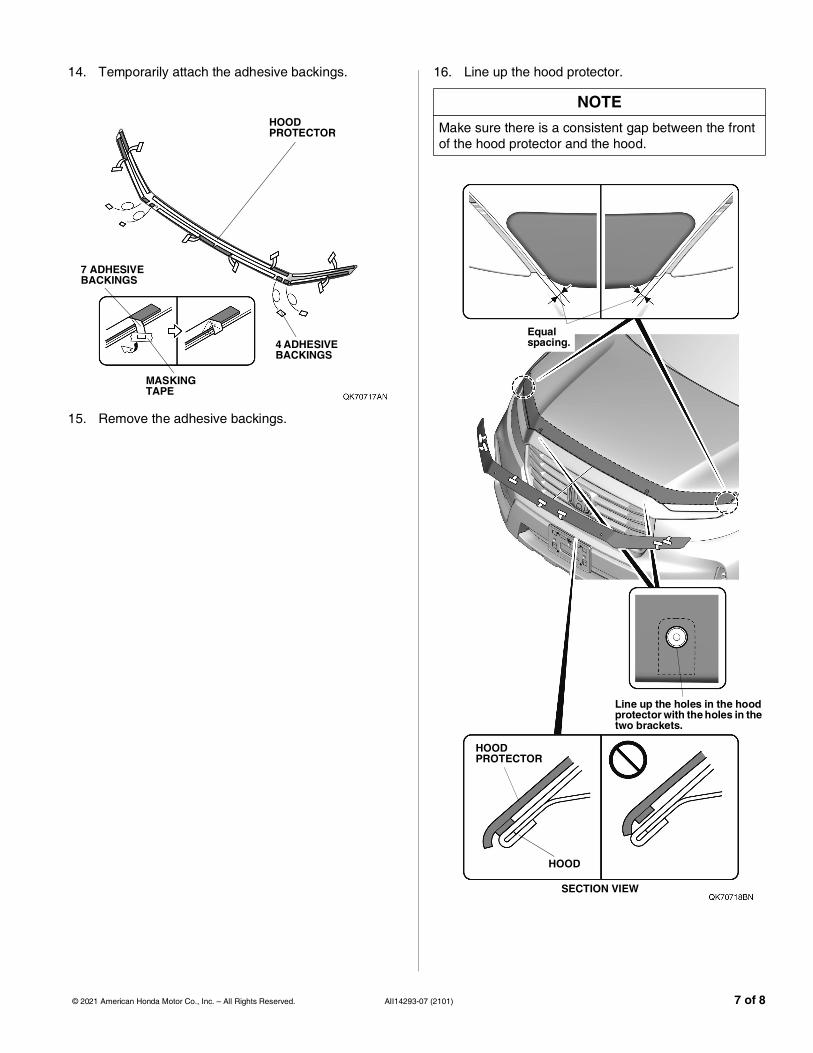
14. Temporarily attach the adhesive backings.
15. Remove the adhesive backings.
7 ADHESIVE BACKINGS
4 ADHESIVE BACKINGS
HOOD PROTECTOR
MASKING TAPE
16. Line up the hood protector.
NOTEMake sure there is a consistent gap between the front of the hood protector and the hood.
Equal spacing.
SECTION VIEW
HOOD PROTECTOR
HOOD
Line up the holes in the hood protector with the holes in the two brackets.
8 of 8 AII14293-07 (2101) © 2021 American Honda Motor Co., Inc. – All Rights Reserved.
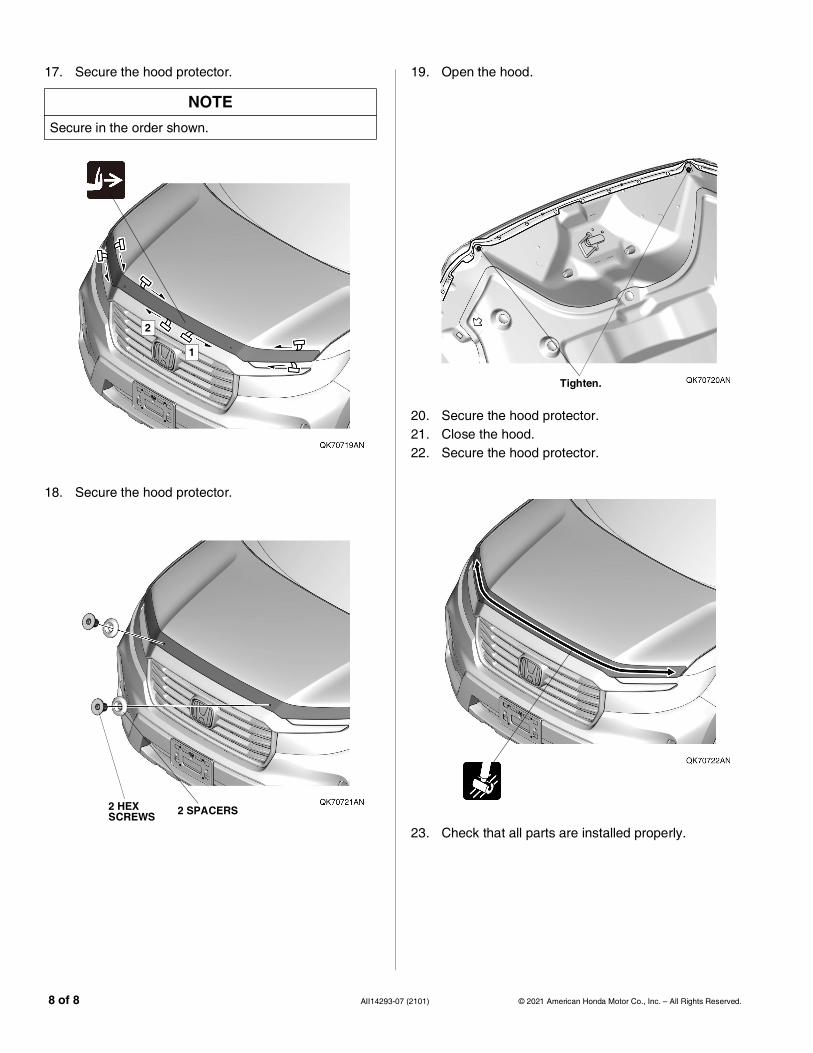
17. Secure the hood protector.
18. Secure the hood protector.
NOTESecure in the order shown.
1
2
2 HEX SCREWS 2 SPACERS
19. Open the hood.
20. Secure the hood protector.21. Close the hood.22. Secure the hood protector.
23. Check that all parts are installed properly.
Tighten.