public.apsb.org Documents/Curriculum... · Web viewFocus GLEs. PS 41. Identify the parts and...
50
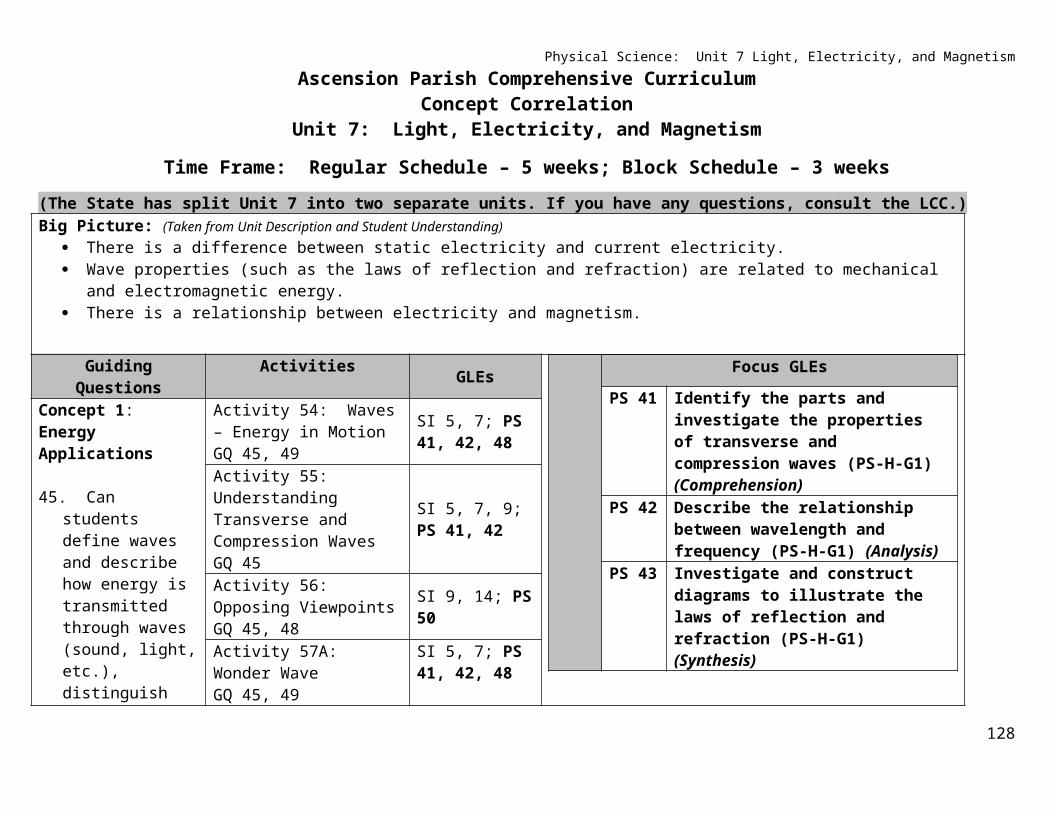
Physical Science: Unit 7 Light, Electricity, and Magnetism Ascension Parish Comprehensive Curriculum Concept Correlation Unit 7: Light, Electricity, and Magnetism Time Frame: Regular Schedule – 5 weeks; Block Schedule – 3 weeks (The State has split Unit 7 into two separate units. If you have any questions, consult the LCC.) Big Picture: (Taken from Unit Description and Student Understanding) There is a difference between static electricity and current electricity. Wave properties (such as the laws of reflection and refraction) are related to mechanical and electromagnetic energy. There is a relationship between electricity and magnetism. Guiding Questions Activities GLEs Focus GLEs PS 41 Identify the parts and investigate the properties of transverse and compression waves (PS-H-G1) (Comprehension) PS 42 Describe the relationship between wavelength and frequency (PS-H-G1) (Analysis) PS 43 Investigate and construct diagrams to illustrate the laws of reflection and refraction (PS-H-G1) (Synthesis) Concept 1: Energy Applications 45. Can students define waves and describe how energy is transmitted through waves (sound, light, etc.), distinguish Activity 54: Waves – Energy in Motion GQ 45, 49 SI 5, 7; PS 41, 42, 48 Activity 55: Understanding Transverse and Compression Waves GQ 45 SI 5, 7, 9; PS 41, 42 Activity 56: Opposing Viewpoints GQ 45, 48 SI 9, 14; PS 50 Activity 57A: Wonder Wave GQ 45, 49 SI 5, 7; PS 41, 42, 48 128
Transcript of public.apsb.org Documents/Curriculum... · Web viewFocus GLEs. PS 41. Identify the parts and...
Physical Science: Unit 7 Light, Electricity, and MagnetismAscension Parish Comprehensive Curriculum
Concept CorrelationUnit 7: Light, Electricity, and Magnetism
Time Frame: Regular Schedule – 5 weeks; Block Schedule – 3 weeks(The State has split Unit 7 into two separate units. If you have any questions, consult the LCC.)Big Picture: (Taken from Unit Description and Student Understanding)
There is a difference between static electricity and current electricity. Wave properties (such as the laws of reflection and refraction) are related to mechanical and electromagnetic energy. There is a relationship between electricity and magnetism.
Guiding Questions Activities GLEs
Focus GLEs
PS 41 Identify the parts and investigate the properties of transverse and compression waves (PS-H-G1) (Comprehension)
PS 42 Describe the relationship between wavelength and frequency (PS-H-G1) (Analysis)
PS 43 Investigate and construct diagrams to illustrate the laws of reflection and refraction (PS-H-G1) (Synthesis)
PS 44 Illustrate the production of static electricity (PS-H-G2) (Application)
PS 45 Evaluate diagrams of series and parallel circuits to determine the flow of electricity (PS-H-G2) (Evaluation)
PS 46 Diagram a magnetic field (PS-H-G2) (Application)
PS 47 Explain how electricity and magnetism are related (PS-H-G2) (Analysis)
Concept 1: Energy Applications
45. Can students define waves and describe how energy is transmitted through waves (sound, light, etc.), distinguish between transverse and compression waves, and identify the relationship between wavelength and frequency?
46. Can students identify and describe the Doppler Effect?
47. Can students explain at least one application of the
Activity 54: Waves – Energy in MotionGQ 45, 49
SI 5, 7; PS 41, 42, 48
Activity 55: Understanding Transverse and Compression WavesGQ 45
SI 5, 7, 9; PS 41, 42
Activity 56: Opposing Viewpoints GQ 45, 48
SI 9, 14; PS 50
Activity 57A: Wonder WaveGQ 45, 49
SI 5, 7; PS 41, 42, 48
Activity 57B: What’s the Frequency Roy G. BivGQ 49, 50
SI 5, 7; PS 41, 42, 48
Activity 58A: Sound Waves and The Doppler EffectGQ 47, 48
SI 5, 6, 7; PS 48, 49; ESS 23, 30
128

Physical Science: Unit 7 Light, Electricity, and MagnetismDoppler Effect?
48. Can students relate waves to aspects of everyday life?
PS 48 Compare properties of waves in the electromagnetic spectrum (PS-H-G3) (Analysis)
PS 49 Describe the Doppler effect on sound (PS-H-G3) (Comprehension)
PS 50 Identify positive and negative effects of electromagnetic/mechanical waves on humans and human activities (e.g., sound, ultraviolet rays, X-rays, MRIs, fiber optics) (PS-H-G4) (PS-H-G3) Application
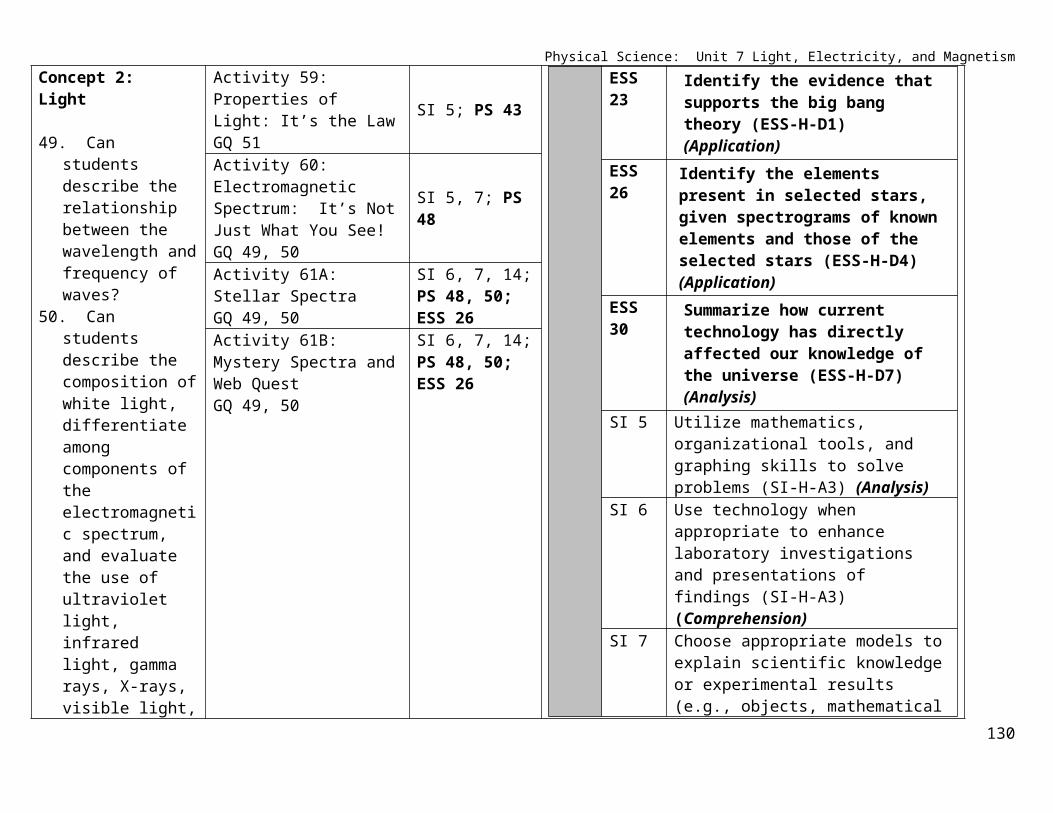
ESS 23 Identify the evidence that supports the big bang theory (ESS-H-D1) (Application)
ESS 26 Identify the elements present in selected stars, given spectrograms of known elements and those of the selected stars (ESS-H-D4) (Application)
ESS 30 Summarize how current technology has directly affected our knowledge of the universe (ESS-H-D7) (Analysis)
SI 5 Utilize mathematics, organizational tools, and graphing skills to solve problems (SI-H-A3) (Analysis)
SI 6 Use technology when appropriate to enhance laboratory investigations and presentations of findings (SI-H-A3) (Comprehension)
SI 7 Choose appropriate models to explain scientific knowledge or experimental results (e.g., objects, mathematical relationships, plans, schemes, examples, role-playing, computer simulations) (SI-H-A4) (Application)
Activity 58B: The Doppler EffectGQ 47, 48
SI 5, 6, 7; PS 48, 49; ESS 23, 30
Activity 58C: The Doppler EffectGQ 47, 48
SI 5, 6, 7; PS 48, 49; ESS 23, 30
Concept 2: Light
49. Can students describe the relationship between the wavelength and frequency of waves?
50. Can students describe the composition of white light, differentiate among components of the electromagnetic spectrum, and evaluate the use of ultraviolet light, infrared light, gamma rays, X-rays, visible light, and radio waves in medical technology?
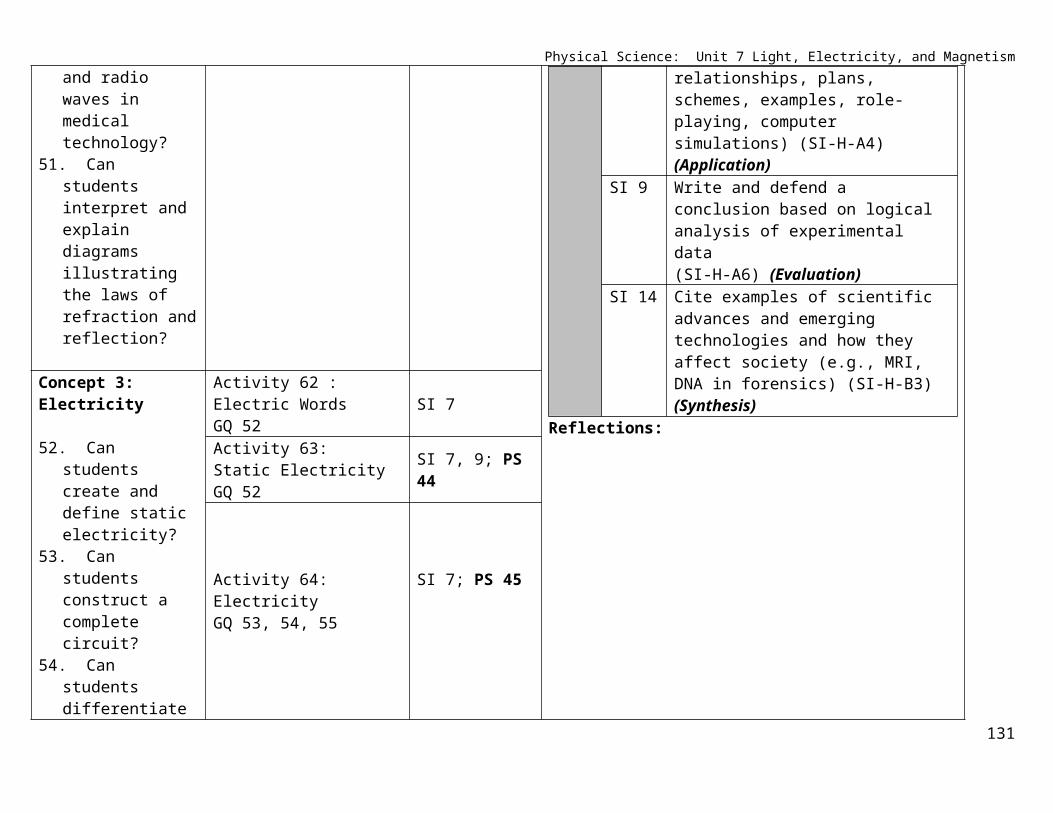
51. Can students interpret and explain diagrams illustrating the laws of refraction and reflection?
Activity 59: Properties of Light: It’s the LawGQ 51
SI 5; PS 43
Activity 60: Electromagnetic Spectrum: It’s Not Just What You See! GQ 49, 50
SI 5, 7; PS 48
Activity 61A: Stellar SpectraGQ 49, 50
SI 6, 7, 14; PS 48, 50; ESS 26
Activity 61B: Mystery Spectra and Web QuestGQ 49, 50
SI 6, 7, 14; PS 48, 50; ESS 26
Concept 3: Electricity Activity 62 : Electric Words GQ 52
SI 7
129
Physical Science: Unit 7 Light, Electricity, and Magnetism52. Can students create
and define static electricity?
53. Can students construct a complete circuit?
54. Can students differentiate between parallel and series circuits?
55. Can students trace the flow of electrical energy on diagram of a complete circuit?
SI 9 Write and defend a conclusion based on logical analysis of experimental data (SI-H-A6) (Evaluation)
SI 14 Cite examples of scientific advances and emerging technologies and how they affect society (e.g., MRI, DNA in forensics) (SI-H-B3) (Synthesis)
Reflections:
Activity 63: Static ElectricityGQ 52
SI 7, 9; PS 44
Activity 64: ElectricityGQ 53, 54, 55
SI 7; PS 45
Concept 4: Magnetism56. Can students
describe a magnetic field?
57. Can students describe a relationship between electricity and magnetism?
Activity 65: MagnetismGQ 56 SI 9; PS 46
Activity 66A: Electromagnetic ConnectionGQ 57
SI 7, 9; PS 47
Activity 66B: Constructing a GalvanometerGQ 57
SI 7, 9; PS 47
130
Physical Science: Unit 7
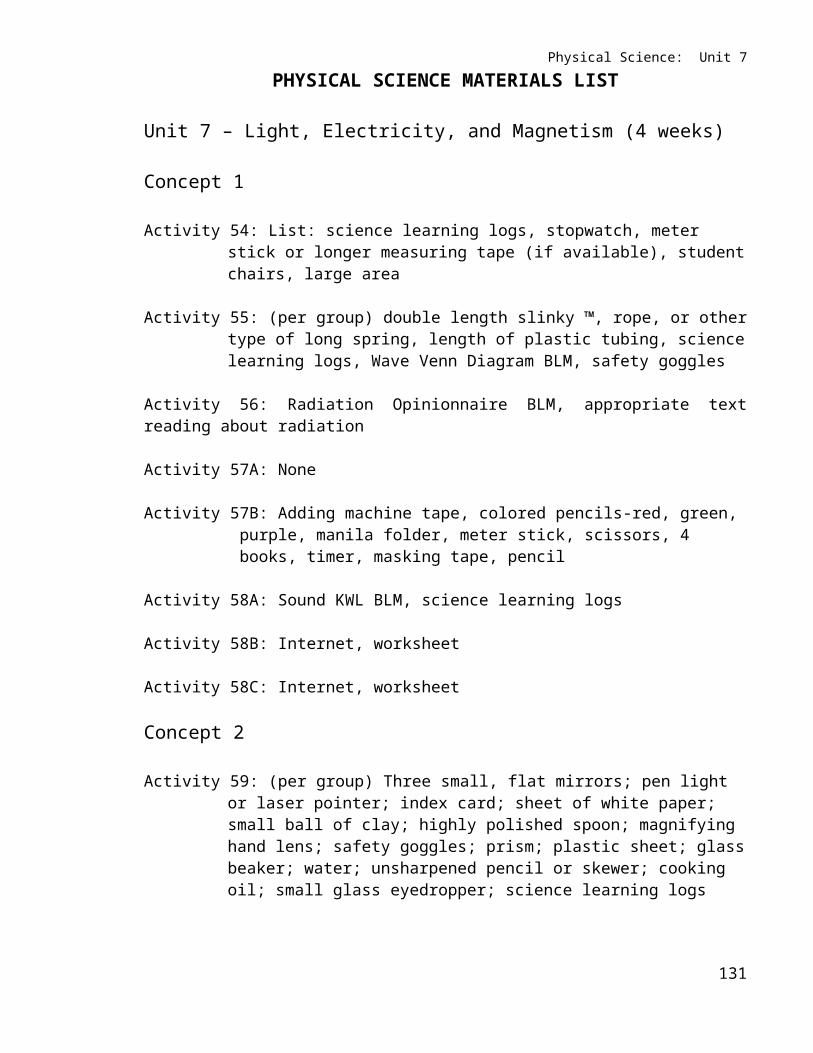
PHYSICAL SCIENCE MATERIALS LIST
Unit 7 – Light, Electricity, and Magnetism (4 weeks)
Concept 1
Activity 54: List: science learning logs, stopwatch, meter stick or longer measuring tape (if available), student chairs, large area
Activity 55: (per group) double length slinky ™, rope, or other type of long spring, length of plastic tubing, science learning logs, Wave Venn Diagram BLM, safety goggles
Activity 56: Radiation Opinionnaire BLM, appropriate text reading about radiation
Activity 57A: None
Activity 57B: Adding machine tape, colored pencils-red, green, purple, manila folder, meter stick, scissors, 4 books, timer, masking tape, pencil
Activity 58A: Sound KWL BLM, science learning logs
Activity 58B: Internet, worksheet
Activity 58C: Internet, worksheet
Concept 2
Activity 59: (per group) Three small, flat mirrors; pen light or laser pointer; index card; sheet of white paper; small ball of clay; highly polished spoon; magnifying hand lens; safety goggles; prism; plastic sheet; glass beaker; water; unsharpened pencil or skewer; cooking oil; small glass eyedropper; science learning logs
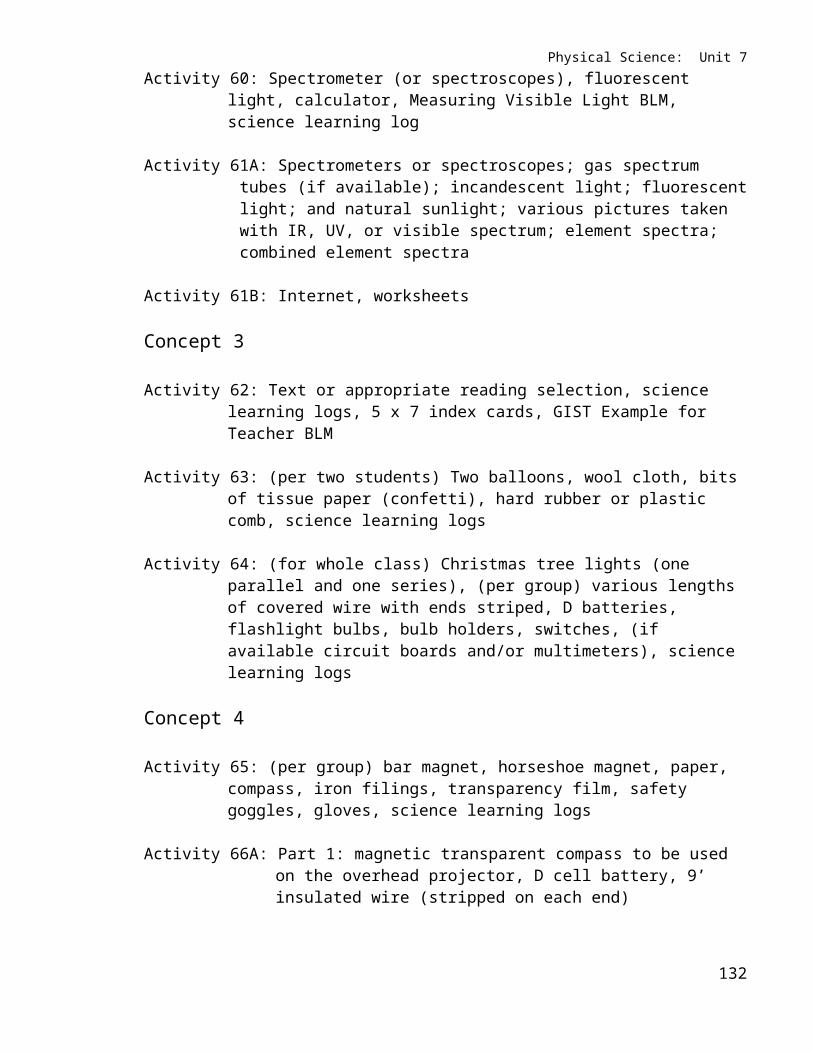
Activity 60: Spectrometer (or spectroscopes), fluorescent light, calculator, Measuring Visible Light BLM, science learning log
Activity 61A: Spectrometers or spectroscopes; gas spectrum tubes (if available); incandescent light; fluorescent light; and natural sunlight; various pictures taken with IR, UV, or visible spectrum; element spectra; combined element spectra
Activity 61B: Internet, worksheets
Concept 3
Activity 62: Text or appropriate reading selection, science learning logs, 5 x 7 index cards, GIST Example for Teacher BLM
131

Physical Science: Unit 7
Activity 63: (per two students) Two balloons, wool cloth, bits of tissue paper (confetti), hard rubber or plastic comb, science learning logs
Activity 64: (for whole class) Christmas tree lights (one parallel and one series), (per group) various lengths of covered wire with ends striped, D batteries, flashlight bulbs, bulb holders, switches, (if available circuit boards and/or multimeters), science learning logs
Concept 4
Activity 65: (per group) bar magnet, horseshoe magnet, paper, compass, iron filings, transparency film, safety goggles, gloves, science learning logs
Activity 66A: Part 1: magnetic transparent compass to be used on the overhead projector, D cell battery, 9’ insulated wire (stripped on each end)
Part 2 (per group): large nail, long lengths of coated copper wire (stripped on each end), D-cell battery, electrical tape, paper clips
Part 3 (per group): D cell battery, round ceramic magnet, two paper clips, sandpaper, electrical tape, approximately 30 “ length of thinly coated copper wire (stripped on the ends)
Activity 66B: Wire, card board, ruler, tape, compass, scissors, pencil, cylinder (markers), bar magnet
132
Physical Science: Unit 7
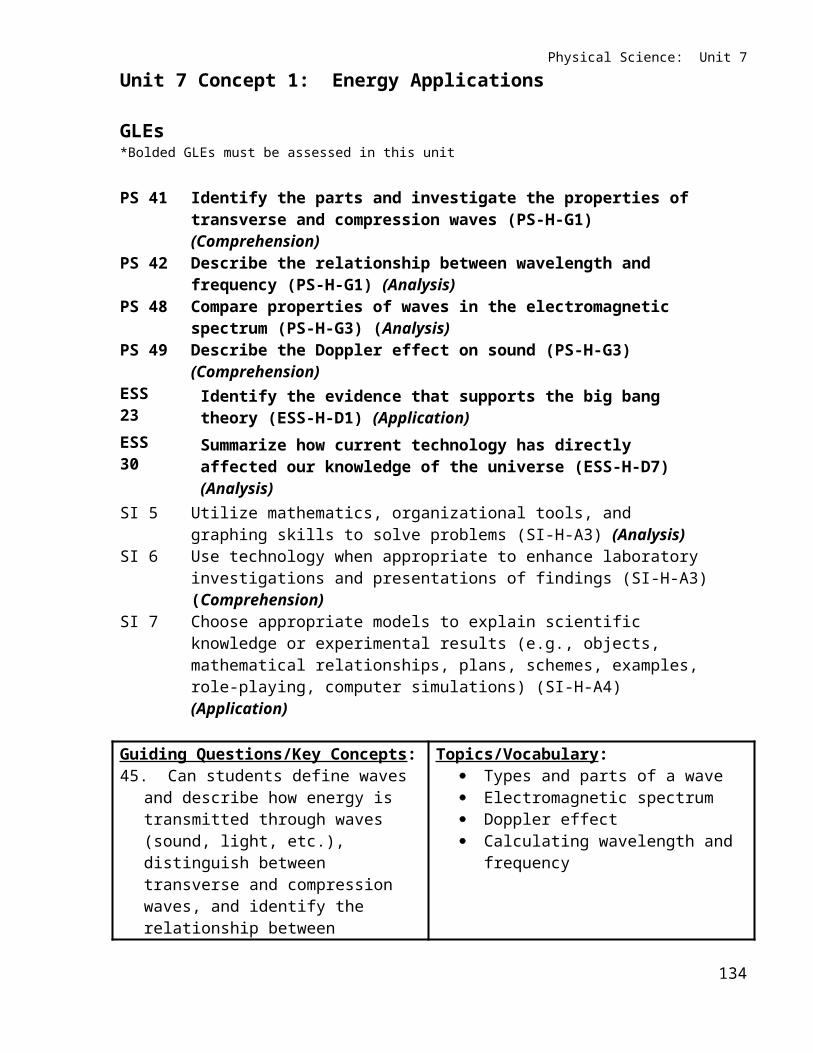
Unit 7 Concept 1: Energy Applications
GLEs*Bolded GLEs must be assessed in this unit
PS 41 Identify the parts and investigate the properties of transverse and compression waves (PS-H-G1) (Comprehension)
PS 42 Describe the relationship between wavelength and frequency (PS-H-G1) (Analysis)
PS 48 Compare properties of waves in the electromagnetic spectrum (PS-H-G3) (Analysis)
PS 49 Describe the Doppler effect on sound (PS-H-G3) (Comprehension)ESS 23 Identify the evidence that supports the big bang theory (ESS-H-D1)
(Application)ESS 30 Summarize how current technology has directly affected our knowledge of
the universe (ESS-H-D7) (Analysis)SI 5 Utilize mathematics, organizational tools, and graphing skills to solve problems
(SI-H-A3) (Analysis)SI 6 Use technology when appropriate to enhance laboratory investigations and
presentations of findings (SI-H-A3) (Comprehension)SI 7 Choose appropriate models to explain scientific knowledge or experimental
results (e.g., objects, mathematical relationships, plans, schemes, examples, role-playing, computer simulations) (SI-H-A4) (Application)
Guiding Questions/Key Concepts:45. Can students define waves and describe
how energy is transmitted through waves (sound, light, etc.), distinguish between transverse and compression waves, and identify the relationship between wavelength and frequency?
46. Can students identify and describe the Doppler Effect?
47. Can students explain at least one application of the Doppler Effect?
48. Can students relate waves to aspects of everyday life?
Topics/Vocabulary: Types and parts of a wave Electromagnetic spectrum Doppler effect Calculating wavelength and frequency
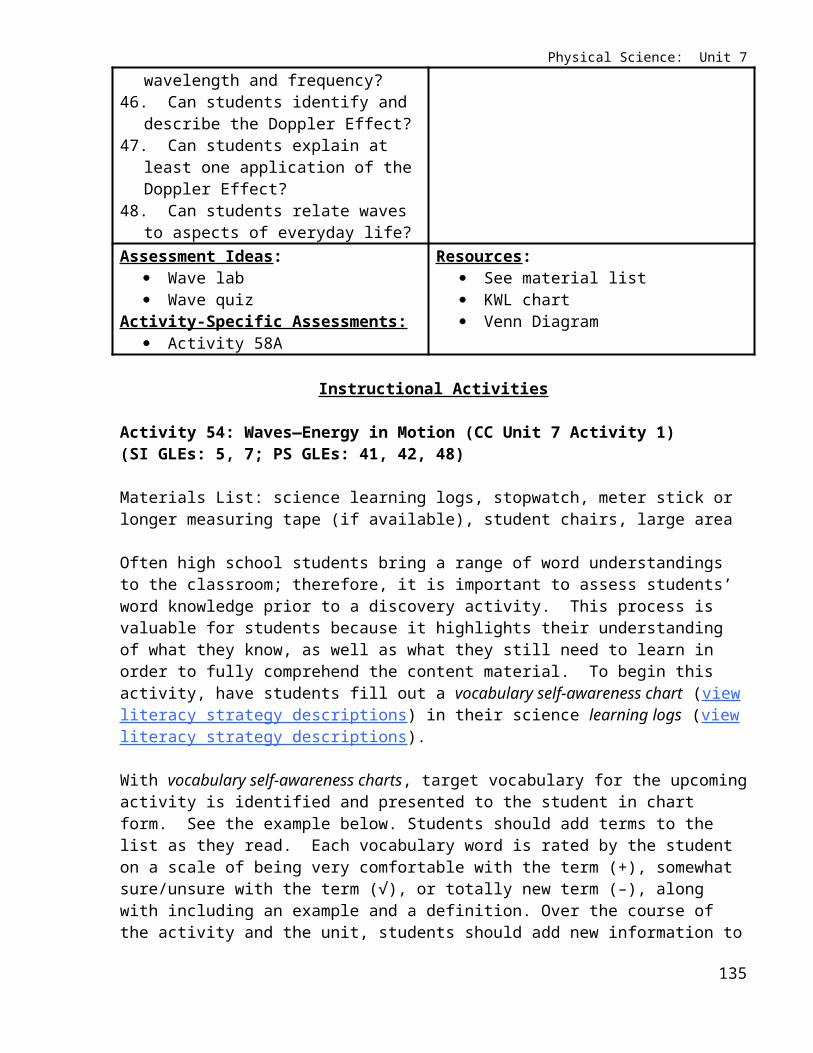
Assessment Ideas: Wave lab Wave quiz
Activity-Specific Assessments: Activity 58A
Resources: See material list KWL chart Venn Diagram
Instructional Activities
Activity 54: Waves—Energy in Motion (CC Unit 7 Activity 1)(SI GLEs: 5, 7; PS GLEs: 41, 42, 48)
133
Physical Science: Unit 7
Materials List: science learning logs, stopwatch, meter stick or longer measuring tape (if available), student chairs, large area
Often high school students bring a range of word understandings to the classroom; therefore, it is important to assess students’ word knowledge prior to a discovery activity. This process is valuable for students because it highlights their understanding of what they know, as well as what they still need to learn in order to fully comprehend the content material. To begin this activity, have students fill out a vocabulary self-awareness chart (view literacy strategy descriptions) in their science learning logs (view literacy strategy descriptions).
With vocabulary self-awareness charts, target vocabulary for the upcoming activity is identified and presented to the student in chart form. See the example below. Students should add terms to the list as they read. Each vocabulary word is rated by the student on a scale of being very comfortable with the term (+), somewhat sure/unsure with the term (√), or totally new term (–), along with including an example and a definition. Over the course of the activity and the unit, students should add new information to the chart. The goal is to bring all students to a comfortable level with the unit’s content vocabulary. Because students continually revisit their vocabulary charts to revise their entries, they have multiple opportunities to practice and extend their growing understanding of important content terms. Students should also be encouraged to add terms to their chart at anytime during the unit.
Waves Vocabulary Self-Awareness Chartword + √ – example definition
wavewavelengthcresttroughfrequencyamplitudeperiod
By physically doing the “wave” made popular at sporting events, students will investigate waves in terms of their properties, frequency, amplitude, wave velocity, and wavelength. Students will then describe the behavior of waves as they interact and hit one another.
Place a chair for each student close together in a circle. If there is a space limitation, this activity can be conducted outside or in a gym. Two students will serve as timer and counter/recorder; they will stand outside the circle. Have other seated students practice a few waves. Students should identify all parts of a wave, including the crest, the trough, and the normal rest position. They should identify these points in their human wave, observing that they have no trough position in their wave.
To incorporate a trough, have students stand with raised hands for the crest and then kneel with hands lowered for the trough. The second student in the human wave will raise their hands when the first one begins to kneel. The rest position will be halfway between hands up/standing and
134

Physical Science: Unit 7
hands lowered/kneeling. This may take some practice trials.
After this wave has gone around the circle with success (a few continuous rounds), have students identify the wavelength (distance from crest to crest, i.e., distance from student with hands up to next student with hands up), crest (highest point of wave, i.e., student with hands up), and amplitude (distance from rest to crest, i.e., distance from student with hands at rest to student with hands up). An average of the amplitude will be taken with this “human wave” because heights will vary between students.Students should identify the wave medium as being themselves and should recognize that the wave they have demonstrated is an example of a transverse wave. Note: the medium for a wave is the substance or material which carries the wave; make sure students add this term to their vocabulary self awareness charts. It is difficult to do the wave by standing and kneeling, so to simplify from this point in the activity have students go back to the original sitting and standing wave for the remainder of the activity.
Ask the students to define the period of their wave, the time it takes for one student to stand and sit back down. The timekeeper, who is outside the circle, should calculate the period of the wave as the students do their wave.
Challenge students to demonstrate how they would double the period (they should go one half the original speed) and how to cut their original period in half (they should go twice as fast).
Students should define their frequency by having the timekeeper time the students doing the wave for a set time (30-60 seconds), while another student outside the circle counts the number of waves that go by.
Challenge the students to double their frequency (they should double their speed). Then ask them to cut the frequency in half (they should half their original speed). Because this requires the cooperation of everyone in the circle, many attempts may be necessary to achieve the desired results.
To conclude this activity, discuss what would happen when two waves interact. Allow students to simulate this interference.
For final closure, have students revisit their wave vocabulary chart to revise or add definitions and examples. They should also update their rating of their understanding of the term.
This activity is based on materials developed by ROBIE project participants ErinBabin, Greg Sollie, Celeste Carmouche, Lucy Dunaway, Michele Macloud, ShellySimmons and Mary Gail Yeates under the direction of Dr. Greg Guzik. The project was funded by the Louisiana Technology Innovation Fund and further supported by Louisiana State University. Permission to use was granted by Dr. Guzik. More information can be found at http://www.bro.lsu.edu/radio/Classroom/classroom.html.
Activity 55: Understanding Transverse and Compression Waves (SI GLEs: 5, 7, 9; PS GLEs: 41, 42)
135
Physical Science: Unit 7
Materials List: (per group) double length slinky ™, rope, or other type of long spring, length of plastic tubing, science learning logs, Wave Venn Diagram BLM, safety goggles
To investigate compression or longitudinal waves, students should lay the spring out on a smooth floor to a length of about 6 to 10 meters. One student (the holder) holds one end that does not move during the observation. Another student (the shaker) holds the opposite end of the spring in one hand. With their free hand, the shaker should grasp the stretched spring about a meter from their end. Have the shaker pull the meter of spring together toward their hand on the end of the spring and then release it. Make sure the shaker does not let go of the fixed end in their other hand. Instruct students to observe the single wave, or pulse, that travels along the spring. In a compression (or longitudinal) wave, the pulse of energy moves back and forth along the same direction as the wave travels (the length of the spring). Point out to students that the wave carries energy, but the spring remains stationary after the pulse has passed through it and reflected from the other end. Note: The compression wave can be seen more easily if the students tie small pieces of string to several tops of the loops of the spring and watch their motion when the spring is pulsed. Using their science learning logs (view literacy strategy descriptions), students should record their observations and sketch/label the compression wave. Have them answer the following questions along with any others determined by the teacher and/or students:
What did you observe about the progress of the compression wave? (The wave traveled down the length of the spring and back from the end until it slowed and stopped.)
What happens to the energy of the wave? (It dissipates as the friction between the floor and the spring are overcome.)
Where do we find compression waves on Earth? (Sound waves and seismic waves (the P waves) are compression waves. Seismic waves called S waves are shear waves and do not pass through liquids, such as the molten core.)
To investigate and compare transverse waves, students should hold the spring along the floor in a similar manner as before. The holder holds his/her end stationary at all times, and the shaker moves his/her hand back and forth at right angles to the stretched spring until a pulse is produced that travels down only one side of the spring (the “bump” on the spring due to the pulse is only on the right or left side of the spring). In a transverse wave the wave or pulse of energy moves at right angles (transverses to) the length of the spring. Students should also recognize this wave as similar to the one studied in Activity 1.
Again using their science learning logs, have students record their observations and sketch/label their transverse wave. Using their spring wave model, have students answerthe following questions along with any others as determined by the teacher and/or students:
Does the size of the pulse change as it travels along the spring? (Yes.) If yes, how does it change? (It becomes smaller.) Does the pulse reflected from the far stationary end return to you on the same side
of the spring as the original wave, or does it return on the opposite side? (It returns on the opposite side.)
Why? (Since the holder is holding the spring stationary, the wave has to invert [or reflect] to continue to move back down the spring.)
Does a change in the tension of the spring have any effect on the speed of the pulses? Note that when you stretch the spring farther, you are changing the nature
136
Physical Science: Unit 7
of the medium through which the pulses move. (As the tension in the spring increases, the speed of the pulses increases. If the tension is decreased, then the speed of the pulses will decrease. This is a direct relationship.)
For the next investigation, have students attach a length of plastic tubing (or rope) to the end of their spring, and again create a transverse wave. This demonstrates what occurs when a wave travels from one medium to another, an event called refraction. After recording their observations in their science learning logs and sketching the wave model, students should be able to answer the following question:
What happens to the pulse, or wave when it reaches the place where the spring is attached to the tubing (the boundary between the two media)? (When a wave hits the boundary between the two types of material, part of the wave is reflected and part is transmitted.)
Describe its size, its shape, its speed, and the direction in BOTH media after the pulse reaches the boundary. Notice that at the far end of your spring, where it is attached to the different media, the tubing should now be free to move back and forth at the joint, which it was unable to do before because the holder was holding it. If you notice that the far end of the spring is not moving freely, be sure to make a note of it in your observations as you record the answer to this question. (If the boundary is free to move, the reflected pulse should be on the same side as the incident [original] pulse, smaller than the incident pulse, the same shape as the incident pulse, and should travel with the same speed. The wave or pulse, that travels into the other medium [the tubing], will be on the same side of the new medium as the incident wave, but it will be smaller than the original pulse, and travel with a different speed.)
To investigate interference, have students detach the tubing they added for the prior investigation. Instruct students to return to their original transverse wave generation model, and have the shaker send a pulse down the spring at the exact same time that the holder sends a pulse down the spring. They must be sent on the same side and students may need to practice this before making a final observation. The waves meet and interact; this is called interference. Instruct students to record their observations and sketch/label their interference model. They should describe the size, the shape, the speed, and the direction of each wave or pulse during and after the interaction. Teacher note: it will be easier to see what happens in the interaction if one pulse is larger than the other. They should then answer the following questions along with any others as determined by the teacher:
What happens when the two pulses reach the center of the spring? (When the two pulses meet in the center, they will add together to make a pulse that is as large as the sum of the two pulses. The shape should be the same, just larger. The speed of the pulses remains the same as they travel through each other. Teacher note: students will often say that the pulses bounce off of each other or reflect. If they do this, suggest that the students make the pulses different sizes and that they lower the tension in the spring.)
What happens when two pulses on opposite sides of the spring meet? To investigate this, students must send one wave down the right side and have their partner must send another down the left side at the same time.
137

Physical Science: Unit 7
Students should describe the size, the shape, the speed, and the direction as they did in previous questions. (When waves or pulses on opposite sides of the spring meet, they cancel out if the pulses are the same size. If they are not the same size the addition [or subtraction] of the pulses when they meet should result in a smaller pulse being formed, but only momentarily. The shape will flatten out if the pulses are the same size or become smaller if they are not the same size. The speed of the two pulses should stay the same.)
As the two pulses pass each other when they start on opposite sides of the spring, can you observe a point on the spring that does not move at all? Explain. (There is a point where the spring does not move if the pulses start from opposite sides of the spring. This is called a node. It is formed when the opposite motions of the spring cancel out and there is no movement.)
From the observations you have just made make a general statement about the displacement caused by the addition of two waves or pulses at the same point. (Waves or pulses traveling in the same medium either add together or subtract from each other when they meet.)
To investigate the relationship between wavelength and frequency, have the shaker vibrate his/her hand steadily back and forth while the holder holds the opposite end of the spring stationary. They should produce a train of waves or pulses, called a periodic wave. Remind students that the distance between any two adjacent crests on such a periodic wave is the wavelength. The rate at which you vibrate the spring will determine the frequency of the periodic wave. Instruct students to produce various short bursts of periodic waves having different frequencies. After their experimentation, have students record their observations in the science learning logs, and determine the relationship between wavelength and frequency. They should record specific observations from their experiment to defend their position on this relationship. (Wavelength and frequency are inversely proportional. As the wavelength gets smaller, the frequency increases. As the student moves his/her hand faster, the waves are closer together. Any of these three sentences is an acceptable answer.)
As closure to this activity, allow students to add some or all of the following terms to their vocabulary self-awareness chart (view literacy strategy descriptions) in their science learning logs (in addition to any the teacher indicates): transverse wave, compression wave, reflected wave, pulse, refraction, incident wave, node, interference, direct relationship, indirect relationship. Additionally, they can complete a graphic organizer (view literacy strategy descriptions) in the form of a Venn diagram to compare and contrast transverse and compression waves. See Wave Venn Diagram BLM for handout.
This activity was adapted from Waves Light Up the Universe, produced as part of the Education and Public Outreach program of NASA’s Swift Mission. More information can be found at http://swift.sonoma.edu/education/slinky_booklet/index.html
Activity 56: Opposing Viewpoints (SI GLEs: 9, 14; PS GLE: 50)
Materials List: Radiation Opinionnaire BLM, appropriate text reading about radiation
This activity is meant to be a springboard to engage students in the topic of the electromagnetic spectrum for the activities that follow. Have students complete the Radiation Opinionnaire (view
138
Physical Science: Unit 7
literacy strategy descriptions) BLM prior to reading a short appropriate selection of text about the various forms of radiation in the electromagnetic spectrum. Depending on the text, the teacher may need to adjust the supplied opinionnaire. Using an opinionnaire requires students to generate statements about the topic of radiation and forces them to take positions and defend them. The emphasis is on students’ points of view and not the “correctness” of their opinions. At this point in the unit, students have had not investigated the electromagnetic spectrum in depth, but prior knowledge should offer some basis for their opinions.
Have students work in pairs to read and discuss each statement, then write down reasons for their opinions. Encourage students to write clear, concise, thoughtful answers for their justification of their opinion. At this point in the activity, after opinions have been written, allow students to read the appropriate text with content about the electromagnetic spectrum. After reading, offer students the opportunity to discuss and revise their opinions with their partner. Afterward, invite students to share their opinions for each statement and separate supporters from non-supporters. Force each student to take a stand. Then, ask the two groups to briefly debate the statement and allow for any students who have changed their minds to move to the other group. By taking a stand on issues related to radiation and the electromagnetic spectrum and engaging in critical discussion about those issues, students will heightened their expectation of the content about radiation to follow and make many new connections from their opinions and ideas to those of their classmates. Specific topics related to the questions may arise as a result of this discussion. The teacher should use his/her discretion in selecting topics to debate. The discussion should evoke from the students that electromagnetic waves have not only been helpful to man (e.g., in allowing us to see and communicate) but also harmful to man (e.g., in causing cancer from overexposure to the Sun). The discussion of the statements should show students how strongly these types of energies are integrated into their daily lives.
Activity 57A: Wonder Wave (Teacher-Made for CC Unit 6 Activity 7)(SI GLEs: 5, 7; PS GLEs: 41, 42, 48)The students rotate to five different stations to explore different characteristics of waves.
Activity 57B: What’s the Frequency Roy G. Biv? (Teacher-Made for CC Unit 6 Activity 7)(SI GLEs: 5, 7; PS GLEs: 41, 42, 48) See resources section for link to properties of light online tour. This lab serves as an enrichment activity for exploring wavelength and frequency.
Activity 58A: Sound Waves and The Doppler Effect (CC Unit 6 Activity 8) (SI GLEs: 5, 6, 7; PS GLEs: 48, 49; ESS GLEs: 23, 30)
Materials List: Sound KWL BLM, science learning logs
As an anticipatory activity, have students fill in a graphic organizer (view literacy strategy descriptions) in the form of a KWL chart about sound and the Doppler Effect. See Sound KWL BLM for an example of the chart. Once the chart is completed, have students discuss what they already know about this phenomenon, provide examples, and share what they are interested in learning about it. After analyzing the KWL charts, the teacher should address misconceptions or gaps in understanding with direct instruction, specific text readings, and guiding questions to improve student understanding of the relationship between pitch, frequency, and wavelengths.
139

Physical Science: Unit 7
If computer instruction is available, a good applet that shows sound waves and the Doppler Effect can be found at http://www.walter-fendt.de/ph11e/dopplereff.htm. Another good source online is http://www.glenbrook.k12.il.us/gbssci/phys/Class/waves/u10l3d.html. This Doppler Effect diagram can be printed out as an example for students. Most students can explain what they hear as an ambulance approaches and passes them, but they cannot explain why. Instruct students to record illustrations in their science learning logs (view literacy strategy descriptions) to explain the Doppler Effect. Provide students with the opportunity to complete their Sound KWL chart individually to indicate what they have learned from the lesson.
Apply the Doppler Effect to light by showing that electromagnetic waves from an object moving away will demonstrate a red shift as the waves are stretched and the compression of waves results in a blue shift when an object is approaching. A teacher lead discussion should investigate areas of science where the Doppler Effect is applied. An immediate response may be with Doppler based weather reports. After direct instruction, students should be able to indicate what part of the weather system will demonstrate a red shift and which area of activity will show a blue shift. In addition, students should be asked to explain how Doppler readings are made with the instruments. They should also be able to explain the technology available to scientists and researchers today, and how that technology provides evidence that supports the Big Bang theory. Several spectral images showing shifted patterns should be given to the students for interpretation. Information about this spectral shift can be found online at http://en.wikipedia.org/wiki/Spectral_class, http://en.wikipedia.org/wiki/Red_shift, http://imagine.gsfc.nasa.gov/YBA/M31-velocity/spectral-info.html
Activity 58B: The Doppler Effect (Teacher-Made for CC Unit 6 Activity 8) (SI GLEs: 5, 6, 7; PS GLEs: 48, 49; ESS GLEs: 23, 30)Virtual lab on Doppler Effect applied to sound waves.
Activity 58C: The Doppler Effect (Teacher-Made for CC Unit 6 Activity 8)(SI GLEs: 5, 6, 7; PS GLEs: 48, 49; ESS GLEs: 23, 30)Think quest activity which explores the Doppler Effect on the internet
See Appendix
140
Assessment The students will reexamine their KWL charts to analyze what they thought they
knew prior to this activity. Research indicates that students will retain their previous misconceptions about a topic, in preference to new information, until they actively recognize and correct their own errors. Therefore, it is important to have students re-examine the facts/beliefs they put on their KWL list. It will also be helpful to review the list by marking each entry as correct or incorrect. Previously held incorrect ideas will be replaced with correct information.
Physical Science: Unit 7
Unit 7 Concept 2: Light
GLEs*Bolded GLEs must be assessed in this unit
PS 43 Investigate and construct diagrams to illustrate the laws of reflection and refraction (PS-H-G1) (Synthesis)
PS 48 Compare properties of waves in the electromagnetic spectrum (PS-H-G3) (Analysis)
PS 50 Identify positive and negative effects of electromagnetic/mechanical waves on humans and human activities (e.g., sound, ultraviolet rays, X-rays, MRIs, fiber optics) (PS-H-G4) (PS-H-G3) Application
ESS 26 Identify the elements present in selected stars, given spectrograms of known elements and those of the selected stars (ESS-H-D4) (Application)
SI 5 Utilize mathematics, organizational tools, and graphing skills to solve problems (SI-H-A3) (Analysis)
SI 6 Use technology when appropriate to enhance laboratory investigations and presentations of findings (SI-H-A3) (Comprehension)
SI 7 Choose appropriate models to explain scientific knowledge or experimental results (e.g., objects, mathematical relationships, plans, schemes, examples, role-playing, computer simulations) (SI-H-A4) (Application)
SI 14 Cite examples of scientific advances and emerging technologies and how they affect society (e.g., MRI, DNA in forensics) (SI-H-B3) (Synthesis)
Guiding Questions/Key Concepts:49. Can students describe the relationship
between the wavelength and frequency of waves?
50. Can students describe the composition of white light, differentiate among components of the electromagnetic spectrum, and evaluate the use of ultraviolet light, infrared light, gamma rays, X-rays, visible light, and radio waves in medical technology?
51. Can students interpret and explain diagrams illustrating the laws of refraction and reflection?
Topics/Vocabulary: Laws of reflection and refraction Properties of waves in electromagnetic
spectrum Positive and negative affects of waves
on humans Spectrograms from stars
Assessment Ideas: Web quest Mystery Spectra worksheet
Activity-Specific Assessments: Activity 59
Resources: See material list Internet
141
Physical Science: Unit 7
Instructional Activities
Activity 59: Properties of Light: It’s the Law (CC Unit 7 Activity 5) (SI GLEs: 5; PS GLE: 43)
Materials List: (per group) three small, flat mirrors; pen light or laser pointer; index card; sheet of white paper; small ball of clay; highly polished spoon; magnifying hand lens; safety goggles; prism; plastic sheet; glass beaker; water; unsharpened pencil or skewer; cooking oil; small glass eyedropper; science learning logs
Working in groups of three to four, have students place the flat mirror perpendicular and on top of the paper. Shine the penlight (or laser) on the mirror from the side at an angle (caution students about viewing lasers directly, and monitor their use closely). Students should trace a pencil line along the edge of the mirror and then from the mirror/paper interface along the two light paths. Ask students what they notice about the angle at which the light is reflected from the mirror? (It is the same as the angle of the incident light ray.) Have students investigate a few more angles to see if this is always the case for the flat mirror. Students should record their observations in their science learning logs (view literacy strategy descriptions) along with a definition of the law of reflection in their own words. To test their new understanding of reflection, place an index card with a one-inch black circle somewhere in the room. Challenge students to use their light source and three mirrors to shine their light on the circle (lasers work best in this activity). The clay will help in positioning the mirrors in a stationary position. Remind students to keep their mirrors perpendicular to the table. (Students must reflect their light from one mirror to the next mirror to the third mirror to the index card.)
Have students look at one side of the spoon and determine if their reflection is upside-down or right-side-up. Students should observe if the image is smaller or larger than their actual face. Once everyone in the group has observed and recorded their observations, the students should turn the spoon over and make the same observations and recordings.
Have students compare and contrast the side of the spoon that caves inward (the concave side) to the side that bends outward (the convex side).
Supply student groups with a magnifying hand lens and ask students to determine how it works. They should notice that the lens is convex on both sides. Convex lenses magnify objects larger and concave lenses magnify objects smaller (magnification is defined as causing an image to appear larger or smaller than the corresponding object although we often only use it in conjunction with making images larger). Mirrors can also magnify images if the surface is convex rather than flat. Discuss with students that the law of reflection still applies, but the shape of the surface can cause the angle of reflection to be different from the angle of incidence (the original image or beam of light).
Using their prisms, the penlight or laser pointer, and various mediums such as water, plastic, and glass, allow students to investigate the angle that the light travels through the various mediums, the plastic, and the glass, and record their observations.
Instruct students to fill the beaker 2/3 full of water and place the pencil or skewer inside the beaker in the water. Students must view from above the glass to notice any changes to the pencil’s appearance. They should also look at the pencil from the side of the glass and up towards the water surface. The apparent “bending” of the pencil is the difference of the light
142
Physical Science: Unit 7
refraction in different mediums, air, water, and glass. Tell students to determine exactly where the light is bending. They should draw a diagram showing the pencil and how light from the pencil travels to their eyes.
Direct students to pour the water out of the glass and replace it with some cooking oil, deep enough to submerge the glass part of the eyedropper. The air should be squeezed out of the eyedropper and then placed in the oil. Make sure that students are watching the eyedropper as the bulb is released and the oil flows into the dropper. Using their knowledge of the law of refraction students should explain what they are seeing. When light travels from one medium to another, the place where the medium changes is called the interface. Depending on the medium, some of the incident light is reflected and part of the incident light is refracted or its path is “bent” in relation to the path of the incident light. Both the reflection and the refraction occur at the interface.
See Appendix
Activity 60: Electromagnetic Spectrum: It’s Not Just What You See! (SI GLEs: 5, 7; PS GLEs: 48)
Materials List: spectrometer (or spectroscopes), fluorescent light, calculator, Measuring Visible Light BLM, science learning log
To predict and physically verify the relationship of frequency and wavelength of visible light have students investigate the fluorescent light found in the classroom (hallway or nearest room with fluorescent lighting, if classroom doesn’t have fluorescent lighting) using a spectrometer. A spectrometer is an optical instrument used to study and measure properties of light over a specific area of the electromagnetic spectrum. Inexpensive spectrometers for use in the classroom can be obtained and are often found in physics labs. Spectrometers allow students to actually determine the wavelength of the light component they are viewing, and it is the preferred instrument for this activity. However, if none are available, simple spectroscopes can be easily made. Spectroscopes will break down the light into its components, but students must use additional charts (like the ones found below) for specific wavelengths. Instructions on how to make and use spectroscopes can be found at http://asd-www.larc.nasa.gov/edu_act/simple_spec.htmlhttp://sci-toys.com/scitoys/scitoys/light/cd_spectroscope/spectroscope.html
Divide students into groups of three to four, and taking turns using the spectrometer, instruct them to look at the spectrum of fluorescent light. They should determine the wavelength at the center of the bright band of each color, reading the scale to the nearest tenth. Exact wavelengths for various colors of light can be found athttp://eosweb.larc.nasa.gov/EDDOCS/Wavelengths_for_Colors.html and a summary is found below:
143
Assessment
The student will work in groups to design an experiment to illustrate the laws of reflection or refraction. Their experimental design and final report should be assessed with a teacher-developed rubric.

PercentError =
accepted value (m) - calculated value (m) accepted value (m) X 100
Physical Science: Unit 7
Accepted Average Wavelength of Visible Light (400-700 nm)
violet 400 nmindigo 445 nmblue 475 nmgreen 510 nmyellow 570 nmorange 590 nmred 650 nm
The following percent error calculation of this activity may be considered as optional or enrichment by some teachers. Students will calculate the percent error for wavelength of each color by comparing their calculated values to the original values as shown above. From prior activities, students have learned about the fundamental concepts of frequency (ƒ) and wavelength (λ) of light. They will need the constant value of the speed of light in vacuum:
C (speed of light) = 3.00 x 10⁸ m/s (meters per second)
And the formula relating speed of light, frequency, and wavelength:C (m/s) = ƒ (frequency in Hertz (HZ)) X λ (wavelength in meters (m))
Students may not be familiar with these formulas. They must be introduced to students along with the symbols used specifically for each variable. For example, C is to designate the speed of light, ƒ is the commonly accepted symbol for frequency, and λ is the symbol used for wavelength.
For the calculation of percent error, use the following formula (note nanometers (nm) must be converted to meters (m) for the frequency calculations):
Students will record their observations and calculations in a table similar to the one below (found on the Measuring Visible Light BLM):
Color of fluorescent light
Spectrometer
reading to nearest nm
Wavelength( ) in nanometers
Wavelength( ) in meters
Frequency(Hz)ƒ = c / λ
Percent Error
redorangeyellowbluegreenviolet
144

Physical Science: Unit 7
For closure to this part of the activity, ask students why their observed wavelength might be different from the accepted values of the wavelengths of the various colors of the visible spectrum (user error, sensitivity of the spectrometer, etc.). What did you notice about the frequency of the colors of the spectrum as the wavelength changed? (As the wavelength decreased, the frequency increased.) Why did you see different colors through the spectrometer (or spectroscope) when the fluorescent light is white? (White light is a mixture of light colors and therefore a mixture of light frequencies. The spectrometer [or spectroscope] separated the mixture of light into separate wavelengths that allowed us to see the individual colors and measure the wavelength.)
Knowing that decreasing the wavelength of the visible part of the electromagnetic spectrum increases the frequency of the light, have students apply that concept to the entire electromagnetic spectrum. A chart of the Electromagnetic Spectrum can be found at http://eosweb.larc.nasa.gov/EDDOCS/Wavelengths_for_Colors.html. Using that chart or a similar chart, have students provide examples of uses of each component of the electromagnetic spectrum and also to explore how their lives are affected by electromagnetic radiation by keeping an electromagnetic journal for one week. This may be kept in their science learning log (view literacy strategy descriptions). Ask them to record each time they observe or come in contact with electromagnetic radiation each day--such as listening to the radio, talking on their cordless phone, watching cable TV, going through security at the airport, getting a sunburn, etc. Students should record the date, time, and a one-sentence explanation of the incident, including what type of electromagnetic radiation they encountered. Instruct students to share these encounters with electromagnetic radiation and create a class tally, which can then be graphed and analyzed to find out the most popular daily activity involving exposure to electromagnetic radiation.
At the close of this journal activity, review with students the “wave-particle” dual nature of light. It is important for them to understand that this is not a difference in what radiation is across the spectrum, but only in how it behaves. Low energy photons (such as radio) behave more like waves, while higher energy photons (such as X-rays) behave more like particles. Also discuss that the term radiation does not always mean harmful energy.
Activity 61A: Stellar Spectra (CC Unit 7 Activity 6) (SI GLEs: 6, 7, 14; PS GLEs: 48, 50; ESS GLE: 26)
Materials List: spectrometers or spectroscopes; gas spectrum tubes (if available); incandescent light; fluorescent light; and natural sunlight; various pictures taken with IR, UV, or visible spectrum; element spectra; combined element spectra
Safety note: Do not view the Sun directly with any spectroscope as this can permanently damage eyesight; rather view light in a direction away from the Sun itself.
Review the components of the electromagnetic spectrum as to wavelength and frequency, and the order of the colors and wavelengths of visible light. Also review the uses of the various energies found in the electromagnetic spectrum identifying positive and negative effects on humans and human activities (e.g., UV rays, X-rays, microwaves, etc). Discuss how uses of these technologies have affected society and everyday life.
In this activity students will explore a technological use of the properties of light combined with the properties of elements. Using spectrometers or spectroscopes (and gas spectrum tubes, if available) have students view the spectrum of incandescent, fluorescent, and natural sunlight.
145
Physical Science: Unit 7
(Viewing light through the classroom window is acceptable, as long as the Sun is not viewed directly. An alternative to sunlight would be natural sunlight light bulbs that are now commonly available). Instructions on how to make and use spectroscopes can be found at http://asd-www.larc.nasa.gov/edu_act/simple_spec.htmlhttp://sci-toys.com/scitoys/scitoys/light/cd_spectroscope/spectroscope.html Determine students understanding of modern astronomical telescopes by viewing various pictures taken of stars and other objects (visible, UV, IR, etc.; these can be downloaded from http://science.hq.nasa.gov/kids/imagers/ems/index.html; go to the bottom of the page and scroll through the various areas of the electromagnetic spectrum). Explain that rather than taking pictures, some of the new instruments actually capture spectrograms of stars to determine their composition and movement.
For this activity, students will utilize an interactive website to examine spectra of elements, compare those to spectra from stars, and identify the elements detected in the star’s spectra. If Internet access is available, have students go to http://www.learner.org/teacherslab/science/light/color/spectra , read the background information on spectrographs, and complete the online activity. If computers are not available, the teacher can print out the spectral analysis sheets from this activity on a color printer and use those to complete the activity with students. Guide students in analyzing each spectrogram for its component elements. (These spectrograms were taken of a star’s atmospheres.) Students must complete the analysis of the unknown spectrogram by comparing it with the known spectra of various elements (calcium, magnesium, iron, and hydrogen). The investigation is essentially the same if conducted online or as a paper and pencil activity. As a result of this analysis, students will recognize that analysis of the electromagnetic spectrum of distant stars can yield much information about the star’s composition.
Activity 61B: Mystery Spectra and Web Quest (Teacher-Made for CC Activity 2) (SI GLEs: 6, 7, 14; PS GLEs: 48, 50; ESS GLE: 26)
Students will complete the mystery spectra worksheet and then complete a web quest about the electromagnetic spectrum and white light.
146
Physical Science: Unit 7
Unit 7 Concept 3: Electricity
GLEs*Bolded GLEs must be assessed in this unit
PS 44 Illustrate the production of static electricity (PS-H-G2) (Application)PS 45 Evaluate diagrams of series and parallel circuits to determine the flow of
electricity (PS-H-G2) (Evaluation)SI 7 Choose appropriate models to explain scientific knowledge or experimental results
(e.g., objects, mathematical relationships, plans, schemes, examples, role-playing, computer simulations) (SI-H-A4) (Application)
SI 9 Write and defend a conclusion based on logical analysis of experimental data (SI-H-A6) (Evaluation)
Guiding Questions/Key Concepts:52. Can students create and define static
electricity?53. Can students construct a complete circuit?54. Can students differentiate between parallel
and series circuits?55. Can students trace the flow of electrical
energy on diagram of a complete circuit?
Topics/Vocabulary: Static electricity Types of circuits Conductor, insulator Parts of a circuit, ex. Battery, switch
Assessment Ideas:Construct a circuitActivity-Specific Assessments:
Activity 63
Resources: See material list Diagrams of circuits
147

Physical Science: Unit 7
Instructional Activities
Activity 62: Electric Words (SI GLE: 7)
Material List: text or appropriate reading selection, science learning logs, 5 x 7 index cards, GIST Example for Teacher BLM
The ability to summarize is perhaps the most important subskill involved in a student’s comprehension. It is difficult to master as students tend to say too much or too little, thus, the value of summarizing is lost. GISTing (view literacy strategy descriptions) is an excellent strategy for helping students paraphrase and summarize essential information. The concept of electricity is often discussed at length in textbooks with much of the material repeated for emphasis. Helping students sort through this large amount of information and determining what is most important is a valuable skill worthy of the time is often takes to teach. In GISTing, students read sections of text and are then required to limit the GIST (or summary) of a paragraph to a set number of words. The GIST should be recorded in their science learning logs (view literacy strategy descriptions).
The teacher should select an appropriate section of text about current electricity on which to write GISTs. It’s best to start with relatively short paragraphs of no more than three to five sentences, if possible. However, science texts often have paragraphs much longer. (This is a way to help students conquer using the text as a reference and how to get important information out of a large amount of text.) If only longer paragraphs are available, conduct the GIST on fewer selected and appropriate paragraphs.
Next, the teacher should establish a limited number of spaces to represent the total number of words of the GIST, say 15 or so. Have students read the first sentence of the paragraph and, using only the 15 spaces allowed, write a statement in those 15 spaces capturing the essential information of the sentence (students don’t have to use all spaces, but can not use more). This is the beginning of their GIST. Now the students read the second sentence of the paragraph and using the information from the first and second sentences of the paragraph they rewrite their GIST statement by combining information from the first sentence with information from the second (fitting in the 15 allotted spaces).
This process continues with the remaining sentences of the paragraph. As students read each succeeding sentence they should rework their GIST statement by accommodating any new information from the sentence into the existing GIST statement, while not using any more than the allotted number of spaces. Finally, students should share their GISTs with a partner for comment and critique. NOTE: See the GIST Example for Teacher BLM with an example of a GIST of a paragraph of text.
As a follow up to the GIST activity, have students create a vocabulary card (view literacy strategy descriptions) for the terms they will encounter in their study of electricity. Vocabulary cards help students see the connections between terms, examples of the term, and the critical attributes associated with the term. See the example below. Using 5 x 7 inch index cards the term electricity should be written in the center of the card.
148

electricity
Flow of electric current Carries energy to make devices work
Lighted bulbs, hairdryer on
Physical Science: Unit 7
EXAMPLE OFA VOCABULARYCARD
Students should write the definition in the upper left-hand corner of the card and the characteristics of electricity on the upper right-hand side. One or two examples of electricity are written on the lower left side of the card. Finally, an illustration should be included on the lower right-hand side of the card.
Initially, have students prepare cards from terms already covered. These are determined by the teacher, but in the course of the unit, the terms may include static electricity, conduction, induction, electric discharge, electric current, electric charge, circuit, battery, potential difference, voltage, resistance, superconductor, Ohm’s Law, direct current, alternating current, power, series circuit, parallel circuit, fuse, circuit breaker. More vocabulary cards will be added to this first card during the unit as students use that term. Students should be aware of the necessity to keep up with their cards and to add to their cards, as this is a valuable tool for review for future activities, quizzes, and tests.
Activity 63: Static Electricity (CC Unit 8 Activity 2) (SI GLEs: 7, 9; PS GLE: 44)
Materials List: (per two students) two balloons, wool cloth, bits of tissue paper (confetti), hard rubber or plastic comb, science learning logs
Utilizing balloons and students' hair, have students compare and contrast, through trial and error, the interactions between (a) a balloon that has been rubbed against hair and one that has not been rubbed against hair, and (b) two balloons that have both been rubbed against hair. To accomplish this task, students should work in pairs, record their observations, and hypothesize about the cause and effects of static electricity. They should be able to defend their conclusions based on their experimentation. Conduct a debriefing or culminating discussion in which students report their recorded results, explain what they infer is the cause and effect(s) of static electricity, and defend their position to the rest of the class. Included in this whole-class discussion, the teacher should review the structure of atoms and the ability of electrons in outer energy levels to freely move. Even though the size of protons and electrons are quite different, the magnitudes of their individual charges are equal (and opposite) to each other. Often student misconceptions arise due to their conception of moving charges. If an electron moves from one atom to another, the one gaining the electron becomes negatively charged and the one loosing the electron becomes positively charged. Included in this discussion should also be a comparison of conductors and insulators. Conductors have charge particles that freely move and insulators do not. However, the molecules of seemingly neutral insulators can be realigned to have the positive ends positioned differently from the negative ends.
149
Physical Science: Unit 7
A discussion of the various ways that static charging, friction, induction, and conduction occur is appropriate. Make sure that students understand that static electricity is the build-up of electrical charges on an object (whether it is positive or negative). Once the charge is built up, the charges do not flow; they are now at rest. Therefore the term static, meaning stationary or not moving, is appropriate.
Allow students to investigate interactions between a hard rubber or plastic comb, small bits of tissue paper, and wool cloth. Instruct students to hold the comb close to the bits of tissue paper on their desk and observe. Have then rub the comb with a piece of wool cloth, again hold the comb near the bits of tissue paper, and once more observe. In this demonstration, the comb does not have to touch the paper bits for the paper to move. This is an example of induction of charges within a neutral material. In this case, the molecules of the paper realign themselves with all the negative ends the same way and all the positive ends the opposite way. Rubbing the comb with the wool cloth (friction) allows electrons to move from the cloth to the comb. The comb is now negatively charged and causes movement of charges within the paper and thus the comb and the side of the paper more negatively charged attract. After a few seconds, through conduction, some bits of paper repel from the comb because they have acquired a similar charge of the comb. Have students identify and illustrate this process through drawing/recording in their science learning logs (view literacy strategy descriptions).
In closing the lesson, provide a clear explanation that includes the cause and effects of static electricity. Including a discussion of the real-world phenomenon of lightening as the discharge of static electricity build up between clouds and Earth (and also between clouds) is a great way to apply newly acquired understandings of static electricity.
Activity 64: Electricity (CC Unit 8 Activity 3) (SI GLE: 7; PS GLE: 45)
Materials List: (for whole class) Christmas tree lights (one parallel and one series), (per group) various lengths of covered wire with ends striped, D batteries, flashlight bulbs, bulb holders, switches, (if available circuit boards and/or multimeters), science learning logs
150
Assessment The students will demonstrate their understanding of static electricity utilizing a
classroom demonstration assessment. Tie a piece of cereal to one end of a 30 cm length of thread. Find a place to attach the other end so that the cereal does not hang close to anything else. Charge a clean rubber or plastic comb by vigorously rubbing it with a piece of wool. Slowly bring the comb near the cereal. It will swing to touch the comb. Hold it still until the cereal jumps away by itself. Now try to touch the comb to the cereal again. It will move away as the comb approaches. Have students write a short explanation of what happened in the demonstration. The student’s written analysis should be assessed utilizing a teacher made rubric to determine the level of the answer provided. [Expected explanation: Rubbing the comb with the wool removed electrons from the comb and it now has a negative charge. The neutral cereal was attracted to it. When they touched, electrons slowly moved from the comb to the cereal. Now both objects had the same negative charge, and the cereal was repelled.]
Physical Science: Unit 7
Provide students with one wire, one D battery, and one bulb, and have them work in pairs or small groups to create a complete circuit as an engagement activity. Have them record diagrams of successful circuits in their science learning logs (view literacy strategy descriptions). There are four correct answers, two with changing the bulb to positive and negative and two with the wire connecting to the ridges of bulb and the end of the bulb on the battery and the wire connecting to the end of the bulb and the ridges of the bulb on the battery.
Display two strings of Christmas tree lights: one wired in a parallel circuit and one wired in a series circuit. Remove a light bulb from each light string and have the students observe and record what happens. Allow students to briefly discuss in groups of 3-4 why one string remained lit and the other went out. Allow students to offer their best explanations. Through whole class direct instruction, explain and illustrate the difference between series and parallel circuits.
Using wires, batteries, bulbs, and switches have students create series and parallel circuits. Have students demonstrate and record the effects of removing a bulb from each type of circuit, adding bulbs to each type of circuit, and adding an additional battery to each type of circuit. If circuit boards and/or multimeters are available have student utilize those in their investigations. Multimeters can be used to measure the current, voltage, and resistance within circuits.
Furnish students with diagrams that illustrate series and parallel circuits. Instruct students on the meaning of symbols used in circuit diagrams. Trace the path of electrical energy through two of the circuits, one of each type, together as a class for guided practice. Have the students analyze these two diagrams to determine if the circuit is complete and if light bulbs will remain lit when one light bulb is removed from the circuit. Have students analyze the additional diagrams, trace the flow of electricity, and label the circuit diagrams as parallel, series, or incomplete. These diagrams can be completed individually or in groups of 2-4 students, as determined by the teacher.For closure to the activity, ask student if they can suggest a reason for the price difference in the series wired Christmas tree lights and the parallel wired Christmas tree lights (additional wire for parallel, more labor for parallel, etc.).
See Appendix
151
Physical Science: Unit 7
Unit 7 Concept 4: Magnetism
GLEs*Bolded GLEs must be assessed in this unit
PS 46 Diagram a magnetic field (PS-H-G2) (Application)PS 47 Explain how electricity and magnetism are related (PS-H-G2) (Analysis)SI 7 Choose appropriate models to explain scientific knowledge or experimental results
(e.g., objects, mathematical relationships, plans, schemes, examples, role-playing, computer simulations) (SI-H-A4) (Application)
SI 9 Write and defend a conclusion based on logical analysis of experimental data (SI-H-A6) (Evaluation)
Guiding Questions/Key Concepts:56. Can students describe a magnetic field?57. Can students describe a relationship
between electricity and magnetism?
Topics/Vocabulary: Magnets, magnetic field, magnetism Electromagnet, electromagnetic field Poles Aurora Borealis, Aurora Australis
Assessment Ideas: Magnet Lab Construction of electromagnet
Activity-Specific Assessments: Activity 67
Resources: See material list Illustrations of Aurora Borealis and
Aurora Australis
Instructional Activities
Activity 65: Magnetism (CC Unit 8 Activity 4)(SI GLEs: 9; PS GLE: 46)
Materials List: (per group) bar magnet, horseshoe magnet, paper, compass, iron filings, transparency film, safety goggles, gloves, science learning logs
Safety Note: Eye irritation can occur from the iron filings. Instruct students to wear safety goggles and avoid rubbing their eyes during this activity. Students should wear gloves or wash hands after the activity to remove all traces of the small iron filings.
In this activity, students will work in groups of two to three to make a magnetic map (a map of the magnetic field). Have student place the bar magnet in the middle of the piece of paper and carefully trace around it to mark its position under the paper. Note: the paper must not be moved from this position during the remainder of the exercise. Have one student place the compass on or close to the paper near the magnet. Determine the farthest point between the compass and the magnet where the compass needle is affected by the magnetic field. Have students carefully draw a few arrows along this distance to indicate the way the compass needle is pointing. Repeat this process several times around the magnet, making sure that students record at least 6-8 areas (both short sides, both long sides, and between these along the bar magnet). Have students connect these lines of arrows to determine where the magnetic field exists. Students should identify areas where it is the strongest (at the poles), and where it is the weakest (along the long length of the bar).
152
Physical Science: Unit 7
Provide the student groups with bar magnets and iron filings. Have the students place transparency film under and over the magnet. Next, have students sprinkle filings on the top transparency to view the magnetic field around the magnet and to observe the interaction between two magnetic fields when a second magnet is added. Instruct students to diagram the magnetic field observed, including arrows to indicate the direction of the lines of force as learned in their prior activity. When students have completed this part, ask them to predict what the magnetic field of a horseshoe magnet would look like. Then let the groups repeat the above procedure with a horseshoe magnet. Alternatively, teachers can use the overhead to show the magnetic fields to the whole class at one time and this part of the activity can be conducted as a whole group.
For real-life connection, illustrate the magnetic field surrounding Earth and its poles. Allow students to investigate and interpret the interactions between the Earth and a compass. Require students to write a paragraph comparing their bar magnet model with the Earth’s magnetic field.
To allow students to reflect on what they have just learned, have them create a SPAWN (view literacy strategy descriptions) writing. In this strategy, the teacher presents the SPAWN prompt to students by writing it on the board or projecting it from the overhead or computer. The students should write their responses within a reasonable period of time, in most cases 10 minutes should be adequate. Have students copy the prompt into their science learning logs (view literacy strategy descriptions) before writing responses and record the date. Since this is not formal writing, SPAWN writing should not be graded as such and only completion point awarded if a grade is given. SPAWN writing should be viewed as a tool that students can use to reflect their developing knowledge and critical thinking.
The SPAWN acronym stands for:S-special powers
Your body has suddenly acquired the ability to turn on and off a magnetic field. Explain what walking around the school is like
P-problem solvingYou used a compass in one of your investigations. Explain how a compass works.
A-alternative viewpointsWhy do we call the end of the compass needle that points north, the north end if opposite poles attract and like poles repel?
W-what if?What would happen if the Earth’s magnetic poles suddenly shifted places overnight?
N-nextIf you wrap wire around a piece of iron and then run an electric current through it, it becomes a magnet (an electromagnet). Why do you think this happens?
Choose one of the above prompts (or similar prompts) for student’s SPAWN writings, or allow students to choose their own prompt. With the Special Powers and What if? prompts, students must apply their knowledge to unique situations. The Problem solving prompt allows further thought about a common everyday object. The Alternative viewpoint prompt allows students to investigate a common misconception (the geographical north pole is really the geographical south pole if the north end of the compass needle [and north ends of a magnet] is attracted to it.). The next prompt allows students to predict about the next activity.
153

Physical Science: Unit 7
The teacher should choose the best prompt for the students and what he or she wishes to emphasize and/or review. When complete, allow students to share their SPAWN writings in groups or with the whole class.
Activity 66A: Electromagnetic Connection (CC Unit 8 Activity 5)(SI GLEs: 7, 9; PS GLE: 47)
Materials List:
Part 1: magnetic transparent compass to be used on the overhead projector, D cell battery, 9’ insulated wire (stripped on each end)
Part 2 (per group): large nail, long lengths of coated copper wire (stripped on each end), D-cell battery, electrical tape, paper clips
Part 3 (per group): D cell battery, round ceramic magnet, two paper clips, sandpaper, electrical tape, approximately 30 “ length of thinly coated copper wire (stripped on the ends)
SAFETY NOTE: Holding wires to the poles of batteries in a closed circuit may cause a large production of heat, and could burn students’ fingers if they hold the wire in contact with the batteries. Caution students to be careful when making circuits.
Part 1: The Dutch physicist, Hans Christian Oersted is credited with experimentation that led to the discovery of electromagnetism. A similar experiment is easy to perform using an overhead projector, a transparent compass, a D-cell, and 9” thick, flexible insulated wire (stripped on the ends). Use a fresh D-cell battery because the experiment draws a large current from the battery (really a short circuit), but only for a very short time.
Place the compass on the glass, and let everyone see that it points north. (Note: if a transparent compass is not available or easy to locate, an alternative would be to have students perform this activity in groups of 3 to 4. There are safety precautions in doing that because the short circuit of the battery generates a lot of heat quickly and students might get a slight burn if not careful.)
Then with your thumb, press one end of the wire against the bottom of the D-cell (or tape in place with a small length of electrical tape). The wire should form a short loop, coming back close to the other terminal of the battery, but not touching it.
Position the wire so that the middle of the wire passes over the compass needle and is parallel to it. Then touch the other end of the wire to the other end of the battery--just a short touch (1-2 seconds). The needle will immediately pivot to stand at 90 degrees to the wire.
Explain to the students that you will not hold the connection for very long because it is an example of a short circuit, not good for the battery, and it also it generates a lot of heat at the contact ends of the battery.
Next, reverse the electrical contacts by turning the D-cell battery around. The needle will swing to stand at 90 degrees in the opposite direction. Have students record their observations in the science learning logs (view literacy strategy descriptions). Make sure students include a diagram
154

Physical Science: Unit 7
of both positions of the battery and the results on the compass. Since the compass pointed in the opposite direction when the battery direction was changed, students should see the connection between the flow of the current and the direction of the magnetic field as recorded by the compass. Students should operationally define electromagnetism as the relationship between electricity and magnetism. A magnetic field is created when an electric current flows through a wire, with a direction of the magnetic field the same as the direction of current. Part 2: Provide student groups with nails, copper wire, magnets, and a battery and challenge them to build a simple electromagnet that will pick up the most paper clips. Through trial and error, allow students to discover that increased wraps of wire (in the same direction) will increase the induced magnetism. Discuss the relationship between electricity and magnetism. Show students what happens when loops overlap to the overall induced magnetism (often a group will inadvertently do this and not understand why their magnetic strength has decreased).
Part 3: Provide directions, discuss safety measures, and have students construct a simple electromagnetic motor using a D-cell battery; a round, ceramic magnet; paper clips; electrical tape; sand paper; and a coil of thinly coated copper wire, stripped on the ends. Tape the magnet to the round side of the battery. Unwind one end of two paper clips and lightly sand these ends of the paper clips to remove the coating and assure a good connection. Tape the unwound end of each paperclip to each terminal of the battery so that the paperclip extends up and the magnet is also on top of the battery. The coil of copper wire should be about 2-3 cm in diameter with wire extensions on either side. Place the wire coil extensions into the hooks created by the unwound ends of the paperclips. It should spin freely if everything is set up correctly. Instructions for a similar simple electric motor can be found at http://www.exploratorium.edu/snacks/stripped_down_motor.html and commercial versions of this simple device are available from many science supply companies.
Instruct students to analyze each device constructed, the electromagnet, and the electric motor, in order to describe the relationship between electricity and magnetism for each device. The electricity from the battery induces magnetism in the nail, and the magnetic field creates the spin in the electric motor. To accomplish these tasks, students should work in pairs or small groups.
For closure, have students write explanations in the science learning logs to communicate their analysis of the electricity/magnetism relationship. They should also analyze how Oersted’s discovery of relationship between electricity and magnetism affects their lives today. Make additional vocabulary cards (view literacy strategy descriptions) for the new terms from this activity.
Activity 66B: Constructing a Galvanometer (Teacher-Made for CC Activity 6)(SI GLEs: 7, 9; PS GLE: 47) In this lab the student will construct a galvanometer and test it.
155
Assessment The student will design an alarm system for his or her school locker when given
magnets, wires, batteries, buzzers, switches, light bulbs and bulb holders. He or she should provide a detailed circuit drawing and a working model. The evaluation rubric should include an assessment of the overall function of the alarm as well as the form of the design.
Physical Science: Unit 7
Sample Assessments
General Guidelines
Assessment techniques should include use of drawings/illustrations/models, laboratory investigations with reports, laboratory practicals (problem-solving and performance-based assessments), group discussion and journaling (reflective assessment), and paper-and-pencil tests (traditional summative assessments).
Students should be monitored throughout the work on all activities via teacher observation and journal entries.
All student-developed products should be evaluated as the unit continues. Student investigations should be evaluated with a rubric. When possible, students should assist in developing any rubrics that will be used. For some multiple-choice items on written tests, ask students to write a justification
for their chosen response.
General Assessments
The student will construct series and parallel circuits and trace the flow of electrical energy through each circuit; this will be evaluated through teacher assessment.
The student’s overall progress will be evaluated through checklists as they conduct inquiry investigations.
The student will create diagrams of magnetic fields. The student will work in groups to create multimedia presentations or videos to
introduce the concept of electricity to lower elementary students. The student will compare and contrast series and parallel circuits.
Activity-Specific Assessments
Activity 56 : Students will analyze their changes in opinions as a result of the specific assigned readings.
Activity 59 : The student will work in groups to design an experiment to illustrate the laws of reflection or refraction. They should test their experimental design and create a final report.
Activity 60 and 61A : Using spectrometers or spectroscopes, students will analyze various spectrums of specific elements for their fingerprint spectra. Given specific spectrums, students should identify the elements present.
Activity 62 : The student will work in groups and will be assigned a particular location on Earth. The student will determine the position of the Sun in the sky for their location at noon for four days during the year: winter solstice, vernal equinox, summer solstice, and autumnal equinox. The student will demonstrate the position of the Sun for those four times through drawings or models.
156
Physical Science: Unit 7
Activity 63 : The student will research the size, density, temperatures, and composition of each of Earth’s four layers. Using research, the student will design and construct a scale model of the interior of the Earth. The student will include a written report detailing the attributes of each layer.
Activity 64 : The student will identify the tectonic forces occurring or ones that have occurred when given a location on a plate boundary map and a geophysical relief map. The student will write a short analysis of his or her location as if he or she were a geologist preparing a report to the USGS. Plate boundary maps can be found online at http://www.ig.utexas.edu/research/projects/plates/images/topo.pb.htm or http://zephyr.rice.edu/plateboundary/plate.11.17.pdf
Resources Allen, Maureen, et al. Electrical Connections. Fresno: AIMS Education Foundation,
1991. Hoover, Evalyn, et al. Mostly Magnets. Fresno: AIMS Education Foundation, 1991. Spectrograms of stars available online:
http://www.learner.org/teacherslab/science/light/color/spectra/ http://spacelink.nasa.gov/Instructional.Materials/
NASA.Educational.Products/.index.html Information about Doppler Effect online:
http://www.exploratorium.edu/origins/hubble/tools/doppler.htmlhttp://www.kettering.edu/~drussell/Demos/doppler/doppler.html
Information about the electromagnetic spectrum online:http://imagine.gsfc.nasa.gov/docs/science/know_l1/emspectrum.html
Tour of properties of light online: http://cse.ssl.berkeley.edu/light/light_tour.html
157
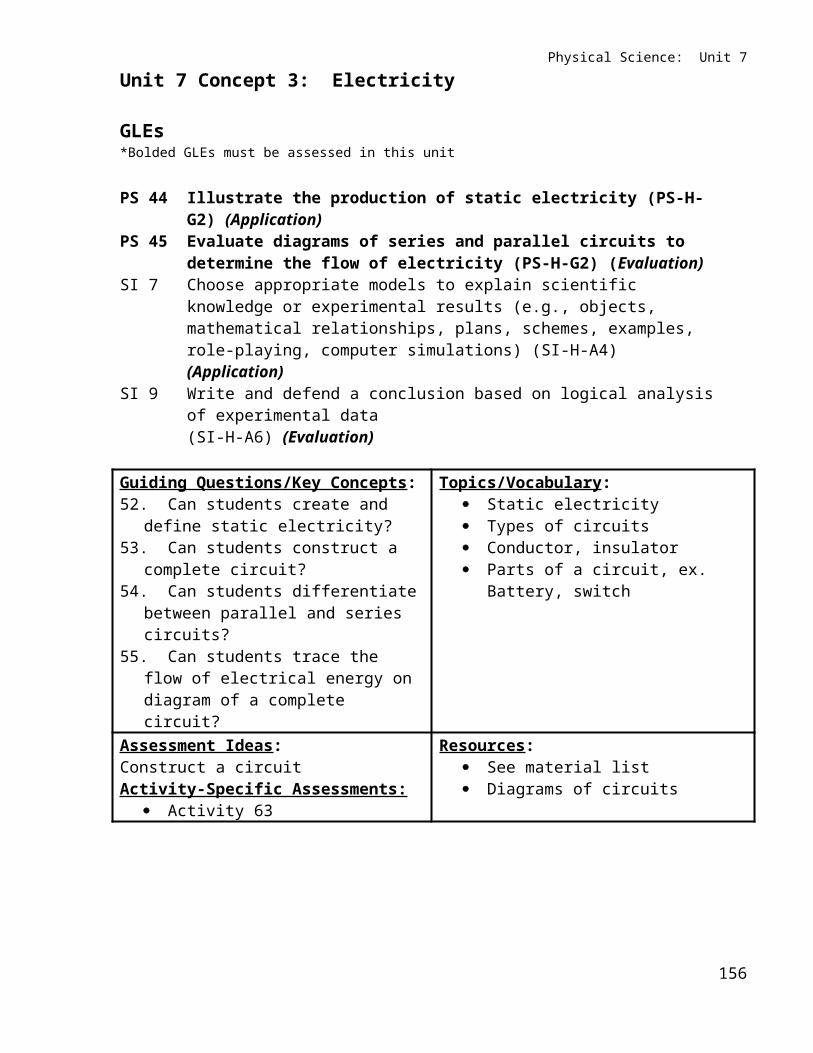
Physical Science: Unit 7
Name/School_________________________________ Grade _______________________Feedback Form
This form should be filled out as the unit is being taught and turned in to your teacher coach upon completion.
Concern and/or Activity Number
Changes needed* Justification for changes
* If you suggest an activity substitution, please attach a copy of the activity narrative formatted like the activities in the APCC (i.e. GLEs, guiding questions, etc.).
158