PTZApp 2 - AVer USA
32
PTZApp 2 User Manual
Transcript of PTZApp 2 - AVer USA

PTZApp 2
User Manual

1
PTZApp 2
In PTZApp 2, user can change the IP address setting, configure the parameters of the camera, set up
AI tracking functions and some advanced image and audio settings, pan, tilt, and zoom the camera.
Install PTZApp 2
Please go to https://www.aver.com/download-center (Global & European Headquarters) or
https://www.averusa.com/business/support/ (USA) to download the PTZApp 2. After downloading,
double-click on the file and follow the on-screen instructions to complete the installation.
After installing the PTZApp 2, double-click on the PTZApp 2 icon to run the application.
Use PTZApp 2 with USB Devices
1. Run your video application and make a video call.
2. During your video call, you can use the PTZApp 2 to pan, tilt and zoom the camera in/out and
enable/disable the true WDR, brightness, and sharpness feature.
3. Launch PTZApp 2 ( ) and it will open in Chrome browser automatically.
4. Choose “USB devices” and connect USB camera to PC/laptop with USB cable. When the
camera is detected, the product card will show up.

2
5. Set up IP address. The camera default IP address is 192.168.1.168. Click pencil icon ( ) to
edit IP address.
6. Click the setting icon to change Language, Hotkey Control, and Software Version.

3
Language: Select desired language and click the check icon to confirm the selection.
Hotkey Control: User can control the camera by using keyboard. This is a general list for all Aver
USB Cameras. Backlight control equals to WDR function in VC520 Pro2.
Software Version: Get current PTZApp 2’s version number and do auto update here.
7. Information: Click the drop-down triangle icon to review the information of camera. To minimize
the information, click the triangle or the bottom area of the information icon.

4
8. Camera: Click the camera icon to view the camera live view. IP address is displayed as well. Click the X icon to close the camera live view. If the live video did not appear, please check the camera and the laptop/PC connection to make sure all are correct and well connected.
The resolution of this small live view is 640x480 resolutions.

5
Full Screen: PTZApp 2 can switch to full screen mode. Click “ ” icon and video screen
will switch to full screen mode. In full screen mode, user can use direction panel to control
camera direction. Click “ ” icon to go back to normal screen view.
The resolution of full screen mode is 1080p.

6
People Count and Stream Interval: Click the icon to show people count number and
stream interval. Click the or icon to hide the stream interval.
Control Panel: To control the camera direction, zoom in and out, and to enable/disable the
“Smart Framing” during your video call.

7
9. Setting: Click “Setting” button to setup parameters of the camera and speakerphone. Click
arrow icon to leave the Setting page.

8
PTZ Control: To setup preset positions.
User can set 10 preset positions.
1. In live screen, use mouse to scroll up or down and click the preset number frame (0~9).
2. Use ▲, ▼, , and zoom in/out buttons to adjust the camera screen view to desired
position.
3. Select “Set Preset” button to save the preset. The system will capture the preset screen
view and display in preset number frame.
4. Select icon to edit name of preset frame. Click other Web interface to save the name
edited.
5. To set another preset, repeat the above steps.
Enter name of
preset positon
9
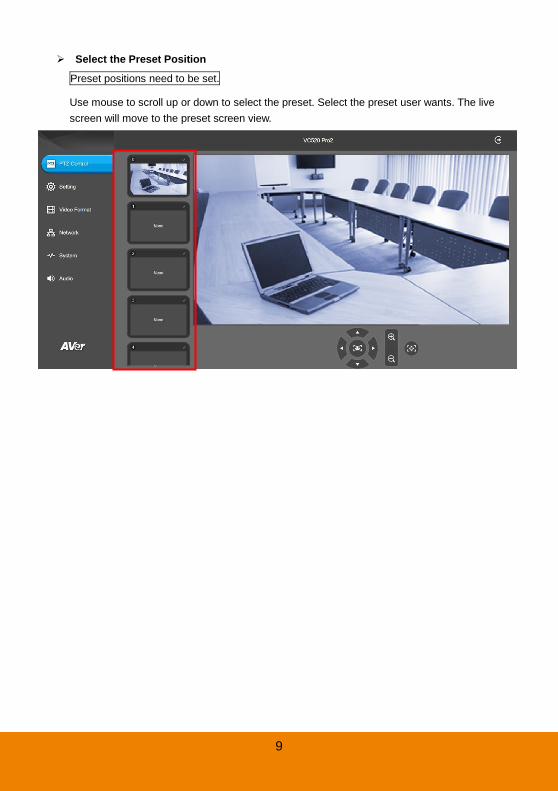
Select the Preset Position Preset positions need to be set.
Use mouse to scroll up or down to select the preset. Select the preset user wants. The live
screen will move to the preset screen view.

10
Setting: To setup parameters of the camera.
The video icon is to turn on camera live view while doing any settings.
Tracking Mode
Select Setting > Camera > Tracking Mode > Off, Manual Frame, Auto Frame, or Preset
Framing.
Off: Tracking mode is disabled.
Manual Frame: User one-click SmartFrame button and camera will adjust view angle to fit
all participants in screen for once.
Auto Frame: Camera automatically adjusts view angle to frame all participants on screen
every time when it detects participants’ faces or bodies. This action will be activated once
IP icon shows the IP address of the camera.
Press the icon to show the time interval of enabling
the live streaming of the camera.
Press X button to turn off live view.
Press the icon to show people count number.
Live screen preview

11
people in the room sit or stand still for 1~5 seconds, depending on the framing speed you
select. Once all the participants are in frame, the camera will keep the image stable by not
completing any action until subjects move in or out of the screen. When a participant touch
the sides of the screen, it will trigger the camera and automatically track, detect, and frame
all the participants again.
Preset Framing: Set up preset points in advance. (Only for Preset points 1~9. Preset 0 is
for home position). This is designed for only one presenter. Camera tracks presenter and
shoot the preset zones instead of focusing and zooming into presenter. To ensure smooth
transition, please set up zones with overlapping presets. If the preset zones do not overlap,
it will activate video tracking function. The camera will follow the presenter until he/she
enters another preset zone.
Overlap beginning & end of each zone

12
Framing Speed
Select Setting > Camera > Framing Speed > Slow Speed, Middle Speed, or High Speed
(default).
When in auto framing or preset framing mode, camera will automatically frame people if they
stand still without moving for 1~5 seconds.
Slow speed: camera starts to frame people if they don’t move for 5 seconds.
Middle speed: camera starts to frame people if they don’t move for 3 seconds.
High speed: camera starts to frame people if they don’t move for 1 second.
Smart Frame Preset Point
Select Setting > Camera > Smart Frame Preset Point > Default(Center of the screen) or
Preset0 ~ Preset9.
The default is the central of the image screen. Choose a preset point so that camera can detect
participants from the wide view of the assigned preset area direction.

13
Auto Focus Set auto focus mode.
Select Setting > Camera > Auto Focus > PTZ or Continuous.
PTZ: By clicking the button (such as pan, tilt, or zoom in/out) to adjust focus once.
Continuous: The camera will adjust the focus when the objects have moved.
Home Position
Every time when powering on the camera, it will turn to this position.
Select Setting > Camera > Home Position > Last Operation Position, Factory Center
Position, or Preset 0.

14
Sleep Position
When the camera idles for certain period, it will enter sleep mode and go to the sleep position.
Please set up sleep timer to enable sleep mode.
Select Setting > Camera > Sleep Position > Factory Downside Position or Preset 9.
Sleep Timer
Set the camera idle time to enter sleep mode.
Select Setting > Camera > Sleep Timer > Off, 10 sec, 5 min, 10 min, or 20 min.
Please notice that whenever there is USB streaming or RTSP/RTMP streaming, the camera
won’t enter sleep mode.

15
On Screen Menu
Enable/disable on screen display status information. For instance, when it is at auto frame
mode, it will appear “Auto framing” on the bottom of the screen. If you don’t want to see the
words, please select Off.
Select Setting > Camera > On Screen Menu > Off, On, or Load Preset Off.
Camera Binding
With multiple cameras connection, users can set each camera to buttons 1 to 3 on the remote
control.
Select Setting > Camera > Camera Binding > Camera1, Camera2, or Camera3.

16
Save Preset
Enable/disable “save preset” function. When applicable, IT personnel can limit end-user access to
change preset points by locking “save preset” function and switching this function off.
When off, user can’t save preset points via IR remote, Hot key, VISCA, and webpage.
Select Setting > Camera > Save Preset > Off or On.
Image Settings
Image Flip
If the camera is installed in the upside down position, please enable the "Flip".
Select Setting > Image > Image Flip > Off or On.

17
Image Mirror
To mirror the camera image.
Select Setting > Image > Image Mirror > Off or On.
True WDR
In back light environment, enabling WDR to improve the brightness of image.
Select Setting > Image > True WDR > Off or On.
The frame rate will be limited to 30fps while WDR is on.
If user enables this function in a normal light condition, the image will become over exposure
and encounter image blur.

18
Frequency
Select the frequency of the camera.
Select Setting > Image > Frequency > 50 HZ or 60 HZ.
White Balance
Select the white balance setting for various light conditions or color temperature.
Select Setting > Image > White Balance > Auto or Manual.

19
Noise Reduction
To reduce the noise from the signal.
Select Setting > Image > Noise Reduction > Off, Low, Middle or High.
Brightness
Adjust the value of brightness.
Select Setting > Image > Brightness > 1 ~ 9.

20
Sharpness
Adjust the value of sharpness.
Select Setting > Image > Sharpness > Off, Low, Middle or High.
Saturation
Adjust the value of saturation.
Select Setting > Image > Saturation > 1 ~ 9.

21
Low Light Compensation
Select Setting > Image > Low Light Compensation > Off or On.
Please notice that the frame rate will drop to 10~15 fps.
RS232 Setting When USB camera connects with PTZ camera controller through the RS232 port, please setup
ADDR, Baud Rate, Protocol, and Visca Over IP settings.
Select Setting > RS232.

22
System: To setup system.
I/O Port
Except USB port, user can enable or disable all I/O ports.
Firmware Update
Update the camera’s firmware.
Select System > FW Update > Auto Update or Manual Update.
Auto Update: The system will check firmware version from AVer server and request to
update.
Manual Update: To update the firmware from specific location.
After updating, the camera will reboot and the connection will be lost. Please wait for few
minutes and always keep the power cable connected. If unplugging the power during this
process, it will cause damage of the device.

23
Factory Default
Reset the camera back to factory default setting.
1. Select System > Factory Default > Reset.
2. User can choose to keep current IP address or back to default.
3. Select Continue to reset back to factory default.
[Note] When factory default is activated, the password of Webpage login will not be set to
default. For security concerns, to reset password of webpage access, please download
PTZApp 2 to reset it.
Trouble Shooting: Click Start and Output to output log to save in local PC.
Test Speakerphone: Click Start and Start to check the speakerphone status. It will require
user to record a short message and play it back to ensure the speakerphone is working.
24
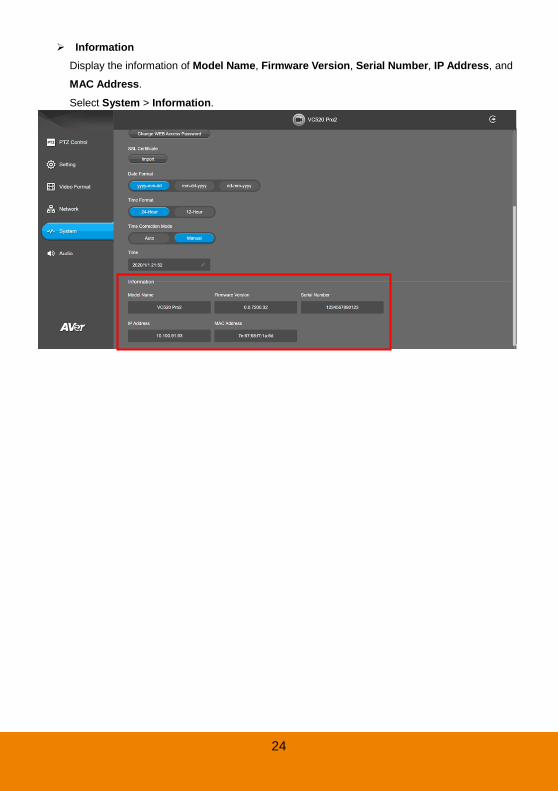
Information
Display the information of Model Name, Firmware Version, Serial Number, IP Address, and
MAC Address.
Select System > Information.

25
Audio: To setup audio parameters.
Noise Suppression
It is to reduce ambient noise.
Select Audio > Noise Suppression > Off or On.
When enabling the noise suppression function, please set value of noise suppression (1~40).
Automatically Gain Control Enable/disable the auto gain control. It is to control ambient sound level and maintain a suitable
output, despite variation of the one at the input.
Select Audio > Automatic Gain Control > Off or On.

26
Echo Cancellation
Enable/disable echo situation.
Select Audio > Echo Cancellation > Off or On.
Keyboard Noise Suppression
Enable/disable keyboard noise reduction.
Select Audio > Keyboard Noise Suppression > Off or On.

27
Phone In Jack Set Phone in input source.
Select Audio > Phone In Jack > Phone In, 3.5mm External Microphone Only, or 3.5mm
External Microphone Mix In.
Phone In: When the mobile phone is connecting to Phone in port, please select “Phone In”
option.
3.5mm External Microphone Only: The speakerphone will transfer the sound that it
receives from the external microphone (connected on phone in port) to far site.
3.5mm External Microphone Mix In: The speakerphone will transfer the sound that it
receives from the external microphone (connected on phone in port) and speakerphone to
far site.

28
10. Click the icon to display the connected devices to the USB camera.
11. PTZApp 2 Minimize: Minimize the app to system tray. To quit the application, right-click the icon
on the system tray and select “Quit”.
If you can’t launch PTZApp 2 right after installation, please also check here and see if it is already minimized. Right –click the icon and choose Restore.

29
Use PTZApp 2 with a Virtual Stream
With this function, you can have a virtual meeting with only Ethernet connection and get rid of USB
cable connection. Make sure the camera is connected with Ethernet and under the same subnetwork
as the meeting room PC (e.g. NUC).
1. Launch PTZApp2 ( ) on a PC and click Virtual Stream.
2. When the camera card appears, click Start to enable the Virtual Stream function.

30
3. Virtual Stream technology uses an RTSP stream. If you set a password for RTSP, you will be
asked to provide that password while enabling this function.
4. Launch VC software (e.g. Zoom, Teams, Skype) and choose AVer USB VCam as the video
source to start collaborating.
5. While using the Virtual Stream function, you cannot change any camera settings. To pan/tilt or
zoom in/out the camera, use a remote control or VISCA control.
6. Click Stop and Home to stop using this function.
[Notes]
1. This technology only transmits video, not audio sources.
2. Video latency may vary depending on CPU power (i5 or higher is recommended).
For more details, please refer to the website of PTZApp 2:
https://communication.aver.com/line/usb-videoconferencing/ptzapp2

31
MORE HELP
For FAQs, technical support, software and user manual download, please visit:
Global: https://www.aver.com/HelpCenter/conferencing-collaboration
USA: https://www.averusa.com/business/support/
European Headquarters: https://www.aver.com/download-center/
Technical Support: Global: https://aver.com/technical-support USA: https://averusa.force.com/support/s/contactsupport
European Headquarters: https://www.avereurope.com/technical-support/
Contact Information
Global
AVer Information Inc.
https://www.aver.com
8F, No.157, Da-An Rd.,
Tucheng Dist.,
New Taipei City 23673,
Taiwan
Tel: +886 (2) 2269 8535
USA
AVer Information Inc.
https://www.averusa.com
668 Mission Ct.,
Fremont, CA 94539
Tel: +1 (408) 263 3828
Toll-free: +1 (877) 528 7824
Technical support:
European Headquarters
AVer Information Europe B.V.
https://www.avereurope.com
Westblaak 140, 3012KM,
Rotterdam, Netherlands
Tel: +31 (0) 10 7600 550
Technical support: