
PS OMM Backup Procedure
12
PS OMM backup procedure 1 Data Backup steps No . Operation Description 1 Handling flog failure log Back up files under directory of flog on OMM server, delete original files and stop failure LOG function. 2 Backup of security variables Back up configuration of security variables. 3 Backup of related foreground files Back up foreground board information. 4 Migration of sysmanager Copy sysmanager path to non OMM path. 5 Backup of configuration and protocol stack data Back up basic configuration data via command BAK of OMM. 6 Closing OMM server program Close OMM server. 7 Backup via auto backup & restore tool Perform backup by using backup & restore tool. 2 Data backup procedures 2.1 Handling flog failure log Check whether the function about SGSN records failure information of active user is enabled before upgrade, i.e. check whether security variable ‘Enable SGSN to
-
Upload
aleksandar-koprivica -
Category
Documents
-
view
15 -
download
1
description
PS OMM Backup Procedure
Transcript of PS OMM Backup Procedure
PS OMM backup procedure
1 Data Backup steps
No. Operation Description
1Handling flog
failure log
Back up files under directory of flog on OMM server, delete
original files and stop failure LOG function.
2Backup of
security variables
Back up configuration of security variables.
3Backup of related
foreground files
Back up foreground board information.
4Migration of
sysmanager
Copy sysmanager path to non OMM path.
5
Backup of
configuration and
protocol stack
data
Back up basic configuration data via command BAK of OMM.
6Closing OMM
server program
Close OMM server.
7
Backup via auto
backup & restore
tool
Perform backup by using backup & restore tool.
2 Data backup procedures
2.1 Handling flog failure log
Check whether the function about SGSN records failure information of active user
is enabled before upgrade, i.e. check whether security variable ‘Enable SGSN to
report subscriber’s service failure log’ under SGSN system control parameters is
set to ‘Yes’. If not, skip over the following step; while if so, operate as follows:
Check whether there is any failure log file saved in directory (including all sub-
directories) of zxwomcs/ums-svr/flog on server. If there is any and it has not been
obtained yet, notify to obtain it and remove after it is done. On the other hand, if
there is none, no operation is needed. Notify user to disable ‘Enable SGSN to
report subscriber’s service failure log’ and set variable settings to ‘No’ before

upgrade, enable it upon successful upgrade.
2.2Backup of security variables
Compare security variables in foreground and background, ensuring that the
security variables on both sides are identical before upgrade. In <System Control
Parameter> under <Variables Control>, click <Export all data of this bureau to
backup> button to back up security variables of current bureau. Security variables
of all bureaus shall be backed up.
2.3 Backup of related foreground files
Open <Professional Maintenance> -> < File Management>, and back up files as
follows:
Back up file named CfgTable.ZDB under directory of IDE0/DATA1
corresponding to OMP module
Back up all files under directory of /DOC0/SECVAR/ corresponding to
OMP module
Back up all files under directory of /IDE0/SECVAR/ corresponding to
OMP module
Back up all files under directory of /DOC0/DATA1/ corresponding to
RPU module

2.4Migration of sysmanager
Back up directory of sysmanager to a non-OMM related directory, and remove all
information under directory of zxwomcs/ums-svr/backup/sysmanager.
Back up directory of EMS performance files to a non-OMM related directory, and
remove all information under directory of /zxwomcs/ums-svr/pmdata/upload/.
Back up directory of CORBA performance files to a non-OMM related directory,
and remove all information under directory of
/zxwomcs/ums-svr/runtime/ftp/naf/.
Too many files or too large files may extend the upgrade duration.
2.5Backup of configuration & protocol stack data via OMM
Steps:
1. Log in to the OMM client as user admin.
2. Check whether configuration data in the foreground and background is
identical. Check whether there is any changed table via running
[SHOW CHG] in command terminal. If it exists, find which OMM user’s
operation leads to this via command [SHOW USERLOCK]. Check
whether the different data is correct then synchronize all tables and
verify whether service is correct.
3. Run commands as follows to back up configuration data and protocol
stack data. Save the backup data on OMM server.
Example for CGSL OS:
BAK:FILENAME="COMMON233",FILEPATH="/omm",CDATATYPE=COMMON;//
Configuration data
BAK:FILENAME="IPSTACK233",FILEPATH="/omm",CDATATYPE=IPSTACK;
//Protocol stack data
Example for Windows 2003 OS:
BAK:FILENAME="COMMON233",FILEPATH="D:\\
backupdata",CDATATYPE=COMMON;//Configuration data
BAK:FILENAME="IPSTACK233",FILEPATH="D:\\
backupdata",CDATATYPE=IPSTACK; //Protocol stack data
The following two parameters in the commands above shall be altered according
to actual situation:
FILENAME: Name the backup file
FILEPATH: Set the directory to save backup file
2.6Closing OMM server program
Operation on single server: Close OMM server program, ensuring that
OMM server program does not start automatically along with the OS.
Reboot the OS then.
Take the following steps to close OMM server:
For CGSL Linux OS: Enter directory of ../zxwomcs/ums-svr/bin via
command terminal and run [./close-console_linux.sh] to close OMM
server program
[root@ kpn01 bin]# ./close-console_linux.sh
For Windows 2003 OS: Click <Stop> button to stop the process, and
then click the close button of the console, input the verify code on the
popup dialog, and then click <OK> button to close the console.
Operation on dual-server: For how to close OMM program, reboot OS
and freeze resources in VCS. Refer to “C.3 How to stop OMM, reboot
OS & freeze resource in VCS”.

2.7Backup via auto backup & restore tool
Start OMM backup & restore tool and back up.
Steps:
1. Delete all files and folders under directory of
../zxwomcs/tools/patch/packages on the server, except the file
named patch-history.log.
2. Log in to the current active server to start up OMM backup and restore
tool. In this example, the current active server is kpn01.
The start method is as following:
For CGSL Linux: Enter directory of ../zxwomcs/tools/backuprestoretool
via command terminal and run the command of ./run-linux.sh in the terminal
to start up OMM backup and restore tool.
[root@kpn01 backuprestoretool]#./run-linux.sh
For CGSL Linux: Enter directory of ../zxwomcs/tools/backuprestoretool,
double click of run.bat to start up OMM backup and restore tool.
Notes: The following figures are taken CGSL OS as example; For Windows
2003 OS, only the path style on the figure is different, please pay attention
to the notes below the figures.
An interface as follows pops up:
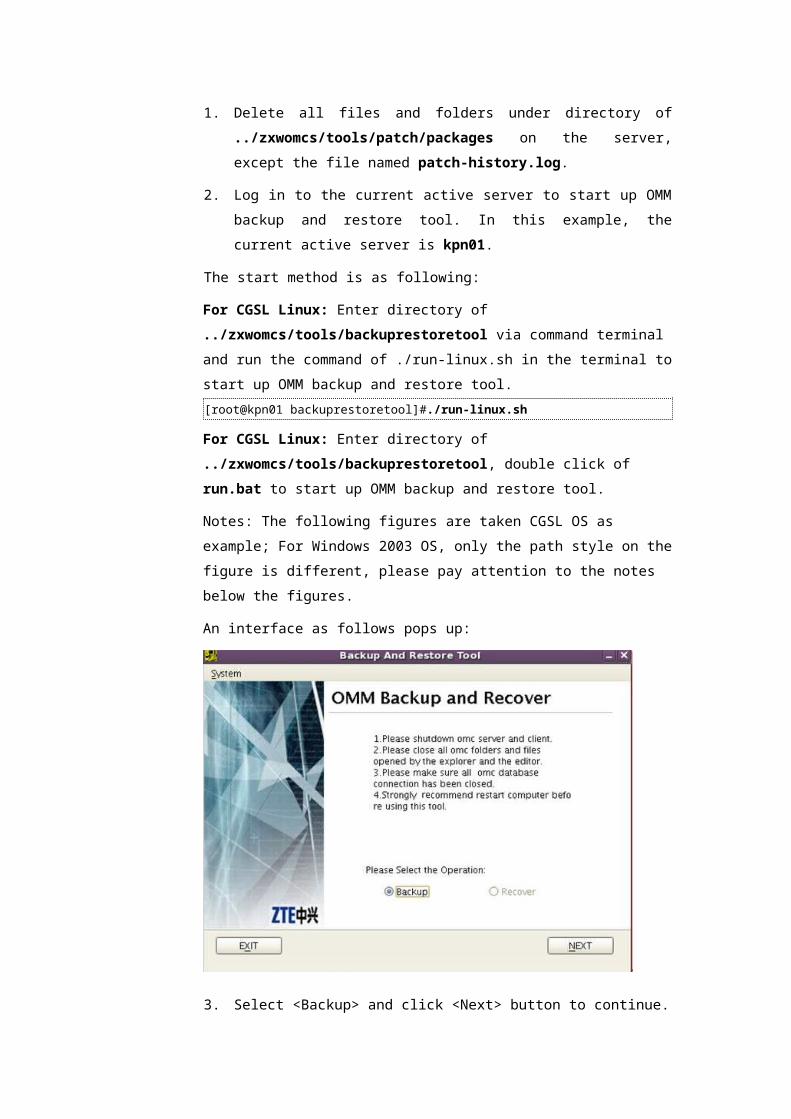
3. Select <Backup> and click <Next> button to continue.
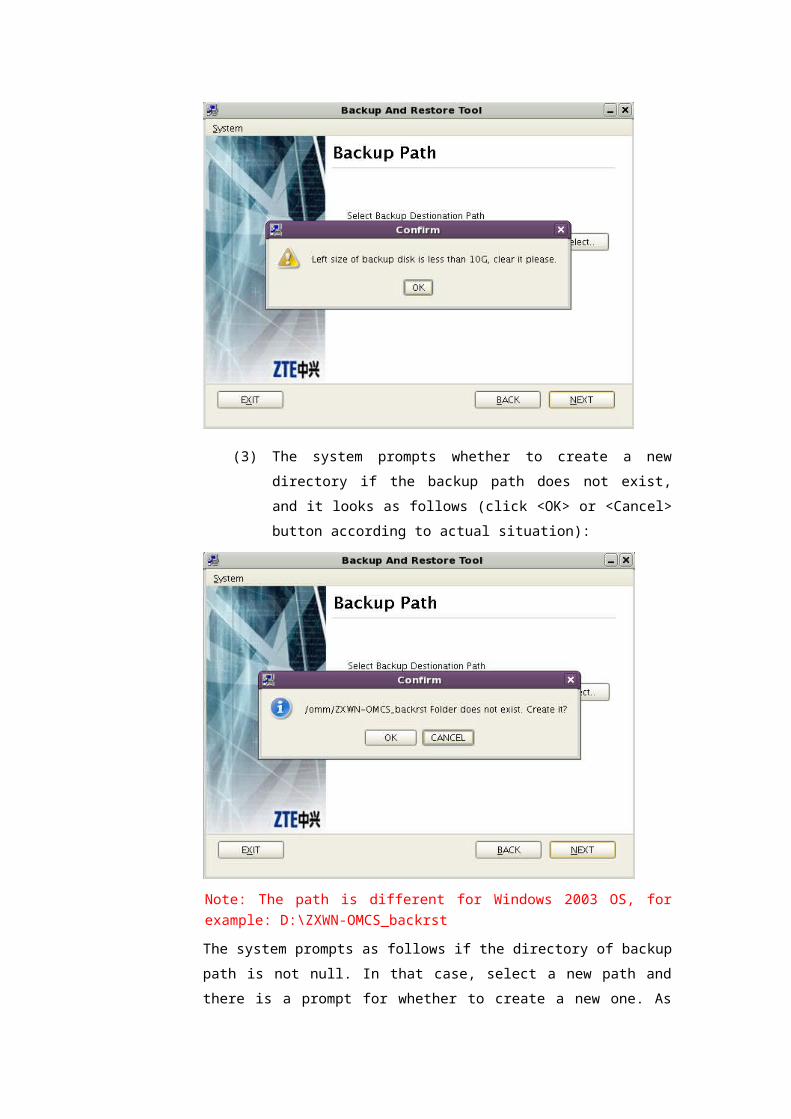
Note: The path is different for Windows 2003 OS, for example: D:\ZXWN-OMCS_backrst
4. Select the backup path and click <Next> button to continue.
(1) The system prompts as follows if system disk space is no more
than 1G.
(2) The system prompts as follows if target disk space is no more
than 10G.

(3) The system prompts whether to create a new directory if the
backup path does not exist, and it looks as follows (click <OK>
or <Cancel> button according to actual situation):
Note: The path is different for Windows 2003 OS, for example: D:\ZXWN-OMCS_backrst
The system prompts as follows if the directory of backup path is not null. In that
case, select a new path and there is a prompt for whether to create a new one. As
follows (click <OK> or <Cancel> button according to actual situation):
If the backup directory exists and is null, a backup database interface as follows
will appear:
Note: The path is different for Windows 2003 OS, for example: D:\ZXWN-OMCS_backrst
5. In figure 2-9, select database to be backed up according to actual
situation. Usually, keep default setting. Besides, it is necessary to
select <NM Middle > if there is any on the site. Click <Next> button to
continue:

Note: The path is different for Windows 2003 OS, for example: D:\ZXWN-OMCS_backrst
6. An interface as follows appears upon completion of file copy.
7. Click <Next> button to continue:

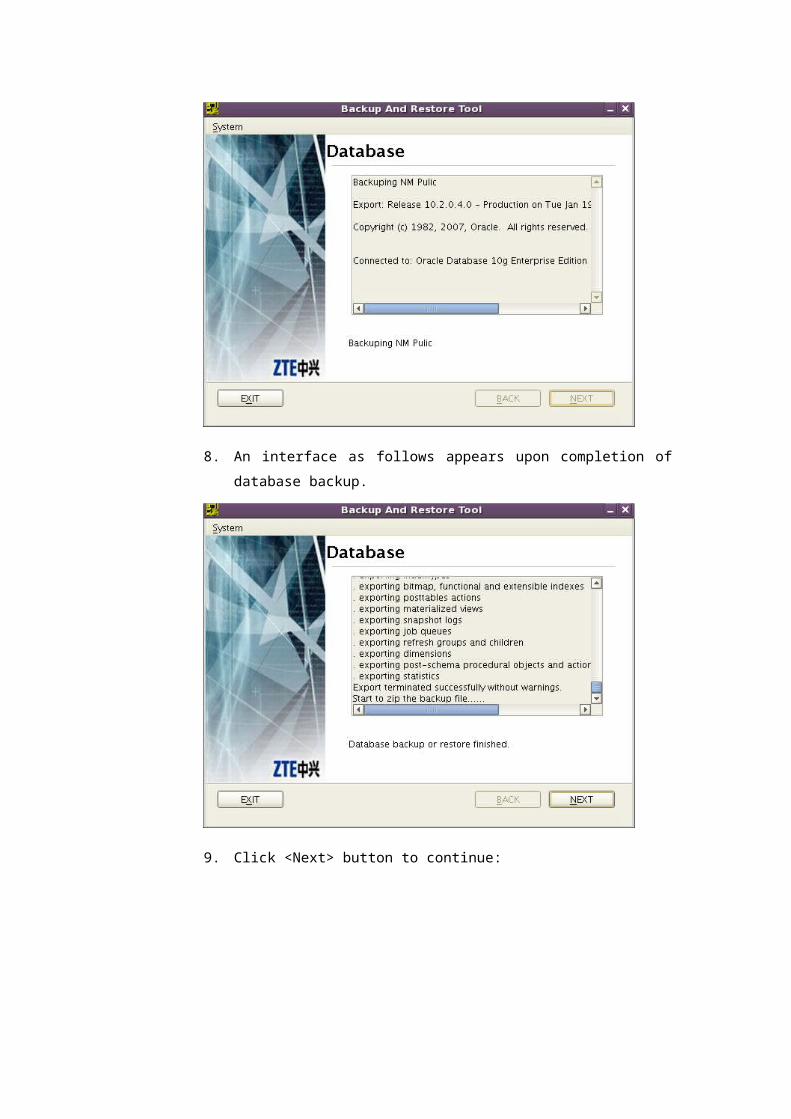
8. An interface as follows appears upon completion of database backup.
9. Click <Next> button to continue:
10. Click <Finish> button to finish automatic backup.