(PRS) -...
121
D R A F T Program Registry System (PRS) User Guide Version 2001_2002(b) Alberta Learning Information Technology
Transcript of (PRS) -...

D R A F T
Program Registry System
(PRS)
User Guide Version 2001_2002(b)
Alberta Learning Information Technology

D R A F T
September 2001

Table of Contents
Introduction --------------------------------------------------------------------------------------- I Overview of PRS ---------------------------------------------------------------------------------- I Purpose --------------------------------------------------------------------------------------------- I
Navigating Through the System -------------------------------------------------------------- II
Registry Toolbar Items ----------------------------------------------------------------------- III
Registry Menu Items --------------------------------------------------------------------------- V
Help Keys --------------------------------------------------------------------------------------- VII
Closing the Screen --------------------------------------------------------------------------- VIII
Querying Data -------------------------------------------------------------------------------- VIII
Accessing the Program Registry System --------------------------------------------------- IX Launching PRS ---------------------------------------------------------------------------------- IX
Proposal Records Screen ----------------------------------------------------------------------- 1
Creating a New Proposal ----------------------------------------------------------------------- 3 Submitting Proposal to Branch ---------------------------------------------------------------- 10
Editing an Existing Proposal ----------------------------------------------------------------- 11
Deleting a Proposal ---------------------------------------------------------------------------- 11
Reports ------------------------------------------------------------------------------------------- 12 Status Report ------------------------------------------------------------------------------------- 12 Program Proposal Report ---------------------------------------------------------------------- 12
Trouble with Opening Reports -------------------------------------------------------------- 13
Introduction --------------------------------------------------------------------------------------- 1 Overview of PRS – Program Maintenance ---------------------------------------------------- 1
Accessing The Program Registry System ---------------------------------------------------- 2 Launching PRS ------------------------------------------------------------------------------------ 2
Work In Progress Records Screen ------------------------------------------------------------ 4
Editing an Existing Program------------------------------------------------------------------- 5 Adding Program to the Program WIP ---------------------------------------------------------- 5 Selecting and Editing the Program ------------------------------------------------------------- 6 Cross Reference Section ------------------------------------------------------------------------- 8 Activating a Campus for a Program ------------------------------------------------------------ 9 Deactivating a Campus for a Program ------------------------------------------------------- 10 Compare Report --------------------------------------------------------------------------------- 16 Submitting Program Edits to the Branch ---------------------------------------------------- 17 Viewing the Original Program After Edits Have Occurred ------------------------------- 17 Deleting a Program from the WIP ------------------------------------------------------------ 18
Creating a New Campus ---------------------------------------------------------------------- 19 Deleting a Campus ------------------------------------------------------------------------------ 20

Editing a Campus ------------------------------------------------------------------------------- 21
Setup New Programs --------------------------------------------------------------------------- 22 Check for New Approved Programs --------------------------------------------------------- 22 Setup the Data for a New Approved Program ---------------------------------------------- 22 Submitting the Edited Program back to the Department ---------------------------------- 23
Copying a Program(s) into the Next Year -------------------------------------------------- 24
Deleting Program(s) from an Existing Year ----------------------------------------------- 25
Introduction -------------------------------------------------------------------------------------- 1 Overview of Program Registry System– EDINFO ------------------------------------------ 1 Contacting EDINFO Administration ---------------------------------------------------------- 1
Accessing The Program Registry System---------------------------------------------------- 2 Launching PRS ------------------------------------------------------------------------------------ 2
Editing an Existing Program ------------------------------------------------------------------ 5 Adding an Existing Program to the WIP ------------------------------------------------------ 5 Editing an Existing Program -------------------------------------------------------------------- 6 Check Program Edits Against the Original Program Information ------------------------- 9
Deleting a Program(s) from the WIP-------------------------------------------------------- 12
Create New Programs -------------------------------------------------------------------------- 13
Editing the Provider Overview --------------------------------------------------------------- 15
Editing the Standard Admission Requirements ------------------------------------------- 16
Appendix A --------------------------------------------------------------------------------------- 1
Overview ------------------------------------------------------------------------------------------ 1
Brokering to a Host Institution ---------------------------------------------------------------- 2 Select the Brokered Program and Fill out the Brokering Information -------------------- 2 Get Brokered Student Records ------------------------------------------------------------------ 6 Modifying Exported Student Records --------------------------------------------------------- 7 Load Student Records to LERS ---------------------------------------------------------------- 9 Verify if Student Records are Imported ----------------------------------------------------- 10
Brokering from a Sponsoring Institution--------------------------------------------------- 11 Coping an Existing Program ------------------------------------------------------------------ 11 Modifying the New Program (copied program) -------------------------------------------- 12 Activating a Campus --------------------------------------------------------------------------- 13 Filling out the Brokering Information ------------------------------------------------------- 13 Setting the Year and Submission ------------------------------------------------------------- 15 Querying and Exporting Student Records --------------------------------------------------- 16 Transferring Student Records to the Sponsoring Institution------------------------------ 18
Quick Reference Manual ----------------------------------------------------------------------- 1 Part I – Proposals --------------------------------------------------------------------------------- 1 Part II – Programs -------------------------------------------------------------------------------- 4 Part III – EDINFO ------------------------------------------------------------------------------ 11

Appendix B. LERS Toolbar Items ---------------------------------------------------------- 15 PRS Main Menu Button Items ---------------------------------------------------------------- 15
Glossary of Terms------------------------------------------------------------------------------ 15

Table of Figures
Overview Figure 0 - 1: Program Registry Screen ------------------------------------------------------------- IIFigure 0 - 2: Alberta Learning Welcome Screen ------------------------------------------------- IXFigure 0 - 3: The Logon Screen ---------------------------------------------------------------------- XFigure 0 - 4: PRS Main Menu Screen -------------------------------------------------------------- XI Part I – Proposal Figure 1 - 1: The Proposal WIP Screen _______________________________________ 1Figure 1 - 2: The Proposed Screen - Proposed Tab ______________________________ 4Figure 1 - 3: The Proposed Screen - Proposal Comments Tab ______________________ 6Figure 1 - 4: The Proposed Screen - Enrollment Tab _____________________________ 7Figure 1 - 5: The Proposed Screen - Funding Tab _______________________________ 8Figure 1 - 6: The Proposed Screen - Program Xref Tab ___________________________ 9Figure 1 - 7: The General Preferences Screen _________________________________ 13 Part II - Program Maintenance Figure 2 - 1: (Alberta Learning Welcome Screen) ------------------------------------------------- 2Figure 2 - 2: (Launch Bar Screen) -------------------------------------------------------------------- 2Figure 2 - 3: (Network Password Logon Screen) -------------------------------------------------- 2Figure 2 - 4: The Prs Program Submit Screen ------------------------------------------------------ 4Figure 2 - 5: (Add to Work In Progress POP-UP Screen) ---------------------------------------- 5Figure 2 - 6: The Programs Screen - Identification Tab ------------------------------------------- 6Figure 2 - 7: The Programs Screen - Length/Approval Tab -------------------------------------- 7Figure 2 - 8: The Xref Description Screen ---------------------------------------------------------- 8Figure 2 - 9: The Programs Screen - Locations Tab ----------------------------------------------- 9Figure 2 - 10: Yearly Program Provider Locations Screen - Admission Tab ---------------- 11Figure 2 - 11: The Yearly Program Provider Locations Screen - Require Tab -------------- 12Figure 2 - 12: The Yearly Program Provider Locations Screen - Delivery Tab ------------- 13Figure 2 - 13: The Yearly Program Provider Locations Screen - Special Tab --------------- 14Figure 2 - 14: The Yearly Program Provider Locations Screen - Funding Tab -------------- 15Figure 2 - 15: The Provider Details Screen ------------------------------------------------------- 19Figure 2 - 16: The Copy / Delete Programs ------------------------------------------------------- 24

Part III - EDINFO Figure 3 - 1: The PRS Main Menu Screen ---------------------------------------------------------- 3Figure 3 - 2: The Prs Program Submit - Edinfo WIP Screen ------------------------------------- 3Figure 3 - 3: (Add to Work in Progress POP-UP Screen) ----------------------------------------- 5Figure 3 - 4: (EDINFO Program Maintenance Screen) ------------------------------------------- 6Figure 3 - 5: Transfers Screen) ------------------------------------------------------------------------ 7Figure 3 - 6: (Editor Comments Screen) ------------------------------------------------------------- 8Figure 3 - 7: (EDINFO Program Maintenance Screen) - Original ------------------------------- 9Figure 3 - 8: (EDINFO Program Maintenance Screen) – Highlighted Edits ----------------- 10Figure 3 - 9: (EDINFO Program WIP Screen) ---------------------------------------------------- 11Figure 3 - 10: (EDINFO Program Maintenance Screen) ---------------------------------------- 13Figure 3 - 11: (Provider Overview Screen) -------------------------------------------------------- 15Figure 3 - 12: (Standard Admission Screen) ------------------------------------------------------ 16 Brokering Figure 4 - 1: The Programs Screen ------------------------------------------------------------------- 3Figure 4 - 2: The Yearly Program Provider Locations Screen - Brokering Tab --------------- 4Figure 4 - 3: The Select Student Screen ------------------------------------------------------------- 7Figure 4 - 4: The Student Update Screen ------------------------------------------------------------ 8Figure 4 - 5: The Load Students Screen ------------------------------------------------------------- 9Figure 4 - 6: The Copy/Delete Programs Screen ------------------------------------------------- 11Figure 4 - 7: The Maintain Student Screen -------------------------------------------------------- 16Figure 4 - 8: The Student Export Screen ----------------------------------------------------------- 17


PRS User Guide
- I -
Introduction
Overview of PRS
This guide is intended to provide a Program Registry System user with all of the necessary details to navigate and perform functions within the Program Registry application. Information on policy, procedures and definitions may be found in the PRS Reporting Manual and Common Definitions manuals, which are companion guides to this document.
Purpose
The Program Registry System collects program data for all post secondary training providers/institutions. It replaced three systems in the Department of Learning and one system in the Department of Human Resources and Employment that collected program data. It allows for the electronic exchange of program information between the department of Learning and post secondary institutions via the Internet. It is the intention of the department of Learning to capture all program information in a single database in the near future to ensure consistency of information and eliminate duplication of effort.

PRS User Guide
- II -
Navigating Through the System
Figure 0 - 1: Program Registry Screen

PRS User Guide
- III -
Registry Toolbar Items
Icon Item Description
Save Changes
Saves any outstanding changes and commits them to the database. This includes inserts, updates and deletes. This function is also available from the Action - Save menu item.
Prints a screen capture for the active window. This function is also available from the Action – Print menu item.
Exit
This button allows you to go back to a previous screen or the menu.
Enter Query
‘Enter query’ mode provides the capability to enter search criteria. The user will know they are in enter query mode because most of the screens will show up in a turquoise blue color.
Execute Query
When you press this button you will be asking the system to execute the query based on the criteria that you entered. When the query has finished, the screen fields will turn from turquoise to white. The query functions are also available under the Query menu item.
Cancel Query
This icon cancels the search.
Insert
Puts you into insert mode for the active window. That is, you can insert values into all enterable fields. If the active window has data and the Insert button is pressed, the field contents for the active window are cleared (not deleted from the database) and the cursor is positioned on the first enterable

PRS User Guide
- IV -
Icon Item Description field. This function is also available from the Record – Insert menu item.
Delete
Clears the record from the screen field in preparation for delete. This function is also available from the Record – Remove menu item. The save changes button actually commits the delete in the database.
Note: The next four ‘arrow’ icons allow you to navigate within the Program Registry records:
Tool Tips: Text ‘tool tips’ have been provided on the Menu Bar. When the mouse pointer is placed over a menu bar button, a small text box will appear describing the function that button will perform.
Icon Item Description
Previous Block
Saves any outstanding changes and commits them to the database. This includes inserts, updates and deletes. This function is also available from the Action - Save menu item.
Previous Record
Go back one record.
Next Record
Go to the next record.
Next Block
Go to the next block of records.

PRS User Guide
- V -
Registry Menu Items Underlying menu items are automatically displayed as the mouse pointer, arrow keys, or shortcut keys are used to navigate through menu items.
Menu Item Description Action Save Saves any changes to the database.
Action Clear All Clears all records from the screen.
Action Print Prints the entire window.
Action Exit Closes the current form, or application.
Edit Edit Bring up editor dialog for text fields only.
Edit Display
List Bring list of allowable values for field.
Query Enter Put system in Query Mode.
Query Execute Execute query based on criteria entered.
Query Cancel Exit from query mode, cancels query.
Query Last Criteria
Can be used in query mode to display the last criteria entered.
Query Count Hits Use in query mode to indicate how many database rows will be returned (status bar message).
Query Fetch Next Set
Will retrieve the next set of records from the database.
Block Previous Go to the previous data block.
Block Next Go to the next data block.
Block Clear Clear the current block.
Record Previous Go to the previous record.
Record Next Go to the next record.
Record Scroll Up Scroll up through records. Same as Page Up key.

PRS User Guide
- VI -
Menu Item Description
Record Scroll Down
Scroll down through records. Same as Page Down key.
Record Insert Insert a blank new record.
Record Remove Delete the current record.
Record Lock Temporarily lock the record from revision by any other user.
Record Duplicate Copy the values from a previous record to this record.
Record Clear Clear the current record from the screen.
Field Previous Go to the previous field. Same as holding SHIFT and then pressing TAB.
Field Next Go to the next field. Same as pressing the TAB.
Field Clear Clear the current field from the screen.
Field Duplicate Copy the values from the previous record field to the current record field.
Help Help Display on-line help (not implemented).
Help Keys Display list of Oracle shortcut keys.

PRS User Guide
- VII -
Help Keys
Screen functions may also be used by: Entering a series of keys rather than pressing a menu button Selecting the choice using a mouse
For a list of these keys, access the Help function of the menu.

PRS User Guide
- VIII -
Closing the Screen
You may close the current screen by:
• Clicking on the ‘X’ button on the top right corner of the screen or
• Clicking on the Exit icon • Click on the File menu and by clicking on Exit if you are on the main menu
If any changes have been made to the record(s) or if you add new record and if you try to exit the form, “Do you want to save the changes you have made?” message comes up. Click Yes to save, click No if you do not wish to save and click on Cancel to cancel and work on the opened screen.
Status Bar
The status bar provides text descriptions of fields and system events depending on the position of the cursor or the function being performed. The status bar is found at the bottom of the Program Registry window.
Querying Data
The Enter Query and Execute Query buttons, located on the toolbar, allow the user to enter information to find a particular record, or set of records, from the database.
A user may query any field with a display list arrow beside it. Clicking on this arrow pops up a list of values containing all of the allowable values for the current field. This function is also available from the Edit – Display List menu item.
PRS User Guide
- IX -
Formatted: Bullets and Numbering
Accessing the Program Registry System
Launching PRS
Note: In order to log in to the system, your web browser must be 4.0 or later and you must have a minimum of 32 MB of RAM.
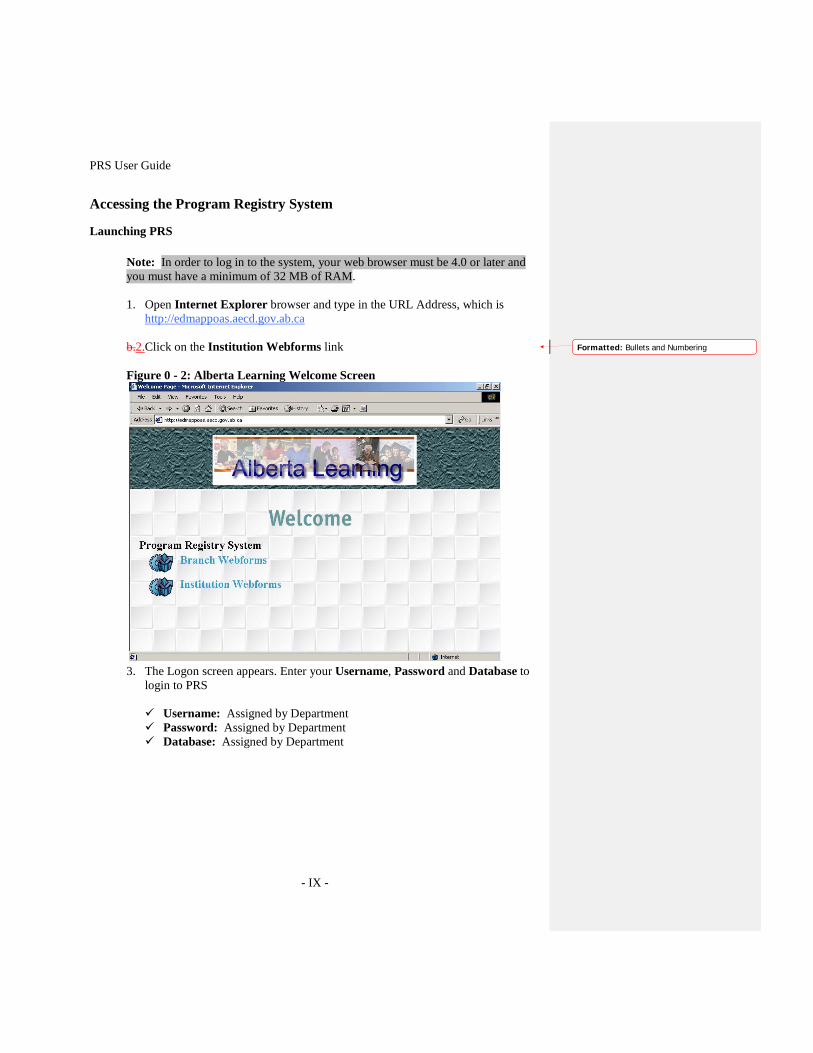
1. Open Internet Explorer browser and type in the URL Address, which is
http://edmappoas.aecd.gov.ab.ca b.2.Click on the Institution Webforms link
Figure 0 - 2: Alberta Learning Welcome Screen
3. The Logon screen appears. Enter your Username, Password and Database to login to PRS Username: Assigned by Department Password: Assigned by Department Database: Assigned by Department

PRS User Guide
- X -
Figure 0 - 3: The Logon Screen
4. Once you have entered the logon information, press the Enter key on your key pad to continue, or click on the Connect button on the Logon dialog box

PRS User Guide
- XI -
The following PRS main menu will appear with your institution’s name identified at the top.
Figure 0 - 4: PRS Main Menu Screen
If you receive an error message, hit the Refresh icon on the Internet browser and repeat steps 1 to 4 until login is successful.


D R A F T
Program Registry System
(PRS)
Part I – Proposal
Version 2001_2002(b)
Alberta Learning Information Technology
September 2001


PRS User Guide Part I – Proposal
- 1 -
Proposal Records Screen
1. Click on the Maintain Proposals button located on the PRS main menu. The Proposal Records screen appears as shown below.
The Proposal Records screen will display the program proposals, changes, and other information that are in progress between the institution and the department.
Figure 1 - 1: The Proposal WIP Screen
The Proposal Records screen displays all current proposals that have not yet been approved. The Current Owner field indicates whether the proposal is in the possession of the department or the institution. When an institution begins to develop a proposal, the initiative will appear in the institution’s Work in Progress (WIP) with the notation in the Current Owner field that reads as “Institution – Draft”. Institutional staff has access to the initiative to add to, alter and take out content to arrive at a final product. The proposal can be saved, opened and closed numerous times before being sent to the department as several people may wish to work on it. Throughout this draft phase, the proposal cannot be seen in the department and does not appear in the department’s work in progress area. Once the proposal has been fully developed internally and has been approved, the Vice-President Academic or designate can send the proposal to the department.

PRS User Guide Part I – Proposal
- 2 -
When the proposal is forwarded electronically to the department using the To Branch button, the initiative will continue to appear in the institution’s WIP but the Current Owner field will have changed to read “Alberta Learning”. At this point, the initiative appears in the department's WIP When the department returns the proposal with its comments and or approval the institution's WIP display will change to show “Institution – WIP” in the Current Owner field. This notation signals that the document is now in the possession of the institution again for action. Electronic exchange of the proposal continues between institutions and the department until the proposal is approved or declined by the department.

PRS User Guide Part I – Proposal
- 3 -
Creating a New Proposal To enter a new proposal:
1. Click on the New Proposal button on the Proposal Records screens and a prompt
screen appear as shown below 2. Select one of the three types of proposals from the Program Type Code drop
down menu
3. Your institution’s name should automatically appear in the Provider Name field. If it does not, use the drop down arrow and select your institution name.
4. Type in the new proposal name in the Program Name field as it would appear on
your calendar and click on OK. The Proposed screen appears as shown on the next page

PRS User Guide Part I – Proposal
- 4 -
Figure 1 - 2: The Proposed Screen - Proposed Tab
1. Click on the Proposed tab and fill out all the necessary information. Please refer to the PRS Reporting manual if you are not sure what to enter or select in those fields A few points to remember when you fill out the Proposed form: • On this screen department staff fills in the Assigned Officer and Proposal
Received Data fields • Those fields that have a small square or an arrow beside them will provide
you with ‘drop down’ options
• Always use the drop down icon when it appears –do not attempt to type in values or create new values that are not part of the drop down menu items
• Dates always take the form of DD-MON-YYYY. For example, the proposed
implementation date might be 01-JAN-2003
• Program Duration is a free flow text field – Program Duration is usually expressed in terms of 1 year or 2 years etc.
PRS User Guide Part I – Proposal
- 5 -
• Program synopsis is meant to be a brief description of the proposal – details of the proposal follow on subsequent screens.
12.• In the case of a program where a provider will be collaborating with your
institution to deliver the program, always enter your institution in the first line as the “lead” role, and the collaborating provider section with a role of “collaborating”
Note: You may edit the program synopsis by typing directly into the field or by using the Edit button. Since the records are locked until you send them, you may edit proposals as many times as you like before they are sent to the department by selecting the To Branch button in the top right corner of the screen.
2. Once you are done filling out the form, click on the Save icon on the tool
Formatted: Bullets and Numbering

PRS User Guide Part I – Proposal
- 6 -
1. Click on the Proposal Comments tab and the following screen appears
Figure 1 - 3: The Proposed Screen - Proposal Comments Tab
2. Put the insertion point in the Section and Section items area. The selected items will be highlighted in yellow
3. Type in your comments in the Provider Comments area. The Department
Comments will be filled by the department 4. Enter all the necessary information and click on the Save icon on the tool bar
to save the information on this tab
13.Note that each template on the left of this screen has several subsections associated with it on the right. The easiest way to navigate through the templates is by tabbing or by placing your cursor in the field. You will know which record you are in by the yellow highlight color. The only section you are not required to fill in on this tab is Section F, Recommendations for department.
The information to be filled in is derived from templates that have been in use between the department and the institutions for several years. If you are in doubt about what should be entered in a given field, please contact the Public Institutions branch of Adult Learning division for further information at: (780) 427-1678.
Formatted: Bullets and Numbering

PRS User Guide Part I – Proposal
- 7 -
1. Click on the Enrollment tab and the enrollment tab screen appears as shown below
Figure 1 - 4: The Proposed Screen - Enrollment Tab
Information on estimated enrollment and FLE’s is required on this template. Both full time and part time enrollments are requested.
2. Enter all the necessary information and click on the Save icon on the tool bar
to save the information on this tab

PRS User Guide Part I – Proposal
- 8 -
1. Click on the Funding tab and the Funding tab appears as shown below
Figure 1 - 5: The Proposed Screen - Funding Tab
Note: Estimates for the first several years of the program and ongoing funding are required for this screen.
2. Select the Year from the drop down list box 3. Enter all the necessary information and click on the Save icon on the tool bar
Formatted

PRS User Guide Part I – Proposal
- 9 -
1. Click on the Program Xref tab and the Program Xref tab screen appears as shown below
Figure 1 - 6: The Proposed Screen - Program Xref Tab
2. Click on the Add Program Link button at the bottom of the screen to add a link
to your proposed program. The Program list box comes up
3. Find the program name that you want to link it to and click on the OK button on the Programs dialog box. The program name and your institution name appears on the screen
If you made a mistake selecting the wrong program, click on the program name that you just selected and click on the Delete Program Xref button. This will remove the program name and the institution name from the screen If you want to view the program select the program and click on the ellipse icon
4. Once finished, click on the Save icon on the tool bar

PRS User Guide Part I – Proposal
- 10 -
Submitting Proposal to Branch
14.Once you complete the screens, you may check your entries by tabbing through the document. Once you are satisfied with the information, it should be sent to the department.
To send the proposed program to the department:
1. Click on the To Branch button located on the top right corner of the Proposed screen Once the proposal has been sent to the department, the Work in Progress Current Owner field will be updated to reflect this. The next time you login, the proposal will show “Institution.” If you wish to verify that the program has in fact changed ownership you may exit the program by going out the turquoise door, then coming back in or by hitting the F7 key twice followed by the F8 key. This refreshes the view of the WIP screen.
Formatted: Bullets and Numbering

PRS User Guide Part I – Proposal
- 11 -
Editing an Existing Proposal
Note: Proposals that have been submitted to the department and have a Current Owner status of “Alberta Learning” cannot be edited.
1. Click on the Maintain Proposals button located on the PRS main menu
2. Click on the Program Name to select the proposal that you want to edit (When it is selected the row will turn yellow).
3. Click on the Edit Record… button at the bottom of the Proposed screen
4. Change the information and click on the Save icon on the tool bar
5. Click the To Branch button located in the top right corner of the screen to send the edited proposal to the department for review
Note: Only the Vice President Academic or designate should send proposals to the department.
Deleting a Proposal
Note: Proposals that have been submitted to the department and have a Current Owner status of “Alberta Learning” cannot be deleted. However, if you decide to delete a proposal before you have forwarded it, the process is as follows:
1. Click on the Maintain Proposals button located on the PRS main menu
2. Select the Program Name (the program will be highlight in yellow)
3. Click on the Edit Record… button located on the bottom right-hand corner of
the Proposed screen
4. Click on the Delete Proposal button located on the top right-hand side of the Proposed screen to delete the proposal. ‘Are you sure you want to delete this proposal’ message comes up.
5. Click on Yes and the proposal will be deleted
Note: You can also delete the proposal the first time you started creating the proposal and before saving and putting the proposal on the WIP. Once it is on the WIP it can only be deleted by following the steps above.

PRS User Guide Part I – Proposal
- 12 -
Reports
Status Report
This report displays the status of all program proposals from public and private post-secondary institutions. It will allow users to call up a report based on a specified period and/or for specified institutions. Only the name of the institution, program name, and current approval or review status will appear on the report.
1. Click on the Status Report button located on the PRS main menu 2. Select the Single Provider (the Institution your are trying to lookup) or select
Yes in the All provider list to select all providers
3. Select the Program Status from the drop down list box that you want displayed on the report
4. Enter the Start Date and End Date to view a particular program
5. Click on the Submit Query button located at the top of the screen
Click on Reset if you want to clear the form and start your search again
Program Proposal Report
To view or print a copy of a proposal:
1. Click on the Maintain Proposals button located on the PRS main menu
2. Select the Proposal, from the WIP, that you would like to print the Program Proposal Report for
3. Click on the Edit Record button located at the bottom of the Proposal Records screen
4. Click on the Run Report button located on the top right hand corner of the Proposed screen

PRS User Guide Part I – Proposal
- 13 -
Trouble with Opening Reports
If you have an older version of Acrobat Reader we recommend that you upgrade to Version 4.0 or later. You can download the latest version from the following site: http://www.adobe.com/products/acrobat/readstep.html
Once you have Acrobat Reader installed on your machine, there is an option setting that must be set for the reader to work properly.
1. Open up Acrobat Reader from your start menu (if you used the default
settings, during installation, it will be found under Programs / Adobe Acrobat 4.0)
2. In Acrobat Reader go to ‘General’ from the File/Preferences menu item or press Ctrl-K
3. Near the bottom of the General Preferences window you will see a check box labeled Web Browser Integration as shown in blue circle in the figure below. Make sure this option is not checked
Figure 1 - 7: The General Preferences Screen
1. Re-open your browser. The reports should now load normally.


Program Registry System
(PRS)
Part II – Program Maintenance
Version 2001_2002(b)
Alberta Learning Information Technology
September 2001
D R A F T


PRS User Guide Part II – Program Maintenance
- 1 -
Introduction
Overview of PRS – Program Maintenance This section of the PRS User Guide is intended to provide step-by-step instructions to assist in the maintenance of approved programs and the updating or editing of existing programs. Instructions will include use of the Work in Progress (WIP) method of transferring data electronically between the institution and the department.

PRS User Guide Part II – Program Maintenance
- 2 -
Accessing The Program Registry System
Launching PRS
1. There are two ways for you to login to the Program Registry System:
a. Open Internet browser and type in the following URL Address: http://edmappoas.aecd.gov.ab.ca and click on the Institution Webforms link.
Figure 2 - 1: (Alberta Learning Welcome Screen)
b. Or by clicking on the PRS icon on the launch screen. Figure 2 - 2: (Launch Bar Screen)
2. Once you reach the site, you will enter your username and password to complete the logon task.
Figure 2 - 3: (Network Password Logon Screen)

PRS User Guide Part II – Program Maintenance
- 3 -
3. Once you have entered the logon information: a. Press the Enter or Return key on your keypad to continue or click on
the Connect button on the Logon screen

PRS User Guide Part II – Program Maintenance
- 4 -
Work In Progress Records Screen
1. Click on the Maintain Programs button in the PRS main menu. The Prs Program Submit screen appears as shown below
Figure 2 - 4: The Prs Program Submit Screen
The Program WIP screen displays the programs currently considered active in the WIP. The column WIP Type identifies the type of activity that is taking place.
The column titled WIP Status displays the ownership of that record.
The status of “Working” indicates the institution is currently working on this record. The status of “Sent to Branch” means that the department is reviewing the record for approval. “Approved” means the program is approved by the department
Note: To edit an existing or new program, it must appear on the WIP before you make changes.
Formatted

PRS User Guide Part II – Program Maintenance
- 5 -
Editing an Existing Program
Adding Program to the Program WIP
1. To make changes to an existing program, press the Change Existing Program button at the bottom left side of the Prs Program Submit screen, and the following pop up screen will appear: Figure 2 - 5: (Add to Work In Progress POP-UP Screen)
2. Select the appropriate Year from the drop down list box
3. Select the Program you wish to make a change to from the programs drop down list box
4. Click on the Add button and the program will appear on the Program WIP
To view the program that you selected:
1. Click on the View Program button as shown on the above figure. The Programs screen appears
Note: You cannot make any changes to the program from this view

PRS User Guide Part II – Program Maintenance
- 6 -
Selecting and Editing the Program 1. Select the program that you wish to edit. This action highlights the program in
yellow
2. Click on the Edit Program… button at the bottom of the Prs Program Submit screen. The Programs screen appears as shown below. This screen has four tabs (Identification, Length/Approval, Locations and Edinfo)
Figure 2 - 6: The Programs Screen - Identification Tab
Identification Tab
This tab contains the screen with the basic characteristics of the program. The first field that must be changed when a program on the WIP has been newly approved by the department is the Program ID. When it first appears on the WIP there will be a number that has been generated by the PRS program in the program ID field. Note: It is vitally important to change this program ID to an institution-specific id before sending the identification information back to the department. This page also includes all of the fields outlining the program characteristics including: standard name, program classification, Stats Can type, qualification, and Admin Unit. Several of these elements are critical to accurate Key Performance Indicator (KPI) reporting. You can manually enter the information

PRS User Guide Part II – Program Maintenance
- 7 -
or use the drop down lists (by clicking on the , or icons on the right side of the description area. When an arrow appears, a selection should be made from the drop down list to avoid data entry errors.
Length/Approval Tab 1. Click on the Length/Approval Tab and the screen below appears
Figure 2 - 7: The Programs Screen - Length/Approval Tab
The information entered or displayed on this screen indicates the program approval status and dates, program length and the program load information. The program load section is the basis for the Full Load Equivalent (FLE) calculation.

PRS User Guide Part II – Program Maintenance
- 8 -
Cross Reference Section
1. To open the Xref Description, click on the button located beside the Description field in the Xref Programs area
Figure 2 - 8: The Xref Description Screen
2. Click on one of the options and click on Ok
3. Once you made changes to the record click on the Save icon
This section allows for entry of cross-referenced programs. The Completion X-Ref is used to group programs for purposes of calculating the KPI Program Completion Indicator. The characteristics of the cross-referenced program, including program length, type, and qualification, apply to all programs in the group. The Continuity X-Ref is used when you introduce a new Program ID, due to changes to program content, length, load, or other reasons. The X-Ref entered is the code of the original approved program. In most cases, a new program is defaulted to be cross-referenced to itself.

PRS User Guide Part II – Program Maintenance
- 9 -
Location Tab
1. Click on the Locations tab and the screen below appears Figure 2 - 9: The Programs Screen - Locations Tab
The location screen lists all campuses created for the institution and their status of active, inactive or undefined.
Activating a Campus for a Program
1. To activate a campus, click on the button labeled Yearly Info that corresponds to the campus you want to activate. You will be prompted with the following message
2. Click on Yes. The response of yes brings you to the Yearly Program Provider Locations screen. This screen has the Admission, Requirements, Delivery Methods, Special, Funding Arrangements and Brokering.

PRS User Guide Part II – Program Maintenance
- 10 -
You must create a new record in order to activate a location. You can continue to fill these screens in at this time or simply exit through the blue door. If you choose to exit at this time, you will receive the following prompt:
3. Click Yes or No. Clicking yes will save the information. A pop-up screen informs you that your transaction is complete and saved. Press OK. The campus you originally selected will now show as activated. Clicking no cancels the save and exits the Yearly Program Provider Locations screen and the Program screen with the location tab will reappear.
Deactivating a Campus for a Program
1. Click on the Inactive radio button that corresponds to the campus you want deactivate
2. Click on the Save icon located on the toolbar to save the changes
Yearly Information
Press the Yearly Info button (found in the Locations tab), to update six tabs (Admission, Require, Delivery, Special, Funding, and Brokering). Note: Except for Brokering, this information does not have to be sent to the department WIP

PRS User Guide Part II – Program Maintenance
- 11 -
Admission Tab 1. Click on the Admission tab and the screen below appears Figure 2 - 10: Yearly Program Provider Locations Screen - Admission Tab
2. Enter the Quotas, Intakes, and Applications and Applicants area. Please
refer to the PRS Reporting Manual as to what to enter If you do not wish to enter information in a field, do not tab into it. The program will not let you exit until you enter some data into the field.
3. Click on the Save icon on the tool bar to save the data

PRS User Guide Part II – Program Maintenance
- 12 -
Require Tab
1. Click on the Require tab and the screen below appears
Figure 2 - 11: The Yearly Program Provider Locations Screen - Require Tab
2. Enter all the information required to get into the program in the Education
and Other Requirements area 3. Click on the Save icon located on the toolbar to save the changes

PRS User Guide Part II – Program Maintenance
- 13 -
Delivery Tab
1. Click on the Delivery tab and the screen below appears Figure 2 - 12: The Yearly Program Provider Locations Screen - Delivery Tab
2. Select the Mode, Location and Audience in the Delivery area 3. Select the Type of Body and the Agreement in the Cooperating Bodies area 4. Click on the Save icon located on the toolbar to save the changes
Information regarding arrangements with cooperating bodies must be identified in this section.

PRS User Guide Part II – Program Maintenance
- 14 -
Special Tab
1. Click on the Delivery tab and the screen below appears
Figure 2 - 13: The Yearly Program Provider Locations Screen - Special Tab
2. Select the Agency and Supervision in the Work Experience area. Type in the Length/Days, Remuneration, Hours/Day and the Load/Units
3. Select the Community Consortia 4. Select the Collaboration Providers in the Collaboration area and select the
Type, Level and Requirement in the Transfer area
5. Click on the Save icon located on the toolbar to save the changes
Details of the work experience arrangements, any brokering and collaborating arrangements, whether the enrolment reporting is to be included or not, must be indicated in these elements.

PRS User Guide Part II – Program Maintenance
- 15 -
Funding Tab
1. Click on the Funding tab and the screen below appears
Figure 2 - 14: The Yearly Program Provider Locations Screen - Funding Tab
2. Enter the Tuition Fees and Program Specific Fees in the Fees area. 3. Select the Funding Type by clicking on the button in the Operating Revenue
area and enter the Amount% and Ending Year 4. Click on the Save icon located on the toolbar to save the changes
Program funding data is specific to each active campus. These elements are used to generate various funding reports and should be consistent with the Tuition Fee Policy. This information is used in LERS to produce the tuition fee policy reports.

PRS User Guide Part II – Program Maintenance
- 16 -
Brokering Tab The brokering section is attached as an appendix before the Quick Reference Guide. This will give you a step-by-step instruction of how to do brokering arrangement with an institution.
Compare Report 1. Click on the Maintain Programs button on the PRS Main menu 2. Select the Program Name to compare it to its original program information (value) 3. Click on the Edit Program… button located on the bottom of the Prs ‘Program
Submit’ screen 4. Click on the Compare Report button located on the upper right-hand corner of the
screen. The screen that has the original value cannot be edited

PRS User Guide Part II – Program Maintenance
- 17 -
Submitting Program Edits to the Branch
1. Once all the necessary information has been entered, click on the Exit icon located on the toolbar. This will take you to the Programs screen.
2. Click on the Exit icon again to go back to the WIP
3. From the Prs Program Submit screen, select the Program Name that you want to
send to the department. The program will be highlighted in yellow
4. Click on the Submit Button… button located at the bottom right-hand side of the screen. The WIP Status input field should now read, “Sent to Branch”.
Viewing the Original Program After Edits Have Occurred
1. Click on the Maintain Programs button on the PRS main menu 2. Click on the Program Name that you wish to edit in the Prs Program Submit
screen
3. Click on the Edit Program… button located on the bottom of the ‘Program WIP’ screen
4. Make changes to the program by adding or changing information in the input
fields
5. Click on the Original Program button to view the program before changes had been made to it

PRS User Guide Part II – Program Maintenance
- 18 -
Deleting a Program from the WIP
1. Click on the Maintain Programs button on the PRS Main menu
2. Click on the Program Name that you wish to delete in the Prs Program Submit screen
3. Click on the Delete WIP… button located at the bottom of the Prs Program
Submit screen. “Are you sure you would like to DELETE from the WIP’ message comes up.
4. Click on Yes to delete the program from the WIP and click on No to leave the
program on the WIP
Note: Only Programs with a WIP status of “Working”, “Returned From Branch” and “Approved” may be deleted. The Submit Button… and the Delete WIP… are grayed out if the program has a WIP Status of “Sent to Branch”
PRS User Guide Part II – Program Maintenance
- 19 -
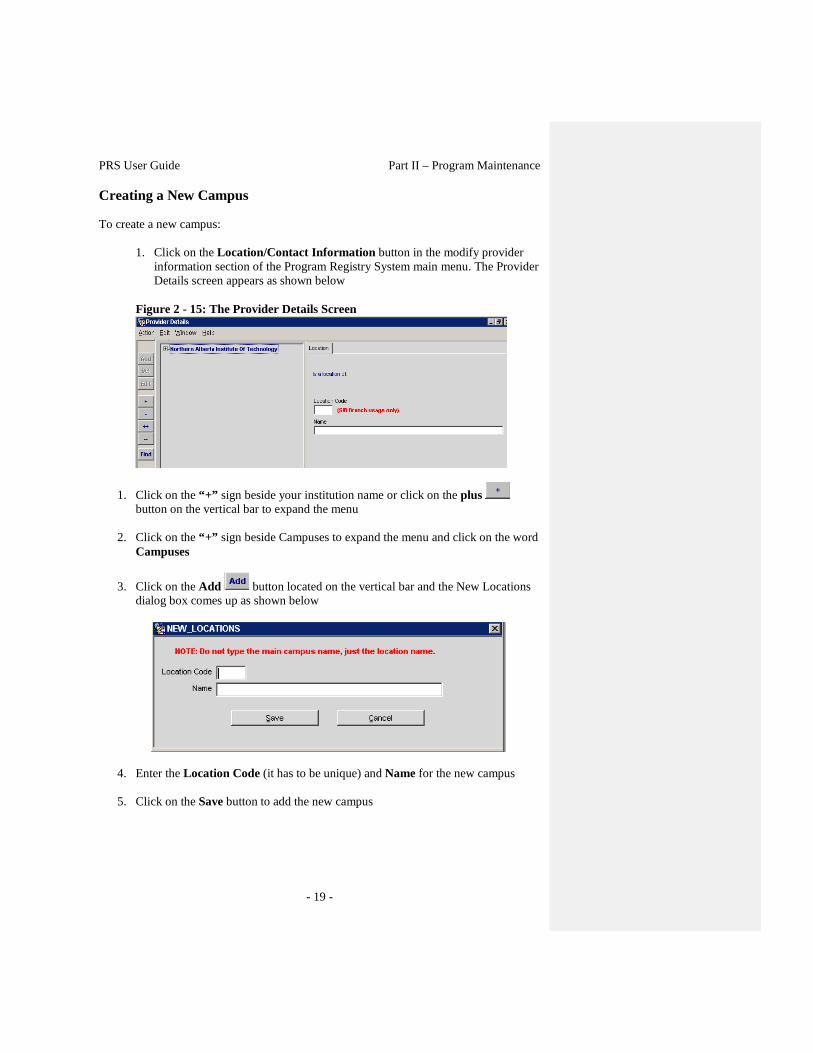
Creating a New Campus To create a new campus:
1. Click on the Location/Contact Information button in the modify provider information section of the Program Registry System main menu. The Provider Details screen appears as shown below
Figure 2 - 15: The Provider Details Screen
1. Click on the “+” sign beside your institution name or click on the plus button on the vertical bar to expand the menu
2. Click on the “+” sign beside Campuses to expand the menu and click on the word Campuses
3. Click on the Add button located on the vertical bar and the New Locations dialog box comes up as shown below
4. Enter the Location Code (it has to be unique) and Name for the new campus
5. Click on the Save button to add the new campus

PRS User Guide Part II – Program Maintenance
- 20 -
Deleting a Campus To delete a campus:
1. Click on the Location/Contact Information button in the modify provider information section of the Program Registry System main menu. The Provider Details screen appears as shown on the previous page
2. Click on the “+” sign beside your institution name or click on the plus
button on the vertical bar to expand the menu
3. Click on the “+” sign beside Campuses to expand the menu
4. Click on the Campus name you want to delete and the following screen comes up
5. Click on the Del button and a warning message comes up 6. If you are sure that you want to delete the campus, click on the Delete button
on the Delete Location dialog box. The campus cannot be deleted if program(s) or contact(s) had been linked to the location

PRS User Guide Part II – Program Maintenance
- 21 -
Editing a Campus To modify a campus information:
1. Click on the Campus name you want to edit and click on the Edit button
2. If the campus is going to be off site put a check mark in the Off Site Check box. Note: You can follow the same step to add, delete or edit contact information

PRS User Guide Part II – Program Maintenance
- 22 -
Setup New Programs
New program proposals are submitted to the Public Institutions Branch through the Proposal section of PRS.
Check for New Approved Programs
1. To check for new approved programs, login to PRS following the steps outlined under the topic Accessing the Program Registry System
2. Click on the Maintain Programs button from the PRS main menu, under the General Procedures section. The new approved program(s) now appear on the Prs Program Submit screen. The WIP type is New Public Program and the WIP status will show as “Working” (a status of “Approved” is in development).
Setup the Data for a New Approved Program
1. Click on the Maintain Programs button located on the PRS main menu to open the Prs Program Submit screen
2. Ensure that the new approved program you wish to work on is selected and
click on the Edit Program… button
3. The Program Registry System assigns a numeric Program ID after the department has approved it. In order to change this number to your institution’s program Id, you must enter it at this time. You cannot save your changes unless the Program ID is changed
4. Click on the Program Id, delete the existing number and type the new
Program Id. The Program Id shows as changed when the Program WIP record is submitted to the department
5. Now the screen containing the Identification, Lookup, Location, and EDINFO
tabs appears. These screens will all be empty and require the setup data to be entered.
6. Pease follow the topic “Selecting and Editing the Program” section of this
User Guide and refer to PRS Reporting Manual to enter the correct data Please note that the program has an Inactive Status at this point. This will change to “Active” once the campus where this program will be offered is activated. Please refer to Page 9 of Part II of this User Guide to activate the campus.

PRS User Guide Part II – Program Maintenance
- 23 -
Submitting the Edited Program back to the Department
1. Once all the information is filled out for the new approved program, return to
the WIP by clicking on the Exit icon on the toolbar, and click on the Submit button located at the bottom of the Prs Program Submit screen to send the data to the department
2. A pop-up message appears as shown below
3. Click Yes and the WIP Status changes to “Sent to Branch”.
PRS User Guide Part II – Program Maintenance
- 24 -
Copying a Program(s) into the Next Year
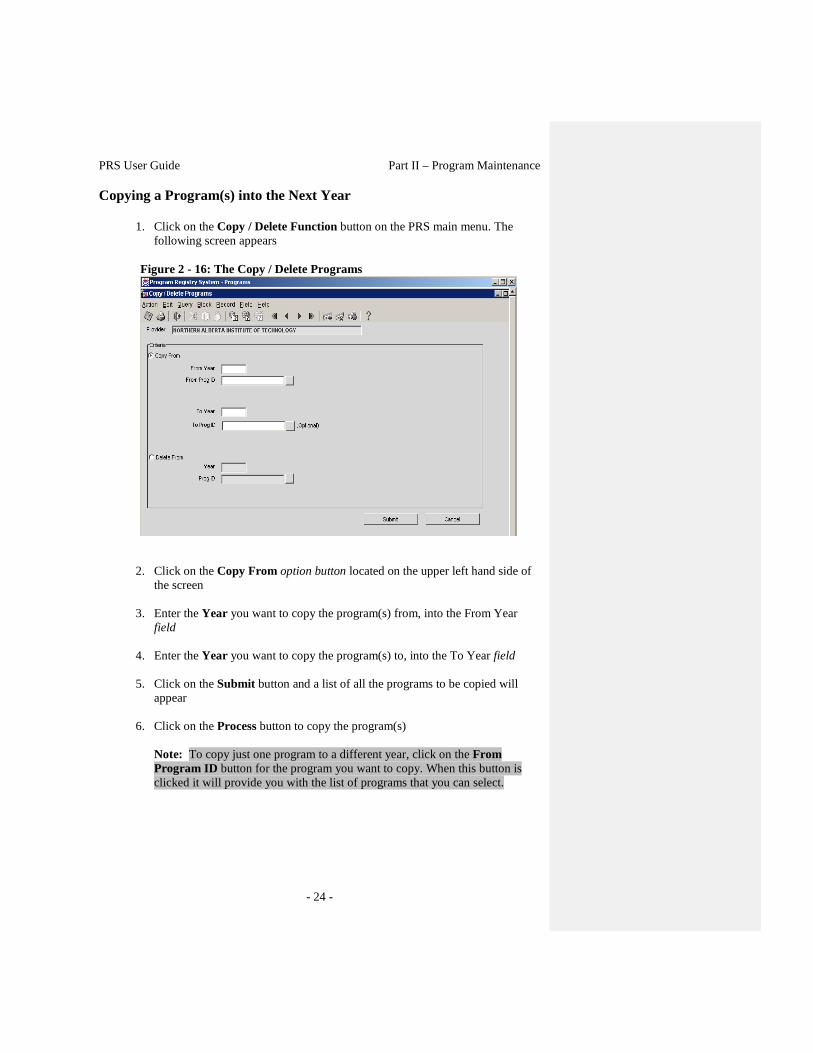
1. Click on the Copy / Delete Function button on the PRS main menu. The following screen appears
Figure 2 - 16: The Copy / Delete Programs
2. Click on the Copy From option button located on the upper left hand side of
the screen
3. Enter the Year you want to copy the program(s) from, into the From Year field
4. Enter the Year you want to copy the program(s) to, into the To Year field
5. Click on the Submit button and a list of all the programs to be copied will appear
6. Click on the Process button to copy the program(s)
Note: To copy just one program to a different year, click on the From Program ID button for the program you want to copy. When this button is clicked it will provide you with the list of programs that you can select.

PRS User Guide Part II – Program Maintenance
- 25 -
Deleting Program(s) from an Existing Year
1. Click on the Copy Delete Function button on the PRS main menu. The Copy / Delete Programs screen appears as shown on the previous page
2. Click on the Delete From option button located on the lower left hand side of
the screen
3. Enter the Year you want to delete the program(s) from, into the Year field
4. Do not select a program if you want to delete all the programs in that year OR select a program from the Prog ID drop down list box to delete just that program from that year
5. Click on the Submit button and a list of all the program(s) to be deleted will
appear
6. Click on the Process button to delete the program(s)


Program Registry System
(PRS)
Part III - EDINFO
Version 2001_2002(b)
Part 3: EDINFO
Alberta Learning Information Technology
September 2001
D R A F T


PRS User Guide Part III – EDINFO
- 1 -
Introduction
Overview of Program Registry System– EDINFO
The EDINFO website, found on the Internet at http://www.aecd.gov.ab.ca/edinfo provides the public with current, factual information about:
• Educational and training programs available on-site and through distance
learning in Alberta
• Distance learning programs offered in British Columbia, Saskatchewan and Manitoba
Currently, educational providers update their EDINFO program entries using the ‘Provider Update Facility’ that can be accessed through the Provider Update button on the EDINFO home page. Starting in November 1999, the ‘Provider Update Facility’ became part of the Program Registry System and therefore it can now be accessed either through the PRS Menu or through the Provider Update button on the EDINFO home page.
Thus, although the process of updating is essentially the same, the look and feel of the screens has changed.
This User Guide is intended to describe the process involved in entering new programs, updating existing programs, and revising Provider Overviews and Standard Admission Requirements using the new ‘Provider Update Facility’ screens in the Program Registry System.
Contacting EDINFO Administration
If any of these instructions are unclear or you have any questions, please e-mail EDINFO administration at [email protected] or telephone us at:
• Joyce Gelinas: (780) 422-5316 • Maureen Scrutton: (780) 422-5282

PRS User Guide Part III – EDINFO
- 2 -
Accessing The Program Registry System
Launching PRS There are two ways to access the logon screen.
1. Open Internet Explorer browser and type in the URL Address, which is
http://edmappoas.aecd.gov.ab.ca and click on the Institution Webforms
2. Or, click on the PRS icon on the Alberta Learning Systems launch bar as shown below. You can access this launch bar by clicking on the red triangle Alberta Learning icon on you windows desktop
3. Once the Logon dialog box comes up, enter your User Name, Password and Database and click on the Connect button click on the Enter or Return key on your keyboard
If you get an Error message, click on the refresh icon on the Internet Explorer tool bar as shown on the diagram below
The Program Registry System main menu appears, if connection to the system was successful

PRS User Guide Part III – EDINFO
- 3 -
Figure 3 - 1: The PRS Main Menu Screen
1. Click on the Provider Update Facility button on the PRS main menu in the
Edinfo area. The ‘EDINFO WIP’ screen appears as shown below Figure 3 - 2: The Prs Program Submit - Edinfo WIP Screen

PRS User Guide Part III – EDINFO
- 4 -
Note: Hitting the EDINFO tab when working in the ‘Maintain Programs’ function can also access this screen.
EDINFO Submit/Work In Progress Screen
The ‘EDINFO Submit/Work In Progress’ screen displays the programs currently considered active in the Work In Progress (WIP). The column WIP type identifies the type of activity that is taking place. The column entitled WIP Status displays the current status of that record (i.e. ‘Working’ indicating that your institution is currently working on the entry, ‘Sent to EDINFO’ indicating you have sent this record to EDINFO for approval).
Note: To edit an existing program the program must appear on the ‘EDINFO Program WIP’ screen.

PRS User Guide Part III – EDINFO
- 5 -
Editing an Existing Program
Adding an Existing Program to the WIP 1. In order to make changes to an existing program, that program must be in the
‘Work In Progress’ (WIP). If it is not in the ‘Work In Progress,’ click on the Change Existing Program button at the bottom left side of the ‘Submit EDINFO/Work In Progress’ screen, and the following screen will appear:
Figure 3 - 3: (Add to Work in Progress POP-UP Screen)
2. Click on the program title ‘drop down’ menu to select the program to which you wish to add to the WIP.
3. Then click on the Add Existing Program to WIP button and the program
will show up on the ‘EDINFO Program WIP’ screen with ‘Working’ in the WIP status column.
Note: The ‘drop down’ list contains only those programs not already on the ‘EDINFO Program WIP’ screen. Thus if a program is already in the Work In Progress, it will not appear on this ‘drop down’ menu.
PRS User Guide Part III – EDINFO
- 6 -
Editing an Existing Program
4. When you are ready to edit the information, make sure that the program is highlighted in yellow on the WIP.
5. Click on the View Details button at the bottom of the ‘EDINFO Program WIP’
screen.
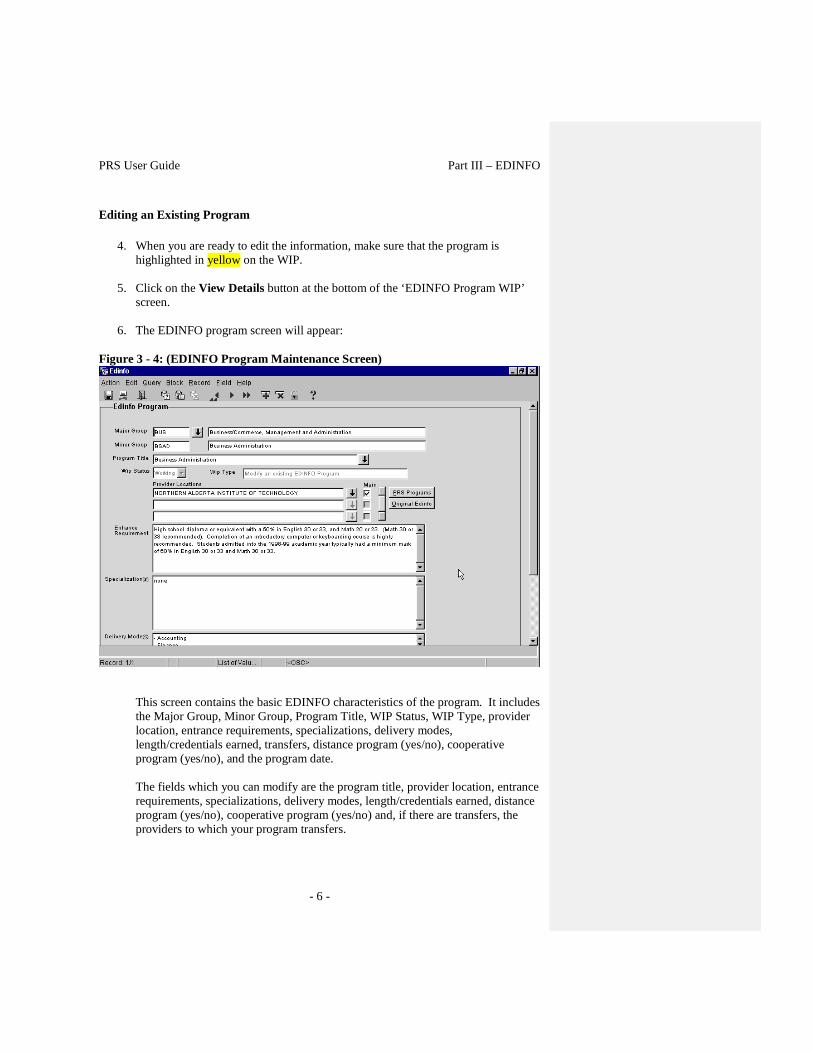
6. The EDINFO program screen will appear:
Figure 3 - 4: (EDINFO Program Maintenance Screen)
This screen contains the basic EDINFO characteristics of the program. It includes the Major Group, Minor Group, Program Title, WIP Status, WIP Type, provider location, entrance requirements, specializations, delivery modes, length/credentials earned, transfers, distance program (yes/no), cooperative program (yes/no), and the program date.
The fields which you can modify are the program title, provider location, entrance requirements, specializations, delivery modes, length/credentials earned, distance program (yes/no), cooperative program (yes/no) and, if there are transfers, the providers to which your program transfers.

PRS User Guide Part III – EDINFO
- 7 -
Indicate the Program is Transferable to Another Institution
7. If the program is transferable to another institution scroll down to the bottom of the screen and press the Transfers button and the Transfers screen will appear.
Figure 3 - 5: Transfers Screen)
8. On the Transfers screen, select the appropriate provider(s) to which the program will transfer.
9. Once you have completed your selections, click on the Back button to return
to the EDINFO Program screen.
Note: Once one (or more) provider(s) have been added to the Transfers screen, the ‘Transferable’ status button on the EDINFO Program screen changes from ‘No’ to ‘Yes’ automatically.

PRS User Guide Part III – EDINFO
- 8 -
Add / Edit Comments
10. When you click on the Edit button, you will get an Editor window that you can use to exchange comments pertaining to the program entry with the EDINFO administration. Here you can explain changes, make comments, and if necessary, ask questions, and then submit them electronically to EDINFO.
Figure 3 - 6: (Editor Comments Screen)
This Editor also has a ‘search and replace’ feature.
11. When you have finished writing your comments, click on OK and you will return to the ‘EDINFO Program’ screen.
12. Once you are satisfied with all the edits you made on that particular program,
click the Save icon on the toolbar located at the top of the screen.

PRS User Guide Part III – EDINFO
- 9 -
Check Program Edits Against the Original Program Information
13. If you wish to check your edits against the original program information, click on the Original Ed… button and the Original EDINFO Program screen will appear.
Figure 3 - 7: (EDINFO Program Maintenance Screen) - Original
14. When you click on the Back button, you will return to the EDINFO Program
screen, but this time all fields that have been changed from the original document will be highlighted in yellow.

PRS User Guide Part III – EDINFO
- 10 -
Figure 3 - 8: (EDINFO Program Maintenance Screen) – Highlighted Edits
15. If you click on the Exit icon on the toolbar at the top of the screen, the ‘EDINFO Program WIP’ screen will appear.
Submit your Program Edits to EDINFO
16. Once you have completed work on this program entry, click on the Submit to EDINFO button and the following screen appears:
17. By clicking Yes you will submit your program to EDINFO for approval. After this step, you will notice that the WIP Status of the submitted program has changed from ‘Working’ to ‘Sent to EDINFO.’

PRS User Guide Part III – EDINFO
- 11 -
When EDINFO approves the submitted program and sends it back, the word ‘Approved’ will appear in the WIP status column for that program.
Figure 3 - 9: (EDINFO Program WIP Screen)

PRS User Guide Part III – EDINFO
- 12 -
Deleting a Program(s) from the WIP
1. Once you have completed the updating process, click on the Delete from WIP button to delete either the current program or all of the programs marked ‘approved.’ You will then see this screen:
2. Click on the All button to remove all ‘approved’ programs, click on Current to remove only the selected ‘approved’ program, or click on None to cancel the remove from WIP request.

PRS User Guide Part III – EDINFO
- 13 -
Create New Programs
To check for new approved programs, logon to the Program Registry System following the steps outlined in section 3.2 of this manual.
1. Click on Provider Update Facility from the PRS main menu.
2. Click Add New Program, the EDINFO Program screen will appear:
Figure 3 - 10: (EDINFO Program Maintenance Screen)
Entering The EDINFO Data For A New Approved Program 3. You can either type in the name of the new program or pick a generic name
from the ‘drop down’ list of all programs that are already included in EDINFO.
4. The next step is choosing provider location(s) from a ‘drop down’ list.
Note: The check box on the right side of the Provider Location field tells you if a particular Provider Location is a main campus or not.
5. After filling in all fields for a new program, click the Save icon and then the
Exit icon to go back to the ‘EDINFO Program WIP’ screen.

PRS User Guide Part III – EDINFO
- 14 -
You will notice that the ‘new program’ appears on the WIP list and its WIP status is ‘working.’
6. If you would like to change some of the information you have entered about the new program, click on the View Details button to make changes.
7. Once you are satisfied with the information, click on the Submit to Edinfo
button located on the ‘EDINFO Program WIP’ to send the program information to EDINFO administration.
The following pop-up screen will appear:
8. Click on Yes and the WIP status on the ‘EDINFO Program WIP’ screen will change to “Sent to EDINFO.”
9. EDINFO administration will then review the new program entry
10. When EDINFO approves the submitted program and sends it back, the word
“Approved” will appear in the WIP status column for that program.

PRS User Guide Part III – EDINFO
- 15 -
Editing the Provider Overview
1. To update the provider overview for your institution, click on the Provider Overview button on the top right hand side of the ‘EDINFO Submit/Work In Progress’ screen.
The following ‘Provider Overview’ screen will appear:
Figure 3 - 11: (Provider Overview Screen)
Note: If you would like to make any comments regarding the Provider Overview, type them in the Comments box and they will also be sent to EDINFO when you submit the revised Provider Overview.
2. Once you complete your editing changes on the Provider Overview, save the
information and return to the ‘EDINFO Program WIP’ screen by clicking on the Save icon and then the Exit icon on the toolbar at the top of the screen.
PRS User Guide Part III – EDINFO
- 16 -
Editing the Standard Admission Requirements
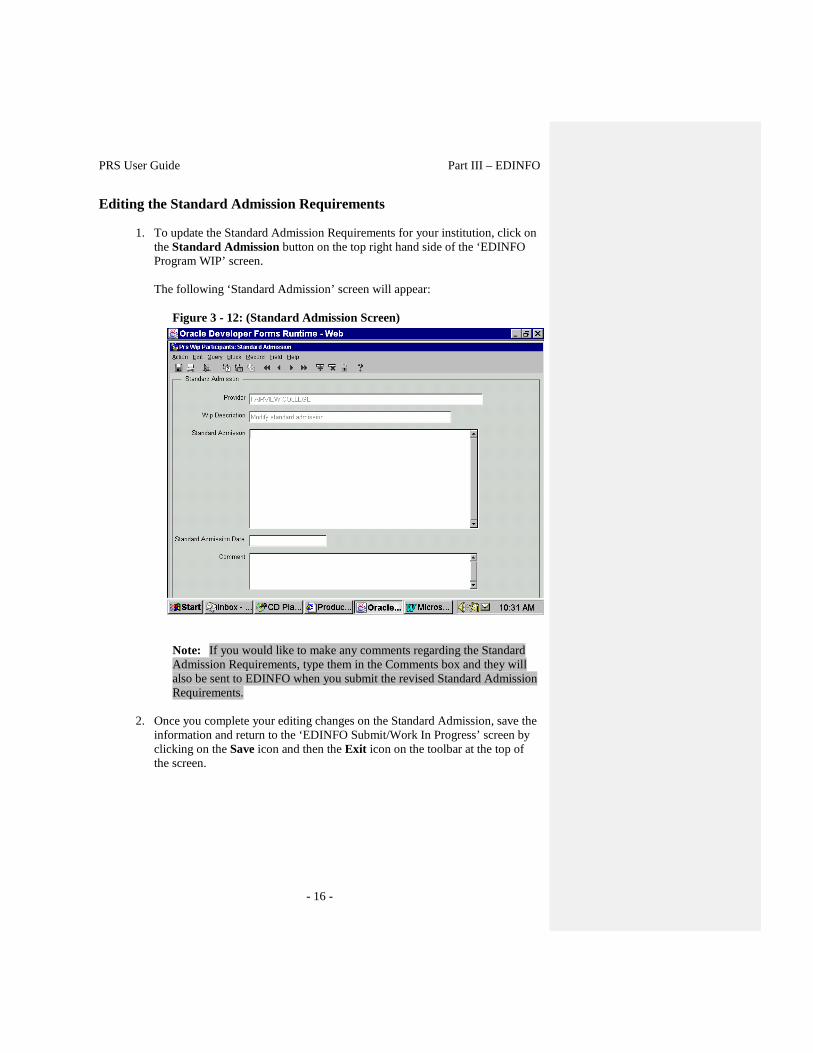
1. To update the Standard Admission Requirements for your institution, click on the Standard Admission button on the top right hand side of the ‘EDINFO Program WIP’ screen.
The following ‘Standard Admission’ screen will appear:
Figure 3 - 12: (Standard Admission Screen)
Note: If you would like to make any comments regarding the Standard Admission Requirements, type them in the Comments box and they will also be sent to EDINFO when you submit the revised Standard Admission Requirements.
2. Once you complete your editing changes on the Standard Admission, save the information and return to the ‘EDINFO Submit/Work In Progress’ screen by clicking on the Save icon and then the Exit icon on the toolbar at the top of the screen.

-
Appendix A
Brokering to / from an institution
Alberta Learning Information Technology
September 2001
D R A F T


PRS User Guide Brokering Reference
- 1 - -
Overview
The purpose of this document is to be used in conjunction with the Learner and Enrollment Reporting System manual, with the Program Registry System manual and the System-Wide Information Reporting manual. This section of the appendix is designed to help you make brokering arrangement with the brokering institution. The appendix is divided into two sections. The first section explains, the process that needs to be done by the sponsoring institution to do a brokering arrangement with the host institution (also called the brokering institution). The second part details the steps that need to be done by the host institution. The first section is titled Brokering to a Host Institution and the second part is titled Brokering from a Sponsoring Institution.
The brokering process involves both the PRS (Program Registry System) and the LERS (Learner and Enrollment Reporting System) systems. Below each title there is a label to indicate if the process is done using LERS or PRS system.

PRS User Guide Brokering
- 2 -
Brokering to a Host Institution PRS System
Select the Brokered Program and Fill out the Brokering Information
This step allows you to select the program that will be brokered, select the location where the program is offered and select the host institution that you are making brokering arrangement with.
Few points to remember:
• If the program that you want to broker is not displayed on the work in progress (WIP) Records area, then you need to add it to the WIP
• The location needs to be activated if is not active so that the host institution can
select your Program ID from the Program ID field on the brokering tab
• The host institution needs to add the brokered program at its institution before the Program ID can be selected on the brokering tab. Make sure to take a screen shot of the Identifications and the Length/Approval tab and to send this information as an attachment in an email to the brokering institution (host institution). The host institution has to create the Program that you are brokering using the copy function. The location also has to be activated for this new program at the host institution. Otherwise this program ID will not appear in the Program ID list when you do step 11.
1. Launch Internet Explorer browser and type http://edmappoas.aecd.gov.ab.ca on
your web browser or click on the PRS button on the Launch bar. The Logon dialog box appears
2. Type in the Username, Password and Database and click Connect
3. Click on the Maintain Programs button on the PRS Main menu. The Prs
Program Submit screen appears
4. Put the insertion point on the Program Name in the Work in Progress Records area. This will highlight the brokered program in yellow.
If the program is not on the WIP then click on the Change Existing Program button. Select the Year and the Program from the drop down list box and click on the Add button to add it to the WIP
5. Click on the Edit Program… button located at the bottom of the ‘Prs Program Submit’ screen. The Programs screen appears as shown on the next page

PRS User Guide Brokering
- 3 -
Figure 4 - 1: The Programs Screen
6. Click on the Locations tab and select the Provider Location where the program is offered.
7. Click on the Yearly Info button that corresponds to the location you selected
If you selected an inactive or undefined location clicking on the Yearly Info button brings up the Create New Record dialog box as shown below. This message indicates that the location will be activated if you click Yes. Click Yes to activate the campus
8. Click on the Brokering tab. The Yearly Program Provider Locations screen
appears as shown below

PRS User Guide Brokering
- 4 -
Figure 4 - 2: The Yearly Program Provider Locations Screen - Brokering Tab
9. Select To from the Broker drop down list box
10. Select the Provider and the Campus from the drop down list. The provider name
should be the Host Institution name and the campus is the name of the location where the brokered program will be offered at the host institution To find the provider and campus, use the scroll bar or enter the first few letters of the provider name in the Find field and click on the Find button and then click on OK
11. Select the Program ID from the drop down list. This Program ID is the brokered
program that has been named according to the hosts program-naming standard. (This program could be called the same as the Program ID that your institution is brokering)
12. Select the Broker Agreement from the drop down list
13. Type the Cost Share %, Year of Program and Enrollment %
Note: The Cost Share % and the Enrollment % for your institution and the host institution have to compute to a total of 100%
Once all the information has been filled the screen should look similar to the figure below

PRS User Guide Brokering
- 5 -
14. Once all brokered information has been filled, click on the Save icon located on
the toolbar (a message should appear at the status bar if the message had been saved successfully). Click on the Exit icon to close the Yearly Program Provider Locations screen
15. Click on the Exit icon to close the Programs screen and then click on the Exit
icon to close the Prs Program Submit screen
16. Click on the Close button on the PRS main menu or click on File and click on Exit to close the PRS system

PRS User Guide Brokering
- 6 -
Get Brokered Student Records The host institution will send you any required student records that needs to be loaded to your LERS system. The student records will be sent to your institution as an attachment in an email. If the files are zipped, use WinZip utility to decompress the files.

PRS User Guide Brokering
- 7 -
LERS System
Modifying Exported Student Records
This step allows you to update the exported students records before they are loaded into the LERS system. This is done using the Maintain Student Extract procedure.
Do step 1 on this page if you have not already set the correct year and submission
1. Open LERS and set the correct Year and Submission (December or July) to
which you want to append the submitted records. Set the Academic Year
2. Go to the menu bar and choose Utility. Click on Maintain Student Extract and the following dialog box appears as shown below.
Figure 4 - 3: The Select Student Screen
3. Click on the Browse button to locate the folder where the student records had been saved
4. There are two .dbf files. Click on the .dbf file without the major.dbf and click on
the Ok button. At this point the Maintain Student Extract screen appears.
This first screen might give you an error that says Program name not on file. This is because the host institution created a program with a different Program ID for the brokered program, which does not exist at your institution. However the host can create a Program ID that is the same as yours, which eliminates this error.
5. Clicking on the Update icon on the tool bar The Student Update screen
appears as shown below
This screen allows you to update more than one student records at once.

PRS User Guide Brokering
- 8 -
Figure 4 - 4: The Student Update Screen
6. Modify the Program ID, the Provider, the Location and the Academic Year
(located at the bottom of the Student Update screen) 7. Click on the Do Update button to update the changes. When performing an
update on the Student Extract screen, a confirmation message will display the name of the file being updated
The updated student records file (.dbf) is now ready to be loaded into the LERS student database. Remember this file is not in the LERS system yet.

PRS User Guide Brokering
- 9 -
LERS System
Load Student Records to LERS
This step allows you to load the modified student records into the LERS system 1. Go to the menu bar and choose File. Click on Students and from the submenu
click on Load Students. Load Students screen appears as shown below Figure 4 - 5: The Load Students Screen
2. Click on the Browse button and then click on the .dbf file that you modified using the Student Update screen
3. Click on the OK button. A “Records exist -- append?’ message will appear.
Click Yes. This will add the student records to the existing student records
4. Click on the Cancel button to exit the Load Student screen

PRS User Guide Brokering
- 10 -
LERS System
Verify if Student Records are Imported
This step allows you to make sure all the student records had been loaded to LERS database.
Query imported student records
1. Go to the menu bar and choose File. Click on Students and from the submenu click on Maintain Students. Maintain Students screen appears.
2. Click on the Binoculars icon on the tool bar.
3. Enter the query (search) criteria – The criteria would be the brokered Program
ID at your institution.
Click on the Do Query button at the bottom right corner of the Maintain Student screen. At this time the student records you just added should appear on the Maintain Student screen. You can view each record by using the navigation
buttons on the tool bar.

PRS User Guide Brokering
- 11 -
Brokering from a Sponsoring Institution PRS System
Coping an Existing Program
This step allows you to create the brokered program at you institution. First find an existing program that is similar to the brokered program. (For example, if the brokered program is a degree business program then find a bachelors program similar to business at your institute). Then you can copy the program to the current year.
1. Click on the Copy/Delete Function button on the PRS main menu. The Copy
Delete screen appears as shown below Figure 4 - 6: The Copy/Delete Programs Screen
2. Make sure the Copy From option button is selected 3. Enter the From Year field. (E.g. 2000) and select the Program ID from the From
Prog ID from the drop down list
4. Enter the To Year (e.g.2001) field and enter the new Program ID for the brokered Program in the To Prog ID field
5. Click on the Submit button and click on the Process button and a message comes
up. Click OK for the button and click on the Exit button to exit the screen

PRS User Guide Brokering
- 12 -
Modifying the New Program (copied program)
This step allows you to add the copied program to the WIP and modify it so that it matches the brokered program at the sponsoring institution.
1. Click on the Maintain Programs button on the PRS main menu.
2. Click on the Change Existing Program button at the bottom of the Prs Program
Submit screen. A pop up screen will appear as shown below
3. Select the Year from the Year drop down list box and the Program from the
Programs drop down list box. When selecting the program, select the program that you just created using the copy function
4. Click on the Add button to add it to the WIP
5. Put the insertion point on the Program Name that you just added to the WIP. The
program name will be highlighted in yellow
6. Click on the Edit Program… button located at the bottom of the Prs Program Submit screen. The Programs screen will appear
7. Use the screen shot that was sent to you in an email to modify the Identification
and the Length/Approval tabs. This program’s data has to be exactly the same as the brokered program. Once finished click on the Save button on the tool bar
At this point, if you need to create a new location follow the section creating a new Campus on this User Guide

PRS User Guide Brokering
- 13 -
Activating a Campus 8. Click on the Locations tab and click on the Yearly Info button that corresponds
to the location where this new-brokered program will be offered. A message comes up to indicate that the location needs to be activated to broker the program. Click Yes for the message. The Yearly Program Provider Locations screen appears Note: If this step is not done the sponsoring institution cannot be able to select your Program ID when they fill out the brokering information
Filling out the Brokering Information
9. Click on the Brokering tab and select From from the Broker drop down list box 10. Select the Provider and the Campus from the drop down list box. The provider
name should be the Sponsoring Institution name and the campus is the name of the location where the brokered program is offered at the sponsoring institution To find the provider and campus, use the scroll bar or enter the first few letters of the provider name in the Find field and click on the Find button. Once you find the provider and the campus click OK
11. Select the Program ID from the drop down list box. This Program ID is the program at the sponsoring institution. If you are not sure contact your sponsoring institution for the name for Program ID
12. Select the Broker Agreement from the drop down list box
13. Type the Cost Share %, Year of Program and Enrollment %
Note: The Cost Share % and the Enrollment % for your institution and the
sponsoring institution have to add up to a total of 100% Once all the information has been filled the screen should look similar as in the figure below.
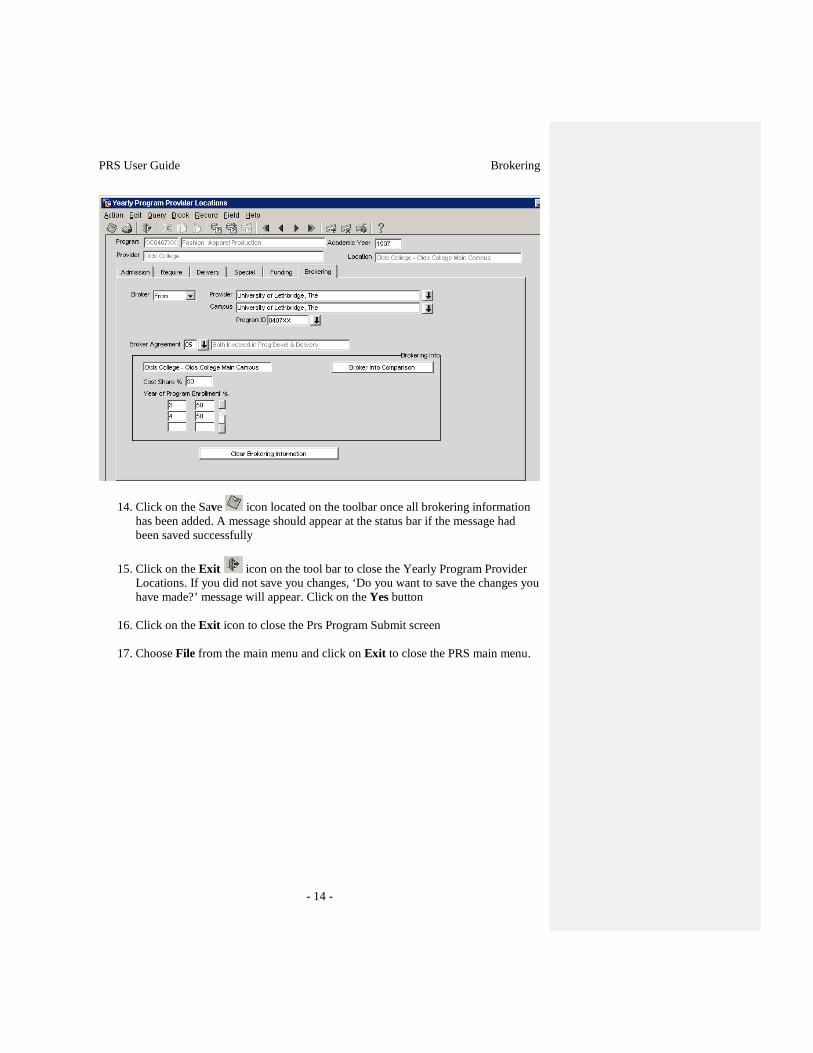
PRS User Guide Brokering
- 14 -
14. Click on the Save icon located on the toolbar once all brokering information has been added. A message should appear at the status bar if the message had been saved successfully
15. Click on the Exit icon on the tool bar to close the Yearly Program Provider
Locations. If you did not save you changes, ‘Do you want to save the changes you have made?’ message will appear. Click on the Yes button
16. Click on the Exit icon to close the Prs Program Submit screen
17. Choose File from the main menu and click on Exit to close the PRS main menu.

PRS User Guide Brokering
- 15 -
LERS System
Setting the Year and Submission
Figure 1: The Set Year and Submission Screen
1. Go to the menu bar and choose Utility. Click on Set Year and Submission. The Set Year and Submission dialog box appears as shown below.
2. The Provider Code will default to your institution code and name
3. Type the Academic Year as four characters and the other half of the academic
year will appear, e.g., type 2000 to select the 2000 – 2001 academic year.
4. Under Submission, select either December (first data submission) or July (second data submission) and click on the OK button

PRS User Guide Brokering
- 16 -
LERS System
Querying and Exporting Student Records
This step allows you to search (query) and export all the student records that took the brokered program. Once all the student records are found you can export their records from the LERS system.
1. Go to the menu bar and choose File. Click on Students and from the submenu
click on Maintain Students. The Maintain Students screen appears as shown below Figure 4 - 7: The Maintain Student Screen
2. Click on the binoculars icon to search for the student who will be taking the brokered program. At this time the Student Query screen appears
3. Enter the Program ID of the brokered program in the Program ID field.
4. Click on the Do Query button at the bottom right hand corner of the Student
Query screen to find the student records. This will display all the students who are currently taking the brokered program at you institution
Refine your query so that you get only the students who will be taking the brokered program.

PRS User Guide Brokering
- 17 -
To export the student records:
5. Click on the Export icon on the tool bar. The Student Export dialog box appears as shown below
Figure 4 - 8: The Student Export Screen
6. Click on the FoxPro option button in the Type of File area and then click on the Browze button. The Open dialog box appears.
7. Create a new folder or locate an existing folder where you would like to save the
student records. Type in a descriptive name that starts with an alphabet and not number for the exported file and click on the Ok button. The path for the directory and the file name where you exported the student records will be written in the Output File area
8. Click on the Ok button and a Student Export dialog box with an Export to
message will appear
9. Click OK and then click on the Cancel button
PRS User Guide Brokering
- 18 -
Transferring Student Records to the Sponsoring Institution
1. Find the folder and the files that you just exported on step 7 above and attach the folder that has the exported student records to an email and send it to the sponsoring institution Note: If the exported file is too large, you may need to compress (zip) the file
using WinZip utility before the file can be sent via email.

PRS User Guide Button Items
- 1 -
Quick Reference Manual
Part I – Proposals Procedure Steps Reference
Page for Details
Launching PRS
#1 1. Type http://edmappoas.aecd.gov.ab.ca
into your Internet browser 2. Complete the Logon task
a. Enter your Username b. Enter your Password c. Enter your Database
3. Click on the Connect button OR press the Enter key on your keyboard.
OR
#2 1. Click on the PRS icon from the launch
bar. 2. Complete the Logon task
a. Enter your Username b. Enter your Password c. Enter your Database
3. Click on the Connect button OR press the Enter key on your keyboard
Page IX
Create a New Proposal
1. Click on the Maintain Proposals button
located on the PRS main menu. 2. Click on New Proposal button located
on the ‘Program Proposal Work in Progress’ screen.
3. Complete the prompt screen. 4. Select the Product Type Code. 5. Enter the Program Name. 6. Click on the OK button. 7. Complete the proposed screen by
entering the information into the appropriate input boxes.
8. Clicking on the To Branch button will send the new proposal to the branch for review.
Part I - Page 3

PRS User Guide Button Items
- 2 -
Procedure Steps Reference Page for Details
Submit Proposal to Branch
1. Click on the Maintain Proposals button
located on the PRS main menu. 2. Highlight the Proposal that you want to
send to the branch. 3. Click on the Edit Proposal button. 4. Clicking on the To Branch button will
send the new proposal to the branch for review.
Part I – Page 10
Edit an Existing Proposal
1. Click on the Maintain Proposals button
located on the PRS main menu. 2. Select the proposal that you want to edit
by clicking on that row on the WIP. (When it is selected the row will turn yellow.)
3. Click on the Edit Record… button to enter the ‘Proposed’ screen.
4. Edit the ‘Proposed’ screen by entering the information into the appropriate input boxes.
5. Clicking on the To Branch button will send the edited proposal to the branch for review.
Part I – Page 11
Delete a Proposal
1. Click on the Maintain Proposals button 2. Highlight the Program that you want to
delete 3. Click on the Edit Proposal button
located on the bottom right-hand side of the screen
4. Clicking on the Delete Proposal button, located on the top right-hand side of the screen
Part I – Page 11
Reports Status Report
1. Click on the Status Report button located on the PRS main menu
2. Select the Single Provider (The institution) OR select Yes in the All provider list
Part I – Page 12

PRS User Guide Button Items
- 3 -
Procedure Steps Reference Page for Details
3. Select the Program status that you want displayed on the report
4. Click on the Submit Query button located at the top of the screen.
Program Proposal Report
1. Click on the Maintain Proposals button
located on the PRS main menu 2. Select the Proposal, from the WIP, that
you would like to print the Program Proposal Report for
3. Click on the Edit Record button in the ‘Program Proposal Work in Progress’ screen
4. Click on the Run Report button located on the top right hand corner of the ‘Proposed’ screen.
Part I – Page 12

PRS User Guide Button Items
- 4 -
Part II – Programs Procedure Steps Reference
Page for Details
Launching PRS
#1 1. Type http://edmappoas.aecd.gov.ab.ca
into your Internet browser 2. Complete the Logon task
a. Enter your Username b. Enter your Password c. Enter your Database
3. Click on the Connect button OR press the Enter key on your keyboard.
OR
#2 1. Click on the PRS icon from the launch
bar. 2. Complete the Logon task
a. Enter your Username b. Enter your Password c. Enter your Database
3. Click on the Connect button OR press the Enter key on your keyboard.
Part II - Page 2
Add a Program to the Work in Progress (WIP)
1. Click on the Maintain Programs
button on the PRS main menu. 2. Click on the Change Existing
Program button on the bottom of the ‘Prs Program Submit’ screen
3. Select the year and select the program that you want to add to the Work In Progress List (WIP)
4. Click the Add button to add it to the WIP
Part II - Page 5

PRS User Guide Button Items
- 5 -
Procedure Steps Reference
Page for Details
Delete a Program from the WIP
Note: Only Programs with a WIP status of “Working”, “Returned From Branch” and “Approved” may be deleted. 1. Click on the Maintain Programs
button on the PRS Main menu. 2. Select the Program Name you wish to
delete 3. Click on the Delete WIP… button
located on the bottom of the ‘Prs Program Submit’ screen.
Part II – Page 18
Selecting and Editing a Program
1. Click on the Maintain Programs
button on the PRS Main menu. 2. Highlight the program you wish to edit. 3. Click on the Edit Program… button
located on the bottom of the ‘Prs Program Submit’ screen.
4. Make changes to the program by adding or changing information in the input fields.
5. Click on the Save icon located on the toolbar once all information has been added or changed.
6. You may now exit the screen by clicking on the Exit icon located on the toolbar
Part II – Page 8
View the Original Program After Edits Have Occurred
Note: Viewing the Original Program is part of the Edit Program procedure. 1. Click on the Maintain Programs
button on the PRS Main menu. 2. Highlight the program you wish to edit. 3. Click on the Edit Program… button
located on the bottom of the Prs Program Submit screen
4. Make changes to the program by adding or changing information
Part II – Page 17

PRS User Guide Button Items
- 6 -
Procedure Steps Reference Page for Details
5. Click on the Original Program button to view the original program information
Activate a Campus for a Program
Note: Activating a campus is part of the Edit Program procedure. Please refer to the Edit Program procedure. 1. Click on the Maintain Programs
button on the PRS Main menu. 2. Highlight the program you wish to edit. 3. Click on the Edit Program… button
located on the bottom of the ‘Prs Program Submit’ screen.
4. Go to the Locations tab located in the ‘Programs’ screen.
5. Click on the Yearly Info button that corresponds to the campus you want to activate.
6. Click Yes on the popup to create a new record.
7. Create the record. 8. Click on the Exit Icon located on the
toolbar. 9. Click on Yes if you want to save the
changes to that record. 10. The radio button for that campus should
become active.
Part II - Page 9
Deactivate a Campus for a Program
Note: Deactivating a campus is part of the Edit Program procedure. Please refer to the Edit Program procedure. 1. Click on the Maintain Programs
button on the PRS Main menu. 2. Select the program you wish to edit 3. Click on the Edit Program… button
located on the bottom of the ‘Prs Program Submit’ screen.
4. Go to the Locations tab located in the ‘Programs’ screen.
5. Click on the Inactive radio button that corresponds to the campus you want
Part II - Page 10

PRS User Guide Button Items
- 7 -
Procedure Steps Reference Page for Details
deactivated. 6. Click on the Save icon located on the
toolbar.
Submit Program Edits to the Branch
Note: Only Programs with a WIP status of “Working” or “Returned From Branch” may be submitted. 1. Click on the Maintain Programs
button on the PRS Main menu. 2. Highlight the program you wish to edit. 3. Click on the Submit Button… icon
located on the bottom right-hand side of the screen.
4. The Wip Status of this field should now read, “Sent to Branch”.
Part II - Page 17
Create a New Campus
1. Click on the Location / Contact
Information button located in the PRS main menu.
2. Once inside the Providers details screen, Click on the “+” sign beside Participants to expand the menu.
3. Click on the “+” sign beside Providers to expand the menu.
4. Click on the “+” sign beside Institute to expand the menu.
5. Click on the “+” sign beside Campuses to expand the menu.
6. Select Campuses on the menu 7. Click on the Add icon located on the
toolbar on the left hand side of the screen.
8. Enter a name and a unique location code for your new campus.
9. Click on Save to add the new campus. Note: Reference tables will need to be refreshed in the LERS system in order to reflect the new campus.
Part II - Page 19
Check for New Approved
1. Click on the Maintain Programs
Part II -

PRS User Guide Button Items
- 8 -
Procedure Steps Reference Page for Details
Programs button on the PRS main menu. 2. The Wip Status will show as Working,
Approved, or Sent To Branch. 3. All of the approved programs will have
an Approved in the Wip Status corresponding to the program in that row.
Page 22
Setup the Data for a New Approved Program
1. Click on the Maintain Programs
button on the PRS main menu. 2. Highlight the program you wish to
setup. 3. Highlight the generated program Id and
type in your institution program Id into the Program Id input box.
4. Enter the new program information into the appropriate input fields.
5. Click the Save icon once all the information has been entered.
6. Exit the screen through the Exit icon. Note: The new program will remain inactive until a campus is activated in the Locations tab.
Part II - Page 22
Copy Program(s) into the Next Year
1. Click on the Copy Delete Function
button on the PRS main menu 2. Click on the Copy From option button
located on the upper left hand side of the screen
3. Enter the year you want to copy the program(s) from, into the From Year input box
4. Enter the year you want to copy the program(s) to, into the To Year input box
5. Click on the Submit button and a list of all the programs to be copied will be displayed
6. Click on the Process button to copy the program(s).
Part II - Page 24

PRS User Guide Button Items
- 9 -
Procedure Steps Reference Page for Details
Note: To copy just one program to a different year select the From Prog Id that you want to copy.
Delete Programs from an Existing Year
1. Click on the Copy Delete Function
button on the PRS main menu. 2. Click on the Delete From option button
located on the lower left hand side of the screen.
3. Enter the year you want to delete the program(s) from, into the Year input box.
4. Do not select a program if you want to delete all the programs in that year OR select a program from the Program ID drop down list box to delete just that program from that year.
5. Click on the Submit button and a list of all the program(s) to be deleted will be displayed.
6. Click on the Process button to delete the program(s)
Part II - Page 25
Brokering TO an Institution
Please see detailed information
Brokering - Page 2
Brokering FROM an Institution
Please see detailed information
Brokering -Page 11

PRS User Guide Button Items
- 10 -
Procedure Steps Reference
Page for Details
Compare Report
1. Click on the Maintain Programs
button on the PRS Main menu 2. Select the Program Name to compare it
to its original program information 3. Click on the Edit Program… button
located on the bottom of the Prs ‘Program Submit’ screen.
4. Click on the Compare Report button located on the upper right-hand corner of the screen
Part II – Page 16
WIP Program Status Report
1. Click on the Work in Progress button
on the PRS main menu 2. The status of submitted programs will
be displayed
Part I - Page 12

PRS User Guide Button Items
- 11 -
Part III – EDINFO Procedure Steps Reference
Page for Details
Launching PRS
#1 1. Type http://edmappoas.aecd.gov.ab.ca
into your Internet browser 2. Complete the Logon task
d. Enter your Username e. Enter your Password f. Enter your Database
3. Click on the Connect button OR press the Enter key on your keyboard.
OR #2 1. Click on the PRS icon from the launch
screen. 2. Complete the Logon task
d. Enter your Username e. Enter your Password f. Enter your Database
2. Click on the Connect button OR press the Enter key on your keyboard.
3. Click on the Connect button OR press the Enter key on your keyboard.
Edinfo – Page 2
Add an Existing Program to the WIP
1. Click on Provider Update Facility
button located on the PRS main menu.
2. Click on the Change Existing Program button at the bottom left side of the Submit EDINFO/Work In ‘Progress’ screen.
3. Click on the program title drop down menu and select the program to which you wish to make a change
4. Click on the Add Existing Program to WIP button.
Edinfo – Page 5

PRS User Guide Button Items
- 12 -
Procedure Steps Reference Page for Details
Edit an Existing Program
1. Click on Provider Update Facility
button located on the PRS main menu. 2. Highlight the program row that requires
editing. 3. Click on the View Details button at the
bottom of the EDINFO Submit/Work In ‘Progress’ screen.
4. Make changes to the program information in the appropriate input fields.
5. Once you are satisfied with all the edits you made to that particular program, click on the Save icon located on the toolbar.
Edinfo – Page 6
Check Program Edits Against the Original Program Information
Note: This step is a continuation of Edit Existing Program.
1. Click on the Original Ed… button located on the right hand of the screen.
2. Once you have finished viewing the original program information click on the Back button and you will return to the ‘EDINFO Program’ screen, but this time all fields that have been changed for the original document will be highlighted in yellow.
Part III – Page 9
Submit your Program Edits to EDINFO
1. Click on Provider Update Facility
button located on the PRS main menu. 2. Highlight the program row that you
would like to send to the branch 3. Click on the Submit to Edinfo button
located on the lower right-hand side of the ‘EDINFO Submit/Work In Progress’ screen.
Part III – Page 10

PRS User Guide Button Items
- 13 -
Procedure Steps Reference Page for Details
Delete Program(s) from the WIP
1. Click on Provider Update Facility button located on the PRS main menu.
2. Highlight the program row that you want to remove from the WIP and has the Wip Status input box that contains Approved.
3. Click on the Delete from WIP button located on the bottom right hand corner of the screen. A prompt screen will appear. Click on the All button to remove all ‘approved’, click on Current to remove only the selected ‘approved’ WIP, or click on None to cancel the remove request.
Edinfo – Page 12
Create New Programs
1. Click on ‘Provider Update Facility’
from the main PRS menu. 2. Click ‘Add New Program,’ the
‘EDINFO Program’ screen will appear. 3. Enter the EDINFO data for the New
Approved Program. 4. Once you are satisfied with the
information, click on the Submit to EDINFO button to send the program information to EDINFO administration.
5. Click on Yes and the WIP status on the ‘EDINFO Submit/Work In Progress’ screen will change to ‘Sent to EDINFO.’
6. EDINFO administration will then review the new program entry.
7. When EDINFO approves the submitted program and sends it back, the word ‘Approved’ will appear in the WIP status column for that program.
Edinfo – Page 13
Edit the Provider Overview
1. Click on ‘Provider Update Facility’
from the main PRS menu. 2. To update the provider overview for
your institution, click on the Provider Overview button on the top right hand side of the ‘EDINFO Submit/Work In
Edinfo – Page 15

PRS User Guide Button Items
- 14 -
Procedure Steps Reference Page for Details
Progress’ screen. 3. Once you complete your editing
changes on the Provider Overview, save the information and return to the ‘EDINFO Submit/Work In Progress’ screen by clicking on the Save icon and then the Exit icon on the Oracle menu at the top of the screen.
Edit the Standard Admission Requirements
1. Click on ‘Provider Update Facility’
from the main PRS menu. 2. To update the Standard Admission
Requirements for your institution, click on the Standard button on the top right hand side of the ‘EDINFO Submit/Work In Progress’ screen.
3. Once you complete your editing changes on the Standard Admission, save the information and return to the ‘EDINFO Submit/Work In Progress’ screen by clicking on the Save icon and then the Exit icon on the Oracle menu at the top of the screen.
Edinfo – Page 16
Reports Reference Table Reports
1. Click Reference Tables on the menu
bar located on the main PRS menu 2. Click on the Reference Table report to
view or print
N/A

PRS User Guide Button Items
- 15 -
Appendix B. LERS Toolbar Items
PRS Main Menu Button Items The following buttons are accessible on the PRS main menu. The functionality of each button is described below. Buttons Item Description
Work in Progress
It brings up a pdf file format report of all the programs and their WIP Type. The report displays when the program was created and last date it was modified
Maintain Proposals
This button is an entrance to all the screens related to program proposal. By clicking this button the Proposals Records screen appears, which allows you to access other screens to enter new proposal or modify existing ones.
Maintain Programs
This button is an entrance to all the screens related to program maintenance. By clicking this button the Prs Program Submit screen appears, which allows you to access other screens to modify existing programs, submit the program to the department for review, delete the program from the WIP and so forth. Please refer to Part II of this User Guide for a detailed explanation of each screen.
Copy Delete Function
This button allows you to copy program(s) to another year or delete the program(s) from the specified year. The delete function is used if you forward a program(s) to a different year

PRS User Guide Button Items
- 16 -
Buttons Item Description
Status Report
This button brings up a screen that allows you to select one or more providers program, when the program was submitted to the branch, when the program was approved and when it will be implemented.
Location/Contact Information
This button brings up the Provider Details screen that allows you to add or modify location or contact information
Provider Update Facility
This button brings up the EDINFO Prs Program Submit screen that allows you to add, modify, delete and view existing programs.
Change Program Date
This button allows you to change the date of a program(s). Updates the date of all the programs in the list.
Alberta Learning
When this button is clicked, it brings up the Alberta Learning web page, which is http://www.learning.gov.ab.ca/
PRS Help Manual
When this button is clicked, it brings up the Alberta Learning Application Instruction web page such as the 4 User Guides and Reporting manuals. This is where you download the updated manuals and user
Email List
Currently under construction
Change Password
When this button is clicked it brings up the Password Maintenance dialog box, which

PRS User Guide Button Items
- 17 -
Buttons Item Description allows you to change your password.
Currently under construction


PRS User Guide Glossary of Terms
- 15 -
Glossary of Terms Cursor – A blinking line character that signifies where the next character will be displayed on the screen. Check Box – A box that you can click to turn an option on or off. When the option is on, a check mark appears in the box. Disabled – The control (text box, check box or button) cannot be used to perform a function. If the control is disabled it is grayed out. Download – The process of copying a file from a file server to your local computer or onto a network Insertion point – A blinking line character that signifies where the next character will be displayed on the screen. Export – To format data in such a way that it can be used by another application Enabled – The control (text box, check box or button) can be used to perform a function. If the control is enabled it is not grayed out. Fields – A space allocated to enter a particular item of information File Name – The name of a file FTP – stands for File Transfer Protocol that is used to transfer files between your local PC and a remote FTP server. You can connect to any FTP server, browse through directories and files, and transfer files (upload or download) in either direction. Import – refers to the ability of an application to read and use data produced by a different application Option Buttons – Buttons used for selecting options in interactive forms; only one can be chosen at a time. If an option button is selected by clicking on it, all the other buttons are automatically deselected. Path – A list of directories Submenu – a cascaded menu that appears after selecting a command on the main menu. An arrowhead after a command indicates that a submenu will be displayed with additional menu options. Upload – To transmit data from your PC to a network