ProSecure UTM Quick Start Guide - Computer Networking Products
27
1 1. Basic Internet and Security Configuration ProSecure UTM Quick Start Guide This quick start guide describes how to use the Setup Wizard to configure the ProSecure Unified Threat Management (UTM) Appliance for connection to your network and to the Internet. It also describes how to register the UTM with NETGEAR. For information about other features and for complete configuration steps, see the ProSecure Unified Threat Management (UTM) Appliance Reference Manual, available at http://downloadcenter.netgear.com. This quick start guide contains the following sections: • Steps for Basic WAN, LAN, and Application Security Configuration • Log In to the UTM • Access Troubleshooting Tips • Use the Setup Wizard to Perform the Basic Configuration • Register the UTM with NETGEAR • Verify Correct Installation • Internet Connection Troubleshooting Tips • What to Do Next Steps for Basic WAN, LAN, and Application Security Configuration Typically, the UTM is installed as a network gateway to function as a combined LAN switch, firewall, and content scan engine to protect the network from all incoming and outgoing malware threats. The following steps are required to complete the basic WAN (Internet), LAN, and application security configuration of your UTM: 1. Connect the UTM physically to your network. Connect the cables and restart your network according to the instructions in the installation guide. The installation guide is on the NETGEAR website at http://downloadcenter.netgear.com. 2. Log in to the UTM. After logging in, you are ready to set up and configure your UTM. See Log In to the UTM on page 3.
Transcript of ProSecure UTM Quick Start Guide - Computer Networking Products

1. Basic Internet and Security ConfigurationProSecure UTM Quick Star t Guide
This quick start guide describes how to use the Setup Wizard to configure the ProSecure Unified Threat Management (UTM) Appliance for connection to your network and to the Internet. It also describes how to register the UTM with NETGEAR. For information about other features and for complete configuration steps, see the ProSecure Unified Threat Management (UTM) Appliance Reference Manual, available at http://downloadcenter.netgear.com.
This quick start guide contains the following sections:
• Steps for Basic WAN, LAN, and Application Security Configuration
• Log In to the UTM
• Access Troubleshooting Tips
• Use the Setup Wizard to Perform the Basic Configuration
• Register the UTM with NETGEAR
• Verify Correct Installation
• Internet Connection Troubleshooting Tips
• What to Do Next
Steps for Basic WAN, LAN, and Application Security Configuration
Typically, the UTM is installed as a network gateway to function as a combined LAN switch, firewall, and content scan engine to protect the network from all incoming and outgoing malware threats.
The following steps are required to complete the basic WAN (Internet), LAN, and application security configuration of your UTM:
1. Connect the UTM physically to your network. Connect the cables and restart your network according to the instructions in the installation guide. The installation guide is on the NETGEAR website at http://downloadcenter.netgear.com.
2. Log in to the UTM. After logging in, you are ready to set up and configure your UTM. See Log In to the UTM on page 3.
1

ProSecure Unified Threat Management (UTM) Appliance
3. Use the Setup Wizard to configure basic connections and security. In this step, you connect the UTM to an Internet service provider (ISP). See Use the Setup Wizard to Perform the Basic Configuration on page 5.
4. Register the UTM. See Register the UTM with NETGEAR on page 23.
5. Verify the installation. See Verify Correct Installation on page 25.
Qualified Web BrowsersTo configure the UTM, you need Microsoft Internet Explorer 6 or later, Mozilla Firefox 3 or later, or Apple Safari 3 or later. Browsers must have JavaScript, cookies, and SSL enabled.
Information You Might Need from Your ISPBefore you start the configuration process, use the following table to list the information that you need to have collected from your ISP.
Table 1. ISP information that might be required to configure the Internet connection
Required for Type of Connection
Item Information That You Collected from Your ISP
PPPoE and PPTP
Login name
Password
Account name
Domain name
Primary DNS server address
Secondary DNS server address
PPTPYour IP address
Server IP address
Dynamic IP address
Client identifier
Vendor class identifier
Primary DNS server address
Secondary DNS server address
Static IP address
IP address
IP subnet mask
Gateway IP address
Primary DNS server address
Secondary DNS server address
Basic Internet and Security Configuration
2

ProSecure Unified Threat Management (UTM) Appliance
Log In to the UTM
To connect to the UTM, your computer needs to be configured to obtain an IP address automatically from the UTM through DHCP.
To connect and log in to the UTM:
1. Start any of the qualified web browsers, as listed in Qualified Web Browsers on page 2.
2. In the address field, enter https://192.168.1.1. The NETGEAR Configuration Manager Login screen displays in the browser.
Figure 1.
3. In the Username field, type admin in all lowercase letters.
4. In the Password / Passcode field, type password in all lowercase letters.
Note: The UTM user name and password are not the same as the user name or password you might use to log in to your Internet connection.
5. Click Login. The web management interface displays, showing the System Status screen.
Note: After 5 minutes of inactivity (the default login time-out), you are automatically logged out.
Basic Internet and Security Configuration
3

ProSecure Unified Threat Management (UTM) Appliance
Figure 2.
Access Troubleshooting Tips
If you cannot access the UTM’s web management interface from a computer on your local network, check the following:
• Double-check the Ethernet connection between the computer and the UTM as described in the installation guide.
• Make sure that you are using the SSL https://address login rather than the http://address login.
• Make sure that your browser has Java, JavaScript, or ActiveX enabled. If you are using Internet Explorer, click Refresh to be sure that the Java applet is loaded.
Basic Internet and Security Configuration
4
ProSecure Unified Threat Management (UTM) Appliance
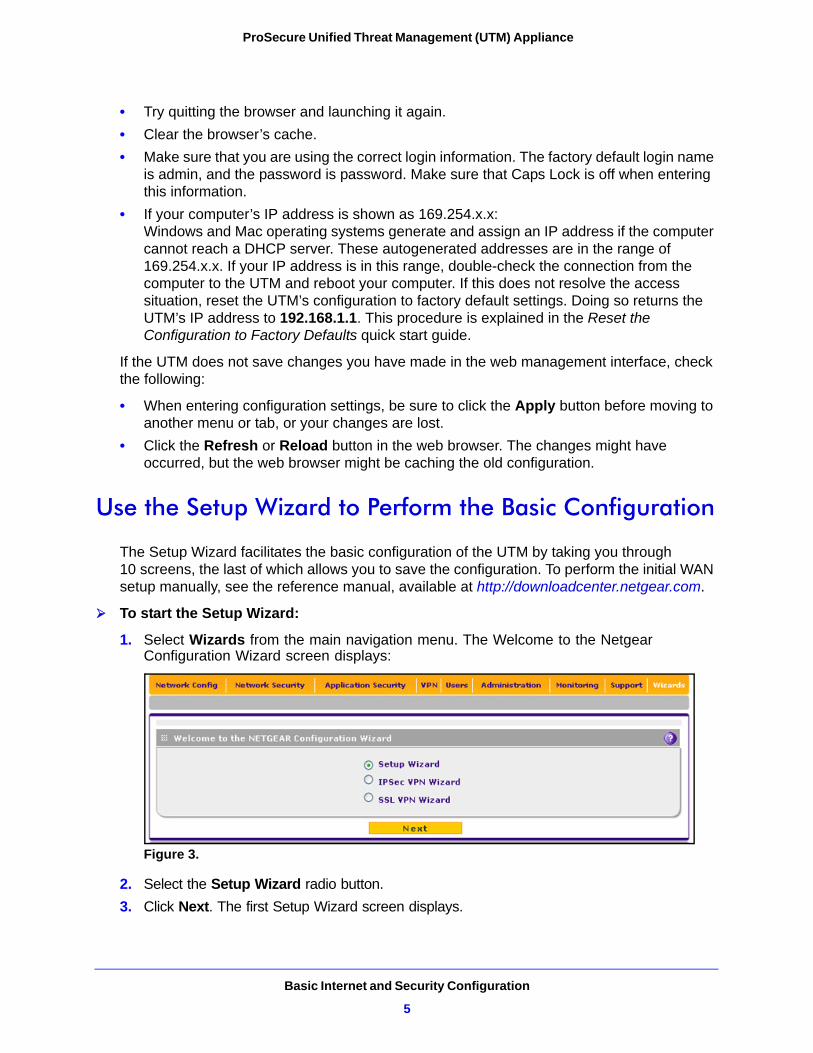
• Try quitting the browser and launching it again.
• Clear the browser’s cache.
• Make sure that you are using the correct login information. The factory default login name is admin, and the password is password. Make sure that Caps Lock is off when entering this information.
• If your computer’s IP address is shown as 169.254.x.x: Windows and Mac operating systems generate and assign an IP address if the computer cannot reach a DHCP server. These autogenerated addresses are in the range of 169.254.x.x. If your IP address is in this range, double-check the connection from the computer to the UTM and reboot your computer. If this does not resolve the access situation, reset the UTM’s configuration to factory default settings. Doing so returns the UTM’s IP address to 192.168.1.1. This procedure is explained in the Reset the Configuration to Factory Defaults quick start guide.
If the UTM does not save changes you have made in the web management interface, check the following:
• When entering configuration settings, be sure to click the Apply button before moving to another menu or tab, or your changes are lost.
• Click the Refresh or Reload button in the web browser. The changes might have occurred, but the web browser might be caching the old configuration.
Use the Setup Wizard to Perform the Basic Configuration
The Setup Wizard facilitates the basic configuration of the UTM by taking you through 10 screens, the last of which allows you to save the configuration. To perform the initial WAN setup manually, see the reference manual, available at http://downloadcenter.netgear.com.
To start the Setup Wizard:
1. Select Wizards from the main navigation menu. The Welcome to the Netgear Configuration Wizard screen displays:
Figure 3.
2. Select the Setup Wizard radio button.
3. Click Next. The first Setup Wizard screen displays.
Basic Internet and Security Configuration
5

ProSecure Unified Threat Management (UTM) Appliance
The following sections explain the 9 configuration screens of the Setup Wizard. On the 10th screen, you can save your configuration. The tables in the following sections explain the buttons and fields of the Setup Wizard screens.
Setup Wizard Step 1 of 10: LAN Settings
Figure 4.
In this first step, you configure the LAN settings for the UTM’s default VLAN. For more information about VLANs, see the reference manual.
Keep the default settings or enter the settings as explained in the following table, and then click Next to go to the next screen.
Basic Internet and Security Configuration
6

ProSecure Unified Threat Management (UTM) Appliance
Table 2. Setup Wizard Step 1: LAN Settings screen settings
# Setting Description
LAN TCP/IP Setup
IP Address Enter the IP address of the UTM’s default VLAN (the factory default address is 192.168.1.1).
Note: Always make sure that the LAN port IP address and DMZ port IP address are in different subnets.
Note: If you change the LAN IP address of the UTM’s default VLAN while connected through the browser, you are disconnected. You then need to open a new connection to the new IP address and log in again. For example, if you change the default IP address from 192.168.1.1 to 10.0.0.1, you now need to enter https://10.0.0.1 in your browser to reconnect to the web management interface.
Subnet Mask Enter the IP subnet mask. The subnet mask specifies the network number portion of an IP address. The UTM automatically calculates the subnet mask based on the IP address that you assign. Unless you are implementing subnetting, use 255.255.255.0 as the subnet mask (computed by the UTM).
DHCP
Disable DHCP Server If another device on your network is the DHCP server for the default VLAN, or if you will configure the network settings of all of your computers manually, select the Disable DHCP Server radio button to disable the DHCP server. By default, this radio button is not selected, and the DHCP server is enabled.
Enable DHCP Server Select the Enable DHCP Server radio button to enable the UTM to function as a Dynamic Host Configuration Protocol (DHCP) server, providing TCP/IP configuration for all computers connected to the default VLAN. Enter the following settings.
Domain Name
This setting is optional. Enter the domain name of the UTM.
Starting IP Address
Enter the starting IP address. This address specifies the first of the contiguous addresses in the IP address pool. Any new DHCP client joining the LAN is assigned an IP address between this address and the ending IP address. The IP address 192.168.1.2 is the default starting address.
Ending IP Address
Enter the ending IP address. This address specifies the last of the contiguous addresses in the IP address pool. Any new DHCP client joining the LAN is assigned an IP address between the starting IP address and this IP address. The IP address 192.168.1.100 is the default ending address.
Note: The starting and ending DHCP IP addresses should be in the same network as the LAN TCP/IP address of the UTM (that is, the IP address in the LAN TCP/IP Setup section as described earlier in this table).
Basic Internet and Security Configuration
7
ProSecure Unified Threat Management (UTM) Appliance
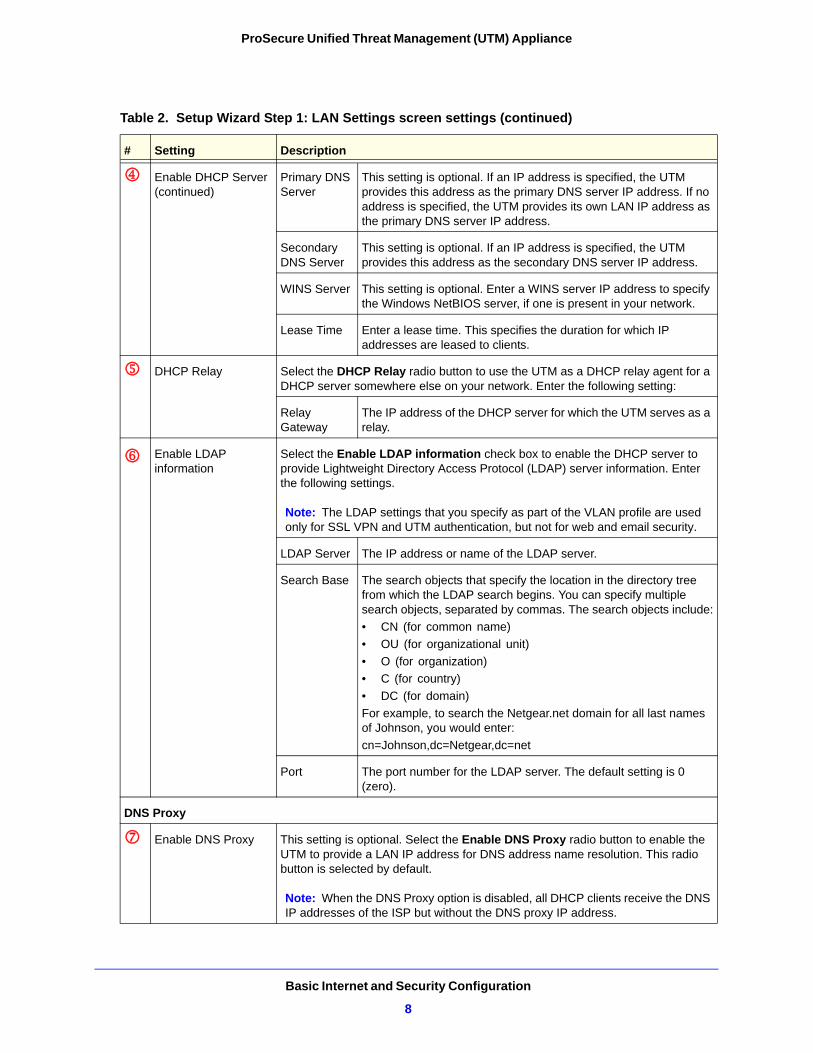
Enable DHCP Server (continued)
Primary DNS Server
This setting is optional. If an IP address is specified, the UTM provides this address as the primary DNS server IP address. If no address is specified, the UTM provides its own LAN IP address as the primary DNS server IP address.
Secondary DNS Server
This setting is optional. If an IP address is specified, the UTM provides this address as the secondary DNS server IP address.
WINS Server This setting is optional. Enter a WINS server IP address to specify the Windows NetBIOS server, if one is present in your network.
Lease Time Enter a lease time. This specifies the duration for which IP addresses are leased to clients.
DHCP Relay Select the DHCP Relay radio button to use the UTM as a DHCP relay agent for a DHCP server somewhere else on your network. Enter the following setting:
Relay Gateway
The IP address of the DHCP server for which the UTM serves as a relay.
Enable LDAP information
Select the Enable LDAP information check box to enable the DHCP server to provide Lightweight Directory Access Protocol (LDAP) server information. Enter the following settings.
Note: The LDAP settings that you specify as part of the VLAN profile are used only for SSL VPN and UTM authentication, but not for web and email security.
LDAP Server The IP address or name of the LDAP server.
Search Base The search objects that specify the location in the directory tree from which the LDAP search begins. You can specify multiple search objects, separated by commas. The search objects include:
• CN (for common name)
• OU (for organizational unit)
• O (for organization)
• C (for country)
• DC (for domain)
For example, to search the Netgear.net domain for all last names of Johnson, you would enter:
cn=Johnson,dc=Netgear,dc=net
Port The port number for the LDAP server. The default setting is 0 (zero).
DNS Proxy
Enable DNS Proxy This setting is optional. Select the Enable DNS Proxy radio button to enable the UTM to provide a LAN IP address for DNS address name resolution. This radio button is selected by default.
Note: When the DNS Proxy option is disabled, all DHCP clients receive the DNS IP addresses of the ISP but without the DNS proxy IP address.
Table 2. Setup Wizard Step 1: LAN Settings screen settings (continued)
# Setting Description
Basic Internet and Security Configuration
8
ProSecure Unified Threat Management (UTM) Appliance
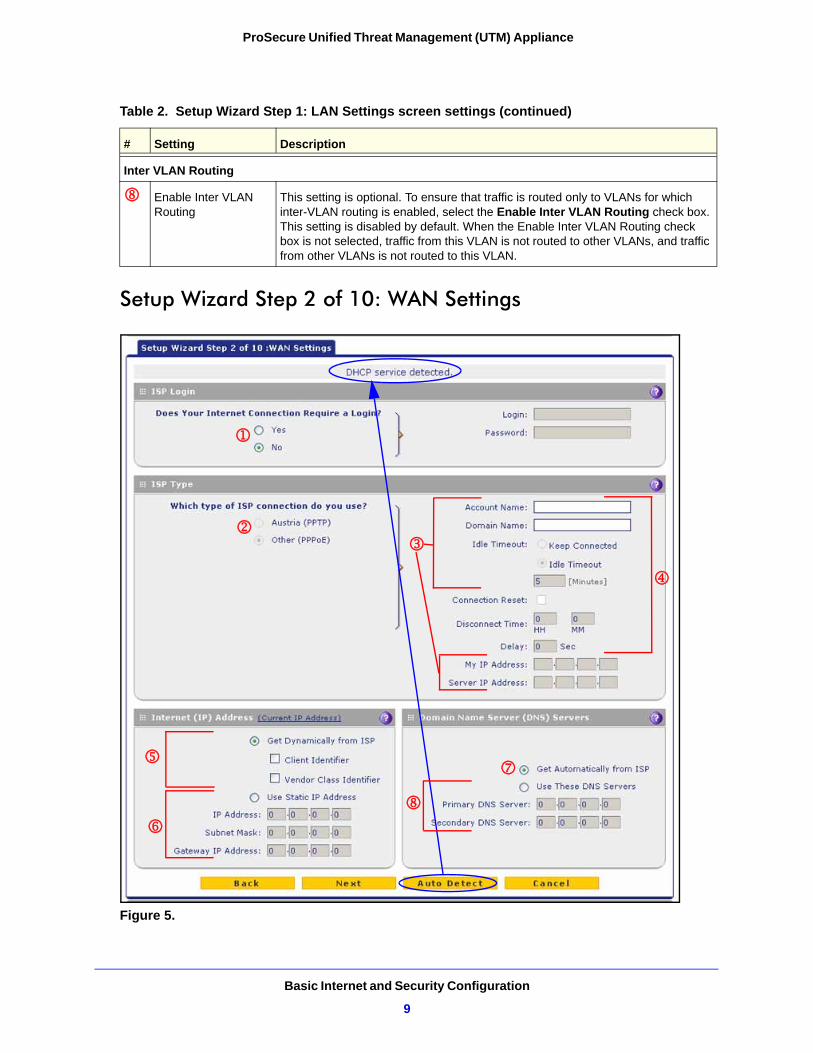
Setup Wizard Step 2 of 10: WAN Settings
Figure 5.
Inter VLAN Routing
Enable Inter VLAN Routing
This setting is optional. To ensure that traffic is routed only to VLANs for which inter-VLAN routing is enabled, select the Enable Inter VLAN Routing check box. This setting is disabled by default. When the Enable Inter VLAN Routing check box is not selected, traffic from this VLAN is not routed to other VLANs, and traffic from other VLANs is not routed to this VLAN.
Table 2. Setup Wizard Step 1: LAN Settings screen settings (continued)
# Setting Description
Basic Internet and Security Configuration
9

ProSecure Unified Threat Management (UTM) Appliance
Click the Auto Detect button at the bottom of the screen or enter the settings as explained in the following table, and then click Next to go to the next screen.
Note: If you click the Auto Detect button, the autodetect process probes the WAN port for a range of connection methods and suggests one that your ISP is most likely to support. You might have to enter information that you collected from your ISP (see Information You Might Need from Your ISP on page 2).
Table 3. Setup Wizard Step 2: WAN Settings screen settings
# Setting Description
ISP Login
Does your Internet connection require a login?
If you need to enter login information every time you connect to the Internet through your ISP, select the Yes radio button. Otherwise, select the No radio button, which is the default setting, and skip the ISP Type section. If you select the Yes radio button, enter the following settings.
Login The login name that your ISP has assigned to you.
Password The password that your ISP has assigned to you.
ISP Type
What type of ISP connection do you use?
If your connection is PPPoE or PPTP, then you need to log in. Select the Yes radio button. Based on the connection that you select, the text fields that require data entry are highlighted. If your ISP has not assigned any login information, then select the No radio button and skip this section. If you select the Yes radio button, enter the following settings.
Austria (PPTP) If your ISP is Austria Telecom or any other ISP that uses PPTP for login, select this radio button and enter the following settings:
Account Name The account name is also known as the host name or system name. Enter the valid account name for the PPTP connection (usually your email ID assigned by your ISP). Some ISPs require you to enter your full email address here.
Domain Name Your domain name or workgroup name assigned by your ISP, or your ISP’s domain name. You can leave this field blank.
Basic Internet and Security Configuration
10
ProSecure Unified Threat Management (UTM) Appliance
Austria (PPTP) (continued)
Idle Timeout Select the Keep Connected radio button to keep the connection always on. To log out after the connection is idle for a period:
1. Select the Idle Timeout radio button.
2. In the time-out field, enter the number of minutes to wait before disconnecting.
This is useful if your ISP charges you based on the time that you are logged in.
My IP Address The IP address assigned by the ISP to make the connection with the ISP server.
Server IP Address The IP address of the PPTP server.
Other (PPPoE) If you have installed login software such as WinPoET or Ethernet, then your connection type is PPPoE. Select this radio button and enter the following settings:
Account Name The valid account name for the PPPoE connection.
Domain Name The name of your ISP’s domain or your domain name if your ISP has assigned one. You can leave this field blank.
Idle Timeout Select the Keep Connected radio button to keep the connection always on. To log out after the connection is idle for a period:
1. Select the Idle Timeout radio button.
2. In the time-out field, enter the number of minutes to wait before disconnecting.
This is useful if your ISP charges you based on the period that you are logged in.
Note: When you use a PPPoE connection and select the Idle Timeout radio button, you cannot configure load balancing. To use load balancing on a PPPoE connection, select the Keep Connected radio button.
Connection Reset Select the Connection Reset check box to specify a time when the PPPoE WAN connection is reset. The connection is disconnected momentarily and then reestablished. Then, specify the disconnect time and delay.
Disconnect Time Specify the hour and minutes when the connection should be disconnected.
Delay Specify the period in seconds after which the connection should be reestablished.
Table 3. Setup Wizard Step 2: WAN Settings screen settings (continued)
# Setting Description
Basic Internet and Security Configuration
11

ProSecure Unified Threat Management (UTM) Appliance
Internet (IP) Address
Click the Current IP Address link to see the currently assigned IP address.
Get Dynamically from ISP
If your ISP has not assigned you a static IP address, select the Get dynamically from ISP radio button. The ISP automatically assigns an IP address to the UTM using DHCP network protocol.
Client Identifier Select the Client Identifier check box if your ISP requires the client identifier information to assign an IP address using DHCP.
Vendor Class Identifier Select the Vendor Class Identifier check box if your ISP requires the vendor class identifier information to assign an IP address using DHCP.
Use Static IP Address If your ISP has assigned you a fixed (static or permanent) IP address, select the Use Static IP Address radio button and enter the following settings.
IP Address The static IP address assigned to you. This address identifies the UTM to your ISP.
Subnet Mask The subnet mask, which is usually provided by your ISP.
Gateway IP Address The IP address of the ISP’s gateway, which is usually provided by your ISP.
Domain Name Server (DNS) Servers
Get Automatically from ISP
If your ISP has not assigned any Domain Name Servers (DNS) addresses, select the Get Automatically from ISP radio button.
Use These DNS Servers
If your ISP has assigned DNS addresses to you, select the Use These DNS Servers radio button. Make sure that you fill in valid DNS server IP addresses in the fields. Incorrect DNS entries might cause connectivity issues.
Primary DNS Server The IP address of the primary DNS server.
Secondary DNS Serve The IP address of the secondary DNS server.
Table 3. Setup Wizard Step 2: WAN Settings screen settings (continued)
# Setting Description
Basic Internet and Security Configuration
12

ProSecure Unified Threat Management (UTM) Appliance
Setup Wizard Step 3 of 10: System Date and Time
Figure 6.
Enter the settings as explained in the following table, and click Next to go to the next screen.
Table 4. Setup Wizard Step 3: System Date and Time screen settings
# Setting Description
Set Time, Date, and NTP Servers
Date/Time From the drop-down list, select the local time zone in which the UTM operates. The correct time zone is required for scheduling to work correctly. The UTM includes a real-time clock (RTC), which it uses for scheduling.
Automatically Adjust for Daylight Savings Time
If daylight savings time is supported in your region, select the Automatically Adjust for Daylight Savings Time check box.
NTP Server (default or custom)
Select either the Use Default NTP servers or Use Custom NTP Servers radio button.
• Use Default NTP Servers. The UTM regularly updates its RTC by contacting a default NETGEAR NTP server on the Internet.
• Use Custom NTP Servers. The UTM regularly updates its RTC by contacting one of the two NTP servers (primary and backup), both of which you need to specify in the fields that become available with this selection.
Note: If you select this option but leave either the Server 1 or Server 2 field blank, both fields are set to the default NETGEAR NTP servers.
Note: A list of public NTP servers is available at http://support.ntp.org/bin/view/Servers/WebHome.
Server 1 Name / IP Address
Enter the IP address or host name of the primary NTP server.
Server 2 Name / IP Address
Enter the IP address or host name of the backup NTP server.
Basic Internet and Security Configuration
13

ProSecure Unified Threat Management (UTM) Appliance
Setup Wizard Step 4 of 10: Services
Figure 7.
Enter the settings as explained in the following table, and then click Next to go to the next screen.
Table 5. Setup Wizard Step 4: Services screen settings
# Setting Description
SMTP SMTP scanning is enabled by default on standard service port 25.
To disable any of these services, clear the corresponding check box. You can change the standard service port or add ports in the corresponding Ports to Scan field.
POP3 POP3 scanning is enabled by default on standard service port 110.
IMAP IMAP scanning is enabled by default on standard service port 143.
Web
HTTP HTTP scanning is enabled by default on standard service port 80.
To disable HTTP scanning, clear the corresponding check box. You can change the standard service port or add ports in the corresponding Ports to Scan field.
HTTPS HTTPS scanning is disabled by default.
To enable HTTPS scanning, select the corresponding check box. You can change the standard service port (443) or add ports in the corresponding Ports to Scan field.
FTP FTP scanning is enabled by default on standard service port 21.
To disable FTP scanning, clear the corresponding check box. You cannot change the standard service port in the corresponding Ports to Scan field.
Basic Internet and Security Configuration
14

ProSecure Unified Threat Management (UTM) Appliance
Setup Wizard Step 5 of 10: Email Security
Figure 8.
Enter the settings as explained in the following table, and click Next to go to the next screen.
Table 6. Setup Wizard Step 5: Email Security screen settings
# Setting Description
Action
Note: The UTM can quarantine emails only if you have integrated a ReadyNAS and configured the quarantine settings. For more information, see the reference manual.
SMTP The Anti-Virus check box for SMTP is selected by default. When the UTM detects an infected email that is processed through an SMTP server, the default setting causes the email to be blocked.
From the SMTP drop-down list, select one of the following actions to be taken when an infected email is detected:
• Block infected email. This is the default setting. The email is blocked, and a log entry is created.
• Delete attachment. The email is not blocked, but the attachment is deleted, and a log entry is created.
• Log only. A log entry is created. The email is not blocked, and the attachment is not deleted.
• Quarantine attachment. The email is not blocked, but the attachment is quarantined on a ReadyNAS, and a log entry is created.
• Quarantine infected email. The email is quarantined on a ReadyNAS, and a log entry is created.
Basic Internet and Security Configuration
15

ProSecure Unified Threat Management (UTM) Appliance
POP3 The Anti-Virus check box for POP3 is selected by default. When the UTM detects an infected email that is processed through a POP3 server, the default setting causes the attachment to be deleted.
From the POP3 drop-down list, select one of the following actions to be taken when an infected email is detected:
• Delete attachment. This is the default setting. The email is not blocked, but the attachment is deleted, and a log entry is created.
• Log only. A log entry is created. The email is not blocked, and the attachment is not deleted.
• Quarantine attachment. The email is not blocked, but the attachment is quarantined on a ReadyNAS, and a log entry is created.
IMAP The Anti-Virus check box for IMAP is selected by default. When the UTM detects an infected email that is processed through an IMAP server, the default setting causes the attachment to be deleted.
From the IMAP drop-down list, select one of the following actions to be taken when an infected email is detected:
• Delete attachment. This is the default setting. The email is not blocked, but the attachment is deleted, and a log entry is created.
• Log only. A log entry is created. The email is not blocked, and the attachment is not deleted.
• Quarantine attachment. The email is not blocked, but the attachment is quarantined on a ReadyNAS, and a log entry is created.
Scan Exceptions
The default maximum size of the file or message that is scanned is 2048 KB, but you can define a maximum size of up to 10240 KB. However, setting the maximum size to a high value might affect the UTM’s performance.
From the drop-down list, select one of the following actions to be taken when the file or message exceeds the maximum size:
• Skip. The file is not scanned but skipped, leaving the end user vulnerable. This is the default setting.
• Block. The file is blocked and does not reach the end user.
Table 6. Setup Wizard Step 5: Email Security screen settings (continued)
# Setting Description
Basic Internet and Security Configuration
16

ProSecure Unified Threat Management (UTM) Appliance
Setup Wizard Step 6 of 10: Web Security
Figure 9.
Enter the settings as explained in the following table, and then click Next to go to the next screen.
Table 7. Setup Wizard Step 6: Web Security screen settings
# Setting Description
Action
Note: The UTM can quarantine infected files and objects only if you have integrated a ReadyNAS and configured the quarantine settings. For more information, see the reference manual.
HTTP The Anti-Virus check box for HTTP is selected by default. When the UTM detects infected traffic, the default settings cause the downloaded files to be blocked and deleted.
From the HTTP drop-down list, select one of the following actions to be taken when an infected web file or object is detected:
• Delete file. This is the default setting. The web file or object is deleted, and a log entry is created.
• Log only. A log entry is created. The web file or object is not deleted.
• Quarantine file. The web file or object is quarantined, and a log entry is created.
Select the Streaming check box to enable streaming of partially downloaded and scanned HTTP file parts to the user. This method allows the user to experience more transparent web downloading. Streaming is enabled by default.
Basic Internet and Security Configuration
17
ProSecure Unified Threat Management (UTM) Appliance
HTTPS The Anti-Virus check box for HTTPS is selected by default. When the UTM detects infected traffic, the default settings cause the downloaded files to be blocked and deleted.
From the HTTPS drop-down list, select one of the following actions to be taken when an infected web file or object is detected:
• Delete file. This is the default setting. The web file or object is deleted, and a log entry is created.
• Log only. A log entry is created. The web file or object is not deleted.
• Quarantine file. The web file or object is quarantined, and a log entry is created.
Select the Streaming check box to enable streaming of partially downloaded and scanned HTTPS file parts to the user. This method allows the user to experience more transparent web downloading. Streaming is enabled by default.
FTP The Anti-Virus check box for FTP is selected by default. When the UTM detects infected traffic, the default settings cause the downloaded files to be blocked and deleted.
From the FTP drop-down list, select one of the following actions to be taken when an infected web file or object is detected:
• Delete file. This is the default setting. The FTP file or object is deleted, and a log entry is created.
• Log only. A log entry is created. The FTP file or object is not deleted.
• Quarantine file. The FTP file or object is quarantined, and a log entry is created.
Scan Exceptions
The default maximum size of the file or object that is scanned is 2048 KB, but you can define a maximum size of up to 10240 KB. However, setting the maximum size to a high value might affect the UTM’s performance. From the drop-down list, select one of the following actions to be taken when the file or message exceeds the maximum size:
• Skip. The file is not scanned but skipped, leaving the end user vulnerable. This is the default setting.
• Block. The file is blocked and does reach the end user.
Table 7. Setup Wizard Step 6: Web Security screen settings (continued)
# Setting Description
Basic Internet and Security Configuration
18

ProSecure Unified Threat Management (UTM) Appliance
Setup Wizard Step 7 of 10: Web Categories to Be Blocked
Figure 10.
Basic Internet and Security Configuration
19
ProSecure Unified Threat Management (UTM) Appliance
Enter the settings as explained in the following table, and then click Next to go to the next screen.
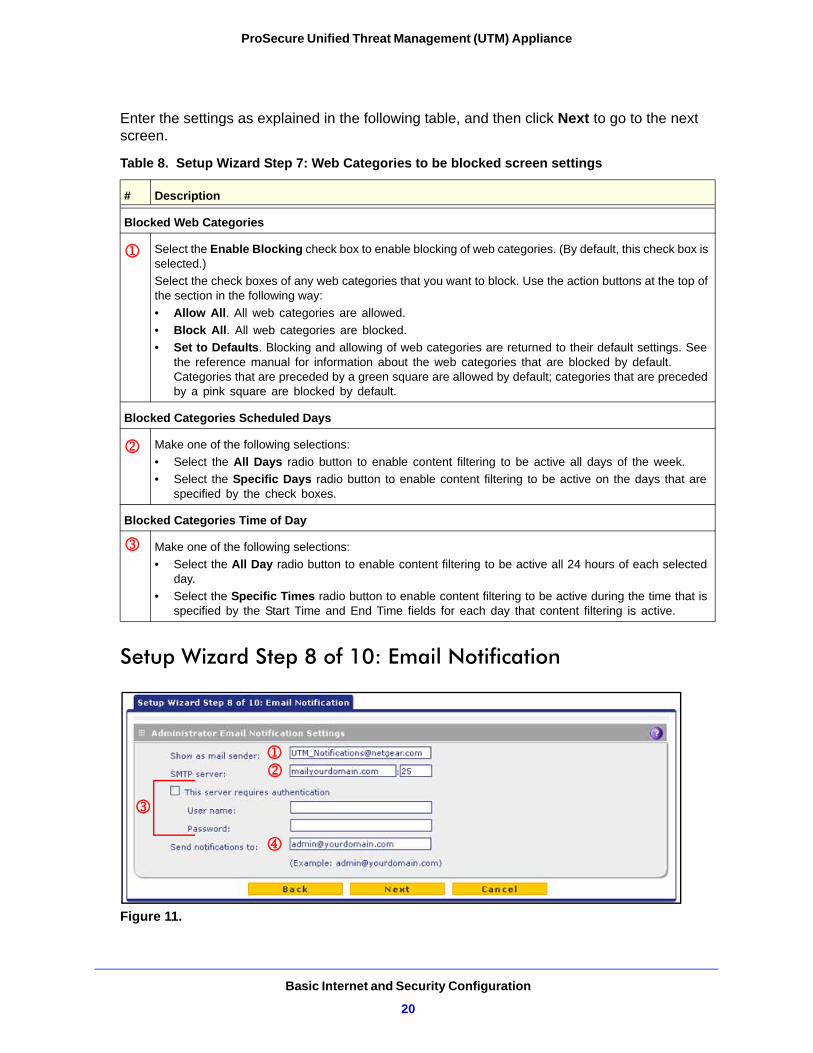
Setup Wizard Step 8 of 10: Email Notification
Figure 11.
Table 8. Setup Wizard Step 7: Web Categories to be blocked screen settings
# Description
Blocked Web Categories
Select the Enable Blocking check box to enable blocking of web categories. (By default, this check box is selected.)
Select the check boxes of any web categories that you want to block. Use the action buttons at the top of the section in the following way:
• Allow All. All web categories are allowed.
• Block All. All web categories are blocked.
• Set to Defaults. Blocking and allowing of web categories are returned to their default settings. See the reference manual for information about the web categories that are blocked by default. Categories that are preceded by a green square are allowed by default; categories that are preceded by a pink square are blocked by default.
Blocked Categories Scheduled Days
Make one of the following selections:
• Select the All Days radio button to enable content filtering to be active all days of the week.
• Select the Specific Days radio button to enable content filtering to be active on the days that are specified by the check boxes.
Blocked Categories Time of Day
Make one of the following selections:
• Select the All Day radio button to enable content filtering to be active all 24 hours of each selected day.
• Select the Specific Times radio button to enable content filtering to be active during the time that is specified by the Start Time and End Time fields for each day that content filtering is active.
Basic Internet and Security Configuration
20

ProSecure Unified Threat Management (UTM) Appliance
Enter the settings as explained in the following table, and then click Next to go to the next screen.
Setup Wizard Step 9 of 10: Signatures & Engine
Figure 12.
Table 9. Setup Wizard Step 8: Email Notification screen settings
# Setting Description
Administrator Email Notification Settings
Show as mail sender A descriptive name of the sender for email identification purposes. For example, enter [email protected].
SMTP server The IP address and port number or Internet name and port number of your ISP’s outgoing email SMTP server. The default port number is 25.
Note: If you leave this field blank, the UTM cannot send email notifications.
This server requires authentication
If the SMTP server requires authentication, select the This server requires authentication check box, and enter the user name and password.
User name The user name for SMTP server authentication.
Password The password for SMTP server authentication.
Send notifications to The email address to which the notifications should be sent. Typically, this is the email address of the administrator.
Basic Internet and Security Configuration
21

ProSecure Unified Threat Management (UTM) Appliance
Enter the settings as explained in the following table, and then click Next to go to the next screen.
Setup Wizard Step 10 of 10: Saving the Configuration
Figure 13.
Click Apply to save your settings and automatically restart the system.
Table 10. Setup Wizard Step 9: Signatures & Engine screen settings
# Setting Description
Update Settings
Update From the drop-down list, select one of the following options:
• Never. The scan engine and pattern files are not automatically updated.
• Scan engine and Signatures. The scan engine and pattern files are automatically updated according to the settings in the Update Frequency section of the screen (see explanations later in this table).
Update From Set the update source server by selecting one of the following radio buttons:
• Default update server. Files are updated from the default NETGEAR update server.
• Server address. Files are updated from the server that you specify. Enter the IP address or host name of the update server in the Server address field.
Update Frequency
Specify the frequency with which the UTM checks for file updates:
• Weekly. From the drop-down lists, select the weekday, hour, and minutes that the updates occur.
• Daily. From the drop-down lists, select the hour and minutes that the updates occur.
• Every. From the drop-down list, select the frequency with which the updates occur. The range is from 15 minutes to 12 hours.
HTTPS Proxy Settings
Enable If computers on the network connect to the Internet through a proxy server, select the Enable check box to specify and enable a proxy server. Enter the following settings.
Proxy server The IP address and port number of the proxy server.
User name The user name for proxy server authentication.
Password The password for proxy server authentication.
Basic Internet and Security Configuration
22

ProSecure Unified Threat Management (UTM) Appliance
Register the UTM with NETGEAR
To receive threat management component updates and technical support, you need to register your UTM with NETGEAR. The UTM comes with four 30-day trial licenses:
• Web protection
• Email protection
• Support and maintenance
• Application control and IPS
The service license keys are provided with the product package. For electronic licensing, you do not need the service license keys (see Electronic Licensing on page 24).
IMPORTANT:
Activating the service licenses initiates their terms of use. Activate the licenses only when you are ready to start using this unit. If your unit has never been registered before, you can use the 30-day trial period for all four types of licenses to perform the initial testing and configuration. To use the trial period, do not click Register in Step 4 of the following procedure, but click Trial instead.
If your UTM is connected to the Internet, you can activate the service licenses:
1. Select Support > Registration. The Registration screen displays (see Figure 14 on page 24).
2. Enter the license key in the Registration Key field.
3. Fill out the customer and value-added reseller (VAR) fields.
WARNING:
To activate the 30-day trial period for a license, do not click Register but click Trial instead. For more information, see the Important information at the beginning of this section.
Note: If you have used the 30-day trial licenses, these trial licenses are revoked once you activate the purchased service license keys. The purchased service license keys offer 1 year or 3 years of service.
4. Click Register. The UTM activates the license and registers the unit with the registration and update server.
5. Repeat Step 2 and Step 4 for additional license keys.
Basic Internet and Security Configuration
23

ProSecure Unified Threat Management (UTM) Appliance
Figure 14.
Electronic LicensingIf you have purchased the UTM with a 1- or 3-year license, you might be able to use the electronic licensing option. When the UTM is connected to the Internet, you need to enter only your customer information and optional value-added reseller (VAR) information on the Register screen but do not need to enter the license numbers. When you click Register, the UTM automatically downloads and activates the license keys because the serial number of the UTM is linked to the license.
If you have purchased a license from a VAR (either directly or over the web) after purchase of the UTM, the VAR should provide you the license keys. To register and activate the license keys, follow the registration procedure explained in the previous section.
Basic Internet and Security Configuration
24

ProSecure Unified Threat Management (UTM) Appliance
Verify Correct Installation
Test the UTM before deploying it in a production environment. These quick tests are designed to ensure that your UTM is functioning correctly.
Test Connectivity Verify that network traffic can pass through the UTM:
1. Ping an Internet URL.
2. Ping the IP address of a device on either side of the UTM.
Test HTTP Scanning Verify that the UTM scans HTTP traffic correctly:
1. Log in to the UTM web management interface, and then verify that HTTP scanning is enabled. HTTP scanning is enabled by default (see Setup Wizard Step 4 of 10: Services on page 14).
2. Take note of the web security settings for HTTP (see Setup Wizard Step 6 of 10: Web Security on page 17).
3. If client computers have direct access to the Internet through your LAN, try to download the eicar.com test file from http://www.eicar.org/download/eicar.com.
The eicar.com test file is a legitimate denial of service (DoS) attack and is safe to use because it is not a malware threat and does not include any fragments of malware code. The test file is provided by EICAR, an organization that unites efforts against computer crime, fraud, and misuse of computers or networks.
4. Check the downloaded eicar.com test file, and note the attached malware information file.
Internet Connection Troubleshooting Tips
If your UTM is unable to access the Internet, you should first determine whether the UTM is able to obtain a WAN address from your ISP. Unless you have been assigned a static IP address, your UTM requests an IP address from the ISP. You can determine whether the request was successful using the web management interface.
To check the WAN IP address:
1. Launch your browser and navigate to an external site such as www.netgear.com.
2. Access the web management interface of the UTM’s configuration at https://192.168.1.1.
3. Select Network Config > WAN Settings. The WAN screen displays.
4. Click the Status button in the Action column of the WAN interface for which you want to check the IP Address. The Connection Status pop-up screen displays.
5. Check that an IP address is shown for the WAN port. If an IP address with zeros only is shown, or if no IP address is shown, your UTM has not obtained an IP address from your ISP.
Basic Internet and Security Configuration
25
ProSecure Unified Threat Management (UTM) Appliance
If your UTM is unable to obtain an IP address from the ISP, force your cable modem, DSL modem, satellite dish, wireless ISP radio antenna, or router to recognize your new UTM:
1. Turn off the power to the modem, dish, radio antenna, or router.
2. Turn off the power to your UTM.
3. Wait 5 minutes, and then turn on the power to the modem, dish, radio antenna, or router.
4. When the LEDs of the modem, dish, radio antenna, or router indicate that synchronization with the ISP has occurred, turn on the power to your UTM.
If your UTM is still unable to obtain an IP address from the ISP, the problem might be one of the following:
• Your ISP might require a login program. Ask your ISP whether they require a PPPoE or PPTP type of login.
• If your ISP requires a login, you might have incorrectly set the login name and password.
• Your ISP might check for your computer’s host name. Select Network Config > WAN Settings, and then click the Edit button for the WAN interface from which you are trying to connect to display the WAN ISP Settings screen. In the Account Name field, enter the host name, system name, or account name that was assigned to you by your ISP. You might also have to enter the assigned domain name or workgroup name in the Domain Name field, and you might have to enter additional information. For more information about these settings, see Setup Wizard Step 2 of 10: WAN Settings on page 9.
• Your ISP allows only one Ethernet MAC address to connect to the Internet, and might check for your computer’s MAC address. In this case, do one of the following:
- Inform your ISP that you have a new network device, and ask them to use the UTM’s MAC address.
- Configure your UTM to spoof your computer’s MAC address. You can do this in the Router’s MAC Address section on the WAN Advanced Options screen. Select Network Config > WAN Settings, and then click the Edit button for the WAN interface from which you are trying to connect to display the WAN ISP Settings screen. Click the Advanced option arrow to display the WAN Advanced Options screen. For more information, see “Set the UTM’s MAC Address and Configure Advanced WAN Options” in Chapter 3, “Manually Configure Internet and WAN Settings,” of the reference manual.
If your UTM can obtain an IP address, but an attached computer is unable to load any web pages from the Internet:
• Your computer might not recognize any DNS server addresses: A DNS server is a host on the Internet that translates Internet names (such as www.netgear.com) to numeric IP addresses. Typically your ISP provides the addresses of one or two DNS servers for your use. You can configure your computer manually with DNS addresses, as explained in your operating system documentation.
• Your computer might not have the UTM configured as its TCP/IP gateway.
Basic Internet and Security Configuration
26

ProSecure Unified Threat Management (UTM) Appliance
What to Do Next
You have connected your UTM to your network. The UTM is now ready to scan the protocols and services that you specified and perform automatic updates based on the update source and frequency that you specified.
If you need to change the settings or view reports or logs, log in to the UTM web management interface. To log in, use the default IP address or the IP address that you assigned to the UTM as described in Setup Wizard Step 1 of 10: LAN Settings on page 6.
The following sections in the reference manual describe important tasks that you might want to address before you deploy the UTM in your network:
• “Configure the WAN Mode” in Chapter 3, “Manually Configure Internet and WAN Settings”
Note: Configuring the WAN mode is required if you want to use multiple WAN ports.
• “Configure Authentication Domains, Groups, and Users” in Chapter 9, “Configure Authentication Domains, Groups, and Users”
• “Manage Digital Certificates for VPN Connections” in Chapter 9, “Configure Authentication Domains, Groups, and Users”
If you want to use IPSec VPN and SSL VPN connections, see the following quick start guides:
• Create IPSec VPN Tunnels with the Wizard
• Create SSL VPN Portals with the Wizard
Basic Internet and Security Configuration
27