ProphetStor StellarFlash® Storage€¦ · · 2017-03-16Document Changes Document changes ......
27
ProphetStor StellarFlash® Storage VMware vSphere Best Practices
Transcript of ProphetStor StellarFlash® Storage€¦ · · 2017-03-16Document Changes Document changes ......
ProphetStor StellarFlash® Storage VMware vSphere Best Practices
2 ProphetStor StellarFlash® Storage Best Practices for VMware vSphere
CONTENTS
Document Changes ......................................................................................................................... 3 Goals and Objectives ....................................................................................................................... 4 Audience ............................................................................................................................................ 4 Prophetstor StellarFlash® All-Flash-Array and Hybrid Storage Introduction ............................... 5
Unified Storage Arrays ................................................................................................................... 5
Key Features ................................................................................................................................... 5
Reference Hardware Specification ............................................................................................ 7
Unified-Storage Management and Scale-Any Architecture .................................................. 8
Quick Reference: Best Practice Settings ........................................................................................ 9 Design Considerations and Best Practices ................................................................................... 10
SAN Design and Setup ................................................................................................................ 11
VMware Native Multipathing plugin(NMP) Configuration .................................................... 11
MRU or Round-Robin configuration and connectivity ....................................................... 12 Networking ................................................................................................................................... 12
iSCSI Configuration .................................................................................................................. 12 Virtual Storage Access Considerations..................................................................................... 15
VMFS Datastore Mounted Volumes ...................................................................................... 16 VMware APIs for Array Integration(VAAI) .................................................................................... 17
Hardware Assisted Locking -- Atomic Test & Set (ATS) ........................................................... 18
Full Copy or Hardware Accelerated Copy: XCOPY (Extended Copy) ............................... 21
Block Zero or WRITE_SAME .......................................................................................................... 21
Guest OS Level configuration ........................................................................................................ 23 Parameter tuning Checklist Summary .......................................................................................... 26
ProphetStor StellarFlash® Storage Best Practices for VMware vSphere 3
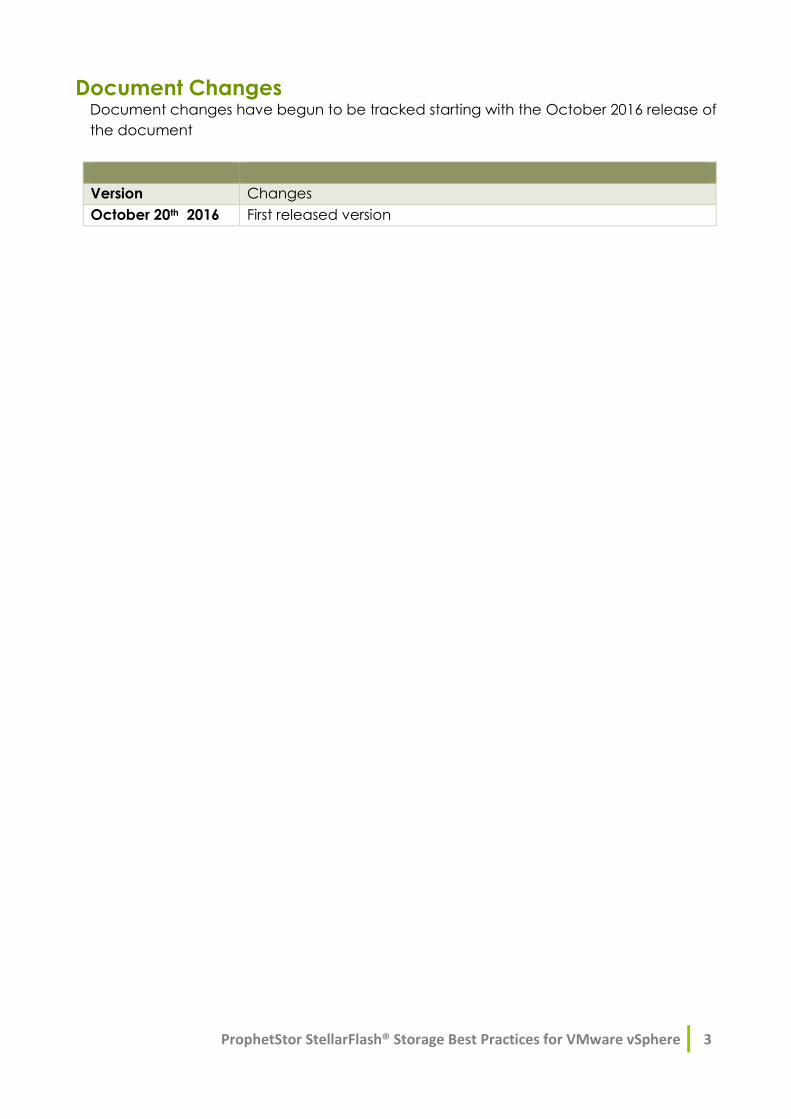
Document Changes Document changes have begun to be tracked starting with the October 2016 release of
the document
Version Changes
October 20th 2016 First released version

4 ProphetStor StellarFlash® Storage Best Practices for VMware vSphere
Goals and Objectives This document is intended to provide understanding and insight into any pertinent best
practices when using VMware vSphere with ProphetStor StellarFlash® Storage. Options or
configurations that are to be left at the default are generally not mentioned and
recommendations for the default should be assumed. Changing or altering parameters
not mentioned in this guide may in fact be supported but are likely not recommended
and should be considered on a case-by-case basis.
Please note this will be updated frequently, so for the most up-to-date version please refer
to ProphetStor official website.
Audience This document is intended for use by pre-sales consulting engineers, sales engineers,
partners, and customers who want to deploy the ProphetStor StellarFlash® Storage in
VMware vSphere-based virtualized datacenters.
ProphetStor StellarFlash® Storage Best Practices for VMware vSphere 5
Prophetstor StellarFlash® All-Flash-Array and Hybrid Storage
Introduction
Unified Storage Arrays StellarFlash® Storage appliances deliver powerful and flexible storage systems offering
enterprise class data services. With built in storage optimization and integration
technologies with particular x86 hardware, StellarFlash® offers businesses a high
performance scalable storage infrastructure at unbeatable prices.
StellarFlash® Storage appliances are available in all-flash-array (AFA) configuration that
delivers unprecedented user experiences or as a hybrid combination of both SSDs and
hard disks offering a blend of capacity and performance.
With the StellarFlash®, digital business services are given a new lease of life.
Key Features
Cost Effective Performance
StellarFlash® AFA delivers the industry-leading standard for All-Flash-Arrays, serving
businesses with over 400K IOPs in a cost efficient package. Whether Virtual Desktop
Infrastructures (VDI) or Customer Relationship Management (CRM) systems, businesses
can now deliver unparalleled user experiences for its digital business services.
Smart Caching
Smart Cache, a patent pending technology that comprises the Traffic Modelling
Module (TMM) and Elastic Resource Control (ERC), automatically utilizes predictive
analysis of IO operations to dynamically design an optimized cache policy based on
workloads. With this, StellarFlash® improves its IOPs utilization by over 45% and ensures
critical business services are allocated with the required resources as necessary.
Optimized Storage Utilization
While flash is expensive, StellarFlash® AFA includes native deduplication and
compression technologies that makes efficient use of space, reducing the storage
footprint dramatically. Together with Smart Cache, savings of over 90% can be
achieved, making the StellarFlash® AFA a truly unique value proposition.
Predictive Analytics
StellarFlash® AFA is supported by a patented analytics service that addresses data loss
prevention in a unique way. StellarFlash® AFA’s predictive analytics service accesses
operational data of SSDs to accurately predict when disk failures will occur and
generates actionable prescriptions to determine the best time for replacement without
affecting the service levels.

6 ProphetStor StellarFlash® Storage Best Practices for VMware vSphere
Data Protection
As businesses come to rely on StellarFlash® AFA for its mission critical data, StellarFlash®
AFA offers unrivalled data protection technologies built in. With high availability,
snapshots and replication, StellarFlash® AFA protects your investment against
hardware, software and site level failures.
Faster Deployment
StellarFlash® AFA includes a web-based interface for centralized management of the
entire storage environment through a single pane that simplifies and speeds up the
process of deployment in data centers. In addition, StellarFlash® AFA include feature
rich REST APIs for integration, allowing for rapid provisioning of flash resources for
workloads.
ProphetStor StellarFlash® Storage Best Practices for VMware vSphere 7
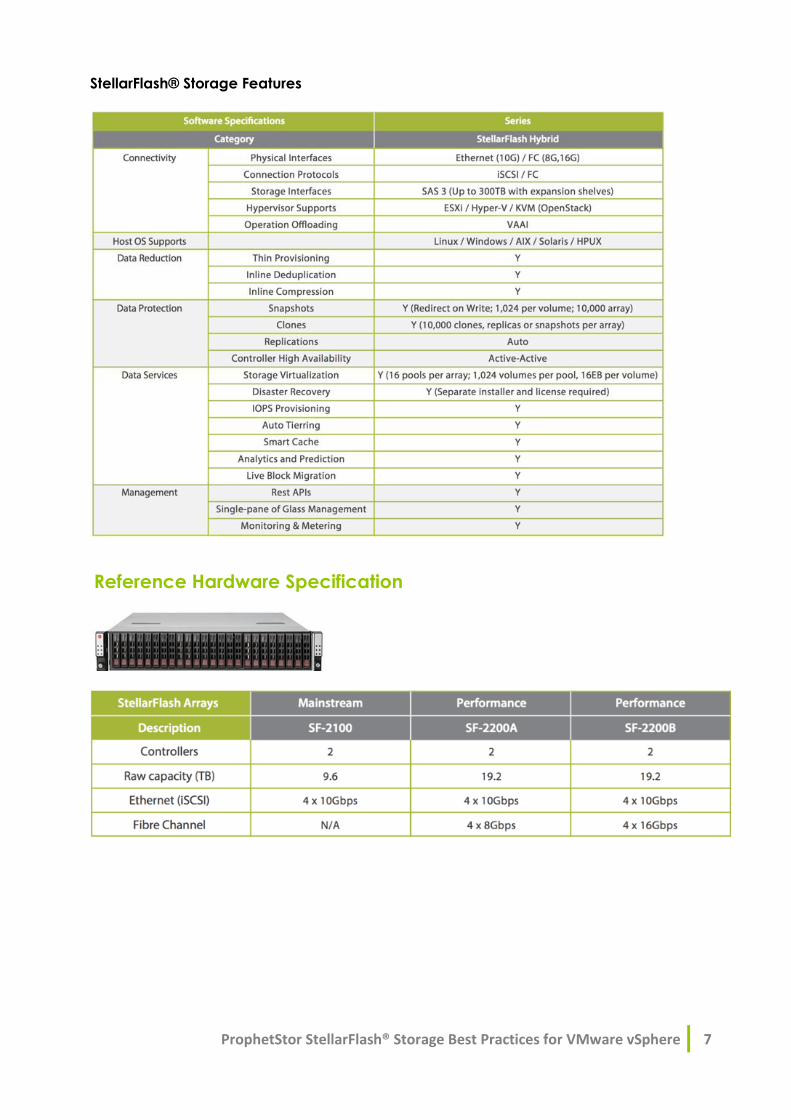
StellarFlash® Storage Features
Reference Hardware Specification
8 ProphetStor StellarFlash® Storage Best Practices for VMware vSphere
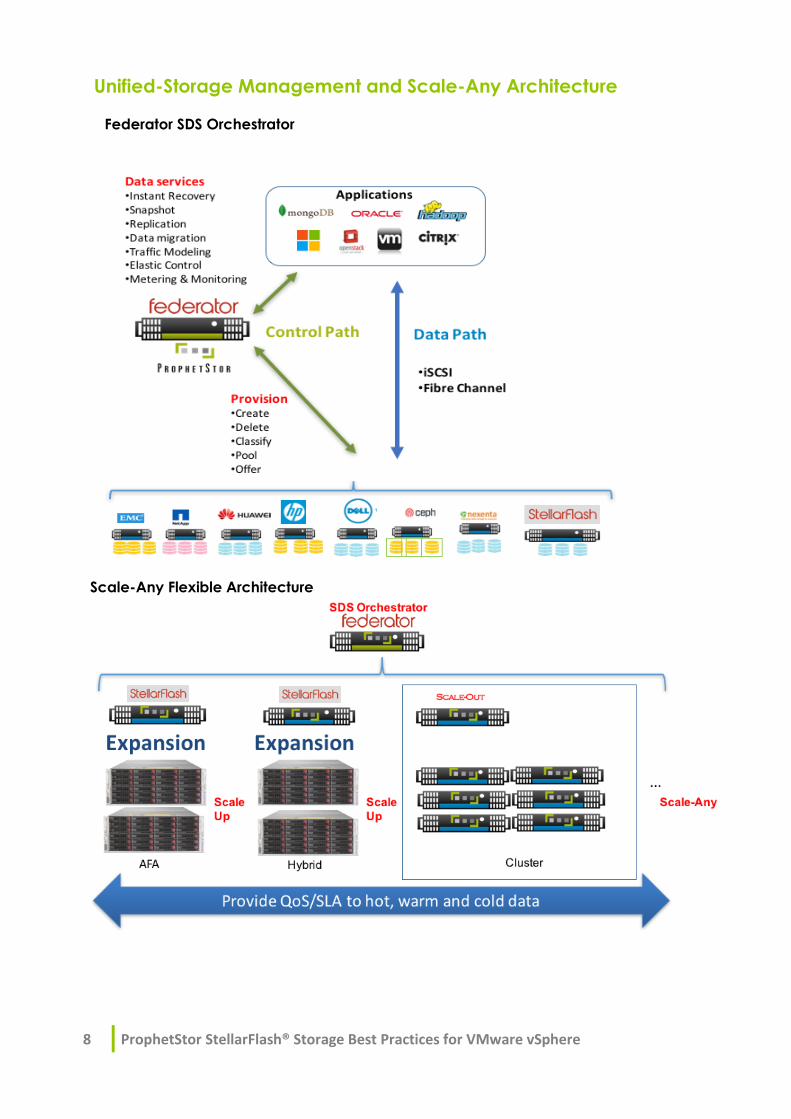
Unified-Storage Management and Scale-Any Architecture
Federator SDS Orchestrator
Scale-Any Flexible Architecture
ProphetStor StellarFlash® Storage Best Practices for VMware vSphere 9
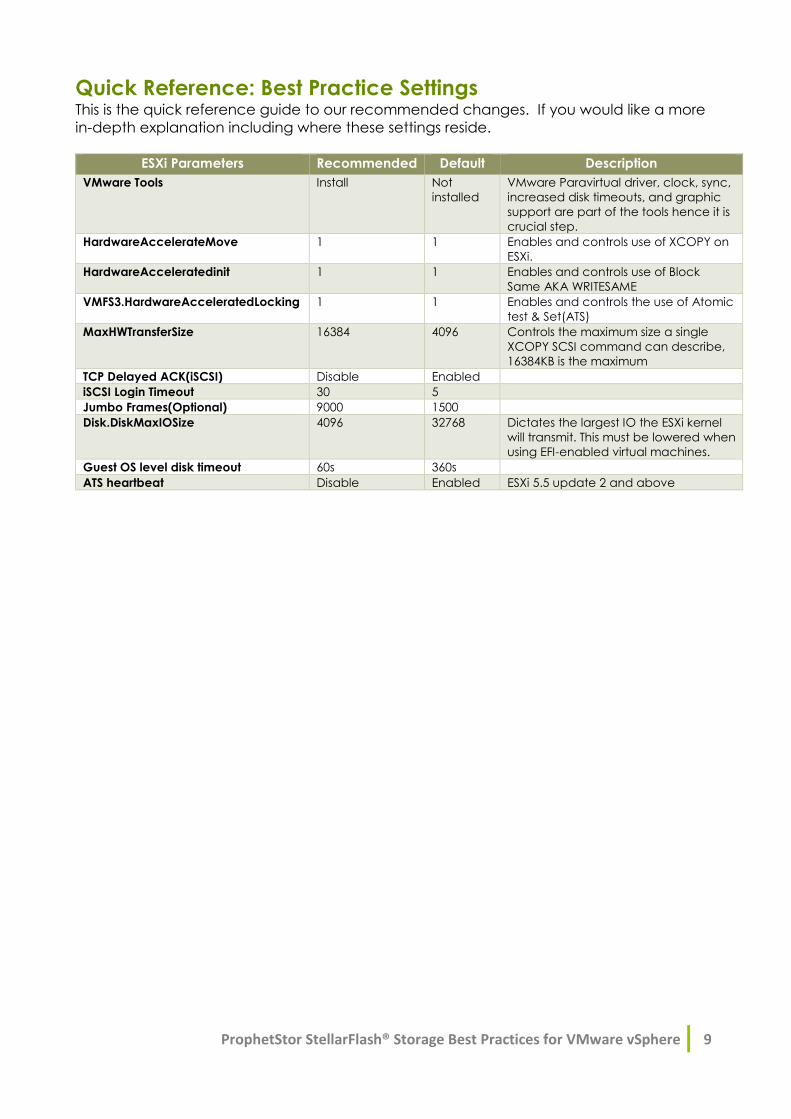
Quick Reference: Best Practice Settings This is the quick reference guide to our recommended changes. If you would like a more
in-depth explanation including where these settings reside.
ESXi Parameters Recommended Default Description
VMware Tools Install Not
installed
VMware Paravirtual driver, clock, sync,
increased disk timeouts, and graphic
support are part of the tools hence it is
crucial step.
HardwareAccelerateMove 1 1 Enables and controls use of XCOPY on
ESXi.
HardwareAcceleratedinit 1 1 Enables and controls use of Block
Same AKA WRITESAME
VMFS3.HardwareAcceleratedLocking 1 1 Enables and controls the use of Atomic
test & Set(ATS)
MaxHWTransferSize 16384 4096 Controls the maximum size a single
XCOPY SCSI command can describe,
16384KB is the maximum
TCP Delayed ACK(iSCSI) Disable Enabled
iSCSI Login Timeout 30 5
Jumbo Frames(Optional) 9000 1500
Disk.DiskMaxIOSize 4096 32768 Dictates the largest IO the ESXi kernel
will transmit. This must be lowered when
using EFI-enabled virtual machines.
Guest OS level disk timeout 60s 360s
ATS heartbeat Disable Enabled ESXi 5.5 update 2 and above
10 ProphetStor StellarFlash® Storage Best Practices for VMware vSphere
Design Considerations and Best Practices VMware vSphere enables customers to transform current IT infrastructure into a private
cloud. It provides a solid foundation with built-in availability, scalability, manageability
and business continuity for the virtualization of business critical applications. If you want to
take advantage of the build-in features such as vSphere HA, DRS, vmotion, Storage
vmotion, shared storage is a requirement. There storage planning and architectural
design become imperative for the successful deployment of a solid foundational
architecture that provides Infrastructure as a Service.
ProphetStor StellarFlash® Storage solution is built to provide a complete application-
aware data storage solution that includes primary storage. Intelligent caching, instant
application-aware backup, and replication. You can consolidate management of
primary, secondary, and off-site disaster recovery storage within a single storage solution.
A ProphetStor StellarFlash® Storage provide FC/iSCSI volumes to VMware hosts as well as
guest virtual machines. Any Volumes that you create on StellarFlash® storage are highly
optimized for virtual machines by providing the following benefits:
IOPS provisioning: Provides “Static” and “Dynamic” IOPS provisioning, increasing
storage utilization.
IOPS and Throughput throttling: Efficiently uses storage capacity.
Flexible volume block size: provides 4k, 8k, 16k, 32k, 64k, 128k block size volume
for application-aware. Recommended for 32k, 64k on VMware environment.
Thin provisioning: Efficiently stores actual written rather than reserved space.
In-line Compression: Reduces storage footprint on physical disk by 50-90%.
Snapshot backup: Instant point-in-time backup that eliminated the backup
windows.
WAN-Optimized and high- safety Replication: Dramatically reduces bandwidth
required for disaster recovery, also provide 128bit Encryption to make data
safety.
This document reviews the design considerations and best practices for implementing
VMware vSphere with Prophetstor StellarFlash® Storage. It is written for audiences that
have a basic understanding of VMware vSphere and ProphetStor StellarFlash® Storage
ProphetStor StellarFlash® Storage Best Practices for VMware vSphere 11
SAN Design and Setup
The most of IT virtual infrastructure storage deployments are based on SANs. SANs provide
storage connectivity to a virtual server or a cluster through a protocol like Fibre Channel
or iSCSI which offer a high reliability, availability and scalability. Designing a highly flexible
SAN fabric includes at minimum
Dual initiator ports per host
Dual fabric switch infrastructures
Highly-available storage platform
These components are important for business critical application deployment.
The following are some of the general guidelines while configuring a SAN switch. For
specific SAN switch setting, you should contact the switch vendor to get help or
reference vendor’s best practice.
Implement dual SAN fabric design to supply redundant and resilient inter-hardware
connectivity.
Implement a single initiator to all of StellarFlash® HA target zoning. Multiple initiators
and multiple target is a definite risk for spurious Registered State-Change Notifications
(RSCNs) waiting to overwhelm the initiators and targets, hence it should be avoided.
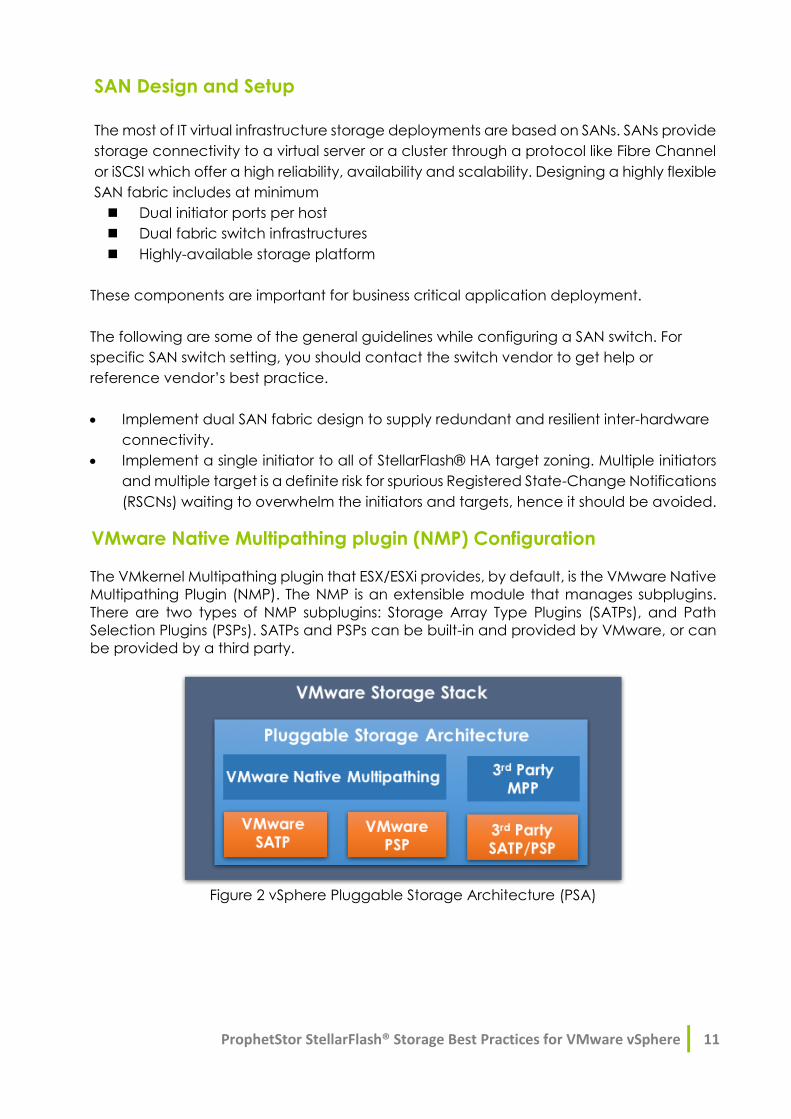
VMware Native Multipathing plugin (NMP) Configuration
The VMkernel Multipathing plugin that ESX/ESXi provides, by default, is the VMware Native
Multipathing Plugin (NMP). The NMP is an extensible module that manages subplugins.
There are two types of NMP subplugins: Storage Array Type Plugins (SATPs), and Path
Selection Plugins (PSPs). SATPs and PSPs can be built-in and provided by VMware, or can
be provided by a third party.
Figure 2 vSphere Pluggable Storage Architecture (PSA)
12 ProphetStor StellarFlash® Storage Best Practices for VMware vSphere
MRU or Round-Robin configuration and connectivity
The StellarFlash® is an ALUA-complaint storage. When StellarFlash® Storage
connects to an ESXi host, the array’s devices are claimed by the
“WMW_SATP_ALUA” storage array type policy (SATP). The default SATP selection is
“Most Recently Used”.
On Multi-Initiator or Multi-target
For optimal performance, this needs to be changed to Round Robin. Furthermore, an
advanced parameter within the Round Robin PSP allows an administrator to
configure how often Round Robin moves on to a different active logical path for a
given device when issuing I/O. By default, ESXi will switch to a new active path every
1,000 I/Os that it issues to that device. StellarFlash® recommends lowing this down to
the minimum value of 1. This will cause ESXi to change paths after every I/O. This
behavior will allow ESXi to better leverage the StellarFlash® access path.
On Single Initiator environment
It is no change requirement for general environment. It is important to verify proper
connectivity prior to implementing production workloads on a host or volume.
1.> Verify proper Multipathing setting in ESXi
2.> Verify the proper numbers of paths
Networking
iSCSI Configuration Make sure that the VMware vSphere ESX host has a minimum of two physical NICs. It is
recommended that you have a minimum of two physical NICs dedicated for
StellarFlash® Storage access via iSCSI protocol, for production environment we prefer
use of 10 or 40 Gb/s Ethernet Adapter. On the ESX host, you can use the following NIC
configuration as reference:
• vmnic0 and vmnic1(Management, vMotion traffic and VM traffic): 1Gb/s,
10Gb/s Ethernet Adapter.
• vmnic2 and vmnic3(VMkernel port for IP storage): 10,40 Gb/s Ethernet Adapter.
iSCSI connectivity is one of the methods for accessing StellarFlash® Storage. You can
use the following methods to achieve high availability and load distribution for storage
access.
Method 1:
One vmnic per vSwitch, and vmkernel port per vSwitch.
All vmkernel ports must be bound to software iSCSI adapter.
Method 2:
Two or more vmnics per vSwitch, dedicated one vmkernel port to one vmnic.
All vmkernel ports must be bound to the software iSCSI adapter.
ProphetStor StellarFlash® Storage Best Practices for VMware vSphere 13
Tips:
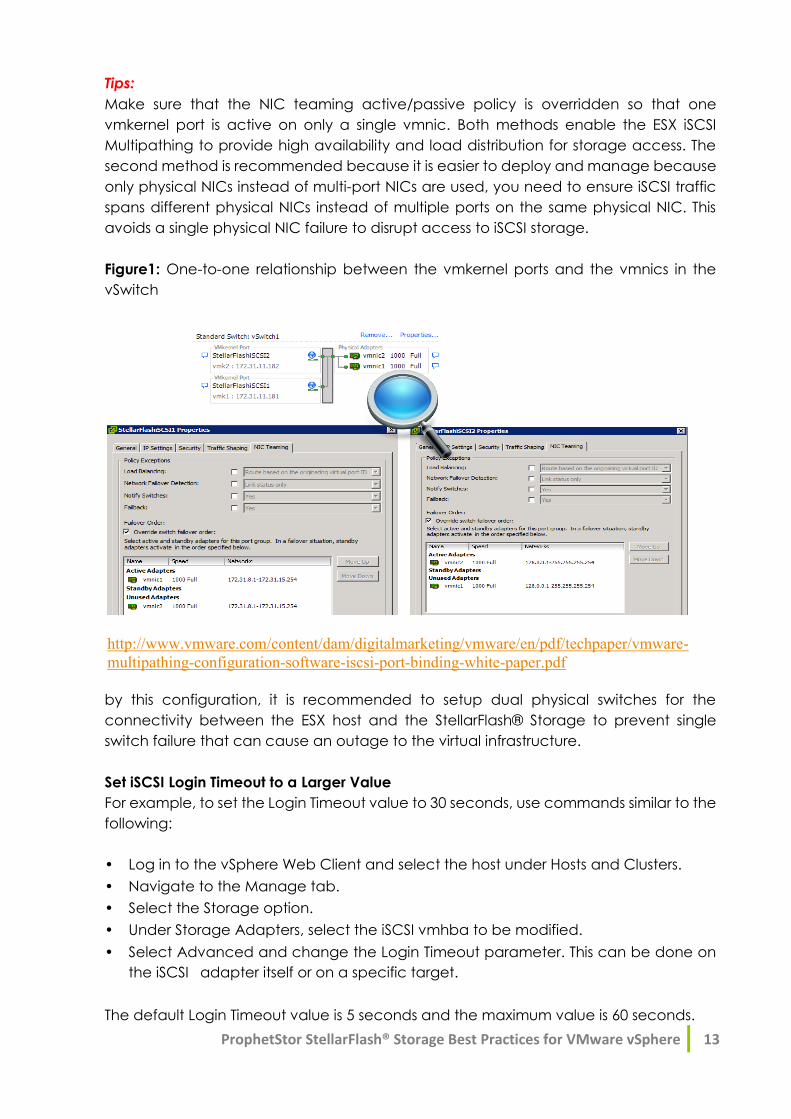
Make sure that the NIC teaming active/passive policy is overridden so that one
vmkernel port is active on only a single vmnic. Both methods enable the ESX iSCSI
Multipathing to provide high availability and load distribution for storage access. The
second method is recommended because it is easier to deploy and manage because
only physical NICs instead of multi-port NICs are used, you need to ensure iSCSI traffic
spans different physical NICs instead of multiple ports on the same physical NIC. This
avoids a single physical NIC failure to disrupt access to iSCSI storage.
Figure1: One-to-one relationship between the vmkernel ports and the vmnics in the
vSwitch
http://www.vmware.com/content/dam/digitalmarketing/vmware/en/pdf/techpaper/vmware-
multipathing-configuration-software-iscsi-port-binding-white-paper.pdf
by this configuration, it is recommended to setup dual physical switches for the
connectivity between the ESX host and the StellarFlash® Storage to prevent single
switch failure that can cause an outage to the virtual infrastructure.
Set iSCSI Login Timeout to a Larger Value
For example, to set the Login Timeout value to 30 seconds, use commands similar to the
following:
• Log in to the vSphere Web Client and select the host under Hosts and Clusters.
• Navigate to the Manage tab.
• Select the Storage option.
• Under Storage Adapters, select the iSCSI vmhba to be modified.
• Select Advanced and change the Login Timeout parameter. This can be done on
the iSCSI adapter itself or on a specific target.
The default Login Timeout value is 5 seconds and the maximum value is 60 seconds.
14 ProphetStor StellarFlash® Storage Best Practices for VMware vSphere
Disable DelayedAck
DelayedAck is an advanced iSCSI option that allows or disallows an iSCSI initiator to
delay acknowledgement of received data packets.
Disabling DelayedAck in ESXi 5.x:
• Log in to the vSphere Web Client and select the host under Hosts and Clusters.
• Navigate to the Manage tab.
• Select the Storage option.
• Under Storage Adapters, select the iSCSI vmhba to be modified.Navigate to
Advanced Options and modify the DelayedAck setting by using the option that best
matches your requirements, as follows:
Option 1: Modify the DelayedAck setting on a particular discovery address
(recommended) as follows:
• Select Targets.
• On a discovery address, select the Dynamic Discovery tab.
• Select the iSCSI server.
• Click Advanced.
• Change DelayedAck to false.
Option 2: Modify the DelayedAck setting on a specific target as follows:
• Select Targets.
• Select the Static Discovery tab.
• Select the iSCSI server and click Advanced.
• Change DelayedAck to “false”.
Option 3: Modify the DelayedAck setting globally for the iSCSI adapter as follows:
• Select the Advanced Options tab and click Advanced.
• Change DelayedAck to “false”.
DelayedAck is highly recommended to be disabled. In highly congested networks, if
packets are lost, or simply take too long to be acknowledged, due to that congestion,
performance can drop. If DelayedAck is enabled, where not every packet is
acknowledged at once (instead one acknowledgement is sent per so many packets)
far more re-transmission can occur, further exacerbating congestion. This can lead to
continually decreasing performance until congestion clears. Since DelayedAck can
contribute to this, it is recommended to disable it in order to greatly reduce the effect
of congested networks and packet retransmission.
Enabling jumbo frames can further harm this since packets that are retransmitted are
far larger. If jumbo frames are enabled, it is absolutely recommended to disable
DelayedAck.
ProphetStor StellarFlash® Storage Best Practices for VMware vSphere 15
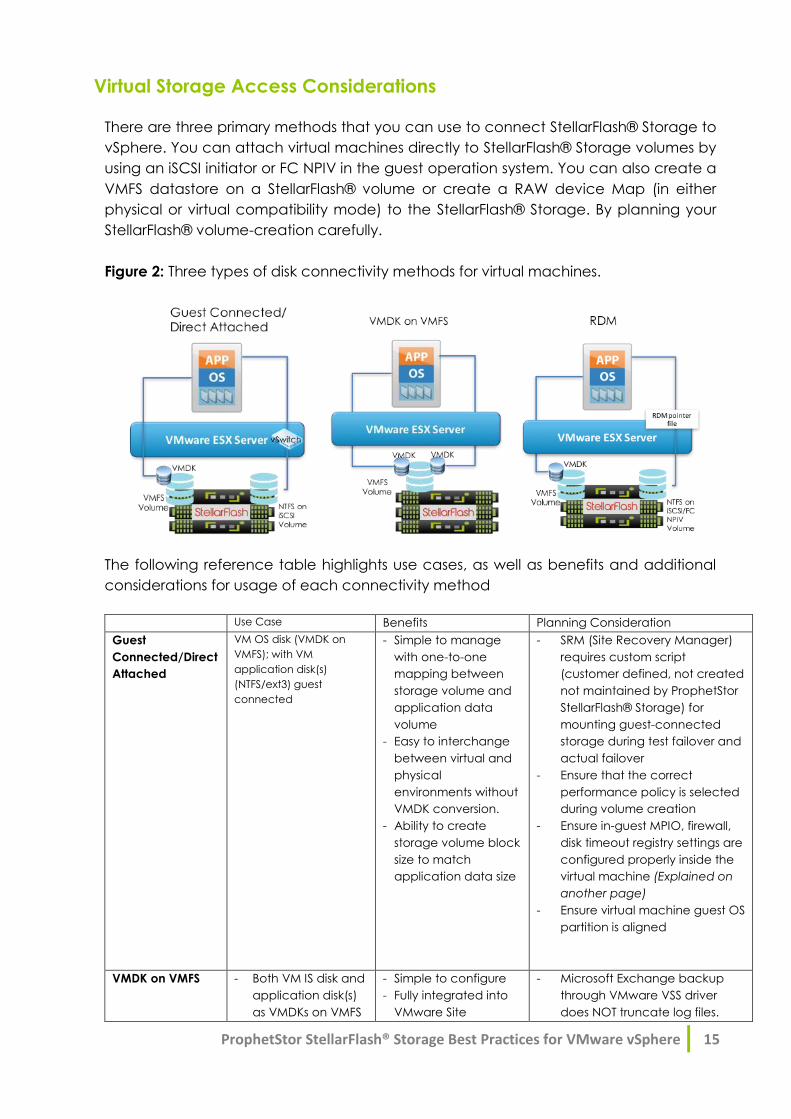
Virtual Storage Access Considerations
There are three primary methods that you can use to connect StellarFlash® Storage to
vSphere. You can attach virtual machines directly to StellarFlash® Storage volumes by
using an iSCSI initiator or FC NPIV in the guest operation system. You can also create a
VMFS datastore on a StellarFlash® volume or create a RAW device Map (in either
physical or virtual compatibility mode) to the StellarFlash® Storage. By planning your
StellarFlash® volume-creation carefully.
Figure 2: Three types of disk connectivity methods for virtual machines.
The following reference table highlights use cases, as well as benefits and additional
considerations for usage of each connectivity method
Use Case Benefits Planning Consideration
Guest
Connected/Direct
Attached
VM OS disk (VMDK on
VMFS); with VM
application disk(s)
(NTFS/ext3) guest
connected
- Simple to manage
with one-to-one
mapping between
storage volume and
application data
volume
- Easy to interchange
between virtual and
physical
environments without
VMDK conversion.
- Ability to create
storage volume block
size to match
application data size
- SRM (Site Recovery Manager)
requires custom script
(customer defined, not created
not maintained by ProphetStor
StellarFlash® Storage) for
mounting guest-connected
storage during test failover and
actual failover
- Ensure that the correct
performance policy is selected
during volume creation
- Ensure in-guest MPIO, firewall,
disk timeout registry settings are
configured properly inside the
virtual machine (Explained on
another page)
- Ensure virtual machine guest OS
partition is aligned
VMDK on VMFS - Both VM IS disk and
application disk(s)
as VMDKs on VMFS
- Simple to configure
- Fully integrated into
VMware Site
- Microsoft Exchange backup
through VMware VSS driver
does NOT truncate log files.
16 ProphetStor StellarFlash® Storage Best Practices for VMware vSphere
- Application
consistent
quiescent through
VMware Tools VSS
driver
- Item level recovery
Recovery Manager
for virtual protection,
test failover, failover,
and failback.
Ensure there is third party
Exchange truncation backup
solution in place.
- If all VMS in a VMFS volume are
hosting applications that are
stateless in nature (i.e., Web
Server, File Server, Print Server),
VMware VSS quiesced
snapshot is NOT required for
such VMs; therefor, ensure that
the volume synchronization
setting is set to “None”
- Running multiple VMDS on a
VMFS volume requires
additional time for VMware VSS
quiesced snapshots to be
taken for all VMDKSs on the
given datastore.
- Item level recovery involves
additional steps to clone VMFS
volume snapshot and
attaching VMDK to staging
virtual machine to export files to
destination VM needing restore
RDM (Physical
Compatibility
Mode)
- VMDK for IS and
application binary,
RDM in physical
Compatibility mode
for application
data disk.
None - There is no performance
benefit in using RDM in
comparison to VMDK or guest
connected iSCSI/FC storage
- vSphere has 256 target
maximum, consider trade-off
on running more VMs per VMFS
volume with one RDM target
per VM.
VMFS Datastore Mounted Volumes
Mounting a StellarFlash® Storage volume as a VMFS datastore provides the simplest
configuration when you use StellarFlash® Storage with vSphere. At minimum, VMFS
datastore are used to hold the virtual machine configuration and Operation System
volume. Using VMFS Datastores reduces management burden by not requiring the
installation of additional tools and the maintenance on each guest to properly
quiesce applications or database. In addition, VMFS Datastores permit keeping the
entire virtual machine together on the same protected volume. Using VMFS datastores
is a convenient method of mounting storage to VMware.
ProphetStor StellarFlash® Storage Best Practices for VMware vSphere 17
VMware APIs for Array Integration (VAAI)
In a virtualized environment, storage operations traditionally have been expensive from a
resource perspective. Functions such as cloning and snapshots can be performed more
efficiently by the storage device than by the host.
VMware vSphere Storage APIs “Array Integration (VAAI), also referred to as hardware
acceleration or hardware offload APIs, are a set of APIs to enable communication
between VMware vSphere ESXi hosts and storage devices. The APIs define a set of storage
primitives. that enable the ESXi host to offload certain storage operations to the array,
which reduces resource overhead on the ESXi hosts and can significantly improve
performance for storage-intensive operations such as storage cloning, zeroing, and so on.
The goal of VAAI is to help storage vendors provide hardware assistance to speed up
VMware I/O operations that are more efficiently accomplished in the storage hardware.
Without the use of VAAI, cloning or migration of virtual machines by the vSphere VMkernel
Data Mover involves software data movement. The Data Mover issues I/O to read and
write blocks to and from the source and destination datastores. With VAAI, the Data
Mover can use the API primitives to offload operations to the array if possible. For example,
if the desired operation were to copy a virtual machine disk (VMDK) le from one datastore
to another inside the same array, the array would be directed to make the copy
completely inside the array. Whenever a data movement operation is invoked and the
corresponding hardware offload operation is enabled, the Data Mover will first attempt
to use the hardware offload. If the hardware offload operation fails, the Data Mover
reverts to the traditional software method of data movement.
The VMWare APIs for Array Integration VAAI) is a feature set introduced vSphere 4.1. These
features enable and ESXi host to offload specific virtual machine and storage
management operations to compliant storage hardware. With the storage hardware
assistance, an ESXi host can perform these operations faster and more efficiently while
consuming far less CPU, memory, and storage fabric bandwidth. StellarFlash® supports
VAAI in ESXi5.0 and later.
The following five vStorage APIs are available for block storage vendors to implement and
support:
• Hardware Assisted Locking—commonly referred to as Atomic Test & Set (ATS) uses
the SCSI command COMPARE and WRITE (0x89), which is used during the creation,
alteration and deletion of files and metadata on a VMFS volume.
• Full Copy—leverages the SCSI command XCOPY (0x83), which is used to copy or
move virtual disks.
• Block Zero—leverages the SCSI command WRITE SAME (0x93) which is used to zero-
out virtual disk regions during virtual disk block allocation operations.
• Dead Space Reclamation—leverages the SCSI command UNMAP (0x42) to reclaim
previously used but now deleted space on a block SCSI device.
18 ProphetStor StellarFlash® Storage Best Practices for VMware vSphere
• (*) Thin Provisioning Stun and Resume—allows for the underlying storage to inform
ESXi that capacity has been entirely consumed, which then causes ESXi to
immediately “pause” virtual machines until additional capacity can be
provisioned. Note: (*) StellarFlash® will support in future release version.
Hardware Assisted Locking -- Atomic Test & Set (ATS)
In VMware vSphere VMFS, many operations must establish a lock on the volume when
updating a resource. Because VMFS is a clustered le system, many ESXi hosts can
share the volume. When one host must make an update to the VMFS metadata, a
locking mechanism is required to maintain le system integrity and prevent another
host from coming in and updating the same metadata. The following operations
require this lock:
1. Acquire on-disk locks
2. Upgrade an optimistic lock to an exclusive/physical lock
3. Unlock a read-only/multiwriter lock
4. Acquire a heartbeat
5. Clear a heartbeat
6. Replay a heartbeat
7. Reclaim a heartbeat
8. Acquire on-disk lock with dead owner
It is not essential to understand all of these operations in the context of this whitepaper.
It is sufficient to understand that various VMFS metadata operations require a lock.
ATS is an enhanced locking mechanism designed to replace the use of SCSI
reservations on VMFS volumes when doing metadata updates. A SCSI reservation
locks a whole LUN and prevents other hosts from doing metadata updates of a VMFS
volume when one host sharing the volume has a lock. This can lead to various
contention issues when many virtual machines are using the same datastore. It is a
limiting factor for scaling to very large VMFS volumes. ATS is a lock mechanism that
must modify only a disk sector on the VMFS volume. When successful, it enables an
ESXi host to perform a metadata update on the volume. This includes allocating
space to a VMDK during provisioning, because certain characteristics must be
updated in the metadata to reflect the new size of the le. The introduction of ATS
addresses the contention issues with SCSI reservations and enables VMFS volumes to
scale too much larger sizes.
In vSphere 4.0, VMFS3 used SCSI reservations for establishing the lock, because there
was no VAAI support in that release. In vSphere 4.1, on a VAAI-enabled array, VMFS3
used ATS for only operations 1 and 2 listed previously, and only when there was no
contention for disk lock acquisitions. VMFS3 reverted to using SCSI reservations if there
was a multihost collision when acquiring an on-disk lock using ATS.

ProphetStor StellarFlash® Storage Best Practices for VMware vSphere 19
In the initial VAAI release, the ATS primitives had to be implemented differently on
each storage array, requiring a different ATS opcode depending on the vendor. ATS
is now a standard T10 SCSI command and uses opcode 0x89 (COMPARE AND WRITE).
For VMFS5 datastores formatted on a VAAI-enabled array, all the critical section
functionality from operations 1 to 8 is done using ATS. There no longer should be any
SCSI reservations on VAAI-enabled VMFS5. ATS continues to be used even if there is
contention. On non-VAAI arrays, SCSI reservations continue to be used for establishing
critical sections in VMFS5.
Figure 3: Diagram representing old method before VAAI on the left and hardware-
assisted locking method available with VAAI on the right
ATS Only Flag
An ATS only flag appears on newly created VMFS5 datastores. When the host detects
that the array supports ATS on the device, the ATS only flag is written to the datastore.
From that point on, ATS always will be used on that datastore, so it can be used for all
metadata operations.
The flag is not enabled, however, on VMFS5 volumes that were upgraded from
VMFS3, facilitating seamless upgrades from VMFS3 to VMFS5. This is because VMFS3
was not ATS complete, and during the upgrade process, some hosts might continue
to use SCSI reservations for certain metadata operations.
20 ProphetStor StellarFlash® Storage Best Practices for VMware vSphere
The standard use cases benefiting the most from ATS include:
• High virtual machine to VMFS density
• Extremely dynamic environments—numerous provisioning and de-provisioning of
VMs (e.g. VDI using non-persistent linked-clones).
• High intensity virtual machine operations such as boot storms, or virtual disk growth
ATS heartbeat
A new VMFS heartbeat update method was supported since ESXi 5.5 Update 2.
Whereas previous version ESXi kernel handles heartbeat validation by using SCSI
Read/Write commands, the new heartbeat update method offloads the validation
to VAAI-enabled storage system by leveraging VAAI ATS commands.
The new heartbeat update method reduces the processing load of ESXi kernel, but
may fail heartbeat with ATS miscompare errors in certain circumstances.
To ensure ESXi cooperates with StellarFlash® Storage without this issue, the solution is
to disable ATS heartbeat. ESXi then reverts to legacy SCSI Read/Write heartbeat if ATS
heartbeat is disabled.
To disable ATS heartbeat, run the CLI command:
#esxcli system settings advanced set -i 0 -o /VMFS3/UseATSForHBOnVMFS5
To enable ATS heartbeat:
#esxcli system settings advanced set -i 1 -o /VMFS3/UseATSForHBOnVMFS5
To confirm ATS heartbeat is disabled properly, run the CLI command:
# esxcli system settings advanced list -o /VMFS3/UseATSForHBonVMFS3
You should see “Int Value:” in the output is ‘0’:
Path: /VMFS3/UseATSForHBOnVMFS3
Type: integer
Int Value: 0
Default Int Value: 0
Min Value: 0
Max Value: 1
String Value:
Default String Value:
Valid Characters:
Description: Use ATS for HB on ATS supported VMFS3 volumes
ProphetStor StellarFlash® Storage Best Practices for VMware vSphere 21
Full Copy or Hardware Accelerated Copy: XCOPY (Extended Copy)
Without VAAI, a clone or migrate operation must use the VMkernel software Data Mover
driver. If the files being cloned are multiple GB in size, the operation might last for many
minutes to many hours. This full copy consumes host resources such as CPU cycles, DMA
buffers and SCSI commands in the HBA queue.
This primitive requests that the array perform a full copy of blocks on behalf of the Data
Mover. It primarily is used in clone and migration operations (such as a VMware vSphere
Storage vMotion® instance). ESXi hosts can be configured to enable the EXTENDED
COPY SCSI command. The SCSI opcode for XCOPY is 0x83.
XCOPY benefits are leveraged during the following operations3:
• Virtual machine cloning
• Storage vMotion
• Deploying virtual machines from template
Block Zero or WRITE_SAME
ESXi supports three disk formats for provisioning virtual disks:
1. Eagerzeroedthick—the entirety of the virtual disk is completely reserved and pre-
zeroed on the VMFS upon creation. This virtual disk allocation mechanism offers
the most predictable performance and the highest level of protection against
capacity exhaustion.
2. Zeroedthick—this format reserves the space on the VMFS volume upon creation
but does not pre- zero the allocated blocks until the guest OS writes to them. New
writes cause iterations of on- demand zeroing in segments of the block size of the
target VMFS (almost invariably 1 MB with VMFS 5). There is a slight performance
impact on writes to new blocks due to the on-demand zeroing.
3. Thin—this format neither reserves space on the VMFS volume nor pre-zeroes blocks.
Space is allocated and zeroed on-demand in segments in accordance to the
VMFS block size. Thin virtual disks allow for the highest virtual machine density but
provide the lowest protection against possible capacity exhaustion. There is a
slight performance impact on writes to new blocks due to the on-demand zeroing
behavior.
Prior to WRITE SAME support, the performance differences between these virtual disk
allocation mechanisms were distinct. This was because before an unallocated block
could be written to, zeroes would have to be written first causing an allocate-on-first-
write penalty (increased latency). Therefore, for every new block written to there were
actually two writes; the zeroes then the actual data. For thin and zeroedthick virtual
disks, this zeroing was on-demand so the penalty was seen by applications. For
eagerzeroedthick, it was noticed during deployment because the entire virtual disk had
22 ProphetStor StellarFlash® Storage Best Practices for VMware vSphere
to be zeroed prior to use. This zeroing caused unnecessary I/O on the SAN fabric,
subtracting available bandwidth from “real” I/O.
To resolve this issue, VMware introduced WRITE SAME support. WRITE SAME is a SCSI
command that tells a target device (or array) to write a pattern (in this case, zeros) to
a target location. ESXi utilizes this command to avoid having to actually send a payload
of zeros but instead simply communicates to any array that it needs to write zeros to a
certain location on a certain device. This not only reduces traffic on the SAN fabric, but
also speeds up the overall process since the zeros do not have to traverse the data
path.
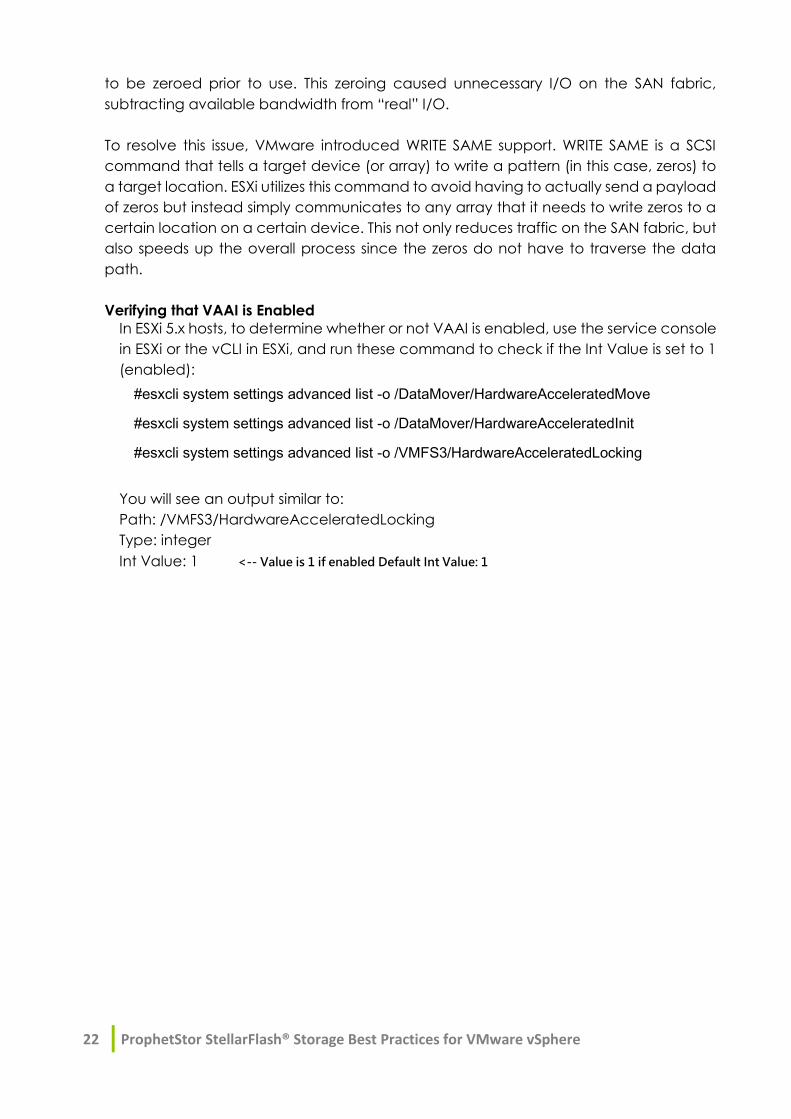
Verifying that VAAI is Enabled
In ESXi 5.x hosts, to determine whether or not VAAI is enabled, use the service console
in ESXi or the vCLI in ESXi, and run these command to check if the Int Value is set to 1
(enabled):
#esxcli system settings advanced list -o /DataMover/HardwareAcceleratedMove
#esxcli system settings advanced list -o /DataMover/HardwareAcceleratedInit
#esxcli system settings advanced list -o /VMFS3/HardwareAcceleratedLocking
You will see an output similar to:
Path: /VMFS3/HardwareAcceleratedLocking
Type: integer
Int Value: 1 <-- Value is 1 if enabled Default Int Value: 1
ProphetStor StellarFlash® Storage Best Practices for VMware vSphere 23
Guest OS Level configuration
Overview
One of the important considerations for deploying StellarFlash® storage to interoperate
effectively with the VMware ESX/ESXi guest operating systems in a SAN environment is to
utilize the StellarFlash® recommended guest OS tunings in the virtual machines. This article
describes the guest OS tunings utilized and the settings recommended by StellarFlash® to
help improve interoperability. The article also describes the purpose of updating guest OS
tunings from the previous settings and provides guidance on adopting the updated guest
OS tunings.
Why are guest OS tunings required?
The following are some reasons why guest OS tunings are required:
• To help improve error handling and interoperability during storage controller
failover events.
• To improve recovery times following a storage controller failover event.
What are the guest OS tunings utilized?
In a typical VMware virtual machine deployment, the guests utilize the local SCSI disks
served by the VMware vSphere hypervisor with the backing storage, either using VMware
virtual disk (VMDK) or raw device map (RDM) formats. The guest OS tunings
recommended are for the SCSI disks inside the virtual machines. In particular, the following
is a list of the tunings for the different guest operating systems:
1. Windows: disk timeout
2. Linux: disk timeout
3. Solaris: disk timeout and additional I/O tunings concerning busy/not-ready/reset
retries and I/O throttle settings
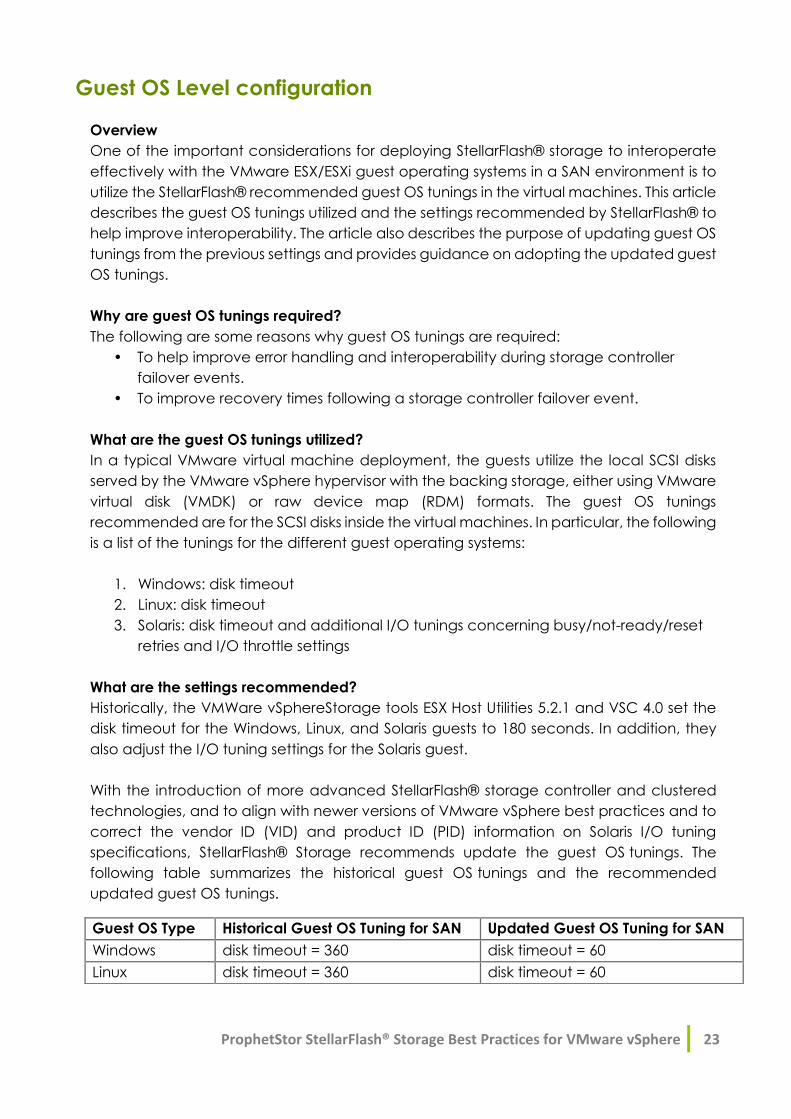
What are the settings recommended?
Historically, the VMWare vSphereStorage tools ESX Host Utilities 5.2.1 and VSC 4.0 set the
disk timeout for the Windows, Linux, and Solaris guests to 180 seconds. In addition, they
also adjust the I/O tuning settings for the Solaris guest.
With the introduction of more advanced StellarFlash® storage controller and clustered
technologies, and to align with newer versions of VMware vSphere best practices and to
correct the vendor ID (VID) and product ID (PID) information on Solaris I/O tuning
specifications, StellarFlash® Storage recommends update the guest OS tunings. The
following table summarizes the historical guest OS tunings and the recommended
updated guest OS tunings.
Guest OS Type Historical Guest OS Tuning for SAN Updated Guest OS Tuning for SAN
Windows disk timeout = 360 disk timeout = 60
Linux disk timeout = 360 disk timeout = 60
24 ProphetStor StellarFlash® Storage Best Practices for VMware vSphere
What are the StellarFlash® Storage guidelines for deployment?
Use the following guidelines to determine if you should update the guest OS tunings:
1. This KB addresses the guest OS tuning updates for a VMware SAN deployment.
2. There is no need to update the Windows and Linux guest OS tunings in existing
solutions that are working well with the historical guest OS tuning settings.
3. For the Solaris guest OS, adopt the corrected VID/PID information provided below
to help improve error handling and interoperability during storage controller
failover events.
4. When upgrading the ESX/ESXi hosts or StellarFlash® Storage controller software to
a recent release, utilize the opportunity to also deploy the updated guest OS
tunings.
5. If you are utilizing software iSCSI initiator from the guest OS, please follow respective
StellarFlash® documentations on the native OS interoperability requirements for
supported configurations, multipathing configurations, and any additional
required tunings in Host Utilities.
How to implement the updated guest OS tunings
You can manually configure the virtual machines with the recommended guest
OS tunings or utilize the scripts bundled within VSC to implement the tunings. Reboot the
guest after the tuning update for the settings to take effect.
Manual Configuration
WARNING: Using Registry Editor incorrectly might cause serious problems that require
reinstalling your operating system. Make a backup copy of the registry before making
any changes to the Windows registry.
• Windows: Set Windows disk timeout to 60 seconds by using the TimeOutValue
registry key located
below:HKEY_LOCAL_MACHINE\System\CurrentControlSet\Services\Disk\TimeOutValue
• Linux: Set Linux disk timeout to 60 seconds can be achieved by creating an udev
rule with the following entry.
DRIVERS=="sd", SYSFS =="0|7|14", RUN+="/bin/sh -c 'echo 60 > /sys$$DEVPATH/device/timeout'"
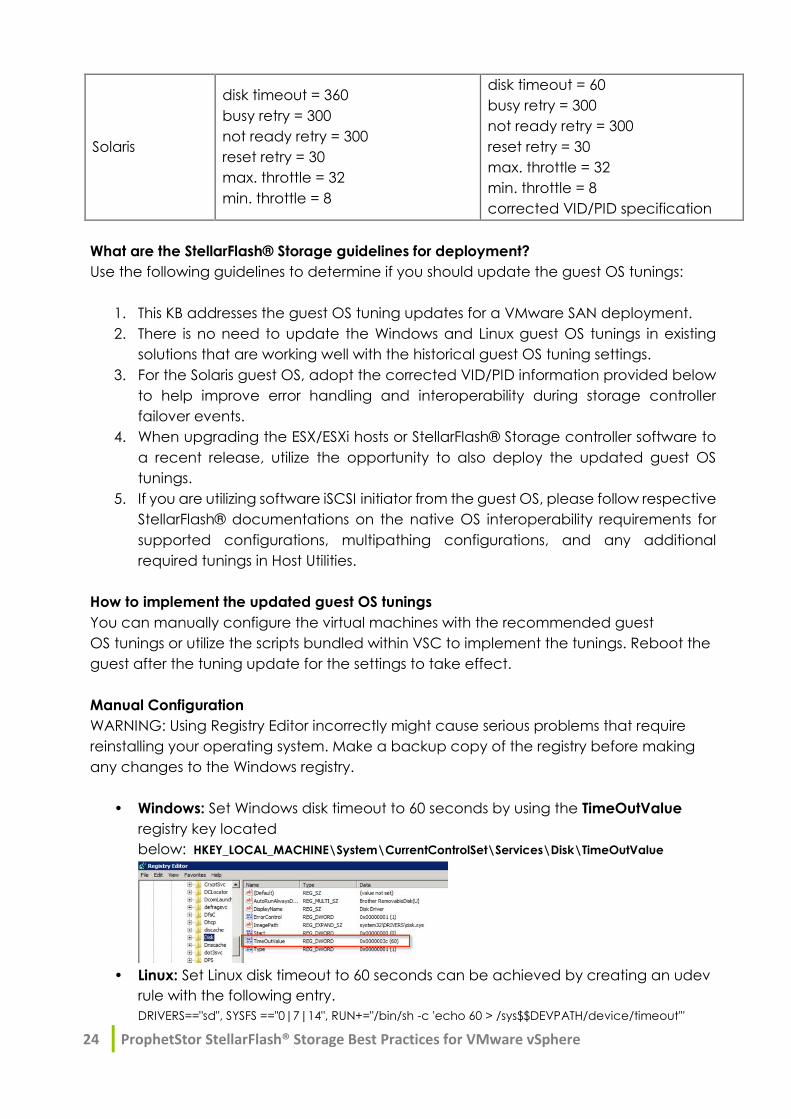
Solaris
disk timeout = 360
busy retry = 300
not ready retry = 300
reset retry = 30
max. throttle = 32
min. throttle = 8
disk timeout = 60
busy retry = 300
not ready retry = 300
reset retry = 30
max. throttle = 32
min. throttle = 8
corrected VID/PID specification
ProphetStor StellarFlash® Storage Best Practices for VMware vSphere 25
◦ In addition, the VMware Tools in the Linux guest OS provide an udev rule to
set the disk timeout to 180 seconds automatically for VMware virtual disks.
You can 'grep' for the 'VMware' vendor ID in the udev rules directory to find
out which script was installed by VMware and modify it accordingly.
◦ Verify again after a VMware Tools update to ensure the disk timeouts is at
the desired value.
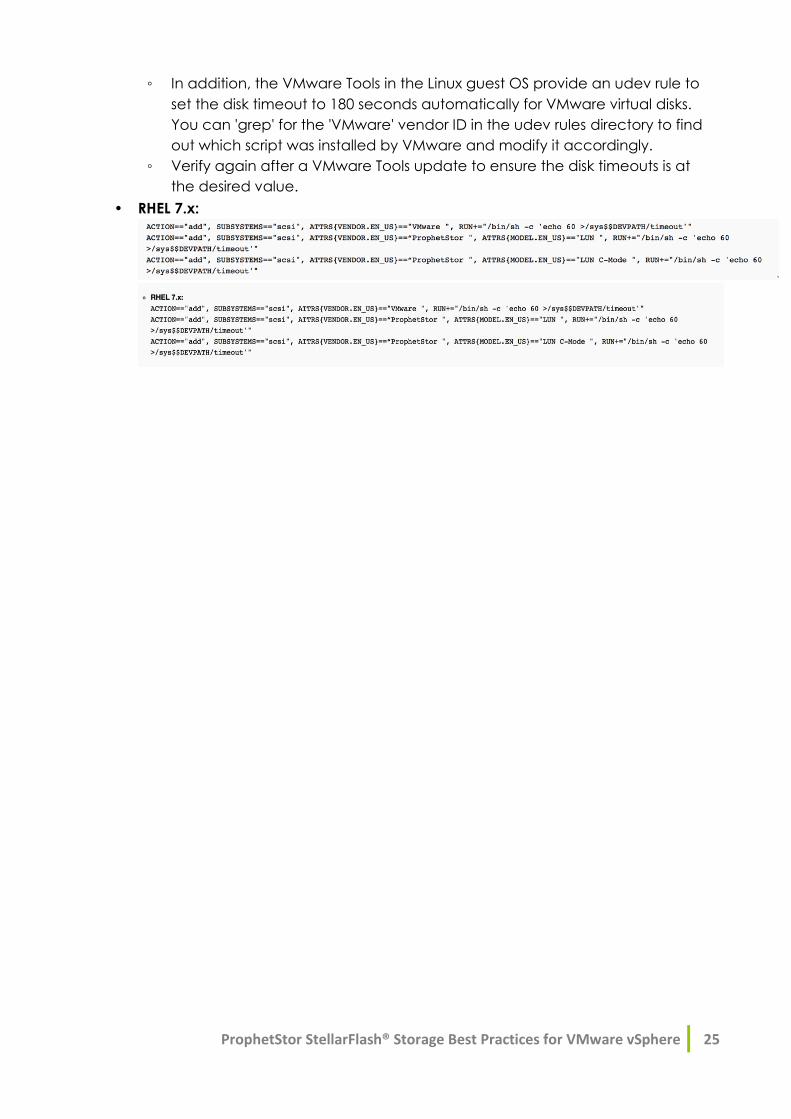
• RHEL 7.x:
26 ProphetStor StellarFlash® Storage Best Practices for VMware vSphere
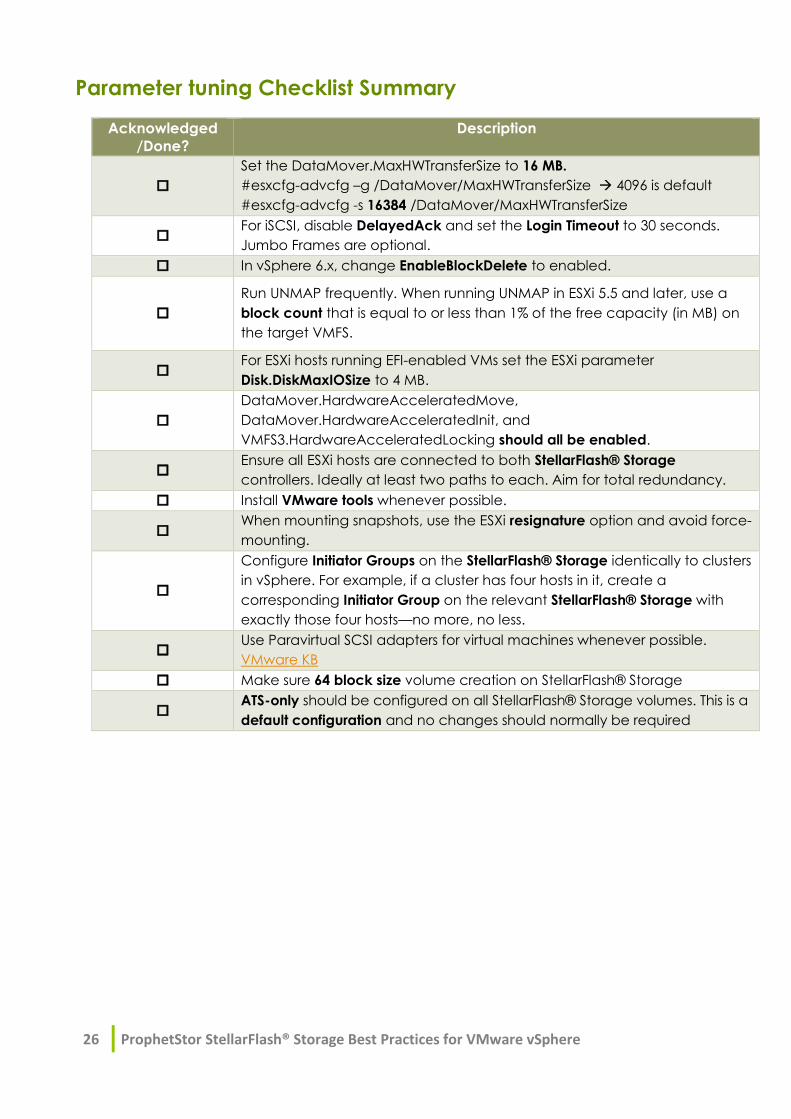
Parameter tuning Checklist Summary
Acknowledged
/Done?
Description
Set the DataMover.MaxHWTransferSize to 16 MB.
#esxcfg-advcfg –g /DataMover/MaxHWTransferSize 4096 is default
#esxcfg-advcfg -s 16384 /DataMover/MaxHWTransferSize
For iSCSI, disable DelayedAck and set the Login Timeout to 30 seconds.
Jumbo Frames are optional.
In vSphere 6.x, change EnableBlockDelete to enabled.
Run UNMAP frequently. When running UNMAP in ESXi 5.5 and later, use a
block count that is equal to or less than 1% of the free capacity (in MB) on
the target VMFS.
For ESXi hosts running EFI-enabled VMs set the ESXi parameter
Disk.DiskMaxIOSize to 4 MB.
DataMover.HardwareAcceleratedMove,
DataMover.HardwareAcceleratedInit, and
VMFS3.HardwareAcceleratedLocking should all be enabled.
Ensure all ESXi hosts are connected to both StellarFlash® Storage
controllers. Ideally at least two paths to each. Aim for total redundancy.
Install VMware tools whenever possible.
When mounting snapshots, use the ESXi resignature option and avoid force-
mounting.
Configure Initiator Groups on the StellarFlash® Storage identically to clusters
in vSphere. For example, if a cluster has four hosts in it, create a
corresponding Initiator Group on the relevant StellarFlash® Storage with
exactly those four hosts—no more, no less.
Use Paravirtual SCSI adapters for virtual machines whenever possible.
VMware KB
Make sure 64 block size volume creation on StellarFlash® Storage
ATS-only should be configured on all StellarFlash® Storage volumes. This is a
default configuration and no changes should normally be required