tentacle.netprophet/raspberrypi/Raspberry... · Praise for the First Edition of Raspberry Pi The...
169
Transcript of tentacle.netprophet/raspberrypi/Raspberry... · Praise for the First Edition of Raspberry Pi The...


Praise for the First Edition of Raspberry Pi
The Raspberry Pi is bringing back the golden days of experimenting with home
computers, and Maik’s book is an ideal starting point. The included projects are
perfect for Raspberry Pi users of any age or level of experience.
Tony Williamitis, Senior Embedded Systems Engineer
Schmidt takes a quick dip into many of the things you can do with a Raspberry
Pi straight out of the box. I found it very useful for understanding exactly what I
can use my Pi for, and it’s given me some ideas for what I can do next!
Stephen Orr, Technical Enthusiast and Web Developer
This is the owner’s manual all Raspberry Pi buyers should get before they start
diving in. It’s clear, comprehensive, and succinct. I couldn’t ask for more.
Thomas Lockney, Professional Geek
DorkbotPDX
A wonderfully clear, concise, and useful introduction to the Raspberry Pi.
Michael Hunter

Raspberry Pi: A Quick-Start Guide,2nd Edition
Maik Schmidt
The Pragmatic BookshelfDallas, Texas • Raleigh, North Carolina

Many of the designations used by manufacturers and sellers to distinguish their products
are claimed as trademarks. Where those designations appear in this book, and The Pragmatic
Programmers, LLC was aware of a trademark claim, the designations have been printed in
initial capital letters or in all capitals. The Pragmatic Starter Kit, The Pragmatic Programmer,
Pragmatic Programming, Pragmatic Bookshelf, PragProg and the linking g device are trade-
marks of The Pragmatic Programmers, LLC.
Every precaution was taken in the preparation of this book. However, the publisher assumes
no responsibility for errors or omissions, or for damages that may result from the use of
information (including program listings) contained herein.
Our Pragmatic courses, workshops, and other products can help you and your team create
better software and have more fun. For more information, as well as the latest Pragmatic
titles, please visit us at http://pragprog.com.
The team that produced this book includes:
Jacquelyn Carter (editor)
Potomac Indexing, LLC (indexer)
Cathleen Small (copyeditor)
David J Kelly (typesetter)
Janet Furlow (producer)
Ellie Callahan (support)
For international rights, please contact [email protected].
Copyright © 2014 The Pragmatic Programmers, LLC.
All rights reserved.
No part of this publication may be reproduced, stored in a retrieval system, ortransmitted, in any form, or by any means, electronic, mechanical, photocopying,recording, or otherwise, without the prior consent of the publisher.
Printed in the United States of America.
ISBN-13: 978-1-93778-580-2
Encoded using the finest acid-free high-entropy binary digits.
Book version: P1.0—February 2014

Contents
Acknowledgments . . . . . . . . . . . ix
Preface . . . . . . . . . . . . . . xi
1. Meet the Raspberry Pi . . . . . . . . . . . 1
Get to Know the Hardware 1
What Else You Need 6
Next Steps 9
2. Install an Operating System . . . . . . . . . 11
See What’s Available 11
Have a Look Around with NOOBS 14
Prepare a Bootable SD Card 17
Next Steps 22
3. Configure Raspbian . . . . . . . . . . . 23
Boot the Pi for the First Time 23
Customize Your Installation with Raspi-config 24
Start the Desktop 31
Manage Your Software with apt-get 33
Install Software and Media Using the Pi Store 38
Next Steps 39
4. Configure the Firmware . . . . . . . . . . 41
Update the Firmware and Kernel 41
Configure the Video Output 43
Test and Configure the Audio System 45
Next Steps 46
5. Intermezzo: Build a Kiosk with the Pi . . . . . . 47
Display Twitter Live Search Information 47
Refresh Websites Automatically 50
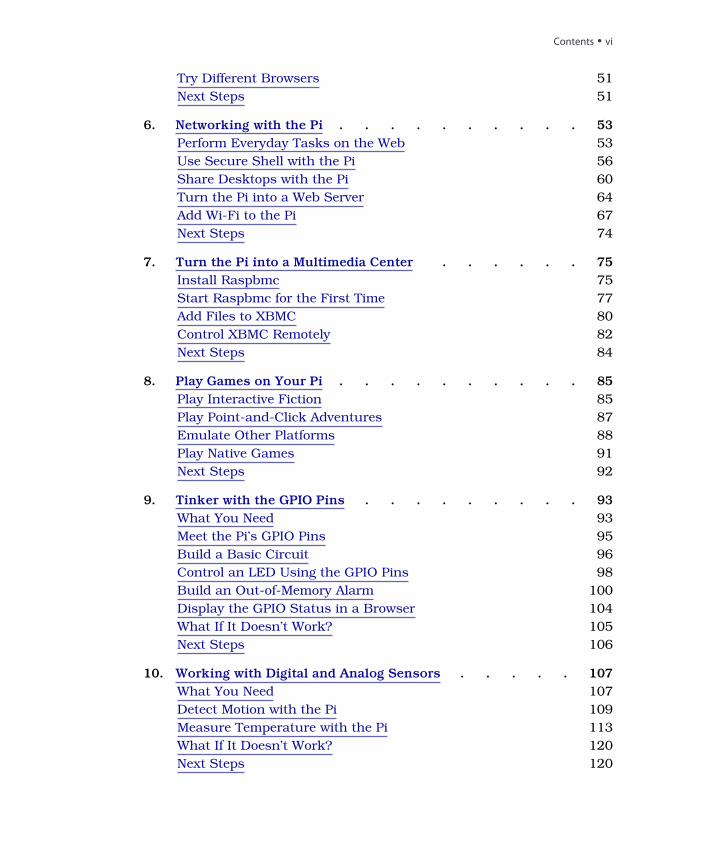
Try Different Browsers 51
Next Steps 51
6. Networking with the Pi . . . . . . . . . . 53
Perform Everyday Tasks on the Web 53
Use Secure Shell with the Pi 56
Share Desktops with the Pi 60
Turn the Pi into a Web Server 64
Add Wi-Fi to the Pi 67
Next Steps 74
7. Turn the Pi into a Multimedia Center . . . . . . 75
Install Raspbmc 75
Start Raspbmc for the First Time 77
Add Files to XBMC 80
Control XBMC Remotely 82
Next Steps 84
8. Play Games on Your Pi . . . . . . . . . . 85
Play Interactive Fiction 85
Play Point-and-Click Adventures 87
Emulate Other Platforms 88
Play Native Games 91
Next Steps 92
9. Tinker with the GPIO Pins . . . . . . . . . 93
What You Need 93
Meet the Pi’s GPIO Pins 95
Build a Basic Circuit 96
Control an LED Using the GPIO Pins 98
Build an Out-of-Memory Alarm 100
Display the GPIO Status in a Browser 104
What If It Doesn’t Work? 105
Next Steps 106
10. Working with Digital and Analog Sensors . . . . . 107
What You Need 107
Detect Motion with the Pi 109
Measure Temperature with the Pi 113
What If It Doesn’t Work? 120
Next Steps 120
Contents • vi
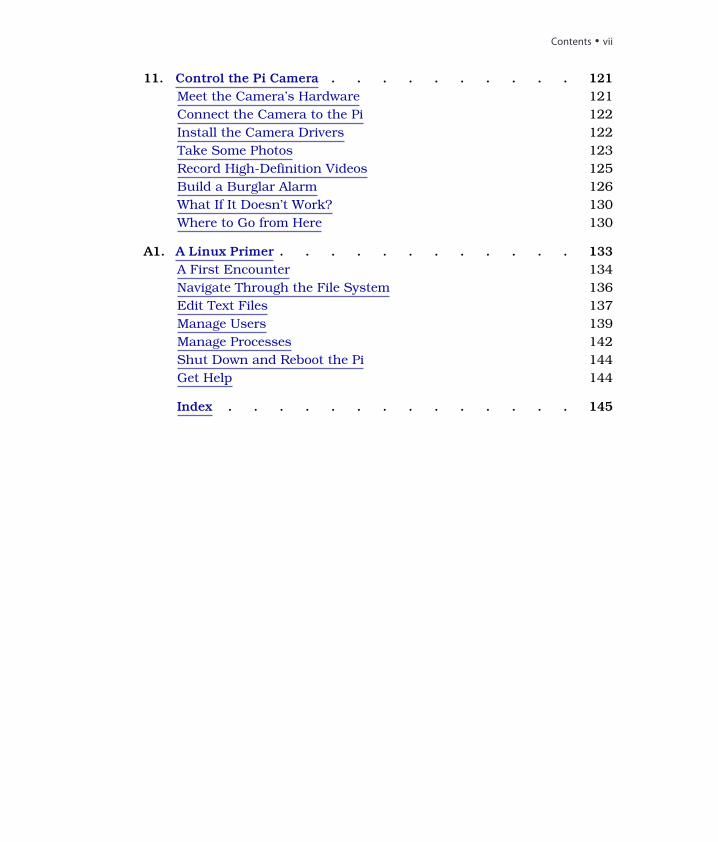
11. Control the Pi Camera . . . . . . . . . . 121
Meet the Camera’s Hardware 121
Connect the Camera to the Pi 122
Install the Camera Drivers 122
Take Some Photos 123
Record High-Definition Videos 125
Build a Burglar Alarm 126
What If It Doesn’t Work? 130
Where to Go from Here 130
A1. A Linux Primer . . . . . . . . . . . . 133
A First Encounter 134
Navigate Through the File System 136
Edit Text Files 137
Manage Users 139
Manage Processes 142
Shut Down and Reboot the Pi 144
Get Help 144
Index . . . . . . . . . . . . . . 145
Contents • vii

Acknowledgments
Whenever I tell people that I’m an author, they look at me dreamily for a few
seconds. Obviously, many people think that writing is about sitting at an old
wooden desk, staring outside the window on a stormy day, and enjoying a
good glass of red wine. For me this has rarely been the case, but still, most
of the time I have a lot of fun while writing books.
I had a lot of fun writing this book, too—mainly because of the invaluable
support of my editor, Jacquelyn Carter. She cheered me up on countless
occasions, and her thoughtful advice made most of my problems disappear
immediately. Thank you very much, Jackie!
As always, the whole team at the Pragmatic Bookshelf has been tremendously
helpful and agile. Without you, this book would’ve been impossible!
This book deals with electronics, and I have created all the circuit diagrams
with Fritzing.1 I am deeply grateful that the Fritzing team has made such a
great tool available for free. The Adafruit Fritzing library2 has been tremen-
dously helpful, too. Also, I have to thank Gordon Henderson for WiringPi.3 It
makes working with the Raspberry Pi’s GPIO pins a piece of cake, and it saved
me countless hours of debugging low-level code.
Simon Quernhorst kindly gave me permission to use screenshots of his great
game, A-VCS-tec Challenge, in this book.
I cannot thank my reviewers enough: Daniel Bachfeld, Gordon Haggart,
Michael Hunter, Thomas Lockney, Christian Müller, Angus Neil, Stephen Orr,
Mike Riley, Sam Rose, Mike Williamitis, Tony Williamitis, and Jim Wilson.
Your comments and suggestions made this book so much better.
Finally, I have to thank Tanja and Mika for being so patient and understand-
ing. I am so glad I have you!
1. http://fritzing.org/2. https://github.com/adafruit/Fritzing-Library/3. https://projects.drogon.net/raspberry-pi/wiringpi/
report erratum • discuss
Preface
Over the past decades, computers have gotten cheaper and cheaper, so today
you can find them not only at your desk, but also in nearly every consumer
electronics device, such as smartphones and DVD players. Still, computers
aren’t so cheap that you spontaneously buy one when shopping for your
groceries. Usually, you carefully plan your next computer purchase, because
you have to use it for a couple of years.
Computers like the Raspberry Pi will change the situation completely in the
near future. The Raspberry Pi—or Pi, for short—is a full-blown desktop PC
that costs only $35. You can connect it directly to the Internet, and it can
display high-definition videos. Also, it runs Linux, so you don’t have to pay
for an operating system. This makes the Pi probably the first throwaway
computer in history.
Originally, the Raspberry Foundation1 built the Pi to teach children how to
program, so it comes as no surprise that the Pi is an excellent device for
exactly this purpose. On top of that, you can use the Pi for many other
exciting things. For example, you can turn it into a multimedia center, use
it as a cheap but powerful web server, or play some classic games.
The Pi is also a great machine for experimenting with electronics. In contrast
to many popular microcontroller boards, such as the Arduino, the Pi runs a
full-blown operating system, and you can choose from a wide range of pro-
gramming languages to implement your projects.
With cheap and small devices like the Raspberry Pi, a new era of ubiquitous
computing has begun, and you can be part of it. This book will help you get
up to speed quickly.
1. http://www.raspberrypi.org/
report erratum • discuss

Who Should Read This Book?
This book is for everyone who wants to get started with the Raspberry Pi.
Even if you have some experience with other computers, you’ll quickly see
that the Pi is different in many regards, and this book will help you avoid the
most common pitfalls.
You can choose from a variety of operating systems for the Pi, but this book’s
focus is on Debian Linux (Raspbian), because it’s the most convenient choice
for beginners. If you’ve never worked with Linux before, you should start with
Appendix 1, A Linux Primer, on page 133. Even if you’ve worked with Linux
before, you still might learn a few things, because running Linux on the Pi is
different in some ways.
Of course, you’ll get the most out of this book if you have a Raspberry Pi and
follow all the book’s examples closely.
What’s in This Book?
The Raspberry Pi doesn’t come with a user guide, but in this book you’ll learn
step by step how to get the most out of your mini-computer quickly. You’ll
learn how the Pi’s hardware works, as well as how to run different operating
systems and use the Pi for special purposes, such as turning it into a multi-
media center.
Here’s a list of all the things you’re going to learn:
• The book starts with an introduction to the Raspberry Pi’s hardware.
You’ll learn what the Pi’s connectors are for and which additional hardware
you need to start the Pi for the first time.
• After you’ve connected all the necessary devices to your Pi, you need an
operating system. Although the Pi is a fairly young project, you can already
choose from several operating systems, and you’ll learn about their pros
and cons.
• Installing an operating system on the Pi is quite different from installing
an operating system on a regular PC. So, you’ll learn how to get Debian
Linux up and running on the Pi.
• Debian Linux runs fine out of the box on the Pi, but to get the most out
of it, you have to tweak a few configuration parameters. For example, it’s
beneficial to set the correct layout for your keyboard. In addition, you’ll
learn how to install, update, and remove software.
Preface • xii
report erratum • discuss
• The Pi’s hardware—especially its graphics hardware—is special in many
regards. Depending on the display you’re using, you have to adjust some
low-level settings for the Pi’s firmware. You’ll learn what settings are
available and how to solve the most common firmware problems.
• To see what you can achieve with the Pi with a minimum of effort, you’ll
turn it into a kiosk system. It will be able to display a set of static slides
as well as live information from the Internet.
• At this point in the book, you’ll have used the Pi more or less in isolation,
but now you’ll learn how to integrate it with networks. You’ll use the Pi
for everyday tasks such as browsing the Web, you’ll make it accessible
via Secure Shell, and you’ll even turn it into a full-blown web server. Also,
you’ll learn how to share your Pi’s desktop with a PC, and vice versa.
• With the XBMC project, you can turn your Raspberry Pi into a multimedia
center with ease. Not only can you show your photo collections to your
friends in your living room, but you can also play music in all popular
formats, and you can watch your favorite movies and TV shows in high
definition.
• The Raspberry team originally built the Pi for educational purposes, but
you can easily use it to play some entertaining games. Even though it’s
possible to run some first-person shooters, you might prefer some classic
genres, such as interactive fiction and point-and-click adventures.
• One of the greatest advantages the Pi has over regular PCs is its GPIO
pins. In the book’s final chapters, you’ll learn how to use them to attach
your own electronics projects to the Pi.
• The Pi’s homogeneous hardware makes it easy to create additional hard-
ware. The Raspberry team has released a camera, for example, that works
perfectly with the Pi; you can easily integrate it with your own projects.
• The appendix contains a short introduction to Linux. If you’ve never
worked with Linux before, you should read the appendix before you start
with Chapter 3, Configure Raspbian, on page 23.
Where Can I Get a Raspberry Pi and Additional Hardware?
In the beginning, only two distributors in the UK produced and sold the
Raspberry Pi: Farnell2 and RS Components.3 Today, you can buy a Pi from
2. http://www.farnell.com/3. http://www.rs-online.com/
report erratum • discuss
Where Can I Get a Raspberry Pi and Additional Hardware? • xiii
many other stores, such as Adafruit,4 SparkFun,5 and Maker Shed.6 These
shops also sell many accessories for the Pi, such as power supplies, keyboards,
mice, and so on.
You can find a growing list of compatible hardware on the project’s wiki,7 but
when in doubt, it’s better to buy hardware from one of the vendors mentioned
here.
Debian Linux
The most popular operating system for the Pi is Linux. Several Linux distri-
butions are available for the Pi, and we chose Debian. In May 2013 the Debian
team froze the latest version, named wheezy, and because of the great efforts
of the Raspbian team,8 it became quickly available for the Pi. Raspbian
supersedes Debian squeeze, which was the reference operating system for
the Pi for a long time.
The Raspbian distribution has many advantages over all of its predecessors. It is
much faster, it has more recent software, and it is more stable. Also, it’s the pre-
ferred solution of the Raspberry team, so this book’s focus is on Raspbian.
Code Examples and Conventions
In this book you’ll find a few code examples written in PHP, Python, HTML,
and the programming language of the Bash shell. They’re all very short, and
if you’ve done some programming before, you’ll have no problem understanding
them. If you haven’t developed software before, you’ll still be able to copy the
code to the Pi and make it run.
Online Resources
This book has its own web page at http://pragprog.com/titles/msraspi, where you can
download the code for all examples, or you can click the filename above each
code example to download the source file directly. On the web page, you can
also participate in a discussion forum and meet other readers and me. If you
find bugs, typos, or other annoyances, please let me and the world know
about them on the book’s errata page.
Now it’s time to unbox your Raspberry Pi and have some real fun!
4. http://adafruit.com/5. http://sparkfun.com/6. http://makershed.com7. http://elinux.org/RPi_VerifiedPeripherals8. http://www.raspbian.org/
Preface • xiv
report erratum • discuss
CHAPTER 1
Meet the Raspberry Pi
Before you start the Raspberry Pi for the first time, you should get familiar
with its connectors and its capabilities. This will help you decide what kind
of projects you can use the Pi for, and it will help you understand what kind
of additional hardware you’ll need. For example, you’ll need a power supply,
a keyboard, a mouse, and a display. In this chapter, you’ll learn which devices
work best.
Get to Know the Hardware
Unboxing a new Pi is exciting, but it certainly is not comparable to unboxing
a new Apple product. Usually, the Pi comes in a plain cardboard box with
one or two sheets of paper containing the usual safety hints for electronic
devices and a quick-start guide.
The first version of the Pi looks attractive only to real geeks. It is a single-
board computer without a case, and it’s the size of a credit card. It somewhat
resembles the innards of the many electronic devices you might have opened
when you were a child. Later versions of the Pi might have a case, but until
then we have to focus on its inner values, and that’s what counts, isn’t it?
What’s on the Pi
The Pi is available in two flavors: Model A and Model B. Model B has been
revised and is available in two slightly different versions now: Model B (Revi-
sion 1) and Model B (Revision 2). Model A is a bit cheaper and does not have
as many connectors as Model B. I’ll explain their differences and the differ-
ences between the two Model B revisions in detail in the following text.
I’ll mostly cover Model B in the rest of this book, because it’s much more
popular than Model A. You can see it in Figure 1, The front side of a Model B
(Revision 1), on page 2.
report erratum • discuss
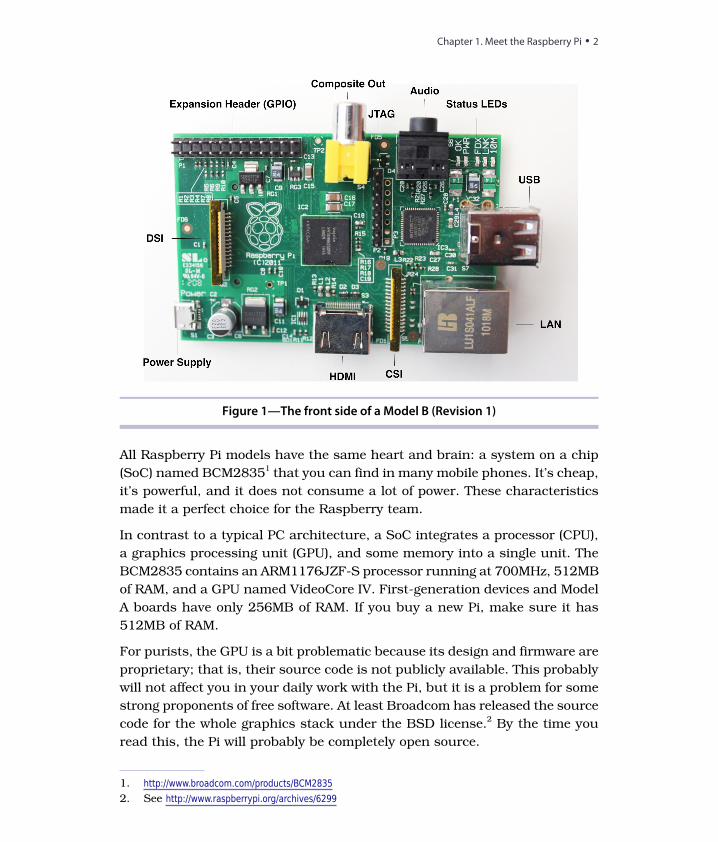
Figure 1—The front side of a Model B (Revision 1)
All Raspberry Pi models have the same heart and brain: a system on a chip
(SoC) named BCM28351 that you can find in many mobile phones. It’s cheap,
it’s powerful, and it does not consume a lot of power. These characteristics
made it a perfect choice for the Raspberry team.
In contrast to a typical PC architecture, a SoC integrates a processor (CPU),
a graphics processing unit (GPU), and some memory into a single unit. The
BCM2835 contains an ARM1176JZF-S processor running at 700MHz, 512MB
of RAM, and a GPU named VideoCore IV. First-generation devices and Model
A boards have only 256MB of RAM. If you buy a new Pi, make sure it has
512MB of RAM.
For purists, the GPU is a bit problematic because its design and firmware are
proprietary; that is, their source code is not publicly available. This probably
will not affect you in your daily work with the Pi, but it is a problem for some
strong proponents of free software. At least Broadcom has released the source
code for the whole graphics stack under the BSD license.2 By the time you
read this, the Pi will probably be completely open source.
1. http://www.broadcom.com/products/BCM28352. See http://www.raspberrypi.org/archives/6299
Chapter 1. Meet the Raspberry Pi • 2
report erratum • discuss

The Pi has many connectors, and most of them look familiar. On a Model B
board, you’ll find two regular-sized USB ports that you can use to connect a
keyboard and a mouse, for example. You’ll also find a micro-USB port, but
you’ll need it to power the Pi, and you cannot use it to connect more devices.
If you need to connect more devices, you have to connect them to a USB hub.
The Model A board has only a single USB port, so you’ll probably always need
a USB hub.
You can connect the Model B to a network directly using its Ethernet (LAN)
port. Model A does not have an Ethernet port, but you can add one by
attaching a USB-to-Ethernet converter. Interestingly, Model B uses its internal
USB hardware for networking, too, so there’s no difference in networking
performance between a Model B and a Model A with a USB-to-Ethernet
adapter.
To connect the Pi to a display or a TV set, you have two options; the Pi has
ports for connecting both HDMI and composite video. The digital HDMI
standard is much more powerful than its much older brother, the analog
composite standard. With HDMI, you can transmit high-definition video in
crystal-clear quality, while the composite output is limited to what older geeks
know as “the childhood TV.” Using composite video, you cannot display high-
definition graphics, and the output usually flickers a bit. Its biggest advantage
is that many TV sets still have a composite connector, but HDMI is gaining
ground quickly. By the way, the Raspberry team did not add a VGA connector,
because it thinks that VGA is at the end of its life. Of course, you can use an
adapter to connect the Pi’s HDMI output to a DVI or VGA display.
With HDMI you can also transmit both video and sound, but if you’re using
composite video, you’ll need a separate connector for sound output. That’s
what the audio jack is for—you can connect it to headphones, to speakers,
or to your audio receiver using a standard 3.5mm plug.
To the left of the composite video connector, you’ll see an expansion header
that consists of two rows of pins. Most of these pins are general-purpose
input/output pins (GPIOs), and you can use them to connect the Pi to other
electronic devices. As you might have guessed from their name, they do not
have a special purpose, so you can do many different things with them. For
example, you can use them to connect your good old Atari VCS 2600 game
controllers to the Pi so you can run your favorite 8-bit games in an emulator.
In Chapter 9, Tinker with the GPIO Pins, on page 93, you’ll learn how to use
the expansion header, and you’ll build a small hardware project.
report erratum • discuss
Get to Know the Hardware • 3
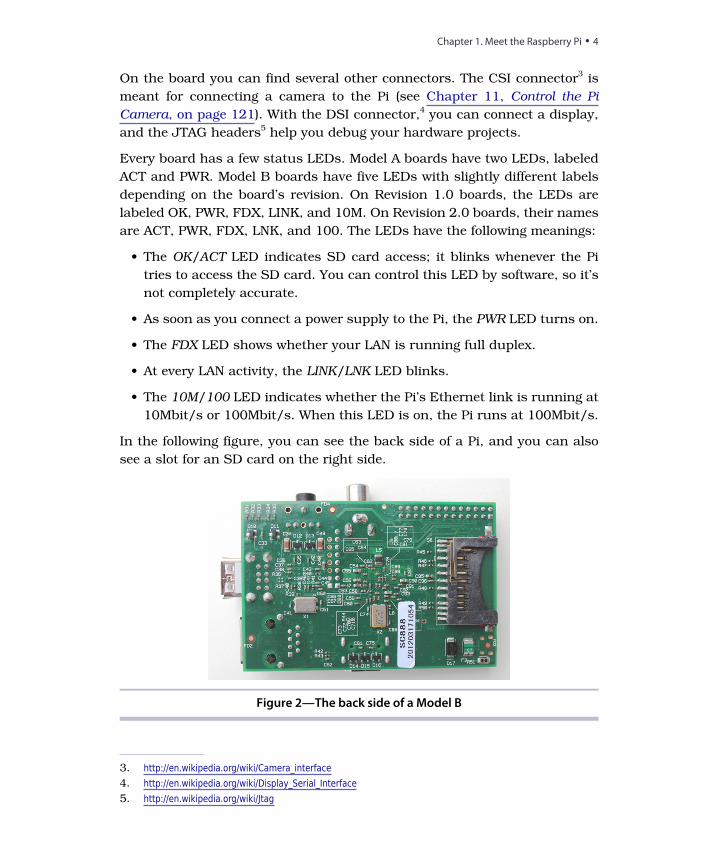
On the board you can find several other connectors. The CSI connector3 is
meant for connecting a camera to the Pi (see Chapter 11, Control the Pi
Camera, on page 121). With the DSI connector,4 you can connect a display,
and the JTAG headers5 help you debug your hardware projects.
Every board has a few status LEDs. Model A boards have two LEDs, labeled
ACT and PWR. Model B boards have five LEDs with slightly different labels
depending on the board’s revision. On Revision 1.0 boards, the LEDs are
labeled OK, PWR, FDX, LINK, and 10M. On Revision 2.0 boards, their names
are ACT, PWR, FDX, LNK, and 100. The LEDs have the following meanings:
• The OK/ACT LED indicates SD card access; it blinks whenever the Pi
tries to access the SD card. You can control this LED by software, so it’s
not completely accurate.
• As soon as you connect a power supply to the Pi, the PWR LED turns on.
• The FDX LED shows whether your LAN is running full duplex.
• At every LAN activity, the LINK/LNK LED blinks.
• The 10M/100 LED indicates whether the Pi’s Ethernet link is running at
10Mbit/s or 100Mbit/s. When this LED is on, the Pi runs at 100Mbit/s.
In the following figure, you can see the back side of a Pi, and you can also
see a slot for an SD card on the right side.
Figure 2—The back side of a Model B
3. http://en.wikipedia.org/wiki/Camera_interface4. http://en.wikipedia.org/wiki/Display_Serial_Interface5. http://en.wikipedia.org/wiki/Jtag
Chapter 1. Meet the Raspberry Pi • 4
report erratum • discuss
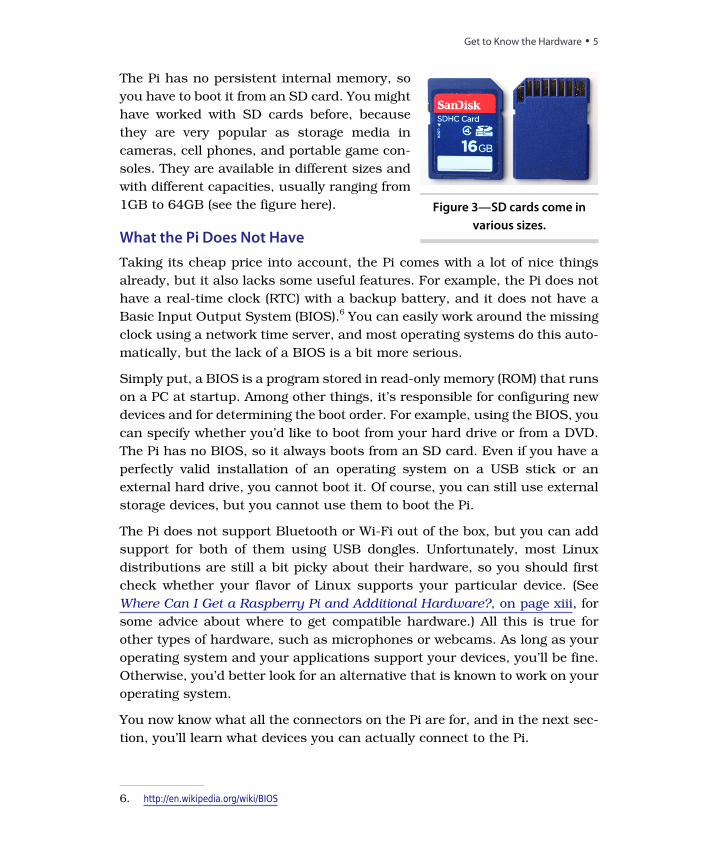
Figure 3—SD cards come in
various sizes.
The Pi has no persistent internal memory, so
you have to boot it from an SD card. You might
have worked with SD cards before, because
they are very popular as storage media in
cameras, cell phones, and portable game con-
soles. They are available in different sizes and
with different capacities, usually ranging from
1GB to 64GB (see the figure here).
What the Pi Does Not Have
Taking its cheap price into account, the Pi comes with a lot of nice things
already, but it also lacks some useful features. For example, the Pi does not
have a real-time clock (RTC) with a backup battery, and it does not have a
Basic Input Output System (BIOS).6 You can easily work around the missing
clock using a network time server, and most operating systems do this auto-
matically, but the lack of a BIOS is a bit more serious.
Simply put, a BIOS is a program stored in read-only memory (ROM) that runs
on a PC at startup. Among other things, it’s responsible for configuring new
devices and for determining the boot order. For example, using the BIOS, you
can specify whether you’d like to boot from your hard drive or from a DVD.
The Pi has no BIOS, so it always boots from an SD card. Even if you have a
perfectly valid installation of an operating system on a USB stick or an
external hard drive, you cannot boot it. Of course, you can still use external
storage devices, but you cannot use them to boot the Pi.
The Pi does not support Bluetooth or Wi-Fi out of the box, but you can add
support for both of them using USB dongles. Unfortunately, most Linux
distributions are still a bit picky about their hardware, so you should first
check whether your flavor of Linux supports your particular device. (See
Where Can I Get a Raspberry Pi and Additional Hardware?, on page xiii, for
some advice about where to get compatible hardware.) All this is true for
other types of hardware, such as microphones or webcams. As long as your
operating system and your applications support your devices, you’ll be fine.
Otherwise, you’d better look for an alternative that is known to work on your
operating system.
You now know what all the connectors on the Pi are for, and in the next sec-
tion, you’ll learn what devices you can actually connect to the Pi.
6. http://en.wikipedia.org/wiki/BIOS
report erratum • discuss
Get to Know the Hardware • 5

What Else You Need
After unboxing the Pi for the first time, you’ll quickly realize that the Raspberry
team obeys the BYOP mantra—Bring Your Own Peripherals. The box contains
nothing but the board; you’ll need a couple of other things to get it up and
running. You’ll probably already have most of them at home.
Choose a Power Supply
First you need a power supply with a Micro USB connector, because currently
the Pi does not ship with one. According to the Pi’s specification, both models
need a power supply that outputs 5V. The power supply should source 300mA
for a Model A and 700mA for a Model B. Depending on the devices you connect
to the Pi, it might have to source even more.
Figure 4—A USB wall charger
Many cell-phone chargers meet the Pi’s
requirements, and this is not a coincidence.
The Raspberry team wanted the Pi to work
with cell-phone chargers because of their
ubiquity. I used the charger of a Samsung
Galaxy S II for a couple of days, and it worked
well for my first experiments. When I started
to add more devices, it was no longer suffi-
cient, and I replaced it with a wall charger
from Belkin (see the figure here). It outputs
1A and works better, but for some hardware
setups, you still need more power.
The Pi’s biggest limitation regarding the power
supply is that no external device should draw more than 100mA from any of
its USB ports. So, as long as your keyboard and your mouse need 100mA
each, everything works fine. Usually, you can find a small sticker with the
power characteristics on the back of a device. If one device draws more than
100mA, sooner or later you’ll observe strange effects.7 To be on the safe side,
use a power supply that delivers 1A to 1.2A for the Model B. For Model A it
should be between 500mA and 700mA.
You can unburden the Pi with a powered USB hub, but it doesn’t work with
every product. So, before you buy something for your Pi, it’s best to take a
look at the project’s wiki.8
7. http://elinux.org/RPi_Hardware#Power8. http://elinux.org/RPi_VerifiedPeripherals
Chapter 1. Meet the Raspberry Pi • 6
report erratum • discuss
Choose an SD Card
Even with a perfect power supply, a Pi will not do much when you start it,
because it needs an SD card with an operating system. You can buy
preloaded SD cards,9 but you can also start with an empty card and prepare
it yourself. (See Prepare a Bootable SD Card, on page 17, for how to do this.)
Usually this is the better approach, because it ensures that you get the latest
and greatest software for your Pi.
Some users have reported problems with incompatible SD cards, so when in
doubt, you should take a look at Where Can I Get a Raspberry Pi and Addi-
tional Hardware?, on page xiii. In theory, you can use a card of any size. Of
course, the minimum size depends on your operating system, on the
applications you’re going to install, and on the data you’re going to create on
the Pi later. As often in life, bigger is better, and you should use a card with
a capacity of at least 4GB for the most convenient Pi experience.
Connect a Keyboard and a Mouse
Unless you’re planning to use the Pi as a headless system,10 you’ll need a
keyboard and a mouse. You probably have a spare keyboard and mouse at
home, and as long as they have a USB connector, they’ll likely work with the
Pi. Note that sometimes keyboards with an internal USB hub cause problems
because they steal some current from the Pi that it might need for other
things. If you experience strange effects, such as an unresponsive keyboard
or infinite repetitions of keystrokes, try another keyboard or connect the
keyboard to the Pi using a powered USB hub. It’s best if your keyboard and
mouse consume only 100mA each.
Some wireless keyboards and mice will not work properly because Linux does
not support them all. In the beginning, be conservative and use wired equip-
ment until everything works as expected. Then start to replace components
one by one. If you run into problems, check to see whether your operating
system supports your particular keyboard or mouse.
Often you’ll need even more than two USB devices (or one, if you have a
Model A), so you’ll have to connect them to the Pi using a USB hub. Make
sure the hub delivers enough current to power all connected devices. In
nearly all cases, you’ll need a hub that has its own power supply.
9. http://uk.farnell.com/raspberry-pi-accessories#operatingsystem or http://uk.rs-online.com/web/p/flash-memory/7631030/?
10. http://en.wikipedia.org/wiki/Headless_system
report erratum • discuss
What Else You Need • 7

Choose a Display
Depending on the display you’re going to use, you need an HDMI cable or a
composite-video cable. If you’re using HDMI and your display also has audio
output, you’re finished. Otherwise, you have to connect the Pi’s audio jack
to your sound system using a cable with a standard 3.5mm TRS connector.
It’s the same connector you’ll find at the end of your iPod’s headphones, and
of course you can use those, too.
Choose the Right Network Equipment
If you want to connect a Model B to a network, you need only an Ethernet
cable. The Model A does not have an Ethernet port, so to connect a Model A
to a network, you need a USB-to-Ethernet converter or a Wi-Fi dongle.
Add a Case
Future releases of the Pi might come with a case, but until then you have to
protect it yourself. Like every electronics device, the Pi is sensitive to dust
and conductive surfaces, so sooner or later you should put your Pi in a case.
The Pi community is very creative, and people have already created cases
using Legos11 and even paper.12 One of the biggest problems with most self-
made cases is that they usually don’t offer convenient access to the Pi’s
connectors. So, the best solution is often to buy a professional case—for
example, from Adafruit13 or ModMyPi.14
Figure 5—A wired Pi
In addition to all the devices men-
tioned, you need a separate PC for
some tasks, such as copying an
image to an SD card or cross-com-
piling applications. So, all in all,
setting up a Pi is not as cheap as it
sounds at first.
A typical Pi setup looks quite messy
on your desk after you’ve connected
all cables (see the figure here). But
despite its look, the hardware is
ready for a first test run!
11. http://www.raspberrypi.org/archives/151512. http://squareitround.co.uk/Resources/Punnet_net_Alpha3.pdf13. https://www.adafruit.com/products/85914. http://modmypi.com
Chapter 1. Meet the Raspberry Pi • 8
report erratum • discuss
Next Steps
In this chapter, you learned what all the connectors on the Pi are for, and
you learned what additional devices you need and how to choose the right
ones. In theory, you could start your Pi for the first time, but it won’t do much
without an operating system. In the next chapter, you’ll learn what your
options are and how to install a full-blown Linux system.
report erratum • discuss
Next Steps • 9
CHAPTER 2
Install an Operating System
Like every computer, the Raspberry Pi needs an operating system, and Linux
is the preferred one for the Pi. That’s partly because it’s free, but mainly it’s
because Linux runs on the Pi’s ARM processor while most other operating
systems work only on Intel architecture. Still, not every Linux distribution
will run on the Pi, because some don’t support the Pi’s particular type of ARM
processor. For example, you can’t install Ubuntu Linux on a Pi. In this
chapter, you’ll first learn what your operating system options are.
Choosing an operating system is only a first step; you also have to install it.
The installation procedure on the Pi is quite different from what you’re prob-
ably used to, but it’s not difficult: you need to install the operating system
on an SD card. In this chapter, we’re going to install the latest Debian Linux
distribution, but the process is the same for all operating systems. You can
actually create several SD cards, each with a different operating system, so
in the end you’ll have a pretty versatile system that you can turn into com-
pletely different machines by simply replacing the card.
See What’s Available
Linux is still the most popular choice for an operating system on the Pi, and
it helps you to get the most out of your Pi. Also, many people are already
familiar with Linux, whereas the other operating systems running on the Pi
are a bit more exotic.
Even if a Linux distribution runs on the Pi, it will often look and behave
differently from its regular desktop PC equivalent, because it might use a
windows manager that doesn’t need a lot of resources. Also, you won’t find
all of the applications you’re used to, such as many popular web browsers or
office products.
report erratum • discuss

In addition, you’ll face some limitations around installing the operating system.
Modern operating systems are fairly big, and they ship on DVD or are available
as ISO image downloads. These images and DVDs contain the full installation
process for the operating system; they start a program that detects your
computer’s hardware, and then they copy all files needed to the hard drive.
Unfortunately, you can’t insert a DVD into the Pi and install it, because the
Pi has no BIOS. (See What the Pi Does Not Have, on page 5.) You can’t boot
from an external USB drive, either. You also can’t copy an ISO image of a
DVD to an SD card. Instead, you need a snapshot of a system that has already
been installed and that you can boot from.
So, you have to create or find an image of a Linux distribution that you can
copy to an SD card, and it has to be compatible with the Pi. The easiest way
to get such an image is to visit the download page of the Raspberry project.1
At the time of this writing, you can find images for Raspbian (Debian wheezy),
Arch Linux ARM, Pidora, and RISC OS. More operating systems will certainly
appear in the future; at the least, Bodhi Linux2 and openSUSE3 are already
available. Also, some clever folks are currently trying to port Google’s Chrome
OS.4
At the moment, the best choice for your first steps with the Pi is Raspbian
(Debian wheezy). It fully supports the Pi’s hardware, it comes with a full-blown
desktop (see Figure 6, The Raspbian (Debian wheezy) desktop, on page 13),
and it contains some useful applications, such as a web browser.
On top of that, it has a powerful package manager that makes it very easy to
install more software. We’ll use Debian in the rest of this book, and in the
next section you’ll learn how to install it. Note that we’ll use the names
Raspbian and Debian interchangeably.
The other distributions are very interesting, too, but they target a different
audience. Still, I’ll briefly describe them in the following sections.
Arch Linux ARM
Arch Linux5 is very minimalist and assumes that you already have a fair
amount of Linux knowledge. Arch Linux doesn’t use many resources, and it
has a nice package manager, so it’s a good choice when you want to use the
1. http://www.raspberrypi.org/downloads2. http://jeffhoogland.blogspot.co.uk/2012/06/bodhi-linux-arm-alpha-release-for.html3. http://news.opensuse.org/2013/09/09/opensuse-arm-gets-new-raspberry-pi-images/4. http://www.cnx-software.com/2012/04/19/building-chromium-os-for-raspberry-pi-armv6/5. http://www.archlinux.org/
Chapter 2. Install an Operating System • 12
report erratum • discuss
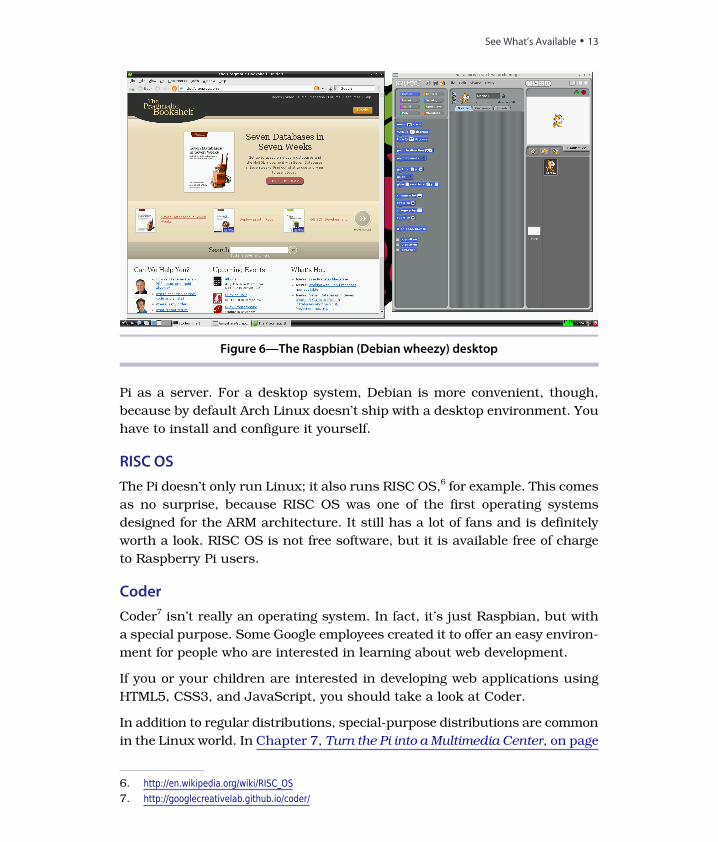
Figure 6—The Raspbian (Debian wheezy) desktop
Pi as a server. For a desktop system, Debian is more convenient, though,
because by default Arch Linux doesn’t ship with a desktop environment. You
have to install and configure it yourself.
RISC OS
The Pi doesn’t only run Linux; it also runs RISC OS,6 for example. This comes
as no surprise, because RISC OS was one of the first operating systems
designed for the ARM architecture. It still has a lot of fans and is definitely
worth a look. RISC OS is not free software, but it is available free of charge
to Raspberry Pi users.
Coder
Coder7 isn’t really an operating system. In fact, it’s just Raspbian, but with
a special purpose. Some Google employees created it to offer an easy environ-
ment for people who are interested in learning about web development.
If you or your children are interested in developing web applications using
HTML5, CSS3, and JavaScript, you should take a look at Coder.
In addition to regular distributions, special-purpose distributions are common
in the Linux world. In Chapter 7, Turn the Pi into a Multimedia Center, on page
6. http://en.wikipedia.org/wiki/RISC_OS7. http://googlecreativelab.github.io/coder/
report erratum • discuss
See What’s Available • 13

75, you’ll get to know Raspbmc, a Linux distribution that will turn your Pi
into a multimedia center.
Even though you can’t change the Pi’s hardware easily, you can still turn it
into many different machines within a second: simply insert an SD card
containing another operating system.
If you don’t know what operating system works best for you, you might want
to try a few before settling down. Don’t worry, because in the next section
you’ll learn how to play around with various operating systems using NOOBS.
Have a Look Around with NOOBS
The number of different operating systems available for the Pi can be a bit
overwhelming for new users. Thanks to the New Out Of Box Software (NOOBS)
project, it’s easy to try out various operating systems.
NOOBS is an automatic installer for the Pi’s most popular operating systems.
At the time of this writing, it supports Arch Linux, OpenELEC, Pidora, RISC
OS, Raspbmc, and Raspbian. Two different versions of NOOBS are available
on the Raspberry Pi’s download page.8 You can download a fairly big zip
archive (more than 1GB) that already contains all supported operating sys-
tems. Alternatively, you can download NOOBS Lite, which contains only the
installer. It will download the operating systems as needed. To make sure
you’ve downloaded NOOBS from a trustworthy server, check the zip file’s
SHA-1 checksum. (You can learn how to do this in Prepare a Bootable SD
Card, on page 17.)
You need an SD card with a capacity of at least 4GB to install NOOBS. Before
you install NOOBS, you have to format the SD card with the FAT file system.
If you’re not familiar with formatting SD cards on your operating system, take
a look at the official tools for Windows9 and Mac OS X.10 On Linux, it’s best
to use gparted.11
After you’ve formatted the SD card, you can extract the zip archive and copy
its content to the SD card. When you extract the zip archive, the content will
be stored in a directory named NOOBS_v1_3 or something similar. Make sure
you copy only the directory’s content to the SD card, and not the directory
itself.
8. http://www.raspberrypi.org/downloads9. https://www.sdcard.org/downloads/formatter_4/eula_windows/10. https://www.sdcard.org/downloads/formatter_4/eula_mac/11. http://gparted.sourceforge.net/
Chapter 2. Install an Operating System • 14
report erratum • discuss
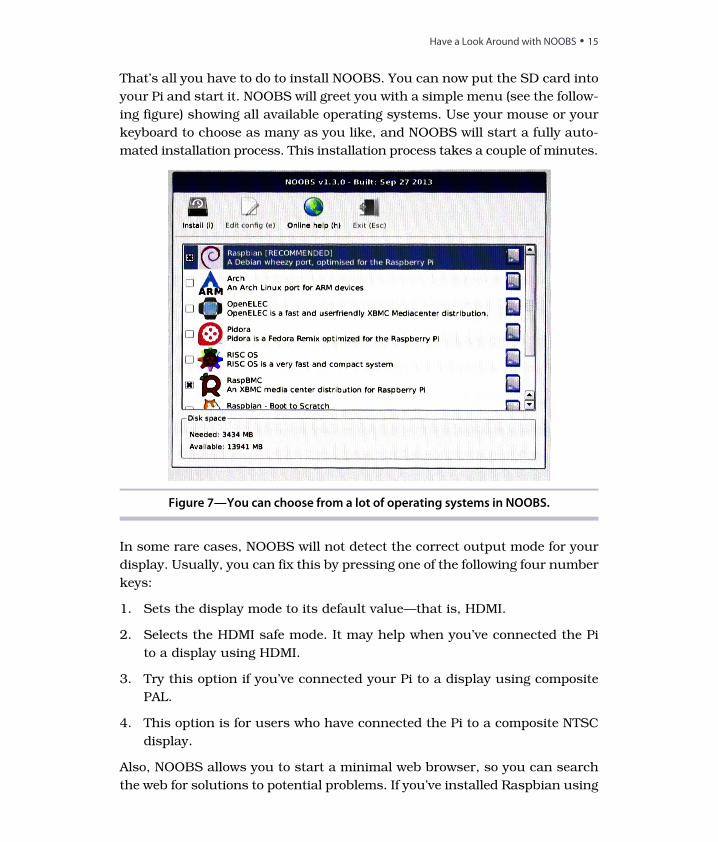
That’s all you have to do to install NOOBS. You can now put the SD card into
your Pi and start it. NOOBS will greet you with a simple menu (see the follow-
ing figure) showing all available operating systems. Use your mouse or your
keyboard to choose as many as you like, and NOOBS will start a fully auto-
mated installation process. This installation process takes a couple of minutes.
Figure 7—You can choose from a lot of operating systems in NOOBS.
In some rare cases, NOOBS will not detect the correct output mode for your
display. Usually, you can fix this by pressing one of the following four number
keys:
1. Sets the display mode to its default value—that is, HDMI.
2. Selects the HDMI safe mode. It may help when you’ve connected the Pi
to a display using HDMI.
3. Try this option if you’ve connected your Pi to a display using composite
PAL.
4. This option is for users who have connected the Pi to a composite NTSC
display.
Also, NOOBS allows you to start a minimal web browser, so you can search
the web for solutions to potential problems. If you’ve installed Raspbian using
report erratum • discuss
Have a Look Around with NOOBS • 15
NOOBS, you can also edit /boot/config.txt from the main menu. In Chapter 4,
Configure the Firmware, on page 41, you’ll learn what this file is for.
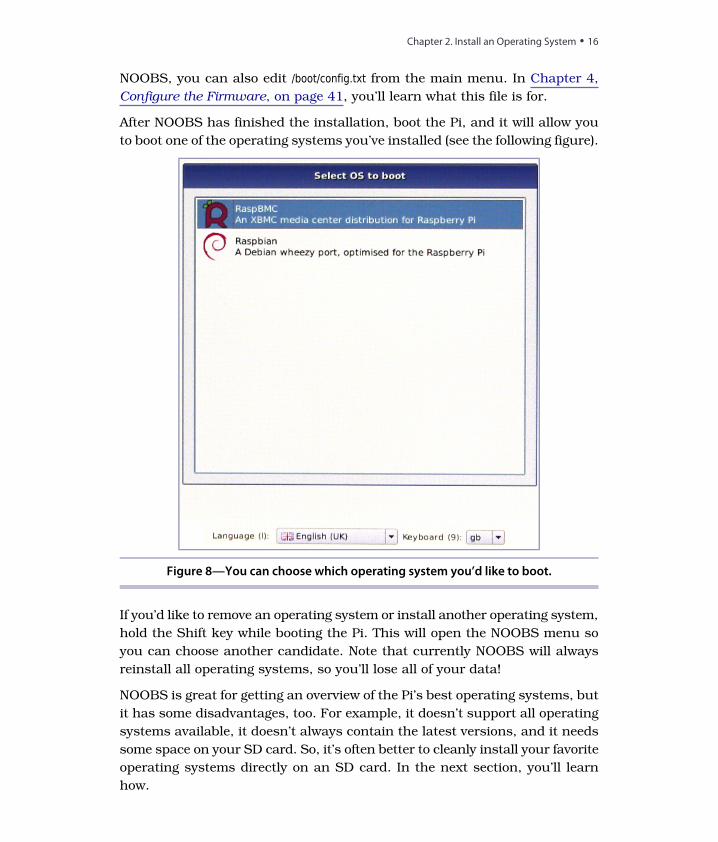
After NOOBS has finished the installation, boot the Pi, and it will allow you
to boot one of the operating systems you’ve installed (see the following figure).
Figure 8—You can choose which operating system you’d like to boot.
If you’d like to remove an operating system or install another operating system,
hold the Shift key while booting the Pi. This will open the NOOBS menu so
you can choose another candidate. Note that currently NOOBS will always
reinstall all operating systems, so you’ll lose all of your data!
NOOBS is great for getting an overview of the Pi’s best operating systems, but
it has some disadvantages, too. For example, it doesn’t support all operating
systems available, it doesn’t always contain the latest versions, and it needs
some space on your SD card. So, it’s often better to cleanly install your favorite
operating systems directly on an SD card. In the next section, you’ll learn
how.
Chapter 2. Install an Operating System • 16
report erratum • discuss
Prepare a Bootable SD Card
As you saw in Chapter 1, Meet the Raspberry Pi, on page 1, the Raspberry
Pi doesn’t have a BIOS or internal persistent storage. It has only an SD card
slot. You use a separate computer to install the Pi’s operating system on an
SD card that you then use to boot the Pi. Fortunately, people have done this
already for several operating systems, and they’ve kindly made available the
content of such SD cards for free on the Internet. In this section, you’ll learn
how to transfer an SD card image to an SD card.
You’ll need a PC with a card reader (which is quite a misnomer, because you
can use it for writing, too) to modify the SD card. Some PCs have built-in
readers, but you can also get USB readers for a few dollars. It doesn’t matter
which operating system you use, and we’ll look at how to create the SD card
on all major platforms. If you have access to a Windows box, I strongly suggest
you use it, because it’s easier and more convenient than Mac OS X or Linux
for this particular purpose. Preparing an SD card on Mac OS X or Linux isn’t
rocket science, but you have to invoke a fairly dangerous command, and you
can easily delete some important files. Also, on Windows you’ll get more
feedback while copying the card image.
No matter what operating system you plan to use for the installation process,
you have to download the Debian image from the official download site.12 You
can download it using HTTP or via torrent. After the download has finished,
you should have a file named 2014-01-07-wheezy-raspbian.zip on your local hard
drive. (The filename might vary if a new version has been released.)
The procedures described in the following sections will be the same for images
of all operating systems compatible with the Pi. You have to replace only the
name of the image file.
Prepare an SD Card on Windows
Preparing the SD card on a Windows box is the most convenient alternative,
because of Win32 Disk Imager.13 This small application is free, has a nice
user interface, and has a single purpose: writing images to SD cards. You
don’t even have to install it; you can just download the zip file from the
project’s website and unzip it to a directory of your choice. Double-click
Win32DiskImager.exe, and you’re ready to go.
12. http://www.raspberrypi.org/downloads13. http://sourceforge.net/projects/win32diskimager/
report erratum • discuss
Prepare a Bootable SD Card • 17
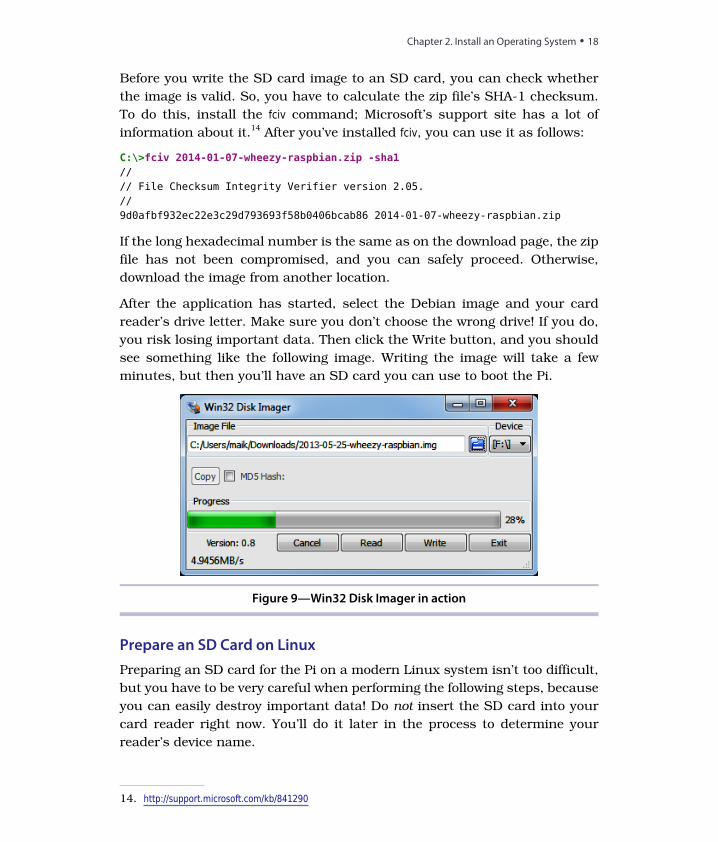
Before you write the SD card image to an SD card, you can check whether
the image is valid. So, you have to calculate the zip file’s SHA-1 checksum.
To do this, install the fciv command; Microsoft’s support site has a lot of
information about it.14 After you’ve installed fciv, you can use it as follows:
C:\>fciv 2014-01-07-wheezy-raspbian.zip -sha1//// File Checksum Integrity Verifier version 2.05.//9d0afbf932ec22e3c29d793693f58b0406bcab86 2014-01-07-wheezy-raspbian.zip
If the long hexadecimal number is the same as on the download page, the zip
file has not been compromised, and you can safely proceed. Otherwise,
download the image from another location.
After the application has started, select the Debian image and your card
reader’s drive letter. Make sure you don’t choose the wrong drive! If you do,
you risk losing important data. Then click the Write button, and you should
see something like the following image. Writing the image will take a few
minutes, but then you’ll have an SD card you can use to boot the Pi.
Figure 9—Win32 Disk Imager in action
Prepare an SD Card on Linux
Preparing an SD card for the Pi on a modern Linux system isn’t too difficult,
but you have to be very careful when performing the following steps, because
you can easily destroy important data! Do not insert the SD card into your
card reader right now. You’ll do it later in the process to determine your
reader’s device name.
14. http://support.microsoft.com/kb/841290
Chapter 2. Install an Operating System • 18
report erratum • discuss
Download the zip file containing the Debian image from the official download
site, open a terminal, and change to the directory containing the zip file you’ve
just downloaded. Although it’s not necessary, it doesn’t hurt to check the
integrity of the file you’ve downloaded.
maik> sha1sum 2014-01-07-wheezy-raspbian.zip9d0afbf932ec22e3c29d793693f58b0406bcab86 2014-01-07-wheezy-raspbian.zip
If the long hexadecimal number is the same as on the download page, the zip
file has not been compromised, and you can safely proceed. Otherwise,
download the image from another location.
The following command unzips the image file to the current directory:
maik> unzip 2014-01-07-wheezy-raspbian.zipArchive: 2014-01-07-wheezy-raspbian.zip
inflating: 2014-01-07-wheezy-raspbian.img
Next you have to determine your card reader’s location. Run the following
command to get a list of all storage devices currently connected to your
computer:
maik> df -hFilesystem Size Used Avail Use% Mounted on/dev/sda1 63G 15G 46G 24% /udev 494M 4.0K 494M 1% /devtmpfs 201M 740K 200M 1% /runnone 5.0M 0 5.0M 0% /run/locknone 501M 124K 501M 1% /run/shm
Insert the SD card into your reader and run the command again.
maik> df -hFilesystem Size Used Avail Use% Mounted on/dev/sda1 63G 15G 46G 24% /udev 494M 4.0K 494M 1% /devtmpfs 201M 772K 200M 1% /runnone 5.0M 0 5.0M 0% /run/locknone 501M 124K 501M 1% /run/shm/dev/sdc2 1.6G 1.2G 298M 81% /media/18c27e44-ad29-4264-9506-c93bb7083f47/dev/sdc1 75M 29M 47M 39% /media/95F5-0D7A
As you can see, on my system the SD card is named sdc, and it has two
partitions named sdc1 and sdc2. Of course, this will vary on your system;
that is, you might have more or fewer partitions, and your SD card might be
named sdd, for example. Before you proceed, you need to unmount all parti-
tions, so in this case you’ll have to invoke the following commands:
maik> umount /dev/sdc1maik> umount /dev/sdc2
report erratum • discuss
Prepare a Bootable SD Card • 19
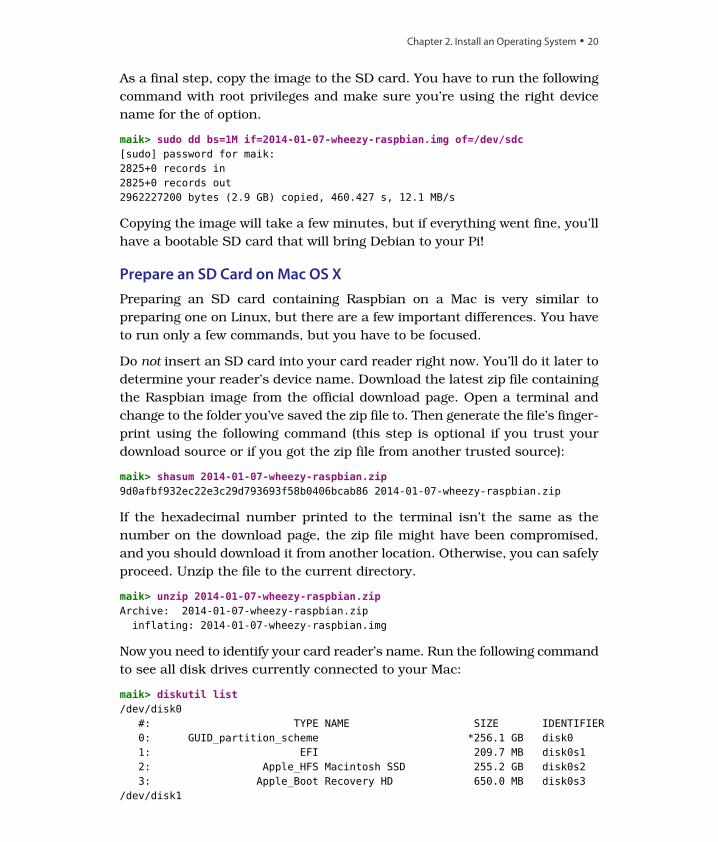
As a final step, copy the image to the SD card. You have to run the following
command with root privileges and make sure you’re using the right device
name for the of option.
maik> sudo dd bs=1M if=2014-01-07-wheezy-raspbian.img of=/dev/sdc[sudo] password for maik:2825+0 records in2825+0 records out2962227200 bytes (2.9 GB) copied, 460.427 s, 12.1 MB/s
Copying the image will take a few minutes, but if everything went fine, you’ll
have a bootable SD card that will bring Debian to your Pi!
Prepare an SD Card on Mac OS X
Preparing an SD card containing Raspbian on a Mac is very similar to
preparing one on Linux, but there are a few important differences. You have
to run only a few commands, but you have to be focused.
Do not insert an SD card into your card reader right now. You’ll do it later to
determine your reader’s device name. Download the latest zip file containing
the Raspbian image from the official download page. Open a terminal and
change to the folder you’ve saved the zip file to. Then generate the file’s finger-
print using the following command (this step is optional if you trust your
download source or if you got the zip file from another trusted source):
maik> shasum 2014-01-07-wheezy-raspbian.zip9d0afbf932ec22e3c29d793693f58b0406bcab86 2014-01-07-wheezy-raspbian.zip
If the hexadecimal number printed to the terminal isn’t the same as the
number on the download page, the zip file might have been compromised,
and you should download it from another location. Otherwise, you can safely
proceed. Unzip the file to the current directory.
maik> unzip 2014-01-07-wheezy-raspbian.zipArchive: 2014-01-07-wheezy-raspbian.zip
inflating: 2014-01-07-wheezy-raspbian.img
Now you need to identify your card reader’s name. Run the following command
to see all disk drives currently connected to your Mac:
maik> diskutil list/dev/disk0
#: TYPE NAME SIZE IDENTIFIER0: GUID_partition_scheme *256.1 GB disk01: EFI 209.7 MB disk0s12: Apple_HFS Macintosh SSD 255.2 GB disk0s23: Apple_Boot Recovery HD 650.0 MB disk0s3
/dev/disk1
Chapter 2. Install an Operating System • 20
report erratum • discuss
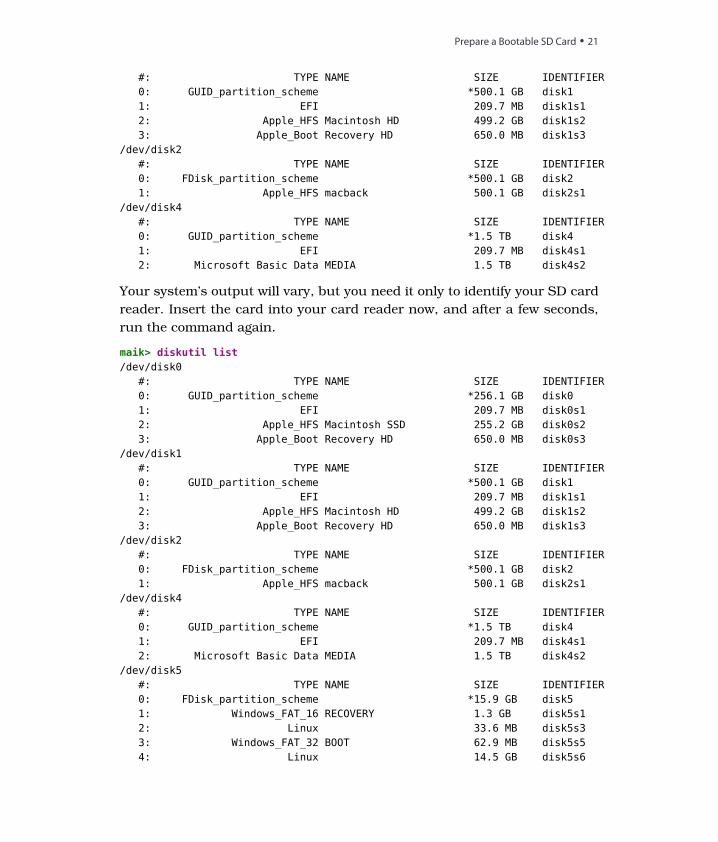
#: TYPE NAME SIZE IDENTIFIER0: GUID_partition_scheme *500.1 GB disk11: EFI 209.7 MB disk1s12: Apple_HFS Macintosh HD 499.2 GB disk1s23: Apple_Boot Recovery HD 650.0 MB disk1s3
/dev/disk2#: TYPE NAME SIZE IDENTIFIER0: FDisk_partition_scheme *500.1 GB disk21: Apple_HFS macback 500.1 GB disk2s1
/dev/disk4#: TYPE NAME SIZE IDENTIFIER0: GUID_partition_scheme *1.5 TB disk41: EFI 209.7 MB disk4s12: Microsoft Basic Data MEDIA 1.5 TB disk4s2
Your system’s output will vary, but you need it only to identify your SD card
reader. Insert the card into your card reader now, and after a few seconds,
run the command again.
maik> diskutil list/dev/disk0
#: TYPE NAME SIZE IDENTIFIER0: GUID_partition_scheme *256.1 GB disk01: EFI 209.7 MB disk0s12: Apple_HFS Macintosh SSD 255.2 GB disk0s23: Apple_Boot Recovery HD 650.0 MB disk0s3
/dev/disk1#: TYPE NAME SIZE IDENTIFIER0: GUID_partition_scheme *500.1 GB disk11: EFI 209.7 MB disk1s12: Apple_HFS Macintosh HD 499.2 GB disk1s23: Apple_Boot Recovery HD 650.0 MB disk1s3
/dev/disk2#: TYPE NAME SIZE IDENTIFIER0: FDisk_partition_scheme *500.1 GB disk21: Apple_HFS macback 500.1 GB disk2s1
/dev/disk4#: TYPE NAME SIZE IDENTIFIER0: GUID_partition_scheme *1.5 TB disk41: EFI 209.7 MB disk4s12: Microsoft Basic Data MEDIA 1.5 TB disk4s2
/dev/disk5#: TYPE NAME SIZE IDENTIFIER0: FDisk_partition_scheme *15.9 GB disk51: Windows_FAT_16 RECOVERY 1.3 GB disk5s12: Linux 33.6 MB disk5s33: Windows_FAT_32 BOOT 62.9 MB disk5s54: Linux 14.5 GB disk5s6
report erratum • discuss
Prepare a Bootable SD Card • 21
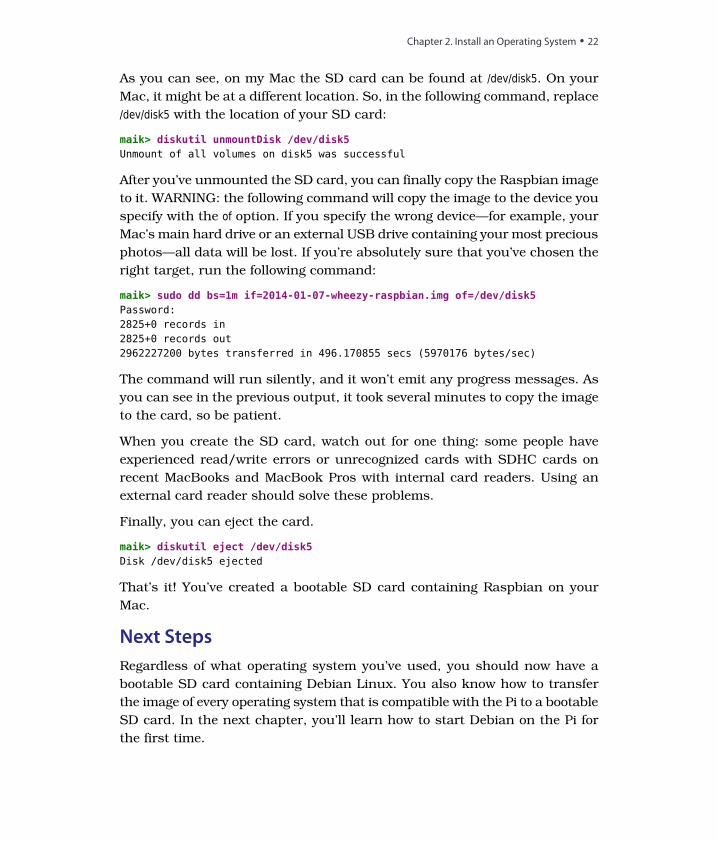
As you can see, on my Mac the SD card can be found at /dev/disk5. On your
Mac, it might be at a different location. So, in the following command, replace
/dev/disk5 with the location of your SD card:
maik> diskutil unmountDisk /dev/disk5Unmount of all volumes on disk5 was successful
After you’ve unmounted the SD card, you can finally copy the Raspbian image
to it. WARNING: the following command will copy the image to the device you
specify with the of option. If you specify the wrong device—for example, your
Mac’s main hard drive or an external USB drive containing your most precious
photos—all data will be lost. If you’re absolutely sure that you’ve chosen the
right target, run the following command:
maik> sudo dd bs=1m if=2014-01-07-wheezy-raspbian.img of=/dev/disk5Password:2825+0 records in2825+0 records out2962227200 bytes transferred in 496.170855 secs (5970176 bytes/sec)
The command will run silently, and it won’t emit any progress messages. As
you can see in the previous output, it took several minutes to copy the image
to the card, so be patient.
When you create the SD card, watch out for one thing: some people have
experienced read/write errors or unrecognized cards with SDHC cards on
recent MacBooks and MacBook Pros with internal card readers. Using an
external card reader should solve these problems.
Finally, you can eject the card.
maik> diskutil eject /dev/disk5Disk /dev/disk5 ejected
That’s it! You’ve created a bootable SD card containing Raspbian on your
Mac.
Next Steps
Regardless of what operating system you’ve used, you should now have a
bootable SD card containing Debian Linux. You also know how to transfer
the image of every operating system that is compatible with the Pi to a bootable
SD card. In the next chapter, you’ll learn how to start Debian on the Pi for
the first time.
Chapter 2. Install an Operating System • 22
report erratum • discuss
CHAPTER 3
Configure Raspbian
No operating system or hardware will fit every user’s needs out of the box.
This is especially true for the version of Debian that runs on the Pi, because
it comes as an image, which means you cannot choose all the configuration
parameters that you usually enter at installation time. For example, the image
comes with a fixed keyboard layout and locale. In this chapter, you’ll boot
the Pi for the first time and take a look around. You’ll learn how to configure
a lot of basics, such as your password and the time zone.
Boot the Pi for the First Time
Preparing the hardware and installing an operating system are important,
but it’s much more fun to actually boot the Raspberry Pi and see what it’s
capable of. So, insert the SD card you prepared in the previous chapter, and
plug in the power supply.
If you’ve worked with Linux before, you’ll recognize most of the messages
pouring onto the screen. This comes as no surprise, because even if the Pi is
an unusual computer, Raspbian still is an ordinary Linux distribution.
When you boot Raspbian for the first time, it starts a configuration program
named Raspi-config. This program helps you configure the most important
aspects of the Linux system. You can see its main menu in Figure 10, Raspi-
config makes most configuration tasks a breeze, on page 24.
You’re probably used to controlling user interfaces with your mouse, but you
have to control Raspi-config with your keyboard. Use the down cursor key to
move to the next menu item, and use the up cursor key to move to the pre-
ceding one. To select a menu item, press the Tab key or the right cursor key.
This will highlight the Select button at the bottom. Press the spacebar or the
Return key to select the menu item. Use the Esc key to leave Raspi-config.
report erratum • discuss
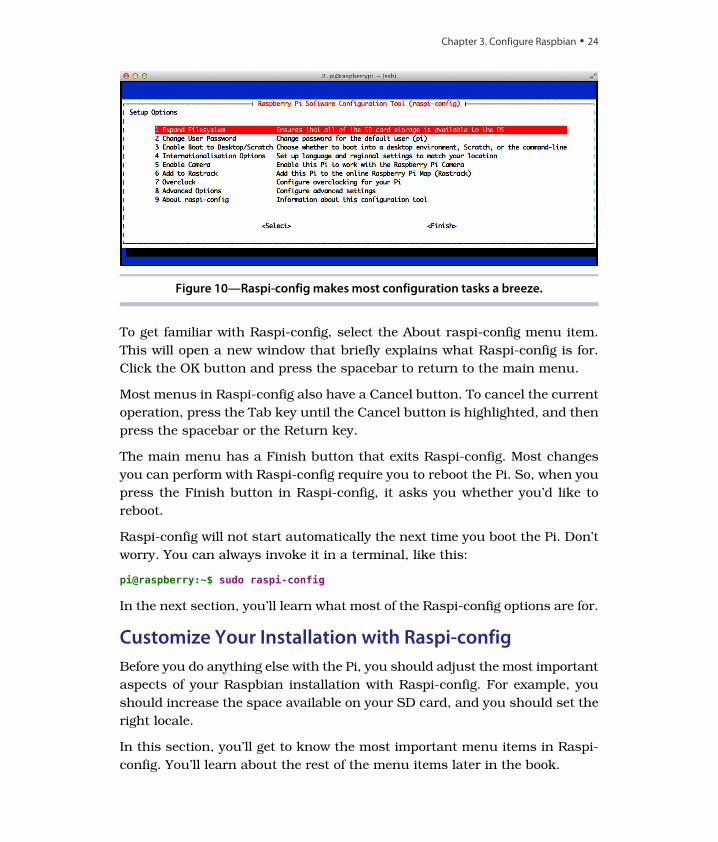
Figure 10—Raspi-config makes most configuration tasks a breeze.
To get familiar with Raspi-config, select the About raspi-config menu item.
This will open a new window that briefly explains what Raspi-config is for.
Click the OK button and press the spacebar to return to the main menu.
Most menus in Raspi-config also have a Cancel button. To cancel the current
operation, press the Tab key until the Cancel button is highlighted, and then
press the spacebar or the Return key.
The main menu has a Finish button that exits Raspi-config. Most changes
you can perform with Raspi-config require you to reboot the Pi. So, when you
press the Finish button in Raspi-config, it asks you whether you’d like to
reboot.
Raspi-config will not start automatically the next time you boot the Pi. Don’t
worry. You can always invoke it in a terminal, like this:
pi@raspberry:~$ sudo raspi-config
In the next section, you’ll learn what most of the Raspi-config options are for.
Customize Your Installation with Raspi-config
Before you do anything else with the Pi, you should adjust the most important
aspects of your Raspbian installation with Raspi-config. For example, you
should increase the space available on your SD card, and you should set the
right locale.
In this section, you’ll get to know the most important menu items in Raspi-
config. You’ll learn about the rest of the menu items later in the book.
Chapter 3. Configure Raspbian • 24
report erratum • discuss
Use All the Space on Your SD Card
The Raspbian image limits your root file system to 2GB. In other words, no
matter what the real capacity of your SD card is, you’ll be limited to 2GB.
You could copy the image to a 16GB SD card, for example, but you still would
only be able to use 2GB.
With the Expand Filesystem menu in Raspi-config, you can easily change
this situation. Select the menu item, and after the next reboot, the Pi will
grab all the space it can get on your SD card. Depending on your SD card’s
capacity and speed, this will take a while.
A few people have reported file system errors after they’ve resized the SD file
system on an overclocked Pi. (See Accelerate/Overclock the Pi, on page 29, to
learn more about overclocking.) In this case, rebooting the Pi usually helps.
Keep in mind that Raspi-config will not start automatically again. You have
to log in with the username pi and the password raspberry. To start Raspi-
config again, run the following command:
pi@raspberry:~$ sudo raspi-config
Change Your Password
At the time of this writing, you have to enter the username pi and the password
raspberry to log into the Pi. If you’re one of the lucky few who got one of the
first boards, you also got a flyer with incorrect credentials. In previous
releases the password was suse, so to be completely sure, check the creden-
tials on the download page.1
Select the Change User Password menu item in Raspi-config to change the
password. Raspi-config asks you for a new password, and it asks you to
confirm that password. Note that for security reasons, you cannot choose
simple passwords such as 123 or aaaa. If you want to learn more about users
and passwords, take a look at Manage Users, on page 139.
By the way, raspberry is a really bad password—not only because it’s easily
guessed, but also because it contains the character y. For anyone without
an English or American keyboard layout, this will lead to some frustrating
login sessions. By default, Debian uses a QWERTY keyboard layout, but in
Germany, for example, people usually use a QWERTZ layout. So if you’re
absolutely sure you’ve typed the password correctly for the tenth time, try
raspberrz instead.
1. http://www.raspberrypi.org/downloads
report erratum • discuss
Customize Your Installation with Raspi-config • 25
Enable Boot to Desktop
By default, the Pi does not start a graphical desktop environment. Instead,
it greets you with a plain terminal.
In Start the Desktop, on page 31, you’ll learn how to start the desktop environ-
ment manually. The “Enable Boot to Desktop/Scratch” menu itemgives you
the options of starting the Pi in command line mode, in desktop mode, or
with the Scratch programming environment.2 Scratch is a graphical program-
ming language that makes it easy to create animations and games, even for
children.
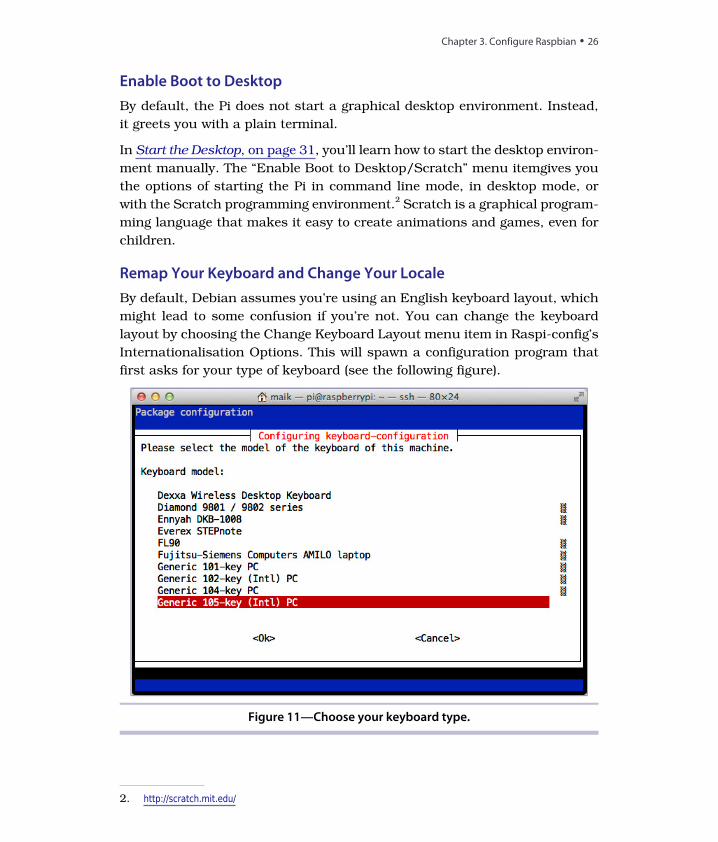
Remap Your Keyboard and Change Your Locale
By default, Debian assumes you’re using an English keyboard layout, which
might lead to some confusion if you’re not. You can change the keyboard
layout by choosing the Change Keyboard Layout menu item in Raspi-config’s
Internationalisation Options. This will spawn a configuration program that
first asks for your type of keyboard (see the following figure).
Figure 11—Choose your keyboard type.
2. http://scratch.mit.edu/
Chapter 3. Configure Raspbian • 26
report erratum • discuss
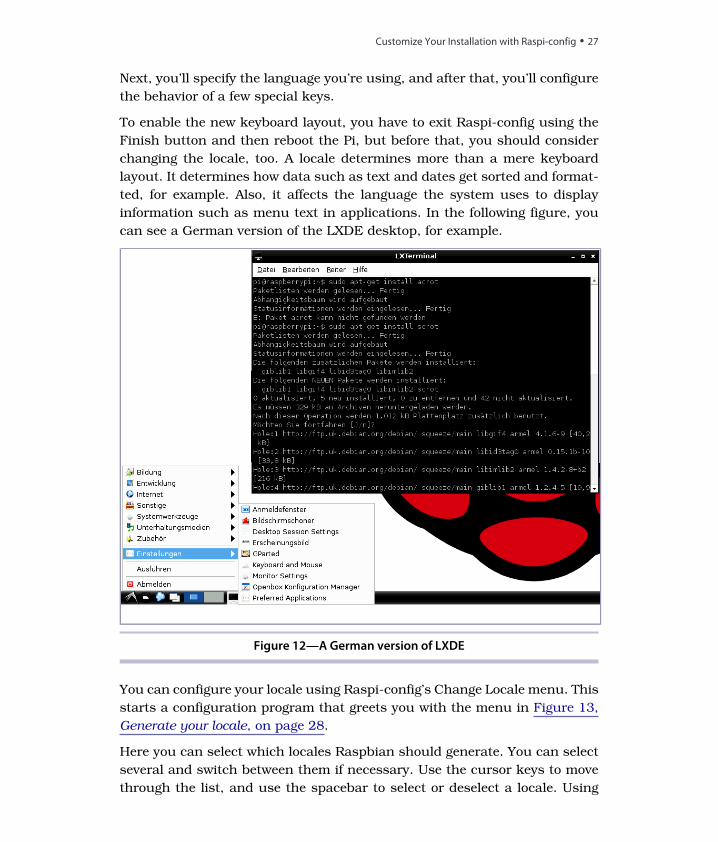
Next, you’ll specify the language you’re using, and after that, you’ll configure
the behavior of a few special keys.
To enable the new keyboard layout, you have to exit Raspi-config using the
Finish button and then reboot the Pi, but before that, you should consider
changing the locale, too. A locale determines more than a mere keyboard
layout. It determines how data such as text and dates get sorted and format-
ted, for example. Also, it affects the language the system uses to display
information such as menu text in applications. In the following figure, you
can see a German version of the LXDE desktop, for example.
Figure 12—A German version of LXDE
You can configure your locale using Raspi-config’s Change Locale menu. This
starts a configuration program that greets you with the menu in Figure 13,
Generate your locale, on page 28.
Here you can select which locales Raspbian should generate. You can select
several and switch between them if necessary. Use the cursor keys to move
through the list, and use the spacebar to select or deselect a locale. Using
report erratum • discuss
Customize Your Installation with Raspi-config • 27
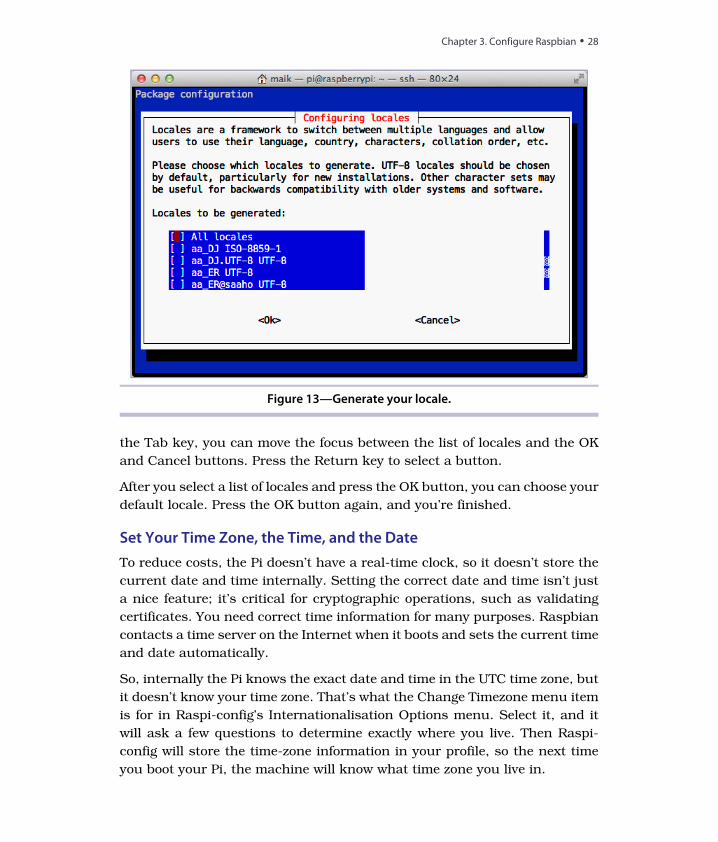
Figure 13—Generate your locale.
the Tab key, you can move the focus between the list of locales and the OK
and Cancel buttons. Press the Return key to select a button.
After you select a list of locales and press the OK button, you can choose your
default locale. Press the OK button again, and you’re finished.
Set Your Time Zone, the Time, and the Date
To reduce costs, the Pi doesn’t have a real-time clock, so it doesn’t store the
current date and time internally. Setting the correct date and time isn’t just
a nice feature; it’s critical for cryptographic operations, such as validating
certificates. You need correct time information for many purposes. Raspbian
contacts a time server on the Internet when it boots and sets the current time
and date automatically.
So, internally the Pi knows the exact date and time in the UTC time zone, but
it doesn’t know your time zone. That’s what the Change Timezone menu item
is for in Raspi-config’s Internationalisation Options menu. Select it, and it
will ask a few questions to determine exactly where you live. Then Raspi-
config will store the time-zone information in your profile, so the next time
you boot your Pi, the machine will know what time zone you live in.
Chapter 3. Configure Raspbian • 28
report erratum • discuss

If you haven’t connected your Pi to the Internet, you can manually set the
date and time like this:
pi@raspberry:~$ sudo date --set="2014-02-04 13:24:42"
This solution has a few disadvantages. It’s not as accurate as it might be,
and you have to repeat it whenever the Pi boots, so it’s easy to forget it.
Enable the Pi Camera
The camera is a useful accessory for the Pi, and in Chapter 11, Control the Pi
Camera, on page 121, you’ll learn how to control it. Before you can use the
camera, you have to enable it with the Enable Camera option.
Add Your Pi to Rastrack
Rastrack3 is an online service that shows the locations of thousands of Pis
on a map. If you want to make your Pi show up on the map as well, choose
the Add to Rastrack menu option.
Accelerate/Overclock the Pi
By default, the Pi’s internal clock rate is 700MHz. This is pretty fast for most
tasks, but compared to the speed of modern PCs it’s still rather modest. As
with many PCs, you can overclock the Pi using Raspi-config’s Overclock menu
item. Here you can set the clock rate to 700MHz, 800MHz, 900MHz, 950MHz,
or even 1GHz. This will increase your Pi’s speed, but it will also lead to greater
power consumption and a higher working temperature.
Note: depending on the quality of your power supply, overclocking can lead
to stability problems or even damage the file system. In that case, hold the
Shift key while booting the Pi. This will disable the overclocking, and you can
then set a lower clock rate using Raspi-config.
Configure the Pi’s Overscan Mode
The Raspberry team wanted the Pi to work with as many displays as possible,
so they had to take into account overscan and underscan. In the case of
underscan, the video output doesn’t use the whole display size, so you can
see a black frame around the actual video output. In the case of overscan,
the opposite happens, so in some cases you can’t see the whole output because
it gets clipped at the display’s borders. With the Overscan menu in Raspi-
config’s Advanced Options menu, you can enable or disable the overscan
3. http://rastrack.co.uk/
report erratum • discuss
Customize Your Installation with Raspi-config • 29

mode completely. In Configure the Video Output, on page 43, you’ll learn how
to control video output in a more refined manner.
Adjust the Pi’s Memory Layout
As you’ve learned, a Pi has either 256MB or 512MB of RAM. Let’s assume
you have the 256MB variant. Using the following command, you can check
how much memory is on your Pi:
pi@raspberry:~$ free -mtotal used free shared buffers cached
Mem: 186 37 149 0 5 19-/+ buffers/cache: 12 174Swap: 127 0 127
Oops! Apparently the Pi has much less than 256MB of RAM. How can that
be? Don’t worry: everything’s OK with your hardware, and your Pi has 256MB
of RAM. It just splits it between the CPU and the GPU (the device responsible
for processing graphics). By default, the CPU gets 192MB of RAM, while the
GPU gets 64MB. In most cases this is reasonable, but in some cases a different
setup might make more sense. If you use the Pi as a server, for example, you
won’t need much graphics power, but you’ll need more RAM for the CPU.
You can change the memory layout using the Memory Split menu item in
Raspi-config’s Advanced Options menu. Here you can determine how much
memory the GPU gets. Choose the right amount for your usage and reboot
the Pi.
Enable the SPI Kernel Module
The Pi is an excellent platform for creating electronic projects. In these projects
you may use devices you can integrate using a protocol named SPI (Serial
Peripheral Interface Bus). Such devices depend on a certain kernel module,
and you can enable or disable this module using the SPI menu item in Raspi-
config’s Advanced Options menu. You’ll learn a lot more about SPI in Chapter
10, Working with Digital and Analog Sensors, on page 107.
Choose the Audio Output
The Pi can output audio using two different channels: via HDMI or using its
RCA jack. When connecting the Pi to a display using HDMI, it usually makes
sense to output audio via HDMI, too. If you’ve connected the Pi to a display
using its composite connector, you probably want to output audio with the
analog RCA connector.
Chapter 3. Configure Raspbian • 30
report erratum • discuss
Under some circumstances the Pi cannot determine the correct settings
automatically, so you have to adjust them manually. You can do this using
the Audio menu item in Raspi-config’s Advanced Options menu.
Start the Desktop
Unlike in other operating systems, a desktop environment is optional on
Linux. So, it’s not uncommon to have to start the environment manually.
Alternatively, you can start a desktop environment automatically whenever
the Pi boots. Choose Raspi-config’s Enable Boot to Desktop/Scratch menu
item to enable this behavior. If you rarely use the command line, this is a
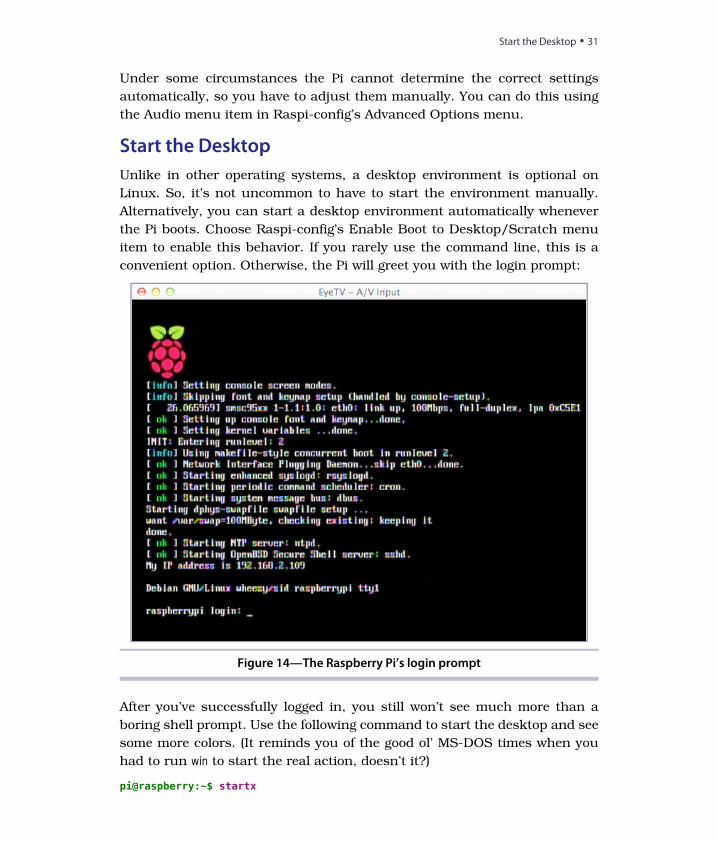
convenient option. Otherwise, the Pi will greet you with the login prompt:
Figure 14—The Raspberry Pi’s login prompt
After you’ve successfully logged in, you still won’t see much more than a
boring shell prompt. Use the following command to start the desktop and see
some more colors. (It reminds you of the good ol’ MS-DOS times when you
had to run win to start the real action, doesn’t it?)
pi@raspberry:~$ startx
report erratum • discuss
Start the Desktop • 31
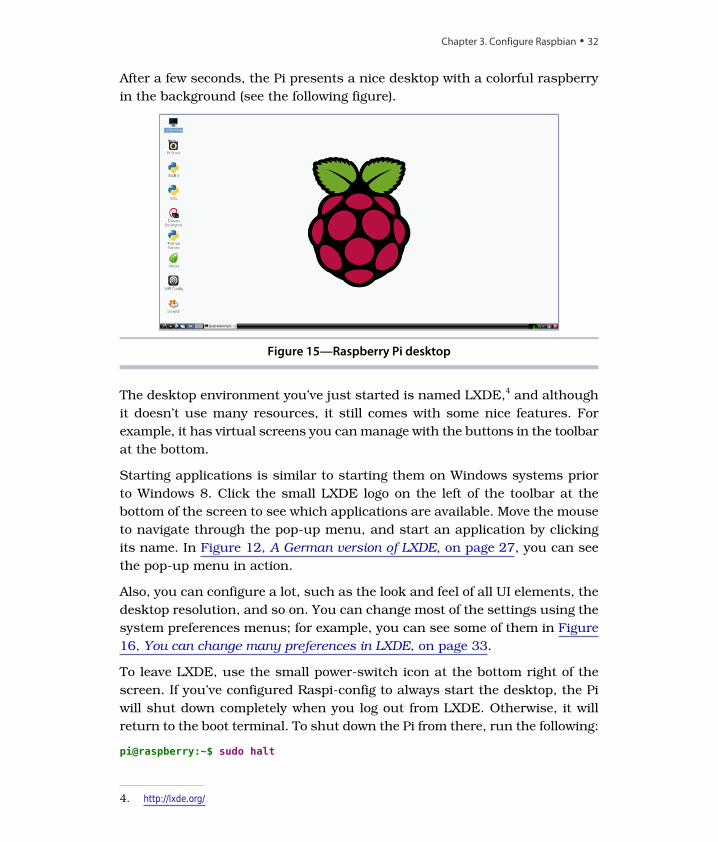
After a few seconds, the Pi presents a nice desktop with a colorful raspberry
in the background (see the following figure).
Figure 15—Raspberry Pi desktop
The desktop environment you’ve just started is named LXDE,4 and although
it doesn’t use many resources, it still comes with some nice features. For
example, it has virtual screens you can manage with the buttons in the toolbar
at the bottom.
Starting applications is similar to starting them on Windows systems prior
to Windows 8. Click the small LXDE logo on the left of the toolbar at the
bottom of the screen to see which applications are available. Move the mouse
to navigate through the pop-up menu, and start an application by clicking
its name. In Figure 12, A German version of LXDE, on page 27, you can see
the pop-up menu in action.
Also, you can configure a lot, such as the look and feel of all UI elements, the
desktop resolution, and so on. You can change most of the settings using the
system preferences menus; for example, you can see some of them in Figure
16, You can change many preferences in LXDE, on page 33.
To leave LXDE, use the small power-switch icon at the bottom right of the
screen. If you’ve configured Raspi-config to always start the desktop, the Pi
will shut down completely when you log out from LXDE. Otherwise, it will
return to the boot terminal. To shut down the Pi from there, run the following:
pi@raspberry:~$ sudo halt
4. http://lxde.org/
Chapter 3. Configure Raspbian • 32
report erratum • discuss
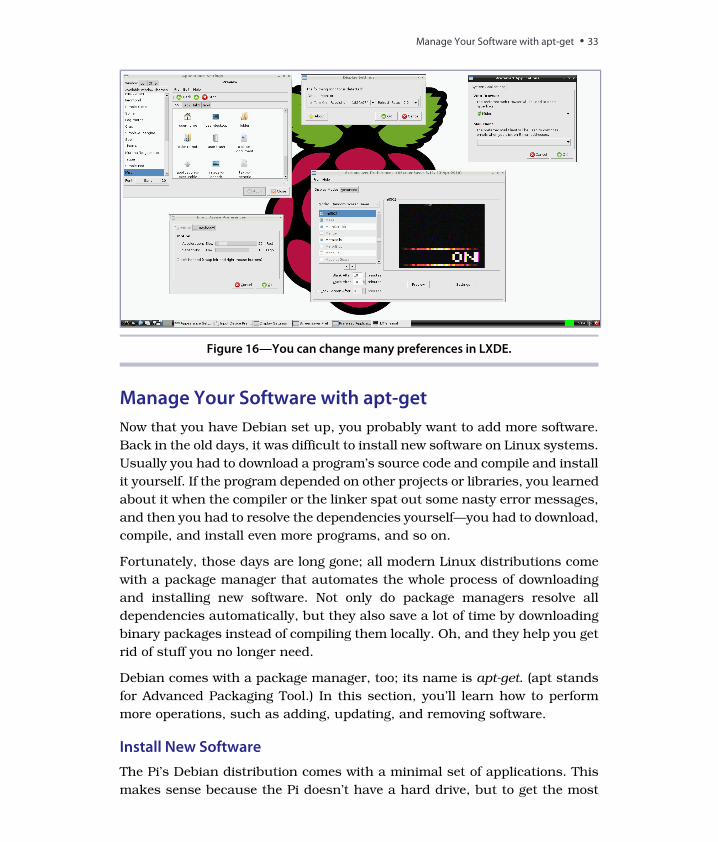
Figure 16—You can change many preferences in LXDE.
Manage Your Software with apt-get
Now that you have Debian set up, you probably want to add more software.
Back in the old days, it was difficult to install new software on Linux systems.
Usually you had to download a program’s source code and compile and install
it yourself. If the program depended on other projects or libraries, you learned
about it when the compiler or the linker spat out some nasty error messages,
and then you had to resolve the dependencies yourself—you had to download,
compile, and install even more programs, and so on.
Fortunately, those days are long gone; all modern Linux distributions come
with a package manager that automates the whole process of downloading
and installing new software. Not only do package managers resolve all
dependencies automatically, but they also save a lot of time by downloading
binary packages instead of compiling them locally. Oh, and they help you get
rid of stuff you no longer need.
Debian comes with a package manager, too; its name is apt-get. (apt stands
for Advanced Packaging Tool.) In this section, you’ll learn how to perform
more operations, such as adding, updating, and removing software.
Install New Software
The Pi’s Debian distribution comes with a minimal set of applications. This
makes sense because the Pi doesn’t have a hard drive, but to get the most
report erratum • discuss
Manage Your Software with apt-get • 33
out of the Pi, you’ll probably have to install a few programs. The good news
is that installing software on the Pi is no different from installing software on
a regular PC running Debian. You’ll get your software mostly from the same
sources, and you can choose from many applications. Unfortunately, not all
packages are available for the Pi’s ARM architecture, and some applications
simply don’t run because they need more resources than the Pi has to offer.
Still, you can find plenty of useful programs.
In this section, you’ll install a PDF reader on your Pi. If you’ve worked exclu-
sively with Microsoft Windows or Mac OS X before, you probably didn’t worry
much about PDF readers, but on some Linux systems—and especially on the
little Pi—you can’t take a good PDF reader for granted.
Interestingly, you can choose from a variety of different tools, and there’s even
a website dedicated to free PDF readers.5 Two of these readers look especially
interesting: Xpdf 6 and Evince.7 You’ll install them both, try them, and unin-
stall the one you don’t like.
You can install new packages using the install command. To install Xpdf and
Evince, run the following command (just make sure you’re connected to the
Internet):
pi@raspberry:~$ sudo apt-get install xpdfpi@raspberry:~$ sudo apt-get install evince
Alternatively, you can install more than one package at a time like this:
pi@raspberry:~$ sudo apt-get install xpdf evince
Note that the most recent version of Raspbian installs Xpdf by default. In that
case, apt-get will tell you that Xpdf is installed already.
Now you have both PDF readers installed as independent packages, and you
can start and test them to see which one better suits your needs. You can
find shortcuts for both applications in the Graphics section of the LXDE
desktop’s start menu. Also, you can start them from a terminal by running
either of the following (only if you’ve started the desktop environment before):
pi@raspberry:~$ evince
or:
pi@raspberry:~$ xpdf
5. http://pdfreaders.org/6. http://www.foolabs.com/xpdf/7. http://projects.gnome.org/evince/
Chapter 3. Configure Raspbian • 34
report erratum • discuss
In the following figure, you can see both programs in action rendering the
same PDF document.
Figure 17—Two PDF readers showing the same document
Remove Software
Play around with both applications for a while and see which one you like
best. Let’s assume that you prefer Evince; you can uninstall Xpdf using the
following command:
pi@raspberry:~$ sudo apt-get purge xpdfReading package lists... DoneBuilding dependency treeReading state information... DoneThe following packages were automatically installed and are nolonger required:
cups-bsd cups-client fonts-droid ghostscript lesstif2libcupsimage2 libfile-copy-recursive-perl libgs9 libgs9-commonlibijs-0.35 libpaper-utils libpaper1 libpoppler19 libxp6 poppler-datapoppler-utils update-inetd
Use 'apt-get autoremove' to remove them.The following packages will be REMOVED:
xpdf*0 upgraded, 0 newly installed, 1 to remove and 24 not upgraded.After this operation, 404 kB disk space will be freed.Do you want to continue [Y/n]?(Reading database ... 60245 files and directories currently installed.)Removing xpdf ...
report erratum • discuss
Manage Your Software with apt-get • 35
Purging configuration files for xpdf ...Processing triggers for mime-support ...Processing triggers for man-db ...Processing triggers for menu ...Processing triggers for desktop-file-utils ...
The Xpdf application is gone now, without any trace. If you want to remove
the application but keep its configuration files, use remove instead of purge.
Keep Your Software Up to Date
To make the software installation process as easy and as unobtrusive as
possible, apt-get comes with a small database containing a list of all available
packages and their dependencies. This database consists of only a few files.
You usually won’t work with it directly, but you should run the following
command occasionally to update it:
pi@raspberry:~$ sudo apt-get update
This downloads the latest package lists from a central server and updates
apt-get’s local database. So, if you run the apt-get command before you install
a new package, you can be sure that you will get the latest version available.
Note that in some cases you have to run this command twice. apt-get is nice
enough to tell you when this is the case.
If you’ve already installed software on your Pi using apt-get, you’ll probably
want to update it from time to time. The following command upgrades all
software that is currently installed on your Pi:
pi@raspberry:~$ sudo apt-get upgrade
Running this command will take a while, but when it’s finished you’ll have
the latest version of every single application and library on your Pi. For this,
apt-get has to download a lot of files that you no longer need after apt-get
has installed the applications. You can delete these obsolete files easily.
pi@raspberry:~$ sudo apt-get autocleanReading package lists... DoneBuilding dependency tree...Reading state information... Done
Sometimes dependencies between packages and package versions change,
so you might not need some of the installed packages anymore. You can
remove them using the following command:
pi@raspberry:~$ sudo apt-get autoremoveReading package lists... DoneBuilding dependency treeReading state information... Done
Chapter 3. Configure Raspbian • 36
report erratum • discuss
The following packages will be REMOVED:ghostscript lesstif2 libxp6 poppler-data poppler-utils0 upgraded, 0 newly installed, 5 to remove and 0 not upgraded.After this operation, 15.3 MB disk space will be freed.Do you want to continue [Y/n]?(Reading database ... 49185 files and directories currently installed.)Removing ghostscript ...Removing lesstif2 ...Removing libxp6 ...Removing poppler-data ...Removing poppler-utils ...Processing triggers for man-db ...
In theory, this is all you need to know about managing software on a Debian
system. There is one more helpful tool that you should know about, which you’ll
learn about in the next section.
Find Packages with apt-file
If you know the exact name of a package you’d like to install, apt-get is all you
need, but in some cases you might not know the name. For example, you still
have to install a lot of software from source and compile it yourself. If this software
depends on a certain library that you don’t have installed, the compiler or the
linker will stop with an error message. Usually, the error message contains the
missing file’s name, so it would be great to have a tool that searches for all
packages that contain this file. apt-file is such a tool, and you can install it as
follows:
pi@raspberry:~$ sudo apt-get install apt-file
Like apt-get, the apt-file command depends on a local database containing a list of
all packages and their dependencies. To update this database, you should run
the following command:
pi@raspberry:~$ sudo apt-file update
Now you can use apt-file to search for a package containing a certain file. Let’s
assume you’ve heard about a cool PDF reader for the Pi named Evince, and you
don’t know which package you have to install to use it. The command shown here
is all you need:
pi@raspberry:~$ apt-file -l search evinceevinceevince-commonevince-dbgevince-gtkgir1.0-evince-2.30libevince-devlibevince2python-evince
report erratum • discuss
Manage Your Software with apt-get • 37

This outputs a list of all packages referring to Evince so you can decide which
one you’d like to install.
You can also use apt-file to list the contents of a package, even if you haven’t
installed the package.
pi@raspberry:~$ apt-file list evince
Package managers are really helpful, and every modern Linux distribution
has one. On Debian it’s apt-get, on Fedora it’s yum, and on Arch Linux it’s
pacman. Although they differ slightly in their syntax, they all offer the same
operations and behavior.
Install Software and Media Using the Pi Store
At the end of 2012, the Raspberry Pi Foundation launched the Pi Store8
together with IndieCity9 and Velocix.10 In the store, you can find free and
commercial applications, games, development tools, and media such as
magazines or videos. The store offers two types of commercial applications:
you have to pay a fee upfront for some, while for others you can make a
donation if you like the application.
The Pi Store is available as a website, but it’s much more convenient to use
its native client (see Figure 18, The Pi Store has a native client, on page 39).
The latest Raspbian image contains the Pi Store client, and you can launch
it by double-clicking its icon on the desktop.
If you don’t already have the Pi Store client, you can install it using the follow-
ing commands:
pi@raspberry:~$ sudo apt-get updatepi@raspberry:~$ sudo apt-get install pistore
The application is fairly self-explanatory. After you’ve logged in, you can install
software with a single mouse click. At the moment, the store contains only a
few items, but taking the Pi’s popularity into account, that might change
soon. One title is particularly interesting: Iridium Rising11 is an exclusive game
for the Pi. It’s free, and it looks very professional.
8. http://store.raspberrypi.com/9. http://www.indiecity.com/10. http://www.velocix.com/11. http://store.raspberrypi.com/projects/iridiumrising
Chapter 3. Configure Raspbian • 38
report erratum • discuss
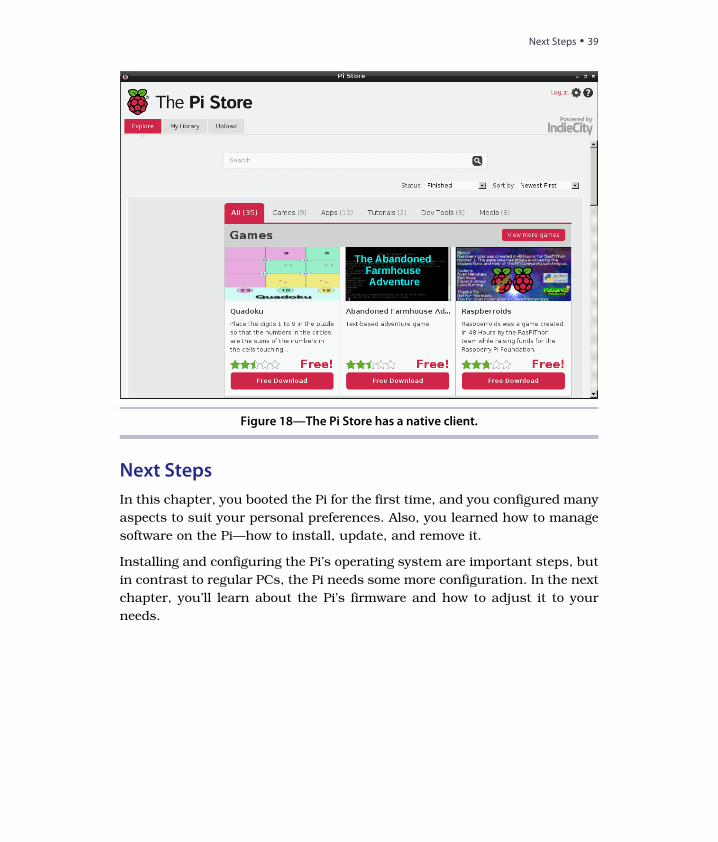
Figure 18—The Pi Store has a native client.
Next Steps
In this chapter, you booted the Pi for the first time, and you configured many
aspects to suit your personal preferences. Also, you learned how to manage
software on the Pi—how to install, update, and remove it.
Installing and configuring the Pi’s operating system are important steps, but
in contrast to regular PCs, the Pi needs some more configuration. In the next
chapter, you’ll learn about the Pi’s firmware and how to adjust it to your
needs.
report erratum • discuss
Next Steps • 39
CHAPTER 4
Configure the Firmware
The Pi needs not only an operating system, but also firmware that controls
its hardware on a low level. For example, the firmware controls and configures
the GPU, the card reader, and in some regards even the CPU. It’s a vital piece
of the Raspberry Pi, and you can solve many issues, such as problems with
the video output, by setting the correct parameters. In this chapter, you’ll
learn how to configure and update the Pi’s firmware.
Also, you have to update the Linux kernel itself from time to time. The kernel
is the heart of a Linux system, because it manages all processes and the
hardware. All applications depend on the kernel, and in this chapter, you’ll
learn how to keep it up to date.
Update the Firmware and Kernel
The Debian image already comes with firmware for the Pi, but the developers
of the Linux kernel and the Pi’s firmware release updates frequently. New
releases usually contain bug fixes and improvements, so it’s beneficial to
update both the kernel and the firmware from time to time. To check which
versions of the kernel and firmware are installed on your Pi, run the following
commands:
pi@raspberrypi ~ $ uname -aLinux raspberrypi 3.10.25+ #622 PREEMPT Fri Jan 3 18:41:00 GMT 2014 armv6l GNU/Linuxpi@raspberrypi ~ $ /opt/vc/bin/vcgencmd versionJan 6 2014 21:16:43Copyright (c) 2012 Broadcomversion b00bb3ae73bd2799df0e938b7a5f17f45303fb53 (clean) (release)
You can find the latest version of all files on GitHub,1 and you can download
them to the SD card. To install a new kernel and new firmware, you have to
1. https://github.com/raspberrypi/firmware
report erratum • discuss
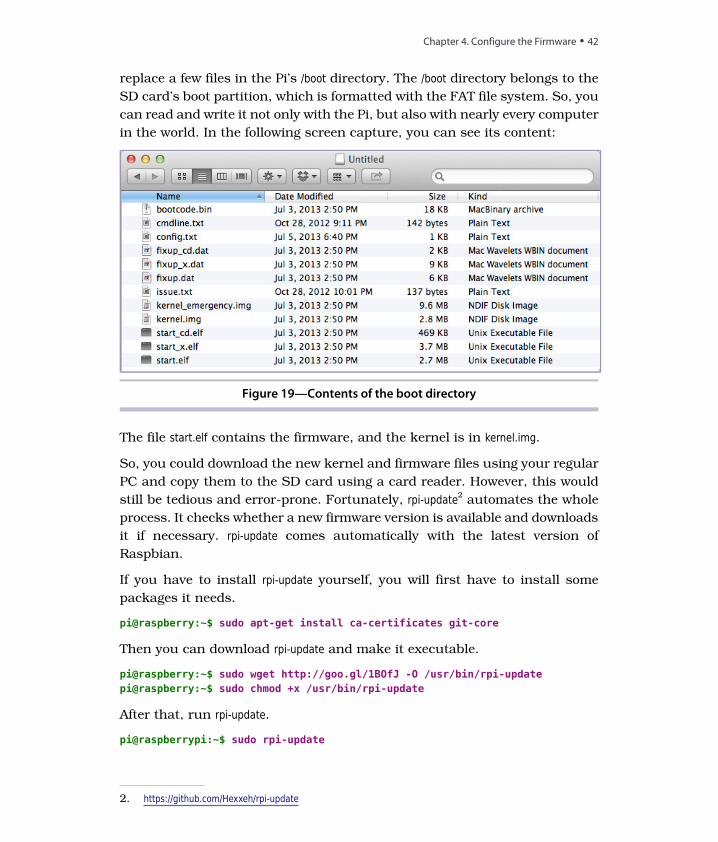
replace a few files in the Pi’s /boot directory. The /boot directory belongs to the
SD card’s boot partition, which is formatted with the FAT file system. So, you
can read and write it not only with the Pi, but also with nearly every computer
in the world. In the following screen capture, you can see its content:
Figure 19—Contents of the boot directory
The file start.elf contains the firmware, and the kernel is in kernel.img.
So, you could download the new kernel and firmware files using your regular
PC and copy them to the SD card using a card reader. However, this would
still be tedious and error-prone. Fortunately, rpi-update2 automates the whole
process. It checks whether a new firmware version is available and downloads
it if necessary. rpi-update comes automatically with the latest version of
Raspbian.
If you have to install rpi-update yourself, you will first have to install some
packages it needs.
pi@raspberry:~$ sudo apt-get install ca-certificates git-core
Then you can download rpi-update and make it executable.
pi@raspberry:~$ sudo wget http://goo.gl/1BOfJ -O /usr/bin/rpi-updatepi@raspberry:~$ sudo chmod +x /usr/bin/rpi-update
After that, run rpi-update.
pi@raspberrypi:~$ sudo rpi-update
2. https://github.com/Hexxeh/rpi-update
Chapter 4. Configure the Firmware • 42
report erratum • discuss
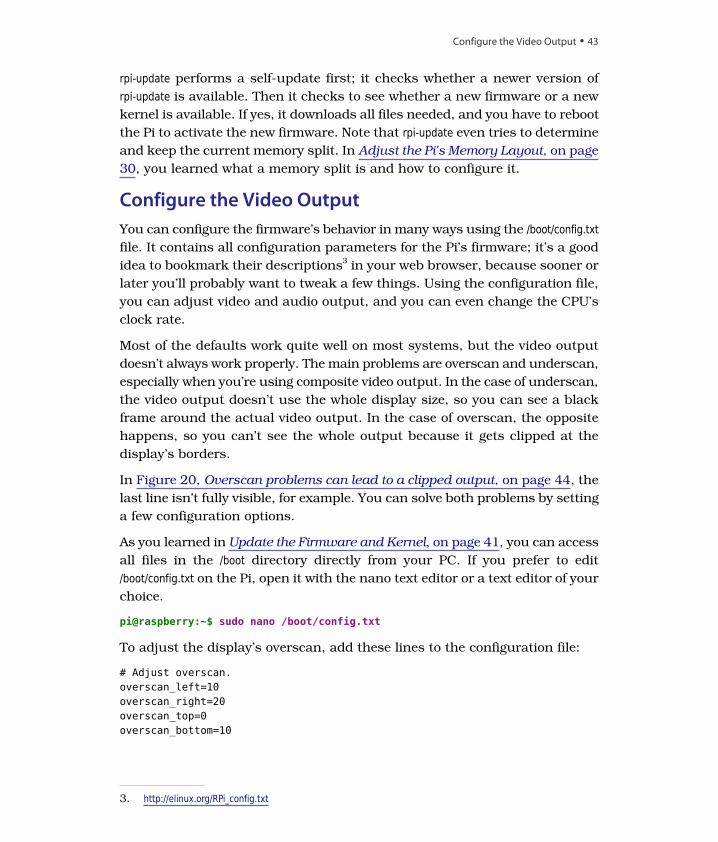
rpi-update performs a self-update first; it checks whether a newer version of
rpi-update is available. Then it checks to see whether a new firmware or a new
kernel is available. If yes, it downloads all files needed, and you have to reboot
the Pi to activate the new firmware. Note that rpi-update even tries to determine
and keep the current memory split. In Adjust the Pi's Memory Layout, on page
30, you learned what a memory split is and how to configure it.
Configure the Video Output
You can configure the firmware’s behavior in many ways using the /boot/config.txtfile. It contains all configuration parameters for the Pi’s firmware; it’s a good
idea to bookmark their descriptions3 in your web browser, because sooner or
later you’ll probably want to tweak a few things. Using the configuration file,
you can adjust video and audio output, and you can even change the CPU’s
clock rate.
Most of the defaults work quite well on most systems, but the video output
doesn’t always work properly. The main problems are overscan and underscan,
especially when you’re using composite video output. In the case of underscan,
the video output doesn’t use the whole display size, so you can see a black
frame around the actual video output. In the case of overscan, the opposite
happens, so you can’t see the whole output because it gets clipped at the
display’s borders.
In Figure 20, Overscan problems can lead to a clipped output, on page 44, the
last line isn’t fully visible, for example. You can solve both problems by setting
a few configuration options.
As you learned in Update the Firmware and Kernel, on page 41, you can access
all files in the /boot directory directly from your PC. If you prefer to edit
/boot/config.txt on the Pi, open it with the nano text editor or a text editor of your
choice.
pi@raspberry:~$ sudo nano /boot/config.txt
To adjust the display’s overscan, add these lines to the configuration file:
# Adjust overscan.overscan_left=10overscan_right=20overscan_top=0overscan_bottom=10
3. http://elinux.org/RPi_config.txt
report erratum • discuss
Configure the Video Output • 43
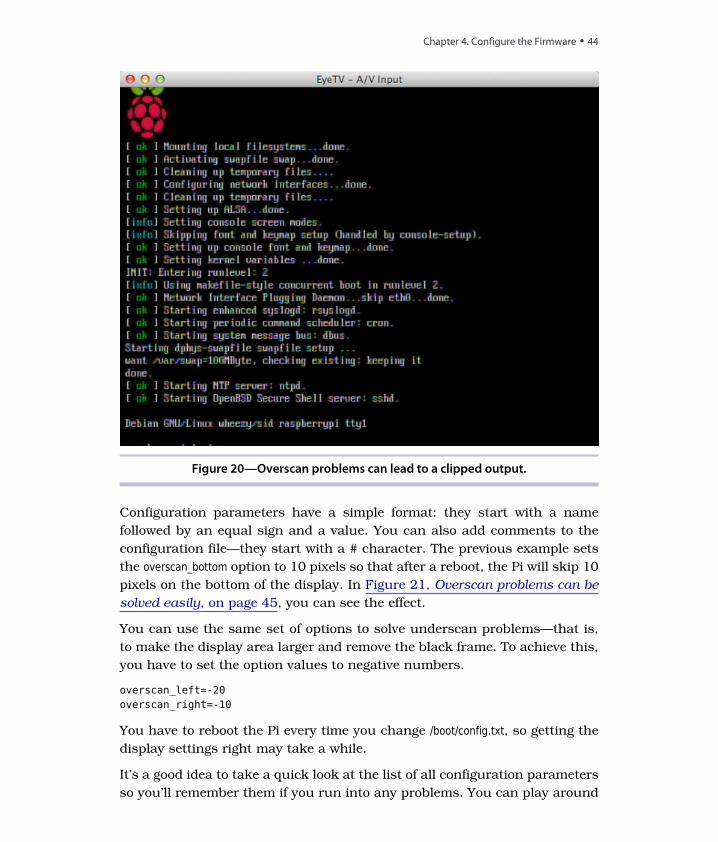
Figure 20—Overscan problems can lead to a clipped output.
Configuration parameters have a simple format: they start with a name
followed by an equal sign and a value. You can also add comments to the
configuration file—they start with a # character. The previous example sets
the overscan_bottom option to 10 pixels so that after a reboot, the Pi will skip 10
pixels on the bottom of the display. In Figure 21, Overscan problems can be
solved easily, on page 45, you can see the effect.
You can use the same set of options to solve underscan problems—that is,
to make the display area larger and remove the black frame. To achieve this,
you have to set the option values to negative numbers.
overscan_left=-20overscan_right=-10
You have to reboot the Pi every time you change /boot/config.txt, so getting the
display settings right may take a while.
It’s a good idea to take a quick look at the list of all configuration parameters
so you’ll remember them if you run into any problems. You can play around
Chapter 4. Configure the Firmware • 44
report erratum • discuss
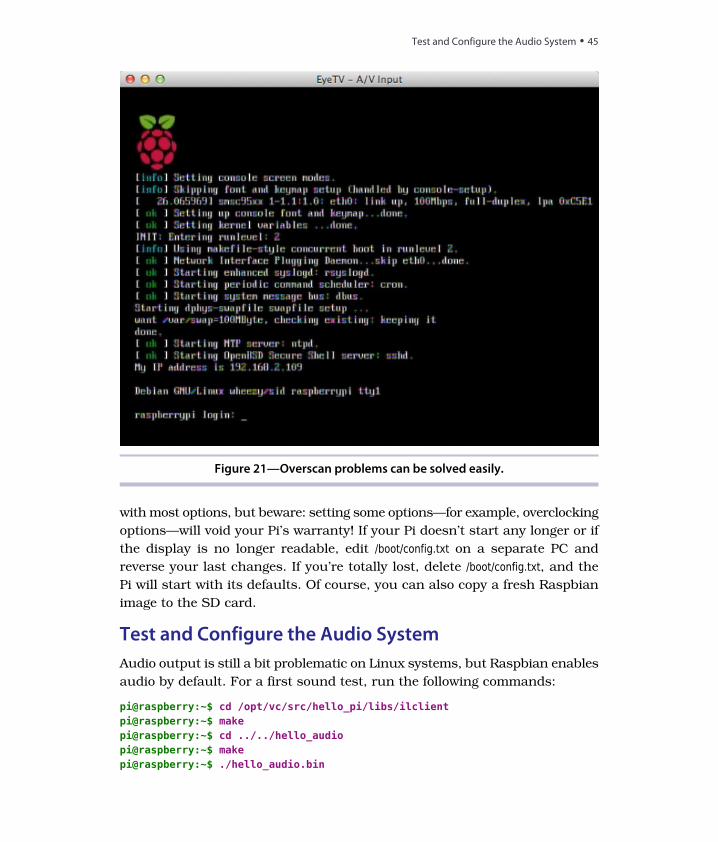
Figure 21—Overscan problems can be solved easily.
with most options, but beware: setting some options—for example, overclocking
options—will void your Pi’s warranty! If your Pi doesn’t start any longer or if
the display is no longer readable, edit /boot/config.txt on a separate PC and
reverse your last changes. If you’re totally lost, delete /boot/config.txt, and the
Pi will start with its defaults. Of course, you can also copy a fresh Raspbian
image to the SD card.
Test and Configure the Audio System
Audio output is still a bit problematic on Linux systems, but Raspbian enables
audio by default. For a first sound test, run the following commands:
pi@raspberry:~$ cd /opt/vc/src/hello_pi/libs/ilclientpi@raspberry:~$ makepi@raspberry:~$ cd ../../hello_audiopi@raspberry:~$ makepi@raspberry:~$ ./hello_audio.bin
report erratum • discuss
Test and Configure the Audio System • 45
This will compile a small test program that plays a siren sound. It outputs
the sound via the analog audio jack, so plug in some headphones or speakers
to hear it. Alternatively, you can play the sound via HDMI.
pi@raspberry:~$ ./hello_audio.bin 1
The Pi determines the best way to output audio automatically. It uses HDMI
when available and analog output otherwise. In recent versions of Raspbian,
you can change this behavior using Raspi-config (see Choose the Audio Output,
on page 30) or using amixer. This is a small tool that allows you to configure
the sound hardware. Run it as follows to see which options you can change:
pi@raspberry:~$ amixer controlsnumid=3,iface=MIXER,name='PCM Playback Route'numid=2,iface=MIXER,name='PCM Playback Switch'numid=1,iface=MIXER,name='PCM Playback Volume'
You can change only three options, and you must reference them by their
numid. It’d be much nicer if the options had a real name, but the developers
of amixer decided to use numerical IDs instead. The option for setting the
playback route has a numid value of 3. Set it as follows:
pi@raspberry:~$ sudo amixer cset numid=3 1
This sets the playback route to 1 (analog output). You can also set it to 0
(automatic) or 2 (HDMI). When everything works as expected, you can add
the amixer command to the /etc/rc.local file, so the Pi runs it automatically at
startup. Open a text editor, such as nano, and add the following line to
/etc/rc.local:
amixer cset numid=3 1
Add it to the end of the file, but don’t make it the last line. Put it in front of
the exit 0 statement.
By the way, some displays don’t detect an HDMI cable correctly, so you might
have video output via HDMI while audio output does not work. You can change
this by setting the firmware configuration parameter hdmi_drive to 2 in
/boot/config.txt. See Configure the Video Output, on page 43, to learn how to do
this.
Next Steps
In this chapter, you learned how to configure the Pi’s firmware. You can solve
problems with the display, and you know how to adjust system parameters.
In the next chapter, you’ll take a short break and turn the Pi into a kiosk
system.
Chapter 4. Configure the Firmware • 46
report erratum • discuss
CHAPTER 5
Intermezzo: Build a Kiosk with the Pi
If you’ve been in a waiting room lately, chances are good that you’ve seen a
kiosk system.1 Usually, it consists of an old TV set with a DVD player and
sometimes even a VCR. In a doctor’s waiting room, you’ll see and hear a lot
about new and expensive treatments, while repair shops often bombard you
with advertisements for useless parts. Often the video signal flickers, the text
on the show contains many typos, and you feel as if you should leave the
office and look for a more professional medical provider.
On the other hand, you can find really good kiosk systems—for example,
while waiting for the subway or train. Here you can see news, weather fore-
casts, and cartoons on huge screens. The biggest difference between the good
and bad kiosks is that the good ones usually don’t repeat the same content
for all eternity. They often update it via the Internet.
The Raspberry Pi is a perfect platform for building a cheap but powerful kiosk
system. In this chapter, you’ll learn how to turn the Pi into a kiosk that dis-
plays Twitter live search information.
Display Twitter Live Search Information
The only piece of software you need to build most kiosk applications is a web
browser. Web browsers are very good at displaying multimedia content, so
you simply have to make the information you’d like to present available as
an HTML page.
Also, you have to disable all the browser’s menu bars and make sure the
browser refreshes the content automatically at a certain interval. Most modern
browsers already have a kiosk mode that does all of this automatically.
1. http://en.wikipedia.org/wiki/Kiosk_software
report erratum • discuss
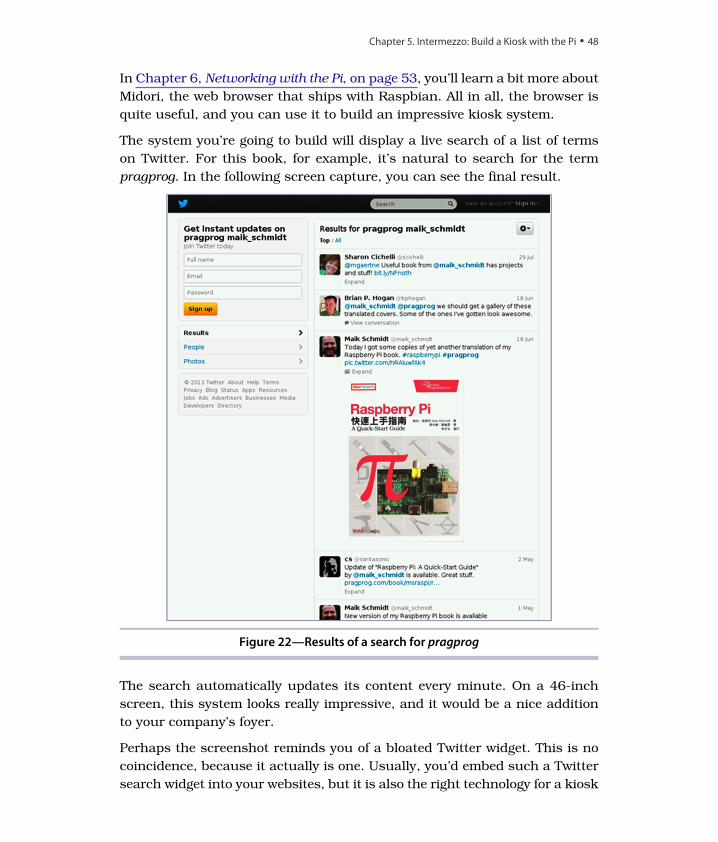
In Chapter 6, Networking with the Pi, on page 53, you’ll learn a bit more about
Midori, the web browser that ships with Raspbian. All in all, the browser is
quite useful, and you can use it to build an impressive kiosk system.
The system you’re going to build will display a live search of a list of terms
on Twitter. For this book, for example, it’s natural to search for the term
pragprog. In the following screen capture, you can see the final result.
Figure 22—Results of a search for pragprog
The search automatically updates its content every minute. On a 46-inch
screen, this system looks really impressive, and it would be a nice addition
to your company’s foyer.
Perhaps the screenshot reminds you of a bloated Twitter widget. This is no
coincidence, because it actually is one. Usually, you’d embed such a Twitter
search widget into your websites, but it is also the right technology for a kiosk
Chapter 5. Intermezzo: Build a Kiosk with the Pi • 48
report erratum • discuss
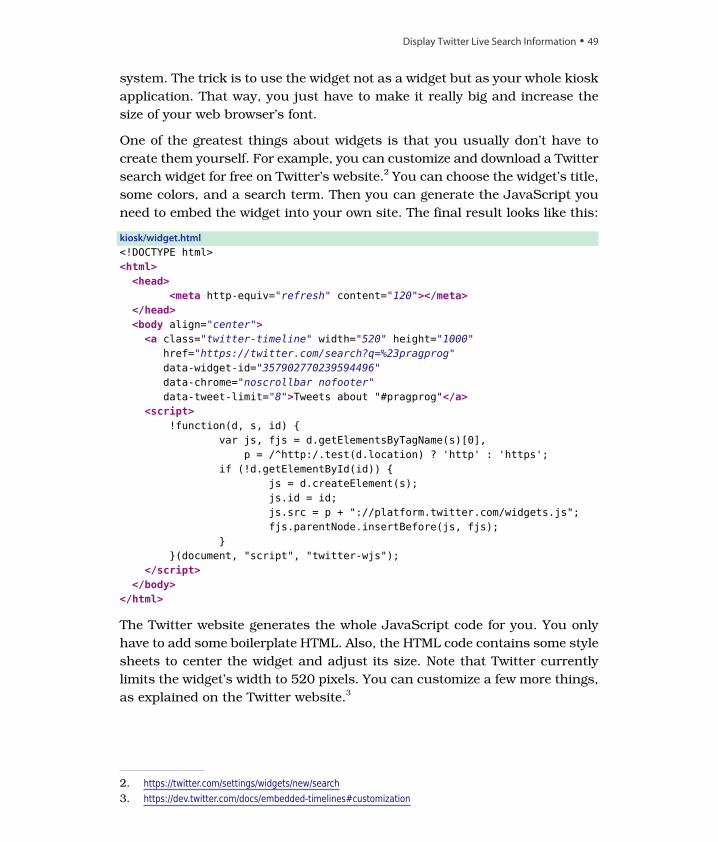
system. The trick is to use the widget not as a widget but as your whole kiosk
application. That way, you just have to make it really big and increase the
size of your web browser’s font.
One of the greatest things about widgets is that you usually don’t have to
create them yourself. For example, you can customize and download a Twitter
search widget for free on Twitter’s website.2 You can choose the widget’s title,
some colors, and a search term. Then you can generate the JavaScript you
need to embed the widget into your own site. The final result looks like this:
kiosk/widget.html
<!DOCTYPE html><html>
<head><meta http-equiv="refresh" content="120"></meta>
</head><body align="center"><a class="twitter-timeline" width="520" height="1000"
href="https://twitter.com/search?q=%23pragprog"data-widget-id="357902770239594496"data-chrome="noscrollbar nofooter"data-tweet-limit="8">Tweets about "#pragprog"</a>
<script>!function(d, s, id)
var js, fjs = d.getElementsByTagName(s)[0],p = /^http:/.test(d.location) ? 'http' : 'https';
if (!d.getElementById(id)) js = d.createElement(s);js.id = id;js.src = p + "://platform.twitter.com/widgets.js";fjs.parentNode.insertBefore(js, fjs);
(document, "script", "twitter-wjs");
</script></body>
</html>
The Twitter website generates the whole JavaScript code for you. You only
have to add some boilerplate HTML. Also, the HTML code contains some style
sheets to center the widget and adjust its size. Note that Twitter currently
limits the widget’s width to 520 pixels. You can customize a few more things,
as explained on the Twitter website.3
2. https://twitter.com/settings/widgets/new/search3. https://dev.twitter.com/docs/embedded-timelines#customization
report erratum • discuss
Display Twitter Live Search Information • 49
Note that every Twitter widget gets a unique ID that you can see in the
data-widget-id= attribute. If you want to change the search term, you have to
generate a new Twitter widget with a new ID.
To get the widget code onto your Pi, you can open a text editor, such as nano,
and type it in. A better approach is to download the zip archive containing
the book’s source code from the book’s website4 or click the filename above
the preceding code example. By default, Midori stores all downloads in the
/tmp directory, so after Midori has downloaded the file, open a terminal and
run the following commands:
pi@raspberrypi ~ $ cd /tmppi@raspberrypi ~ $ unzip msraspi-code.zip
Now you can find the widget code in /tmp/code/kiosk/widget.html. To run the kiosk
widget, start the LXDE desktop on your Pi, and then start the Midori browser.
After that, choose the Open menu in Midori and select the file containing the
widget code. The widget will start right away, but to see the full effect, press
F11 to enable Midori’s full-screen mode.
The widget now covers the whole screen and updates automatically. Press
Ctrl++ (plus) a few times to increase the font size. Without writing a single
line of code, you’ve turned the Pi into a kiosk system.
Refresh Websites Automatically
Many websites update their content periodically using JavaScript, and in the
past Twitter widgets used this mechanism, too. The website you used in the
preceding section uses a different approach. It updates its content using the
<meta> tag in the head section of the HTML page.
<meta http-equiv="refresh" content="120"></meta>
This element reloads the page every 120 seconds. It’s an easy solution, but
it works only when you’re allowed to change the page and have access to the
server hosting it. So, the best solution would be if you could tell your browser
to reload the current page at a certain interval. Most browsers have such a
function, and usually it’s called kiosk mode. Midori has a kiosk mode, too.
To use it, you have to start Midori from the command line. Using the -a option,
you specify the address Midori should display. To set the update interval, use
the -i option, and to turn on full-screen mode, use -e. The final command looks
like this:
4. http://media.pragprog.com/titles/msraspi/code/msraspi-code.zip
Chapter 5. Intermezzo: Build a Kiosk with the Pi • 50
report erratum • discuss
pi@raspberrypi ~ $ midori -i 30 -e Fullscreen \-a "http://twitter.com/search?q=pragprog"
This shows the results of a Twitter search for the term pragprog and refreshes
the page every thirty seconds. Increase the font size by hitting Ctrl++ a few
times, and you’re finished. Note that Midori supports many more options for
controlling it from the outside. You can list them using the following command:
pi@raspberrypi ~ $ midori --help-execute
Try Different Browsers
When the Pi was released, the Midori browser was the only relatively capable
browser running on the limited hardware. As the community grew, Raspbian
and its applications got better and better, and now ports of Chromium and
Iceweasel run fairly well on the Pi. (See But I Want My Regular Browser, on
page 54, to learn how to install them.)
These browsers have kiosk modes, too.5 They might provide better results for
some websites than Midori does. Depending on your project’s needs you might
give them a try.
Next Steps
In this chapter, you learned how to turn the Pi into a kiosk system in only a
few steps. Look around in your company for possible applications. For
example, you could permanently display the status of your most critical sys-
tems on a big screen. Also, you could display the current number of customers
or orders. Of course, you could also be conservative and simply display a set
of slides explaining how wonderful your company is.
5. See http://www.vatofknow.com/?p=932, for example.
report erratum • discuss
Try Different Browsers • 51
CHAPTER 6
Networking with the Pi
Like any computer, the Pi gets even more exciting the moment you connect
it to a network. Suddenly, you can use the Pi for everyday tasks, such as
surfing the Web or tweeting messages. You also can make the Pi accessible
via Secure Shell, so you can securely and conveniently work on it from
another computer. You can even share the Pi’s graphical desktop with your
PC over a network, and vice versa.
In addition, you can use the Pi as a cheap but powerful web server that not
only serves static content, but also is able to run web applications written in
languages such as PHP, for example.
Perform Everyday Tasks on the Web
You’re probably used to performing many tasks using only your web browser:
checking email, reading RSS feeds, watching videos, sending tweets, and so
on. This is all possible because most browsers today support HTML5,
JavaScript, Flash, and Java. Without these technologies, the Web would still
look very much like it did in 1995.
All these nice things work only with modern browsers, such as Google Chrome
or Mozilla Firefox. Although you can already install Chromium on Raspbian,1
it will be a while until it will run sufficiently fast on the Pi. Also, it doesn’t
support all features, such as video, at the moment. The biggest limitation is
due to the Pi’s small memory, because modern browsers use a lot of it. The
browser that ships with the Debian distribution for the Pi is Midori.2 It’s a
pretty good web browser that doesn’t use a lot of memory. Unfortunately, it’s
still in its infancy, and it has some limitations. For one thing, technologies
1. http://hexxeh.net/?p=3281178592. http://twotoasts.de/index.php/midori/
report erratum • discuss
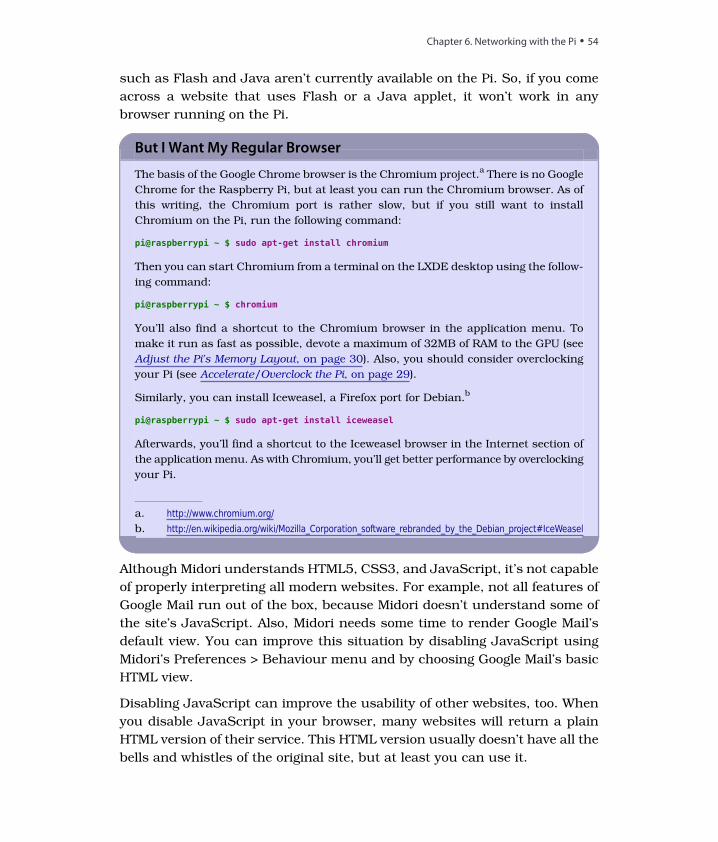
such as Flash and Java aren’t currently available on the Pi. So, if you come
across a website that uses Flash or a Java applet, it won’t work in any
browser running on the Pi.
But I Want My Regular Browser
The basis of the Google Chrome browser is the Chromium project.a There is no Google
Chrome for the Raspberry Pi, but at least you can run the Chromium browser. As of
this writing, the Chromium port is rather slow, but if you still want to install
Chromium on the Pi, run the following command:
pi@raspberrypi ~ $ sudo apt-get install chromium
Then you can start Chromium from a terminal on the LXDE desktop using the follow-
ing command:
pi@raspberrypi ~ $ chromium
You’ll also find a shortcut to the Chromium browser in the application menu. To
make it run as fast as possible, devote a maximum of 32MB of RAM to the GPU (see
Adjust the Pi's Memory Layout, on page 30). Also, you should consider overclocking
your Pi (see Accelerate/Overclock the Pi, on page 29).
Similarly, you can install Iceweasel, a Firefox port for Debian.b
pi@raspberrypi ~ $ sudo apt-get install iceweasel
Afterwards, you’ll find a shortcut to the Iceweasel browser in the Internet section of
the application menu. As with Chromium, you’ll get better performance by overclocking
your Pi.
a. http://www.chromium.org/b. http://en.wikipedia.org/wiki/Mozilla_Corporation_software_rebranded_by_the_Debian_project#IceWeasel
Although Midori understands HTML5, CSS3, and JavaScript, it’s not capable
of properly interpreting all modern websites. For example, not all features of
Google Mail run out of the box, because Midori doesn’t understand some of
the site’s JavaScript. Also, Midori needs some time to render Google Mail’s
default view. You can improve this situation by disabling JavaScript using
Midori’s Preferences > Behaviour menu and by choosing Google Mail’s basic
HTML view.
Disabling JavaScript can improve the usability of other websites, too. When
you disable JavaScript in your browser, many websites will return a plain
HTML version of their service. This HTML version usually doesn’t have all the
bells and whistles of the original site, but at least you can use it.
Chapter 6. Networking with the Pi • 54
report erratum • discuss
For Twitter, it’s similar. Midori can render it, but it’s rather slow. A good
solution is to use Twitter’s mobile website.3 It won’t have all the features of
the original site, but it will still provide a very good Twitter experience, and
it works on Midori.
Another trick that sometimes helps is to change Midori’s user agent. All web
browsers send with every request a unique identifier that tells the web server
exactly what kind of browser has sent the request. This identifier is called
the user agent, and some websites change their response depending on its
value. For example, some websites generate an error message if they don’t
know the user agent. In Midori, you can change the user agent in the
Preferences > Network menu. Here you can tell Midori that it should pretend
to be a Mozilla Firefox browser, Safari, or an iPhone.
Some sites won’t work at the moment, no matter what you try. YouTube,4 for
example, depends on video support in the browser, be it HTML5 video or
Flash. Midori doesn’t support either of these on Raspbian at the moment, so
you can’t render YouTube properly. You’re out of luck, too, if a website depends
on some JavaScript code that doesn’t work on Midori or if it needs a Java
applet. Fortunately, Java applets aren’t very popular today, but some online
banking sites still use them.
In addition to all this, Midori sometimes uses a lot of resources, especially the
CPU. Midori often needs nearly the whole CPU to render a website—sometimes
you have to wait for a few minutes for just one page to render.
A Glimpse into the Future
The Raspberry Pi team has always known that the lack of a really good web browser
is one of the platform’s biggest problems. Instead of waiting for someone else to come
up with a decent solution, they’ve tried to improve the situation—chances are good
now that the Pi will eventually get a really good web browser.a
This browser is named “Web” (admittedly not the most creative name for a web
browser), and it has been around for quite a long time.b At the moment, early beta
ports for the Pi are available, and they look quite promising.
a. http://www.raspberrypi.org/archives/5535b. http://en.wikipedia.org/wiki/Web_%28web_browser%29
3. http://mobile.twitter.com4. http://youtube.com
report erratum • discuss
Perform Everyday Tasks on the Web • 55
If you keep in mind that you can disable JavaScript and that most popular
websites have a mobile version, Midori is sufficient for most situations. Also,
the Pi’s popularity might result in major improvements in the near future.
Use Secure Shell with the Pi
It’s likely that you’ll connect your Pi to a network so you can access the Pi
from other computers, and vice versa. One of the best ways to communicate
securely between two computers is via Secure Shell (SSH), a network protocol
for secure data communication. Debian comes with everything you need to
use SSH; you simply have to configure a few things.
Access the Pi Using a Password
If you only want to access other computers from the Pi, you don’t have to
configure anything. For example, you can connect as the admin user to the
host maik-schmidt.de by starting SSH on the Pi with the other computer’s name
and password.
pi@raspberrypi ~ $ ssh [email protected]@maik-schmidt.de's password:Last login: Wed Jan 2 09:41:34 2013 from [email protected]:~$ exitlogoutConnection to maik-schmidt.de closed.
However, if you want to access the Pi using SSH, you first have to enable the
SSH server on the Pi using Raspi-config.
pi@raspberrypi ~ $ sudo raspi-config
Choose the SSH menu item in the Advanced Options menu and enable the
SSH server. Then click the Finish button to leave Raspi-config. After you
reboot, the Pi’s boot log will contain a new message.
Starting OpenBSD Secure Shell server: sshdMy IP address is 192.168.2.109
This means you can access the Pi via SSH now, and that the Pi’s IP address
is 192.168.2.109. In your case, the IP address will likely be different. If you
need to determine your Pi’s IP address later, you can run this:
pi@raspberrypi ~ $ ip addr | grep 'inet .* eth0'inet 192.168.2.109/24 brd 192.168.2.255 scope global eth0
The first IP address that appears in the output is your Pi’s address. Using
this address, you can access the Pi from all the other computers on your
network.
Chapter 6. Networking with the Pi • 56
report erratum • discuss
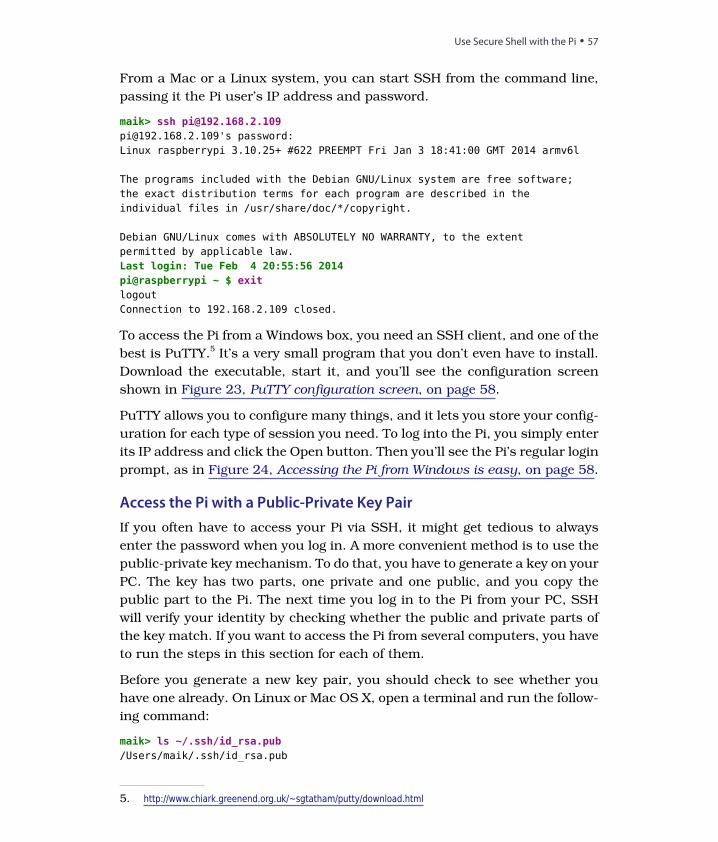
From a Mac or a Linux system, you can start SSH from the command line,
passing it the Pi user’s IP address and password.
maik> ssh [email protected]@192.168.2.109's password:Linux raspberrypi 3.10.25+ #622 PREEMPT Fri Jan 3 18:41:00 GMT 2014 armv6l
The programs included with the Debian GNU/Linux system are free software;the exact distribution terms for each program are described in theindividual files in /usr/share/doc/*/copyright.
Debian GNU/Linux comes with ABSOLUTELY NO WARRANTY, to the extentpermitted by applicable law.Last login: Tue Feb 4 20:55:56 2014pi@raspberrypi ~ $ exitlogoutConnection to 192.168.2.109 closed.
To access the Pi from a Windows box, you need an SSH client, and one of the
best is PuTTY.5 It’s a very small program that you don’t even have to install.
Download the executable, start it, and you’ll see the configuration screen
shown in Figure 23, PuTTY configuration screen, on page 58.
PuTTY allows you to configure many things, and it lets you store your config-
uration for each type of session you need. To log into the Pi, you simply enter
its IP address and click the Open button. Then you’ll see the Pi’s regular login
prompt, as in Figure 24, Accessing the Pi from Windows is easy, on page 58.
Access the Pi with a Public-Private Key Pair
If you often have to access your Pi via SSH, it might get tedious to always
enter the password when you log in. A more convenient method is to use the
public-private key mechanism. To do that, you have to generate a key on your
PC. The key has two parts, one private and one public, and you copy the
public part to the Pi. The next time you log in to the Pi from your PC, SSH
will verify your identity by checking whether the public and private parts of
the key match. If you want to access the Pi from several computers, you have
to run the steps in this section for each of them.
Before you generate a new key pair, you should check to see whether you
have one already. On Linux or Mac OS X, open a terminal and run the follow-
ing command:
maik> ls ~/.ssh/id_rsa.pub/Users/maik/.ssh/id_rsa.pub
5. http://www.chiark.greenend.org.uk/~sgtatham/putty/download.html
report erratum • discuss
Use Secure Shell with the Pi • 57
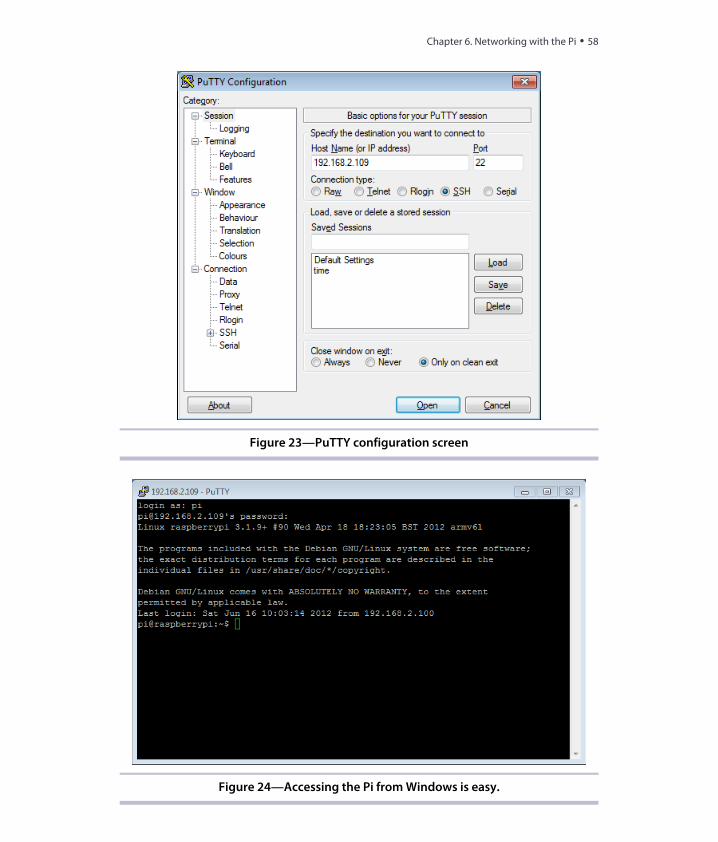
Figure 23—PuTTY configuration screen
Figure 24—Accessing the Pi from Windows is easy.
Chapter 6. Networking with the Pi • 58
report erratum • discuss
The file id_rsa.pub contains the public key, and the command shown earlier
tries to list it. If the output looks like the previous output, you already have
a key, and you can skip the key generation and copy the public key to the Pi,
as described next. If you get a “No such file or directory” message instead,
you have to generate a key, as in the following:
maik> ssh-keygen -t rsa -C "[email protected]"Generating public-private rsa key pair.Enter file in which to save the key (/Users/maik/.ssh/id_rsa):Enter passphrase (empty for no passphrase):Enter same passphrase again:Your identification has been saved in/Users/mschmidt/.ssh/id_rsa.Your public key has been saved in/Users/mschmidt/.ssh/id_rsa.pub.The key fingerprint is:f0:09:09:49:42:46:42:6f:42:3b:42:44:42:09:6a:[email protected] key's randomart image is:+--[ RSA 2048]----+| . .o.. ||+ ..o + . ||o.o + B o ||.+ o o B . || E = S . || . . o || . || || |+-----------------+
This generated a key pair in your home directory. You can find the public key
in a file named id_rsa.pub. You now have to transfer this file to the Pi, where
SSH keeps a list of all authorized keys in a file named .ssh/authorized_keys in the
Pi user’s home directory. The following commands append the id_rsa.pub file to
the Pi’s list of authorized keys:
maik> scp ~/.ssh/id_rsa.pub [email protected]:/tmpmaik> ssh [email protected] "mkdir ~/.ssh"maik> ssh [email protected] "cat /tmp/id_rsa.pub >> ~/.ssh/authorized_keys"
The first command copies id_rsa.pub to the Pi’s /tmp directory, and the second
command creates a hidden directory named .ssh that contains configuration
data for SSH. The last command appends the file’s content to the
~/.ssh/authorized_keys file. If you don’t plan to keep several keys in the authorized_keysfile, you can copy id_rsa.pub directly, of course.
maik> scp ~/.ssh/id_rsa.pub [email protected]:/home/pi/.ssh/authorized_keys
report erratum • discuss
Use Secure Shell with the Pi • 59
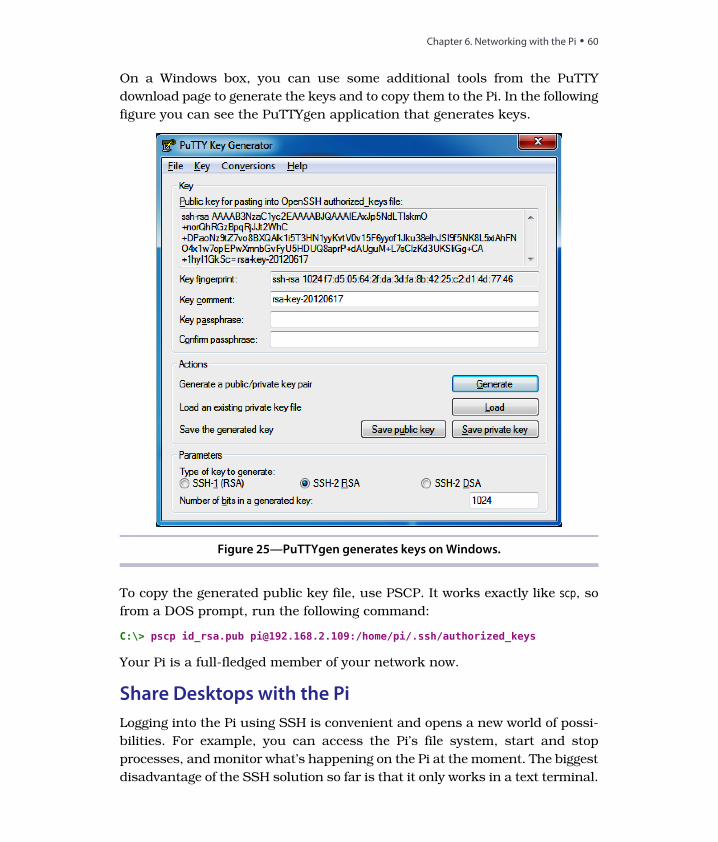
On a Windows box, you can use some additional tools from the PuTTY
download page to generate the keys and to copy them to the Pi. In the following
figure you can see the PuTTYgen application that generates keys.
Figure 25—PuTTYgen generates keys on Windows.
To copy the generated public key file, use PSCP. It works exactly like scp, so
from a DOS prompt, run the following command:
C:\> pscp id_rsa.pub [email protected]:/home/pi/.ssh/authorized_keys
Your Pi is a full-fledged member of your network now.
Share Desktops with the Pi
Logging into the Pi using SSH is convenient and opens a new world of possi-
bilities. For example, you can access the Pi’s file system, start and stop
processes, and monitor what’s happening on the Pi at the moment. The biggest
disadvantage of the SSH solution so far is that it only works in a text terminal.
Chapter 6. Networking with the Pi • 60
report erratum • discuss
You can easily overcome this limitation and control the Pi’s desktop, keyboard,
and mouse using another computer. One solution is Virtual Network
Computing (VNC),6 a technology that transmits the whole screen and all
mouse and keyboard events from one computer to another.
To enable VNC, you need a VNC client and server. The server runs on the
machine you’d like to control, and the client runs on the controlling machine.
So, if you want to control the Pi using your PC, you have to install a VNC
server on your Pi. You can choose from several, but one of the best is
TightVNC.7 It’s available for free for all major platforms, and you can install
it via apt-get.
pi@raspberrypi ~ $ sudo apt-get install tightvncserverpi@raspberrypi ~ $ tightvncserver
You will require a password to access your desktops.
Password:Verify:Would you like to enter a view-only password (y/n)? n
New 'X' desktop is raspberrypi:1
Creating default startup script /home/pi/.vnc/xstartupStarting applications specified in /home/pi/.vnc/xstartupLog file is /home/pi/.vnc/raspberrypi:1.log
When you run tightvncserver for the first time, it asks you to set a password.
You have to enter this password in the VNC client later to prevent unautho-
rized people from accessing your Pi. In addition, TightVNC allows you to
optionally define a view-only password. This password gives clients read-only
access so they can see the screen, but they cannot control the keyboard and
mouse. This is useful for presentations, for example.
After you’ve defined the passwords, TightVNC creates a new virtual screen
that you can access from your PC or Mac. The great thing about VNC is that
it allows you to create as many virtual screens as you need. These screens
don’t necessarily have to correspond to physical screens. They are purely
virtual, so many users can access your Pi, for example, and each will get an
independent desktop environment.
To address a virtual screen, you need two things: the Pi’s IP address and the
screen’s port address. VNC’s base port is 5900, so to access screen number 1,
6. http://en.wikipedia.org/wiki/Vnc7. http://www.tightvnc.com/
report erratum • discuss
Share Desktops with the Pi • 61
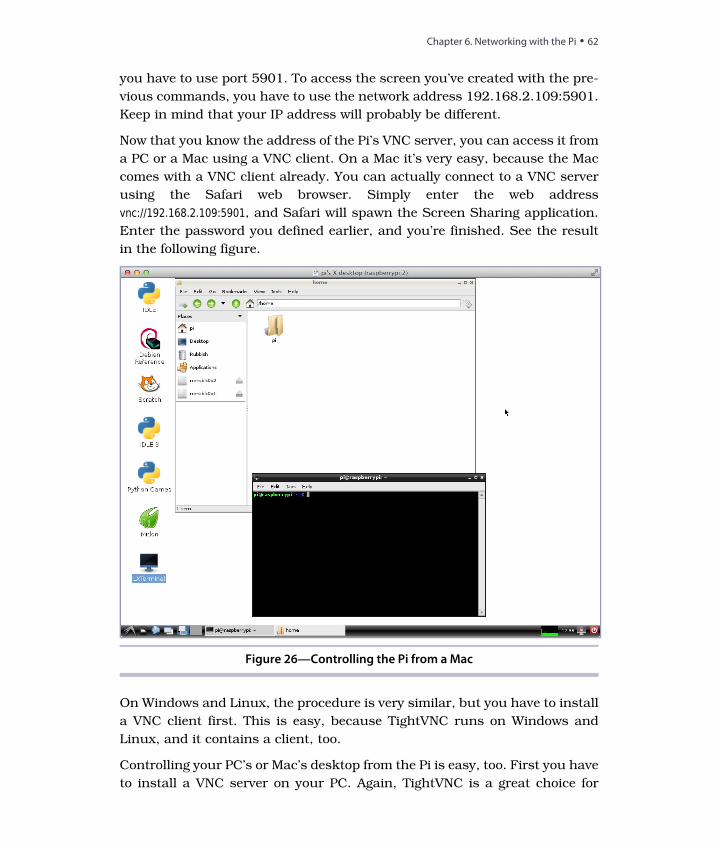
you have to use port 5901. To access the screen you’ve created with the pre-
vious commands, you have to use the network address 192.168.2.109:5901.
Keep in mind that your IP address will probably be different.
Now that you know the address of the Pi’s VNC server, you can access it from
a PC or a Mac using a VNC client. On a Mac it’s very easy, because the Mac
comes with a VNC client already. You can actually connect to a VNC server
using the Safari web browser. Simply enter the web address
vnc://192.168.2.109:5901, and Safari will spawn the Screen Sharing application.
Enter the password you defined earlier, and you’re finished. See the result
in the following figure.
Figure 26—Controlling the Pi from a Mac
On Windows and Linux, the procedure is very similar, but you have to install
a VNC client first. This is easy, because TightVNC runs on Windows and
Linux, and it contains a client, too.
Controlling your PC’s or Mac’s desktop from the Pi is easy, too. First you have
to install a VNC server on your PC. Again, TightVNC is a great choice for
Chapter 6. Networking with the Pi • 62
report erratum • discuss

Windows and Linux. On a Mac it’s even easier, because Mac OS X has an
integrated VNC server that you simply have to enable. In the System Prefer-
ences, select Sharing and then enable Screen Sharing. Click the Computer
Settings button to set a password. (You can see the preferences panel in the
following figure.)
Figure 27—Sharing the Mac’s screen is easy.
Now you need a VNC client on the Pi, and xtightvncviewer is a good one. Install
it using apt-get.
pi@raspberrypi ~ $ sudo apt-get install xtightvncviewer
Then open a terminal on the Pi’s desktop and start the client, passing it your
PC’s IP address and VNC port.
pi@raspberrypi ~ $ xtightvncviewer 192.168.2.100:5900
In Figure 28, Controlling a Mac from the Pi, on page 64, you can see a Mac’s
desktop inside a window on the Pi’s desktop. If it doesn’t work, make sure
report erratum • discuss
Share Desktops with the Pi • 63
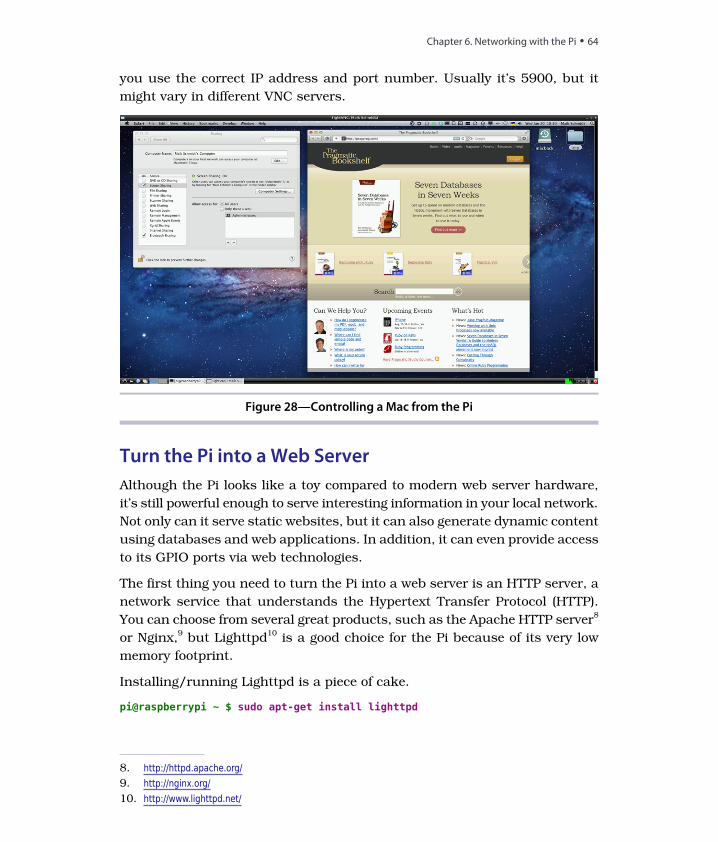
you use the correct IP address and port number. Usually it’s 5900, but it
might vary in different VNC servers.
Figure 28—Controlling a Mac from the Pi
Turn the Pi into a Web Server
Although the Pi looks like a toy compared to modern web server hardware,
it’s still powerful enough to serve interesting information in your local network.
Not only can it serve static websites, but it can also generate dynamic content
using databases and web applications. In addition, it can even provide access
to its GPIO ports via web technologies.
The first thing you need to turn the Pi into a web server is an HTTP server, a
network service that understands the Hypertext Transfer Protocol (HTTP).
You can choose from several great products, such as the Apache HTTP server8
or Nginx,9 but Lighttpd10 is a good choice for the Pi because of its very low
memory footprint.
Installing/running Lighttpd is a piece of cake.
pi@raspberrypi ~ $ sudo apt-get install lighttpd
8. http://httpd.apache.org/9. http://nginx.org/10. http://www.lighttpd.net/
Chapter 6. Networking with the Pi • 64
report erratum • discuss

After the installation has completed, Lighttpd is up and running, and you
can point your PC’s web browser to your Pi’s IP address. For example, in the
following figure you can see the server’s welcome page.
Figure 29—Lighttpd’s welcome page
To create your own web pages, you have to add them to Lighttpd’s document
root, a directory containing all files it should serve for a website. Lighttpd’s
document root by default is the /var/www directory. You should make sure that
only members of the operating system group www-data have permission to
write to it. The following commands add a Pi user to the www-data group and
set the permission flags of the /var/www directory accordingly:
pi@raspberrypi ~ $ sudo adduser pi www-datapi@raspberrypi ~ $ sudo chown -R www-data:www-data /var/wwwpi@raspberrypi ~ $ sudo chmod -R 775 /var/www
report erratum • discuss
Turn the Pi into a Web Server • 65
After the next login, you can create new web pages. You can do it with any
text editor, such as nano. The following command creates a new file named
index.html that will be the start page of your first website:
pi@raspberrypi ~ $ nano /var/www/index.html
Enter the following text:
Networking/index.html
<!DOCTYPE html><html>
<head><title>Hello, world!</title>
</head><body><h1>Hello, world!</h1>
</body></html>
When you’re finished, press Ctrl+X to leave nano. Press Y to confirm that you
want to save the file, and then press Enter to confirm the filename. After that,
point your browser to the new web page, and you’ll see a result like this:
Figure 30—Results of pointing to the new web page
By the way, if you prefer, you can edit the index.html file on your PC and copy
it to the Pi afterward. (Remember to replace the IP address with your Pi’s IP
address.)
maik> scp index.html [email protected]:/var/www
Using only a few commands, you’ve turned the Pi into a full-blown web server
that can serve static content, such as HTML pages. This is useful, but
sometimes you need more dynamic content. For example, you might want to
embed data from a database into your pages, or you might even embed envi-
ronmental data you collect with sensors attached to the Pi.
Chapter 6. Networking with the Pi • 66
report erratum • discuss
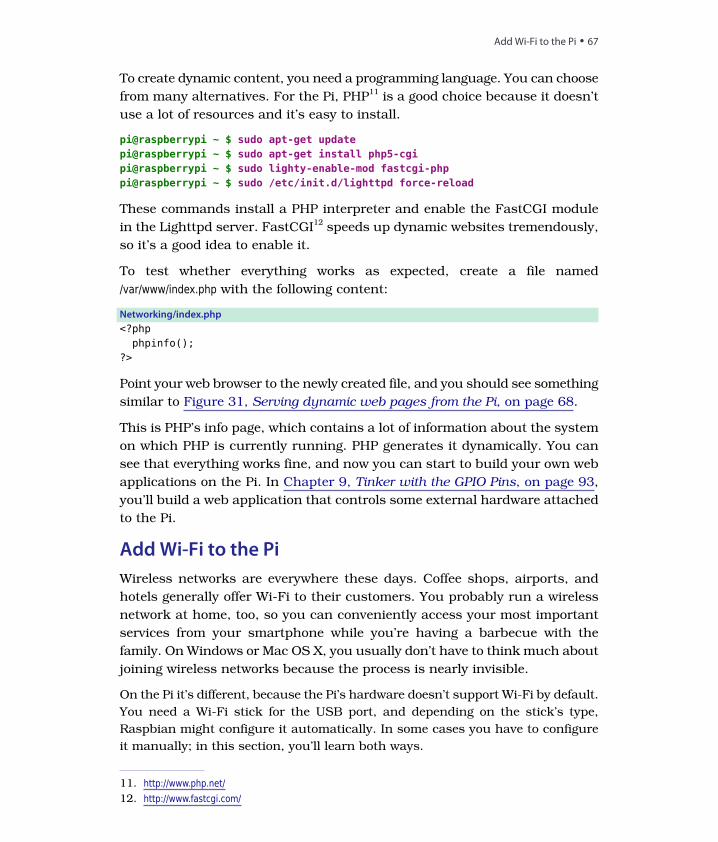
To create dynamic content, you need a programming language. You can choose
from many alternatives. For the Pi, PHP11 is a good choice because it doesn’t
use a lot of resources and it’s easy to install.
pi@raspberrypi ~ $ sudo apt-get updatepi@raspberrypi ~ $ sudo apt-get install php5-cgipi@raspberrypi ~ $ sudo lighty-enable-mod fastcgi-phppi@raspberrypi ~ $ sudo /etc/init.d/lighttpd force-reload
These commands install a PHP interpreter and enable the FastCGI module
in the Lighttpd server. FastCGI12 speeds up dynamic websites tremendously,
so it’s a good idea to enable it.
To test whether everything works as expected, create a file named
/var/www/index.php with the following content:
Networking/index.php
<?phpphpinfo();
?>
Point your web browser to the newly created file, and you should see something
similar to Figure 31, Serving dynamic web pages from the Pi, on page 68.
This is PHP’s info page, which contains a lot of information about the system
on which PHP is currently running. PHP generates it dynamically. You can
see that everything works fine, and now you can start to build your own web
applications on the Pi. In Chapter 9, Tinker with the GPIO Pins, on page 93,
you’ll build a web application that controls some external hardware attached
to the Pi.
Add Wi-Fi to the Pi
Wireless networks are everywhere these days. Coffee shops, airports, and
hotels generally offer Wi-Fi to their customers. You probably run a wireless
network at home, too, so you can conveniently access your most important
services from your smartphone while you’re having a barbecue with the
family. On Windows or Mac OS X, you usually don’t have to think much about
joining wireless networks because the process is nearly invisible.
On the Pi it’s different, because the Pi’s hardware doesn’t support Wi-Fi by default.
You need a Wi-Fi stick for the USB port, and depending on the stick’s type,
Raspbian might configure it automatically. In some cases you have to configure
it manually; in this section, you’ll learn both ways.
11. http://www.php.net/12. http://www.fastcgi.com/
report erratum • discuss
Add Wi-Fi to the Pi • 67
Figure 31—Serving dynamic web pages from the Pi
Configure Wi-Fi Using WiFi Config
The easiest way to configure Wi-Fi on Raspbian is to use a graphical tool
named WiFi Config. Plug the Wi-Fi stick into a USB port and start the LXDE
desktop:
pi@raspberrypi ~ $ startx
On the desktop you’ll find an icon for WiFi Config. Double-click it, and you’ll
see the application shown in Figure 32, WiFi Config lets you scan for wireless
networks, on page 69.
Chapter 6. Networking with the Pi • 68
report erratum • discuss

Figure 32—WiFi Config lets you scan for wireless networks.
Choose wlan0 from the Adapter drop-down menu and then click the Scan
button to search for wireless networks. If you find the network you’ve been
looking for, double-click its name, and the configuration dialog in Figure 33,
You can change many parameters in WiFi Config, on page 70 will appear.
Usually, you don’t have to change anything here. You only have to enter your
Wi-Fi password in the PSK text field. Press the Save button to return to the main
menu and then press the Connect button to connect the Pi to the wireless network.
If everything works as expected, save the current configuration using the File >
Save Configuration menu.
As long as Raspbian and WiFi Config recognize your Wi-Fi stick, WiFi Config
is the most convenient way to join wireless networks with the Pi.
Unfortunately, WiFi Config doesn’t work with all Wi-Fi sticks, and sometimes
you might need to avoid the desktop system because you’re running a server.
In these cases you have to configure Wi-Fi manually.
Configure Wi-Fi Manually
Configuring Wi-Fi on the command line isn’t very convenient, but it isn’t rocket
science, either. Plug your Wi-Fi stick into one of the Pi’s USB ports and run the
lsusb command to see whether the Pi recognizes it properly:
report erratum • discuss
Add Wi-Fi to the Pi • 69
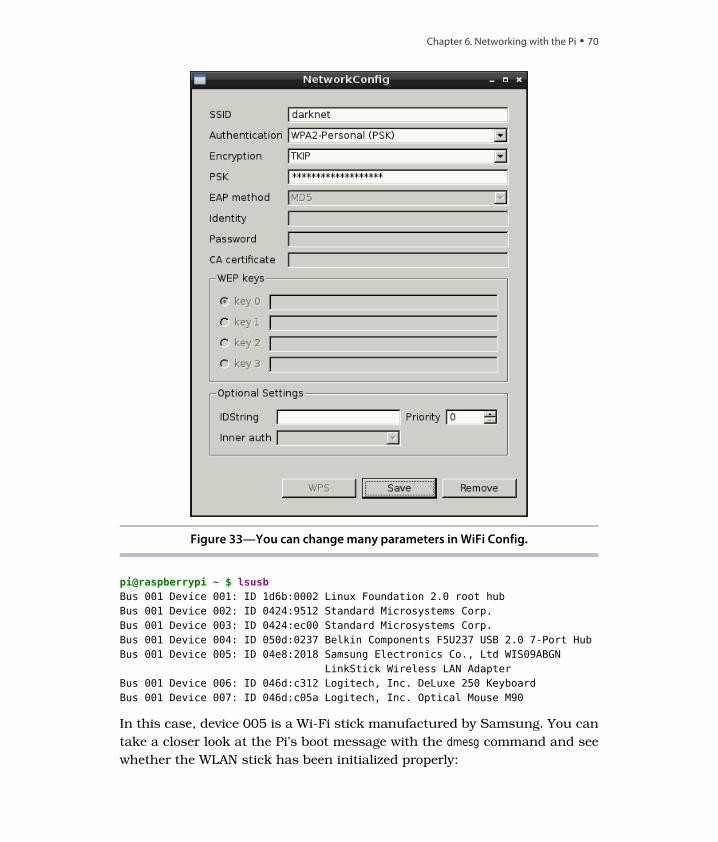
Figure 33—You can change many parameters in WiFi Config.
pi@raspberrypi ~ $ lsusbBus 001 Device 001: ID 1d6b:0002 Linux Foundation 2.0 root hubBus 001 Device 002: ID 0424:9512 Standard Microsystems Corp.Bus 001 Device 003: ID 0424:ec00 Standard Microsystems Corp.Bus 001 Device 004: ID 050d:0237 Belkin Components F5U237 USB 2.0 7-Port HubBus 001 Device 005: ID 04e8:2018 Samsung Electronics Co., Ltd WIS09ABGN
LinkStick Wireless LAN AdapterBus 001 Device 006: ID 046d:c312 Logitech, Inc. DeLuxe 250 KeyboardBus 001 Device 007: ID 046d:c05a Logitech, Inc. Optical Mouse M90
In this case, device 005 is a Wi-Fi stick manufactured by Samsung. You can
take a closer look at the Pi’s boot message with the dmesg command and see
whether the WLAN stick has been initialized properly:
Chapter 6. Networking with the Pi • 70
report erratum • discuss
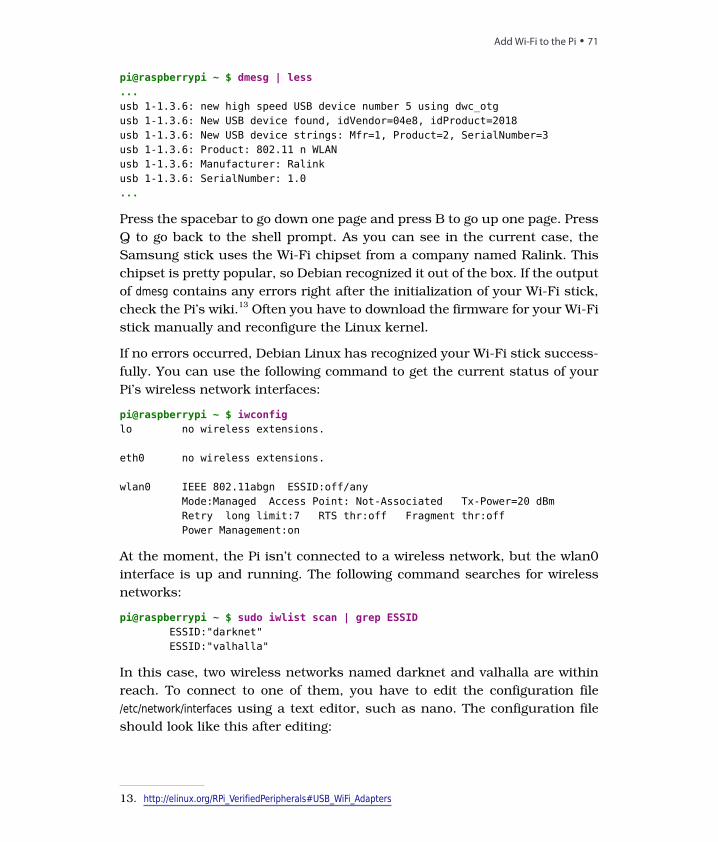
pi@raspberrypi ~ $ dmesg | less...usb 1-1.3.6: new high speed USB device number 5 using dwc_otgusb 1-1.3.6: New USB device found, idVendor=04e8, idProduct=2018usb 1-1.3.6: New USB device strings: Mfr=1, Product=2, SerialNumber=3usb 1-1.3.6: Product: 802.11 n WLANusb 1-1.3.6: Manufacturer: Ralinkusb 1-1.3.6: SerialNumber: 1.0...
Press the spacebar to go down one page and press B to go up one page. Press
Q to go back to the shell prompt. As you can see in the current case, the
Samsung stick uses the Wi-Fi chipset from a company named Ralink. This
chipset is pretty popular, so Debian recognized it out of the box. If the output
of dmesg contains any errors right after the initialization of your Wi-Fi stick,
check the Pi’s wiki.13 Often you have to download the firmware for your Wi-Fi
stick manually and reconfigure the Linux kernel.
If no errors occurred, Debian Linux has recognized your Wi-Fi stick success-
fully. You can use the following command to get the current status of your
Pi’s wireless network interfaces:
pi@raspberrypi ~ $ iwconfiglo no wireless extensions.
eth0 no wireless extensions.
wlan0 IEEE 802.11abgn ESSID:off/anyMode:Managed Access Point: Not-Associated Tx-Power=20 dBmRetry long limit:7 RTS thr:off Fragment thr:offPower Management:on
At the moment, the Pi isn’t connected to a wireless network, but the wlan0
interface is up and running. The following command searches for wireless
networks:
pi@raspberrypi ~ $ sudo iwlist scan | grep ESSIDESSID:"darknet"ESSID:"valhalla"
In this case, two wireless networks named darknet and valhalla are within
reach. To connect to one of them, you have to edit the configuration file
/etc/network/interfaces using a text editor, such as nano. The configuration file
should look like this after editing:
13. http://elinux.org/RPi_VerifiedPeripherals#USB_WiFi_Adapters
report erratum • discuss
Add Wi-Fi to the Pi • 71
auto loiface lo inet loopbackiface eth0 inet dhcp
allow-hotplug wlan0iface wlan0 inet manualwpa-roam /etc/wpa_supplicant/wpa_supplicant.confiface default inet dhcp
These lines will activate the wlan0 network interface automatically the next
time you boot the Pi without an Ethernet connection. Also, they’ll make the
Pi obtain an IP address using DHCP (Dynamic Host Configuration Protocol).
You still have to configure your Wi-Fi credentials. Open /etc/wpa_supplicant/wpa_sup-plicant.conf with your text editor of choice and enter the following lines:
ctrl_interface=DIR=/var/run/wpa_supplicant GROUP=netdevupdate_config=1
network=ssid="darknet"psk="dontTellAny0ne"proto=RSNkey_mgmt=WPA-PSKpairwise=TKIPauth_alg=OPEN
Of course, you have to adjust the parameters ssid and psk accordingly.
If you’re impatient, you don’t have to reboot the Pi. Run the following command
to make the Pi join your wireless network:
pi@raspberrypi ~ $ sudo ifup wlan0Internet Systems Consortium DHCP Client 4.2.2Copyright 2004-2011 Internet Systems Consortium.All rights reserved.For info, please visit https://www.isc.org/software/dhcp/
Listening on LPF/wlan0/00:12:fb:28:a9:51Sending on LPF/wlan0/00:12:fb:28:a9:51Sending on Socket/fallbackDHCPDISCOVER on wlan0 to 255.255.255.255 port 67 interval 8DHCPDISCOVER on wlan0 to 255.255.255.255 port 67 interval 14DHCPDISCOVER on wlan0 to 255.255.255.255 port 67 interval 14DHCPREQUEST on wlan0 to 255.255.255.255 port 67DHCPOFFER from 192.168.1.1DHCPACK from 192.168.1.1bound to 192.168.1.101 -- renewal in 2983 seconds.
Chapter 6. Networking with the Pi • 72
report erratum • discuss
The Pi has the IP address 192.168.1.101 now and is connected to your network
wirelessly. (Your IP address probably will differ.) Use the ping command to
check whether you can access a website such as Google, for example:
pi@raspberrypi ~ $ ping -c 3 google.comPING google.com (173.194.69.100) 56(84) bytes of data.64 bytes from google.com (173.194.69.100): icmp_req=1 ttl=45 time=26.7 ms64 bytes from google.com (173.194.69.100): icmp_req=2 ttl=45 time=32.3 ms64 bytes from google.com (173.194.69.100): icmp_req=3 ttl=45 time=34.8 ms
--- google.com ping statistics ---3 packets transmitted, 3 received, 0% packet loss, time 2002msrtt min/avg/max/mdev = 26.752/31.338/34.863/3.395 ms
As you can see, the Pi is connected to the Internet via Wi-Fi now. Run the
following command to get some statistics about the signal strength and so
on:
pi@raspberrypi ~ $ iwconfiglo no wireless extensions.
eth0 no wireless extensions.
wlan0 IEEE 802.11abgn ESSID:"darknet"Mode:Managed Frequency:2.442 GHz Access Point: 54:E6:FC:CF:77:8ABit Rate=135 Mb/s Tx-Power=20 dBmRetry long limit:7 RTS thr:off Fragment thr:offPower Management:onLink Quality=40/70 Signal level=-70 dBmRx invalid nwid:0 Rx invalid crypt:0 Rx invalid frag:0Tx excessive retries:1 Invalid misc:6 Missed beacon:0
Keep in mind that a computer like the Pi can have more than one IP address.
If you connect it via Ethernet and Wi-Fi, for example, your boot message will
display something like the following:
My IP address is 192.168.2.109 192.168.1.101
That means that you’ve connected your Pi using two network interfaces, and
for each interface it has a different IP address.
Configure Static IP Addresses
Until now you’ve configured all network devices using DHCP. That is, your
router assigns an IP address to your Pi automatically. This IP address is
unique, but it might change. In some cases it’s more convenient to assign a
static IP address—that is, an IP address that always stays the same. Of course,
you have to make sure you don’t use an IP address that is being used by
another device in your network.
report erratum • discuss
Add Wi-Fi to the Pi • 73
Configuring static IP addresses isn’t much different from configuring
dynamic IP addresses. You have to edit /etc/network/interfaces first. The following
file assigns a dynamic IP address to the Ethernet device. Also, it assigns the
static IP address 192.168.1.105 to the Wi-Fi device:
auto loiface lo inet loopbackiface eth0 inet dhcp
allow-hotplug wlan0iface wlan0 inet manualwpa-roam /etc/wpa_supplicant/wpa_supplicant.conf
iface home inet staticaddress 192.168.1.105netmask 255.255.255.0network 192.168.1.0gateway 192.168.1.1
Make sure you’re using the correct addresses for netmask, network, and gateway.Also, make sure the address 192.168.1.105 isn’t used by any other device on
your wireless network.
In this case, the static interface’s name is “home.” You have to connect it to
the Wi-Fi credentials by changing /etc/wpa_supplicant/wpa_supplicant.conf slightly:
ctrl_interface=DIR=/var/run/wpa_supplicant GROUP=netdevupdate_config=1
network=ssid="darknet"psk="t0p$ecret"proto=RSNkey_mgmt=WPA-PSKpairwise=TKIPauth_alg=OPENid_str="home"
The only thing you have to add is id_str="home". After you reboot the Pi, it will
listen on a dynamic Ethernet address and a static wireless address.
Next Steps
In this chapter, you learned how to integrate the Pi into your network. You
can now conveniently access the Pi via SSH, and you can even use it as a
web server. In the next chapter, you’ll do something completely different:
you’ll turn the Pi into a multimedia center.
Chapter 6. Networking with the Pi • 74
report erratum • discuss

CHAPTER 7
Turn the Pi into a Multimedia Center
The Pi’s small size, its low power consumption, and its graphics capabilities
make it a perfect candidate for a fully integrated multimedia center, just like
a PlayStation or an Apple TV box. To turn the Pi into such a multimedia
center, you need a special piece of software named XBMC.1
XBMC is a media player on steroids that can turn nearly every PC into an
entertainment hub for digital media. The Pi is no exception. In this chapter,
you’ll learn how to run XBMC on the Pi.
Install Raspbmc
XBMC is a really big software project, and installing and configuring it can
be tricky. Fortunately, you don’t have to do it yourself for the Pi; you can
benefit from the glorious efforts of the Raspbmc2 team. Raspbmc is a Linux
distribution for the Pi that does nothing but run XBMC. You can install it
using NOOBS (see Have a Look Around with NOOBS, on page 14) or copy an
image of this distribution to an SD card as usual. Then you can use the SD
card to boot the Pi. Instead of starting a terminal or a desktop environment,
the Raspbmc distribution starts XBMC automatically.
In contrast to other Linux distributions for the Pi, the Raspbmc team not only
offers for download a complete image file for an SD card, they also decided
to create an installer for all major platforms. This installer downloads the
latest version of Raspbmc from the Web and automatically copies it to your
SD card.
1. http://xbmc.org/2. http://www.raspbmc.com/
report erratum • discuss
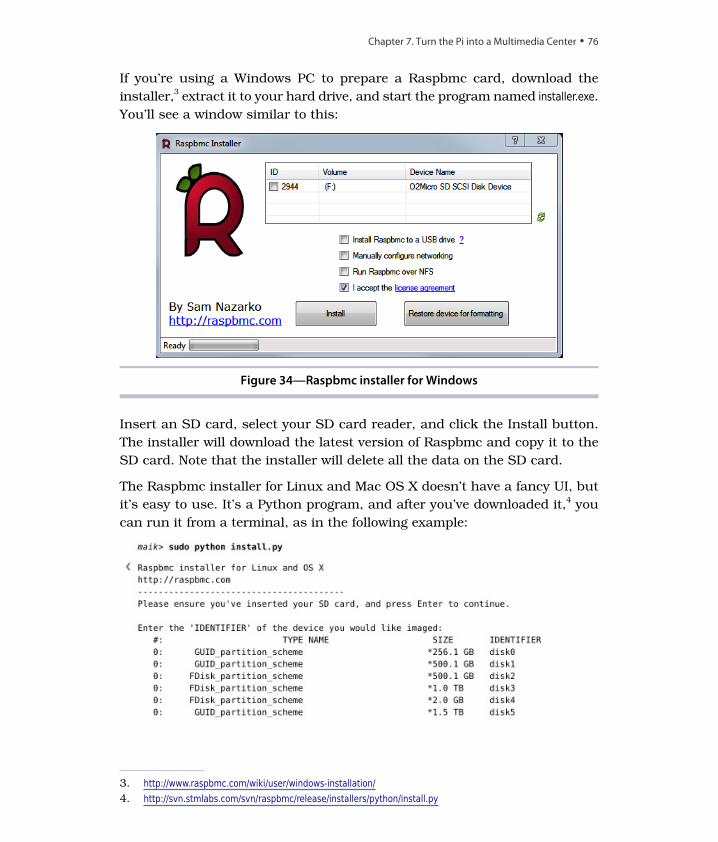
If you’re using a Windows PC to prepare a Raspbmc card, download the
installer,3 extract it to your hard drive, and start the program named installer.exe.You’ll see a window similar to this:
Figure 34—Raspbmc installer for Windows
Insert an SD card, select your SD card reader, and click the Install button.
The installer will download the latest version of Raspbmc and copy it to the
SD card. Note that the installer will delete all the data on the SD card.
The Raspbmc installer for Linux and Mac OS X doesn’t have a fancy UI, but
it’s easy to use. It’s a Python program, and after you’ve downloaded it,4 you
can run it from a terminal, as in the following example:
3. http://www.raspbmc.com/wiki/user/windows-installation/4. http://svn.stmlabs.com/svn/raspbmc/release/installers/python/install.py
Chapter 7. Turn the Pi into a Multimedia Center • 76
report erratum • discuss
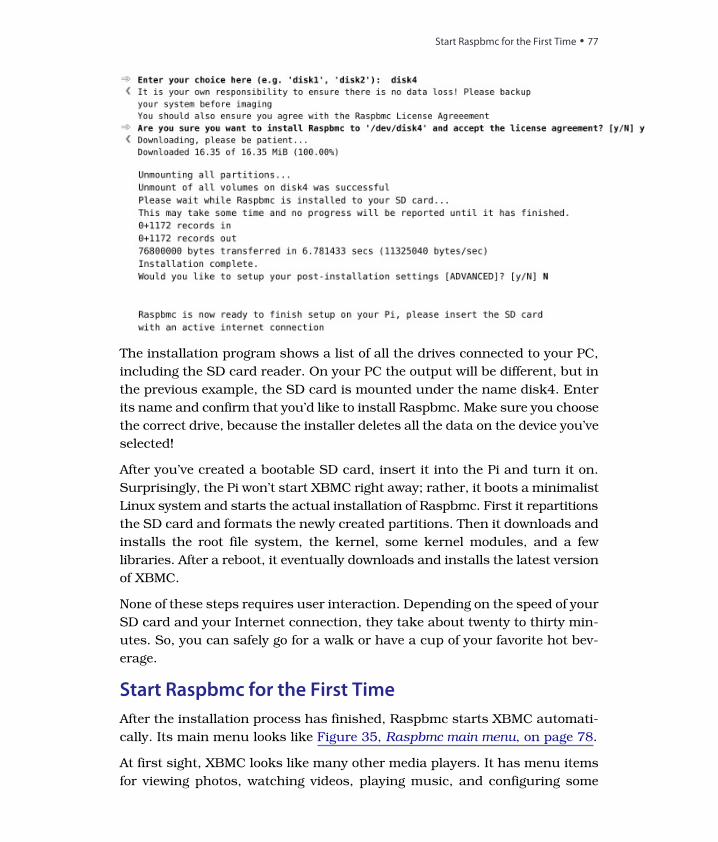
The installation program shows a list of all the drives connected to your PC,
including the SD card reader. On your PC the output will be different, but in
the previous example, the SD card is mounted under the name disk4. Enter
its name and confirm that you’d like to install Raspbmc. Make sure you choose
the correct drive, because the installer deletes all the data on the device you’ve
selected!
After you’ve created a bootable SD card, insert it into the Pi and turn it on.
Surprisingly, the Pi won’t start XBMC right away; rather, it boots a minimalist
Linux system and starts the actual installation of Raspbmc. First it repartitions
the SD card and formats the newly created partitions. Then it downloads and
installs the root file system, the kernel, some kernel modules, and a few
libraries. After a reboot, it eventually downloads and installs the latest version
of XBMC.
None of these steps requires user interaction. Depending on the speed of your
SD card and your Internet connection, they take about twenty to thirty min-
utes. So, you can safely go for a walk or have a cup of your favorite hot bev-
erage.
Start Raspbmc for the First Time
After the installation process has finished, Raspbmc starts XBMC automati-
cally. Its main menu looks like Figure 35, Raspbmc main menu, on page 78.
At first sight, XBMC looks like many other media players. It has menu items
for viewing photos, watching videos, playing music, and configuring some
report erratum • discuss
Start Raspbmc for the First Time • 77
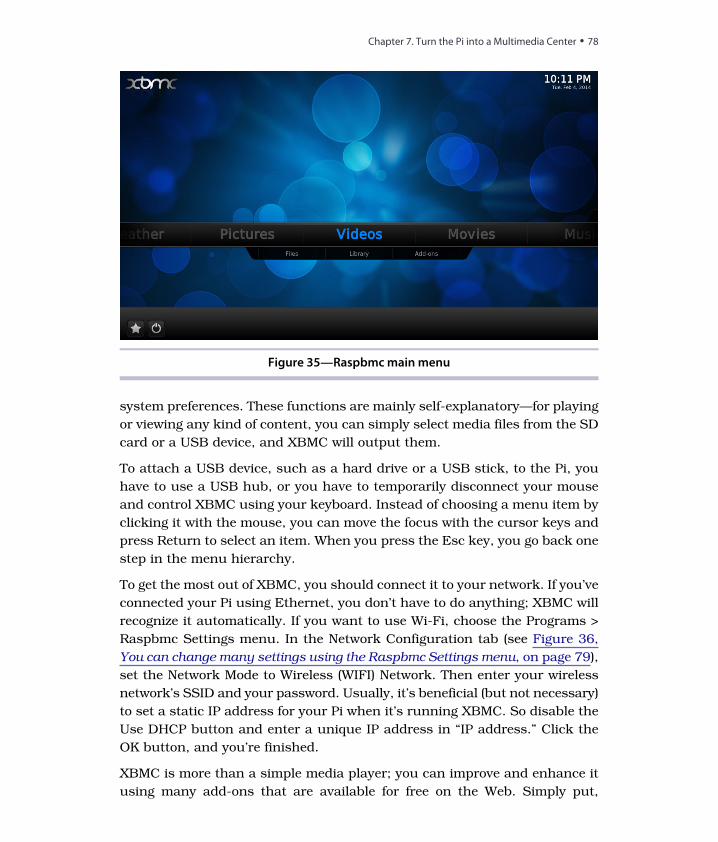
Figure 35—Raspbmc main menu
system preferences. These functions are mainly self-explanatory—for playing
or viewing any kind of content, you can simply select media files from the SD
card or a USB device, and XBMC will output them.
To attach a USB device, such as a hard drive or a USB stick, to the Pi, you
have to use a USB hub, or you have to temporarily disconnect your mouse
and control XBMC using your keyboard. Instead of choosing a menu item by
clicking it with the mouse, you can move the focus with the cursor keys and
press Return to select an item. When you press the Esc key, you go back one
step in the menu hierarchy.
To get the most out of XBMC, you should connect it to your network. If you’ve
connected your Pi using Ethernet, you don’t have to do anything; XBMC will
recognize it automatically. If you want to use Wi-Fi, choose the Programs >
Raspbmc Settings menu. In the Network Configuration tab (see Figure 36,
You can change many settings using the Raspbmc Settings menu, on page 79),
set the Network Mode to Wireless (WIFI) Network. Then enter your wireless
network’s SSID and your password. Usually, it’s beneficial (but not necessary)
to set a static IP address for your Pi when it’s running XBMC. So disable the
Use DHCP button and enter a unique IP address in “IP address.” Click the
OK button, and you’re finished.
XBMC is more than a simple media player; you can improve and enhance it
using many add-ons that are available for free on the Web. Simply put,
Chapter 7. Turn the Pi into a Multimedia Center • 78
report erratum • discuss
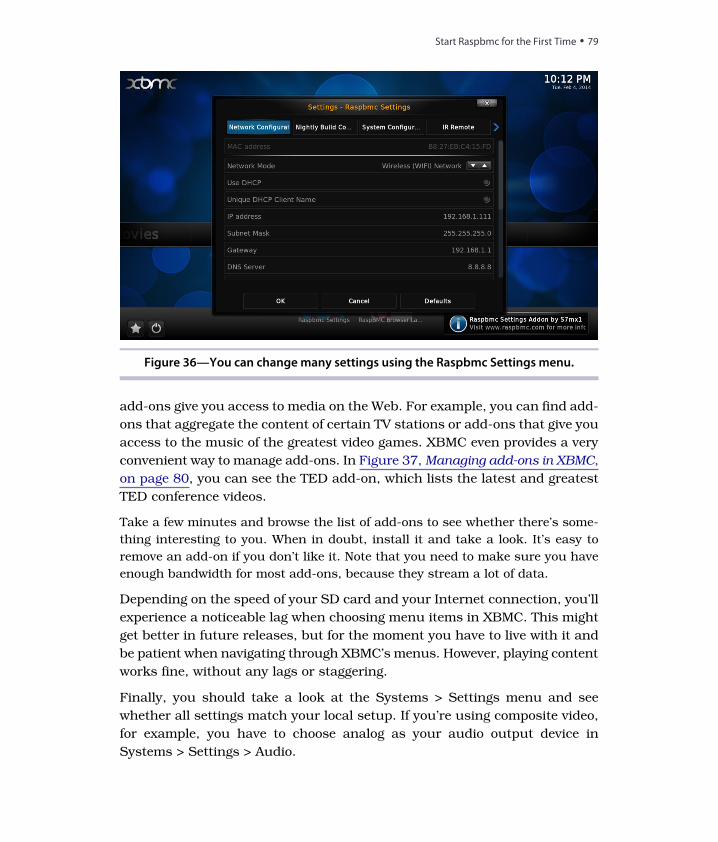
Figure 36—You can change many settings using the Raspbmc Settings menu.
add-ons give you access to media on the Web. For example, you can find add-
ons that aggregate the content of certain TV stations or add-ons that give you
access to the music of the greatest video games. XBMC even provides a very
convenient way to manage add-ons. In Figure 37, Managing add-ons in XBMC,
on page 80, you can see the TED add-on, which lists the latest and greatest
TED conference videos.
Take a few minutes and browse the list of add-ons to see whether there’s some-
thing interesting to you. When in doubt, install it and take a look. It’s easy to
remove an add-on if you don’t like it. Note that you need to make sure you have
enough bandwidth for most add-ons, because they stream a lot of data.
Depending on the speed of your SD card and your Internet connection, you’ll
experience a noticeable lag when choosing menu items in XBMC. This might
get better in future releases, but for the moment you have to live with it and
be patient when navigating through XBMC’s menus. However, playing content
works fine, without any lags or staggering.
Finally, you should take a look at the Systems > Settings menu and see
whether all settings match your local setup. If you’re using composite video,
for example, you have to choose analog as your audio output device in
Systems > Settings > Audio.
report erratum • discuss
Start Raspbmc for the First Time • 79
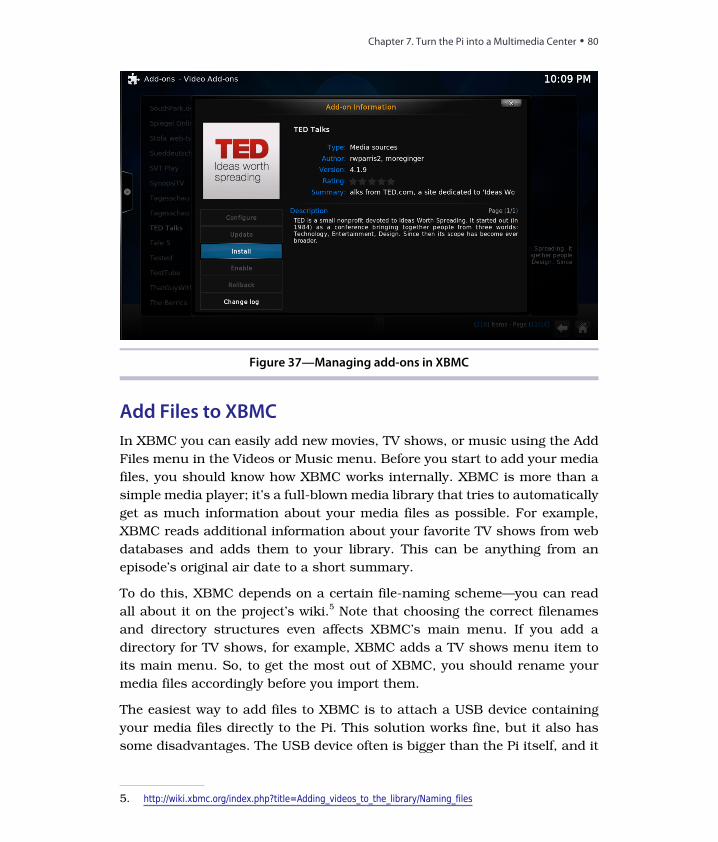
Figure 37—Managing add-ons in XBMC
Add Files to XBMC
In XBMC you can easily add new movies, TV shows, or music using the Add
Files menu in the Videos or Music menu. Before you start to add your media
files, you should know how XBMC works internally. XBMC is more than a
simple media player; it’s a full-blown media library that tries to automatically
get as much information about your media files as possible. For example,
XBMC reads additional information about your favorite TV shows from web
databases and adds them to your library. This can be anything from an
episode’s original air date to a short summary.
To do this, XBMC depends on a certain file-naming scheme—you can read
all about it on the project’s wiki.5 Note that choosing the correct filenames
and directory structures even affects XBMC’s main menu. If you add a
directory for TV shows, for example, XBMC adds a TV shows menu item to
its main menu. So, to get the most out of XBMC, you should rename your
media files accordingly before you import them.
The easiest way to add files to XBMC is to attach a USB device containing
your media files directly to the Pi. This solution works fine, but it also has
some disadvantages. The USB device often is bigger than the Pi itself, and it
5. http://wiki.xbmc.org/index.php?title=Adding_videos_to_the_library/Naming_files
Chapter 7. Turn the Pi into a Multimedia Center • 80
report erratum • discuss
Video and Music Formats
XBMC supports nearly all container formats and codecs on the market. You’ll rarely
find a multimedia file that the Pi can’t play. There’s one problem, though: the Rasp-
berry Foundation licensed hardware acceleration only for the H.264 video codec.
Fortunately, this is one of the most popular codecs available, but if you have video
files using a different codec, you might not be able to watch them unless you buy a
license for them. At the moment, you can buy licenses for MPEG-2 and VC-1 online.a
You provide your Pi’s serial number and get back a license key that you enter in
Raspbmc’s Settings menu.
a. http://www.raspberrypi.com/license-keys/
probably consumes more power, too. In addition, it requires at least one of
your valuable USB ports. A better solution is to store media on the SD card
or to stream media from your local network. Because of XBMC’s great network
integration, you can implement both solutions easily.
XBMC supports FTP, SFTP, SSH, NFS, and Samba out of the box, and you
don’t have to configure much to get them all up and running. XBMC enables
SSH by default, so to copy data to the SD card, you can use scp, for example,
as you did in Use Secure Shell with the Pi, on page 56. Run the following
command from your PC’s terminal to create a folder named Movies in XBMC’s
home directory:
maik> ssh [email protected] "mkdir /home/pi/Movies"
Replace the IP address with your Pi’s address. Note that Raspbmc also comes
with a user named pi that has the password raspberry at the moment. Now
you can copy media files using scp and add them to the XBMC library
afterward.
maik> scp Pulp\ Fiction\ (1994).avi [email protected]:Movies
Even if you use an SD card with plenty of space, it probably won’t be enough
to store your whole media library. Also, it doesn’t make sense to always copy
files before you can watch a film or listen to some music. That’s what network
file systems such as NFS and Samba were built for, and XBMC supports them
all.
Using NFS or Samba, you can host all your media files on your regular PC
and stream them to the Pi when you want to use them. Configuring NFS6 or
6. http://wiki.xbmc.org/index.php?title=NFS
report erratum • discuss
Add Files to XBMC • 81

Samba7 is beyond the scope of this book, but the XBMC wiki has excellent
documentation for all major platforms.
As soon as your media files are available in your home network via NFS or
Samba, you can easily access them using XBMC. For NFS you don’t usually
have to do anything, and you can configure your Samba settings in the
System > Service > SMB client menu.
Control XBMC Remotely
If you want to use the Pi as a multimedia center in your living room, sooner
or later you’ll want a remote control. If you have a modern TV, chances are
good that you can control the Pi using your TV’s remote control. Modern TV
sets use the HDMI cable not only for transferring video and audio data, but
also for transmitting remote-control commands. In this case, your TV set will
send remote-control commands automatically to the Raspberry Pi.
If your TV isn’t quite as modern, you can use some special hardware with an
infrared dongle,8 but the easiest method is just to use your smartphone.
Not only does XBMC have add-ons for managing your multimedia files, it also
allows you to install web interfaces for controlling XBMC remotely. Go to the
System > Settings > Services > Webserver menu and enable the “Allow control
of XBMC via HTTP” option. Then click the “Web interface” button and select
Get More. In Figure 38, XBMC comes with several web interfaces, on page 83,
you can see the currently available web interfaces. Enable all of them so you
can try them and choose your favorite.
After you’ve enabled the web interface, you can use it with every browser that
has access to your network. The interface listens on port 80, so in your
browser, you only have to enter your Pi’s IP address, such as http://192.168.2.109,to open XBMC’s web interface. (Remember to replace the IP address with your
Pi’s IP address.) In Figure 39, The AWXi web interface in action, on page 83,
you can see the AWXi web interface in action, for example. It has all the
usual buttons, such as play, pause, and stop, and it allows you to search
your whole media library.
If you have an iPad/iPhone9 or an Android phone,10 you can even install a
native remote control application for XBMC. In Figure 40, Control XBMC on
7. http://wiki.xbmc.org/index.php?title=Samba8. http://www.raspbmc.com/wiki/user/configuring-remotes/9. http://itunes.apple.com/gb/app/official-xbmc-remote/id52048036410. https://play.google.com/store/apps/details?id=org.xbmc.android.remote
Chapter 7. Turn the Pi into a Multimedia Center • 82
report erratum • discuss
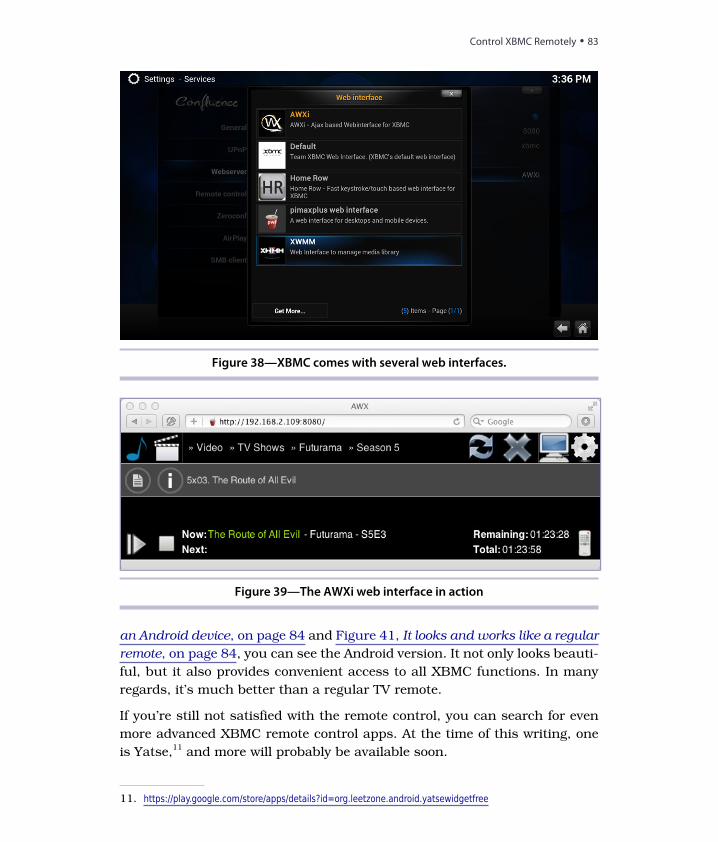
Figure 38—XBMC comes with several web interfaces.
Figure 39—The AWXi web interface in action
an Android device, on page 84 and Figure 41, It looks and works like a regular
remote, on page 84, you can see the Android version. It not only looks beauti-
ful, but it also provides convenient access to all XBMC functions. In many
regards, it’s much better than a regular TV remote.
If you’re still not satisfied with the remote control, you can search for even
more advanced XBMC remote control apps. At the time of this writing, one
is Yatse,11 and more will probably be available soon.
11. https://play.google.com/store/apps/details?id=org.leetzone.android.yatsewidgetfree
report erratum • discuss
Control XBMC Remotely • 83
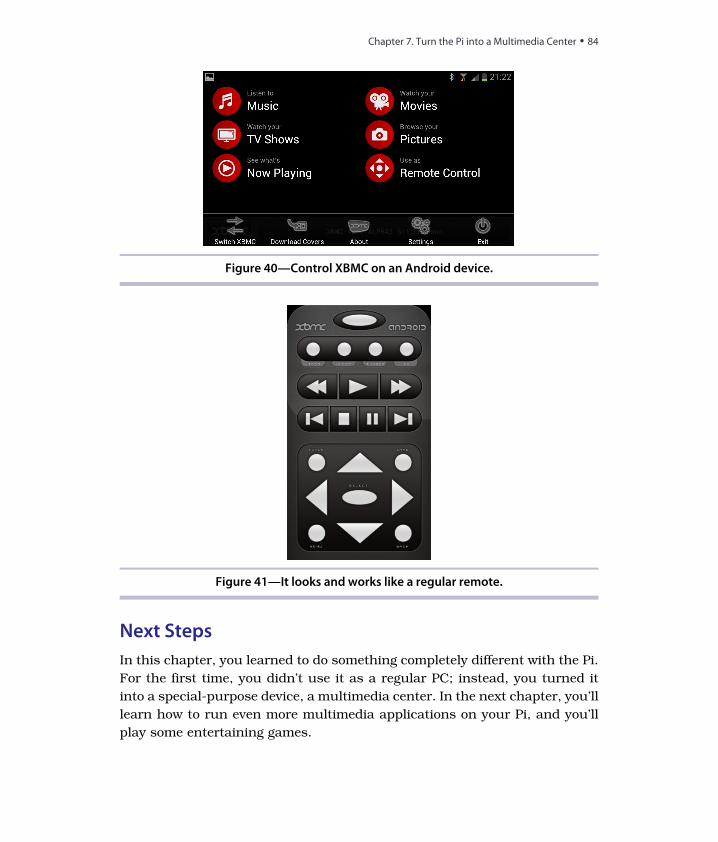
Figure 40—Control XBMC on an Android device.
Figure 41—It looks and works like a regular remote.
Next Steps
In this chapter, you learned to do something completely different with the Pi.
For the first time, you didn’t use it as a regular PC; instead, you turned it
into a special-purpose device, a multimedia center. In the next chapter, you’ll
learn how to run even more multimedia applications on your Pi, and you’ll
play some entertaining games.
Chapter 7. Turn the Pi into a Multimedia Center • 84
report erratum • discuss
CHAPTER 8
Play Games on Your Pi
Linux has never been a popular gaming platform. Even though the situation
has improved over the years, it probably will take some time for the first
blockbuster titles to become available. Still, you can already play some
entertaining and sometimes even addictive games on the Raspberry Pi.
For example, you can enjoy thousands of text adventure games on the Pi.
Although commercial publishers abandoned this genre long ago, it still has
an active and enthusiastic fan base that releases new games frequently. And
if you haven’t played classic games such as Zork, you should give them a try.
Another classic genre is point-and-click adventure, including games such as
The Secret of Monkey Island and Day of the Tentacle. Thanks to the efforts of
the open-source community, you can play most titles on your Pi.
Even if the Pi isn’t powerful enough to run modern games, it still has enough
power to run some native Linux games, such as Quake III. It even has enough
power to emulate some home computers and game consoles from the past.
For example, on the Pi you can play all games made for Atari’s VCS 2600.
Play Interactive Fiction
Text adventure games were very popular with users of the first home comput-
ers. In contrast to modern games with spectacular 3D graphics and surround
sound, text adventures look very spartan. They output only text, and you
control the game by typing commands on your keyboard. Here you can see
the opening of Zork, one of the most famous text adventures.
❮ ZORK I: The Great Underground EmpireCopyright (c) 1981, 1982, 1983 Infocom, Inc. All rights reserved.ZORK is a registered trademark of Infocom, Inc.Revision 88 / Serial number 840726West of House
report erratum • discuss
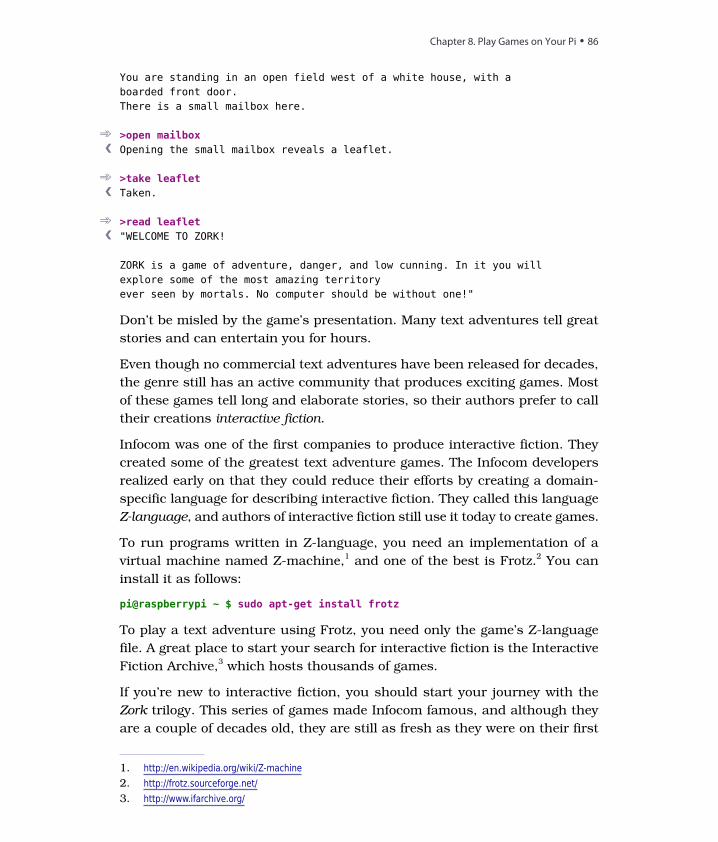
You are standing in an open field west of a white house, with aboarded front door.There is a small mailbox here.
>open mailbox
Opening the small mailbox reveals a leaflet.❮
>take leaflet
Taken.❮
>read leaflet
"WELCOME TO ZORK!❮
ZORK is a game of adventure, danger, and low cunning. In it you willexplore some of the most amazing territoryever seen by mortals. No computer should be without one!"
Don’t be misled by the game’s presentation. Many text adventures tell great
stories and can entertain you for hours.
Even though no commercial text adventures have been released for decades,
the genre still has an active community that produces exciting games. Most
of these games tell long and elaborate stories, so their authors prefer to call
their creations interactive fiction.
Infocom was one of the first companies to produce interactive fiction. They
created some of the greatest text adventure games. The Infocom developers
realized early on that they could reduce their efforts by creating a domain-
specific language for describing interactive fiction. They called this language
Z-language, and authors of interactive fiction still use it today to create games.
To run programs written in Z-language, you need an implementation of a
virtual machine named Z-machine,1 and one of the best is Frotz.2 You can
install it as follows:
pi@raspberrypi ~ $ sudo apt-get install frotz
To play a text adventure using Frotz, you need only the game’s Z-language
file. A great place to start your search for interactive fiction is the Interactive
Fiction Archive,3 which hosts thousands of games.
If you’re new to interactive fiction, you should start your journey with the
Zork trilogy. This series of games made Infocom famous, and although they
are a couple of decades old, they are still as fresh as they were on their first
1. http://en.wikipedia.org/wiki/Z-machine2. http://frotz.sourceforge.net/3. http://www.ifarchive.org/
Chapter 8. Play Games on Your Pi • 86
report erratum • discuss

day. Meanwhile, they are available for free,4 so download Zork I5 and start it
as follows:
pi@raspberrypi ~ $ unzip zork1.zippi@raspberrypi ~ $ frotz zork1/DATA/ZORK1.DAT
This invokes the Z-machine interpreter and runs the game stored in ZORK1.DAT.You might need a few moments to get used to this kind of game,6 but it’s
certainly well worth it.
If you enjoy playing interactive fiction, you might also enjoy creating it using
today’s tools. It’s really easy,7 at least on a technical level. You still have to
come up with a compelling and original story, though.
Play Point-and-Click Adventures
Another genre that has always been popular is point-and-click adventures.
In these games, you control the main character using the mouse. You can
make the character move to a certain place on the screen by clicking the
place, and you can perform actions by clicking the action’s name on the
screen. Popular point-and-click adventures are The Secret of Monkey Island,
Day of the Tentacle, and Maniac Mansion.
There has always been a demand for new point-and-click adventures, but
very few have been released over the last several years. The big publishers
didn’t believe in them and preferred to release countless first-person shooters,
such as Call of Duty and Battlefield, instead.
Tim Schafer, one of the creators of The Secret of Monkey Island, got frustrated
by this situation and tried to raise some money on Kickstarter.com to fund
a new point-and-click adventure. He raised more than $3.3 million and proved
that people are still very interested in this genre.
Similar to text adventures, most point-and-click adventures run on a virtual
machine. The most popular one is SCUMM, which stands for Script Creation
Utility for Maniac Mansion.
Originally, it was created by the developers of LucasArts to implement the
game Maniac Mansion, and they have used it to implement many other games
since.
4. http://www.infocom-if.org/downloads/downloads.html5. http://www.infocom-if.org/downloads/zork1.zip6. At http://pr-if.org/doc/play-if-card/play-if-card.html, you can find a nice help sheet.
7. http://inform7.com/
report erratum • discuss
Play Point-and-Click Adventures • 87
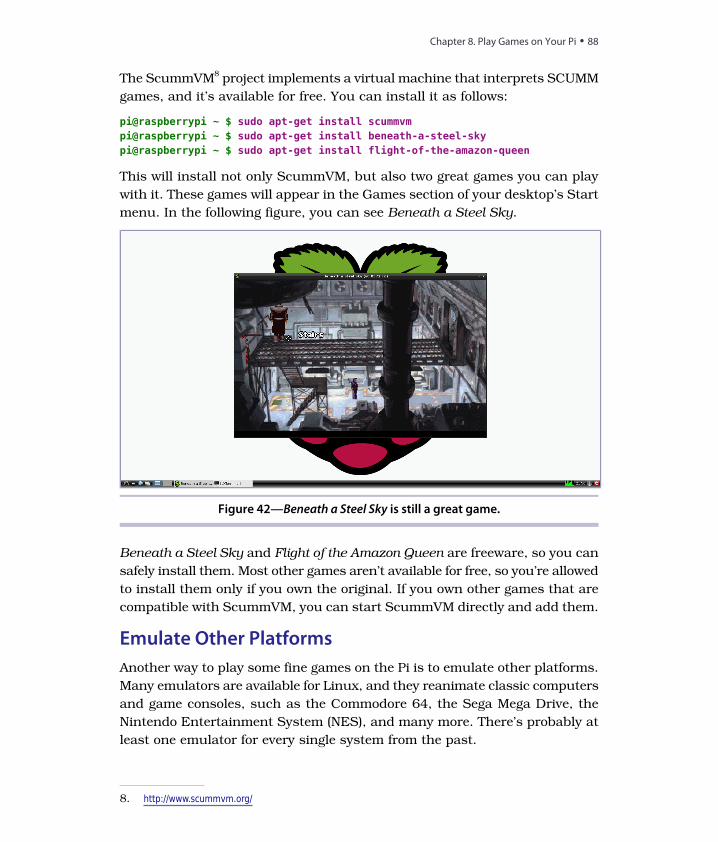
The ScummVM8 project implements a virtual machine that interprets SCUMM
games, and it’s available for free. You can install it as follows:
pi@raspberrypi ~ $ sudo apt-get install scummvmpi@raspberrypi ~ $ sudo apt-get install beneath-a-steel-skypi@raspberrypi ~ $ sudo apt-get install flight-of-the-amazon-queen
This will install not only ScummVM, but also two great games you can play
with it. These games will appear in the Games section of your desktop’s Start
menu. In the following figure, you can see Beneath a Steel Sky.
Figure 42—Beneath a Steel Sky is still a great game.
Beneath a Steel Sky and Flight of the Amazon Queen are freeware, so you can
safely install them. Most other games aren’t available for free, so you’re allowed
to install them only if you own the original. If you own other games that are
compatible with ScummVM, you can start ScummVM directly and add them.
Emulate Other Platforms
Another way to play some fine games on the Pi is to emulate other platforms.
Many emulators are available for Linux, and they reanimate classic computers
and game consoles, such as the Commodore 64, the Sega Mega Drive, the
Nintendo Entertainment System (NES), and many more. There’s probably at
least one emulator for every single system from the past.
8. http://www.scummvm.org/
Chapter 8. Play Games on Your Pi • 88
report erratum • discuss

An emulator rebuilds the hardware of a certain computer or game console in
software. So, you run the emulator on the Pi, and then you can work with
the emulated system as if you’re using the original hardware. Most
importantly, you can run all the old software and games that were available
for the old system.
Emulating a complete computer is extremely difficult even for simple systems,
and most emulators suffer from two major problems. The first is accuracy;
often an emulator can’t emulate the original system at 100 percent. The second
problem is performance, because emulating even very old and slow hardware
requires a tremendous amount of resources. For example, the Commodore
64 ran at a clock speed of only 1MHz, but you need a lot of computing power
to emulate it. Even the Pi’s hardware isn’t powerful enough to emulate the
C64 at a reasonable frame rate at the moment, although it has a multiple of
the C64’s resources. This might change with better graphics drivers for the
Pi.
Still, the Pi is powerful enough to emulate some cool game consoles, and one
of them is the Atari VCS 2600.9 This device was popular from 1977 until the
early 1990s, and you could play great games such as Pac-Man, Centipede,
and Pitfall on it. The console was so popular that several emulators exist for
it, and one of the best is Stella.10 You can install and start it as follows:
pi@raspberrypi ~ $ sudo apt-get install stellapi@raspberrypi ~ $ stella
First Stella asks you where it should look for game ROMs. The games for the
VCS 2600 shipped on cartridges containing a few kilobytes of read-only
memory (ROM). To play a game using Stella, you need a copy of its cartridge’s
ROM. You can copy the content of a cartridge to your PC using a special
device. Fortunately, you can find ROM files for all games on the Web,11 but
there’s one big problem: although most games for the VCS 2600 are very old,
they are still copyrighted. So in most countries, it’s illegal to download and
use ROM files of games you don’t actually own!
You can buy used cartridges on the Web for very little money, and some
publishers still sell Atari game collections that ship on CDs. These collections
do nothing but run an emulator and play the original ROM files.
9. http://en.wikipedia.org/wiki/Atari_260010. http://stella.sourceforge.net/11. http://atariage.com/
report erratum • discuss
Emulate Other Platforms • 89

The size of a ROM file is usually between 4KB and 8KB, and the filenames
end with the extension .bin. So, Pac-Man’s ROM file is named pacman.bin, for
example. If you’ve copied a ROM file to the Pi, you can select it in Stella’s
main menu, and it will start immediately. By default, you can use the cursor
keys for movements and the spacebar for actions. Stella allows you to remap
all keys, and it also has support for joysticks. On top of that, you can change
countless video and audio options, but note that the Pi won’t emulate the
VCS 2600 properly in the most demanding video modes.
Playing some classic games might bring back childhood memories, but the
VCS 2600 has an incredibly active user group that still creates games.12 Many
of these home-brew titles actually look and sound better than most of the
original games, and they’re usually available for free. In the following figure,
you can see A-VCS-tec Challenge, for example.13 Some of these home-brew
games are available on cartridges even today.
Figure 43—People still create great games for the VCS 2600.
By the way, developing games or demos for the VCS 2600 is very difficult,
but you can learn a lot, and it can be fun! Most people can’t imagine how
limited the hardware was. It ran at a clock speed of 1.19MHz, it had only 128
bytes of RAM, and it had no frame buffer for the video display. Developing
software for this machine was really painful back in the old days, but today’s
tools and documentation make it much easier. For example, Stella comes
12. http://en.wikipedia.org/wiki/Atari_2600_homebrew13. http://www.quernhorst.de/atari/ac.html
Chapter 8. Play Games on Your Pi • 90
report erratum • discuss
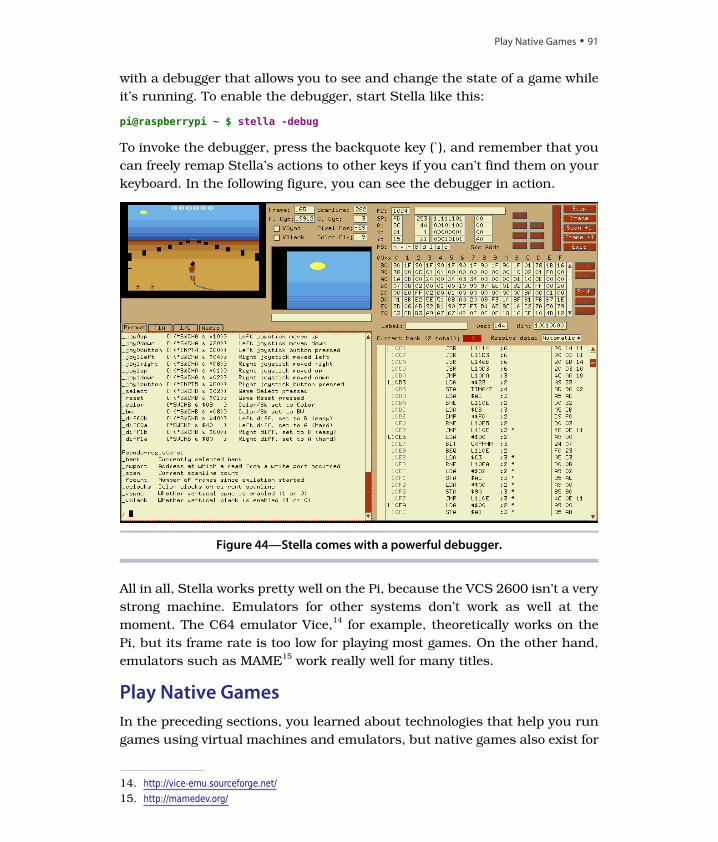
with a debugger that allows you to see and change the state of a game while
it’s running. To enable the debugger, start Stella like this:
pi@raspberrypi ~ $ stella -debug
To invoke the debugger, press the backquote key (`), and remember that you
can freely remap Stella’s actions to other keys if you can’t find them on your
keyboard. In the following figure, you can see the debugger in action.
Figure 44—Stella comes with a powerful debugger.
All in all, Stella works pretty well on the Pi, because the VCS 2600 isn’t a very
strong machine. Emulators for other systems don’t work as well at the
moment. The C64 emulator Vice,14 for example, theoretically works on the
Pi, but its frame rate is too low for playing most games. On the other hand,
emulators such as MAME15 work really well for many titles.
Play Native Games
In the preceding sections, you learned about technologies that help you run
games using virtual machines and emulators, but native games also exist for
14. http://vice-emu.sourceforge.net/15. http://mamedev.org/
report erratum • discuss
Play Native Games • 91

Linux. For example, on the LXDE desktop, you can find a compilation of some
classic games written in Python: Four in a Row, Snake, and so on.
Because the Pi is a regular Linux system, you can run every game compatible
with your current distribution as long as the Pi’s resources are sufficient. If
you search the Web for classic games, such as Tetris or Pac-Man, you’ll
quickly find really good clones.
pi@raspberrypi ~ $ sudo apt-get install ltris pacman
It’s worth trying to install all the games you find, but many are too demanding
for the Pi. Surprisingly, the Pi is capable of running Quake II and Quake III
(two famous first-person shooters) at a decent frame rate. As of this writing,
they have some problems with sound output, but they’re still playable.
In addition, you can find cool games in the Pi Store (see Install Software and
Media Using the Pi Store, on page 38). Iridium Rising, for example, is an
exclusive game for the Pi, and it’s very professional.
Finally, Mojang16 has released a special Minecraft edition for the Pi.17 It has
some unique features, and it’s free. So, it’s worth looking for new Pi games.
Next Steps
In this chapter, you learned how to kill some time playing classic games on
the Pi. The Pi might not be an Xbox or a PlayStation, but it runs some enter-
taining games that you won’t find on most modern video game consoles. The
next chapter deals with a completely different topic. You’ll learn how to build
and attach electronics projects to the Pi’s GPIO ports.
16. http://www.mojang.com/17. http://www.raspberrypi.org/archives/3263
Chapter 8. Play Games on Your Pi • 92
report erratum • discuss

CHAPTER 9
Tinker with the GPIO Pins
The Raspberry Foundation built the Pi not only to teach kids how to program,
but also to teach them how to tinker with electronics. That’s why the Pi has
an expansion header that makes it easy to connect it to your own electronics
projects.
In this chapter, you’ll learn how to build your own small electronics devices
and control them with the Pi. We’ll start slowly and build a very basic circuit
that makes a light-emitting diode (LED) shine. After that, we’ll control the
LED using the Pi’s expansion header, and we’ll turn the LED on and off by
issuing commands from the Pi.
Then we’ll build a small memory alarm that shows how much memory is left
on the Pi. It will work like a traffic light, where a red light indicates that the
amount of remaining memory is critically low. In addition, we’ll make the
results of the memory alarm available in a web browser.
What You Need
To build all projects in this chapter, you need only a few cheap parts. (You
can see them all in Figure 45, The parts you need, on page 94.)
• A half-size breadboard
• Three 5mm LEDs (red, yellow, and green)
• Three resistors in the range of 220Ω to 1kΩ
• Four female/male jumper wires
report erratum • discuss
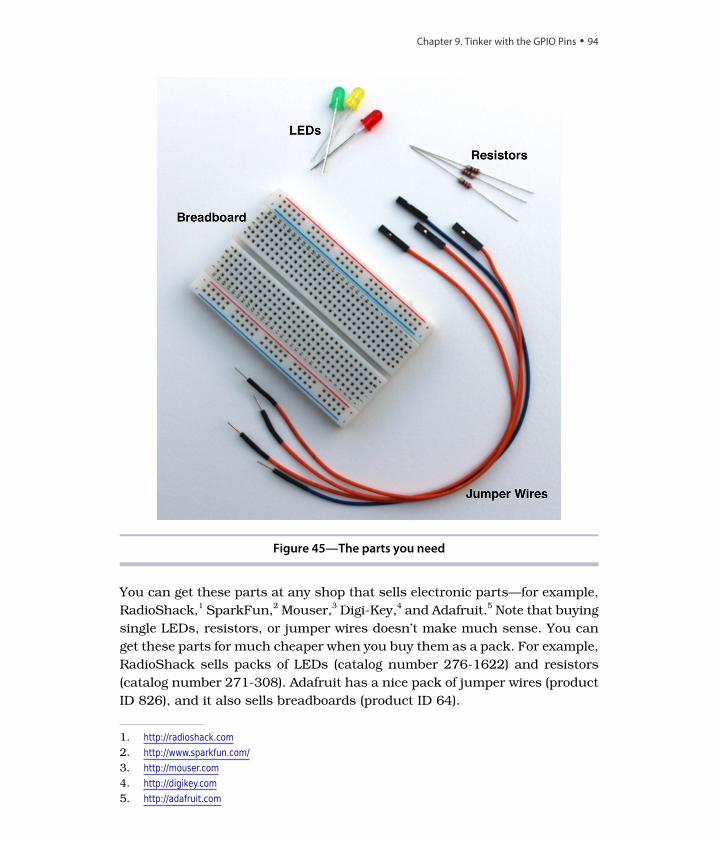
Figure 45—The parts you need
You can get these parts at any shop that sells electronic parts—for example,
RadioShack,1 SparkFun,2 Mouser,3 Digi-Key,4 and Adafruit.5 Note that buying
single LEDs, resistors, or jumper wires doesn’t make much sense. You can
get these parts for much cheaper when you buy them as a pack. For example,
RadioShack sells packs of LEDs (catalog number 276-1622) and resistors
(catalog number 271-308). Adafruit has a nice pack of jumper wires (product
ID 826), and it also sells breadboards (product ID 64).
1. http://radioshack.com2. http://www.sparkfun.com/3. http://mouser.com4. http://digikey.com5. http://adafruit.com
Chapter 9. Tinker with the GPIO Pins • 94
report erratum • discuss

Meet the Pi’s GPIO Pins
To connect your own electronics projects to the Pi, you can use the expansion
header in the top-left corner of the Pi (see Figure 1, The front side of a Model
B (Revision 1), on page 2). It consists of twenty-six pins arranged in two rows
containing thirteen pins each. The top row contains the even-numbered pins,
and the other row contains the odd-numbered pins. That is, the first pin in
the lower row is pin 1, and you can find the label “P1” on the Pi below the
pin.
In the following figure, you can see the meaning and the numbering of the
pins. Note that the meaning of some pins has changed between revision 1
and revision 2. With the pins labeled Ground, the Pi can share a common
ground with our electronics projects. Using the pins labeled 3v3 and 5V, you
can power external devices connected to the Pi with 3.3 volts or 5 volts. The
Pi limits the output of pin 1 to 50mA, while pin 2 allows for a current draw
that depends on the USB input current. If you power the Pi with a 1A power
supply, for example, you can draw up to 300mA from pin 2, because the Pi
Model B needs 700mA for itself.
Rev 2 5V 5V Ground GPIO14 GPIO15 GPIO18 Ground GPIO23 GPIO24 Ground GPIO25 GPIO8 GPIO7
Rev 1 5V - Ground GPIO14 GPIO15 GPIO18 - GPIO23 GPIO24 - GPIO25 GPIO8 GPIO7
Pin 2 4 6 8 10 12 14 16 18 20 22 24 26
Pin 1 3 5 7 9 11 13 15 17 19 21 23 25
Rev 1 3v3 GPIO0 GPIO1 GPIO4 - GPIO17 GPIO21 GPIO22 - GPIO10 GPIO9 GPIO11 -
Rev 2 3v3 GPIO2 GPIO3 GPIO4 Ground GPIO17 GPIO27 GPIO22 3v3 GPIO10 GPIO9 GPIO11 Ground
Figure 46—The Pi’s GPIO pins
In revision 1, pins 4, 9, 14, 17, 20, and 25 were reserved for future
enhancements, so you couldn’t use them in your own projects. The remaining
pins are general-purpose input/output (GPIO) pins that you can use as digital
input or output pins. Note that the GPIO pin names don’t correspond to the
pin numbers of the expansion header.
You can use the GPIO pins, for example, to read the state of a push button
or to turn an LED on and off. For this chapter’s examples, you can assume
that all GPIO pins work the same, but you should know that some of the Pi’s
pins are special. Pin 12, for example, supports pulse-width modulation (PWM),6
6. http://en.wikipedia.org/wiki/Pulse_width_modulation
report erratum • discuss
Meet the Pi’s GPIO Pins • 95
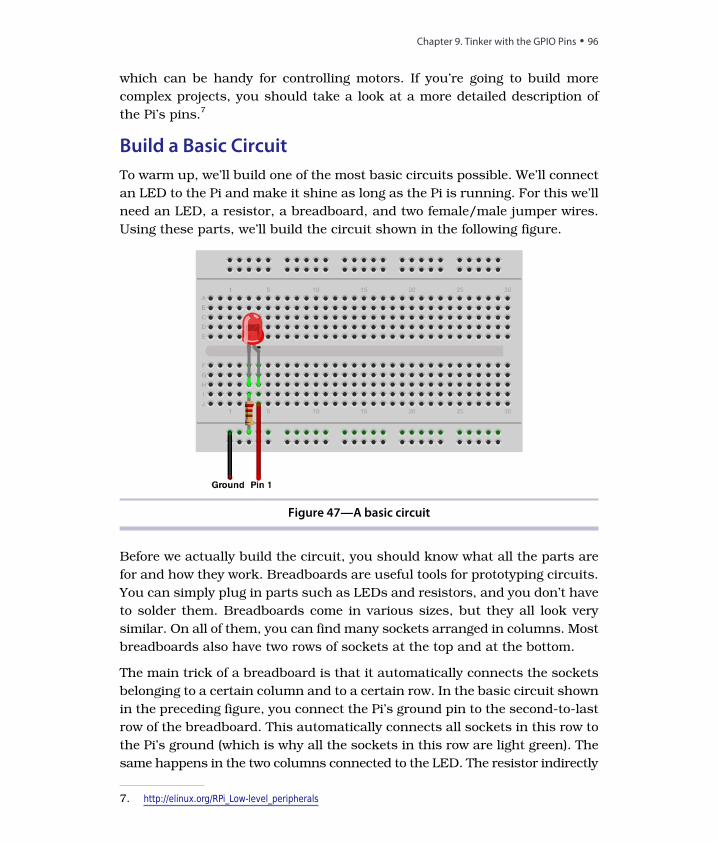
which can be handy for controlling motors. If you’re going to build more
complex projects, you should take a look at a more detailed description of
the Pi’s pins.7
Build a Basic Circuit
To warm up, we’ll build one of the most basic circuits possible. We’ll connect
an LED to the Pi and make it shine as long as the Pi is running. For this we’ll
need an LED, a resistor, a breadboard, and two female/male jumper wires.
Using these parts, we’ll build the circuit shown in the following figure.
Figure 47—A basic circuit
Before we actually build the circuit, you should know what all the parts are
for and how they work. Breadboards are useful tools for prototyping circuits.
You can simply plug in parts such as LEDs and resistors, and you don’t have
to solder them. Breadboards come in various sizes, but they all look very
similar. On all of them, you can find many sockets arranged in columns. Most
breadboards also have two rows of sockets at the top and at the bottom.
The main trick of a breadboard is that it automatically connects the sockets
belonging to a certain column and to a certain row. In the basic circuit shown
in the preceding figure, you connect the Pi’s ground pin to the second-to-last
row of the breadboard. This automatically connects all sockets in this row to
the Pi’s ground (which is why all the sockets in this row are light green). The
same happens in the two columns connected to the LED. The resistor indirectly
7. http://elinux.org/RPi_Low-level_peripherals
Chapter 9. Tinker with the GPIO Pins • 96
report erratum • discuss

connects the Pi’s ground pin to one of the LED’s connectors. In addition, you
connect the Pi’s pin 1 directly to the other connector of the LED by plugging
it into a socket in the same column.
By the way, LED stands for light-emitting diode, so an LED is basically a
diode. Diodes are useful because they let electricity pass in only one direction.
That’s true for LEDs, too, and LEDs emit light as a side effect.
Working with LEDs isn’t very difficult, but we have to take care of a few things.
First, we have to connect them the right way. LEDs have two wires, and one
of them is a bit shorter than the other. The shorter wire is called a cathode
(negative), and we have to connect it to the Pi’s ground pin. The longer wire
is called an anode (positive), and we have to connect it to one of the Pi’s
power supply or GPIO pins. You can also identify the anode and cathode by
taking a close look at the LED’s case. The flat side belongs to the cathode and
the round side to the anode. In Figure 47, A basic circuit, on page 96, the
anode is slightly bent.
Also, you always have to put a resistor in front of an LED. If you don’t, the
LED will consume too much power and will be destroyed. Simply put, a
resistor limits the amount of current that flows through an electric connection
and protects the LED. Calculating the resistor value for a certain type of LED
isn’t difficult, but it’s beyond the scope of this book. Simply keep in mind that
the lower the resistor value, the brighter the light will shine. When in doubt,
use a 330Ω or 470Ω resistor.
Now it’s time to actually build the circuit. First, connect the LED to the
breadboard. Make sure that the LED’s direction is correct, and plug it in. You
have to press firmly but not too hard—otherwise, you’ll bend the connectors,
and they won’t fit. It’s usually easier to plug in parts after you’ve shortened
the connectors. When cutting the connectors, wear safety glasses to protect
your eyes!
The resistor is next, and this time the direction doesn’t matter. Before plugging
in the resistor, you have to bend its connectors. Also, it usually helps to
shorten them.
Finally, connect the two jumper wires to the Pi and to the breadboard. Connect
the female side to the Pi and the male side to the breadboard. Make sure
you’re using the correct pins on the Pi, and then turn on the Pi. If you’ve
connected everything correctly, the LED will turn on, too. Otherwise, take a
look at What If It Doesn't Work?, on page 105.
report erratum • discuss
Build a Basic Circuit • 97
Control an LED Using the GPIO Pins
Making an LED shine is a fun exercise, but it gets boring pretty quickly. In
this section, you’ll learn how to control an LED using software—we’ll turn it
on and off by issuing commands on the Pi.
Programming hardware directly is usually a difficult task. Using the WiringPi
project,8 it becomes a piece of cake. WiringPi is an open-source project that
hides the ugly low-level functions behind a nice, clean interface. If you’ve
worked with the popular Arduino project9 before, WiringPi will look very
familiar because it tries to bring most of the Arduino goodies to the Pi.
WiringPi not only makes programming the Pi’s hardware easier, but it also
comes with a small command-line utility named gpio that allows you to control
the hardware without writing code.
You can install WiringPi on the Pi as follows:
pi@raspberry:~$ cd /tmppi@raspberry:~$ sudo apt-get install git-corepi@raspberry:~$ sudo apt-get updatepi@raspberry:~$ sudo apt-get upgradepi@raspberry:~$ git clone git://git.drogon.net/wiringPipi@raspberry:~$ cd wiringPipi@raspberry:~$ ./build
These commands install the WiringPi libraries and the gpio command. You
can use WiringPi from many programming languages, such as C, C++, Python,
Ruby, and so on. In this chapter, we’ll use it exclusively from the command
line and in a short but effective shell script.
All we need for our first interactive electronics experiments is the gpio com-
mand. It supports many useful options and a lot of powerful commands. The
most important ones are mode, read, and write. For example, the following
command sets the GPIO18 pin into output mode:
pi@raspberry:~$ gpio -g mode 18 out
All GPIO pins can be in one of the following modes in, out, pwm, up, down, or tri.We’re only interested in in and out at the moment. To read digital signals from
a GPIO pin, set its mode to in. Set it to out if you’d like to emit digital signals.
You have to set a pin’s mode only once, and the pin will remember its mode
until you set it to a different one.
8. http://wiringpi.com/9. http://arduino.cc
Chapter 9. Tinker with the GPIO Pins • 98
report erratum • discuss

After you’ve set GPIO18’s mode to out, you can turn it on like this:
pi@raspberry:~$ gpio -g write 18 1
Turning it off works similarly:
pi@raspberry:~$ gpio -g write 18 0
Finally, you can read GPIO18’s current state using the read command:
pi@raspberry:~$ gpio -g read 180
This command returns 0 if there’s currently no signal and 1 otherwise.
With gpio, we can control the LED on our breadboard easily. You have to
connect it to only one of the Pi’s GPIO pins instead of connecting it directly
to a power-supply pin. For example, you can use GPIO18, which is pin 12 in
Figure 46, The Pi's GPIO pins, on page 95. Choosing and addressing the correct
pins can be a bit confusing because of the different naming and numbering
schemes. By default, WiringPi uses its own numbering scheme,10 but for our
first experiments we’ll use the official GPIO pin names. Fortunately, gpioaccepts them when you pass it the -g option.
So, in the circuit, disconnect the jumper wire from pin 1 and connect it to
pin 12 instead. Then run the following commands:
pi@raspberry:~$ gpio -g mode 18 outpi@raspberry:~$ gpio -g write 18 1
These commands will turn on the LED, and the following command will turn
it off:
pi@raspberry:~$ gpio -g write 18 0
gpio supports many more commands and options, and it really pays to read
its manual page. For example, with the readall command, you can look at the
current state of all the Pi’s GPIO pins (see Figure 48, Results of the readall
command, on page 100).
With only a few parts and a single command-line tool, we’ve created our first
circuit. Even better, we can control it with the Raspberry Pi! In the next sec-
tion, we’ll create a more complex project using the techniques we’ve discussed
so far.
10. https://projects.drogon.net/raspberry-pi/wiringpi/pins/
report erratum • discuss
Control an LED Using the GPIO Pins • 99
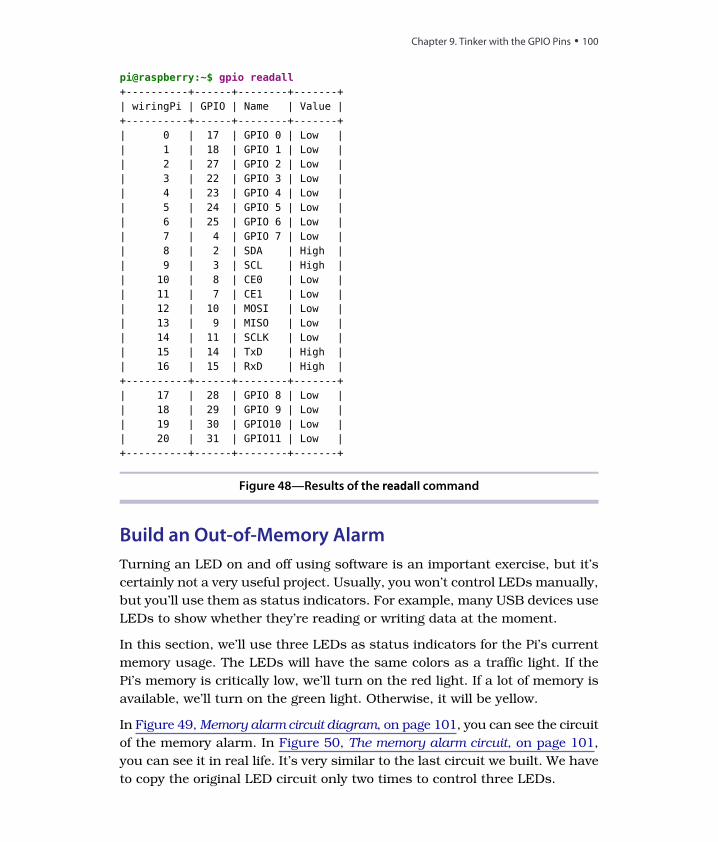
pi@raspberry:~$ gpio readall+----------+------+--------+-------+| wiringPi | GPIO | Name | Value |+----------+------+--------+-------+| 0 | 17 | GPIO 0 | Low || 1 | 18 | GPIO 1 | Low || 2 | 27 | GPIO 2 | Low || 3 | 22 | GPIO 3 | Low || 4 | 23 | GPIO 4 | Low || 5 | 24 | GPIO 5 | Low || 6 | 25 | GPIO 6 | Low || 7 | 4 | GPIO 7 | Low || 8 | 2 | SDA | High || 9 | 3 | SCL | High || 10 | 8 | CE0 | Low || 11 | 7 | CE1 | Low || 12 | 10 | MOSI | Low || 13 | 9 | MISO | Low || 14 | 11 | SCLK | Low || 15 | 14 | TxD | High || 16 | 15 | RxD | High |+----------+------+--------+-------+| 17 | 28 | GPIO 8 | Low || 18 | 29 | GPIO 9 | Low || 19 | 30 | GPIO10 | Low || 20 | 31 | GPIO11 | Low |+----------+------+--------+-------+
Figure 48—Results of the readall command
Build an Out-of-Memory Alarm
Turning an LED on and off using software is an important exercise, but it’s
certainly not a very useful project. Usually, you won’t control LEDs manually,
but you’ll use them as status indicators. For example, many USB devices use
LEDs to show whether they’re reading or writing data at the moment.
In this section, we’ll use three LEDs as status indicators for the Pi’s current
memory usage. The LEDs will have the same colors as a traffic light. If the
Pi’s memory is critically low, we’ll turn on the red light. If a lot of memory is
available, we’ll turn on the green light. Otherwise, it will be yellow.
In Figure 49, Memory alarm circuit diagram, on page 101, you can see the circuit
of the memory alarm. In Figure 50, The memory alarm circuit, on page 101,
you can see it in real life. It’s very similar to the last circuit we built. We have
to copy the original LED circuit only two times to control three LEDs.
Chapter 9. Tinker with the GPIO Pins • 100
report erratum • discuss
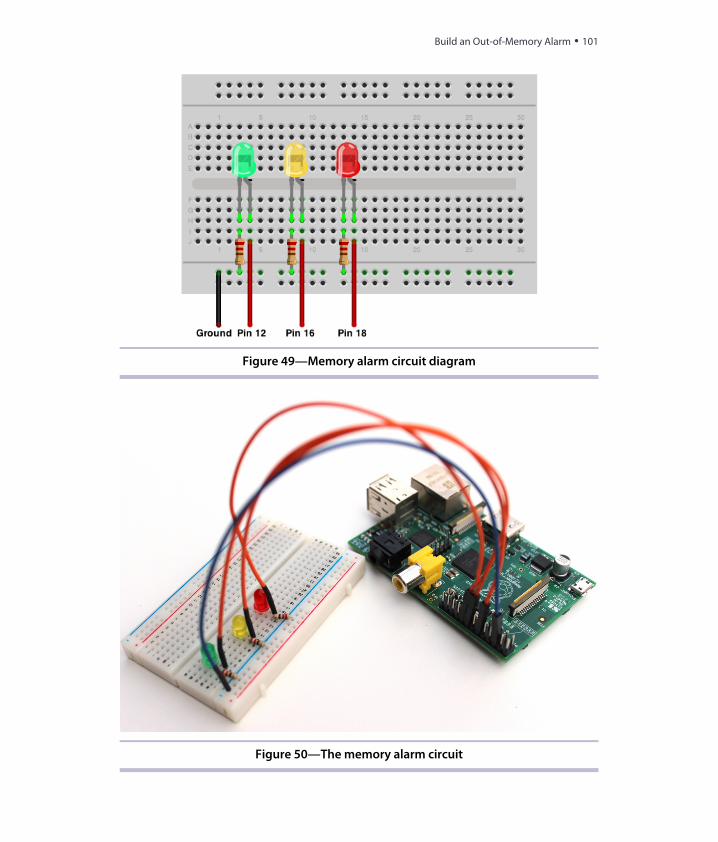
Figure 49—Memory alarm circuit diagram
Figure 50—The memory alarm circuit
report erratum • discuss
Build an Out-of-Memory Alarm • 101
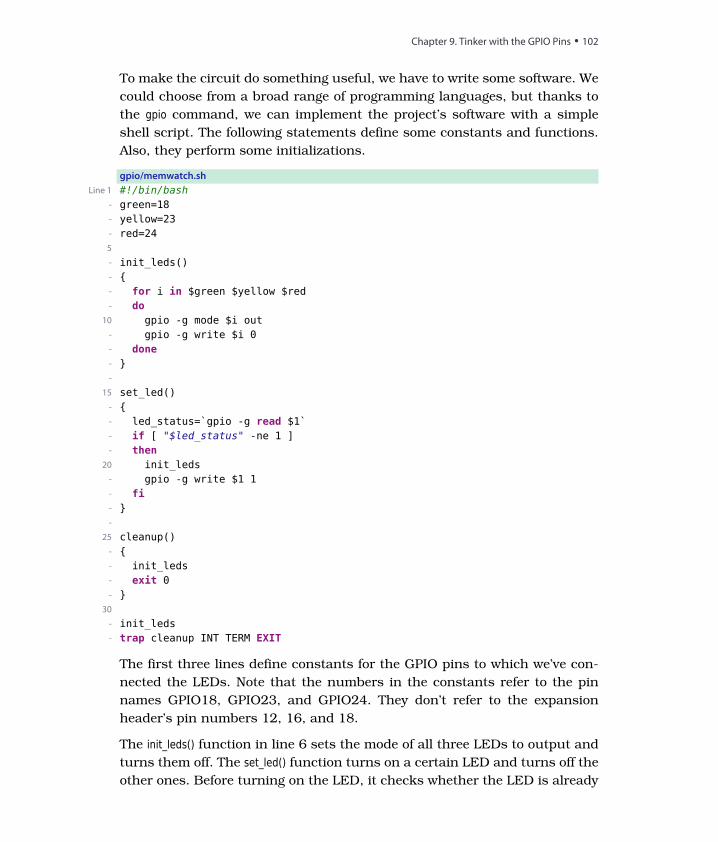
To make the circuit do something useful, we have to write some software. We
could choose from a broad range of programming languages, but thanks to
the gpio command, we can implement the project’s software with a simple
shell script. The following statements define some constants and functions.
Also, they perform some initializations.
gpio/memwatch.sh
Line 1 #!/bin/bash- green=18- yellow=23- red=245
- init_leds()-
-
done
for i in $green $yellow $reddo-
gpio -g mode $i out10
gpio -g write $i 0-
-
-
-
15 set_led()-
- led_status=`gpio -g read $1`-
thenif [ "$led_status" -ne 1 ]
-
init_leds20
gpio -g write $1 1-
fi-
-
-
25 cleanup()-
- init_leds- exit 0-
30
-
trap cleanup INT TERM EXITinit_leds
-
The first three lines define constants for the GPIO pins to which we’ve con-
nected the LEDs. Note that the numbers in the constants refer to the pin
names GPIO18, GPIO23, and GPIO24. They don’t refer to the expansion
header’s pin numbers 12, 16, and 18.
The init_leds() function in line 6 sets the mode of all three LEDs to output and
turns them off. The set_led() function turns on a certain LED and turns off the
other ones. Before turning on the LED, it checks whether the LED is already
Chapter 9. Tinker with the GPIO Pins • 102
report erratum • discuss
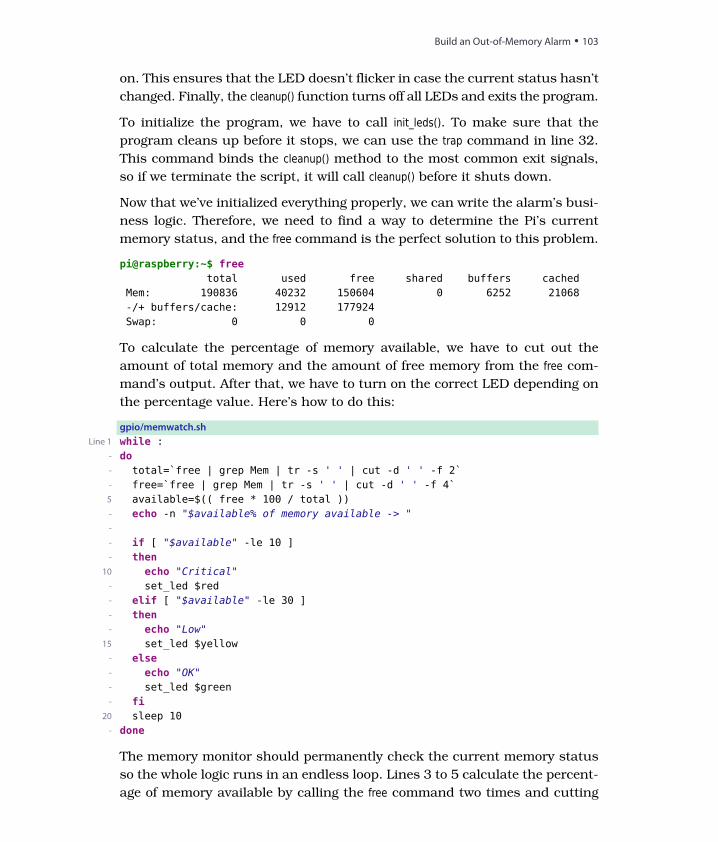
on. This ensures that the LED doesn’t flicker in case the current status hasn’t
changed. Finally, the cleanup() function turns off all LEDs and exits the program.
To initialize the program, we have to call init_leds(). To make sure that the
program cleans up before it stops, we can use the trap command in line 32.
This command binds the cleanup() method to the most common exit signals,
so if we terminate the script, it will call cleanup() before it shuts down.
Now that we’ve initialized everything properly, we can write the alarm’s busi-
ness logic. Therefore, we need to find a way to determine the Pi’s current
memory status, and the free command is the perfect solution to this problem.
pi@raspberry:~$ freetotal used free shared buffers cached
Mem: 190836 40232 150604 0 6252 21068-/+ buffers/cache: 12912 177924Swap: 0 0 0
To calculate the percentage of memory available, we have to cut out the
amount of total memory and the amount of free memory from the free com-
mand’s output. After that, we have to turn on the correct LED depending on
the percentage value. Here’s how to do this:
gpio/memwatch.sh
Line 1 while :do-
- total=`free | grep Mem | tr -s ' ' | cut -d ' ' -f 2`- free=`free | grep Mem | tr -s ' ' | cut -d ' ' -f 4`5 available=$(( free * 100 / total ))- echo -n "$available% of memory available -> "-
- if [ "$available" -le 10 ]- then
echo "Critical"10
set_led $red-
- elif [ "$available" -le 30 ]- then
echo "Low"-
set_led $yellow15
- elseecho "OK"-
set_led $green-
fi-
20
donesleep 10
-
The memory monitor should permanently check the current memory status
so the whole logic runs in an endless loop. Lines 3 to 5 calculate the percent-
age of memory available by calling the free command two times and cutting
report erratum • discuss
Build an Out-of-Memory Alarm • 103
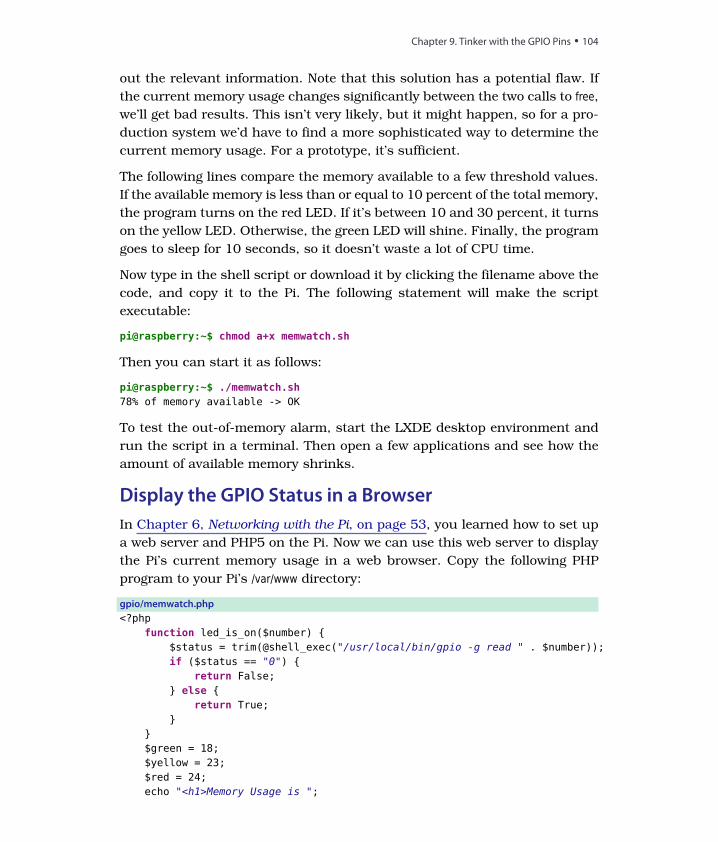
out the relevant information. Note that this solution has a potential flaw. If
the current memory usage changes significantly between the two calls to free,we’ll get bad results. This isn’t very likely, but it might happen, so for a pro-
duction system we’d have to find a more sophisticated way to determine the
current memory usage. For a prototype, it’s sufficient.
The following lines compare the memory available to a few threshold values.
If the available memory is less than or equal to 10 percent of the total memory,
the program turns on the red LED. If it’s between 10 and 30 percent, it turns
on the yellow LED. Otherwise, the green LED will shine. Finally, the program
goes to sleep for 10 seconds, so it doesn’t waste a lot of CPU time.
Now type in the shell script or download it by clicking the filename above the
code, and copy it to the Pi. The following statement will make the script
executable:
pi@raspberry:~$ chmod a+x memwatch.sh
Then you can start it as follows:
pi@raspberry:~$ ./memwatch.sh78% of memory available -> OK
To test the out-of-memory alarm, start the LXDE desktop environment and
run the script in a terminal. Then open a few applications and see how the
amount of available memory shrinks.
Display the GPIO Status in a Browser
In Chapter 6, Networking with the Pi, on page 53, you learned how to set up
a web server and PHP5 on the Pi. Now we can use this web server to display
the Pi’s current memory usage in a web browser. Copy the following PHP
program to your Pi’s /var/www directory:
gpio/memwatch.php
<?phpfunction led_is_on($number)
$status = trim(@shell_exec("/usr/local/bin/gpio -g read " . $number));if ($status == "0")
return False; else
return True;
$green = 18;$yellow = 23;$red = 24;echo "<h1>Memory Usage is ";
Chapter 9. Tinker with the GPIO Pins • 104
report erratum • discuss
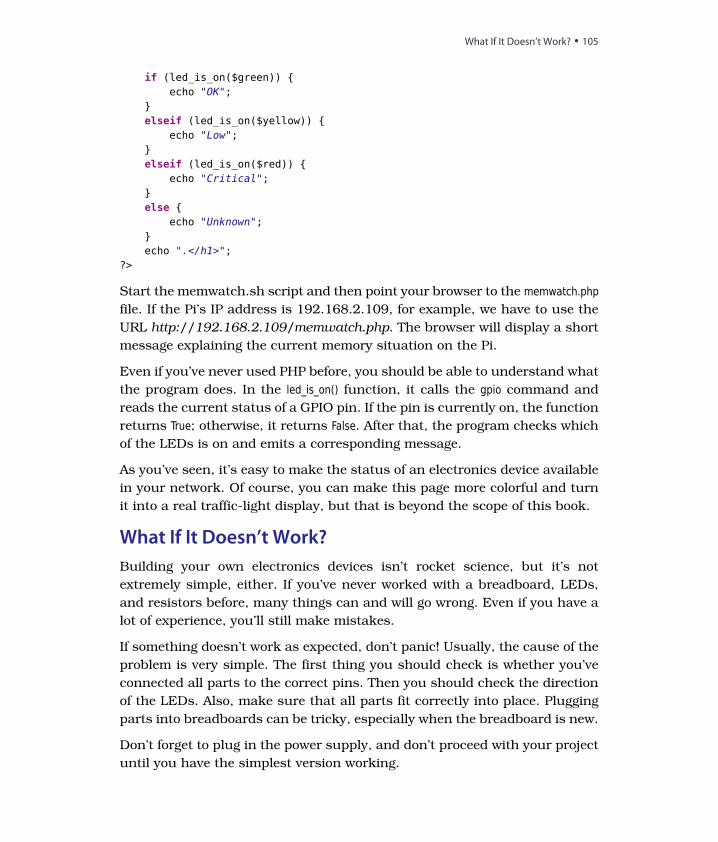
if (led_is_on($green)) echo "OK";
elseif (led_is_on($yellow))
echo "Low";elseif (led_is_on($red))
echo "Critical";else
echo "Unknown";echo ".</h1>";
?>
Start the memwatch.sh script and then point your browser to the memwatch.phpfile. If the Pi’s IP address is 192.168.2.109, for example, we have to use the
URL http://192.168.2.109/memwatch.php. The browser will display a short
message explaining the current memory situation on the Pi.
Even if you’ve never used PHP before, you should be able to understand what
the program does. In the led_is_on() function, it calls the gpio command and
reads the current status of a GPIO pin. If the pin is currently on, the function
returns True; otherwise, it returns False. After that, the program checks which
of the LEDs is on and emits a corresponding message.
As you’ve seen, it’s easy to make the status of an electronics device available
in your network. Of course, you can make this page more colorful and turn
it into a real traffic-light display, but that is beyond the scope of this book.
What If It Doesn’t Work?
Building your own electronics devices isn’t rocket science, but it’s not
extremely simple, either. If you’ve never worked with a breadboard, LEDs,
and resistors before, many things can and will go wrong. Even if you have a
lot of experience, you’ll still make mistakes.
If something doesn’t work as expected, don’t panic! Usually, the cause of the
problem is very simple. The first thing you should check is whether you’ve
connected all parts to the correct pins. Then you should check the direction
of the LEDs. Also, make sure that all parts fit correctly into place. Plugging
parts into breadboards can be tricky, especially when the breadboard is new.
Don’t forget to plug in the power supply, and don’t proceed with your project
until you have the simplest version working.
report erratum • discuss
What If It Doesn’t Work? • 105
Next Steps
In this chapter, you learned how to build your own electronics projects and
control them with the Raspberry Pi. Even though you used only a few cheap
parts, you could actually build something fun and useful.
The next chapter will show you how to do even more exciting stuff. You’ll
connect digital and analog sensors to the Pi, so you can detect motion and
measure the current temperature, for example.
Chapter 9. Tinker with the GPIO Pins • 106
report erratum • discuss
CHAPTER 10
Working with Digital and Analog Sensors
Sensors are everywhere today, and many of them have become so ubiquitous
that often you don’t even notice them. When entering a grocery store, you
expect the doors to open automatically. Using temperature sensors, your car
automatically turns on the heat to defrost the side mirrors. Distance sensors
help you to navigate even the tiniest parking spots.
Of course, you can also find plenty of sensors in your tablet PC and in your
smartphone. For example, acceleration sensors turn the screen to landscape
or portrait mode automatically; you can also use them for controlling video
games.
Attaching sensors to a PC usually isn’t so easy. Fortunately, the Pi is
different—you can connect it to many intelligent sensors with little effort,
although it’s still not as easy as using sensors with a microcontroller board,
such as the Arduino. In this chapter, you’ll learn how to enhance your Pi with
both digital and analog sensors.
What You Need
To build all the projects in this chapter, you need the parts you see in Figure
51, The parts you need, on page 108.
• A half-size breadboard
• A PIR sensor
• A TMP36 temperature sensor
• An MCP3008-I/P analog-to-digital converter
• Six female/male jumper wires
• Some wires
You already learned where you can get a breadboard and wires in What You
Need, on page 93. Most of the vendors mentioned there also sell the two
report erratum • discuss
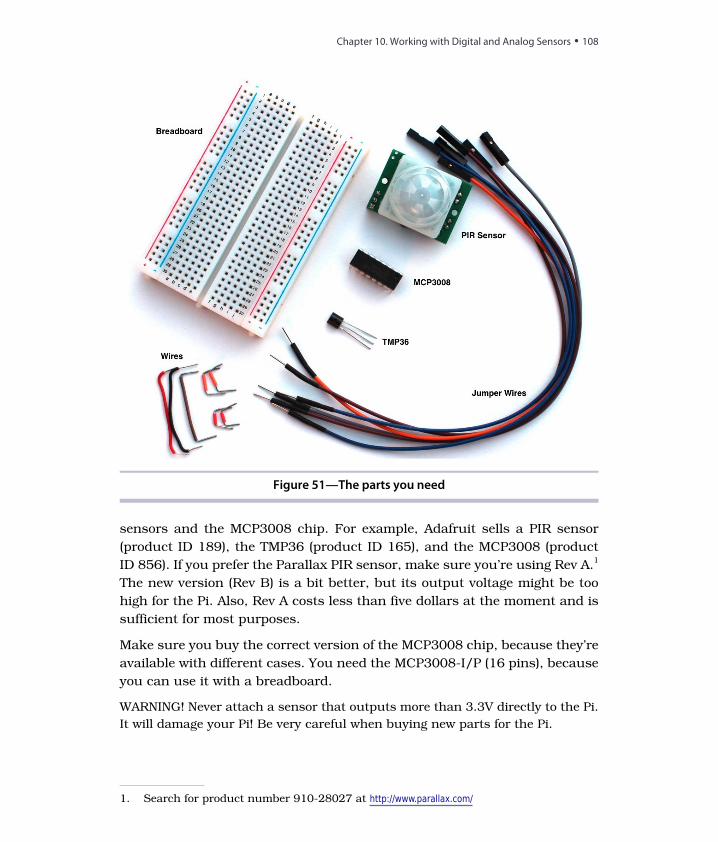
Figure 51—The parts you need
sensors and the MCP3008 chip. For example, Adafruit sells a PIR sensor
(product ID 189), the TMP36 (product ID 165), and the MCP3008 (product
ID 856). If you prefer the Parallax PIR sensor, make sure you’re using Rev A.1
The new version (Rev B) is a bit better, but its output voltage might be too
high for the Pi. Also, Rev A costs less than five dollars at the moment and is
sufficient for most purposes.
Make sure you buy the correct version of the MCP3008 chip, because they’re
available with different cases. You need the MCP3008-I/P (16 pins), because
you can use it with a breadboard.
WARNING! Never attach a sensor that outputs more than 3.3V directly to the Pi.
It will damage your Pi! Be very careful when buying new parts for the Pi.
1. Search for product number 910-28027 at http://www.parallax.com/
Chapter 10. Working with Digital and Analog Sensors • 108
report erratum • discuss

Detect Motion with the Pi
Chances are good that you benefit from motion detectors several times a week
or even several times a day. They might turn on the lights automatically at
dark, or perhaps they turn on the lights when you enter the restroom at work.
In this section, you’ll learn how these detectors work, and you’ll learn how to
turn the Pi into a motion detector.
Connect the PIR Sensor to the Pi
Many motion detectors use passive infrared (PIR) sensors.2 A PIR sensor
permanently measures infrared light and notices whenever something in the
infrared spectrum changes. This is all you need to detect motion, because
nearly every object emits infrared light. That’s true for everything in front of
your house: the ground, a bicycle, a garbage can, and so on. All of these
things emit a fairly constant portion of infrared light, and it doesn’t change
rapidly. But if a human being or an animal approaches your front door, the
sensor will notice a big variation and fire a signal.
The innards of PIR sensors are rather complex, but using them is easy. In
the following figure, you can see the Parallax PIR sensor (Rev A) that we’ll use
in this section’s examples. The sensor has a jumper you can use for changing
its behavior. Make sure it’s in position H; that is, the jumper covers the pin
next to the H.3
Figure 52—Top and bottom of a passive infrared sensor
2. http://en.wikipedia.org/wiki/Passive_infrared_sensor3. At http://www.ladyada.net/learn/sensors/pir.html, you’ll find an excellent tutorial explaining all
the sensor’s details.
report erratum • discuss
Detect Motion with the Pi • 109
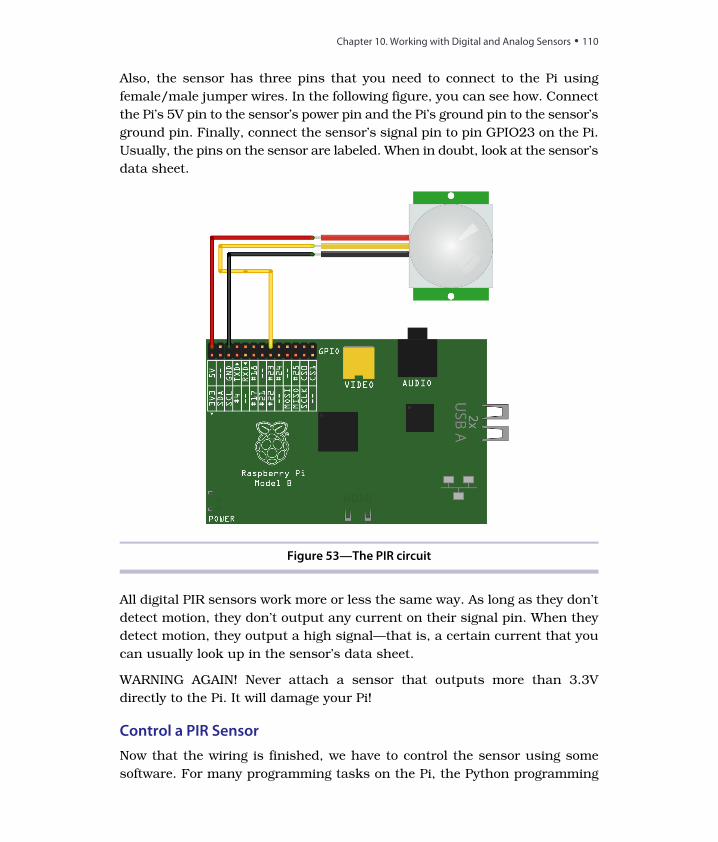
Also, the sensor has three pins that you need to connect to the Pi using
female/male jumper wires. In the following figure, you can see how. Connect
the Pi’s 5V pin to the sensor’s power pin and the Pi’s ground pin to the sensor’s
ground pin. Finally, connect the sensor’s signal pin to pin GPIO23 on the Pi.
Usually, the pins on the sensor are labeled. When in doubt, look at the sensor’s
data sheet.
Figure 53—The PIR circuit
All digital PIR sensors work more or less the same way. As long as they don’t
detect motion, they don’t output any current on their signal pin. When they
detect motion, they output a high signal—that is, a certain current that you
can usually look up in the sensor’s data sheet.
WARNING AGAIN! Never attach a sensor that outputs more than 3.3V
directly to the Pi. It will damage your Pi!
Control a PIR Sensor
Now that the wiring is finished, we have to control the sensor using some
software. For many programming tasks on the Pi, the Python programming
Chapter 10. Working with Digital and Analog Sensors • 110
report erratum • discuss
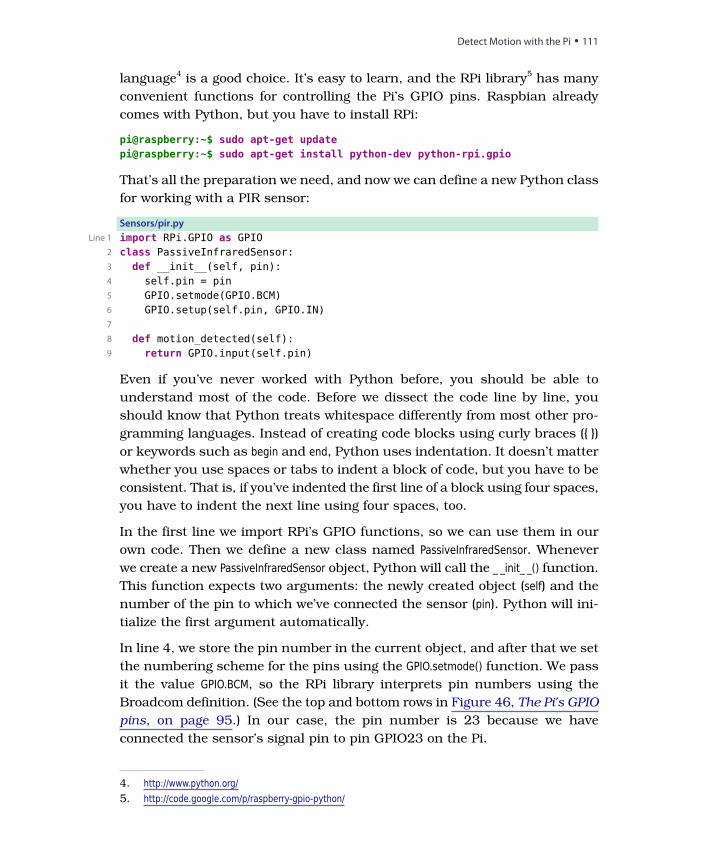
language4 is a good choice. It’s easy to learn, and the RPi library5 has many
convenient functions for controlling the Pi’s GPIO pins. Raspbian already
comes with Python, but you have to install RPi:
pi@raspberry:~$ sudo apt-get updatepi@raspberry:~$ sudo apt-get install python-dev python-rpi.gpio
That’s all the preparation we need, and now we can define a new Python class
for working with a PIR sensor:
Sensors/pir.py
Line 1 import RPi.GPIO as GPIO2 class PassiveInfraredSensor:3 def __init__(self, pin):
self.pin = pin4
GPIO.setmode(GPIO.BCM)5
GPIO.setup(self.pin, GPIO.IN)6
7
8 def motion_detected(self):return GPIO.input(self.pin)9
Even if you’ve never worked with Python before, you should be able to
understand most of the code. Before we dissect the code line by line, you
should know that Python treats whitespace differently from most other pro-
gramming languages. Instead of creating code blocks using curly braces ( )
or keywords such as begin and end, Python uses indentation. It doesn’t matter
whether you use spaces or tabs to indent a block of code, but you have to be
consistent. That is, if you’ve indented the first line of a block using four spaces,
you have to indent the next line using four spaces, too.
In the first line we import RPi’s GPIO functions, so we can use them in our
own code. Then we define a new class named PassiveInfraredSensor. Whenever
we create a new PassiveInfraredSensor object, Python will call the _ _init_ _() function.
This function expects two arguments: the newly created object (self) and the
number of the pin to which we’ve connected the sensor (pin). Python will ini-
tialize the first argument automatically.
In line 4, we store the pin number in the current object, and after that we set
the numbering scheme for the pins using the GPIO.setmode() function. We pass
it the value GPIO.BCM, so the RPi library interprets pin numbers using the
Broadcom definition. (See the top and bottom rows in Figure 46, The Pi's GPIO
pins, on page 95.) In our case, the pin number is 23 because we have
connected the sensor’s signal pin to pin GPIO23 on the Pi.
4. http://www.python.org/5. http://code.google.com/p/raspberry-gpio-python/
report erratum • discuss
Detect Motion with the Pi • 111
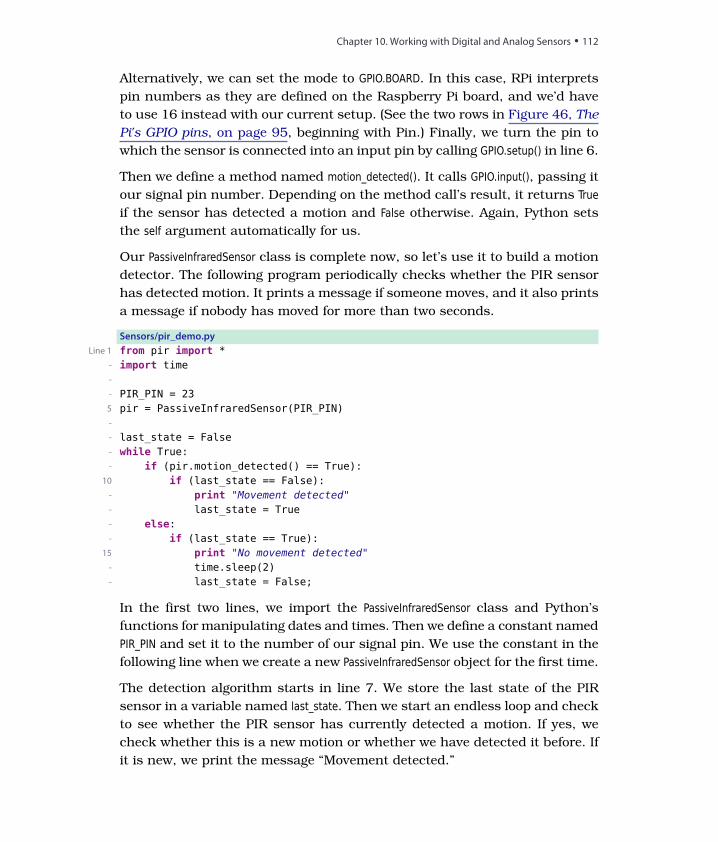
Alternatively, we can set the mode to GPIO.BOARD. In this case, RPi interprets
pin numbers as they are defined on the Raspberry Pi board, and we’d have
to use 16 instead with our current setup. (See the two rows in Figure 46, The
Pi's GPIO pins, on page 95, beginning with Pin.) Finally, we turn the pin to
which the sensor is connected into an input pin by calling GPIO.setup() in line 6.
Then we define a method named motion_detected(). It calls GPIO.input(), passing it
our signal pin number. Depending on the method call’s result, it returns Trueif the sensor has detected a motion and False otherwise. Again, Python sets
the self argument automatically for us.
Our PassiveInfraredSensor class is complete now, so let’s use it to build a motion
detector. The following program periodically checks whether the PIR sensor
has detected motion. It prints a message if someone moves, and it also prints
a message if nobody has moved for more than two seconds.
Sensors/pir_demo.py
Line 1 from pir import *- import time-
- PIR_PIN = 235 pir = PassiveInfraredSensor(PIR_PIN)-
- last_state = False- while True:
if (pir.motion_detected() == True):-
if (last_state == False):10
print "Movement detected"-
last_state = True-
else:-
if (last_state == True):-
print "No movement detected"15
time.sleep(2)-
last_state = False;-
In the first two lines, we import the PassiveInfraredSensor class and Python’s
functions for manipulating dates and times. Then we define a constant named
PIR_PIN and set it to the number of our signal pin. We use the constant in the
following line when we create a new PassiveInfraredSensor object for the first time.
The detection algorithm starts in line 7. We store the last state of the PIR
sensor in a variable named last_state. Then we start an endless loop and check
to see whether the PIR sensor has currently detected a motion. If yes, we
check whether this is a new motion or whether we have detected it before. If
it is new, we print the message “Movement detected.”
Chapter 10. Working with Digital and Analog Sensors • 112
report erratum • discuss
If the PIR sensor hasn’t detected a motion, we check whether it has previously
detected a motion. If it has, we print the message “No movement detected”
and wait for two seconds until we start again. Overall, we make sure that we
print a message only if the state has actually changed. This prevents our
motion detector from looking a bit nervous.
Now run the program, move a little in front of the PIR sensor, and stand still
from time to time.
pi@raspberry:~$ sudo python pir_demo.pyMovement detectedNo movement detected
That’s all you need to turn the Pi into a motion detector. Printing a message
isn’t very spectacular, but you can easily improve the program so that it sends
an email or switches on a light. That way, you could turn your Pi into a burglar
alarm or make it the basis of a home-automation system.
Attaching most digital sensors to the Pi is easy as long as their output voltage
matches the Pi’s specifications and as long as they don’t depend on an accu-
rate timing. Working with analog sensors can be more complicated, but in
the next section you’ll see that it isn’t rocket science, either.
Measure Temperature with the Pi
Digital sensors have many applications and are easy to use, but in many
cases analog sensors have some advantages. For example, most processes in
nature are analog, so analog sensors are a better fit for measuring phenomena
such as temperature or acceleration.
Analog sensors usually measure a certain parameter and output a voltage
that corresponds to the size of their current input signal. For example, a
temperature sensor such as the TMP36 outputs a higher voltage for higher
temperatures and a lower voltage for lower temperatures.
Although this sounds reasonable and easy, we still have a problem: digital
computers like the Raspberry Pi don’t understand analog voltage signals.
They can only interpret digital signals—that is, HIGH or LOW current.
Microcontroller boards such as the Arduino have native support for analog
signals because they have an analog-to-digital converter (A/D) that takes a
voltage signal and turns it into a binary number. To achieve the same with
the Raspberry Pi, we need to attach an A/D to the Pi.
report erratum • discuss
Measure Temperature with the Pi • 113
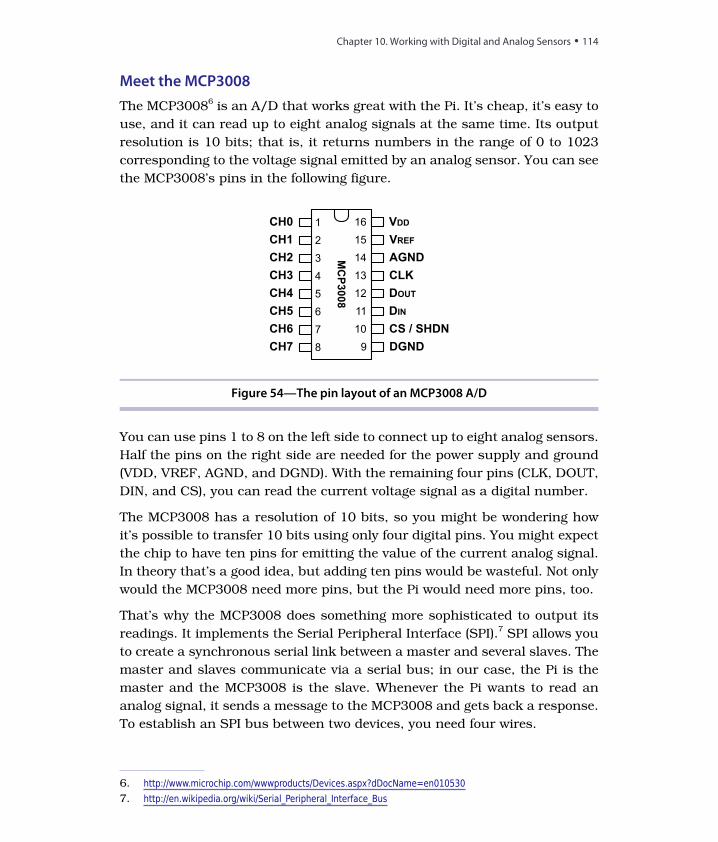
Meet the MCP3008
The MCP30086 is an A/D that works great with the Pi. It’s cheap, it’s easy to
use, and it can read up to eight analog signals at the same time. Its output
resolution is 10 bits; that is, it returns numbers in the range of 0 to 1023
corresponding to the voltage signal emitted by an analog sensor. You can see
the MCP3008’s pins in the following figure.
MC
P3
00
8
CH0
CH1
CH2
CH3
CH4
CH5
CH6
CH7
VDD
VREF
AGND
CLK
DOUT
DIN
CS / SHDN
DGND
1
2
3
4
5
6
7
8
16
15
14
13
12
11
10
9
Figure 54—The pin layout of an MCP3008 A/D
You can use pins 1 to 8 on the left side to connect up to eight analog sensors.
Half the pins on the right side are needed for the power supply and ground
(VDD, VREF, AGND, and DGND). With the remaining four pins (CLK, DOUT,
DIN, and CS), you can read the current voltage signal as a digital number.
The MCP3008 has a resolution of 10 bits, so you might be wondering how
it’s possible to transfer 10 bits using only four digital pins. You might expect
the chip to have ten pins for emitting the value of the current analog signal.
In theory that’s a good idea, but adding ten pins would be wasteful. Not only
would the MCP3008 need more pins, but the Pi would need more pins, too.
That’s why the MCP3008 does something more sophisticated to output its
readings. It implements the Serial Peripheral Interface (SPI).7 SPI allows you
to create a synchronous serial link between a master and several slaves. The
master and slaves communicate via a serial bus; in our case, the Pi is the
master and the MCP3008 is the slave. Whenever the Pi wants to read an
analog signal, it sends a message to the MCP3008 and gets back a response.
To establish an SPI bus between two devices, you need four wires.
6. http://www.microchip.com/wwwproducts/Devices.aspx?dDocName=en0105307. http://en.wikipedia.org/wiki/Serial_Peripheral_Interface_Bus
Chapter 10. Working with Digital and Analog Sensors • 114
report erratum • discuss
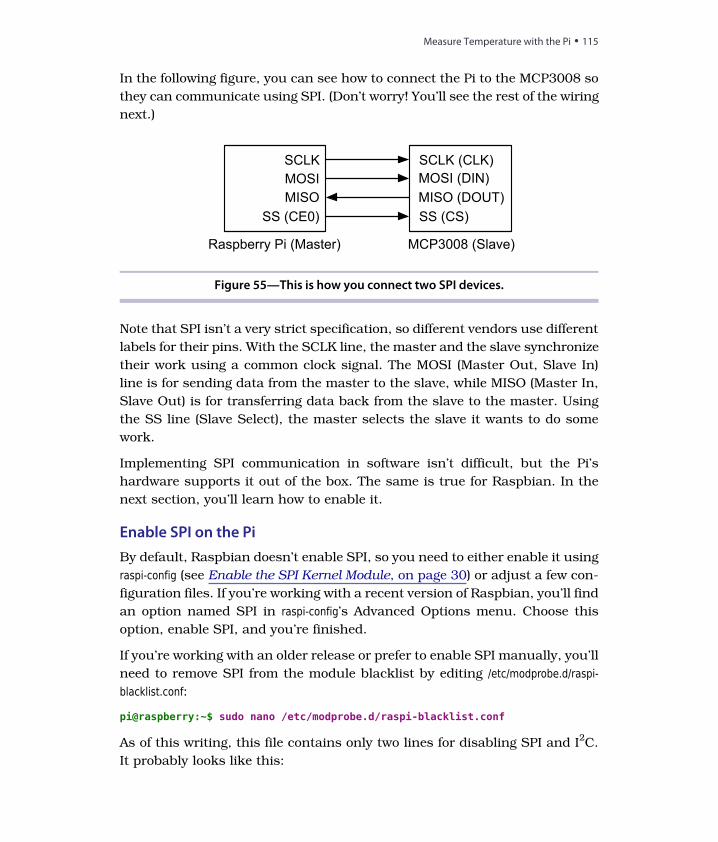
In the following figure, you can see how to connect the Pi to the MCP3008 so
they can communicate using SPI. (Don’t worry! You’ll see the rest of the wiring
next.)
SCLK
MOSI
MISO
SS (CE0)
Raspberry Pi (Master)
SCLK (CLK)
MOSI (DIN)
MISO (DOUT)
SS (CS)
MCP3008 (Slave)
Figure 55—This is how you connect two SPI devices.
Note that SPI isn’t a very strict specification, so different vendors use different
labels for their pins. With the SCLK line, the master and the slave synchronize
their work using a common clock signal. The MOSI (Master Out, Slave In)
line is for sending data from the master to the slave, while MISO (Master In,
Slave Out) is for transferring data back from the slave to the master. Using
the SS line (Slave Select), the master selects the slave it wants to do some
work.
Implementing SPI communication in software isn’t difficult, but the Pi’s
hardware supports it out of the box. The same is true for Raspbian. In the
next section, you’ll learn how to enable it.
Enable SPI on the Pi
By default, Raspbian doesn’t enable SPI, so you need to either enable it using
raspi-config (see Enable the SPI Kernel Module, on page 30) or adjust a few con-
figuration files. If you’re working with a recent version of Raspbian, you’ll find
an option named SPI in raspi-config’s Advanced Options menu. Choose this
option, enable SPI, and you’re finished.
If you’re working with an older release or prefer to enable SPI manually, you’ll
need to remove SPI from the module blacklist by editing /etc/modprobe.d/raspi-blacklist.conf:
pi@raspberry:~$ sudo nano /etc/modprobe.d/raspi-blacklist.conf
As of this writing, this file contains only two lines for disabling SPI and I2C.
It probably looks like this:
report erratum • discuss
Measure Temperature with the Pi • 115
blacklist spi-bcm2708blacklist i2c-bcm2708
To remove SPI support from the blacklist, you need to comment out the cor-
responding line so the file looks like this:
#blacklist spi-bcm2708blacklist i2c-bcm2708
Alternatively, you can delete the line. Save the file and then add the SPI
module to the list of modules the Pi loads automatically when it starts:
pi@raspberry:~$ sudo nano /etc/modules
Add a new line containing only the word spidev and save the file. Then reboot
the Pi:
pi@raspberry:~$ sudo reboot
Now your Pi should support two SPI devices. You can look them up using the
following command:
pi@raspberry:~$ ls /dev/spidev*/dev/spidev0.0 /dev/spidev0.1
In the next section, we’ll bring one of these devices to life by connecting an
MCP3008 and a temperature sensor to the Pi.
Wire It All Up
Now that we know how SPI works in principle, we need to connect the Pi to
the MCP3008, and the MCP3008 to the TMP36 temperature sensor. In Figure
56, The TMP36 circuit, on page 117, you can see how to do this.
We need to connect the Pi’s power and ground pins to a couple of places on
the breadboard. So, we connect them to the two rows at the left of the
breadboard. From there, we can easily distribute power and ground to other
places using short wires.
Next we plug in the MCP3008 chip; we have to make sure it has the right
orientation. Chips have a U notch at the top, and the MCP3008 is no
exception. Pin 1 is to the left of the U notch. Gently plug it into the breadboard.
You’ll have to press firmly after you get them all lined up, but first double-
check to ensure that all pins fit into their holes. Use a small screwdriver as
a lever if you need to remove the chip.
Also, be very careful when wiring the MCP3008 to the Pi. Table 1, Pin mapping
for connecting the Pi to the MCP3008, on page 117 explains in detail how to
connect the Pi’s GPIO pins to the MCP3008.
Chapter 10. Working with Digital and Analog Sensors • 116
report erratum • discuss
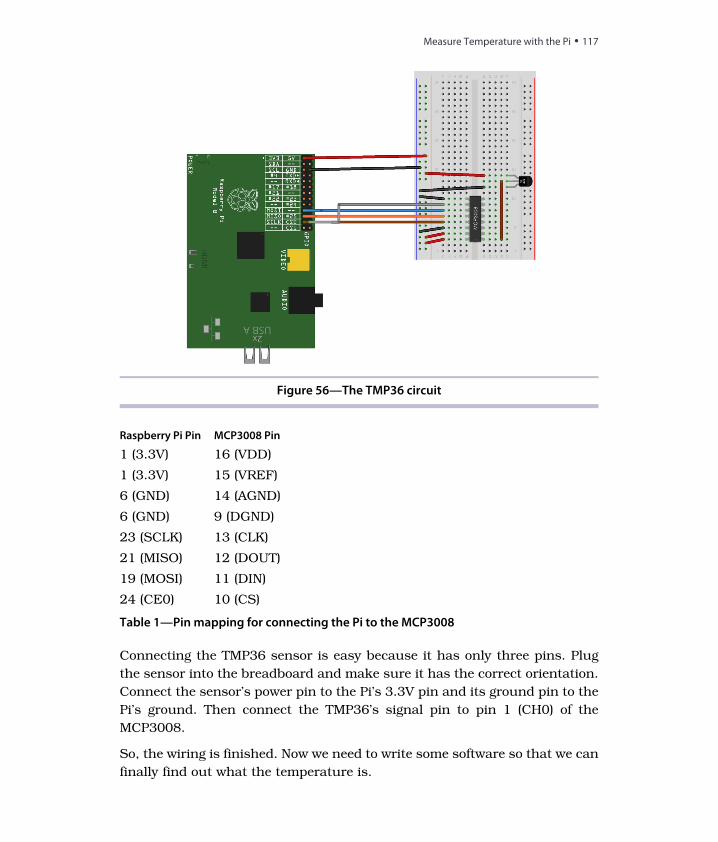
Figure 56—The TMP36 circuit
MCP3008 PinRaspberry Pi Pin
16 (VDD)1 (3.3V)
15 (VREF)1 (3.3V)
14 (AGND)6 (GND)
9 (DGND)6 (GND)
13 (CLK)23 (SCLK)
12 (DOUT)21 (MISO)
11 (DIN)19 (MOSI)
10 (CS)24 (CE0)
Table 1—Pin mapping for connecting the Pi to the MCP3008
Connecting the TMP36 sensor is easy because it has only three pins. Plug
the sensor into the breadboard and make sure it has the correct orientation.
Connect the sensor’s power pin to the Pi’s 3.3V pin and its ground pin to the
Pi’s ground. Then connect the TMP36’s signal pin to pin 1 (CH0) of the
MCP3008.
So, the wiring is finished. Now we need to write some software so that we can
finally find out what the temperature is.
report erratum • discuss
Measure Temperature with the Pi • 117
Control the MCP3008
The MCP3008 is an SPI device, so we need to find a way to communicate with
it using the Pi’s SPI hardware. Fortunately, several people have already done
this. py-spidev8 is a small library that provides everything we need. Install it
as follows:
pi@raspberry:~$ sudo apt-get install python-dev python-rpi.gpiopi@raspberry:~$ git clone git://github.com/doceme/py-spidevpi@raspberry:~$ cd py-spidevpi@raspberry:~$ sudo python setup.py install
The following is all we need to implement an MCP3008 class using Python:
Sensors/mcp3008.py
Line 1 import spidev-
- class MCP3008:- def __init__(self, bus = 0, client = 0):
self.spi = spidev.SpiDev()5
self.spi.open(bus, client)-
-
- def analog_read(self, channel):if (channel < 0 or channel > 7):-
return -110
result = self.spi.xfer2([1, (8 + channel) << 4, 0])-
- return ((result[1] & 3) << 8) + result[2]
It’s just a short class, but it needs some explanation. In the first line we import
the spidev library we installed before. Then we define a class named MCP3008.As before, in the PassiveInfrared class, we define a method named _ _init_ _() that
will be called whenever we create a new MCP3008 object. _ _init_ _() expects three
parameters: the newly created instance (self), the number of the SPI bus to
be used (bus), and the number of the client (slave) we’d like to talk to (client).In line 5, we create a new SpiDev object, and we open a connection to the device
in the following line.
So far we’ve only established a communication channel to an SPI device; that
is, what we do in the _ _init_ _() method isn’t specific to the MCP3008. It would
be the same for every other SPI device. The specific parts happen in analog_read().This method takes a port number and returns the current reading of the
analog sensor that has been connected to the port. We check whether the
port number is between 0 and 7, and if it’s not we return –1.
8. https://github.com/doceme/py-spidev
Chapter 10. Working with Digital and Analog Sensors • 118
report erratum • discuss
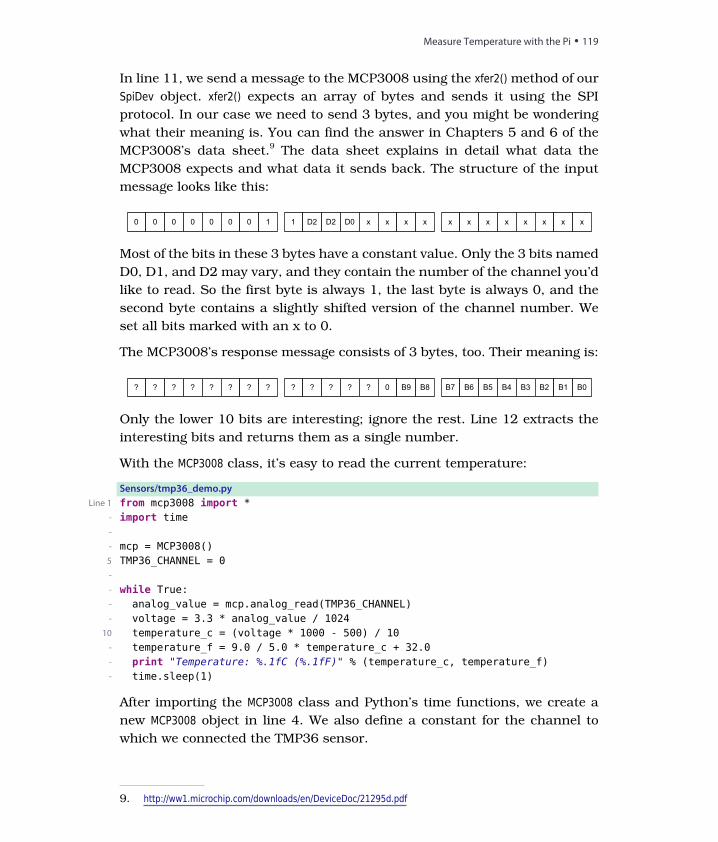
In line 11, we send a message to the MCP3008 using the xfer2() method of our
SpiDev object. xfer2() expects an array of bytes and sends it using the SPI
protocol. In our case we need to send 3 bytes, and you might be wondering
what their meaning is. You can find the answer in Chapters 5 and 6 of the
MCP3008’s data sheet.9 The data sheet explains in detail what data the
MCP3008 expects and what data it sends back. The structure of the input
message looks like this:
0 0 0 0 0 0 0 1 1 D2 D2 D0 x x x x x x x x x x x x
Most of the bits in these 3 bytes have a constant value. Only the 3 bits named
D0, D1, and D2 may vary, and they contain the number of the channel you’d
like to read. So the first byte is always 1, the last byte is always 0, and the
second byte contains a slightly shifted version of the channel number. We
set all bits marked with an x to 0.
The MCP3008’s response message consists of 3 bytes, too. Their meaning is:
? ? ? ? ? ? ? ? ? ? ? ? ? 0 B9 B8 B7 B6 B5 B4 B3 B2 B1 B0
Only the lower 10 bits are interesting; ignore the rest. Line 12 extracts the
interesting bits and returns them as a single number.
With the MCP3008 class, it’s easy to read the current temperature:
Sensors/tmp36_demo.py
Line 1 from mcp3008 import *- import time-
- mcp = MCP3008()5 TMP36_CHANNEL = 0-
- while True:- analog_value = mcp.analog_read(TMP36_CHANNEL)- voltage = 3.3 * analog_value / 1024
10 temperature_c = (voltage * 1000 - 500) / 10- temperature_f = 9.0 / 5.0 * temperature_c + 32.0-
time.sleep(1)print "Temperature: %.1fC (%.1fF)" % (temperature_c, temperature_f)
-
After importing the MCP3008 class and Python’s time functions, we create a
new MCP3008 object in line 4. We also define a constant for the channel to
which we connected the TMP36 sensor.
9. http://ww1.microchip.com/downloads/en/DeviceDoc/21295d.pdf
report erratum • discuss
Measure Temperature with the Pi • 119
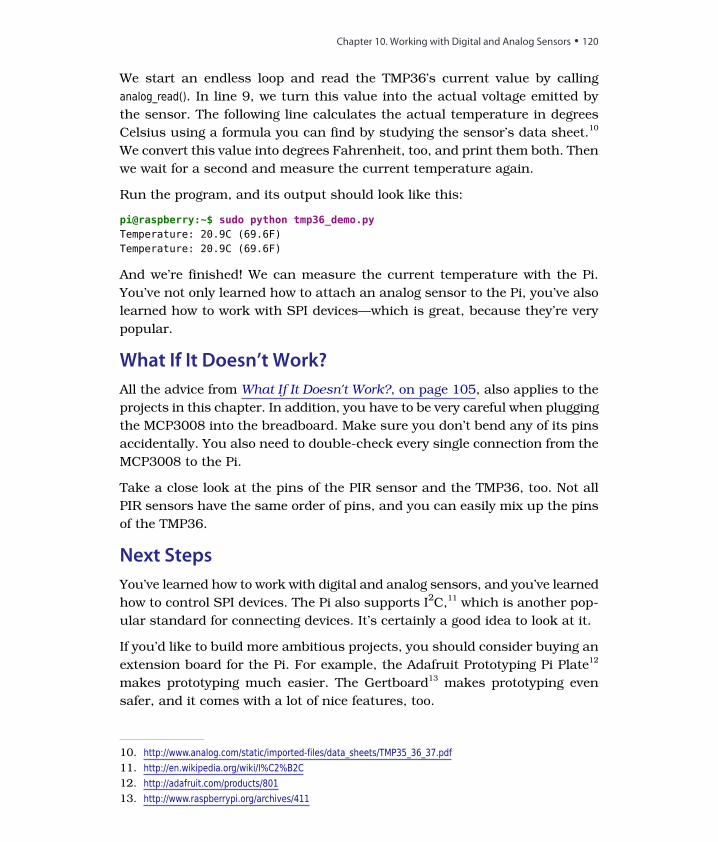
We start an endless loop and read the TMP36’s current value by calling
analog_read(). In line 9, we turn this value into the actual voltage emitted by
the sensor. The following line calculates the actual temperature in degrees
Celsius using a formula you can find by studying the sensor’s data sheet.10
We convert this value into degrees Fahrenheit, too, and print them both. Then
we wait for a second and measure the current temperature again.
Run the program, and its output should look like this:
pi@raspberry:~$ sudo python tmp36_demo.pyTemperature: 20.9C (69.6F)Temperature: 20.9C (69.6F)
And we’re finished! We can measure the current temperature with the Pi.
You’ve not only learned how to attach an analog sensor to the Pi, you’ve also
learned how to work with SPI devices—which is great, because they’re very
popular.
What If It Doesn’t Work?
All the advice from What If It Doesn't Work?, on page 105, also applies to the
projects in this chapter. In addition, you have to be very careful when plugging
the MCP3008 into the breadboard. Make sure you don’t bend any of its pins
accidentally. You also need to double-check every single connection from the
MCP3008 to the Pi.
Take a close look at the pins of the PIR sensor and the TMP36, too. Not all
PIR sensors have the same order of pins, and you can easily mix up the pins
of the TMP36.
Next Steps
You’ve learned how to work with digital and analog sensors, and you’ve learned
how to control SPI devices. The Pi also supports I2C,11 which is another pop-
ular standard for connecting devices. It’s certainly a good idea to look at it.
If you’d like to build more ambitious projects, you should consider buying an
extension board for the Pi. For example, the Adafruit Prototyping Pi Plate12
makes prototyping much easier. The Gertboard13 makes prototyping even
safer, and it comes with a lot of nice features, too.
10. http://www.analog.com/static/imported-files/data_sheets/TMP35_36_37.pdf11. http://en.wikipedia.org/wiki/I%C2%B2C12. http://adafruit.com/products/80113. http://www.raspberrypi.org/archives/411
Chapter 10. Working with Digital and Analog Sensors • 120
report erratum • discuss
CHAPTER 11
Control the Pi Camera
One of the greatest advantages of the Pi’s homogeneous hardware is that it’s
easy to build new accessories for it. The Raspberry Pi team has had a CSI
(Camera Serial Interface) slot on the board from the beginning, and they
recently released a camera module.
The camera is tiny but powerful. You can use it to take high-definition photos
and record videos. Its small size, low weight, and modest power consumption
make it an ideal candidate for many interesting projects. For example, you
can attach it to a remote-controlled quadcopter to record some videos of your
latest maneuvers.
In this chapter, you’ll learn how to connect the camera to the Pi and how to
get it up and running. You’ll use simple command-line tools to take photos
and record videos. Also, you’ll build an automatic burglar alarm using the
camera and a PIR sensor.
Meet the Camera’s Hardware
The Pi camera module is very small: 24mm x 25mm. Its height is 9mm, and
it weighs only about 3 grams. Like the Pi, it doesn’t look very pretty (see Figure
57, The camera's design is similar to the Pi's, on page 122), but like the Pi it’s
surprisingly powerful and versatile.
In most regards, the camera is similar to the cameras you can find in modern
smartphones. It has a fixed-focus lens that captures photos at a resolution
of 2592 x 1944 pixels. It supports three video modes with different resolutions
and frame rates: 1080p at 30 FPS, 720p at 60 FPS, and 640 x 480 at 60 or
90 FPS.
report erratum • discuss
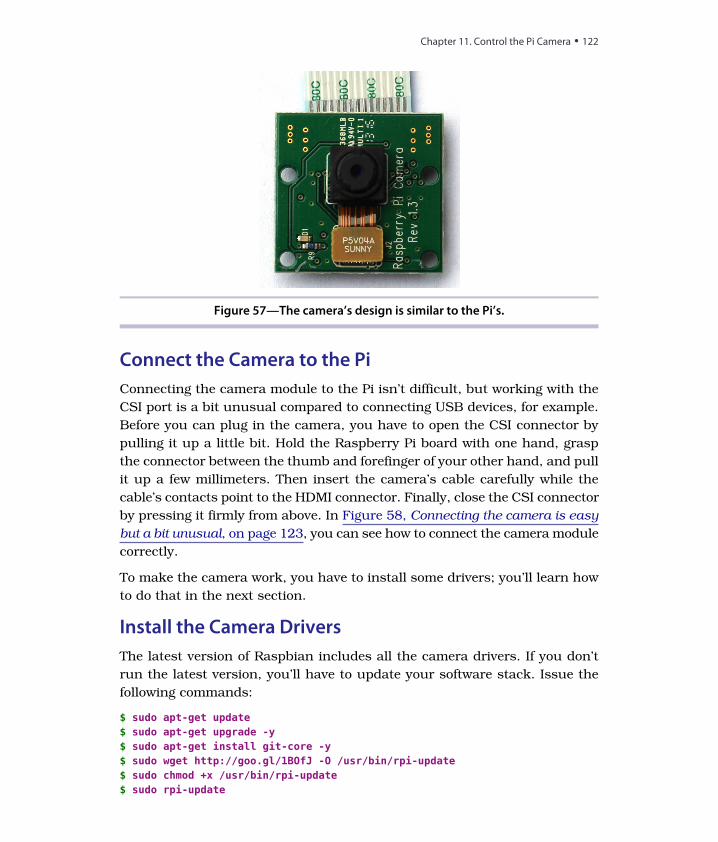
Figure 57—The camera’s design is similar to the Pi’s.
Connect the Camera to the Pi
Connecting the camera module to the Pi isn’t difficult, but working with the
CSI port is a bit unusual compared to connecting USB devices, for example.
Before you can plug in the camera, you have to open the CSI connector by
pulling it up a little bit. Hold the Raspberry Pi board with one hand, grasp
the connector between the thumb and forefinger of your other hand, and pull
it up a few millimeters. Then insert the camera’s cable carefully while the
cable’s contacts point to the HDMI connector. Finally, close the CSI connector
by pressing it firmly from above. In Figure 58, Connecting the camera is easy
but a bit unusual, on page 123, you can see how to connect the camera module
correctly.
To make the camera work, you have to install some drivers; you’ll learn how
to do that in the next section.
Install the Camera Drivers
The latest version of Raspbian includes all the camera drivers. If you don’t
run the latest version, you’ll have to update your software stack. Issue the
following commands:
$ sudo apt-get update$ sudo apt-get upgrade -y$ sudo apt-get install git-core -y$ sudo wget http://goo.gl/1BOfJ -O /usr/bin/rpi-update$ sudo chmod +x /usr/bin/rpi-update$ sudo rpi-update
Chapter 11. Control the Pi Camera • 122
report erratum • discuss
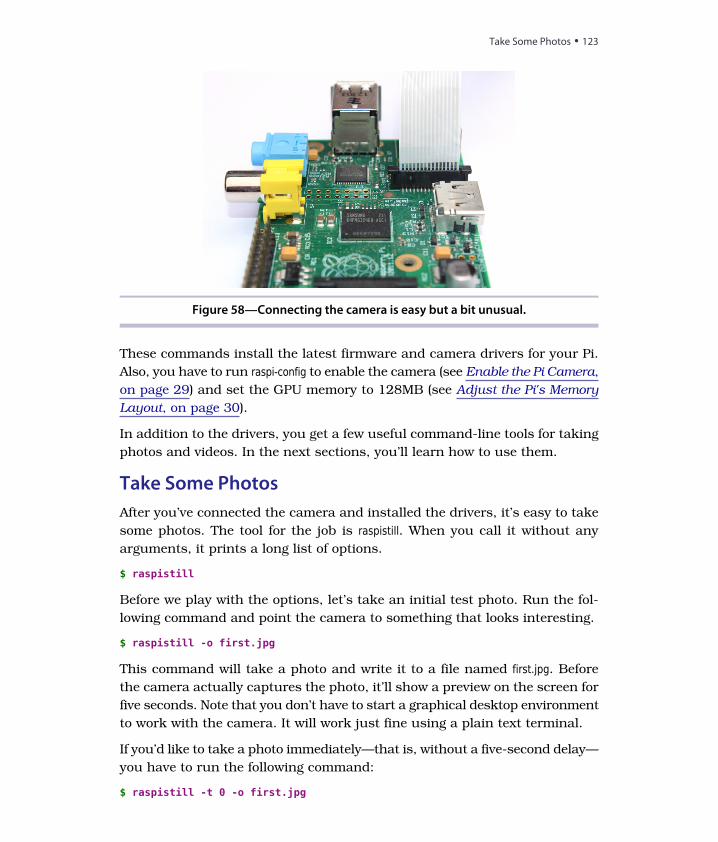
Figure 58—Connecting the camera is easy but a bit unusual.
These commands install the latest firmware and camera drivers for your Pi.
Also, you have to run raspi-config to enable the camera (see Enable the Pi Camera,
on page 29) and set the GPU memory to 128MB (see Adjust the Pi's Memory
Layout, on page 30).
In addition to the drivers, you get a few useful command-line tools for taking
photos and videos. In the next sections, you’ll learn how to use them.
Take Some Photos
After you’ve connected the camera and installed the drivers, it’s easy to take
some photos. The tool for the job is raspistill. When you call it without any
arguments, it prints a long list of options.
$ raspistill
Before we play with the options, let’s take an initial test photo. Run the fol-
lowing command and point the camera to something that looks interesting.
$ raspistill -o first.jpg
This command will take a photo and write it to a file named first.jpg. Before
the camera actually captures the photo, it’ll show a preview on the screen for
five seconds. Note that you don’t have to start a graphical desktop environment
to work with the camera. It will work just fine using a plain text terminal.
If you’d like to take a photo immediately—that is, without a five-second delay—
you have to run the following command:
$ raspistill -t 0 -o first.jpg
report erratum • discuss
Take Some Photos • 123
With the -t option, we can set the delay in milliseconds. When we set it to 0,
raspistill doesn’t show a preview window. If you’d like to have a delay but you
want to disable the preview window, you have to set the -n option.
$ raspistill -t 2000 -n -o first.jpg
In this case, raspistill will wait for two seconds before taking a photo, but it
won’t show the preview window. We can adjust the preview window’s size in
a couple of ways. We can make it occupy the entire screen, and we can set it
to an arbitrary size.
You might’ve noticed that the photos you’ve taken so far have been flipped
horizontally. Using -hf, we can change this behavior:
$ raspistill -hf -o first.jpg
Setting the -vf option flips the photo vertically. Note that raspistill doesn’t show
a preview when we’re using the flipping options. It only shows the final result
before writing it to a file.
Usually the JPEG format is a good choice for storing photos, but sometimes
you might need a different format. Using the -e option, we can set the output
file encoding to JPG, PNG, BMP, or GIF. For example, the following command
stores a photo in PNG format:
$ raspistill -e PNG -o first.png
In addition, you can choose from various effects that you’re probably used to
from your regular camera. Using the options -ex, -ifx, and -awd, you can adjust
the camera to different lightings and generate popular effects.
Create Time-Lapse Videos
One of the greatest advantages of the Pi camera module over most regular
cameras is that you can automate it. For example, it’s very easy to use it to
create time-lapse videos. Although you could write a program that automati-
cally calls raspistill every few seconds, raspistill supports time-lapsing right out
of the box.
$ mkdir photos$ raspistill -n -tl 3000 -t 600000 -o photos/photo%04d.jpg
The preceding command takes a photo every three seconds (3,000 millisec-
onds) for ten minutes (600,000 milliseconds). It stores all photos in a folder
named photos, and all filenames start with the prefix “photo” followed by a
four-digit number. raspistill does the numbering automatically, so in the photosfolder, you’ll find files named photo0001.jpg, photo0002.jpg, and so on.
Chapter 11. Control the Pi Camera • 124
report erratum • discuss

Now we have to combine the photo files into a single video file. Several free
tools are available for this job. FFmpeg1 and avconv2 are very popular because
they’re extremely powerful.
In theory, you can install and run both tools on the Pi, but it’s usually best
to install just avconv, for a couple of reasons. To install FFmpeg, you have to
compile it yourself, which is a bit inconvenient. Also FFmpeg and avconv are
very similar because avconv is a fork of the FFmpeg project.
$ sudo apt-get install libav-tools
Then we can create a time-lapse video using the following command:
$ cd photos$ avconv -r 4 -i photo%04d.jpg -r 4 -vcodec libx264 -crf 20 -g 15 video.mp4
avconv has a huge number of command-line options, and we can control
every single aspect of the generated video file. Run man avconv to read the pro-
gram’s manual.
Generating videos consumes a lot of resources, and it literally takes hours to
generate a video on the Pi itself. The best solution is to copy the photo files
to a more powerful computer. Then you can use ffmpeg to generate the video:
$ cd photos$ ffmpeg -qscale 5 -r 4 -b 9600 -i photo%04d.jpg video.mp4
After running this command, you’ll find a video file named video.mp4 in the
photos folder. Like avconv, ffmpeg supports a vast number of options, and you
can look them up by running man ffmpeg.
raspistill is an amazingly versatile tool, and even though you’ve learned about
many of its options, there are still more to explore. Don’t be shy—go ahead
and play around with them.
Record High-Definition Videos
raspistill is probably all you’ll ever need to take photos with the Pi camera
module, but you can’t use it to record videos. That’s what raspivid is for, and
it supports nearly the same set of options as raspistill.
To record one minute (60,000 milliseconds) of high-definition video using 25
frames per second, run the following command:
$ raspivid -t 60000 -fps 25 -o video.h264
1. http://www.ffmpeg.org/2. http://libav.org/avconv.html
report erratum • discuss
Record High-Definition Videos • 125

This results in a file named video.h264 that contains the video data encoded
using the H.264 codec. This codec is popular, but to make it work with most
video players we have to put it into a suitable container, like MP4:
$ avconv -r 25 -i video.h264 -vcodec copy video.mp4
Now video.mp4 contains an MP4 version of our video that we can play using
nearly any video player in the world.
All in all, the Pi camera produces good videos. The only thing that’s missing
is a microphone. Still, you can create many useful and fun projects with it.
In the next section, you’ll learn how to build a burglar alarm using the camera
and a motion detector.
Build a Burglar Alarm
In Detect Motion with the Pi, on page 109, you learned how to control a motion
sensor with the Pi. The controlling software only printed messages to the
console—which is fine for demonstration purposes, but in real life it’s not
very useful. In this section, you’ll learn how to build an actual burglar alarm
that takes photos automatically as soon as someone moves, and then sends
an email with the latest photo attached.
Disable the Camera’s LED
A burglar alarm should work as unobtrusively as possible, and one feature
of the Pi camera contradicts this principle. Whenever the camera takes a
photo or records a video, it turns on a bright-red LED. Usually this is good
because it shows that the camera is working and it prevents you from taking
pictures of people secretly. However, for a burglar alarm we should disable
the LED.
We could simply hide it under some duct tape, but that wouldn’t be very ele-
gant. The Raspbian team provided an option to disable the camera LED
completely. Open the file /boot/config.txt using the nano text editor, for example:
$ sudo nano /boot/config.txt
Add the following line at the end of the file:
disable_camera_led=1
Finally, reboot the Pi:
$ sudo reboot
Chapter 11. Control the Pi Camera • 126
report erratum • discuss
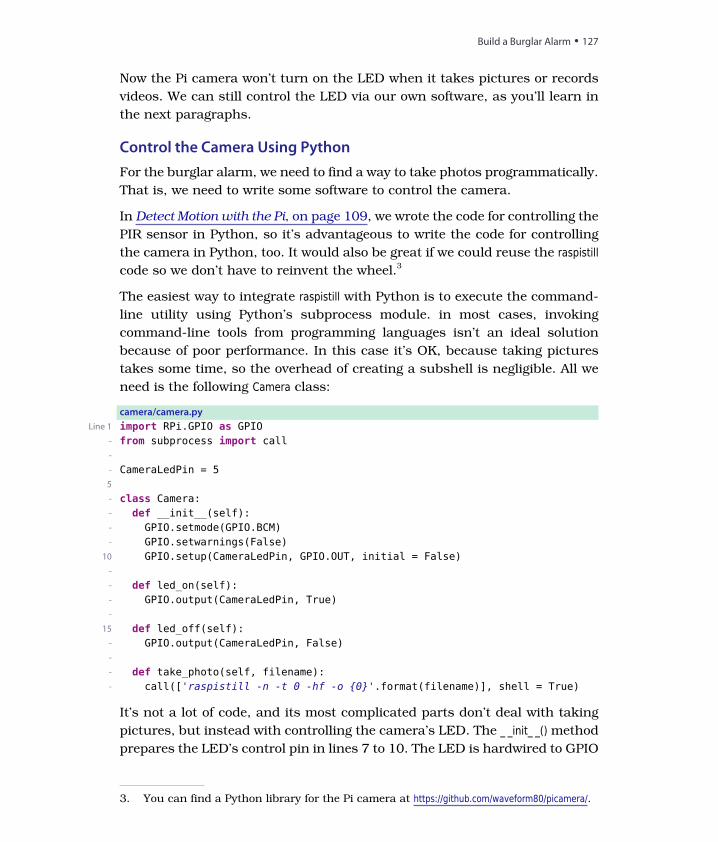
Now the Pi camera won’t turn on the LED when it takes pictures or records
videos. We can still control the LED via our own software, as you’ll learn in
the next paragraphs.
Control the Camera Using Python
For the burglar alarm, we need to find a way to take photos programmatically.
That is, we need to write some software to control the camera.
In Detect Motion with the Pi, on page 109, we wrote the code for controlling the
PIR sensor in Python, so it’s advantageous to write the code for controlling
the camera in Python, too. It would also be great if we could reuse the raspistillcode so we don’t have to reinvent the wheel.3
The easiest way to integrate raspistill with Python is to execute the command-
line utility using Python’s subprocess module. in most cases, invoking
command-line tools from programming languages isn’t an ideal solution
because of poor performance. In this case it’s OK, because taking pictures
takes some time, so the overhead of creating a subshell is negligible. All we
need is the following Camera class:
camera/camera.py
Line 1 import RPi.GPIO as GPIO- from subprocess import call-
- CameraLedPin = 55
-
def __init__(self):class Camera:
-
def led_on(self):
GPIO.setmode(GPIO.BCM)-
GPIO.setwarnings(False)-
GPIO.setup(CameraLedPin, GPIO.OUT, initial = False)10
-
-
GPIO.output(CameraLedPin, True)-
-
15 def led_off(self):GPIO.output(CameraLedPin, False)-
-
- def take_photo(self, filename):call(['raspistill -n -t 0 -hf -o 0'.format(filename)], shell = True)-
It’s not a lot of code, and its most complicated parts don’t deal with taking
pictures, but instead with controlling the camera’s LED. The _ _init_ _() method
prepares the LED’s control pin in lines 7 to 10. The LED is hardwired to GPIO
3. You can find a Python library for the Pi camera at https://github.com/waveform80/picamera/.
report erratum • discuss
Build a Burglar Alarm • 127

pin number 5, so we can easily turn it on and off using led_on() and led_off(),respectively.
Using the take_photo() method, we can take a new photo, and the method will
delegate its work to raspistill. It sets a few reasonable defaults that we can
change easily. The following program shows how to use the Camera class:
camera/camera_demo.py
from camera import *camera = Camera()camera.led_off()camera.take_photo('photo.jpg')
This small demo program includes the Camera class and creates a new instance
named camera. Then it turns off the camera’s LED and takes a new photo. It
stores the photo in a file named photo.jpg.
Now that we can control the camera from a Python program, we need a way
to send an email with a photo attachment. You’ll learn how to do that in the
next section.
Send an Email
Sending emails programmatically is no big deal using modern programming
languages, and Python is no exception. It has great support for SMTP,4 and
it supports email attachments in various forms. The following EmailNotificationclass provides all the functionality for sending emails with photo attachments:
camera/email_notification.py
import smtplibfrom email.mime.image import MIMEImagefrom email.mime.multipart import MIMEMultipart
class EmailNotification:def __init__(self, server, user, pwd):self.server = serverself.user = userself.pwd = pwdself.subject = 'INTRUDER ALERT!'self.from_addr = '[email protected]'self.to_addr = '[email protected]'
def send(self, image_file):msg = MIMEMultipart()msg['Subject'] = self.subjectmsg['From'] = self.from_addrmsg['To'] = self.to_addr
4. http://en.wikipedia.org/wiki/Simple_Mail_Transfer_Protocol
Chapter 11. Control the Pi Camera • 128
report erratum • discuss
msg.preamble = self.subjectmsg.attach(self.__read_image(image_file))self.__send_email(msg)
def __read_image(self, image_file):attachment = open(image_file, 'rb')image_data = MIMEImage(attachment.read())attachment.close()return image_data
def __send_email(self, msg):server = smtplib.SMTP(self.server)server.ehlo()server.starttls()server.login(self.user, self.pwd)server.sendmail(self.from_addr, self.to_addr, msg.as_string())server.quit()
The _ _init_ _() method initializes the name of your SMTP server, its username,
and its password. Also, it defines the default subject of your email, its origin
address, and its recipient. You’re free to change all of them.
Using the send() method, we can send an image file via email. The method
creates a new MIMEMultipart object containing all of the email’s properties,
including an image file that has been created using the Pi camera.
Finally, _ _send_email() sends an email using Python’s smptlib. Depending on
your current email provider, you might have to adjust this method. For
example, some providers insist on the call to ehlo() and others don’t.
Build the Final Product
We now have software to control the PIR sensor and the Pi camera, and we’re
able to send emails. The only thing left to do is to combine all the single parts
into a complete burglar alarm.
Using the PassiveInfraredSensor, Camera, and EmailNotification classes, it’s easy to
build a burglar alarm:
camera/burglar_alarm.py
Line 1 from pir import *- from camera import *- from email_notification import *- import time5
- PIR_PIN = 23- PREFIX = 'photos/alert'-
EMAIL_USER = '[email protected]'EMAIL_SERVER = 'smtp.gmail.com:587'
-
report erratum • discuss
Build a Burglar Alarm • 129
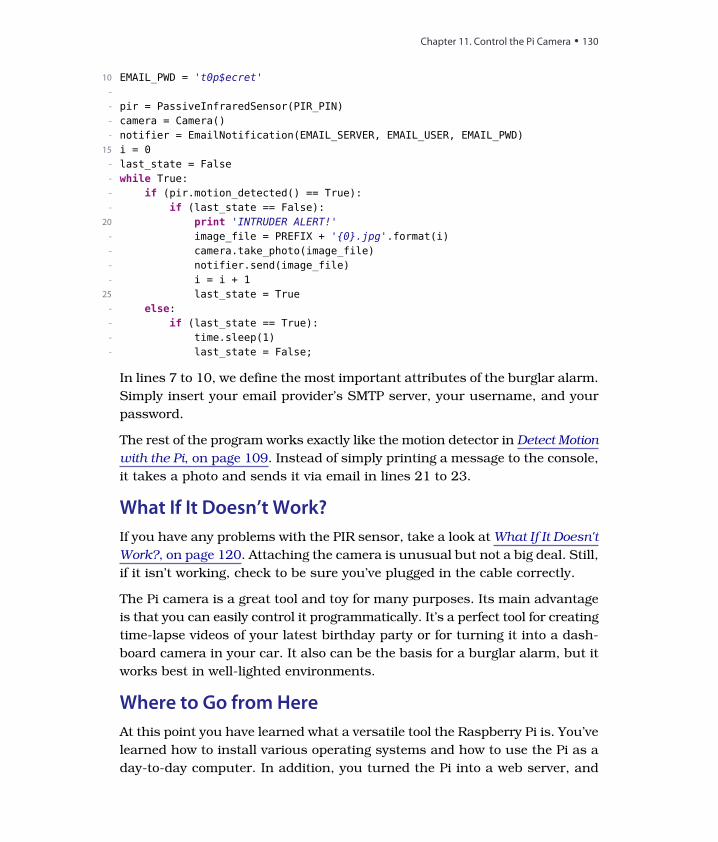
10 EMAIL_PWD = 't0p$ecret'-
- pir = PassiveInfraredSensor(PIR_PIN)- camera = Camera()- notifier = EmailNotification(EMAIL_SERVER, EMAIL_USER, EMAIL_PWD)
15 i = 0- last_state = False- while True:
if (pir.motion_detected() == True):-
if (last_state == False):-
print 'INTRUDER ALERT!'20
image_file = PREFIX + '0.jpg'.format(i)-
camera.take_photo(image_file)-
notifier.send(image_file)-
i = i + 1-
last_state = True25
else:-
if (last_state == True):-
time.sleep(1)-
last_state = False;-
In lines 7 to 10, we define the most important attributes of the burglar alarm.
Simply insert your email provider’s SMTP server, your username, and your
password.
The rest of the program works exactly like the motion detector in Detect Motion
with the Pi, on page 109. Instead of simply printing a message to the console,
it takes a photo and sends it via email in lines 21 to 23.
What If It Doesn’t Work?
If you have any problems with the PIR sensor, take a look at What If It Doesn't
Work?, on page 120. Attaching the camera is unusual but not a big deal. Still,
if it isn’t working, check to be sure you’ve plugged in the cable correctly.
The Pi camera is a great tool and toy for many purposes. Its main advantage
is that you can easily control it programmatically. It’s a perfect tool for creating
time-lapse videos of your latest birthday party or for turning it into a dash-
board camera in your car. It also can be the basis for a burglar alarm, but it
works best in well-lighted environments.
Where to Go from Here
At this point you have learned what a versatile tool the Raspberry Pi is. You’ve
learned how to install various operating systems and how to use the Pi as a
day-to-day computer. In addition, you turned the Pi into a web server, and
Chapter 11. Control the Pi Camera • 130
report erratum • discuss

then you turned it into a multimedia center. On top of that, you’ve used it as
a basis for electronics projects and attached digital and analog sensors.
The Pi is a much more open platform than most regular PCs. For example,
you can easily create your own hardware extensions using the Pi’s GPIO parts.
Along with its friendly and active community, the Pi will be one of the most
popular, useful, and fun gadgets in the years ahead. People publish useful
projects every day, and there’s no reason why you shouldn’t create something
special with the Pi, too.
report erratum • discuss
Where to Go from Here • 131
APPENDIX 1
A Linux Primer
The most popular operating system for the Pi is Linux, especially the Debian
Linux distribution (Raspbian). If you’ve worked exclusively with operating
systems such as Windows or Mac OS X until now, Linux might produce a
little culture shock for you, mainly because on Linux systems the graphical
user interface (GUI) is optional. That means you can run a Linux system
without using a mouse and without double-clicking colorful icons.
Still, you need a way to interact with the system, and on Linux you have to
use a shell for this purpose. A shell is a program that awaits your commands
via a keyboard and passes them to the operating system (Linux). After Linux
has run the command, the shell passes the results back to you.
The shell itself runs in a terminal that goes back to the very beginnings of
computing. In these times, you had to connect to the “real” computers using
a more or less dumb terminal that basically forwarded your inputs and dis-
played the computer’s outputs. Today you no longer have to use explicit
terminal devices, but the metaphor still lives on, and Linux depends on it.
So, whenever you log into a Linux computer, it usually starts a shell in a
terminal session. In the shell, you can invoke commands that actually run
on the Linux computer.
Nowadays, Linux comes with graphical desktop systems that are very similar
to Windows and Mac OS X. Still, these desktop systems ship with a terminal
emulator you can use to invoke commands directly. The LXDE desktop, for
example, comes with a desktop emulator named LXTerminal. You can find a
shortcut on the LXDE desktop, so double-click it, and the Pi will start a new
terminal session.
report erratum • discuss
A First Encounter
After you’ve logged into the Pi or after you’ve started a new terminal from the
desktop, you’ll see the following prompt awaiting your commands:
pi@raspberrypi ~ $
It doesn’t look like much, but it already gives you a lot of information. For
example, the first part (pi@raspberrypi) tells you that the host name of your
computer is raspberrypi. It also tells you that your username is pi. This is an
important piece of information, because Linux is a multiuser operating system.
This means that multiple people can work on the same computer simultane-
ously (over a network, for example). Also, you can switch to another user
account whenever you need to, so it’s good to know who you are at the
moment.
The next part of the prompt contains the file system path you’re currently in.
Here it consists only of the tilde character (~), which is an abbreviation for
the user’s home directory. Every Linux user has a home directory for storing
personal data and configuration files. It’s similar to the My Documents folder on
Windows or the Documents folder on Mac OS X. The dollar sign at the end marks
the end of the prompt.
To see the content of the current directory, type ls and press the Enter key
to run the ls command.
pi@raspberrypi ~ $ lsDesktop python_games
The current directory contains two items named Desktop and python_games. From
only their names, you cannot tell whether they are regular files or directories.
Fortunately, you can control the behavior of most Linux commands using
command options. Usually, these options consist of only a single letter pre-
ceded by a dash. The ls command supports many options, and when you pass
it the -l (short for “long”) option, it displays more information about the files
in the current directory.
pi@raspberrypi ~ $ ls -ltotal 8drwxr-xr-x 2 pi pi 4096 Jul 15 19:36 Desktopdrwxr-xr-x 2 pi pi 4096 Jul 15 19:36 python_games
At first it looks a bit scary, but it’s really easy to understand. For every item
in the directory, ls displays the information shown in the following figure.
Appendix 1. A Linux Primer • 134
report erratum • discuss

drwxr-xr-x 2 pi pi 4096 Jul 15 19:36 Desktop
File Mode Modification TimestampSize FilenameOwner
Links Group
Figure 59—The different components of ls output
The file mode contains the file type and its permissions. If the first character
is a dash, the file is a regular file. If it contains a d, it is a directory. So, both
Desktop and python_games are directories.
The following nine characters encode the file permissions of three groups of
people: the owner, the group, and others. The first three characters are rwx,and they mean that the owner of the file is allowed to read (r), write (w), and
execute (x) it. In case of a directory, execute means to enter the directory.
Every file on a Linux system belongs to a user and to a group. Groups help
to build teams who work together on the same resources. So, for every file,
Linux stores permissions for the group, too. In the current case, they are r-x,which means that group members can read and execute the file but aren’t
allowed to change it.
Finally, Linux stores permissions for other users who are not a file’s owner
and who don’t belong to the file’s group. Again, r-x means that other users
might read and execute the file but aren’t allowed to change it.
The next information ls outputs is the number of links to a file. For your first
tour through Linux, you can safely ignore it.
Then you can find the name of the file’s owner and its group. In this case,
both are pi; that is, on the current Linux system, there’s both a user named
pi and a group named pi.
Next you can find the file size. On Linux, directories are files too, and they
simply contain the names of the files stored in the directory. By default, Linux
allocates some space for this list of files up front, and in case of Debian on
the Raspberry Pi, it’s 4,096 bytes.
report erratum • discuss
A First Encounter • 135
To the right of the file size, you can see the date the file was modified for the
last time. And, finally, ls outputs the file’s name.
Navigate Through the File System
The pwd (print working directory) command outputs the directory you’re cur-
rently in.
pi@raspberrypi ~ $ pwd/home/pi
As you can see, your home directory (~) expands to the absolute path /home/pi.Linux distinguishes between absolute and relative paths. Absolute paths
always begin with a forward slash (/) and reference the same file no matter
where you are in the file system. Relative paths, on the contrary, are relative
to your current position in the file system. The following example will clarify
the difference between absolute and relative paths.
As you saw in the preceding section, the pi user’s home directory contains
two directories named Desktop and python_games.
pi@raspberrypi ~ $ lsDesktop python_games
Using the cd (change directory) command, you can change the current direc-
tory to another one.
pi@raspberrypi ~ $ cd Desktop/pi@raspberrypi ~/Desktop $
Now your current working directory has changed. You can see that your
prompt has changed, and you can also check it using the pwd command.
pi@raspberrypi ~/Desktop $ pwd/home/pi/Desktop
To go back to the pi user’s home directory, you have a couple of options. First,
you can invoke cd with the absolute path to the home directory.
pi@raspberrypi ~/Desktop $ cd /home/pipi@raspberrypi ~ $
Alternatively, you can use a relative path like this:
pi@raspberrypi ~/Desktop $ cd ..pi@raspberrypi ~ $ pwd/home/pi
The abbreviation .. stands for the parent directory of the current directory. In
the previous command, your current working directory is /home/pi/Desktop. When
Appendix 1. A Linux Primer • 136
report erratum • discuss
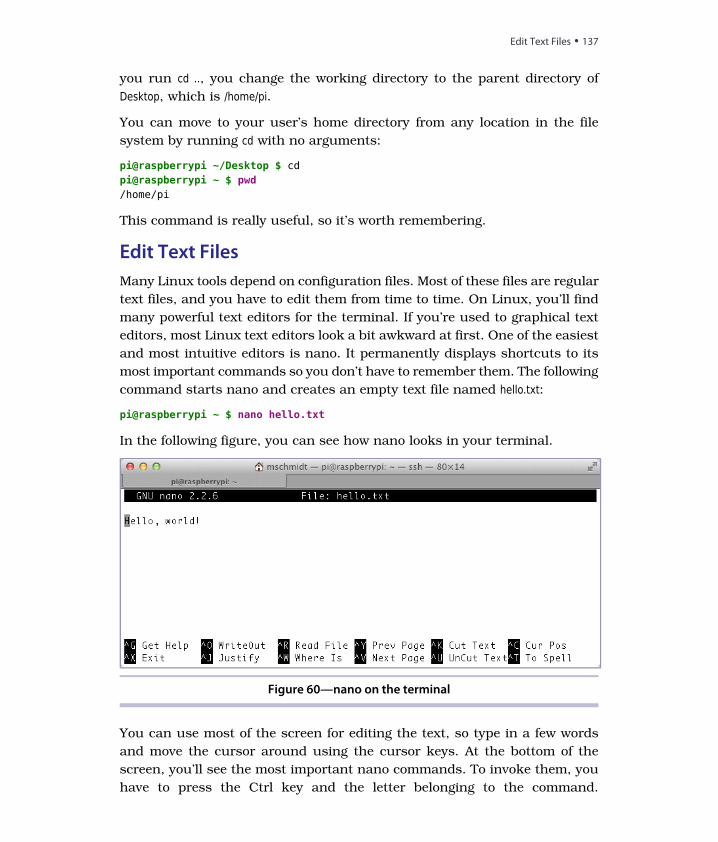
you run cd .., you change the working directory to the parent directory of
Desktop, which is /home/pi.
You can move to your user’s home directory from any location in the file
system by running cd with no arguments:
pi@raspberrypi ~/Desktop $ cdpi@raspberrypi ~ $ pwd/home/pi
This command is really useful, so it’s worth remembering.
Edit Text Files
Many Linux tools depend on configuration files. Most of these files are regular
text files, and you have to edit them from time to time. On Linux, you’ll find
many powerful text editors for the terminal. If you’re used to graphical text
editors, most Linux text editors look a bit awkward at first. One of the easiest
and most intuitive editors is nano. It permanently displays shortcuts to its
most important commands so you don’t have to remember them. The following
command starts nano and creates an empty text file named hello.txt:
pi@raspberrypi ~ $ nano hello.txt
In the following figure, you can see how nano looks in your terminal.
Figure 60—nano on the terminal
You can use most of the screen for editing the text, so type in a few words
and move the cursor around using the cursor keys. At the bottom of the
screen, you’ll see the most important nano commands. To invoke them, you
have to press the Ctrl key and the letter belonging to the command.
report erratum • discuss
Edit Text Files • 137
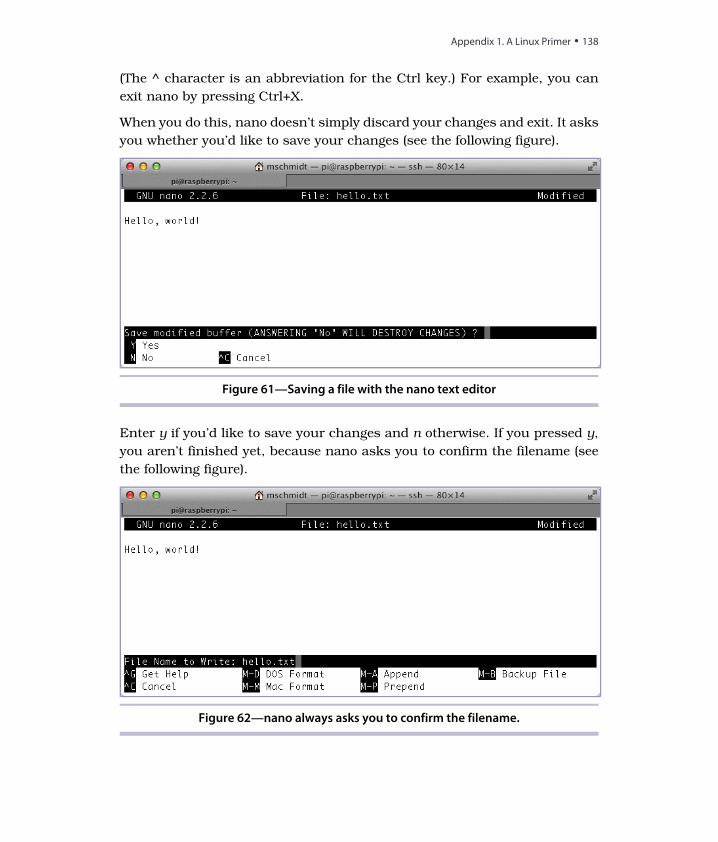
(The ^ character is an abbreviation for the Ctrl key.) For example, you can
exit nano by pressing Ctrl+X.
When you do this, nano doesn’t simply discard your changes and exit. It asks
you whether you’d like to save your changes (see the following figure).
Figure 61—Saving a file with the nano text editor
Enter y if you’d like to save your changes and n otherwise. If you pressed y,
you aren’t finished yet, because nano asks you to confirm the filename (see
the following figure).
Figure 62—nano always asks you to confirm the filename.
Appendix 1. A Linux Primer • 138
report erratum • discuss
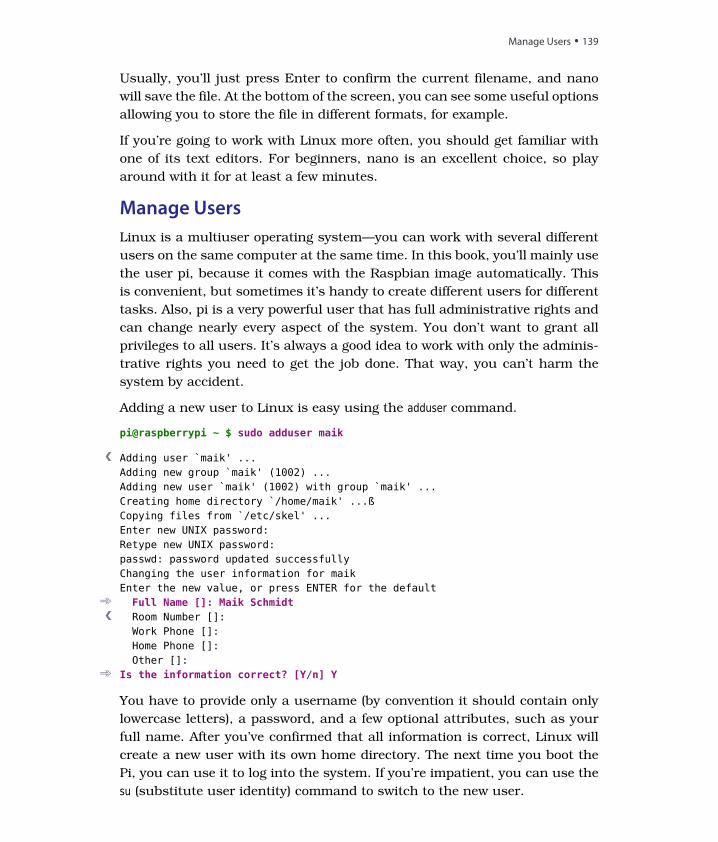
Usually, you’ll just press Enter to confirm the current filename, and nano
will save the file. At the bottom of the screen, you can see some useful options
allowing you to store the file in different formats, for example.
If you’re going to work with Linux more often, you should get familiar with
one of its text editors. For beginners, nano is an excellent choice, so play
around with it for at least a few minutes.
Manage Users
Linux is a multiuser operating system—you can work with several different
users on the same computer at the same time. In this book, you’ll mainly use
the user pi, because it comes with the Raspbian image automatically. This
is convenient, but sometimes it’s handy to create different users for different
tasks. Also, pi is a very powerful user that has full administrative rights and
can change nearly every aspect of the system. You don’t want to grant all
privileges to all users. It’s always a good idea to work with only the adminis-
trative rights you need to get the job done. That way, you can’t harm the
system by accident.
Adding a new user to Linux is easy using the adduser command.
pi@raspberrypi ~ $ sudo adduser maik
❮ Adding user `maik' ...Adding new group `maik' (1002) ...Adding new user `maik' (1002) with group `maik' ...Creating home directory `/home/maik' ...ßCopying files from `/etc/skel' ...Enter new UNIX password:Retype new UNIX password:passwd: password updated successfullyChanging the user information for maikEnter the new value, or press ENTER for the default
Full Name []: Maik Schmidt
❮
Is the information correct? [Y/n] Y
Room Number []:Work Phone []:Home Phone []:Other []:
You have to provide only a username (by convention it should contain only
lowercase letters), a password, and a few optional attributes, such as your
full name. After you’ve confirmed that all information is correct, Linux will
create a new user with its own home directory. The next time you boot the
Pi, you can use it to log into the system. If you’re impatient, you can use the
su (substitute user identity) command to switch to the new user.
report erratum • discuss
Manage Users • 139
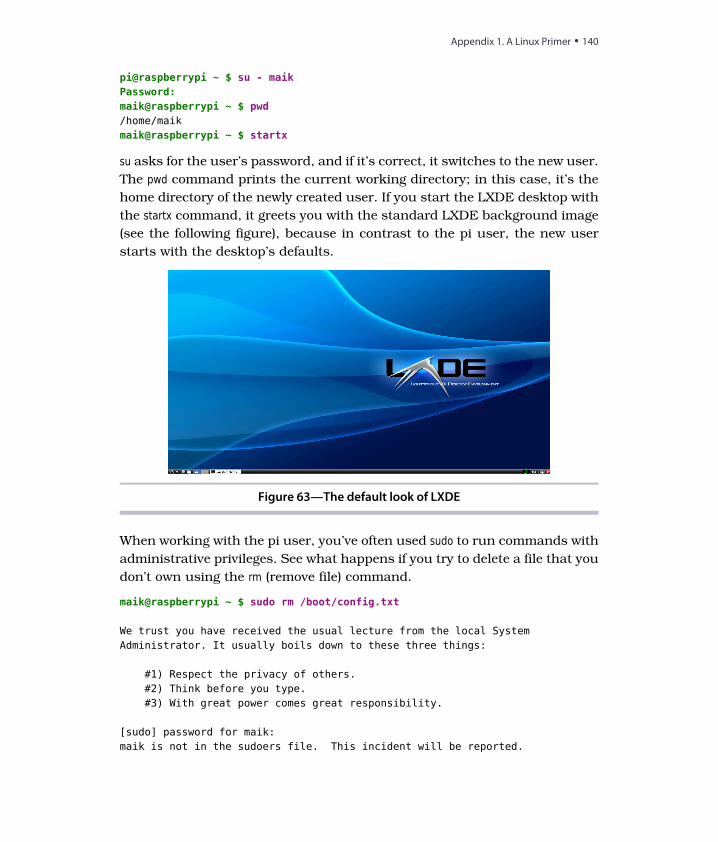
pi@raspberrypi ~ $ su - maikPassword:maik@raspberrypi ~ $ pwd/home/maikmaik@raspberrypi ~ $ startx
su asks for the user’s password, and if it’s correct, it switches to the new user.
The pwd command prints the current working directory; in this case, it’s the
home directory of the newly created user. If you start the LXDE desktop with
the startx command, it greets you with the standard LXDE background image
(see the following figure), because in contrast to the pi user, the new user
starts with the desktop’s defaults.
Figure 63—The default look of LXDE
When working with the pi user, you’ve often used sudo to run commands with
administrative privileges. See what happens if you try to delete a file that you
don’t own using the rm (remove file) command.
maik@raspberrypi ~ $ sudo rm /boot/config.txt
We trust you have received the usual lecture from the local SystemAdministrator. It usually boils down to these three things:
#1) Respect the privacy of others.#2) Think before you type.#3) With great power comes great responsibility.
[sudo] password for maik:maik is not in the sudoers file. This incident will be reported.
Appendix 1. A Linux Primer • 140
report erratum • discuss
The command prints a warning and then asks for your password. Obviously,
the new user isn’t allowed to delete files in the /boot directory, so Linux refuses
to invoke the rm command.
While it’s a good default behavior to deny new users access to dangerous
operations, sometimes users need more privileges. If you want to give your
new users the same rights as the pi user, you have to add the user to the
sudoers file. This file contains a list of all users who are allowed to run the sudocommand, and it specifies which operations the users are allowed to perform.
You can’t edit the sudoers file directly; you have to use the visudo command,
which invokes the text editor vi by default. If you want to edit the file using
a different text editor, such as nano, you have to specify it on the command
line. (Make sure you’re using the pi user again.)
pi@raspberrypi ~ $ sudo EDITOR=nano visudo
This opens the /etc/sudoers file using the nano text editor. In the file, you’ll find
a section that looks like this:
# User privilege specificationroot ALL=(ALL) ALLsuse ALL=(ALL) ALLpi ALL=(ALL) ALL
Add a new line that looks exactly like one of the previous three lines, but
replace the username with the name of your new user. If you’re using nano
to edit the file, press Ctrl+X and confirm that you’d like to save the changes.
Then confirm the filename, and you’re finished—your new user now has the
same rights as the original pi user.
If you no longer need a certain user, it’s reasonable to delete it.
pi@raspberrypi ~ $ sudo userdel maik
The previous command will delete the user’s account but not the user’s files.
The user can no longer log into the system, but all the files he or she has
created in the home directory are still available. If you want to delete the files
as well, run the following:
pi@raspberrypi ~ $ sudo userdel -r maik
If you ever need to change a user’s attributes, such as his or her home
directory, you can use the usermod command. You can use it to lock or unlock
accounts, for example.
pi@raspberrypi ~ $ sudo usermod -L maik
report erratum • discuss
Manage Users • 141

This will lock the account of the user named maik. The user can no longer
log into the system. To unlock the account, run the following command:
pi@raspberrypi ~ $ sudo usermod -U maik
You can read usermod’s manual page (and the manual page of every other
Linux command) using the man command.
pi@raspberrypi ~ $ man usermod
This displays the command’s manual pages. You can stop the man command
by pressing Q.
One important action is changing a user’s password. For this, you can use
the passwd command.
pi@raspberrypi ~ $ passwd maikChanging password for maik.Old Password:New Password:Retype New Password:
passwd asks for the current password and then for the new password. If
everything is OK, it prints no message, and your user has a new password.
Manage Processes
Whenever you run a command or an application on a Linux system, the
operating system’s kernel spawns a new process. You can list your current
processes using the ps command.
pi@raspberrypi ~ $ psPID TTY TIME CMD
1880 pts/2 00:00:00 bash1892 pts/2 00:00:00 ps
At the moment, you own only two processes. The first has the process ID
(PID) 1880, and it belongs to a command named bash. (The process IDs on
your system will vary.) This is the process that belongs to the shell in which
you’re currently working. The process with the PID 1892 belongs to the pscommand you’ve used to list your current processes. At the moment, you see
the output of the ps command; process 1892 will be gone already. To see the
effect, run ps again.
pi@raspberrypi ~ $ psPID TTY TIME CMD
1880 pts/2 00:00:00 bash1894 pts/2 00:00:00 ps
Appendix 1. A Linux Primer • 142
report erratum • discuss
As you can see, the shell still has the PID 1880, but your latest call to ps was
handled by a new process with PID 1894.
You can get more information about your processes using the -f option.
pi@raspberrypi ~ $ ps -fUID PID PPID C STIME TTY TIME CMDpi 1880 1879 0 12:51 pts/2 00:00:00 -bashpi 1895 1880 0 12:58 pts/2 00:00:00 ps -f
Now you can see the user ID (UID) of the user who has spawned a certain
process. Not surprisingly, the UID is pi for all of your processes. In addition
to the PID, you can see the parent process ID (PPID). This is the ID of the
process that has created another process. For example, the ps -f command
you’ve run before has the PPID 1880. This is the PID of the shell you’re using.
So, the shell is the parent of the process created by the ps -f command.
To see all information about all processes currently running on your Pi, run
the following command:
pi@raspberrypi ~ $ ps -ef
This will output a fairly long list of processes that contains every single Linux
service your Pi has started.
Getting a list of all active processes is useful, but most often you’ll be looking
for a certain process for a reason. Perhaps the process uses too many
resources or takes too long, and you’d like to terminate it. But how can you
terminate a process?
Terminating a long-running process is easy when you start it directly from
the shell. To demonstrate, the following command searches for all text files
on your SD card, so it will take a long time to finish:
pi@raspberrypi ~ $ find / -name '*.txt'
While the process is running, you can terminate it by pressing Ctrl+C on your
keyboard. When you press Ctrl+C, the shell recognizes your keypress and
sends a signal to the process that is currently running. Signals are small
messages that all processes listen for in the background. Pressing Ctrl+C
generates a signal named SIGINT that tells a process it got interrupted. When
a process receives a SIGINT signal, it usually cleans up and terminates.
For processes that are still running in your terminal, pressing Ctrl+C is a
good option, but what if you need to terminate a process that is running in
the background? For example, most Linux services run in the background
report erratum • discuss
Manage Processes • 143
by default, and you don’t start them yourself. In this case, you have to find
out the PID of the process and pass it to the kill command.
pi@raspberrypi ~ $ kill 4711
The previous command sends the SIGTERM command to the process with the ID
4711. You can send other signals with the kill command, too. For example, the
following command will terminate the process with the PID 4711 in any case:
pi@raspberrypi ~ $ kill -KILL 4711
Of course, you need to have the permission to terminate a process. Usually
you are allowed to kill only your own processes.
Shut Down and Reboot the Pi
When you’re finished with your work, don’t simply switch off the Pi. It might
result in the loss of data. Always shut it down using the following command:
pi@raspberrypi ~ $ sudo halt
If you need to reboot the Pi, use the following command:
pi@raspberrypi ~ $ sudo reboot
Get Help
Since their beginnings, the Unix/Linux operating systems came with a great
manual system named man pages. Whenever you need to look up the options
of a certain command, you can display its manual using the man command.
To look up all options of the ls command, for example, run the following
command:
pi@raspberrypi ~ $ man ls
To scroll down a line, press the down cursor key. Press the up cursor key to
scroll up a line. To scroll down a page, press the spacebar. Press Ctrl+B to
scroll up a page. To leave the program, press Q.
The man command has many more options. To learn more about it, run the
following:
pi@raspberrypi ~ $ man man
Appendix 1. A Linux Primer • 144
report erratum • discuss
Index
SYMBOLS# character, configuration file
comments, 44
$ sign in prompt, 134
' character, Stella game emu-lator debugger, 91
.. abbreviation for parent direc-tory, 136
/ character and absolutepaths, 136
^ character in nano naviga-tion, 137
~ character in prompt, 134
DIGITS100/10M status LED, 4
8-bit games emulator, 3, 85, 89–91
A-a option, kiosk mode, 50
A-VCS-tec Challenge, 90
A/D converters, see analog-to-digital converters
absolute paths, 136
accelerating, see overclocking
accuracy, game emulators, 89
ACT status LED, 4
Adafruit, xiii, 8, 94, 120
Adafruit Prototyping Pi Plate,120
add-ons, XBMC, 78, 82
adduser command, 65, 139
AGND pin, MCP3008, 114
alarmsburglar alarm project,
121, 126–130memory alarm project,
93–105
amixer tool, 46
analog sensors, temperaturesensor project, 107, 113–120
analog-to-digital converters,107, 113–120
analog_read() method, tempera-ture sensor project, 118, 120
Android, multimedia centerremote control, 82
anode, 97
Apache HTTP server, 64
apt-file, 37
apt-get, managing softwarewith, 33–38
Arch Linux ARM, 12, 38
Arduino, 98, 113
ARM1176JZF-S processor, 2, 11
Atari VCS 2600 emulator, 3, 85, 89–91
attachments, email, 128
attributes, adding new users,139
audioconfiguring and testing,
45connecting display, 8connector, 3, 8game emulators, 90XBMC, 79
audio jack, 3, 8
authorized keys, 59
autoclean command, 36
autoremove command, 36
avconv, 125
-awd option, camera, 124
AWXi web interface, 82–83
Bbackquote key, Stella game
emulator debugger, 91
backup battery, lack of, 5
base port, VNC, 61
Basic Input Output System,see BIOS
battery, lack of backup, 5
BCM2835 SoC, 2
Beneath a Steel Sky, 88
BIOS, lack of, 5, 12
blacklist, removing SPI from,115
Bluetooth, 5
BMP format, 124
BOARD mode, GPIO pins, 112
Bodhi Linux, 12
/boot directory, firmware andkernel, 41
/boot/config.txtconfiguring video, 43–45disabling camera LED,
126NOOBS, 15
bootingconfiguring, 26desktop, 26, 31–32disabling overclocking
while, 29initial, 23

lack of BIOS, 5from NOOBS, 16rebooting, 144from SD cards, 5, 17–22
breadboardsabout, 96extension boards, 120memory alarm project,
93, 96motion detector project,
107temperature sensor
project, 107, 116–117troubleshooting, 105, 120
Broadcom, 2, 111
burglar alarm project, 121, 126–130
bus argument, temperaturesensor project, 118
Ccamera
burglar alarm project,121, 126–130
controlling, 121–126CSI connector, 4, 122disabling camera LED,
126–127drivers, 122enabling, 29, 123high-definition, 121, 125still photos, 123time-lapse videos, 124
Camera class, 127, 129
cancelingmenus in Raspi-config,
24processes, 143
carat character in nano navi-gation, 137
card readers, preparingbootable SD cards, 17–22
cartridges, game, 89
cases, 8
cathode, 97
cd command, 136
cell-phone chargers, powersupply from, 6
Centipede, 89
checking downloads, 14, 18–20
checksum, 14, 18–20
chip orientation, 116
chmod command, Lighttpd, 65
chown command, Lighttpd, 65
Chromium, 12, 51–54, 131,see also web browsers
circuitsbuilding basic, 96memory alarm project,
100–101PIR sensor, 110TMP36 temperature sen-
sor, 116–117
cleanup() function, memoryalarm project, 102
client argument, temperaturesensor project, 118
clients, VNC, 61–64
CLK pin, MCP3008, 114
clock, real-time, 5, 28
codeGPU source code, 2graphic drivers source
code, 2used in this book, xiv
codecscamera, 126licenses, 81
Coder, 13
comments, configuration file,44
Commodore 64 emulator, 88, 91
composite videoabout, 3connectors, 3output modes and
NOOBS, 15XBMC, 79
configuringaudio, 45configuration file com-
ments, 44Debian Linux, 23–32defaults, 44desktop, 32editing Linux text files,
137firmware, 41–46overscan/underscan, 29,
43parameters format, 44Samba, 82SPI, 115SSH, 56static IP addresses, 73video, 43–45Wi-Fi, 67–74
connectorsabout, 3–5
camera, 4, 122display, 3–4, 8illustration, 8networking, 3, 8
constantsmemory alarm project,
102motion detector project,
112temperature sensor
project, 119
copyright, games, 89
CPUabout, 2Midori use, 55RAM distribution, 30
CS pin, MCP3008, 114
CSI connector, 4, 122
Ctrl key in nano navigation,137
current directory, 136
cursor keysgames navigation, 90locale configuration, 27man pages navigation,
144nano navigation, 137Raspi-config navigation,
23XBMC navigation, 78
Ddata sheets
MCP3008 analog-to-digi-tal converter, 119
TMP36 temperature sen-sor, 120
data-widget-id= attribute, 50
datefile, 136setting, 28–29
date command, 29
Day of the Tentacle, 85, 87
Debian Linux, see also Linuxadvantages, xii, 11versions, xiv, 41
debuggingJTAG headers, 4Stella game emulator, 90
delay, camera, 124
deleting/boot/config.txt, 44files, 36, 140–141operating systems with
NOOBS, 16
Index • 146

packages, 36software, 35users, 141
desktopArch Linux ARM, 12booting, 26, 31–32configuring, 32Debian Linux, 13defaults for new users,
140exiting, 32games, 91German language ver-
sion, 27navigating, 32sharing, 60–64terminal access, 133
df -h command, 19
DGND pin, MCP3008, 114
DHCP, 72
Digi-Key, 94
digital sensorsburglar alarm project,
121, 126–130motion detector project,
107–113
DIN pin, MCP3008, 114
directorieschanging, 136current working, 136file type and permissions,
135home, 134, 136, 139listing contents, 134parent, 136size, 135XBMC, 80
disk drives, listing, 20
displayschoosing, 8connectors, 3–4output modes and
NOOBS, 15overscan/underscan, 29,
43
dmesg command, Wi-Fi config-uration, 70
document root, Lighttpd, 65
dollar sign in prompt, 134
DOUT pin, MCP3008, 114
down mode, GPIO pins, 98
driverscamera, 122graphic drivers source
code, 2
DSI connector, 4
DVI displays, 3
dynamic content, webservers, 67–68
Dynamic Host ConfigurationProtocol (DHCP), 72
E-e option
camera, 124kiosk mode, 50
editingLinux text files, 137NOOBS config file, 15
-ef option, listing processes,143
effects, camera, 124
ehlo() method, email, 129
electronicsmemory alarm project,
93–105troubleshooting, 105, 120
email, burglar alarm project,126, 128–130
EmailNotification class, 128–129
emulators, game, 3, 85, 88–91
errors, see also troubleshoot-ing
Midori user agent, 55preparing bootable SD
cards, 22resized SD file system, 25
/etc/rc.local file, audio configura-tion, 46
Ethernet (LAN)configuring static IP ad-
dresses, 74connectors, 3, 8status LEDs, 4XBMC, 78
Evince, 34
-ex option, camera, 124
execute file permissions, 135
exiting, LXDE desktop, 32
Expand Filesystem menu,Raspi-config, 25
expansion headerabout, 3connecting electronic
projects, 95
extension boards, 120
external storage devicesinability to boot from, 5listing, 19
F-f option, listing processes,
143
Farnell, xiii
FastCGI, 67
FAT file system, 14
fciv command, checksumwith, 18
FDX status LED, 4
Fedora, 38
FFmpeg, 125
file mode, 135
file permissions, 135
filenameconfirming filename in
nano, 138ls command, 136
filesadding to XBMC, 80–82confirming filename in
nano, 138deleting, 36, 140–141editing Linux text files,
137file mode, 135file system errors, 25formats, 139ls command, 136navigating file system,
136permissions, 135size, 135type, 135
firmwarecamera, 123configuring, 41–46Wi-Fi, 71
Flash, 53, 55
Flight of the Amazon Queen,88
flipping photos, 124
floating-point unit, 12
font size, Twitter widget, 50
formatsfile, 139music and video, 81photos, 124
formatting SD cards, 14
forums, xiv
Index • 147
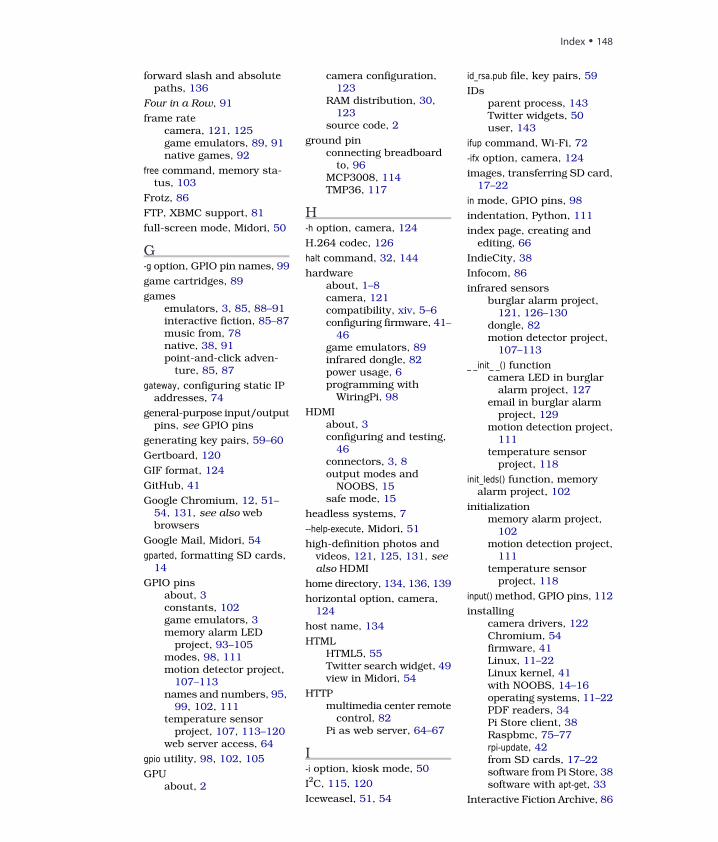
forward slash and absolutepaths, 136
Four in a Row, 91
frame ratecamera, 121, 125game emulators, 89, 91native games, 92
free command, memory sta-tus, 103
Frotz, 86
FTP, XBMC support, 81
full-screen mode, Midori, 50
G-g option, GPIO pin names, 99
game cartridges, 89
gamesemulators, 3, 85, 88–91interactive fiction, 85–87music from, 78native, 38, 91point-and-click adven-
ture, 85, 87
gateway, configuring static IPaddresses, 74
general-purpose input/outputpins, see GPIO pins
generating key pairs, 59–60
Gertboard, 120
GIF format, 124
GitHub, 41
Google Chromium, 12, 51–54, 131, see also webbrowsers
Google Mail, Midori, 54
gparted, formatting SD cards,14
GPIO pinsabout, 3constants, 102game emulators, 3memory alarm LED
project, 93–105modes, 98, 111motion detector project,
107–113names and numbers, 95,
99, 102, 111temperature sensor
project, 107, 113–120web server access, 64
gpio utility, 98, 102, 105
GPUabout, 2
camera configuration,123
RAM distribution, 30, 123
source code, 2
ground pinconnecting breadboard
to, 96MCP3008, 114TMP36, 117
H-h option, camera, 124
H.264 codec, 126
halt command, 32, 144
hardwareabout, 1–8camera, 121compatibility, xiv, 5–6configuring firmware, 41–
46game emulators, 89infrared dongle, 82power usage, 6programming with
WiringPi, 98
HDMIabout, 3configuring and testing,
46connectors, 3, 8output modes and
NOOBS, 15safe mode, 15
headless systems, 7
--help-execute, Midori, 51
high-definition photos andvideos, 121, 125, 131, see
also HDMI
home directory, 134, 136, 139
horizontal option, camera,124
host name, 134
HTMLHTML5, 55Twitter search widget, 49view in Midori, 54
HTTPmultimedia center remote
control, 82Pi as web server, 64–67
I-i option, kiosk mode, 50
I2C, 115, 120
Iceweasel, 51, 54
id_rsa.pub file, key pairs, 59
IDsparent process, 143Twitter widgets, 50user, 143
ifup command, Wi-Fi, 72
-ifx option, camera, 124
images, transferring SD card,17–22
in mode, GPIO pins, 98
indentation, Python, 111
index page, creating andediting, 66
IndieCity, 38
Infocom, 86
infrared sensorsburglar alarm project,
121, 126–130dongle, 82motion detector project,
107–113
_ _init_ _() functioncamera LED in burglar
alarm project, 127email in burglar alarm
project, 129motion detection project,
111temperature sensor
project, 118
init_leds() function, memoryalarm project, 102
initializationmemory alarm project,
102motion detection project,
111temperature sensor
project, 118
input() method, GPIO pins, 112
installingcamera drivers, 122Chromium, 54firmware, 41Linux, 11–22Linux kernel, 41with NOOBS, 14–16operating systems, 11–22PDF readers, 34Pi Store client, 38Raspbmc, 75–77rpi-update, 42from SD cards, 17–22software from Pi Store, 38software with apt-get, 33
Interactive Fiction Archive, 86
Index • 148

interactive fiction games, 85–87
Internationalisation Optionsmenu, 26, 28
IP addressDHCP, 72multimedia center
project, 78, 81–82static, 73, 78viewing, 56VNC, 61
iPad/iPhone, multimediacenter remote control, 82
Iridium Rising, 38, 92
iwconfig command, Wi-Fi con-figuration, 71
JJava applets, 53, 55
JavaScriptdisabling in Midori, 54Twitter search widget, 49
joysticks, 90
JPEG format, 124
JTAG headers, 4
jumper, PIR sensor, 109
jumper wiresmemory alarm project,
93, 97motion detector project,
107, 110temperature sensor
project, 107
Kkernel
updating, 41–43Wi-Fi configuration, 71
key pairs, public-private, 57
keyboardsconfiguring, 26connecting, 7games navigation, 90locale configuration, 27man pages navigation,
144nano navigation, 137password selection, 25Raspi-config navigation,
23remapping, 26, 91Wi-Fi configuration, 71XBMC navigation, 78
kill command, 143
kiosk mode, 50
kiosk project, 47–51
L-L option, user files, 141
-l option, Linux, 134
lag, XBMC menu, 79
LAN, status LEDs, 4, see al-
so Ethernet (LAN)
languages, specifying, 27
last_state variable, motion detec-tor project, 112
led_is_on(), memory alarmproject, 105
led_off() method, burglar alarmproject, 127
led_on() method, burglar alarmproject, 127
LEDsabout, 97circuit, 96, 100–101connecting, 97disabling camera LED,
126–127memory alarm project,
93–105status, 4
Lego case, 8
licensescodecs, 81game copyrights, 89
lighting effects, camera, 124
Lighttpd, 64–67
LINK/LNK status LED, 4
links, file, 135
Linuxcommand options, 134configuring, 23–32desktop, 13editing text files, 137hardware compatibility,
5image, 17installing, 11–22kernel, 41–43, 71managing processes,
142–144managing users, 139–142manuals, 142, 144navigating file system,
136operating system down-
loads, 12preparing bootable SD
cards, 17–18
primer, xii, 133–144prompt, 134special-purpose distribu-
tions, 13SSH, 57wireless keyboards and
mice, 7
listingdirectory contents, 134disk drives, 20Midori options, 51package contents, 38processes, 142storage devices, 19
locale, configuring, 26, 28
locking/unlocking accounts,141
login, 25, 57
ls command, Linux, 134
lsusb command, Wi-Fi configu-ration, 69
LucasArts, 87
LXDE desktopdefaults for new users,
140exiting, 32games, 91German language ver-
sion, 27navigating, 32terminal, 133
LXTerminal, 133
MMac OS X
preparing bootable SDcards, 17, 20–22
SSH, 57VNC, 62–64
MacBooks/MacBook Pros,preparing bootable SDcards, 22
Maker Shed, xiii
MAME, 91
man commandabout, 142, 144avconv, 125FFmpeg, 125
Maniac Mansion, 87
manualsabout, 144avconv, 125FFmpeg, 125usermod, 142
Index • 149
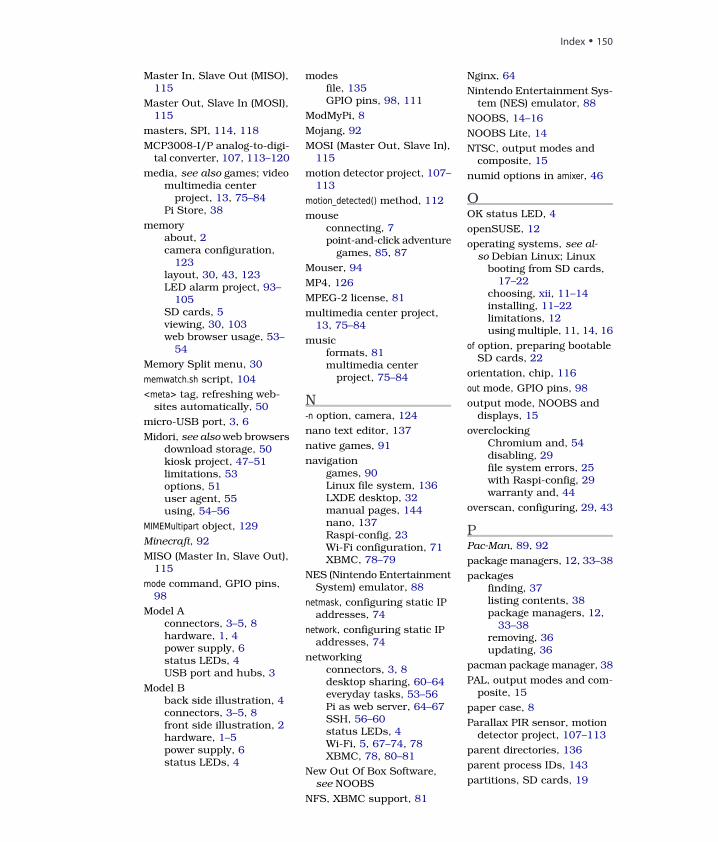
Master In, Slave Out (MISO),115
Master Out, Slave In (MOSI),115
masters, SPI, 114, 118
MCP3008-I/P analog-to-digi-tal converter, 107, 113–120
media, see also games; videomultimedia center
project, 13, 75–84Pi Store, 38
memoryabout, 2camera configuration,
123layout, 30, 43, 123LED alarm project, 93–
105SD cards, 5viewing, 30, 103web browser usage, 53–
54
Memory Split menu, 30
memwatch.sh script, 104
<meta> tag, refreshing web-sites automatically, 50
micro-USB port, 3, 6
Midori, see also web browsersdownload storage, 50kiosk project, 47–51limitations, 53options, 51user agent, 55using, 54–56
MIMEMultipart object, 129
Minecraft, 92
MISO (Master In, Slave Out),115
mode command, GPIO pins,98
Model Aconnectors, 3–5, 8hardware, 1, 4power supply, 6status LEDs, 4USB port and hubs, 3
Model Bback side illustration, 4connectors, 3–5, 8front side illustration, 2hardware, 1–5power supply, 6status LEDs, 4
modesfile, 135GPIO pins, 98, 111
ModMyPi, 8
Mojang, 92
MOSI (Master Out, Slave In),115
motion detector project, 107–113
motion_detected() method, 112
mouseconnecting, 7point-and-click adventure
games, 85, 87
Mouser, 94
MP4, 126
MPEG-2 license, 81
multimedia center project,13, 75–84
musicformats, 81multimedia center
project, 75–84
N-n option, camera, 124
nano text editor, 137
native games, 91
navigationgames, 90Linux file system, 136LXDE desktop, 32manual pages, 144nano, 137Raspi-config, 23Wi-Fi configuration, 71XBMC, 78–79
NES (Nintendo EntertainmentSystem) emulator, 88
netmask, configuring static IPaddresses, 74
network, configuring static IPaddresses, 74
networkingconnectors, 3, 8desktop sharing, 60–64everyday tasks, 53–56Pi as web server, 64–67SSH, 56–60status LEDs, 4Wi-Fi, 5, 67–74, 78XBMC, 78, 80–81
New Out Of Box Software,see NOOBS
NFS, XBMC support, 81
Nginx, 64
Nintendo Entertainment Sys-tem (NES) emulator, 88
NOOBS, 14–16
NOOBS Lite, 14
NTSC, output modes andcomposite, 15
numid options in amixer, 46
OOK status LED, 4
openSUSE, 12
operating systems, see al-
so Debian Linux; Linuxbooting from SD cards,
17–22choosing, xii, 11–14installing, 11–22limitations, 12using multiple, 11, 14, 16
of option, preparing bootableSD cards, 22
orientation, chip, 116
out mode, GPIO pins, 98
output mode, NOOBS anddisplays, 15
overclockingChromium and, 54disabling, 29file system errors, 25with Raspi-config, 29warranty and, 44
overscan, configuring, 29, 43
PPac-Man, 89, 92
package managers, 12, 33–38
packagesfinding, 37listing contents, 38package managers, 12,
33–38removing, 36updating, 36
pacman package manager, 38
PAL, output modes and com-posite, 15
paper case, 8
Parallax PIR sensor, motiondetector project, 107–113
parent directories, 136
parent process IDs, 143
partitions, SD cards, 19
Index • 150
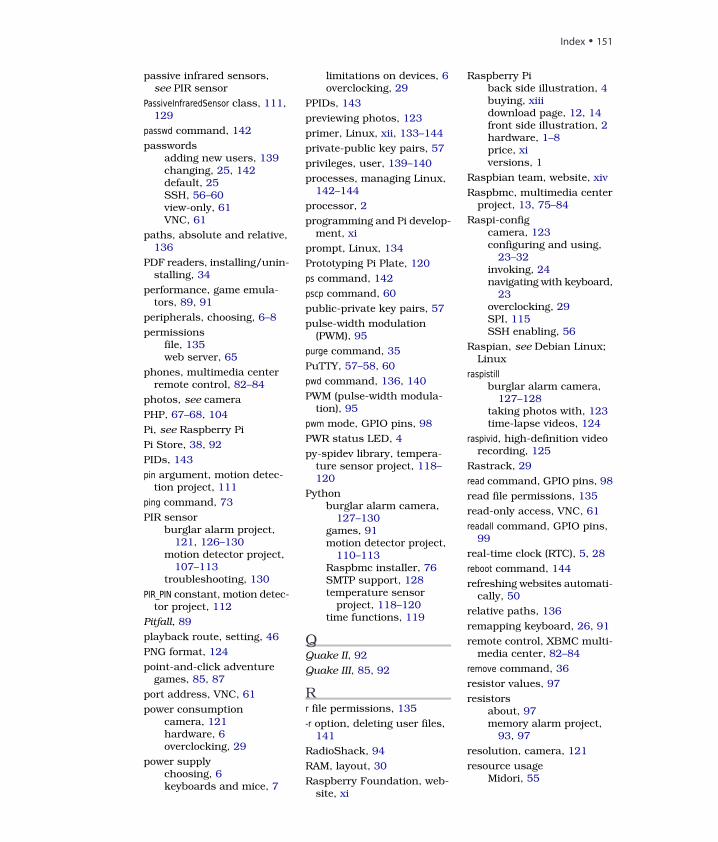
passive infrared sensors,see PIR sensor
PassiveInfraredSensor class, 111, 129
passwd command, 142
passwordsadding new users, 139changing, 25, 142default, 25SSH, 56–60view-only, 61VNC, 61
paths, absolute and relative,136
PDF readers, installing/unin-stalling, 34
performance, game emula-tors, 89, 91
peripherals, choosing, 6–8
permissionsfile, 135web server, 65
phones, multimedia centerremote control, 82–84
photos, see camera
PHP, 67–68, 104
Pi, see Raspberry Pi
Pi Store, 38, 92
PIDs, 143
pin argument, motion detec-tion project, 111
ping command, 73
PIR sensorburglar alarm project,
121, 126–130motion detector project,
107–113troubleshooting, 130
PIR_PIN constant, motion detec-tor project, 112
Pitfall, 89
playback route, setting, 46
PNG format, 124
point-and-click adventuregames, 85, 87
port address, VNC, 61
power consumptioncamera, 121hardware, 6overclocking, 29
power supplychoosing, 6keyboards and mice, 7
limitations on devices, 6overclocking, 29
PPIDs, 143
previewing photos, 123
primer, Linux, xii, 133–144
private-public key pairs, 57
privileges, user, 139–140
processes, managing Linux,142–144
processor, 2
programming and Pi develop-ment, xi
prompt, Linux, 134
Prototyping Pi Plate, 120
ps command, 142
pscp command, 60
public-private key pairs, 57
pulse-width modulation(PWM), 95
purge command, 35
PuTTY, 57–58, 60
pwd command, 136, 140
PWM (pulse-width modula-tion), 95
pwm mode, GPIO pins, 98
PWR status LED, 4
py-spidev library, tempera-ture sensor project, 118–120
Pythonburglar alarm camera,
127–130games, 91motion detector project,
110–113Raspbmc installer, 76SMTP support, 128temperature sensor
project, 118–120time functions, 119
QQuake II, 92
Quake III, 85, 92
Rr file permissions, 135
-r option, deleting user files,141
RadioShack, 94
RAM, layout, 30
Raspberry Foundation, web-site, xi
Raspberry Piback side illustration, 4buying, xiiidownload page, 12, 14front side illustration, 2hardware, 1–8price, xiversions, 1
Raspbian team, website, xiv
Raspbmc, multimedia centerproject, 13, 75–84
Raspi-configcamera, 123configuring and using,
23–32invoking, 24navigating with keyboard,
23overclocking, 29SPI, 115SSH enabling, 56
Raspian, see Debian Linux;Linux
raspistillburglar alarm camera,
127–128taking photos with, 123time-lapse videos, 124
raspivid, high-definition videorecording, 125
Rastrack, 29
read command, GPIO pins, 98
read file permissions, 135
read-only access, VNC, 61
readall command, GPIO pins,99
real-time clock (RTC), 5, 28
reboot command, 144
refreshing websites automati-cally, 50
relative paths, 136
remapping keyboard, 26, 91
remote control, XBMC multi-media center, 82–84
remove command, 36
resistor values, 97
resistorsabout, 97memory alarm project,
93, 97
resolution, camera, 121
resource usageMidori, 55
Index • 151

PHP, 67video generation, 125
resourcesbook web page, xivcompatible hardware,
xiv, 6Debian image, 17download page, 12, 14GPIO pins, 95NFS, 81PDF readers, 34Python, 110Raspberry Foundation, xiSamba, 81Twitter search widget, 49XBMC, 80–81
RISC OS, 12–13
rm command, 140
ROM, game cartridges, 89
RPi library, motion detectorproject, 110–113
rpi-update, 42
RS Components, xiii
RTC (real-time clock), 5, 28
rwx file permissions, 135
SSafari, VNC servers, 62
safe mode, HDMI, 15
Samba, XBMC support, 81
saving changes in nano, 138
Schafer, Tim, 87
scp commandgenerating key pairs, 59XBMC, 81
Scratch, 26
screen sharing, VNC, 60–64
Script Creation Utility forManiac Mansion (SCUMM),87
scrolling, man pages naviga-tion, 144
SCUMM, 87
ScummVM, 88
SD cardsadding files to XBMC, 80booting from, 5, 17–22choosing, 7compatibility, 7configuring space on, 25formatting, 14installing operating sys-
tems from, 11NOOBS installation, 14
partitions, 19preparing bootable, 17–
22Raspbmc/XBMC, 75–77sizes, 5, 7, 25slot, 4status LED, 4unmounting, 22
searchingpackages, 37Twitter for kiosk project,
47–51wireless networks, 69, 71
The Secret of Monkey Island,85, 87
Secure Shell, see SSH
security, see passwords; SSH
Sega Mega Drive emulator, 88
self argumentmotion detection project,
111temperature sensor
project, 118
send() method, burglar alarmproject, 129
_ _send_email() method, burglaralarm project, 129
sensorsburglar alarm project,
121, 126–130motion detector project,
107–113temperature sensor
project, 107, 113–120
serial bus, SPI, 114, 118
Serial Peripheral Interface(SPI), 114–120
serversArch Linux ARM, 12Pi as web server, 64–67VNC, 61–64
set_led() function, memoryalarm project, 102
setmode() function, GPIO pins,111
setup() method, GPIO pins, 112
SFTP, XBMC support, 81
SHA-1 checksum, 14, 18–20
sharing, desktop, 60–64
shell, about Linux, 133
shutdown, 32, 144
SIGINT signal, 143
siren sound test, 46
Slave Select (SS) line, 115
slaves, SPI, 114, 118
smartphones, multimediacenter remote control, 82–84
smptlib, 129
SMTP, 128
Snake, 91
SoC (system on a chip), 2
softwareinstalling, 33, 38managing with apt-get, 33–
38Pi Store, 38updating, 36, 122
sound, see audio
spacebargames navigation, 90locale configuration, 27man pages navigation,
144Raspi-config navigation,
23Wi-Fi configuration, 71
SparkFun, xiii, 94
speeddefault, 29game emulators, 89, 91overclocking, 25, 29, 44,
54XBMC menu, 79
SPI (Serial Peripheral Inter-face), 114–120
spidev library, temperaturesensor project, 116, 118–120
SpiDev object, 118
SS line (Slave Select), 115
SSHclients, 57key pairs, 57using, 56–60XBMC support, 81
.ssh/authorized_keys file, keypairs, 59
startx command, 31, 140
static IP addressesconfiguring, 73multimedia center
project, 78
statistics, Wi-Fi, 73
status LEDsabout, 4memory alarm project,
100–105
Index • 152
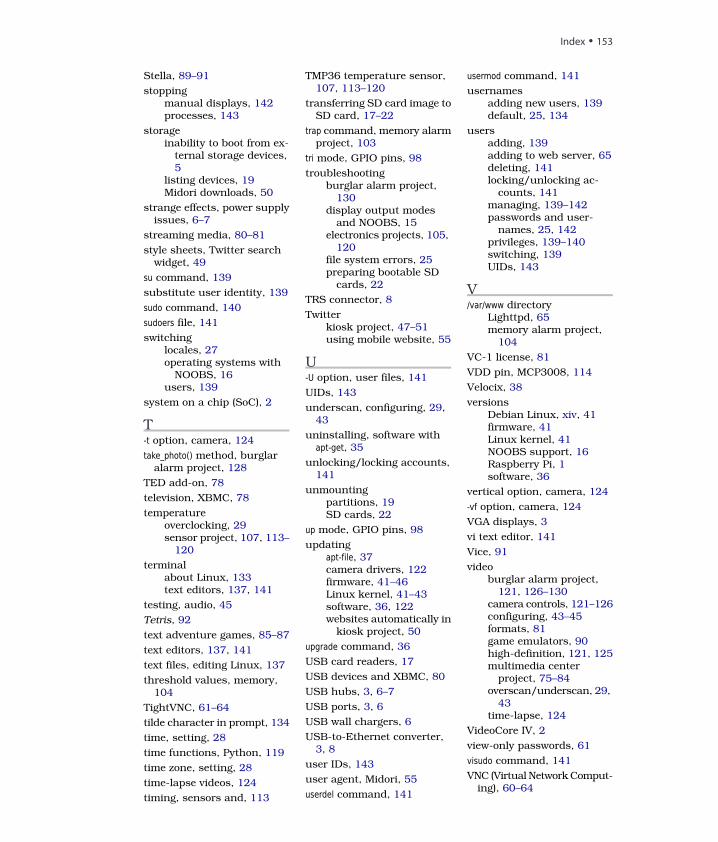
Stella, 89–91
stoppingmanual displays, 142processes, 143
storageinability to boot from ex-
ternal storage devices,5
listing devices, 19Midori downloads, 50
strange effects, power supplyissues, 6–7
streaming media, 80–81
style sheets, Twitter searchwidget, 49
su command, 139
substitute user identity, 139
sudo command, 140
sudoers file, 141
switchinglocales, 27operating systems with
NOOBS, 16users, 139
system on a chip (SoC), 2
T-t option, camera, 124
take_photo() method, burglaralarm project, 128
TED add-on, 78
television, XBMC, 78
temperatureoverclocking, 29sensor project, 107, 113–
120
terminalabout Linux, 133text editors, 137, 141
testing, audio, 45
Tetris, 92
text adventure games, 85–87
text editors, 137, 141
text files, editing Linux, 137
threshold values, memory,104
TightVNC, 61–64
tilde character in prompt, 134
time, setting, 28
time functions, Python, 119
time zone, setting, 28
time-lapse videos, 124
timing, sensors and, 113
TMP36 temperature sensor,107, 113–120
transferring SD card image toSD card, 17–22
trap command, memory alarmproject, 103
tri mode, GPIO pins, 98
troubleshootingburglar alarm project,
130display output modes
and NOOBS, 15electronics projects, 105,
120file system errors, 25preparing bootable SD
cards, 22
TRS connector, 8
Twitterkiosk project, 47–51using mobile website, 55
U-U option, user files, 141
UIDs, 143
underscan, configuring, 29, 43
uninstalling, software withapt-get, 35
unlocking/locking accounts,141
unmountingpartitions, 19SD cards, 22
up mode, GPIO pins, 98
updatingapt-file, 37camera drivers, 122firmware, 41–46Linux kernel, 41–43software, 36, 122websites automatically in
kiosk project, 50
upgrade command, 36
USB card readers, 17
USB devices and XBMC, 80
USB hubs, 3, 6–7
USB ports, 3, 6
USB wall chargers, 6
USB-to-Ethernet converter,3, 8
user IDs, 143
user agent, Midori, 55
userdel command, 141
usermod command, 141
usernamesadding new users, 139default, 25, 134
usersadding, 139adding to web server, 65deleting, 141locking/unlocking ac-
counts, 141managing, 139–142passwords and user-
names, 25, 142privileges, 139–140switching, 139UIDs, 143
V/var/www directory
Lighttpd, 65memory alarm project,
104
VC-1 license, 81
VDD pin, MCP3008, 114
Velocix, 38
versionsDebian Linux, xiv, 41firmware, 41Linux kernel, 41NOOBS support, 16Raspberry Pi, 1software, 36
vertical option, camera, 124
-vf option, camera, 124
VGA displays, 3
vi text editor, 141
Vice, 91
videoburglar alarm project,
121, 126–130camera controls, 121–126configuring, 43–45formats, 81game emulators, 90high-definition, 121, 125multimedia center
project, 75–84overscan/underscan, 29,
43time-lapse, 124
VideoCore IV, 2
view-only passwords, 61
visudo command, 141
VNC (Virtual Network Comput-ing), 60–64
Index • 153
voltageanalog sensors, 113–
114, 120digital sensors, 107, 110,
113GPIO pins, 95power supply, 6
VREF pin, MCP3008, 114
Wwall chargers, 6
warranty and overclocking,44
Web (web browser), 55
web applications, Coder, 13
web browserschoosing, 51Chromium, 12, 51–54everyday tasks, 53–56kiosk mode, 50kiosk project, 47–51limitations, 53memory alarm project,
104multimedia center remote
control, 82NOOBS, 15
VNC servers, 62Web, 55
web pagescreating, 65dynamic content, 67–68
web serverspermissions, 65Pi as web server, 12, 64–
67
websitesdisabling JavaScript, 54refreshing automatically,
50
wheezy distribution, see De-bian Linux; Linux
whitespaces, Python, 111
Wi-Ficonfiguring, 67–74hardware, 5XBMC, 78
widgets, kiosk project, 48
WiFi Config tool, 68
Win32 Disk Imager, 17
Windowspreparing bootable SD
cards, 17SSH, 57–58, 60
wireless keyboards and mice,problems with, 7
WiringPi, 98
working directory, 136
write command, GPIO pins, 98
write file permissions, 135
www-data group, 65
Xx file permissions, 135
XBMC, multimedia centerproject, 75–84
xfer2() method, temperaturesensor project, 119
Xpdf, 34
xtightvncviewer client, 63
YYouTube, 55
yum package manager, 38
ZZ-language, 86
Z-machine, 86
Zork, 85–87
Index • 154

Sound and Arduino!Add live sound to your apps, and explore the Arduino.
Programming Sound with Pure DataSound gives your native, web, or mobile apps that extra
dimension, and it’s essential for games. Rather than
using canned samples from a sample library, learn
how to build sounds from the ground up and produce
them for web projects using the Pure Data program-
ming language. Even better, you’ll be able to integrate
dynamic sound environments into your native apps or
games—sound that reacts to the app, instead of
sounding the same every time. Start your journey as
a sound designer, and get the power to craft the sound
you put into your digital experiences.
Tony Hillerson
(196 pages) ISBN: 9781937785666. $36
http://pragprog.com/book/thsound
ArduinoArduino is an open-source platform that makes DIY
electronics projects easier than ever. Even if you have
no electronics experience, you’ll be creating your first
gadgets within a few minutes. Step-by-step instructions
show you how to build a universal remote, a motion-
sensing game controller, and many other fun, useful
projects. This book has now been updated for Arduino
1.0, with revised code, examples, and screenshots
throughout. We’ve changed all the book’s examples
and added new examples showing how to use the Ar-
duino IDE’s new features.
Maik Schmidt
(272 pages) ISBN: 9781934356661. $35
http://pragprog.com/book/msard

Long Live the Command Line!Use tmux and Vim for incredible mouse-free productivity.
tmuxYour mouse is slowing you down. The time you spend
context switching between your editor and your con-
soles eats away at your productivity. Take control of
your environment with tmux, a terminal multiplexer
that you can tailor to your workflow. Learn how to
customize, script, and leverage tmux’s unique abilities
and keep your fingers on your keyboard’s home row.
Brian P. Hogan
(88 pages) ISBN: 9781934356968. $16.25
http://pragprog.com/book/bhtmux
Practical VimVim is a fast and efficient text editor that will make
you a faster and more efficient developer. It’s available
on almost every OS—if you master the techniques in
this book, you’ll never need another text editor. In more
than 100 Vim tips, you’ll quickly learn the editor’s core
functionality and tackle your trickiest editing and
writing tasks.
Drew Neil
(346 pages) ISBN: 9781934356982. $29
http://pragprog.com/book/dnvim

Android and ProcessingScript your Android device right on the device, and explore Processing on Android for faster
development.
Developing Android on AndroidTake advantage of the open, tinker-friendly Android
platform and make your device work the way you want
it to. Quickly create Android tasks, scripts, and pro-
grams entirely on your Android device—no PC required.
Learn how to build your own innovative Android pro-
grams and workflows with tools you can run on An-
droid itself, and tailor the Android default user inter-
face to match your mobile lifestyle needs. Apply your
favorite scripting language to rapidly develop programs
that speak the time and battery level, alert you to im-
portant events or locations, read your new email to
you, and much more.
Mike Riley
(232 pages) ISBN: 9781937785543. $36
http://pragprog.com/book/mrand
3D Game Programming for KidsYou know what’s even better than playing games?
Creating your own. Even if you’re an absolute beginner,
this book will teach you how to make your own online
games with interactive examples. You’ll learn program-
ming using nothing more than a browser, and see cool,
3D results as you type. You’ll learn real-world program-
ming skills in a real programming language: Java-
Script, the language of the web. You’ll be amazed at
what you can do as you build interactive worlds and
fun games. Appropriate for ages 10-99!
Chris Strom
(250 pages) ISBN: 9781937785444. $36
http://pragprog.com/book/csjava

Seven in SevenFrom Web Frameworks to Concurrency Models, see what the rest of the world is doing with
this introduction to seven different approaches.
Seven Web Frameworks in Seven WeeksWhether you need a new tool or just inspiration, Seven
Web Frameworks in Seven Weeks explores modern
options, giving you a taste of each with ideas that will
help you create better apps. You’ll see frameworks that
leverage modern programming languages, employ
unique architectures, live client-side instead of server-
side, or embrace type systems. You’ll see everything
from familiar Ruby and JavaScript to the more exotic
Erlang, Haskell, and Clojure.
Jack Moffitt, Fred Daoud
(302 pages) ISBN: 9781937785635. $38
http://pragprog.com/book/7web
Seven Concurrency Models in Seven WeeksYour software needs to leverage multiple cores, handle
thousands of users and terabytes of data, and continue
working in the face of both hardware and software
failure. Concurrency and parallelism are the keys, and
Seven Concurrency Models in Seven Weeks equips you
for this new world. See how emerging technologies
such as actors and functional programming address
issues with traditional threads and locks development.
Learn how to exploit the parallelism in your computer’s
GPU and leverage clusters of machines with Map-Re-
duce and Stream Processing. And do it all with the
confidence that comes from using tools that help you
write crystal clear, high-quality code.
Paul Butcher
(300 pages) ISBN: 9781937785659. $38
http://pragprog.com/book/pb7con
Put the “Fun” in FunctionalElixir puts the “fun” back into functional programming, on top of the robust, battle-tested,
industrial-strength environment of Erlang.
Programming ElixirYou want to explore functional programming, but are
put off by the academic feel (tell me about monads just
one more time). You know you need concurrent appli-
cations, but also know these are almost impossible to
get right. Meet Elixir, a functional, concurrent language
built on the rock-solid Erlang VM. Elixir’s pragmatic
syntax and built-in support for metaprogramming will
make you productive and keep you interested for the
long haul. This book is the introduction to Elixir for
experienced programmers.
Dave Thomas
(240 pages) ISBN: 9781937785581. $36
http://pragprog.com/book/elixir
Programming Erlang (2nd edition)A multi-user game, web site, cloud application, or
networked database can have thousands of users all
interacting at the same time. You need a powerful, in-
dustrial-strength tool to handle the really hard prob-
lems inherent in parallel, concurrent environments.
You need Erlang. In this second edition of the best-
selling Programming Erlang, you’ll learn how to write
parallel programs that scale effortlessly on multicore
systems.
Joe Armstrong
(548 pages) ISBN: 9781937785536. $42
http://pragprog.com/book/jaerlang2

The Pragmatic BookshelfThe Pragmatic Bookshelf features books written by developers for developers. The titles
continue the well-known Pragmatic Programmer style and continue to garner awards and
rave reviews. As development gets more and more difficult, the Pragmatic Programmers will
be there with more titles and products to help you stay on top of your game.
Visit Us OnlineThis Book’s Home Page
http://pragprog.com/book/msraspi2Source code from this book, errata, and other resources. Come give us feedback, too!
Register for Updates
http://pragprog.com/updatesBe notified when updates and new books become available.
Join the Community
http://pragprog.com/communityRead our weblogs, join our online discussions, participate in our mailing list, interact with
our wiki, and benefit from the experience of other Pragmatic Programmers.
New and Noteworthy
http://pragprog.com/newsCheck out the latest pragmatic developments, new titles and other offerings.
Buy the BookIf you liked this eBook, perhaps you'd like to have a paper copy of the book. It's available
for purchase at our store: http://pragprog.com/book/msraspi2
Contact Ushttp://pragprog.com/catalogOnline Orders:
[email protected] Service:
[email protected] Rights:
[email protected] Use:
http://pragprog.com/write-for-usWrite for Us:
+1 800-699-7764Or Call: